

Page 1
Owners Manual
For safe use and product knowledge, please
completely read this Product OWNERS MANUAL.
TR800 / TR1000 / TR1200 / TR1200i
www.leisureconcepts.com.au
Page 2

35
Console Overview
Treadmill Operations
31
Moving and Storage
Maintenance and Troubleshooting
37
TR800 / TR1000
TR1200 / TR1200i
2
3
15
20
23
Page 3
this treadmill
To reduce the risk of electric shock, unplug the treadmill from the wall outlet when not in use,
before performing any maintenance, or before moving the treadmill.
Do not lean against or climb on the treadmill. Doing so may result in the treadmill tipping and
falling and could result in serious personal injury.
Do not hang or place items on the treadmill. Doing so could result in shifting the weight
balance of the treadmill causing it to tip over or fall causing serious personal injury.
Do not operate with the side rails removed.
Keep the treadmill on a solid surface, with the side rails and front a minimum of two feet from any
walls or furniture. Make sure that the area behind the treadmill remains completely clear during
use. A minimum of 1.5m of clearance is required for safety reasons.
Do not operate where aerosol spray products are being used or where oxygen is being administered.
Never place the power cord under carpeting or place any object on top of the cord, this may
Use this exercise product for its intended use as described in this Owner’s Manual.
Do not leave your treadmill running while not in use.
When in use children and pets should be kept at least 3m away.
treadmill at all times.
Grounding Instructions
Never use extension cords between the treadmill and the wall outlet.
This product has a grounding plug similar to the illustration below.
Never remove or otherwise bypass the eletrical ground terminal.
Gounded Wall Outlets
Treadmill
Plug
Gounded
Socket
Danger: Improper connection of the equipment
grounding conduct
or service person if you are in doubt as to whether
the product is properly
grounded. Do not modify
in the outlet, have the proper outlet installed by a
Note: Read all instructions and save for future use.
Do not wear clothing or jewelry that might catch on any part of the treadmill.
This treadmill is equipped with a safety key. If the key is removed from the display, the treadmill will
immediately stop. Always clip the cord that is attached to the safety key to a part of your clothing so
the key will be pulled from the display, stopping the treadmill, in case of an emergency.
Owners Manual
2
Page 4
Treadmill
We
ACSM: American College of Sports Medicine.
AHA: American Heart Association.
USA.
3
TR800 / TR1000
TR1200 / TR1200i
Page 5
Owners Manual
4
Treadmill
Page 6
5
TR800 / TR1000
TR1200 / TR1200i
Page 7
Owners Manual
6
Page 8
7
TR800 / TR1000
TR1200 / TR1200i
Page 9
Owners Manual
8
Page 10
9
14 kgs
Our
TR800 / TR1000
TR1200 / TR1200i
Page 11
Owners Manual
10
Page 12
11
We’re
TR800 / TR1000
TR1200 / TR1200i
Page 13
Owners Manual
12
Taking Americans for example:
Page 14
13
TR800 / TR1000
TR1200 / TR1200i
Page 15
Owners Manual
14
Page 16

15
treadmill
1
13
10
6
5
7
9
14
25
4
11
2
3
15
8
12
Tools and Screws included in Hardware Bag
Wrench-17mm
Wrench-5mm
Wrench-6mm
M4*10L (4 pcs)
M8*70L (2pcs)
Wrench-13mm
We
Item# description
1 Main Frame
2 Left handrail post
3 Right handrail post
4 Handrail
5 Console
6 Accessory Tray
7 Back cover
8 Console Bracket
9 Left handrail cover-outer
10 Right handrail cover-outer
11 Left handrail cover-inner
12 Right handrail cover-inner
13 Base cover-Left
14 Base cover-Right
1255 S
Console housing
afety bar cover (TR1200)
(x2 on the TR800)
(x2 on the TR800)
TR800 / TR1000
TR1200 / TR1200i
Page 17
Owners Manual
16
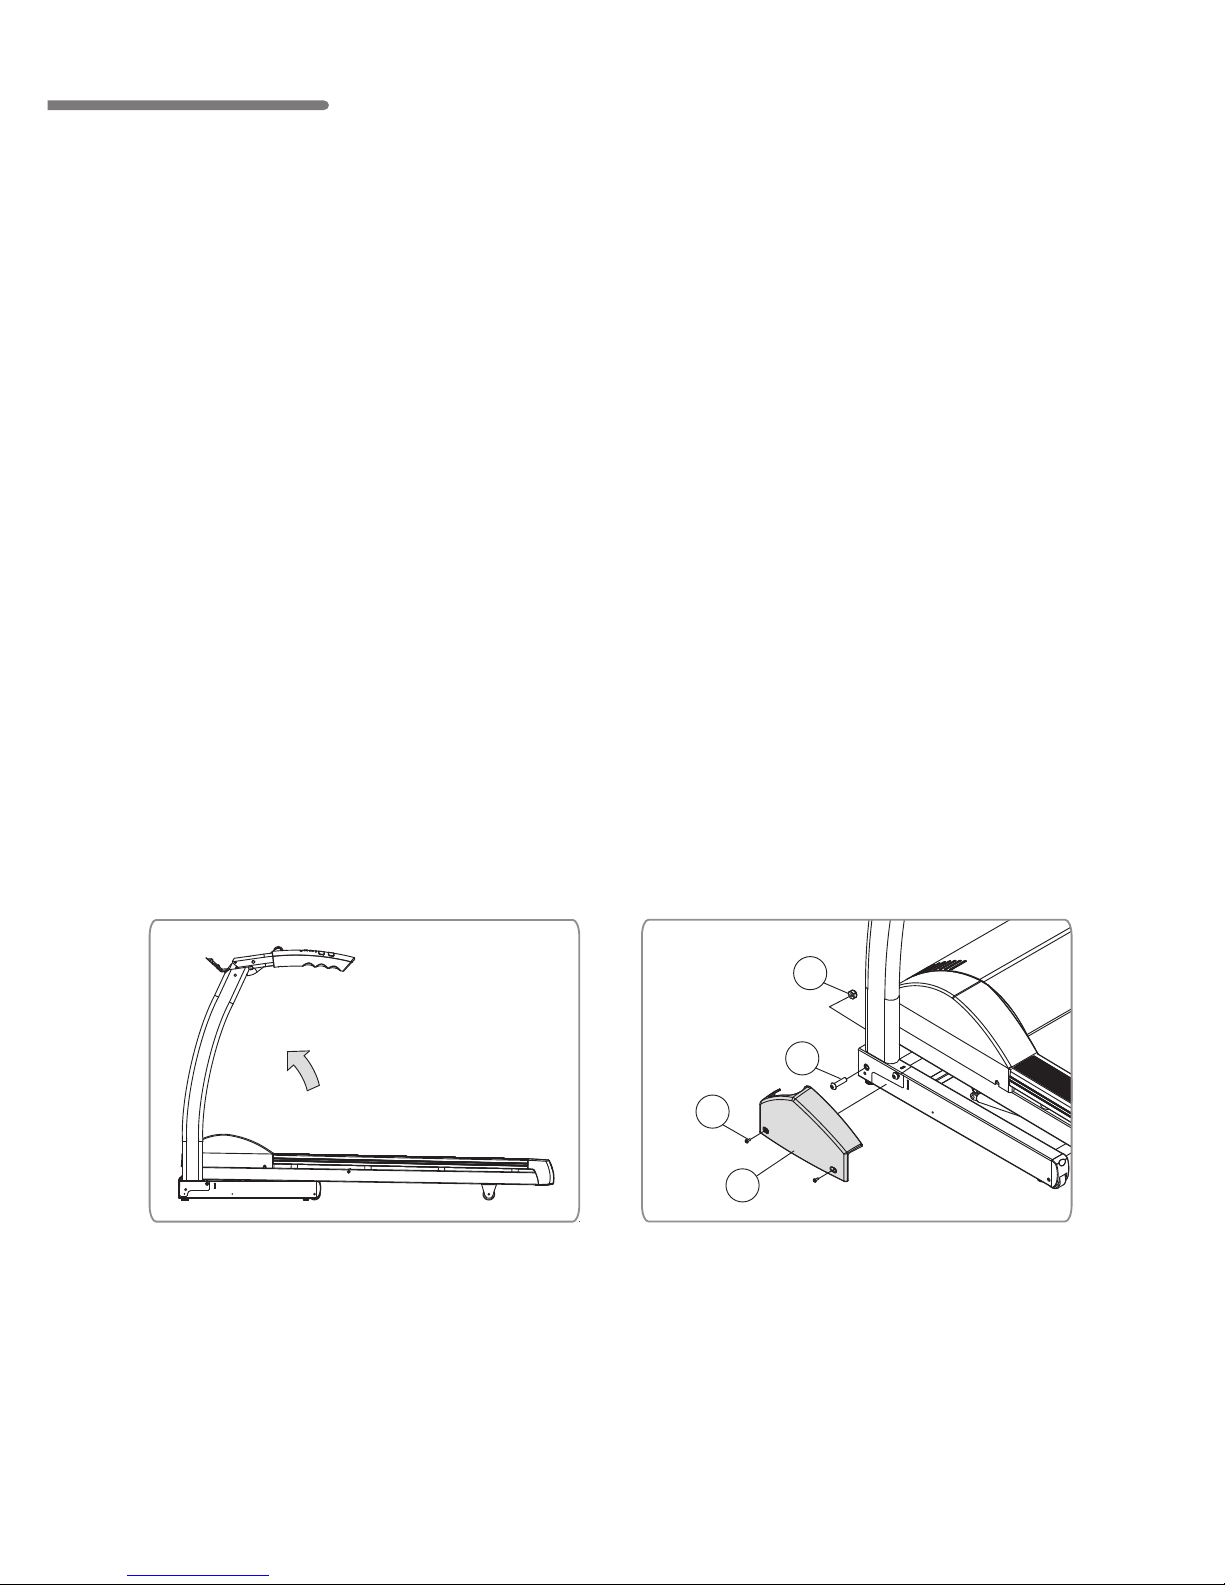
Step 2: Handlebar Support Post Assembly
A. Remove the screw (A) and nut (E) that are pre-assembled on the frame from each side of the
base using the 6 mm Allen wrench and 17 mm open end wrench provided in your tool kit.
These two screws will prevent the handlebars from rotating up into their upright position.
B. Stand the support posts and handlebars up into their operating position and re-attach the
.yleruces nethgiT .A2 pets ni devomer )E( stun dna )A( swercs
C. Attach the left (13) and right (14) base covers using a Phillips screwdriver and 2 machine screws (G)
on each side. The 4 base cover attaching screws are located in the hardware bag.
13
G
A
E
Step 1: Unpacking Treadmill
A.
B.
Cut packaging straps and remove.
Remove the box top.
C.
Remove small parts and packaging material and unwrap parts.
D.
Cut corners of the bottom box and remove all packaging material to begin assembly. The
treadmill can be assembled in the box. No need to pick the treadmill up to remove it from box.
Note: Make sure the wire harness coming from the front of the frame to the base of the right
handlebar support will not be pinched when pivoting the right handlebar support up
into position.
Page 18
17
9
C
B
10
blue rubber ring
X
8
TR800
12
*Note: the TR800 inside handlebar
cover is not pre-attached and
comes in two pieces.
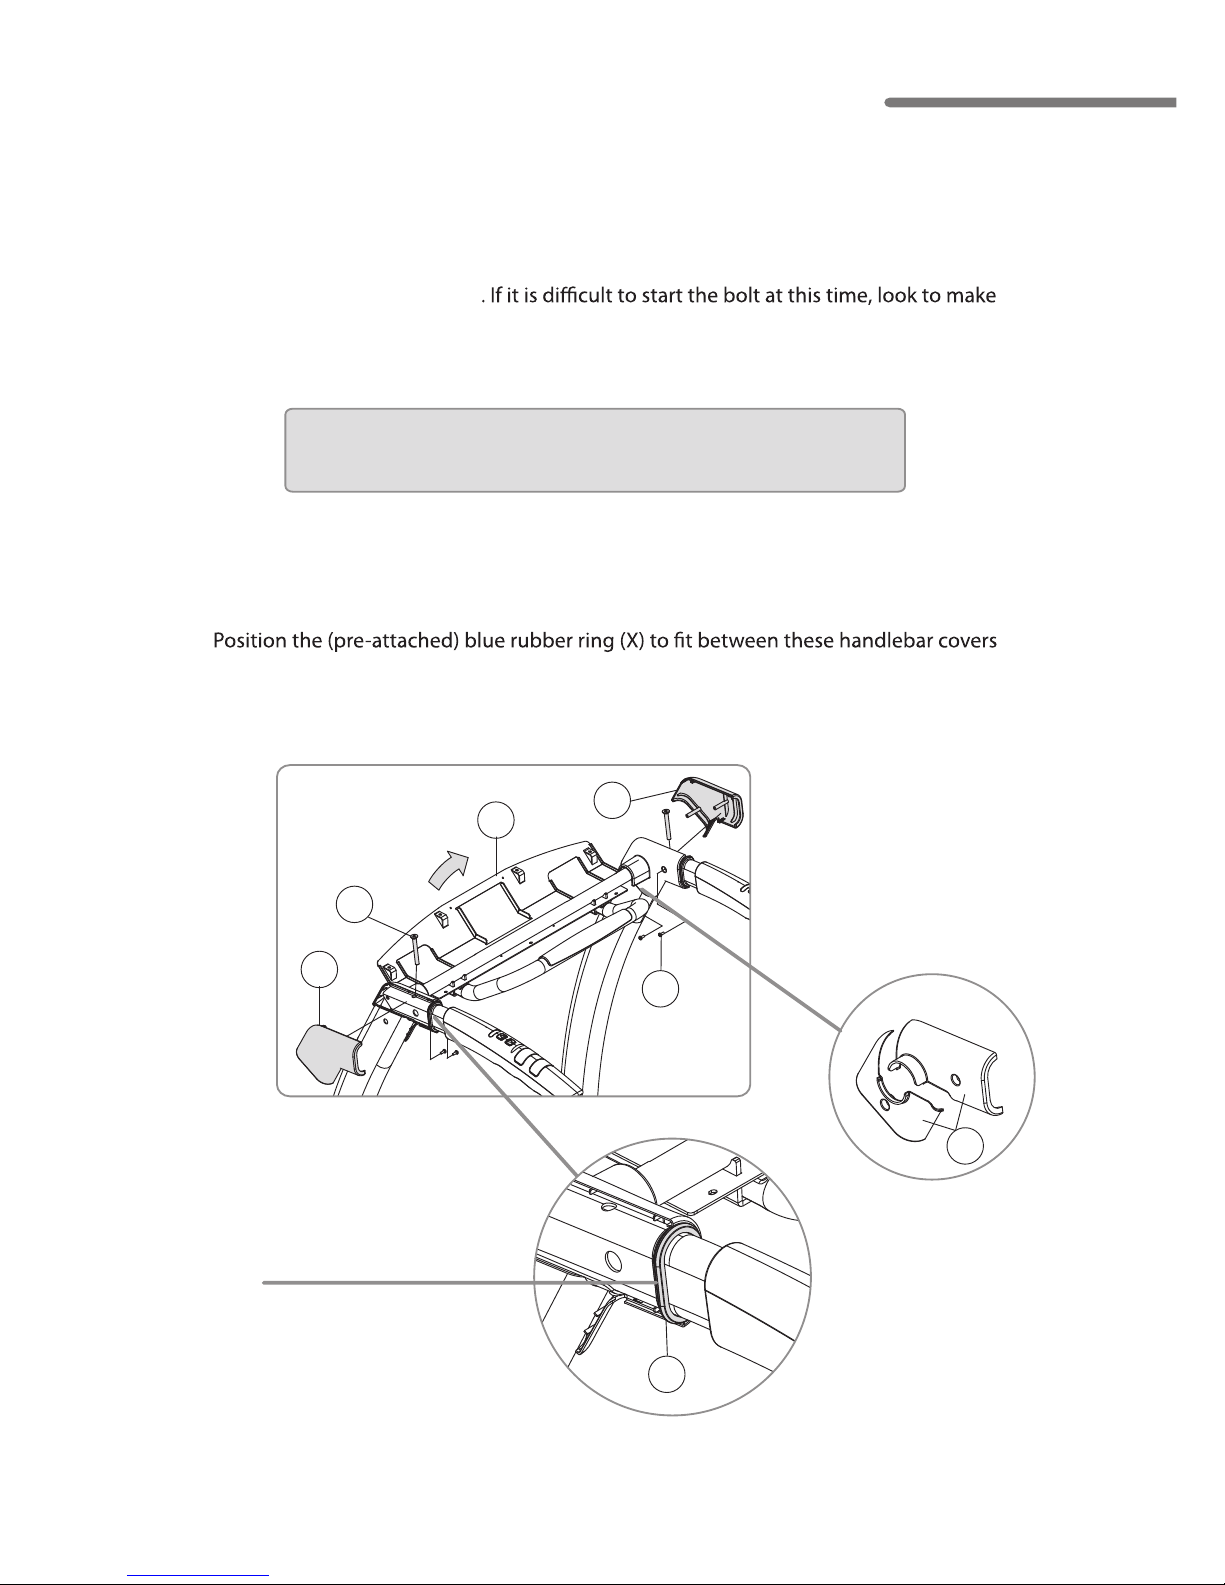
Step 3: Handlebar Assembly
A. Rotate the handlebars down so they are positioned on top of the handlebar posts.
Secure the right and left handlebars to the support post using the 2 M8 x70L screws (B)
provided in the hardware bag
Note: Make sure that the wires on both sides are not pinched
in-between the handlebars and the handlebar post.
B. Rotate the console bracket (8) up in the back until it reaches its normal operating position.
C. Place the left outside handlebar cover (9) next to the inside handlebar cover (pre-attached).
allowing the plastic ridge to sit in the groove of the blue rubber ring. Secure these three
parts together using the self-tapping screws (C), which are pre-installed in the outer cover.
Repeat this process on the other side with the right outside handlebar cover (10).
sure there are no wires obstructing the bolt hole. Also, lightly pulling the handlebar
one way or the other will help line up the bolt holes.
TR800 / TR1000
TR1200 / TR1200i
Page 19
Owners Manual
18
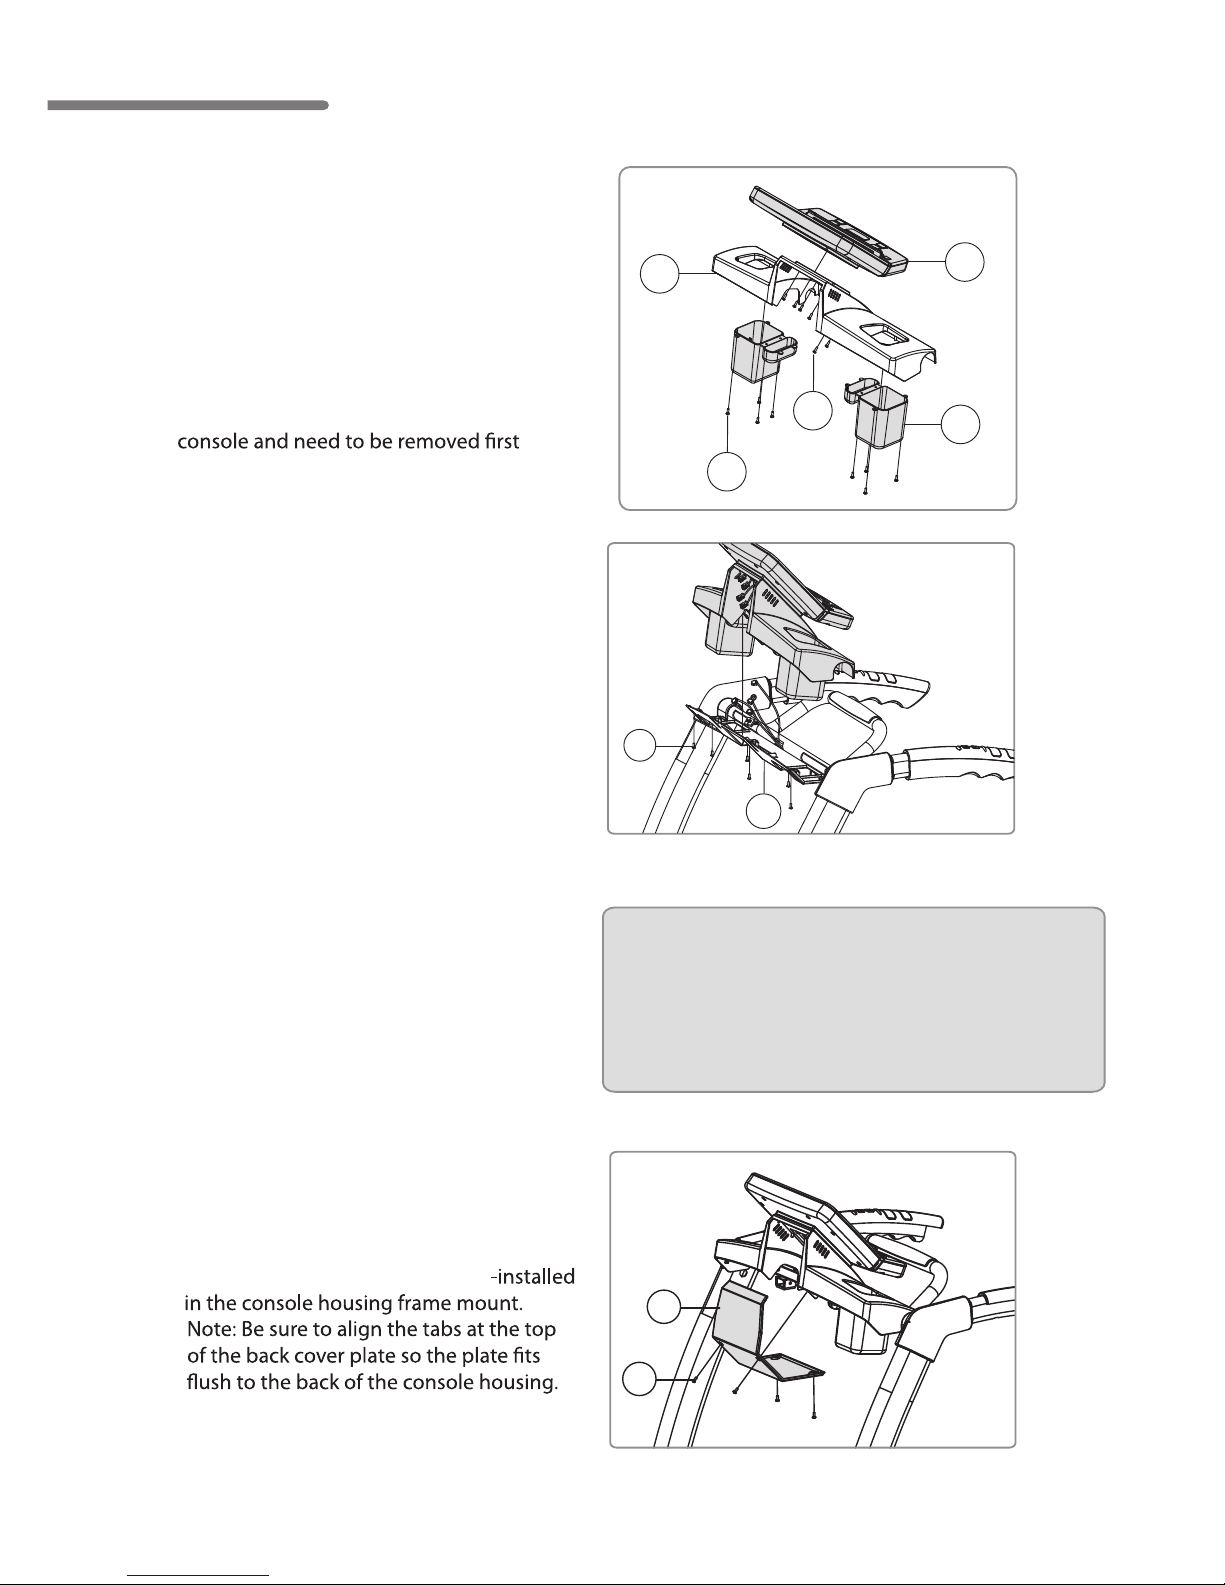
Step 4: Assemble Console Components
A. Attach the blue accessory trays (6) to the
bottom of the console housing using 8
self tapping sc
console housing (25).
rews (G). Preinstalled in
B. Attach the console (5) to the console
housing (25) using 6 screws (G). These
eht fo kcab eht no dellatsni-erp era swercs
and then reinstalled with the console in
place.
G
G
25
5
6
Step 5: Attach Console Assembly
A. Place the console assembly onto the
console housing frame mount (8) and
attach the assembly using the 7
screws (F), preinstalled in console
housing (25). Be sure not to pinch wire
harnesses during this step.
i. Main Harness: 5-pin and 7-pin
ii. Hand Pulse harness: 2-pin
iii. Speed Control Harness: 3-pin
(the wire colors need to be
matched.)
iv. Incline Control Harness: 3-pin
(the wire colors need to be
matched)
Note: Be careful to properly connect all wiring
connectors with their correct corresponding
wiring harness. Pay attention not to bend any
pins and make sure the connectors click in
place.
F
B. Connect all wire harnesses including:
C. Tuck extra wiring harness into the
opening behind the console.
8
(color doesn’t matter.)
Note: TR800 and TR1000 have 5-pin
Step 6: Attach the Back Cover Plate
A. Align the back console cover plate (7)
over the back of the console housing and
7
H
attach using the 4 screws (H), pre
Page 20
19
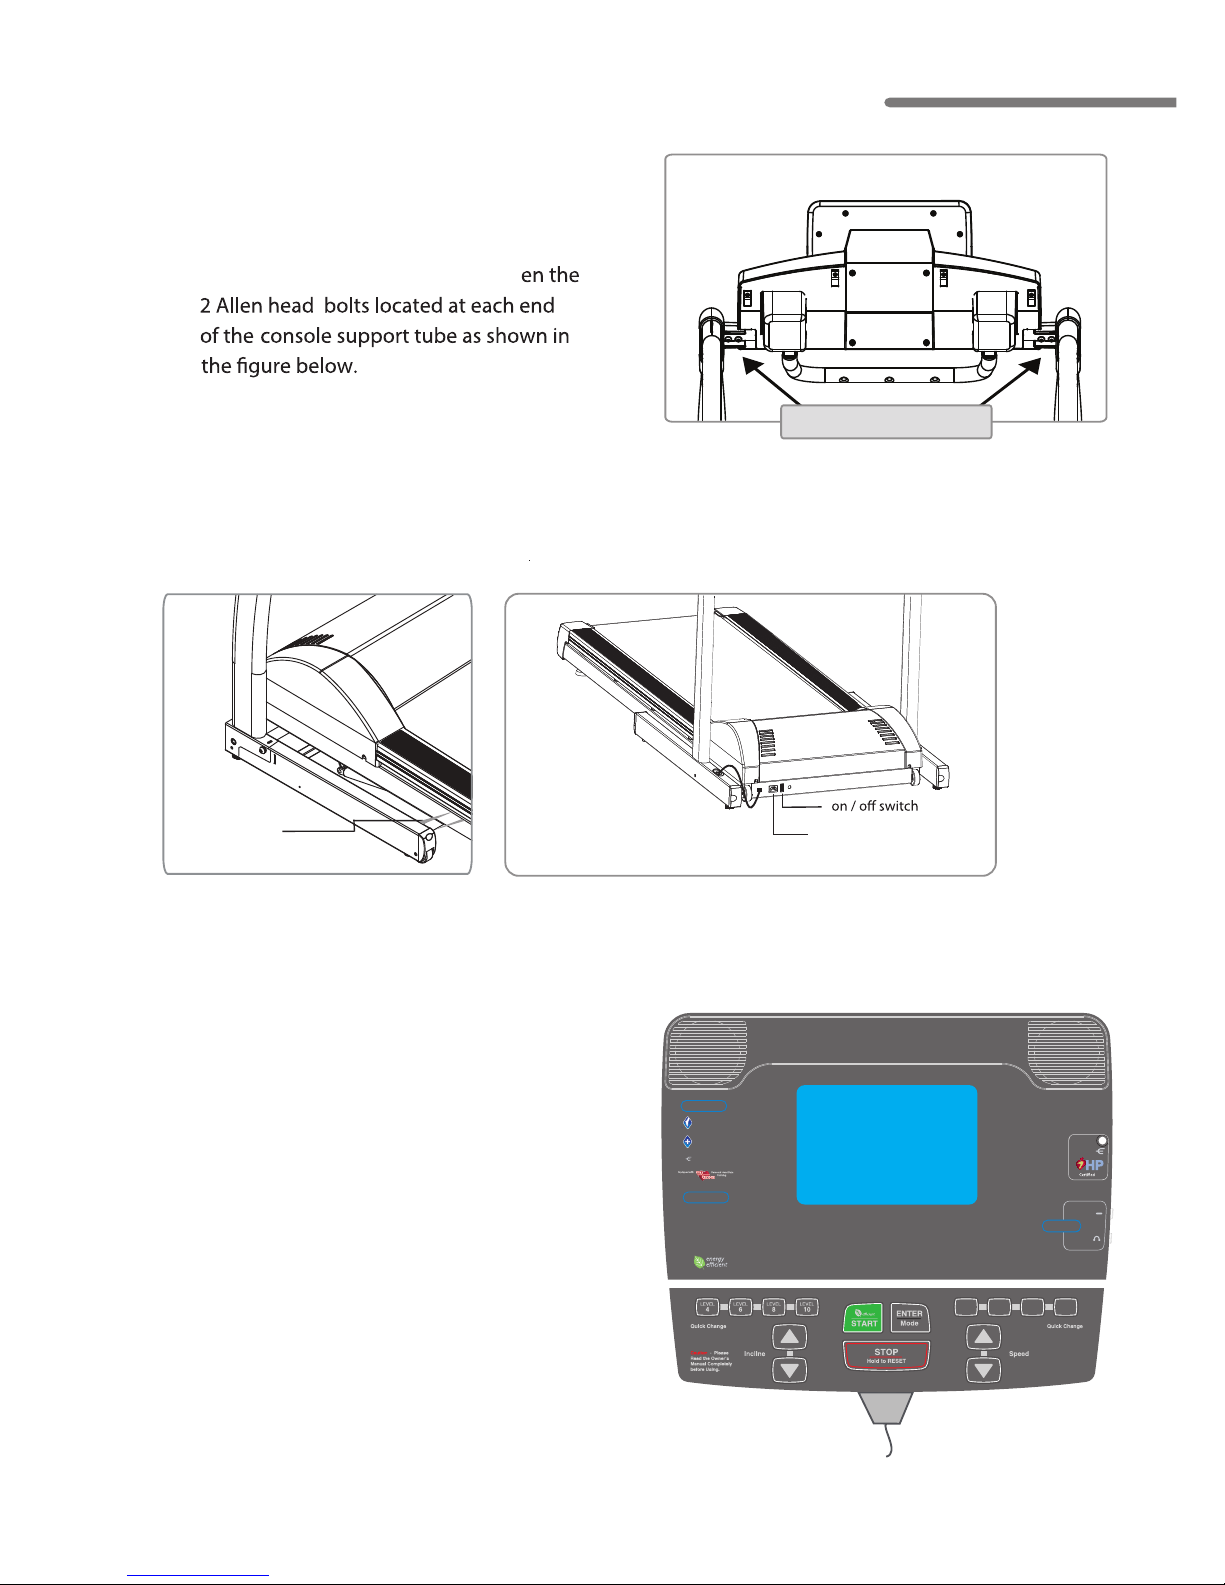
Step 8: Cut red tie strap and roll out of box
Step 9: Plug the power cord in and turn the treadmill on
Step 10: Install safety key
Step 11: (TR1200i only) Set Time and Date
power receptacle
red tie strap
Step 8
Step 9
See Moving and Storage on page 32
safety key
To set your consoles time and date,
follow these steps:
1. Remove the safety key and re-install
2. Press any of the quick speed buttons for 3
seconds to initiate the date and time set up
mode.
3. Press the UP / DOWN buttons to set the correct
YEAR, Press Enter
4. Press the UP / DOWN buttons to select the
correct MONTH, Press Enter
5. Press the UP / DOWN buttons to select the
correct DAY, Press Enter
6. Press the UP / DOWN buttons to set the HOUR,
Press Enter
7. Press the UP / DOWN buttons to set the
MINUTES, Press Enter
USB - Port
Head
Phones
Mp3-IPod
comp ati ble
AudioCenter
INTELLI - Guard
Automatic Safety pause
INTELLI - Step
Count your steps
INTELLI - Port
Transfer and track your
workout data
3.0
MPH
4.0
MPH
5.0
MPH
6.0
MPH
Features
To Start
Press and hold START
button to t urn on
Press START to begin
energy
Step 7: Lock Console Angle
thgit hcnerw nellA mm 5 eht gnisU .A
Securely
Tighten
TR800 / TR1000
TR1200 / TR1200i
Page 21
TR1200/1200i(Option)
TR800 / TR1000
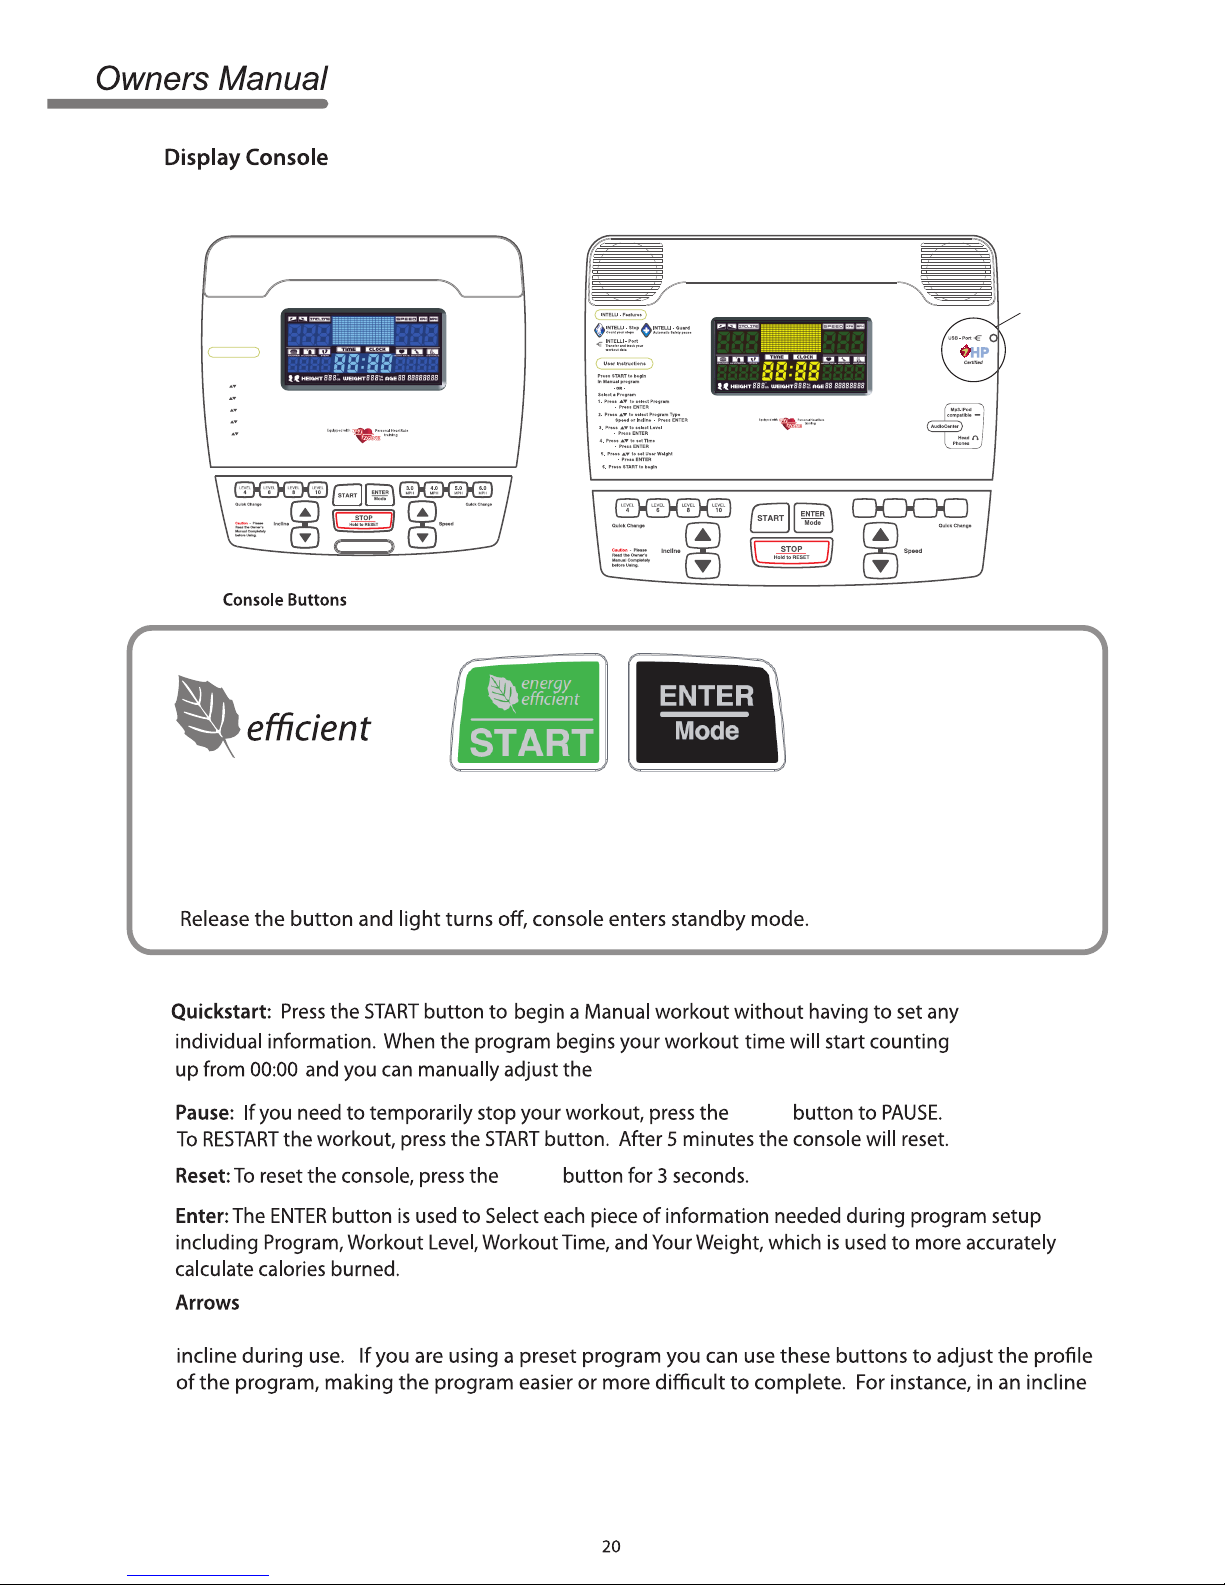
incline or speed as you exercise.
and Handlebar Control Buttons: The up and down buttons for speed and incline are used
to modify the value of each selection during the program set up process and to adjust the speed or
program, your can raise the incline level across the entire program by pressing the incline up button.
Quick Select Buttons: The treadmill come with 4 quick select buttons for speed and
4 quick select buttons for incline. These buttons allow you to quickly jump directly to the desired
speed or incline rather than requiring that you scroll to get to the value.
STOP
STOP
energy
Energy Saving Indicator: Optional (For CE required countries)
1. If user doesn’t press any button in ten minutes under standby mode, the console enters to
energy saving mode. The START key light turns on.
2. To leave energy saving mode, press START key for 1 second till the light turns on.
Option
3.0
MPH
4.0
MPH
5.0
MPH
6.0
MPH
User Instr ucti ons
Press START t o begin
Select a Program
in Manual program
3. Press t o sel ect Level
- Press ENTER
4. Press t o set Ti me
- Press ENTER
6. Press START to begin
5. Press t o set User Weight
- Press ENTER
2. Press t o sel ect Program Type
Speed or I ncli ne - Press ENTER
1. Press t o sel ect Program
- Press ENTER
-OR-
Page 22
21
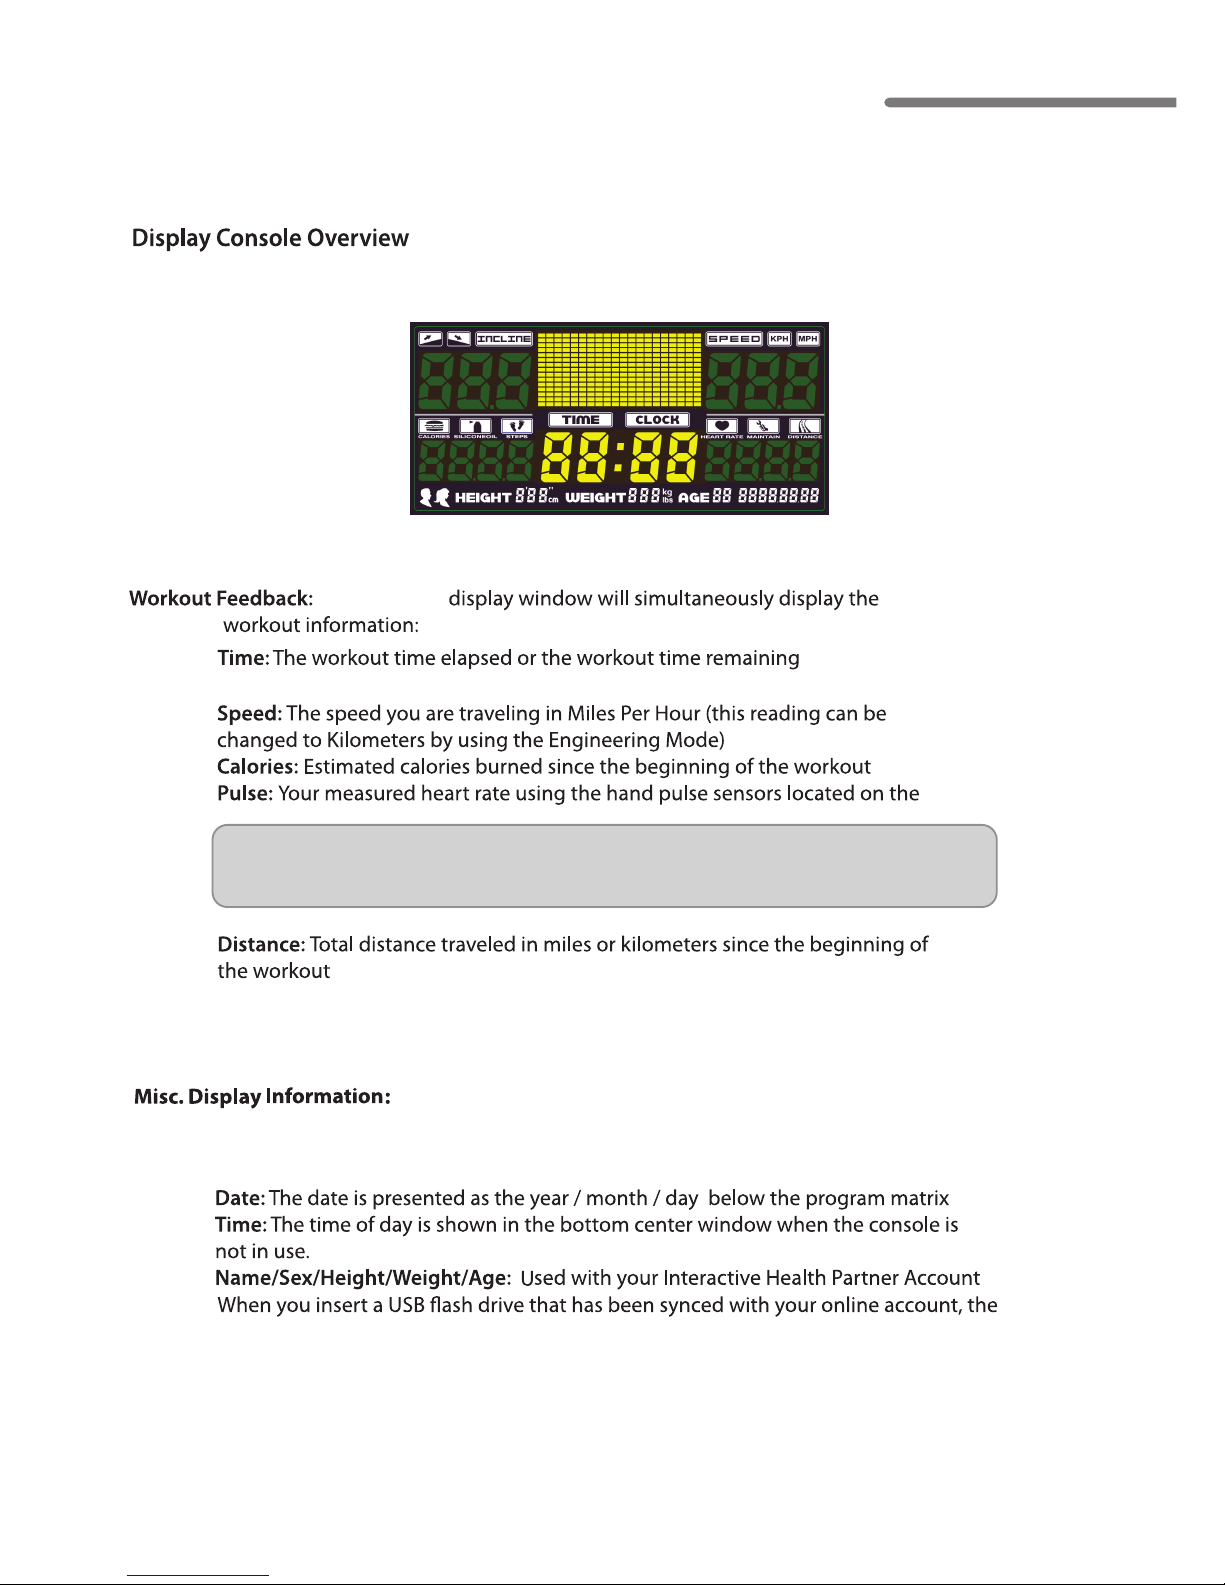
The treadmill
following
Incline: The level of belt incline ranging from 0-15 (TR1200 / TR1200i) and 0-12 (TR800 / TR1000)
The TR1200i (only) will also show the following information
This information will be used by the treadmill as part of the USB feature to save your workout
information on the date and time of your workout.
.
handlebars
Pressing the Enter/Mode button during use will change heart rate to distance on
ylno i0021RT eht no spets ot seirolac dna i0021RT / 0 / TR1200001RT / 008RT eht
console will read your name, sex, height, weight and age.
Step Count: (TR1200i only) If you participate in a daily or weekly step program you can use
the Step Count window to follow the number of seps you have taken in your workout.
Remember 10,000 steps per day is recommended by the Centers for Disease Control (CDC).
TR800 / TR1000
TR1200 / TR1200i
Page 23
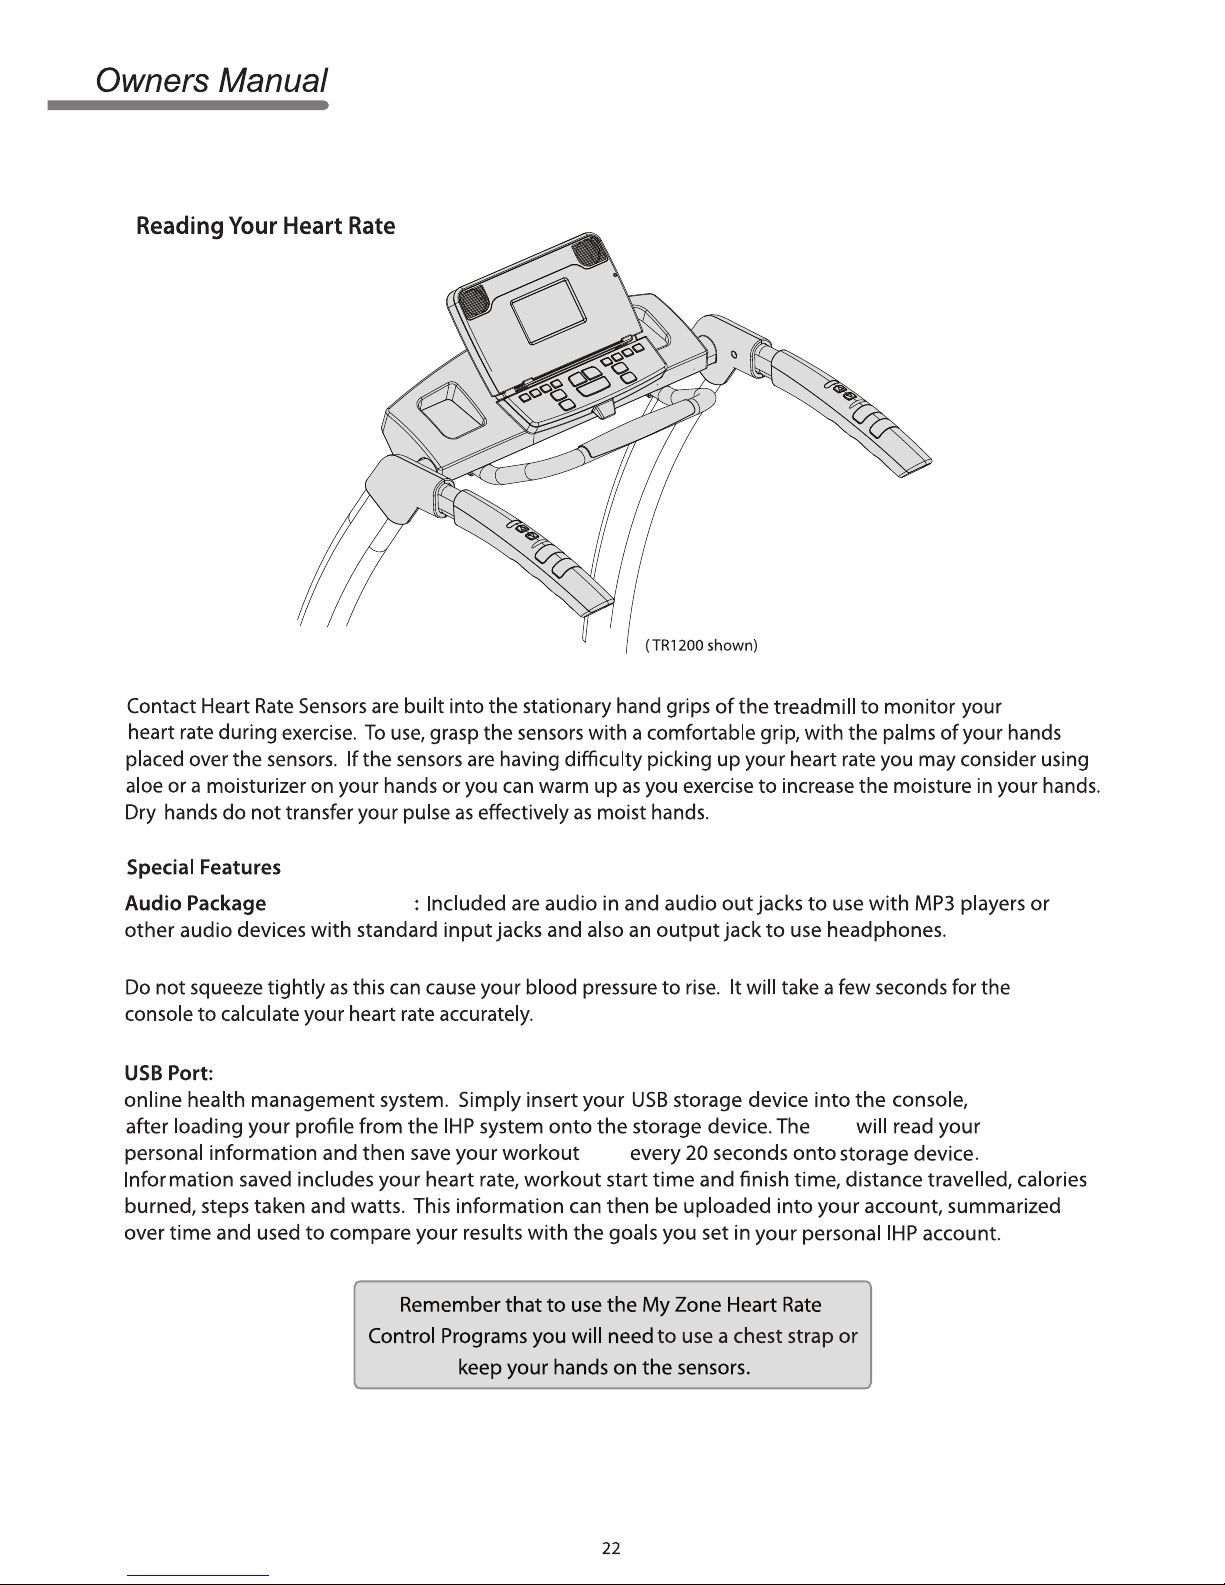
The TR1200i (only) includes a USB port that works with the Interactive Health Partner
USB
data
(TR1200i only)
Page 24
23
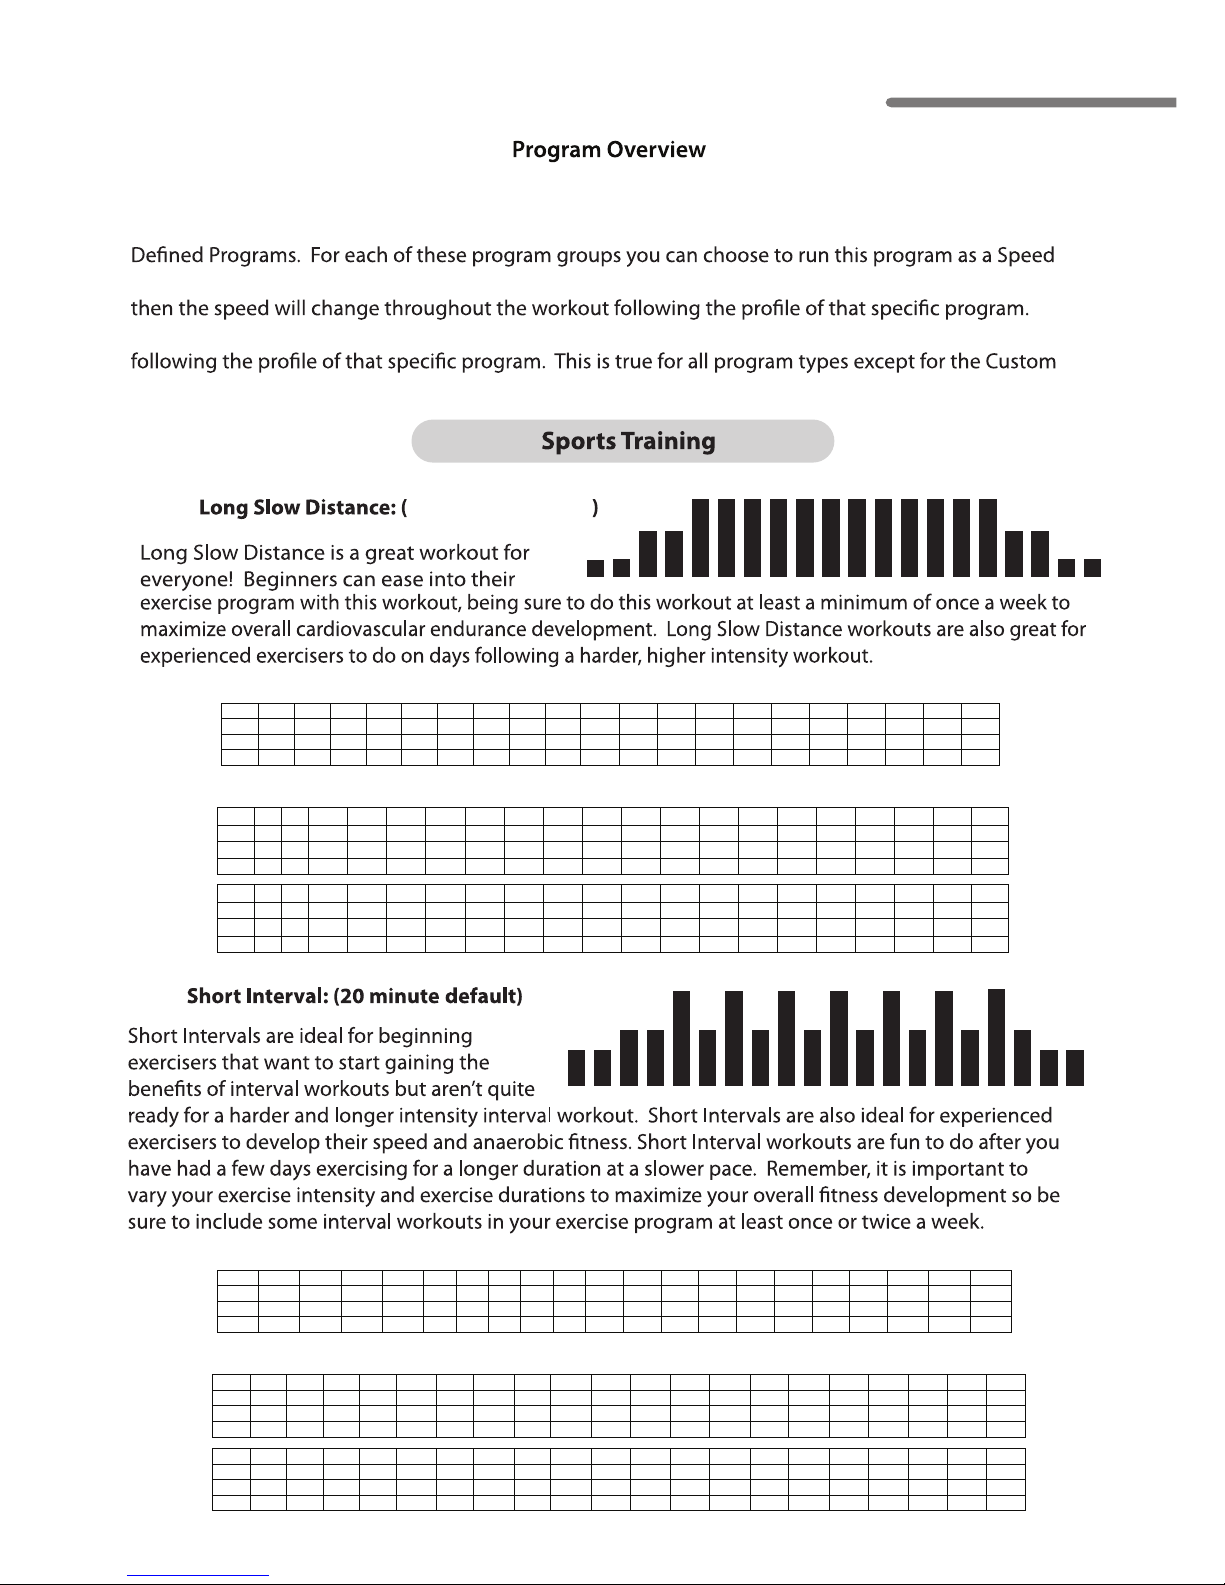
The advance console used on the treadmill includes programs grouped into each of the
following 5 areas: Sports Training, Healthy Living, Weight Management, Heart Rate Control and User
Control program or an Incline Control program. After selecting the program, if you select Speed Control
If you choose Incline after selecting the program, the incline will change throughout the workout
User Programs which allow you to preselect both the Speed and Incline of the program.
1 2 3 4 5 6 7 8 9 10 11 12 13 14 15 16 17 18 19 20
L1 1 1 2 2 4 4 4 4 4 4 4 4 4 4 4 4 2 2 1 1
L2 1 1 3 3 5 5 5 5 5 5 5 5 5 5 5 5 3 3 1 1
L3 1 1 4 4 6 6 6 6 6 6 6 6 6 6 6 6 4 4 1 1
Km/h
1 2 3 4 5 6 7 8 9 10 11 12 13 14 15 16 17 18 19 20
L1
L2
L3
MPH 1 2 3 4 5 6 7 8 9 10 11 12 13 14 15 16 17 18 19 20
L1 1 1 2 2 3 3 3 3 3 3 3 3 3 3 3 3 2 2 1 1
L2
2 2 3 3 4.5 4.5 4.5 4.5 4.5 4.5 4.5 4.5 4.5 4.5 4.5 4.5 3 3 2 2
L3
3 3 3.5 3.5 5 5 5 5 5 5 5 5 5 5 5 5 3.5 3.5 3 3
Incline
Speed
Incline
Speed
1 2 3 4 5 6 7 8 9 10 11 12 13 14 15 16 17 18 19 20
L 1 1 1 2 2 4 2 4 2 4 2 4 2 4 2 4 2 4 2 1 1
L 2 2 2 3 3 5 3 5 3 5 3 5 3 5 3 5 3 5 3 2 2
L 3 2 2 3 3 6 3 6 3 6 3 6 3 6 3 6 3 6 3 2 2
Km/h
1 2 3 4 5 6 7 8 9 10 11 12 13 14 15 16 17 18 19 20
L1
L2
L3
MPH
1 2 3 4 5 6 7 8 9 10 11 12 13 14 15 16 17 18 19 20
L1 1 1 2 2 3 2 3 2 3 2 3 2 3 2 3 2 3 2 1 1
L2 2 2 3 3 4.5 2 4.5 2 4.5 2 4.5 2 4.5 2 4.5 2 4.5 3 2 2
L3 3 3 4 4 5 3 5 3 5 3 5 3 5 3 5 3 5 4 3 3
40 minute default
P-01:
P-02:
1.6 1.6 3.2 3.2 4.8 4.8 4.8 4.8 4.8 4.8 4.8 4.8 4.8 4.8 4.8 4.8 3.2 3.2 1.6 1.6
3.2 3.2 4.8 4.8 7.2 7.2 7.2 7.2 7.2 7.2 7.2 7.2 7.2 7.2 7.2 7.2 4.8 4.8 3.2 3.2
4.8 4.8 5.6 5.6 8.0 8.0 8.0 8.0 8.0 8.0 8.0 8.0 8.0 8.0 8.0 8.0 5.6 5.6 4.8 4.8
1.6 1.6 3.2 3.2 4.8 3.2 4.8 3.2 4.8 3.2 4.8 3.2 4.8 3.2 4.8 3.2 4.8 3.2 1.6 1.6
3.2 3.2 4.8 4.8 7.2 3.2 7.2 3.2 7.2 3.2 7.2 3.2 7.2 3.2 7.2 3.2 7.2 4.8 3.2 3.2
4.8 4.8 6.4 6.4 8.0 4.8 8.0 4.8 8.0 4.8 8.0 4.8 8.0 4.8 8.0 4.8 8.0 6.4 4.8 4.8
TR800 / TR1000
TR1200 / TR1200i
Page 25
24
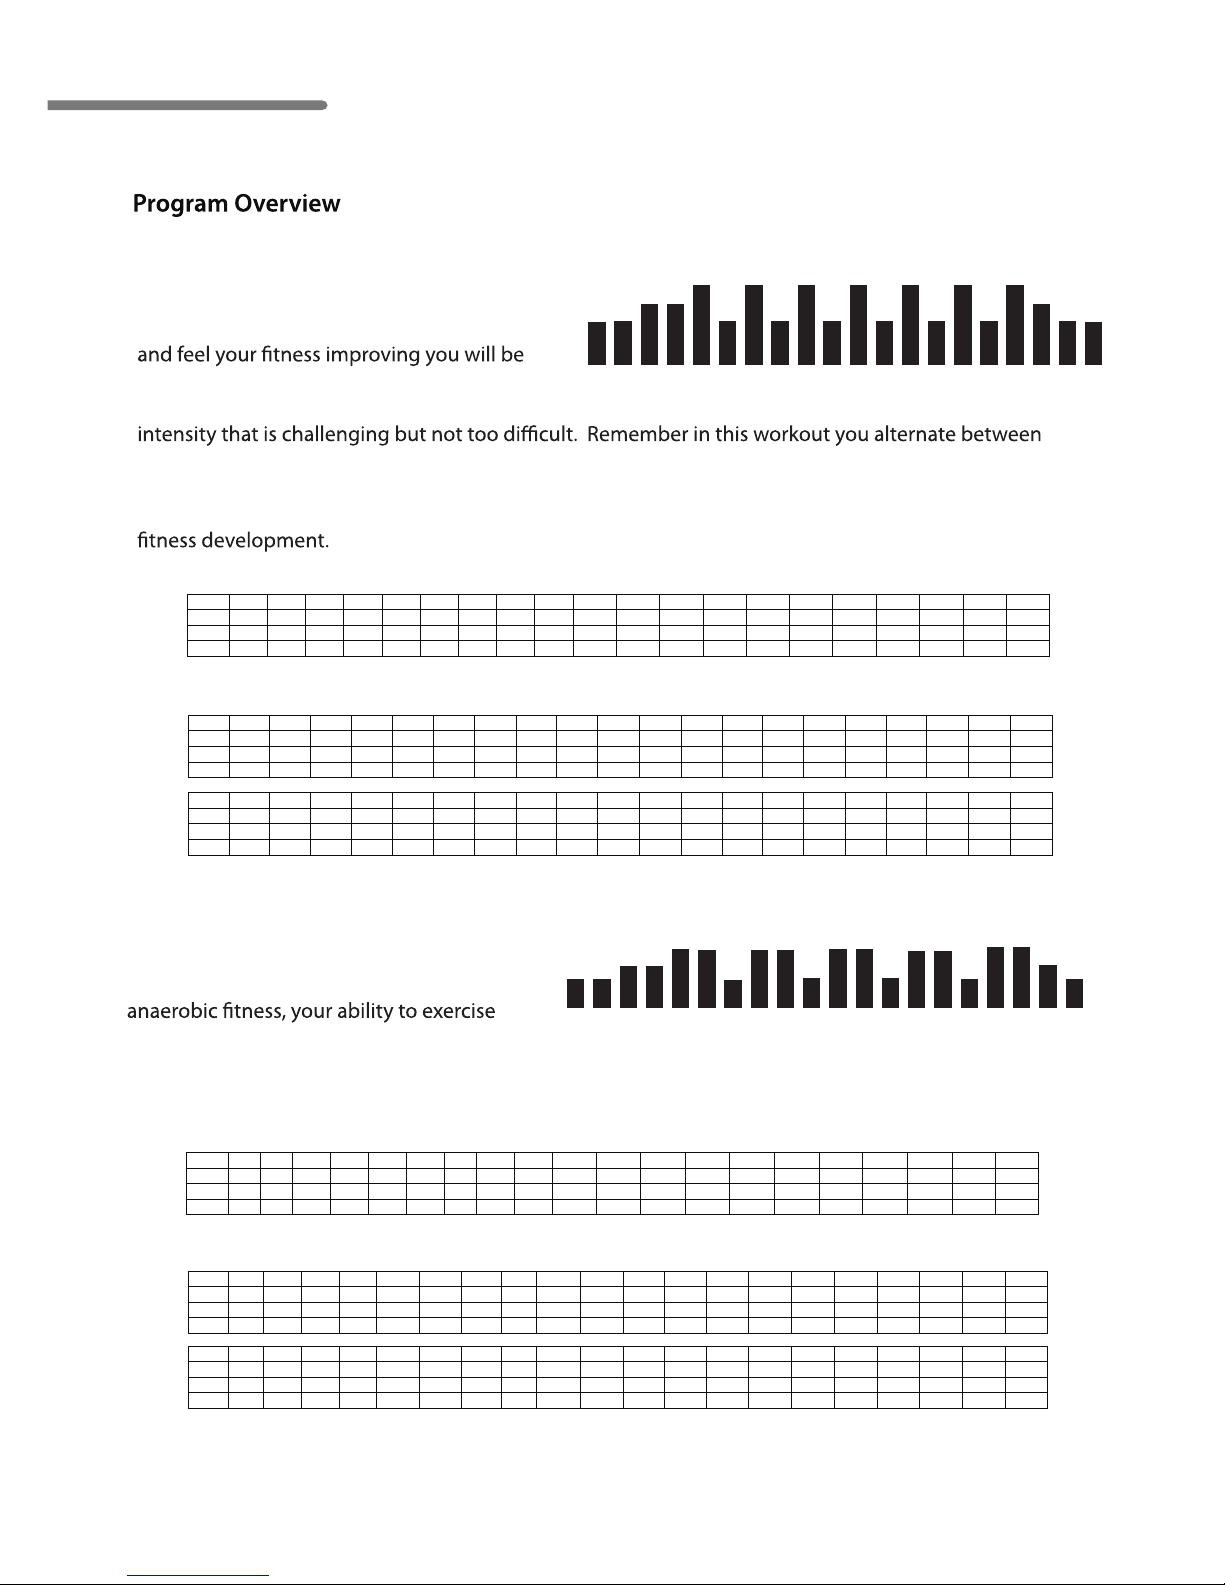
Moderate Interval: (30 minute default)
Long Interval: (40 minute deault)
Long Interval workouts are great to
maximize calorie burn and improve your
harder, at a higher intensity level. As in the Moderate Interval workouts, remember you have a recovery
period after each higher intensity interval so you can comfortably push yourself to exercise at a
progressively higher level.
As you begin to exercise on a regular basis
ready to begin doing “Moderate Intensity
Interval” workouts. You should begin with an intensity that is easy and then progress to an exercise
an easy recovery interval followed by a higher intensity interval. You should feel comfortable to push
yourself as you do this workout as you are never too far away from an easier recovery interval.
This workout will improve your overall aerobic endurance while also maximizing your anaerobic
Incline
Speed
1 2 3 4 5 6 7 8 9 10 11 12 13 14 15 16 17 18 19 20
L1 1 1 2 2 3 2 3 2 3 2 3 2 3 2 3 2 3 2 1 1
L2 3 3 4 4 5 3 5 3 5 3 5 3 5 3 5 3 5 4 3 3
L3 3 3 4 4 6 4 6 4 6 4 6 4 6 4 6 4 6 5 4 4
1 2 3 4 5 6 7 8 9 10 11 12 13 14 15 16 17 18 19 20
L1
L2
L3
1 2 3 4 5 6 7 8 9 10 11 12 13 14 15 16 17 18 19 20
L1
2 2 3 3 3.5 2 3.5 2 3.5 2 3.5 4.5 3 4.5 3 4.5 3.5 3 3 2
L2
3 3 3.7 3.7 4.5 3 4.5 3 4.5 3 4.5 3 4.5 3 4.5 3 3.7 3.7 3 3
L3
3.7 3.7 5 5 6 4.5 6 4.5 6 4.5 6 4.5 6 4.5 6 4.5 6 5 3.7 3.7
1 2 3 4 5 6 7 8 9 10 11 12 13 14 15 16 17 18 19 20
L1 1 1 2 2 3 3 1 3 3 1 3 3 1 3 3 1 3 3 2 1
L2 2 2 3 3 4 4 2 4 4 2 4 4 2 4 4 2 4 4 3 2
L3 3 3 4 4 5 5 2 5 5 2 5 5 2 5 5 2 5 5 4 3
Incline
Speed
1 2 3 4 5 6 7 8 9 10 11 12 13 14 15 16 17 18 19 20
L1
L2
L3
1 2 3 4 5 6 7 8 9 10 11 12 13 14 15 16 17 18 19 20
L1 1 1 2 2 3 3 2 2 3 3 2 2 3 3 2 2 3 3 2 1
L2 2 2 3 3 4.5 4.5 2 2 4.5 4.5 2 2 4.5 4.5 2 2 3 3 2 2
L3 3 3 4 4 5 5 3 3 5 5 3 3 5 5 3 3 4 4 3 3
P
-03:
P
-04:
Km/h
MPH
Km/h
MPH
Owners Manual
3.2 3.2 4.8 4.8 5.6 3.2 5.6 3.2 5.6 3.2 5.6 7.2 4.8 7.2 4.8 7.2 5.6 4.8 4.8 3.2
4.8 4.8 5.9 5.9 7.2 4.8 7.2 4.8 7.2 4.8 7.2 4.8 7.2 4.8 7.2 4.8 5.9 5.9 4.8 4.8
5.9 5.9 8.0 8.0 9.6 7.2 9.6 7.2 9.6 7.2 9.6 7.2 9.6 7.2 9.6 7.2 9.6 7.2 5.9 5.9
1.6 1.6 3.2 3.2 4.8 4.8 3.2 3.2 4.8 4.8 3.2 3.2 4.8 4.8 3.2 3.2 4.8 4.8 3.2 1.6
3.2 3.2 4.8 4.8 7.2 7.2 3.2 3.2 7.2 7.2 3.2 3.2 7.2 7.2 3.2 3.2 4.8 4.8 3.2 3.2
4.8 4.8 6.4 6.4 8.0 8.0 4.8 4.8 8.0 8.0 4.8 4.8 8.0 8.0 4.8 4.8 6.4 6.4 4.8 4.8
Page 26
25
Incline
Speed
Incline
Speed
1 2 3 4 5 6 7 8 9 10 11 12 13 14 15 16 17 18 19 20
L1 2 3 3 4 4 4 5 5 5 6 6 5 5 5 4 4 4 3 3 2
L2 1 2 2 2 3 3 4 4 4 5 5 4 4 4 3 3 2 2 2 1
L3 1 1 1 2 2 2 3 3 3 4 4 3 3 3 2 2 2 1 1 1
1 2 3 4 5 6 7 8 9 10 11 12 13 14 15 16 17 18 19 20
L1
L2
L3
1 2 3 4 5 6 7 8 9 10 11 12 13 14 15 16 17 18 19 20
L1 1 1 1.5 2 2 2.5 3 3 3.5 4 4 3.5 3 3 2.5 2 2 1.5 1 1
L2 2 2 2.5 3 3 3.5 4 4 4.5 5 5 4.5 4 4 3.5 3 3 2.5 2 2
L3 3 3 3.5 3.7 3.7 4.5 5 5 5.5 6 6 5.5 5 5 4.5 3.7 3.7 3.5 3 3
1 2 3 4 5 6 7 8 9 10 11 12 13 14 15 16 17 18 19 20
L1 2 2 2 3 3 3 4 4 4 5 5 4 4 4 3 3 3 2 2 2
L2 2 2 3 4 4 4 5 5 5 6 6 5 5 5 4 4 4 3 2 2
L3 3 3 4 5 5 5 6 6 6 7 7 6 6 6 5 5 5 4 3 3
1 2 3 4 5 6 7 8 9 10 11 12 13 14 15 16 17 18 19 20
L1
L2
L3
1 2 3 4 5 6 7 8 9 10 11 12 13 14 15 16 17 18 19 20
L1 1 1.5 2 2 2.5 3 3 3 3.5 4 4 4 3.5 3 3 2.5 2 2 1.5 1
L2 2 2.5 3 3 3.5 4.5 4.5 4.5 4.7 5 5 5 4.7 4.5 4.5 3.5 3 3 2.5 2
L3 3 3.5 4.5 4.5 4.7 5 5 5 5.5 6 6 6 5.5 5 5 4.7 4.5 4.5 3.5 3
P-05:
P-06:
Km/h
MPH
Km/h
MPH
1.6 1.6 2.4 3.2 3.2 4.0 4.8 4.8 5.6 6.4 6.4 5.6 4.8 4.8 4.0 3.2 3.2 2.4 1.6 1.6
3.2 3.2 4.0 4.8 4.8 5.6 6.4 6.4 7.2 8.0 8.0 7.2 6.4 6.4 5.6 4.8 4.8 4.0 3.2 3.2
4.8 4.8 5.6 5.9 5.9 7.2 8.0 8.0 8.8 9.6 9.6 8.8 8.0 8.0 7.2 5.9 5.9 5.6 4.8 4.8
1.6 2.4 3.2 3.2 4.0 4.8 4.8 4.8 5.6 6.4 6.4 6.4 5.6 4.8 4.8 4.0 3.2 3.2 2.4 1.6
3.2 4.0 4.8 4.8 5.6 7.2 7.2 7.2 7.5 8.0 8.0 8.0 7.5 7.2 7.2 5.6 4.8 4.8 4.0 3.2
4.8 5.6 7.2 7.2 7.5 8.0 8.0 8.0 8.8 9.6 9.6 9.6 8.8 8.0 8.0 7.5 7.2 7.2 5.6 4.8
TR800 / TR1000
TR1200 / TR1200i
Page 27
Owners Manual
26
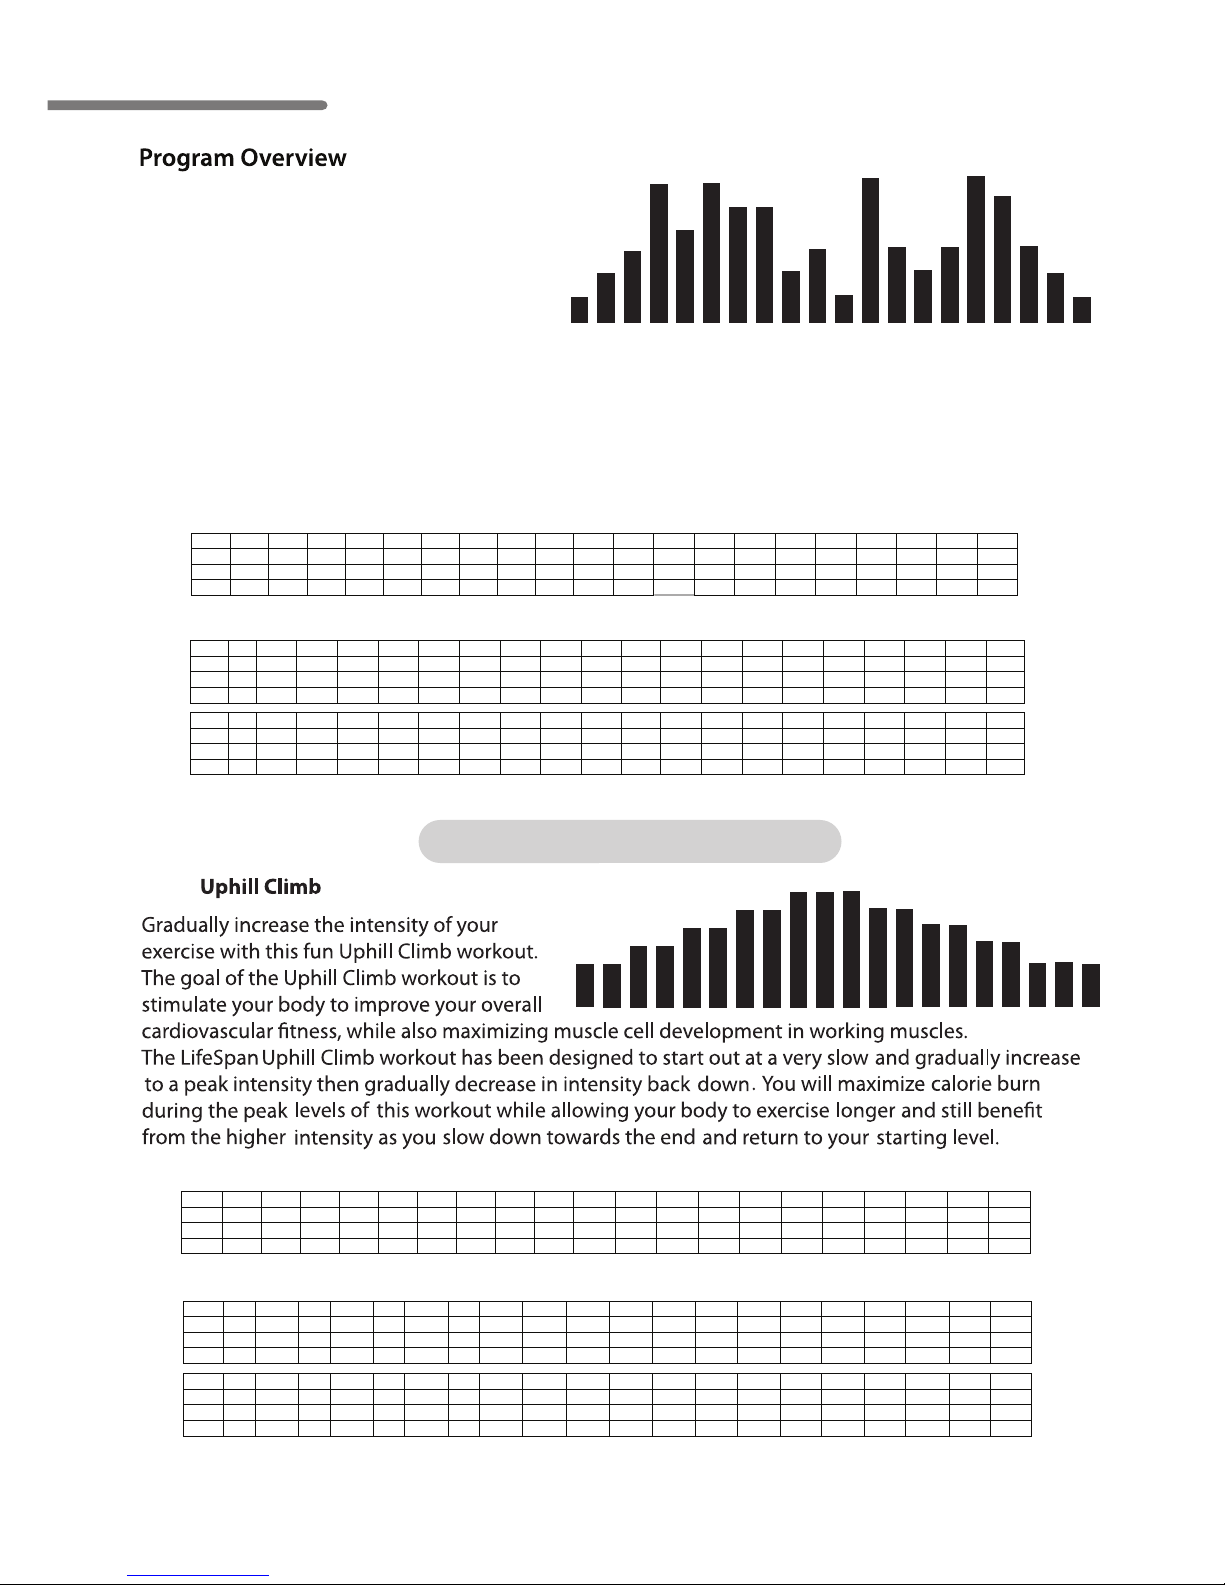
Fartlek
Varying y
our exercise intensity with a
constantly changing interval workout that
starts out at an easy pace and then increases
to a moderate or higher intensity pace will
add some great variety into your workouts, make your workouts go by faster than you ever imagined
while providing your body and mind with great tness benets. Constantly varying intensities in a
workout have been found in brain research to have great benets on improving overall brain tness.
Increasing your exercise intensity at constantly changing intervals and then dropping that intensity to
just a slightly lower level, and then returning to the higher level has great anaerobic cardiovascular
tness development on the body.
1 2 3 4 5 6 7 8 9 10 11 12 13 14 15 16 17 18 19 20
L1 1 2 3 4 2 3 4 4 2 1 3 1 4 3 2 1 3 2 1 1
L2 1 2 3 6 4 6 5 5 2 3 1 6 3 2 3 6 5 3 2 1
L3 2 4 2 6 3 6 4 4 5 2 6 3 6 2 6 2 5 4 6 1
1 2 3 4 5 6 7 8 9 10 11 12 13 14 15 16 17 18 19 20
L1
L2
L3
1 2 3 4 5 6 7 8 9 10 11 12 13 14 15 16 17 18 19 20
L1 1 1.5 2.5 2.7 2.5 3 2.7 4.5 2.5 1.5 3 1.5 4.5 3.5 2.7 1.5 3 2.5 1.5 1
L2 1 2.5 3.5 5 2.5 5 2.2 2 3 4.5 5 5 3.5 2 4 4.5 5 3.5 3 2
L3 2 2 2.5 4.7 4 4.5 6 4.5 6 5.5 6 4.5 4.7 4 3.5 3 3.5 5 2.5 2
Incline
Speed
1 2 3 4 5 6 7 8 9 10 11 12 13 14 15 16 17 18 19 20
L1 1 1 2 2 3 3 4 4 5 5 5 4 4 3 3 2 2 1 1 1
L2 2 2 3 3 4 4 5 5 6 6 6 5 5 4 4 3 3 2 2 2
L3 1 3 4 4 5 5 6 6 7 7 7 6 6 5 5 4 4 3 3 2
1 2 3 4 5 6 7 8 9 10 11 12 13 14 15 16 17 18 19 20
L1
L2
L3
1 2 3 4 5 6 7 8 9 10 11 12 13 14 15 16 17 18 19 20
L1 1 1.5 2 2.5 3 3.5 4 4.5 5 5 5 4.5 4 3.5 3 2.5 2 1.5 1 1
L2 2 2.5 3 3.5 4 4.5 5 5.5 6 6 6 5.5 5 4.5 4 3.5 3 2.5 2 2
L3 3 3.5 4 4.5 5 5.5 6 6 6.5 6.5 6.5 6 6 5.5 5 4.5 4 3.5 3 2
Healthy Living
Incline
Speed
: (30 minute default)
: (30 minut
e default)
P-07:
P-08:
Km/h
MPH
Km/h
MPH
1.6 2.4 4.0 4.3 4.0 4.8 4.3 7.2 4.0 2.4 4.8 2.4 7.2 5.6 4.3 2.4 4.8 4.0 2.4 1.6
1.6 4.0 5.6 8.0 4.0 8.0 3.5 3.2 4.8 7.2 8.0 8.0 5.6 3.2 6.4 7.2 8.0 5.6 4.8 3.2
3.2 3.2 4.0 7.5 6.4 7.2 9.6 7.2 9.6 8.8 9.6 7.2 7.5 6.4 5.6 4.8 5.6 8.0 4.0 3.2
1.6 2.4 3.2 4.0 4.8 5.6 6.4 7.2 8.0 8.0 8.0 7.2 6.4 5.6 4.8 4.0 3.2 2.4 1.6 1.6
3.2 4.0 4.8 5.6 6.4 7.2 8.0 8.8 9.6 9.6 9.6 8.8 8.0 7.2 6.4 5.6 4.8 4.0 3.2 3.2
4.8 5.6 6.4 7.2 8.0 8.8 9.6 9.6 10.4 10.4 10.4 9.6 9.6 8.8 8.0 7.2 6.4 5.6 4.8 3.2
Page 28
27
1 2 3 4 5 6 7 8 9 10 11 12 13 14 15 16 17 18 19 20
L1 1 1 1 2 2 2 3 3 3 4 4 4 3 3 3 2 2 2 1 1
L2 2 2 2 3 3 3 4 4 4 5 5 5 4 4 4 3 3 3 2 2
L3 3 3 3 4 4 4 5 5 5 6 6 6 5 5 5 4 4 4 3 3
1 2 3 4 5 6 7 8 9 10 11 12 13 14 15 16 17 18 19 20
L1
L2
L3
1 2 3 4 5 6 7 8 9 10 11 12 13 14 15 16 17 18 19 20
L1 1 1 1.5 2 2 2.5 3 3 3.5 4 4 4 3.5 3 3 2.5 2 2 1.5 1
L2 2 2 2.5 3 3 3.5 4 4 4.5 5 5 5 4.5 4 4 3.5 3 3 2.5 2
L3 2 3 3.5 4 4 4.5 5 5 5.5 6 6 6 5.5 5 5 4.5 4 4 3.5 2
Incline
Speed
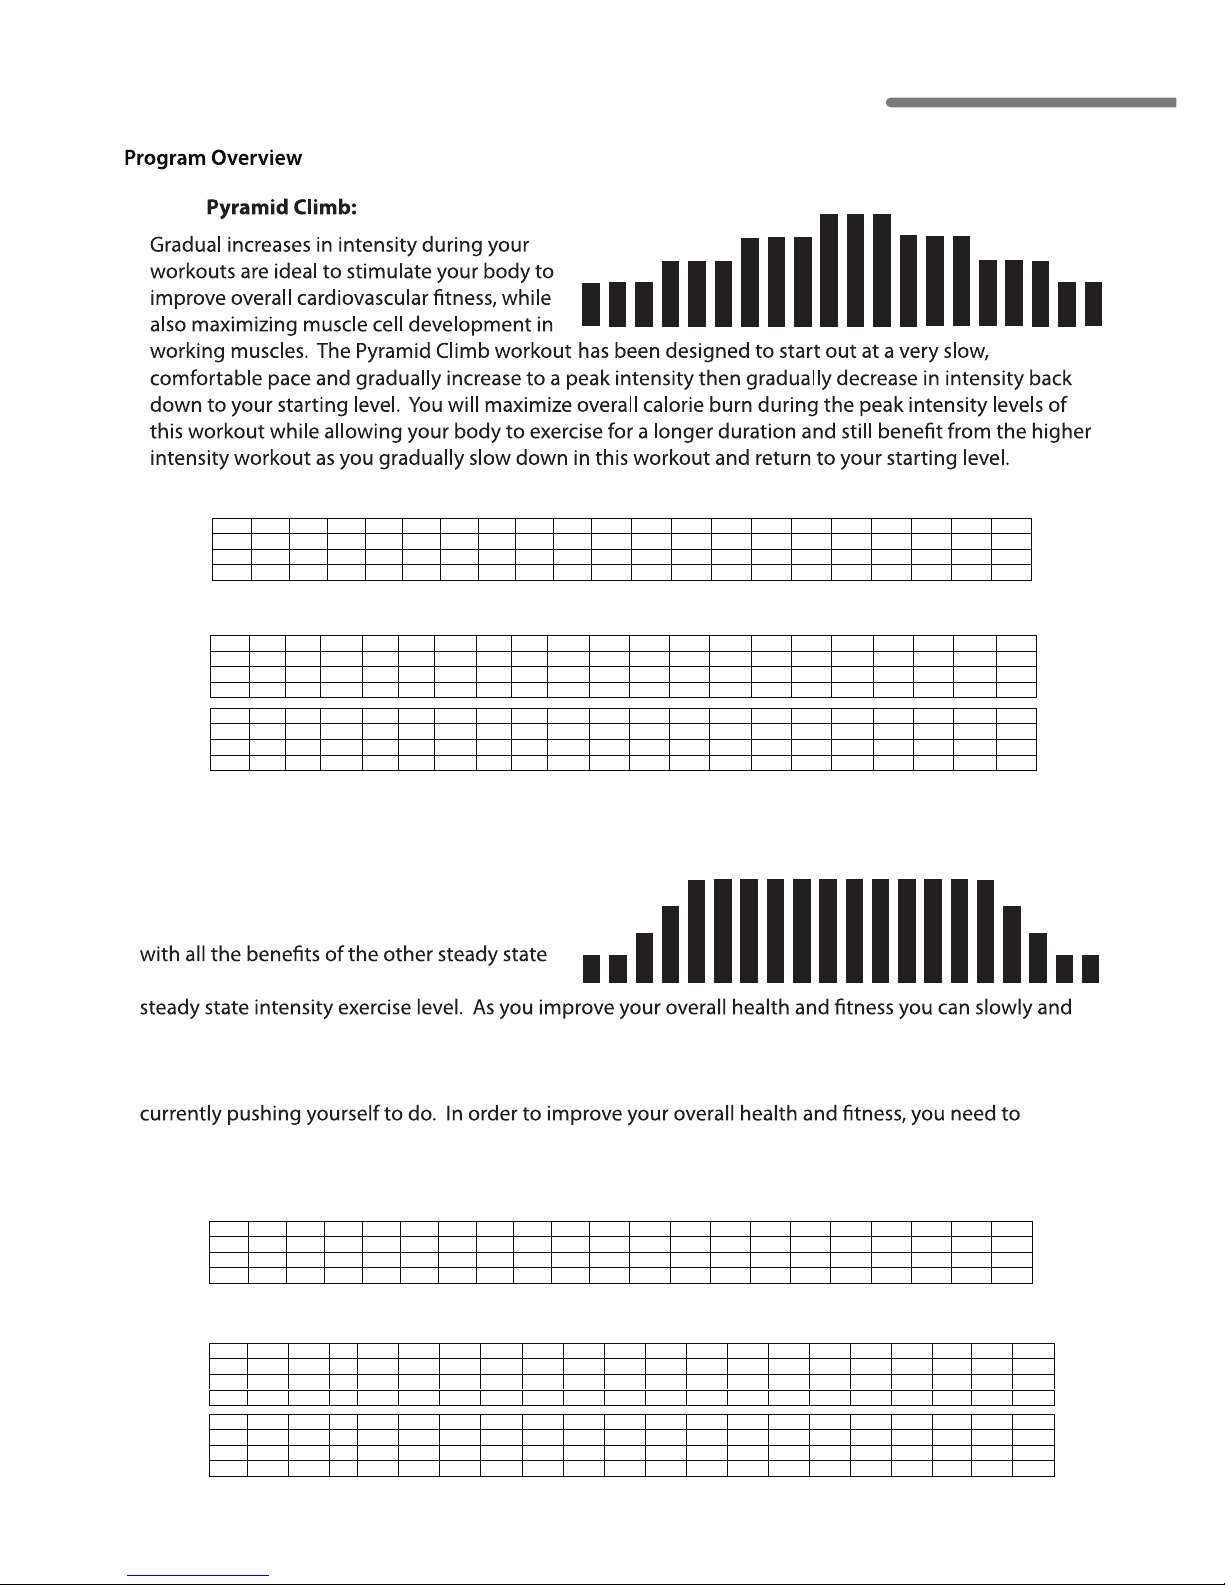
Plateau Climb:
A Plateau Climb workout will provide you
workouts, but push you to maintain a higher
of course always comfortably push yourself to higher overall exercise intensity for longer periods of
time. Remember, if you simply get on your treadmill and go at the same pace, for the same amount of
time every day when you workout, your body will only improve to the level of the workouts you are
always “change” your workouts so you don’t do the same workout within one week, while at the same
time slowly increase your overall exercise intensity while also increasing your overall exercise time.
1 2 3 4 5 6 7 8 9 10 11 12 13 14 15 16 17 18 19 20
L1 1 1 2 3 3 3 3 3 3 3 3 3 3 3 3 3 3 2 1 1
L2 1 1 2 3 4 4 4 4 4 4 4 4 4 4 4 4 3 2 1 1
L3 2 2 3 4 5 5 5 5 5 5 5 5 5 5 4 3 2 2 1 1
1 2 3 4 5 6 7 8 9 10 11 12 13 14 15 16 17 18 19 20
L1
L2
L3
1 2 3 4 5 6 7 8 9 10 11 12 13 14 15 16 17 18 19 20
L1 1 1.5 2 2.5 2.5 2.5 2.5 2.5 2.5 2.5 2.5 2.5 2.5 2.5 2.5 2.5 2.5 2 1.5 1
L2 1.5 1.5 2 2.5 3.5 3.5 3.5 3.5 3.5 3.5 3.5 3.5 3.5 3.5 3.5 3.5 2.5 2 1.5 1.5
L3 2 2 3 4 5 5 5 5 5 5 5 5 5 5 5 5 4 3 2 2
Incline
Speed
(30 minute default)
(40 minute default)
P-10:
P-09:
Km/h
MPH
Km/h
MPH
1.6 1.6 2.4 3.2 3.2 4.0 4.8 4.8 5.6 6.4 6.4 6.4 5.6 4.8 4.8 4.0 3.2 3.2 2.4 1.6
3.2 3.2 4.0 4.8 4.8 5.6 6.4 6.4 7.2 8.0 8.0 8.0 7.2 6.4 6.4 5.6 4.8 4.8 4.0 3.2
3.2 4.8 5.6 6.4 6.4 7.2 8.0 8.0 8.8 9.6 9.6 9.6 8.8 8.0 8.0 7.2 6.4 6.4 5.6 3.2
1.6 2.4 3.2 4.0 4.0 4.0 4.0 4.0 4.0 4.0 4.0 4.0 4.0 4.0 4.0 4.0 4.0 3.2 2.4 1.6
2.4 2.4 3.2 4.0 5.6 5.6 5.6 5.6 5.6 5.6 5.6 5.6 5.6 5.6 5.6 5.6 4.0 3.2 2.4 2.4
3.2 3.2 4.8 6.4 8.0 8.0 8.0 8.0 8.0 8.0 8.0 8.0 8.0 8.0 8.0 8.0 6.4 4.8 3.2 3.2
TR800 / TR1000
TR1200 / TR1200i
Page 29
Owners Manual
28
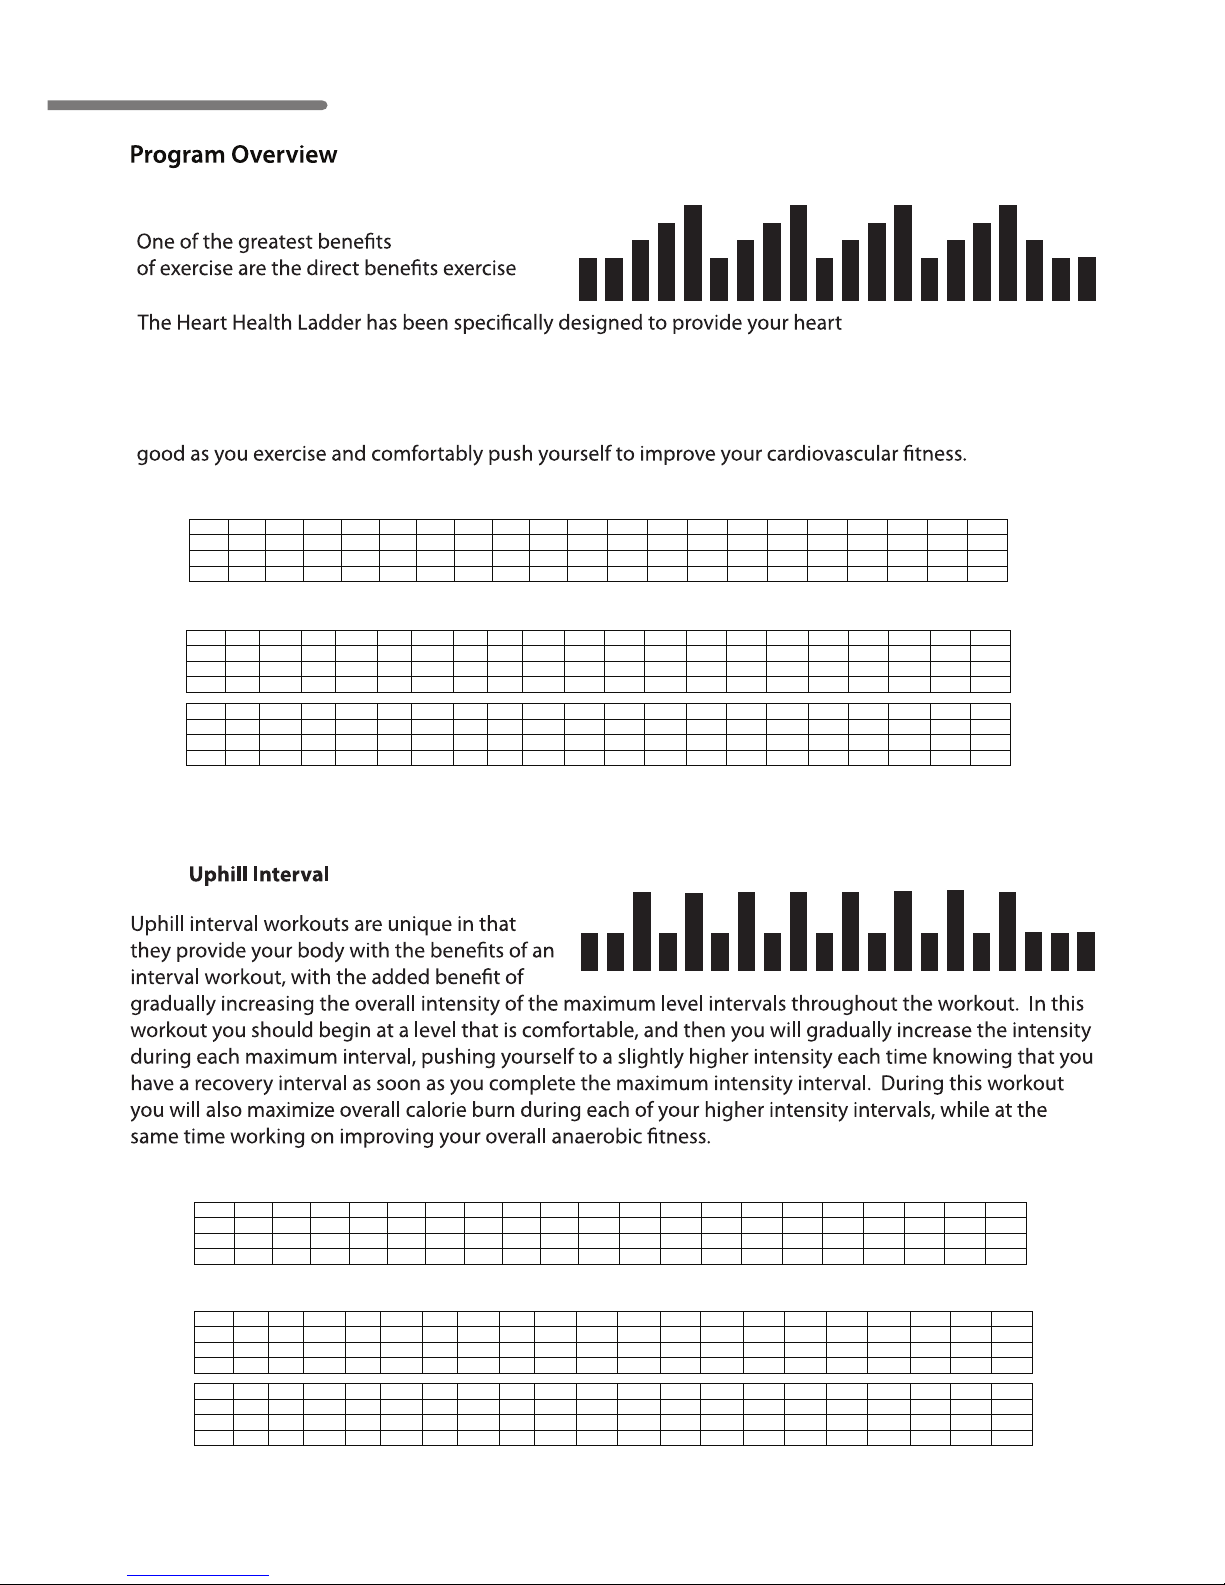
Ladder
has on the heart and cardiovascular system.
system with a series of progressively harder exercise intensity’s that will improve your overall
aerobic endurance, while also stimulating your anaerobic endurance. Remember as you go
through this workout that it may be challenging for a few minutes, but each progression has been
carefully timed to also provide recovery intervals after the highest intensity interval, so you can feel
1 2 3 4 5 6 7 8 9 10 11 12 13 14 15 16 17 18 19 20
L1 1 1 2 3 4 2 3 4 2 3 4 2 3 4 2 3 4 3 2 1
L2 2 2 3 4 5 3 4 5 3 4 5 3 4 5 3 4 5 4 3 2
L3 2 3 4 5 6 4 5 6 4 5 6 4 5 6 4 5 6 5 4 3
1 2 3 4 5 6 7 8 9 10 11 12 13 14 15 16 17 18 19 20
L1
L2
L3
1 2 3 4 5 6 7 8 9 10 11 12 13 14 15 16 17 18 19 20
L1 1 1.5 2 3 4 2.5 3 4 2.5 3 4 2.5 3 4 2.5 3 4 3.5 2 1
L2 2 2.5 3 3.5 5 3.5 4 5 3.5 4 5 3.5 4 5 3.5 4 5 3.5 3 2
L3 2 3 4 5 6 4 5 6 4 5 6 4 5 6 4 5 6 5 4 3
Incline
Speed
1 2 3 4 5 6 7 8 9 10 11 12 13 14 15 16 17 18 19 20
L1 1 1 2 3 2 3 2 3 2 3 2 3 2 3 2 3 2 3 2 1
L2 2 2 4 2 4 2 4 2 4 2 4 2 4 2 4 2 4 2 2 2
L3 2 3 5 3 5 3 5 3 5 3 5 3 5 3 5 3 5 3 3 2
1 2 3 4 5 6 7 8 9 10 11 12 13 14 15 16 17 18 19 20
L1
L2
L3
1 2 3 4 5 6 7 8 9 10 11 12 13 14 15 16 17 18 19 20
L1 1 2 3 2 3 2 3 2 3 2 3 2 3 2 3 2 3 2 2 1
L2 2 2 4.5 2 4.5 2 4.5 2 4.5 2 4.5 2 4.5 2 4.5 2 4.5 2 2 2
L3 2 3 5 3 5 3 5 3 5 3 5 3 5 3 5 3 5 3 3 3
Incline
Speed
: (30 minute default)
and cardiovascular
: (20 minute default)
P
-11:
P-12 :
Km/h
MPH
Km/h
MPH
1.6 2.4 3.2 4.8 6.4 4.0 4.8 6.4 4.0 4.8 6.4 4.0 4.8 6.4 4.0 4.8 6.4 5.6 3.2 1.6
3.2 4.0 4.8 5.6 8.0 5.6 6.4 8.0 5.6 6.4 8.0 5.6 6.4 8.0 5.6 6.4 8.0 5.6 4.8 3.2
3.2 4.8 6.4 8.0 9.6 6.4 8.0 9.6 6.4 8.0 9.6 6.4 8.0 9.6 6.4 8.0 9.6 8.0 6.4 4.8
1.6 3.2 4.8 3.2 4.8 3.2 4.8 3.2 4.8 3.2 4.8 3.2 4.8 3.2 4.8 3.2 4.8 3.2 3.2 1.6
3.2 3.2 7.2 3.2 7.2 3.2 7.2 3.2 7.2 3.2 7.2 3.2 7.2 3.2 7.2 3.2 7.2 3.2 3.2 3.2
3.2 4.8 8.0 4.8 8.0 4.8 8.0 4.8 8.0 4.8 8.0 4.8 8.0 4.8 8.0 4.8 8.0 4.8 4.8 4.8
Page 30
29
1 2 3 4 5 6 7 8 9 10 11 12 13 14 15 16 17 18 19 20
L1 1 2 3 3 3 3 3 3 3 3 3 3 3 3 3 3 3 3 2 1
L2 2 2 4 4 4 4 4 4 4 4 4 4 4 4 4 4 4 4 2 2
L3 2 3 5 5 5 5 5 5 5 5 5 5 5 5 5 5 5 5 3 2
1 2 3 4 5 6 7 8 9 10 11 12 13 14 15 16 17 18 19 20
L1
L2
L3
1 2 3 4 5 6 7 8 9 10 11 12 13 14 15 16 17 18 19 20
L1 2 2.5 3 3 3 3 3 3 3 3 3 3 3 3 3
3
3 3 2.5 2
L2 3 3.5 4.5 4.5 4.5 4.5 4.5 4.5 4.5 4.5 4.5 4.5 4.5 4.5 4.5 4.5 4.5 4.5 3.5 3
L3 2 3.5 5 5 5 5 5 5 5 5 5 5 5 5 5 5 5 5 3.5 2
Incline
Speed
This is
1 2 3 4 5 6 7 8 9 10 11 12 13 14 15 16 17 18 19 20
L1 1 1 2 2 2 2 2 2 2 2 2 2 2 2 2 2 2 2 1 1
L2 2 2 3 3 3 3 3 3 3 3 3 3 3 3 3 3 3 3 2 2
L3 2 3 4 4 4 4 4 4 4 4 4 4 4 4 4 4 4 4 3 2
1 2 3 4 5 6 7 8 9 10 11 12 13 14 15 16 17 18 19 20
L1
L2
L3
1 2 3 4 5 6 7 8 9 10 11 12 13 14 15 16 17 18 19 20
L1 1 1 2.5 2.5 2.5 2.5 2.5 2.5 2.5 2.5 2.5 2.5 2.5 2.5 2.5 2.5 2.5 2.5 1 1
L2 2 2 3.5 3.5 3.5 3.5 3.5 3.5 3.5 3.5 3.5 3.5 3.5 3.5 3.5 3.5 3.5 3.5 2 2
L3 2 3 4.5 4.5 4.5 4.5 4.5 4.5 4.5 4.5 4.5 4.5 4.5 4.5 4.5 4.5 4.5 4.5 3 2
Incline
Speed
1 2 3 4 5 6 7 8 9 10 11 12 13 14 15 16 17 18 19 20
L1 1 1 3 3 3 3 3 3 3 3 3 3 3 3 3 3 3 3 1 1
L2 2 2 5 5 5 5 5 5 5 5 5 5 5 5 5 5 5 5 2 2
L3 3 4 6 6 6 6 6 6 6 6 6 6 6 6 6 6 6 6 4 3
1 2 3 4 5 6 7 8 9 10 11 12 13 14 15 16 17 18 19 20
L1
L2
L3
1 2 3 4 5 6 7 8 9 10 11 12 13 14 15 16 17 18 19 20
L1 1 1.5 3.5 3.5 3.5 3.5 3.5 3.5 3.5 3.5 3.5 3.5 3.5 3.5 3.5 3.5 3.5 3.5 2.5 1.5
L2 2 2.5 4.5 4.5 4.5 4.5 4.5 4.5 4.5 4.5 4.5 4.5 4.5 4.5 4.5 4.5 4.5 4.5 3.5 2.5
L3 3 4.5 5.5 5.5 5.5 5.5 5.5 5.5 5.5 5.5 5.5 5.5 5.5 5.5 5.5 5.5 5.5 3.5 2.5 1.5
Incline
Speed
(40 minute default)
(40 minute default)
: (20 minute default)
P-13:
P-14:
P-15:
29
Km/h
MPH
Km/h
MPH
Km/h
MPH
3.2 4.0 4.8 4.8 4.8 4.8 4.8 4.8 4.8 4.8 4.8 4.8 4.8 4.8 4.8 4.8 4.8 4.8 4.0 3.2
4.8 5.6 7.2 7.2 7.2 7.2 7.2 7.2 7.2 7.2 7.2 7.2 7.2 7.2 7.2 7.2 7.2 7.2 5.6 4.8
3.2 5.6 8.0 8.0 8.0 8.0 8.0 8.0 8.0 8.0 8.0 8.0 8.0 8.0 8.0 8.0 8.0 8.0 5.6 3.2
1.6 1.6 4.0 4.0 4.0 4.0 4.0 4.0 4.0 4.0 4.0 4.0 4.0 4.0 4.0 4.0 4.0 4.0 1.6 1.6
3.2 3.2 5.6 5.6 5.6 5.6 5.6 5.6 5.6 5.6 5.6 5.6 5.6 5.6 5.6 5.6 5.6 5.6 3.2 3.2
3.2 4.8 7.2 7.2 7.2 7.2 7.2 7.2 7.2 7.2 7.2 7.2 7.2 7.2 7.2 7.2 7.2 7.2 4.8 3.2
1.6 2.4 5.6 5.6 5.6 5.6 5.6 5.6 5.6 5.6 5.6 5.6 5.6 5.6 5.6 5.6 5.6 5.6 4.0 2.4
3.2 4.0 7.2 7.2 7.2 7.2 7.2 7.2 7.2 7.2 7.2 7.2 7.2 7.2 7.2 7.2 7.2 7.2 5.6 4.0
4.8 7.2 8.8 8.8 8.8 8.8 8.8 8.8 8.8 8.8 8.8 8.8 8.8 8.8 8.8 8.8 8.8 5.6 4.0 2.4
TR800 / TR1000
TR1200 / TR1200i
Page 31
Owners Manual
30
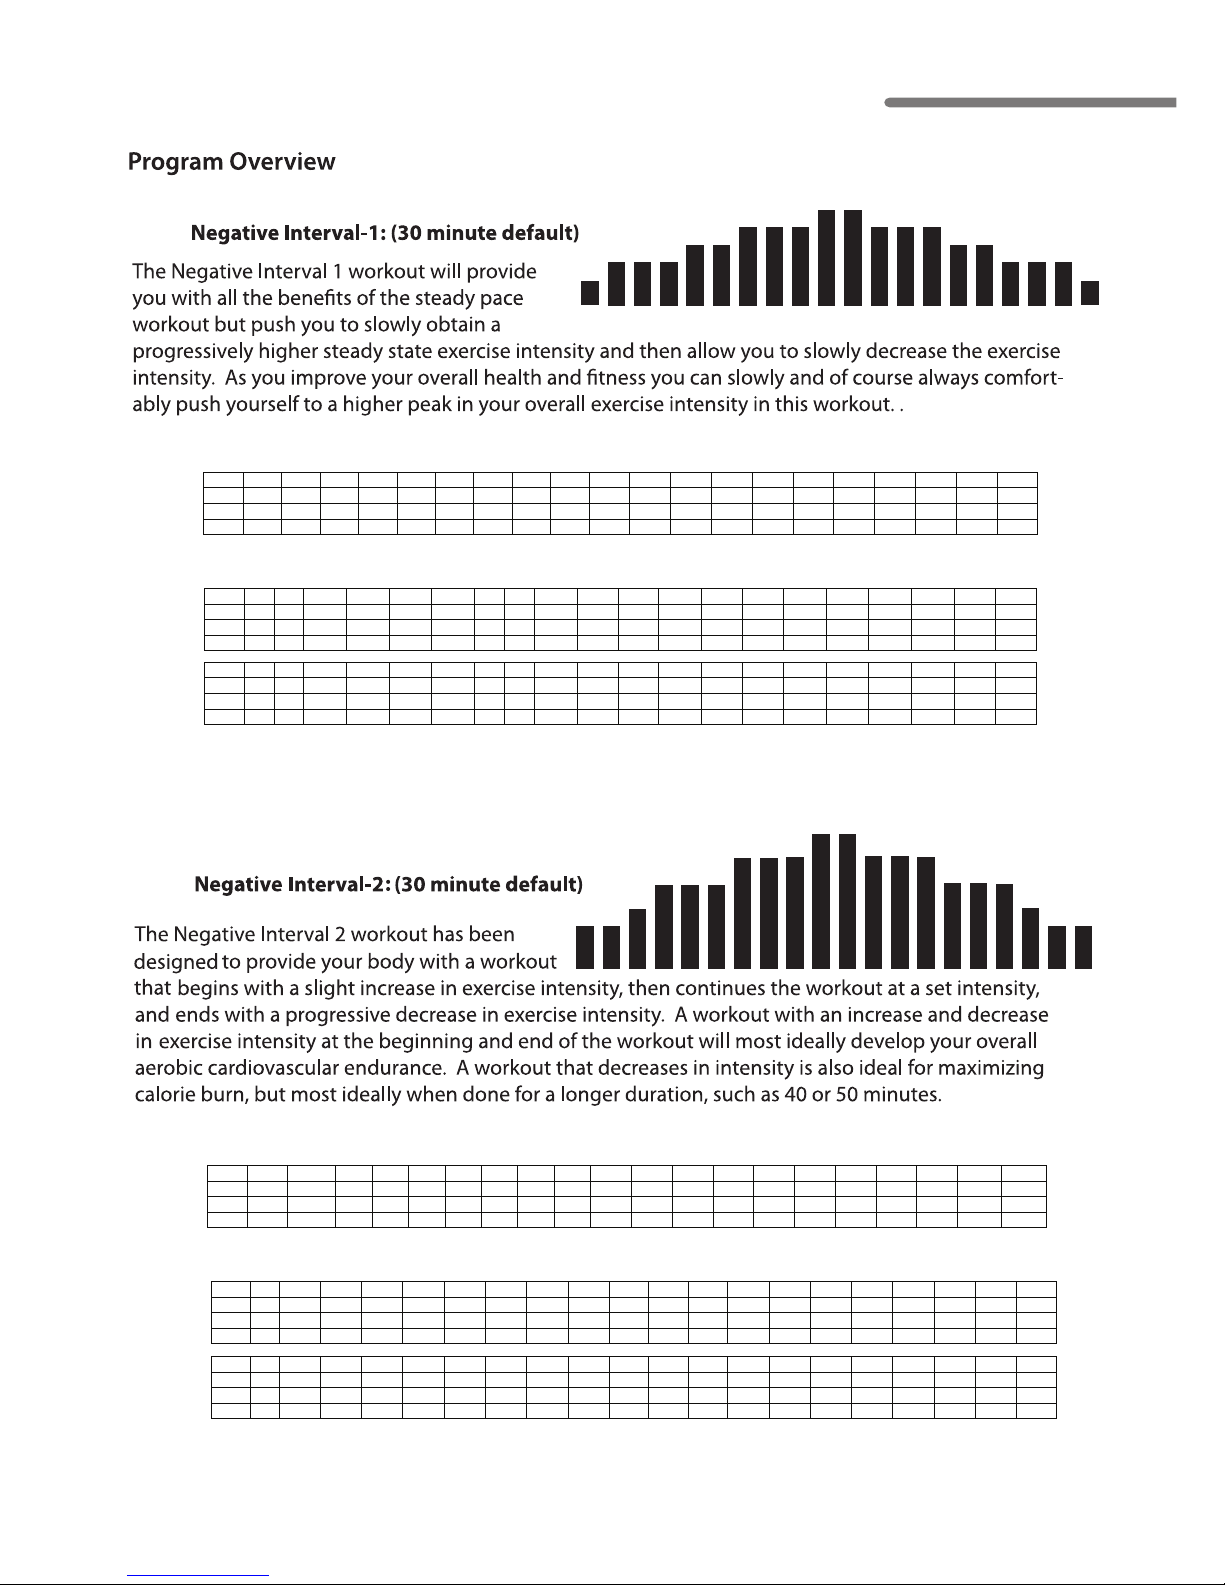
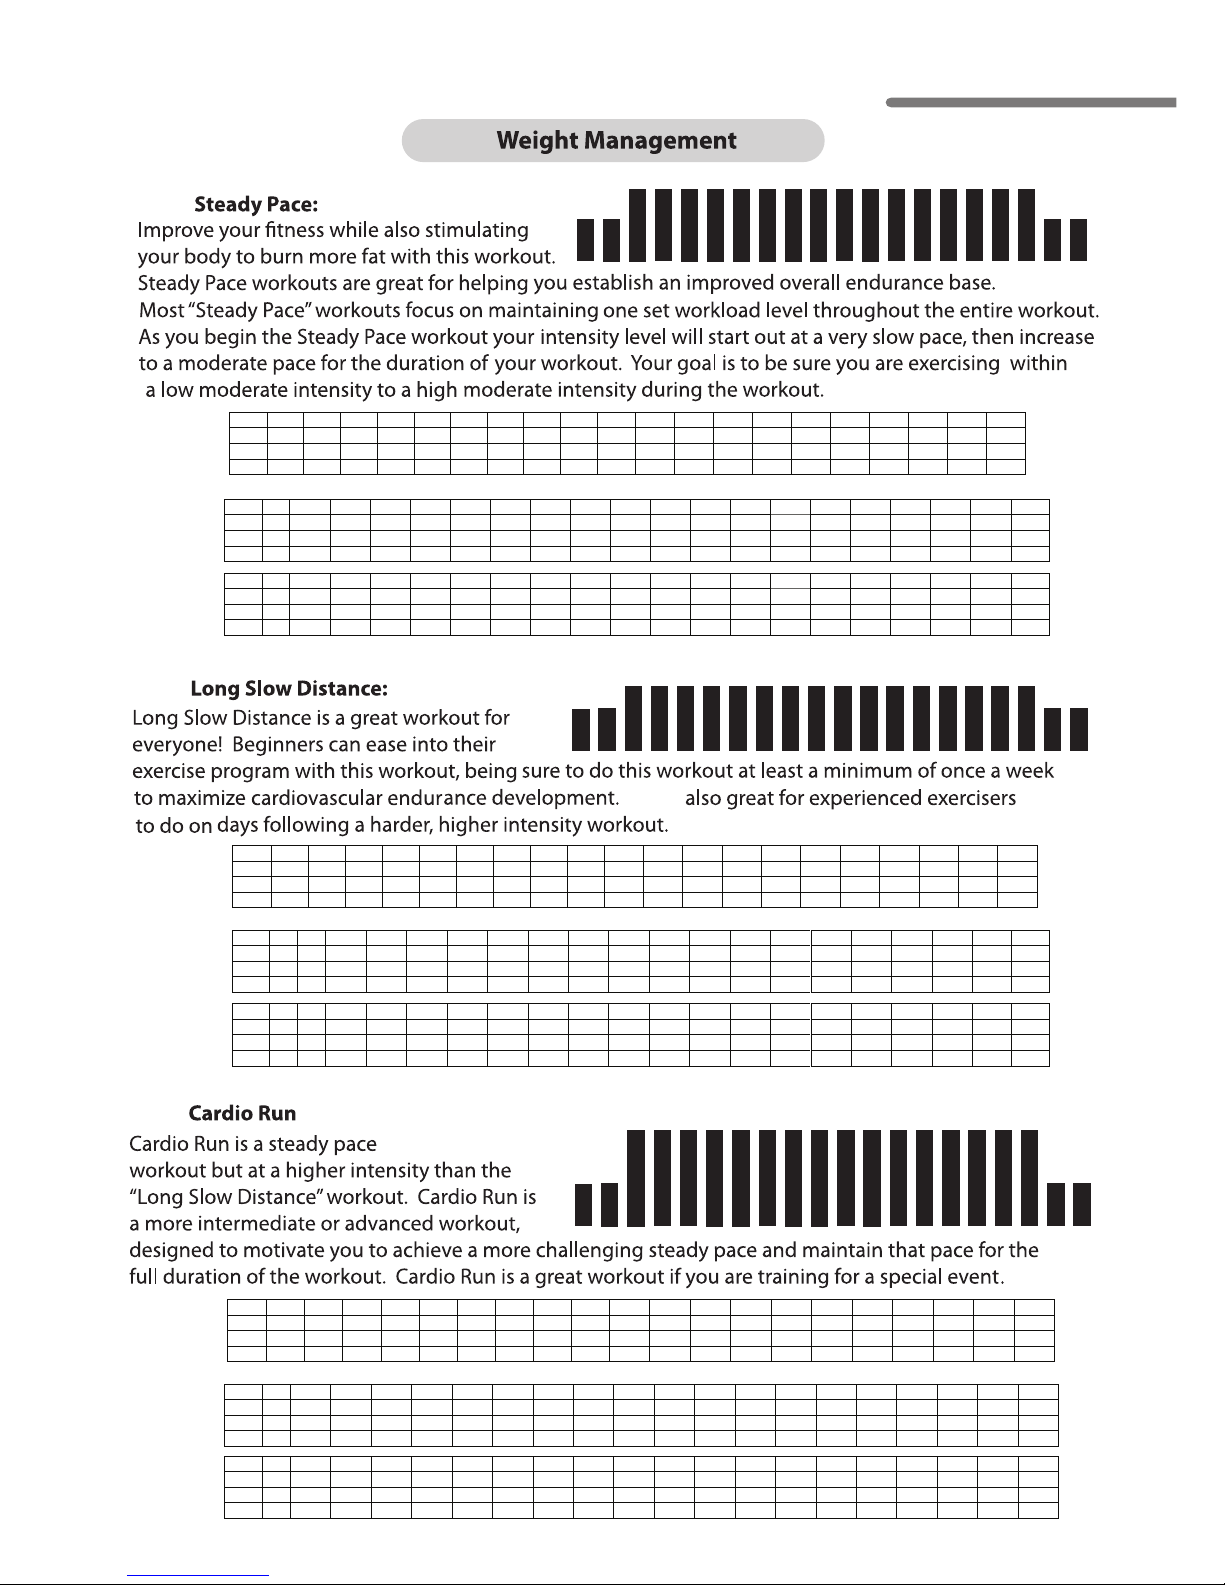
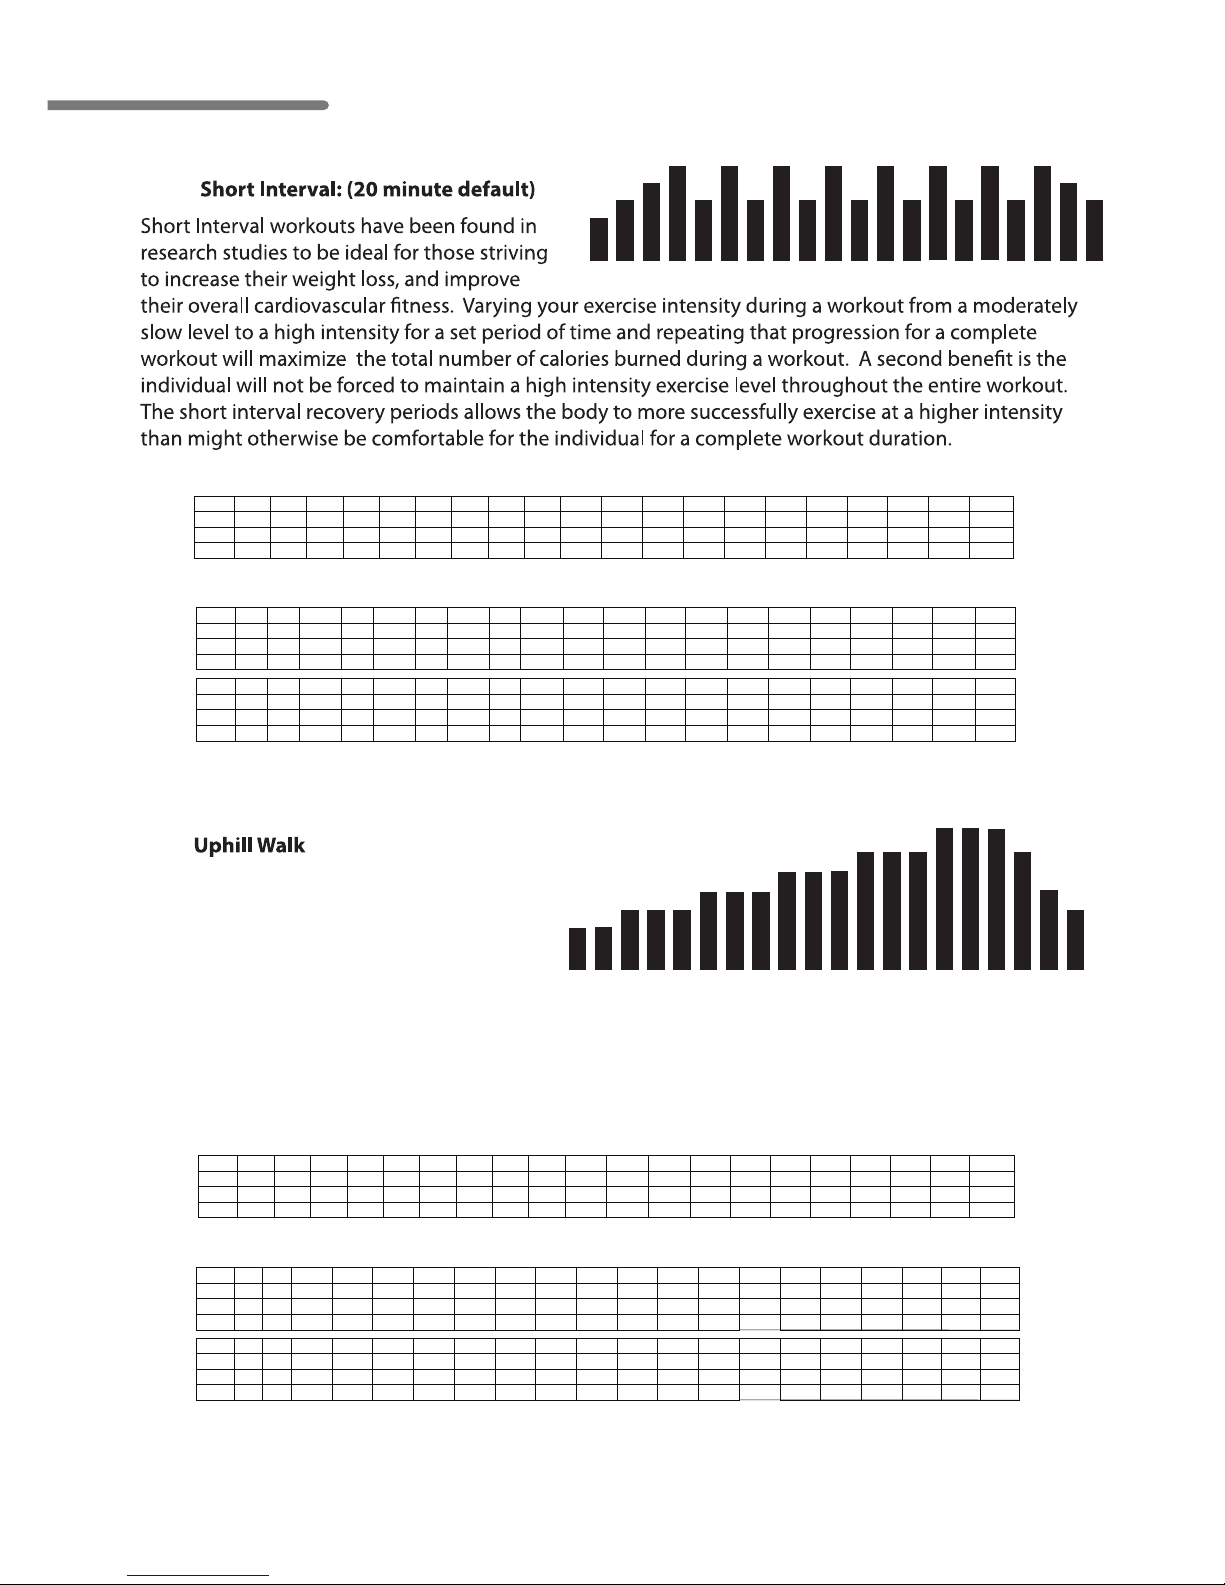
The Uphill Walk gradually increases the
intensity of your exercise peaking at a high
intensity. The goal of the Uphill Walk workout is to stimulate your body to improve
your overall cardiovascular tness, while also
maximizing muscle cell development in working muscles. The Uphill Walk workout has been designed
to start out at a slow, comfortable pace and gradually increase to a peak intensity then with a quick
decrease in intensity back down to a recovery level. You will maximize overall calorie burn during the
peak intensity levels of this workout while allowing your body to exercise for a longer duration.
1 2 3 4 5 6 7 8 9 10 11 12 13 14 15 16 17 18 19 20
L1 1 2 3 4 2 4 2 4 2 4 2 4 2 4 2 4 2 4 3 2
L2 2 3 4 5 3 5 3 5 3 5 3 5 3 5 3 5 3 5 4 3
L3 2 3 5 6 4 6 4 6 4 6 4 6 4 6 4 6 4 6 5 3
1 2 3 4 5 6 7 8 9 10 11 12 13 14 15 16 17 18 19 20
L1
L2
L3
1 2 3 4 5 6 7 8 9 10 11 12 13 14 15 16 17 18 19 20
L1 1 2 3.5 3 2.5 3 2.5 3 2.5 3 2.5 3 2.5 3 2.5 3 2.5 3 3.5 2
L2 2 3 4.5 5 3.5 5 3.5 5 3.5 5 3.5 5 3.5 5 3.5 5 3.5 5 4.5 3
L3 2 3 4.5 6 4.5 6 4.5 6 4.5 6 4.5 6 4.5 6 4.5 6 4.5 6 3.5 2
1 2 3 4 5 6 7 8 9 10 11 12 13 14 15 16 17 18 19 20
L1 1 1 2 2 2 3 3 3 4 4 4 5 5 5 6 6 6 5 3 2
L2 2 2 3 3 3 4 4 4 5 5 5 6 6 6 7 7 7 6 4 3
L3 2 2 3 3 4 4 4 5 5 5 6 6 6 7 7 7 6 5 4 3
1 2 3 4 5 6 7 8 9 10 11 12 13 14 15 16 17 18 19 20
L1
L2
L3
1 2 3 4 5 6 7 8 9 10 11 12 13 14 15 16 17 18 19 20
L1 1 1 1.5 1.5 1.5 1.5 2 2 2 2.5 2.5 2.5 3 3 3 3.5 3.5 3 2 1
L2 2 2 3.5 3.5 3.5 4 4 4 4.5 4.5 4.5 5 5 5 5.5 5.5 5.5 4 3 2
L3 3 3 4 4 4 4.5 4.5 4.5 5 5 5 5.5 5.5 5.5 6 6 6 5 4 3
Incline
Speed
Incline
Speed
: (30 minute default)
P
-16:
P-17:
Km/h
MPH
Km/h
MPH
1.6 3.2 5.6 4.8 4.0 4.8 4.0 4.8 4.0 4.8 4.0 4.8 4.0 4.8 4.0 4.8 4.0 4.8 5.6 3.2
3.2 4.8 7.2 8.0 5.6 8.0 5.6 8.0 5.6 8.0 5.6 8.0 5.6 8.0 5.6 8.0 5.6 8.0 7.2 4.8
3.2 4.8 7.2 9.6 7.2 9.6 7.2 9.6 7.2 9.6 7.2 9.6 7.2 9.6 7.2 9.6 7.2 9.6 5.6 3.2
1.6 1.6 2.4 2.4 2.4 2.4 3.2 3.2 3.2 4.0 4.0 4.0 4.8 4.8 4.8 5.6 5.6 4.8 3.2 1.6
3.2 3.2 5.6 5.6 5.6 6.4 6.4 6.4 7.2 7.2 7.2 8.0 8.0 8.0 8.8 8.8 8.8 6.4 4.8 3.2
4.8 4.8 6.4 6.4 6.4 7.2 7.2 7.2 8.0 8.0 8.0 8.8 8.8 8.8 9.6 9.6 9.6 8.0 6.4 4.8
Page 32
31
down arrows for speed and incline or using the quick select buttons. After obtaining your desired selec-
you each time you select it and press the “start” button.
The treadmill comes with two types of heart rate control programs: Constant and Interval. Within each of
these you can select either a “Speed” control option or an “Incline” control option.
There is a 3 minute warm up for this program prior to the treadmill taking control of the speed or incline.
Note: To use the Heart Rate Control programs the treadmill needs to receive your heart rate throughout the
entire workout either through using the grip pulse pads or a chest strap heart rate transmitter.
Constant Heart Rate Control: The “Constant” program lets you select a single heart rate that you
want to maintain throughout your workout and the treadmill will maintain this heart rate for you by either
adjusting the speed or the incline. After selecting the Constant Heart Rate program the next selection
option will be Incline Mode or Speed Mode. Select which mode you prefer and the treadmill will adjust the
speed or incline every 10 seconds to keep you at your selected heart rate level. For instance, if you select
the incline mode there will be a 3 minute warm up and then the incline will start to adjust each 10 seconds
obtain and maintain your target heart rate. You choose the speed that you want the belt to run and the
treadmill will control the incline.
Typically for Weight Loss set the target heart rate at 65% of your predicted maximum heart rate and for
Cardio Training set the target at 80% of your predicted maximum. Refer to the Heart Rate Training section
of this manual to determine your optimal training zones based on your age and exercise objectives.
Interval Heart Rate Control: The “Interval” program is designed to help you increase your aerobic
endurance and improve heart rate recovery. This program lets you select a LOW or recovery target heart
rate and a HIGH target. After a 3 minute warm-up the console will adjust the speed or incline, which ever
you select, every 10 seconds to maintain your LOW target to 2 minutes. Then the console will adjust the
speed or incline to raise your heart rate to the HIGH target that you selected and once again keep it at this
level for 2 minutes and then repeat the process until the end of the workout. It is recommended that you
Custom User Set-up Programs
TR800 / TR1000
TR1200 / TR1200i
Page 33
Owners Manual
32
- Press the Incline or Speed UP / DOWN buttons to scroll to the desired program.
Select Program Mode - with each program selection you can choose to run the program in the
Incline Mode or the Speed Mode. Use the UP / DOWN arrows to make the selection then Press Enter.
quick speed
Set Program Level - There are 3 levels of intensity with each preset program (1 being the easiest
Use the UP / Down arrows to make the selection then Press Enter.
6.
Operating Your Treadmill
Starting in Manual Mode
UP / DOWN
(TR1200i only)
Page 34
33
2. Select Program Mode - select either the Incline Control Mode of the Speed Control Mode using the
UP / DOWN arrow keys. Press Enter.
STOP
2. Select Program Mode - select either the Incline Control Mode of the Speed Control Mode using the
UP / DOWN arrow keys. Press Enter.
8.
Speed and Incline
H02
H01
While using the HRC programs you will be required to hold the pulse grips or wear a chest strap for
the duration of the workout.
TR800 / TR1000
TR1200 / TR1200i
Page 35
Owners Manual
34
Innovative Features (TR1200i only)
Intelli-Guard - This treadmill is equipped with the Intelli-Guard safety feature. This feature senses when you
stop walking on the treadmill and for safety purposes it automatically pauses the treadmill to avoid
accidental falls and resulting injury. The Intelli-Guard feature is triggered when the treadmill senses that you
are no longer walking or running on the treadmill.
Caution:The Intelli-Guard feature will automatically be disengaged when the treadmill is
operated at speeds under 1.5 mph or at an incline level over 5.
Caution: At 20 seconds the console will beep once per second for 5 seconds
and then automatically pause the treadmill. These beeps are a notice that the
treadmill belt is about to stop. If for some reason you are still on the treadmill
when this occurs move your feet to the side rails and prepare for the belt to stop.
The Intelli-Guard feature does not replace the use of your saftey key or using proper
precaution in stopping the treadmill when it is not in use.
Intelli-Step – The treadmill comes with the Intelli-Step counting feature. This feature senses the resistance
feature including your walking style, your weight, and your usage characteristics. For example, the Intelli-
may also be the case at lower speeds. In summary, the Intelli-Step is a great feature for users interested in
maintaining a step count walking or running program, but it is dependant on many variables for accuracy
and the accuracy of the count will depend on your individual characteristics as well as variables related to
the treadmills usage.
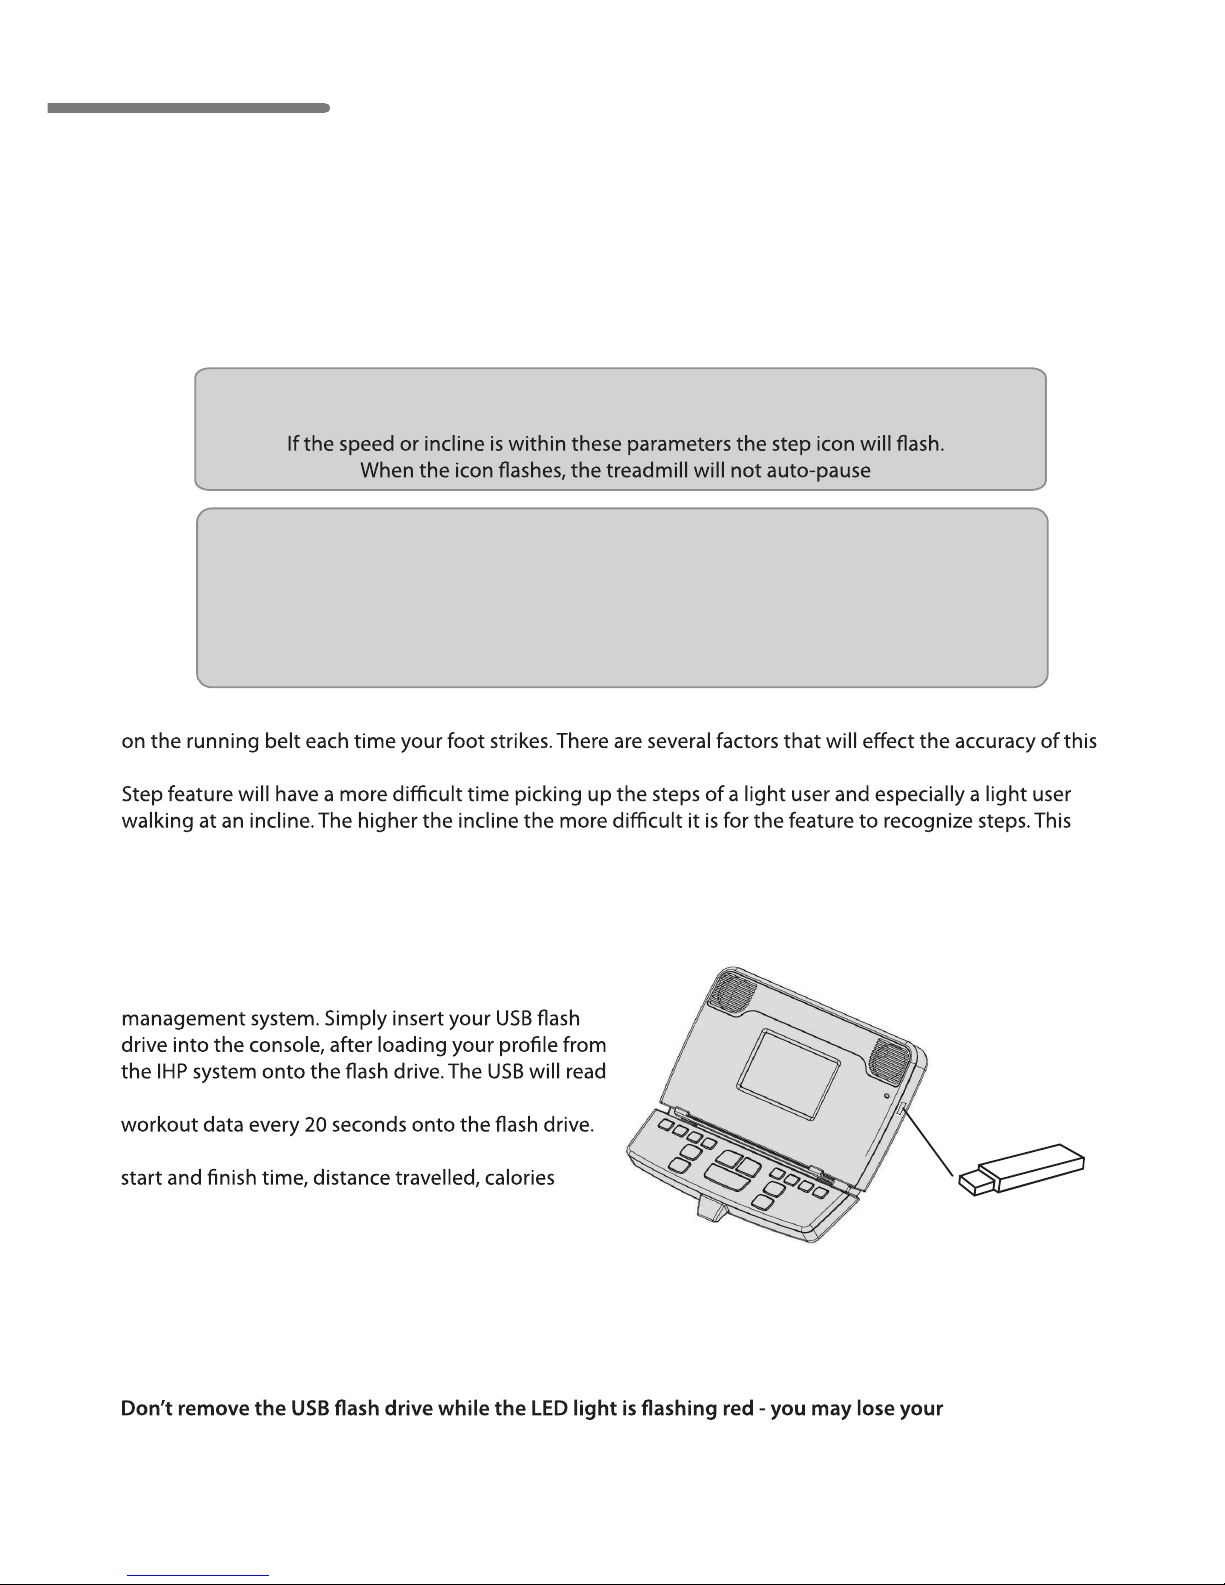
UBS Port: The TR1200i includes a USB port that works
with the Interactive Health Partner online health
your personal information and then save your
Information saved includes your heart rate, workout
burned and steps taken. This information can then be
uploaded into your account, summarized over time
and used to compare your results with the goals you
set in your personal IHP account. Prior to using your USB, make sure you refer to the “Getting Started
Guide” and “Success Guide” found in your membership kit, located in your owner’s manual packet.
USB Port
workout information
Energy Saving Mode: The energy saving mode cuts all power to the treadmill with the exception of one
dimly lit LED at the Start button. This will cut power consumption to well under 0.1 watts.
Page 36
35
Belt Lubrication
Use only 100% Silicone and avoid using aerosol silicone sprays which include additives and petroleum
distillates. One ounce of Silicone should be used for each application.
The running belt should be lubricated every 3 months (irregardless of use) or every 50
over time and the belt will dry out.
Note: Even though the running belt is lubed from the manufacturer, it is not a bad idea to lubricate
the unit was manufactured and when it was purchased.
The Silicone icon will turn on in the display every 100 hours of use and is a reminder that it is time to
lubricate the running belt. As indicated above it is best to lubricate the running belt every 50 hours of use.
Apply the silicone to the underside of the treadmill belt. Do ot apply to the walking surface.
This may be accomplished by folding the treadmill and applying the silicone to the back of the belt
from each back corner. Spray the silicone down and across the belt from each corner. Rotate the
belt 1/2 of the circumference and repeat from each corner.
Note: When lubricating the belt, make sure the treadmill is located on a surface that can be easily
Cleaning
It is recommended to wipe the treadmill down after each use to keep the treadmill clean and dry. A
mild detergent may be used at times to help remove all dirt and salt from the belt, painted parts and
the display.
The maintenance icon shows up in the display every 150 hours of use. This is a reminder to clean
the unit thoroughly. This cleaning would include removing the motor cover and cleaning around the
motor and electronics. It is recommended to clean the motor compartment if the treadmill is in an
motor compartment. It is a good idea at this time to check and tighten all assembly hardware as well.
Warning: Unplug the Power Cord Before Removing the Motor Cover.
TR800 / TR1000
TR1200 / TR1200i
Page 37
36
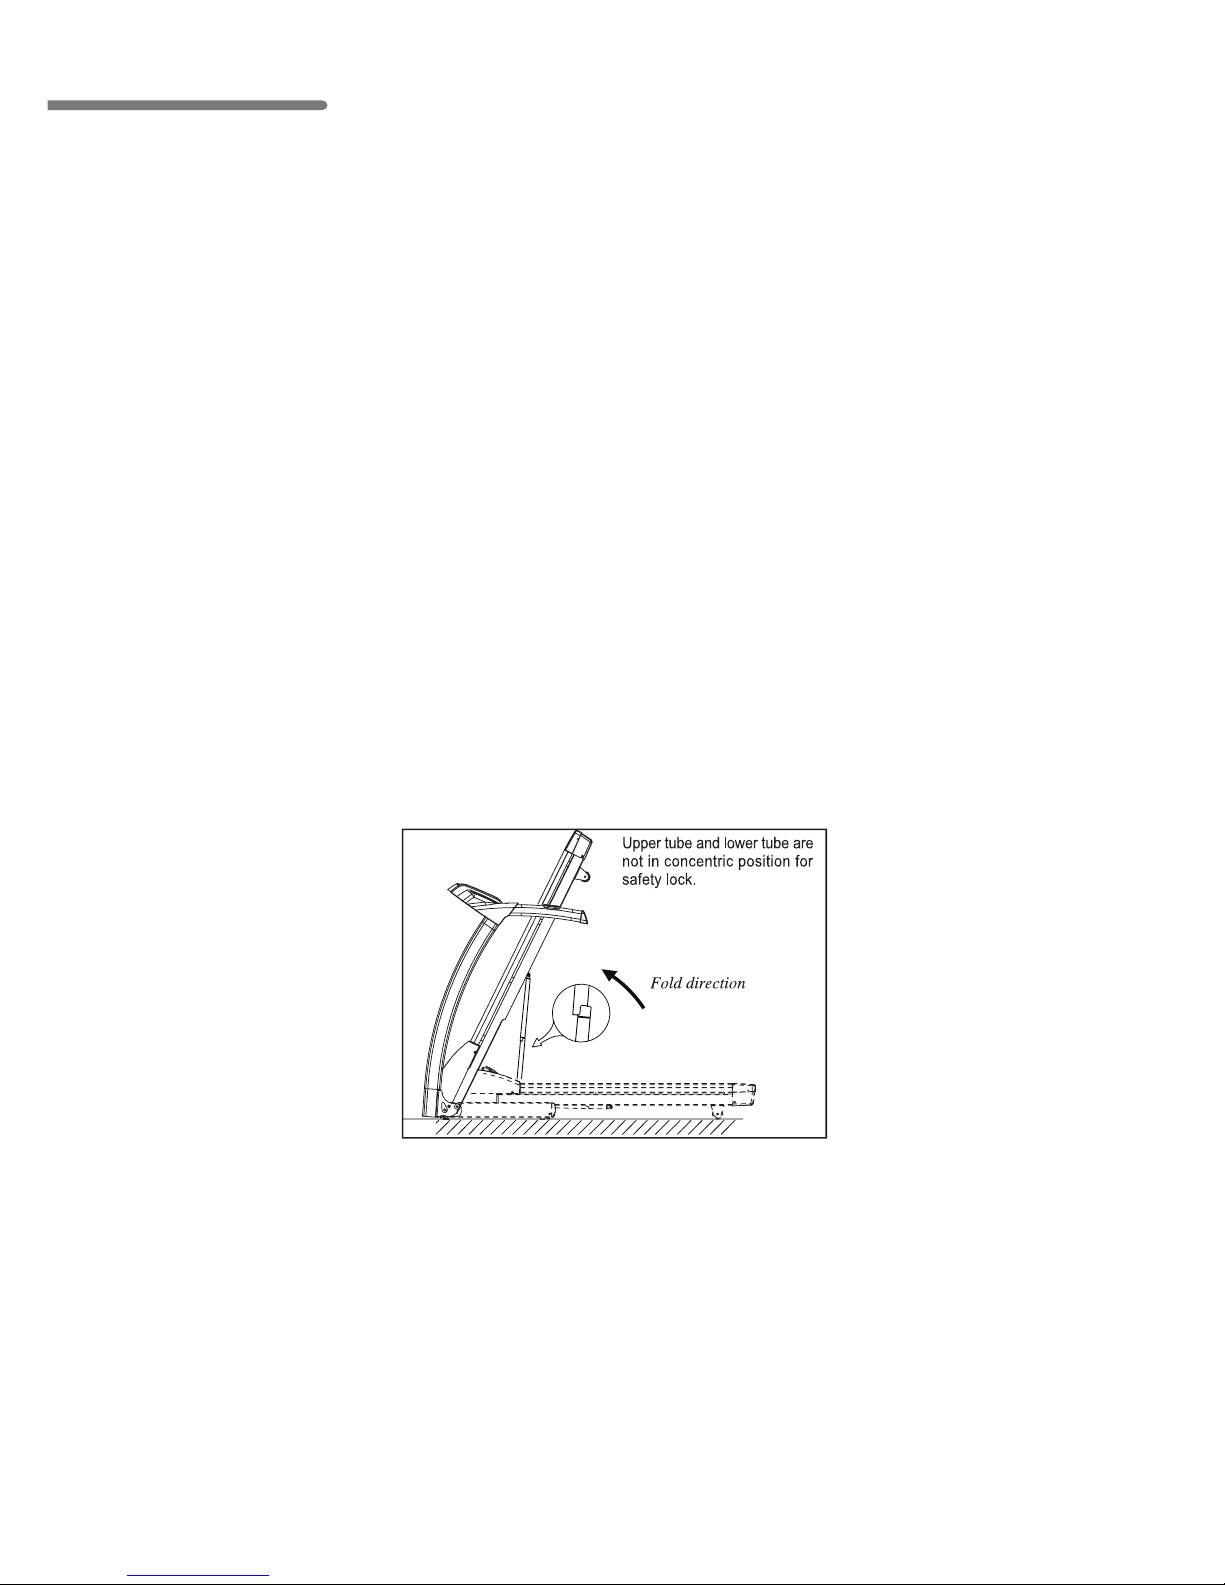
The treadmill comes with a folding feature that reduces the amount of storage space required
when your treadmill is not in use and makes the treadmill easier to move.
Folding the Treadmill
1. Make sure that the On/O switch is turned O and the power cord is removed from the wall.
2. Make sure that nothing is on or near your treadmill which might spill, be knocked over or
prevent the treadmill from completely folding.
3. (a.) Place both hands under the support bar that is located directly under the back of the
running belt on your treadmill to make sure that you have a solid lifting point.
(b.) Lift the treadmill all of the way forward and make sure that the hydraulic lift is
properly locked in place.
Caution: When lifting, use proper safety precautions and lifting techniques. Bend your knees
and elbows, keep your back straight and pull up evenly with both arms.
(c.) Ensure that the locking mechanism is secure by gently pulling back on the
treadmill and make sure that it doesn’t move. When doing this, be careful to be securely
positioned in case the treadmill lock has not engaged.
Caution:
• Do not fold the treadmill by lifting on the running belt or rear roller. These parts do not
lock in place and are dicult to grip when folding - personal injury or damage to the treadmill
could result.
• Do not lean against the treadmill once it is folded or place items on it that could cause it to
become unstable or fall over. This could result in serious personal injury.
• Do not connect the power cord when the treadmill is folded or try to operate the treadmill in
the folded position.
Moving and Storage
Owners Manual
Page 38
37
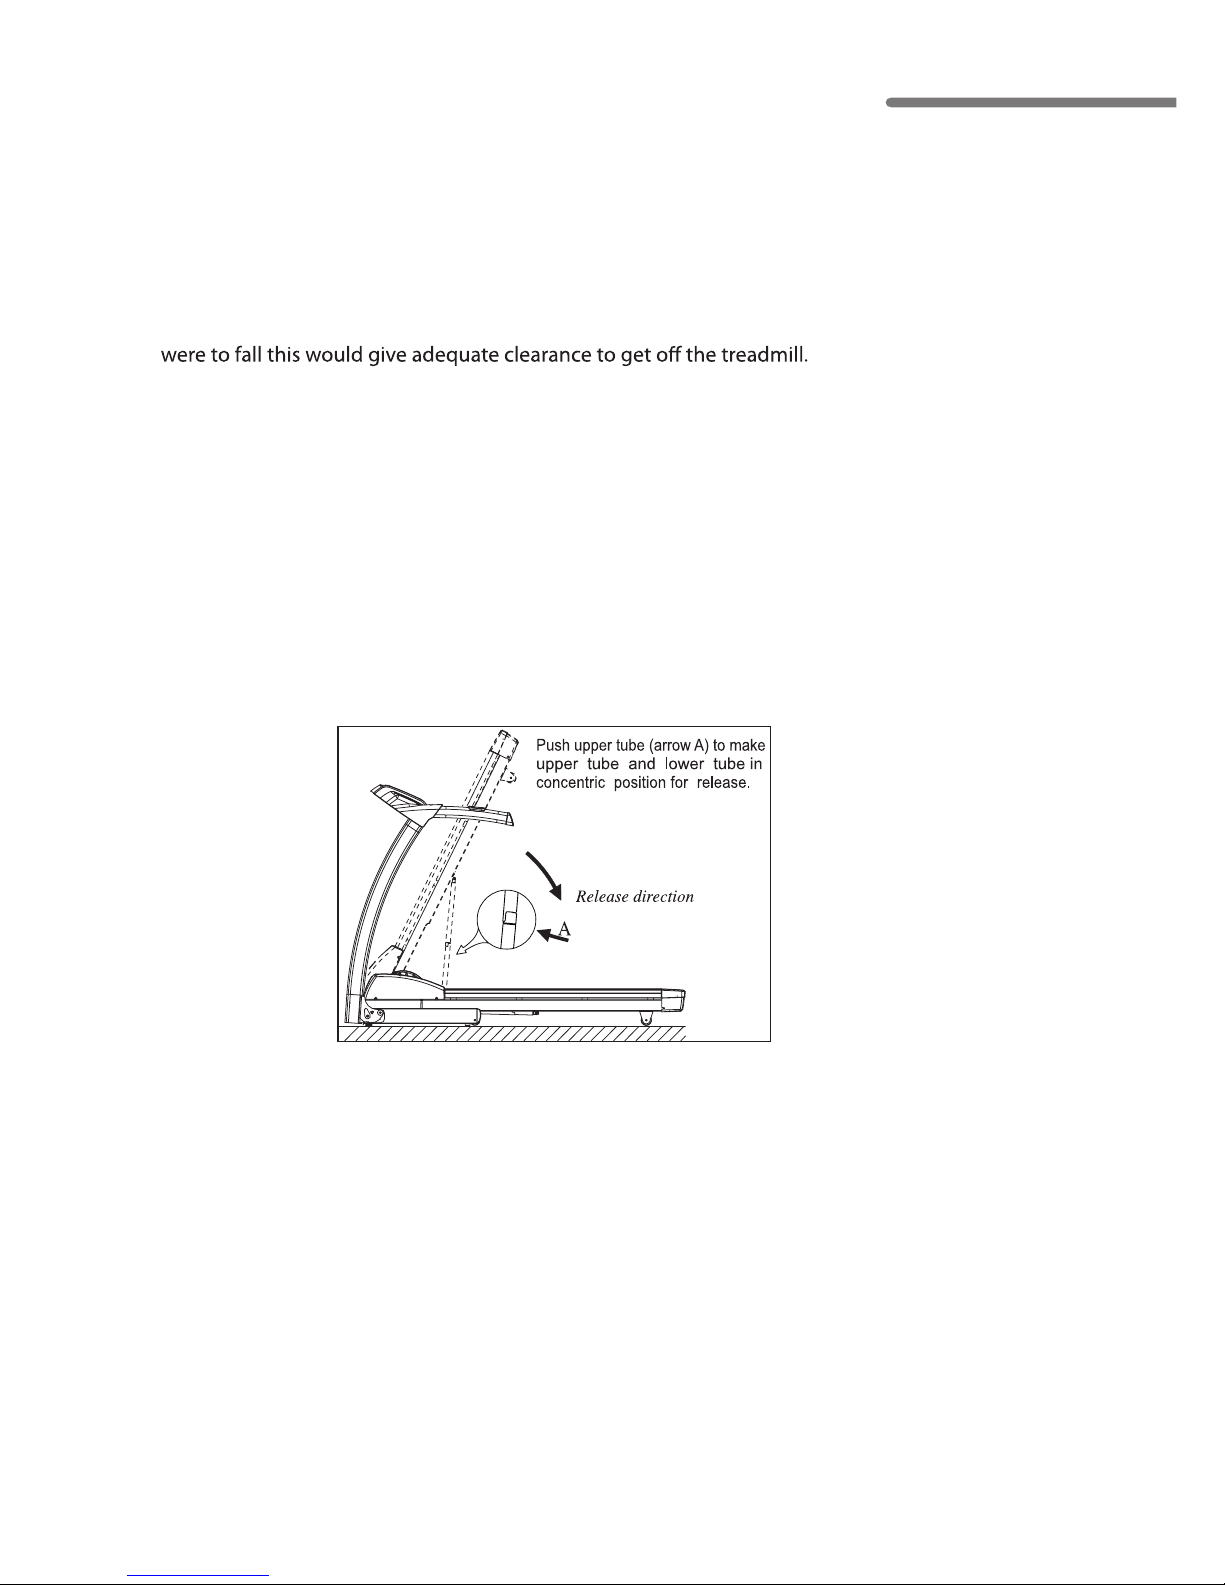
Unfolding the Treadmill
1. Make sure you have adequate space to lay the treadmill down. There needs to be at least
2 feet of clearance on both sides and in the front of the treadmill. There should be at
least 4 feet of clearance on the back side of the treadmill for safety reasons. If the user
2. Inspect to ensure that nothing is on or near your treadmill that might spill, be knocked
over or prevent the treadmill from completely unfolding.
3. Position yourself behind the treadmill. Slightly push the treadmill forward towards the
display and with your left foot lightly push the top portion of the hydraulic lift forward till
the locking tube frees and the treadmill can be pulled back away from the console.
4. The hydraulic lift is set up to drop softly without assistance. It is not a bad idea to hold
onto the treadmill until it is about 2/3 of the way down. Make sure that you use proper
lifting technique, bending your knees and keeping your back straight.
TR800 / TR1000
TR1200 / TR1200i
Page 39

38
Owners Manual
The treadmill is designed and manufactured to be reliable and easy to use. However, if
Problem: The console is erratic or not lighting up
Solution: Check to make sure that the treadmill is properly plugged in, turn the power
Problem: The belt does not stay in the center of the treadmill when in use.
Solution: First check to make sure that the treadmill is level, then refer to the instructions in
this manual on how to tension and adjust the belt.
Problem: The treadmill motor seems strained or E1 comes up after several minutes of use.
Solution: The lubricating silicone that is applied to the deck and belt is wearing down and
the belt needs to be lubricated with silicone spray.
Problem: The treadmill belt slips during use.
Solution: The belt may need to be tensioned after a period of use. Refer to the Belt
Tensioning and Adjustment Section of this manual.
Problem: Speed does not match quick keys. Treadmill Starts at 1 and goes to 16.
Solution: The treadmill is set up in Metric Mode. See chart on next page for Console
Engineering Mode.
Problem: Heart Rate is erratic or not picking up.
Solution: Make sure your hands are moist (Aloe Vera helps). Make sure all connectors at the
back of the console are properly connected and no wires are damaged.
If wearing a chest strap make sure the batteries are good and that the electrodes
are moist and positioned properly on your chest.
Problem: Treadmill automaticaly pauses during workout.
Solution: Treadmill is not picking up Step Count. Go into Engineering Mode to turn intelli-
Warning: This will disengage the intelli-guard feature but may be necessary
Problem: Silicone icon lights up on console.
Solution: Lubricate the running belt with 100% pure silicone. Then simultaneously press
Troubleshooting
Check all wire harness connections to be sure they are all properly connected.
If the problem persists contact LifeSpan Customer Service.
Problem:
Solution:
The Start button LED is dimly lit and no other lights are on.
The unit is in energy saving mode. Press and hold the Start button for
two seconds.
Page 40
39
Belt Tensioning
If the belt begins to slip during use, it will need to be tensioned. Your treadmill is equipped with
tension bolts that are accessible from the back of the treadmill. Before tensioning the belt, start
the treadmill and set the speed to 6 Km/h or 3 MPH. Using a 6 mm Allen Wrench, included in your
hardware bag, turn the right and left tension bolts 1/2 turn, alternating back and forth until the
belt slipping stops. After you adjust each side 1/2 turn, test to see if the slipping is eliminated. If
the belt still slips repeat this step and test again.
If you turn one side more than the other, the belt will start to drift to the side of the
treadmill and need to be aligned. Do Not tighten more that 2 full turns on each side.
If slippage still occurs, contact LifeSpan Customer Service.
Note: Over tensioning the belt can cause unnecessary friction
and wear and tear on the belt, motor and electronics.
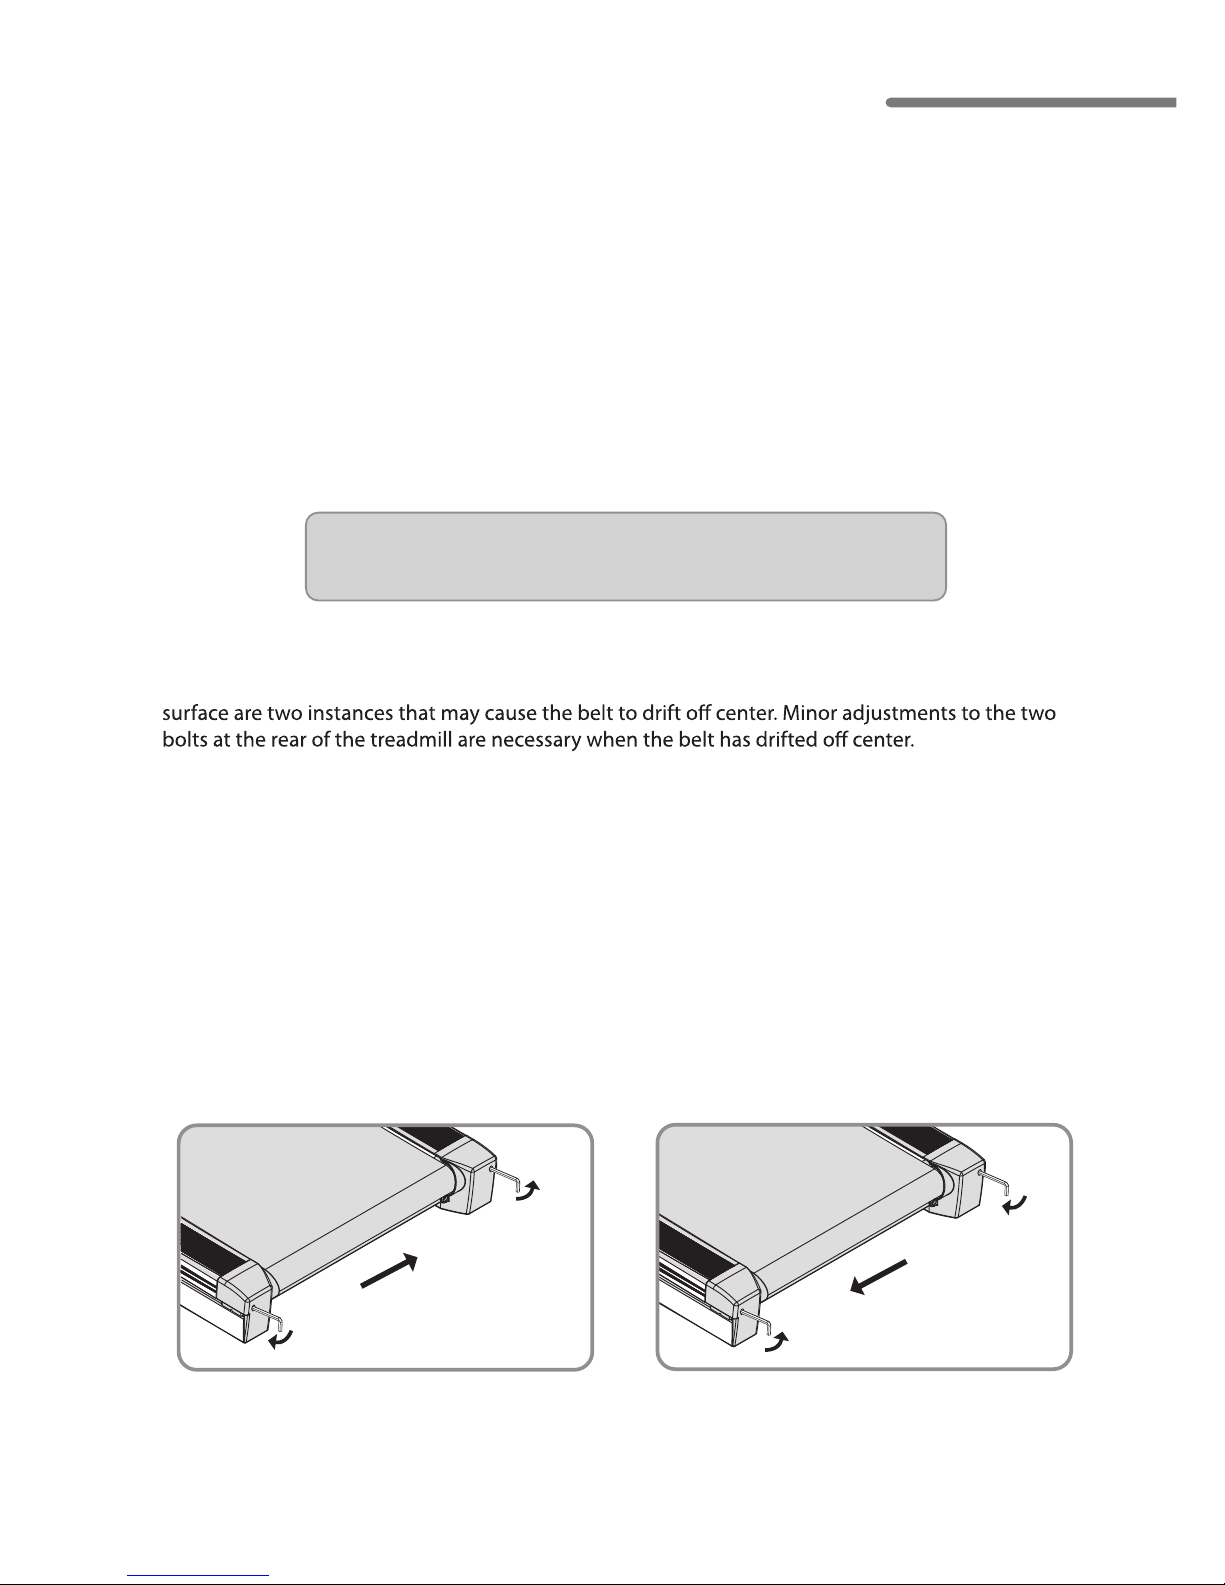
Aligning the Running Belt
Ensure the running belt is centered on your treadmill at all times. Running style and a non- level
1. Press "START", then increase the treadmills speed to 6 Km/h or 3 MPH.
2. Stand at the rear of the treadmill to determine which direction the belt is drifting.
3. If the belt drifts to the left, turn the left adjustment bolt one-quarter turn clockwise and
the right adjustment bolt one-quarter turn counter-clockwise. (See FIG.C)
4. If the belt drifts to the right, turn the left adjustment bolt one-quarter turn counter-clock
wise and the right adjustment bolt one-quarter turn clockwise. (See FIG.D)
5. Observe the tracking of the belt for about two minutes. Repeat step 3, 4 and 5 as needed.
To move belt to the Right
FIG C.
To move belt to the Left
FIG D.
TR800 / TR1000
TR1200 / TR1200i
Page 41

TREADMILL MODEL NUMBER - TR800/TR1000/TR1200/TR1200i
TR800 / TR1000 / TR1200 / TR1200i
Folding Treadmill
Distributed By:
LEISURE CONCEPTS AUSTRALIA
Po Box 6326
PT COOK, 3030
VICTORIA
AUSTRALIA
Ph: 1300 911 441
www.leisureconcepts.com.au
 Loading...