

Page 1

Owner’s Manual
TM5010/TM5030/TM5050
For safe use and product knowledge, please
completely read this Product OWNER’S MANUAL.
v. 1.0
Folding Treadmill
Page 2

Page 3

1
TM5010/TM5030/TM5050
Folding Treadmill
Table of Contents
Welcome
Specications
Important Safety Precautions
Grounding and Power Requirements
Assembly Instructions
Starting an Exercise Program
Display Console Overview
Advanced Programs
Operate Your Exercise Equipment
Maintenance
Trouble Shooting
Engineering Mode
Exercise Guidelines
2
3
5
6
7
11
12
14
18
20
24
26
27
Page 4

Owner’s Manual
2
Welcome
Congratulations in taking a step forward to increase your level of physical activity or add variety
to your current exercise program. Physical activity is now more than ever a necessity to keep
your body healthy and t. Whether your motivation is to Lose Weight, manage a Chronic
Disease like diabetes, train for a sporting event or just live a Healthy Lifestyle.
In this manual we have included exercise information that is specic to each of these 4 key
motivations for exercise.
Our cardio equipment is designed for the more than 60% of consumers who say they prefer to
exercise in the comfort and privacy of their own homes. Each product is designed and
manufactured to exceed your expectations for quality and durability, simple assembly and ease
of operation.
Please read this manual thoroughly before assembly and operation of your new equipment. It
includes information on proper operation, safety precautions, product assembly and ongoing
maintenance.
Remember that some types of service should only be performed by a qualied service
technician. In the instance that service is required, please contact your authorized retailer or log
on to our website and select the Customer Support option. Complete the information
requested and we will respond to your inquiry within 1 business day.
Page 5
3
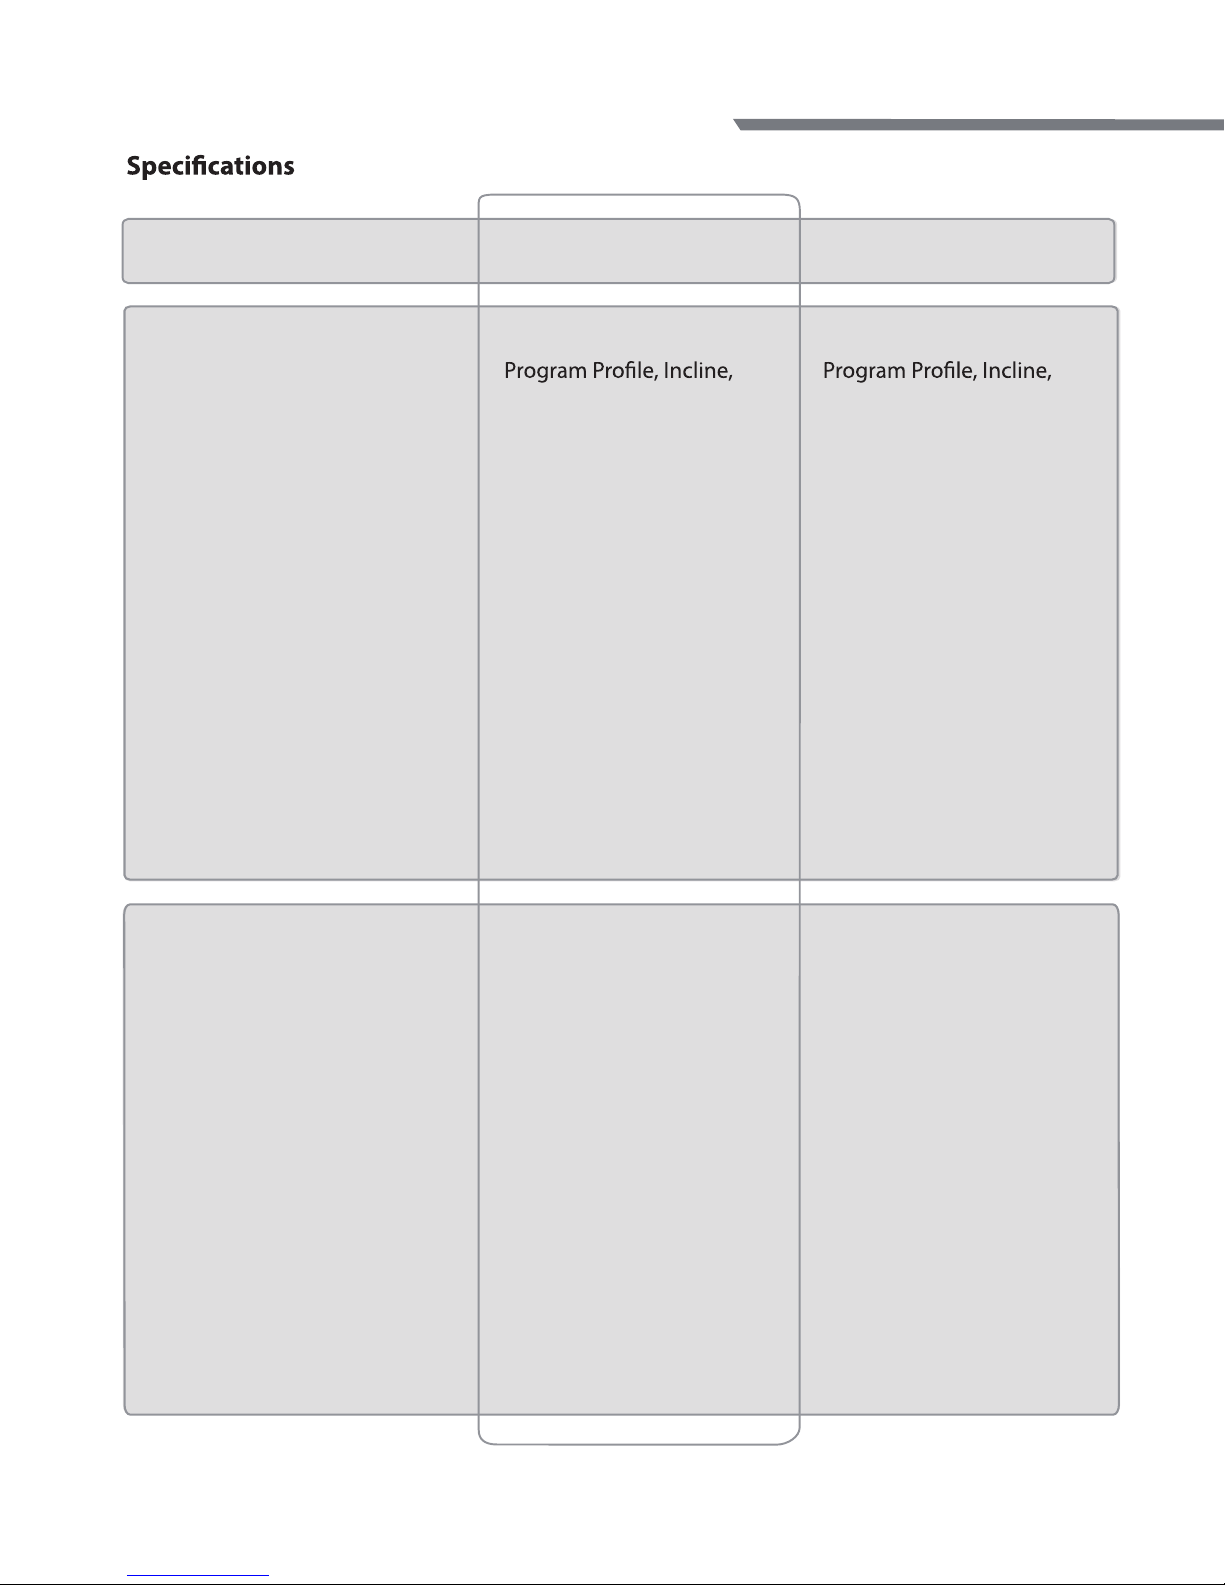
TM5010 TM5030
Speed, Time, Distance,
Height, Calories, Age,
Maintenance, Pulse, BT
3.5” LCD
1 Manual, 17 Preset
Programs, 2 User Programs,
2 Heart Rate Control
Yes
Optional
Optional
Optional
Speed, Time, Distance,
Height, Calories, Age,
Maintenance, Pulse, BT
5.5” Blue Backlit LCD
1 Manual, 17 Preset
Programs, 2 User Programs,
2 Heart Rate Control
Yes
Optional
Optional
Optional
1.75 HP DC
0 -12
1 - 16 KPH
46×132cm (18"×52")
130 kg
168Lx 79Wx 137H (cm)
94Lx 79Wx 153H (cm)
176Lx83Wx37H (cm)
2.0 HP DC
0-15
1 - 18 KPH or 1 - 20 KPH
51×142cm (20"×56")
140 kg
179Lx84Wx137H (cm)
99Lx84Wx160H (cm)
190L×87W×37H (cm)
Motor
Incline
Speed
Running Area
Max. User Weight
Dimensions
Folding Dimensions
Package Dimensions
Readout
Display
Programs
HR Sensor
Audio In & Speaker
USB Charger
BT
TM5010/TM5030/TM5050
Folding Treadmill
Console
Mechanics and Performance
Page 6
4
Owner’s Manual
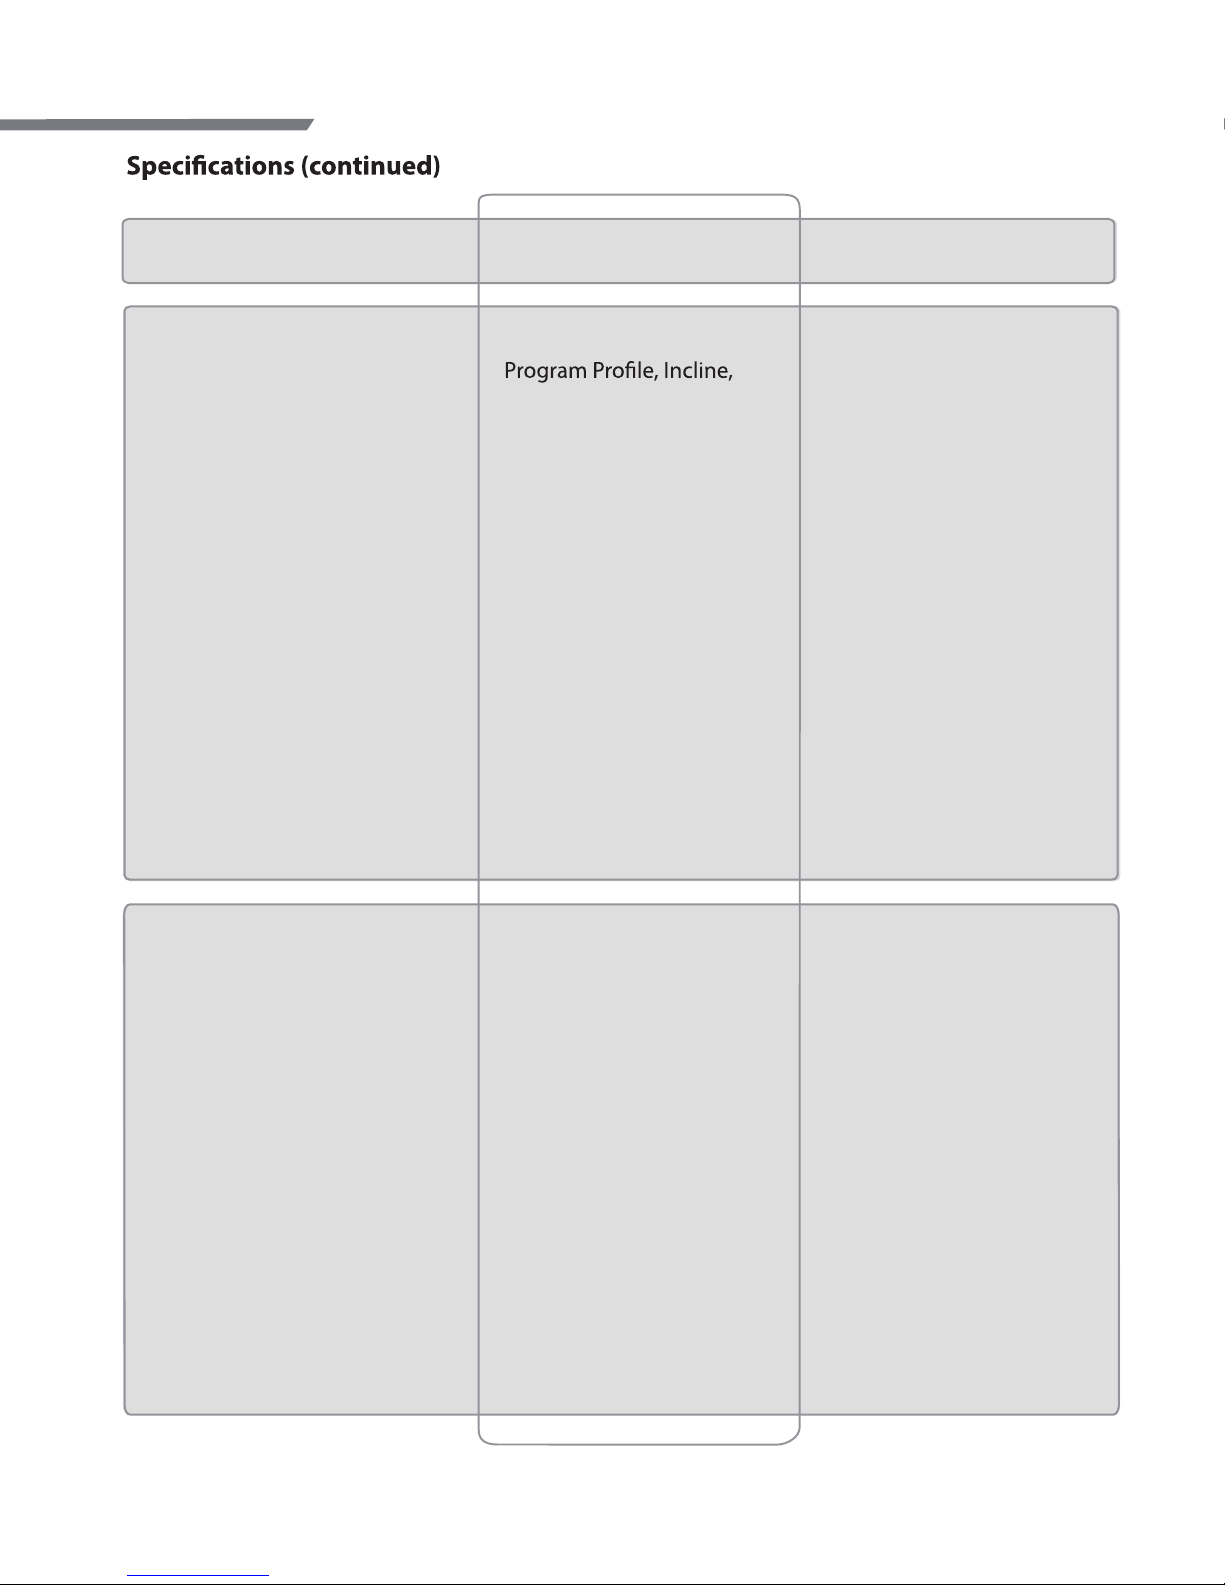
TM5050
Speed, Time, Distance,
Height, Calories, Age,
Maintenance, Pulse, BT
5.5” Blue Backlit LCD
1 Manual, 17 Preset
Programs, 2 User Programs,
2 Heart Rate Control
Yes
Optional
Optional
Optional
3.0 HP DC
0-15
1 - 20 KPH or 0.8 - 20 KPH
51×152cm (20"×60")
160 kg
189Lx84Wx137H (cm)
107Lx84Wx168H (cm)
200L×87W×37H (cm)
Motor
Incline
Speed
Running Area
Max. User Weight
Dimensions
Folding Dimensions
Package Dimensions
Readout
Display
Programs
HR Sensor
Audio In & Speaker
USB Charger
BT
Console
Mechanics and Performance
Page 7
5
Important Safety Precautions
When using exercise equipment, basic precautions should always be followed, including:
• Never drop or insert any object into any opening.
• Never operate this exercise equipment if it has been damaged.
• Do not use outdoors, near swimming pools or in areas of high humidity.
• Keep product on a solid, level surface. Do not operate on deeply padded, plush or shag carpet.
Damage to the carpeting may result.
• Use this exercise equipment for its intended use as described in this Owner’s Manual.
• Wear shoes with rubber or high traction soles.
• Do not use shoes with heels, leather soles, cleats or spikes.
• Keep hands and feet away from moving parts.
• Use caution while participating in other activities while using this exercise equipment, such as
watching television or reading. These distractions may cause you to lose balance which may
result in injury.
Children and Pets:
• Keep children o this exercise equipment at all times.
• When in use, children and pets should be kept at least 10 feet (3m) away.
• This exercise equipment can be used by children aged from 8 years and above and persons with
reduced physical, sensory or lack of experience and knowledge if they have been given
supervision or instruction concerning use of the appliance in a safe way and understand the
hazards involved.
• Children shall not play with this exercise equipment.
• Cleaning and user maintenance shall not be made by children without supervision.
Other Safety Tips
• Always consult a physician before beginning this or any exercise program.
• If you experience chest pains, nausea, dizziness or shortness of breath, stop exercising
immediately and consult your physician before continuing.
Note: Read all instructions before beginning use.
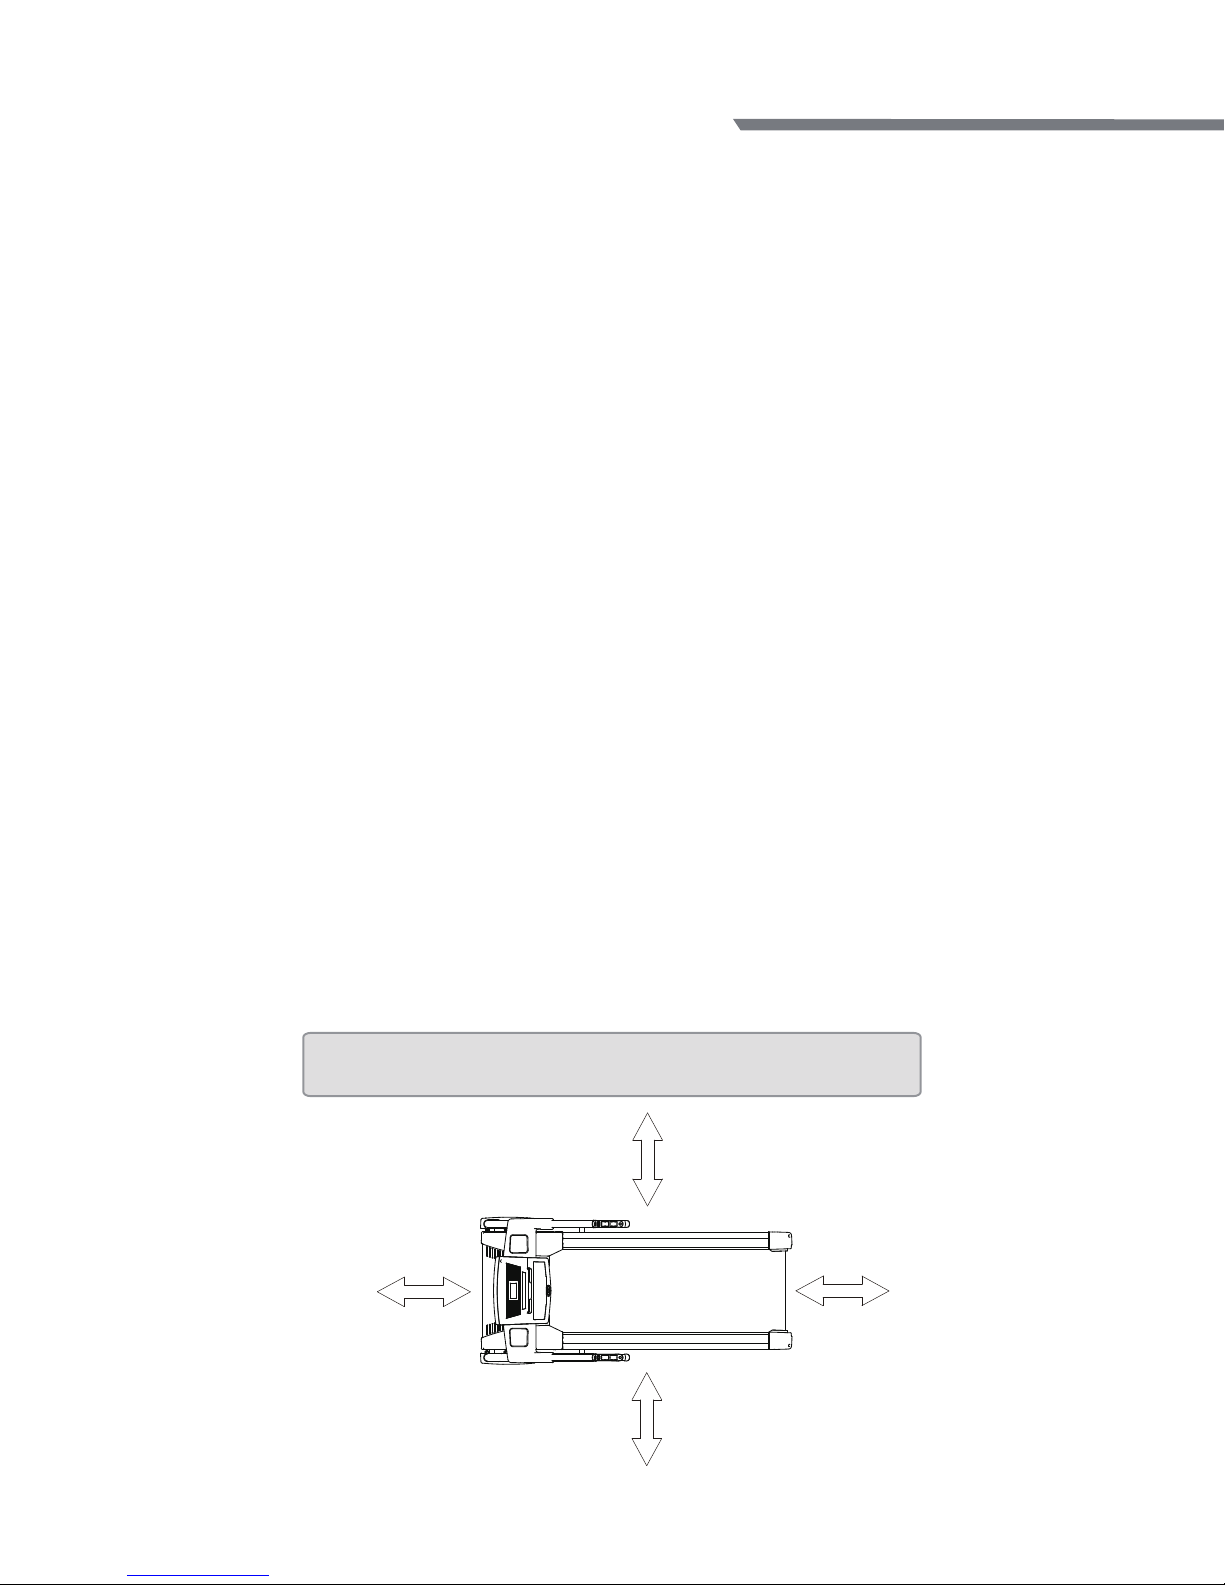
100cm
3 Feet Min
100cm
3 Feet Min
200cm
6 Feet Min
100cm
3 Feet Min
TM5010/TM5030/TM5050
Folding Treadmill
Page 8
6
Owner’s Manual
Grounding and Power Requirements
The TM5010/TM5030/TM5050 Series must be grounded. Improper connection of the
equipment’s grounding conductor can result in a risk of electric shock. Check with a qualied
electrician or service person if you are in doubt as to whether the outlet is properly grounded.
Do not modify the plug provided with the product or use a ground plug adaptor to adapt to a
non-grounded outlet. If the plug will not t the outlet, have the proper outlet installed by a
qualied electrician.
An extension cord should not be used between the equipment and the wall outlet.
The unit should not be plugged into a GFI plug or on a GFI circuit. The unit may not work or trip
the GFI circuit.
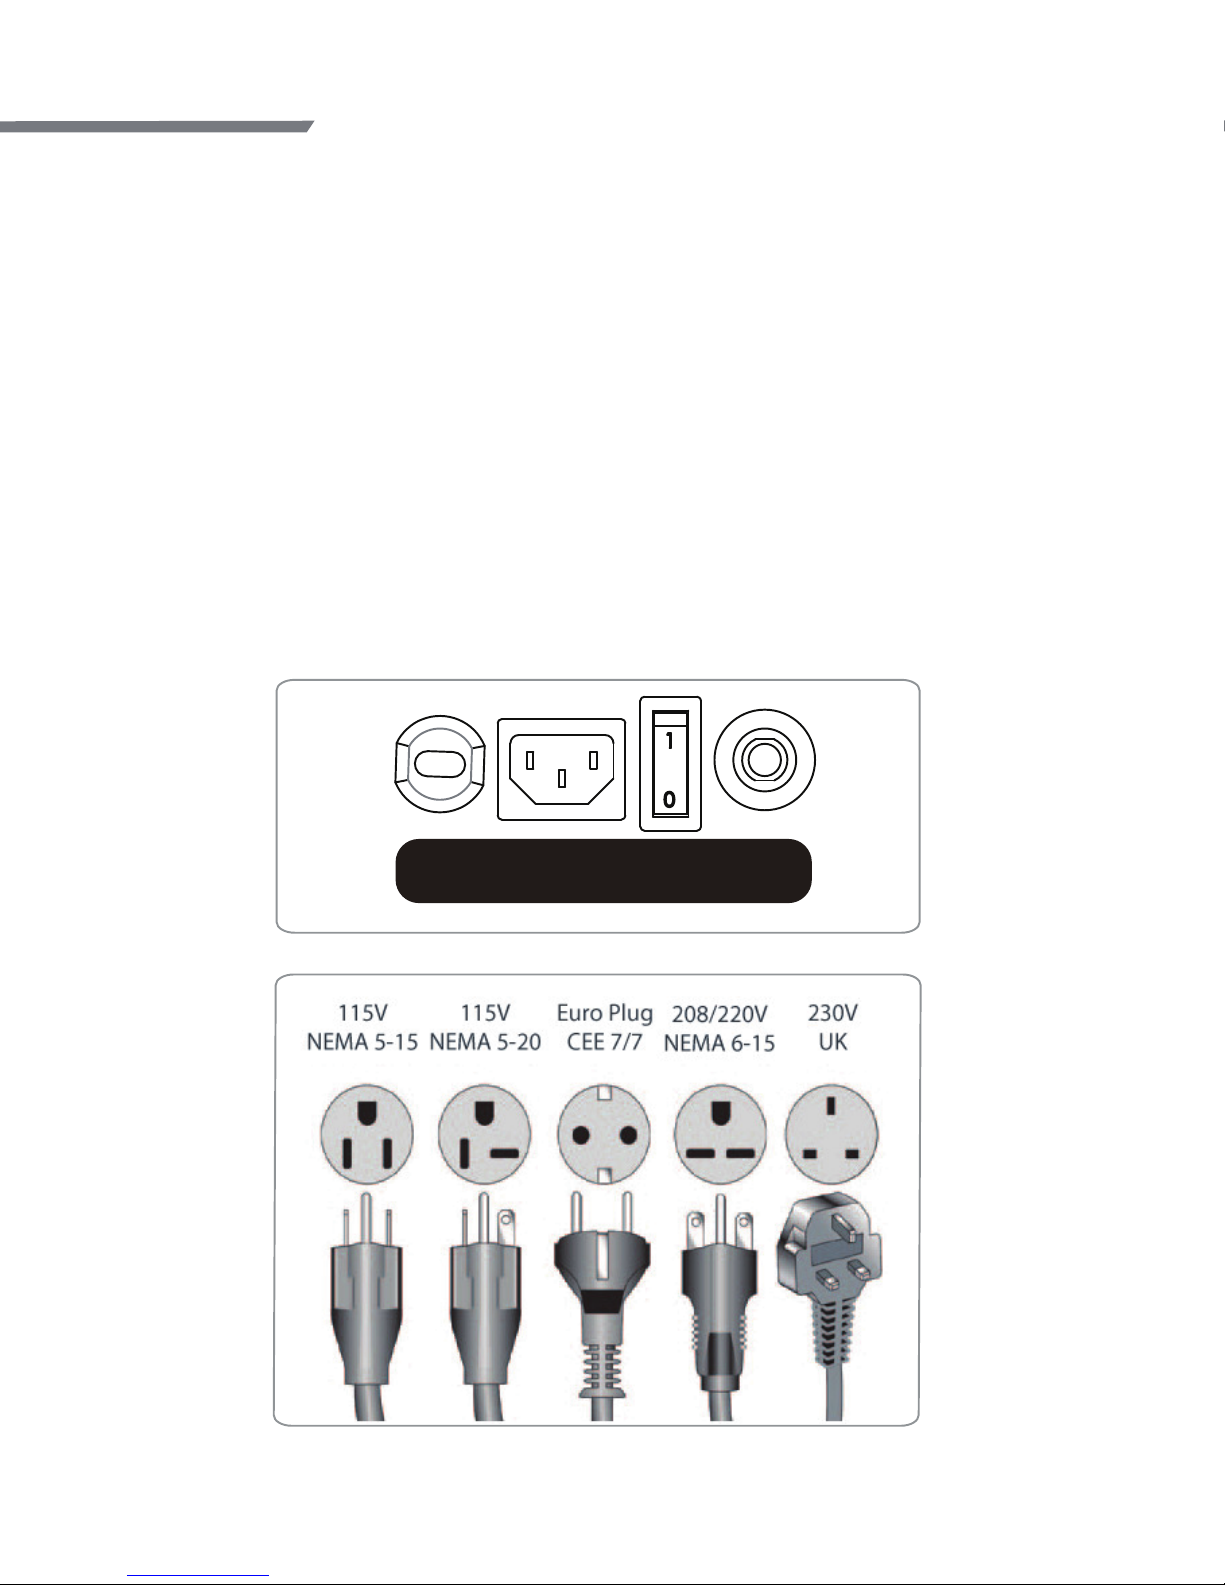
This product should only be run on the proper power designed for this unit. Check the power
label located on the front of the unit for proper power needs (see FIG. 1). To locate the power
outlet for your area please refer to FIG. 2. (example for the US and Canada, these units require a
115 V NEMA 5 - 15 non GFI circuit.)
POWER
CORD SOCKET
SWITCHAC POWER
OVERLOAD
SWITCH
Fig. 1
Fig. 2
Page 9
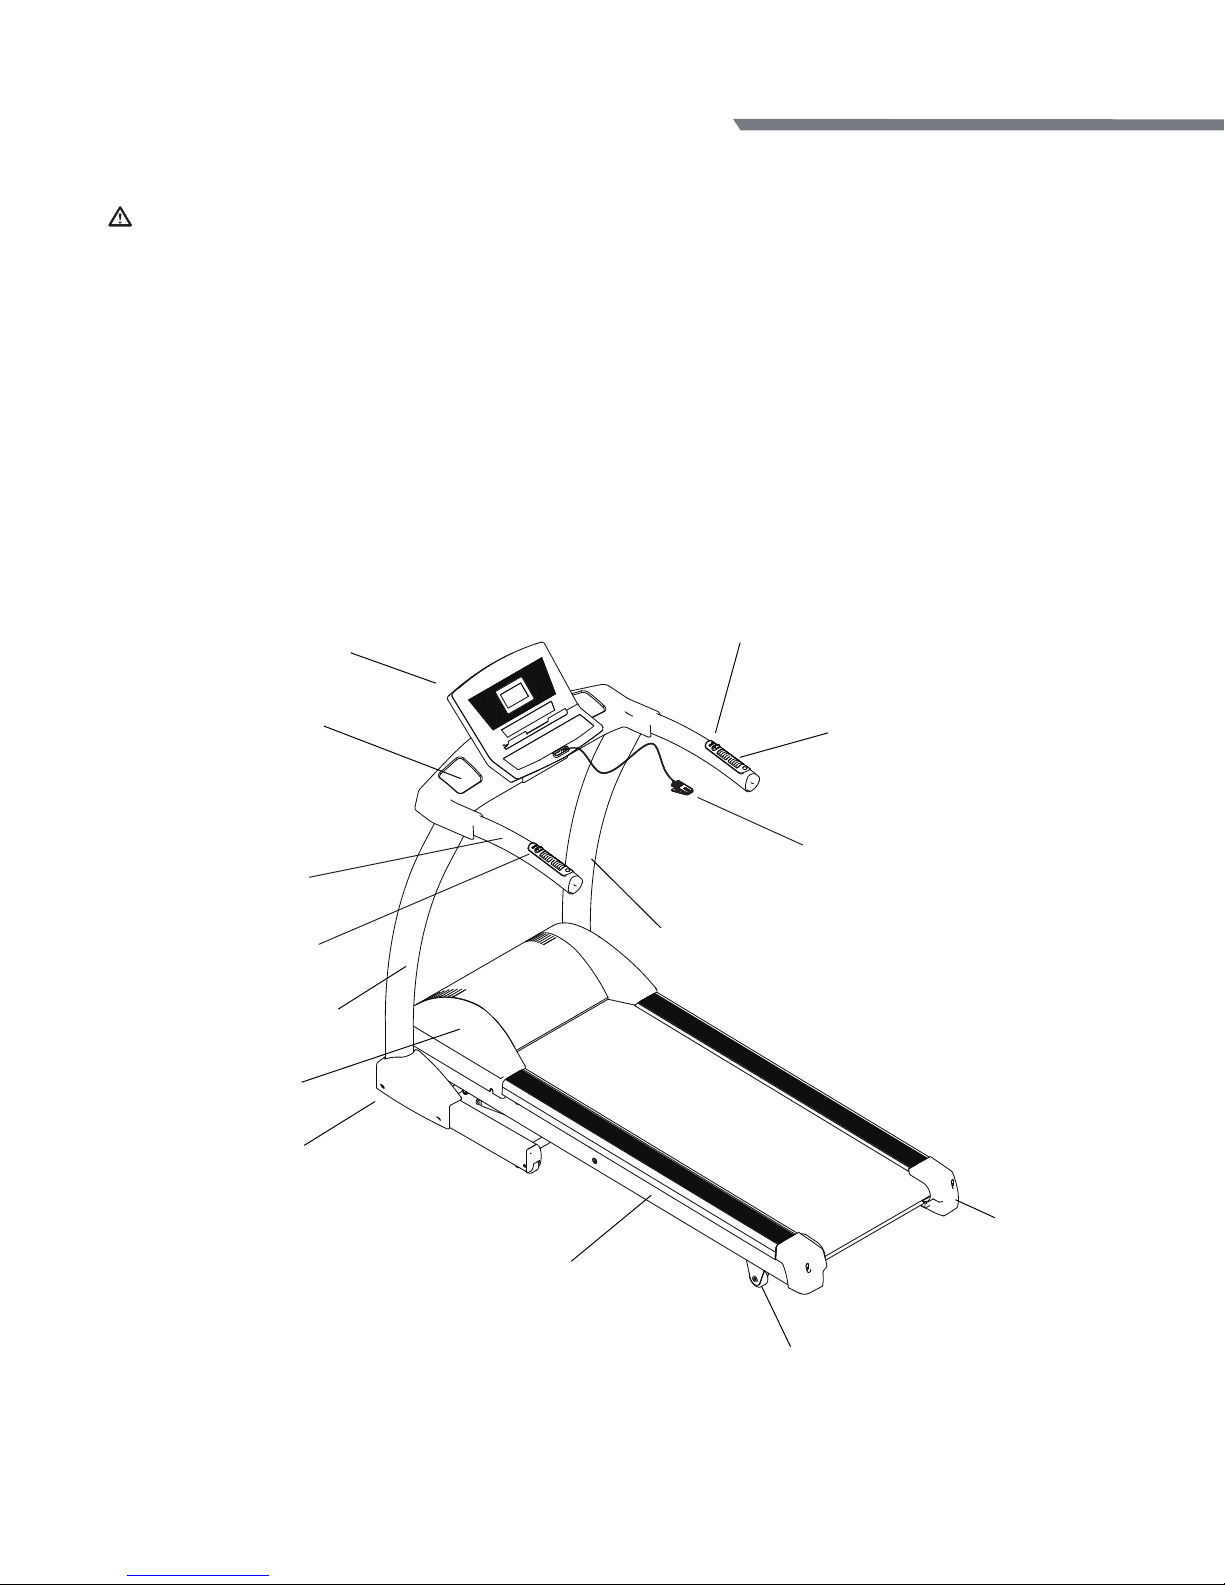
7
WARNING
After unpacking the tness equipment, examine it carefully for possible damage. If there is any
damage or there are missing parts, please contact your retailer or an authorized repair facility for
assistance.
1. Since your treadmill is a heavy piece of equipment, we recommend the after taking o the top
portion of the box; you slit the comers of the lower carton and fold down the sides. This will
eliminate the need to pick up the treadmill over the sides of the box.
2. Prior to starting the assembly process take all the parts out of the box, remove all plastic bags,
and then lay them out on the oor to become familiar with the components. Make sure that
you remove all parts packaged underneath the treadmill. You may need to slightly pick up the
back of the treadmill to get better access to the parts on the bottom.
Assembly Instructions
Safety Key
Motor Cover
Support Post -Left
Support Post -Right
Pulse Grip
Console
Bottle Holder
Handlebar
Frame
Quick Key (Speed)
Quick Key (Incline)
Rear Foot
Rear Cover
TM5010/TM5030/TM5050
Folding Treadmill
Leveler
(not shown)
Page 10
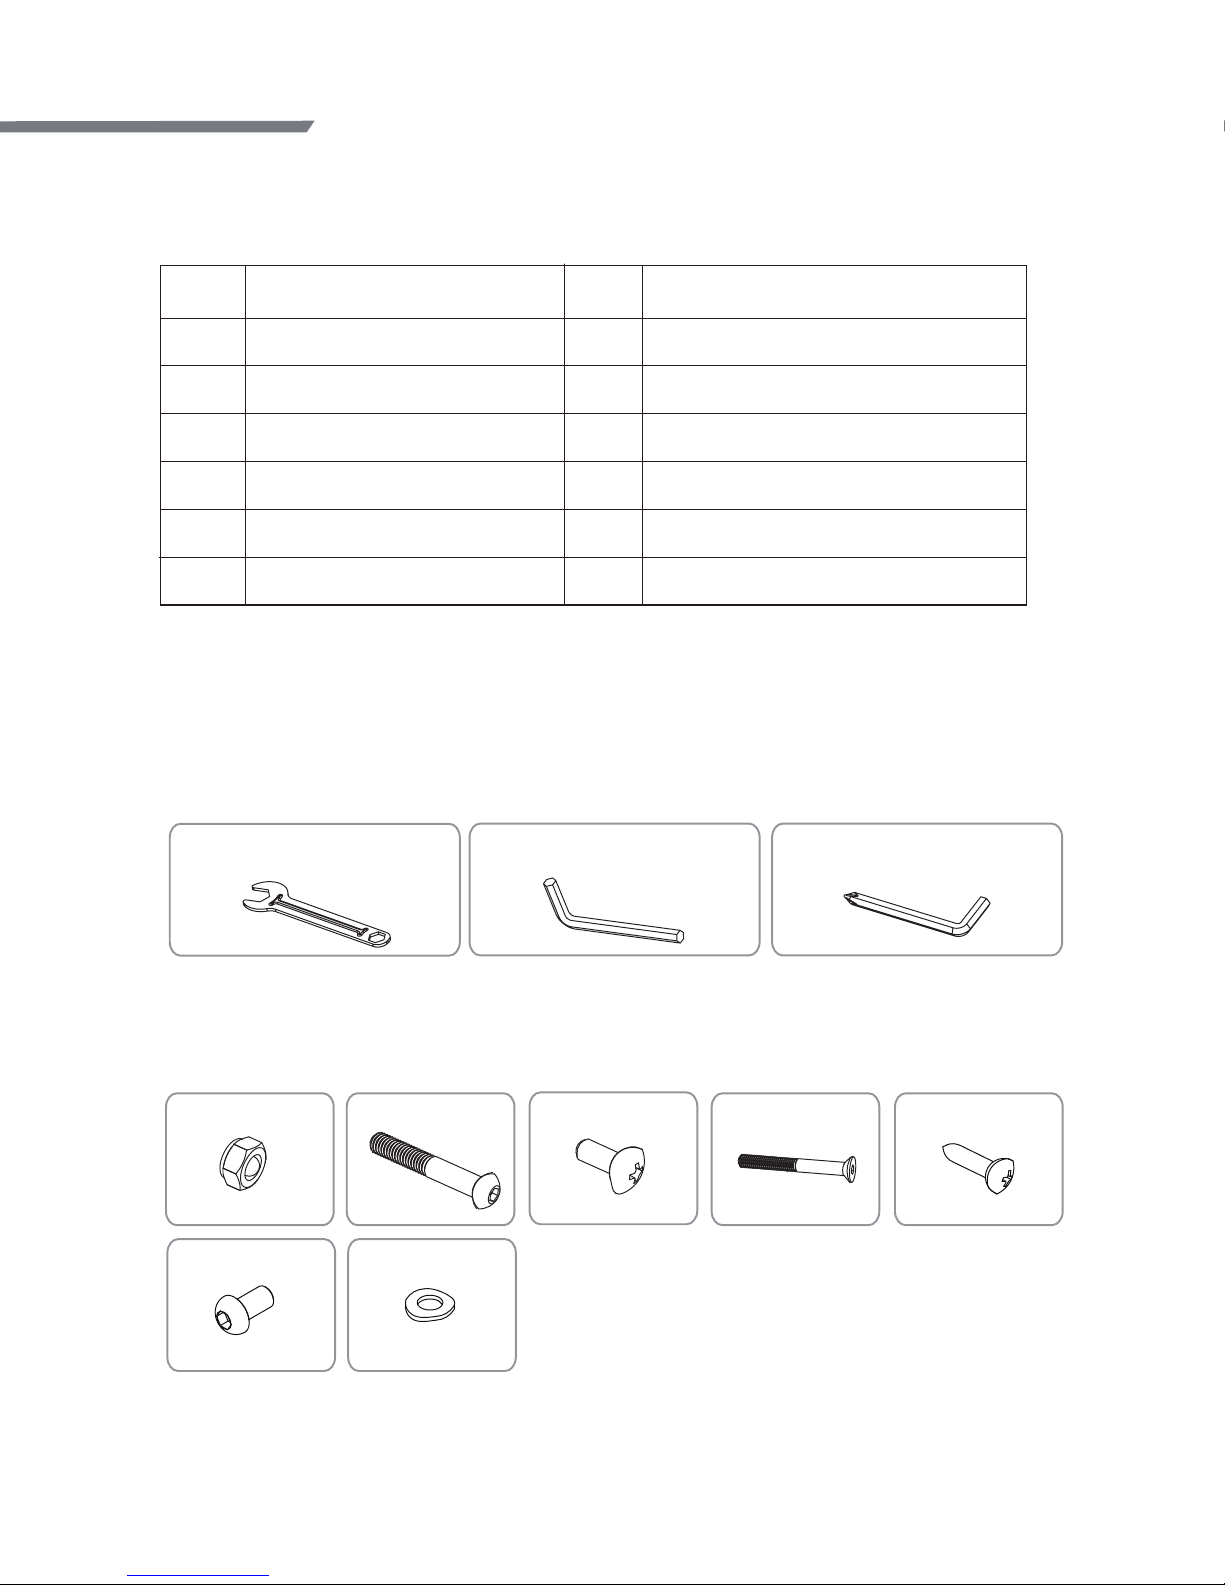
8
Owner’s Manual
Located in hardware bag
Multi-wrench
13, 17 mm
Allen wrench - 6 mm
Allen wrench - 5 mm
Pre-installed hardware
M10 Nut
M10x60L Bolt
4 pcs
4 pcs
#8x0.625”L Screw
6 pcs
M8x70L Bolt
2 pcs
Hardware
Hardware will need to be removed and re-installed during the installation process
M4x10L Screw
8 pcs
M8x15L Bolt
M8 Washer
4 pcs
4 pcs
1
2
3
4
5
6
7
8
9
10
11
Console
Safety Key
Pulse Grip
Quick Key
Bottle Holder
Handlebar
Support Post
Motor Cover
Frame
Rear Foot
Rear Cover
No.
No.
Part Name
Part Name
Parts List
Assembly Instructions (continued)
Page 11
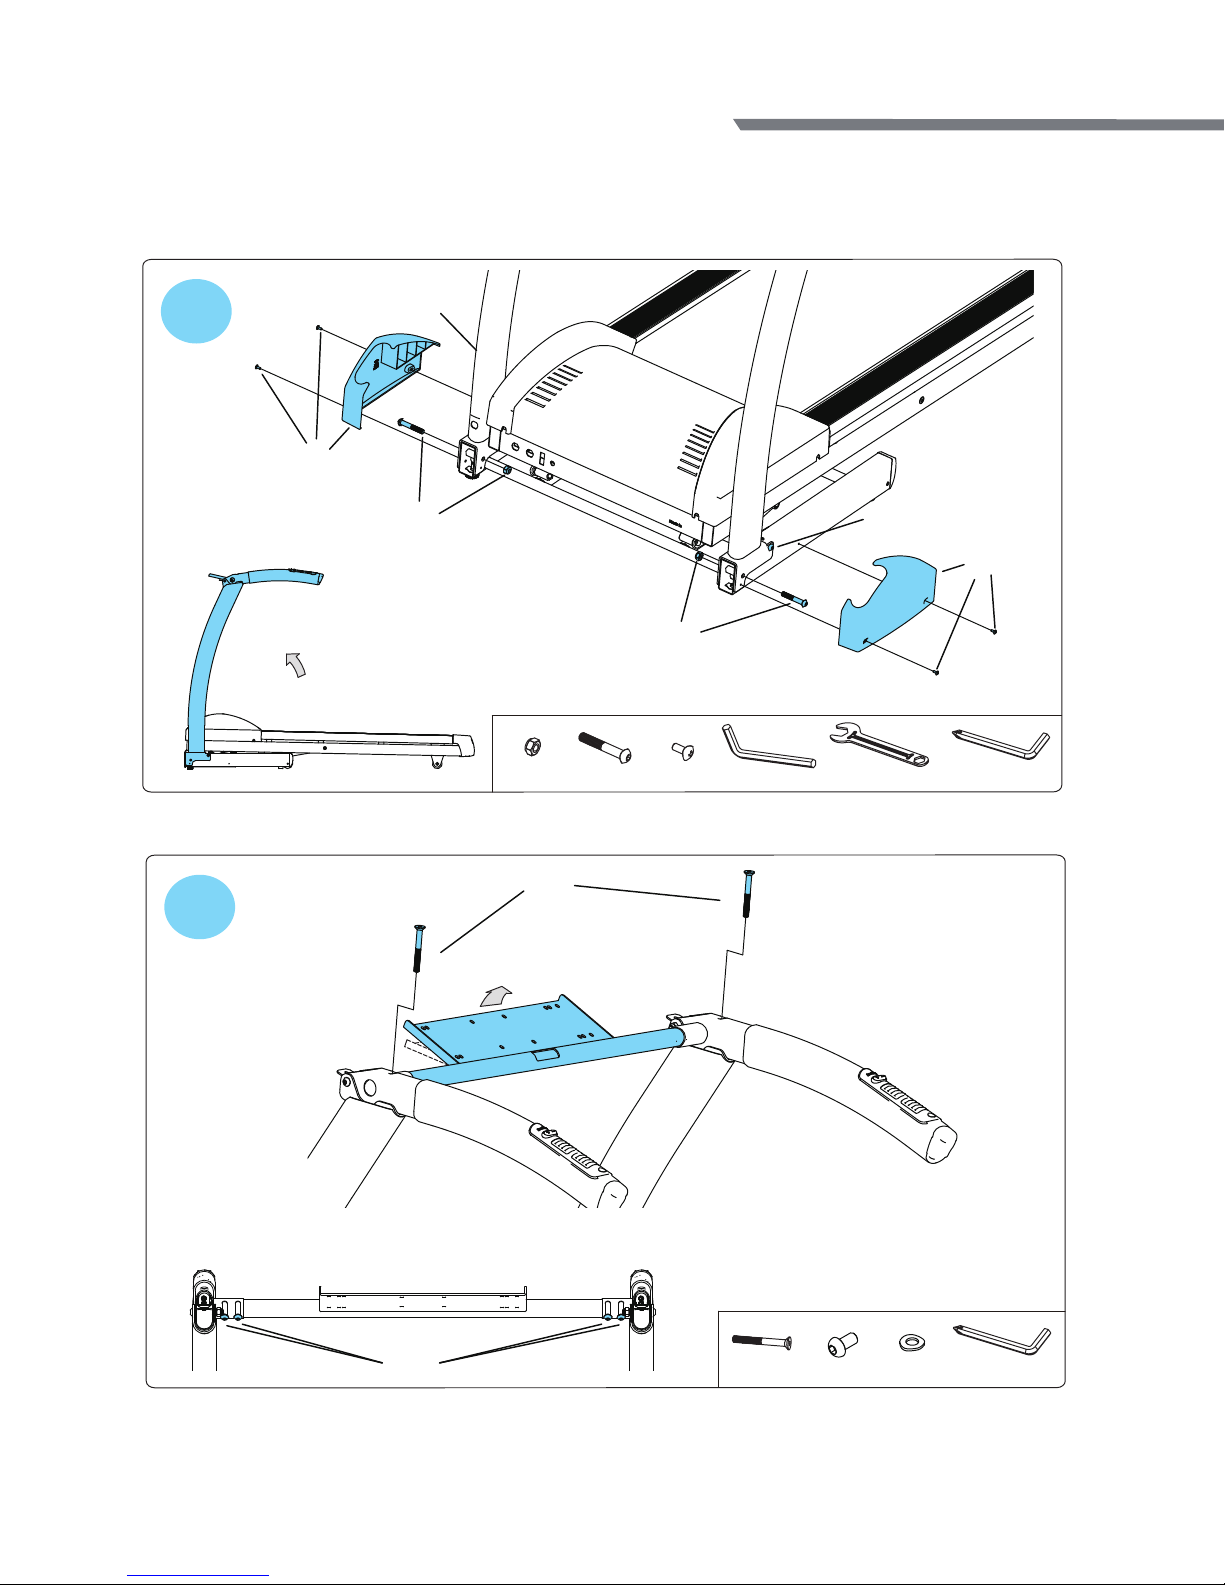
9
TM5010/TM5030/TM5050
Folding Treadmill
Assembly Instructions (continued)
1
M10 Nut*4 M10x60L*4 M4x10L*4 Wrench-6mm Wrench-13/17mm Wrench-5mm
1-2
1-4
1-4
1-3
1-31-2
1-1
2
M8x70L*2 M8x15L*4 M8 Washer *4 Wrench-5mm
2-1
2-2a
2-2b
Page 12
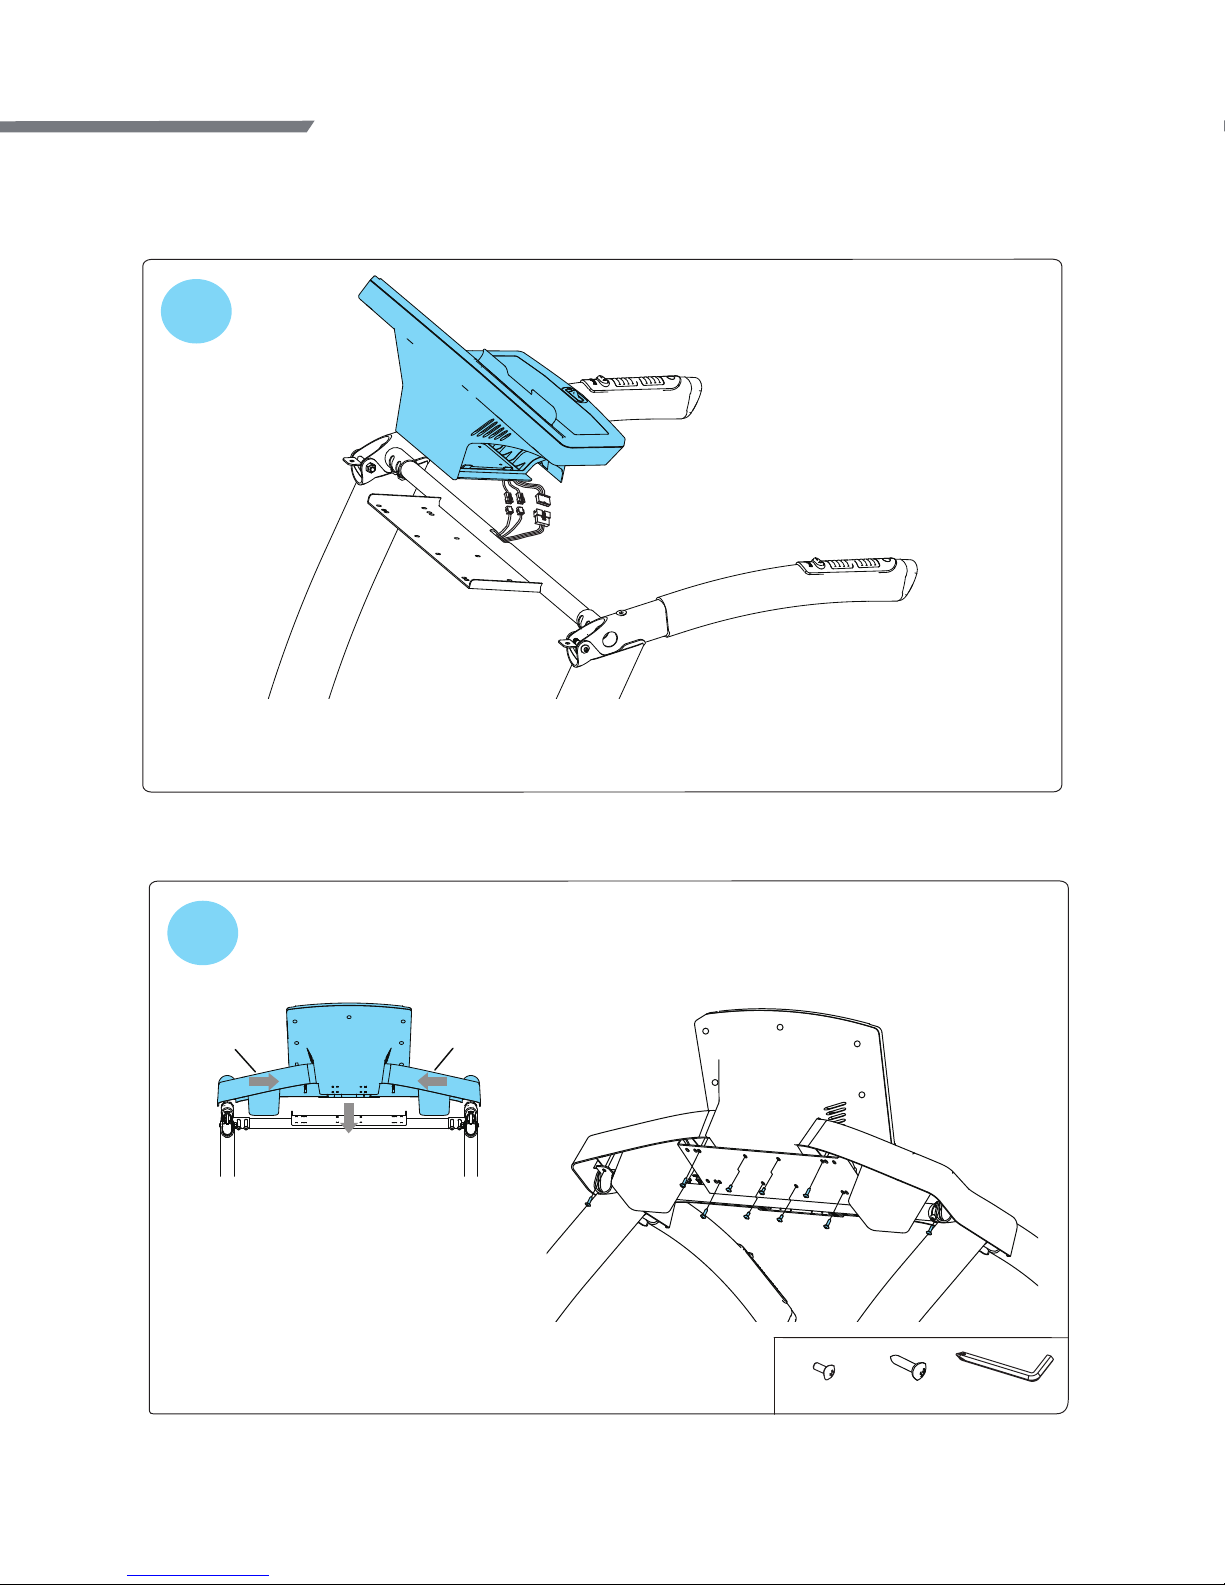
10
Owner’s Manual
Assembly Instructions (continued)
3
4
M4x10L*4 #8x0.625”L*6 Wrench-5mm
4-1
4-1
4-2
4-3
Page 13

11
Starting an Exercise Program
Starting an exercise program can sound like a daunting task, but just remember that your main goal
boost your health by meeting the basic physical activity recommendations.
Before you begin an exercise program, or substantially increase your level of activity, be sure to consult
your primary care physician. In preparation for a visit you may also want to take the PAR-Q Assessment.
This Physical Activity Readiness Questionnaire (PAR-Q) will help you determine your suitability for
beginning an exercise program and prepare you for discussing your physical activity program with
your physician.
1. Has your doctor ever said that you have a heart condition or that you should participate in physical
activity only as recommended by a doctor?
2. Do you feel pain in your
chest during physical activity?
3. In the past month, have you had chest pain when you were not doing physical activity?
4. Do you lose your balance because of dizziness?
5. Do you ever lose consciousness?
6. Do you have a bone or joint problem that could be made worse by a change in your physical
activity?
7. Is your doctor currently prescribing drugs for your blood pressure or a heart condition?
8. Do you know of any reason you should not participate in physical activity?
If you answered yes to one or more of the questions, if you are over 40 years of age and have been
inactive or if you are concerned about your health, consult a physician before beginning an exercise
program or substantially increasing your physical activity. If you answered no to each question, then it’s
likely you can begin an exercise program.
Pre-Exercise Resting Heart Rate Check
Before beginning your exercise program it is recommended that you check your resting heart rate.
Your resting heart rate should be taken in a seated, relaxed position. Find your resting pulse and begin
your count with “zero” on the rst heart beat. Continue counting each time you feel your pulse until
you have counted for a full 30 seconds. Next, double the number that you counted for 30 seconds and
you now have your pre-exercise resting heart rate. Remember this number as we also recommend
taking a post-exercise resting heart rate after you have completed your exercise program and you will
want to remember your pre-exercise heart rate so you can compare the two heart rate measurements.
TM5010/TM5030/TM5050
Folding Treadmill
Page 14
12
Display Console Overview
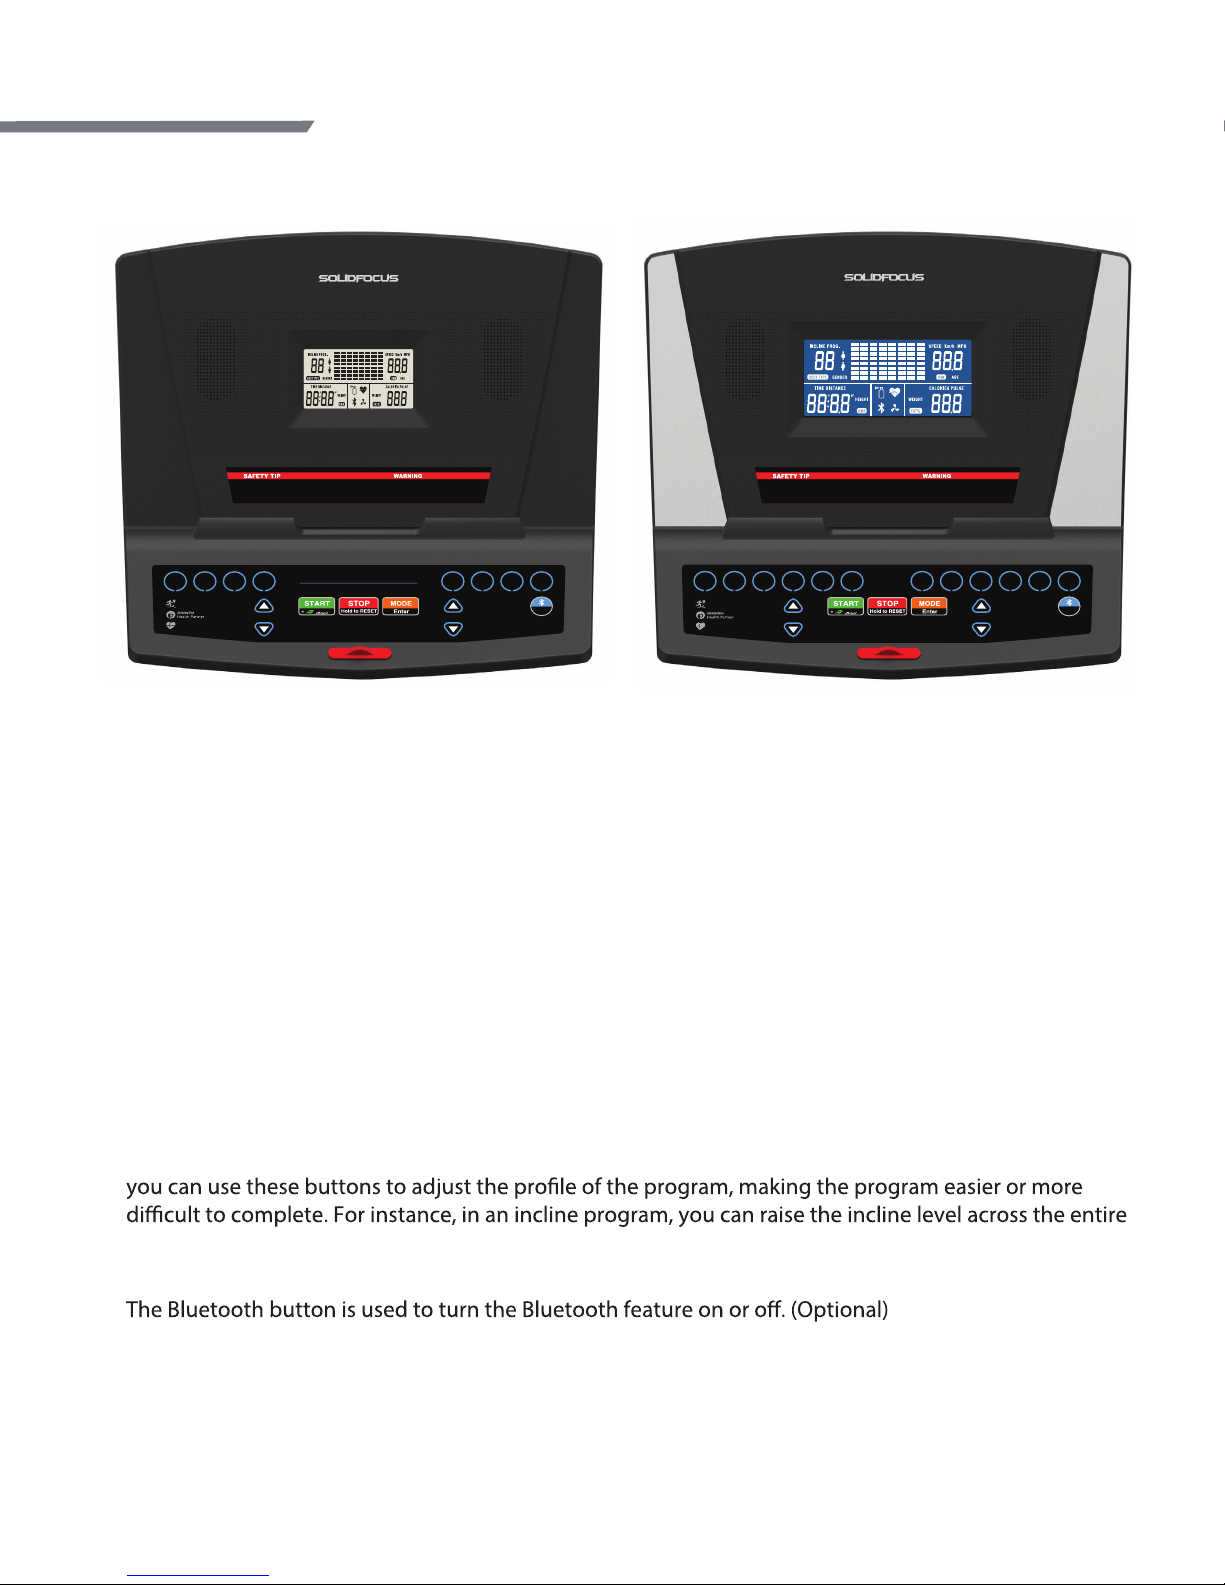
Console Buttons
Start / Stop:
• Press START button to begin a Manual workout without having a set any individual information. When
the program begins, your workout time will start counting up from 00:00 and you can manually adjust
the incline or speed as you workout.
• If you need to temporarily stop your workout, press the STOP button to pause. To restart the workout,
press the START button. After 90 seconds of no activity, the console will reset. The auto-reset can be
changed to 300 seconds by going into the engineering mode.
• If nothing is lit in the display, press the START button for 2 seconds to turn the display on.
MODE/Enter:
The Enter button is used to select each piece of information needed during program setup including
Program, Workout Level, Workout Time, and your Weight (which is used to more accurately calculate
calories burned). MODE is used to change between workout feedback displays.
Speed / Incline
:
The
and buttons for speed and incline are used to modify the value of each selection during the
program setup process and to adjust the speed or incline during use. If you are using a preset program,
program by pressing the incline button.
Bluetooth:
Quick Selection Buttons:
There are 4 (TM5010) or 6 (TM5030/TM5050) quick buttons for speed and incline. These buttons allow
you to quickly jump directly to the desired speed or incline rather than requiring that you scroll to get
the value.
TM5010 TM5030/TM5050
Owner’s Manual
Remove safety key when not in use and
store out of reach of children.
Consult a physician before starting exercise program.
Keep children and pets away during use or folding.
SPEEDinclin e
Please read the owner’s manual completely before using.
CAUTION
(Optional feature)
Bluetooth
2 4 6 8 10 12 753 9 11 13
LEVEL LEVEL LEVEL LEVEL LEVEL LEVEL KPH KPH KPH KPH KPH KPH
energy
Heart Rate Control
Run on Map
Remove safety key when not in use and
store out of reach of children.
Consult a physician before starting exercise program.
Keep children and pets away during use or folding.
Please read the owner’s manual completely before using.
CAUTION
(Optional feature)
Bluetooth
4 6 8 10 5 7 9 11
LEVEL LEVEL LEVEL LEVEL KPH KPH KPH KPH
energy
Heart Rate Control
Run on Map
SPEEDinc line
Page 15
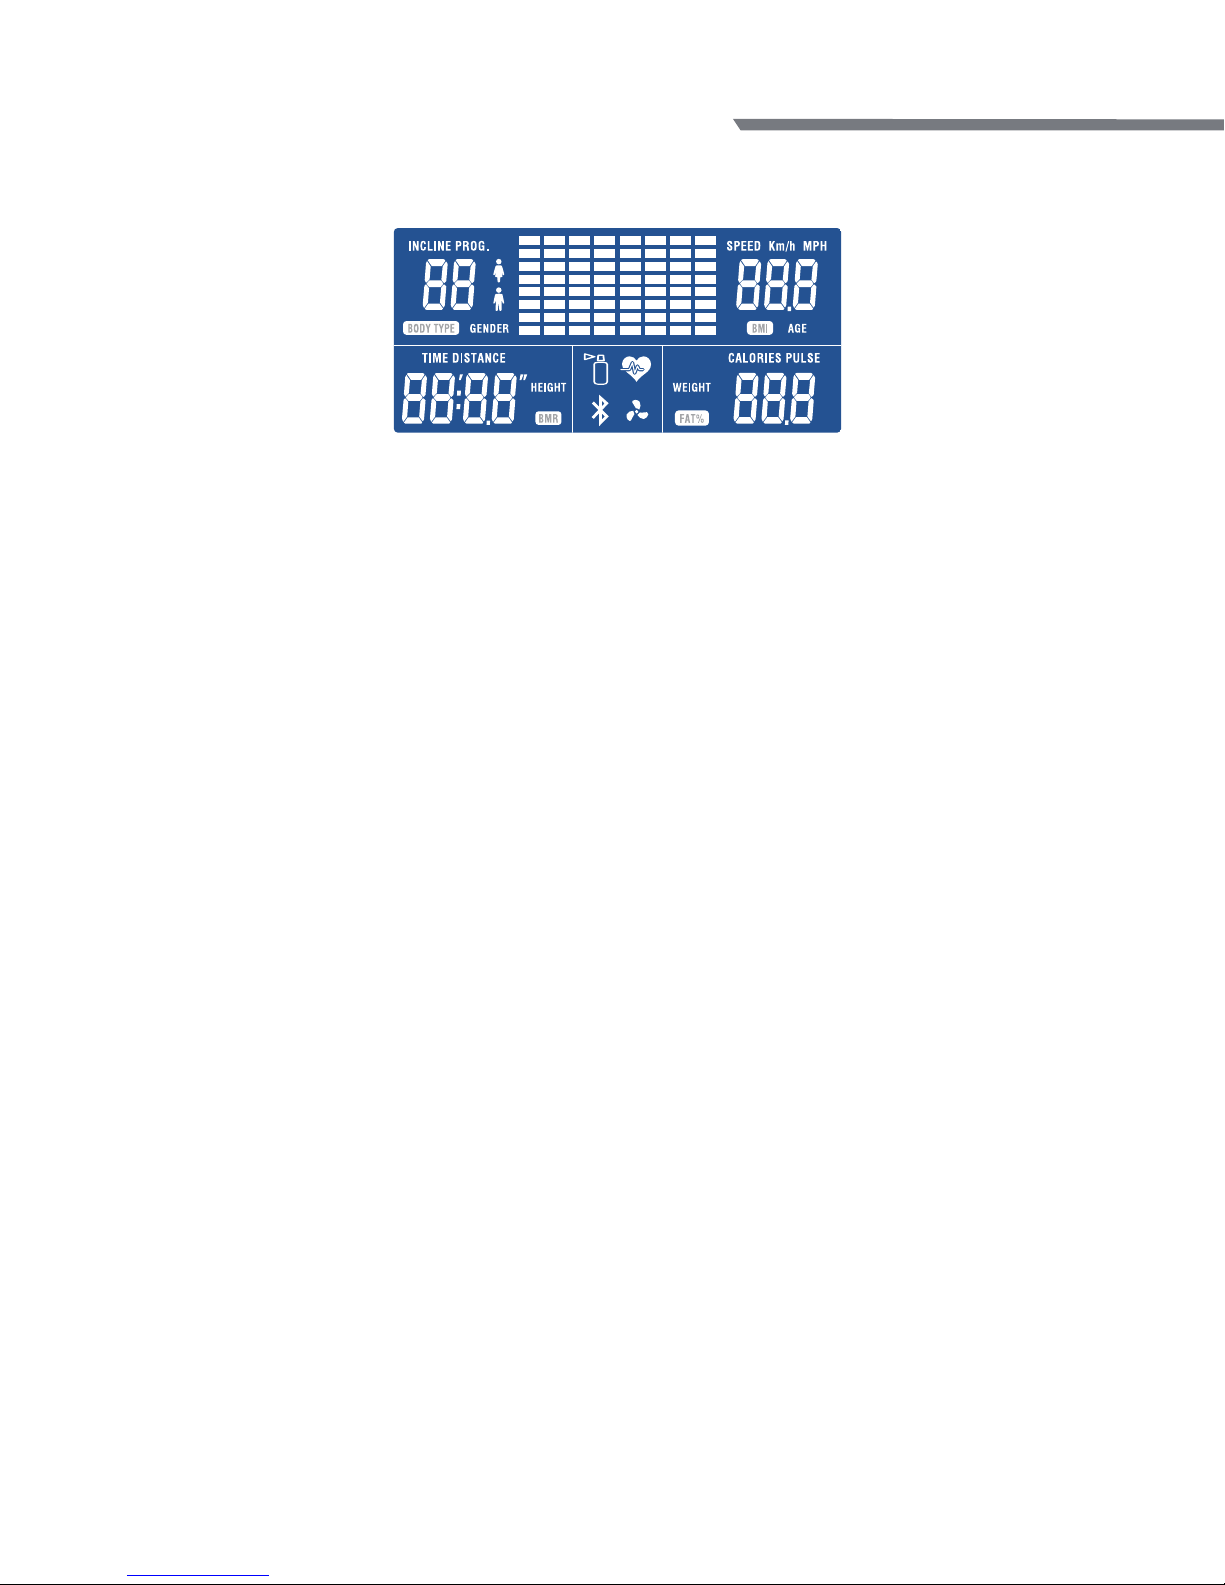
Workout Feedback
INCLINE: The level of belt incline.
PROG.: Display the preset program name P01~P17, U01~U02, H01~H02.
SPEED: Display your workout speed value in Km/h or MPH.
AGE: Instruct user to provide the user age for HRC programs.
TIME: The workout time elapsed or the workout time remaining.
DISTANCE: Total distance traveled in miles or kilometers since the beginning of the workout.
CALORIES: Show your estimated calories burned since the beginning of the workout.
PULSE: Your measured heart rate using the hand pulse sensors located on the handlebars.
WEIGHT: Instruct user to provide the user weight for more accurate calories calculation.
13
TM5010/TM5030/TM5050
Folding Treadmill
Display Console Overview (continued)
Page 16
14
Advanced Programs
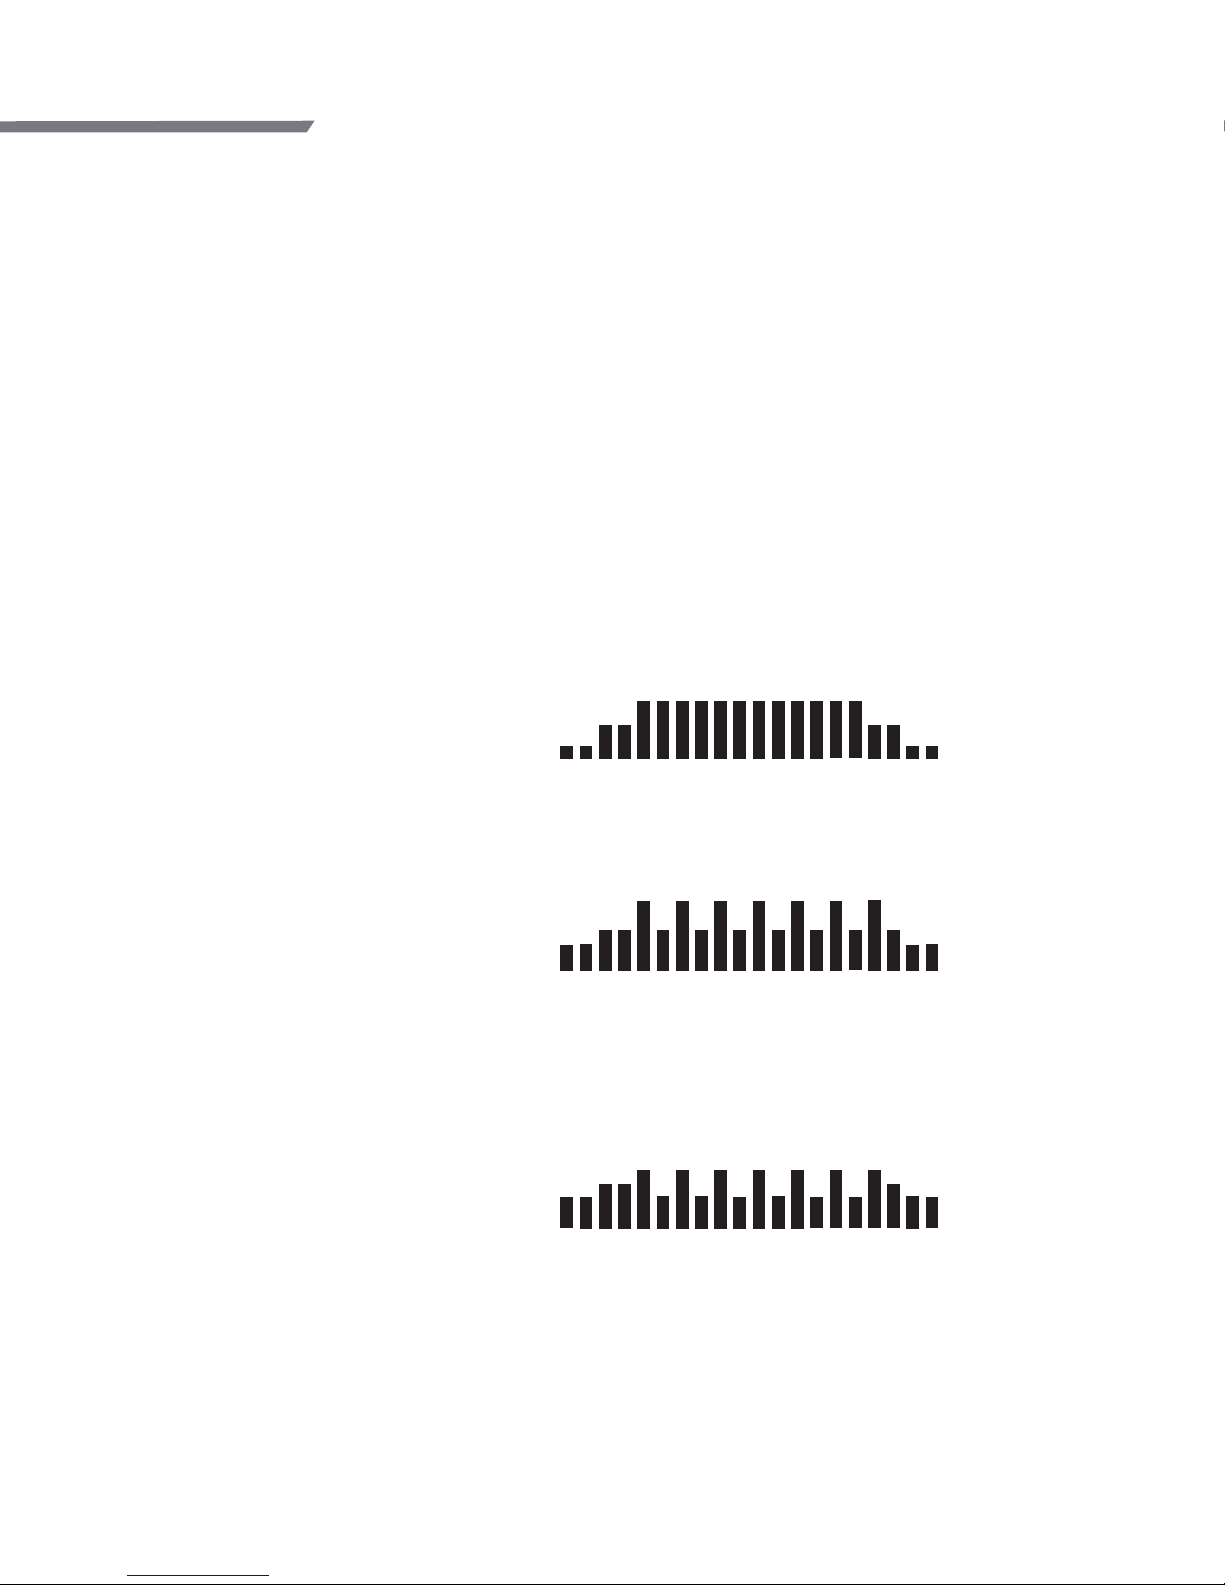
Remember, if you simply get on your treadmill and go at the same pace, for the same amount of
time everyday your body will only improve to the level of the workouts you are pushing yourself
to do. To help get the most out of your time spent exercising, this treadmills include a full range
of workout programs. All programs are available in either “Speed” or “Incline” mode with 3 levels
of intensity that you select during program set-up. When the “Speed” mode is selected, the belt
speed will vary during your workout while the incline level stays constant. In “Incline” mode the
speed remains constant while the incline is adjusted by the program. In either mode you have
full control of the setting that is not being controlled by the program.
To complement these preset programs you also can use either of the 2 types of heart rate
training programs or design your own program.
Preset Programs
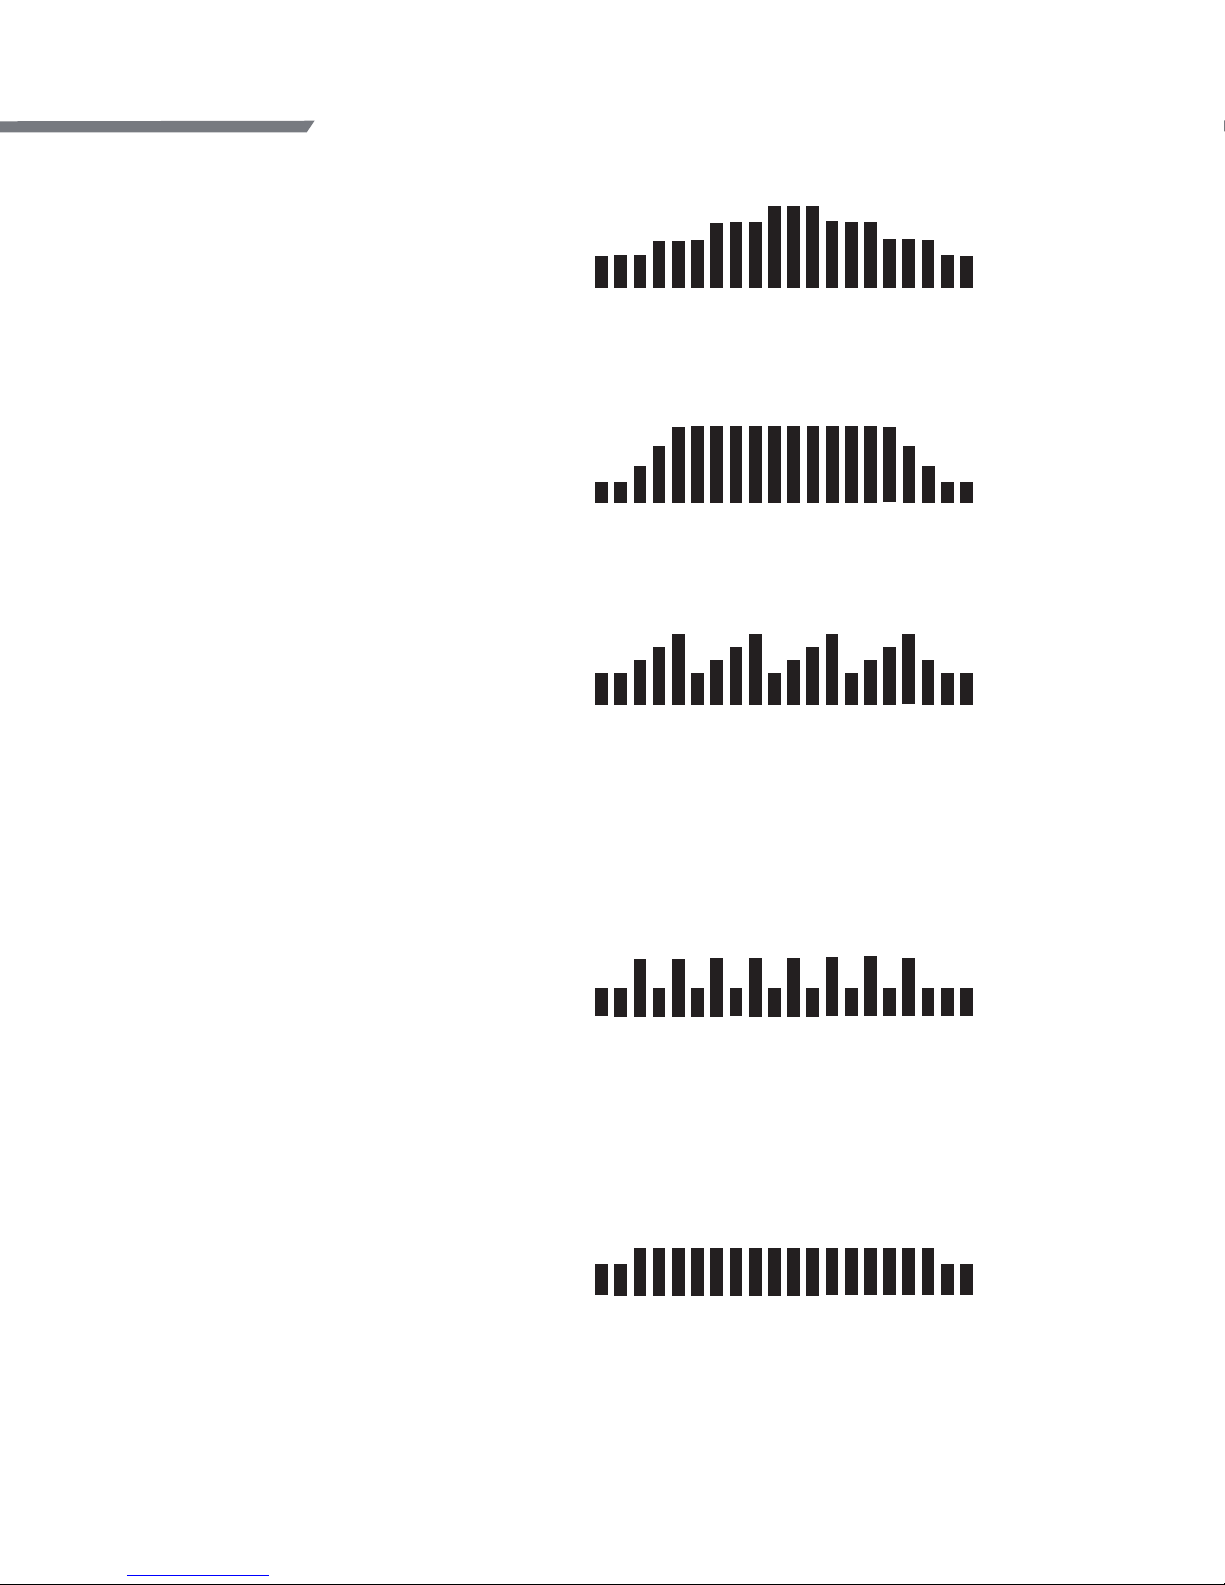
P-01: Long Slow Distance
(40 minutes default)
Long Slow Distance is a great workout for anyone! Beginners can ease into their exercise
program and should include a Long Slow Distance workout each week to maximize overall
cardiovascular endurance development. Long Slow Distance workouts are also great for
experienced exercisers on days following a harder, higher intensity workout.
P-02: S
hort Interval
(20 minute default)
Short Intervals are ideal for beginning exercisers that want to start gaining the benets of
interval workouts but aren’t quite ready for a longer-intensity interval workout. Short intervals
are also ideal for experienced exercisers to develop their speed and anaerobic tness.
Remember, it’s important to vary exercise intensity and duration to maximize overall tness
development so be sure to include some interval workouts at least once a week.
P-03: Moderate Interval
(30 minutes default)
As you begin to exercise on a regular basis and feel your tness improving you will be ready to
begin doing “Moderate Intensity Interval” workouts. Remember in this workout you alternate
between an easy recovery interval and a higher intensity interval. You should feel comfortable
to push yourself as you are never too far away from an easier recovery interval. This workout will
improve your overall aerobic endurance while also maximizing your anaerobic tness
development.
Owner’s Manual
Page 17
TM5010/TM5030/TM5050
Folding Treadmill
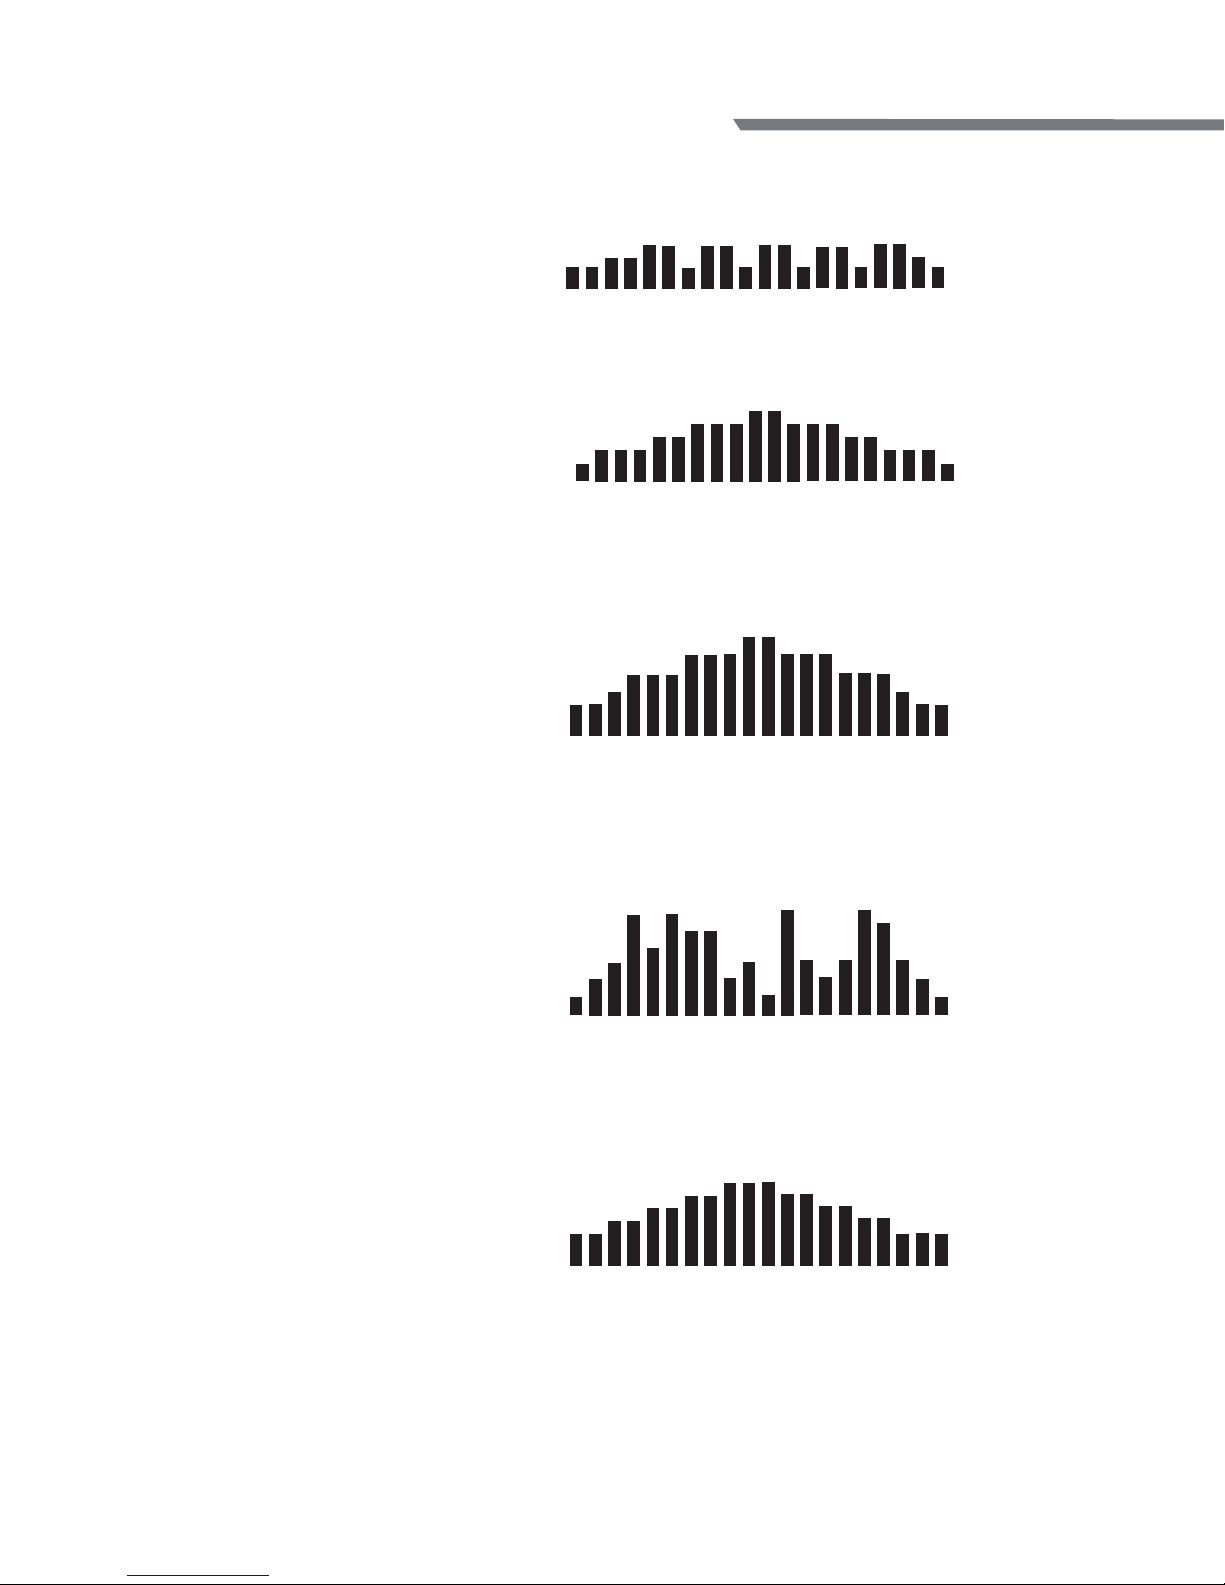
P-04: Long Interval
(40 minute default)
Long Interval workouts are great to maximize calorie burn and improve your anaerobic tness.
As in the Moderate Interval workouts, remember you have a recovery period after each higher
intensity interval so you can comfortably push yourself to exercise at a progressively higher level.
P-05: Negative Interval 1
(30 minute default)
The Negative Interval-1 workout will provide you with all of the benet of a Steady Pace
workout but push you to slowly obtain a progressively higher steady state exercise intensity and
then allow you to slowly decrease the exercise intensity. As you improve your overall health and
tness you can slowly push yourself to a higher peak in your overall exercise intensity in this
workout.
P-06: Negative Interval 2
(30 minute default)
The Negative Interval-2 workout has been designed to provide your body with a workout that
begins with a slight increase in exercise intensity and ends with a progressive decrease in
exercise intensity. A workout with an increase and decrease in exercise intensity will most ideally
develop your overall aerobic cardiovascular endurance. A workout that decreases in intensity is
also ideal for maximizing calorie burn, but most ideally when done for a longer duration, such as
40 or 50 minutes.
P-07: Fartlek
(30 minutes default)
Varying your exercise intensity with a constantly changing interval workout that starts out at an
easy pac
e and then increases to a moderate or higher intensity pace will add variety into your
workouts, make your workouts go by faster and provide you with great tness benets.
Constantly varying intensities in a workout have been found in brain research to have great
benets on improving overall brain tness.
P-08: Uphill Climb
(30 minute default)
Gradually increase the intensity of your exercise with this fun Uphill Climb workout. The goal of
the Uphill Climb is to stimulate your body to improve overall cardiovascular tness while
maximizing muscle cell development in working muscles. You will maximize calorie burn during
the peak levels while allowing your body to exercise longer and still benet from the higher
intensity as you slow down and return to your starting level.
Advanced Programs (continued)
15
Page 18
Owner’s Manual
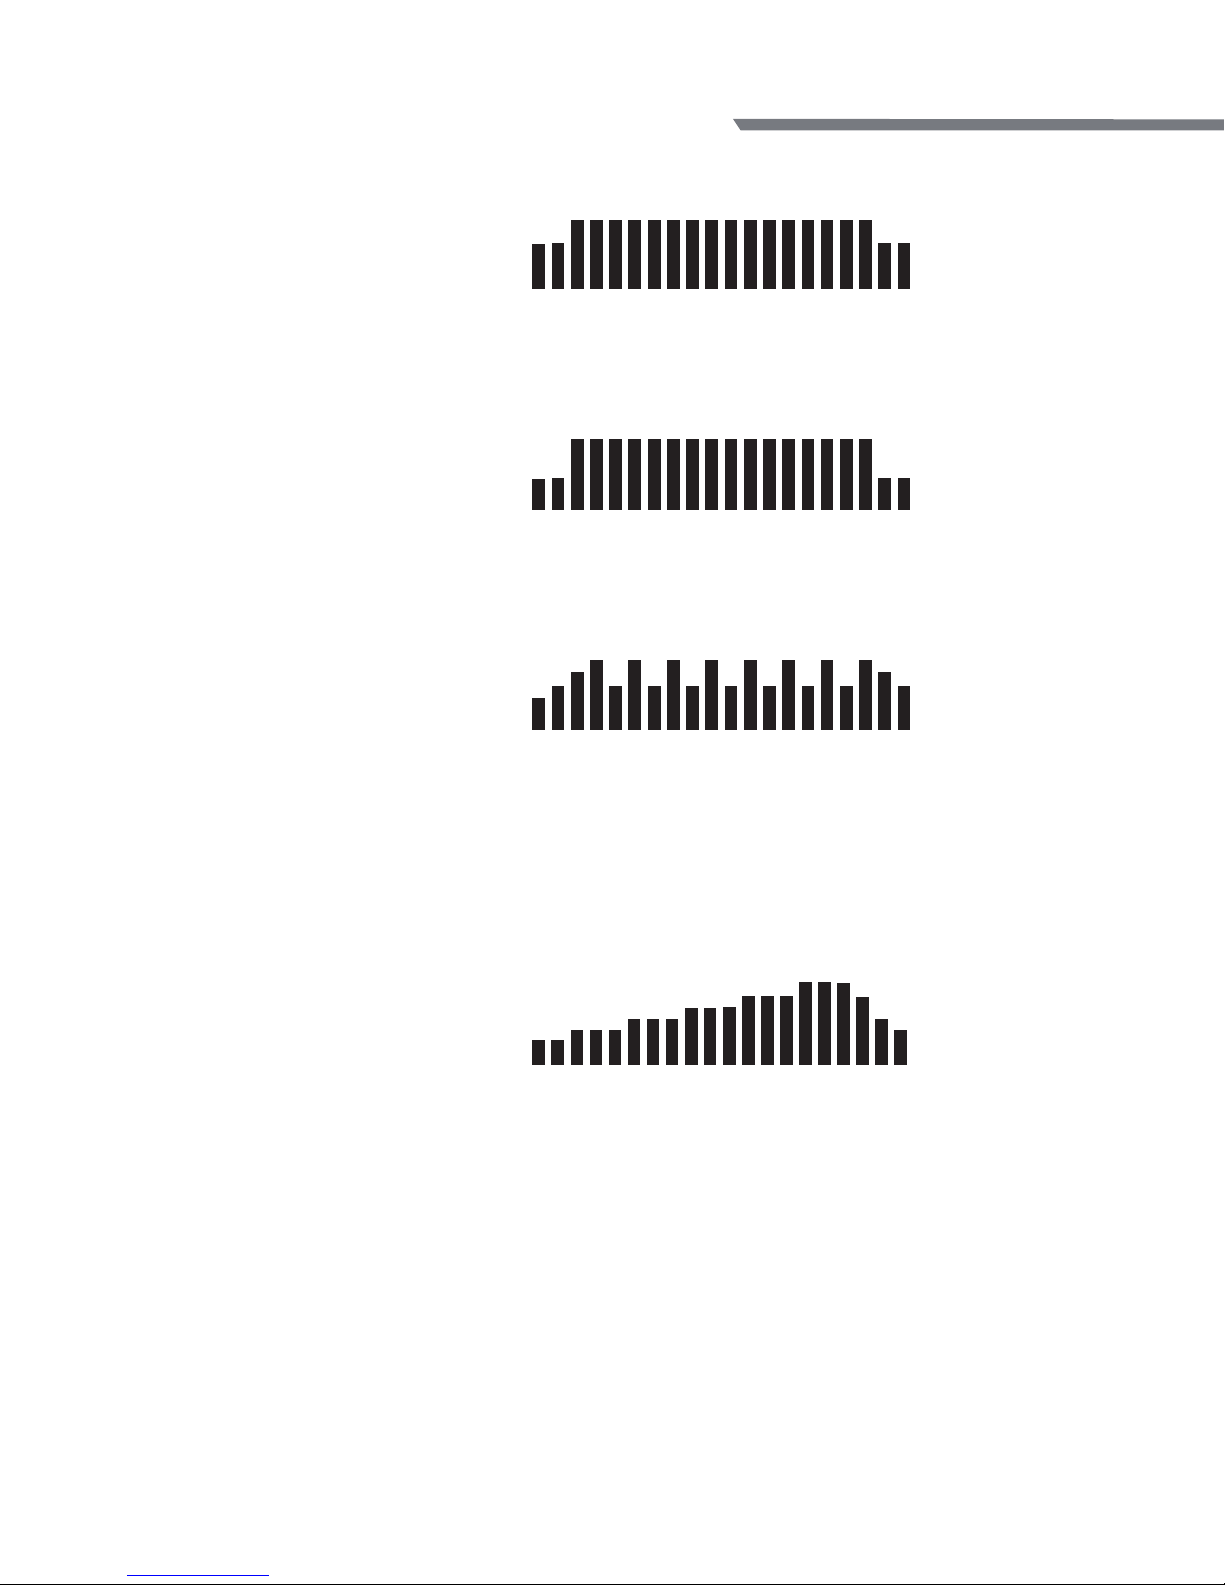
P-09: Pyramid Climb
(30 minute default)
Gradual increases in intensity is ideal to stimulate your body to improve overall cardiovascular
tness, while also maximizing muscle cell development in working muscles. You will maximize
overall calorie burn during the peak intensity levels while allowing your body to exercise for a
longer duration and still benet from the higher intensity as you gradually slowdown.
P-10: Plateau Climb
(40 minute default)
A Plateau Climb workout will provide you with all the benets of other steady state workouts,
but push you to maintain a higher steady state exercise level. As you improve your overall health
and tness you can slowly push yourself to higher overall intensity for longer periods of time.
P-11: Ladder
(30 minutes default)
One of the greatest benets of exercise are the direct benets exercise has on the heart and
cardiovascular system, The heart Health Ladder has been specially designed to provide your
heart and cardiovascular system with a series of progressively harder exercise intensity’s that will
improve your overall aerobic endurance, while also stimulating your anaerobic endurance.
Remember that it may be challenging for a few minutes, but each progression has been carefully
designed to also provide recovery intervals so you can push yourself to improve your
cardiovascular tness.
P-12: Uphill Interval
(20 minute default)
Uphill Interval workouts are unique in that they provide your body with the benet of an interval
workout, with the added benets of gradually increasing the overall intensity, In this workout
you should begin at a level that is comfortable and then gradually increase the intensity during
each maximum interval, pushing yourself to a slightly higher intensity each time. You will get
maximum overall calorie burn during of the higher intensity intervals, while at the same time
working on improving your overall anaerobic tness.
P-13: Steady Pace
(40 minut
e default)
Improving your tness while also simulating your body to burn more fat with this workout.
Steady Pace workouts are great for helping you establish an improved overall endurance base.
Most “Steady Pace” workouts focus on maintaining one set workload throughout the entire
workout. Your goal is to be sure you are exercising within a low moderate intensity to a high
moderate intensity during the workout.
Advanced Programs (continued)
16
Page 19
TM5010/TM5030/TM5050
Folding Treadmill
P-14: Long Slow Distance
(40 minute default)
Long Slow Distance is a great workout for everone! Beginners can ease into their exercise
program with this workout, being sure to do this workout at least a minimum of once a week to
maximize cardiovascular endurance development. This is also great for experienced exercisers
to do on days following a harder, higher intensity workout.
P-15: Cardio Run
(20 minute default)
Cardio Run is a steady pace workout but at a higher intensity than “Long Slow Distance”. Cardio
Run is a more advanced workout, designed to motivate you to achieve a more challenging
steady pace and maintain that pace for the full duration of the workout. Cardio Run is a great
workout if you are training for a special event.
P-16: Short Interval
(20 minute default)
Short interval workouts have been found in research studied to be ideal for those striving to
increase their weight loss, and improve their overall cardiovascular tness. Varying your exercise
intensity during a workout from a moderately slow level to a high intensity for a set period of
time and repeating that progression for a complete workout will maximize the total number of
calories burned during a workout. A second benet is the individual will not be forced to
maintain a high intensity exercise level throughout the entire workout. The short interval
recovery periods allows the body to more successfully exercise at a high intensity than might
otherwise be comfortable for the individual for a complete workout duration.
P-17: Uphill Walk
(30 minute default)
The uphill walk gradually increases the intensity of your exercise peaking at a high intensity. The
goal of the uphill workout is to stimulate your body to improve your overall cardiovascular
tness, while also maximizing muscle cell development in working muscles. The Uphill Walk has
been designed to start slow and gradually increase to a peak intensity then with a quick
decrease back down to a recovery level. You will maximize calorie burn during the peak intensity
levels while allowing your body to exercise for a longer duration.
Advanced Programs (continued)
17
Page 20

Owner’s Manual
Operate Your Exercise Equipment
Starting in Manual Mode
The quickest way to get started is to press the START button. Pressing the START button will select
the Manual program and the TIME will start counting up from 00:00. You can also press ENTER to
select the Manual Program. Using the ENTER button will allow you to set a specic workout TIME,
and set your WEIGHT for more accurate calorie calculation.
Starting a Preset Program
1. Select Program - To use the buttons to select your desired Exercise Program. Each time you
press the button will move to the next/previous program. Once you nd the desired program,
press ENTER button.
2. Select Program Mode - With each program selection you can choose to run the program in
Incline Mode or Speed Mode. Press the speed button to select speed mode, or the incline
button to select incline mode. Press ENTER button.
3. Select Program Level - There are 3 levels of intensity with each preset program (1 being the
easiest and 3 being the most dicult). Use the buttons to make the selection the press
ENTER button.
4. Set Time - Set the program TIME of your workout using the buttons. Press ENTER.
5. Set Weight - Set your WEIGHT in the console for more accurate calorie calculation using the
buttons. Press ENTER button.
6. Press the START button to begin your workout.
Custom User Set-up Programs
User programs need to be set-up before they can be used. To set up an user program:
1. Select USER1 or USER2 Programs - To use the button to select the U-1 or U-2 programs.
Press ENTER button.
2. Set Level - Set the level for each segment in the exercise program. Press ENTER button and
repeat until all 20 segments are complete.
3. Set Time - Set the program TIME of your workout using the buttons. Press ENTER.
4. Set Weight - Set your WEIGHT in the console for more accurate calorie calculation using the
buttons. Press ENTER button.
4. Start - Press the START button.
Once the program has been setup, simply scroll to the U-1 or U-2 program and press START
button.
18
Page 21

TM5010/TM5030/TM5050
Folding Treadmill
Operate Your Exercise Equipment (continued)
Using Heart Rate Control Programs
The Constant Heart Rate Control program requires that you set a heart rate that the display
console will maintain throughout the workout and the interval requires that you set a LOW and
HIGH heart rate. While using the HRC programs you will be required to hold the pulse grips or
wear a chest strap for the duration of the workout.
HRC - Constant
1. Select HRC1 - To use the buttons to select the H-1 program. Press ENTER button.
2. Select Program Mode - Press the speed button to select speed mode, or the incline
button to select incline mode. Press ENTER button.
3. Set Time - Set the program TIME of your workout using the buttons. Press ENTER button.
Remember that the program will include 3 minutes of warm up.
4. Set Age - Set your AGE using the buttons. Press ENTER button.
5. Set Target Heart Rate - Set your Target Heart Rate using the buttons. Press ENTER button.
6. Set Weight - Set your WIGHT using the buttons. Press ENTER button.
7. Press the START button to begin your workout.
HRC - Interval
1. Select HRC2 - To use the buttons to select the H-2 program. Press ENTER button.
2. Select Program Mode - Press the speed button to select speed mode, or the incline
button to select incline mode. Press ENTER button.
3. Set Time - Set the program TIME of your workout using the buttons. Press ENTER button.
Remember that the program will include 3 minutes of warm up.
4. Set Age - Set your AGE using the buttons. Press ENTER button.
5. Set HIGH Target Heart Rate - Set your HIGH Interval training rate using the buttons. Press
ENTER button.
6. Set LOW Target Heart Rate - Set your LOW Interval training rate using the buttons. Press
ENTER button.
7. Set Weight - Set your WIGHT using the buttons. Press ENTER button.
8. Press the START button to begin your workout.
Operations
While exercising you can change the Speed and Incline Level by pressing the
buttons. To pause your exercise program press the START button and to reset your
program, press the RESET button (hold the STOP button for 3 seconds).
19
Page 22
20
Owner’s Manual
Maintenance
Belt Lubrication
Use only 100% Silicone and avoid using aerosol silicone sprays which include additives and petroleum
The running belt should be lubricated every 3 months (regardless of use) or every 50
over time and the belt will dry out.
Note: Even though the running belt is lubed from the manufacturer, you should lubricate
the unit was manufactured and when it was purchased.
The Silicone icon will turn on in the display every 100 hours of use and is a reminder that it is time to
lubricate the running belt. As indicated above it is best to lubricate the running belt every 50 hours of use.
Apply the silicone to the underside of the treadmill belt. Do not apply to the walking surface.
This may be accomplished by standing up the treadmill and applying the silicone to the inside portion
Note: When lubricating the belt, make sure the treadmill is located on a surface that can be easily
Cleaning and Maintenance
It is recommended to wipe the treadmill down after each use to keep the treadmill clean and dry. A
mild detergent may be used at times to help remove all dirt and salt from the belt, painted parts and
the display.
The Maintenance is suggested to be done every 150 hours of use. This is a reminder to clean the
unit really well. This cleaning would include removing the motor cover and cleaning around the
motor and electronics. It is recommended to clean the motor compartment if the treadmill is in an
motor compartment. It is a good idea at this time to check and tighten all assembly hardware as well.
Warning: Unplug the Power Cord Before Removing the Motor Cover.
of the belt. Spray the silicone down and across the belt. Rotate the belt 1/2 of the circumference
and repeat. About one ounce of Silicone should be used for each application.
http://leisureconcepts.com.au
SolidFocus
Page 23
21
TM5010/TM5030/TM5050
Folding Treadmill
Maintenance (continued)
Belt Tensioning
If the belt begins to slip during use, it will need to be tensioned. Your treadmill is equipped with
tension bolts that are accessible from the back of the treadmill. Before tensioning the belt,
start the treadmill and set the speed to 3 mph (5 kph). Using a 6 mm Allen Wrench, included in your
hardware bag, turn the right and left tension bolts 1/2 turn clockwise.
After you adjust each side 1/2 turn, test to see if the slipping is eliminated. If the belt slips repeat
If you turn one side more than the other, the belt will start to drift to the side of the
treadmill and will need to be aligned. DO NOT tighten more than 2 full turns on each side.
If slippage still occurs, contact Customer Service.
Note: Over tensioning the belt can cause unnecessary friction and wear and tear on the belt,
motor and electronics.
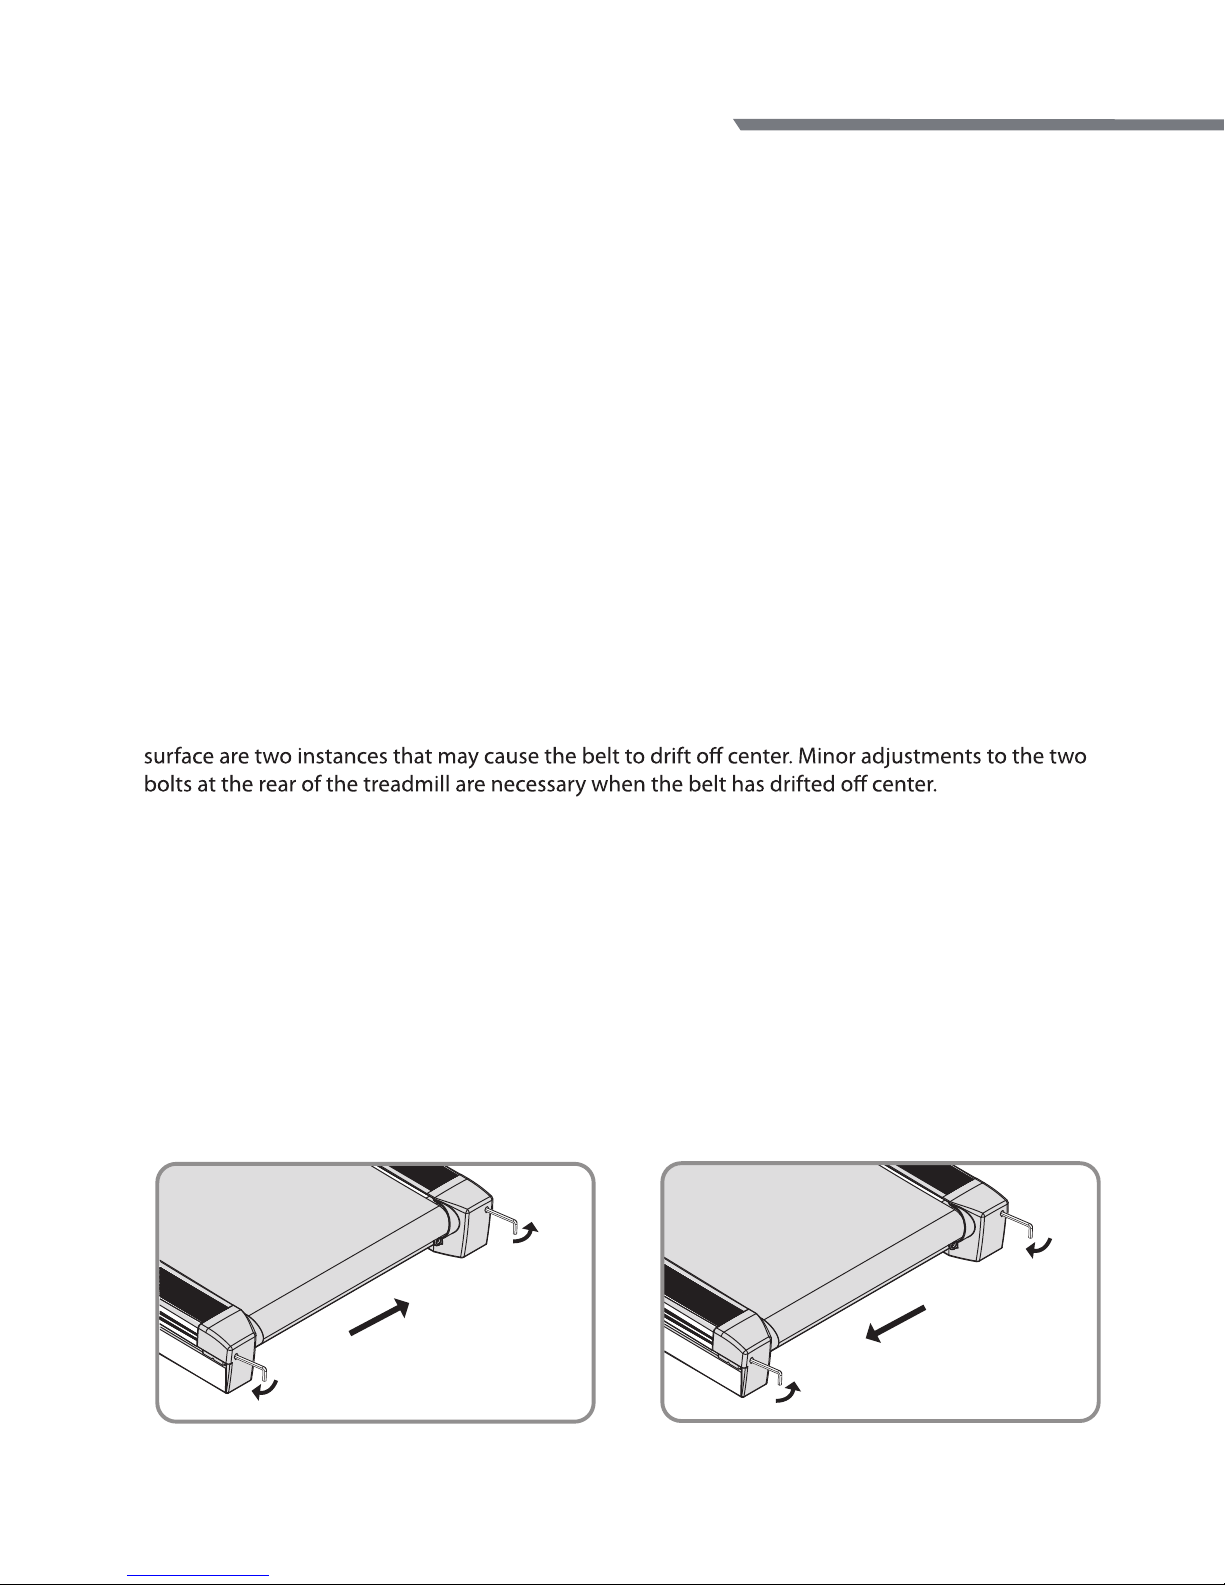
Aligning the Running Belt
Ensure the running belt is centered on your treadmill at all times. Running style and a non- level
1. Press "START", then increase the treadmill speed to 3 mph (5 kph).
2. Stand at the rear of the treadmill to determine which direction the belt is drifting.
3. If the belt drifts to the left, turn the left adjustment bolt one-quarter turn clockwise and
the right adjustment bolt one-quarter turn counter-clockwise. (See FIG.C)
4. If the belt drifts to the right, turn the left adjustment bolt one-quarter turn counter-clock
wise and the right adjustment bolt one-quarter turn clockwise. (See FIG.D)
5. Observe the tracking of the belt for about two minutes. Repeat steps 3, 4 and 5 as needed.
To move belt to the Right
FIG C.
To move belt to the Left
FIG D.
this step and test again.
Page 24
Owner’s Manual
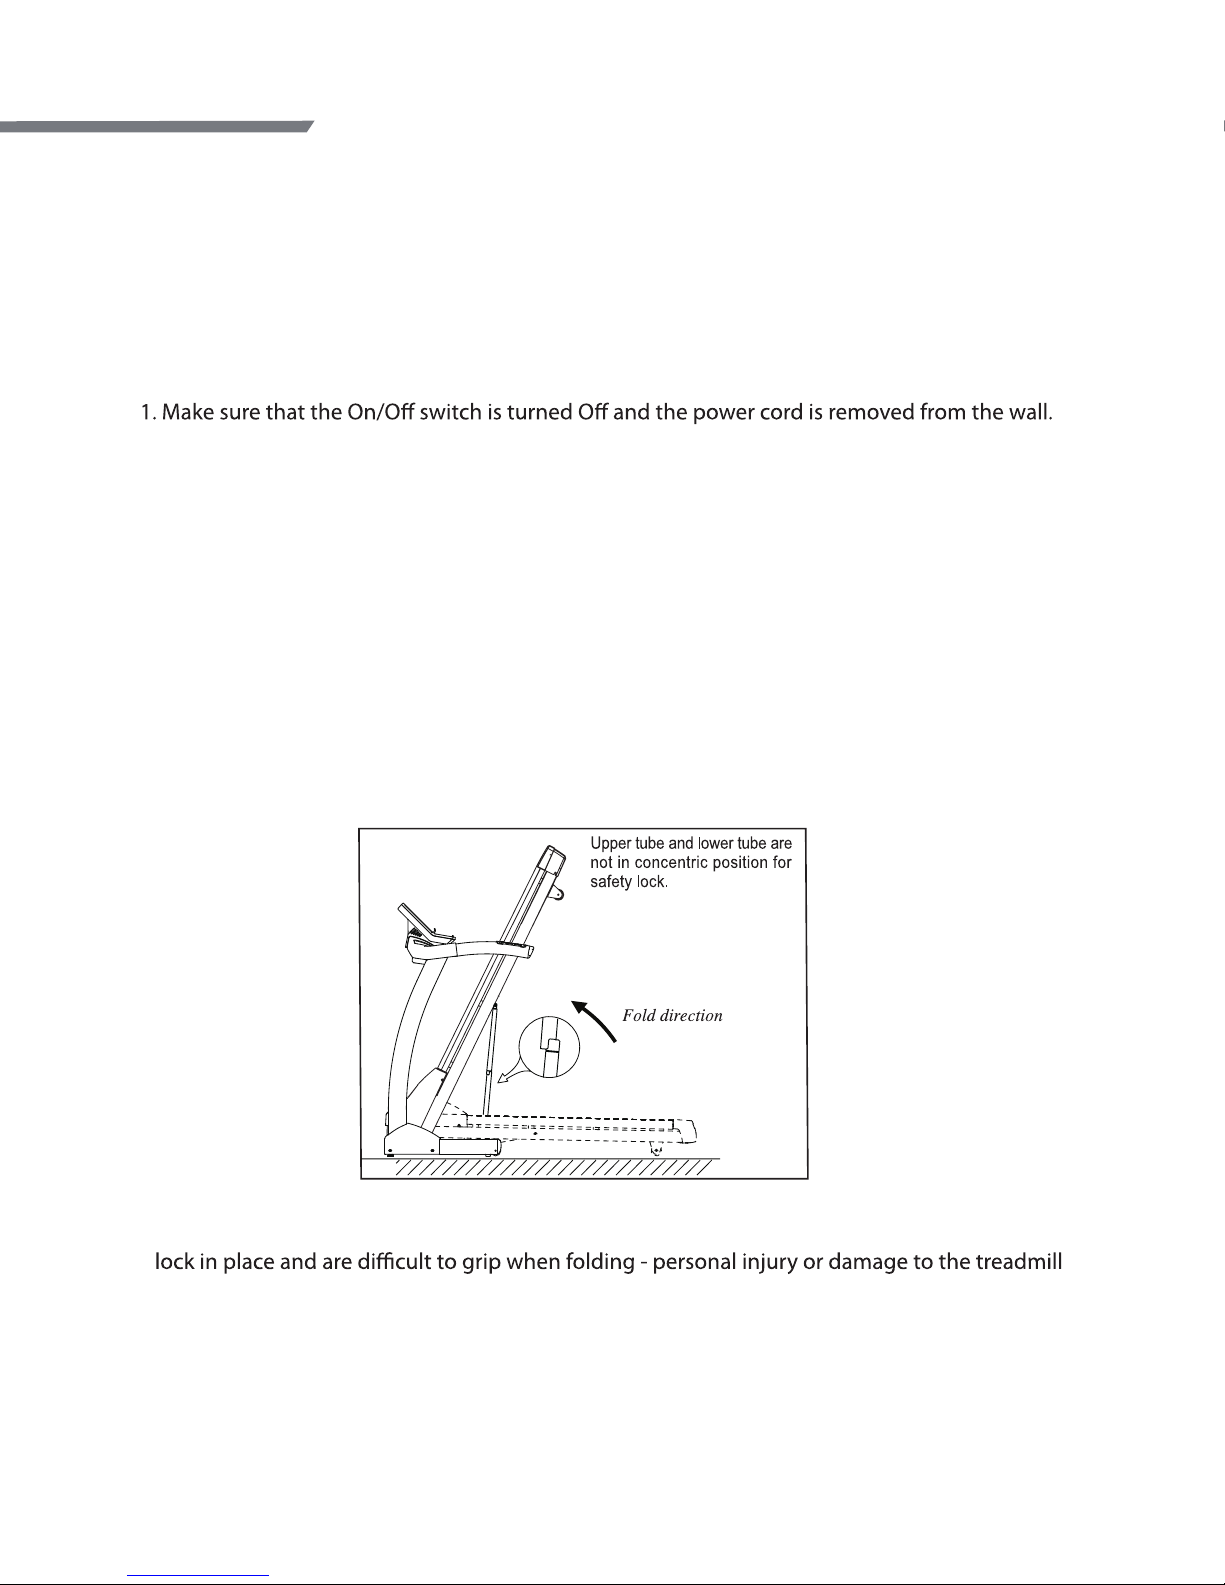
The treadmill comes with a folding feature that reduces the amount of storage space required
when your treadmill is not in use and makes the treadmill easier to move.
Folding the Treadmill
2. Make sure that nothing is on or near your treadmill which might spill, be knocked over or
prevent the treadmill from completely folding.
3. (a.) Place both hands under the support bar that is located directly under the back of the
running belt on your treadmill to make sure that you have a solid lifting point.
(b.) Lift the treadmill all of the way forward and make sure that the hydraulic shock is
properly locked in place.
Caution: When lifting, use proper safety precautions and lifting techniques.
Bend your knees and elbows, keep your back straight and pull up with both arms.
(c.) Ensure that the locking mechanism is secure by gently pulling back on the
treadmill and make sure that it doesn’t move. When doing this, be careful to be securely
positioned in case the treadmill lock has not engaged.
Caution:
• Do not fold the treadmill by lifting on the running belt or rear roller. These parts do not
could result.
• Do not lean against the treadmill once it is folded or place items on it that could cause it to
become unstable or fall over. This could result in serious personal injury.
• Do not connect the power cord when the treadmill is folded or try to operate the treadmill in
the folded position.
Moving and Storage
Maintenance (continued)
22
Page 25
23
TM5010/TM5030/TM5050
Folding Treadmill
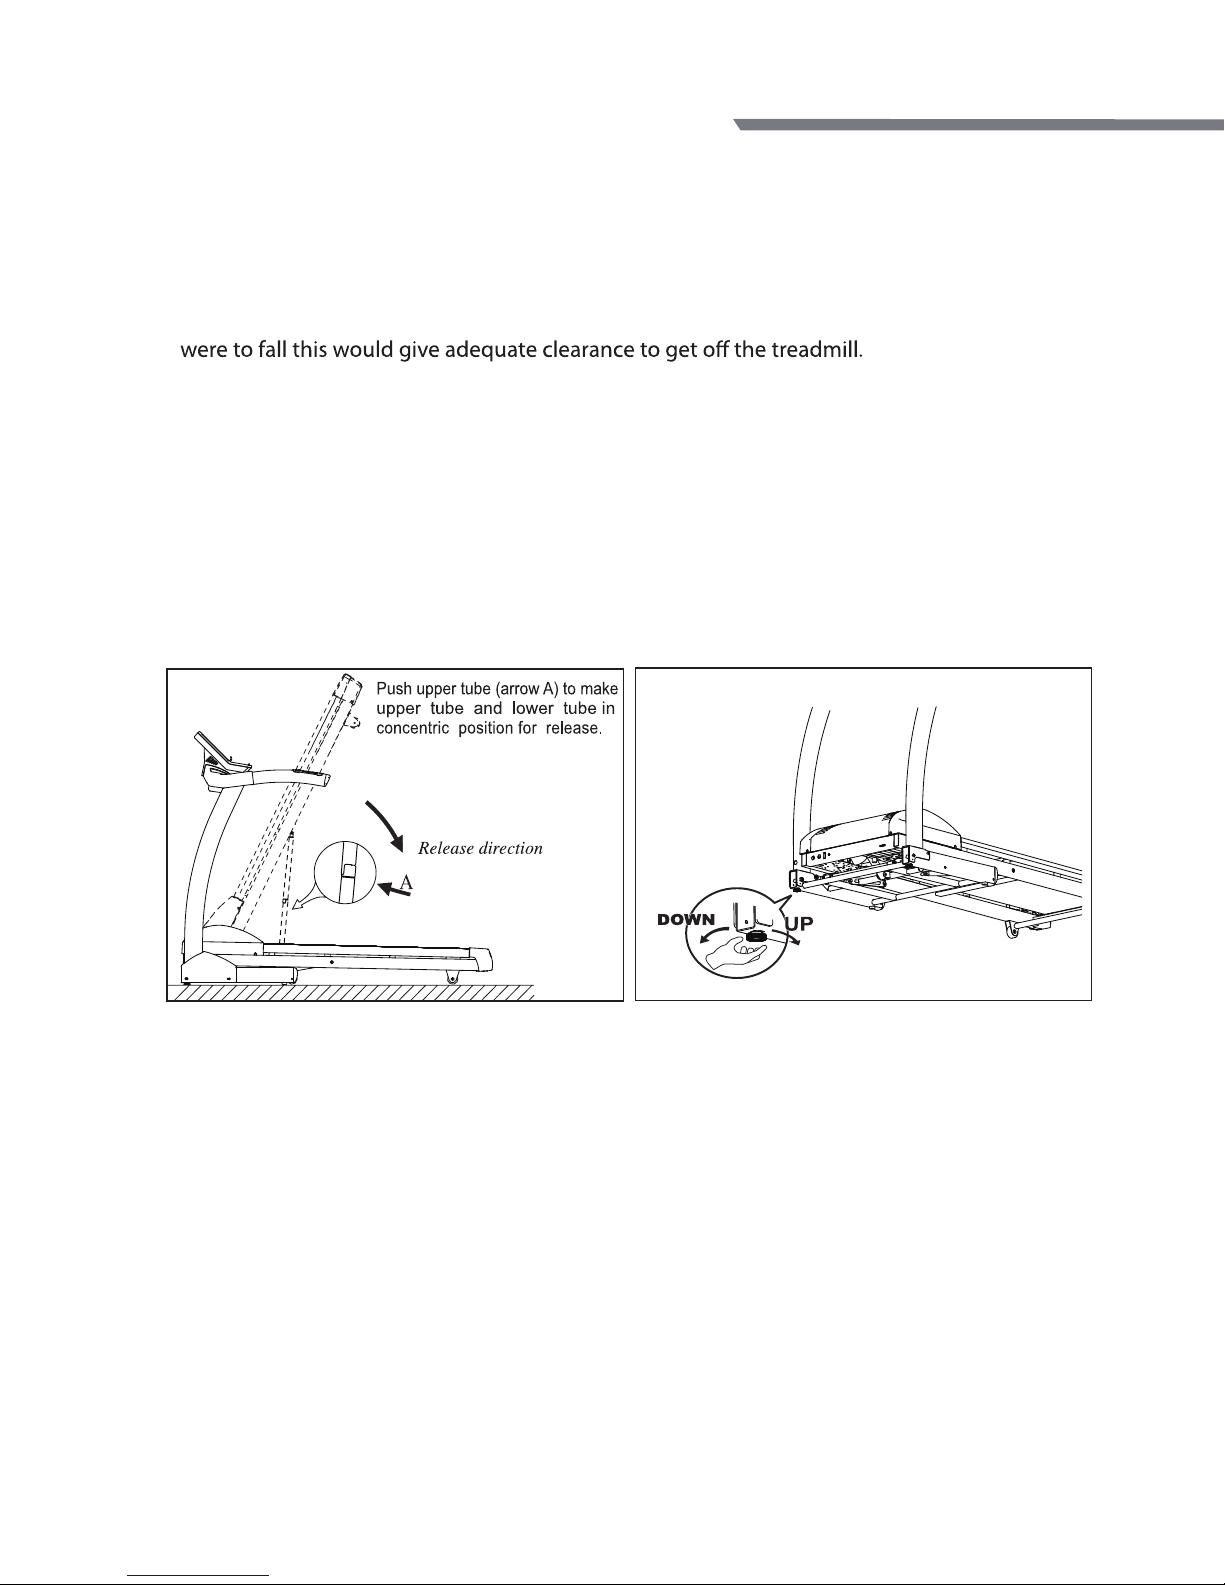
Unfolding the Treadmill
1. Make sure you have adequate space to lay the treadmill down. There needs to be at least
2 feet of clearance on both sides and in the front of the treadmill. There should be at
least 4 feet of clearance on the back side of the treadmill for safety reasons. If the user
2. Inspect to ensure that nothing is on or near your treadmill that might spill, be knocked
over or prevent the treadmill from completely unfolding.
3. Position yourself behind the treadmill. Slightly push the treadmill forward towards the
display and with your left foot lightly push the top portion of the hydraulic shock forward till
the locking tube frees and the treadmill can be pulled back away from the console.
4. The hydraulic shock is set up to drop softly without assistance. It is not a bad idea to hold
onto the treadmill until it is about 2/3 of the way down. Make sure that you use proper
lifting technique, bending your knees and keeping your back straight.
Maintenance (continued)
Horizontal adjustment
To stabilize the treadmill on the oor, you can adjust the two screws located under the front of the
base frame.
1. Lift the machine on one side and then turn the screw under the front of the base frame.
2. Turn the screws clockwise to make it screw up.
3. Turn the screw counterclockwise to make it screw down.
Page 26
24
Owner’s Manual
The treadmill is designed and manufactured to be reliable and easy to use. However, if
Problem: The console is erratic or not lighting up
Solution: Check to make sure that the treadmill is properly plugged in, turn the power
Problem: The belt does not stay in the center of the treadmill when in use.
Solution: First check to make sure that the treadmill is level, then refer to the instructions in
this manual on how to tension and adjust the belt.
Problem: The treadmill motor seems strained or E1 comes up after several minutes of use.
Solution: The lubricating silicone that is applied to the deck and belt is wearing down and
the belt needs to be lubricated with silicone spray.
Problem: The treadmill belt slips during use.
Solution: The belt may need to be tensioned after a period of use. Refer to the Belt
Tensioning and Adjustment Section of this manual.
Problem: Heart Rate is erratic or not picking up.
Solution: Make sure your hands are moist (Aloe Vera helps). Make sure all connectors at the
back of the console are properly connected and no wires are damaged.
If wearing a chest strap make sure the batteries are good and that the electrodes
are moist and positioned properly on your chest.
Problem: Silicone icon lights up on console.
Solution: Lubricate the running belt with 100% pure silicone. Then simultaneously press
Troubleshooting
Check all wire harness connections to be sure they are all properly connected.
If the problem persists contact Customer Service.
Problem:
Solution:
The Start button LED is dimly lit and no other lights are on.
The unit is in energy saving mode. Press and hold the START button for
one second.
Problem: E1 comes up after several minute of use.
Solution:
When E1 is displayed, remove safety key and insert it again to restart treadmill. If E1 is still
shown on display, please check the following:
1. Please check all cable connection is well connected.
2. The treadmill did not move after pressing the START button and show E1, please check
if there is any part stuck.
3. The treadmill run for few seconds after pressing START but stops, please check if the
4. Please check wires connected to the motor are tight and secure.
5. Please contact your local distributor / place of purchase for technical service if E1 can
not be solved.
sensor (near ywheel of front roller) is loose or defective.
Page 27
TM5010/TM5030/TM5050
Folding Treadmill
25
.esu fo etunim lareves retfa pu semoc 7E / 6E :melborP
When E6 / E7 is displayed, remove safety key and insert it again to restart treadmill.
:noituloS
1. Reset incline value:
(2) W
(1) Hold SPEED and press START button for 3 seconds, until beep twice.
hen the position of incline is lower than middle level, press the MODE button and
INCLINE button. Hold both buttons and the incline will be raised. Release the two
buttons till the incline position is up to middle level.
(3) When the position of incline is higher than middle level, press the MODE button and
INCLINE button. Hold both buttons and the incline will be lowered. Release the two
buttons till the incline position is down to middle level.
Please try it for few times. If you can not get the incline moved, please contact local
distributor / place of purchase.
E6 / E7 goes away. If not, please contact your local distributor / place of purchase for
technical service.
2. Please check if red / white incline cables are well connected to MCB.
3. If the above steps can not reset incline, please contact your local distributor /
place of purchase for technical service.
.esu fo etunim lareves retfa pu semoc 9E :melborP
1. Upper control cable and lower control cable are not well connected. To solve the problem,
please check the wiring circuit.
2. Please contact your local distributor for technical service.
:noituloS
E2 comes up after several minute of use.
Problem:
console IC chip
2. Check the console IC chip pin if it is bent or well connected. To solve the problem, please
reconnect the console IC chip.
3. Please contact your local distributor for technical service.
Solution:
Troubleshooting (continued)
Page 28
Owner’s Manual
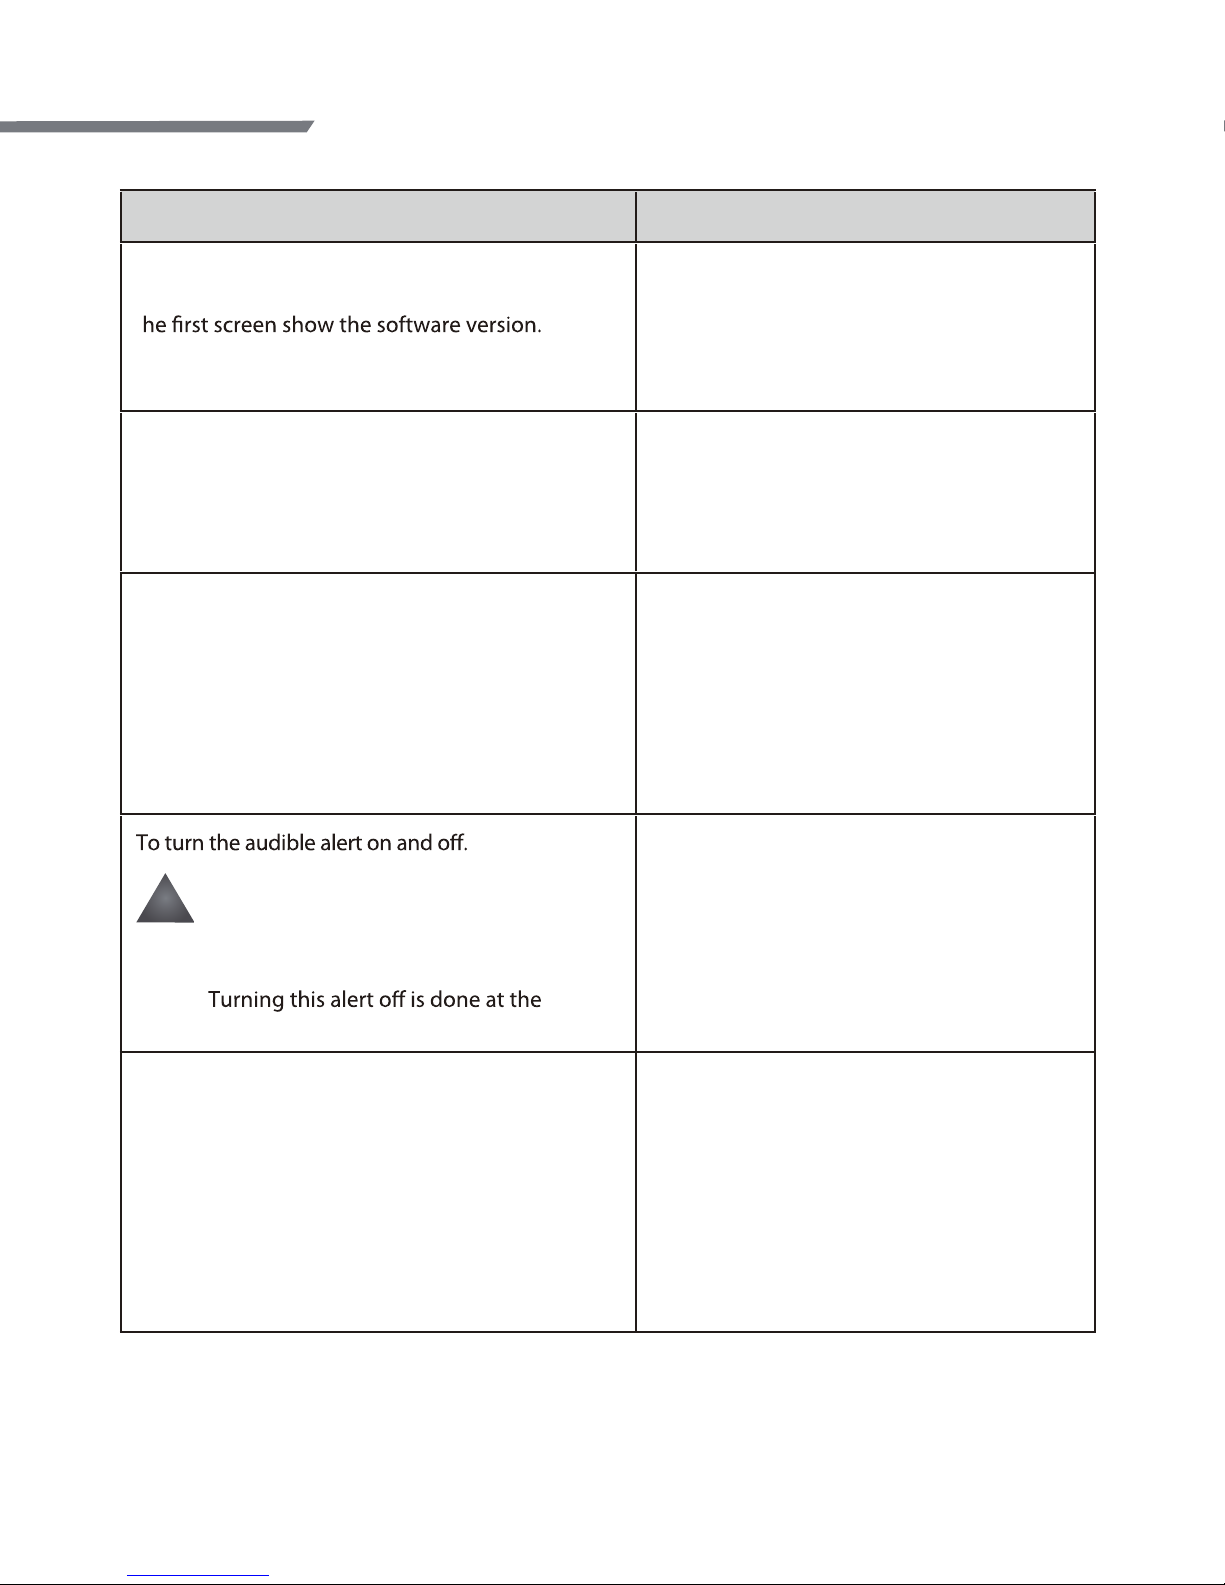
Personal Settings
Engineering Mode
Information viewed on screen
Press and hold MODE/ENTER and then SPEED
to enter engineering mode.
T
Then press MODE/ENTER to next screen for
personal setting or to show factory setting.
100 ENG
MODE
To set up the units of measurement in
metric (Si) or in English (En).
En or Si
To set up the pause time.
This allows you to set the amount of time the
treadmill will be paused prior to automatically
resetting. The options are 90,180, or 300
seconds prior to console reset.
PT
90 or 180 or 300
bz
On or OFF
init 0 or 1
To set up the treadmill starting speed after the
pause button is pressed.
0 indicates to start the treadmill at the lowest
speed.
1 indicates to start the treadmill at the pause speed
it was going prior to pressing the pause button.
WARNING: The audible alert is
turned on from the manufacturer
to warn the user that the treadmill
is starting or the speed is changing.
sole discretion of the user.
!
Press SPEED or to change.
Press MODE/ENTER to accept this setting and
to next screen.
Press SPEED or to change.
Press MODE/ENTER to accept this setting and
to next screen.
Press SPEED or to change.
Press MODE/ENTER to accept this setting and
to next screen.
26
Page 29

27
Exercise Guidelines
With busy schedules, family obligations, and packed weekends, it can often be dicult to get the
recommended amount of physical activity. Try these tips for incorporating exercise into your life:
Do it in short bouts: Research shows that moderate-intensity physical activity can be accumulated
throughout the day in 10-minute bouts, which can be just as eective as exercising for 30 minutes
straight. This can be useful when trying to t physical activity into a busy schedule.
Mix it up: Combinations of moderate and vigorous intensity physical activity can be used to meet
the guidelines. For example, you can exercise at a moderate intensity on your exercise
equipment
for 30 minutes twice per week and then two other days
per week exercise at higher intensity
to provide your body with a constantly changing workout. Having going changes in your workout
will cause your body to receive a greater training response from your workout, then if you simply
did the same exercise every day for the exact same amount of time at the same intensity.
Repetitive workouts will not cause an improvement in your overall tness level because your body
becomes accustomed to the workouts, and therefore your overall tness level will no longer
improve.
Set your schedule: Research has proven that most people prefer to exercise at home. Having a
home based exercise program saves time, is more comfortable and allows you to do it at a time
when it is most convenient for you. One of the main keys to successful exercise program is to set
aside specic days and time for exercise, making it just as much a regular part of your schedule as
everything else
TM5010/TM5030/TM5050
Folding Treadmill
Page 30
28
Exercise Guidelines (continued)
Exercise Intensity
Congratulations again for making a commitment to improve your health and tness with this
exercise equipment purchase.
We are committed to not only providing you with outstanding exercise equipment but we are
also committed to providing you with the most current medically based exercise
recommendations so you achieve great success in your exercise program. Our company has
developed the following recommendations based on the most recent medical tness research to
provide you with guidelines that you may use to get started in your exercise program, to achieve
success and to maintain your exercise program for the rest of your life! After all, the greatest gift
you can give yourself is the “Gift of Health & Fitness!” At the time of the publication of this Owner’s
Manual new physical activity guidelines have just been announced in U.S.A. This announcement
marks the rst time the federal government of the USA has released exercise recommendations
for the public.
Choose your age category below, and nd recommendations, research and tips from ACSM and
AHA. We are proud to serve as a resource to help people understand the new guidelines and
ultimately live healthier, more active and higher quality lives.
ACSM (American College of Sport Medicine)
AHA (American Heart Association)
Guidelines for adults over age 65
(or adults 50-64 with chronic conditions, such as arthritis)
Basic recommendation from ACSM and AHA:
Do moderately intense aerobic exercise 30 minutes a day,
ve days a week
Or
Do vigorously intense aerobic exercise 20 minutes a day, 3 days a week
And
Do 8-10 strength-training exercises, 10 to 15 repetitions of each exercise
2-3 times a week
And
If you are the risk of falling, perform balance exercises
And
Have a physical activity plan.
Guidelines for healthy adults under the age 65
Basic recommendation from ACSM and AHA:
Do moderately intense cardio 30 minutes a day, ve days a week
Or
Do vigorously intense cardio 20 minutes a day, 3 days a week
And
Do 8 to 10 strength-training exercises, 8 to 12 repetitions of
each exercise twice a week.
Owner’s Manual
Page 31
TM5010/TM5030/TM5050
Folding Treadmill
29
Exercise Guidelines (continued)
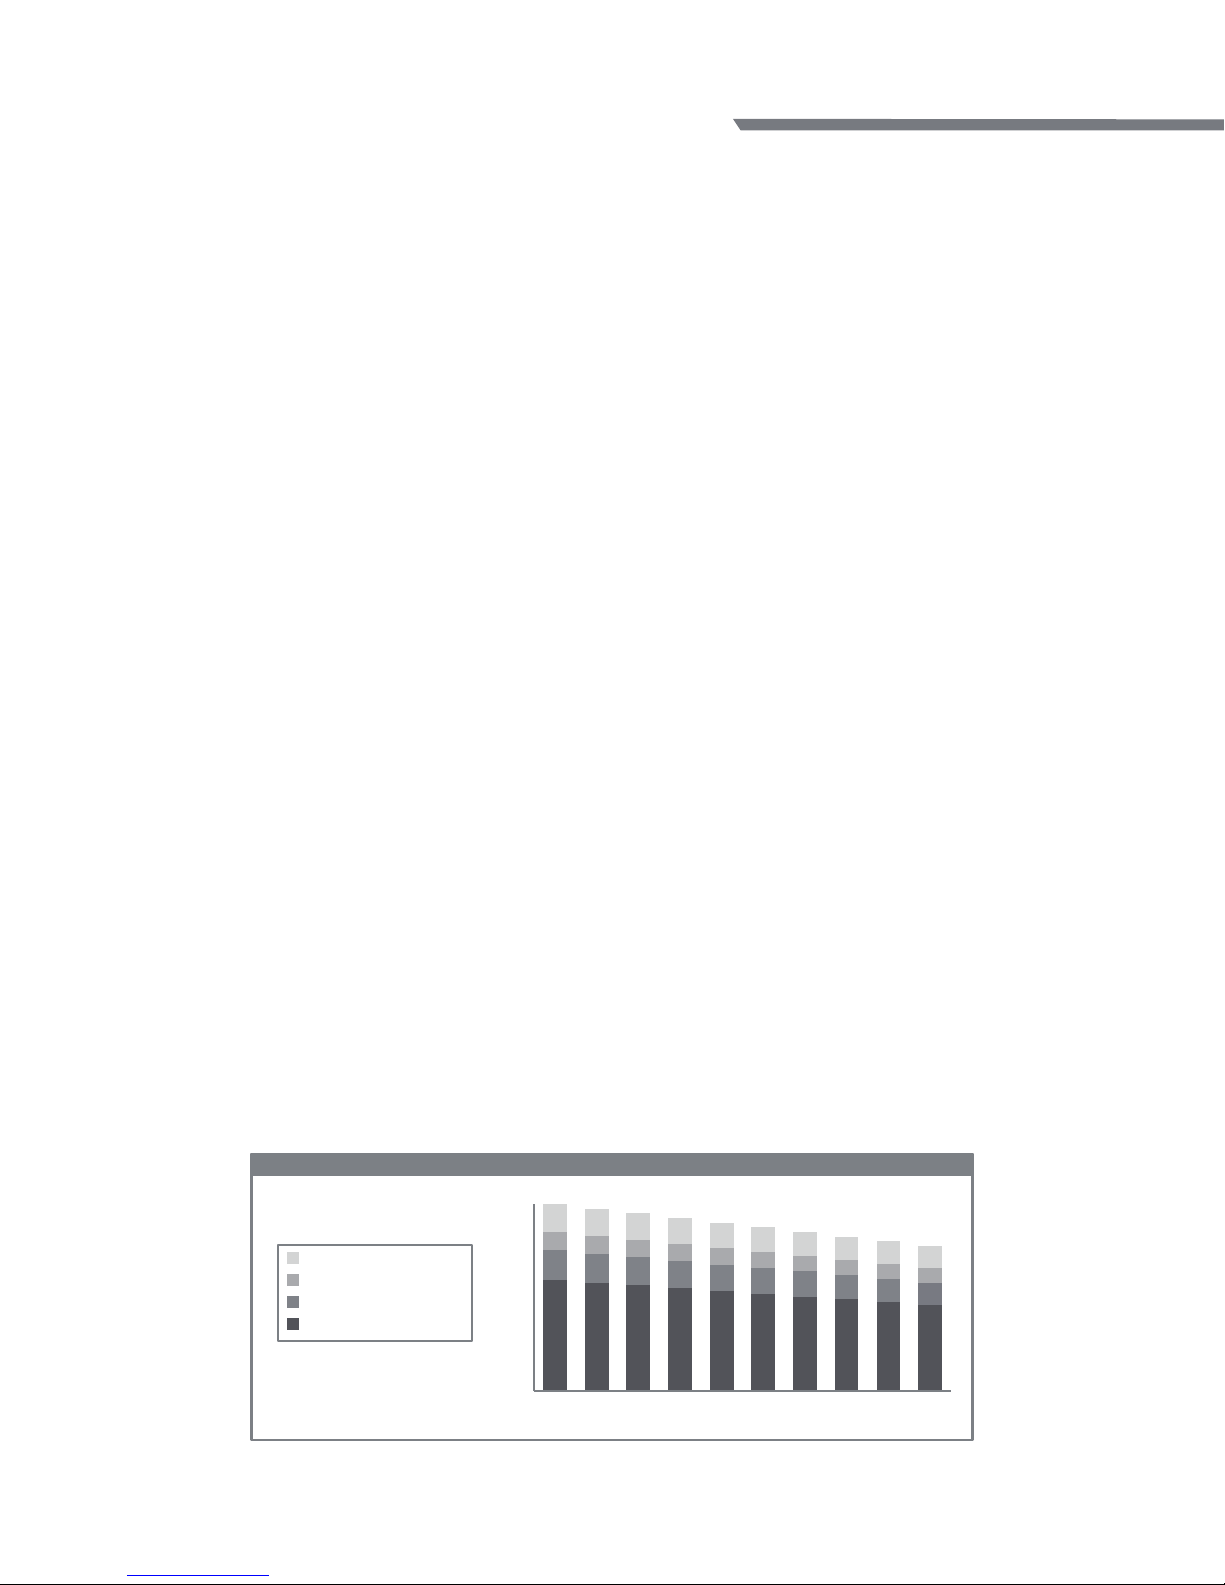
Heart Rate Training Zones
Zone 0 – Low Heart Rate Zone : 40% - 50% of your Max HR
Beginning Exerciser Heart Rate Training Zone
Exercise Benets: An ideal heart rate training zone if you are a beginning exerciser, or to use on
Active Rest, easy or recovery training days.
Zone 1 – Healthy Heart Zone : 50% - 60% of your Max HR
Easiest, Most Comfortable Zone
Exercise Benets: Body fat decreases, blood pressure lowered, cholesterol lowered, muscle mass
improvements, decreased risk for degenerative diseases, safety high.
Zone 2- Temperate Zone : 60% - 70% of your Max HR
Cruise Zone: You can train for extended periods of time in this zone
Exercise Benets: Gain muscle mass, lose fat mass, strengthen heart muscle, your muscle to burn
fat, your fat cells to increase the rate of fat release, increase in the number of mitochondria in the
muscle. (75%-85% of all calories from fat as fuel.)
Zone 3- Aerobic Zone : 70% - 80% of your Max HR
Transition Zone: moving from health zones to performance zones
Still feels comfortable, you will break the sweat, but no anaerobic burn sensation
Exercise Benets: Improved overall functional capacity with increase in the number and size of
blood vessels, increased vital capacity, respiratory rate, increase in size and strength of the heart.
Zone 4- Threshold Zone : 80% - 90% of your Max HR
Max Calorie Burn Zone
Exercise Benets: Max fat burn, but you must be t enough to train with some oxygen present for
additional fat burn. No fat burning if exercising above fat burning heart rate.
Zone 5 - Performance Redline Zone: 90% - 100% of your Max HR Exercise
Peak Race Zone, Athlete Only Zone!
Exercise Benets: Highest total calories burned, but lowest percentage of tat calories. This zone is
ONLY for the VERY HEALTHY & FIT!!! Spending too much time in this zone, even for elite athletes
can be painful, cause injuries and lead to overtraining, which leads to poor performance.
Increased performance range
Aerobic training range
Weight loss training range
Heart rate BPM
TARGET HEART RATE CHART
119
116
113
110
107
104
101
98
95
92
147
143
139
135
131
128
124
120
116
166
162
157
153
149
145
140
136
132
195
190
185
180
175
170
165
160
155
60%
75%
85%
100%
20 25 30 35 40 45 50 55 60 65
AGE
151
170
200
Page 32

30
Exercise Guidelines (continued)
Warm up
Be sure to always warm-up for at least 3-8 minutes or even longer if your are sore and sti from a
previous workout. A warm-up should consist of easy, rhythmic activities at a pace that you can
very easily carry on a full conversation while exercising. You can use your exercise equipment to
warm up or other activities to provide variety. Involve both your upper and lower body when
warming-up. As you complete your warm-up gradually increase your exercise intensity up to your
ideal exercise intensity for your workout. By moving from your warm-up intensity slowly into your
higher workout intensity you will signicantly decrease your risk of injury in your workout.
Cool Down
Following your workout you should always save time to cool down. Once you have completed
your core workout, slow down your intensity to the same intensity you used in your warm-up.
Maintain that pace for at least 5 minutes, longer if again you are still sore from a previous activity.
Be sure to continue your cool down until you feel comfortably recovered and nd your resting
heart rate to be within 10 beats of your pre-exercise resting heart rate within 5 minutes of ending
your exercise.
Remember if you are sore tomorrow from your workout today, you did not cool down suciently,
or if your resting heart rate dose not return to within 10 beats of your pre-exercise heart rate
within 5 minutes of ending your workout, you either did too much in your workout that day, or
you did too much in the day before this workout. Continue cooling down until you feel that your
body is fully recovered and your resting heart rate is close to being within 10 beats of your
pre-exercise resting heart rate. Be consistent with your cool down and pay attention to how your
body feels. You will reduce your risk of injury, feel better following your workouts and be ready for
your next workout session feeling refreshed and energized.
Owner’s Manual
Page 33
31
Exercise Guidelines (continued)
Stretching
A successful exercise program consists of a warm up, aerobic exercise, and a cool down. Do the
entire program at least two and preferably three times a week, resting for a day between workouts. After several months, you can increase your workouts to four or ve times per week.
Warming up is an important part of your workout, and should begin every session. It prepares
your body for more strenuous exercise by heating up and stretching out your muscles, increasing
your circulation and pulse rate, and delivering more oxygen to your muscles. At the end of your
workout, repeat these exercises to reduce sore muscle problems. We suggest the following warm
up and cool down exercises:
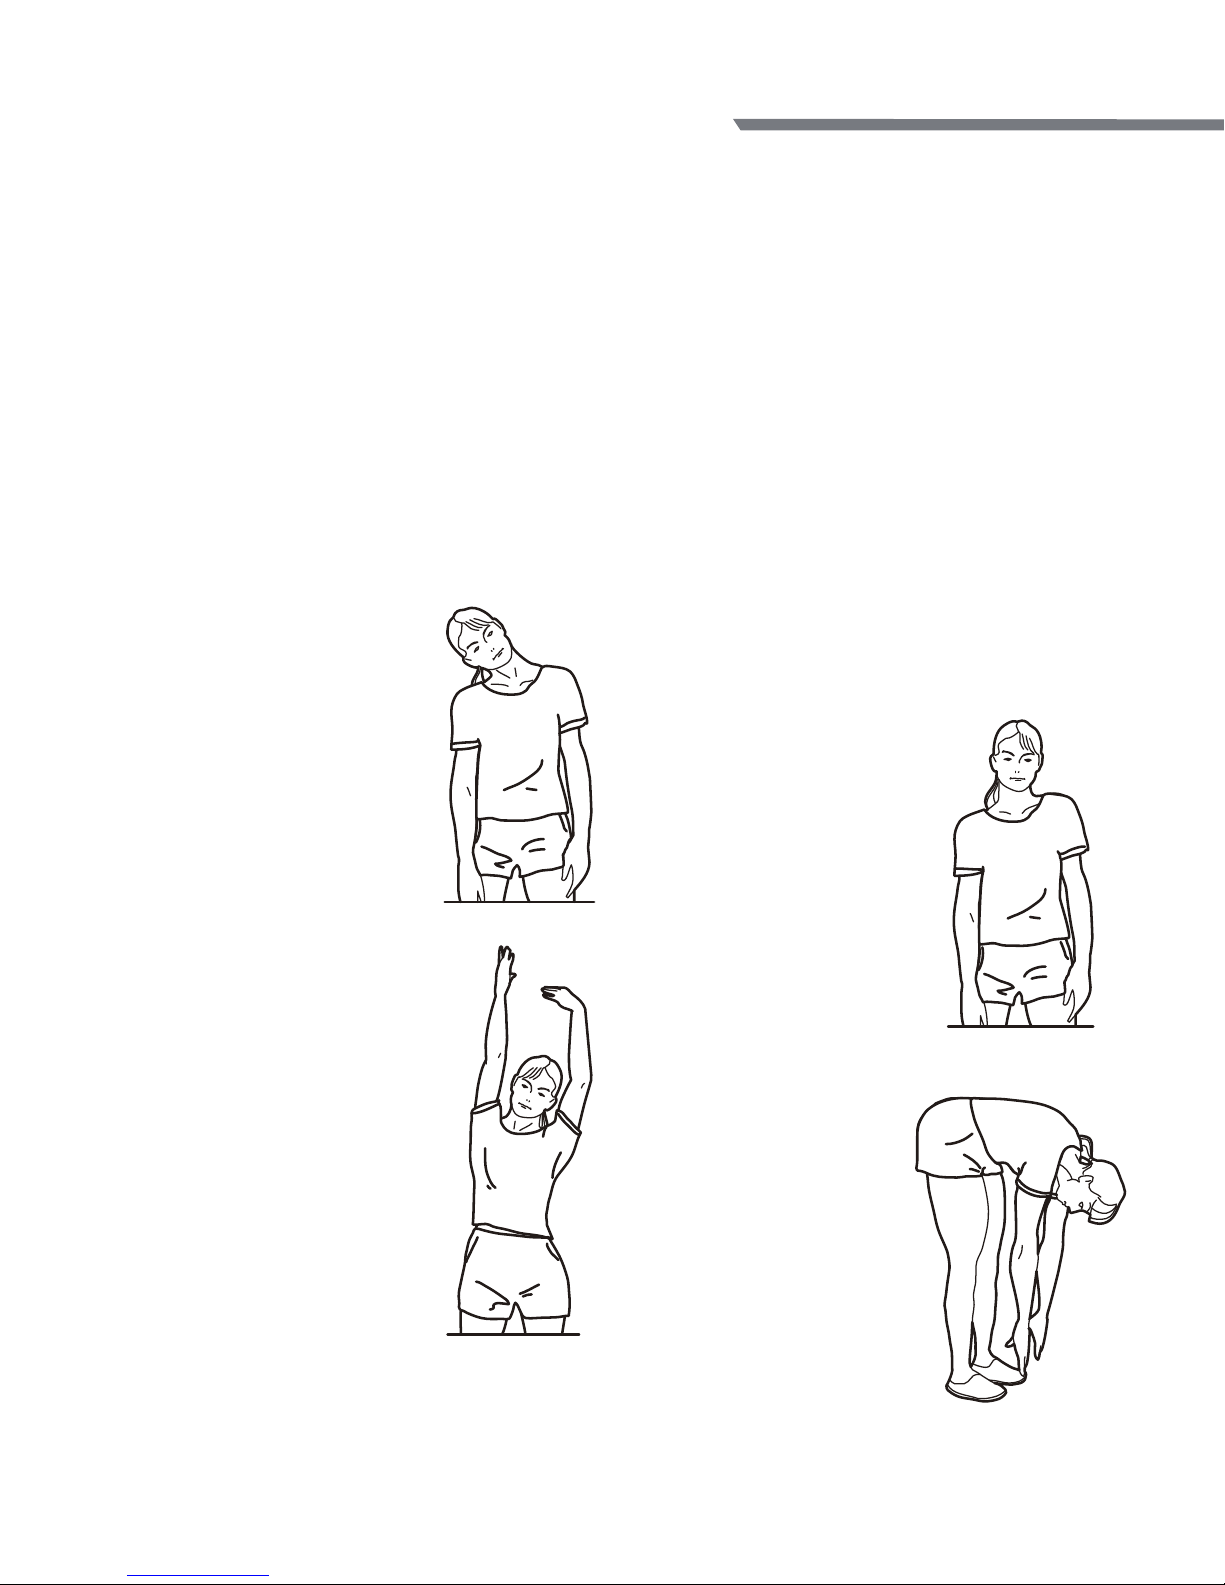
1. Head Roll
Rotate your head to the right
for one count, feeling the
stretch up the left side of
your neck. Next, rotate your
head back for one count,
stretching your chin to the
ceiling and letting your
mouth open. Rotate your
head to the left for one
count, and nally, drop your
head to your chest for one
count.
3. Side Stretch
Open your arms to the side
and continue lifting them
until they are over your head.
Reach your right arm as far
upward toward the ceiling as
you can for one count. Feel
the stretch up your right side.
Repeat this action with your
left arm.
2. Shoulder Lift
Lift your right shoulder up
toward your ear for one
count. Then lift one count.
Then lift your left shoulder up
for one count as you lower
your right shoulder.
4. Toe Touch
Slowly bend forward from
your waist, letting your back
and shoulders relax as you
stretch toward your toes.
Reach down as far as you can
and hold for 15 counts.
TM5010/TM5030/TM5050
Folding Treadmill
Page 34
32
Exercise Guidelines (continued)
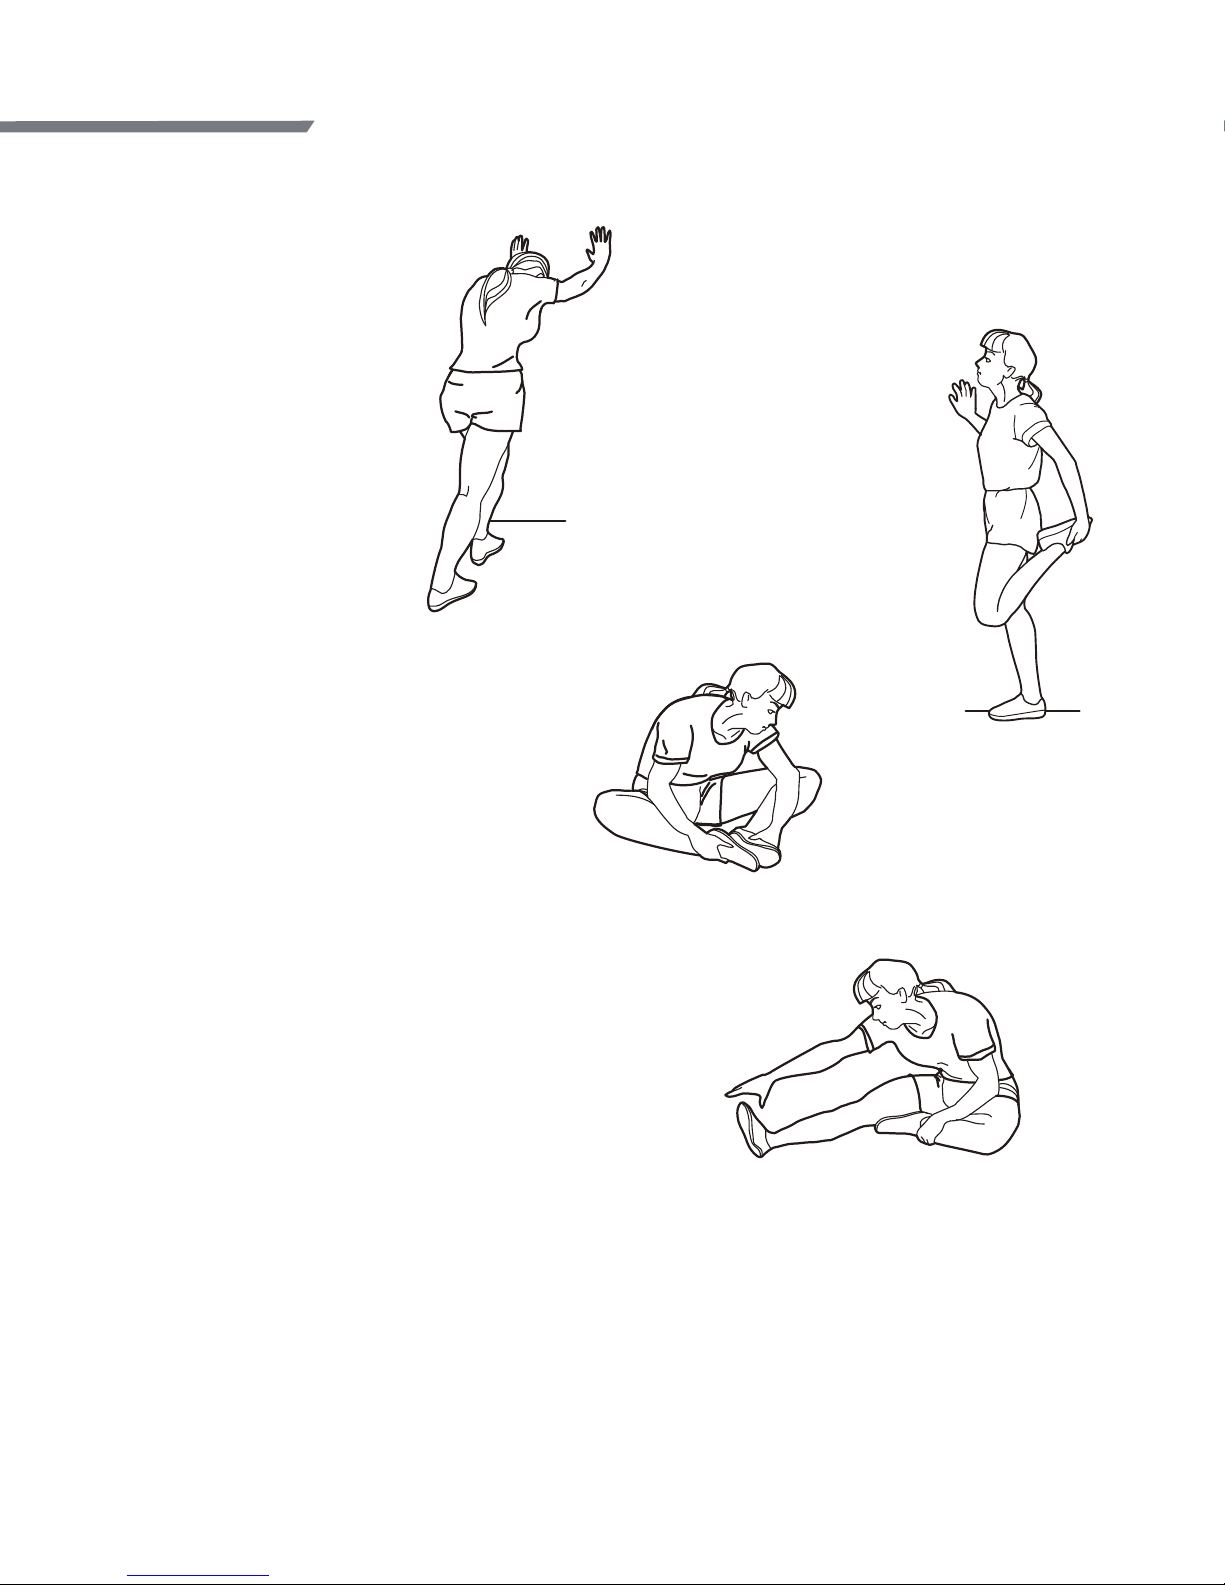
5. Calf-Achilles Stretch
Lean against a wall with your
left leg in front of the right
and your arms forward. Keep
your right leg straight and
the left foot on the oor; then
bend the left leg and lean
forward by moving your hips
toward the wall. Hold, then
repeat on the other side for
15 counts.
7. Inner Thigh Stretch
Sit with the soles of your feet together
with your knees pointing outward. Pull
your feet as close into your groin as
possible. Gently push your knees
towards the oor. Hold for 15 counts.
6. Quadriceps Stretch
With one hand against a wall
for balance, reach back and
grasp one foot with your
other hand. Bring your heel
as close to your buttocks as
possible. Hold for 15 counts,
then relax. Repeat 3 times for
each leg.
8. Hamstring Stretch
Sit with your right leg extended. Rest the
sole of your left foot against your right
inner thigh. Stretch toward your toe as far
as possible. Hold for 15 counts. Relax and
then repeat with left leg extended.
Owner’s Manual
Page 35

Page 36

FOLDING TREADMILL MODEL NUMBER
TM5010/TM5030/TM5050
MADE IN CHINA
 Loading...