

Page 1
Folding Treadmill
Owners Manual
For safe use and product knowledge, please
completely read this Product OWNERS MANUAL.
TM3010/TM3020/TM3030
Made for
•
iPhone 5
•
iPhone 4S
•
iPhone 4
•iPad (3rd generation)
•
iPhone 5S
•
iPhone 5C
•
iPad Air
•
iPad mini with Retina display
•
iPad (4th generation)
•
iPad mini
•
iPad 2
•
iPhone 6
•
iPhone 6 Plus
Page 2

Page 3

Welcome
Congratulations in taking a step forward to increase your level of physical activity or
add variety to your current exercise program. Physical activity is now more than ever
a necessity to keep your body healthy and fit. Whether your motivation is to Lose
Weight, manage a Chronic Disease like diabetes, train for a sporting event or just live
a Healthy Lifestyle
In this manual we have included exercise information that is specific to each of these
4 key motivations for exercise.
prefer to exercise in the comfort and privacy of their own homes. Each product is
Our cardio equipments is designed for the more than 60% of consumers who say they
designed and manufactured to exceed your expectations for quality and durability,
simple a
ssembly and ease of operation.
Please read this manual thoroughly before assembly and operation of your new
equipment. It includes information on proper operation, safety precautions, product
assembly and ongoing maintenance.
Remember that some types of service should only be performed by a qualified service
technician. In the instance that service is required, please contact your authorized
retailer or log on to our website and select the Customer Support option. Complete the
information requested and we will respond to your inquiry within 1 business day.
3
TM3010 / TM3020/ TM3030
Folding Treadmill
Page 4

Welcome
Impor
tant Safety Precautions
Assembly Instructions
- Console Overview
Treadmill Instruction
3
5
7
12
- Innovative Features
Pr
ogram Overview
Moving and Storage
Troubleshooting
Engineering Mode
19
Treadmill Operations
17
29
Maintenance
31
32
34
Grounding and Power Requirements
6
14
Folding And Unfolding The Treadmill
4
Page 5
5
three feet
three feet (100 cm)
(100 cm)
us.
treadmill.
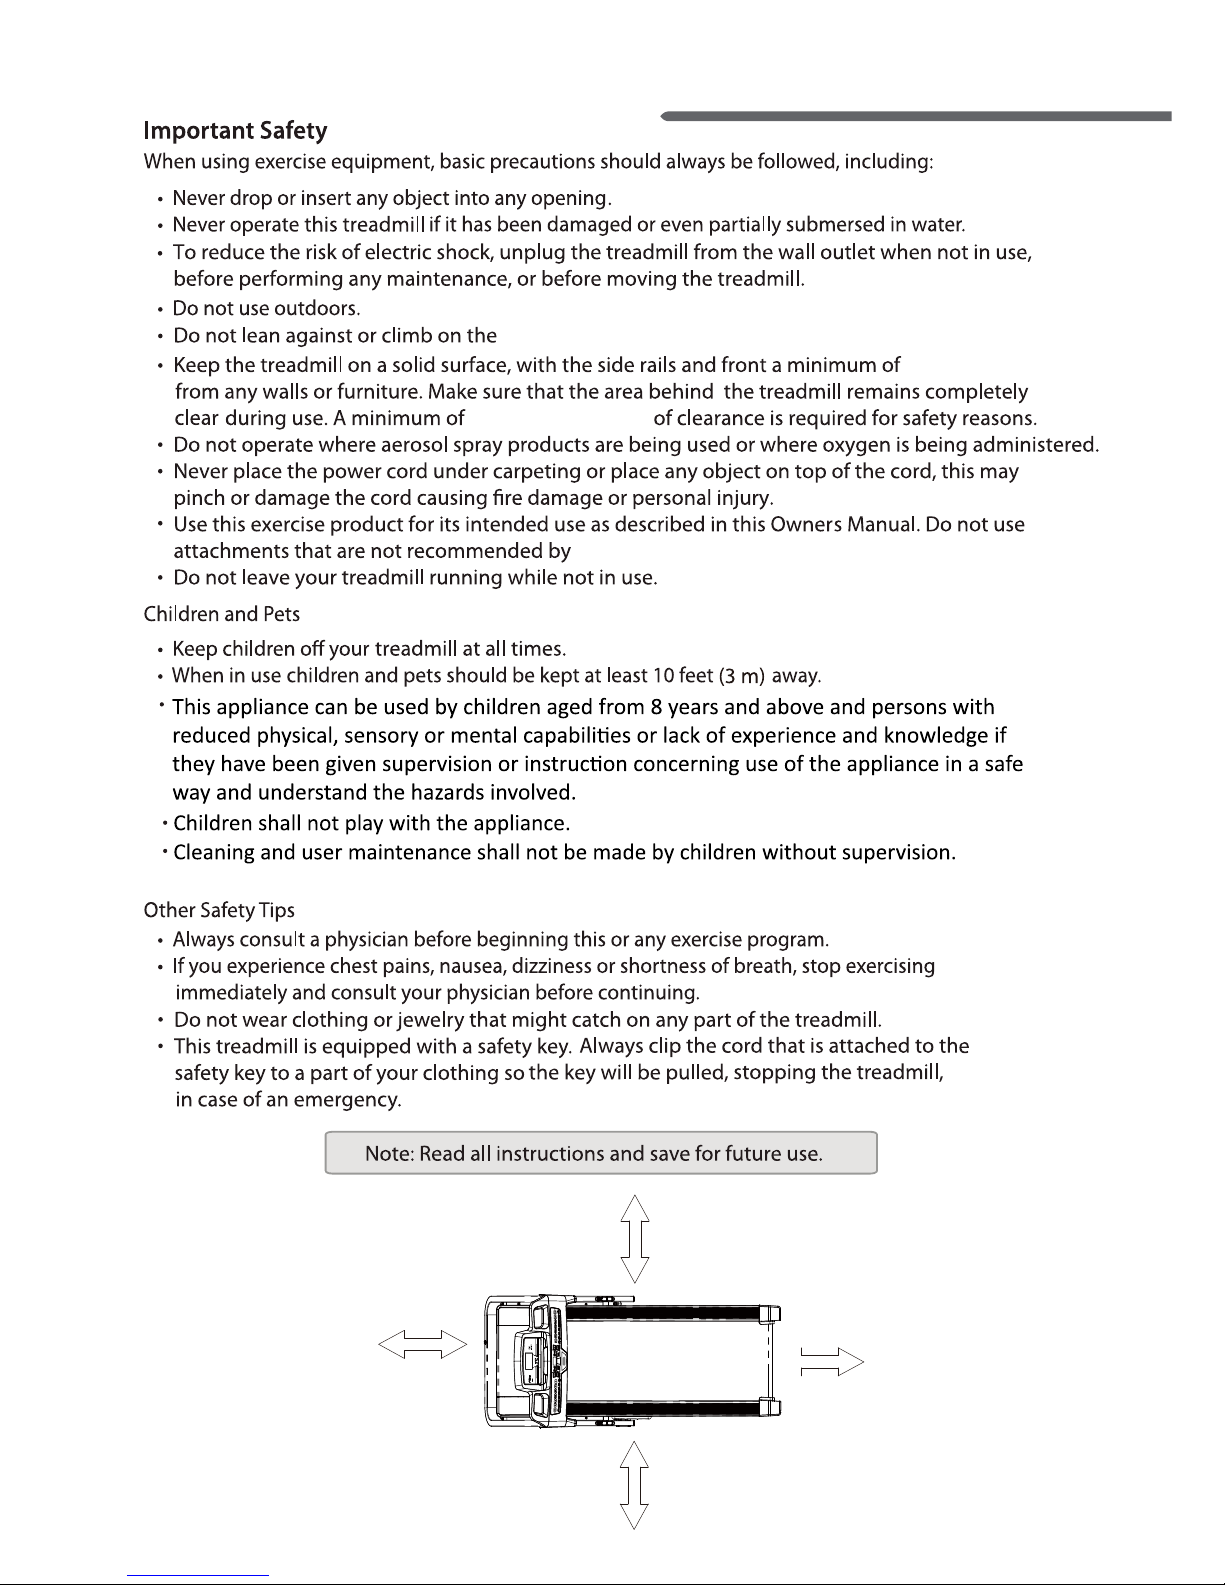
100cm
3 Feet Min
100cm
3 Feet Min
200cm
6 Feet Min
100cm
3 Feet Min
Wh
i
l
e
i
n
use
o
f
eF
o
l
d
“up
”
o
r
“
d
o
w
n
”
,
make
sure
n
o
p
eop
l
e
or
pe
t
s
are
on
/
u
n
de
r
n
e
a
t
h
t
he
t
read
m
i
l
l
deck
.
Rem
o
v
e
s
a
f
e
ty
k
e
y
wh
e
n
n
o
t i
n
u
s
e
a
n
d
s
t
o
r
e
o
u
t
of
r
e
a
c
h
o
f
c
h
il
d
r
e
n
.
1
.I
n
s
e
rt
s
a
f
ety
k
e
y.
2
.E
n
t
e
r
p
r
ogram
u
s
i
ng
a
rr
o
w
s,
p
r
e
s
s
m
o
d
e
.
3
.E
n
te
r
l
e
v
e
l
u
s
i
n
g
a
r
r
ows
,
p
r
e
ss
m
o
d
e
.
4
.E
n
t
e
r
t
i
m
e
u
s
i
n
g
a
r
r
o
w
s
,
p
r
e
s
s
m
o
d
e
.
5
.E
n
t
er
weigh
t
u
s
i
n
g
a
r
r
o
w
s
,
p
r
e
s
s
m
o
d
e
.
6
.P
r
e
ss
s
t
a
rt
t
o
b
e
g
i
n
w
o
r
k
o
u
t.
P
r
e
s
s
q
u
i
c
k
k
e
y
t
o
c
hoos
e
s
p
e
e
d
o
r
i
n
c
li
n
e
a
ft
e
r
pr
e
s
s
s
t
a
r
t.
R
i
s
k
of i
n
j
u
r
y
t
o
p
e
r
s
on
:
T
o a
v
o
i
d
i
nj
u
ry
,
st
a
n
d
o
n
t
he
s
i
d
e
rail
s
bef
ore
s
t
a
rt
in
g
t
r
e
a
d
m
ill
.
R
e
a
d
o
w
n
e
r
'
s
m
a
n
u
a
l
b
e
f
o
re
u
s
i
n
g
.
TM3010 / TM3020/ TM3030
Folding Treadmill
Precaution
Page 6
6
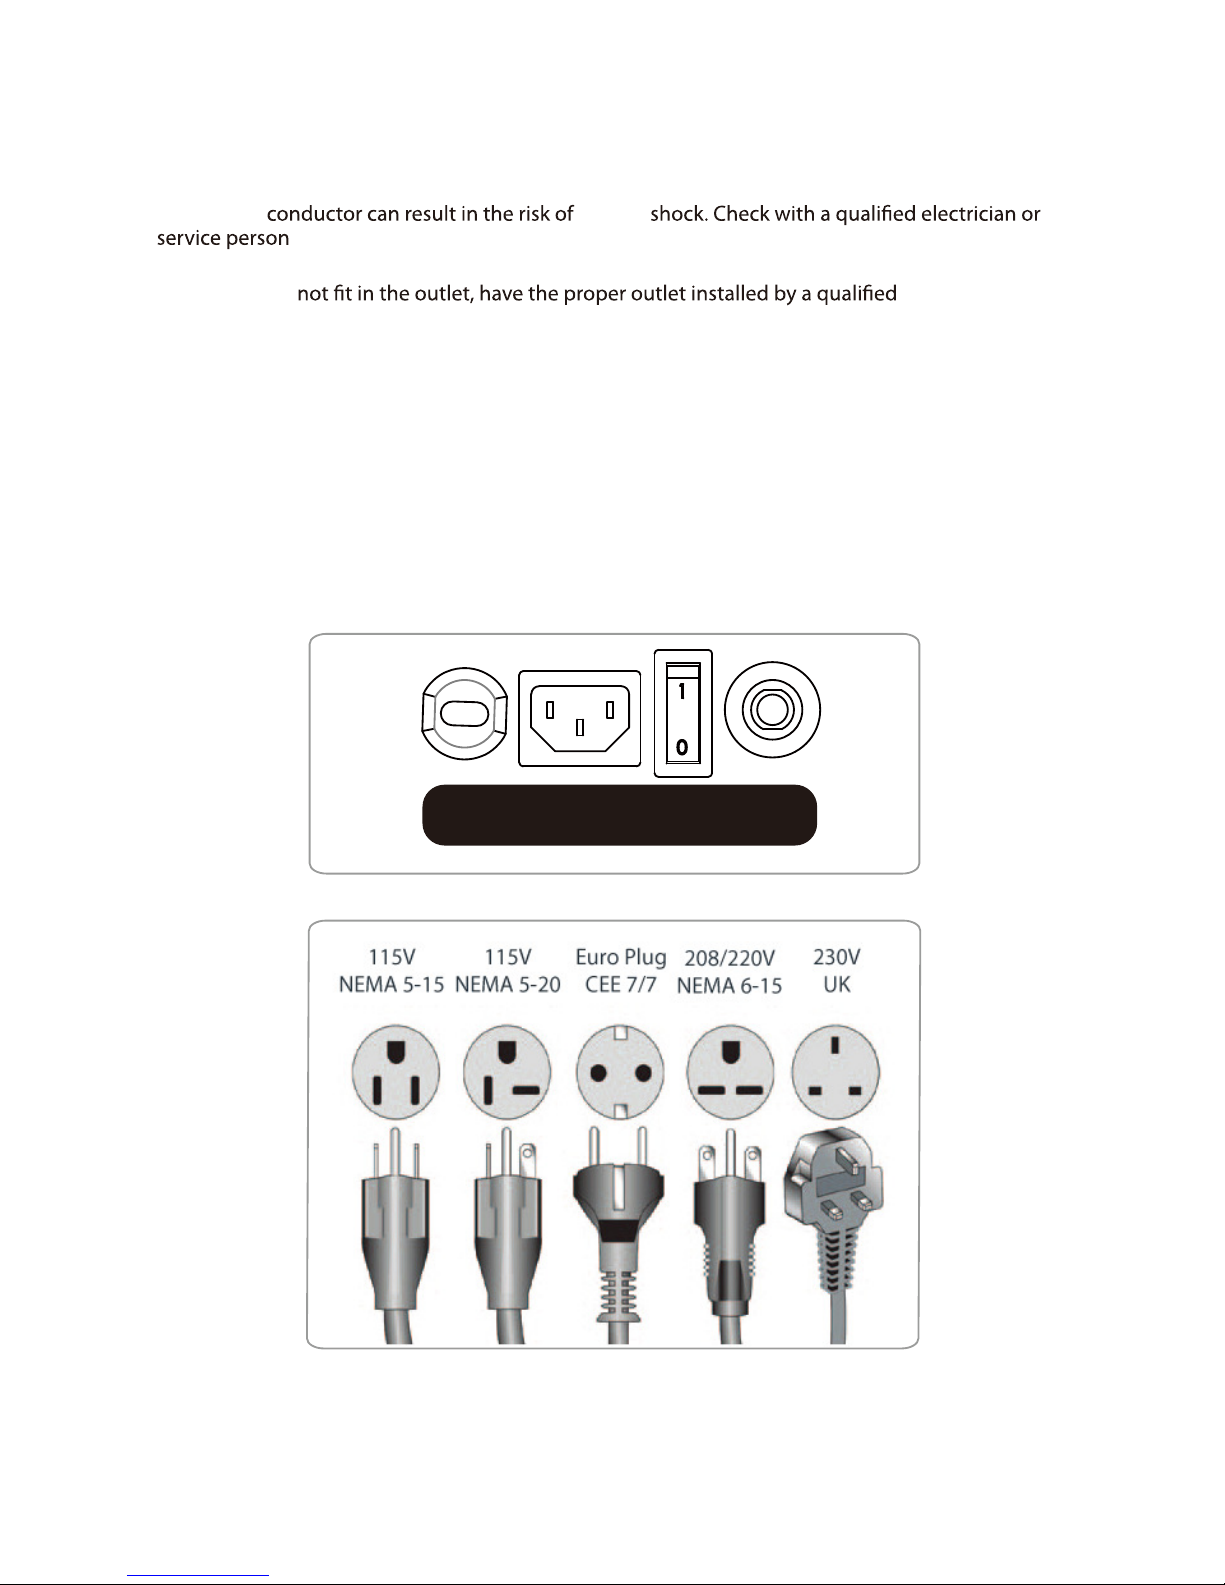
The TM3010/TM3020/TM3030 Series must be grounded. Improper connection of the equipment’s
grounding
if you are in doubt as to whether the outlet is properly grounded. Do not modify the
provided with the product or use a ground plug adaptor to adapt to a non-grounded outlet.
If the plug will
An extension cord should not be used between the equipment and the wall outlet.
T
the GFI circuit.
he unit should not be plugged into a GFI plug or on a GFI circuit. The unit may not work or trip
This product should only be run on the proper power designed for this unit. Check the power
POWER
CORD SOCKET
SWITCHAC POWER
OVERLOAD
SWITCH
Fig. 1
Fig. 2
Grounding and Power Requirements
electrician.
electric
label located on the front of the unit for proper power needs (see FIG. 1). To locate the power
outlet for your area please refer to FIG. 2. (example for the US and Canada, these units require a
115 V NEMA 5 - 15 non GFI circuit.)
plug
6351TW001001 6351TW001001 6351TW001001
Page 7
7
treadmill
Tools found in hardware bag:
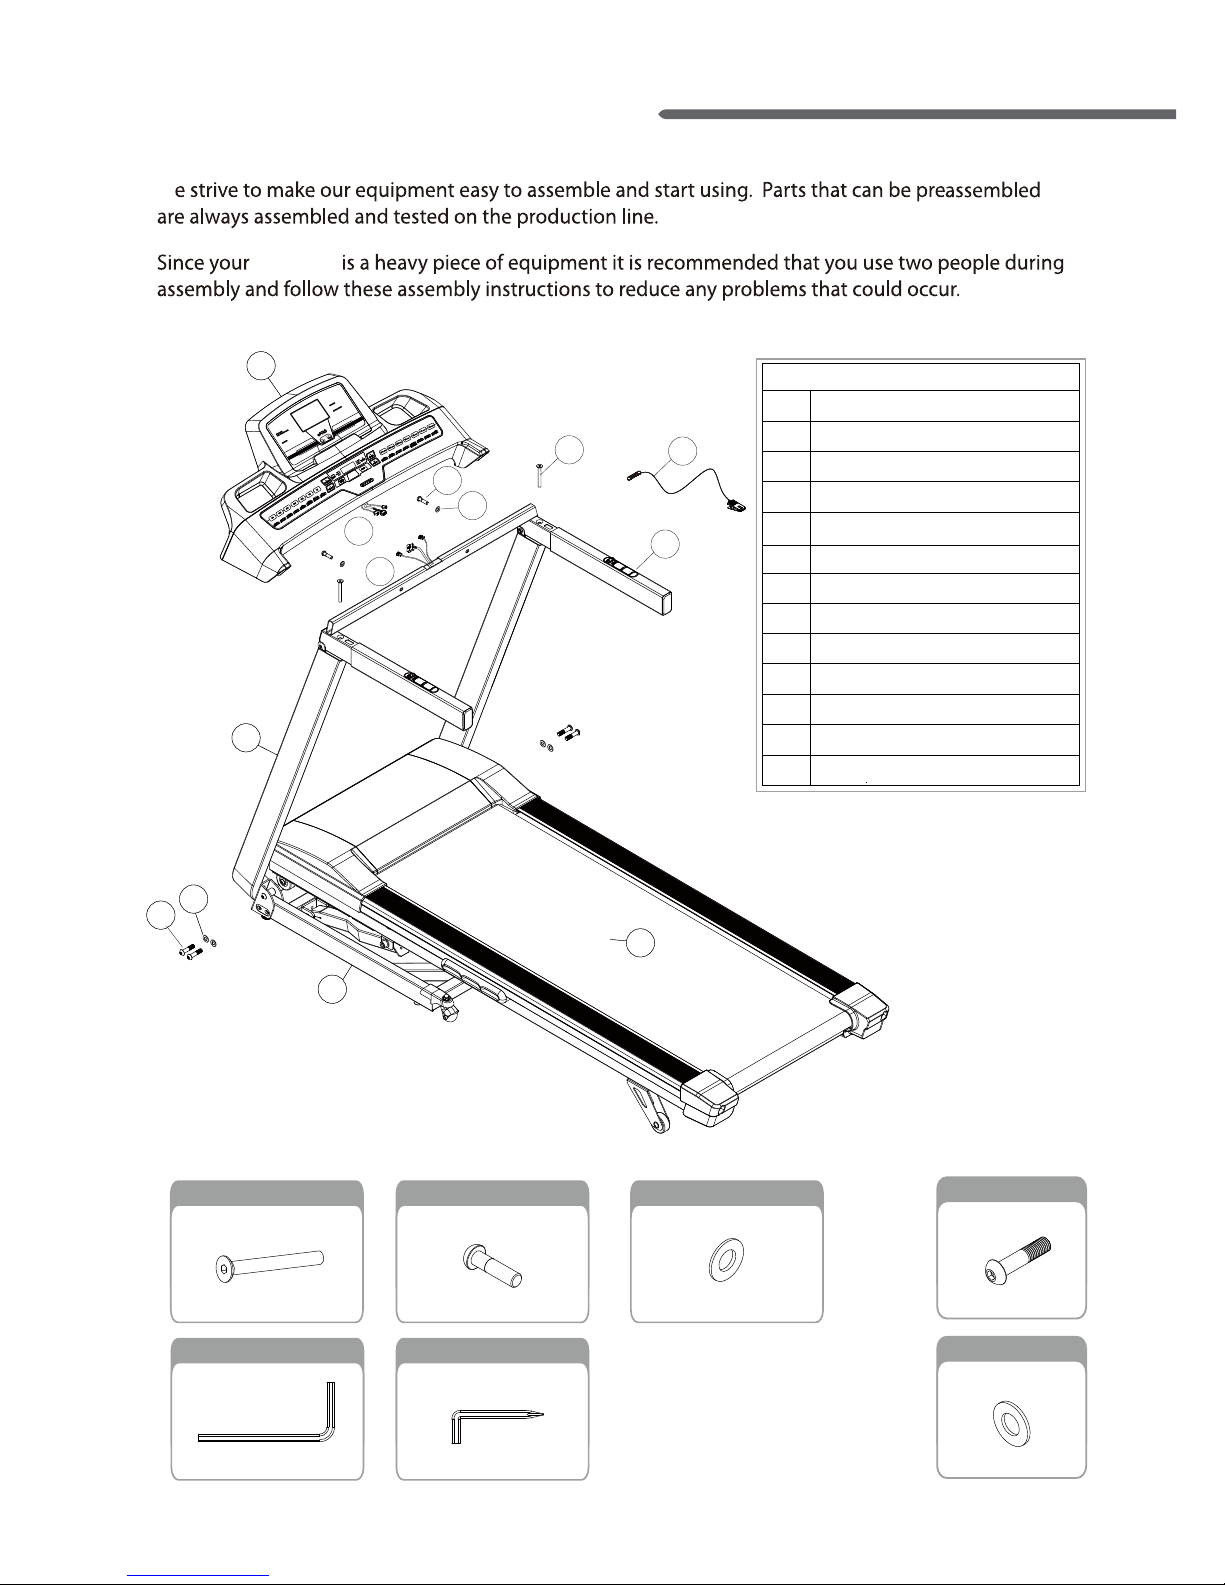
Assembly Components
1
2
12
3
4
5
6
7
8a
9
10
11
8b
Main Frame
Base tube
Supporting frames
Hex-head socket screw
(M8*35L)
Washer (M8)
Console assembly
Handlebar set
Hex-head socket screw (M10*55L)
Washer (M10)
Console & HR cables—Upper section
Console & HR cables—Lower section
Flat-head screw (M8*70L)
Safety key
Assembly Instructions
Pr
e-installed:
Hex-head socket screw
M10 x 55L(4pcs)
6
Flat-head screw
M8*70L (2PCS)
9
W
4
1
1
2
3
5
7
6
8a
8b
910
11
12
Wh
ile
in use of eFold “up” or “down”, make sure
no peop
le
or
pets are on/underneath the treadmill deck.
Remove safety
key
when not in use and
store out of reach of children.
1.Insert safety key.
2.Enter program using arrows,press mode.
3.Enter level
using arrows, press mode.
4
.Enter time using arrows,
pr
ess mo
de.
5.Enter
weight using arrows, press mode.
6.Press start to begin workout.
Pr
ess quick
key to choose speed or incline
after press start.
Risk of injury to pers
on:
To avoid injury, stand on the side rails
before starting treadmill. Read owner's
manua
l
before using.
Washer
M10 (
4pcs)
7
Hex-head socket screw
M8*35L (2PCS)
11
Washer
M8 (2PCS)
12
Hex wrench
M6 (1PCS)
Hex wrench
M5(1PCS)
TM3010 / TM3020/ TM3030
Folding Treadmill
Page 8
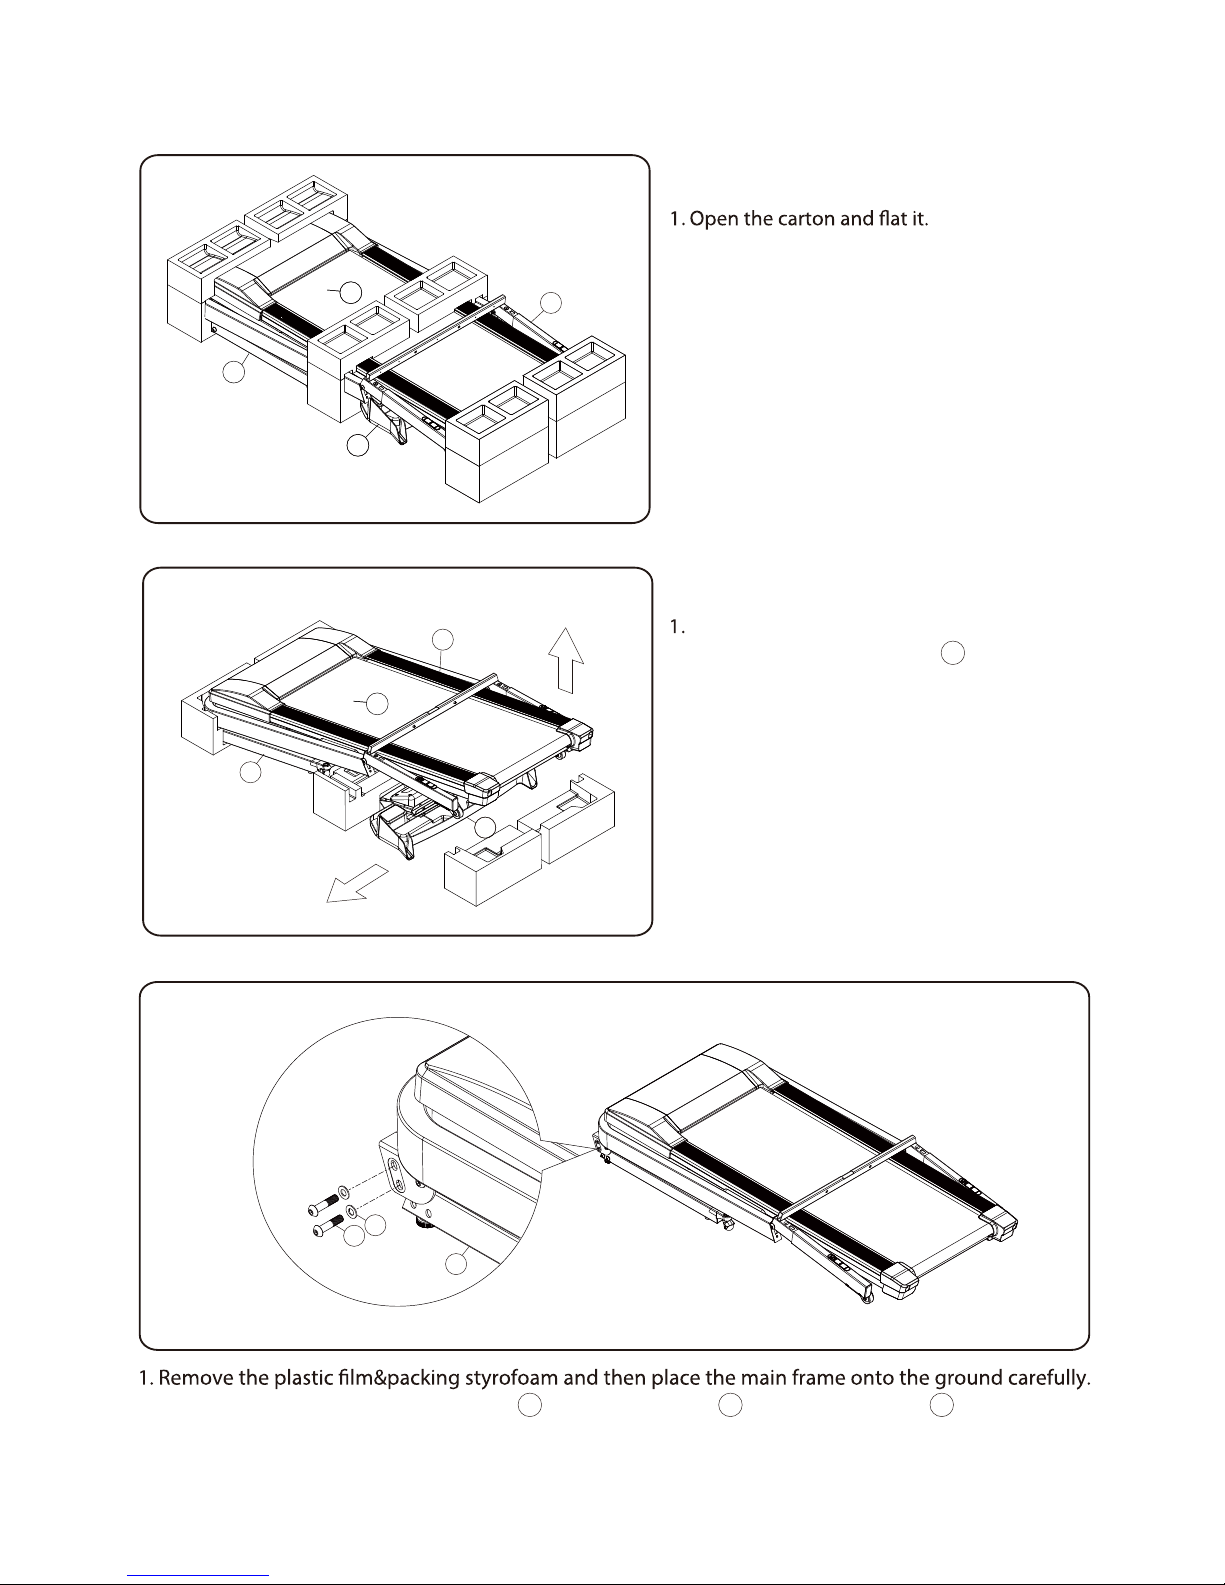
8
Unpacking and assembly procedures:
2. Take out the owner’s manual, hardware
bag, and power cord. Then read the manual
Lift up the rear side of the treadmill.
before assembly.
(Fig. 1)
(Fig. 2)
2. Take out console assembly under the
product by means of lifting up the main
frame.
4
1
2
4
5
1
3
2
4
2. Unscrew 2 pcs hex-head socket screws and 2pcs washers from the base tube .
3. Do the same way to the other side and keep these 4 pcs screws and 2pcs washers for later use.
6 7 2
(Fig. 3)
2
6
7
Page 9
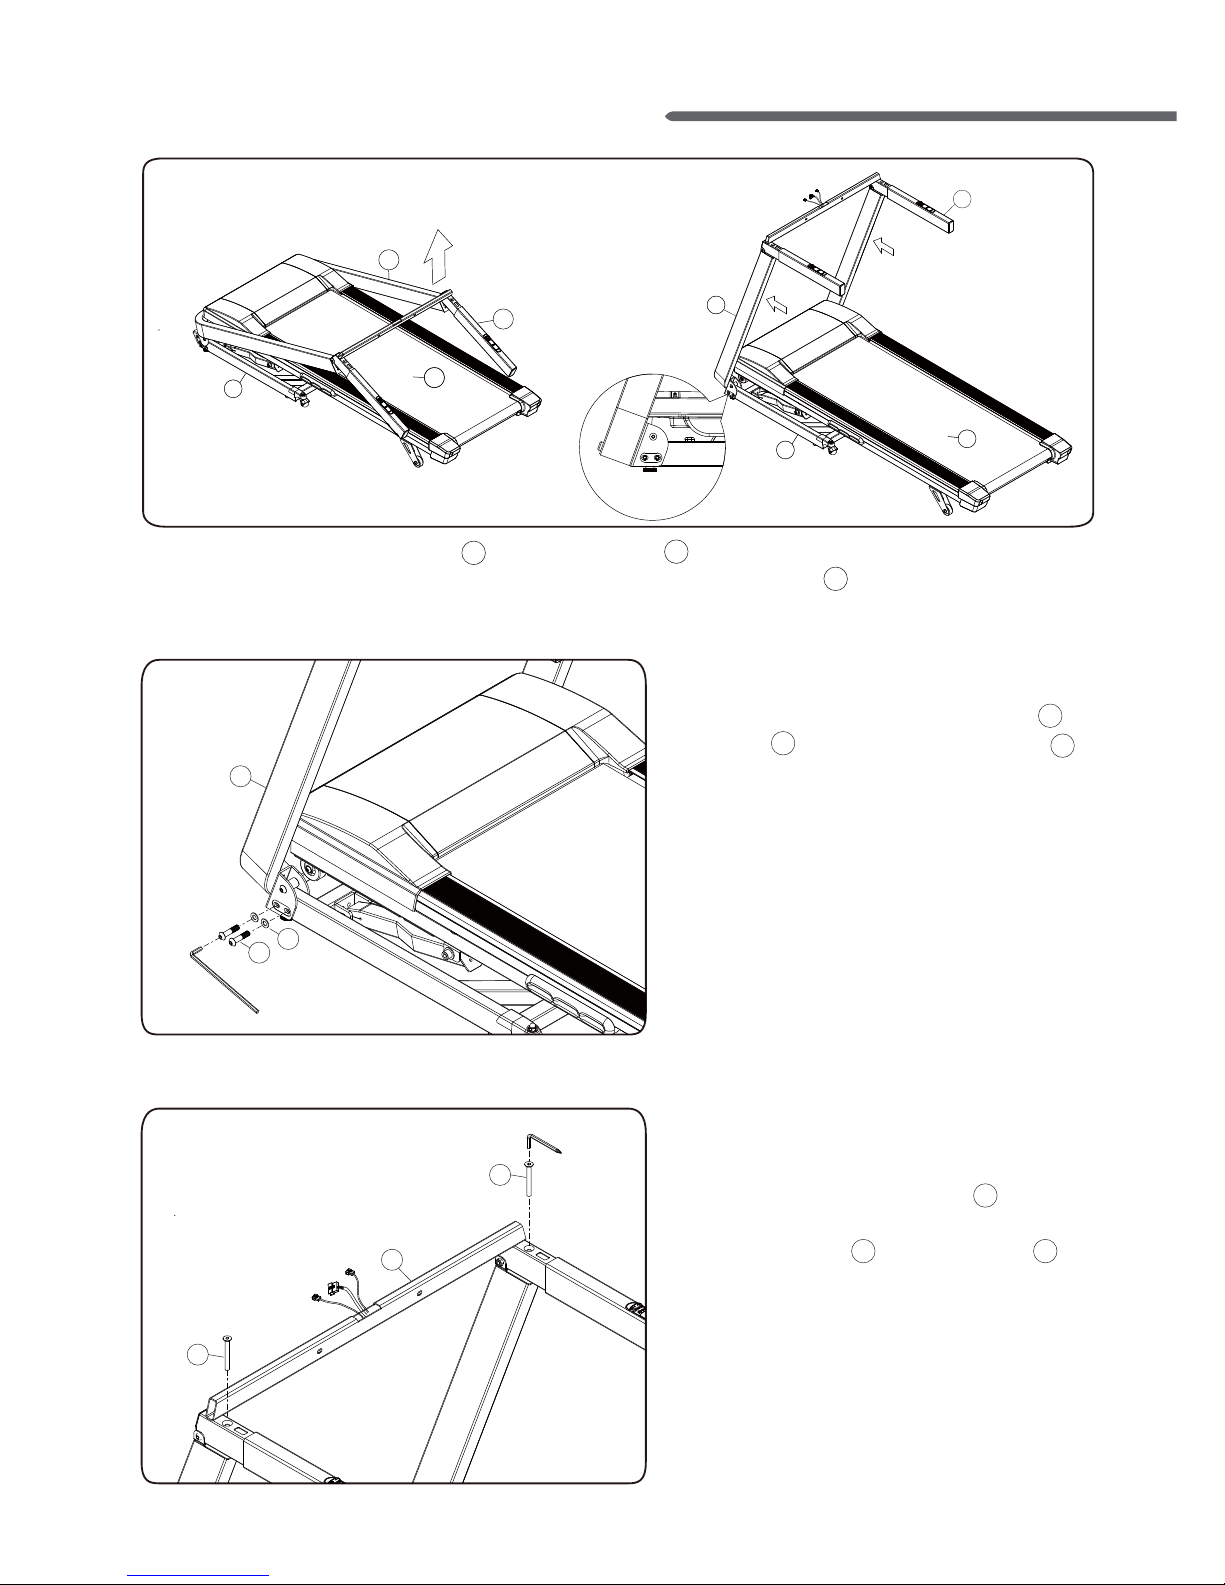
9
(Fig. 4)
1. Raise up the supporting frames and handlebar set .
2. Adjust the supporting frames screw hole contacting with the base tube .
2
3
5
5
3
1
2
1
1
2
3
5
(Fig. 5)
6
9
7
(Fig. 6)
7
6
3
9
9
5
1.Tighten 2 pcs hex-head socket screws and
washers into the supporting frames by
the hex wrench M6.
3
1.Take out 2pcs at-head screws and hex
wrench-M5 from the hardware bag.
2.Install the screws to handlebar set .
9
5
TM3010 / TM3020/ TM3030
Folding Treadmill
Page 10
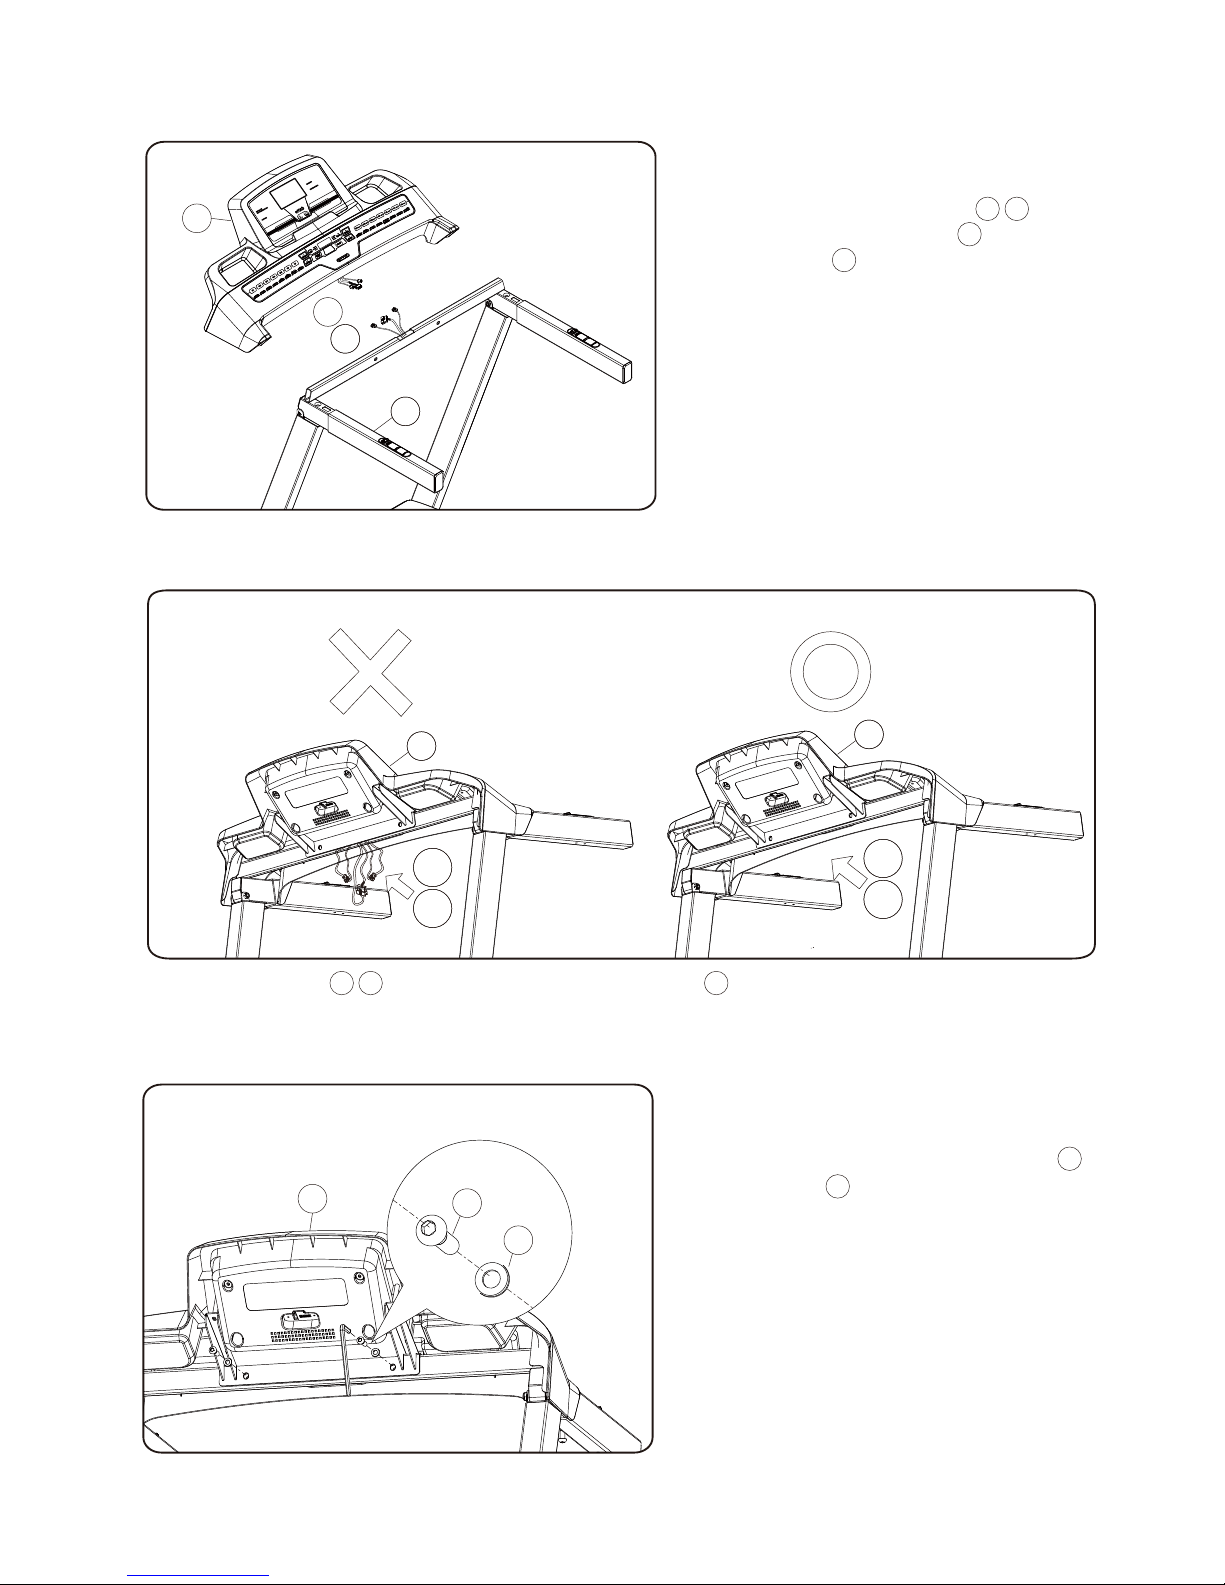
10
(Fig. 7)
(Fig. 8)
8a
8b
4
8a
8b
4
8a
8b
4
4
8a
8b
5
While in use of eFold “up” or “down”, make sure no people
or pets
are on/underneath the t
readmill deck.
Remove safety key when not in use and
store out of reach of children.
1.Insert safety key.
2.Enter program using arrows,press mode.
3.Enter level using arrows, press mo
de.
4.Enter time using arrows, press mo
de.
5.Enter we
ight using arrows, press mode.
6.Press
start to begin workout.
Press quick key to choose speed or incline
after press start.
Risk of injury to person:
To avoid injury, stand on the side rails
before starti
ng treadmill. Read owner's
manual before using.
(Fig. 9)
4
11
12
11
1. Connect console & HR cables .
2. Place the console assembly 4 onto the
handlebar set 5 .
8a 8b
1. Insert the cables into the back of console assembly .
1. Tighten 2pcs hex-head socket screws
and washers 12 by hex wrench-M5.
Page 11
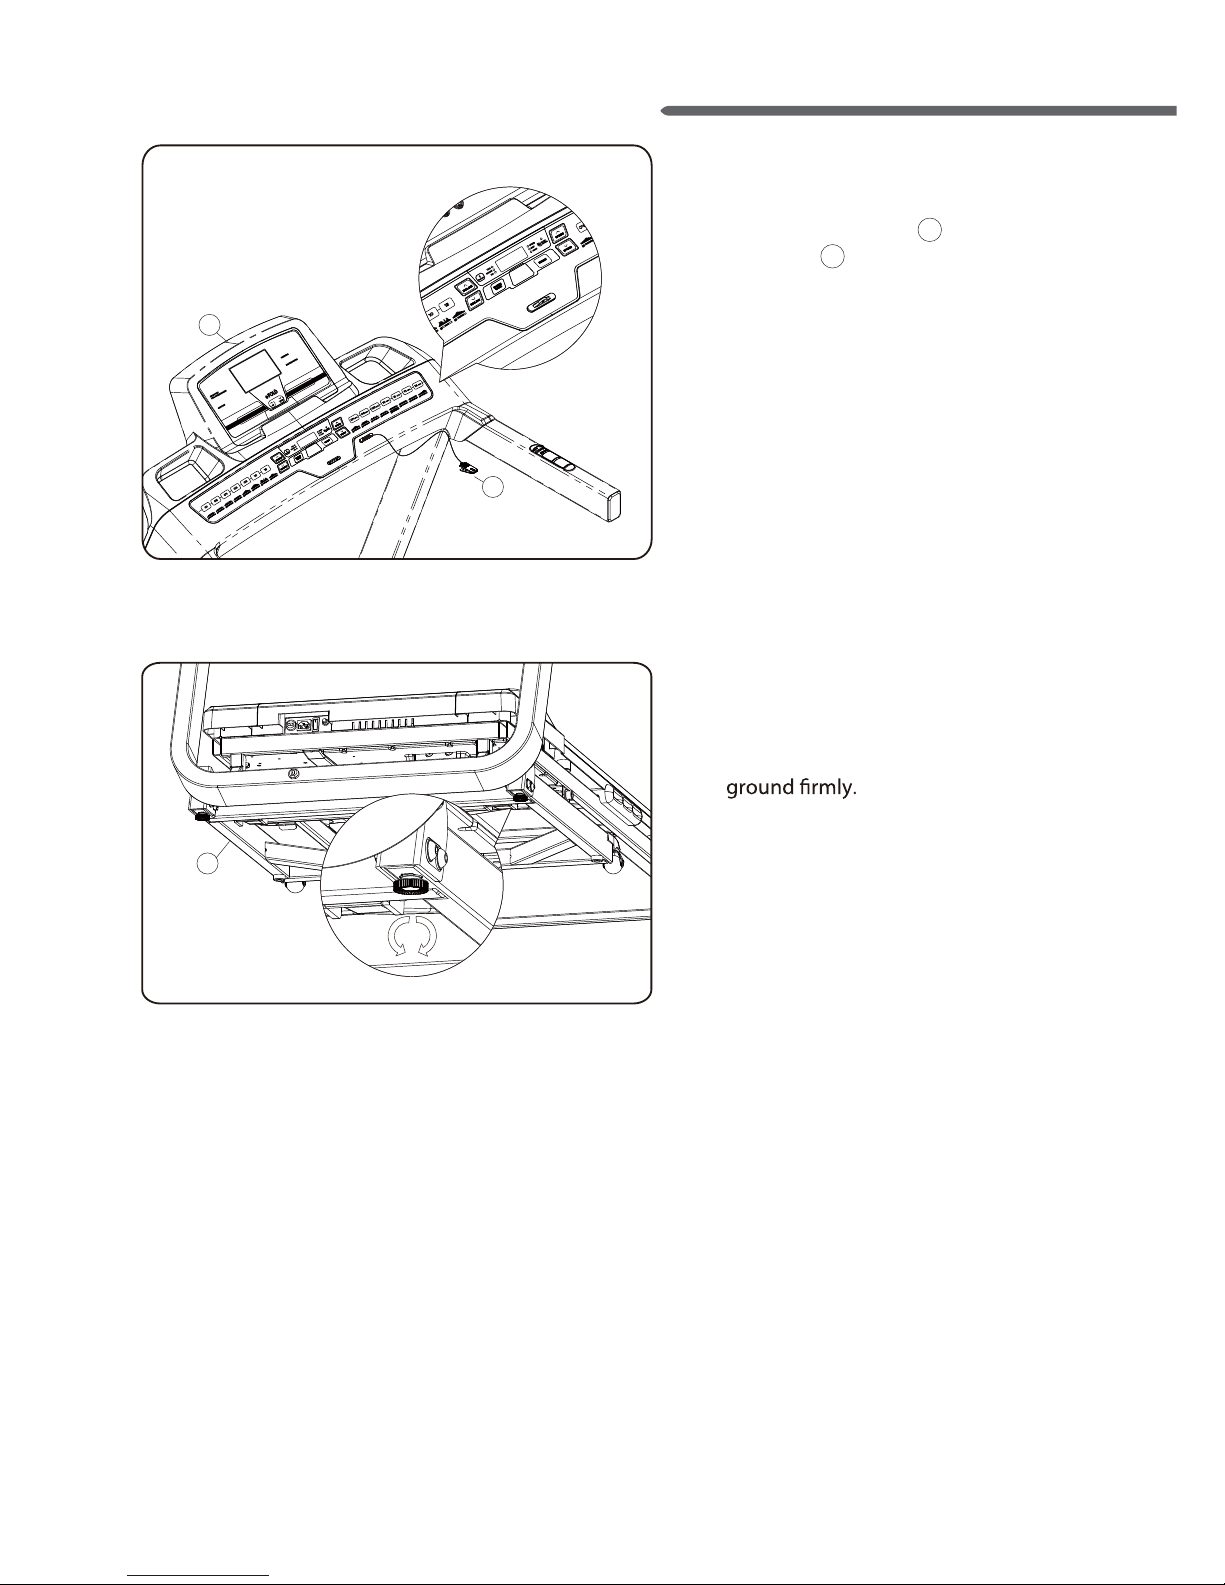
11
10
4
While in use of eFold “up” or “down”, make sure no people
or pe
ts are on/
underneath the treadmill deck.
Remove safety key when not in use and
store out of reach of children.
1.Insert safety key.
2.Enter program using arrows,press mode.
3.Enter level using arrows, press mode.
4.Enter time using arrows, press mode.
5.Enter weight using arrows, press mode.
6.Press start to begin workout.
Press quick key to choose speed or incline
after press start.
Risk of injury to person:
To avoid injury, stand on the side rails
before starting treadmill. Read owner's
manual before using.
1. Place the safety key 10 onto the console
assembly 4 .
2
1. Adjust the height adjustment pad located
under the product so that it can be on
(Fig.10)
(Fig.11)
TM3010 / TM3020/ TM3030
Folding Treadmill
Page 12
12
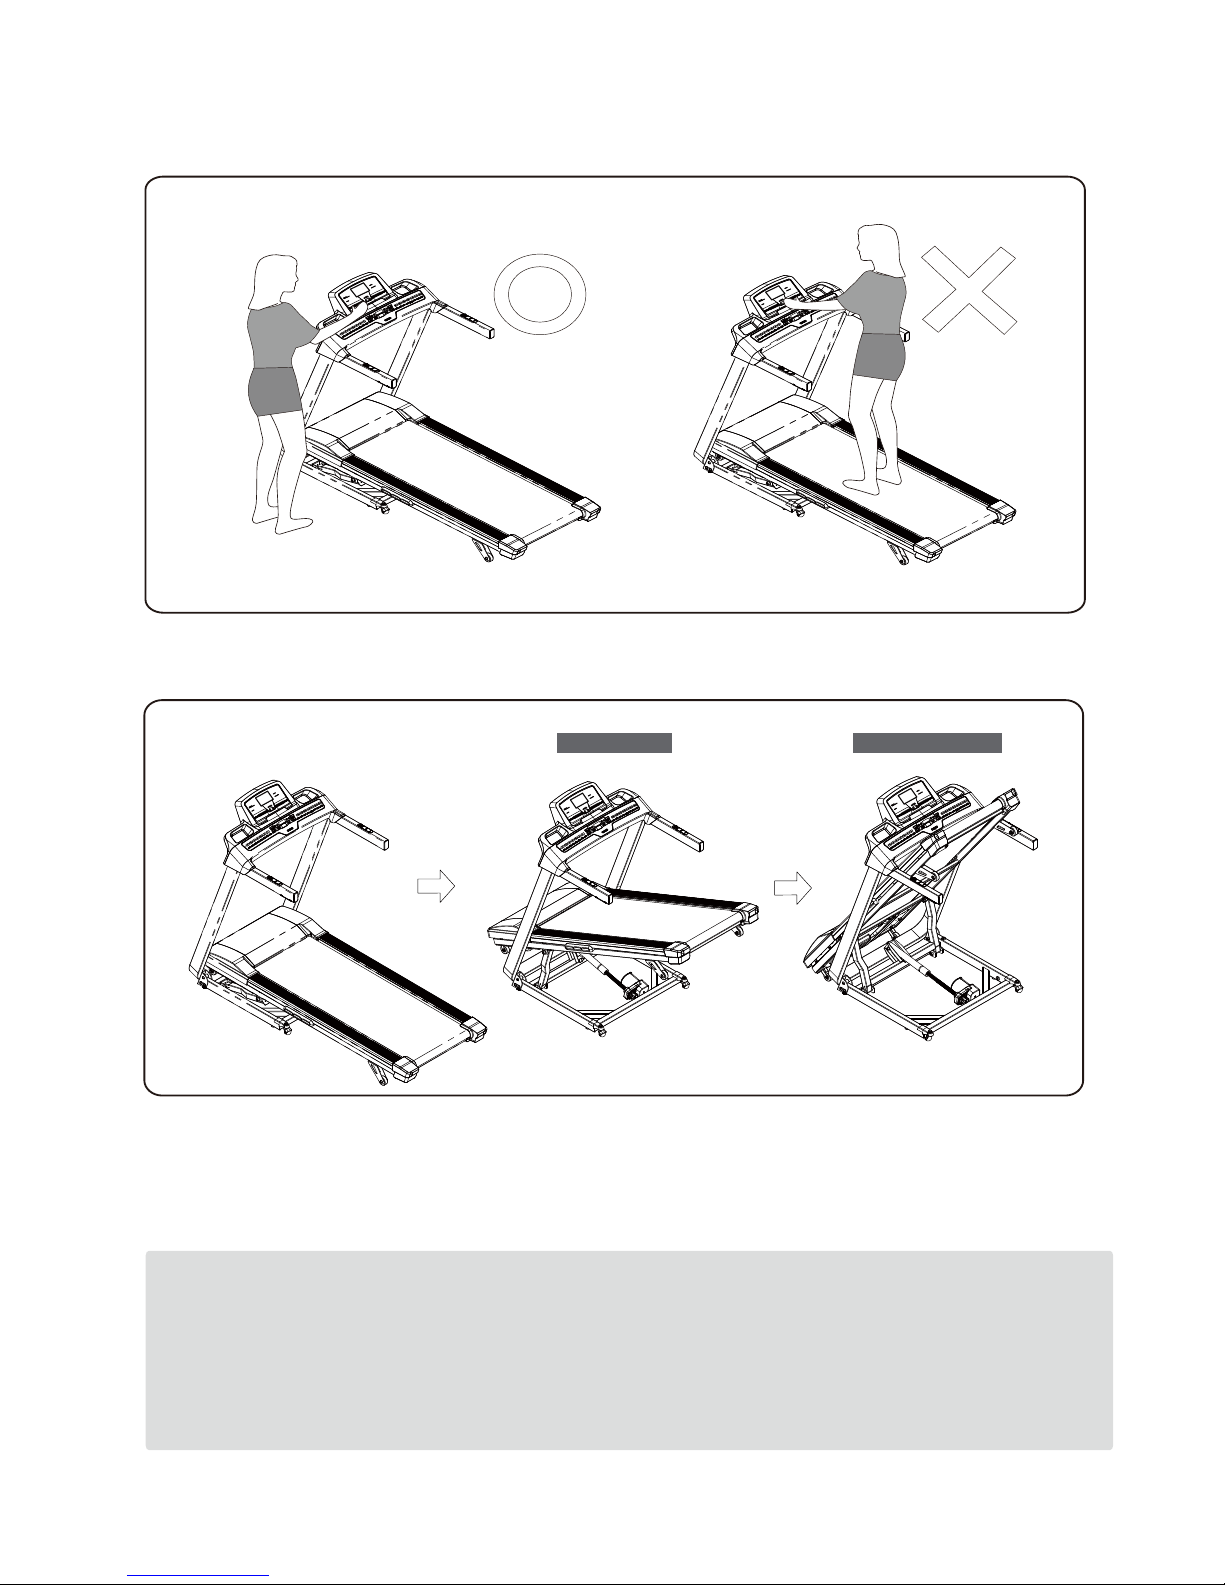
Folding and unfolding the treadmill
(Fig. 1)
(Fig. 2)
1. Do not stand on the treadmill when eFOLD is operating. Stand on the side of the treadmill to
operate it.
W
h
i
l
e
i
n
u
s
e
o
f
e
Fo
ld
“u
p
”
or
“d
own
”,
m
ak
e
sure
no p
eop
l
e
o
r
pe
t
s
a
re
on
/
underne
a
t
h
t
he
t
r
e
a
dm
i
l
l
deck
.
R
emo
v
e
s
a
fet
y
k
ey
w
hen
no
t
i
n
us
e
an
d
st
or
e
ou
t
of
r
e
ac
h
of
chi
l
dr
en
.
1
.
I
n
se
r
t
s
a
f
e
t
y key.
2.
E
nt
er
pr
o
gr
am
usi
n
g
a
r
ro
ws
,
p
r
es
s
m
od
e.
3.
E
nt
er
l
ev
el
usi
ng
a
r
r
ow
s
, pr
e
s
s
m
od
e.
4.
En
t
e
r
t
im
e
u
s
i
ng
a
r
r
ows,
pr
e
ss m
od
e.
5.
Ent
er
w
ei
g
h
t
usi
ng
ar
r
ows,
pr
es
s m
od
e
.
6.
P
r
es
s
star
t
t
o
beg
i
n
w
or
kout.
P
r
ess q
uic
k ke
y to
c
hoo
s
e
sp
eed or
i
ncl
i
ne
af
ter
p
r
ess
st
art
.
R
i
s
k o
f
i
njur
y
t
o
pe
r
s
on
:
T
o
av
o
i
d
inj
ur
y
,
st
a
nd
on
t
he
si
de rai
l
s
be
f
o
r
e
sta
r
t
i
n
g
t
r
ead
m
i
ll
.
R
ea
d
o
wne
r's
manua
l
bef
or
e
u
s
i
ng.
W
hi
l
e in
u
s
e
o
f
e
F
ol
d
“
u
p
”
o
r
“
d
own”
,
m
a
ke
sur
e
n
o
p
e
op
l
e
or
pe
t
s
ar
e on/
u
n
d
e
rnea
t
h
t
he
tr
ea
dm
i
l
l
d
e
ck
.
Re
m
o
ve
s
a
f
et
y
k
ey
w
hen
no
t
i
n
u
se
an
d
stor
e
ou
t
o
f
r
eac
h
of
chi
l
dr
en.
1
.
I
ns
e
r
t
saf
e
t
y
k
ey
.
2.
E
n
t
e
r
p
r
ogr
am
u
s
i
ng
a
r
r
ow
s,
p
r
e
s
s
mode
.
3
.E
n
ter
l
e
v
el
using
a
rrows,
pr
e
s
s
m
ode
.
4.E
nt
e
r
t
im
e
u
sin
g
a
rr
ow
s,
p
r
es
s
mo
de
.
5.
E
n
t
er
w
eig
ht
us
ing
a
r
rows,
pr
es
s
mod
e.
6.
P
r
es
s sta
r
t
t
o
beg
in
w
or
ko
ut.
Pr
e
ss
qu
ick
key
t
o
c
h
o
o
se s
pe
ed
o
r
in
cl
ine
a
f
t
e
r
pr
es
s sta
r
t
.
R
isk
o
f
inj
u
r
y
t
o
pe
rso
n
:
T
o avoid
inju
r
y
,
s
t
a
nd
o
n the
side
r
ail
s
befor
e
s
t
a
r
ti
ng
t
r
ea
dm
i
l
l
.
R
ead
o
wne
r
'
s
m
a
nu
a
l
b
efor
e
using.
Wh
i
le in use of
eFold “up”
or
“down”,
make
sur
e
no
peo
ple
or
pe
ts
ar
e
o
n
/
und
ern
ea
t
h
the treadm
i
ll de
c
k.
R
em
o
ve
safety key when
n
ot
i
n
u
s
e
a
n
d
st
ore out
o
f
re
a
c
h of
chil
dr
en.
1
.In
sert s
a
f
ety
key
.
2.
Ent
e
r
prog
r
a
m
using
a
r
row
s,
pr
e
ss
m
ode.
3
.E
nt
er
l
ev
e
l u
s
in
g
arrows, press
m
ode
.
4.E
nte
r t
i
m
e u
s
i
ng ar
r
ow
s,
p
re
s
s
mode.
5.E
nt
er
wei
gh
t
using a
rro
ws
, p
r
e
s
s
mode.
6
.Pre
s
s s
t
ar
t
to
b
egin
w
or
kout.
Pre
ss quick
key
to choose spee
d o
r
i
ncl
i
n
e
after pr
e
s
s
sta
rt.
R
isk
of in
j
ury to p
e
r
s
o
n:
T
o
av
o
i
d
inj
ur
y,
s
t
and
o
n
t
he si
de rai
ls
be
f
o
re sta
rti
n
g
t
r
eadmill.
R
ea
d
owner
's
manual
be
f
or
e
using.
W
h
i
le in us
e
of
eF
ol
d
“
u
p
”
o
r
“down”,
m
a
ke
s
u
r
e
no
peo
ple
o
r pet
s
are
o
n
/u
n
d
ern
eat
h
t
he
t
rea
dmill d
e
ck
.
Re
move safet
y
key
w
hen
not
i
n
use and
st
or
e
out
o
f r
eac
h
of childre
n.
1.Insert safet
y k
e
y
.
2.Ent
er pr
ogr
am
using arro
ws,
pr
e
ss
m
ode.
3.Enter
le
v
el
using ar
rows,
p
r
ess mode.
4.E
nter time using arrows, press mode.
5.
Ente
r
weight
using ar
rows,
pr
e
ss
m
o
de
.
6.Press st
ar
t
to b
e
g
in wo
r
kou
t.
Pr
ess
qui
c
k key
t
o ch
oose
s
peed o
r
incline
af
ter
press st
a
r
t.
Risk of injury to
per
son:
To avo
id
inju
r
y, s
tand
on the sid
e r
ail
s
befo
r
e
star
t
i
ng
treadm
ill.
Read
ow
ner's
m
anual before using.
W
h
i
le
i
n
u
s
e
of e
F
ol
d
“
up”
or
“d
own”
, m
ak
e
s
ure
no pe
ople
or pets
are o
n/
under
ne
at
h
the tre
a
dmi
ll
deck.
R
emove saf
ety key
when no
t i
n us
e
and
s
tor
e out of re
ac
h o
f c
hi
ldren.
1.Insert safety
ke
y.
2.Enter pr
o
gr
am u
s
ing arr
ows
,
pr
e
ss
m
ode.
3.Ent
er
l
ev
el
usi
ng
ar
r
ows,
pre
ss
mode.
4.Enter tim
e
us
ing arrows
, pr
es
s
m
ode.
5.
E
nte
r
weig
ht us
ing arrow
s, pre
s
s mode.
6.Pre
s
s
start to begi
n work
out.
Press qui
ck k
ey
to ch
o
o
se
s
peed
or
incl
i
ne
after
pr
es
s
s
tar
t.
Risk
of inj
ur
y
to pe
r
son
:
T
o
a
v
oi
d
injur
y, stand on the sid
e
r
ai
l
s
be
f
o
r
e
starting treadmi
ll
. Re
a
d owne
r'
s
manu
al b
efore u
sing.
1. Hold eFOLD UP button for 2-3 seconds to start the folding-up. It comes with a beep sound every
2-3 second during operation. It stops once it’s completely folded.
2. Hold eFOLD DOWN button for 2-3 seconds to start the folding-down. It comes with a beep sound
every 2-3 second during operation. It stops once it’s completely unfolded.
Start eFOLD up Complete eFOLD up
Coution :
•eFOLD only works at stand-by mode without the motor operating.
•It comes with a beep sound every 2-3 second during operation and it won’t stop operation until it’s
positioned.
•When the power is outage during folding, it needs to restart and operate under standby mode.
•When an emergency happens, please press STOP button or remove the safety key to stop eFOLD
function immediately.
Page 13
13
(Fig. 3)
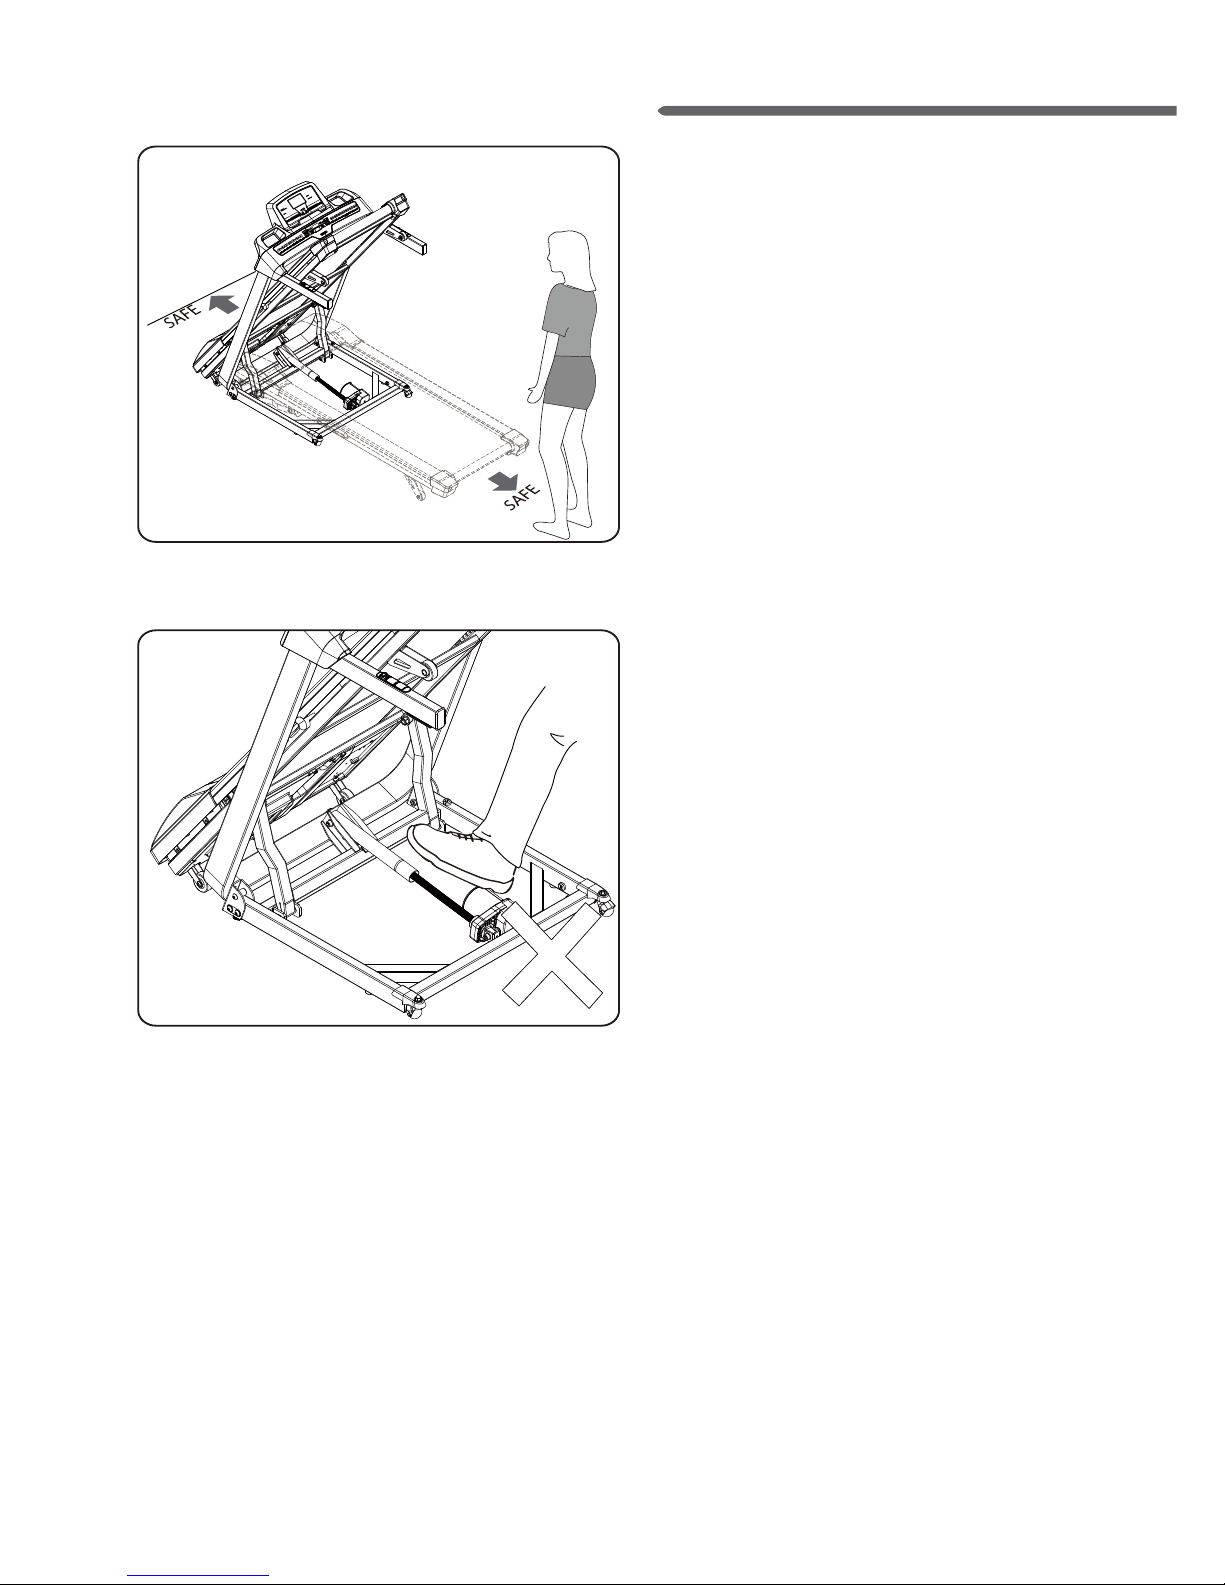
1. Make sure you have adequate space to
lay the treadmill down.
2. Leave 100cm safety zone in front of treadmill
away from the wall or obstructions.
(Fig. 4)
1. While in use of eFOLD UP or DOWN, make
sure no people or pets are on/underneath
the treadmill deck.
2.Do not step on the incline motor or incline
rod.
While in
use
of eF
o
ld “up”
or “down”, ma
ke
sure no people
or
pets a
r
e on/undern
eat
h the
treadmill de
ck
.
Remove
s
afety key when not in use and
store out of reach of children.
1.Insert safety key.
2.Enter program using arrows,press mode.
3.Enter level using arrows, press mode.
4.Enter time using arrows, press
mode.
5.Ent
er wei
ght using arrows, press mode.
6.Press sta
rt t
o begi
n workout.
Press quick key to choose speed or i
ncline
after press s
tart.
Risk of i
njury to pers
on:
To av
oid
injury
, s
tand on the side rails
before startin
g treadmill. Read owner's
manu
al before using.
TM3010 / TM3020/ TM3030
Folding Treadmill
Page 14
Coution :
14
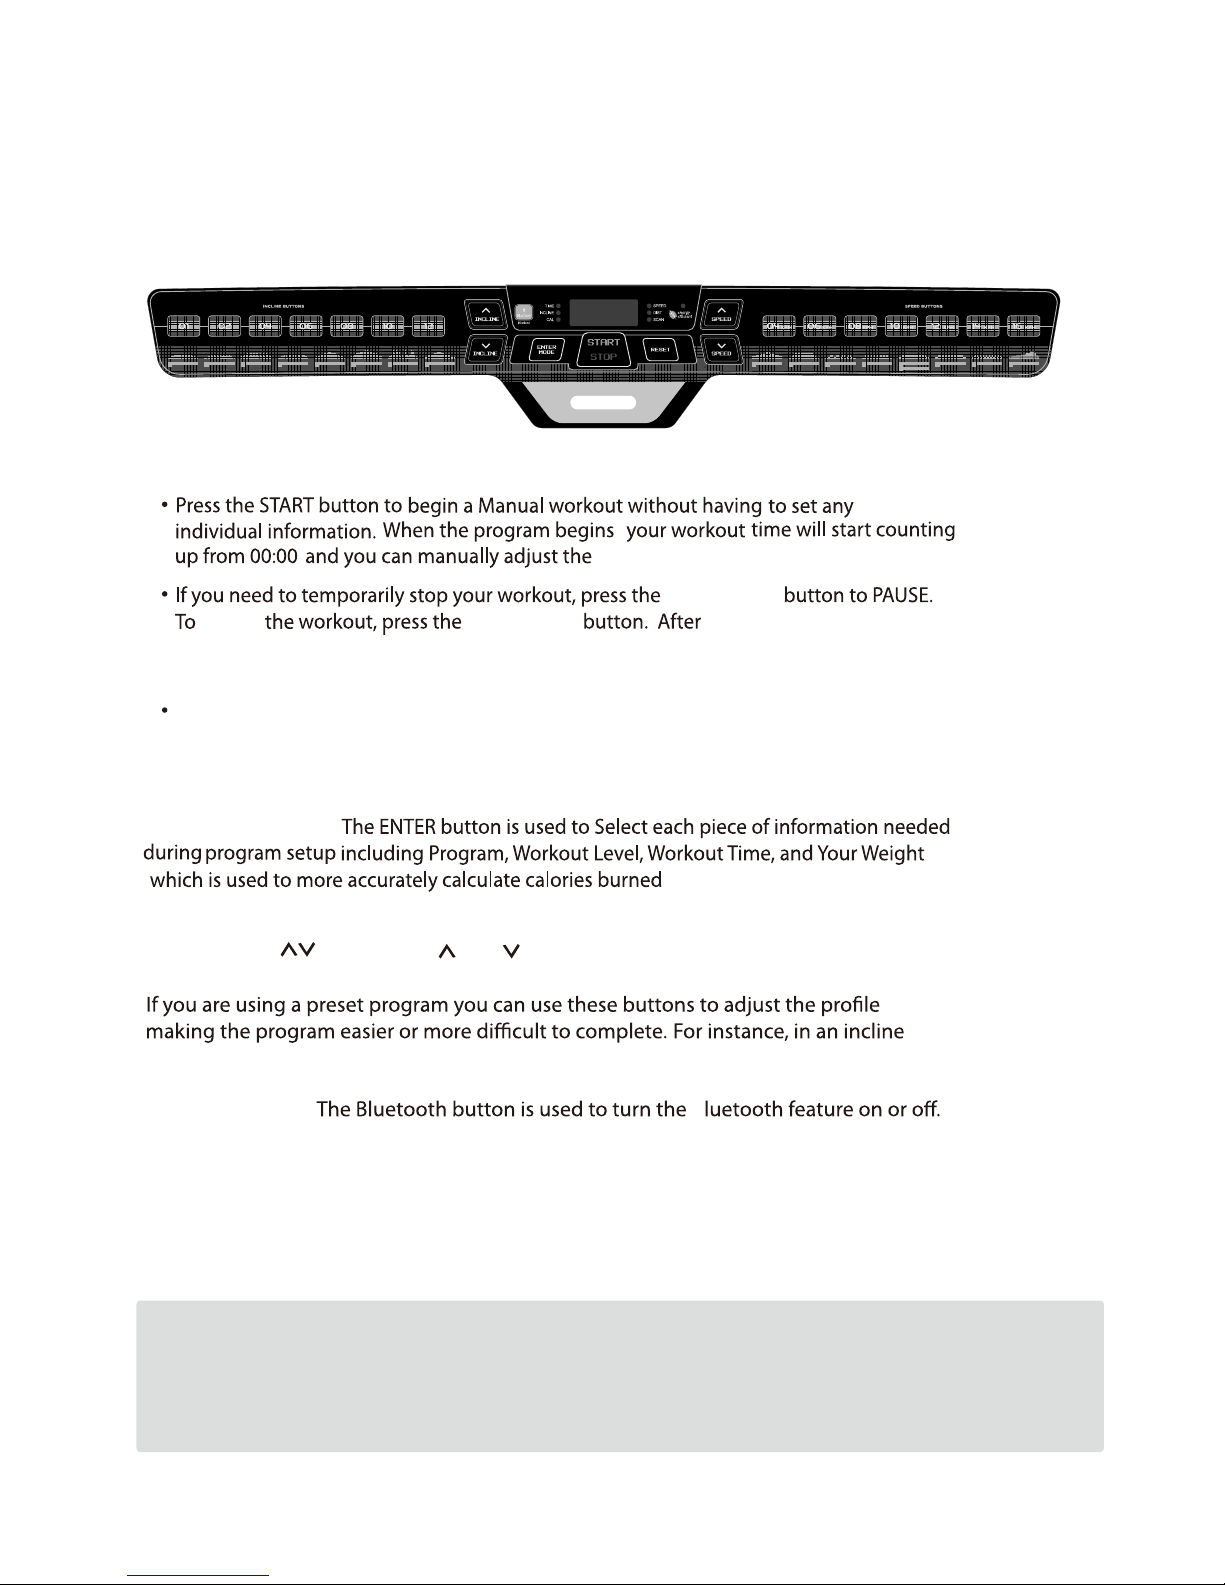
Console Overview
Treadmill Instruction
incline or speed as you workout.
The and buttons for speed and incline are used to
modify the value
of each selection during the program set up process and to adjust the speed or incline during use.
program, you can
raise the incline level across the entire program by pressing the incline up button.
(
).
Start/Stop Button:
Reset Button: To reset the console, press the RESET button. This will clear any workout data.
Enter/Mode Button:
Mode is used to change between
workout feedback displays.
Bluetooth Button:
Incline/Speed Buttons:
,
B
of no activity the
console will reset. The auto-reset can be changed to 300 seconds by going into the
START/STOP
START/STOP 90 secondsrestart
If nothing is lit in the display and the Scan light is dimly lit, press the START/STOP button for 2
seconds to turn the display on.
Engineering mode found on page 34 of this manual.
of the program,
(Optional)
eFOLD Button:
eFOLD ▲ UP - It comes with a beep sound every 2-3 seconds during operation. It stop once it’s
completely foled.
eFOLD ▼ DOWM - It comes with a beep sound every 2-3 seconds wecond during operation. It stop once
it’s completely foled.
The sensor will be only workable when eFOLD down. The eFOLD down will be stopped right away if
the sensor senses any objects under deck. If the objects cannot be removed, a beep sound comes
every second and the treadmill will with no function. If you like to continue the eFOLD down, please
remove objects and press the eFOLD down button again.
P14
P13
Long Slow Distance
Steady Pace
P15
Cardio Run
P16
Short Interval
P17
Uphill Walk
P12
Uphill Interval
P11
Ladder
P10
Plateau Climb
P9
Pyramid Climb
P8
Uphill Climb
P7
Fartlek
P6
Negative Interval -2
P5
Negative Interval -1
P4
Long Interval
P3
Moderate Interval
P2
Short Interval
P1
Long Slow Distance
Page 15
15
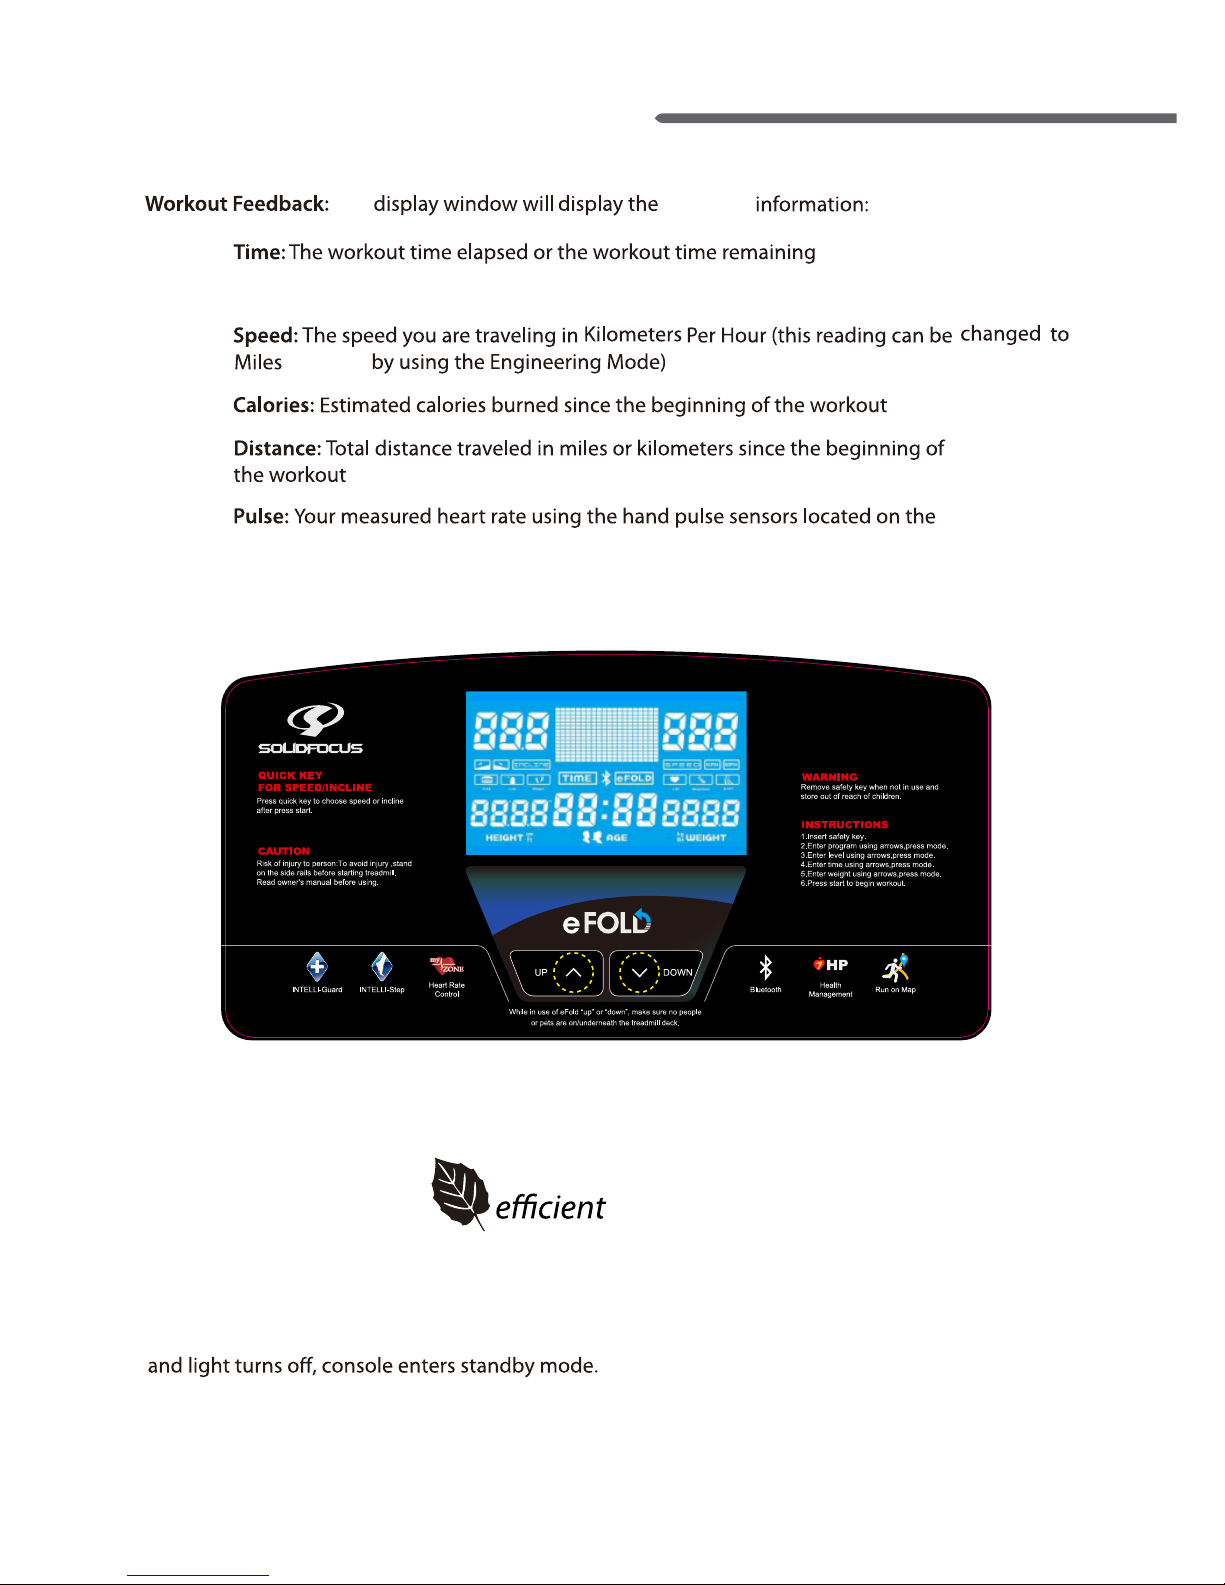
The
following
Incline : The level of belt incline
handlebars
Console Overview (Continued)
Scan: gniyalpsid dna etaR traeH ,seirolaC ,ecnatsiD ,emiT hguorht sllorcs edom sihT
each
for 5 seconds
per hour
energy
Energy Saving indicator:
1. If user doesn’t press any button in ten minutes under standby mode, the console enters to energy
saving mode. The Scan light turns on.
2. To leave energy saving mode, press START key for 1 second till the light turns on. Release the button
TM3010 / TM3020/ TM3030
Folding Treadmill
Page 16
Innovative Features
The treadmill includes a Bluetooth module to support SolidFocus Apps,
which can
be downloaded from the
App Store or Google play.
The energy saving mode cuts all power to the treadmill with the exception of
one dimly lit Scan light. This will cut power consumption to well under 0.1 watts.
eFOLD is an Easy and Electronic Folding System. It helps save your energy to fold
(Optional)
the treadmill.
16
Intelli-Guard
Energy Saving Mode
eFOLD Function
Bluetooth
TM
This treadmill is equipped with the Intelli-Guard safety feature. This feature
senses when you stop walking on the treadmill and for safety purposes it
automatically pauses the treadmill to avoid accidental falls and resulting
injury. The Intelli-Guard feature is triggered when the treadmill senses that
you are no longer walking or running on the treadmill.
CAUTION: The Intelli-Guard feature will automatically be disengaged
when the treadmill is operated at speeds under 1.0 mph (1.6 kph). If
1.0 mph (1.6 kph) Intelli-Guard will not activate until 25 steps are
taken and counted.
CAUTION: At 20 seconds the console will beep once per second
for 5 seconds and then automatically pause the treadmill. These
beeps are a notice that the treadmill belt is about to stop. If for some
reason you are still on the treadmill when this occurs move your feet
to the side rails and prepare for the belt to stop. The Intelli-Guard
feature does not replace the use of your safety key or using proper
precaution in stopping the treadmill when it is not in use.
Intelli-Step
TM
The treadmill comes with the Intelli-Step counting feature. This feature
senses the resistance on the running belt each time your foot strikes. There
walking style, your weight, and your usage characteristics.
the steps of a light user and especially a light user walking at an incline. The
may also be the case at lower speeds. In summary, the Intelli-Step is a great
feature for users interested in maintaining a step count walking or running
program, but it is dependent on many variables for accuracy and the accuracy
of the count will depend on your individual characteristics as well as variables
related to the treadmills usage.
!
!
Page 17
- Use the buttons to select your desired Exercise Program. Each time
you press the button
Select Program Mode - With each program selection you can choose to run the program in
Incline Mode or Speed Mode. Press the speed button to select speed mode or the
Set Program Level - There are 3 levels of intensity with each preset program (1 being the easiest
Use the buttons to make the selection then Press Enter.
6.
Starting in Manual Mode
incline to select incline mode. Press ENTER.
program.
buttons.
buttons. Press Enter.
buttons. Press Enter.
buttons
buttons. Press Enter.
U-1 or U-2
U-1 or U-2
Treadmill Operations
TM3010 / TM3020/ TM3030
Folding Treadmill
17
Page 18
2. Select Program Mode - Press speed button to select speed mode or incline button to
select incline mode. Press Enter.
2. Select Program Mode -
8.
Speed and Incline
Operating Your Treadmill (continued)
While using the HRC programs you will be required to hold the pulse grips or wear a chest strap for
the duration of the workout.
the RESET button.
Press speed button to select speed mode or incline button to
select incline mode. Press Enter.
E
E
S
buttons.
buttons.
buttons.
buttons.
buttons.
buttons.
buttons.
buttons.
buttons.
buttons to select the H-2 program.
buttons to select the H-1 program. Press the Enter button to select.
.
.
18
Page 19
The advance console used on these treadmills include programs grouped into each of the
following 4 areas: Sports Training, Healthy Living, Weight Management and Heart Rate Control.
Control
program or an Incline Control program. After selecting the program, if you select Speed Control
If you choose Incline after selecting the program, the incline will change throughout the workout
User Programs which allow you to preselect both the Speed and Incline of the program.
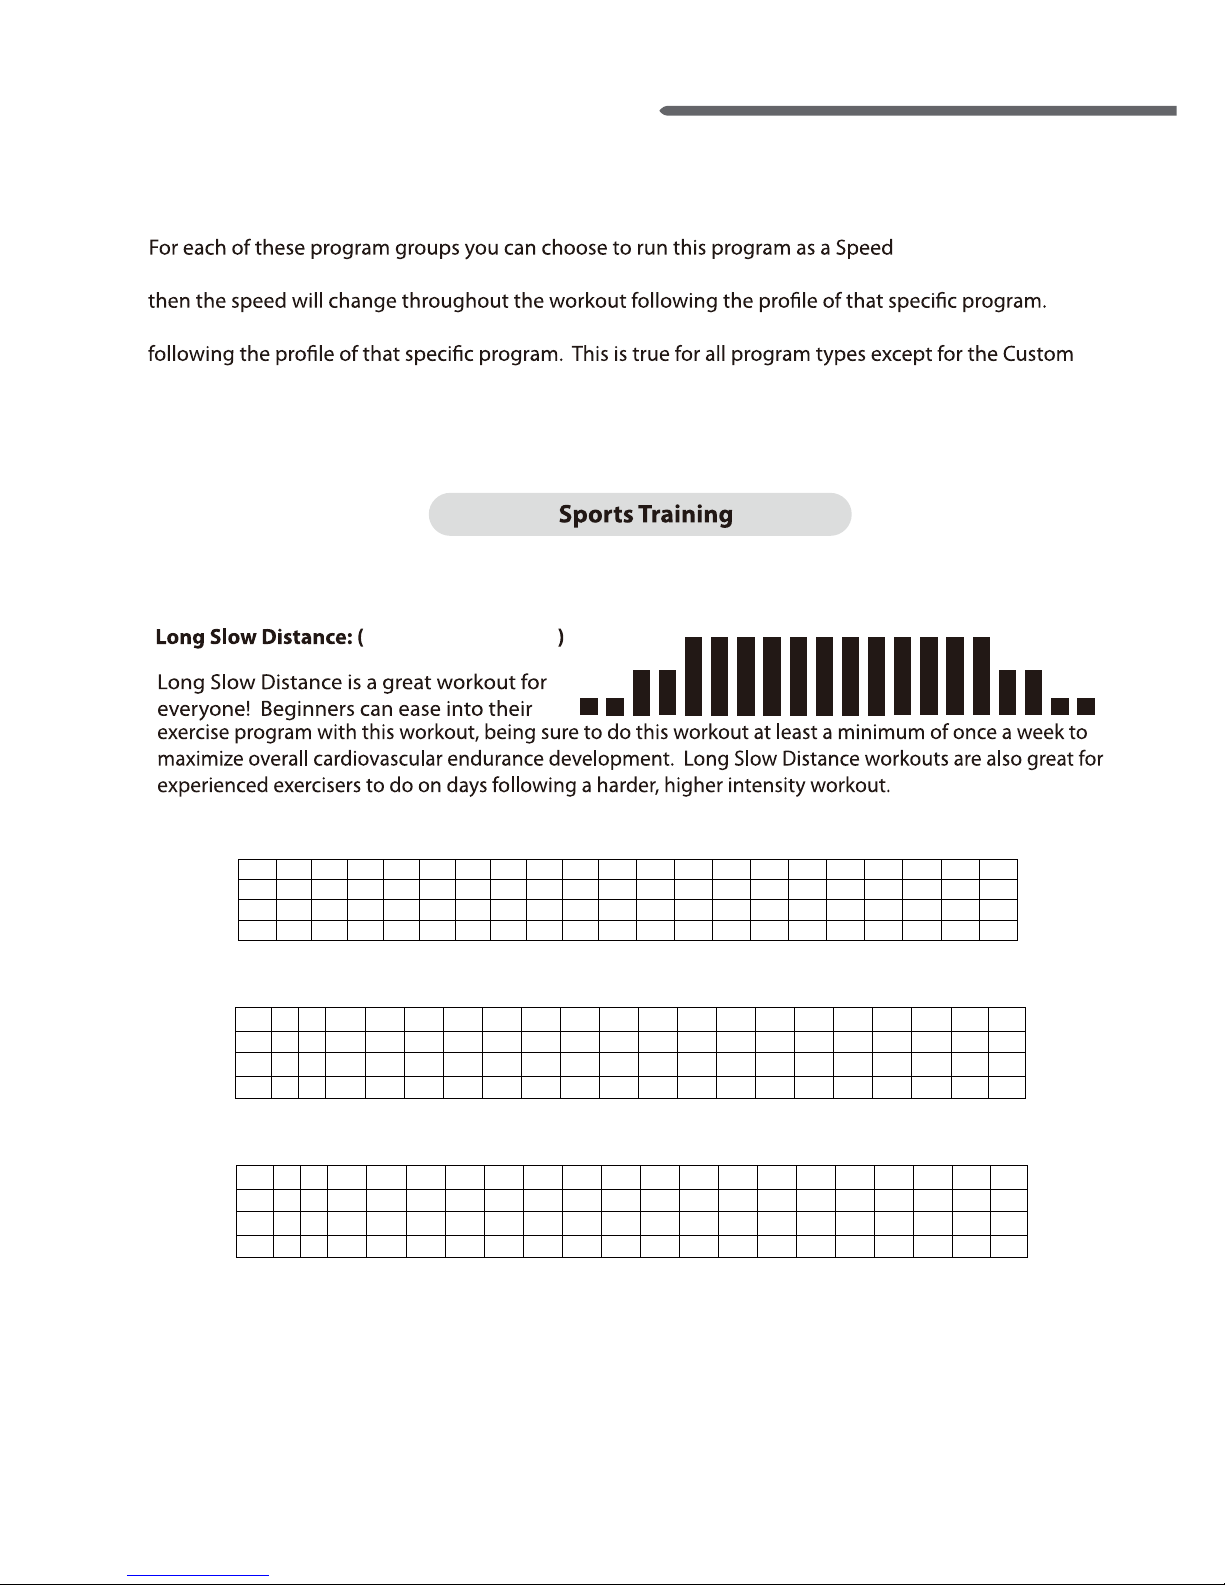
1 2 3 4 5 6 7 8 9 10 11 12 13 14 15 16 17 18 19 20
L1 1 1 2 2 4 4 4 4 4 4 4 4 4 4 4 4 2 2 1 1
L2 1 1 3 3 5 5 5 5 5 5 5 5 5 5 5 5 3 3 1 1
L3
L2
L3
L2
L3
1 1 4 4 6 6 6 6 6 6 6 6 6 6 6 6 4 4 1 1
1 2
3 4 5 6 7 8 9 10 11 12 13 14 15 16 17 18 19 20
L1
1 1 2 2 3 3 3 3 3 3 3 3 3 3 3 3 2 2 1 1
2 2 3 3 4.5 4.5 4.5 4.5 4.5 4.5 4.5 4.5 4.5 4.5 4.5 4.5 3 3 2 2
3 3 3.5 3.5 5 5 5 5 5 5 5 5 5 5 5 5 3.5 3.5 3 3
Incline
Speed (MPH)
40 minutes default
1 2
3 4 5 6 7 8 9 10 11 12 13 14 15 16 17 18 19 20
L1
1.6 1.6 1.6 1.63.2
3.2 3.2
3.2 3.2 3.2
3.2 3.2
4.8
7.2 7.2 7.2 7.2 7.2 7.2 7.2 7.2 7.2 7.2 7.2 7.24.84.8
5.65.6 5.65.64.84.8
4.8 4.8 4.8 4.8 4.8 4.8 4.8 4.8 4.8 4.8 4.8
4.8 4.8
4.8 4.8
8 8 8 8 8 8 8 8 8 8 8 8
Speed (KPH)
P-01: Long Slow Distance
Program Overview
TM3010 / TM3020/ TM3030
Folding Treadmill
19
Page 20
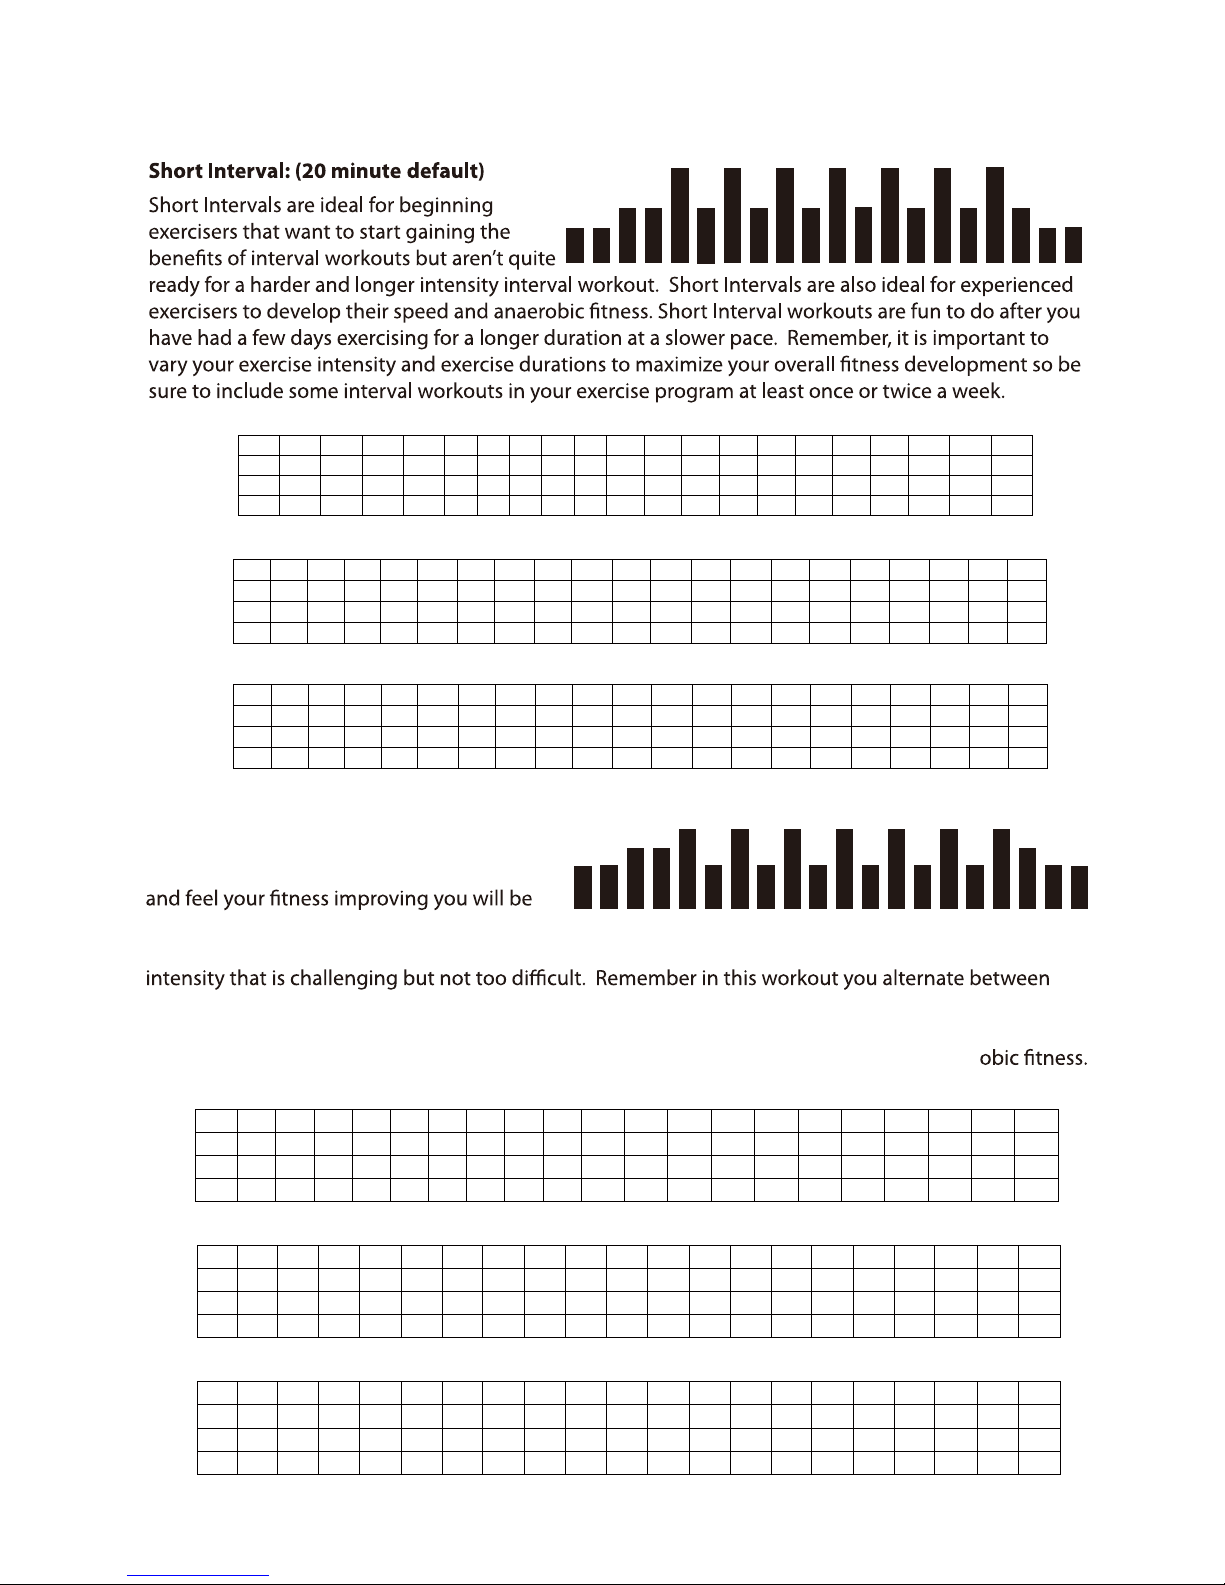
Moderate Interval: (30 minute default)
As you begin to exercise on a regular basis
ready to begin doing “Moderate Intensity
Interval” workouts. You should begin with an intensity that is easy and then progress to an exercise
an easy recovery interval followed by a higher intensity interval. You should feel comfortable to push
yourself as you do this workout as you are never too far away from an easier recovery interval.
This workout will improve your overall aerobic endurance while also maximizing your anaer
Incline
Speed (MPH)
1 2 3 4 5 6 7 8 9 10 11 12 13 14 15 16 17 18 19 20
1 1 2 2 3 2 3 2 3 2 3 2 3 2 3 2 3 2 1 1
L2 3 3 4 4 5 3 5 3 5 3 5 3 5 3 5 3 5 4 3 3
3 3 4 4 6 4 6 4 6 4 6 4 6 4 6 4 6 5 4 4
1 2 3 4 5 6 7 8 9 10 11 12 13 14 15 16 17 18 19 20
L1L1
2 2 3 3 3.5 2 3.5 2 3.5 2 3.5 4.5 3 4.5 3 4.5 3.5 3 3 2
L2
3 3 3.7 3.7 4.5 3 4.5 3 4.5 3 4.5 3 4.5 3 4.5 3 3.7 3.7 3 3
L3L3
3.7 3.7 5 5 6 4.5 6 4.5 6 4.5 6 4.5 6 4.5 6 4.5 6 5 3.7 3.7
Speed (KPH)
1 2 3 4 5 6 7 8 9 10 11 12 13 14 15 16 17 18 19 20
L1
L2
L3
Incline
Speed (MPH)
1 2 3 4 5 6 7 8 9 10 11 12 13 14 15 16 17 18 19 20
L 1 1 1 2 2 4 2 4 2 4 2 4 2 4 2 4 2 4 2 1 1
L 2 2 2 3 3 5 3 5 3 5 3 5 3 5 3 5 3 5 3 2 2
L 3 2 2 3 3 6 3 6 3 6 3 6 3 6 3 6 3 6 3 2 2
1 2 3 4 5 6 7 8 9 10 11 12 13 14 15 16 17 18 19 20
L1L1 1 1 2 2 3 2 3 2 3 2 3 2 3 2 3 2 3 2 1 1
L2 2 2 3 3 4.5 2 4.5 2 4.5 2 4.5 2 4.5 2 4.5 2 4.5 3 2 2
L3 3 3 4 4 5 3 5 3 5 3 5 3 5 3 5 3 5 4 3 3
Speed (KPH)
1 2 3 4 5 6 7 8 9 10 11 12 13 14 15 16 17 18 19 20
1.6 1.6 1.6 1.63.2 3.2
3.2 3.2
4.8
4.8 4.8
4.8
4.8 6.4 6.4
7.2
3.2
3.2 7.2 3.2 7.2 3.2 7.2 3.2 7.2 3.2 7.2 3.2 7.2
8
4.8 3.2 4.8 3.2 4.8 3.2 4.8 3.2 4.8 3.2 3.2
3.2 3.2
4.8
4.8
4.84.8
8
4.8
8
4.8
88
4.8
8
4.8
8
4.8 4.86.4
L2
L3
3.2 3.2 4.8 4.8 5.6 3.2 5.6 3.2 5.6 3.2 5.6 7.2 4.8 7.2 4.8 7.2 5.6 4.8 4.8 3.2
4.8 4.8 5.9 5.9 7.2 4.8 7.2 4.8 7.2 4.8 7.2 4.8 7.2 4.8 7.2 4.8 5.9 5.9 4.8 4.8
5.9 5.9
8 8 9.6 7.2 9.6 7.2
9.6 7.2 9.6
7.2 9.6 7.2 9.6 7.2 9.6 8 5.9 5.9
P-02: Short Interval
P-03: Moderate Interval
20
Page 21
Incline
Speed (MPH)
1 2 3 4 5 6 7 8 9 10 11 12 13 14 15 16 17 18 19 20
L1 2 3 3 4 4 4 5 5 5 6 6 5 5 5 4 4 4 3 3 2
L2 1 2 2 2 3 3 4 4 4 5 5 4 4 4 3 3 2 2 2 1
L3 1 1 1 2 2 2 3 3 3 4 4 3 3 3 2 2 2 1 1 1
1 2 3 4 5 6 7 8 9 10 11 12 13 14 15 16 17 18 19 20
1 1 1.5 2 2 2.5 3 3 3.5 4 4 3.5 3 3 2.5 2 2 1.5 1 1
L2 2 2 2.5 3 3 3.5 4 4 4.5 5 5 4.5 4 4 3.5 3 3 2.5 2 2
L3 3 3 3.5 3.7 3.7 4.5 5 5 5.5 6 6 5.5 5 5 4.5 3.7 3.7 3.5 3 3
Speed (KPH)
1 2 3 4 5 6 7 8 9 10 11 12 13 14 15 16 17 18 19 20
L2
L3
1 1 2 2 3 3 1 3 3 1 3 3 1 3 3 1 3 3 2 1
L2 2 2 3 3 4 4 2 4 4 2 4 4 2 4 4 2 4 4 3 2
L3 3 3 4 4 5 5 2 5 5 2 5 5 2 5 5 2 5 5 4 3
Incline
Speed (MPH)
1 2 3 4 5 6 7 8 9 10 11 12 13 14 15 16 17 18 19 20
1 2 3 4 5 6 7 8 9 10 11 12 13 14 15 16 17 18 19 20
L1
L1
L1
L1
1 1 2 2 3 3 2 2 3 3 2 2 3 3 2 2 3 3 2 1
L2 2 2 3 3 4.5 4.5 2 2 4.5 4.5 2 2 4.5 4.5 2 2 3 3 2 2
L3 3 3 4 4 5 5 3 3 5 5 3 3 5 5 3 3 4 4 3 3
Speed (KPH)
1 2 3 4 5 6 7 8 9 10 11 12 13 14 15 16 17 18 19 20
L1
L2
L3
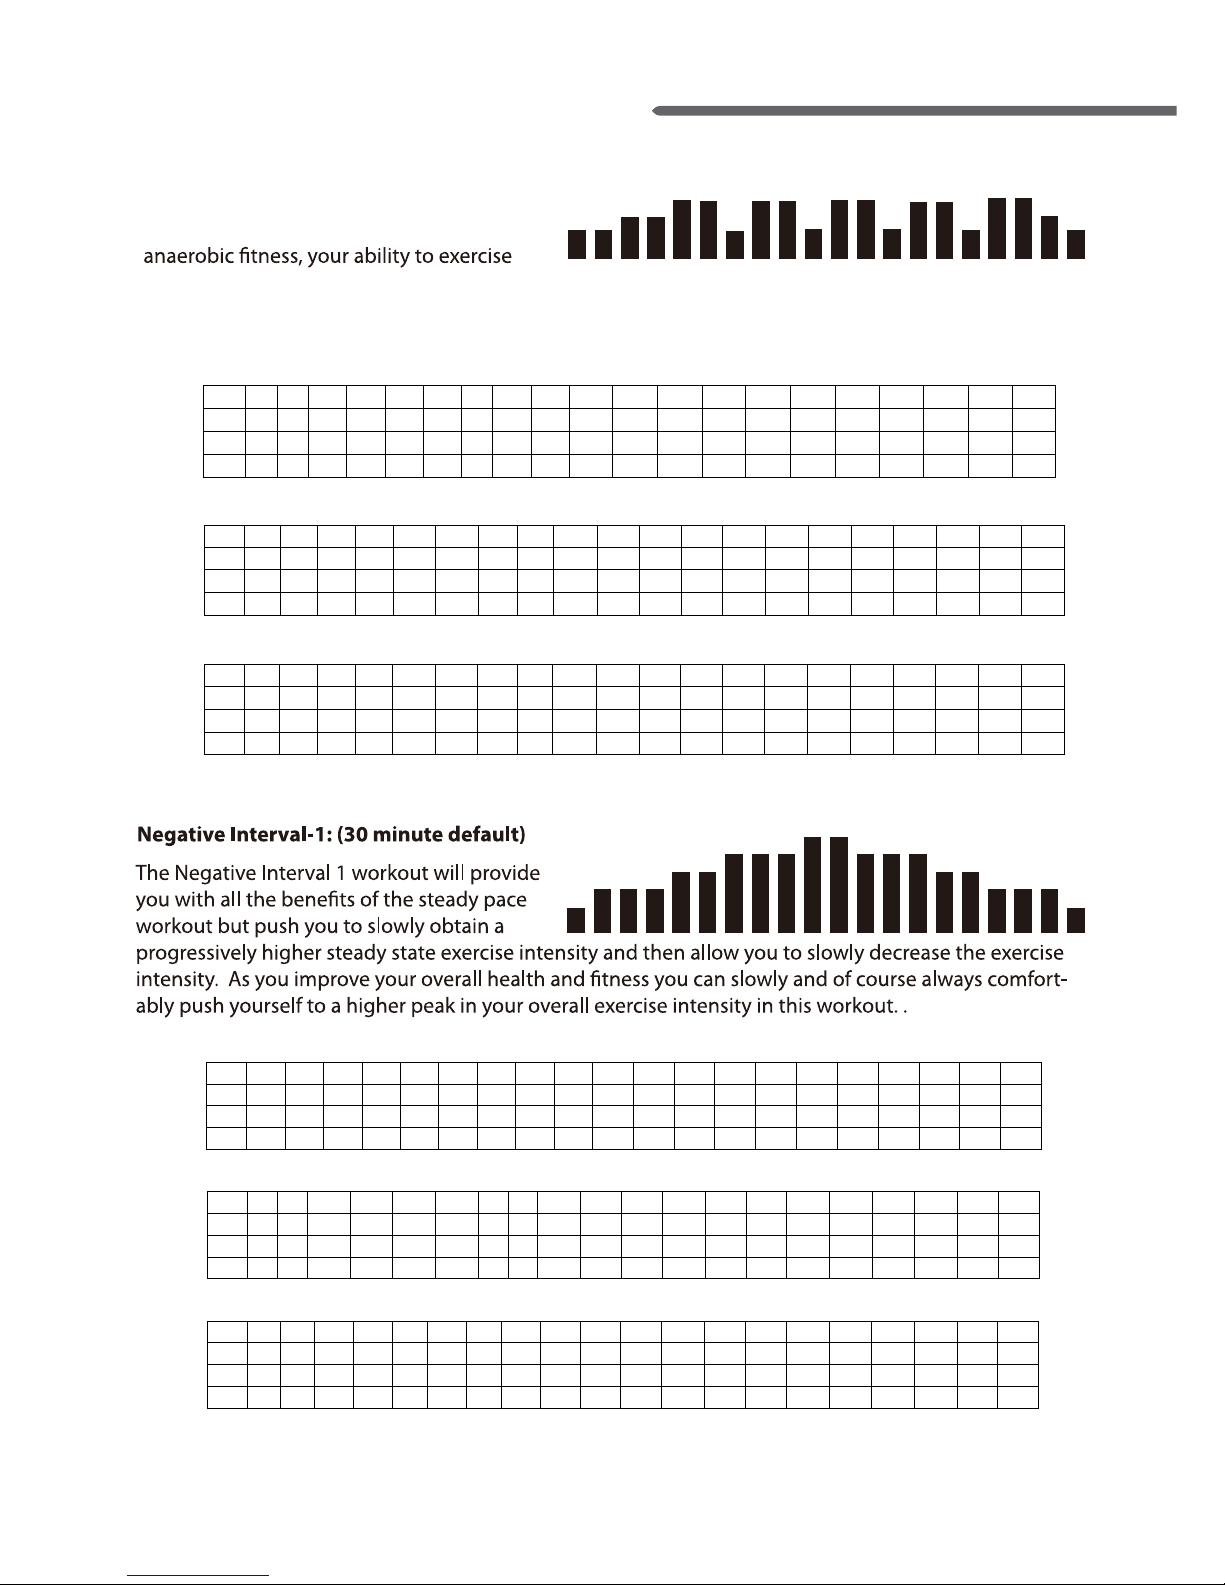
Long Interval: (40 minute default)
Long Interval workouts are great to
maximize calorie burn and improve your
harder, at a higher intensity level. As in the Moderate Interval workouts, remember you have a recovery
period after each higher intensity interval so you can comfortably push yourself to exercise at a
progressively higher level.
1.6 1.6 3.2 3.2 4.8 4.8 3.2 3.2 4.8 4.8 3.2 3.2 4.8 4.8 3.2 3.2 4.8 4.8 3.2 1.6
3.2 3.2 4.8 4.8 7.2 7.2 3.2 3.2 7.2 7.2 3.2 3.2 7.2 7.2 3.2 3.2 4.8 4.8 3.2 3.2
4.8 4.8 6.4 6.4 8 8 4.8 4.8 8 8 4.8 4.8 8 8 4.8 4.8 6.4 6.4 4.8 4.8
1.6 1.6 2.4 3.2 3.2 4 4.8 4.8 5.6 6.4 6.4 5.6 4.8 4.8 4 3.2 3.2 2.4 1.6 1.6
3.2 3.2 4 4.8 4.8 5.6 6.4 6.4 7.2 8 8 7.2 6.4 6.4 5.6 4.8 4.8 4 3.2 3.2
4.8 4.8 5.6 5.9 5.9 7.2 8 8 8.8 9.6 9.6 8.8 8 8 7.2 5.9 5.9 5.6 4.8 4.8
P-04: Long Interval
P-05: Negative Interval -1
TM3010 / TM3020/ TM3030
Folding Treadmill
21
Page 22
22
Incline
Speed
1 2 3 4 5 6 7 8 9 10 11 12 13 14 15 16 17 18 19 20
L1 2 2 2 3 3 3 4 4 4 5 5 4 4 4 3 3 3 2 2 2
L2 2 2 3 4 4 4 5 5 5 6 6 5 5 5 4 4 4 3 2 2
L3 3 3 4 5 5 5 6 6 6 7 7 6 6 6 5 5 5 4 3 3
1 2 3 4 5 6 7 8 9 10 11 12 13 14 15 16 17 18 19 20
L1
L2
L3
1.6 2.4 3.2 3.2 4.0 4.8 4.8 4.8 5.6 6.4 6.4 6.4 5.6 4.8 4.8 4.0 3.2 3.2 2.4 1.6
3.2 4.0 4.8 4.8 5.6 7.2 7.2 7.2 7.5 8.0 8.0 8.0 7.5 7.2 7.2 5.6 4.8 4.8 4.0 3.2
4.8 5.6 7.2 7.2 7.5 8.0 8.0 8.0 8.8 9.6 9.6 9.6 8.8 8.0 8.0 7.5 7.2 7.2 5.6 4.8
1 2 3 4 5 6 7 8 9 10 11 12 13 14 15 16 17 18 19 20
L1 1 1.5 2 2 2.5 3 3 3 3.5 4 4 4 3.5 3 3 2.5 2 2 1.5 1
L2 2 2.5 3 3 3.5 4.5 4.5 4.5 4.7 5 5 5 4.7 4.5 4.5 3.5 3 3 2.5 2
L3 3 3.5 4.5 4.5 4.7 5 5 5 5.5 6 6 6 5.5 5 5 4.7 4.5 4.5 3.5 3
Km/h
MPH
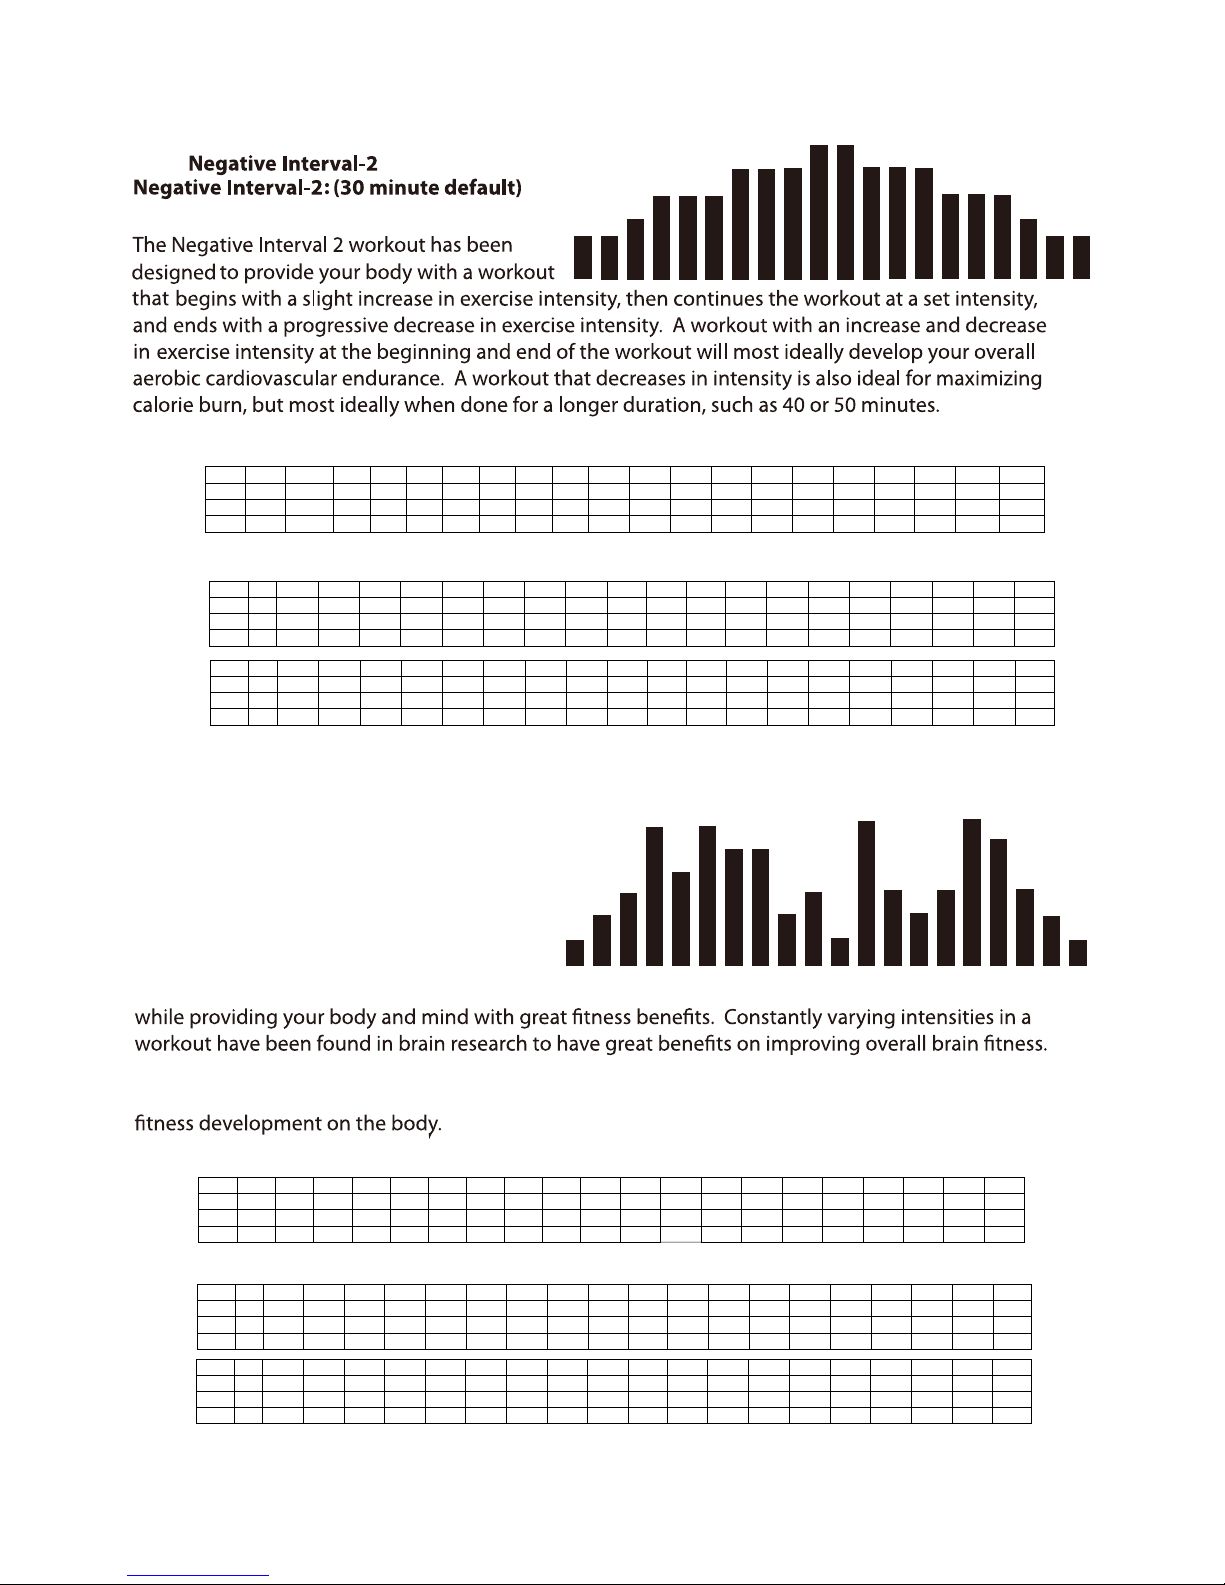
Fartlek
Varying your exercise intensity with a
constantly changing interval workout that
starts out at an easy pace and then increases
to a moderate or higher intensity pace will
add some great variety into your workouts, make your workouts go by faster than you ever imagined
Increasing your exercise intensity at constantly changing intervals and then dropping that intensity to
just a slightly lower level, and then returning to the higher level has great anaerobic cardiovascular
1 2 3 4 5 6 7 8 9 10 11 12 13 14 15 16 17 18 19 20
L1 1 2 3 4 2 3 4 4 2 1 3 1 4 3 2 1 3 2 1 1
L2 1 2 3 6 4 6 5 5 2 3 1 6 3 2 3 6 5 3 2 1
L3 2 4 2 6 3 6 4 4 5 2 6 3 6 2 6 2 5 4 6 1
1 2 3 4 5 6 7 8 9 10 11 12 13 14 15 16 17 18 19 20
L1
L2
L3
Incline
Speed
: (30 mintue default)
1.6 2.4 4.0 4.3 4.0 4.8 4.3 7.2 4.0 2.4 4.8 2.4 7.2 5.6 4.3 2.4 4.8 4.0 2.4 1.6
1.6 4.0 5.6 8.0 4.0 8.0 3.5 3.2 4.8 7.2 8.0 8.0 5.6 3.2 6.4 7.2 8.0 5.6 4.8 3.2
3.2 3.2 4.0 7.5 6.4 7.2 9.6 7.2 9.6 8.8 9.6 7.2 7.5 6.4 5.6 4.8 5.6 8.0 4.0 3.2
1 2 3 4 5 6 7 8 9 10 11 12 13 14 15 16 17 18 19 20
L1 1 1.5 2.5 2.7 2.5 3 2.7 4.5 2.5 1.5 3 1.5 4.5 3.5 2.7 1.5 3 2.5 1.5 1
L2 1 2.5 3.5 5 2.5 5 2.2 2 3 4.5 5 5 3.5 2 4 4.5 5 3.5 3 2
L3 2 2 2.5 4.7 4 4.5 6 4.5 6 5.5 6 4.5 4.7 4 3.5 3 3.5 5 2.5 2
Km/h
MPH
P-06:
P-07:
Fartlek
Page 23
1 2 3 4 5 6 7 8 9 10 11 12 13 14 15 16 17 18 19 20
L1 1 1 2 2 3 3 4 4 5 5 5 4 4 3 3 2 2 1 1 1
L2
L1
L2
L1
L2
2 2 3 3 4 4 5 5 6 6 6 5 5 4 4 3 3 2 2 2
L3 1 3 4 4 5 5 6 6 7 7 7 6 6 5 5 4 4 3 3 2
1 2 3 4 5 6 7 8 9 10 11 12 13 14 15 16 17 18 19 20
1 1.5 2 2.5 3 3.5 4 4.5 5 5 5 4.5 4 3.5 3 2.5 2 1.5 1 1
2 2.5 3 3.5 4 4.5 5 5.5 6 6 6 5.5 5 4.5 4 3.5 3 2.5 2 2
L3 3 3.5 4 4.5 5 5.5 6 6 6.5 6.5 6.5 6 6 5.5 5 4.5 4 3.5 3 2
Incline
Speed (MPH)
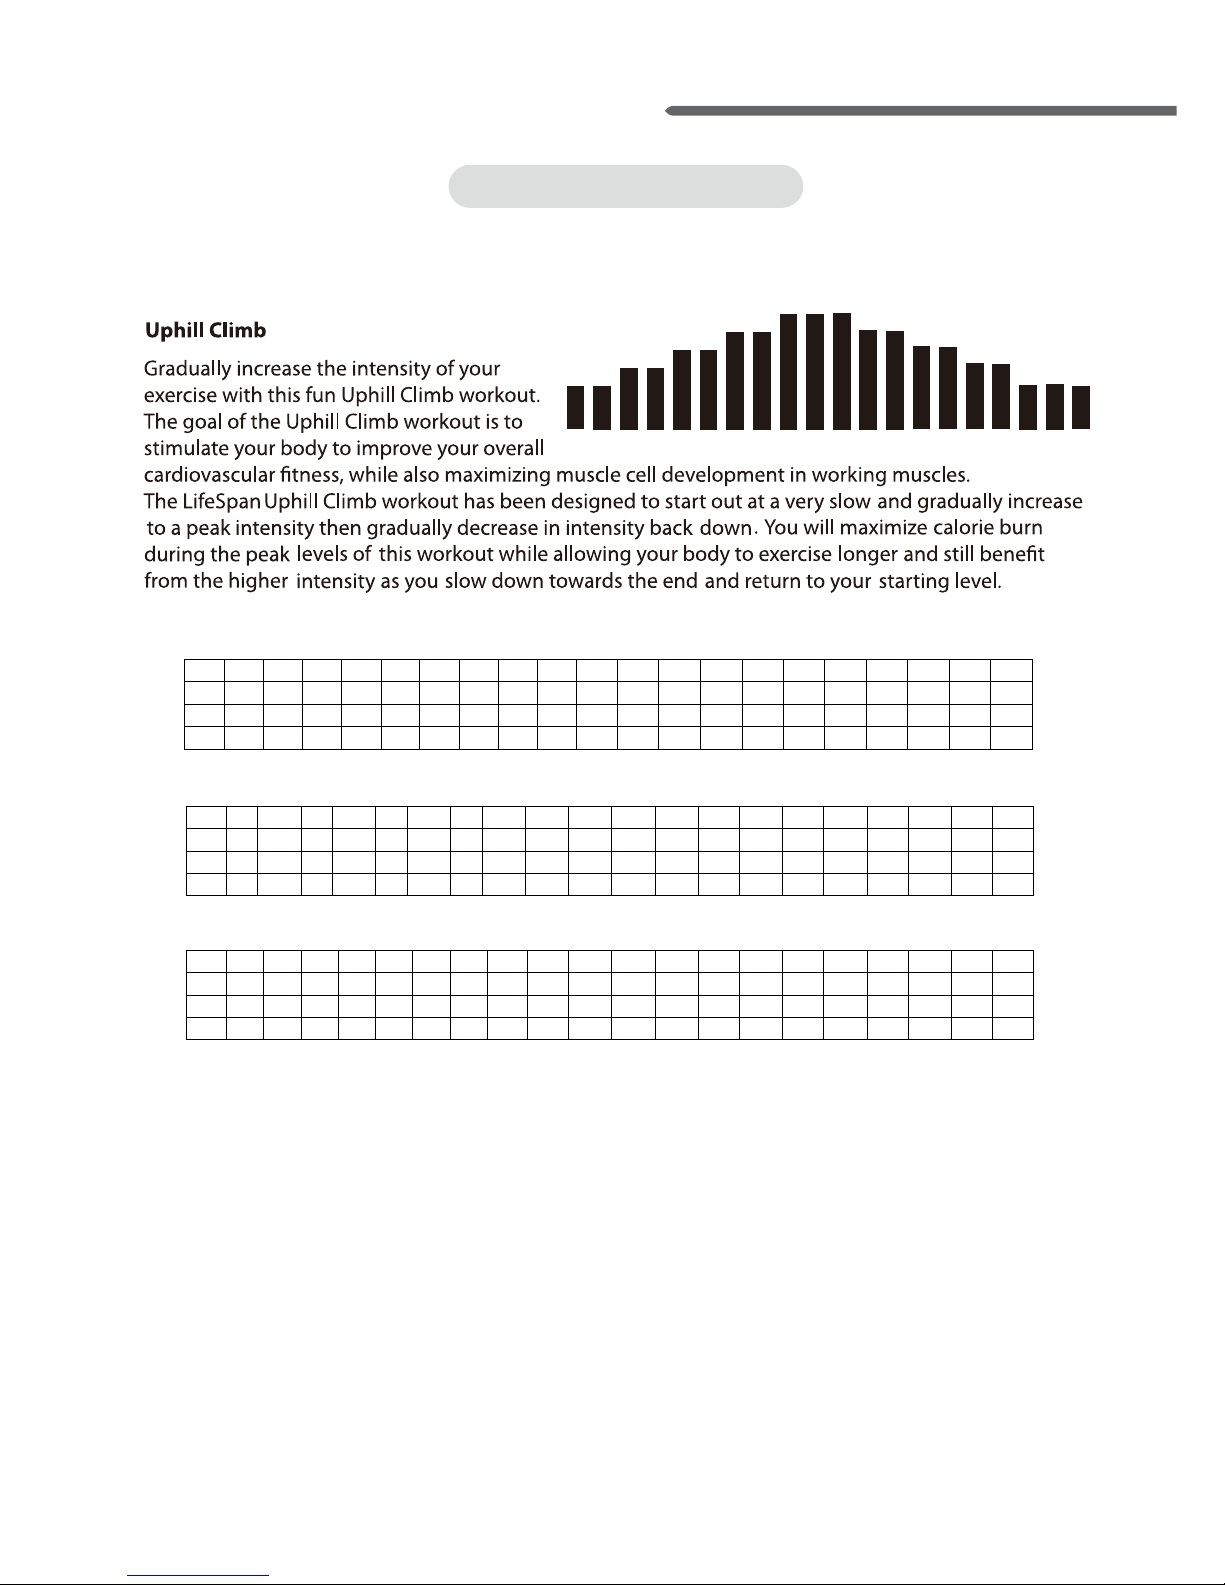
: (30 minute default)
1 2 3 4 5 6 7 8 9 10 11 12 13 14 15 16 17 18 19 20
L3
Speed (KPH)
Healthy Living
1.6 2.4 3.2 4 4.8 5.6 6.4 7.2 8 8 8 7.2 6.4 5.6 4.8 4 3.2 2.4 1.6 1.6
3.2 4 4.8 5.6 6.4 7.2 8 8.8 9.6 9.6 9.6 8.8 8 7.2 6.4 5.6 4.8 4 3.2 3.2
4.8 5.6 6.4 7.2 8 8.8 9.6 9.6 10.4 10.4 10.4 9.6 9.6 8.8 8 7.2 6.4 5.6 4.8 3.2
P-08: Uphill Climb
TM3010 / TM3020/ TM3030
Folding Treadmill
23
Page 24
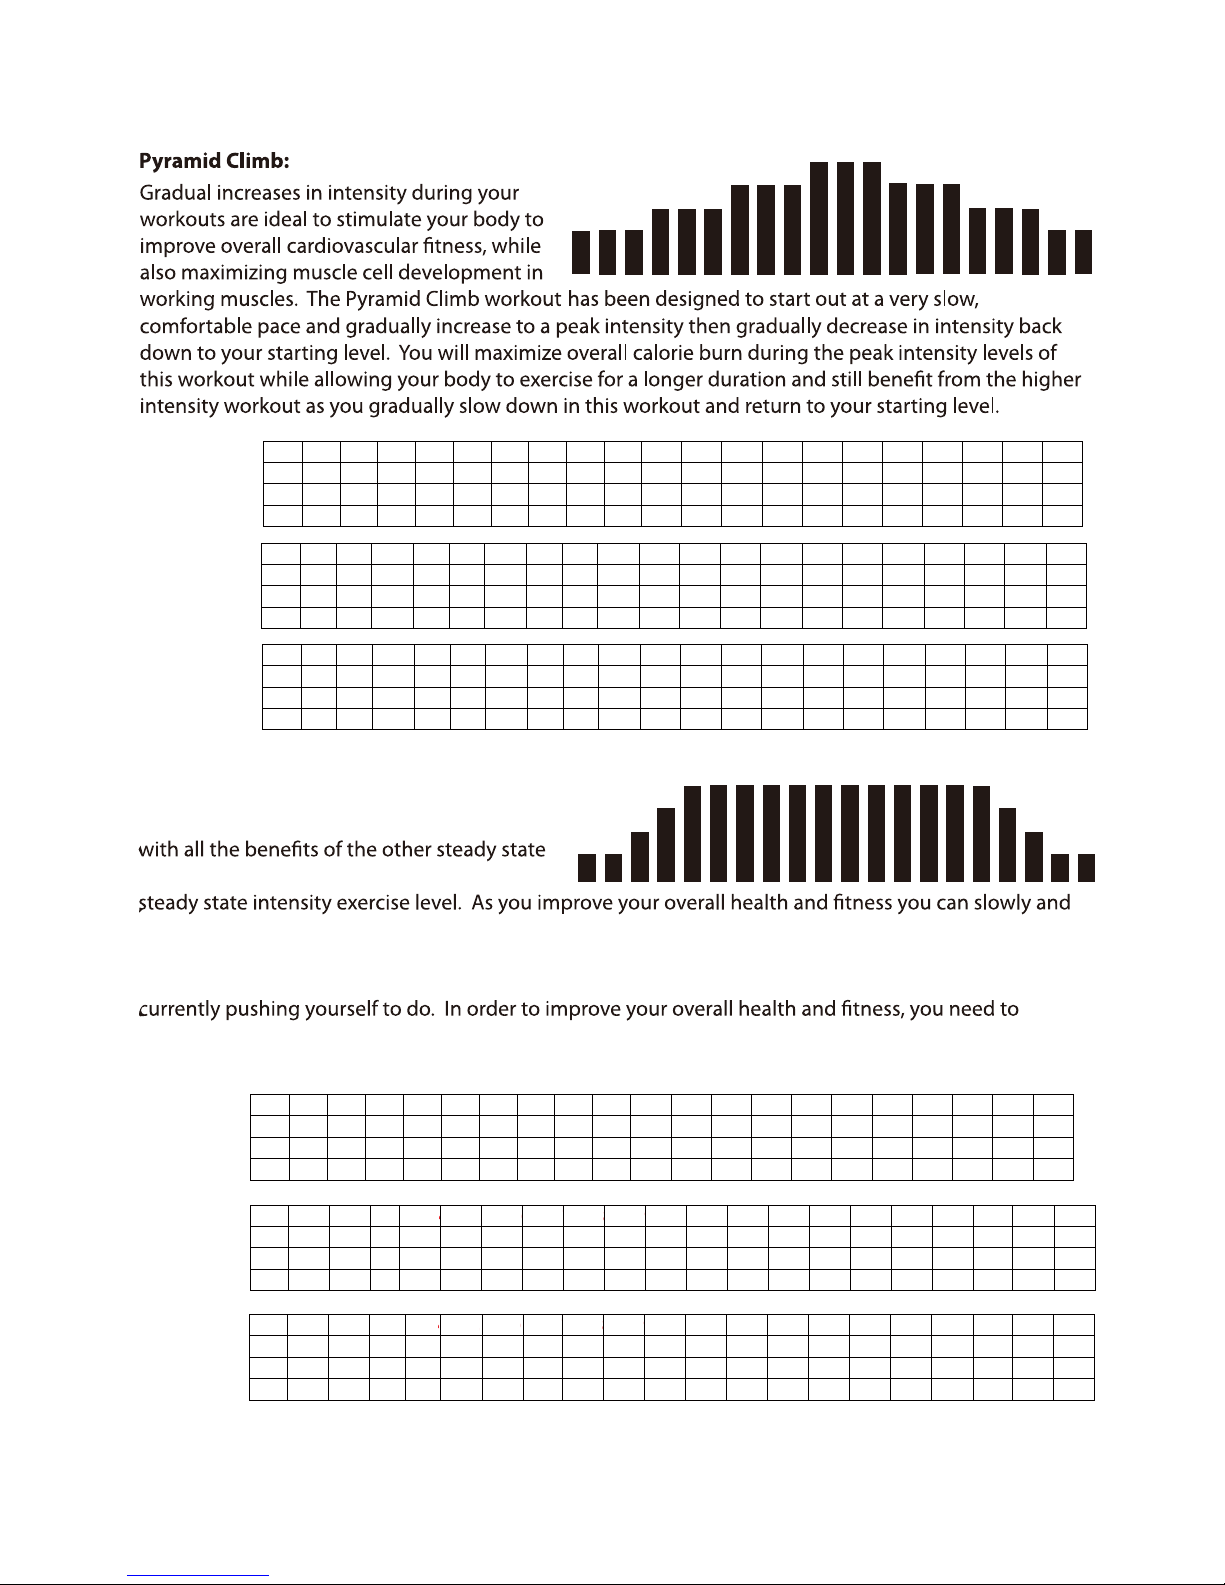
Plateau Climb:
A Plateau Climb workout will provide you
workouts, but push you to maintain a higher
of course always comfortably push yourself to higher overall exercise intensity for longer periods of
time. Remember, if you simply get on your treadmill and go at the same pace, for the same amount of
time every day when you workout, your body will only improve to the level of the workouts you are
always “change” your workouts so you don’t do the same workout within one week, while at the same
time slowly increase your overall exercise intensity while also increasing your overall exercise time.
12345678910111213141516171819
20
L1 1 1 2 3 3 3 3 3 3 3 3 3 3 3 3 3 3 2 1 1
L2 1 1 2 3 4 4 4 4 4 4 4 4 4 4 4 4 3 2 1 1
L3 2 2 3 4 5 5 5 5 5 5 5 5 5 5 4 3 2 2 1 1
1 2 4 5 6 7 8 9 10111213141516171192
L1 1 1.5 2 2.5 2.5 2.5 2.5 2.5 2.5 2.5 2.5 2.5 2.5 2.5 2.5 2.5 2.5 2 1.5 1
L2 1.5 1.5 2 2.5 3.5 3.5 3.5 3.5 3.5 3.5 3.5 3.5 3.5 3.5 3.5 3.5 2.5 2 1.5 1.5
L3 2 2 3 4 5 5 5 5 5 5 5 5 5 5 5 5 4 3 2 2
Incline
Speed
(MPH)
(40 minute default)
1 2 3 4 5 6 7 8 9 10 11 12 13 14 15 16 17 18 19 20
1 2 3 4 5 6 7 8 9 10 11 12 13 14 15 16 17 18 19 20
1 2 3 4 5 6 7 8 9 10 11 12 13 14 15 16 17 18 19 20
1 2 3 4 5 6 7 8 9 10 11 12 13 14 15 16 17 18 19 20
1 2 3 445 6 7 8 9
1 2 3 5 6 7 8 9
10 11 12 13 14 15 16 17 18 19 20
10 11 12 13 14 15 16 17 18 19 20
L1 1 1 1 2 2 2 3 3 3 4 4 4 3 3 3 2 2 2 1 1
L2 2 2 2 3 3 3 4 4 4 5 5 5 4 4 4 3 3 3 2 2
L3 3 3 3 4 4 4 5 5 5 6 6 6 5 5 5 4 4 4 3 3
123 456 789 10111213141516171819
2
L1 1 1 1.5 2 2 2.5 3 3 3.5 4 4 4 3.5 3 3 2.5 2 2 1.5 1
L2 2 2 2.5 3 3 3.5 4 4 4.5 5 5 5 4.5 4 4 3.5 3 3 2.5 2
L3 2 3 3.5 4 4 4.5 5 5 5.5 6 6 6 5.5 5 5 4.5 4 4 3.5 2
Incline
Speed
(MPH)
(30 minute default)
123 456 789 10111213141516171819
2
L1
L2
L3
Speed
(KPH)
1 2 4 5 6 7 8 9 10111213141516171192
L1
L2
L3
Speed
(KPH)
1.6 1.6 2.4 3.2 3.2 4 4.8 4.8 5.6 6.4 6.4 6.4 5.6 4.8 4.8 4 3.2 3.2 2.4 1.6
3.2 3.2 4 4.8 4.8 5.6 6.4 6.4 7.2 8 8 8 7.2 6.4 6.4 5.6 4.8 4.8 4 3.2
3.2 4.8 5.6 6.4 6.4 7.2 8 8 8.8 9.6 9.6 9.6 8.8 8 8 7.2 6.4 6.4 5.6 3.2
1.6 2.4 3.2 4 4 4 4 4 4 4444 4 4 4 4 3.2 2.4 1.6
2.4 2.4 3.2 4 5.6 5.6 5.6 5.6 5.6 5.6 5.6 5.6 5.6 5.6 5.6 5.6 4 3.2 2.4 2.4
3.2 3.2 4.8 6.4 8 8 8 8 8 8 8 8 8 8 8 8 6.4 4.8 3.2 3.2
P-10: Plateau Climb
P-09: Pyramid Climb
24
Page 25
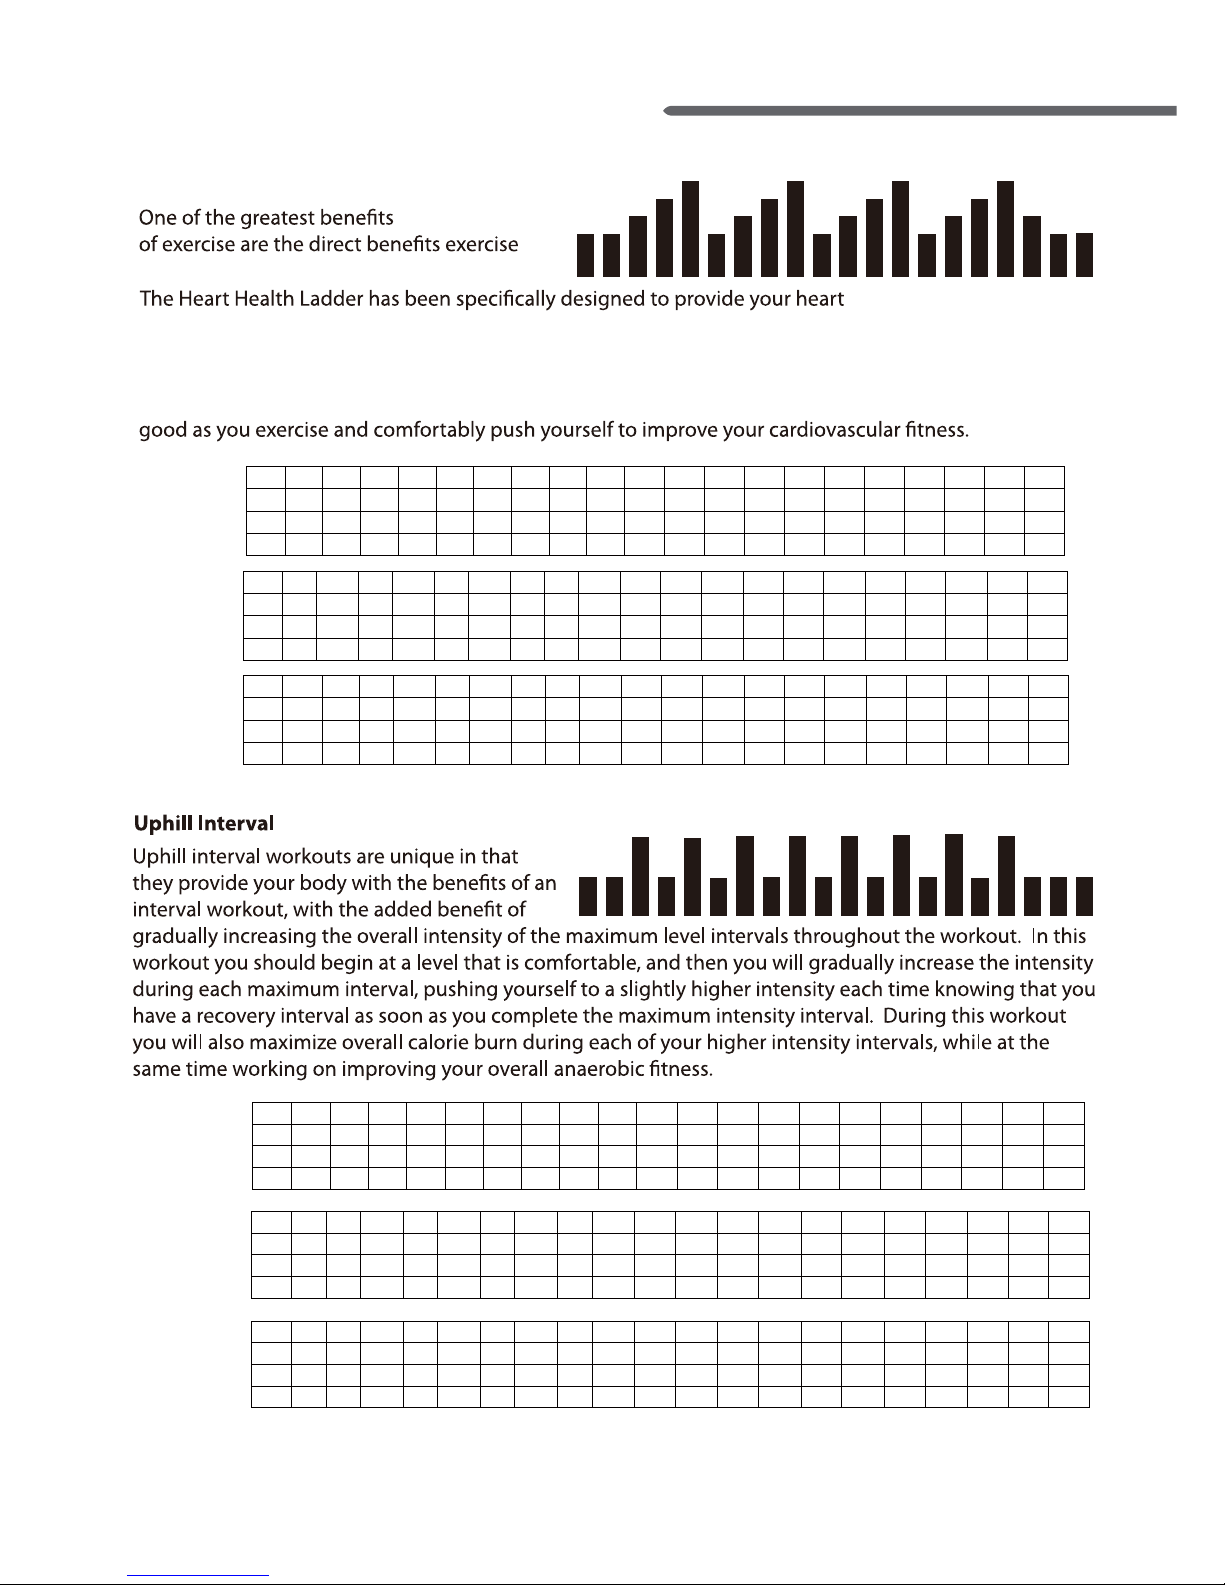
system with a series of progressively harder exercise intensity’s that will improve your overall
aerobic endurance, while also stimulating your anaerobic endurance. Remember as you go
through this workout that it may be challenging for a few minutes, but each progression has been
carefully timed to also provide recovery intervals after the highest intensity interval, so you can feel
1 2 3 4 5 6 7 8 9 10 11 12 13 14 15 16 17 18 19 20
L1 1 1 2 3 4 2 3 4 2 3 4 2 3 4 2 3 4 3 2 1
L2 2 2 3 4 5 3 4 5 3 4 5 3 4 5 3 4 5 4 3 2
L3 2 3 4 5 6 4 5 6 4 5 6 4 5 6 4 5 6 5 4 3
1 2 3 4 5 6 7 8 9 10 11 12 13 14 15 16 17 18 19 20
L1 1 1.5 2 3 4 2.5 3 4 2.5 3 4 2.5 3 4 2.5 3 4 3.5 2 1
L2 2 2.5 3 3.5 5 3.5 4 5 3.5 4 5 3.5 4 5 3.5 4 5 3.5 3 2
L3 2 3 4 5 6 4 5 6 4 5 6 4 5 6 4 5 6 5 4 3
Incline
Speed
(MPH)
1 2 3 4 5 6 7 8 9 10 11 12 13 14 15 16 17 18 19 20
L1 1 1 2 3 2 3 2 3 2 3 2 3 2 3 2 3 2 3 2 1
L2 2 2 4 2 4 2 4 2 4 2 4 2 4 2 4 2 4 2 2 2
L3 2 3 5 3 5 3 5 3 5 3 5 3 5 3 5 3 5 3 3 2
1 2 3 4 5 6 7 8 9 10 11 12 13 14 15 16 17 18 19 20
L1 1 2 3 2 3 2 3 2 3 2 3 2 3 2 3 2 3 2 2 1
L2 2 2 4.5 2 4.5 2 4.5 2 4.5 2 4.5 2 4.5 2 4.5 2 4.5 2 2 2
L3 2 3 5 3 5 3 5 3 5 3 5 3 5 3 5 3 5 3 3 3
Incline
Speed
(MPH)
: (20 minute default)
1 2 3 4 5 6 7 8 9 10 11 12 13 14 15 16 17 18 19 20
L1
L2
L3
Speed
(KPH)
1 2 3 4 5 6 7 8 9 10 11 12 13 14 15 16 17 18 19 20
L1
L2
L3
Speed
(KPH)
1.6 2.4 3.2 4.8 6.4 4 4.8 6.4 4 4.8 6.4 4 4.8 6.4 4 4.8 6.4 5.6 3.2 1.6
3.2 4 4.8 5.6 8 5.6 6.4 8 5.6 6.4 8 5.6 6.4 8 5.6 6.4 8 5.6 4.8 3.2
3.2 4.8 6.4 8 9.6 6.4 8 9.6 6.4 8 9.6 6.4 8 9.6 6.4 8 9.6 8 6.4 4.8
1.6 3.2 4.8 3.2 4.8 3.2 4.8 3.2 4.8 3.2 4.8 3.2 4.8 3.2 4.8 3.2 4.8 3.2 3.2 1.6
3.2 3.2 7.2 3.2 7.2 3.2 7.2 3.2 7.2 3.2 7.2 3.2 7.2 3.2 7.2 3.2 7.2 3.2 3.2 3.2
3.2 4.8 8 4.8 8 4.8 8 4.8 8 4.8 8 4.8 8 4.8 8 4.8 8 4.8 4.8 4.8
Ladder
has on the heart and cardiovascular system.
: (30 minute default)
P-12: Uphill Interval
P-11: Ladder
TM3010 / TM3020/ TM3030
Folding Treadmill
25
Page 26
1 2 3 4 5 6 7 8 9 10 11 12 13 14 15 16 17 18 19 20
L1 1 2 3 3 3 3 3 3 3 3 3 3 3 3 3 3 3 3 2 1
L2 2 2 4 4 4 4 4 4 4 4 4 4 4 4 4 4 4 4 2 2
L3 2 3 5 5 5 5 5 5 5 5 5 5 5 5 5 5 5 5 3 2
1 2 3 4 5 6 7 8 9 10 11 12 13 14 15 16 17 18 19 20
L1 2 2.5 3 3 3 3 3 3 3 3 3 3 3 3 3 3 3 3 2.5 2
L2 3 3.5 4.5 4.5 4.5 4.5 4.5 4.5 4.5 4.5 4.5 4.5 4.5 4.5 4.5 4.5 4.5 4.5 3.5 3
L3 2 3.5 5 5 5 5 5 5 5 5 5 5 5 5 5 5 5 5 3.5 2
Incline
Speed
(MPH)
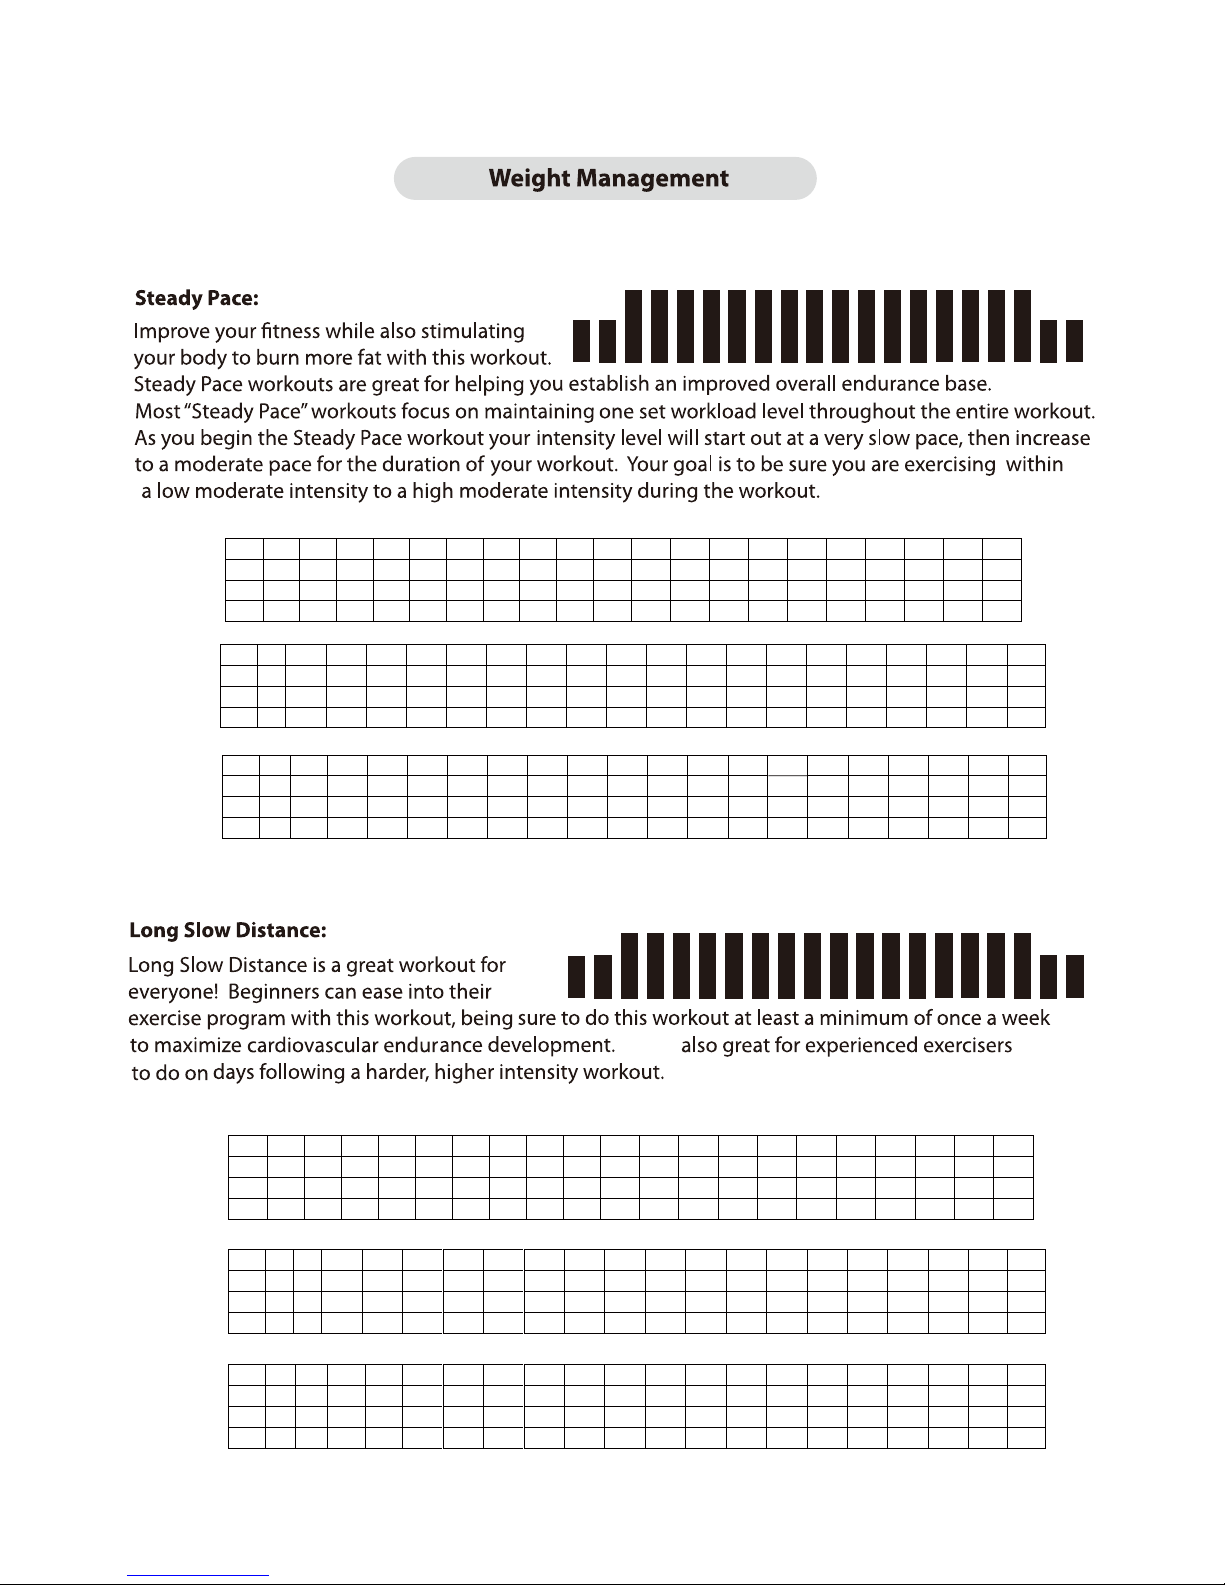
This is
1 2 3 4 5 6 7 8 9 10 11 12 13 14 15 16 17 18 19 20
L1 1 1 2 2 2 2 2 2 2 2 2 2 2 2 2 2 2 2 1 1
L2 2 2 3 3 3 3 3 3 3 3 3 3 3 3 3 3 3 3 2 2
L3 2 3 4 4 4 4 4 4 4 4 4 4 4 4 4 4 4 4 3 2
1 2 3 4 5 6 7 8 9 10 11 12 13 14 15 16 17 18 19 20
L1 1 1 2.5 2.5 2.5 2.5 2.5 2.5 2.5 2.5 2.5 2.5 2.5 2.5 2.5 2.5 2.5 2.5 1 1
L2 2 2 3.5 3.5 3.5 3.5 3.5 3.5 3.5 3.5 3.5 3.5 3.5 3.5 3.5 3.5 3.5 3.5 2 2
L3 2 3 4.5 4.5 4.5 4.5 4.5 4.5 4.5 4.5 4.5 4.5 4.5 4.5 4.5 4.5 4.5 4.5 3 2
Incline
Speed
(MPH)
(40 minute default)
1 2 3 4 5 6 7 8 9 10 11 12 13 14 15 16 17 18 19 20
L1
L2
L3
Speed
(KPH)
1 2 3 4 5 6 7 8 9 10 11 12 13 14 15 16 17 18 19 20
L1
L2
L3
Speed
(KPH)
3.2 4 4.8 4.8 4.8 4.8 4.8 4.8 4.8 4.8 4.8 4.8 4.8 4.8 4.8 4.8 4.8 4.8 4 3.2
4.8 5.6 7.2 7.2 7.2 7.2 7.2 7.2 7.2 7.2 7.2 7.2 7.2 7.2 7.2 7.2 7.2 7.2 5.6 4.8
3.2 5.6 8 8 8 8 8 8 8 8 8 8 8 8 8 8 8 8 5.6 3.2
1.6 1.6 4 4 4 4 4 4 4 4 4 4 4 4 4 4 4 4 1.6 1.6
3.2 3.2 5.6 5.6 5.6 5.6 5.6 5.6 5.6 5.6 5.6 5.6 5.6 5.6 5.6 5.6 5.6 5.6 3.2 3.2
3.2 4.8 7.2 7.2 7.2 7.2 7.2 7.2 7.2 7.2 7.2 7.2 7.2 7.2 7.2 7.2 7.2 7.2 4.8 3.2
(40 minute default)
P-13: Steady Pace
P-14: Long Slow Distance
26
Page 27
1 2 3 4 5 6 7 8 9 10 11 12 13 14 15 16 17 18 19 20
1234 5 6 7 8 9 10 11 12 13 14 15 16 17 18 19 20
1 2 3 4 5 6 7 8 9 10 11 12 13 14 15 16 17 18 19 20
1 2 3 4 5 6 7 8 9 10 11 12 13 14 15 16 17 18 19 20
L1 1 1 3 3 3 3 3 3 3 3 3 3 3 3 3 3 3 3 1 1
L2 2 2 5 5 5 5 5 5 5 5 5 5 5 5 5 5 5 5 2 2
L3 3 4 6 6 6 6 6 6 6 6 6 6 6 6 6 6 6 6 4 3
L1 1 1.5 3.5 3.5 3.5 3.5 3.5 3.5 3.5 3.5 3.5 3.5 3.5 3.5 3.5 3.5 3.5 3.5 2.5 1.5
2 2.5 4.5 4.5 4.5 4.5 4.5 4.5 4.5 4.5 4.5 4.5 4.5 4.5 4.5 4.5 4.5 4.5 3.5 2.5
L3 3 4.5 5.5 5.5 5.5 5.5 5.5 5.5 5.5 5.5 5.5 5.5 5.5 5.5 5.5 5.5 5.5 3.5 2.5 1.5
Incline
Speed
(MPH)
: (20 minute default)
L1
L2
L2
L3
L2
L3
L2
L3
Speed
(KPH)
1 2 3 4 5 6 7 8 9 10 11 12 13 14 15 16 17 18 19 20
L1 1 2 3 4 2 4 2 4 2 4 2 4 2 4 2 4 2 4 3 2
2 3 4 5 3 5 3 5 3 5 3 5 3 5 3 5 3 5 4 3
2 3 5 6 4 6 4 6 4 6 4 6 4 6 4 6 4 6 5 3
1 2 3 4 5 6 7 8 9 10 11 12 13 14 15 16 17 18 19 20
L1 1 2 3.5 3 2.5 3 2.5 3 2.5 3 2.5 3 2.5 3 2.5 3 2.5 3 3.5 2
2 3 4.5 5 3.5 5 3.5 5 3.5 5 3.5 5 3.5 5 3.5 5 3.5 5 4.5 3
2 3 4.5 6 4.5 6 4.5 6 4.5 6 4.5 6 4.5 6 4.5 6 4.5 6 3.5 2
Incline
Speed
(MPH)
L1
L2
L3
Speed
(KPH)
1.6 2.4 5.6 5.6 5.6 5.6 5.6 5.6 5.6 5.6 5.6 5.6 5.6 5.6 5.6 5.6 5.6 5.6 4 2.4
3.2 4 7.2 7.2 7.2 7.2 7.2 7.2 7.2 7.2 7.2 7.2 7.2 7.2 7.2 7.2 7.2 7.2 5.6 4
4.8 7.2 8.8 8.8 8.8 8.8 8.8 8.8 8.8 8.8 8.8 8.8 8.8 8.8 8.8 8.8 8.8 5.6 4 2.4
1.6 3.2 5.6 4.8 4 4.8 4 4.8 4 4.8 4 4.8 4 4.8 4 4.8 4 4.8 5.6 3.2
3.2 4.8 7.2 8 5.6 8 5.6 8 5.6 8 5.6 8 5.6 8 5.6 8 5.6 8 7.2 4.8
3.2 4.8 7.2 9.6 7.2 9.6 7.2 9.6 7.2 9.6 7.2 9.6 7.2 9.6 7.2 9.6 7.2 9.6 5.6 3.2
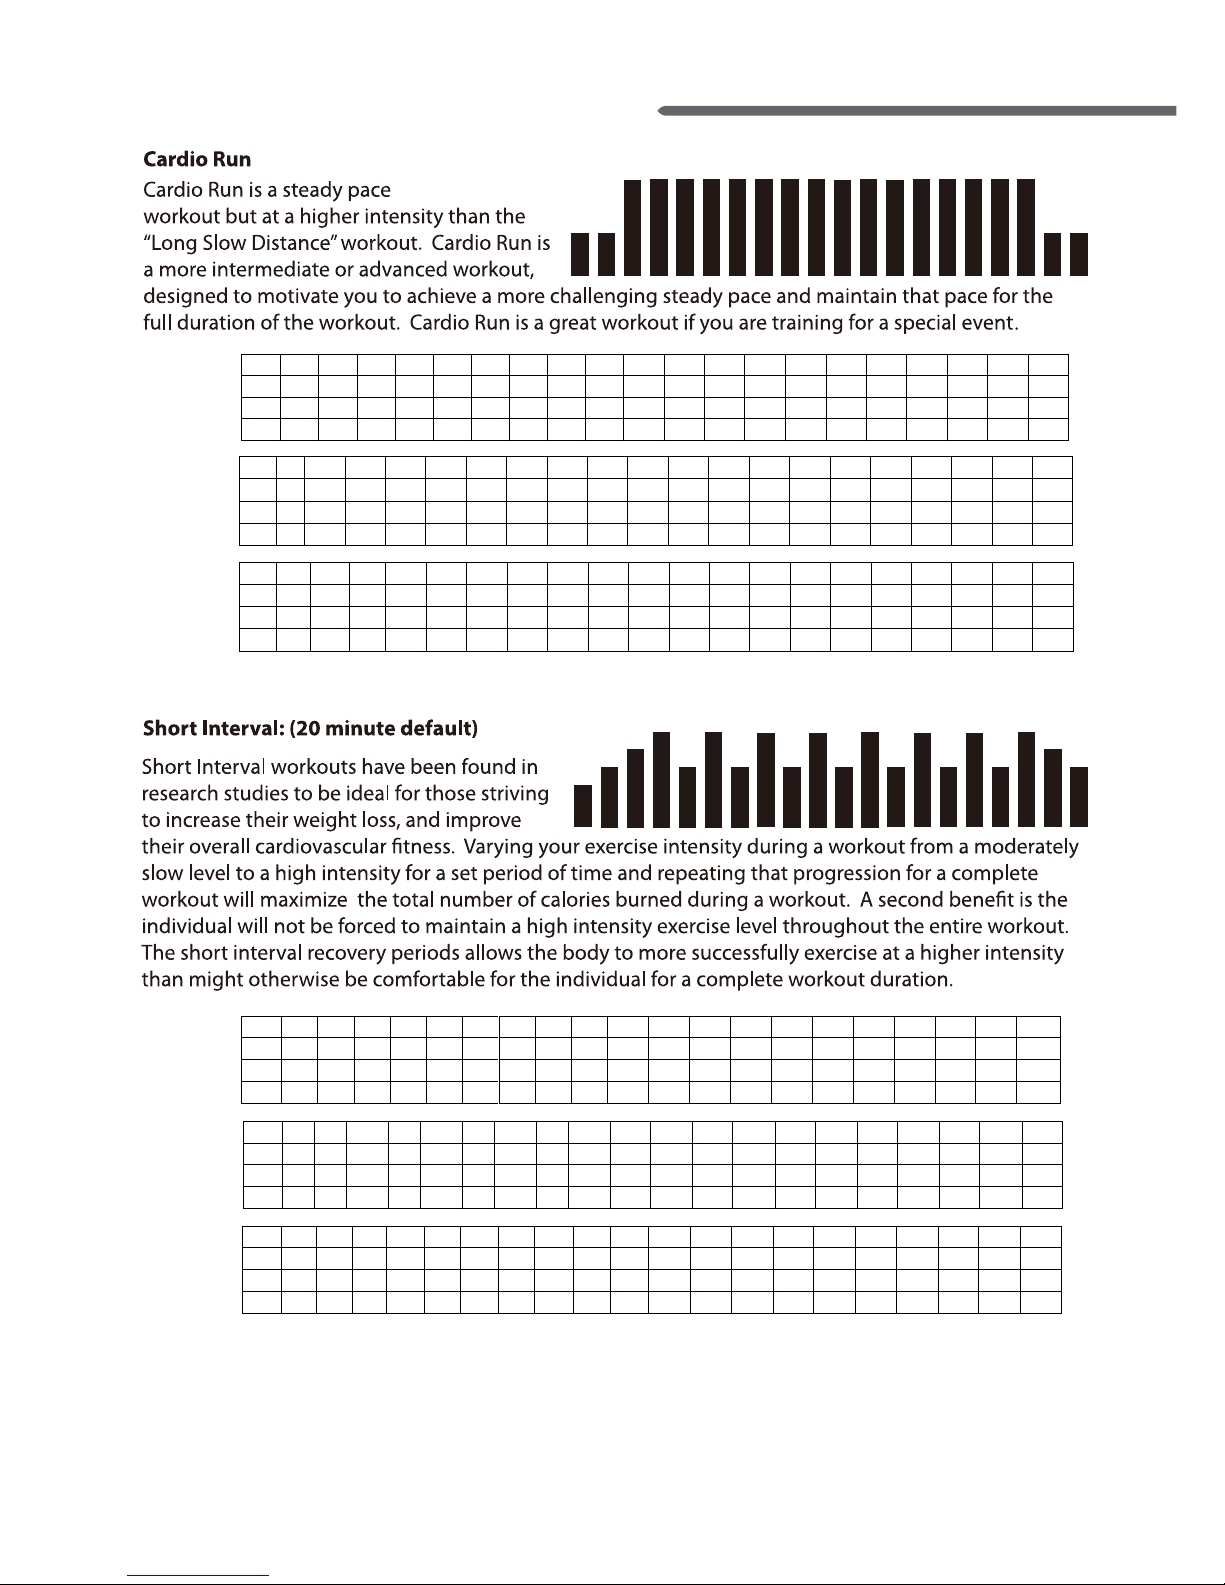
P-15: Cardio Run
P-16: Short Interval
TM3010 / TM3020/ TM3030
Folding Treadmill
27
Page 28
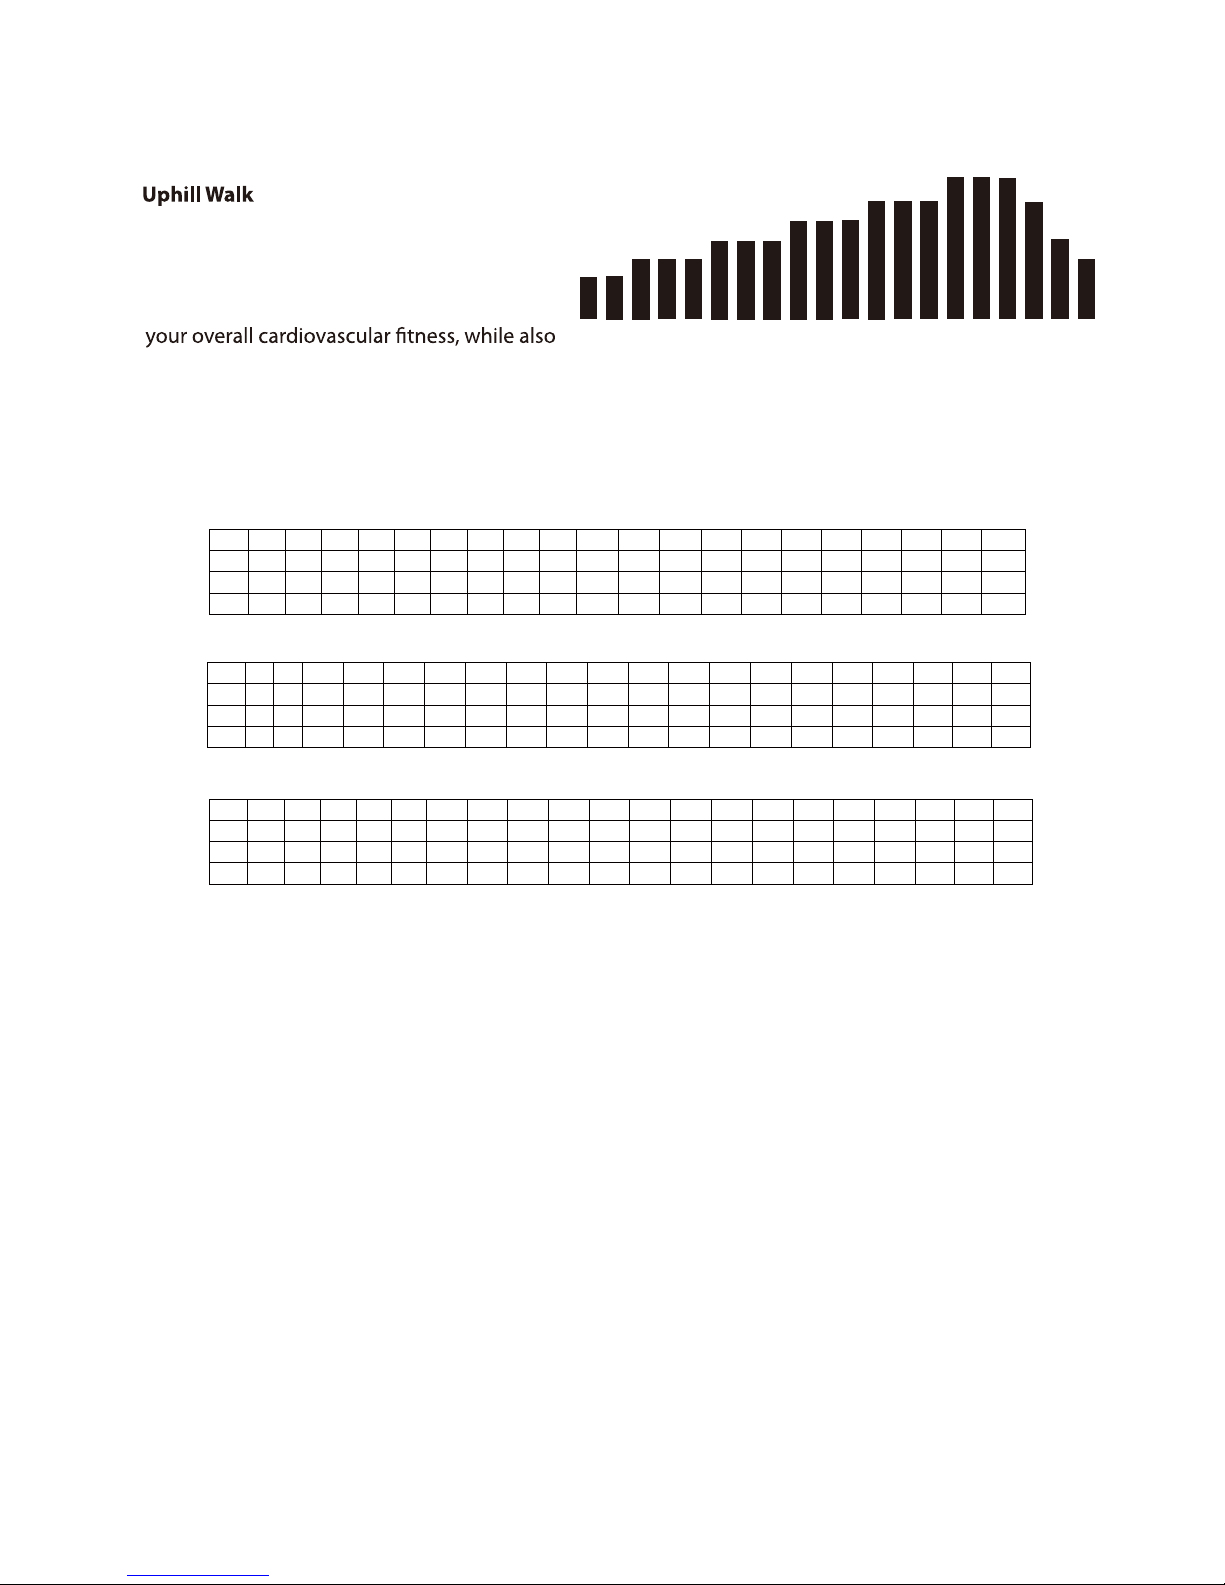
The Uphill Walk gradually increases the
intensity of your exercise peaking at a high
intensity. The goal of the Uphill Walk workout is to stimulate your body to improve
maximizing muscle cell development in working muscles. The Uphill Walk workout has been designed
to start out at a slow, comfortable pace and gradually increase to a peak intensity then with a quick
decrease in intensity back down to a recovery level. You will maximize overall calorie burn during the
peak intensity levels of this workout while allowing your body to exercise for a longer duration.
1 2 3 4 5 6 7 8 9 10 11 12 13 14 15 16 17 18 19 20
1 2 3 4 5 6 7 8 9 10 11 12 13 14 15 16 17 18 19 20
L1 1 1 2 2 2 3 3 3 4 4 4 5 5 5 6 6 6 5 3 2
L2
L2
L2
2 2 3 3 3 4 4 4 5 5 5 6 6 6 7 7 7 6 4 3
L3 2 2 3 3 4 4 4 5 5 5 6 6 6 7 7 7 6 5 4 3
12
1 2 3 4 5 6 7 8 9 10 11 12 13 14 15 16 17 18 19 20
L1 1 1 1.5 1.5 1.5 1.5 2 2 2 2.5 2.5 2.5 3 3 3 3.5 3.5 3 2 1
2 2 3.5 3.5 3.5 4 4 4 4.5 4.5 4.5 5 5 5 5.5 5.5 5.5 4 3 2
L3 3 3 4 4 4 4.5 4.5 4.5 5 5 5 5.5 5.5 5.5 6 6 6 5 4 3
Incline
Speed (MPH)
: (30 minute default)
12
L1
L3
Speed (KPH)
1.6 1.6 2.4 2.4 2.4 2.4 3.2 3.2 3.2 4 4 4 4.8 4.8 4.8 5.6 5.6 4.8 3.2 1.6
3.2 3.2 5.6 5.6 5.6 6.4 6.4 6.4 7.2 7.2 7.2 8 8 8 8.8 8.8 8.8 6.4 4.8 3.2
4.8 4.8 6.4 6.4 6.4 7.2 7.2 7.2 8 8 8 8.8 8.8 8.8 9.6 9.6 9.6 8 6.4 4.8
P-17: Uphill Walk
28
Page 29

B
Maintenance
elt Tensioning
If the belt begins to slip during use, it will need to be tensioned. Your treadmill is equipped with
tension bolts that are accessible from the back of the treadmill. Before tensioning the belt,
ruoy ni dedulcni ,hcnerW xeH mm 6 a gnisU .)HPM3(HPK8.4 ot deeps eht tes dna llimdaert eht trats
hardware bag, turn the right and left tension bolts 1/2 turn clockwise.
After you adjust each side 1/2 turn, test to see if the slipping is eliminated. If the belt slips repeat
If you turn one side more than the other, the belt will start to drift to the side of the
treadmill and will need to be aligned. DO NOT tighten more than 2 full turns on each side.
If slippage still occurs, contac
t your authorized retailer.
Aligning the Running Belt
Ensure the running belt is centered on your treadmill at all times. Running style and a non- level
1. Press "START", then increase the treadmill speed to 4.8KPH (3MPH).
2. Stand at the rear of the treadmill to determine which direction the belt is drifting.
3. If the belt drifts to the left, turn the left adjustment bolt one-quarter turn clockwise and
the right adjustment bolt one-quarter turn counter-clockwise. (See Fig.1 )
4. If the belt drifts to the right, turn the left adjustment bolt one-quarter turn counter-clock
wise and the right adjustment bolt one-quarter turn clockwise. (See Fig.2 )
5. Observe the tracking of the belt for about two minutes. Repeat steps 3 . 4 and 5 as needed.
Fig.1
To move belt to the Right
Fig.2
To move belt to the Left
this step and test again.
Note: Over tensioning the belt can cause unnecessary friction and wear and tear on
the belt , motor and electronics.
( See Fig.1 )
( See Fig.2 )
TM3010 / TM3020/ TM3030
Folding Treadmill
29
Page 30

Belt Lubrication
Use only 100% Silicone and avoid using aerosol silicone sprays which include additives and petroleum
The running belt should be lubricated every 3 months (regardless of use) or every 50
over time and the belt will dry out.
Note: Even though the running belt is lubed from the manufacturer, you should lubricate
the unit was manufactured and when it was purchased.
Apply the silicone to the underside of the treadmill belt. Do not apply to the walking surface.
This may be accomplished by standing up the treadmill and applying the silicone to the inside portion
Note: When lubricating the belt, make sure the treadmill is located on a surface that can be easily
Cleaning and Maintenance
It is recommended to wipe the treadmill down after each use to keep the treadmill clean and dry. A
mild detergent may be used at times to help remove all dirt and salt from the belt, painted parts and
the display.
motor cover and cleaning around the
motor and electronics. It is recommended to clean the
motor compartment if the treadmill is in an
motor compartment. It is a good idea at this time to check
and tighten all assembly hardware as well.
Warning: Unplug the Power Cord Before Removing the Motor Cover.
of the belt. Spray the silicone down and across the belt. Rotate the belt 1/2 of the circumference
and repeat. About one ounce of Silicone should be used for each application.
The unit should be cleaned every 150 hours of use. This cleaning would include removing the
While in use of eFold “up”
or “down”, ma
k
e s
u
r
e no pe
o
ple
or pets are
on
/underneath the trea
dm
ill deck.
R
emove s
a
fe
t
y
key
when not in use and
s
t
o
r
e out of
reac
h
of c
hildren.
1.Insert safety ke
y
.
2.Enter program
using arrows,pres
s
mode.
3.E
n
t
er level using
arr
ows, pr
ess
mode.
4.En
ter
ti
m
e u
s
i
ng
arrow
s, press mode.
5.Enter weight using arrows, press mode.
6.Pres
s
sta
r
t t
o begin worko
ut.
Press quic
k
k
ey
to ch
oose speed
or incline
after press s
t
art.
R
i
sk of i
n
jury to
pe
rso
n:
T
o
avoid
i
nj
u
r
y
, sta
n
d
o
n the side ra
i
ls
before start
ing t
readmi
ll. Read owner's
manual
be
fore us
ing.
30
Page 31
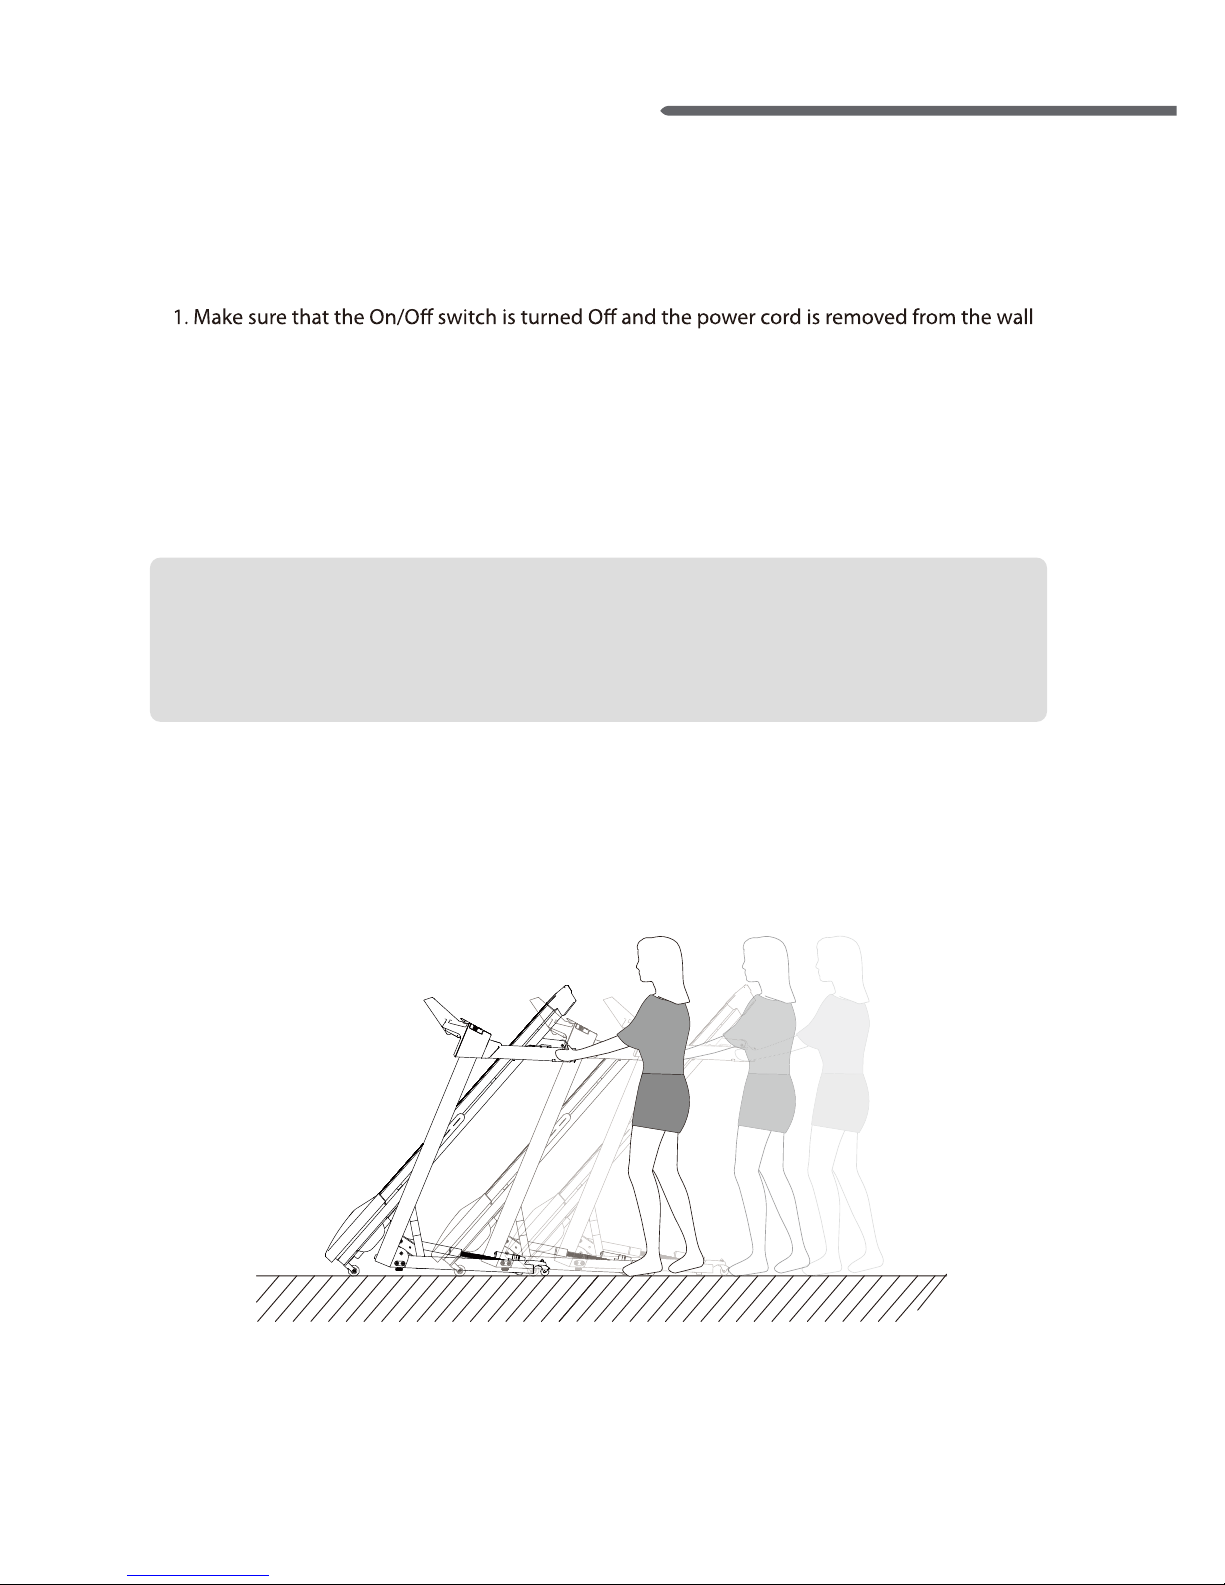
The treadmill comes with a folding feature that reduces the amount of storage space required
when your treadmill is not in use and makes the treadmill easier to move.
Moving the Treadmill
2. Make sure that nothing is on or near your treadmill which might spill, be knocked over or
prevent the treadmill from completely folding.
Caution:
• Do not lean against the treadmill once it is folded or place items on it that could cause it to
become unstable or fall over. This could result in serious personal injury.
• Do not connect the power cord when the treadmill is folded or try to operate the treadmill in
the folded position.
Moving and Storage
and the treadmill.
3. There are 4 wheels for treadmill transportation. Place both hands on the handlebar, anyone can
easily move treadmill by push or pull it.
Place both hands on the handlebar, push or pull it to move treadmill.
TM3010 / TM3020/ TM3030
Folding Treadmill
31
Page 32

The treadmill is designed and manufactured to be reliable and easy to us
problem can not be solved, please contact your local distributor for technical service.
e. However, if
Problem:
The Scan light is dimly lit and no other lights are on.
Solution:
The unit is in energy saving mode. Press and hold the start button for 2 seconds.
Troubleshooting
Problem: The console is erratic or not lighting up
Solution: Check to make sure that the treadmill is properly plugged in, turn the power
Problem: The belt does not stay in the center of the treadmill when in use.
Solution: First check to make sure that the treadmill is level, then refer to the instructions in
this manual on how to tension and adjust the belt.
Problem: The treadmill motor seems strained or E1 comes up after several minutes of use.
Solution: The lubricating silicone that is applied to the deck and belt is wearing down and
the belt needs to be lubricated with silicone spray.
Problem: The treadmill belt slips during use.
Solution: The belt may need to be tensioned after a period of use. Refer to the Belt
Tensioning and Adjustment Section of this manual.
Problem: Heart Rate is erratic or not picking up.
Solution: Make sure your hands are moist (Aloe Vera helps). Make sure all connectors at the
back of the console are properly connected and no wires are damaged.
If wearing a chest strap make sure the batteries are good and that the electrodes
are moist and positioned properly on your chest.
Problem: E1 comes up after several minute of use.
Solution:
Check all wi
re harness connections to be sure they are all properly connected.
If the problem persists contact your local service.
Problem: Silicone icon lights up on console.
Solution: Lubricate the running belt with 100% pure silicone. Then simultaneously press
button
Incline
When E1 is displayed, remove safety key and insert it again to restart treadmill. If E1 is still
shown on display, please check the following:
1. Please check all cable connection is well connected.
2. The treadmill did not move after pressing the “START” button and show E1, please check
if there is any part stuck.
3. The treadmill run for few seconds after pressing “START” but stops, please check if the
4. Please check wires connected to the motor are tight and secure.
5. Please contact your local distributor / place of purchase for technical service if E1 can
not be solved.
sensor
32
Page 33
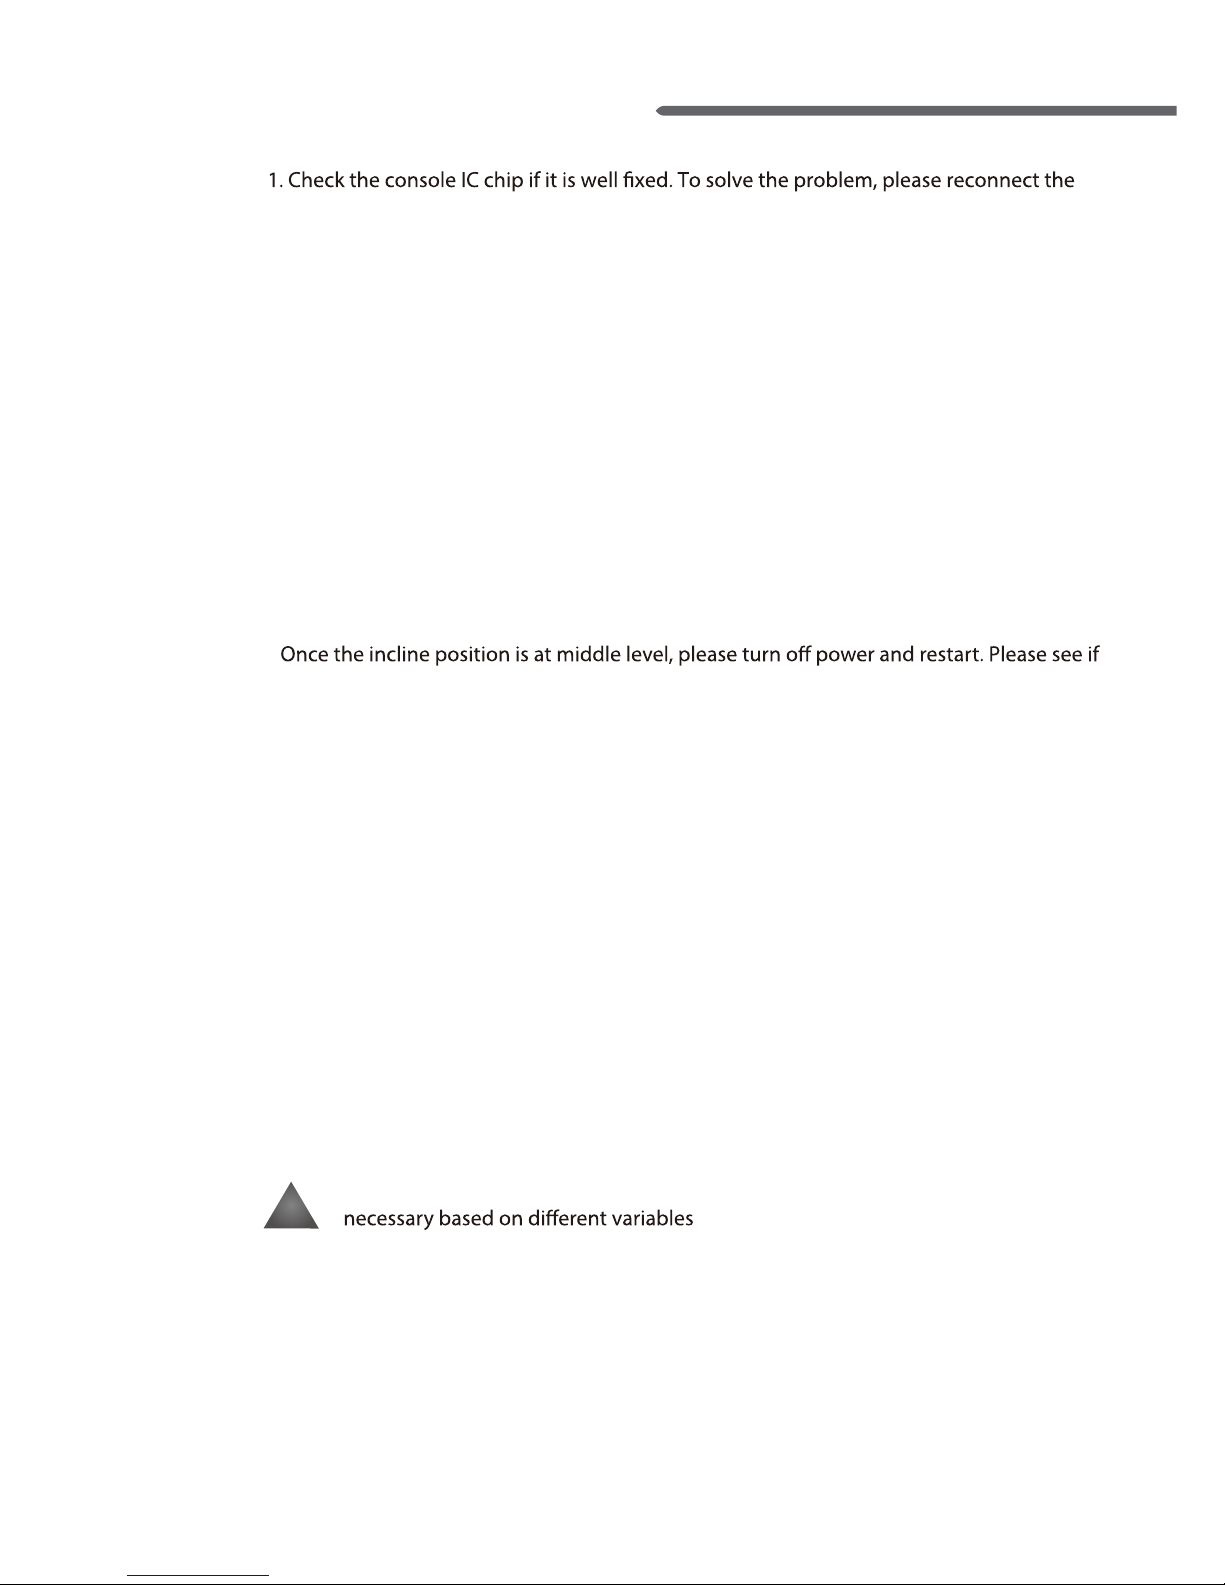
.esu fo etunim lareves retfa pu semoc 7E / 6E :melborF
When E6 / E7 is displayed, remove safety key and insert it again to restart treadmill.
:noituloS
1. Reset incline value:
(1) When the position of incline is lower than middle level, press the “MODE” button and
INCLINE “Λ” button. Hold both buttons and the incline will be raised. Release the two
buttons till the incline position is up to middle level.
(2) When the position of incline is higher than middle level, press the “MODE” button and
INCLINE “V” button. Hold both buttons and the incline will be lowered. Release the two
buttons till the incline position is down to middle level.
Please try it for few times. If you can not get the incline moved, please contact local
distributor / place of purchase.
E6 / E7 goes away. If not, please contact your local distributor / place of purchase for
technical service.
2. Please check if red / white incline cables are well connected to MCB.
3. If the above steps can not reset incline, please contact your local distributor /
place of purchase for technical service.
.esu fo etunim lareves retfa pu semoc 9E :melborF
1. Upper control cable and lower control cable are not well connected. To solve the problem,
please check the wiring circuit.
2. Please contact your local distributor for technical service.
:noituloS
E2 comes up after several minute of use.
Problem:
console IC chip
2. Check the console IC chip pin if it is bent or well connected. To solve the problem, please
reconnect the console IC chip.
3. Please contact your local distributor for technical service.
Solution:
TM3010 / TM3020/ TM3030
Folding Treadmill
33
Problem: Treadmill automatically pauses during workout.
Solution: The treadmill is not detecting your steps because you have stopped
walking or because the user weight is too low to detect the steps, especially
at an incline. One option would be to go to personal settings and turn Intelli Guard o. (Page 34)
Warning: This will disengage the Intelli-Guard feature but may be
!
Page 34
34
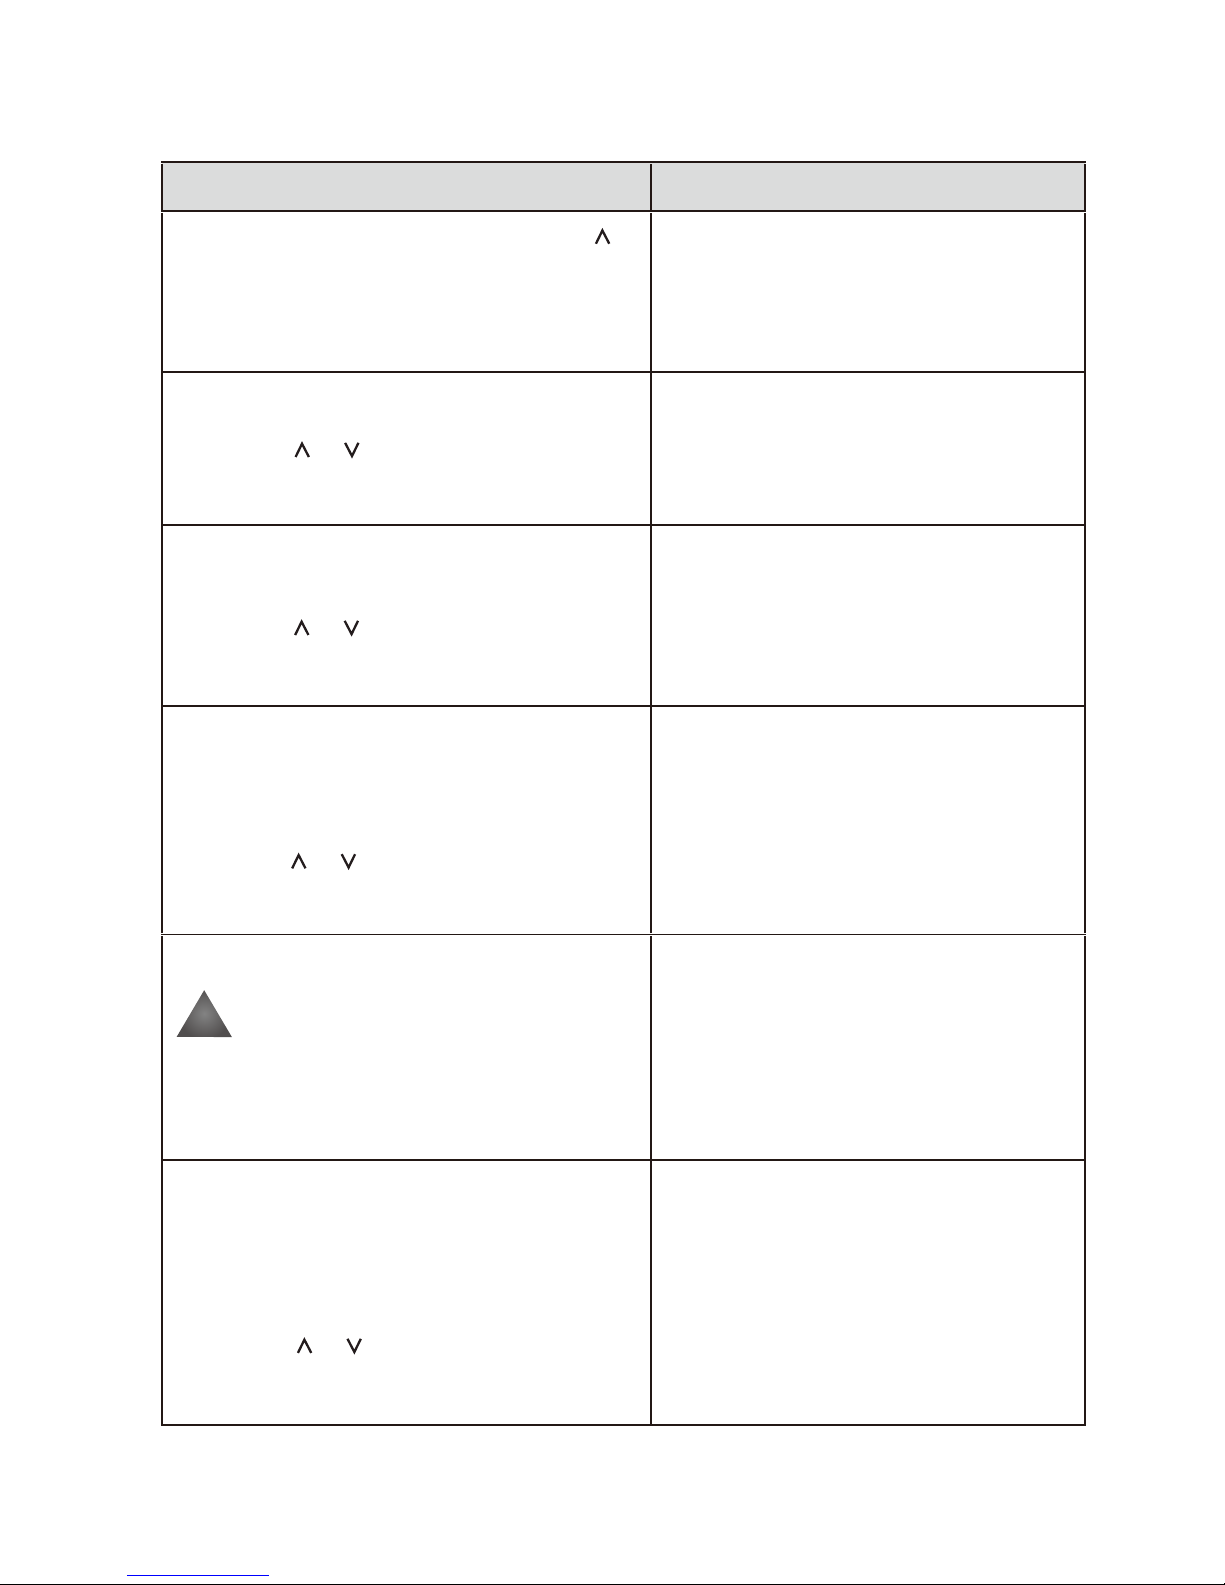
Personal Settings
Engineering Mode
Information viewed on screen
Press and hold ENTER/MODE and then SPEED
for three seconds to enter engineeering mode.
The rst screen show the software version.
Then press ENTER/MODE to next screen for
personal setting or to show factory setting.
200 ENG MODE
I-G
On or oFF
To turn the Intelli-Guard on and o.
Intelli-Guard automatically pauses the unit if it
detects the treadmill is not being walked on.
To set up the units of measurement in
metric (Si) or in English (E).
En or Si
To set up the pause time.
This allows you to set the amount of time the
treadmill will be paused prior to automatically
resetting. The options are 90,180, or 300
seconds prior to console reset.
PAUSE
TIME
90 or 180 or 300
BZ
On or OFF
To turn the audible alert on and o.
INIT
0 or 1
To set up the treadmill starting speed after the
pasue button is pressed.
0 indicates to start the treadmill at the lowest
speed.
1 indicates to start the treadmill at the speed
it was going prior to pressing the pasue button.
WARNING: The audible alert is
turned on from the manufacturer
to warn the user that the treadmill
is starting or the speed is changing.
Turning this alert o is done at the
sole discretion of the user.
!
Press SPEED or to change.
Press ENTER/MODE to accept this setting and
to next screen.
Press SPEED or to change.
Press ENTER/MODE to accept this setting and
to next screen.
Press SPEED or to change.
Press ENTER/MODE to accept this setting and
to next screen.
Press SPEED or to change.
Press ENTER/MODE to accept this setting and
to next screen.
Page 35

Page 36

TREADMILL MODEL NUMBER - TM3010/TM3020/TM3030
VER. 1.0
“Made for iPhone” and “Made for iPad” mean that an electronic accessory has been designed to
connect specifically to iPhone and iPad respectively, and has been certified by the developer to
meet Apple performance standards. Apple is not responsible for the operation of this device or its
compliance with safety and regulatory standards. Please note that the use of this accessory with
iPhone and iPad may affect wireless performance.
iPad and iPhone are trademarks of Apple Inc.,registered in the U.S. and other countries.
 Loading...