

Soleus Air SR017 User Manual
Features:
• 13 digit LCD Screen Displays the hour, minute, second, year (from 2000 to 2099),
month, date, day of the week
• 12-hour/24-hour format selectable. Auto-calendar
• Dual time
• 1/100 second stopwatch (the display range of the stopwatch is 23 hours/59 minutes/59.99
seconds)
• Four groups of alarm. Hourly time signal
• Countdown timer (the maximum display range of countdown time is 23 hours, 59
minutes, 59 seconds)
• Button tone and hourly time signal (on/o synchronized)
•EL backlight (can use “start” button or any other buttons to illuminate the backlight)
Functions
1. In any mode, press A to illuminate EL backlight for 3 seconds
2. In normal time-keeping mode, press C for a short time to turn on/o the hourly time
signal and button tone synchronously, hourly time signal indicator “ “ will appear on
the screen when it is turned on.
In normal timekeeping mode, hold down C for 2 seconds to turn on/o the function
that is the single button with EL backlight or any button with EL backlight. “AEL” indicator will display on the screen when any button with backlight is turned on, in this case,
pressing any button can illuminate the EL backlight.
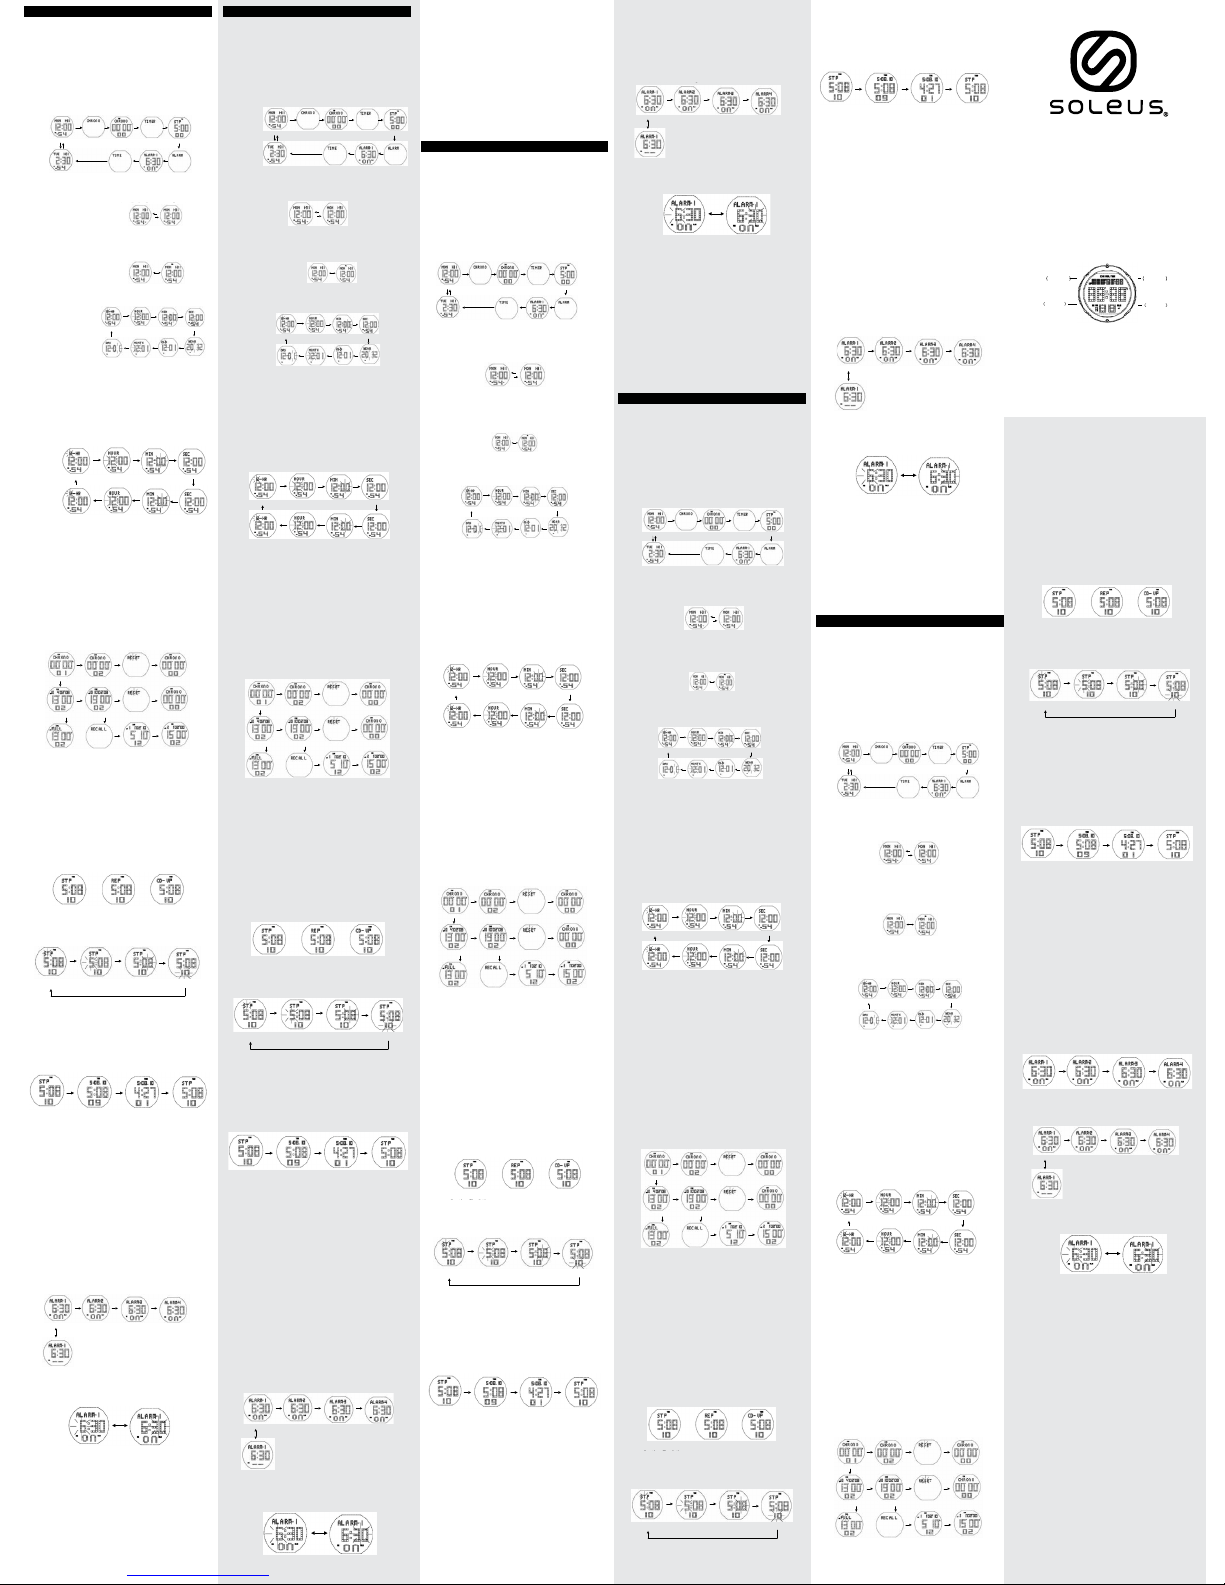
3. Time 1 Setting
• In Time 1 Mode, “12-hour/24-hour” starts to ash by holding down A for 2 seconds, which
indicates Time 1 setting screen, press B to select the items in sequence as shown below:
• Press D or C to select format between 12-hour and 24-hour format
• Press D to increase the value, hold down D to increase fast
• Press C to decrease the value, hold down C to decrease fast
• Seconds reset to zero by pressing D or C button. At the same time, the time of Time 2
also resets to zero
• Press A button to conrm, and exit from setting, then return to normal timekeeping mode
• In setting mode, the watch will automatically exit setting and then return to Time 1
Mode if you do not perform any button operation within 30 seconds
4. Time 2 Setting
• In Time 2 Mode, “12-hour/2-hour” starts to ash by holding down A for 2 seconds, which
indicates Time 1 setting screen, press B to select the items in sequence as shown below:
• Press D or C to select format between 12-hour and 24-hour
• Press D to decrease the value, hold down D to decrease fast
• Press C to increase the value, hold down C to increase fast
• Seconds reset to zero by pressing D or C. At the same time, the time of Time 1 also
resets to zero.
• Press A to conrm, and exit from setting, then return to normal timekeeping mode
• In setting mode, the watch will automatically exit setting and then return to Time 2
Mode if you do not perform any button operation within 30 seconds
5. Stopwatch Mode
• The display range of the stopwatch is from zero to 23 hours/59 minutes/59.99 seconds
• The stopwatch will restart counting from zero when it reaches its maximum limited
time (23 hours, 59 minutes, 59 seconds)
• Ten groups of LAP time can be recorded
To measure times with the stopwatch
• When entering the stopwatch mode, press D to start/stop counting. Seconds reset to
zero by holding down C for 2 seconds
• Press C to enter LAP timing when stopwatch is running, the screen will display next
LAP time after the previous LAP time for 8 seconds. When 10 groups of LAP times are
recorded fully, the screen icon will appear “FULL” if you continue to press C button. The
previous LAP time will be replaced by the last group of LAP times
• When LAP time is running, press D to stop counting, and press A to enter LAP Recall
Mode. In LAP Recall Mode, press D to view each group of LAP times. Press C to exit LAP
Recall Mode, then return to Stopwatch Mode
• In LAP Recall Mode or when stopwatch is stopped, hold down C for 2 seconds to clear
all previous records
• When stopwatch is running, press B to enter other modes, the stopwatch measurement option is continuous even if you exit the Stopwatch Mode
• When stopwatch is stopped, the watch will automatically return to Time Mode if you
do not perform any button operation within 30 seconds
6. Countdown Mode
• The display range of countdown time is from zero to 23 hours, 59 minutes, 59 seconds
• Three methods of countdown can be selected as shown below:
Countdown Time Setting
• When countdown time is stopped, icon of “STP/ERP” or “CD-UP” starts to ash by
pressing A for 2 seconds, which indicates countdown time setting screen, then press B
to select items in sequence as shown below:
• By pressing D or C you can select any one method among three countdown time
methods: STP, ERP, CD-UP
• Press D to increase the value, hold D down to increase faster
• Press C to decrease the value, hold C down to decrease faster
• Press A to conrm, and exit from setting, then return to countdown time mode
• In setting mode, the watch will automatically exit setting and then return to Time
Mode if you do not perform any button operation within 30 seconds
To measure times with countdown timer
• In countdown mode, press D to start/stop counting. When it’s stopped, press C to
return to the original value
• Countdown time is running when icon “TMR” ashes on the screen. When “TMR” icon
stops ashing, it means countdown has been stopped
• When stopwatch is running, press B to enter other modes, the stopwatch measurement operation is continuous even if you exit the Stopwatch Mode
• With One-time Countdown (STP Mode): the countdown time returns to original value
after it reaches zero. At the same time, alarm tone sounds with “BB-BB” for 30 seconds
then automatically returns to Time Mode. Pressing any button can stop the alarm tone
after it starts to sound. The watch will automatically return to Time Mode if you do not
perform any button operation within 30 seconds
• Repeated Stopwatch (REP Mode): the watch repeats countdown automatically after
the countdown is complete. The maximum range of Auto-Repeated Countdown is 100
times. If the countdown value is set from 1 to 59 seconds, alarm tone will sound with
“BB” when repeated countdown reaches to zero. If Repeated Countdown reaches to
100, the alarm tone will sound with “BB-BB” for 30 seconds, then automatically return
to Timekeeping Mode. If the countdown value is set more than 1 minute, alarm tone
will sound with “BB-BB” for 10 seconds when countdown time reaches zero. Pressing
any button can stop the alarm tone after it starts to sound. The watch will automatically
return to Time Mode if you do not perform any button operation within 30 seconds
• Counting Up (CD-UP Mode): The watch will count up automatically after countdown
time reaches zero, meanwhile, alarm tone will sound with “BB-BB” for 30 seconds, then
automatically return to Time Mode. You can press any button to stop the alarm tone
after it starts to sound. The watch will automatically return to Time Mode if you do not
perform any button operation within 30 seconds
7. Alarm Mode
• In Alarm Mode, press D to view the alarm time among 4 groups. In each group of
alarm mode, press C to turn on/o alarm. Shown below:
Alarm Setting
• In Alarm 1 Mode, hold down A for 2 seconds, “Hour” starts to ash, which indicates
alarm setting screen, then press B button to select item in sequence as shown below:
• Press D to increase the value, hold D down to increase faster
• Press C to decrease the value, hold C down to decrease faster
• Press A to conrm, and exit from setting, then return to Alarm Mode
• In setting mode, the watch will automatically exit setting and then return to Time
Mode if you do not perform any button operation within 30 seconds
• In Alarm Mode, the watch will automatically exit from Alarm Mode, then return to
Time Mode if you do not perform any button operation in 30 seconds
• The setting method for all alarm groups are similar
• When alarm set time is reached, the alarm tone will automatically stop after it sounds
for 30 seconds
Note: Alarm 1 thru 4 will sound only when the current time of Time 1 or Time 2 is
reached. For example, if the current time you chose is in Time 2 Mode, and you do not
change the current time to Time 1 Mode before the alarm tone sounds, the alarm tone
will only sound according to the time of Time 2 Mode
If Time 1 chosen: alarm will ego o in chosen Time Zone you have set the watch in
Caractéristiques:
• L’écran LCD à 13 chires ache l’heure, les minutes, les secondes, l’année (de 2000 à
2099), le mois, la date, le jour de la semaine
• formats 12 heures/24 heures sélectionnables. Calendrier automatique
• Double fuseau horaire
• chronomètre de 1/100 secondes (la plage d’achage du chronomètre est de 23
heures/59 minutes/59.99 secondes)
• Quatre groupes d’alarmes. Signal des heures
• Compte à rebours (la plage d’achage maximale du compte à rebours est de 23
heures, 59 minutes, 59 secondes)
• Tonalité et signal des heures (synchronisés activés/désactivés)
• Rétroéclairage EL (appuyer sur la touche “start” ou une autre touche pour allumer le
rétroéclairage)
Fonctions
1. Dans tout mode, appuyer sur A pour allumer le rétroéclairage EL pendant 3 secondes
2. En mode chronométrage normal, appuyer sur C pendant quelques secondes pour
activer/désactiver le signal des heures et la tonalité synchronisés, l’indicateur de
signal des heures “ “ apparaîtra à l’écran lorsqu’il sera activé.
En mode chronométrage normal, appuyer sur C pendant 2 secondes pour activer/
désactiver la fonction de touche unique de rétroéclairage EL ou toute touche avec le
rétroéclairage EL. L’indicateur “AEL” s’achera à l’écran lorsque la touche de rétroéclairage est activée, et dans ce cas, le rétroéclairage pourra être allumé en appuyant sur
n’importe quelle touche.
3. Réglage du temps 1
• En mode temps 1, appuyer sur A pendant 2 secondes pour faire clignoter “12
heures/24 heures”, qui indique l’écran de réglage du temps 1, appuyer sur B pour
sélectionner les items séquentiels tel qu’illustré ci-dessous:
• Appuyer sur D ou C pour sélectionner le format 12 heures ou 24 heures
• Appuyer sur D pour augmenter la valeur, maintenir D pour augmenter rapidement
• Appuyer sur C pour diminuer la valeur, maintenir C pour diminuer rapidement
• Pour réinitialiser les secondes à zéro, appuyer sur les touches D ou C. Au même moment, le temps du temps 2 se réinitialise également à zéro
• Appuyer sur la touche A pour conrmer et sortir des réglages, puis revenir en mode
normal de chronomètre
• En mode réglage, la montre sortira automatiquement des réglages et reviendra au
mode temps 1 si vous n’appuyez sur aucune touche pendant 30 secondes
4. Réglage du temps 2
• En mode temps 2, appuyer sur A pendant 2 secondes pour faire clignoter “12
heures/24 heures”, qui indique l’écran de réglage du temps 1, appuyer sur B pour
sélectionner les items séquentiels tel qu’illustré ci-dessous:
• Appuyer sur D ou C pour sélectionner le format 12 heures ou 24 heures
• Appuyer sur D pour diminuer la valeur, maintenir D pour diminuer rapidement
• Appuyer sur C pour augmenter la valeur, maintenir C pour augmenter rapidement
• Pour réinitialiser les secondes à zéro, appuyer sur les touches D ou C. Au même moment, le temps du temps 1 se réinitialise également à zéro.
• Appuyer sur la touche A pour conrmer et sortir des réglages, puis revenir en mode
normal de chronomètre
• En mode réglage, la montre sortira automatiquement des réglages et reviendra au
mode temps 2 si vous n’appuyez sur aucune touche pendant 30 secondes
5. Mode chronomètre
• La plage d’achage du chronomètre est de 24 heures/59 minutes/59.99 secondes
• Le chronomètre recommencera à compter à partir de zéro lorsqu’il atteindra la limite
maximale (23 heures, 59 minutes, 59 secondes)
• Dix groupes de tours de piste peuvent être enregistrés
Pour mesurer des temps avec le chronomètre
• Lors de l’entrée en mode chronomètre, appuyer sur D pour démarrer/arrêter le chronomètre. Appuyer sur C pendant 2 secondes pour réinitialiser les secondes à zéro
• Appuyer sur C pour le chronométrage de tours de piste lorsque le chronomètre est
en marche, l’écran achera le prochain temps de tour après le tour précédent pendant 8 secondes. Lorsque dix groupes de tours de pistes sont complètement enregistrés, l’icône à l’écran achera “COMPLET” si vous continuez d’appuyer sur la touche C.
Le temps de tour précédent sera remplacé par le dernier groupe de dix tours
• Lorsque le temps de tours est en marche, appuyer sur D pour arrêter le chronomètre,
et appuyer sur A pour aller au mode de rappel de tours. En mode de rappel de tour,
appuyer sur D pour voir chaque groupe de temps de tours. Appuyer sur C pour sortir
du mode de rappel de tours, puis revenir au mode chronomètre
• En mode de rappel de tours ou lorsque le chronomètre est arrêté, maintenir le C
pendant 2 secondes pour eacer tous les enregistrements précédents
• Lorsque le chronomètre est en marche, appuyer sur B pour aller aux autres modes;
l’opération de mesure du chronomètre est en continu même si vous sortez du mode
chronomètre
• Lorsque le chronomètre est arrêté, la montre reviendra automatiquement en mode
temps si vous n’appuyez sur aucune touche pendant 30 secondes
6. Temps de compte à rebours
• La plage d’achage du décompte est de 23 heures/59 minutes/59 secondes
• Trois méthodes de décompte peuvent être sélectionnées tel qu’illustré ci-dessous:
Réglage du temps de décompte
• Lorsque le décompte est arrêté, l’icône “STP/ERP” ou “CD-UP” se met à clignoter si vous
appuyez sur A pendant 2 secondes, ce qui ache l’écran de réglage du temps de décompte,
puis appuyez sur B pour sélectionner les items séquentiels tel qu’illustré ci-dessous:
• En appuyant sur D ou C, vous pouvez sélectionner l’une des trois méthodes de
décompte: STP, ERP, CD-UP
• Appuyer sur D pour augmenter la valeur, maintenir D pour augmenter rapidement
• Appuyer sur C pour diminuer la valeur, maintenir C pour diminuer rapidement
• Appuyer sur la touche A pour conrmer et sortir des réglages, puis revenir en mode
normal de compte à rebours
• En mode réglage, la montre sortira automatiquement des réglages et reviendra au
mode temps si vous n’appuyez sur aucune touche pendant 30 secondes
Pour mesurer les temps avec le compte à rebours
• En mode compte à rebours, appuyer sur D pour démarrer/arrêter le décompte.
Lorsqu’il est arrêté, appuyer sur C pour revenir à la valeur d’origine
• Le temps du compte à rebours est en marche lorsque l’icône “TMR” clignote à l’écran.
Lorsque l’icône “TMR” cesse de clignoter, le compte à rebours est arrêté
• Lorsque le chronomètre est en marche, appuyer sur B pour aller aux autres modes;
l’opération de mesure du chronomètre est en continu même si vous sortez du mode
chronomètre
• Avec le décompte en une fois (Mode STP): le temps du compte à rebours revient
à la valeur d’origine lorsqu’il atteint zéro. Au même moment, la tonalité de l’alarme
résonne avec “BB-BB” pendant 30 secondes puis revient automatiquement en mode
temps. Appuyer sur une touche pour arrêter la tonalité de l’alarme après qu’elle se
soit mise à sonner. La montre reviendra automatiquement au mode temps si vous
n’appuyez sur aucune touche pendant 30 secondes
• Chronomètre à répétition (Mode REP): la montre répète automatiquement le décompte après que le compte à rebours soit terminé. La plage maximale du décompte
à répétition automatique est de 100 fois. Si la valeur du décompte est réglée de 1 à
59 secondes, la sonnerie de l’alarme se fera entendre avec “BB” lorsque le décompte
répété atteindra zéro. Si le décompte à répétition atteint 100, la sonnerie de l’alarme
se fera entendre avec “BB-BB” pendant 30 secondes, puis le mode chronomètre
reviendra automatiquement. Si la valeur du décompte est réglée à plus d’une minute,
la sonnerie de l’alarme avec “BB-BB” se fera entendre pendant 10 secondes lorsque le
temps de décompte atteindra zéro. Appuyer sur une touche pour arrêter la sonnerie
de l’alarme après qu’elle se soit mise à sonner. La montre reviendra automatiquement
au mode temps si vous n’appuyez sur aucune touche pendant 30 secondes
• Mode de comptage (Mode CD-UP): La montre se mettra à compter automatiquement après que le décompte ait atteint zéro; pendant ce temps, la sonnerie de
l’alarme se fera entendre avec “BB-BB” pendant 30 secondes, puis retournera
automatiquement en mode temps. Appuyer sur une touche pour arrêter la sonnerie
de l’alarme après qu’elle se soit mise à sonner. La montre reviendra automatiquement
au mode temps si vous n’appuyez sur aucune touche pendant 30 secondes
7. Mode alerte
• En mode alarme, appuyer sur D pour acher le temps de l’alarme des 4 groupes.
Dans chaque groupe de mode alarme, appuyer sur C pour activer/désactiver l’alarme.
Voir ci-dessous:
Réglage de l’alarme
• En mode alarme 1, maintenir A pendant 2 secondes, “Heure” se mettra à clignoter à
l’écran, puis appuyer sur la touche B pour sélectionner l’item séquentiel tel qu’illustré
ci-dessous:
Funktionen:
• Das 13-stellige LCD-Display zeigt Stunde, Minute, Sekunde, Jahr (2000 bis 2099),
Monat, Datum und Wochentag an
• 12-Stunden/24-Stunden-Format wählbar. Automatischer Kalender
• Zwei Zeitzonen
• 1/100-Sekunden Stoppuhr (der Anzeigebereich der Stoppuhr beträgt 23 Stunden/59 Minuten/59.99 Sekunden)
• Vier Alarmgruppen Stundensignal
• Countdown-Timer (maximale Anzeige für Countdown-Zeit: 23 Stunden, 59
Minuten, 59 Sekunden)
• Tastenton und Stundensignal (an/aus synchronisiert)
• EL-Hintergrundbeleuchtung (kann über die “Start”-Taste oder jede beliebige
andere Tasten aktiviert werden)
Funktionen
1. Sie können die EL-Hintergrundbeleuchtung durch Drücken von A in jedem
Modus für 3 Sekunden einschalten
2. Im normalen Zeitmessung-Modus, drücken Sie für eine kurze Zeit C, um das
Stundensignal und den Tastenton gleichzeitig zu aktivieren/deaktivieren. Die
Stundensignal-Anzeige “ “ erscheint auf dem Display, wenn sie eingeschaltet ist.
Halten Sie im normalen Zeitnehmungsmodus die Taste C für 2 Sekunden gedrückt,
um die Funktion ein-/auszuschalten, dass nur mit einer einzigen Taste oder mit
jeder beliebigen Taste die Hintergrundbeleuchtung eingeschaltet werden kann.
Die Anzeige “AEL” auf dem Display zeigt an, wenn die Hintergrundbeleuchtung mit
jeder beliebigen Taste eingeschaltet werden kann, in diesem Fall können Sie durch
das Drücken einer beliebigen Taste die EL-Hintergrundbeleuchtung einschalten.
3. Einstellung Zeit 1
• Im Modus Zeit 1 beginnt die “12-Stunden/24-Stunden”-Anzeige zu blinken,
wenn Sie A für 2 Sekunden gedrückt halten. Sie benden sich nun im Einstellungsmodus für Zeit 1. Drücken Sie B, um die Einstellung wie nachfolgend gezeigt
vorzunehmen:
• Drücken Sie D oder C, um von der 12-Stunden- zur 24-Stunden-Anzeige zu
wechseln
• Drücken Sie D, um die Zeit vorzustellen; für einen schnelleren Vorlauf halten Sie
D gedrückt
• Drücken Sie C, um die Zeit zurückzustellen; für einen schnelleren Rücklauf halten
Sie C gedrückt
• Die Sekunden werden auf 0 zurückgesetzt, wenn Sie D oder C drücken. Gleichzeitig wird die Zeit von Zeitanzeige 2 auf Null zurückgesetzt
• Drücken Sie A, um Ihre Eingabe zu bestätigen und die Einstellung zu verlassen,
kehren Sie dann in den Normalzeitnehmungs-Modus zurück
• Im Einstellungsmodus verlässt die Uhr automatisch die Einstellung und kehrt
zum Modus Zeit 1 zurück, wenn Sie innerhalb von 30 Sekunden keine Aktion
durchführen
4. Einstellung Zeitzone 2
• Im Modus “Zeitzone 2” beginnt die “12-Stunden/2-Stunden”-Anzeige zu blinken,
wenn Sie A für 2 Sekunden gedrückt halten. Sie benden sich nun im Einstellungsmodus für Zeitzone 1. Drücken Sie B, um die Einstellung vorzunehmen, wie
nachfolgend gezeigt:
• Drücken Sie D oder C, um zwischen der 12-Stunden und der 24-Stunden-Anzeige
zu wechseln
• Drücken Sie D, um die Zeit zurückzustellen. Für einen schnelleren Rücklauf halten
Sie D gedrückt
• Drücken Sie C, um die Zeit vorzustellen, für einen schnelleren Vorlauf halten Sie
C gedrückt
• Die Sekunden werden auf Null zurückgesetzt, wenn Sie D oder C drücken. Gleichzeitig wird die Zeit von Zeitzone 1 auf Null zurückgesetzt.
• Drücken Sie A, um Ihre Eingabe zu bestätigen und die Einstellung zu verlassen,
kehren Sie dann in den Normalzeitnehmungs-Modus zurück
• Im Einstellungsmodus verlässt die Uhr automatisch die Einstellung und kehrt
zum Modus “Zeitzone 2” zurück, wenn Sie innerhalb von 30 Sekunden keine Aktion
durchführen
5. Stoppuhr-Modus
• Die Anzeige der Stoppuhr reicht von 0 bis zu 23 Stunden/59 Minuten/59,99
Sekunden
• Die Stoppuhr beginnt von neuem ab Null zu zählen, sobald sie die maixmale Zählzeit
erreicht hat (23 Stunden, 59 Minuten, 59 Sekunden)
• Es können zehn Gruppen von Rundenzeiten genommen werden
Zeitmessung mit der Stoppuhr
• Im Stoppuhr-Modus drücken Sie D, um das Zählen zu starten/zu stoppen. Die Sekunden werden auf Null zurückgesetzt, wenn Sie C für 2 Sekunden gedrückt halten
Funzioni:
• Lo schermo LCD a 13 caratteri visualizza l’ora, i minuti, i secondi, l’anno (dal 2000 al
2099), il mese, la data e il giorno della settimana
• Formato 12/24 ore selezionabile Calendario automatico
• Doppio orario
• Cronometro a 1/100 di secondo (l’intervallo visualizzabile è di 23 ore, 59 minuti e
59,99 secondi)
• Quattro gruppi di sveglie Segnale orario a ogni ora
• Timer del conto alla rovescia (l’intervallo massimo visualizzabile è di 23 ore, 59
minuti e 59 secondi)
• Pulsante tono e segnale orario a ogni ora (on/o sincronizzato)
• Retroilluminazione EL (utilizzare il pulsante “Start” o qualsiasi altro pulsante per
attivare la retroilluminazione)
Funzioni
1. In qualsiasi modalità, premere A per attivare la retroilluminazione EL per 3 secondi
2. In modalità ora normale, premere brevemente C e simultaneamente il pulsante
del tono per attivare/disattivare il segnale orario a ogni ora. L’indicatore del segnale
orario a ogni ora “ “ sarà visualizzato sullo schermo quando il segnale è attivo.
In modalità cronometraggio normale, tenere premuto C per 2 secondi per attivare/
disattivare la funzione cioè il solo pulsante con retroilluminazione EL o qualsiasi pulsante con retroilluminazione EL. La scritta “AEL” compare sul display quando qualsiasi
pulsante con retroilluminazione viene premuto. In tal caso, la pressione di qualsiasi
pulsante può attivare la retroilluminazione EL.
3. Impostazione Orario 1
• In modalità Orario 1, se si tiene premuto A per 2 secondi, “12-ore/24-ore” inizia a
lampeggiare indicando la schermata di impostazione Orario 1. Premere B per selezionare gli elementi in successione, come mostrato di seguito:
• Premere D o C per selezionare il formato a 12 o 24 ore
• Premere D per aumentare il valore, tenere premuto D per aumentarlo rapidamente
• Premere C per diminuire il valore, tenere premuto C per diminuirlo rapidamente
• Premere il pulsante D o C per azzerare i secondi. Contemporaneamente, anche il
valore di Orario 2 si azzera
• Premere il pulsante A per confermare e uscire dall’impostazione, quindi tornare alla
modalità normale
• Nella modalità di impostazione, in assenza di operazioni per 30 secondi, l’orologio
esce automaticamente dall’impostazione e torna alla modalità Orario 1.
4. Impostazione Orario 2
• In modalità Orario 2, se si tiene premuto A per 2 secondi, “12-ore/2-ore” inizia a lampeggiare, indicando la schermata di impostazione Orario 1. Premere B per selezionare
gli elementi in successione, come mostrato di seguito:
• Premere D o C per selezionare il formato a 12 o 24 ore
• Premere D per diminuire il valore, tenere premuto D per diminuirlo rapidamente
• Premere C per aumentare il valore, tenere premuto C per aumentarlo rapidamente
• I secondi si azzerano premendo D o C. Contemporaneamente, anche l’orario di
Orario 1 si azzera.
• Premere A per confermare e uscire dall’impostazione, quindi tornare alla normale
modalità orario
• In modalità impostazione, in assenza di operazioni per 30 secondi, l’orologio uscirà
automaticamente dall’impostazione e tornerà alla modalità Orario 2
5. Modalità Cronometro
• L’intervallo di visualizzazione del cronometro va da zero a 23 ore, 59 minuti e 59,99
secondi
• Una volta raggiunto il suo limite massimo di tempo (23 ore, 59 minuti e 59 secondi),
il cronometro ricomincia a contare da zero
• Possono essere registrati dieci gruppi di tempi su giro.
Misurare i tempi con il cronometro
• Quando si accede alla modalità Cronometro, premere D per avviare/arrestare il
conteggio. I secondi si azzerano tenendo premuto C per 2 secondi
• Premere C per accedere al tempo di giro mentre il cronometro è in funzione. Lo
schermo mostrerà il tempo di giro successivo dopo quello precedente per 8 secondi.
Quando si raggiunge la registrazione completa di 10 gruppi di tempi di giro, continuando a premere il pulsante C sullo schermo compare l’icona “PIENO”. Il tempo di giro
precedente viene sostituito dall’ultimo gruppo di tempi di giro
• Quando il tempo di giro è in scorrimento, premere D per fermare il conteggio, quindi
premere A per accedere alla modalità Richiamo giro. In modalità Richiamo giro,
premere D per visualizzare ogni gruppo di tempi di giro. Premere C per uscire dalla
modalità Richiamo giro, quindi tornare alla modalità Cronometro
• In modalità Richiamo giro o a cronometro fermo, tenere premuto C per 2 secondi
per cancellare tutte le registrazioni precedenti
• Quando il cronometro è in funzione, premere B per passare ad altre modalità,
l’opzione di misura cronometrica è continua anche se si esce dalla modalità cronometro
• Quando il cronometro è fermo, se non si preme alcun pulsante per 30 secondi,
l’orologio tornerà automaticamente in modalità Orario
6. Modalità conto alla rovescia
• L’intervallo visualizzato di conto alla rovescia va da zero a 23 ore, 59 minuti e 59 secondi
• Possono essere selezionati tre metodi di conto alla rovescia, come illustrato di seguito:
Impostazione del conto alla rovescia
• Quando il conto alla rovescia viene fermato, premendo A per due secondi l’icona
“STP/ERP” o “CD-UP” inizia a lampeggiare, indicando la schermata di impostazione
del conto alla rovescia, quindi premere B per selezionare le voci in sequenza, come
illustrato di seguito:
• Premere D o C per selezionare uno qualunque dei tre metodi di conto alla rovescia:
STP, ERP, CD-UP
• Premere D per aumentare il valore, tenere premuto D per aumentarlo più rapidamente
• Premere C per diminuire il valore, tenere premuto C per diminuirlo più rapidamente
Características:
• La pantalla LCD de 13 dígitos muestra la hora, los minutos, los segundos, el año
(de 2000 a 2099), el mes, la fecha y el día de la semana
• Formato seleccionable 12 horas/24 horas Calendario automático
• Hora doble
• Cronómetro 1/100 de segundos (el rango de visualización del cronómetro es de
23 horas/59 minutos/59.99 segundos)
• Cuatro grupos de alarma. Señal horaria
• Temporizador regresivo (el rango de visualización máximo del conteo regresivo
es de 23 horas, 59 minutos, 59 segundos)
• Botón de tono y señal horaria (on/o sincronizados)
• Luz de fondo EL (puede usar el botón “inicio” o cualquier otro botón para iluminar
la luz de fondo)
Funciones
1. En cualquier modo, presione A para prender la luz de fondo EL durante 3
segundos
2. En el modo de cronometraje normal, presione C brevemente para activar/
desactivar la señal horaria y el botón de tono de forma sincronizada. El indicador
de señal horaria “ “ aparecerá en la pantalla cuando esté activado.
En el modo de cronometraje normal, mantenga presionado C por 2 segundos
para activar/desactivar la función que es el botón único con retroiluminación EL o
cualquier botón con iluminación a contraluz EL. El indicador “AEL” se mostrará en
pantalla cuando cualquier botón con iluminación a contraluz sea activado, en este
caso, presionar cualquier botón puede encender la retroiluminación EL.
3. Conguración hora 1
• En el modo hora 1, “12/24 horas” comienza a destellar si se mantiene presionado
A durante 2 segundos, que indica la pantalla de ajuste de hora 1, presione B para
seleccionar los elementos de la secuencia como se muestra a continuación:
• Presione D o C para seleccionar el formato de 12 horas y formato de 24 horas
• Presione D para aumentar el valor, mantenga pulsado el botón D para aumentar
rápido
• Presione C para disminuir el valor, mantenga presionado C para disminuir rápido
• Los segundos se restablece desde cero pulsando el botón D o C. Del mismo
modo, el tiempo de Hora 2, también se restablece a cero
• Presione el botón A para conrmar y salga de ajustes, luego vuelva al modo
normal de la hora
• En el modo ajustes, el reloj saldrá automáticamente de los ajustes y volverá al
Modo Hora 1 si no toca ningún botón dentro de 30 segundos
4. Conguración Hora 2
• En el modo Hora 2, “12/24 horas” comienza a parpadear si se mantiene presionado el botón A durante 2 segundos, que indica la pantalla de ajuste de Hora
1, presione B para seleccionar los elementos de la secuencia como se muestra a
continuación:
• Presione D o C para seleccionar el formato entre 12 horas y 24 horas
• Presione D para disminuir el valor, mantenga pulsado el botón D para disminuir
rápido
• Presione C para aumentar el valor, mantenga pulsado el botón C para aumentar
rápido
• Los segundos vuelven a cero pulsando D o C. Al mismo tiempo, el tiempo de Hora
1 también se restablece a cero
• Presione A para conrmar y salga de ajustes, luego vuelva al modo normal de la hora
• En el modo ajustes, el reloj saldrá automáticamente de los ajustes y volverá al
Modo Hora 2 si no toca ningún botón dentro de 30 segundos
5. Modo cronómetro
• El alcance de visualización del cronómetro es de cero a 23 horas/59 minutos/59,99 segundos
• El cronómetro se reiniciará contando desde cero cuando alcanza su límite de
tiempo máximo (23 horas, 59 minutos, 59 segundos).
• Se pueden registrar diez grupos de tiempos de Vuelta
Para medir tiempos con el cronómetro
• Al entrar en el modo del cronómetro, presione D para iniciar y detener el conteo.
Los segundos se reestablecen a cero manteniendo apretado C durante 2 segundos
• Presione C para ingresar el tiempo de Vuelta cuando el cronómetro esté funcionando, la pantalla mostrará el tiempo de Vuelta siguiente luego del tiempo de Vuelta
anterior durante 8 segundos. Cuando se completa el registro de 10 grupos, en el
icono de la pantalla aparecerá la palabra “FULL” (“COMPLETO”) si usted continúa
pulsando el botón C. El tiempo de vuelta anterior, será reemplazado por el último
grupo de tiempos de vuelta
• Cuando el tiempo de Vuelta está corriendo, presione D para detener el conteo
y presione A para ingresar al Modo Memoria de Vueltas. En Modo Memoria de
Vueltas, presione el botón D para ver cada uno de los grupos de tiempos de vuelta.
Presione C para salir del modo de memoria de vueltas cronometrada y luego
vuelva al modo cronómetro
• En el Modo Memoria de Vueltas o cuando se detenga el cronómetro, mantenga
presionado el botón C durante 2 segundos para borrar todos los registros
anteriores
• Cuando el cronómetro esté en marcha, pulse B para entrar en otros modos, la
opción de medición del cronómetro es continua, incluso si sale del modo de
cronómetro
• Cuando el cronómetro se detiene, el reloj regresará automáticamente al Modo
Hora si no presiona ningún botón en los siguientes 30 segundos
6. Modo de conteo regresivo
• El rango de visualización del conteo regresivo es de cero a 23 horas, 59 minutos,
59 segundos
• Pueden seleccionarse tres métodos de conteo regresivo como se muestra a
continuación:
Ajuste de horario de cuenta regresiva
• Cuando la cuenta regresiva se detiene, el ícono de “STP/ERP” o “CD-UP” comienza
a parpadear al presionar A durante 2 segundos, lo que el tiempo de conteo
regresivo en la pantalla, luego presione B para seleccionar elementos en secuencia
como se muestra a continuación:
• Al presionar los botones D o C, puede seleccionar cualquiera de los tres métodos
de conteo regresivo: STP, ERP, CD-UP
• Presione D para aumentar el valor, mantenga pulsada la tecla D para aumentar
más rápido
• Presione C para disminuir el valor, mantenga presionado C para disminuir rápido
• Presione el botón A para conrmar y salga de ajustes, luego vuelva al modo de
horario de cuenta regresiva
• En el modo ajustes, el reloj saldrá automáticamente de los ajustes y volverá al
Modo Hora si no presiona ningún botón en 30 segundos
Para medir las horas con el temporizador de cuenta regresiva
• En el modo de cuenta regresiva, presione el botón D para iniciar o detener el
conteo. Cuando está parado, presione C para regresar al valor original
• El horario de conteo regresivo está funcionando cuando el ícono “TMR” parpadea
en la pantalla. Cuando el ícono “TMR” deja de parpadear, signica que la cuenta
regresiva se ha detenido.
• Cuando el cronómetro esté en marcha, presione B para seleccionar otros modos,
la cuenta del cronómetro es continua incluso si usted sale del Modo Cronómetro.
• Con el conteo regresivo de una vez (Modo STP): el tiempo del conteo regresivo
regresa a su valor original después de llegar a cero. Al mismo tiempo, el tono de la
alarma suena con “BB-BB” durante 30 segundos, luego vuelve automáticamente al
Modo Hora. Al pulsar cualquier botón se puede detener el tono de alarma después
que comienza a sonar. El reloj volverá automáticamente al Modo Hora si no toca
ningún botón durante 30 segundos
• Repetida de Cronómetro (REP Mode): el reloj de cuenta regresiva se repite automáticamente después de nalizar la cuenta. El alcance máximo de Autoconteo
regeresivo es de 100 veces. Si el valor del conteo regresivo es establecido de 1 a
59 segundos, el tono de alarma sonará con “BB” cuando el conteo regresivo en
repetición llegue a cero. Si el Conteo regresivo repetido alcanza los 100, el tono de
la alarma sonará con “BB-BB” durante 30 segundos, luego volverá automáticamente al Modo Función de hora. Si el valor de la cuenta regresiva se mantiene
más de 1 minuto, el tono de alarma sonará con “BB-BB” por 10 segundos cuando
la cuenta regresiva llegue a cero. Al pulsar cualquier botón se puede detener el
tono de alarma después que comienza a sonar. El reloj volverá al Modo Hora si no
presiona ningún botón en 30 segundos
• Conteo hacia arriba (Modo CD-UP): El reloj contará automáticamente luego de
que la cuenta regresiva haya llegado a cero, mientras el tono de alarma sonará con
BJF063(F12-SWIF) MODULE MANUAL
The display range of countdown time is from zero to 23 hours, 59 minutes, 59 seconds.
Three methods of cou ntdown can be selected as shown f ollowing:
Countdown Time Setting
When countdown time is stopped, icon of “S TP/ERP” or “CD-UP” star ts to flash by pressing A for 2
seconds, which indicates cou ntdown time settin g screen, then press B to select items in sequence as
show below:
Counting up after countdown
reaches to zero
B B
B
Countdown time
Seconds
Hours Minutes
Button B
Button B
Button B
Button B
One-time Countdown Time
Repeated Countdown Time
screen, then press B button to select item in sequence as shown below:
Hour Minute
Button B
will appear on the screen when it is turned on.
Hourly Time Signal and
Button Tone are turned on
Button C
Hourly Time Signal and
Button Tone are turned off
SR017
ENGLISH FRANÇAIS (FRENCH)
ESPAÑOL (SPANISH)
ITALIANO (ITALIAN)
DEUTSCH (GERMAN)
BJF063(F12-SWIF) MODULE MANUAL
Button C
RE SET
Button D
START/STOP
LIGHT/SET
Button A
LMODE
Button B
BJF063(F12-SWIF) MODULE MANUAL
A . Features
13 digits LCD Screen displays the hour, min ute, second, year (fro m year 2000 to y ear 2099), month,
date, day of the week.
12-hour / 24-hour format selectable. A uto-calendar.
Dual time.
1/100 second stopwatch (the display ra nge of the stopwatch is 23 hours 59 minutes 59.99 seconds).
Four groups of alarm. Hourly time si gnal.
Countdown timer (the maximum display range of countdown time is 23 hours 59 minut es 5 9
seconds.)
Button tone and hourly time signal.( O n / Off synchronized)
EL backlight. (can use “Start” button or any other buttons to illuminate the backlight).
B . Functions
Button C RESET
Button D START/STOP
LIGHT/SETButton A
LMODEButton B
Time 1 Mode
Alarm Mode
Time 2 Mode
Button B Button B
Stopwatch Mode
Countdown Time Mode
Press & Hold D
for 2 seconds
Button B
Button B
Press & Hold D
for 2 seconds
BJF063(F12-SWIF) MODULE MANUAL
A . Features
13 digits LCD Screen displays the hour, m inute, second, year ( from year 2000 to year 2099), month,
date, day of the week.
12-hour / 24-hour format selectable. Auto-calendar.
Dual time.
1/100 second stopwatch (the display range of the stopwatch is 23 hours 59 minutes 59.99 seconds).
Four groups of alarm. Hourly time signal.
Countdown timer (the maximum display range of countdow n tim e is 23 hour s 59 min utes 59
seconds.)
Button tone and hourly time signal.( On / Off synchronized)
EL backlight. (can use “Start” button or any other buttons to illuminate t he backlight).
B . Functions
Button C RESET
Button D START/STOP
LIGHT/SETButton A
LMODEButton B
Time 1 Mode
Alarm Mode
Time 2 Mode
Button B
Button B
Stopwatch Mode
Countdown Time Mode
Press & Hold D
for 2 seconds
Button B
Button B
Press & Hold D
for 2 seconds
Swift Manual
BJF063(F12-SWIF) MODULE MANUAL
2. In normal tim ekeeping mode, pres s C for a short time to turn on / off the hourly time signal and button tone
synchronously, hourly time signal indicator
will appear on the screen when it is turned on.
In normal timekeeping mode, hold down C for 2 seconds to turn on / off the function that is the single button with
EL backlight or any button with EL backlight. “A EL” indicator wi ll display on the screen wh en any button with
backlight is turned on, in this case, pressing any button can illuminate the EL backli ght.
Hourly Time Signal and
Button Tone are turned on
Any button with
EL backlight
Single button with
EL backlight
Button C
Hourly Time Signal and
Button Tone are turned off
D button for
2 seconds
BJF063(F12-SWIF) MODULE MANUAL
synchronously, hourly time signal indicator
will appear on the screen when it is turned on.
Hourly Time Signal and
Button Tone are turned on
Any button with
EL backlight
Single button with
EL backlight
Button C
Hourly Time Signal and
Button Tone are turned off
D button for
2 seconds
BJF063(F12-SWIF) MODULE MANUAL
2. In normal timekeeping mode, press C for a short time to turn on / off the hourly time signal and button tone
synchronously, hourly time signal indicator
will appear on the screen when it is turned on.
In normal timekeeping mode, hold down C for 2 seconds to turn on / off the function that is the single button with
EL backlight or any button with EL backlight. “AEL” indicator will dis play on the screen when an y button with
backlight is turned on, in this case, pressing any button can illuminate the EL backlight.
Hourly Time Signal and
Button Tone are turned on
Any button with
EL backlight
Single button with
EL backlight
Button C
Hourly Time Signal and
Button Tone are turned off
D button for
2 seconds
BJF063(F12-SWIF) MODULE MANUAL
2. In normal timek eeping mode, press C for a short time to turn on / off the h ourly time signal and button tone
synchronously, hourly time signal indicator
will appear on the screen when it is turned on.
In normal timekeeping mode, hold down C for 2 seconds to tu rn on / off the function that is the single button with
EL backlight or any button with EL backlight. “A EL” indicator wil l display on the screen wh en any button with
backlight is turned on, in this case, pressing any button can illuminate the EL backlig ht.
3. Time 1 Setting
In Time 1 Mode, “12-hour / 24-hour” start s to flash by holding down A for 2 seconds, which
indicates Time 1 setting screen, press B to select the items in sequence as show n below:
Button B
12H/24H Hour Minute Second
Year
Month-Date / Date-Month
Month Date
Hourly Time Signal and
Button Tone are turned on
Any button with
EL backlight
Single button with
EL backlight
B
B
B B
Button B
Button B
Button B
Button B
Button C
B
Button B
Button B
Button B
Hourly Time Signal and
Button Tone are turned off
D button for
2 seconds
Button B
BJF063(F12-SWIF) MODULE MANUAL
2. In normal ti mekeeping mode, p ress C for a short time to turn on / off the hourly time sign al and button tone
synchronously, hourly time signal indicator
will appear on the screen when it is turned on.
In normal timekeeping mode, hold down C for 2 seconds to turn on / off the functi on that is the single butt on with
EL backlight or any button with EL backlight. “AEL” indicator will display on the screen when any button with
backlight is turned on, in this case, pressing any button can illuminate the EL bac klight.
3. Time 1 Setting
In Time 1 Mode, “12-h our / 24-ho ur” s tarts t o flas h by holdi ng do wn A for 2 seconds, whic h
indicates Time 1 setting screen, press B to select the items in sequence as sh own below:
Button B
12H/24H Hour Minute Second
Year
Month-Date / Date-Month
Month
Date
Hourly Time Signal and
Button Tone are turned on
Any button with
EL backlight
Single button with
EL backlight
B
B
B B
Button B
Button B
Button B
Button B
Button C
B
Button B
Button B
Button B
Hourly Time Signal and
Button Tone are turned off
D button for
2 seconds
Button B
BJF063(F12-SWIF) MODULE MANUAL
2. In normal timek eeping mode, press C for a short time to turn on / off the h ourly time signal and button tone
synchronously, hourly time signal indicator
will appear on the screen when it is turned on.
In normal timekeeping mode, hold down C for 2 seconds to tu rn on / off the function that is the single button with
EL backlight or any button with EL backlight. “A EL” indicator wil l display on the screen wh en any button with
backlight is turned on, in this case, pressing any button can illuminate the EL backlig ht.
3. Time 1 Setting
In Time 1 Mode, “12-hour / 24-hour” start s to flash by holding down A for 2 seconds, which
indicates Time 1 setting screen, press B to select the items in sequence as show n below:
Button B
12H/24H Hour Minute Second
Year
Month-Date / Date-Month
Month Date
Hourly Time Signal and
Button Tone are turned on
Any button with
EL backlight
Single button with
EL backlight
B
B
B B
Button B
Button B
Button B
Button B
Button C
B
Button B
Button B
Button B
Hourly Time Signal and
Button Tone are turned off
D button for
2 seconds
Button B
BJF063(F12-SWIF) MODULE MANUAL
Press D or C to select format between 12 -hour and 24-hour format.
Press D to increase the value, hold down D for some time to increase fast.
Press C to decrease the value, hold down C for some time to decrease fast.
Seconds reset t o zero by pressing D or C butt on. At the same time, the time of Time 2 also resets
zero.
Press A button to confirm, and exit from setting, then return to norm al timekeeping mode.
In setting mode, the watch will a utomatically exit setting and the n return Time 1 Mode if you d o not
perform any button operation in 30 seconds.
4. Time 2 Setting
In T ime 2 Mod e, “1 2-hour / 24 -hour” starts to flash by ho lding down A f or 2 second s, wh ich
indicates Time 1 setting screen, press B to select the item s in sequence as shown below:
12H/24H
Minute
Second
Year
Month-Date / Date-Month
Month Date
Button B
B B
B
Hour
Button B
Button B
Button B
Button B
Button B
Button B
Button B
BJF063(F12-SWIF) MODULE MANUAL
Press D o r C to select format between 12-h our and 24-hour format.
Press D t o increase the value, hold down D for some time to increase fast.
Press C t o decrease the value, hold down C for some time to decrease fast.
Seconds reset to zero by pressing D or C button . At the same time, the time o f Time 2 also resets
zero.
Press A button to confirm, and exit f rom setting, then return to normal timekeeping mode.
In setting mode, the watch will au tomatically exit setting and then return Time 1 Mode if you do not
perform any button operation in 30 seconds.
4. Time 2 Setting
In Time 2 Mode, “12-ho ur / 24-hou r” sta rts to flash by holdin g dow n A for 2 seconds, which
indicates Time 1 setting screen, press B to select the items in sequence as shown below:
12H/24H
Minute
Second
Year
Month-Date / Date-Month
Month
Date
Button B
B B
B
Hour
Button B
Button B
Button B
Button B
Button B
Button B
Button B
BJF063(F12-SWIF) MODULE MANUAL
Press D o r C to select format between 12-h our and 24-hour format.
Press D t o increase the value, hold down D for some time to increase fast.
Press C t o decrease the value, hold down C for some time to decrease fast.
Seconds reset to zero by pressing D or C button . At the same time, the time o f Time 2 also resets
zero.
Press A button to confirm, and exit f rom setting, then return to normal timekeeping mode.
In setting mode, the watch will au tomatically exit setting and then return Time 1 Mode if you do not
perform any button operation in 30 seconds.
4. Time 2 Setting
In Time 2 Mode, “12-ho ur / 24-hou r” sta rts to flash by holdin g dow n A for 2 seconds, which
indicates Time 1 setting screen, press B to select the items in sequence as shown below:
12H/24H
Minute
Second
Year
Month-Date / Date-Month
Month Date
Button B
B B
B
Hour
Button B
Button B
Button B
Button B
Button B
Button B
Button B
BJF063(F12-SWIF) MODULE MANUAL
Press D o r C to select format between 12-h our and 24-hour format.
Press D t o increase the value, hold down D for some time to increase fast.
Press C t o decrease the value, hold down C for some time to decrease fast.
Seconds reset to zero by pressing D or C button . At the same time, the time o f Time 2 also resets
zero.
Press A button to confirm, and exit f rom setting, then return to normal timekeeping mode.
In setting mode, the watch will au tomatically exit setting and then return Time 1 Mode if you do not
perform any button operation in 30 seconds.
4. Time 2 Setting
In Time 2 Mode, “12-ho ur / 24-hou r” sta rts to flash by holdin g dow n A for 2 seconds, which
indicates Time 1 setting screen, press B to select the items in sequence as shown below:
12H/24H
Minute
Second
Year
Month-Date / Date-Month
Month Date
Button B
B B
B
Hour
Button B
Button B
Button B
Button B
Button B
Button B
Button B
BJF063(F12-SWIF) MODULE MANUAL
When entering the stopwatch mode, press D to start / stop counting. Seconds r eset to zero by holding
down C for 2 seconds.
Reset to zero
Start Stop
Stop
Reset reminder
Reset to zero
LAP timing
Full of LAP records
Reset reminder
LAP Recall Mode
To view LAP records Next LAP record
Button D
Button D
Button C
Button C
Button A
Button D
Button D
Press & Hold C
for 2 seconds
Press & Hold C
for 2 seconds
BJF063(F12-SWIF) MODULE MANUAL
When entering the stopwatc h mode, press D to start / stop counting. Seconds reset to zero by holdin g
down C for 2 seconds.
Reset to zero
Start Stop
Stop
Reset reminder
Reset to zero
LAP timing
Full of LAP records
Reset reminder
LAP Recall Mode
To view LAP records Next LAP record
Button D
Button D
Button C
Button C
Button A
Button D
Button D
Press & Hold C
for 2 seconds
Press & Hold C
for 2 seconds
BJF063(F12-SWIF) MODULE MANUAL
When entering the stopwatch mode, press D to start / stop counting. Seconds r eset to zero by holding
down C for 2 seconds.
Reset to zero
Start Stop
Stop
Reset reminder
Reset to zero
LAP timing
Full of LAP records
Reset reminder
LAP Recall Mode
To view LAP records Next LAP record
Button D
Button D
Button C
Button C
Button A
Button D
Button D
Press & Hold C
for 2 seconds
Press & Hold C
for 2 seconds
BJF063(F12-SWIF) MODULE MANUAL
The di splay range of countdown time is fr om zero to 23 hours, 59 minutes, 5 9 seconds.
Three methods of countdown can be sele cted as shown following:
Countdown Time Setting
When countdown time is stopped, icon of “STP/ERP” or “CD -UP” starts to flash by pressing A for 2
seconds, which indicates countdown time setting screen, the n press B t o select items in sequence as
show below:
Press D or C can select any one meth od among three countdown ti me methods (STP) (ERP)
(CD-UP).
Press D to increase the value, hold down D for some time to increase fast.
Press C to decrease the value, hold down C for some time to decrease fast.
Press A to confirm, and exit from setting , then return to countdown time m ode.
In setting mode, the watch will automatically exit setting and then return Time Mode if y ou do not
perform any button operation in 30 seconds.
To measure times with countdown timer
In countdown mode, press D to start / stop counting. When it stopped, press C to ret urn to the
original value.
Counting up after countdown
reaches to zero
Stop
Start Stop Original value
Button D Button D Button D
B
B
B
Countdown time
Seconds
Hours
Minutes
Button B
Button B
Button B
Button B
Repeated Countdown Time
BJF063(F12-SWIF) MODULE MANUAL
The display r ange of countdown time is from ze ro to 23 hours, 59 minutes, 59 seco nds.
Three metho ds of countdown can be selected as shown following:
Countdown Time Setting
When coun tdown time is stopped, icon of “STP/ERP” or “CD-U P” starts to flash by press ing A for 2
seconds, which indicates countdown time se tting screen, then press B to select items in sequence as
show below:
Press D or C can select any one method amon g three countdown time metho ds (STP) (ERP)
(CD-UP).
Press D to in crease the value, hold down D for s ome time to increase fast.
Press C to de crease the value, hold down C for s ome time to decrease fast.
Press A to con firm, and exit from setting, then return to countdown time mode.
In setting mode, the watch w ill automatically exit setting and then ret urn Time Mo de if you do not
perform any button operation in 30 seconds.
To measure times with countdown timer
In countdown mode, press D to st art / stop counting. When it stopped, press C to return to the
original value.
Counting up after countdown
reaches to zero
Stop
Start Stop Original value
Button D
Button D
Button D
B
B
B
Countdown time
Seconds
Hours
Minutes
Button B
Button B
Button B
Button B
Repeated Countdown Time
BJF063(F12-SWIF) MODULE MANUAL
The di splay range of countdown time is fr om zero to 23 hours, 59 minutes, 5 9 seconds.
Three methods of countdown can be sele cted as shown following:
Countdown Time Setting
When countdown time is stopped, icon of “STP/ERP” or “CD -UP” starts to flash by pressing A for 2
seconds, which indicates countdown time setting screen, the n press B t o select items in sequence as
show below:
Press D or C can select any one meth od among three countdown ti me methods (STP) (ERP)
(CD-UP).
Press D to increase the value, hold down D for some time to increase fast.
Press C to decrease the value, hold down C for some time to decrease fast.
Press A to confirm, and exit from setting , then return to countdown time m ode.
In setting mode, the watch will automatically exit setting and then return Time Mode if y ou do not
perform any button operation in 30 seconds.
To measure times with countdown timer
In countdown mode, press D to start / stop counting. When it stopped, press C to ret urn to the
original value.
Counting up after countdown
reaches to zero
Stop
Start Stop Original value
Button D Button D Button D
B
B
B
Countdown time
Seconds
Hours
Minutes
Button B
Button B
Button B
Button B
Repeated Countdown Time
BJF063(F12-SWIF) MODULE MANUAL
which means countdown has been stooped running.
When stopwatc h is running,, press B to enter other modes, the stopwatch measurement operation
continuous even if you exit the Stopwatch Mode.
With One-time Countdown (STP Mode): the countdown time ret urns to original value after it re aches
to zero. At the same time, alarm ton e sounds with BB-BB for 30 seconds, then automatically return
to Time Mod e. Press any button can s top the alarm tone after i t starts to sound. The wa tch will
automatically return Time Mode if you do not perform any button operation in 30 seconds.
With Repeated Stopwatch (REP Mode): the w atch repeats countdown automatically afte r counting
down is completed. The maximum range of Auto-Repeated Countdown is 1 00 times. If the
countdown value is se t from 1 to 59 seconds, alar m tone will sound with BB w hen repeated
countdown reaches to zero e very time. And if Repeated C ountdown reaches to 100 times, the alarm
tone will sound with BB-BB for 30 sec onds, then automati cally return to Timekeeping Mode. If the
countdown value is set more than 1 minutes, alarm tone will sound with BB-BB for 10 seconds when
countdown time reaches to zero every time. Press any b utton can stop the alarm tone after it starts to
sound. The watch will automatically return Time Mod e if you do not perform any b utton operation in
30 seconds.
With Counting Up (CD-UP Mode): The watc h will count up au tomatically a fter countdow n time
reaches to zero, in the meanw hile, alarm tone will sou nd with BB-BB for 30 seconds, then
automatically back to Time Mode. You can press any button to stop the alarm tone after it sta rts to
sound. The watch will automatically return Time Mo de if you do not perform any button operation in
30 seconds.
7. Alarm Mode
In Alarm Mode, press D to view the alarm time amo ng 4 groups. In each grou p of alarm mode, press C to
turn on / off alarm. As shown following:
Alarm Off
Button C
Button D
Button D
Button D
Alarm On
BJF063(F12-SWIF) MODULE MANUAL
which means countdown has been stooped running.
When s topwatch is running,, press B to enter other modes, the stopwatch measurement operation
continuous even if you exit the Stopwatch Mode.
With One-time Countdown (STP Mode): the countdown time returns to original value af ter it reaches
to zero. At the same time, alarm tone sounds with BB-BB for 30 seconds, then automatically retur n
to Time M ode. Press any button can stop the alarm tone after it starts to sound. The watch will
automatically return Time Mode if you do not perform a ny button operation in 30 seconds.
With Repeat ed Stopwatch (REP Mo de): the watch repeats countdown automatically after counting
down is completed. The m aximum range of Auto-Repeated Coun tdown is 10 0 times. If the
countdown value is set from 1 to 59 seconds, a larm tone will sound with BB when repeated
countdown reaches to zero every time. And if Repeated Countdown reaches to 100 times, the alarm
tone will sound with BB -BB for 30 s econds, then autom atically return to Timekeeping Mode. If the
countdown value is set more than 1 minutes, ala rm tone will sound with BB- BB for 10 seconds when
countdown time reaches to zero ev ery time. Press any button can stop the alarm tone after it starts to
sound. The watch will automatically return Time M ode if you do not perform an y button operation in
30 seconds.
With C ounting Up (CD-UP Mode): The watch wi ll count up automatically after c ountdown tim e
reaches to zero, in the meanwhile , alarm tone will sou nd with BB-BB for 30 seconds, then
automatically back to Tim e Mode. You can press any button to stop the alarm tone after it starts to
sound. The watch will automatically return Time Mode if you do not perform a ny button operation in
30 seconds.
7. Alarm Mode
In Alarm Mode, press D to view the alarm tim e among 4 groups. In eac h group of alarm mode, press C to
turn on / off alarm. As shown following:
Alarm Off
Button C
Button D
Button D
Button D
Alarm On
will appear on the screen when it is turned on.
Hourly Time Signal and
Button Tone are turned on
Button C
Hourly Time Signal and
Button Tone are turned off
will appear on the screen when it is turned on.
Hourly Time Signal and
Button Tone are turned on
Button C
Hourly Time Signal and
Button Tone are turned off
will appear on the screen when it is turned on.
Hourly Time Signal and
Button Tone are turned on
Button C
Hourly Time Signal and
Button Tone are turned off
BJF063(F12-SWIF) MODULE MANUAL
The display r ange of countdown time is from ze ro to 23 hours, 59 minutes, 59 secon ds.
Three method s of countdown can be selected as shown following:
Counting up after countdown
reaches to zero
One-time Countdown Time Repeated Countdown Time
BJF063(F12-SWIF) MODULE MANUAL
The display range of countdown time is from zero to 23 hours, 59 minutes, 59 seconds.
Three methods of countdown can be selected as show n following:
Counting up after countdown
reaches to zero
One-time Countdown Time Repeated Countdown Time
BJF063(F12-SWIF) MODULE MANUAL
The display r ange of countdown time is from ze ro to 23 hours, 59 minutes, 59 secon ds.
Three method s of countdown can be selected as shown following:
Countdown Time Setting
When count down time is stopped, icon of “STP/ERP” or “CD-UP ” starts to flash by press ing A for 2
seconds, which indicates c ountdown time se tting screen, then press B to select items in sequence as
show below:
Counting up after countdown
reaches to zero
B B
B
Countdown time
Seconds
Hours Minutes
Button B
Button B
Button B
Button B
One-time Countdown Time
Repeated Countdown Time
• Appuyer sur D pour augmenter la valeur, maintenir D pour augmenter rapidement
• Appuyer sur C pour diminuer la valeur, maintenir C pour diminuer rapidement
• Appuyer sur la touche A pour conrmer et sortir des réglages, puis revenir en mode alarme
• En mode réglage, la montre sortira automatiquement des réglages et reviendra au
mode temps si vous n’appuyez sur aucune touche pendant 30 secondes
• En mode alarme, la montre sortira automatiquement du mode alarme et reviendra
au mode temps si vous n’appuyez sur aucune touche pendant 30 secondes
• La méthode de réglage pour tous les groupes d’alarme est similaire
• Lorsque le temps de réglage de l’alarme est atteint, la sonnerie de l’alarme s’arrêtera
automatiquement après 30 secondes
À noter: Les alarmes 1 à 4 ne sonneront que lorsque le temps actuel du temps 1 ou du
temps 2 est atteint. Par exemple, si le temps actuel que vous choisissez est en mode
temps 2, et que vous ne changez pas le temps actuel pour le mode temps 1 avant que
la sonnerie de l’alarme ne se fasse entendre, la sonnerie de l’alarme ne sonnera qu’en
fonction du temps du mode de temps 2
Si le temps 1 est sélectionné: l’alarme sonnera dans le fuseau horaire que vous avez
réglé pour la montre
Hour Minute
Button B
BJF063(F12-SWIF) MODULE MANUAL
A . Features
13 digits LCD Screen displays the hour, min ute, second, year (fro m year 2000 to y ear 2099), month,
date, day of the week.
12-hour / 24-hour format selectable. A uto-calendar.
Dual time.
1/100 second stopwatch (the display ra nge of the stopwatch is 23 hours 59 minutes 59.99 seconds).
Four groups of alarm. Hourly time si gnal.
Countdown timer (the maximum display range of countdown time is 23 hours 59 minut es 5 9
seconds.)
Button tone and hourly time signal.( O n / Off synchronized)
EL backlight. (can use “Start” button or any other buttons to illuminate the backlight).
B . Functions
Button C RESET
Button D START/STOP
LIGHT/SETButton A
LMODEButton B
Time 1 Mode
Alarm Mode
Time 2 Mode
Button B
Button B
Stopwatch Mode
Countdown Time Mode
Press & Hold D
for 2 seconds
Button B
Button B
Press & Hold D
for 2 seconds
BJF063(F12-SWIF) MODULE MANUAL
A . Features
13 digits LCD Screen displays the hour, min ute, second, year (fro m year 2000 to y ear 2099), month,
date, day of the week.
12-hour / 24-hour format selectable. A uto-calendar.
Dual time.
1/100 second stopwatch (the display ra nge of the stopwatch is 23 hours 59 minutes 59.99 seconds).
Four groups of alarm. Hourly time si gnal.
Countdown timer (the maximum display range of countdown time is 23 hours 59 minut es 5 9
seconds.)
Button tone and hourly time signal.( O n / Off synchronized)
EL backlight. (can use “Start” button or any other buttons to illuminate the backlight).
B . Functions
Button C RESET
Button D START/STOP
LIGHT/SETButton A
LMODEButton B
Time 1 Mode
Alarm Mode
Time 2 Mode
Button B Button B
Stopwatch Mode
Countdown Time Mode
Press & Hold D
for 2 seconds
Button B
Button B
Press & Hold D
for 2 seconds
BJF063(F12-SWIF) MODULE MANUAL
A . Features
13 digits LCD Screen displays the hour, min ute, second, year (fro m year 2000 to y ear 2099), month,
date, day of the week.
12-hour / 24-hour format selectable. A uto-calendar.
Dual time.
1/100 second stopwatch (the display ra nge of the stopwatch is 23 hours 59 minutes 59.99 seconds).
Four groups of alarm. Hourly time si gnal.
Countdown timer (the maximum display range of countdown time is 23 hours 59 minut es 5 9
seconds.)
Button tone and hourly time signal.( O n / Off synchronized)
EL backlight. (can use “Start” button or any other buttons to illuminate the backlight).
B . Functions
Button C RESET
Button D START/STOP
LIGHT/SETButton A
LMODEButton B
Time 1 Mode
Alarm Mode
Time 2 Mode
Button B
Button B
Stopwatch Mode
Countdown Time Mode
Press & Hold D
for 2 seconds
Button B
Button B
Press & Hold D
for 2 seconds
“BB-BB” durante 30 segundos; luego automáticamente regresará al Modo Hora. Puede
presionar cualquier botón para detener el tono de alarma después que comienza
a sonar. El reloj saldrá automáticamente del Modo Hora si no toca ningún botón
durante 30 segundos
7. Modo de Alarma
• En el Modo Alarma, presione el botón D para ver la hora de la alarma entre 4 grupos.
En cada grupo de modo de alarma, presione el botón C para activar o desactivar la
alarma. Se muestra a continuación:
Ajuste de la alarma
• En el Modo de Alarma 1, mantenga presionado el botón A durante 2 segundos,
“Hora” comienza a parpadear, señala la pantalla de ajustes de alarma, luego presione
“B” para seleccionar el elemento en secuencia como se muestra a continuación:
• Presione el botón D para aumentar el valor, mantenga presionado el botón D para
aumentar más rápido
• Presione C para disminuir el valor, mantenga presionado C para disminuir más rápido
• Presione el botón A para conrmar y salga de ajustes, luego vuelva al Modo Alarma
• En el modo de conguracion, el reloj saldrá automáticamente de los ajustes y volverá al Modo Hora si no toca ningún botón dentro de 30 segundos
• En Modo Alarma, el reloj saldrá automáticamente del Modo Alarma y a continuación
volverá al Modo Hora si no se realiza ninguna operación durante 30 segundos
• Los métodos de ajuste para todos los grupos de alarma son similares
• Cuando llega la hora de la alarma jada, el tono de alarma se detendrá automáticamente después de sonar durante 30 segundos.
Nota: La alarma 1 a 4 sonará sólo cuando se alcanza la hora actual del Tiempo 1 o
Tiempo 2. Por ejemplo, si la hora actual elegida está en el Modo de Hora 2, y no
cambia la hora actual al Modo Hora 1 antes de que suene el tono de alarma, el tono
de alarma sólo sonará de acuerdo a la hora del Modo de Hora 2
Si se elige Hora 1: la alarma se activará en la Zona Horaria que se eligió cuando se
conguró el reloj
screen, then press B button to select item in sequence as shown below:
Hour Mi nute
Button B
BJF063(F12-SWIF) MODULE MANUAL
2. In normal timek eeping mode, press C for a short time to turn on / off the h ourly time signal and button tone
synchronously, hourly time signal indicator
will appear on the screen when it is turned on.
In normal timekeeping mode, hold down C for 2 seconds to tu rn on / off the function that is the single button with
EL backlight or any button with EL backlight. “A EL” indicator wil l display on the screen wh en any button with
backlight is turned on, in this case, pressing any button can illuminate the EL backlig ht.
3. Time 1 Setting
In Time 1 Mode, “12-hour / 24-hour” start s to flash by holding down A for 2 seconds, which
indicates Time 1 setting screen, press B to select the items in sequence as show n below:
Button B
12H/24H Hour Minute Second
Year
Month-Date / Date-Month
Month Date
Hourly Time Signal and
Button Tone are turned on
Any button with
EL backlight
Single button with
EL backlight
B
B
B B
Button B
Button B
Button B
Button B
Button C
B
Button B
Button B
Button B
Hourly Time Signal and
Button Tone are turned off
D button for
2 seconds
Button B
BJF063(F12-SWIF) MODULE MANUAL
When entering the stopwatch mode, press D to start / stop counting. Seconds r eset to zero by holding
down C for 2 seconds.
Reset to zero
Start
Stop
Stop
Reset reminder
Reset to zero
LAP timing
Full of LAP records
Reset reminder
LAP Recall Mode
To view LAP records Next LAP record
Button D
Button D
Button C
Button C
Button A
Button D
Button D
Press & Hold C
for 2 seconds
Press & Hold C
for 2 seconds
BJF063(F12-SWIF) MODULE MANUAL
When entering the stopwatc h mode, press D to start / stop counting. Seconds reset to zero by holdin g
down C for 2 seconds.
Reset to zero
Start Stop
Stop
Reset reminder
Reset to zero
LAP timing
Full of LAP records
Reset reminder
LAP Recall Mode
To view LAP records
Next LAP record
Button D
Button D
Button C
Button C
Button A
Button D
Button D
Press & Hold C
for 2 seconds
Press & Hold C
for 2 seconds
• Premere A per confermare e uscire dall’impostazione, quindi ritornare alla modalità
di conto alla rovescia
• Nella modalità di impostazione, l’orologio esce in automatico dall’impostazione e
torna alla modalità Orario se durante 30 secondi non viene premuto alcun pulsante
Misurare i tempi con il timer
• In modalità Conto alla rovescia, premere D per avviare/arrestare il conteggio. Con il
conteggio arrestato, premere C per tornare al valore originale
• Quando l’icona “TMR” lampeggia sullo schermo il conto alla rovescia è in scorrimento. Quando l’icona “TMR” smette di lampeggiare, signica che il conto alla
rovescia è stato arrestato.
• Quando il cronometro è in esecuzione, premere B per accedere ad altre modalità. Il
cronometro continua a misurare anche se si esce dalla relativa modalità.
• Con Conto alla rovescia unico (Modalità STP): il tempo del conto alla rovescia ritorna
al valore originario al raggiungimento dello zero. Contemporaneamente, il segnale
acustico suona con “BB-BB” per 30 secondi, poi ritorna automaticamente in modalità
Orario. Per arrestare la suoneria dopo che ha iniziato a suonare premere qualsiasi
pulsante. L’orologio torna automaticamente in modalità Orario se non si preme alcun
tasto entro 30 secondi
• Cronometro ripetuto (Modalità REP): l’orologio ripete automaticamente il conto
alla rovescia dopo che il conto alla rovescia è terminato. Il Conto alla rovescia con
ripetizione automatica può ripetersi al massimo no a 100 volte. Se il valore del conto
alla rovescia è impostato in un intervallo compreso tra 1 e 59 secondi, il segnale
acustico suona con “BB” quando il conto alla rovescia ripetuto raggiunge lo zero.
Se il Conto alla rovescia ripetuto arriva a 100 volte, il segnale acustico suona con
“BB-BB” per 30 secondi, poi torna automaticamente in modalità Indicazione dell’ora.
Se il valore del conto alla rovescia è impostato su una durata superiore a un minuto,
il segnale acustico suona con “BB-BB” per 10 secondi quando il conto alla rovescia
raggiunge lo zero. Per arrestare la suoneria dopo che ha iniziato a suonare premere
qualsiasi pulsante. L’orologio torna automaticamente in modalità Orario se non si
preme alcun pulsante entro 30 secondi
• Conteggio in risalita (Modalità CD-UP): l’orologio eettua il conteggio in risalita automaticamente dopo che il conto alla rovescia ha raggiunto lo zero. Nel frattempo, la
suoneria emette un “BB-BB” per 30 secondi, poi automaticamente torna alla modalità
Orario. Per arrestare la suoneria dopo che ha iniziato a suonare premere qualsiasi
pulsante. L’orologio tornà automaticamente in modalità Orario se non si preme alcun
pulsante entro 30 secondi
7. Modalità Sveglia
• In modalità Sveglia, premere D per visualizzare l’ora della sveglia tra 4 gruppi.
Per ogni gruppo di modalità Sveglia, premere C per attivare/disattivare la sveglia.
Riportati di seguito:
Impostazione della sveglia
• In modalità Sveglia 1, tenere premuto A per due secondi, “Ora” inizia a lampeggiare
indicando la schermata di impostazione della sveglia, quindi premere il pulsante B per
selezionare gli elementi in successione, come mostrato di seguito:
• Premere D per aumentare il valore, tenere premuto D per aumentarlo più rapidamente
• Premere C per ridurre il valore, tenere premuto C per ridurlo più rapidamente
• Premere A per confermare e uscire dall’impostazione, poi tornare alla modalità
Sveglia
• In modalità di impostazione, l’orologio esce automaticamente da tale modalità e
torna alla modalità Orario se per 30 secondi non si preme alcun pulsante
• In modalità Sveglia, l’orologio use automaticamente da tale modalità e torna alla
modalità Orario se non si preme alcun pulsante per 30 secondi
• Il metodo di impostazione è simile per tutti i gruppi di sveglie
• Quando l’orario di sveglia impostato è raggiunto, la suoneria si arresta automaticamente dopo aver suonato per 30 secondi
Nota: le sveglie dalla 1 alla 4 suonano solo al raggiungimento dell’ora impostata per
Orario 1 o Orario 2. Se, ad esempio, l’orario corrente scelto è in modalità Orario 2, e
l’orario corrente non viene modicato in modalità Orario 1 prima che si attivi la suoneria, la sveglia suonerà soltanto in base all’orario della modalità Orario 2
Se si sceglie Orario 1: la sveglia suona nella zona di fuso orario prescelta
BJF063(F12-SWIF) MODULE MANUAL
which means countdown has been stooped running.
When stopw atch is running,, press B to enter other mod es, the stopwatch measurement operation
continuous even if you exit the Stopwatch Mode.
With One-time Countdown (S TP Mode): the countdown time returns to original value after i t reaches
to zero. At the same time, alarm to ne sounds with BB-BB for 3 0 seconds, then automatically retur n
to Time Mo de. Press any button can stop the alarm tone after it starts to sound. The w atch will
automatically return Time Mode if you do not perform any button operation in 30 seconds.
With Repeated Stopwatch (REP Mode) : the watch repeats countdown automatically after counting
down is completed. The maxim um range o f Auto-Repeated Countdown is 100 times. If the
countdown value is s et from 1 to 59 seconds, ala rm tone will sound with BB when repeated
countdown reaches to zero every time. And if Repeated C ountdown reaches to 100 times, the alarm
tone will sound with BB-B B for 30 se conds, then automa tically return to Timekeeping Mode. If the
countdown value is set more than 1 minutes, alarm tone will sound with BB-B B for 10 seconds when
countdown time reaches to zero eve ry time. Press any button can stop the alarm tone after it starts to
sound. The watch will automatically return Time Mo de if you do not perform any button operation in
30 seconds.
With Coun ting Up (CD-UP Mode): The w atch will count up automatically after coun tdown time
reaches to zero, in the m eanwhile, alarm t one will sound with BB -BB for 30 seconds, th en
automatically back to Time Mode. You can press any button to stop the alarm tone after it st arts to
sound. The watch will automatically return Time M ode if you do not perform any button operation in
30 seconds.
7. Alarm Mode
In Alarm Mode, press D to view the alarm time a mong 4 groups. In each g roup of alarm mode, pres s C to
turn on / off alarm. As shown following:
Alarm Off
Button C
Button D
Button D
Button D
Alarm On
BJF063(F12-SWIF) MODULE MANUAL
which means countdown has been stooped running.
When stopwatc h is running,, press B to enter other modes, the stopwatch measurement operation
continuous even if you exit the Stopwatch Mode.
With One-time Countdown (STP Mode): the countdown time ret urns to original value after it re aches
to zero. At the same time, alarm ton e sounds with BB-BB for 30 seconds, then automatically return
to Time Mod e. Press any button can s top the alarm tone after i t starts to sound. The wa tch will
automatically return Time Mode if you do not perform any button operation in 30 seconds.
With Repeated Stopwatch (REP Mode): the w atch repeats countdown automatically afte r counting
down is completed. The maximum range of Auto-Repeated Countdown is 1 00 times. If the
countdown value is se t from 1 to 59 seconds, alar m tone will sound with BB w hen repeated
countdown reaches to zero e very time. And if Repeated C ountdown reaches to 100 times, the alarm
tone will sound with BB-BB for 30 sec onds, then automati cally return to Timekeeping Mode. If the
countdown value is set more than 1 minutes, alarm tone will sound with BB-BB for 10 seconds when
countdown time reaches to zero every time. Press any b utton can stop the alarm tone after it starts to
sound. The watch will automatically return Time Mod e if you do not perform any b utton operation in
30 seconds.
With Counting Up (CD-UP Mode): The watc h will count up au tomatically a fter countdow n time
reaches to zero, in the meanw hile, alarm tone will sou nd with BB-BB for 30 seconds, then
automatically back to Time Mode. You can press any button to stop the alarm tone after it sta rts to
sound. The watch will automatically return Time Mo de if you do not perform any button operation in
30 seconds.
7. Alarm Mode
In Alarm Mode, press D to view the alarm time amo ng 4 groups. In each grou p of alarm mode, press C to
turn on / off alarm. As shown following:
Alarm Off
Button C
Button D
Button D
Button D
Alarm On
BJF063(F12-SWIF) MODULE MANUAL
The display r ange of countdown time is from ze ro to 23 hours, 59 minutes, 59 seco nds.
Three metho ds of countdown can be selected as shown following:
Countdown Time Setting
When coun tdown time is stopped, icon of “STP/ERP” or “CD-U P” starts to flash by press ing A for 2
seconds, which indicates countdown time se tting screen, then press B to select items in sequence as
show below:
Press D or C can select any one method amon g three countdown time metho ds (STP) (ERP)
(CD-UP).
Press D to in crease the value, hold down D for s ome time to increase fast.
Press C to de crease the value, hold down C for s ome time to decrease fast.
Press A to con firm, and exit from setting, then return to countdown time mode.
In setting mode, the watch w ill automatically exit setting and then ret urn Time Mo de if you do not
perform any button operation in 30 seconds.
To measure times with countdown timer
In countdown mode, press D to st art / stop counting. When it stopped, press C to return to the
original value.
Counting up after countdown
reaches to zero
Stop
Start
Stop
Original value
Button D Button D Button D
B
B
B
Countdown time
Seconds
Hours
Minutes
Button B
Button B
Button B
Button B
Repeated Countdown Time
BJF063(F12-SWIF) MODULE MANUAL
The display range of countdown time is from zero to 23 hours, 59 minutes, 59 seconds.
Three methods of countdown can be selected as show n following:
Counting up after countdown
reaches to zero
One-time Countdown Time Repeated Countdown Time
screen, then press B button to select item in sequence as shown below:
Hour
Minute
Button B
will appear on the screen when it is turned on.
Hourly Time Signal and
Button Tone are turned on
Button C
Hourly Time Signal and
Button Tone are turned off
BJF063(F12-SWIF) MODULE MANUAL
The display rang e of countdown time is from zero to 23 hours, 59 minutes, 59 seconds.
Three methods o f countdown can be selected as sho wn following:
Countdown Time Setting
When countdow n time is stopped, icon of “STP/ERP” or “CD-UP” starts to flash by pressing A for 2
seconds, which indicates co untdown time sett ing screen, then press B to select items in sequence as
show below:
Counting up after countdown
reaches to zero
B B
B
Countdown time
Seconds
Hours Minutes
Button B
Button B
Button B
Button B
One-time Countdown Time
Repeated Countdown Time
BJF063(F12-SWIF) MODULE MANUAL
The display r ange of countdown time is from ze ro to 23 hours, 59 minutes, 59 secon ds.
Three method s of countdown can be selected as shown following:
Counting up after countdown
reaches to zero
One-time Countdown Time Repeated Countdown Time
• Drücken Sie C, um bei laufender Stoppuhr die Rundenzeit aufzunehmen; die Anzeige zeigt dann nach der vorangegangenen Rundenzeit für 8 Sekunden die nächste
Rundenzeit an. Wenn 10 Gruppen von Rundenzeiten aufgezeichnet wurden, wird auf
dem Display das Symbol “FULL” angezeigt, wenn Sie C weiterhin drücken. Die vorangegangene Rundenzeit wird jeweils durch die letzte Gruppe Rundenzeiten ersetzt
• Die laufende Rundenzeit (LAP-Time) können Sie mit D anhalten und mit A gelangen
Sie in den LAP-Recall-Modus. Im LAP-Recall-Modus können Sie mit D die verschiedenen Rundenzeiten-Gruppen einsehen. Mit C verlassen Sie den LAP-Recall-Modus
und kehren in den Stoppuhr-Modus zurück
• Im LAP-Recall-Modus oder bei angehaltener Stoppuhr können Sie durch Drücken
von C für 2 Sekunden alle bis dahin gespeicherten Zeiten löschen
• Bei laufender Stoppuhr drücken Sie B, um in andere Modi zu gelangen, die Zeitnahme läuft auch dann weiter, wenn sie den Stoppuhr-Modus verlassen
• Wenn die Stoppuhr angehalten wird, kehrt die Uhr automatisch zum Zeitmodus
zurück, wenn Sie innerhalb von 30 Sekunden keine Aktion durchführen
6. Countdown-Modus
• Die Anzeige der Countdown-Zeit reicht von Null bis zu 23 Stunden, 59 Minuten, 59
Sekunden
• Es kann zwischen den folgenden drei Countdown-Methoden gewählt werden:
Einstellung der Countdown-Zeit
• Bei angehaltener Countdown-Zeit blinkt “STP/ERP” oder “CD-UP”, wenn Sie A für 2
Sekunden gedrückt halten. Sie benden sich dann in der Einstellungsanzeige der
Countdown-Zeit. Drücken Sie dann B, um eine Einstellung wie nachfolgende gezeigt
vorzunehmen:
• Durch Drücken von D oder C können Sie eine der drei Countdown-Zeit-Methoden
STP, ERP und CD-UP auswählen
• Drücken Sie D, um einen höheren Wert einzustellen, für eine schnellere Anzeige
halten Sie D gedrückt
• Drücken Sie C, um einen niedrigeren Wert einzustellen, für eine schnellere Anzeige
halten Sie C gedrückt
• Drücken Sie A, um Ihre Eingabe zu bestätigen und die Einstellung zu verlassen,
kehren Sie dann in den Countdownzeit-Modus zurück
• Im Einstellungsmodus verlässt die Uhr automatisch die Einstellung und kehrt zum
Zeitmodus zurück, wenn Sie innerhalb von 30 Sekunden keine Aktion durchführen
Zeiten mit dem Countdown-Timer stoppen
• Im Countdown-Modus drücken Sie D, um den Countdown zu starten/zu stoppen.
Wenn der Countdown gestoppt ist, drücken Sie C, um zum Ausgangswert zurückzukehren
• Die Countdown-Zeit läuft, wenn “TMR” auf der Anzeige blinkt Wenn “TMR” nicht
mehr blinkt, bedeutet dies, dass der Countdown angehalten wurde
• Bei laufender Stoppuhr drücken Sie B, um in andere Modi zu gelangen; die Zeitmessung läuft auch dann weiter, wenn Sie den Stoppuhr-Modus verlassen
• Einmal-Countdown (STP-Modus): Die Countdown-Zeit stellt sich wieder auf den
Ausgangswert ein, nachdem 0 erreicht wurde. Gleichzeitig ertönt der Alarmton mit
“BB-BB” für 30 Sekunden, dann wird automatisch in den Zeit-Modus zurückgekehrt.
Sie können den ausgelösten Alarmton durch Drücken einer beliebigen Taste ausschalten. Die Uhr kehrt automatisch zum Zeitmodus zurück, wenn Sie innerhalb von
30 Sekunden keine Aktion durchführen
• Wiederholungs-Stoppuhr (REP-Modus): Die Uhr wiederholt den Countdown
automatisch, nachdem der Countdown abgelaufen ist. Die automatische Wiederholung des Countdowns kann bis zu 100 Mal erfolgen. Wenn der Countdown-Wert
zwischen 1 und 59 Sekunden eingestellt wird, ertönt ein Alarmsignal mit “BB”, wenn
der Countdown den Wert Null erreicht hat. Wenn die Wiederholung des Countdown
das 100ste Mal erfolgt ist, ertönt ein Alarmton mit “BB-BB” für 30 Sekunden, danach
kehrt die Uhr automatisch in den Zeitnehmer-Modus zurück. Wenn der Wert für den
Countdown auf mehr als 1 Minute eingestellt wird, ertönt ein Alarmton mit “BB-BB”
für 10 Sekunden, wenn der Countdown den Wert Null erreicht hat. Sie können den
ausgelösten Alarmton durch Drücken einer beliebigen Taste ausschalten. Die Uhr
kehrt automatisch zum Zeitmodus zurück, wenn Sie innerhalb von 30 Sekunden
keine Aktion durchführen
• Hochzählen (CD-UP-Modus): Die Uhr zählt automatisch hoch, nachdem die Countdown-Zeit Null erreicht hat, in der Zwischenzeit ertönt ein Alarmton mit “BB-BB” für
30 Sekunden, bevor die Uhr automatisch in den Zeit-Modus zurückkehrt. Sie können
den ausgelösten Alarmton durch Drücken einer beliebigen Taste ausschalten. Die
Uhr kehrt automatisch zum Zeitmodus zurück, wenn Sie innerhalb von 30 Sekunden
keine Aktion durchführen
7. Alarm-Modus
• Im Alarm-Modus drücken Sie D, um die Alarmzeit in 4 Gruppen anzeigen zu lassen.
Drücken Sie C in jeder Gruppe des Alarm-Modus, um den jeweiligen Alarm ein-/
auszuschalten. Siehe unten:
Alarmeinstellung
• Halten Sie A im Modus Alarm 1 für 2 Sekunden gedrückt, “Stunde” beginnt zu
blinken; dies zeigt an, dass der Alarm nun eingestellt werden kann; drücken Sie dann
B um die gewünschte Zeit wie unten gezeigt einzustellen:
• Drücken Sie D, um die Zeit vorzuzustellen, für einen schnelleren Vorlauf halten Sie
D gedrückt
• Drücken Sie C, um die Zeit zurückzustellen, für einen schnelleren Rücklauf halten
Sie C gedrückt
• Drücken Sie A, um Ihre Eingabe zu bestätigen und die Einstellung zu verlassen;
kehren Sie dann in den Alarm-Modus zurück
• Im Einstellungsmodus verlässt die Uhr automatisch die Einstellung und kehrt zum
Zeitmodus zurück, wenn Sie innerhalb von 30 Sekunden keine Aktion durchführen
• Im Alarm-Modus verlässt die Uhr automatisch den Alarm-Modus und kehrt zum
Zeitmodus zurück, wenn Sie innerhalb von 30 Sekunden keine Aktion durchführen
• Das Einstellverfahren ist für alle Alarmgruppen gleich
• Wenn die eingestellte Alarmzeit erreicht wird, schaltet sich das Alarmsignal nach 30
Sekunden automatisch ab
Hinweis: Alarm 1 bis 4 ertönt nur, wenn die aktuelle Zeit 1 oder Zeit 2 erreicht wird.
Wenn zum Beispiel die Alarmzeit im Modus Zeit 2 festgelegt wurde und nicht zu
Modus Zeit 1 gewechselt wird, bevor der Alarm ertönt, wird der Alarm entsprechend
der aktuellen Zeit im Modus Zeit 2 ausgelöst.
Wenn Zeit 1 gewählt wird: Der Alarm wird in der Zeitzone ausgelöst, in der Sie die
Uhr gestellt haben.
BJF063(F12-SWIF) MODULE MANUAL
The display range of countdown time is from zero to 23 hours, 59 minutes, 59 seconds.
Three methods of cou ntdown can be selected as shown f ollowing:
Countdown Time Setting
When countdown time is stopped, icon of “S TP/ERP” or “CD-UP” star ts to flash by pressing A for 2
seconds, which indicates cou ntdown time settin g screen, then press B to select items in sequence as
show below:
Counting up after countdown
reaches to zero
B B
B
Countdown time
Seconds
Hours Minutes
Button B
Button B
Button B
Button B
One-time Countdown Time
Repeated Countdown Time
BJF063(F12-SWIF) MODULE MANUAL
The display range of countdown time is from zero to 23 hours, 59 minutes, 59 seconds.
Three methods of countdown can be selected as show n following:
Counting up after countdown
reaches to zero
One-time Countdown Time Repeated Countdown Time
BJF063(F12-SWIF) MODULE MANUAL
The display r ange of countdown time is from ze ro to 23 hours, 59 minutes, 59 seco nds.
Three metho ds of countdown can be selected as shown following:
Countdown Time Setting
When coun tdown time is stopped, icon of “STP/ERP” or “CD-U P” starts to flash by press ing A for 2
seconds, which indicates countdown time se tting screen, then press B to select items in sequence as
show below:
Press D or C can select any one method amon g three countdown time metho ds (STP) (ERP)
(CD-UP).
Press D to in crease the value, hold down D for s ome time to increase fast.
Press C to de crease the value, hold down C for s ome time to decrease fast.
Press A to con firm, and exit from setting, then return to countdown time mode.
In setting mode, the watch w ill automatically exit setting and then ret urn Time Mo de if you do not
perform any button operation in 30 seconds.
To measure times with countdown timer
In countdown mode, press D to st art / stop counting. When it stopped, press C to return to the
original value.
Counting up after countdown
reaches to zero
Stop
Start
Stop
Original value
Button D Button D Button D
B
B
B
Countdown time
Seconds
Hours
Minutes
Button B
Button B
Button B
Button B
Repeated Countdown Time
BJF063(F12-SWIF) MODULE MANUAL
which means countdown has been stooped running.
When stopwatc h is running,, press B to enter other modes, the stopwatch measurement operation
continuous even if you exit the Stopwatch Mode.
With One-time Countdown (STP Mode): the countdown time ret urns to original value after it re aches
to zero. At the same time, alarm ton e sounds with BB-BB for 30 seconds, then automatically return
to Time Mod e. Press any button can s top the alarm tone after i t starts to sound. The wa tch will
automatically return Time Mode if you do not perform any button operation in 30 seconds.
With Repeated Stopwatch (REP Mode): the w atch repeats countdown automatically afte r counting
down is completed. The maximum range of Auto-Repeated Countdown is 1 00 times. If the
countdown value is se t from 1 to 59 seconds, alar m tone will sound with BB w hen repeated
countdown reaches to zero e very time. And if Repeated C ountdown reaches to 100 times, the alarm
tone will sound with BB-BB for 30 sec onds, then automati cally return to Timekeeping Mode. If the
countdown value is set more than 1 minutes, alarm tone will sound with BB-BB for 10 seconds when
countdown time reaches to zero every time. Press any b utton can stop the alarm tone after it starts to
sound. The watch will automatically return Time Mod e if you do not perform any b utton operation in
30 seconds.
With Counting Up (CD-UP Mode): The watc h will count up au tomatically a fter countdow n time
reaches to zero, in the meanw hile, alarm tone will sou nd with BB-BB for 30 seconds, then
automatically back to Time Mode. You can press any button to stop the alarm tone after it sta rts to
sound. The watch will automatically return Time Mo de if you do not perform any button operation in
30 seconds.
7. Alarm Mode
In Alarm Mode, press D to view the alarm time amo ng 4 groups. In each grou p of alarm mode, press C to
turn on / off alarm. As shown following:
Alarm Off
Button C
Button D
Button D
Button D
Alarm On
BJF063(F12-SWIF) MODULE MANUAL
which means countdown has been stooped running.
When stopwatch is running,, press B to en ter other modes, the s topwatch me asurement op eration
continuous even if you exit the Stopwatch Mode.
With One-t ime Countdown (STP Mode): th e countdown time returns to or iginal value after it reaches
to zero. At the sa me time, alarm tone sounds with BB-BB for 30 seconds, then automatically return
to Time Mode. P ress any button can stop the alarm tone after it s tarts to sound. The watch will
automatically return Time Mode if you do not perf orm any button operation in 30 sec onds.
With Repeated S topwatch (REP Mode): the watch repeats co untdown automatic ally after counting
down is completed. The maximum range of Auto-R epeated Countdown is 100 tim es. If the
countdown va lue is set from 1 to 59 second s, alarm tone will sound wi th BB when repeated
countdown reaches to zero every time. And if Repeated Countdown reache s to 100 tim es, the alarm
tone will sound with BB-BB for 30 seconds, then automatically return to Timekeeping M ode. If the
countdown value is set more than 1 minute s, alarm tone will sound with BB-BB for 10 seconds when
countdown time reaches to zero every time. Press any button can stop the alarm tone after it starts to
sound. The watch will automatically return T ime Mode if you do not perfor m any button operation in
30 seconds.
With Counting Up (CD-UP M ode): The watch will count up automatically after countdown time
reaches to zero, in the meanwhile, alarm tone will sound with BB-BB for 30 seconds, then
automatically back to Time Mode. You can pres s any button to stop the alarm to ne after it starts to
sound. The watch will automatically return T ime Mode if you do not perfo rm any button operation in
30 seconds.
7. Alarm Mode
In Alarm Mode, press D to view th e alarm time among 4 groups. In each group of a larm mode, press C to
turn on / off alarm. As shown following:
Button D
Button D
Button D
Alarm On
screen, then press B button to select item in sequence as shown below:
Hour Minute
Button B
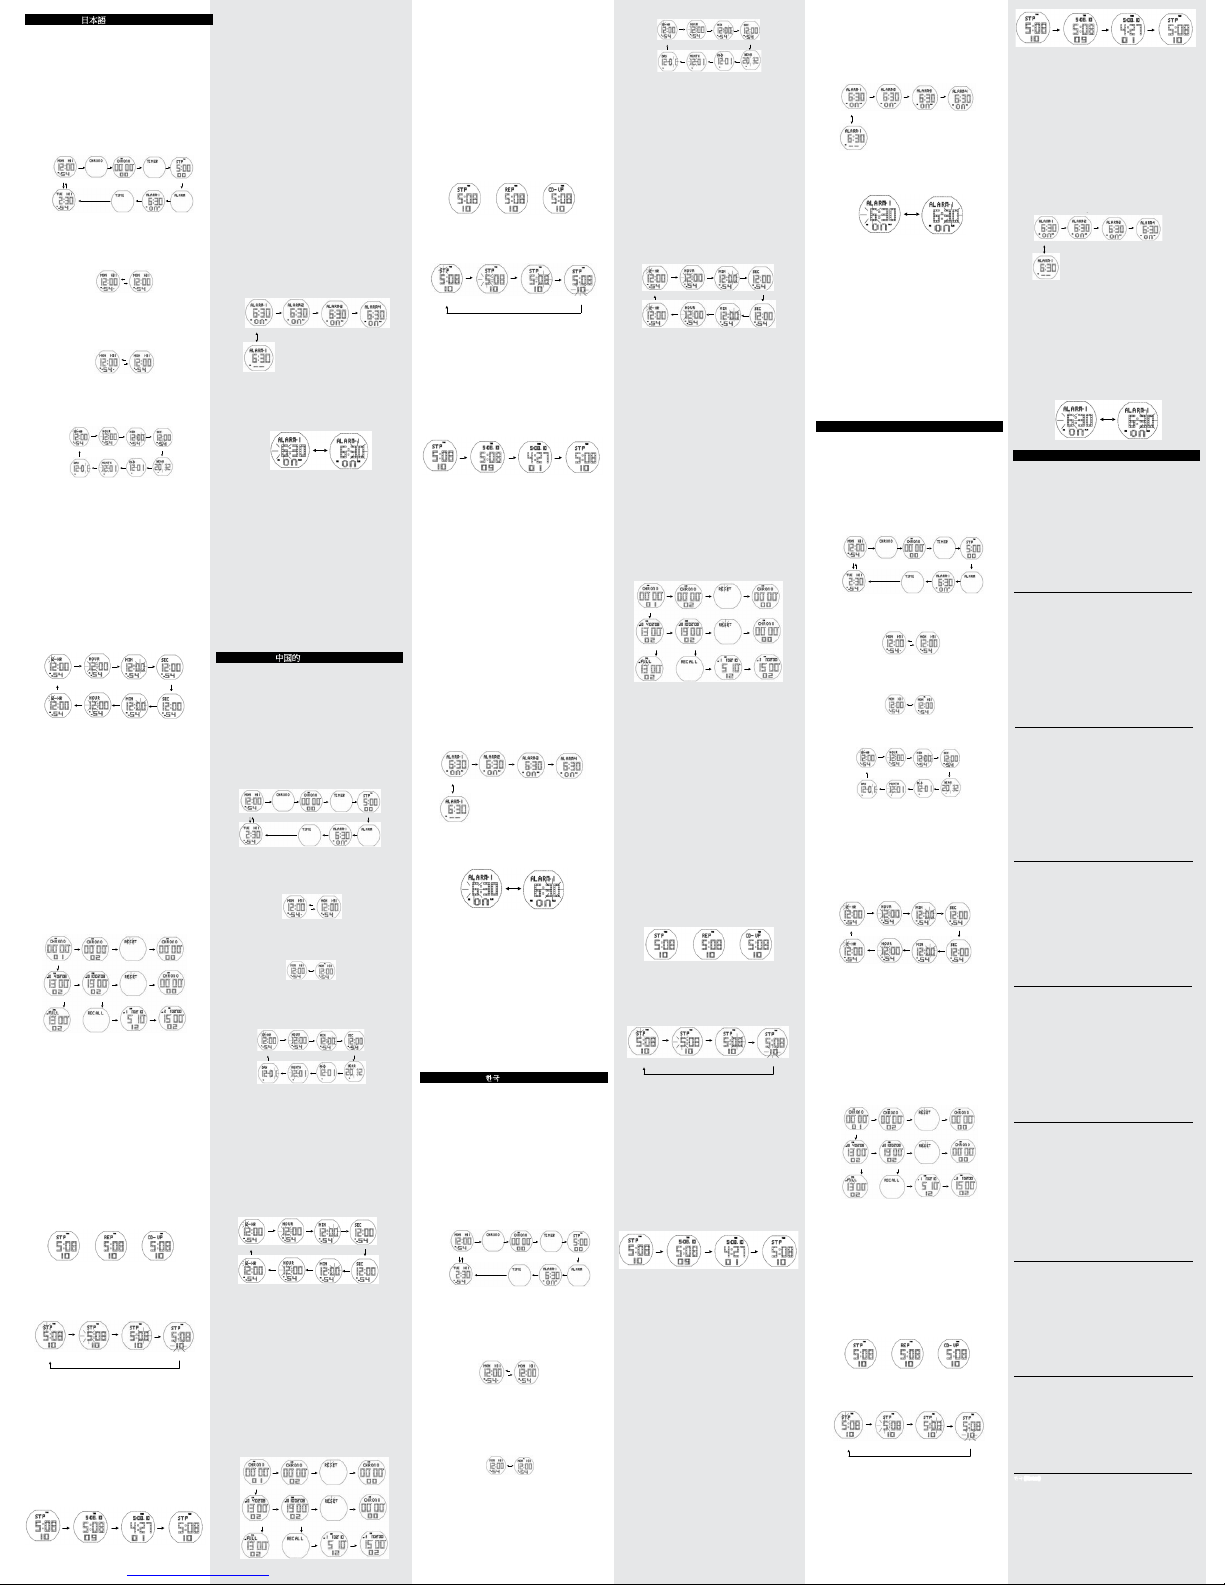
•画面で「TMR」アイコンが点滅中はカウントダウンタイム作
動中です。「TMR」アイコン点滅が停止すると、カウントダウ
ンの停止を意味します
•ストップウォッチ作動中、Bボタンを押すと他モードへ移行
しますが、ストップウォッチ測定作業は継続します
•1回きりカウントダウン(STPモード)では0に達したらカウ
ントダウンタイムのオリジナル値に戻ります。同時に、アラー
ム音が30秒「BB-BB」と鳴り、それから自動的にタイムモード
に戻ります。アラーム音が鳴り始めたらどのボタンを押しても
鳴り止みます。30秒間何のボタン操作もない場合、自動的にタ
イムモードに戻ります
•連続ストップウォッチ(REPモード):カウントダウン終了
後、自動的にカウントダウンを繰り返します。自動連続カウン
トダウンの繰り返し限度は100回までです。カウントダウン値
が1〜59秒間に設定中は、連続カウントダウンが0に達するとア
ラーム音「BB」が鳴ります。連続カウントダウンが100に達す
るとアラーム音「BB‐BB」が30秒間鳴り、その後自動的通常時
刻モードに戻ります。カウントダウン値が1分間以上に設定中
は、カウントダウンが0に達するとアラーム音「BB-BB」が10秒
間鳴ります。アラーム音が鳴り始めたらどのボタンを押しても
鳴り止みます。30秒間何のボタン操作もない場合、自動的にタ
イムモードに戻ります
•カウントアップ(CD-UPモード):カウントダウンタイムが0
に達すると自動的にカウントアップし、アラーム音「BB-BB」
が30秒間鳴り、その後自動的に通常時刻モードに移行します。
アラーム音が鳴り始めたらどのボタンを押しても鳴り止みま
す。30秒間何のボタン操作もない場合、自動的にタイムモー
ドに戻ります
7.アラームモード
•アラームモードでDボタンを押すと4セットのアラーム時刻が
表示されます。アラームモードのそれぞれのグループはCボタ
ンを押すことでアラームをオン/オフ出来ます。下記参照:
アラーム設定
•アラーム1モードでAボタンを2秒間押すと「時」が点滅し始
め、アラームの設定画面となります。次にBボタンを押すと次
の順序で項目を選択出来ます:
•Dボタンを押すと数字が大きくなります、素早く数字を大き
くするにはDボタンを押し続けてください
•Cボタンを押すと数字が小さくなります、素早く数字を小さ
くするにはCボタンを押し続けてください
•Aボタンを押して設定を確認・終了し、アラームモードに戻
ります
•設定モードにおいて30秒間何のボタン操作もない場合、自動
的に設定モードからタイムモードに戻ります
•アラームモードにおいて30秒間何のボタン操作もない場合、
自動的にアラームモードからタイムモードに戻ります
•他のアラームグループの設定方法はすべて似通っています
•アラーム設定時に到達すると、アラーム音が30秒間鳴り、そ
の後自動的に止まります
注:アラーム1から4はタイム1またはタイム2の現在時刻に到達
したときのみに鳴ります。例えば、タイム2モードの現在時刻
が選択されていて、アラームがなる前にタイム1モードに現在
時刻を変更しなかった場合は、アラームはタイム2モードの時
刻に従ってのみ鳴ります。
タイム1が選択されている場合:アラームは時間を設定したタ
イムゾーンに応じて鳴ります
•12-시간 및 24-시간 포맷을 선택하려면 D나 C를 누
르세요
•D를 누르면 값이 증가하고, D를 누르고 있으면 빨리
증가합니다
•C를 누르면 값이 감소하고, C를 누르고 있으면 빨리
감소합니다
•D나 C 버튼을 눌러 초를 0으로 재설정합니다. 동시
에, 시간 2의 시간도 0으로 재설정합니다.
•A를 눌러 확인한 후 설정을 빠져나가 정상 시간유지
모드로 되돌아갑니다
•설정 모드에서 30초 내에 아무 버튼도 누르지 않으
면 자동으로 설정을 빠져나간 후 시간 1 모드로 되돌
아 갑니다
4.시간 2 설정
•시간 2 모드에서 2초간 A를 누르고 있으면 “12-시
간/2-시간”이 번쩍거리기 시작하면서 시간 1 설정 스
크린이 나타납니다. 아래와 같이 차례대로 항목을 선택
하기 위해서는 B를 누르세요:
•12-시간 및 24-시간 포맷을 선택하려면 D나 C를 누
르세요
•D를 누르면 값이 감소하고, D를 누르고 있으면 빨리
감소합니다
•C를 누르면 값이 증가하고, C를 누르고 있으면 빨리
증가합니다
•D나 C를 눌러 초를 0으로 재설정합니다. 동시에, 시
간 1의 시간도 0으로 재설정합니다.
•A를 눌러 확인한 후 설정을 빠져나가 정상 시간유지
모드로 되돌아갑니다
•설정 모드에서 30초 내에 아무 버튼도 누르지 않으
면 자동으로 설정을 빠져나간 후 시간 2 모드로 되돌
아 갑니다
5.스톱와치 모드
•스톱와치의 디스플레이 범위는 0에서 23시간/59
분/59.99초입니다
•스톱와치는 최대 제한 시간(23시간, 59분, 59초)에
다다랐을 때 0부터 카운팅을 다시 시작할 것입니다
•LAP 시간 10개 그룹이 기록될 수 있습니다
스톱와치로 시간 측정하기
•스톱와치 모드로 들어갈 때, 카운팅을 시작/정지하기
위해서는 D를 누르세요 2초간 C를 누르고 있으면 초가
0으로 재설정됩니다
•스톱와치가 작동중일 때 C를 누르면 LAP 타이밍으로
들어가고, 화면은 8초간 이전 LAP 시간을 표시한 후 다
음 LAP 시간을 표시합니다. LAP 시간 10개 그룹이 모두
기록되었을 때, C 버튼을 계속 누르고 있으면 화면 아
이콘에 “FULL”이라고 나타납니다. 이전 LAP 시간은
LAP 시간의 마지막 그룹으로 대체됩니다
•LAP 시간이 작동중일 때, 카운팅을 멈추기 위해서는
D를 누르고, LAP 리콜 모드로 들어가기 위해서는 A를
누르세요. LAP 리콜 모드에서 LAP 시간의 각 그룹을 보
기 위해서는 D를 누르세요. C를 눌러 LAP 리콜 모드를
빠져나간 후 스톱와치 모드로 돌아가세요
•LAP 리콜 모드에서나 스톱와치가 멈춰 있을 때, C를
2초간 누르면 모든 이전 기록이 지워집니다
•스톱와치가 작동중일 때 B를 누르면 다른 모드로 들
어가고, 스톱와치 모드를 빠져나가도 스톱와치 측정 옵
션은 지속됩니다
•스톱와치가 멈췄을 때, 30초 내에 아무 버튼도 누르
지 않으면 스톱와치는 자동으로 시간 모드를 빠져나갑
니다
6.카운트다운 모드
•타운트다운 시간의 디스플레이 범위는 0에서 23시간,
59분, 59초입니다
•카운트다운의 3가지 모드는 다음과 같이 선택 가능
합니다:
카운트다운 시간 설정
•카운트다운 시간이 멈췄을 때, A를 2초간 누르면 카
운트다운 시간 설정 화면을 표시하는 “STP/ERP” 또는
“CD-UP” 아이콘이 번쩍이기 시작합니다. 그리고나서
B를 눌러 아래와 같이 차례대로 항목을 선택합니다:
•D나 C를 누르면 카운트다운 시간의 3가지 모드 STP, ERP, CD-UP - 중 한 모드를 선택할 수 있습니다
•D를 누르면 값이 증가하고, D를 누르고 있으면 더 빨
리 증가합니다
•C를 누르면 값이 감소하고, C를 누르고 있으면 더 빨
리 감소합니다
•A를 눌러 확인한 후 설정을 빠져나가 카운트다운 시
간 모드로 되돌아갑니다
•설정 모드에서 30초 내에 아무 버튼도 누르지 않으
면, 스톱와치는 자동으로 설정을 빠져나간 후 시간 모
드로 되돌아 갑니다
카운트다운 타이머로 시간 측정하기
•카운트다운 모드에서 카운팅을 시작/정지하기 위해서
는 D를 누릅니다. 카운트다운이 멈췄을 때 C를 누르면
초기값으로 되돌아갑니다
•“TMR” 아이콘이 화면에서 번쩍이면 카운트다운 시
간이 작동중입니다 “TMR” 아이콘이 번쩍임을 멈추면,
이는 카운트다운이 멈췄음을 의미합니다
•스톱와치가 작동중일 때 B를 누르면 다른 모드로 들
어가고, 스톱와치 모드를 빠져나가도 스톱와치 측정 옵
션은 지속됩니다
•한번의 카운트다운(STP 모드)으로: 카운트다운 시간
은 0에 도달한 후 초기값으로 되돌아갑니다. 동시에 알
람 톤은 30초간 “BB-BB” 사운드를 낸 후 자동으로 시
간 모드로 되돌아갑니다. 알람이 소리를 내기 시작한
후 아무 버튼이나 누르면 알람을 멈출 수 있습니다. 30
초 내 아무 버튼도 누르지 않으면, 스톱와치는 자동으
로 시간 모드로 되돌아 갑니다
•반복되는 스톱와치 (REP 모드): 카운트다운이 완료된
후 스톱와치는 자동으로 카운트다운을 반복합니다. 카
운트다운은 자동으로 100번까지 반복됩니다. 카운트다
운 값이 1초부터 59초까지 설정되면, 반복되는 카운트
다운이 0이 되었을 때 알람 톤은 “BB” 소리를 냅니
다. 카운트다운이 100번까지 반복되면, 알람 톤은 30
초간 “BB-BB” 소리를 낸 후 자동으로 시간유지 모드
로 되돌아갑니다. 카운트다운 값이 1분 이상으로 설정
되면, 카운트다운 시간이 0이 되었을 때 알람 톤은 10
초간 “BB-BB” 소리를 냅니다. 알람이 사운드를 내기
시작한 후 아무 버튼이나 누르면 알람을 멈출 수 있습
니다. 30초 내 아무 버튼도 누르지 않으면, 스톱와치는
자동으로 시간 모드로 되돌아 갑니다
•카운팅 업 (CD-UP 모드): 스톱와치는 카운트다운 시
간이 0이 되면 자동으로 카운트업합니다. 한편, 알람
톤은 30초간 “BB-BB” 소리를 낸 후 자동으로 타임 모
드로 되돌아갑니다. 이 소리를 내기 시작한 후 아무 버
•当秒表计时时,按C键进入单圈计时。先前一圈时间在
屏幕上显示8秒后,将显示下一圈的时间。当10组单圈时
间全部记录完毕时,如果您继续按C键,在屏幕上会出现
“FULL” 图标。先前的单圈时间将被最后一组的单圈时
间替换
•当单圈时间运行时,按D键停止计时,按A键进入单圈
检索模式。在单圈检索模式中,按D键查看每组的单圈时
间。按C键退出单圈检索模式,然后返回秒表模式
•在单圈复位模式中或秒表停止时,按住C键2秒钟清除先
前的全部记录
•当秒表计时时,按B键进入其它模式。此时,即使您退
出秒表模式,秒表也会继续测时。
•当秒表停止计时时,如果您在30秒内未执行任按键操
作,手表将自动返回到时间模式
6.倒计时模式
•倒计时时间的显示范围是从零到23小时/59分/59.99秒
•如下所示,共计3种倒计时方式:
倒计时时间设置
• 当倒计时时间停止时,按住A键2秒钟,“STP/
ERP” 或 “CD-UP” 图标开始闪烁。这表示进入了倒计
时时间设置屏幕,然后按B键依次选择如下项目:
•您可按D或C键从STP、ERP、CD-UP这三种倒计时时间方
法中任选一种方法。
• 按D键增加数值,按住D键快速增加
• 按C键减小数值,按住C键快速减小数值
• 按A键确认并退出设置,然后返回到倒计时时间
模式
•在设置模式中,如果您在30秒内未执行任何键操作,手
表将自动退出设置模式,然后返回到时间模式
用倒计时计数器测量时间
•在倒计时模式中,按D键开始/停止倒计时当倒计时停止
时,按C键回到初始值
•当屏幕上的 “TMR” 图标闪烁时,表示正在倒计时。
当屏幕上的 “TMR” 图标停止闪烁时,表示已停止倒计
时
•当秒表运行时,按B键进入其它模式。此时即使退出秒
表模式,秒表也会继续测时。
•一次倒计时(STP模式):倒计时时间归零后恢复到初
始值。同时,发出 “BB-BB” 的铃声30秒钟,然后自动
返回到时间模式。开始响铃时,按任意键均可止闹。如
果您在30秒内未执行任何按键操作,手表将自动返回到
时间模式
•重复秒表(REP模式):倒计时完成后,手表自动重新
倒计时。自动重复倒计时的最大范围是100次。如果倒计
时时间设定为1到59秒,当重复倒计时至零时,就会发出
“BB” 的铃声。如果重复倒计时次数达到100次,会发
出 “BB-BB” 的铃声30秒钟,然后自动返回计时模式。
如倒计时时间设置超过1分钟,在倒计时时间至零时,会
发出 “BB-BB”的铃声10秒钟。开始响铃时,按任意键均
可止闹。如果您在30秒内未执行任何按键操作,手表将自
动返回到时间模式
•正计时(CD-UP模式):在倒计时时间至零时,手表会
自动正计时,同时会发出 “BB-BB”的铃声30秒钟,然后
自动返回到时间模式。开始响铃时,您可按任意键止闹。
如果您在30秒内未执行任何按键操作,手表将自动返回
到时间模式
7.闹钟模式
•在闹铃模式下,按D键查看4组闹铃时间。在每组闹铃模
式中,按C键开启/关闭闹铃。如下所示:
闹铃设置
•在闹铃1模式中,按住A键2秒钟,“Hour” 开始闪烁。
这表示进入了闹铃设置界面,然后按B键依次选择如下项
目。
•按D键增加数值,按住D键快速增加
•按C键减小数值,按住C键快速减小数值
•按A键确认并退出设置,然后返回闹铃模式
• 在设置模式中,如果您在30秒内未执行任何按
键操作,手表将自动退出设置模式,然后返回到时间模式
•在闹铃模式中,如果您在30秒内未执行任何按键操作,
手表将自动退出闹铃模式,然后返回到时间模式
•所有闹铃的设置方法均相同
•当到达设定的闹铃时间时,在闹铃声响30秒钟后会自
动停止
注意:只有到达时间1或时间2的当前时间时,闹铃1-4才
会响起。例如,如果您选择的当前时间是在时间2模式
下,您在闹铃音响起前未将当前时间改为时间1模式,闹
铃就只根据时间2模式的时间响起
如果选择时间1模式:闹铃就会根据您设置手表时选择的
所在时区自行发音
튼이나 누르면 알람을 멈출 수 있습니다. 30초 내 아무
버튼도 누르지 않으면, 스톱와치는 자동으로 시간 모드
로 되돌아 갑니다
7.알람 모드
•알람 모드에서 4개 그룹간 알람 시간을 보기 위해서는
D를 누르세요 각 그룹의 알람 모드에서 알람을 온/오프
하기 위해서는 C를 누르세요. 아래를 참조하세요:
알람 설정
•알람 1 모드에서 3초간 A를 누르면 알람 설정 화면을
나타내는 “Hour”가 번쩍이기 시작하는데, 그 후, B를
눌러 아래와 같이 차례대로 항목을 선택합니다:
•D를 누르면 값이 증가하고, D를 누르고 있으면 더 빨
리 증가합니다
•C를 누르면 값이 감소하고, C를 누르고 있으면 더 빨
리 감소합니다
•A를 눌러 확인한 후 설정을 빠져나가 알람 모드로 되
돌아갑니다
•설정 모드에서 30초 내에 아무 버튼도 누르지 않으면,
스톱와치는 자동으로 설정을 빠져나간 후 시간 모드로
되돌아 갑니다
•알람 모드에서 30초 내 아무 버튼도 누르지 않으면,
스톱와치는 자동으로 알람 모드를 빠져나간 후 시간 모
드로 되돌아 갑니다
•모든 알람 그룹의 설정 방법은 비슷합니다
•알람 설정된 시간이 되면, 알람 톤은 30초간 소리를
낸 후 자동으로 멈춥니다
주의: 알람 1부터 알람 4까지는 시간 1 또는 시간 2의
현재 시간이 될 때만 소리를 냅니다. 예를 들어, 선택한
현재 시간이 시간 2 모드에 있고 알람 톤이 소리를 내기
전에 시간 1 모드로 현재 시간을 변경하지 않으면, 알람
톤은 시간 2 모드의 해당 시간이 될 때만 소리를 냅니다
시간 1이 선택되면: 스톱와치가 설정된 시간 대에서 알
람이 울립니다
특징:
•13자리 LCD 화면은 시간, 분, 초, 년 (2000년부터
2099년까지), 월, 일, 요일을 디스플레이합니다
•12-시간/24-시간 포맷 선택 가능. 자동-달력
•이중 시간
•1/100 초 스톱워치 (스톱워치의 디스플레이 범위는
23시간/59분/59.99초입니다)
•알람의 4개 그룹 매시간 시간 안내
•카운트다운 타이머 (카운트다운 시간의 최대 디스
플레이 범위는 23시간, 59분, 59초입니다)
•버튼 톤과 매시간 시간 안내 (동기화된 온/오프)
•EL 역광 (역광을 밝히기 위해서는 “시작” 버튼
또는 다른 아무 버튼이나 누르시면 됩니다)
기능
1.모든 모드에서 A를 누르면 3초간 EL 역광이 밝아
집니다
2.정상 시간 유지 모드에서 C를 짧게 누르면 매시간
시간 안내 및 버튼 톤이 동시에 온/오프되며, 매시
간 시간 안내 표시기는 켜질 때 화면에 “ “이 표
시됩니다.
정상 시간 유지 모드에서 C를 2초간 눌러 EL 역광의
단일 버튼 또는 EL 역광의 어느 버튼으로도 작동하는
기능을 온/오프하세요. “AEL” 표시기는 역광 기능
을 가진 버튼이 온 될 때 화면에 표시되며, 이 때 아
무 버튼이나 눌러서 밝게 할 수 있습니다.
3.시간 1 설정
•시간 1 모드에서 2초간 A를 계속 누르면 “12-시
간/24-시간” 모드가 번쩍거리기 시작하면서 시간 1
설정 스크린이 나타납니다. 아래와 같이 차례대로 항
목을 선택하기 위해서는 B를 누르세요:
4.タイム2設定
•タイム2モードでAボタンを2秒押し続けると
「12-hour/24-hour(12時/24時)」という表示が点滅し
始め、タイム1の設定画面となります。Bボタンを押すと次
の順序で項目を選択出来ます。
•DまたはCボタンを押して12時/24時フォーマットのいず
れかを選択します
•Dボタンを押すと数字が小さくなります、素早く数字を
小さくするにはDボタンを押し続けてください
•Cボタンを押すと数字が大きくなります、素早く数字を
大きくするにはCボタンを押し続けてください
•DまたはCボタンを押すと秒がゼロにリセットされます。
同時にタイム1の時刻もゼロにリセットされます。
•Aボタンを押して設定を確認・終了し、通常時刻モード
に戻ります
•設定モードにおいて30秒間何のボタン操作もない場合、
自動的に設定モードからタイム2モードに戻ります
5.ストップウォッチモード
•ストップウォッチ表示範囲は0から23時間59分59秒99ま
でです
•ストップウォッチは最大値(23時間59分59秒)に達する
とカウントをリスタートします
•LAP時間10セット分を記録できます
ストップウォッチでの測定方法
•ストップウォッチモードに入ってDボタンを押すとスタ
ート/ストップします。Cボタンを2秒押し続けると秒表示
部分がリセットされます
•ストップウォッチ作動中にCボタンを押してLAPタイミン
グに入ります、次回のLAPタイムは前回分を表示後に8秒間
表示されます。LAPタイム10セット分が記録されたら、Cボ
タンを押し続けても画面には「FULL」と表示されます。前
回のLAPタイムはLAPタイムのうち最終セットによって置き
換えられます
•LAPタイム作動中にDボタンを押すとカウントを中止
し、Aボタンを押すとLAPリコールモードに移行しま
す。LAPリコールモードで、Dボタンを押すとLAPタイムの
各グループを見れます。Cボタンを押すとLAPリコールモー
ドを終了し、ストップウォッチモードに戻ります
•LAPリコールモード/ストップウォッチ停止中に、Cボタ
ンを2秒間押すと前回の全記録が消去されます
•ストップウォッチ作動中、Bボタンを押すと他モードへ
移行しますが、ストップウォッチ測定オプションは継続
します
•ストップウォッチ停止中に30秒間何のボタン操作もない
場合、自動的にタイムモードに戻ります
6.カウントダウンモード
•カウントダウンタイム表示範囲は0から23時間59分59秒
までです
•カウントダウンのうち3手法を次から選択できます:
カウントダウンタイム設定
•カウントダウンタイム停止中にAボタンを2秒押し続ける
と「STP/ERP」か「CD-UP」のアイコンが点滅開始し、カウ
ントダウンタイム設定画面となり、次にBボタンを押すと
次の順序で選択できます:
•DかCボタンを押すと次の3種のカウントダウンタイム手
法から1つ選択できます:STP/ERP/CD-UP
•Dボタンを押すと数字が大きくなります、素早く数字を
大きくするにはDボタンを押し続けてください
•Cボタンを押すと数字が小さくなります、素早く数字を
小さくするにはCボタンを押し続けてください
•Aボタンを押して設定を確認・終了し、カウントダウン
タイムモードに戻ります
•設定モードにおいて30秒間何のボタン操作もない場合、
自動的に設定モードからタイムモードに戻ります
カウントダウンタイマーでの時間測定
•カウントダウンモードで、Dボタンを押すとカウント開
始/停止します。停止中、Cを押すとオリジナル値に戻り
ます
機能:
•13桁のLCDスクリーンが時、分、秒、年(2000〜2099
年)、月、日、曜日を表示します
•12時/24時フォーマット選択可自動カレンダー
•デュアルタイム
•1/100秒ストップウォッチ(ストップウォッチの表示範
囲は23時59分59秒99)
•4種類のアラーム設定可時報シグナル
•カウントダウンタイマー(カウントダウンタイム最大
表示範囲は23時59分59秒)
•ボタン音と時報シグナル(オン/オフ同期)
•ELバックライト(「スタート」ボタンまたはその他の
ボタンを押すとバックライトが点灯)
機能
1.どのモードでもAボタンを押すとELバックライトが3秒
間点灯します
2.通常時刻モードでCボタンを短く押すことで時報シグナ
ルのオン/オフ、ボタン音同期が設定されます。オンの
場合は画面上に時報シグナルインジケータ “ “ が表
示されます。
通常時刻モードでCボタンを2秒押し続けることでELバッ
クライト点灯機能を持ったボタンの機能をオン/オフ出
来ます。バックライト点灯機能ボタンのいずれかがオフ
になっている場合は「AEL」インジケータが画面に表示
され、その際はどのボタンを押してもELバックライトが
点灯します。
3.タイム1設定
•タイム1モードでAボタンを2秒押し続けると
「12-hour/24-hour(12時/24時)」という表示が点滅し
始め、タイム1の設定画面となります。Bボタンを押すと
次の順序で項目を選択出来ます。
•DまたはCボタンを押して12時/24時フォーマットのい
ずれかを選択します
•Dボタンを押すと数字が大きくなります、素早く数字を
大きくするにはDボタンを押し続けてください
•Cボタンを押すと数字が小さくなります、素早く数字を
小さくするにはCボタンを押し続けてください
•DまたはCボタンを押すと秒がゼロにリセットされま
す。同時にタイム2の時刻もゼロにリセットされます。
•Aボタンを押して設定を確認・終了し、通常時刻モー
ドに戻ります
•設定モードにおいて30秒間何のボタン操作もない場
合、自動的に設定モードからタイム1モードに戻ります
BJF063(F12-SWIF) MODULE MANUAL
which means countdown has been stooped running.
When stopwatc h is running,, press B to enter other modes, the stopwatch measurement operation
continuous even if you exit the Stopwatch Mode.
With One-time Countdown (STP Mode): the countdown time ret urns to original value after it re aches
to zero. At the same time, alarm ton e sounds with BB-BB for 30 seconds, then automatically return
to Time Mod e. Press any button can s top the alarm tone after i t starts to sound. The wa tch will
automatically return Time Mode if you do not perform any button operation in 30 seconds.
With Repeated Stopwatch (REP Mode): the w atch repeats countdown automatically afte r counting
down is completed. The maximum range of Auto-Repeated Countdown is 1 00 times. If the
countdown value is se t from 1 to 59 seconds, alar m tone will sound with BB w hen repeated
countdown reaches to zero e very time. And if Repeated C ountdown reaches to 100 times, the alarm
tone will sound with BB-BB for 30 sec onds, then automati cally return to Timekeeping Mode. If the
countdown value is set more than 1 minutes, alarm tone will sound with BB-BB for 10 seconds when
countdown time reaches to zero every time. Press any b utton can stop the alarm tone after it starts to
sound. The watch will automatically return Time Mod e if you do not perform any b utton operation in
30 seconds.
With Counting Up (CD-UP Mode): The watc h will count up au tomatically a fter countdow n time
reaches to zero, in the meanw hile, alarm tone will sou nd with BB-BB for 30 seconds, then
automatically back to Time Mode. You can press any button to stop the alarm tone after it sta rts to
sound. The watch will automatically return Time Mo de if you do not perform any button operation in
30 seconds.
7. Alarm Mode
In Alarm Mode, press D to view the alarm time amo ng 4 groups. In each grou p of alarm mode, press C to
turn on / off alarm. As shown following:
Alarm Off
Button C
Button D
Button D
Button D
Alarm On
screen, then press B button to select item in sequence as shown below:
Hour
Minute
Button B
日本語 (JAPANESE)
中国的 (CHINESE)
한국 (KOREAN)
BJF063(F12-SWIF) MODULE MANUAL
A . Features
13 digits LCD Screen displays the hour, min ute, second, year (fro m year 2000 to y ear 2099), month,
date, day of the week.
12-hour / 24-hour format selectable. A uto-calendar.
Dual time.
1/100 second stopwatch (the display ra nge of the stopwatch is 23 hours 59 minutes 59.99 seconds).
Four groups of alarm. Hourly time si gnal.
Countdown timer (the maximum display range of countdown time is 23 hours 59 minut es 5 9
seconds.)
Button tone and hourly time signal.( O n / Off synchronized)
EL backlight. (can use “Start” button or any other buttons to illuminate the backlight).
B . Functions
Button C RESET
Button D START/STOP
LIGHT/SETButton A
LMODEButton B
Time 1 Mode
Alarm Mode
Time 2 Mode
Button B Button B
Stopwatch Mode
Countdown Time Mode
Press & Hold D
for 2 seconds
Button B
Button B
Press & Hold D
for 2 seconds
BJF063(F12-SWIF) MODULE MANUAL
A . Features
13 digits LCD Screen displays the hour, min ute, second, year (fro m year 2000 to y ear 2099), month,
date, day of the week.
12-hour / 24-hour format selectable. A uto-calendar.
Dual time.
1/100 second stopwatch (the display ra nge of the stopwatch is 23 hours 59 minutes 59.99 seconds).
Four groups of alarm. Hourly time si gnal.
Countdown timer (the maximum display range of countdown time is 23 hours 59 minut es 5 9
seconds.)
Button tone and hourly time signal.( O n / Off synchronized)
EL backlight. (can use “Start” button or any other buttons to illuminate the backlight).
B . Functions
Button C RESET
Button D START/STOP
LIGHT/SETButton A
LMODEButton B
Time 1 Mode
Alarm Mode
Time 2 Mode
Button B
Button B
Stopwatch Mode
Countdown Time Mode
Press & Hold D
for 2 seconds
Button B
Button B
Press & Hold D
for 2 seconds
BJF063(F12-SWIF) MODULE MANUAL
2. In normal timekeeping mode, press C for a short time to turn on / off the hourly time signal and button tone
synchronously, hourly time signal indicator
will appear on the screen when it is turned on.
Hourly Time Signal and
Button Tone are turned on
Button C
Hourly Time Signal and
Button Tone are turned off
BJF063(F12-SWIF) MODULE MANUAL
2. In normal timekeeping mode, press C for a short time to turn on / off the hourly time signal and button tone
synchronously, hourly time signal indicator
will appear on the screen when it is turned on.
In normal timekeeping mode, hold down C for 2 seconds to turn on / off the function that is the single button with
EL backlight or any button with EL backlight. “AEL” indicator will dis play on the screen when an y button with
backlight is turned on, in this case, pressing any button can illuminate the EL backlight.
Hourly Time Signal and
Button Tone are turned on
Any button with
EL backlight
Single button with
EL backlight
Button C
Hourly Time Signal and
Button Tone are turned off
D button for
2 seconds
BJF063(F12-SWIF) MODULE MANUAL
2. In normal timek eeping mode, press C for a short time to turn on / off the h ourly time signal and button tone
synchronously, hourly time signal indicator
will appear on the screen when it is turned on.
In normal timekeeping mode, hold down C for 2 seconds to tu rn on / off the function that is the single button with
EL backlight or any button with EL backlight. “A EL” indicator wil l display on the screen wh en any button with
backlight is turned on, in this case, pressing any button can illuminate the EL backlig ht.
3. Time 1 Setting
In Time 1 Mode, “12-hour / 24-hour” start s to flash by holding down A for 2 seconds, which
indicates Time 1 setting screen, press B to select the items in sequence as show n below:
Button B
12H/24H Hour Minute Second
Year
Month-Date / Date-Month
Month Date
Hourly Time Signal and
Button Tone are turned on
Any button with
EL backlight
Single button with
EL backlight
B
B
B B
Button B
Button B
Button B
Button B
Button C
B
Button B
Button B
Button B
Hourly Time Signal and
Button Tone are turned off
D button for
2 seconds
Button B
BJF063(F12-SWIF) MODULE MANUAL
Press D o r C to select format between 12-h our and 24-hour format.
Press D t o increase the value, hold down D for some time to increase fast.
Press C t o decrease the value, hold down C for some time to decrease fast.
Seconds reset to zero by pressing D or C button . At the same time, the time o f Time 2 also resets
zero.
Press A button to confirm, and exit f rom setting, then return to normal timekeeping mode.
In setting mode, the watch will au tomatically exit setting and then return Time 1 Mode if you do not
perform any button operation in 30 seconds.
4. Time 2 Setting
In Time 2 Mode, “12-ho ur / 24-hou r” sta rts to flash by holdin g dow n A for 2 seconds, which
indicates Time 1 setting screen, press B to select the items in sequence as shown below:
12H/24H
Minute
Second
Year
Month-Date / Date-Month
Month Date
Button B
B B
B
Hour
Button B
Button B
Button B
Button B
Button B
Button B
BJF063(F12-SWIF) MODULE MANUAL
Press D or C to select format between 12-hou r and 24-hour format.
Press D to in crease the value, hold down D fo r some time to increase fast.
Press C to d ecrease the value, hold down C for some time to decrease fast.
Se conds reset to zero by pressing D or C butto n. At the same time, the time o f Time 2 also resets
zero.
Pr ess A button to confirm, and exit from setting, then return to normal timekeeping mode.
In setting mode, the watch will au tomatically exit setting and then return Time 1 Mode if you do not
perform any button operation in 30 seconds.
4. Time 2 Setting
In Time 2 Mode, “12-hour / 24-hour” starts to flash by holding down A for 2 seconds, which
indicates Time 1 setting screen, press B to select the items in s equence as shown below:
12H/24H
Minute
Second
Year
Month-Date / Date-Month
Month Date
Button B
B B
B
Hour
Button B
Button B
Button B
Button B
Button B
Button B
BJF063(F12-SWIF) MODULE MANUAL
When entering the stopwatch mode, press D to start / stop counting. Seconds r eset to zero by holding
down C for 2 seconds.
Reset to zero
Start Stop
Stop
Reset reminder
Reset to zero
LAP timing
Full of LAP records
Reset reminder
LAP Recall Mode
To view LAP records
Next LAP record
Button D
Button D
Button C
Button C
Button A
Button D
Button D
Press & Hold C
for 2 seconds
Press & Hold C
for 2 seconds
BJF063(F12-SWIF) MODULE MANUAL
When entering the stopwatc h mode, press D to start / stop counting. Seconds reset to zero by holdin g
down C for 2 seconds.
Reset to zero
Start Stop
Stop
Reset reminder
Reset to zero
LAP timing
Full of LAP records
Reset reminder
LAP Recall Mode
To view LAP records Next LAP record
Button D
Button D
Button C
Button C
Button A
Button D
Button D
Press & Hold C
for 2 seconds
Press & Hold C
for 2 seconds
BJF063(F12-SWIF) MODULE MANUAL
The di splay range of countdown time is fr om zero to 23 hours, 59 minutes, 5 9 seconds.
Three methods of countdown can be sele cted as shown following:
Countdown Time Setting
When countdown time is stopped, icon of “STP/ERP” or “CD -UP” starts to flash by pressing A for 2
seconds, which indicates countdown time setting screen, the n press B t o select items in sequence as
show below:
Press D or C can select any one meth od among three countdown ti me methods (STP) (ERP)
(CD-UP).
Press D to increase the value, hold down D for some time to increase fast.
Press C to decrease the value, hold down C for some time to decrease fast.
Press A to confirm, and exit from setting , then return to countdown time m ode.
In setting mode, the watch will automatically exit setting and then return Time Mode if y ou do not
perform any button operation in 30 seconds.
To measure times with countdown timer
In countdown mode, press D to start / stop counting. When it stopped, press C to ret urn to the
original value.
Counting up after countdown
reaches to zero
Stop
Start
Stop
Original value
Button D
Button D
Button D
B
B
B
Countdown time
Seconds
Hours
Minutes
Button B
Button B
Button B
Button B
Repeated Countdown Time
BJF063(F12-SWIF) MODULE MANUAL
The di splay range of countdown time is fr om zero to 23 hours, 59 minutes, 5 9 seconds.
Three methods of countdown can be sele cted as shown following:
Countdown Time Setting
When countdown time is stopped, icon of “STP/ERP” or “CD -UP” starts to flash by pressing A for 2
seconds, which indicates countdown time setting screen, the n press B t o select items in sequence as
show below:
Press D or C can select any one meth od among three countdown ti me methods (STP) (ERP)
(CD-UP).
Press D to increase the value, hold down D for some time to increase fast.
Press C to decrease the value, hold down C for some time to decrease fast.
Press A to confirm, and exit from setting , then return to countdown time m ode.
In setting mode, the watch will automatically exit setting and then return Time Mode if y ou do not
perform any button operation in 30 seconds.
To measure times with countdown timer
In countdown mode, press D to start / stop counting. When it stopped, press C to ret urn to the
original value.
Counting up after countdown
reaches to zero
Stop
Start
Stop
Original value
Button D Button D Button D
B
B
B
Countdown time
Seconds
Hours
Minutes
Button B
Button B
Button B
Button B
Repeated Countdown Time
BJF063(F12-SWIF) MODULE MANUAL
which means countdown has been stooped running.
When stopwatc h is running,, press B to enter other modes, the stopwatch measurement operation
continuous even if you exit the Stopwatch Mode.
With One-time Countdown (STP Mode): the countdown time ret urns to original value after it re aches
to zero. At the same time, alarm ton e sounds with BB-BB for 30 seconds, then automatically return
to Time Mod e. Press any button can s top the alarm tone after i t starts to sound. The wa tch will
automatically return Time Mode if you do not perform any button operation in 30 seconds.
With Repeated Stopwatch (REP Mode): the w atch repeats countdown automatically afte r counting
down is completed. The maximum range of Auto-Repeated Countdown is 1 00 times. If the
countdown value is se t from 1 to 59 seconds, alar m tone will sound with BB w hen repeated
countdown reaches to zero e very time. And if Repeated C ountdown reaches to 100 times, the alarm
tone will sound with BB-BB for 30 sec onds, then automati cally return to Timekeeping Mode. If the
countdown value is set more than 1 minutes, alarm tone will sound with BB-BB for 10 seconds when
countdown time reaches to zero every time. Press any b utton can stop the alarm tone after it starts to
sound. The watch will automatically return Time Mod e if you do not perform any b utton operation in
30 seconds.
With Counting Up (CD-UP Mode): The watc h will count up au tomatically a fter countdow n time
reaches to zero, in the meanw hile, alarm tone will sou nd with BB-BB for 30 seconds, then
automatically back to Time Mode. You can press any button to stop the alarm tone after it sta rts to
sound. The watch will automatically return Time Mo de if you do not perform any button operation in
30 seconds.
7. Alarm Mode
In Alarm Mode, press D to view the alarm time amo ng 4 groups. In each grou p of alarm mode, press C to
turn on / off alarm. As shown following:
Alarm Off
Button C
Button D
Button D
Button D
Alarm On
BJF063(F12-SWIF) MODULE MANUAL
which means countdown has been stooped running.
When stopwatch is running,, pres s B to e nter other modes, the stopwatch m easurement op eration
continuous even if you exit the Stopwatch Mode.
With One-time Countdown (STP Mode): t he countdown time returns to or iginal value after it reaches
to zero. At the same ti me, alarm tone sounds with BB-BB for 30 seconds, then automatically return
to Time Mode. Press any button can stop the alarm tone after it starts to sound. The watch will
automatically return Time Mode if you do not perform any butt on operation in 30 seconds.
With Repeated Stopwatch (REP Mode): the watch repeats co untdown automati cally after counting
down is completed. T he maximum range of Auto-Repeated Countdown is 100 tim es. If the
countdown value is set fr om 1 to 59 seconds, alarm t one will sound with BB when repeated
countdown reaches to zero every time. And if Repeated Count down reaches to 100 times, th e alarm
tone will sound with BB-BB for 30 seconds , then automatically return to T imekeeping Mode. If the
countdown value is set more than 1 minutes, alarm ton e will sound with BB-BB fo r 10 seconds when
countdown time reaches to zero every time. Press any butto n can stop the alar m tone after it sta rts to
sound. The watch will automatically return Time Mode i f you do not perform any butto n operation in
30 seconds.
With Counting Up (CD-UP M ode): The watch will count up automaticall y after countdown time
reaches to ze ro, in the m eanwhile, alarm to ne will sound with BB-BB for 30 se conds, then
automatically back to Time Mode. You can press a ny button to stop the alarm tone after it starts to
sound. The watch will automatically return Time Mode if you do not perform any butt on operation in
30 seconds.
7. Alarm Mode
In Alarm Mode, press D to view the alarm time among 4 g roups. In each group of al arm mode, press C to
turn on / off alarm. As shown following:
Alarm Off
Button C
Button D
Button D
Button D
Alarm On
will appear on the screen when it is turned on.
Hourly Time Signal and
Button Tone are turned on
Button C
Hourly Time Signal and
Button Tone are turned off
will appear on the screen when it is turned on.
Hourly Time Signal and
Button Tone are turned on
Button C
Hourly Time Signal and
Button Tone are turned off
BJF063(F12-SWIF) MODULE MANUAL
The display range of countdown time is from zero to 23 hours, 59 minutes, 59 seconds.
Three methods of countdown can be selected as show n following:
Counting up after countdown
reaches to zero
One-time Countdown Time
Repeated Countdown Time
BJF063(F12-SWIF) MODULE MANUAL
The display range of countdown time is from zero to 23 hours, 59 minutes, 59 seconds.
Three methods of countdown can be selected as show n following:
Counting up after countdown
reaches to zero
One-time Countdown Time
Repeated Countdown Time
BJF063(F12-SWIF) MODULE MANUAL
The display range of countdown time is from zero to 23 hours, 59 minutes, 59 seconds.
Three methods of cou ntdown can be selected as shown f ollowing:
Countdown Time Setting
When countdown time is stopped, icon of “S TP/ERP” or “CD-UP” star ts to flash by pressing A for 2
seconds, which indicates cou ntdown time settin g screen, then press B to select items in sequence as
show below:
Counting up after countdown
reaches to zero
B B
B
Countdown time
Seconds
Hours Minutes
Button B
Button B
Button B
Button B
One-time Countdown Time
Repeated Countdown Time
BJF063(F12-SWIF) MODULE MANUAL
The display range of countdown time is from zero to 23 hours, 59 minutes, 59 seconds.
Three methods of cou ntdown can be selected as shown f ollowing:
Countdown Time Setting
When countdown time is stopped, icon of “S TP/ERP” or “CD-UP” star ts to flash by pressing A for 2
seconds, which indicates cou ntdown time settin g screen, then press B to select items in sequence as
show below:
Counting up after countdown
reaches to zero
B B
B
Countdown time
Seconds
Hours Minutes
Button B
Button B
Button B
Button B
One-time Countdown Time
Repeated Countdown Time
screen, then press B button to select item in sequence as shown below:
Hour Minute
Button B
screen, then press B button to select item in sequence as shown below:
Hour Mi nute
Button B
功能:
•13位数LCD屏幕显示小时、分钟、秒、年(从2000年至
2099年)、月、日期、星期
•可选择12小时制/24小时制。自动日历
•双时区
•1/100秒秒表(秒表的显示范围是:23小时/59分/59.99秒)
•四组闹铃。整点时间信号
•倒计时计时器(最大倒计时时间显示范围:23小时,59
分,59秒)
•按键音与整点时间信号(同步开/关)
•EL背光(可使用 “启动” 按键或任何其它按键点亮背光)
功能
1.在任何模式中,按A键点亮EL背光3秒钟
2.在正常计时模式中,短按C键同时开启/关闭整点时间信
号及按键音,整点时间信号开启时,其指示器 “” 会显
示于屏幕上。
在正常计时模式中,按住C键2秒钟开启/关闭EL背光信号键
或任意EL背光键功能。当开启任何背光功能键时,“AEL”
指示器将显示在屏幕上。此时,按任何键均能点亮EL背光
3.时间1设置
•在时间1模式中,按住A键2秒钟,“12-hour/24-hour”
开始闪烁。这表示进入了时间1设置屏幕,按B键依次选择
如下项目:
•按D或C键选择12小时或24小时制。
•按D键增加数值,按住D键快速增加
•按C键减小数值,按住C键快速减小数值
•按D或C键将秒数归零。同时,“时间2” 的时间也被归
零。
•按A键确认,并退出设置,然后返回到正常计时模式
•在设置模式下,如果你在30秒内不执行任何按钮操作,
手表将自动退出设置,然后返回到时间1模式
4.时间2设置
•在时间2模式中,按住A键2秒钟,“12-hour/2-hour”开
始闪烁。这表示进入了时间1设置屏幕,按B键依次选择如
下项目:
•按D或C键选择12小时或24小时制
•按D键减小数值,按住D键快速减小数值
•按C增加数值,按住C快速增加数值
•按D或C键将秒数归零。同时,时间1的时间也复位为零。
•按A键确认并退出设置,然后返回到正常计时模式
•在设置模式中,如果您在30秒内未执行任何按键操作,
手表将自动退出设置,然后返回到时间2模式
5.秒表模式
•秒表的显示范围是从零到23小时/59分/59.99秒
•当秒表到达其最大的时间限制(23小时59分59秒)时,
将重新从零开始计数
•可记录10组单圈时间
用秒表计时
•进入秒表模式时,按D键启动/停止计数。按住C键2秒钟
将秒数归零
BJF063(F12-SWIF) MODULE MANUAL
A . Features
13 digits LCD Screen displays the hour, min ute, second, year (fro m year 2000 to y ear 2099), month,
date, day of the week.
12-hour / 24-hour format selectable. A uto-calendar.
Dual time.
1/100 second stopwatch (the display ra nge of the stopwatch is 23 hours 59 minutes 59.99 seconds).
Four groups of alarm. Hourly time si gnal.
Countdown timer (the maximum display range of countdown time is 23 hours 59 minut es 5 9
seconds.)
Button tone and hourly time signal.( O n / Off synchronized)
EL backlight. (can use “Start” button or any other buttons to illuminate the backlight).
B . Functions
Button C RESET
Button D START/STOP
LIGHT/SETButton A
LMODEButton B
Time 1 Mode
Alarm Mode
Time 2 Mode
Button B Button B
Stopwatch Mode
Countdown Time Mode
Press & Hold D
for 2 seconds
Button B
Button B
Press & Hold D
for 2 seconds
BJF063(F12-SWIF) MODULE MANUAL
2. In normal timekeeping mode, press C for a short time to turn on / off the hourly time signal and button tone
synchronously, hourly time signal indicator
will appear on the screen when it is turned on.
In normal timekeeping mode, hold down C for 2 seconds to turn on / off the function that is the single button with
EL backlight or any button with EL backlight. “AEL” indicator will dis play on the screen when an y button with
backlight is turned on, in this case, pressing any button can illuminate the EL backlight.
Hourly Time Signal and
Button Tone are turned on
Any button with
EL backlight
Single button with
EL backlight
Button C
Hourly Time Signal and
Button Tone are turned off
D button for
2 seconds
BJF063(F12-SWIF) MODULE MANUAL
2. In normal ti mekeeping mode, p ress C for a short time to turn on / off the hourly time sign al and button tone
synchronously, hourly time signal indicator
will appear on the screen when it is turned on.
In normal timekeeping mode, hold down C for 2 seconds to turn on / off the functi on that is the single butt on with
EL backlight or any button with EL backlight. “AEL” indicator will display on the screen when any button with
backlight is turned on, in this case, pressing any button can illuminate the EL bac klight.
3. Time 1 Setting
In Time 1 Mode, “12-h our / 24-ho ur” s tarts t o flas h by holdi ng do wn A for 2 seconds, whic h
indicates Time 1 setting screen, press B to select the items in sequence as sh own below:
Button B
12H/24H
Hour
Minute
Second
Year
Month-Date / Date-Month
Month
Date
Hourly Time Signal and
Button Tone are turned on
Any button with
EL backlight
Single button with
EL backlight
B
B
B B
Button B
Button B
Button B
Button B
Button C
B
Button B
Button B
Button B
Hourly Time Signal and
Button Tone are turned off
D button for
2 seconds
Button B
BJF063(F12-SWIF) MODULE MANUAL
Press D o r C to select format between 12-h our and 24-hour format.
Press D t o increase the value, hold down D for some time to increase fast.
Press C t o decrease the value, hold down C for some time to decrease fast.
Seconds reset to zero by pressing D or C button . At the same time, the time o f Time 2 also resets
zero.
Press A button to confirm, and exit f rom setting, then return to normal timekeeping mode.
In setting mode, the watch will au tomatically exit setting and then return Time 1 Mode if you do not
perform any button operation in 30 seconds.
4. Time 2 Setting
In Time 2 Mode, “12-ho ur / 24-hou r” sta rts to flash by holdin g dow n A for 2 seconds, which
indicates Time 1 setting screen, press B to select the items in sequence as shown below:
12H/24H
Minute
Second
Year
Month-Date / Date-Month
Month Date
Button B
B B
B
Hour
Button B
Button B
Button B
Button B
Button B
Button B
BJF063(F12-SWIF) MODULE MANUAL
When entering the stopwatc h mode, press D to start / stop counting. Seconds reset to zero by holdin g
down C for 2 seconds.
Reset to zero
Start
Stop
Stop
Reset reminder
Reset to zero
LAP timing
Full of LAP records
Reset reminder
LAP Recall Mode
To view LAP records Next LAP record
Button D
Button D
Button C
Button C
Button A
Button D
Button D
Press & Hold C
for 2 seconds
Press & Hold C
for 2 seconds
will appear on the screen when it is turned on.
Hourly Time Signal and
Button Tone are turned on
Button C
Hourly Time Signal and
Button Tone are turned off
BJF063(F12-SWIF) MODULE MANUAL
The display rang e of countdown time is from zero to 23 hours, 59 minutes, 59 seconds.
Three methods o f countdown can be selected as sho wn following:
Counting up after countdown
reaches to zero
One-time Countdown Time Repeated Countdown Time
BJF063(F12-SWIF) MODULE MANUAL
The display rang e of countdown time is from zero to 23 hours, 59 minutes, 59 seconds.
Three methods o f countdown can be selected as sho wn following:
Countdown Time Setting
When countdow n time is stopped, icon of “STP/ERP” or “CD-UP” starts to flash by pressing A for 2
seconds, which indicates co untdown time sett ing screen, then press B to select items in sequence as
show below:
Counting up after countdown
reaches to zero
B B
B
Countdown time
Seconds
Hours Minutes
Button B
Button B
Button B
Button B
One-time Countdown Time
Repeated Countdown Time
BJF063(F12-SWIF) MODULE MANUAL
The di splay range of countdown time is fr om zero to 23 hours, 59 minutes, 5 9 seconds.
Three methods of countdown can be sele cted as shown following:
Countdown Time Setting
When countdown time is stopped, icon of “STP/ERP” or “CD -UP” starts to flash by pressing A for 2
seconds, which indicates countdown time setting screen, the n press B t o select items in sequence as
show below:
Press D or C can select any one meth od among three countdown ti me methods (STP) (ERP)
(CD-UP).
Press D to increase the value, hold down D for some time to increase fast.
Press C to decrease the value, hold down C for some time to decrease fast.
Press A to confirm, and exit from setting , then return to countdown time m ode.
In setting mode, the watch will automatically exit setting and then return Time Mode if y ou do not
perform any button operation in 30 seconds.
To measure times with countdown timer
In countdown mode, press D to start / stop counting. When it stopped, press C to ret urn to the
original value.
Counting up after countdown
reaches to zero
Stop
Start Stop Original value
Button D Button D Button D
B
B
B
Countdown time
Seconds
Hours
Minutes
Button B
Button B
Button B
Button B
Repeated Countdown Time
Manual do Swift
Recursos:
• A tela LCD de 13 dígitos exibe hora, minuto, segundo, ano (de 2000 até 2099), mês, data
e dia da semana.
• Seleção do formato de 12 horas/24 horas. Calendário automático.
• Dois fusos horários.
• Cronômetro de centésimo de segundo (o intervalo de exibição do cronômetro é de 23
horas, 59 minutos e 59,99 segundos).
• Quatro grupos de alarme. Sinal de hora cheia.
• Contador regressivo (o intervalo máximo exibido da contagem regressiva é de 23 horas, 59
minutos e 59 segundos).
• Sinal sonoro do botão e sinal de hora cheia (liga / desliga sincronizado).
• A iluminação de fundo EL (pode utilizar o botão “start” ou quaisquer outros botões para
acender a iluminação de fundo).
Funções
1. Em qualquer modo, pressione A para acender a iluminação de fundo EL por 3 segundos.
2. No modo normal de exibição das horas, pressione C por um curto período para ligar /
desligar, de maneira síncrona, o sinal de hora cheia e o sinal sonoro do botão. O indicador
de sinal de hora cheia “ “ aparecerá na tela quando este estiver ligado.
No modo normal de exibição das horas, pressione o botão C por 2 segundos para ligar
/ desligar a função do botão único com iluminação de fundo ou qualquer botão com
iluminação de fundo. O indicador “AEL” será exibido na tela quando qualquer botão
com iluminação de fundo for ligado. Neste caso, qualquer botão pressionado acende a
iluminação de fundo.
3. Ajusto do fuso horário 1
• No modo Time 1 (Fuso horário 1), a inscrição “12-hour/24-hour” cará intermitente quando
o botão A é pressionado por 2 segundos, o que indica a tela de ajuste do Fuso horário 1.
Pressione o botão B para selecionar os itens na sequência, conforme mostrado abaixo:
• Pressione o botão D ou C para selecionar o formato do horário para 12 horas ou 24 horas.
• Pressione o botão D para aumentar o valor, mantenha o botão D pressionado para
aumento rápido.
• Pressione o botão C para reduzir o valor, mantenha o botão C pressionado para redução rápida.
• Redenição dos segundos para zero por meio do botão D ou C. Ao mesmo tempo, o
horário do Fuso horário 2 também é redenido para zero.
• Pressione o botão A para conrmar e sair do modo de ajuste, então retornando ao modo
normal de exibição das horas.
• No modo de ajuste, o relógio automaticamente sairá deste modo e retornará ao modo do
Fuso horário 1, caso nenhuma operação seja realizada dentro de 30 segundos.
4. Ajusto do fuso horário 2
• No modo Time 2 (Fuso horário 1), a inscrição “12-hour/2-hour” cará intermitente quando
o botão A é pressionado por 2 segundos, o que indica a tela de ajuste do Fuso horário 1.
Pressione o botão B para selecionar os itens na sequência, conforme mostrado abaixo:
• Pressione o botão D ou C para selecionar o formato do horário para 12 horas ou 24 horas.
• Pressione o botão D para reduzir o valor, mantenha o botão D pressionado para redução rápida.
• Pressione o botão C para aumentar o valor, mantenha o botão C pressionado para
aumento rápido.
• Para redenir os segundos para zero, pressione o botão D ou C. Ao mesmo tempo, a hora
do Fuso horário 1 também é redenida para zero.
• Pressione o botão A para conrmar e sair do modo de ajuste, então retornando ao modo
normal de exibição das horas.
• No modo de ajuste, o relógio automaticamente sairá deste modo e retornará ao modo do
Fuso horário 2, caso nenhuma operação seja realizada dentro de 30 segundos.
5. Modo cronômetro
• O intervalo de exibição do cronômetro vai de zero até 23 horas, 59 minutos e 59.99
segundos.
• O cronômetro reiniciará a contagem a partir de zero ao alcançar seu limite máximo de
tempo (23 horas, 59 minutos e 59 segundos).
• Dez grupos dos tempos decorridos podem ser registrados.
Para marcação de tempo com o cronômetro
• Ao entrar no modo cronômetro, pressione D para iniciar / parar a contagem. Os segundos
são redenidos para zero pressionando-se e mantendo pressionado o botão C por 2
segundos.
• Pressione o botão C para entrar no modo de contagem de tempo decorrido quando o
cronômetro estiver em execução. A tela exibirá o próximo tempo decorrido após o tempo
decorrido anterior por 8 segundos. Quando 10 grupos de tempos decorridos tiverem sido
registrados, o ícone da tela exibirá a inscrição “FULL” (Cheio), caso o botão C continue a ser
pressionado. O tempo decorrido anterior será, então, substituído pelo último grupo de
tempos decorridos.
• Quando o tempo decorrido estiver em execução, pressione D para interromper a contagem e pressione A para entrar no modo LAP Recall (Registrar tempo decorrido). No modo
LAP Recall, pressione o botão D para visualizar cada grupo de tempos decorridos. Pressione
o botão C para sair do modo LAP Recall e então retorne ao modo Stopwatch (Cronômetro).
• No modo LAP Recall ou quando o cronômetro é parado, mantenha pressionado o botão C
por 2 segundos para limpar todos os registros anteriores.
• Quando o cronômetro estiver em execução, pressione B para entrar em outros modos.
A opção de contagem de tempo do cronômetro é continua, mesmo ao sair do modo
cronômetro.
• Quando o cronômetro for parado, o relógio automaticamente retornará para o modo de
horas, caso não seja realizada qualquer operação dentro de 30 segundos.
6. Modo de contagem regressiva
• O intervalo de exibição da contagem regressiva vai de zero até 23 horas, 59 minutos e 59
segundos.
• Três métodos de contagem regressiva podem ser selecionados, conforme mostrado abaixo:
Ajuste do horário da contagem regressiva
• Quando a contagem regressiva for interrompida, o ícone “STP/ERP” ou “CD-UP” piscará
intermitentemente quando o botão A é pressionado por 2 segundos, o que indica a tela
de ajuste da contagem regressiva. Depois, pressione o botão B para selecionar os itens na
sequência, conforme mostrado abaixo.
• Ao pressionar o botão D ou C, é possível selecionar qualquer método entre os três métodos de contagem regressiva: STP, ERP, CD-UP
• Pressione o botão D para aumentar o valor, mantenha o botão D pressionado para
aumento rápido.
• Pressione o botão C para reduzir o valor, mantenha o botão C pressionado para redução rápida.
• Pressione o botão A para conrmar e sair do modo de ajuste, então retornando ao modo
normal de contagem regressiva.
• No modo de ajuste, o relógio automaticamente sairá deste modo e retornará ao modo de
exibição das horas caso nenhuma operação seja realizada dentro de 30 segundos.
Contagem de tempo com a contagem regressiva
• No modo de contagem regressiva, pressione o botão D para iniciar / parar a contagem.
Quanto tiver parado, pressione o botão C para retornar ao valor original.
English
Battery Details
BATTERY LIFE:
The battery in your Soleus watch is estimated to last 2 years, depending on frequency and use of
certain features.
BATTERY REPLACEMENT:
Battery replacement must be performed by an
Authorized Soleus service center to retain a valid warranty.
In addition to battery replacement, the service center will test movement,
Gaskets, water resilience and hardware, to further ensure the long-term care
of your watch.
WARNING!
Keep watch batteries away from children. If swallowed, contact a doctor immediately.
WARNING! Batteries contain chemical substances. They should be
Disposed of properly according to local regulations.
WATER RESISTANCE: 50 meters
ATTENTION: Water damage may occur
If the buttons are pressed underwater
OPERATING TEMPERATURE:
-5° to 50° Celsius
Français (French)
Détails sur la pile
DURÉE DE VIE DE LA PILE :
la pile de votre montre Soleus devrait durer 2 ans, suivant le degré d’utilisation de certaines
fonctionnalités.
REMPLACEMENT DE LA PILE :
le remplacement de la pile doit être eectué dans un centre agréé Soleus
pour préserver la garantie.
En sus du remplacement de la pile, le technicien agréé va tester le mouvement
les joints, la résistance à l’eau et les accessoires, an d’assurer que votre montre
vous serve le plus longtemps possible.
AVERTISSEMENT !
Garder les piles hors de portée des enfants. En cas d’ingestion, contacter immédiatement les
services médicaux.
AVERTISSEMENT ! Les piles contiennent des substances chimiques. Veillez à
recycler ou jeter les piles en respectant les réglementations locales.
RÉSISTANCE À L’EAU : 50 mètres
ATTENTION : peut être endommagée par l’eau si vous appuyez
sur les boutons alors que la montre est submergée.
TEMPÉRATURE DE FONCTIONNEMENT :
-5° à 50° Celsius
Español (Spanish)
Detalles de la batería
DURACIÓN DE LA BATERÍA:
La batería del reloj Soleus tiene una vida útil de 2 años aproximadamente, según el uso que haga
de sus funciones.
SUSTITUCIÓN DE LA BATERÍA:
La sustitución de la batería deberá efectuarse en un centro de servicio técnico autorizado de
Soleus; de lo contrario, la garantía perderá su validez.
El centro de servicio técnico, además, controlará el mecanismo, las juntas, la resistencia al agua y
demás componentes del reloj para garantizar un buen funcionamiento a largo plazo.
ADVERTENCIA
Mantenga las baterías del reloj fuera del alcance de los niños. En caso de ingestión, comuníquese
con un médico de forma urgente.
ADVERTENCIA
Las baterías contienen sustancias químicas. Respete las normas y regulaciones locales al momento
de desecharlas.
RESISTENCIA AL AGUA: 50 metros
ATENCIÓN
Si presiona los botones del reloj debajo del agua, puede dañar el mecanismo.
TEMPERATURA DE FUNCIONAMIENTO:
-5° a 50° centígrados
Português (Portuguese)
Duração da bateria:
A bateria do seu relógio Soleus Estima-se últimos 2 anos, dependendo da freqüência e uso de
determinados recursos.
Substituição da bateria:
A substituição da bateria deve ser realizada por um
Autorizado Soleus centro de serviços para manter a garantia válida.
Além da substituição da bateria, o centro de atendimento testar movimento,
Juntas, resiliência água e hardware, para garantir ainda mais a cuidados de longa duração
do seu relógio.
ATENÇÃO!
Mantenha o relógio longe do alcance de crianças. Em caso de ingestão, procure um médico
imediatamente.
ATENÇÃO! As pilhas contêm substâncias químicas. Eles devem ser
Eliminadas de acordo com as regulamentações locais.
Resistência à água: 50 metros
ATENÇÃO: Os danos da água pode ocorrer
Se os botões são pressionados subaquática
Temperatura de operação:
-5 ° a 50 ° Celsius
Italiano (Italian)
Dettagli sulla batteria
DURATA DELLA BATTERIA:
La batteria dell’orologio Soleus ha una durata stimata in 2 anni, a seconda della frequenza e
dell’uso di determinate funzionalità.
SOSTITUZIONE DELLA BATTERIA:
La sostituzione della batteria deve essere eseguita
presso un centro assistenza Soleus autorizzato anché la garanzia resti valida.
Oltre a sostituire la batteria, il centro assistenza collauderà movimento,
guarnizioni, impermeabilità e accessori, in modo da garantire che l’orologio
duri il più a lungo possibile.
AVVISO!
Tenere le batterie fuori dalla portata dei bambini. Se ingerite, contattare immediatamente un
medico.
AVVISO! Le batterie contengono sostanze chimiche. Devono essere
smaltite in modo adeguato, in conformità alle normative locali.
RESISTENZA ALL’ACQUA: 50 metri
ATTENZIONE: Possono vericarsi danni
dovuti all’acqua se i pulsanti vengono premuti sott’acqua
TEMPERATURA OPERATIVA:
da -5° a 50° Celsius
Deutsch (German)
Batterie-Informationen
BATTERIE-LEBENSDAUER:
Die Batterie in Ihrer Soleus-Uhr hält im Schnitt 2 Jahre,
je nach Häugkeit und Verwendung bestimmter Funktionen.
BATTERIE-AUSTAUSCH:
Batterien müssen von einem autorisierten Soleus-Service Center
ausgetauscht werden, damit sie ihre gültige Garantie behalten.
Zusätzlich zum Austausch der Batterie testet das Service Center Bewegung,
Dichtungsringe, Wasserbeständigkeit und Ausstattung, um die Langlebigkeit
Ihrer Uhr zu gewährleisten.
WARNUNG!
Halten Sie Uhrenbatterien von Kindern fern.
Bei Verschlucken sofort einen Arzt aufsuchen.
WARNUNG!
Batterien enthalten chemische Substanzen. Sie sollten ordnungsgemäß
und nach örtlichen Vorschriften entsorgt werden.
WASSERBESTÄNDIGKEIT: 50 m
ACHTUNG: Eine Beschädigung durch Wasser kann entstehen,
wenn Knöpfe unter Wasser gedrückt werden.
BETRIEBSTEMPERATUR:
-5 °C bis 50 °C
日本語 (Japanese)
電池に関する詳細情報
電池の寿命:
Soleus 腕時計で使用される電池の推定寿命は 2 年間です。ただし、一部機能の使用
頻度や使用時間によって異なる場合があります。
電池の交換:
電池の交換は必ず認定 Soleus サービス センターにご依頼ください。
サービス センター以外で電池の交換をされますと、保証が無効となります。
大切な腕時計を何年も末永くお使いいただくため、サービス センターでは、電池の交
換以外に、ムーブメント、ガスケット、ウォーター レジリエンス、ハードウェアの点
検も承っています。
警告!
腕時計の電池は、お子様の手の届かないところに保管してください。電池を飲み込ん
だ場合は、ただちに医師にご相談ください。
警告!電池には化学物質が含まれています。破棄する場合は、各自治体の規制に従い
適切に処分してください。
耐水性: 50 メートル
ご注意: 水中でボタンを押すと
水により損傷することがあります。
作動温度:
-5 ~ 50°C
中国的 (Chinese)
电池详情
电池寿命:
Soleus 手表的电池约可持续使用 2 年,但取决于某些功能的使用频率和使用情况而定。
电池更换:
必须由经过授权的 Soleus 维修中心更换电池,才能维持有效的质保。
除电池更换外,维修中心还会测试机芯、垫圈、防水性能和硬件,以进一步确保为您的
手表提供长期的保养。
警告!
切勿让儿童接触手表电池。如果误食,请立即与医生联系。
警告!电池含有化学物质。应依据当地法规妥善弃置。
防水深度:50 米
注意:如果在水下按任何按钮,
可能会导致手表因遭水侵渍而受损
工作温度:
-5 ℃ 至50 ℃
한국 (Korean)
배터리 상세내역
배터리 수명 :
Soleus 시계의 배터리는 일정한 기능을 얼마나 자주 많이 사용하는가에 따라 조금
씩 다르지만 2년 정도 지속됩니다.
배터리 교체 :
유효한 보증을 받기 위해서는 공인 Soleus 서비스 센터를 통해 배터리를 교체해
야 합니다.
서비스 센터는, 시계를 장기간 사용하실 수 있도록 하기 위해, 배터리 교체 외에도
시계의 움직임과 개스킷, 방수력, 부품상태 등을 점검해 드립니다.
경고!
시계 배터리는 어린이로부터 멀리하십시오. 삼킨 경우 즉시 의사에게 연락하십시오.
경고! 배터리에는 화학물질이 함유되어 있습니다 배터리는 해당 지역 규정에 따라
적절하게 처분해야 합니다.
방수력 : 50미터
주의 사항 : 수중에서 버튼을 누를 경우 물에 의한 손상이 발생할 수 있습니다.
작동 온도 :
섭씨 -5° 내지 50°
PORTUGUES (PORTUGUESE)
BJF063(F12-SWIF) MODULE MANUAL
A . Features
13 digits LCD Screen displays the hour, min ute, second, year (fro m year 2000 to y ear 2099), month,
date, day of the week.
12-hour / 24-hour format selectable. A uto-calendar.
Dual time.
1/100 second stopwatch (the display ra nge of the stopwatch is 23 hours 59 minutes 59.99 seconds).
Four groups of alarm. Hourly time si gnal.
Countdown timer (the maximum display range of countdown time is 23 hours 59 minut es 5 9
seconds.)
Button tone and hourly time signal.( O n / Off synchronized)
EL backlight. (can use “Start” button or any other buttons to illuminate the backlight).
B . Functions
Button C RESET
Button D START/STOP
LIGHT/SETButton A
LMODEButton B
Time 1 Mode
Alarm Mode
Time 2 Mode
Button B
Button B
Stopwatch Mode
Countdown Time Mode
Press & Hold D
for 2 seconds
Button B
Button B
Press & Hold D
for 2 seconds
BJF063(F12-SWIF) MODULE MANUAL
2. In normal timekeeping mode, press C for a s hort time to turn on / off the hourly time signal and button tone
synchronously, hourly time signal indicator
will appear on the screen when it is turned on.
In normal timekeeping mode, hold down C for 2 seconds to turn on / off the function that is the single button with
EL backlight or any button with EL backlight. “AEL” indicator will display on the screen when any button wi th
backlight is turned on, in this case, pressing any button can illuminate the EL backlight.
Hourly Time Signal and
Button Tone are turned on
Any button with
EL backlight
Single button with
EL backlight
Button C
Hourly Time Signal and
Button Tone are turned off
D button for
2 seconds
BJF063(F12-SWIF) MODULE MANUAL
2. In normal timek eeping mode, press C for a short time to turn on / off the h ourly time signal and button tone
synchronously, hourly time signal indicator
will appear on the screen when it is turned on.
In normal timekeeping mode, hold down C for 2 seconds to tu rn on / off the function that is the single button with
EL backlight or any button with EL backlight. “A EL” indicator wil l display on the screen wh en any button with
backlight is turned on, in this case, pressing any button can illuminate the EL backlig ht.
3. Time 1 Setting
In Time 1 Mode, “12-hour / 24-hour” start s to flash by holding down A for 2 seconds, which
indicates Time 1 setting screen, press B to select the items in sequence as show n below:
Button B
12H/24H Hour Minute Second
Year
Month-Date / Date-Month
Month Date
Hourly Time Signal and
Button Tone are turned on
Any button with
EL backlight
Single button with
EL backlight
B
B
B B
Button B
Button B
Button B
Button B
Button C
B
Button B
Button B
Button B
Hourly Time Signal and
Button Tone are turned off
D button for
2 seconds
Button B
BJF063(F12-SWIF) MODULE MANUAL
Press D or C to select format between 12-hou r and 24-hour format.
Press D to in crease the value, hold down D fo r some time to increase fast.
Press C to d ecrease the value, hold down C for some time to decrease fast.
Se conds reset to zero by pressing D or C butto n. At the same time, the time o f Time 2 also resets
zero.
Pr ess A button to confirm, and exit from setting, then return to normal timekeeping mode.
In setting mode, the watch will au tomatically exit setting and then return Time 1 Mode if you do not
perform any button operation in 30 seconds.
4. Time 2 Setting
In Time 2 Mode, “12-hour / 24-hour” starts to flash by holding down A for 2 seconds, which
indicates Time 1 setting screen, press B to select the items in s equence as shown below:
12H/24H
Minute
Second
Year
Month-Date / Date-Month
Month Date
Button B
B B
B
Hour
Button B
Button B
Button B
Button B
Button B
Button B
Button B
BJF063(F12-SWIF) MODULE MANUAL
When entering the stopwatch mode, press D to start / stop c ounting. Seconds reset to zero by holding
down C for 2 seconds.
Reset to zero
Start Stop
Stop
Reset reminder
Reset to zero
LAP timing
Full of LAP records
Reset reminder
LAP Recall Mode
To view LAP records Next LAP record
Button D
Button D
Button C
Button C
Button A
Button D
Button D
Press & Hold C
for 2 seconds
Press & Hold C
for 2 seconds
will appear on the screen when it is turned on.
Hourly Time Signal and
Button Tone are turned on
Button C
Hourly Time Signal and
Button Tone are turned off
BJF063(F12-SWIF) MODULE MANUAL
The display range of countdown time is from zero to 23 hours, 59 minutes, 59 seconds.
Three methods of countdown can be selected as show n following:
Counting up after countdown
reaches to zero
One-time Countdown Time Repeated Countdown Time
BJF063(F12-SWIF) MODULE MANUAL
The display range of countdow n time is from zero to 23 hours, 59 minutes, 59 seconds.
Three methods of countdown can be selected as shown followin g:
Countdown Time Setting
When countdown time is stopped, icon of “STP/ERP ” or “CD-UP” starts to f lash by pressing A for 2
seconds, which indicates countd own time setting screen, then press B to select items in sequence as
show below:
Counting up after countdown
reaches to zero
B B
B
Countdown time
Seconds
Hours
Minutes
Button B
Button B
Button B
Button B
One-time Countdown Time
Repeated Countdown Time
• A contagem regressiva estará em execução quando o ícone “TMR” estiver intermitente
na tela. Quando o ícone “TMR” não estiver mais intermitente, signica que a contagem
regressiva parou.
• Quando o cronômetro estiver em execução, pressione B para entrar em outros modos.
A opção de contagem de tempo do cronômetro é continua, mesmo ao sair do modo
cronômetro.
• Com uma contagem regressiva (Modo STP): a contagem regressiva retorna ao valor
original após ter atingido o valor zero. Ao mesmo tempo, o alarme soará com a inscrição
“BB-BB” por 30 segundos e, então, automaticamente retornará para o modo de exibição das
horas. O acionamento de qualquer botão pode parar o alarme sonoro após este ter sido
iniciado. O relógio automaticamente retornará ao modo de exibição das horas caso não seja
realizada qualquer operação dentro de 30 segundos.
• Cronômetro repetido (Modo REP): o relógio repete automaticamente a contagem regressiva após a contagem regressiva ter sido concluída. O intervalo máximo da contagem regressiva com repetição automática é de 100 vezes. Caso o valor da contagem regressiva seja
denido entre 1 e 59 segundos, o alarme soará com a inscrição “BB” quando a contagem
regressiva repetida atingir zero. Caso a contagem regressiva repetida alcance o valor 100, o
alarme soará com a inscrição “BB-BB” por 30 segundos e, então, automaticamente retornará
para o modo normal de exibição das horas. Caso o valor da contagem regressiva seja
denido para mais de 1minuto, o alarme soará com a inscrição “BB-BB” por 10 segundos
quando a contagem regressiva atingir zero. O acionamento de qualquer botão pode parar
o alarme sonoro após este ter sido iniciado. O relógio automaticamente retornará ao modo
de exibição das horas caso não seja realizada qualquer operação dentro de 30 segundos.
• Contagem progressiva (Modo CD-UP): O relógio iniciará a contagem progressiva automaticamente após o tempo de a contagem regressiva alcançar zero. Enquanto isso, o alarme
soará com a inscrição “BB-BB” por 30 segundos e, então, automaticamente retornará para
o modo normal de exibição das horas. É possível pressionar qualquer botão parar o alarme
sonoro após este ter sido iniciado. O relógio retornará ao modo de exibição das horas
automaticamente caso não seja realizada qualquer operação dentro de 30 segundos.
7. Modo de alarme
• No modo de alarme, pressione o botão D para visualizar o horário do alarme dentre os 4
grupos. Em cada grupo do modo de alarme, pressione C para ligar / desligar o alarme. Isto
é mostrado abaixo:
Ajuste do alarme
• No modo do Alarme 1, mantenha pressionado o botão A por 2 segundos, a inscrição
“Hour” (Hora) cará intermitente, o que indica a tela de ajuste do alarme. Então, pressione o
botão B para selecionar o item na sequência, conforme mostrado abaixo.
• Pressione o botão D para aumentar o valor, mantenha o botão D pressionado para
aumento rápido.
• Pressione o botão C para reduzir o valor, mantenha o botão C pressionado para redução
rápida.
• Pressione o botão A para conrmar e sair do modo de ajuste, então retornando ao modo
de alarme.
• No modo de ajuste, o relógio automaticamente sairá deste modo e retornará ao modo de
exibição das horas caso nenhuma operação seja realizada dentro de 30 segundos.
• No modo de alarme, o relógio automaticamente sairá deste modo e, então, retornará ao
modo normal de exibição das horas caso nenhuma operação seja realizada dentro de 30
segundos.
• O método de ajuste para todos os grupos de alarme é similar.
• Quando o horário denido do alarme é alcançado, o alarme sonoro automaticamente será
interrompido após soar por 30 segundos.
Nota: O Alarme 1 até o 4 somente soará quando o horário atual do Fuso horário 1 ou 2 for
alcançado. Por exemplo, caso o tempo atual escolhido esteja no modo do Fuso horário
2 e caso não seja alterado o horário atual para o Fuso horário 2 antes de o alarme soar. O
alarme soará somente de acordo com o horário do modo do Fuso horário 2.
Caso o Fuso horário 1 seja escolhido: o alarme será desligado de acordo com o Fuso horário
denido no relógio.
screen, then press B button to select item in sequence as shown below:
Hour Minute
Button B
BJF063(F12-SWIF) MODULE MANUAL
which means countdown has been stooped running.
When stopwatch is running ,, press B to enter other modes, the stopwa tch measurem ent operation
continuous even if you exit the Stopwatch Mode.
With One-time Countdown (STP Mode): the coun tdown time returns to original v alue after it reaches
to zero. At the same time , alarm tone sounds with BB -BB for 30 seconds, then aut omatically return
to Time Mode. Press any button c an stop the alarm tone af ter it starts to sound. Th e watch will
automatically return Time Mode if you do not perform any button o peration in 30 seconds.
With Repeated Stopwat ch (REP Mode): the watch repeats countdown automatically after co unting
down is completed. The maximum range of Auto-R epeated Countdown is 100 times. If the
countdown value is set from 1 to 59 seconds, alarm tone will sound with BB when r epeated
countdown reaches to zero every time. And if Repeated Countdow n reaches to 100 times, the alarm
tone will sound with BB-BB for 30 seconds, then automatically return to Tim ekeeping Mode. If the
countdown value is set more than 1 minutes, alarm tone will sound with BB-BB for 1 0 seconds when
countdown time reaches to zero every tim e. Press any button can stop the alarm tone after it starts to
sound. The watch will automatically return Time Mode if y ou do not perform any button operation in
30 seconds.
With Counting Up (CD- UP Mode): The watch will cou nt up automatically after countdown time
reaches to zero, in the mea nwhile, alarm tone will sound with BB-BB for 30 seconds, then
automatically back to Time Mode. You c an press any button to stop the a larm tone afte r it starts to
sound. The watch will automatically return Time Mode if you do not perform any button operation in
30 seconds.
7. Alarm Mode
In Alarm Mode, press D to view the alarm time among 4 groups. In each group of alarm m ode, press C to
turn on / off alarm. As shown following:
Alarm Off
Button C
Button D
Button D
Button D
Alarm On
BJF063(F12-SWIF) MODULE MANUAL
The di splay range of countdown time is fr om zero to 23 hours, 59 minutes, 5 9 seconds.
Three methods of countdown can be sele cted as shown following:
Countdown Time Setting
When countdown time is stopped, icon of “STP/ERP” or “CD -UP” starts to flash by pressing A for 2
seconds, which indicates countdown time setting screen, the n press B t o select items in sequence as
show below:
Press D or C can select any one meth od among three countdown t ime methods (STP) (ERP)
(CD-UP).
Press D to increase the value, hold down D for some time to increase fast.
Press C to decrease the value, hold down C for some time to decrease fast.
Press A to confirm, and exit from setting , then return to countdown time m ode.
In setting mode, the watch will automatically exit setting and then return Time Mode if y ou do not
perform any button operation in 30 seconds.
To measure times with countdown timer
In countdown mode, press D to start / stop counting. When it stopped, press C to ret urn to the
original value.
Counting up after countdown
reaches to zero
Stop
Start Stop Original value
Button D Button D Button D
B
B
B
Countdown time
Seconds
Hours
Minutes
Button B
Button B
Button B
Button B
Repeated Countdown Time
73012
 Loading...