

Page 1
Model: KC-15U
KC-18U
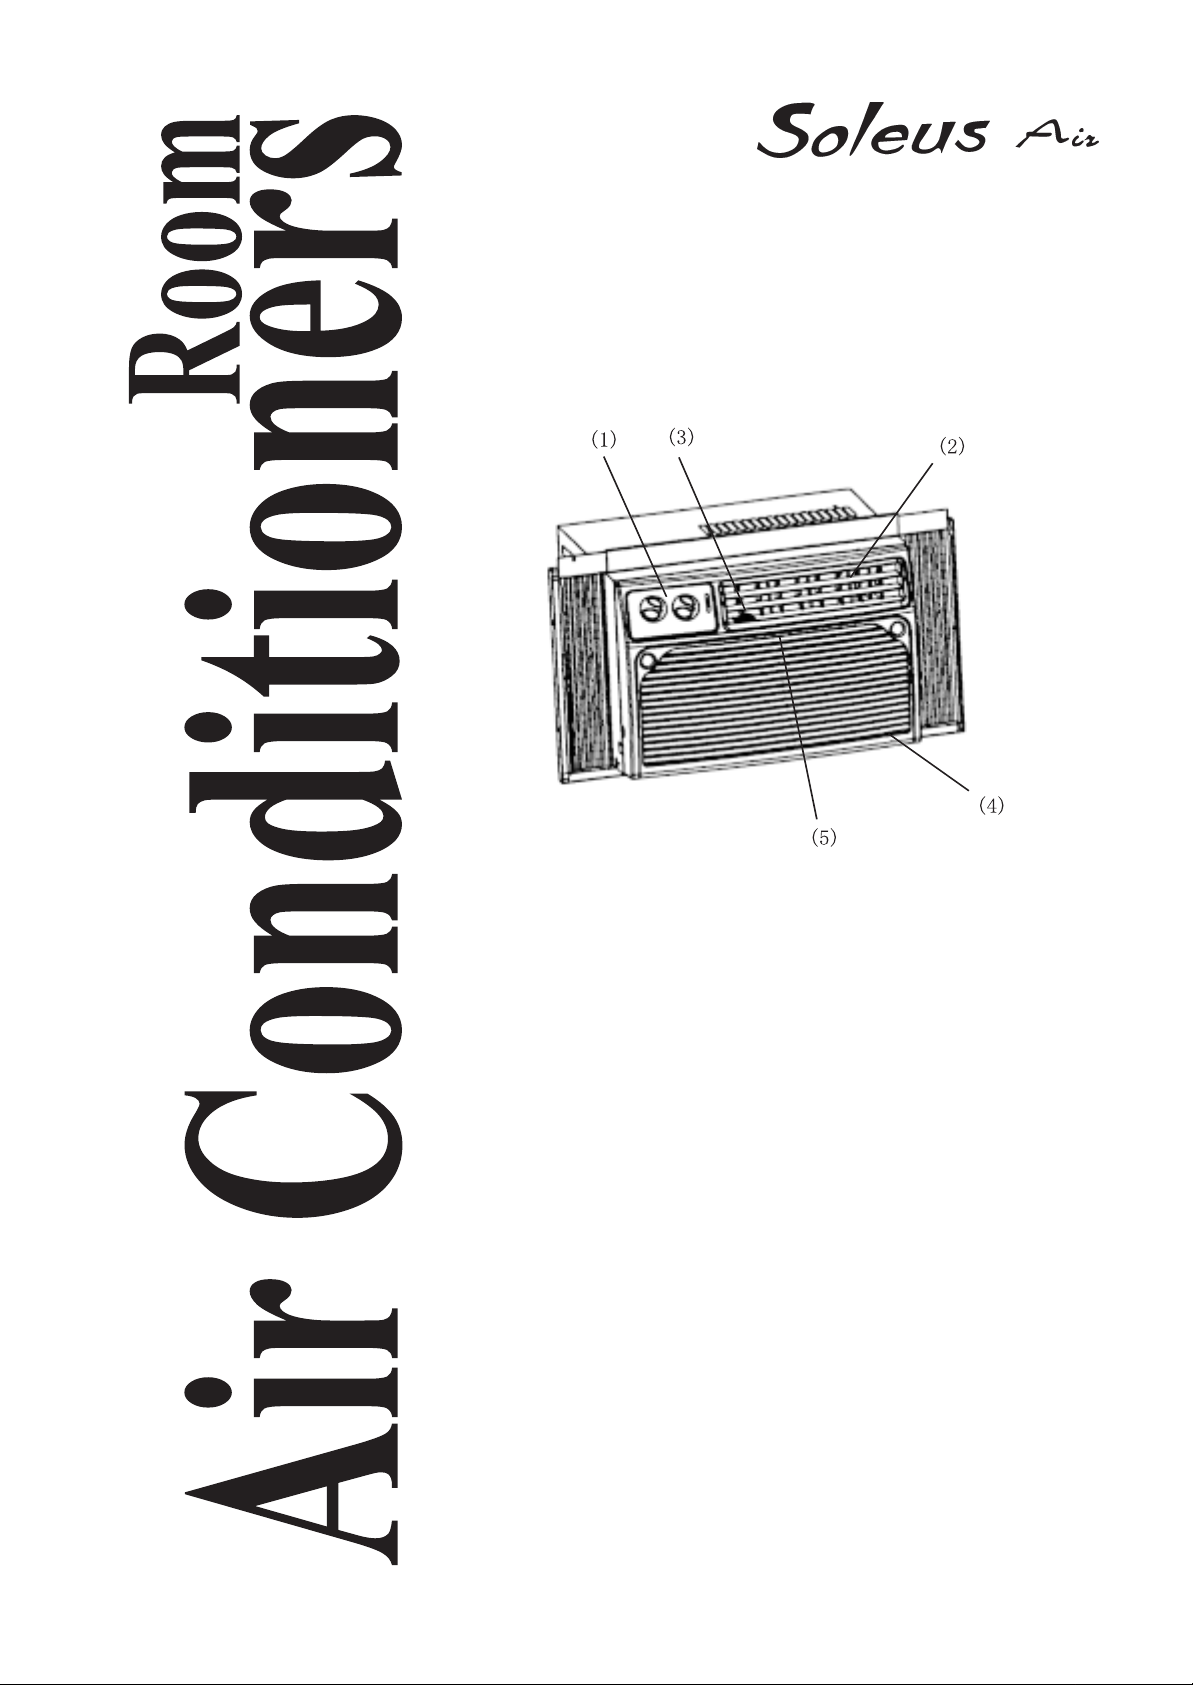
1. Front Panel
2. Air Louvers
3. Air Direction Tabs
4. Control Panel
5. Slide-out Filter
Thank you for choosing Soleus Air Conditioner.
Please keep this owner’s manual for instructions and
warranty.
Page 2

Contents
Air Conditioner Safety ................................................................. 1
Important Safety Instructions..............................................1
Operating your Air Conditioner .................................................... 2
Starting your Air Conditioner ............................................. 2
Changing Air Direction........................................................3
Saving Energy ....................................................................3
Normal Operating Sounds...................................................3
Caring for yourAir Conditioner ......................................................4
Cleaning the Air Filter .........................................................4
Cleaning the Front Panel ................................................... 4
Repairing Paint Damage.................................................... 4
Performing Annual Maintenance...................................................5
Troubleshooting ............................................................................6
Ordering Accessories...................................................................8
Completing Installation................................................................10
Positioning the Air Conditioner ................................................... 11
Electrical Requirements............................................................. 12
Location .....................................................................................14
Tools Needed..............................................................................15
Warranty.....................................................................................16
Page 3
Air Conditioner ’s Safety Instruction
Your safety and the safety of others
is very important.
We have provided many important safety instructions in this manual and on your
vnit. Always read and follow all safety instructions.
This is the safety alert symbol. This symbol aleres you to hazards that
could cause serions injury to you and others. All safety instructions will
be preceded by the safety alert symbol and the word "DANGER" or
"WARNING". These words mean:
You could be seriously injured if you don't follow instructions.
You could be seriously injured if you don't follow instructions.
Safety instructions will identify the hazard, tell you how to reduce the chance of
inujry and tell you what could happen if the instructions were not followed.
IMPORTANT SAFETY
INSTRUCTIONS
WARNING - To reduce the risk of fire, electrical shock, injury , or sickness when using your
air conditioner, follow these basic precautions:
Plug into a grounded 3 prong outlet.
Do not remove ground prong.
Do not use an adapter.
Do not use an extension cord.
Unplug air conditioner before servicing.
Use two or more people to move or install air conditioner.
Water collected inside the cabinet is not drinkable.
SA VE THESE INSTRUCTIONS
Help us help you
Please:
Install your air conditioner in a window that will hold the weight, and secure the air condi-
tioner according to the Installation Instructions.
Connect the air conditioner to the proper kind of outlet with the correct electrical supply
and ground. (See the Installation Instructions.)
Make sure the air conditioner is the correct size for the area you want to cool.
Use the air conditioner only to do what a window air conditioner is designed to do.
Make sure the air conditioner is not used by anyone unable to operate it properly.
Also, remove the Energy Label. Use a damp cloth to take off any glue residue. DO NOT
use sharp instruments, flammable fluids, or abrasive cleaners to prevent damage to the air
conditioner’s finish.
1
Page 4
Operating Your Air Conditioner
Operating your air conditioner properly helps you to obtain the best possible result.
This section explains proper air conditioner operation.
IMPORT ANT:
If you turn the air conditioner off, wait at least 3 minutes before turning it back on. This
prevents the air conditioner from blowing a fuse or tripping a circuit breaker.
Do not try to operate your air conditioner in the cooling mode when outside temperature is
below 65
0
F(180C). The inside evaporator coil will freeze up and the air conditioner will not
operate properly.
Starting your air conditioner
1.Set the EXHAUST Control(some models) to CLOSED for maxi-
mum continuous cooling. The EXHAUST Control set to OPEN
positions allows you to draw stale air and/or smoke from the
room.
OPEN-to exhaust room air to the outside.
CLOSED-to circulate room air.
The EXHAUST Control will function only when the FAN CONTROL
is operating.
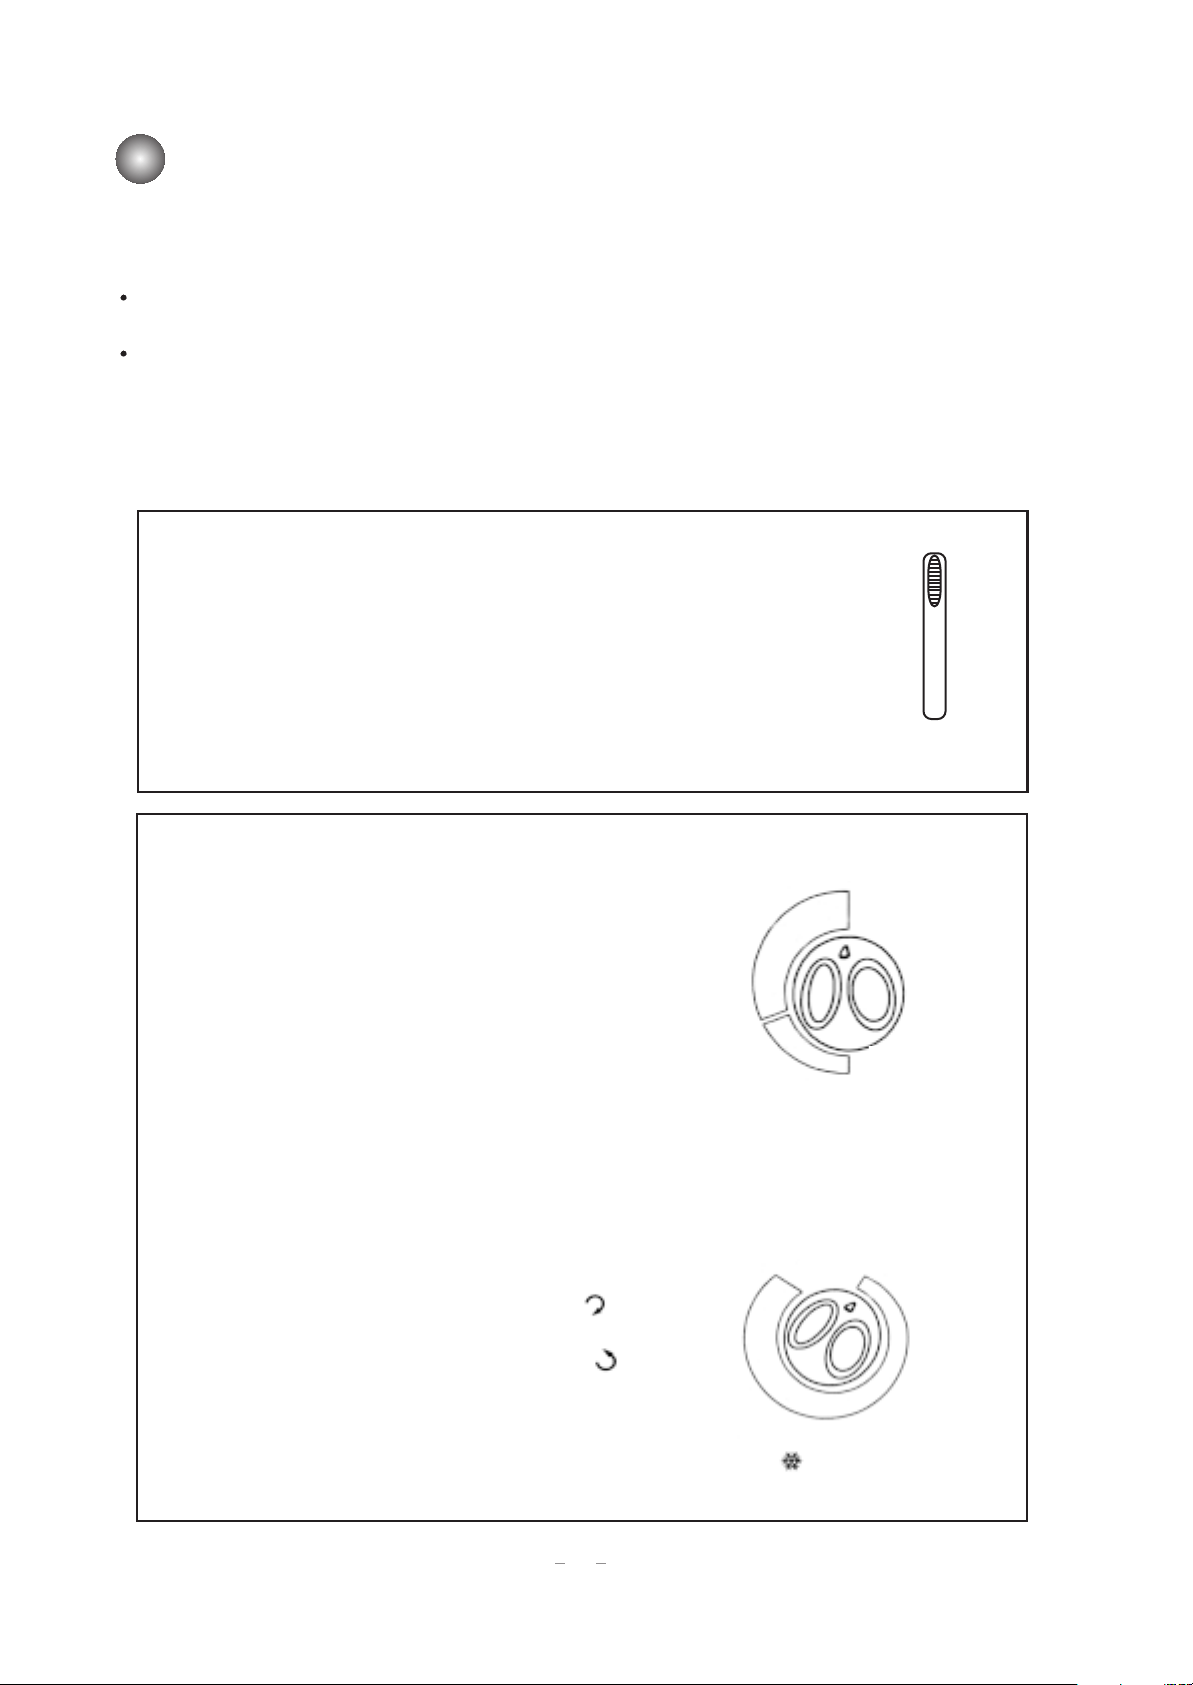
2.Set the UNIT CONTROL to the desired setting.
When the air conditioner is operating at LOW
Your air conditioner has one of these controls:
COOL, MED COOL(some models), or HIGH
COOL, the fan circulates air continuously.
HIGH COOL-for maximum cooling MED COOL
(some models)-for normal cooling LOW
COOL-for sleeping comfort
FAN ONLY
LOW
COOL
FAN
ONLY
MED
COOL
when the FAN ONLY setting is selected, the fan
will run continuously to circulute air, but the air will
not be cooled.
HIGH
COOL
OFF
UNIT CONTROL
CLOSED
OPEN
EXHAUST
3.Turn the THERMOSTAT Control to a mid-
setting.
Adjust the air conditioner's perfor-mance by turning the THERMOST A T Control clockwise ( ) for
maximum cooling. For less cooling,turn the
THERMOST AT Control counterclockwise ( ).
Experiment and find the setting that best suit your
needs.
2
Your air conditioner has one of these controls:
COLDER
7
6
5
THERMOSTAT
WARMER
1
2
3
4
Page 5
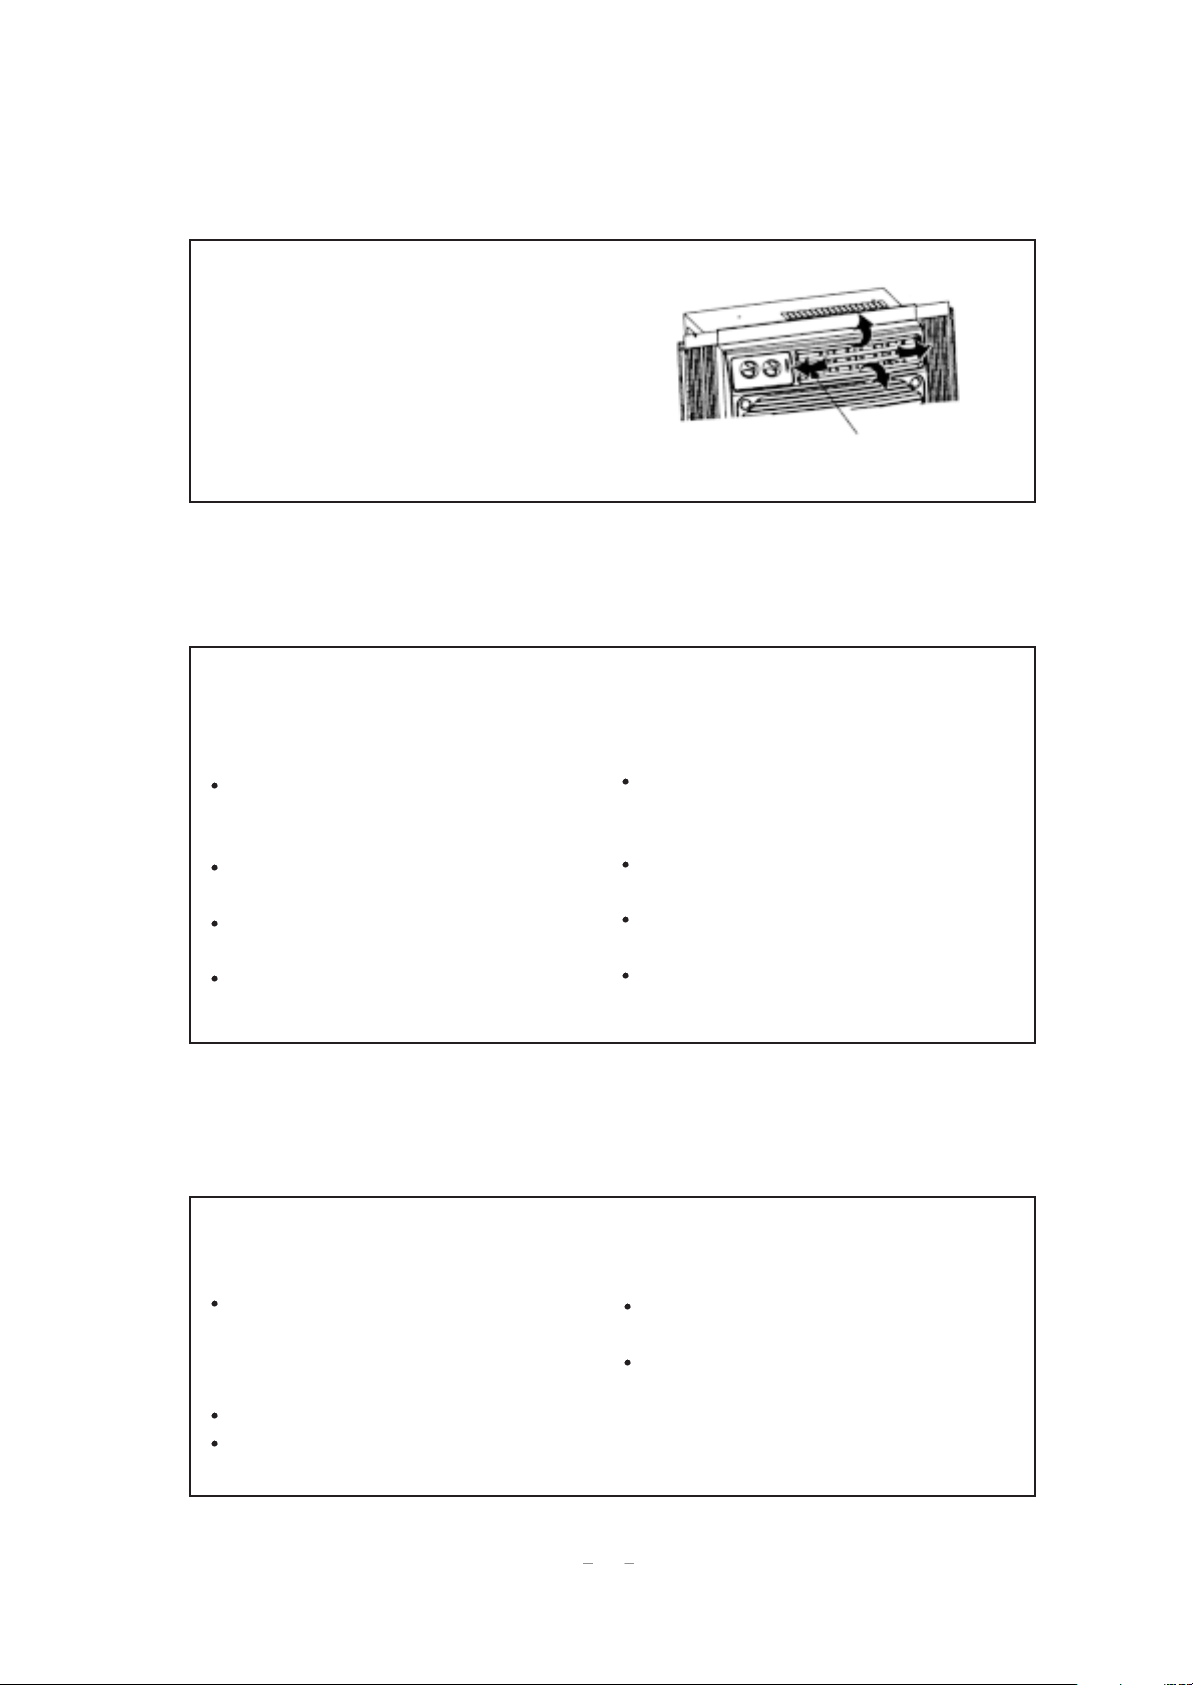
Changing air direction
The louvers in the top of the
front panel allow you to control the direction of the cooled
air. Use the tabs to direct the
air right or left(some models).
Rotate the entire louvers to
direct air up, down or straight
ahead.
tabs
Saving energy
Along with using POWER SAVER(some models), there are many things you
can do to help save energy.
Improve your home's insulation.
Seal doors and windows.Close fireplace flue.
Close blinds or drapes on the sunny
side of your house. Add awnings.
Make sure drapes or furniture do not
block airflow from your air conditioner.
Turn lights and appliances off when
they are not needed.
Ventilate your attic. High tempera-
tures in the attic add to the air
conditioner's cooling load.
Try not to use heat-producing appli-
ances during the hottest part of the day.
Keep heat registers and cool-air re-
turns closed.
Use exhaust vent fans while cooking,
doing laundiry, or bathing.
Normal operating sounds
When your air conditioner is operating normally,you may hear sounds such as:
Droplets of water hitting the
condenser, causing a "pinging" or
"clicking" sound.The water droplets
help cool the condenser.
Air movement from the fan.
Clicks from the thermostat cycle.
Vibrations or noise due to poor wall
or window construction.
A high-pitched hum or pulsating noise
Caused by the high efficiency compressor cycling on and off.
3
Page 6
Caring for Your Air Conditioner
Your new air conditioner is designed to give you many years of dependable service.
This section tells you how to clean and care for your air conditioner properly. Call your
local authorized dealer for an annual checkup. Remember.., you are responsible for
the cost of this type of service call.
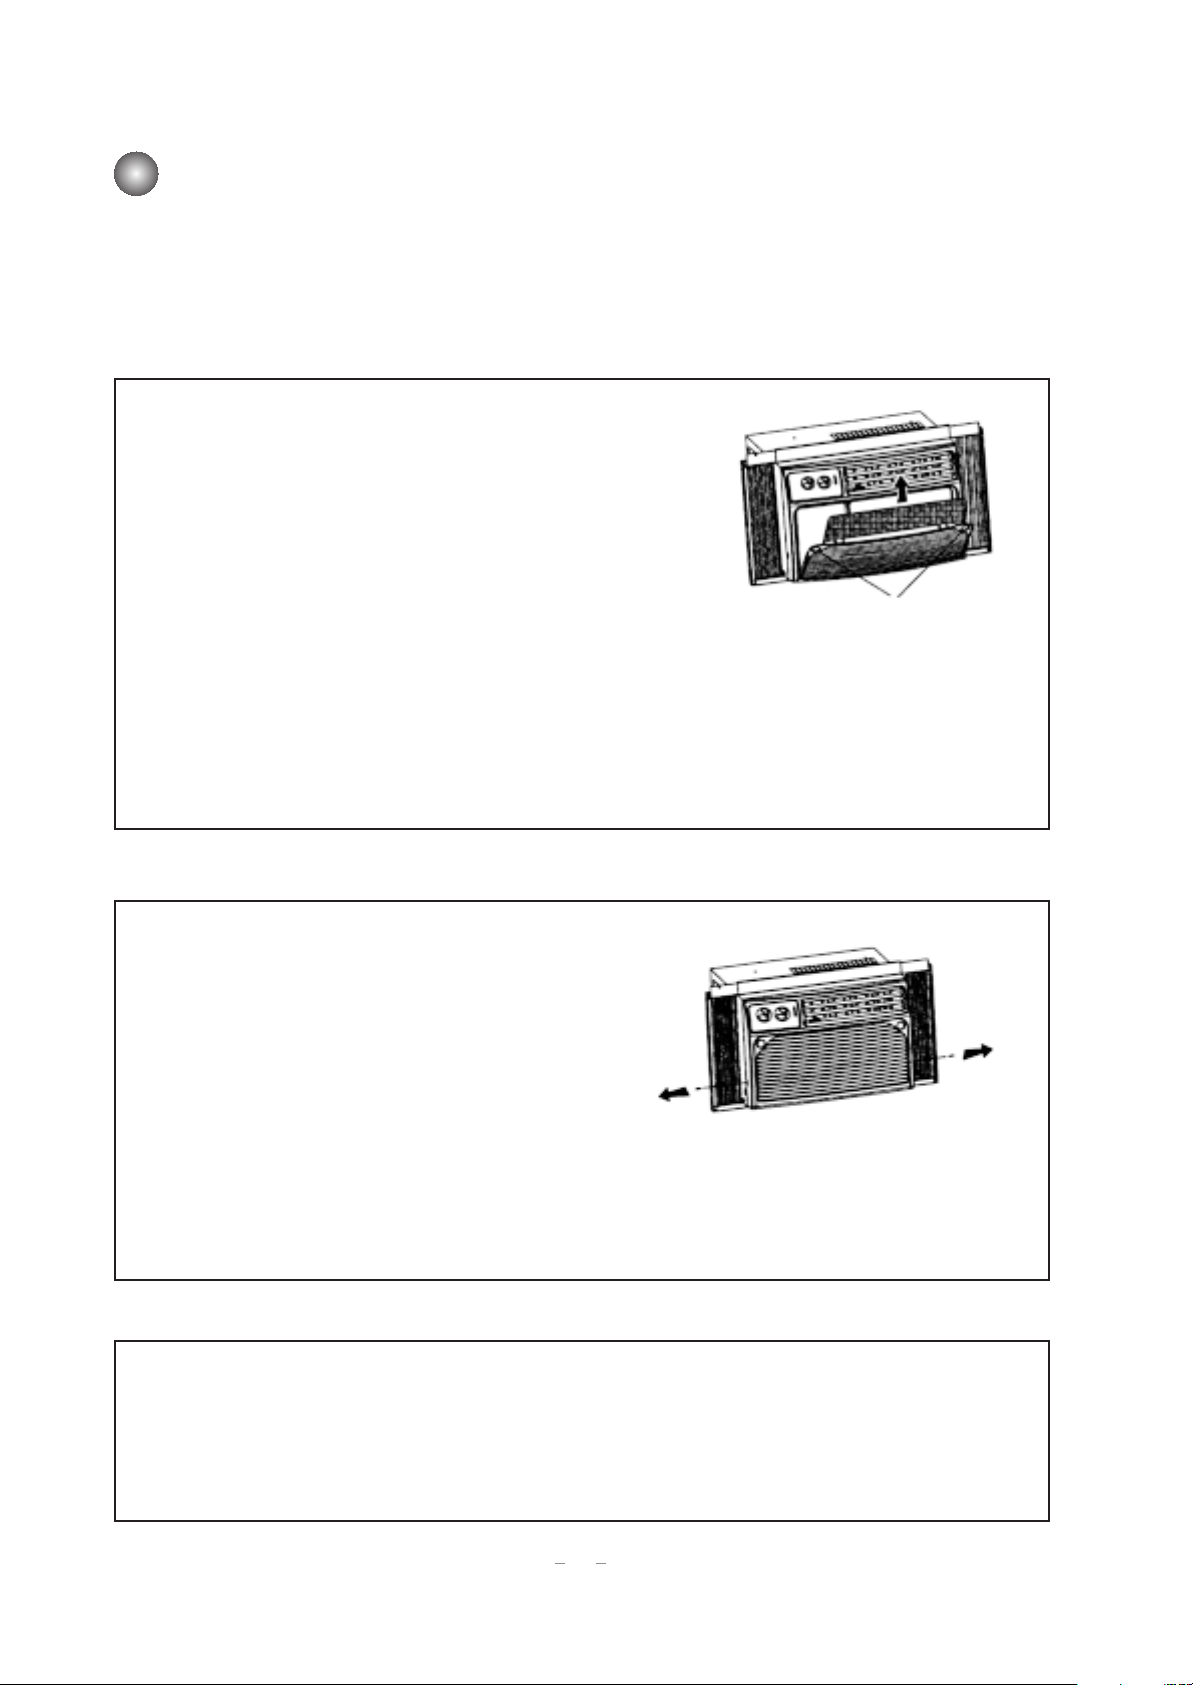
Cleaning the air filter
The air filter is removable for easy cleaning. A clean
filter helps remove dust, lint, and other particles from
the air and is important for cooling or heating and
efficiency operation.
Check the filter every 2 weeks to see if it needs
cleaning. Do not operate the air conditioner without
the filter in place.
1.Unplug air conditioner or disconnect power.
2. Pull the top of filter door and pull filter
door down. Filter door is not removable.
3.Slide air filter up and out to remove
4.Use a vacuum cleaner to clean air filter. If air filter is very dirty,wash it in warm water
with a mild detergent. Do not wash air filter in the dishwasher or use any chemical
cleaners. Air dry filter completely before replacing to ensure maximum efficiency.
5.Slide air filter down into the filter door. Close filter door.
6.Plug in air conditioner or reconnect power.
indents
Cleaning the front panel
1.Unplug air conditioner or disconnect power.
2.Remove the air filter and clean it separately.
(See"Cleaning the air filter," above).
3.Pull control knobs off.
4.Remove two screws from two sides of the
front panel. Pull panel out and away from
the cabinet.
5.Use a soft cloth to clean front panel with
warm water and mild soap or detergent.
6.Rinse control panel and dry thoroughly with a soft,dry cloth.
7.Insert top of panel into cabinet, then push bottom of panel into cabinet. Replace screws. Replace control knobs. Close control panel door(some models).
8.Plug in air conditioner or reconnect power.
Repairing paint damage
Check once or twice a year for paint
chips. This is very important, especially
in areas near oceans or where corrosion is a problem. If needed, touch up
with a good grade enamel paint.
NOTE: T o reduce paint damage during
the winter, install a heavy-duty cover over
air conditioner cabinet. For infor-mation
on ordering a heavy-duty cover. please
contract your authorized dealers.
4
Page 7

Performing Annual Maintenance
Electrical Shock Hazard
Disconnect power before maintenance. Do not
drink the water collected by the air conditioner.
Failure to follow these instructions can result in
electric shock, sickness and other possible serious
injuries.
Excessive Weight Hazard
Use two or more people to move and install air
conditioner.
Failure to do so can result in back or other injuries.
Your air conditioner needs annual maintenance to help ensure top performance throughout
the year.
Call your local authorized dealer to schedule an annual checkup. The expense of an annual
inspection is your responsibility. OR
If you are familiar with electrical appliances, you can do the cleaning and maintenance yourself.
If you choose to do so, follow these steps:
1.Unplug air conditioner or disconnect power.
2.Remove air conditioner from window.
3.Remove front panel (See "Cleaning the front panel" on page 9).
4.Slide curtains out to fullest width. From the back side, remove the Phillips-head screws
which attach curtains to cabinet (A).
5.Remove slotted-hex head screws (B) from top channel and from sides of cabinet (C).
NOTE: Do not lift, push, or pul on any expanded polystyrene from inside the air conditioner.
6.Holding cabinet on both sides, carefully lift cabinet off base. Watch out for sharp metal fins
on the front and rear coils.
7.Wrap fan motor (D), capacitor terminals (E), electrical control box (F), and compressor
terminals (G) in plastic film and make sure no water or other liquid gets inside any of these
parts. It could damage the insulation and cause serious mechanical problems.
8.Carefully clean and hose out base (H), condenser coil (I), evaporator coil (J), and condensate pan (K). Clean at least once a year or more often if the condenser and evaporator coils and pan collect dirt, sand, leaves, insects, or algae. Also, clean if you detect an
odor coming from the air conditioner.
9.Remove plastic film from motor and electrical parts.
10. After replacing cabinet on air conditioner, reattach top channel, side curtains,front panels and tighten all screws.
NOTE: Wait 24 hours before starting air conditioner . This allows time for all relevant parts to
dry out.
1 1 .Plug in air conditioner or reconnect power.
5
Page 8

Troubleshooting
Y ou can solve many common air conditioner’s problems yourself, but when in doubt, please
consult with our authorized service center.
Air conditioner will not operate.
Check if
The power supply cord
is unplugged.
A household fuse has
blown or circuit breaker
has tripped.
The CONTROL is turned
to the “off ” position.
The local power has failed.
Then
Firmly plug the power supply cord into an active outlet
with proper voltage.
Replace the fuse or reset the circuit breaker. Make sure
the air conditioner is plugged into a properly grounded
outlet as described in the lnstallation lnstructions.
Turn the CONTROL to the “on” setting.
Wait for power to be restored.
Air conditioner blows fuses or trips circuit breakers.
Check if
Too many appliances
are being used on the
same circuit.
Time delay fuse or circuit breaker of the
wrong capacity is used.
Then
Unplug or relocate appliances that share the same
circuit.
Replace with a 15-amp time delay fuse or circuit breaker
of the correct capacity. See “Electrical requirements” in
the lnstallation lnstructions for the correct capacity.
An extension cord is
being used.
Y ou are trying to restart
the air conditioner too
soon after turning UNIT
CONTROL to “off”
Do not use an extension cord with this or any other
appliance.
Wait at least 3 minutes after turning CONTROL to “off”
before trying to restart the air conditioner.
Air conditioner seems to run too much.
Check if
The current air conditioner replaced an
older model.
The air conditioner is in
a heavily occupied
room or heat producing
appliances are in use in
the same room.
Then
The use of more efficient components may cause the
air conditioner to run longer than an older model, but
the total energy consumption will be less, Newer air
conditioners do not emit the “blast” of cold air you may
be accustomed to from older units, but this IS NOT an
indication of lesser cooling capacity or efficiency. Refer to the efficiency rating(EER) and capacity rating (in
BTUs/hr.) marked on the air conditioner.
Use exhaust vent fans while cooking or bathing and try
nt to use beat producing appliances during the hotteds
part of the day. A higher capacity air conditioner may
be required depending on the size of the room being
cooled.
6
Page 9

Air conditioner cycles on and off too much.
Check if
The air conditioner is not
properly sized for your
room.
The filter is dirty or ob
structed by debris.
The inslde evaporator and
outside condenset coils
are dirty or obstructed by
debris.
There is excessive heat or
moisture from cooking,
showers, etc.in the room
The louvers are blocked.
The outside temperature is
below 65
0
F (180C).
Then
Check the cooling capabilities of your room conditioner. Room
air conditioners are not designed to cool multiple rooms.
Clean the filter See page 5.
Clean the inside evaporator and outside condenser coils.
See page 6.
Use a fan to exhaust heat or moisture from the room. Try not
to use heat-producing appliances during the hottest part of
the day.
Install the air conditioner in a location where the louvers are
free from curtains, blinds, furniture, etc.
Do not try to operate your air conditioner in the cooling mode
when the outside temperature is below 65
0
F(180C).
The temperature of the
room you are trying to cool
is extremely hot.
Allow extra time for the air conditioner to cool off a very hot
room.
Windows or doors to the
outside are open.
The EXHAUST is set to
Close all windows and doors.
Set the EXHAUST Control to CLOSED for maximum cooling.
OPEN.
The THERMOSTAT Con-
trol is not at a cool enough
Adjust the THERMOST AT Control to a cooler setting by tuming
the knod clockwise, Tum UNIT CONTROL to HIGH COOL.
setting.
The air conditioner is in-
stalled on the sunny side of
Install your air conditioner in a more shaded window.
your house.
Water drips from cabinet into your house.
Check if
The air conditioner is properly leveled. The air conditioner should slope slightly
downward toward the
outside.
Then
Level the air conditioner to provide a downward slope toward
the outside (1/2 bubble on a carpenter’s level) to ensure proper
drainage. See the lnstallation lnstructions.
Reposition or shim the cabinet as necessary.
NOTE:Do NOT drill a hole in the bottom of the metal base
and condensate pan.
7
Page 10

Ordering Accessories
You can order the following accessories for your air conditioner from your local authorized
dealer.
Replacement air filter
A good, clean air filter is important for best cooling with least energy consumption.
Your air filter should be cleaned regularly. See page 5 for cleaning instructions. We suggest
you replace your air filter once a year.
Installing kits
Wide window kit
Mounting kit with mounting instruction. Part No. 51061501 (Not include, available through
special order or your dealer).
Heavy-duty cover
If you decide to leave your air conditioner installed during the winter, a heavy-duty cover will
help protect your air conditioner and reduce drafts. The cover protects against cold drafts
through the unit's air passages and protects the cabinet from snow, rain, sleet, rust, and dust.
8
Page 11

IMPORTANT
INSTRUCTIONS FOR INSTALLATION
NOTE: Install window-lock bracket to prevent air conditioner from falling out of
window.
Place window-lock bracket (H) on top of lower window and against upper incow
9
sash (I). Use a3/32'drill bit to drill a starter hole through the hole in the bracket.
Attach window-lock bracket. Seal small openings around window with gumtype sealer.
Insert foam seal (J) behind the top of the lower window sash (K) and against
the glass of the upper window.
READ AND SAVE THESE INSTRUCTIONS
Congratulations!
you have successfully installed your new air conditioner.
T o get the most efficient use from your new air conditioner ,
read the Use and Care Guide section of this book.
Important:
Installer: Leave Installation Instructions with the homeowner.
Homeowner: Keep Installation Instructions for future reference.
Save Installation Instructions for local electrical inspector's use.
Page 12

Check that air conditioner cabinet is tilted to the outside so that water will run to the
outside.
Place level (B) on the top,right side of air conditioner cabinet, There should be a tilt
to the outside of about 1/2bubble on the carpenter's level. (C) Place level on left
sode of air conditioner and check that cabinet is tilted properly, If cabinet is not
properly positioned. reposition or shim cabinet to provide the proper tilt.
10
Pull left curtain (D) out until it fits firmly into the window channel (E). Repeat with right
curtain.
Insert one of the round-head screws (F) through left curtain and into the window channel
or through alternate hole (G) at the top of the curtain and into the window channel to
fasten the curtain to the window. Repeat for right curtain.
Page 13

Installation
Positioning the air
conditioner
11
Handle air conditioner with care. Watch out for sharp metal fins on the rear coils.
Be sure your air conditioner does not fall out of the opening during installation.
Air conditioner should be placed no more than four feet(122cm)from a grounded outlet.
Center air conditioner in window. Check that lower rail of air conditioner is behind and
against back side of window seal. Lower window sash (A) to hold cabinet in place.
Do not block louvers
Page 14

12
Electrical requirements
WARNING
Requirements
Electrical Shock Hazard
Plug into a grounded 3 prong outlet.
Do not remove ground prong.
Do not use an adapter.
Do not use an extension cord.
Failure to follow these instructions can result in fire,electrical shock, and cause serious injuries to yourself.
If codes permit and a separate ground wire is used, it is recommended that a qualified elec-
trician determine that the ground path is adequate.
Check with a qualified electrician if you are not sure the air conditioner is properly grounded.
A three-wire,single-phase, 60-Hz, AC-only, electrical supply is required on a separate circuit. A 15-
amp time-delay fuse or circuit breaker is required.Copper wire (#14 gauge)is required.The fuse size
must not exceed the circuit rating specified on the model and serial label.
The model and serial label (A)is located behind the front panel above the coil area.
Recommended ground method
For your personal safety, this air conditioner must be grounded, This air conditioner is equipped with a
power supply cord having a 3-prong ground plug. T o minimize possible shock hazard, the cord must be
plugged into a mating, 3-prong ground-type outlet, grounded in accordance with all local codes and
ordinances. If a mating outlet is not available, it is the customer's responsibility to have a properly
grounded, 3-prong outlet installed by a licensed installer.
It is the customer's responsibility:
Page 15

13
conformance with National Electrical Code, ANSI/NFP A 70-latest edition*, and
all local codes and ordinances.
Copies of the standards listed may be obtained from:
*National Fire Protection Association
Batterymarch Park
Quincy, Massachusetts 02269
Specific electrical requirements are listed in the chart. Follow the requirements for the
type of plug on the power supply cord.
Power supply cord plug outlet Wiring requirements
115 volt(103.5min.-126.5max.)
0- 12 amperes
15-amp time-delay fuse or circuit breaker
14 gauge copper wiring
230 volt (207min.-253 max.)
230/208 volt(197.6min.-253max.)
0-12 amperes
15-amp time-delay fuse or circuit breaker
14 gauge copper wiring
230 volt(207 min.-253 max.)
230/208 volt(197.6 min.-253max)
0-24 amperes
30-amp time-delay fuse or circuit breaker
10 gauge copper wiring
230 volt(207 min.-253 max.)
230/208 volt(197.6 min.-253 max.)
0-16 amperes
20-amp time-delay fuse or double-pole circuit breaker
12 gauge copper wiring
Page 16

14
Introduction
Window opening
measurements
Location
W ARNING
Excessive Weight Hazard
Use two or more people to move and install air conditioner.
Failure to do so can result in back or other injury.
Important:Observe all governing codes and ordinances.
Check the location where air conditioner will be installed. Proper installation is your responsibility. Make sure you
have everything necessary for correct installation.
The location should provide:
Grounded electrical outlet within four feet(122cm)of the window. Do not use an extension cord.
Free movement of air to rooms to be cooled.
A large enough opening for the air conditioner. Installation parts are supplied for double-hung windows up to 38"
(96.5cm) wide.
Adequate wal support for the weight of the air conditioner. (Air conditioner weighs between 56 to 80 lbs)
Do not install the air conditioner in an area where the front panel will be exposed to heat sources that will raise the
panel suface temperature above 1200F
Air Conditioner Size
5000-6000
BTUs
8000-12,000
BTUs
A
25"to38"
(63.5cm to 96.
5cm)
26"to38"
(66cm to 96.5 cm)
B
1 6"
(40.6cm)
1 6"
(40.6cm)
Page 17

Tools needed:
A. level
B.gioves
C.flat-blade and phillips screwdrivers
D.utility knife
E.drill and 3/32" or smaller bit
F.safety glasses
G.tape measure
Parts supplied:
H.window-lock bracket
1.2,foam seal
J.3,8"x3/4"round-head metal screws
K.gum-type sealer
 Loading...