

Soleus Air GPS Pulse User Manual
Soleus GPS Pulse
Introduction
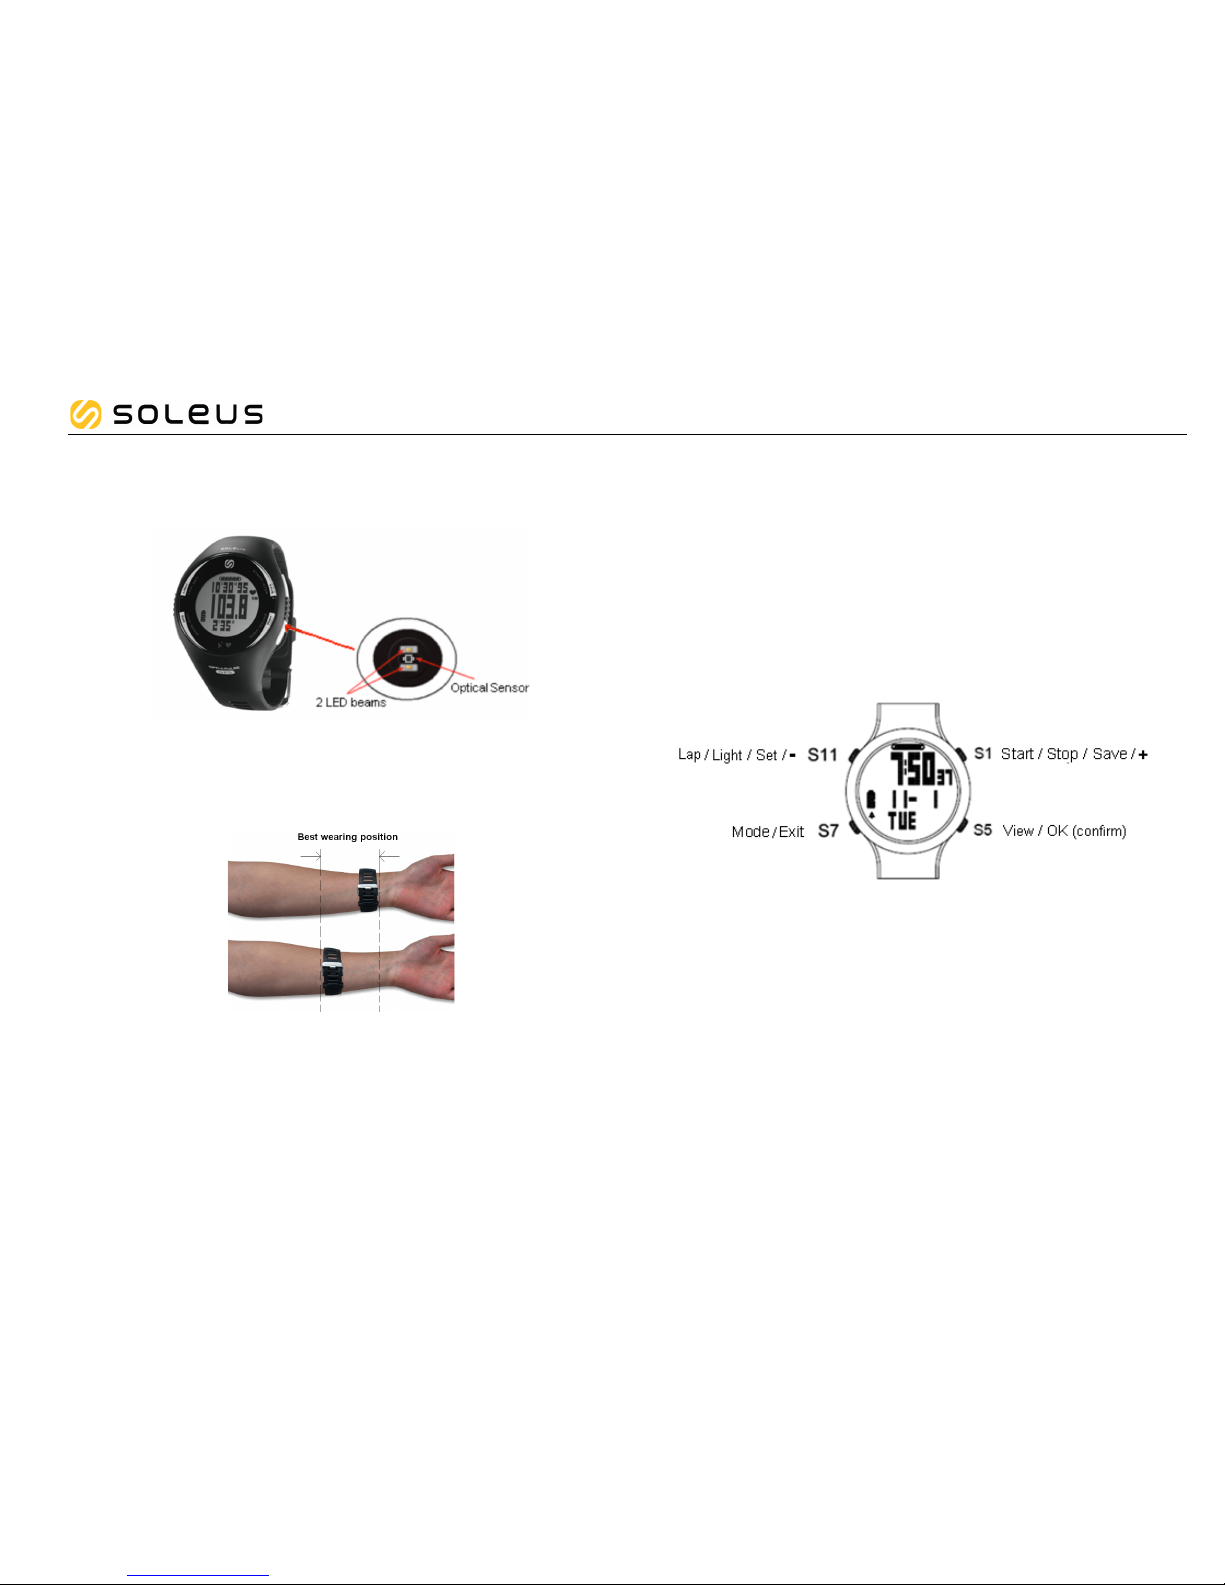
Thank you for purchasing the Soleus GPS Pulse watch. This product uses an Electro-optical
technology to sense the heart beat. It has two LED beams and electro-optical cell to sense
the volume of blood under your skin.
Note that the actual color of the watch and artwork may vary from style to style.
How to wear the watch properly in your forearm:
• Fasten the watch snugly so that the optical sensor makes a tight contact with your skin.
The tighter you can wear the watch the better.
• Wear the watch not on your wrist bone but higher on your forearm.
Important note:
Before starting your exercise
• You may need to tighten the strap.
** After sweating, you have to tighten the watch again for more accurate
measurement.
• Make sure the heart rate reading is already stable.
• Minimize extreme wrist movement while the HR is in use
Caring for your Watch:
Clean your Watch with a dampened cloth preferably with mild detergent solution. Wipe dry
using a dry cloth. Do not use chemical cleaners and solvents that may damage plastic
components.
Do not store your Watch to prolonged exposure to extreme temperatures as this may result to
permanent damage to your unit.
Getting Started
Step 1) Know your Watch:
• This product has also a GPS function with the following main modes as you press S7:
TIME, RUN, CHRONO, TIMER, HRM, DATA, ALARM and SET mode.
Push button main function:
Caution:
• Consult your doctor before you begin a new exercise program.
• This watch provides heart rate measurements. However, this is not a medical device.
• This watch may affect pacemakers. If you have any concerns, consult your doctor
before using this watch.
Soleus GPS Pulse
Step 2) Charging the Battery:
Charge the unit for at least 4-5 hours before first use. The length of time for a fully charged
battery will last depending on the actual usage. It is recommended to regularly re-charge your
battery every 1-2 months even if it is not used to maintain good battery condition.
2.1) Plug your USB PC link cable to your PC
2.2) Align the charging clip with the contacts on the back of the Watch.
2.3) Connect the charging clip securely to the watch.
Note: Please thoroughly dry the charging contacts and surrounding area to ensure
proper electrical contact and prevent corrosion.
Battery low condition:
You cannot turn ON the GPS when the battery is low. You need to recharge the battery in
order to use the GPS again.
When the battery is almost low and you still perform your exercise, your data may not be
saved. Please make sure the battery have enough battery power before doing your exercise
in order not to lose your data.
Water immersion:
This GPS Optic HRM watch, is designed to be water resistant up to 3 ATM. It can resist water
pressure up to 30 meters. After submersion to water, please make sure to wipe dry and air
dry the unit before using or charging.
Caution:
! Prolonged water submersion may cause electronic shorting in the unit which may
cause minor skin burn or irritation.
! Persons who are using Pacemakers should not use this device with the HRM belt.
Signal from the HRM belt may interfere with the pacemaker.
Step 3) Configure your Watch:
Before using your watch, please set your Watch.
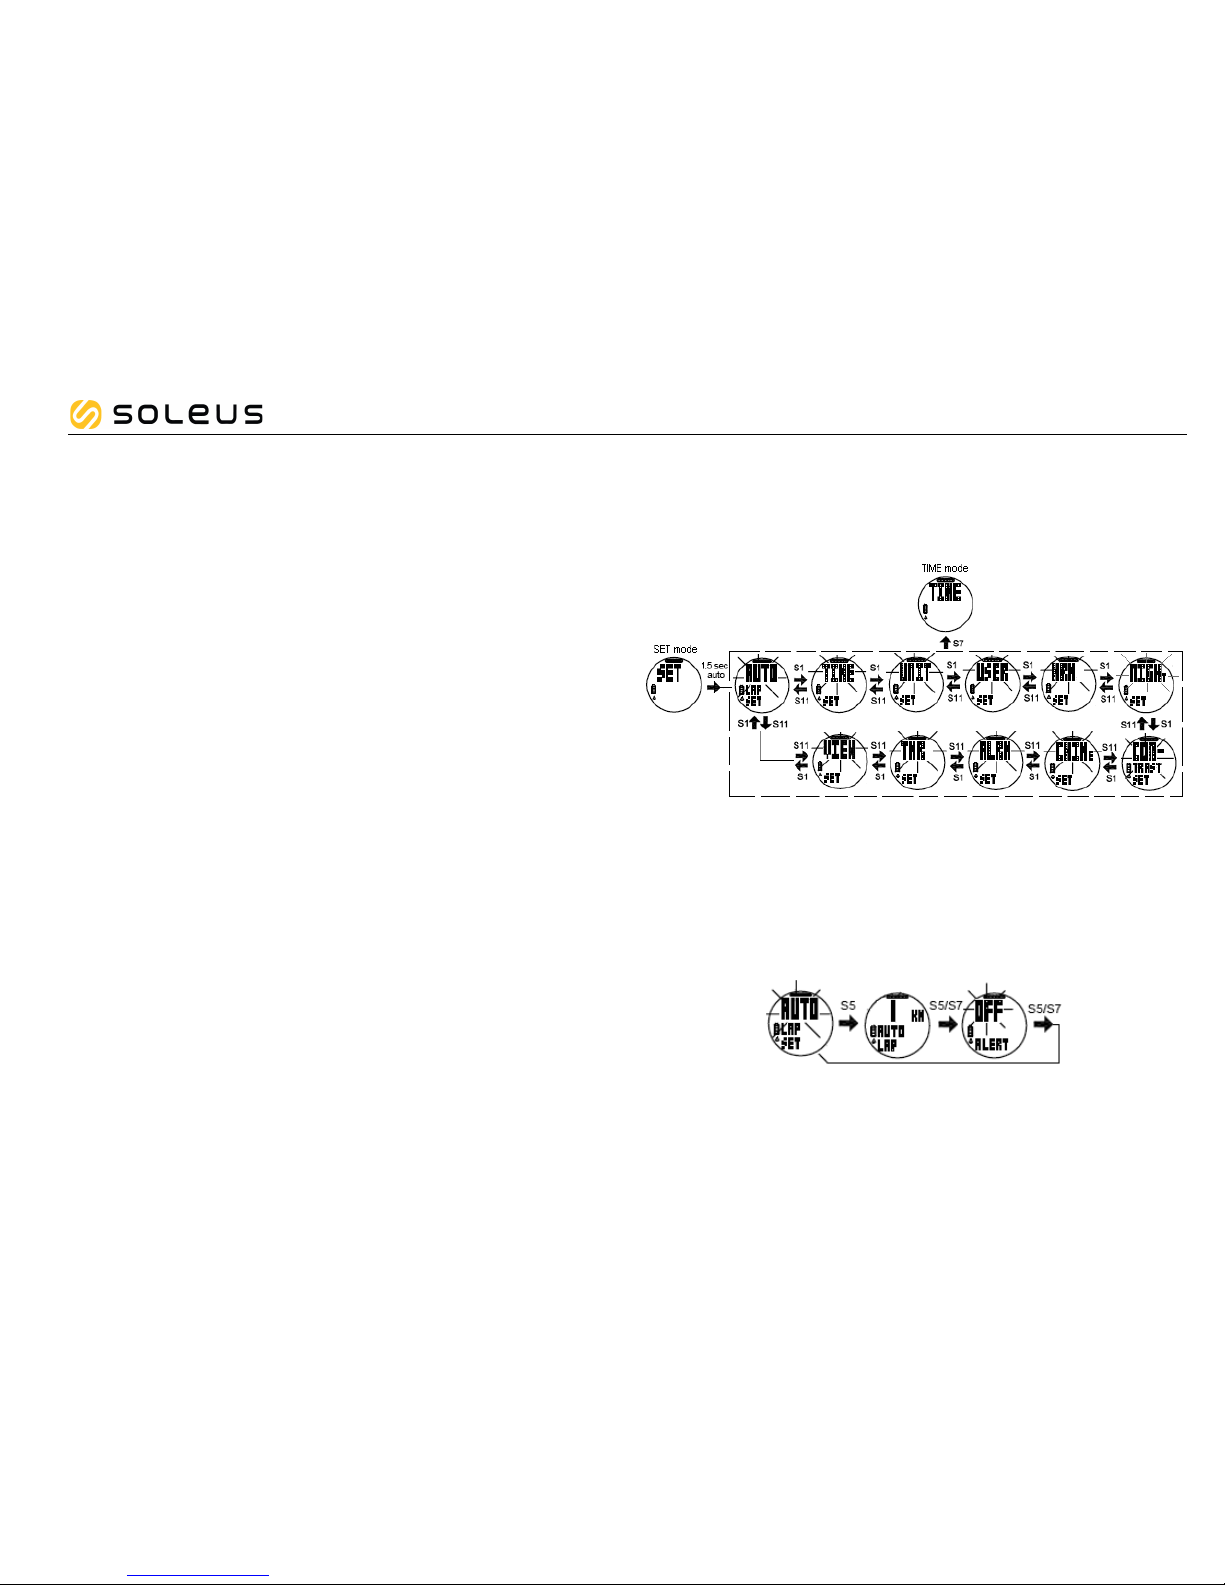
3.1) While in TIME mode, press S7 to go to SET mode and set the following parameters:
AUTO LAP, TIME, UNIT, USER, HRM, NIGHT, CONTRAST, CHIME, ALARM, TIMER,
and VIEW.
• Press S1 or S11 to change the blinking parameter to set.
The watch will auto exit setting mode if there is no push button operation within 3 to 4
minutes.
How to set the AUTOLAP:
• Press S5 while AUTO LAP is blinking. The digit will start to blink.
• Press S1/S11 to change the setting. Auto lap preset settings are: off, 0.4, 1, 2, 3, 4,
and 5 KM.
• Press S5 to confirm and set ALERT ON or OFF.
• Press S1/S11 to change the setting. There is a beep sound and EL on for 10 sec every
auto lap taking when ALERT is set to ON.
• Press S5 to confirm setting and go back to Auto lap setting screen.
Auto Lap setting range: 0.4, 1, 2, 3, 4, 5, and OFF
Soleus GPS Pulse
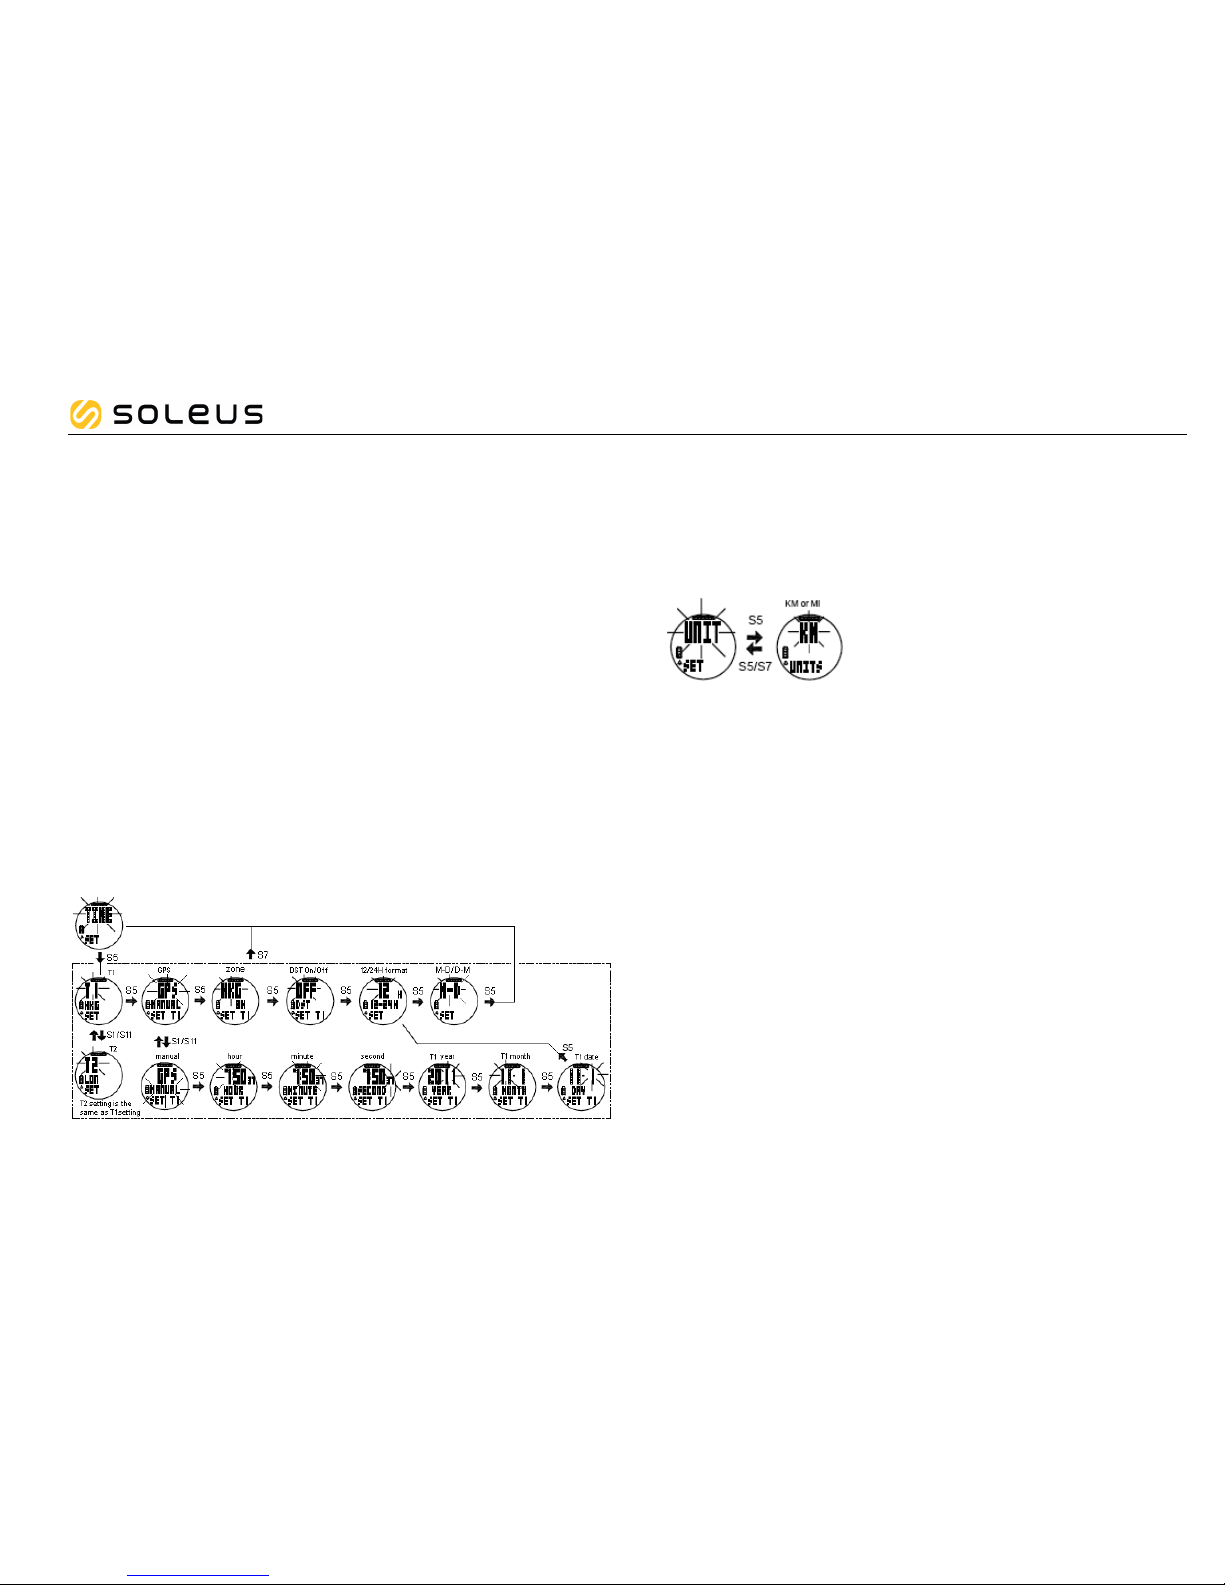
How to set the TIME:
TIME 1/ Time 2 setting:
• Press S5 while TIME is blinking. The watch will display T1 or T2.
• Press S1/S11 to choose between T1 or T2 to set.
• Press S5 to set the selected time (T1 or T2). The watch will display GPS or MANUAL.
• Press S1/S11 to select GPS or MANUAL. You have two options in setting the watch,
GPS or MANUAL. In manual setting, you can manually set the time. If you select the
GPS option, the watch will be automatically set based on the data and time data from
GPS satellites.
GPS setting:
o While GPS is blinking, Press S5 to set the TIME ZONE.
o Press S1 or S11 to change the time zone. There are 36 city codes to choose.
o Press S5 to confirm and set DST ON /OFF.
o Press S1/S11 to change setting.
o Press S5 to confirm and set 12H/ 24H format setting.
o Press S1/S11 to change 12H/24H format setting.
o Press S5 to confirm and go back to TIME setting screen.
MANUAL setting:
o While MANUAL is blinking, Press S5 to enter.
o Set the HOUR by pressing S1 or S11 and then press S5 to enter.
o Set the Minute by pressing S1 or S11 and then press S5 to enter.
o Set the SECOND by pressing S1 or S11 and then press S5 to enter.
o Set the YEAR by pressing S1 or S11 and then press S5 to enter.
o Set the MONTH by pressing S1 or S11 and then press S5 to enter.
o Set the DATE by pressing S1 or S11 and then press S5 to enter.
o Set the 12/24H by pressing S1 or S11 and then press S5 to enter.
o Press S5 to enter.
• Year range: 2001 to 2099
• Total of 36 city codes are available for various Time zones.
• Time can be displayed in 12 hour or 24 hour format
• Dual time zone Time 1 and Time 2
How to set the UNIT:
• Press S5 while UNIT is blinking. KM will start to blink.
• Press S1/S11 to change the unit.
• Press S5/S7 to confirm setting and go back to UNIT setting screen.
Soleus GPS Pulse
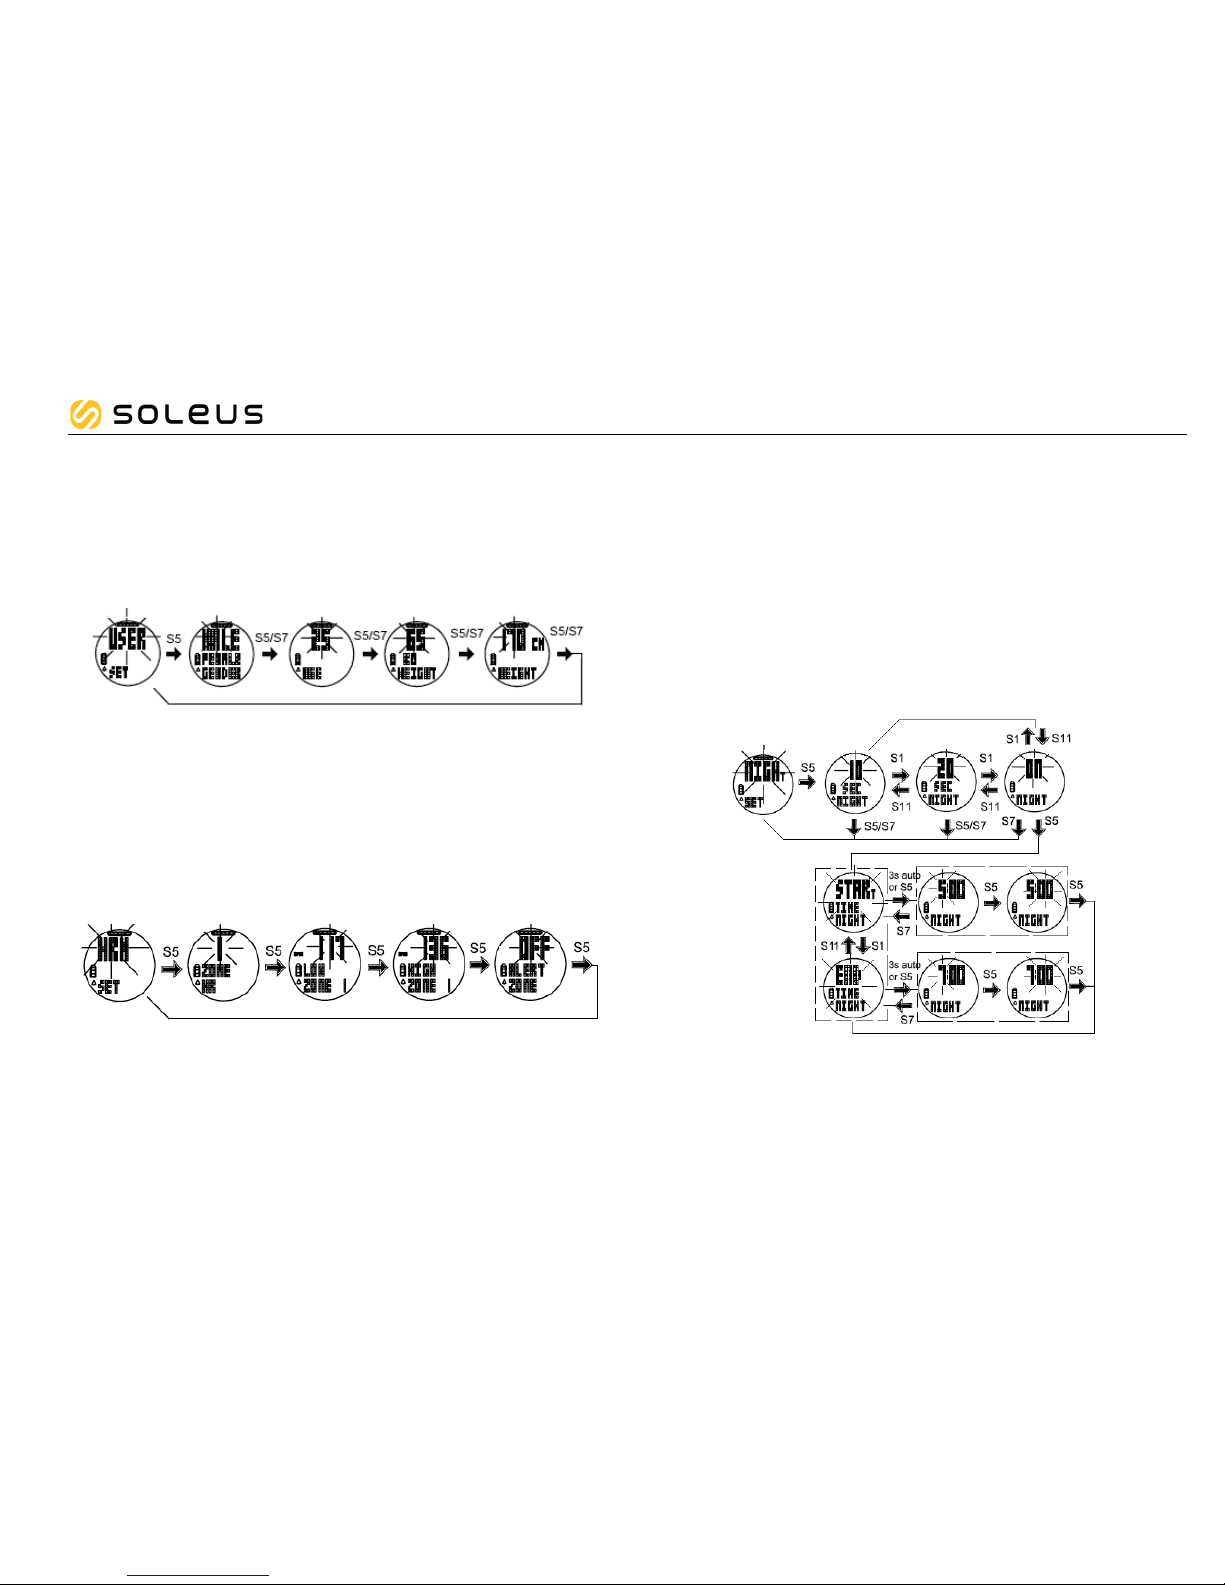
How to set USER details:
• Press S5 while USER is blinking. MALE will start to blink.
• Press S1/S11 to change the gender.
• Press S5 to confirm and set the AGE. Age digits will start to blink.
• Press S1/S11 to change the age digits.
• Press S5 to confirm and set the WEIGHT. Weight digits will start to blink.
• Press S1/S11 to change the weight digits.
• Press S5 to confirm and set the HEIGHT. Height digits will start to blink.
• Press S1/S11 to change the height digits.
• Press S5 to confirm and go back to USER setting screen.
• Press S7 to exit
How to set the HRM:
• Press S5 while HRM is blinking. ZONE 1 will start to blink.
• Press S1/S11 to change the zone. There are 3 preset zones
• Press S5 and the watch will display the LOWER limits of the selected zone. LOW limit
digit will start to blink.
• Press S1/S11 to change the low limit value.
• Press S5 to confirm. High limit digit will start to blink.
• Press S1/S11 to change the high limit value.
• Press S5 to confirm. The watch will display ZONE ALERT ON or OFF.
• Press S1/S11 to change ON to OFF or vice versa
• Press S5 to confirm and the watch will go back to HRM setting screen.
How to set the NIGHT mode function:
• Press S5 while NIGHT is blinking. The watch will display 10 seconds blinking.
• Press S1/S5 to change to 20 sec or NIGHT ON.
• While on 10 SEC or 20 SEC setting, Press S5 to accept the setting and go back to
NIGHT setting screen.
• While on NIGHT ON setting screen Press S5 to accept the ON setting. The watch will
display the START TIME.
• Press S1/S11 to toggle between START TIME and END TIME.
• Press S5 or 3 seconds auto to set the START TIME. Hour digit will start to blink.
• Press S1/S11 to change the hour setting.
• Press S5 to change the MINUTE. Minute digits will start to blink.
• Press S1/S11 to change the minute setting.
• Press S5 to go back to START TIME setting screen.
• Press S1/S11 to set the END TIME. Hour digit will start to blink.
Note: Follow the procedure in setting the START TIME.
• Press S7 to exit to NIGHT ON setting screen.

Soleus GPS Pulse
Night mode settings:
• 10 SECONDS – Press S11 will turn ON the Light for 10 seconds.
• 20 SECONDS – Press S11 will turn ON the Light for 20 seconds.
• NIGHT ON – Default Start Time / END Time for NIGHT ON setting is 5 PM to 7 AM.
Following are the characteristics of NIGHT ON setting:
o Start Time and END TIME for NIGHT ON setting can be changed in SET
mode/ NIGHT.
o When the Night setting is ON, pressing any button within the Start Time / End
Time will turn ON the EL for 10 seconds.
o Outside the Start time / End Time, only press S11 will turn ON the EL for 10
seconds.
o When the chronograph is running within the Start Time/ End Time, the EL will
be always ON. It will turn OFF 10 seconds after the chronograph is stopped.
How to set the LCD display CONTRAST:
• Press S5 while CONTRAST is blinking. Contrast percentage will start to blink.
• Press S1/S11 to change to your desired value. LCD Contrast range is from 10 to 100%.
• Press S5/S7 to exit to CONTRAST setting screen
Contrast range = 10 to 100%
How to set the CHIME:
• Press S5 while CHIME is blinking.
• Press S1/S11 to change to CHIME ON or OFF.
• Press S5/S7 to confirm and exit setting.
How to set the ALARM and CHIME:
• Press S5 while ALARM is blinking. AL-1 will start to blink.
• Press S1/S1 to toggle through Alarm 1 to alarm 5. The watch has 5 alarms which can be
set individually
• Press S5 to set the selected Alarm number. The HOUR digit will start to blink.
• Press S1/S11 to change the hour digit.
• Press S5 to confirm and set the MINUTE digit. The minute digit starts to blink.
• Press S1/S11 to change the minute digit.
• Press S5 to confirm and set the T1 or T2 setting. T1 or T2 starts to blink. The alarm time
will be referred to Time 1 or Time 2.
• Press S1/S11 to change setting
• Press S5 to confirm. Alarm ON or OFF will start to blink.
• Press S1/S11 to change the setting.
• Press S5 to confirm. Daily Alarm OFF or ON (MON/TUE/WED/THU/FRI/SAT/SUN) will
start to blink.
• Press S1/S11 to confirm the setting.
• Press S7 in any alarm screen. The watch will display CHIME ON.
• Press S1/S11 to change to CHIME OFF or ON.
• Press S7 to confirm and exit to CHIME setting screen
Soleus GPS Pulse
How to set the TIMER:
• Press S5 while TIMER is blinking. The segment number will start to blink.
• Press S1/S11 to change the segment number
• Press S5 to set the HOUR. The hour digit starts to blink.
• Press S1/S11 to change the digits
• Press S5 to set the MINUTE. The minute digit starts to blink.
• Press S1/S11 to change the digits
• Press S5 to set the SECONDS. The second digit starts to blink.
• Press S1/S11 to zero the digits.
• Press S7 to set the Timer alert then press S1/S11 to turn ON or OFF.
• Press S5/S7exit to TIMER setting screen
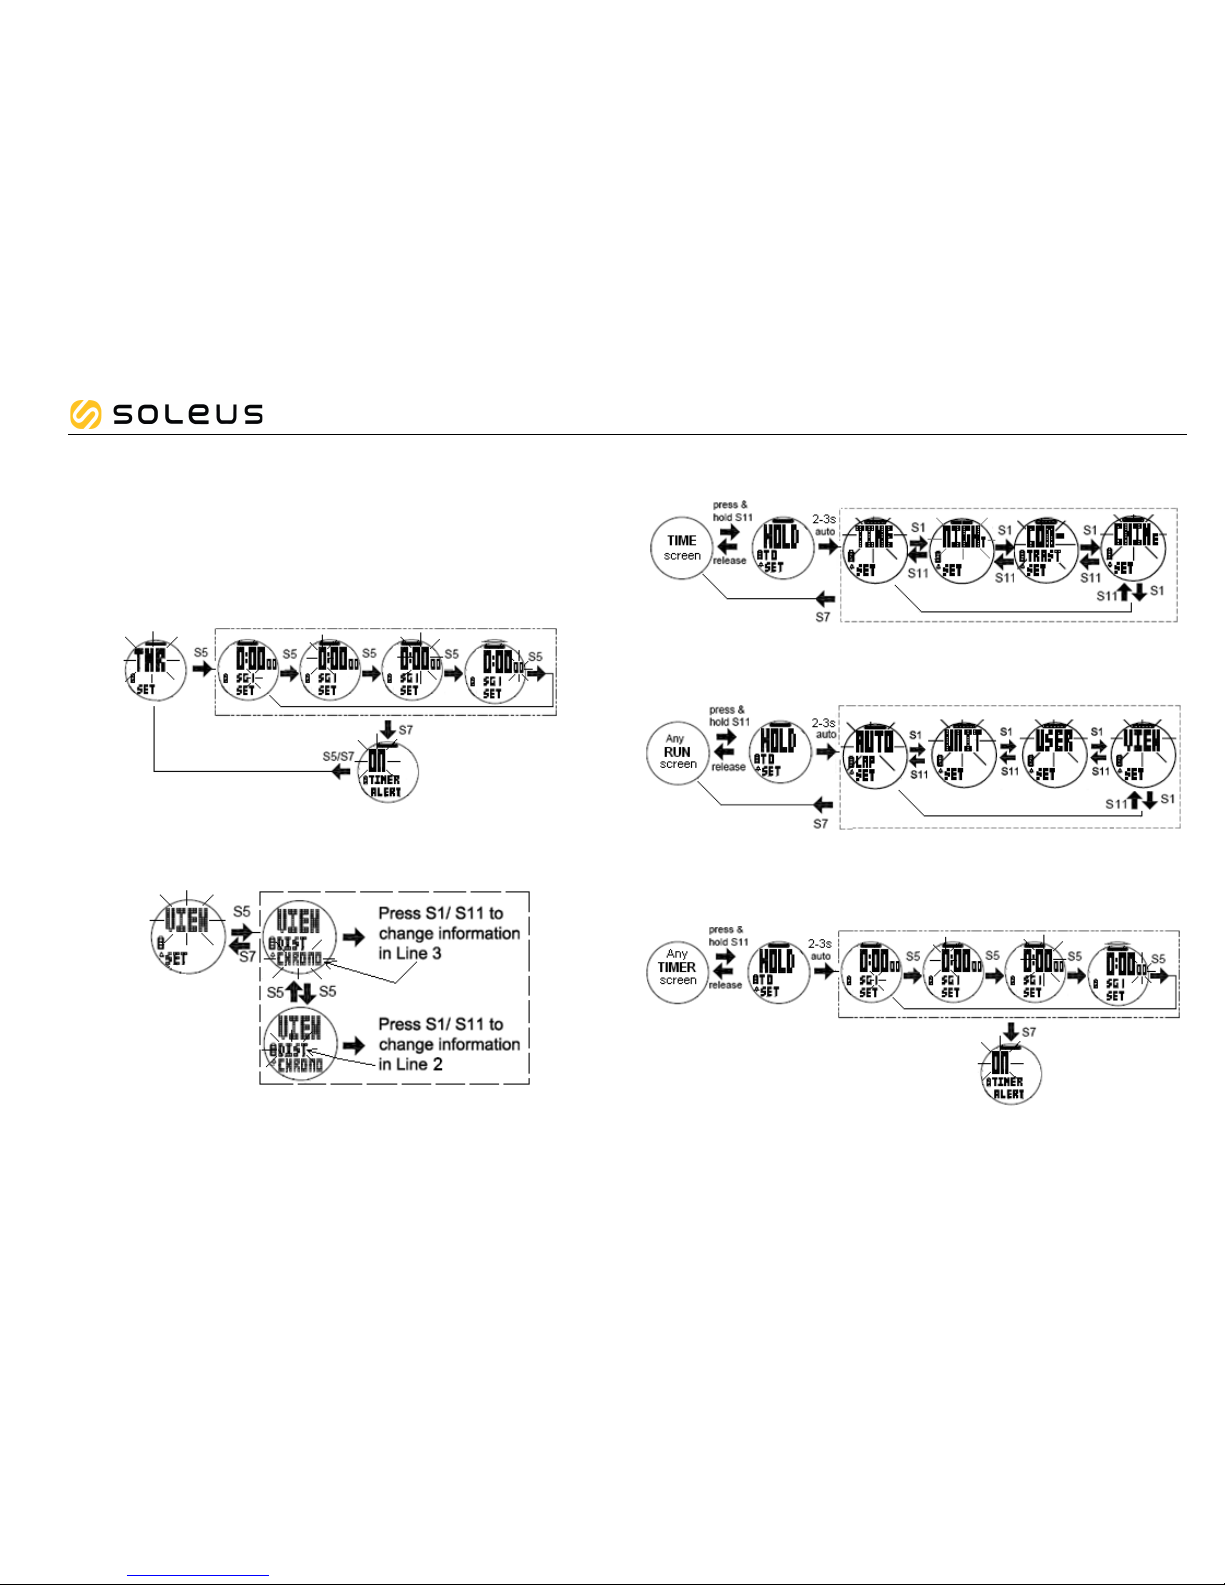
How to set the VIEW
• Press S5 while VIEW is flashing. CHRONO will start to flash.
• While “CHRONO” is flashing, press S1/S11 to scroll the various parameters to set. The
parameters are CHRONO, DISTANCE, PACE, SPEED, HRM, CALORIE and CLOCK.
You can select what information to display in Line 2 & Line 3 for RUN mode
3.2) TIME, NIGHT, CONTRAST and ALERT, can also be set in TIME quick SET mode.
• Press and hold S11 while in Time mode. TIME will start to blink.
• Press S1/S11 to toggle through TIME, NIGHT, CONTRAST and CHIME.
3.3) AUTO LAP, UNITS, USER, and VIEW can also be set in RUN quick SET mode.
• Press and hold S11 until AUTO LAP blinks.
• Press S1/S11 to toggle through between AUTO LAP, UNIT, USER and VIEW.
3.4) TIMER can also be set in TIMER SET mode
• Press and hold S11 until SG 1 (segment 1) blinks.
• Press S5 to set the hour, minute and second.
• Press S7 to set the Timer alert then press S1/S11 to turn ON or OFF.
 Loading...