

Page 1
PR HRM manual
PR HRM User Manual
This product shows the following features/functions:
Chronograph with 1/100 seconds resolution in the first hour and 1 second resolution
for the succeeding hours up to 24 hours
6 Interval countdown timers.
5 Alarms that can be set individually
Dual time T1 and T2 with a year range of 2012 to 2061.
Data mode to view your exercise data
12H / 24H display format option
5.3k HRM
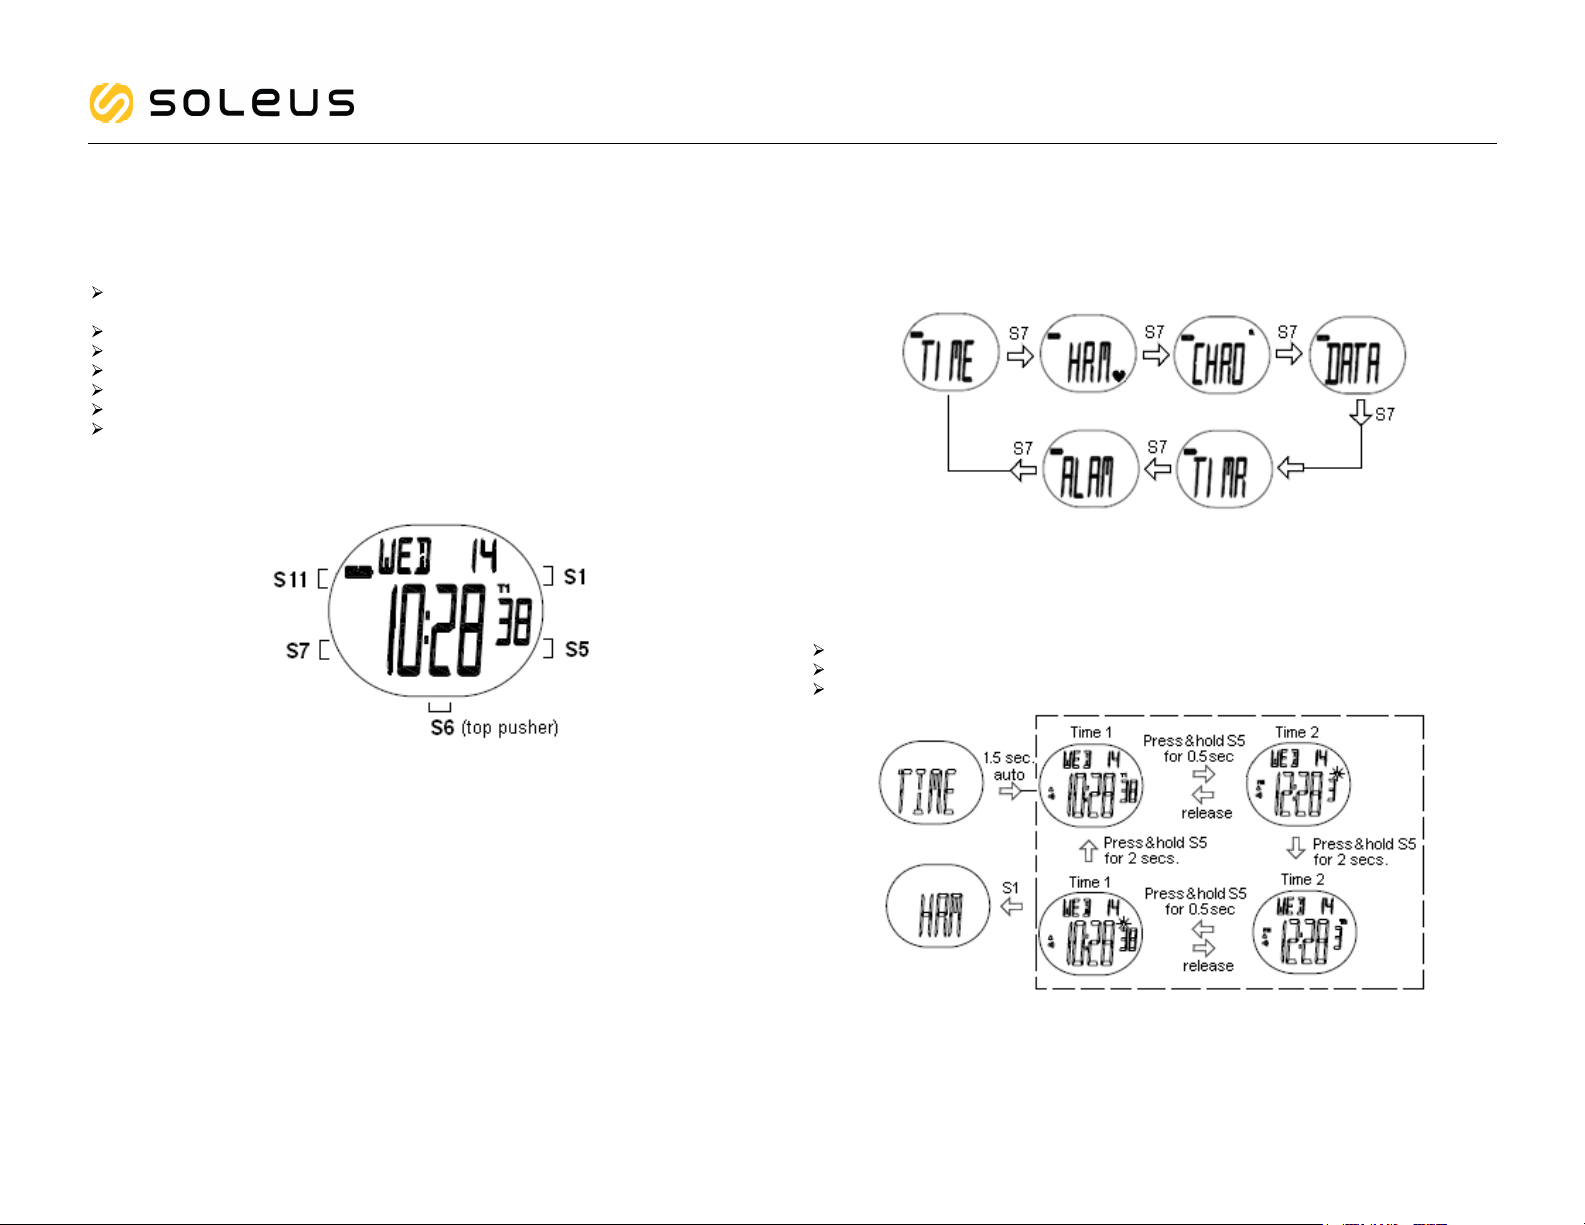
Push button Location:
General Operations
All Modes:
Press S7 to scroll through the different modes; Time, HRM, CHRONO, Data, Timer, and
Alarm modes.
Time Mode:
Press S7 to go to Time mode. The watch will momentarily display TIME and then display
view 1. Time 1 and Time 2 runs independently but has the same seconds.
Press S5 for 0.5 seconds to view T2 from T1 or vice versa.
Press and hold S5 for 2 seconds to change T1 to T2 or vice versa.
In any Time screen, Press S1 to go to HRM.
Push button main function:
S1 – Start / Stop / Increase adjust
S5 – View / OK
S6 – Set / Reset / Light / Lap / Save / Decrease adjust
S7 – Mode / Exit
S11 – Set / Reset / Light / Lap / Save / Decrease adjust
Note: S6 and S11 have the same function.
Page 2

PR HRM manual
How to set the Time
Press and hold S6 or S11 for 2 seconds and it will momentarily display SET HOLD
TO. The “TIME” blinks.
Press S5 to enter Hour setting. Press S1/S6 or S11 to set the hour.
Press S5 to enter Minute setting. Press S1/S6 or S11 to set the minute.
Press S5 to enter Second setting. Press S1/S6 or S11 to zero the second digits.
Press S5 to enter Year setting. Press S1/S6 or S11 to set the year.
Press S5 to enter Month setting. Press S1/S6 or S11 to set the month.
Press S5 to enter Day setting. Press S1/S6 or S11 to set the day.
Press S5 to enter 12/24 hours format. Press S1/S6 or S11 to set the 12/24H format.
Press S5 to enter Weekday or Month. Press S1/S6 or S11 to set the weekday or
month.
Note: Press S1/S6 or S11 to toggle between Weekday and Month or vice versa.
From any of the displays above, press and hold S7 to exit setting mode.
How to set the Night mode, Contrast and Chime
Press and hold S6 or press and hold S11 for 2 seconds and it will momentarily display
SET HOLD TO. The “TIME” blinks.
Press S1/S6 or S11 to scroll the Time, Night, CONT (Contrast) and Chime setting.
Press S5 to enter setting.
Press S1/S6 or S11 to change setting.
Press S5/S7 to confirm setting.
Press and hold S7 to exit setting.
Note:
• This watch has a night mode feature. When the night mode is ON, press any
button between 6:00 pm to 7:00 am will turn ON the EL back light for 5 seconds.
• When night mode is OFF, only press S6 or S11 will turn ON the EL back light for
5 seconds.
Page 3
PR HRM manual
HRM mode:
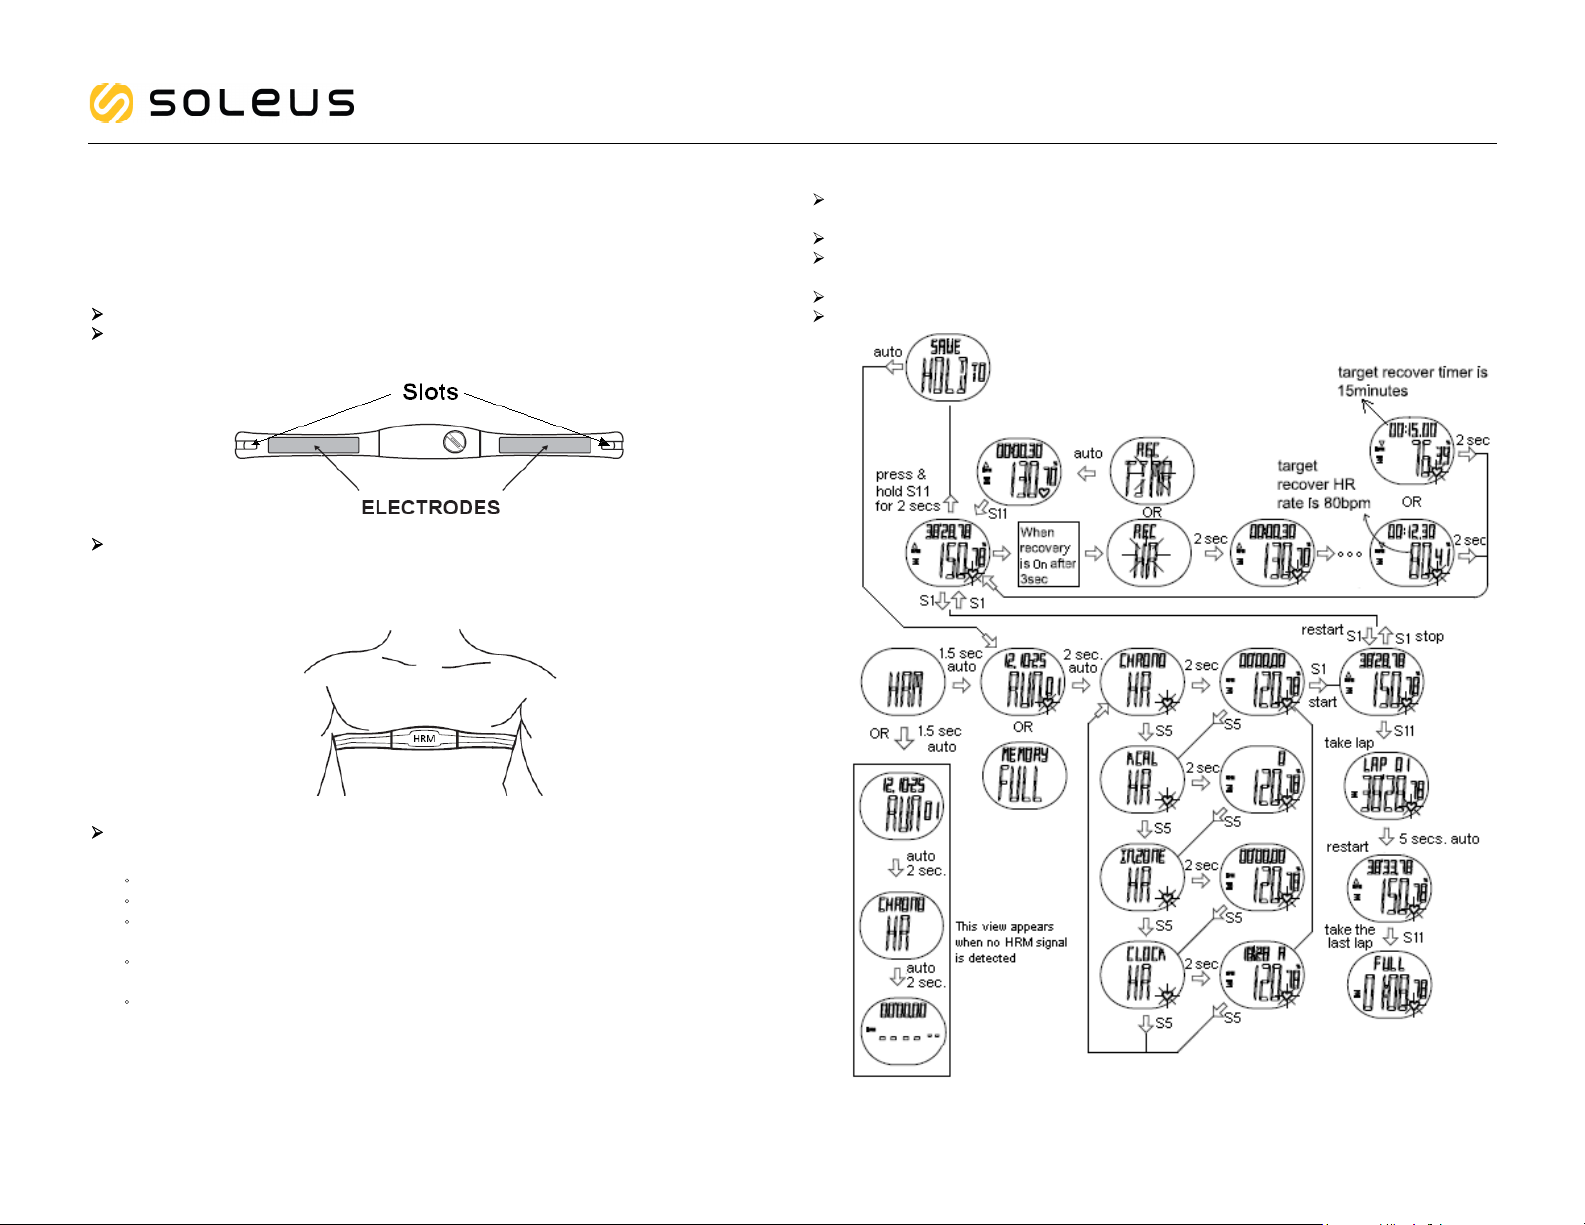
How to Pair your Heart Rate monitor
The HRM belt is on standby and ready to send data to your Watch. Wear the belt directly
on your skin just below your breastplate. It should be snug enough to stay in place during
your run.
Push one tab on the strap through the slot in the HRM transmitter.
Wet both electrodes with a damp cloth on the back of the HRM belt. This will help
create a strong electrical connection between your chest and the HRM transmitter.
Wrap around the chest belt around your rib cage just below the pectoral muscles and
attach the other end of the strap to the HRM transmitter. The elastic strap should be
adjusted so that it is snug enough so that it will not move during use but not so tight as
to restrict breathing.
How to pair the Watch with HRM belt
Press S7 to go to HRM mode. The watch will momentarily display HRM and then
display the RUN screen then followed by HRM screen.
Press S1 to start/restart/stop the chronograph.
Press S6 or S11 to take manual lap. The watch will display the Lap number & Lap
time for 5 seconds and continue running.
Press S5 to change views
Press & hold S6 or S11 to save the file. The watch will display “SAVE HOLD TO”.
If the heart rate data does not appear on the Watch, or if you have erratic data, follow
the tips below. If the problem persists, you may have to pair the HR belt again.
•
Make sure the HR belt is snugly fit to your body.
Reapply water or electrode gel to the electrode of the HR belt.
•
Clean the electrodes from possible contamination that may interfere with heart
•
rate signals.
Wear a cotton shirt or if possible, wet your cotton shirt. Synthetic fabric that rubs
•
with your skin may create static electricity and interfere with the heart rate signal.
Move away from strong electromagnetic fields and other wireless sensors which
•
can interfere with your heart rate sensor. Possible sources of wireless
interference may include high voltage power lines, electric motors, microwave
ovens, cordless phones, and wireless LAN or access points.
Page 4

PR HRM manual
How to set while in HRM mode
After data is saved or reset, press and hold S6 or S11 to enter setting mode and the
watch will momentarily display “SET HOLD TO”.
Press S5 to scroll the various HRM parameters including the 3 levels (L1 to L3) of
HRM zone.
Press S1/S6 or S11 to change the setting.
Press and hold S7 to confirm and exit setting
Chronograph Mode:
Press S7 to go to CHRONO mode. The watch will momentarily display CHRO.
Press S1 to start or take LAP.
When Lap is taken beyond the memory capacity, the watch will display FULL.
Press S1 to stop or restart.
Press & hold S6 or S11 and the watch will display “RESET HOLD TO”.
Note:
• Chronograph has 1/100 seconds resolution for the first hour. Succeeding hours has 1
second resolution.
• Maximum chronograph time is 24:00:00 hours and auto stop.
RDY13
Page 5

PR HRM manual
DATA Mode:
How to the view the data
Press S7 to go to DATA mode. The watch will momentarily display DATA and then the
RUN number and date of your exercise.
If there is no data available, the watch will display NO DATA.
Press S1 to scroll through the other RUN numbers.
Press S5 to view the details of the selected RUN number.
Press S7 to exit.
How to delete the data
Delete data individually.
Press and hold S5 from any view in Data mode and it will momentarily display
“DELETE HOLD TO” then the RUN screen.
Press S1 to select any Run data to be deleted.
Press and hold S5 to delete the selected Run data and it will momentarily display
“DELETE HOLD TO”. Data will be deleted and the watch will display the next RUN
number.
Delete all data.
Press and hold S5 from any view in Data mode and it will momentarily display
“DELETE HOLD” TO then the RUN screen.
Press S1 until the “DELETE ALL” screen appears
Press S5 and it will appear “DELETE ALL
(Press S1 to toggle between “DELETE ALL
Press S5 to confirm and the watch will display NO DATA.
- - “or “DELETE ALL ON”.
- -“and “DELETE ALL ON”).
Page 6

PR HRM manual
TIMER Mode:
Press S7 to go to TIMER mode. The watch will momentarily display TIMR and then
display Segment 1
The watch has 6 segment timers which can be set individually
The timers will loop for maximum of 30 loops.
Press S5 to scroll any of the preset Timer view.
Press S1 to start/restart/stop.
Press and hold S6 or S11 to go back to preset Timer view.
How to set the Timer
Press and hold S6 or S11 from any preset timer view and the watch will momentarily
display SET HOLD TO. Segment number will start to blink.
Set the segment number by pressing S1/S6 or S11. Press S5 to enter. SECOND
digits will start to blink.
Set the SECOND digits by pressing S1/S6 or S11. Press S5 to enter. MINUTE digits
will start to blink.
Set the MINUTE digits by pressing S1/S6 or S11. Press S7 to enter. HOUR digits will
start to link.
Set the HOUR digits y pressing S1/S6 or S11. Press S7 to enter. Segment number
starts to blink.
Repeat the procedure until all segments are set.
From any views above, press and hold S5 to exit setting mode.
How to reset the Timer
Press and hold S5 in any Timer segment (SG1 to SG6) and the watch will
momentarily display “RESET HOLD TO”. Segment reset zero.
Page 7

PR HRM manual
ALARM Mode:
The watch has 5 Alarms that can be set individually with Chime.
Any alarms can be referred to T1 or T2.
Alarm sounds for 20 seconds at alarm time everyday if the alarm is set to ON. The
Alarm icon will also flash.
Press any key while the sound is active to disable the alarm sound, otherwise, it
will automatically stop after 20 seconds.
Press S7 to go to ALARM mode.
The watch will display ALRM and then Alarm 1.
Press S1 to turn ON or OFF the alarm and Chime.
Press S5 to toggle Alarm 1 to alarm 5 and Chime.
Press S7 to exit.
ALARM setting Mode
Press and hold S6 or S11 from any Alarm views and the watch will momentarily
display “SET HOLD TO”. Alarm digit will start to blink.
Press S5 to set the Alarm 1-5, alarm hour, minute, T1/T2, alarm On/Off and Chime.
Press S1/S6 or S11 to change digit.
Press and hold S7 to exit setting.
Press S7 and it will go back to Time mode.
Battery Replacement:
If the Display dims, the user is recommended to go to authorized service center for correct
battery replacement (CR2032).
 Loading...