

Page 1
User’s Manual:
)
HRM Optical Pulse watch
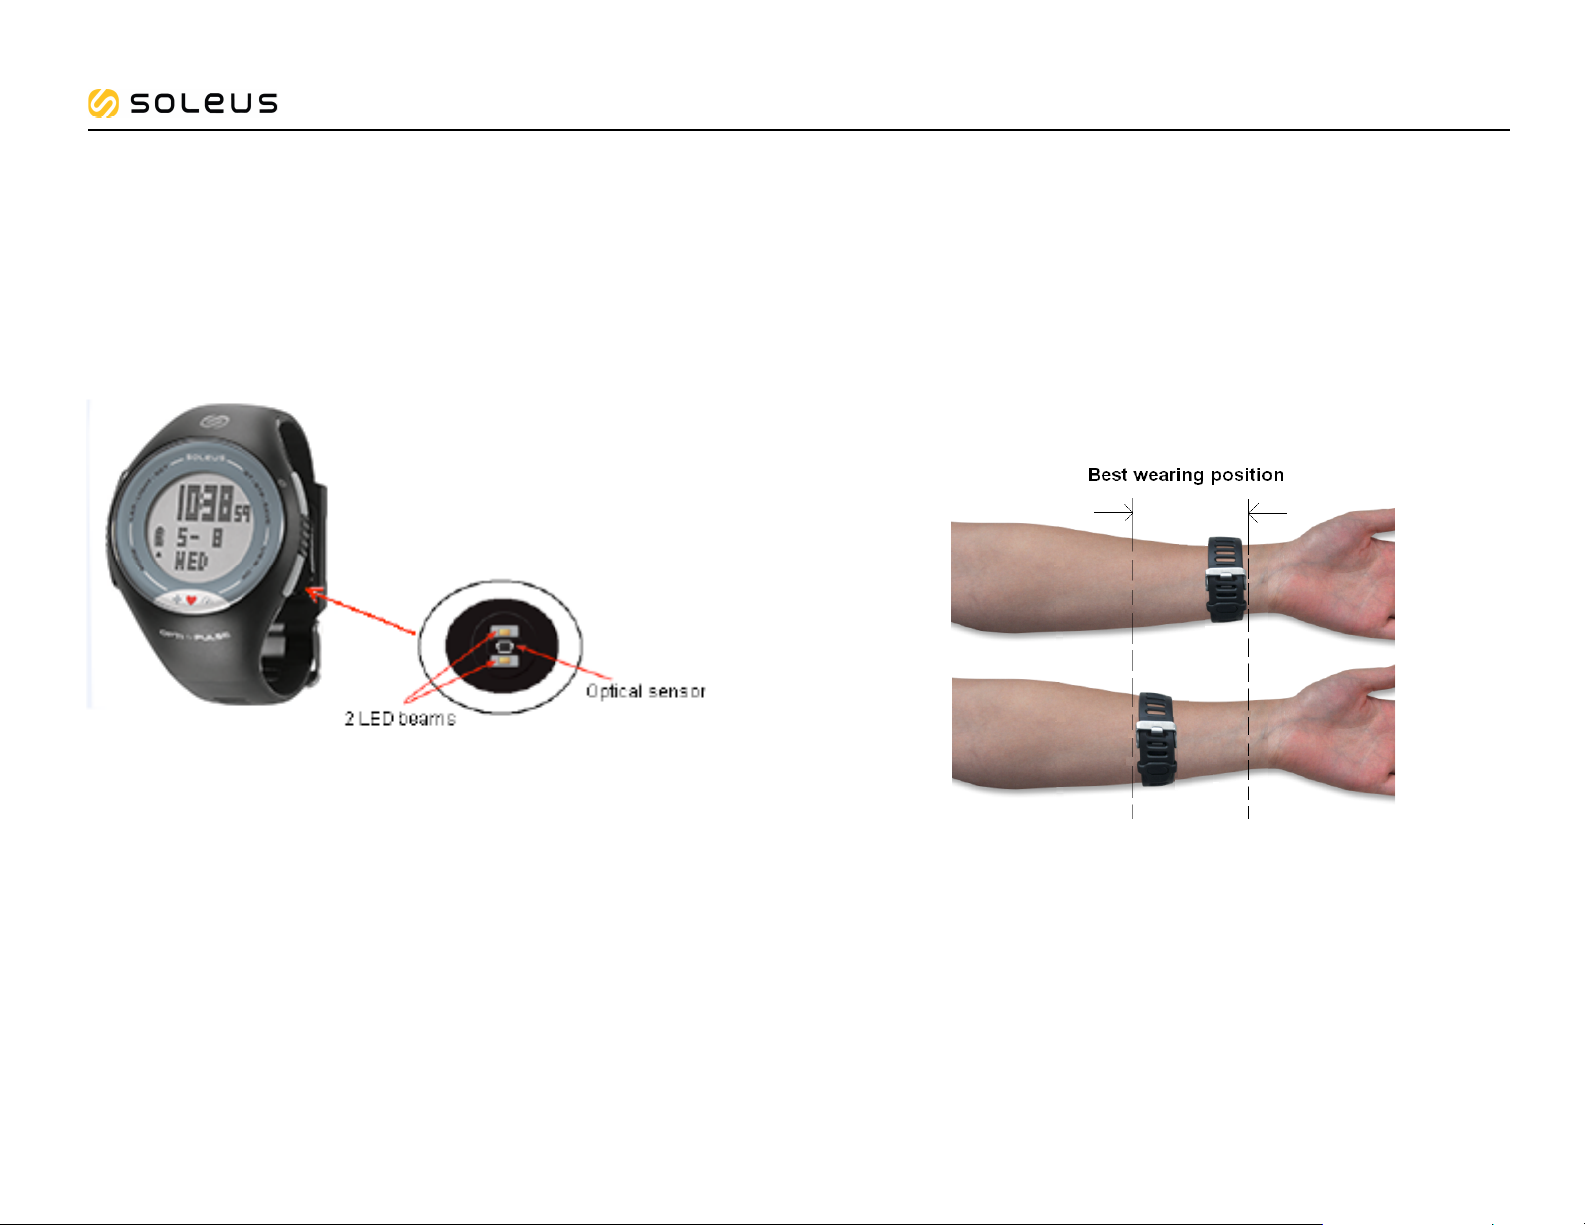
This product uses an Electro-optical technology to sense the heart beat. It has two LED
beams and electro-optical cell to sense the volume of blood under your skin.
This product will show the User current MET (Metabolic Equivalent of Training) calorie
burned every day. MET calorie burn will help the User to understand and control body
fitness through daily movement /exercise.
Soleus Pulse HRM
How to wear the watch properly in your forearm:
• The heart rate beat is taken directly through your skin to the watch sensor, so it
is very important that there are no obstructions that will interfere with the
transmission of Heart rate data.
• Fasten the watch snugly so that the optical sensor makes a tight contact with
your skin. The tighter you can wear the watch the better.
• Your Skin should be smooth and Healthy. There should be no HAIR or SCARS
or any other object in y
• Wear the watch not on your wrist bone but higher on your f
• If the Heart rate data displayed in the watch is not stable or erratic, try to move
the watch along your forearm within the best wearing position as illustrated
below.
our skin that will interfere with the sensor.
orearm.
Note that the actual color of the watch and artwork may vary from style to style.
Caution:
• Consult your doctor before beginning a new exercise program.
• This watch provides heart rate measurements. However, this is not a medical
device.
• This watch may affect pacemakers. If you have any concerns, consult your
doctor before using this watch.
Important notes:
Before starting your exercise
• You may need to tighten the strap
** After sweating, you have to tighten the watch again for more accurate
measurement.
• Make sure the heart rate reading is already stable.
• Minimize extreme wrist movement while the HR is in use.
Page 2
Soleus Pulse HRM
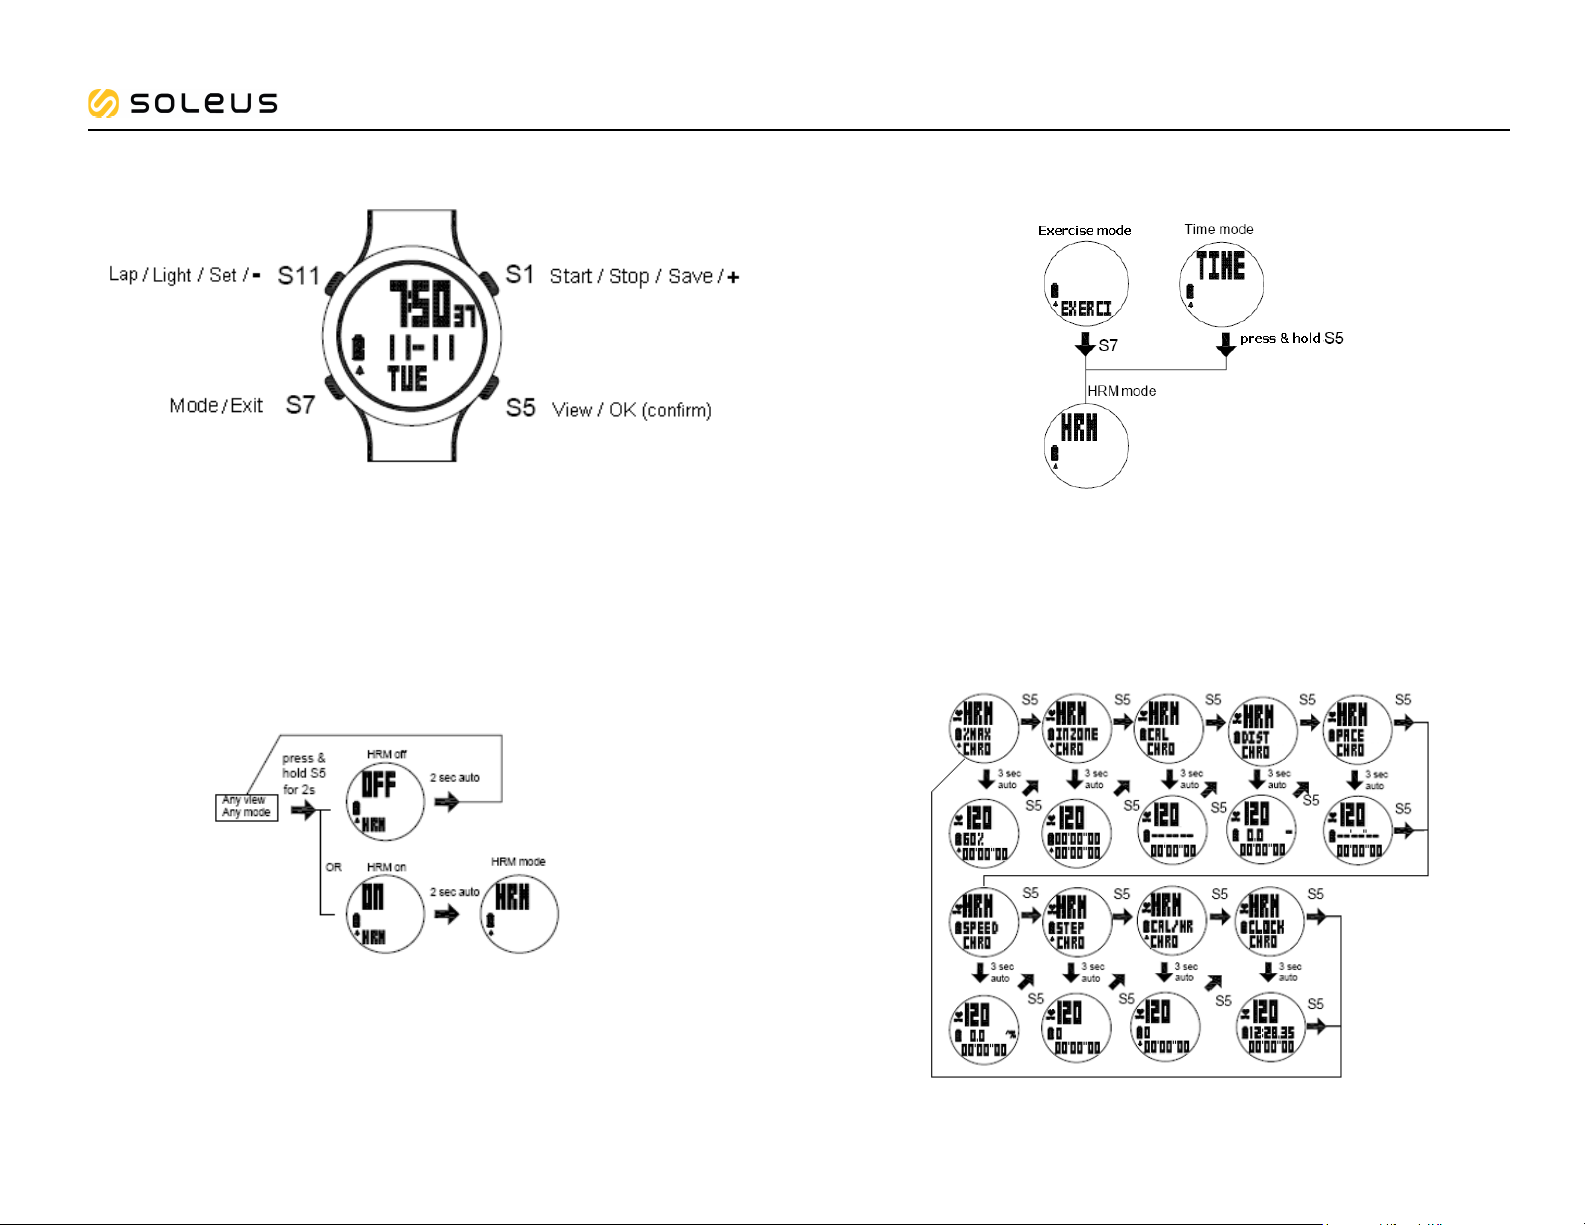
Push Button location / Main function
1) How to get your Heart rate displayed in the watch
• Fasten the watch snugly so that the optical sensor makes a tight contact with
your skin. The tighter you can wear the watch the better.
• You can view your heart rate and use the heart rate monitor when you put your
watch in any of the EXERCISE modes like Exercise or HRM mode.
2) How to turn ON or OFF the HRM function
• Press and hold S5 from any mode to turn ON or OFF the HRM.
3) How to enter HRM mode
• Press S7
HRM mode (HRM ON).
to go to HRM mode or Press and hold S5 from TIME mode to go to
Note: If you press and hold S7 from any mode where the chronograph
is running, the watch will go back to TIME mode.
4) How to change views HRM mode
• Press S5 to change the information displayed in Line 2. Following are the
information you can select to display in line 2: % Max, In Zone, Calorie,
Distance, Pace, Speed, Step, Calorie/Hour and Clock.
• The watch will remember the last view you have selected and display it first the
next time you enter HRM m
ode.
RDY14
Page 3
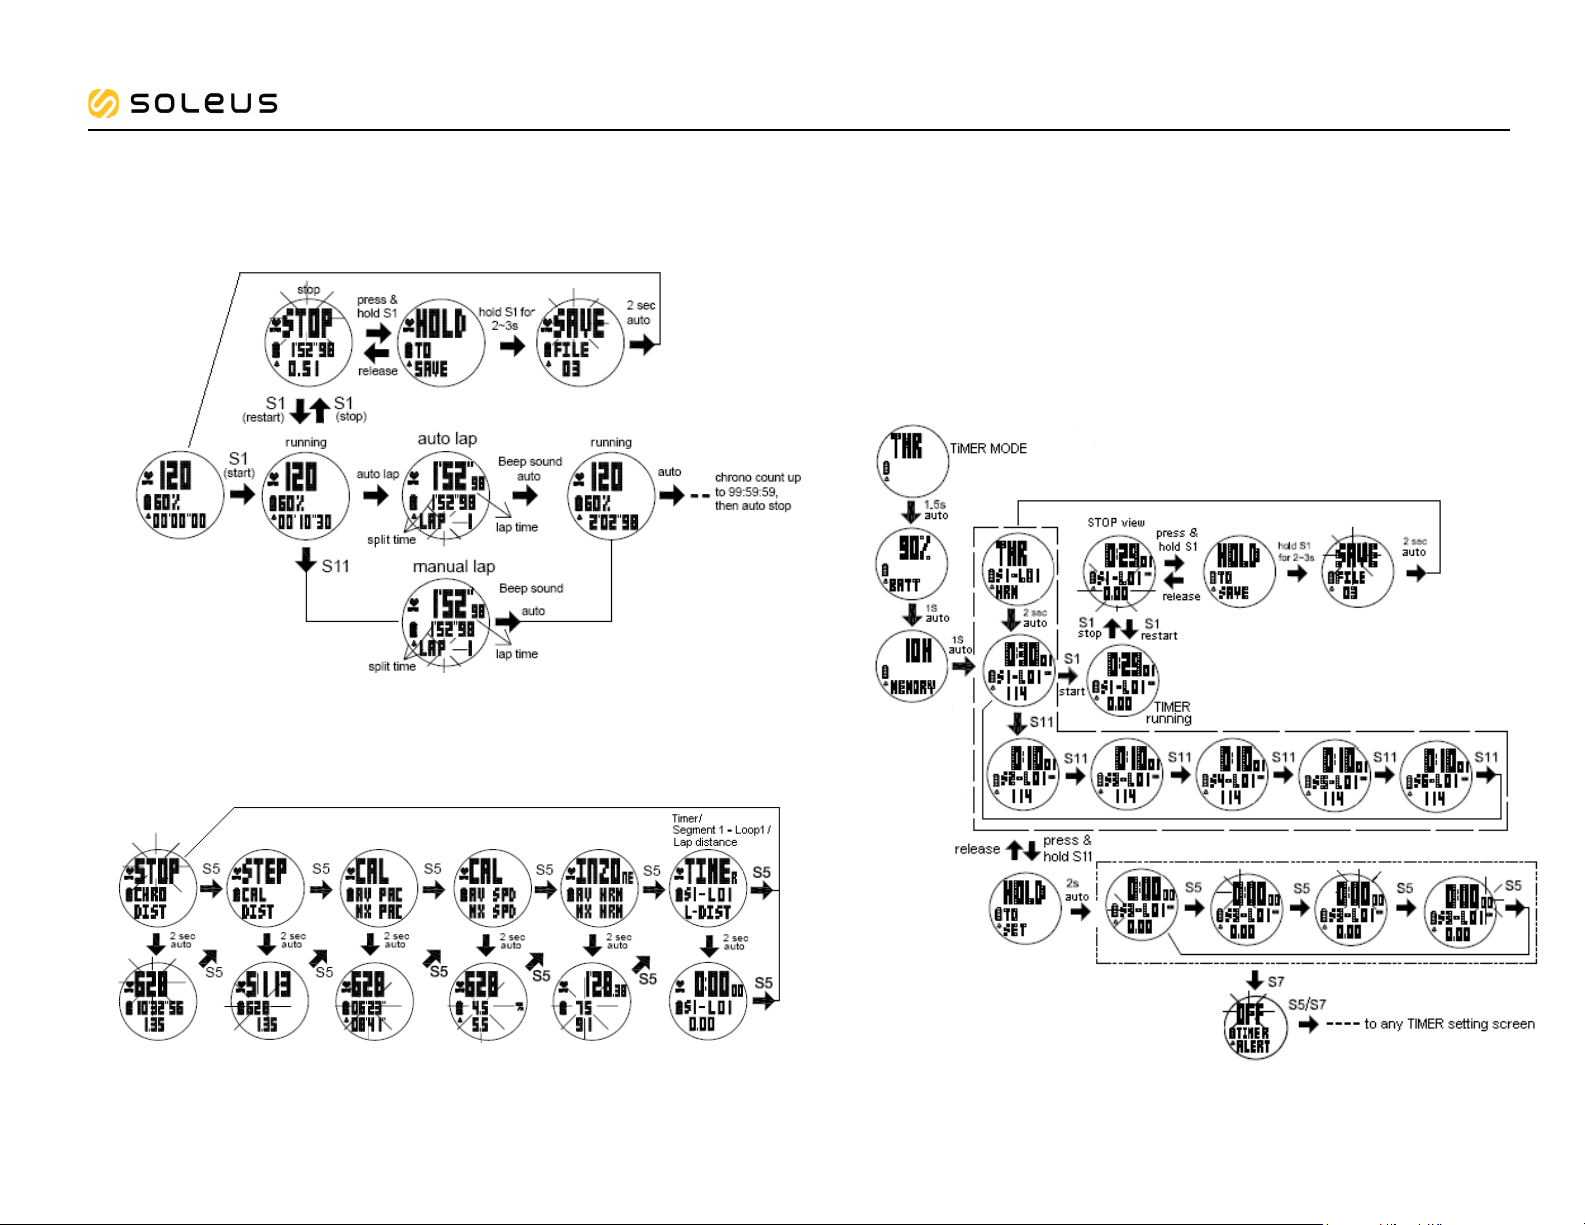
5) How to Start, take LAP, STOP and SAVE
• Press S1 to START, STOP, or Re-START
• Press S11 to take manual Lap. The display will freeze for 10 seconds to display
the Lap number, Lap time, and Split Time.
• Press and hold S1 to save data.
Soleus Pulse HRM
7) How to set Timer:
• Press S7 to go to Timer mode.
• Press & hold S11 while in any TIMER mode screen. The watch will display “HOLD
TO SET” and then SEG 1 (segment 1) will start to blink.
• Press S1/S11 to select SG 1 to SG 6.
• Press S5 to enter and HOUR digits will start to blink.
• Press S1/S11 to change the hour digits.
• Press S5 to enter and MINUTE digits will start to blink.
• Press S1/S11 to change the minute digits.
• Press S5 to enter an
• Press S1/S11 to change the second digits.
• Press S5 to enter and the SG # will start to blink.
• Press S7 to set TIMER ALERT ON/OFF.
• Press S1/S11 to change the setting. Press S7 to exit.
d SECOND digits will start to blink.
Note: The watch will take AUTO LAP based on the distance set in AUTO LAP
settings in SET mode.
6) How to view your current data while the chronograph is stopped.
• Following are the information as you press S5:
Note: Timer can also be set in SET mode.
RDY14
Page 4
Soleus Pulse HRM
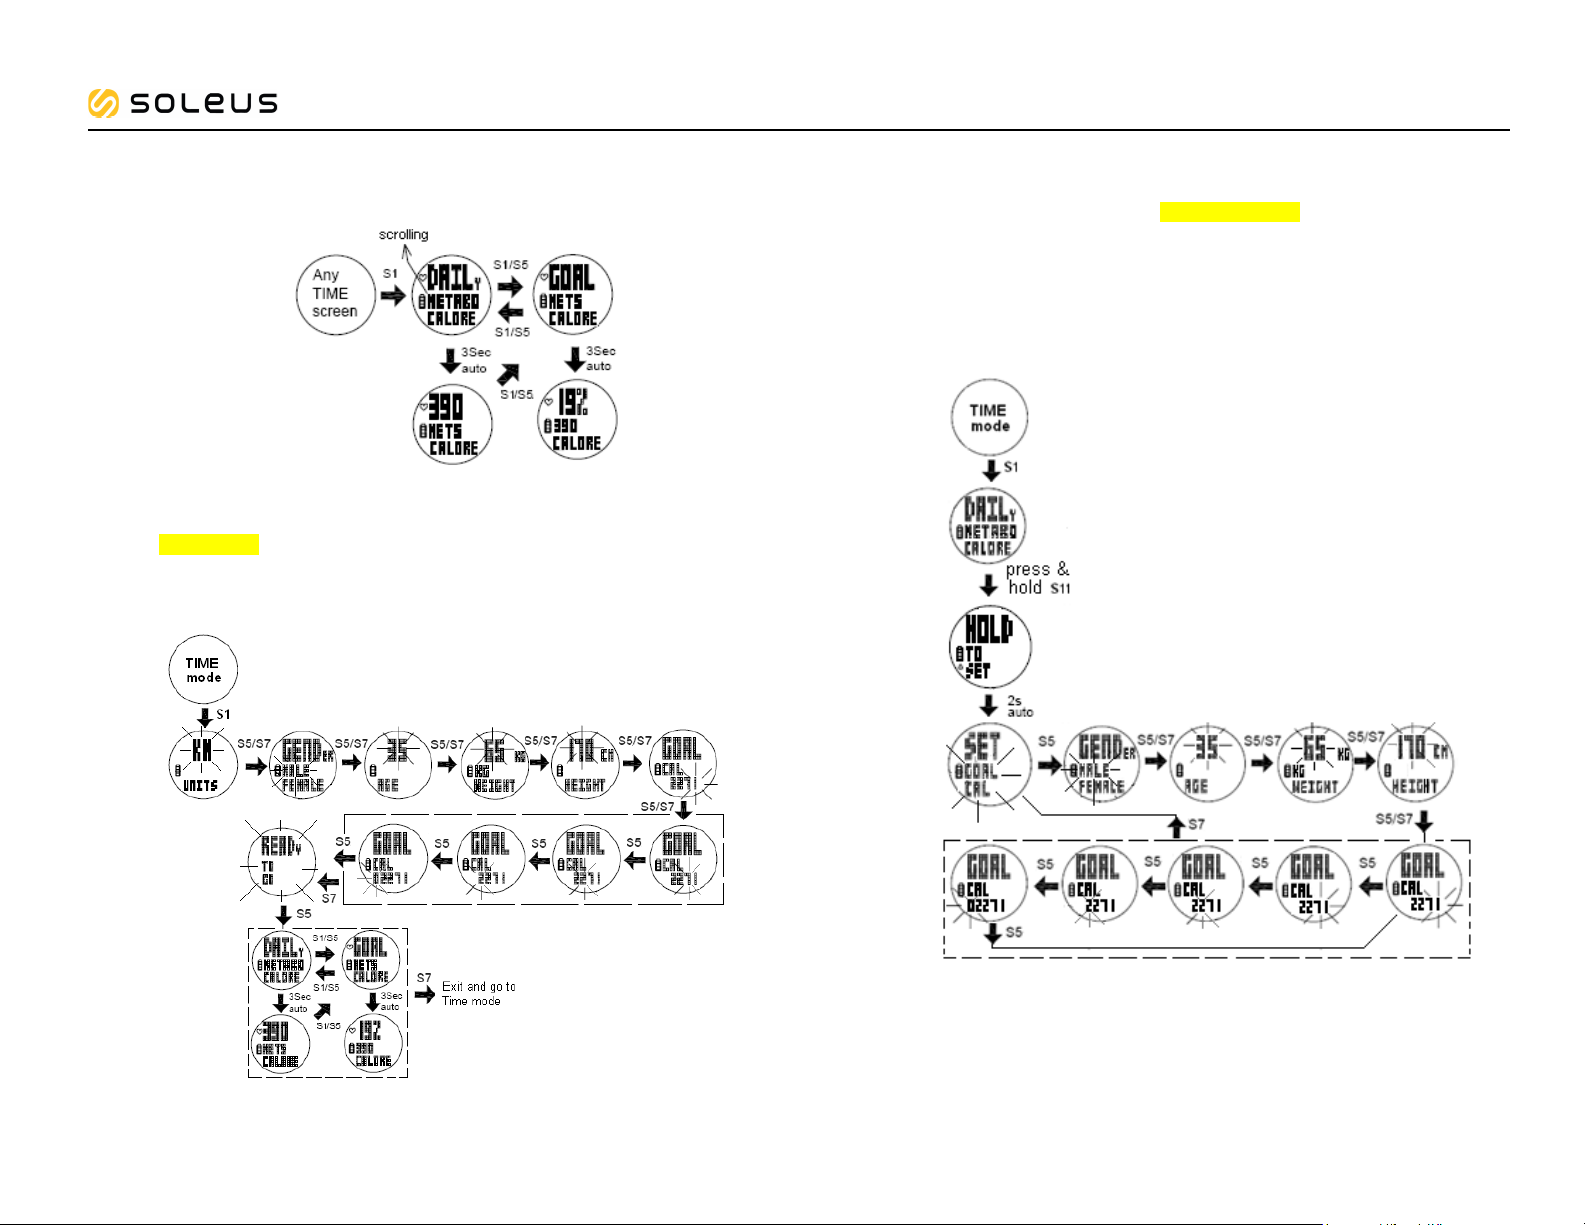
8) How to view DAILY METS Calorie/ GOAL METS Calorie
• Press S1 while in TIME mode to display the DAILY METABOLIC CALORIE.
• Press S1/S5 to change screen to your GOAL Metabolic Calorie.
9) How to set your personal information and to view the DAILY Calorie/
GOAL METS Calorie
• The first time you enter the Daily Data/ Metabolic Calorie view by pressing S1,
the watch will prompt you to update your personal information like Units,
Gender, Age, Weight, Height, and Goal Calorie.
• After you have completed updating the information, it will display READY to GO.
• Press S7 to exit and it will go to TIME mode.
10) User can also set the Goal calorie and other information while in Time
mode.
If the User wishes to set again after the first time you enter the Daily Data/
Metabolic Calorie view.
• Press S1 while in Time mode.
• Press and hold S11 to set the following information Goal Calorie, Gender, Age,
Weight, Height, and Goal Calorie setting.
• Press S1/S11 to change the blinking digit.
• Press S5 or S7 to confirm
• Press S7 to exit.
RDY14
Page 5

Soleus Pulse HRM
11) How to set the ff. parameters: TIME, NIGHT, CONTRAST, CHIME and
GOAL CALORIE while in Time mode.
• Press and hold S11. TIME will appear and blinks.
• Press S1 to toggle the TIME through GOAL CAL.
• Press S7 to exit.
How to set the TIME:
TIME 1/ Time 2 setting:
• Press S5 while TIME is blinking. The watch will display T1 or T2.
• Press S1/S11 to choose between T1 or T2 to set.
• Press S5 to set the selected time (T1 or T2). The HOUR blinks.
o Set the HOUR by pressing S1 or S11 and press S5 to enter.
o Set the Minute by pressing S1 or S11 and press S5 to enter.
o Set the SECOND by pressing S1 or S11 and press S5 to enter.
o
Set the YEAR by pressing S1 or S11 and press S5 to enter.
o Set the MONTH by pressing S1 or S11 and press S5 to enter.
o Set the DAY by pressing S1 or S11 and press S5 to enter.
o Set the 12/24H by pressing S1 or S11 and press S5 to enter.
o Set the Month/Date of Date/Month format by pressing S1 or S11 and press S5
to enter.
o Press S7 to exit.
How to set the NIGHT mode function:
• Press S5 while NIGHT is blinking. The watch will display 10 seconds blinking.
• Press S1/S11 to change to 20 sec or NIGHT ON.
• While in 10 SEC or 20 SEC setting, Press S5 to accept the setting and go back to
NIGHT setting screen.
• While in NIGHT ON setting screen, Press S5 to accept the ON setting. The watch
will display the START TIME.
• Press S1/S11 to toggle between START TIME and END TIME.
• Press S5 or 3 seconds auto to set the START TIME. Hour
digit will start to blink.
• Press S1/S11 to change the hour setting.
• Press S5 to change the MINUTE. Minute digits will start to blink.
• Press S1/S11 to change the minute setting.
• Press S5 to go back to START TIME setting screen.
• Press S1/S11 to set the END TIME. Hour digit will start to blink.
Note: Follow the procedure in setting the START TIME.
• Press S7 to exit to NIGHT ON setting screen.
Night mode settings:
• 10 SECONDS – Press S11 will turn ON the Light for 10 seconds.
• 20 SECONDS – Press S11 will turn ON the Light for 20 seconds.
• NIGHT ON – Light will continuously ON when CHRONO is running in preset duration
time (5:00 pm to 7:00 am). Start and End time can also be manually set to different
times.
RDY14
Page 6

How to set the LCD display CONTRAST:
• Press S5 while CONTRAST is blinking. Contrast percentage will start to blink.
• Press S1/S11 to change to your desired value. LCD Contrast range is from 10 to
100%.
• Press S5/S7 to confirm
• Press S7 to exit CONTRAST setting screen.
Soleus Pulse HRM
Contrast range: 10 to 100%
How to set the CHIME:
• Press S5while CHIME is blinking. The watch will display CHIME ON.
• Press S1/S11 to change to CHIME OFF or OFF.
• Press S5/S7 to confirm
• Press S7 to exit Chime setting screen
When Chime is ON, there is an hourly chime.
How to set the GOAL CALORIE:
• Press S5 while GOAL CAL is blinking. MALE will start to blink.
• Press S1/S11 to change the gender.
• Press S5/S7 to confirm and set the AGE. Age digits will start to blink.
• Press S1/S11 to change the age digits.
• Press S5/S7 to confirm and set the WEIGHT. Weight digits will start to blink.
• Press S1/S11 to change the weight digits.
• Press S5/S7 to confirm and set the HEIGHT. Height digits will start to blink.
• Press
• Press S5/S7 to confirm and set the GOAL CAL. The 1st digit will start to blink.
• Press S5 to confirm and go back to 1
• Press S7 to exit.
S1/S11 to change the height digits.
(2nd digit up to the last digit blinks as you press S5).
st
setting screen of GOAL CAL.
12) How to enter EXERCISE mode
• Press S7 from any TIME mode screens to enter EXERCISE mode.
• The watch will display EXERCISE, then the remaining Battery level, and the
remaining Memory, and then display the first screen of Exercise mode.
13) How to Calibrate (Stride calculation) in Exercise mode
• Press S7 to go to Exercise mode.
• Press S5 until you reach the “HRM/ DISTANCE/ CHRONO” screen.
• Press S1 to start and while the CHRONO is running (Walk at least 100 meters).
You cannot enter calibration mode if your distance is less than 100 meters.
• Press S1 to stop.
• Press S11 to enter calibration mode.
• Press S1/S11 to change the distance to the correct value- the actual distance
you have traveled.
• Press S
• Press S7 and the watch will display “CALIB DIS OK” (Calibration distance is Ok)
5 to confirm.
RDY14
Page 7

Soleus Pulse HRM
14) How to change views in EXERCISE mode
• Press S5 to change the information displayed in Line 1. Following are the
information you can select from to display in Line 1: HRM, CAL (Calorie), PACE,
SPEED, STEP, CAL/HR (Calorie/Hour), CLOCK, CHRONO, and DIST
(Distance0.
15) How to view the DATA
• Press S7 to go to DATA mode.
• Press S1/S11 to select between EXER (exercise) data and DAILY data or select
between Daily Data and Weekly Data.
• Press S5 to enter.
Follow the function flow as shown.
Notes:
• Line 2 and line 3 information can be set in SET mode / VIEW.
• The watch will remember the last view you have selected and display it first
the next time you enter HRM mode, Exercise mode and Timer mode.
RDY14
Page 8

Soleus Pulse HRM
16) How to enter Alarm mode
Press S7 from DATA mode to enter ALARM mode. The watch will display the alarm view.
The watch has five alarms that can be set individually.
• Press S5 to view Alarm 1 to Alarm 5.
• Press S1 to turn ON or OFF the selected alarm.
Alarm will sound for 20 seconds during alarm time. Pressing any button will stop the
sound without the button function.
Setting ALARM in ALARM mode:
• Press and hold S11 and the watch will display HOLD TO SET.
blink.
• Press S1/S11 to toggle through Alarm 1 to alarm 5. The watch has 5 alarms
which can be set individually
• Press S5 to set the selected Alarm number. The HOUR digit will start to blink.
• Press S1/S11 to change the hour digit.
• Press S5 to confirm and set the MINUTE digit. The minute digit starts to blink.
• Press S1/S11 to change the minute digit.
• Press S5 to confirm and set the T1 or T2 setting. T1 or T2 starts to blin
alarm time will be referred to Time 1 or Time 2.
• Press S5 to confirm. Daily Alarm ON or OFF will start to blink.
• Press S1/S11 to change ON or OFF.
• Press S5 to confirm to go to next setting (MON – SUN). Same setting procedure
above.
• Press S7 to exit.
AL-1 will start to
k. The
17) How to enter Set mode
Press S7 from ALARM mode to SET mode. 1.5 seconds later the watch will display the
setting options. The ff. sequence are as follows; AUTO LAP, TIME, UNIT, USER, HRM,
NIGHT, CONTRAST, CHIME, ALARM, TIMER, VIEW and GOAL CALORIE.
• Press S1/S11 to toggle trough these parameter.
• Press S5 to enter selected parameter to set.
• Press S1/S11 to change values.
• Press S7 to exit setting to Time mode.
Setting the Auto Lap:
• While AUTO LAP is blinki
• Press S1/S11 to change values. Preset range for auto lap is 0.4, 1, 2, 3, 4, 5
KM. Default value is 1 KM,
• Press S5 to confirm setting and exit to AUTO LAP setting screen.
SETTING THE TIME:
TIME 1/ TIME 2 setting
• Press S5 while TIME is blinking. The watch will display T1 or T2.
• Press S1/S11 to choose between T1 or T2 to set.
• Press S5 to set the selected time (T1 or T2). The HOUR blinks.
o Set the HOUR by pressing S1 or S11 and press S5 to enter.
o Set the Minute by pressing S1 or S11 and press S5 to enter.
o Set the SECOND by pressing S1 or S11 and press S5 to enter.
o Set the YEAR by pressing S1 or S11 and press S5 to enter.
o Set the MONTH by pressing S1 or S11 and press S5 to enter.
o Set the DAY by pressing S1 or S11 and press S5 to enter.
o Set the 12/24H by pressing S1 or S11 and press S5 to enter.
o Set the Month/Date of Date/Month format by pressing S1 or S11 and press S5
to enter.
o Press S7 to exit.
ng, Press S5 to set. “1 KM” will start to blink
RDY14
Page 9

Setting the UNIT:
• Press S5 while UNIT is blinking. KM or MI will start to blink.
• Press S1/S11 to change the value.
• Press S5/S7 to confirm and the watch will go back to UNIT setting screen.
Setting the USER’s information:
• Press S5 while USER is blinking. MALE or FEMALE will start to blink.
• Press S1/S11 to change the gender.
• Press S5/S7 to set the AGE. Age digits will start to blink.
• Press S1/S11 to change the age digits.
• Press S5 to set the WEIGHT. Weight digits will start to blink.
• Press S1/S11 to change the weight digits.
• Press S5 to set the HEIGHT. Height digits will start to blink.
• Press S1/S11 to change the height digits.
• Press S5/S7
to confirm and the watch will go back to USER setting screen.
Soleus Pulse HRM
Setting HRM:
• Press S5 while HRM is blinking. ZONE 1 will start to blink.
• Press S1/S11 to change the zone. There are 3 preset zones
• Press S5/S7 and the watch will display the LOWER limits of the selected zone.
LOW limit digit will start to blink.
• Press S1/S11 to change the low limit value.
• Press S5 to confirm. High limit digit will start to blink.
• Press S1/S11 to change the high limit value.
• Press S5 to confirm. The watch will display ZONE ALERT ON or OFF.
Press S1/S11 to change ON to OFF or vice versa
•
• Press S5/S7 to confirm and the watch will go back to HRM setting screen.
Setting the NIGHT mode:
• Press S5 while NIGHT is blinking. 10 sec will start to blink.
• Press S1/S11 to change to 20 sec or NIGHT ON.
• While on 10 SEC or 20 SEC setting, Press S5 to accept the setting and go back to
NIGHT setting screen.
• Press S5 to set the START and END time for continuous light ON. NIGHT START
TIME will start to blink.
• Press S1/S11 to change to NIGHT START TIME. 3 seconds auto or press S5, the
HOUR digit will start to blink.
• Press S1/S11 to change the
• Press S5 to change the MINUTE. Minute digits will start to blink.
• Press S1/S11 to change the minute setting.
• Press S5 to go back to NIGHT setting screen.
Light conditions for the various night mode settings:
10 SECONDS – Press S11 will turn ON the Light for 10 seconds.
20 SECONDS – Press S11 will turn ON the Light for 20 seconds.
NIGHT ON – Light will continuously ON when CHRONO is running within the preset
duration time (5:00 pm to 7:00 am). However, the User can opt t
time (Start time and End time).
hour setting.
o manually set the Night
RDY14
Page 10

Setting the CONTRAST (LCD contrast):
• Press S5 while CONTRAST is blinking. 50% will start to blink.
• Press S1/S11 to change to your desired value. LCD Contrast range is from 10 to
100%.
• Press S5/S7 to exit to CONTRAST setting screen
Setting the Chime:
• Press S5 while CHIME is blinking. The watch will display CHIME ON.
• Press S1/S11 to change to CHIME OFF or CHIME ON
• Press S5/S7 to confirm and exit to CHIME setting screen
Soleus Pulse HRM
Setting ALARM:
• Press S5 while “ALRM” is blinking. AL-1 will start to blink.
• Press S1/S11 to toggle through Alarm 1 to alarm 5. The watch has 5 alarms which
can be set individually
• Press S5 to set the selected Alar
• Press S1/S11 to change the hour digit.
• Press S5 to confirm and set the MINUTE digit. The minute digit starts to blink.
• Press S1/S11 to change the minute digit.
• Press S5 to confirm and set the T1 or T2 setting. T1 or T2 starts to blink. The
alarm time will be referred to Time 1 or Time 2.
• Press S5 to confirm. Alarm ON or OFF will start to blink.
• Press S1/S11 to change the setting.
• Press S5 to confirm and go back to ala
• Press S7 to exit to ALARM setting screen.
Setting TIMER:
• Press S5 while “TMR” (TIMER) is blinking. The segment number will start to blink.
• Press S1/S11 to change the segment number
• Press S5 to set the HOUR. The hour digit starts to blink.
• Press S1/S11 to change the digits
• Press S5 to set the MINUTE. The minute digit starts to blink.
• Press S1/S11 to change the digits
• Press S5 to set the SECONDS. The second digit starts to blink.
• Press S1/S11 to zero the digits. If the value
be added to the minute digits
• Press S5 to set the Timer alert ON or OFF.
• Press S1/S11 to change setting
• Press S5/S7 to confirm
m number. The HOUR digit will start to blink.
rm setting screen
is more than 30 seconds, 1 minute will
Note: When Chime is ON, there is an hourly Chime and the Key tone will automatically
ON. There is also a confirmation sound every time you press a button. The Chime icon
also appears in all modes. If Chime is OFF the Key tone will automatically OFF.
RDY14
Page 11

Soleus Pulse HRM
Setting the VIEW:
• Press S5 while VIEW is blinking. The watch will display VIEW/DIST/ CHRONO.
CHRONO is blinking in line 3.
• Press S1/S11 to change the information in line 3. You can select CHRONO,
Distance, HRM, CAL (Calorie), Pace, Speed, Step, Cal/Hr (Calorie/hour), Clock
and ODO (Odometer).
• Press S5 to enter. Line 2 will start to blink.
• Press S1/S11 to change the information displayed in Line 2. You can select
CHRONO, Distance, HRM, CAL (Calorie), Pace, Speed, Step, Cal/Hr
(Calorie/
• Press S7 to exit.
Setting the GOAL CAL (Goal Calorie):
• Press S5 while GOAL CAL is blinking. MALE will start to blink.
• Press S1/S11 to change the gender.
• Press S5/S7 to confirm and set the AGE. Age digits will start to blink.
• Press S1/S11 to change the age digits.
• Press S5/S7 to confirm and set the WEIGHT. Weight digits will start to blink.
• Press S1/S11 to change the weight digits.
• Press S5/S7 to confirm and set the HEIGHT. Height digits will start to blink.
• Press S1/S11 to change the heig
• Press S5/S7 to confirm and set the GOAL CAL. The 1st digit will start to blink.
• Press S5 to confirm and go back to 1
• Press S7 to exit.
hour), Clock and ODO (Odometer).
ht digits.
(2nd digit up to the last digit blinks as you press S5).
st
setting screen of GOAL CAL.
Help Functions:
• If the Heart rate data displayed in the watch is not stable or erratic, try to move
the watch along your forearm within the best wearing position as illustrated in
page 1.
• Fasten the watch snugly so that the optical sensor makes a tight contact with
your skin. The tighter you can wear the watch the better.
• Your skin should be no SCARS or any other object in your skin that will interfere
with the sensor.
• The heart rate is ta
very important that there are no obstructions that will interfere with the
transmission of the Heart rate data.
• Try to wear the watch on your other wrist.
Charge Battery:
When the power is low (battery icon blinks), it is time to charge the battery of your watch.
The watch can be charged using the USB port and it takes about 4-5 hours to fully
charge the battery. Plea
Once fully charged, the battery icon will stop blinking and turns to solid.
Battery life:
When the battery is fully charged, your watch can be used up to 20 hours of activities but
this will vary depending on Customer’s usage. Like for an instance, using the backlight
more frequently or all the time, the battery is used more quickly.
Battery Replacement
The battery on this device is not User replaceable and it is highly recommended by an
authorized service personnel only.
ken directly through your skin to the watch sensor, so it is
se charge the device before using and never to hit empty.
Water Resistant:
The watch can withstand up to 3ATM.
Water damage may occur if the buttons are pressed underwater.
RDY14
 Loading...