

Page 1
TBOS-II™ FIELD TRANSMITTER
DRAFT
Field transmitter (Radio/IR compatible)
868 (EU, South Africa)
915 (US, Canada, Mexico, Australia)
Page 2

STATEMENT
RF EXPOSURE
This device complies with FCC RF and Industry Canada
radiation exposure limits set forth for general population.
This device must be installed to provide a separation distance
of at least 20cm from all persons and must not be co-located
or operating in conjunction with any other antenna or
transmitter.
FCC STATEMENT
The user’s manual or instruction manual for an intentional or
unintentional radiator shall caution the user that changes or
modifications not expressly approved by the party responsible
for compliance could void the user's authority to operate the
equipment.
NOTE: This equipment has been tested and found to comply
with the limits for a Class B digital device, pursuant to part 15
of the FCC Rules.
These limits are designed to provide reasonable protection
against harmful interference in a residential installation.
This equipment generates, uses and can radiate radio
frequency energy and, if not installed and used in accordance
with the instruction, may cause harmful interference to radio
communications.
However, there is no guarantee that interference will not occur
in a particular installation. If this equipment does cause harmful
interference to radio or television reception which can be
determined by turning the equipment off and on, the user is
encouraged to try to correct interference by one or more of the
following measures:
- Reorient or relocate the receiving antenna.
- Increase the separation between the equipment and receiver.
- Connect the equip ment into an outlet on circuit different from
that to which the receiver is connected.
- Consult the dealer or an experienced radio/TV technician for
help.
NOTICE CONSOLE TBOS-II
IC STATEMENT
RSS Gen / Transmitter Antenna.
Under Industry Canada regulations, this radio transmitter may
only operate using an antenna of a type and maximum (or
lesser) gain approved for the transmitter by Industry Canada.
To reduce potential radio interference to other users, the
antenna type and its gain should be so chosen that the
equivalent isotropically radiated power (e.i.r.p.) is not more
than that necessary for successful communication.
Conformément à la réglementation d'Industrie Canada, le
présent émetteur radio peut fonctionner avec une antenne
d'un type et d'un gain maximal (ou inférieur) approuvé pour
l'émetteur par Industrie Canada.
Dans le but de réduire les risques de brouillage radioélectrique
à l'intention des autres utilisateurs, il faut choisir le type
d'antenne et son gain de sorte que la puissance isotrope
rayonnée équivalente (p.i.r.e.) ne dépasse pas l'intensité
nécessaire à l'établissement d'une communication
satisfaisante.
RSS Gen / User Manual Notice for Licence-Exempt Ra dio
Apparatus.
This device complies with Industry Canada licence-exempt
RSS standard(s).
Operation is subject to the following two conditions:
(1) this device may not cause interference, and
(2) this device must accept any interference, including
interference that may cause undesired operation of the device.
Le présent appareil est conforme aux CNR d'Industrie Canada
applicables aux appareils radio exempts de licence.
L'exploitation est autorisée aux deux conditions suivantes :
(1) l'appareil ne doit pas produire de brouillage, et
(2) l'utilisateur de l'appareil doit accepter tout brouillage
radioélectrique subi, même si le brouillage e st susceptible d'en
compromettre le fonctionnement.
Normes CEM (radio)
TM
CANADA
- RSS-210 Issue 7- Jun 2007
- RSS-Gen Issue 2- Jun 2007
FCC
- FCC Part 15, Subpart C 15.247
- ANSI C63.4 (2009)"
SOLEM ©
2
Page 3

Table of Contents
A – PRESENTATION OF THE TBOS-II™
RADIO SYSTEM
The TBOS-II™ system
Description of the system
New features of the TBOS-II™ system
- General menu of the TBOS-II™ eld transmitter
- Interactions between the TBOS-II™ eld transmitter
and the TBOS-II™ control modules
Presentation of the TBOS-II™ eld transmitter
- The keypad
......................................................................................................................3
...................................................................................................................3
................................................................................................4
.......................................................4
....................5
Manual actions
....................................................................................................................................12
- Stopping watering
- Starting a channel manually
- Running a program manually
- Testing watering on all channels
- Rain Delay ON/OFF position
- Saving the general program in the TBOS-II™
eld transmitter
- Saving the program in the TBOS™ control module
- Customising channel and control module names
B – FIELD TRANSMITTER START-UP /
CONFIGURATION
Charging the battery
Field transmitter conguration
...............................................................................................................6
..................................................................................................................6
............................................................................6
- Date and time settings
- Setting texts
- Setting console name
- Language selection
- Setting screen lighting time
- Displaying transmitter data
C – USING THE FIELD TRANSMITTER VIA
INFRARED (I.R.)
Programming the TBOS-II™ eld transmitter
........................................................................................................................8
..........................8
- Creating Irrigation Schedules
Watering days
Start times
Watering run time
- Transmission of date, time and program
- Programming the Water budget
- Deleting irrigation schedules
- Reading irrigation schedules
- Transmitting an irrigation schedule to a TBOS™/TBOS-II™
control module
D – USING THE TBOS-II™ FIELD TRANSMITTER
VIA RADIO
Radio tagging of TBOS-II™ products
Special tagging of old TBOS™ products
...................................................................................................................................16
......................................................16
..........................................17
Changing the network number of TBOS-II™
products
............................................................................................................................................................17
Automatic radio search of existing TBOS™
control modules
Receiving a program via radio
Transmitting a program by radio
................................................................................................................................18
...........................................................................18
.................................................................19
2
Page 4
INTRODUCTION
RAIN BIRD thanks you for having purchased a TBOS-II™ series eld transmitter.
This new transmitter is universal and is compatible with the entire TBOS™ range (old and new generation).
Adding a radio interface unit enhances the programming of the old generation TBOS™ modules.
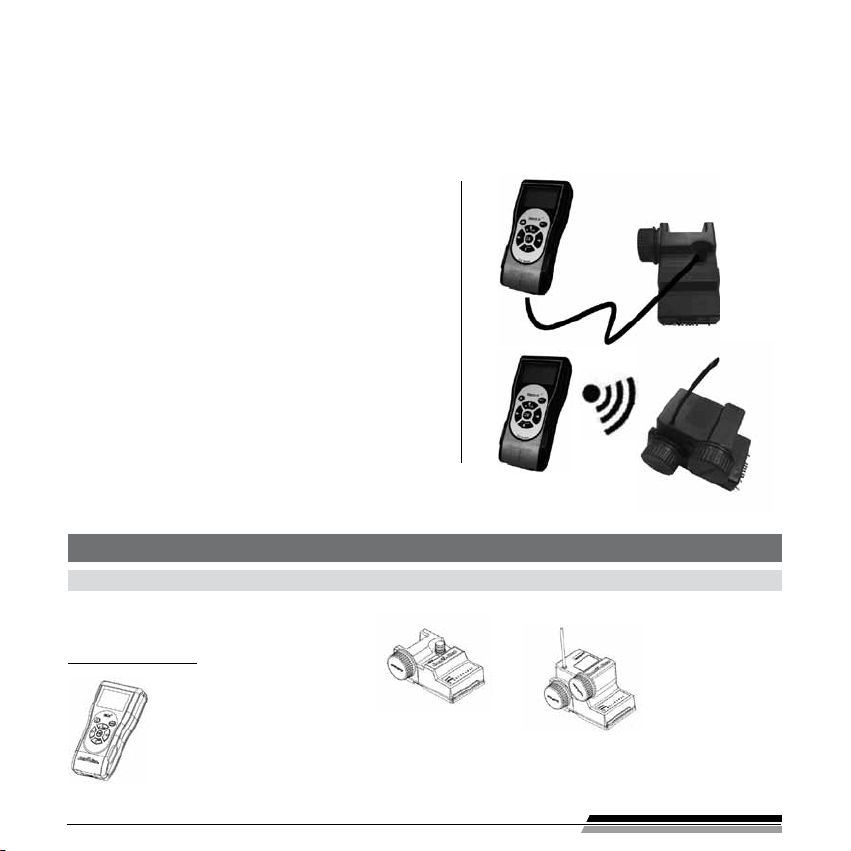
Once the program data has been entered into the eld transmitter, it could be sent in one of two ways:
- Via an infrared connection, using the cord supplied with
the transmitter.
- Via a radio connection, using the TBOS-II™ radio adaptor
that attaches to the control module.
This dual radio/Infrared communication option allows
continued transmission in the event of disruption to the
radio system (bad weather, low batteries in the radio module,
etc...)
The new programming module also includes new features
that will provide additional benets for the management of
your TBOS™ and/or TBOS-II™ modules.
* except VRM1 and FS1
The information contained in this document is purely indicative. It may be changed without notice and does not represent a commitment on the part
of RAIN BIRD.
A – PRESENTATION OF THE TBOS-II™ RADIO SYSTEM
1. The TBOS-II™ system
The new generation system works with products using the 868MHz (EU, South Africa) or 915 MHz (US, Canada,
Mexico, Australia) frequency band.
System composition:
• A universal FIELD TRANSMITTER
(FT) that serves to congure
your irrigation programs and
transfer them via infrared
or radio connection to the
TBOS™ and/or TBOS-II™ control
modules.
• One (or more) TBOS™/
TBOS-II™ CONTROL
MODULE(S) installed
underground, in valve
box.
• a TBOS-II™ RADIO
INTERFACE UNIT for
radio reception of
data, installed underground, in valve box.
3
Page 5
2. Description of the system
Old TBOS system
Old eld transmitter
TBOS™ control module
TBOS™ module
Latching solenoid
New TBOS-II system
New eld transmitter
TBOS-II™ (FT)
TBOS™ / TBOS-II™
Control Module
1 to 6 stations
3. New features of the TBOS-II™ system
The TBOS-II™ eld transmitter (FT)
• Powered by rechargeable NiMH batteries (charger
provided)
• Back-lit dot-matrix display
• Scrolling menus with reverse video
• Transmitter name customisation
Field transmitter (FT) <- > TBOS™/TBOS-II™ interactions
Rain Delay (1 to 31 for TBOS-II™ model and 1 to 6 for model TBOS™)
•
• Check program
• Day setting OFF
• Water budget (per program A/B/C or per month)
• 3 saved programs
• Reading of irrigation program
Radio module
When tted with a TBOS-II™
radio adaptor, an old
TBOS™ module will have
Radio Adaptor
TBOS-II™
additional functions.
• Language selection
• Miscellaneous display settings
• Storage of 3 saved programs in the in the eld
transmitter once connected to the TBOS
•
Consultation and modication of the following parameters:
™
controller
− TBOS™ module name − Station run times
− Station names − Assignment of a station to
− Manual actions one or more programs
− Programming cycle − Water budget by program
− Start Times
4
Page 6

4. Presentation of the TBOS-II™ eld transmitter
Radio
Backlit dot matrix
7-key
keypad
2 AAA rechargeable
NiMh batteries in
the back
Built-in infrared cord
• Size 160*70
• Thickness 30 mm
• Dark grey ABS housing (P430)
• Waterproof 7-key keypad
• UV-resistant plastic
• Operating temperature: between -10° and +65° C
• Allowable air humidity: 95% max (de 4°C to 49°C)
• Storage temperature: - 40°C to + 66°C
• Portable infrared cord
• Backlit monochrome LCD display (128 x 64 pixel)
• Rechargeable (NiMh 750mAh 2.2V). Battery pack +
charger
• Internal radio antenna
• Sealed (Class IP44)
Details of keypad
Main menu
+/ON/
Scroll upwards through the menus
Increase the numerical value (or higher value) in data
input mode
Conrm watering day ON or station ON
ABC
Navigation between programs A/B and C
Key enabled whenever ABC are ashing in reverse video
Scroll to the right through the menus
Conrm input
OK
Conrm input
Enables/disables input on certain screens
-/OFF/
Scroll downward through menus
Conrm “OFF“
Decrease the numerical value
Scroll to the right through the menus
5
Page 7
B – FIELD TRANSMITTER START-UP / CONFIGURATION
1. Charging the battery
When using the eld transmitter for the 1st time, or when changing the batteries, it will be
necessary to set the time and the date of the transmitter (see next paragraph “2/ Field
transmitter conguration – Date and time settings“)
The eld transmitter must be charged for at least 10 hours before it is rst used.
When connected to the charger, the screen will light and display the default time of «00 : 00».
The batteries will begin charging. The battery charge symbol will appear on the screen.
The battery life depends on the daily use made of the eld transmitter and the backlight on time setting.
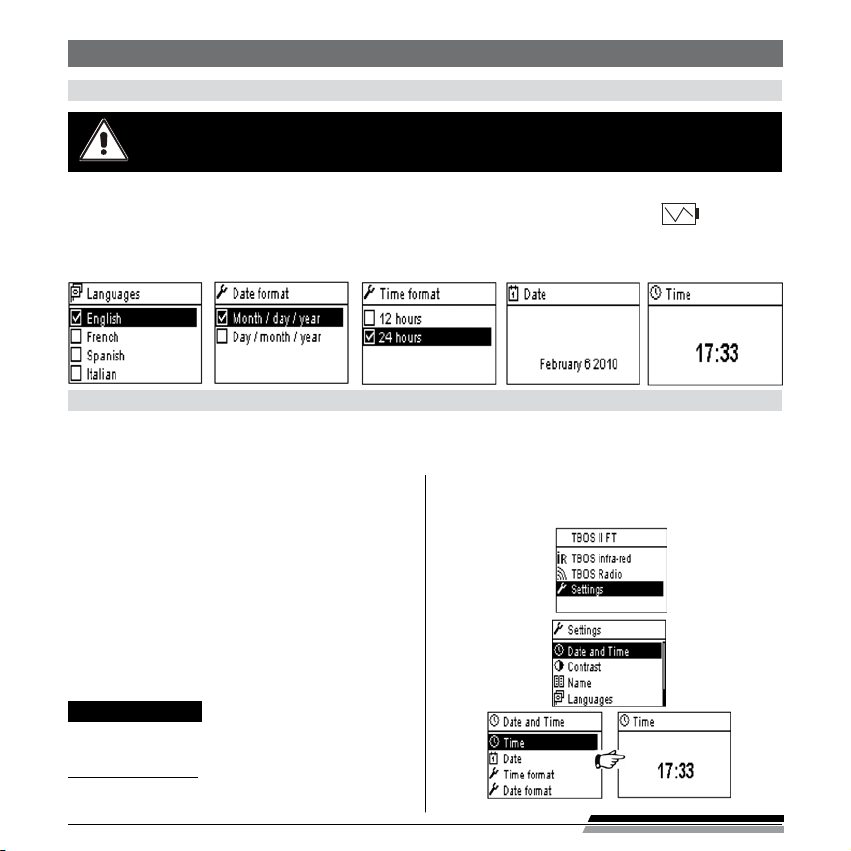
When connecting for the rst time, please set the following:
2. Field transmitter conguration
Once the eld transmitter is charged, you can make initial setting adjustments, namely:
- Date and time settings,
- Contrast adjustment,
- Setting the name of the eld transmitter,
- Language selection,
- Screen lighting time adjustment,
- Field transmitter information display.
All of these settings are made via the ‘‘Parameters“,
menu that can be accessed from the eld terminal’s
welcome screen, by performing the following steps:
Press any key to turn on the eld transmitter and
display the welcome menu.
Press OK, or, select ‘‘Parameters“ with the OFF
key and conrm by pressing OK.
The dierent parameters will then be displayed on
the screen. Simply select the parameter your choice.
Setting Time/Date
Select “Date and Time“ from the ‘‘Parameters“
menu and conrm by pressing OK.
Changing the time:
- Select “Time“ + press OK.
- Move from hours to minutes by pressing.
6
Page 8

- Increase or decrease the hours or minutes using the
ON & OFF keys and conrm by pressing OK.
Changing Time Format:
- Select “Time Format“ + press OK.
- Select 12 or 24 hours.
Changing the date:
- Select “Date“ + press OK.
- Move from Day to Month to Year by pressing arrows.
- Increase or decrease each value using the ON OFF.
keys and conrm by pressing OK.
Changing date format:
- Select “Date Format“ + press OK.
- Select Mont/Day/year or Day/month/year.
Adjusting the contrast
Select “Contrast“, from the “Parameters“ menu
and conrm by pressing OK.
Set the contrast level using the ON OFF keys and
conrm by pressing OK.
Setting the console name (16 letters and numbers)
Select “Name“ from the “Parameters“ screen and
conrm by pressing OK.
- Move between the left-hand and right-hand letters
using arrows.
- Scroll through the characters using the ON & OFF
keys, and conrm by pressing OK.
The “Space“ character is situated after
the letter “Z“.
Field transmitter language selection
Select “Languages“ in the “Parameters“ screen
and conrm by pressing OK.
Then chose the desired language using the ON &
OFF keys, and conrm by pressing OK.
Proposed languages: French, English,
Spanish, Italian, Germany, Portuguese,
Greek and Turkish.
7
Page 9

Setting the screen lighting time
Select “Lighting time-out“ from the “Parameters“
screen and conrm by pressing OK.
Set the length of time using the ON OFF keys
and conrm by pressing OK.
Displaying eld transmitter data
Select “About“ from the “Parameters“ screen
and conrm by pressing OK.
The following information will then appear on
the screen:
- Field transmitter ID.
- The embedded software version.
C – USING THE FIELD TRANSMITTER via INFRARED (I.R.) CONNECTION
The eld transmitter is able to communicate via infrared with all types of old or new generation TBOS™ control modules.
Certain exclusive functions are only accessible when the eld transmitter is connected to a TBOS-II™ IR control module, i.e.:
- Water budget,
- Assignment of a station to several programs, each with a dierent time,
- Station test,
- 1 to 31 day cyclical irrigation schedules (1 to 6 days for the TBOS™ model),
- Customisation of TBOS-II™ module and its stations,
- Saving of program in the control module,
The eld transmitter can also add the “Rain Delay“ function to all TBOS™ control modules.
It has 6 memory storage areas that can store 6 dierent programs: 3 are dedicated to old model TBOS™ modules
and the 3 others to the TBOS-II™ modules. It also allows the deletion of the programs contained in any TBOS™
module (deletion of one or all programs, TBOS™ module reset).
1. Programming the TBOS-II™ eld transmitter
Before conguring the functions, connect the infrared cord supplied with your product.
Press any key to turn on the eld transmitter and
display the welcome menu.
Press the OK key, select “TBOS IR infrared“ by means
of the key and conrm by pressing OK in order to
read the program data contained in your TBOS™
eld transmitter. The reading of program data can
take between 2 and 12 seconds according to the
TBOS™ module version (old or new).
The rst infrared welcome screen indicates the
status of the various external items (TBOS™ module
sensor or battery), ON/OFF state, of the Water budget
or the watering operation in progress (TBOS-II™ only).
8
Page 10

The time displayed on this screen is that of the eld transmitter an not that of the TBOS™ controller.
It is therefore necessary to synchronise the 2 devices (see “Transmitting program date and time“).
Creating Irrigation Schedules
The eld transmitter contains 3 independent programs (A/B and C). Separate watering days, start times and watering run
times can be set for each program. Note: a station can be assigned to only one program, either A, B or C in the case of
an old generation TBOS™ eld transmitter, but to one or more programs in the case of the TBOS-II™ eld transmitter.
Then, select “Programs“ in the Infraredwelcome screen,
and conrm by pressing OK.
• Watering days
Select “Watering days“ and conrm by pressing OK.
You can then choose a specic watering cycle:
- Week (custom cycle)
- Even-numbered days
- Odd-numbered days
(if the last day of the month is an odd-numbered day,
watering will not be performed)
- Odd numbered days 31 (watering performed on last
day of the month, i.e. over 2 consecutive days with
the 1st day of the following month)
- Cyclical (every “X“ days)
If you select “Custom cycle“ (all days set to ON by default).
Select the desired program A, B or C in the ashing
box in the top left-hand corner of the screen using
the ABC key.
Using the ON & OFF keys, select the watering days in the
calendar per program and conrm by pressing OK.
If you choose “Cyclical“.
Select the watering cycle (1 to 6 days for the TBOS
to 31 days for the TBOS-II
ON OFF keys, and conrm by pressing OK.
Then, enter your watering cycle start date “dd/m/year“
using the ON OFF keys.
TM
controller only) using the
TM
/ 1
9
Page 11

• Start times
Select “Start times“ and conrm by pressing OK.
Select your program A, B or C in The box in the top
left-hand corner of the screen using the ABC key.
Set the hours and minutes for each start time (up to
8 start times per program) using the ON OFF keys,
and conrm by pressing OK.
When you exit this screen, the watering starts will
automatically be sorted in chronological order.
• Watering run time
Each station can be assigned to the 3 programs A, B
and C, with dierent times for each program (TBOS-II™
controllers only).
Then select “Programs“ from the Infrared welcome
menu and conrm by pressing OK.
Select “Valve run time“ and conrm by pressing OK.
Select the program A/B or C to be assigned to each
valve (1 to 6) using the ON OFF keys, then go to
hours and minutes by pressing arrows. Enable the
input with OK. Conrm by pressing OK.
Transmitting the time, date and program.
Press the centre key of the eld transmitter to return
to the Infrared welcome screen.
Select “Transmit“ and conrm by pressing.
If you wish to synchronise the time and the
date of the TBOS controller with that of the
eld transmitter, simply read the contents of
the TBOS module and make a transmission
without altering the program.
Water budget programming
You have the option of changing the watering time for
each one of the 3 programs A, B and C and for each station.
• Seasonal adjustment per program
Press the centre key of the eld transmitter to return
to the Infrared welcome screen.
Select “Water budget“ and conrm by pressing OK.
10
Page 12

Then select “per program“ and conrm by pressing OK.
Then choose to which of the programs A, B or C to assign the
water budget. Modify the permitted watering run times in 1%
increments (from 0 to 300%) and conrm by pressing OK.
By default:
100% = no change to watering run times
> 100% = increase of watering run times
< 100% = decrease of watering run times
• Seasonal adjustment per month
Select “per month“ and conrm by pressing OK.
Change the watering run times for each of the months by fractions and
conrm by pressing OK. Programs A, B and C will be aected.
Water budgets per program and per month are cumulative.
Example of water budget:
- A valve programmed with a time of 10 minutes on program A and 20
minutes on program B.
- A water budget set at 50% on program. A and 200% on program B.
- Un water budget set at 300% for the current month.
=> The effective watering run time will be 15 min (10 x 50% x 300% = 15)
on program A and 120 min (20 x 200% x 300% = 120) on program B.
The water budget does not apply to manual actions.
The maximum watering run time is 24 hours.
Deleting irrigation schedules
Select “Delete programs“ from the TBOS
IR welcome menu and conrm by pressing OK.
Then select the type of program to delete:
- Individual program to delete only one of the programs (A, B or C)
- All programs (A, B and C)
- Reset factory parameters ( TBOS name = ID, station names, Rain
Delay, programs A B C empty, etc.)
Conrm your choice by pressing OK.
A deletion conrmation message will be displayed once again.
Answer yes or no by pressing OK.
Reading irrigation schedules
Select “Check programs“ from the Welcome screen and conrm
by pressing OK.
Then select the desired display and conrm by pressing OK:
- Review programs that displays details of each of
the programs A, B and C + Rain Delay + Water budget per
month.
11
Page 13

- Program run times (programs A, B and C)
- Station run times (1 to 6)
Transmitting a watering program to the control
module
Once programs A, B and C have been set, they can be
sent via infrared to the connected TBOS control module.
Select “Transmit“ from the Welcome menu and
conrm by pressing OK.
The program to be downloaded will be displayed on
the screen. Conrm the transmission by pressing OK.
2 . Manual actions
Manual actions override other actions. Any program that is running will therefore be deactivated
to take account of the manual function.
Stop watering
Select “Manual watering“ in the TBOS IR welcome
screen and conrm by pressing OK.
Then, select the type of manual action to be performed:
- Stop watering
- Start a station
- Start a program A, B or C
- Perform a test on all stations.
Select the “Stop watering“ menu and conrm by
pressing OK to manually stop the watering operating
in progress.
12
Page 14

Starting a channel manually
Select “Start station“ and choose the station to be started by
means of ON OFF and conrm by pressing OK. Then, set the
manual watering run time and conrm by pressing OK to send
the data to the TBOS control module.
Watering will start after a manual time delay of 2 seconds.
Running a program manually
Select “Run program“ and choose one of the 3 programs A, B or C
to be started using the ON OFF keys and conrm by pressing OK.
Remember, a program consists of all stations operating in
sequence.
The program data is then transmitted to the TBOSTM control module.
Testing watering on all channels
Select “Test all stations“ and conrm by pressing.
Then, set the watering test run time (1 to 10 min) using the ON
OFF keys, and conrm by pressing OK to transmit the program
data to the control module.
Rain Delay ON/OFF position
The TBOS-II universal led transmitter has an “OFF“ function that
allows you to disable watering (e.g. when it rains) regardless of
programming. To re-enable watering, the default position is “ON“.
Select “ON/OFF“ from the Welcome menu and conrm
by pressing OK.
Then, select the time during which you wish to stop the program
(1 to 14 days or complete shut-down) and conrm by pressing OK.
13
Page 15

The data will then be immediately transmitted to the TBOSTM and is
totally independent of the programming.
If you select the “OFF“ option, watering will be automatically stopped until switched back on. To restart, perform
the same steps as above and select the “ON“ option.
Saving the general program in the TBOS-II™ eld transmitter
The new TBOS-II™ universal eld transmitter contains an internal memory that can store up to 3 dierent programs
(irrigation + names).
You can, for example, create 3 dierent programs covering specic seasons (Spring/ Summer/ Autumn) and save them
in the eld transmitter. This action allows you to save time, as they can be transmitted by a simple click at the time of
your choosing. The program of the control module must be read beforehand.
Select “Program memories“ from the TBOS™ IR welcome
screen and conrm by pressing OK.
Then, choose between two options: “Save“ the data in the eld
transmitter or “Restore“ the data.
The “Restore“ function allows you to delete all data
contained in the eld transmitter except for the time
and the date. “Restoration“ replaces the program
displayed on the eld transmitter. A transmission
must then be made to the control module.
Saving program data on the TBOS-IITM control module
The TBOS-II™ has memory for storing another program in addition
to its current program.
Select “Backup TBOS“ from the TBOS™ IR welcome menu and
conrm by pressing OK. The console can send a save instruction
to the TBOS™, which will then make a copy of its current
program in its backup memory.
Then choose “Save“ if you wish to save your program in the internal
memory of the control module. Conrm by pressing OK.
Choose “Manual recall“. Upon receiving this instruction, the TBOS™
immediately replaces its current program with the backup program.
14
Page 16

Choose “Automatic recall“ if you wish to program the ove-
rwriting programs already saved in the control module and
replace them with new ones (between 1 and 90 days).
Select your time period using the ON OFF keys and conrm by
pressing OK.
After the specied time period, the new program will be
automatically transmitted by the TBOS™ to the control module.
The control module will thus contain the “saved“ program
and the “active“ program. Both are stored in the memory
in case of a power failure.
Changing the names of the TBOS-II™ control modules and stations
The dierent control modules and watering stations can be individually named for ease of identication, and thus
simpler programming system operation.
Select “Names“ from the TBOS™ IR welcome menu and conrm
by pressing OK.
To name your control module, select “TBOS“ then enter the
characters using the ON OFF and arrows keys.
To name your various stations, select the station from the list and
enter the characters in the same way. (Ex: NORTH RAB for the
North round-a-bout.) Then conrm by pressing OK and move to
the next character.
15
Page 17

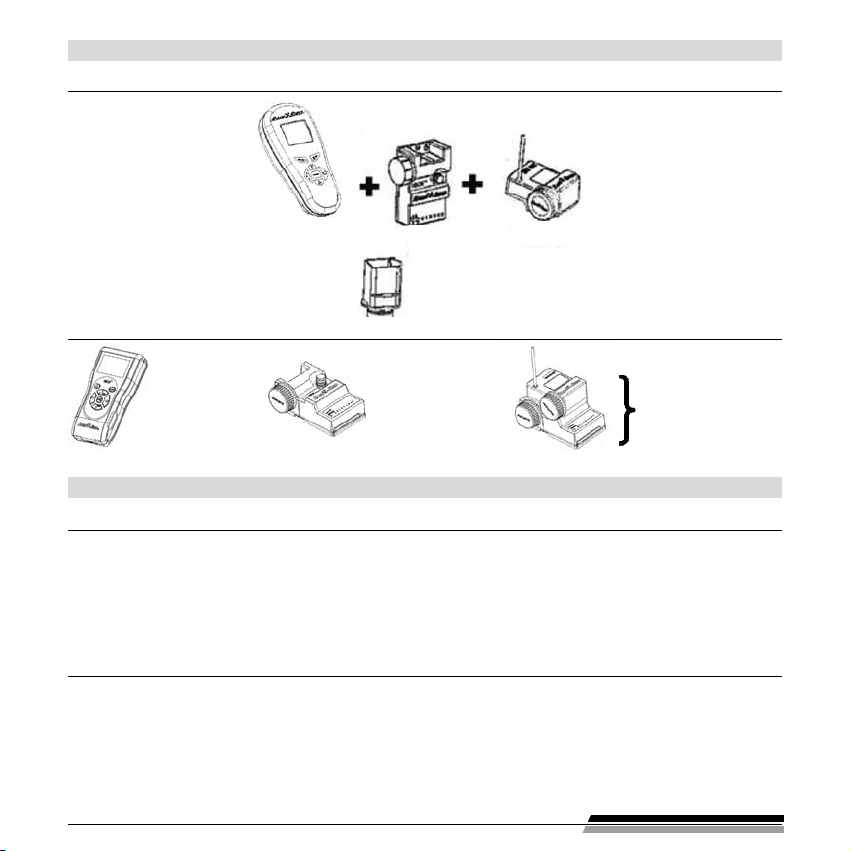
D – USING THE TBOS-II™ FIELD TRANSMITTER via RADIO
As indicated in the foreword, the addition of a radio interface unit enhances the programming of old generation
TBOS™ control modules and allows the transfer of programs by radio to the new TBOS-II™ control modules.
This simply requires the radio interface unit to be mounted on the old or new generation TBOS™ control module.
For information, the radio interface unit is compatible with the following old model TBOS™ control
modules:
- K80 120, K80 220, K80 420, K80 620 (Europe)
- K80 110, K80 210, K80 310, K80 410 (U.S)
TBOS-II™ control module
1, 2, 4, 6 (old generation)
TBOS-II™ Field
Transmitter
TBOS-II™ control module
1, 2, 4, 6
TBOS-II™ Field radio
interface
1. Radio tagging of TBOS-II™ products
Radio tagging consists in sending the network number of the TBOS-II™ eld transmitter to
the radio interface unit. The two radio products (TBOS-II™ eld transmitter and radio interface unit) must have the same network number in order to communicate with one another.
Radio tagging is performed only once in the lifetime of the product (the rst time it is
used after leaving the factory) or if the user moves a radio interface unit
from one site to another (E.g. site 1 with network number 0001,
site 2: 0002, etc.).
Press any key to turn on the eld transmitter and display the
welcome menu.
Press OK, select “TBOS Radio“ using the OFF key and conrm by
pressing OK.
The select “Radio tagging“ from the TBOS™ Radio menu.
A message will then appear on the screen.
Remove and reinsert the radio interface unit battery.
Conrm the radio tag on the TBOS-II™ eld transmitter within 20
seconds of reinserting the battery.
16
Page 18

If tagging has failed, the message “FAILURE CODE 1“ will be
displayed after a few seconds (1 indicating a radio error).
If tagging has been performed correctly, the message
“SUCCESS“ will be displayed on the screen, followed by the
unique identication code of the radio interface unit just
tagged (12 digits).
2. Special radio tagging procedure for old TBOS™ products
If the radio interface unit is attached to an old TBOS™ controller and the user performs radio tagging, the irrigation
program held in the old TBOS™ is automatically transferred to the radio interface unit that then becomes the
controller.
An empty program is then sent to the old TBOS™ control module that when only serves to control the solenoids.
If network tagging is subsequently performed again, it is an empty program that will be transferred, causing the loss of the interface unit’s program. To prevent this happening, you must remove
the radio interface unit from the old control module if you which to perform network tagging of a
module that has already been operated.
3. Changing the network number of TBOS-II™ products
Each TBOS-II™ eld transmitter and each radio interface unit is assigned a network number of “9999“ in the factory.
This user-modiable number is stored in the memory of the TBOS-II™ eld transmitter and the radio interface unit
even when switched o.
Press OK, select “TBOS Radio“ using the OFF + key and
conrm by pressing OK.
Then, select “Radio tagging“ from the TBOSTM radio menu.
A message will then appear on the screen.
Select “Network number“. A warning message will automatically
be displayed informing you of your action.
The default network number will be displayed (9999). Use the
ON OFF keys to change the numbers and arrows to move from
one number to another.
17
Page 19

4. Automatic radio search of existing TBOS™ control modules
This is an essential step for communicating by radio with all radio interface units mounted on a TBOS™ or TBOS-II™
control module. This search will automatically detect all nearby TBOS™ control modules; up to a limit of 32 products
(the rst 32 control modules detected will be listed).
Press any key to switch on the eld transmitter and display the
welcome menu.
Press OK, select “TBOS Radio“ using the OFF key and conrm by
pressing OK
Then, in the TBOS Radio II menu, select “TBOS nding“.
The “Finding… “ screen will be displayed for a minimum of 25 to 60
seconds according to the number of TBOS
Once TBOS™ module detection is completed the “TBOS list“ screen
is displayed, with the characteristics of each module:
TM
modules detected.
- TBOS module name (max. 12 characters).
- The battery charge level icon of the TBOS-II™ module.
- (0 to 3 bars) or the TBOS™ module (low battery.
- or no icon if the battery charge level is OK).
- Radio interface unit battery charge level icon (0 to 3 bars).
- Level of radio signal reception between the TBOS-II™ eld
transmitter and the radio interface unit.
This TBOS™ control module Radio search list is saved and
can subsequently be accessed via the“TBOS list“ menu in
the “TBOS Radio“ screen.
5. Receiving a program via radio
™
Select “TBOS list“ from the TBOS
conrm by pressing OK.
Once the list of TBOS™ modules is displayed on the screen, select
the chosen module using the OFF key and conrm by pressing OK.
A radio reception “Receiving...“ message is displayed, followed
by a summary of the TBOS™ module program.
Radio welcome menu and
18
Page 20

In the event of a radio communication problem, a reception
failure message will be displayed on the screen.
Repeat the operation.
Failure codes:
- Failure code 1: Radio communication problem Check the
radio interface battery.
- Failure code 2: Infrared communication problem Clean the
infrared part of the apparatus or check the TBOS™ controller
battery.
- Failure code 3: TBOS™ module type reading error
A radio interface unit has been placed on a TBOS™ controller
then moved onto a TBOS-II™ controller. This error will continue
to appear until the radio interface unit’s battery is changed.
- Failure code 4: Authentication problem.
Communication cannot be established between the items of
equipment. This authetication phase between the TBOS-II™ eld
transmitter and the radio interface unit/controller ensures that
only RAIN BIRD products can communicate with one another.
When the battery of a radio interface unit is changed,
the program requires to be sent again by radio. This
applies where the radio interface unit is tted on an
old model TBOS™ module.
6 . Transmitting a program by radio
This operation is performed in the same way as for a transmission via infrared.
Once the irrigation program has been changed, it can be transmitted by radio to
the TBOS™ controller of your choice.
Select “Transmit“ from the Welcome menu and conrm by
pressing OK.
If the program is incomplete, a check screen indicates the missing
elds.
19
Page 21

Rain Bird Europe SNC
900, rue Ampère, B.P. 72000
13792 Aix en Provence Cedex 3
FRANCE
Tel: (33) 4 42 24 44 61
Fax: (33) 4 42 24 24 72
rbe@rainbird.eu - www.rainbird.eu
Rain Bird France SNC
900, rue Ampère, B.P. 72000
13792 Aix en Provence Cedex 3
FRANCE
Tel: (33) 4 42 24 44 61
Fax: (33) 4 42 24 24 72
rbf@rainbird.eu - www.rainbird.fr
Rain Bird Sweden AB
Fleningevägen 315
254 77 Fleninge
SWEDEN
Tel: (46) 42 25 04 80
Fax : (46) 42 20 40 65
rbs@rainbird.eu - www.rainbird.se
Rain Bird Iberica S.A.
Polígono Ind. Pinares Llanos
c/ Carpinteros, 12, 2ºC
28670 Villaviciosa de Odón, Madrid
ESPAÑA
Tel: (34) 91 632 48 10
Fax: (34) 91 632 46 45
rbib@rainbird.eu - www.rainbird.es
portugal@rainbird.eu - www.rainbird.pt
® Registered Trademark of Rain Bird Corporation.
© 2011 Rain Bird Corporation. 03/11
Rain Bird Deutschland GmbH
Oberjesinger Str. 53
71083 Herrenberg-Kuppingen
DEUTSCHLAND
Tel: (49) 07032 99010
Fax: (49) 07032 9901 11
rbd@rainbird.eu - www.rainbird.de
www.rainbird.eu
Rain Bird Türkiye
İstiklal Mahallesi,
Alemdağ Caddesi, No.262
34760 Ümraniye İstanbul
TÜRKİYE
Tel: (90) 216 443 75 23
Fax: (90) 216 461 74 52
rbt@rainbird.eu - www.rainbird.com.tr
RBE-11-GE-06
 Loading...