

Page 1
INSTALLATION INSTRUCTIONS
FARMHOUSE FIRECLAY KITCHEN SINK
Page 2

CAUTION:
Risk of personal injury or product damage. Handle with care.
Product can break, chip, cause injury or product damage.
CAUTION
WARNING:
This product can expose you to chemicals, including lead, which is
known to the state of California to cause cancer and birth defects or
other reproductive harm.
For more information go to
p65warnings.ca.gov
IMPORTANT INFORMATION
Read these instructions carefully before you begin this installation.
Observe all applicable local plumbing and building codes.
Soleil Sinks recommends all sinks are installed by experienced and professional installers. To ensure safety and
damage-free installation, this sink should be installed by two people. Soleil Sinks reserves the right to revise the
design of products without notice.
BEFORE YOU BEGIN
Before installation, inspect the sink for damage. Soleil Sinks is not responsible for sink damage or any other
damage during the installation.
A custom countertop, sink base cabinet and support framing is required for proper installation. Fireclay sinks
should only be installed with a solid surface countertop (i.e., granite, Corian® or Silestone®).
The cabinet must be installed, secured, plumb, and level. Ensure the support frame fasteners are long enough
to secure the support framing but short enough not to go through the walls of adjacent cabinets. Failure of this
step can lead to product damage.
Due to the dimensional variation from the fireclay manufacturing process, Soleil Sinks does not offer the cutout
template for fireclay sinks. Soleil Sinks recommends providing the actual sink to the cabinet maker or any other
contractor involved in the project. It is critical that the carpenter, tiler, and plumber coordinate the requirements
of the project. Soleil Sinks is not responsible for improper installations.
Shut off the hot and cold water supplies. Inspect the drain, supply tubing, and faucets. Replace if necessary.
Due to the variety of installations possible with this sink, you may use procedures other than those described in
these instructions.
Page 3
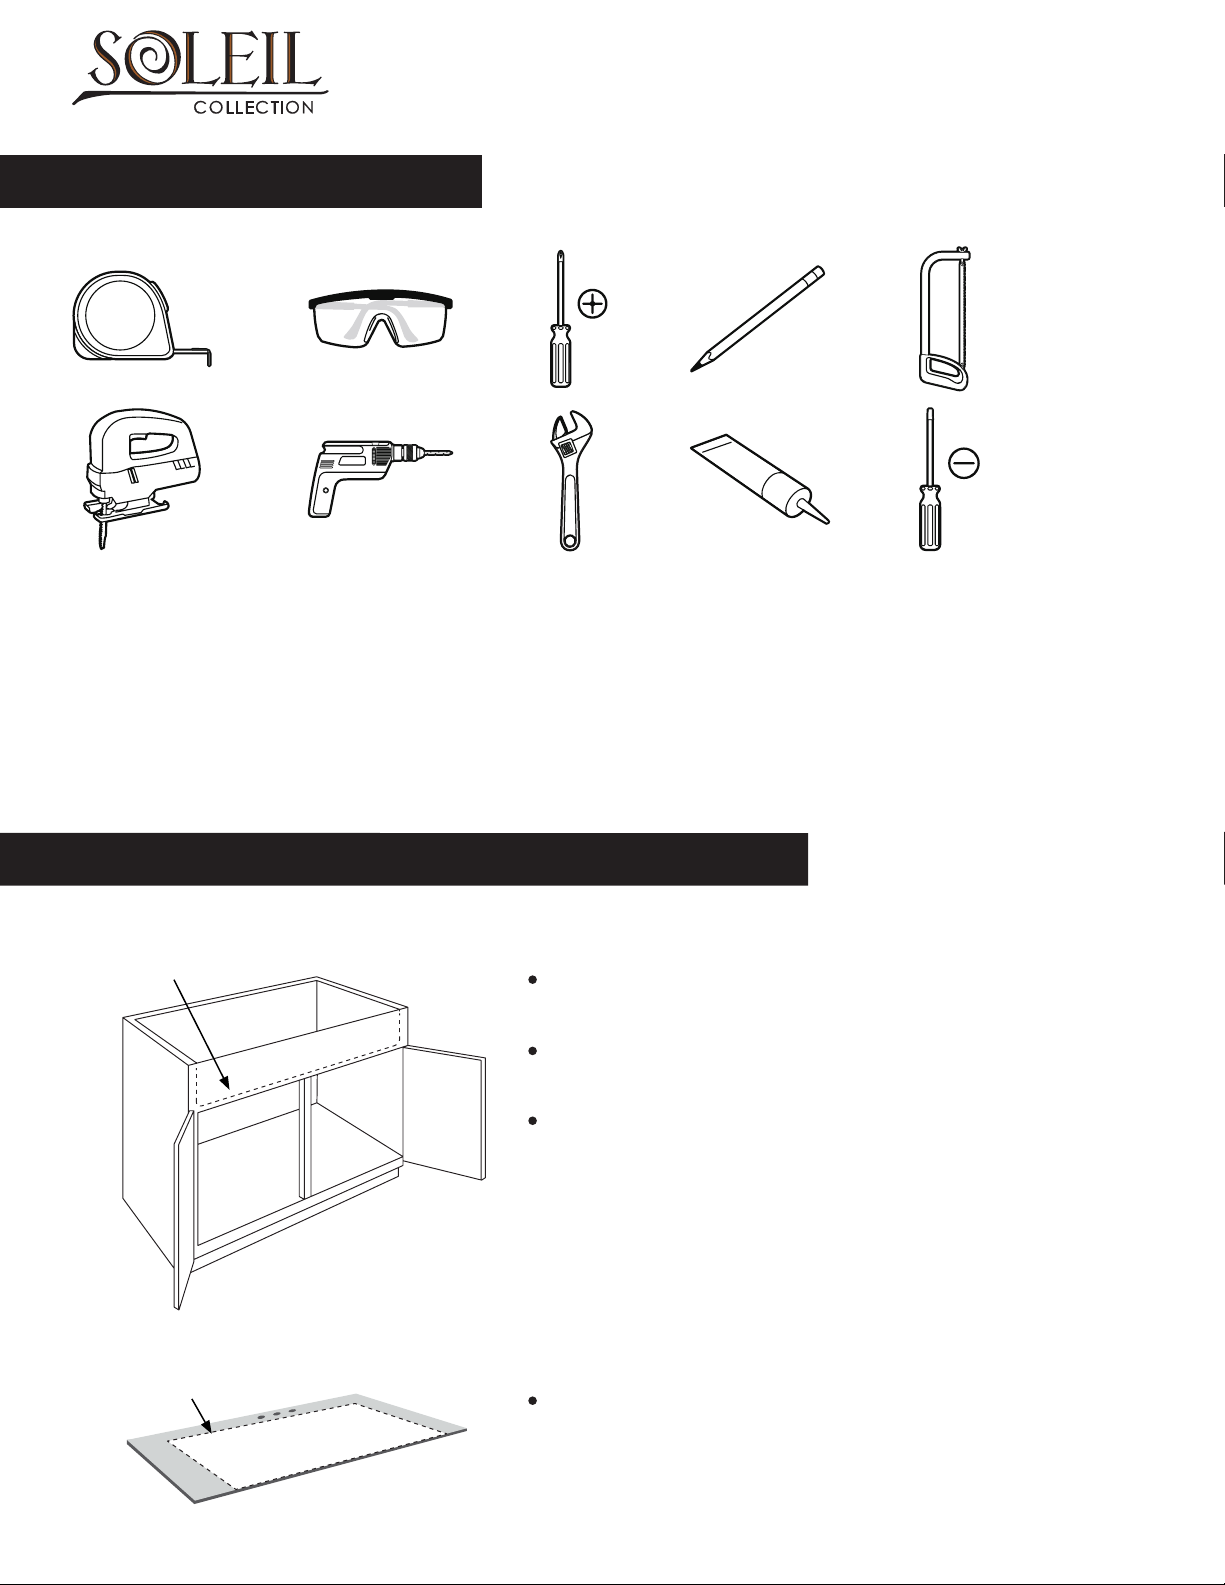
RECOMMENDED TOOLS
□ Tape Measure
□ Safety Glasses
□ Painter’s Tape
□ Level
□ Ear Protecon
□ Hacksaw/Jigsaw
□ Pencil (Not permanent marker)
□ Shims or Cabinet Fillers
□ Denatured Alcohol
□ Clamps
□ Construcon Adhesive
□ Silicone Adhesive Sealant
□ Support Framing Material (1 ¼” (32mm) Max Thickness)
□ Screws (recommended by countertop manufacturer)
FIRECLAY SINK INSTALLATION INSTRUCTIONS
STEP1: BASE CABINET PREPARATION
Outline for Apron Front Sink Cutout
Measure the size of the sink, including the front apron. Cut the face of the
cabinet to allow the sink to slide in.
Use painter’s tape for marking and cutting purpose to protect the cabinet
and sink from damage.
IMPORTANT:
process, Soleil Sinks does not offer the cutout template for fireclay sinks.
It is essential that prior to installation, you discuss with your installer and
agree on the final appearance. Cabinet should NOT be cut or fabricated
without the sink.
Due to the dimensional variation from the fireclay manufacturing
STEP2: COUNTERTOP PREPARATION
Outline for Apron Front Sink Cutout
Measure the size of the sink, including the front apron. Cut the countertop
to allow the sink to slide in.
Page 4
STEP3: CABINET/SUPOORT FRAME CONSTRUCTION
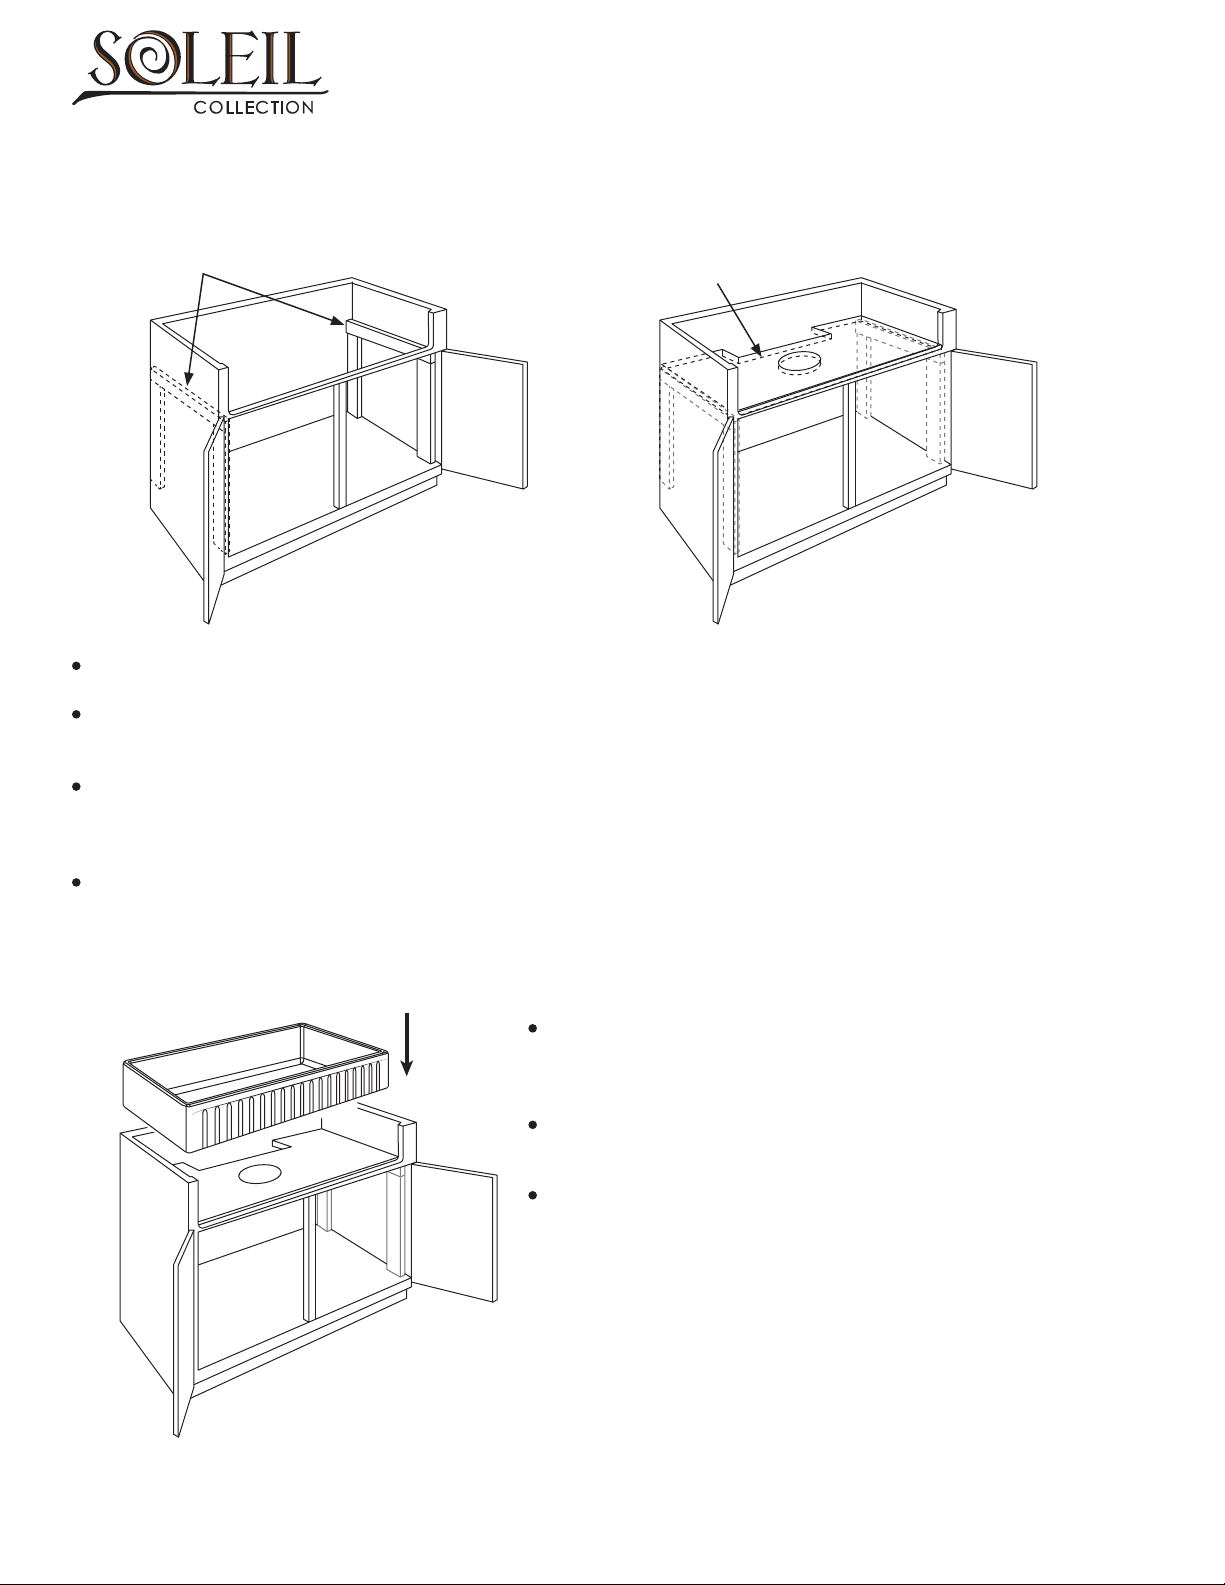
Support Strips
This step is to ensure that the bottom of the sink has enough support.
Construct a wood support frame to fit inside the cabinet opening. Allow adequate clearance for the water supply
lines and drainage system.
The recommended support frame design is shown in the illustration on the left, which consists of four vertical
supporting strips, two horizontal supporting strips and one supporting board. Due to the variety of installations
possible with this sink, your installer may suggest a different support frame design.
Support Board
IMPORTANT:
when full is approximately 300 lbs. Base cabinet and support frame must sufficiently support this weight.
Base cabinet and wood support frame are essential for proper installation. The weight of the sink
STEP4: SINK INSTALLATION
Using two people, carefully place the sink in place. Verify that the sink
can fit in the cabinet opening and rest properly on the supporting system.
Make a small adjustment to fit as necessary.
Verify the overall appearance and check for levelness to ensure correct
drainage.
IMPORTANT:
The product can break, chip, cause injury or product damage.
Risk of personal injury or product damage. Handle with care.
Page 5

STEP5: COUNTERTOP INSTALLATION
Apply Silicone Sealant After Cleaning the
Sink Edge and Countertop
After cleaning, apply a bead of silicone sealant between the top flange (or lip) of the sink and the countertop to
create a watertight seal. Clean excess silicone immediately. Verify the overall appearance and check for levelness
to ensure correct drainage.
Carefully place the countertop and verify that it is level.
IMPORTANT:
the cutout template for fireclay sinks. It is essential that prior to installation, you discuss with your installer and
agree on the final appearance. Cabinet should NOT be cut or fabricated without the sink.
IMPORTANT:
granite, Corian® or Silestone®).
Due to the dimensional variation from the fireclay manufacturing process, Soleil Sinks does not offer
Apron front sinks from Soleil Sinks should only be fastened to a solid surface countertop (i.e.,
Apply Silicone Sealant Where the Sink Meets
the Countertop and Cabinet
FINAL STEP
Connect water supply and drainage system per manufacturer’s instructions. Run water to test for leakage.
Copyright ©2021. All rights reserved.
Page 6

FIRECLAY CARE
To maintain the appearance of this product, Soleil Sinks recommends it should be cleaned using a soft cloth
and a non-abrasive cleaning product. A simple solution of warm water and a mild liquid non-antibiacterial detergent
generally does an excellent job. Ensure that the product is rinsed thoroughly and wiped dry.
Never use any form of abrasive cleaner or applicator as they often contain sand or silica and will eventually scratch
the surface.
The gloss surface of the sink is susceptible to damage from sharp and metallic objects. The worst offender is metal
cutlery. Try to avoid metal objects coming into contact with the surface by using protective plastic bowls, wire grid
cutlery holders and drainers with non-abrasive bases.
WOODEN BOARD CARE (If applicable)
Scientifically proven, wood has a great natural ability to decontaminate itself, killing most microorganisms and
bad bacteria, making it an extremely hygienic surface for food preparation. Wooden chopping boards will last for
years but some amount of care is needed. The following tips will help ensure that your chopping board remains
in good condition:
• Clean your board with warm mild soapy water. DO NOT let the board soak in water.
• Dry with a tea towel or Soft cloth.
• Leave your board standing upright to allow for all round air drying.
• Try not to leave the board in direct sunlight.
• Do not drop board into the sink.
• Do not put the board in the dishwasher or leave soaking.
• Do not allow liquids to stand on board for extended periods of time.
• Avoid abrasive cleaners and scouring powders.
• Do not use scouring pads or wire sponges.
• Do not use or place board in microwave oven or conventional oven.
• Do not cut fish or poultry on the chopping board without previous surface treatment.
• You can occasionally sprinkle regular salt or baking soda over the board and rub the board with a slice of lemon,
then rinse well with hot water. This will help to clean and neutralise any odour.
Oiling a chopping board is essential: Detergents and soaps used for cleaning tend to wash out the oils which help
to seal the wood and prevent the wood from absorbing too much moisture which can cause splitting, warping
and mould.
We recommend oiling the board weekly to monthly depending on the frequency of use and washing. After washing,
once the board has dried properly, apply oil generously using a paper towel or small cloth. Leave for approximately
half an hour for the oil to absorb into the wood, then with a clean paper towel or cloth buff off any excess oil.
Too much excess oil left on the board may dry and become sticky.
Recommended food-safe oils: Walnut Oil, Beeswax, Mineral Oil, Almond Oil, Coconut Oil.
 Loading...