

SolarWinds UDT Administrator's Manual

ADMINISTRATOR GUIDE
User Device Tracker
Version 3.2.4
Last Updated: May 3 0, 201 7
Retrieve the latest version from:
https://support.solarwinds.com/Success_Center/User_Device_Tracker_(UDT)/UDT_Documentation

© 2016 SolarWinds Worldwide, LLC. All rights reserved.
This document may not be reproduced by any means nor modified, decompiled, disassembled, published
or distributed, in whole or in part, or translated to any electronic medium or other means without the prior
written consent of SolarWinds. All right, title, and interest in and to the software and documentation are
and shall remain the exclusive property of SolarWinds and its respective licensors.
SOLARWINDS DISCLAIMS ALL WARRANTIES, CONDITIONS OR OTHER TERMS, EXPRESS OR IMPLIED,
STATUTORY OR OTHERWISE, ON SOFTWARE AND DOCUMENTATION FURNISHED HEREUNDER INCLUDING
WITHOUT LIMITATION THE WARRANTIES OF DESIGN, MERCHANTABILITY OR FITNESS FOR A PARTICULAR
PURPOSE, AND NONINFRINGEMENT. IN NO EVENT SHALL SOLARWINDS, ITS SUPPLIERS, NOR ITS LICENSORS
BE LIABLE FOR ANY DAMAGES, WHETHER ARISING IN TORT, CONTRACT OR ANY OTHER LEGAL THEORY EVEN
IF SOLARWINDS HAS BEEN ADVISED OF THE POSSIBILITY OF SUCH DAMAGES.
The SolarWinds and other SolarWinds marks, identified on the SolarWinds website, as updated from
SolarWinds from time to time and incorporated herein, are registered with the U.S. Patent and Trademark
Office and may be registered or pending registration in other countries. All other SolarWinds trademarks
may be common law marks or registered or pending registration in the United States or in other countries.
All other trademarks or registered trademarks contained and/or mentioned herein are used for
identification purposes only and may be trademarks or registered trademarks of their respective
companies.
Version 3.2.4, revised 9/1/2016
2

Introduction to UDT
19
What Is a Device?
What SolarWinds User Device Tracker Offers
How SolarWinds User Device Tracker Works
Installing SolarWinds User Device Tracker
Scalability
Requirements for SolarWinds UDT
UDT Server Software Requirements
SolarWinds Server Hardware Requirements
Requirements for Virtual Machines and Servers
Requirements for the Orion Platform database Server (SQL Server)
Additional SolarWinds UDT Requirements
Scalability
FIPS Support
19
19
20
21
21
21
21
22
23
23
25
25
25
Server Sizing
SNMP Requirements for Monitored Devices
Enabling Microsoft Internet Information Services (IIS)
Enabling IIS on Windows Server 2003 and Windows XP
Enabling IIS on Windows Vista and Windows Server 2008 (R2)
Enabling IIS on Windows 7
Installing SolarWinds User Device Tracker
Activating Your License
To evaluate the software without a license
To license the software on a server with Internet access
To license the software on a server without Internet access
Finishing SolarWinds UDT Installation
Moving SolarWinds UDT to a New Server
26
26
27
27
27
28
29
30
30
30
30
31
31
Licensing
Maintaining Licenses with License Manager
32
33
3

Installing License Manager
33
Deactivating and Registering Licenses with the License Manager
Excluding Orion Data Directories from Anti-Virus Scanning
Exclude for Windows XP/Server 2003
Exclude for Windows Vista/7/Server 2008
Running SolarWinds UDT
Internet Explorer Security Settings
Discovering and Adding Network Devices
Adding Devices
Adding Ports
Network Discovery
Adding Multiple Devices (Network Sonar Discovery)
Using the Network Sonar Results Wizard
Adding a Node (Add a Single Device)
34
34
34
35
35
35
36
36
36
36
37
41
42
Manage Nodes
User Device Tracker Port Discovery
Adding Orion Nodes to UDT
Event Notification for Nodes and Ports added to UDT
Adding Active Directory Controllers and Users
Managing Active Directory Credentials
Adding a New AD Credential
Editing an AD Credential
Deleting an AD Credential
Domain controller configuration validation
Managing Active Directory Domain Controllers
Adding a New AD domain controller
Editing an AD domain controller
43
43
44
44
46
46
46
47
47
47
48
48
49
Assign a credential to an AD domain controller
Deleting an AD Domain Controller
4
49
49

Setting Up Polling of User Data Across Domains
50
Defining Credentials for Polling Across Domains
Setting WMI Namespace Security
Adding a New AD Credential
Managing the UDT White List
Enabling DNS Resolution for Wireless Nodes
Adding Endpoints to the White List
Add Endpoints to the DNA Whitelist by Adding Rules
Add Endpoints to the Whitelist by Enabling Rules
Removing Endpoints from the White List
Removing Endpoints from the White List by Editing Rules
Remove Endpoints from the White List by Disabling Rules
Ignoring Endpoints in UDT
Ignoring Endpoints in the White List by Adding Rules
50
50
51
52
53
53
53
54
54
54
55
55
56
Ignoring Endpoints in the White List by Enabling Rules
Deleting White List Rules
Managing UDT
Getting Started with Orion
Discovery Central
Network Sonar Discovery
Add a Node
Node & Group Management
Manage Nodes
Manage Dependencies
Manage Groups
Accounts
Manage Accounts
56
57
58
59
59
60
60
60
60
60
60
61
61
Account List
Credentials
61
61
5

Manage Windows Credentials
61
Customize
Customize Menu Bars
Color Scheme
External Websites
Manage Alerts
Manage Advanced Alerts
Product Updates
Available Product Updates
SolarWinds product Team Blog
Views
Manage Views
Add New View
Views by Device Type
61
61
62
62
62
62
63
63
63
63
63
64
64
Settings
Web Console Settings
Polling Settings
Orion Thresholds
UDT Settings
Details
Database Details
Polling Engines
Orion Platform Details
License Details
Configuring SolarWinds UDT
Port Management
Manage Ports
64
64
64
64
64
65
65
65
65
65
66
66
66
User Device Tracker Discovery
Track Users and Endpoints
66
66
6

Manage the White List
67
Manage Active Directory Domain Controller
Manage Watch List
UDT Settings
Polling Interval
Data Retention
Port Thresholds
View UDT Job Status
Advanced Settings
License Summary
UDT License Summary
thwack Community
UDT thwack Forum
UDT Credentials
67
67
67
67
67
67
68
68
68
68
68
69
69
Manage Active Directory Administrator Credentials
Viewing Status: Device, Port, User, SSID
Using the Device Tracker Summary
Using the Device Tracker Port Details
Viewing Node and Port Data in Tooltips
Using the Device Tracker Access Point Details
Using the Device Tracker SSID Details
Using the Device Tracker User Details
Viewing User Data in Tooltips
Common Tasks with SolarWinds UDT
Finding the switch and port where a particular hostname, IP, or MAC address is or was connected
Seeing Rogue Endpoint Connections in Real-time
Tracking Status for a Group of Ports
69
70
70
72
73
74
76
77
78
79
79
80
81
Shutting Down a Network Device Port
Creating and Managing a Watch List
83
83
7

Finding Wireless Endpoint Connections
84
Finding a User's Connections
Finding Endpoints in a Subnet
Resolving IP Address Conflicts with IPAM and UDT Integration
Alerting and Reporting
Editing Alerts
Configuring SolarWinds UDT Alerts
Configuring a default UDT alert
Setting up the alert trigger action
Creating SolarWinds UDT-Specific Reports
Using Predefined SolarWinds UDT Reports
Viewing and Editing Reports
Filtering and Grouping Data in Resources
SQL Syntax
84
85
87
90
90
90
91
91
93
93
94
98
98
SWQL Syntax
SolarWinds Core Components
Discovery Central
Network Discovery
Additional Discovery Central Resources
Discovering and Adding Network Devices
Network Discovery Using the Network Sonar Discovery Wizard
Using the Network Sonar Discovery Results Wizard
Importing a List of Nodes Using a Seed File
Managing Scheduled Discovery Results
Using the Discovery Ignore List
Managing the Orion Web Console
Logging in for the First Time as an Administrator
99
102
102
103
103
103
104
110
112
114
115
117
118
Windows Authentication with Active Directory
Using the Web Console Notification Bar
118
119
8

Navigating the Orion Web Console
120
Using Web Console Tabs
Using and Disabling Web Console Breadcrumbs
Administrative Functions of the Orion Web Console
Changing an Account Password
Orion Website Administration
Viewing Secure Data on the Web
Handling Counter Rollovers
General Thresholds
General Threshold Types
Setting General Thresholds
Customizing Views
Creating New Views
Editing Views
120
121
122
122
122
127
127
128
128
130
130
131
131
Configuring View Limitations
Copying Views
Deleting Views
Views by Device Type
Resource Configuration Examples
Using the Orion Web Console Message Center
Exporting Views to PDF
Creating a Custom Summary View
Creating and Editing External Website Views
Customizing the Orion Web Console
Customizing Web Console Menu Bars
Changing the Web Console Color Scheme
Changing the Web Console Site Logo
133
134
134
134
135
144
145
145
146
147
147
149
149
Configuring the Available Product Updates View
Updating Your SolarWinds Installation
9
150
150

Orion Web Console and Chart Settings
151
Web Console Settings
Chart Settings
Discovery Settings
Using Node Filters
Applying a Node Filter
Example Filters with Associated SQL Queries
Valid Status Levels
Custom Charts in the Orion Web Console
Customizing Charts in the Orion Web Console
Custom Node Charts
Custom Volume Charts
Custom Chart View
Custom Object Resources in the Orion Web Console
151
152
153
153
153
153
154
154
154
156
157
158
160
Editing a Custom Object Resource
Selecting Custom Objects and Resources
Available Custom Resources
Integrating SolarWinds Engineer's Toolset
Configuring a Toolset Integration
Adding Programs to a Toolset Integration Menu
Accessing Nodes Using HTTP, SSH, and Telnet
Using Integrated Remote Desktop
Managing Orion Web Console Configurations
Creating a Web Console Configuration Backup
Restoring a Web Console Configuration Backup
Clearing a Web Console Configuration
Managing Devices in the Web Console
160
160
161
161
161
162
164
164
164
165
165
166
167
Adding Devices for Monitoring in the Web Console
Deleting Devices from Monitoring
10
168
171

Viewing Node Data in Tooltips
172
Editing Object Properties
Promoting a Node from ICMP to SNMP Monitoring
Viewing Node Resources
Setting Device Management States
Unscheduled Device Polling and Rediscovery
Monitoring Windows Server Memory
Scheduling a Node Maintenance Mode Time Period
Managing Groups and Dependencies
Managing Groups
Creating Groups
Editing Existing Groups
Managing Group Members
Deleting Groups
173
174
176
176
177
178
178
179
179
180
181
182
182
Managing the Display of Group Status
Managing Dependencies
Creating a New Dependency
Editing an Existing Dependency
Deleting an Existing Dependency
Viewing Alerts on Child Objects
Managing Web Accounts
Creating New Accounts
Editing User Accounts
User Account Access Settings
Setting Account Limitations
Defining Pattern Limitations
Setting Default Account Menu Bars and Views
182
184
185
186
187
188
189
189
190
191
192
194
195
Configuring an Account Report Folder
Configuring Audible Web Alerts
196
197
11

Managing SolarWinds UDT Polling Engines
198
Viewing Polling Engine Status in the Web Console
Configuring Polling Engine Settings
Orion Platform Polling Settings
Polling Intervals
Polling Statistics Intervals
Database Settings
Network
Calculations & Thresholds
Calculating Node Availability
Node Status
Percent Packet Loss
Calculating a Baseline
Using the Polling Engine Load Balancer
198
199
199
199
200
201
202
203
204
204
204
205
205
Setting the Node Warning Level
Managing Packet Loss Reporting
Monitoring Network Events in the Web Console
Viewing Event Details in the Web Console
Acknowledging Events in the Web Console
Using Orion Platform Advanced Alerts
Creating and Configuring Advanced Alerts
Creating a New Advanced Alert
Naming, Describing, and Enabling an Advanced Alert
Setting a Trigger Condition for an Advanced Alert
Setting a Reset Condition for an Advanced Alert
Setting a Suppression for an Advanced Alert
Setting the Monitoring Period for an Advanced Alert
206
207
209
209
210
211
212
212
214
215
218
219
221
Setting a Trigger Action for an Advanced Alert
Setting a Reset Action for an Advanced Alert
12
221
222

Alert Escalation
222
Understanding Condition Groups
Using the Advanced Alert Manager
Adding Alert Actions
Available Advanced Alert Actions
Sending an E-mail / Page
Playing a Sound
Logging an Advanced Alert to a File
Logging an Advanced Alert to the Windows Event Log
Logging an Advanced Alert to the NetPerfMon Event Log
Sending a Syslog Message
Executing an External Program
Executing a Visual Basic Script
Emailing a Web Page
223
224
228
228
229
230
231
232
233
234
235
236
237
Using Text to Speech Output
Sending a Windows Net Message
Sending an SNMP Trap
Using GET or POST URL Functions
Dial Paging or SMS Service
Testing Alert Actions
Viewing Alerts in the Orion Web Console
Acknowledging Advanced Alerts in the Web Console
Escalated Advanced Alerts
Escalated Alert Example
Creating a Series of Escalated Alerts
Viewing Alerts from Mobile Devices
Creating Network Maps
238
239
240
241
241
242
243
243
244
244
245
248
249
Creating and Viewing Reports
Predefined Orion Platform reports
250
250
13

Availability
251
Current Node Status
Current Volume Status
Daily Node Availability
Events
Historical CPU and Memory Reports
Historical Response Time Reports
Historical VMware ESX Server Reports
Groups: Current Groups and Groups Members Status
Groups: Daily Group Availability
Groups: Group Availability (with members)
Groups: Historical Groups Status
Historical Volume Usage Reports
Inventory
252
253
254
255
256
257
258
259
260
261
261
262
263
Viewing Reports
Viewing Reports in the Orion Web Console
Viewing Reports in the SolarWinds UDT Report Writer
Using Report Writer
Preview Mode
Design Mode
Creating and Modifying Reports
General Options Tab
Select Fields Options Tab
Filter Results Options Tab
Top XX Records Options Tab
Time Frame Options Tab
Summarization Options Tab
264
264
265
265
266
266
266
267
268
269
269
270
270
Report Grouping Options Tab
Field Formatting Options Tab
270
271
14

Customizing the Report Header and Footer Image
271
Exporting Reports
Example Device Availability Report
Using Orion Report Scheduler
Creating a Scheduled Report Job
Using Orion Report Scheduler with HTTPS
Troubleshooting the Orion Report Scheduler
Reports and Account Limitations
Monitoring Syslog Messages
Configuring the Orion Syslog Port
Syslog Messages in the Web Console
Syslog Resources
Viewing Syslog Messages in the Web Console
Acknowledging Syslog Messages in the Web Console
272
272
278
279
280
281
282
283
284
284
284
286
287
Using the Syslog Viewer
Viewing and Acknowledging Current Messages
Searching for Syslog Messages
Syslog Server Settings
Configuring Syslog Viewer Filters and Alerts
Available Syslog Alert Actions
Forwarding Syslog Messages
Syslog Alert Variables
Syslog Date/Time Variables
Other Syslog Variables
Syslog Message Priorities
Syslog Facilities
Syslog Severities
287
288
288
288
289
292
293
294
294
296
296
296
297
Monitoring SNMP Traps
The SNMP Trap Protocol
299
300
15

Viewing SNMP Traps in the Web Console
300
Using the Trap Viewer
Viewing Current Traps
Searching for Traps
Trap Viewer Settings
Configuring Trap Viewer Filters and Alerts
Available Trap Alert Actions
Trap Alert Variables
Trap Date/Time Variables
Other Trap Variables
Creating Custom Properties
Creating a Custom Property
Removing a Custom Property
Importing Custom Property Data
301
301
301
302
302
305
307
307
309
310
311
311
312
Custom Property Editor Settings
Editing Custom Properties
Using Filters in Edit View
Creating Custom Properties Filters
Removing Custom Properties Filters
Creating Account Limitations
Using the Account Limitation Builder
Creating an Account Limitation
Deleting an Account Limitation
Managing the SolarWinds UDT Database
Using Database Manager
Adding a Server
Using SQL Server Management Studio
313
313
314
314
315
316
316
317
317
319
320
320
320
Database Maintenance
Running Database Maintenance
323
323
16

Common Orion Tasks
324
Creating an Alert to Discover Network Device Failures
Creating a Custom Property
Creating an Alert Using a Custom Property
Configuring Alert Actions
Testing Alerts
Scheduling and Emailing Business Hours Reports
Creating a Business Hours Report
Scheduling and Emailing a Report
Creating Geographic or Departmental Views
Creating a Custom Group
Creating a Custom View
Additional Polling Engine and Web Console
Additional Polling Engine System Requirements
324
324
326
327
331
333
334
335
336
337
337
340
340
Installing an Additional Polling Engine
Upgrading an Additional Polling Engine
Configuring an Additional Polling Engine
Changing Polling Engine Node Assignments
Installing an Additional Web Console
Copying the Default Reports
Troubleshooting
Checking Device Compatibility
Scanning a Device
Analyzing Test Results
Node Discovery Completely Fails
Node Discovery Fails for Some Devices
UDT Missing User Data
341
343
343
344
345
346
347
347
348
348
349
350
350
UDT Polling Spikes CPU on Target Device(s)
Wrong Hostname Reported for Endpoint
351
352
17

Wrong IP Address Reported for Endpoint
352
Wrong MAC Address Reported for Endpoint
Wrong Connection Type Reported for Endpoint
Wrong VLAN Reported for Endpoint
No DNS Data for a Device
No Layer 3 Data for a Device
No Layer2 Data for a Device
No User Data Retrieved Via WMI (Windows Server 2003)
UDT Not Receiving User Data from Domain Controllers
Event code setup
Adding a Deleted Port Back into UDT
Orion Platform Components
Verify Program Operation
Stop and Restart
352
353
353
353
354
354
355
355
355
356
356
357
357
Run the Configuration Wizard
Using Full Variable Names
Working with Temporary Directories
Slow Performance on Windows Server 2008
Regular Expression Pattern Matching
Characters
Character Classes or Character Sets [abc]
Anchors
Quantifiers
Dot
Word Boundaries
Alternation
Regular Expression Pattern Matching Examples
358
358
358
359
361
361
361
363
364
366
366
366
367
18

Introduction to UDT
SolarWinds User Device Tracker (SolarWinds UDT) allows you to monitor devices, ports, and users for your
network. With SolarWinds UDT, you can analyze your port usage and capacity and be alerted to issues
before or as soon as they occur.
SolarWinds UDT allows you to find where devices are connected in your network and offers detailed
information about capacity analysis. UDT regularly polls switches and routers for information about what
is connected to them. Based on this information, SolarWinds UDT stores current and historical information
about where a device has been connected. It also provides alerts and reports about devices connected to
the network. For capacity analysis, SolarWinds UDT can report on how many ports are used on switches
currently, as well as over time, so you can better understand the true utilization of the ports on your
switches.
UDT also polls Active Directory domain controllers event logs for user login activity and based on it
provides current and historical views of endpoints to which users have been connected on the network.
What Is a Device?
A device is a MAC address, hostname, or IP Address. SolarWinds UDT allows you to search on this
information to find where the device is connected in the network and where it has been connected in the
past.
n
What SolarWinds User Device Tracker Offers
n
How Does SolarWinds User Device Tracker Work?
What SolarWinds User Device Tracker Offers
SolarWinds UDT provides focused device and port monitoring for network engineers. SolarWinds UDT
provides many features to help, including:
n Discover IPv4 and IPv6 devices.
n Quickly find where a device (MAC address, hostname or IP Address) or user is connected on the
network
n Find out where a device or user has been connected in the past
n Find out what has been connected to a port over time
n Provides port capacity analysis for a switch (how many ports are being used, including both
monitored and un-monitored ports)
n Provides global port capacity analysis for used/available ports and network capacity planning
n Configure a watchlist to track when specific devices appear on the network and alert when the
devices appear
19
n Provides enhanced network topology mapping
n Generates 7 new predefined reports on connected devices, device capacity, and AD users
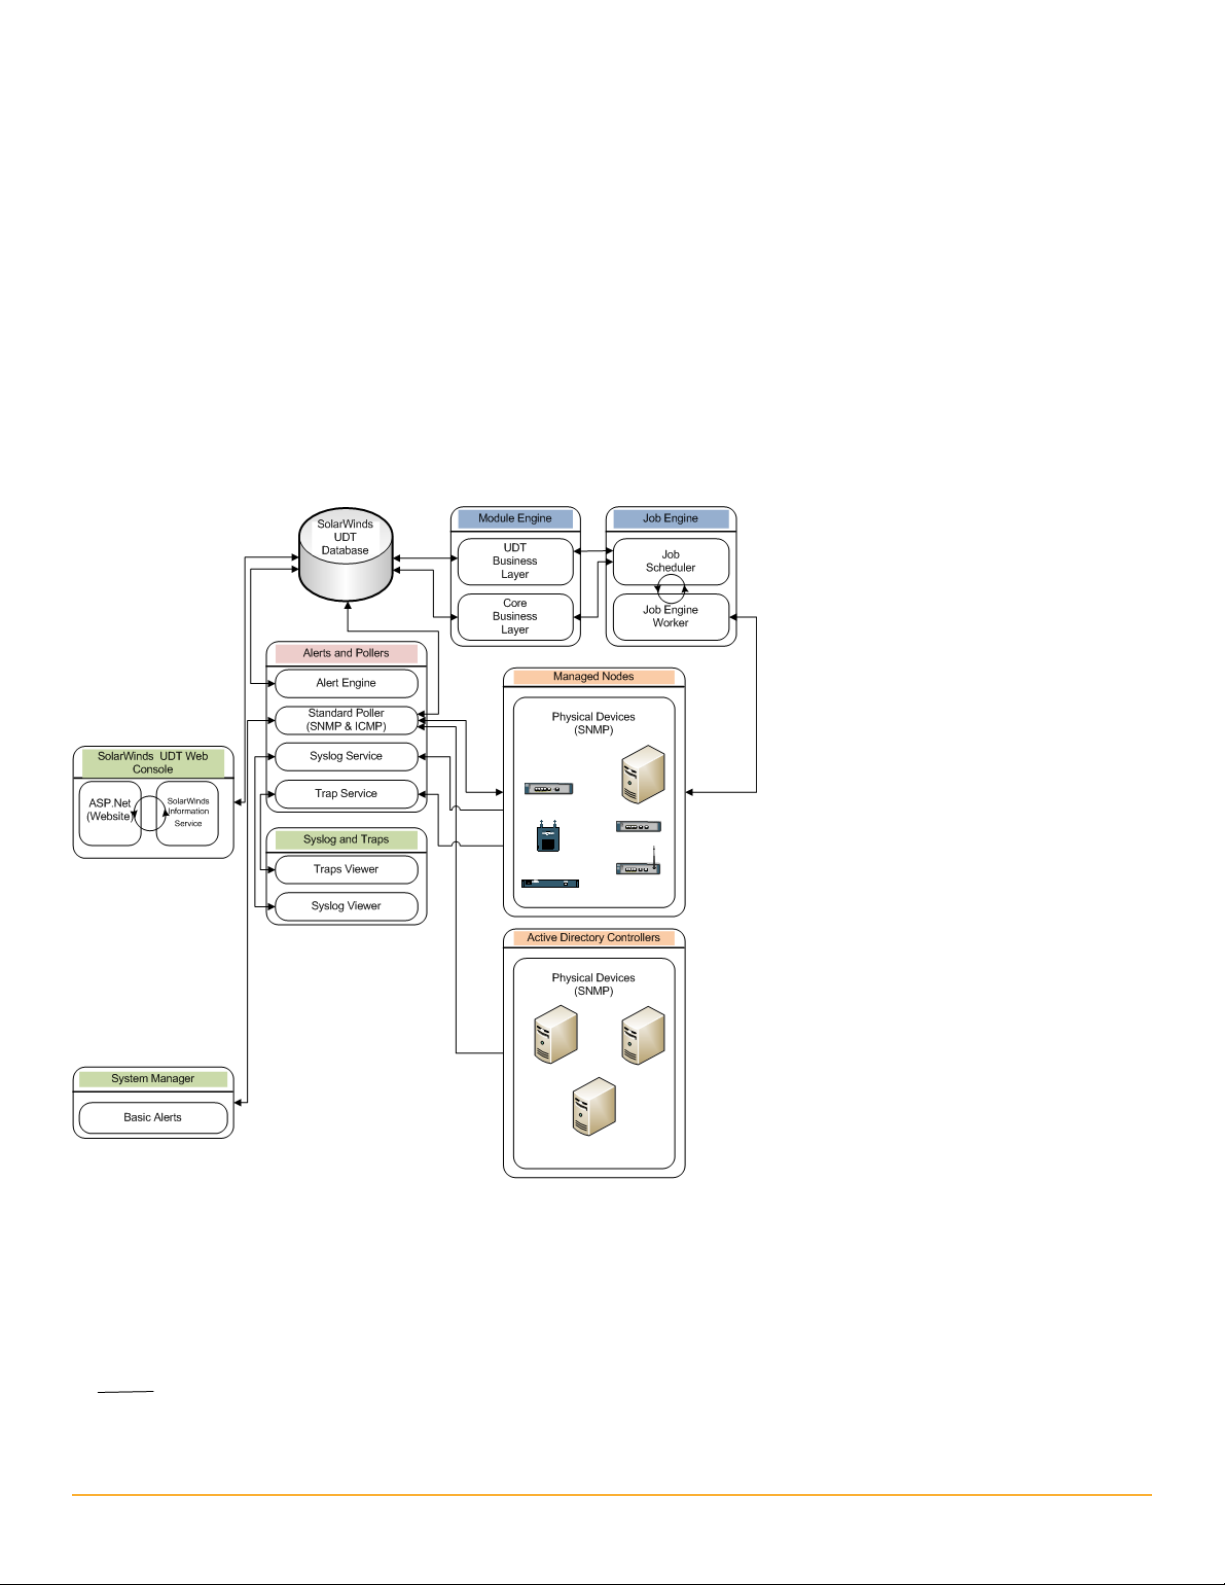
How SolarWinds User Device Tracker Works
Using SNMP calls to your network framework, SolarWinds User Device Tracker provides real time feedback
on your monitored devices and users and trending through statistics stored in the Orion Platform
database. Keeping with the SolarWinds common components infrastructure, there are no agents installed
on your servers and no remote software to maintain. All calls are made in real time and displayed on a
Web Console accessible from any supported browser.
The following diagram provides an overview of the current SolarWinds UDT architecture, including
interactions among SolarWinds UDT components, the SolarWinds UDT database, Active Directory domain
controllers, and the managed devices on your network.
20

Installing SolarWinds User Device Tracker
Installing SolarWinds User Device Tracker (SolarWinds UDT) is a wizard-driven process. Resource and
space requirements are such that most deployments do not require hardware updates to your server.
SolarWinds UDT is a standalone product. It can be installed by itself or with other SolarWinds products (for
example SolarWinds Network Performance Monitor) to provide an integrated experience.
n
Requirements for SolarWinds UDT
n
FIPS Support
n
Server Sizing
n
SNMP Requirements for Monitored Devices
n
Enabling Microsoft Internet Information Services (IIS)
n
Installing SolarWinds User Device Tracker
n
Activating Your License
n
Finishing SolarWinds UDT Installation
n
Moving SolarWinds UDT to a New Server
n
Licensing
n
Maintaining Licenses with License Manager
n
Excluding Orion Data Directories from Anti-Virus Scanning
n
Running SolarWinds UDT
n
Internet Explorer Security Settings
Scalability
By adding individual polling engines, you can transparently scale your SolarWinds UDT installation to any
environment.
For more information see "Additional Polling Engine and Web Console"
Requirements for SolarWinds UDT
SolarWinds recommends installing your SolarWinds product on its own server, with the Orion Platform
database hosted separately, on its own SQL Server. Installations of multiple SolarWinds UDT servers using
the same database are not supported.
UDT Server Software Requirements
The following table lists minimum software requirements and recommendations for your UDT server.
Software Requirements
Operating
System
Windows Server 2008 R2, 2012 or 2012 R2 with IIS in 32-bit mode.
21

Web
Server
IIS must be installed. SolarWinds recommends that SolarWinds software administrators
have local administrator privileges to ensure full functionality of local SolarWinds tools.
Accounts limited to use of the Orion Web Console do not require administrator privileges.
Notes:
n SolarWinds does not support production installations of SolarWinds products on
Windows XP, Windows Vista, or Windows 7 systems.
n If you are installing SolarWinds UDT on Windows Server 2003, confirm that your full
computer name is no longer than 15 characters in length. Windows Server 2003 trims
any characters beyond the fifteenth, and this may prevent SolarWinds services from
properly identifiying your UDT server.
n While UDT is supported on Windows Server 2008 R2, it is not supported on Windows
Server 2008.
Microsoft IIS, version 6.0 and higher, in 32-bit mode.
DNS specifications require that hostnames be composed of alphanumeric characters (A-Z,
0-9), the minus sign (-), and periods (.). Underscore characters (_) are not allowed. For more
information, see RFC 952.
Note: SolarWinds neither recommends nor supports the installation of any SolarWinds UDT
product on the same server or using the same database server as a Research in Motion
(RIM) Blackberry server.
.NET
Framework
Version 4.0 .NET Framework.
SNMP
Trap
Windows operating system management and monitoring tools component
Services
Web
Console
Browser
n Microsoft Internet Explorer 7, 8, or 9
n Mozilla Firefox 3 or later
n Google Chrome 8
SolarWinds Server Hardware Requirements
The following table lists minimum hardware requirements and recommendations for your UDT server.
Note: Hardware requirements are listed by SolarWinds license level.
Hardware UT2500, UT5000, or UT10000 UT25000 or UT50000 UTX
2.0 GHz 2.4 GHz 3.0 GHz
CPU Speed
Note: Dual processor, dual core is recommended.
22

2 GB 5 GB 20 GB
Hard Drive
Space
Memory 3 GB 4 GB 4 GB
Application
Ports
Requirements for Virtual Machines and Servers
SolarWinds installations on VMware Virtual Machines and Microsoft Virtual Servers are fully supported if
the following minimum configuration requirements are met for each virtual machine.
Note: A RAID 1 drive for server operating system, SolarWinds installation, and tempdb files
is recommended. The SolarWinds installer needs 1GB on the drive where temporary
Windows system or user variables are stored. Per Windows standards, some common files
may need to be installed on the same drive as your server operating system..
161/SNMP and 443/SNMP. VMware ESX/ESXi Servers are polled on 443.
17777/TCP open for Orion Platform traffic
17778/ HTTPS open to access the SolarWinds Information Service API
Note: SolarWinds strongly recommends that you maintain your SQL Server database on a separate
physical server.
Virtual
Machine
Configuration
Orion Requirements by License Level
UT2500, UT5000, or UT10000 UT25000 or UT50000 UTX
CPU Speed 2.0 GHz 2.4 GHz 3.0 GHz
Allocated
Hard Drive
Space
Memory 3 GB 4 GB 4 GB
Network
Interface
Requirements for the Orion Platform database Server (SQL Server)
The following table lists software and hardware requirements for your Orion Platform database server.
SolarWinds UDT license levels are provided as a reference.
2GB 5GB 20GB
Note: Due to intense I/O requirements, SQL Server should be hosted on a separate
physical server configured as RAID 1+0. RAID 5 is not recommended for the SQL Server
hard drive.
Each virtual machine on which Orion is installed should have its own, dedicated network
interface card.
Note: Since Orion Platform SNMP to monitor your network, if you are unable to dedicate a
network interface card to your Server, you may experience gaps in monitoring data due to
the low priority generally assigned to SNMP traffic.
Requirements UT2500, UT5000, or UT10000 UT25000 or UT50000 UTX
23

SQL Server
SQL Server 2005 SP1 Express, Standard, or Enterprise
SQL Server 2008 Express, Standard, or Enterprise
SQL Server 2012 SP1 Express, Standard, or Enterprise
SQL Server 2014 Express, Standard, or Enterprise
Notes:
n Due to latency effects, SolarWinds does not recommend installing your SQL Server
and your SolarWinds UDT server or additional polling engine in different locations
across a WAN. For more information, see SolarWinds Knowledge Base article Can I
install my Server or Additional Polling Engine and my Orion Platform database
(SQL Server) in different locations across a WAN?
n Either mixed-mode or SQL authentication must be supported.
n If you are managing your SolarWinds UDT database, SolarWinds recommends you
install the SQL Server Management Studio component.
n If your SolarWinds UDT product installs SQL Server System CLR Types, a manual
restart of the SQL Server service for your SolarWinds UDT database is required.
n Use the following database select statement to check your SQL Server version,
service pack or release level, and edition:
select SERVERPROPERTY ('productversion'), SERVERPROPERTY ('productlevel'),
SERVERPROPERTY ('edition')
CPU Speed 2.0 GHz 2.4 GHz 3.0 GHz
2 GB 5 GB 20 GB
Note: Due to intense I/O requirements, a RAID 1+0 drive is strongly recommended the
Hard Drive
Space
SQL Server database and SolarWinds UDT data and log files. RAID 5 is not recommended
for the SQL Server hard drive. The SolarWinds UDT installer needs at least 1GB on the
drive where temporary Windows system or user variables are stored. Per Windows
standards, some common files may need to be installed on drive as your server
operating system.
Memory 2 GB 3 GB 4 GB
The Configuration Wizard installs the following required x86 components if they are not found on your
SolarWinds UDT database server:
n SQL Server System Common Language Runtime (CLR) Types. SolarWinds products use secure SQL
CLR stored procedures for selected, non-business data operations to improve overall performance.
n Microsoft SQL Server Native Client
24

n Microsoft SQL Server Management Objects
Additional SolarWinds UDT Requirements
Enterprise-level SolarWinds UDT deployments with the potential for more than 50,000 ports may need
additional computing resources above the standards required for SolarWinds common components:
Ports Additional Requirements
Up to 50,000 No additional requirements
More than 50,000 8+ GB RAM
n
If you are running Windows Server 2008, you must upgrade to Windows Server 2008 R2,
because SolarWinds UDT does not support Windows Server 2008 due to known WMI issues.
nIf you are running Windows Server 2003 your server must either be in the same domain as the
domain controller or have WMI connectivity setup between the two machines. Consult this
Knowledge Base article for information on retrieving user data across domains.
Scalability
By adding individual polling engines, you can transparently scale your SolarWinds UDT installation to any
environment.
For more information see "Additional Polling Engine and Web Console"
FIPS Support
FIPS (Federal Information Processing Standard) defines security and interoperability standards for
computers used by the U.S. Federal Government.
To enable FIPS in the Local Security Policy on Windows:
1.
Click Start > Control Panel > System and Security > Administrative Tools, and then double-click Local
Security Policy.
2.
Expand the Local Policies category in the left pane, and then click Security Options.
3.
Right-click System cryptography: Use FIPS compliant algorithms for encryption, hashing, and signing.
4.
In the context menu that is displayed, click Properties.
5.
In the Local Security Setting tab, click Enabled and then click OK.
FIPS can also be enabled as part of Group Policy.
SolarWinds UDT installations on Windows Server 2008 R2 and Windows 7 (supported for evaluation
purposes only) require a Microsoft hotfix to realize the FIPS-compatibility features of this release. For more
information about this required Microsoft hotfix, see the article http://support.microsoft.com/kb/981119.
As noted in the KB article, you need to enable FIPS first before applying the Microsoft hotfix.
25

Server Sizing
SolarWinds UDT is capable of monitoring networks of any size, ranging from small corporate LANs to large
enterprise and service provider networks. Most SolarWinds UDT systems perform well on 3.0 GHz systems
with 4 GB of RAM, using default polling engine settings. However, when monitoring larger networks, you
should give additional consideration to the hardware used and the system configuration.
There are three primary variables that affect scalability. The most important consideration is the number
of monitored ports, nodes, and users. Systems monitoring more than 50,000 elements require 8+ GB of
RAM. The second variable to consider is polling frequency. For instance, if you are collecting statistics more
frequently than the default, the system will have to work harder and system requirements will increase.
Finally, the number of simultaneous users accessing SolarWinds UDT directly impacts system
performance.
When planning an SolarWinds UDT installation, there are four main factors to keep in mind with respect to
polling capacity: CPU, memory, number of polling engines, and polling engine settings. For minimum
hardware recommendations, see Requirements for SolarWinds UDT. For more information about polling
engines, see "Additional Polling Engine and Web Console."
In most situations, installing SolarWinds UDT and SQL Server on different servers is highly recommended,
particularly if you are planning to monitor a high number of ports. If you experience performance
problems or you plan to monitor a very large network, you should certainly consider this option. This
scenario offers several performance advantages, as the SolarWinds UDT server does not perform any
database processing, and it does not have to share resources with SQL Server.
If you plan to monitor 150,000 or more ports, SolarWinds recommends that you install additional polling
engines on separate servers to help distribute the work load. For more information about sizing
SolarWinds UDT to your network, contact the SolarWinds sales team or visit www.solarwinds.com. For more
information about configuring additional pollers, see "Additional Polling Engine and Web Console."
SNMP Requirements for Monitored Devices
SolarWinds UDT can monitor the performance of any SNMPv1-, SNMPv2c-, or SNMPv3-enabled device on
your network. Consult your device documentation or a technical representative of your device
manufacturer to acquire specific instructions for configuring SNMP on your device.
nTo properly monitor devices on your network, you must enable SNMP on all devices that are
capable of SNMP communications .
nIf SNMPv2c is enabled on a device you want SolarWinds UDT to monitor, by default,
SolarWinds UDT will attempt to use SNMPv2c to poll the device for performance information.
If you only want SolarWinds UDT to poll using SNMPv1, you must disable SNMPv2c on the
device to be polled.
26

Enabling Microsoft Internet Information Services (IIS)
To host the Orion Web Console, Microsoft Internet Information Services (IIS) must be installed and enabled
on your SolarWinds UDT server. Windows Server 2003 and Windows XP require IIS version 6; Windows
Server 2008 R2 and Windows Vista require IIS version 7, as detailed in the following sections:
n
Enabling IIS on Windows Server 2003 and Windows XP
n
Enabling IIS on Windows Vista and Windows Server 2008 (R2)
n
Enabling IIS on Windows 7
Enabling IIS on Windows Server 2003 and Windows XP
The following procedure enables IIS on Windows Server 2003 and XP.
1. Click Start > Control Panel > Add or Remove Programs.
2. Click Add/Remove Windows Components.
3. Select Application Server and confirm that it is checked.
4. Click Details.
5. Select Internet Information Services (IIS) and confirm that it is checked.
6. Click Details.
7. Select World Wide Web Service and confirm that it is checked.
8. Click Details.
9. Select World Wide Web Service and confirm that it is checked.
10. Click OK.
11. Click OK on the Internet Information Services (IIS) window.
12. Click OK on the Application Server window.
13. Select Management and Monitoring Tools and confirm that it is checked.
14. Click Details.
15. Select both Simple Network Management Protocol and WMI SNMP Provider and confirm that they
are checked, and then click OK.
16. Click Next on the Windows Components window, and then click Finish after completing the Windows
Components Wizard.
17. If you are currently enabling IIS as part of a SolarWinds UDT installation, restart the SolarWinds
UDT installer.
You may be prompted to install additional components, to provide your Windows Operating System
media, or to restart your computer.
Enabling IIS on Windows Vista and Windows Server 2008 (R2)
IIS is enabled automatically after UDT installation and prior to the start of the Configuration Wizard. If the
Configuration Wizard detects that IIS is not installed on Windows 2008 R2, it installs IIS. The following
manual procedure is provided for Windows Vista, or in case problems occur with the automatic IIS
installation for Windows Server 2008 R2.
27

1. Click Start > All Programs > Administrative Tools > Server Manager.
2. Click Roles in the left pane.
3. Click Add Roles on the right, in the main pane.
4. Click Next to start the Add Roles Wizard.
5. Check Web Server (IIS).
6. If you are prompted to add features required for Web Server (IIS), click Add Required Features.
7. Click Next on the Select Server Roles window.
8. Click Next on the Web Server (IIS) window.
9. Confirm that Common HTTP Features > Static Content is installed.
10. Check Application Development > ASP.NET.
11. Click Add Required Role Services.
12. Check both Security > Windows Authentication and Security > Basic Authentication.
13. Check Management Tools > IIS 6 Management Compatibility.
14. Click Next on the Select Role Services window.
15. Click Install on the Confirm Installation Selections window.
16. Click Close on the Installation Results window.
17. If you are currently enabling IIS as part of an SolarWinds UDT installation, restart the
SolarWinds UDT installer.
Enabling IIS on Windows 7
SolarWinds only supports evaluations of SolarWinds UDT version 2.0 and later on Windows 7. These
versions of SolarWinds UDT install and enable IIS automatically.
The following manual procedure is provided in case problems occur with the automatic IIS installation for
Windows 7.
1. Click Start and then click Control Panel.
2. In Control Panel, click Programs and Features and then click Turn Windows features on or off.
3. In the Windows Features dialog box, expand Internet Information Services.
4. Expand the category for Web Management Tools and check IIS 6 Management Compatibility. To do
this, you must expand IIS 6 Management Compatibility and then check all of the sub-options
underneath.
5. Expand the category for World Wide Web Services.
6. Expand the sub-category for Application Development Features and check ASP.NET. Note that this
also checks several other options.
7. Expand the category for Common HTTP Features and check Static Content.
8. Expand the category for Security and check both Basic Authentication and Windows Authentication.
9. Click OK.
28

Installing SolarWinds User Device Tracker
SolarWinds User Device Tracker offers an intuitive wizard to guide you through installing and configuring
the product.
SolarWinds User Device Tracker does not require SolarWinds NPM. However, if you are performing a clean
install of SolarWinds UDT 3.1 and also want to install SolarWinds NPM, you should install SolarWinds NPM
version 11.0.1 or later before or after you install SolarWinds UDT 3.1. For more information, see "Installing
SolarWinds Network Performance Monitor" in the SolarWinds Network Performance Monitor Administrator
Guide.
Note: If you have any additional SolarWinds UDT web consoles or pollers, you must upgrade them too by
repeating this procedure for each additional SolarWinds UDT poller or web console. Be sure to use the
correct installers for pollers or web consoles, since these are different from the standard installer package.
For information about installing additional Orion Web Consoles or pollers, refer to the Chapter "Additional
Polling Engine and Web Console"
To install or upgrade SolarWinds User Device Tracker:
1.
Using a local administrator account log on the server where you want to install or upgrade
SolarWinds UDT.
2. If you downloaded the product from the SolarWinds website, navigate to your download
location and launch the executable.
3.
If you are prompted to install requirements, click Install, and then complete the installation,
including a reboot, if required.
Notes:
n Downloading and installing Microsoft .NET Framework 3.5 may take up to 20 minutes or
more, depending on your existing system configuration.
n If a reboot is required, after restart, click Install to resume installation, and then click Next on
the Welcome window.
4.
If the Microsoft Installer Wizard detects that Microsoft Internet Information Services (IIS) is
not installed, select Suspend installation to manually install IIS, click Next, quit setup, and then
install IIS as shown in one of the following sections, depending on your platform:
n Enabling IIS on Windows Server 2003 and Windows XP
n Enabling IIS on Windows Vista and Windows Server 2008 (R2) R2
n Enabling IIS on Windows 7
The Orion Web Console requires that Microsoft IIS is installed on the SolarWinds UDT Server.
If you do not install IIS at this point, you must install IIS later, and then configure a website for
the Orion Web Console to use.
5.
Read the message about the Orion Improvement Program. If you are willing to send anonymous data
back to SolarWinds for product improvement, click Send data. Otherwise, click Do not send data.
Notethat you can stop sending this data at any time by uninstalling the Orion Improvement Program
using the Control Panel.
6. Read the welcome message, and then click Next.
29

7.
If you are upgrading, type Yes that you acknowledge creating a database backup before installing the
new version of UDT.
For information on creating a database backup see "Creating Database Backups."
8. Select I accept the terms of the License Agreement, and then click Next.
9. Select an Installation Folder or accept the default, and then click Next.
10.
Click Next to begin the installation.
11. Click Finish when the setup completes.
Activating Your License
After installing the software through the setup wizard, you are prompted to enter the license activation key
for your product. If you do not have an activation key, the product runs in a time-limited evaluation mode.
To evaluate the software without a license
Click Continue Evaluation.
To license the software on a server with Internet access
1. Click Enter Licensing Information.
2. Select I have internet access and an activation key.
3. Click the http://www.solarwinds.com/customerportal link to access the customer portal on the
SolarWinds web site.
4.
Log on to the portal using your SolarWinds customer ID and password.
5. Click License Management on the left navigation bar.
6. Navigate to your product, choose an activation key from the Unregistered Licenses section, and then
copy the activation key.
7. If you cannot find an activation key in the Unregistered Licenses section, contact SolarWinds
customer support.
8. Return to the Activate UDT window, and then enter the activation key in the Activation Key field.
9. If you access Internet web sites through a proxy server, click I access the internet through a
proxy server, and enter the proxy address and port.
10. Click Next.
11. Enter your email address and other registration information, and then click Next.
To license the software on a server without Internet access
1. Click Enter Licensing Information
2. Select This server does not have internet access, and then click Next.
3. Click Copy Unique Machine ID.
4.
Paste the copied data into a text editor document.
5.
Transfer the document to a computer with Internet access.
6.
On the computer with Internet access, complete the following steps:
30
 Loading...