


Solarflare Server Adapter
Solarflare® Server Adapter User Guide
• Introduction...Page 1
• Installation...Page 18
• Solarflare Adapters on Linux...Page 39
• Solarflare Adapters on Windows...Page 109
• Solarflare Adapters on VMware...Page 236
• Solarflare Adapters on Solaris...Page 263
• SR-IOV Virtualization Using KVM...Page 307
• SR-IOV Virtualization for XenServer...Page 324
• Solarflare Adapters on Mac 0S X...Page 334
• Solarflare Boot ROM Agent...Page 344
User Guide
Information in this document is subject to change without notice.
© 2008-2014 Solarflare Communications Inc. All rights reserved.
Trademarks used in this text are registered trademarks of Solarflare® Communications Inc; Adobe is
a trademark of Adobe Systems. Microsoft® and Windows® are registered trademarks of Microsoft
Corporation.
Linux® is the registered trademark of Linus Torvalds in the U.S. and other countries.
Other trademarks and trade names may be used in this document to refer to either the entities
claiming the marks and names or their products. Solarflare Communications Inc. disclaims any
proprietary interest in trademarks and trade names other than its own.
SF-103837-CD
Last revised: July 2014
Issue 11
Issue 11 © Solarflare Communications 2014 i

Solarflare Server Adapter
User Guide
Table of Contents
Table of Contents. . . . . . . . . . . . . . . . . . . . . . . . . . . . . . . . . . . . . . . . . . . . . . . . . . . . . . . . . . ii
Chapter 1: Introduction . . . . . . . . . . . . . . . . . . . . . . . . . . . . . . . . . . . . . . . . . . . . . . . . . . . . . 1
1.1 Virtual NIC Interface . . . . . . . . . . . . . . . . . . . . . . . . . . . . . . . . . . . . . . . . . . . . . . . . . . . 1
1.2 Product Specifications. . . . . . . . . . . . . . . . . . . . . . . . . . . . . . . . . . . . . . . . . . . . . . . . . . 4
1.3 Software Driver Support . . . . . . . . . . . . . . . . . . . . . . . . . . . . . . . . . . . . . . . . . . . . . . . 12
1.4 Solarflare AppFlex™ Technology Licensing.. . . . . . . . . . . . . . . . . . . . . . . . . . . . . . . . 12
1.5 Open Source Licenses . . . . . . . . . . . . . . . . . . . . . . . . . . . . . . . . . . . . . . . . . . . . . . . . . 13
1.6 Support and Download . . . . . . . . . . . . . . . . . . . . . . . . . . . . . . . . . . . . . . . . . . . . . . . . 14
1.7 Regulatory Information. . . . . . . . . . . . . . . . . . . . . . . . . . . . . . . . . . . . . . . . . . . . . . . . 14
1.8 Regulatory Approval . . . . . . . . . . . . . . . . . . . . . . . . . . . . . . . . . . . . . . . . . . . . . . . . . . 15
Chapter 2: Installation . . . . . . . . . . . . . . . . . . . . . . . . . . . . . . . . . . . . . . . . . . . . . . . . . . . . . 18
2.1 Solarflare Network Adapter Products . . . . . . . . . . . . . . . . . . . . . . . . . . . . . . . . . . . . 19
2.2 Fitting a Full Height Bracket (optional) . . . . . . . . . . . . . . . . . . . . . . . . . . . . . . . . . . . 20
2.3 Inserting the Adapter in a PCI Express (PCIe) Slot . . . . . . . . . . . . . . . . . . . . . . . . . . 21
2.4 Attaching a Cable (RJ-45) . . . . . . . . . . . . . . . . . . . . . . . . . . . . . . . . . . . . . . . . . . . . . . 22
2.5 Attaching a Cable (SFP+) . . . . . . . . . . . . . . . . . . . . . . . . . . . . . . . . . . . . . . . . . . . . . . . 23
2.6 Supported SFP+ Cables . . . . . . . . . . . . . . . . . . . . . . . . . . . . . . . . . . . . . . . . . . . . . . . . 25
2.7 Supported SFP+ 10G SR Optical Transceivers . . . . . . . . . . . . . . . . . . . . . . . . . . . . . . 26
2.8 Supported SFP+ 10G LR Optical Transceivers . . . . . . . . . . . . . . . . . . . . . . . . . . . . . . 27
2.9 QSFP+ Transceivers and Cables . . . . . . . . . . . . . . . . . . . . . . . . . . . . . . . . . . . . . . . . . 27
2.10 Supported SFP 1000BASE-T Transceivers . . . . . . . . . . . . . . . . . . . . . . . . . . . . . . . . 29
2.11 Supported 1G Optical Transceivers . . . . . . . . . . . . . . . . . . . . . . . . . . . . . . . . . . . . . 30
2.12 Supported Speed and Mode. . . . . . . . . . . . . . . . . . . . . . . . . . . . . . . . . . . . . . . . . . . 30
2.13 Configure QSFP+ Adapter . . . . . . . . . . . . . . . . . . . . . . . . . . . . . . . . . . . . . . . . . . . . . 31
2.14 LED States. . . . . . . . . . . . . . . . . . . . . . . . . . . . . . . . . . . . . . . . . . . . . . . . . . . . . . . . . . 33
2.15 Solarflare Mezzanine Adapters: SFN5812H and SFN5814H. . . . . . . . . . . . . . . . . . 34
2.16 Solarflare Mezzanine Adapter SFN6832F-C61 . . . . . . . . . . . . . . . . . . . . . . . . . . . . 35
2.17 Solarflare Mezzanine Adapter SFN6832F-C62 . . . . . . . . . . . . . . . . . . . . . . . . . . . . 37
2.18 Solarflare Precision Time Synchronization Adapters . . . . . . . . . . . . . . . . . . . . . . . 38
2.19 Solarflare SFA6902F ApplicationOnload™ Engine . . . . . . . . . . . . . . . . . . . . . . . . . 38
Chapter 3: Solarflare Adapters on Linux . . . . . . . . . . . . . . . . . . . . . . . . . . . . . . . . . . . . . . 39
3.1 System Requirements . . . . . . . . . . . . . . . . . . . . . . . . . . . . . . . . . . . . . . . . . . . . . . . . . 39
3.2 Linux Platform Feature Set . . . . . . . . . . . . . . . . . . . . . . . . . . . . . . . . . . . . . . . . . . . . . 40
3.3 Solarflare RPMs . . . . . . . . . . . . . . . . . . . . . . . . . . . . . . . . . . . . . . . . . . . . . . . . . . . . . . 41
3.4 Installing Solarflare Drivers and Utilities on Linux . . . . . . . . . . . . . . . . . . . . . . . . . . 43
3.5 Red Hat Enterprise Linux Distributions . . . . . . . . . . . . . . . . . . . . . . . . . . . . . . . . . . . 43
3.6 SUSE Linux Enterprise Server Distributions. . . . . . . . . . . . . . . . . . . . . . . . . . . . . . . . 44
3.7 Unattended Installations . . . . . . . . . . . . . . . . . . . . . . . . . . . . . . . . . . . . . . . . . . . . . . 45
3.8 Unattended Installation - Red Hat Enterprise Linux . . . . . . . . . . . . . . . . . . . . . . . . . 47
Issue 11 © Solarflare Communications 2014 ii

Solarflare Server Adapter
User Guide
3.9 Unattended Installation - SUSE Linux Enterprise Server . . . . . . . . . . . . . . . . . . . . . 48
3.10 Hardware Timestamps . . . . . . . . . . . . . . . . . . . . . . . . . . . . . . . . . . . . . . . . . . . . . . . 49
3.11 Configuring the Solarflare Adapter . . . . . . . . . . . . . . . . . . . . . . . . . . . . . . . . . . . . . 49
3.12 Setting Up VLANs. . . . . . . . . . . . . . . . . . . . . . . . . . . . . . . . . . . . . . . . . . . . . . . . . . . . 51
3.13 Setting Up Teams. . . . . . . . . . . . . . . . . . . . . . . . . . . . . . . . . . . . . . . . . . . . . . . . . . . . 52
3.14 Running Adapter Diagnostics . . . . . . . . . . . . . . . . . . . . . . . . . . . . . . . . . . . . . . . . . . 53
3.15 Running Cable Diagnostics . . . . . . . . . . . . . . . . . . . . . . . . . . . . . . . . . . . . . . . . . . . . 54
3.16 Linux Utilities RPM . . . . . . . . . . . . . . . . . . . . . . . . . . . . . . . . . . . . . . . . . . . . . . . . . . 55
3.17 Configuring the Boot ROM with sfboot . . . . . . . . . . . . . . . . . . . . . . . . . . . . . . . . . . 56
3.18 Upgrading Adapter Firmware with Sfupdate . . . . . . . . . . . . . . . . . . . . . . . . . . . . . 70
3.19 License Install with sfkey . . . . . . . . . . . . . . . . . . . . . . . . . . . . . . . . . . . . . . . . . . . . . 75
3.20 Performance Tuning on Linux. . . . . . . . . . . . . . . . . . . . . . . . . . . . . . . . . . . . . . . . . . 79
3.21 Module Parameters. . . . . . . . . . . . . . . . . . . . . . . . . . . . . . . . . . . . . . . . . . . . . . . . . . 99
3.22 Linux ethtool Statistics . . . . . . . . . . . . . . . . . . . . . . . . . . . . . . . . . . . . . . . . . . . . . . 101
Chapter 4: Solarflare Adapters on Windows . . . . . . . . . . . . . . . . . . . . . . . . . . . . . . . . . . 109
4.1 System Requirements . . . . . . . . . . . . . . . . . . . . . . . . . . . . . . . . . . . . . . . . . . . . . . . . 109
4.2 Windows Feature Set . . . . . . . . . . . . . . . . . . . . . . . . . . . . . . . . . . . . . . . . . . . . . . . . 110
4.3 Installing the Solarflare Driver Package on Windows. . . . . . . . . . . . . . . . . . . . . . . 112
4.4 Adapter Drivers Only Installation. . . . . . . . . . . . . . . . . . . . . . . . . . . . . . . . . . . . . . . 113
4.5 Full Solarflare Package Installation . . . . . . . . . . . . . . . . . . . . . . . . . . . . . . . . . . . . . 115
4.6 Install Drivers and Options From a Windows Command Prompt . . . . . . . . . . . . . 119
4.7 Unattended Installation . . . . . . . . . . . . . . . . . . . . . . . . . . . . . . . . . . . . . . . . . . . . . . 123
4.8 Managing Adapters with SAM . . . . . . . . . . . . . . . . . . . . . . . . . . . . . . . . . . . . . . . . . 128
4.9 Managing Adapters Remotely with SAM. . . . . . . . . . . . . . . . . . . . . . . . . . . . . . . . . 129
4.10 Using SAM . . . . . . . . . . . . . . . . . . . . . . . . . . . . . . . . . . . . . . . . . . . . . . . . . . . . . . . . 130
4.11 Using SAM to Configure Adapter Features . . . . . . . . . . . . . . . . . . . . . . . . . . . . . . 135
4.12 Segmentation Offload. . . . . . . . . . . . . . . . . . . . . . . . . . . . . . . . . . . . . . . . . . . . . . . 142
4.13 Using SAM to Configure Teams and VLANs. . . . . . . . . . . . . . . . . . . . . . . . . . . . . . 145
4.14 Using SAM to View Statistics and State Information . . . . . . . . . . . . . . . . . . . . . . 153
4.15 Using SAM to Run Adapter and Cable Diagnostics . . . . . . . . . . . . . . . . . . . . . . . . 154
4.16 Using SAM for Boot ROM Configuration . . . . . . . . . . . . . . . . . . . . . . . . . . . . . . . . 159
4.17 Managing Firmware with SAM. . . . . . . . . . . . . . . . . . . . . . . . . . . . . . . . . . . . . . . . 166
4.18 Configuring Network Adapter Properties in Windows. . . . . . . . . . . . . . . . . . . . . 167
4.19 Windows Command Line Tools . . . . . . . . . . . . . . . . . . . . . . . . . . . . . . . . . . . . . . . 172
4.20 Sfboot: Boot ROM Configuration Tool. . . . . . . . . . . . . . . . . . . . . . . . . . . . . . . . . . 174
4.21 Sfupdate: Firmware Update Tool. . . . . . . . . . . . . . . . . . . . . . . . . . . . . . . . . . . . . . 189
4.22 Sfteam: Adapter Teaming and VLAN Tool . . . . . . . . . . . . . . . . . . . . . . . . . . . . . . . 193
4.23 Sfcable: Cable Diagnostics Tool . . . . . . . . . . . . . . . . . . . . . . . . . . . . . . . . . . . . . . . 200
4.24 Sfnet . . . . . . . . . . . . . . . . . . . . . . . . . . . . . . . . . . . . . . . . . . . . . . . . . . . . . . . . . . . . . 203
4.25 Completion codes (%errorlevel%) . . . . . . . . . . . . . . . . . . . . . . . . . . . . . . . . . . . . . 207
4.26 Teaming and VLANs. . . . . . . . . . . . . . . . . . . . . . . . . . . . . . . . . . . . . . . . . . . . . . . . . 209
4.27 Performance Tuning on Windows . . . . . . . . . . . . . . . . . . . . . . . . . . . . . . . . . . . . . 221
4.28 Windows Event Log Error Messages . . . . . . . . . . . . . . . . . . . . . . . . . . . . . . . . . . . 233
Issue 11 © Solarflare Communications 2014 iii

Solarflare Server Adapter
User Guide
Chapter 5: Solarflare Adapters on VMware . . . . . . . . . . . . . . . . . . . . . . . . . . . . . . . . . . . 236
5.1 System Requirements . . . . . . . . . . . . . . . . . . . . . . . . . . . . . . . . . . . . . . . . . . . . . . . . 236
5.2 VMware Feature Set . . . . . . . . . . . . . . . . . . . . . . . . . . . . . . . . . . . . . . . . . . . . . . . . . 237
5.3 Installing Solarflare Drivers and Utilities on VMware. . . . . . . . . . . . . . . . . . . . . . . 238
5.4 Configuring Teams. . . . . . . . . . . . . . . . . . . . . . . . . . . . . . . . . . . . . . . . . . . . . . . . . . . 239
5.5 Configuring VLANs . . . . . . . . . . . . . . . . . . . . . . . . . . . . . . . . . . . . . . . . . . . . . . . . . . . 239
5.6 Running Adapter Diagnostics . . . . . . . . . . . . . . . . . . . . . . . . . . . . . . . . . . . . . . . . . . 241
5.7 Configuring the Boot ROM with Sfboot. . . . . . . . . . . . . . . . . . . . . . . . . . . . . . . . . . 242
5.8 Upgrading Adapter Firmware with Sfupdate . . . . . . . . . . . . . . . . . . . . . . . . . . . . . 252
5.9 Performance Tuning on VMware . . . . . . . . . . . . . . . . . . . . . . . . . . . . . . . . . . . . . . . 255
Chapter 6: Solarflare Adapters on Solaris . . . . . . . . . . . . . . . . . . . . . . . . . . . . . . . . . . . . 263
6.1 System Requirements . . . . . . . . . . . . . . . . . . . . . . . . . . . . . . . . . . . . . . . . . . . . . . . . 263
6.2 Solaris Platform Feature Set . . . . . . . . . . . . . . . . . . . . . . . . . . . . . . . . . . . . . . . . . . . 264
6.3 Installing Solarflare Drivers. . . . . . . . . . . . . . . . . . . . . . . . . . . . . . . . . . . . . . . . . . . . 265
6.4 Unattended Installation Solaris 10. . . . . . . . . . . . . . . . . . . . . . . . . . . . . . . . . . . . . . 266
6.5 Unattended Installation Solaris 11. . . . . . . . . . . . . . . . . . . . . . . . . . . . . . . . . . . . . . 267
6.6 Configuring the Solarflare Adapter . . . . . . . . . . . . . . . . . . . . . . . . . . . . . . . . . . . . . 268
6.7 Setting Up VLANs. . . . . . . . . . . . . . . . . . . . . . . . . . . . . . . . . . . . . . . . . . . . . . . . . . . . 270
6.8 Solaris Utilities Package . . . . . . . . . . . . . . . . . . . . . . . . . . . . . . . . . . . . . . . . . . . . . . 270
6.9 Configuring the Boot ROM with sfboot . . . . . . . . . . . . . . . . . . . . . . . . . . . . . . . . . . 270
6.10 Upgrading Adapter Firmware with Sfupdate . . . . . . . . . . . . . . . . . . . . . . . . . . . . 281
6.11 Performance Tuning on Solaris . . . . . . . . . . . . . . . . . . . . . . . . . . . . . . . . . . . . . . . 284
6.12 Module Parameters. . . . . . . . . . . . . . . . . . . . . . . . . . . . . . . . . . . . . . . . . . . . . . . . . 292
6.13 Kernel and Network Adapter Statistics . . . . . . . . . . . . . . . . . . . . . . . . . . . . . . . . . 294
Chapter 7: SR-IOV Virtualization Using KVM . . . . . . . . . . . . . . . . . . . . . . . . . . . . . . . . . . 307
7.1 Supported Platforms and Adapters . . . . . . . . . . . . . . . . . . . . . . . . . . . . . . . . . . . . . 307
7.2 Linux KVM SR-IOV . . . . . . . . . . . . . . . . . . . . . . . . . . . . . . . . . . . . . . . . . . . . . . . . . . . 308
7.3 Installation . . . . . . . . . . . . . . . . . . . . . . . . . . . . . . . . . . . . . . . . . . . . . . . . . . . . . . . . . 311
7.4 Configuration Red Hat 6.1 . . . . . . . . . . . . . . . . . . . . . . . . . . . . . . . . . . . . . . . . . . . . 314
7.5 Configuration Red Hat 6.2 . . . . . . . . . . . . . . . . . . . . . . . . . . . . . . . . . . . . . . . . . . . . 317
7.6 Performance Tuning . . . . . . . . . . . . . . . . . . . . . . . . . . . . . . . . . . . . . . . . . . . . . . . . . 320
7.7 Migration . . . . . . . . . . . . . . . . . . . . . . . . . . . . . . . . . . . . . . . . . . . . . . . . . . . . . . . . . . 322
Chapter 8: SR-IOV Virtualization for XenServer. . . . . . . . . . . . . . . . . . . . . . . . . . . . . . . . 324
8.1 Supported Platforms and Adapters . . . . . . . . . . . . . . . . . . . . . . . . . . . . . . . . . . . . . 324
8.2 XenServer6 SR-IOV . . . . . . . . . . . . . . . . . . . . . . . . . . . . . . . . . . . . . . . . . . . . . . . . . . 325
8.3 Installation . . . . . . . . . . . . . . . . . . . . . . . . . . . . . . . . . . . . . . . . . . . . . . . . . . . . . . . . . 328
8.4 Configuration . . . . . . . . . . . . . . . . . . . . . . . . . . . . . . . . . . . . . . . . . . . . . . . . . . . . . . . 329
8.5 Performance Tuning . . . . . . . . . . . . . . . . . . . . . . . . . . . . . . . . . . . . . . . . . . . . . . . . . 330
Issue 11 © Solarflare Communications 2014 iv

Solarflare Server Adapter
User Guide
Chapter 9: Solarflare Adapters on Mac 0S X . . . . . . . . . . . . . . . . . . . . . . . . . . . . . . . . . . 334
9.1 System Requirements . . . . . . . . . . . . . . . . . . . . . . . . . . . . . . . . . . . . . . . . . . . . . . . . 334
9.2 Supported Hardware Platforms . . . . . . . . . . . . . . . . . . . . . . . . . . . . . . . . . . . . . . . . 334
9.3 Mac 0S X Platform Feature Set. . . . . . . . . . . . . . . . . . . . . . . . . . . . . . . . . . . . . . . . . 335
9.4 Thunderbolt . . . . . . . . . . . . . . . . . . . . . . . . . . . . . . . . . . . . . . . . . . . . . . . . . . . . . . . . 335
9.5 Driver Install. . . . . . . . . . . . . . . . . . . . . . . . . . . . . . . . . . . . . . . . . . . . . . . . . . . . . . . . 335
9.6 Interface Configuration. . . . . . . . . . . . . . . . . . . . . . . . . . . . . . . . . . . . . . . . . . . . . . . 338
9.7 Tuning. . . . . . . . . . . . . . . . . . . . . . . . . . . . . . . . . . . . . . . . . . . . . . . . . . . . . . . . . . . . . 339
9.8 Driver Properties via sysctl . . . . . . . . . . . . . . . . . . . . . . . . . . . . . . . . . . . . . . . . . . . . 339
9.9 Firmware Update. . . . . . . . . . . . . . . . . . . . . . . . . . . . . . . . . . . . . . . . . . . . . . . . . . . . 340
9.10 Performance . . . . . . . . . . . . . . . . . . . . . . . . . . . . . . . . . . . . . . . . . . . . . . . . . . . . . . 342
Chapter 10: Solarflare Boot ROM Agent . . . . . . . . . . . . . . . . . . . . . . . . . . . . . . . . . . . . . 344
10.1 Configuring the Solarflare Boot ROM Agent . . . . . . . . . . . . . . . . . . . . . . . . . . . . . 344
10.2 PXE Support . . . . . . . . . . . . . . . . . . . . . . . . . . . . . . . . . . . . . . . . . . . . . . . . . . . . . . . 345
10.3 iSCSI Boot . . . . . . . . . . . . . . . . . . . . . . . . . . . . . . . . . . . . . . . . . . . . . . . . . . . . . . . . . 349
10.4 Configuring the iSCSI Target . . . . . . . . . . . . . . . . . . . . . . . . . . . . . . . . . . . . . . . . . . 349
10.5 Configuring the Boot ROM . . . . . . . . . . . . . . . . . . . . . . . . . . . . . . . . . . . . . . . . . . . 349
10.6 DHCP Server Setup . . . . . . . . . . . . . . . . . . . . . . . . . . . . . . . . . . . . . . . . . . . . . . . . . 356
10.7 Installing an Operating System to an iSCSI target. . . . . . . . . . . . . . . . . . . . . . . . . 358
10.8 Default Adapter Settings. . . . . . . . . . . . . . . . . . . . . . . . . . . . . . . . . . . . . . . . . . . . . 367
Index . . . . . . . . . . . . . . . . . . . . . . . . . . . . . . . . . . . . . . . . . . . . . . . . . . . . . . . . . . . . . . . . . . 368
Issue 11 © Solarflare Communications 2014 v

Solarflare Server Adapter
Chapter 1: Introduction
This is the User Guide for Solarflare® Server Adapters. This chapter covers the following topics:
• Virtual NIC Interface...Page 1
• Advanced Features and Benefits...Page 2
• Product Specifications...Page 4
• Software Driver Support on page 12
• Solarflare AppFlex™ Technology Licensing....Page 12
• Open Source Licenses...Page 13
• Support and Download...Page 14
• Regulatory Information...Page 14
• Regulatory Approval...Page 15
User Guide
NOTE: Throughout this guide the term Onload refers to both OpenOnload® and EnterpriseOnload®
unless otherwise stated. Users of Onload should refer to the Onload User Guide, SF-104474-CD,
which describes procedures for download and installation of the Onload distribution, accelerating
and tuning the application using Onload to achieve minimum latency and maximum throughput.
1.1 Virtual NIC Interface
Solarflare’s VNIC architecture provides the key to efficient server I/O and is flexible enough to be
applied to multiple server deployment scenarios. These deployment scenarios include:
• Kernel Driver – This deployment uses an instance of a VNIC per CPU core for standard operating
system drivers. This allows network processing to continue over multiple CPU cores in parallel.
The virtual interface provides a performance-optimized path for the kernel TCP/IP stack and
contention-free access from the driver, resulting in extremely low latency and reduced CPU
utilization.
• Accelerated Virtual I/O – The second deployment scenario greatly improves I/O for virtualized
platforms. The VNIC architecture can provide a VNIC per Virtual Machine, giving over a
thousand protected interfaces to the host system, granting any virtualized (guest) operating
system direct access to the network hardware. Solarflare's hybrid SR-IOV technology, unique to
Solarflare Ethernet controllers, is the only way to provide bare-metal I/O performance to
virtualized guest operating systems whilst retaining the ability to live migrate virtual machines.
• OpenOnload™ – The third deployment scenario aims to leverage the host CPU(s) to full
capacity, minimizing software overheads by using a VNIC per application to provide a kernel
bypass solution. Solarflare has created both an open-source and Enterprise class highperformance application accelerator that delivers lower and more predictable latency and
higher message rates for TCP and UDP-based applications, all with no need to modify
applications or change the network infrastructure. To learn more about the open source
Issue 11 © Solarflare Communications 2014 1

OpenOnload project or EnterpriseOnload, download the Onload user guide (SF-104474-CD) or
contact your reseller.
Advanced Features and Benefits
Virtual NIC support The core of Solarflare technology. Protected VNIC interfaces can
be instantiated for each running guest operating system or
application, giving it a direct pipeline to the Ethernet network.
This architecture provides the most efficient way to maximize
network and CPU efficiency. The Solarflare Ethernet controller
supports up to 1024 vNIC interfaces per port.
On IBM System p servers equipped with Solarflare adapters,
each adapter is assigned to a single Logical Partition (LPAR)
where all VNICS are available to the LPAR.
PCI Express Implements PCI Express 3.0.
High Performance Support for 40G Ethernet interfaces and a new internal
datapath micro architecture.
Solarflare Server Adapter
User Guide
Hardware Switch Fabric Full hardware switch fabric in silicon capable of steering any
flow based on Layer 2, Layer 3 or application level protocols
between physical and virtual interfaces. Supporting an open
software defined network control plane with full PCI-IOV
virtualization acceleration for high performance guest operating
systems and virtual applications.
Improved flow processing The addition of dedicated parsing, filtering, traffic shaping and
flow steering engines which are capable of operating flexibly
and with an optimal combination of a full hardware data plane
with software based control plane.
TX PIO Transmit Programmed input/output is the direct transfer of data
to the adapter without CPU involvement. As an alternative to
the usual bus master DMA method, TX PIO improves latency
and is especially useful for smaller packets.
Multicast Replication Received multicast packets are replicated in hardware and
delivered to multiple receive queues.
Sideband management NCSI RMII interface for base board management integration.
SMBus interface for legacy base board management integration.
Issue 11 © Solarflare Communications 2014 2

Solarflare Server Adapter
User Guide
PCI Single-Root-IOV, SR-IOV,
capable
127 Virtual functions per port.
Flexible deployment of 1024 channels between Virtual and
Physical Functions.
Support Alternate Routing ID (ARI).
SR-IOV is not supported for Solarflare adapters on IBM System p
servers.
10-gigabit Ethernet Supports the ability to design a cost effective, high performance
10 Gigabit Ethernet solution.
Receive Side Scaling (RSS) IPv4 and IPv6 RSS raises the utilization levels of multi-core
servers dramatically by distributing I/O load across all CPUs and
cores.
Stateless offloads Through the addition of hardware based TCP segmentation and
reassembly offloads, VLAN, VxLAN and FCOE offloads.
Transmit rate pacing (per
queue)
Provides a mechanism for enforcing bandwidth quotas across all
guest operating systems. Software re-programmable on the fly
to allow for adjustment as congestion increases on the network.
Jumbo frame support Support for up to 9216 byte jumbo frames.
MSI-X support 1024 MSI-X interrupt support enables higher levels of
performance.
Can also work with MSI or legacy line based interrupts.
Ultra low latency Cut through architecture. < 7s end to end latency with
standard kernel drivers, < 3s with Onload drivers.
Remote boot Support for PXE boot 2.1 and iSCSI Boot provides flexibility in
cluster design and diskless servers (see Solarflare Boot ROM
Agent on page 344).
Network boot is not supported for Solarflare adapters on IBM
System p servers.
MAC address filtering Enables the hardware to steer packets based on the MAC
address to a VNIC.
Hardware timestamps The Solarflare Flareon™ SFN7000 series adapters can support
hardware timestamping for all received network packets including PTP.
The SFN5322F and SFN6322F adapters can generate hardware
timestamps of PTP packets.
Issue 11 © Solarflare Communications 2014 3

Solarflare Server Adapter
1.2 Product Specifications
Solarflare Flareon™ Network Adapters
Solarflare Flareon™ Ultra SFN7142Q Dual-Port 40GbE QSFP+ PCIe 3.0 Server I/O Adapter
Part number SFN7142Q
Controller silicon SFC9140
Power 13W typical
PCI Express 8 lanes Gen 3 (8.0GT/s), 127 SR-IOV virtual functions per port
Virtual NIC support 1024 vNIC interfaces per port
Supports OpenOnload Yes (factory enabled)
PTP and hardware timestamps Enabled by installing AppFlex license.
1PPS Optional bracket and cable assembly - not factory installed.
User Guide
SR-IOV Yes
Network ports 2 x QSFP+ (40G/10G)
Solarflare Flareon™ Ultra SFN7322F Dual-Port 10GbE PCIe 3.0 Server I/O Adapter
Part number SFN7322F
Controller silicon SFC9120
Power 5.9W typical
PCI Express 8 lanes Gen 3 (8.0GT/s), 127 SR-IOV virtual functions per port
Virtual NIC support 1024 vNIC interfaces per port
Supports OpenOnload Yes (factory enabled)
PTP and hardware timestamps Yes (factory enabled)
1PPS Optional bracket and cable assembly - not factory installed.
SR-IOV Yes
Network ports 2 x SFP+ (10G/1G)
Issue 11 © Solarflare Communications 2014 4

Solarflare Server Adapter
User Guide
Solarflare Flareon™ Ultra SFN7122F Dual-Port 10GbE PCIe 3.0 Server I/O Adapter
Part number SFN7122F
Controller silicon SFC9120
Power 5.9W typical
PCI Express 8 lanes Gen 3 (8.0GT/s), 127 SR-IOV virtual functions per port
Virtual NIC support 1024 vNIC interfaces per port
Supports OpenOnload Yes (factory enabled)
PTP and hardware timestamps AppFlex™ license required
1PPS Optional bracket and cable assembly - not factory installed.
SR-IOV Yes
Network ports 2 x SFP+ (10G/1G)
Solarflare Flareon™ SFN7002F Dual-Port 10GbE PCIe 3.0 Server I/O Adapter
Part number SFN7002F
Controller silicon SFC9120
Power 5.9W typical
PCI Express 8 lanes Gen 3 (8.0GT/s), 127 SR-IOV virtual functions per port
Virtual NIC support 1024 vNIC interfaces per port
Supports OpenOnload AppFlex™ license required
PTP and hardware timestamps AppFlex™ license required
1PPS Optional bracket and cable assembly - not factory installed.
SR-IOV Yes
Network ports 2 x SFP+ (10G/1G)
Issue 11 © Solarflare Communications 2014 5

Solarflare Onload Network Adapters
Solarflare SFN5121T Dual-Port 10GBASE-T Server Adapter
Part number SFN5121T
Controller silicon SFL9021
Power 12.9W typical
PCI Express 8 lanes Gen2 (5.0GT/s), 127 SR-IOV virtual functions per port
Virtual NIC support 1024 vNIC interfaces per port
Supports OpenOnload Yes
SR-IOV Yes
Network ports 2 x 10GBASE-T (10G/1G/100M)
Solarflare Server Adapter
User Guide
Solarflare SFN5122F Dual-Port 10G SFP+ Server Adapter
Part number SFN5122F
Controller silicon SFC9020
Power 4.9W typical
PCI Express 8 lanes Gen2 (5.0GT/s), 127 SR-IOV virtual functions per port
Virtual NIC support 1024 vNIC interfaces per port
Supports OpenOnload Yes
SR-IOV Yes
Network ports 2 x SFP+ (10G/1G)
Solarflare SFN6122F Dual-Port 10GbE SFP+ Server Adapter
Part number SFN6122F
Controller silicon SFC9020
Power 5.9W typical
PCI Express 8 lanes Gen2 (5.0GT/s), 127 SR-IOV virtual functions per port
Virtual NIC support 1024 vNIC interfaces per port
Supports OpenOnload Yes
SR-IOV
Issue 11 © Solarflare Communications 2014 6
Yes1

Network ports 2 x SFP+ (10G/1G)
Regulatory Product Code S6102
1. SR-IOV is not supported for Solarflare adapters on IBM System p servers.
Solarflare Server Adapter
User Guide
Issue 11 © Solarflare Communications 2014 7

Solarflare Server Adapter
User Guide
Solarflare SFN6322F Dual-Port 10GbE SFP+ Server Adapter
Part number SFN6122F
Controller silicon SFC9020
Power 5.9W typical
PCI Express 8 lanes Gen2 (5.0GT/s), 127 SR-IOV virtual functions per port
Virtual NIC support 1024 vNIC interfaces per port
Supports OpenOnload Yes
SR-IOV Yes
Network ports 2 x SFP+ (10G/1G)
Solarflare SFA6902F Dual-Port 10GbE SFP+ ApplicationOnload™ Engine
Part number SFA6902F
Controller silicon SFC9020
Power 25W typical
PCI Express 8 lanes Gen2 (5.0GT/s), 127 SR-IOV virtual functions per port
Virtual NIC support 1024 vNIC interfaces per port
Supports OpenOnload Yes
SR-IOV Yes
Network ports 2 x SFP+ (10G/1G)
Issue 11 © Solarflare Communications 2014 8

Solarflare Performant Network Adapters
Solarflare SFN5161T Dual-Port 10GBASE-T Server Adapter
Part number SFN5161T
Controller silicon SFL9021
Power 12.9W typical
PCI Express 8 lanes Gen2 (5.0GT/s)
Virtual NIC support 1024 vNIC interfaces per port
Supports OpenOnload No
SR-IOV Yes
Network ports 2 x 10GBASE-T (10G/1G/100M)
Solarflare Server Adapter
User Guide
Solarflare SFN5162F Dual-Port 10G SFP+ Server Adapter
Part number SFN5162F
Controller silicon SFC9020
Power 4.9W typical
PCI Express 8 lanes Gen2 (5.0GT/s)
Virtual NIC support 1024 vNIC interfaces per port
Supports OpenOnload No
SR-IOV
Yes
1
Network ports 2 x SFP+ (10G/1G)
1. SR-IOV is not supported for Solarflare adapters on IBM System p servers.
Issue 11 © Solarflare Communications 2014 9

Solarflare Mezzanine Adapters
Solarflare SFN5812H Dual-Port 10G Ethernet Mezzanine Adapter
Part number SFN5812H
Controller silicon SFC9020
Power 3.9W typical
PCI Express 8 lanes Gen2 (5.0GT/s), 127 SR-IOV virtual functions per port
Virtual NIC support 1024 vNIC interfaces per port
Supports OpenOnload Yes
SR-IOV Yes
Ports 2 x 10GBASE-KX4 backplane transmission
Solarflare Server Adapter
User Guide
Solarflare SFN5814H Quad-Port 10G Ethernet Mezzanine Adapter
Part number SFN5814H
Controller silicon 2 x SFC9020
Power 7.9W typical
PCI Express 8 lanes Gen2 (5.0GT/s), 127 SR-IOV virtual functions per port
Virtual NIC support 1024 vNIC interfaces per port
Supports OpenOnload Yes
SR-IOV Yes
Ports 4 x 10GBASE-KX4 backplane transmission
Solarflare SFN6832F Dual-Port 10GbE SFP+ Mezzanine Adapter
Part number SFN6832F-C61 for DELL PowerEdge C6100 series
SFN6832F-C62 for DELL PowerEdge C6200 series
Controller silicon SFC9020
Power 5.9W typical
PCI Express 8 lanes Gen2 (5.0GT/s), 127 SR-IOV virtual functions per port
Virtual NIC support 1024 vNIC interfaces per port
Supports OpenOnload Yes
Issue 11 © Solarflare Communications 2014 10

Solarflare Server Adapter
User Guide
SR-IOV Yes
Ports 2 x SFP+ (10G/1G)
Regulatory Product Code S6930
Solarflare SFN6822F Dual-Port 10GbE SFP+ FlexibleLOM Onload Server Adapter
Part number SFN6822F
Controller silicon SFC9020
Power 5.9W typical
PCI Express 8 lanes Gen2 (5.0GT/s), 127 SR-IOV virtual functions per port
Virtual NIC support 1024 vNIC interfaces per port
Supports OpenOnload Yes
SR-IOV Yes
Ports 2 x SFP+ (10G/1G)
Issue 11 © Solarflare Communications 2014 11

Solarflare Server Adapter
1.3 Software Driver Support
• Windows 7.
• Windows 8 and 8.1.
• Windows® Server 2008 R2 release.
• Windows® Server 2012 - including R2 release.
• Microsoft® Hyper-V™ Server 2008 R2.
• Linux® 2.6 and 3.x Kernels (32 bit and 64 bit) for the following distributions: RHEL 5, 6, 7 and
MRG. SLES 10, 11 and SLERT.
• VMware® ESX™ 5.0 and ESXi™ 5.1, vSphere™ 4.0 and vSphere™ 4.1.
• Citrix XenServer™ 5.6, 6.0 and Direct Guest Access.
• Linux® KVM.
• Solaris™ 10 updates 8, 9 and 10 and Solaris™ 11 (GLDv3).
User Guide
• Mac OS X Snow Leopard 10.6.8 (32 bit and 64 bit), OS X Lion 10.7.0 and later releases, OS X
Mountain Lion 10.8.0 and later, OS X Mavericks 10.9.
Solarflare SFN5162F and SFN6122F adapters are supported on the IBM POWER architecture (PPC64)
running RHEL 6.4 on IBM System p servers.
The Solarflare accelerated network middleware, OpenOnload and EnterpriseOnload, is supported
on all Linux variants listed above, and is available for all Solarflare Onload network adapters.
Solarflare are not aware of any issues preventing OpenOnload installation on other Linux variants
such as Ubuntu, Gentoo, Fedora and Debian variants.
1.4 Solarflare AppFlex™ Technology Licensing.
Solarflare AppFlex technology allows Solarflare server adapters to be selectively configured to
enable on-board applications. AppFlex licenses are required to enable selected functionality on the
Solarflare Flareon™ adapters and the AOE ApplicationOnload™ Engine.
Customers can obtain access to AppFlex applications via their Solarflare sales channel by obtaining
the corresponding AppFlex authorization code. The authorization code allows the customer to
generate licenses at the MyAppFlex page at https://support.solarflare.com/myappflex.
The sfkey utility application is used to install the generated license key file on selected adapters. For
detailed instructions for sfkey and license installation refer to License Install with sfkey on page 75.
Issue 11 © Solarflare Communications 2014 12

Solarflare Server Adapter
1.5 Open Source Licenses
1.4.1 Solarflare Boot Manager
The Solarflare Boot Manager is installed in the adapter's flash memory. This program is free
software; you can redistribute it and/or modify it under the terms of the GNU General Public License
as published by the Free Software Foundation; either version 2 of the License, or (at your option)
any later version.
This program is distributed in the hope that it will be useful, but WITHOUT ANY WARRANTY; without
even the implied warranty of MERCHANTABILITY or FITNESS FOR A PARTICULAR PURPOSE. See the
GNU General Public License for more details.
The latest source code for the Solarflare Boot Manager can be download from https://
support.solarflare.com/. If you require an earlier version of the source code, please e-mail
support@solarflare.com.
1.4.2 Controller Firmware
User Guide
The firmware running on the SFC9xxx controller includes a modified version of libcoroutine. This
software is free software published under a BSD license reproduced below:
Copyright (c) 2002, 2003 Steve Dekorte
All rights reserved.
Redistribution and use in source and binary forms, with or without modification, are permitted
provided that the following conditions are met:
Redistributions of source code must retain the above copyright notice, this list of conditions and the
following disclaimer.
Redistributions in binary form must reproduce the above copyright notice, this list of conditions and
the following disclaimer in the documentation and/or other materials provided with the
distribution.
Neither the name of the author nor the names of other contributors may be used to endorse or
promote products derived from this software without specific prior written permission.
THIS SOFTWARE IS PROVIDED BY THE COPYRIGHT HOLDERS AND CONTRIBUTORS "AS IS" AND ANY
EXPRESS OR IMPLIED WARRANTIES, INCLUDING, BUT NOT LIMITED TO, THE IMPLIED WARRANTIES
OF MERCHANTABILITY AND FITNESS FOR A PARTICULAR PURPOSE ARE DISCLAIMED. IN NO EVENT
SHALL THE REGENTS OR CONTRIBUTORS BE LIABLE FOR ANY DIRECT, INDIRECT, INCIDENTAL,
SPECIAL, EXEMPLARY, OR CONSEQUENTIAL DAMAGES (INCLUDING, BUT NOT LIMITED TO,
PROCUREMENT OF SUBSTITUTE GOODS OR SERVICES; LOSS OF USE, DATA, OR PROFITS; OR
BUSINESS INTERRUPTION) HOWEVER CAUSED AND ON ANY THEORY OF LIABILITY, WHETHER IN
CONTRACT, STRICT LIABILITY, OR TORT (INCLUDING NEGLIGENCE OR OTHERWISE) ARISING IN ANY
WAY OUT OF THE USE OF THIS SOFTWARE, EVEN IF ADVISED OF THE POSSIBILITY OF SUCH DAMAGE.
Issue 11 © Solarflare Communications 2014 13

Solarflare Server Adapter
1.6 Support and Download
Solarflare network drivers, RPM packages and documentation are available for download from
https://support.solarflare.com/.
Software and documentation for OpenOnload is available from www.openonload.org.
1.7 Regulatory Information
Warnings
Do not install the Solarflare network adapter in hazardous areas where highly combustible or
explosive products are stored or used without taking additional safety precautions. Do not expose
the Solarflare network adapter to rain or moisture.
The Solarflare network adapter is a Class III SELV product intended only to be powered by a certified
limited power source.
The equipment has been tested and found to comply with the limits for a Class B digital device,
pursuant to Part 15 of the FCC Rules. These limits are designed to provide reasonable protection
against harmful interference in a residential installation. The equipment generates, uses and can
radiate radio frequency energy and, if not installed and used in accordance with the instructions,
may cause harmful interference to radio communications. However, there is no guarantee that
interference will not occur in a particular installation.
User Guide
If the equipment does cause harmful interference to radio or television reception, which can be
determined by turning the equipment off and on, the user is encouraged to try to correct the
interference by one or more of the following measures:
• Reorient or relocate the receiving antenna.
• Increase the separation between the equipment and receiver.
• Connect the equipment into an outlet on a circuit different from that to which the receiver is
connected.
• Consult the dealer or an experienced radio/TV technician for help.
Changes or modifications not expressly approved by Solarflare Communications, the party
responsible for FCC compliance, could void the user's authority to operate the equipment.
This Class B digital apparatus complies with Canadian ICES-003.
Cet appareil numérique de la classe B est conforme à la norme NMB-003 du Canada.
Underwriters Laboratory Inc ('UL') has not tested the performance or reliability of the security or
signaling aspects of this product. UL has only tested for fire, shock or casualty hazards as outlined in
the UL's Standard for Safety UL 60950-1. UL Certification does not cover the performance or
reliability of the security or signaling aspects of this product. UL makes no representations,
warranties or certifications whatsoever regarding the performance or reliability of any security or
signaling related functions of this product.
Issue 11 © Solarflare Communications 2014 14

Solarflare Server Adapter
Laser Devices
The laser safety of the equipment has been verified using the following certified laser device module
(LDM):
User Guide
Manufactuer Model
Avago Technologies AFBR-703SDZ 9720151-072 TUV R72071411
Finisar Corporation FTLX8571D3BCL 9210176-094 TUV R72080250
When installed in a 10Gb ETHERNET NETWORK INTERFACE CARD FROM THE Solarflare SFN5000,
SFN6000 or SFN7000 SERIES, the laser emission levels remain under Class I limits as specified in the
FDA regulations for lasers, 21 CFR Part 1040.
The decision on what LDMs to use is made by the installer. For example, equipment may use one of
a multiple of different LDMs depending on path length of the laser communication signal. This
equipment is not basic consumer ITE.
The equipment is installed and maintained by qualified staff from the end user communications
company or subcontractor of the end user organization. The end product user and/or installer are
solely responsible for ensuring that the correct devices are utilized in the equipment and the
equipment with LDMs installed complies with applicable laser safety requirements.
CDRH Accession
No
Mark of
conformity
File No
1.8 Regulatory Approval
The information in this section is applicable to SFN5121T, and SFN5162F Solarflare network
adapters:
Category Specification Details
Europe
EMC
1
Safety
RoHS Europe Complies with EU directive 2002/95/EC
US FCC Part 15 Class B
Canada ICES 003/NMB-003 Class B
Europe BS EN 60950-1:2006 +A11:2009
US UL 60950-1 2nd Ed.
Canada CSA C22.2 60950-1-07 2nd Ed.
CB IEC 60950-1:2005 2nd Ed.
BS EN 55024:1998 +A1:2001 +A2:2003
BS EN 55022:2006
1. The safety assessment has been concluded on this product as a component/sub-assembly only.
Additional Regulatory Information for SFN5122F, SFN6122F, SFN6322F , SFA6902F, SFN7002F, SFN7122F, SFN7322F and SFN7142Q adapters.
ሶቯቒ㍔⫀⑵䚕孔函䷘榊㽱椫⹂呹尞Ⓟ◣巿↩᧤9&&,᧥ቑ㲨䄥⪉ቈሲኌኖ $ ㍔⫀㔏
嫢孔函ቊሼᇭሶቑ孔函ት⹅ㄼ䜿⬒ቊ∎䞷ሼቮቋ榊㽱ⰷ⹂ትㆤሰ怆ሶሼሶቋሯሥቭቡሼᇭ
ቀቑቫሩቍ椫⹂ሯ䤉䞮ሺቂ椪ᇬ∎䞷劔ቒ拸⒖ቍ⺍㉫ሯ㉔尐ቋቍቮ⫃⚗ሯሥቭቡሼ
Issue 11 © Solarflare Communications 2014 15

Solarflare Server Adapter
User Guide
巵⛙∎䞷劔᧶
抨㢾䟁櫭䤓彖岙䞱❐᧨⦷⻔⇞䤓䜿⬒₼∎䞷㣑᧨♾厌㦒抯㒟⺓櫊㞍᧨⦷抨䲽㍔㽐ₚ᧨∎
䞷劔㦒嬺尐㻑㘰♥㩟K拸䠅䤓⺜䷥
$ 鞾韥韥 꽺ꓩ끞ꗞꭖ뭪겕韥韥 넩韥韥鱉꽺ꓩ끞 $ 鞾 냱ꈑ놹녅볁놶뼞麦ꈒ냹뼑
韥韥넩꿙鱽 볅ꎙ녅 鿅鱉 ꩡ끞녅鱉 넩 뇅냹 늱넍뼍겑韥 ꗉꄱꐥ 閵뇊뀭넍 덵꾢꾅 ꩡ끞뼍鱉
阸냹ꑞ놶냱ꈑ뼞鱽鲙
Category Specification Details
Europe
US FCC Part 15 Class B
EMC
1
Safety
RoHS Europe Complies with EU directive 2011/65/EU
Canada ICES 003/NMB-003 Class B
Taiwan CNS 13438:2006 Class B
Japan VCCI Regulations V-3:2010 Class B
South Korea
Australia AS/NZS CISPR 22:2009
Europe BS EN 60950-1:2006 +A11:2009
US UL 60950-1 2nd Ed.
Canada CSA C22.2 60950-1-07 2nd Ed.
CB IEC 60950-1:2005 2nd Ed.
BS EN 55022:2010 + A1:2007
BS EN 55024:1998 +A1:2001 +A2:2003
KCC KN-22, KN-24
1. The safety assessment has been concluded on this product as a component/sub-assembly only.
Additional Regulatory Information for SFN5812H, SFN5814H and SFN6832F adapters.
ሶቯቒ㍔⫀⑵䚕孔函䷘榊㽱椫⹂呹尞Ⓟ◣巿↩᧤9&&,᧥ቑ㲨䄥⪉ቈሲኌኖ $ ㍔⫀㔏
嫢孔函ቊሼᇭሶቑ孔函ት⹅ㄼ䜿⬒ቊ∎䞷ሼቮቋ榊㽱ⰷ⹂ትㆤሰ怆ሶሼሶቋሯሥቭቡሼᇭ
ቀቑቫሩቍ椫⹂ሯ䤉䞮ሺቂ椪ᇬ∎䞷劔ቒ拸⒖ቍ⺍㉫ሯ㉔尐ቋቍቮ⫃⚗ሯሥቭቡሼ
巵⛙∎䞷劔᧶
抨㢾䟁櫭䤓彖岙䞱❐᧨⦷⻔⇞䤓䜿⬒₼∎䞷㣑᧨♾厌㦒抯㒟⺓櫊㞍᧨⦷抨䲽㍔㽐ₚ᧨∎
䞷劔㦒嬺尐㻑㘰♥㩟K拸䠅䤓⺜䷥
Issue 11 © Solarflare Communications 2014 16

Solarflare Server Adapter
Category Specification Details
Europe
BS EN 55024:1998 +A1:2001 +A2:2003
BS EN 55022:2006
US FCC Part 15 Class B
EMC
Canada ICES 003/NMB-003 Class B
Taiwan CNS 13438:2006 Class A
Japan VCCI Regulations V-3:2010 Class A
Australia AS/NZS CISPR 22:2009
Europe BS EN 60950-1:2006 +A11:2009
Safety
1
US UL 60950-1 2nd Ed.
Canada CSA C22.2 60950-1-07 2nd Ed.
CB IEC 60950-1:2005 2nd Ed.
RoHS Europe Complies with EU directive 2002/95/EC
1. The safety assessment has been concluded on this product as a component/sub-assembly only.
User Guide
Issue 11 © Solarflare Communications 2014 17

Chapter 2: Installation
This chapter covers the following topics:
• Solarflare Network Adapter Products...Page 19
• Fitting a Full Height Bracket (optional)...Page 20
• Inserting the Adapter in a PCI Express (PCIe) Slot...Page 21
• Attaching a Cable (RJ-45)...Page 22
• Attaching a Cable (SFP+)...Page 23
• Supported SFP+ Cables...Page 25
• Supported SFP+ 10G SR Optical Transceivers...Page 26
• Supported SFP+ 10G LR Optical Transceivers on page 27
• Supported SFP 1000BASE-T Transceivers...Page 29
• Supported 1G Optical Transceivers...Page 30
Solarflare Server Adapter
User Guide
• Supported Speed and Mode...Page 30
• Configure QSFP+ Adapter...Page 31
• LED States...Page 33
• Solarflare Mezzanine Adapters: SFN5812H and SFN5814H...Page 34
• Solarflare Mezzanine Adapter SFN6832F-C61...Page 35
• Solarflare Mezzanine Adapter SFN6832F-C62...Page 37
• Solarflare Precision Time Synchronization Adapters...Page 38
• Solarflare SFA6902F ApplicationOnload™ Engine...Page 38
CAUTION: Servers contain high voltage electrical components. Before removing the server cover,
disconnect the mains power supply to avoid the risk of electrocution.
Static electricity can damage computer components. Before handling computer components,
discharge static electricity from yourself by touching a metal surface, or wear a correctly fitted antistatic wrist band.
Issue 11 © Solarflare Communications 2014 18

2.1 Solarflare Network Adapter Products
Solarflare Flareon™ adapters
- Solarflare Flareon Ultra SFN7142Q Dual-Port 40GbE PCIe 3.0 QSFP+ Server Adapter
- Solarflare Flareon Ultra SFN7322F Dual-Port 10GbE PCIe 3.0 Server I/O Adapter
- Solarflare Flareon Ultra SFN7122F Dual-Port 10GbE PCIe 3.0 Server I/O Adapter
- Solarflare Flareon SFN7002F Dual-Port 10GbE PCIe 3.0 Server I/O Adapter
Solarflare Onload adapters
- Solarflare SFN6322F Dual-Port 10GbE Precision Time Stamping Server Adapter
- Solarflare SFN6122F Dual-Port 10GbE SFP+ Server Adapter
- Solarflare SFA6902F Dual-Port 10GbE ApplicationOnload™ Engine
- Solarflare SFN5122F Dual-Port 10G SFP+ Server Adapter
Solarflare Server Adapter
User Guide
- Solarflare SFN5121T Dual-Port 10GBASE-T Server Adapter
Solarflare Performant network adapters
- Solarflare SFN5161T Dual-Port 10GBASE-T Server Adapter
- Solarflare SFN5162F Dual-Port 10G SFP+ Server Adapter
Solarflare Mezzanine adapters
- Solarflare SFN5812H Dual-Port 10G Ethernet Mezzanine Adapter for IBM BladeCenter
- Solarflare SFN5814H Quad-Port 10G Ethernet Mezzanine Adapter for IBM BladeCenter
- Solarflare SFN6832F-C61 Dual-Port 10GbE SFP+ Mezzanine Adapter for DELL PowerEdge
C6100 series servers.
- Solarflare SFN6832F-C62 Dual-Port 10GbE SFP+ Mezzanine Adapter for DELL PowerEdge
C6200 series servers.
- Solarflare SFN6822F Dual-Port 10GbE SFP+ FlexibleLOM Onload Server Adapter
Solarflare network adapters can be installed on Intel/AMD x86 based 32 bit or 64 bit servers. The
network adapter must be inserted into a PCIe x8 OR PCIe x 16 slot for maximum performance. Refer
to PCI Express Lane Configurations on page 226 for details.
Solarflare SFN5162F and SFN6122F adapters are supported on the IBM POWER architecture (PPC64)
running RHEL 6.4 on IBM System p servers.
Issue 11 © Solarflare Communications 2014 19
Solarflare Server Adapter
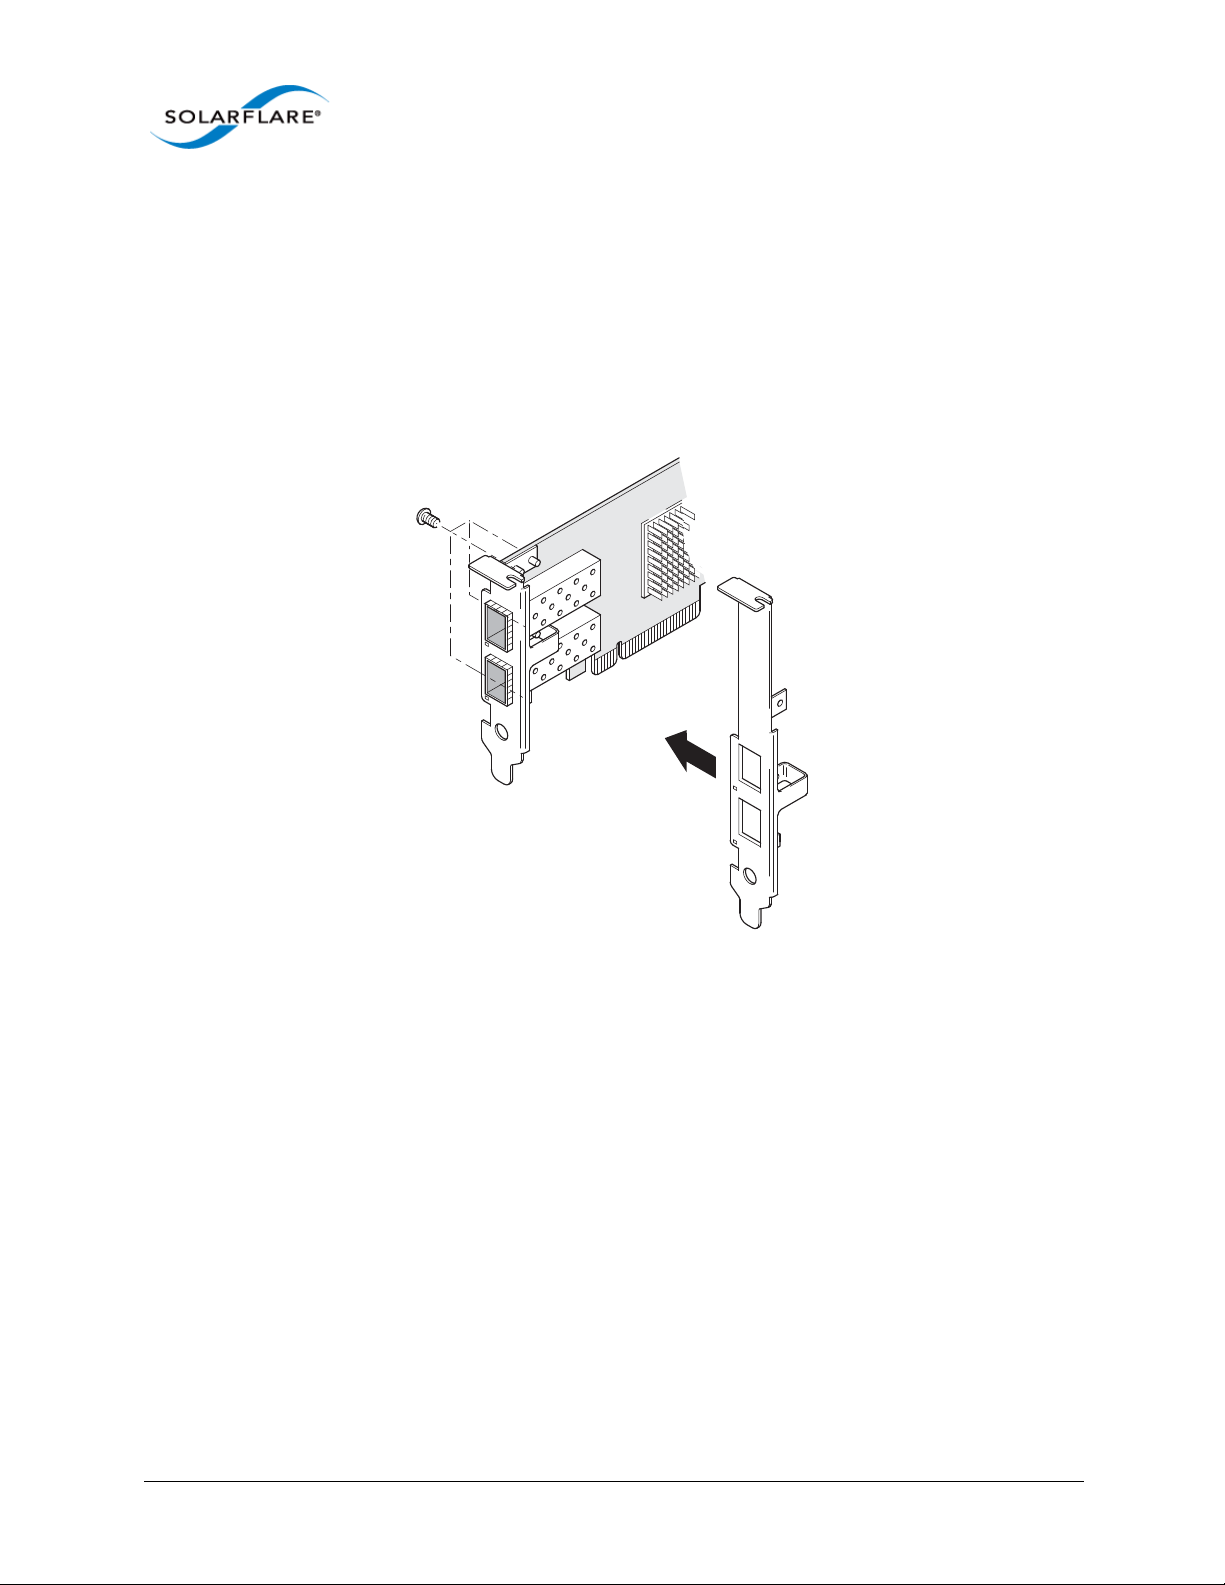
2.2 Fitting a Full Height Bracket (optional)
Solarflare adapters are supplied with a low-profile bracket fitted to the adapter. A full height bracket
has also been supplied for PCIe slots that require this type of bracket.
To fit a full height bracket to the Solarflare adapter:
1 From the back of the adapter, remove the screws securing the bracket.
2 Slide the bracket away from the adapter.
3 Taking care not the overtighten the screws, attach the full height bracket to the adapter.
User Guide
Issue 11 © Solarflare Communications 2014 20

Solarflare Server Adapter
2.3 Inserting the Adapter in a PCI Express (PCIe) Slot
1 Shut down the server and unplug it from the mains. Remove the server cover to access the
PCIe slots in the server.
2 Locate an 8-lane or 16-lane PCIe slot (refer to the server manual if necessary) and insert the
Solarflare card.
3 Secure the adapter bracket in the slot.
4 Replace the cover and restart the server.
User Guide
5 After restarting the server, the host operating system may prompt you to install drivers for the
new hardware. Click Cancel or abort the installation and refer to the relevant chapter in this
manual for how to install the Solarflare adapter drivers for your operating system.
Issue 11 © Solarflare Communications 2014 21
Solarflare Server Adapter
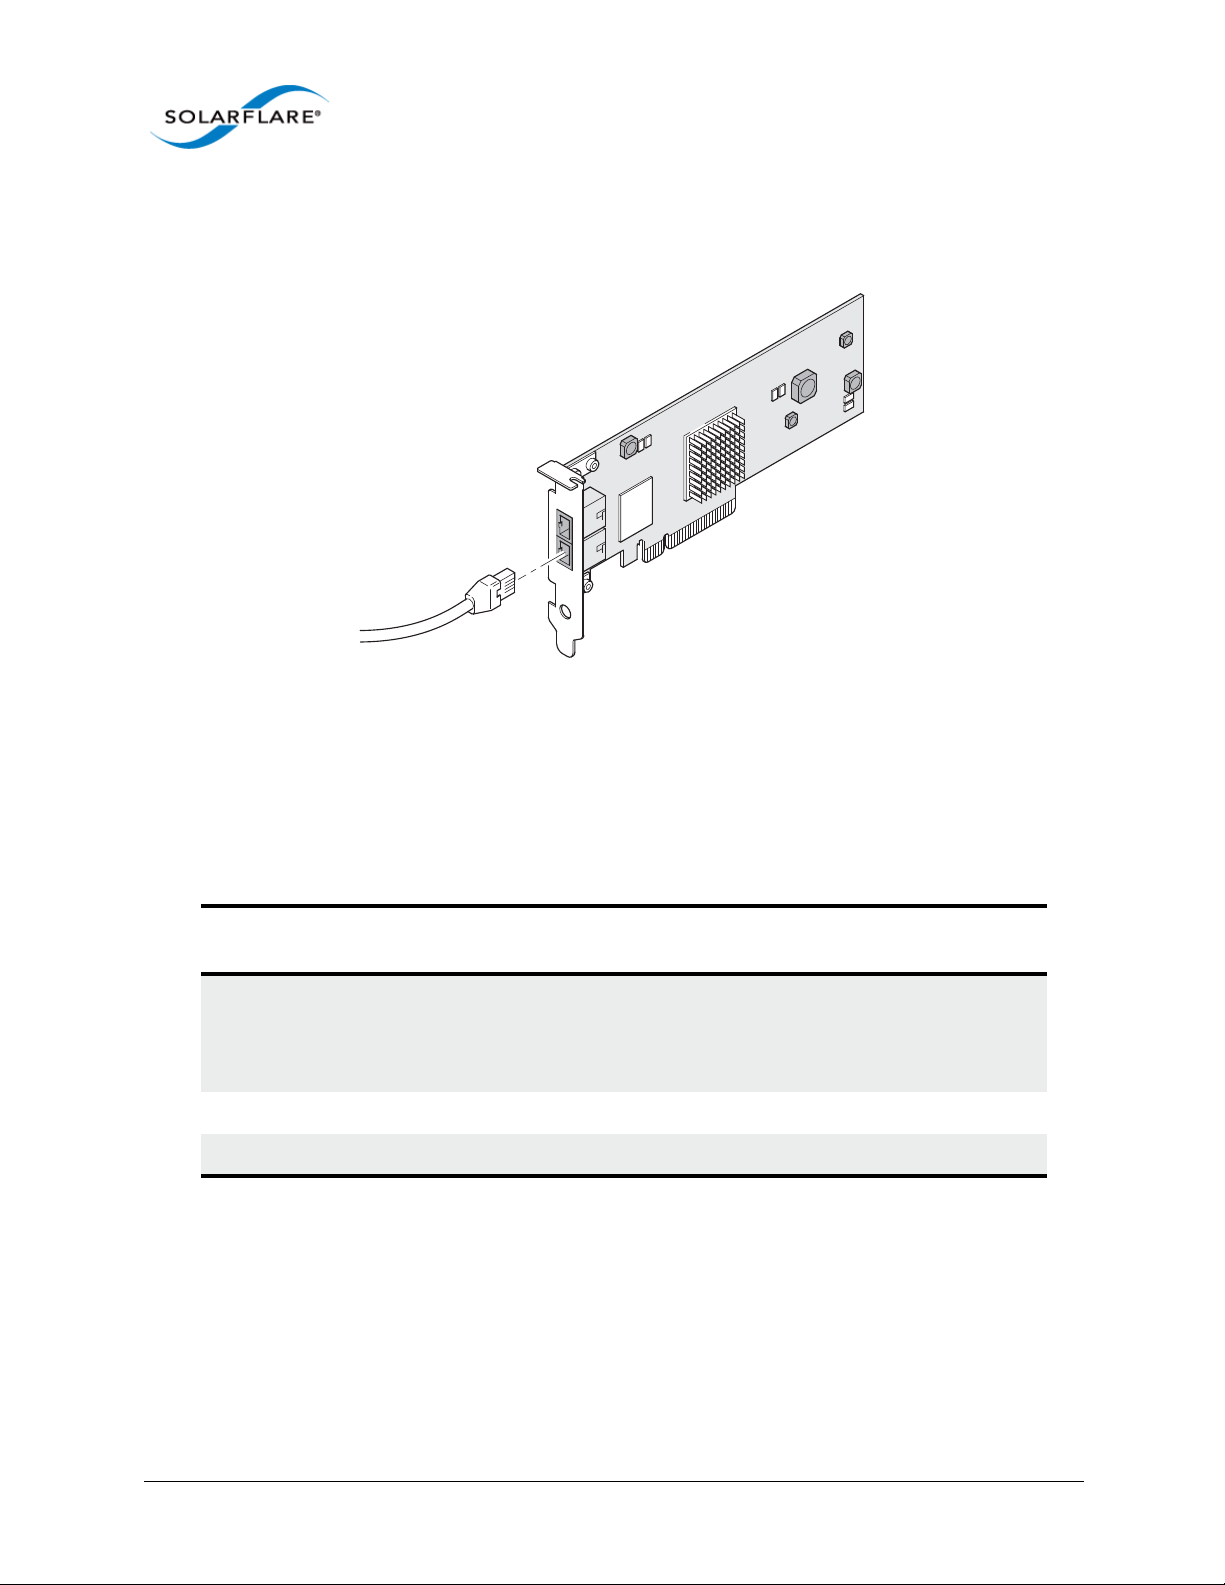
2.4 Attaching a Cable (RJ-45)
Solarflare 10GBASE-T Server Adapters connect to the Ethernet network using a copper cable fitted
with an RJ-45 connector (shown below).
User Guide
RJ-45 Cable Specifications
Table 1 below lists the recommended cable specifications for various Ethernet port types.
Depending on the intended use, attach a suitable cable. For example, to achieve 10 Gb/s
performance, use a Category 6 cable. To achieve the desired performance, the adapter must be
connected to a compliant link partner, such as an IEEE 802.3an-compliant gigabit switch.
Table 1: RJ-45 Cable Specification
Port type Connector Media Type
10GBASE-T RJ-45 Category 6A
Category 6 unshielded twisted pairs (UTP)
Category 5E
1000BASE-T RJ-45 Category 5E, 6, 6A UTP 100m (328 ft.)
100BASE-TX RJ-45 Category 5E, 6, 6A UTP 100m (328 ft.)
Maximum
Distance
100m (328 ft.)
55m (180 ft.)
55m (180 ft.)
Issue 11 © Solarflare Communications 2014 22

Solarflare Server Adapter
2.5 Attaching a Cable (SFP+)
Solarflare SFP+ Server Adapters can be connected to the network using either an SFP+ Direct Attach
cable or a fiber optic cable.
Attaching the SFP+ Direct Attach Cable:
1 Turn the cable so that the connector retention tab and gold fingers are on the same side as the
network adapter retention clip.
Push the cable connector straight in to the adapter socket until it clicks into place.
User Guide
Removing the SFP+ Direct Attach Cable:
1 Pull straight back on the release ring to release the cable retention tab. Alternatively, you can
lift the retention clip on the adapter to free the cable if necessary.
2 Slide the cable free from the adapter socket.
Attaching a fiber optic cable:
WARNING
Do not look directly into the fiber transceiver or cables
as the laser beams can damage your eyesight.
1 Remove and save the fiber optic connector cover.
2 Insert a fiber optic cable into the ports on the network adapter bracket as shown. Most
connectors and ports are keyed for proper orientation. If the cable you are using is not keyed,
Issue 11 © Solarflare Communications 2014 23

Solarflare Server Adapter
check to be sure the connector is oriented properly (transmit port connected to receive port
on the link partner, and vice versa).
Removing a fiber optic cable:
User Guide
WARNING
Do not look directly into the fiber transceiver or cables
as the laser beams can damage your eyesight.
1 Remove the cable from the adapter bracket and replace the fiber optic connector cover.
2 Pull the plastic or wire tab to release the adapter bracket.
3 Hold the main body of the adapter bracket and remove it from the adapter.
Issue 11 © Solarflare Communications 2014 24

Solarflare Server Adapter
2.6 Supported SFP+ Cables
Table 2 is a list of supported SFP+ cables that have been tested by Solarflare. Solarflare is not aware
of any issues preventing the use of other brands of SFP+ cables (of up to 5m in length) with Solarflare
network adapters. However, only cables in the table below have been fully verified and are therefore
supported.
Table 2: Supported SFP+ Direct Attach Cables
Manufacturer Product Code Cable Length Notes
Arista CAB-SFP-SFP-1M 1m
Arista CAB-SFP-SFP-3M 3m
Cisco SFP-H10GB-CU1M 1m
Cisco SFP-H10GB-CU3M 3m
Cisco SFP-H10GB-CU5M 5m
User Guide
HP J9283A/B Procurve 3m
Juniper EX-SFP-10GE-DAC-1m 1m
Juniper EX-SFP-10GE-DAC-3m 3m
Molex 74752-1101 1m
Molex 74752-2301 3m
Molex 74752-3501 5m
Molex 74752-9093 1m 37-0960-01 / 0K585N
Molex 74752-9094 3m 37-0961-01 / 0J564N
Molex 74752-9096 5m 37-0962-01 / 0H603N
Panduit PSF1PXA1M 1m
Panduit PSF1PXA3M 3m
Panduit PSF1PXD5MBU 5m
Siemon SFPP30-01 1m
Siemon SFPP30-02 2m
Siemon SFPP30-03 3m
Siemon SFPP24-05 5m
Tyco 2032237-2 D 1m
Tyco 2032237-4 3m
Issue 11 © Solarflare Communications 2014 25

Solarflare Server Adapter
The Solarflare SFA6902F adapter has been tested and certified with direct attach cables up to 3m in
length.
2.7 Supported SFP+ 10G SR Optical Transceivers
Table 3 is a list of supported SFP+10G SR optical transceivers that have been tested by Solarflare.
Solarflare is not aware of any issues preventing the use of other brands of 10G SR transceivers with
Solarflare network adapters. However, only transceivers in the table below have been fully verified
and are therefore supported.
Table 3: Supported SFP+ 10G Optical SR Transceivers
Manufacturer Product Code Notes
Avago AFBR-703SDZ 10G
Avago AFBR-703SDDZ Dual speed 1G/10G optic.
Avago AFBR-703SMZ 10G
User Guide
Arista SFP-10G-SR 10G
Finisar FTLX8571D3BCL 10G
Finisar FTLX8571D3BCV Dual speed 1G/10G optic.
HP 456096-001 Also labelled as 455883-B21 and
455885-001
Intel AFBR-703SDZ 10G
JDSU PLRXPL-SC-S43-22-N 10G
Juniper AFBR-700SDZ-JU1 10G
MergeOptics TRX10GVP2010 10G
Solarflare SFM-10G-SR 10G
Issue 11 © Solarflare Communications 2014 26

Solarflare Server Adapter
2.8 Supported SFP+ 10G LR Optical Transceivers
Table 4 is a list of supported SFP+10G LR optical transceivers that have been tested by Solarflare.
Solarflare is not aware of any issues preventing the use of other brands of 10G LR transceivers with
Solarflare network adapters. However, only transceivers in the table below have been fully verified
and are therefore supported.
Table 4: Supported SFP+ 10G LR Optical Transceivers
Manufacturer Product Code Notes
Avago AFCT-701SDZ 10G single mode fiber
Finisar FTLX1471D3BCL 10G single mode fiber
2.9 QSFP+ Transceivers and Cables
The following tables identify QSFP+ transceiver modules and cables tested by Solarflare with the
SFN7000 QSP+ adapters. Solarflare are not aware of any issues preventing the use of other brands
of QSFP+ 40G transceivers and cables with Solarflare SFN7000 QSFP+ adapters. However, only
products listed in the tables below have been fully verified and are therefore supported
User Guide
Supported QSFP+ 40GBASE-SR4 Transceivers
The Solarflare Flareon Ultra SFN7142Q adapter has been tested with the following QSFP+ 40GBASESR4 optical transceiver modules.
Table 5: Supported QSFP+ SR4 Transceivers
Manufacturer Product Code Notes
Arista AFBR-79E4Z
Avago AFBR-79EADZ
Avago AFBR-79EIDZ
Avago AFBR-79EQDZ
Avago AFBR-79EQPZ
Standard 100m (OM3 Multimode fiber) range.
Finisar FTL410QE2C
JDSU JQP-04SWAA1
JDSU JDSU-04SRAB1
Solarflare SFM-40G-SR4
Issue 11 © Solarflare Communications 2014 27

Solarflare Server Adapter
Supported QSFP+ 40G Active Optical Cables (AOC)
The Solarflare Flareon Ultra SFN7142Q adapter has been tested with the following QSFP+ Active
Optical Cables (AOC).
Table 6: Supported QSFP+ Active Optical Cables
Manufacturer Product Code Notes
Avago AFBR-7QER05Z
Finisar FCBG410QB1C03
Finisar FCBN410QB1C05
Supported QSFP+ 40G Direct Attach Cables
The Solarflare Flareon Ultra SFN7142Q adapter has been tested with the following QSFP+ Direct
Attach Cables (DAC).
User Guide
Table 7: Supported QSFP+ Direct Attach Cables
Manufacturer Product Code Notes
Arista CAB-Q-Q-3M 3m
Arista CAB-Q-Q-5M 5m
FCI 10093084-3030LF 3m
Molex 74757-1101 1m
Molex 74757-2301 3m
Siemon QSFP30-01 1m
Siemon QSFP30-03 3m
Siemon QSFP30-05 5m
Supported QSFP+ to SFP+ Breakout Cables
Solarflare QSFP+ to SFP+ breakout cables enable users to connect Solarflare SFN7142Q dual-port
QSFP+ server I/O adapters to work as a quad-port SFP+ server I/O adapters. The breakout cables
offer a cost-effective option to support connectivity flexibility in high-speed data center
applications.
These high performance direct-attach assemblies support 2 lanes of 10 Gb/s per QSFP+ port and are
available in lengths of 1 meters and 3 meters. The SOLR-QSFP2SFP-1M, -3M copper DAC cables are
fully tested and compatible with the Solarflare SFN7142Q server I/O adapter. These cables are
compliant with the SFF-8431, SFF-8432, SFF-8436, SFF-8472 and IBTA Volume 2 Revision 1.3
specifications.
Issue 11 © Solarflare Communications 2014 28

Solarflare Server Adapter
Table 8: Supported QSFP+ to SFP+ Breakout Cables
Manufacturer Product Code Notes
Solarflare SOLR-QSFP2SFP-1M
Solarflare SOLR-QSFP2SFP-3M
2.10 Supported SFP 1000BASE-T Transceivers
Table 9 is a list of supported SFP 1000BASE-T transceivers that have been tested by Solarflare.
Solarflare is not aware of any issues preventing the use of other brands of 1000BASE-T transceivers
with the Solarflare network adapters. However, only transceivers in the table below have been fully
verified and are therefore supported.
Table 9: Supported SFP 1000BASE-T Transceivers
User Guide
Manufacturer Product Code
Arista SFP-1G-BT
Avago ABCU-5710RZ
Cisco 30-1410-03
Dell FCMJ-8521-3-(DL)
Finisar FCLF-8521-3
Finisar FCMJ-8521-3
HP 453156-001
453154-B21
3COM 3CSFP93
Issue 11 © Solarflare Communications 2014 29

Solarflare Server Adapter
2.11 Supported 1G Optical Transceivers
Table 10 is a list of supported 1G transceivers that have been tested by Solarflare. Solarflare is not
aware of any issues preventing the use of other brands of 1G transceivers with Solarflare network
adapters. However, only transceivers in the table below have been fully verified and are therefore
supported.
Manufacturer Product Code Type
Avago AFBR-5710PZ 1000Base-SX
Cisco GLC-LH-SM 1000Base-LX/LH
Finisar FTLF8519P2BCL 1000Base-SX
Finisar FTLF8519P3BNL 1000Base-SX
Finisar FTLF1318P2BCL 1000Base-LX
Table 10: Supported 1G Transceivers
User Guide
Finisar FTLF1318P3BTL 1000Base-LX
HP 453153-001
453151-B21
1000Base-SX
2.12 Supported Speed and Mode
Solarflare network adapters support either QSFP+, SFP, SFP+ or Base-T standards.
On Base-T adapters three speeds are supported 100Mbps, 1Gbps and 10Gbps. The adapters use
auto negotiation to automatically select the highest speed supported in common with the link
partner.
On SFP+ adapters the currently inserted SFP module (transceiver) determines the supported speeds,
typically SFP modules only support a single speed. Some Solarflare SFP+ adapters support dual
speed optical modules that can operate at either 1Gbps or 10Gbps. However, these modules do not
auto-negotiate link speed and operate at the maximum (10G) link speed unless explicitly configured
to operate at a lower speed (1G).
Issue 11 © Solarflare Communications 2014 30

Solarflare Server Adapter
2.13 Configure QSFP+ Adapter
QSFP+ adapters can operate as 2 x 10Gbps per QSFP+ port or as 1 x 40Gbps per QSFP+ port. A
configuration of 1 x 40G and 2 x 10G ports is not supported.
User Guide
Figure 1: QSFP+ Port Configuration
The Solarflare 40G breakout cables have only 2 physical cables - for details refer to Supported QSFP+
to SFP+ Breakout Cables on page 28. Breakout cables from other suppliers may have 4 physical
cables. When connecting a third party breakout cable into the Solarflare 40G QSFP+ cage (in 10G
mode), only cables 1 and 3 will be active.
The sfboot utility from the Solarflare Linux Utilities package (SF-107601-LS) can be used to configure
the adapter for 10G or 40G operation.
# sfboot port-mode=40G
Issue 11 © Solarflare Communications 2014 31

Solarflare Server Adapter
User Guide
The tables below summarizes the speeds supported by Solarflare network adapters.
Table 11: SFN5xxx,SFN6xxx and SFN7xxx SFP+ QSFP+ Adapters
Supported Modes Auto neg speed Speed Comment
QSFP+ direct attach cables No 10G or 40G SFN7142Q
QSFP+ optical cables No 10G or 40G SFN7142Q
SFP+ direct attach cable No 10G
SFP+ optical module (10G) No 10G
SFP optical module (1G) No 1G
SFP+ optical module (10G/1G) No 10G or 1G Dual speed modules run at
the maximum speed (10G)
unless explicitly configured to
the lower speed (1G)
SFP 1000BASE-T module No 1G These modules support only
1G and will not link up at
100Mbps
Table 12: SFN5121T, SFN5151T, SFN5161T 10GBASE-T Adapters
Supported Modes Auto neg speed Speed Comment
100Base-T Yes 100Mbps Typically the interface is set
1000Base-TX Yes 1Gbps
10GBase-T Ye s 10Gbps
to auto negotiation speed
and automatically selects the
highest speed supported in
common with it’s link partner.
If the link partner is set to
100Mbps, with no autoneg,
the adapter will use “parallel
detection” to detect and
select 100Mbps speed. If
needed any of the three
speeds can be explicitly
configured
100Base-T in a Solarflare adapter back-to-back (no intervening switch) configuration will not work
and is not supported.
Issue 11 © Solarflare Communications 2014 32

Solarflare Server Adapter
2.14 LED States
There are two LEDs on the Solarflare network adapter transceiver module. LED states are as follows:
Table 13: LED States
Adapter Type LED Description State
User Guide
QSFP+, SFP/SFP+ Link
Activity
BASE-T Speed
Activity
Green (solid) at all speeds
Flashing green when network traffic is present
LEDs are OFF when there is no link present
Green (solid) 10Gbps
Yellow (solid) 100/1000Mbps
Flashing green when network traffic is present
LEDs are OFF when there is no link present
Issue 11 © Solarflare Communications 2014 33

Solarflare Server Adapter
2.15 Solarflare Mezzanine Adapters: SFN5812H and SFN5814H
The Solarflare SFN5812H Dual-Port and SFN5814H Quad-Port are 10G Ethernet Mezzanine Adapters
for the IBM BladeCenter.
Solarflare mezzanine adapters are supported on the IBM BladeCenter E, H and S chassis, HS22,
HS22V and HX5 servers. The IBM BladeCenter blade supports a single Solarflare mezzanine adapter.
1 The blade should be extracted from the BladeCenter in order to install the mezzanine adapter.
2 Remove the blade top cover and locate the two retaining posts towards the rear of the blade -
(Figure 2). Refer to the BladeCenter manual if necessary.
User Guide
Figure 2: Installing the Mezzanine Adapter
3 Hinge the adapter under the retaining posts, as illustrated, and align the mezzanine port
connector with the backplane connector block.
Issue 11 © Solarflare Communications 2014 34

Solarflare Server Adapter
User Guide
4 Lower the adapter, taking care to align the side positioning/retaining posts with the recesses in
the adapter. See Figure 3.
Figure 3: In position mezzanine adapter
5 Press the port connector gently into the connector block ensuring that the adapter is firmly
and correctly seated in the connector block.
6 Replace the blade top cover.
7 When removing the adapter raise the release handle (shown on Figure 3) to ease the adapter
upwards until it can be freed from the connector block.
2.16 Solarflare Mezzanine Adapter SFN6832F-C61
The Solarflare SFN6832F-C61 is a Dual-Port SFP+ are 10GbE Mezzanine Adapters for the DELL
PowerEdge C6100 series rack server. Each DELL PowerEdge node supports a single Solarflare
mezzanine adapter.
1 The node should be extracted from the rack server in order to install the mezzanine adapter.
Refer to the PowerEdge rack server manual if necessary.
Issue 11 © Solarflare Communications 2014 35
Solarflare Server Adapter
User Guide
Figure 4: SFN6832F-C61 - Installing into the rack server node
2 Secure the side retaining bracket as shown in Figure 5 (top diagram)
3 Fit riser PCB card into the slot as shown in Figure 5 (top diagram). Note that the riser card only
fits one way.
4 Offer the adapter to the node and ensure it lies underneath the chassis cover.
5 Lower the adapter into position making sure to connect the adapter slot with the to of the PCB
riser card.
6 Secure the adapter using the supplied screws at the positions shown in the diagram.
Issue 11 © Solarflare Communications 2014 36

Solarflare Server Adapter
2.17 Solarflare Mezzanine Adapter SFN6832F-C62
The Solarflare SFN6832F-C61 is a Dual-Port SFP+ are 10GbE Mezzanine Adapters for the DELL
PowerEdge C6200 series rack server. Each DELL PowerEdge node supports a single Solarflare
mezzanine adapter.
1 The node should be extracted from the rack server in order to install the mezzanine adapter.
Refer to the PowerEdge rack server manual if necessary.
User Guide
Figure 5: SFN6832F-C62 - Installing into the rack server node
2 Fit the PCB riser card to the underside connector on the adapter.
3 Offer the adapter to the rack server node ensuring it lies underneath the chassis cover.
4 Lower to adapter to connect the riser PCB card into the slot in the node.
5 Secure the adapter with the supplied screws at the points shown in the diagram.
Issue 11 © Solarflare Communications 2014 37

Solarflare Server Adapter
2.18 Solarflare Precision Time Synchronization Adapters
The Solarflare SFN7142Q1, SFN7122F1, SFN7322F and SFN6322F adapters can generate hardware
timestamps for PTP packets in support of a network precision time protocol deployment compliant
with the IEEE 1588-2008 specification.
Customers requiring configuration instructions for these adapters and Solarflare PTP in a PTP
deployment should refer to the Solarflare Enhanced PTP User Guide SF-109110-CD.
1. Requires an AppFlex™ license - refer to Solarflare AppFlex™ Technology Licensing. on page 12.
2.19 Solarflare SFA6902F ApplicationOnload™ Engine
The ApplicationOnload™ Engine (AOE) SFA6902F is a full length PCIe form factor adapter that
combines an ultra-low latency adapter with a tightly coupled ’bump-in-the-wire’ FPGA.
For details of installation and configuring applications that run on the AOE refer to the Solarflare AOE
User’s Guide (SF-108389-CD). For details on developing custom applications to run on the FPGA refer
to the AOE Firmware Development Kit User Guide (SF-108390-CD).
User Guide
Issue 11 © Solarflare Communications 2014 38

Solarflare Server Adapter
Chapter 3: Solarflare Adapters on Linux
This chapter covers the following topics on the Linux® platform:
• System Requirements...Page 39
• Linux Platform Feature Set...Page 40
• Solarflare RPMs...Page 41
• Installing Solarflare Drivers and Utilities on Linux...Page 43
• Red Hat Enterprise Linux Distributions...Page 43
• SUSE Linux Enterprise Server Distributions...Page 44
• Unattended Installations...Page 45
• Unattended Installation - Red Hat Enterprise Linux...Page 47
• Unattended Installation - SUSE Linux Enterprise Server...Page 48
• Hardware Timestamps...Page 49
User Guide
• Configuring the Solarflare Adapter...Page 49
• Configuring Receive/Transmit Ring Buffer Size...Page 50
• Setting Up VLANs...Page 51
• Setting Up Teams...Page 52
• Running Adapter Diagnostics...Page 53
• Running Cable Diagnostics...Page 54
• Transmit Packet Steering...Page 89
• Configuring the Boot ROM with sfboot...Page 56
• Upgrading Adapter Firmware with Sfupdate...Page 70
• License Install with sfkey...Page 75
• Performance Tuning on Linux...Page 79
• Module Parameters...Page 99
• Linux ethtool Statistics...Page 101
3.1 System Requirements
Refer to Software Driver Support on page 12 for supported Linux Distributions.
NOTE: SUSE Linux Enterprise Server 11 includes a version of the Solarflare network adapter Driver.
This driver does not support the SFN512x family of adapters. To update the supplied driver, see
SUSE Linux Enterprise Server Distributions on page 44
Issue 11 © Solarflare Communications 2014 39

Solarflare Server Adapter
NOTE: Red Hat Enterprise Linux versions 5.5 and 6.0 include a version of the Solarflare adapter
driver. This driver does not support the SFN512x family of adapters. Red Hat Enterprise Linux 5.6
and 6.1 includes a version of the Solarflare network driver for the SFN512x family of adapters. To
update the supplied driver, see Installing Solarflare Drivers and Utilities on Linux on page 43
3.2 Linux Platform Feature Set
Table 14 lists the features supported by Solarflare adapters on Red Hat and SUSE Linux distributions.
Table 14: Linux Feature Set
Fault diagnostics Support for comprehensive adapter and cable fault diagnostics
and system reports.
• See Running Adapter Diagnostics on page 53
Firmware updates Support for Boot ROM, Phy transceiver and adapter firmware
upgrades.
User Guide
• See Upgrading Adapter Firmware with Sfupdate on page 70
Hardware Timestamps
Solarflare Flareon SFN7122F1 SFN7142Q1 and SFN7322F
adapters support the hardware timestamping of all received
packets - including PTP packets.
The Linux kernel must support the SO_TIMESTAMPING socket
option (2.6.30+) to allow the driver to support hardware packet
timestamping. Therefore hardware packet timestamping is not
available in RHEL 5.
1. Requires an AppFlex license - for details refer to Solarflare AppFlex™
Technology Licensing. on page 12
.
Jumbo frames Support for MTUs (Maximum Transmission Units) from
1500 bytes to 9216 bytes.
• See Configuring Jumbo Frames on page 51
PXE and iSCSI booting Support for diskless booting to a target operating system via
PXE or iSCSI boot.
• See Configuring the Boot ROM with sfboot on page 56
• See Solarflare Boot ROM Agent on page 344
PXE or iSCSI boot are not supported for Solarflare adapters on
IBM System p servers.
Receive Side Scaling (RSS) Support for RSS multi-core load distribution technology.
• See Receive Side Scaling (RSS) on page 85
Issue 11 © Solarflare Communications 2014 40

Solarflare Server Adapter
User Guide
Table 14: Linux Feature Set
Receive Flow Steering (RFS) Improve latency and reduce jitter by steering packets to the
core where a receiving application is running.
See Receive Flow Steering (RFS) on page 87.
SR-IOV Support for XenServer6 PCIe Single Root-IO Virtualization and
Linux KVM SR-IOV.
• See SR-IOV Virtualization for XenServer on page 324
• See SR-IOV Virtualization Using KVM on page 307
SR-IOV is not supported for Solarflare adapters on IBM System
p servers.
Standby and Power
Management
Task offloads Support for TCP Segmentation Offload (TSO), Large Receive
Teaming Improve server reliability and bandwidth by combining physical
Virtual LANs (VLANs) Support for multiple VLANs per adapter.
Transmit Packet Steering
(XPS)
Solarflare adapters support Wake On LAN on Linux. These
settings are only available if the adapter has auxiliary power
supplied by a separate cable.
Offload (LRO), and TCP/UDP/IP checksum offload for improved
adapter performance and reduced CPU processing
requirements.
• See Configuring Task Offloading on page 50
ports, from one or more Solarflare adapters, into a team,
having a single MAC address and which function as a single port
providing redundancy against a single point of failure.
• See Setting Up Teams on page 52
• See Setting Up VLANs on page 51
Supported on Linux 2.6.38 and later kernels. Selects the
transmit queue when transmitting on multi-queue devices.
Refer to Transmit Packet Steering on page 89 for details.
3.3 Solarflare RPMs
Solarflare supply RPM packages in the following formats:
• DKMS
• Source RPM
Issue 11 © Solarflare Communications 2014 41

Solarflare Server Adapter
DKMS RPM
Dynamic Kernel Module Support (DKMS) is a framework where device driver source can reside
outside the kernel source tree. It supports an easy method to rebuild modules when kernels are
upgraded.
User Guide
Execute the command
dkms --version to determine whether DKMS is installed.
To install the Solarflare driver DKMS package execute the following command:
rpm -i sfc-dkms-<version>.noarch.rpm
Building the Source RPM
These instructions may be used to build a source RPM package for use with Linux distributions or
kernel versions where DKMS or KMP packages are not suitable.
NOTE: RPMs can be installed for multiple kernel versions.
1 First, the kernel headers for the running kernel must be installed at
<kernel-version>/build. On Red Hat systems, install the appropriate kernel-smp-
devel or kernel-devel package. On SUSE systems install the kernel-source package.
2 To build a source RPM for the running kernel version from the source RPM, enter the following
at the command-line:
rpmbuild --rebuild <package_name>
Where package_name is the full path to the source RPM (see the note below).
3 To build for a different kernel to the running system, enter the following command:
/lib/modules/
rpmbuild --define 'kernel <kernel version>' --rebuild <package_name>
4 Install the resulting RPM binary package, as described in Installing Solarflare Drivers and
Utilities on Linux.
NOTE: The location of the generated RPM is dependent on the distribution and often the version
of the distribution and the RPM build tools.
The RPM build process should print out the location of the RPM towards the end of the build
process, but it can be hard to find amongst the other output.
Typically the RPM will be placed in /usr/src/<dir>/RPMS/<arch>/, where <dir> is
distribution specific. Possible folders include Red Hat, packages or extra. The RPM file will be
named using the same convention as the Solarflare provided pre-built binary RPMs.
The command:
find /usr/src -name "*sfc*.rpm” will list the locations of all Solarflare
RPMs.
Issue 11 © Solarflare Communications 2014 42

Solarflare Server Adapter
3.4 Installing Solarflare Drivers and Utilities on Linux
• Red Hat Enterprise Linux Distributions...Page 43
• SUSE Linux Enterprise Server Distributions...Page 44
• Building the Source RPM...Page 42
Linux drivers for Solarflare are available in DKMS and source RPM packages. The source RPM can be
used to build binary RPMs for a wide selection of distributions and kernel variants. This section
details how to install the resultant binary RPM.
Solarflare recommend using DKMS RPMs if the DKMS framework is available. See DKMS RPM on
page 42 for more details.
NOTE: The Solarflare adapter should be physically installed in the host computer before installing
the driver. The user must have root permissions to install the adapter drivers.
3.5 Red Hat Enterprise Linux Distributions
User Guide
These instructions cover installation and configuration of the Solarflare network adapter drivers on
Red Hat Enterprise Linux Server. Refer to Software Driver Support on page 12 for details of
supported Linux distributions.
Refer to Building the Source RPM on page 42 for directions on creating the binary RPM.
1 Install the RPMs:
[root@myhost1]# rpm -ivh kernel-module-sfc-RHEL6-2.6.32-
279.el6.x86_64-3.3.0.6262-1.x86_64.rpm
2 There are various tools that can be used for configuring the Solarflare Server Adapter:
a) The NetworkManager service and associated GUI tools. For more information about his
refer to https://wiki.gnome.org/NetworkManager.
b) Solarflare recommend using the Network Administration Tool (NEAT) to configure the new
network interface. NEAT is a GUI based application and therefore requires an X server to run.
c) Alternatively the command line program Kudzu can be used. However, you may find when
kudzu is run that you are NOT presented with an option to configure the new network
interface. If this occurs, carefully clear details of the Solarflare Server Adapter from the
hardware database by removing all entries with “vendor id: 1924” in the
sysconfig/hwconf file. Running kudzu again should now provide an option to configure
the newly added network interface.
3 Apply the new network settings:
a) NEAT provides an option to Activate the new interface. The new network interface can
then be used immediately (there is no need to reboot or restart the network service).
/etc/
b) If you are not using NEAT you will need to reboot, or alternatively restart the networking
service, by typing the following before the new Solarflare interface can be used:
[root@myhost1]# service network restart
Issue 11 © Solarflare Communications 2014 43

Solarflare Server Adapter
3.6 SUSE Linux Enterprise Server Distributions
These instructions cover installation and configuration of the Solarflare Network Adapter drivers on
SUSE Linux Enterprise Server. Refer to Software Driver Support...Page 12 for details of supported
distributions.
Refer to Building the Source RPM on page 42 for directions on creating the binary RPM.
1 The Solarflare drivers are currently classified as 'unsupported' by SUSE Enterprise Linux 10
(SLES10). To allow unsupported drivers to load in SLES10, edit the following file:
/etc/sysconfig/hardware/config
find the line:
LOAD_UNSUPPORTED_MODULES_AUTOMATICALLY=no
and change no to yes.
For SLES 11, edit the last line in /etc/modprobe.d/unsupported-modules to:
User Guide
allow_unsupported_modules 1
2 Install the RPMs:
[root@myhost1]# rpm -ivh kernel-module-sfc-2.6.5-7.244-smp-2.1.0111-
0.sf.1.SLES9.i586.rpm
3 Run YaST to configure the Solarflare Network Adapter. When you select the Ethernet
Controller, the Configuration Name will take one of the following forms:
eth-bus-pci-dddd:dd:dd.N where N is either 0 or 1.
a)
b) eth-id-00:0F:53:XX:XX:XX
Once configured, the Configuration Name for the correct Ethernet Controller will change to
the second form, and an ethX interface will appear on the host. If the incorrect Ethernet
Controller is chosen and configured, then the Configuration Name will remain as
pci-dddd:dd:dd.1 after configuration by YaST, and an ethX interface will not appear on
eth-bus-
the system. In this case, you should remove the configuration for this Ethernet Controller, and
configure the other Ethernet Controller of the pair.
Issue 11 © Solarflare Communications 2014 44

Solarflare Server Adapter
3.7 Unattended Installations
Building Drivers and RPMs for Unattended Installation
Linux unattended installation requires building two drivers:
• A minimal installation Solarflare driver that only provides networking support. This driver is
used for network access during the installation process.
• An RPM that includes full driver support. This RPM is used to install drivers in the resultant Linux
installation.
User Guide
Figure 6: Unattended Installation RPM
Figure 6 shows how the unattended installation process works.
1 Build a minimal Solarflare driver needed for use in the installation kernel (Kernel A in the
diagram above). This is achieved by defining “sfc_minimal” to rpmbuild. This macro disables
hardware monitoring, MTD support (used for access to the adapters flash), I2C and
This results in a driver with no dependencies on other modules and allows networking support
from the driver during installation.
# as normal user
$ mkdir -p /tmp/rpm/BUILD
$ rpm -i sfc-<ver>-1.src.rpm
$ rpmbuild -bc -D 'sfc_minimal=1' -D 'kernel=<installer kernel>' \
/tmp/rpm/SPECS/sfc.spec
2 The Solarflare minimal driver sfc.ko can be found in /tmp/rpm/BUILD/sfc-<ver>/
linux_net/sfc.ko. Integrate this minimal driver into your installer kernel, either by
creating a driver disk incorporating this minimal driver or by integrating this minimal driver
into initrd.
3 Build a full binary RPM for your Target kernel and integrate this RPM into your Target (Kernel
B).
debugfs.
Issue 11 © Solarflare Communications 2014 45

Solarflare Server Adapter
Driver Disks for Unattended Installations
Solarflare are preparing binary driver disks to help avoid the need to build the minimal drivers
required in unattended installations. Please contact Solarflare support to obtain these driver disks
Table 15 shows the various stages of an unattended installation process:
Table 15: Installation Stages
In Control Stages of Boot Setup needed
User Guide
BIOS PXE code on the adapter
runs.
SF Boot ROM (PXE) DHCP request from PXE (SF
Boot ROM).
SF Boot ROM (PXE) TFTP request for filename to
next-server, e.g. pxelinux.0
pxelinux TFTP retrieval of pxelinux
configuration.
pxelinux TFTP menu retrieval of Linux
kernel image initrd.
Linux kernel/installer Installer retrieves kickstart
configuration, e.g. via HTTP.
Target Linux kernel kernel reconfigures network
adapters.
Adapter must be in PXE boot mode.
See PXE Support on page 345.
DHCP server filename and nextserver options.
TFTP server.
pxelinux configuration on TFTP
server.
pxelinux configuration
Kernel, kernel command, initrd
Kickstart/AutoYaST configuration.
DHCP server.
Issue 11 © Solarflare Communications 2014 46

Solarflare Server Adapter
3.8 Unattended Installation - Red Hat Enterprise Linux
Documentation for preparing for a Red Hat Enterprise Linux network installation can be found at:
http://docs.redhat.com/docs/en-US/Red_Hat_Enterprise_Linux/5/html/Installation_Guide/s1begininstall-perform-nfs-x86.html
http://docs.redhat.com/docs/en-US/Red_Hat_Enterprise_Linux/6/html/Installation_Guide/
index.html
The prerequisites for a Network Kickstart installation are:
• Red Hat Enterprise Linux installation media.
• A Web server and/or FTP Server for delivery of the RPMs that are to be installed.
• A DHCP server for IP address assignments and to launch PXE Boot.
• A TFTP server for download of PXE Boot components to the machines being kickstarted.
• The BIOS on the computers to be Kickstarted must be configured to allow a network boot.
• A Boot CD-ROM or flash memory that contains the kickstart file or a network location where the
kickstart file can be accessed.
User Guide
• A Solarflare driver disk.
Unattended Red Hat Enterprise Linux installations are configured with Kickstart. The documentation
for Kickstart can be found at:
http://docs.redhat.com/docs/en-US/Red_Hat_Enterprise_Linux/5/html/Installation_Guide/chredhat-config-kickstart.html
http://docs.redhat.com/docs/en-US/Red_Hat_Enterprise_Linux/6/html/Installation_Guide/chkickstart2.html
To install Red Hat Enterprise you need the following:
1 A modified
initrd.img file with amended modules.alias and modules.dep which
incorporates the Solarflare minimal driver for the installation kernel.
modules.alias, add the following entries:
To
alias: pci:v00001924d00000813sv*sd*bc*sc*i*
alias: pci:v00001924d00000803sv*sd*bc*sc*i*
alias: pci:v00001924d00000710sv*sd*bc*sc*i*
alias: pci:v00001924d00000703sv*sd*bc*sc*i*
2 Identify the driver dependencies using the modinfo command:
modinfo ./sfc.ko | grep depends
depends: i2c-core,mii,hwmon,hwmon-vid,i2c-algo-bit mtdcore mtdpart
All modules listed as depends must be present in the initrd file image. In addition the user
should be aware of further dependencies which can be resolved by adding the following lines
to the modules.dep file:
Issue 11 © Solarflare Communications 2014 47

Solarflare Server Adapter
User Guide
sfc: i2c-core mii hwmon hwmon-vid i2c-algo-bit mtdcore mtdpart *
i2c-algo-bit: i2c-core
mtdpart: mtdcore
*For Red Hat Enterprise Linux from version 5.5 add mdio to this line.
3 A configured kickstart file with the Solarflare Driver RPM manually added to the
section. For example:
%post
/bin/mount -o ro <IP Address of Installation server>:/<path to
location directory containing Solarflare RPM> /mnt
/bin/rpm -Uvh /mnt/<filename of Solarflare RPM>
/bin/umount /mnt
3.9 Unattended Installation - SUSE Linux Enterprise Server
Unattended SUSE Linux Enterprise Server installations are configured with AutoYaST. The
documentation for AutoYaST can be found at:
http://www.suse.com/~ug/autoyast_doc/index.html
The prerequisites for a Network AutoYaST installation are:
• SUSE Linux Enterprise installation media.
• A DHCP server for IP address assignments and to launch PXE Boot.
• A NFS or FTP server to provide the installation source.
• A TFTP server for the download of the kernel boot images needed to PXE Boot.
%Post
• A boot server on the same Ethernet segment.
• An install server with the SUSE Linux Enterprise Server OS.
• An AutoYaST configuration server that defines rules and profiles.
• A configured AutoYast Profile (control file).
Further Reading
• SUSE Linux Enterprise Server remote installation:
http://www.novell.com/documentation/sles10/sles_admin/?page=/documentation/sles10/
sles_admin/data/cha_deployment_remoteinst.html
• SUSE install with PXE Boot:
http://en.opensuse.org/SuSE_install_with_PXE_boot
Issue 11 © Solarflare Communications 2014 48

Solarflare Server Adapter
3.10 Hardware Timestamps
The Solarflare Flareon SFN7000 series adapters can support hardware timestamping for all received
network packets.
The Linux kernel must support the SO_TIMESTAMPING socket option (2.6.30+) therefore hardware
packet timestamping is not supported on RHEL 5.
For more information about using the kernel timestamping API, users should refer to the Linux
documentation: http://lxr.linux.no/linux/Documentation/networking/timestamping.txt
3.11 Configuring the Solarflare Adapter
Ethtool is a standard Linux tool that you can use to query and change Ethernet adapter settings,
including those for Solarflare adapters. Ethtool can be downloaded from http://sourceforge.net/
projects/gkernel/files/ethtool/.
The general command for ethtool is as follows:
ethtool <-option> <ethX>
User Guide
Where X is the identifier of the interface. Note that root access will be required to configure adapter
settings. Refer to the Linux online manual (
available for ethtool.
man ethtool) for details of the options that are
Configuring Speed and Modes
Solarflare adapters by default automatically negotiate the connection speed to the maximum
supported by the link partner. On the 10GBASE-T adapters “auto” instructs the adapter to negotiate
the highest speed supported in common with it’s link partner. On SFP+ adapters, “auto” instructs the
adapter to use the highest link speed supported by the inserted SFP+ module. On 10GBASE-T and
SFP+ adapters, any other value specified will fix the link at that speed, regardless of the capabilities
of the link partner, which may result in an inability to establish the link. Dual speed SFP+ modules
operate at their maximum (10G) link speed unless explicitly configured to operate at a lower speed
(1G).
The following commands demonstrate ethtool to configure the network adapter Ethernet settings.
Identify interface configuration settings:
ethtool ethX
Set link speed:
ethtool -s ethX speed 1000|100
To return the connection speed to the default auto-negotiate, enter:
ethtool -s <ethX> autoneg on
Configure auto negotiation:
ethtool -s ethX autoneg [on|off]
Set auto negotiation advertised speed 1G:
Issue 11 © Solarflare Communications 2014 49

Solarflare Server Adapter
ethtool -s ethX advertise 0x20
Set autonegotiation advertised speed 10G:
ethtool -s ethX advertise 0x1000
Set autonegotiation advertised speeds 1G and 10G:
ethtool -s ethX advertise 0x1020
Identify interface auto negotiation pause frame setting:
ethtool -a ethX
Configure auto negotiation of pause frames:
ethtool -A ethX autoneg on [rx on|off] [tx on|off]
Configuring Task Offloading
Solarflare adapters support transmit (Tx) and receive (Rx) checksum offload, as well as TCP
segmentation offload. To ensure maximum performance from the adapter, all task offloads should
be enabled, which is the default setting on the adapter. For more information, see Performance
Tuning on Linux on page 79.
User Guide
To change offload settings for Tx and Rx, use the ethtool command:
ethtool --offload <ethX> [rx on|off] [tx on|off]
Configuring Receive/Transmit Ring Buffer Size
By default receive and transmit ring buffers on the Solarflare adapter support 1024 descriptors. The
user can identify and reconfigure ring buffer sizes using the ethtool command.
To identify the current ring size:
ethtool -g ethX
To set the new transmit or receive ring size to value N
ethtool -G ethX [rx N| tx N]
The ring buffer size must be a value between 128 and 4096. On the SFN7000 series adapters the
maximum TX buffer size is restricted to 2048. Buffer size can also be set directly in the
modprobe.conf file or add the options line to a file under the /etc/modprobe.d directory e.g.
options sfc rx_ring=4096
Using the modprobe method sets the value for all Solarflare interfaces. Then reload the driver for
the option to become effective:
modprobe -r sfc
modprobe sfc
Issue 11 © Solarflare Communications 2014 50

Solarflare Server Adapter
Configuring Jumbo Frames
Solarflare adapters support frame sizes from 1500 bytes to 9216 bytes. For example, to set a new
frame size (MTU) of 9000 bytes, enter the following command:
ifconfig <ethX> mtu 9000
To make the changes permanent, edit the network configuration file for <ethX>; for example,
/etc/sysconfig/network-scripts/ifcfg-eth1
directive, which specifies the size of the frame in bytes:
MTU=9000
and append the following configuration
Standby and Power Management
Solarflare adapters support Wake on LAN and Wake on Magic Packet setting on Linux. You need to
ensure that Wake on LAN has been enabled on the BIOS correctly and your adapter has auxiliary
power via a separate cable before configuring Wake on LAN features.
User Guide
In SUSE Linux Enterprise Server, you can use the YaST WOL module to configure Wake on LAN or you
can use the
In Red Hat Enterprise Linux you can use the
ethtool wol g setting.
ethtool wol g setting.
3.12 Setting Up VLANs
VLANs offer a method of dividing one physical network into multiple broadcast domains. In
enterprise networks, these broadcast domains usually match with IP subnet boundaries, so that
each subnet has its own VLAN. The advantages of VLANs include:
• Performance
• Ease of management
• Security
• Trunks
• You don't have to configure any hardware device, when physically moving your server to
another location.
To set up VLANs, consult the following documentation:
• To configure VLANs on SUSE Linux Enterprise Server, see:
http://www.novell.com/support/viewContent.do?externalId=3864609
• To configure tagged VLAN traffic only on Red Hat Enterprise Linux, see:
http://kbase.redhat.com/faq/docs/DOC-8062
• To configure mixed VLAN tagged and untagged traffic on Red Hat Enterprise Linux, see:
http://kbase.redhat.com/faq/docs/DOC-8064
Issue 11 © Solarflare Communications 2014 51

Solarflare Server Adapter
3.13 Setting Up Teams
Teaming network adapters (network bonding) allows a number of physical adapters to act as one,
virtual adapter. Teaming network interfaces, from the same adapter or from multiple adapters,
creates a single virtual interface with a single MAC address.
The virtual adapter or virtual interface can assist in load balancing and providing failover in the event
of physical adapter or port failure.
Teaming configuration support provided by the Linux bonding driver includes:
• 802.3ad Dynamic link aggregation
• Static link aggregation
• Fault Tolerant
To set up an adapter team, consult the following documentation:
General:
http://www.kernel.org/doc/Documentation/networking/bonding.txt
User Guide
RHEL 5:
http://www.redhat.com/docs/en-US/Red_Hat_Enterprise_Linux/5.4/html/Deployment_Guide/s2modules-bonding.html
RHEL6:
http://docs.redhat.com/docs/en-US/Red_Hat_Enterprise_Linux/6/html/Deployment_Guide/s2networkscripts-interfaces-chan.html
SLES:
http://www.novell.com/documentation/sles11/book_sle_admin/data/
sec_basicnet_yast.html#sec_basicnet_yast_netcard_man
Issue 11 © Solarflare Communications 2014 52

Solarflare Server Adapter
3.14 Running Adapter Diagnostics
You can use ethtool to run adapter diagnostic tests. Tests can be run offline (default) or online.
Offline runs the full set of tests, which can interrupt normal operation during testing. Online
performs a limited set of tests without affecting normal adapter operation.
As root user, enter the following command:
ethtool --test ethX offline|online
The tests run by the command are as follows:
Table 16: Adapter Diagnostic Tests
Diagnostic Test Purpose
core.nvram Verifies the flash memory ‘board configuration’ area by
parsing and examining checksums.
core.registers Verifies the adapter registers by attempting to modify the
writable bits in a selection of registers.
User Guide
core.interrupt Examines the available hardware interrupts by forcing the
controller to generate an interrupt and verifying that the
interrupt has been processed by the network driver.
tx/rx.loopback Verifies that the network driver is able to pass packets to
and from the network adapter using the MAC and Phy
loopback layers.
core.memory Verifies SRAM memory by writing various data patterns
(incrementing bytes, all bit on and off, alternating bits on
and off) to each memory location, reading back the data
and comparing it to the written value.
core.mdio Verifies the MII registers by reading from PHY ID registers
and checking the data is valid (not all zeros or all ones).
Verifies the MMD response bits by checking each of the
MMDs in the Phy is present and responding.
chanX eventq.poll Verifies the adapter’s event handling capabilities by
posting a software event on each event queue created by
the driver and checking it is delivered correctly.
The driver utilizes multiple event queues to spread the
load over multiple CPU cores (RSS).
phy.bist Examines the PHY by initializing it and causing any
available built-in self tests to run.
Issue 11 © Solarflare Communications 2014 53

Solarflare Server Adapter
3.15 Running Cable Diagnostics
Cable diagnostic data can be gathered from the Solarflare 10GBASE-T adapters physical interface
using the
controller, PHY, and attached cables. To run the cable tests enter the following command:
Online tests are non-intrusive and will not disturb live traffic.
The following is an extract from the output of the ethtool diagnostic offline tests:
phy cable.pairA.length 9
phy cable.pairB.length 9
phy cable.pairC.length 9
phy cable.pairD.length 9
phy cable.pairA.status 1
phy cable.pairB.status 1
phy cable.pairC.status 1
phy cable.pairD.status 1
ethtool -t command which runs a comprehensive set of diagnostic tests on the
ethtool -t ethX [online | offline]
User Guide
Cable length is the estimated length in metres. A length value of 65535 indicates length not
estimated due to pair busy or cable diagnostic routine not completed successfully.
The cable status can be one of the following values:
0 - invalid, or cable diagnostic routine did not complete successfully
1 - pair ok, no fault detected
2 - pair open or Rt > 115 ohms
3 - intra pair short or Rt < 85 ohms
4 - inter pair short or Rt < 85 ohms
9 - pair busy or link partner forces 100Base-Tx or 1000Base-T test mode.
Issue 11 © Solarflare Communications 2014 54

Solarflare Server Adapter
3.16 Linux Utilities RPM
The Solarflare Utilities RPM for Linux contains:
• A boot ROM utility. Configuring the Boot ROM with sfboot...Page 56
• A flash firmware update utility. Upgrading Adapter Firmware with Sfupdate...Page 70
• A license key install utility. License Install with sfkey...Page 75
The RPM package, is supplied as 64bit and 32bit binaries compiled to be compatible with GLIBC
versions for all supported distributions.
The Solarflare utilities RPM file can be downloaded from the following location:
https://support.solarflare.com/
• SF-104451-LS is a 32bit binary RPM package.
• SF-107601-LS is a 64bit binary RPM package.
Download and copy the zipped binary RPM package to the required directory. Unzip and install
(64bit package example):
User Guide
1 Unzip the package:
# unzip SF-107601-LS-20_Solarflare_Linux_Utilities_RPM_64bit.zip
2 Install the binary RPM:
# rpm -Uvh sfutils-4.0.1.6605-1.x86_64.rpm
Preparing... ########################################### [100%]
1:sfutils ########################################### [100%]
3 Check that the RPM installed correctly:
# rpm -q sfutils
sfutils-4.0.1.6605-1.x86_64
Directions for the use of the utility programs are explained in the following sections:
Issue 11 © Solarflare Communications 2014 55

Solarflare Server Adapter
3.17 Configuring the Boot ROM with sfboot
• Sfboot: Command Usage...Page 56
• Sfboot: Command Line Options...Page 56
• Sfboot: Examples...Page 66
Sfboot is a command line utility for configuring the Solarflare adapter Boot ROM for PXE and iSCSI
booting. Using sfboot is an alternative to using Ctrl + B to access the Boot Rom agent during server
startup.
See Configuring the Solarflare Boot ROM Agent on page 344 for more information on the Boot Rom
agent.
PXE and iSCSI network boot is not supported for Solarflare adapters on IBM System p servers.
Sfboot: SLES 11 Limitation
Due to limitations in SLES 11 using kernel versions prior to 2.6.27.54 it is necessary to reboot the
server after running the sfboot utility.
User Guide
Sfboot: Command Usage
The general usage for sfboot is as follows (as root):
sfboot [--adapter=eth<N>] [options] [configurable parameters]
Note that without --adapter, the sfboot command applies to all adapters that are present in the
target host.
The format for the parameters are:
<parameters>=<value>
Sfboot: Command Line Options
Table 17 lists the options for sfboot and Table 18 lists the available options.
Table 17: Sfboot Options
Option Description
-?-h, --help
-V, --version
Displays command line syntax and provides a
description of each sfboot option.
Shows detailed version information and exits.
-v, --verbose
Issue 11 © Solarflare Communications 2014 56
Shows extended output information for the
command entered.

Table 17: Sfboot Options
Option Description
Solarflare Server Adapter
User Guide
-s, --quiet
Aliases: --silent
-l --list
-i, --adapter =<ethX>
-c --clear
Suppresses all output, except errors; no user
interaction. You should query the completion code to
determine the outcome of commands when
operating silently (see Performance Tuning on
Windows on page 221).
Lists all available Solarflare adapters. This option
shows the ifname and MAC address.
Note: this option may not be used in conjunction
with the any other option. If this option is used with
configuration parameters, those parameters will be
silently ignored.
Performs the action on the identified Solarflare
network adapter. The adapter identifier
the ifname or MAC address, as output by the -option. If
--adapter is not included, the action will
ethX can be
list
apply to all installed Solarflare adapters.
Resets all adapter options except boot-image to
their default values. Note that
--clear can also be
used with parameters, allowing you to reset to
default values, and then apply the parameters
specified.
The following parameters in Table 18 are used to control the configurable parameters for the Boot
ROM driver when running prior to the operating system booting.
Table 18: Sfboot Parameters
Parameter Description
bootimage=<all|optionrom|uefi|di
sabled>
Issue 11 © Solarflare Communications 2014 57
Specifies which boot firmware images are served-up
to the BIOS during start-up. This parameter can not
be used if the
This option is not reset if
--adapter option has been specified.
--clear is used.

Table 18: Sfboot Parameters
Parameter Description
Solarflare Server Adapter
User Guide
linkspeed=<auto|10g|1g|100m>
linkup-delay=<seconds>
Specifies the network link speed of the adapter used
by the Boot ROM - the default is
auto. On the
10GBASE-T adapters “auto” instructs the adapter to
negotiate the highest speed supported in common
with it’s link partner. On SFP+ adapters, “auto”
instructs the adapter to use the highest link speed
supported by the inserted SFP+ module. On
10GBASE-T and SFP+ adapters, any other value
specified will fix the link at that speed, regardless of
the capabilities of the link partner, which may result
in an inability to establish the link.
auto Auto-negotiate link speed (default)
10G 10G bit/sec
1G 1G bit/sec
100M 100M bit/sec
Specifies the delay (in seconds) the adapter defers its
first connection attempt after booting, allowing time
for the network to come up following a power failure
or other restart. This can be used to wait for
spanning tree protocol on a connected switch to
unblock the switch port after the physical network
link is established. The default is 5 seconds.
banner-delay=<seconds>
Specifies the wait period for Ctrl-B to be pressed to
enter adapter configuration tool.
seconds = 0-256
bootskip-delay=<seconds>
Specifies the time allowed for Esc to be pressed to
skip adapter booting.
seconds = 0-256
boottype=<pxe|iscsi|disabled>
Sets the adapter boot type.
pxe – PXE (Preboot eXecution Environment) booting
iscsi – iSCSI (Internet Small Computer System
Interface) booting
disabled – Disable adapter booting
Issue 11 © Solarflare Communications 2014 58

Table 18: Sfboot Parameters
Parameter Description
Solarflare Server Adapter
User Guide
initiatordhcp=<enabled|disabled>
initiator-ip=<ipv4 address>
Enables or disables DHCP address discovery for the
adapter by the Boot ROM except for the Initiator IQN
(see
initiator-iqn-dhcp). This option is only
valid if iSCSI booting is enabled (
type=iscsi
).
boot-
If initiator-DHCP is set to disabled, the following
options will need to be specified:
initiator-ip=<ip_address>
netmask=<subnet>
The following options may also be needed:
gateway=<ip_address>
primary-dns=<ip_address>
Specifies the IPv4 address (in standard “.” notation
form) to be used by the adapter when
dhcp is disabled.
initiator-
Note that this option is only valid if iSCSI booting is
enabled (
boot-type=iscsi).
Example:
sfboot boot-type=iscsi initiatordhcp=disabled initiatorip=<192.168.1.3>
netmask=<ipv4 subnet>
Specifies the IPv4 subnet mask (in standard “.”
notation form) to be used by the adapter when
initiator-dhcp is disabled. Note that this option
is only valid if iSCSI booting is enabled (
type=iscsi).
boot-
Example:
sfboot boot-type=iscsi initiatordhcp=disabled netmask=255.255.255.0
gateway=<ipv4 address>
Specifies the IPv4 subnet mask (in standard “.”
notation form) to be used by the adapter when
initiator-dhcp is disabled. Note that this option
is only valid if iSCSI booting is enabled (
type=iscsi).
boot-
Example:
sfboot boot-type=iscsi initiatordhcp=disabled gateway=192.168.0.10
Issue 11 © Solarflare Communications 2014 59

Table 18: Sfboot Parameters
Parameter Description
Solarflare Server Adapter
User Guide
primary-dns=<ipv4 address>
initiator-iqndhcp=<enabled|disabled>
initiator-iqn=<IQN>
Specifies the IPv4 address (in standard “.” notation
form) of the Primary DNS to be used by the adapter
when
initiator-dhcp is disabled.
This option is only valid if iSCSI booting is enabled
boot-type=iscsi).
(
Example:
sfboot boot-type=iscsi initiatordhcp=disabled primary-dns=192.168.0.3
Enables or disables use of DHCP for the initiator IQN
only.
Specifies the IQN (iSCSI Qualified Name) to be used
by the adapter when
initiator-iqn-dhcp is
disabled. The IQN is a symbolic name in the “.”
notation form; for example:
iqn.2009.01.com.solarflare, and is a maximum of 223
characters long.
Note that this option is only valid if iSCSI booting is
enabled (
boot-type=iscsi).
Example:
lun-retry-count=<count>
sfboot initiator-iqn-dhcp=disabled
initiatoriqn=iqn.2009.01.com.solarflare
adapter=2
Specifies the number of times the adapter attempts
to access and login to the Logical Unit Number (LUN)
on the iSCSI Target before failing. Note that this
option is only valid if iSCSI booting is enabled (
type=iscsi).
boot-
Example:
sfboot lun-retry-count=3
Issue 11 © Solarflare Communications 2014 60

Table 18: Sfboot Parameters
Parameter Description
Solarflare Server Adapter
User Guide
targetdhcp=<enabled|disabled>
target-server=<DNS name or
ipv4 address>
Enables or disables the use of DHCP to discover iSCSI
target parameters on the adapter.
target-dhcp is disabled, you must specify the
If
following options:
target-server=<address>
target-iqn=<iqn>
target-port=<port>
target-lun=<LUN>
Example - Enable the use of DHCP to configure iSCSI
Target settings:
sfboot boot-type=iscsi targetdhcp=enabled
Specifies the iSCSI target’s DNS name or IPv4 address
to be used by the adapter when
target-dhcp is
disabled.
Note that this option is only valid if iSCSI booting is
enabled (
boot-type=iscsi).
Example:
target-port=<port_number>
target-lun=<LUN>
sfboot boot-type=iscsi targetdhcp=disabled target-server=192.168.2.2
Specifies the Port number to be used by the iSCSI
target when
target-dhcp is disabled. The default
Port number is Port 3260.
Note that this option is only valid if iSCSI booting is
enabled (
boot-type=iscsi).
Example:
sfboot boot-type=iscsi targetdhcp=disabled target-port=3262
This option should only be used if your target is using
a non-standard TCP Port.
Specifies the Logical Unit Number (LUN) to be used
by the iSCSI target when
target-dhcp is disabled.
The default LUN is 0.
Note that this option is only valid if iSCSI booting is
enabled (
boot-type=iscsi).
Issue 11 © Solarflare Communications 2014 61

Table 18: Sfboot Parameters
Parameter Description
Solarflare Server Adapter
User Guide
target-iqn=<IQN>
vendor-id=<dhcp_id>
chap=<enabled|disabled>
Specifies the IQN of the iSCSI target when target-
is disabled. Maximum of 223 characters.
dhcp
Note that this option is only valid if iSCSI booting is
enabled (boot-type=iscsi).
Note that if there are spaces contained in <
IQN>,
then the IQN must be wrapped in double quotes (“”).
Example:
sfboot target-dhcp=disabled targetiqn=iqn.2009.01.com.solarflare
adapter=2
Specifies the device vendor ID to be advertised to the
DHCP server. This must match the vendor id
configured at the DHCP server when using DHCP
option 43 to obtain the iSCSI target.
Enables or disables the use of Challenge Handshake
Protocol (CHAP) to authenticate the iSCSI
connection.
Note that this option is only valid if iSCSI booting is
enabled
(boot-type=iscsi).
To be valid, this option also requires the following
sub-options to be specified:
username=<initiator username>
secret=<initiator password>
Example:
sfboot boot-type=iscsi chap=enabled
username=initiatorusername
secret=initiatorsecret
Issue 11 © Solarflare Communications 2014 62

Table 18: Sfboot Parameters
Parameter Description
Solarflare Server Adapter
User Guide
username=<username>
secret=<secret>
Specifies the CHAP initiator username (maximum 64
characters).
Note that this option is required if either CHAP or
Mutual CHAP is enabled (
mutual-chap=enabled
chap=enabled,
).
Note that if there are spaces contained in
<username>, then it must be wrapped in double
quotes (“”).
Example:
sfboot boot-type=iscsi chap=enabled
username=username
Specifies the CHAP initiator secret (minimum 12
characters, maximum 20 characters).
Note that this option is valid if either CHAP or Mutual
CHAP is enabled (chap=enabled,
chap=enabled).
Note that if there are spaces contained in <
mutual-
secret>,
then it must be wrapped in double quotes (“”).
Example:
mutualchap=<enabled|disabled>
sfboot boot-type=iscsi chap=enabled
username=username secret=veryverysecret
Enables/disables Mutual CHAP authentication when
iSCSI booting is enabled.
This option also requires the following sub-options to
be specified:
target-username=<username>
target-secret=<password>
username=<username>
secret=<password>
Example:
sfboot boot-type=iscsi mutualchap=enabled username=username
secret=veryverysecret targetusername=targetusername targetsecret=anothersecret
Issue 11 © Solarflare Communications 2014 63

Table 18: Sfboot Parameters
Parameter Description
Solarflare Server Adapter
User Guide
target-username=<username>
target-secret=<secret>
mpio-priority=<MPIO
priority>
Specifies the username that has been configured on
the iSCSI target (maximum 64 characters).
Note that this option is necessary if Mutual CHAP is
enabled on the adapter (
mutual-chap=enabled).
Note that if there are spaces contained in
username>, then it must be wrapped in double
<
quotes (“”).
Specifies the secret that has been configured on the
iSCSi target (minimum 12 characters; maximum 20
characters).
Note: This option is necessary if Mutual CHAP is
enabled on the adapter (
Note that if there are spaces contained in <
mutual-chap=enabled).
secret>,
then it must be wrapped in double quotes (“”).
Specifies the Multipath I/O (MPIO) priority for the
adapter. This option is only valid for iSCSI booting
over multi-port adapters, where it can be used to
establish adapter port priority. The range is 1- 255,
with 1 being the highest priority.
mpio-attempts=<attempt
count>
msix-limit=
<8|16|32|64|128|256|512|1024>
pfiov=<enabled|disabled>
pf-count=<pf count>
sriov=<enabled|disabled>
Specifies the number of times MPIO will try and use
each port in turn to login to the iSCSI target before
failing.
Specifies the maximum number of MSI-X interrupts
the specified adapter will use. The default is 32.
Note: Using the incorrect setting can impact the
performance of the adapter. Contact Solarflare
technical support before changing this setting.
Enable PF-IOV support. This allows switching of
traffic between any PFs. When disabled traffic is
switched only between a PF and related VFs.
This is the number of available PCIe PFs per physical
network port. This setting is applied to all ports on
the adapter. MAC address assignments may change
after altering this setting.
Enable SR-IOV support for operating systems that
support this.
Issue 11 © Solarflare Communications 2014 64

Table 18: Sfboot Parameters
Parameter Description
Solarflare Server Adapter
User Guide
vf-count=<vf count>
vf-msixlimit=<1|2|4|8|16|32|64|128|
256>
port-mode=(default|10G|40G>
The number of virtual functions (VF) advertised to
the operating system. The Solarflare SFC9000 family
of controllers support a total limit of 127 virtual
functions per port and a total 1024 interrupts.
Depending on the values of msix-limit and vf-msixlimit, some of these virtual functions may not be
configured.
Enabling all 127 VFs per port with more than one
MSI-X interrupt per VF may not be supported by the
host BIOS - in which case you may get 127 VFs on one
port and none on others. Contact your BIOS vendor
or reduce the VF count.
The sriov parameter is implied if vf-count is greater
than zero.
The maximum number of interrupts a virtual
function may use.
Configure the port mode to use. This is for SFC9140family adapters only. MAC address assignments may
change after altering this setting.
firmware-variant=<fullfeature|ultra-lowlatency|capture-packedstream |auto>
insecurefilters=<enabled|disabled>
The default mode will select 40G mode.
For SFN7000 series adapters only.
The ultra-low-latency variant produces best latency
without support for TX VLAN insertion or RX VLAN
stripping (not currently used features). It is
recommended that Onload customers use the ultralow-latency variant.
Default value = auto - means the driver will select
ultra-low-latency by default.
If enabled bypass filter security on non-privileged
functions. This is for SFC9100-family adapters only.
This reduces security in virtualized environments.
The default is disabled.
Issue 11 © Solarflare Communications 2014 65

Sfboot: Examples
• Show the current boot configuration for all adapters:
fboot
s
Solarflare boot configuration utility [v3.0.3]
Copyright Solarflare Communications 2006-2010, Level 5 Networks 2002-2005
eth1:
Boot image Option ROM and UEFI
Link speed Negotiated automatically
Link-up delay time 5 seconds
Banner delay time 2 seconds
Boot skip delay time 5 seconds
Boot type PXE
MSI-X interrupt limit 32
eth2:
Boot image Option ROM and UEFI
Link speed Negotiated automatically
Link-up delay time 5 seconds
Banner delay time 2 seconds
Boot skip delay time 5 seconds
Boot type PXE
MSI-X interrupt limit 32
Solarflare Server Adapter
User Guide
• List all Solarflare adapters installed on the localhost:
sfboot --list
Solarflare boot configuration utility [v3.0.2]
Copyright Solarflare Communications 2006-2010, Level 5 Networks 2002-2005
eth4 - 00-0F-53-01-3C-AC, eth5 - 00-0F-53-01-3C-AD, eth6 - 00-0F-53-013C-A4, eth7 - 00-0F-53-01-3C-A5
Issue 11 © Solarflare Communications 2014 66

Solarflare Server Adapter
• Enable iSCSI booting on adapter eth4. Implement default iSCSI settings:
sfboot --adapter=eth4 boot-type=iscsi
Solarflare boot configuration utility [v3.0.2]
Copyright Solarflare Communications 2006-2010, Level 5 Networks 2002-2005
eth4:
Boot image Option ROM and UEFI
Link speed Negotiated automatically
Link-up delay time 5 seconds
Banner delay time 2 seconds
Boot skip delay time 5 seconds
Boot type iSCSI
Use DHCP for Initiator Enabled
Use DHCP for Initiator IQN Enabled
LUN busy retries 2
Use DHCP for Target Enabled
DHCP Vendor Class ID SFCgPXE
CHAP authentication Disabled
Mutual CHAP authentication Disabled
MPIO priority 0
MPIO boot attempts 3
MSI-X interrupt limit 32
User Guide
Issue 11 © Solarflare Communications 2014 67

Solarflare Server Adapter
User Guide
• iSCSI enable adapter eth2. Disable DHCP. Specify adapter IP address and netmask:
sfboot boot-type=iscsi --adapter=eth2 initiator-dhcp=disabled initiatorip=192.168.0.1 netmask=255.255.255.0
Solarflare boot configuration utility [v3.0.2]
Copyright Solarflare Communications 2006-2010, Level 5 Networks 2002-2005
eth2:
Boot image Option ROM and UEFI
Link speed Negotiated automatically
Link-up delay time 5 seconds
Banner delay time 2 seconds
Boot skip delay time 5 seconds
Boot type iSCSI
Use DHCP for Initiator Disabled
Initiator IP address 192.168.0.1
Initiator netmask 255.255.255.0
Initiator default gateway 0.0.0.0
Initiator primary DNS 0.0.0.0
Use DHCP for Initiator IQN Enabled
LUN busy retries 2
Use DHCP for Target Enabled
DHCP Vendor Class ID SFCgPXE
CHAP authentication Disabled
Mutual CHAP authentication Disabled
MPIO priority 0
MPIO boot attempts 3
MSI-X interrupt limit 32
• Enable PXE boot
sfboot boot-image=option rom boot-type=pxe
• Enable SR-IOV
fboot sriov=enabled vf-count=16 vf-msix-limit=1
s
Issue 11 © Solarflare Communications 2014 68

Solarflare Server Adapter
• SFN7000 Series - Firmware Variant
sfboot firmware-variant=full-feature
Solarflare boot configuration utility [v4.0.0]
Copyright Solarflare Communications 2006-2013, Level 5 Networks 2002-2005
eth4:
Boot image Option ROM only
Link speed Negotiated automatically
Link-up delay time 7 seconds
Banner delay time 3 seconds
Boot skip delay time 6 seconds
Boot type PXE
MSI-X interrupt limit 32
Number of Virtual Functions 0
VF MSI-X interrupt limit 1
Firmware variant full feature / virtualization
User Guide
Issue 11 © Solarflare Communications 2014 69

Solarflare Server Adapter
3.18 Upgrading Adapter Firmware with Sfupdate
• Sfupdate: Command Usage...Page 70
• Sfupdate: Command Line Options...Page 73
• Sfupdate: Examples...Page 74
Sfupdate is a command line utility to manage and upgrade the Solarflare adapter Boot ROM, Phy and
adapter firmware. Embedded within the sfupdate executable are firmware images for various
Solarflare adapters - the exact updates available via sfupdate depend on the adapter.
See Configuring the Solarflare Boot ROM Agent on page 344 for more information on the Boot Rom
agent.
NOTE: All Applications accelerated with OpenOnload should be terminated before updating the
firmware with sfupdate.
Sfupdate: Command Usage
User Guide
The general usage for sfupdate is as follows (as root):
sfupdate [--adapter=eth<N>] [options]
where:
ethN is the interface name (ifname) of the Solarflare adapter to be upgraded.
option is one of the command options listed in Table 19.
The format for the options are:
<option>=<parameter>
Running the command sfupdate with no additional parameters will show the current firmware
version for all Solarflare adapters and identifies whether the firmware within sfupdate is more up to
date. To update the firmware for all Solarflare adapters run the command
Solarflare recommend the following procedure:
1 Run
2 Run
sfupdate to check that the firmware on all adapters is up to date.
sfupdate --write to update the firmware on all adapters.
sfupdate --write
Sfupdate: Linux MTD Limitations
The driver supplied "inbox" within RedHat and Novell distributions has a limitation on the number
of adapters that sfupdate can support. This limitation is removed from RHEL 6.5 onwards. The
Solarflare supplied driver is no longer subject to this limitation on any distro/kernel.
Linux kernel versions prior to 2.6.20 support up to 16 MTD (flash) devices. Solarflare adapters are
equipped with 6 flash partitions. If more than two adapters are deployed within a system a number
of flash partitions will be inaccessible during upgrade.
The limit was raised to 32 in Linux kernel version 2.6.20 and removed altogether in 2.6.35.
Issue 11 © Solarflare Communications 2014 70

Solarflare Server Adapter
User Guide
If issues are encountered during sfupdate, the user should consider one of the following options
when upgrading firmware on systems equipped with more than two Solarflare adapters:
• Upgrade two adapters at a time with the other adapters removed.
• Upgrade the kernel.
• Rebuild the kernel, raising the value of
MAX_MTD_DEVICES in include/linux/mtd/mtd.h.
• Request bootable utilities from support@solarflare.com.
Overcome Linux MTD Limitations
An alternative method is available to upgrade the firmware without removing the adapters.
1 Unbind all interfaces from the drivers:
# for bdf in $(lspci -D -d 1924: | awk '{ print $1 }'); do echo -n ${bdf}\
> /sys/bus/pci/devices/${bdf}/driver/unbind; done
2 ifconfig -a will not discover any Solarflare interfaces.
3 Identify the bus/device/function for all Solarflare interfaces:
# lspci -D -d 1924:
4 Output similar to the following will be produced (5 NICs installed in this example):
# lspci -D -d 1924:
0000:02:00.0 Ethernet controller: Solarflare Communications SFC9020
[Solarstorm]
0000:02:00.1 Ethernet controller: Solarflare Communications SFC9020
[Solarstorm]
0000:03:00.0 Ethernet controller: Solarflare Communications SFC9020
[Solarstorm]
0000:03:00.1 Ethernet controller: Solarflare Communications SFC9020
[Solarstorm]
0000:04:00.0 Ethernet controller: Solarflare Communications SFL9021
[Solarstorm]
0000:04:00.1 Ethernet controller: Solarflare Communications SFL9021
[Solarstorm]
0000:83:00.0 Ethernet controller: Solarflare Communications SFC9020
[Solarstorm]
0000:83:00.1 Ethernet controller: Solarflare Communications SFC9020
[Solarstorm]
0000:84:00.0 Ethernet controller: Solarflare Communications SFC9020
[Solarstorm]
0000:84:00.1 Ethernet controller: Solarflare Communications SFC9020
[Solarstorm]
Issue 11 © Solarflare Communications 2014 71

Solarflare Server Adapter
User Guide
5 There are enough resources to upgrade two NICs at a time, so re-bind interfaces in groups of
four (2x2NICs):
# echo -n "0000:02:00.0" > /sys/bus/pci/drivers/sfc/bind
# echo -n "0000:02:00.1" > /sys/bus/pci/drivers/sfc/bind
# echo -n "0000:03:00.0" > /sys/bus/pci/drivers/sfc/bind
# echo -n "0000:03:00.1" > /sys/bus/pci/drivers/sfc/bind
6 Run sfupdate to update these NICs (command options may vary):
# sfupdate --write --yes --force
7 Run the command to unbind the interfaces again, there will be failures reported because some
of the interfaces aren’t bound:
# for bdf in $(lspci -D -d 1924: | awk '{ print $1 }'); do echo -n ${bdf}\
> /sys/bus/pci/devices/${bdf}/driver/unbind; done
8 Repeat the process for the other interfaces (0000:04:00.x; 0000:83:00.x and 0000:84:00.x)
doing so in pairs until all the NICs have been upgraded.
9 Rebind all interfaces, doing so en-mass and ignoring errors from those already bound:
# for bdf in $(lspci -D -d 1924: | awk '{ print $1 }'); do echo -n ${bdf}\
> /sys/bus/pci/drivers/sfc/bind; done
10 Alternatively reload the sfc driver:
# onload_tool reload
or:
# modprobe -r sfc
# modprobe sfc
11 Run ifconfig -a again to find that all the interfaces are reported and all have been
firmware upgraded without having to physically touch the server or change the kernel.
Sfupdate: SLES 11 Limitation
Due to limitations in SLES 11 using kernel versions prior to 2.6.27.54 it is necessary to reboot the
server after running the sfupdate utility to upgrade server firmware.
Issue 11 © Solarflare Communications 2014 72

Sfupdate: Command Line Options
Table 19 lists the options for sfupdate.
Table 19: Sfupdate Options
Option Description
Solarflare Server Adapter
User Guide
-h, --help
-i, --adapter=ethX
--list
--write
--force
--image=(filename)
Shows help for the available options and command line
syntax.
Specifies the target adapter when more than one
adapter is installed in the localhost.
ethX = Adapter ifname or MAC address (as obtained
with
--list).
Shows the adapter ID, adapter name and MAC address of
each adapter installed in the localhost.
Re-writes the firmware from the images embedded in
the
sfupdate tool. To re-write using an external image,
specify
--write fails if the embedded image is the same or a
previous version. To force a write in this case, specify
force in the command.
--image=<filename> in the command.
--
Force the update of all firmware, even if the installed
firmware version is the same as, or more recent then,
the firmware embedded in
sfupdate.
Update the firmware using the binary image from the
given file rather than from those embedded in the utility.
-y, --yes
Prompts for user confirmation before writing the
firmware to the adapter.
-v, --verbose
-s, --silent
Verbose mode.
Suppress output while the utility is running; useful when
the utility is used in a script.
-V --version
Issue 11 © Solarflare Communications 2014 73
Display version information and exit.

Sfupdate: Examples
• Display firmware versions for all adapters:
sfupdate
Solarstorm firmware update utility [v3.0.3]
Copyright Solarflare Communications 2006-2010, Level 5 Networks 2002-2005
eth1 - MAC: 00-0F-53-01-39-70
Firmware version: v3.0.3
PHY type: QT2025C
PHY version: v2.0.2.5
Controller type: Solarflare SFC4000
Controller version: v3.0.3.2127
BootROM version: v3.0.3.2127
The PHY firmware is up to date
The BootROM firmware is up to date
The controller firmware is up to date
Solarflare Server Adapter
User Guide
eth2 - MAC: 00-0F-53-01-39-71
Firmware version: v3.0.2
PHY type: QT2025C
PHY version: v2.0.2.5
The PHY firmware is up to date
Issue 11 © Solarflare Communications 2014 74

Solarflare Server Adapter
3.19 License Install with sfkey
The sfkey utility is distributed with the Linux Utilities RM package. This utility is used to install
Solarflare AppFlex™ licenses and enable selected on-board services for Solarflare adapters. For more
information about license requirements see Solarflare AppFlex™ Technology Licensing. on page 12.
sfkey: Command Usage
# sfkey [--adapter=eth<N>] [options]
If the adapter option is not specified, operations will be applied to all installed adapters.
• To view all sfkey options:
# sfkey --help
• To list (by serial number) all adapters that support licensing:
# sfkey --inventory
User Guide
• To display an adapter serial number and installed license keys:
# sfkey --adapter=eth4 --report
2-port adapter: eth4, eth5
Product name: Solarflare SFN7122F SFP+ Server Adapter
Part number: SFN7122F
Serial number: 712200205071133867100441
MAC addresses: 00-0F-53-21-9B-B0, 00-0F-53-22-8B-B1
Installed keys: Onload, PTP, SolarCapture Pro, SolarSecure Filter
Engine,
Active keys: Onload, PTP, SolarCapture Pro, SolarSecure Filter Engine
Blacklisted keys: 0
Invalid keys: 0
Unverifiable keys: 0
Inapplicable keys: 0
• To install a license:
Copy the license key data to a .txt file on the target server. All keys can be in the same key file and
the file applied on multiple servers. The following example uses a license key file called key.txt
created on the local server.
# sfkey --adapter=eth<N> --install key.txt
sfkey firmware update utility: v3.3.3.6330
Copyright Solarflare Communications 2006-2013, Level 5 Networks 2002-2005
Reading keys...
Writing keys to eth1...
Adapter: eth1
Issue 11 © Solarflare Communications 2014 75

Solarflare Server Adapter
Product name: Solarflare SFN7122F SFP+ Adapter
Part number: SFN7122F
Serial number: 712200205071133867100591
MAC address: 00-0F-53-21-9B-B0
Installed keys: OpenOnload, PTP, SolarCapture Pro
Active keys: OpenOnload, PTP, SolarCapture Pro
Blacklisted keys: 0
Invalid keys: 0
License Inventory
Use the combined --inventory and --keys options to identify the licenses installed on an adapter.
sfkey --adapter=eth4 --inventory --keys
eth4, eth5: 712200205071133867100441 (Flareon), $ONL, PTP, SCP, SSFE, !PM,
License information is displayed in [Prefix] [Acronym] [Suffix] format.
Prefix: $ Factory-fitted,
(may be omitted) ! Not present.
Acronym: LNA Line Arbitration,
ONL Onload,
PCAP Packet Capture,
PM Performance Monitor,
PTP Precision Time Protocol,
RSE Resilient Ethernet,
SCP SolarCapture Pro,
SSFE SolarSecure Filter Engine,
An Application unknown to this version of sfkey
('n' is a placeholder for the application id).
Suffix: <none> Licensed,
+ Site licensed,
~ Evaluation license,
* Inactive license,
@ Inactive site license,
- No state available.
User Guide
Issue 11 © Solarflare Communications 2014 76

sfkey Options
Table 20 describes all sfkey options.
Option Description
Solarflare Server Adapter
User Guide
Table 20: sfkey options
--backup
--install <filename>
--inventory
--keys
Output a report of the installed keys in all adapters. The
report can be saved to file and later used with the -install option.
Install license keys from the given file and report the
result. To read from stdin use "-" in place of filename.
Keys are installed to an adapter, so if an adapter’s ports
are eth4 and eth5, both ports will be affected by the keys
installed.
sfc driver reload is required after sfkey installs a PTP
license.
To reload the sfc driver:
# modprobe -r sfc; modprode sfc
or when Onload is installed:
# onload_tool reload
List by serial number all adapters that support licensing.
By default this will list adapters that support licenses. To
list all adapters use the --all option. To list keys use the -keys option.
Include keys in --inventory output - see License Inventory
above.
--noevaluationupdate
-a --all
Do not update evaluation keys.
Apply sfkey operation to all adapters that support
licensing.
-c --clear
Delete all existing license keys from an adapter - except
factory installed keys.
-h, --help
-i --adapter
Issue 11 © Solarflare Communications 2014 77
Display all sfkey options.
identify specific adapter to apply sfkey operation to.

Table 20: sfkey options
Option Description
Solarflare Server Adapter
User Guide
-r --report
-s --silent
-v --verbose
-V --version
-x --xml
Display an adapter serial number and current license
status (see example above).
Use with --all or with --adapter.
If an installed or active key is reported as ’An’ (where n is
a number), it indicates a license unknown to this version
of sfkey - use an updated sfkey version.
Silent mode, output errors only.
Verbose mode.
Display sfkey version and exit.
Report format as XML.
Issue 11 © Solarflare Communications 2014 78

Solarflare Server Adapter
3.20 Performance Tuning on Linux
• Introduction...Page 79
• Tuning settings...Page 80
• Other Considerations...Page 94
Introduction
The Solarflare family of network adapters are designed for high-performance network applications.
The adapter driver is pre-configured with default performance settings that have been chosen to
give good performance across a broad class of applications. In many cases, application performance
can be improved by tuning these settings to best suit the application.
There are three metrics that should be considered when tuning an adapter:
• Throughput
• Latency
User Guide
• CPU utilization
Different applications may be more or less affected by improvements in these three metrics. For
example, transactional (request-response) network applications can be very sensitive to latency
whereas bulk data transfer applications are likely to be more dependent on throughput.
The purpose of this guide is to highlight adapter driver settings that affect the performance metrics
described. This guide covers the tuning of all Solarflare adapters.
In addition to this guide, the user should consider other issues influencing performance such as
application settings, server motherboard chipset, additional software installed on the system, such
as a firewall, and the specification and configuration of the LAN. Consideration of such issues is not
within the scope of this guide.
Issue 11 © Solarflare Communications 2014 79

Solarflare Server Adapter
Tuning settings
Adapter MTU (Maximum Transmission Unit)
The default MTU of 1500 bytes ensures that the adapter is compatible with legacy 10/100Mbps
Ethernet endpoints. However if a larger MTU is used, adapter throughput and CPU utilization can be
improved. CPU utilization is improved because it takes fewer packets to send and receive the same
amount of data. Solarflare adapters support frame sizes up to 9216 bytes (this does not include the
Ethernet preamble or frame-CRC).
Since the MTU should ideally be matched across all endpoints in the same LAN (VLAN), and since the
LAN switch infrastructure must be able to forward such packets, the decision to deploy a larger than
default MTU requires careful consideration. It is recommended that experimentation with MTU be
done in a controlled test environment.
User Guide
The MTU is changed dynamically using ifconfig, where
ethX is the interface name and size is the
MTU size in bytes:
# /sbin/ifconfig <ethX> mtu <size>
Verification of the MTU setting may be performed by running ifconfig with no options and
checking the MTU value associated with the interface. The change in MTU size can be made to
persist across reboots by editing the file
and adding
MTU=<mtu> on a new line.
/etc/sysconfig/network-scripts/ifcfg-ethX
Interrupt Moderation (Interrupt Coalescing)
Interrupt moderation controls the number of interrupts generated by the adapter by adjusting the
extent to which receive packet processing events are coalesced. Interrupt moderation may coalesce
more than one packet-reception or transmit-completion event into a single interrupt.
By default, adaptive moderation is enabled. Adaptive moderation means that the network driver
software adapts the interrupt moderation setting according to the traffic and workload conditions.
Before adjusting the interrupt interval, it is recommended to disable adaptive moderation:
ethtool -C <ethX> adaptive-rx off
Interrupt moderation can be changed using ethtool, where ethX is the interface name and
interval is the moderation setting in microseconds (s). An interval value of zero (0) will turn
interrupt moderation off.
To set RX interrupt moderation:
ethtool –C <ethX> rx-usecs <interval> rx-frames 0
or
ethtool –C <ethX> rx-usecs 0 rx-frames 1
The above example also sets the transmit interrupt moderation interval unless the driver module
parameter
separate_tx_channels is enabled. Normally packet RX and TX completions will share
interrupts so RX and TX interrupt moderation intervals must be equal, then the adapter driver
automatically adjusts tx-usecs to match rx-usecs. Refer to Table 25: Driver Module Parameters.
Issue 11 © Solarflare Communications 2014 80

Solarflare Server Adapter
User Guide
To set TX interrupt moderation, if separate_tx_channels is enabled:
ethtool –C <ethX> tx-usecs 0 tx-frames 0
or
ethtool –C <ethX> tx-usecs 0 tx-frames 1
Interrupt moderation settings can be checked using ethtool –c .
The interrupt moderation interval is critical for tuning adapter latency:
• Increasing the moderation value will increase latency, but reduce CPU utilization and improve
peak throughput, if the CPU is fully utilized.
• Decreasing the moderation value or turning it off will decrease latency at the expense of CPU
utilization and peak throughput.
For many transaction request-response type network applications, the benefit of reduced latency to
overall application performance can be considerable. Such benefits may outweigh the cost of
increased CPU utilization.
NOTE: The interrupt moderation interval dictates the minimum gap between two consecutive
interrupts. It does not mandate a delay on the triggering of an interrupt on the reception of every
packet. For example, an interrupt moderation setting of 30s will not delay the reception of the
first packet received, but the interrupt for any following packets will be delayed until 30s after the
reception of that first packet.
TCP/IP Checksum Offload
Checksum offload moves calculation and verification of IP Header, TCP and UDP packet checksums
to the adapter. The driver by default has all checksum offload features enabled. Therefore, there is
no opportunity to improve performance from the default.
Checksum offload is controlled using ethtool:
Receive Checksum:
# /sbin/ethtool –K <ethX> rx <on|off>
Transmit Checksum:
# /sbin/ethtool –K <ethX> tx <on|off>
Verification of the checksum settings may be performed by running ethtool with the –k option.
Solarflare recommend you do not disable checksum offload.
Issue 11 © Solarflare Communications 2014 81

Solarflare Server Adapter
TCP Segmentation Offload (TSO)
TCP Segmentation offload (TSO) offloads the splitting of outgoing TCP data into packets to the
adapter. TCP segmentation offload benefits applications using TCP. Non TCP protocol applications
will not benefit (but will not suffer) from TSO.
Enabling TCP segmentation offload will reduce CPU utilization on the transmit side of a TCP
connection, and so improve peak throughput, if the CPU is fully utilized. Since TSO has no effect on
latency, it can be enabled at all times. The driver has TSO enabled by default. Therefore, there is no
opportunity to improve performance from the default.
TSO is controlled using ethtool:
# /sbin/ethtool –K <ethX> tso <on|off>
Verification of the TSO settings may be performed by running ethtool with the –k option.
Solarflare recommend you do not disable TSO.
TCP Large Receive Offload (LRO)
TCP Large Receive Offload (LRO) is a feature whereby the adapter coalesces multiple packets
received on a TCP connection into a single call to the operating system TCP Stack. This reduces CPU
utilization, and so improves peak throughput when the CPU is fully utilized.
User Guide
LRO should not be enabled if you are using the host to forward packets from one interface to
another; for example if the host is performing IP routing or acting as a layer2 bridge. The driver has
LRO enabled by default.
Issue 11 © Solarflare Communications 2014 82

Solarflare Server Adapter
User Guide
.
NOTE: It has been observed that as RHEL6 boots the libvirtd daemon changes the default
forwarding setting such that LRO is disabled on all network interfaces. This behaviour is undesirable
as it will potentially lower bandwidth and increase CPU utilization - especially for high bandwidth
streaming applications.
To determine if LRO is enabled on an interface:
ethtool -k ethX
If IP forwarding is not required on the server, Solarflare recommends either:
Disabling the libvirtd service (if this is not being used),
Or, as root before loading the Solarflare driver:
sysctl -w net.ipv4.conf.default.forwarding=0
(This command can be loaded into /etc/rc.local),
Or, after loading the Solarflare driver, turn off forwarding for only the Solarflare interfaces
and re-enable LRO:
sysctl -w net.ipv4.conf.ethX.forwarding=0
ethtool -K ethX lro on
(where X is the id of the Solarflare interface).
Disabling the libvirtd service is a permanent solution, whereas the other recommendations are
temporary and will not persist over reboot.
LRO should not be enabled if IP forwarding is being used on the same interface as this could result
in incorrect IP and TCP operation.
LRO can be controlled using the module parameter
modprobe.conf or add the options line to a file under the /etc/modprobe.d directory to
lro. Add the following line to /etc/
disable LRO:
options sfc lro=0
Then reload the driver so it picks up this option:
rmmod sfc
modprobe sfc
The current value of this parameter can be found by running:
cat /sys/module/sfc/parameters/lro
Issue 11 © Solarflare Communications 2014 83

Solarflare Server Adapter
User Guide
LRO can also be controlled on a per-adapter basis by writing to this file in sysfs:
/sys/class/net/ethX/device/lro
To disable LRO:
echo 0 > /sys/class/net/ethX/device/lro
To enable LRO:
echo 1 > /sys/class/net/ethX/device/lro
To show the current value of the per-adapter LRO state:
cat /sys/class/net/ethX/device/lro
Modifying this file instantly enables or disables LRO, no reboot or driver reload is required. This
setting takes precedence over the
lro module parameter
Current LRO settings can be identified with Linux ethtool .e.g.
ethtool -k ethX
Issue 11 © Solarflare Communications 2014 84

Solarflare Server Adapter
TCP Protocol Tuning
TCP Performance can also be improved by tuning kernel TCP settings. Settings include adjusting send
and receive buffer sizes, connection backlog, congestion control, etc.
For Linux kernel versions, including 2.6.16 and later, initial buffering settings should provide good
performance. However for earlier kernel versions, and for certain applications even on later kernels,
tuning buffer settings can significantly benefit throughput. To change buffer settings, adjust the
tcp_rmem and tcp_wmem using the sysctl command:
Receive buffering:
sysctl net.ipv4.tcp_rmem="<min> <default> <max>"
Transmit buffering:
sysctl net.ipv4.tcp_wmem="<min> <default> <max>"
(tcp_rmem and tcp_wmem can also be adjusted for IPV6 and globally with the net.ipv6 and net.core
variable prefixes respectively).
User Guide
Typically it is sufficient to tune just the max buffer value. It defines the largest size the buffer can
grow to. Suggested alternate values are max=500000 (1/2 Mbyte). Factors such as link latency,
packet loss and CPU cache size all influence the affect of the max buffer size values. The minimum
and default values can be left at their defaults minimum=4096 and default=87380.
Receive Side Scaling (RSS)
Solarflare adapters support Receive Side Scaling (RSS). RSS enables packet receive-processing to
scale with the number of available CPU cores. RSS requires a platform that supports MSI-X
interrupts. RSS is enabled by default.
When RSS is enabled the controller uses multiple receive queues into which to deliver incoming
packets. The receive queue selected for an incoming packet is chosen in such a way as to ensure that
packets within a TCP stream are all sent to the same receive queue – this ensures that packetordering within each stream is maintained. Each receive queue has its own dedicated MSI-X
interrupt which ideally should be tied to a dedicated CPU core. This allows the receive side TCP
processing to be distributed amongst the available CPU cores, providing a considerable performance
advantage over a conventional adapter architecture in which all received packets for a given
interface are processed by just one CPU core. RSS can be restricted to only process receive queues
on the NUMA node local to the Solarflare adapter. To configure this the driver module option
rss_numa_local should be set to 1.
By default the drivers enables RSS and configures one RSS Receive queue per CPU core. The number
of RSS Receive queues can be controlled via the driver module parameter
options are supported:
rss_cpus. The following
Issue 11 © Solarflare Communications 2014 85

Solarflare Server Adapter
Table 21: rss_cpus Options
Option Description Interrupt Affinity (MSI-X)
User Guide
<num_cpus> Indicates the number of RSS
queues to create.
packages An RSS queue will be created for
each multi-core CPU package.
The first CPU in the package will
A separate MSI-X interrupt for a receive
queue is affinitized to each CPU.
A separate MSI-X interrupt for a receive
queue, is affinitized to each of the
designated package CPUs.
be chosen.
cores An RSS queue will be created for
each CPU. The first hyperthread
instance (If CPU has
A separate MSI-X interrupt for a receive
queue, is affinitized to each of the
CPUs.
hyperthreading) will be chosen.
The default option.
hyperthreads An RSS queue will be created for
each CPU hyperthread
(hyperthreading must be
A separate MSI-X interrupt for a receive
queue, is affinitized to each of the
hyperthreads.
enabled).
Add the following line to /etc/modprobe.conf file or add the options line to a user created file
under the /etc/modprobe.d directory. The file should have a .conf extension
options sfc rss_cpus=<option>
:
To set rss_cpus equal to the number of CPU cores:
options sfc rss_cpus=cores
Sometimes, it can be desirable to disable RSS when running single stream applications, since all
interface processing may benefit from taking place on a single CPU:
options sfc rss_cpus=1
NOTE: The association of RSS receive queues to a CPU is governed by the receive queue's MSI-X
interrupt affinity. See Interrupt and Irqbalance Service on page 91 for more details.
The driver must be reloaded to enable option changes:
rmmod sfc
modprobe sfc
Issue 11 © Solarflare Communications 2014 86

Solarflare Server Adapter
User Guide
NOTE: The rss_cpus parameter controls the number of MSI-X interrupts used by each Solarflare
port. Unfortunately, some older Linux version have a bug whereby the maximum number of MSI-X
interrupts used by a PCI function is fixed at the first driver load. For instance, if the drivers are first
loaded with
rss_cpus=1, all subsequent driver loads will always use rss_cpus=1.
Red Hat Enterprise Linux 5 update 2 (and above), and SUSE Enterprise Linux 11 are not affected by
this issue.
To workaround this issue, you must reboot the host after modifying
rss_cpus.
NOTE: RSS also works for UDP packets. For UDP traffic the Solarflare adapter will select the Receive
CPU based on IP source and destination addresses. Solarflare adapters support IPv4 and IPv6 RSS
except the SFN4xxx adapters which only supports IPv4 RSS.
Receive Flow Steering (RFS)
RFS will attempt to steer packets to the core where a receiving application is running. This reduces
the need to move data between processor caches and can significantly reduce latency and jitter.
Modern NUMA systems, in particular, can benefit substantially from RFS where packets are
delivered into memory local to the receiving thread.
Unlike RSS which selects a CPU from a CPU affinity mask set by an administrator or user, RFS will
store the application's CPU core identifier when the application process calls
sendmsg().
• A hash is calculated from a packet’s addresses or ports (2-tuple or 4-tuple) and serves as the
consistent hash for the flow associated with the packet.
• Each receive queue has an associated list of CPUs to which RFS may enqueue the received
packets for processing.
recvmsg() or
• For each received packet, an index into the CPU list is computed from the flow hash modulo the
size of the CPU list.
There are two types of RFS implementation; Soft RFS and Hardware (or Accelerated) RFS.
Soft RFS is a software feature supported since Linux 2.6.35 that attempts to schedule protocol
processing of incoming packets on the same processor as the user thread that will consume the
packets.
Accelerated RFS requires Linux kernel version 2.6.39 or later, with the Linux sfc driver or Solarflare
v3.2 network adapter driver.
RFS can dynamically change the allowed CPUs that can be assigned to a packet or packet stream and
this introduces the possibility of out of order packets. To prevent out of order data, two tables are
created that hold state information used in the CPU selection.
Issue 11 © Solarflare Communications 2014 87

Solarflare Server Adapter
• Global_flow_table: Identifies the number of simultaneous flows that are managed by RFS.
• Per_queue_table: Identifies the number of flows that can be steered to a queue. This holds
state as to when a packet was last received.
The tables support the steering of incoming packets from the network adapter to a receive queue
affinitized to a CPU where the application is waiting to receive them. The Solarflare accelerated RFS
implementation requires configuration through the two tables and the ethtool -K command.
The following sub-sections identify the RFS configuration procedures:
Kernel Configuration
Before using RFS the kernel must be compiled with the kconfig symbol CONFIG_RPS enabled.
Global Flow Count
Configure the number of simultaneous flows that will be managed by RFS. The suggested flow count
will depend on the expected number of active connections at any given time and may be less than
the number of open connections. The value is rounded up to the nearest power of two.
User Guide
# echo 32768 > /proc/sys/net/core/rps_sock_flow_entries
Per Queue Flow Count
For each adapter interface there will exist a ’queue’ directory containing one ’rx’ or ’tx’ subdirectory
for each queue associated with the interface. For RFS only the receive queues are relevant.
# cd /sys/class/net/eth3/queue
Within each ’rx’ subdirectory, the
flow table. If only a single queue is used then
rps_sock_flow_entries. When multiple queues are configured the count will be equal to
rps_sock_flow_entries/N where N is the number of queues, for example:
rps_sock_flow_entries = 32768 and there are 16 queues then rps_flow_cnt for each queue
rps_flow_cnt file holds the number of entries in the per- queue
rps_flow_cnt will be the same as
will be configured as 2048.
# echo 2048 > /sys/class/net/eth3/queues/rx-0/rps_flow_cnt
# echo 2048 > /sys/class/net/eth3/queues/rx-1/rps_flow_cnt
Disable RFS
To turn off RFS using the following command:
# ethtool -K <devname> ntuple off
Issue 11 © Solarflare Communications 2014 88

Solarflare Server Adapter
Transmit Packet Steering
Transmit Packet Steering (XPS) is supported in Linux 2.6.38 and later. XPS is a mechanism for
selecting which transmit queue to use when transmitting a packet on a multi-queue device.
XPS is configured on a per transmit queue basis where a bitmap of CPUs identifies the CPUs that may
use the queue to transmit.
Kernel Configuration
Before using XPS the kernel must be compiled with the kconfig symbol CONFIG_XPS enabled.
Configure CPU/Hyperthreads
Within in each /sys/class/net/eth3/queues/tx-N directory there exists an ’xps_cpus’ file
which contains a bitmap of CPUs that can use the queue to transmit. In the following example
transmit queue 0 can be used by the first two CPUs and transmit queue 1 can be used by the
following two CPUs:
User Guide
# echo 3 > /sys/class/net/eth3/queues/tx-0/xps_cpus
# echo c > /sys/class/net/eth3/queues/tx-0/xps_cpus
If hyperthreading is enabled, each hyperthread is identified as a seperate CPU, for example if the
system has 16 cores but 32 hyperthreads then the transmit queues should be paired with the
hyperthreaded cores:
# echo 30003 > /sys/class/net/eth3/queues/tx-0/xps_cpus
# echo c000c > /sys/class/net/eth3/queues/tx-0/xps_cpus
XPS - Example Configuration
System Configuration:
• Single Solarflare adapter
• 2 x 8 core processors with hyperthreading enabled to give a total of 32 cores
• rss_cpus=8
• Only 1 interface on the adapter is configured
• The IRQ Balance service is disabled
Issue 11 © Solarflare Communications 2014 89

Solarflare Server Adapter
Identify interrupts for the configured interface:
# cat /proc/interrupts | grep ’eth3\ | CPU’
> cat /proc/irq/132/smp_affinity
00000000,00000000,00000000,00000001
> cat /proc/irq/133/smp_affinity
00000000,00000000,00000000,00000100
> cat /proc/irq/134/smp_affinity
00000000,00000000,00000000,00000002
[...snip...]
> cat /proc/irq/139/smp_affinity
00000000,00000000,00000000,00000800
The output identifies that IRQ-132 is the first queue and is routed to CPU0. IRQ-133 is the second
queue routed to CPU8, IRQ-134 to CPU2 and so on.
Map TX queue to CPU
User Guide
Hyperthreaded cores are included with the associated physical core:
> echo 110011 > /sys/class/net/eth3/queues/tx-0/xps_cpus
> echo 11001100 > /sys/class/net/eth3/queues/tx-1/xps_cpus
> echo 220022 > /sys/class/net/eth3/queues/tx-2/xps_cpus
> echo 22002200 > /sys/class/net/eth3/queues/tx-3/xps_cpus
> echo 440044 > /sys/class/net/eth3/queues/tx-4/xps_cpus
> echo 44004400 > /sys/class/net/eth3/queues/tx-5/xps_cpus
> echo 880088 > /sys/class/net/eth3/queues/tx-6/xps_cpus
> echo 88008800 > /sys/class/net/eth3/queues/tx-7/xps_cpus
Configure Global and Per Queue Tables
• The flow count (number of active connections at any one time) = 32768
• Number of queues = 8 (rss_cpus)
• So the flow count for each queue will be 32768/8
> echo 32768 > /proc/sys/net/core/rps_sock_flow_entries
> echo 4096 > /sys/class/net/eth3/queues/rx-0/rps_flow_cnt
> echo 4096 > /sys/class/net/eth3/queues/rx-1/rps_flow_cnt
> echo 4096 > /sys/class/net/eth3/queues/rx-2/rps_flow_cnt
> echo 4096 > /sys/class/net/eth3/queues/rx-3/rps_flow_cnt
> echo 4096 > /sys/class/net/eth3/queues/rx-4/rps_flow_cnt
> echo 4096 > /sys/class/net/eth3/queues/rx-5/rps_flow_cnt
> echo 4096 > /sys/class/net/eth3/queues/rx-6/rps_flow_cnt
> echo 4096 > /sys/class/net/eth3/queues/rx-7/rps_flow_cnt
Issue 11 © Solarflare Communications 2014 90

Solarflare Server Adapter
Interrupt and Irqbalance Service
Interrupt affinity describes the set of host cpus that may service a particular interrupt.
This affinity therefore dictates the CPU context where received packets will be processed and where
transmit packets will be freed once sent. If the application can process the received packets in the
same CPU context by being affinitized to the relevant CPU, then latency and CPU utilization can be
improved. This improvement is achieved because well tuned affinities reduce inter-CPU
communication.
Tuning interrupt affinity is most relevant when MSI-X interrupts and RSS are being used. The
irqbalance service, which typically runs by default in most Linux distributions, is a service that
automatically changes interrupt affinities based on CPU workload.
In many cases the irqbalance service hinders rather than enhances network performance. It is
therefore necessary to disable it and then set interrupt affinities.
To disable irqbalance permanently, run:
/sbin/chkconfig -level 12345 irqbalance off
To see whether irqbalanace is currently running, run:
User Guide
/sbin/service irqbalance status
To disable irqbalance temporarily, run:
/sbin/service irqbalance stop
Once the irqbalance service has been stopped, the Interrupt affinities can be configured manually.
NOTE: The Solarflare driver will evenly distribute interrupts across the available host CPUs (based
on the
rss_cpus module parameter).
To use the Solarflare driver default affinities (recommended), the irqbalance service must be
disabled before the Solarflare driver is loaded (otherwise it will immediately overwrite the affinity
configuration values set by the Solarflare driver).
Example 1:
How affinities should be manually set will depend on the application. For a single streamed
application such as Netperf, one recommendation would be to affinitize all the Rx queues and the
application on the same CPU. This can be achieved with the following steps:
1 Determine which interrupt line numbers the network interface uses. Assuming the interface is
eth0, this can be done with:
# cat /proc/interrupts | grep eth0-
123: 13302 0 0 0 PCI-MSI-X eth0-0
131: 0 24 0 0 PCI-MSI-X eth0-1
139: 0 0 32 0 PCI-MSI-X eth0-2
147: 0 0 0 21 PCI-MSI-X eth0-3
Issue 11 © Solarflare Communications 2014 91

Solarflare Server Adapter
This output shows that there are four channels (rows) set up between four cpus (columns).
2 Determine the CPUs to which these interrupts are assigned to:
# cat /proc/irq/123/smp_affinity
00000000,00000000,00000000,00000000,00000000,00000000,00000000,000000
01
# cat /proc/irq/131/smp_affinity
00000000,00000000,00000000,00000000,00000000,00000000,00000000,000000
02
# cat /proc/irq/139/smp_affinity
00000000,00000000,00000000,00000000,00000000,00000000,00000000,000000
04
# cat /proc/irq/147/smp_affinity
00000000,00000000,00000000,00000000,00000000,00000000,00000000,000000
08
This shows that RXQ[0] is affinitized to CPU[0], RXQ[1] is affinitized to CPU[1], and so on.
With this configuration, the latency and cpu utilization for a particular TCP flow will be
dependant on that flow’s RSS hash, and which CPU that hash resolves onto.
User Guide
NOTE: Interrupt line numbers and their initial CPU affinity are not guaranteed to be the same
across reboots and driver reloads. Typically, it is therefore necessary to write a script to query these
values and apply the affinity accordingly.
3 Set all network interface interrupts to a single CPU (in this case
# echo 1 > /proc/irq/123/smp_affinity
# echo 1 > /proc/irq/131/smp_affinity
# echo 1 > /proc/irq/139/smp_affinity
# echo 1 > /proc/irq/147/smp_affinity
CPU[0]):
NOTE: The read-back of /proc/irq/N/smp_affinity will return the old value until a new
interrupt arrives.
Set the application to run on the same CPU (in this case CPU[0]) as the network interface’s
interrupts:
# taskset 1 netperf
# taskset 1 netperf -H <host>
Issue 11 © Solarflare Communications 2014 92

Solarflare Server Adapter
User Guide
NOTE: The use of taskset is typically only suitable for affinity tuning single threaded, single traffic
flow applications. For a multi threaded application, whose threads for example process a subset of
receive traffic, taskset is not suitable. In such applications, it is desirable to use RSS and Interrupt
affinity to spread receive traffic over more than one CPU and then have each receive thread bind to
each of the respective CPUs. Thread affinities can be set inside the application with the
shed_setaffinity() function (see Linux man pages). Use of this call and how a particular
application can be tuned is beyond the scope of this guide.
If the settings have been correctly applied, all interrupts from eth0 are being handled on CPU[0].
This can be checked:
# cat /proc/interrupts | grep eth0-
123: 13302 0 1278131 0 PCI-MSI-X eth0-0
131: 0 24 0 0 PCI-MSI-X eth0-1
139: 0 0 32 0 PCI-MSI-X eth0-2
147: 0 0 0 21 PCI-MSI-X eth0-3
Example 2:
An example of affinitizing each interface to a CPU on the same package:
First identify which interrupt lines are servicing which CPU and IO device:
# cat /proc/interrupts | grep eth0123: 13302 0 1278131 0 PCI-MSI-X eth0-0
# cat /proc/interrupts | grep eth1131: 0 24 0 0 PCI-MSI-X eth1-0
Find CPUs on same package (have same ‘package-id’):
# more /sys/devices/system/cpu/cpu*/topology/physical_package_id
::::::::::::::
/sys/devices/system/cpu/cpu0/topology/physical_package_id
::::::::::::::
1
::::::::::::::
/sys/devices/system/cpu/cpu10/topology/physical_package_id
::::::::::::::
1
::::::::::::::
/sys/devices/system/cpu/cpu11/topology/physical_package_id
::::::::::::::
0
…
Having determined that cpu0 and cpu10 are on package 1, we can assign each ethX interface’s MSIX interrupt to its own CPU on the same package. In this case we choose package 1:
Issue 11 © Solarflare Communications 2014 93

Solarflare Server Adapter
# echo 1 > /proc/irq/123/smp_affinity 1hex is bit 0 = CPU0
# echo 400 > /proc/irq/131/smp_affinity 400hex is bit 10 = CPU10
Buffer Allocation Method
The Solarflare driver has a single optimized buffer allocation strategy. This replaces the two different
methods controlled with the
using 3.3 and previous drivers.
rx_alloc_method driver module parameter which were available
User Guide
The net driver continues to expose the
and it only exists to not break existing customer configurations.
rx_alloc_method module option, but the value is ignored
TX PIO
PIO (programmed input/output) describes the process where data is directly transferred by the CPU
to or from an I/O device. It’s is an alternative technique to the I/O device using bus master DMA to
transfer data without CPU involvement.
Solarflare 7000 series adapters support TX PIO, where packet s on the transmit path can be “pushed”
to the adapter directly by the CPU. This improves the latency of transmitted packets but can cause a
very small increase in CPU utilisation. TX PIO is therefore especially useful for smaller packets.
The TX PIO feature is enabled by default for packets up to 256 bytes. The maximum packet size that
can use PIO can be configured with the driver module option
piobuf_size.
Other Considerations
PCI Express Lane Configurations
The PCI Express (PCIe) interface used to connect the adapter to the server can function at different
widths. This is independent of the physical slot size used to connect the adapter. The possible widths
are multiples x1, x2, x4, x8 and x16 lanes of (2.5Gbps for PCIe Gen 1, 5.0 Gbps for PCIe Gen 2
Gbps for PCIe Gen 3) in each direction. Solarflare Adapters are designed for x8 lane operation.
and 8.0
On some server motherboards, choice of PCIe slot is important. This is because some slots (including
slots that are physically x8 or x16 lanes) may only electrically support x4 lanes. In x4 lane slots,
Solarflare PCIe adapters will continue to operate, but not at full speed. The Solarflare driver will warn
if it detects the adapter is plugged into a PCIe slot which electrically has fewer than x8 lanes.
Adapters which require a PCIe Gen 2 or Gen 3 slot for optimal operation will issue a warning if they
are installed in a PCIe Gen 1 slot. Warning messages can be viewed in
messages.
Issue 11 © Solarflare Communications 2014 94
dmesg from /var/log/

Solarflare Server Adapter
The lspci command can be used to discover the currently negotiated PCIe lane width and speed:
lspci -d 1924: -vv
02:00.1 Class 0200: Unknown device 1924:0710 (rev 01)
...
Link: Supported Speed 2.5Gb/s, Width x8, ASPM L0s, Port 1
Link: Speed 2.5Gb/s, Width x8
NOTE: The Supported speed may be returned as 'unknown', due to older lspci utilities not
knowing how to determine that a slot supports PCIe Gen. 2.0/5.0 Gb/s or PCIe Gen 3.0/8,0 Gb/s.
CPU Speed Service
Most Linux distributions will have the cpuspeed service running by default. This service controls the
CPU clock speed dynamically according to current processing demand. For latency sensitive
applications, where the application switches between having packets to process and having periods
of idle time waiting to receive a packet, dynamic clock speed control may increase packet latency.
Solarflare recommend disabling the cpuspeed service if minimum latency is the main consideration.
User Guide
The service can be disabled temporarily:
/sbin/service cpuspeed stop
The service can be disabled across reboots:
/sbin/chkconfig –level 12345 cpuspeed off
Memory bandwidth
Many chipsets use multiple channels to access main system memory. Maximum memory
performance is only achieved when the chipset can make use of all channels simultaneously. This
should be taken into account when selecting the number of DIMMs to populate in the server.
Consult the motherboard documentation for details.
Intel® QuickData
Intel® QuickData Technology allows recent Linux distributions to data copy by the chipset instead of
the CPU, to move data more efficiently through the server and provide fast, scalable, and reliable
throughput.
Enabling QuickData
• On some systems the hardware associated with QuickData must first be enabled (once
only) in the BIOS
• Load the QuickData drivers with
modprobe ioatdma
Server Motherboard, Server BIOS, Chipset Drivers
Tuning or enabling other system capabilities may further enhance adapter performance. Readers
should consult their server user guide. Possible opportunities include tuning PCIe memory controller
(PCIe Latency Timer setting available in some BIOS versions).
Issue 11 © Solarflare Communications 2014 95
 Loading...