

Solace iDATASTART BM, iDATASTART HC, iDATASTART CLASSIC, ADS-ALCA, DEI 4X10 Installation Manual
...
MODEL
SIC3-RFK
INSTALLATION
GUIDE
MODULE
DIAGNOSTICS
A
CONNECTOR A (BLACK 4 PIN)
B
LED’S
CONNECTOR B (WHITE 4 PIN)
CONNECTOR C (BLUE 5 PIN)
C
CONNECTOR D (WHITE 2 PIN)
D
RED LED (FLASHING / ON)
1x / Sec. Power On
On Ignition On (Data / Analog)
TO BYPASS MODULE OR REMOTE STARTER
TO SOLACE ANTENNA ( NOT INCLUDED )
GRAY / BLACK - START / STOP (-)
WHITE / BLACK - TRUNK RELEASE (-)
GREEN - LOCK (-)
BLUE - UNLOCK (-)
PINK - IGNITION INPUT (+)
RED - 12V INPUT (+)
BLACK - CHASSIS GROUND (-)
WHITE LED (FLASHING)
1x Data communication from connected
device (after remote function or status from car).
2x - 4x Programming
PROGRAMMING
DATA PROTOCOL SELECTION
1 Leave Ignition in OFF position
2 Press programming button (antenna button) 8x within 10 seconds (White LED on SIC3-RFK
flash 1x)
3 Choose your protocol below by pressing the programming button:
Option 2 - Press 2x - iData Telematics (Default)
Option 4 - Press 4x - iData / Fortin RF
Option 6 - Press 6x - D2D
Option 8 - Press 8x - Future Use
4 After 5 seconds White LED will flash according your selection.
REMOTE PROGRAMMING
1 Turn Igntion ON-OFF-ON (Analog Ignition connection may be required)
2 Press and hold the programming button (White LED will illuminate on SIC3-RFK)
3 After 3 Seconds the White LED will flash 1x. Release antenna button and press Lock on each
transmitter to be programmed. (White LED on SIC3-RFK flash 1x for each remote programmed)
4 Turn Ignition to OFF
(When using iData/Fortin RF protocol, the Solace remotes need to be programmed to bypass module. See
manufacturer's guide for details)
solaceremotestarters.com
REV112316

OPTIONS
MODEL
SIC3-RFK
MENU 1*
1-01 Ignition Locks
1-02 Lock / Unlock Options
1-03 Lock Pulse Timing
1-04 Unlock Pulse Timing
1-05 Trunk Pulse Timing
1-07 Park Light Output
1-08 Start / Stop Pulses
1-09 Auxiliary Timing
1-10 Auxiliary Timing
Menu 2*
2-01 Start / Stop Output
2-02 Lock Output
2-03 Unlock Output
2-04 Trunk Output
Option 1 Option 2 Option 3
Enabled
Both 1x
0.8 Secs.
0.8 Secs.
0.8 Secs
On
1x On / Off
0.8 Secs
0.8 Secs
Option 1 Option 2-8
Start / Stop
Lock
Unlock
Trunk Release
Disabled
Lock x1 / Unlock x2
100 mS
100 mS
100 mS
Off
2x On / Off
Latched
Latched
See Table
See Table
See Table
See Table
Option 2 Park Lights ( - )
Option 3 Horn ( - )
Option 4 GWA ( - )
Option 5 Aux 1 ( - )
Option 6 Aux 2 ( - )
Option 7 Disarm ( - )
Option 8 Rearm ( - )
Unlock Only
Lock x2 / Unlock x1
3 Seconds
3 Seconds
3 Seconds
3x On / Off
2 Secs.
2 Secs.
INSTALLATION
GUIDE
Option 4
Lock x2 / Unlock x2
8 Seconds
8 Seconds
8 Seconds
4 Secs.
4 Secs.
BRIDGEWORK
MORE INFO
*Programming must be done with the SHHP-BT
SIC3-RFK & AUTOCONNECT
When adding an Autoconnect with this module, swapping the RX / TX lines on supplied cable(s)
may be required depending on installation. See image below
Connect SIC3-RFK to one of the data ports on the IC3 supplied with Autoconnect.
INSTALL GUIDES & BYPASS MODULES
When using the SIC3-RFK in conjunction with a remote starter and/or bypass module please visit
www.solaceremotestarters.com/manuals for a complete guide on how to program and connect
the units together.
solaceremotestarters.com
REV112316

CONNECTIONS
MODEL
*Ignition supported through data
SIC3-RFK & EVO-ONE
INSTALLATION
GUIDE
PROGRAMMING
PROGRAM SIC3-RFK DATA PROTOCOL TO OPTION 4 - IDATA / FORTIN RF
MODULE
1 Run FlashLink Manager, plug in EVO-ONE
2 Click Toggle to switch to Remote Starter Connection
3 Click Configuration, then select Options
4 Under RF Kits select Fortin 2
5 Click on “SAVE”
PROGRAMMING REMOTES
PROGRAMMING
1 Follow programming guide to program remotes to SIC3-RFK
2 Program remotes to EVO-ALL following instructions below
PROGRAMMING REMOTE TRANSMITTER(S)
The system can learn up to a maximum
of 4 transmitters. When a 5th
transmitter is learned the the 1st
1 32 4
STEP 1 STEP 2 STEP 3 STEP 4 STEP 5 STEP 6
remote is erased (FIFO).
Download the specic vehicle
installation guide, user guide or the
latest quick installation guide at:
WWW.FORTIN.CA
Turn the
Ignition ON.
Press and hold the valet
switch until the parking
light turn ON, the horn/
siren will chirp once.
solaceremotestarters.com
x5
Press and release the valet switch
ve times.
The parking lights will ash and the
horn/siren wil chirp each time to
conrm.
x1
Press and release
the brake pedal
once
x1
On each transmitter press
lock button. The LED will
stop ashing conrming
programming
Turn the
Igntion OFF
to exit
programming
REV112316

CONNECTIONS
*Not required when using a T-Harness
(use datalink cable supplied with EVO)
RED - 12V+
BLACK - GROUND (-)
MODEL
*Ignition supported through data
SIC3-RFK & EVO-ALL (STANDALONE FW.)
INSTALLATION
GUIDE
PROGRAMMING
PROGRAM SIC3-RFK DATA PROTOCOL TO OPTION 4 - IDATA / FORTIN RF
MODULE
1 Run FlashLink Manager, plug in EVO-ALL
2 Click on “EVO-ALL OPTIONS” Tab
3 Activate “SUPPORTED RF KITS” and Option “H2”
4 Click on “SAVE OPTIONS”
5 Wait for “Options Saved” Message to appear.
PROGRAMMING REMOTES
PROGRAMMING
1 Follow programming guide to program remotes to SIC3-RFK
2 Program remotes to EVO-ALL following instructions below
1 To program remotes to the EVO-ALL, Press and hold the FORTIN programming button. Insert the 4‐Pin (Data‐Link)
connector. Release the programming button when the LED’s are BLUE AND RED.
2 Press and hold the FORTIN programming button again for 5 seconds (Blue and Red will go Off and back On after 5
seconds). Turn ignition On, the Yellow LED will turn On.
3 Press the LOCK button on remotes you wish to program one at a time. All remotes must be program at the same
time. The BLUE and RED LED’s will flash once to confirm each remote is coded.
4 Turn Ignition OFF
solaceremotestarters.com
REV112316

CONNECTIONS
MODEL
*Ignition supported through data
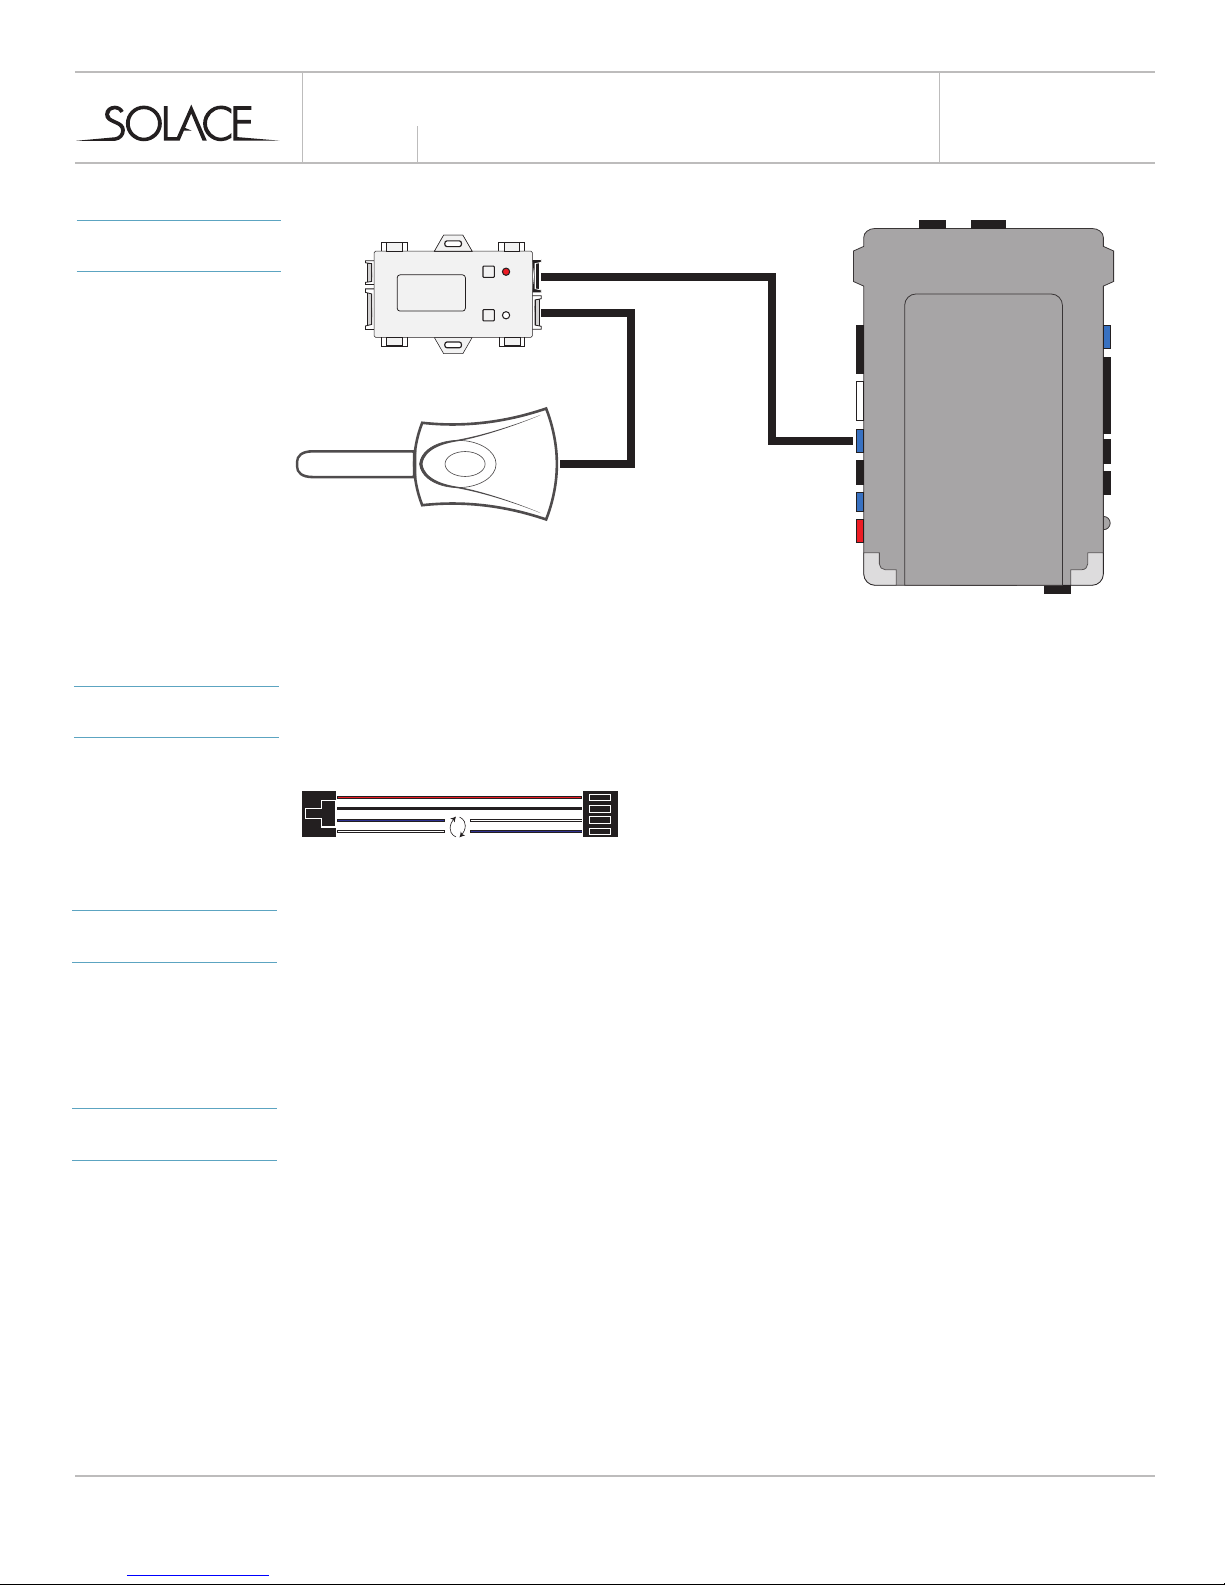
SIC3-RFK & iDATASTART HC
INSTALLATION
GUIDE
**
NOTES
PROGRAMMING
MODULE
PROGRAMMING
**IMPORTANT - DATA CABLE MODIFICATION REQUIRED
1 Please see diagram below on how to modify SIC3-RFK cable for functionality.
Swap the BLUE & WHITE wires on one end of the cable or cut and reconnect.
PROGRAM SIC3-RFK DATA PROTOCOL TO OPTION 2 - IDATA TELEMATICS
1 Open “Weblink Program”
2 Choose Year / Make / Model
3 Select iDatastart RF Kit & Drone
4 Configure module and Flash firmware
PROGRAMMING REMOTES
1 Follow programming guide to program remotes to SIC3-RFK
2 There is no other programming required.
solaceremotestarters.com
REV112316
CONNECTIONS
MODEL
*Ignition supported through data
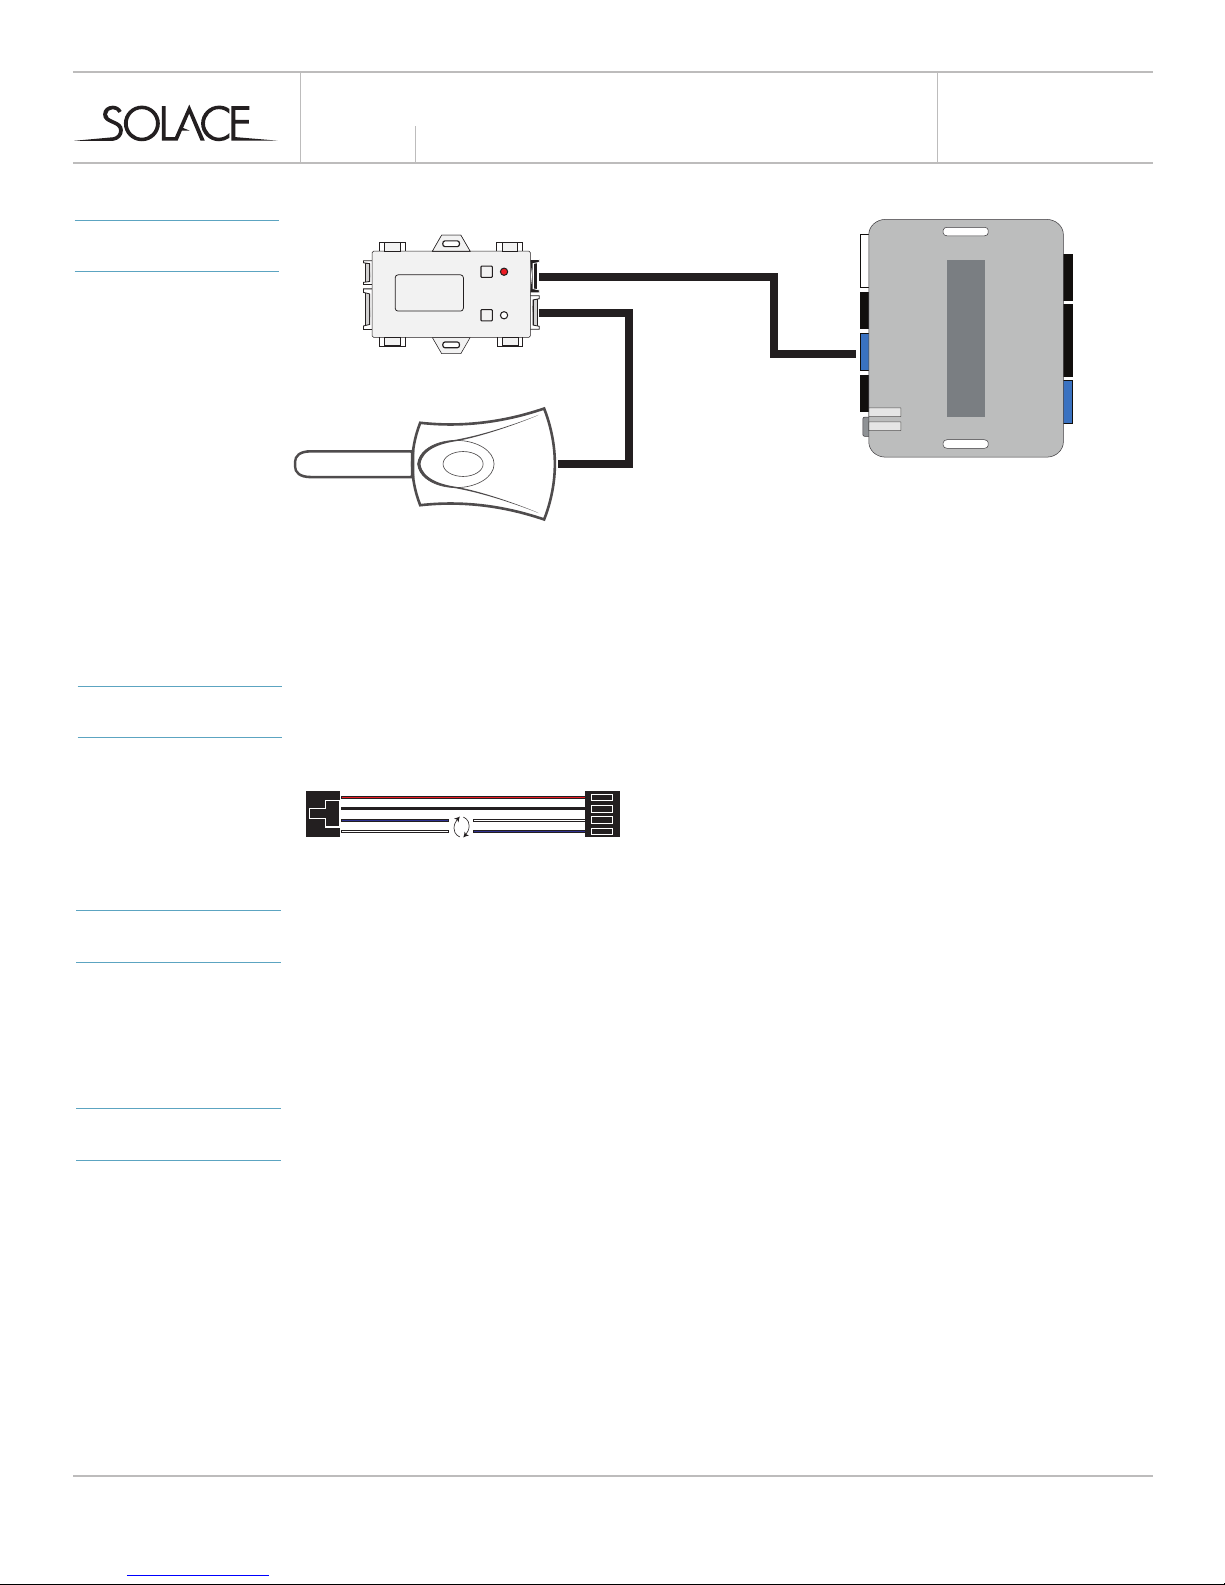
SIC3-RFK & iDATASTART (BM & BZ)
INSTALLATION
GUIDE
**
NOTES
PROGRAMMING
MODULE
PROGRAMMING
**IMPORTANT - DATA CABLE MODIFICATION REQUIRED
1 Please see diagram below on how to modify SIC3-RFK cable for functionality.
Swap the BLUE & WHITE wires on one end of the cable or cut and reconnect.
PROGRAM SIC3-RFK DATA PROTOCOL TO OPTION 2 - IDATA TELEMATICS
1 Open “Weblink Program”
2 Choose Year / Make / Model
3 Select Drone telematics kit.
4 Configure module and Flash firmware
PROGRAMMING REMOTES
1 Follow programming guide to program remotes to SIC3-RFK
2 There is no other programming required.
solaceremotestarters.com
REV112316
CONNECTIONS
MODEL
*Ignition supported through data
SIC3-RFK & iDATASTART (CLASSIC)
INSTALLATION
GUIDE
**
NOTES
PROGRAMMING
MODULE
PROGRAMMING
**IMPORTANT - DATA CABLE MODIFICATION REQUIRED
1 Please see diagram below on how to modify SIC3-RFK cable for functionality.
Swap the BLUE & WHITE wires on one end of the cable or cut and reconnect.
PROGRAM SIC3-RFK DATA PROTOCOL TO OPTION 2 - IDATA TELEMATICS
1 Open “Weblink Program”
2 Choose Year / Make / Model
3 Select Drone telematics kit.
4 Configure module and Flash firmware
PROGRAMMING REMOTES
1 Follow programming guide to program remotes to SIC3-RFK
2 There is no other programming required.
solaceremotestarters.com
REV112316

CONNECTIONS
RED - 12V+
BLACK - GROUND (-)
YELLOW - IGNITION
MODEL
SIC3-RFK & ADS-ALCA (R.S. FW.)
INSTALLATION
GUIDE
PROGRAMMING
MODULE
PROGRAMMING
PROGRAM SIC3-RFK DATA PROTOCOL TO OPTION 2 - IDATA TELEMATICS
1 Open “Weblink Program”
2 Choose Year / Make / Model
3 Select Drone telematics kit.
4 Configure module and Flash firmware
PROGRAMMING REMOTES
1 Follow programming guide to program remotes to SIC3-RFK
2 There is no other programming required.
solaceremotestarters.com
REV112316

CONNECTIONS
YELLOW - IGNITION
MODEL
SIC3-RFK & DEI (4X10/5X10)
INSTALLATION
GUIDE
NOTES
PROGRAMMING
MODULE
PROGRAMMING
**IMPORTANT - DATA CABLE MODIFICATION REQUIRED
1 Please see diagram below on how to modify SIC3-RFK cable for functionality.
Swap the BLUE & WHITE wires on one end of the cable or cut and reconnect.
PROGRAM SIC3-RFK DATA PROTOCOL TO OPTION 6 - D2D
1 Open “XK Loader”
2 Choose Year / Make / Model
3 Configure Module features
4 Enable “SMART START” without RF
5 Flash Firmware
PROGRAMMING REMOTES
1 Follow programming guide to program remotes to SIC3-RFK
2 There is no other programming required.
solaceremotestarters.com
REV112316

CONNECTIONS
YELLOW - IGNITION
MODEL
SIC3-RFK & DEI (DBALL RSR FW.)
INSTALLATION
GUIDE
NOTES
PROGRAMMING
MODULE
PROGRAMMING
**IMPORTANT - DATA CABLE MODIFICATION REQUIRED
1 Please see diagram below on how to modify SIC3-RFK cable for functionality.
Swap the BLUE & WHITE wires on one end of the cable or cut and reconnect.
PROGRAM SIC3-RFK DATA PROTOCOL TO OPTION 6 - D2D
1 Open “XK Loader”
2 Choose Year / Make / Model
3 Configure Module features
4 Enable “SMART START” without RF
5 Flash Firmware
PROGRAMMING REMOTES
1 Follow programming guide to program remotes to SIC3-RFK
2 There is no other programming required.
solaceremotestarters.com
REV112316
 Loading...