


manual de instrucciones / instructions for use
mode d’emploi / manual de instruçoes
gebrauchsanweisung / manuale d’instruzioni
LICUADORA DE PRENSADO EN FRÍO
COLD PRESS SLOW JUICER
PRESSE-AGRUMES À MASTICATION LENTE
ESPREMEDOR DE SUMOS LENTO
ENTSAFTER KALTPRESSUG SLOW JUICER
ESTRATTORE DI SUCCO A FREDDO
Precaución: lea y conserve estas importantes instrucciones
Caution: please read and preserve these important instructions
ref. SS-5141
2015 / 863 / EU

español english français portuguese deutsch italiano
IMPORTANTE:
1. Lea siempre el libro de instrucciones con
atención antes de usarlo.
2. Este manual se puede descargar desde
nuestro sitio web, www.sogo.com
3. Guarde estas instrucciones para futuras
consultas.
INSTRUCCIONES DE SEGURIDAD
PARA EL USUARIO
• Lea atentamente las instrucciones antes de utilizar
el aparato.
• Este producto está diseñado para uso doméstico
en interiores, no industrial y no comercial. No
utilice el artículo al aire libre ni para ningún otro
propósito. El uso indebido o el manejo inadecuado
pueden causar problemas con el aparato y
pueden causar lesiones al usuario.
• Asegúrese de que el voltaje indicado en la
placa de características coincida con el voltaje
del tomacorriente de pared principal antes de
enchufar el aparato.
• El aparato se ha incorporado con un enchufe con
conexión a tierra. Asegúrese de que la toma de
corriente de su casa esté bien conectada a tierra.
• Siempre retire el enchufe de la toma de corriente
cuando el aparato no está en uso. No deje el
aparato desatendido cuando esté encendido.
• Desconecte siempre el aparato del suministro
si se deja desatendido y antes de montarlo,
desmontarlo o limpiarlo.
• Antes de limpiar o almacenar su electrodoméstico,
desenchufe siempre el electrodoméstico de la
fuente de alimentación y deje que se enfríe.
2

español english français portuguese deutsch italiano
• Los aparatos no están diseñados para funcionar
mediante un temporizador externo o un sistema
de control remoto independiente.
• No coloque ni opere el aparato cerca de fuentes
de agua.
• Nunca sumerja el aparato o el enchufe en agua o
cualquier otro líquido. En caso de que el aparato
se caiga al agua, desconéctelo inmediatamente
del suministro principal y llévelo a un agente de
servicio autorizado para que lo repare antes de
volver a usarlo.
• Para protegerse contra descargas eléctricas, no
sumerja el cable, los enchufes o el aparato en
agua o cualquier otro líquido.
• No coloque ni utilice el aparato y su cable de
alimentación sobre o cerca de supercies
calientes (por ejemplo, estufas) o llamas abiertas.
• No deje el cable de alimentación colgando de
bordes alados y manténgalo alejado de objetos
calientes y llamas. No enrolle el cable alrededor
del aparato y no lo doble.
• No utilice el aparato si el cable o el enchufe están
dañados. En el caso de que el cable esté dañado,
solo debe ser reemplazado por el fabricante,
su agente de servicio o personas calicadas de
manera similar, para evitar peligros.
• En caso de necesidad de reparación, no intente
desmontar o reparar usted mismo, para evitar
cualquier tipo de daño o lesión personal.
• En caso de un mal funcionamiento del
electrodoméstico o si se ha dañado de alguna
manera, devuelva el electrodoméstico al centro
de servicio autorizado más cercano para que lo
examinen, reparen o ajusten.
3

español english français portuguese deutsch italiano
• Cuando desee quitar el enchufe de la toma de
pared, hágalo tirando del enchufe y no del cable o
del propio aparato.
• Asegúrese de que sus manos estén secas antes
de enchufar o desenchufar.
• Este aparato no debe ser utilizado por personas
(incluidos niños) con capacidades físicas,
sensoriales o mentales reducidas o con falta de
experiencia y conocimiento, a menos que hayan
recibido supervisión o instrucción.
• Este aparato puede ser utilizado por niños a
partir de 8 años y personas con capacidades
físicas, sensoriales o mentales reducidas, o
con falta de experiencia y conocimiento si se
les ha supervisado o instruido sobre el uso del
aparato de forma segura y entienden los peligros
involucrados.
• Los niños deben ser supervisados para
asegurarse de que no jueguen con el aparato.
• Los niños no deben realizar la limpieza y el
mantenimiento del usuario sin supervisión.
• Este aparato no debe ser utilizado por niños.
Mantenga el aparato y su cable fuera del alcance
de los niños.
• Es necesaria una estrecha supervisión cuando su
electrodoméstico sea utilizado por niños o cerca
de ellos.
• No utilice el aparato para ningún otro propósito
que no sea el descrito en este manual.
• No deje que el aparato funcione sin supervisión.
• Nunca use accesorios que no sean
recomendados por el fabricante.
• El uso de accesorios no recomendados o
vendidos por el fabricante del electrodoméstico
4

español english français portuguese deutsch italiano
puede provocar incendios, descargas eléctricas o
lesiones a las personas.
• Coloque siempre el aparato sobre una supercie
plana y uniforme.
Instrucciones de seguridad que se deben
seguir al usar el exprimidor lento
• No utilice el aparato si el tamiz giratorio o la cubierta
protectora están dañados o si tiene grietas visibles.
• Antes de enchufarlo a la toma de corriente,
asegúrese de que las partes extraíbles estén
completamente instaladas, como el cuerpo de
exprimidor, la barrena, el colador no, la cubierta
del cuerpo de exprimidor, etc.
• Durante el funcionamiento, está estrictamente
prohibido introducir los dedos u objetos alados en
la entrada del material, para evitar el contacto con
las partes giratorias, como la barrena, etc. Además,
está estrictamente prohibido utilizar cualquier
objeto para reemplazar las varillas empujadoras y
mantener ojos muy cerca de la entrada de material,
para evitar cualquier daño o lesión personal.
• Los ingredientes deben cortarse en trozos
pequeños, para que puedan introducirse en
la entrada del exprimidor lento. Si hay frutas y
verduras con pepitas, semillas duras, piel gruesa o
cáscara dura, se recomienda eliminarlas antes de
procesarlas.
• Está prohibido utilizar ingredientes duros como
el hielo, la caña de azúcar y el coco, ya que
estas frutas pueden atascarse fácilmente en
las entradas y pueden causar daños en los
componentes afectando la vida útil del producto.
• Es normal que el colador no, la cubierta del cuerpo
5

español english français portuguese deutsch italiano
del exprimidor, la barrena y otras partes se manchen
después de hacer jugo de ciertas frutas y verduras.
No afectará la calidad de los alimentos de ninguna
manera y no dañará la salud del consumidor.
• El producto está diseñado de tal manera que
mientras procesa ingredientes duros, el motor se
bloqueará y la corriente aumentará, luego la máquina
emite un sonido de tic y el motor deja de funcionar.
Este proceso asegura la larga vida útil del aparato.
• Si el motor se detiene debido a la protección de
limitación de corriente o al rotor bloqueado, y
el motor no se puede invertir automáticamente
durante el proceso de operación, presione la
tecla “Reverse” del interruptor de encendido. Es
esencial sacar los ingredientes y luego presionar
la tecla “Adelante” del interruptor de encendido
para el uso normal de la máquina. En caso de
rotor bloqueado aún, para proteger el motor, se
recomienda limpiar los ingredientes de la barrena
y seguir utilizando.
• Después de cada uso, espere hasta que el motor
y la barrena dejen de girar y asegúrese de que la
energía esté desconectada antes de desmontar
las partes desmontables del aparato.
• Ninguna de las partes desmontables de este
producto debe desinfectarse con agua caliente a más
de 80 ° C y no debe usarse en hornos microondas,
para evitar daños por deformación térmica.
• No utilice lana metálica o limpiadores abrasivos o
líquidos corrosivos para limpiar el producto.
• Apague el aparato y desconéctelo del suministro
eléctrico antes de cambiar accesorios o acercarse
a piezas que se muevan durante el uso.
6
español english français portuguese deutsch italiano
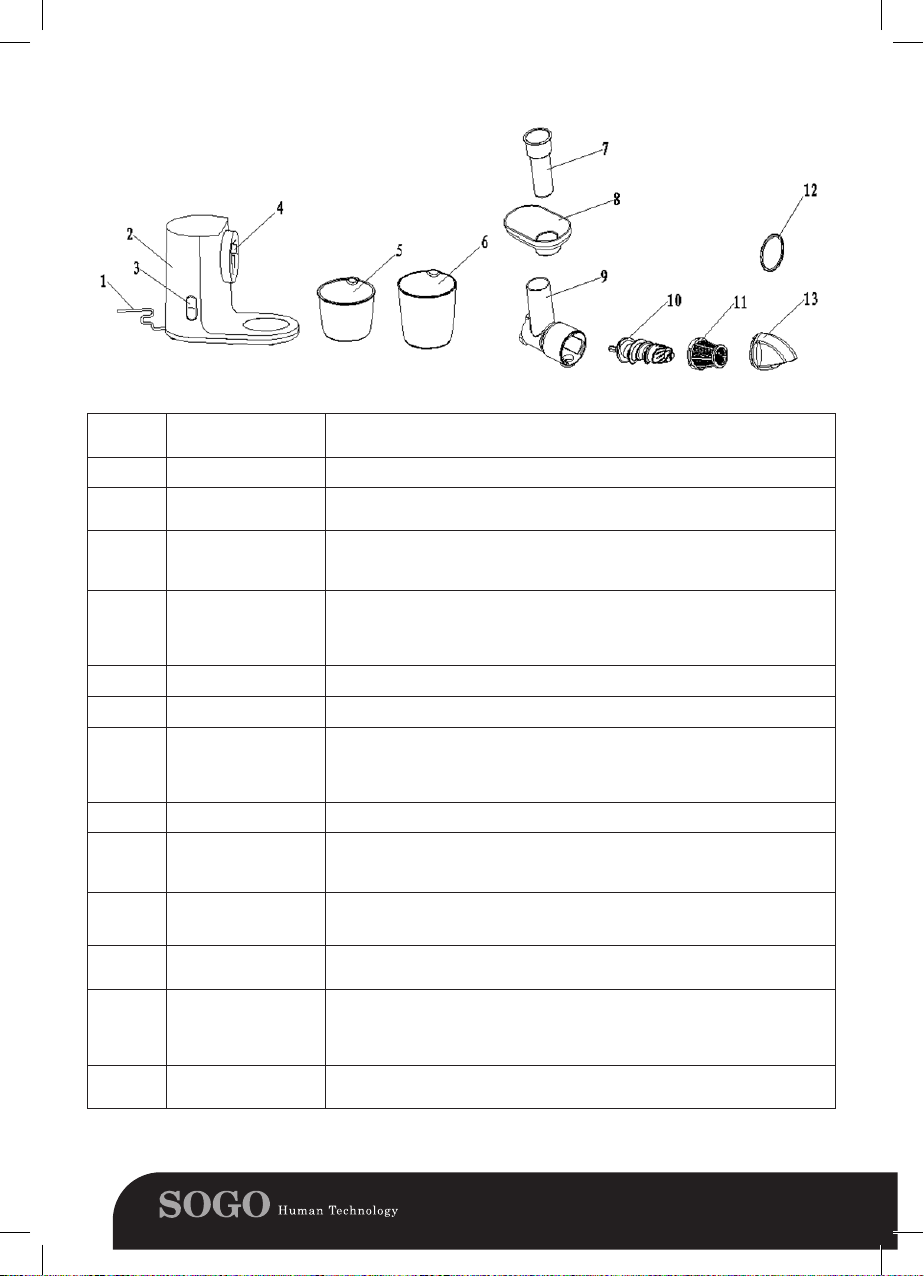
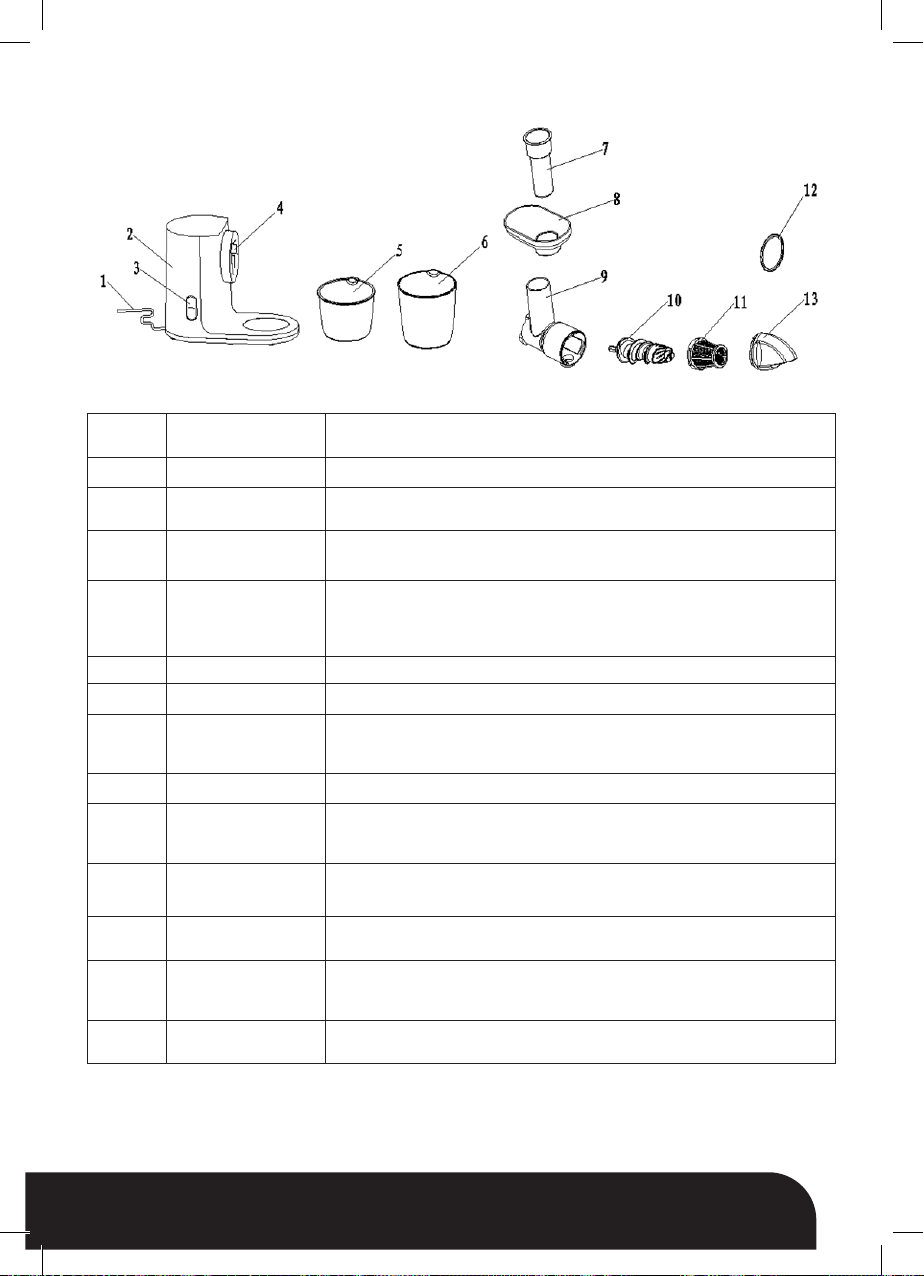
PIEZAS Y FUNCIONES DEL EXPRIMIDOR LENTO
Número
de serie
Nombre de las
partes
1 Cable principal
2 Cuerpo exprimidor
Interruptor de
3
encendido / apagado
y marcha atrás
4 Botón
5 Tarro de jugo
6 Tarro de pulpa
7 Empujador
8 Tolva
9 Cuerpo exprimidor
10 Barrena
Colador no (con
11
rejilla en el interior)
Bucle de silicona de
12
cubierta del cuerpo
del exprimidor
Cubierta del cuerpo
13
del exprimidor
Introducción a la función
Para enchufar la toma de corriente.
La parte principal del aparato, incluido el motor y otras partes. Es la
fuente para hacer funcionar el dispositivo.
Controla el estado de funcionamiento del producto encendiéndolo y
apagándolo, incluida la rotación hacia adelante y hacia atrás.
Se utiliza para bloquear el cuerpo del exprimidor y evitar que el
cuerpo se suelte del cuerpo de la máquina durante el funcionamiento.
Cuando necesite quitar el cuerpo del exprimidor del cuerpo de la
máquina, debe presionar y mantener presionado el botón.
Para recoger el zumo de fruta separada del cuerpo prensado. (600ml)
Recoge la pulpa separada del jugo. (1000ml)
Cuando se coloquen los ingredientes, utilice para empujar
suavemente los ingredientes, de modo que los ingredientes estén
en pleno contacto con la barrena, para aumentar la eciencia del
exprimido.
Se utiliza principalmente para almacenar ingredientes en jugo.
Es la parte principal para extraer jugo. Los ingredientes se introducen
desde la entrada, en la parte superior del cuerpo del exprimidor, y liberan
el jugo y la pulpa a través de la salida del jugo y la salida de la pulpa.
Es la parte principal para hacer jugo. Se utiliza para trasvasar los
ingredientes y moler los ingredientes, pasando por el colador no.
Corre con la barrena para moler las verduras y frutas, y ltra el jugo.
Se coloca en la unión entre el cuerpo del exprimidor y la cubierta
del cuerpo del exprimidor (para evitar que el jugo salga de la
articulación), y también para ajustar la estanqueidad del cuerpo del
exprimidor y la cubierta del cuerpo del exprimidor.
Los componentes principales del exprimidor conectan el cuerpo del
exprimidor para desempeñar un papel en la protección de seguridad.
7
español english français portuguese deutsch italiano
MÉTODO DE APLICACIÓN
Antes de utilizar este producto por primera vez, lave minuciosamente todas las partes que tocarán los
ingredientes alimentarios (consulte el capítulo “Mantenimiento y conservación”)
Instrucciones de funcionamiento de las teclas:
• Tecla ON / OFF: funcionamiento normal, tecla para hacer funcionar
el exprimidor y parar.
• Tecla “Reverse”: se utiliza cuando la descarga de pulpa no es
suave o está bloqueada. (Sugerencia: cuando la descarga de pulpa
no es suave o está bloqueada, presione y mantenga presionado el
botón “Reverse” suavemente durante unos 3 segundos, la barrena
comenzará a retroceder. Suelte el botón y detenga la inversión; si
presiona el botón “Forward “en este momento, la máquina reanuda
su trabajo en la dirección de avance).
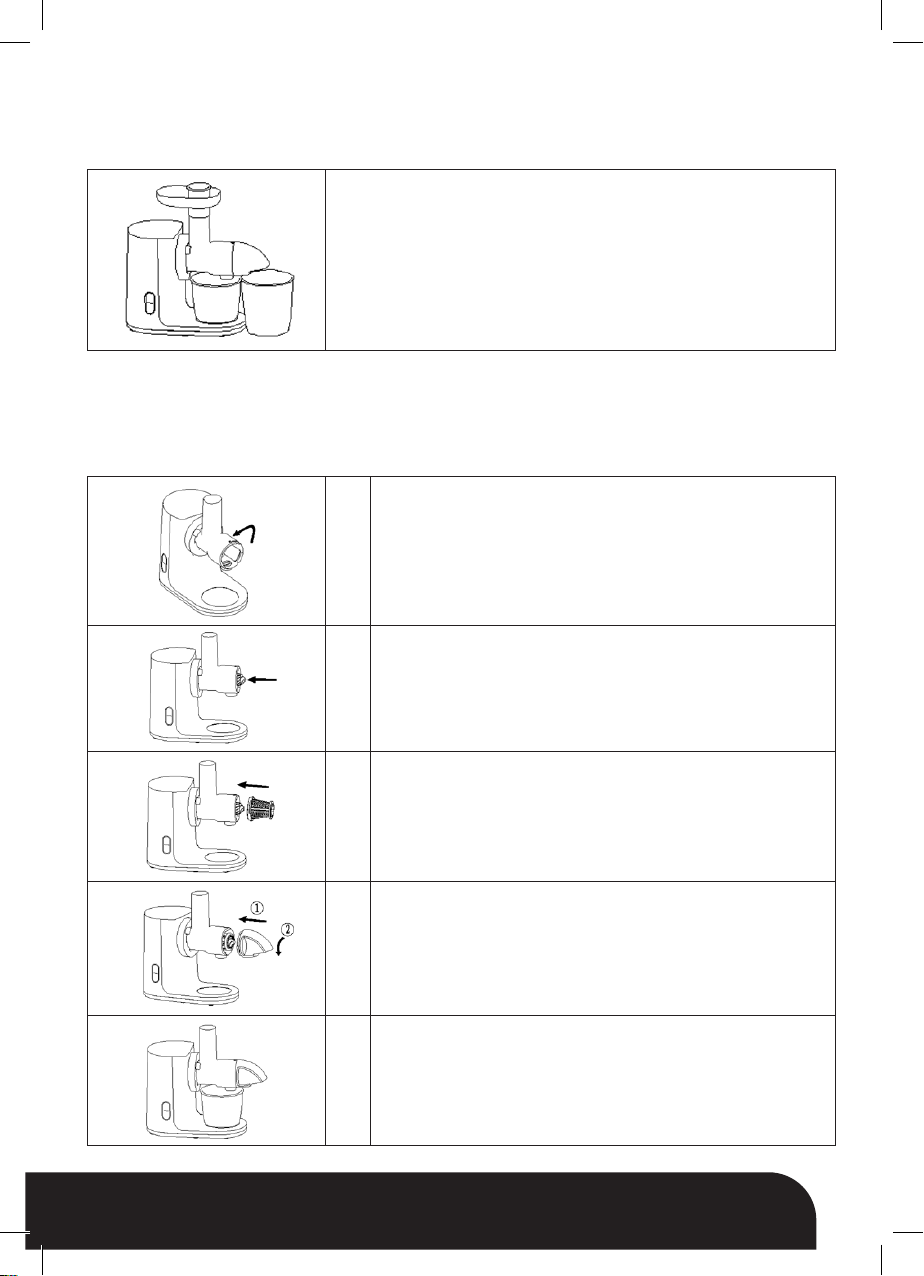
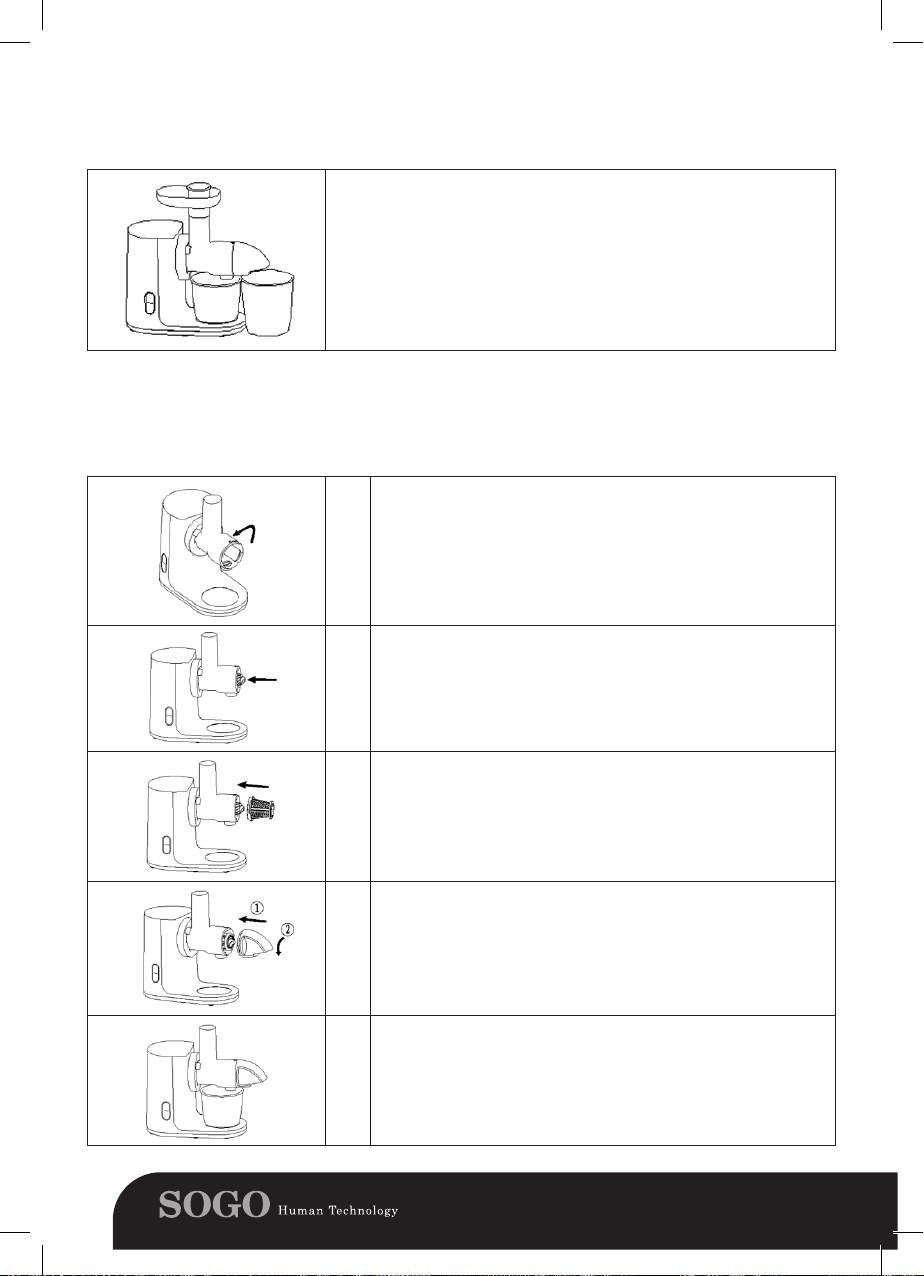
CÓMO INSTALAR Y UTILIZAR EL PRODUCTO
Siga estos pasos para instalar y utilizar el producto:
1. Hacer jugos
Conecte el cuerpo del exprimidor al cuerpo de la máquina:
1. Coloque la posición central de la entrada del cuerpo del
exprimidor y alinee con la posición del “signo de desbloqueo”
en el cuerpo de la máquina (los tres sujetadores del cuerpo del
1
exprimidor estarán alineados).
2. Luego gire en sentido antihorario, y cuando escuche un
sonido de “tic”, signica que el cuerpo del exprimidor está
completamente conectado.
Alinee el eje hexagonal de la barrena con el oricio del cuerpo
2
de la máquina y empújelo horizontalmente hasta el fondo. (Si
no está alineado, alinéelo girando la barrena)
Coloque el extremo más ancho del colador no desde el
extremo del sinfín y alinee los tres sujetadores del colador no
3
con las tres ranuras de sujeción en el cuerpo del exprimidor.
(El colador no solo se usa junto con el botón del exprimidor
en la parte posterior, y esta función se usa para hacer jugo)
Desplace las tres ranuras de sujeción en la cubierta del cuerpo
del exprimidor de las tres ranuras de sujeción en el cuerpo del
4
exprimidor, empújelas horizontalmente y luego gire en sentido
antihorario para atornillar rmemente la cubierta del cuerpo del
exprimidor y el cuerpo del exprimidor.
Coloque la taza de jugo junto al cuerpo de la máquina de
5
modo que su abertura se alinee con la salida de jugo del
cuerpo del exprimidor
8
español english français portuguese deutsch italiano
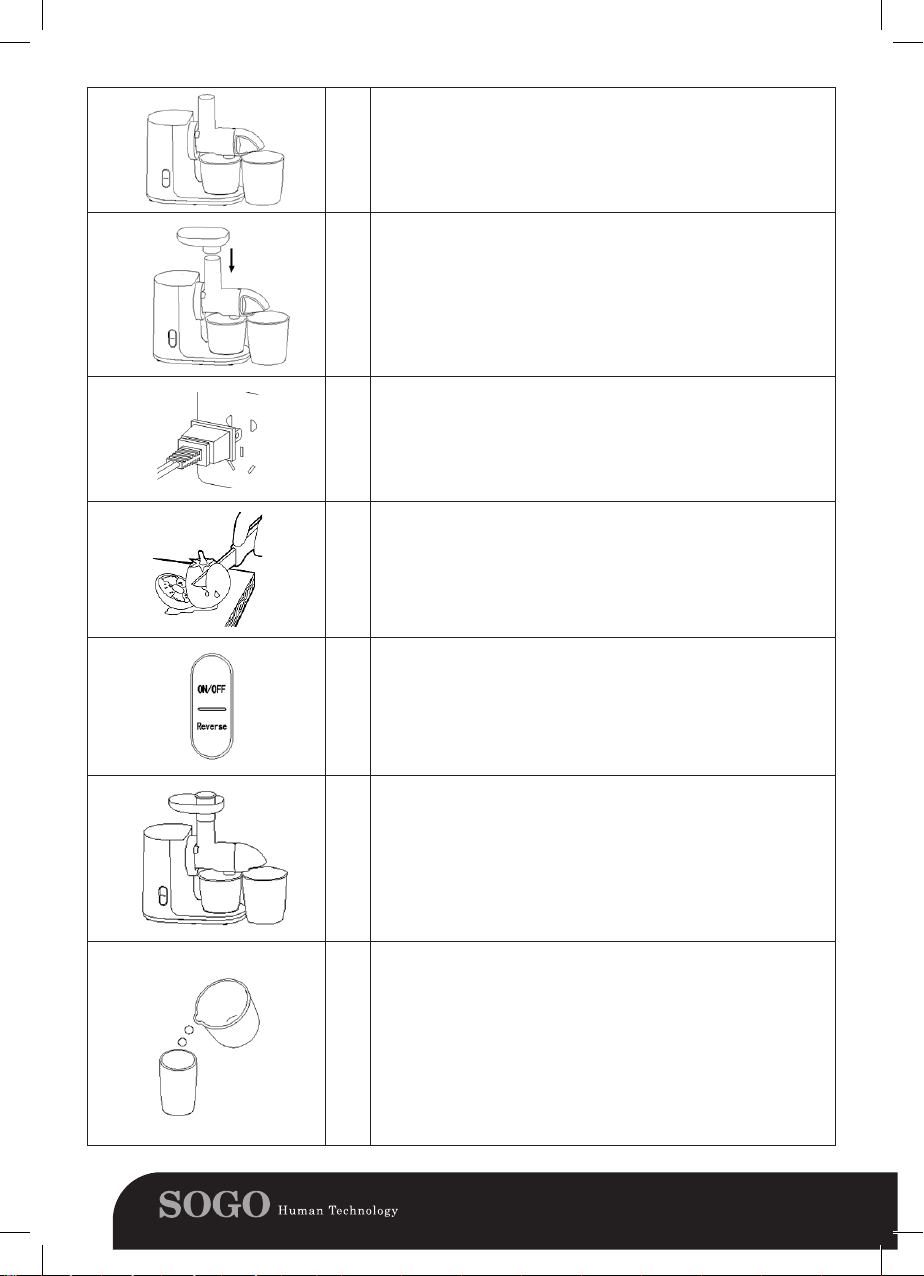
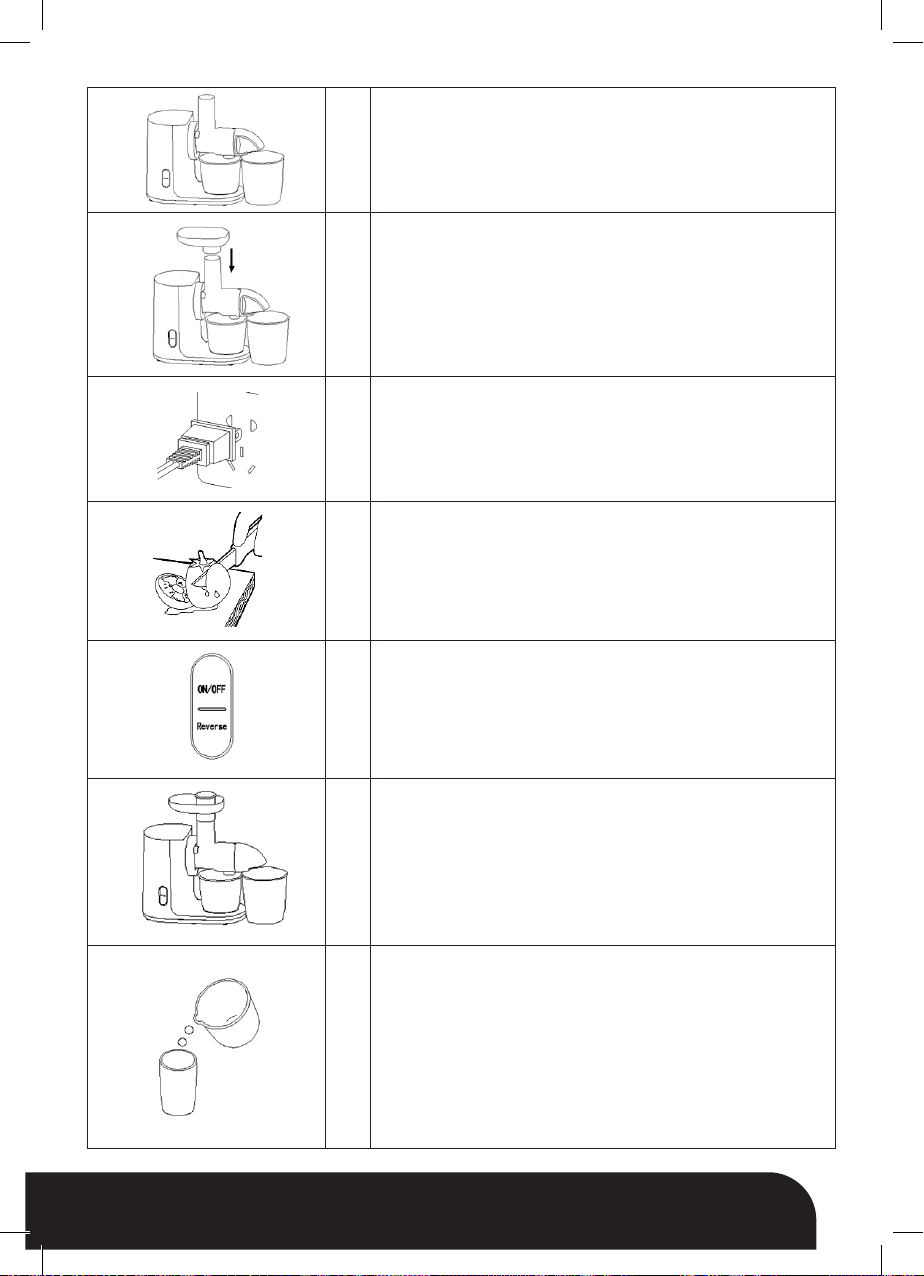
Coloque la taza de pulpa debajo de la salida de pulpa del
cuerpo del exprimidor, cerca de la taza de jugo (el extremo
6
superior de la taza de pulpa debe estar cerca de la salida de
pulpa, esto es más propicio para la descarga de la pulpa).
Coloque la tolva en el extremo superior del barril de alimentos
del cuerpo del exprimidor.
La tolva ayuda a pasar los ingredientes alimentarios de
7
manera más conveniente, especialmente cuando se procesan
ingredientes de grano pequeño como uvas, fresas, etc.
Enchufe el enchufe del exprimidor en el tomacorriente de la
pared, encienda la alimentación y prepárese para trabajar.
8
(Asegúrese de que el interruptor de encendido / apagado esté
en la posición de apagado antes de encender la unidad)
Lave las frutas y verduras, córtelas en trozos pequeños
para que puedan introducirse en la entrada de alimento y
colóquelas en la tolva para su uso.
9
Quite primero los granos, las semillas duras y la cáscara
gruesa o dura de las frutas y verduras.
Nota: Las frutas como la caña de azúcar, la guayaba y el
mango no se pueden exprimir con esta máquina.
Presione la tecla “ON” del interruptor y el exprimidor comienza
a funcionar. El tiempo de trabajo será menor o igual a 10
minutos.
10
Solo asegúrese de que sus manos estén secas y no
mojadas, para evitar cualquier tipo de descarga eléctrica,
fuga eléctrica o incendio.
Coloque los ingredientes en la entrada de alimento del cuerpo
del exprimidor y empuje los ingredientes con el empujador.
Cuando los ingredientes estén en la entrada de alimentos,
no presione con fuerza, y es aconsejable que los
11
ingredientes se corten en trozos pequeños.
(¡No coloque los dedos ni otros objetos en la entrada de
alimentación del cuerpo del exprimidor! Si el recipiente
para pulpa o el recipiente para jugo están llenos,
desconecte la alimentación y límpielo antes de usarlo).
Cuando se completa el procesamiento de jugo y no sale más
jugo de la salida de jugo, apague el interruptor y desconecte
la energía, y saque el cable de la toma de corriente. Espere
hasta que la barrena deje de girar por completo y luego retire
la taza de jugo de la boca del jugo. (El jugo fresco debe usarse
inmediatamente. No permita que el jugo quede expuesto al
12
aire, ya que al estar expuesto durante un largo período de
tiempo, afecta su sabor y valor nutricional, al oxidarlo).
Los residuos no se pueden almacenar durante
períodos prolongados.
No toque el interruptor de encendido con las manos mojadas
para evitar descargas eléctricas, fugas eléctricas o incendios.
9
español english français portuguese deutsch italiano
CONSEJOS PARA LA SELECCIÓN DE FRUTAS
1. Seleccione y use frutas y verduras frescas que contengan más jugo. Las frutas particularmente
adecuadas incluyen: piña, apio, manzanas, pepinos, espinacas, melón, tomates, naranjas, uvas y
similares.
2. En lugar de pelar la cáscara na de frutas y verduras, solo necesita pelar la cáscara gruesa de frutas y
verduras como naranjas, piñas, remolachas crudas, etc. Las semillas de frutas cítricas también deben
eliminarse porque causarán amargor el jugo.
3. El jugo de manzana recién exprimido puede volverse marrón rápidamente. Puede agregar unas gotas
de jugo de limón para ralentizar este proceso.
4. Las hojas y los tallos de las hojas (como la lechuga) pueden exprimirse con esta máquina.
5. Los nutrientes de frutas y verduras comunes son los siguientes:
Frutas / verduras Vitaminas / sustancias minerales KJ/Calorias
Manzana Vitamina C 200g= 150KJ (72 Calorias)
Albaricoque Abundante en bra dietética, contiene potasio. 30g= 85KJ (20Calorias)
Remolacha Buena fuente de ácido fólico, bra dietética,
160g= 190KJ (45 Calorias)
vitamina C y potasio.
Arándano Vitamina C 125g= 295KJ (70 Calorias)
Coles de Bruselas Vitamina C, B, B6, E, ácido fólico
100g= 110KJ (26 Calorias)
y bra dietética
Col Vitamina C, ácido fólico, potasio, B6
100g= 110KJ (26 Calorias)
y bra dietética
Zanahoria Vitamina A, C, B6 y bra dietética 120g= 125KJ (30Calorias)
Apio Vitamina C y potasio 80g= 55KJ (13Calorias)
Pepino Vitamina C 280g= 120KJ (29Calorias)
Hinojo Vitamina C y bra dietética 300g= 145KJ (35 Calorias)
Uva Vitamina C, B6 y potasio 125g= 355KJ (85 Calorias)
Kiwi Vitamina C y potasio 100g= 100KJ (40 Calorias)
Melon Vitamina C, ácido fólico, bra dietética
200g= 210KJ (50 Calorie)
y vitamina A
Nectarina Vitamina C, B3, potasio y bra dietética. 180g= 355KJ (85 Calorias)
Melocotón Vitamina C, B3, potasio y bra dietética. 150g= 205KJ (49Calorias)
Pera Fibra dietética. 150g= 250KJ (60Calorias)
Piña Vitamina C 150g= 245KJ (59 Calorias)
Frambuesa Vitamina C, hierro, potasio y magnesio. 125g= 130KJ (31Calorias)
Tomate Vitamina C, bra dietética, vitamina E,
100g= 90KJ (22 Calorias)
ácido fólico y vitamina A
10

español english français portuguese deutsch italiano
MANTENIMIENTO Y CONSERVACIÓN
1. Antes de limpiar este producto, asegúrese de apagar el interruptor y desconectar la fuente de
alimentación.
2. Limpie este producto después de su uso.
3. No utilice productos químicos abrasivos ni limpiadores abrasivos para limpiar estas piezas. Utilice
una esponja suave si es necesario y un paño seco para limpiar todas las piezas desmontables. No se
recomienda limpiar ninguna pieza desmontable en el lavavajillas para garantizar una larga vida útil.
4. El cuerpo del exprimidor no debe limpiarse con agua. Las manchas en el cuerpo deben limpiarse con
un paño seco.
5. Asegúrese de que el producto y sus accesorios estén limpios y secos antes de guardarlos.
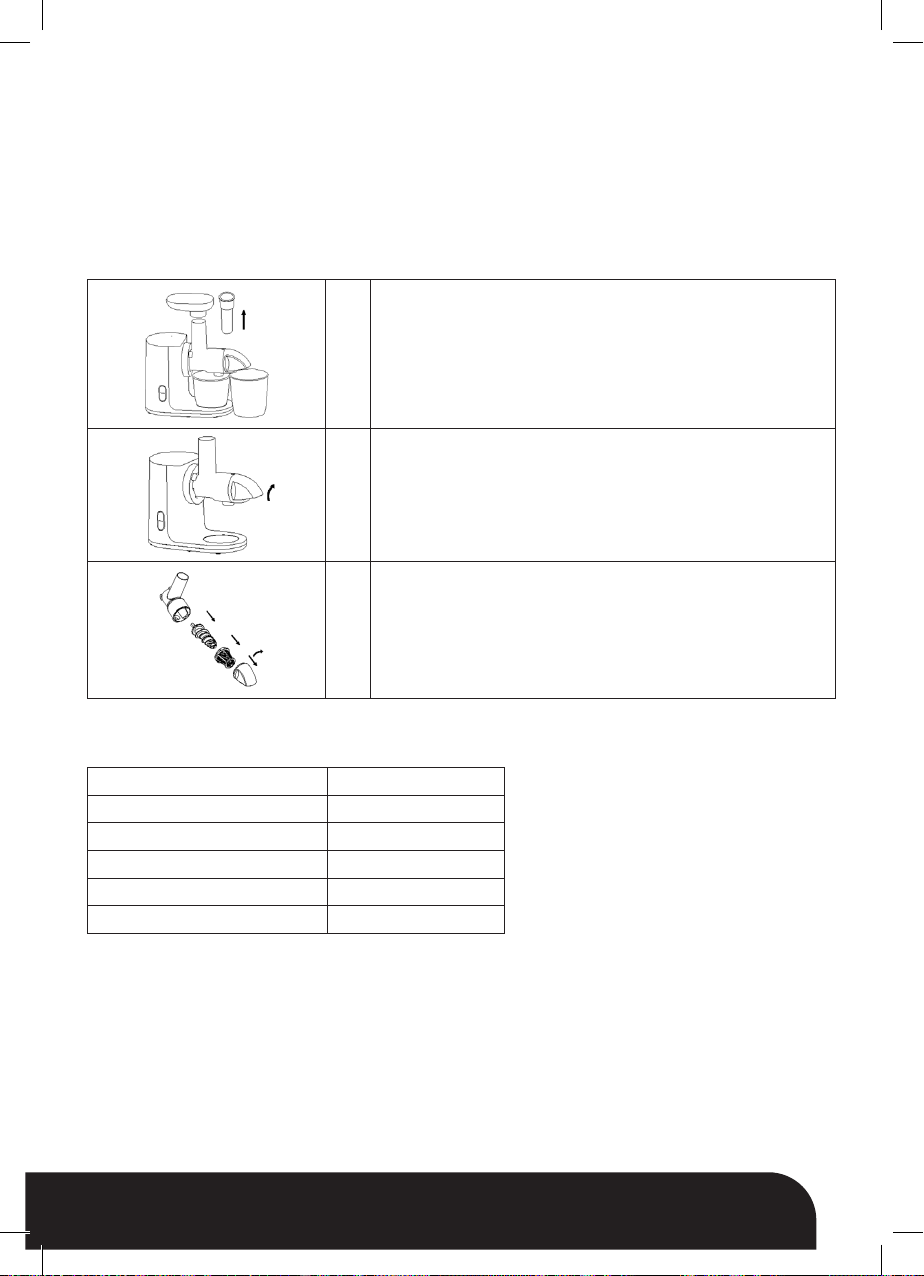
6. Consulte los siguientes pasos para desmontar el exprimidor y luego limpiarlo:
1 Tome primero el empujador y la tolva.
Mantenga presionado el botón cerca del cuerpo del exprimidor
y, al mismo tiempo, gire el cuerpo del exprimidor en el sentido
2
de las agujas del reloj para bajar el cuerpo. Si no se presiona
el botón, el cuerpo no se puede quitar.
Después de desmontar el cuerpo del exprimidor, baje la
cubierta del cuerpo del exprimidor, el colador no de jugo y la
3
barrena en el orden correcto. Las partes extraíbles se pueden
limpiar con agua limpia.
ÍNDICES DE SEGURIDAD DE LOS PRODUCTOS
N º de Modelo. SS-5141
Voltaje nominal 220-240V~
Potencia nominal 150W
Frecuencia nominal 50/60Hz
Horas de trabajo continuas ≤10 minutos
Intervalo ≥20 minutos
11

español english français portuguese deutsch italiano
ANÁLISIS DE FALLOS Y RESOLUCIÓN DE PROBLEMAS
Fenómeno de fallo Análisis de causas Resolución de fallo
Después de
conectar la fuente
de alimentación y
encender el interruptor, el producto no
funciona.
Cuando el producto
se usa inicialmente,
el motor huele fatal.
La máquina se
detiene durante la
aplicación.
1. El enchufe de alimentación no
está enchufado correctamente
2. La salida tiene un mal contacto
3. El cable interno de la unidad
principal está apagado o la
placa de circuito está dañada.
1. Vuelva a enchufar el cable de alimentación
2. Reemplace la toma de corriente y vuelva
a intentarlo.
3. Envíe el producto al taller de
mantenimiento más cercano para su
inspección.
Este no es un evento anormal Si el producto aún emite este olor después
de un uso repetido, envíelo al taller de mantenimiento más cercano para su inspección.
1. El voltaje es demasiado bajo
2. Ingredientes excesivos o duros
3. El tiempo de trabajo continuo
es demasiado largo.
1. Compruebe si el voltaje es
demasiado bajo
2. Desconecte la alimentación y elimine
el exceso de ingredientes (la caña de
azúcar no se puede exprimir. Las frutas
y verduras de piel dura / núcleo duro
deben eliminarse primero de la piel dura /
núcleo duro antes de exprimirse)
3. Es un fenómeno normal y el motor volverá
a funcionar después de una pausa.
Ruido al trabajar 1. La barrena y el colador no
no están completamente
instalados, lo que provoca un
funcionamiento inestable;
1. Instale completamente la barrena y el
colador no.
2. Envíelo al taller de mantenimiento más
cercano para su inspección.
2. El motor de arranque en el
cuerpo de la máquina se
descompone.
3. Demasiado ruido cuando se
exprimen algunos ingredientes.
Es difícil
desenroscar la
cubierta del cuerpo
del exprimidor
después del
exprimido.
1. Hay una mancha de aceite en
la supercie de la cubierta del
cuerpo del exprimidor;
2. Los ingredientes de la red
de jugos no se exprimen
completamente
1. Limpiar la supercie de la cubierta del
cuerpo del exprimidor;
2. Continúe encendiendo y exprimiendo los
ingredientes por completo, o mantenga
presionado el botón de retroceso
durante unos segundos para rotar los
ingredientes fuera de la red de jugo
Nota:
Los anteriores son análisis y resolución de fallas comunes. En cuanto a otras fallas, comuníquese con el
departamento de servicio al cliente de esta empresa o acuda a un centro de servicio designado de esta
empresa para un cambio. Asegúrese de no desarmar ni reparar usted mismo.
• Para obtener más detalles sobre los centros de servicio designados de esta empresa, consulte la
tarjeta de garantía.
12

español english français portuguese deutsch italiano
IMPORTAN:
1. Always read the instruction book carefully
before use.
2. This manual can be downloaded from our
website, www.sogo.com
3. Keep these instructions for future reference.
SAFETY INSTRUCTIONS FOR THE USER
• Please read the instructions carefully before
using the appliance.
• This product is designed for indoor household,
non-industrial and non-commercial use. Do not
use the item outdoors or for any other purpose.
Misuse or improper handling can cause
problems with the appliance and can cause
injury to the user.
• Make sure that the voltage indicated on the
rating plate matches the main wall outlet
voltage before plugging in the appliance.
• The appliance has been incorporated with a
grounded plug. Please ensure the wall outlet in
your house is well earthed.
• Always remove the plug from the outlet when
the appliance is not in use. Do not leave the
appliance unattended when it is switched on.
• Always disconnect the appliance from the
supply if it is left unattended and before
assembling, disassembling or cleaning.
• Before cleaning or storing your appliance,
always unplug the appliance from the power
source and allow it to cool.
• The appliances are not intended to be operated
by means of an external timer or separate
remote-control system.
13

español english français portuguese deutsch italiano
• Do not place or operate the appliance near
sources of water.
• Never immerse the appliance or the plug-
in water or any other liquid. In the event
of the appliance being dropped into water,
immediately disconnect it from the main supply
and take it to an authorized service agent for
repair before using it again.
• To protect against electric shock do not
immerse cord, plugs, or appliance in water or
any other liquid.
• Do not place or use the appliance and its power
cord on or near hot surfaces (for example,
cooktops) or open ames.
• Do not leave the power cord hanging by sharp
edges and keep it away from hot objects
and ames. Do not wrap the cord around the
appliance and do not bend it.
• Do not use the appliance if the cord or plug
is damaged. In the event that the cord is
damaged, it should only be replaced by the
manufacturer, its service agent, or similarly
qualied persons, to avoid hazards.
• In the event of need repair do not try to
dismount or repair to avoid any type of damage
or personal injury.
• In the event of a malfunction of the appliance
or if it has been damaged in any way, return
the appliance to the nearest authorized service
center for examination, repair or adjustment.
• When you want to remove the plug from the
wall socket, do so by pulling the plug and not by
the cord or the appliance itself.
• Make sure your hands are dry before plugging
14

español english français portuguese deutsch italiano
or unplugging.
• This appliance is not to be used by the persons
(including children) with reduced physical,
sensory or mental capabilities or lack of
experience and knowledge, unless they have
been given supervision or instruction.
• This appliance can be used by children aged
from 8 years and above, and persons with
reduced physical, sensory or mental capabilities
or lack of experience and knowledge if they
have been given supervision or instruction
concerning, use of the appliance in a safe way
and understand the hazards involved.
• Children must be supervised to ensure that
they do not play with the appliance.
• Cleaning and user maintenance shall not be
made by children without supervision.
• This appliance shall not be used by children.
Keep the appliance and its cord out of reach of
children.
• Close supervision is necessary when your
appliance being used by or near children.
• Do not use the appliance for any other purpose
than described in this manual.
• Do not let the appliance operate unattended.
• Never use accessories that are not
recommended by the manufacturer.
• The use of accessories not recommended or
sold by the appliance manufacturer may result
in re, electric shock or injury to persons.
• Always place the appliance on to the at and
even surface.
15

español english français portuguese deutsch italiano
Safety instructions to be follow while using
Slow juicer
• Do not use the appliance if the rotating sieve or
the protecting cover is damaged or has visible
cracks.
• Before plugging in to the wall outlet, please
make sure that the removable parts are fully
installed, such as the juicing body, auger, ne
strainer, juicing body cover, etc.
• During operation, it is strictly prohibited to put
ngers or sharp objects into the material inlet
to avoid contacting the rotating parts such as
the auger, etc. Also, it is strictly prohibited to
use any object to replace pusher rods and keep
eyes very close to the material inlet to avoid
any harm or personal injury.
• The ingredients should be cut into small pieces,
so that they can be put into the inlet of the
slow juicer. If there are fruits and vegetables
with kernel, hard seed, thick skin or hard shell
it is recommended to remove them before
processing.
• It is prohibited to use hard ingredients such as
ice, sugarcane and coconut as these fruits can
get stuck easily into the inlets and cause the
damage of components aecting the service life
of the product.
• It is normal for the ne strainer, juicing body
cover, auger and other parts to be stained after
making juice of certain fruits and vegetables.
It will not aect the quality of the food in
any manner and will not does any harm for
consumer`s health.
16

español english français portuguese deutsch italiano
• The product is designed in such a way while
processing hard ingredients, the motor will be
locked-rotor and the current gets increased,
then machine makes a tick sound and then
motor stops working. This process makes
assure the long service life of appliance.
• If the motor stops due to current limiting
protection or locked-rotor and the motor cannot
be automatically reversed during the operation
process, press the “Reverse” key of the power
switch. It is essential to take the ingredients out,
and then press the “Forward” key of the power
switch for normal use of the machine. In case
of still locked-rotor, to protect the motor it is
recommended to clean up the ingredients in the
auger and continue to use it.
• After every single use, please wait until the
motor and auger stop rotating and make
sure that the power is disconnected before
disassembling the detachable parts of
appliance.
• All the detachable parts of this product should
not be disinfected with hot water over 80°C and
not used in microwave ovens to avoid thermal
deformation damage.
• Do not use metallic wool or abrasive cleaners
or corrosive liquids in order to clean the
product.
• Switch o the appliance and disconnect
from supply before changing accessories or
approaching parts that move in use.
17
español english français portuguese deutsch italiano
SLOW JUICER PARTS AND FUNCTIONS
Serial
number
1 Main cord
2 Juicer Body
3
Name of parts Function introduction
To plug in the power outlet.
The main part of the appliance, including the motor and other parts. It
is the source to make running the appliance.
On / O and
reverse switch
Control the working status of the product by switching on and o,
including forward rotation and reverse rotation.
It is used to lock the juicing body and prevent the body from
4 Button
loosening from the machine body during operation. When you need
to remove the juicing body from the machine body, you must press
and hold the button.
5 Juice Jar To collect fruit juice separated from the juicing body. (600ml)
6 Pomace Jar
To collect pomace separated from the juice. (1000ml)
When ingredients are placed, use to gently push the ingredients, so
7 Pusher
that the ingredients are in full contact with the auger to increase the
juicing eciency.
8 Hopper
It is mainly used to store juiced ingredients.
It is the main part of extracting juice. The ingredients are put in from the
9 Juicing body
inlet on top of the juicing body, and reléase the juice and pomace through
the juice outlet and pomace outlet.
10 Auger
Fine strainer (with
11
screen inside)
Juicing body cover
12
silicone loop
13 Juicing body cover
It is the main part of juicing, it is used to convey the ingredients and
grind the ingredients by running in with the ne strainer.
Run in with the auger to grind the vegetables and fruits and lter out
the juice.
It is placed at the joint between the juicing body and the juicing body
cover (to prevent juice from owing out from the joint) and also to
adjust the tightness of the juicing body and the juicing body cover.
The main components of juicing connects the juicing body to play a
role in security protection.
18
español english français portuguese deutsch italiano
METHOD OF APPLICATION
Before using this product for the rst time, please wash thoroughly all the parts which touch the food
ingredients (see “Chapter Maintenance and Preservation”)
Keys operation instructions:
• ON / OFF key: normal operation key to make functioning the juicer
and to stop.
• “Reverse” key: Used when the pomace discharging is not smooth or
locked. (Hint: When the pomace discharging is not smooth or locked,
press and hold the “Reverse” button gently for about 3 seconds, the
auger will start to reverse, release the button, and stop the reversal; if
you press “Forward” key at this time, the machine resumes working in
the forward direction.
HOW TO, INSTALL AND USE THE PRODUCT
Follow these steps to install and use the product:
1. Juicing
Connect the juicing body to the machine body:
1. Put the central position of the inlet of the juicing body to align
1
the position of “unlocking sign” on the machine body (the three
fasteners of the juicing body will be aligned).
2. Then rotate anticlockwise, and when you hear a “tick” sound
Align the auger’s hexagonal axis with the hole of the machine
2
body and push it horizontally to the bottom. (If it is not aligned,
align it by rotating the auger)
Put the broader end of the ne strainer in from the end of the
auger, and align the three fasteners of the ne strainer to the
3
three fastening slots in the juicing body. (The ne strainer is
only used in conjunction with the juicing button on the back,
and this function is used for juicing)
Displace the three fastening slots on the juicing body cover
from the three fastening slots on the juicing body, push into
4
horizontally, and then rotated counterclockwise to screw tightly
the juicing body cover and the juicing body.
Place the juice cup next to the machine body so that its open
5
aligns the juice outlet of the juicing body.
19
español english français portuguese deutsch italiano
Put the pomace cup under the pomace outlet of the juicing
body, close to the juice cup (the high end of the pomace cup
6
shall be close to the pomace outlet, which is more conducive
for pomace discharging).
Place the hopper on the upper end of the food barrel of the
juicing body.
7
The hopper helps to pass through food ingredients more
conveniently, especially when processing small-grained
ingredients such as grapes, strawberries, etc.
Plug in the juicer plug into the wall outlet and turn the power
8
on and get ready for work. (Make sure the on/o switch is in o
position before turning on the power)
Wash the fruits and vegetables, cut them into small pieces,
so that can be put into the feed inlet, and place them on the
hopper for use.
Please remove kernels, hard seeds, thick or hard shell of
9
fruits and vegetables rst.
Note: Fruits such as sugar cane, guava, and mango
cannot be juiced with this machine.
Press the “ON” key of the switch and the juicer starts to work.
The working time shall be less than or equal to 10 minutes.
10
Just make sure that your hands are dry and not wet to
avoid any type of electric shock, electric leakage or re.
Put the ingredients into the feed inlet of the juicing body and
push the ingredients with the pusher.
When ingredients are into the food inlet donot push hard
and it is advisable that the ingredients must be cut into the
11
small pieces.
(Don’t put your ngers or other objects into the feed inlet
of the juicing body! If the pomace cup or juice cup is full,
disconnect the power and clean it before use.)
When the juicing processing is completed and there is no juice
out of the juice outlet, turn o the switch and disconnect the
power and pullo ut the cord of wall outlet. Wait until the auger
completely stops rotating, and then remove the juice cup from
the juice mouth. (The fresh juice must use immediately. Do
not let the juice exposed to the air, as being for a long period
12
of time in air its taste and nutritional value get aected by
oxidising of it .)
Residues cannot be stored for long periods.
Do not touch the power switch with wet hands to avoid
electric shock, electric leakage or re.
20

español english français portuguese deutsch italiano
TIPS FOR FRUIT SELECTION
1. Select and use fresh fruits and vegetables, which contain more juice. Particularly suitable fruits include:
pineapple, celery sticks, apples, cucumbers, spinach, melons, tomatoes, oranges, grapes, and the like.
2. Instead of paring the thin skin of fruits and vegetables, you only need to pare the thick skin of fruits and
vegetables like oranges, pineapples, raw beetroots, etc. Seeds of citrus fruits also need to be removed
because they will bring bitterness to the juice.
3. Freshly juiced apple juice may quickly turn brown, and you can add a few drops of lemon juice to slow
this process.
4. Leaves and leaf stems (such as lettuce) can be juiced with this machine.
5. The nutrients of common fruits and vegetables are as follows:
Fruits/vegetables Vitamins/mineral substances KJ/Calorie
Apple Vitamin C 200g= 150KJ (72 Calorie)
Apricot Abundant in dietary ber, containing kalium 30g= 85KJ (20Calorie)
Beet Good sources of folic acid, dietary ber,
160g= 190KJ (45 Calorie)
vitamin C and kalium
Blueberry Vitamin C 125g= 295KJ (70 Calorie)
Brussels sprouts Vitamin C, B, B6, E, folic acid and
100g= 110KJ (26 Calorie)
dietary ber
Cabbage Vitamin C, folic acid, kalium, B6 and
100g= 110KJ (26 Calorie)
dietary ber
Carrot Vitamin A, C, B6 and dietary ber 120g= 125KJ (30Calorie)
Celery Vitamin C and kalium 80g= 55KJ (13Calorie)
Cucumber Vitamin C 280g= 120KJ (29Calorie)
Foeniculum vulgare Vitamin C and dietary ber 300g= 145KJ (35 Calorie)
Grape Vitamin C, B6 and kalium 125g= 355KJ (85 Calorie)
Kiwi fruit Vitamin C and kalium 100g= 100KJ (40 Calorie)
Melon Vitamin C, folic acid, dietary ber
200g= 210KJ (50 Calorie)
and vitamin A
Nectarine Vitamin C, B3, kalium and dietary ber 180g= 355KJ (85 Calorie)
Peach Vitamin C, B3, kalium and dietary ber 150g= 205KJ (49Calorie)
Pear Dietary ber 150g= 250KJ (60Calorie)
Pineapple Vitamin C 150g= 245KJ (59 Calorie)
Raspberry Vitamin C, ferrum, kalium and magnesium 125g= 130KJ (31Calorie)
Tomato Vitamin C, dietary ber, vitamin E, folic acid
100g= 90KJ (22 Calorie)
and vitamin A
21
español english français portuguese deutsch italiano
MAINTENANCE AND PRESERVATION
1. Before Cleaning this product, be sure to turn o the switch and disconnect the power supply.
2. Please clean this product after usage.
3. Do not use any abrasive chemicals nor abrasive cleaner to clean these parts. Use soft sponge if
necessary and dry cloth to wipe clean all detachable parts. It is not recommended to clean any
detachable parts in the dishwasher to ensure long life.
4. The juicer body must not be cleaned with water. The stains on the body must be wiped with a dry cloth.
5. Please make sure the product and its accessories are clean and dry before storage.
6. Please refer to the following steps to disassemble the juicer and then clean:
1 Take the pusher and the hopper rst.
Hold the button near the juicing body down, and at the same
2
time rotate the juicing body clockwise to take the body down.
If the button is not pressed, the body can't be taken down.
After the juicing body is disassembled, take the juicing body
cover, the juice ne strainer and the auger down in proper
3
order, and the removable parts can be cleaned with clear
water.
PRODUCT SAFETY INDEXES
Model No. SS-5141
Rated voltage 220-240V~
Rated power 150W
Rated frequency 50/60Hz
Continuous Working Hours ≤10 minutes
Interval ≥20 minutes
22
 Loading...