


manual de instrucciones / instructions for use
mode d’emploi / manual de instruçoes
gebrauchsanweisung / manuale d’instruzioni
VENTILADOR DE TECHO DE 52”
CEILING FAN 52”
VENTILATEUR DE PLAFOND 52”
VENTILADOR DE TETO 52”
DECKENVENTILATOR 52”
VENTILATORE DA SOFFITTO 52”
Precaución: lea y conserve estas importantes instrucciones
Caution: please read and preserve these important instructions
ref. SS-21810
2015 / 863 / EU

español english français portuguese deutsch italiano
INSTRUCCIONES DE SEGURIDAD
IMPORTANTES
• Este manual de instrucciones también se
puede descargar desde nuestra página web
www.sogo.es
• ADVERTENCIA: Al usar aparatos eléctricos,
siempre se deben seguir las precauciones
básicas de seguridad para reducir el riesgo
de incendio, descarga eléctrica y lesiones
personales.
• Utilice este ventilador únicamente como se
describe en este manual. Cualquier otro uso,
no recomendado, puede provocar incendios,
descargas eléctricas o lesiones a personas.
Esto también anulará su garantía.
• Conéctese solo a un proveedor de energía
principal de 220-240V~ 50-60 Hz.
• Solamente para uso en interiores.
• Según los términos de nuestra garantía,
este ventilador de techo debe ser instalado
correctamente por un electricista autorizado. Los
ventiladores de techo instalados incorrectamente
pueden ser peligrosos y costosos de reparar, y
también anularían la garantía.
• Antes de instalar el ventilador, asegúrese
de haber apagado el suministro eléctrico
principal. No lo vuelva a encender hasta que
el ventilador esté completamente instalado y
listo para usar.
• Para protegerse contra descargas eléctricas:
no sumerja la unidad o el cable en agua, ni
rocíe con líquidos.
• Este aparato puede ser utilizado por niños a
2

español english français portuguese deutsch italiano
partir de 8 años y personas con capacidades
físicas, sensoriales o mentales reducidas o
con falta de experiencia y conocimiento si han
recibido supervisión o instrucción sobre el uso
del aparato de forma segura y entienden los
peligros involucrados.
• Los niños no deben jugar con el aparato.
• Los niños no deben realizar la limpieza y el
mantenimiento del usuario sin supervisión.
• Apague el ventilador cuando no esté en uso
y antes de desmontarlo o limpiarlo. Monte
completamente el ventilador antes de volver a
encenderlo.
• El uso de accesorios no recomendados por el
fabricante puede ser peligroso.
• No lo utilice si la carcasa del ventilador está
dañada.
• Si el cable está dañado, debe ser
reemplazado por el fabricante, su agente de
servicio o personas cualicadas similares
para evitar peligro.
• Si el ventilador no funciona correctamente,
comuníquese con un técnico cualicado para
que lo examine y lo repare. Nunca intente
desmontar el ventilador usted mismo.
ADVERTENCIA: Para reducir el riesgo de
descarga eléctrica e incendio, no use este
ventilador con ningún dispositivo de control
de velocidad de ventilador de estado sólido o
reóstato. No separe el interruptor de marcha
atrás hasta que el ventilador se haya detenido
por completo.
3

español english français portuguese deutsch italiano
No inserte nada en las aspas del ventilador
mientras están girando.
ADVERTENCIA: Para reducir el riesgo de
lesiones personales, no doble los soportes de
la hoja (también denominados “bridas”) durante
el montaje o después de la instalación. No
inserte objetos en la trayectoria de las palas.
Para evitar lesiones personales o daños al
ventilador y otros elementos, tenga cuidado
cuando trabaje alrededor o limpie el ventilador.
No use agua ni detergente para limpiar el
ventilador o las aspas del ventilador. Un paño
seco para el polvo o un paño ligeramente
humedecido será adecuado para la mayoría de
las limpiezas.
NOTA: Las importantes precauciones e
instrucciones de seguridad que aparecen en el
manual no están destinadas a cubrir todas las
posibles condiciones y situaciones que pueden
ocurrir. Debe entenderse que el sentido común
y la precaución son factores necesarios en la
instalación y operación de este ventilador.
ADVERTENCIA:
El equipo debe instalarse a una altura de al
menos 2,3 metros del suelo (2,3 metros signica
desde el suelo hasta la parte inferior del
ventilador), 0,76 m de la pared u obstrucción.
Debido a la instalación de los conjuntos
de equipos, la alimentación de la red debe
realizarse mediante enchufe de cable exible
o mediante interruptor de polo con distancia de
apertura de los contactos no inferior a 3 mm.
4

español english français portuguese deutsch italiano
DESCRIPCIÓN DEL PRODUCTO
Dosel superior Placa de soporte Varilla de soporte
Dosel inferior Motor Kit de luz LED
Aspas Pantalla de lámpara Control remoto
A: Tornillos y arandelas para asegurar las
cuchillas (jados en la carcasa del motor)
B: Tornillos para techos de hormigón
C: Tornillos y arandelas para techo con vigas
de madera
D: Kit de equilibrio
5

español english français portuguese deutsch italiano
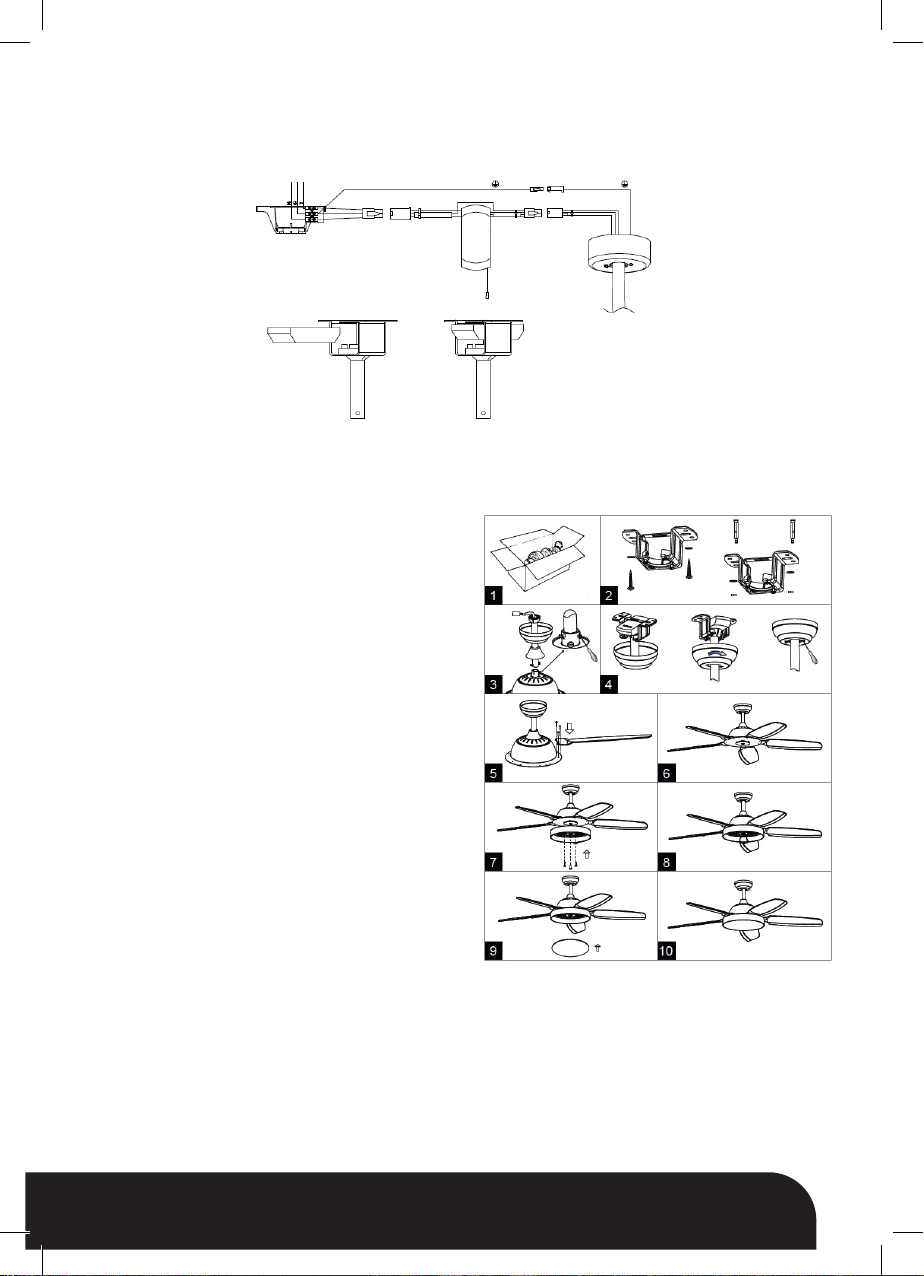
CONEXIÓN DE CONTROL REMOTO
ADVERTENCIA: Para evitar lesiones o daños personales, asegúrese de desconectar la alimentación de
la caja de fusibles principal antes de realizar el cableado.
Soporte
Lugar receptor
Amarillo / verde
Control
remoto
Amarillo / verde
MONTAJE
Asegúrese de tener todos los componentes antes de comenzar la instalación. Para evitar daños, acople el
motor a la varilla de soporte sobre una supercie blanda o utilice el poliestireno contenido en el paquete.
1. Abra la caja de cartón y saque el ventilador (g. 1).
2. Monte la placa de soporte en el techo con dos o
más tacos de tornillo y las arandelas adecuadas.
Atención: los tornillos suministrados son para vigas
de madera y techos de hormigón. (Figura 2).
3. Inserte la varilla de soporte a través de la tapa
superior y la tapa inferior.
4. Inserte los cables eléctricos que salen del motor
a través de la varilla de soporte y conéctelos al
terminal de tornillo colocado en la parte superior
de la varilla de soporte.
5. Fije la varilla de soporte al motor usando el
pasador y la tuerca del pasador. (Fig. 3)
6. Cuelgue el ventilador en el gancho de la placa
de soporte y conecte el cable eléctrico, que viene
del techo, al terminal de tornillo colocado en la
parte superior de la varilla de soporte. Asegúrese
de que el receptor esté insertado en la placa de
soporte (consulte Conexión del control remoto).
7. Deslice hacia arriba la tapa superior y fíjela con el
tornillo. (gura 4)
8. Deslice hacia abajo la tapa inferior; debe ser
soportado por el motor. Fíjelo con el tornillo.
(gura 4)
9. Centre las ranuras en las hojas con las cabezas
de los tornillos de jación de las hojas y deslice
las hojas de modo que la cabeza de los tornillos
quede colocada en el extremo de la ranura.
(gura 5)
10. Apriete el tornillo. (gura 6)
11. Quite los tornillos de la placa de conexión del motor, organice todos los cables con cuidado en la
placa de conexión. Ensamble y alinee los oricios en la parte posterior de la luz LED con los tres
tornillos en la placa de conexión del motor. (gura 7)
12. Luego apriete los tres tornillos de la placa LED, conecte el conector junto con el cable del motor.
Asegúrese de que el kit de luz no se pueda mover después de apretar los tornillos. (gura 8)
13. Coloque la pantalla de la lámpara sobre el ventilador (g. 9)
6

español english français portuguese deutsch italiano
INSTRUCCIONES DE USO
El ventilador de techo está provisto de un mando a distancia. Para encender
el ventilador de techo, seleccione la velocidad deseada y el ventilador se
encenderá con la velocidad seleccionada:
HI alta velocidad
MED Velocidad media
LOW Baja velocidad
STOP Apaga el ventilador de techo
LUZ: Para encender la luz, presione el botón “LIGHT ON / OFF”.
Hay tres niveles de intensidad de luz. Cuando lo presiona una vez, la luz se
encenderá al nivel de intensidad 1 (3000K), presionarlo nuevamente lo cambiará
al nivel de intensidad 2 (4000K). Presiónelo por tercera vez para obtener la
máxima intensidad de luz (6000K) y presiónelo una vez más para apagar la luz.
La luz también se puede encender mientras el ventilador está apagado.
TEMPORIZADOR: El temporizador de apagado se puede congurar usando la
cuarta opción del control remoto: 1h, 2h, 4h y 8h. Si el temporizador se conguró
antes, al presionar cualquiera de los botones del temporizador nuevamente, se
restablecerá el temporizador desde el principio.
LIMPIEZA Y MANTENIMIENTO
Limpieza:
1. Antes de limpiar, apague la unidad, corte el suministro eléctrico del tomacorriente y espere a que la
unidad se enfríe.
2. Para limpiar la unidad, use un paño suave para limpiar el polvo.
3. No intente abrir la unidad sin un electricista autorizado. Si se instala incorrectamente, la unidad puede
ser peligrosa.
4. Limpie la unidad al menos una vez al año.
Mantenimiento:
1. Haga que un electricista autorizado repare su producto
2. Este producto eléctrico cumple con los requisitos de seguridad aplicables. Las reparaciones solo
deben ser realizadas por electricistas autorizados utilizando repuestos originales, de lo contrario puede
suponer un peligro considerable para el usuario.
3. Póngase en contacto con la tienda en la que compró el producto para obtener servicios posventa, si
corresponde
INFORMACIÓN TÉCNICA
Modelo: SS-21810
Voltaje / Frecuencia: 220-240V~ 50-60Hz
Potencia: 100W
7

español english français portuguese deutsch italiano
IMPORTANT SAFETY INSTRUCTIONS
• This instruction manual can also be
downloaded from our web page www.sogo.es
• WARNING: When using electrical appliance,
basic safety precautions should always be
followed to reduce the risk of re, electrical
shock and personal injury.
• Use this fan only as described in this manual.
Other use not recommended may cause re,
electric shock or injury to persons. This will
also void your warranty.
• Connect to a main power supplier of
220-240V~ 50-60 Hz only.
• Indoor use only.
• Under our warranty terms, this ceiling fan
must be correctly installed by a licensed
electrician. Improperly installed ceiling fans
can be dangerous and expensive to repair, it
will also void your warranty.
• Before installing the fan, make sure you have
turned o the main electricity supply. Do not
turn it back on until the fan is fully installed
and ready to use.
• To protect against electric shock: do not
immerse unit or cord in water or spray with
liquids.
• This appliance can be used by children
aged from 8 years and above and
persons with reduced physical, sensory or
mental capabilities or lack of experience
and knowledge if they have been given
supervision or instruction concerning use of
the appliance in a safe way and understand
8

español english français portuguese deutsch italiano
the hazards involved.
• Children shall not play with the appliance.
• Cleaning and user maintenance shall not be
made by children without supervision.
• Turn the fan OFF when not in use and before
disassembling or cleaning. Fully assemble the
fan before switching on again.
• The use of attachments not recommended by
the manufacturer may be hazardous.
• Do not operate if the fan housing is damaged.
• If the cord is damaged, it must be replaced by
the manufacturer, its service agent or similarly
qualied persons in order to avoid a hazard.
• If the fan is not working properly, contact
a qualied technician for examination and
repair. Never attempt to dismantle the fan
yourself.
WARNING: To reduce the risk of electrical
shock and re, do not use this fan with any
solid-state fan speed control device, or
rheostat. Do not separate the reverse switch
until the fan has come to a complete stop.
Do not insert anything into the fan blades while
they are rotating.
WARNING: To reduce the risk of personal
injury, do not bend the blade brackets (also
referred to as “anges”) during assembly or
after installation. Do not insert objects in the
path of the blades.
To avoid personal injury or damage to the fan
and other items, be cautious when working
around or cleaning the fan. Do not use water or
9

español english français portuguese deutsch italiano
detergent when cleaning the fan or fan blades.
A dry dust cloth or lightly dampened cloth will
be suitable for most cleaning.
NOTE: The important safety precautions
and instructions appearing in the manual are
not meant to cover all possible conditions
and situations that may occur. It must be
understood that common sense and caution
are necessary factors in the installation and
operation of this fan.
WARNING:
Equipment must be installed at the height of
at least 2,3 meters from the oor (2,3 meters
means from the oor to the bottom of the fan),
0.76m from wall or obstruction. Since the
installation of the equipment sets, the power of
the network must be done through exible cable
plug or by pole switch with contact opening
distance not less than 3 mm.
10

español english français portuguese deutsch italiano
PRODUCT DESCRIPTION
Upper canopy Support plate Support rod
Lower canopy Motor LED light kit
Blades Lamp shade Remote control
A: Screws and washers for securing the
blades (xed on the motor housing).
B: Screws for concrete ceiling
C: Screws and washers for wood joist ceiling
D: Blance kit
11
español english français portuguese deutsch italiano
REMOTE CONTROL CNNECTION
WARNING: To avoid personal injury or damage, be sure to turn o the power to the main fuse box before wiring.
Bracket
Receiver place
Yellow/Green
Remote
control
Yellow/Green
ASSEMBLING
Make sure you have all the components before beginning installation. To prevent damage, attach the motor
to the support rod on a soft surface or use the polystyrene contained in the package.
1. Open the carton box and take out the fan (g. 1).
2. Assemble the support plate on the ceiling using two
or more screw anchors and appropriate washers.
Attention: the provided screw are for wood joist and
concrete ceiling. (g. 2).
3. Insert the support rod through the upper cap and
lower cap.
4. Insert the electric cables coming out from the motor
through the support rod and connect them to the
screw terminal placed on the top of support rod.
5. Fix the support rod to the motor using the pin and
pin’s nut. (g. 3)
6. Hang the fan on the hook on the support plate and
connect the electrical cable coming from the ceiling
to the screw terminal placed on the top of support
rod, make sure the receiver must be insert into
support plate (see Remote control connection).
7. Slide upwards the upper capand x it with the
screw. (g. 4)
8. Slide downwards the lower cap; it must be
supported by the motor. Fix it with the screw. (g. 4)
9. Center the slots on the blades with the heads of the
blades xing screws and slide the blades so that the
head of the screws are positioned at the end of slot.
(g. 5)
10. Tighten the screw. (g. 6)
11. Remove the screws from connect plate of the motor,
please organize all the wires carefully into connect
plate.Assemble and align the holes on the back of
LED light to the three screws on the connect plate of
motor. (g. 7)
12. Then tighten the three screws on the LED plate, connect the connector together with the motor wire,
please make sure the light kit can’t be moved after tighten the screws. (g. 8)
13. Place the lamp shade on the fan.(g. 9)
12

español english français portuguese deutsch italiano
INSTRUCTIONS FOR USE
The ceiling fan is provided with a remote control. To turn on the ceiling
fan select the desired speed and the fan will turn on with the selected speed:
HI High speed
MED Medium speed
LOW Low speed
STOP Turn o the ceiling fan
LIGHT: To turn On the light push the button “LIGHT ON/OFF”.
There are three levels of light intensity. When you press it once the light will switch
on at intensity level 1 (3000K), pressing it again will change it to intensity level 2
(4000K), press it for the third time for maximum light intensity (6000K) and press it
once more to switch o the light. Light can also be turned on while the fan is o.
TIMER: O timer can be set using the four option on the remote control 1h, 2h, 4h
and 8h. If the timer has been set before, pressing any of the timer button again will
reset the timer from the beginning.
CLEANING AND MAINTAINENCE
Cleaning:
1. Before cleaning, turn the unit o, cut o the power supply from electrical outlet and wait for the unit to
cool down.
2. To clean the unit, use a soft cloth to wipe o any dust.
3. Do not try to open the unit without a licensed electrician. Improperly installed the unit can be
dangerous.
4. Clean the unit at least once a year.
Maintenance:
1. Have your product repaired by a licensed electrician
2. This electric product is in accordance with the relevant safety requirements. Repairs should only be
carried out by licensed electricians using original spare parts, otherwise this may result in considerable
danger to the user.
3. Please contact the store which you bought the product for after sale services if any.
TECHNICAL INFORMATION
Model: SS-21810
Voltage / Frequency: 220-240V~ 50-60Hz
Output Power: 100W
13

español english français portuguese deutsch italiano
CONSIGNES DE SÉCURITÉ IMPORTANTES
• Ce manuel d’instructions peut également être
téléchargé à partir de notre page Web
www.sogo.es
• AVERTISSEMENT: Lors de l’utilisation
d’appareils électriques, des précautions
de sécurité de base doivent toujours être
suivies an de réduire les risques d’incendie,
d’électrocution et de blessures.
• Utilisez ce ventilateur uniquement comme décrit
dans ce manuel. Toute autre utilisation, non
recommandée, peut provoquer un incendie, un
choc électrique ou des blessures corporelles.
Cela annulera également votre garantie.
• Connectez uniquement à un fournisseur
d’alimentation principal de 220-240V~ 50-60 Hz.
• Utilisation en intérieur uniquement.
• Selon nos conditions de garantie, ce
ventilateur de plafond doit être correctement
installé par un électricien agréé. Les
ventilateurs de plafond mal installés peuvent
être dangereux et coûteux à réparer, cela
annulerait également votre garantie.
• Avant d’installer le ventilateur, assurezvous d’avoir coupé l’alimentation électrique
principale. Ne le rallumez pas tant que le
ventilateur n’est pas entièrement installé et
prêt à être utilisé.
• Pour vous protéger contre les chocs électriques:
ne plongez pas l’appareil ou le cordon dans
l’eau et ne vaporisez pas de liquide.
• Cet appareil peut être utilisé par des enfants
âgés de 8 ans et plus et des personnes ayant
14

español english français portuguese deutsch italiano
des capacités physiques, sensorielles ou
mentales réduites ou un manque d’expérience
et de connaissances s’ils ont reçu une
surveillance ou des instructions concernant
l’utilisation de l’appareil en toute sécurité et
comprendre les dangers encourus.
• Les enfants ne doivent pas jouer avec l’appareil.
• Le nettoyage et l’entretien par l’utilisateur ne
doivent pas être eectués par des enfants
sans surveillance.
• Éteignez le ventilateur lorsqu’il n’est pas utilisé
et avant de le démonter ou de le nettoyer.
Assemblez complètement le ventilateur avant
de le rallumer.
• L’utilisation d’accessoires non recommandés
par le fabricant peut être dangereuse.
• Ne pas faire fonctionner si le boîtier du
ventilateur est endommagé.
• Si le cordon est endommagé, il doit être
remplacé par le fabricant, son agent de
service ou des personnes de qualication
similaire an d’éviter tout danger.
• Si le ventilateur ne fonctionne pas
correctement, contactez un technicien qualié
pour examen et réparation. N’essayez jamais
de démonter le ventilateur vous-même.
AVERTISSEMENT: pour réduire le risque de
choc électrique et d’incendie, n’utilisez pas ce
ventilateur avec un dispositif de contrôle de
vitesse de ventilateur à semi-conducteurs ou
un rhéostat. Ne séparez pas l’interrupteur de
marche arrière tant que le ventilateur n’est pas
complètement arrêté.
15

español english français portuguese deutsch italiano
N’insérez rien dans les pales du ventilateur
lorsqu’elles tournent.
AVERTISSEMENT: pour réduire le risque
de blessures, ne pliez pas les supports de
lame (également appelés «brides») pendant
l’assemblage ou après l’installation. N’insérez
pas d’objets sur la trajectoire des lames.
Pour éviter des blessures personnelles ou
des dommages au ventilateur et à d’autres
éléments, soyez prudent lorsque vous travaillez
à proximité ou nettoyez le ventilateur.
N’utilisez pas d’eau ou de détergent pour
nettoyer le ventilateur ou les pales du
ventilateur. Un chion à poussière sec ou un
chion légèrement humidié conviendra pour la
plupart des nettoyages.
REMARQUE: les précautions et instructions de
sécurité importantes gurant dans le manuel
ne visent pas à couvrir toutes les conditions et
situations possibles qui peuvent se produire. Il
faut comprendre que le bon sens et la prudence
sont des facteurs nécessaires dans l’installation
et le fonctionnement de ce ventilateur.
ATTENTION:
L’équipement doit être installé à une hauteur d’au
moins 2,3 mètres du sol (2,3 mètres signie du sol
au bas du ventilateur), à 0,76 m du mur ou d’un
obstacle. En raison de l’installation des ensembles
d’équipements, l’alimentation du réseau doit être
eectuée via une che de câble exible ou par un
interrupteur à pôles avec une distance d’ouverture
des contacts d’au moins 3 mm.
16

español english français portuguese deutsch italiano
DESCRIPTION DU PRODUIT
Auvent supérieur Plaque de support Tige de support
Auvent inférieur Moteur Kit d’éclairage LED
Lames Abat-jour Télécommande
A: Vis et rondelles de xation des lames
(xées sur le carter du moteur)
B: Vis pour plafonds en béton
C: Vis et rondelles pour plafond à poutrelles
de bois
D: Kit d’équilibre
17

español english français portuguese deutsch italiano
CONNEXION DE LA TÉLÉCOMMANDE
AVERTISSEMENT: pour éviter des blessures ou des dommages, assurez-vous de couper l’alimentation
de la boîte à fusibles principale avant de procéder au câblage.
Support
Lieu de réception
Jaune / vert
télécommande
Jaune / vert
MONTAGE
Assurez-vous d’avoir tous les composants avant de commencer l’installation. Pour éviter tout dommage,
xez le moteur à la tige de support sur une surface molle ou utilisez le polystyrène contenu dans
l’emballage.
1. Ouvrez la boîte en carton et retirez le ventilateur
(g. 1).
2. Assemblez la plaque de support au plafond à l’aide
d’au moins deux ancrages à vis et des rondelles
appropriées. Attention: les vis fournies sont
destinées aux poutrelles de bois et aux plafonds en
béton. (g.2).
3. Insérez la tige de support à travers le capuchon
supérieur et le capuchon inférieur.
4. Insérez les câbles électriques sortant du moteur à
travers la tige de support et connectez-les à la borne
à vis placée sur le dessus de la tige de support.
5. Fixez la tige de support au moteur à l’aide de la
goupille et de l’écrou de la goupille. (g. 3)
6. Accrochez le ventilateur au crochet de la plaque de
support et connectez le câble électrique, venant du
plafond, à la borne à vis placée sur le dessus de la
tige de support. Assurez-vous que le récepteur est
inséré dans la plaque de support (voir Connexion
de la télécommande).
7. Faites glisser le capuchon supérieur vers le haut et
xez-le avec la vis. (g.4)
8. Faites glisser vers le bas le capuchon inférieur; il
doit être soutenu par le moteur. Fixez-le avec la
vis. (g.4)
9. Centrez les fentes sur les lames avec les têtes
des vis de xation des lames et faites glisser les
lames de manière à ce que la tête des vis soit
positionnée à l’extrémité de la fente. (g.5)
10. Serrez la vis. (g.6)
11. Retirez les vis de la plaque de connexion du moteur, veuillez organiser soigneusement tous les
ls dans la plaque de connexion. Assemblez et alignez les trous à l’arrière de la lumière LED
avec les trois vis sur la plaque de connexion du moteur. (g.7)
12. Serrez ensuite les trois vis sur la plaque LED, connectez le connecteur avec le l du moteur.
Veuillez vous assurer que le kit d’éclairage ne peut pas être déplacé après avoir serré les vis. (g.8)
13. Placez l’abat-jour sur le ventilateur (g. 9).
18

español english français portuguese deutsch italiano
MODE D’EMPLOI
Le ventilateur de plafond est équipé d’une télécommande. Pour allumer le
ventilateur de plafond, sélectionnez la vitesse souhaitée et le ventilateur se mettra
en marche à la vitesse sélectionnée:
HI haute vitesse
MED Vitesse moyenne
LOW Basse vitesse
STOP Éteint le ventilateur de plafond
LUMIÈRE: Pour allumer la lumière, appuyez sur le bouton «LIGHT ON / OFF».
Il existe trois niveaux d’intensité lumineuse. Lorsque vous appuyez dessus une
fois, la lumière s’allume au niveau d’intensité 1 (3000K), appuyez à nouveau
dessus pour le changer au niveau d’intensité 2 (4000K). Appuyez une troisième
fois pour obtenir une intensité lumineuse maximale (6000 K) et appuyez à
nouveau pour éteindre la lumière. La lumière peut également être allumée lorsque
le ventilateur est éteint.
TIMER: La minuterie d’arrêt peut être réglée à l’aide de la quatrième option de la
télécommande: 1h, 2h, 4h et 8h. Si la minuterie a été réglée auparavant, appuyez
à nouveau sur l’un des boutons de la minuterie pour réinitialiser la minuterie depuis
le début.
NETTOYAGE ET ENTRETIEN
Nettoyage:
1. Avant de nettoyer, éteignez l’appareil, coupez l’alimentation électrique de la prise électrique et attendez
que l’appareil refroidisse.
2. Pour nettoyer l’appareil, utilisez un chion doux pour essuyer toute poussière.
3. N’essayez pas d’ouvrir l’unité sans un électricien agréé. Mal installé, l’appareil peut être dangereux.
4. Nettoyez l’appareil au moins une fois par an.
Entretien:
1. Faites réparer votre produit par un électricien agréé
2. Ce produit électrique est conforme aux exigences de sécurité applicables. Les réparations ne doivent
être eectuées que par des électriciens agréés utilisant des pièces de rechange d’origine, sinon cela
peut entraîner un danger considérable pour l’utilisateur.
3. Veuillez contacter le magasin où vous avez acheté le produit pour les services après-vente, si vous en
avez besoin.
INFORMATION TECHNIQUE
Modèle: SS-21810
Tension / Fréquence: 220-240V~ 50-60Hz
Puissance: 100W
19

español english français portuguese deutsch italiano
IMPORTANTES INSTRUÇÕES DE
SEGURANÇA
• Este manual de instruções também pode ser
baixado da nossa página web www.sogo.es
• AVISO: Ao usar aparelhos elétricos, as
precauções básicas de segurança devem
ser sempre seguidas, para reduzir o risco de
incêndio, choque elétrico e ferimentos pessoais.
• Use este ventilador apenas conforme descrito
neste manual. Qualquer outro uso não
recomendado pode causar incêndio, choque
elétrico ou ferimentos em pessoas. Isso
também anulará sua garantia.
• Conecte apenas a um fornecedor de energia
principal de 220-240V~ 50-60 Hz.
• Uso interno somente.
• Sob nossos termos de garantia, este
ventilador de teto deve ser instalado
corretamente por um eletricista licenciado.
Ventiladores de teto instalados incorretamente
podem ser perigosos e caros para consertar,
mas também anulariam a garantia.
• Antes de instalar o ventilador, certique-se
de desligar o fornecimento de eletricidade
principal. Não ligue-o novamente até que o
ventilador esteja totalmente instalado e pronto
para uso.
• Para proteção contra choque elétrico: não
mergulhe a unidade ou o cabo em água, nem
borrife líquidos.
• Este aparelho pode ser usado por crianças
a partir de 8 anos de idade e pessoas com
capacidades físicas, sensoriais ou mentais
20

español english français portuguese deutsch italiano
reduzidas ou com falta de experiência
e conhecimento, caso tenham recebido
supervisão ou instruções sobre o uso do
aparelho de forma segura e eles entendem os
perigos envolvidos.
• As crianças não devem brincar com o aparelho.
• A limpeza e manutenção do usuário não
devem ser feitas por crianças sem supervisão.
• DESLIGUE o ventilador quando não estiver
em uso e antes de desmontá-lo ou limpá-lo.
Monte totalmente o ventilador antes de ligá-lo
novamente.
• O uso de acessórios não recomendados pelo
fabricante pode ser perigoso.
• Não opere se a caixa do ventilador estiver
danicada.
• Se o cabo estiver danicado, deve ser
substituído pelo fabricante, seu agente de
serviço ou pessoas igualmente qualicadas
para evitar riscos.
• Se o ventilador não estiver funcionando
corretamente, entre em contato com um
técnico qualicado para exame e reparo.
Nunca tente desmontar o ventilador sozinho.
AVISO: Para reduzir o risco de choque elétrico
e incêndio, não use este ventilador com
nenhum dispositivo de controle de velocidade
de ventilador de estado sólido ou reostato. Não
separe a chave reversa até que o ventilador
tenha parado completamente.
Não insira nada nas pás do ventilador
enquanto elas estiverem girando.
21

español english français portuguese deutsch italiano
AVISO: Para reduzir o risco de ferimentos,
não dobre os suportes da lâmina (também
chamados de “anges”) durante a montagem
ou após a instalação. Não insira objetos no
caminho das lâminas. Para evitar ferimentos
pessoais ou danos ao ventilador e outros itens,
tome cuidado ao trabalhar ao redor ou limpar o
ventilador.
Não use água ou detergente ao limpar o
ventilador ou as pás do ventilador. Um pano
de pó seco ou um pano levemente umedecido
será adequado para a maioria das limpezas.
NOTA: As importantes precauções e
instruções de segurança que aparecem no
manual não têm como objetivo cobrir todas as
condições e situações possíveis que podem
ocorrer. Deve-se entender que bom senso e
cautela são fatores necessários na instalação
e operação deste ventilador.
ATENÇÃO:
O equipamento deve ser instalado a uma
altura de pelo menos 2,3 metros do chão
(2,3 metros signica do chão até a parte
inferior do ventilador), 0,76m da parede ou
obstrução. Devido à instalação dos conjuntos
de equipamentos, a alimentação da rede deve
ser feita através de plugue de cabo exível ou
por chave de pólo com distância de abertura do
contato não inferior a 3 mm.
22

español english français portuguese deutsch italiano
DESCRIÇÃO DO PRODUTO
Copa superior Prato de suporte Haste de suporte
Canopy inferior Motor Kit luz led
Lâminas Abajur Controle remoto
A: Parafusos e arruelas para prender as lâmi-
nas (xadas na carcaça do motor)
B: Parafusos para tetos de concreto
C: Parafusos e arruelas para teto de vigas de
madeira
D: Kit de equilíbrio
23

español english français portuguese deutsch italiano
CONEXÃO DE CONTROLE REMOTO
AVISO: Para evitar ferimentos ou danos pessoais, certique-se de desligar a alimentação da caixa de
fusíveis principal antes de conectar a ação.
Suporte
Lugar receptor
Amarelo / Verde
Controle
remoto
Amarelo / Verde
MONTAGEM
Certique-se de ter todos os componentes antes de iniciar a instalação. Para evitar danos, xe o motor na
haste de suporte em uma superfície macia ou use o poliestireno contido na embalagem.
1. Abra a caixa de papelão e retire o ventilador (g. 1).
2. Monte a placa de suporte no teto usando duas ou
mais buchas e as arruelas apropriadas. Atenção: os
parafusos fornecidos são para vigas de madeira e
tetos de concreto. (Figura 2).
3. Insira a haste de suporte através da tampa superior
e da tampa inferior.
4. Insira os cabos elétricos que saem do motor através
da haste de suporte e conecte-os ao terminal de
parafuso colocado na parte superior da haste de
suporte.
5. Fixe a haste de suporte ao motor usando o pino e a
porca do pino. (g. 3)
6. Pendure a ventoinha no gancho da placa de
suporte e conecte o cabo elétrico, vindo do teto, ao
terminal de parafuso colocado na parte superior da
haste de suporte. Certique-se de que o receptor
esteja inserido na placa de suporte (consulte
Conexão do controle remoto).
7. Deslize para cima a tampa superior e xe-a com o
parafuso. (g. 4)
8. Deslize para baixo a tampa inferior; deve ser
apoiado pelo motor. Fixe com o parafuso. (g. 4)
9. Centralize as fendas nas lâminas com as cabeças
dos parafusos de xação das lâminas e deslize as
lâminas de forma que a cabeça dos parafusos que
posicionada na extremidade da fenda. (g. 5)
10. Aperte o parafuso. (g. 6)
11. Remova os parafusos da placa de conexão do
motor, organize todos os os cuidadosamente na
placa de conexão. Monte e alinhe os orifícios na parte de trás da luz LED aos três parafusos na placa
de conexão do motor. (g. 7)
12. Em seguida, aperte os três parafusos na placa de LED, conecte o conector junto com o o do motor.
Certique-se de que o kit de luz não pode ser movido após apertar os parafusos. (g. 8)
13. Coloque o abajur no ventilador. (Fig. 9)
24

español english français portuguese deutsch italiano
INSTRUÇÕES DE USO
O ventilador de teto é fornecido com um controle remoto. Para ligar o ventilador
de teto, selecione a velocidade desejada e o ventilador ligará com a velocidade
selecionada:
HI alta velocidade
MED Velocidade média
LOW Baixa velocidade
STOP desliga o ventilador de teto
LUZ: Para acender a luz, pressione o botão “LIGHT ON / OFF”.
Existem três níveis de intensidade de luz. Ao pressioná-lo uma vez, a luz acende
no nível de intensidade 1 (3000K), pressionando-o novamente mudará para o
nível de intensidade 2 (4000K). Pressione pela terceira vez para a intensidade
máxima da luz (6000K) e pressione mais uma vez para desligar a luz. A luz
também pode ser ligada enquanto o ventilador está desligado.
TEMPORIZADOR: O temporizador pode ser denido usando a quarta opção no
controle remoto: 1h, 2h, 4h e 8h. Se o cronômetro foi denido antes, pressionar
qualquer botão do cronômetro novamente irá zerar o cronômetro desde o início.
LIMPEZA E MANUTENÇÃO
Limpeza:
1. Antes de limpar, desligue a unidade, desligue a fonte de alimentação da tomada elétrica e espere que
a unidade esfrie.
2. Para limpar a unidade, use um pano macio para limpar a poeira.
3. Não tente abrir a unidade sem um eletricista licenciado. Instalada incorretamente, a unidade pode ser
perigosa.
4. Limpe a unidade pelo menos uma vez por ano.
Manutenção:
1. Faça com que seu produto seja reparado por um eletricista licenciado
2. Este produto elétrico está de acordo com os requisitos de segurança relevantes. Os reparos devem
ser realizados apenas por eletricistas licenciados, usando peças sobressalentes originais, caso
contrário, isso pode resultar em perigo considerável para o usuário.
3. Entre em contato com a loja onde comprou o produto para serviços pós-venda, se precisar.
INFORMAÇÕES TÉCNICAS
Modelo: SS-21810
Tensão / freqüência: 220-240V~ 50-60Hz
Poder: 100W
25

español english français portuguese deutsch italiano
WICHTIGE SICHERHEITSANWEISUNGEN
• Diese Bedienungsanleitung kann auch von
unserer Webseite www.sogo.es
• WARNUNG: Bei der Verwendung von
Elektrogeräten sollten immer grundlegende
Sicherheitsvorkehrungen getroen werden,
um das Risiko von Feuer, Stromschlag und
Personenschäden zu verringern.
• Verwenden Sie diesen Lüfter nur wie in
diesem Handbuch beschrieben. Jede andere,
nicht empfohlene Verwendung kann zu Feuer,
Stromschlag oder Verletzungen von Personen
führen. Dadurch erlischt auch Ihre Garantie.
• Nur an einen Hauptstromversorger mit
220-240 V~ 50-60 Hz anschließen.
• Nur für den Innenbereich.
• Gemäß unseren Garantiebedingungen
muss dieser Deckenventilator von einem
zugelassenen Elektriker ordnungsgemäß
installiert werden. Nicht ordnungsgemäß
installierte Deckenventilatoren können
gefährlich und teuer in der Reparatur sein.
Außerdem erlischt Ihre Garantie.
• Stellen Sie vor der Installation des Lüfters
sicher, dass Sie die Hauptstromversorgung
ausgeschaltet haben. Schalten Sie es erst
wieder ein, wenn der Lüfter vollständig
installiert und betriebsbereit ist.
• Zum Schutz vor elektrischem Schlag: Tauchen
Sie das Gerät oder das Kabel nicht in Wasser
und sprühen Sie es nicht mit Flüssigkeiten ein.
• Dieses Gerät kann von Kindern ab 8 Jahren
und Personen mit eingeschränkter körperlicher,
sensorischer oder geistiger Leistungsfähigkeit
26

español english français portuguese deutsch italiano
oder mangelnder Erfahrung und Kenntnis
verwendet werden, wenn sie in sicherer Weise
beaufsichtigt oder unterwiesen wurden und die
damit verbundenen Gefahren verstehen.
• Kinder dürfen nicht mit dem Gerät spielen.
• Reinigung und Wartung durch den Benutzer
dürfen nicht von Kindern ohne Aufsicht
durchgeführt werden.
• Schalten Sie den Lüfter aus, wenn er nicht
verwendet wird und bevor Sie ihn zerlegen
oder reinigen. Bauen Sie den Lüfter
vollständig zusammen, bevor Sie ihn wieder
einschalten.
• Die Verwendung von vom Hersteller nicht
empfohlenen Anbaugeräten kann gefährlich sein.
• Nicht betreiben, wenn das Lüftergehäuse
beschädigt ist.
• Wenn das Kabel beschädigt ist, muss es vom
Hersteller, seinem Servicemitarbeiter oder
ähnlich qualizierten Personen ausgetauscht
werden, um eine Gefahr zu vermeiden.
• Wenn der Lüfter nicht richtig funktioniert,
wenden Sie sich zur Prüfung und Reparatur
an einen qualizierten Techniker. Versuchen
Sie niemals, den Lüfter selbst zu zerlegen
WARNUNG: Um die Gefahr von
Stromschlägen und Bränden zu verringern,
verwenden Sie diesen Lüfter nicht mit einem
Festkörper-Lüfterdrehzahlregelgerät oder
Rheostat. Trennen Sie den Rückwärtsschalter
erst, wenn der Lüfter vollständig zum Stillstand
gekommen ist.
27

español english français portuguese deutsch italiano
Führen Sie während der Drehung nichts in die
Lüfterblätter ein.
WARNUNG: Um das Risiko von
Personenschäden zu verringern, biegen Sie
die Klingenhalterungen (auch als „Flansche“
bezeichnet) während der Montage oder nach der
Installation nicht. Fügen Sie keine Gegenstände
in den Pfad der Klingen ein. Seien Sie vorsichtig,
wenn Sie herumarbeiten oder den Lüfter reinigen,
um Verletzungen oder Schäden am Lüfter und
anderen Gegenständen zu vermeiden.
Verwenden Sie zum Reinigen des Lüfters
oder der Lüfterblätter kein Wasser oder
Reinigungsmittel. Ein trockenes Staubtuch oder
ein leicht angefeuchtetes Tuch ist für die meisten
Reinigungsarbeiten geeignet.
HINWEIS: Die wichtigen Sicherheitsvorkehrungen
und Anweisungen im Handbuch sollen nicht
alle möglichen Bedingungen und Situationen
abdecken, die auftreten können. Es versteht sich,
dass gesunder Menschenverstand und Vorsicht
notwendige Faktoren bei der Installation und dem
Betrieb dieses Lüfters sind.
WARNUNG:
Die Ausrüstung muss in einer Höhe von
mindestens 2,3 m über dem Boden (2,3 m vom
Boden bis zum Boden des Lüfters) und 0,76
m von der Wand oder dem Hindernis installiert
werden. Aufgrund der Installation der Gerätesätze
muss die Stromversorgung des Netzwerks
über einen exiblen Kabelstecker oder einen
Polschalter mit einem Kontaktönungsabstand
von mindestens 3 mm erfolgen.
28

español english français portuguese deutsch italiano
PRODUKTBESCHREIBUNG
Oberer Baldachin Trägerplatte Stützstange
Unteres Verdeck Motor LED-Beleuchtungsset
Klingen Lampenschirm Fernbedienung
A: Schrauben und Unterlegscheiben
zur Sicherung der Schaufeln (am
Motorgehäuse befestigt)
B: Schrauben für Betondecken
C: Schrauben und Unterlegscheiben für
Holzbalkendecken
D: Balance-Kit
29

español english français portuguese deutsch italiano
FERNBEDIENUNGSANSCHLUSS
WARNUNG: Um Verletzungen oder Beschädigungen zu vermeiden, schalten Sie den
Hauptsicherungskasten vor der Verkabelung aus.
Halterung
Empfängerplatz
Gelb / Grün
Fernbedienung
Gelb / Grün
MONTAGE
Stellen Sie sicher, dass Sie alle Komponenten haben, bevor Sie mit der Installation beginnen. Um
Beschädigungen zu vermeiden, befestigen Sie den Motor an der Stützstange auf einer weichen Oberäche
oder verwenden Sie das im Lieferumfang enthaltene Polystyrol.
1. Önen Sie den Karton und nehmen Sie den Lüfter
heraus (Abb. 1).
2. Montieren Sie die Trägerplatte mit zwei oder
mehr Schraubankern und den entsprechenden
Unterlegscheiben an der Decke. Achtung: Die
mitgelieferten Schrauben sind für Holzbalken und
Betondecken. (Abb. 2).
3. Führen Sie die Stützstange durch die obere und die
untere Kappe.
4. Führen Sie die aus dem Motor austretenden
elektrischen Kabel durch die Stützstange und
verbinden Sie sie mit der Schraubklemme oben an
der Stützstange.
5. Befestigen Sie die Stützstange mit dem Stift und der
Stiftmutter am Motor. (Abb. 3)
6. Hängen Sie den Lüfter an den Haken an der
Trägerplatte und verbinden Sie das von der
Decke kommende elektrische Kabel mit der
Schraubklemme oben auf der Stützstange. Stellen
Sie sicher, dass der Empfänger in die Trägerplatte
eingesetzt ist (siehe Anschluss der Fernbedienung).
7. Schieben Sie die obere Kappe nach oben und
befestigen Sie sie mit der Schraube. (Abb. 4)
8. Schieben Sie die untere Kappe nach unten. es
muss vom Motor getragen werden. Befestigen Sie
es mit der Schraube. (Abb. 4)
9. Zentrieren Sie die Schlitze mit den Köpfen der
Klingenbefestigungsschrauben auf den Klingen
und schieben Sie die Klingen so, dass der Kopf der
Schrauben am Ende des Schlitzes positioniert ist.
(Abb. 5)
10. Ziehen Sie die Schraube fest. (Abb. 6)
11. Entfernen Sie die Schrauben von der Verbindungsplatte des Motors. Ordnen Sie alle Drähte sorgfältig
in der Verbindungsplatte an. Montieren Sie die Löcher auf der Rückseite des LED-Lichts und richten
Sie sie an den drei Schrauben an der Verbindungsplatte des Motors aus. (Abb. 7)
12. Ziehen Sie dann die drei Schrauben an der LED-Platte fest und verbinden Sie den Stecker mit dem
Motorkabel. Bitte stellen Sie sicher, dass das Beleuchtungsset nach dem Anziehen der Schrauben
nicht bewegt werden kann. (Abb. 8)
13. Setzen Sie den Lampenschirm auf den Lüfter (Abb. 9).
30

español english français portuguese deutsch italiano
GEBRAUCHSANWEISUNG
Der Deckenventilator ist mit einer Fernbedienung ausgestattet. Um den
Deckenventilator einzuschalten, wählen Sie die gewünschte Geschwindigkeit und
der Ventilator schaltet sich mit der ausgewählten Geschwindigkeit ein:
HI Hohe Geschwindigkeit
MED Mittlere Geschwindigkeit
LOW Niedrige Drehzahl
STOP Schaltet den Deckenventilator aus
LICHT: Um das Licht einzuschalten, drücken Sie die Taste „LIGHT ON / OFF“.
Es gibt drei Stufen der Lichtintensität. Wenn Sie es einmal drücken, schaltet sich
das Licht bei Intensitätsstufe 1 (3000K) ein. Wenn Sie es erneut drücken, wird
es auf Intensitätsstufe 2 (4000K) geändert. Drücken Sie es zum dritten Mal, um
eine maximale Lichtintensität (6000 K) zu erzielen, und drücken Sie es erneut,
um das Licht auszuschalten. Das Licht kann auch bei ausgeschaltetem Lüfter
eingeschaltet werden.
TIMER: Der Ausschalttimer kann mit der vierten Option auf der Fernbedienung
eingestellt werden: 1h, 2h, 4h und 8h. Wenn der Timer zuvor eingestellt wurde,
wird der Timer durch erneutes Drücken einer der Timertasten von Anfang an
zurückgesetzt.
REINIGUNG UND INSTANDHALTUNG
Reinigung:
1. Vor der Reinigung, schalten das Gerät aus dem Stromversorgungsausgang und warten, bis das Gerät
abkühlen.
2. Verwenden Sie zum Reinigen ein weiches Tuch, um Staub zu entfernen.
3. Versuchen Sie nicht ohne einen Elektriker das Laufwerk zu önen. Wenn nicht ordnungsgemäß
installiert ist, kann das Gerät gefährlich sein.
4. Reinigen Sie das Gerät mindestens einmal im Jahr.
Instandhaltung:
1. Lassen Sie Ihr Produkt von einem zugelassenen Elektriker reparieren
2. Dieses elektrische Produkt entspricht den einschlägigen Sicherheitsanforderungen.
Reparaturen sollten nur von zugelassenen Elektrikern mit Originalersatzteilen durchgeführt werden, da
dies zu einer erheblichen Gefahr für den Benutzer führen kann.
3. Bitte wenden Sie sich an das Geschäft, in dem Sie das Produkt gekauft haben, falls vorhanden.
TECHNISCHE INFORMATION
Modell: SS-21810
Spannung / Frequenz: 220-240V~ 50-60Hz
Leistung: 100W
31

español english français portuguese deutsch italiano
IMPORTANTI ISTRUZIONI DI SICUREZZA
• Questo manuale di istruzioni può anche essere
scaricato dalla nostra pagina web www.sogo.es
• AVVERTENZA: quando si utilizzano
apparecchi elettrici, è necessario seguire
sempre le precauzioni di sicurezza di base per
ridurre il rischio di incendi, scosse elettriche e
lesioni personali.
• Utilizzare questo ventilatore solo come
descritto in questo manuale. Qualsiasi altro
uso, non consigliato, può provocare incendi,
scosse elettriche o lesioni alle persone. Ciò
annullerà anche la garanzia.
• Collegare solo a un alimentatore principale di
220-240 V~ 50-60 Hz.
• Solo per uso interno.
• In base ai nostri termini di garanzia, questo
ventilatore da sotto deve essere installato
correttamente da un elettricista autorizzato. I
ventilatori da sotto installati in modo errato
possono essere pericolosi e costosi da
riparare, inoltre annullerebbero la garanzia.
• Prima di installare la ventola, assicurarsi di
aver spento l’alimentazione elettrica principale.
Non riaccenderlo nché la ventola non è
completamente installata e pronta per l’uso.
• Per proteggersi da scosse elettriche: non
immergere l’unità o il cavo in acqua, né
spruzzare liquidi.
• Questo apparecchio può essere utilizzato da
bambini di età pari o superiore a 8 anni e da
persone con ridotte capacità siche, sensoriali
o mentali o con mancanza di esperienza
32

español english français portuguese deutsch italiano
e conoscenza se supervisionati o istruiti
sull’uso dell’apparecchio in modo sicuro e
comprendono i rischi coinvolti.
• I bambini non devono giocare con
l’apparecchio.
• La pulizia e la manutenzione dell’utente non
devono essere eseguite da bambini senza
supervisione.
• Spegnere la ventola quando non è in uso
e prima di smontarla o pulirla. Montare
completamente il ventilatore prima di
riaccenderlo.
• L’uso di accessori non consigliati dal
produttore può essere pericoloso.
• Non azionare se l’alloggiamento della ventola
è danneggiato.
• Se il cavo è danneggiato, deve essere
sostituito dal produttore, dal suo agente
dell’assistenza o da persone qualicate allo
stesso modo per evitare rischi.
• Se la ventola non funziona correttamente,
contattare un tecnico qualicato per l’esame e
la riparazione. Non tentare mai di smontare il
ventilatore da soli.
AVVERTENZA: per ridurre il rischio di scosse
elettriche e incendi, non utilizzare questa
ventola con alcun dispositivo di controllo della
velocità della ventola a stato solido o reostato.
Non separare l’interruttore di retromarcia no
a quando la ventola non si è completamente
arrestata.
Non inserire nulla nelle pale del ventilatore
33

español english français portuguese deutsch italiano
mentre stanno ruotando.
AVVERTENZA: per ridurre il rischio di
lesioni personali, non piegare le stae delle
lame (chiamate anche “ange”) durante
l’assemblaggio o dopo l’installazione. Non
inserire oggetti nel percorso delle lame. Per
evitare lesioni personali o danni alla ventola e
ad altri oggetti, prestare attenzione quando si
lavora o si pulisce la ventola.
Non utilizzare acqua o detergente per pulire
la ventola o le pale della ventola. Un panno
antipolvere asciutto o un panno leggermente
inumidito sarà adatto per la maggior parte della
pulizia.
NOTA: Le importanti precauzioni di sicurezza
e le istruzioni che compaiono nel manuale non
intendono coprire tutte le possibili condizioni
e situazioni che possono vericarsi. Deve
essere chiaro che il buon senso e la cautela
sono fattori necessari per l’installazione e il
funzionamento di questo ventilatore.
Avvertimento:
L’apparecchiatura deve essere installata ad
un’altezza di almeno 2,3 metri dal pavimento
(2,3 metri signica dal pavimento alla parte
inferiore del ventilatore), a 0,76 m dal muro o da
un ostacolo. A causa dell’installazione dei set di
apparecchiature, l’alimentazione della rete deve
essere eettuata tramite spina del cavo essibile
o tramite interruttore di polo con distanza di
apertura dei contatti non inferiore a 3 mm.
34

español english français portuguese deutsch italiano
DESCRIZIONE DEL PRODOTTO
Baldacchino superiore Piastra di supporto Asta di supporto
Baldacchino inferiore Motore Kit luci a LED
Lame Paralume Telecomando
A: Viti e rondelle per il ssaggio delle lame
(ssate sull’alloggiamento del motore)
B: Viti per sotti in cemento
C: Viti e rondelle per sotto con travetti in legno
D: kit di bilanciamento
35

español english français portuguese deutsch italiano
CONNESSIONE TELECOMANDO
AVVERTENZA: per evitare lesioni personali o danni, assicurarsi di spegnere l’alimentazione della scatola
dei fusibili principali prima del cablaggio.
Supporto
Posto di ricezione
Giallo / Verde
Telecomando
Giallo / Verde
MONTAGGIO
Assicurati di avere tutti i componenti prima di iniziare l’installazione. Per evitare danneggiamenti, ssare
il motore all’asta di supporto su una supercie morbida oppure utilizzare il polistirolo contenuto nella
confezione.
1. Aprire la scatola di cartone ed estrarre la ventola
(g. 1).
2. Assemblare la piastra di supporto al sotto
utilizzando due o più tasselli e le apposite rondelle.
Attenzione: le viti fornite sono per travetti in legno e
sotti in cemento. (g.2).
3. Inserire l’asta di supporto attraverso il tappo
superiore e il tappo inferiore.
4. Inserire i cavi elettrici in uscita dal motore attraverso
l’asta di supporto e collegarli al morsetto a vite posto
sulla sommità dell’asta di supporto.
5. Fissare l’asta di supporto al motore utilizzando il
perno e il dado del perno. (g.3)
6. Appendere il ventilatore al gancio della piastra di
supporto e collegare il cavo elettrico, proveniente
dal sotto, al morsetto a vite posto sulla sommità
dell’asta di supporto. Vericare che il ricevitore
sia inserito nella piastra di supporto (vedere
Collegamento del telecomando).
7. Far scorrere verso l’alto il tappo superiore e ssarlo
con la vite. (g.4)
8. Far scorrere verso il basso il tappo inferiore; deve
essere supportato dal motore. Fissalo con la vite.
(g.4)
9. Centrare le fessure sulle lame con le teste delle
viti di ssaggio delle lame e far scorrere le lame
in modo che le teste delle viti siano posizionate
all’estremità della fessura. (g.5)
10. Stringere la vite. (g.6)
11. Rimuovere le viti dalla piastra di collegamento del
motore, organizzare con cura tutti i li nella piastra di collegamento. Assemblare e allineare i fori sul
retro della luce LED alle tre viti sulla piastra di collegamento del motore. (g.7)
12. Quindi stringere le tre viti sulla piastra LED, collegare il connettore insieme al cavo del motore.
Assicurati che il kit luci non possa essere spostato dopo aver serrato le viti. (g.8)
13. Posizionare il paralume sul ventilatore. (Fig. 9)
36

español english français portuguese deutsch italiano
ISTRUZIONI PER L’USO
Il ventilatore da sotto è dotato di telecomando. Per accendere il ventilatore
da sotto, selezionare la velocità desiderata e il ventilatore si accenderà con la
velocità selezionata:
HI Alta velocità
MED Media velocità
LOW Bassa velocità
STOP Spegne il ventilatore da sotto
LUCE: Per accendere la luce, premere il pulsante “LUCE ON / OFF”.
Sono disponibili tre livelli di intensità della luce. Quando lo premete una volta,
la luce si accenderà al livello di intensità 1 (3000K), premendolo nuovamente
la cambierà al livello di intensità 2 (4000K). Premerlo per la terza volta per la
massima intensità luminosa (6000K) e premerlo ancora una volta per spegnere la
luce. La luce può anche essere accesa mentre la ventola è spenta.
TIMER: Il timer di spegnimento può essere impostato utilizzando la quarta opzione
sul telecomando: 1h, 2h, 4h e 8h. Se il timer è stato impostato in precedenza,
premendo di nuovo uno qualsiasi dei pulsanti del timer il timer verrà ripristinato
dall’inizio.
PULIZIA E MANUTENZIONE
Pulizia:
1. Prima di pulire, spegnere l’unità, interrompere l’alimentazione dalla presa elettrica e attendere che
l’unità si rareddi.
2. Per pulire l’unità, utilizzare un panno morbido per rimuovere la polvere.
3. Non tentare di aprire l’unità senza un elettricista autorizzato. Se installata in modo errato, l’unità può
essere pericolosa.
4. Pulire l’unità almeno una volta all’anno.
Manutenzione:
1. Far riparare il prodotto da un elettricista autorizzato
2. Questo prodotto elettrico è conforme ai requisiti di sicurezza pertinenti. Le riparazioni devono essere
eseguite solo da elettricisti autorizzati utilizzando parti di ricambio originali, altrimenti ciò potrebbe
comportare un notevole pericolo per l’utente.
3. Contatta il negozio dove hai acquistato il prodotto per i servizi post vendita, se ne hai bisogno.
INFORMAZIONI TECNICHE
Modello: SS-21810
Tensione / frequenza: 220-240V~ 50-60Hz
Potenza: 100W
37

ENG / ESP
Technical Specication / Especicaciones Técnicas
ERP COMMISSION REGULATION (EU) No 327/2011
Directive 2009/125/EC
Description Symbol Value Unit
Power Supply / Fuente de alimentacion 220-240V~ 50-60Hz
Power / Potencia 100W
Class / Clase I
Maximum fan ow rate / Velocidad máxima de ujo del ventilador F m3/min
Fan power input / Entrada de energía del ventilador P W
Service value / Valor del servicio SV (m3/min)/W
Standby power consumption / Consumo de energía en espera P
O power consumption / Consumo de energía apagado P
SB
o
W
W
Fan sound power level / Nivel de potencia del sonido del ventilador L WA dB(A)
Maximum air velocity / Velocidad máxima del aire c meters/sec
Seasonal electricity consumption / Consumo de electricidad en uso Q kWh/a
Measurement standard for service value /
IEC 60879:1986 /corr.1992)
Estándar de medición para volar del servicio
FRA / POR
Spécications techniques / Especicação técnica
ERP COMMISSION REGULATION (EU) No 327/2011
Directive 2009/125/EC
Description Symbol Value Unit
Alimentation / Fonte de energia 220-240V~ 50-60Hz
Puissance / Potência 100W
Classe / Class I
Débit du ventilateur / Caudal do ventilador F m3/min
Puissance d’entrée du ventilateur / Entrada de energia do ventilador P W
Valeur du service / Valor do serviço SV (m3/min)/W
Consommation électrique en veille / Consumo de energia em espera P
Hors consommation d’énergie / Consumo de energia desligada P
Niveau de puissance acoustique du ventilateur / Nível de potência
SB
o
L WA dB(A)
W
W
sonora do ventilador
Vitesse de l’air / Velocidade do ar c meters/sec
Consommation d’électricité utilisée / Consumo de eletricidade em uso Q kWh/a
Norme de mesure pour voler du service /
IEC 60879:1986 /corr.1992)
Padrão de medição para sair do serviço

ITA / ALE
Specica tecnica / Technische Spezikation
ERP COMMISSION REGULATION (EU) No 327/2011
Directive 2009/125/EC
Description Symbol Value Unit
Alimentazione / Stromversorgung 220-240V~ 50-60Hz
Potere / Potenz 100W
Clase / Klasse I
Portata del ventilatore / Lüfterdurchuss F m3/min
Potenza assorbita dal ventilatore / Lüfterleistungseingang P W
Valore del servicio / Servicewert SV (m3/min)/W
Consumo energético in standby / Standby-Stromverbrauch P
Consumo energetico spento / Stromverbrauch ausschalten P
Livello di potenza sonora del ventilatore /
SB
o
L WA dB(A)
W
W
Lüfter-Schallleistungspegel
Velocità dell’aria / Luftgeschwindigkeit c meters/sec
Consumo di elettricità in uso / Stromverbrauch im Einsatz Q kWh/a
Standard di misura per volare dal servicio / Messstandard, um
IEC 60879:1986 /corr.1992)
vom Dienst zu iegen

español english français portuguese deutsch italiano
DECLARACIÓN DE CONFORMIDAD
Este dispositivo cumple con la Directiva de baja
tensión 2014/35/CE, la Directiva de Compatibilidad
Electromagnética 2014/30/UE, la Directiva 2015/863
UE sobre restricciones a la utilización de
determinadas sustancias peligrosas en aparatos
eléctricos y electrónicos y la Directiva 2009/125 CE
en los requisitos de diseño ecológico aplicables
a los productos relacionados con la energía.
2015 / 863 / EU 2015 / 863 / EU
DECLARAÇÃO DE CONFORMIDADE
Este dispositivo está em conformidade com a
Directiva de Baixa Tensão 2014/35/CE, a
Directiva de Compatibilidade Electromagnética
2014/30/UE, a Directiva 2015/863/UE relativa à
restrição do uso de determinadas substâncias
perigosas em equipamentos eléctricos e
electrónicos e da Directiva 2009/125/CE sobre
os requisitos de concepção ecológica aplicáveis
aos produto relacionados com a energia.
DECLARATION OF CONFORMITY
This device complies with Low Voltage Directive
2014/35/EC, Electromagnetic Compatibility Directive
2014/30/EU, Directive 2015/863/EU on the restriction
of the use of certain hazardous substances in
electrical and electronic equipment and Directive
2009/125/EC on the eco-design requirements
applicable to energy-related products.
2015 / 863 / EU 2015 / 863 / EU
DÉCLARATION DE CONFORMITÉ
Cet appareil est conforme à la Directive Basse
Tension 2014/35/CE, la directive Compatibilité
électromagnétique 2014/30/UE, la directive
2015/863/UE relative à la limitation de l’utilisation de
certaines substances dangereuses dans les
équipements et la directive 2009/125/CE électriques
et électroniques sur les exigences en matière d’éco
conception applicables aux produits liés à l’énergie.
2015 / 863 / EU 2015 / 863 / EU
DICHIARAZIONE DI CONFORMITÀ
Questo dispositivo è conforme alla Direttiva sulla
Bassa Tensione 2014/35/EC, Direttiva
sulla Compatibilità Elettromagnetica 2014/30/EU,
Direttiva 2015/863/EU sulla restrizione dell’uso di
determinate sostanze pericolose nelle Apparecchi
elettrici ed elettronici e la Direttiva 2009/125/CE
relativa ai requisiti di progettazione ecocompatibile
applicabili ai prodotti connessi all’energia.
KONFORMITÄTSERKLÄRUNG
Dieses Gerät entspricht die 2014/35/EG
Niederspannungs Richtlinie, die 2014/30/EU
Elektromagnetische Verträglichkeit Richtlinie, die
2015/863/EU Richtlinie auf die Beschränkung der
Verwendung bestimmter gefährlicher Stoe in
Elektro- und Elektronikgeräten und die 2009/125/CE
Richtlinie auf die die Ökodesign-Anforderungen für
energieverbrauchsrelevante Produkte.
40

español english français portuguese deutsch italiano
Este símbolo signica que, si desea
deshacerse del producto, una vez transcurrida
la vida del mismo, debe depositarlo por los
medios adecuados a manos de un gestor
de residuos autorizado para la recogida
selectiva de Residuos de Aparatos Eléctricos
y Electrónicos (RAEE).
Este símbolo signica que se desejar
desfazer-se do produto depois de terminada
a sua vida útil, deve entregá-lo através dos
meios adequados ao cuidado de um gestor
de resíduos autorizado para a recolha
selectiva de Resíduos de Equipamentos
Eléctricos e Electrónicos (REEE).
Importado por:
Sanysan Appliances S.L, NIF: B98753056,
C/ Barcas 2, 2
46002 Valencia, España
Producto fabricado en P.R.C - Diseñado por
SOGO basada en las normas de calidad
europeas
Servicio postventa: www.sogosat.com
sogosat@sogosat.com / 0034 902 222 161
This symbol means that in case you wish to
dispose of the product once its working life
has ended, take it to an authorised waste
agent for the selective collection of waste
electrical and electronic equipment (WEEE).
Imported by:
Sanysan Appliances S.L, NIF: B98753056,
C/ Barcas 2, 2
46002 Valencia, Spain
Product made in P.R.C. – Designed by
SOGO based on the European Quality
Standards
Customer Service: www.sogosat.com /
sogosat@sogosat.com / 0034 902 222 161
Ce symbole signie que si vous souhaitez
vous défaire du produit, une fois que celuici
n’est plus utilisable, remettez-le, suivant
la méthode appropriée, à un gestionnaire
de déchets d’équipements électriques et
électroniques (DEEE).
Importado por:
Sanysan Appliances S.L, NIF: B98753056,
C/ Barcas 2, 2
46002 Valencia, Espanha
Produto fabricado na P.R.C - projetado pelo
SOGO com base nas normas de qualidade
europeias.
Serviço pós-venda: www.sogosat.com /
sogosat@sogosat.com / 0034 902 222 161
Questo simbolo indica che nel caso in qui si
desidera smaltire il prodotto una volta la sua
vita lavorativa è nite si dovrebbe prendere
ad un agente autorizzato di riuti per la
raccolta selettiva di apparecchi elettriche ed
elettroniche (WEEE).
Importato da:
Sanysan Appliances S.L, NIF: B98753056,
C/ Barcas 2, 2
46002 Valencia, Espanha
Prodotto fatto a P.R.C - Disegnato da SOGO
in base alla Norme di Qualità Europea
Servizio al cliente: www.sogosat.com /
sogosat@sogosat.com / 0034 902 222 161
Dieses Symbol bedeutet, dass für den Fall,
möchten Sie das Produkt entsorgen, sobald
seine Lebensdauer beendet ist, sollen
Sie sich an einen autorisierten Abfallmittel
wenden, für die Abfällen von Elektro- und
Elektronikgeräten selektive Sammlung
(WEEE).
Importé par:
Sanysan Appliances S.L, NIF: B98753056,
C/ Barcas 2, 2
46002 Valencia, Espagne
Produit fabriqué en P.R.C - Conçu par
SOGO sur la base des normes de qualité
européennes.
Service après-vente: www.sogosat.com /
sogosat@sogosat.com / 0034 902 222 161
Importiert durch:
Sanysan Appliances S.L, NIF: B98753056,
C/ Barcas 2, 2
46002 Valencia, Spain
Produkt gemacht in P.R.C. -Entworfen von
Sogo auf der Grundlage der europäischen
Qualitätsstandards
Kundendienst: www.sogosat.com /
sogosat@sogosat.com / 0034 902 222 161
41

ref. SS-21810
2015 / 863 / EU
 Loading...