


manual de instrucciones / instructions for use
mode d’emploi / manual de instruçoes
gebrauchsanweisung / manuale d’instruzioni
VENTILADOR DE PIE CON PANEL DE CONTROL TÁCTIL
STAND FAN WITH TOUCH CONTROL PANEL
VENTILATEUR SUR PIED AVEC PANNEAU DE COMMANDE TACTILE
VENTILADOR DE PÉ COM PAINEL DE CONTROLE DE TOQUE
STANDVENTILATOR MIT TOUCH-BEDIENFELD
VENTILATORE DA TERRA CON PANELLO DI CONTROLLO TOUCH
Precaución: lea y conserve estas importantes instrucciones
Caution: please read and preserve these important instructions
ref. SS-21250
2015 / 863 / EU

español english français portuguese deutsch italiano
IMPORTANTE:
• Lea siempre el libro de instrucciones
con atención antes de usarlo.
• Este manual se puede descargar desde
nuestra página web, www.sogo.es
• Conserve estas instrucciones para
futuras consultas.
INSTRUCCIONES DE SEGURIDAD PARA
EL USUARIO
• Este producto está diseñado para uso
doméstico en interiores, no industrial y no
comercial. No utilice el artículo al aire libre
ni para ningún otro propósito. El mal uso
o el manejo inadecuado pueden causar
problemas en el aparato y pueden causar
lesiones al usuario.
• Asegúrese de que el voltaje indicado en la
placa de identicación coincida con el voltaje
de la red antes de enchufar el aparato.
• No utilice ni almacene el aparato al aire libre.
• Siempre retire el enchufe de la toma de
corriente cuando el aparato no esté en uso.
No deje el aparato desatendido cuando esté
encendido.
• Antes de limpiar o guardar su
electrodoméstico, desenchufe siempre
el electrodoméstico de la fuente de
alimentación.
• Los aparatos no están diseñados para
funcionar mediante un temporizador externo o
un sistema de control remoto independiente.
2

español english français portuguese deutsch italiano
• No coloque ni opere este aparato cerca de
fuentes de agua.
• Nunca sumerja el aparato o el enchufe en
agua o cualquier otro líquido. En caso de que
el aparato se caiga al agua, desconéctelo
inmediatamente del suministro principal y
llévelo a un agente de servicio autorizado
para su reparación antes de volver a utilizarlo.
• No coloque ni utilice el aparato y su cable de
alimentación sobre o cerca de supercies
calientes (por ejemplo, placas de cocina) o
llamas abiertas.
• No deje el cable de alimentación colgando
de bordes alados y manténgalo alejado de
objetos calientes y llamas. No enrolle el cable
alrededor del aparato y no lo doble.
• No utilice el aparato si el cable o el enchufe
están dañados. En caso de que el cable se
dañe, debe ser reemplazado únicamente
por el fabricante, su agente de servicio o
personas similarmente cualicadas, para
evitar peligros.
• En caso de mal funcionamiento del
electrodoméstico, o si se ha dañado de
alguna manera, devuelva el electrodoméstico
al centro de servicio autorizado más cercano
para su examen, reparación o ajuste.
• En caso de problemas de hardware, no
intente reparar el producto usted mismo. Las
reparaciones solo deben ser realizadas por
técnicos cualicados.
• Nunca use accesorios que no sean
recomendados por el fabricante.
• El uso de accesorios no recomendados
3

español english français portuguese deutsch italiano
o vendidos por el fabricante del
electrodoméstico puede provocar incendios,
descargas eléctricas o lesiones a las
personas.
• Coloque siempre el aparato sobre una
supercie plana y uniforme.
• No utilice el aparato para ningún otro
propósito que no sea el descrito en este
manual.
• No deje que el aparato funcione sin
supervisión.
• Cuando desee quitar el enchufe del contacto
de pared, hágalo en el enchufe mismo y no
tirando del cable o del aparato en sí.
• Asegúrese de que sus manos estén secas
antes de enchufar o desenchufar.
• Este aparato no debe ser utilizado por
personas (incluidos niños) con capacidades
físicas, sensoriales o mentales reducidas,
o con falta de experiencia y conocimiento,
a menos que hayan recibido supervisión o
instrucción.
• Los niños deben ser supervisados para
asegurarse de que no jueguen con el aparato.
• Los niños no deben realizar la limpieza y el
mantenimiento del usuario.
• Mantenga el aparato y su cable fuera del
alcance de los niños.
• Los niños no deben jugar con el aparato.
• Este aparato puede ser utilizado por niños a
partir de 8 años y personas con capacidades
físicas, sensoriales o mentales reducidas o
con falta de experiencia y conocimiento, si
han recibido supervisión o instrucción sobre
4

español english français portuguese deutsch italiano
el uso del aparato de forma segura y ellos
comprenden los peligros involucrados.
Instrucciones a seguir a la hora de usar
el aparato
• No cubra la rejilla.
• Si el ventilador va a almacenarse para
un periodo largo de tiempo o no se usará
regularmente, utilice el embalaje original (o
similar) y guárdelo en un lugar seco y limpio.
Antes de utilizar de nuevo, comprobar si la
unidad está limpia y seca, si las aspas del
ventilador giran libremente.
• Siempre desconecte el aparato de la red
si se deja desatendido y antes de montar,
desmontar o limpiar.
• Asegúrese de que el ventilador esté apagado
y que se haya quitado el enchufe del
tomacorriente de la pared antes de quitar la
rejilla de protección para nes de limpieza o
almacenamiento.
• Se proporciona un cable de alimentación
corto con este producto. No se recomienda
usar un cable de extensión con este producto,
pero si debe usarse uno:
- La clasicación eléctrica marcada del cable
debe ser al menos tan buena como la del
producto.
- Disponga el cable de extensión de modo que
no cuelgue donde pueda tropezar o tirar de él
sin querer.
5

español english français portuguese deutsch italiano
• Los niños menores de 8 años solo deben encender / apagar el aparato, siempre que se haya colocado o instalado en su posición de funcionamiento
normal prevista, y se les haya supervisado o instruido sobre el uso del aparato de forma segura, y
ellos comprenden los peligros involucrados.
•
Asegúrese de que el ventilador no encuentre ninguna obstrucción al oscilar.
•
No ponga los dedos ni ningún otro objeto en la
carcasa frontal del ventilador en ningún momento.
Preste especial atención cuando utilice el ventilador cerca de los niños, para evitar que los niños
jueguen con el ventilador.
•
No permita que el cabello, las cortinas de red, los
manteles, la ropa o las cortinas estén cerca de la
entrada o salida del ventilador. Podrían ser absorbidos por el ventilador y causar daños o lesiones.
•
No utilice este ventilador con ningún control de
velocidad de semiconductores.
•
No opere el ventilador en un área donde se usa
o almacena gasolina, pintura u otros líquidos
inamables.
•
Una vez que el ventilador está montado, está prohibido desmontar la carcasa durante la limpieza.
•
Si la unidad requiere limpieza externa, asegúrese
de que esté desenchufada de la fuente de alimentación. Utilice un paño suave o un paño seco para
una limpieza general. Para eliminar la suciedad
más persistente, utilice un paño humedecido con
jabón. No utilice disolventes (como diluyentes), ya
que pueden dañar la carcasa de plástico.
6

español english français portuguese deutsch italiano
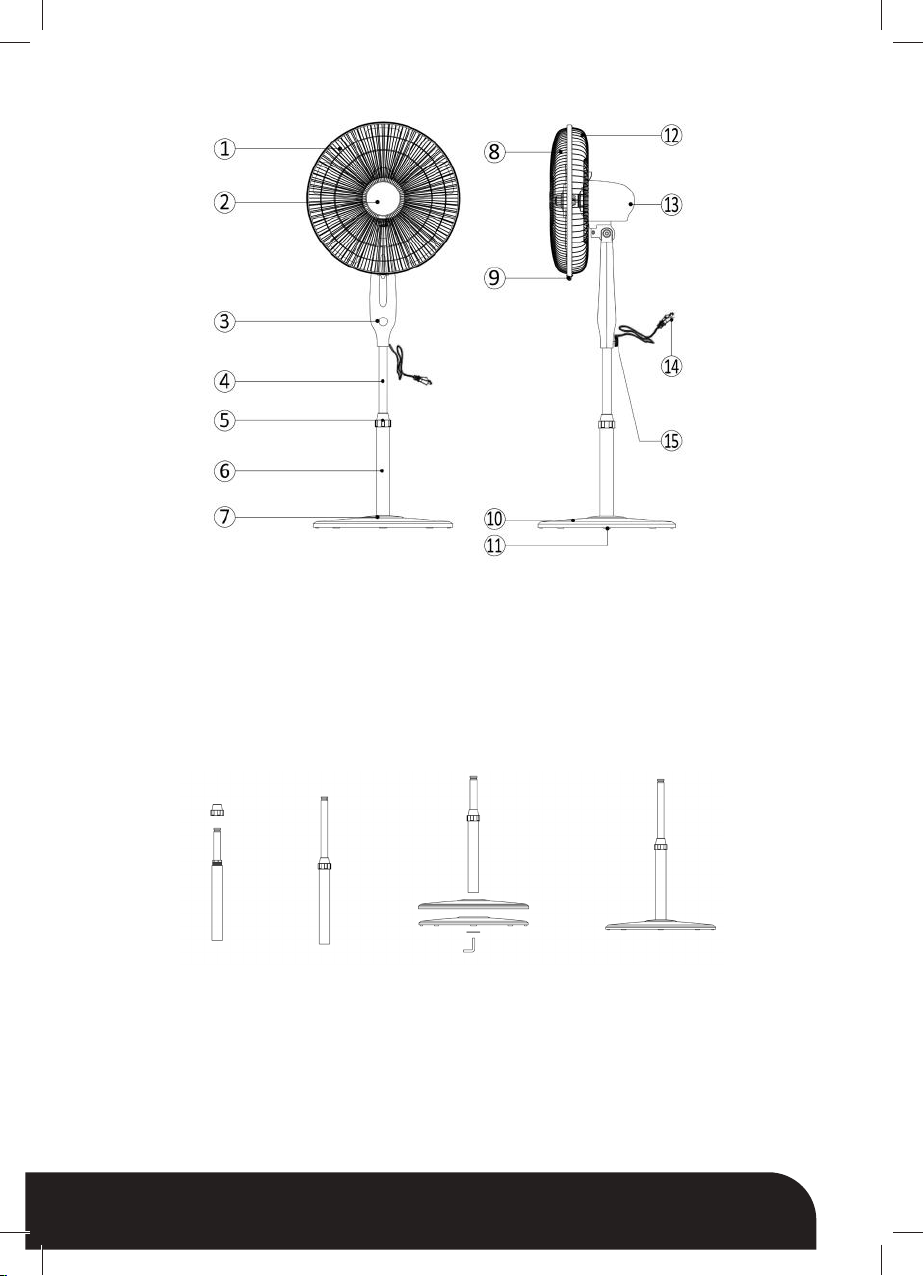
DESCRIPCIÓN
1. Aspa
2. Rejilla delantera
3. Panel de control táctil
4. Columna de extensión
5. Anillo de ajuste de altura
6. Columna inferior
7. Tapa decorativa de la base
8. Rejilla delantera
9. Tornillo de anillo
10. Base
11. Peso de la base
12. Rejilla trasera
13. Motor
14. Cable de alimentación
15. Tornillo de conexión del ventilador
MONTAJE DEL VENTILADOR
Montaje de la columna de extensión con la base del ventilador:
Para ensamblar la columna de extensión con la base, coloque la base (pieza n.°10) y fíjela al peso
de la base (n.°11), apriete desde abajo, con la perilla en forma de L que se entrega con la unidad.
Luego tome la columna de extensión (ya montada con las partes 4, 5 y 6), la parte 6 es la columna
inferior que se ja a la base y la parte 4 es la columna de extensión. Con la ayuda del tubo de
extensión, puede mejorar la altura del ventilador según sus necesidades. Y el anillo de ajuste de
altura de la parte 5 ayuda a conectar la columna de extensión y la columna inferior, y las mantiene
intactas y ajustadas.
7

español english français portuguese deutsch italiano
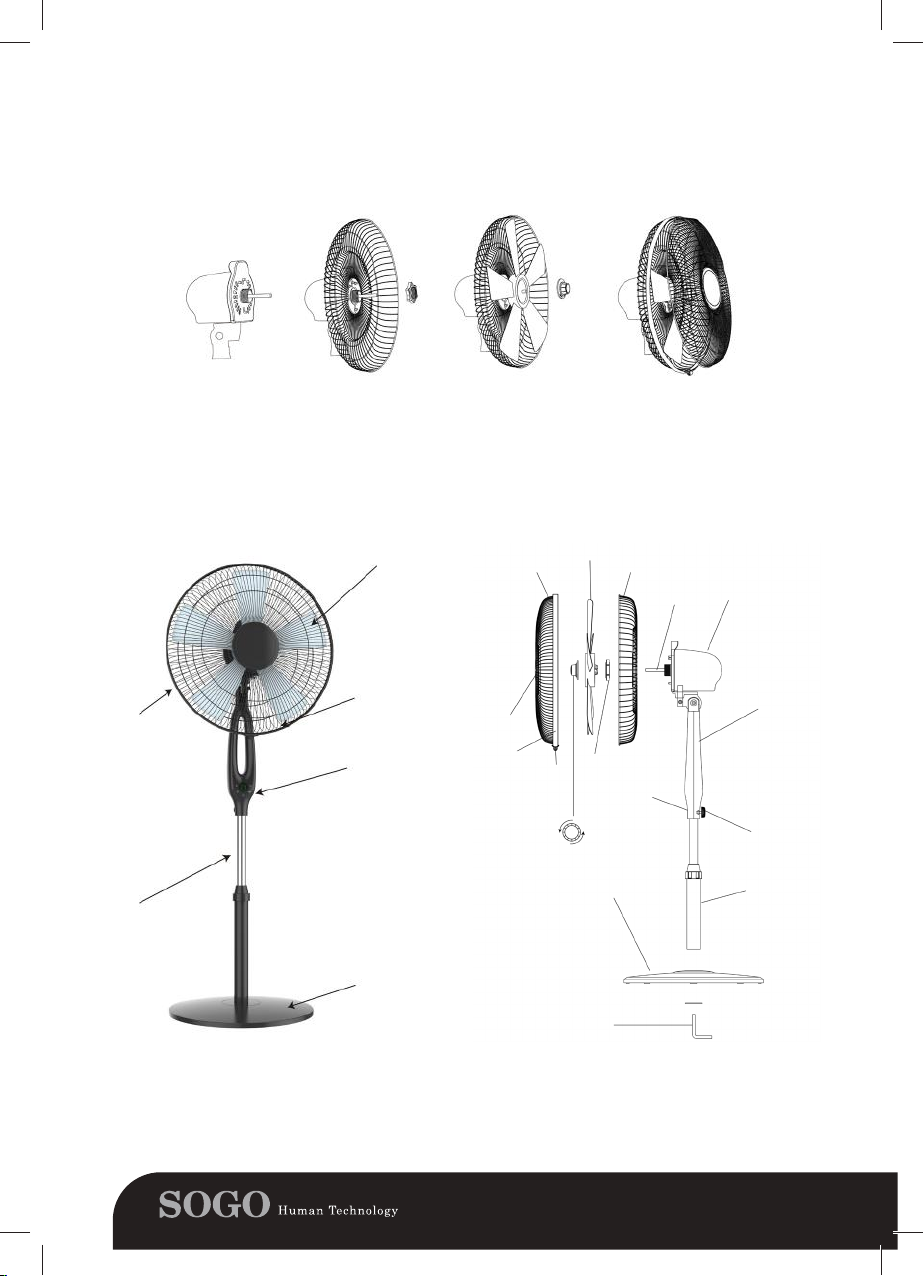
ENSAMBLAJE DE LA REJILLA Y ASPA AL MOTOR
Monte la rejilla trasera (pieza 12) en el motor y apriete con la tuerca de plástico apretando en el
sentido de las agujas del reloj. Monte la aspa (Parte 1) y apriete con la rueda giratoria de plástico
para mantener la aspa en su lugar. Instale la rejilla delantera en la rejilla trasera con la ayuda del
anillo de plástico y apriete con el tornillo.
Montaje del motor a la columna de extensión
Mejore la altura deseada del ventilador con la ayuda de la columna de extensión. Inserte la parte
inferior del motor (ya ensamblada con aspa y rejillas) en el tubo de extensión y apriete con el tornillo
de conexión del ventilador.
Rejilla trasera
Aspa
Tuerca de
plástico
Clip
Botón giratorio
Base redonda
Panel de
control
Aojar
Eje
Motor
Caja
ventilador
Botón de
jación
Tubo
Borde de
protección
Tubo de extensión
Aspa de ventilador
Protección
del ventilador
Panel de control
Pieza
central
Anillo de
seguridad
Rejilla
delantera
Apretar
Placa inferior
8
Tornillo L
español english français portuguese deutsch italiano
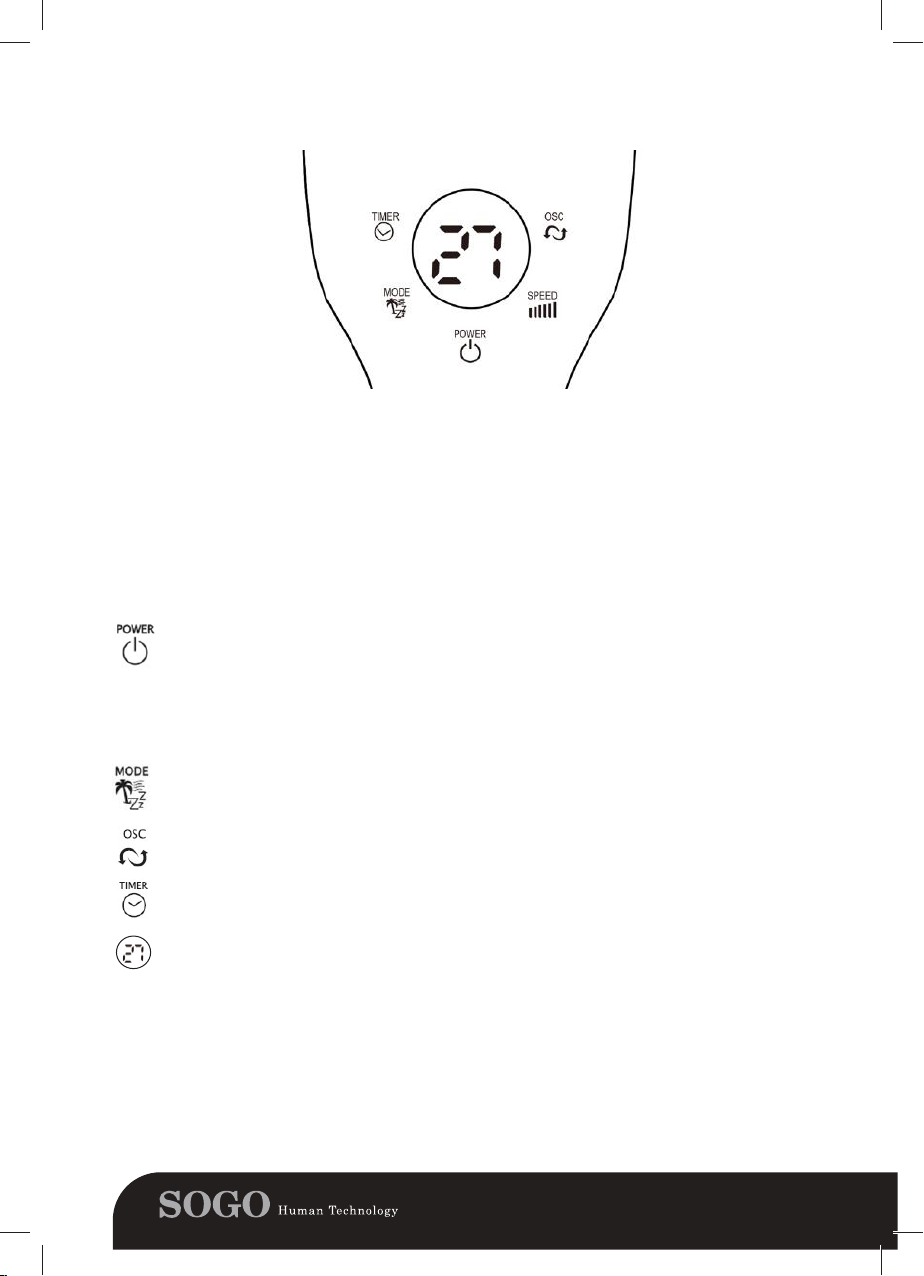
PANTALLA DE VENTILADOR DIGITAL
Frente de la pantalla / panel suave de la cubierta superior (Figura 1)
Panel de control táctil
Este ventilador puede ser operado por el panel de control táctil, ubicado en la parte frontal del ventilador (como se muestra en la Figura 1) o por su control remoto.
1. Coloque el ventilador sobre una supercie estable y plana. Enchufe el cable de alimentación en una toma de corriente CA 220-240V. Asegúrese de que el voltaje de la toma de
corriente de la pared del ventilador sea el mismo que el voltaje del ventilador. La pantalla
LED se iluminará y mostrará la temperatura ambiente actual.
2. ENCENDIDO: Con la ayuda de la tecla de encendido puede encender y apagar el ventilador, presione el mismo botón. Al encender el ventilador, se inicia automáticamente a la
velocidad preestablecida, que es baja en el modo de ventilador normal.
3. VELOCIDAD: El botón de velocidad le ayuda a ajustar la velocidad. Para cambiar la velocidad, puede seguir presionando hasta obtener la velocidad deseada. Esta velocidad del
ventilador se puede ajustar hasta 6 niveles con 6 velocidades que aumentan gradualmente. Una vez que establezca el nivel de velocidad, será visible en el panel del ventilador.
4. MODO: Presione el botón para congurar el ventilador en Normal (mostrado por “1”),
Natural (NA) o modo de suspensión (SL). El modo también se mostrará en la pantalla
LED.
5. OSC: Para poner el ventilador en modo de oscilación, presione el botón “OSC” y el ventilador comenzará a oscilar. Para detener la oscilación, presione el botón nuevamente.
6. TEMPORIZADOR: Presione el botón para congurar el tiempo de apagado deseado,
hay 12 intervalos de tiempo. Puede congurar el temporizador de 1 hora a 12 horas
(máx.).
7. TEMPERATURA AMBIENTE: La pantalla digital del ventilador siempre muestra la tempe-
ratura ambiente como función predeterminada. Cuando cambia la conguración de velocidad o la conguración de modo, comienza a mostrar la conguración de velocidad actual
y la conguración de modo, pero en pocos segundos, se desaparece automáticamente y
vuelve a mostrar la temperatura.
Nota: Modo de ahorro de energía: cuando el modo de “suspensión” o el temporizador están activados, la pantalla principal se apagará después de 30 segundos y puede presionar cualquier tecla
para volver a encender la pantalla.
9

español english français portuguese deutsch italiano
Control remoto
1. Este ventilador también está provisto de un control remoto. Puede utilizar el menú del control
remoto así como el panel de pantalla táctil frontal del ventilador. El control remoto del ventilador
tiene los mismos botones que el panel de pantalla táctil del ventilador.
2. Para obtener la descripción completa del menú de botones del control remoto, lea detenidamente
la descripción del panel de control táctil.
Inclinar
Puede inclinar el cabezal del ventilador para que la brisa se oriente en ángulo. Fije la carcasa del
motor del ventilador con una mano y sujete el ventilador con la otra. Incline con cuidado la cabeza
del ventilador hasta que alcance el ángulo deseado. El cabezal del ventilador se mantendrá en esa
posición. Tenga cuidado de no inclinar la cabeza hacia atrás más de lo previsto, ya que dañaría la
unidad.
Ajuste de altura
Para ajustar la altura del ventilador, agarre la columna de extensión y aoje la contratuerca de ajuste
de altura (5). Mueva la columna de extensión hacia arriba o hacia abajo, y una vez que obtenga la
altura deseada, vuelva a apretar con la ayuda de la contratuerca de ajuste de altura.
LIMPIEZA Y MANTENIMIENTO:
ADVERTENCIA: SIEMPRE DESCONECTE LA UNIDAD ANTES DE MOVER O REALIZAR EL
MANTENIMIENTO. ¡NO SUMERJA EL CABLE DE ALIMENTACIÓN, EL ENCHUFE Y LA UNIDAD
EN AGUA NI ENJUAGUE BAJO EL GRIFO!
Precaución: No use detergente, gasolina, benceno, diluyente u otros solventes para limpiar la
unidad, para evitar daños al aparato.
- Desenchufe la unidad y espere hasta que el ventilador deje de funcionar antes de limpiar.
- Utilice un paño húmedo para limpiar la supercie del ventilador.
- Use la aspiradora para quitar el polvo dentro del ventilador, también puede usar un cepillo suave.
NO use un paño húmedo para limpiar las partes internas del ventilador.
- Se recomienda limpiar el ventilador todos los meses.
- Si el ventilador no se va a utilizar durante mucho tiempo, guárdelo en un lugar fresco, seco, seguro y lejos de los niños. No guarde el aparato en un lugar caliente o bajo el sol.
- Si la unidad requiere limpieza externa, asegúrese de que esté desenchufada de la fuente de
alimentación. Utilice un paño suave o un paño seco para la limpieza general. Para eliminar la
suciedad más persistente, utilice un paño humedecido con jabón. No utilice disolventes (como
diluyentes), ya que pueden dañar las piezas de plástico del ventilador.
ESPECIFICACIONES TÉCNICAS
N ° de modelo Voltaje Potencia Frecuencia
SS-21250
10
220-240V
45W 50Hz

español english français portuguese deutsch italiano
IMPORTANT
• Always read the instruction book
carefully before using.
• This manual can be downloaded from our
web page www.sogo.es
• Keep these instructions for future reference.
SAFETY INSTRUCTIONS FOR THE USER
• This product is intended for indoor, non-
industrial, non-commercial; household use
only household wae maker. Do not use
the item outdoors or for any other purpose.
Misuse or improper handling may cause
problems in the appliance and cause injury
to the user.
• Ensure that the voltage indicated on the
nameplate matches the mains voltage
before plugging in the appliance.
• Do not use or store the appliance outdoors.
• Always remove the plug from the power
socket when the appliance is not in use. Do
not leave the appliance unattended when
switched on.
• Before cleaning or storing your appliance,
always unplug the appliance from the power
supply.
• The appliances are not intended to be
operated by means of an external timer or
separate remote-control system.
• Do not place or operate this appliance near
water sources.
• Never immerse the appliance or the plug-
11

español english français portuguese deutsch italiano
in water or any other liquid. In the event of
the appliance falling in water, disconnect
immediately from the mains supply and take
it to an authorized service agent for repair
before reusing.
• Do not place or operate the appliance and
its power cord on or near hot surfaces (e.g.,
stove plates) or open ames.
• Do not leave the power cord hanging from
sharp edges and keep away from hot
objects and ames. Do not wind the cord
around the appliance and do not bend it.
• Do not use the appliance if the cable or
plug is damaged. In case of the cord be
damaged, it must be replaced only by the
manufacturer, its service agent or similarly
qualied persons in order to avoid Hazard.
• In case of appliance malfunction, or if it has
been damaged in any manner, return the
appliance to the nearest authorized service
facility for examination, repair or adjustment.
• In case of hardware problems, do not
attempt to repair the product yourself.
Repairs should only be carried out by
qualied technicians.
• Never use accessories that are not
recommended by the manufacturer.
• The use of accessories not recommended
or sold by the appliance manufacturer
may result in re, electric shock or injury to
persons.
• Always place the appliance on to the at
and even surface.
• Do not use the appliance for any other
12

español english français portuguese deutsch italiano
purpose than described in this manual.
• Do not let the appliance operate
unattended.
• When you want to remove the plug from
the wall contact, please do this at the plug
itself and not by pulling on the cable or the
appliance itself.
• Make sure your hands are dry before plug
or unplugging.
• the appliance is not to be used by persons
(including children) with reduced physical,
sensory or mental capabilities, or lack of
experience and knowledge, unless they
have been given supervision or instruction.
• Children should be supervised to ensure
that they do not play with the appliance.
• Cleaning and user maintenance shall not be
made by children without supervision.
• Keep the appliance and its cord out of the
reach of the children.
• This appliance can be used by children
aged from 8 years and above and
persons with reduced physical, sensory or
mental capabilities or lack of experience
and knowledge if they have been given
supervision or instruction concerning use of
the appliance in a safe way and understand
the hazards involved.
13

español english français portuguese deutsch italiano
Things to remember while using the
appliance
• Do not cover the grille.
• If the fan is to be stored for an extended
period of time or not used regularly, replace
it in the original packaging (or similar) and
store it in a dry and clean place. Before
using again, check if the unit is clean and
dry if the fan blades rotates freely.
• Always disconnect the appliance from the
supply if it is left unattended and before
assembling, disassembling or cleaning.
• Ensure that the fan is switched o and plug
has been removed from the wall outlet
before removing the protective grille for
cleaning or storage purpose.
• A short power supply cord is provided
with this product. An extension cord is not
recommended for use with this product, but
if one must be used:
- The marked electrical rating of the cord
must be at least as great as that of the
product.
- Arrange the extension cord so that it does
not hang where it can be tripped over or
pulled unintentionally.
14

español english français portuguese deutsch italiano
• Children aged less than 8 years shall only switch
on/o the appliance provided that it has been
placed or installed in its intended normal operating position and they have been given supervision or instruction concerning use of the appliance in a safe way and understand the hazards
involved.
• Please make sure that the fan will not meet any
obstruction when oscillating.
• Do not put your ngers or any other object into
the front case of the fan at any times. Please
pay special attention when using the fan near
children, to avoid children play with fan.
• Do not let hair, net curtains, tablecloth, clothes or
curtains be next to the inlet or outlet of the fan.
They could be sucked into the fan, causing damage or injuries.
• Do not use this fan with any semi-conductors
speed control.
• Do not operate the fan in an area where gaso-
line is used or stocked, painting or such ammable liquids.
• Once the fan is assembled, it is forbidden to di-
sassemble the housing when cleaning.
• If the unit requires external cleaning, make sure
it is unplugged from the power supply. Use a soft
tissue or dry cloth for general cleaning. To remove more persistent dirt or grime with a warm
soapy dampened cloth. Do not use any solvents
(such as thinners), and these may damage the
plastic casing.
15
español english français portuguese deutsch italiano
DESCRIPTION:
1. Blade
2. Front grill
3. Touch control panel
4. Extension column
5. High adjustment ring
6. Lower column
7. Base decorative cap
8. Front gill
9. Ring screw
10. Base
11. Bae weight
12. Rear grill
13. Motor
14. Power cord
15. Fan connecting screw
FAN ASSEMBLING
Extension column assembling with the fan base:
In order to assemble the extension column with the base, place the base (part no.10) and x with the
base weight (no.11), tighten up from the bottom with the L shape knob given with the unit. now take
the extension column (already mounted with part 4, 5, and 6), part 6 is lower column which xed to
the base and part 4 is extension column, with the help of extension tube you can enhance the height
of the fan as per need and part 5 height adjustment rings helps to connect the extension column and
lower column and keep them intact and tighten.
16
español english français portuguese deutsch italiano
GRILLE & BLADE ASSEMBLY TO MOTOR
Mount the rear grill (part 12) on to the Motor and tighten up with plastic nut by tightening in clockwise
direction. Mount blade (Part 1) and tighten up with plastic spinner to hold the blade in its place. Install
the front grill on to the rear grill with the help of plastic ring and tighten up with the screw.
Motor assembly to the extension column
Enhance the desired height of the fan with the help of extension column, insert the motor bottom
(already assembled with blade and grills)part in to the extension tube and tighten up with fan
connecting screw.
Rear guard
Fan blade
Front
Guard
Blade
Shaft
Motor
Guard Rim
Extension tube
Fan Guard
Control panel
Bottom plate
Center
piece
Circlip
Tighten
Clip
Spinner
Plastic Nut
Control Part
Loosen
Round base
Knob
Fan Box
Fastening
Knob
Tube
17

español english français portuguese deutsch italiano
DIGITAL FAN DISPLAY
Front of display / soft panel of top cover (Figure 1)
Touch control panel
This Fan can be operated by the touch control panel located on front of the fan (as shown in Figure
1) or by your remote control.
1. Place the Fan on a stable and at surface. Plug the Power Cord into an AC 220-240V
electrical outlet. Make sure that fan wall outlet voltage is same as fan voltage. The LED
screen will illuminate and display the current room temperature.
2. POWER: With the help of power key, you can turn the fan on and to turn o, press the
same button. By turning on the fan it start automatically on to the preset speed which is
low in normal fan mode.
3. SPEED: The speed button helps you to adjust the speed, in order to change the speed,
you can keep pressing until you get the desired speed This fan speed can be adjusted till
6 levels with gradually increasing 6 speeds. Once you set the speed level, is will be visible
on to the fan panel.
4. MODE: Press the button to set the Fan as Normal (Displayed by “1”), Natural (NA), or
Sleep mode (SL). The mode will also display on the LED screen.
5. OSC: To turn the fan on in oscillation mode, press the “OSC” button and fan starts oscillating. To stop the oscillation, press the button again.
6. TIMER: Pressing the button to set desired power o time, there are 12time intervals. You
can set the timer from 1-hour to 12-hours (Max).
7. AMBIENCE TEMPERATURE: The digital display of the fan always shows the ambience
temperature as a default function. When you change the speed settings or mode settings,
then it starts showing the current speed settings and mode settings, but within few seconds it disappears automatically and once again it shows the temperature.
Note: Power save mode: when the “sleep” mode or the timer is on, the main display will be o after
30 seconds, and you can press any keys to turn on the display again.
18

español english français portuguese deutsch italiano
Remote Control
1. This fan has provided with a remote control as well. You can use the remote control menu as well
fan’s front touch screen panel. The fan’s remote control have the same buttons as fan’s touch
screen panel.
2. To get the complete description of remote control button menu read thoroughly touch control panel
description.
Tilt
You can tilt the fan head so that the breeze is targeted at an angle, steady the motor
housing of the fan with one hand and grip the fan with another, carefully tilt the head of the fan until
it reaches the desired angle. The fan head will be hold in that position. Be careful as to not to tilt the
head back further than it is intended to go, doing so it will damage the unit.
Height Adjustment
To adjust the fan height, grip the extension column and loosen the height adjustment locking nut
(5). Move upwards or downwards the extension column and once get the desired height, tighten up
again with the help of height adjustment locking nut.
CLEANING AND MAINTENANCE:
WARNING: ALWAYS UNPLUG THE UNIT BEFORE MOVING OR MAINTENANCE. DO NOT IMMERSE THE POWER CORD, PLUG AND THE UNIT INTO WATER OR RINSE UNDER THE TAP !
Caution: Do not use detergent, gasoline, benzene, thinner, or other solvents to clean the unit to
avoid damage of the appliance.
- Unplug the unit and wait until the fan stop running before cleaning.
- Use a damp cloth to clean the surface of the fan.
- Use the vacuum cleaner to remove the dust inside the fan, you can use a soft brush as well. DO
NOT use damp cloth to clean the inside parts of the fan.
- It is recommended to clean the fan every month.
- If the fan will not be used for a long time, store it in the cool, dry, safety place and far away from
children. Do not store the appliance in hot place and under sunshine.
- If the unit requires external cleaning, make sure it is unplugged from the power supply. Use a soft
tissue or dry cloth for general cleaning. To remove more persistent dirt or grime with a warm soapy
dampened cloth. Do not use any solvents (such as thinners) as these may damage the plastic
parts of the fan.
TECHNICAL SPECIFICATIONS
Model No.
SS-21250
220-240V
Voltage Power Frequency
45W 50Hz
19

español english français portuguese deutsch italiano
IMPORTANT:
• Lisez toujours attentivement le manuel
d’instructions avant de l’utiliser.
• Ce manuel peut être téléchargé à partir de
notre page Web, www.sogo.es
• Conservez ces instructions pour référence
future.
CONSIGNES DE SÉCURITÉ POUR
L’UTILISATEUR
• Ce produit est destiné à un usage domestique
intérieur uniquement, non industriel, non
commercial. N’utilisez pas l’article à l’extérieur
ou à toute autre n. Une mauvaise utilisation
ou une mauvaise manipulation peut causer
des problèmes dans l’appareil et peut causer
des blessures à l’utilisateur.
• Assurez-vous que la tension indiquée sur la
plaque signalétique correspond à la tension du
secteur avant de brancher l’appareil.
• N’utilisez pas et ne stockez pas l’appareil à
l’extérieur.
• Retirez toujours la che de la prise de courant
lorsque l’appareil n’est pas utilisé. Ne laissez pas
l’appareil sans surveillance lorsqu’il est allumé.
• Avant de nettoyer ou de ranger votre
appareil, débranchez toujours l’appareil de
l’alimentation électrique.
• Les appareils ne sont pas destinés à être
actionnés au moyen d’une minuterie externe
ou d’un système de télécommande séparé.
• Ne placez pas et n’utilisez pas cet appareil à
proximité de sources d’eau.
20
 Loading...