

Precaución: lea y conserve estas importantes instrucciones
manual de instrucciones / instructions for use
mode d’emploi / manual de instruçoes
Batidora licuadora de 2 Velocidades
2 speed Table Blender
2 vitesses Mixeur et Blender
Blender liquicador 2 velocidade
BQS
Best Quality SOGO
Mejor Calidad SOGO
manual de instrucciones / instructions for use
mode d’emploi / manual de instruçoes
gebrauchsanweisung / manuale d’instruzioni
Batidora Licuadora de 2 Velocidades
2 Speed Table Blender
2 Vitesses Mixeur et Blender
Blender liquicador 2 velocidade
Mischer Blender 2 Drehzahl
Frullatore Tavolo A 2 Velocità
manual de instrucciones / instructions for use
manual de instrucciones / instructions for use
mode d’emploi / manual de instruçoes
mode d’emploi / manual de instruçoes
gebrauchsanweisung / manuale d’instruzioni
BQS
BQS
Best Quality SOGO
Best Quality SOGO
Mejor Calidad SOGO
Mejor Calidad SOGO
Climatizador de aire portátil
Raffreddatore d’aria portatile
Caution: please read and preserve these important instructions
ref. SS-10525
ref. SS-5045
ref. SS-21065
Portable air cooler
Rafraîchisseur d’air
Refrigerador do ar portátil
Tragbarer Luftkühler

español english français portuguese deutsch italiano
Estimado cliente: lea detenidamente estas instrucciones
antes del uso para evitar daños debidos a un uso incorrecto
y para comprender mejor las funciones de este producto.
Preste especial atención a la guía de seguridad.
Si pasa el dispositivo a un tercero, estas instrucciones de
funcionamiento también se deben entregar.
Por favor, guárdelas para futuras referencias.
Una copia de este manual de instrucciones en varios idiomas
está disponible en nuestro sitio web: www.sogo.es.
INSTRUCCIONES DE SEGURIDAD PARA EL
USUARIO IMPORTANTES :
1. Úselo según la tensión nominal del producto.
2. No repare o remonte el aparato usted mismo, debe
ser reparado por un técnico cualicado.
3. No utilice el aparato con las manos mojadas para
evitar el riesgo de electrocución.
4. Si el cable de alimentación está dañado, debe ser
reemplazado por el fabricante, su agente de servicio
o personas similarmente cualicadas, para evitar
daños o peligros.
5. Cuando el electrodoméstico no esté en uso, apáguelo
y desconéctelo.
6. No inserte objetos extraños en las salidas y entradas
de aire, para evitar daños.
7. No use el aparato cerca de gases explosivos y
combustibles. Evite la radiación solar directa a largo
plazo.
8. Use el aparato solo sobre una supercie plana.
9. No lo use al aire libre.
10. El nivel del tanque de agua no debe superar la marca
“MAX” en ningún momento, cuando se humidica, el
2
español english français portuguese deutsch italiano
nivel total del tanque de agua no debe ser inferior a
la marca “MIN”.
11. Después de agregar agua al tanque de agua, no lo
incline ni golpee cuando lo ponga o mueva. Si desea
moverlo, presione lentamente desde un lado, para
evitar derramarlo.
12. No incline el aparato. Si se vuelca y hay agua en
el cuerpo, debe desconectar primero la fuente de
alimentación. Luego, envíelo al departamento de
reparaciones o al servicio postventa y revise el
electrodoméstico.
13. No cubra el oricio de ventilación.
14. Limpie el aparato con un paño ligeramente
humedecido. No use ningún tipo de detergente o
solución. No enjuague el aparato.
15. No coloque las tomas de aire y entradas cerca de la
pared o una cortina.
16. No golpee ni sacuda el cuerpo cuando lo utilice, de
lo contrario, puede detenerse automáticamente.
17. El agua en el tanque se metamorfosea fácilmente y
emite olor en verano; renueve el agua con frecuencia.
18. Este aparato no debe ser utilizado por personas
(incluidos niños) con capacidades físicas, sensoriales
o mentales reducidas, o con falta de experiencia
y conocimiento, a menos que se les haya dado
supervisión o instrucciones sobre el uso del aparato
por una persona responsable de su seguridad.
19. Los niños deben ser supervisados para asegurarse
de que no jueguen con el aparato.
20. Para evitar el riesgo causado por la inestabilidad
de la unidad, debe jar las ruedas rmemente, de
acuerdo con el manual.
3

español english français portuguese deutsch italiano
21. Si fuera necesario mover la unidad después de
agregar el agua, gírela suavemente a la posición
requerida y active el soporte de las ruedas.
22. El cable de alimentación tiene una conexión tipo “Y”
y debe ser sustituido por técnicos profesionales si
fuera necesario.
23. Este aparato puede ser utilizado por niños mayores
de 8 años si se les ha supervisado o instruido
sobre el uso del artefacto de una manera segura y
comprenden los peligros involucrados. Los niños
no deben jugar con el aparato. Los niños no deben
realizar tareas de limpieza y mantenimiento a menos
que sean mayores de 8 años y sean supervisados.
24. Mantenga el aparato y su cable fuera del alcance de
los niños menores de 8 años.
25. No utilice este aparato con un programador,
contador u otro dispositivo que pueda encenderlo
automáticamente, ya que si el electrodoméstico
está cubierto o tiene una ubicación incorrecta, existe
peligro de incendio.
4
español english français portuguese deutsch italiano
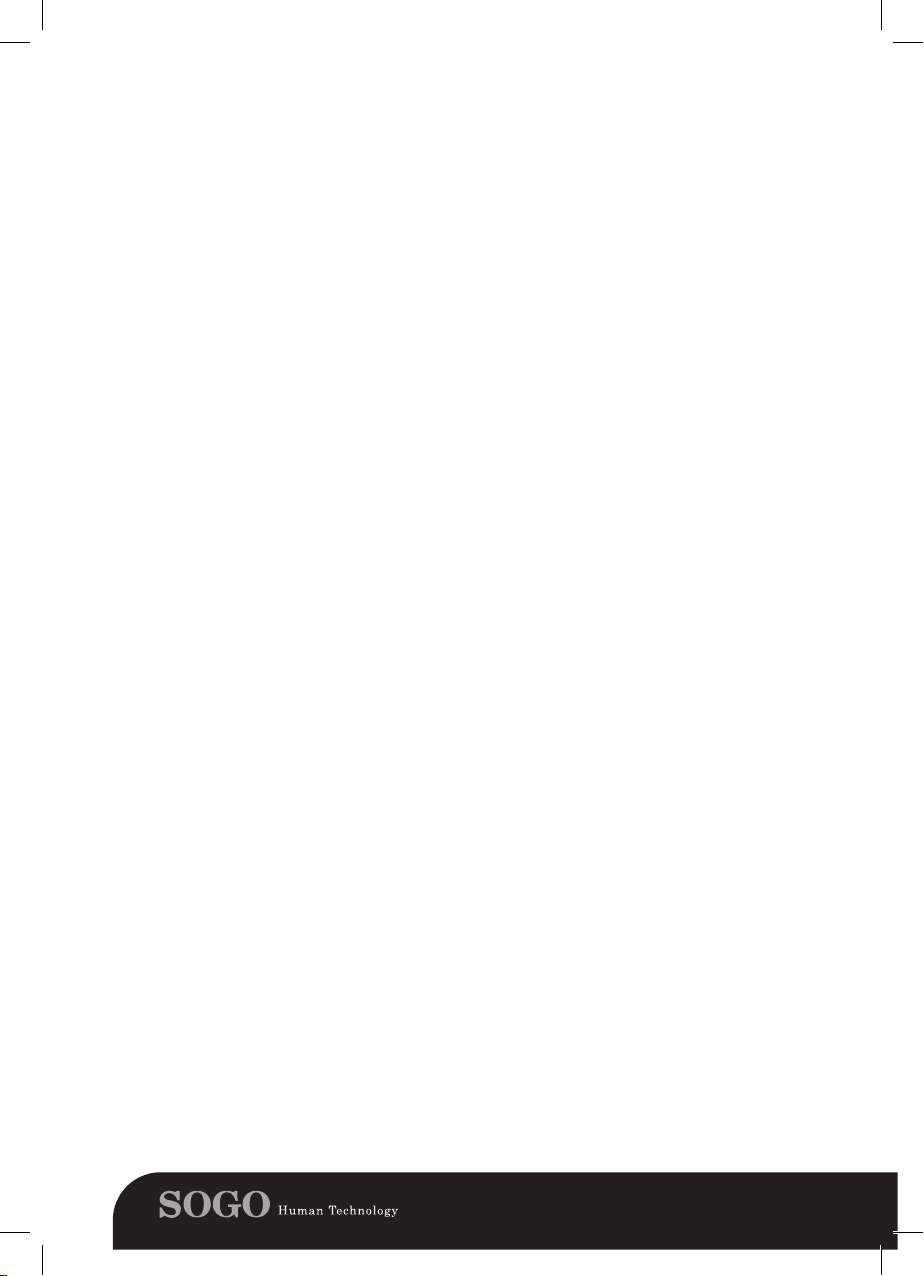
Ensamblaje de ruedas:
Cómo llenar el agua en el tanque de agua
Coloque el aparato sobre una supercie plana,
saque la llave de la caja de espuma y luego
monte las ruedas.
Atención: las ruedas traseras van con freno,
pero las delanteras van sin freno. (mapa 1)
Panel de control de funciones
1. Boton “ON / OFF” (encendido / apagado)
• Presione el botón para iniciar la unidad,
aparecerá el indicador “LOW” en el panel de
control y el enfriador de aire comenzará a
funcionar a baja velocidad.
• Presione el botón nuevamente para apagar la
unidad.
2. Botón “SPEED” (velocidad)
• Hay tres conguraciones de velocidad: baja,
media y alta. Cuando la unidad está encendida,
comienza a baja velocidad. Presione el botón
de velocidad para seleccionar la velocidad
requerida. Según la selección, el indicador de
Bajo, Medio o Alto aparecerá en el panel de
control.
3. Botón “WIND” (viento)
• Tiene dos conguraciones Sleep y Nature.
Si esta función está activada, el ujo de aire
cambiará continuamente. Si esta función está
desactivada, el ujo de aire será continuo en
función de la velocidad seleccionada.
4. Botón “TIMER” (minutero)
• El temporizador de apagado se puede
programar usando este botón desde 0,5 h
hasta 7,5 h. Al presionar el botón, el minutero
aumentará cada vez en 0,5 horas. En el panel
de control, los dígitos aparecerán para indicar
si el temporizador está activado.
5. Botón “SWING” (oscilación)
• Presione el botón, aparecerá el indicador
“SWING” en el panel de control y las barras
verticales comenzarán a moverse para hacer
circular el aire.
6. Botón “COOLER” (enfriador)
• Presione el botón cuando el enfriador de
aire esté funcionando, el indicador “COOL”
aparecerá en el panel de control.
Saque el tanque de agua de la parte inferior de
la parte posterior después de abrir la cerradura.
Llene el tanque con 1/3 de agua.
• Tenga en cuenta la visualización del nivel del
agua mientras se vierte el agua.
• El nivel de agua del tanque de agua debe ser
menor que “máximo” y mayor que “mínimo”
cuando la función de enfriamiento deba
activarse.
• Las cajas de hielo congelado (o hielo) pueden
insertarse en el tanque de agua para enfriar
aún más el aire.
Advertencia:
El nivel de agua del tanque de agua debe ser
inferior a “MAX” después de que se inserten
las cajas de hielo (o hielo) en el tanque de
agua.
con freno/sin freno
Cómo usar las cajas de hielo
Las cajas de hielo se pueden llenar con agua y
guardar en el refrigerador. Una vez que el agua
dentro de la caja se convierte en hielo, inserte
la caja en el tanque de agua del refrigerador de
aire. Esto hará que el agua dentro del tanque se
enfríe y la salida de aire será más fría que el aire
normal. Viene con dos cajas de hielo para que
una caja se pueda colocar en el refrigerador y la
otra en el tanque de agua.
Filtro de aire
Parte trasera
Panel de control
Papel de cortina mojado
Bomba de agua
Depósito de agua
Nevera
Salida
Ruedas con bloqueo
5
español english français portuguese deutsch italiano
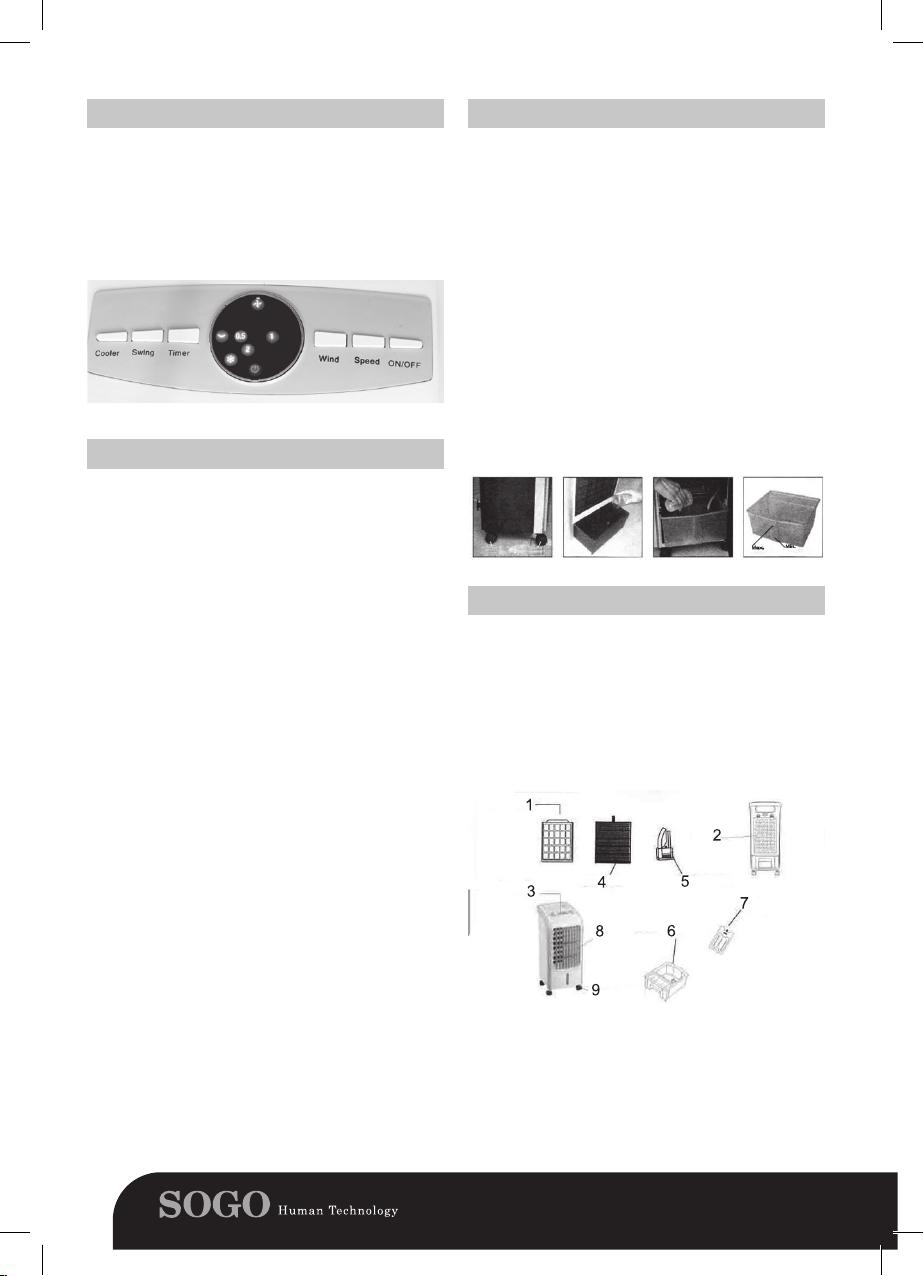
Limpieza
• Limpieza del ltro de aire:
Desconecte el enchufe y desenrosque el ltro de
aire con un destornillador. Sacarlo presionando
los dos botones con la mano. Limpie el ltro de
aire con un limpiador neutro o un cepillo suave y
luego límpielo con agua.
• Limpieza del papel de cortina mojado:
Asegúrese de que la unidad esté desenchufada.
Después de limpiar el ltro de aire, saque el papel
de cortina mojado del enfriador de aire. Límpielo
con agua o con un cepillo limpio y suave. No lo
frote con fuerza, ya que puede dañar el papel de
cortina mojado.
Mientras limpia el enfriador de aire, el usuario
debe desconectarlo y cortar la corriente. El panel
de control no puede estar en el agua.
Especicacióntécnica:
Modelo Num.: SS-21065
Voltaje / Frecuencia 220 – 240V ~ 50/60Hz
Potencia de entrada 80W
Flujo de aire 300m3/h
Nivel de ruido <= 55Db
Distancia de tiro de
8.6 m/s
aire
Capacidad del
4.0L
tanque
Capacidad de
enfriamiento
12.5m2 (125 pies
cuadrados)
Importante:
Para evitar fugas, el papel de cortina mojado
debe instalarse sin problemas.
• Limpieza del tanque de agua:
Asegúrese de que la unidad esté desenchufada.
Saque el tanque de agua después de
desbloquearlo. Tenga en cuenta que el tanque
no saldrá por completo ya que la bomba de agua
está conectada a él. Límpielo con una toalla
limpia y un poco de detergente. Luego límpielo
con agua.
• Remontaje de todas las partes
Una vez que haya terminado toda la limpieza,
cierre el tanque de agua y asegúrelo. Coloque
de nuevo el papel de cortina mojado. Si no
lo pone correctamente, no encajará. Solo
hay una manera de colocarlo, así que no lo
fuerce si no encaja. Simplemente voltéelo y
vuelva a intentarlo. Una vez que esté colocado
correctamente, vuelva a colocar el ltro de aire y
ciérrelo con el tornillo.
• Limpie la carcasa:
Limpie la carcasa con un limpiador neutro y un
paño suave.
Importante:
6

español english français portuguese deutsch italiano
Dear consumer, Please read these instructions carefully
before use in order to avoid damage due to incorrect use
and to better understand the functions of this product. Please
pay particular attention to the safety guide.
If you pass the device on to a third party, these Operating
Instructions must also be handed over.
Please keep them for future references.
A copy of this instruction manual in various languages is
available on our website: www.sogo.es..
IMPORTANT SAFEGUARDS:
1. Use as per the rating voltage on the product.
2. Do not repair or remake the appliance by yourself, it
should be repaired by a qualied technician.
3. Do not operate the appliance with wet hands, in order
to avoid a shock hazard.
4. If the supply cord is damaged, it must be replaced by
the manufacturer, its service agent or similarly qualied
persons in order to avoid a damage or hazard.
5. When the appliance is not in use, switch off and unplug
it.
6. Do not insert foreign things to air outlets and inlets, in
order to avoid damage.
7. Do not use the appliance near explosive and
combustible gas. Avoid long-term direct solar radiation.
8. Use the appliance only on a at surface.
9. Do not use outdoors.
10. The level of water tank should not be over “MAX”
scale at any time, when humidifying, the total level of
water tank should not be below “MIN” scale.
11. After adding water to the water tank, do not tilt or
knock over it when you put or move. If you want to
move, please push slowly from the side, in order to
7

español english français portuguese deutsch italiano
avoid spilling.
12. Do not tilt over the appliance. If it is toppled over
and there is some water in the body, should unplug
the power supply rst. Then send it to the repair
department or after-sales service and overhaul the
appliance.
13. Do not cover the air vent.
14. Clean the appearance with a lightly damp cloth. Do
not use any type of detergents or solutions. Do not
rinse the appliance.
15. Do not make air outlets and inlets near the wall or
curtain.
16. Do not knock or shake the body when using, otherwise
it may cause stop automatically.
17. The water in tank will easily metamorphose and has
odor in summer, please renew the water frequently.
18. This appliance is not intended for use by persons
(including children) with reduced physical, sensory
or mental capabilities, or lack of experience and
knowledge, unless they have been given supervision
or instruction concerning use of the appliance by a
person responsible for their safety.
19. Children should be supervised to ensure that they do
not play with the appliance.
20. To avoid the risk caused by instability of unit, you
must x the castors rmly according to manual book.
21. Should it be necessary to move the unit after the
water has been added, roll gently to the required
position and activate the bracket of the castors.
22. The power cord is with “Y” type connection and it must
be changed by professional technicians if necessary.
23. This appliance can be used by children aged from 8
8

español english français portuguese deutsch italiano
years and above if they have been given supervision
or instruction concerning use of the appliance in a
safe way and understand the hazards involved.
Children shall not play with the appliance. Cleaning
and user maintenance shall not be made by children
unless they are older than 8 years and supervised.
24. Keep the appliance and its cord out of reach of
children aged less than 8 years.
25. Do not use this appliance with a programmer, counter
or another device which can automatically turn it on
because if the appliance is covered or incorrectly
positioned there is a danger of re.
9

español english français portuguese deutsch italiano
Assembling castors:
Howtollwaterinthewatertank
Put the appliance on a at surface, take out
the wrench from foam box, then assemble the
castors.
Attention: the back castors are with brake, but
the front ones are without. (map 1)
Function Control Panel
1. “ON/OFF” button
• Press the button to start the unit, the indicator
“LOW” will appear on the control panel and
the air cooler will start working at low speed.
• Press the button again to switch of the unit.
2. “SPEED” button
• There are three speed settings Low, Medium
and High. When the unit is switched on, it
starts at low speed. Press the speed button
to select the required speed. Based on the
selection, the Low, Medium or High indicator
will appear on the control panel.
3. “WIND” button
• It has two settings Sleep and Nature. If this
function is activated the air ow will keep
changing continuously. If this function is
deactivated the air ow will be continuous
based on the selected speed.
Pull out the water tank from the bottom of the
back side after opening the lock. Fill the tank
with 1/3 of water.
Please note the display of water level while
pouring in the water.
The water level of water tank must be less
than “max.” and more than “min” when cooling
function needs to be activated.
The frozen ice boxes (or ice) can be inserted in
the water tank to make the air even cooler.
Warning:
The water level of water tank must be less than
“MAX”after ice boxes (or ice) is inserted in the
water tank.
How to use ice boxes
Ice box can be lled with water and kept in the
refrigerator. Once the water inside the icebox is
converted to ice, Insert the icebox in the water
tank of the air cooler. This will make the water
inside the tank cooler and air output will be cooler
than normal air. It comes with two iceboxes so
that one box can be place in the fridge and the
other one in the water tank.
4. “TIMER” button
• Off timer can be programmed using this button
from 0.5 hr to 7.5 hr. Pressing each time the
button will increase the off timer by 0.5hr. On
the control panel, digits will appear to indicate
if timer is activated.
5. “SWING” button
• Press the button, the indicator “SWING”
appears on the control panel and the vertical
bars will start moving to circulate air.
6. “COOLER” button
• Press the button when air cooler is working,
the indicator “COOL” will appear on the
control panel.
10
1 Air Filter
2 Back side
3 Control panel
4 Wet Curtain paper
5 Water pump
6 Water tank
7 Icebox
8 Outlet
9 Casters with lock

español english français portuguese deutsch italiano
Cleaning
• Clean air lter:
Pull off the plug, and unscrew the air lter using
screw driver. Take it out by pressing two buttons
by hand. Clean air lter by neutral cleaner or soft
brush and then clean it by water.
Clean the wet curtain paper:
Make sure the unit is unplugged. After cleaning
the air lter, take out the wet curtain paper from
the air cooler. Clean it with water or with some
cleaner and soft brush. Don’t rub it forcefully, as
it can damage the wet curtain paper.
Important:
In order to avoid leak, wet curtain paper must be
installed smoothly.
TechnicalSpecication:
Model No: SS-21065
Voltage / Frequency 220 – 240V ~
50/60Hz
Input Power 80W
Air Flow 300m3/hr
Noise level <= 55Db
Air Throw Distance 8.6 m/s
Tank Capacity 4.0L
Cooling Capacity 12.5m2
(125 sq ft)
• Clean water tank:
Make sure the unit is unplugged. Take the water
tank out after unlocking it. Please note, the tank
would not come out completely as the water
pump is attached to it. Wipe it with the clean
towel and little cleaner. Then clean it with water.
Mounting back all the parts
Once all the cleaning is done, close the water
tank and lock it. Place back the wet curtain
paper. If you don’t put it correctly, it won’t t in.
There is only one way you can place it so don’t
force if it doesn’t t in. Just ip it and try again.
Once it is correctly placed, put back the air lter
and close it with the screw.
• Clean the housing:
Wipe off the housing by neutral cleaner and soft
cloth.
Important:
While cleaning the air cooler, the user must pull
off the plug and cut off the power. Control panel
cannot be into water.
11

español english français portuguese deutsch italiano
Cher utilisateur, avant la première utilisation, Lire la présente notice
d’utilisation en respectant les consignes de sécurité et les Conseils
d’utilisation. Aviser les utilisateurs potentiels de ces consignes.
Conservez là pour une utilisation ultérieure.
Déballer l’appareil en conservant tous les emballages.
Une copie de ce manuel d›utilisation en plusieurs langues est disponible sur notre site web : www.sogo.es.
MISES EN GARDE IMPORTANTES
1. Utilisation comme par la tension nominale sur le produit.
2. Ne pas réparer ou refaire l’appareil par vous-même, il
doit être réparé par un technicien qualié.
3. Ne pas faire fonctionner l’appareil avec des mains hu-
mides, an d’éviter un risque de choc électrique.
4. Si le cordon d’alimentation est endommagé, il doit être
remplacé par le fabricant, son agent de service ou une
personne qualiée an d’éviter un dommage ou un danger.
5. Lorsque l’appareil n’est pas utilisé, mettez-le hors ten-
sion et débranchez-le.
6. N’insérez pas les choses pour les sorties d’air et les bras,
an d’éviter des dommages.
7. N’utilisez pas l’appareil près d’explosifs et gaz combus-
tibles. À long terme d’éviter le rayonnement solaire direct.
8. Utilisez l’appareil uniquement sur une surface plane.
9. Ne pas utiliser à l’extérieur.
10. Le niveau du réservoir d’eau ne doivent pas être à plus
grande échelle «MAX» à tout moment, quand l’humi-
dication, le niveau total du réservoir d’eau ne doit pas
être en dessous de «MIN».
11. Après avoir ajouté de l’eau le réservoir d’eau, ne pas in-
cliner ou frapper au-dessus de cela lorsque vous placez
12

español english français portuguese deutsch italiano
ou déplacer. Si vous voulez déplacer, veuillez pousser
lentement sur le côté, an d’éviter La renverser.
12. Ne pas basculer sur l’appareil. S’il est renversé et il y
a un peu d’eau dans l’organisme, doit débrancher l’alimentation d’abord. Puis l’envoyer sur le service de réparation. Ou le service après-vente et de révision de
l’appareil.
13. Ne pas couvrir l’aérateur.
14. Nettoyer l’apparence avec un chiffon humide légèrement. Ne pas utiliser de détergents ou de solutions. Ne
pas rincer l’appareil.
15. Ne pas faire de sorties d’air et les bras près du mur ou
le rideau.
16. Ne pas frapper ou secouer le corps lors de l’utilisation,
sinon il peut causer arrêter automatiquement.
17. L’eau dans le réservoir sera facilement se métamorphosent et a l’odeur de l’été, merci de renouveler l’eau
fréquemment.
18. Cet appareil n’est pas destiné à être utilisé par des personnes (y compris les enfants) avec des capacités physiques, sensorielles ou intellectuelles sont réduites, ou
manque d’expérience et de connaissances, à moins
qu’elles ont été données ou supervision
Instruction concernant l’utilisation de l’appareil par une
personne responsable de leur sécurité.
19. Les enfants doivent être surveillés pour s’assurer qu’ils
ne jouent pas avec l’appareil.
20. Pour éviter les risques causés par l’instabilité de l’uni-
té, vous devez xer les roulettes solidement selon livre
manuel.
21. S’il s’avère nécessaire de déplacer l’unité lorsque l’eau
a été ajoutée, roll doucement jusqu’à la position requise
13

español english français portuguese deutsch italiano
et d’activer le support des roulettes.
22. Le cordon d’alimentation est sur «Y» par type de
connexion et il doit être changé par des techniciens
professionnels si nécessaire.
23. Cet appareil peut être utilisé par des enfants âgés de 8
ans et plus s’ils ont reçu des instructions quant à l’utilisation ou la supervision de l’appareil dans un endroit sûr
Cours et comprendre les dangers encourus. Les enfants ne doivent pas jouer avec l’appareil. Le nettoyage
et l’entretien par l’utilisateur ne doit pas être faites par
des enfants, sauf s’ils sont âgés de plus de 8 ans et
surveillé.
24. Gardez l’appareil et le cordon d’alimentation hors de
portée des enfants de moins de 8 ans.
25. N’utilisez pas cet appareil avec un programmeur, compteur ou un autre appareil qui peut automatiquement
l’activer car si l’appareil est couvert ou mal Placé il y a
risque d’incendie.
14

español english français portuguese deutsch italiano
Assemblage de roulettes :
Put l’appareil sur une surface plane, sortir l’outil
clé de boîte de mousse, puis assembler les
roulettes.
Attention : les roulettes sont de retour avec
frein, mais l’avant sont sans. (Carte 1)
Panneau de fonction
1. Le bouton “MARCHE/ARRÊT”
• Appuyez sur le bouton pour démarrer l’unité,
l’indicateur “LOW” s’afche sur le tableau de
contrôle et le refroidisseur d’air commence à
fonctionner à basse vitesse.
• Appuyez de nouveau sur le bouton pour
basculer de l’unité.
2. “Vitesse”
• Il y a trois réglages de vitesse faible, moyen
et élevé. Lorsque l’unité est sous tension,
il démarre à faible vitesse. Appuyez sur la
touche pour sélectionner la vitesse requise.
En fonction de la sélection, le Faible, Moyen
ou Élevé indicateur apparaît sur le panneau
de contrôle.
3. Bouton “VENT”
• Il a deux réglages de sommeil et la nature. Si
cette fonction est activée, l’air ne cessent de
changer en permanence. Si cette fonction est
désactivée le ux d’air sera continu basé sur
la vitesse sélectionnée.
4. Le bouton “TIMER”
• Arrêt programmable peut être programmée à
l’aide de ce bouton de 0,5 h à 7,5 h. appuyant
sur chaque fois que le bouton va augmenter
l’arrêt programmable par 0.5Hr. Sur le
panneau de contrôle, les chiffres s’afche
pour indiquer si la minuterie est activée.
5. Bouton “SWING”
Appuyez sur la touche, l’indicateur “SWING”
apparaît sur le panneau de contrôle et les barres
verticales commencera à se déplacer pour faire
circuler l’air.
6. Bouton “REFROIDISSEUR”
• Appuyez sur le bouton lorsque le refroidisseur
d’air fonctionne, l’indicateur “COOL” s’afche
sur le tableau de contrôle.
Comment remplir l’ eau dans le réservoir
d’eau
Retirez le réservoir d’eau de la partie inférieure
de l’arrière après l’ouverture de la serrure.
Remplir le réservoir avec de l’ eau de 1/3.
• Veuillez noter que l’afchage du niveau de
l’eau en versant dans l’eau.
• Le niveau d’eau du réservoir d’eau doit être
inférieure à “max” et plus de “min” lorsque la
fonction de refroidissement doit être activé.
• Les boîtes de glace (ou de glace) peut être
inséré dans le réservoir d’eau pour rendre l’air
encore plus froid.
• Avertissement :
Le niveau d’eau du réservoir d’eau doit être
inférieure à “MAX”après les boîtes de glace (ou
de glace) est inséré dans le réservoir d’eau.
Comment utiliser les boîtes de glace
Ice Box peut être rempli avec de l’eau et dans le
réfrigérateur. Une fois que l ‘eau à l’intérieur de la
glacière est converti en glace, insérez la glacière
dans le réservoir d’eau du refroidisseur d’air.
Cela permettra de rendre l’eau à l’intérieur du
réservoir d’air de suralimentation et en sortie sera
plus froide que l’air normal. Il est livré avec deux
glacières an qu’une boîte peut être place dans
le réfrigérateur et l’autre dans le réservoir d’eau.
1. Filtre à air
2. Côté arrière
3. Panneau de commande
4. Papier Rideau humide
5. La pompe à eau
6. Réservoir d’eau
7. Glacière
8. Promotions
9. Roulettes avec serrure
15

español english français portuguese deutsch italiano
Le nettoyage
• Nettoyer le ltre à air :
Retirer le bouchon et dévisser le ltre à air à
l’ aide de tournevis. Prenez-le en appuyant sur
deux boutons à la main. Nettoyer le ltre à air
par nettoyant neutre ou d’une brosse douce, puis
nettoyez-le par l’eau.
• Nettoyer le rideau humide : papier
Assurez-vous que l’appareil est débranché.
Après le nettoyage du ltre à air, retirer le
rideau de papier humide le refroidisseur d’air.
Le nettoyer avec de l’eau ou avec un peu plus
propre et une brosse douce. Ne pas frotter avec
force, car cela pourrait endommager le rideau
humide papier.
Important :
An d’éviter une fuite, rideau humide papier doit
être correctement installés.
• Réservoir d’eau propre :
Assurez-vous que l’appareil est débranché.
Prendre la sortie du réservoir d’eau après le
déverrouillage. Veuillez noter, le réservoir ne
serait pas complètement que la pompe à eau est
attaché à lui. L’essuyer avec la serviette propre
et peu plus propre. Nettoyez -le avec de l’eau.
• Retour de xation de toutes les pièces
Une fois que tous le nettoyage est terminé,
fermez le réservoir d’eau et le verrouiller. Placez
le rideau humide papier. Si vous ne la mettez
pas correctement, il ne rentre pas dans. Il n’y
a qu’une façon vous pouvez le placer ainsi ne
pas forcer si elle ne tient pas dans. Retournez
simplement elle et essayez à nouveau. Une fois
qu’il est correctement placé, remettre le ltre à
air et fermez-le avec la vis.
l ‘utilisateur doit retirer le bouchon et couper
l’alimentation. Panneau de contrôle ne peut pas
être dans l’eau.
Spécicationtechnique:
Modèle No : SS-21065
Fréquence/tension 220 - 240 V ~
50/60 Hz
Puissance d’entrée 80W
Le ux d’air 300m3/h
Niveau de bruit < = 55Db
La distance d’éjection de
8.6 m/s
l’air
Capacité du réservoir 4.0L
Capacité de
refroidissement
12,5 m2 (125
sq ft)
• Nettoyer le boîtier :
Essuyez le boîtier en nettoyant neutre et d’un
chiffon doux.
Important :
Pendant le nettoyage du refroidisseur d’air,
16

español english français portuguese deutsch italiano
Prezado consumidor, por favor, leia estas instruções cuidadosamente antes de usar para evitar danos devido a uso incorreto
e para melhor compreender as funções deste produto. Por favor, preste especial atenção ao guia de segurança.
Se você passar o dispositivo para um terceiro, estas Instruções
de Utilização também deve ser entregue.
Uma cópia deste manual de instruções em várias línguas está
disponível em nosso site: www.sogo.es.
IMPORTANTES SALVAGUARDAS
1. Use conforme a tensão nominal do equipamento.
2. Não repare ou refazer o aparelho por si mesmo, ele
deve ser reparado por um técnico qualicado.
3. Não opere o aparelho com as mãos molhadas, para
evitar risco de choque.
4. Se o cabo de alimentação estiver danicado, deve
ser substituído pelo fabricante, seu agente de serviço ou por pessoal devidamente qualicado para evitar danos ou perigo.
5. Quando o aparelho não estiver em uso, desligue e
desconecte-o da tomada.
6. Não insira as coisas estrangeiras para as entradas e
saídas de ar, a m de evitar danos.
7. Não utilize o aparelho próximo de explosivo e gás
combustível. A longo prazo, evitar radiação solar direta.
8. Só use o aparelho em uma superfície plana.
9. Não utilizar no exterior.
10. O nível do reservatório de água não deve ser mais
de escala “MAX” a qualquer momento, quando a
humidicação, o nível total do reservatório de água
não deve ser inferior a escala “MIN”.
17

español english français portuguese deutsch italiano
11. Após a adição de água para o tanque de água, não
incline ou bater sobre ele quando você colocar ou
mover. Se você deseja mover, pressione lentamen-
te para o lado, a m de evitar escorra.
12. Não incline sobre o aparelho. Se for tombou e há
um pouco de água no corpo, deve desligar a fonte de alimentação primeiro. E, em seguida, enviá-lo
para a reparação.
Ou serviço pós-venda e revisão do aparelho.
13. Não cubra o arejador.
14. A aparência limpa com um pano levemente úmido.
Não utilize qualquer tipo de detergentes ou soluções. Não lave o aparelho.
15. Não faça as entradas e saídas de ar perto da pare-
de ou cortinas.
16. Não bater ou sacudir o corpo durante o uso, caso
contrário ele pode causar parar automaticamente.
17. A água no tanque irá facilmente metamorphose e
tem odor no verão, por favor, renove a água com
freqüência.
18. Este aparelho não se destina à utilização por pes-
soas (inclusive crianças) com capacidades físicas,
sensoriais ou mentais reduzidas, ou com falta de
experiência e conhecimento, a não ser que lhes
tenha sido dada supervisão ou instruções sobre o
uso do aparelho por uma pessoa responsável pela
sua segurança.
19. As crianças devem ser vigiadas para garantir que
não brincam com o aparelho.
20. Para evitar o risco causado pela instabilidade do
aparelho, você deve xar rmemente os rodízios
conforme manual de endereços.
18

español english français portuguese deutsch italiano
21. Caso seja necessário mover a unidade após a água
ter sido adicionado, rode suavemente para a posição desejada e ativar o suporte dos rodízios.
22. O cabo de alimentação estiver com conexão tipo
“Y” e deve ser alterada por técnicos prossionais,
se necessário.
23. Este aparelho pode ser utilizado por crianças com
idades compreendidas entre os 8 anos e acima, se
tiver sido dada supervisão ou instruções sobre o
uso do aparelho em um cofre
Forma e entender os riscos envolvidos. As crianças
não brincam com o aparelho. Limpeza e manutenção do usuário não devem ser feitos por crianças,
a menos que eles têm mais de 8 anos e supervisionados.
24. Mantenha o aparelho e o o fora do alcance das
crianças com idade inferior a 8 anos.
25. Não utilize este aparelho com um programador,
contador ou outro dispositivo que pode ligá-lo automaticamente, pois se o aparelho está coberto ou
incorretamente posicionados há um perigo de incêndio.
19

español english français portuguese deutsch italiano
Montar rodízios:
Como encher de água no depósito de água
Put o aparelho sobre uma superfície plana,
retirar a chave de caixa de espuma e, em
seguida, montar os rodízios.
Atenção: os rodízios estão de volta com o freio,
mas a frente são sem. (Mapa 1).
Painel de controle de função
1. “ON/OFF”
• Pressione o botão para iniciar a unidade, o
indicador “BAIXA” será exibida no painel de
controle e do arrefecedor de ar começará a
funcionar em baixa velocidade.
• Pressione novamente o botão para mudar de
unidade.
2. “Velocidade”
• Existem três ajustes de velocidade baixa,
média e alta. Quando a unidade é ligada,
começa a baixa velocidade. Pressione a tecla
para selecionar a velocidade necessária.
Com base na selecção, o Baixo, Médio ou Alto
indicador irá aparecer no painel de controle.
3. “Vento”
• Ele tem duas congurações sono e natureza.
Se esta função está activada, o uxo de
ar vai continuar a mudar continuamente.
Se esta função for desativado, o uxo de
ar será contínuo baseado na velocidade
seleccionada.
4. “TIMER”
• O temporizador pode ser programado
usando este botão de 0,5 horas para 7,5
horas pressionando cada vez que o botão irá
aumentar o off timer por 0.5Hr. No painel de
controle, dígitos aparecerá para indicar se o
temporizador estiver activado.
5. “SWING”
Pressione o botão, o indicador “Swing” é exibido
no painel de controle e as barras verticais
começará a se mover para circular o ar.
6. “Resfriador”
• Pressione o botão de ar quando o refrigerador
está funcionando, o indicador “cool” irá
aparecer no painel de controle.
Retire o depósito de água do fundo da parte
de trás, depois de abrir a fechadura. Encha o
tanque com 1/3 de água.
• Por favor, note que o visor do nível de água
enquanto vertendo na água.
• O nível de água do reservatório de água deve
ser menor do que o “máximo” e mais de “min”
quando a função de refrigeração precisa ser
ativado.
• As caixas de gelo congelado (gelo) ou pode
ser inserido no tanque de água para fazer
com que o refrigerador de ar mesmo.
Aviso:
O nível de água do reservatório de água deve
ser inferior a “MÁX.”Depois de gelo (ou gelo) é
inserido no tanque de água.
Como usar caixas de gelo
Caixa de gelo pode ser enchido com água e
mantidos em geladeira. Uma vez que a água
dentro do congelador é convertida em gelo, insira
a geleira no depósito da água do resfriador de ar.
Isto fará a água dentro do tanque, refrigerador e
ar saída será mais frio do que o ar normal. Ele
vem com 2 iceboxes , de modo que só pode ser
colocado na geladeira e a outra no tanque de
água.
1. Filtro de Ar
2. Parte de trás
3. Painel de controle
4. Cortina de papel molhado
5. Bomba de água
6. Depósito de água
7. Geleira
8. Outlet
9. Rodízios com trava
20

español english français portuguese deutsch italiano
A limpeza
• Limpe o ltro de ar:
Retire o bujão, e desapertar o parafuso do
ltro de ar usando o driver. Levá-lo para fora,
pressionando dois botões com a mão. Limpe o
ltro de ar pelo ltro neutro ou escova macia e,
em seguida, limpe-o com água.
• Limpar a cortina molhada papel:
Certique-se de que a unidade está desligada.
Após a limpeza do ltro de ar, retirar o papel de
cortina molhada do resfriador de ar. Limpe-o com
água ou com um aspirador e uma escova macia.
Não esfregue-o com vigor, pois pode danicar a
cortina de papel molhado.
Importante:
Para evitar vazamento, cortina de papel
molhado deve ser instalado sem problemas.
• Tanque de água limpa:
Certique-se de que a unidade está desligada.
Pegue o tanque de água após o destrancamento.
Por favor, note que o depósito não saem
totalmente como a bomba de água está anexado
a ele. Limpe-o com uma toalha limpa e um pouco
de pó. Em seguida, limpe -o com água.
• Voltar montagem de todas as peças
Uma vez que toda a limpeza é feita, perto do
tanque de água e bloqueá-lo. Volte a colocar o
papel de cortina molhada. Se você não colocá-lo
corretamente, ele não vai caber em. Só existe uma
maneira você pode colocá-lo de modo não force se
não se encaixar. Apenas vire-o e tente novamente.
Uma vez que é posicionada corretamente, volte a
colocar o ltro de ar e feche-o com o parafuso.
EspecicaçãoTécnica:
Modelo nº: SS-21065
Voltagem / Frequência 220 - 240V ~
50/60 Hz
Potência de entrada 80W
O uxo de ar 300m3/h
O nível de ruído <= 55db
Distância de projeção
8,6 m/s
de ar
Capacidade do tanque 4.0L
Capacidade de
refrigeração
12,5m2 (125
sq ft)
• Limpe o alojamento:
Limpe o alojamento pelo limpador neutro e um
pano macio.
Importante:
Durante a limpeza do resfriador de ar, o usuário
deve retirar a cha e corta a alimentação. Painel
de controle não pode ser na água.
21

español english français portuguese deutsch italiano
Lieber Verbraucher, lesen Sie bitte diese Anleitung vor Gebrauch
sorgfältig, um Schäden durch unsachgemäße Verwendung zu
vermeiden und um besser auf die Funktionen dieses Produkts zu
verstehen. Bitte beachten Sie besonders den Sicherheitsleitfaden.
Wenn Sie das Gerät an Dritte weitergeben, muss diese
Betriebsanleitung ebenfalls übergeben werden.
Bitte bewahren Sie sie für zukünftige Referenzen auf.
Eine Kopie dieser Bedienungsanleitung in verschiedenen
Sprachen nden Sie auf unserer Website: www.sogo.es.
WICHTIGE SICHERHEITSMASSNAHMEN :
1. Verwenden Sie nach der Nennspannung auf dem
Produkt.
2. Das Gerät nicht selbst reparieren oder erneuern, es soll
von einem qualizierten Techniker repariert werden.
3. Betreiben Sie das Gerät nicht mit nassen Händen, um
eine Stromschlaggefahr zu vermeiden.
4. Wenn das Netzkabel beschädigt ist, muss es durch
den Hersteller, seinen Kundendienst oder ähnlich
qualizierte Personen ersetzt werden, um eine
Beschädigung oder Gefahr zu vermeiden.
5. Wenn das Gerät nicht benutzt wird, schalten Sie es aus
und ziehen Sie es ab.
6. Legen Sie keine Fremdkörper in die Luftauslässe und
-einlässe, um Beschädigungen zu vermeiden.
7. Verwenden Sie das Gerät nicht in der Nähe von
explosiven und brennbaren Gasen. Vermeiden Sie
langfristige direkte Sonneneinstrahlung.
8. Verwenden Sie das Gerät nur auf einer ebenen Fläche.
9. Verwenden Sie nicht im Freien.
10. Der Füllstand des Wasserbehälters sollte zu
keinem Zeitpunkt über der „MAX“ -Skala liegen.
Beim Befeuchten sollte der Gesamtfüllstand des
22

español english français portuguese deutsch italiano
Wasserbehälters nicht unter der „MIN“ -Skala liegen.
11. Nachdem Sie Wasser in den Wassertank getan
haben, kippen oder stürzen Sie es nicht um, wenn Sie
es einsetzen oder bewegen. Wenn Sie es bewegen
möchten, drücken Sie langsam von der Seite, um zu
vermeiden, es zu verschütten.
12. Nicht über das Gerät kippen. Wenn es umgestürzt
ist und Wasser im Körper ist, sollten Sie zuerst den
Netzstecker ziehen. Dann schicken Sie es an die
Reparaturabteilung oder After-Sales-Service und das
Gerät überarbeiten.
13. Decken Sie den Luftauslass nicht ab.
14. Reinigen Sie das Gerät mit einem leicht feuchten
Tuch. Verwenden Sie keine Reinigungsmittel oder
Lösungen. Spülen Sie das Gerät nicht aus.
15. Stellen Sie die Luftauslässe und Lufteinlässe nicht in
die Nähe der Wand oder eines Vorhangs.
16. Klopfen oder schütteln Sie den Körper während der
Benutzung nicht, sonst kann dies automatisch zum
Stoppen führen.
17. Das Wasser im Tank wird leicht metamorphose
und hat im Sommer Geruch, bitte erneuern Sie das
Wasser häug.
18. Dieses Gerät ist nicht für Personen (einschließlich
Kinder) mit eingeschränkten physischen, sensorischen
oder geistigen Fähigkeiten oder Mangel an Erfahrung
und Wissen, außer wenn sie Aufsicht oder Unterrichts
in der Benutzung des Gerätes gegeben worden sind
von einer Person, die für ihre Sicherheit verantwortlich
ist.
19. Kinder sollten beaufsichtigt werden, um sicherzustellen,
dass sie nicht mit dem Gerät spielen.
23

español english français portuguese deutsch italiano
20. Um das Risiko zu vermeiden, das durch die Instabilität
des Geräts verursacht wird, müssen Sie die Rollen
gemäß dem Handbuch fest befestigen.
21. Sollte es notwendig sein, das Gerät nach dem
Hinzufügen des Wassers zu bewegen, rollen Sie es
vorsichtig in die gewünschte Position und aktivieren
Sie die Halterung der Rollen.
22. Das Netzkabel ist mit einem „Y“ -Anschluss verbunden
und muss bei Bedarf von professionellen Technikern
ausgetauscht werden.
23. Dieses Gerät kann von Kindern über 8 Jahren, wenn sie
in einer sicheren Art und Weise in Bezug auf gegeben
worden sind und, die damit verbundenen Gefahren
verstehen. Kinder dürfen nicht mit dem Gerät spielen.
Reinigung und Wartung durch den Benutzer dürfen
nicht von Kindern vorgenommen werden, es sei denn,
sie älter als 8 Jahre und beaufsichtigt sind.
24. Bewahren Sie das Gerät und sein Kabel außerhalb
der Reichweite von Kindern unter 8 Jahren auf.
25. Verwenden Sie dieses Gerät nicht mit einem
Programmiergerät, einem Zähler oder einem anderen
Gerät, das sich automatisch einschalten lässt. Wenn
das Gerät abgedeckt oder falsch positioniert ist,
besteht Brandgefahr.
24

español english français portuguese deutsch italiano
Zusammenbau der Rollen:
WiemanWasserindenWassertankfüllt
Stellen Sie das Gerät auf eine ebene
Fläche, nehmen Sie den Schlüssel aus der
Schaumstoffbox und montieren Sie die Rollen.
Achtung: Die hinteren Rollen sind mit Bremse,
aber die vorderen sind ohne. (Karte 1)
Funktionssteuerfeld
1. “ON / OFF“ -Taste (Ein / Aus)
• Drücken Sie die Taste, um das Gerät zu
starten, die Anzeige “LOW” erscheint auf dem
Bedienfeld und der Luftkühler beginnt mit
niedriger Geschwindigkeit zu arbeiten.
• Drücken Sie die Taste erneut, um das Gerät
auszuschalten.
2. “SPEED” -Taste (Geschwindigkeit)
• Es gibt drei Geschwindigkeitsstufen: Niedrig,
Mittel und Hoch. Wenn das Gerät eingeschaltet
wird, startet es mit niedriger Geschwindigkeit.
Drücken Sie die Geschwindigkeitstaste, um die
gewünschte Geschwindigkeit auszuwählen. Je
nach Auswahl erscheint auf dem Bedienfeld
die Anzeige Niedrig, Mittel, oder Hoch.
3. “WIND” -Taste
• Es hat zwei Einstellungen Schlaf und Natur.
Wenn diese Funktion aktiviert ist, ändert sich
der Luftstrom kontinuierlich. Wenn diese
Funktion deaktiviert ist, wird der Luftstrom
basierend auf der gewählten Geschwindigkeit
kontinuierlich sein.
4. “TIMER” -Taste
• Der Ausschalttimer kann mit dieser Taste
zwischen 0,5 und 7,5 Stunden programmiert
werden. Durch Drücken der Taste wird der
Ausschaltzeitpunkt um jeweils 0,5 Stunden
erhöht. Auf dem Bedienfeld erscheinen Ziffern,
um anzuzeigen, ob der Timer aktiviert ist.
5. “SWING” -Taste
• Drücken Sie die Taste, die Anzeige “SWING”
erscheint auf dem Bedienfeld und die
vertikalen Balken beginnen sich zu bewegen,
um Luft zirkulieren zu lassen.
6. “COOLER” -Taste (Kühler)
• Drücken Sie die Taste, wenn der Luftkühler
funktioniert, die Anzeige “COOL” erscheint auf
dem Bedienfeld.
Ziehen Sie den Wassertank nach dem Öffnen
des Schlosses von der Unterseite der Rückseite
heraus. Füllen Sie den Tank mit 1/3 Wasser.
• Bitte beachten Sie die Anzeige des
Wasserstandes beim Einfüllen des Wassers.
• Der Wasserstand des Wassertanks muss
weniger als “max.” und mehr als “min” sein,
wenn die Kühlfunktion aktiviert werden muss.
• Die gefrorenen Eisbehälter (oder Eis) können
in den Wassertank eingesetzt werden, um die
Luft noch kühler zu machen.
Warnung:
Der Wasserstand des Wassertanks muss kleiner
als “MAX” sein, nachdem gefrorenen Eisbehälter
(oder Eis) in den Wassertank eingesetzt wurden.
Wie man die gefrorenen Eisbehälter
verwendet
Diegefrorenen Eisbehälter können mit Wasser gefüllt
und im Kühlschrank aufbewahrt werden. Sobald das
Wasser in der Eisbehälter in Eis umgewandelt wurde,
legen Sie der Eisbehälter in den Wassertank des
Luftkühlers. Dadurch wird das Wasser im Tankkühler
und die Luftleistung wird kühler als normale Luft. Es
kommt mit zwei Eisbehälter, so dass eine Box in
den Kühlschrank und die andere in den Wassertank
platziert werden kann.
1. Luftlter
2. Rückseite
3. Schalttafel
4. Nasses Vorhangpapier
5. Wasserpumpe
6. Wassertank
7. Eisfach
8. Auslauf
9. Rollen mit Schloss
25

español english français portuguese deutsch italiano
Reinigung
• Reinigung des Luftlters:
Ziehen Sie den Stecker ab und schrauben Sie
den Luftlter mit einem Schraubenzieher ab.
Nehmen Sie es heraus, indem Sie die beiden
Knöpfe von Hand drücken. Reinigen Sie den
Luftlter mit einem neutralen Reiniger oder
einer weichen Bürste und reinigen Sie ihn
anschließend mit Wasser.
• Reinigen Sie den nassen Vorhang Papier:
Stellen Sie sicher, dass das Gerät nicht
angeschlossen ist. Nehmen Sie nach dem
Reinigen des Luftlters das nasse Papier aus
dem Luftkühler heraus. Reinigen Sie es mit
Wasser oder mit eine sauberer und weicher
Bürste. Reiben Sie es nicht mit Gewalt, da es
das nasse Papier beschädigen kann.
Reiniger und einem weichen Tuch ab.
Wichtig:
Während der Reinigung des Luftkühlers muss
der Benutzer den Stecker ziehen und den Strom
abschalten. Das Bedienfeld kann nicht in Wasser
sein.
TechnischeSpezikation:
Modell Nr: SS-21065
Spannung / Frequenz 220 – 240V ~
50/60Hz
Eingangsleistung 80W
Air Flow 300m3/hr
Geräuschpegel <= 55Db
Luftwurfweite 8.6 m/s
Tankinhalt 4.0L
Kühlkapazität 12.5m2 (125
Quadratfuß)
Wichtig:
Um ein Auslaufen zu vermeiden, muss das
nasse Vorhangpapier glatt installiert werden.
• Reinigung des Wassertanks:
Stellen Sie sicher, dass das Gerät nicht
angeschlossen ist. Nehmen Sie den Wassertank
nach dem Entriegeln heraus. Bitte beachten Sie,
dass der Tank nicht vollständig herauskommt, da
die Wasserpumpe daran befestigt ist. Wischen
Sie es mit einem sauberen Handtuch und ein
bisschen Reinigungsmittel ab. Dann reinigen Sie
es mit Wasser.
• Alle Teile wieder montieren
Sobald die Reinigung abgeschlossen ist,
schließen Sie den Wassertank und verriegeln
Sie ihn. Legen Sie das nasse Papier zurück.
Wenn Sie es nicht richtig einsetzen, wird es
nicht passen. Es gibt nur eine Möglichkeit,
es zu platzieren, also erzwingen Sie es nicht,
wenn es nicht passt. Drehen Sie es einfach
und versuchen Sie es erneut. Sobald es richtig
platziert ist, setzen Sie den Luftlter zurück und
schließen Sie ihn mit der Schraube.
• Reinigen Sie das Gehäuse:
Wischen Sie das Gehäuse mit einem neutralen
26

español english français portuguese deutsch italiano
Gentile consumatore, si prega di leggere attentamente
queste istruzioni prima dell'uso al ne di evitare danni dovuti
a un uso scorretto e per comprendere meglio le funzioni di
questo prodotto. Si prega di prestare particolare attenzione
alla guida di sicurezza.
Se si passa il dispositivo a terzi, è necessario consegnare
anche queste istruzioni per l'uso.
Si prega di tenerli per riferimenti futuri.
Una copia di questo manuale di istruzioni in varie lingue è
disponibile sul nostro sito web: www.sogo.es.
MISURE DI SICUREZZA IMPORTANTI :
1. Utilizzare come per la tensione nominale del prodotto.
2. Non riparare o rifare l’apparecchio da soli, deve essere
riparato da un tecnico qualicato.
3. Non utilizzare l’apparecchio con le mani bagnate per
evitare il rischio di scosse elettriche.
4. Se il cavo di alimentazione è danneggiato, deve essere
sostituito dal produttore, dal suo agente di assistenza
o da personale qualicato per evitare danni o pericoli.
5. Quando l’apparecchio non è in uso, spegnerlo e
scollegarlo.
6. Non inserire oggetti estranei nelle prese d’aria e negli
ingressi, al ne di evitare danni.
7. Non utilizzare l’apparecchio vicino a gas esplosivi e
combustibili. Evitare radiazioni solari dirette a lungo
termine.
8. Utilizzare l’apparecchio solo su una supercie piana.
9. Non usare all’aperto.
10. Il livello del serbatoio dell’acqua non deve essere
superiore alla scala “MAX” in qualsiasi momento,
durante l’umidicazione, il livello totale del serbatoio
27

español english français portuguese deutsch italiano
dell’acqua non deve essere inferiore alla scala “MIN”.
11. Dopo aver aggiunto acqua al serbatoio dell’acqua,
non inclinarlo o rovesciarlo quando si mette o si
sposta.
Se si desidera spostarlo, si prega di spingere
lentamente da un lato, per evitare di spargerlo.
12. Non inclinare l’apparecchio. Se è rovesciato e c’è
acqua nel corpo, è necessario scollegare prima
l’alimentazione. Poi inviarlo al reparto di riparazione
o servizio post-vendita e revisionare l’apparecchio.
13. Non coprire la presa d’aria.
14. Pulire l’apparecchio con un panno leggermente
umido. Non utilizzare alcun tipo di detergente o
soluzione. Non risciacquare l’apparecchio.
15. Non mettere le uscite d’aria e l’ingressi vicino alla
parete o di una tenda.
16. Non battere o scuotere il corpo durante l’utilizzo,
altrimenti potrebbe causare l’arresto automatico.
17. L’acqua nel serbatoio può facilmente metamorfosare
e ha odore in estate, si prega di rinnovare l’acqua
frequentemente.
18. Questo apparecchio non è destinato all’uso da parte
di persone (compresi i bambini) con attitudini mentale,
sensoriale oppure siche redotte o che mancano
esperienza e conoscimento, salvo che hanno rebuto
prescizioni oppure supervisione con riferenza al uso
dell’apparecchio da una persona responsabile della
sua sicurezza.
19. I bambini dovrebbero essere sorvegliati per
assicurarsi che non giochino con l’apparecchio.
20. Per evitare il rischio causato dall’instabilità dell’unità,
è necessario ssare saldamente le rotelle, in base al
28

español english français portuguese deutsch italiano
manuale.
21. Se è necessario spostare l’unità dopo aver aggiunto
l’acqua, ruotare delicatamente no alla posizione
richiesta e attivare la staffa delle rotelle.
22. Il cavo di alimentazione è del tipo “Y” e deve essere
sostituito da tecnici professionisti se necessario.
23. Questo apparecchio può essere usato per
bambini de 8 anni e piú, sempre che hanno rebuto
prescizioni oppure supervisione con riferenza al uso
dell’apparecchio de forma sicura e dei pericoli possibili.
I bambini non devono giocare con l’apparecchio.
Pulizia e manutenzione da parte dell’utente non
devono essere realizzati dai bambini a meno che
siano di età superiore a 8 anni e sorvegliati.
24. Tenere l’apparecchio e il suo cavo fuori dalla portata
dei bambini di età inferiore a 8 anni.
25. Non utilizzare questo apparecchio con un
programmatore, un contatore o un altro dispositivo
che può accendersi automaticamente perché se
l’apparecchio è coperto o posizionato in modo errato
esiste il pericolo di incendio.
29

español english français portuguese deutsch italiano
Assemblaggio delle ruote:
Mettere l’apparecchio su una supercie piana,
estrarre la chiave da una scatola di gommapiuma,
quindi montare le ruote.
Attenzione: le ruote posteriori sono con freno,
ma quelle anteriori sono senza. (mappa 1)
Pannello di controllo delle funzioni
• Pulsante “ON / OFF” (Acceso / Spento)
Premere il pulsante per avviare l’unità, l’indicatore
“LOW” apparirà sul pannello di controllo e il
dispositivo di raffreddamento di aria inizierà a
lavorare a bassa velocità.
Premere di nuovo il pulsante per spegnere
l’unità.
• Pulsante “SPEED” (Velocità)
Sono disponibili tre impostazioni di velocità:
Bassa, Media e Alta. Quando l’unità è accesa,
inizia a bassa velocità. Premere il tasto della
velocità per selezionare la velocità richiesta. In
base alla selezione, l’indicatore Basso, Medio o
Alto apparirà sul pannello di controllo.
• Pulsante “WIND” (vento)
Ha due impostazioni Sleep e Natura. Se questa
funzione è attivata, il usso d’aria continuerà a
cambiare continuamente. Se questa funzione è
disattivata, il usso d’aria sarà continuo in base
alla velocità selezionata.
• Pulsante “TIMER”
Il timer di spegnimento può essere programmato
utilizzando questo pulsante da 0,5 ore a 7,5 ore.
Premendo il pulsante si aumenterà ogni volta il
timer di spegnimento di 0,5 ore. Sul pannello di
controllo, appariranno delle cifre per indicare se
il timer è attivato.
• Pulsante “SWING”
Premere il pulsante, l’indicatore “SWING” appare
sul pannello di controllo e le barre verticali
inizieranno a muoversi per far circolare l’aria.
Pulsante “COOLER” (refrigeratore)
Premere il pulsante quando il condizionatore
d’aria funziona, l’indicatore “COOL” apparirà sul
pannello di controllo.
Come riempire l’acqua nel serbatoio
dell’acqua
Estrarre il serbatoio dell’acqua dalla parte
inferiore del lato posteriore dopo aver aperto il
blocco. Riempi il serbatoio con 1/3 di acqua.
Si prega di notare la visualizzazione del livello
dell’acqua mentre si versa l’acqua.
Il livello dell’acqua del serbatoio dell’acqua deve
essere inferiore a “max” e superiore a “min” quando
è necessario attivare la funzione di raffreddamento.
Le scatole di ghiaccio congelate (o ghiaccio)
possono essere inserite nel serbatoio dell’acqua
per rendere l’aria ancora più fresca.
Avvertimento:
Il livello dell’acqua del serbatoio dell’acqua
deve essere inferiore a “MAX” dopo che le
scatole di ghiaccio congelate (o ghiaccio) sono
state inserite nel serbatoio dell’acqua.
Come usare le scatole di ghiaccio congelate
Le scatole di ghiaccio possono essere riempite con
acqua e conservate in frigorifero. Una volta che
l’acqua all’interno della ghiacciaia viene convertita
in ghiaccio, inserire scatole di ghiaccio congelate nel
serbatoio dell’acqua del refrigeratore d’aria. Questo
renderà l’acqua all’interno del serbatoio più freddo e
l’uscita dell’aria sarà più fredda dell’aria normale. Viene
fornito con due scatole di ghiaccio in modo che una
scatola possa essere collocata nel frigorifero e l’altra
nel serbatoio dell’acqua.
1. Filtro dell’aria
2. Lato posteriore
3. Pannello di controllo
4. Carta bagnata
5. Pompa dell’acqua
6. Serbatoio d’acqua
7. Ghiacciaia
8. Presa
9. Ruote con serratura
30

español english français portuguese deutsch italiano
Pulizia
• Pulizia del ltro dell’aria:
Togliere la spina e svitare il ltro dell’aria usando
un cacciavite. Toglilo premendo i due pulsanti a
mano. Pulire il ltro dell’aria con un detergente
neutro o una spazzola morbida, quindi pulirlo con
acqua.
• Pulire la carta bagnata:
Assicurarsi che l’unità sia scollegata. Dopo aver
pulito il ltro dell’aria, estrarre la carta bagnata
dal condizionatore d’aria. Pulirla con acqua o
con un pennello pulito e morbido. Non stronarlo
con forza, poiché potrebbe danneggiare la carta
bagnata.
Importante:
Per evitare perdite, la carta bagnata deve essere
installata senza problemi.
Pulizia del serbatoio dell’acqua:
Assicurarsi che l’unità sia scollegata. Rimuovere
il serbatoio dell’acqua dopo averlo sbloccato.
Si prega di notare che il serbatoio non uscirà
completamente quando la pompa dell’acqua è
collegata ad esso. Pulisci con un asciugamano
pulito e un piccolo di detergente. Quindi puliscilo
con acqua.
• Rimontare tutte le parti
Terminata la pulizia, chiudere il serbatoio
dell’acqua e bloccarlo. Riposizionare la carta
della cortina bagnata. Se non la inserisci
correttamente, non si adatta. C’è un solo modo
per posizionarla, quindi non forzarla se non si
adatta. Basta capovolgerla e riprovare. Una
volta posizionata correttamente, rimontare il ltro
dell’aria e chiuderlo con la vite.
raffreddamento, l’utente deve staccare la spina
e interrompere l’alimentazione. Il pannello di
controllo non può essere in acqua.
Specicatecnica:
Modello No: SS-21065
Voltaggio / Frequenza 220 – 240V ~
50/60Hz
Potenza di ingresso 80W
Flusso d’aria 300m3/h
Livello di rumore <= 55Db
Distanza del colpo
8.6 m/s
d’aria
Capacità del serbatoio 4.0L
Capacità di
raffreddamento
12,5m2 (125 piedi
quadrati)
• Pulire l’alloggiamento:
Pulire l’alloggiamento con un detergente neutro
e un panno morbido.
Importante:
Durante la pulizia del dispositivo di
31

DECLARACIÓN DE CONFORMIDAD
Este dispositivo cumple con la Directiva
de baja tensión 2014/35/CE, la Directiva
de Compatibilidad Electromagnética
2014/30/UE, la Directiva 2011/65/UE sobre
restricciones a la utilización de determinadas
sustancias peligrosas en aparatos eléctricos
y electrónicos y la Directiva 2009/125/CE en
los requisitos de diseño ecológico aplicables
a los productos relacionados con la energía.
DECLARATION OF CONFORMITY
This device complies with Low Voltage
Directive 2014/35/EC, Electromagnetic
Compatibility Directive 2014/30/EU, Directive
2011/65/EU on the restriction of the use of
certain hazardous substances in electrical
and electronic equipment and Directive
2009/125/EC on the eco-design requirements
applicable to energy-related products.
DÉCLARATION DE CONFORMITÉ
Cet appareil est conforme à la Directive
Basse Tension 2014/35/CE, la directive
Compatibilité électromagnétique 2014/30/UE,
la directive 2011/65/UE relative à la limitation
de l’utilisation de certaines substances
dangereuses dans les équipements et
la directive 2009/125 / CE électriques et
électroniques sur les exigences en matière
d’éco-conception applicables aux produits
liés à l’énergie.
DECLARAÇÃO DE CONFORMIDADE
Este dispositivo está em conformidade
com a Directiva de Baixa Tensão 2014/35/
CE, a Directiva de Compatibilidade
Electromagnética 2014/30/UE, a Directiva
2011/65/UE relativa à restrição do uso de
determinadas substâncias perigosas em
equipamentos eléctricos e electrónicos e da
Directiva 2009/125/CE sobre os requisitos de
concepção ecológica aplicáveis aos produtos
relacionados com a energia.
DICHIARAZIONE DI CONFORMITÀ
Questo dispositivo è conforme alla Direttiva
sulla Bassa Tensione 2014/35/EC, Direttiva
sulla Compatibilità Elettromagnetica 2014/30/
EU, Direttiva 2011/65/EU sulla restrizione
dell’uso di determinate sostanze pericolose
nelle Apparecchi elettrici ed elettronici e la
Direttiva 2009/125/CE relativa ai requisiti di
progettazione ecocompatibile applicabili ai
prodotti connessi all’energia.
KONFORMITÄTSERKLÄRUNG
Dieses Gerät entspricht die 2014/35/
EG Niederspannungs Richtlinie, die
2014/30/EU Elektromagnetische
Verträglichkeit Richtlinie, die 2011/65/
EU Richtlinie auf die Beschränkung der
Verwendung bestimmter gefährlicher
Stoffe in Elektro- und Elektronikgeräten
und die 2009/125/CE Richtlinie auf
die die Ökodesign-Anforderungen für
energieverbrauchsrelevante Produkte.

español english français portuguese deutsch italiano
DECLARACIÓN DE CONFORMIDAD
2014/30/EU Elektromagnetische
Este dispositivo cumple con la Directiva
de baja tensión 2014/35/CE, la Directiva
de Compatibilidad Electromagnética
2014/30/UE, la Directiva 2011/65/UE sobre
restricciones a la utilización de determinadas
sustancias peligrosas en aparatos eléctricos
y electrónicos y la Directiva 2009/125/CE en
los requisitos de diseño ecológico aplicables
a los productos relacionados con la energía.
DECLARAÇÃO DE CONFORMIDADE
Este dispositivo está em conformidade
com a Directiva de Baixa Tensão 2014/35/
CE, a Directiva de Compatibilidade
Electromagnética 2014/30/UE, a Directiva
2011/65/UE relativa à restrição do uso de
determinadas substâncias perigosas em
equipamentos eléctricos e electrónicos e da
Directiva 2009/125/CE sobre os requisitos de
concepção ecológica aplicáveis aos produtos
relacionados com a energia.
DECLARATION OF CONFORMITY
This device complies with Low Voltage
Directive 2014/35/EC, Electromagnetic
Compatibility Directive 2014/30/EU, Directive
2011/65/EU on the restriction of the use of
certain hazardous substances in electrical
and electronic equipment and Directive
2009/125/EC on the eco-design requirements
applicable to energy-related products.
DÉCLARATION DE CONFORMITÉ
Cet appareil est conforme à la Directive
Basse Tension 2014/35/CE, la directive
Compatibilité électromagnétique 2014/30/UE,
la directive 2011/65/UE relative à la limitation
de l’utilisation de certaines substances
dangereuses dans les équipements et
la directive 2009/125 / CE électriques et
électroniques sur les exigences en matière
d’éco-conception applicables aux produits
liés à l’énergie.
DICHIARAZIONE DI CONFORMITÀ
Questo dispositivo è conforme alla Direttiva
sulla Bassa Tensione 2014/35/EC, Direttiva
sulla Compatibilità Elettromagnetica 2014/30/
EU, Direttiva 2011/65/EU sulla restrizione
dell’uso di determinate sostanze pericolose
nelle Apparecchi elettrici ed elettronici e la
Direttiva 2009/125/CE relativa ai requisiti di
progettazione ecocompatibile applicabili ai
prodotti connessi all’energia.
KONFORMITÄTSERKLÄRUNG
Dieses Gerät entspricht die 2014/35/
EG Niederspannungs Richtlinie, die
Verträglichkeit Richtlinie, die 2011/65/
EU Richtlinie auf die Beschränkung der
Verwendung bestimmter gefährlicher
Stoffe in Elektro- und Elektronikgeräten
und die 2009/125/CE Richtlinie auf
die die Ökodesign-Anforderungen für
energieverbrauchsrelevante Produkte.
33

español english français portuguese deutsch italiano
Este símbolo signica que, si desea
deshacerse del producto, una vez transcurrida
la vida del mismo, debe depositarlo por los
medios adecuados a manos de un gestor
de residuos autorizado para la recogida
selectiva de Residuos de Aparatos Eléctricos
y Electrónicos (RAEE).
Este símbolo signica que se desejar
desfazer-se do produto depois de terminada
a sua vida útil, deve entregá-lo através dos
meios adequados ao cuidado de um gestor
de resíduos autorizado para a recolha
selectiva de Resíduos de Equipamentos
Eléctricos e Electrónicos (REEE).
Importado por:
Sanysan Appliances S.L, NIF: B98753056,
C/ Barcas 2, 2
46002 Valencia, España
Producto fabricado en P.R.C - Diseñado por
SOGO basada en las normas de calidad
europeas
Servicio postventa: www.sogosat.com /
sogosat@sogosat.com / 0034 902 222 161
This symbol means that in case you wish to
dispose of the product once its working life
has ended, take it to an authorised waste
agent for the selective collection of waste
electrical and electronic equipment (WEEE)
Imported by:
Sanysan Appliances S.L, NIF: B98753056,
C/ Barcas 2, 2
46002 Valencia, Spain
Product made in P.R.C. – Designed by
SOGO based on the European Quality
Standards
Customer Service: www.sogosat.com /
sogosat@sogosat.com / 0034 902 222 161
Ce symbole signie que si vous souhaitez
vous défaire du produit, une fois que celuici n’est plus utilisable, remettez-le, suivant
la méthode appropriée, à un gestionnaire
de déchets d’équipements électriques et
électroniques (DEEE).
Importado por:
Sanysan Appliances S.L, NIF: B98753056,
C/ Barcas 2, 2
46002 Valencia, Espanha
Produto fabricado na P.R.C - projetado pelo
SOGO com base nas normas de qualidade
europeias.
Serviço pós-venda: www.sogosat.com /
sogosat@sogosat.com / 0034 902 222 161
Questo simbolo indica che nel caso in qui si
desidera smaltire il prodotto una volta la sua
vita lavorativa è nite si dovrebbe prendere
ad un agente autorizzato di riuti per la
raccolta selettiva di apparecchi elettriche ed
elettroniche (WEEE).
Importato da:
Sanysan Appliances S.L, NIF: B98753056,
C/ Barcas 2, 2
46002 Valencia, Espanha
Prodotto fatto a P.R.C - Disegnato da SOGO
in base alla Norme di Qualità Europea
Servizio al cliente: sogosat.com /
sogosat@sogosat.com / 0034 902 222 161
Dieses Symbol bedeutet, dass für den Fall,
möchten Sie das Produkt entsorgen, sobald
seine Lebensdauer beendet ist, sollen
Sie sich an einen autorisierten Abfallmittel
wenden, für die Abfällen von Elektro- und
Elektronikgeräten selektive Sammlung
(WEEE).
Importé par:
Sanysan Appliances S.L, NIF: B98753056,
C/ Barcas 2, 2
46002 Valencia, Espagne
Produit fabriqué en P.R.C - Conçu par
SOGO sur la base des normes de qualité
européennes.
Service après-vente: www.sogosat.com /
sogosat@sogosat.com / 0034 902 222 161
34
Importiert durch:
Sanysan Appliances S.L, NIF: B98753056,
C/ Barcas 2, 2
46002 Valencia, Spain
Produkt gemacht in P.R.C. -Entworfen von
Sogo auf der Grundlage der europäischen
Qualitätsstandards
Kundendienst: sogosat.com /
sogosat@sogosat.com / 0034 902 222 161


ref. SS-21065
BQS
Best Quality SOGO
Mejor Calidad SOGO
 Loading...