

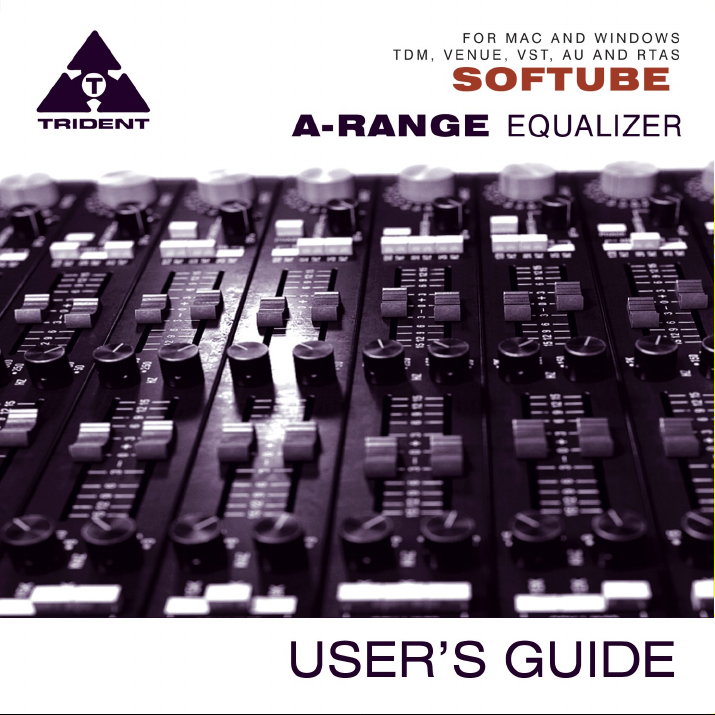
Page 1
Page 2

Foreword by Malcolm Toft
I have evaluated the Softube Trident A-Range equaliser plug-in at
my studio with some very experienced recording engineers. After
exhaustive listening tests with many different instruments and
vocals, I am pleased to say that we all agree this is an incredibly
accurate software recreation of my original A Range design from
1971.
It exhibits all of the nuances of tone from the original, right down
to the 'saturation' control which emulates the overdriven artifacts
from the original when large amounts of equalisation are applied
or the input is driven hard.
Well done to all the guys at Softube.
Professor Malcolm Toft
Original designer of the Trident A-Range console
Torquay, Devon, England
December 17, 2009
2
Page 3

Table of Contents
Contact Details.............................................................................................. 4
Support................................................................................................................. 4
Installation and Authorization.......................................................................5
Introduction................................................................................................... 6
About the Trident A-Range..................................................................................7
User Interface................................................................................................ 8
Equalizer Bands................................................................................................... 9
Low Pass and High Pass Filters........................................................................10
Phase Invert....................................................................................................... 11
Saturation........................................................................................................... 11
Output Volume................................................................................................... 11
Key and Mouse Commands.............................................................................. 12
Technical Side Notes...................................................................................13
Mono and Stereo Operation.............................................................................. 13
RTAS on Pro Tools|HD......................................................................................13
Buying Recommendations.................................................................................14
System Requirements................................................................................. 15
3
Page 4

Contact Details
If you would like to get in touch with Softube, please e-mail info@softube.com.
Alternatively, you could use the phone or send an old-fashioned mail (do you remember
envelopes, stamps and paper?) to:
Softube AB
S:t Larsgatan 10c
SE-582 24 Linköping
Web: www.softube.com
E-mail: info@softube.com
Phone: +46 13 21 1623 (9 am – 5 pm CET)
Sweden
Support
On the Softube website (www.softube.com) you will find answers to common questions
(FAQ) and other topics that might interest you.
Support questions can be posted at http://www.softube.com, where we will help you as
fast as we can!
© 2010 SOFTUBE AB, SWEDEN. ALL PRODUCT AND COMPANY NAMES ARE TRADEMARKS OF THEIR
RESPECTIVE OWNERS. SOFTUBE IS A REGISTERED TRADEMARK OF SOFTUBE AB, SWEDEN. ALL
VISUAL AND AURAL REFERENCES TO THE TRIDENT A-RANGE ARE TRADEMARKS BEING MADE WITH
WRITTEN PERMISSION FROM PMI AUDIO. THE TRIDENT, A-RANGE AND TRIANGLE LOGO ARE
TRADEMARKS OF PMI AUDIO GROUP, USED UNDER LICENSE. ALL SPECIFICATIONS SUBJECT TO
CHANGE WITHOUT NOTICE. ALL RIGHTS RESERVED.
THIS SOFTUBE PRODUCT IS PROTECTED BY PATENT SE525332 AND PENDING PATENTS US20040258250, EP1492081 AND JP2004-183976.
4
Page 5
Installation and Authorization
I F Y O U B O UG H T T H E P R OD U C T I N A B OX you will have to register it in order to transfer the
license to your iLok account:
1. Go to http://www.softube.com/register to transfer the license to your iLok
account. You will need the License Code found in the box, your iLok.com
User ID, and your iLok USB dongle. Follow the instructions on the web page.
I F Y O U BO U GH T T HE P R OD U CT O N LI N E and have got the confirmation e-mail, the license
will already be deposited in your iLok account:
2. Make sure that you have the latest iLok drivers installed. They can be found at
http://www.ilok.com.
3. Log on to http://www.ilok.com and transfer the newly received license to your
physical iLok dongle.
4. Install the software from the DVD, or download the latest version from
http://www.softube.com/installers.
Sometimes the DVD contains installers for all Softube products, but you will only be able to
run those that you have acquired licenses for. In some cases, extra demo licenses are
included when you buy a Softube product.
5
Page 6

Introduction
The TridentTM A-Range® is a legendary piece of equipment. As only
thirteen A-Range consoles were ever made, it remains a holy grail for
sound engineers and producers around the world that hope to create
equal works of art to those that were originally recorded on the
A-Range – David Bowie's Ziggy Stardust, Queen, Elton John, the list
goes on...
The A-Range was originally designed in the early 70's for Trident
Studios in London by Malcolm Toft and Barry Porter. Toft was employed
as a sound engineer at Trident Studios and when the studio needed a
24 track recording console, he started Trident Audio Developments to
design and build the Trident A-Range. Other products followed and
found their way to studios around the world. Toft remains active to this
day, developing products under the Trident name.
The A-Range plug-in from Softube is the first and only native plug-in
that has been fully endorsed
by Toft and Trident
Audio.
6
Page 7

About the Trident A-Range
The plug-in version of the A-Range is modeled after a channel on one of the original 13
Trident A-Range consoles. This particular channel strip is channel number 15 from Sweet
Silence Studio 'B' in Denmark and was borrowed from Danish producer Flemming
Rasmussen. The A-Range console has been in Rasmussen's care for a long time and used
by Flemming Rasmussen when recording albums such as Metallica's Ride the Lightning,
Master of Puppets and ...And Justice for All.
The A-Range channel features four bands of equalization and high and low pass filters, the
sound of the filters are often referred to as “colorful” and “musical”. When running a hot
enough signal through the original unit and boosting the bands it is possible to get it to
distort, the sound is a hairy and effective saturation that is just right in some situation and
just wrong in others! Even
though the unit was never
designed to distort, it has
definitely been used
this way by renowned
producers and we
thought it was only
appropriate to stay
true to the original unit
and add the saturation
to the plug-in as an
option!
7
Page 8

User Interface
The layout of the A-Range equalizer is simple and easy. You have four different bands of
equalization, with a frequency selector knob and a gain fader each. Low and High Pass
filters can be activated by pressing the off-white buttons, and a handy Phase Invert switch
is found on the right side of the panel. The Saturation knob engages the console
saturation, and is best used as a subtle effect. If you don't wish to get saturation, just put it
in the OFF position and all saturation circuits will be de-activated.
The A-Range console was actually designed to have very little distortion, but it was
nevertheless possible to crank up the input volume and equalization bands to make it
distort, an effect that has been of much use in lots of recordings. The actual amount of
saturation depended heavily on the audio material and amplification before the console, so
we added the Saturation knob to make things easier for you. If all bands are set to zero
gain, Saturation on its default position (12 o'clock) and Output Volume on 0 dB, the
A-Range plug-in will have unity gain.
8
Page 9

Equalizer Bands
The four equalizer bands have two controls each – a
“frequency selector” knob and a gain fader. The fader will
boost the signal up to 15 dB by dragging the fader to the
right and attenuate the signal by 15 dB by dragging it to
the left.
High Shelving Band
The frequency options for the High Shelving Band are 15 kHz, 12 kHz, 10 kHz and 8 kHz.
When boosted, the High Shelving Band gives a beautiful high-end shimmer
to just about any material. Don't be afraid to try it on a master bus, as the result
can be fantastic!
High Mid Band
The High Mid Band is of bell type with the following center frequencies: 9 kHz, 7 kHz,
5 kHz and 3 kHz.
The bell filters interacts with each other in a rather funny way. For example,
even if the gain of the Low Mid Band is set to zero, changing the frequency of
that band will affect the frequency response of the High Mid Band filter
significantly. The results are quite unpredictable and this is part of the reason
for the unusual sound of the A-Range!
High shelving band (top)
and high mid band (bottom).
9
Page 10

Low Mid Band
The Low Mid Band is of bell type with the following
center frequencies: 2 kHz, 1 kHz, 500 Hz and 250 Hz.
Low Shelving Band
The frequency options for the Low Shelving Band are
150 Hz, 100 Hz, 80 Hz and 50 Hz.
Low mid band (top) and the
low shelving band (bottom).
Low Pass and High Pass Filters
The Low Pass and High Pass filters are controlled by three buttons
respectively, which sets the cut-off frequency for the filters – 15 KHz,
12 kHz and 9 kHz for the Low Pass and 100 Hz, 50 Hz and 25 Hz for the
High Pass. The cut-off characteristic is unusual and not exactly coherent
but the slope is about 12 dB per octave.
The three settings work independently and can be used in any combination
which means that the more buttons you engage, the more attenuation you get.
For example, pressing all three Low Pass buttons will actually result in a filter
with an even lower cut-off frequency than 9 kHz.
10
Page 11

Phase Invert
The Phase button inverts the phase when
pressed (as seen in the picture).
Saturation
The Saturation or distortion of the A-Range is
placed after the equalizer bands and is
depending on the gain settings of the bands.
A louder or “hotter” signal will make the unit
distort more and a weaker signal will make it
distort less.
To be able to handle signals of different volumes and to make up for equalizer band
settings we added a Saturation knob that basically is a volume compensated input gain
for the saturation circuits. The LED next to the saturation knob indicates when the signal is
being distorted. If you want to be sure not to add any saturation to the sound, click the
“OFF” label and the saturation circuit will be bypassed.
You will get the best result if the saturation is used sparingly on percussive
sounds, like a drum bus. Let it take care of occasional peaks, and do not run
it too hot.
The Phase switch, Saturation knob and
indicator LED and the Output Volume.
Output Volume
The Output knob controls the output volume from the plug-in. The range of the output
volume is -30 dB to 10 dB.
11
Page 12

Key and Mouse Commands
All labels (such as the dB or frequency labels) are
clickable. This allows you to easy select a setting by
clicking on the wanted value. Hovering above a label will
turn the mouse pointer into a pointing hand.
Mouse
• U P/ D O WN :
Change a parameter, such as a knob or a switch.
• C LI C K :
Clicking on labels or activate the “About” box.
• M OU S E W H E EL (Mac only):
Use the mouse wheel to change parameters.
Keyboard Commands
Use these key commands while changing a parameter.
• F IN E AD J U ST :
Command (Mac) or Control (Win)
Figure 1: From top to
bottom: Knob- and switch-
changing cursor, Label
cursor and the “About”
box cursor.
• R ES E T T O DE F AU LT :
Alt (while clicking on the knob or fader).
Pro Tools Specific Keyboard Commands
• A UT O M AT I ON C ON T R OL WI N D OW :
Control+Command+Alt+click (Mac) or Control-Windows-Alt-click (Windows)
• S HO W AU T O MA T IO N TR A CK :
Control+Command+click (Mac) or Control-Windows-click (Windows)
12
Page 13

Technical Side Notes
Mono and Stereo Operation
The T R ID E N T A -R A NG E plug-in is designed to work in both stereo and mono. How the
different modes are selected depends on your host software. In most hosts you can select
these when you select the plug-in. In other cases, inserting one the plug-in on a mono
track will usually make it use the M ON O mode, while selecting it on a stereo track makes it
use the S T ER E O mode.
TDM/RTAS Stereo Operation
TDM stereo is not supported due to DSP limit constraints. You will need to use the “M UL T I-
M ON O ” mode instead of S T ER E O mode. Normal ST E R EO mode is however available in
RTAS. If you plan to use “deck change” (online switching between RTAS and TDM), you
should always use the M UL T I- M O NO mode instead of S TE R EO mode, otherwise deck
change won't work.
RTAS on Pro Tools|HD
There are some specific issues to consider when using an RTAS plug-in in recording mode
on a Pro Tools|HD system. First of all, an audio buffer latency is introduced in the RTAS
version.
Secondly, all RTAS plug-ins are automatically bypassed in recording mode, unless an
TDM plug-in is inserted on the insert slot before the RTAS plug-in.
Enabling the plug-in in recording mode (Pro Tools|HD 7 or higher):
• Insert a TDM plug-in (such as the “Trim” plug-in) on your track.
• Insert the Trident A-Range plug-in as RTAS on an insert slot after the TDM plug-in.
Please see your Pro Tools reference guide for more info.
13
Page 14

Buying Recommendations
We always make buying recommendations in our manuals for a hardware equivalent of the
plug-in. In this case, it's really simple and really hard – If you can find an A-Range channel
and can afford it, get it!
This is a photo of channel 15 and 18 from one of the original Trident A consoles. These
two are the ones we measured for the A-Range plug-in. A few cosmetic changes have
been made to these units while at the Sweet Silence Studios: the original flip switches on
the Mute button has been changed to big red switches, the gray fader handles have been
changed to bright yellow, and three frequency selector knobs have also been replaced.
But it has the original face plate color, a strange but beautiful aubergine style purple!
14
Page 15

System Requirements
Supported sample rates: 44.1, 48, 88.2, 96, 176.4 and 192 kHz, in both mono and stereo.
All native versions
• Mac OS 10.4 (or higher) on a G4 or Intel CPU (or higher)
• Windows XP (or higher) on a PIII CPU (or higher)
• 512 MB RAM
• Any VST, Audio Units or RTAS (Pro Tools 7 or higher) compatible host application
• iLok USB key and the latest iLok drivers (download them from http://www.ilok.com)
• DVD drive or Internet access for installation
TDM and VENUE versions
• Pro Tools|HD Accel card is required
• Pro Tools|HD compatible system
Please, make sure that you always use the latest iLok driver. It is not included in the
Softube installer, but can be downloaded from www.ilok.com.
15
Page 16

Trident A-Range plug-in was made by: Niklas Odelholm – modeling, Oscar Öberg – DSP
programming and modeling. Torsten Gatu – framework programming. Arvid Rosén –
framework programming. Ulf Ekelöf – 3D rendering. Original hardware was designed by
Malcolm Toft and Barry Porter at Trident Audio Developments. The original unit is owned
by Flemming Rasmussen at Sweet Silence Studios.
© 2010 Softube AB, Sweden
 Loading...