

Page 1
Quick Start Guide
M|80
1
!
!
What’s in the box ?
!
The M|80 box (a Sonnet Thunderbolt expansion chassis + a Deltacast DELTA-hd-elp-d 80
card)!
• A USB dongle (holds the licenses for the 8 channels of MovieRecorder 3)!
• 8 x BNC Female to DIN SDI Cable - 1!
• 1 x Thunderbolt cable (1,5 m)!
• Power Adapter and Cord!
!
Connect the M|80 to your computer
To start using the M|80, unpack it, connect it to:!
• a power outlet!
• your computer using the Thunderbolt cable!
!
On your computer
Connect the USB dongle (the small green light should light up)!
• Download MovieRecorder 3 (http://softron.tv/downloads.html)!
• Download and install the drivers for the Deltacast card (http://www.deltacast.tv/hdlevel0/
prepare.aspx?dl=VideoMasterHD_Redist_MacOS)!
!
Note that you will have to restart your computer after you have installed the drivers for the
card.!
!
Connection Diagram
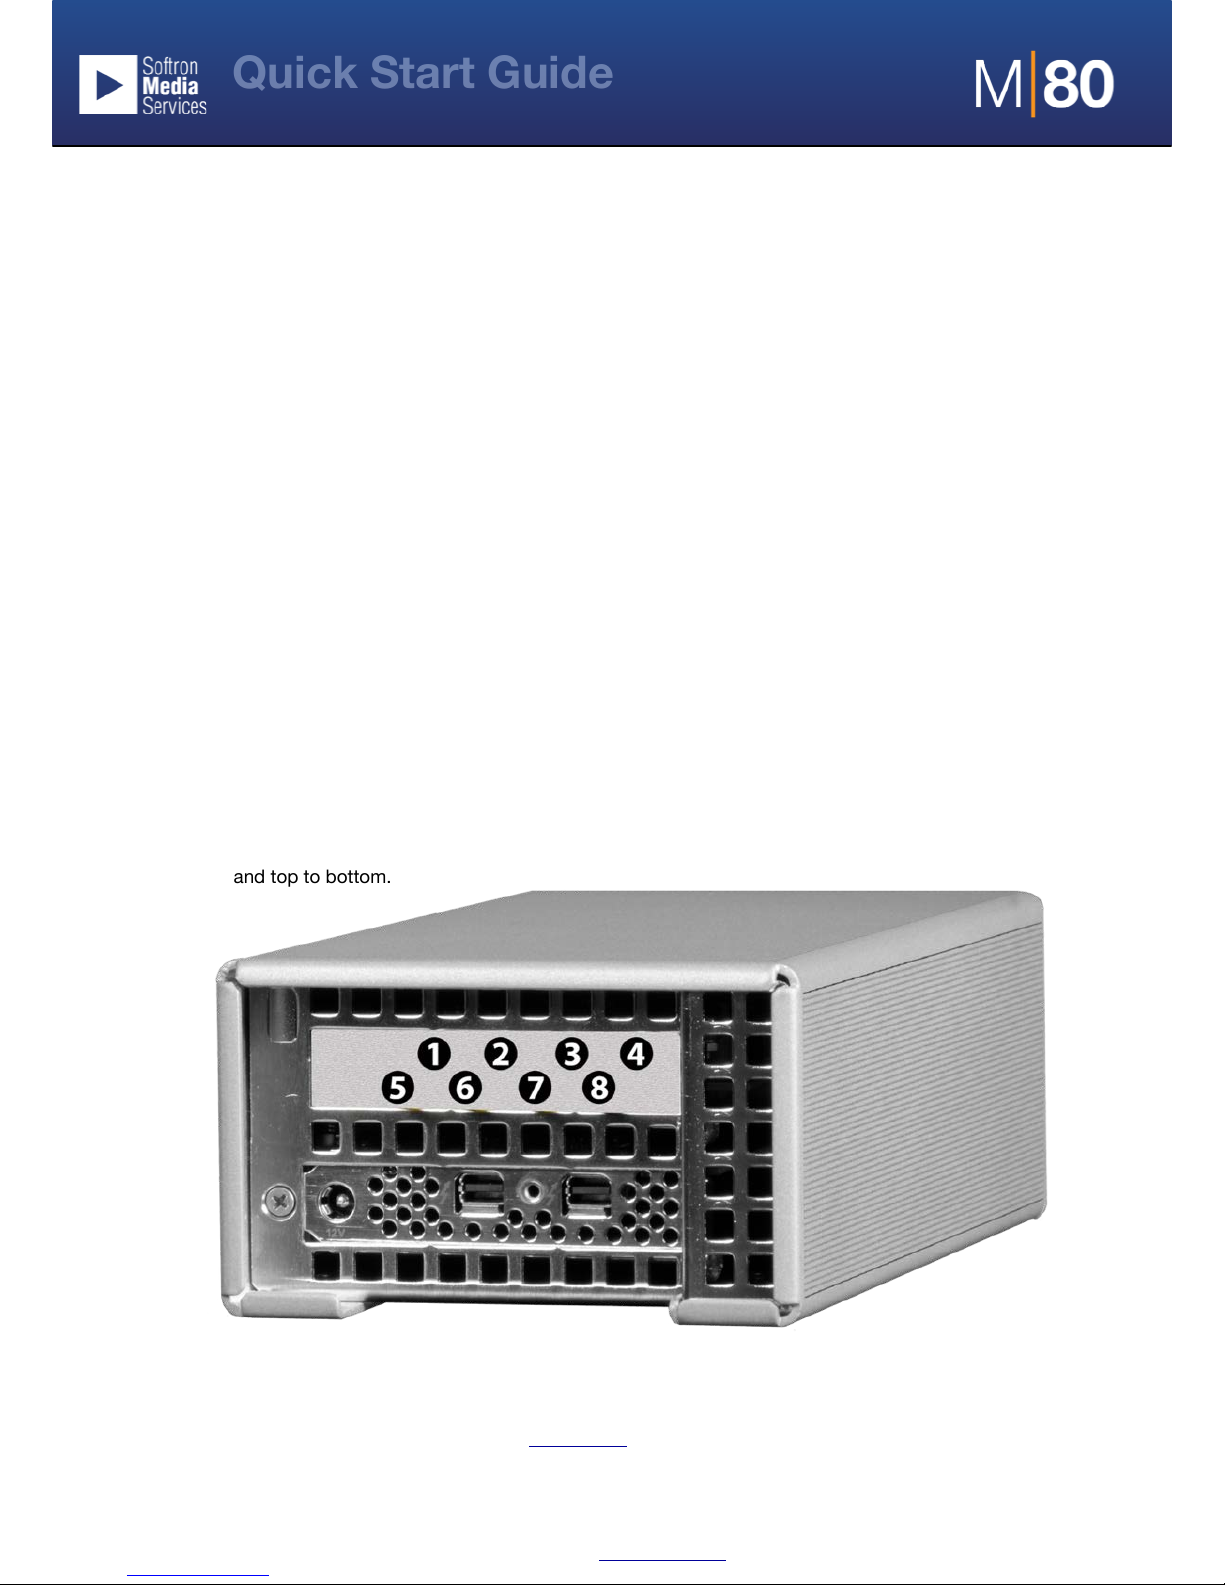
The M|80 has eight 75 Ohms, DIN 1.0/2.3 connectors. The order of inputs is easy to
remember: when you look at the back of the device, it follows the reading order, left to right
and top to bottom.!
!
!
!
!
!
!
Software Installation
!
1. Download MovieRecorder from our website .!
2. Unzip the downloaded file.!
3. Drag and drop the MovieRecorder application in your Applications folder.!
www.softron.tv
Page 2
Quick Start Guide
M|80
2
!
!
!
Setting up Sources
!
!
Once MovieRecorder 3 has started, the first things you will want to do is to set where the
signal comes from (Video source), where you want to record and in which format
(Destinations). !
On the left hand side of the MovieRecorder 3 Window, you will see two tabs, one labeled
Sources and one labeled Destinations. Make sure the “Sources” tab is selected. The Sources
tab lists all the video sources available for MovieRecorder 3.!
!
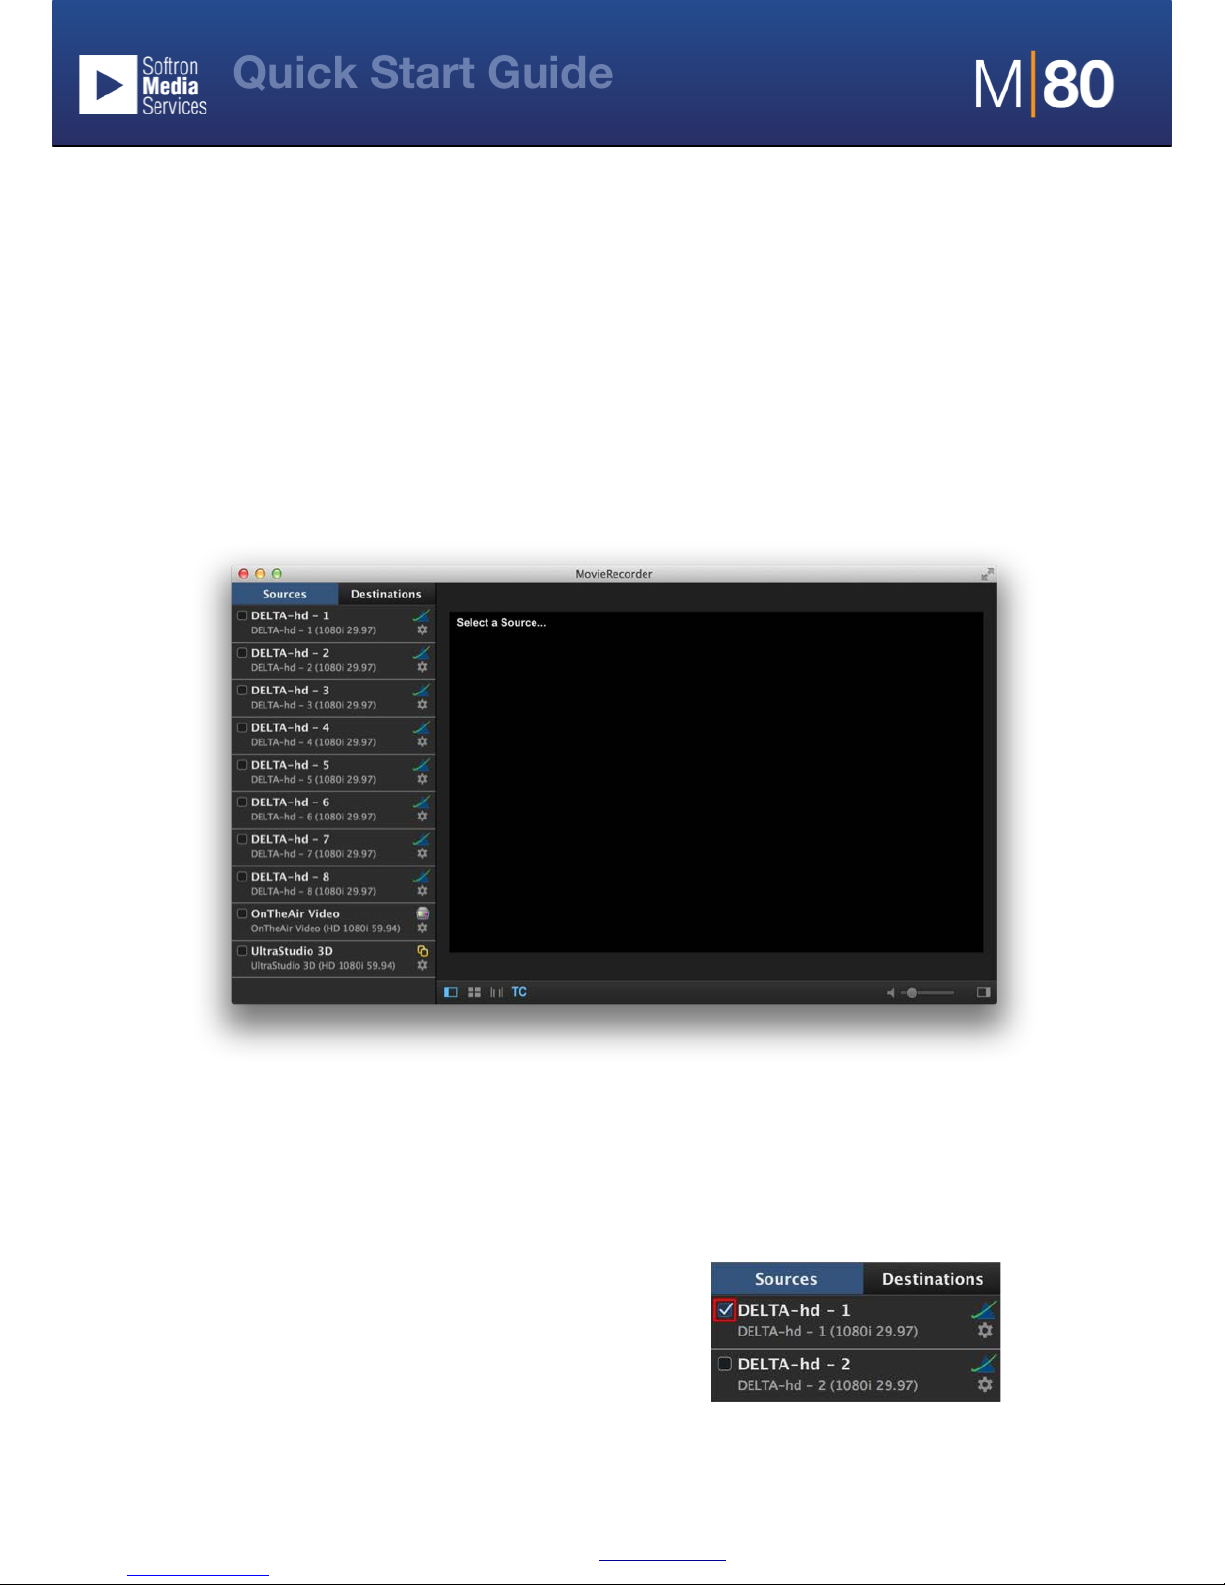
If your video device is correctly connected to the computer and the appropriate version of the
drivers are installed, you should see something like this:!
In the screenshot above, you can see the 8 inputs of an M|80, the direct link from a OnTheAir
Video application running on the same computer, and a Blackmagic UltraStudio 3D.!
!
!
!
Enable one (or more) Sources
!
To be able to use any of the sources listed there, the
first thing you need to do is to “enable” it. To enable it
simply tick the checkbox in front of it. If you can not
enable a source, open the log window (cmd+shift+L)
and check if you don’t see a log there. For example, if
the card is already in use by another application, it will
be logged there.!
!
Enable as many sources as you need.!
!
www.softron.tv
Page 3
Quick Start Guide
M|80
3
!
Configure one (or more) Sources
!
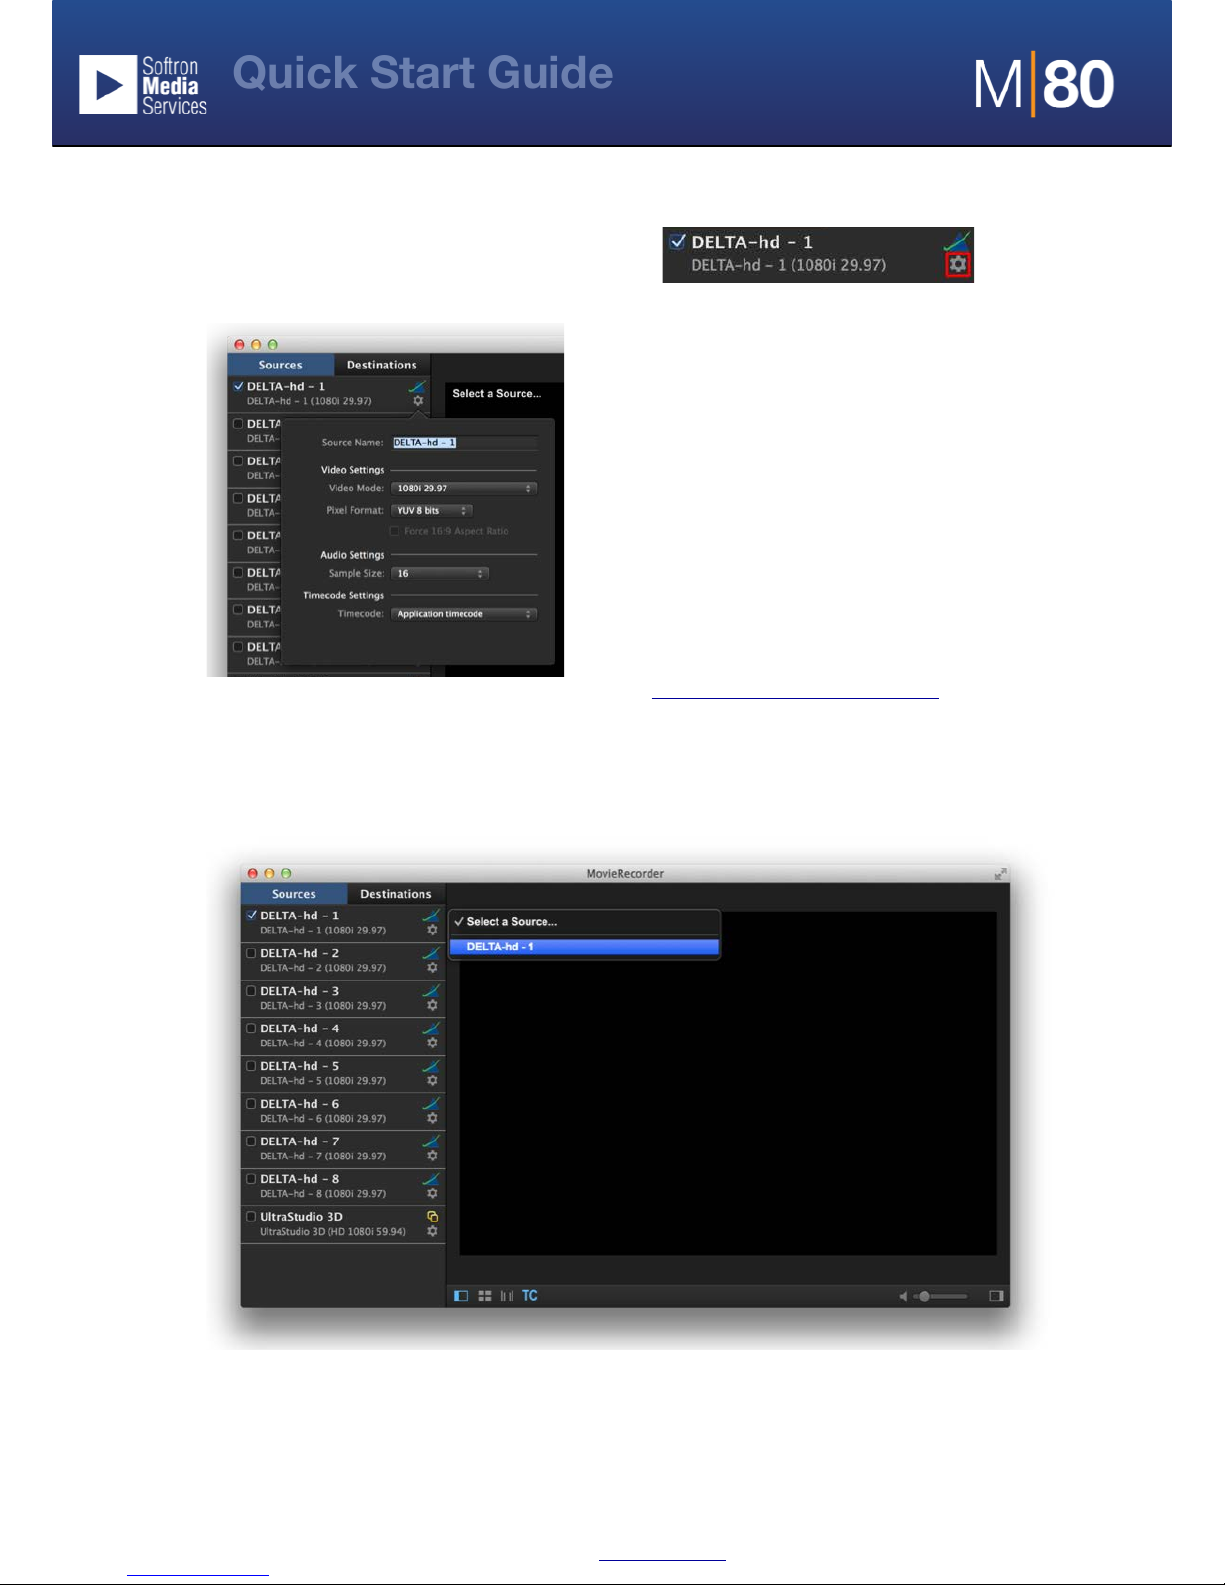
To configure a source, click on the gear icon
below the video card manufacturer’s logo.!
!
!
In the popover window that shows up, you will be
able to:!
•
Rename the Source from its default name!
•
Establish the Video Mode and frame rate (the
modes available depend on the video card you
use)!
•
Select the Pixel Format (YUV 8 bits or YUV 10
bits)!
•
Set if the video input is 16:9 (only for SD input)!
•
Select the Audio Settings (Sample Size) !
•
Select the Timecode Settings. You can choose
between “Application timecode” (the timecode
set in the preferences of MovieRecorder), and
“Videocard timecode (the timecode that the
card reads either from RP-188 or its Audio LTC
connector or any other TC source it has). You
can read more about TC sources here.!
!
!
!
As soon as a source is enabled it will be available in the popup menu located on the top left
corner of each portal:!
!
Once selected in a portal you should see a video input.!
!
!
!
www.softron.tv
Page 4
Quick Start Guide
M|80
4
!
If the preview area remains black and that you have no video input, check:!
•
that the video format and fps corresponds to the format of your video input. If your video
input is 1080i29.97, and you have selected 720p59.94, it won’t work.!
•
that the video card settings are properly set, you may have to change the input connector
(HDMI or SDI for example)!
•
that the cables are correctly connected!
•
you may have another application using the same device!
!
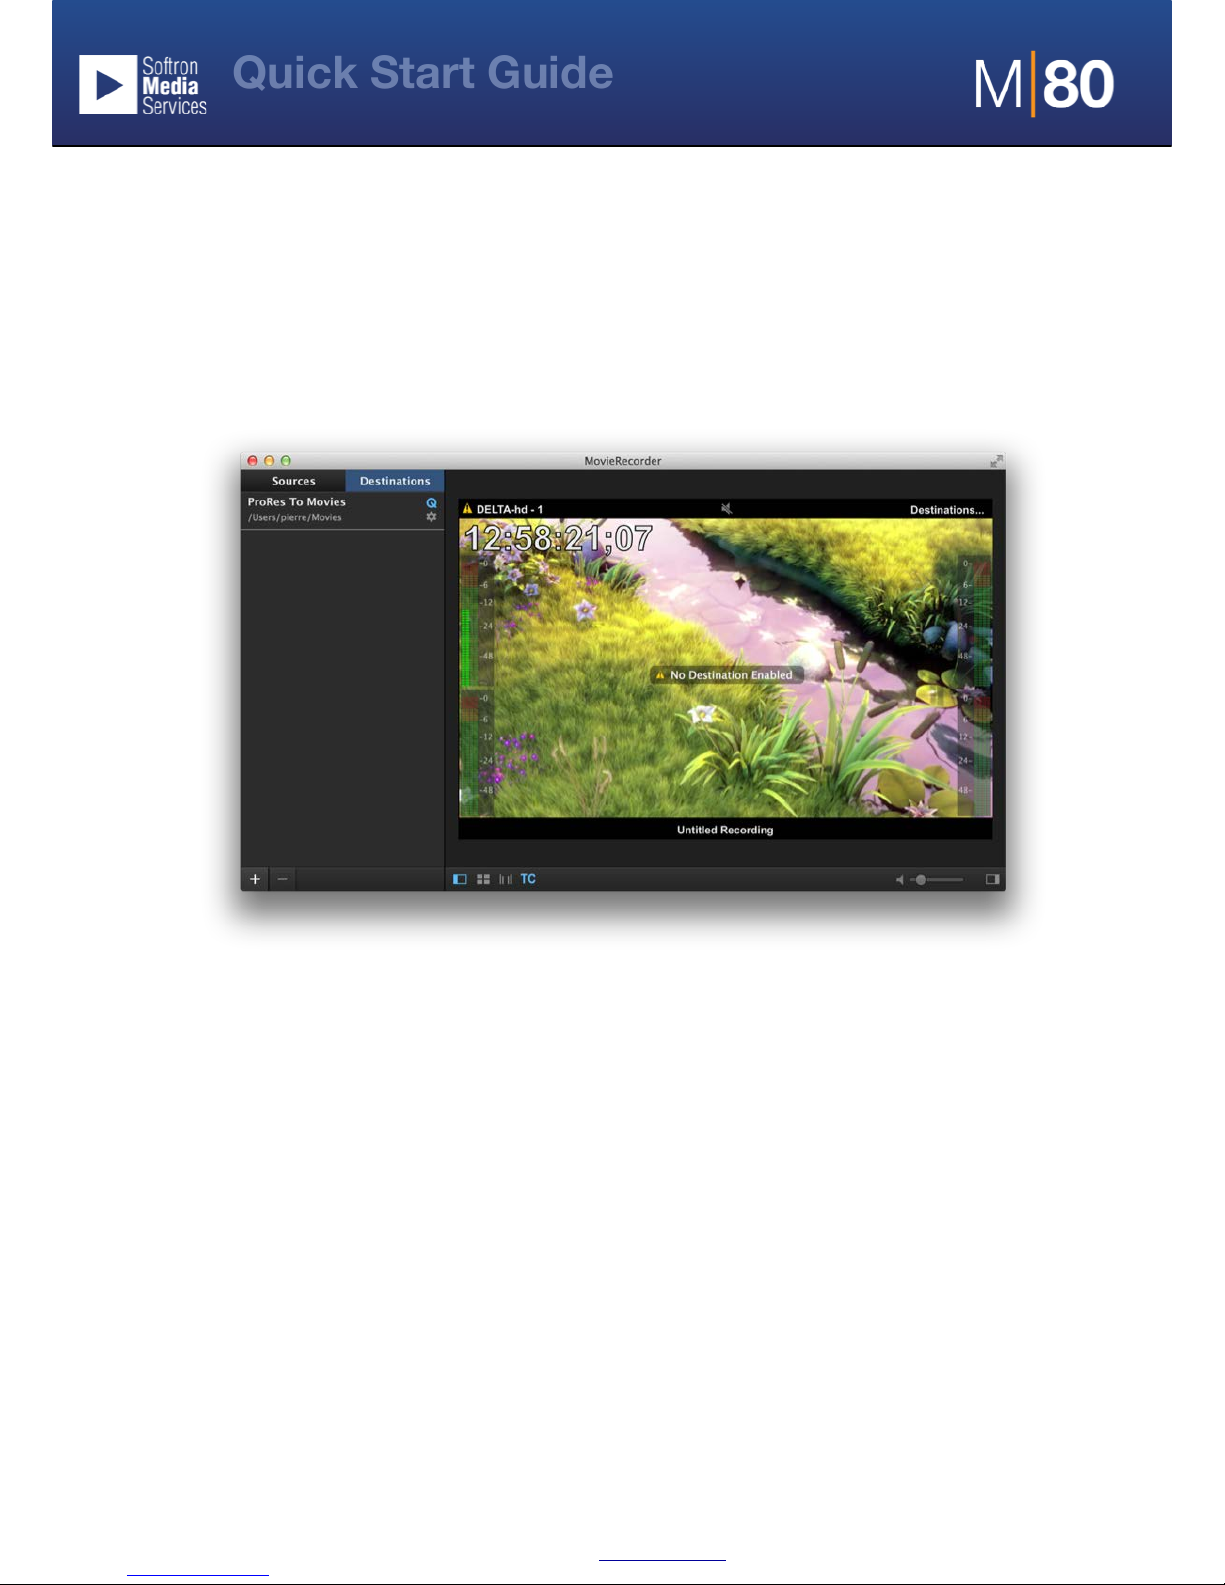
Once the video source is enabled and selected in the preview window, you will have to enable
at least one destination in order to be able to start recording. When no destination is enabled
you will see a warning in the middle of the preview saying “No Destination Enabled”.!
!
!
!
!
www.softron.tv
Page 5
Quick Start Guide
M|80
5
!
Setting up Destinations
!
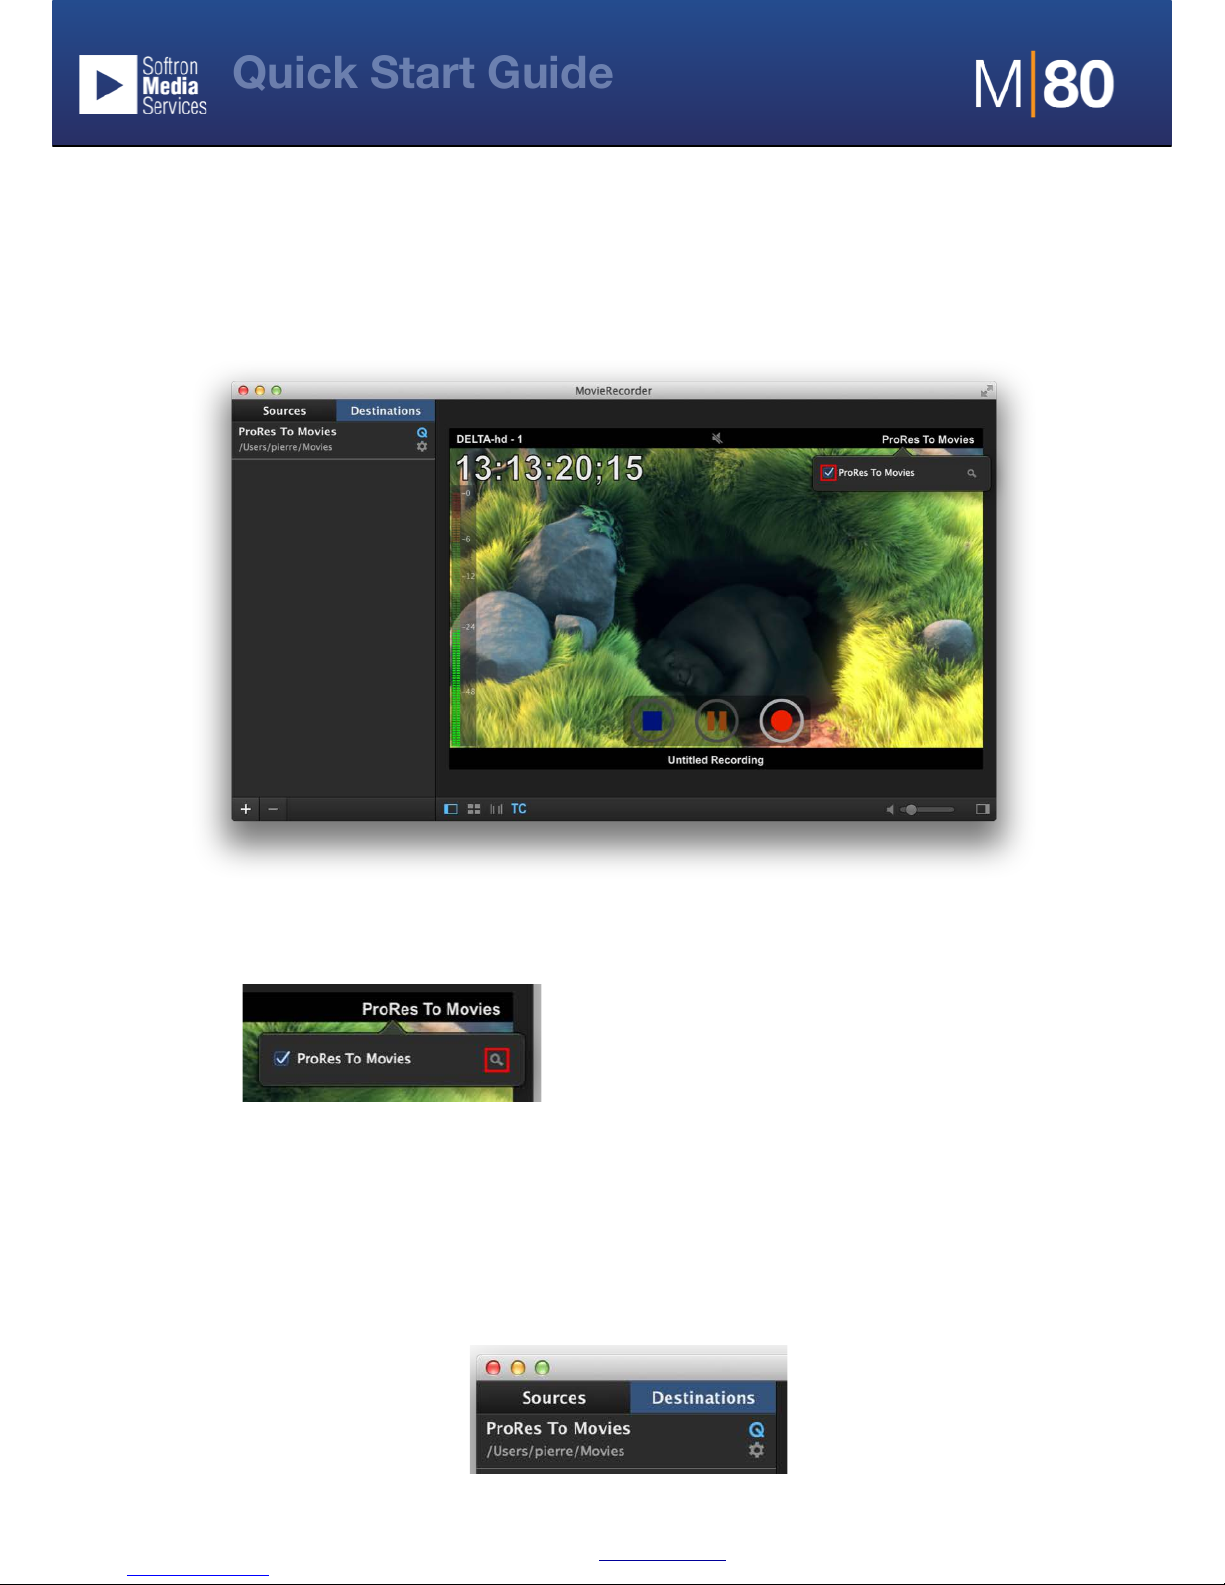
You can use the default destination (ProRes To Movies) that is created by default. It will create
a file in ProRes 422 in the current user’s Movies folder. To enable it, click on the top right
corner of a portal. A popover menu will show up showing the destinations that are available.
Tick on the checkbox to enable it.!
Once a destination is enabled, you are able to start recording of the selected source to the
selected destination.!
!
!
Once you have started recording, you can use the
magnifying glass next to the Destination name to reveal
the file in Finder.!
!
!
!
!
Create Destinations!
!
In the example above, we have showed the quick way by using the destination that is created
when you first start the application. But you may want to record to a different folder, using a
different codec, etc… And the very nice thing with MovieRecorder 3 is that you can create as
many destinations as you want. For that, click on the “Destinations” tab:!
!
www.softron.tv
Page 6
Quick Start Guide
M|80
6
!
!
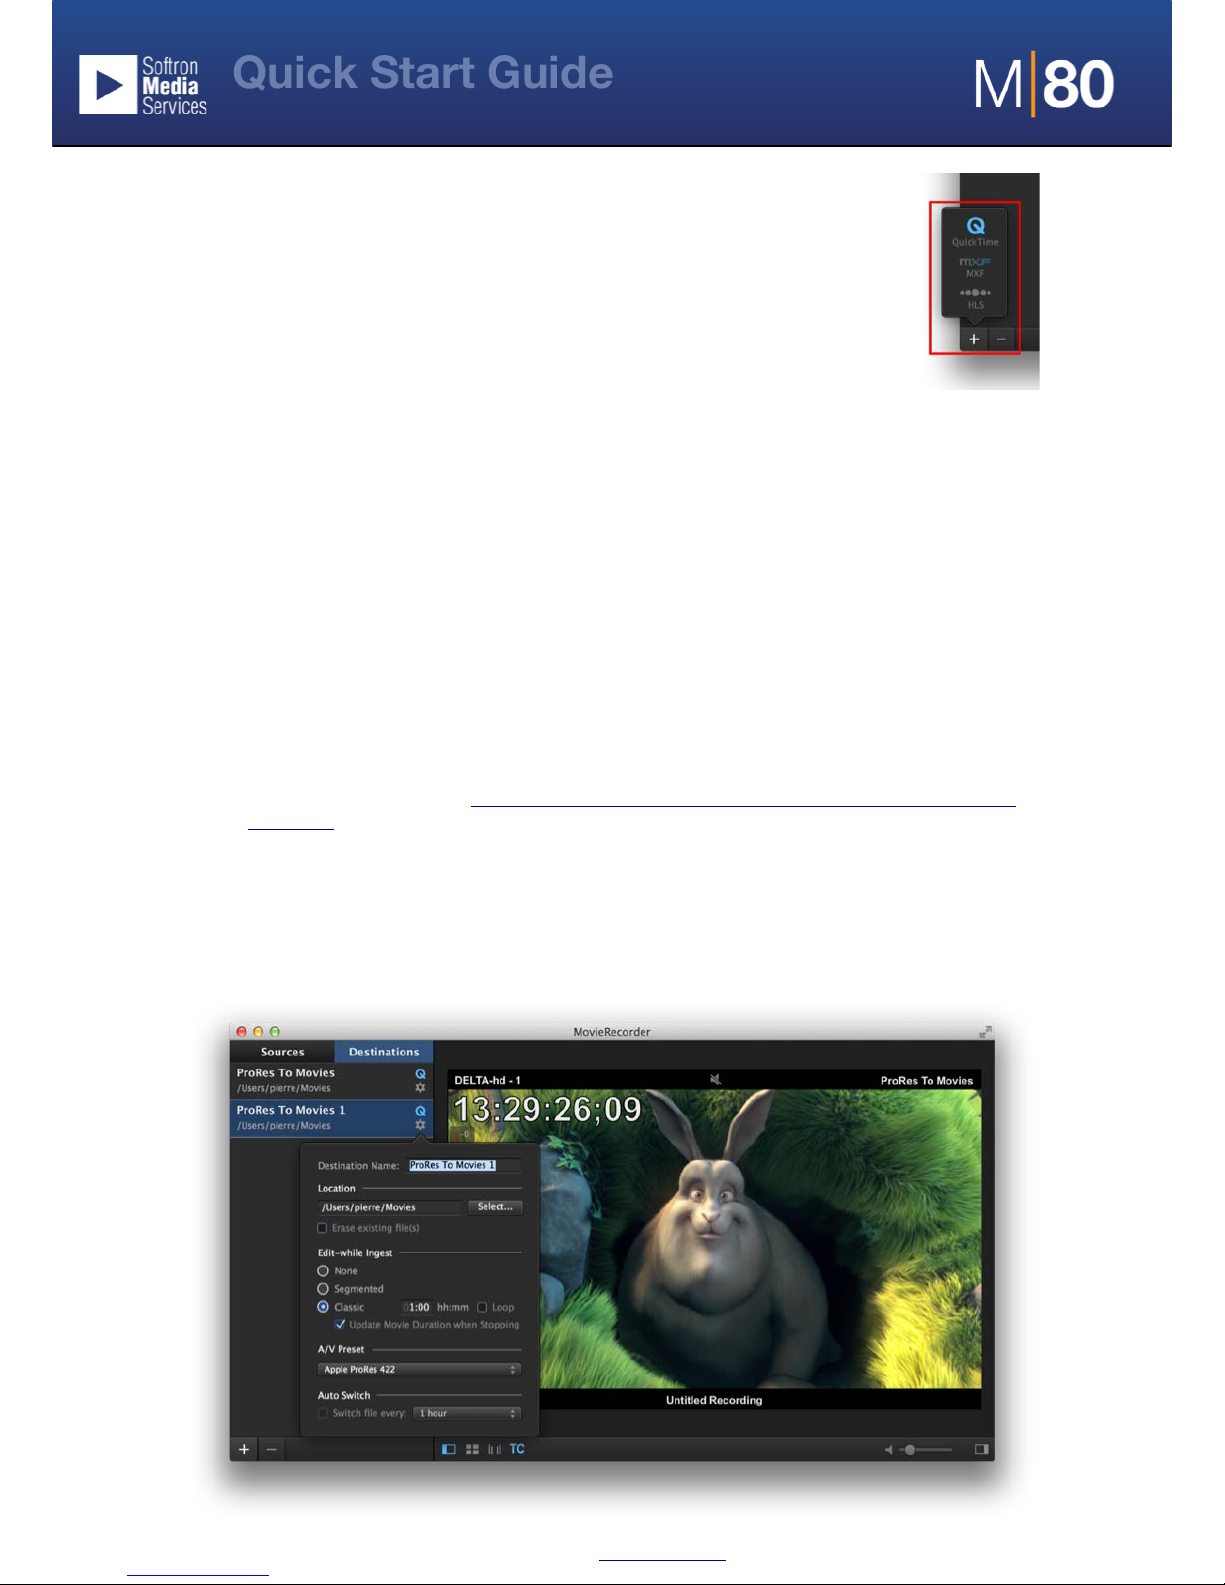
By clicking on the Destinations tab, you will open an area where you can create
one, two or many more destinations. On the bottom left of this panel, you can
find a plus and minus sign. Clicking on the plus sign (“+”) will pop up a menu to
create either:!
•
a QuickTime file (.mov) !
•
an MXF file (.mxf) - COMING SOON!
•
a series of HTTP Live Streaming transport stream files (.ts) - COMING SOON!
!
!
Depending on the type of destination that you use, there will be different settings available.
You can create as many destinations as you want.!
!
!
Edit a QuickTime Destination!
!
Selecting QuickTime will create a QuickTime file capable of being edited using a QuickTime
editing or compositing application.!
!
When the Quicktime Destination is created, you will be able to :!
•
Rename the Destination preset !
•
Establish its location (Volume and folder where you want to record. It can be a local or on a
shared storage)!
•
Whether or not you want to overwrite a preexisting file of the same name (when disabled a
counter number will be added at the end of the file)!
•
Select the type of Quicktime file that you want to create. Depending on the type of file
created, you will have different settings and codecs available. Loop recording is only
available in Classic mode. To read more about the advantages of each file type, please read
this article.!
•
Select the A/V Preset that you want to use. A/V Presets are configured in the Preferences of
the application. (Some codecs are only available in some QuickTime file types. For example
the H.264 codec is only available in None and Segmented.)!
•
Set the Auto-Switch attribute. MovieRecorder 3 can automatically switch to a new file after
a given duration in order to record 24/7 without loosing a frame. When in “Classic mode”,
the auto-switch option is disabled, as the auto-switch will occur at the duration set next to
the Classic mode option.!
!
!
!
!
!
!
!
!
!
!
!
!
!
!
!
!
!
!
!
!
!
!
www.softron.tv
Page 7
Quick Start Guide
M|80
7
!
!
!
!
Enabling multiple destinations
!
!
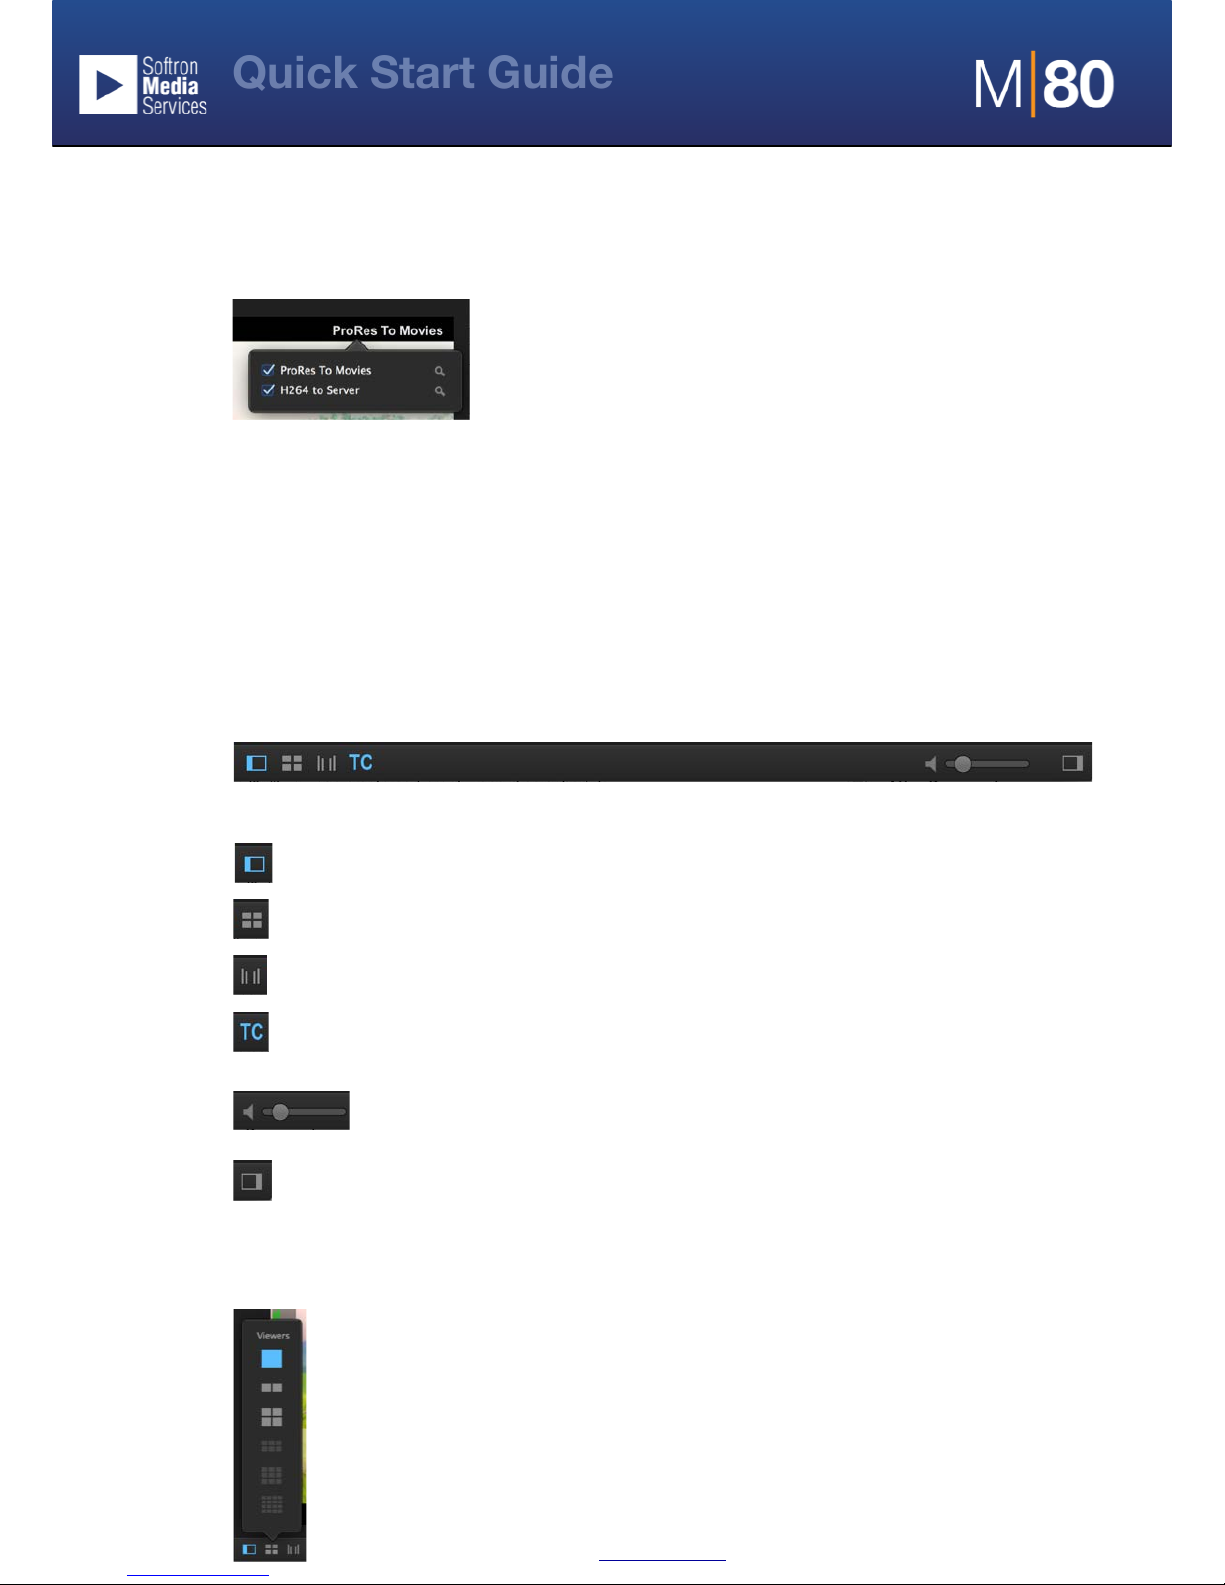
Each Source can have multiple Destinations assigned. As
explained earlier, just tick the checkbox in front of the
destinations that you want to use. In the example here, one
input will be recorded to ProRes and H.264 at the same time.!
!
!
WARNING!
We don’t limit the number of destinations that you can enable per source. But the limit is the
CPU of your computer. Make sure to monitor this and monitor the log window to make sure
that you don’t ask too much.!
!
!
!
About the window icons
!
!
Along the bottom of the MovieRecorder window, you will find a bar with multiple buttons: !
Here is a short description of what they do:!
!
Show or hide the Sources/Destinations pane !
!
Select the number of portals that you want to be displayed in the main window.
Depending on the size of your window, you will be able to select more or less portals.!
!
Turn on and off the audio Vu-meters that appear in the portals. !
!
Allows you to turn on the display of the time information (Current TC as set in source
settings, Elapsed and Remaining recording times).!
!
Modify the Preview audio volume. Note that additionally you can turn on or off
the audio of each individual portal by clicking on the small audio icon at the
center top of each portal.!
!
Show or hide the “Scheduled Recordings” Panel.!
!
!
!
About the number of portals that you can display!
!
As said above, the number of portals (or viewers) that you can display at once on
your screen depend on the size of your MovieRecorder window. In the example at
the left here, you can see that :!
•
The first icon (one portal) is blue. This is the currently selected view.!
•
The second and third icons are in light grey. This means that you can display
a maximum of 4 Viewers in this window size. If you want to display more you
will need to make your window bigger.!
•
The last 3 icons are greyed out, you can not select them.!
www.softron.tv
Page 8
Quick Start Guide
M|80
8
!
!
!
Name and manually start your recording
!
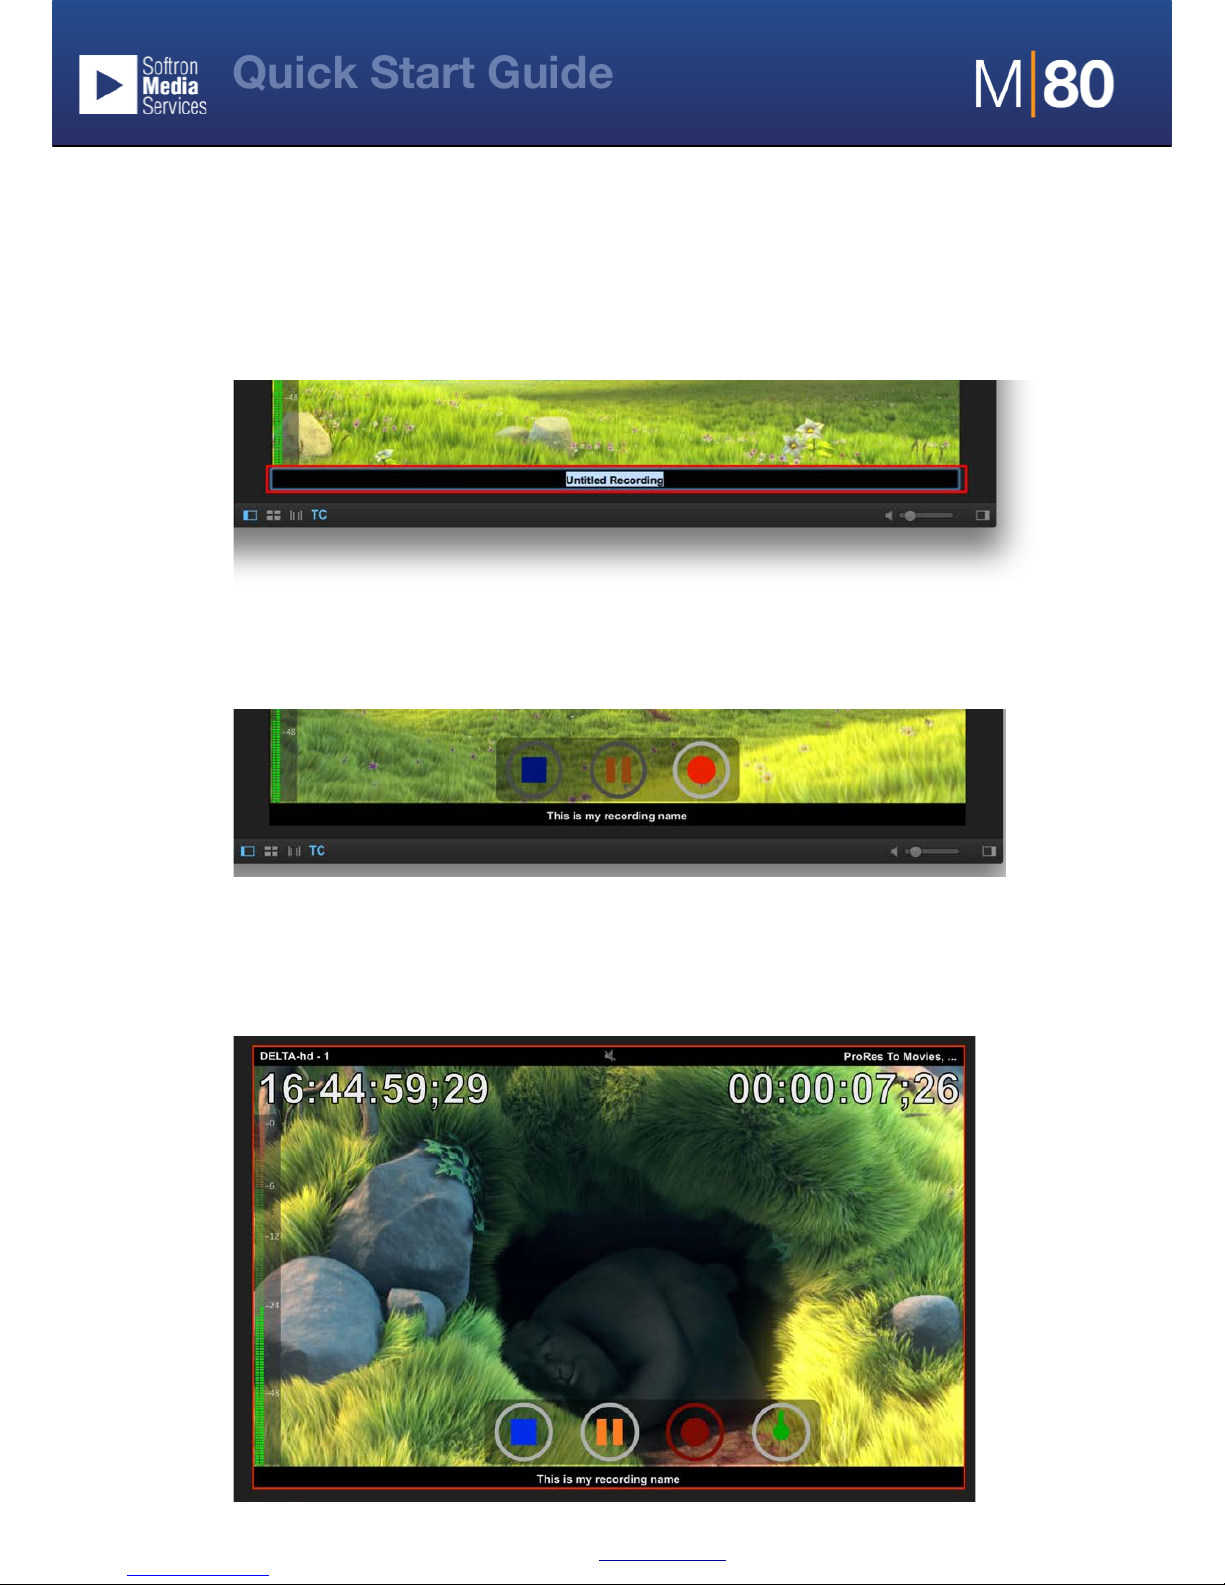
Once you are ready and all set, you are ready to start your first recording. But first you may
want to set a recording name. You can modify the recording name at the bottom of each
portal:!
When you have given the appropriate name for your recording, you can start the recording.
When you move your cursor over the preview portal, the stop recording, pause recording and
start recording buttons will appear. To start recording simply click on the red record button.!
!
You can tell you are recording because !
•
there is a red box drawn around the border of your proxy portal.!
•
the status of the buttons change!
•
an additional (Timer) button appears!
www.softron.tv
Page 9
Quick Start Guide
M|80
9
!
!
About the “Timer” button!
!
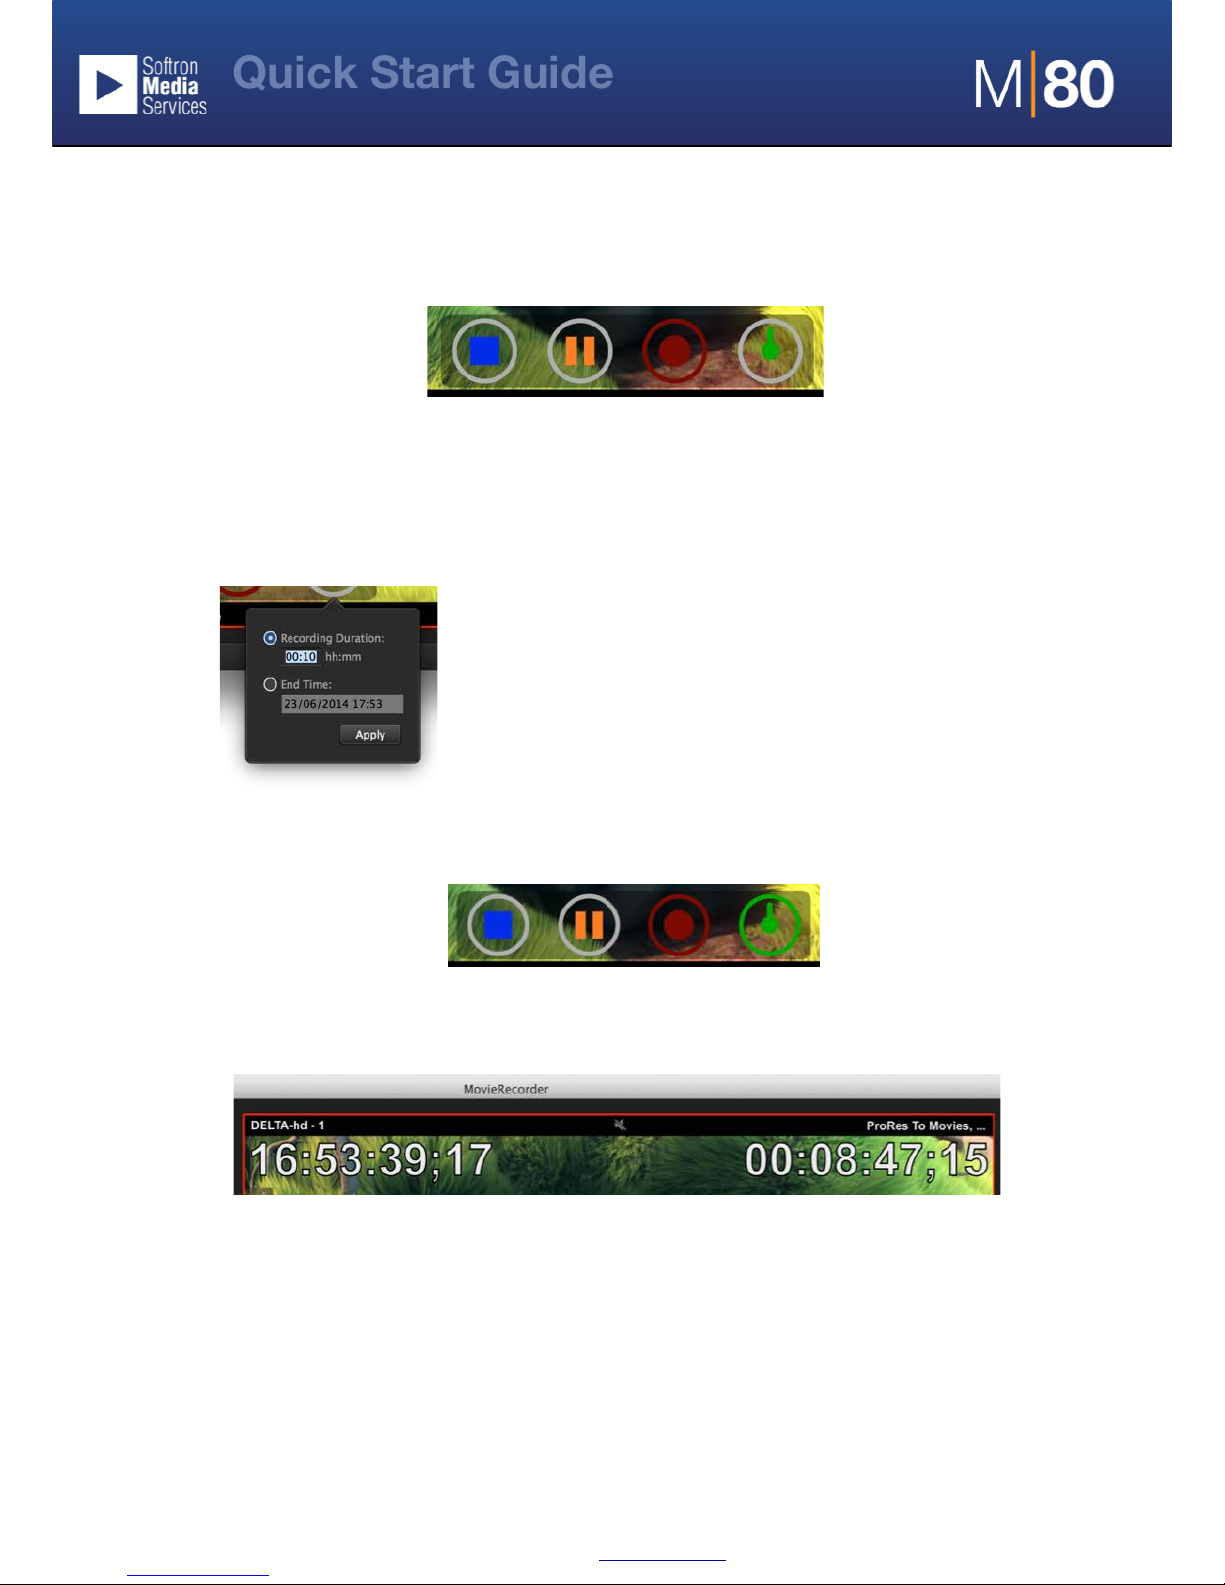
While your clip is recording, another button will appear to the right of the record button.!
!
This button will allow you to automatically stop the recording either after a period of time, or
at a given time (instead of having to manually stop it). It can also be used to modify the
recording remaining time of a scheduled recording (see below). To set when you want the
recording to start, click on the clock icon. This will open a popover window where you will be
able to set either:!
!
!
!
•
the recording duration: in the example on the right, the
recording will stop 10 minutes after it started!
•
the end time: in the example here, the recording will stop on
the 23rd of June at 5:53PM.!
!
!
!
!
!
Once this is set, click on “Apply”. The Timer icon will turn completely green when a timer is
applied:!
!
Once a timer is applied, you can also display the recording remaining time simply by clicking
on the time information on the top right. Just check if it counts up or down to know if it’s a
remaining or elapsed time.!
!
!
!
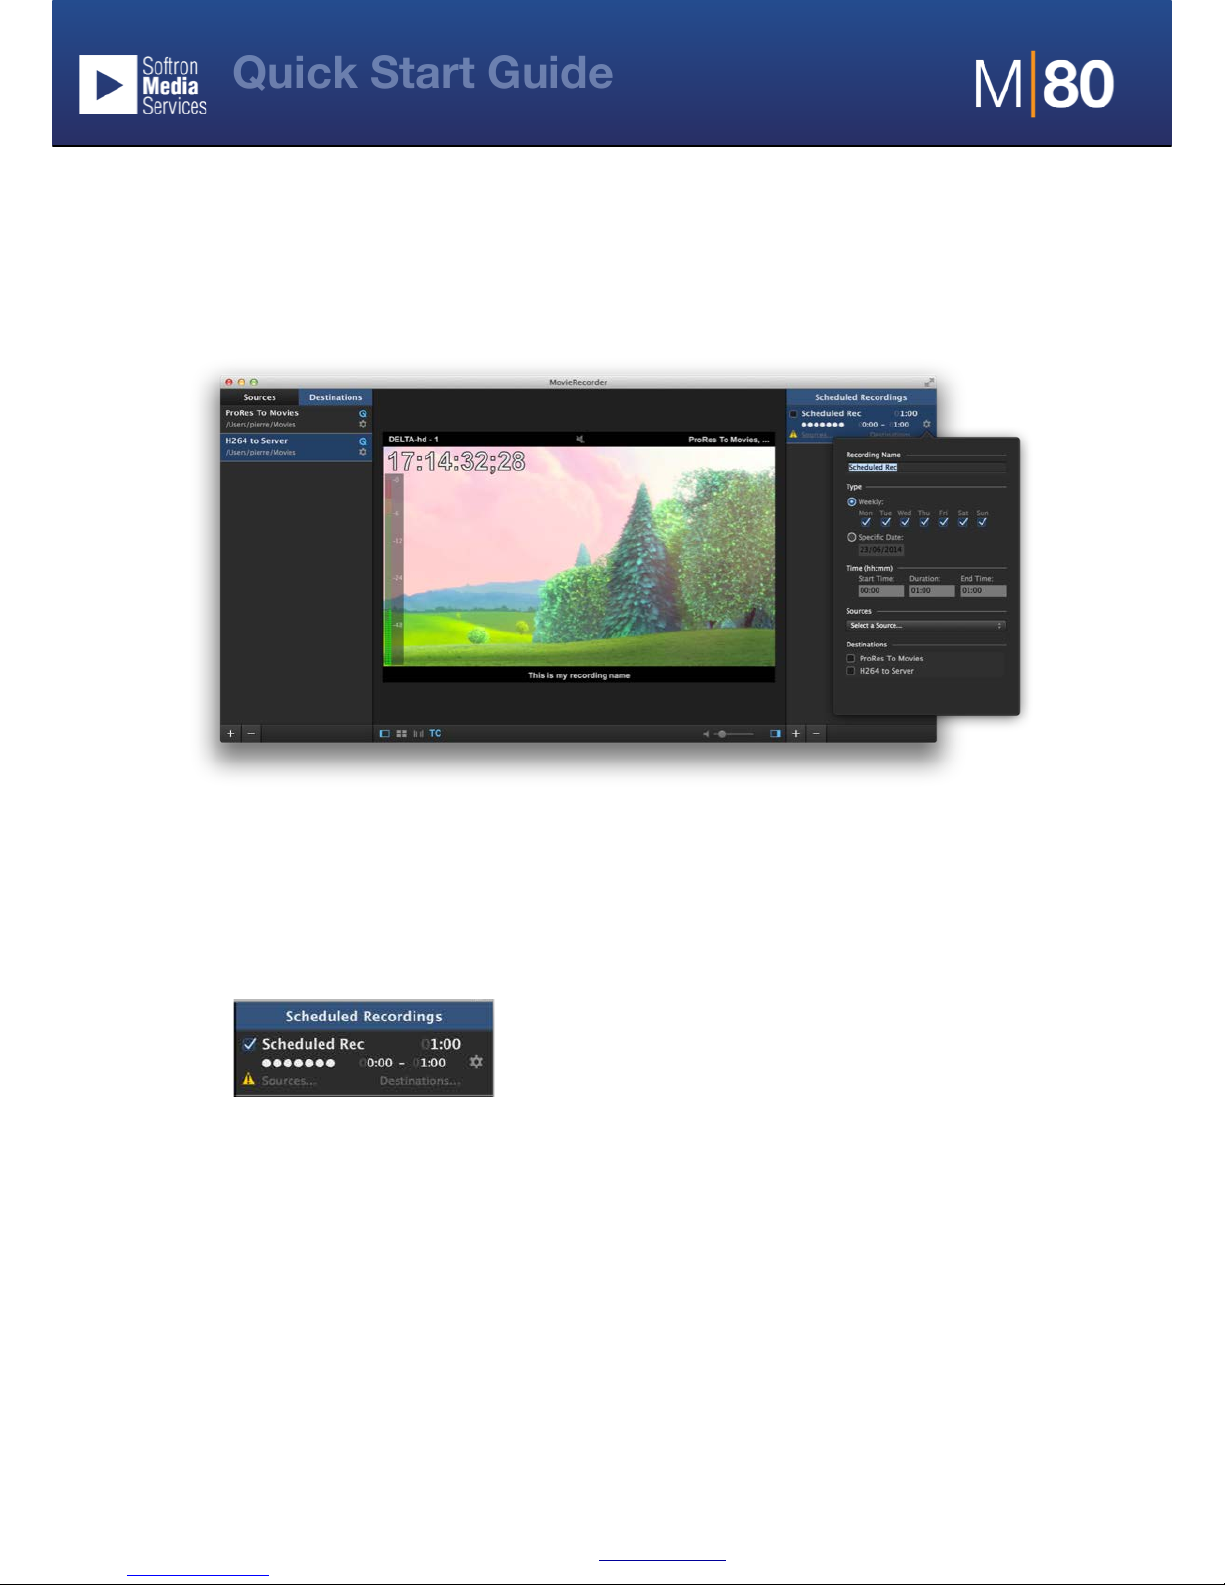
And by clicking on the gear icon you will reveal the control window that is used to designate
the date, time, source, and destination of the recordings you want MovieRecorder 3 to create
when running unattended. !
!
!
!
!
!
!
!
www.softron.tv
Page 10
Quick Start Guide
M|80
10
!
!
!
Scheduled Recording
!
MovieRecorder 3 allows you to schedule recordings so you can make sure that you don’t
miss a recording session. When you first open the scheduled recording pane, it should be
empty. To create a scheduled recording, click on the + icon at the bottom of the pane.!
!
!
!
!
!
For each scheduled recording, you will be able to set:!
•
its name: will also be the name given to the recorded file!
•
the type of recording: either a recurring weekly recording, or a recording on a specific date!
•
the Source to use: you can select one source per recording. If you want to record multiple
sources at the same time, you can just duplicate the scheduled recording and assign a
different source.!
•
the Destinations to use: each scheduled recording can use a different destination as well!
!
Once it is created, make sure that:!
•
It is enabled
•
A source and at least one destination is selected for each
scheduled recording. If not, an attention icon will be
displayed next to it.!
!
!
!
!
www.softron.tv
Page 11
Quick Start Guide
M|80
11
!
Gang Recording
!
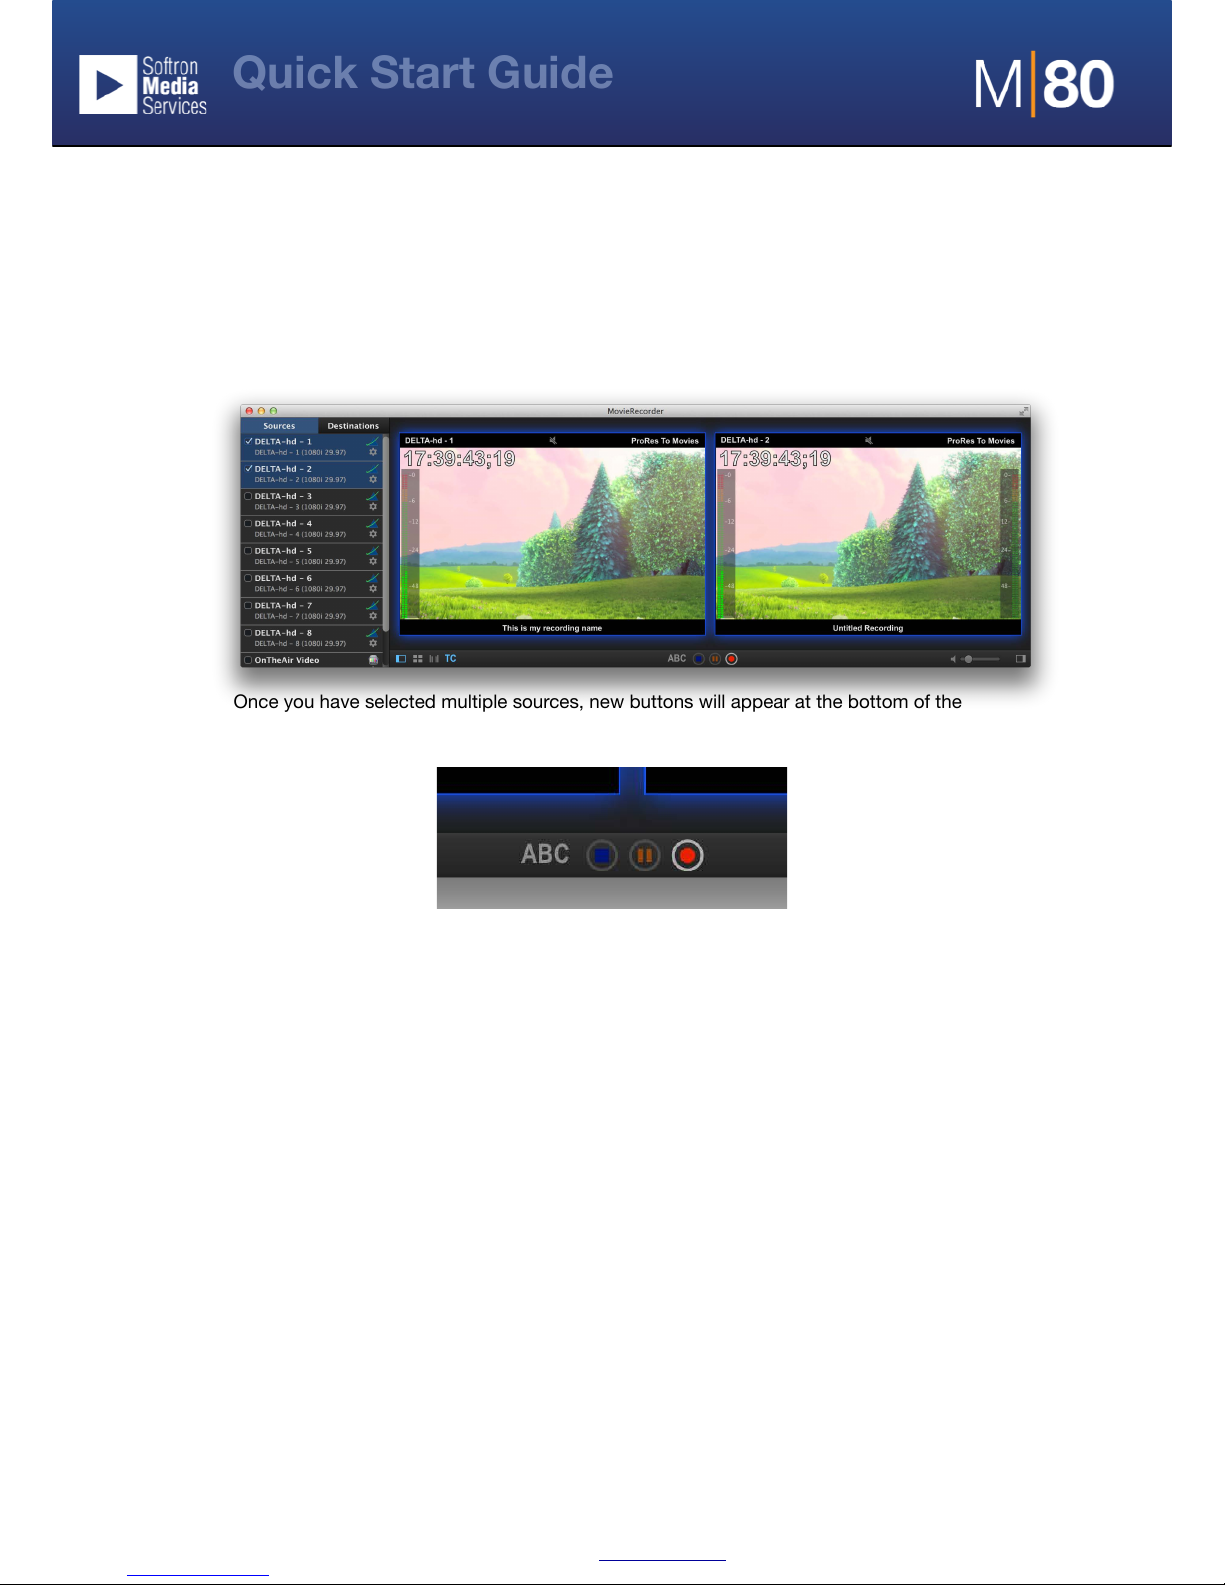
When you want to record multicam session, you don’t want to have to manually start each
recording. This is why we allow gang recording. To control multiple sources at the same time,
you must first select the sources that you want to control. And you can select them by:!
• Clicking on the Portal itself. It will be surrounded by blue when selected.!
• Clicking on the Source cell in the Sources pane.!
!
Once you have selected multiple sources, new buttons will appear at the bottom of the
window:!
!
With these buttons, you can start/stop/pause the recording of all the selected sources at the
same time. And you can also use the “ABC” button to modify the recording name of all the
selected Portals at once. !
!
!
!
Note
!
(Note: There are many more features and capabilities not covered in the Quick Setup for more
manuals, updates, information, video tutorials and help desk support visit: http://
www.softron.tv) We hope you enjoy your new software and feel free to contact us with any
questions or concerns.!
!
PLEASE NOTE THAT MOVIERECORDER 3 HAS MANY ITEMS THAT ARE NOT YET “TURNED
ON.” SOME OF THESE WILL BE DELIVERED WITH THE DEFAULT LICENSE. OTHER ITEMS
SUCH AS CLOSED CAPTIONING AND PRO CODEC SUPPORT REQUIRE THE PURCHASE
OF ADDITIONAL PLUGINS. PLEASE CONSULT WITH YOUR RESELLER OR WITH
SOFTRON DIRECTLY IF YOU HAVE ANY QUESTIONS. !
www.softron.tv
 Loading...