

Page 1

UserGuide
TM
LANEXPERT
Inline Gigabit Network Analyzer
Tips for viewing PDFs:
To use thumbnails, click the Thumbnail tab, and double-click on the
page number you want to view (The page will appear on the right side
of your screen.)
To print, specify a range of pages in the Acrobat Print dialog box, or
specify non-contiguous pages or a particular page before opening
the dialog box. Click the Print button or choose File>Print.
This User guide is for the models LANEXPERT™ 80 and
LANEXPERT™ 85. Some features will be applicable for only the
LANEXPERT™ 80 or LANEXPERT™ 85. These features will
be sited on the individual pages in the manual.
For more information, select Help> Reader Guide from the Acrobat
window.
If you need assistance:
Customer Support 8am to 5pm PST ----- (619) 287-9970
support@psiber.com
1005-0800-0000 Rev. 1.36
Page 2

Copyright
This guide is copyrighted by Psiber Data Systems Inc. with all rights
reserved. Under the copyright laws, this guide cannot be reproduced in any
form without the prior written permission of Psiber Data Systems Inc. No
patent liability is assumed, however, with respect to the use of the
information contained herein.
© 2008-2011 by Psiber Data Systems Inc. All rights reserved.
Notice
The information contained in this manual, including but not limited to any
product specifications, is subject to change without notice.
PSIBER DA TA SYSTEMS INC. AND PSIBER DATA GMBH (PSIBER)
PROVIDE NO WARRANTY WITH REGARD TO THIS MANUAL OR ANY
OTHER INFORMATION CONTAINED HEREIN AND HEREBY EXPRESSL Y DISCLAIM ANY IMPLIED WARRANTIES OF MERCHANT ABILITY OR FITNESS FOR ANY P ARTICULAR PURPOSE WITH REGARD
TO ANY OF THE FOREGOING. PSIBER ASSUMES NO LIABILITY FOR
ANY DAMAGES INCURRED DIRECTL Y OR INDIRECTL Y FROM ANY
TECHNICAL OR TYPOGRAPHICAL ERRORS OR OMISSIONS CONT AINED HEREIN OR FOR DISCREPANCIES BETWEEN PRODUCT AND
THE MANUAL. IN NO EVENT SHALL PSIBER BE LIABLE FOR ANY
INCIDENTAL, CONSEQUENTIAL, SPECIAL, OR EXEMPLARY DAMAGES, WHETHER BASED ON TORT, CONTRACT OR OTHERWISE,
ARISING OUT OF OR IN CONNECTION WITH THIS MANUAL OR ANY
OTHER INFORMATION CONTAINED HEREIN OR THE USE THEREOF.
ii
Trademarks
The Psiber Logo, Psiber and LanExpert are trademarks of Psiber Data
Systems Inc.
All other brands and product names are trademarks or registered trademarks of their respective companies.
Page 3

Table of Contents
Introduction vix
Chapter 1 Finding Your W ay Around 1-1
Make Sure You Have Everthing 1-1
Front Port View 1-2
Rear Port View 1-3
Display View 1-4
Chapter 2 Getting Started 2-1
Preparing the Unit 2-1
Initial Startup of Analyzer 2-2
iii
Connecting AC Adapter 2-2
Charging the Battery 2-3
Using the Analyzer for First Time 2-4
Power On 2-4
Setting Time and Date 2-5
Setting Power Options 2-6
Setting Illumination Options 2-6
Status Indicators 2-7
Navigating the Screen 2-8
Active Buttons 2-9
Battery Symbol 2-9
Page 4

Table of Contents
Chapter 3 Setup 3-1
Navigating to Setup Screens 3-1
Select Profile 3-2
Profile Name 3-3
Ports 3-4
Ports Configuration 3-4
Link As 3-5
Speed/Duplex 3-5
Transmit 3-6
Tag 3-6
MAC 3-7
IP Address 3-8
Link Search Timeout 3-9
iv
Link Lost Timeout 3-9
EXT Server Timeout 3-9
Protocols 3-10
Ephemeral Ports 3-10
User Defined 3-10
Ping/Trace 3-11
Repeat 3-11
Max Rate 3-11
Payload 3-11
Timeout 3-12
Page 5

Table of Contents
v
Ping Targets 3-12
Gateway 3-12
DHCP Server 3-12
IP Range 3-13
Ping List Entries 1 to 16 3-13
Discover 3-14
Traffic Generation 3-15
Duration 3-15
Size 3-15
Rate 3-16
Sink IP 3-16
Check Sum 3-16
Stress Test 3-17
Remote IP 3-17
Frame Size 3-17
Max Bit Rate 3-17
Max Frame Rate 3-17
Inter-test Delay 3-17
Accuracy 3-18
Throughput 3-18
Latency 3-18
Frame Loss 3-19
Back to Back 3-19
Page 6

Capture 3-20
Capture Source MAC 3-20
Capture Destination MAC 3-20
Capture Frame T ype 3-21
Capture VLAN Frames 3-21
Capture Primary Protocols 3-22
Capture Source IP 3-23
Capture Destination IP 3-23
Capture IP Protocols 3-23
Capture UDP/TCP Ports 3-24
Security 3-25
Account Access 3-25
Admin Account 3-27
viTable of Contents
User Account 3-28
Secure Erase 3-29
Colors 3-30
Build Info 3-31
Select Language 3-31
Chapter 4 Analyze the Network 4-1
Prepare to Use the Analyzer 4-1
Selecting the Test Mode 4-2
Link 4-2
Partner Capability 4-2
Signals 4-3
Relink 4-3
Link IP Information 4-3
Page 7

Port Info 4-4
Expert 4-6
Vitals 4-10
Good Frames 4-11
Good Bytes 4-11
Bad Frames 4-11
Protocols 4-12
Top Talkers 4-14
Devices 4-15
Ping/Trace 4-16
Tracert 4-16
Traffic Generate 4-17
802.1X 4-19
viiTable of Contents
Email 4-20
VoIP 4-21
Frame Capture 4-27
Remote Access 4-28
Inline PoE 4-29
Save 4-30
Setup 4-31
Chapter 5 Stress Test 5-1
Understanding RFC2544 5-1
Stress Test Basic Setup 5-2
Stress Test home Screen 5-4
Throughput 5-6
Latency 5-7
Frame Loss 5-8
Page 8

Back-to-Back 5-9
Basic Storage 5-10
Chapter 6 Cable Test (LE80 ONLY) 6-1
Port Identification 6-2
Tone 6-2
Length 6-3
Wiremap 6-4
PoE 6-5
Chapter 7 Loopback 7-1
Setup Loopback Mode 7-2
Chapter 8 Recall Saved Data 8-1
Recall Internal Data 8-2
Recall External Data 8-3
viiiTable of Contents
Chapter 9 Technical Support 9-1
Chapter 10 Update Firmware 10-1
Install Console Application 10-2
Firmware Update Instructions 10-3
Appendix A Connecting the Analyzer A-1
Appendix B Graphics B-1
Appendix C UTC Time Zones C-1
Page 9

Introduction
The LANEXPERT Inline Gigabit Network Analyzer is a handheld network
tool that features protocol analysis, packet capture, traffic generation,
cable testing and IPv4/IPv6 support. The LANEXPERT utilizes a color
touch screen interface to access one of the most complete suites of test
and analysis functions available in a portable test tool. The Inline Mode
allows users to non-intrusively monitor network traffic (10/100/
1000BaseTX) to identify protocols, port usage, VoIP statistics and network
utilization. The LANEXPERT can capture and store up to 10,000 packets
with user defined filters for detailed analysis in the field, downloaded over
the network or to a USB flash drive. Use either RJ-45 port to test Ping,
Link, Trace Route, DHCP and Discovery which will quickly identify network
problems. The LANEXPERT can generate up to 100% traffic loading in
1% increments to demonstrate network performance at various traffic
levels. A stress test that generates traffic and measures performance
metrics (per RFC 2544) is also provided. The stress test can be conducted
using the two independent ports on a single unit or used with a second
unit located remotely on a network. PoE tests include voltage and inline
current measurement to determine the actual power used by a powered
device. The LANEXPERT also tests cable for shorts, opens, split pairs,
reversed pairs, measures cable length and generates tones for cable
tracing.
vix
This Guide
This guide introduces the analyzer’s features.
You can:
Read the entire guide beginning to end.
Skim through and stop when a topic interests you.
Use the table of contents and index to find specific information.
Read through Part I to familiarize yourself with the parts of the analyzer.
Page 10

Introduction
Other Documentation
Other Documentation
In addition to this user’s guide, the LANEXPERT comes with the
following documentation:
A Quick Start Guide which explains the basics to get started
analyzing networks quickly.
Electronic help and definition pages built into every screen displayed
on the LANEXPERT.
Update help and information available at our web site.
Warranty/Service option
Psiber Data Systems Inc. warrants that the product shall be free from
defects in parts or workmanship for a period of 12 months from the date of
purchase if used in accordance with Psiber Data Systems Inc. operating
specifications.
THIS IS THE ONL Y WARRANTY MADE BY PSIBER DATA SYSTEMS
INC. AND IS EXPRESSL Y MADE IN LIEU OF ALL OTHER W ARRANTIES,
EXPRESSED OR IMPLIED, INCLUDING BUT NOT LIMITED TO ANY
IMPLIED WARRANTIES OF MERCHANTABILITY OR FITNESS FOR ANY
PARTICULAR PURPOSE.
x
Should any parts or workmanship prove defective, Psiber Data Systems
Inc. will repair or replace at Psiber’s discretion, with no cost to the Buyer
except for shipping costs from the Buyer’s location to Psiber’s location.
This is the Buyer’s SOLE AND EXCLUSIVE REMEDY under this agree-
ment. This warranty does not apply to products which have been subject
to neglect, accident or improper use, or to units which have been altered
or repaired by other than an authorized repair facility.
Return of Equipment - Return of product to Psiber Data Systems Inc.
requires a Return Merchandise Authorization (RMA) issued by Customer
Service. To obtain an RMA, contact us at 619-287-9970 (8am to 4pm PST)
or email support@psiber.com. The RMA# must be clearly marked on the
shipping label or package. See sample label:
To: Psiber Data Systems Inc.
7075-K Mission Gorge Rd.
San Diego, CA 92120
RMA# XXXXXXX
Page 11

Chapter 1
Page 12

Finding Your Way
Around
This chapter presents a tour of the Network Analyzer and serves as a
reference to locate specific parts of the analyzer.
Make Sure You Have Everything
This section lists all items to be included with the LANEXPERT™
Network Analyzer.
LANEXPERT Gigabit Inline Network Analyzer
LANEXPERT Wiremap Terminator (LE80)
Flash Drive or DVD (Contains User Guide and Console
Application)
AC Adapter with Country Specific Power Cord
RJ45 Patch Cable
Wrist Strap
Quick Start Guide
Carrying Case with Removable Shoulder Strap
SFP Modules:
- Two Single Mode (LE85S) -Two Mulitmode (LE85M)
- One 10/100/1000BaseT(LE85)
Two Fiber Patch Cables (LE85)
Notify supplier immediately of any missing or damaged items.
1-1
Page 13

Find Your Wa y Around
Front Port View
Front Port View
1-2
10/100/1000BaseT
Port with Cable
Test mode (LE80)
(Port 2)
10/100/ 1000 BaseT
Port
(Port 1)
Port 1 is a 10/100/1000BaseT RJ-45 Port.
Port 2 is a 10/100/1000BaseT RJ-45 Port with Cable Test modes (LE80).
For more information on the Cable test performed by the LANEXPERT
80 go to chapter 6, page 6-1.
Both ports can be used simultaneously when running Inline, Independent
and Stress Test modes.
Two SFP Port s:
Single Mode, Multimode,
or Copper
10/100/1000BaseT
Chapter 1
Page 14
Find Your Wa y Around
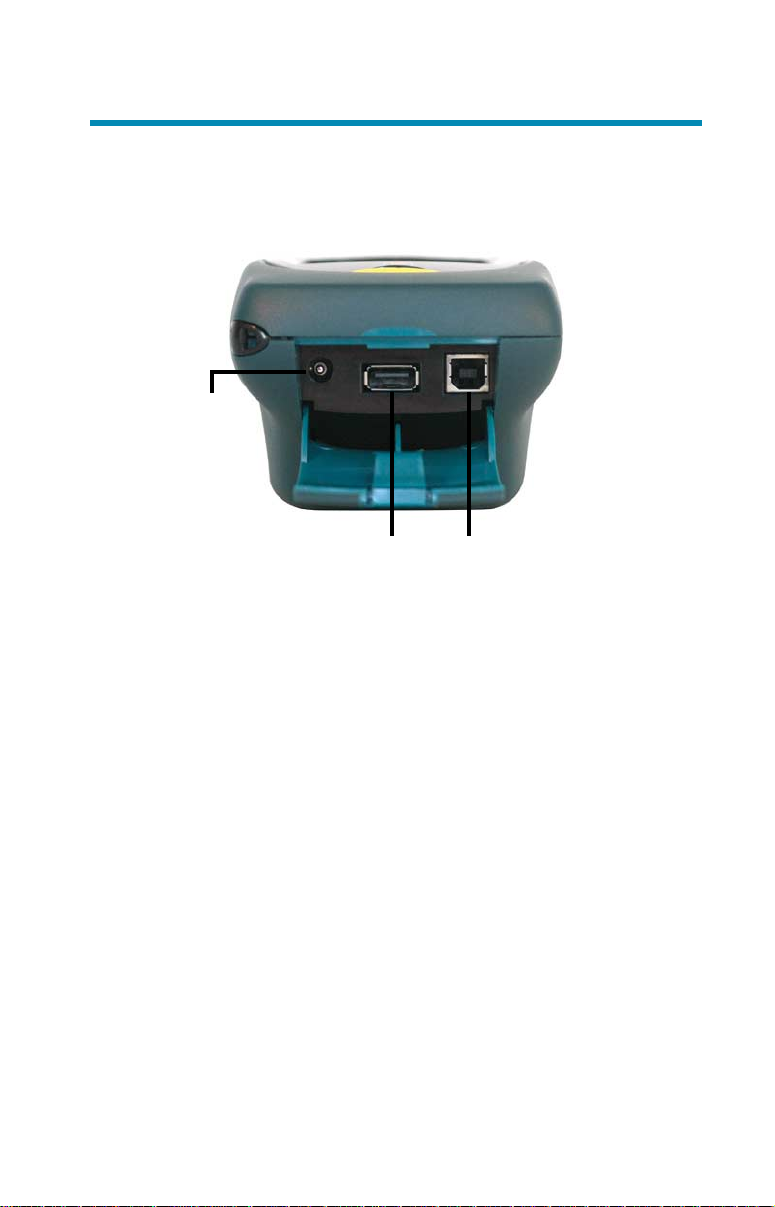
Rear Port View
Rear Port View
External
Power
Use the External Power jack to plug in the AC adapter. For more information, see Connecting the AC adapter in Chapter 2 page 2-2.
1-3
USB A Port USB B Port
The USB A Port is used to plug in the Flash Drive to save data externally.
The USB B Port will connect the LANEXPERT to your computer. This
feature is for future use.
Chapter 1
Page 15

Find Your Wa y Around
Display View
Display View
Status
Indicators
Display /
Touchscreen
Area
1-4
Power
Button
The Status indicators provide information about various functions of the
analyzer. For more information, see Status Indicators (LEDs) in Chapter 2
on page 2-6.
The Display/Touchscreen area is the interface for the LANEXPERT. For
more information see Navigating the Screen in Chapter 2 on page 2-7.
The Power button turns the LANEXPERT on and off. For more information see Power On Chapter 2 on page 2-4.
Chapter 1
Page 16

Chapter 2
Page 17

Getting Started
This chapter describes how to connect the LANEXPERT to other
devices and how to operate the Network Analyzer.
Preparing the Unit
The LANEXPERT Network Analyzer is portable and designed to be used
in a variety of circumstances and locations. The analyzer can be handheld or placed on a surface large enough for stable use.
The analyzer has an optional wrist strap to securely tether the unit to the
wrist to avoid dropping.
Environment
To keep your analyzer in prime operating condition, protect the unit from:
Dust, moisture and direct sunlight.
Liquids and corrosive materials.
Equipment that generates a strong electromagnetic field.
Rapid changes in temperature or humidity.
Extreme heat or cold. Operate the analyzer within the specified
temperature range.
2-1
Page 18

Getting Started
Precautions
Precautions
Your LANEXPERT Network Analyzer is designed to withstand the rigors
of everyday use and travel. However, you should observe certain
precautions to further reduce the risk of personal injury or damage to the
analyzer.
Never apply heavy pressure to the analyzer, especially on or
around the display area. Avoid sharp impacts to the analyzer.
Excessive pressure or impact can damage components or
otherwise cause the analyzer to malfunction.
Do not submerge, float or allow liquids to spill into or onto the
analyzer.
Do not use excessive force to connect or disconnect cables or
peripherals.
Use wrist strap to prevent accidentally dropping the analyzer.
Never use sharp objects on the display / touchscreen area. Use
the supplied stylus.
Initial Start Up of Analyzer
2-2
The analyzer contains a rechargeable battery pack which needs to be
fully charged before use for any length of time. The battery pack will come
with enough charge to power up the analyzer and perform a few tasks
but, should then be connected to the AC adapter and allowed to fully
charge.
Connecting the AC Adapter
The AC adapter provides power to the analyzer from an AC outlet and
charges the analyzer’s battery pack.
Chapter 2
Page 19

Getting Started
Charging the Battery
To connect AC power to analyzer:
DANGER: To avoid electric shock, never modify, forcibly bend, damage,
apply heat to or place heavy objects on top of power cord. If power cable
becomes damaged or plug overheats, discontinue use.
2-3
AC adapter and power cable
Connect the power cable to the AC adapter.
Plug the AC adapter into the analyzer’s External Power jack.
Connect the power cable to a live AC outlet.
Never remove the power plug from the outlet with wet hands.
CAUTION: Using the wrong AC adapter could damage your analyzer.
Psiber assumes no liability for damage in such cases.
Never pull directly on the power cable to unplug it. Hold the power plug
when removing the cable from the outlet.
Charging the Battery
Before using the battery pack to power the analyzer for any length of
time, it must be fully charged. Connect the analyzer to a live AC outlet
using the AC adapter and power cable.
The battery pack can be charged with the analyzer turned on or off.
Charging time is reduced if the analyzer is turned off. With the analyzer
turned on, the Status indicator and Battery symbol on the display provides
the charge status of the battery pack.
For more information on the Status indicators and the Battery icon, see
Status indicators on page 2-6 and Battery symbol on page 2-8.
Chapter 2
Page 20

Getting Started
Using the Analyzer for the First Time
Using the Analyzer for the First Time
Power on
Turn on the LANEXPERT by pressing the power button until the
screen lights up, then release the button. The unit displays the
welcome screen for approximately 3 seconds. The firmware
versionis shown on this screen.
If Security is enabled, then a Username and Password must be
entered before the HOME screen can be displayed. If the incorrect
username or password is entered, an error screen stating “Invalid
Log on no Matching Account” appears, and then returns back to the
log on screen. If the correct username and password is entered the
LanExpert displays a green screen saying “Logged on as Admin or
User #”, depending on what was entered.
If Security is disabled, the HOME screen comes up automatically.
NOTE: There is no way to get the username or password back
from the LanExpert so write down the the entered data or the
LanExpert will need to be returned to the factory for Service.
(Service fee will apply).
2-4
Log On Screen if Security
was already set up.
Logged On as Admin Screen
Straight to Home Screen if
Security is disabled
Chapter 2
Page 21
Getting Started
Using the Analyzer for the First Time
Using the Analyzer for the First T ime
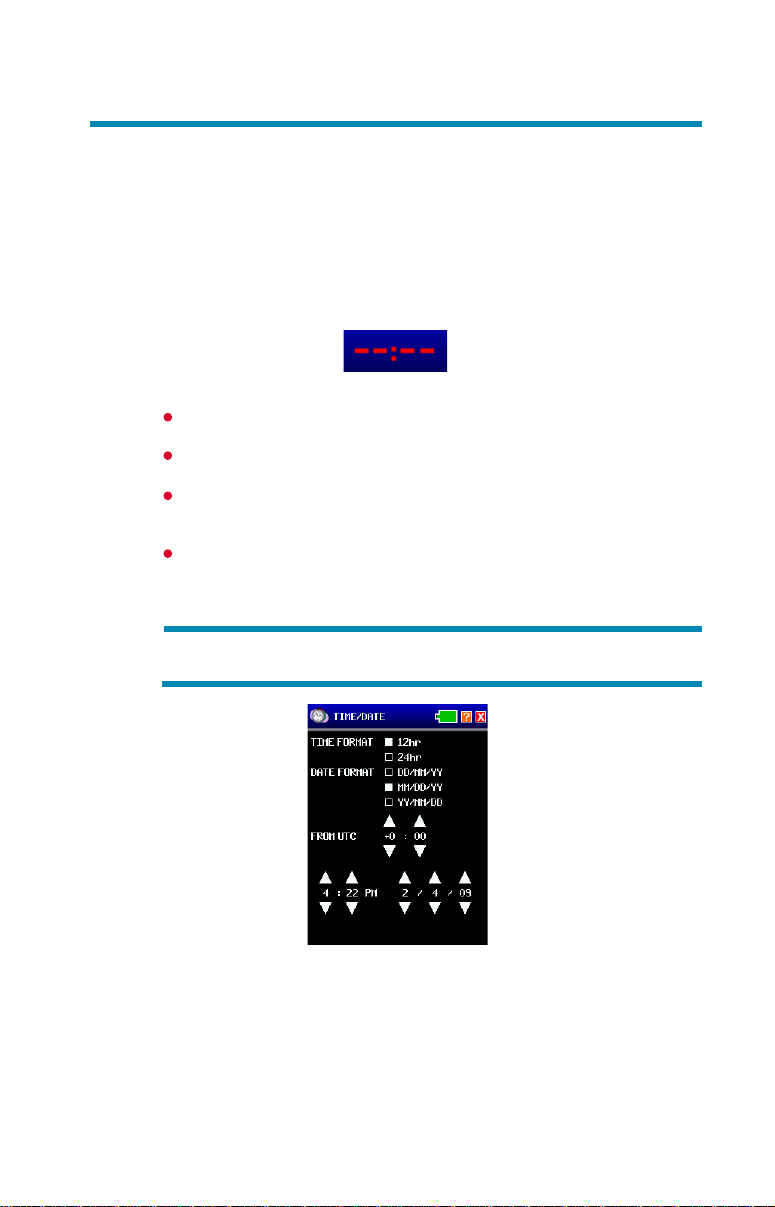
Setting time and date
Initially the analyzer comes from the factory without the time and date set.
There will be red dashes in place of the numbers.
Red Dashes
Click on dashes or displayed time to access TIME/DATE screen.
Select the time format for use as either 12hr or 24hr.
Select the date format for use as DD/MM/YY, MM/DD/YY or
YY/MM/DD.
Select the correct time zone in relation to UTC time by using the up
and down arrows. Use the up or down arrows to set time and date.
The time and date will automatically update to preview your selections.
NOTE: The LANEXPERT does not automatically update for daylight
savings time.
2-5
Time/Date Screen
Chapter 2
Page 22

Getting Started
Using the Analyzer for the First Time - Setting Power Options
Setting power options
Select the Battery Symbol in the top right of the screen. The POWER
screen displays power timing options and illumination settings.
Power Screen
There are three options for BATTERY power off times; Default (Factory
Set), Other and Stay On. Select an option by clicking the box to the left of
the name. The option is selected when the box is filled.
For example, if the default is 5 minutes, then after 5 minutes of inactive use
the unit will display a brief message indicating it will shut down unless the
user touches the screen.
2-6
If selecting Other under either the BATTERY or AC power, then the user
can change the time by pressing on the button to the right of the word. A
numerical keyboard is displayed. After selecting the desired numbers,
select ENTER to go back to the POWER screen.
Setting illumination options
The Illumination of the Backlight of the display and the LEDs intensity can
be adjusted on the Power Screen as well. The brightness options for
both are lowest at the leftmost and progressively brighten as boxes to the
right are selected.
Chapter 2
Page 23

Getting Started
Status Indicators
Status Indicators
From left to right, the indicators are Power, Port 1, Port 2, and Activity.
2-7
Status Indicators
Power - shows battery and external power status.
Port 1 and Port 2 - shows the status of each port when it is
connected.
Activity - shows network activity on either port when the
LANEXPERT receives a frame.
NOTE: When monitoring heavy network traffic, the Activity Indicator
appears to stay on continuously, even with a steady flow of good traffic
indicated.
Green - Battery has more than 25% charge.
Red - Battery has less than 25% charge.
Orange - External power connected.
Green - connected at 1 Gbit
Orange - connected at 100Mbit
Red - connected at 10Mbit
Flashing Red - trying to link.
Off - not trying to Link or is not linked.
Green indicates a good frame is detected
Red indicates a bad frame is detected.
Chapter 2
Page 24

Getting Started
Navigating the Screen
Navigating the Screen
The LanExpert’s touch screen display has five distinct areas. The
layout for all screens is the same except for the home screen.
Top Area displays (from left to right) Mode Identifier Graphic, Screen
Title, T ime, Battery, Help and Exit buttons.
Bottom Area consists of a left scroll button, three graphical icon
buttons and a right scroll button.
Data Area is the main portion of the screen between the top area
and the bottom area. This area will display all the information, data,
measurements and detection results.
Data Action Buttons are selectable buttons directly above the
bottom section. These buttons appear only on certain screens. They
perform actions pertinent only to the displayed screen (i.e. data clear,
start test, stop test or data format selection buttons).
Data Scroll Bar is on the left hand side of the screen. This scrolls up
and down to view more test results or configurations.
2-8
Screen Areas
Chapter 2
Page 25

Getting Started
Navigating the Screen - Active Buttons
Active Buttons
Help
Select the Question Mark button next to the Battery Symbol. This screen
displays helpful information for the specific screen being used. Information
could be definitions, step-by-step instructions or other useful information.
Select the Exit button to return to the previous screen.
Exit
Select the Exit button at the far right in the Top Area. By pressing this
button, the LanExpert reverts back to the previous screen.
Battery Symbol
The battery status symbol fills from the right and indicates the approximate
percentage of battery charge available. A full battery will be completely
gray with a white outline.
Battery Power ONLY: 20% or more power remaining.
(Gray with White Outline)
2-9
Battery Power ONLY: 20% or less power remaining.
(Yellow with White Outline)
Battery Power ONLY: 5 % or less power remaining.
(Red with White Outline)
AC and Battery Power connected with 100% fully charged.
battery. (Solid Green with White Outline)
>> >>
Battery is charging, the symbol will pulse green from the right to
the approximate current charge level.
(Solid Green with White Outline)
Battery fault, the battery is not connected or the Battery needs
to be replaced. (Black with Red Outline)
Chapter 2
Page 26

Chapter 3
Page 27

Setup
This chapter describes how to configure the LANEXPERT using the
setup screens.
Navigating to Setup Screens
Select the SETUP button from the HOME screen. The available
configurable categories are displayed at the bottom of the screen. Use the
left and right scroll arrows to select a different category. When completed
with any setup configuration, select the EXIT button to return to the
previous screen or Home screen.
Home Screen LE80
Home Screen LE85
3-1
Page 28

Setup
Select Profile
Select Profile
SELECT PROFILE shows a listing of all the profile names. There are
49 changeable profiles and one factory default. The factory default
profile cannot be changed. Select a profile by clicking on the box to
the left. This will enable the stored parameters to be used for testing.
3-2
Select Profile Screen
NOTE: Select another Setup button visible on the screen or by scrolling to
the right or left with the white arrows or select the Exit button.
Chapter 3
Page 29

Setup
Profile Name
Profile Name
PROFILE NAME button changes the name of the SELECTED profile
(indicated by a filled white box). A screen with an alphanumeric keyboard
will appear. Select CLEAR to remove the currently displayed name.
Choose any name with up to 16 characters. If there are more than 16
characters detected, an error screen will indicate “too many characters”.
Select CLEAR and re-enter a new profile name. If no characters were
entered for a name and ENTER is selected, an error message will indicate
“too few characters”. After entering a correct profile name, select ENTER
to return to the SELECT PROFILE screen.
3-3
Full Keyboard
NOTE: Select another Setup button visible on the screen or by scrolling to
the right or left with the white arrows or select the Exit button.
Chapter 3
Page 30

Setup
Ports
Ports
3-4
To edit or view the parameters for the SELECTED profile, select the button
called PORTS.
Single Mode
Port Configuration
PORT CONFIGURATION has three modes the unit can be set to: SINGLE,
INLINE or INDEP (INDEPENDENT). See Configurations in Apendix A, page
A-1 for more details on how to connect the LANEXPERT.
SINGLE mode connects one port on the LanExpert straight into a
hub, switch or network device. SINGLE mode can be plugged into
either Port 1 or Port 2. If both Ports are plugged in at the same time,
then whichever Port links first will be enabled. This will cause the
unused port to be disabled. The LEDs will indicate which Port is
linked.
INLINE mode must have both ports connected to two network
devices. INLINE mode can be used to observe the traffic flowing
between two network devices. Disconnect the cable between the
two network devices and connect one end into Port 1. Add a patch
cable from the other network device into Port 2. The LanExpert
is now between the two network devices. If a Port is not plugged in,
the corresponding LED will flash red to indicate that no cable is
plugged in.
INDEPENDENT mode must also have both Ports connected to one or
two network devices. INDEPENDENT mode can inject variable traffic
from one port onto the network while the other port listens to
investigate the effects on the network. INDEPENDENT mode can
monitor two separate network devices simultaneously. If
INDEPENDENT mode is selected then both Ports 1 and 2 will need to
be configured independently.
Inline Mode
Chapter 3
Page 31

Setup
Ports - Link As
NOTE: If INDEPENDENT mode is selected, Port 1 parameters will be
configured first. Port 2 parameters will then be available. The parameters will be port identified for clarity.
Link As
LINK AS parameter determines whether the LANEXPERT is going to
connect as an Auto MDI-X, Auto + Detect, LAN or NIC device on the
network.
In INLINE mode, there are two additional options of forcing Port 1 to
connect as NIC while Port 2 connects as LAN (P1: NIC P2: LAN) or vise
versa (P1: LAN P2: NIC).
3-5
Auto MDI-X will auto crossover the port (LAN or NIC). It will link at
the first compatible mode to provide faster testing.
Auto + Detect will auto crossover the port (LAN or NIC) and give more
link information than auto MDI-X. It will test for all modes available
before linking and will display the configuration for the link partners.
Some SOHO (Small office, home office) gigabit switches are not fully
compatible with Auto + Detect detection.
LAN will force the analyzer‘s port to look like a switch or a hub to the
device it is connected to.
NIC will force the analyzer‘s port to look like a PC to the device it is
connected to.
Speed/Duplex
SPEED/DUPLEX parameter can be conducted in an Auto-negotiating mode
or forced to a single FIXED speed/duplex . For AUTO, select any
combination of the five speed/duplex modes; 10H, 10F, 100H, 100F or
1000F. In FIXED, only ONE port speed/duplex can be selected.
NOTE: Press the DOWN arrow on the right of the screen to scroll to the
next page of parameters.
Chapter 3
Page 32

Setup
Ports - Transmit
Transmit
TRANSMIT parameter displays how the LanExpert communicates
with the user’s network, i.e. DISABLED, RFC894, LLC/SNAP or VLAN.
3-6
Ports Setup Screen II
DISABLE turns off all packet generation for non-intrusive
testing. No IP address is required for this configuration.
RFC894 enables packet transmission. This protocol is the most
common standard using IP datagrams.
Tag
LLC/SNAP enables packet transmission. It is a legacy standard
using IEEE 802.2 frames.
VLAN logically groups computers together across one or more
switches. (For example the IT Department VLAN). The VLAN
Identifier or tag specifies the VLAN to which the frame belongs.
A value of 0 means the frame is not assigned to any VLAN. A ll
other values may be used as VLAN identifiers allowing up to
4095 VLANs. VLAN 1 is often reserved for management of a
network bridge.
Next to VLAN, the user can select or change the TAG number if
there is more than one. Select the TAG=? button. A numerical
keyboard screen is displayed. Valid entries are 0 to 4095. If a
non-valid entry is chosen, then an error message will appear
indicating the error. The screen will then revert back to the
keyboard to re-enter a valid number. The CLEAR button removes
the incorrect entered digits from the display. After selecting a
valid number, select ENTER to return to the PORTS parameters
screen.
Chapter 3
Page 33

Setup
Ports - MAC
Transmit - cont.
MTU is used to set the size (in bytes) of the largest frame that a
given layer of a communications protocol can process. A higher
MTU brings higher bandwidth efficiency. Not all network devices
can process large packets which can reduce network
performance.
Select the parameter button next to MTU. A numerical keyboard
screen will be displayed. Valid entries are 100 to1518. If a nonvalid entry is chosen, an error message will appear indicating
the error. The screen will then revert back to the keyboard to reenter a valid number. The CLEAR button removes the incorrect
digits from the display. After selecting a valid number, select
ENTER to return to the PORTS parameters screen.
MAC
MAC address parameters are displayed. The user has a choice of the
FACTORY or USER MAC address.
FACTORY - MAC Address of the LANEXPERT is factory set
and CANNOT be changed.
USER - User can enter a MAC address of their choice for device
cloning purposes. MAC cloning allows the LanExpert to
simulate another network device by using its own MAC address
to detect issues originating from that device. Select the address
button to go to a Hexadecimal keyboard screen to enter a MAC
address. The CLEAR button removes the entered digits from the
display before entering a new address. After entering the
desired address, select ENTER to return to the PORTS
parameters screen.
3-7
NOTE: Press the DOWN arrow on the right of the screen to scroll to the
next page of parameters.
Chapter 3
Page 34

Setup
Ports - IP Addess
IP Address
IP ADDRESS parameters allow selection of Ipv4 and FIXED or DHCP. This
must match the network to which the LANEXPERT is being connected.
3-8
Ports Setup Screen III Fixed
Ipv4 - is a protocol type to be used for all transmitted packets
used by traffic generation, PING, DHCP and other tests.
FIXED allows the IP, Subnet, Gateway, WINS, DNS1, DNS2 and
DNS3 fields to be available to change. Selecting the button next
to the name displays a numerical keyboard to enter the desired
address. After entering the desired addresses, select ENTER to
return to the PORTS parameters screen.
DHCP causes the IP, Subnet, Gateway, WINS, DNS1, DNS2 and
DNS3 fields not to appear because they are unavailable for
change. These will automatically be assigned to the
LANEXPERT once a link is established with the DHCP server.
NOTE: If INDEPENDENT mode is selected, Port 1 parameters will be
configured first, then Port 2 parameters will be available. The parameters
will be port identified for clarity.
NOTE: Press the DOWN arrow on the right of the screen to scroll to the
next page of parameters.
Ports Setup Screen III DHCP
Chapter 3
Page 35

Setup
Ports - Port Flow Control
Link Search Timeout
LINK SEARCH TIMEOUT allows the user to select either 5s (factory
default) or Other. Link Search Timeout is the time it takes, in seconds, for
the LANEXPERT to acquire a link before it determines there is no link.
Select the Other button then select the Time button to the right to change
the parameter. This will display a numerical keyboard screen. Valid
entries are 1 to 99. After entering a valid time, select ENTER to return to
the PORTS parameters.
Link Lost Timeout
LINK LOST TIMEOUT allows the user to select either 3s (factory default)
or Other. Link Lost Timeout is the time it takes, in seconds, to determine
when there is a lost link after the link was established. Select the Other
button then select the Time button to the right to change the parameter.
This will display a numerical keyboard screen. Valid entries are 1 to 99.
After entering a valid time, select ENTER to return to the PORTS
parameters.
3-9
Ext Server Timeout
EXT SERVER TIMEOUT allows the user to select either 10s (factory
default) or Other. Ext Server Timeout is the time it takes, in seconds, to
determine when there is no external server present. Select the Other
button then select the Time button to the right to change the parameter.
This will display a numerical keyboard screen. Valid entries are 1 to 99.
After entering a valid time, select ENTER to return to the PORTS
parameters.
NOTE: Select another Setup button visible on the screen or by scrolling to
the right or left with the white arrows or select the Exit button.
Chapter 3
Page 36

Setup
Protocols
Protocols
To edit or view the parameters for the SELECTED profile, select the
PROTOCOLS button.
Ephemeral Ports
EPHEMERAL PORTS are temporary ports that are used by clients to
communicate with a server. These temporary ports within the defined
range are disregarded by the LANEXPERT. Select either of the
numbered buttons to change the range of ephemeral ports. This will
display a numerical keyboard. Valid entries are 0 to 65535. After selecting
valid numbers, select ENTER to return to the PROTOCOLS parameters.
3-10
Protocols Screen
User Defined
USER DEFINED ports allow the user to enter unique port names and
numbers. Select whether the port is a TCP, UDP or Both. User defined
ports take priority over any other factory defined port definition. For
example; Port 80 is HTTP (80:HTTP) but, if the user defines port 80 to be
named Factory it will display Factory instead of HTTP (80:Factory) under
the PROTOCOLS screen.
Port Names and Numbers can be entered or changed by selecting
either the name or number button. This will display either an alphanumeric
or numerical keyboard screen. Valid Port Names are a maximum of 10
characters. Valid Port Number entries are 0 to 65535. After entering a
valid name or number, select ENTER to return to the PROTOCOLS
parameters.
NOTE: Select another Setup button visible on the screen or by scrolling to
the right or left with the white arrows or select the Exit button.
Chapter 3
Page 37

Setup
Ping / Trace
Ping/Trace
To edit or view the parameters for the SELECTED profile, select the
PING/TRACE button.
Repeat
REPEAT determines the number of times to ping a device. Ping is a
network tool used to test whether a particular host is reachable across an
IP network. There are three options; Once, Count or Continuous. Select
the Count button then select the number field to the right to change the
parameter. This will display a numerical keyboard screen. Valid entries are
1 to 999. After entering a valid number, select ENTER to return to the
PING/TRACE parameters.
3-11
Ping /Trace Screen I
Max Rate
MAX RATE is the maximum time between sending one ping to sending the
next. There are two options, Default or Other. Default is 1 second
(factory default). Other is a user-defined time in milliseconds. Select the
time field to display a numerical keyboard. A valid entry is 0 to 99999. After
entering a valid time, select ENTER to return to the PING/TRACE parameter
screen.
Payload
PAYLOAD is the amount of data sent with the ping packet in bytes. There
are two options, Default or Other. Default is 50 bytes (factory default).
Other is a user-defined amount of bytes. Select the byte field to display a
numerical keyboard. A valid entry is 10 to 50000. After entering a valid
number, select ENTER to return to the PING/TRACE parameters screen.
Chapter 3
Page 38

Setup
Ping / Trace - Timeout
Timeout
TIMEOUT is the amount of time the LANEXPERT waits before a ping
response returns. There are two options, Default or Other. Default is 10s
(factory default). Other is a user-defined time in seconds. Select the time
field to display a numerical keyboard. A valid entry is 1 to 99. After
entering a valid number, select ENTER to return to the PING/TRACE
parameters screen.
NOTE: Press the DOWN arrow on the right of the screen to scroll to the
next page of parameters.
3-12
Ping Targets
PING TARGETS allows the user to select what the LANEXPERT will
PING. Select one target, or any combination of targets, from the list. The
options are Gateway, DHCP Server, IP Range (user defined), or up to
sixteen separate User Defined Targets (Ping List Entries). The Deselect
All button clears all the selected choices.
Gateway
GATEWAY allows for the pinging of the established gateway.
DHCP Server
DHCP SERVER allows for the pinging of the established DHCP Server.
Ping Trace Screen II
Chapter 3
Page 39

Setup
Ping / Trace - IP Range
IP Range
IP RANGE allows for the pinging of a user defined range of IP Addresses.
Select the EDIT Field to display a numerical keyboard. Select the box to
change the IP range. After entering the desired range, select ENTER to
return to the PING/TRACE parameters.
Ping List Entries 1 to 16
PING LIST ENTRIES 1 to 16 are user defined. Select any of the numbered
choices to edit. Select the EDIT field to go the Ping List Entry parameter
screen. Under Ping List Entry:
TARGET selects how to enter and display the parameters on the
list. The choices are IP Address, Name (DNS) or Name (WINS).
IP ADDRESS allows for an entry of a Name and an IP address.
Select the editable fields to enter the desired name or number.
After entering the desired name and/or number, select ENTER to
return to the Ping List Entry parameters screen.
NAME (DNS) allows for an entry of a Name. Select the editable
fields to enter the desired name. After entering the desired name,
select ENTER to return to the Ping List Entry parameters
screen.
3-13
NAME (WINS) allows for an entry of a Name and an IP. Select
the editable fields to enter the desired name. After entering the
desired name, select ENTER to return to the Ping List Entry
parameters screen.
To exit the Ping List Entry screens, select the Exit button in the top right
corner to return to the PING/TRACE parameters screen.
NOTE: Select another Setup button visible on the screen or by scrolling to
the right or left with the white arrows or select the Exit button.
Chapter 3
Page 40

Setup
Discover
Discover
To edit or view the parameters for the SELECTED profile, select the
DISCOVER button.
Discover sends out an ARP, NETBIOS and DNS request that actively
searches for network devices on a network. When performing the
Discover action and the ARP checkbox is selected, the LANEXPERT
sends ARPs to the entire range of the configured subnet (or the class C
subnet if the LANEXPERT‘s subnet is wider than the configured
subnet). If this subnet is the same as the physical network subnet, the
first and last IPs are special IPs used for subnet multicasting. Selecting
ignore will not send an ARP to them. Here are a few examples of how to
configure.
3-14
Discover Screen
If you are unsure or if the LanExpert subnet is the actual
subnet of the users’ network, set both checkboxes (i.e. neither
the first nor the last IP will be ARPed).
If the LanExpert subnet is at the lowermost end of the
actual subnet of the users’ network , set the IGNORE 1st IP and
clear the IGNORE LAST IP checkboxes.
If the LanExpert subnet is at the uppermost end of the
actual subnet of the users’ network – clear the IGNORE 1st IP
and set the IGNORE LAST IP checkboxes.
Otherwise, clear both checkboxes.
NOTE: Sending an ARP to the first and last IP address in a class C
subnet may cause a problem if misconfigured.
NOTE: Select another Setup button visible on the screen or by scrolling to
the right or left with the white arrows or select the Exit button.
Chapter 3
Page 41

Setup
Traffic Generation
Traffic Generation
To edit or view the parameters for the SELECTED profile, select the
TRAFFIC GENERATION button or go to ANAL YZE NETWORK to TRAFFIC
GENERA TION and select SETUP.
Traffic Generation Screen
WARNING: The LANEXPERT is a high performance tester and
can generate a high amount of traffic very quickly. This can take
down any network. Psiber is not liable for this action.
3-15
Duration
DURATION has two options; either TIME which sends a constant stream
of packets from the LANEXPERT for a user-defined amount of time or
FRAMES sends a user-defined amount of packets. Once the defined
amount of packets is reached, the LANEXPERT will stop sending
packets. To change the PACKET count, select the editable field buttons
next to the word FRAMES. This will display a numerical keyboard to
change the number of frames in Kilobytes or Megabytes to send. A valid
entry is 0 to 9,999K or 0M to 999,999M. After entering a valid number,
select ENTER to return to the TRAFFIC GENERATION parameters screen.
Size
SIZE is the frame size of the packet in bytes. To change the Size, select
the editable field button. This will display a numerical keyboard to change
each frame size. A valid entry is 64 to 1518. After entering a valid number,
select ENTER to return to the TRAFFIC GENERATION parameters screen.
Select RANDOM to have a mixture of packet sizes from 64 to 1518 sent
from the LANEXPERT.
Chapter 3
Page 42

Setup
Traffic Generation - Rate
Rate
RATE is how fast the stream of frames is being generated by the
LANEXPERT . To change the Rate of the frames, select the editable field
button next to the word FRAMES/S. This will display a numerical keyboard
to change how fast each frame is generated in kilo frames or frames per
second. A valid entry is 0 to 9999 and 0 to 1999K. After entering a valid
number, select ENTER to return to the TRAFFIC GENERATION parameters
screen. LINK RATE can also be change to a user-defined percentage of
the actual link rate To change Link Rate, select the editable field button next
to the word LINK RATE. This will display a numerical keyboard to change
the percentage of the link rate the frames will be sent at. A valid entry is 0
to 100%. After entering a valid number, select ENTER to return to the
TRAFFIC GENERA TION parameters screen.
Remote IP
REMOTE IP is a known IP address of a device on the network or a
random IP address. If the IP address selected is not a valid address on the
network, then the LANEXPERT will send out broadcasts frames to the
entire network. To change the Remote IP Address, select the editable field
button next to the word Remote IP. This will display a numerical keyboard
to change the IP Address. After entering the desired IP address, select
ENTER to return to the TRAFFIC GENERATION p arameters screen.
3-16
Broadcast
If the Broadcast button is enabled then an ARP is generated for the
remote IP. If there is a resopnse to the ARP then traffic is generated to the
remote IP with the responding MAC address. If there is no response to the
ARP then the traffic generated to the remote IP is with a broadcast MAC
address (i.e the traffic would generate throughout the network)
Direction
DIRECTION displays REMOTE->LOCAL or LOCAL->REMOTE. This
sends traffic from the Remote unit to the local unit or from the Local unit to
the Remote unit. This gives a downstream and an upstream path.
WARNING: The LANEXPERT is a high performance tester and
can generate a high amount of traffic very quickly. This can take
down any network. Psiber is not liable for this action.
NOTE: Select another Setup button visible on the screen or by scrolling to
the right or left with the white arrows or select the Exit button.
Chapter 3
Page 43

Setup
Stress Test
Stress Test
To edit or view the parameters for the SELECTED profile, select the
STRESS TEST button.
Remote IP
Select the IP address button to enter or change the IP address. The IP
address of the second port or another LanExpert must be entered as
the destination for the transmitted test packets.
3-17
Stress test Screen
Frame Size
Select from one to seven of the standard frame sizes. These frame sizes
are generated by the LanExpert to test the network. This setting is
used for all tests.
Max Bit Rate
Select the maximum bit rate percentage for testing. Selecting 100% has
no effect on the network. The maximum bit rate setting is not used for the
Back-to-Back tests.
Max Frame Rate
Select the maximum frame rate for testing (in integer Kfps). Selecting a
very high number, e.g. 10000K, effectively removes the effect. The
maximum frame rate setting is not used for the Back-to-Back tests.
Inter-test Delay
Select the delay between tests to receive test results before performing
another test.
NOTE: Press the DOWN arrow on the right of the screen to scroll to the
next page of parameters.
Chapter 3
Page 44

Setup
Stress Test - Accuracy
Accuracy
Select one box for both throughput and back-to-back to measure the
accuracy. The lower the number the faster the test.
Throughput
SEARCH is the test time for each test while searching for the
maximum error-free throughput.
3-18
Stress test Screen
Latency
NOTE: Press the DOWN arrow on the right of the screen to scroll to the
next page of parameters.
VALIDATE is the validation test time for the final error-free throughput
validation and all latency tests.
TIME sets the wait time at the end of every test before checking the
results. This allows the data to have propagated to the other end and
also allows for all intermediate devices to recover.
NUMBER selects the number of Latency tests. This is the number of
times the Latency test is repeated.
Chapter 3
Page 45

Setup
Stress Test - Frame Loss
Frame Loss
STEP size lowers the frame loss rate percentage. The Source sends
traffic at maximum line rate (100%) and then measures if the network
dropped any frames. If frames are dropped, the values are recorded,
and the test will restart at the next step size down. This test is
repeated until there is no frame loss for three consecutive iterations.
TIME sets the maximum number of frames which can be sent.
3-19
Back-to-back
START selects the Initial Back-to-Back Test Time (in integer seconds).
This indirectly sets the starting number of frames sent when
performing the Back-to-Back test. The result will always be equal to
or smaller than the maximum number of frames which can be sent in
this time.
NUMBER selects the number of Back-to-Back tests. This is the
number of times the Back-to-Back test is repeated.
NOTE: Select another Setup button visible on the screen or by scrolling
to the right or left with the white arrows or select the Exit button.
Stress test Screen
Chapter 3
Page 46

Setup
Capture
Capture
To edit or view the parameters for the SELECTED profile, select the
CAPTURE button.
CAPTURE allows the user to define a filter to capture a certain frame
type. The LANEXPERT can capture 1000 packets. Once the
LANEXPERT reaches 1000 packets, it can STOP capturing or
CONTINUE. If CONTINUE is selected, the first packets captured will be
the first packets sent out. Select to capture on one or both ports.
3-20
Capture Screen I
Capture source MAC
CAPTURE SOURCE MAC will either capture packets from the user
defined Source MAC address entered or ANY MAC address. Source MAC
address is where the packet originated. To change the Source MAC
address, select the editable MAC field button. This will display a
Hexadecimal keyboard to change the MAC Address. After entering the
desired MAC address, select ENTER to return to the CAPTURE
parameters screen.
Capture destination MAC
CAPTURE DESTINATION MAC will either capture packets from the user
defined Destination MAC address entered, any UNICAST, MULTICASTS, or
BROADCASTS. Destination MAC address is where the packet is received.
To change the Destination MAC address, select the editable MAC field
button. This will display a Hexadecimal keyboard to change the MAC
Address. After entering the desired MAC address, select ENTER to return
to the CAPTURE parameters screen.
NOTE: Press the DOWN arrow on the right of the screen to scroll to the
next page of parameters.
Chapter 3
Page 47

Setup
Capture - Frame Types
Capture frame types
CAPTURE FRAME TYPES allows for the selection of one or a combination
for frame types detected. Select RFC894, STP, LLC and/or LLC/SNAP.
3-21
Capture Screen 2
Capture VLAN frames
CAPTURE VLAN FRAMES allows for the selection of one or a
combination of VLAN options. Select NON-VLAN, ANY and/or a specific
VLAN tag. Next to VLAN, the user can select or change the TAG number.
A numerical keyboard screen is displayed. Valid entries are 0 to 4095. If a
non-valid entry is chosen, an error message will appear. The screen will
then revert back to the keyboard to re-enter a valid number. The CLEAR
button removes the incorrect digits from the display. After selecting a valid
number, select ENTER to return to the CAPTURE VLAN FRAMES
parameters screen.
NOTE: Press the DOWN arrow on the right of the screen to scroll to the
next page of parameters.
Chapter 3
Page 48

Setup
Capture - Primary Protocols
Capture Primary Protocols
CAPTURE PRIMARY PROTOCOLS allows for the selection of either one
or a combination of protocols to be detected. Use the list below to select
certain protocols or select the ANY button to search all protocols. If there
are none, there will be no more parameters to select.
Capture Screen 3
3-22
NOTE: Press the DOWN arrow on the right of the screen to scroll to the
next page of parameters.
Chapter 3
Page 49

Setup
Capture - Source IP
Capture Source IP
CAPTURE SOURCE IP allows for the selection to capture from ANY
source IP address or a single user-defined source IP address. Select the
address button to go to a numerical keyboard screen to enter a source IP
address. If a non-valid entry is chosen, an error message will appear.
The screen will then revert back to the keyboard to re-enter a valid
number. The CLEAR button removes the incorrect digits from the display
before entering a new address. After entering the desired address, select
ENTER to return to the PORTS parameters screen.
3-23
Capture Screen 4
Capture Destination IP
CAPTURE DESTINATION IP allows for the selection to capture from ANY
destination IP address or a single user-defined destination IP address.
Select the address button to go to a numerical keyboard screen to enter a
destination IP address. If a non-valid entry is chosen, an error message
will appear. The screen will then revert back to the keyboard to re-enter a
valid number. The CLEAR button removes the incorrect digits from the
display before entering a new address. After entering the desired
address, select ENTER to return to the PORTS parameters screen.
Capture IP Protocols
CAPTURE IP PROTOCOLS allows for the selection of one or a
combination of IP protocols to detected. Select from the list to choose
certain protocols or select the ANY button to search all protocols.
NOTE: Press the DOWN arrow on the right of the screen to scroll to the
next page of parameters.
Chapter 3
Page 50

Setup
Capture - UDP / TCP ports
Capture UDP/TCP ports
CAPTURE UDP/TCP PORTS allows for the selection to capture ERRORS,
ANY PORT and/or a user-defined port number. Select to capture UDP and/
or TCP packets. Select the port number button to go to a numerical
keyboard screen to enter a port number. If a non-valid entry is chosen,
error message will appear. The screen will then revert back to the
keyboard to re-enter a valid number. The CLEAR button removes the
incorrect digits from the display before entering a new address. After
entering the desired address, select ENTER to return to the CAPTURE
UDP/TCP PORTS parameters screen.
3-24
Capture Screen 5
NOTE: Select another Setup button visible on the screen or by scrolling
to the right or left with the white arrows or select the Exit button.
Chapter 3
Page 51

Setup
Security
Security
To securely lock features for different users, select SECURITY.
3-25
Security Home Screen
Account Access
This screen is used to set up a username and password for an
administrator and up to three users.
Select the ACCESS button. The ACCESS button only affects USERS #1
thru #3 and can only be accessed by the ADMIN user (checking the
respective box enables the access) –
· ENABLED – enables the respective user account (does not affect
the stored username & password).
· NAMES & PASSWORDS – allows the respective user to edit
usernames and passwords for USERS #1 thru 3 (a “user” can
never edit the ADMIN username or password).
· SECURE ERASE – allows the respective user to perform a secure
erase (a “user” can never perform a total erase).
· SELECT PROFILE - allows the respective user to change which
profile is selected (if not enabled, they can still view which is
selected, they just can’t change it).
· SETUP PROFILE – allows the respective user to make alterations to
the selected profile (i.e. all setup is disabled and the user cannot
rename the profile if this is not enabled).
Security Access Screen
Chapter 3
Page 52

Setup
Security
Account Access
All of the VIEW settings are designed to prohibit an unauthorized user
from viewing potentially secure data (phone numbers, email addresses,
device names etc.) – check the box to enable each function.
· VoIP DATA – the user can START/STOP/CLEAR VoIP data collection,
and can save the results of the collection as part of the detector
database.
· EMAIL DATA – similar to VoIP DATA but affects the EMAIL screen.
3-26
Security Access Screen
· CAPTURED DATA - similar to VoIP DATA but af fect s the CAPTURE
screen.
· 802.1X DATA - similar to VoIP DATA but affects the 802.1X screen.
· DEVICE DATA - similar to VoIP DATA but affects the DEVICES and
TOP T ALKERS screens.
All of the GENERATE settings are designed to stop an unauthorized user
from performing an operation that has the potential of bringing down a
network, or setting off a network security alarm.
· TRAFFIC – enables/disables the respective user‘s ability to use
TRAFFIC GENERATE.
· PINGS - enables/disables the respective user‘s ability to use PING/
TRACE.
NOTE: Select the Exit button to apply the changes to the users’ access
and to go back to the Security Home Screen.
Chapter 3
Page 53

Setup
Security
Admin Account
3-27
Admin Account Screen
Select SETUP next to Admin to create a username and password by using
the keyboard. The ADMIN account can enable/disable and set the abilities
of the user accounts and only the ADMIN account can perform a total
SDcard secure erase.
· If both the username and password of the ADMIN account is blank
then security is turned off and no logon is required.
· Any user account username and/or password can be blank.
· Any username or password can be the same as another account‘s
username – the username/password pairing determines the user level. If
both the username and password are the same as another user account
– the lowest numbered account is logged into by that username/
password.
· While logging in the password is not visible (each character is
shown as an asterisk character), the password is visible while editing it in
the security screen.
While editing the username/password the following “special” actions can
be done –
While entering the username, pressing the ENTER area ends
entry of the username and starts entry of the password.
While entering the password, pressing the ENTER area ends
entry of the password and saves the edited data (as applicable).
Selecting the “X“ EXIT button saves the username and
password entries as applicable.
Both the username and the password are case sensitive and
can be up to 16 characters long. There are no restrictions on the
characters (using the keyboard provided on the screen).
Admin Account Screen
NOTE: There is no way to get the username or password back
from the LanExpert so write down the the entered data or the
LanExpert will need to be returned to the factory for Service.
(Service fee will apply)
Chapter 3
Page 54

Setup
Security
User Account
3-28
Admin Account Accepted
Screen
Select EDIT next to User 1 to 3 to enter a username and password by
using the keyboard. This is done by the Admin to allow access for 3
different user.
· Any user account username and/or password can be blank.
· Any username or password can be the same as another account‘s
username – the username/password pairing determines the user level. If
both the username and password are the same as another user account
– the lowest numbered account is logged into by that username/
password.
· While logging in the password is not visible (each character is
shown as an asterisk character), the password is visible while editing it in
the security screen.
While editing the username/password the following “special” actions can
be done –
While entering the username, pressing the ENTER area ends
entry of the username and starts entry of the password.
While entering the password, pressing the ENTER area ends
entry of the password and saves the edited data (as applicable).
Selecting the “X“ EXIT button saves the username and
password entries as applicable.
Both the username and the password are case sensitive and
can be up to 16 characters long. There are no restrictions on the
characters (using the keyboard provided on the screen).
User #1 Name and Password
Screen
NOTE: If the username or password is lost then logon under the
Admin username and password. This will allow the Admin to
change or retrieve the User’s name and password. Admin
username and password can not be retrieved.
Chapter 3
Page 55

Setup
Security
Secure Erase
3-29
Admin Account Accepted
Screen
Under Admin Account, allow the Admin to Erase profiles, saved data or the
entier memory. Select the START button next to either ALL PROFILES or
ALL SAVED DATA. A message stating “this function cannot be undone“
appears.
Select CONFIRM to confirm the requested secure erase. Once selected
the LanExpert returns to the Security Home screen and the respective
START button is now CONFIRM. Press the CONFIRM button to actually
perform the erase.
For the ALL MEMORY button, which is only available under Admin logon,
a message stating “this renders the unit inoperable“ appears and the
unit automatically powers down after CONFIRMED completion.
NOTE: If ALL MEMORY is selected and Confirmed the LanExpert
beomes inoperable and will need to be returned to the factory for
Service. (Service fee will apply).
While erasing, the percentage completion is displayed to the right of the
respective START/CONFIRM button.
User #1 Name and Password
Screen
NOTE: Select another Setup button visible on the screen or by scrolling to
the right or left with the white arrows or select the Exit button.
Chapter 3
Page 56

Setup
Colors
Colors
3-30
.
To edit or view the parameter, select the COLORS button.
Colors Screen
This screen will change the colors on the display of the Top Area, Middle
Area, Bottom Area and Keys. Select the boxes of the desired colors. Colors
will automatically update to preview the selections.
NOTE: Select another Setup button visible on the screen or by scrolling to
the right or left with the white arrows or select the Exit button.
Chapter 3
Page 57

Setup
Build Info and Select Language
Build Info
BUILD INFO will display Firmware version, Hardware version, Port 1 and
Port 2 MAC addresses as well as the Serial Number.
NOTE: Select another Setup button visible on the screen or by scrolling to
the right or left with the white arrows or select the Exit button.
Select Language
SELECT LANGUAGE will display the various languages that the
LANEXPERT supports. Select the desired language for the screens to
be represented in that language.
NOTE: Select another Setup button visible on the screen or by scrolling to
the right or left with the white arrows or select the Exit button.
3-31
Chapter 3
Page 58

Chapter 4
Page 59

Analyze Network
This chapter will explain the screens presented for using the
LANEXPERT to analyze the device under test (i.e. PC, network device).
Home Screen LE80
Home Screen LE85
Preparing to Use the Analyzer
Before selecting the ANALYZE NETWORK button on the HOME screen,
determine how the LANEXPERT is to be connected to the device being
tested (i.e. PC, netwok device, etc.). This will be based on how the
analyzer was set up in the Ports Configuration section of the setup.
Single Mode - attach the patch cable to either Port 1 or Port 2.
Inline Mode - attach a patch cable to both Ports 1 and 2.
Indepentent Mode - attach a patch cable to both Ports 1 and 2.
If only one port is connected while in Inline or Independent Mode, that port
will link while the other port continues searching for a link. The Port LED
that has not established a link will keep blinking red and the screen will
display a “LINKING“ message for the unlinked port until a link is established.
Only minimum information about the linked port will be displayed. No
additional information will be shown unless both ports are connected and
a link established.
4-1
Page 60

Analyze Network
Selecting the Test Mode
Selecting the Test Mode
Select the ANALYZE NETWORK button with the stylus on the HOME
screen. Notice that both Status Port LEDs are blinking red until a link is
established on the connected ports. For detailed information on the LEDs,
see Status Indicator section page 2-6.
Link
The first screen that appears is the LINK Screen. This screen will display
the partner’s capabilities and actual link status.
When Link Signals are detected on either/both Ports, the Link Screen is
displayed. The linked Port(s) are shown with the actual link parameters
including connection type (LAN or NIC), speed (10/100/1000) and duplex
mode (Half or Full).
For the LANEXPERT 85, the unit measures Optical Power Recieved(Rx)
and Transmited (Tx) when Fiber is connected. The measurment in
displayed in 0.1dBm increment with a Range of -32dBm to +8dBm and
accuracy +/- 2 dB. The Tempurature of the SFPs are displayed in C.
The LANEXPERT Displays the text:
White if the measurement is within the range of the spec
Orange if it’s marginal
Red if it’s outside of the range.
4-2
Example Copper Link Screen
Partner Capabilities
A connection to a network device that can automatically swap the transmit
and receive pairs is indicated by AUTO MDI-X. A fixed port is shown as
LAN or NIC. The MDI-X mode is provided only if Auto+Detect is selected in
PORTS Setup. If not, the analyzer displays NOT TESTED. All Speed and
duplex modes advertised by the Link Partner are displayed. If a fixed
speed is selected then the partners speed will show only that specific
fixed speed and not all advertised speeds.
Example Fiber Link Screen
Chapter 4
Page 61

Analyze Network
Signals
Signals
Polarity (normal or reversed) is shown for 10/100BaseT links. Master or
slave status is shown for gigabit links. Gigabit links require one end to be
the master and the other to be a slave.
Relink
In the Data Action Buttons area, pressing RELINK will force a reestablishment of the link partner; note that this also clears all the data
collected. If no link is established within the timeout period configured,
a message is displayed in the EXPERT Screen but, the unit will attempt to
automatically re-link.
Setup
In the data action button area, pressing SETUP provides a quick way of
navigating to the SETUP->PORTS screen for the presently selected
profile. Select the [X] exit button in the upper right of the SETUP screen to
return to the previous screen. For more information on this Port
Configuration, see page 3-4.
NOTE: Press the Down arrow on the right of the screen to scroll to IP
information of the unit.
4-3
Link IP Information
Link IP Information includes MAC address, IP address, Subnet Mask,
Gateway IP address and DHCP Server IP address. The WINS (Windows
Internet Name Service) name and up to three DNS (Domain Name System)
Server IP addresses are also provided if assigned. When the port is
configured for DHCP, the lease time and time remaining on the lease are
displayed.
NOTE: If some of the information fields are left blank, a longer EXT
SERVER TIMEOUT can be selected in PORTS Setup.
Once a link is established, if the cable is disconnected, the analyzer
displays LINKING while attempting to find a link partner. If the cable is
disconnected and reconnected within the timeout period, the
LANEXPERT will re-establish a link with the current configurations. The
previously collected data is not cleared and new data will be added to the
displayed data. If the cable is disconnected and reconnected out of the
timeout period, the LANEXPERT will connect to a link and the previously
collected data is cleared.
NOTE: Select another Test button visible on the screen or by scrolling to
the right or left with the white arrows or select the Exit button.
Chapter 4
Page 62

Analyze Network
Selecting the Test Mode
Port Info
Select the PORT INFO button in the Bottom Area. The PORT INFO Screen
decodes LLDP and CDP frames which are shown on the screen in the
order they were received.
4-4
Example Port 1 Info Screen
Example Port 2 Info Screen Example Port 3 Info Screen
LLDP/CDP/FDP Frames Decoded
Type 1 TLVs –
Type 2 TLVs–
Type 3 TLVs–
Displays “Type 1 – Device ID”
Displays “LENGTH: “ followed by the actual string length in the
TLV (Displays up to 25 characters of the string in the TLV)
Displays “Type 2 – n Addresses” (where n is the actual number
of addresses contained in the TLV – note this displays “1
address” if the number of addresses is 1)
Displays one line per address in the TLV as follows (n is 1
upwards indicating the position in the TLV) –
Either : “n: IPv4 xxx.xxx.xxx.xxx” where xxx.xxx.xxx.xxx is the
IPv4 address in this part of the TLV
Or : “n: IPv6”
Or : “n: IP UNKNOWN” if the length of the address field was not
4 or 16
Or : “n: NLPID UNKNOWN” if defined using NLPID but the protocol
was not the IP type (0xCC)
Or : “n: 802.2 UNKNOWN” if defined using 802.2 but the protocol
was not 8 bytes, or was not 0xAAAA030000000800
Or : “n: PROTOCOL UNKNOWN” if not defined suing either NLPID
or 802.2
Displays “Type 3 – Port ID”
Displays “LENGTH: “ followed by the actual string length in the
TLV (Displays up to 25 characters of the string in the TLV
hexadecimal format, e.g. 0x00000000)
Chapter 4
Page 63

Analyze Network
Selecting the Test Mode
LLDP/CDP/FDP Frames Decoded
4-5
Type 4 TLVs –
Type 5 TLVs –
Type 6 TLVs –
Type 7 TLVs –
Type 9 TLVs –
Type 10 TLVs –
Displays “Type 4 – Capabilities”
Displays “VALUE: “ followed by the capabilities value
Displays “Type 5 – Version”
Displays “LENGTH:“ followed by the actual string length
(Displays up to 25 characters of the string in the TLV)
Displays “Type 6 – Platform”
Displays “LENGTH: “ followed by the actual string length
(Displays up to 25 characters of the string in the TLV)
Displays “Type 7 – n IP Prefixes” (where n is the actual number
of prefixes contained in the TLV – note this displays “1 Prefix” if
the number of prefixes is 1)
Displays one line per prefix in the TLV as follows (n is 1
upwards indicating the position in the TLV) –
“n: xxx.xxx.xxx.xxx:yy” where xxx.xxx.xxx.xxx is the IP prefix
in this part of the TLV and yy is the subnet mask number
Displays “Type 9 – VTP Domain”
Displays “LENGTH: “ followed by the actual string length
(Displays up to 25 characters of the string in the TLV)
Displays “Type 10 – Native VLAN”
Displays “VALUE: “ followed by the VLAN tag
Type 11 T LVs –
Displays “Type 11 – Duplex”
Displays “VALUE: “ followed by the duplex value
Type 14 TLVs –
Displays “Type 14 – Appliance ID”
Displays “VALUE: “ followed by the VLAN tag value
Type 16 TLVs –
Displays “Type 16 – Power”
Displays “VALUE: “ followed by the power consumption
Any other type of TLV –
Displays “TYPE 0xyyyy” where yyyy is the hexadecimal type #
of the TLV
Chapter 4
Page 64

Analyze Network
Problems
Expert
Select the EXPERT button in the Bottom Area. The Problems Screen
displays any problems the analyzer detects. The LANEXPERT can
display up to 50 different problems. One page will include the problem
number, the problem detected and the recommendation on how to solve
the problem.
A <NO PROBLEMS DETECTED>!message is displayed until a problem
occurs.
Clear
Select Clear in the data action buttons to clear the problems found.
Expert Messages
The following are problems the LANEXPERT will detect and the
recommendations for correction:
(1) Did not link
device.
4-6
Recommendations -
Check the LanExpert PORT settings.
Check the cable between the LanExpert and the
Check that the device is powered.
Replace the device.
(2) Lost link for a total of (Seconds)
Recommendations -
Check cable between LanExpert and device.
Check power to the device.
Replace the device.
(3) High sustained byte traffic
Recommendations-
Use higher speed or split link into segments.
(4) High sustained frame traffic
Recommendations -
Check the MTU settings of all devices.
Check for devices generating unexpected traffic.
Use higher speed or split link into segments.
(5) High peak byte traffic
Recommendations -
Use higher speed or split link into segments.
(6) High peak frame traffic
Recommendations -
Check the MTU settings of all devices.
Check for devices generating unexpected traffic.
Use higher speed or split link into segments.
Chapter 4
Page 65

Analyze Network
Problems - cont.
(7) Detected Pause frames when using half duplex
(8) High volume of Pause frames (Type of traffic)
(9) High volume (Type) of traffic from (address)
(10) Could not obtain address from DHCP server
(11) No response from the DNS server(s)
(12) Could not resolve a WINS name
4-7
Recommendations -
Check for device not configured for half duplex.
Check operation of device bridging full to half duplex.
Use full duplex throughout network.
Recommendations -
Use faster devices.
Split the link into separate segments.
Recommendations -
Check the device for unexpected activity.
Use higher speed or split link into segments.
Recommendations -
Check the DHCP server(s).
Recommendations -
Check the DNS IP addresses.
Recommendations -
If using a WINS server Check the WINS IP address.
If not using a WINS server Check all computer NetBios names.
(13) VoIP device (address) did not authenticate. See VoIP screen
for details
Recommendations-
Check configuration of the VoIP device.
(14) Detected (#) discarded IP fragments. Can indicate there
are multiple paths between devices
Recommendations -
Check configuration of your network and routers.
(15) Detected (#) duplicated or overlapping IP fragments
(16) Detected (#) CRC errors within frames
Can indicate there are multiple paths between devices.
Not unusual when the source is outside of local network.
Recommendations -
Check configuration of your network and routers.
Recommendations -
Check all cables and devices.
Chapter 4
Page 66

Analyze Network
Problems - cont.
4-8
(17) Detected (#) frame alignment errors
(18) Detected (#) undersize frames (runts)
(19) Detected (#) oversize frames
(20) Detected (#) jabber frames
(21) Detected (#) improperly formatted frames
(22) Detected (#) improperly sized frames
Usually caused by a faulty device.
Can be caused by improper half duplex operation.
Recommendations -
Check all devices within the network.
Usually caused by a faulty device.
Can be caused by improper half duplex operation.
Recommendations -
Use faster devices.
Check all devices within the network.
Usually caused by a faulty device.
Can be caused by improper half duplex operation.
Can be caused by using Jumbo frames.
Recommendations -
Check all devices within the network.
Recommendations -
Check all devices within the network.
Recommendations -
Check all devices within the network.
Can be caused by improper half duplex operation by a
device.
Recommendations-
Check all devices within the network.
(23) Detected (#) IP Header errors from (address)
Recommendations -
Check switches and routers between the LanExpert
and the device.
Replace the device.
(24) Detected (#) UDP Header errors from (address)
Can indicate there are multiple paths between devices.
Not unusual when the source is outside of local network.
Recommendations -
Check switches and routers between the LanExpert
and the device.
Replace the device.
Chapter 4
Page 67

Analyze Network
Problems - cont.
(25) Detected (#) TCP Header errors from (address)
(26) Detected (#) ICMP Header errors from (address)
(27) Detected (#) ICMP Unreachable frames
4-9
Recommendations -
Check switches and routers between the LanExpert
and the device.
Replace the device.
Recommendations -
Check switches and routers between the LanExpert
and the device.
Replace the device.
Recommendations -
Check switches and routers between the LanExpert
and the device.
Replace the device.
(28) Detected (#) ICMP Unreachable frames
(29) Devices on P1 and P2 have mismatched speed
capabilities. They will not operate together
(30) Devices on P1 and P2 have mismatched MDI/X capabilities.
They will not operate together
(31) Collisions have been detected
(32) Cable has reversed polarity in 1 (or more) wire pairs
Recommendations -
(33) VoIP device (address) SIP response timeout. See VoIP
screen for details
Small numbers of these are not unusual. High numbers
usually indicate that a device is misconfigured (incorrect
server IP or port).
Recommendations -
Change the devices for compatibility.
Recommendations -
Change the devices for compatibility.
Recommendations-
Change the devices for compatibility.
Recommendations -
Check devices are properly configured for half duplex
operation.
Change network to only use full duplex.
Check the cable and the device.
Recommendations -
Check configuration of the VoIP device.
Check connectivity to SIP server.
Chapter 4
Page 68

Analyze Network
Vitals
Vitals
Select the VITALS button in the Bottom Area. The VITALS screen displays
Frame information in a List or Bar chart format. While in the List screen, it
displays how long the link has been connected (Elapsed Time) and time it
has unlinked (Time Unlinked) both in milliseconds. It also displays the
Maximum Frame Size received. This screen breaksdown the individual
frames collected into good and bad frames. The good frames are then
brokendown into unicast, multicast and broadcast with the amount of
frames detected of each. Each frame is shown as a percentage of the
entire network traffic.
4-10
Example Vitals Screen
Clear
Select CLEAR in the data action buttons to clear all the data received.
NOTE: Linked time will NOT be cleared because the link never disconnected
List/Chart
Select LIST in the data action buttons. A bar chart describing good and
bad frames is displayed. These colored bars show the percentage of the
total frames received that are multicast or broadcast frames in relation to
the total frames. The bars are green if the frames are good and red if the
frames are bad. Each bar is logarithmically set in length and is horizontal
(there are 0.1%, 1%, 10%, 100% markers shown in the first line of the
data area which cannot be changed).
Select CHART in the Data Action buttons. The LIST will be displayed again
showing the good and bad frame counts and percentages.
Chapter 4
Page 69

Analyze Network
Vitals - Good Frames
Total
The TOTAL button in the Data Action Area is used to change how the
information is presented. The amount of Frames, Good and Bad frames
and Good Bytes collected will be presented in the time frame selected.
This function works in both the List and Chart mode.
The choices below are how the information can be presented:
Good Frames
GOOD FRAMES are displayed in number of frames and percentage (of
total received frames) of good unicast, multicast, and broadcast Ethernet
frames received in relation to the total frames. Select the outlined white box
to show the breakdown of good frames. Select the filled box to hide the
breakdown.
4-11
avg/s - shows the average of frames and bytes collected per
second.
/1s - shows frames and bytes that were collected within the last
second. This will update every second.
/10s - shows frames and bytes that were collected within the last
10 seconds. This will update every 10 seconds.
/1m - shows frames and bytes that were collected within the last
minute. This will update every minute.
Total - shows all frames and bytes that were collected since the
link was established.
Good Bytes
GOOD BYTES are displayed in number of KB of good multicast and
broadcast Ethernet bytes received in relation to the total bytes.
Bad Frames
BAD FRAMES are displayed in red if there are any found. They are
displayed in number of frames and percentage (of total received frames) of
bad unicast, multicast, and broadcast Ethernet frames received in relation
to the total frames. Select the outlined white box to show the breakdown of
bad frames. Select the filled box to hide the breakdown.
NOTE: Select another Test button visible on the screen or by scrolling to
the right or left with the white arrows or select the Exit button.
Chapter 4
Page 70

Analyze Network
Protocols
Protocols
Select the PROTOCOLS button in the Bottom Area. The protocols screen
shows the number of packets and percentage of the total captured data for
each protocol. A protocol is added to the protocol list as it is detected. The
protocols at the Ethernet Frame level (i.e. RFC894, IEEE 802.2/3, LLC,
LCC+Snap, VLAN, etc.) and Ethernet type level (i.e. ARP, IP, IPX,
AppleTalk, NetBIOS, IPv6, etc) are displayed first when detected. It shows
how many frames received in KB and the percentage of a given protocol in
relation to the total number of protocols received.
An outlined white box to the left of the protocol’s name means there are
more protocols to be displayed under that Ethernet type. The box will be
filled in and shows the rest of the protocols under that type. The
LANEXPERT provides protocol names for standard protocols such as
LLC, ARP and NETBIOS. Unknown protocols are indicated by the word
TYPE with the transmitting port number. Port numbers in hexadecimal
format are indicated by an “h“ following the number.
If there are too many protocols to display on one screen, press the Down
arrow on the right of the screen to scroll to the rest of the protocols. The
LANEXPERT can display up to 31 different protocols. After 31 protocols
are detected, all additional new protocols are counted together in the 32
slot under OTHERS.
4-12
nd
Example Protocols Screen
Example Protocols 2 Screen
Chapter 4
Page 71

Analyze Network
Protocols - cont.
Clear
Select CLEAR in the data action buttons to clear all the detected protocols.
List/Chart
Select LIST in the Data Action buttons. This will display the percentage of
each protocol in a bar chart format. These colored bars show the
percentage of the each protocol received. Each bar is logarithmically set in
length and is horizontal (there are 0.1%, 1%, 10%, 100% markers shown in
the first line of the data area which cannot be changed).
Select CHART in the Data Action buttons. The LIST will be displayed again
showing the good and bad frame counts and percentages.
Total
The TOTAL button in the Data Action Area is used to change how the
information is presented. The amount of protocols collected will be
presented in the time frames selected. This function works in both the List
and Chart mode.
The choices below are how the information can be presented:
4-13
avg/s - shows the average of protocols collected per second.
/1s - shows protocols that were collected within the last
second. This will update every second.
/10s - shows protocols that were collected within the last 10
seconds. This will update every 10 seconds.
/1m - shows protocols that were collected within the last minute.
This will update every minute.
Total - shows all protocols that were collected since the link was
established.
NOTE: Select another Test button visible on the screen or by scrolling to
the right or left with the white arrows or select the Exit button.
Chapter 4
Page 72

Analyze Network
Top Talkers
Top Talkers
Select the TOP TALKERS button in the Bottom Area. This displays the
MAC address (if found), Registered owner of that MAC address, IP
address, name (if found), the number and percentage of transmitted
frames on the network.
The LANEXPERT lists the devices in order from the highest used
bandwidth to the lowest.
Bandwidth usage
Over 50% is displayed in RED.
Between 49.9% to 20% is displayed in ORANGE
19.9% and below is displayed in WHITE
This allows the user to quickly determine where the problem might be.
Clear
Select CLEAR in the data action buttons to clear all the detected devices.
4-14
Example Top Talkers Screen
NOTE: Select another Test button visible on the screen or by scrolling to
the right or left with the white arrows or select the Exit button.
Chapter 4
Page 73

Analyze Network
Devices
Devices
Select the DEVICES button in the Bottom Area. All devices found by the
LANEXPERT will be displayed.
NOTE: This may not be the complete list of devices on the network.
The first layer of devices are SERVERS, VoIP DEVICES, ROUTERS,
PRINTERS, and OTHERS. Select the outlined white box next to the
SERVERS names to drill down to see which servers were found. Under
SERVERS, there may be DHCP, POP3, HTTP, DNS, VoIP/SIP, etc. Select
the outlined white box next to the name of the desired server to see the
MAC address, Registered owner of that MAC address, IP address, and
number of transmitted and received frames. The data for VoIP DEVICES,
ROUTERS, PRINTERS and OTHERS has the same format as the SERVERS
detected. OTHERS describes PCs or workstations and anything else not
described under the other devices listed above.
Discover
For a more complete list, select the DISCOVER button in the data action
buttons. This sends user-defined packets including ARP, NetBios, and DNS
to all the devices on the network. This allows for a more detailed list of
devices on the network.
4-15
Clear
Select Clear in the data action buttons to clear all the devices found.
Example Devices Screen
NOTE: Select another Test button visible on the screen or by scrolling to
the right or left with the white arrows or select the Exit button.
Chapter 4
Page 74

Analyze Network
Ping / Trace
Ping/Trace
Select the PING/TRACE button in the Bottom Area. The PING test is used
to verify connectivity, measure round trip communication time, check data
integrity, determine a MAC address and search a stored list or a range of IP
addresses.
Select START in the data action buttons to start Pinging with the selected
profile parameters. Select STOP in the data action buttons to stop Pinging
if using continuous ping. Once the ping test is done, the MAC address of
the pinged devices is shown. The LANEXPERT also displays the last
ping response time in milliseconds, how many Attempted, Lost and Bad
pings there were. The next line describes the minimum, average and
maximum ping response in milliseconds.
Select SETUP in the data action buttons to go straight to the PING/TRACE
setup to change parameters quickly.
4-16
Tracert
Example Ping Screen Example Trace Route Screen
Select TRACERT button under the device name to trace the route to that
device. The device is listed with the number of hops it took the
LANEXPERT to get to the device. The IP address (if available) is
displayed with the roundtrip time in milliseconds. If the LANEXPERT
cannot resolve the IP address, it displays “IP NOT KNOWN”.
Repeat
Select REPEAT to run through the test again.
Return
Select RETURN to go back to the PING Screen.
NOTE: Select another Test button visible on the screen or by scrolling to
the right or left with the white arrows or select the Exit button.
Chapter 4
Page 75

Analyze Network
Traffic Generate
Traffic Generate
Select the TRAFFIC GENERATE button in the Bottom Area. The Traffic
Generate Screen displays first the Remote IP address to where the
frames are sent. Then it displays the size of the packets being sent with
how many Transmitted and Received frames. If there are any lost packets
then the LANEXPERT displays then number of frames lost with the
percentage. Lastly, the remaining time in seconds will be displayed along
with the percentage of the total time left.
If you configure for BROADCAST – that means that the LANEXPERT
does not expect there to be a LANEXPERT port at the remote end.
If the configured IP of the remote end actually exists, data is
simply sent to the configured remote IP in the normal manner.
This means traffic is not broadcast all over the network but just
to that one IP. This is useful to “stress” a computer without
stressing the entire network.
If the configured IP of the remote end does not exist (it does not
respond to an ARP) then data is broadcast all over the users
network with that destination IP but a broadcast MAC is used.
This is useful to “stress” an entire network.
Each port has only one receiver and one generator. A LANEXPERT can
use both receivers and both generators at the same time. Traffic
Generator guidlines:
4-17
In INLINE mode you might think there were two ports – there is
really only one from the traffic generate point of view.
A port can be a local generator (sending traffic to somewhere
else) and be a traffic sink to another generator at the same time
– but both the remote generator and the remote sink must be the
same LANEXPERT.
A port cannot be generating traffic in the REMOTE->LOCAL di
rection and receive traffic from another LANEXPERT in its’
LOCAL->REMOTE direction (this requires two traffic sinks on
the same port), or vice versa (that would require two generat
tors).
The LANEXPERT will react to pause frames, and slow down the traffic
generate rate. When broadcasting, the remote computer (if it exists) or the
entire network (if it doesn’t) will slow down the LANEXPERT– you can
read the “AVG RATE” data on the traffic generator screen to see what the
maximum receive rate for the specific computer or the entire network is.
Chapter 4
Page 76

Analyze Network
Traffic Generate
Traffic Generate
Traffic generate relies upon getting data back from the remote end when
using LOCAL->REMOTE direction, and relies upon control frames in both
directions when using REMOTE->LOCAL direction. This means that
neither can quite reach 100% utilization if either:
a) the connection is using half duplex
b) using the REMOTE->LOCAL direction.
NOTE: Performing high % utilization traffic generate when using DHCP
has no time left to negotiate a lease renewal.
Select START to start the test and watch the actual frame and rate the
LANEXPERT uses. Select SETUP to change the TRAFFIC GENERATE
parameters.
4-18
Example Traffic Generate
Screen
NOTE: Select another Test button visible on the screen or by scrolling
to the right or left with the white arrows or select the Exit button.
Example Traffic Generate
Screen
Chapter 4
Page 77

Analyze Network
802.1X
802.1X
The 802.1X screen displays a filtered capture of packets detected by the
LanExpert. Select START to start the test and watch the actual frame
detected from the LanExpert. Select STOP to stop the capture.
The LanExpert detects and saves the last received 64 802.1X
frames received. If configured in INDEP mode only 802.1X traffic on port
#1 is collected. For each captured frame the following is displayed on the
802.1X screen:
4-19
1st line – the captured frame counter and the date/time at which
the frame was detected.
2nd line - the source MAC address of the frame
3rd line - the destination MAC address of the frame
4th line - the 802.1X frame version (the standard is up to 4 now)
5th line - the 802.1X frame type number and the text description
of the type (e.g. EAP, Start, Logoff etc.)
6th line - the 802.1X frame payload byte length (if the type is
known to require a payload and there is not one then ERROR is
also displayed).
The following only is shown for 802.1X frame type EAP with a valid
payload size –
7th line - the EAP code # and the text description of the type
(e.g. Request, Response, Success, Failure)
8th line - the EAP frame ID #
9th line - the EAP payload byte length (if the code is known to
require a payload and there is not one then ERROR is also
displayed).
The following only is shown for EAP Request and Response codes with a
valid payload size –
10th line - the EAP request/response type # and the text
description of the type (e.g. Identity, Notification, Nak, MD5, OTP,
Generic etc.)
NOTE: Select another Test button visible on the screen or by scrolling
to the right or left with the white arrows or select the Exit button.
Chapter 4
Page 78

Analyze Network
Email
Email
Select the EMAIL button in the Bottom Area.
4-20
Example Email Screen
For the best EMAIL information, set the LanExpert to inline mode
between the computer sending out the emails and the network.
This screen displays the device IP address that receives an email and the
IP address of the email server used (POP3). The LANEXPERT displays
the email address or the username of the current email session and how
many attempts were made to log-in. It describes the Last attempt and
whether it was successful or not. Next, the LANEXPERT displays how
many recieved and deleted emails and the total number of bytes the emails
contained.
For Sending an email from a computer, the LANEXPERT displays the IP
address of the email server connected (SMTP), Username, attempted logins, state of the last attempted log-in and how many sent and failed emails.
The email displays the total number of bytes the emails contained.
NOTE: Select another Test button visible on the screen or by scrolling to
the right or left with the white arrows or select the Exit button.
Example Email Screen 2
Chapter 4
Page 79

Analyze Network
VoIP
VoIP
Select the VoIP button in the Bottom Area.
VoIP uses three different protocols. Detected phone lines could also be
video links or data links.
4-21
SIP is used for <Session Management> - the VoIP device/line
combination registers with the SIP server at intervals (usually
every few minutes). In this way, the location and status of the
device/line is maintained with the VoIP provider. This
authenticates the device/line also. Incoming and outgoing calls
are also managed through the SIP server.
RTP is used for the actual <streaming data> (i.e. audio in a
phone call) - when a call is made to/from a device/line then the
SIP server provides the device/line with the IPs of the RTP
server to use. The device/line then sends or receives a data
stream to/from the RTP server. Generally, this data is at a
consistent rate (usually 50fps for audio) and there are two data
streams (one for inbound data, the other for outbound).
RTCP is used to allow each end of an active RTP session to
communicate link quality information with each other. Not all RTP
devices or servers do this. If this occurs, the sender will
generally send one packet every few seconds. This allows the
VoIP provider to maintain knowledge of the performance of the
network.
There are separate entries for each line/device/server combination. The
example on the following page shows one device, one server and two
lines. The terminology used in this example is from the definition of SIP.
NOTE: Select another Test button visible on the screen or by scrolling to
the right or left with the white arrows or select the Exit button.
Chapter 4
Page 80

Analyze Network
VoIP
VoIP example
Line
LINE shows the <display name> and SIP <name> for the line. Some
devices might not have a <display name>, in which case there is only
one line of text shown. This identifies the actual line (i.e. phone line).
Device
4-22
Example VoIP Screen 1
DEVICE shows the MAC address of the device and IP address:UDP port
used by the device for SIP purposes.
Registration
REGISTRATION shows a count of the attempted and successful
registrations of the device/line with the server. These numbers <should>
be the same but, they can be slightly off due to network loss and server
down times.
TO - Shows the IP:UDP port of the server with which the device/line last
attempted to register.
FROM - Shows the IP:UDP port for the server which the device/line last
received registration info from. These might be different because some
systems send registrations to one server and receive the response from
another.
NOTE: Select another Test button visible on the screen or by scrolling to
the right or left with the white arrows or select the Exit button.
Chapter 4
Page 81

Analyze Network
VoIP - cont.
VoIP example - cont.
Example VoIP Screen 2
Registration cont.
STATUS shows the textual (informative) part of the last registration
status. Generally, this should be alright but, if there is an issue, this will
describe the problem (e.g. <UNAUTHORIZED> indicates that the device/line
did not correctly authenticate with the server).
4-23
Completed Calls
COMPLETED CALLS shows the number of calls made to (IN) and from
(OUT) the device/line. Note - this includes calls which did not have a data
stream (e.g. if the other end never picked up the call).
This example uses two phone calls to demonstrate. There is a white
horizontal line separating the two phone lines.
NOTE: Select another Test button visible on the screen or by scrolling to
the right or left with the white arrows or select the Exit button.
Chapter 4
Page 82

Analyze Network
VoIP - cont.
VoIP example - cont.
Example VoIP Screen 3
Last Call
LAST CALL - gives information regarding the last call made or the call in
progress, if any. If no calls have been made, or if there is no call in
progress, this section will not be displayed. The call being made will also
be displayed as OUTGOING or INCOMING .
4-24
STATUS - Shows the last SIP status information for the call progress.
Generally, this should be OK, during origination of the call this will show
textual status, e.g. <RINGING>.
FROM - Shows the SIP <name> of the line which originated the call.
TO - Shows the SIP <name> of the line that received the call.
NOTE: Select another Test button visible on the screen or by scrolling
to the right or left with the white arrows or select the Exit button.
Chapter 4
Page 83

Analyze Network
VoIP - cont.
VoIP example - cont.
Example VoIP Screen 4
Media Stream
MEDIA STREAM shows the details of the RTP connections for the calls
and the protocols (codecs) being used. This is the information negotiated
with the SIP server. For each end being used, the IP address and the
codec (if known) are displayed.
SERVER - shows the server <end> of the RTP link.
4-25
DEVICE - shows the device <end> of the RTP link - generally, this will be
the same IP as the one used by the device for SIP but, not always.
STATISTICS - shows the statistics for each of the two RTP data streams
as measured by the LanExpert (we do NOT use any received RTCP
data). The <DEVICE> column shows the data for the stream coming from
the device. The <SERVER> column shows the data for the stream coming
from the server.
RTCP FRAMES - shows a count of the RTCP frames (if any).
RTP FRAMES - shows a count of the number of RTP (i.e. data stream)
frames. Since audio is usually 50fps, this can be used to provide an
estimate of the length of the call. Note - the DEVICE and SERVER data
should be similar.
NOTE: Select another Test button visible on the screen or by scrolling
to the right or left with the white arrows or select the Exit button.
Chapter 4
Page 84

Analyze Network
VoIP - cont.
VoIP example - cont.
Example VoIP Screen 5
Media Stream - cont.
RESTARTS, MISORDERS, LOST and JITTER shows the corresponding
statistics data for the data stream. The meanings of these are exactly as
defined in the SIP RFC.
RESTARTS is the number of times that a badly scrambled data stream
needed to be restarted (this is bad).
4-26
MISORDERS is the number of times that frames were received out of
order but, not lost (these frames generate poor signal quality, e.g. garbled
audio).
LOST is the number of frames which were not found in the data stream
(these frames generate poor signal quality if they reach a high volume).
JITTER is a measure of the timing of the frames (if the frame rate is 50fps
for the data stream, then a figure of 1ms corresponds to a 2% uncertainty
in the frequency of the audio signal).
NOTE: Select another Test button visible on the screen or by scrolling
to the right or left with the white arrows or select the Exit button.
Chapter 4
Page 85

Analyze Network
Frame Capture
Frame Capture
The FRAME CAPTURE screen displays a filtered or non-filtered capture of
packets detected by the LanExpert. Select START to start capturing
packets.
Once a packet is detected it displays which LANEXPERT port number
the packet is received on, the packet number received from the start of the
capture test sequentially and the size of the packet. It also displays the
date and time in microseconds when the packet was detected. Select
STOP to stop the capture.
Select START to start the test and watch the actual frame detected from
the LANEXPERT. Select SETUP to change the Capture parameters.
NOTE: Selecting START again will clear detected data for a new capture.
4-27
Example Capture Time
Screen
Example Capture Summary
Screen
Example Capture Show
Screen
Time / Summary
Select TIME to toggle to SUMMARY where more information if shown
about the packets. Under SUMMARY the Source and destination MAC is
displayed along with the type of packet detected. Select the SETUP button
to modify the captured data.
Select the SHOW button to display the bytes of the packet in HEX or in
ASCII. Select RETURN to go back to the other captured packets.
NOTE: Select another Test button visible on the screen or by scrolling to
the right or left with the white arrows or select the Exit button.
Chapter 4
Page 86

Analyze Network
Remote Access
Remote Access
Select the REMOTE ACCESS button in the Bottom Area. The Remote Access
Screen displays UDP Sessions and Pings received. The LANEXPERT IP
address is also shown here.
UDP SESSIONS describe the connection to another network device. The
LANEXPERT displays the IP address and the port number the packet
comes from. Also the LANEXPERT will tell if the link is Active or Inactive
and how many transmitted and received packets between the two devices.
PINGS RECEIVED displays what IP address sent the Pings and how many
pings received. Select CLEAR to clear collected data.
4-28
Example Remote Access
Screen
Once a Remote unit connects to the LanExpert, a green info message
appears stating “REMOTE SESSION STARTED“ which includes the remote
unit‘s IP Address.
NOTE: Select another Test button visible on the screen or by scrolling to
the right or left with the white arrows or select the Exit button.
Chapter 4
Page 87

Analyze Network
PoE
Inline PoE
Select the PoE button in the Bottom Area. This is INLINE PoE, which is not
the same as the PoE under cable test. By selecting this button, make sure
the LANEXPERT is in INLINE mode or a screen will be displayed saying
<Only available when configured in inline mode>. Make sure one side of
the LANEXPERT is a Powered device and the other side a Power
Source.
This screen will show whether the Power is Midspan (power on 45-78),
Endspan (power on 12-36) or allspan (power on 12-36 and 45-78)
depending on where the voltage is detected.
Inline currnet is displayed in mA along with the Power in watts and the
flow of current going from the source to the device. In this case the
current flow is going from P2 and is powering up P1.
4-29
Example Inline PoE
Screen
NOTE: Select another Test button visible on the screen or by scrolling to
the right or left with the white arrows or select the Exit button.
Chapter 4
Page 88

Analyze Network
Save
Save
Select the SAVE button in the Bottom Area.
Capture (.CAP files) is used to store the frames in the Frame Capture
mode. Up to 8192 frames in each of 10 memory storage locations can be
stored. Once stored the frames must be downloaded to the computer and
viewed in the Wireshark protocol analysis software (this is a free software
package go to www.wireshark.org to download the latest version). Select
Internal to save the data internally in the unit and use the LANEXPERT
Console Application to extract the data. Select External and insert a USB
flashdrive to save externally. Give the data a filename no more than eight
characters long.
NOTE: Write down the internal numbers and the external filename to
remember where you saved the data.
CAUTION: Do NOT remove the flashdrive while saving the data to it.The
drive may become unreadable and needs to reformatted. Saving data
may take several seconds. A percentage is shown for its progress and
may apear to be “fixed” at times so please be patient.
Detectors (.DET files) is used to store all the information shown in the
Link, Problems, Vitals, Protocols, Top Talkers, Devices, Ping/Trace, Email
and VoIP. The LANEXPERT starts a database of information as soon as
the unit Links with the network. Some information is collected without
running a specific test. Running other tests adds more information to the
data base. This data is saved until the Link is broken and then a new data
base is started. Saving <Detectors> will save all the information in the
data base and when recalled any of the listed tests will show the
information in the database at the time it was stored. So it is not limited to
just a single test result. Any saved tests can be printed from the Screen
Cature in the LANEXPERT Console Appication.
4-30
Select to store the data internally in the LANEXPERT and RECALL the
test results later or save to an external flash drive. Enter a number to
where the LANEXPERT will save the data internally then press Save.
The detector data can only be viewed on a LANEXPERT.
Example Save Screen
Chapter 4
Page 89

Analyze Network
Setup
Setup
Select the SETUP button in the Bottom Area. This will display the
SELECTED PROFILES screen. See how to change parameters under the
SETUP in chapter 3 page 3-2.
4-31
NOTE: Select another Test button visible on the screen or by scrolling to
the right or left with the white arrows or select the Exit button.
Chapter 4
Page 90

Chapter 5
Page 91

Stress Test
This chapter describes how to test the network with the RFC2544 Stress
Test.
Understanding RFC2544
The LANEXPERT Network Analyzer uses Throughput, Latency, Frame
Loss and Back-to-Back tests to measure the performance of a network
consisting of one or more active devices.
Throughput - defines the maximum number of frames per
second that can be transmitted without any errors. The test
starts at a mid-range frame rate and then compares the number
of transmitted and received frames. If no frames are lost, the
rate is increased until frame loss occurs. If frames are lost, the
rate is decreased until no frames are lost.
Latency - measures the time required for a frame to travel from
the originating device through the network to the destination
device and then back to the source. The frames are tagged with
a time-stamp during transmission. When the tagged frame is
received back, the latency is measured.
Frame Loss - measures the networks response to overload
conditions. Traffic is sent at the maximum line rate and then the
number of dropped frames is counted. When dropped frames
are detected, the test restarts at a slower rate. This test is
repeated until there is no frame loss for two consecutive
iterations.
Back-to-Back Frames - measures the maximum number of
frames received at full line rate before a frame is lost.
5-1
Page 92

Stress Test
Stess Test Screen
Basic Setup
This section will describe how to configure the LANEXPERT for a
RFC2544 Stress Test.
Stress Test with One LanExpert
Select SETUP and select any Profile besides Factory Default under the
Select Profile. Go to PORTS and change the configuration to INDEP for
Independent mode.
5-2
NOTE: If you are not connected to a network that has DHCP or connected directly into the other port of the LanExpert with a cable, you must
select a fixed IP address that has the same subnet mask as Port 2.
If you are not connected to a network that has DHCP, press the DOWN
arrow twice to display Port 1 IP address. Select FIXED and give PORT 1 an
IP address, Subnet and Gateway IP address.
Press the DOWN arrow three more times to display Port 2 IP address.
Select FIXED and give PORT 2 an IP address which is in the same subnet
mask as Port 1. Select the same Subnet Mask and Gateway IP address as
Port 1.
For Example,
Port 1 IP address 192.125.1.100
Port 2 IP address 192.125.1.101
Make sure to change the Remote IP address to Port 2 IP address.
Select STRESS TEST under setup to change the Remote IP.
Subnet Mask 255.255.255.0
Gateway 192.125.1.1
Subnet Mask 255.255.255.0
Gateway 192.125.1.1
Chapter 5
Page 93

Stress Test
Stess Test Screen
Basic Setup
This section will describe how to configure the LANEXPERT for a
RFC2544 Stress Test.
Stress Test with Two LanExperts
Select SETUP on both LANEXPERTs and select Factory Default under
the Select Profile. Press [X] to return to the Home Screen.
5-3
Select Stress Test and wait for both LANEXPERTs to link. On the main
LANEXPERT (the one where you will press start), Select Setup and
change the Remote IP address to the other LANEXPERT IP address
(Remote LANEXPERT).
Select START to start the Stress test with the configuration set under
Stress Test setup. Select the RESULTS button to see the results of the
test.
NOTE: If you are not connected to a network that has DHCP or connected directly into the other
a fixed IP address for both of the
address are within ths same subnet mask.
NOTE: Since stress testing does not (and cannot by definition) respond
to pause frames, it cannot be slowed down. This means you cannot
perform stress testing on an active network. Remember, stress testing
has a zero tolerance to lost frames – just a single frame lost is a failure
of the test.
LANEXPERT
LANEXPERT
with a cable, you must select
. Make sure the IP
Chapter 5
Page 94

Stress Test
Stess Test Screen
Stress Test Screen
Select the STRESS TEST button from the HOME screen. This screen
displays the port link connection and the IP address associated with that
port. All Stress Test packets are sent to either the second port on the
LANEXPERT or another LANEXPERT. The IP address for the other
port or the second LanExpert must be entered in the Stress Test
Setup and is shown as the Remote IP address.
There is a button under the Remote IP address labeled LOCAL-> REMOTE
or REMOTE -> LOCAL. This describes where the packets originate from.
Selecting LOCAL-> REMOTE describes the packet originates from the
Local LANEXPERT and is sent to the remote LANEXPERT. This gives
us an upstream configured test.
Selecting REMOTE -> LOCAL describes the packet originates from the
Remote LANEXPERT and is sent to the Local LANEXPERT. This gives
us an downstream configured test.
Select from one to four test(s) to be performed. The estimated time for
each test is given. Select START to begin the test(s). Stopping a test
before it is complete may give invalid results.
5-4
Stress test Screen
Stress test Screen with
invalid IP address
Start/Stop
Select START in the data action buttons to start the selected tests. The
LANEXPERT tests the connection to the remote IP address to ensure a
valid IP was entered. If an invalid IP address was entered then the
LanExpert displays an error message saying <REMOTE DEVICE
NOT FOUND> and returns to the stress test screen where the remote IP is
now in red. Select a valid IP address (either from PORT 2 or another
LANEXPERT on the network). Select STOP in the data action buttons to
stop the test.
Chapter 5
Page 95

Stress Test
Stess Test Screen
Stress Test Screen
5-5
Stress test Screen
Storage Screen
Storage
Select STORAGE in the Data action buttons to save current test results or
recall previously saved test results. The SAVE button can only be used
when the set of tests have been performed completely and no changes to
SETUP or test selection have been made. Select an internal or external
store number to save the current test data for further analysis or recall
previously saved data.
Setup
Select SETUP in the data action buttons to go to the stress test setup to
change test parameters.
Results
Select RESULTS in the data action buttons to go to the stress test results
screen of a selected test.
Chapter 5
Page 96

Stress Test
Thoughput
Throughput
Throughput test results are shown as the maximum number of frames
transmitted and the percent utilization of the total bandwidth with zero lost
frames. One row of data is shown for each enabled frame size (up to 7
rows).
5-6
The above screens show two different examples of Stress Tests:
The left screen shows the test results when Port 1 of a LANEXPERT is
connected to a gigabit switch with Port 2 of the same LANEXPERT also
connected to the gigabit switch. The maximum line rate is 100% of 1000
megabits per second (Mbps). The measured throughput of the switch
under test is 98% of the maximum line rate. 98% of 1000 Mbs is 980Mbps
showing that the switch is operating at full speed.
The right screen shows the test results when a LANEXPERT is
connected to a gigabit switch and then converted and transmitted over a
microwave link with a speed of 155 megabits per second. The microwave
transmission is converted back to copper and connected to a second
gigabit switch which is connected to a second LANEXPERT. The
maximum line rate is limited to the speed of the microwave link of 155Mbps.
Calculated utilization is 155/1000 = 0.155 or 15.5%. Actual tests measured
a 15-16% utilization rate. The difference is due to rounding as only whole
numbers are displayed.
NOTE: Select the red Exit button to go back to the main Stress Test
Screen. Select another result button to view results of the other test.
Chapter 5
Page 97

Stress Test
Latency
Latency
Test results are shown as the minimum, average and maximum latency
time (in microseconds) for each size frame that is tested. The total
number of packets used in the Latency test is determined by the length of
time and number of tests selected in Setup. One row of data is shown for
each enabled frame size (up to 7 rows).
5-7
When the latency time varies, it causes issues with real-time services.
For example, latency variation in VoIP applications would degrade the
voice quality. Long latency can also degrade Ethernet service quality. In
client-server applications, the server might time out or poor application
performance can occur.
The screen on the left shows very small latency times which we would
expect from going through only one switch.
The screen on the right shows much longer latency times. This is due to the
fact that the sent packets have to go through different medias (i.e. copper
and radio link) and speeds to make a roundtrip.
NOTE: Select another Setup button visible on the screen or by scrolling to
the right or left with the white arrows or select the Exit button.
Chapter 5
Page 98

Stress Test
Frame Loss
Frame Loss
Test results are shown as Frame Loss percentage versus percent of
maximum line speed for each packet size. The test starts at 100% of the
line speed and steps down in selectable step sizes until two consecutive
steps have 0% frame loss which ends the test. Dashed lines are
displayed for line speeds not tested when the 0% frame loss is met.
In the first example below, the test shows 0% loss at both 100% and 90%
of the maximum line speed which ended the test. Everything below 90%
will also have no frame loss and is not tested. The line speeds less than
90% have dashed lines showing that frame loss rate was not tested.
In the second example below (based on the previous microwave link
test),there was 100% frame loss down to 30% of the maximum line rate.
Some frames were transmitted correctly from 30% to 20%. Between 20%
and 10% transmission reached 0% frame loss. 0% frame loss was
expected at about 15.5% because of the 155Mbps microwave link. More
accurate results can be attained by changing the Frame Loss setup to a
smaller step size such as 1%.
5-8
Chapter 5
Page 99

Stress Test
Back to Back
Back to Back
Test results are shown as the number of frames sent at maximum line
speed until a frame was lost. The test is repeated for each selected frame
size with one row of data for each frame size (up to 7 rows).
5-9
The screen on the left shows that the LANEXPERT can send a very
large about of back-to-back frames before an error occurs. This shows
that our single switch has good buffering capabilities to keep up with the
flow of traffic.
The screen on the right shows that the burst of frames isn‘t as big as what
can go through a single switch. Going through multiple devices and medias
decrease the amount of back-to-back frames.
NOTE: Select another Setup button visible on the screen or by scrolling to
the right or left with the white arrows or select the Exit button.
Chapter 5
Page 100

Stress Test
Storage
Storage
This section will describe how to Save a RFC2544 Stress Test.
After performing a stress test, select STORAGE from the main stress test
screen. Select to SAVE the stress test data collected internally or
externally onto a flashdrive. For saving to flashdrive:
The files are placed into the LANDATA directory, under the name entered
on the LanExpert when the files were saved. The previous binary
file (username.STT) is still saved in the LANDATA directory. This .STT file
allows the LanExpert to recall the data at a later time from the unit.
WARNING: DO NOT DISCONNECT THE USB DRIVE UNTIL THE
<SAVING xxx%> TEXT GOES AWAY ON THE
SCREEN.
THIS MIGHT TAKE SEVERAL SECONDS TO SAVE AND IT MIGHT
APPEAR “STUCK” BUT DO NOT UNPLUG USB. THE USB DRIVE
WILL NEED TO BE REFORMATTED IF YOU DO THAT.
The CSV files placed into the sub-directory with the user defined name
are as follows -
throughput test was performed then this file does not exist. Each line of
the this file has the format <frame size, frames per second, %utilization>
(e.g. 64,12345678,99); NOTE - unlike the display the frames per second
data is always in units of 1fps (i.e. it NEVER has a K character on the end
and scaled in 1000’s).
latency test was performed then this file does not exist. Each line of the
this file has the format <frame size, min, avg, max> (e.g. 64,5,5,6); NOTE -
unlike the display, the data is always in integer microseconds.
test was performed then this file does not exist. The first line has the
format 0,%,%,%.... where each % is the percentage frame rate for the
corresponding column. The remaining lines have the format <frame
size,loss rate,loss rate>. Where the loss rate is in integer percent (NOTE -
if the % character is missing then the data was not actually measured).
back test was performed then this file does not exist. Each line of this file
has the format <frame size, max frame burst>.
website to make a Printable Stress Test Report.
NOTE - Stress test data saved (internal or external) using this version or
an earlier version can be recalled and then resaved with this version in
order to generate the CSV files.
5-10
LANEXPERT
TPUT.CSV - this is the throughput stress test results. If no
LATENCY.CSV - this is the latency stress test results. If no
LOSS.CSV - this is the frame loss test results. If no frame loss
BTB.CSV - this is the back-to-back test results. If no back-to-
Use the Excel Macro RFC2544 Report Generator from the
WARNING: DO NOT SAVE DATA COLLECTED FROM AN ABORTED
STRESS TEST. Tests not actually performed might yield random data in
the CSV files.
Chapter 5
 Loading...