

Page 1
Cordless Serial Adapter with
®
Bluetooth
Instant cable-free serial connection for devices with an
RS-232 serial port
Wireless Technology
User’s Guide
Page 2

Table of Contents
CHAPTER 1 INTRODUCTION 3
CHAPTER 2 SETUP 6
STEP 1: Install the Software 6
STEP 2: Attach the CSA to the Computer 7
STEP 3: Prepare Communications Settings 7
STEP 4: Configure the CSA 8
SCENARIO 1: Set up a CSA pair for cable replacement. 11
SCENARIO 2: Set up CSA as passive serial Bluetooth receiver. 15
STEP 5: Attach CSA to Device 18
CHAPTER 3 CONFIGURATION UTILITY 20
Configuration Functions 21
General Properties 23
Connections Properties — ACCEPTOR MODE 24
Connections Properties — INITIATOR MODE 25
Remote Target (Initiator only) 26
Port Settings 27
Advanced (Acceptor only) 28
APPENDIX A SPECIFICATIONS 29
APPENDIX B SAFETY AND USAGE TIPS 31
APPENDIX C GLOSSARY 34
APPENDIX D TROUBLESHOOTING 36
APPENDIX E TECHNICAL SUPPORT 37
\
Limited Warranty 38
Limited Software Warranty 39
Copyright Notice 40
Regulatory Compliance 41
2
Page 3
Chapter 1 Introduction
E
y
B
y
p
E
B
f
P
Overview
Socket’s Cordless Serial Adapter (CSA) with Bluetooth Wireless
Technology eliminates your conventional RS-232 serial cable, providing an
easy-to-use, invisible connection with superior freedom of movement. This
tiny adapter allows any device with a standard 9-pin serial port to
communicate wirelessly. You can communicate with another CSA or other
Bluetooth enabled devices such as a laptop computer or PDA. Take
advantage of Personal Area Networking quickly and easily.
You don't need to install any drivers on the host device — just plug the
CSA into the 9-pin serial port on your industrial equipment and wirelessly
download the information you need to any Bluetooth enabled notebook,
Pocket PC, Palm or Mac OS device. Reduce costs by decreasing cycle
times for equipment maintenance and servicing through easier access to
serial ports in difficult or dangerous-to-access areas. Do you have cabled
connections you would like to replace with a cordless solution? Attach a
CSA on each side, and make bulky cables a thing of the past.
The CSA communicates over the Bluetooth Serial Port Profile. The adapter
can be powered from either the included AC power adapter or from the host
device over Pin 9 on the CSA.
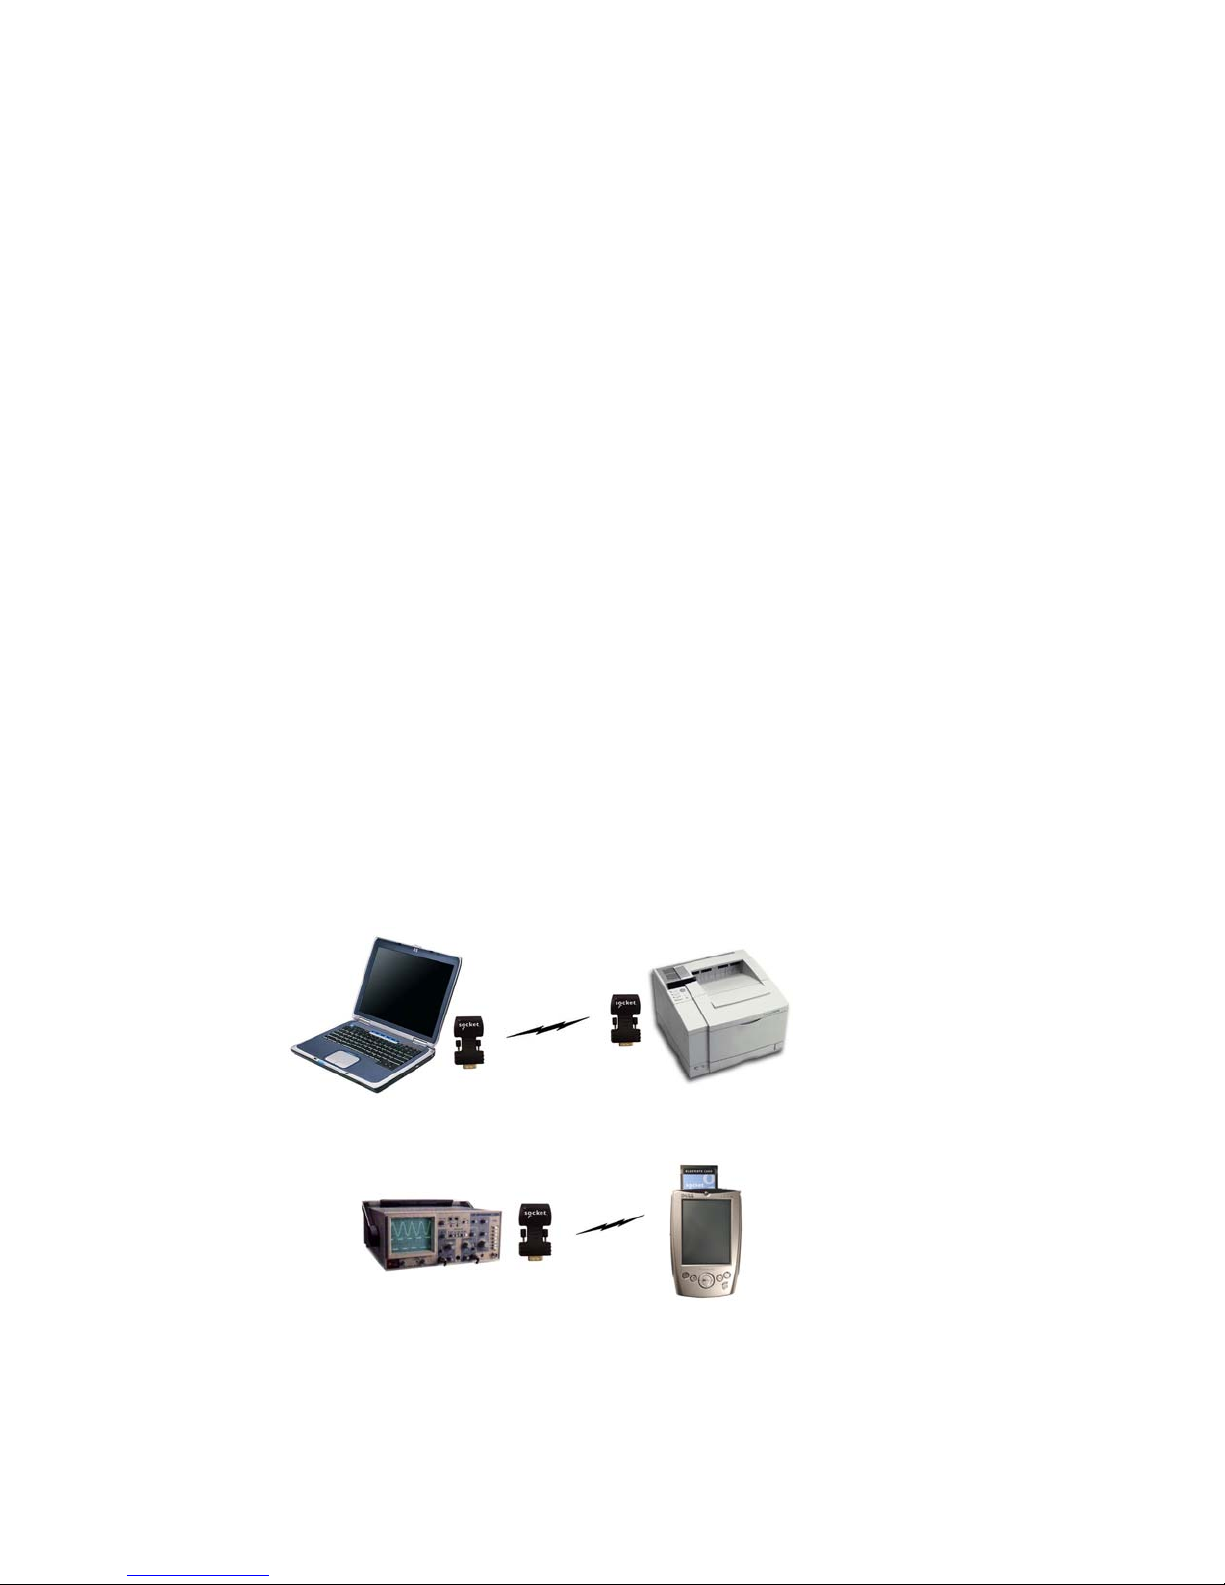
Common Usage Scenarios
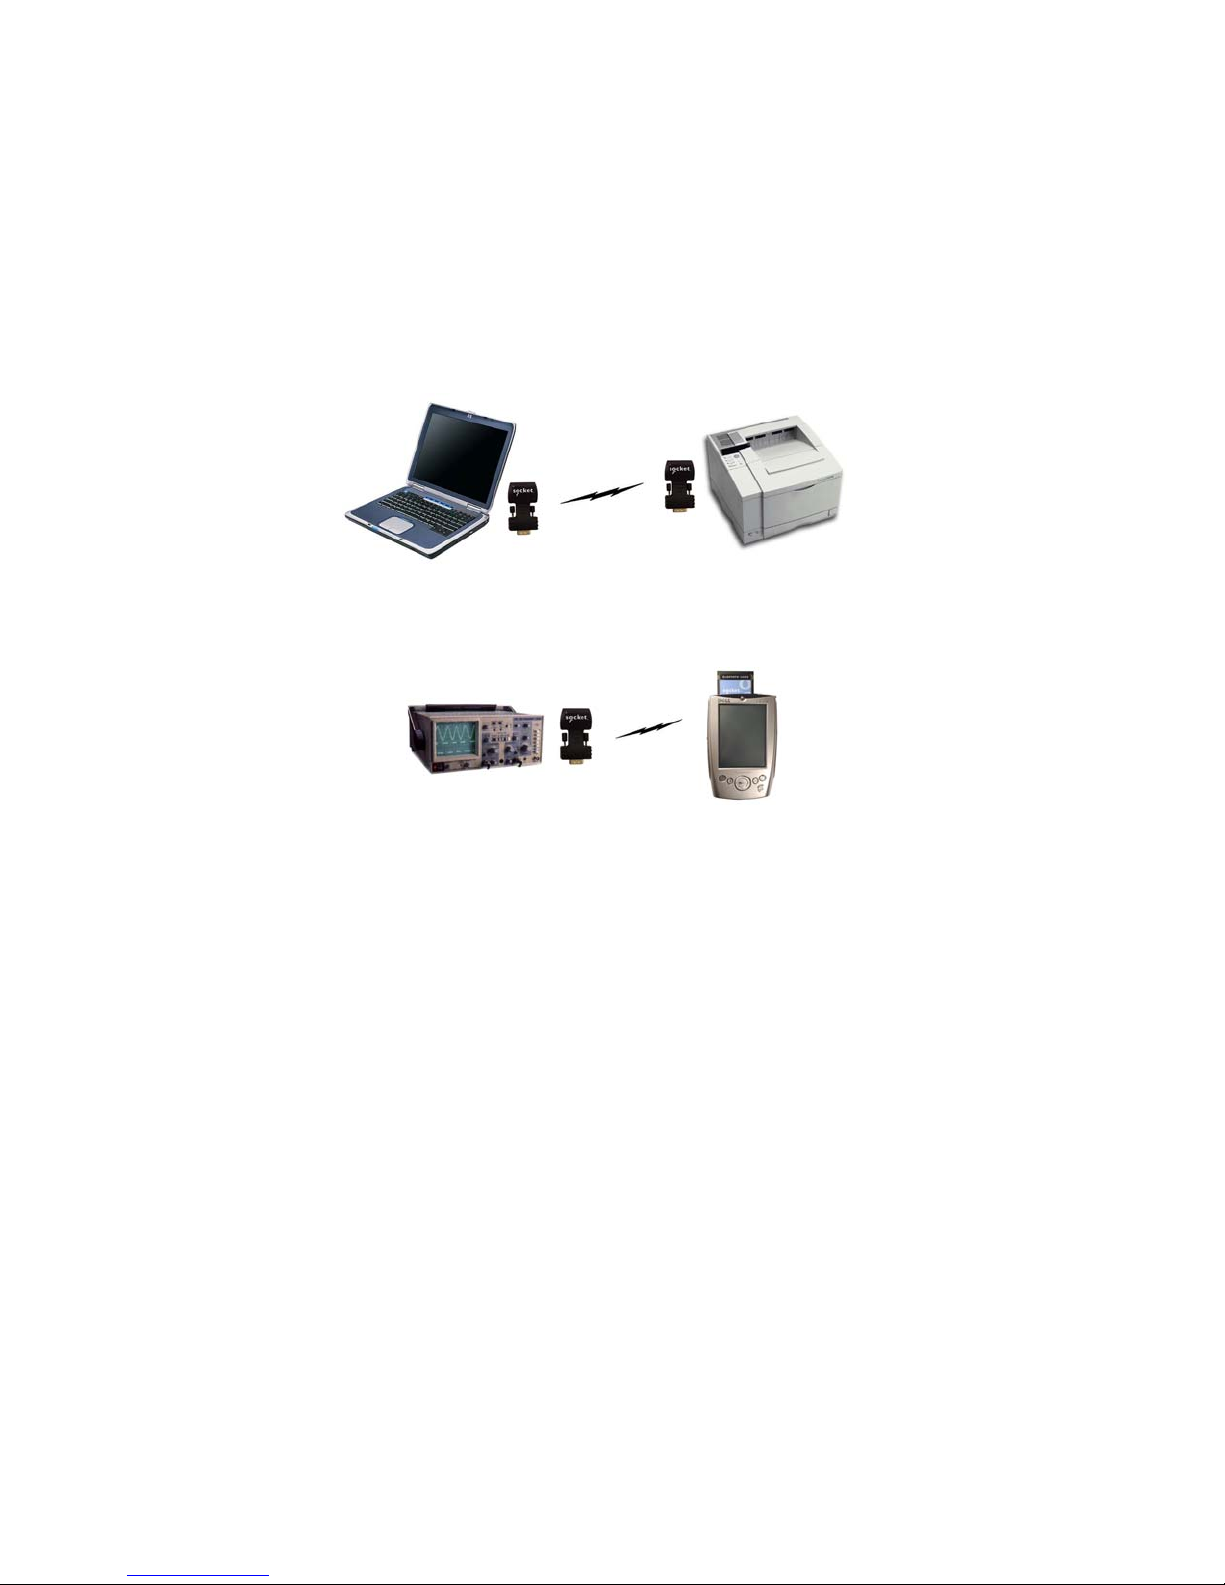
Scenario 1: Set up a CSA pair as serial cable replacement.
Scenario 2: Set up the CSA as a passive serial Bluetooth receiver.
xample: Replace
our printer cable
with a wireless
luetooth
connection between
our laptop and
rinter.
xample: Use the CSA to
luetooth enable industrial
equipment, which you can
then control and monitor
rom a Bluetooth enabled
ocket PC.
CHAPTER 1: INTRODUCTION | 3
Page 4
Custom versions of the CSA are available to OEMs. For more information,
r
contact Socket’s Embedded Systems Group at: esg@socketcom.com
.
Notes:
• The Cordless Serial Adapter was not designed to Bluetooth enable your
computer for ActiveSync.
• The Cordless Serial Adapter was designed for use with industrial serial
equipment only. Because of power requirements, custom drivers, and
custom serial communication protocols, the Cordless Serial Adapter is
not intended for use with some consumer serial devices, including but not
limited to: 56k modems, cellular phone data cables, digital camera data
cables, joysticks, keyboards, mice, Pocket PC cradles, scanners, etc.
About the Software
Socket’s Cordless Serial Adapter Configuration
Utility is an easy-to-use Windows application that
lets you to reprogram many of the default settings
on your CSA. You have the freedom to custom
configure settings to match your individual needs.
The utility runs under Windows 95, 98, Me, 2000 or XP
Cordless Serial Adapte
*
.
Software updates: www.socketcom.com/support/support_cordless.asp
Developers: To use a terminal device to manually reprogram the CSA via
AT commands, please refer to the Socket Cordless Serial Command Set in
the Docs folder on the installation CD.
Product Registration
Socket highly recommends that all users register their Socket products.
Registered users receive priority for technical support. Register online at:
www.socketcom.com/prodreg
*
Windows 95 v4.00.950B; Windows 98SE
4 | CHAPTER 1: INTRODUCTION
Page 5

Package Contents
• Socket Cordless Serial Adapter with Bluetooth Wireless Technology
• 9-pin female/female null modem
• AC power adapter
• Socket Cordless Serial Adapter Installation CD
• Quick Start Guide with warranty and copyright information
CHAPTER 1: INTRODUCTION | 5
Page 6
Chapter 2 Setup
This chapter covers the setup procedure for the Cordless Serial Adapter
with Bluetooth Wireless Technology. Please note that no drivers are
necessary, so the only software you need to install is the CSA
Configuration Utility.
Setup Summary
STEP 1. Install the software.
STEP 2: Attach the CSA to your computer.
STEP 3. Prepare communications settings.
STEP 4: Configure the CSA.
STEP 5: Attach CSA to device.
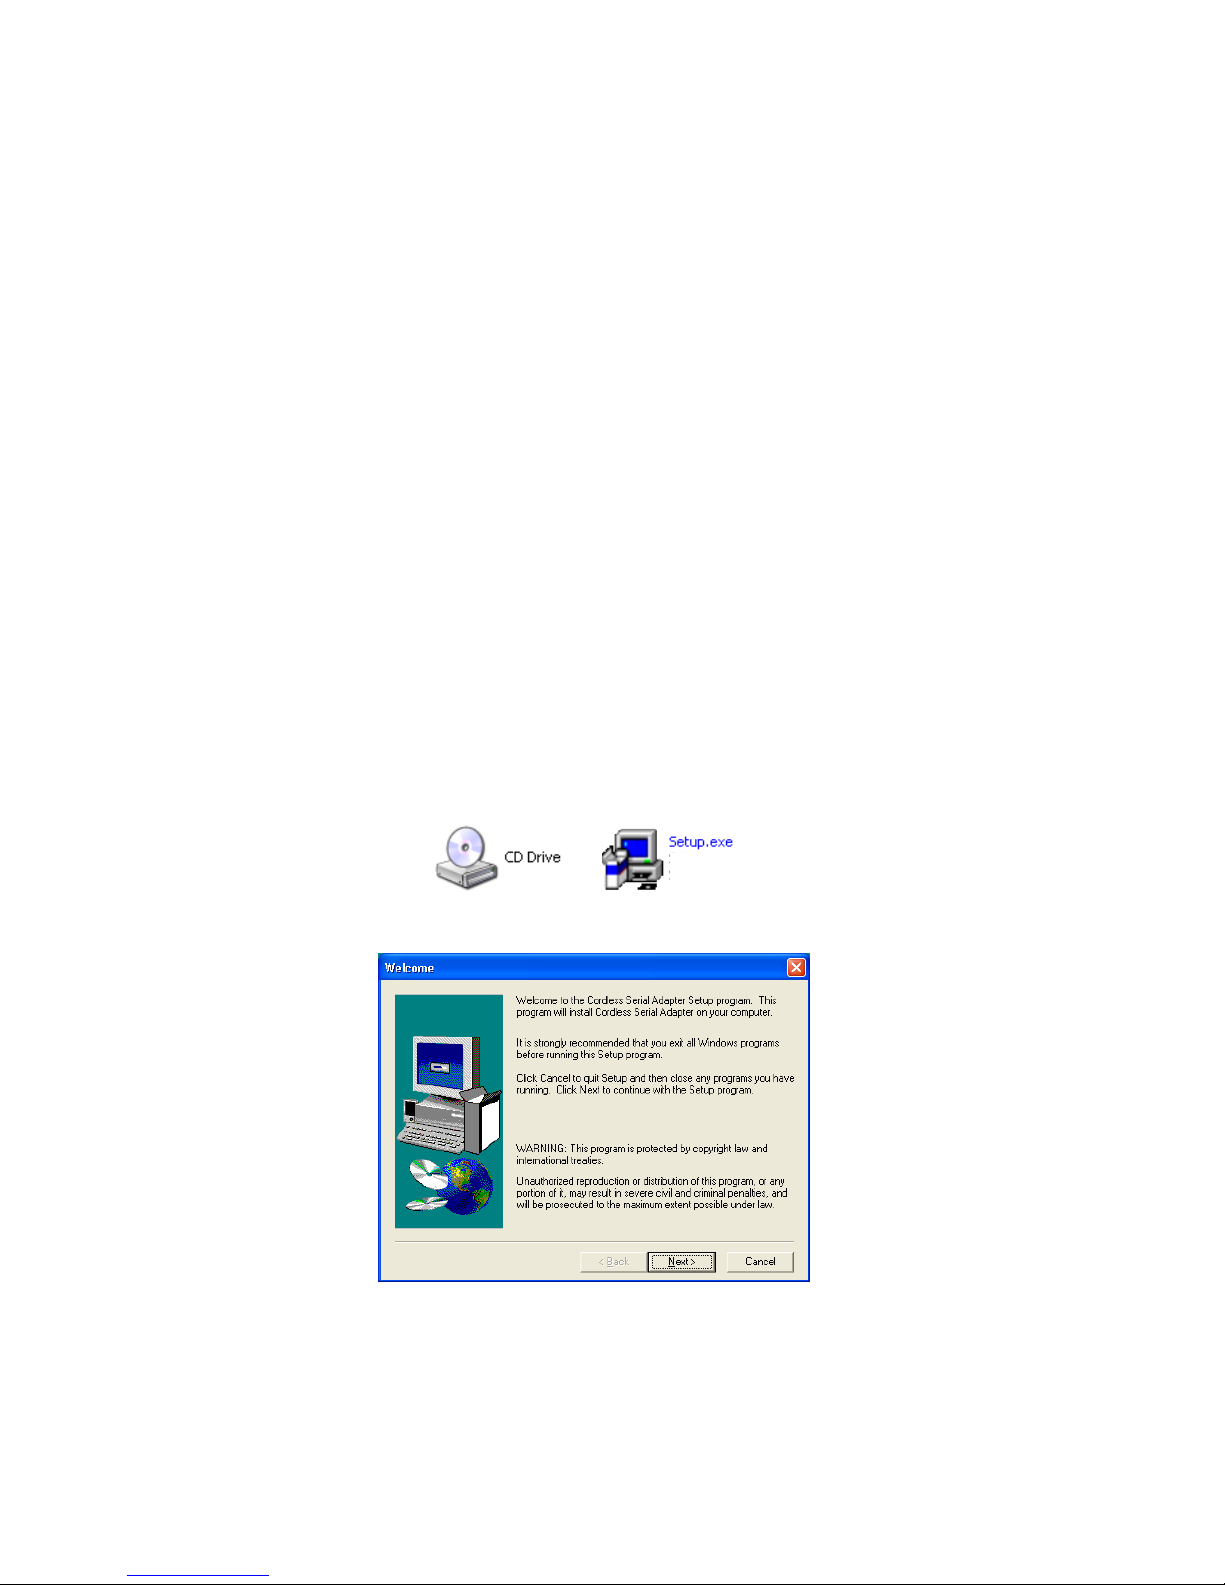
STEP 1: Install the Software
1. Insert the Socket Cordless Serial Adapter CD.
2. Use My Computer or Windows Explorer to access your CD-ROM drive.
In the CD, click on SETUP.EXE.
3. Follow the instructions on your screen to install the software.
6 | CHAPTER 2: SETUP
Page 7

STEP 2: Attach the CSA to the Computer
1. Attach the Cordless Serial Adapter (CSA) to the serial port of the
computer you just installed the software on.
2. Determine the COM port number where you just attached the CSA.
• Click Start | Control Panel | System.
• Click on the Hardware tab. Click on the Device Manager button.
• In the list, click on Ports. The Communications Port should be listed
with its COM number.
3. Use the AC adapter to connect the CSA to a power outlet.
Alternatively, the CSA can draw power off of Pin 9 of your computer’s
serial port if supported.
4. When the adapter has power, the LED should begin flashing blue.
Flash Rate
Once per 2 seconds Not discoverable.
Twice per 2 seconds Waiting to connect.
Three times per 2 seconds Connected.
STEP 3: Prepare Communications Settings
Find out what communications settings you need to connect your devices.
The necessary settings may include the following (only some may apply):
• Bluetooth address of the device you wish the CSA to connect to
• Baud rate, data bits, parity, stop bits, flow control
• Does the local host send DTR signals?
• Does the local host accept notifications of Bluetooth events?
• Security settings (e.g., PIN, encryption, etc.)
• Bluetooth device/service classes detectable by the remote device
• Advanced users only: page scan timing, inquiry scan timing, sniff mode
Meaning
parameters
CHAPTER 2: SETUP | 7
Page 8
STEP 4: Configure the CSA
r
Socket’s Cordless Serial Adapter Configuration Utility lets you reprogram
the default settings on the CSA for Bluetooth. You can custom configure
settings to match your individual needs.
Preliminary Configuration
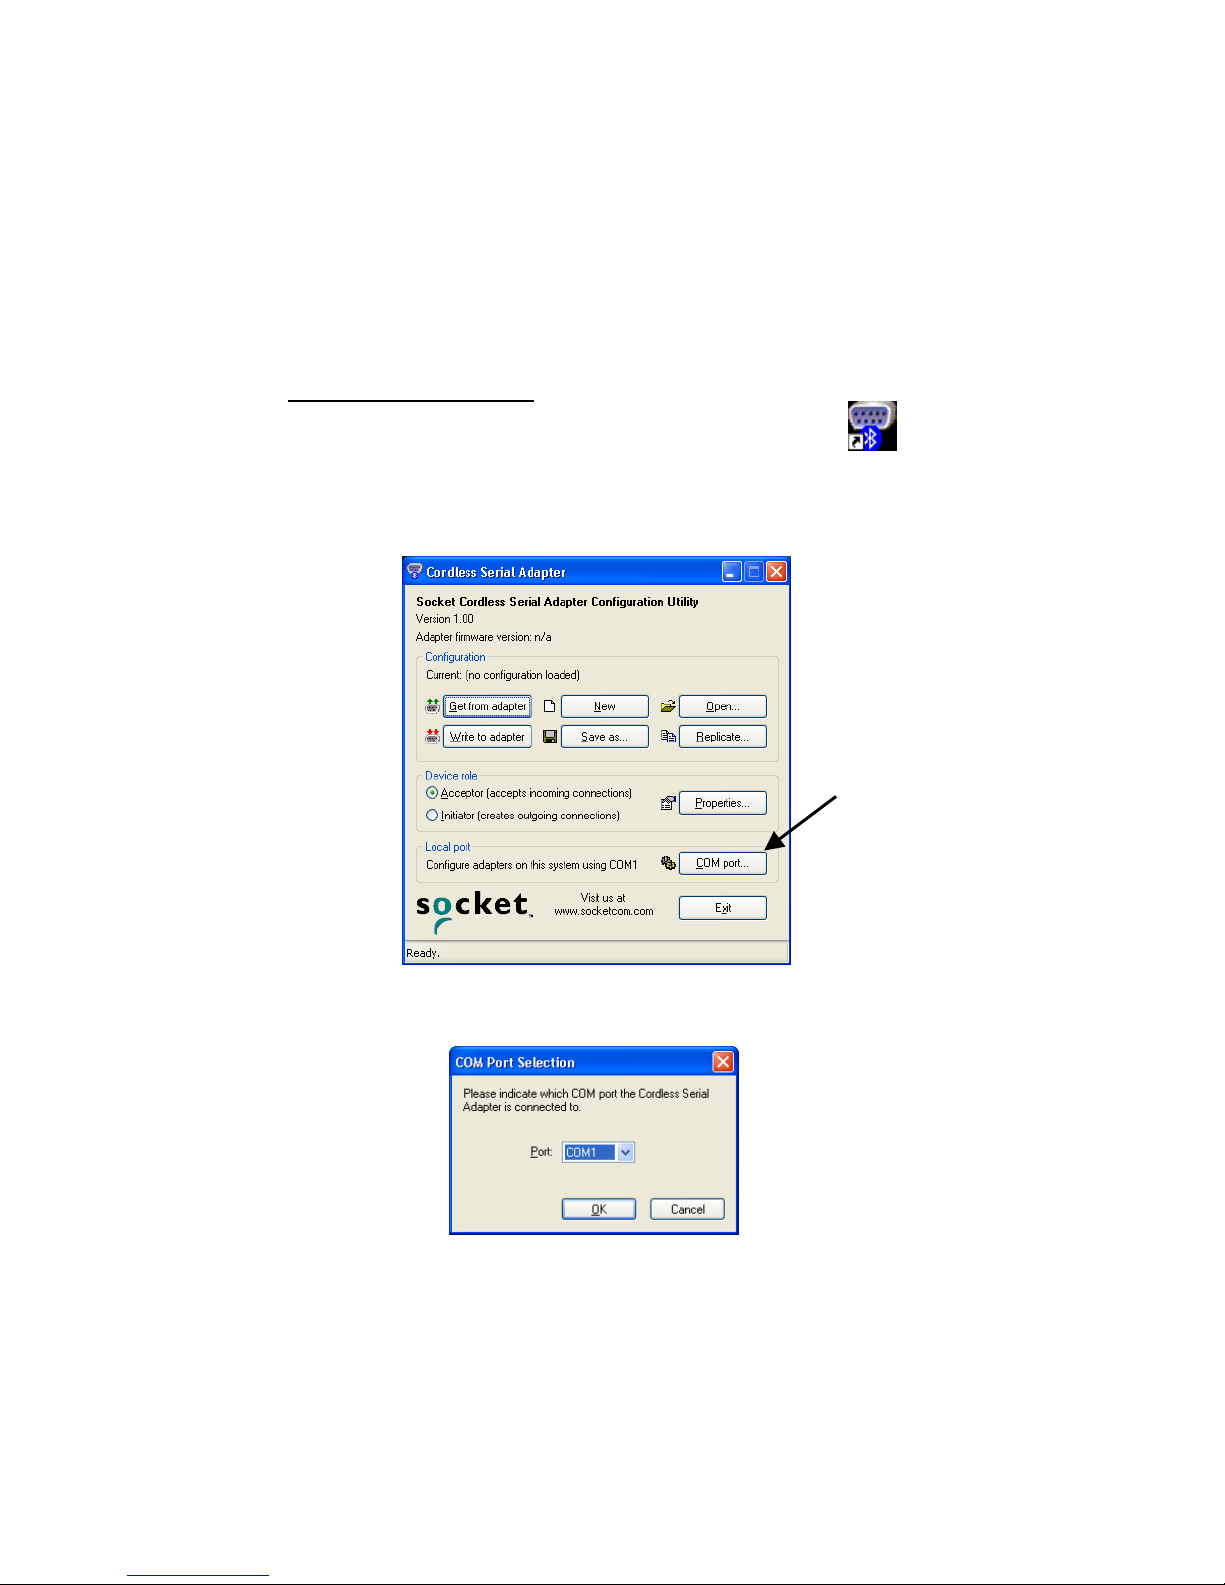
1. Open the utility, by doing either of the following:
• Click on the icon on your desktop.
• Go to Start | Programs | Cordless Serial Adapter.
2. The Cordless Serial Adapter Configuration Utility will appear. Click on
the COM port button.
Cordless Serial Adapte
Click
COM
port.
3. In the screen that appears, select the COM port number where the CSA
is attached to your computer. Click OK.
8 | CHAPTER 2: SETUP
Page 9
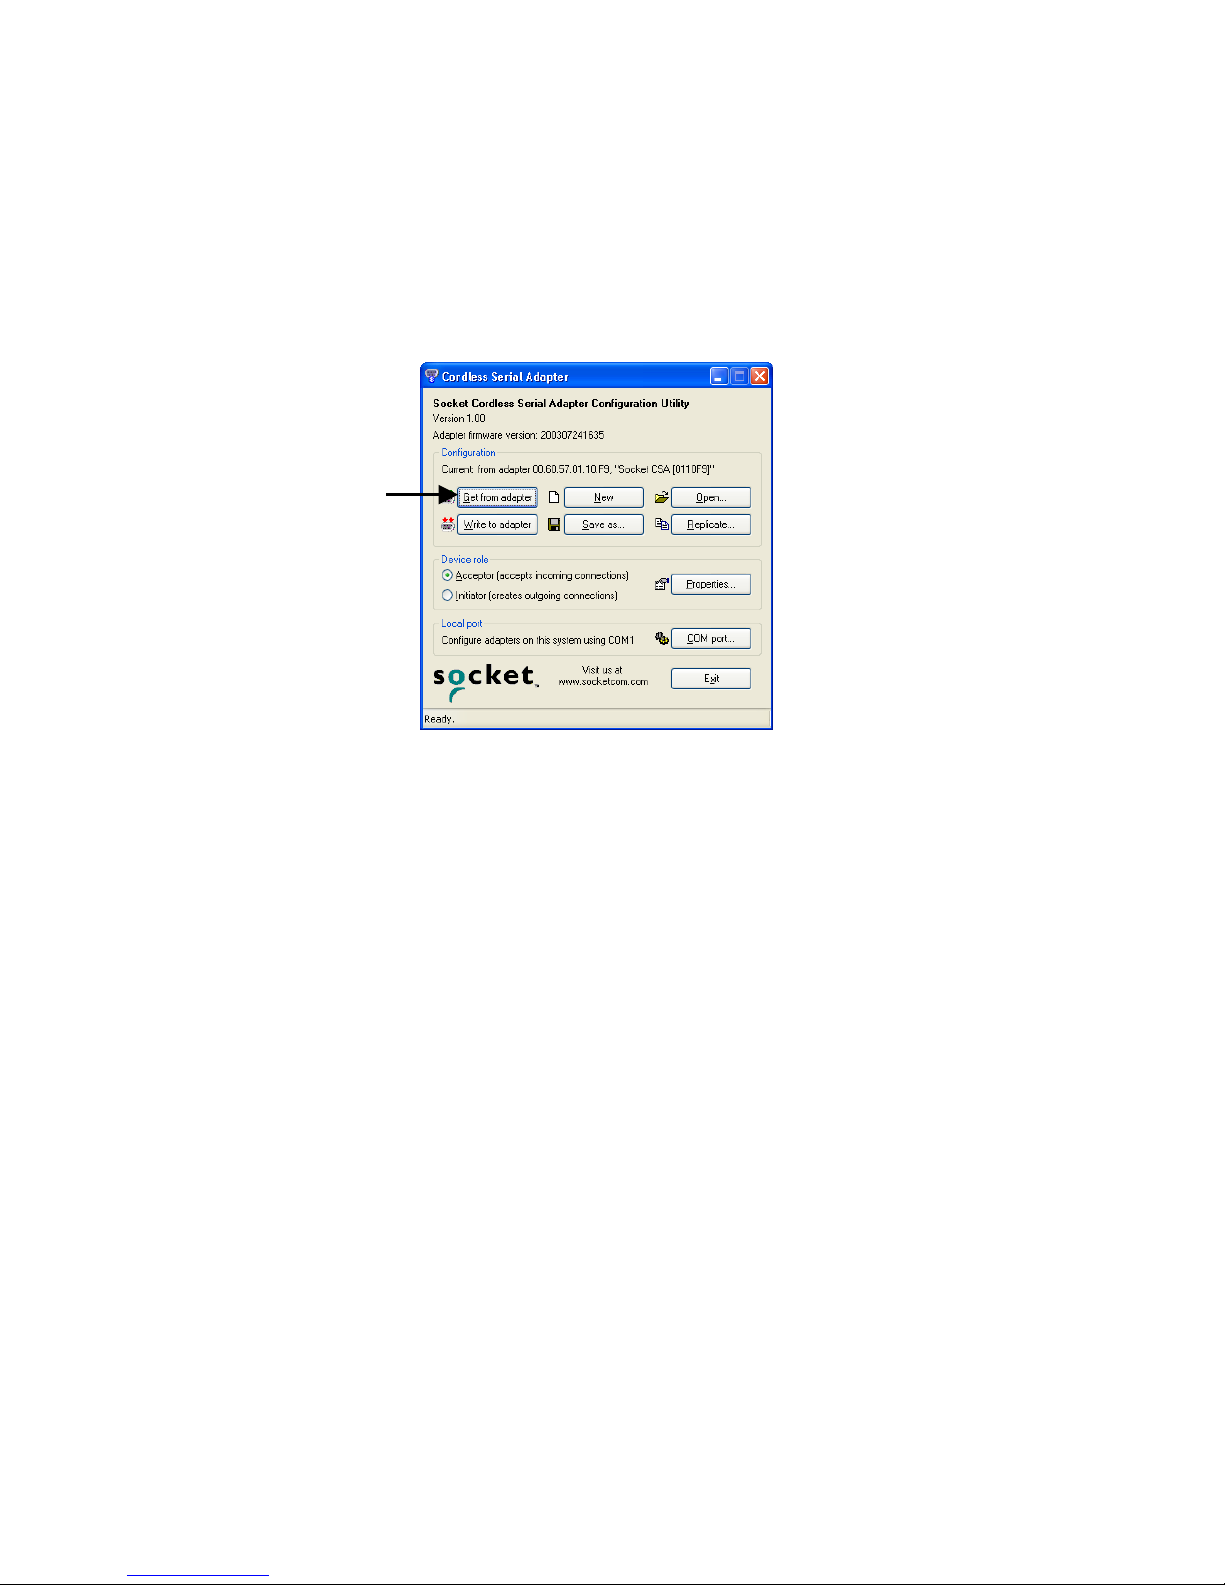
4. In the Configuration box, the current configuration should be reported
as no configuration loaded. To verify that you have properly connected,
click Get from adapter. The utility should now report the CSA’s
firmware version, Bluetooth address and friendly name.
Click
Get from
adapter.
Note:
• If this is your first time using the CSA, the utility will report “new
configuration.”
• If you get an error message reporting communications problems,
make sure the CSA is pushed all the way into the serial port, and
make sure you chose the correct COM port in the previous step.
CHAPTER 2: SETUP | 9
Page 10
5. Now you are ready to enter the Device role and properties. The
appropriate settings will vary depending on what device(s) you are using
and how they can communicate. The following pages will include
instructions for two of the most common scenarios:
• Scenario 1: Set up a CSA pair as serial cable replacement.
Example: Replace a printer cable with a wireless Bluetooth
connection between your laptop and printer.
• Scenario 2: Set up one CSA as a passive serial Bluetooth receiver.
Example: Use the CSA to Bluetooth enable industrial equipment,
which you can then control and monitor from a Bluetooth enabled
Pocket PC.
Notes:
• If you have another scenario, refer to Chapter 3 for instructions on each
properties page.
• Make sure you manually configure your baud rate and other settings in
any third-party applications used with the CSA. Auto-detect and Plug
and Play functions are not reliable with Bluetooth, and the CSA may not
work properly unless you manually enter the correct settings.
10 | CHAPTER 2: SETUP
Page 11
SCENARIO 1: Set up a CSA pair for cable replacement.
To set up a pair of Cordless Serial Adapters as serial cable replacement, one
CSA must be an acceptor, and the other an initiator (e.g., in the previous
example, the printer would be acceptor, and the laptop would be initiator).
Set up the Acceptor
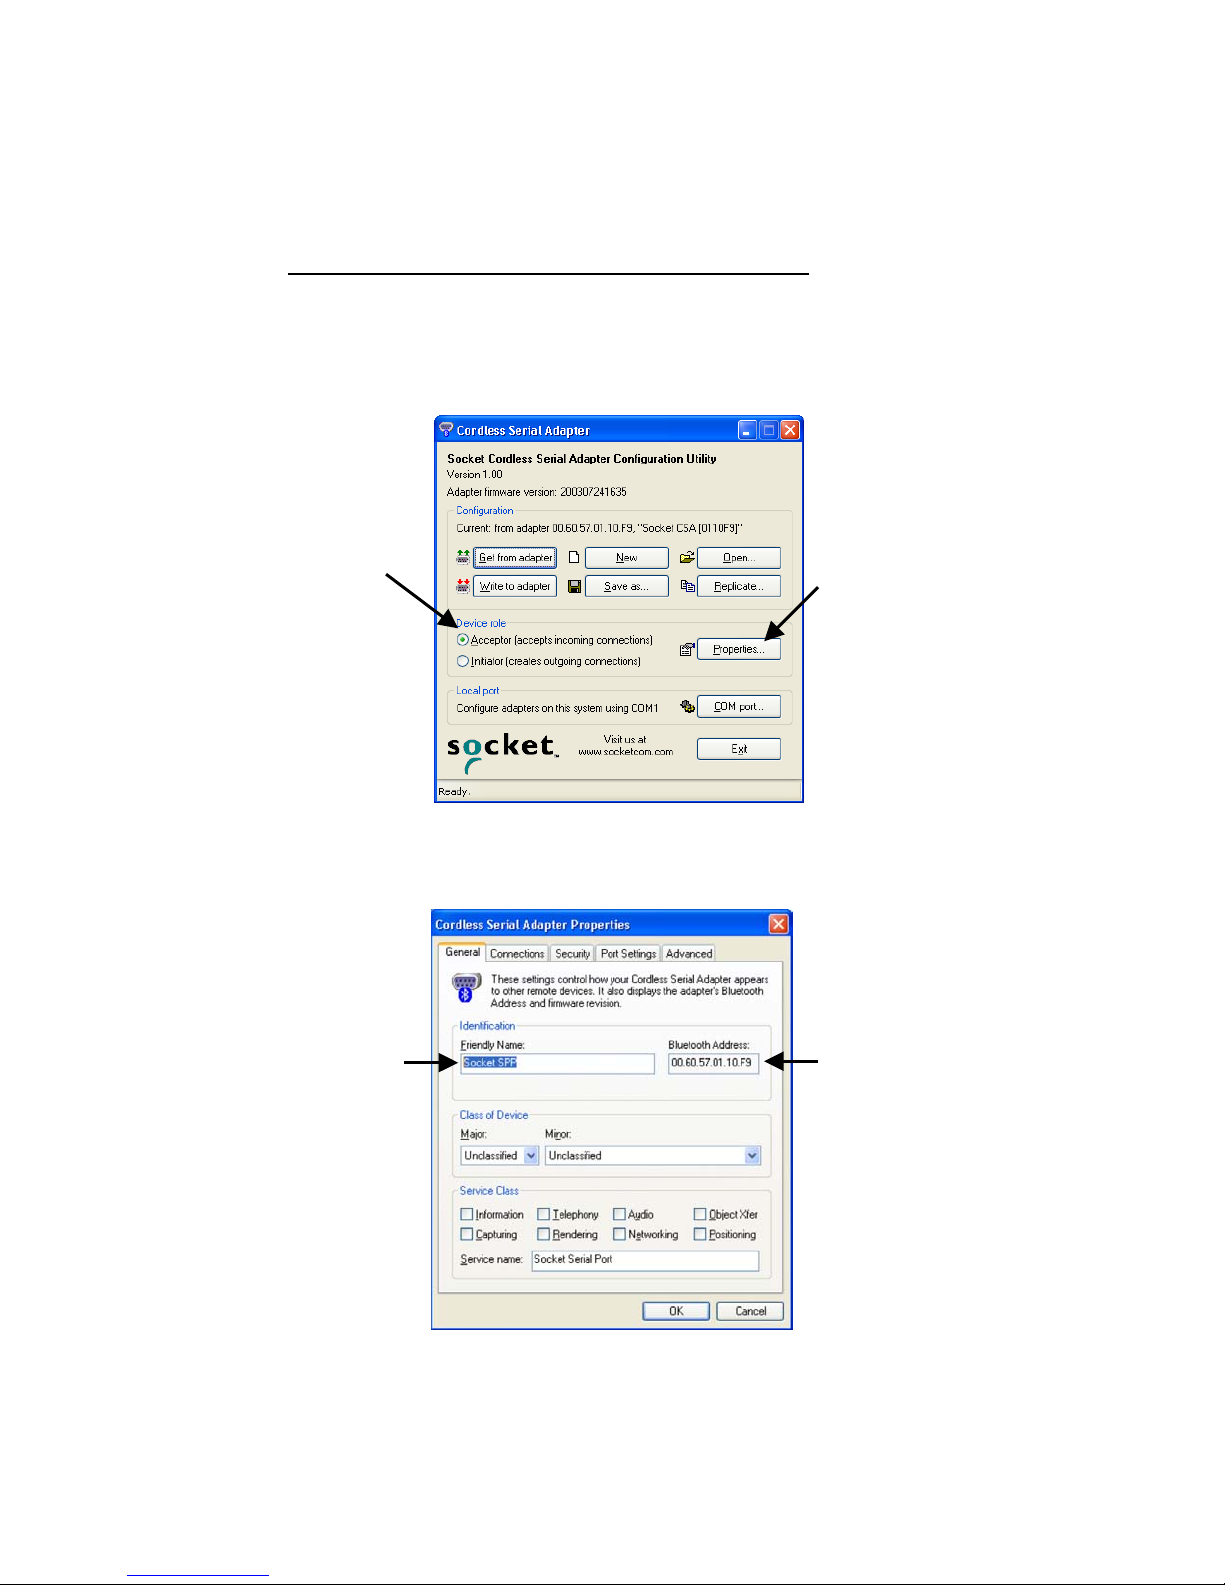
1. In the Device role box, select Acceptor. Click Properties.
Select
Acceptor.
Click
Properties.
2. In the General screen, change the Friendly Name if desired. For example,
you may want to enter a name like “Socket SPP-Acceptor.” Note the
Bluetooth Address of this CSA. You will need it to configure the initiator.
Write down
If
desired,
change
the
Friendly
Name.
the Bluetooth
Address. You
will need it
while
configuring
the other
CSA.
CHAPTER 2: SETUP | 11
Page 12
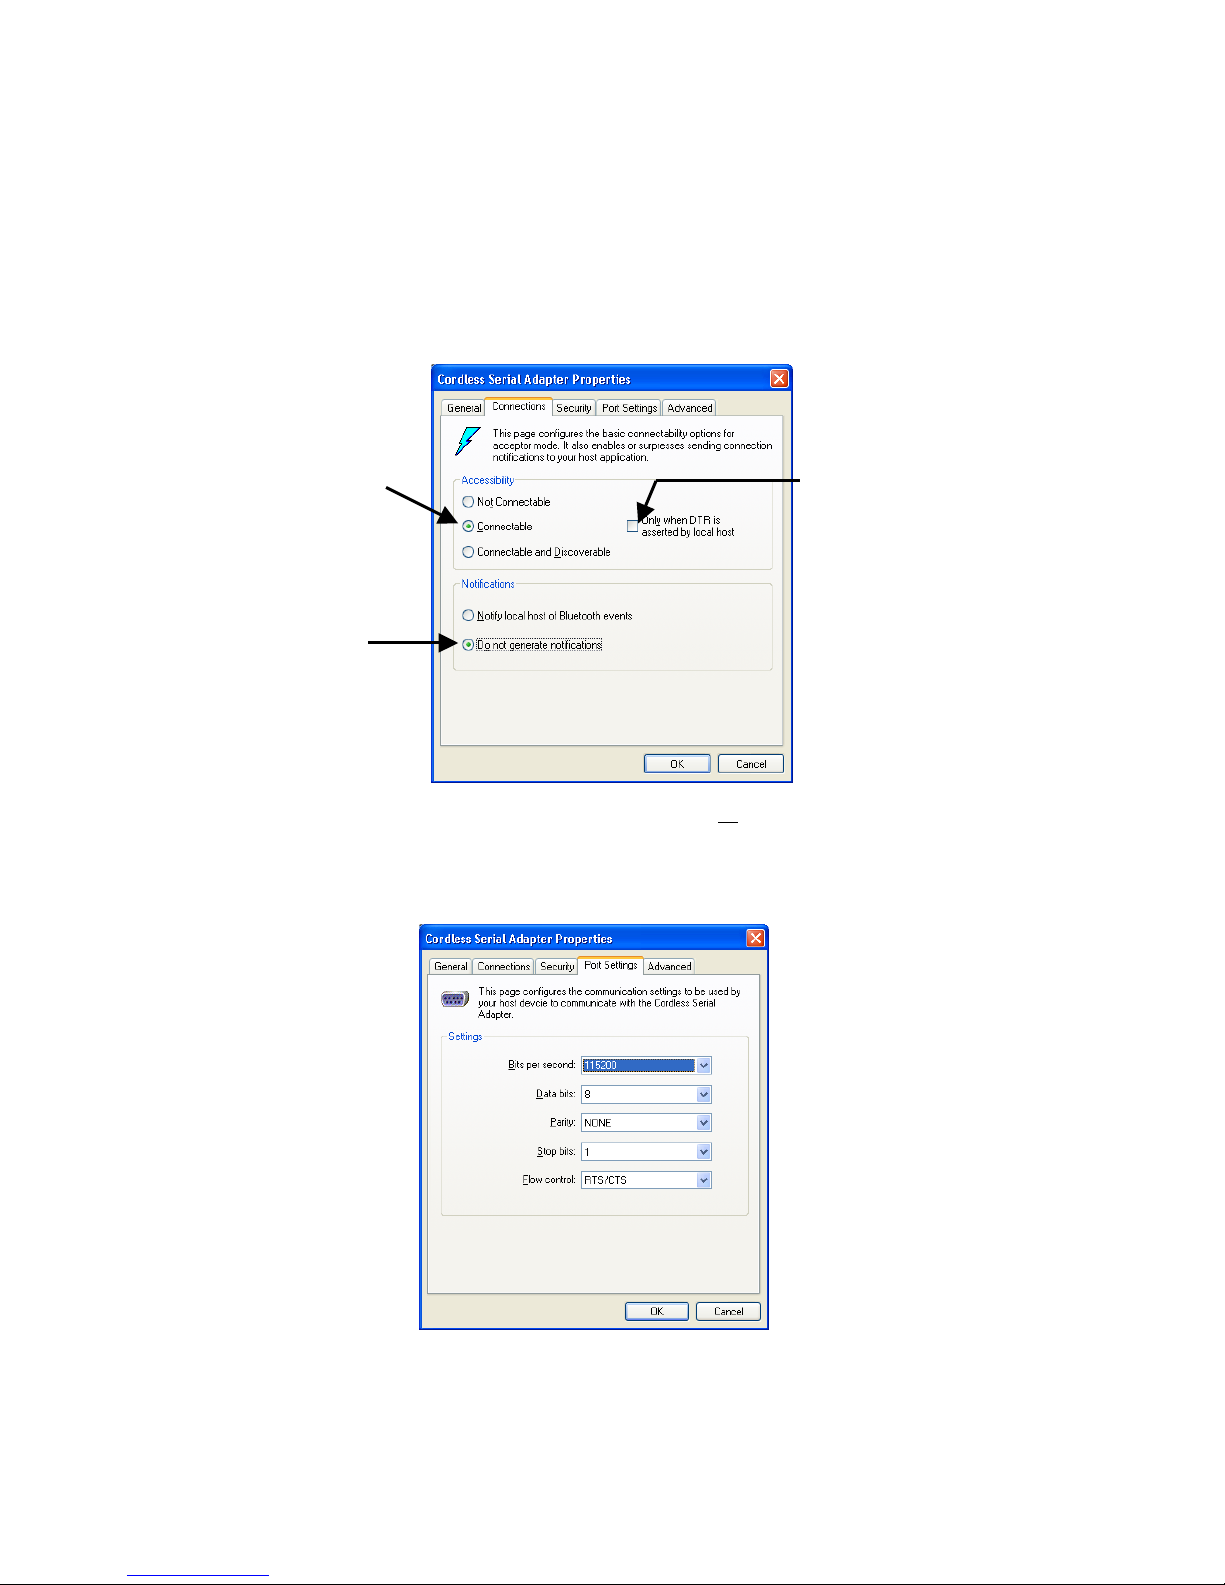
3. Click on the Connections tab. Enter the following settings:
I
B
p
s
• Accessibility: Select Connectable
Uncheck Only when DTR is asserted by local host
• Notifications: Select Do not generate notifications
Select
Connectable.
Select
Do not
generate
notifications.
Uncheck.
4. Click on the Security tab. Make sure all boxes are unchecked.
5. Click on the Port Settings tab. Enter the appropriate settings for your
devices and applications. Do not change any default settings in the
Advanced screen. Afterwards, click OK to exit the properties screens.
mportant!
e sure to set
the baud rate
to match that
of the local
host serial
ort!
You must
also enter the
ame baud
rate in any
third party
applications
used with the
CSA!
12 | CHAPTER 2: SETUP
Page 13
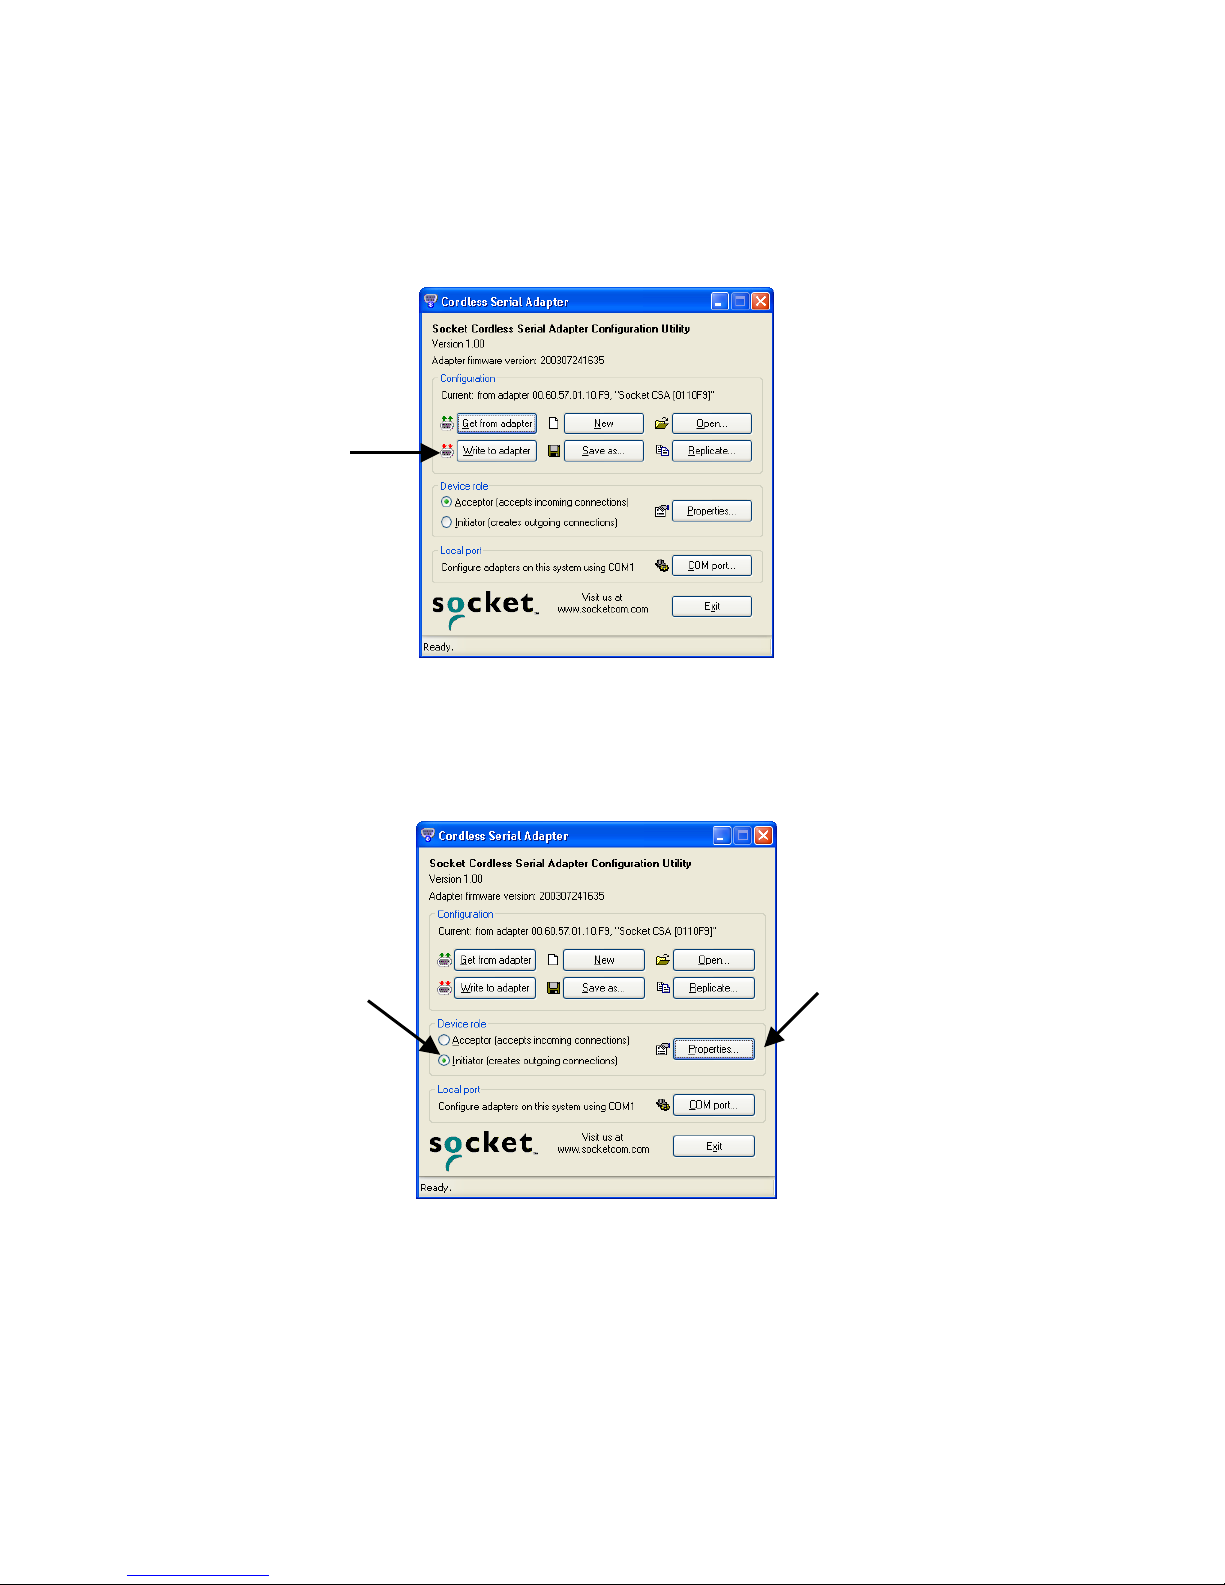
6. Click Write to adapter to configure your CSA with the new settings.
I
I
Click
Write to
adapter.
f you do not click
Write to adapter,
the CSA will not
be configured with
the new settings!
7. Unplug the CSA from the computer. Now you are ready to configure the
mportant!
second CSA.
Set up the Initiator
1. In the Device role box, select Initiator. Click Properties.
Select
Initiator.
Click
Properties.
2. In the General screen, change the Friendly Name if desired. For example,
you may want to enter a name like “Socket SPP-Initiator.”
CHAPTER 2: SETUP | 13
Page 14

3. Click on the Connections tab. Enter the following settings:
B
• Accessibility: Select Connect automatically
Uncheck Only when DTR is asserted by local host
• Notifications: Select Do not generate notifications
Select
Connect
automatically.
Uncheck.
Select
Do not
generate
notifications.
4. Click on the Remote Target tab. In the Connect to field, enter the
Bluetooth address of the other CSA.
Enter the
luetooth
address
of the
other
CSA.
14 | CHAPTER 2: SETUP
Page 15

5. Click on the Security tab. Make sure all boxes are unchecked.
6. Click on the Port Settings tab. Enter the appropriate settings for your
devices and applications. All the settings should be the same as the CSA
set up as Acceptor.
7. After entering all the properties, click OK to exit the properties screens.
8. Click Write to adapter to configure your CSA with the new settings.
Unplug the CSA from your computer. Now you are ready to proceed to
Step 5 to attach it to the device.
SCENARIO 2: Set up a CSA as a passive serial Bluetooth receiver.
1. In the Device role box, select Acceptor. Click Properties.
Select
Acceptor.
2. In the General screen, change the Friendly Name if desired.
CHAPTER 2: SETUP | 15
Click
Properties.
Page 16

3. Click on the Connections tab. Enter the following settings:
• Accessibility: Select Connectable and Discoverable
Uncheck Only when DTR is asserted by local host
• Notifications: Select Do not generate notifications
Select
Connectable
and
Discoverable.
Select
Do not
generate
notifications.
Uncheck.
4. Click on the Security tab. If the other device requires special security
settings, make the appropriate selections.
16 | CHAPTER 2: SETUP
Page 17

5. Click on the Port Settings tab. Enter the appropriate settings for your
I
I
I
B
p
s
devices and applications. Do not change any of the default settings in
the Advanced screen. Afterwards, click OK to exit the properties
screens.
mportant!
e sure to set
the baud rate
to match that
of the local
host serial
ort!
You must
also enter the
ame baud
rate in any
third party
applications
used with the
CSA!
6. Click Write to adapter to configure your CSA with the new settings.
mportant!
Click
Write to
adapter.
f you do not click
Write to adapter,
the CSA will not
be configured with
the new settings!
7. Unplug the CSA from the computer. Now you are ready to attach the
CSA to the device.
CHAPTER 2: SETUP | 17
Page 18

STEP 5: Attach CSA to Device
After configuring the CSA, now you are ready to attach it to the serial port
of your target device.
Assemble correct hardware to attach CSA.
Depending on the type of target device you are using and what type of
serial port it has, you may or may not need to use additional hardware to
correctly attach and communicate via the CSA.
Note: For more information about Data Communications Equipment
(DCE) and Data Terminal Equipment (DTE) devices, please refer to the
glossary in Appendix C.
Target Device
Type
DCE with female
serial port
(with pinholes)
Device Type
Examples
Most modems
and printers
and some
industrial
equipment
Additional Hardware Required
None. Attach the CSA directly to the serial port of your
device
DTE with male
serial port
(with pins)
DTE with female
serial port
(with pinholes)
*Male gender changers are available from most computer stores.
18 | CHAPTER 2: SETUP
Most desktop
and notebook
computers
Miscellaneou
s industrial
equipment
Null modem with 2 female serial ports (included)
Male gender changer (not included)*
Null modem with 2 female serial ports (included)
Page 19

CSA connects either automatically or with manual initiation.
Depending on how your configured the CSA, it may automatically connect
with the remote device, or you may need to manually initiate a connection.
In the previous scenarios, the following should happen:
SCENARIO 1: Set up a CSA pair for cable replacement.
After you attach the CSA to each device (with each powered on), they
should automatically try to connect.
Example: After you attach the initiator CSA to the laptop and the acceptor
CSA to the printer, the two CSA’s will automatically try to connect.
SCENARIO 2: Set up one CSA as passive serial Bluetooth receiver.
After you attach the CSA, your device will be discoverable and ready to
accept a Bluetooth connection. Perform a device discovery from the
initiator device, then commence the connection.
Example: The industrial equipment with the CSA will be discoverable and
ready to accept a Bluetooth connection. Perform a device discovery from
the Bluetooth enabled Pocket PC, then start the connection.
Important!
Make sure you manually configure your baud rate and other settings in any
third-party applications used with the CSA. Auto-detect and Plug and Play
functions are not reliable with Bluetooth, and the CSA may not work
properly unless you manually enter the correct settings.
CHAPTER 2: SETUP | 19
Page 20

Chapter 3 Configuration Utility
r
This chapter explains how to use Socket’s Cordless Serial Adapter
Configuration Utility. Besides covering the basic configuration
functions, this chapter will also explain how to use each property
screen.
The utility includes the following properties screens:
• General
• Connections — Acceptor mode
• Connections — Initiator mode
• Remote Target (Initiator mode only)
• Security
• Port Settings
• Advanced (Acceptor mode only)
The utility can be accessed by either of two methods:
• Click on the icon on your desktop.
Cordless Serial Adapte
• Click Start | Programs | Cordless Serial Adapter.
Developers: You can also reprogram the Cordless Serial Adapter
manually through AT commands via a terminal device. Refer to
the Socket Cordless Serial Command Set, available in the Docs
folder on the installation CD.
20 | CHAPTER 3: CONFIGURATION UTILITY
Page 21

Configuration Functions
Get from adapter:
Click to read the configuration currently written to the CSA. You
can read the current configuration and modify the settings if
desired. Checking to see if a configuration can be read is also a
good method for verifying that the CSA is properly attached and
ready to have a configuration written to it.
Write to adapter:
Click to physically configure the CSA with the settings entered
into the utility.
Warning! Do not remove the CSA during the writing process, or
you can damage the CSA!
New:
Click to enter settings for a new configuration, with all the settings
starting at default.
Open:
Click to open a previously saved configuration.
Save as:
Click to save a configuration for future use. If you need to use the
CSA with multiple devices and/or applications, you may want to
save a configuration for each, instead of manually entering settings
every time you need to re-configure the CSA.
CHAPTER 3: CONFIGURATION UTILITY | 21
Page 22

Replicate:
Click to make a copy of the current configuration. A screen will
appear for you to enter some unique settings (e.g., friendly name,
security settings) for this configuration. Enter any necessary
settings and click OK.
This function is useful if you have multiple CSA’s and need to
configure them all with the same settings. The screen varies
depending on whether you are in Acceptor or Initiator mode.
22 | CHAPTER 3: CONFIGURATION UTILITY
Page 23

General Properties
The General properties page displays general device identification,
device class, and service class information. This page appears for
both acceptor and initiator modes.
Friendly Name. If desired, enter a new name. For example, you may want
the friendly name to reflect which device you plan to attach it to.
Class of Device/ Service Class: ADVANCED USERS ONLY! If
the CSA is in Acceptor mode, and the Bluetooth device initiating
the connection can only detect and/or connect to certain
device/service classes, make the appropriate selection(s). For more
information, please refer to the Bluetooth Assigned Numbers
document at: www.bluetoothsig.org/assigned-numbers/baseband.htm
Note: If no configuration is loaded, no Bluetooth Address will
appear.
IMPORTANT!
After entering all the adapter properties, click OK to exit the
properties screen. Then click Write to adapter, or the CSA will not
be configured with the new settings!
CHAPTER 3: CONFIGURATION UTILITY | 23
Page 24

Connections Properties — ACCEPTOR MODE
Accessibility
• Not Connectable: Select to prevent the CSA from connecting to
other devices.
• Connectable: Select to allow other devices to connect to the
CSA.
• Connectable and Discoverable: Selected by default.
• Only when DTR is asserted by the local host: Check ONLY IF
you know that the local host sends DTR (Data Terminal Ready)
signals. If you are not sure, uncheck the box.
Important!
If you check Only when DTR is asserted by local host, the CSA
will only become discoverable and/or connectable after
receiving DTR signals from the local host. If you are not sure
whether your local host sends DTR signals, or if you have
trouble connecting, UNCHECK this box.
Notifications
• Notify local host of Bluetooth events: Selected by default.
• Do not generate notification: Select if your local host cannot
accept notifications of Bluetooth events, or if you are not sure
whether or not your local host can accept them.
Note: Notifications may be useful if you are writing custom software for
the CSA. Your software would decide how to process notifications.
24 | CHAPTER 3: CONFIGURATION UTILITY
Page 25

Connections Properties — INITIATOR MODE
When to connect
• Connect automatically: Select
for the CSA to connect
automatically.
Note: If you check Connect
automatically, the CSA will
need to receive a software
command to initiate a
connection.
• Only when DTR is
asserted by the local
host: Check ONLY IF
you know that the
local host sends DTR
(Data Terminal
Ready) signals. If you
are not sure, uncheck
the box.
Important!
If you check Only when DTR is asserted by local host, the CSA will only
initiate connections after receiving DTR signals from the local host. If you
are not sure whether your local host sends DTR signals, or if you have
trouble connecting, UNCHECK this box.
If you enable Connect automatically but disable Only when DTR is asserted
by local host, the CSA will always automatically try to connect to the
target device. If the target device is within range, you may have trouble
using the Socket CSA Configuration Utility, because the CSA has already
connected to the target device. If you are experiencing these problems,
move the target device about 10-30 meters away (outside the Bluetooth
range), in order to break the connection.
Notifications
• Notify local host of Bluetooth events: Select ONLY IF you know your
local host can accept notifications of Bluetooth events. Some devices
cannot accept such notifications and will malfunction.
• Do not generate notification: Select if your local host cannot accept
notifications of Bluetooth events, or if you are not sure whether or not
your local host can accept them.
Note: Notifications may be useful if you are writing custom software for
the CSA. Your software would decide how to process notifications.
CHAPTER 3: CONFIGURATION UTILITY | 25
Page 26

Remote Target (Initiator only)
You have two options for
identifying the remote device
(the device you wish the CSA
to connect to):
OPTION 1:
If you know the Bluetooth
Address of the remote device,
simply type it in the Connect
to: field.
OPTION 2:
If you do not know the
Bluetooth Address of the
remote device, perform a
device discovery:
Device Discovery
1. Click on the Filter… button to select the Bluetooth device
and/or service class to discover.
2. Click Discover… The utility will search for Bluetooth devices in range.
3. In the Discovered devices field, click on the Bluetooth address
of the device you wish the CSA to connect to. It should appear
in the Connect to: field.
Note: If you do not know the Bluetooth address of the remote device,
perform the device discovery with the remote device on, then with the
device off, to determine the correct Bluetooth address.
26 | CHAPTER 3: CONFIGURATION UTILITY
Page 27

Port Settings
Select the correct port settings for your remote device.
IMPORTANT!
After entering all the adapter properties, click OK to exit the
properties screen. Then click Write to adapter, or the CSA will not
be configured with the new settings!
CHAPTER 3: CONFIGURATION UTILITY | 27
Page 28

Advanced (Acceptor only)
Important!
It is beyond the scope of this User’s Guide to explain the effects
of the Advanced settings.
DO NOT adjust any of the settings in the Advanced screen unless
you are an advanced user and completely understand what you
are doing!
IMPORTANT!
After entering all the adapter properties, click OK to exit the
properties screen. Then click Write to adapter, or the CSA will not
be configured with the new settings!
28 | CHAPTER 3: CONFIGURATION UTILITY
Page 29

Appendix A Specifications
Physical Characteristics:
Dimensions: 65 x 35 x 17 mm
Total Mass: 25 g
Serial Connector: 9 pin male DB-9, DTE
Antenna: Integrated
Class 2 Bluetooth module
Baud Rate:
Default: 19,200 bps
Configurable range: 9,600-230,000 bps
Environmental Conditions:
Operating Temperature: -20 to +85 °C
Humidity: 5% to 95% non-condensing
Storage Temperature: -40 to +95 °C
Serial COM Interface Standard: Asynchronous RS-232
Range:
Approx. 10 m (open office environment)
Hardware Compatibility: Any device with serial communications port.
Software Included: Socket Cordless Serial Adapter Configuration Utility
Software Compatibility: COM port
Software Operating System Support:
Windows 95 v4.00.950B, 98SE, Me, 2000, XP
Warranty: Three years
Certification/Compliance:
Bluetooth 1.1
FCC: Part 15, Class B
Industry Canada
CE: ETS 300 328, ETS 300 826
C-Tick S.182
Bluetooth Profiles: Serial Port
APPENDIX A: SPECIFICATIONS | 29
Page 30

Pin Assignments
Pin # Direction Function
1 IN DCD — Carrier detect
2 IN RXD serial data from local host
3 OUT TXD serial data to local host
4 OUT DTR Data terminal ready
5 Ground
6 IN DSR Data set ready
7 OUT RTS Request to send to local host
8 IN CTS Clear to send from local host
9 Optional power input (3.3 to 5.0 Vdc)
30 | APPENDIX A: SPECIFICATIONS
Page 31

Appendix B Safety and Usage Tips
About Bluetooth and Health
Bluetooth wireless technology allows you to use short-range radio signals
to connect a variety of devices, such as mobile phones, Pocket PCs,
notebook computers, printers, LAN access points, and many other devices
at home or work. These radio signals replace the cables that have
traditionally connected these devices.
Bluetooth products have small radio transmitters and receivers. Output
power is normally very low, only 1 mW (1/1000 of a watt). This gives a
working range of approximately 10 meters.
The maximum exposure levels from Bluetooth products are far below
recommended safety guidelines. At most, typical Bluetooth devices (1mW)
reach only one percent of the prescribed safety levels.
Product Care
• Do not expose your product to liquid, moisture or extreme humidity.
There is a risk of electrical shock.
• Do not expose your product to extreme high or low temperatures.
• Do not expose your product to lit candles, cigarettes, or cigars, or to
open flames, etc.
• Do not drop, throw or try to bend the product, as rough treatment could
damage it.
• Do not paint your product, as the paint could obstruct parts and prevent
normal use.
• Do not attempt to disassemble your product: a broken warranty seal will
void the warranty. There is danger of fires, electrical shock, damage to
the unit, and injury. The product does not contain consumer serviceable
components. Should your Cordless Serial Adapter need service, please
contact Socket technical support at: support@socketcom.com
• Treat your product with care. Keep in a clean and dust-free place.
• Changes or modifications of this product, not expressly approved by
Socket, may void the user’s authority to operate the equipment.
• The Cordless Serial Adapter is susceptible to physical damage. Do not
exert excessive force on it, or permanent damage can occur!
• Do not use this unit in an area where people wearing pacemakers may
be nearby (such as in a crowded train).
• People wearing a pacemaker should use the system at least 22 cm from
the pacemaker.
.
APPENDIX B: SAFETY AND USAGE TIPS | 31
Page 32

• Do not use this unit in medical facilities such as hospitals or in other
places near medical electronic equipment. Likewise, do not attach
medical electronic equipment to the Bluetooth Card.
• Do not use the unit near automatic doors, fire detection devices, or other
automatically controlled devices.
• If the Cordless Serial Adapter gives any electromagnetic interference to
other devices, either remove the CSA from the host device or unplug the
CSA from its power source.
• Do not put the unit in your mouth.
• Do not insert any metal objects such as staples or paper clips into the
unit.
• Do not place the unit in direct sunlight, in a closed car, near a heating
device or any other location where the temperature may become high.
• Do not expose the unit to high levels of dust.
• Do not use the unit near a microwave oven or in areas where there is a
risk of electrical shock, static electricity or electromagnetic interference.
• Do not use the Cordless Serial Adapter in a place with risk of strong
vibration.
• Do not use benzene or paint thinner to clean the Cordless Serial
Adapter.
Antenna Care and Efficient Use
Do not surround your Cordless Serial Adapter with metal since it will
reduce the radio transmission efficiency.
Driving
RF energy may affect some electronic systems in motor vehicles, such as
car stereo, safety equipment, etc. Check with your vehicle manufacturer’s
representative to be sure that your Cordless Serial Adapter will not affect
the electronic system in your vehicle.
Aircraft
• Turn off your Cordless Serial Adapter before boarding any aircraft.
• To prevent interference with communications systems, you must not use
your Cordless Serial Adapter while the plane is in the air.
• Do not use it on the ground without permission from the crew.
Radio Frequency Exposure
Your Cordless Serial Adapter is a radio transmitter and receiver. When in
operation, it communicates with a Bluetooth-equipped mobile phone,
mobile computer or other device by receiving and transmitting radio
frequency (RF) magnetic fields in the frequency range 2400 to 2500 MHz.
The output power of the radio transmitter is 0.001 Watt.
32 | APPENDIX B: SAFETY AND USAGE TIPS
Page 33

The Cordless Serial Adapter is designed to be in compliance with the RF
exposure limits set by national authorities and international health agencies
when installed or used separately from other antennas or radio transmitters.
Restrictions
• The Cordless Serial Adapter was not designed to be used with systems
directly responsible for sustaining human life. Avoid using this product
with such systems (e.g., medical equipment for life support, surgery,
etc.).
• When this product is to be used in installations responsible for human
safety or the maintenance of public installations (e.g., main control or
safety systems in nuclear power plants, mass transportation systems,
etc.), special transport, maintenance, operation, and wiring (i.e., safety
systems installed in close consultation with a Socket representative)
becomes necessary. Please contact an authorized Socket service center.
1
1
Examples of RF exposure standards and guidelines:
ICNIRP, “Guidelines for limiting exposure to time-varying electric, magnetic, and
electromagnetic fields (up to 300 GHz)”, International Commission on NonIonizing Radiation Protection (ICNIRP), Health Physics, vol. 74, pp 494-533, April
1998.
99/519/EC, EU Council Recommendation on the limitation of exposure to the
general public to electromagnetic fields 0 Hz – 300 GHz, Official Journal of the
European Communities, July 12, 1999.
ANSI/IEEE C95.1-1992, “Safety levels with respect to human exposure to radio
frequency electromagnetic fields, 3 kHz to 300 GHz”, The Institute of Electrical and
Electronics Engineers, Inc., New York, 1991.
FCC Report and Order, ET Docket 93-62, FCC 96-326, Federal Communications
Commission (FCC), August 1996.
Radiocommunications (Electromagnetic Radiation Human Exposure) Standard
1999, Australian Communications Authority (ACA), May 1999.
APPENDIX B: SAFETY AND USAGE TIPS | 33
Page 34

Appendix C Glossary
acceptor: A Bluetooth device that accepts an action (e.g., a connection)
from another Bluetooth device, known as the initiator
AT command: The de facto standard language for controlling modems.
The AT command set was developed by Hayes and is recognized by
virtually all personal computer modems
authentication: Verification of identity as a security measure. Passwords
and digital signatures are forms of authentication
Bluetooth: Short-range, low power wireless technology used primarily for
cable replacement between devices. For more information about
Bluetooth and how it works, read Socket’s technology briefs online at:
www.socketcom.com/support/learn.asp
COM port: A serial communications port
CSA: Socket Cordless Serial Adapter with Bluetooth Wireless Technology
data bit: Bits that contain information, as opposed to bits used for starting,
stopping, or error checking
Data Communications Equipment (DCE): In serial communications, a
device between the communication endpoints that is responsible for
facilitating the communications process. A modem is the most common
kind of DCE
Data Terminal Equipment (DTE): In serial communications, a device at
the endpoint of the communications path. The CSA is a DTE. Other
examples of DTE are terminals, computers, protocol converters, and
multiplexors
Data Terminal Ready (DTR): A signal from a communications program
to a DCE, which indicates that the program is loaded and ready to run
device class: A parameter that indicates the type of device and which types
of services are supported. The class is reported during a device discovery
discoverable: Capable of being found by other Bluetooth devices during
the device discovery phase
encryption: The encoding of data to make it unreadable by unauthorized
users
female serial port: A serial port with pinholes
flow control: The control of transmission between communications
devices, to make sure the sender does not send data until the receiver is
ready to receive it
friendly name: A name you can assign to a Bluetooth device, e.g.,
“Lesley’s Computer.” If the Bluetooth device is discoverable, the friendly
name is provided to other Bluetooth devices during device discovery
gender changer: An adapter that changes a serial connector from male to
female, or vice versa
initiator: A Bluetooth device that initiates an action (e.g., a connection) to
another Bluetooth device, known as the acceptor
.
34 | APPENDIX C: GLOSSARY
Page 35

inquiry scan: A mode that a remote device enters when advertising that a
service is available
local host or local device: The device that the CSA is attached to
male serial port: A serial port with pins
null modem: An adapter that enables two RS-232 DTE devices to
communicate with each other without a regular modem or other DCE
device between them
page scan: A mode in which a Bluetooth device analyzes pages by other
Bluetooth devices to determine if any of the pages are addressed to it.
Before connecting to a remote device, a local device must get the remote
device's attention by paging the remote device.
parity: An integer's property of being odd or even. Parity checking is used
to detect errors in binary-coded data
remote device: The other Bluetooth device that the CSA connects to
RS-232: (Recommended Standard-232.) An Electronics Industries
Association standard for asynchronous serial lines, used commonly for
modems, computer terminals, and serial printers. RS-232 uses a 25-pin or
9-pin connector
Serial Port Profile: A serial communications service offered by a
Bluetooth device, which must be implemented as defined by the
Bluetooth SIG. For two Bluetooth devices to interoperate in serial
communications, both devices must have this profile
service class: The type of service that a Bluetooth device can provide to
other Bluetooth devices
stop bit: In serial communications, where each bit of the message is
transmitted in sequence, stop bits are extra "1" bits which follow the data
and any parity bit. They mark the end of a unit of transmission (normally
a byte or character)
APPENDIX C: GLOSSARY | 35
Page 36

Appendix D Troubleshooting
SYMPTOM:
The Configuration Utility is not working properly (e.g., I cannot
read the settings from the CSA).
POSSIBLE REASONS SOLUTION
The CSA is not attached properly
to your computer.
The CSA does not have power.
The LED is not blinking.
The CSA currently is configured
with automatic connections and
DTR disabled, and the remote
device is within range. Thus, you
are currently connected to the
remote device.
ActiveSync has control of the port
where the CSA is attached.
SYMPTOM:
The CSA is not communicating properly with my third party
software.
POSSIBLE REASONS SOLUTION
You configured the CSA and/or
the third party software
incorrectly.
You are using auto-detect and Plug
and Play functions.
Various possible reasons, such as
incompatible hardware.
Properly insert the CSA, pushing it
into your computer’s serial port as far
as it will go.
Use the AC adapter to connect the
CSA to an electrical outlet.
Remove the remote target from range.
In the ActiveSync connection settings,
make sure a serial cable connection is
not allowed at the COM port where
you attached the CSA.
Make sure the CSA and third party
software are set for the same baud rate
and other settings.
Auto-detect and Plug and Play
functions do not work reliably with
Bluetooth. Make sure you manually
enter the baud rate and other settings
to match those of your local host
device’s serial port.
If your hardware responds to standard
AT commands, set up a test
connection with Windows Hyper
Terminal using the CSA COM port as
the connecting modem.
36 | APPENDIX D: TROUBLESHOOTING
Page 37

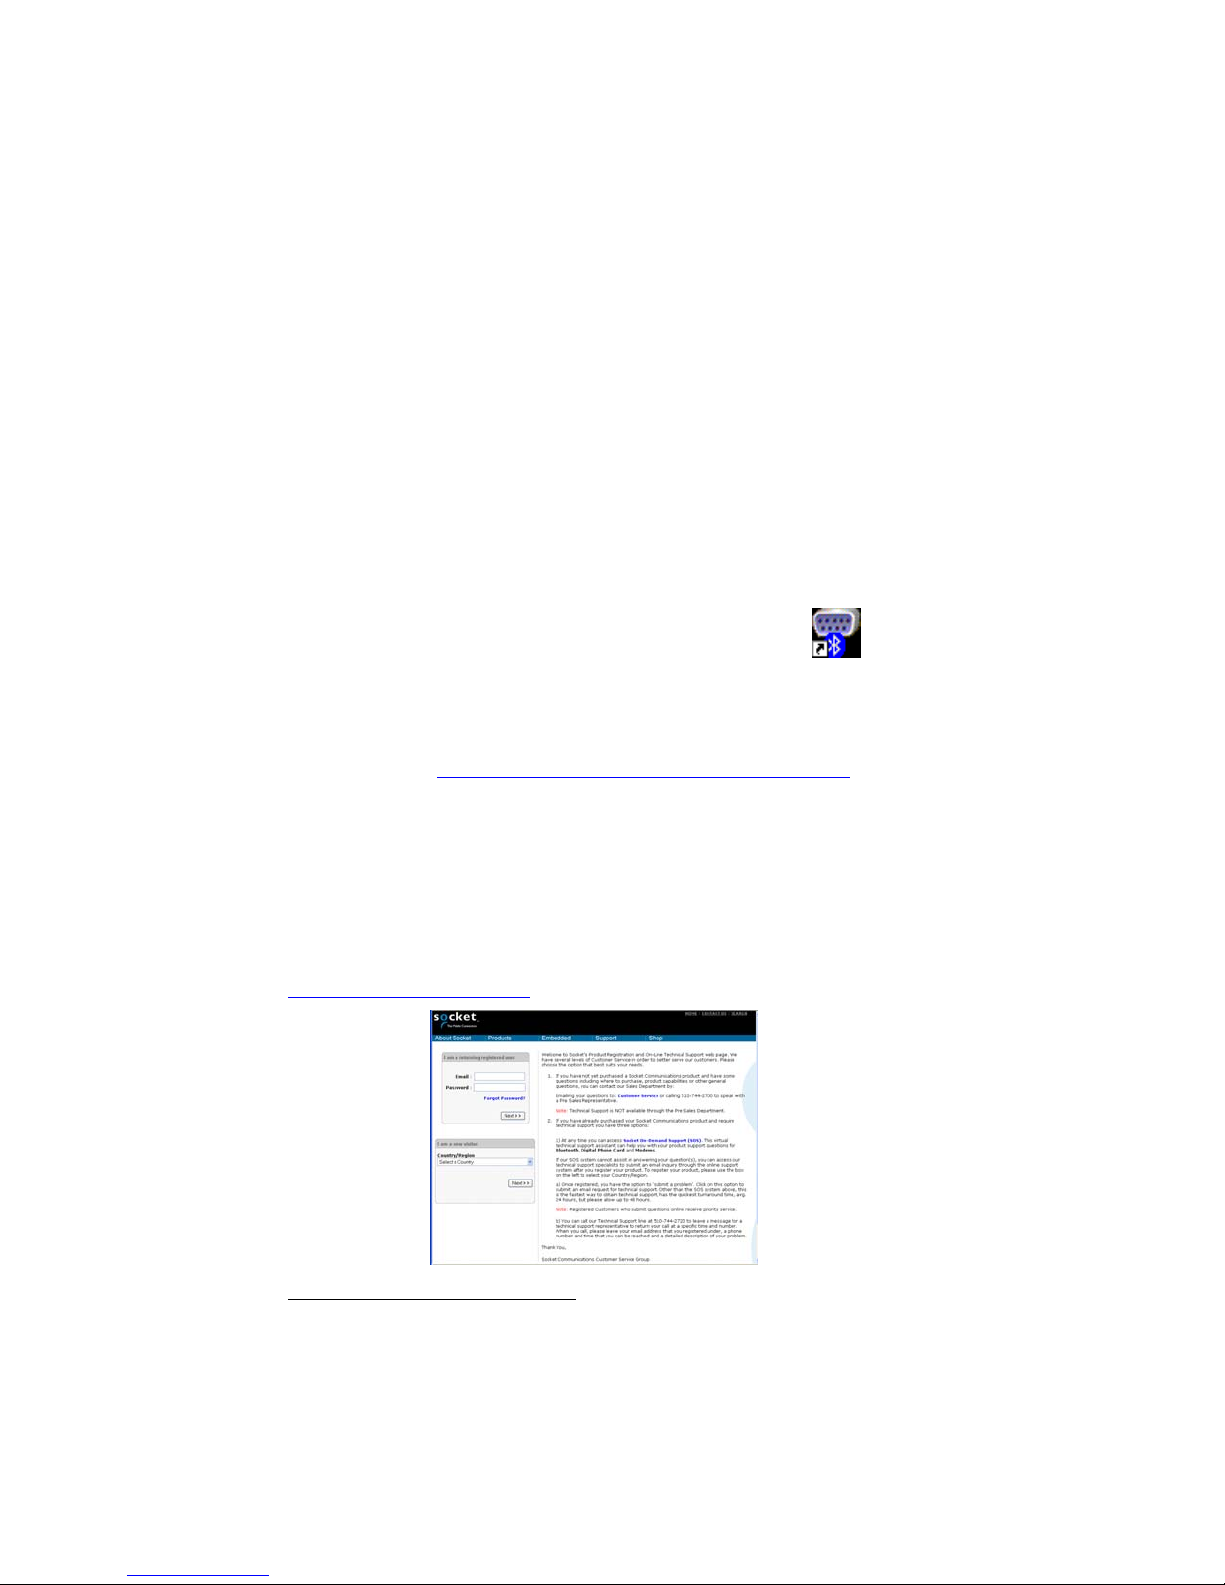
Appendix E Technical Support
If you have trouble installing or using the Cordless Serial Adapter with
Bluetooth Wireless Technology, refer to Appendix D, “Troubleshooting.” If
you still have problems, contact Socket’s technical support department via
the online support system.
IMPORTANT! To obtain technical support for your product, you must
first register your product online at www.socketcom.com/prodreg
To submit an email inquiry through the online support system:
After you register your product, you will be presented with an option to
submit a problem. Click on this option to follow the online process to
submit an email request for technical support.
After you
have
registered,
click here to
submit a
problem.
.
This is the fastest way to obtain technical support and has the quickest
turnaround time. Registered customers who submit a question online will
receive priority service. If we are unable to resolve your support inquiry via
email, we can arrange for a technical support representative to call you at a
specific time.
APPENDIX E: TECHNICAL SUPPORT | 37
Page 38

Limited Warranty
Socket Communications Incorporated (Socket) warrants this product against defects
in material and workmanship, under normal use and service, for the following
period from the date of purchase:
Cordless Serial Adapter: Three years
Incompatibility is not a defect covered by Socket’s warranty. During the warranty
period, Socket will, at its option, repair or replace the defective product at no charge
when furnished with proof of retail purchase, provided that you deliver the product
to Socket or to an authorized Socket Service Center.
The returned product must be accompanied by a return material authorization
(RMA) number issued by Socket or by Socket's Authorized Service Center. If you
ship the product, you must use the original container or equivalent and you must pay
the shipping charges to Socket. Socket will pay shipping charges back to any
location in the contiguous United States. This warranty applies only to the original
retail purchaser and is not transferable.
Socket may, at its option, replace or repair the product with new or reconditioned
parts and the returned product becomes Socket's property. Socket warrants the
repaired or replaced products to be free from defects in material or workmanship for
ninety (90) days after the return shipping date, or for the duration of the original
warranty period, whichever is greater.
This warranty does not cover the replacement of products damaged by abuse,
accident, misuse or misapplication, nor as a result of service or modification other
than by Socket.
SOCKET IS NOT RESPONSIBLE FOR INCIDENTAL OR CONSEQUENTIAL
DAMAGES RESULTING FROM BREACH OF ANY EXPRESS OR IMPLIED
WARRANTY, INCLUDING DAMAGE TO PROPERTY AND, TO THE EXTENT
PERMITTED BY LAW, DAMAGES FOR PERSONAL INJURY. THIS
WARRANTY IS IN LIEU OF ALL OTHER WARRANTIES INCLUDING
IMPLIED WARRANTIES OF MERCHANTABILITY AND FITNESS FOR A
PARTICULAR PURPOSE.
Some states do not allow limitation of implied warranties, or the exclusion or
limitation of incidental or consequential damages, so that the above limitations or
exclusions may not apply to you. This warranty gives you specific legal rights and
you may also have other rights which vary from state to state.
This product may contain fully tested, recycled parts, warranted as if new.
For warranty information, email info@socketcom.com.
38
Page 39

Limited Software Warranty
LIMITED WARRANTY. SOCKET warrants that the original disk or CD ROM is
free from defects for 90 days from the date of delivery of the SOFTWARE.
CUSTOMER REMEDIES. SOCKET’S entire liability and your exclusive remedy
shall be, at SOCKET’S option, either (a) return of the price paid or (b) replacement
of the SOFTWARE which does not meet SOCKET’S Limited Warranty and which
is returned to SOCKET with a copy of your receipt. Any replacement SOFTWARE
will be warranted for the remainder of the original warranty period or 30 days,
whichever is longer. THESE REMEDIES ARE NOT AVAILABLE OUTSIDE OF
THE UNITED STATES OF AMERICA.
NO OTHER WARRANTIES. SOCKET disclaims all other warranties, either
express or implied, including but not limited to implied warranties of
merchantability and fitness for a particular purpose, with respect to the
SOFTWARE and the accompanying written materials. This limited warranty gives
you specific legal rights. You may have others which vary from state to state.
NO LIABILITY FOR CONSEQUENTIAL DAMAGES. In no event shall SOCKET
or its suppliers be liable for any damages whatsoever (including, without limitation,
damages for loss of business profits, business interruption, loss of business
information, or other pecuniary loss) arising out of the use of or inability to use the
SOFTWARE, even if SOCKET has been advised of the possibility of such
damages. Because some states do not allow the exclusion or limitation of liability
for consequential or incidental damages, the above limitation may not apply to you.
EXPORT LAW ASSURANCES. You may not use or otherwise export or reexport
the SOFTWARE except as authorized by United States law and laws of the
jurisdiction in which the SOFTWARE was obtained. In particular, but without
limitation, none of the SOFTWARE may be used or otherwise exported or
reexported (a) into (or to a national or resident of) a United States embargoed
country or (b) to anyone on the U.S. Treasury Department’s list of Specially
Designated Nationals or the U.S. Department of Commerce’s Table of Denial
Orders. By using the SOFTWARE, you represent and warrant that you are not
located in, under control of, or a national or resident of any such country or on any
such list.
GOVERNMENT END USERS. If the SOFTWARE is supplied to the U. S.
Government, the SOFTWARE is classified as “restricted computer software” as
defined in clause 52.227-19 of the FAR. The U. S. Government ‘s rights to the
SOFTWARE are as provided in clause 52.227-19 of the FAR.
CONTROLLING LAW AND SEVERABILITY. This License shall be governed by
the laws of the United States and the State of California. If for any reason a court of
competent jurisdiction finds any provision, or portion thereof, to be unenforceable,
the remainder of this License shall continue in full force and effect.
39
Page 40

October 2003 Document # 6410-00207 A
Copyright Notice
Copyright © 2003 Socket Communications, Inc. All rights reserved.
Socket, the Socket logo and Battery Friendly are registered trademarks of
Socket Communications, Inc. Cordless Serial Adapter with Bluetooth
Wireless Technology is a trademark of Socket Communications, Inc. The
Bluetooth word mark and logo are owned by the Bluetooth SIG, Inc., and
any use of such marks by Socket Communications, Inc. is under license. All
other brand and product names are trademarks of their respective holders.
The Cordless Serial Adapter with Bluetooth Wireless Technology includes
technology licensed under United States Patent Nos. 4,543,450, 4,603,320,
4,686,506, and 4,972,470.
Reproduction of the contents of this manual without the permission of
Socket Communications is expressly prohibited. Please be aware that the
products described in this manual may change without notice.
Feel free to contact SOCKET COMMUNICATIONS at:
Socket Communications, Inc.
37400 Central Court
Newark, CA 94560
Other than the above, Socket Communications can assume no responsibility
for anything resulting from the application of information contained in this
manual.
Socket Communications requests that you refrain from any applications of
the Socket Cordless Serial Adapter that are not described in this manual.
Please refrain from disassembling the card. Disassembly of this device will
void the product warranty.
You can track new product releases, software updates and technical
bulletins by visiting Socket’s web page at: www.socketcom.com.
40
Page 41

Regulatory Compliance
The Socket Cordless Serial Adapter with Bluetooth Wireless Technology is
designed to be compliant with the rules and regulations in locations where
they are sold and will be labeled as required. This product is type approved
users are not required to obtain license or authorization before using.
Radio Frequency Interference Requirements
This device complies with part 15 of the FCC rules. Operation is subject to
the following conditions: (1) This device may not cause harmful
interference, and (2) this device must accept any interference received,
including interference that may cause undesired operation.
This equipment is also ETS 300 328, ETS 300 826 and C-TICK compliant.
These limits are designed to provide reasonable protection against harmful
interference when the equipment is operated in a commercial environment.
This equipment generates, uses, and can radiate radio frequency energy
and, if not installed and used in accordance with the instruction manual,
may cause harmful interference to radio communications. Operation of this
equipment in a residential area is likely to cause harmful interference in
which case the user will be required to correct the interference at his or her
own expense.
This equipment generates and radiates radio-frequency energy. To comply
with FCC RF exposure compliance requirements, the following antenna
installation and device operation configurations must be satisfied: (1) Users
are not permitted to make changes or modify the system in any way, and (2)
connecting external antennas to the card is prohibited. Changes or
modifications not expressly approved by the party responsible for
compliance could void the user’s authority to operate the equipment.
If this equipment does cause harmful interference to radio or television
reception, which can be determined by turning the equipment off and on,
the user may try to correct the interference by one or more of the following
measures:
• Reorient or relocate the receiving antenna of the radio or television.
• Increase the distance separating the equipment and the receiver.
• Connect the equipment to an outlet on a different branch circuit than
that of the receiver.
• Consult the dealer or an experienced radio/TV technician for help.
The user may find the following booklet helpful:
How to Identify and Resolve Radio-TV Interference Problems
This booklet is available from the U.S. Government Printing Office,
Washington, D.C. 20402.
41
Page 42

U.S. Regulatory Wireless Notice
This product emits radio frequency energy, but the radiated output power of
this device is far below the FCC radio frequency exposure limits.
Nevertheless, the device should be used in such a manner that the potential
for human contact with the antenna during normal operation is minimized.
Radio Frequency Interference Requirements – Canada
This Class B digital apparatus meets the requirements of the Canadian
Interference-Causing Equipment Regulations. Cet appareil numérique de la
Classe B respecte toutes les exigencies du Reglement sur le Matériel
Brouilleur du Canada.
NOTE: To comply with FCC and Industry Canada exposure requirements,
this device is approved for operations in a user’s hand when there is a
distance of 20 cm or more between the device antenna and the user’s body.
Canadian Regulatory Wireless Notice
Operation is subject to the following two conditions: (1) this device may
not cause interference, and (2) this device must accept any interference,
including interference that may cause undesired operation of the device.
To prevent radio interference to the licensed service, this device is intended
to be operated indoors and away from windows to provide maximum
shielding. Equipment (or its transmit antenna) that is installed outdoors is
subject to licensing.
The term “IC:” before the certification/registration number only signifies
that the Industry Canada technical specifications were met.
CE Marking & European Union Compliance
Products intended for sale within the European Union are marked with a
CE Mark which indicates compliance to applicable Directives and
European Normes (EN), as follows. Amendments to these Directives or Ens
are included: Normes (EN), as follows:
42
Page 43

© Socket Communications, Inc. October 2003 Printed in U.S.A.
 Loading...