

Page 1

In-Hand Scan Card Imager
CompactFlash Card with
Built-in Bar Code CMOS Imager for:
• Pocket PC 2000/2002
• Handheld PC Pros, HPC 2000s and Pen Tablets
based on Windows CE
• Windows 98/Me/2000/XP Notebooks
User’s Guide
™
Page 2

Table of Contents
CHAPTER 1 INTRODUCTION ....................................... 4
CHAPTER 2 SETUP FOR WINDOWS CE ..................... 6
STEP 1: Register the Card 6
STEP 2: Uninstall Old Scanning Software 6
STEP 3: Install the Software 7
STEP 4: Insert the ISC-I into Your Device 8
STEP 5: Start SocketScan 8
STEP 6: Assign a Trigger Button 9
STEP 7: Scan Data into a Windows Program 10
Optional: Configure Prefix/Suffixes 11
OPTIONAL: Run Scan Demo 12
OPTIONAL: Configure Sounds 13
OPTIONAL: Use a Floating Trigger 14
CHAPTER 3 SETUP FOR WINDOWS 98/ME/
2000/XP .................................................................. 15
STEP 1: Register the Card 15
STEP 2: Uninstall Old Scanning Software 15
STEP 3: Install the Software 16
STEP 4: Insert the ISC-I into Your Computer 17
STEP 5: Complete the New Hardware Wizard 18
STEP 6: Start SocketScan 20
STEP 7: Assign a Trigger Button 20
STEP 8: Scan Data into a Windows Program 21
Optional: Configure Prefix/Suffixes 22
Optional: Configure Sounds 23
APPENDIX A ISC-I SPECIFICATIONS........................ 24
APPENDIX B BAR CODE LABEL SPECIFICATIONS 25
APPENDIX C ENABLING/DISABLING BAR CODE
SYMBOLOGIES ..................................................... 26
APPENDIX D DEPTH OF FOCUS ............................... 30
APPENDIX E TROUBLESHOOTING........................... 31
APPENDIX F SUPPORT RESOURCES ...................... 32
Page 3

LIMITED WARRANTY.................................................. 33
COPYRIGHT NOTICE .................................................. 35
REGULATORY COMPLIANCE.................................... 36
Page 4

Chapter 1 Introduction
Overview
The Socket In-Hand Scan Card-Imager (ISC-I)
gives you the freedom to scan linear, stacked,
2D/matrix or postal bar codes anytime anywhere
using a variety of Windows-based mobile
computers. You can also use the Socket ISCImager to capture VGA grayscale images.
The world’s only bar code image scanner built into a CompactFlash card, the
ISC-I is sleekly designed with no cables or batteries. Simply pop in the
scanner when you need it, and remove it when you’re done. The card’s
compact design lets you scan with only one hand when used with a PDA.
The ISC-I is available in two decode configurations: The “Basic” configuration
reads all linear and stacked bar code symbologies and includes image capture
capabilities. The “Full” configuration adds all 2D/Matrix and postal
symbologies, as well as OCR-A & B. Refer to the product specifications in
Appendix A for a more detailed explanation of the two decode configurations.
In order to switch configurations, you must contact customer support and send
the ISC-I back to Socket.
When combined with a Type I CompactFlash-to-PC Card adapter, the
CompactFlash ISC-I also works in the PC Card slot of compatible mobile
computers. The adapter is available separately online under Accessories at:
www.socketcom.com/shop/default.asp
About the Software
SocketScan™ software functions as a “keyboard wedge,”
sending scanned bar code data directly into any active Windows
program. Your Windows application will accept the data as if it
were manually typed.
The SocketScan Trigger™ launches an on-screen trigger icon
that you can tap on to trigger the ISC-I. This serves as an
alternative to using a hardware button on your device. Windows
CE only. Must be installed separately from the CD.D.
The Socket ISC-I Demo™ lets you perform basic bar code
scanning and image capture with the ISC-I. You can also
configure the decoder and image capture settings, and perform
image transfers. Refer to the separate User’s Guide for the ISC-I
Demo for instructions. Windows CE only.
4 | CHAPTER 1: INTRODUCTION
Page 5

For software updates or help on advanced configuration, please visit:
www.socketcom.com/support/support_bar.asp
About This User’s Guide
This User’s Guide shows how to install and use the In-Hand Scan CardImager in conjunction with SocketScan keyboard emulation software.
The In-Hand Scan Card-Imager may simply be referred to as the In-Hand
Scan Card or ISC-I in this User’s Guide.
Important!
This User’s Guide DOES NOT include instructions for using the Socket
ISC-I Demo application. Please refer to the User’s Guide specific to that
application.
Package Contents
The In-Hand Scan Card-Imager (ISC-I) package
includes:
• In-Hand Scan Card-Imager
• SocketScan Installation CD
• Quick Start Guide with software installation,
copyright, and warranty information
CHAPTER 1: INTRODUCTION | 5
Page 6

Chapter 2 Setup for Windows CE
This chapter shows how to install, configure, and use the InHand Scan Card-Imager (ISC-I) with a Pocket PC
2000/2002/2003 based on Windows CE v3.0 or greater
This chapter shows Pocket PC 2002 screens. Other
Windows CE devices will have functionally equivalent
screens except where otherwise noted.
For instructions on using the In-Hand Scan Card-Imager
Demo, please refer to the User’s Guide for that specific application.
Installation Steps Summary
STEP 1: Register the card.
STEP 2: Uninstall old bar code scanning software.
STEP 3: Install the software.
STEP 4: Insert the ISC-I into Your Device.
STEP 5: Start SocketScan.
STEP 6: Assign a trigger button.
STEP 7: Start scanning data into a Windows program!
OPTIONAL: Select symbologies.
OPTIONAL: Configure prefix/suffixes.
OPTIONAL: Run Scan Demo to scan unknown bar codes.
OPTIONAL: Configure sounds.
OPTIONAL: Manually configure specific symbologies or extensions.
STEP 1: Register the Card
Socket highly recommends that all customers register their Socket products.
Registered users receive priority for technical support. Register the card
online at www.socketcom.com/prodreg
STEP 2: Uninstall Old Scanning Software
Remove any bar code scanning software you may already have installed on
your mobile computer.
6 | CHAPTER 2: SETUP FOR WINDOWS CE
Page 7

STEP 3: Install the Software
I
N
P
Follow these steps for software installation BEFORE inserting the ISC-I.
1. Make an active connection between the mobile computer and a host PC.
Use ActiveSync and a serial/USB/Ethernet connection cable or cradle.
2. Insert the SocketScan Installation CD into your CD-ROM drive.
ote: The host
C can be a
desktop or
notebook PC.
3. Use My Computer or Windows Explorer to access your CD-ROM drive.
In the CD, click on SETUP.HTM.
4. Follow the SocketScan Setup Center to install the software for
Windows CE.
5. In the File Download screen, select the option that lets you open (or run)
the file from its current location.
MPORTANT!
YOU MUST OPEN
THE FILE!
DO NOT
4. A Security Warning screen will appear. Click Yes.
5. Follow the instructions that appear on your screen until setup is done.
SAVE!
6. Disconnect the mobile computer from the host PC. Soft reset the
mobile computer.
7. Soft reset the device by pressing the reset button. Now you are ready to
insert the ISC-I.
CHAPTER 2: SETUP FOR WINDOWS CE | 7
Page 8

STEP 4: Insert the ISC-I into Your Device
P
I
I
P
N
R
p
Important! Damage may occur!
Make sure the card is positioned correctly in the slot.
Do NOT insert the card upside down or shove the card in too hard.
lug directly
into a
CompactFlash
/O slot.
nsert into
an adapter,
then plug
the
OR
combined
unit into a
slot.
C Card
STEP 5: Start SocketScan
1. Pocket PCs: Go to Start | Programs | SocketScan.
HPCs: Tap on the SocketScan icon on your desktop.
2. After approximately 5 seconds, the “ISC-I detected” icon should
appear in the task tray (in the Today screen for Pocket PCs).
ISC-I detected
No scanning card detected
ote: The “No scanning card
detected” icon may indicate an
improperly inserted card.
emove and reinsert the ISC-I,
ushing it in all the way. Be
sure the card is properly
aligned in the CF card slot. Do
not use excessive force.
8 | CHAPTER 2: SETUP FOR WINDOWS CE
Page 9

STEP 6: Assign a Trigger Button
Follow the appropriate directions for your device and refer to your device’s
user documentation to assign a hardware button to trigger the In-Hand Scan
Card-Imager (ISC-I).
Alternatively, you can use the “floating trigger” on your screen via
SocketScan Trigger. Refer to OPTIONAL: Use Floating Trigger for
instructions.
Note: If SocketScan is not running yet, you can press the
assigned trigger button to launch SocketScan. After
SocketScan is open, pressing the trigger button will
activate the imager.
1. Go to Start | Settings | Personal | Buttons.
2. From the Button list, select a button to trigger the In-Hand Scan Card.
In the Button assignment field, select SocketScan. When done, tap ok.
CHAPTER 2: SETUP FOR WINDOWS CE | 9
Page 10

STEP 7: Scan Data into a Windows Program
For information about bar code scanning applications, please email
info@socketcom.com
1. If not already open, start SocketScan. You can press the trigger button
to quickly launch the program.
2. Start the Windows application that you want to receive the data (e.g.,
Excel, Notepad, etc.). Make sure a new document or spreadsheet is open.
3. Press the assigned trigger button and scan the code Use the green
aiming beam to focus .
For example, try this Code 39 bar code:
When data is read, a beep should sound, and the imager should turn off,
indicating a good read. If the ISC-I fails to read data within a few
seconds, the imager will turn off, and you must try again.
Note: If your mobile computer enters sleep mode when SocketScan is
running, press the ON button to restart SocketScan.
4. After a successful scan, data should appear in your document. For
example, after you scan the code above into Pocket Excel, data should
appear in the first cell:
10 | CHAPTER 2: SETUP FOR WINDOWS CE
Page 11

OPTIONAL: Configure Prefix/Suffixes
N
The SocketScan applet lets you specify prefix and/or suffix characters to be
added automatically to the data you scan. This helps to further eliminate
manual data entry.
1. Tap on the ISC-I icon in the task tray to launch the applet (visible in
the Today screen for Pocket PCs). In the pop-up menu, tap Prefix/Suffix.
ote: You can also
configure prefix/suffixes if
the “no scanning card
detected” icon appears.
2. In the screen that appears, enter the characters you want to be appended
to each scan (128 character maximum). Tap ok.
CHAPTER 2: SETUP FOR WINDOWS CE | 11
Page 12

OPTIONAL: Run Scan Demo
N
I
N
Scan Demo makes it easy to obtain the character count and decoded data (in
either ASCII or Hex) of any bar code you scan. This is especially useful if
you encounter a bar code that SocketScan will not decode.
Note: For instructions on using the In-Hand Scan Card-Imager Demo, refer
to the separate User’s Guide for that application.
1. Tap on the Imager icon in the task tray (in the Today screen for Pocket
PCs). In the pop-up menu, select Scan Demo. This will close
SocketScan and open Scan Demo as a separate application.
ote: SocketScan will
close, and Scan Demo
will open as a separate
application.
2. The Scan Demo screen will appear with the following options:
Enable all symbologies: By default, this option is checked. Different
symbologies can sometimes interpret the same bar code differently, so
you may want to uncheck this option.
Display as hex data: Check this box to view scanned data in
hexadecimal format. Otherwise, data will appear as ASCII.
3. Scan the bar code. You can do so via a trigger button you assigned, the
floating SocketScan trigger if it is running, or tap File | Scan.
4. Scan Demo will report properties of the bar code.
12 | CHAPTER 2: SETUP FOR WINDOWS CE
ote: ScanDemo does not report
the Barcode type for the ISC-
mager. This feature will be
included in a future release.
To exit, tap File | Exit.
Page 13

OPTIONAL: Configure Sounds
N
P
f
D
I
f
f
The SocketScan applet lets you choose any WAV sound file to be played to
indicate a successful scan.
1. Tap on the ISC-I icon in the task tray (visible in the Today screen for
Pocket PCs). In the pop-up menu, tap on Sounds...
2. In the screen that appears, select the sound you want to indicate
successful scans. Tap ok.
Browse box
To you want to play a .WAV file, after selecting Play .wav file, you can
search through files by tapping the browse box. In the Open screen, tap
on the file you want:
ote: For Pocket
Cs, you can only
select a WAV file
rom the My
ocuments folder.
f needed, copy the
ile you need to this
older.
CHAPTER 2: SETUP FOR WINDOWS CE | 13
Page 14

OPTIONAL: Use a Floating Trigger
N
f
The SocketScan Trigger puts a trigger on your device screen that you can
tap on to activate the imager. You must load this application separately
from the CD.
1. Go Start | Programs | SocketScan Trigger.
2. The SocketScan Trigger icon should appear in the task tray (in the
Today screen for Pocket PCs).
3. Tap and hold your stylus on the SocketScan Trigger icon. In the pop-up
menu, select Launch Floating Trigger.
4. The floating trigger will appear on your device screen. If the floating
trigger does not appear, it may be hidden under your Pocket PC’s
virtual keyboard if it is open.
ote: You can
hold your
stylus on the
title bar of the
loating
trigger, then
drag the
trigger
around the
screen.
5. To remove the floating trigger from your screen, tap on the icon and in
the pop-up menu, select Remove Floating Trigger. The program will still
be running. To close the program, select Close SocketScan Trigger.
14 | CHAPTER 2: SETUP FOR WINDOWS CE
Page 15

Chapter 3 Setup for Windows
98/Me/2000/XP
This chapter explains how to install and use the In-Hand
Scan Card-Imager on a notebook computer running
Windows 98/Me/2000/XP.
This chapter features screen images from Windows 98SE.
Other Windows versions will have functionally
equivalent screens except where otherwise noted.
The ISC-I does not work with Windows NT at this time.
Installation Steps Summary
STEP 1: Register the card.
STEP 2: Uninstall old bar code scanning software.
STEP 3: Install the software.
STEP 4: Insert the ISC-I.
STEP 5: Complete new hardware wizard.
STEP 6: Start SocketScan.
STEP 7: Assign a trigger button.
STEP 8: Start scanning data into a Windows program!
OPTIONAL: Configure prefix/suffixes
OPTIONAL: Configure sounds.
OPTIONAL: Configure SocketScan for specific symbologies or extensions.
STEP 1: Register the Card
Socket highly recommends that all customers register their Socket products.
Registered users receive priority for technical support. Register the card
online at www.socketcom.com/prodreg
STEP 2: Uninstall Old Scanning Software
Remove any bar code scanning software you may already have installed on
your mobile computer.
*
*
Windows 98 and Windows 98 SE
CHAPTER 3: SETUP FOR WINDOWS 98/Me/2000/XP | 15
Page 16

STEP 3: Install the Software
1. Insert the SocketScan Installation CD into your CD-ROM drive.
2. Use My Computer or Windows Explorer to access your CD-ROM
drive. In the CD, click on SETUP.EXE.
3. The SocketScan Setup Center will launch. Follow the instructions on
your screen to install the software for your Windows version.
4. IMPORTANT! Leave the installation CD inside your computer.
16 | CHAPTER 3: SETUP FOR WINDOWS 98/Me/2000/XP
Page 17

STEP 4: Insert the ISC-I into Your Computer
Important! Damage may occur!
Make sure the card is positioned correctly in the slot.
Do NOT insert the card upside down or shove the card in too hard.
Insert the ISC-I into a CompactFlash-to-PC Card adapter, then plug the
combined unit into your computer’s PC Card slot.
Windows 2000
: After you insert the ISC-I, a screen may appear reporting
Digital Signature Not Found. Click Yes.
CHAPTER 3: SETUP FOR WINDOWS 98/Me/2000/XP | 17
Page 18

STEP 5: Complete the New Hardware Wizard
F
D
1. Make sure the installation CD is still inside your computer.
2. The first time you insert the ISC-I, a new hardware or device driver
wizard will appear. Complete the wizard by following the appropriate
instructions for your Windows version:
Windows 98
• The first screen will introduce the wizard. Click Next>.
• In the next screen, select Search for the best driver for your device.
Click Next>.
• In the next screen, check CD-ROM drive. Click Next>.
• Follow the remaining screens until the drivers are installed.
Windows Me
• Select Specify the location of the driver.
WARNING!
OR WINDOWS Me,
O NOT SELECT
Automatic search for
a new driver!
• In the next screen, select Search for the best driver for your device, and
check Removable Media. Click Next>.
• Follow the remaining screens until installation is complete.
18 | CHAPTER 3: SETUP FOR WINDOWS 98/Me/2000/XP
Page 19

Windows 2000
• In the welcome screen, click Next>.
• Select Search for a suitable driver for my device.
• In the next screen, check Specify a location. Click Next>.
• In the next screen, browse to your CD drive. Click OK.
• Follow the remaining screens until the drivers are installed.
Windows XP
• In the welcome screen, select Install from a list or specific location.
Click Next>.
• In the next screen, select Include the location in the search and browse
to your CD drive. Click Next>.
Note: Windows may report that the product has not passed Windows
logo testing to verify compatibility with Windows XP. Ignore and click
Continue Anyway.
• Follow the remaining instructions until installation is complete.
CHAPTER 3: SETUP FOR WINDOWS 98/Me/2000/XP | 19
Page 20

STEP 6: Start SocketScan
I
B
p
1. Go to Start | Programs | SocketScan.
2. Whenever SocketScan is running, either of two icons will appear in
your computer’s task tray.
ISC-I detected No scanning card detected.
Note: The “No scanning card” detected icon may indicate an
improperly inserted ISC-I. Remove and reinsert the card.
STEP 7: Assign a Trigger Button
Note: If SocketScan is not running yet, then pressing the assigned trigger
button is a quick way to launch SocketScan. Pressing the trigger button will
activate the imager only when SocketScan is open.
Follow these steps and refer to your Windows documentation to assign a
trigger button:
1. Right-click the ISC-I icon on your Windows task tray.
2. In the pop-up menu that appears, click Settings…
3. In the next screen, select a function key for the trigger button. Click OK.
mportant!
e careful not
to pick a key
used by
another
rogram!
20 | CHAPTER 3: SETUP FOR WINDOWS 98/Me/2000/XP
Page 21

STEP 8: Scan Data into a Windows Program
Follow these steps to use the ISC-I to scan data into a Windows program.
For information about bar code scanning applications (available separately),
email info@socketcom.com
1. If not already open, start SocketScan. You can press the trigger button to
quickly launch the program.
2. Start the Windows application you want to receive the data, such as
Notepad, Word or Excel. Make sure a new document or spreadsheet is
open that you can scan data into.
3. Press the assigned trigger button and scan the code. The bright green
aiming bar indicates that the imager is on. For example, try this Code 39
bar code:
4. When data is read, a beep should sound, and the imager should turn off.
If the ISC-I fails to read data within a few seconds, the imager will turn
off, and you must try again.
5. After a successful scan, data should appear in your document. If you
scan the code above into an Excel spreadsheet, data should appear in the
first cell:
CHAPTER 3: SETUP FOR WINDOWS 98/Me/2000/XP | 21
Page 22

OPTIONAL: Configure Prefix/Suffixes
The SocketScan applet lets you specify prefix and suffix characters or
functions to be added automatically to the data that you scan. This makes it
easy to use the ISC-I with existing Windows applications.
1. Right-click on the SocketScan icon in the task bar at the bottom of
your screen.
2. In the pop-up menu, select Settings…
3. Start the applet. In SocketScan Settings, click on the Prefix/Suffix tab.
4. In the Prefix and Suffix fields, enter the characters you want to be
appended to each scan (128 character maximum).
When done, click OK.
22 | CHAPTER 3: SETUP FOR WINDOWS 98/Me/2000/XP
Page 23

OPTIONAL: Configure Sounds
The SocketScan applet lets you choose any WAV sound file to be played to
indicate a successful scan.
1. Tap on the ISC-I icon in the task bar. In the pop-up menu, select
Settings. Click on the Sound tab.
2. Select a sound for indicating successful scans, then click OK.
To you want to play a .WAV file, after selecting Play .wav file, you can
search through files by tapping the Browse button. In the Select a WAV
file screen, select the file you want, then click on the Open button:
CHAPTER 3: SETUP FOR WINDOWS 98/Me/2000/XP | 23
Page 24

Appendix A ISC-I Specifications
Physical Characteristics:
Overall Size: 83.08 x 51 x 23 mm Total Mass: approx. 51.5 g
CompactFlash Portion: 42.4 x 42.8 x 3.3 mm
(Conforms to CF Type I Extended Spec. 36.4 mm + 6 mm)
Scan Head Portion: 40.65 x 51 x 23 mm
Power Consumption (3.3V supply):
Idle: 20 mA (66 mW) Scanning: 340 mA (1122 mW)
Operating System Support:
Windows CE v2.11 for Handheld PC Pro and pen tablet
Windows CE v3.0 or greater for Pocket PC 2000/2002/2003, HPC 2000
Windows CE for Casio Cassiopeia Pocket Manager BE-300 and BE-500
Windows Windows 98 and 98 Second Edition (Q’3 03)
Windows Me, 2000, and XP (Q’3 03)
Bar Code Symbologies Automatically Detected:
Basic Decode: Code 39, Code 128, UPC & EAN/JAN, I 2 of 5, Matrix 2
of 5, Code 93, Code 49, Code 11, MSI/Plessey, IATA, Codabar, PDF417,
MicroPDF and RSS (linear and composite)
Full Decode: All of the symbologies listed above plus:
Matrix Codes: Aztec Mesa, Maxicode, Data Matrix, QR Code, VeriCode,
Codablock, Composite
Postal Codes
OCR: OCR-A, OCR-B, US Currency
Image Output (Basic and Full Decode):
Size: 640x480 pixels VGA at max. resolution Color: 256 color grayscale
Imager Performance:
Rotational Sensitivity: 360° Viewing Angle: ±45°
Ambient Light: Total darkness to 100,000 lux (full sunlight)
Interface Standards:
CompactFlash, Type I Extended (CF Specifications 2.0)
PC Card (with CompactFlash-to-PC Card adapter)
Certification: FCC: Part 15, Class B, CE: EN55024:1998, C-TICK s.182
(pending)
Software: Universal Installer, configuration utility and virtual keyboard
wedge for Windows
: Postnet (US), Canada, Japan, Britain, Australia, Netherlands
24 | APPENDIX A: ISC-I SPECIFICATIONS
Page 25

Appendix B Bar Code Label
Specifications
All bar code symbols/labels should satisfy the appropriate AIM Uniform
Symbology Specification.
Background Substrate:
The bar code symbol should be printed on material (media) that is reflective
and has a matte (not glossy) finish. A background diffuse reflectance of at
least 70% to 80% is desirable for optimum contrast. Retro-reflective media
should be used to obtain decode distances greater than 36 inches.
Ink Color and Type:
The inked bars should not exceed 25% reflectance at the wavelength that is
being used for reading, whether printed with black ink or colored ink. The
reflectance value should not vary more than 5% within the same character.
Voids and Specks:
The code should be printed clearly, free of voids, specks, blemishes and
lines that could “fool” the scanner. Specks or blemishes in the white
spaces, or false or missing bar sections could be interpreted by the reading
equipment as part of the code. Generally, the width of such flaws is more
serious than the height. Code symbols/ labels should be rejected if these
defects are present.
Definition:
The bars in the bar code symbol should be well defined. Their edges should
not be rough or fuzzy, so that the bars and spaces have the proper widths
intended for the bar code symbology used.
Contrast:
Background reflectance (that of the substrate on which the codes are
printed) should always provide a good contrast relative to the ink
reflectance (that of the code bars). The difference between the two should
be at least 37.5% at the wavelength used for reading.
Tolerance:
The ratio of the widths of bars and spaces in a bar code symbol must
conform to the appropriate AIM bar code specifications and can cause
problems if not correct throughout the bar code. Problems can occur when
bar edges are smeared or rough, or when they exhibit voids.
APPENDIX B: BAR CODE LABEL SPECIFICATIONS | 25
Page 26

Appendix C Enabling/Disabling
Bar Code Symbologies
Note: This information is valid for Release 1.X of SocketScan software.
Bar code symbologies can be enabled or disabled by using the ISC-Imager
Demo application located on the Programs page. Specific parameters for
each symbology can also be set.
1. Open ISC-I Demo application from the Programs page.
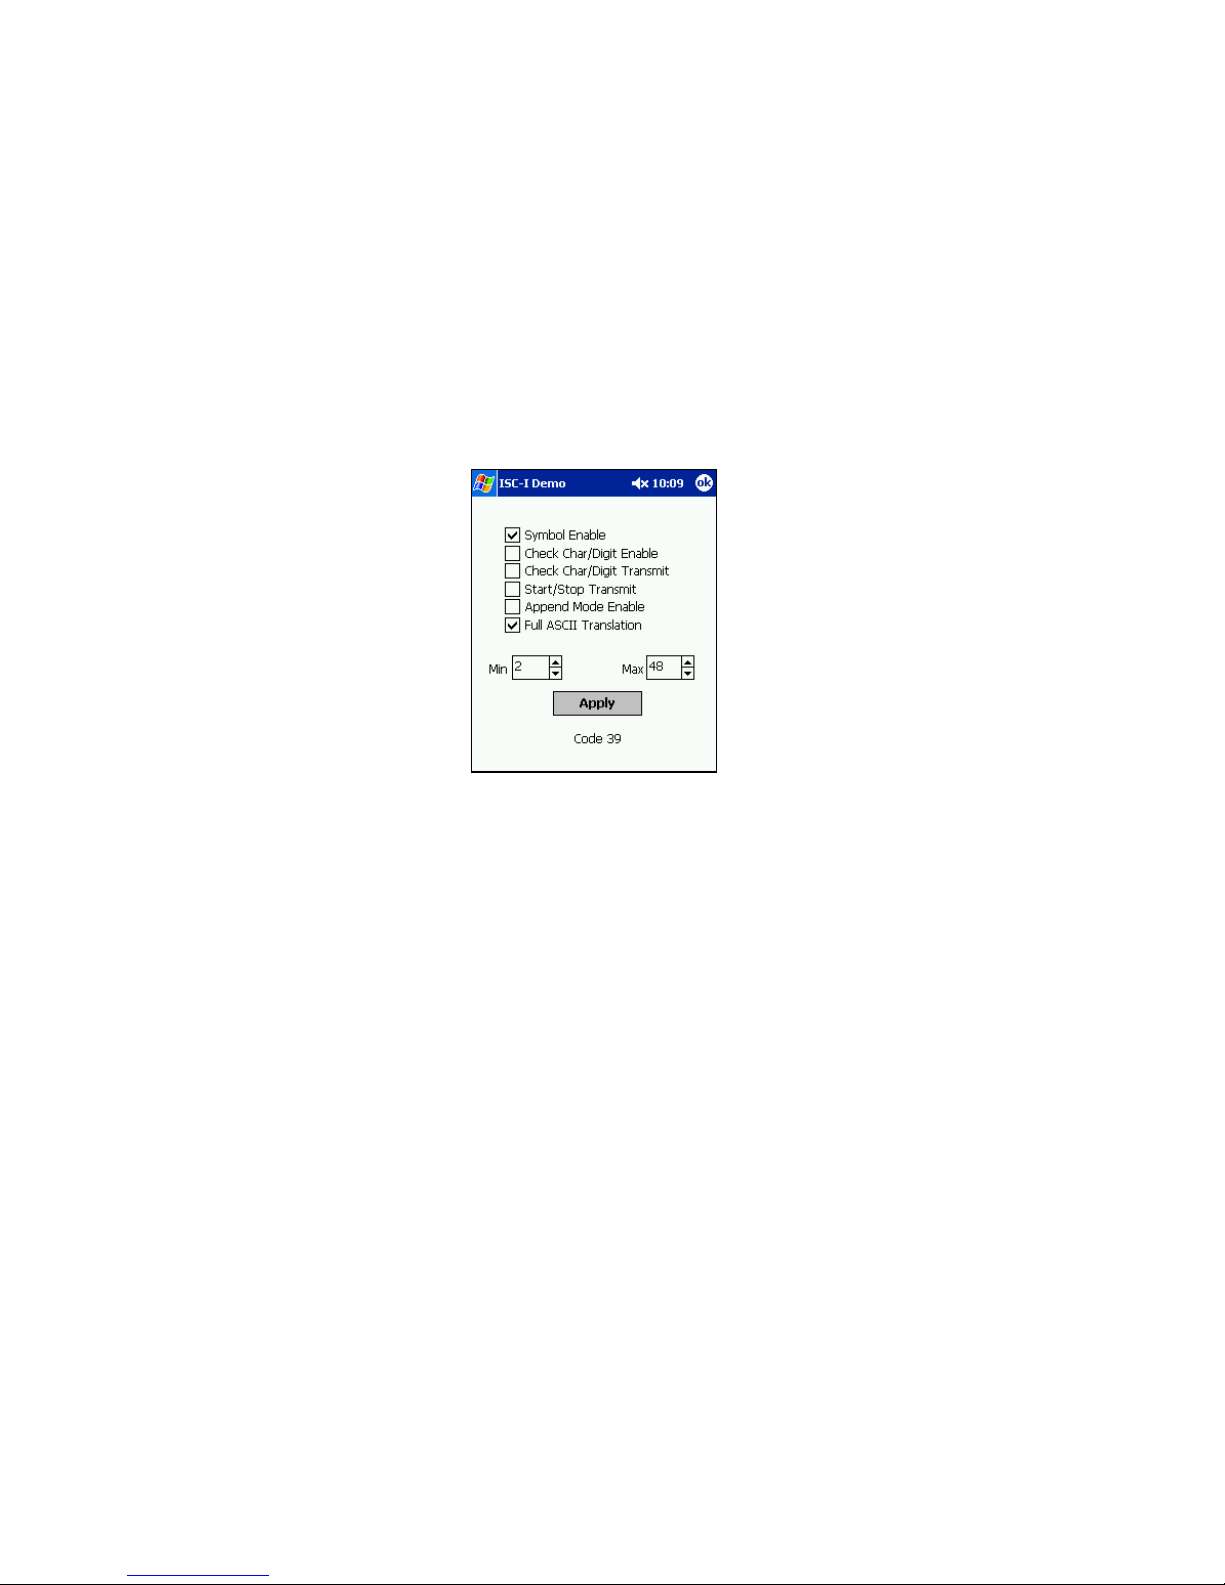
2. Tap on the Imager menu and select Symbology Setup.
The ISC-Imager is available in either a “Basic” or “Full” decode
Note:
configuration. Only those symbologies supported by the Imager will be
available on this page.
3. On the Symbology Setup page, all
possible symbologies supported by the
ISC-Imager can be enabled by tapping
the Enable All Symbologies button.
Caution:
consider all possible symbologies when
analyzing digital images, the decode
process may be slightly slower when all
symbologies are enabled.
26 | APPENDIX C: ENABLING/DISABLING SYMBOLOGIES
Because the Imager must
Page 27
4. Tapping the Default Symbol button sets the ISC-Imager to default values.
Default values are described at the end on this appendix.
5. Tapping the Default All Symbologies button sets the parameters for all
enabled symbologies to default values
6. By selecting a specific symbology in the top window, a second window
appears where parameters appropriate for the symbology can be selected.
APPENDIX C: ENABLING/DISABLING SYMBOLOGIES | 27
Page 28

ISC-Imager Symbology Default Settings
Symbology Enabled
Linear Codes
Min
Length
Max
Length
Chk Digit
Enabled
Chk Digit
Transfer
Other Options
Codabar* Yes 2 60 N N
Code 11* No 4 80 Y -
Code 128* Yes 1 80 - -
Append Mode-N, Full
Code 39* Yes 2 48 N N
ASCII-Y
Code 49* No 1 81 - -
Code 93* No 1 80 - -
2 or 5-digit Addenda EAN-8* No - - - -
Disabled
2 or 5-digit Addenda EAN-13* Yes - - - -
Disabled
Interleaved 2of5* Yes 6 80 N N
IATA 2 of 5* No 4 80 - -
ISBT 128 No - - - -
MSI/Plessey* No 4 48 - -
TL Code 39* No - - - -
2 or 5-digit Addenda UPC-A* Yes - - - N
Disabled
2 or 5-digit Addenda UPC-E0* No - - - N
Disabled
2 or 5-digit Addenda UPC-E1* No - - - N
Disabled
2D/Matrix Codes
Aztec No 1 3750 - - Aztec Rune - Disabled
Aztec Mesa No - - - -
Codablock No 1 2048 - -
UPC Composite Composite* No 1 120 - -
Disabled
Datamatrix No 1 1500 - -
Maxicode No 1 150 - -
Micro PDF* Yes 1 2750 - -
PDF417* Yes 1 2750 - -
QR Code No 1 3500 - -
RSS* No 1 80 - - RSE, RSL - Enabled
28 | APPENDIX C: ENABLING/DISABLING SYMBOLOGIES
Page 29

Postal Codes
Australian Post No
British Postal No
Canadian Postal No
Dutch Postal No
JAPOST No
Planet No
US Postnet No
* Included in ISC-Imager Basic Decode Configuration
APPENDIX C: ENABLING/DISABLING SYMBOLOGIES | 29
Page 30

Appendix D Depth of Focus
Depth of Focus for 7.0” Standard Focus
Symbology Near Depth of Focus
(inches)
Maxicode 35-mil 2.0 13.0
Datamatrix 15-mil
(ECC200)
PDF 10-mil 3.1 9.8
PDF 8-mil 3.3 8.0
PDF 6.6-mil 4.5 6.25
Code 39 15-mil 2.1 12.8
Code 39 10-mil 3.2 9.2
Code 39 8-mil 3.5 7.6
UPC 13-mil (100%) 2.5 12.5
Postnet 4.0 5.9
12-point OCR A 2.5 11.8
12-point OCR B 2.5 11.0
3.7 6.5
Far Depth of Focus
(inches)
30 | APPENDIX D: DEPTH OF FOCUS
Page 31

Appendix E Troubleshooting
SYMPTOM:
I get the “No Card Detected” icon in the system tray
and can’t trigger the imager or scan any bar codes.
POSSIBLE REASON SOLUTION
Your mobile computer does not
recognize the ISC-I.
SYMPTOM:
While scanning, the imager activates, but no data appears
on my screen, and the light eventually disappears.
POSSIBLE REASON SOLUTION
The ISC-I is too close or too far
from the bar code.
The bar code is incorrectly
formatted or poorly printed.
The bar code symbology may be
disabled in the ISC-I
configuration.
SYMPTOM:
When I press the trigger button, nothing happens.
POSSIBLE REASON SOLUTION
You programmed the trigger
button incorrectly.
Make sure the ISC-I is inserted
properly. If necessary, remove and
reinsert. If using battery power, be
sure to tap Y
to use battery power.
Practice so you get accustomed
the most effective distance and
scanning angle.
Try scanning a bar code that is
correctly formatted or printed,
such as on a retail package.
Use Scan Demo to determine the
symbology. If needed,
reconfigure the ISC-I using the
Demo application.
Test the button by assigning a
different program to it and make
sure it works properly.
es if asked if you want
APPENDIX E: TROUBLESHOOTING | 31
Page 32

Appendix F Support Resources
If you have trouble installing or using the In-Hand Scan Card-Imager,
please refer to Appendix C, “Troubleshooting” for help.
Technical Support
If you have trouble installing or using the ISC-I, contact Socket’s technical
support department via the online support system.
IMPORTANT! To obtain technical support for your product, you must
first register your product online at www.socketcom.com/prodreg
To submit an email inquiry through the online support system:
register your product, you will be presented with an option to 'submit a
problem'. Click on this option to follow the online process to submit an
email request for technical support.
This is the fastest way to obtain technical support and has the quickest
turnaround time. Registered customers who submit a question online will
receive priority service. If we are unable to resolve your support inquiry via
email, we can arrange for a technical support representative to call you at a
specific time.
Users’ Forum
If you would like to discuss the ISC-I with other people using the product,
visit Socket’s users’ forum at: www.socketforum.com
Important! Socket does NOT provide technical support via the users’ forum!
Note: Socket may, but is not obligated to, monitor or review any areas on
the Site where users transmit or post Communications or communicate
solely with each other, including but not limited to the user forum, and the
content of any such Communications. Socket, however, will have no liability
related to the content of any such Communications, whether or not arising
under the laws of copyright, libel, privacy, obscenity, or otherwise. Socket
retains the right to remove messages that include any material Socket
deems abusive, defamatory, obscene or otherwise unacceptable.
.
After you
32 | APPENDIX F: SUPPORT RESOURCES
Page 33

Limited Warranty
Socket Communications Incorporated (Socket) warrants this product against defects
in material and workmanship, under normal use and service, for the following
periods from the date of purchase:
In-Hand Scan Card-Imager: 2 years
Incompatibility is not a defect covered by Socket’s warranty. During the warranty
period, Socket will, at its option, repair or replace the defective product at no charge
when furnished with proof of retail purchase, provided that you deliver the product
to Socket or to an authorized Socket Service Center.
The returned product must be accompanied by a return material authorization
(RMA) number issued by Socket or by Socket's Authorized Service Center. If you
ship the product, you must use the original container or equivalent and you must pay
the shipping charges to Socket. Socket will pay shipping charges back to any
location in the contiguous United States. This warranty applies only to the original
retail purchaser and is not transferable.
Socket may, at its option, replace or repair the product with new or reconditioned
parts and the returned product becomes Socket's property. Socket warrants the
repaired or replaced products to be free from defects in material or workmanship for
ninety (90) days after the return shipping date, or for the duration of the original
warranty period, whichever is greater.
This warranty does not cover the replacement of products damaged by abuse,
accident, misuse or misapplication, nor as a result of service or modification other
than by Socket.
SOCKET IS NOT RESPONSIBLE FOR INCIDENTAL OR CONSEQUENTIAL
DAMAGES RESULTING FROM BREACH OF ANY EXPRESS OR IMPLIED
WARRANTY, INCLUDING DAMAGE TO PROPERTY AND, TO THE EXTENT
PERMITTED BY LAW, DAMAGES FOR PERSONAL INJURY. THIS
WARRANTY IS IN LIEU OF ALL OTHER WARRANTIES INCLUDING
IMPLIED WARRANTIES OF MERCHANTABILITY AND FITNESS FOR A
PARTICULAR PURPOSE.
Some states do not allow limitation of implied warranties, or the exclusion or
limitation of incidental or consequential damages, so that the above limitations or
exclusions may not apply to you. This warranty gives you specific legal rights and
you may also have other rights which vary from state to state.
This product may contain fully tested, recycled parts, warranted as if new.
For warranty information, phone (510) 744-2700.
33
Page 34

Limited Software Warranty
LIMITED WARRANTY. SOCKET warrants that the original disk or CD ROM is
free from defects for 90 days from the date of delivery of the SOFTWARE.
CUSTOMER REMEDIES. SOCKET’S entire liability and your exclusive remedy
shall be, at SOCKET’S option, either (a) return of the price paid or (b) replacement
of the SOFTWARE which does not meet SOCKET’S Limited Warranty and which
is returned to SOCKET with a copy of your receipt. Any replacement SOFTWARE
will be warranted for the remainder of the original warranty period or 30 days,
whichever is longer. THESE REMEDIES ARE NOT AVAILABLE OUTSIDE OF
THE UNITED STATES OF AMERICA.
NO OTHER WARRANTIES. SOCKET disclaims all other warranties, either
express or implied, including but not limited to implied warranties of
merchantability and fitness for a particular purpose, with respect to the SOFTWARE
and the accompanying written materials. This limited warranty gives you specific
legal rights. You may have others which vary from state to state.
NO LIABILITY FOR CONSEQUENTIAL DAMAGES. In no event shall SOCKET
or its suppliers be liable for any damages whatsoever (including, without limitation,
damages for loss of business profits, business interruption, loss of business
information, or other pecuniary loss) arising out of the use of or inability to use the
SOFTWARE, even if SOCKET has been advised of the possibility of such damages.
Because some states do not allow the exclusion or limitation of liability for
consequential or incidental damages, the above limitation may not apply to you.
EXPORT LAW ASSURANCES. You may not use or otherwise export or re-export
the SOFTWARE except as authorized by United States law and laws of the
jurisdiction in which the SOFTWARE was obtained. In particular, but without
limitation, none of the SOFTWARE may be used or otherwise exported or reexported (a) into (or to a national or resident of) a United States embargoed country
or (b) to anyone on the U.S. Treasury Department’s list of Specially Designated
Nationals or the U.S. Department of Commerce’s Table of Denial Orders. By using
the SOFTWARE, you represent and warrant that you are not located in, under
control of, or a national or resident of any such country or on any such list.
GOVERNMENT END USERS. If the SOFTWARE is supplied to the U. S.
Government, the SOFTWARE is classified as “restricted computer software” as
defined in clause 52.227-19 of the FAR. The U. S. Government ‘s rights to the
SOFTWARE are as provided in clause 52.227-19 of the FAR.
CONTROLLING LAW AND SEVERABILITY. This License shall be governed by
the laws of the United States and the State of California. If for any reason a court of
competent jurisdiction finds any provision, or portion thereof, to be unenforceable,
the remainder of this License shall continue in full force and effect.
34
Page 35

June 2003 Document # 6410-00202 A
Copyright Notice
Copyright © 2003 Socket Communications, Inc. All rights reserved.
Socket Communications, Socket, the Socket Communications logo, InHand Scan Card, In-Hand Scan Card-Imager and Mobility Friendly are
registered trademarks or trademarks of Socket Communications, Inc. All
other brand and product names are trademarks of their respective holders.
Reproduction of the contents of this manual without the permission of
Socket Communications is expressly prohibited. Please be aware that the
products described in this manual may change without notice.
Feel free to contact SOCKET COMMUNICATIONS at:
Socket Communications
37400 Central Court
Newark, CA 94560
Phone: (510) 744-2700
Fax: (510) 744-2727
Other than the above, Socket Communications can assume no responsibility
for anything resulting from the application of information contained in this
manual.
Socket Communications requests that you refrain from any applications of
the In-Hand Scan Card that are not described in this manual. Socket
Communications also requests that you refrain from disassembling the
CompactFlash Card. Disassembly of this device will void the product
warranty.
You can track new product releases, software updates and technical
bulletins by visiting Socket’s web page at www.socketcom.com
35
Page 36

Regulatory Compliance
This equipment has been tested and found to comply with the limits for a
Class B digital device, pursuant to Part 15 of the FCC rules. This equipment
is also CE EN55024:1998 and C-TICK compliant. These limits are
designed to provide reasonable protection against harmful interference
when the equipment is operated in a commercial environment.
This equipment generates, uses, and can radiate radio frequency energy and,
if not installed and used in accordance with the instruction manual, may
cause harmful interference to radio communications. Operation of this
equipment in a residential area may cause harmful interference in which
case the user will be required to correct the interference at his or her own
expense.
If this equipment does cause harmful interference to radio or television
reception, which can be determined by turning the equipment off and on,
the user may try to correct the interference by doing any of the following:
• Reorient or relocate the receiving antenna of the radio or television.
• Increase the distance separating the equipment and the receiver.
• Connect the equipment to an outlet on a different branch circuit than
that of the receiver.
• Consult the dealer or an experienced radio/TV technician for help.
The user may find the following booklet helpful:
How to Identify and Resolve Radio-TV Interference Problems
This booklet is available from the U.S. Government Printing Office,
Washington, D.C. 20402
36
Page 37

© 2003 Socket Communications, Inc. Printed in U.S.A.
 Loading...