

Page 1
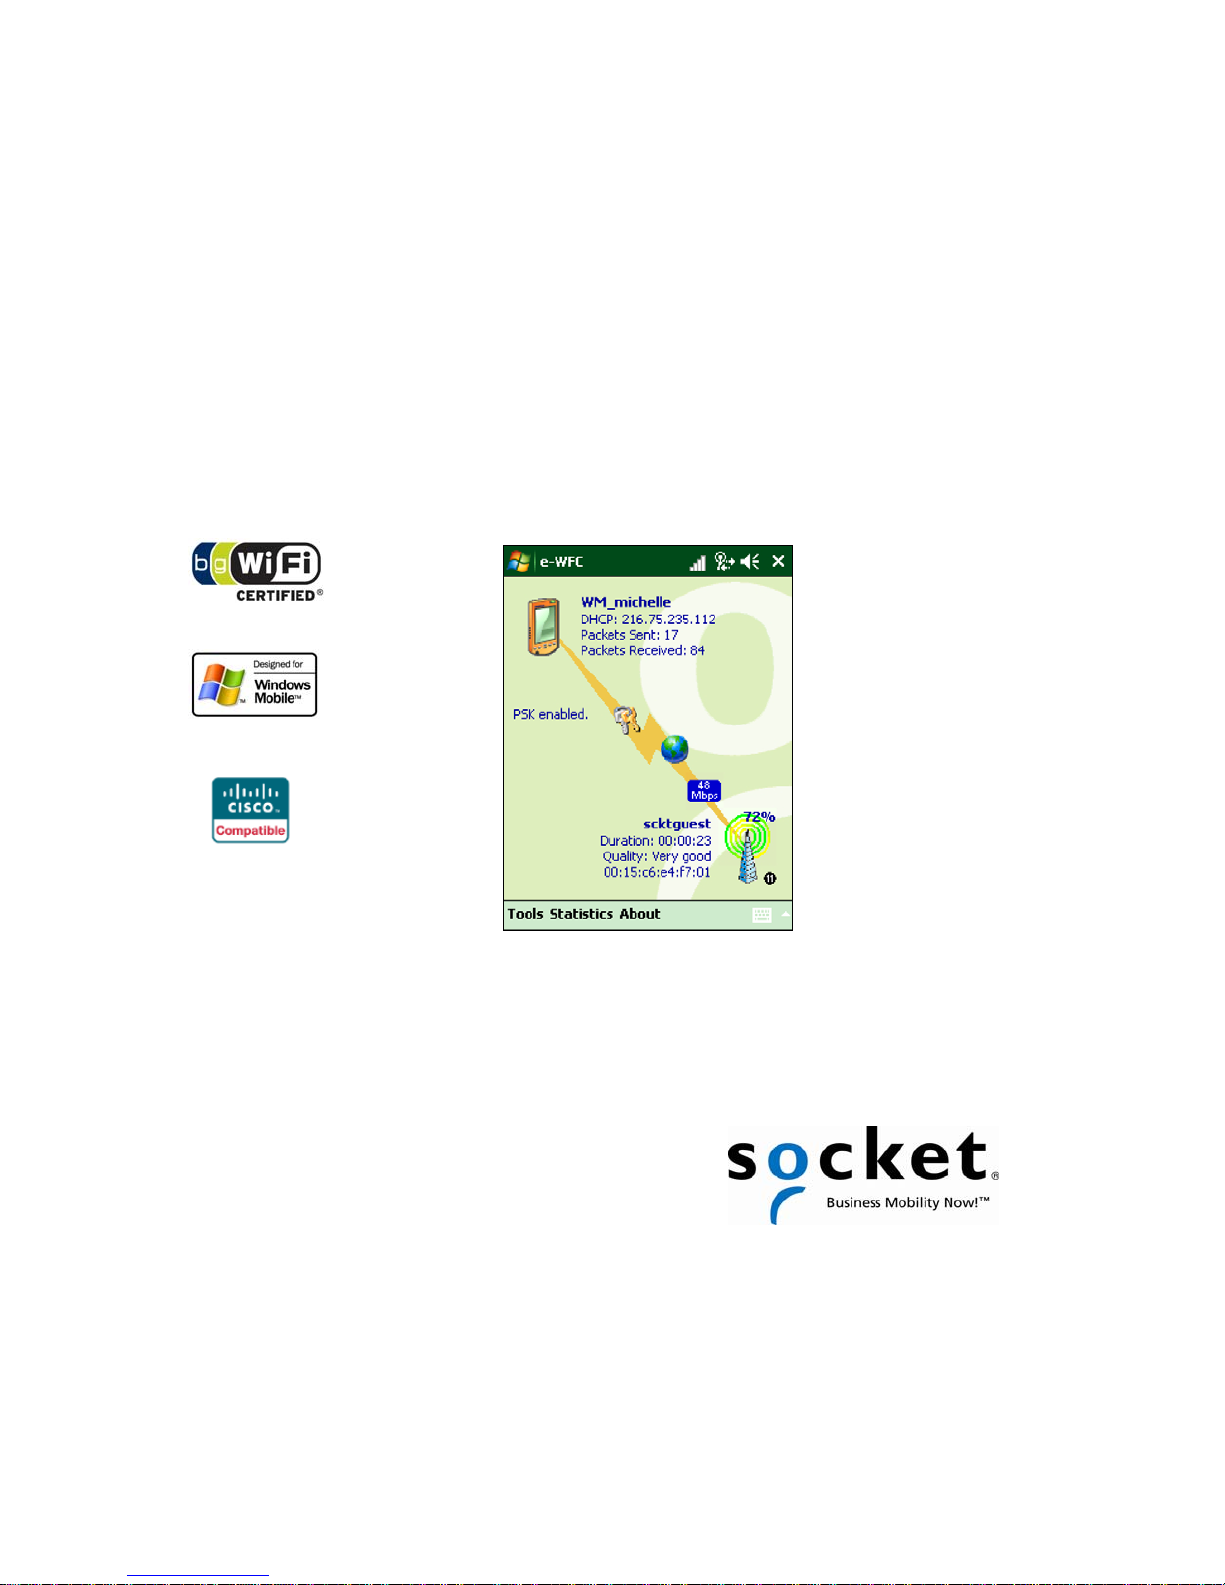
Enhanced Wi-Fi® Companion™ Software
for the SoMo® 650 Handheld Computer
User’s Guide
Page 2

4/2010 Document # 6410-00299 F
COPYRIGHT NOTICE
Copyright © 2010 Socket Mobile, Inc. All rights reserved.
Socket Mobile, the Socket logo, Go Wi-Fi!, Battery Friendly, Enhanced Wi-Fi
Companion, Business Mobility Now! and SoMo are registered trademarks or
trademarks of Socket Mobile, Inc. Wi-Fi is a registered trademark of the Wi-Fi
Alliance. All other brand and product names are trademarks of their respective
holders.
Portions of the software copyright © 1998-2008 The Open SSL Project. All rights
reserved.
Portions of the software copyright © 1995-1998 Eric Young (eay@cryptsoft.com
rights reserved.
Reproduction of the contents of this manual without the permission of Socket
Mobile is expressly prohibited. Please be aware that the products described in this
manual may change without notice.
Feel free to contact SOCKET MOBILE at:
Socket Mobile, Inc.
39700 Eureka Drive
Newark, CA 94560
USA
Other than the above, Socket Mobile can assume no responsibility for anything
resulting from the application of information contained in this manual.
Socket Mobile requests that you refrain from any applications of the SoMo or
Enhanced Wi-Fi Companion that are not described in this manual. Please refrain
from disassembling the product. Disassembly of this device will void the product
warranty.
You can track new product releases, software updates and technical bulletins by
visiting the Socket Mobile website at: http://www.socketmobile.com
) All
2
Page 3

TABLE OF CONTENTS
OPYRIGHT NOTICE 2
C
1 | INTRODUCTION 4
Key Features Supported 4
System Compatibility Requirements 5
Product Registration 5
Software and Documentation Updates 5
2 | SOFTWARE INSTALLATION 6
3 | INSTALLING AUTHENTICATION CERTIFICATES 8
Install a Root Certificate 8
Install a Personal Certificate 9
4 | CONNECTING TO AN ACCESS POINT 11
5 | ENHANCED WI-FI COMPANION 17
Main Screen 18
Turn Wireless Radio On/Off 19
Find Networks 20
View IP Addresses 22
Enable Power Save 23
Install Personal Authentication Certificate 24
Manage Authentication Certificates 25
Ping 26
Trace Route 28
View Diagnostic Display 30
View Rates 31
View Graphs 32
View Tables 33
View Help Files 34
View Version Information 34
PPENDIX A SAFETY AND USAGE TIPS 35
A
APPENDIX B TROUBLESHOOTING 36
APPENDIX C TECHNICAL SUPPORT 37
IMITED SOFTWARE WARRANTY 38
L
DISCLAIMER 39
3
Page 4
1 | INTRODUCTION
Thank you for purchasing the Socket SoMo 650 handheld computer, featuring
Socket Enhanced Wi-Fi Companion (e-WFC) software. The e-WFC software secures
proprietary information communicating over wireless networks by providing
advanced business-level security and CCX (Cisco Compatible Extensions) 4.0
certification to ensure compatibility with Cisco WLAN infrastructure, including
features for enhanced security, reliability, mobility, quality of service, and network
management.
The e-WFC software is highly scalable, offers tiered levels of security, and includes
support for LEAP, EAP-FAST, QoS and CCKM (fast roaming). It also provides
reliability in interference-sensitive applications.
For businesses that have already invested in Cisco WLAN infrastructure, e-WFC is a
practical way to expand the usefulness of your WLAN network and increase the
productivity of your employees with a Windows Mobile-based handheld solution
that is secure, easy to use, and compatible with your existing equipment.
Enhanced Wi-Fi Companion features a user-friendly graphical interface that makes
it easy to set up, connect and monitor Wi-Fi connections. The software is compatible
with Wi-Fi and IEEE 802.11b/g compliant networks.
Key Features Supported
Enhanced Wi-Fi Companion supports these security protocols and features:
• WPA/WPA2 – support for pre-shared key (PSK) and enterprise versions, which
support TKIP and AES-CCMP encryption types.
• 802.1x authentication
• Dynamic WEP keys (You need to enable 802.1x for this)
• EAP (Enhanced Authentication Protocol) methods such as LEAP, EAP-FAST, TTLS-
MSCHAPv2, PEAPv0-MSCHAPv2, PEAPv1-GTC, and EAP-TLS etc.
o LEAP and EAP-FAST are Cisco proprietary and are part of the CCX certification
compliance program.
• CCKM based FAST-Roaming
• CCX v4.0 certified
4
Page 5

• Socket profile editor with XML configuration files (used for configuration of the
Wi-Fi client and connect to the AP).
System Compatibility Requirements
• SoMo 650 handheld computer running Windows Mobile 6 or later
EXCEPTION SoMo 650DX, which does not have a Wi-Fi radio.
Product Registration
Socket recommends that all customers register their products. Registered users
receive priority for technical support and can choose to receive special offers,
software updates, and the latest new product information. Register online at:
http://support.socketmobile.com
Software and Documentation Updates
Download documentation updates online at:
http://www.socketmobile.com/support/downloads/
Registered users can download free software updates for the SoMo by logging into:
http://support.socketmobile.com
Note: There are different versions of Enhanced Wi-Fi Companion software for the
SoMo 650 and for Socket Go Wi-Fi!® WLAN cards.
Note: To determine if your SoMo has Wi-Fi Companion (WFC) or Enhanced Wi-Fi
Companion (e-WFC), look at the main screen. The main screen of Wi-Fi Companion
has a blue background. The main screen of Enhanced Wi-Fi Companion has a green
background.
HAPTER 1: INTRODUCTION 5
C
Page 6
2 | SOFTWARE INSTALLATION
This chapter covers software installation and activation for Enhanced Wi-Fi
Companion (e-WFC). By default, the SoMo has Wi-Fi Companion (WFC) installed. For
SoMo devices running Windows Mobile 6 Service Pack 4 or later, Enhanced Wi-Fi
Companion (e-WFC) is also pre-loaded but must be manually installed. After e-WFC
is installed, it will replace WFC.
Note: If you have a SoMo running a version of Windows Mobile 6 prior to Service
Pack 4, you can get Enhanced Wi-Fi Companion free by registering your device and
submitting an online request at: http://support.socketmobile.com
installation instructions provided with the software.
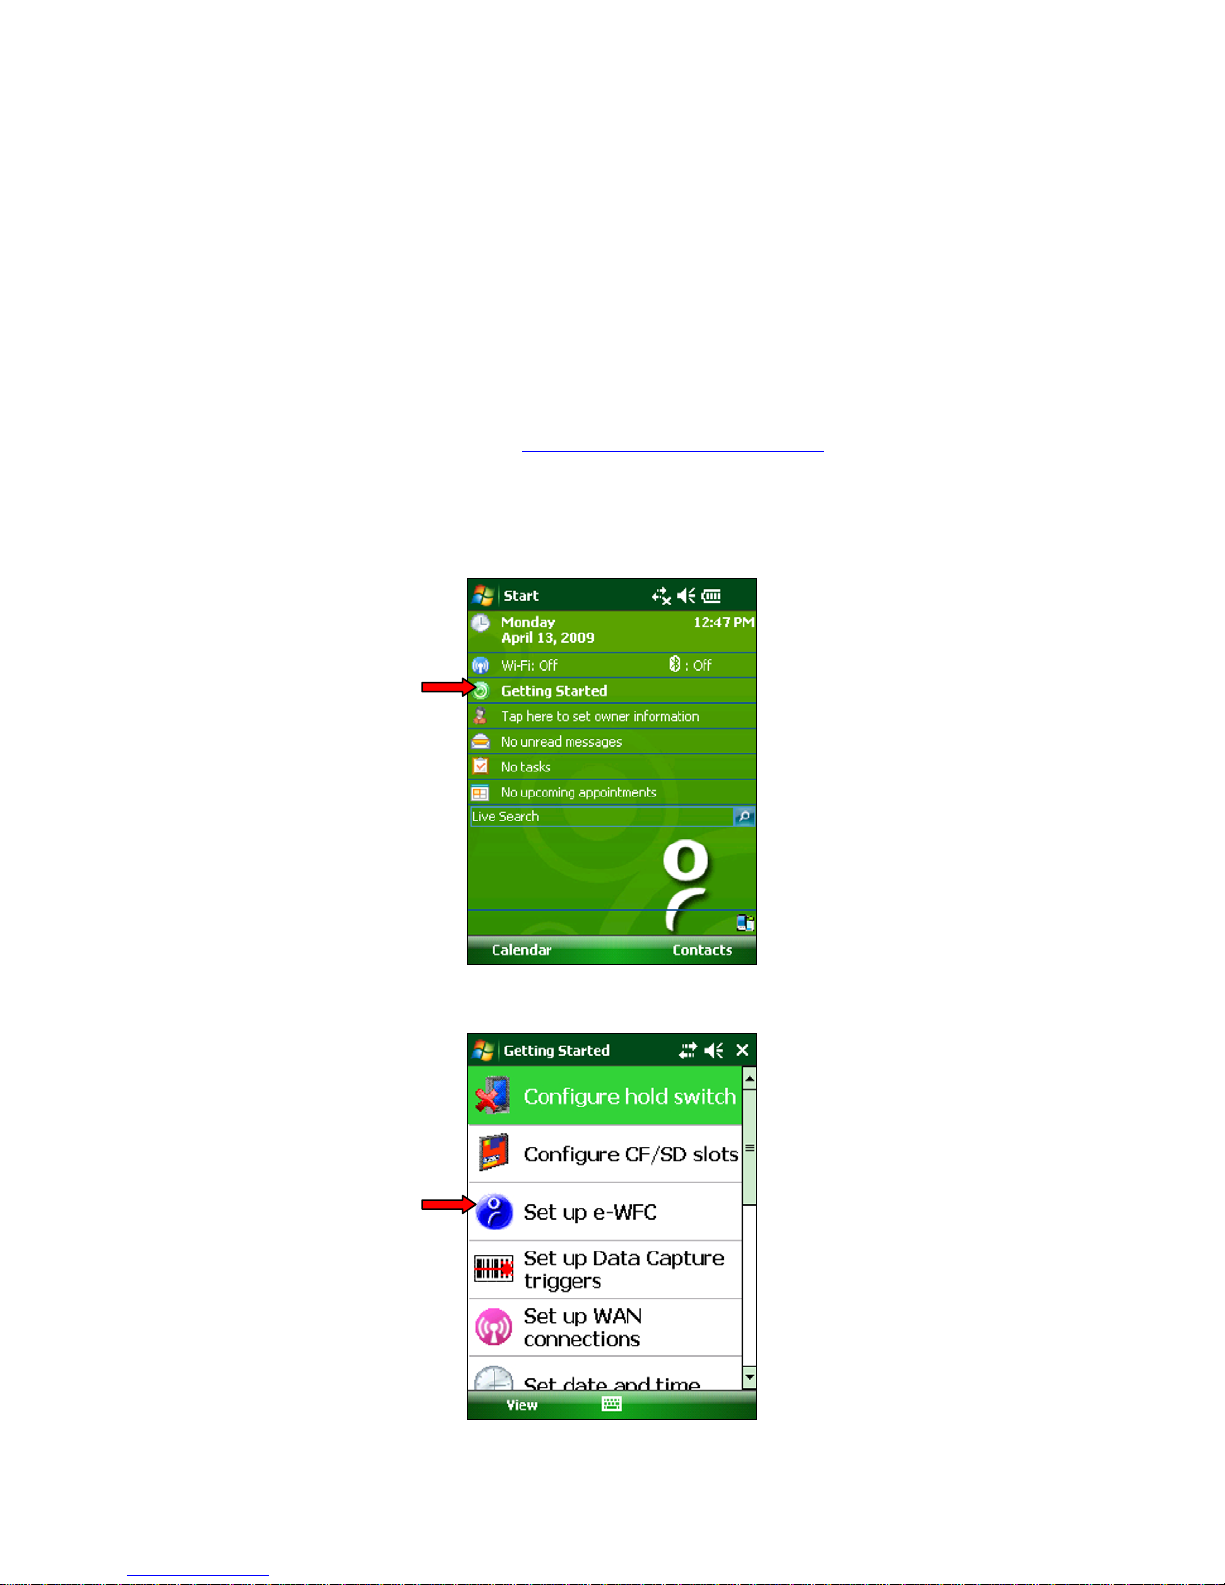
Windows Mobile 6.1 only
1. In the Today screen, tap Getting Started.
Follow the
2. In the list of Getting Started wizards, tap Set up e-WFC.
6
Page 7
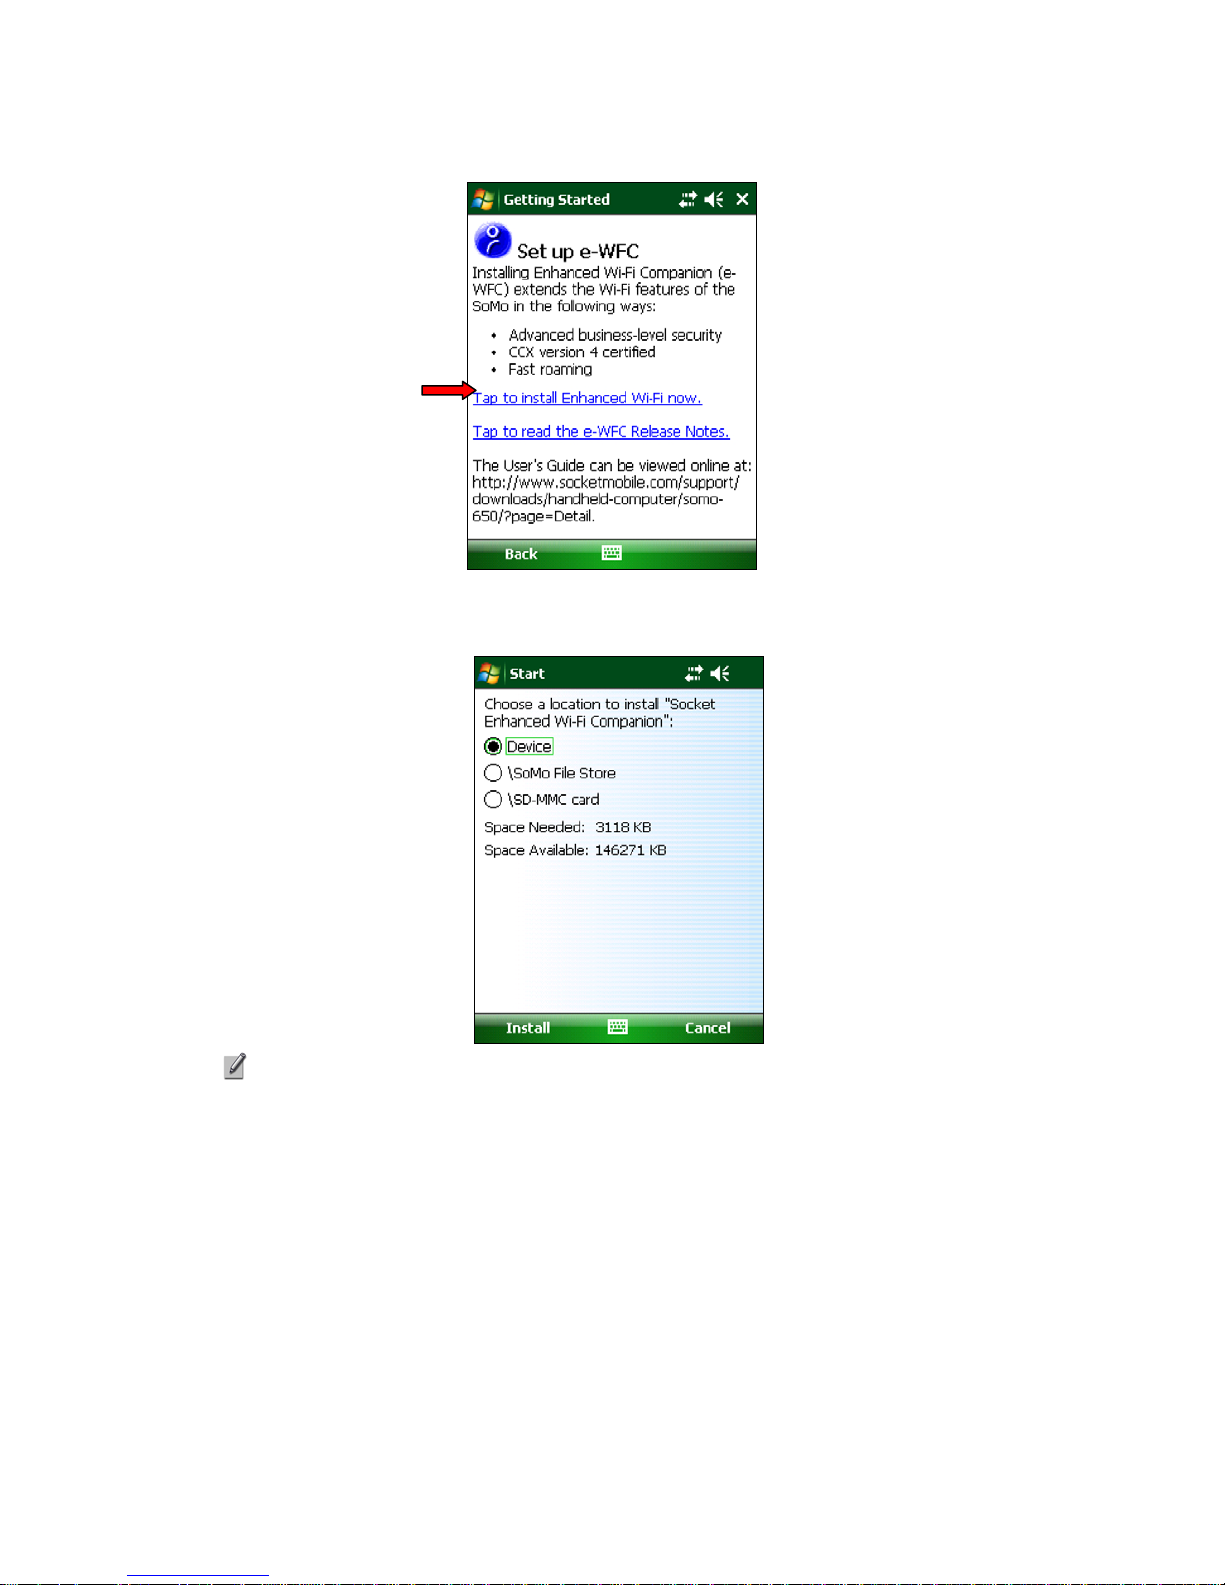
3. To install the application, tap on the first link.
4. The device will begin to install the software. When prompted, choose where you
will like the software installed. Tap Install.
If you install the software in SoMo File Store, it will remain installed after a
hard reset, but not after a ROM flash.
5. After installation, you will be prompted to restart the SoMo. Tap Ok.
HAPTER 2: SOFTWARE INSTALLATION 7
C
Page 8
3 | INSTALLING AUTHENTICATION CERTIFICATES
IMPORTANT!
This step is needed only for WPA and WPA2 Enterprise networks,
which require authentication certificates! LEAP and EAP-FAST do not
require authentication certificates.
Install a Root Certificate
1. If you have not done so already, get a root (server) certificate from your
network administrator. It must come from a Trusted Root Authority (not
an intermediary authority).
2. Use a serial/USB cable or cradle and synchronization software (Windows
Mobile Device Center or ActiveSync) to make an active connection
between your device and host PC.
If you only need to install a root certificate, you may want to use a
memory card instead.
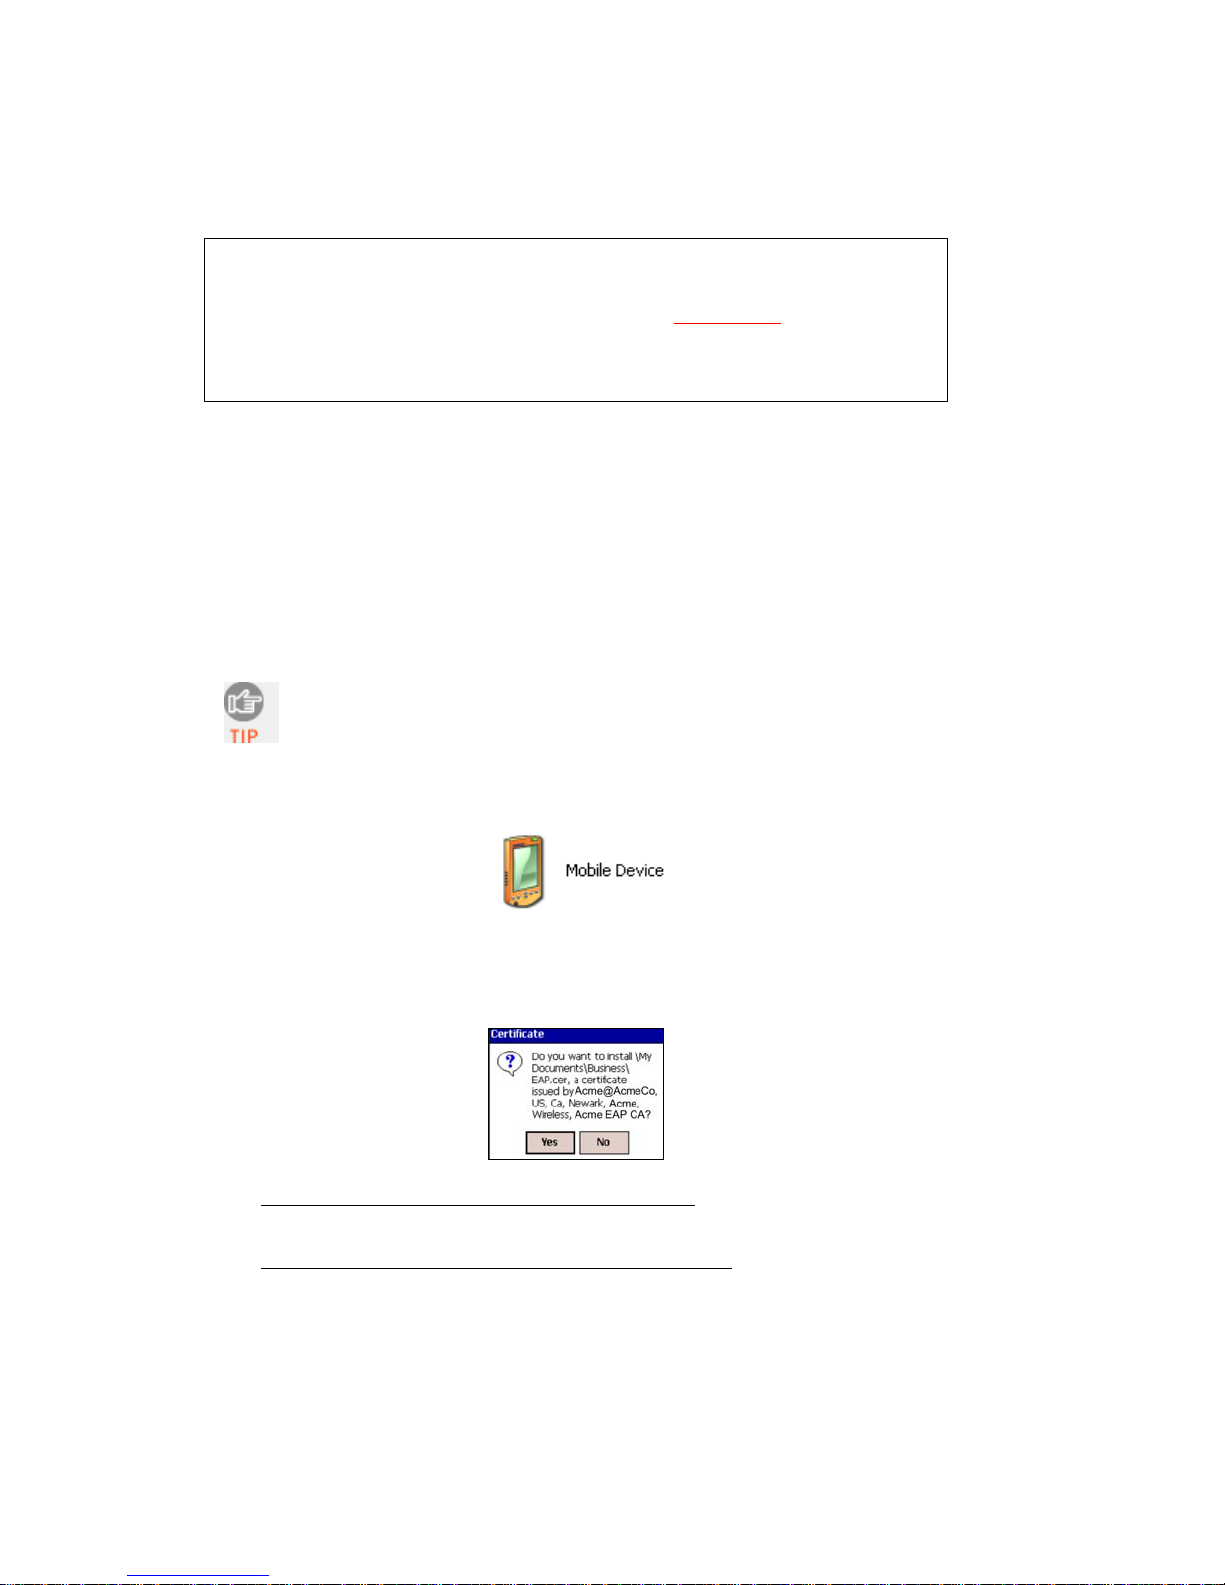
3. Use My Computer or Windows Explorer to access your Mobile
Device and copy the root certificate onto your device.
4. On your device, use File Explorer to navigate to the location of the root
certificate. Tap on the file.
5. When asked if you want to install the certificate. Tap Yes.
• If your network requires only a root certificate
the host PC. Soft reset the device by pressing the reset button.
• If your network also requires a personal certificate, follow the
instructions on the next page using a LAN connection. Do not use Wi-Fi.
, disconnect your device from
8
Page 9
Install a Personal Certificate
IMPORTANT!
This step requires that your Windows Mobile device have a wired
connection to your LAN hosting an Authentication server.
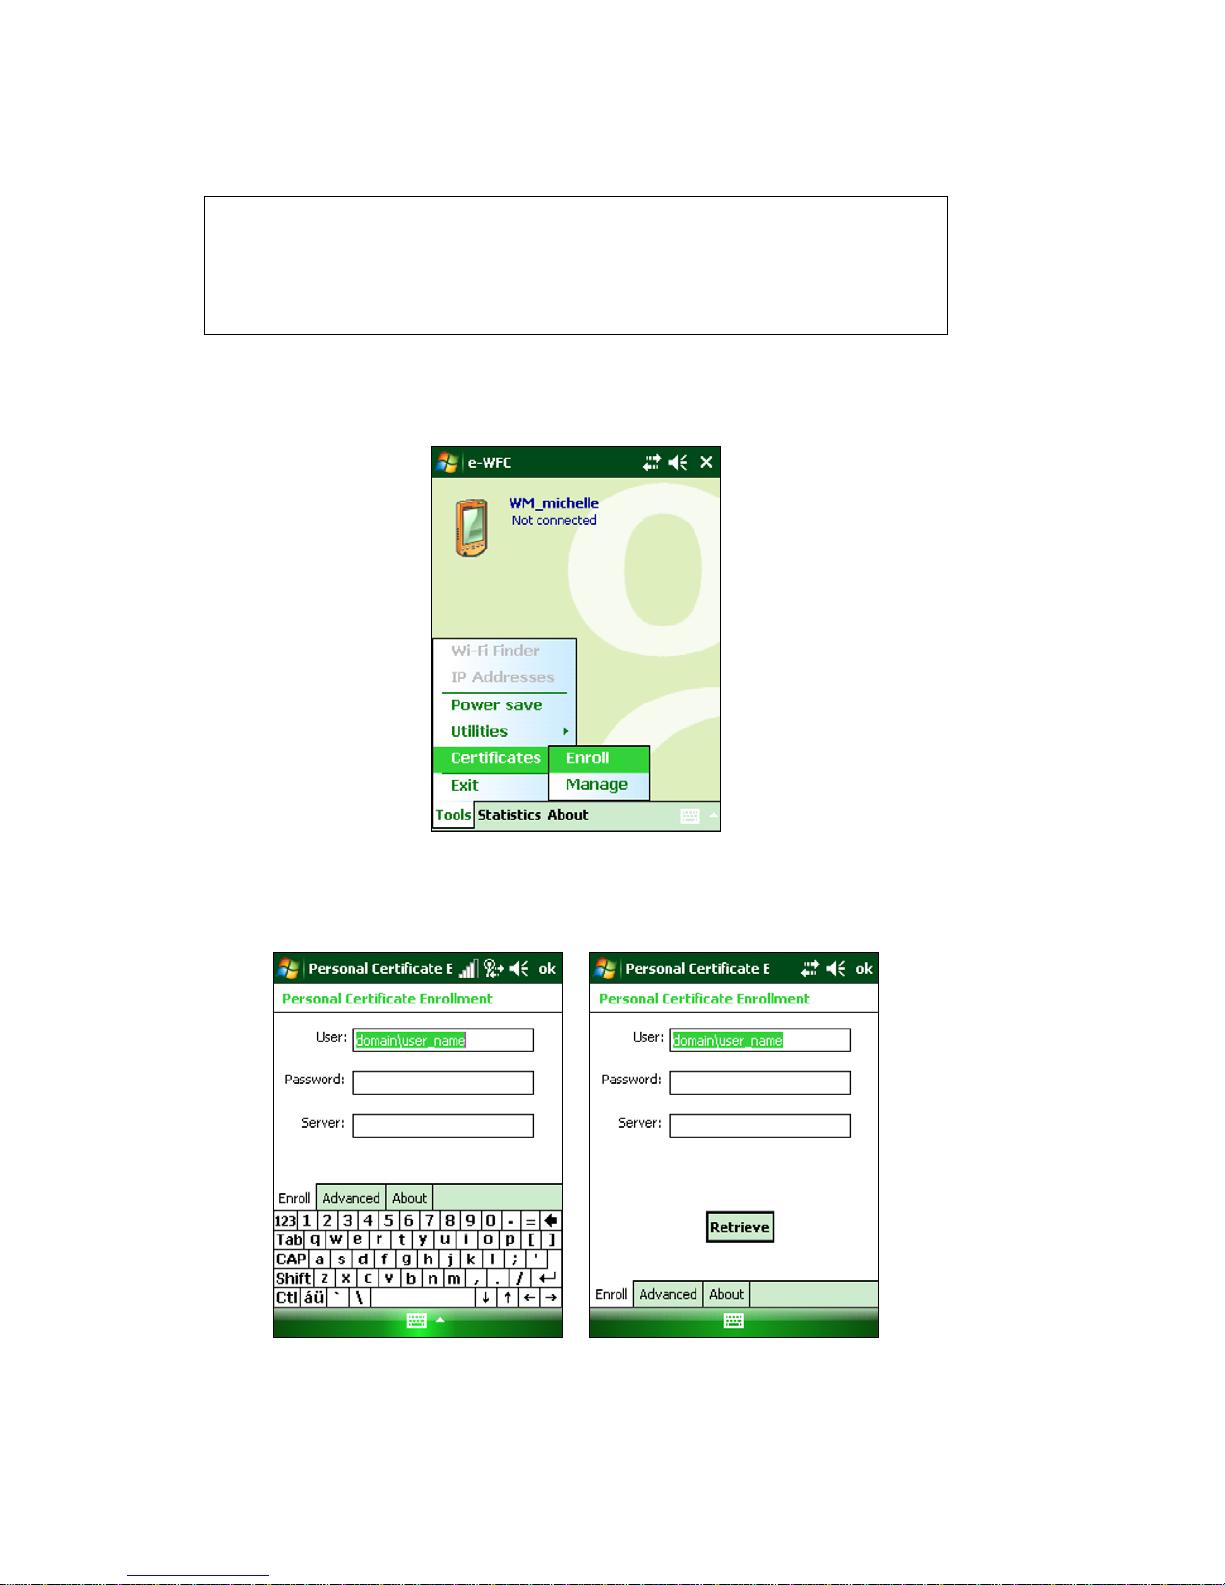
1. Tap Start | Programs | e-WFC.
2. In Enhanced Wi-Fi Companion, tap Tools | Certificates | Enroll.
3. Enter the User, Password, and Server provided by your network
administrator. In the User field, enter your domain and user name in the
format shown, using a backslash (“\”) between the domain and user
name.
In the Server field, enter either the name or the IP address (using
standard dot notation) of the server running Certificate Services on your
network.
4. Close the soft keyboard and tap Retrieve.
C
HAPTER 3: INSTALLING AUTHENTICATION CERTIFICATES 9
Page 10

5. After your device retrieves a personal certifi
cate, tap ok.
The device must be connected to the server in order to ret
personal certificate.
6. Disconnect the device from the host PC.
rieve the
10
Page 11
4 | CONNECTING TO AN ACCESS POINT
This chapter covers how to use Enhanced Wi-Fi Companion to find, configure
and connect your SoMo 650 to a WLAN.
For help using the software, tap Start | Help.
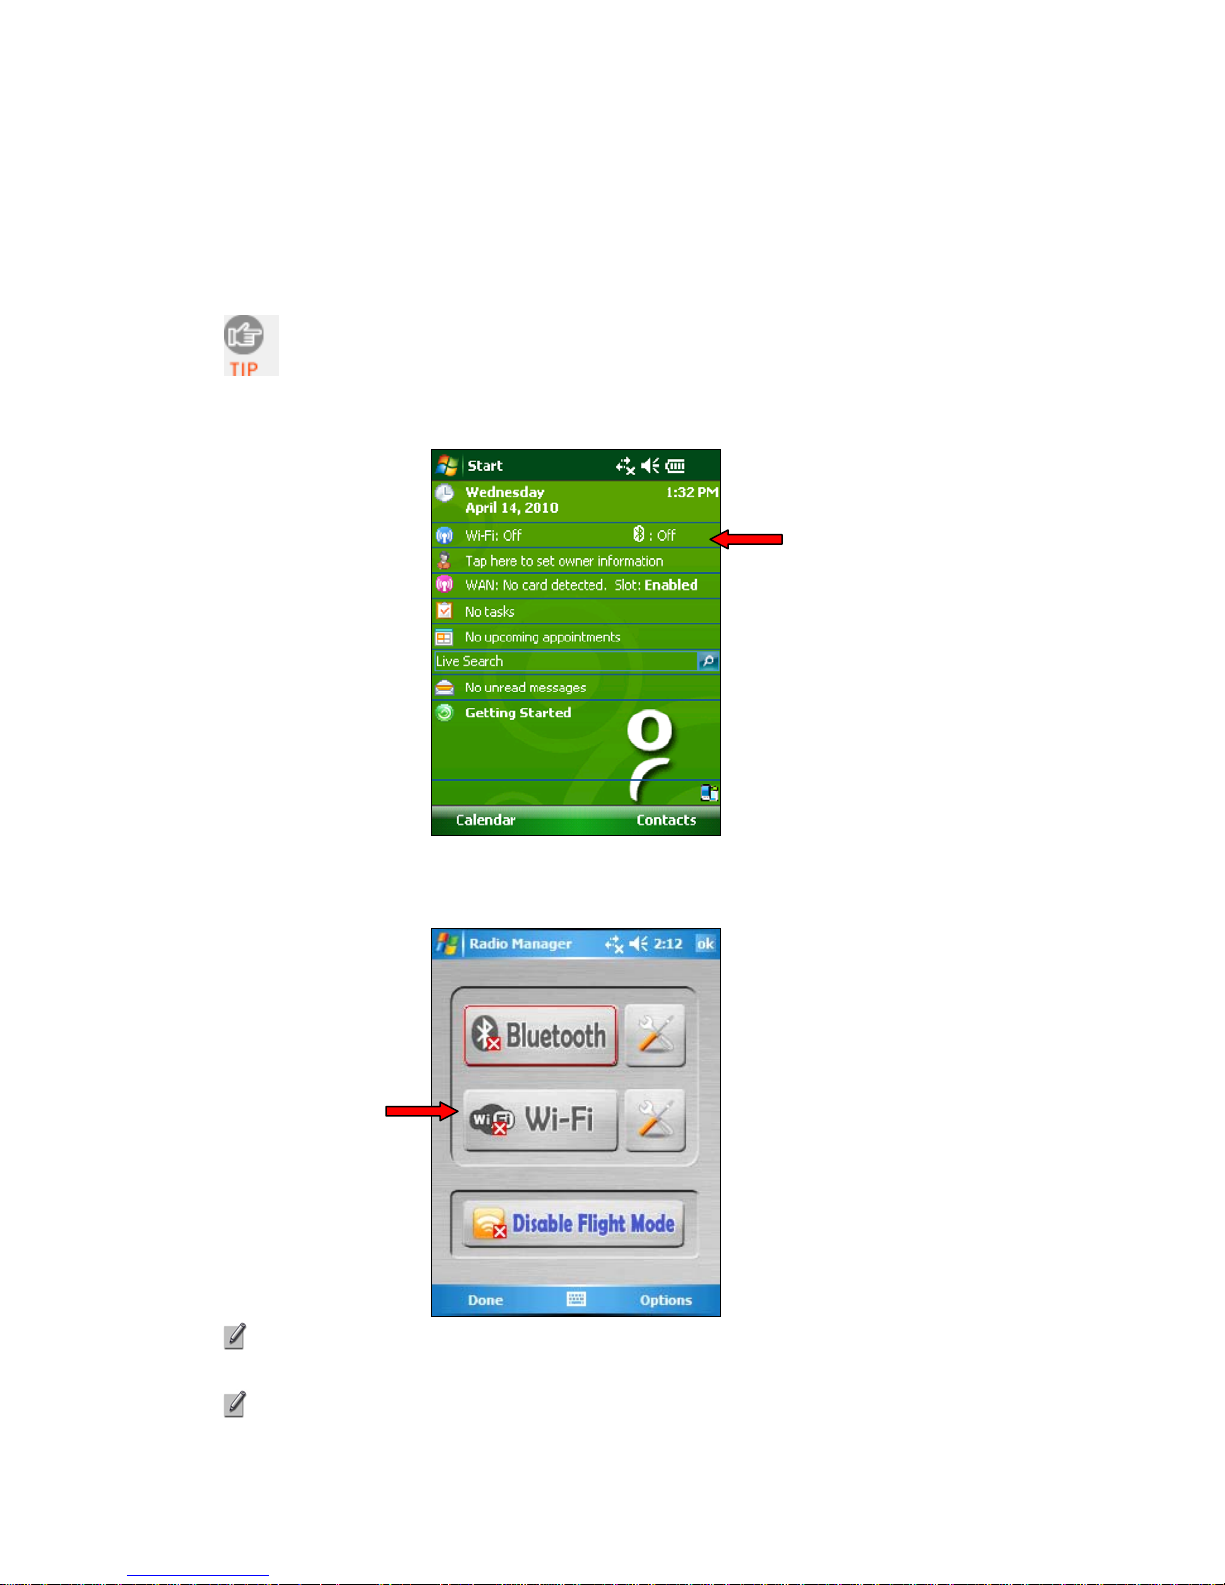
1. Turn on the Wi-Fi radio of your SoMo. Press the button on the right side
of the SoMo 650. Alternatively, tap the Wi-Fi and Bluetooth status line in
the Today screen.
2. In the Radio Manager, a red “x” appears on the Wi-Fi button when the
radio is off. Tap on the button to turn on the radio.
Flight mode turns off Bluetooth and Wi-Fi. When flight mode is disabled,
the previously running wireless radio(s) will turn on again.
The LED of the SoMo will blink green to indicate that the Wi-Fi radio is on.
C
HAPTER 4: CONNECTING TO AN ACCESS POINT 11
Page 12
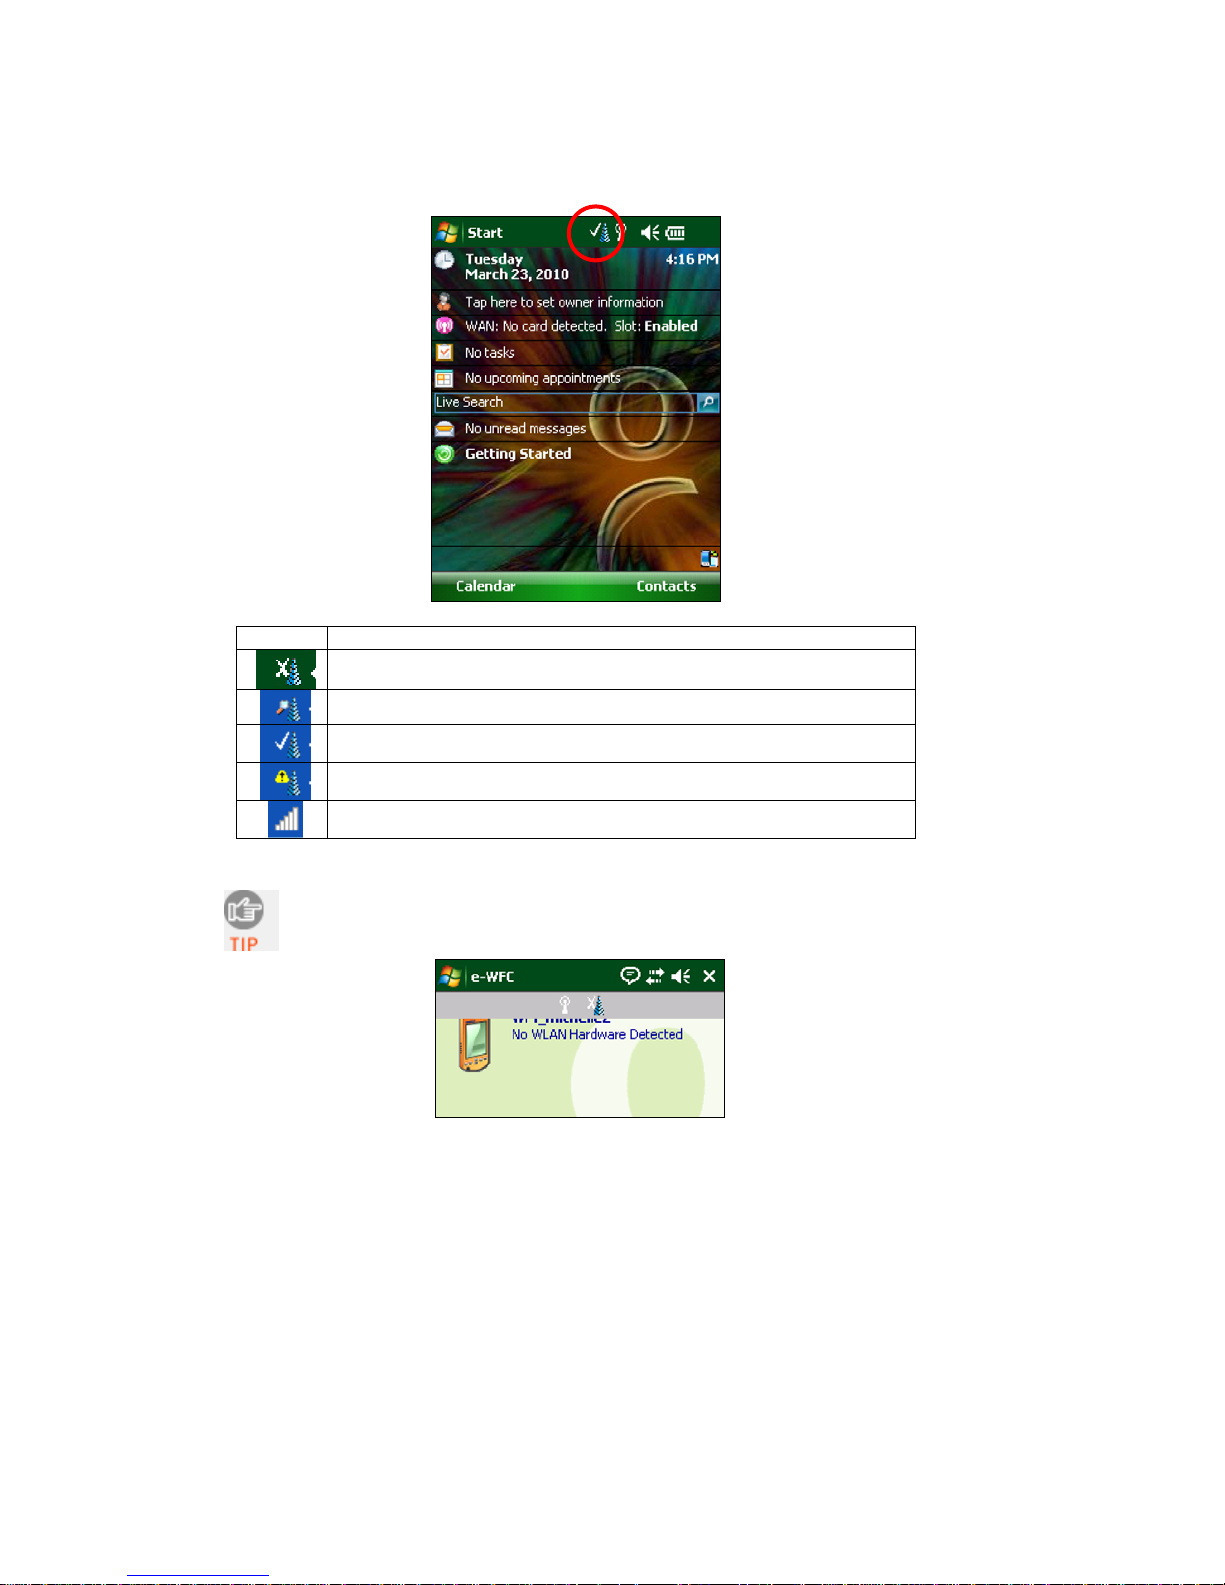
3. Enhanced Wi-Fi Companion will automatically launch, indicated by the
tower icon at the top of the screen. Tap on the tower icon.
Icon Meaning
Sometimes the connection status icon is hidden by a notification icon
(speech balloon). Tap on the balloon to reveal the connection status
icon.
No WLAN hardware detected or WLAN radio off
Searching for networks
Networks available
Networks out of range but configured
Associated or Connected. Number of bars indicates signal strength.
12
Page 13

4. The main screen of Enhanced Wi-Fi Companion will appear. Tap on the tower
icon at the bottom of the screen. Alternatively, tap Tools | Wi-Fi Finder.
5. Wi-Fi Finder will list access points detected in range. Tap on any access
point in the list to view additional properties.
Tap to filter the
list by type.
Signal strength of strongest access
point or ad hoc radio
WEP encryption, WPA, WPA2 or
802.1x
Channel number
Profile saved
Tap to sort the list.
Tap on a listing to view AP Details.
Tap and hold stylus on any listing to
manage profiles and/or connect.
No encryption
Access point currently connected to
C
HAPTER 4: CONNECTING TO AN ACCESS POINT 13
802.11b/g
Multiple encryption types
Page 14

6. Tap and hold your stylus on the access point you want to connect to. In
the pop-up menu, tap Get Connected.
Note:
• If your access point is not listed, tap Refresh.
• If your access point is not listed because its SSID is hidden, tap New
to create a new profile for your network.
7. The profile editor will appear. Enter the following:
Network name: If you chose an access point in the list, this field should
automatically be filled. If you are creating a profile for an access point
with a hidden SSID, manually enter the SSID.
Show keys and passwords as clear text: Check this box if you do not
want keys and passwords to appear as asterisks in the profile editor.
Tap Next.
14
Page 15

8. Enter additional settings for your access point. If you chose an access
point from the list, some of the fields will be automatically filled. The
fields will vary depending on the selections you make.
9. In the last screen, tap Finish. Your device will automatically try to
connect to the access point.
In Wi-Fi Finder, the listing for your access point will show a folder icon
on the left side to indicate that a profile has been saved for it.
C
HAPTER 4: CONNECTING TO AN ACCESS POINT 15
Page 16

10. After your device connects to the access point, the tower icon at the top
of the screen will change to signal strength icon of 1-5 bars. Additionally,
the “x” will vanish from the connection icon.
Tower icon indicates
connection to access point
11. Tap ok.
Icons will change
16
Page 17

5 | ENHANCED WI-FI COMPANION
This chapter explains how to use the different features of Enhanced Wi-Fi
Companion (e-WFC).
The utility allows you to do the following:
• Turn WLAN radio on/off
• Find networks
• View IP addresses
• Enable power save
• Install personal authentication certificate
• Manage authentication certificates
• Ping
• Trace route
• View diagnostic display
• View rates
• View graphs
• View tables
• View Help files
• View version information
CHAPTER 6: WI-FI COMPANION 17
Page 18

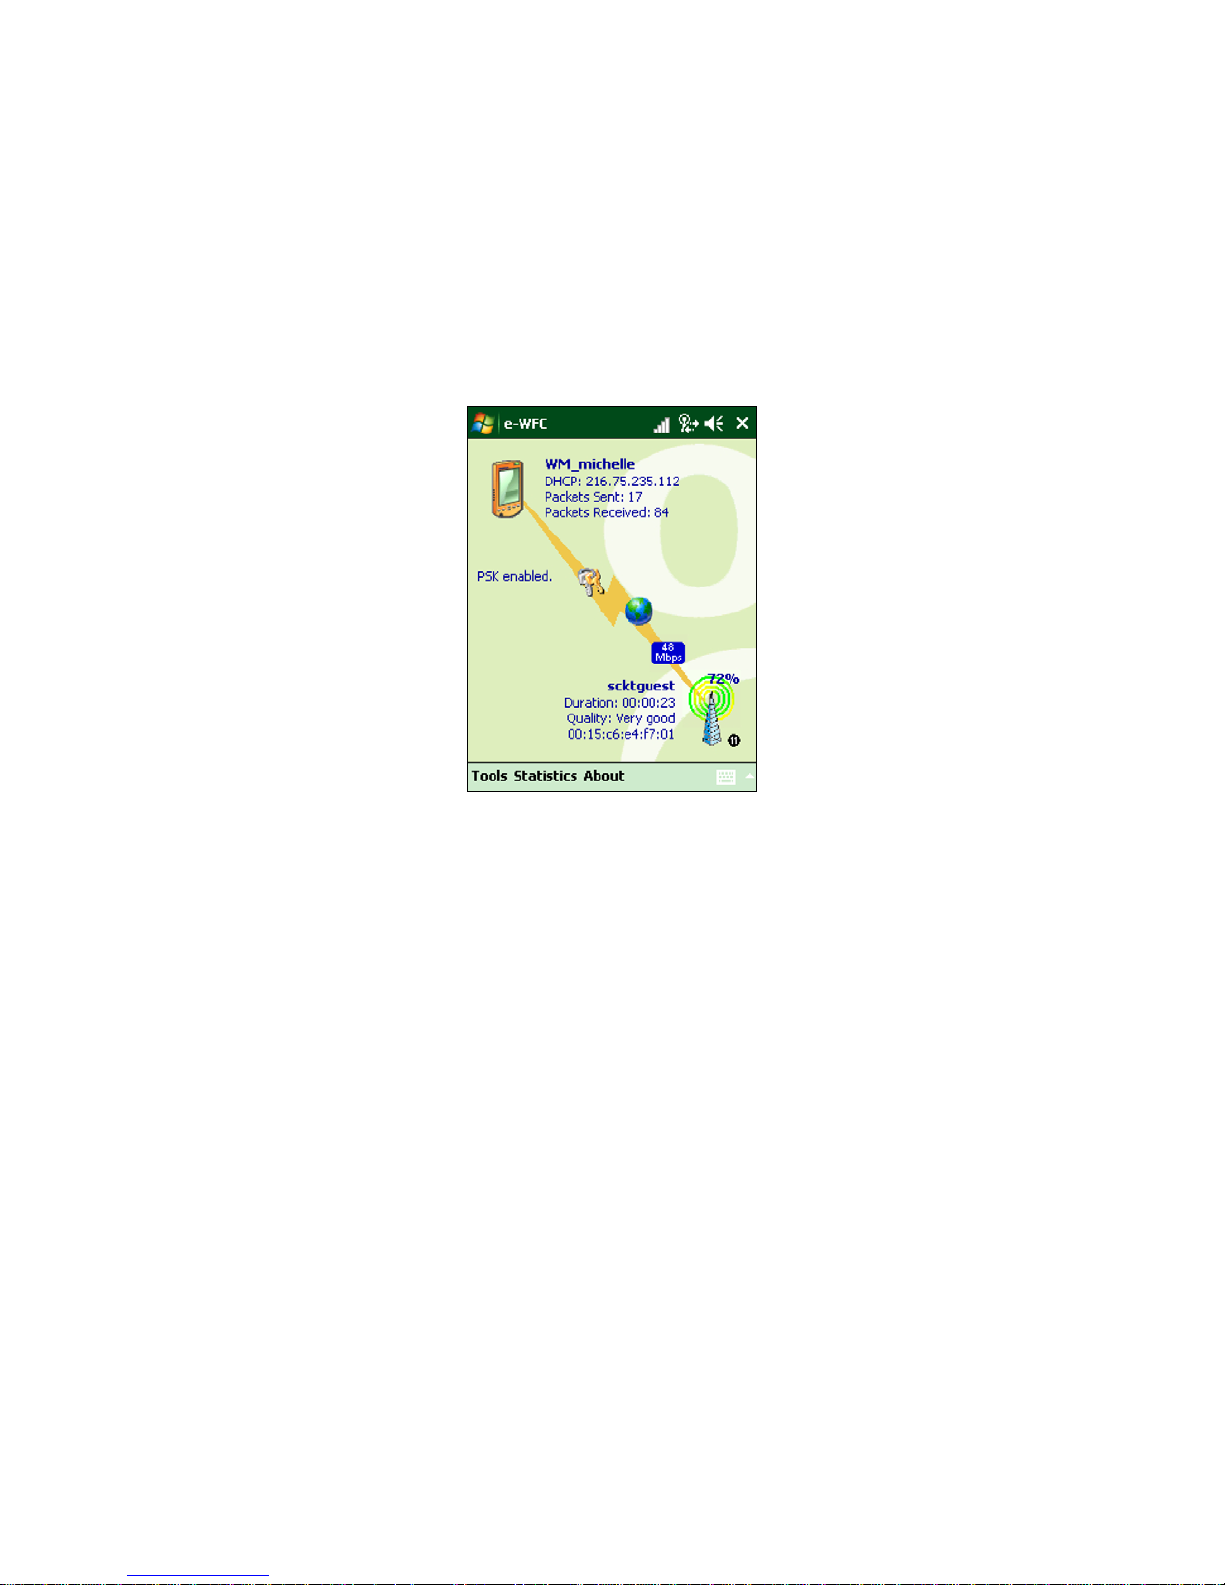
Connection status
MAIN SCREEN
The screen content varies depending on your connection status.
Device icon always appears,
regardless of connection status.
Tap to view more IP addresses or
turn the radio on/off.
Encryption status
Your device properties.
• Device name
• IP address
• MAC address
•
Connection status icon.
Tap to open Enhanced Wi-Fi Companion.
Valid IP address.
Tap to launch web browser,
email, ping, or trace route
Data rate
Access point icon.
Tap to access Wi-Fi Finder
Access point/remote device properties.
• SSID
• Connection duration
• Signal quality rating, percentage and power
• MAC address (also known as BSSID)
• Channel number (in black circle)
Tap for Wi-Fi Finder.
18
Page 19

TURN WIRELESS RADIO ON/OFF
You may want to turn off the radio to save power or if you are entering an area
with radio restrictions (e.g., on an airplane).
1. Open the Radio Manager by doing any of the following:
• Press the button on the right side of the SoMo.
• In the Today screen, tap on the wireless status line.
• In the main screen of e-WFC, tap and hold your stylus on the device icon in the
top left corner. In the pop-up menu, tap Radio Manager.
2. In the radio manager, tap the Wi-Fi button to disable the Wi-Fi radio.
3. An “x” will appear on the Wi-Fi button indicate that the Wi-Fi radio has been
disabled.
When you tap Disable Flight Mode, Radio Manager will turn on the radios that
were previously running.
C
HAPTER 5: ENHANCED WI-FI COMPANION 19
Page 20

FIND NETWORKS
1. In the e-WFC main screen, tap on the signal tower icon.
Alternatively, tap Tools | Wi-Fi Finder.
2. The device will begin searching for networks in range.
3. After the search, a list of discovered networks will be displayed.
Tap to filter the
list by type.
Current
connection.
Tap on any listing to
expand details.
Tap and hold stylus
on any listing to
configure or manage
profiles and/or
connect.
Tap to sort the list.
Signal strength of strongest access
point or ad hoc radio
WEP encryption, WPA, WPA2 or
802.1x
Channel number
Profile saved
No encryption
Access point currently connected to
20
802.11b/g
Multiple encryption types
Page 21

4. If desired, you can perform a variety of functions in the Show Networks screen:
• To begin another search for networks in range, tap Refresh.
• To create a new profile, tap New.
• To configure network profiles, tap on a WLAN in the list. In the pop-up menu,
tap Connect if no profile exists yet, or tap Edit Profile if a profile has already
been saved for the WLAN .
5. To exit Wi-Fi Finder, tap ok.
C
HAPTER 5: ENHANCED WI-FI COMPANION 21
Page 22

VIEW IP ADDRESSES
You can only view IP address data if your device is actively connected to a
WLAN network.
.
1. Whenever your device has connected to a WLAN, the main screen of e-WFC will
display the device’s IP address, labeled as either “DHCP” or “static.” To view more
comprehensive IP address information, do either of the following:
• Tap on the device icon. In the pop-up menu, tap IP Addresses.
• Tap Tools | IP Addresses.
2. The IP Addresses screen will appear, reporting Gateway, DNS server, DHCP server,
and other IP address assignments.
Note: Lease information
appears only if a network
uses DHCP.
3. If your network uses DHCP, the Renew and Release functions will be enabled at
the bottom of the screen.
• Renew: Tap to get a new IP address and/or to update related lease data.
• Release: Tap to release the IP address from the DHCP server.
22
Page 23

ENABLE POWER SAVE
Enhanced Wi-Fi Companion offers both automatic and manual power management
for the Wi-Fi radio.
1. In the main screen of e-WFC, tap Tools | Power save.
2. The Power Save screen will appear. If desired, check the box Manage the radio
power automatically for automatic power management. This will enable best
performance when charging and best power savings when running on batteries.
Otherwise, uncheck the box and use the slider to manually choose your power
setting.
3. Tap ok.
C
HAPTER 5: ENHANCED WI-FI COMPANION 23
Page 24

INSTALL PERSONAL AUTHENTICATION CERTIFICATE
Enhanced Wi-Fi Companion has a quick link to the Cert Enroll utility, which helps
you install a personal certificate for 802.1x networks running EAP-TLS
authentication.
1. In the main screen of e-WFC, tap Tools | Certificates | Enroll.
2. The Personal Certificate Enrollment screen will appear. For help using the utility,
pleaser refer to Chapter 3.
Minimize the soft keyboard to access the Retrieve button.
24
Page 25

MANAGE AUTHENTICATION CERTIFICATES
Enhanced Wi-Fi Companion provides quick links to the certificate management utility
included with Windows Mobile.
1. In the main screen of e-WFC, tap Tools | Certificates | Manage.
Alternatively, if the e-WFC is currently connected, tap on the security status icon,
which will appear either as a pair of keys or an error symbol, depending on
whether the security settings are correctly configured.
2. The Manage Certificates utility will appear. For help installing certificates for WPA,
WPA2 or 802.1x, refer to Chapters 3 or 4. For more information about the
certificate management utility, refer to your device manual.
C
HAPTER 5: ENHANCED WI-FI COMPANION 25
Page 26

PING
Use the Ping utility to perform an ICMP ping to another network address. It is a
useful diagnostic tool to establish Layer 3 connectivity to another network node. In
the continuous ping mode, it can be used as a site survey tool to determine the edge
of WLAN range or find dead spots.
1. In the main screen of e-WFC, tap Tools | Utilities | Ping.
Alternatively, in the main screen of e-WFC, tap on the globe icon. In the pop-up
menu, tap Ping.
2. The Ping screen will appear. Tap Tools | Configure.
3. In the Configure Ping screen, enter the appropriate settings:
• Address: Enter a target address in the form of an IP address or a URL that can
be resolved by a Domain Name System (DNS). For convenience, the last address
used is the default, and the drop-down list shows prior addresses used.
• Size: Select a packet size, from 32 bytes up to 65550.
• Content: Select the packet payload data — either All 00, All FF
(hexadecimal), or Random.
• Repeat: Select a repeat number of pings, from a minimum of 5 to a maximum
of Continuous.
• Verify Data: Select either Yes or No.
• Tap ok.
4. The main Ping screen will reappear. Tap Start.
26
Page 27

5. The ping test will begin. For each successful ping, the Roundtrip Time (RTT) will
be shown. A line graph will display the series of RTTs for the last 24 pings.
If a ping is not successful within 2 seconds, a timeout will be displayed.
6. To stop the test, tap Stop. A prompt will report statistics of the test results. View
the statistics and tap ok.
To view the statistics again, tap Tools | Statistics.
C
HAPTER 5: ENHANCED WI-FI COMPANION 27
Page 28

TRACE ROUTE
The Trace Route utility traces a packet from the device to an Internet host, showing
each hop and how long it takes to reach the destination. This allows the user to
figure out where the longest delays are occurring if performance appears slow.
1. In the main screen of e-WFC, tap Tools | Utilities | Trace Route.
2. The Trace Route screen will appear. Tap Tools | Configure.
3. In the Configure Trace Route screen, enter your settings:
• Address: Enter a target address in the form of an IP address or a URL that can
be resolved by a Domain Name System (DNS). For convenience, the last address
used is the default, and the drop-down list shows prior addresses used.
• Max hops: Select the maximum number of hops (default is 20).
• Resolve IP: Indicate whether you want to resolve the IP address from a URL
(default is Yes).
• Tap ok.
4. Tap Start.
28
Page 29

5. The Trace Route test will begin. For each successful hop, the hop time, host name
and IP address are shown. Tap Stop to stop the trace at any time, or let the trace
run until it is complete.
6. When the trace is complete, the Statistics dialog box will report the best hop,
worst hop, average hop, and number of timeouts. Tap ok to close the box.
To view the statistics again, tap Statistics.
To view the full host name for any of the hops, simply tap on the hop in the list.
C
HAPTER 5: ENHANCED WI-FI COMPANION 29
Page 30

VIEW DIAGNOSTIC DISPLAY
The diagnostic display is designed to help you troubleshoot connection problems by
reporting the status of the supplicant, intermediate driver and WLAN miniport
driver.
1. To view the diagnostic display, in the main screen of e-WFC, tap Tools | Utilities
|Diagnostic Display.
2. The diagnostic display will appear.
The binding information is for use by Socket support personnel and not intended by
the end user.
30
Page 31

VIEW RATES
Note: You can only view statistical rate information if the SoMo is actively
connected to a WLAN network.
1. Whenever your device has connected to a WLAN, the main screen of e-WFC will
display the data rate. To view more comprehensive data rate information, tap on the
data rate icon.
Alternatively, tap Statistics | Rates.
2. The Rates screen will report the current signal strength and quality as well as a
history of the relative number of packets sent at the 12 possible 802.11b/g
connection speeds. Additionally, the current BSSID and connection duration are
shown.
The green arrow
indicates the current
network speed.
3. By default, the device will refresh the rate information every second. To change the
refresh rate, tap Configure at the bottom of the screen.
C
HAPTER 5: ENHANCED WI-FI COMPANION 31
Page 32

VIEW GRAPHS
You can only view the statistical graphs if the SoMo is actively connected to
a WLAN network.
1. In the main screen of e-WFC, tap Statistics | Graphs.
2. The Graphs screen will display scrolling line graphs of the signal quality, rate, and
sent and received data rates.
Two numbers are reported with each graph:
• Current value: displayed after the graph title
• Maximum value: displayed on the far right.
For the Sent and Received graphs, the maximum value may change.
Signal quality refers to the clarity of the signal, whereas signal strength refers to
the magnitude of the signal at a particular point.
3. By default, e-WFC will refresh the graph information every second. To change the
refresh rate, tap Configure at the bottom of the screen.
32
Page 33

VIEW TABLES
You can only view the statistical tables if the device is actively connected to a
WLAN network.
1. In the main screen of e-WFC, tap Statistics | Tables.
2. The Tables screen will display a table of comprehensive information about the
current connection.
The table is divided into five screens: IP, TCP, UDP, ICMP, and Interface. Almost all
of the information presented in the tables relates to performance and error
counts.
Tap on a column header to sort the data.
Reset: Tap to reset the Current column to zero.
Refresh: Tap to refresh the data of the open table. By default, the data will
refresh every time you open a new table (e.g., when you switch between the
different tabs).
C
HAPTER 5: ENHANCED WI-FI COMPANION 33
Page 34

VIEW HELP FILES
There are two ways to access Help files for e-WFC.
1. To view a list of all the Help files, make sure e-WFC is running and tap Start |
Help.
2. To view a Help file for the screen of e-WFC that is currently open, tap on the Help
button. Except for the main screen, all screens of e-WFC feature a Help button.
VIEW VERSION INFORMATION
1. In the main screen of e-WFC, tap About.
2. The About screen will appear.
34
Page 35

APPENDIX A
S
AFETY AND USAGE TIPS
Please observe these Safety and Usage Tips when using the SoMo 650.
Product Care
• Do not expose the product to liquid, moisture or extreme humidity.
• Do not expose the product to extreme high or low temperatures.
• Do not drop, throw or try to bend the product, as rough treatment can damage
it.
• Do not attempt to disassemble the product – a broken seal will void the
warranty. The product does not contain consumer serviceable components.
Should your product need service, contact Socket technical support at
http://support.socketmobile.com
• Treat the product with care. Keep in a clean, dry and dust-free place.
• Changes or modifications of the product, not expressly approved by Socket, may
void the user’s authority to operate the equipment.
Antenna Care
Do not place a metal shield around the product since it will reduce the radio
transmission efficiency.
Efficient Use
For optimum performance, please make sure that there is no metal surrounding
your product.
Driving
RF energy may affect some electronic systems in motor vehicles, such as car stereo,
safety equipment, etc. Check with your vehicle manufacturer’s representative to be
sure that your product will not affect the electronic system in your vehicle.
Aircraft
• Turn off the Wi-Fi radio before boarding any aircraft.
• To prevent interference with communications systems, you must not use the Wi-Fi
radio while the plane is in the air.
• Do not use it on the ground without permission from the crew.
PPENDIX B: SAFETY AND USAGE TIPS 35
A
Page 36

APPENDIX B
T
ROUBLESHOOTING
SYMPTOM: The Wi-Fi status icon doesn’t appear after I turn on the Wi-Fi
radio.
POSSIBLE REASONS SOLUTION
Your device may be frozen. Soft reset the device by pressing the reset button.
The Wi-Fi status icon is hidden,
and a balloon icon appears at
the top of the screen.
SYMPTOM: My device is not receiving a valid IP address.
POSSIBLE REASONS SOLUTION
The DHCP request was not
successful in receiving an IP
address
The SSID may be incorrect. Check and re-enter the SSID. It is case-sensitive.
Your network profile does not
match access point settings.
SYMPTOM: My device does not associate with an access point known to be
within range.
POSSIBLE REASONS SOLUTION
The SSID may be incorrect. Check and re-enter the SSID. Try using an SSID of
Your network profile does not
match access point settings.
Tap on the balloon icon to reveal the Wi-Fi status
icon.
Disable and enable the Wi-Fi radio.
Alternatively, try using an SSID of “any”.
Check with your company IT department to
confirm access point security settings.
“any”.
Check with your company IT department to
confirm access point security settings.
36 | A
PPENDIX C: TROUBLESHOOTING
Page 37

APPENDIX C
T
ECHNICAL SUPPORT
If you have trouble using e-WFC, tap Start | Help to view Help files. You can also tap
the Help icon
Also view the Diagnostic Display by tapping Tools | Utilities | Diagnostic Display.
If you need further assistance, Socket has two technical support resources to help
you. Please note that support is available only in English.
Technical Support
• Online Knowledge Base
Topics any time. www.socketmobile.com/support/faq
• Online Requests
http://support.socketmobile.com
• By Phone:
USA & Canada Toll-free: 800-279-1390
Direct: +1-510-933-3020
for help with the open screen.
: Search for articles, Frequently Asked Questions or Hot
: Register your product and submit a question.
PPENDIX D: TECHNICAL SUPPORT | 37
A
Page 38

LIMITED SOFTWARE WARRANTY
Note: To view the hardware warranty and regulatory compliance for the SoMo 650,
please refer to your SoMo manual.
LIMITED WARRANTY. Socket Mobile, Inc. (Socket) warrants that the original disk or CD ROM is
free from defects for 90 days from the date of delivery of the SOFTWARE.
CUSTOMER REMEDIES. The entire liability of Socket and your exclusive remedy shall be, at the
option of Socket, either (a) return of the price paid or (b) replacement of the SOFTWARE
which does not meet the Socket Limited Warranty and which is returned to Socket with a
copy of your receipt. Any replacement SOFTWARE will be warranted for the remainder of the
original warranty period or 30 days, whichever is longer. THESE REMEDIES ARE NOT
AVAILABLE OUTSIDE OF THE UNITED STATES OF AMERICA.
NO OTHER WARRANTIES. Socket disclaims all other warranties, either express or implied,
including but not limited to implied warranties of merchantability and fitness for a particular
purpose, with respect to the SOFTWARE and the accompanying written materials. This limited
warranty gives you specific legal rights. You may have others which vary from state to state.
NO LIABILITY FOR CONSEQUENTIAL DAMAGES. In no event shall Socket or its suppliers be
liable for any damages whatsoever (including, without limitation, damages for loss of
business profits, business interruption, loss of business information, or other pecuniary loss)
arising out of the use of or inability to use the SOFTWARE, even if Socket has been advised of
the possibility of such damages. Because some states do not allow the exclusion or limitation
of liability for consequential or incidental damages, the above limitation may not apply to
you.
EXPORT LAW ASSURANCES. You may not use or otherwise export or reexport the SOFTWARE
except as authorized by United States law and laws of the jurisdiction in which the
SOFTWARE was obtained. In particular, but without limitation, none of the SOFTWARE may
be used or otherwise exported or reexported (a) into (or to a national or resident of) a United
States embargoed country or (b) to anyone on the U.S. Treasury Department’s list of Specially
Designated Nationals or the U.S. Department of Commerce’s Table of Denial Orders. By using
the SOFTWARE, you represent and warrant that you are not located in, under control of, or a
national or resident of any such country or on any such list.
GOVERNMENT END USERS. If the SOFTWARE is supplied to the U. S. Government, the
SOFTWARE is classified as “restricted computer software” as defined in clause 52.227-19 of
the FAR. The U. S. Government ‘s rights to the SOFTWARE are as provided in clause 52.227-19
of the FAR.
CONTROLLING LAW AND SEVERABILITY. This License shall be governed by the laws of the
United States and the State of California. If for any reason a court of competent jurisdiction
finds any provision, or portion thereof, to be unenforceable, the remainder of this License
shall continue in full force and effect.
38
Page 39

DISCLAIMER
EXCEPT TO THE EXTENT EXPRESSLY WARRANTED BY SOCKET MOBILE, INC, THIS
PRODUCT IS PROVIDED "AS IS" WITHOUT WARRANTY OF ANY KIND, EXPRESS OR
IMPLIED, INCLUDING WITHOUT LIMITATION, THE IMPLIED WARRANTIES OF
MERCHANTABILITY OR FITNESS FOR A PARTICULAR PURPOSE. EXCEPT TO THE
EXTENT REQUIRED BY LAW, SOCKET MOBILE DOES NOT ASSUME ANY PRODUCT
LIABILITY ARISING OUT OF, OR IN CONNECTION WITH, THE APPLICATION OR USE OF
ANY PRODUCT OR APPLICATION DESCRIBED HEREIN.
PORTIONS OF THIS SOFTWARE ARE PROVIDED BY THEOPENSSL PROJECT OR ERIC
YOUNG “AS IS” AND ANY EXPRESSED OR IMPLIED WARRANTIES, INCLUDING, BUT
NOT LIMITED TO, THE IMPLIED WARRANTIES OF MERCHANTABILITY AND FITNESS
FOR A PARTICULAR PURPOSE ARE DISCLAIMED. IN NO EVENT SHALL THE OPENSSL
PROJECT, ERIC YOUNG OR CONTRIBUTORS BE LIABLE FOR ANY DIRECT, INDIRECT,
INCIDENTAL, SPECIAL, EXEMPLARY, OR CONSEQUENTIAL DAMAGES (INCLUDING,
BUT NOT LIMITED TO, PROCUREMENT OF SUBSTITUTE GOODS OR SERVICES; LOSS
OF USE, DATA OR PROFITS; OR BUSINESS INTERRUPTION) HOWEVER CAUSED AND
ON ANY THEORY OF LIABILITY, WHETHER IN CONTRACT, STRICT LIABILITY, OR TORT
(INCLUDING NEGLIGENCE OR OTHERWISE) ARISING IN ANY WAY OUT OF THE USE
OF THIS SOFTWARE, EVEN IF ADVISED OF THE POSSIBILITY OF SUCH DAMAGE.
39
Page 40

4/2010 Printed in U.S.A.
 Loading...