

Page 1
CHARGING STAND
USERGUIDE
Page 2
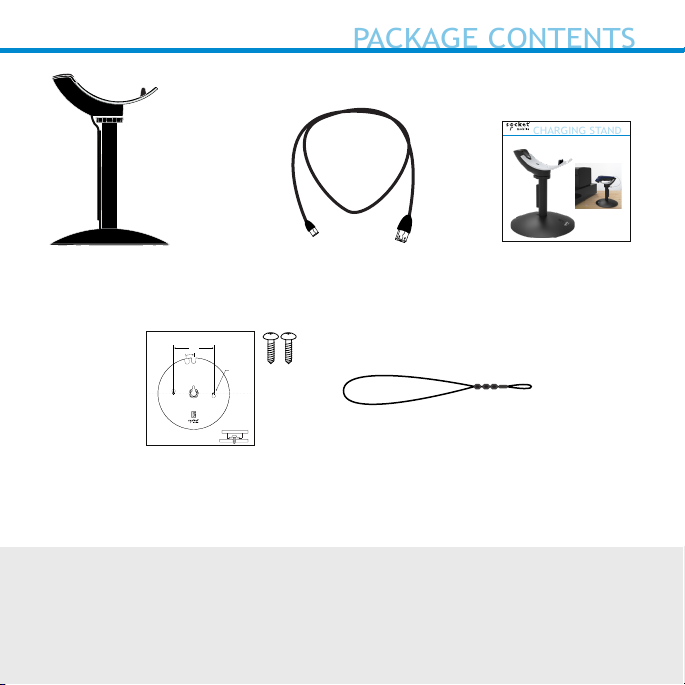
PACKAGE CONTENTS
CHARGING STAND
USERGUIDE
Charging Stand
*Table Mounting
Charging Stand Table Mount Drill Template
5
/
”
16
3
Lock
Insert
TOP VIEW
SCALE 1:1
2x DRILL DIA
Leave space ~2 mm-4 mm
Charging Cable
3
/
32
”
Micro USB
*Security Cable
User Guide
Template
*Optional
© 2019 Socket Mobile, Inc. All rights reserved. Socket®, the Socket Mobile logo, SocketScan®, DuraScan®, Battery Friendly® are
registered trademarks or trademarks of Socket Mobile, Inc. Microsoft® is a registered trademark of Microsoft Corporation in the
United States and other countries. Apple®, iPad®, iPad Mini®, iPhone®, iPod Touch®, and Mac iOS® are registered trademarks of
Apple, Inc., registered in the U.S. and other countries. The Bluetooth® Technology word mark and logos are registered trademarks
owned by the Bluetooth SIG, Inc. and any use of such marks by Socket Mobile, Inc. is under license. Other trademarks and trade
names are those of their respective owners.
Page 3
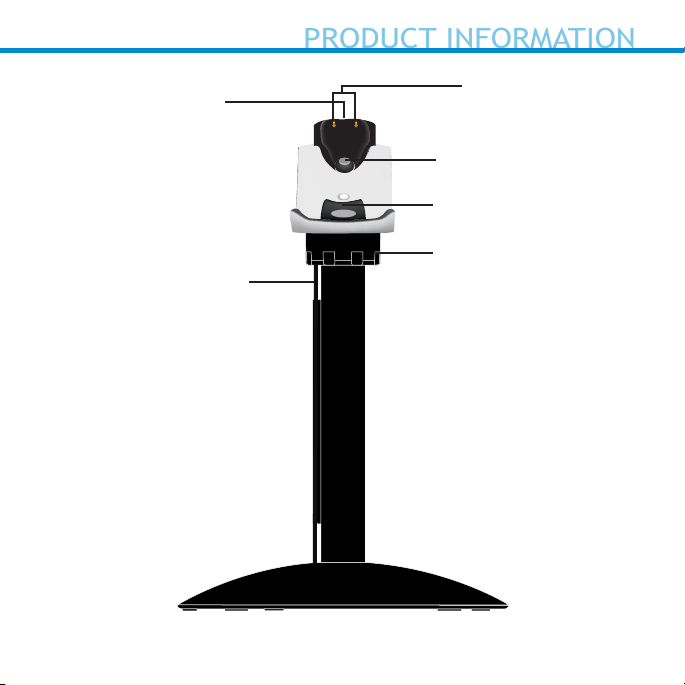
Light*
PRODUCT INFORMATION
Charging Cable
*Illuminates Red when connected to AC Power.
Charging Pins
Magnet
Hook
Slot for security cable
3
Page 4
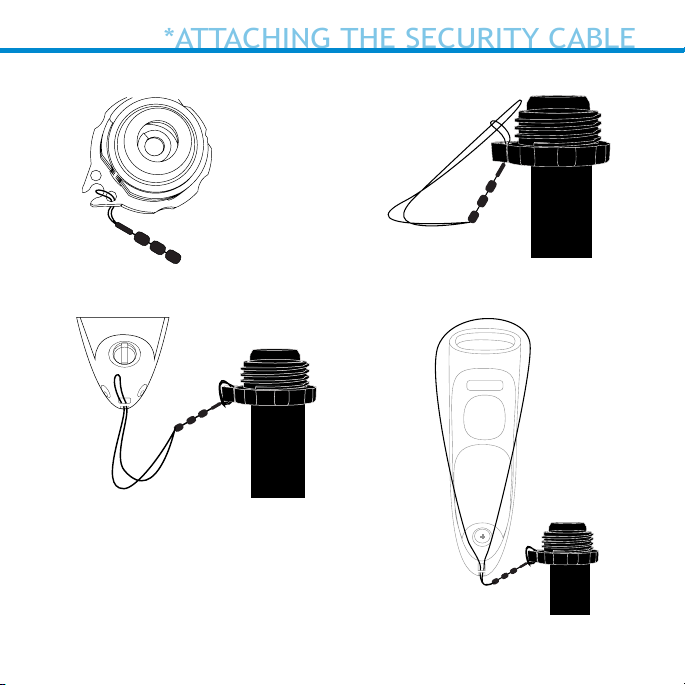
Step 1 Step 2
*ATTACHING THE SECURITY CABLE
Step 3 Step 4
*Security cable comes Pre-installed for your
convenience. To remove, follow step 2 and
step 1.
+
4
Page 5
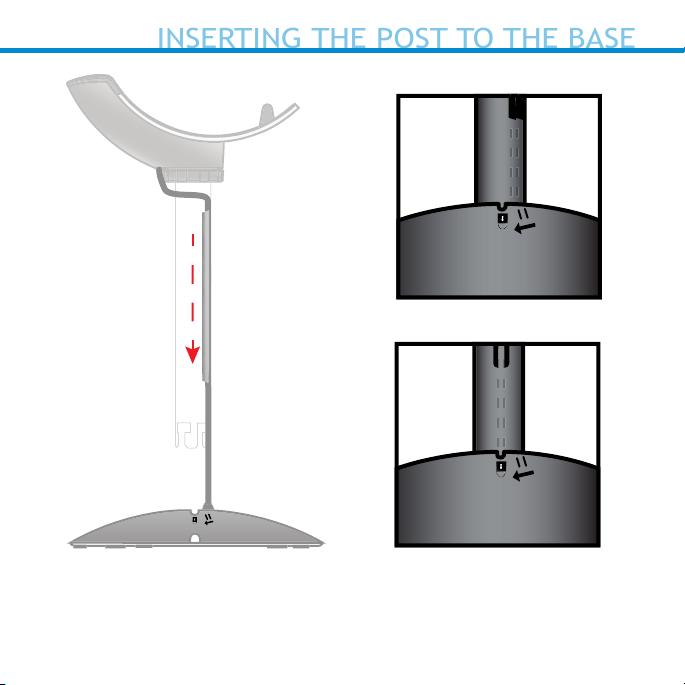
Insert the post into the top of the base, lining up the marker on the
INSERTING THE POST TO THE BASE
post to the unlock icon. Push down and turn the post towards the lock
icon until you hear a click. Run the USB cord through the channel at the
bottom of the base.
5
Page 6

The charging pins must align
CHARGING STAND OPERATIONS
to supply power to the scanner.
The red light will illuminate and
the scanner will beep twice.
6
Page 7

Approximately
CHARGING STAND OPERATIONS
4-8 inches*
(10-20 cm)
*When set to Auto Scan with Socket Mobile’s 2D barcode scanners
(7Qi, 7Xi, D740, D750, D760, S740, S760), the barcode should be 4 to 8
inches away.
7
Page 8

Two keyholes are provided on the Charging Stand base for an optional
OPTIONAL TABLE MOUNTING
installation on a wooden surface (screws and drill template included).
1. Place the Charging Stand on the drill template and position these
in the desired location. Rotate the Charging Stand to align with the
solid notch (not the dotted notch) on the template.
2. Rotate the Stand/template combination so the Socket Mobile logo
faces the direction you want the scanner to aim.
3. Tape the template to the surface and remove the Charging Stand.
4. Drill two
5. Tighten the two screws with about
3
/
32” holes through the drill marks on the template.
1
/
4” of the screw head exposed.
6. Place the Charging Stand on the template aligned with the dotted
notch.
7. You can now tear away the template.
8. Twist the Charging Stand clockwise to lock the screws in the
keyholes.
Charging Stand Table Mount Drill Template
5
/
”
16
3
Lock
Insert
2x DRILL DIA
3
/
32
”
TOP VIEW
SCALE 1:1
Leave space ~2 mm-4 mm
8
Page 9

Magnet
OPTIONAL TABLE MOUNTING
Command barcode
for conguring
Auto Scan
Model:
Charging Stand
Do Not Expose To
Extreme Temperatures
© 2019 Socket Mobile, Inc.
Made in Singapore
Auto Scan
Magnet Magnet
Notch for charging cable
Keyholes for table mounting
9
Page 10

Charging Stand Modes
COMMAND BARCODES
Auto Scan
Scan the barcode to enable Auto Scan.
This will allow the scanner to
automatically scan barcodes without
pressing the scan button.
Manual Mode - Normal (default)
Scan the barcode to congure the scanner
back to normal. It will be in manual scan
mode even when placed in the stand or
cradle.
#FNB 41FBA50003#
#FNB 41FBA50000#
10
Page 11

Charging Stand Modes
COMMAND BARCODES
Stand Mode*
Scan the barcode to congure the scanner
is permanently in Auto Scan mode,
regardless whether it is connected to
power or not.
#FNB 41FBA50001#
*This mode will drain the battery faster if not connected to
power.
11
Page 12

1. Scan command barcode to place your scanner in Auto Scan.
AUTO SCANNING MODE (CONTINUED)
Note: Turn o host device’s Bluetooth before scanning command
barcode.
2. Once the scanner is in Auto Scan, it will switch to automatic
scanning when it detects power coming from the charging pins of
the Dock or Stand. Place a barcode in the scanners eld of view
and the scanner will automatically scan it.
*Supported 2D Scanners:
7Qi, 7Xi, D740, D750, D760, S740, and S760
12
Page 13

How Auto Scanning Mode Works in the Stand or Dock
AUTO SCAN MODE
Action Behavior
Place Scanner
in the Stand
Place a barcode
in the Scanners
Field of View
Scanner
switches to
Auto Scan Mode
Decode
barcode
Beep Pattern Light Activity Vibrate
High-high tone
conrms proper
seating*
1 Beep when
Data
successfully
scanned
Notication
Battery Status
Light is
Disabled
Green Light
blinks (while
scanning)
None
None
How the Scanner reverts to Manual Mode (Not in the Stand)
Action Behavior
Remove the
Scanner from
the Stand and
press the scan
button
Press the scan
button
Auto Scanning Mode: Barcodes placed in the Scanner’s eld of view are automatically
scanned.
Manual Mode (default): Pressing the scan button initiates a scan.
Scanner
switches to
Manual Mode
Decode
barcode
Beep Pattern Light Activity Vibrate
None Battery Status
1 Beep when
Data
successfully
scanned
Notication
Light is Enabled
Green Light
blinks (while
scanning)
Enabled
Vibrate when
Data
successfully
scanned
13
Page 14

Dimensions
PRODUCT SPECIFICATIONS
Stand Height 6.5 in (165 mm)
Charging Mount Width 1.80 in (46 mm)
Charging Mount Length 5.50 in (140 mm)
Base Diameter 5.75 in (146mm)
Total Weight
Without Scanner and Power Adapter 12.7 oz (360 g)
Antimicrobial Rating JLS z2801:2000 Test:
2.49 on MRSA 6.07 when
cleaned with SaniCloth
Plus cloth wipes Biosafe
HM4100, EPA#83019-1
14
Page 15

Technical Support and Product Registration: support.socketmobile.com
HELPFUL RESOURCES
COMPLIANCE STATEMENT
Phone: 800-279-1390 +1-510-933-3020 (worldwide)
Warranty Checker: socketmobile.com/warranty-checker
Socket Mobile Developer Program: socketmobile.com/developer
Download Socket Mobile’s scanner User Guide and Command Barcodes at
socketmobile.com/downloads
CE MARKING AND EUROPEAN UNION COMPLIANCE
The unit under test was found compliant with all the applicable Directives,
2004/108/EC and 2006/95/EC.
WASTE ELECTRICAL AND ELECTRONIC EQUIPMENT
The WEEE directive places an obligation on all EU-based manufacturers and
importers to take-back electronic products at the end of their useful life.
ROHS STATEMENT OF COMPLIANCE
This product is compliant to Directive 2011/65/EU.
NON-MODIFICATION STATEMENT
Changes or modications not expressly approved
by the party responsible for compliance.
RoHS
2019 6430-00358G Printed in U.S.A.
 Loading...