

Socket 7X,7XRx Quick Start Manual

Quick Start Guide
Bluetooth® Cordless Hand Scanner
(CHS)
7X and 7XRx
7X SKU# CX2849-1242 (P/N 8550-00036)
7XRx SKU# CX2843-1160 (P/N 8550-00047)
© 2010 Socket Mobile, Inc. All rights reserved. Socket, the Socket logo, Socket Bluetooth Cordless Hand Scanner, and Business
Mobility Now! are registered trademarks or trademarks of Socket Mobile, Inc. The Bluetooth word mark is a registered trademark
of the Bluetooth SIG, Inc. USA, and any use by Socket Mobile, Inc. is under license. All other trademarks and trade names contained
herein may be those of their respective owners.
Assembling the AC Adapter:
The included AC adapter comes with four plugs.
Find the correct plug for your region and slide it
into the head of the adapter.
Charging the CHS:
The CHS must be fully charged before first use.
Total charging time from empty to full is about
3.5 hours. The LED of the CHS will be red while
charging, and green when fully charged.
WARNING! Do not remove the factoryinstalled battery!
Attaching the Tether:
Use a coin or screwdriver to turn the lock under
the CHS. Remove the battery cover and wrap
the string loop of the tether around the inside
part of the lock. Replace the battery cover. If
desired, attach the tether to a lanyard/belt.
Touch Screen Stylus:
Use the stylus tip on Pocket PC and other device
touch screens. Do not use the stylus if damaged,
as it may scratch the screen. The stylus does not
work on tablets with Active Matrix displays.
Optional Charging Accessories: Available separately.
http://www.socketmobile.com/products/bluetooth-barcodescanners/accessories/
Charging Cradle
AC4026-708
Charging Cradle,
Antimicrobial
AC4050-1152
USB to DC Plug
Charging Cable
AC4051-1192
Mobile Power
Pack (not sold in
EMEA)
AC4050-1152
Package Contents
• Socket Bluetooth Cordless Hand Scanner (CHS) 7X or 7XRx
• Lanyard / belt clip with retractable tether
• Rechargeable battery (pre-installed, DO NOT REMOVE)
• Charging cable
Basic Functionality
Note: No software is required for normal operation.
Function Procedure
Powering on
/off
Power On: Press and hold down the power button
until you hear two (low-high) tones.
Power Off: Press and hold down the power button
until you hear two (high-low) tones.
Scanning
barcodes
Press and hold the trigger button to activate the
scanner. An aiming beam will appear for 3 seconds.
Position the red aiming beam over the 2D (or 1D)
barcode. The CHS will beep, flash a green LED, and
vibrate to confirm the barcode data was decoded and
recorded in your application. Refer to User’s Guide for
more details.
Enabling/
Disabling
Symbologies
Please refer to the Command Sheet in the User’s
Guide, available online at:
http://www.socketmobile.com/support/downloads
LED
Trigger
button
Power button
Disconnecting
Disconnect through your device’s Bluetooth software
or simply turn off the CHS.
Factory Reset
Reverts CHS back to factory default state. You can do
this to remove a pairing or revert to the default
Bluetooth device (keyboard for Windows, “other” for
iPad).
1. Power on CHS
2. Press and hold down the Trigger button and
momentarily press the Power button while still
holding down the Trigger button.
3. After 15 seconds, the scanner will beep. Release
the Trigger button.
4. The scanner will beep 5 times and power off.
5. The next time you power on the scanner, it will
take longer than normal. After the scanner
finishes powering on, it will have factory default
settings.
Pairing Reset
Releases the Bluetooth pairing from the last system
the CHS was paired to. This allows new pairing to
another system.
1. Power on CHS
2. Press and hold down the Trigger button and press
the Power button until you hear a series of 3
tones.
LED
LED LED Behavior Meaning
1 blink per second Bluetooth radio is on, but not
connected
Bluetooth
Status
(Blue)
1 blink per 3 seconds Scanner connected to computer
On Data successfully scanned and
transmitted to host device
Good
Read
(Green)
On when connected
to charging source
Scanner is fully charged
1 blink per second 20% battery capacity remaining
On when connected
to charging source
Battery Charging (on cradle or
AC power)
Battery
Status
(Red)
Off Powered off or Good Battery
status
Beeps
Beep Patterns Meaning
2 beeps (low-high) Power on
2 beeps (high-low) Power off
1 beep Scanner connected to computer. When
connected, the scanner will auto power off
after 2 hours of inactivity.
2 beeps (same tone) Scanner disconnected from computer. When
disconnected, the scanner will auto power off
after 5 minutes of inactivity.
2 long beeps (same
tone)
Scanner unsuccessfully tried 10 times to connect
to computer. After these attempts, the scanner
will go into sleep mode and power off after 5
minutes of inactivity.
1 beep with green
LED
Data successfully scanned and sent to
computer.
5 consecutive tones The scanner detects an internal fault and will
reset itself. If the scanner is connected to a host
computer, it will disconnect during the reset.
6/2010 Printed in USA
Setup for Windows 7, Vista and XP
STEP
1: TURN ON THE CHS
Press and hold the small power button until the LED turns blue
and the CHS beeps twice (low-high). The LED should blink blue once
per second to show that the Bluetooth radio is on but not connected.
STEP 2: START BLUETOOTH ON YOUR COMPUTER
Note: Refer to your Bluetooth hardware/software manual for full
instructions.
1. If using an add-on Bluetooth adapter, plug it into your PC.
2. Start the Bluetooth software and turn on the Bluetooth radio.
• For some PCs, the radio is enabled through the software.
• Some PCs have a hardware switch and automatically launch the
Bluetooth software when the radio is on.
STEP 3: CONFIGURE BLUETOOTH SETTINGS
Follow the instructions for your Bluetooth stack. Configuration is only
needed the first time you connect the CHS to the PC. Refer to your
Bluetooth software manual for full instructions.
Note: The CHS appears as Socket CHS 7x [xxxxxx} to other Bluetooth
devices. The characters in brackets are the last 6 characters of the
Bluetooth Device Address, which is labeled inside the battery
compartment.
Microsoft Bluetooth Stack:
1. Right-click on the Bluetooth icon in the task tray. In the pop-up
menu, click Add a Device (Windows 7) or Add a Bluetooth
Device (Windows Vista/XP).
2. Windows Vista/XP: Check the box My device is set up and
ready to be found. Click Next.
3. In the device list, select Socket CHS 7x. Click Next.
4. Select Enter the device’s pairing code (Windows 7) or Use the
passkey found in the documentation (Windows Vista/XP).
5. Enter 0000 (four zeroes). Click Next. Complete the wizard.
Toshiba Bluetooth Stack:
1. Double-click on the Bluetooth icon in the task tray. In the pop-
up menu, click New Connection.
2. Select Express Mode and click Next.
3. In the device list, select Socket CHS 7x [xxxxxx]. Click Next.
4. If a passkey is requested, enter 0000 (four zeroes). Click OK.
Complete the rest of the wizard.
Broadcom (Widcomm) Bluetooth Stack:
Note: With a Broadcom Stack, v2.1 is highly recommended for best
results.
1. Double-click the Bluetooth icon in the task tray. Click Add a
Bluetooth Device and click Next.
Note: Do not use Quick Connect Æ Bluetooth serial device as the
scanner does not support Serial Port Profile.
2. In the device list, select Socket CHS 7x.
3. If a passkey is requested, enter 0000 (four zeroes) and click Pair
Now. Click the checkbox for CHS7x and click Finish.
Note: After completing the wizard, you are now ready to scan
barcoded data into any open application. Place the cursor where you
want data to enter, then press the trigger button to scan a barcode.
Setup for Windows Mobile
STEP
1: TURN ON THE CHS
Press and hold the small power button until the LED turns blue
and the CHS beeps twice (low-high). The LED should blink blue once
per second to show that the Bluetooth radio is on but not connected.
STEP 2: CONFIGURE BLUETOOTH SETTINGS
Configuration is only needed the first time you connect the CHS to
the device. Refer to your Bluetooth software manual for full
instructions.
1. Tap Start | Settings | Connections tab.
2. Tap on the Bluetooth icon. Tap on the Mode tab. Select the
check box Turn on Bluetooth.
3. Tap on the Devices tab. Tap Add new device… or tap Add on
the bottom of the screen.
4. In the device list, select Socket CHS 7x [xxxxxx].
Note: The characters in brackets are the last 6 characters of the
scanner’s Bluetooth Device Address, which is labeled inside the
battery compartment.
5. If a passkey is requested, enter 0000 (four zeroes) and tap Next.
4. If you are prompted to select services from the CHS to use, select
the check box Input Device and tap Finish.
Note: You are now ready to scan barcoded data into any open
application. Place the cursor where you want scanned data to enter,
then press the trigger button to scan a barcode.
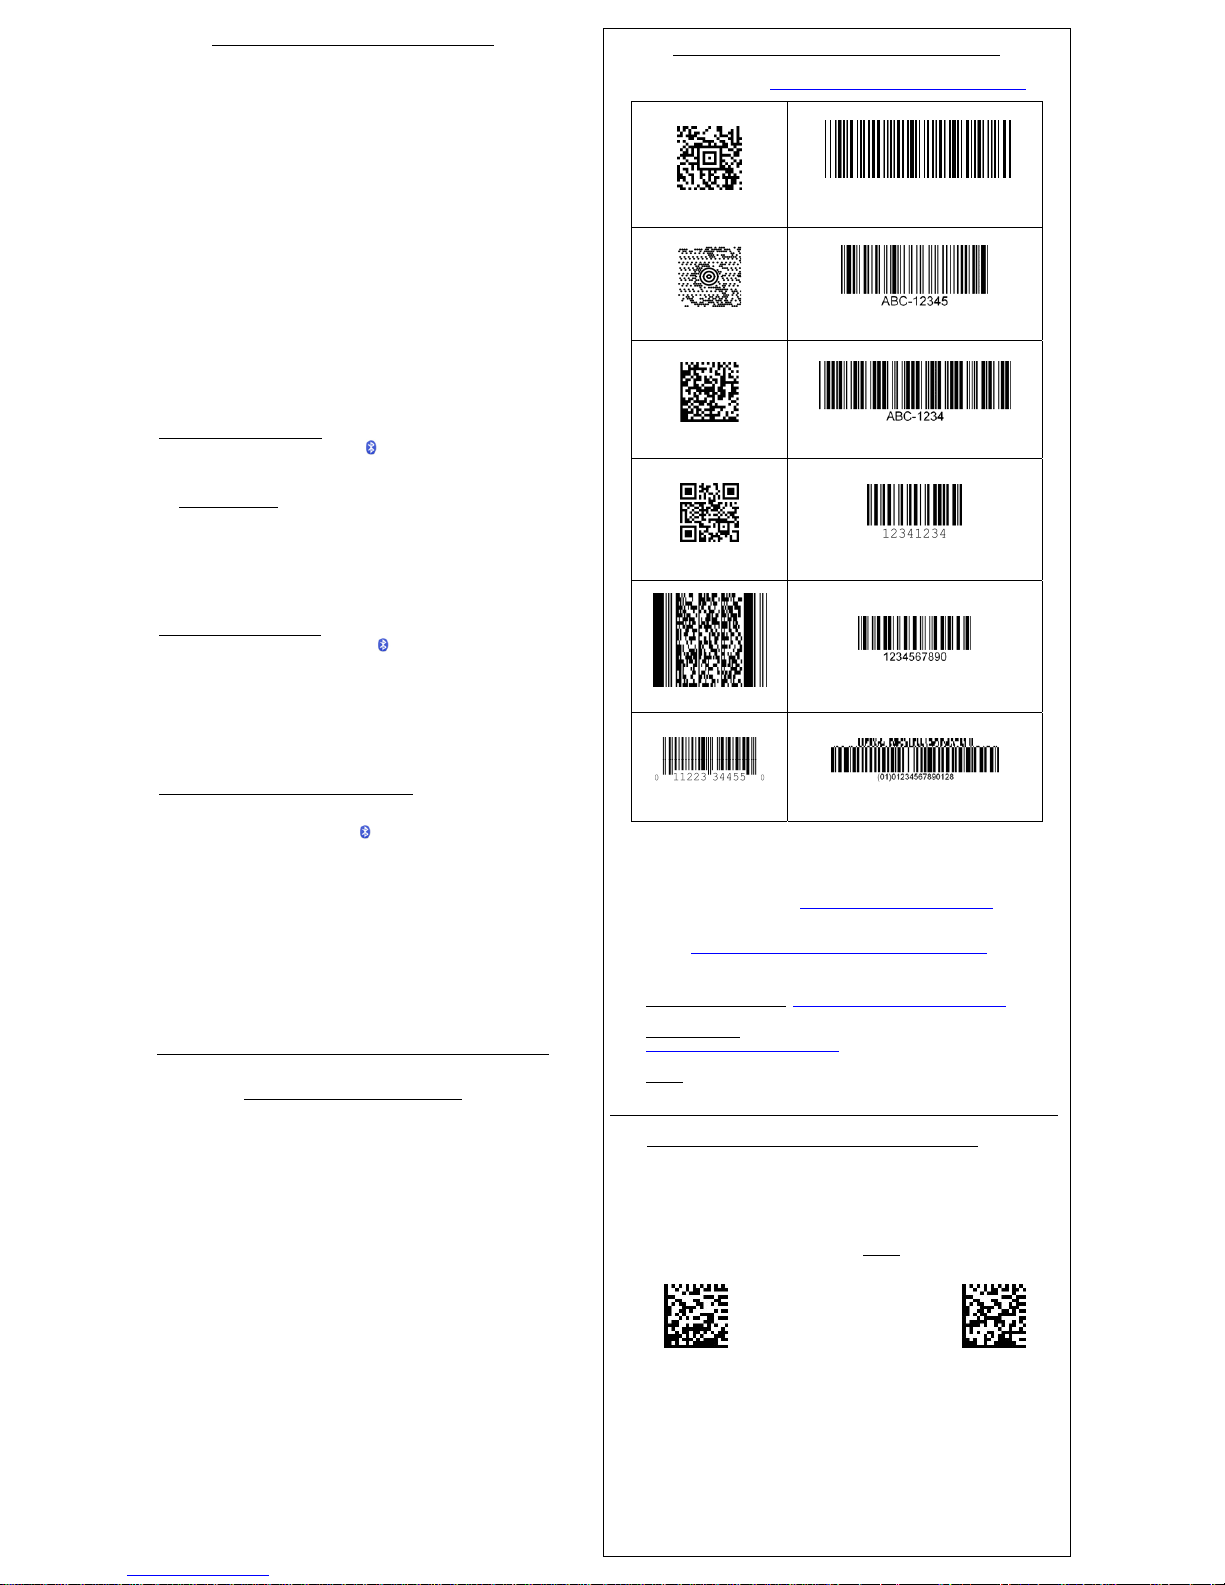
Default Symbologies – Sample Barcodes
To configure symbology settings, please refer to the Command Sheet in the User’s
Guide, available online at: http://www.socketmobile.com/support/downloads
Aztec Code
B123456789D
Codabar
Maxicode
Code 93
Data Matrix
Code 39
QR Code
Code 128
PDF417
Interleaved 2 of 5
UPC/EAN
GS1 Composite
Future Releases: A feature-rich 7X version (with software) is coming
soon. Please contact Technical Support or your Account Manager.
Product Registration: Register online to access technical support and
opt to receive special offers: http://support.socketmobile.com/
Downloads: Get the latest documentation, including the User’s Guide,
online at: http://www.socketmobile.com/support/downloads/
Technical Support
• Online Knowledge Base: http://support.socketmobile.com/faq
• Online Requests
: Register your product and submit a question.
http://support.socketmobile.com/
• Phone
: Direct: +1-510-933-3020
USA & Canada Toll-free: 800-279-1390
Setup for Apple iPad, iPhone, iPod touch
STEP
1: TURN ON THE CHS
Press and hold the small power button until the LED turns blue
and the CHS beeps twice (low-high). The LED should blink blue once
per second to show that the Bluetooth radio is on but not connected.
STEP 2: CONFIGURE SCANNER Scan the Enable Apple Mode barcode.
Enable Apple Mode Disable Apple Mode
STEP 3: PAIR SCANNER WITH DEVICE
1. Turn on the CHS.
2. On the Apple device, turn on Bluetooth. Start a Bluetooth device
search. In the list of devices, select Socket CHS 7X. Tap Pair.
Note: You are now ready to scan barcoded data into any open application.
Place the cursor where you want scanned data to enter, then press the
trigger button to scan a barcode.
Note: If you use Windows or another OS and cannot find the CHS during a
Bluetooth search, scan the Disable Apple Mode barcode and search again.
Note: After you scan the
Enable barcode, the CHS will
beep 5 times and turn off.
 Loading...