


USER GUIDE


3
Contents
Box contents ................................................................................................................
Set up guide ................................................................................................................
Existing camera set up ................................................................................................
Cable free set up ........................................................................................................
Factory reset ...............................................................................................................
Controlling the camera ................................................................................................
Alerts ...........................................................................................................................
Other features .............................................................................................................
Troubleshooting ..........................................................................................................
Warranty & support .....................................................................................................
Snug Wi-Fi Baby Monitor for Smartphones
With this baby monitor video camera you can watch your child from literally anywhere
as long as you have Wi, 3G, or 4G enabled on your device. Whether you need to
run out for a quick errand or you’re gone for the whole day at work, ensure your infant
stays safe at all times until you get home.
4
5
12
13
18
19
20
21
23
24

4
BOX CONTENTS
1. Snug camera
2. Power supply unit
3. Router cable (for standard set up)
4. Wall/ceiling mount kit
5. User Guide

5
1 Attach antenna
2 Power up the camera
SET UP
To set up the camera before rst use we must temporarily connect
it to your router via the included network cable. Once setup is
complete you can move the camera wherever you need it.

6
3 Connect to router
5 Download the “Snugcam” app
4 Wait 2 minutes
(for camera to calibrate)
You must accept notications if prompted to receive audio and motion detection alerts

7
6 Connect phone/tablet to Wi-Fi
Make sure you are connected to the same network you intend to connect the camera
7 Add camera
Add camera

8
You can also add your camera by entering the ID or scanning the
QR code on the sticker on the base of the camera.
8 Search network for camera
Camera ID
QR Code
Search local network for camera

9
9 Enter WiFi Details
10 Select Camera
Please use alphanumeric characters only as the camera does not compute special
characters

10
11 Create Username & Password
12 Click Done
Please use alphanumeric characters only as the camera does not compute special
characters

11
15 Unplug network cable
You can now unplug the network cable and the camera should be working ne with
WiFi, allow a few seconds after unplugging the cable for the camera to switch from
cable to WiFi.
Please wait for a few moments and if setup has gone smoothly you should see your
camera with the word “Online” appearing once the camera accepts the new details
you entered.
14 Online
12
EXISTING CAMERA SETUP
If you have already set up your baby monitor and would like to access it from
more than one device, follow the instructions below
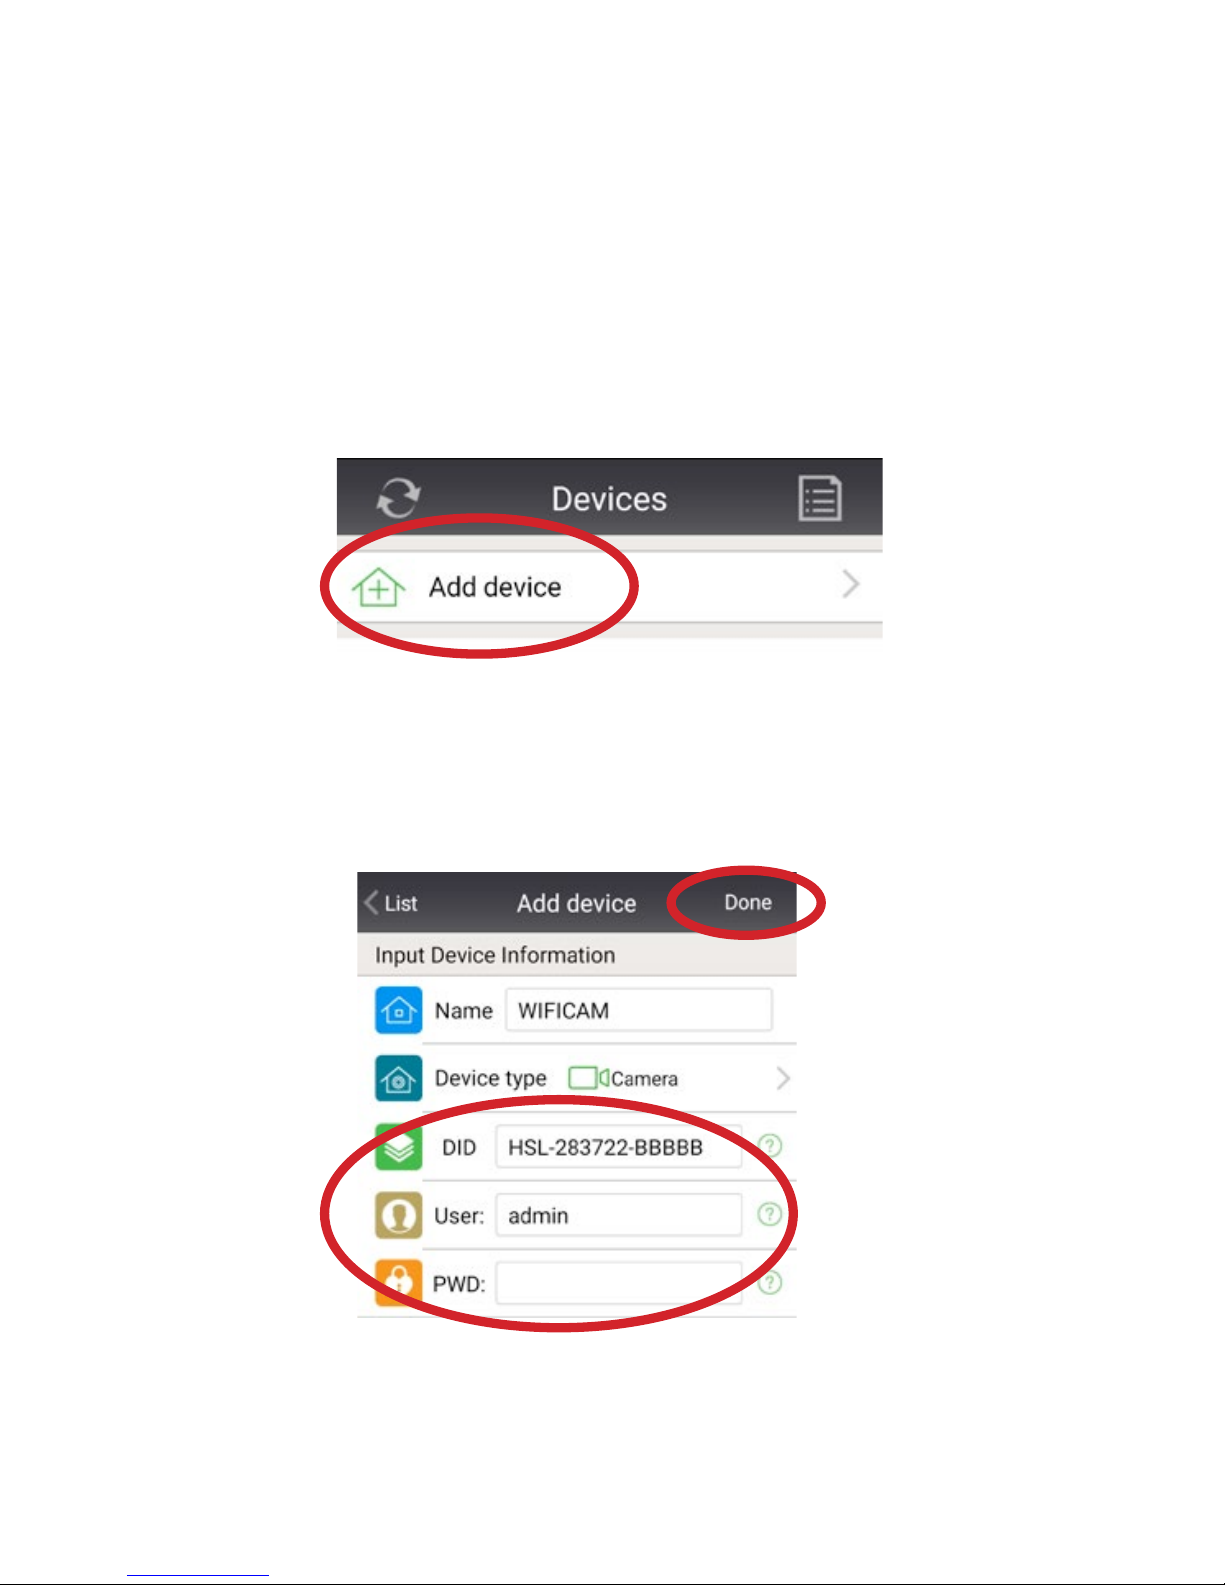
1 Add camera
Enter the Camera ID, as well as the User and Password created when rst setting up
the camera. Then click Done. Wait approximately 2 minutes and you should then be
online.
2 Search network for camera

13
CABLE-FREE SETUP
If connecting to your router is not convenient, please try the
following “Audio matching” setup method
1 Connect phone/tablet to Wi-Fi
Make sure you are connected to the same network you intend to connect the camera
2 Add camera

14
3 Cable-free set up
4 Enter Wi-Fi details
Your_WiFi_Name
Your_WiFi_Password
Cable free setup
(usually found on back of router)

15
5 Audio matching
Make sure your phone speaker is pointing directly at the
baby monitor, within a few inches and is not on silent mode.
You will hear a coded audio signal for 2 seconds and if the
connection has been successful you will then hear voice
prompts from the camera to conrm the connection.
Your camera name and ID will then appear on screen, please
select the camera to nsh setup

16
If setup has gone smoothly you should see your camera with the word “Online”
6 Online
7 Security
Click on the green cog again next to your camera, then User Setting.
Here you can edit the Administrator login details for your camera.
Once you have made these changes, click done and you will then
need to log back in to the camera with the new details

17
Go back to the main Devices pages, click on the notes icon, top right, and then click
on the notes icon on your camera. Here you can change the user name and password
to the details you just set in the previous step. Then click done and go back to the
main Devices page. You should now be back online.
8 Log in with new details

18
If you are having any issues setting up or using the camera, it may
be best to do a factory reset and start again.
FACTORY RESET
To do a factory reset:
1. With the power on, use pencil tip or
similar object to hold the reset button
down until you hear an audio prompt to
conrm the reset was successful
2. The camera will now begin to
recalibrate, please wait 2 minutes until
this process has nished before trying
to re-install
Reset button
If a factory reset does not solve your issues, please get in touch and we will be happy
to walk you through the setup process to get you up and running.

19
CONTROLLING THE CAMERA
1. Tap on the small camera image to open up the camera
2. Swipe your nger either left, right, up or down to move the camera
3. Tap the screen when on full screen viewing to bring up options. The icons that
appear along the bottom control the speaker/ microphone, snapshot, video, HD,
position pre-set, brightness, contrast and night vision (infrared)
4. The icons in the top right allow you to pan the camera fully left / right and move it
up/ down automatically (without swiping) and also ip the image (required if you
ceiling/ wall mount the camera)
5. To return to the devices list screen tap “List” in the top left of the screen
6. To hide the options tap the screen again
TIP
The time taken for the camera to move and the image to be sent back to you depends
on the connection speed of your network or cell phone carrier. If you swipe your nger
the camera will eventually move so just wait for the signal to catch up. If you over
swipe it will move too much.

20
ALERTS
Setting alarms
Tap the green cog on the Device list screen and then tap Alarm setting. Tap Motion
detection to activate this alert and select the sensitivity (1 being most sensitive). Tap
Audio detection to activate this alert and select the sensitivity.
Stop the alerts
To stop the alerts tap the green cog on the device list screen and go to the Alarm
setting. Deselect Motion Detection and/ or Audio detection. The button will be green
when activated and gray when deactivated.
Change the alarm sound/vibration
Tap About at the bottom of the screen and then System Settings. Here you can turn
on/off the alarm vibration and if you tap Audio Alarm Setting you can choose form 3
sounds
Email Alerts
Tap the green cog on the devices page and tap mail setting. You can enter up to 4
email addresses to receive alerts.
NOTE: It can take up to a few minutes to receive email alerts as this speed depends
on email servers and how busy they are

21
OTHER FEATURES
Camera Focus
By default the camera should arrive to you in focus with a clear image. If this is not the
case the focus can be adjusted using the white dial around the lens - twist clockwise
and anti-clockwise until the image on screen is clear and in focus.
Turning the Camera Microphone On
To listen through the cameras microphone tap the screen when on full camera viewing
screen to bring up the options icons along the bottom. Tap the speaker icon on the far
left of the bottom row to turn the volume on. Tap again to turn off.
Speak through the Microphone
Tap the speaker (as above) and you will notice a microphone icon appear in the
bottom right of the screen. Hold this down and talk, your voice will be played through
the cameras speaker. Release when you have nished talking.
Night Vision (Infrared)
The camera is set for night vision to be activated by default. If it is not coming on then
when on the full camera viewing screen tap the screen to bring up the icons along the
bottom. Tap the bulb icon (infrared) on the bottom far right and tap open.
If it is still not working do a factory reset as this xes most bugs.
Zooming the Camera
The camera can zoom; just zoom as you would normally on your device. If you do not
know how to zoom on your device please see your device manual handbook.
Deleting the camera
On the device list screen tap the icon in the top right of the screen that looks like a
piece of paper with writing on. Then tap the trash can icon.

22
Turn off /on the blinking green LED
There is a green LED at the front of the camera which is set to off by default. You may
want to turn it on to check the camera is working OK of show it is on. In the app tap
the green cog when on the Device list screen to enter the settings. Tap on Indicator
LED and you can turn the LED on and off.
Taking a Picture
You can take a picture simply by doing a screen shot on your device e.g. on an
iPhone/ iPad hold the menu and power button down at the same time.
You can also take a screen snap shot within the app with the snapshot option when
on the camera options (tap the screen when on the full camera viewing screen and
tap the camera icon). You can then view it in my messages on the main screen. It will
have a date stamp though so the rst option is better.
Video
There is a TF card slot in the back of the camera to record video. Insert your TF card
and then view the camera in full screen mode. Tap the screen to bring up the option
icons along the bottom; tap the video icon which is the third from the left.

23
TROUBLESHOOTING
When I unplug the camera from the router during set up it says disconnected
and won’t connect
Please make sure you have entered the correct WiFi details during setup. The WiFi
details can usually be found on your router. The camera can only use alphanumeric
characters so if there are any special characters in your WiFi name or password this
may cause an issue and should be changed. Once you have changed your WiFi
password, delete the camera and start the setup process again with the new WiFi
details. Please make sure to enter the same username and password for the camera
login as before as this is saved on the camera.
If this does not resolve the situation it may be best to delete the camera within the app
and do a factory reset (p. 19) and then start over.
*Please note if you do a factory reset any passwords you have created will be deleted
and you will need to use the default password which means leave the password blank.
If everything seems to be setup correctly but the camera is still not working over WiFi
then it may be possible that your router is set up to block access. The camera uses
port 81 of your router to transmit data to and from your smartphone. Your ISP should
be able to help allow access over port 81. A quick test to check if the router is the
issue is to use your phone as a WiFi hotspot using 3G/4G, if you can enter those WiFi
details instead and the camera works over WiFi with your phone signal then it is very
likely the router settings causing issues.
Wi-Fi consistently loses the connection to the router
You should have at least a 10 metre range from the router to the camera. If you are
within this try moving the camera to different location within the area. Something could
be interfering with it in its present location.
I have added my own password for security but am locked out; it says
I have no permission/password error
To enter the password you created…. tap the icon on the top right corner when on
the add camera screen that looks like a piece of paper with lines on. Then tap the
icon on the left of the trash can that brings up a modify device screen. Type your
chosen password in to the password box and hit done. If, after this, you are still having
problems you can do a factory reset to restore the camera to its default settings.
.

24
Camera is not functioning properly
Perform a factory reset (p.19) as this usually xes any bugs and restores the camera
to full operation.
Camera has no power/the red light has gone off on the power supply
unit (PSU)
Check the socket is working with a different device. If it is then it is likely that the PSU
has failed and a new one will be sent to you if the camera is still under warranty. See
warranty.
My time zone is not correct
To change the time zone on your camera tap the green cog to open the settings. Tap
Time Setting and select the zone you want.
WARRANTY
This item comes with a 2 year manufacturer’s warranty. No registration is required
after purchase. If you believe your device may have a fault please contact us by email
-
support@snugtogether.com
CUSTOMER SUPPORT
For any support whether it be for help setting up your camera, help with functions or
help with a fault please contact us by...
Email - support@snugtogether.com
Phone (USA 9am - 6pm EST) 1-302-212-4570
Phone (UK 9am - 5pm) 01656 790030
We aim to reply to emails within 24 hours during normal working hours. If you do not
receive a reply please check your junk/spam folders.


www.snugtogether.com
support@snugtogether.com
1-302-212-4570 (USA 9am - 6pm ET)
01656 790030 (UK 9am - 5pm)
 Loading...