

Page 1

Electric Pole Chain Saw
Electric Pole Chain Saw
Model No. SWJ800ERM
A Division of Snow Joe, LLC
IMPORTANT!
Safety Instruction
All Operators Must Read These
Instructions Before Use
Always follow these safety guidelines. Failure to do so may
result in serious bodily injury or death.
mDANGER! This indicates a hazardous situation, which,
if not followed, will result in death or serious injury.
mWARNING! This indicates a hazardous situation, which,
if not avoided, could result in death or serious injury.
mCAUTION! This indicates a hazardous situation, which,
if not avoided, could result in minor or moderate injury.
General Safety
m
WARNING! When using electric gardening appliances,
basic safety precautions should always be followed to reduce
the risk of re, electric shock, and personal injury, including the
following:
• KEEP GUARDS IN PLACE and in working order.
• REMOVE ADJUSTING KEYS AND WRENCHES. Form habit
of checking to see that adjusting wrenches are removed
from the saw before turning it on.
• KEEP WORK AREA CLEAN. Clear working area of
branches and limbs after every cutting. Cluttered areas
invite accidents.
• DON’T USE IN DANGEROUS ENVIRONMENTS. Don’t use
power tools in damp or wet locations.
• DON’T USE THE POLE SAW IN THE RAIN.
• KEEP CHILDREN AWAY. All visitors should be kept a safe
distance from work area.
• DON’T FORCE TOOL. It will do the job better and safer at
the rate for which it was designed.
• USE RIGHT TOOL. Don’t force tool or attachment to do a
job for which it was not designed.
• WEAR PROPER APPAREL. Do not wear loose clothing
or jewelry which may get caught in moving parts. Use of
rubber gloves and substantial footware is recommended
when working outdoors.
• Wear protective hair covering to contain long hair.
• ALWAYS USE SAFETY GLASSES. Also use face or dust
mask if cutting operation is dusty.
Form No. SJ-SWJ800ERM-880E
OPERATOR’S MANUAL
• Everyday eyeglasses only have impact resistant lenses, they
are NOT safety glasses.
• DON’T OVERREACH. Keep proper footing and balance at
all times.
• MAINTAIN TOOLS WITH CARE. Keep tools sharp and clean
for best and safest performance. Follow instructions for
lubricating and changing accessories.
• DISCONNECT TOOL. Disconnect the Pole Saw from the
power supply when not in use, before servicing, when
changing accessories or chain.
• REDUCE THE RISK OF UNINTENTIONAL STARTING.
Make sure switch is in off position before plugging it
into a power source.
• USE RECOMMENDED ACCESSORIES. Consult the owner’s
manual for recommended accessories. The use of improper
accessories may cause risk of injury.
• CHECK FOR DAMAGED PARTS. Before each use, a
guard or other part that is damaged should be repaired or
replaced and check for alignment of moving parts, binding
of moving parts, breakage of parts and any other conditions
that may affect its operation.
• NEVER LEAVE TOOL RUNNING UNATTENDED.
Turn power OFF. Don’t leave saw until it comes to
a complete stop.
• AVOID UNINTENTIONAL STARTING. Don’t carry Pole Saw
with nger on the switch.
• DON’T GRASP THE EXPOSED CUTTING BLADE OR
CUTTING EDGES WHEN PICKING UP OR HOLDING SAW.
• STAY ALERT. Watch what you are doing. Use common
sense. Do not operate Pole Saw when you are tired.
• STORE IDLE TOOL INDOORS. When not in use, appliances
should be stored indoors in dry, and high or locked-up
places out of reach of children.
Electrical Safety
WARNING! Repair or replace damaged or worn cords
m
immediately.
mWARNING! Don’t expose power tools to rain or wet
conditions. Water entering a power tool will increase the risk of
electrical shock.
mWARNING! To reduce the risk of electric shock, use
only with an extension cord intended for outdoor use, such
as an extension cord of cord type SW-A, SOW-A, STW-A,
STOW-A, SJW-A, SJOW-A, SJTW-A. or SJTOW-A.
© 2013 by Snow Joe, LLC
All rights reserved. Original instructions.
SAVE THESE INSTRUCTIONS
1
Page 2
Extension Cords
• Make sure your extension cord is in good condition. When
using an extension cord, be sure to use one heavy enough
to carry the current your product will draw. An undersized
cord will cause a drop in line voltage resulting in loss of
power and overheating. Table 1 shows the correct size
to use depending on cord length and nameplate Ampere
rating. If in doubt, use the next heavier gauge. The smaller
the gauge number, the heavier the cord.
• Ground Fault Circuit Interrupter (GFIC) protection should
be provided on the circuits or outlets to be used for this
Pole Saw. Receptacles are available having built-in GFIC
protection and maybe used for this measure of safety.
• Use only UL listed extension cords. Inspect extension
cord before use and never use damaged or altered
extension cords. Follow extension cord manufacturer
safety instructions.
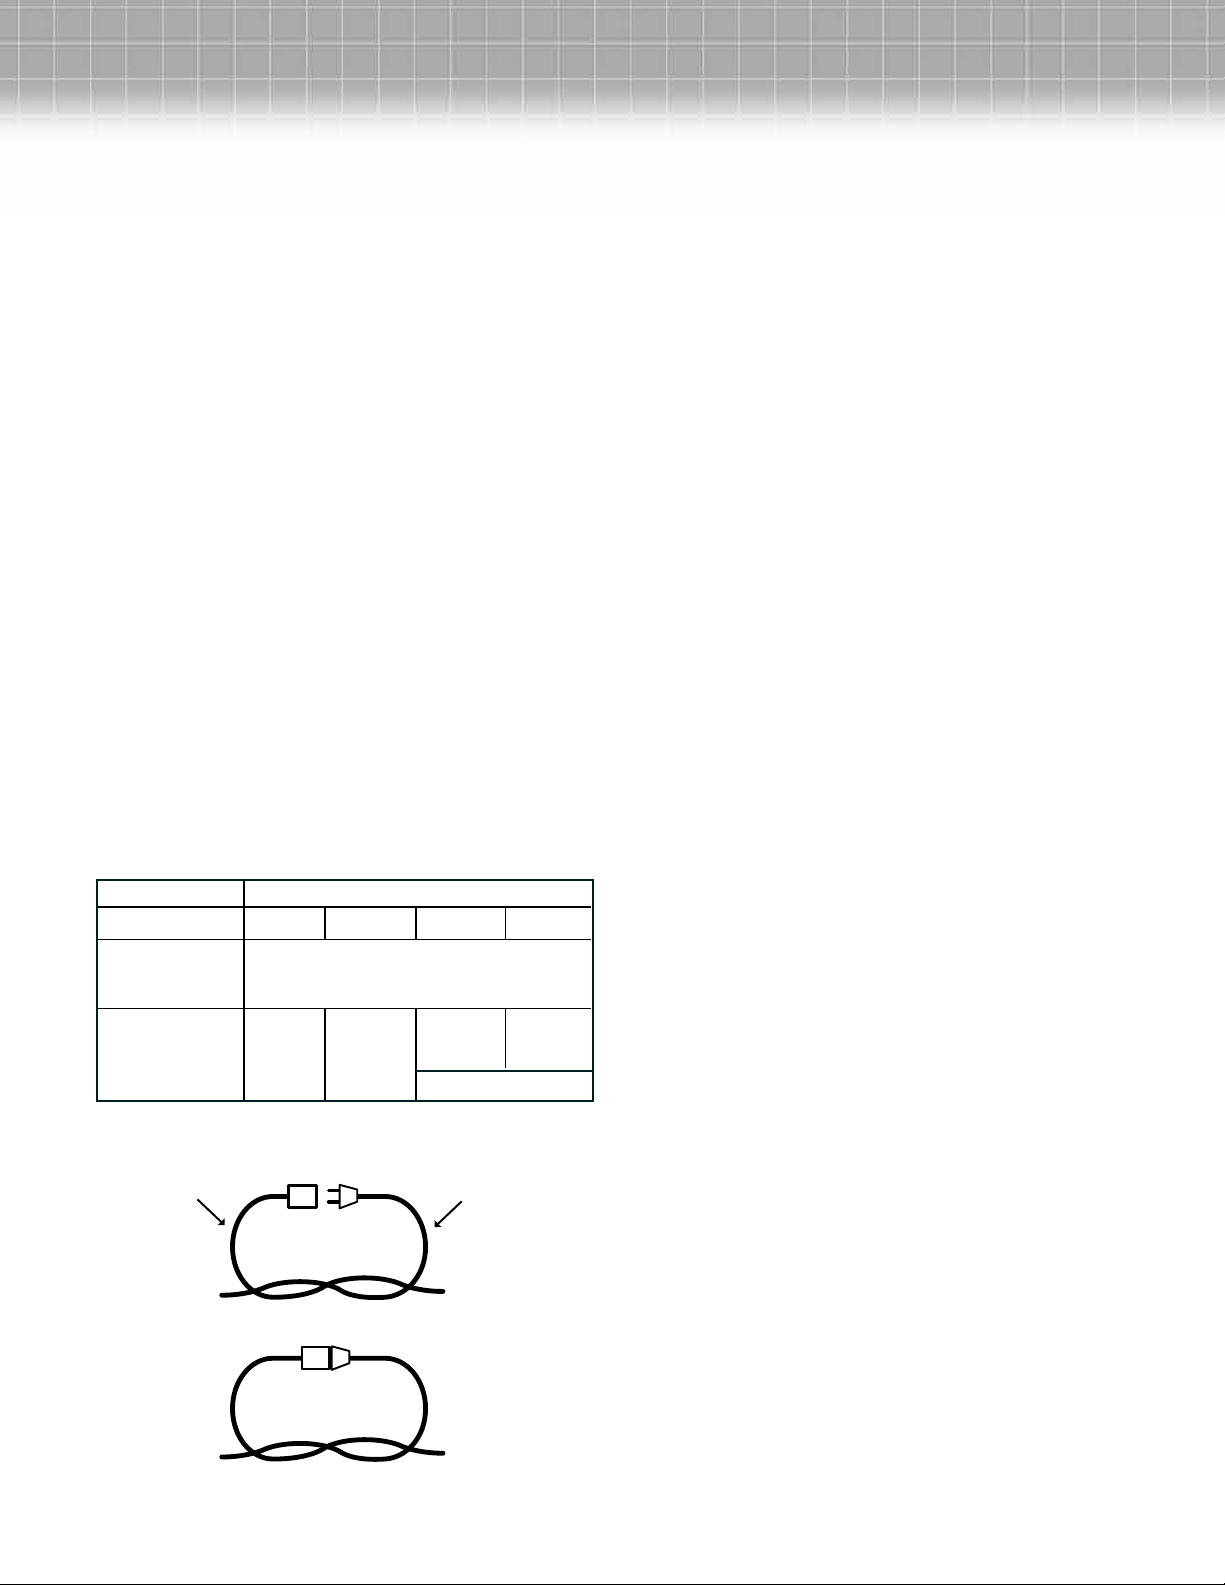
• To reduce the risk of disconnection of appliance cord from
the extension cord during operating use the plug-receptacle
retaining straps provide or make a knot with the two cords
as shown in Table 2.
• Do not abuse the cord. Never use the cord to carry
the tools or pull the plug from the outlet.
• Keep cord away from heat, oil, sharp edges or moving
parts. Replace damaged cords immediately. Damaged
cords increase the risk of electrical shock.
Table 1. Minimum Recommended Extension Cord
Gauge (AWG) Chart
Volts
120V
Ampere Rating
1 – 5
6 – 10
10 – 12
12 – 16
Table 2. Method of securing Extension Cord
Cord set Appliance cord
(A) Tie cord as shown
Total length of cord in feet
25
18
18
14
14
50
AWG
(Extension Cord Gauge)
16
16
14
12
Not Recommended
100
16
14
14
150
14
12
12
Specic Safety Rules For
Pole Saw
m
WARNING!
Shock Hazard. To protect yourself from electrocution do not
operate saw within 50 feet of overhead wires. Failure to do so
could result in personal injury.
While Operating Pole Saw
• Stay alert. Use common sense while operating the unit.
• Keep work area clean. Cluttered areas invite injuries.
• Be aware of extension cord while operating Pole Saw. Be
careful not to trip over the cord.
• Keep the cord away from the chain and the operator at all
times.
• Keep children, animals, and bystanders away from Pole
Saw and extension cord.
• Only Pole Saw operator should be in work area.
• Do not use the Pole Saw to cut down trees.
• Do not use near power lines. Keep at least 50 feet away
from electrical lines.
• Grip Pole Saw securely with one hand on the trigger, the
other on the pole.
• Before starting Pole Saw, make sure chain is not in contact
with anything.
• Do not allow the Pole Saw to become in contact with
grounded objects such as pipes, fences, and metal posts.
• Keep all parts of body away from chain when Pole Saw
is running.
• Do not force Pole Saw while cutting. Apply light pressure.
It will perform better and more safely at the rate for which it
was intended.
• When cutting a limb that is under tension, use extreme
caution. Be alert that the wood may spring after it is cut.
When wood tension is released, limb could spring back
and strike operator causing severe injury or death.
• Carry Pole Saw from one place to another with unit
unplugged; holding the pole at its balance point
(close to saw end), with guide bar and chain to rear.
• Do not cut small brush and saplings with the Pole Saw.
Small branches may catch in the chain and be whipped
towards the operator and could pull the operator off
balance.
(B) Connect plug and receptacle
2
Page 3
Kickback
Safety Symbols
mWARNING!
Kickback may occur when the nose or tip of the guide bar
touched an object, or when the wood closes in and pinches
the saw chain in the cut.
In some cases when the tip makes contact it may cause a fast
reverse reaction, kicking the guide bar up and back towards
the operator. Pinching the saw chain along the top of the guide
bar may push the guide bar rapidly back towards the operator.
Either of these reactions may cause you to lose control of the
Pole Saw which could result in serious injury to yourself.
• Kickback safety devices on this Pole Saw – The Pole Saw
has a skip chain and low kickback guide bar, these reduce
the chance of a kickback. Kickbacks can still occur with this
Pole Saw.
• When operating the tool use both hands - one gripping the
trigger and the other gripping the pole. USE A FIRM GRIP.
• Thumbs and ngers must wrap around trigger and pole.
• Keep all safety items in place on Pole Saw. Make sure they
work properly.
• Do not overreach or extend arms above shoulder height.
• Keep solid footing and balance at all times.
• Never try cutting through two branches at the same time.
Only cut one at a time.
• Do not bury guide bar nose or try to cut by boring the guide
bar nose into the wood.
• Watch for shifting of wood or other forces that may
pinch chain.
• Use extreme caution when re-entering a previous cut.
• Use low-kickback chain and guide bar supplied with
the Pole Saw. Only use replacement parts listed for
the Pole Saw.
• Never use a dull or loose chain. Keep chain sharp with
proper tension.
Pole Saw Trimming Precautions
• Never stand directly under the limb you are trimming.
Always position yourself out of the path of falling debris.
• Never stand on a ladder or other type of unstable support
while using the Pole Saw.
• Keep all handles and grip surfaces clean and dry at
all times.
• Always use both hands to operate Pole Saw. Keep a rm,
steady pressure on the Pole Saw while cutting but do not
try to cut limbs larger in diameter than the length of the
guide bar.
• Keep other persons away from cutting end of Pole Saw and
at a safe distance from work area.
• Do not use Pole Saw near cable, electric power or
telephone lines. Maintain a minimum clearance of 50 feet
from all power lines.
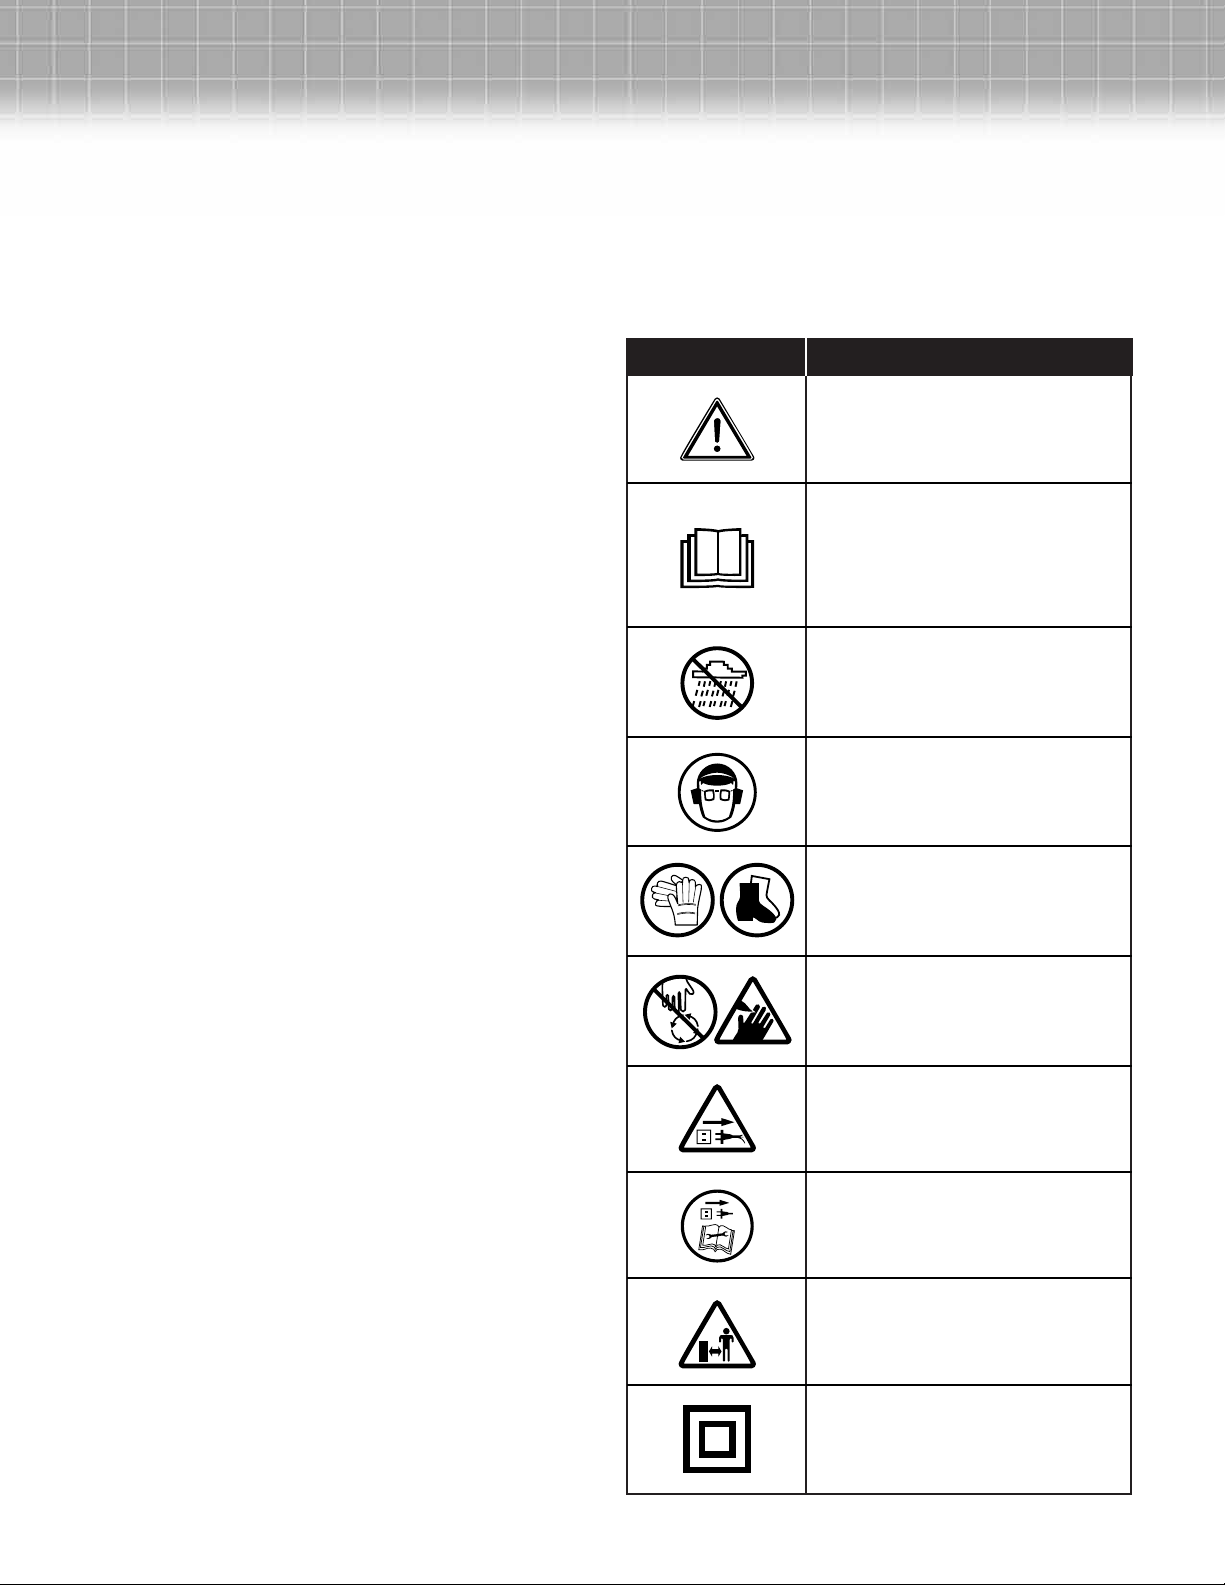
The following table depicts and describes safety symbols that
may appear on this product. Read, understand, and follow all
instructions on the machine before attempting to assemble
and operate.
Symbol Description
SAFETY ALERT – indicates
a precaution, a warning or
a danger.
READ THE OPERATOR’S
MANUAL(S) Read, understand
and follow all instructions in the
manual(s) before attempting to
assemble and operate.
WARNING! Keep out of rain
and away from wet areas.
For protection against injury,
wear safety goggles and
ear protection.
Wear protective gloves and
non-slip footwear when using
the machine and handling debris.
DANGER! Rotating blades.
Keep hands and feet out of
openings while saw is running.
SWITCH OFF! Remove plug
from outlet immediately if the
cord is damaged or cut.
SWITCH OFF! Remove plug
from outlet before cleaning
or maintenance.
Keep bystanders at
a safe distance.
Double insulation
3
Page 4
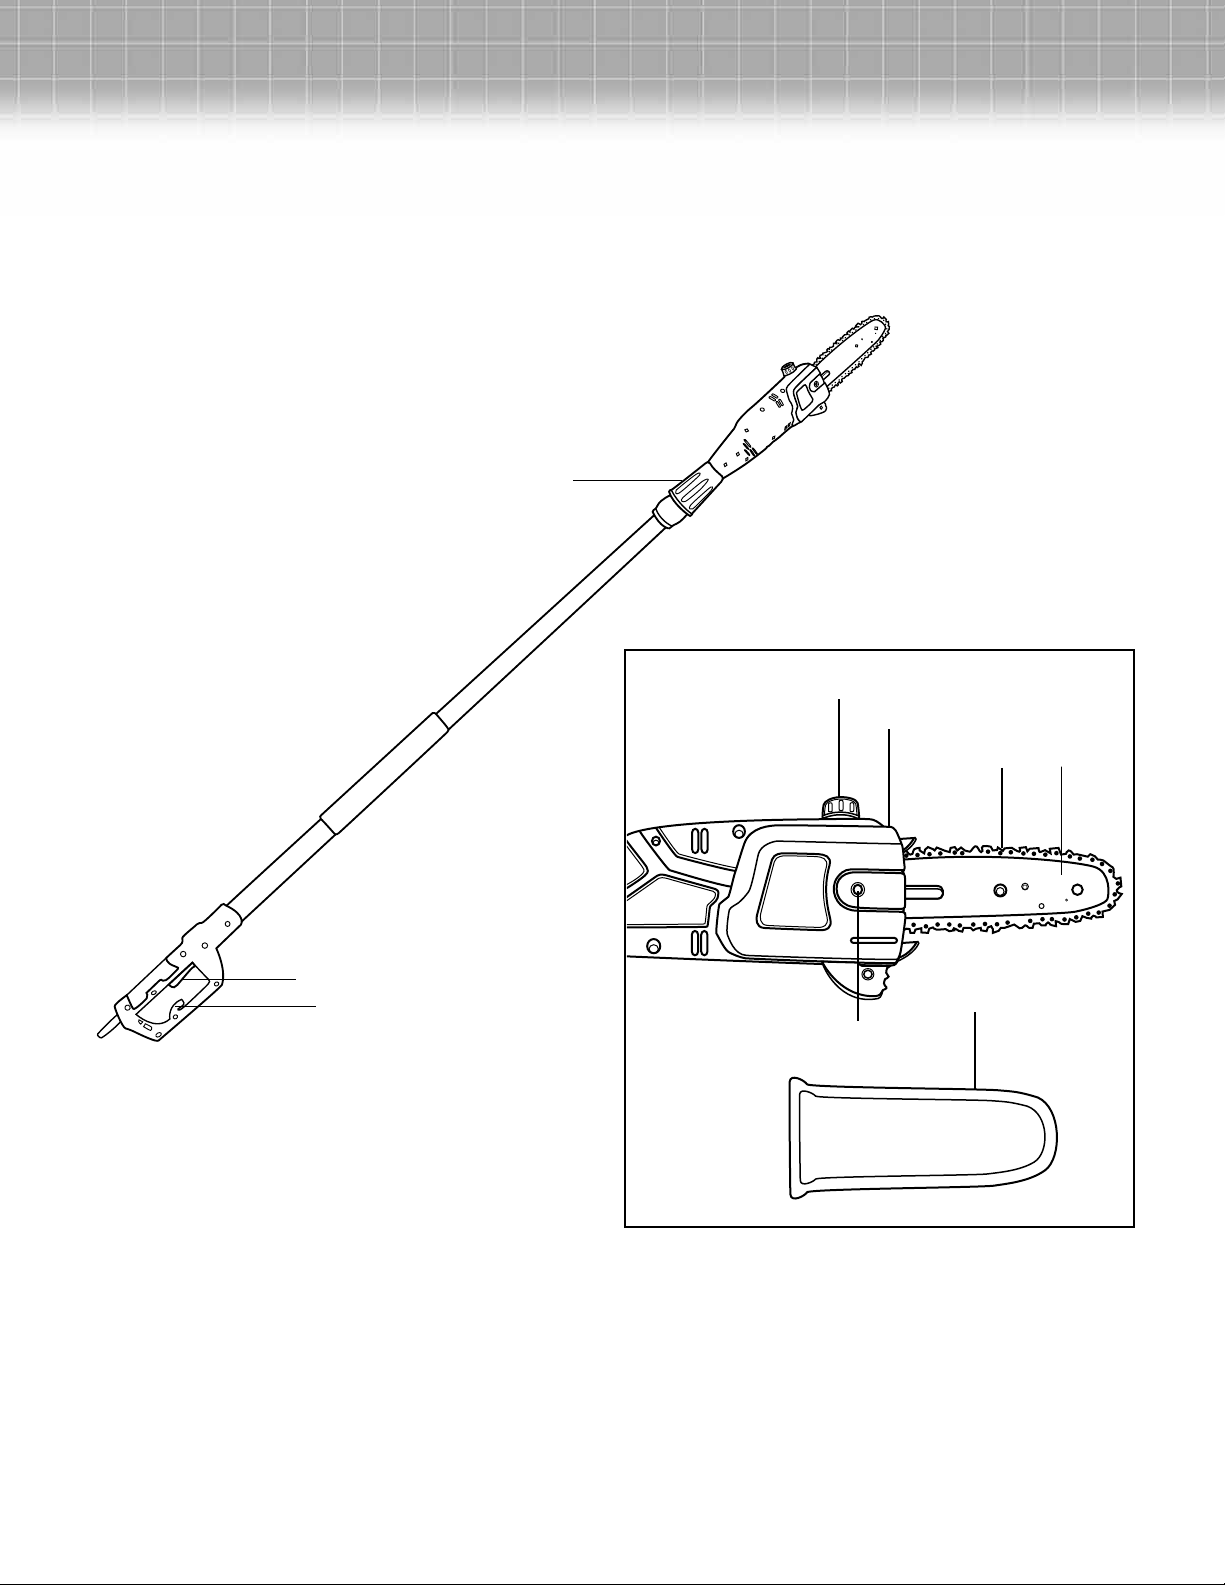
Know Your Pole Chain Saw
Read this owner’s manual and safety rules carefully before operating the Pole Saw. Compare the illustration below
of the Pole Saw in order to become familiar with the location of the various controls and adjustments.
Save this manual for future reference.
1. Bar Cover
2. Oil Tank Cap
3. Guide Bar (reversible)
4. Sprocket Cover
5. Sprocket Cover Bolt
6. Chain
7. Collar
8. Trigger
9. Cord Relief Hook
7
2
4
6
3
8
9
Technical Data
Rated Voltage 120 V ~ 60 Hz
Motor 6.5 amp
Bar/Chain Length 8 in (20.3 cm)
Telescopic Shaft 67 in –104 in (5.6 ft – 8.7 ft)
1
5
Maximum Cutting Diameter 8 in (20.3 cm)
Oil Tank Capacity 80 ml
No Load Speed 6,000 rpm
Weight 7 lbs (3.2 kgs)
4
Page 5

Unpacking
Carton Contents:
• Corded pole saw body
• Bar & chain
• 7/32-inch Hex key wrench/ blade screwdriver
• Bar cover
• Safety and operating instructions
Unpacking:
1. Carefully remove the contents from the shipping carton.
Make sure that all items listed in the carton contents are
included.
2. Inspect the product carefully to make sure no breakage or
damage occurred during shipping. If you nd damaged or
missing parts, DO NOT return to store, please call
1-866-766-9563.
NOTE: Do not discard the shipping carton and packaging
material until you are ready to use your new Corded Pole Saw.
Assembling the Corded
1. Using a 7/32-inch hex key wrench, unscrew the sprocket
cover bolt (E) and remove the cover (F) (Fig. 1).
2. Lay out the saw chain in a loop and straighten any kinks.
THE SHARP SIDE OF THE TEETH SHOULD FACE IN THE
DIRECTION OF THE CHAIN ROTATION (Fig. 1). If they face
backwards, turn the loop (C) over.
3. Place the chain drive links (D) into the bar groove (Fig. 1).
NOTE: Make certain of the direction of the chain.
4. Position the chain so there is a loop (C) at the back of the
bar (Fig. 1). Hold the chain in position on the bar and place
the loop around the sprocket (Fig. 2).
5. Fit the bar ush against the mounting surface so that the
bar slot mounts onto the slot ange in the head and hold
rmly in place.
NOTE: When placing the bar on the ange, ensure that the
tensioner pin is in the chain tensioner pin hole in the bar
(Fig. 2). Adjust the chain tension as needed by adjusting
the chain tensioner screw with a at tip screwdriver, so it
lines up with the pin hole (Fig. 3).
Fig. 2
Chain over Sprocket
Bar Slot over
Slot Flange
Pole Saw (Fig. 1 - Fig. 4)
Tools and Supplies Required:
• 7/32-inch Hex key wrench/ blade screwdriver (supplied)
• Gloves
Fig. 1
(C) Loop
(D) Chain Drive Link
(A) Sprocket
(B) Tensioner Pin
Chain Rotation
Rear Tab Slot
6. Tighten the chain tensioner screw only enough to hold the
bar and chain in place (Fig. 3) ensuring the chain is still in
place over the sprocket (Fig. 2).
Chain Tensioner
Pin in Hole
Fig. 3
Chain Tensioner Screw
(G) Read Tab
(E) Sprocket
Cover Bolt
(F) Sprocket Cover
5
Page 6

7. Install the sprocket cover (F) by inserting the rear tab (G)
(Fig. 1) rst into the rear tab slot (Fig. 2) and position the
cover onto the saw head.
8. Install the sprocket cover bolt by hand and leave the bar
free to move for tension adjustment (Fig. 4).
Fig. 4
9. Remove all slack from the chain by turning the chain
tensioner screw (Fig. 3) clockwise until the chain seats
snugly against the bar with the drive links in the bar
groove. For more information on chain tensioning, see
Chapter 4 “Maintaining Your Corded Pole Saw” (Pg. 9).
NOTE: A cold chain is correctly tensioned when there is no
slack on the underside of the guide bar, the chain is snug,
but you can turn it by hand without binding.
10. Tighten the sprocket cover bolt using the 7/32-inch hex
key wrench (Fig. 4).
Sprocket Cover
Spocket Cover Bolt
(Fig. 5). One minute of use will consume approximately
0.15 . oz. (5ml) of oil. Rell when the oil level drops to
1/4 of a tank.
NOTE: Your Corded Pole Saw is equipped with an
automatic oil pump for bar and chain oiling.
• Starting, stopping, and restarting an electric motor
repeatedly within a few seconds can generate a great deal
of heat and damage the motor. To protect the life of your
Corded Pole Saw, always wait at least ve seconds after
stopping before restarting the saw.
mWARNING! Be certain that the chain is not in contact
with any object when you start the motor.
1. Perform the daily checks listed on page 10.
2. Connect the Corded Pole Saw to a working 120 V outlet
using a heavy-duty outdoor extension power cord. Make
a loop in the power cord and push it up through the hole
in the handle and around the cord relief hook (Fig. 6) then
plug it into the power receptacle.
Fig. 6
Lock-Off Button
Cord Relief
Operating Your Corded Pole
Saw (Fig. 5)
Starting and Stopping the Saw
Fig. 5
Oil Level
Window
MIN
Minimum Level Mark
Oil Tank Cap
mNOTICE
• Before starting the saw, remove the oil tank cap (Fig. 5) and
add #32 bar & chain oil to the top of the oil level window
Trigger ON/OFF Switch
3. Firmly grip the rear handle with your right hand and the
pole with your left hand (whether or not you are right
handed or left handed).
4. Push the lock-off button (Fig. 6) with your right thumb
and squeeze the trigger ON/OFF Switch with your ngers.
Once the motor starts you can remove your thumb from
the lock-off button. If the saw does not start, make sure
you plug the power cord into a live 120 V outlet (simply
use a lamp to check the power outlet) and rmly plug the
power cord into the saw power receptacle.
5. To stop the saw, simply release the trigger ON/OFF switch.
6
Page 7

Using the Saw
Adjusting Telescoping Pole (Fig. 7)
1. Rotate the collar counterclockwise to loosen (Fig. 7).
Fig. 7
2. Push poles towards each other to shorten the pole or pull
away from each other to lengthen the pole.
3. When you achieved the desired length, rotate the collar
clockwise to secure.
4. Be certain you fully tighten the collars before operating the
saw. Check them periodically for tightness during use to
avoid serious injury.
Collar
Proper Cutting Stance (Fig. 8)
• Balance your weight with both feet on solid ground.
• Your body should always be to the left of the chain line.
• The most typical cutting application is to position the unit at
an angle of 60° or less depending on the specic situation
(Fig. 8). As the angle of the pole saw shaft to ground
increases, the difculty of making the rst cut (from the
underside of limb) increases.
Fig. 8
Clockwise
Counterclockwise
up to 6 inches in diameter. Practice cutting a few small limbs
using the following technique to get the “feel” of using the saw
before you begin a major sawing operation.
• Take the proper stance in front of the tree with the
saw OFF (Fig. 8).
• Squeeze the trigger and let the chain accelerate to full
speed before entering the cut.
• Keep the saw running the entire time you are cutting,
maintain a steady speed.
• Allow the chain to cut for you; exert only light downward
pressure. If you force the cut, damage to the bar, chain, or
unit can result.
• PUSH and PULL – This reaction force is always opposite
to the direction the chain is moving when it is in contact
with the wood. Thus, the operator must be ready to control
the PULL when cutting on the bottom edge of the bar, and
PUSH when cutting along the top edge.
• Do not put pressure on the saw at the end of the cut.
Pruning
Pruning is trimming limbs from a live tree.
• Remove long branches in several stages.
• Cut lower branches rst to allow the top branches more
room to fall.
• When pruning trees it is important not to make the nishing
cut next to the main limb or trunk until you have cut off
the limb further out to reduce the weight. This prevents
stripping the bark from the main member.
• Under cut the branch 1/3 through for your rst cut. Your
second cut should over cut to drop the branch off (Fig. 9).
Be prepared to balance the weight of the Pole Saw tool
when the limb falls.
NOTE: For the second and nal cuts (from top of limb or
branch), hold front cutting guide against the limb you are
cutting (Fig. 10). This will help steady the limb and make it
easier to cut. Allow the chain to cut for you; exert only light
downward pressure. If you force the cut, damage to the bar,
chain, or motor can result.
60˚ MAXIMUM
Basic Cutting Procedure
This unit is designed for trimming small branches and limbs
Load
Second Cut
First Cut
1/3 Diameter
Finishing Cut
Fig. 9
7
Page 8

Fig. 10
Cutting Guide
• Now make your nishing cut from the topside of the branch
smoothly and neatly against the main member so the bark
will grow back to seal the wound.
• Release the trigger ON/OFF switch as soon as the cut is
completed. Failure to follow proper cutting procedures will
result in the bar and chain binding and becoming pinched
or trapped in the limb.
Limbing
Limbing is removing branches from a fallen tree.
• You should cut limbs one at a time. Remove the cut limbs
from the work area often to help keep the work area clean
and safe.
• Cut branches under tension from the bottom up to avoid
binding the Pole Saw.
• Keep the tree between you and the Pole Saw while limbing.
Cut from the side of the tree opposite the branch you are
cutting.
bar can be driven rapidly back toward the operator. Either
of these reactions can cause loss of saw control, which can
result in serious injury. Do not rely exclusively upon the safety
devices built into the saw. As a Pole Saw user, you should take
several steps to keep your cutting jobs free from accident or
injury.
You should follow the following precautions to minimize
kickback:
• Before you start the unit, make sure the Pole Saw is not
contacting any object.
• Always grip the pole and handle rmly with both hands
when unit is running. Place one hand on the pole and your
other hand on the molded handle with your thumbs and
ngers encircling the pole and handle. A rm grip together
with positioning the handle against your body will help you
maintain control of the saw if kickback occurs.
• Make sure that the area in which you are cutting is free from
obstructions.
Fig. 11
Kickback Danger Zone
If the Saw Becomes Pinched or Trapped
1. Wait for the blade to stop, wait ve minutes for the saw to
cool, unplug the power cord and wear gloves to protect
your hands from the chain teeth.
2. If you can reach the limb from the ground, lift the limb
while holding the saw. This should release the “PINCH”
and free the saw.
3. If the saw is still trapped, call a professional for assistance.
Minimize Kickback
Kickback may occur when the moving Chain contacts an
object at the upper portion of the tip of the guide bar or when
the wood closes in and pinches the Pole Saw in the cut.
Contact at the upper portion of the tip of the guide bar can
cause the chain to dig into the object and stop the chain for an
instant. The result is a lightening fast, reverse reaction, which
kicks the guide bar up and back toward the operator. If the
Pole Saw is pinched along the top of the guide bar, the guide
• Do not let the kickback danger zone area of the guide bar
contact a log, branch, fence or any other obstruction that
could be hit while you are operating the Saw (Fig. 11).
• Always cut with the unit running at full speed. Fully squeeze
the ON/OFF trigger and maintain a steady cutting speed.
• Wear non-slip gloves for maximum grip and protection.
• Extend the Pole only to the length required to reach the limb
cut. Do not extend the Handle above waist height.
Maintaining Your Corded
Pole Saw
This chapter explains how to adjust the chain tension, sharpen
the chain and guide bar maintenance.
mWARNING! Always unplug the power cord before
performing any adjustments, maintenance, or repairs to your
Pole Saw.
8
Page 9

Chain Tension
Check the chain tension before using the saw when the chain
is cold. The correct tension of a cold chain is when there is no
slack on the underside of the guide bar, the chain is snug, but
you can turn it by hand without binding.
During normal saw operation, the temperature of the chain
will increase. The drive links of a correctly tensioned warm
chain will hang approximately 0.050-inch (1.25mm) out of the
bar groove (Fig. 12). Be aware that a chain tensioned while
warm, may be too tight upon cooling. Check the “cold tension”
before next use. The chain must be re-tensioned whenever the
ats on the drive links hang out of the bar groove (Fig. 12).
Turn the saw over, check the underside of the guide bar, and
make sure that the lubrication holes and chain groove are free
from impurities.
Troubleshooting Your
Corded Pole Saw
Troubleshooting Tips
Most difculties are easy to x. Consult the troubleshooting
table for common problems and their solutions. If you continue
to experience problems or need repairs beyond these minor
adjustments, please call 1-866-766-9563 for assistance.
Fig. 12
NOTE: A new chain tends to stretch so check the chain
tension frequently and retension as required.
Properly Adjusted Warm Chain
Approximately .050 in. (1.25mm)
Chain Needs Tensioning
Chain Sharpening
For smooth and fast cutting, you need to maintain the chain
properly. The chain requires sharpening when the wood chips
are small and powdery, if you must force the chain through the
wood during cutting, or the chain cuts to one side.
mWARNING! Always unplug the power cord before
performing any adjustments, maintenance, or repairs to your
Pole Saw.
Troubleshooting Table
Problems Corrective Action
The saw
motor fails
to start
The saw
runs, but
the chain
speed is
low
Bar and
chain
running
hot and
smoking
• Check that you installed the power cord properly
into the Pole Saw power cord receptacle and you
plugged the power cord into a live 120 V outlet.
• Make sure that you fully push in the lock-off button
before squeezing the ON/OFF trigger switch.
• The chain is too tight, re-tension.
• The Chain tension is too tight, re-tension.
• The chain oil tank is empty, rell.
• The lubrication holes are plugged, clean them out.
Guide Bar Maintenance
When the guide bar shows signs of wear, turn it over on the
saw to distribute the wear for maximum bar life. Feathering or
burring of the bar rails is a normal process of bar wear. You
should smooth such faults with a le as soon as they occur.
Replace a bar with any of the following faults:
• Wear inside the bar rails permitting the chain to layover
sideways
• Bent guide bar
• Cracked or broken rails
• Spread rails
9
The saw
motor
runs, but
the chain
is not
turning
• The chain tension is too tight, re-tension.
• The guide bar or chain is damaged, inspect
and replace the damaged part.
Page 10

Daily Checklist, Cleaning and
Storing for your Pole Saw
To help maintain your Pole Saw for optimum performance, we
recommend you follow this checklist each time you use your
Pole Saw.
mWARNING! Do not plug in the power cord until you
have completed all of the daily checks.
INSPECT: Before plugging in the power cord, inspect for any
visible damage to the chain, bar guide, hand guard, or motor
housing.
• Inspect the oil port and bar guide rails and clean them to
remove any debris.
• Check the chain tension.
• Check the chain teeth for sharpness.
• Check the bar and chain oil level, ll with only new chain oil
specically formulated for chain saws.
NOISES: If you notice anything unusual, such as a vibration or
odd sound, shut the saw OFF immediately. Remove the power
cord and check the saw for any damage.
If you cannot nd the cause of the problem or are uncertain
what to do, then have the saw inspected by a qualied repair
shop before using it.
Service and Support
If your Pole Saw requires service or maintenance, please call
1-866-766-9563 for assistance.
Model and Serial Numbers
When contacting the company or reordering parts, you will
need to provide the model and serial numbers of your product.
These are found on the decal afxed to the housing or guard
of your Corded Pole Saw. Copy these numbers into the space
provided below.
Record the following numbers from the housing or handle of your
new product:
Model #:
S W J 8 0 0 E R M
Serial #:
mCAUTION!
• Remove the power cord and allow the saw to cool for at
least ve minutes before servicing or storing.
• If you drop the saw, carefully inspect it for damage. If the
guide bar is bent, housing cracked, or handles broken or
if you see any other condition that may affect the saw’s
operation, DO NOT USE, have your unit serviced.
Cleaning the Pole Saw
Use only mild soap and a damp cloth to clean the saw.
Never let any liquid get inside the motor housing and NEVER
immerse any part of the saw housing into a liquid.
Storage
• Ensure that the plastic bar cover is in place when storing.
• Do not store the saw near chemicals, such as fertilizers,
organic or other solvents. Do not expose brake uids,
gasoline, petroleum-based products, penetrating oils,
etc., to the plastic parts of the saw. These products are
often highly corrosive and may cause permanent damage,
weaken, or destroy the plastic to your saw.
• When not in use, your Corded Pole Saw should be stored
indoors in a dry and high or locked-up place, out of reach
of children.
10
Page 11

NOTES
11
Page 12

A One-Year Full Warranty
for residential use
in the United States and Canada
General Conditions:
Snow Joe®, LLC warrants this product to the original purchaser for one year against defects in material or workmanship when used
for normal residential purposes. Snow Joe
part, subject to the conditions, limitations, and exclusions set forth herein. Such repair or parts replacement will be free from charge to
the original purchaser except noted below.
The duration of the warranty applies only if the product is put to personal use around the household or residence. If the product is put
to any business use, commercial or industrial, then the duration of this warranty is 90 days from the date of original purchase. If any
product is rented or leased, the duration of the warranty is 90 days from the date of original purchase.
It is the owner’s responsibility to perform correctly all maintenance, and minor adjustments explained in the owner’s manual.
Electric Products:
To obtain a replacement electric powered unit or repair the existing electric powered unit, you must return the complete unit and
postage prepaid to: Snow Joe Return Center, 86 Executive Avenue, Edison, NJ 08817.
Gasoline / Battery Products:
Limitations
• Batteries are warranted only for the period of 12 months after the date of purchase on a prorated basis. Rechargeable batteries
will be replaced free from charge during the rst 90 days. After the initial 90 days, batteries will be replaced at a prorated cost to
the customer.
• Idlers, cables, and electrical components are warranted to the original purchaser for use at household or residence for a period
of one year.
®
, LLC will repair any defect in material or workmanship, and repair or replace any defective
Exclusions
®
• Snow Joe
brand engines are covered under this warranty. All other engines and engine accessories are covered only by the
engine manufacturer’s warranty and are not covered by this warranty.
®
• Parts used that are not genuine Snow Joe
parts are not covered by this warranty.
• Damages resulting from misuse, alteration, improper assembly, improper adjustment, neglect, or accident which requires repair
is not covered under this warranty.
• Belts, augers, and tines are not covered under warranty – belts, augers, and tines wear out and can be purchased at
www.snowjoe.com or by calling 1-866-766-9563.
®
Snow Joe
obligating Snow Joe
, LLC may from time to time change the design of its products. Nothing contained in this warranty shall be construed as
®
, LLC to incorporate such design changes into previously manufactured products, nor shall such changes be
construed as an admission that previous designs were defective.
®
This warranty is intended to cover product defects only. Snow Joe
®
in connection with the use of the Snow Joe
Products covered by this warranty. This warranty does not cover any cost or expense
, LLC is not liable for indirect, incidental, or consequential damages
incurred by the purchaser in providing substitute equipment or service during reasonable periods of malfunction or non-use of this
product, while waiting for completion of repairs under this warranty. Some states do not allow exclusions of incidental or consequential
damages, so the above exclusions may not apply in all states. This warranty may give you specic legal rights in your state.
®
If you wish to contact Snow Joe
, please direct inquiries to the:
Customer Service Department
Snow Joe Center
86 Executive Avenue
Edison, NJ 08817
®
Customers who have purchased Snow Joe
products exported from the United States and Canada should contact their Snow Joe®
Distributor (Dealer) to obtain information applicable for your country, province, or state. If for any reason, you are not satised with the
®
distributor’s service, or if you have difculty obtaining warranty information, contact your Snow Joe
®
are unsatisfactory, please write to the Snow Joe
Center at the above address.
seller. If in the event your efforts
If you have any questions about your product warranty, please call 1-866-SNOW-JOE or visit us online at www.snowjoe.com.
12
 Loading...