

Page 1

30" ROUND FIRE PIT
Model SJFP30
A Division of Snow Joe®, LLC
IMPORTANT!
Safety Instructions
All Operators Must Read These
Instructions Before Use
Read all the instructions contained in this manual. Keep this
manual in a safe place, so that the information is available at
all times. If you give this equipment to another person, make
sure to provide these operating instructions. Basic safety
precautions should always be followed to reduce the risk of
re or explosion, which could cause property damage,
personal injury or death.
Notice the personal safety alert symbol
manual to draw your attention to a WARNING given along
with the particular operating instruction. This means that
the operation requires special ATTENTION, CAUTION and
AWARENESS.
m used in this
m FOR OUTDOOR USE ONLY
(outside any enclosure)
m WARNING
1. Improper installation, adjustment, alteration, service or
maintenance may result in property damage, injury or
death.
2. Throughly read the instructions for installation, operation
and maintenance before installing or servicing this
equipment.
3. Failure to follow these instructions could result in a re or
explosion, which could cause property damage, personal
injury or death.
m WARNING
1. This item is for outdoor use only, and should NEVER be
used in a building, garage or any other enclosed area.
2. DO NOT use this re pit for indoor heating. TOXIC carbon
monoxide fumes can accumulate and cause asphyxiation
or death.
3. This re pit is NOT for commercial use.
4. This re pit is NOT to be operated by children.
Form No. SJ-SJFP30-880E-M
OPERATOR’S MANUAL
5. This re pit is NOT to be used in or on boats or
recreational vehicles.
6. Always use this equipment in accordance with all
applicable local, state and national regulations. Contact
your local re department for details on outdoor burning.
7. When using this re pit, exercise the same precautions as
you would with any open re.
8. The use of alcohol, prescription or non-prescription drugs
may impair the consumer’s ability to properly assemble or
safely operate this re pit.
9. DO NOT use this re pit without reading this entire
manual and all WARNINGS, cautions and instructions.
10. This re pit is designed for use with dry, seasoned
hardwood. Such wood will burn hotter, burn more
completely and create less smoke.
11. DO NOT burn charcoal briquettes, lump charcoal,
manufactured logs, driftwood, trash, leaves, papers,
cardboard, plywood, or painted, stained or
pressure-treated wood. Avoid using softwoods such as
pine or cedar that can throw sparks.
12. DO NOT alter this re pit in any manner.
13. DO NOT use this re pit until it is COMPLETELY
assembled and all parts are securely fastened and
tightened.
14. DO NOT store or use gasoline or other ammable vapors
or liquids in the vicinity of this or any other appliance.
15. DO NOT store or use an LP gas cylinder within 10 feet
(3.05 m) of this re pit while it is in operation.
16. DO NOT use this re pit near automobiles, trucks, vans or
recreational vehicles.
17. DO NOT use in an explosive atmosphere. Keep outdoor
area clean and free from combustible materials, gasoline
and other ammable liquids.
18. DO NOT use this re pit under an overhead or near any
unprotected combustible constructions. Avoid using near
or under overhanging trees and shrubs.
19. Always use this re pit on a hard level non-combustible
surface such as concrete, rock or stone. An asphalt or
blacktop surface may not be acceptable for this purpose.
DO NOT use on wooden decks.
20. Always empty this re pit before each use.
21. DO NOT wear ammable or loose clothing when operating
this re pit.
22. DO NOT use in windy conditions.
© 2014 by Snow Joe®, LLC
All rights reserved. Original instructions.
SAVE THESE INSTRUCTIONS
1
Page 2

23. DO NOT use this re pit unless spark guards are securely
in place.
24. DO NOT use gasoline, kerosene, diesel fuel, lighter uid or
use these items to relight res.
25. Keep all electrical cords away from a hot re pit.
26. All surfaces of this re pit are hot when in operation.
To avoid burns, do NOT touch the re pit until it has
completely cooled, unless you are wearing protective
gear (i.e. pot holders, gloves, BBQ mittens, hot pads, etc.)
Never touch ashes or coals to see if they are hot.
27. DO NOT leave a lit re pit unattended, especially around
children and pets.
28. DO NOT attempt to move or store this re pit until all of
the ashes and coals are completely extinguished.
29. DO NOT remove ashes or coals until they are completely
extinguished.
30. Use heat-resistant gloves or hot pads when contacting
handles.
31. Use long, sturdy re pit tools when adding or moving logs.
32. DO NOT place wood directly onto the bottom of the re
pit. Place wood only on the log grid.
33. DO NOT overload the re pit. DO NOT add additional
rewood until the re burns down.
NOTICE: If any portion of the bowl lid or spark guard
of this re pit glows red, this indicates that the re pit is
overloaded.
34. DO NOT lean over this re pit when lighting or when in
use.
35. DO NOT place a hot spark guard or hot re pit tools onto
combustible surfaces such as grass, wooden decks or
furniture.
36. Avoid breathing smoke from the re and avoid getting it
into your eyes.
37. This re pit should be thoroughly inspected and cleaned
on a regular basis.
38. After a period of storage and/or non-use, check for signs
of damage and creosote buildup. DO NOT operate until all
necessary repairs and/or proper cleaning procedures have
been successfully executed.
39. Death, serious injury or damage to property may occur if
any of the above precautions are not followed exactly.
2
Page 3
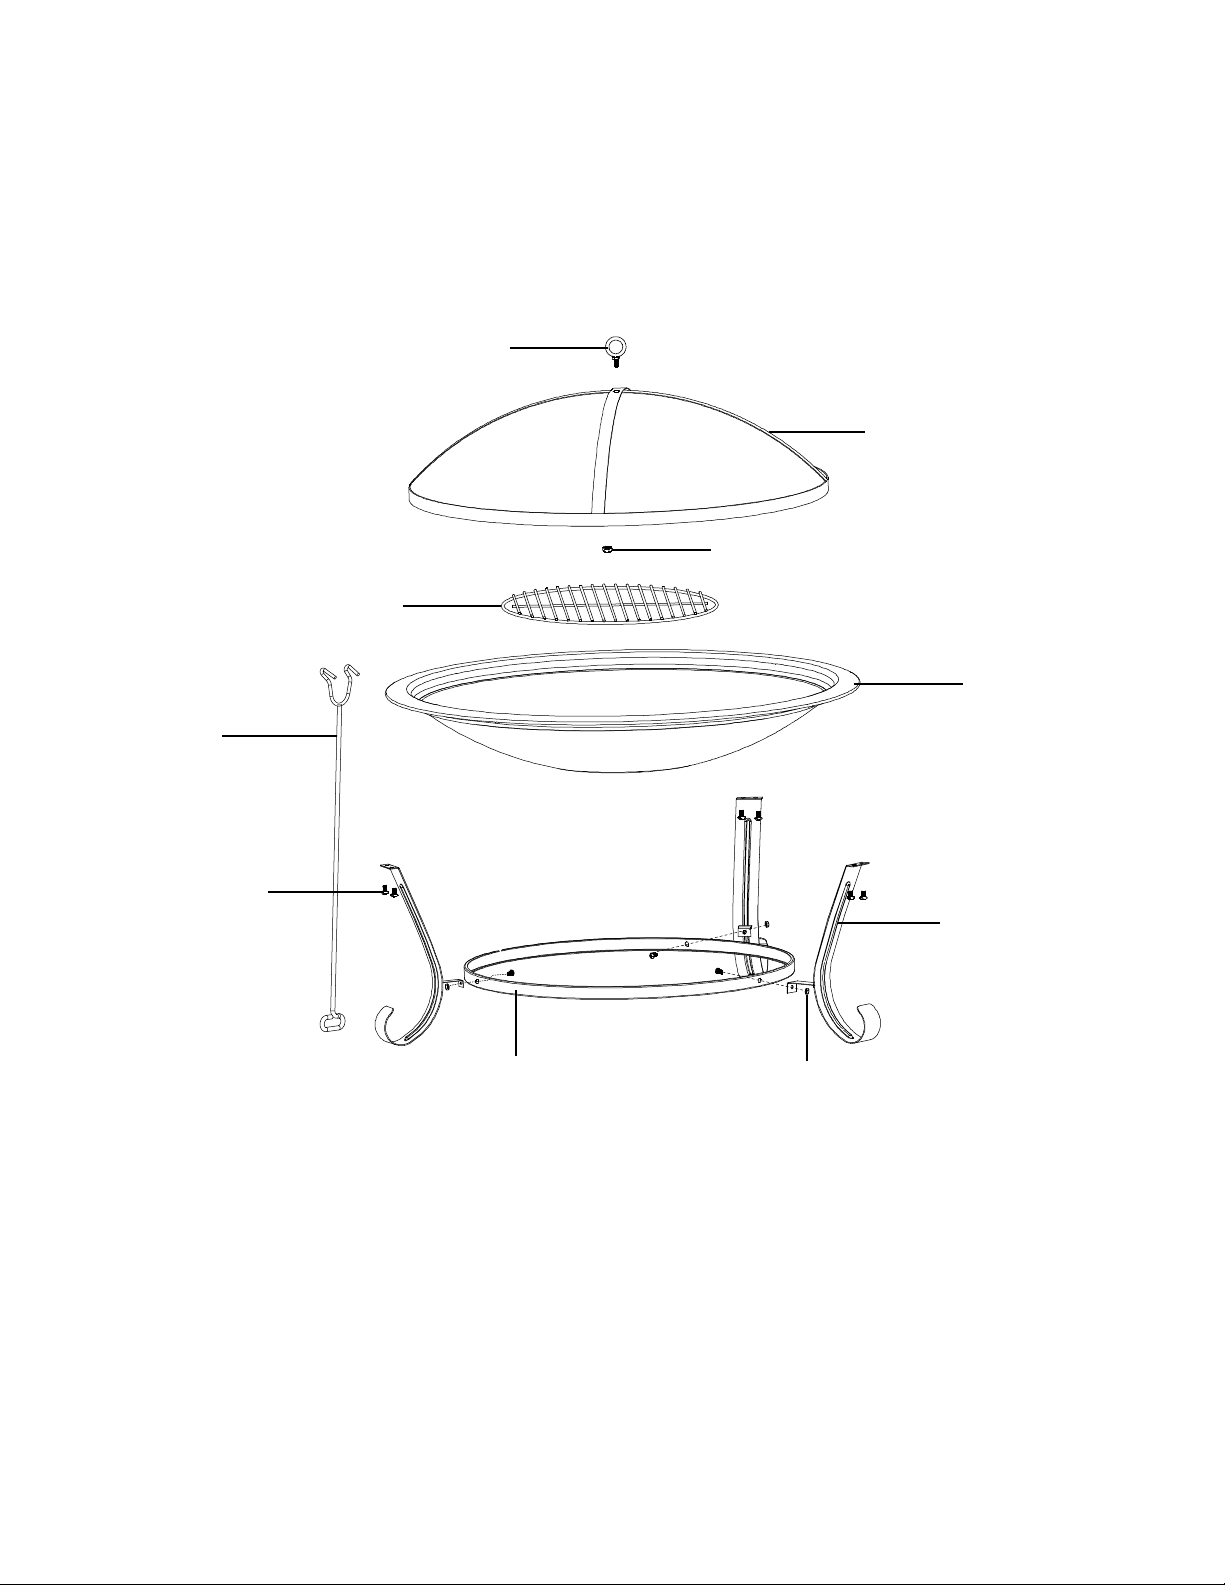
Know Your Fire Pit
Read the owner’s manual and safety rules carefully before using your re pit. Compare the illustration below to the actual unit in
order to familiarize yourself with the location of the various parts and hardware. Save this manual for future reference.
1. M6 ring screw
2. Screen
3. M6 ange nut
4. Log grid
5. Fire bowl
6. Screen hook
7 Leg (3)
8. Connecting ring
9. M6 x 8 mm bolt (9)
10. M6 nut (3)
6
1
2
3
4
5
D
9
7
Technical Data
Fire Bowl Diameter 29.5 in. (75 cm)
Fire Bowl Depth 4.9 in. (12.5 cm)
Protective Screen Dimensions 25.8 in. x 6.7 in.
(65.5 cm x 17 cm)
8
Screen Hook Dimensions 24 in. (61 cm)
Log Grid Dimensions 16.5 in. (42 cm)
Temperature Resistance 1,022 ºF (550 ºC)
Weight 11 lbs (5 kg)
10
3
Page 4

Unpacking
NOTE: Before beginning assembly, make sure that all of
the parts and hardware listed below are present. If any part
is missing or damaged, do not attempt to assemble the
product. Contact the Snow Joe
department at 1-866-SNOWJOE (1-866-766-9563).
®
+ Sun Joe® customer service
Parts
1. Screen hook 4. Fire bowl
2. Screen 5. Connecting ring
3. Log grid 6. Leg (3)
Hardware
7. M6 x 8 mm bolt (9)
8. M6 ring screw
9. M6 ange nut
10. M6 nut (3)
Assembling the Fire Pit
Tools required (not included): Phillips screwdriver
2. Place the re bowl upside down, and connect the legs to
the re bowl using the remaining six (6) M6 x 8 mm bolts
(Fig. 2).
M6 x 8 mm
bolt
Fire Bowl
Hardware used: M6 x 8 mm bolt (x6)
Fig. 2
3. Attach the M6 ring screw to the top of the screen and
secure it with the M6 ange nut (Fig. 3).
Choose a soft and level location for assembly. Remove all
parts from the packaging, and check for missing parts.
1. Attach the 3 legs to the connecting ring using three
(3) M6 x 8 mm bolts and three (3) M6 nuts (Fig. 1).
Connecting
ring
Leg
M6 x 8 mm
bolt
Hardware used: M6 x 8 mm bolt (3)
Hardware used: M6 nut (3)
M6 nut
M6 ring screw
Screen
M6 ange
nut
Hardware used: M6 ring screw
Hardware used: M6 ange nut
Fig. 3
Fig. 1
4
Page 5

4. Place the log grid on top of re bowl followed by the
screen and the screen hook (Fig. 4).
Screen hook
Screen
Log grid
1. Using the hook that is provided and heat-resistant gloves,
carefully remove the spark guard.
2. Using a long-handled re pit tool, shift the coals and logs
to allow for additional air ow.
3. DO NOT add gasoline, kerosene, diesel fuel, lighter uid or
alcohol to relight or enhance an existing re.
4. Use a match to light the kindling or re-starter.
5. Wait until glowing coals have developed before adding
any additional wood. If additional wood is required, place
the wood on top of the coals, taking care not to shift the
ashes.
Extinguishing
1. Let the re burn itself out.
2. DO NOT use water to extinguish the re. Such action is
dangerous and can cause irreversible damage to the re
pit.
Inspecting
This re pit should be inspected on a regular basis to ensure
product safety and longer product life.
m DO NOT attempt to inspect this re pit until the re is
COMPLETELY out and the re pit has COMPLETELY cooled.
1. Check components for any signs of damage or rust.
2. If damage to any component is detected, DO NOT use the
re pit until repairs are properly performed.
Fig. 4
Care and Maintenance
Lighting
1. Make sure there is only a small amount of ash in the
bottom of the bowl.
2. Place a layer of dry kindling or a natural re-starter onto
the center of the log grid.
3. Above the kindling or re-starter, place a layer of dry
seasoned hardwood that is cut to lengths that are no
more than 3/4 the diameter of the bowl.
4. Use a match to light kindling or re-starter.
5. Using the hook that is provided and heat-resistant gloves,
replace the spark guard once the kindling or re-starter is
lit.
Tending the Fire
You may need to shift and/or add logs for an ideal re pit
experience. DO NOT place a hot spark guard or hot re pit
tools onto combustible surfaces such as grass, wooden decks
or furniture.
Cleaning
This re pit should be cleaned on a regular basis to promote
safer experiences and longer product life.
NOTE: After repeated use, a slight discoloration of the nish
may occur.
DO NOT attempt to clean this re pit until the re is
COMPLETELY out and the re pit has COMPLETELY cooled.
DO NOT use oven cleaner or abrasive cleaners as they will
damage this product.
DO NOT clean any part of this re pit in a self-cleaning oven as
this may damage the nish.
1. Wipe exterior surfaces with a mild dish washing detergent
or baking soda.
2. For stubborn surfaces, use a citrus-based degreaser and
a nylon scrubbing brush
3. Rinse and clean with water.
4. Remove built-up creosote from components with a
chimney cleaning product.
Storage
DO NOT move or store this re pit until the re is
COMPLETELY out and the re pit is cool to the touch.
1. Once the re is out, the coals have completely cooled and
the re pit can be safely handled, remove and properly
dispose the ashes.
5
Page 6

2. Store the re pit in a clean and dry location to maximize
product life.
3. Store the re pit assembled in a safe location away from
children and pets.
Support
If your Sun Joe® Fire Joe SJFP30 round re pit requires
-service or maintenance, please call 1-866-SNOWJOE
(1-866-766-9563) for assistance.
Accessories
Model and Serial Numbers
When contacting the company, reordering parts or arranging
service from an authorized dealer, you will need to provide
the model and serial numbers, which can be found on the
decal located on the unit. Copy these numbers into the space
provided below.
Record the following numbers from your new product:
Model #:
S J F P 3 0
Serial #:
WARNING! ALWAYS use only authorized Snow Joe
m
replacement parts or accessories that are not intended for use with this re pit. Contact Snow Joe
unsure whether it is safe to use a particular replacement part or accessory with your re pit. The use of any other attachment or
accessory can be dangerous and could cause injury or mechanical damage.
®
+ Sun Joe® replacement parts and accessories. NEVER use
®
+ Sun Joe® if you are
ModelAccessories Item
1
Screen hook
2
Screen guard
3
Log grid
SJFP30-A
SJFP30-B
SJFP30-C
4
Fire bowl
NOTE: Accessories are subject to change without any obligation on the part of Snow Joe
can be ordered online at snowjoe.com or via phone by contacting the Snow Joe
at 1-866-SNOWJOE (1-866-766-9563).
®
+ Sun Joe® customer service center
6
SJFP30-D
®
+ Sun Joe®. Accessories
Page 7

SNOW JOE® + SUN JOE® CUSTOMER PROMISE
ABOVE ALL ELSE, Snow Joe® + Sun Joe® are dedicated to you, our customer. We strive to make your experience
as pleasant as possible. Unfortunately, there are times when a product does not work or breaks under normal
operating conditions. We think it’s important that you know what you can expect from us. That’s why we created
the Snow Joe® + Sun Joe® promise.
OUR PROMISE: Snow Joe® + Sun Joe® warrant new products for two years from the date of purchase. If your product
does not work, or there’s an issue with a specic part, we will x this by either sending you a free replacement part or
by sending you a new or comparable product at no charge. How cool is that! Before you know it, you’ll be back in
action cutting, sawing, mowing, washing and…?
GENERAL CONDITIONS:
®
Snow Joe
+ Sun Joe® operating under Snow Joe®, LLC warrants
this new product to the original purchaser for two years against
defects in material or workmanship when used for normal
residential purposes. If a replacement part or product is needed,
it will be sent free of charge to the original purchaser except as
noted below.
The duration of this warranty applies only if the product is put
to personal use around the household. If the product is put to
any business, commercial or industrial use or is rented or leased,
then the duration of this warranty is 90 days from the date of
original purchase. It is the owner’s responsibility to correctly
perform all maintenance and minor adjustments explained in
the owner’s manual.
HOW TO OBTAIN YOUR REPLACEMENT PART OR PRODUCT:
To obtain a replacement part or product, please visit
snowjoe.com/help or email us at help@snowjoe.com for
instructions. Please be sure to register your unit beforehand to
speed up this process. Certain products may require a serial
number, typically found on the decal axed to the housing
or guard of your product. All products require a valid proof
of purchase.
EXCLUSIONS:
• Wearing parts like belts, augers, chains and tines are
not covered under this warranty. Wearing parts can be
purchased at snowjoe.com or by calling 1-866-SNOWJOE
(1-866-766-9563).
• Batteries are covered in full for 90-days from the date of
purchase.
Snow Joe® + Sun Joe® may from time to time change the design
of its products. Nothing contained in this warranty shall be
®
construed as obligating Snow Joe
+ Sun Joe® to incorporate
such design changes into previously manufactured products, nor
shall such changes be construed as an admission that previous
designs were defective.
This warranty is intended to cover product defects only.
®
Snow Joe
, LLC is not liable for indirect, incidental or
consequential damages in connection with the use or misuse of
®
the Snow Joe
+ Sun Joe® products covered by this warranty.
This warranty does not cover any cost or expense incurred
by the purchaser in providing substitute equipment or service
during reasonable periods of malfunction or non-use of this
product while waiting for a replacement part or unit under this
warranty. Some states do not allow exclusions of incidental or
consequential damages so the above exclusions may not apply
in all states. This warranty may give you specic legal rights in
your state.
HOW TO REACH US:
We’re here to help Monday through Friday from 9AM to 6PM EST.
You can reach us at 1-866-SNOWJOE (1-866-766-9563), online
at snowjoe.com, via email at help@snowjoe.com or tweet us
@snowjoe.
EXPORTS:
®
Customers who have purchased Snow Joe
+ Sun Joe®
products exported from the United States and Canada should
®
contact their Snow Joe
+ Sun Joe® distributor (dealer) to obtain
information applicable to your country, province or state. If for
any reason, you are not satised with the distributor’s service,
or if you have diculty obtaining warranty information, contact
®
your Snow Joe
+ Sun Joe® seller. If in the event your eorts are
unsatisfactory, please reach out to us directly.
7
Page 8

snowjoe.com
 Loading...