

Page 1

40 V Cordless Snow Blower
40 V Cordless Snow Blower
Model No. iON18SBRM
A Division of Snow Joe®, LLC
IMPORTANT!
Safety Instructions
All Operators Must Read These
Instructions Before Use
Read all instructions when using cordless snow blowers.
Basic safety precautions should always be followed to reduce
the risk of re, electric shock, and personal injury.
General Safety Rules
Notice the personal safety alert symbol m used in this
manual to draw your attention to a WARNING given along
with the particular operating instruction. This means that
the operation requires special ATTENTION, CAUTION, and
AWARENESS.
• Keep work area clean and well lit – Cluttered, dark areas
invite accidents.
• Keep bystanders away – All bystanders and pets should
be kept a safe distance away from the work area.
• Dress properly – Do not wear loose clothing or jewelry.
They can get caught in moving parts. Protective rubber
gloves and non-slip footwear are recommended when
working outdoors.
• Use the right product – Do not use this machine for any
job except that for which it is intended.
•
mCAUTION! – Exercise caution to avoid slipping or falling.
Wear protective footwear that will protect your feet and
improve your footing on slippery surfaces.
• Use safety glasses – Also use safety footwear, snug-tting
clothing, protective gloves, hearing and head protection.
• Do not force the snow blower – Use the snow blower
at the rate for which it was designed to ensure optimal
performance and safe operation.
• Stay alert – Watch what you are doing. Use common
sense. Do not operate the snow blower when you are tired
or under the inuence of alcohol or drugs.
• Do not overreach –
all times.
• Store indoors – When not in use, the snow blower should
be kept dry and stored out of the reach of children in a high
or locked place.
• Maintain snow blower with care – Follow instructions for
lubricating and changing accessories.
Keep proper footing and balance at
Form No. SJ-iON18SBRM-880E
OPERATOR’S MANUAL
mWARNING! Turn o the power switch and disconnect
the battery before making any adjustments, inspecting,
servicing, changing accessories, cleaning the snow blower,
or when any other dangerous conditions present. Any
such operation should be performed after revolving parts
inside the snow blower stop completely. Such preventive
safety measures reduce the risk of starting the power tool
accidentally.
mWARNING! When replacing any parts, you must strictly
observe the instructions and procedures described in this user
manual. Special care should be paid to any rubber parts, since
these parts may increase the engine load and decrease its
mechanical power if damaged.
mWARNING! If you notice that the snow blower is not
running properly or hear abnormal sounds from the engine
when it is in use, immediately stop the machine, disconnect
the battery, and contact your service center.
• Surfaces – This snow blower is intended for use on
paved surfaces. Do not use on gravel, stone or other
unpaved surfaces unless the snow blower is adjusted for
such surfaces according to the instructions given in the
operator’s manual.
• Moving parts present risks – Keep your face, hair,
clothing, hands, and feet away from moving parts. All
guards and safety attachments must be installed properly
before using the unit. Shut o and disconnect the battery
before touching any parts other than the handles and
switch.
• Avoid unintentional starting – Make sure the safety switch
and the switch bar lever are in the o position before
inserting the battery in the unit. Do not carry the snow
blower with the safety switch and the switch bar lever
engaged.
• Do not overreach – Maintain proper footing and balance
at all times. Place heels rmly on the ground and tightly
grasp the handle bar. Watch for uneven surfaces and do not
overreach. In case you fall or collide with the snow blower,
inspect the unit for any damages or cracks. When stepping
backwards, be careful to avoid obstacles beneath your feet
or behind you to avoid falling.
mWARNING! If the snow blower strikes any object,
follow these steps:
i) Stop the snow blower. Remove the battery.
ii) Inspect for damage.
iii) Repair any damage before restarting and operating
the snow blower.
© 2014 by Snow Joe®, LLC
All rights reserved. Original instructions.
SAVE THESE INSTRUCTIONS
1
Page 2

Battery & Charger Safety
Instructions
mWARNING! Use only approved replacement batteries;
other batteries may damage the snow blower and cause it to
malfunction, which can lead to personal injury.
mCAUTION! To reduce the risk of injury, charge the
EcoSharp
lithium-ion charger, the iCHRG40. Other types of chargers may
cause personal injury or damage. Do not wire a battery pack
to a power supply plug or car cigarette lighter. Battery packs
will be permanently disabled or damaged if such unacceptable
measures are taken.
• Avoid dangerous environments – Do not charge the
• Charge in a well ventilated area – Do not block the
NOTE: The safe temperature range for the battery is
• Maintain charger cord – When unplugging the charger, pull
• Do not use an extension cord unless it is absolutely
• Charger iCHRG40 is rated for 120 volt AC only – The
• Use only recommended attachments – Use of an
• Unplug charger when not in use – Make sure to remove
™
iBAT40 lithium-ion pack only in its designated
battery pack in rain, snow, damp, or wet locations. Do not
use the battery pack or charger in the presence of explosive
atmospheres (gaseous fumes, dust, or ammable materials)
because sparks may be generated when inserting or
removing the battery pack, which could potentially lead to
a re.
charger vents. Keep them clear to allow for proper
ventilation. Do not allow smoking or open ames near a
charging battery pack. Vented gases may explode.
-4°F (-20°C) to 113°F (45°C). Do not charge the battery
outside in freezing weather; charge it at room temperature.
the plug rather than the cord to reduce the risk of damage
to the electrical plug and cord. Never carry the charger
by its cord. Keep the cord away from heat, oil, and sharp
edges. Make sure the cord will not be stepped on, tripped
over, or subjected to damage or stress. Do not use the
charger with a damaged cord or plug. Replace a damaged
charger immediately.
necessary – Using the wrong, damaged, or improperly
wired extension cord poses a risk of re and electric shock.
If an extension cord must be used, plug the charger into
a properly wired 16 gauge or larger extension cord with
blades that are the same number, size, and shape as the
blades on the charger. Make sure that the extension cord is
in good electrical condition.
charger must be plugged into an appropriate receptacle.
attachment not recommended or sold by the battery
charger or battery pack manufacturer may result in a risk of
re, electric shock, or personal injury.
battery packs from unplugged chargers.
mWARNING! To reduce the risk of electric shock,
always unplug the charger before performing any cleaning or
maintenance task. Do not allow water to ow into the AC/DC
plug. Use a Ground Fault Circuit Interrupter (GFCI) to reduce
shock hazards.
• Do not burn or incinerate battery packs – Battery packs
may explode, causing personal injury or damage. Toxic
fumes and materials are created when battery packs are
burned.
• Do not crush, drop, or damage battery packs – Do not
use the battery pack or charger if they have sustained a
sharp blow, been dropped, run over, or damaged in any
way (e.g. pierced with a nail, hit with a hammer, stepped on,
etc.).
• Do not disassemble – Incorrect reassembly may pose
a serious risk of electric shock, re, or exposure to toxic
battery chemicals. If the battery or charger are damaged,
contact your Snow Joe
service center.
• Battery chemicals cause serious burns – Never let a
damaged battery pack contact the skin, eyes, or mouth.
If a damaged battery pack leaks battery chemicals, use
rubber or neoprene gloves to safely dispose of it. If skin
is exposed to battery uids, wash the aected area with
soap and water and rinse with vinegar. If eyes are exposed
to battery chemicals, immediately ush with water for 20
minutes and seek medical attention. Remove and dispose
of contaminated clothing.
• Do not short circuit – A battery pack will short circuit if
a metal object makes a connection between the positive
and negative contacts on the battery pack. Do not place a
battery pack near anything that may cause a short circuit,
such as coins, keys, or nails. A short-circuited battery pack
may cause re and personal injury.
• Store your battery pack and charger in a cool,
dry place – Do not store the battery pack or charger
where temperatures may exceed 120ºF (50ºC), such as in
direct sunlight or inside a vehicle or metal building during
the summer.
®
dealer or Snow Joe® customer
Additional Safety Instructions
Safety Instructions for Walk-Behind
Snow Blowers
• Read the operator’s manual carefully – Learn your snow
blower’s applications and limitations as well as the specic
potential hazards related to this machine. Do not use this
machine for any purpose other than the one for which it
was designed. Failure to adhere to these precautions may
cause mechanical defaults, serious damage, or personal
injury.
• Preliminary unit inspection – Thoroughly inspect the
unit before use. Make sure all the parts are secure and
installed correctly. If you notice any abnormalities, do not
use the machine until it has been properly repaired. Always
2
Page 3

perform a test run the rst time you use the snow blower
or after replacing parts to ensure that the unit is functioning
properly.
• Preliminary area inspection – Clear the area to be plowed
before each use. Remove all objects such as rocks, broken
glass, nails, wire, or string, which can be thrown by or
become entangled in the snow blower. Keep the area of
operation clear of all persons, children, and pets.
• Excessive force – The snow blower was designed to
respond at a certain rate for various snow conditions for
optimal safety and performance. Do not force it; keep the
applied pressure constant throughout its operation.
• Malfunctioning switch – Do not use the snow blower if
the switch does not turn it on and o. Any appliance that
cannot be controlled by the switch is not safe to use and
must be repaired.
• Hitting an object – If the snow blower accidentally strikes
an object, rst stop the snow blower and remove the
battery; next, inspect for damage; nally, repair or replace
any damaged part before restarting and operating the
snow blower.
• Discharge chute safety – Never direct the snow discharge
chute at the operator, at bystanders, at vehicles, or at
windows. The discharged snow, which may contain foreign
objects accidentally picked up by the snow blower, can
cause serious damage and personal injury. Do not use your
hands to unclog the discharge chute. Stop the motor before
removing debris.
• Hand-held operating position – Operation of the snow
blower in the hand-held position is unsafe.
• Abnormal operation – If you nd that the snow blower
is not running properly or hear abnormal sounds from the
engine, immediately stop the machine, remove the battery,
and contact your original distributor.
• Noise control – When using the snow blower, respect
the local laws and regulations regarding noise control and
environmental protection. To avoid noise disturbance, you
should carefully decide upon an appropriate operation time
and consider the surrounding conditions.
• When work is completed – Disconnect the snow blower
from the power source when not in use, when changing
accessories, and before performing any maintenance task.
• Store safely – Store the snow blower indoors in a dry area
between uses. Keep in a locked area, where children and
unauthorized users cannot gain access. Do not store the
machine while it is still connected to the power source. It
may cause damage and injury.
• Maintain for safety and longevity – Check for
misalignment or binding of moving parts, breakage of
parts, and any other conditions that may aect the unit’s
operation. If damaged, repair or replace the damaged part
before use. Use only those replacement parts made for your
model. When replacing any parts, you must strictly observe
the instructions and procedures described in this manual.
Special care should be paid to any rubber parts, since
these parts may increase the engine load and decrease its
mechanical power if damaged.
Electrical Safety
• Electrical plugs must match the outlet – Never modify
the plug in any way. Do not use any adapter plugs with
grounded appliances. Unmodied plugs and matching
outlets will reduce the risk of electric shock.
• Avoid accidental starting – Make sure the safety switch
and the switch bar lever is in the OFF position before
inserting the battery pack into the unit. Do not carry the
snow blower with the safety switch and switch bar lever
engaged.
3
Page 4
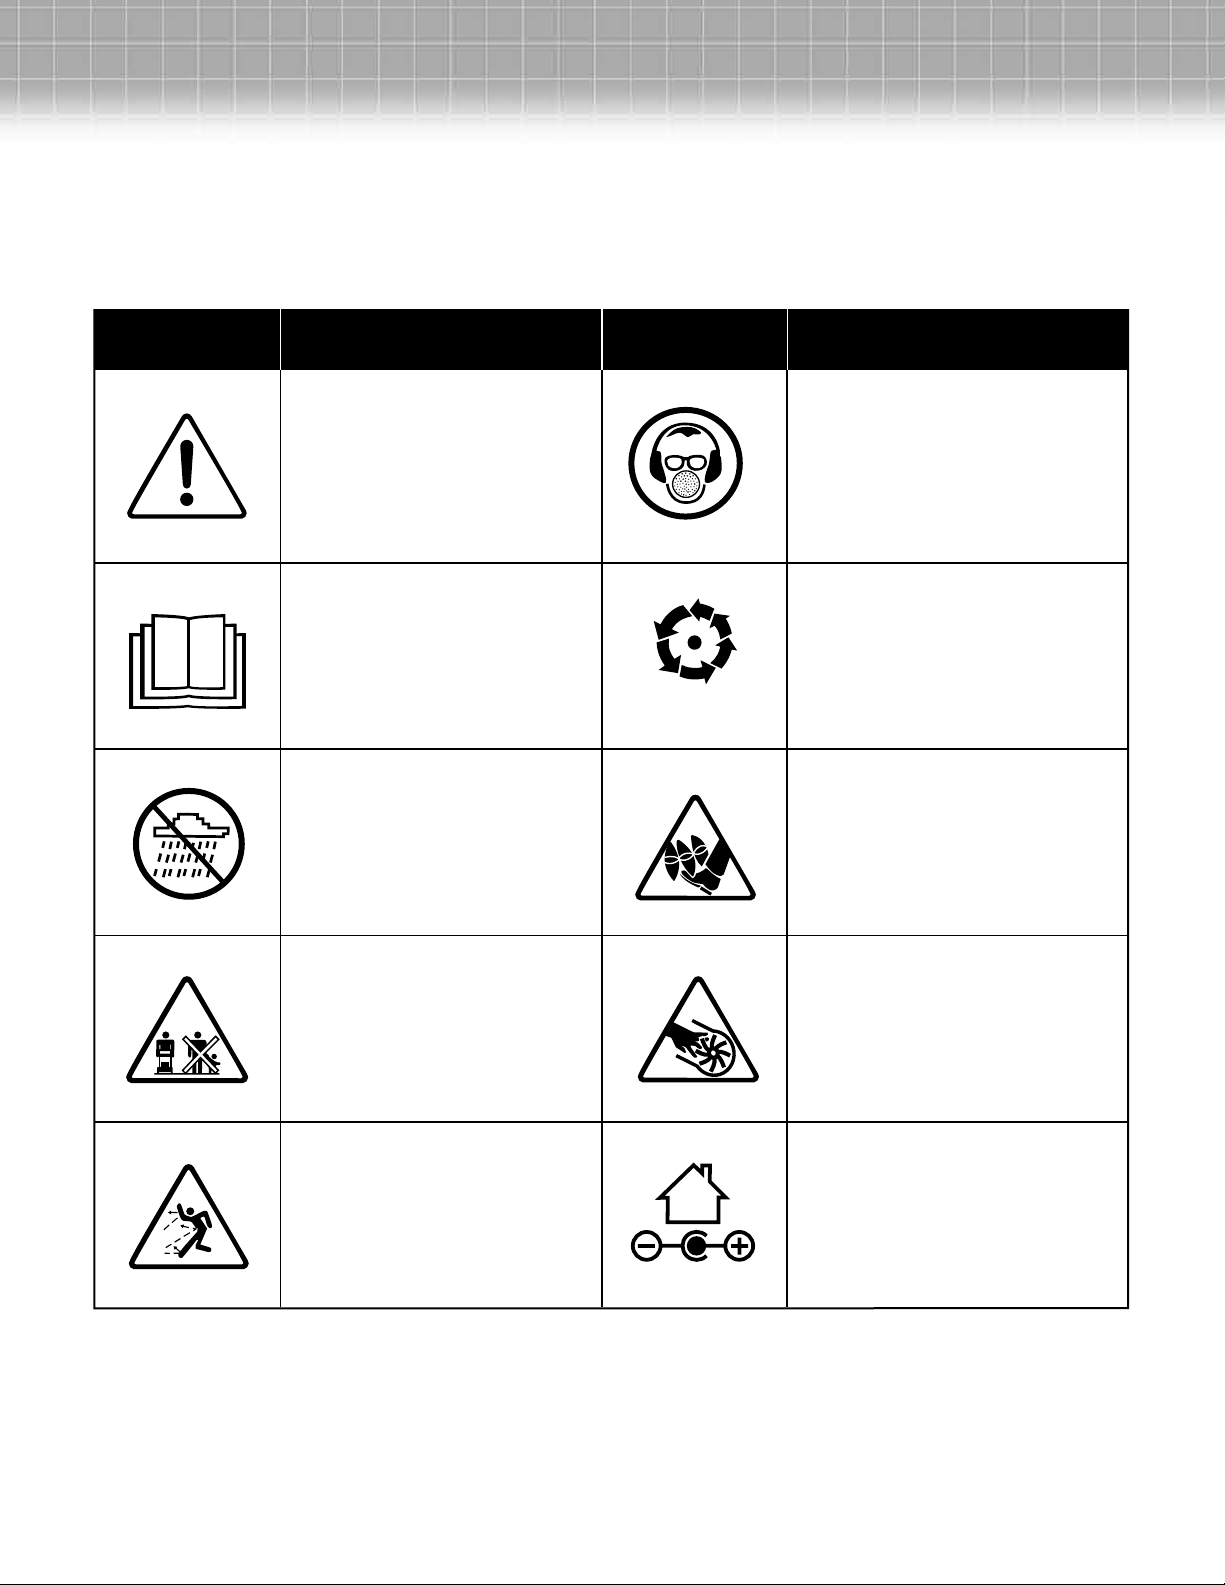
Safety Symbols
The following table depicts and describes safety symbols that may appear on this product. Read, understand, and follow all
instructions on the machine before attempting to assemble and operate.
Symbols Descriptions Symbols Descriptions
Wear hearing protection.
Safety Alert. Caution.
WARNING! To reduce the
risk of injury, user must read
instruction manual.
STOP
Wear eye protection.
Wear breathing protection.
The rotating part will
continuously run for several
seconds after you turn o the
machine.
Do not expose to rain.
Keep dry.
Keep the bystander away.
Use at a distance of at least
33 ft (10 m) from other people.
CAUTION! Beware
of ying debris.
DANGER! Keep hands and
feet away from openings while
the machine is running.
Rotating blades – Do not
use hands to unclog chute.
Stop motor before removing
debris.
Indoor use only. Only use
battery charger indoors.
4
Page 5
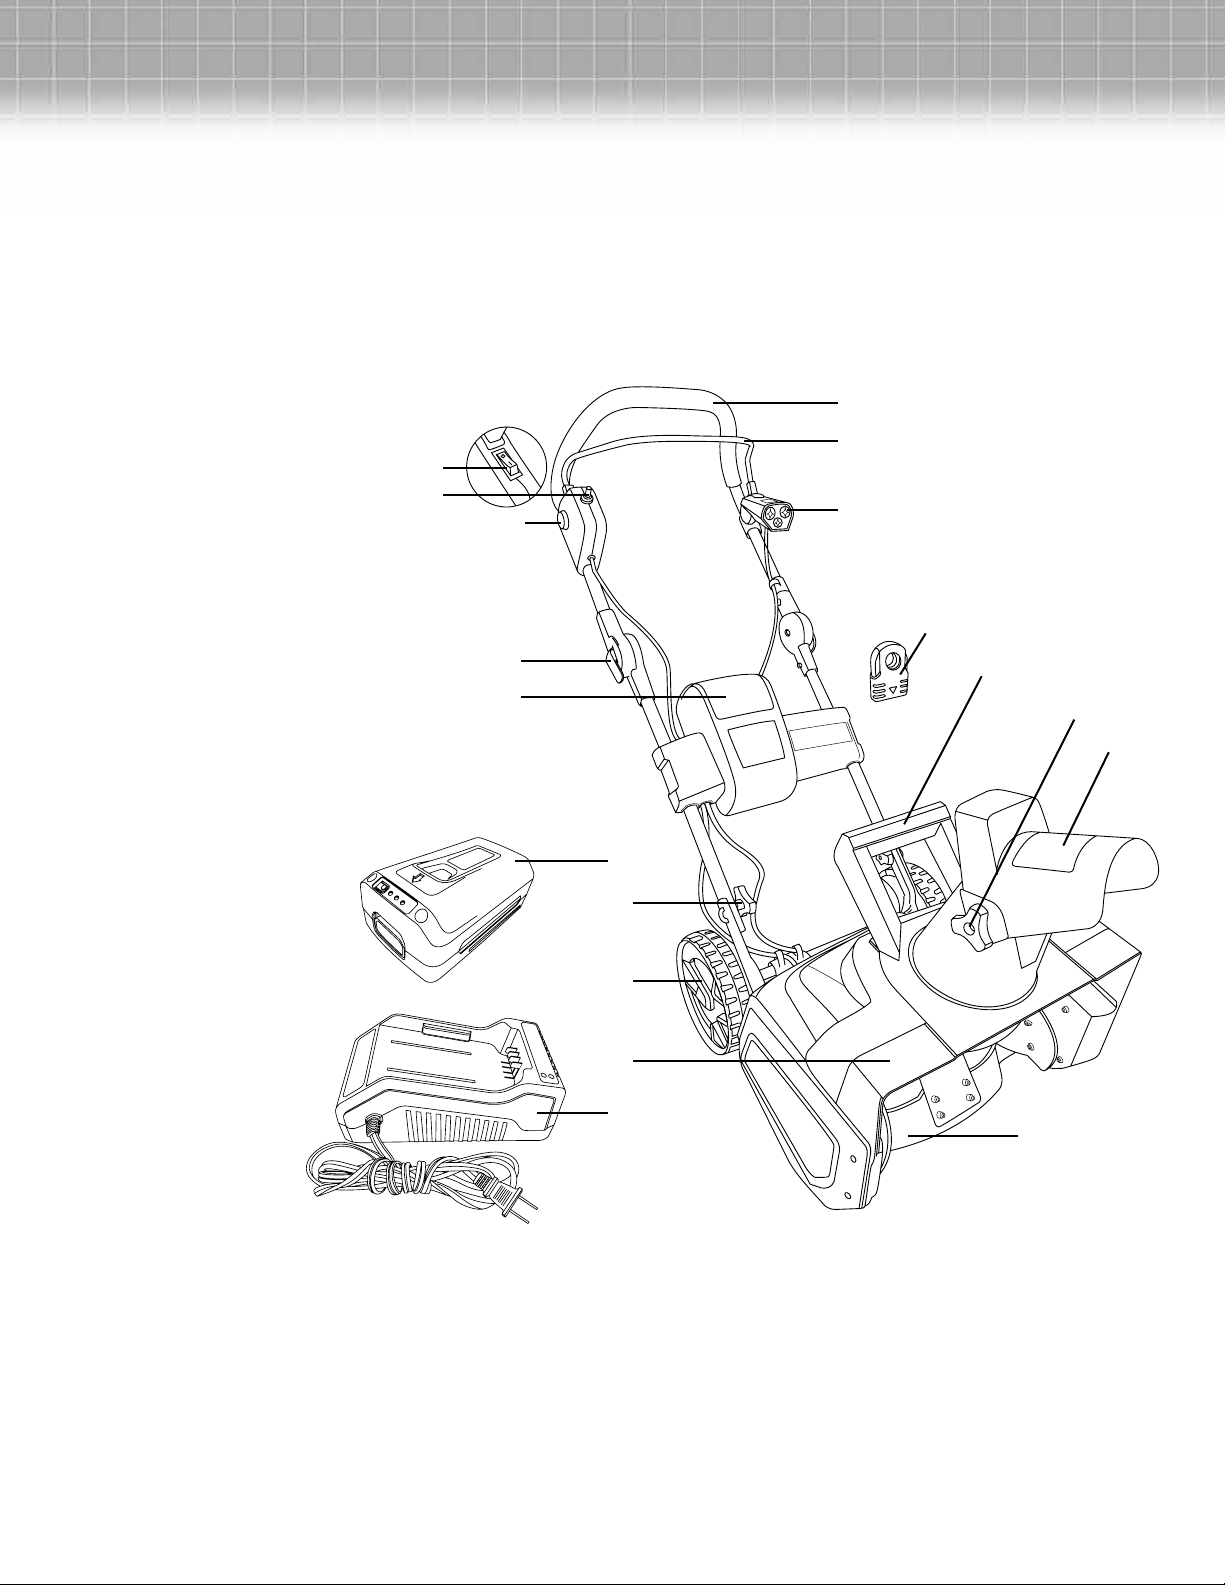
Know Your Cordless Snow Blower
Read the owner’s manual and safety rules carefully before operating the snow blower.
Compare the illustration below to the snow blower in order to familiarize yourself with
the location of the various controls and adjustments. Save this manual for future reference.
1. LED light switch
2. Chute remote switch
3. Safety switch button
4. Handle lock/Release clips (x2)
5. Battery compartment
™
6. EcoSharp
7. Handle knob
8. Wheels
9. Main cover
10. EcoSharp
11. Handle bar
12. ON/OFF switch bar lever
13. LED light
14. Safety key
15. Carrying or lifting handle (For transport only)
16. Deector knob
17. Chute deector
18. Auger
lithium-ion battery (iBAT40)
™
battery charger (iCHRG40)
1
2
11
12
3
13
14
4
5
15
16
17
6
7
Technical Data
Battery Voltage 40 V ~ 4 Ah
Charging Time 2.5 – 3 hours
No Load Speed 2,500 rpm
Clearing Width 18 in. (45.7 cm)
Depth of Snow Cut 8 in. (20.3 cm)
8
9
10
18
Throwing Distance (Max) 20 ft (6 m)
Plowing Capacity (Max) 495 lbs/min (225 kg/min)
Directional Control 180º auto-rotate chute
LED Light 3 watt
Weight (with battery installed) 31.5 lbs (14.3 kg)
5
Page 6
Unpacking
2. Secure the connection of the middle frame to the upper
frame by fastening the handle locks on each side (Fig. 2).
Carton Contents:
• Cordless snow blower
™
• 40 V EcoSharp
• EcoSharp
• Safety key
• Manual
1. Carefully remove the snow blower and all other items from
the shipping carton.
2. Inspect the product carefully to make sure no breakage or
damage occurred during shipping. If you nd damaged or
missing parts, DO NOT return the unit to the store. Please
call 1-866-766-9563.
NOTE: Do not discard the shipping carton and packaging
material until you are ready to use your new cordless snow
blower.
battery
™
battery charger
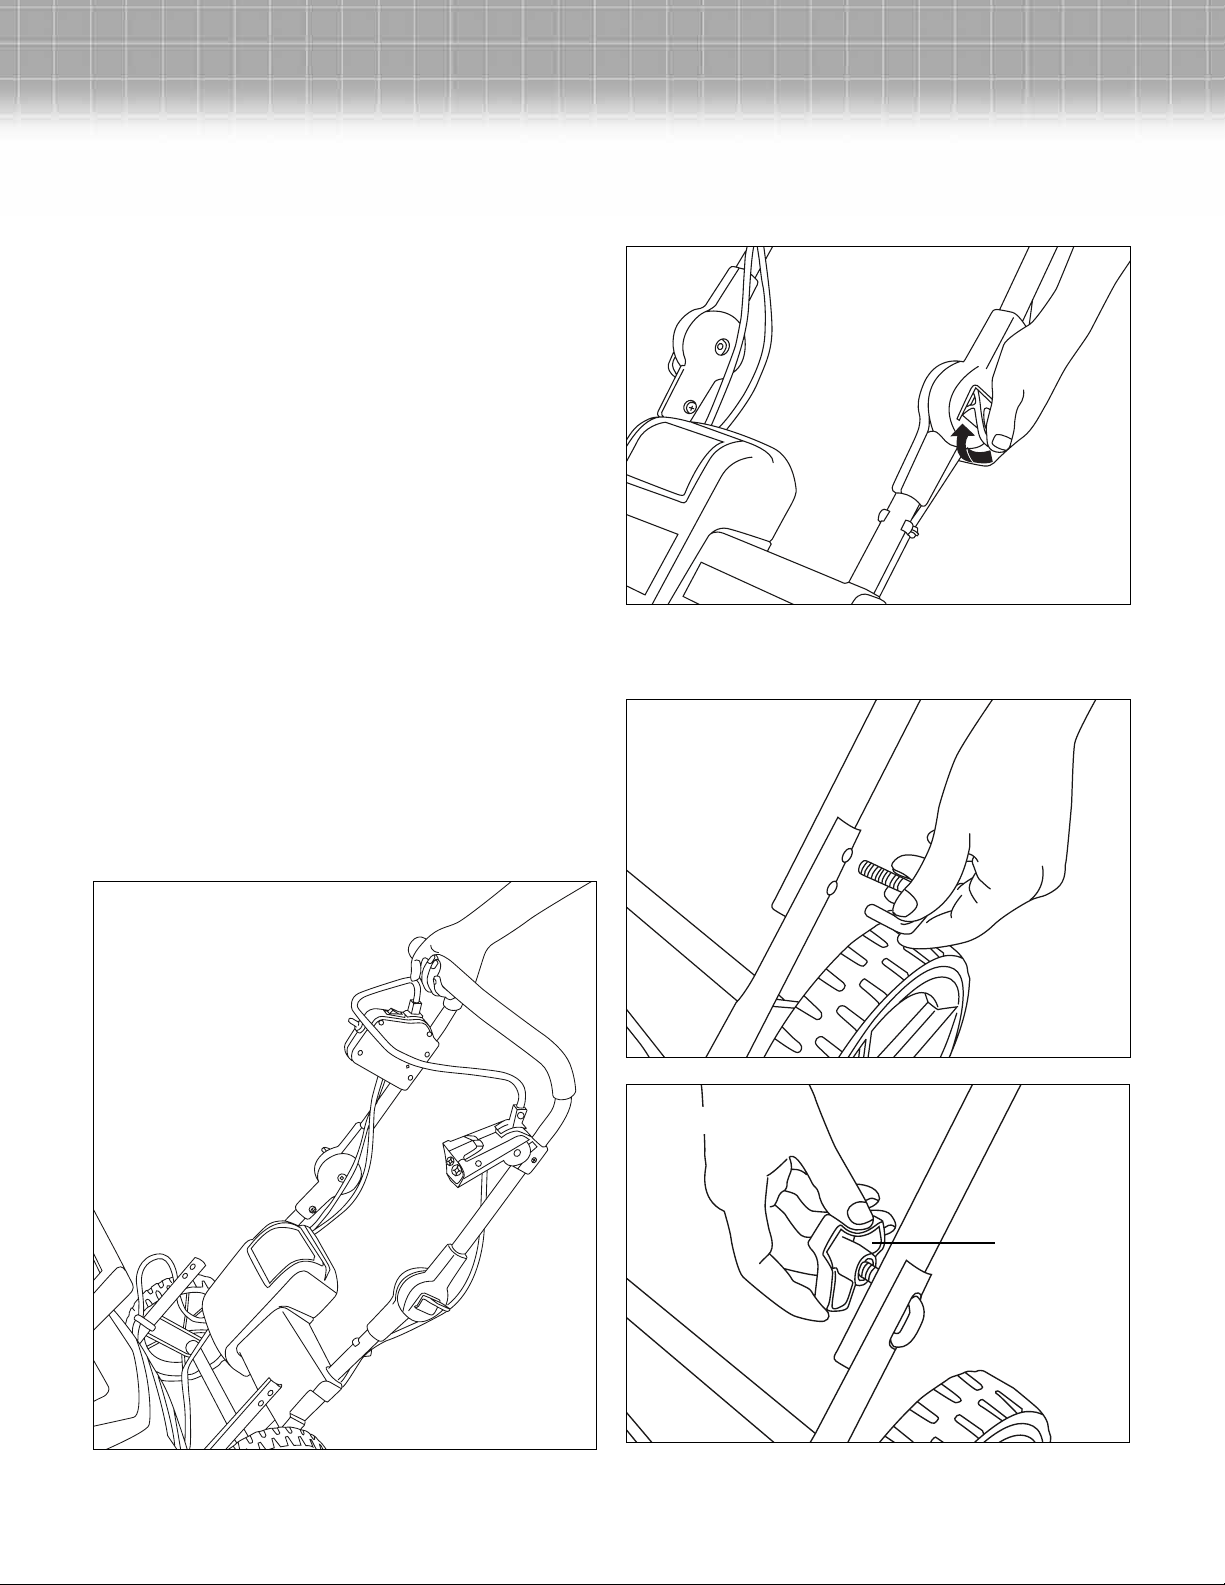
Assembly
Assembling the handles
1. For easy assembly, the snow blower comes equipped with
most of the parts already connected. In just a few simple
steps, your snow blower will be ready to go. To engage
the handle, pull up on the upper frame (Fig. 1).
Fig. 2
3. Secure the connection of the lower frame to the middle
frame by fastening the handle knobs on each side
(Figs. 3 & 4).
Fig. 3
Fig. 1
Fig. 4
Handle knob
6
Page 7

Discharge Chute Assembly
1. Lift the chute deector until it locks securely into place on
the discharge chute.
2. Raise or lower the chute deector to the desired height of
the snow stream.
3. Insert the gaskets into the middle of the chute connection
and tighten with the deector knobs on each side
(Figs. 5 & 6).
NOTE: Do not overtighten the knobs.
Fig. 5
Chute deector
Gasket
Powering On and O
1. Open the battery compartment cover and slide the battery
down to lock it into position (Fig. 7).
Fig. 7
Battery
2. Insert the safety key into the slot and close the battery
compartment cover (Figs. 8 & 9).
Fig. 8
Fig. 6
Deector knob
Screw
Operation
NOTE: Before using this machine, make sure that the snow
blower’s roll shaft and rubber plates are rmly secured with
screws, and that the rubber plates are facing the correct
direction. Perform a test run to ensure that the rotor turns
freely.
Safety key
Fig. 9
Safety key
7
Page 8

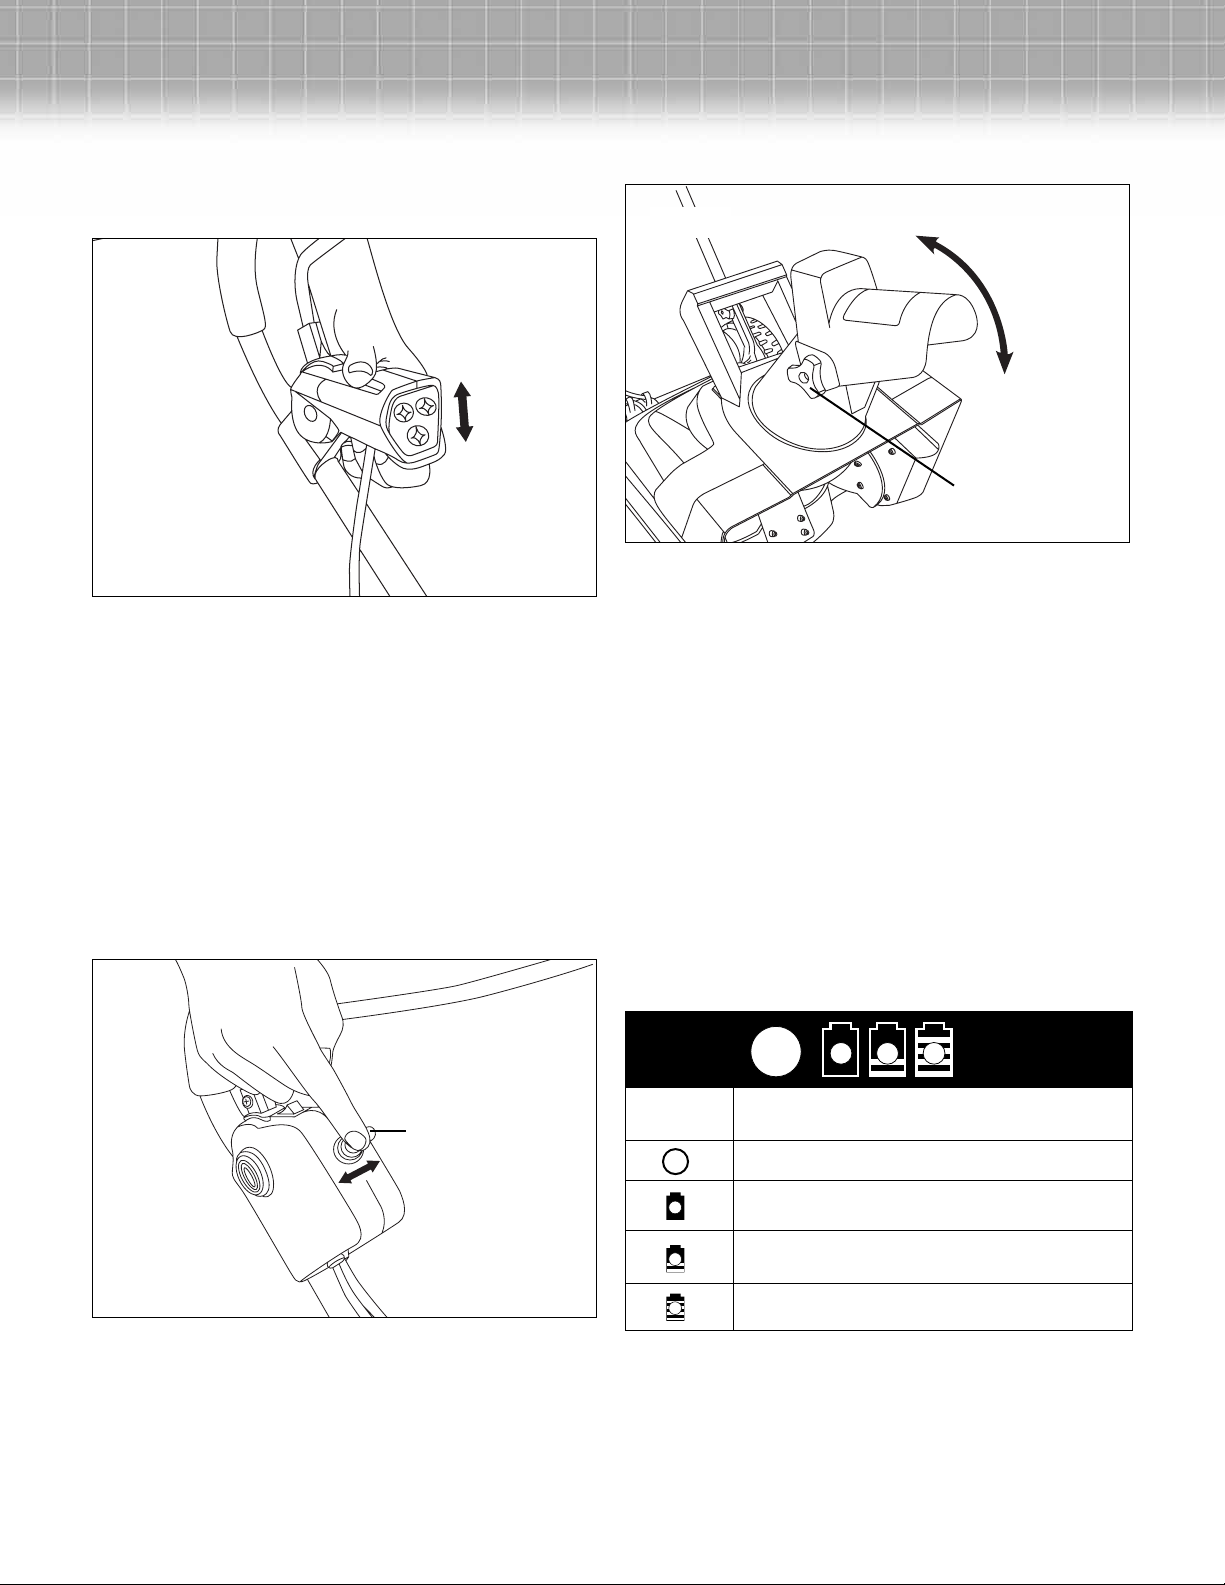
3. To power on, rst press the safety switch button found
alongside the switch housing (Fig. 10).
Fig. 10
Safety switch button
4. While depressing the safety switch button with one hand,
use your other hand to simultaneously pull the ON/OFF
switch bar lever toward you (Fig. 11). Once the machine
powers on, release the safety switch button and proceed
with operation. The snow blower can only be started
by pressing the safety switch button rst, followed by
squeezing the ON/OFF switch bar lever; reverse operation
will not start the machine.
Fig. 11
ON/OFF switch bar lever
5. To power o, release your grip on the ON/OFF switch bar
lever.
Operating Tips
stop the snow blower, remove the battery, remove the
obstruction, and inspect the unit for damage. Repair or
replace any damaged part before restarting and operating
the unit.
2. Keep children, pets, and bystanders away from the area of
operation. Be aware that the normal noise of the machine
when turned on may make it dicult for you to hear
approaching people.
3. When moving the snow blower, use the wheels on one
side as the pivot point. Slightly tilt the snow blower on this
pivot point to move it forward or backward.
4. Start your clearing path outward, throwing snow in a back
and forth motion. To clear in the opposite direction, pivot
the snow blower on its wheels. Make sure to overlap
clearing paths.
5. Note the wind direction. If possible, move in the same
direction as the wind so that the snow is not thrown
against the wind (and thus back into your face and on the
just cleared path).
6. Do not push the snow blower with excessive force. You
should push the machine gently and evenly in accordance
with the unit’s throw rate.
7. Do not apply additional man-made load to the motor since
this may cause motor damage.
8. Some parts of the snow blower may freeze under extreme
temperature conditions. Do not attempt to operate the
snow blower with frozen parts. If the parts freeze while the
snow blower is in use, stop the snow blower, remove the
battery, and inspect for frozen parts. Free all parts before
restarting or operating the snow blower. Never force
controls that have frozen.
9. When working on pebbles, gravel, or unpaved surfaces,
avoid throwing loose surface material along with the snow
by pushing down on the handle to raise the scraper at the
base of the unit above the pebbles or gravel.
10. To utilize the LED light for nighttime snow removal,
activate the LED light switch located on the switch bar
harness (Fig. 12).
NOTE: After you have nished using your snow blower,
remember to turn OFF the light switch.
Fig. 12
mWARNING! Foreign objects, such as rocks, broken
glass, nails, wire, or string, can be picked up and thrown by
the snow blower, causing serious personal injury. Remove all
foreign objects from the area to be plowed before operating
the snow blower.
1. Keep the area of operation free of foreign objects that can
become thrown by the rotor blades. Perform a thorough
inspection of the area since some objects may be hidden
from view by surrounding snow. If the snow blower hits an
obstruction or picks up a foreign object during use,
LED light switch
8
Page 9
11. The LED light can be adjusted by moving it up and down
as depicted (Fig. 13).
Fig. 13
Changing Throw Direction and Throw
Height
mWARNING! Never direct the snow discharge chute at
the operator, at bystanders, at vehicles, or at nearby windows.
The discharged snow and foreign objects accidentally picked
up and thrown by the snow blower can cause serious damage
and personal injury.
Fig. 15
Deector knobs
mWARNING! Make sure that the chute deector locks
completely onto the discharge chute. An opening between
the discharge chute and the chute deector may allow foreign
objects to be picked up by the snow blower and thrown in the
direction of the operator causing serious bodily injury.
• Do not advance the chute deector too far forward as this
can cause an opening to appear between the deector and
discharge chute.
• Do not overtighten the knobs on the chute deector
(Fig. 15).
Always orient the discharge chute in the opposite direction
from where the operator, bystanders, surrounding vehicles, or
windows are located.
1. The discharge chute can be controlled 180 degrees by
rotating the chute with the remote switch (Fig. 14).
Fig. 14
Chute remote switch
2. The chute deector on the top of the discharge chute
controls the height of the snow stream. Loosen the knobs
to raise or lower the deector to the desired height of
snow you wish to throw. Tighten the knobs to secure the
deector (Fig. 15).
Battery Pack Operation
Fuel Gauge
Use the fuel gauge to determine the battery pack’s remaining
run time. Press the fuel gauge button to display the lights. The
fuel gauge will stay lit for two seconds.
Light IndicatorsLights
Fuel Gauge button
The battery is at 30% capacity
and requires charging
The battery is at 60% capacity
and requires charging soon
The battery is at full capacity
NOTE: If the fuel gauge does not appear to be working, place
the battery pack on the charger and charge as needed.
Immediately after using the battery pack, the fuel gauge may
display a lower charge than it will if checked a few minutes
later. The battery cells “recover” some of their charge
after resting.
9
Page 10

Cold Weather Operation
The Snow Joe® EcoSharp™ iBAT40 lithium-ion battery pack
can be safely used at temperatures ranging from -4ºF (-20ºC)
to 113ºF (45ºC).
NOTE: Do not charge the battery in freezing weather; charge it
at room temperature.
Charger Operation
WARNING! Charge only Snow Joe
m
iBAT40 lithium-ion battery packs in the Snow Joe
EcoSharp
types of batteries may cause personal injury and damage.
The iBAT40 battery pack and iCHRG40 charger are not
compatible with V
To reduce the risk of electric shock, do not allow water to ow
into the AC/DC plug.
™
iCHRG40 lithium-ion battery chargers. Other
™
-Technology or NiCd systems.
When to Charge the EcoSharp™ iBAT40
Lithium-Ion Battery
Remove the battery pack from the tool for charging when it
is convenient for you or when the fuel gauge indicator lights
indicate a diminished battery capacity. The Snow Joe
lithium-ion battery packs do not develop a “memory” when
charged after only a partial discharge. Therefore, it is not
necessary to run down the battery pack before placing it into
the charger.
• Use the fuel gauge to determine when to charge your
Snow Joe
• You can “top-o” your battery pack’s charge before starting
a big job or after a long day use.
®
iBAT40 lithium-ion battery pack.
®
EcoSharp™
®
®
iBAT40
3. The red light will turn on to indicate that the charger is
working and the battery is being charged.
NOTE: A ashing red light indicates that the battery pack
is either too hot or too cold. Hot or cold battery packs
may take longer to charge.
4. The red light will go o and the green light will come on
when the battery is completely charged.
5. A fully discharged pack with an internal temperature in the
normal range will fully charge in 2.5 to 3 hours (between
32ºF (0 ºC) and 113ºF (45ºC)). Heavily cycled battery
packs may take longer to charge completely.
6. The fuel gauge lights on the battery pack will display
as the pack is being charged to indicate the battery’s
capacity.
7. After charging is complete, the continuous green light will
turn on and the fuel gauge will turn o.
8. The charger will keep the battery pack fully charged if the
pack is left in the charger.
9. If the light indicator ashes red and green, check that
the battery pack is fully seated into the bay. Remove the
pack and reinsert. If the problem persists, contact the
Snow Joe
10. If the light indicator does not come on, check that the
battery pack is fully seated into the bay. Remove the pack
and reinsert. If the light indicator still does not come on,
contact the Snow Joe
11. Remove the battery from the charger by pressing the
release button and sliding the battery backward to unlock
it from the charger (Fig. 17).
®
customer service center.
®
customer service center.
Fig. 17
Installing and Charging the Battery
1. Place the battery pack into the charger by sliding the pack
forward to lock it into position (Fig. 16).
2. Plug the charger into a electrical wall outlet.
Fig. 16
Release button
10
Page 11

Charging a Hot or Cold Battery Pack
The red ashing indicator light on the charger indicates that
the battery pack temperature is outside the charging range.
Once the pack is within the acceptable range, normal charging
will take place and the red light will be continuous. Hot or cold
battery packs may take longer to charge.
Lithium-Ion Charging Status
Battery Pack
Temperature
Too hot Flashing Not charging
Normal range Continuous Normal charging
Too cold Flashing Not charging
Red Charger
Indicator Light
Charging
Status
3. Use only mild soap on a damp cloth to clean the battery
pack and charger, keeping away from all electrical
contacts. Certain cleaning agents and solvents are
harmful to plastics and other insulated parts. Some of
these include gasoline, turpentine, lacquer thinner, paint
thinner, chlorinated cleaning solvents, ammonia, and
household detergents containing ammonia. Never use
ammable or combustible solvents around battery packs,
battery chargers, or tools.
4. The Snow Joe
no serviceable parts.
®
iCHRG40 lithium-ion battery charger has
Replacing the Rubber Plates
NOTE: When replacing worn rubber plates, pay close attention
to the order in which you remove the plates. Insert the new
plates in the reverse order.
Maintenance
WARNING! Make sure to turn o the switch and
m
remove the battery before performing any maintenance task on
your snow blower.
Lifetime Lubrication (Motor and Auger)
Lubrication is not necessary and may damage the unit. The
snow blower is lubricated for lifetime use at the factory before
shipment.
General Maintenance Tips
1. Do not attempt to repair the machine unless you have the
proper tools and instructions for disassembly and repair of
the machine.
2. Check bolts and screws at frequent intervals for proper
tightness to ensure that the equipment is in safe working
condition.
3. After each snow removal session, run the snow blower
for a few minutes to prevent the collector/impeller from
freezing. Shut o the motor, wait for all revolving parts
to stop completely, and wipe residual ice and snow o
the unit. Rotate the chute deector by the remote switch
several times to remove any excess snow.
1. Detach the worn rubber plate assembly by removing the 8
sets of nuts and bolts used to secure it (Figs. 18 & 19).
Fig. 18
Fig. 19
Proper Care for Battery/Charger
mWARNING! To reduce the risk of injury, always unplug
the charger and remove the battery pack from the charger
before performing any maintenance task. Never disassemble
the battery pack or charger. Contact your Snow Joe
Snow Joe
1. To reduce the risk of injury and damage, never immerse
2. Clean out dust and debris from charger vents and
®
customer service center for ALL repairs.
your battery pack or charger in liquid or allow a liquid to
ow inside them.
electrical contacts by blowing with compressed air.
®
dealer or
3. Install the new rubber plate assembly by tightening the 8
sets of nuts and bolts on both sides (Fig. 18).
11
Page 12

Replacing the Scraper Bar
1. The scraper bar is located at the base of the snow blower
beneath the rotor housing (Fig. 21).
Fig. 21
Scraper bar 4 Screws
damage the charger and the battery pack. Do not use oil
or solvents to clean or lubricate your battery pack as the
plastic casing can become brittle and crack, causing a
serious risk of injury.
2. Store the battery pack and charger at room temperature
away from moisture. Do not store in damp locations where
corrosion of terminals may occur. As with other battery
pack types, permanent capacity loss can result if the pack
is stored for long periods of time at high temperatures
(over 120ºF (49ºC)). Snow Joe
packs maintain their charge during storage longer than
other battery pack types. After about a year of storage,
charge the pack as you normally would.
3. As a general practice, it is best to unplug battery chargers
and remove battery packs when they are not in use.
However, battery pack damage will not occur if the
charger and battery pack are left plugged in.
®
iBAT40 lithium-ion battery
2. Detach the worn scraper bar from the snow blower by
removing the 4 screws that hold it in place (Fig. 22).
Fig. 22
3. Install the new scraper bar and fasten it securely to the
snow blower with 4 screws (Fig. 21).
Storage
1. Clean the snow blower before storing or transporting.
Be sure to secure the unit while transporting.
2. Remove the battery and the safety key from the snow
blower.
3. Inspect the snow blower carefully for worn, loose, or
damaged parts. Check connections and screws and
tighten if necessary. For repairing or replacing parts,
contact your Snow Joe
service center at 1-866-766-9563.
4. Store the unit in a locked, dry place out of the reach of
children to prevent unauthorized use or damage. Cover
loosely with a tarp for added protection.
®
dealer or Snow Joe® customer
Environmentally Safe Battery
Disposal
Always dispose of your battery pack according to federal,
state, and local regulations. Contact a recycling agency in your
area for recycling locations.
mCAUTION! Even discharged battery packs contain
some energy. Before disposing, use electrical tape to cover
the terminals to prevent the battery pack from shorting, which
could cause a re or explosion.
mWARNING! To reduce the risk of injury or explosion,
never burn or incinerate a battery pack even if it is damaged,
dead, or completely discharged. When burned, toxic fumes
and materials are emitted into the surrounding atmosphere.
Service and Support
If your Snow Joe® iON18SB snow blower requires service or
maintenance, please call 1-866-766-9563 for assistance.
Model and Serial Numbers
When contacting the company, reordering parts, or arranging
service from an authorized dealer, you will need to provide the
model and serial numbers, which can be found on the decal on
the main cover of the unit of the discharge chute. Copy these
numbers into the space provided below.
Record the following numbers from the housing or handle of your
new product:
i O N 1 8 S B R M
Model #:
Serial #:
Battery/Charger O-Season Storage
1. Do not expose your battery pack or charger to water,
rain, or allow them to get wet. This could permanently
12
Page 13

NOTES
13
Page 14

A One-Year Full Warranty
for residential use
in the United States and Canada
General Conditions:
Snow Joe®, LLC warrants this product to the original purchaser for one year against defects in material or workmanship when used
for normal residential purposes. Snow Joe
part, subject to the conditions, limitations, and exclusions set forth herein. Such repair or parts replacement will be free from charge to
the original purchaser except noted below.
The duration of the warranty applies only if the product is put to personal use around the household or residence. If the product is put
to any business use, commercial or industrial, then the duration of this warranty is 90 days from the date of original purchase. If any
product is rented or leased, the duration of the warranty is 90 days from the date of original purchase.
It is the owner’s responsibility to perform correctly all maintenance, and minor adjustments explained in the owner’s manual.
Electric Products:
To obtain a replacement electric powered unit or repair the existing electric powered unit, you must return the complete unit and
postage prepaid to: Snow Joe Return Center, 86 Executive Avenue, Edison, NJ 08817.
Gasoline / Battery Products:
Limitations
• Batteries are warranted only for the period of 12 months after the date of purchase on a prorated basis. Rechargeable batteries
will be replaced free from charge during the rst 90 days. After the initial 90 days, batteries will be replaced at a prorated cost to
the customer.
• Idlers, cables, and electrical components are warranted to the original purchaser for use at household or residence for a period
of one year.
®
, LLC will repair any defect in material or workmanship, and repair or replace any defective
Exclusions
®
• Snow Joe
brand engines are covered under this warranty. All other engines and engine accessories are covered only by the
engine manufacturer’s warranty and are not covered by this warranty.
®
• Parts used that are not genuine Snow Joe
parts are not covered by this warranty.
• Damages resulting from misuse, alteration, improper assembly, improper adjustment, neglect, or accident which requires repair
is not covered under this warranty.
• Belts, augers, and tines are not covered under warranty – belts, augers, and tines wear out and can be purchased at
www.snowjoe.com or by calling 1-866-766-9563.
®
Snow Joe
obligating Snow Joe
, LLC may from time to time change the design of its products. Nothing contained in this warranty shall be construed as
®
, LLC to incorporate such design changes into previously manufactured products, nor shall such changes be
construed as an admission that previous designs were defective.
®
This warranty is intended to cover product defects only. Snow Joe
®
in connection with the use of the Snow Joe
Products covered by this warranty. This warranty does not cover any cost or expense
, LLC is not liable for indirect, incidental, or consequential damages
incurred by the purchaser in providing substitute equipment or service during reasonable periods of malfunction or non-use of this
product, while waiting for completion of repairs under this warranty. Some states do not allow exclusions of incidental or consequential
damages, so the above exclusions may not apply in all states. This warranty may give you specic legal rights in your state.
®
If you wish to contact Snow Joe
, please direct inquiries to the:
Customer Service Department
Snow Joe Center
86 Executive Avenue
Edison, NJ 08817
®
Customers who have purchased Snow Joe
products exported from the United States and Canada should contact their Snow Joe®
Distributor (Dealer) to obtain information applicable for your country, province, or state. If for any reason, you are not satised with the
®
distributor’s service, or if you have diculty obtaining warranty information, contact your Snow Joe
®
are unsatisfactory, please write to the Snow Joe
Center at the above address.
seller. If in the event your eorts
If you have any questions about your product warranty, please call 1-866-SNOW-JOE or visit us online at www.snowjoe.com.
14
 Loading...