

Page 1

40 V 16-Inch Cordless Lawn Mower
Model iON16LM
A Division of Snow Joe®, LLC
IMPORTANT!
Safety Instructions
All Operators Must Read These
Instructions Before Use
Read all the instructions contained in this manual. Keep this
manual in a safe place, so that the information is available at
all times. If you give the equipment to another person, make
sure to provide these operating instructions. Basic safety
precautions should always be followed to reduce the risk of
re, electric shock and personal injury.
General Safety Rules
Notice the personal safety alert symbol m used in this
manual to draw your attention to a WARNING given along
with the particular operating instruction. This means that
the operation requires special ATTENTION, CAUTION and
AWARENESS.
1. Keep the work area clean and well-lit – Cluttered, dark
areas invite accidents.
2. Keep children, bystanders and pets away – Always
keep children and spectators a safe distance away from
the mower during operation and as the machine cools.
Children must always be supervised to ensure that they
do not play with the equipment.
3. Dress properly – Always wear personal safety gear
(i.e. safety glasses, rubber gloves, protective non-slip
footwear and dust masks) and proper clothing when using
the mower. Loose clothing, long hair or jewelry may get
caught in the moving parts.
4. Use the right appliance – Do not use the lawn mower for
any puposes other than those for which it is intended.
5. Do not force the lawn mower – It will perform better with
less likelihood of personal or mechanical injury if it is used
at the rate for which it is designed.
6.
mCAUTION: Sharp blades! – Remove the battery before
carrying out any repair work. The blades will continue to
rotate after the motor is switched o.
7. Stay alert – Always stay alert and watch what you are
doing. Use common sense. Do not operate the lawn
mower when you are tired or under the inuence of
alcohol or drugs. This lawn mower is not designed to be
used by people (including children) with limited physical,
sensory or mental capacities. It should also not be used
Form No. SJ-iON16LM-880E-M
OPERATOR’S MANUAL
by those lacking the proper experience and/or knowledge
unless they are supervised by a person who is responsible
for their safety or they have received instructions from
such a person on how to safely use the mower.
8. Store idle lawn mower indoors – When not in use, the
lawn mower should be stored indoors in a dry, locked
place out of the reach of children.
9. Maintain the lawn mower with care – Keep cutting
edges sharp and clean to maximize your mower's
performance and ensure operator safety. Keep handles
dry, clean and free from oil and grease.
mWARNING! Turn o the power switch and disconnect
the battery before adjusting, inspecting, servicing or cleaning
the lawn mower, when changing accessories or when
any other dangerous conditions present themselves. All
maintenace tasks should be performed after revolving parts
inside the lawn mower stop completely. Such preventive
safety measures reduce the risk of starting the power tool
accidentally.
mWARNING! If you notice that the lawn mower is
not running properly or unusual vibrations occur from the
engine when it is in use, immediately stop the machine and
disconnect the battery. Check the cutters and clear them if
necessary. If the machine continues to vibrate, contact an
authorized Snow Joe
10. Moving parts present risks – Keep your face, hair,
clothing, hands and feet away from all moving parts. All
guards and safety attachments must be installed properly
before using the unit. Shut o and disconnect the battery
before touching any parts other than the handles and the
switch.
11. Cutting/dismemberment hazard of hand – Do not touch
the cutters until the battery has been disconnected from
the mower and the cutters have reached a complete
standstill.
12. Avoid unintentional starting – Make sure the safety
switch and the switch bar lever are in the OFF position
before inserting the battery into the unit. Do not carry the
lawn mower with the safety switch and the switch bar
lever engaged.
13. Do not overreach – Maintain proper footing and balance
at all times. Place heels rmly on the ground and tightly
grasp the handle bar. Watch for uneven surfaces and do
not overreach. In case you fall or collide with the lawn
mower, inspect the unit for any damages or cracks.
When stepping backwards, be careful to avoid obstacles
beneath your feet or behind you to avoid falling.
®
/Sun Joe® service center.
© 2014 by Snow Joe®, LLC
All rights reserved. Original instructions.
SAVE THESE INSTRUCTIONS
1
Page 2

mWARNING! If the lawn mower strikes any object,
follow these steps:
i) Stop the lawn mower. Remove the battery.
ii) Inspect for damage.
iii) Repair any damage before restarting and operating
the lawn mower.
IMPORTANT!
Safety Instructions for
Walk-Behind Mowers
General Operation
• Read, understand and follow all the safety regulations
and instructions on the machine and in the manual before
starting.
• Only responsible adults who are thoroughly familiar with
the operator controls and the operation of the machine
should be allowed to use the mower.
• Make sure that the mowing area is clear of children, pets
and other bystanders before starting the machine. Stop
the machine if anyone enters the area.
• Do not tip the machine when starting. The machine should
be on level ground and you should have a rm grasp on
the handle when powering ON.
• Disconnect the power supply (i.e. remove the battery):
i) whenever you leave the machine unattended;
ii) before releasing a blocked cutter;
iii) before inspecting, cleaning or performing other
maintenance on the machine;
iv) if a foreign body has been struck;
v) whenever the machine starts to vibrate oddly.
• Never mow in the direct vicinity of persons – especially
children – or animals.
• Do not operate the machine barefooted or while wearing
sandals. Always wear substantial footwear.
• Check the ground on which the equipment will be used
and remove all objects that could be picked up and
violently ung by the rotary mower blade.
• Before using the mower, visually inspect it to ensure that
the blade, mounting bolts and the entire cutting apparatus
are in proper working order (i.e. not worn or damaged).
To prevent any operating imbalance, replace worn or
damaged blades and mounting bolts as a set only (if
applicable).
Handling
• Only mow in broad daylight or under well-lit conditions.
• Avoid dangerous environments. Do not use the mower in
the rain or on damp/wet grass.
• Always maintain good footing on inclines.
• Only operate the mower at a walking pace.
• Always mow across hills (i.e. never straight up or straight
down).
• Be particularly careful when you change direction on a
slope.
• Do not mow on overly steep inclines.
• Take extra caution when turning the mower around and
when pulling it towards you.
• Switch the mower o, remove the battery and wait until
the cutters have reached a complete standstill when
tipping the mower over, transporting it over surfaces other
than grass, and when moving the mower to and from the
area you wish to mow.
• Never use the lawn mower if the guards (e.g. sidedischarge chute deectors, grass-catching devices) are
damaged or not properly tted.
• Use the ON/OFF switch carefully as described in the
manufacturer’s instructions. Make sure that your feet are
far enough away from the mower blade when starting and
using the mower!
• The lawn mower should not be tilted when the motor
is switched on unless it has to be raised for starting
purposes. In this case, tilt it as little as absolutely
necessary and only raise the side opposite to that of the
user.
• Do not switch on the mower if you are positioned in front
of the discharge chute.
• Never move your hands or feet toward or under any
rotating parts. Keep clear of the discharge chute opening
at all times.
• Never lift or carry a lawn mower with the engine running.
• Switch o the motor, remove the battery and wait for
the rotating blades to stop completely: before you
dislodge any blockages or clogs in the discharge chute
or mower deck; before carrying out any checks, cleaning,
maintenance or other work on the lawn mower; and
immediately after striking a foreign object. Examine the
mower for signs of damage and carry out any necessary
repairs before restarting and continuing to work with
the mower. If the lawn mower starts to vibrate oddly,
immediately switch it o and inspect it.
• Switch o the mower and remove the battery whenever
you leave the mower.
Maintenance and Storage
• Make sure that all nuts, bolts and screws are tightened
securely and that the machine is in safe working condition.
• Allow the mower to cool before you put it into an enclosed
area.
• To avoid the risk of re, keep the motor housing and
ventilation slots clear of grass, leaves, oil and grease.
• Routinely check the grass basket for signs of wear and
impaired functionality.
2
Page 3

• For your own safety, have worn or damaged parts
immediately replaced.
• Take care not to jam your ngers between moving blades
and stationary parts of the equipment while you are
adjusting the equipment.
• While you are carrying out maintenance work on the
blades, remember that the blades can still be moved even
if the power source has been switched o.
Battery & Charger Safety
Instructions
We pay a great deal of attention to the design of every battery
pack to ensure that we supply you with batteries that are safe,
durable and have a high energy density. The battery cells have
a wide range of safety devices. Each individual cell is initially
formatted and its electrical characteristic curves are recorded.
These data are then used exclusively to be able to assemble
the best possible battery packs.
Despite all the safety precautions, caution must always be
exercised when handling batteries. The following points must
be obeyed at all times to ensure safe use. Safe use can only
be guaranteed if undamaged cells are used. Incorrect handling
of the battery pack can cause cell damage.
IMPORTANT! Analyses conrm that incorrect use and poor
care of high-performance batteries are the main factors
responsible for personal and/or product damage.
mWARNING! Use only approved replacement batteries;
other batteries may damage the lawn mower and cause it to
malfunction, which can lead to serious personal injury.
mCAUTION! To reduce the risk of injury, charge the
EcoSharp
lithium-ion charger, the iCHRG40. Other types of chargers
present risk of re, personal injury and damage. Do not wire
a battery pack to a power supply plug or car cigarette lighter.
Such misuse will permanently disable or damage the battery
pack.
• Avoid dangerous environments – Do not charge the
• Charge in a well-ventilated area – Do not block the
NOTE: The safe temperature range for the battery is -4°F
• Maintain charger cord – When unplugging the charger, pull
™
iBAT40 lithium-ion pack only in its designated
battery pack in rain, snow or in damp or wet locations.
Do not use the battery pack or charger in the presence of
explosive atmospheres (gaseous fumes, dust or ammable
materials) because sparks may be generated when inserting
or removing the battery pack, which could lead to a re.
charger vents. Keep them clear to allow for proper
ventilation. Do not allow smoking or open ames near a
charging battery pack. Vented gases may explode.
(-20°C) to 113°F (45°C). Do not charge the battery outside
in freezing weather; charge it at room temperature.
the plug, not the cord, from the receptacle to reduce the
risk of damage to the electrical plug and cord. Never carry
the charger by its cord or yank it by the cord to disconnect
it from the receptacle. Keep the cord away from heat, oil
and sharp edges. Make sure the cord will not be stepped
on, tripped over or subjected to damage or stress when the
charger is in use. Do not use the charger with a damaged
cord or plug. Replace a damaged charger immediately.
• Do not use an extension cord unless it is absolutely
necessary – Using the wrong, damaged or improperly
wired extension cord poses a risk of re and electric shock.
If an extension cord must be used, plug the charger into
a properly wired 16 gauge or larger extension cord with
blades that are the same number, size and shape as the
blades on the charger. Make sure that the extension cord is
in good electrical condition.
• Charger iCHRG40 is rated for 120 volt AC only – The
charger must be plugged into an appropriate receptacle.
• Use only recommended attachments – Use of an
attachment not recommended or sold by the battery
charger or battery pack manufacturer may result in risk of
re, electric shock or personal injury.
• Unplug charger when not in use – Make sure to remove
battery packs from unplugged chargers.
mWARNING! To reduce the risk of electric shock,
always unplug the charger before performing any cleaning or
maintenance. Do not allow water to ow into the AC/DC plug.
Use a Ground Fault Circuit Interrupter (GFCI) to reduce shock
hazards.
• Do not burn or incinerate battery packs – Battery packs
may explode, causing personal injury or damage. Toxic
fumes and materials are created when battery packs are
burned.
• Do not crush, drop or damage battery packs – Do not
use the battery pack or charger if they have sustained a
sharp blow, been dropped, run over or have been damaged
in any way (e.g. pierced with a nail, hit with a hammer,
stepped on, etc.).
• Do not disassemble – Incorrect reassembly may pose
a serious risk of electric shock, re or exposure to toxic
battery chemicals. If the battery or charger are damaged,
contact your Snow Joe
Sun Joe
• Battery chemicals cause serious burns – Never let a
damaged battery pack contact the skin, eyes or mouth.
If a damaged battery pack leaks battery chemicals, use
rubber or neoprene gloves to safely dispose of it. If skin
is exposed to battery uids, wash the aected area with
soap and water and rinse with vinegar. If eyes are exposed
to battery chemicals, immediately ush with water for 20
minutes and seek medical attention. Remove and dispose
of contaminated clothing.
• Do not short circuit – A battery pack will short circuit if
a metal object makes a connection between the positive
and negative contacts on the battery pack. Do not place a
battery pack near anything that may cause a short circuit,
such as paper clips, coins, keys, screws, nails and other
®
customer service center.
®
/Sun Joe® dealer or Snow Joe®/
3
Page 4

metallic objects. A shortcircuited battery pack poses a risk
of re and severe personal injury.
• Store your battery pack and charger in a cool, dry
place – Do not store the battery pack or charger where
temperatures may exceed 104ºF (40ºC), such as in direct
sunlight or inside a vehicle or metal building during the
summer.
Information about the battery
1. The battery pack supplied with your cordless lawn mower
is not charged. The battery pack has to be charged before
you use the tool for the rst time.
2. For optimum battery performance avoid low discharge
cycles. Charge the battery pack frequently.
3. Store the battery pack in a cool place, ideally at 59°F
(15°C) and charged to at least 40%.
4. Lithium-ion batteries are subject to a natural aging
process. The battery pack must be replaced at the latest
when its capacity falls to just 80% of its capacity when
new. Weakened cells in an aged battery pack are no
longer capable of meeting the high power requirements
needed for the proper operation of your lawn mower, and
therefore pose a safety risk.
5. Do not throw battery packs into an open re. There is a
risk of explosion!
6. Do not ignite the battery pack or expose it to re.
7. Do not exhaustively discharge batteries. Exhaustive
discharge will damage the battery cells. The most
common cause of exhaustive discharge is lengthy storage
or non-use of partially discharged batteries. Stop working
as soon as the performance of the battery falls noticeably
or the electronic protection system triggers. Place the
battery pack in storage only after it has been fully charged.
8. Protect batteries and the tool from overloads. Overloads
will quickly result in overheating and cell damage inside
the battery housing even if this overheating is not apparent
externally.
9. Avoid damage and shocks. Immediately replace batteries
that have been dropped from a height of more than one
meter or those that have been exposed to violent shocks,
even if the housing of the battery pack appears to be
undamaged. The battery cells inside the battery may have
suered serious damage. In such instances, please read
the waste disposal information for proper battery disposal.
10. If the battery pack suers overloading and overheating,
the integrated protective cuto will switch o the
equipment for safety reasons.
IMPORTANT! Do not press the ON/OFF switch any more
if the protective cut-o has been activated. This may
damage the battery pack.
11. Use only original battery packs. The use of other batteries
poses a re risk and may result in injuries or an explosion.
Information about the charger and the
charging process
1. Please check the data marked on the rating plate of the
battery charger. Be sure to connect the battery charger
to a power supply with the voltage marked on the rating
plate. Never connect it to a dierent mains voltage.
2. Protect the battery charger and its cord from damage.
Keep the charger and its cord away from heat, oil and
sharp edges. Have damaged cords repaired without delay
by a qualied technician at an authorized Snow Joe
Sun Joe
3. Electrical plugs must match the outlet. Never modify
the plug in any way. Do not use any adapter plugs with
grounded appliances. Unmodied plugs and matching
outlets will reduce the risk of electric shock.
4. Keep the battery charger, battery(ies) and the cordless tool
out of the reach of children.
5. Do not use the supplied battery charger to charge other
cordless tools.
6. During periods of heavy use, the battery pack will become
warm. Allow the battery pack to cool to room temperature
before inserting it into the charger to recharge.
7. Do not over-charge batteries. Do not exceed the
maximum charging times. These charging times only apply
to discharged batteries. Frequent insertion of a charged or
partially charged battery pack will result in over-charging
and cell damage. Do not leave batteries in the charger for
days on end.
8. Never use or charge batteries if you suspect that it has
been more than 12 months since the last time they were
charged. There is a high probability that the battery pack
has already suered dangerous damage (exhaustive
discharge).
9. Charging batteries at a temperature below 50°F (10°C) will
cause chemical damage to the cells and may cause a re.
10. Do not use batteries that have been exposed to heat
during the charging process, as the battery cells may have
suered dangerous damage.
11. Do not use batteries that have suered curvature or
deformation during the charging process or those that
exhibit other atypical symptoms (gassing, hissing,
cracking, etc.)
12. Never fully discharge the battery pack (maximum
recommended depth of discharge is 80%) A complete
discharge of the battery pack will lead to premature aging
of the battery cells.
®
service center.
®
/
4
Page 5

Protection from environmental infuences
1. Wear suitable work clothes. Wear safety goggles.
2. Protect your cordless tool and the battery charger from
moisture and rain. Moisture and rain can cause dangerous
cell damage.
3. Do not use the cordless tool or the battery charger near
vapors and ammable liquids.
4. Use the battery charger and cordless tools only in dry
conditions and at an ambient temperature of 50-104°F
(10-40°C).
5. Do not keep the battery charger in places where the
temperature is liable to reach over 104°F (40°C). In
particular, do not leave the battery charger in a car that is
parked in the sunshine.
6. Protect batteries from overheating. Overloads, overcharging and exposure to direct sunlight will result in
overheating and cell damage. Never charge or work
with batteries that have been overheated – replace them
immediately, if possible.
7. Store the charger and your cordless tool only in dry
locations with an ambient temperature of 50-104°F
(10-40°C). Store your lithium-ion battery pack in a cool,
dry place at a temperature of 50-68°F (10-20°C). Protect
the battery pack, charger and cordless tool from humidity
and direct sunlight. Only place fully charged batteries in
storage (charged to at least 40%).
8. Prevent the lithium-ion battery pack from freezing. Battery
packs that were stored below 32°F (0°C) for more than 60
minutes must be discarded.
9. When handling batteries, be wary of electrostatic charge.
Electrostatic discharges can damage the electronic
protection system and the battery cells. Avoid electrostatic
charging and never touch the battery poles.
5
Page 6

Safety Symbols
The following table depicts and describes safety symbols that may appear on this product. Read, understand and follow all
instructions on the machine before attempting to assemble and operate.
Symbols SymbolsDescriptions Descriptions
WARNING! To reduce the
risk of injury, user must read
instruction manual.
Safety Alert. Caution.
Severing of toes or ngers
by rotary mower blade.
Slip on slope hazard – Use
extra caution when mowing
on slopes to prevent slip and
fall accidents.
Keep bystanders and children
a safe distance away.
Wear eye and hearing
protection. For protection
against injury, wear ear
defenders and safety goggles.
Cutting/dismemberment
hazard of hand. Keep hands
away from the rotating blade.
WARNING! Always turn the
machine OFF and remove the
safety key before conducting
inspection, cleaning and
maintenance.
CAUTION! Objects picked
up and thrown by the
rotating blade can cause
severe injury.
Double Insulation.
The rotating part will
continuously run for several
seconds after you turn o
the machine.
Indoor use only. Only use
battery charger indoors.
6
Page 7

Know Your Cordless Lawn Mower
Read the owner’s manual and safety rules carefully before operating the lawn mower. Compare the illustration below
to the actual unit in order to familiarize yourself with the location of the various controls and adjustments. Save this
manual for future reference.
1. Switch bar lever
2. Safety switch button
3. Cable clip (2)
4. Upper handle knob and bolt (2)
5. Grass indicator window
6. Battery cover
7. Battery compartment
8. Safety key
9. Locking button for battery cover
10. Upper handle
11. Lower handle
12. Ejector ap
13. Grass bag
14. Multi-position height adjusmtent
quick lock wheel
15. Rear wheel (2)
16. Cutting height adjustment lever
17. Front wheel (2)
18. Push button for battery indicator
19. Battery indicator
20. Push lock button
™
21. EcoSharp
(iBAT40)
22. EcoSharp
(iCHRG40)
lithium-ion battery
™
battery charger
18
3
4
5
6
7
8
9
19
16
1
2
10
11
12
13
14
15
20
21
22
Technical Data
Battery Voltage 40 V D.C.
Battery Capaciy 4.0 Ah (160 Wh)
Charging Time 2.5 – 3 hours (for full charge)
No Load Speed 3,500 rpm
Rotor 15 in. (38 cm) steel blade
Deck Size 16 in. (41 cm)
17
Cutting Height 1.18 in. to 3.15 in.
(30 mm to 80 mm)
Grass bag capacity 9.25 gal (35 l)
Wheel size 6 in. (15.2 cm) front
8 in. (20.3 cm) rear
Weight (mower alone) 34.6 lbs (15.7 kg)
Weight (mower with battery installed) 37.3 lbs (16.9 kg)
7
Page 8

Unpacking
Carton Contents
• Cordless lawn mower
™
• 40 V EcoSharp
• EcoSharp
• Grass bag
• Safety key
• Upper handle knob and bolt (2)
• Cable clip (2)
• Manual
1. Carefully remove the lawn mower and check to see that all
of the above items are supplied.
2. Inspect the product carefully to make sure no breakage
or damage occurred during shipping. If you nd damaged
or missing parts, DO NOT return the unit to the store.
Please call the Snow Joe
department at 1-866-766-9563.
NOTE: Do not discard the shipping carton and packaging
material until you are ready to use your new cordless lawn
mower. The packaging is made of recyclable materials.
Properly dispose of these materials in accordance with
local regulations.
IMPORTANT! The equipment and packaging material are not
toys. Do not let children play with plastic bags, foils or small
parts. These items can be swallowed and pose a suocation
risk!
battery
™
battery charger
®
/Sun Joe® customer service
IMPORTANT! Due to the high risk of bodily injury to the user,
the lawn mower may not be used to trim bushes, hedges or
shrubs, to cut scaling vegetation, planted roofs, or balconygrown grass, to clean (suck up) dirt and debris o walkways,
or to chop up tree or hedge clippings. Moreover, the lawn
mower may not be used as a power cultivator to level out high
areas such as molehills.
For safety reasons, the lawn mower may not be used as a
drive unit for other work tools or toolkits of any kind.
Reduce noise generation and keep
vibration to a minimum!
• Use only equipment that is in perfect condition.
• Maintain and clean the equipment regularly.
• Adjust your work rate to the equipment's performance.
• Do not overload the equipment.
• Have the equipment checked if necessary.
• Switch o the equipment when not in use.
• Wear gloves.
Assembly
Fitting the Upper and Lower Handles
1. The handle is fully pre-assembled and must only be
unfolded and adjusted to the required height. To do so,
loosen the upper handle knobs and unfold the upper
handle. Then secure the upper handle again with the
handle knobs on each side (Fig. 1).
Intended Use
Carefully follow the instructions below to assemble your
iON cordless lawn mower.
The equipment may only be used for the tasks it is designed
to handle. Any other use is deemed to be a case of misuse.
The user/operator, not the manufacturer, will be liable for any
damage or injuries of any kind resulting from such misuse of
the mower.
The lawn mower is intended for private residential use (i.e. for
use in home and gardening environments). Private use of the
lawn mower refers to an annual operating time generally not
exceeding 50 hours, during which the machine is primarily
used to maintain small-scale, residential lawns and home/
hobby gardens. Public facilities, sporting halls and agricultural/
forestry applications are excluded. Please note that this
equipment has not been designed for commercial, trade
or industrial applications. The warranty will be voided if the
machine is used in commercial, trade or industrial businesses
or for equivalent purposes.
Keep these instructions and refer to them prior to each
mowing session in order to ensure that the lawn mower
is properly used and maintained. The instructions contain
valuable information on operating, maintenance and servicing.
Fig. 1
Upper handle
Upper handle knob
8
Page 9
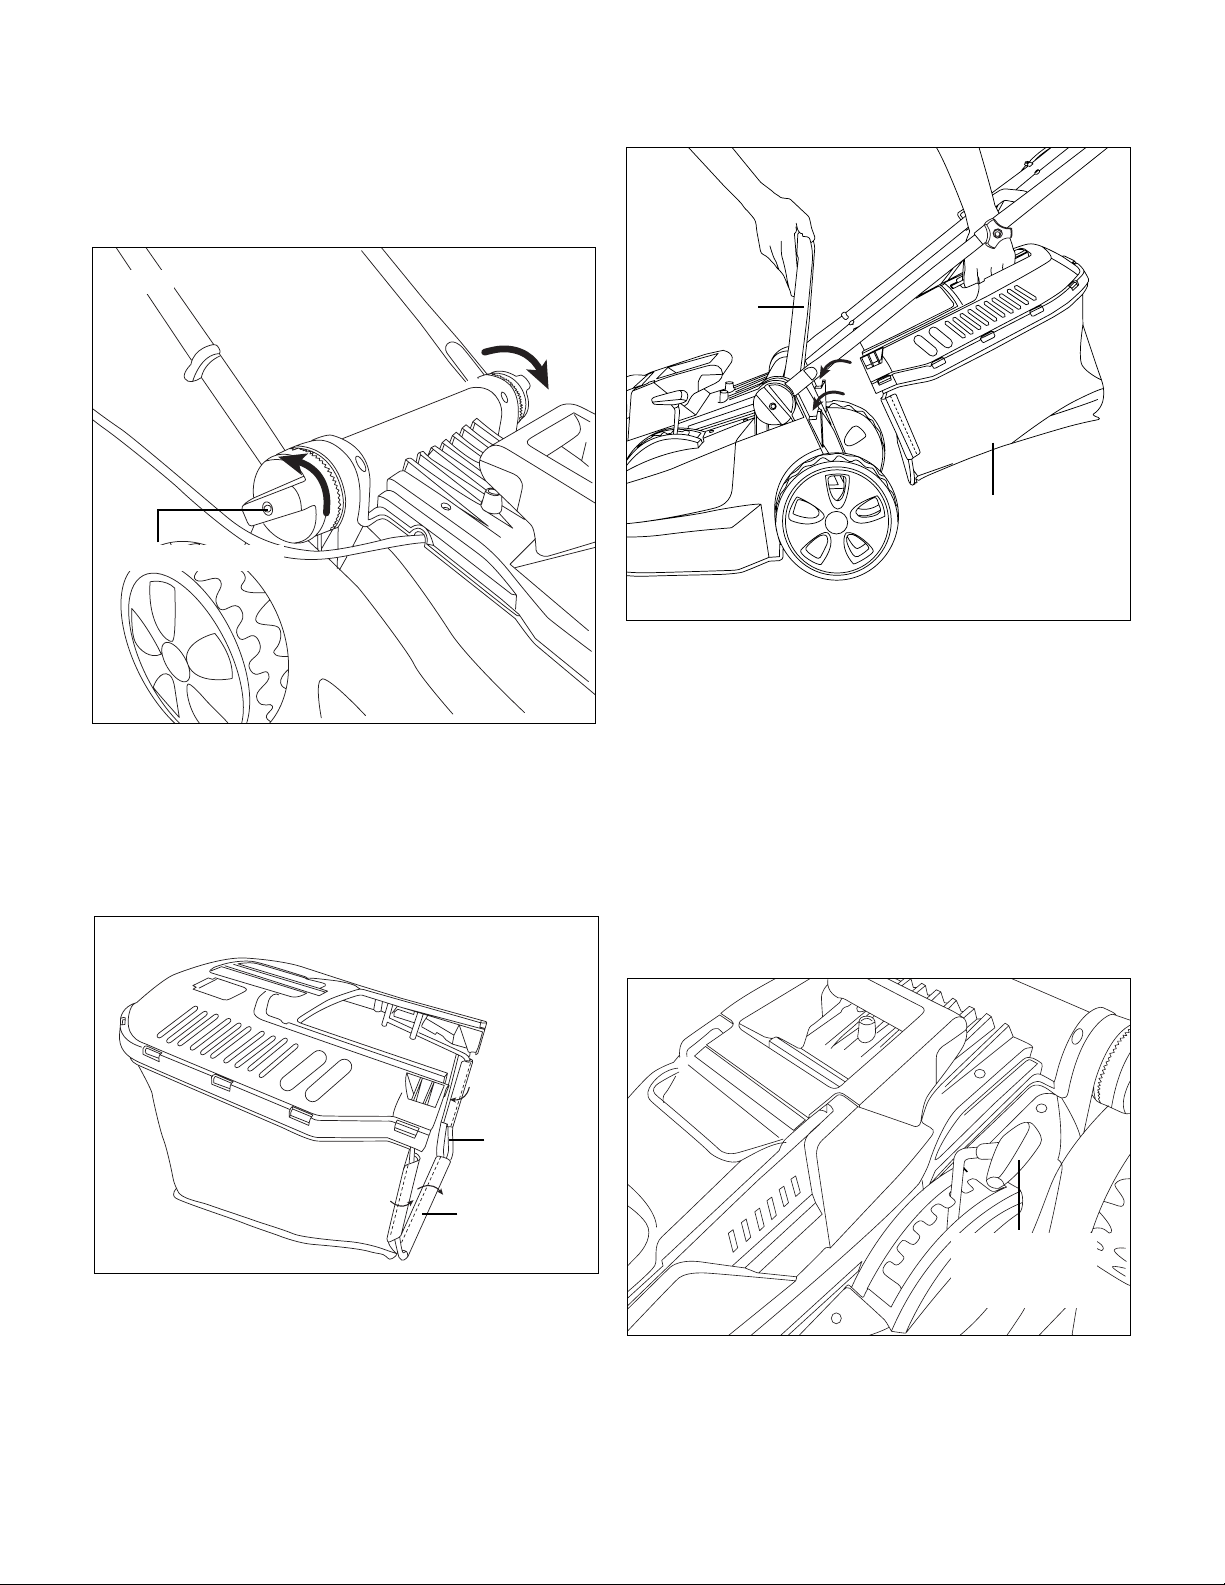
2. Next, release the quick-lock wheel for the lower handle by
turning it counterclockwise. This will allow you to move
the handle to the required position. Secure the handle by
turning the wheel in the opposite direction (Fig. 2).
Fig. 2
Quick-lock wheel
Fitting the Grass Bag
IMPORTANT! Before tting the grass bag, ensure that the
safety key has been pulled, the motor is switched o and the
blade has come to a complete standstill.
1. Clip the protective plastic straps onto the support rod
(Fig. 3).
Fig. 3
Fig. 4
Ejector ap
Grass bag
Setting the Cutting Height
IMPORTANT! Before adjusting the cutting height, make sure
the motor is switched o and the safety key has been pulled.
1. To set the cutting height on your lawn mower, pull out
the cutting height adjustment lever, move the lever to the
left or right and push it back into one of the six cutting
positions indicated below. Make sure that the lever
engages properly (Fig. 5).
6-Position Height Adjustment:
1. 1.18 in. (30 mm) 4. 2.17 in. (55 mm)
2. 1.38 in. (35 mm) 5. 2.60 in. (66 mm)
3. 1.77 in. (45 mm) 6. 3.15 in. (80 mm)
Support rod
Protective
plastic straps
2. Lift the ejector ap with one hand.
3. With the other hand, hold the grass bag by the handle and
hook it in from above (Fig. 4).
Fig. 5
2
3
4
5
6
Palanca de
ajuste de altura
de corte
Before you begin to mow, check to ensure that the blade is not
blunt and that none of the fasteners are damaged. To prevent
any imbalance, replace blunt and/or damaged blades. To carry
out this check, rst switch o the motor and pull out the safety
key.
9
Page 10

Battery Pack Operation
The equipment is tted with a lithium-ion battery. The battery
pack is completely closed and maintenance free.
• Use the battery charge indicator lights to determine when to
charge your EcoSharp
• You can "top-o" your battery pack's charge before starting
a big job or after a long day of use.
™
iBAT40 lithium-ion battery pack.
Battery Charge Level Indicator
The battery pack is equipped with a push button for checking
the charge level. Simply press the push button to read o the
battery charge level from the LEDs of the battery indicator:
• All 3 level monitoring LEDs are lit: Battery charge level
is high.
• 2 level monitoring LEDs are lit: Battery charge level is
decreasing. Stop work as soon as possible.
• 1 level monitoring LED is lit: Battery is at. Stop work
IMMEDIATELY and charge the battery. Otherwise the
battery’s service life will be greatly shortened.
Light IndicatorsLights
Charge level button
The battery is at 30% capacity
and requires charging
The battery is at 60% capacity
and requires charging soon
The battery is at full capacity
Installing and Charging the Battery
1. Open the battery cover on the lawn mower by depressing
the locking button found on the outside of the battery
compartment (Fig. 6).
Fig. 6
Locking
button
NOTE: If the charge level button does not appear to be
working, place the battery pack on the charger and charge as
needed.
Immediately after using the battery pack, the charge level
button may display a lower charge than it will if checked a few
minutes later. The battery cells “recover” some of their charge
after resting.
Charger Operation
WARNING! Charge only EcoSharp
m
battery packs in compatible EcoSharp
battery chargers. Other types of batteries may cause personal
injury and damage.
To reduce the risk of electric shock, do not allow water to ow
into the charger's AC/DC plug.
When to Charge the EcoSharp™ iBAT40
Lithium-Ion Battery
NOTE: The EcoSharp™ iBAT40 lithium-ion battery packs do
not develop a "memory" when charged after only a partial
discharge. Therefore, it is not necessary to run down the
battery pack before placing it into the charger.
™
iBAT40 lithium-ion
™
iCHRG40 lithium-ion
2. Pull the push lock button on the battery to pull the battery
pack up and out of the equipment (Fig. 7).
Fig. 7
Push lock button
10
Page 11

3. Check that the mains voltage is the same as that marked
on the rating plate of the battery charger. Then, insert the
charger's plug into the electrical wall outlet. When you
plug in the charger, the top green light will illuminate and
stay green (Fig. 8).
NOTE: An alternately ashing red and green light indicates a
temperature abnormality (i.e. that the battery pack is either
too hot or too cold). If there is only a red blinking light, this
indicates that something is wrong with the battery. Contact
Snow Joe
®
/Sun Joe® customer service at 1-866-766-9563.
Fig. 8
green
Power on
4. Place the battery pack into the charger by sliding the
pack as shown to lock it into position. When you insert
the battery into the charger, the bottom red light will
illuminate to indicate that the battery is charging (Fig. 9).
5. When the bottom light turns green, the battery is fully
charged (Fig. 9).
Flashing green
Flashing red
Temperature abnormal
Something is wrong
Flashing red only
6. A fully discharged pack with an internal temperature
in the normal range will fully charge in 2.5 to 3 hours
(between 32ºF/0ºC and 113ºF/45ºC). Heavily cycled
battery packs may take longer to charge completely.
7. The battery charge indicator lights on the battery pack
will display as the pack is charging to indicate the
battery’s capacity.
8. After charging is complete, the continuous green light will
turn on and the charge level indicator on the battery will
turn o.
9. If the charging light indicator alternately blinks red and
green or the light indicator does not come on at all, check
that the battery pack is fully seated into the bay. Remove
the pack and reinsert. If the problem persists, contact the
Snow Joe
®
/Sun Joe® customer service center at
1-866-766-9563 for assistance.
10. When charging is complete, remove the battery from the
charger by pulling the push lock button and sliding the
battery backward to unlock it from the charger (Fig. 10).
Fig. 10
Fig. 9
Charging
green
red
Release button
11. Timely recharging of the battery will help prolong the
battery's life. You must recharge the battery pack when
you notice a drop in the equipment's power.
IMPORTANT! Never allow the battery pack to become fully
discharged as this will cause irreversible damage to the
battery.
green
green
Fully charged
11
Page 12

Charging a Hot or Cold Battery Pack
A red and green ashing indicator light on the charger indicates
that the battery pack temperature is outside the charging
range. Once the pack is within the acceptable range, normal
charging will take place and the red light will be continuous.
Hot or cold battery packs may take longer to charge.
Lithium-Ion Charging Status
Powering On and O
1. Open the battery compartment cover and slide the battery
down to lock it into position (Fig. 12).
Fig. 12
Battery Pack
Temperature
Too hot Flashing Not charging
Normal range Continuous Normal charging
Too cold Flashing Not charging
Red Charger
Indicator Light
Charging
Status
Operation
IMPORTANT! The lawn mover is equipped with a safety circuit
to prevent unauthorized use. Directly before starting up the
lawn mower insert the safety key into the slot found inside
the battery housing (Fig. 11) and remove the safety key again
whenever you interrupt or terminate your work.
Fig. 11
Safety key
Battery
2. Insert the safety key into the slot and close the battery
compartment cover (Figs. 13 & 14).
Fig. 13
Safety key
To prevent the equipment switching on accidentally, the lawn
mower is equipped with a safety switch button, which must be
pressed before the ON/OFF switch bar lever can be activated.
12
Page 13

Fig. 14
Battery cover
Battery
Safety key
3. To power on, press and hold the safety lock button while
puling the switch bar lever toward you (Fig. 15). Once the
mahcine powers on, release the safety lock button and
proceed with operation. The lawn mower can only be
started by pressing the safety switch button rst, followed
by squeezing the ON/OFF switch bar lever; reverse
operation will not start the machine.
4. To power o, release the ON/OFF switch bar lever
(Fig. 15).
Grass Bag Filling Level Indicator
1. The grass bag is equipped with a lling level indicator
window that is opened by the airow that the lawn mower
generates during operation (Fig. 16).
2. If the ap closes during mowing, this indicates that the
grass bag is full and must be emptied (Fig. 16).
Fig. 16
GO
STOP
Grass indicator window
NOTE: To ensure that the lling level indicator functions
properly, keep the holes under the ap clean and permeable.
Fig. 15
Switch bar level
Safety lock button
Mowing Tips
mWARNING! Inspect the area prior to mowing and
remove all the stones, sticks, wires and other foreign objects
that could be picked up and thrown by the rotating blade.
Failure to comply not only will damage the mower blade, but
can also lead to serious personal injury.
• Be sure to check the mowing blade periodically for signs
of wear and sharpen it at least once per year, as described
in the maintenance section.
NOTE: A sharp blade will greatly enhance the
performance of the mower, especially when cutting tall
blades of grass.
• When cutting thick grass, reduce your walking speed
in order to allow for a more eective cut and a proper
discharge of the clippings. For a healthy lawn, always cut
o one-third or less from the total length of the grass. The
average lawn should be approximately 1.5 to 2 in. (3.8 to 5
cm) long during cool months, and more than 2 in. (5 cm)
long during hot months. If there is growth, the lawn should
be cut in the fall.
• The lawn will look better if it is always cut to the same
height and in alternate directions.
13
Page 14

• When crossing any graveled surfaces, release the switch
bar lever to turn o the mower. The stones can be picked
up and thrown by the rotating blade.
• Set the mower to the highest cutting height when mowing
on uneven ground or in tall weeds.
mWARNING! If you strike a foreign object, stop the motor
and remove the safety key. Thoroughly inspect the mower and
repair any damage before resuming work.
• IMPORTANT! Never open the ejector ap when the grass
bag has been detached (to be emptied) and the motor is
still running. A rotating blade can cause serious injuries!
• Always carefully fasten the ejector ap and grass bag.
Switch o the motor before emptying the grass bag.
Always ensure that a safe distance (provided by the length
of the long handles) is maintained between the user and
the mower housing. Be especially careful when mowing
and changing direction on slopes and inclines.
• Maintain a solid footing and wear sturdy, non-slip footwear
and long trousers. Always mow across an incline (not up
and down).
• For safety reasons, the lawn mower may not be used to
mow inclines with gradients exceeding 15 degrees.
• Use special caution when backing up and pulling the lawn
mower towards you as such maneuvering of the machine
poses a tripping hazard.
Cleaning, Maintenance and
Ordering Spare Parts
mWARNING! Before cleaning, repairing, inspecting or
carrying out any other maintenance work, ensure that the blade
is not rotating and that the safety key has been disconnected.
Cleaning
• Keep all safety devices, air vents and the motor housing
free of dirt and dust as best as possible.
• Wipe the equipment with a clean cloth or blow it with
compressed air at low pressure.
• Clean the equipment immediately after use with a damp
cloth and some soft, non-abrasive soap. Do not use
cleaning agents or harsh solvents; these may damage
the plastic parts in the equipment. Ensure that no water
penetrates the equipment's interior.
• Do not clean the lawn mower with running water,
particularly with high-pressure water.
• Keep the handles dry, clean and free of oil and grease.
• At the end of the season, perform a general inspection of
the lawn mower and remove any grass, dirt or other debris
that may have accumulated.
• At the start of each season, check the condition of
the mower blade. If repairs are necessary, please call
the Snow Joe
assistance at 1-866-766-9563.
®
/Sun Joe® customer service center for
Servicing
• Ensure that all mounting components (i.e. screws, bolts,
nuts etc.) are always tightened so that the equipment can
be safely operated at all times.
• Frequently inspect the grass bag assembly for signs of
wear and replace immediately with a genuine Snow Joe
Sun Joe
• Replace excessively worn or damaged parts immediately.
• To maximize your mower's longevity, all screwed parts,
including the wheels and axles, should be cleaned and
lubricated.
• There are no parts inside the equipment which require
additional maintenance or lubrication.
®
part if damage is found.
®
/
Replacing the Mower Blade
NOTE: The mower blade is sharp and can cause severe
personal injury if handled incorrectly. Wrap the blade or wear
protective gloves, and use extra caution when servicing.
• The cutting components are subjected to more wear and
tear than any other components of the unit. Therefore,
routinely check the condition of the blade and make sure
that it is tightly fastened. If the blade is completely worn, it
must be immediately replaced or resharpened.
• An excessively vibrating mower means that the blade
is not properly balanced or has become deformed from
striking an object. In this case, the blade must be repaired
or replaced.
• For safety reasons, we recommend having the blade
replaced or resharpened by an authorized Snow Joe
Sun Joe
®
service center.
®
/
Ordering Replacement Parts
When servicing the mower, use only genuine replacement parts
that are available from the manufacturer. In order to obtain
replacement parts, visit our website at snowjoe.com or call our
toll-free customer service helpline at 1-866-766-9563. The use
of parts that do not meet the original equipment specications
may lead to improper performance of the lawn mower, may
compromise operator safety and will void the manufacturer's
warranty.
14
Page 15

Storage
1. Remove the battery and the safety key from the lawn
mower.
2. Clean the lawn mower as described in the cleaning
section.
3. Inspect the mower carefully for worn, loose or damaged
parts. Check connections and screws and tighten if
necessary. Pay special attention to the mower blade and
replace/sharpen if it shows signs of wear.
4. Store the mower indoors in a dry, clean and cool area
out of the reach of children. Do not store the unit next to
corrosive materials, such as fertilizer and rock salt.
5. Do not cover the lawn mower with a solid plastic sheet .
Plastic coverings trap moisture around the mower, which
can damage the unit.
6. The handle on your lawn mower can be completely folded
for compact storage. Start by loosening the handle knobs
on each side of the upper handle and fold down the upper
handle (Fig. 17).
7 Next, release the quick-lock wheel for the lower handle
until you are able to collapse the handle completely
(Fig. 17).
Disposal and Recycling
The equipment is supplied in packaging to keep it intact
during transit. The packaging is made of recyclable materials.
Properly dispose of these materials in accordance with
regulations.
Environmentally Safe
Battery Disposal
m
CAUTION! Rechargeable battery packs and cordless
electric tools contain materials that are potentially harmful to
the environment. Never place any cordless electric tools or
battery packs in your household refuse. When cordless electric
tools become defective or worn, remove the rechargeable
battery pack and dispose of these items in accordance with
federal, state and local regulations. Contact a recycling agency
in your area for recycling locations.
mCAUTION! Even discharged battery packs contain
some energy. Before disposing, use electrical tape to cover
the terminals to prevent the battery pack from shorting, which
could cause a re or explosion.
Fig. 17
Upper handle
Upper handle knob
Lower handle
Quick-lock
wheel
mWARNING! To reduce the risk of injury or explosion,
never burn or incinerate a battery pack even if it is damaged,
dead, or completely discharged. When burned, toxic fumes
and materials are emitted into the surrounding atmosphere.
Support
If your Sun Joe® iON16LM cordless lawn mower requires
service or maintenance, please call 1-866-SNOWJOE
(1-866-766-9563) for assistance.
Model and Serial Numbers
When contacting the company, reordering parts or arranging
service from an authorized dealer, you will need to provide the
model and serial numbers, which can be found on the decal
located on the housing of the unit. Copy these numbers into
the space provided below.
Record the following numbers from the housing or handle of your
new product:
Model #:
i O N 1 6 L M
Serial #:
15
Page 16

Troubleshooting
Fault Possible Cause Remedy
Motor does not start
Motor performance
drops
Unclean cuts
a) Capacitor defective
b) Battery pack empty
c) Cable defective
d) Switch/plug block defective
e) Motor terminals or capacitor
disconnected
f) Mower standing in high grass
g) Mower housing is clogged
h) Safety key is not inserted
i) Battery is not correctly inserted
a) Grass too tall or damp
b) Mower housing is clogged
c) Blades badly worn
d) Battery performance decreasing
a) Blades worn
b) Wrong cutting height
a) Contact an authorized service center
b) Charge battery pack
c) Check the cable
d) Contact an authorized service center
e) Contact an authorized service center
f) Start motor on shorter grass or
previously mowed area; change
cutting height if necessary
g) Clean housing so that the blade can
run freely
h) Insert safety key (Fig. 13)
i) Remove the battery and reinsert
a) Correct the cutting height
b) Clean housing
c) Replace blades
d) Check the battery performance and
charge the battery if necessary
a) Replace or resharpen the blade; contact
an authorized service center
b) Correct the cutting height
IMPORTANT! For protection, the motor is equipped with a thermal switch that cuts out when the motor is overloaded and
switches on again automatically after a short cooling period.
16
Page 17

Accessories
m
WARNING! ALWAYS use only authorized Snow Joe
replacement parts or accessories that are not intended for use with this tool. Contact Snow Joe
whether it is safe to use a particular replacement part or accessory with your tool. The use of any other attachment or accessory
can be dangerous and could cause injury or mechanical damage.
NOTE: Accessories are subject to change without any obligation on the part of Snow Joe
online at snowjoe.com or via phone by contacting the Snow Joe
(1-866-766-9563)
®
/Sun Joe® replacement parts and accessories. NEVER use
®
/Sun Joe® customer service department at 1-866-SNOWJOE
®
/Sun Joe® if you are unsure
®
/Sun Joe®. Accessories can be ordered
ModelAccessories Item
1
EcoSharp™ 40 V Lithium-Ion Battery
2
iBAT40
EcoSharp™ 40 V Lithium-Ion Battery Charger
iCHRG40
3
Safety Key
iON16LM-KEY
4
15-Inch Mower Blade
iON16LM-BLD
5
9.25 gal (35 l) Grass Bag
iON16LM-BAG
17
Page 18

NOTES
18
Page 19

A Two-Year Full Warranty
for residential use
in the United States and Canada
General Conditions:
Snow Joe®, LLC warrants this product to the original purchaser for two years against defects in material or workmanship when used
for normal residential purposes. Snow Joe
part, subject to the conditions, limitations, and exclusions set forth herein. Such repair or parts replacement will be free from charge to
the original purchaser except noted below.
The duration of the warranty applies only if the product is put to personal use around the household or residence. If the product is put
to any business use, commercial or industrial, then the duration of this warranty is 90 days from the date of original purchase. If any
product is rented or leased, the duration of the warranty is 90 days from the date of original purchase.
It is the owner’s responsibility to perform correctly all maintenance, and minor adjustments explained in the owner’s manual.
Electric Products:
To obtain a replacement electric powered unit or repair the existing electric powered unit, you must return the complete unit and
postage prepaid to: Snow Joe Return Center, 86 Executive Avenue, Edison, NJ 08817.
Gasoline / Battery Products:
Limitations
• Batteries are warranted only for the period of 12 months after the date of purchase on a prorated basis. Rechargeable batteries
will be replaced free from charge during the rst 90 days. After the initial 90 days, batteries will be replaced at a prorated cost to
the customer.
• Idlers, cables, and electrical components are warranted to the original purchaser for use at household or residence for a period
of two years.
®
, LLC will repair any defect in material or workmanship, and repair or replace any defective
Exclusions
®
• Snow Joe
brand engines are covered under this warranty. All other engines and engine accessories are covered only by the
engine manufacturer’s warranty and are not covered by this warranty.
®
• Parts used that are not genuine Snow Joe
parts are not covered by this warranty.
• Damages resulting from misuse, alteration, improper assembly, improper adjustment, neglect, or accident which requires repair
is not covered under this warranty.
• Belts, augers, and tines are not covered under warranty – belts, augers, and tines wear out and can be purchased at
snowjoe.com or by calling 1-866-766-9563.
®
Snow Joe
obligating Snow Joe
, LLC may from time to time change the design of its products. Nothing contained in this warranty shall be construed as
®
, LLC to incorporate such design changes into previously manufactured products, nor shall such changes be
construed as an admission that previous designs were defective.
®
This warranty is intended to cover product defects only. Snow Joe
®
in connection with the use of the Snow Joe
Products covered by this warranty. This warranty does not cover any cost or expense
, LLC is not liable for indirect, incidental, or consequential damages
incurred by the purchaser in providing substitute equipment or service during reasonable periods of malfunction or non-use of this
product, while waiting for completion of repairs under this warranty. Some states do not allow exclusions of incidental or consequential
damages, so the above exclusions may not apply in all states. This warranty may give you specic legal rights in your state.
®
If you wish to contact Snow Joe
, please direct inquiries to the:
Customer Service Department
Snow Joe Center
86 Executive Avenue
Edison, NJ 08817
Customers who have purchased Snow Joe
®
products exported from the United States and Canada should contact their Snow Joe
®
Distributor (Dealer) to obtain information applicable for your country, province, or state. If for any reason, you are not satised with the
®
distributor’s service, or if you have diculty obtaining warranty information, contact your Snow Joe
®
are unsatisfactory, please write to the Snow Joe
Center at the above address.
seller. If in the event your eorts
If you have any questions about your product warranty, please call 1-866-SNOW-JOE or visit us online at snowjoe.com.
19
Page 20

snowjoe.com
 Loading...