

Page 1

Electric Wood Chipper/Shredder
Electric Wood Chipper/Shredder
Model No. CJ601ERM
A Division of Snow Joe®, LLC
IMPORTANT!
Safety Instructions
All Operators Must Read These
Instructions Before Use
Always follow these safety guidelines. Failure to do so may
result in serious bodily injury or death.
Safety Precautions
TO REDUCE RISK OF INJURY: Before any use be sure
everyone using this product reads and understands all safety
instructions and other information contained in this manual.
m WARNING! Wear appropriate personal hearing
protection during use. Under some conditions and duration of
use, noise from this product may contribute to hearing loss.
m WARNING! When using electric gardening
appliances, basic safety precautions should always be
followed to reduce risk of re, electric shock, and/or
personal injury.
Save these instructions and review frequently prior to use
and in instructing others.
General Safety
• AVOID DANGEROUS ENVIRONMENTS – Don’t use this
product in rainy, stormy, damp or wet locations. Do not
operate in gaseous or explosive atmospheres. Motors in
these products normally spark, and the sparks might
ignite fumes.
• DRESS PROPERLY – Don’t wear loose clothing or jewelry
and wear protective hair covering to contain long hair.
They can be caught in moving parts. Use of rubber
gloves and substantial footwear is recommended
when working outdoors.
• USE SAFETY GLASSES – Wear safety glasses with side
shields or goggles that are marked to comply with ANSI
Z87.1 standard when operating this product.
• USE DUST MASK – Wear face or dust mask when
operating this product.
• USE HEARING PROTECTION – Wear ear plugs or muffs
when operating this product.
• GROUND FAULT CIRCUIT INTERRUPTER – (GFCI) protection should be provided on the circuit(s) or outlet(s) to
be used for this product if you are using an extension cord.
Receptacles are available having built-in GFCI protection
and may be used.
Form No. SJ-CJ601ERM-880E
OPERATOR’S MANUAL
• DOUBLE INSULATION – This product has double insula-
tion. This means that all external metal parts are insulated
from the electrical supply. This is achieved by introducing
an insulation layer between electrical and mechanical
parts. The double insulation guarantees you the greatest
possible safety.
• EXTENSION CORD – Make sure your extension cord is
in good condition. Use only extension cords having an
electrical rating not less than the rating of the product. An
undersized extension cord will cause a drop in line voltage
resulting in loss of power and overheating.
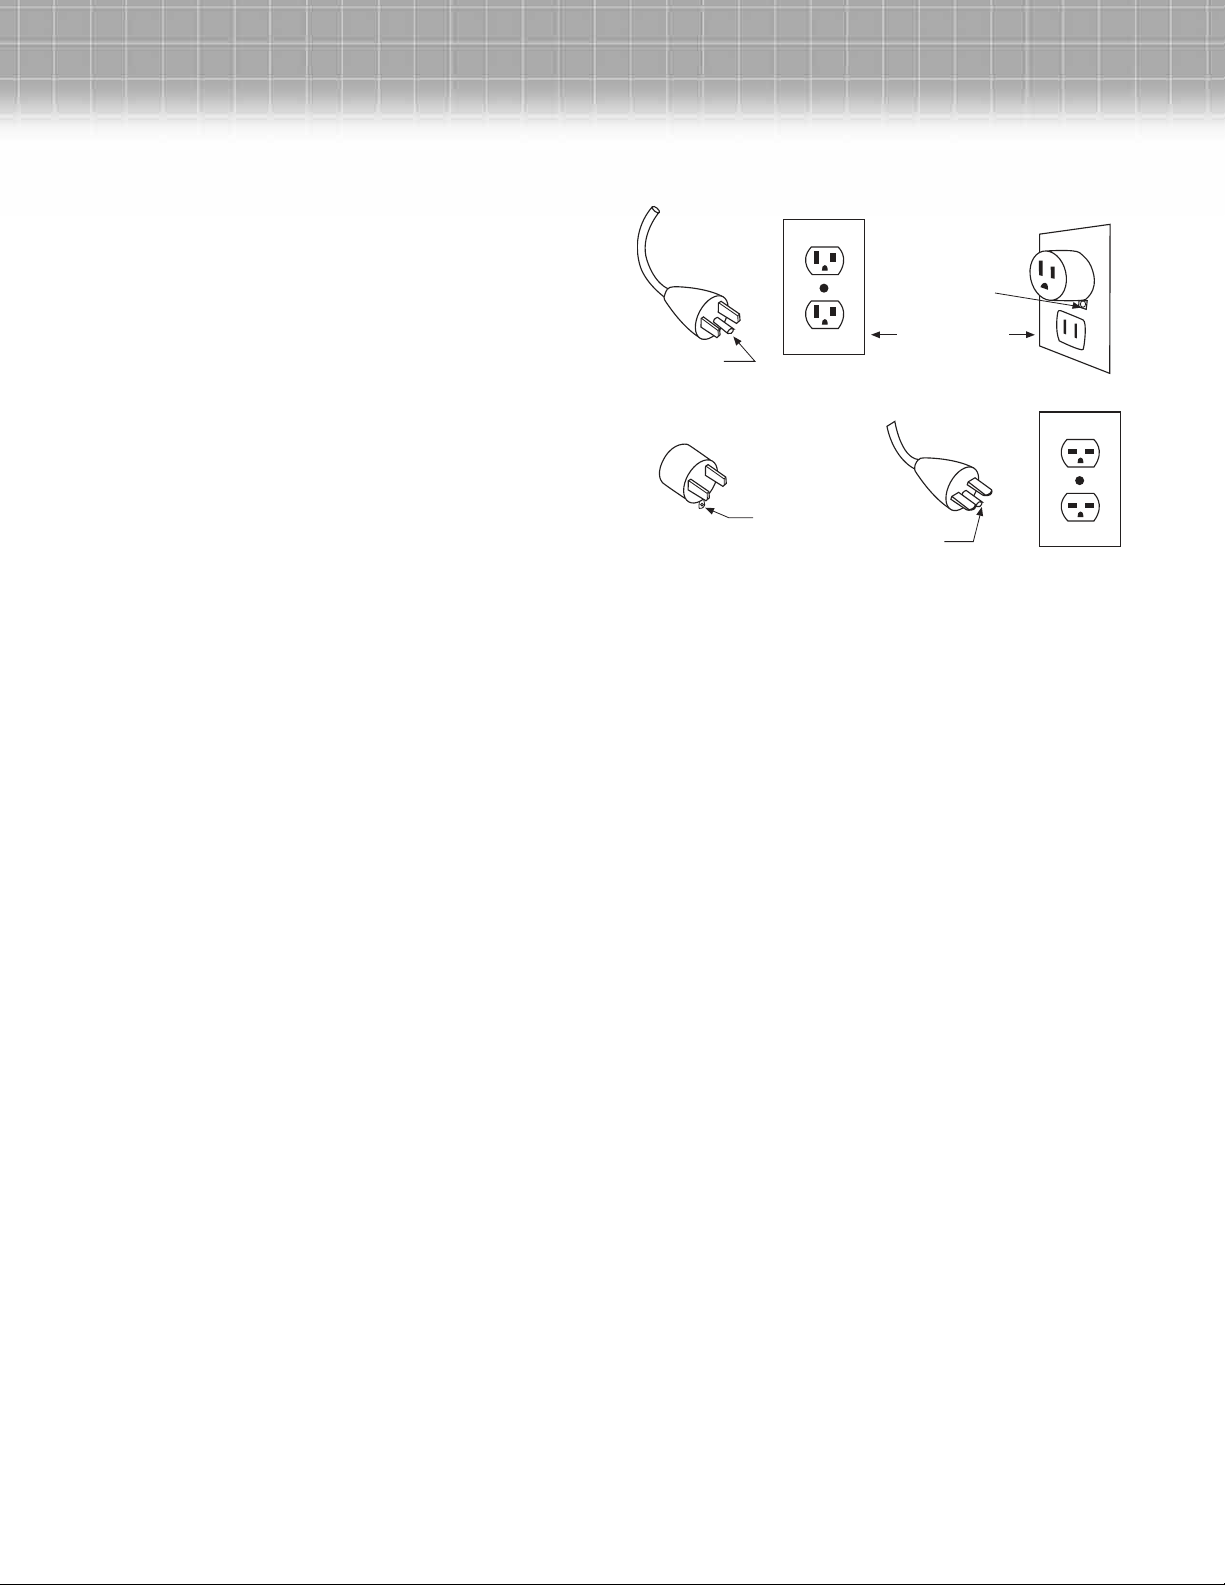
• POLARIZED PLUGS – To reduce the risk of electric shock,
this product has a polarized plug (one blade is wider than
the other). This product must be used with a suitable
polarized extension cord. Polarized connections will t together only one way. Make sure that the receptacle end of
the extension cord has large and small blade slot widths. If
the plug does not t fully into the extension cord, reverse
the plug. If it still does not t, obtain a suitable extension
cord. Do not change the tool plug or extension cord in any
way.
m WARNING: Use outdoor extension cords marked
SW-A, SOW-A, STW-A, STOW-A, SJW-A, SJTW-A, or
SJTOWA. These cords are rated for outdoor use and reduce
the risk of electric shock.
• DISCONNECT UNIT from the power supply when not
in use or when servicing or cleaning. Do not leave unattended.
• DON’T ABUSE CORD – Never carry or pull this product by
the cord or yank the cord to disconnect from the receptacle. Keep cord from heat, oil, and sharp edges.
• STAY ALERT – Watch what you are doing. Use common
sense. Do not operate the garden shredder when you are
tired or under the inuence of drugs or medication.
• STORE IDLE UNIT INDOORS – When not in use, the
garden shredder should be stored indoors in a dry and
high or locked-up place, out of children’s reach.
• MAINTAIN UNIT WITH CARE – Keep clean for best
performance and to reduce the risk of injury. Inspect
extension cord periodically and replace if damaged. Keep
handles dry, clean and free from oil and grease.
• CHECK FOR DAMAGED PARTS – Before further use of
the product, any part that is damaged should be carefully checked to determine that it will operate properly
and perform its intended function. Check for alignment
of moving parts, binding of moving parts, breakage of
parts, mounting and any other condition that may affect
its operation. Any part that is damaged should be properly
repaired or replaced. Call our customer service help line
for assistance at 1-866-766-9563 for assistance.
© 2013 by Snow Joe, LLC
All rights reserved. Original instructions.
SAVE THESE INSTRUCTIONS
1
Page 2
GROUNDING METHOD
(A)
(C)
(D)
AA210
(B)
METAL SCREW
COVER OF GROUNDED
OUTLET BOX
ADAPTER
GROUNDING
PIN
GROUNDING
PIN
GROUNDING
MEANS
• LIGHTING – Only operate your garden shredder in daylight
or good articial light.
• DON’T OVERREACH – Keep proper footing and balance
at all times. Wear oil resistant rubber soled footwear.
• Never leave a running tool unattended. Turn the garden
shredder off and wait until it comes to a complete stop
before leaving the work area.
• Avoid accidental start-ups. Make sure switch is in off position before plugging in the power cord.
• USE RIGHT APPLIANCE – Do not use this product for any
job except that for which it is intended.
• KEEP CHILDREN AWAY – All visitors, children and pets
should stay at a safe distance from the work area.
m WARNING: Some dust and debris created by
the use of this tool could contain chemicals known to the
State of California to cause cancer and birth defects or other
reproductive harm.
Some examples of these chemicals are:
- chemicals in fertilizers
- compounds in insecticides, herbicides and pesticides
- arsenic and chromium from chemically treated lumber
Your risk from exposure to these chemicals varies depending
on how often you do this type of work. To reduce your
exposure, work in a well-ventilated area and with approved
safety equipment, such as dust masks that are specically
designed to lter out microscopic particles.
m WARNING: The wires of this product could
contain chemicals know to the State of California to cause
cancer and birth defects or reproductive harm. Wash hands
after handling.
Electrical Safety
1. Always check that the power supply corresponds to the
voltage on the rating plate.
2. Do not operate in an area where there is a possibility
of body contact with grounded items (i.e.: pipes, metal
structures). Avoid contact with metal objects.
3. Do not pull/yank the power cord. Keep the power cord
away from hot surfaces and sharp objects.
4. Always use a grounded three-wire extension cord and receptacle that are made of rubber and intended for outdoor
use. The machine is designed to operate on 120 Volt AC
household current. The chipper power cord has a grounding prong. To avoid the possibility of shock it must always
be used with a properly grounded three-prong receptacle
protected with a 20A fuse. Never remove the ground prong
from the plug.
Note: If necessary, the machine can be switched to a
single-phase network (120V/60Hz). Connect the main
leads to a standard 120V/60Hz electrical supply which has
protection devices of under-voltage, over-voltage, overcurrent as well as a residual current device (RCD) with a
maximum residual current rated at 30mA. Only a qualied
electrician should only do this.
5. Do not operate the machine where water is present
(i.e.: rain, sprinkler, puddles).
6. Do not touch electrical plugs with wet hands.
7. Keep the extension cord away from the moving parts and
hot motor housing.
8. Immediately replace and dispose of damaged wires and
plugs.
9. Do not open the switch box on the motor. If service is
necessary take the machine to a qualied electrician.
10. Ground Fault Circuit Interrupter (GFCI) protection should
be provided on the circuit(s) or outlet(s) to be used for the
gardening appliance. Receptacles are available having
built-in GFCI protection and may be used for this measure
of safety.
11. Warning – Use outdoor extension cords marked SW-A,
SOW-A, STW-A, STOW-A, SJW-A, SJTW-A, or SJTOWA.
These cords are rated for outdoor use and reduce the risk
of electric shock.
Exception: Types SW, SOW, STW, STOW, SJW, SJOW,
SJTW, and SJTOW are alternative designations to Types
SW-A, SOW-A, STW-A, STOW-A, SJW-A, SJOW-A,
SJTW-A, and SJTOW-A, respectfully.
12. Extension Cord – Make sure your extension cord is in
good condition. When using an extension cord, be sure to
use one heavy enough to carry the current your product
2
Page 3
will draw. An undersized extension cord will cause a drop
in line voltage resulting in loss of power and overheating.
Table 1 shows the correct size to use depending on cord
length and nameplate ampere rating. If in doubt, use the
next heavier gauge. The smaller the gauge number, the
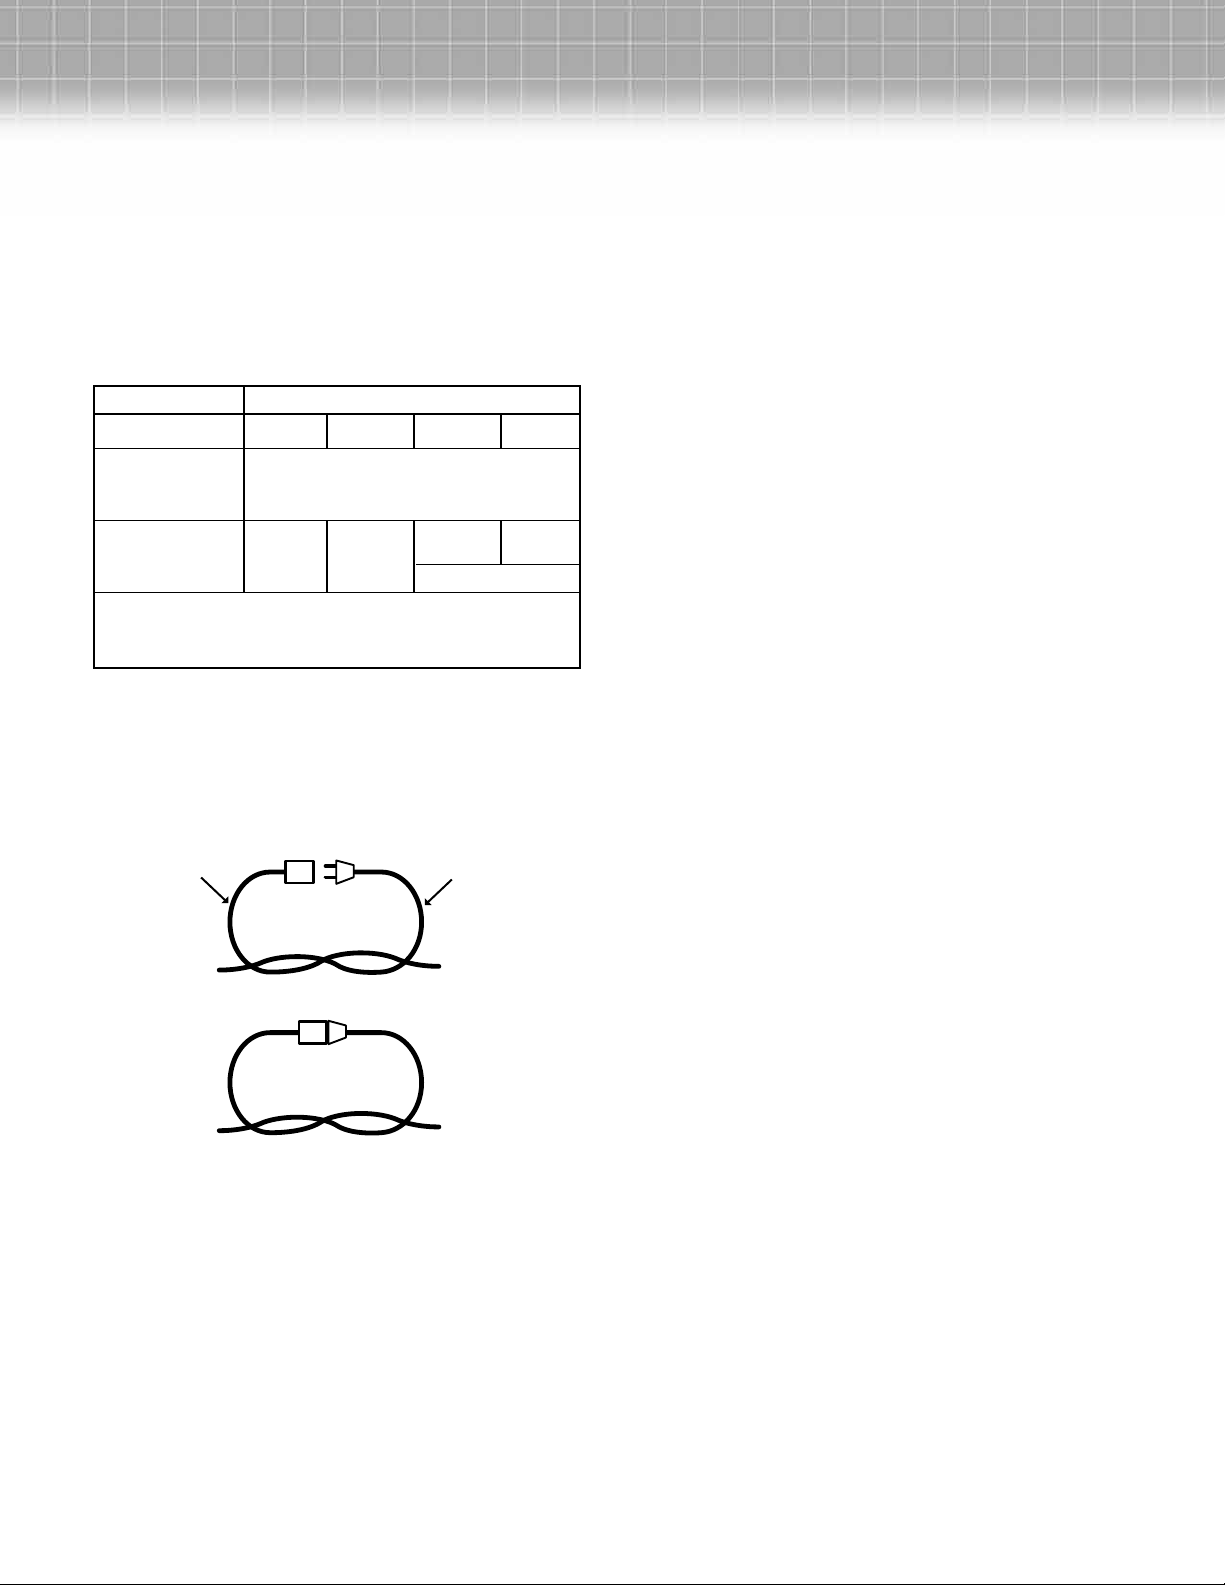
heavier the cord. To reduce the risk of disconnection of
appliance cord from the extension cord during operating:
Minimum Gauge For Extension Cords
Volts
120V
Ampere Rating
More than
Not more than
0 – 6
6 – 10
10 – 12
NOTE – Only the applicable parts of the Table need to
be included. For instance, a 120-volt product need not
include the 240-volt heading.
i) Make a knot as shown in Figure 1 or
ii) Use one of the plug-receptacle retaining straps or
connectors described in this manual.
Total length of cord in feet
25
18
18
16
50
16
16
16
100
AWG
Not Recommended
Table 1
16
14
Method of securing extension cord
Cord set Appliance cord
150
14
12
16. Don’t Overreach – Keep proper footing and balance at
all times.
17. Stay Alert – Watch what you are doing. Use common
sense. Do not operate appliance when you are tired.
18. Disconnect Appliance – Disconnect the appliance from
the power supply when not in use, before servicing, and
when changing accessories.
19. Store Idle Appliances Indoors – When not in use,
appliances should be stored indoors in dry, and high or
locked-up place – out of reach of children.
20. Maintain Appliance With Care – Keep cutting edge sharp
and clean for best performance and to reduce the risk
of injury. Follow instructions for lubricating and changing
accessories. Inspect extension cords periodically and
replace if damaged, have it repaired by an authorized
service facility. Keep handles dry, clean, and free from oil
and grease.
21. Check Damaged Parts – Before further use of the
appliance, a guard or other part that is damaged should be
carefully checked to determine that it will operate properly
and perform its intended function. Check for alignment of
moving parts, binding of moving parts, breakage of parts,
mounting, and any other condition that may affect its
operation. A guard or other part that is damaged should
be properly repaired or replaced by an authorized service
center unless indicated elsewhere in this manual.
Personal Safety
(A) Tie cord as shown
Figure 1
(B) Connect plug and receptacle
13. Avoid Unintentional Starting – Don’t carry plugged-in
appliance with nger on switch. Be sure switch is off when
plugging in.
14. Don’t Abuse Cord – Never carry appliance by cord or
yank it to disconnect from receptacle. Keep cord from
heat, oil, and sharp edges.
15. Don’t Force Appliance – It will do the job better and with
less likelihood of a risk of injury at the rate for which it
was designed.
• Stay alert, watch what you are doing and use common
sense when operating a power tool. Do not use a power
tool while you are tried or under the inuence of drugs,
alcohol or medication. A moment of inattention while
operating power tools may result in serious personal injury.
• Use personal protective equipment. Always wear eye
protection. Protective equipment such as dust mask,
non-skid safety shoes, hard hat, or hearing protection used
for appropriate conditions will reduce personal injuries.
• Prevent unintentional starting. Ensure the switch is in the
OFF-position before connecting to power source
and/or battery pack. Picking up or carrying the tool:
carrying power tools with your nger on the switch invites
accidents.
• Remove any adjusting key or wrench before turning the
power tool on. A wrench or a key left attached to a rotating
part of the power tool may result in personal injury.
• Do not overreach. Keep proper footing and balance at
all times. This enables better control of the power tool in
unexpected situations.
• Dress properly. Do not wear loose clothing or jewelry, keep
your hair clothing and gloves away from moving parts,
3
Page 4

loose clothes, jewelry or long hair can be caught in moving
parts.
• If devices are provided for the connection of dust extraction and collection facilities, ensure these are connected
and properly used. Use of dust collection can reduce
dust-related hazards.
Operating Tips
1. Before starting the garden shredder, make sure that the
hopper inlet is empty.
2. Keep your face and body away from the opening.
3. Do not allow hands or any other part of the body or
clothing near the hopper or discharge chute.
4. Never put your hands into the hopper while the garden
shredder is running. Always use the paddle supplied with
your shredder to push items into the hopper.
5. Do not try to force objects larger than the recommended
diameter of 1-1/2” into the hopper.
6. Keep proper balance and footing at all times. Do not
overreach. Never stand at a higher level than the base
of the tool when feeding material into garden shredder.
7. Always stand clear of the discharge zone when operating
the garden shredder. Never reach under the shredder until
it has come to a complete stop.
8. When feeding material into the garden shredder be careful
to remove pieces of metal, rocks, bottles, cans or other
foreign objects that may damage the blades.
9. If the cutting mechanism strikes a foreign object or if the
garden shredder should start making any unusual noise
or vibration, turn it off and allow it to come to a complete
stop. Disconnect from power supply and take the
following steps:
- Inspect for damage;
- Check for and tighten any loose parts.
Remember that the starting mechanism on engine
powered tools will cause the cutting mechanism to move.
12. Keep all guards and deectors in place and in good
working condition.
13. Do not operate the garden shredder on a paved or gravel
surface where ejected material could cause injury.
14. Turn off the garden shredder and disconnect it from the
power supply whenever you leave the work area.
15. Do not tilt the garden shredder while it is running.
16. Never reach into the hopper until the garden shredder has
come to a complete stop and has been disconnected from
the power supply.
Service
Your power tool should be serviced by a qualied repair
person using only identical replacement parts. This will ensure
that the safety of the power tool is maintained.
m WARNING: Never reach into the hopper until
the garden shredder has come to a complete stop and
is unplugged. The blades will continue to rotate for a few
seconds after the shredder is turned off.
10. Do not allow processed material to build up in the
discharge zone; this may prevent proper discharge and
can result in kickback of material through the hopper.
m WARNING: Never put your hands near the
discharge chute. Failure to heed the warning could result in
serious injury.
11. If the shredder becomes clogged, turn it OFF and
disconnect from power supply before clearing debris.
Keep the power source clear of debris and other
accumulations to prevent damage to the power source.
4
Page 5

Safety Symbols
The following table depicts and describes safety symbols that may appear on this product. Read, understand, and follow all
instructions on the machine before attempting to assemble and operate.
Symbol Description
SAFETY ALERT
READ THE OPERATOR’S MANUAL(S) Read, understand
and follow all instructions in the manual(s) before
attempting to assemble and operate.
Do not use in wet weather conditions.
Wear eye protection, dust mask protection,
and ear protection.
Wear protective gloves when using the machine
and handling debris. Wear foot protection.
DANGER! Rotating blades. Keep hands and feet out of
openings while garden shredder is running.
SWITCH OFF! Remove plug from outlet immediately if
the cord is damaged or cut.
SWITCH OFF! Remove plug from outlet before cleaning
or maintenance.
DANGER! Of being hit by thrown objects.
Keep bystanders at a safe distance.
Double Insulation
5
Page 6

Know Your Electric Wood Chipper/Shredder
OFF
ON
REMOVE
TO LOCK
6
1
2
7
8
3
9
4
10
11
5
1. Hopper Locking Knob
2. Reset Button
3. Motor
4. Stand Assembly
5. Axle
6. Hopper
Technical Data
Rated voltage 120V AC 60Hz 14A
No Load Speed 4,300/RPM
Max. Cutting Diameter 1½-IN
Weight 25.4 lb (11.52 kg)
7. Main Body
8. Power On/Off Trigger Switch
9. Paddle
10. Paddle Holder
11. Wheels (two)
6
Page 7

Assembly
1. Remove all parts from package.
2. Check all the parts against the list in the manual. If any
parts are damaged or missing do not use the wood
chipper/shredder until the part is repaired or replaced.
Call our customer service help line at 1-866-766-9563
for assistance.
3. Assemble the wheel axle to the stand assembly; put the
spacer onto the axle; insert the wheels on the axle, then
attach washer and lock nut to the axle with the supplied
wrench to secure. (Fig. 2 and Fig. 3)
Fig. 5
Fig. 2
Fig. 3
5. Turn the main body upside down, insert the two ends of
the stand assembly into the housing, align the holes on the
housing and stand assembly, insert the four washers onto
the screws (A) and install into the stand assembly. (Fig. 6
and Fig. 7)
Fig. 6
Fig. 7
4. Press the wheel covers into the wheels to cover the ends
of the axles. You may use a hammer to seat them securely
over the axles. There may be some clearance between the
wheel and the wheel cover, it is not necessary to press it to
the bottom. (Fig. 4 and Fig. 5)
Fig. 4
(A) Screw
washer
7
Page 8

Operation
starting it accidently (See Fig. 8). The shredder cannot be
started when the safety switch is removed.
Starting (Fig. 8)
Make sure the switch is in the OFF position. Plug the garden
shredder into a suitable outlet using an approved extension
cord if necessary. Push the ON/OFF switch to “ON” to turn
the garden shredder on.
Stopping (Fig. 8)
Push the ON/OFF switch to “OFF” to turn the garden
shredder off.
CAUTION: The garden shredder will not operate if the hopper
locking knob is loose.
(D) Hopper Locking
Knob
(B) Reset
Button
ON
Fig. 8
B
R
T
E
I
A
U
K
C
E
R
I
R
C
P
T
R
E
E
S
S
E
S
R
T
O
OFF
ON
REMOVE
TO LOCK
OFF
Safety
Switch
Overload Protection (Fig. 8)
Your garden shredder is designed with overload protection.
If the shredder is clogged during shredding, the overload
protection will cut the power automatically to protect your
shredder. Wait at least 1 minute before restarting by rst
pressing the reset button (B) and then the ON/OFF switch.
Hopper Locking Knob (Fig. 8)
The garden shredder is tted with a safety interlock switch on
the closure between the hopper and main body. The switch is
activated when the hopper is securely closed and tightened by
the hopper locking knob. When the hopper is opened or not
tted well, the shredder will not run. Always tighten the hopper
locking knob (D) by turning it clockwise before operation.
Blades
The blades on the rotary plate are reversible. For quality and
safety reasons, we recommend that only identical replacement
blades be used should it become necessary to replace them.
Shredding Material
m WARNING! Before starting, ensure that the feed
inlet is empty.
m WARNING! Always wear ear and eye protection and
wear gloves during operation.
m CAUTION! Longer material standing out from the
shredder could lash out when being pulled in by the blades.
Keep a safe distance.
m CAUTION! When using the garden shredder and
feeding branches into the shredder, sometimes the blades pull
the material into the opening. Keep hands at a safe distance.
m CAUTION! The ventilation slots must not be covered.
1. Only insert as much material as to prevent blockage of the
feeding funnel. Chop garden waste that has been stored
for a few days and is wilted and damp alternately with dry
branches. This prevents the cutting blades from blocking
up. Widely branched material with leaves must be completely chopped before new material is fed. Make sure that
the chopped material can fall freely from the ejection slot.
2. Keep hold of branches while feeding them into the garden
shredder until they are automatically drawn in.
3. Keep to the working speed of the garden shredder and do
not overload it.
4. To protect the garden shredder from clogging, shred wilted
garden waste that has been left for a few days and shred
thin twigs alternately with branches.
5. Before you shred roots, remove any remaining soil and
stones from them.
6. Do not shred soft, damp material such as kitchen waste,
take it straight to the compost.
7. Keep a few dry branches for the end, as they will help
clean the garden shredder.
8. Only switch the garden shredder off after all of the shredding material has passed through the discharge chutes.
Otherwise, the discharge chutes may jam the next time the
shredder is turned on.
Safety Switch (Remove To Lock Fig. 8)
As a safety precaution, the safety switch may be removed
when you are not using the shredder to prevent children from
8
Page 9

Maintenance
m
WARNING! Always turn off the garden shredder and
unplug the power cord from the outlet before maintaining
the shredder.
m WARNING! Always wear gloves when cleaning.
1. Cleaning garden shredder: (See Fig. 9)
a) Unscrew the hopper locking knob (D) counter clockwise
and open the hopper.
b) Clean cutting blades and discharge area and remove
wood sticks or objects that may clog the blades.
c) The garden shredder has two blades that are attached
to a rotary plate with two screws, (See Fig. 10). Before
any maintenance or cleaning is done on the blades,
always turn the switch off and disconnect the plug from
the outlet.
d) Check blades for damage. Use only identical replace-
ment parts if it becomes necessary to replace them.
e) Return the hopper to its upright position and tighten the
knob before operating the garden shredder.
2. Use only a warm damp cloth and a soft brush to clean
your garden shredder. Always wear safety glasses to
protect your eyes during cleaning.
3. Never spray water on the garden shredder or wash it with
water. Do not use detergents or solvents as these could
cause irreparable damage to your shredder.
4. The fastening screws of the stand assembly should be
checked from time to time. Periodically check all nuts,
bolts and screws to be sure the shredder is in safe
working condition.
5. Make sure the ventilation slots are always kept clean and
are free of debris.
6. To protect the garden shredder from corrosion when
storing for a long period, treat the cutting blade with oil.
7. Cutting blade replacement. (Fig. 9 & 10)
Fig. 9
(D) Hopper Locking
Knob
B
R
T
E
I
(B) Reset
Button
Fig. 10
A
U
K
C
E
R
I
R
C
P
T
R
E
E
S
S
E
S
R
T
O
a) The reversible blade is xed to the rotary plate with
two screws. Before any maintenance or cleaning of the
blades, always turn the switch off and disconnect the
plug from the outlet.
b) Turn the Hopper Locking Knob (D) counterclockwise until
the housing cover can be opened.
ON
REMOVE
TO LOCK
OFF
c) Lift up the housing cover to expose the two blades.
d) Align the slots on the board, the blade support and the
main body and insert a metal rod like a screwdriver into
the slots to prevent rotating when removing the blade
with the supplied hex key.
e) Remove the old blade. Either reverse the blade so the
sharp edge is in the cutting position or insert a replacement blade. Use the same method to replace the
other blade.
f) Replace and tighten the two screws to secure the new
blade to the support.
9
Page 10

Troubleshooting
Problems Possible Cause Possible Solution
The motor does not
run.
- Power failure/unit not plugged into
a working receptacle.
- The overload protection has
responded.
- The hopper is opened.
- Check to make sure unit is plugged into a working
outlet. Make sure extension cord is not damaged.
- Remove any chips and press the reset button. Wait one
minute before pressing the ON/OFF switch to restart the
unit.
- Check to make sure the hopper is secured and the lock
knob is tightened.
The material to be
chopped is not pulled
in.
Blades becomes
worn.
- The material is jammed in the feed
inlet.
- The cutting blade is blocked.
- The discharge chute is blocked.
Service and Support
If your Electric Wood Chipper/Shredder requires service or
maintenance, please call 1-866-766-9563 for assistance.
Model and Serial Numbers
When contacting the company or reordering parts, you will
need to provide the model and serial numbers of your product.
These are found on the decal afxed to the housing or guard
of your Electric Wood Chipper/Shredder. Copy these numbers
into the space provided below:
- Disconnect the power supply and open the hopper. Pull
the material from the feed inlet. Replace the hopper.
- Disconnect the power supply and open the hopper.
Open the blade cover. Remove the blocked material
and replace the blade cover and hopper.
- Disconnect the power supply and open the hopper.
Open the plate of the discharge chute to clear the
blocked material. Replace the plate and hopper.
Reverse the blades by rst disconnecting the unit
from the power supply. The reversible blade is xed
to the rotary plate with two screws. Align the slots on
the board and the blade support, insert the end of the
supplied spanner into the slots to prevent rotating when
reversing the blades and use the supplied hex key to
unscrew the screws. Call our customer service help line
at 1-866-766-9563 for assistance or to order replacement blades.
Record the following numbers from the housing or handle of your
new product:
Model #:
C J 6 0 1 E R M
Serial #:
10
Page 11

NOTES
11
Page 12

A One-Year Full Warranty
for residential use
in the United States and Canada
General Conditions:
Snow Joe®, LLC warrants this product to the original purchaser for one year against defects in material or workmanship when used
for normal residential purposes. Snow Joe
part, subject to the conditions, limitations, and exclusions set forth herein. Such repair or parts replacement will be free from charge to
the original purchaser except noted below.
The duration of the warranty applies only if the product is put to personal use around the household or residence. If the product is put
to any business use, commercial or industrial, then the duration of this warranty is 90 days from the date of original purchase. If any
product is rented or leased, the duration of the warranty is 90 days from the date of original purchase.
It is the owner’s responsibility to perform correctly all maintenance, and minor adjustments explained in the owner’s manual.
Electric Products:
To obtain a replacement electric powered unit or repair the existing electric powered unit, you must return the complete unit and
postage prepaid to: Snow Joe Return Center, 86 Executive Avenue, Edison, NJ 08817.
Gasoline / Battery Products:
Limitations
• Batteries are warranted only for the period of 12 months after the date of purchase on a prorated basis. Rechargeable batteries
will be replaced free from charge during the rst 90 days. After the initial 90 days, batteries will be replaced at a prorated cost to
the customer.
• Idlers, cables, and electrical components are warranted to the original purchaser for use at household or residence for a period
of one year.
®
, LLC will repair any defect in material or workmanship, and repair or replace any defective
Exclusions
®
• Snow Joe
brand engines are covered under this warranty. All other engines and engine accessories are covered only by the
engine manufacturer’s warranty and are not covered by this warranty.
®
• Parts used that are not genuine Snow Joe
parts are not covered by this warranty.
• Damages resulting from misuse, alteration, improper assembly, improper adjustment, neglect, or accident which requires repair
is not covered under this warranty.
• Belts, augers, and tines are not covered under warranty – belts, augers, and tines wear out and can be purchased at
www.snowjoe.com or by calling 1-866-766-9563.
®
Snow Joe
obligating Snow Joe
, LLC may from time to time change the design of its products. Nothing contained in this warranty shall be construed as
®
, LLC to incorporate such design changes into previously manufactured products, nor shall such changes be
construed as an admission that previous designs were defective.
®
This warranty is intended to cover product defects only. Snow Joe
®
in connection with the use of the Snow Joe
Products covered by this warranty. This warranty does not cover any cost or expense
, LLC is not liable for indirect, incidental, or consequential damages
incurred by the purchaser in providing substitute equipment or service during reasonable periods of malfunction or non-use of this
product, while waiting for completion of repairs under this warranty. Some states do not allow exclusions of incidental or consequential
damages, so the above exclusions may not apply in all states. This warranty may give you specic legal rights in your state.
®
If you wish to contact Snow Joe
, please direct inquiries to the:
Customer Service Department
Snow Joe Center
86 Executive Avenue
Edison, NJ 08817
®
Customers who have purchased Snow Joe
products exported from the United States and Canada should contact their Snow Joe®
Distributor (Dealer) to obtain information applicable for your country, province, or state. If for any reason, you are not satised with the
®
distributor’s service, or if you have difculty obtaining warranty information, contact your Snow Joe
®
are unsatisfactory, please write to the Snow Joe
Center at the above address.
seller. If in the event your efforts
If you have any questions about your product warranty, please call 1-866-SNOW-JOE or visit us online at www.snowjoe.com.
12
 Loading...