

Page 1

A Division of Snow Joe®, LLC Model ASHJ202E Form No. SJ-ASHJ202E-880E-MR1
OPERATOR’S MANUAL
ELECTRIC ASH VACUUM
5-AMP | 4.8-GALLON
© 2017 by Snow Joe®, LLC
All rights reserved. Original instructions.
SAVE THESE INSTRUCTIONS
1
R
IMPORTANT!
Safety Instructions
All Operators Must Read These
Instructions Before Use
Any electrical appliance can be dangerous if used incorrectly.
Some of the safety precautions given in this manual apply
generally to many appliances. Other warnings are specic to
the use of this ash vacuum.
Always follow these safety guidelines. Failure to do so may
result in serious bodily injury or death.
mDANGER! This indicates a hazardous situation, which,
if not followed, will result in serious injury or death.
mWARNING! This indicates a hazardous situation, which,
if not avoided, could result in serious injury or death.
mCAUTION! This indicates a hazardous situation, which,
if not avoided, could result in minor or moderate injury.
General Safety
mWARNING! This ash vac is for household use only.
mCAUTION! Never use this product to vacuum
liquids. Only use this unit to vacuum dry dust material!
• Do not vacuum up soot.
• Only vacuum up cold, noncombustible ashes.
• Do not vacuum up hot, burning, or red hot objects, such
as cigarettes, charcoal, or smoldering ashes.
• The temperature of the vacuumed material must be below
104°F (40°C). If it exceeds 104°F (40°C), there is a risk of
re.
mWARNING! When using electric tools, basic safety
precautions should always be followed to reduce the risk of
re, electric shock, and personal injury, including the following:
1. Keep lter in place – Ensure that the equipment is
assembled correctly and the lter is in the correct position.
2. Keep bystanders and children away – All bystanders,
including children and pets, should be kept a safe
distance away from the work area.
3. Disconnect tool – Disconnect the ash vac from the
power supply when not in use, before servicing, when
transporting, or when changing accessories.
4. Do not use in dangerous environments – Do not use
power tools in damp or wet locations.
5. Do not use the ash vac in the rain.
6. Check for damaged parts – Before each use, repair,
or replace any part that is damaged. In addition, check
for alignment of moving parts, binding of moving parts,
breakage of parts, and any other conditions that may
aect the tool's operation.
Inspect the ash vac cord periodically and if damage is
found have it repaired by an authorized service facility.
Extension cords should also be inspected periodically and
immediately replaced if damaged.
7. Avoid unintentional starting – Make sure the switch is o
before plugging in the appliance.
8. Use the right tool – Do not force the tool or any
attachment on the tool to do a job for which they were
not designed.
9. Wear face or dust masks – If the cutting operation is
dusty, the use of a face or dust mask specially designed
to lter out microscopic particles is recommended.
10. Maintain tools with care – Keep tools clean for best
and safest performance. Follow instructions for changing
accessories. If the appliance is not working as it should,
has been dropped, damaged, left outdoors, or dropped
into water, please call Snow Joe® + Sun Joe® customer
service center at 1-866-SNOWJOE (1-866-766-9563).
11. Reduce the risk of unintentional starting – Make sure
the switch is in the OFF position before plugging the tool
into a power source.
12. Use recommended accessories – Consult the owner’s
manual for recommended accessories. The use of
improper accessories may cause risk of injury.
13. Do not abuse the cord – Never carry the appliance by its
cord or yank it to disconnect it from the receptacle. Keep
the cord away from heat, oil, and sharp edges.
14. Do not force the appliance – It will do the job better and
with less likelihood of a risk of injury if it is used at the rate
for which it was designed.
15. Do not overreach – Keep proper footing and balance
at all times.
16. Stay alert – Watch what you are doing. Use common
sense. Do not operate the appliance when you are tired.
Page 2

2
17. Maintain appliance with care – Inspect extension
cords periodically and immediately replace them if they
are damaged. Only use an authorized service facility to
repair the appliance. Keep the handles of the unit dry,
clean, and free from oil and grease.
18. Never leave tool unattended while it is running – Turn
the power OFF by removing the power cord directly from
its socket.
19. Avoid unintentional starting – Do not carry the ash vac
with your nger on the switch.
20. Store idle tool indoors – When not in use, appliances
should be stored indoors in a dry and high or locked-up
place out of the reach of children.
Personal Safety
• Keep the appliance away from children and pets.
• The device must not be used by people (including
children) with limited physical, sensory or mental faculties
or by those who lack the necessary experience and/or
knowledge required to properly use the machine. The only
time such individuals may use the machine is when they
are supervised by a person who is responsible for their
safety and can instruct them on the safe operation of the
appliance.
• Children in the work area must be supervised to ensure
that they do not play with the appliance. This appliance is
NOT a toy and should never be used as such.
• Never leave a machine that is ready for operation
unattended at the workplace.
• People and animals should never be vacuumed with the
machine.
• Nozzles and suction tubes must not reach head level while
in use as this can result in serious bodily injury.
• Do not vacuum substances or dust particles that are hot,
glowing, combustible, explosive or hazardous to one’s
health. This includes hot ashes, petrol, solvents, acids or
caustic solutions. Personal injury could occur.
• Keep hair, loose clothing, ngers, and all parts of the body
away from openings and moving parts.
• Maintain proper footing and use extra care when using the
appliance on stairs.
Electrical Safety
1. Ground fault circuit interrupter (GFCI) protection should
be provided on the circuit(s) or outlet(s) to be used for
the ash vac. Receptacles are available having
built-in GFCI protection and may be used for this
measure of safety.
2. To prevent electric shock, use only with an extension cord
suitable for outdoor use, such as SW-A, SOW-A, STW-A,
STOW-A, SJW-A, SJOW-A, SJTW-A, or SJTOW-A.
Before use, check that the extension cord is in good
condition. When using an extension cord, make sure to
use one heavy enough to carry the current your product
will draw. For lengths less than 50 ft (15 m), a No.16 AWG
(or greater) extension cord should be used. An undersized
cord will cause a drop in line voltage resulting in loss of
power and overheating.
3. To reduce the risk of electric shock, this appliance has
a polarized plug (i.e. one blade is wider than the other).
Use this appliance only with a polarized UL-, CSA-, or
ETL-rated extension cord for outdoor, all-weather use.
The appliance plug will t into a polarized extension
cord only one way.
If the appliance plug does not t fully into the extension
cord, reverse the plug. If the plug still does not t, obtain
a correct polarized extension cord. A polarized extension
cord will require the use of a polarized wall outlet. The
extension cord plug will t into the polarized wall outlet
only one way. If the plug does not t fully into the wall
outlet, reverse the plug. If the plug still does not t,
contact a qualied electrician to install the proper wall
outlet. Do not modify the appliance plug, extension cord
receptacle, or extension cord plug in any way.
m WARNING! m
Electric shock may cause SEVERE INJURY or
DEATH. Heed these warnings:
• Do not allow any part of the ash vac to make contact
with water while it is in operation. If the appliance
becomes wet while turned o, wipe dry before
starting.
• Use only a UL-, CSA-, or ETL-rated extension cord
for outdoor, all-weather use.
• Do not use an extension cord over 100 ft (30 m).
• Do not touch the appliance or its plug with wet hands
or while standing in water. Wearing rubber boots
oers some protection.
EXTENSION CORD CHART
Cord Length:
Min. Wire Gauge (A.W.G.):
Up to 50 ft
(15 m)
16
+50 ft - 100 ft
(+15 m - 30 m)
14
Page 3

3
4. To prevent the appliance cord from disconnecting from
the extension cord during operation, make a knot with the
two cords as shown in Table 1.
5. Do not abuse the cord. Never pull the ash vac by the cord
or yank the cord to disconnect it from the receptacle.
Keep the cord away from heat, oil, and sharp edges.
Specic Safety Rules for Ash
Vacuums
This motor-operated ash vacuum is intended for vacuuming
cold ashes and ne dust material from replaces, wood/
coal-red ovens, ashtrays, repits and barbecues. This
equipment is not suitable for vacuuming liquids, soot or
cement dust or for vacuuming heating boilers or oil-burning
ovens. Vacuuming of glowing embers or materials and dusts
that are combustible, explosive or hazardous to one’s health is
prohibited. The manufacturer will not be held responsible for
injuries resulting from incorrect use of the device or from use
that does not comply with the directions.
NOTE: This ash vacuum is intended for household use only.
mCAUTION! Extreme temperature conditions may
damage the tubes, the ash lter, or the vacuum canister.
Completely empty the vacuum cleaner and the ash lter in a
safe area after cleaning.
mWARNING! To reduce the risk of electric shock, do
not use outdoors or in damp or wet environments. Do not
expose to rain. Store indoors in a dry place.
mWARNING! For your own safety, read and
understand the operator’s manual. Do not run the unit
unattended. Do not pick up hot ashes, coals, toxic
substances, ammable materials or other hazardous
debris. Do not use the device in an area with explosive
liquids or vapors.
mCAUTION! To reduce the risk of injury from moving
parts, unplug the unit before servicing.
• Do not use the ash vacuum without pleated lter and wire
lter basket in place.
• When vacuuming, do not place the equipment on heat
sensitive oors. For safety reasons, use a reproof base
when cleaning ovens, chimneys or barbecue equipment.
• Do not extinguish hot ash particles with water as the
sudden temperature dierences can cause cracks in your
chimney.
• Empty and clean the vacuum before and after vacuuming
to avoid the accumulation of debris that could pose a re
hazard.
mCAUTION! Do not vacuum hazardous substances
(e.g. petrol, solvents, acids or lyes) and ash from unauthorized
fuels (i.e. from oil-burning ovens or heating boilers). These
substances pose a serious risk of injury.
• Do not use the vacuum in areas where ammable or
combustible liquids, such as gasoline, may be present.
• Do not vacuum ne, combustible dust particles that can
ignite and potentially lead to an explosion.
• This ash vacuum is designed for cold ash pickup only. Do
not vacuum hot ashes and hot, glowing or combustible
objects (e.g. charcoal, cigarettes, matches, etc.). These
objects pose a re hazard if vacuumed.
• Do not vacuum liquids, soot, plaster or cement dust.
Vacuuming such substances can damage the equipment.
• Do not use the appliance without the pleated lter and
wire lter basket tted properly in place.
• Do not put foreign objects into openings. Do not use the
vacuum with any opening blocked; keep all openings free
of dust, lint, hair, and anything that may reduce air ow.
• Always check the hose and vacuum cleaner for heating
when vacuuming.
• The vacuum must not exceed a temperature of 104°F
(40°C). Vacuumed material that appears cool from the
outside may still be hot inside. Hot vacuumed material can
re-ignite in the air stream. Furthermore, the equipment can
be damaged. In the event there is a noticeable increase
in the appliance’s temperature, switch o the equipment
and disconnect the plug. Place the equipment outside and
monitor it as it cools.
(B) Connect plug and receptacle
Cord set Appliance cord
(A) Tie cord as shown
Table 1. Method of Securing Extension Cord
Page 4

4
Safety Symbols
The following table depicts and describes safety symbols that may appear on this product. Read, understand, and follow all
instructions on the machine before attempting to assemble and operate.
To reduce the risk of injury,
user must read the instruction
manual.
For cold ashes only*!
Matter exceeding a temperature
of 40°C/104°F poses a re risk!
To reduce the risk of electric
shock, do not use outdoors or
in damp or wet environments.
Do not expose to rain. Store
indoors in a dry place.
Safety alert. Exercise caution.
Symbols Descriptions Symbols Descriptions
WARNING! Always turn the
machine OFF and disconnect
the electrical power before
conducting inspection, cleaning
and maintenance. Remove the plug
from the outlet immediately if the
cord is damaged or cut.
Open, empty and clean the vacuum outdoors
before and after vacuuming.
During vacuuming, constantly check the hoses and vacuum
for heating. Do not vacuum up soot or combustible materials.
The vacuumed material must not exceed a temperature of
40°C/104°F.
* “Cold ashes” are ashes that have cooled for a sucient time and no longer contain pockets of embers. This can be determined
by sifting through the ashes with a metal implement before using the equipment. The cold ashes emit no further perceptible heat
radiation.
Page 5

5
Know Your Ash Vacuum
Read the owner’s manual and safety instructions carefully before operating the ash vac. Compare the illustration below
to the ash vac in order to familiarize yourself with the location of the various controls and adjustments. Save this manual for future
reference.
1 2 3 4 5 6
15
16
18
20
17
19
7
8
9
10
11
12
13
14
1. Power cord
2. Accessory holder
3. Inspection window
blockage indicator
4. Retaining bracket
5. Container lid
6. On/O switch
7. Hose connection
8. Seal clips (3)
9. Carry handle
10. Metal container
11. Wire lter basket
12. Wire lter basket tabs
13. Pleated lter
14. Suction tube
15. Metal suction hose
16. Air lter
17. Filter housing
18. Metal retainer clips (3)
19. Safety stop switch
20. Pre-lter
Technical Data
Rated Voltage 120 V ~ 60 Hz
Power 5 amp
Container Capacity 4.8 gallons (18 l)
Air Flow 42.4 ft³/min
Suction Hose Length 3.9 ft (1.2 m)
Suction Tube Length 11.8 in. (30 cm)
Cord Length 8 ft (2.4 m)
Weight 8.8 lbs (4 kg)
Page 6

6
Unpacking
Carton Contents
• Container lid
• Metal container
• Pre-lter
• Flexible metal suction hose
• Aluminium suction tube
• Wire lter basket with pleated lter
• Manual with registration card
1. Carefully remove the ash vac and check to see that all of
the above items are supplied.
2. Inspect the product carefully to make sure no breakage or
damage occurred during shipping. If you nd damaged or
missing parts, DO NOT return the unit to the store. Please
call the Snow Joe® + Sun Joe® customer service center at
1-866-SNOWJOE (1-866-766-9563).
NOTE: Do not discard the shipping carton and packaging
material until you are ready to use your new ash vac.
The packaging is made of recyclable materials. Properly
dispose of these materials in accordance with local
regulations.
IMPORTANT! The equipment and packaging material are
not toys. Do not let children play with plastic bags, foils,
or small parts. These items can be swallowed and pose a
suocation risk!
Assembly
mDANGER! Never start the motor before installing the
pleated lter and the wire lter basket.
mWARNING! To avoid serious personal injury, read and
understand all safety instructions provided.
mWARNING! Before performing any maintenance, make
sure the tool is unplugged from the power supply and the On/
O switch is turned o. Failure to heed this warning could
result in serious personal injury.
Fitting the Pre-Filter
The coarse-dust pre-lter is made of a specially designed
glass fabric cloth that eectively lters approximately 95%
of coarse-dust particles. Installing the pre-lter correctly
will reduce the cleaning of the pleated lter and prolong the
pleated lter lifetime.
1. Check that the wire lter basket and the pleated lter
(inside of the wire lter basket) are securely mounted in
the correct position (Fig. 1).
2. Insert the pre-lter into the ash vacuum metal container,
aligning the PVC edge of the lter with the rim of the
container (Figs. 2 – 3).
Fig. 1
Pre-lter
Fig. 2
Fig. 3
Pre-lter
PVC edge
Page 7

7
3. Place the container lid on the metal container and lock it
using the seal clips (Figs. 4 – 5).
Fig. 5
Metal
container
Container lid
assembly
Seal clip
Fitting the Suction Hose and Tube
1. Connect the suction hose to the metal container by
screwing the rotatable plastic end piece of the suction
hose (the end with the printed symbol) into the hose
connection securely (Fig. 6).
NOTE: When assembling/detaching the suction hose, hold
the black plastic end piece, not the metal suction hose.
Twisting or bending the hose could damage it (Fig. 6).
2. Insert the suction tube into the rigid end piece of the
suction hose (Fig. 7).
Operation
Switching ON/OFF
Do not switch on the ash vac until it has been completely
assembled. Before switching on the unit, always check the
appliance cord and the extension cord for signs of damage.
Use only intact cords.
mWARNING! Damaged cords pose a severe risk of injury.
Replace damaged cords immediately.
1. Connect the power cord into a working 120 V 60 Hz outlet.
NOTE: The equipment is tted with a safety stop switch,
which allows for operation only when the pleated lter and
wire lter basket are installed correctly.
2. If using an extension cord, make a knot with the two cords
like indicated by Table 1 on page 3.
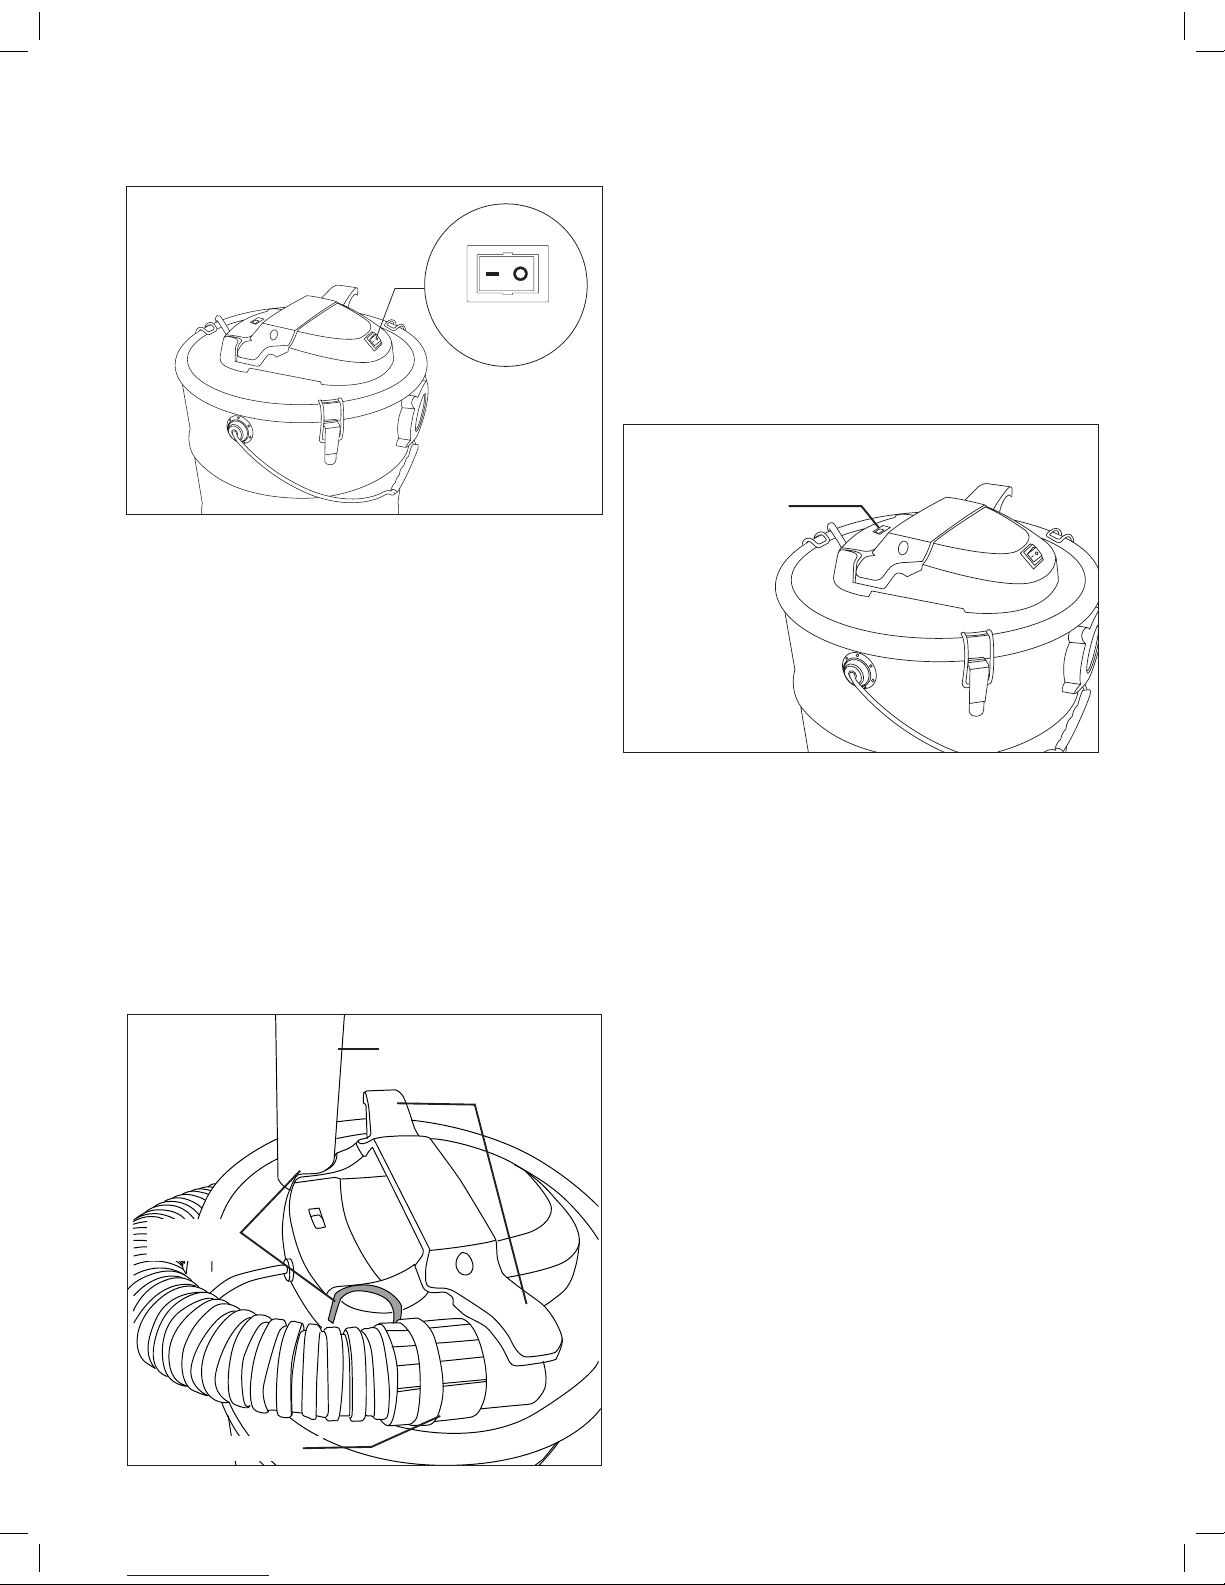
3. To switch the unit on, set the On/O switch to position "–"
(Fig. 8).
4. To switch the unit o, set the On/O switch to position "o"
(Fig. 8).
Fig. 4
Metal
container
Container lid
assembly
Fig. 6
Suction hose
Hose
connection
The printed symbol
Plastic end piece
Fig. 7
Suction tube
Rigid end piece
Page 8
8
Basic Vacuum Procedures
mWARNING! The vacuuming of glowing embers and
materials that are combustible, explosive or harmful to your
health is prohibited. Failure to adhere to this warning could
result in severe personal injury.
• Place the equipment on a level surface that is not heat
sensitive.
• Always use the suction tube for vacuuming. Hold the
suction tube at a distance of approximately 0.4 in. (1 cm)
above the ash.
• Vacuum only cooled ash that is less than 104°F (40°C).
• When vacuuming, check the metal container and suction
hose periodically to ensure there is no rise in temperature.
• In the event of a rise in temperature, switch o the
equipment and disconnect the plug. Place the equipment
outside and monitor it as it cools.
• During rest periods, you can use the accessory holder
located on the container lid to secure the suction tube,
and you can secure the suction tube under the retaining
bracket (Fig. 9).
• Always use the carry handle for transporting the
equipment.
• In order to ensure that the pleated lter remains clear, ll
the metal container no more than halfway.
• Empty the container outside in order to avoid a mess (see
Maintenance section).
• Clean the pleated lter (see Maintenance section) if the
suction performance deteriorates or when the inspection
window blockage indicator on the container lid turns red
(Fig. 10).
Maintenance
mWARNING! Disconnect the extension cord before
performing any maintenance task. If the extension cord is
plugged into the unit, someone could accidentally operate it
while you are performing maintenance on it, resulting in serious
personal injury.
mWARNING! Never hose the appliance down with
water. Never use aggressive cleaning agents or solvents.
These substances can damage the appliance.
Clean the Metal Container
Clean the equipment routinely after each use:
• Take the unit outside to clean it to avoid creating a mess
indoors.
• Remove the container lid and empty the metal container.
Clean the metal container with water and allow it to dry
completely.
Clean the Wire Filter Basket and Pleated
Filter
NOTE: Replace the pleated lter if it is worn, damaged or
heavily soiled. Visit snowjoe.com or call our toll-free customer
service helpline at 1-866-SNOWJOE (1-866-766-9563) to
purchase replacement lters.
1. Take o the container cover.
OFFON
Fig. 8
On/O switch
Fig. 9
Suction tube
Accessory
holders
Suction hose
Retaining
bracket
Fig. 10
Inspection window
blockage indicator
Page 9

9
2. Remove the wire lter basket by turning it
counterclockwise. Tap out the basket to remove any
accumulated residue (Figs. 11 – 12).
3. Take out the pleated lter and tap it clean. Remove any
debris with a clean and dry paintbrush or hand brush
(Fig. 13).
NOTE: Do not wash the pleated lter in water.
4. After cleaning, replace the pleated lter on the motor and
lter housing located on the underside of the container lid
(Fig. 14).
NOTE: Check that the rubber rim of the pleated lter is
seated ush against the container lid.
5. Fit the wire lter basket over the pleated lter and turn it
clockwise until it stops. The wire lter basket tabs must
cover and depress the safety stop switch.
NOTE: Make sure the wire lter basket tabs are under the
metal retainer clips.
Cleaning the Air Filter
1. Take o the container cover, wire lter basket and
pleated lter.
2. Take the air lter out of the lter housing (Fig. 15).
3. Clean the lter with soap and water and let it air dry.
4. Place the air lter back into the lter housing and
reassemble the pleated lter and the wire lter basket.
Cleaning the Pre-lter
1. Gently clean the pre-lter with water and hang to dry.
NOTE: Make sure not to rub the cloth when cleaning as this
could damage the coarse cloth grain.
Fig. 11
Wire lter
basket
Fig. 12
Wire lter
basket
Fig. 13
Pleated lter
Fig. 14
0 mm
Fig. 15
Air lter
Page 10

10
Storage
• To store, wind the power cord around the retaining bracket
on the container lid.
• Use the retaining bracket to secure the end of the suction
hose.
• Insert the suction tube into the accessory holder.
• Keep the equipment in a secure and dry place out of the
reach of children.
Service and Support
If your Snow Joe® ASHJ202E ash vacuum requires service or
maintenance, please call 1-866-SNOWJOE (1-866-766-9563)
for assistance.
Model and Serial Numbers
When contacting the company, reordering parts, or arranging
for service, you will need to provide the model and serial
numbers of your product. These can be found on the decal
axed to the housing of your ash vacuum. Copy these
numbers into the space provided below.
Record the following numbers from the housing or handle of your
new product:
Model #:
Serial #:
A S H J 2 0 2 E
Page 11

11
Troubleshooting
Only a company specialist may be able to correct faults that cannot be rectied with the aid of this table. Please call the
Snow Joe® + Sun Joe® customer service center at 1-866-SNOWJOE (1-866-766-9563).
Device does not start Mains voltage is not present Check plug socket, cable, line, plug and
fuse; if damage is found, contact a qualied
electrician to repair
Switch on the equipment (see “Switching
ON” section)
Insert the pleated lter correctly
(see “Maintenance” section)
Contact Snow Joe
®
customer service at
1-866-SNOWJOE (1-866-766-9563) to repair
Remove obstructions and blockages
Close the metal container
Empty the metal container (see
“Maintenance” section)
Clean or replace the pleated lter
(see “Maintenance” section)
Clean the air lter (see “Maintenance”
section)
The equipment is not switched ON
Safety stop switch is activated due to missing or
incorrectly inserted pleated lter
Defective ON/OFF switch
Defective motor
Suction hose or suction tube is blocked
The metal container is not closed
The metal container is full
The pleated lter is clogged
The air lter is clogged
Low or lack of suction
Problem Possible Cause Possible Solution
Page 12

12
Optional Accessories
mWARNING! ALWAYS use only authorized Snow Joe
®
+ Sun Joe® replacement parts and accessories. NEVER use
replacement parts or accessories that are not intended for use with this tool. Contact Snow Joe® + Sun Joe® if you are unsure
whether it is safe to use a particular replacement part or accessory with your tool. The use of any other attachment or accessory
can be dangerous and could cause injury or mechanical damage.
ModelAccessories Item
1
Ash Vac Replacement Pre-Filter ASHJ201PRFLT
Ash Vac Replacement Filter
ASHJ201FTR
2
NOTE: Accessories are subject to change without any obligation on the part of Snow Joe® + Sun Joe® to provide notice of such
changes. Accessories can be ordered online at snowjoe.com or via phone by contacting the Snow Joe® + Sun Joe® customer
service center at 1-866-SNOWJOE (1-866-766-9563).
Page 13

13
NOTES
Page 14

14
NOTES
Page 15

15
SNOW JOE® + SUN JOE® CUSTOMER PROMISE
PRODUCT REGISTRATION:
Snow Joe®, LLC (“Snow Joe® + Sun Joe®”) strongly encourages
you to register your purchase. You can register online at
snowjoe.com/ProductRegistration, or by printing and mailing
in a registration card available online from our website, or
calling our Customer Service Department at 1-866-SNOWJOE
(1-866-766-9563), or by e-mailing us at help@snowjoe.com.
Failure to register your product purchase will not diminish your
warranty rights. However, registering your purchase will allow
Snow Joe® + Sun Joe® to better serve you with any of your
customer service needs.
WHO CAN SEEK WARRANTY COVERAGE?
This Warranty is extended by Snow Joe® + Sun Joe® to the owner
of this Machine (a “Machine” consists of a product powered by
a motor) for residential and personal household use only. This
Warranty does not apply to products used for commercial, rental
or re-sale purposes. Should ownership of this machine change
during the 2-year period, please update the Machine’s owner
information at snowjoe.com/ProductRegistration.
WHAT IS COVERED?
Snow Joe® + Sun Joe® warrants to the owner that if this Machine
fails within 2 years from the date of purchase due to a defect in
material or workmanship or as a result of normal wear and tear
from ordinary household use, Snow Joe® + Sun Joe® will send a
replacement part or product, as needed, free of charge and with
free shipping to the original purchaser.
If, in Snow Joe® + Sun Joe®’s sole discretion, the failed Machine
cannot be repaired with a part, Snow Joe® + Sun Joe® will elect to
either (A) send a new Machine at no charge and with free shipping
or (B) refund the full purchase price to the owner.
WHAT IS NOT COVERED?
This Warranty does not apply to the Machines that have been used
commercially or in non-household applications. This Warranty
does not cover cosmetic changes that do not aect performance.
This Warranty is only valid if the Machine is used and maintained
in accordance with the instructions, warnings and safeguards
contained in the owner’s manual. Snow Joe® + Sun Joe® will not
be responsible for the cost of any unauthorized warranty repairs.
This warranty does not cover any cost or expense incurred by
the purchaser in providing substitute equipment or service during
reasonable periods of malfunction or non-use of this product
while waiting for a replacement part or unit under this warranty.
Wearing parts like belts, augers, chains and tines are not covered
under this warranty, and can be purchased at snowjoe.com or
by calling 1-866-SNOWJOE (1-866-766-9563). Batteries are
covered in full for 90-days from the date of purchase.
Repair, replacement or refund of the purchase price are the
exclusive remedies of purchaser and the sole liability of Snow Joe®
+ Sun Joe® under this warranty. No employee or representative
of Snow Joe® + Sun Joe® is authorized to make any additional
warranty or any modication to this warranty which may be
binding upon Snow Joe® + Sun Joe®. Accordingly, purchaser
should not rely upon any additional statements made by any
employee or representative of Snow Joe® + Sun Joe®. In no event,
whether based on contract, indemnity, warranty, tort (including
negligence), strict liability or otherwise, shall Snow Joe® +
Sun Joe® be liable for any special, indirect, incidental, or
consequential damages, including, without limitation, loss of
prot or revenue.
Some states do not allow limits on warranties. In such states, the
above limitations may not apply to you.
Outside the USA, other warranties may apply.
ABOVE ALL ELSE, Snow Joe® + Sun Joe® are dedicated to you, our customer. We strive to make your experience as pleasant
as possible. Unfortunately, there are times when a product does not work or breaks under normal operating conditions. We
think it’s important that you know what you can expect from us. That’s why we created the Snow Joe® + Sun Joe® promise.
OUR PROMISE: Snow Joe® + Sun Joe® warrant new products for two years from the date of purchase. If your product does
not work, or there’s an issue with a specic part, we will x this by either sending you a free replacement part or by sending
you a new or comparable product at no charge. How cool is that! Before you know it, you’ll be back in action cutting,
sawing, mowing, washing and…?
Page 16

snowjoe.com
mWARNING! This product or its power cord contains chemicals, including lead, known to the State of California
to cause cancer and birth defects or other reproductive harm. Wash hands after handling. For more information go to
www.P65Warnings.ca.gov.
mWARNING! Some dust created by power sanding, sawing, grinding, drilling, and other construction activities
contains chemicals known [to the State of California] to cause cancer, birth defects, or other reproductive harm. Some
examples of these chemicals are:
• lead from lead-based paints,
• crystalline silica from bricks and cement and other masonry products, and
• arsenic and chromium from chemically-treated lumber.
Your risk from these exposures varies, depending on how often you do this type of work. To reduce your exposure to
these chemicals: work in a well ventilated area, and work with approved safety equipment, such as those dust masks
that are specically designed to lter out microscopic particles. For more information go to www.P65Warnings.ca.gov.
 Loading...