

SnowEx SR-210 User Manual
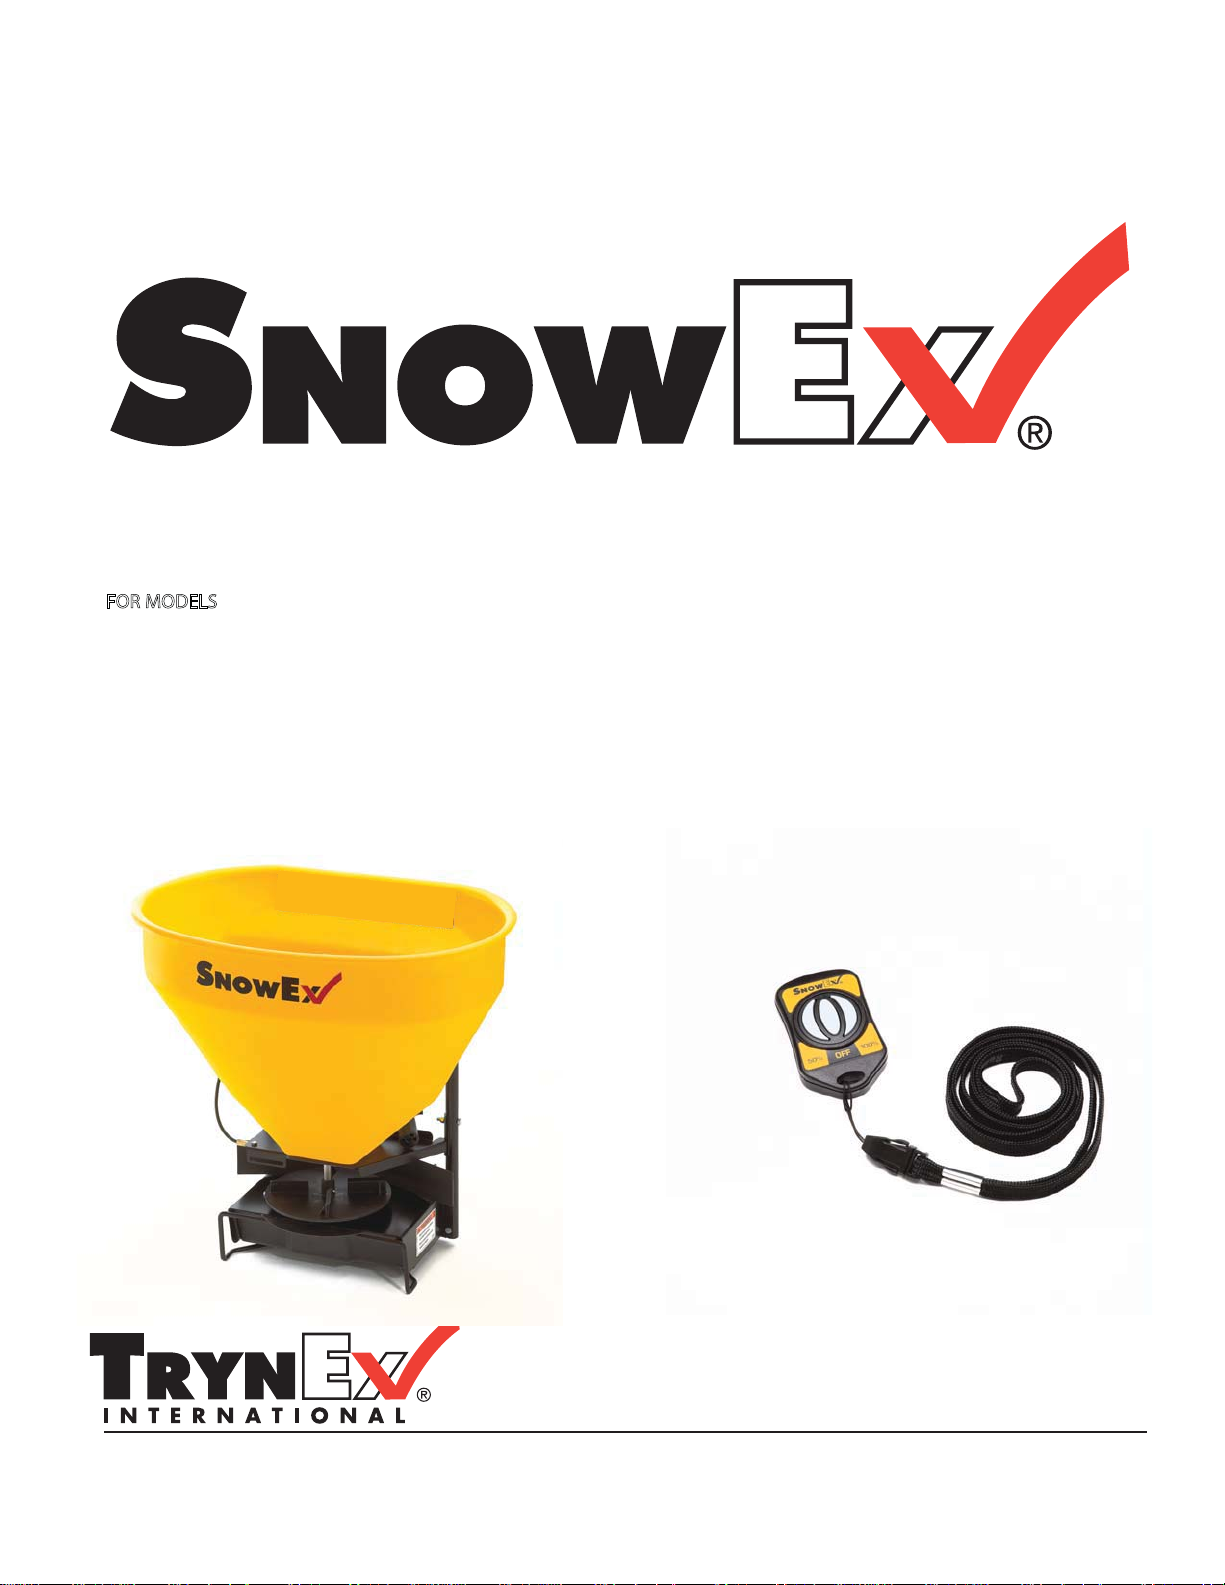
Owner / Operator’s Manual
FOR MODELS
This Manual Must Be Read Before Operating The Equipment
Spreaders for Snow & Ice Control
SR-110 Wireless Accurate Flow
SR-210 Wireless Multi-Purpose
New Plug & Perform Technology
Easy As 1-2-3 Installation
State of The Art Wireless Control
Simple Push Button Operation
Warren, Michigan 48089
800-837-0159
© Trynex International 2009 (REV 000) L1600
CUSTOMER COPY
Protected by the following patents, #6,089,478, #6,088,865, #Des.425,915
and other pending U.S. and foreign patent applications.
1 — 1

This Page Intentionally Left Blank
1 — 2
© Trynex International 2009 L1600
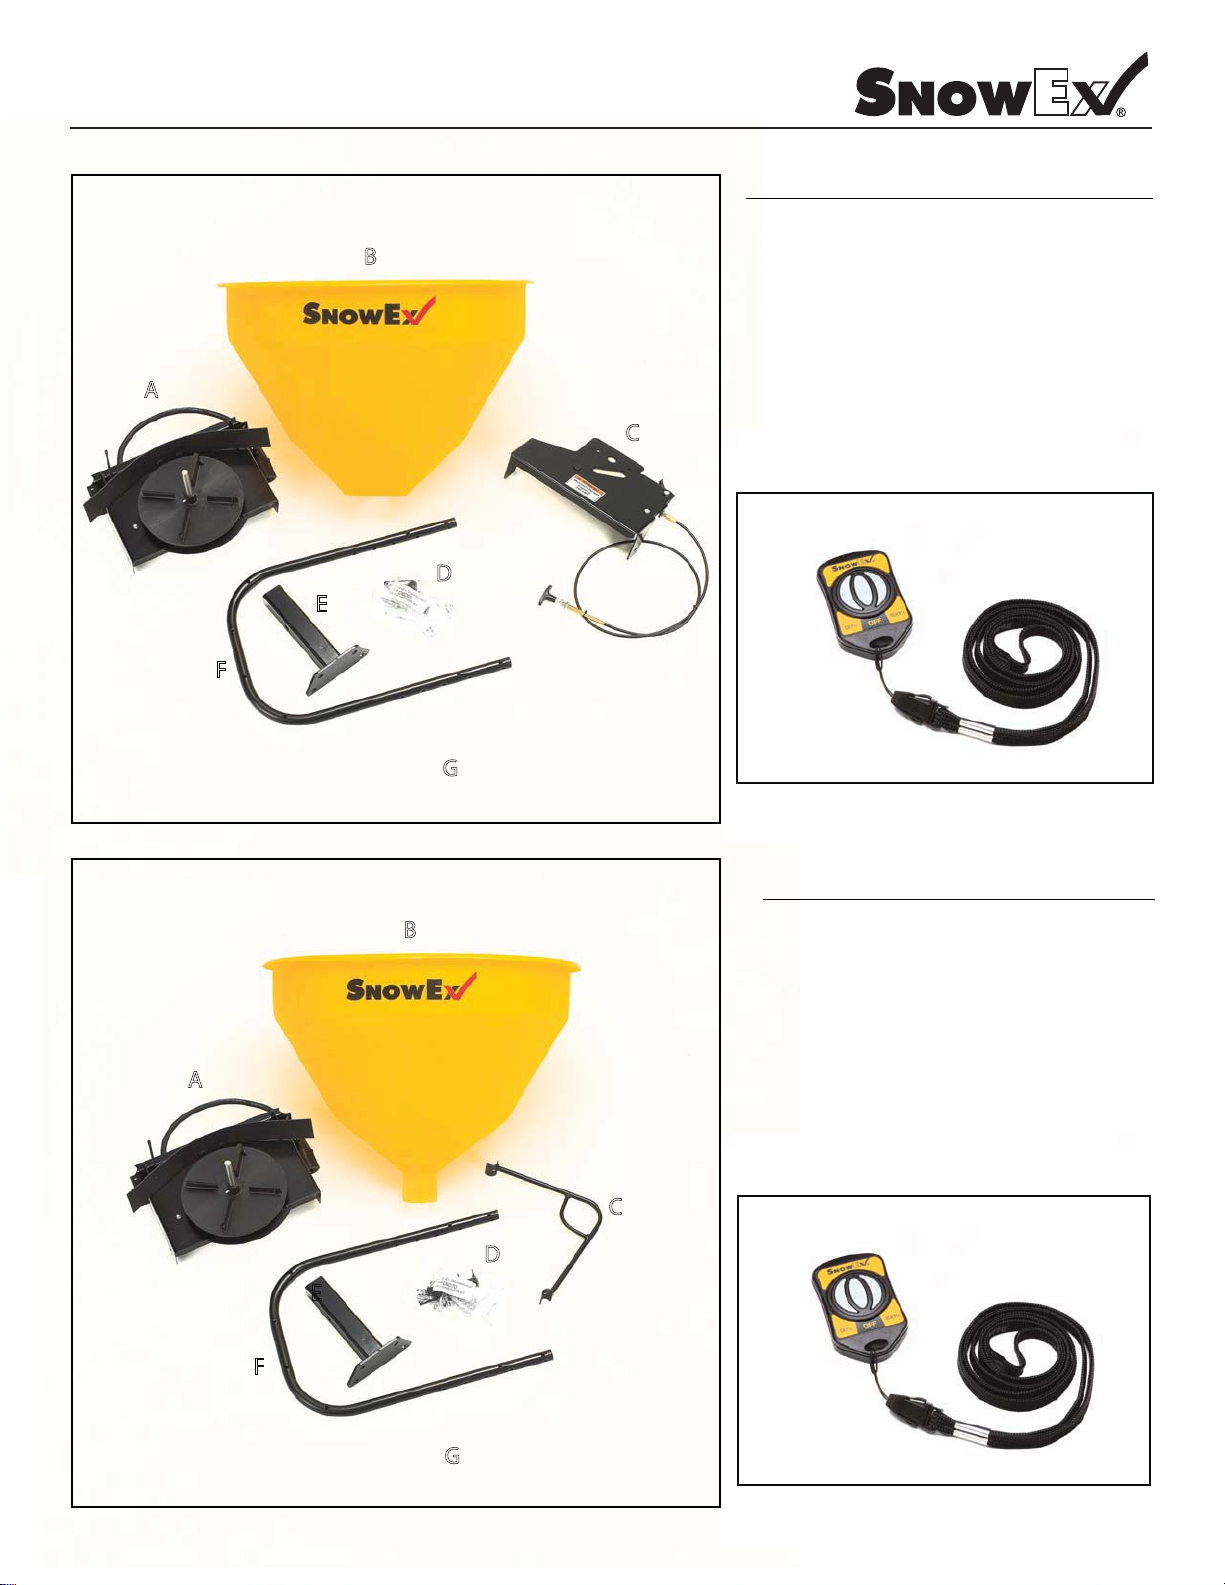
Box Inventory
Model # SR-110 / SR-210
SR-110 Box Contents
A
F
ITEM DESCRIPTION QTY
A)
B
B)
C)
D)
E)
F)
C
G)
Spinner Drive Assembly
Hopper
Gate Deck/Hopper Support
Hardware Pack
Receiver Mount
Hopper Support Tube
Key Fob Transmitter
1
1
1
1
1
1
1
D
E
SEE KEY FOB ILLUSTRATION
G
TO THE RIGHT
SR-210 Box Contents
A
F
ITEM DESCRIPTION QTY
B
A)
B)
C)
D)
E)
F)
G)
Spinner Drive Assembly
Hopper
Lower Hopper Support
Hardware Pack
Receiver Mount
Hopper Support Tube
Key Fob Transmitter
1
1
1
1
1
1
1
C
D
E
SEE KEY FOB ILLUSTRATION
G
TO THE RIGHT
© Trynex International 2009 L1600
1 — 3
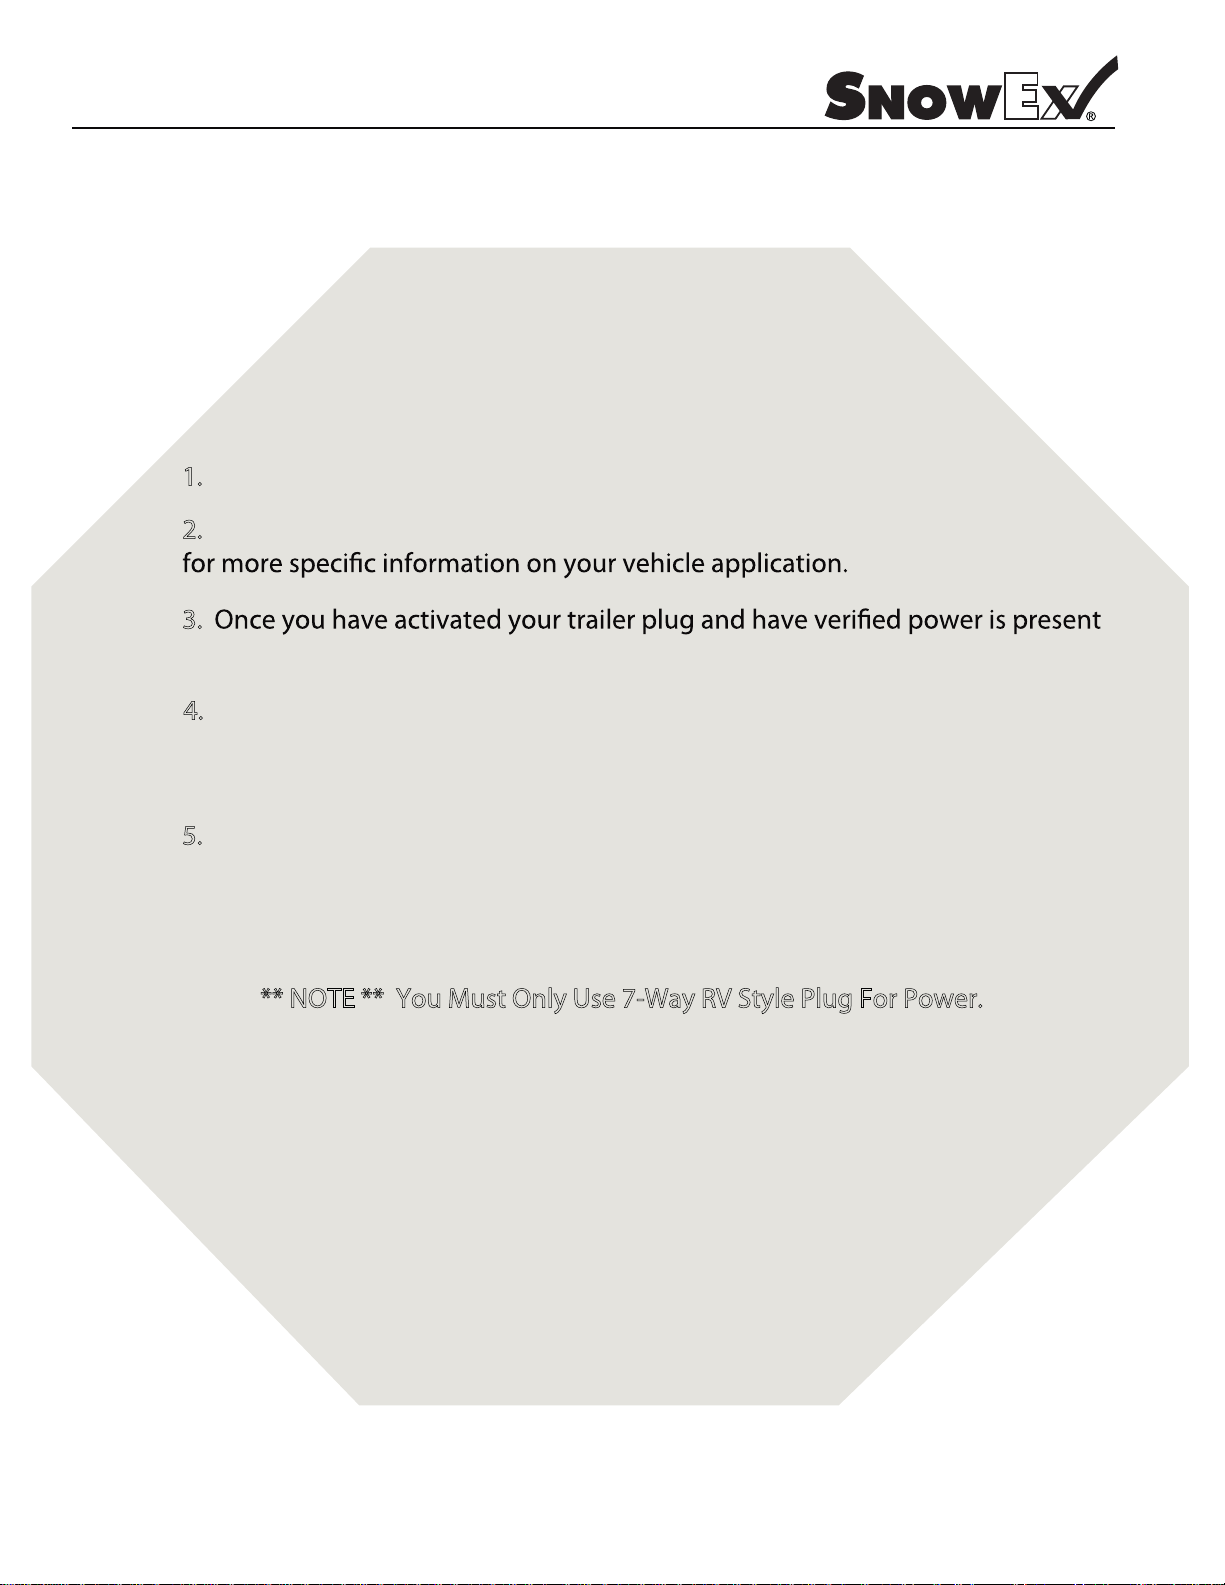
Vehicle Trailer Plug Activation Information
Model # SR-110 / SR-210
STOP
1.
Verify that your vehicle has a 7-way RV style trailer plug on vehicle.
If your vehicle is equipped with the proper plug continue to pages 5 and 6
2.
3.
you can continue with the installation.
4.
If you do not have power, consult your vehicle owner’s manual trailering
section for more information. If this does not resolve your problem, contact your
nearest auto/truck dealer or trailer hitch installation center.
5.
If your vehicle is not equipped with a 7-way trailer plug, you may purchase
a custom harness from Trynex International. The part number is D-6068 and
can be shipped direct to your location. Please contact Trynex International
customer service at the number listed below.
** NOTE ** You Must Only Use 7-Way RV Style Plug For Power.
ATTENTION
Have a question or missing parts? Call the number below
SnowEx Customer Service
1 — 4
(800) 837-0159
Monday through Friday 8:00 AM to 4:30 PM EST
© Trynex International 2009 L1600

Vehicle Application List
Model # SR-110 / SR-210
FACTORY PLUG
MAKE YEAR
Chevrolet
Chevrolet
Chevrolet
Chevrolet
Chevrolet
Chevrolet
Chevrolet
Chevrolet
Chevrolet
Chevrolet
Chevrolet
Chevrolet
Dodge
Dodge
Dodge
Dodge
Dodge
Dodge
Dodge
Dodge
Dodge
Ford
Ford
Ford
Ford
Ford
Ford
Ford
Ford
Ford
GMC
GMC
GMC
GMC
GMC
GMC
GMC
GMC
Factory Plug Note * (1) Locate red wire under power
distribution box and hook the eyelet to the AUX stud
on front of the power distribution box. Verify that the
30 AMP mega fuse is installed for the trailer fuse slot.
Refer to the vehicle owner’s manual for fuse location.
Factory Plug Note ***(3) Ford vehicles with factory
7-Wire plug, install provided 30 AMP fuse into the
trailer to battery charge circuit. Install provided 30
AMP relay into the trailer tow battery charge circuit.
MODEL
Colorado
Blazer S-Series
Blazer K-Series
S-10
K-1500 - K-3500
Silverado
Suburban
Suburban
Express
Tahoe
Trailblazer
G-Series Van
Dakota
Dakota
Durango
Durango
Nitro
Van B-Series
Ram Van
Ram Pick-Up
Ram Pick-Up
Escape
Expedition
Excursion
Explorer
Explorer
F-150 Pick-up
F-150 Pick-Up
F-250 & F-350
F-250 & F-350
Canyon
S-15 Sonoma
Blazer S-Series
Blazer K-Series
Envoy
K-1500 - K-3500
Sierra
Yukon
04 & Newer
05 & Prior
94 & Prior
04 & Prior
99 & Prior
99 & Prior
02 & Prior
02 & Newer
02 & Newer
02 & Newer
02 & Current
02 & Prior
02 & Prior
02 & Newer
02 & Prior
02 & Newer
07 & Newer
02 & Prior
02 & Newer
02 & Previous
02 & Newer
01 & Newer
97 & Newer
00 & Newer
02 & Prior
02 & Newer
02 & Prior
02 & Newer
02 & Prior
02 & Newer
04 & Newer
04 & Prior
05 & Prior
94 & Prior
02 & Current
99 & Prior
99 - Current
02 & Prior
AVAILABLE?
Yes
NA
NA
NA
NA
Yes
NA
Yes
Yes
Yes
Yes
NA
NA
Yes
NA
Yes
NA
NA
Yes
NA
Yes
NA
Yes
Yes
NA
Yes
NA
Yes
NA
Yes
Yes
NA
NA
NA
Yes
NA
Yes
NA
AFTERMARKET
PLUG REQUIRED
NA
Yes
Yes
Yes
Yes
NA
Yes
NA
NA
NA
NA
Yes
Yes
NA
Yes
NA
Yes
Yes
NA
Yes
NA
Yes
NA
NA
Yes
NA
Yes
NA
Yes
NA
NA
Yes
Yes
Yes
NA
Yes
NA
Yes
Aftermarket Plug Note ** (2) If vehicle is equipped with 7-way
plug, verify pin #4 has a 12 volt power source and pin #1 has a
common ground source. See included diagram. Consult your
local trailer hitch installer for more information. If vehicle is not
equipped with a 7-way plug, please contact your nearest hitch
dealer.
FACTORY PLUG
See Note *(1)
NA
NA
NA
NA
See Note *(1)
NA
See Note *(1)
See Note *(1)
See Note *(1)
See Note *(1)
NA
NA
Nothing Required
NA
Nothing Required
NA
NA
Nothing Required
NA
Nothing Required
NA
See Note ***(3)
See Note ***(3)
NA
See Note ***(3)
NA
See Note ***(3)
NA
See Note ***(3)
See Note *(1)
NA
NA
NA
See Note *(1)
NA
See Note *(1)
NA
AFTERMARKET PLUG
NA
See Note **(2)
See Note **(2)
See Note **(2)
See Note **(2)
NA
See Note **(2)
NA
NA
NA
NA
See Note **(2)
See Note **(2)
NA
See Note **(2)
NA
See Note **(2)
See Note **(2)
NA
See Note **(2)
NA
See Note **(2)
NA
NA
See Note **(2)
NA
See Note **(2)
NA
See Note **(2)
NA
NA
See Note **(2)
See Note **(2)
See Note **(2)
NA
See Note **(2)
NA
See Note **(2)
Refer to the owner’s manual for fuse and relay information.
© Trynex International 2009 L1600 1 — 5

Vehicle Application List Continued
Model # SR-110 / SR-210
MAKE YEAR
GMC
GMC
GMC
Hummer
Hummer
Hummer
Hummer
Jeep
Jeep
Jeep
Jeep
Jeep
Jeep
Jeep
Jeep
Isuzu
Isuzu
Honda
Toyota
Toyota
Toyota
Toyota
Toyota
Toyota
MODEL
Yukon
Savana
G-Series Van
H2
H2 Sut
H3
H3 T
Cherokee
Grand Cherokee
Grand Cherokee
Commander
Compass
Liberty
Patriot
Wrangler
Rodeo
Pick-Up
Ridgeline
Full Size Pick-Up
Tacoma
4-Runner
Highlander
Land Cruiser
Tundra
02 & Current
02 & Current
02 & Current
03 & Current
06 - Current
06 - Current
06 - Current
All
04 & Prior
04 & Newer
06 - Current
All
All
All
All
All
All
All
02 - Current
02 - Current
02 - Current
02 - Current
00 - Current
00 - Current
FACTORY PLUG
AVAILABLE?
Yes
Yes
NA
Yes
Yes
Yes
Yes
NA
NA
Yes
Yes
NA
NA
NA
NA
NA
NA
NA
Yes
Yes
Yes
Yes
Yes
Yes
AFTERMARKET
PLUG REQUIRED
NA
NA
Yes
NA
NA
NA
NA
Yes
Yes
NA
NA
Yes
Yes
Yes
Yes
Yes
Yes
Yes
NA
NA
NA
NA
NA
NA
FACTORY PLUG
See Note *(1) Pg 19
See Note *(1) Pg 19
NA
NA
NA
Nothing Required
Nothing Required
NA
NA
Nothing Required
Nothing Required
NA
NA
NA
NA
NA
NA
NA
See Note *****(5)
See Note *****(5)
See Note *****(5)
See Note *****(5)
See Note *****(5)
See Note *****(5)
AFTERMARKET PLUG
NA
NA
See Note **(2) Pg 19
See Note ****(4)
See Note ****(4)
NA
NA
See Note *(1) Pg 19
See Note *(1) Pg19
NA
NA
See Note *(1) Pg 19
See Note *(1) Pg 19
See Note *(1) Pg 19
See Note *(1) Pg 19
See Note *(1) Pg 19
See Note **(2) Pg 19
See Note **(2) Pg 19
NA
NA
NA
NA
NA
NA
Nissan
Nissan
Nissan
Nissan
Nissan
Nissan
Nissan Raider All NA
Mercury Mountainer 02 - Current Yes
Factory Plug Note **** (4) Hummer H2 and H3 SUT with
factory 7-wire plug. Remove power distribution box
Pick-Up
Titan
Frontier
Pathnder
X-Treme
Armada
All
04 - Current
All
All
All
All
NA
Yes
NA
NA
NA
NA
cover and remove RED B+ plastic plug and install supplied
30 AMP fuse into this slot. Refer to owner’s manual for
further instruction.
Yes
NA
Yes
Yes
Yes
Yes
Yes
NA
NA
See Note *****(5)
NA
NA
NA
NA
NA
See Note ***(3) Pg 19
See Note **(2) Pg 19
NA
See Note **(2) Pg 19
See Note **(2) Pg 19
See Note **(2) Pg 19
See Note **(2) Pg 19
See Note **(2) Pg 19
NA
Aftermarket Plug Note ***** (5) Full size trucks with factory installed
7-wire plug. Refer to owner’s manual for hook-up of trailer battery
charge circuit. Hook-up to verify that the factory plug (see included
diagram) pin#4 has a 12 volt power source and pin #1 has a common
ground source.
1 — 6
© Trynex International 2009 L1600
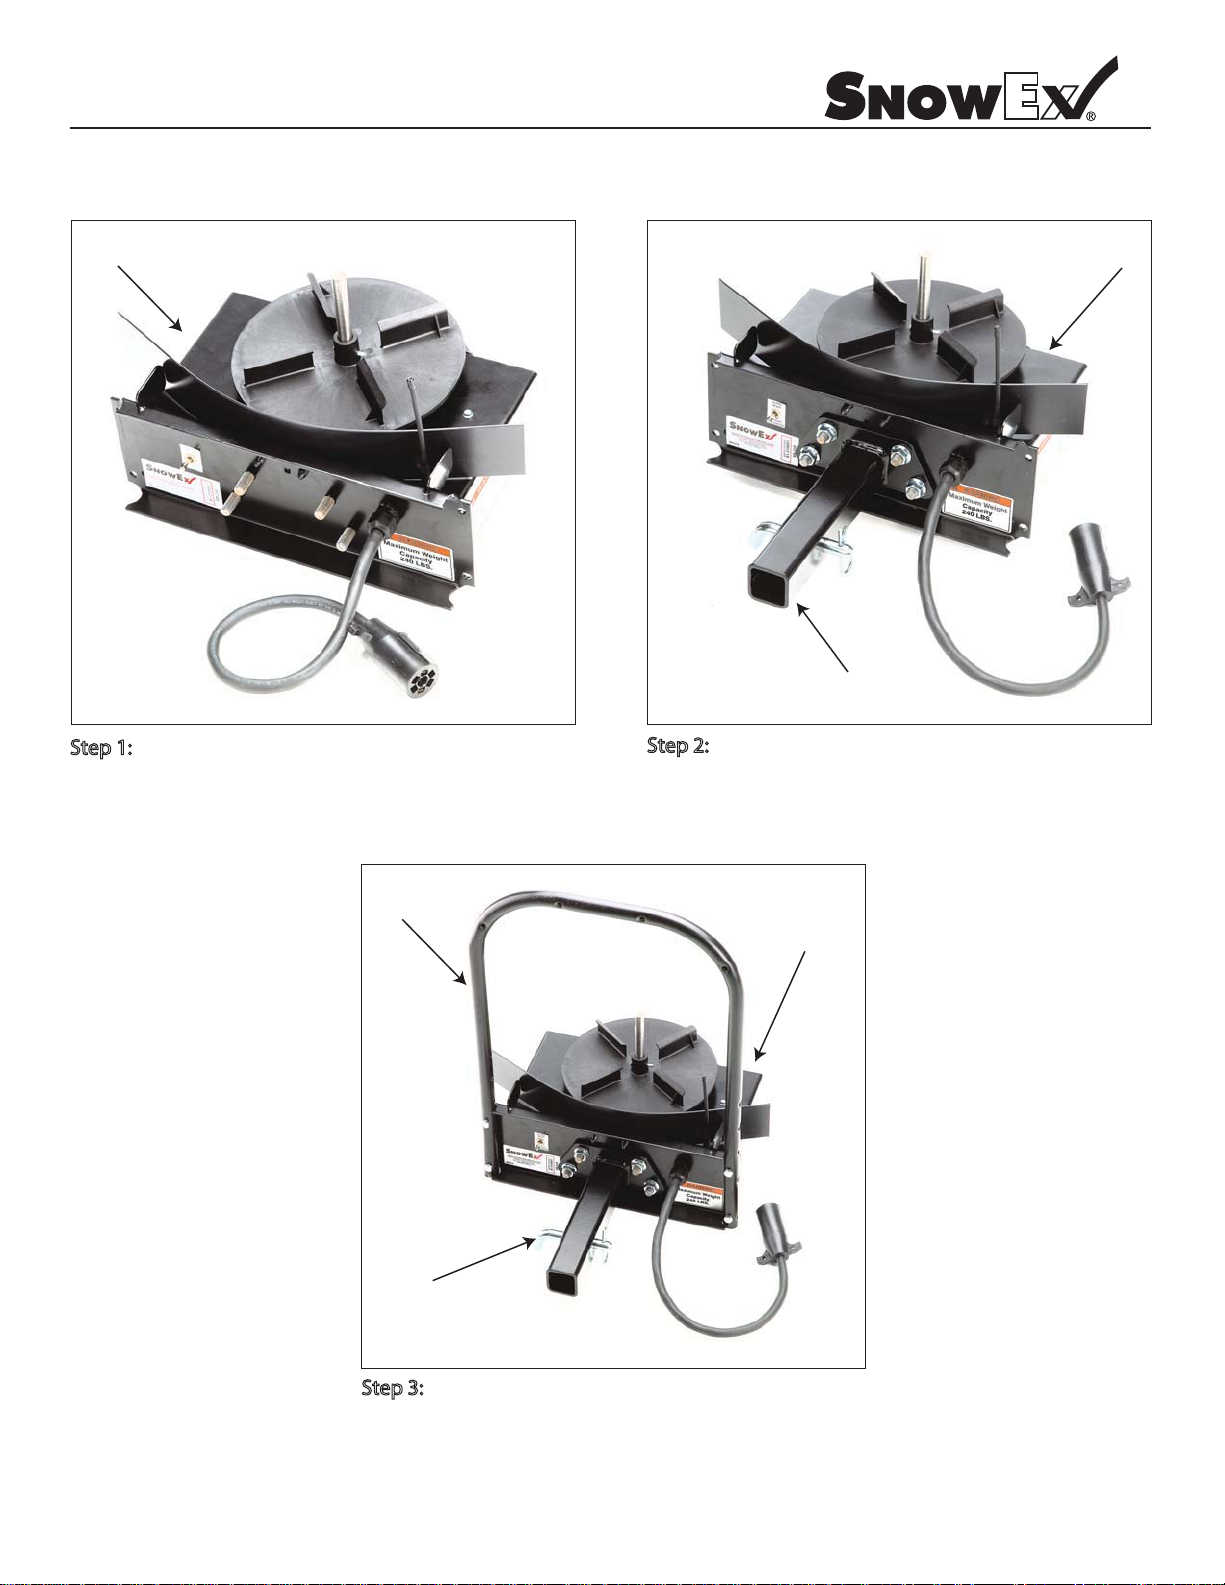
Assembly Instructions
Model # SR-110 (refer to diagram on page 1-10)
Item (A)
Fig 1.
Step 1: Place item (A) on level working surface as
shown in gure 1.
Item (A)
Fig 2.
Step 2:
Using (4) 1/2” lock nuts and tighten securely in place
with 3/4” socket or wrench to 75 Foot pounds.
Item E
Mount item (E) to item (A) as shown in gure 2.
Item (F)
Item (A)
Hitch pin with clip
supplied with hardware
bag item (D)
Step 3:
Using (4) 5/16” hex bolts and (4) 5/16” lock nuts and tighten
securely in place with 1/2” socket or wrench to 18 foot
pounds.
Mount item (F) to item (A) as shown in gure 3.
Fig 3.
© Trynex International 2009 L1600 1 — 7
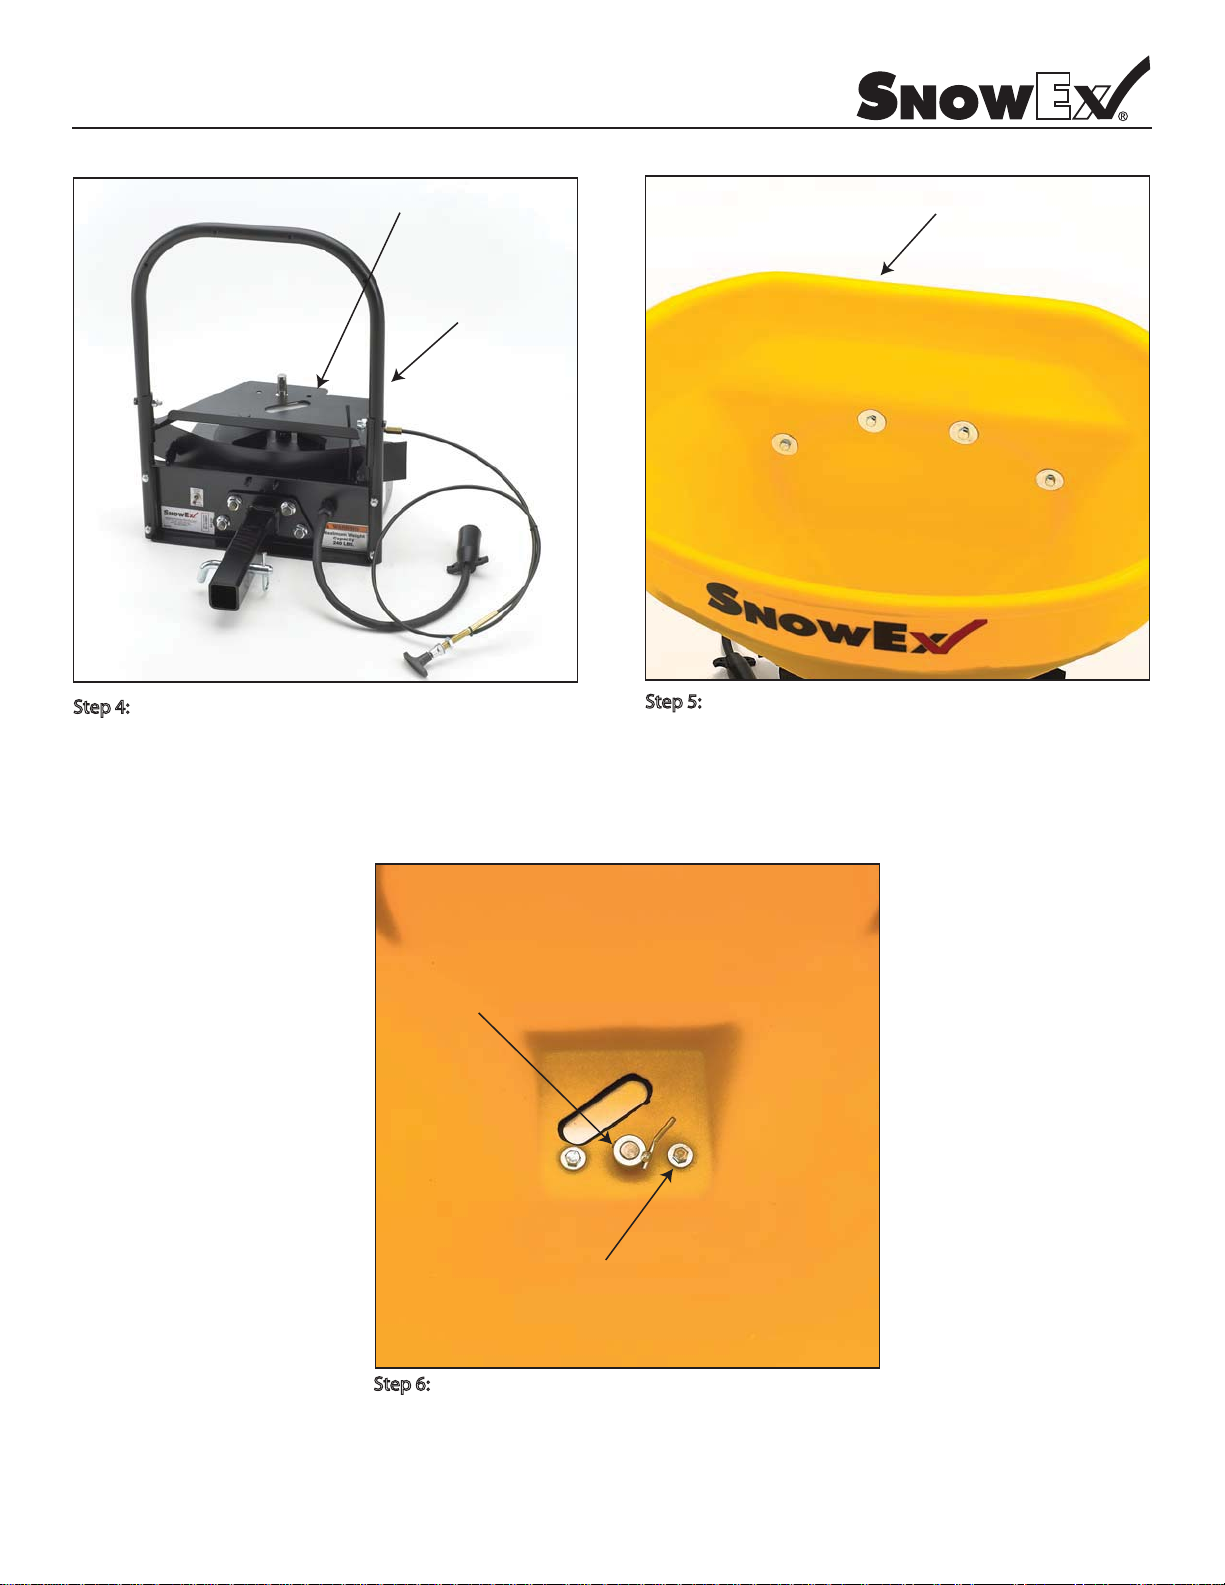
Assembly Instructions
Model # SR-110 (refer to diagram on page 1-10)
Fig 1.
Step 4:
Install item (C) to item (F) as shown in gure 1. Using
(2) 5/16” hex bolts and (2) 5/16”lock nuts supplied in hardware
bag item (D). Tighten securely in place with 1/2” socket or
wrench to 18 foot pounds.
Gate deck/hopper support item (C)
Item (F)
Fig 3.
Fig 2.
Mount item (B) to item (F) as shown in gure 2. Using
Step 5:
(4) 5/16” hex bolts, (4) fender washers and (4) 5/16” lock nuts
supplied in hardware bag item (D). Fender washers must be
installed inside the hopper to provide proper support as
shown in gure 2. Tighten securely in place with 1/2” socket
or wrench to 18 foot pounds.
Hopper item (B)
1 — 8
Material agitator with set screw
Located in hardware bag Item (D)
Hopper bolts with washers
Located in hardware bag Item (D)
Mount item (B) to item (C) using (2) 5/6” hex bolts and (2) washers supplied
Step 6:
in hardware bag item (D). Tighten securely in place with 1/2” socket or wrench to
18 foot pounds. Mount material agitator by placing it on the upper part of the
transmission shaft. Line up set screw with upper at and tighten with a 5/32” allen
wrench. Be sure to put agitiation nger so that it is facing upward as shown in g 3.
© Trynex International 2009 L1600
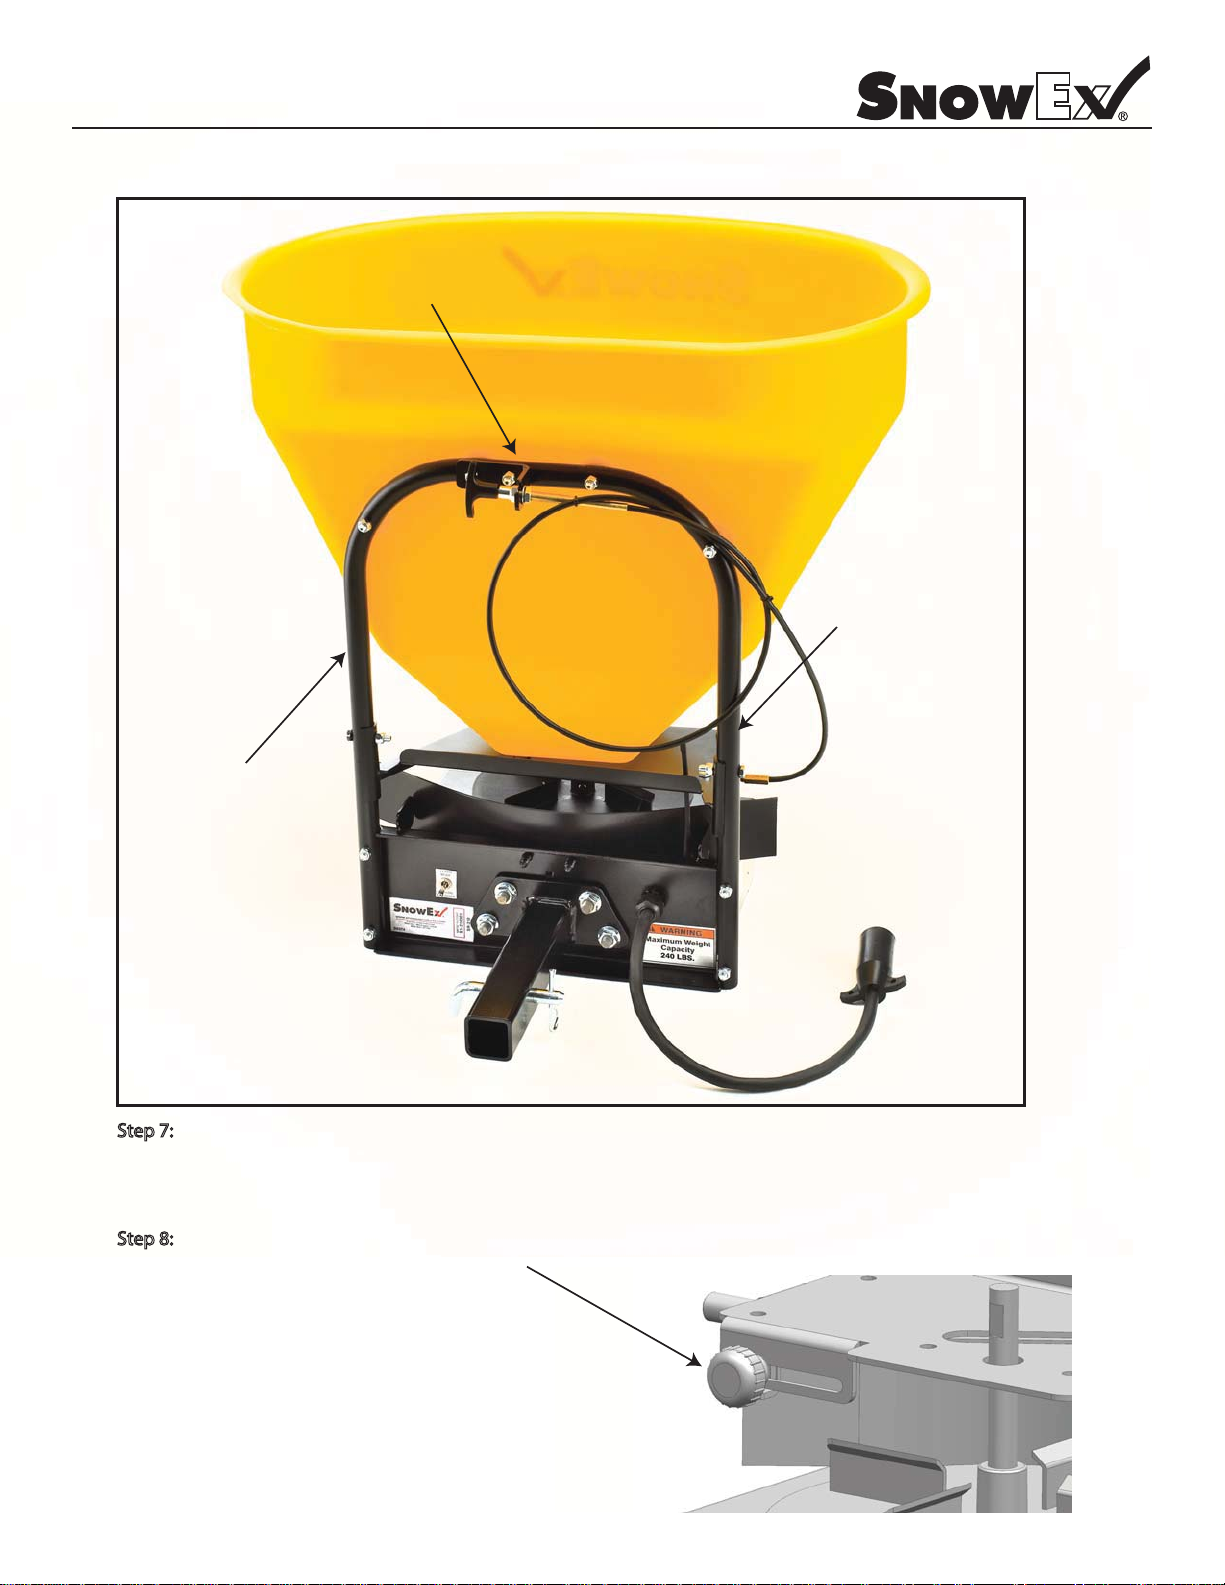
Assembly Instructions
Model # SR-110 (refer to diagram on page 1-10)
Fig 1.
Cable mounting bracket
located in item (D) hardware bag
Gate Adjustment Knob
See Drawing Below
Support item (F)
Step 7: Mount control bracket to item (F) using existing hopper mounting hardware as shown in gure 1. Cable should be
looped as shown in gure 1 if mounted to this way. When mounting in a remote location, be sure to leave a large radius in
cable so it will not bind or kink. You can also mount the control bracket on a vehicle using (2) 5/16” hex bolts and (2) 5/16”
lock nuts supplied in item (D) hardware bag.
Step 8: Material ow can be adjusted with moving the locking knob forward or backward to increase or decrease
the amount of material to be applied to an area.
© Trynex International 2009 L1600 1 — 9
 Loading...