

Page 1

Read all safety rules and instructions carefully before operating this tool.
Owner’s Manual
TOLL-FREE HELPLINE: 1-800-317-7833
www.snapper.com
21" 82V Cordless Self-propelled Mower
1696860 (SXD21SPWM82)
Not for Reproduction
Page 2

Product Specications ............................................................................................. 2
Safety Information ................................................................................................... 3
Symbols .................................................................................................................. 6
Features and Controls ............................................................................................. 7
Assembly ................................................................................................................. 8
Operation .............................................................................................................. 15
Battery & Charger ................................................................................................. 19
Maintenance .......................................................................................................... 21
Environmentally Safe Battery Disposal................................................................... 24
Troubleshooting ..................................................................................................... 25
Warranty................................................................................................................ 26
PRODUCT SPECIFICATIONS
82 V 21" CORDLESS SELF-PROPELLED MOWER
Battery type ....................................................................................................................................82 V Lithium-ion
No-load speed .........................................................................................................................................2800 RPM
Self propelled speed ...........................................................................................................1.6-4.9 fps (0.5-1.5 m/s)
Deck size .............................................................................................................................................21” (53.3 cm)
Height adjustments .........................................................................................................1 3/8 - 3 3/4” (3.5 - 9.5 cm)
Torque (for the blade bolt) ......................................................................................................24-27 lb-ft (33-37 Nm)
Functions .................................................................................................. 3-in-1: Mulch, side discharge or rear bag
Weight (without battery) ................................................................................................................. 70.1 lbs (31.8 kg)
CONTENTS
2
Disclaimer: * Maximum initial battery voltage (measured without a workload) is 82 volts. Nominal voltage is 72.
Not for Reproduction
Page 3

SAFETY INFORMATION
1. GENERAL OPERATION
• Avoid Dangerous Environment – Don’t use lawn mowers in damp or wet locations.
• Don’t Use In Rain.
• Keep Children Away – All visitors should be kept a safe distance from work area.
• Dress properly. Do not wear loose clothing or jewelry that can get caught in moving parts. The wearing of protective
gloves and safety footwear is recommended.
• Use Safety Glasses – Always use face or dust mask if operation is dusty.
• Use Right Appliance – Do not use lawn mower for any job except that for which it is intended.
• Don’t Force Lawn Mower – It will do the job better and safer at the rate for which it was designed.
• Don’t Overreach – Keep proper footing and balance at all times.
• Stay Alert – Do not operate the mower when you are tired. Pay attention to what you are doing. Use common sense.
• Store Idle Lawn Mower Indoors – When not in use, lawn mower should be stored in an indoor dry and locked-up place –
out of reach of children.
• Maintain Lawn Mower With Care – Keep cutting edges sharp and clean for best and safest performance.
• Follow instructions for lubricating and changing accessories.
• Inspect lawn mower cord periodically and if damaged, have it repaired by an authorized service facility.
• Keep handles dry, clean, and free from oil and grease.
• Keep safety devices (guards, shields, switches etc.) in place and working.
• Keep blades sharp.
• Keep hands and feet away from cutting area.
• Objects struck by the lawn mower blade can cause severe injuries to persons. The lawn should always be carefully
examined and cleared of all objects prior to each mowing.
• If lawn mower strikes a foreign object, follow these steps:
i) Stop lawn mower. Release the switch.
ii) Remove battery.
iii) Inspect for damage.
iv) Repair any damage before restarting and operating the lawn mower.
• Use identical replacement blades only.
• Do not charge lawn mower in rain, or in wet locations.
• Remove or disconnect battery before servicing, cleaning, or removing material from the lawn mower.
• Use only approved replacement batteries, other batteries may cause injury or damage to the mower. For use only with
Briggs & Stratton batteries BSB2AH82 (2 amp-hour) or BSB4AH82 (4 amp-hour) or BSB5AH82 (5 amp-hour) and Briggs
& Stratton charger BSRC82 or BSSC82.
• Do not dispose of the battery in a re. The cell may explode. Check with local codes for possible special disposal
instructions.
READ ALL INSTRUCTIONS
WARNING
This mower is capable of amputating hands and feet and throwing objects. Failure to observe the following safety
instructions could result in serious injury or death.
WARNING
When using electric lawn mowers, basic safety precautions should always be followed to reduce the risk of re, electric
shock, and personal injury, including the following:
3
Not for Reproduction
Page 4

4
SAFETY INFORMATION
• Do not open or mutilate the battery. Released electrolyte is corrosive and may cause damage to the eyes or skin. It may
be toxic if swallowed.
• Exercise care in handling batteries in order not to short the battery with conducting materials such as rings, bracelets,
and keys. The battery or conductor may overheat and cause burns.
• Read, understand, and follow all instructions on the machine and in the manual(s) before starting.
• Only allow responsible adults who are familiar with the instructions to operate this machine.
• Clear the area of objects such as rocks, wire, toys, etc., which could be thrown by the blade. Stay behind the handle when
the engine (motor) is running.
• Be sure the area is clear of bystanders before operating. Stop machine if anyone enters the area.
• Do not operate machine barefooted or while wearing sandals. Always wear substantial footwear.
• Do not pull machine backward unless absolutely necessary. Always look down and behind before and while moving
backward.
• Never direct discharged material toward anyone. Avoid discharging material against a wall or obstruction. Material may
ricochet back toward the operator. Stop the blade when crossing gravel surfaces.
• Do not operate machine without the entire grass catcher, discharge guard, rear guard, or other safety protective devices
in place and working.
• Never leave a running machine unattended.
• Stop the motor and wait until the blade comes to a complete stop before removing the grass catcher or unclogging the
chute.
• Operate machine only in daylight or good articial light.
• Do not operate machine while under the inuence of alcohol or drugs.
• Never operate mower in wet grass. Always be sure of your footing; walk, never run.
• Disengage the drive system, if so equipped, before starting the motor.
• If the machine should start to vibrate abnormally, stop the motor and check for the cause immediately. Vibration is
generally a warning of trouble.
• Always wear eye protection when operating machine.
• See manufacturer’s instructions for proper operation and installation of accessories. Only use accessories approved by
the manufacturer.
2. SLOPE OPERATION
• Slopes are a major factor related to slip and fall accidents, which can result in severe injury. Operation on all slopes
requires extra caution. If you feel uneasy on a slope, do not mow it.
• Mow across the face of slopes; never up and down. Exercise extreme caution when changing direction on slopes.
• Watch for holes, ruts, bumps, rocks, or other hidden objects. Uneven terrain could cause a slip and fall accident. Tall
grass can hide obstacles.
• Do not mow on wet grass or excessively steep slopes. Poor footing could cause a slip and fall accident.
3. CHILDREN
Tragic accidents can occur if the operator is not alert to the presence of children. Children are often attracted to the
machine and the mowing activity. Never assume that children will remain where you last saw them.
• Keep children out of the mowing area and under the watchful care of a responsible adult.
• Stay alert, and turn the mower off if a child or any other person enters the mowing area.
• Never allow children to operate the machine
• Use extreme care when approaching blind corners, doorways, shrubs, trees, or other objects that may obscure your view
of a child who may run into the path of the mower.
Not for Reproduction
Page 5

SAFETY INFORMATION
SAVE THESE INSTRUCTIONS
4. SERVICE
• Keep all nuts, bolts, and screws tight in order to be sure that the equipment is in safe working condition.
• Never remove or tamper with safety devices. Check their proper operation regularly. Never do anything to interfere with
the intended function of a safety device or to reduce the protection provided by a safety device.
• Keep machine free of grass, leaves, or other debris build up. Allow machine to cool before storing.
• After striking a foreign object, stop the motor. Thoroughly inspect the mower for any damage. Repair any damage before
operating the mower.
• Never make any adjustments or repairs with the motor running.
• Always remove battery pack from mowers before adjusting, cleaning, or repairing.
• Check grass catcher components and the discharge guard frequently and replace with manufacturer’s recommended
parts, when necessary.
• Mower blades are sharp, and can cut. Wrap the blades or wear gloves, and use extra caution when servicing.
• Maintain or replace safety and instruction labels, as necessary.
WARNING(PROPOSITION65)
This product contains a chemical known to the state of California to cause cancer, birth defects or other reproductive harm.
Some dust created by power sanding, sawing, grinding, drilling and other construction activities contains chemicals known
to cause cancer, birth defects or other reproductive harm. Some examples of these chemicals are:
• Lead from lead-based paints,
• Crystalline silica from bricks and cement and other masonry products, and
• Arsenic and chromium from chemically-treated lumber.
Your risk of exposure to these chemicals varies depending on how often you do this type of work. To reduce your exposure
to these chemicals, work in a well-ventilated area, and work with approved safety equipment, such as dust masks that are
specially designed to lter out microscopic particles.
5
Not for Reproduction
Page 6

Some of the following symbols may be used on this product. Please study them and learn their meaning. Proper
interpretation of these symbols will allow you to operate the product better and safer.
6
SYMBOL NAME DESIGNATION/EXPLANATION
V Volts Voltage
A Amperes Current
Hz Hertz Frequency (cycles per second)
W Watt Power
min Minutes Time
Alternating Current Type of current
Direct Current Type or a characteristic of current
n
o
No Load Speed Rational speed, at no load
Class II Construction Double-insulated construction
/min Per Minute Revolutions, strokes, surface speed, orbits etc., per minute
Wet Conditions Alert Do not expose to rain or use in damp locations.
Read The Operator’s Manual
To reduce the risk of injury, user must read and understand operator’s
manual before using this product.
Safety Alert Precautions that involve your safety.
Eye Protection
Always wear eye protection with side shields marked to comply with ANSI
Z87.1 when operating this equipment.
Keep Hands and Feet Away Keep hands and feet away from blade and cutting area.
No Reach Do not reach hands or feet under mower deck.
No Slope
Do not operate on inclines greater than 15º. Mow across the face of slopes,
never up and down.
Keep Bystanders Away Keep all bystanders at least 100 ft. away.
Ricochet
Pay attention that bystanders are not injured through foreign objects
thrown from the mower.
SYMBOLS
The following signal words and meanings are intended to explain the levels of risk associated with this product.
SYMBOLS SIGNAL MEANING
DANGER
Indicates an imminently hazardous situation, which, if not avoided, will result in death or
serious injury.
WARNING
Indicates a potentially hazardous situation, which, if not avoided, could result in death or
serious injury.
CAUTION
Indicates a potentially hazardous situation, which, if not avoided, may result in minor or
moderate injury.
CAUTION (Without Safety Alert Symbol) Indicates a situation that may result in property damage.
SAVE THESE INSTRUCTIONS
Not for Reproduction
Page 7
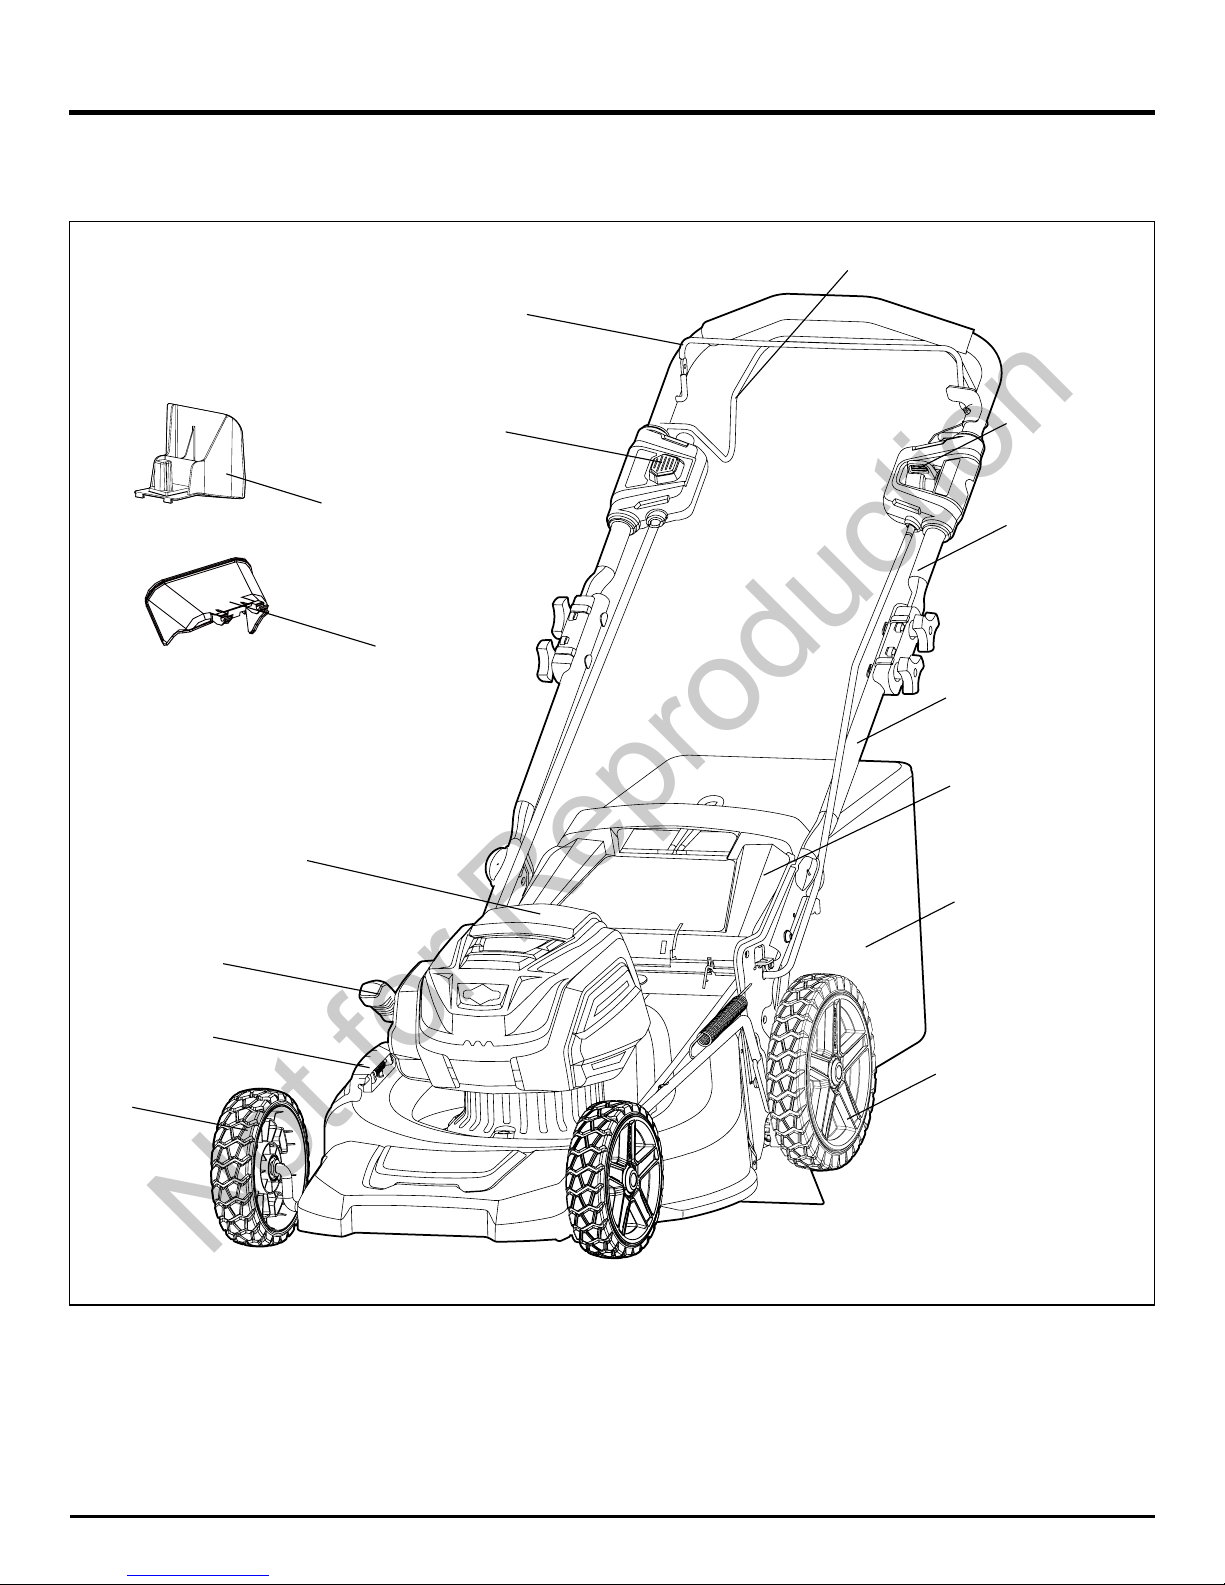
Fig. 1
Read this operator's manual and safety rules before operating your mower. Compare the illustration in Figure 1 to your
mower in order to familiarize yourself with the location of various controls and adjustments. Save this manual for future
reference.
FEATURES AND CONTROLS
7
Lower handle
Grass catcher bag
Rear cover
Height adjustment lever
Battery door
Side discharge cover
Rear wheel
Mulching plug
Side discharge chute
Front wheel
Safety lock-out button
Bail lever
Upper handle
Self-Propel
Speed
Controls
Self propel lever
Not for Reproduction
Page 8

8
UNPACKING
• Carefully remove the product and any accessories from the box. Make sure that all items listed in the packing list are
included.
• Inspect the product carefully to make sure no breakage or damage occurred during shipping.
• Do not discard the packing material until you have carefully inspected and satisfactorily operated the product.
• If any parts are damaged or missing, please call 1-800-317-7833 for assistance.
PACKING LIST
• Lawn Mower • Handle Knob x 4
• Mulching Plug • Handle Bolt x 4
• Side Discharge Chute • Owner's Manual
• Grass Catcher Bag
Note: The mulching plug is installed in the rear discharge opening when shipped
.
WARNING
If any parts are damaged or missing do not operate this product until the parts are replaced. Using a product with damaged
or missing parts could result in serious personal injury.
WARNING
Do not attempt to modify this product or create accessories not recommended for use with this product. Any such alteration
or modication is misuse and could result in a hazardous condition leading to possible serious personal injury.
WARNING
Do not insert battery until assembly is complete and you are ready to mow. Failure to comply could result in accidental
starting and possible serious personal injury.
WARNING
To prevent accidental starting that could cause serious personal injury, always remove the battery pack from the product
when assembling parts.
WARNING
Never operate the mower without the proper safety devices in place and working. Never operate the mower with damaged
safety devices. Operation of this product with damaged or missing parts could result in serious personal injury.
ASSEMBLY
Not for Reproduction
Page 9
ASSEMBLY
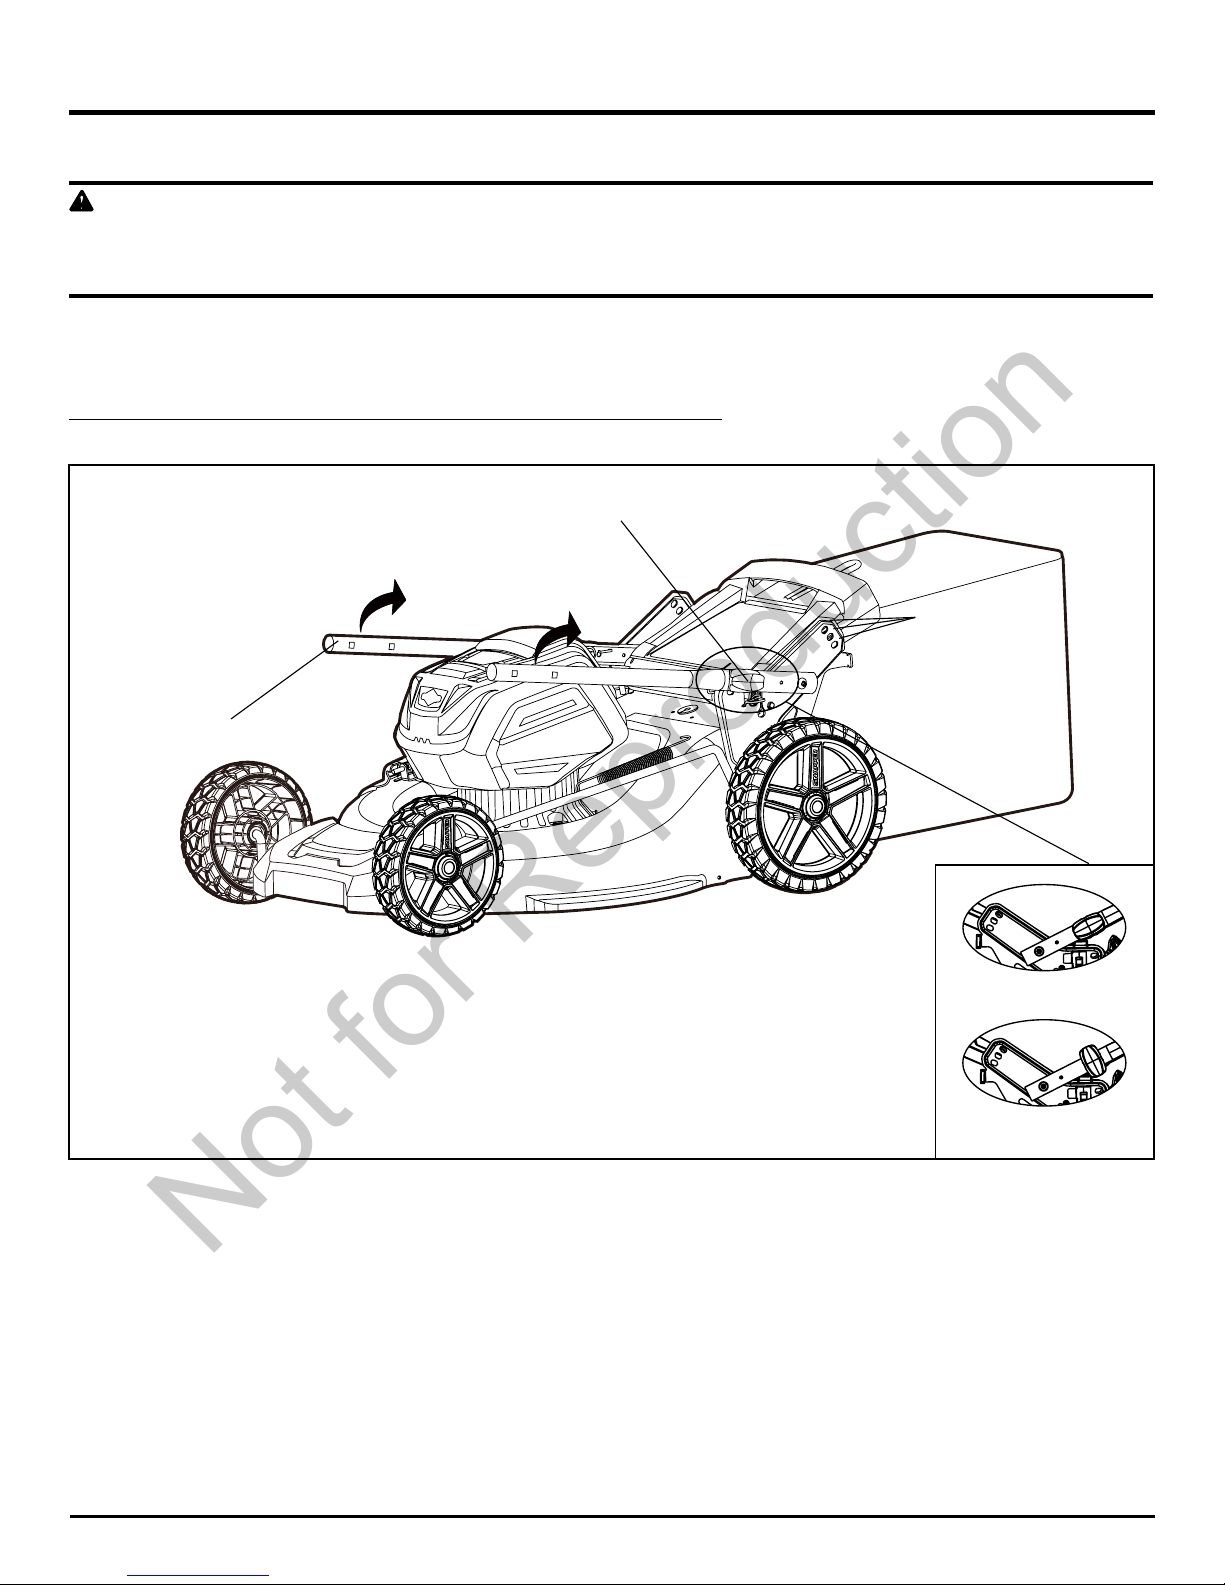
Fig. 2
9
UNFOLDING AND ADJUSTING LOWER HANDLE (See Figure 2)
WARNING
Folding or unfolding the handle improperly can damage the cables, causing an unsafe operating condition.
• Do not damage the cables when folding or unfolding the handle.
• If a cable is damaged, contact an Authorized Service Dealer.
• Pull and rotate the handle knobs (1) 90° on both sides to loosen the lower handles (2) on both sides.
• Move the lower handles to the operating position. You may raise or lower the handle to a position comfortable for you.
There are 3 positions (3) for you to choose. Release the handle knobs to lock the lower handle into position.
Note: Ensure both sides are set at the same position for proper assembly.
(2)
(1)
(3)
Locked position
Unlocked position
Not for Reproduction
Page 10

INSTALLING THE UPPER HANDLE (See Figure 3)
• Align the mounting holes on the upper handle (1) and the lower handle (2). Insert the bolts (3) and use the knobs (4) to
tighten them. Repeat the operation on the other side.
ASSEMBLY
10
Fig. 3
(2)
(1)
(3)
(4)
(4)
Not for Reproduction
Page 11
11
ASSEMBLY
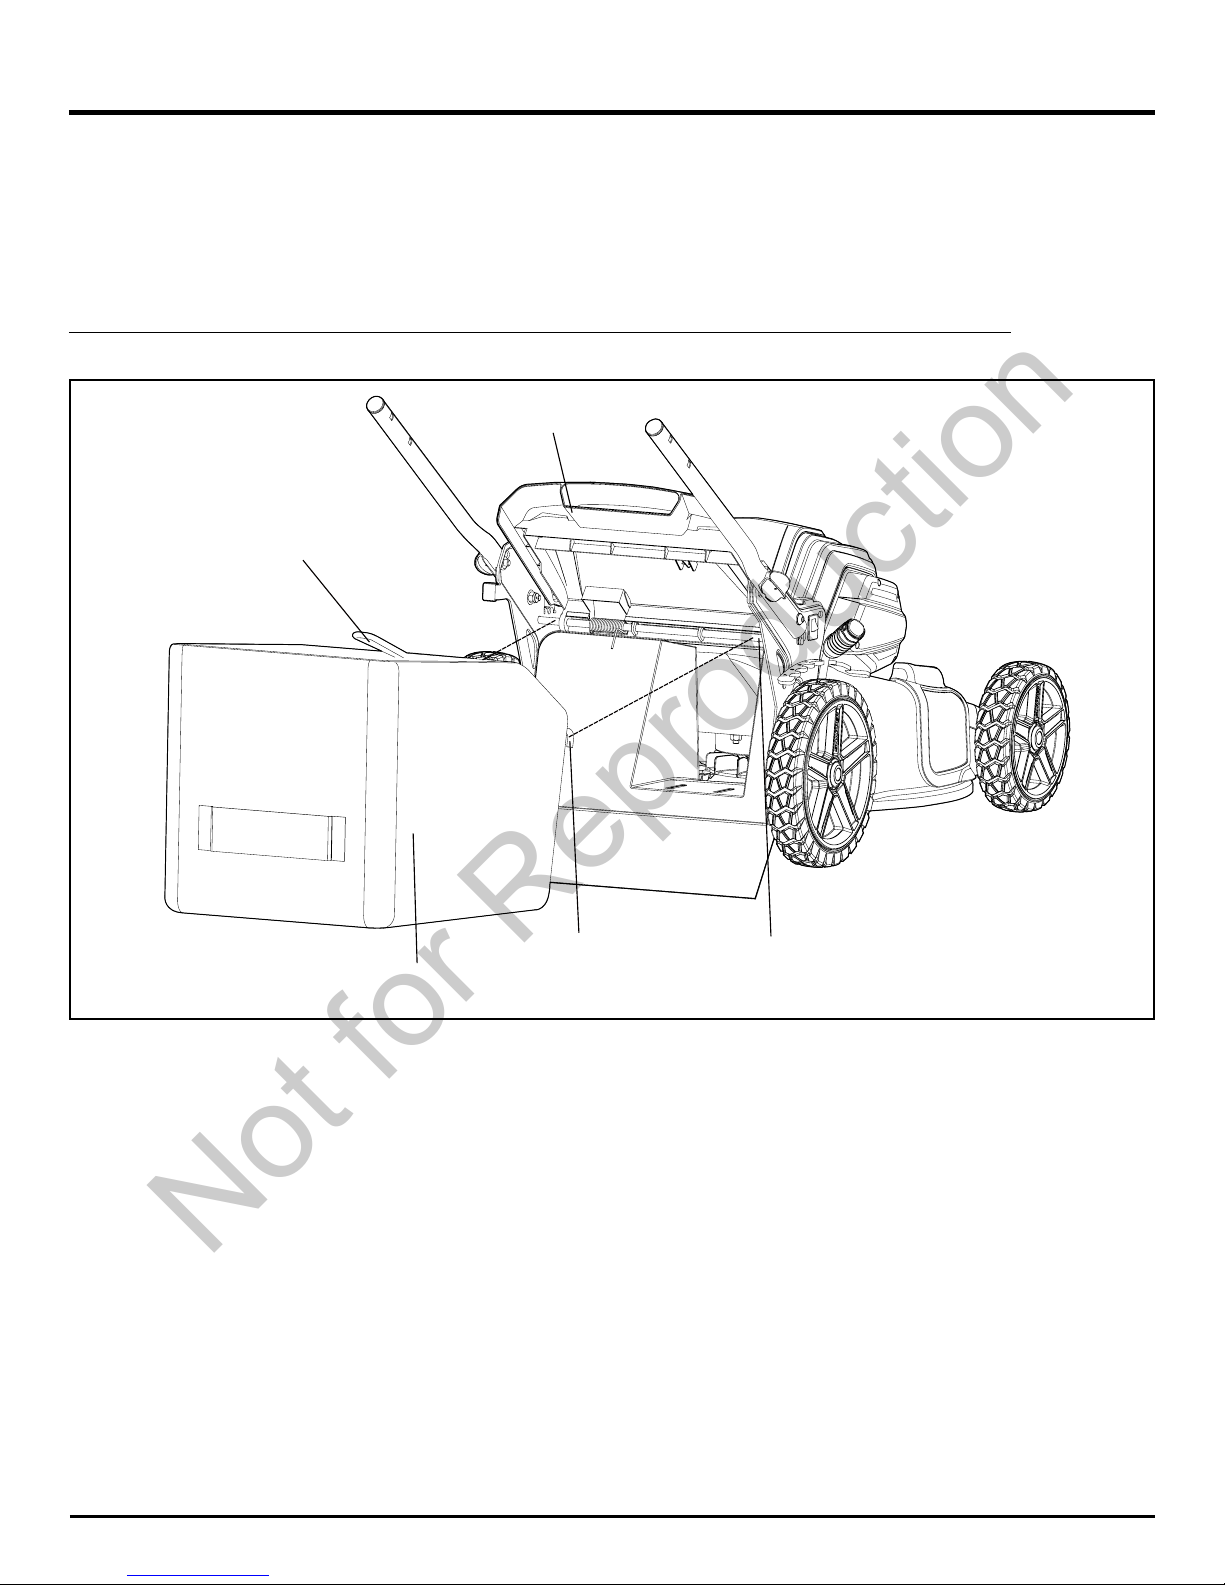
Fig. 4
(3)
(1)
(2)
(5)
INSTALLING THE GRASS CATCHER BAG (See Figure 4)
• Lift the rear cover (1).
• Lift the grass catcher by its handle (2) and place under the rear cover so that the hooks (3) on the grass catcher (4) are
seated on the door rod (5).
• Release the rear cover. When installed correctly, the hooks on the grass catcher will extend through the openings on the
rear cover.
NOTE: When using the grass catcher, do not install either the side discharge deector or the mulching plug.
(4)
Not for Reproduction
Page 12
(2)
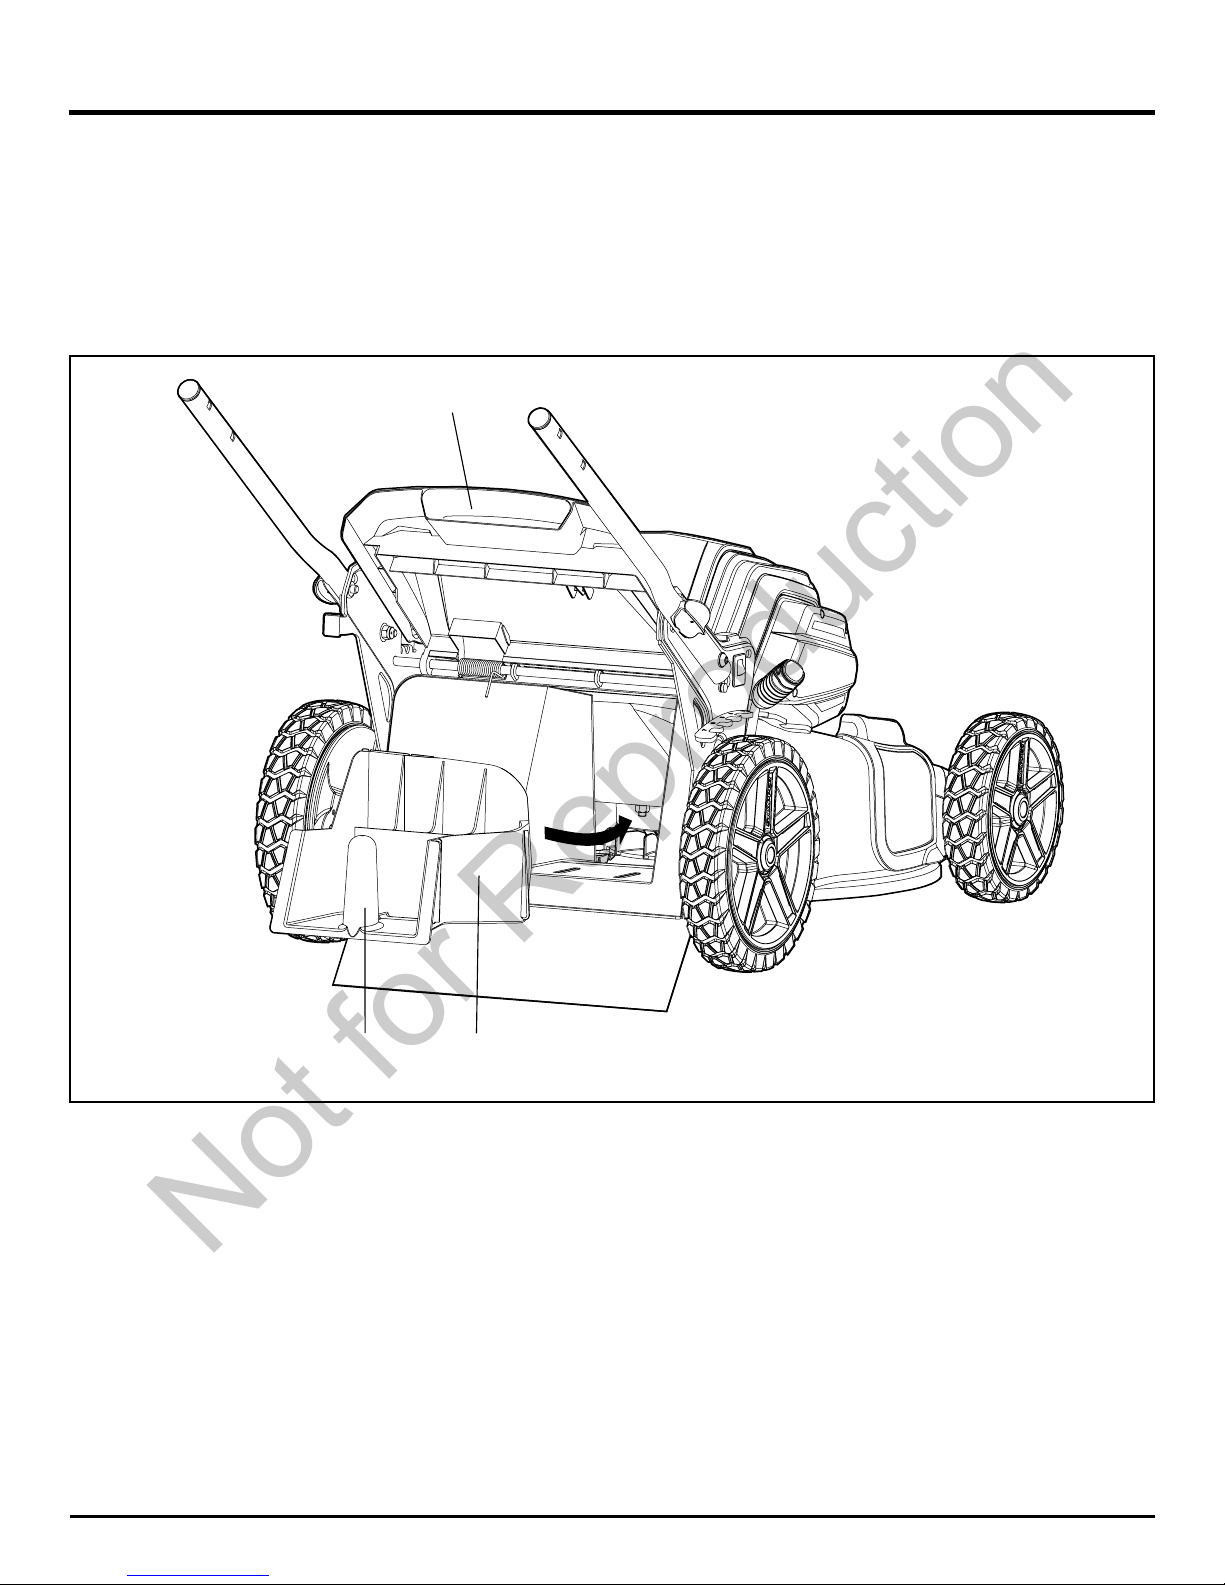
Fig. 5
ASSEMBLY
INSTALLING/REMOVING THE MULCHING PLUG (See Figure 5)
• To remove the mulching plug, lift the rear cover (1).
• Grasp the handle (2) of the mulching plug. Lift and pull the mulching plug out using the handle.
• The mulching plug (3) is inserted at an angle, so it requires some force to remove it.
• The mulching plug must be removed in order to install the grass catcher bag.
• The mulching plug must be re-installed when the grass catcher bag is removed.
(3)
12
(1)
Not for Reproduction
Page 13
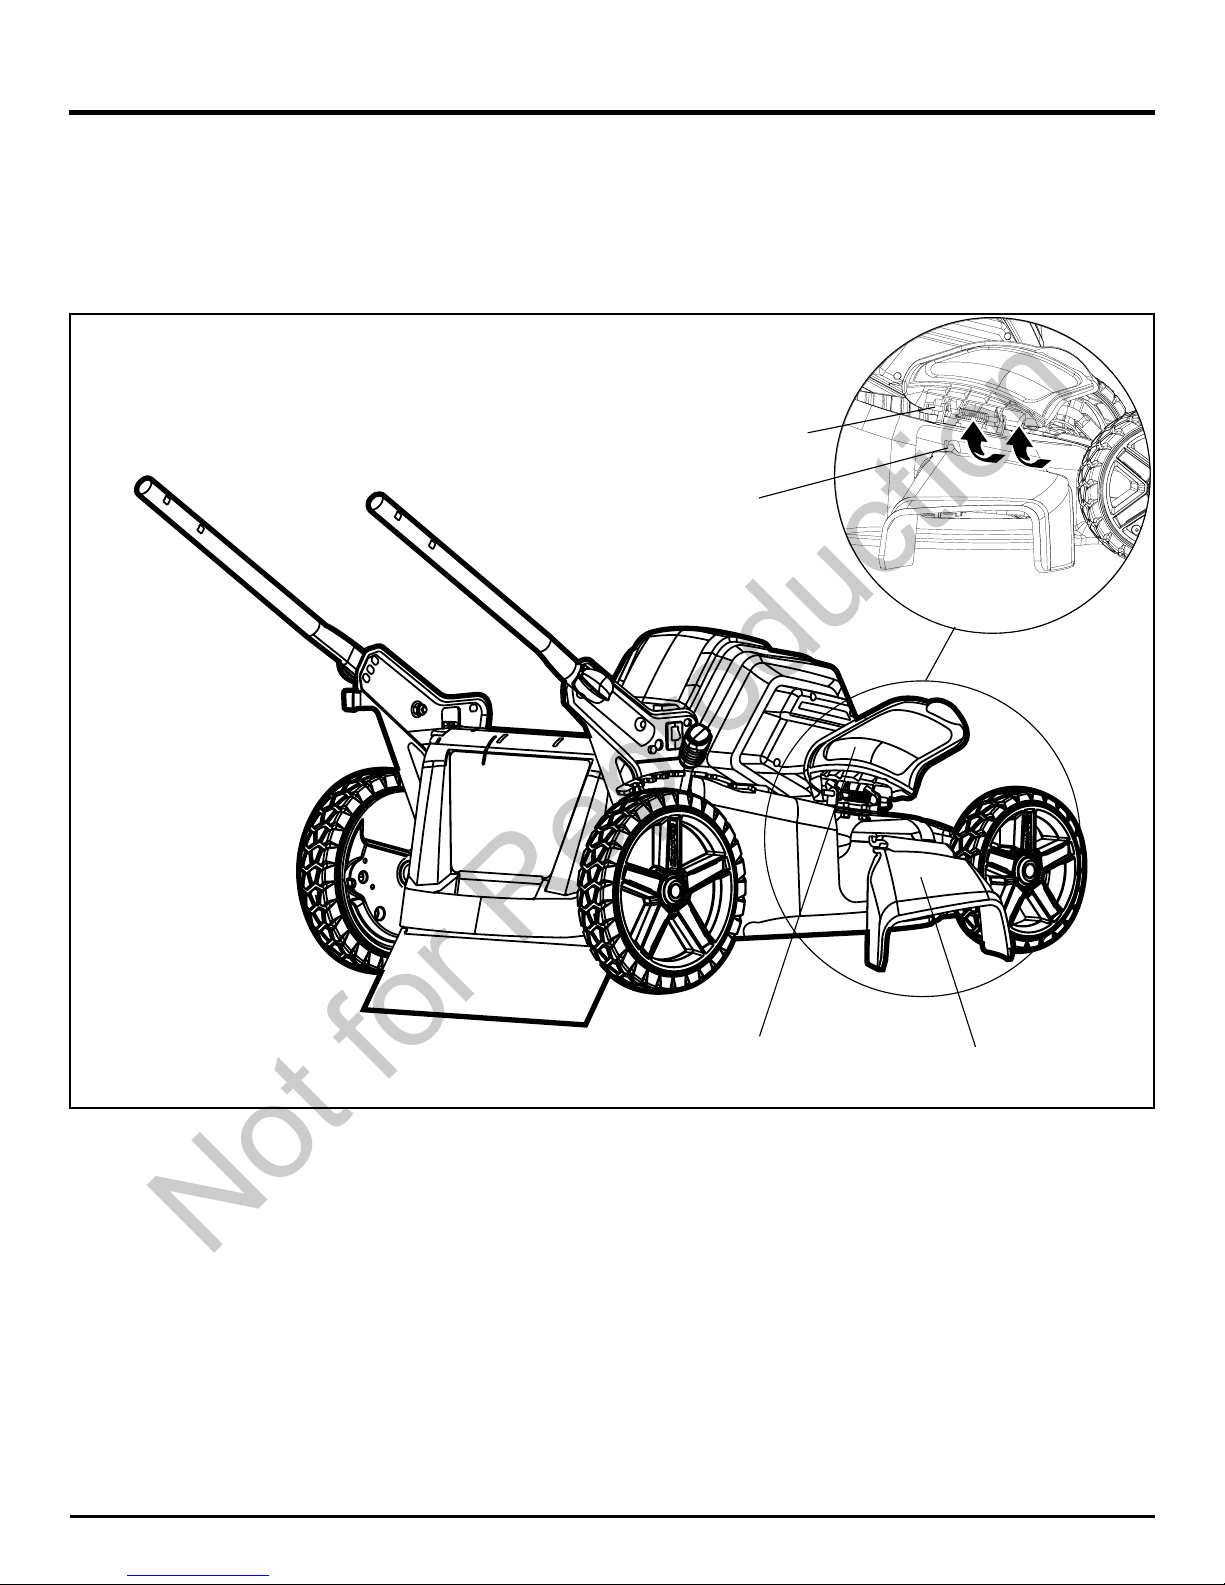
Fig. 6
ASSEMBLY
INSTALLING SIDE DISCHARGE CHUTE (See Figure 6)
• Lift the side discharge cover (1).
• Align the grooves (2) on the discharge chute (3) with the pins (4) on the underside of the discharge cover (1).
• Lower the discharge chute until the hooks on the mower deck are secured in the openings in the discharge chute.
• Release the side discharge cover.
13
(1)
(3)
(2)
(4)
Not for Reproduction
Page 14
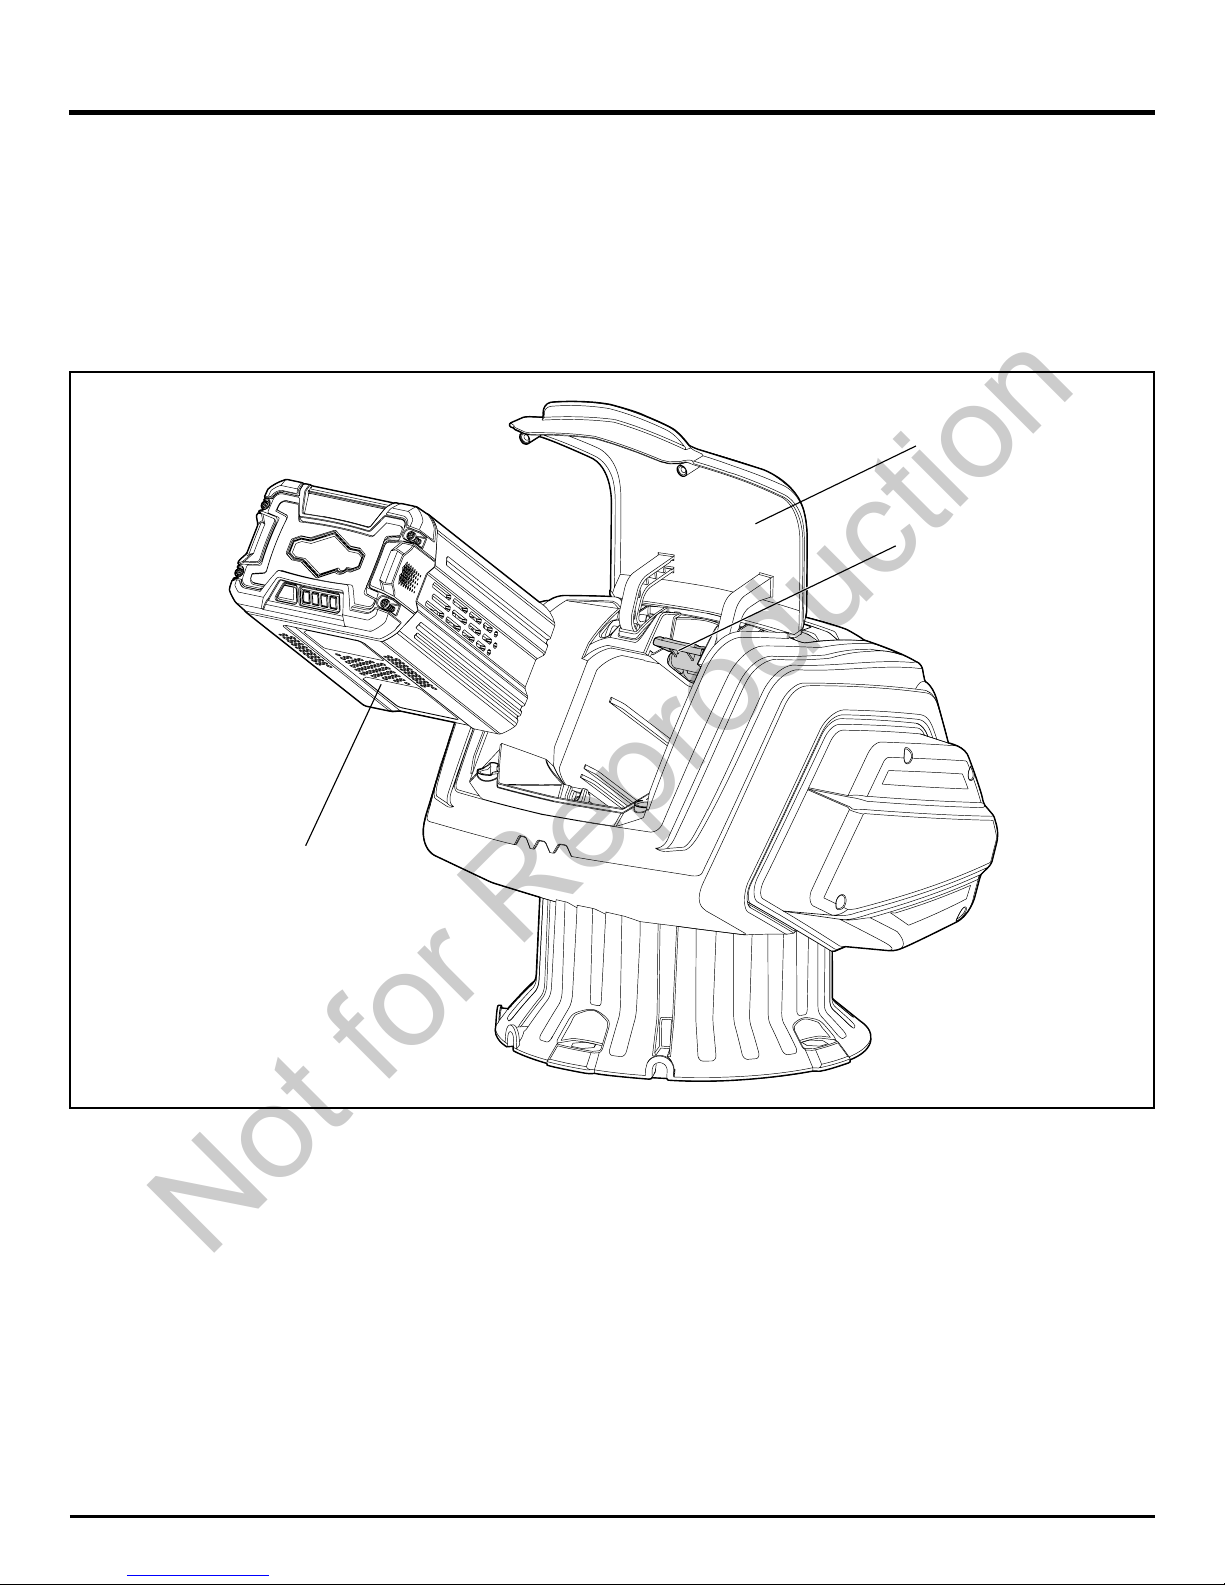
Fig. 7
ASSEMBLY
TO INSTALL BATTERY PACK (See Figure 7)
• Lift and hold up the battery door (1).
• Align the battery (2) with the mower’s battery port.
• Make sure the battery release button (3) snaps in place and that battery is fully seated and secure in the mower before
beginning operation.
• If the machine is not going to be used immediately, remove the battery.
• Close the door.
14
TO REMOVE BATTERY PACK (See Figure 7)
• Release the bail lever to stop the mower.
• Open the battery door.
• Press the battery release button (3) on the mower. This will cause the battery to raise out of the tool slightly.
• Remove battery from the mower.
(3)
(1)
(2)
Not for Reproduction
Page 15
OPERATION
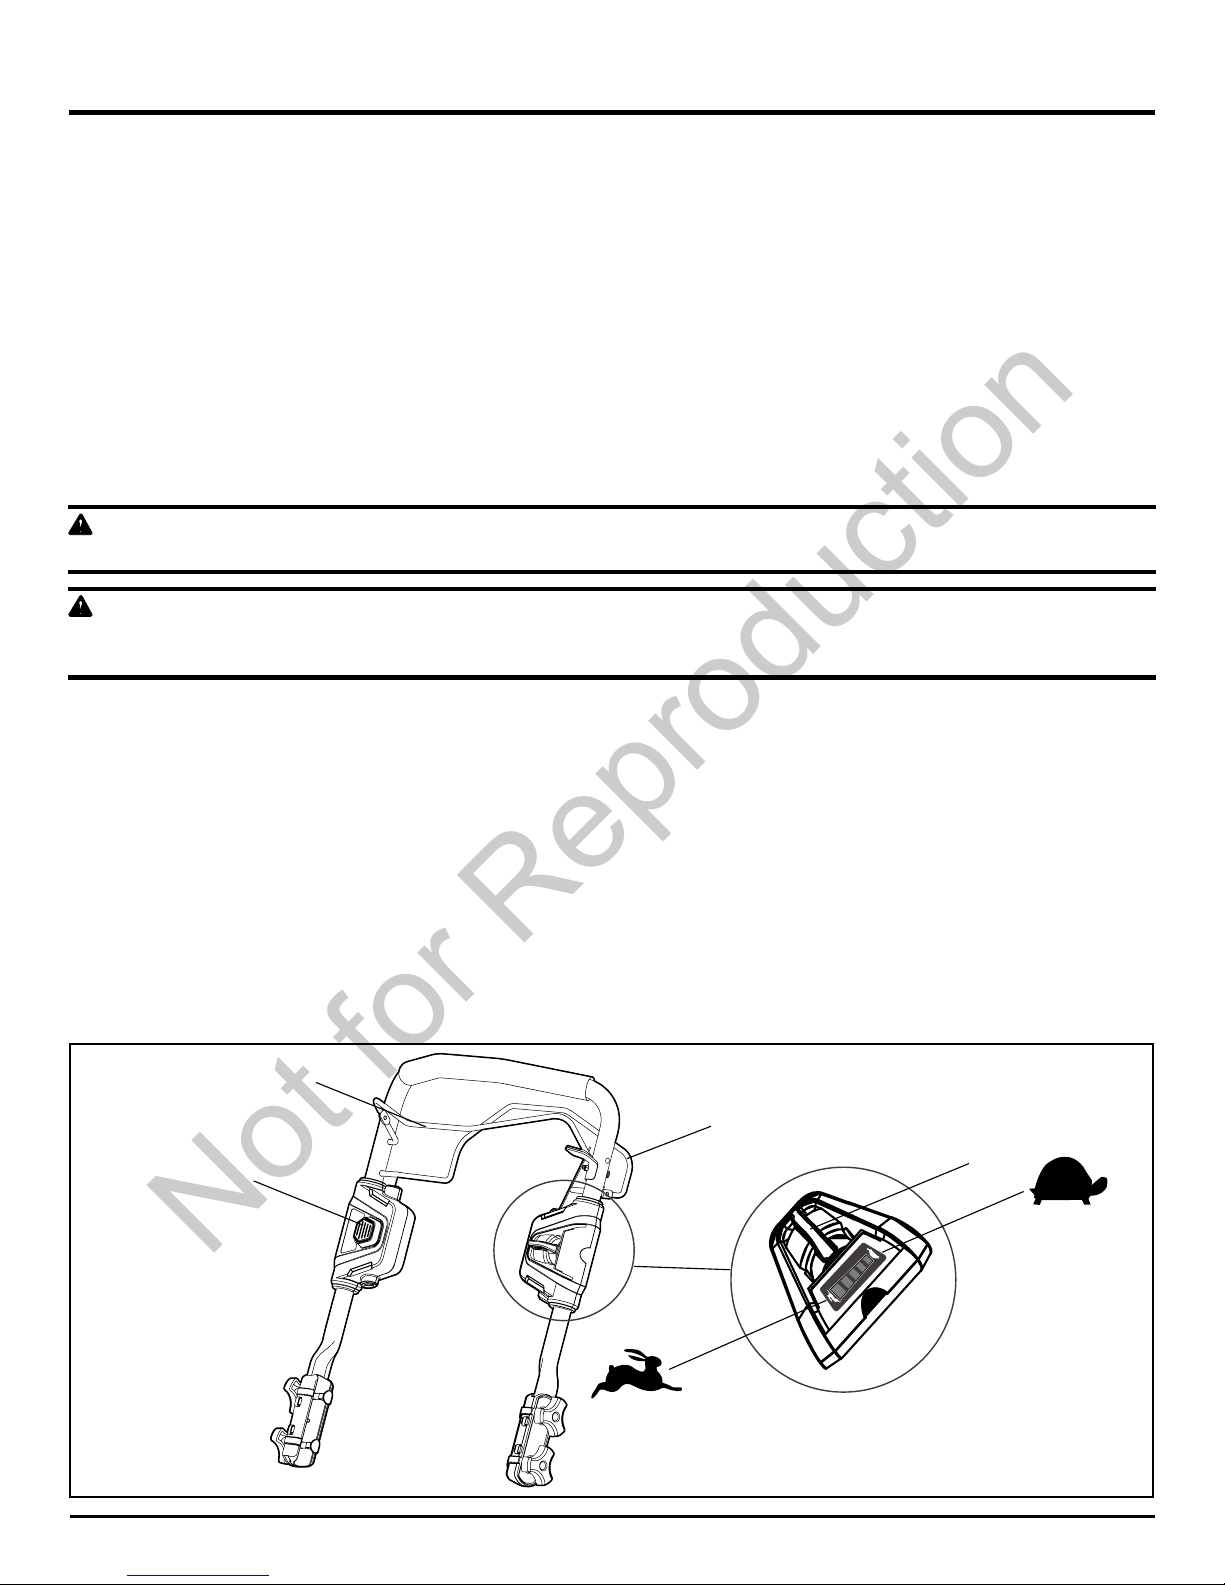
STARTING/STOPPING THE MOWER (See Figure 8)
To start the motor:
• Open the battery door. Insert the battery.
• Press and hold the safety lock-out button (1).
• Pull the bail lever (2) upward to the handle to start the mower and release the button.
To stop the motor:
• Release the bail lever.
Soft-Start
This LI-ION mower is equipped with a “soft-start” feature. When initially starting up, the mower will take approx. 3 seconds
to get up to full speed. If the mower does not initially start: Remove the battery and check under the mower deck to ensure
there is nothing obstructing the blade and that the blade can spin freely by hand. Even a small amount of grass on start up
will prevent the “softstart” from turning the mower on.
CAUTION
Do not attempt to override the operation of the safety lock-out button or bail lever.
WARNING
The operation of any mower can result in foreign objects being thrown into the eyes, which can cause severe eye damage.
Always wear safety glasses while operating the mower and while performing any adjustments or repairs.
INSPECT THE CUTTING AREA. Remove all stones, sticks, wire, bones, and other debris that might be thrown by the
rotating blades.
SELF-PROPELLED MOWING (See Figure 8)
To engage the self-propelled feature:
• Open the battery door. Insert the battery.
• Pull the self propel lever (3) upward to meet the handle.
To disengage the self-propelled feature:
• Release the self propel lever.
To adjust the speed of self-propelled feature:
• Pull the variable speed control lever (4) towards the Rabbit Symbol to increase speed.
• Push the variable speed control lever (4) towards the Turtle Symbol to decrease speed.
15
Fig. 8
(3)
(1)
(2)
(4)
Not for Reproduction
Page 16
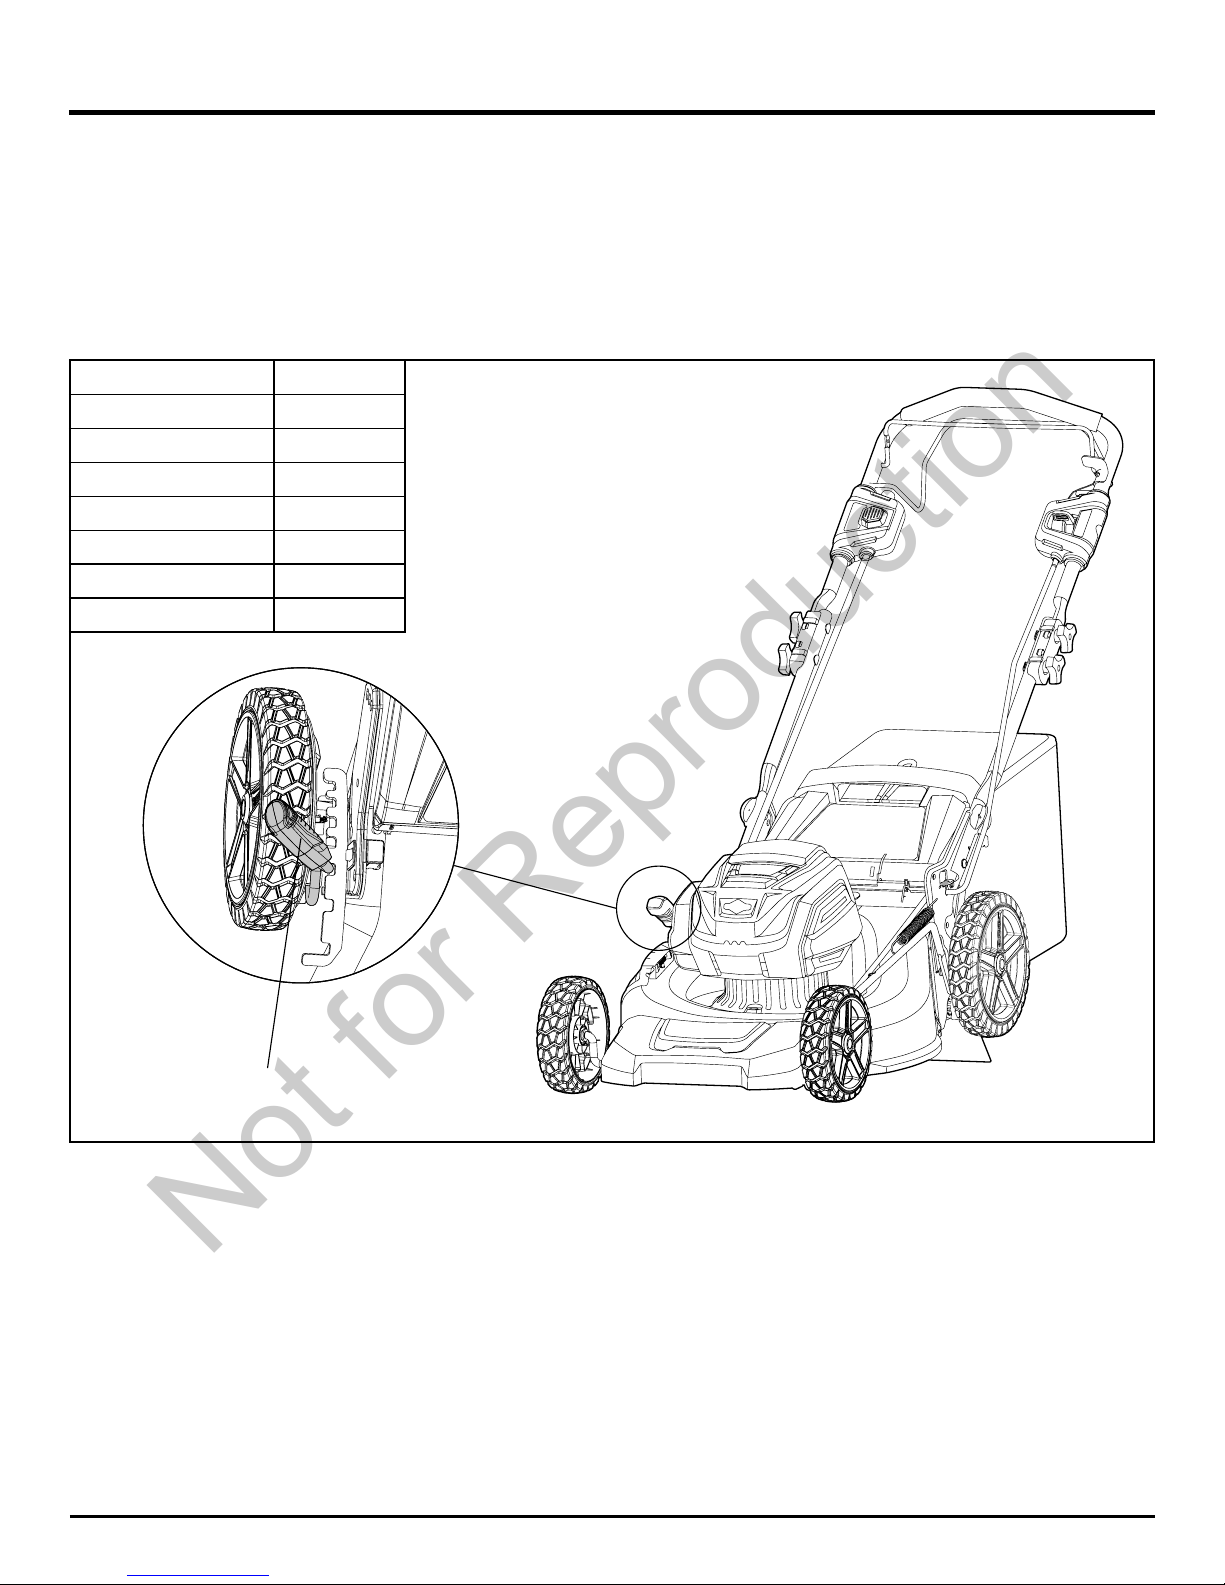
CUTTING HEIGHT ADJUSTMENT (See Figure 9)
When shipped, the wheels on the mower are set to a low-cutting position. Before using the mower for the rst time, raise
the cutting position to the height best suited for your lawn. The average lawn should be between 1 1/2" to 2" (3.8 to 5 cm)
during cool months and between 2" and 3 1/2" (5 cm to 8.3 cm) during hot months
.
To adjust the blade height:
• To raise the blade height, grasp the height adjustment lever (1) and move it toward the back of the mower.
• To lower the blade height, grasp the height adjustment lever (1) and move it toward the front of the mower.
OPERATION
16
7
6
5
4
3
2
1
Fig. 9
Height Adjustments 1 3/8 - 3 3/4"
1st setting 1 3/8"
2nd setting 1 7/8"
3th setting 2 1/8"
4th setting 2 5/8"
5th setting 3"
6th setting 3 3/8"
7th setting 3 3/4"
(1)
Not for Reproduction
Page 17
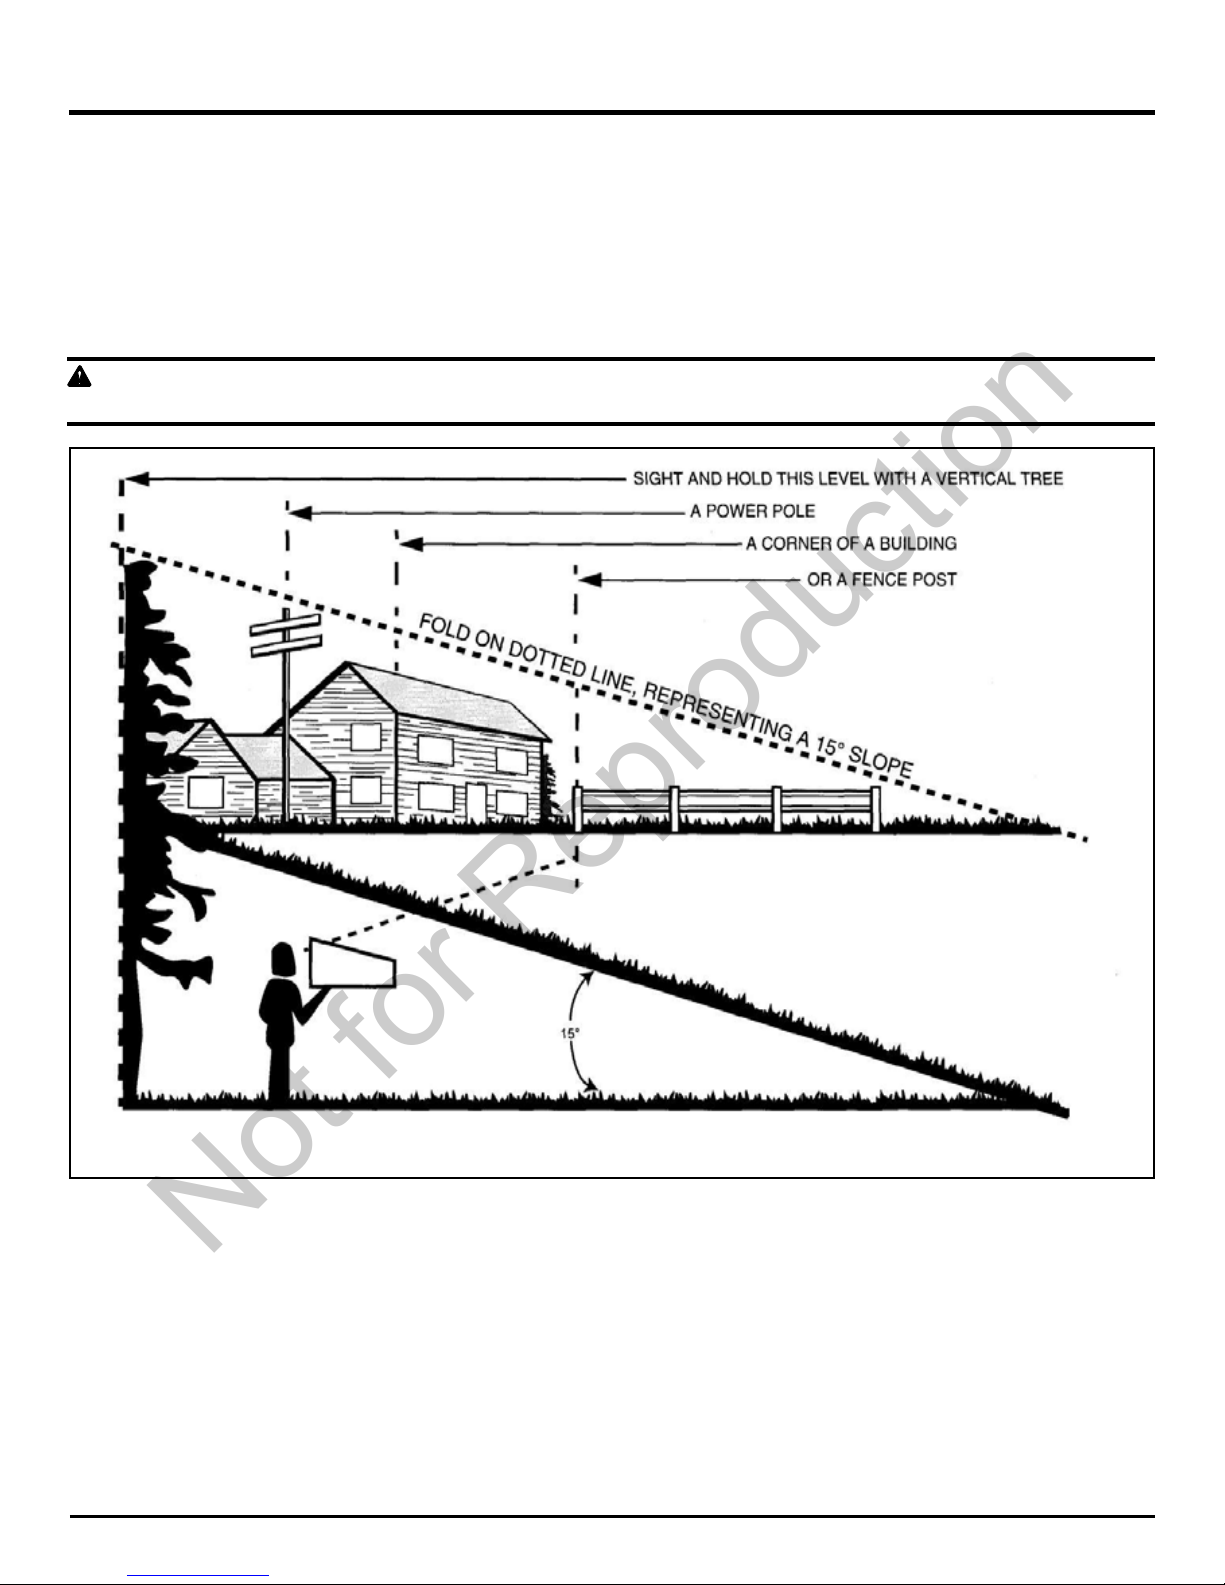
SLOPE GAUGE (See Figure 10)
• For your safety, use the slope gauge that is included as part of this manual to measure slopes before operating this unit
on a sloped or hilly area.
• Always be sure of your footing. If you feel like you are losing your balance, release the blade/ motor control handle
immediately. The blade will stop rotating within 3 seconds.
• Do not mow near drop-offs, ditches, or embankments, because you could lose your footing or balance.
• Do not mow a slope that has an angle of greater than 15°.
WARNING
Do not mow a slope that has an angle of greater than 15° (a rise of approximately 2 1/2 feet [.75 m] every 10 feet [3 m]).
OPERATION
17
Fig. 10
Not for Reproduction
Page 18

MOWING TIPS
NOTE: A sharp blade will greatly enhance the performance of the mower, especially when cutting high grass. Be sure to
check the blade and to sharpen it at least once per year, as described in the Maintenance section.
• Verify that the lawn is free of stones, sticks, wires, and other objects that could damage the blades or the motor. These
objects could be accidentally thrown by the mower in any direction, and could cause serious personal injury to the
operator and to others. In order to prevent electric shock, do not operate the mower in damp or wet conditions.
• Do not mow in circles. Travel back and forth across the lawn.
• When cutting thick grass, reduce walking speed in order to allow for a more effective cut and a proper discharge of the
clippings.
• For a healthy lawn, always cut off one-third or less of the total length of the grass. The average lawn should be
approximately 1 1/2 to 2” (3.8 to 5 cm) long during cool months, and between 2" to 3 1/4" (5 cm to 8.3 cm) long during hot
months. If there is growth, the lawn should be cut in the fall.
MULCHING TIPS
NOTE: INSPECT THE AREA WHERE THE MOWER IS TO BE USED, AND REMOVE ALL STONES, STICKS, WIRE,
BONES, AND OTHER DEBRIS THAT MIGHT BE THROWN BY THE ROTATING BLADE.
• Release the bail lever to turn the mower OFF when crossing any graveled area (stones can be thrown by the blade).
• Set mower to the highest cutting height when mowing on uneven ground or in tall weeds.
• For effective mulching, do not cut wet grass, because it tends to stick to the underside of the deck, preventing proper
mulching of grass clippings. New or thick grass may require a narrower cut. The ground speed should be adjusted to the
condition of the lawn. If mowing has been delayed and the grass has been allowed to grow longer than 4" (10 cm), mow
the lawn twice in order to reduce the grass height to a maximum of 3 1/4” (8.3 cm).
• Walk at a steady pace. Overlap the cutting rows. Do not let the grass get too tall. If the grass gets too long, start at the
highest cutting position and work down to the desired cutting height.
WARNING
If you strike a foreign object, stop the motor and remove the battery. Thoroughly inspect the mower for any damage. Repair
any damage before operating the mower. Excessive vibration of the mower during operation is an indication of damage.
Thoroughly inspect the mower and repair any damage before operating the mower.
OPERATION
18
EMPTYING THE GRASS CATCHER BAG
(See Figure 11)
• Stop mower, allow blades to completely stop, and remove
the battery.
• Lift the rear discharge cover.
• Lift the grass catcher bag by its handle to remove from
mower.
• Empty grass clippings.
• Lift the rear discharge cover and reinstall the grass catcher
bag as described earlier in this manual.
Fig. 11
Not for Reproduction
Page 19
CHARGING PROCEDURE
NOTE: The battery is not shipped fully charged. It is recommended to fully charge before rst use to ensure that maximum
run time can be achieved. This lithium-ion battery will not develop a memory and may be charged at any time.
Low voltage charging:
If the battery has been stored with little to no charge for a long period of time, the charger will go into recovery mode, which
will take 20 hrs to fully charge the battery. This will enhance the life of the battery. Once it is fully charged, the next charge
will return to standard charging.
1. Plug the charger into an AC power outlet.
2. Insert the battery pack into the charger.
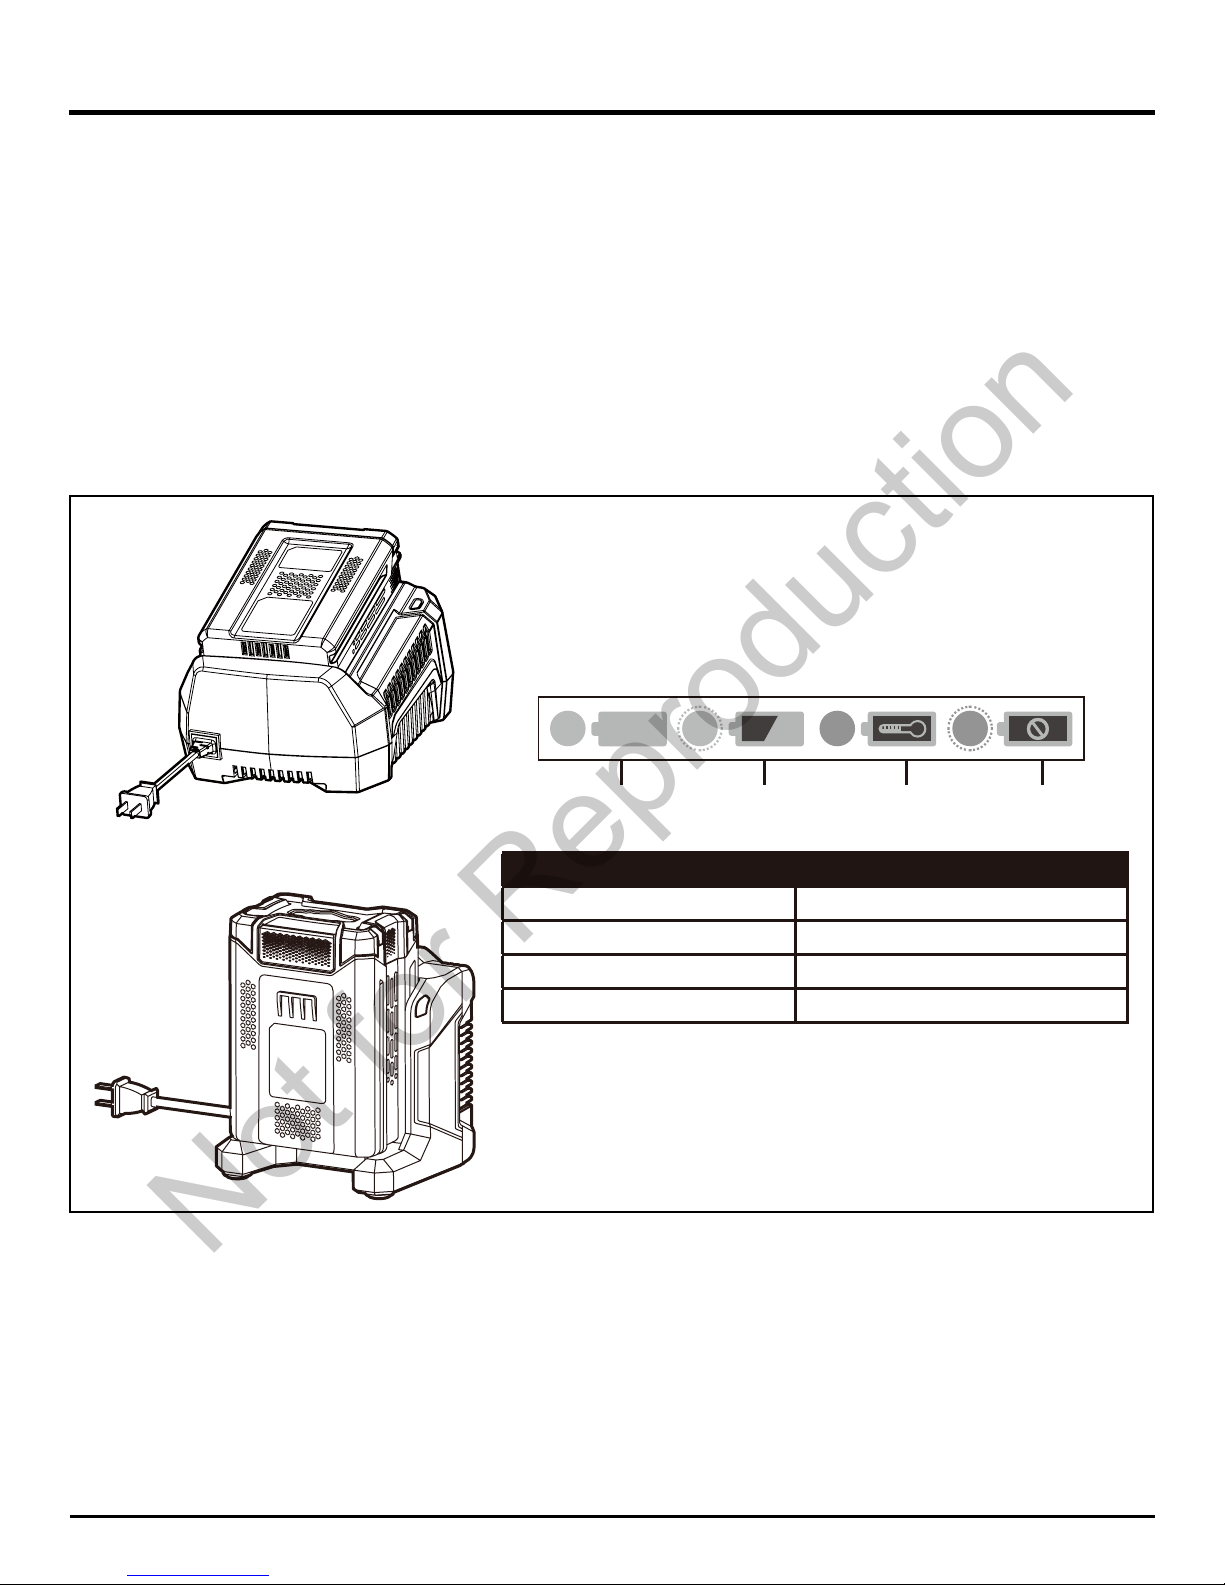
This is a diagnostic charger. The Charger LED Lights will illuminate in specic order to communicate the current battery
status. They are as follows:
LED STATUS DESCRIPTION
Solid Green Fully Charged
Blinking Green Charging
Solid Red Over Temperature
Blinking Red
Charging Fault
Charging Over
Temperature
Charging
Fault
Fully
Charged
False defect note:
When the battery is inserted into the charger and the status LED blinks RED, remove the battery from the charger for
1 minute, then reinsert. If the status LED blinks GREEN, then the battery is properly charging. If the status LED is still
blinking RED, remove the battery and unplug the charger for 1 minute. After 1 minute, plug in the charger and reinsert the
battery. If the status LED blinks GREEN, then the battery is properly charging. If the status LED is still blinking RED, the
battery is defective and needs to be replaced.
19
BATTERY & CHARGER
Not for Reproduction
Page 20

CHARGER MOUNTING
1. This charger can be installed hanging on a wall using two #8 screws (not included).
2. Locate the placement for the charger to be wall mounted.
3. If fastening to wood studs use 2 wood screws (not included).
4. Drill two holes on center 4.5 in. apart ensuring that they are vertically aligned.
5. If fastening to drywall use wall anchors (not included) and screws to secure the charger to the wall.
6. This power unit is intended to be correctly orientated in a vertical or oor mount position.
20
BATTERY & CHARGER
NOTE: If the battery and the charger won’t be used for a long time, remove the battery from the charger and pull out the AC
power plug.
Not for Reproduction
Page 21
MAINTENANCE
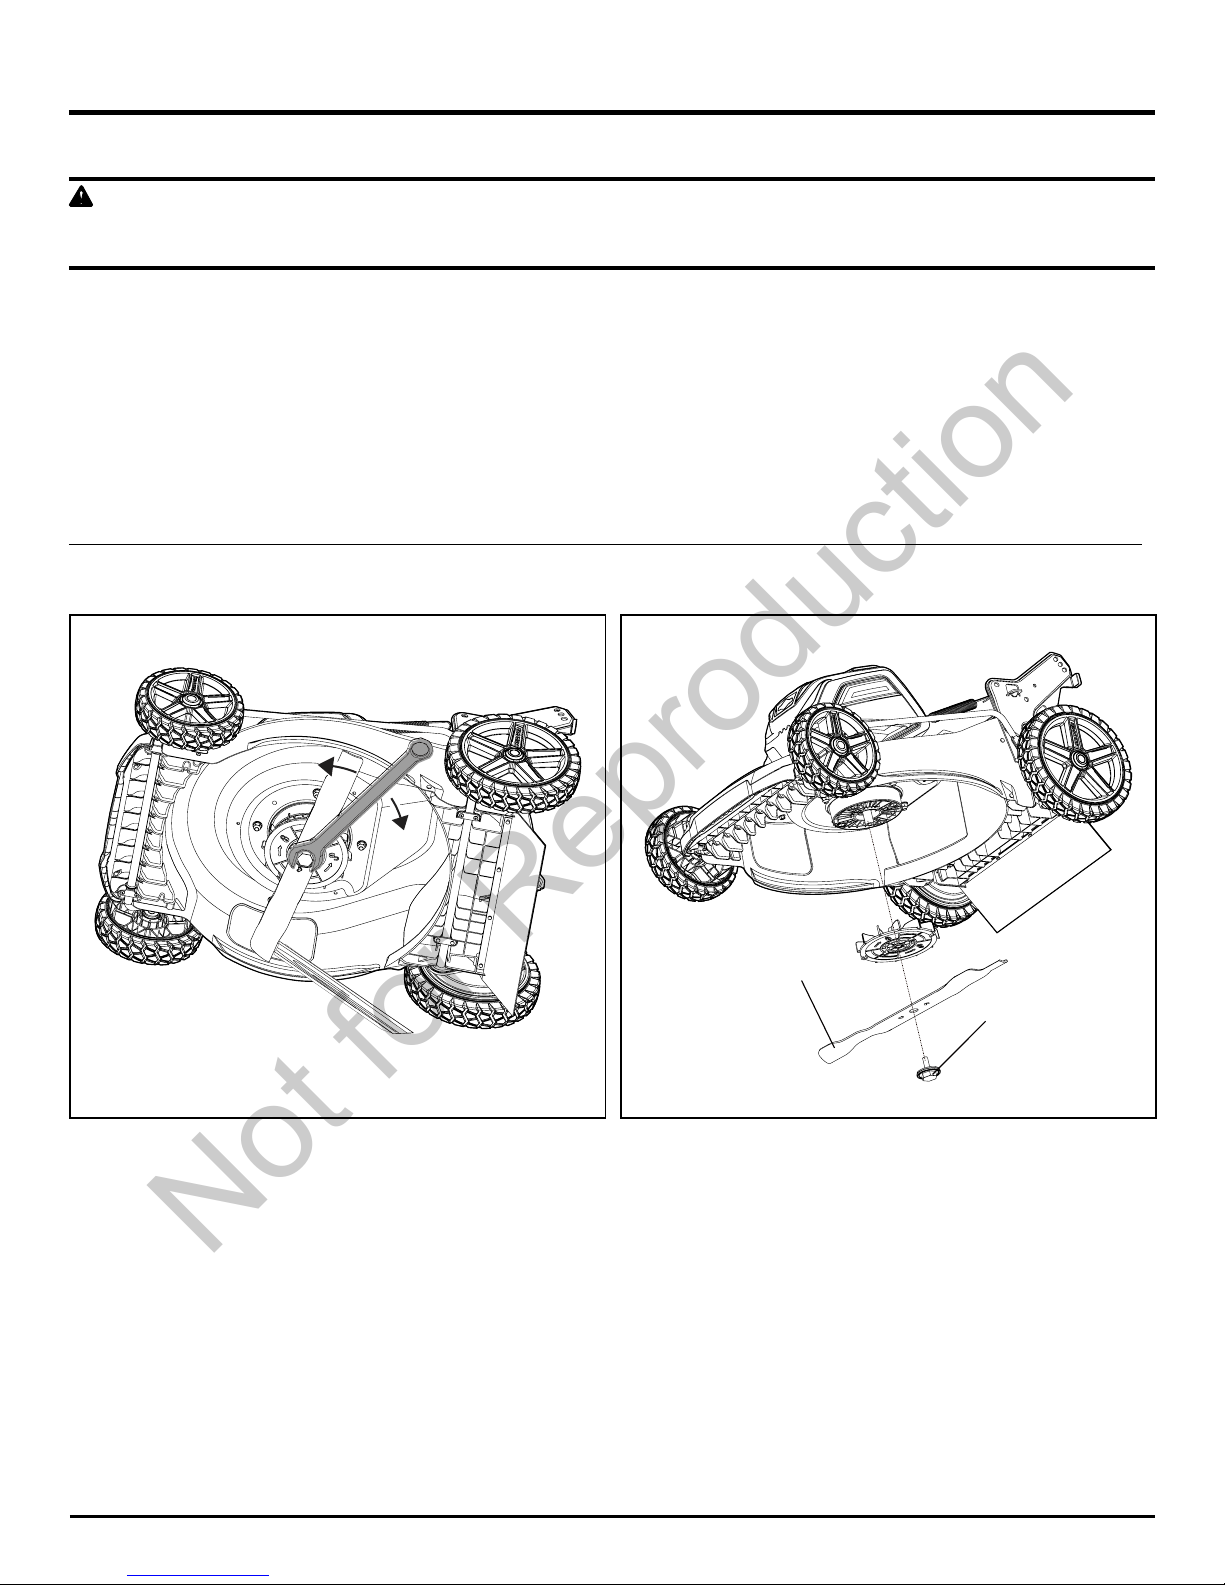
REPLACING THE CUTTING BLADE (See Figures 12-13)
WARNING
Always protect your hands by wearing heavy gloves and/or wrapping the cutting edges with rags or other materials when
performing any maintenance on the blades. ALWAYS remove the battery when servicing or transporting the mower.
• REMOVE BATTERY.
• While wearing leather padded gloves, wedge a block of wood between the blade and the mower deck in order to prevent
the blade from turning when the bolt (1) is being removed.
• Using an adjustable wrench or 27 mm socket, loosen the bolt (1) and remove the blade (2). Turn the bolt
“COUNTERCLOCKWISE” to loosen it and “CLOCKWISE” to tighten it.
• Remove the bolt (1) and the blade (2).
• To re-install the blade, position the blade with the cutting edges toward the ground. Assemble the bolt as shown.
Torque the blade bolt down clockwise using a torque wrench (not provided) to ensure the bolt is properly tightened. The
recommended torque for the blade bolt is 24-27 lb-ft (33-37 Nm).
NOTE: Be sure to replace the parts in the exact order in which they were removed. When installing the cutting blade, verify
that it is installed with the curved ends pointing toward the mower deck, and not toward the ground.
21
Fig. 13Fig. 12
(2)
(1)
Not for Reproduction
Page 22

MAINTENANCE
CLEANING THE MOWER
WARNING
In order to reduce the risk of electric shock, do not expose the mower to water. The underside of the mower deck should be
cleaned after each use, because grass clippings, leaves, dirt, and other debris will accumulate, which will cause rust and
corrosion.
Remove any build-up of grass and leaves on or around the motor cover (do not use water).Occasionally wipe the mower
clean with a dry cloth. If debris builds up on the underside of the mower during use, stop the motor, disconnect it from the
battery, and then tilt the mower on its side, and scrape it clean using an appropriate tool.
STORING THE MOWER
The following steps should be taken in order to prepare the lawn mower for storage.
• Clean the mower as described in the previous section.
• Inspect the blade, and replace it or sharpen it, if required, refer to the Maintenance section.
• Store the mower in a dry, clean location. Do not store it next to corrosive materials, such as fertilizer or rock salt.
• Store the mower indoors, in a cool, dry place, out of the reach of children. Do not cover the lawn mower with a solid
plastic sheet. Plastic coverings trap moisture around the mower, which causes rust and corrosion.
• Remove the battery and store it in a cool dry location, if possible. Charge the battery every two months when not in use
in order to increase its life.
• Remove the battery and store in a secure location out of the reach of children.
WARNING
This battery must be charged every 3 months while in storage to maintain maximum capacity.
• When servicing the mower, use only identical replacement parts that are available from the manufacturer. In order to
obtain replacement parts, call the toll-free helpline, at 1-800-317-7833. The use of parts that do not meet the original
equipment specications may lead to improper performance, and may compromise safety.
• Before cleaning, repairing, or inspecting, verify that the blade and all moving parts have come to a complete stop.
Remove the battery when making any adjustments or when any of the four wheels must be lifted off the ground.
• Follow the instructions for lubricating and changing accessories.
• Keep the handles dry, clean, and free of oil and grease.
• In order to reduce the risk of re, keep the motor free of grass, leaves, and debris build-up.
• Check the blade and motor mounting bolts for proper tightness frequently. Visually inspect blade for damage (e.g., bent,
cracked, or worn).
• For best and safest performance, maintain the mower with care. Keep the mower blade sharp and clean. Mower blades
are sharp, and can cut. Wrap the blades or wear gloves, and use extra caution when servicing.
• Keep all nuts, bolts, and screws tight in order to be sure that the equipment is in safe working condition.
• Never tamper with safety devices. Check them regularly for proper operation.
• After striking a foreign object, stop the motor. Thoroughly inspect the mower for any damage. Repair any damage before
operating the mower.
• The grass catcher components, discharge cover, and trail shield are subject to wear and damage, which could expose
moving parts or allow objects to be thrown. As a safety precaution, check these components frequently, and immediately
replace any parts that show signs of wear, or that are cracked or broken. Use original equipment manufacturer's (OEM)
parts only, as listed in this manual.
• When it is not in use, store the mower indoors in a dry area, and out of the reach of children.
WARNING
Always remove battery when servicing or transporting the mower.
22
Not for Reproduction
Page 23
MAINTENANCE
23
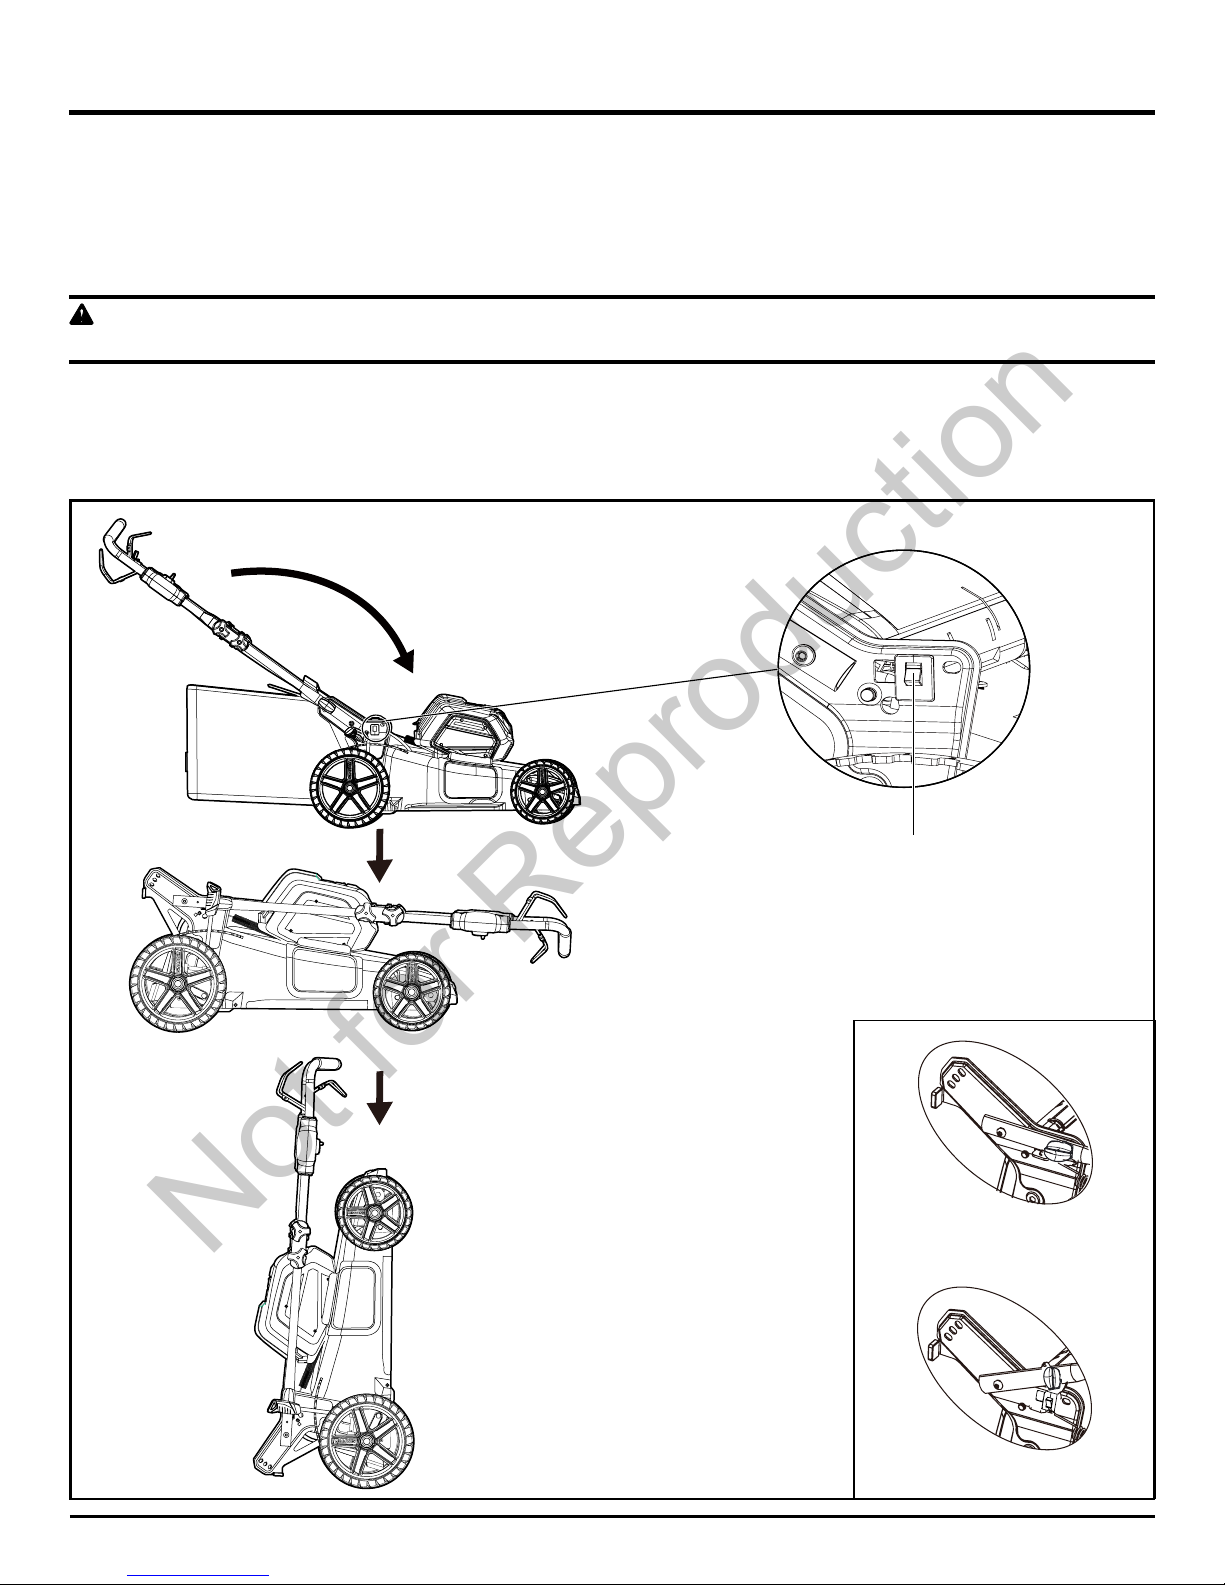
VERTICAL STORAGE FUNCTION (See Figure 14 )
• Remove the battery from the mower. Remove the grass catcher bag.
• Rotate the handle knobs to the unlocked position.
• Lower the handle assembly and rotate the handle knobs to the locked position.
• Lift the mower by the front end to the vertical position.
WARNING
Always remove the battery from the mower before placing the unit in the vertical storage position.
STORAGE SWITCH:
When the handle is rotated into the fully locked storage position, the mower is equipped with a storage switch (1) that will
disable the mower from running in the storage position. The storage switch (1) does not replace the need to remove the
safety key and battery to prevent accidental start-up or unauthorized use.
Locked position
Unlocked position
Fig. 14
(1)
Not for Reproduction
Page 24

The following toxic and corrosive materials are in the batteries used in this tool battery pack: Lithium-Ion, a toxic material.
WARNING
Toxic materials must be disposed of in a specified manner in order to prevent contamination of the environment. Before
disposing of damaged or worn out Lithium-Ion battery packs, contact your local waste disposal agency for information and
specic instructions. Take the battery to a local recycling and/or disposal centre that is certied for disposal. If the battery pack
cracks or breaks, whether it leaks or not, do not recharge it and do not use it. Dispose of it and replace it with a new battery
pack. DO NOT ATTEMPT TO REPAIR IT!
Follow these instructions in order to avoid injury and the risk of re, explosion, or electric shock, and to avoid damage to
the environment:
• Cover the battery's terminals with heavy-duty adhesive tape.
• Do not attempt to remove or destroy any of the components of the battery pack.
• Do not attempt to open the battery pack.
• If a leak develops, the electrolytes that are released are corrosive and toxic. Do not get the solution in the eyes or on the
skin, and do not swallow it.
• Do not place batteries in regular household trash.
• DO NOT incinerate batteries.
• DO NOT place batteries where they will become part of any waste landll or municipal solid waste stream.
• Dispose of batteries at a certied recycling or disposal center.
24
ENVIRONMENTALLY SAFE BATTERY DISPOSAL
Not for Reproduction
Page 25

TROUBLESHOOTING
PROBLEM POSSIBLE CAUSE SOLUTION
The mower does not
start.
The battery is not charged. Charge the battery.
The switch is defective. Replace the switch (Contact an authorized service center).
Grass jammed between the
deck and blade.
Remove battery; check under deck for jams.
The battery is not fully inserted
in the mower.
Check the connection between the battery and the mower. Make
sure the battery clicks into place.
Battery may require service or
replacement.
Contact an authorized service center or replace battery.
The mower cuts the
grass unevenly.
The lawn is rough or uneven. Check the mowing area.
The cutting height is not set
properly.
Move the wheels to a higher setting.
The mower does not
mulch properly.
Wet grass clippings are
sticking to the underside of
the deck.
Wait until the grass dries before mowing.
The mulching plug is missing. Install the mulching plug.
The mower is hard to
push.
The grass is too tall, or the
cutting height is too low.
Raise the cutting height.
The rear of the grass catcher
bag is dragging in thick grass.
Empty the grass clippings from the grass catcher bag.
The mower is
excessively noisy and
vibrates.
The motor shaft is bent. Stop the motor, and inspect for damage.
The blade is unbalanced.
Repair before restarting. If vibration persists, contact an authorized
service center.
25
Not for Reproduction
Page 26

LIMITED WARRANTY
Briggs & Stratton warrants that, during the warranty period specied below, it will repair or replace, free of charge, any part
that is defective in material or workmanship or both. Transportation charges on product submitted for repair or replacement
under this warranty must be borne by purchaser. This warranty is effective for and is subject to the time periods and conditions
stated below. For warranty service, nd the nearest Authorized Service Dealer in our dealer locator map at www.SNAPPER.
com. The purchaser must contact the Authorized Service Dealer, and then make the product available to the Authorized
Service Dealer for inspection and testing.
There is no other express warranty. Implied warranties, including those of merchantability and tness for a particular
purpose, are limited to the warranty period listed below, or to the extent permitted by law. Liability for incidental
or consequential damages are excluded to the extent exclusion is permitted by law. Some states or countries do not
allow limitations on how long an implied warranty lasts, and some states or countries do not allow the exclusion or limitation
of incidental or consequential damages, so the above limitation and exclusion may not apply to you. This warranty gives you
specic legal rights and you may also have other rights which vary from state to state or country to country.**
WARRANTY PERIOD
Consumer Use Commercial Use
Equipment 60 months 90 days
Battery and Battery Charger 24 months none
** In Australia - Our goods come with guarantees that cannot be excluded under the Australian Consumer Law. You are
entitled to a replacement or refund for a major failure and for compensation for any other reasonably foreseeable loss or
damage. You are also entitled to have the goods repaired or replaced if the goods fail to be of acceptable quality and the
failure does not amount to a major failure. For warranty service, find the nearest Authorized Service Dealer in our dealer
locator map at BRIGGSandSTRATTON.COM, or by calling 1300 274 447, or by emailing or writing to salesenquires@
briggsandstratton.com.au, Briggs & Stratton Australia Pty Ltd, 1 Moorebank Avenue, NSW, Australia, 2170.
The warranty period begins on the date of purchase by the first retail or commercial consumer. “Consumer use” means
personal residential household use by a retail consumer. “Commercial use” means all other uses, including use for
commercial, income producing or rental purposes. Once a product has experienced commercial use, it shall thereafter be
considered as a commercial use product for purposes of this warranty.
To ensure prompt and complete warranty coverage, register your product at the website shown above or at www.
onlineproductregistration.com.
Save your proof of purchase receipt. If you do not provide proof of the initial purchase date at the time warranty service is
requested, the manufacturing date of the product will be used to determine the warranty period. Product registration is not
required to obtain warranty service on Briggs & Stratton products.
26
Not for Reproduction
Page 27

27
ABOUT YOUR WARRANTY
Warranty service is available only through Snapper Authorized Service Dealers. This warranty covers only defects in materials
or workmanship. It does not cover damage caused by improper use or abuse, improper maintenance or repair, normal wear
and tear, or stale or unapproved fuel.
Improper Use and Abuse - The proper, intended use of this product is described in the Operator’s Manual. Using the product
in a way not described in the Operator’s Manual or using the product after it has been damaged will not be covered under this
warranty. Warranty coverage will also not be provided if the serial number on the product has been removed or the product
has been altered or modied in any way, or if the product has evidence of abuse such as impact damage or water/chemical
corrosion damage.
Improper Maintenance or Repair - This product must be maintained according to the procedures and schedules provided in
the Operator’s Manual, and serviced or repaired using genuine Briggs & Stratton parts or equivalent. Damage caused by lack
of maintenance or use of non-original parts is not covered by warranty.
Normal We ar and Tear - Like most mechanical devices, your unit is subject to wear even when properly maintained. This
warranty does not cover repairs when normal use has exhausted the life of a part or the equipment. Maintenance and wear
items such as lters, belts, cutting blades, and brake pads (except engine brake pads) are not covered by warranty due to
wear characteristics alone, unless the cause is due to defects in material or workmanship.
Other Exclusions - This warranty excludes damage due to accident, abuse, modications, alterations, improper servicing,
freezing or chemical deterioration. Attachments or accessories that were not originally packaged with the product are also
excluded. There is no warranty coverage on equipment used for primary power in place of utility power or on equipment used
in life support applications. This warranty does not include used, reconditioned, second-hand, or demonstration equipment or
engines. This warranty also excludes failures due to acts of God and other force majeure events beyond the manufacturer’s
control.
LIMITED WARRANTY
Not for Reproduction
Page 28

TOLL-FREE HELPLINE: 1-800-317-7833
Briggs & Stratton Corporation
P.O. Box 702
Milwaukee, WI 53201
388062367 Rev: 00 (07-18-17)
Not for Reproduction
Page 29

Avant d’utiliser le produit, veuillez lire et suivre toutes les consignes de
sécurité et les instructions d’utilisation.
Guide d’utilisation
LIGNE D’ASSISTANCE SANS FRAIS: 1-800-317-7833
www.snapper.com
21 PO. Tondeuse Automotrice Sans Fil de 82V
1696860 (SXD21SPWM82)
Not for Reproduction
Page 30

Fiche technique ....................................................................................................... 2
Règles de sécurité ................................................................................................... 3
Symboles ................................................................................................................ 6
Caractéristiques et Contrôles ................................................................................... 7
Assemblage ............................................................................................................. 8
Utilisation .............................................................................................................. 15
Batterie et du Chargeur ........................................................................................ 19
Entretien ................................................................................................................ 21
Mise au rebut de la batterie sans danger pour l’environnement .............................. 24
Dépannage ............................................................................................................ 25
Garantie Limitée .................................................................................................... 26
FICHE TECHNIQUE
21 PO. TONDEUSE AUTOMOTRICE SANS FIL DE 82V
Batterie ...........................................................................................................................................82 V Lithium-ion
Vitesse à vide........................................................................................................................................... MPR 0082
Vitesse pour avancement automatique ................................................................................ )s/m 5.1-5.0( spf 9.4-6.1
Dimensions
du châssis .........................................................................................................................21” (53.3 cm)
Réglage de hauteur .........................................................................................................1 3/8 - 3 3/4” (3.5 - 9.5 cm)
........................................................................................ 24-27 lb-pi (33-37 Nm)
Fonctions ...................................................................... 3 en 1 : déchiquetage, éjection latérale ou sac arrière
Poids(sans batterie) ....................................................................................................................... 70.1 lbs (31.8 kg)
MATIÈRES
2
Avis de non-responsabilité : *La tension initiale et maximale de la batterie (mesurée à vide) est de 82 volts. La tension
nominale est de 72 V.
Not for Reproduction
Page 31

RÈGLES DE SÉCURITÉ
1. FONCTIONNEMENT GÉNÉRAL
• Évitez les environnements dangereux. N’utilisez pas la tondeuse sous la pluie, ou sur une pelouse humide ou mouillée.
• N’utilisez pas sous la pluie.
• Tenez hors de portée des enfants – Tous les visiteurs doivent se tenir à une distance sûre des espaces de travail.
• Portez des vêtements appropriés. Ne portez pas de vêtements amples ou de bijoux qui pourraient se coincer dans les
pièces mobiles de la tondeuse. Le port de gants protecteurs et de chaussures de sécurité est également recommandé.
• Utilisez des lunettes de sécurité – Portez toujours un masque facial ou antipoussière quand vous utilisez la tondeuse
dans un milieu poussiéreux.
• Utilisez le bon appareil – N’utilisez la tondeuse que pour le travail pour lequel elle est conçue.
• Ne forcez pas la tondeuse. – Elle effectuera un meilleur travail dans de meilleures conditions de sécurité si elle est
utilisée dans les limites de ses capacités.
• Évitez de trop vous étirer – Positionnez bien vos pieds an de garder en tout temps votre équilibre.
• Soyez vigilant. Portez attention à ce que vous faites. Faites preuve de bon jugement et n’utilisez pas la tondeuse si vous
êtes fatigué.
• Rangez votre tondeuse à l’intérieur lorsque vous ne l’utilisez pas - La tondeuse à gazon doit être rangée en un endroit
sec, verrouillé et hors de portée des enfants lorsque vous ne l’utilisez pas.
• Entretenez votre tondeuse à gazon - Gardez les éléments de coupe propres et bien affûtés pour de meilleures
performance et une sécurité accrue.
• Suivez les instructions pour lubrier et modier les accessoires.
• Vériez régulièrement l’état du cordon de la tondeuse, faites réparer celui-ci par un centre de réparation agréé.
• Gardez le guidon propre et sec, et exempt de graisse ou d’huile.
• Maintenez tous les dispositifs de securite(protecteurs,ecrans,interrupteurs,etc)en place et foncyionnels.
• Assurez-vous que les lames sont bien affutées.
• Garder les mains et les pieds à l'écart de la lame et de la zone de coupe.
• Les objets pris dans la lame de la tondeuse peuvent provoquer de graves blessures corporelles. Il est essentiel de bien
examiner le terrain et d’enlever tous les objets avant chaque tonte.
• Si la tondeuse à gazon heurte un objet étranger, suivez ces étapes :
i) Arrêtez la tondeuse, relâchez l’interrupteur.
ii) Retirez la clé ainsi que la batterie.
iii) Vériez les dommages éventuels.
iv) Réparez tout dommage avant remise en marche et utilisation de la tondeuse à gazon.
• Employez des lames remplacement identiques.
• Ne rechargez pas la tondeuse à gazon sous la pluie ou en milieu humide.
• Retirez ou débranchez la batterie avant toute opération d’entretien, de nettoyage, ou de retrait de matériaux de la
tondeuse à gazon.
VEUILLEZ LIRE TOUTES LES INSTRUCTIONS ATTENTIVEMENT
AVERTISSEMENT
La tondeuse peut couper des parties du corps et projeter des objets. Le non-respect des consignes de sécurité suivantes
pourrait causer des blessures graves et même la mort.
AVERTISSEMENT
Pour l’utilisation de matériel de jardinage électriques, des précautions de base devraient toujours être suivies pour réduire
le risque d’incendie, d’électrocution et de blessures, notamment les suivantes:
3
Not for Reproduction
Page 32

4
RÈGLES DE SÉCURITÉ
• Utilisez uniquement des batteries de rechange approuvées par briggs & stratton, car les autres batteries peuvent causer
des blessures ou endommager la tondeuse. À utiliser uniquement avec les batteries Briggs & Stratton BSB2AH82 (2
amp-heure), BSB4AH82 (4 amp-heure) et BSB5AH82 (5 amp-heure). À utiliser uniquement avec le chargeur BSRC82 et
BSSC82 de Briggs & Stratton.
• Ne jetez pas la pile dans un feu. Ceci pourrait faire exploser la cellule. Vériez les codes locaux pour connaître les
dispositions de mise au rebut possible.
• N’ouvrez pas ni mutilez les batteries. L’électrolyte qui s’en dégagerait est corrosive et elle pourrait blesser les yeux ou la
peau. En outre, ce produit est toxique lorsqu’ingéré.
• Faites preuve de précaution lorsque vous manipulez des piles an de ne pas court-circuiter la pile avec des matériaux
conducteurs comme les bagues, les bracelets et les clés. La pile ou le conducteur peuvent surchauffer et provoquer des
brûlures.
• Prenez le temps de lire, de comprendre et de suivre toutes les instructions sur l'appareil et dans le ou les manuels avant
de commencer.
• Laissez uniquement des adultes responsables qui sont familiers avec les instructions opérer cet appareil.
• Enlevez tous les objets comme les pierres, les ls, les jouets, etc. qui pourraient être projetés par la lame. Demeurez
dernière la poignée lorsque le moteur est en fonction.
• Assurez-vous que personne ne se tient aux alentours lorsque vous utilisez la tondeuse. Éteignez l’appareil si quelqu’un
s’approche.
• N’utilisez pas cet appareil les pieds nus ou en sandales. Portez toujours de bonnes chaussures.
• Ne tirez pas sur l’appareil en reculant à moins que cela ne soit vraiment nécessaire. Regardez toujours le sol et derrière
vous avant et lorsque vous reculez.
• Ne dirigez jamais les matériaux projetés vers quiconque. Évitez toujours de projeter des matériaux contre des murs ou
des obstructions. Les matériaux peuvent rebondir vers l’opérateur. Arrêtez la lame lorsque vous traversez des surfaces
de gravier.
• N’utilisez pas l’appareil sans que le sac à herbe, le protecteur de la décharge, le protecteur arrière ou tout autre dispositif
de protection ne soient en place et en fonction.
• Ne laissez jamais l’appareil en marche sans supervision.
• Fermez le moteur et attendez que les lames soient complètement arrêtées avant de retirer le sac à herbe ou de
débloquer la bouche d’évacuation.
• Utilisez la tondeuse uniquement à la lumière du jour ou sous un bon éclairage articiel.
• N’utilisez pas la tondeuse si vous êtes sous l’inuence d’alcool, de médicaments ou de drogues.
• N’utilisez jamais la tondeuse sur de l’herbe mouillée. Faites attention où vous mettez les pieds; marchez, ne courez pas.
• Désengagez le système d’entraînement, si l’appareil en est pourvu, avant de mettre le moteur en marche.
• Si la tondeuse se met à vibrer de façon anormale, arrêtez le moteur et trouvez immédiatement la cause de la vibration.
En général, la vibration est un signe annonciateur d’un problème.
• Portez toujours une protection oculaire lorsque vous opérez cet appareil.
• Reportez-vous aux instructions du fabricant pour connaître le fonctionnement approprié et l’installation des accessoires.
Utilisez uniquement des appareils approuvés par le fabricant.
2. UTILISATION DANS UNE PENTE
• Les pentes sont souvent à l’origine des accidents survenus après que l’utilisateur ait glissé ousoit tombé; ce genre
d’accident peut entraîner des blessures graves. Faites preuve d’une grandeprudence lorsque vous utilisez la tondeuse
dans une pente. Si vous vous sentez mal à l’aise surla pente, n’utilisez pas la tondeuse.
• Tondez en vous déplaçant en travers de la pente, jamais de haut en bas ni de bas en haut. Soyez extrêmement prudent
lorsque vous changez de direction dans une pente.
• Soyez attentif à la présence de trous, d’ornières, de pierres, d’objets cachés ou de bosses qui pourraient vous faire
glisser ou trébucher. Les herbes hautes peuvent cacher les obstacles.
• Ne passez pas la tondeuse sur de l’herbe mouillée ou dans des pentes abruptes. Vous pourriez perdre pied et tomber.
Not for Reproduction
Page 33

RÈGLES DE SÉCURITÉ
CONSERVER CES INSTRUCTIONS
3. ENFANTS
Des accidents tragiques peuvent survenir si l’utilisateur n’est pas conscient de la présence d’enfants à proximité. Les
enfants sont souvent attirés par l’appareil et par la tonte en soi. Ne présumez jamais que les enfants demeureront là où
vous les avez vus la dernière fois.
• Tenez les enfants à distance de la zone de coupe, et sous la surveillance attentive d’un adulte.
• Faites preuve de vigilance. Fermez le moteur de la tondeuse si un enfant ou une autre personne entre dans la zone de coupe.
• Ne laissez jamais des enfants opérer cet appareil.
• Faites preuve d’une extrême prudence lorsque vous approchez de tournants sans visibilité, de portes, d’arbustes, d’arbres
ou d’autres objets qui pourraient vous empêcher de voir un enfant courant dans la trajectoire de la tondeuse.
4. ENTRETIEN
• Gardez tous les écrous, boulons et vis bien serrés pour vous assurer que la tondeuse est dans un état de marche
sécuritaire.
• Ne retirez jamais ou ne modiez jamais les dispositifs de sécurité. Vériez le fonctionnement adéquat régulièrement. Ne
faites jamais quoi que ce soit qui pourrait interférer avec une fonction prévue d’un dispositif de sécurité ou qui pourrait
réduire la protection fournie par un dispositif de sécurité.
• Retirez les accumulations d’herbe, de feuilles ou d’autres débris. Laissez l’appareil refroidir avant de le ranger.
• Si la tondeuse frappe un objet, arrêtez le moteur. Vériez bien si la tondeuse est endommagée et, s’il y a lieu, réparez les
pièces endommagées avant d’utiliser de nouveau la tondeuse.
• N’effectuez jamais d’ajustements ou de réparations lorsque le moteur est en marche.
• Retirez toujours le bloc-piles de la tondeuse avant d'effectuer un ajustement, un nettoyage ou une réparation.
• Vériez les composants du sac à herbe et le protecteur de la décharge fréquemment et remplacez-le avec les pièces
recommandées du fabricant, le cas échéant.
• Les lames de la tondeuse sont tranchantes et peuvent vous couper. Au moment de l’entretien, enveloppez les lames ou
portez des gants, faites preuve d'un extrême prudence.
• Effectuez l’entretien ou remplacez les étiquettes de sécurité et d’instruction, le cas échéant.
AVERTISSEMENT(PROPOSITION65)
Ce produit contient des produits chimiques qui, selon l’état de Californie, sont susceptibles de provoquer un cancer, des
malformations congénitales ou d’affecter le système reproductif.
Certaines poussières que produisent le ponçage, sciage, meulage et forage électriques ainsi que les autres activités
de construction contiennent des substances chimiques qui sont des cancérogènes connus susceptibles de causer des
anomalies congénitales ou d'autres préjudices à la reproduction. Quelques exemples en sont :
• Plomb des peintures à base de plomb,
• Silice cristalline des briques et du ciment ou d’autres produits de maçonnerie, et
• Arsenic et chrome du bois traité chimiquement.
Le niveau de risque résultant de votre exposition à ces produits varie selon la fréquence à laquelle vous effectuez ce type de
travail. Pour réduire votre exposition à ces produits chimiques travaillez dans un endroit bien aéré et utilisez des équipements de
sécurité approuvés tels que les masques anti-poussière conçus particulièrement pour le ltrage des particules microscopiques.
5
Not for Reproduction
Page 34

Certains des symboles suivants peuvent gurer sur cet article. Familiarisez-vous avec eux et a prenez leur signication.
En comprenant ces symboles, vous serez en mesure de faire fonctionner cet article de façon adéquate et sécuritaire.
6
SYMBOLES
SYMBOLE NOM DÉSIGNATION/EXPLICATION
V Volts Tension
A Ampéres Intensité
Hz Hertz Fréquence(cycles par seconde)
W Watts Puissance
min Minutes Temps
Courant alternatif Type de courant
Courant continu Type ou caractéristique du courant
n
o
Vitesse à vide Vitesse de ratation à vide
Construction de classe II Construction à double isolation
/min Par Minute Tours,coups,vitesse périphérique, orbites,etc,par minute
Avertissement concermant
l'humidité
N'exposez pas le produit à la pluie ou l'humidité.
Lisez le manuel d'utilisation
Pour réduire le risque de blessure.l'utilisateur doit lire et bien comprendre
le manuel d'utilisation de ce produit.
Alerte de sécurité Précautions touchant à votre sécurité.
Protection oculaire
Portez la protection oculaire qui se conforme à ANSI Z87.1 aussi bien que
le protection auditive en opérant ce produit.
Garder les mains et les
pieds à l'écart
Garder les mains et les pieds à l'écart de la lame et de la zone de coupe.
Se tenir lion
Ne pas mettre ses mains ou ses pieds en dessous.du châssis de la
tondeuse.
Eviter les pentes
Ne pas utiliser sur des pentes de plus de 15°. Tondre les oentes dans le
sens transversal,jamais en montant ou en descendant.
Ne laisser pensonne à
l'écart
Garder les badauds et aimaux domestiques à une distance de 30m(100
pi)minimum.
Ricochet
Faites attention que les passants ne sont pas blesses par les objets
étrangers tetés par la tondeuse à gazon.
Les mots indicateurs suivants et leurs signications servent à expliquer les niveaux de risque associés à cet appareil.
SYMBOLE SIGNAL SIGNIFICATION
DANGER
Indique une situation extrêmement dangereuse qui, si elle n’est pas évitée, aura pour
conséquence des blessures graves voire mortelles.
AVERTISSEMENT
Indique une situation potentiellement dangereuse qui, si elle n’est pas évitée, peut
entraîner des blessures graves voire mortelles.
ATTENTION
Indique une situation potentiellement dangereuse qui, si elle n’est pas évitée, peut
entraîner des blessures légères voire modérées.
ATTENTION
(Sans symbole d’alerte de sécurité) Indique une situation pouvant entraîner des
dommages matériels.
CONSERVER CES INSTRUCTIONS
Not for Reproduction
Page 35

Fig. 1
Lisez ce manuel d’instructions et toutes les consignes de sécurité avant d’utiliser votre tondeuse à gazon. Comparez
l’illustration ci-dessus (g. 1) à votre tondeuse an de vous familiariser avec l’emplacement des commandes et réglages.
Conservez ce manuel pour consultation future.
CARACTÉRISTIQUES ET CONTRÔLES
7
Levier de bail
Commandes
de la vitesse
d’entraînement
Levier de l’entraînement
Bouton de verrouillage de sécurité
Partie
supérieure
du guidon
Partie
inférieure
du guidon
Sac arrière
Couvercle de
la bouche
d’évacuation
arrière
Levier de réglage de
la hauteur de coupe
Trappe de la batterie
Couvercle d’éjection latéral
Roue arrière
Accessoire de
déchiquetage
Déecteur d’éjection latéral
Roue avant
Not for Reproduction
Page 36

8
DÉBALLAGE
• Retirez prudemment le produit et les accessoires de la boîte. Assurez-vous que tous les articles énumérés dans la liste
de colisage sont inclus.
• Assurez-vous que le produit n’a pas subi des dommages ou de bris pendant le transport.
• Ne jetez pas l’emballage avant d’avoir inspecté le produit et avant d’avoir vérié s’il fonctionne correctement.
• Si des pièces sont manquantes ou endommagées, veuillez appeler au 1-800-317-7833 pour obtenir de l’aide.
CONTENU DE L’EMBALLAGE
• Tondeuse • Bouton du guidon x 4
• Accessoire de déchiquetage • Boulon du guidon x 4
• Couvercle d’éjection latéral • Manuel d’utilisation
• Sac arrière
Note: La che de déchiquetage est installée dans l’ouverture de la décharge arrière lors de l'expédition.
AVERTISSEMENT
Si une quelconque pièce ou partie de cette tondeuse est manquante ou endommagée, ne l’utilisez pas avant d’avoir
changé la pièce. L’utilisation d’un produit ayant des pièces manquantes ou abîmées peut entraîner de graves blessures.
AVERTISSEMENT
Ne tentez pas de modifi er cet appareil ou de fabriquer des accessoires non recommandés pour l’utilisation avec ce
produit. Toute altération ou modi cation de ce type constitue un mésusage peut entraîner des dangers susceptibles de
provoquer des blessures graves.
AVERTISSEMENT
N’insérez pas la batterie avant d’avoir terminé l’assemblage et d’être prêt à tondre. Vous could risqueriez une mise en
marche accidentelle pouvant entraîner de graves blessures.
AVERTISSEMENT
Pour éviter toute mise en route accidentelle qui pourrait entraîner de graves blessures, retirez toujours le pack batterie du
produit lorsque vous-y montez des accessoires.
AVERTISSEMENT
Ne faites jamais fonctionner la tondeuse sans que ses dispositifs de sécurité soient en place et opérationnels. N’utilisez
jamais de tondeuse dont les éléments de sécurité sont endommagés. L’utilisation d’une tondeuse dont des pièces sont
manquantes ou endommagées peut entraîner de graves blessures.
ASSEMBLAGE
Not for Reproduction
Page 37

ASSEMBLAGE
9
DEPLIAGE ET REGLAGE DE LA PO IGNEE INFERIEURE (Voir gure 2)
AVERTISSEMENT
Pliage ou dépliage incorrect de la poignée peut endommager les câbles, occasionnant une condition d’exploitation
dangereuse.
• Ne pas endommagez les câbles lors pliant ou dépliant la poignée.
• Si le câble est endommagé, veuillez contacter un centre de réparations agréé.
• Tirez et tournez les boutons de poignée (1) 90° sur les deux côtés à desserrer les poignées inférieures (2) sur les deux
côtés.
• Déplacez les poignées inférieures vers la position de fonctionnement. Vous pouvez monter ou baisser la poignée à une
position qui vous convient. Il y a 3 positions (3) pour vous à choisir. Déclenchez les boutons de poignée à verrouiller la
poignée inférieure dans la position.
NOTE: Assurez que les deux côtés sont mis à la même position pour l’assemblage correcte.
Position verrouillée
Position déverrouillée
Fig. 2
(2)
(1)
(3)
Not for Reproduction
Page 38

INSTALLATION DE LA PO IGNEE SUP ERIEURE (Voir gure 3)
• Alignez les trous de montage sur la poignée supérieure (1) et la poignée inférieure (2). Insérez les boulons mécaniques (3)
et employez les boutons (4) an de les serrer. Répétez l’opération sur l’autre côté.
ASSEMBLAGE
10
Fig. 3
(2)
(1)
(3)
(4)
(4)
Not for Reproduction
Page 39

11
ASSEMBLAGE
Fig. 4
(3)
(1)
(2)
(5)
(4)
PO SE DU SAC ARRIÈRE (Voir gure 4)
• Soulevez le couvercle de la bouche d’évacuation (1).
• Levez le collecteur d’herbe par sa poignée (2) et mettez-le au-dessous du couvercle de la bouche d’évacuation de façon
à ce que les crochets (3) sur le collecteur d’herbe (4) s’appuient sur la barre du couvercle (5).
• Relâchez le couvercle de la bouche d’évacuation. Si l’installation est correcte, les crochets sur le collecteur d’herbe
passeront à travers les ouvertures sur le couvercle de la bouche d’évacuation.
NOTE: Lors l’usage du sac à herbe, n’installez pas soit le déecteur de décharge à côté soit le bouchon de paillage.
Not for Reproduction
Page 40

(2)
Fig. 5
(3)
(1)
ASSEMBLAGE
PO SE DE L’ACCESSOIRE DE DÉCHIQUETAGE (Voir gure 5)
• To remove the mulching plug, lift the rear cover (1).
• Pour enlever l’accessoire de déchiquetage, soulevez le couvercle de la bouche d’évacuation (2).
• L’accessoire de déchiquetage (3) est inséré à angle; il faut donc exercer une certaine force pour l’enlever.
• Vous devez enlever l’accessoire de déchiquetage pour pouvoir utiliser le sac arrière.
• Réinstallez le sac arrière si vous enlevez l’accessoire de déchiquetage.
12
Not for Reproduction
Page 41

ASSEMBLAGE
INSTALLATION DU DÉFLECTEUR D’ÉJECTION LATÉRALE (Voir gure 6)
• Levez le couvercle d’éjection latérale (1).
• Alignez les rainures (2) sur le déecteur (3) avec les goupilles (4) sur le côté intérieur du couvercle (1).
• Abaissez le déecteur jusqu’à ce que les crochets sur le châssis de la tondeuse soient bien insérés dans les ouvertures
du déecteur.
• Relâchez le déecteur et le couvercle.
13
Fig. 6
(1)
(3)
(2)
(4)
Not for Reproduction
Page 42

ASSEMBLAGE
POUR INSTALLER LA BATTERIE (Voir gure 7)
• Soulevez le couvercle du compartiment de batterie (1) et gardez-le ouvert.
• Alignez la batterie (2) dans le support prévu à cet effet à l’intérieur de la tondeuse.
• Veillez à ce que le bouton d’éjection de la batterie (3) soit bien en place et que la batterie soit insérée correctement avant
de mettre la tondeuse en marche.
• Si l’appareil n’est pas utilisé dans l’immédiat, retirez la batterie.
• Refermez le couvercle.
14
POUR RETIRER LA BATTERIE (Voir gure 7)
• Relâchez le levier d’alimentation pour arrêter la tondeuse.
• Ouvrez le couvercle de la batterie.
• Appuyez sur le bouton d’éjection de la batterie (3) sur la tondeuse. Ceci éjectera légèrement la batterie hors de la
tondeuse.
• Retirez la batterie de la tondeuse.
Fig. 7
(3)
(1)
(2)
Not for Reproduction
Page 43

UTILISATION
DÉMARRAGE/ARRÊT DE LA TONDEUSED (Voir gure 8)
Pour faire démarrer le moteur :
• Soulevez le couvercle du compartiment de la batterie. Installez la batterie.
• Appuyez et gardez enfoncé le bouton de verrouillage (1).
• Tirez le levier d’alimentation (2) vers le haut (vers la poignée principale) pour faire démarrer le moteur, puis relâchez le bouton.
Pour arrêter le moteur :
• Relâchez le levier d’alimentation.
Démarrage en douceur
Cette tondeuse à batterie LI-ION est équipée d'une fonction de « démarrage en douceur ». Lorsque vous démarrez la tondeuse,
celle-ci atteint la vitesse la plus élevée sous environ 3 secondes. Si la tondeuse ne démarre pas : Retirez la batterie puis vériez
le châssis an de s'assure qu'aucun objet n'obstrue les lames, assurez-vous que les lames peuvent tourner librement en les
faisant tourner à la main. Même une petite quantité d'herbe peut empêcher le « démarrage en douceur ».
ATTENTION
N’essayez pas de dépasser l’opération du levier ou du bouton de marche.
AVERTISSEMENT
Une tondeuse peut projeter des objets en direction de vos yeux et vous blesser gravement.Pendant l’utilisation, le réglage ou
la réparation d’une tondeuse, portez toujours des lunettes protectrices.
EXAMINEZ LA ZONE DE TRAVAIL. Enlevez les pierres, les morceaux de bois et de l métallique,les os, et tout autre
objet qui pourrait être projeté par les lames rotatives de la tondeuse.
DÉMARRAGE/ARRÊT DE LA TONDEUSED (Voir gure 8)
Pour faire démarrer le moteur :
• Soulevez le couvercle du compartiment de la batterie. Installez la batterie.
• Positionnez le levier d’avancement automatique (3) vers le haut pour que celui-ci s’aligne avec la poignée.
Pour désactiver la fonction Avancement automatique :
• Relâchez le levier d’avancement automatique.
Pour régler la vitesse de l’avancement automatique :
• Positionnez le levier de réglage de la vitesse (4) vers l'avant sur le symbole du lapin pour accélérer.
• Positionnez le levier de réglage de la vitesse (4) vers l'avant sur le symbole de la tortue pour ralentir.
15
Fig. 8
(3)
(1)
(2)
(4)
Not for Reproduction
Page 44

RÉGLAGE DE LA HAUTEUR DE COUPE (Voir gure 9)
Pour l’expédition, les roues de la tondeuse sont réglées à la position de coupe au ras du sol. Avant d’utiliser la tondeuse
pour la première fois, réglez la position de coupe à la hauteur la mieux adaptée à votre pelouse. Une pelouse moyenne
devrait avoir de 1 1/2 à 2 po (3,8 à 5 cm) pendant les mois de temps froid et entre 2 et 3 1/2 po (5 à 8,3 cm) pendant les
mois de temps chaud.
Pour régler la hauteur de la lame :
• Pour augmenter la hauteur de la lame, attrapez le levier de réglage de la hauteur (1) et poussezle vers l’arrière de la
tondeuse.
• Pour diminuer la hauteur de la lame, attrapez le levier de réglage de la hauteur (1) et poussez-le vers l’avant de la
tondeuse.
UTILISATION
16
Fig. 9
Réglage de la hauteur 1 3/8 - 3 3/4"
1ère position 1 3/8"
2ème position 1 7/8"
3ème position 2 1/8"
4ème position 2 5/8"
5ème position 3"
6ème position 3 3/8"
7ème position 3 3/4"
7
6
5
4
3
2
1
(1)
Not for Reproduction
Page 45
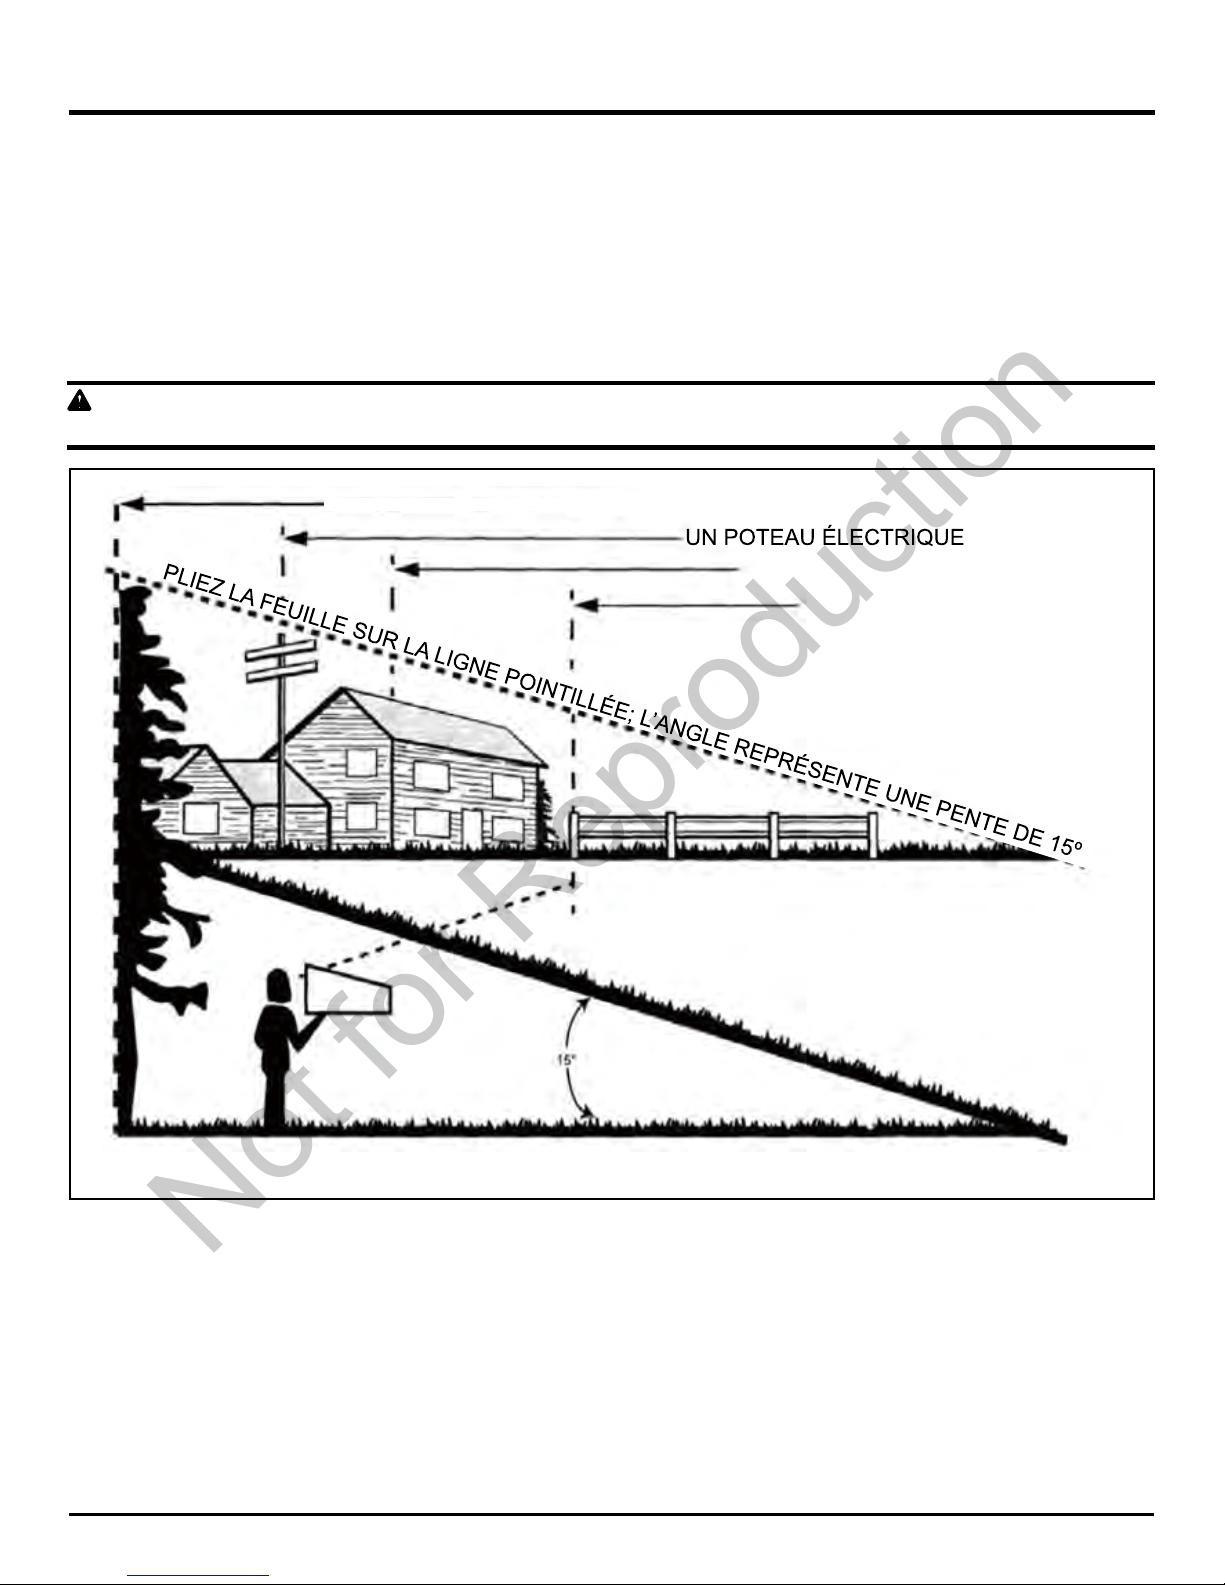
INDICATEUR DE PENTE (Voir gure 10)
• Par mesure de sécurité, servez-vous de l’indicateur de penteinclus dans ce guide an de mesurer la pente avant de
tondre une zone en pente ou vallonnée.
• Maintenez toujours votre équilibre. Si vous avez l'impression de perdre l’équilibre, relâchez immédiatement le levier de
commande du moteur/de la lame; la lame cessera de tourner en trois secondes.
• Ne tondez pas près d’un dénivellement prononcé, d’un fossé ou du rebord d'un talus; vous pourriez perdre pied ou perdre
l’équilibre.
• Ne tondez pas dans une pente inclinée à plus de 15°.
AVERTISSEMENT
ne tondez pas dans une pente dont l’inclinaison est supérieure à 15° ou qui monte d’environ 2 1/2 pi (0,75 m) aux 10 pi (3 m).
UTILISATION
17
Fig. 10
OU UN POTEAU DE CLÔTURE
LE COIN D’UN BÂTIMENT
PLACEZ CE GUIDE À VUE VERTICALEMENT, CONTRE UN ARBRE DROIT
Not for Reproduction
Page 46

CONSEILS SUR LA TONTE DU GAZON
NOTE : la tondeuse offrira un meilleur rendement si la lame est bien affûtée, particulièrement lorsque le gazon est long.
Examinez la lame et affûtez-la au moins une fois l’an de la façon décrite dans la section Entretien.
• Assurez-vous qu’il n’y a pas de pierres, de branches, de câbles ou d’autres objets sur le gazon qui pourraient
endommager la lame ou le moteur. La tondeuse pourrait éjecter ces objets dans n’importe quelle direction et blesser
gravement l’utilisateur et d'autres personnes. Pour réduire le risque de choc électrique, n’exposez pas la tondeuse à l’eau
et ne l’utilisez pas si le sol est mouillé ou humide.
• Ne tondez jamais en décrivant des cercles; effectuez des allers-retours en ligne droite sur le gazon.
• Lorsque le gazon est dense, ralentissez pour que la tondeuse coupe mieux et éjecte les débris de tonte plus
efcacement.
• Pour obtenir une pelouse saine, coupez toujours un maximum de 1/3 de la longueur totale de l'herbe. En général, l’herbe
devrait mesurer entre 1 1/2 à 2 po (3,8 à 5 cm) durant les mois frais, et entre 2 po à 3 1/4 po (5 cm à 8,3 cm) durant les
mois chauds. En automne, tondez le gazon s’il continue à pousser.
CONSEILS SUR LE DÉCHIQUETAGE
NOTE : INSPECTEZ TOUJOURS LA ZONE À TONDRE ET ENLEVEZ LES PIERRES, LESBRANCHES,LES CÂBLES,
LES OS ET AUTRES DÉBRIS QUI POURRAIENT ÊTRE ÉJECTÉS PAR LA LAME.
• Lorsque vous traversez une zone recouverte de gravier, relâchez le levier de commande de la lame/du moteur, car la
lame pourrait projeter du gravier.
• Pour tondre une zone où l’herbe est longue ou en friche, réglez la tondeuse à la hauteur de coupe la plus élevée
• Pour un déchiquetage efcace, ne tondez pas le gazon s’il est mouillé, car les brindilles auront tendance à coller sous le
plateau de tonte et à nuire au déchiquetage. Il peut être nécessaire de tondre plus court le gazon épais ou nouvellement
semé. Ajustez votre vitesse à l’état du gazon. Si vous avez laissé le gazon pousser à une hauteur supérieure à 4 po (10
cm), tondez-le deux fois an de réduire le gazon à une hauteur maximale de 3 1/4 po (8,3 cm).
• Avancez à bonne vitesse et à un rythme régulier. Faites en sorte que les rangées de tonte sechevauchent. Ne laissez
pas le gazon trop pousser. Si le gazon a trop poussé, commencez à le tondre à la position la plus élevée, pour passer par
étapes à la hauteur de coupe voulue.
AVERTISSEMENT
Si la tondeuse frappe un objet, arrêtez le moteur et enlevez la batterie. Vériez bien si la tondeuse est endommagée et, s’il
y a lieu, réparez les pièces endommagées avant d’utiliser de nouveau la tondeuse. Si la tondeuse vibre de façon excessive
pendant son utilisation, c’est qu’elle a été endommagée; faites-la inspecter et réparer sans délai.
UTILISATION
18
VIDAGE DU SAC ARRIÈRE
(Voir gure 11)
• Arrêtez la tondeuse, laissez les lames s'arrêter
complètement, et retirez la batterie.
• Soulevez le couvercle de la bouche d’évacuation.
• Soulevez le sac arrière par sa poignée pour le retirer de la
tondeuse.
• Videz l’herbe du bac.
• Soulevez le couvercle de la bouche d’évacuation et
remettez le sac arrière en place comme décrit plus haut
dans ce manuel.
Fig. 11
Not for Reproduction
Page 47

PROCÉDURE DE CHARGE
NOTE : La batterie n’est pas livrée totalement chargée. Il est recommandé de la recharger totalement avant utilisation pour
lui assurer une autonomie maximale. Cette batterie lithium-ion est exempte d’effet mémoire et peut être rechargée à tout
moment.
Chargement à faible tension :
Si la batterie a été stockée à faible charge ou sans charge pour une longue durée de temps, le chargeur entre dans le
mode de reprise qui prend 20 heures pour une charge complète de la batterie. Ceci augment la vie de la batterie. Une fois
elle est chargée complètement, la charge prochaine reprend le chargement standard.
1. Branchez le chargeur dans une prise secteur.
2. Insérez le pack batterie dans le chargeur.
Ce chargeur est équipé d’un dispositif de diagnostique. Les Voyants LED de Charge s’allumeront dans un ordre particulier
pour vous renseigner sur l’état de la batterie. Leur comportement est le suivant :
19
BATTERIE ET DU CHARGEUR
Indication de défectuosité :
Lorsque la pile est insérée dans le chargeur et que les DEL clignotent en rouge, retirez la pile du chargeur pendant une
minute puis insérez-la de nouveau. Si les DEL clignotent en vert, cela signie que la pile est en cours de chargement
normal. Si les DEL clignotent encore en rouge, retirez la pile et débranchez le chargeur à nouveau. Attendez une minute
puis rebranchez le chargeur et réinsérez la pile. Si les DEL clignotent en vert, cela signie que la pile est en cours de
chargement normal. Si les DEL clignotent toujours en rouge, la pile est défectueuse et doi être remplacée.
ÉTAT DES DEL DESCRIPTION
Vert continu
Vert clignotant Chargement
Rouge continu Température élevée
Rouge clignotant
Défaut de charge
Chargement Température
élevée
Défaut
de charge
Complètement
chargée
Complètement chargée
Not for Reproduction
Page 48

MONTAGE DU CHARGEUR
1. Ce chargeur peut être installé au mur au moyen de #8 vis (non incluses).
2. Repérez l’endroit où vous désirez effectuer le montage mural du chargeur.
3. Si l’endroit choisi comporte des montants de bois, utilisez 2 vis à bois (non incluses).
4. Percez deux trous dans le centre, avec une distance de 11,43 cm entre chaque trou et assurezvous qu’ils sont alignés
verticalement.
5. Si la pose se fait sur des cloisons sèches, utilisez des ancrages pour le mur (non inclus) et des vis pour maintenir
solidement en place le chargeur.
6. Cette unité alimentée est prévue pour être orientée correctement en position verticale ou vers le sol.
20
BATTERIE ET DU CHARGEUR
NOTE: Si vous prévoyez ne pas utiliser la pile et le chargeur durant une longue période, débranchez le cordon
d'alimentation.
Not for Reproduction
Page 49

ENTRETIEN
REMPLACEMENT DE LA LAME (Voir gure 12-13)
AVERTISSEMENT
Avant de faire l’entretien des lames, protégez-vous toujours les mains en portant des gants épais ou en enveloppant les
lames avec des chiffons ou autres matériaux épais. Enlevez TOUJOURS la batterie en entretenant ou en transportant la
tondeuse.
• ENLEVEZ LA BATTERIE.
• Enlez des gants de cuir rembourrés. Coincez un bloc de bois entre la lame et le plateau de tonte pour éviter que la lame
tourne pendant que vous enlevez le boulon (1).
• À l'aide d’une clé ordinaire ou à douilles de 27 mm, desserrez le boulon (1) et retirez la lame (2). Faites tourner le boulon
DANS LE SENS INVERSE DES AIGUILLES D’UNE MONTRE pour le desserrer et DANS LE SENS DES AIGUILLES
D’UNE MONTRE pour le serrer.
• Enlevez le boulon (1) et la lame (2).
• Pour réassembler le tout, positionnez la lame et les arêtes coupantes vers le sol. Placez le boulon tel qu’il est illustré ci-
dessous. Couplez le boulon de la lame dans le sens horaire en utilisant une clé dynamométrique (non fournie) an de
vous assurer que le boulon est adéquatement serré. Le couple recommandé pour le boulon de la lame est 24-27 lb-pi
(33-37 Nm).
NOTE : veillez à replacer les pièces en suivant exactement l'ordre inverse de celui dans lequel elles ont été enlevées.
Lorsque vous installez la lame, assurez-vous de la positionner avec les extrémités courbées pointant vers le plateau de
tonte, et non vers le sol.
21
Fig. 13Fig. 12
(2)
(1)
Not for Reproduction
Page 50

ENTRETIEN
NETTOYAGE DE LA TONDEUSE
AVERTISSEMENT
Pour réduire le risque de choc électrique, n’exposez pas la tondeuse à l’eau. Le dessous du plateau de tonte devrait être
nettoyé après chaque utilisation, car de l’herbe, des feuilles, de la terre et d’autres débris s’y accumulent, causant ainsi de
la rouille et de la corrosion.
Enlevez toute accumulation d'herbe et de feuilles sur le dessus et autour du couvercle du moteur (n’utilisez pas d’eau à
cette n). À l’occasion, nettoyez la tondeuse à l’aide d’un linge sec. Si des débris s'accumulent sous le plateau de tonte,
arrêtez le moteur et débranchez-le de la source d'alimentation. Renversez la tondeuse vers l’avant ou sur le côté, puis
enlevez les débris à l’aide d’un outil approprié.
REMISAGE
Suivez ces étapes pour préparer la tondeuse en vue du remisage :
• Nettoyez la tondeuse selon les instructions de la section précédente.
• Inspectez et remplacez/affûtez la lame, au besoin. Consultez la section Entretien.
• Rangez la tondeuse dans un endroit sec et propre. Ne la rangez pas près de matières corrosives telles que l’engrais et le
sel gemme.
• Rangez la tondeuse à l’intérieur, dans un endroit frais et sec, hors de la portée des enfants. Ne couvrez pas la tondeuse
avec une bâche de plastique rigide. En emprisonnant l’humidité autour de la tondeuse, les bâches de plastique favorisent
la rouille et la corrosion.
• Enlevez la batterie et rangez-la dans un endroit sec et frais, si possible. Chargez la batterie toutes les deux mois lorsque
vous ne l'utilisez pas, an d'en prolonger la durée de vie.
• Retirez la batterie et entreposez-la dans un endroit sûr, hors de la portée des enfants. Il n'est pas nécessaire de retirer la
batterie avant de remiser la tondeuse.
AVERTISSEMENT
Il faut charger la batterie chaque trois mois lors en stockage an de maintenir sa capacité maximale.
• Pour l’entretien de la tondeuse, utilisez uniquement des pièces de rechange disponibles auprès du fabricant. Pour
obtenir des pièces de rechange, appelez le service d’assistance téléphonique sans frais au 1-800-317-7833. L’utilisation
de pièces non conformes aux caractéristiques d’origine de la tondeuse peut nuire au rendement de l’appareil et
compromettre la sécurité des utilisateurs.
• Avant de nettoyer, réparer ou vérier la tondeuse, assurez-vous que les lames et toutes les pièces mobiles sont immobilisées.
Retirez la batterie lorsque vous apportez un ajustement à la tondeuse ou devez soulever l'une des quatre roues.
• Suivez les instructions pour la lubrication et le remplacement des accessoires.
• Gardez le guidon propre et sec, et exempt de graisse ou d’huile.
• Pour prévenir les risques d’incendie, ne laissez pas de feuilles, d’herbe ou de débris s’accumuler dans le moteur.
• Vériez régulièrement si les écrous de montage des lames et du moteur sont bien serrés. Vériez si les lames présentent
des dommages (par exemple, si elles sont courbées, fendues ou usées).
• Pour obtenir un rendement maximum et sécuritaire de votre tondeuse, entretenez-la avec soin. Gardez ses les lames
toujours propres et bien affûtées. Les lames de la tondeuse sont tranchantes et peuvent vous couper. Au moment de
l’entretien, enveloppez les lames ou portez des gants, faites preuve d'un extrême prudence.
• Gardez tous les écrous, boulons et vis bien serrés pour vous assurer que la tondeuse est dans un état de marche sécuritaire.
• N’éliminez pas les dispositifs de sûreté de la tondeuse. Vériez régulièrement s’ils fonctionnent bien.
• Si la tondeuse frappe un objet, arrêtez le moteur. Vériez bien si la tondeuse est endommagée et, s’il y a lieu, réparez les
pièces endommagées avant d’utiliser de nouveau la tondeuse.
• Comme les composantes du sac à herbe, du couvercle d’éjection et de l’écran protecteur peuvent s’user et être
endommagées, des pièces mobiles pourraient être exposées et des objets pourraient être projetés par la tondeuse. Par
mesure de sécurité, vériez souvent les composantes et remplacez immédiatement toute pièce qui semble usée, fendue
ou brisée. Utilisez uniquement des pièces d’origine provenant du fabricant et identiées dans le présent guide.
• Quand la tondeuse ne sert pas, rangez-la à l’intérieur, dans un endroit sec et hors de la portée des enfants.
AVERTISSEMENT
Retirez toujours la batterie avant de réparer ou de transporter la tondeuse.
22
Not for Reproduction
Page 51

RANGEMENT VERTICAL (Voir gure 14 )
• Retirez la batterie de la tondeuse. Retirez le bac à herbe.
• Tournez les poignées vers la position Déverrouillée
• Abaissez la poignée inférieure et tournez les commandes de la poignée vers la position de verrouillage.
• Soulevez la tondeuse par son extrémité avant an de la placer en position verticale.
AVERTISSEMENT
Retirez toujours la batterie dans la tondeuse avant de ranger celle-ci en position verticale.
INTERRUPTEUR DE RANGEMENT :
La tondeuse est équipée d’un interrupteur secondaire (1) qui empêchera la tondeuse de se mettre en marche lorsque la poignée
se trouve en position de rangement. L’interrupteur secondaire (1) ne doit pas être utilisé comme solution de rechange au retrait
de la clé de sécurité et de la batterie pour empêcher les mises en marche accidentelles et les utilisations non autorisées.
Position déverrouillée
Position verrouillée
Fig. 14
(1)
ENTRETIEN
23
Not for Reproduction
Page 52

La batterie de la tondeuse comprend du lithium-ion, une substance toxique.
AVERTISSEMENT
Toutes les substances toxiques doivent être éliminées d’une manière permettant d’éviter la contamination de l’environnement.
Avant d’éliminer les batteries au lithium-ion endommagées ou usées, communiquez avec le service d’élimination des déchets
ou l’agence pour la protection de l’environnement de votre région afin d’obtenir des renseignements et des instructions
précises. Apportez les batteries à un centre local de recyclage ou d’élimination où le traitement des batteries est autorisé. Si
la batterie est fendue ou brisée, ne la chargez pas et ne l’utilisez pas, et ce, qu’elle présente une fuite ou non. Éliminez-la et
remplacez-la par une nouvelle batterie. NE TENTEZ PAS DE RÉPARER LA BATTERIE!
Suivez les consignes suivantes pour éviter les blessures, les risques d’incendie, d’explosion et de choc électrique, ainsi
que les dommages causés à l’environnement:
• Couvrez les bornes de la batterie à l’aide d’un ruban adhésif très résistant.
• Ne tentez pas de retirer ou de détruire les composants de la batterie.
• Ne tentez pas d’ouvrir la batterie.
• Les électrolytes rejetés lors d’une fuite sont corrosifs et toxiques. Évitez tout contact de la solution avec les yeux et la
peau et ne l’avalez pas.
• Ne jetez pas les batteries avec vos ordures ménagères.
• N'INCINÉREZ PAS les batteries.
• NE PLACEZ PAS les batteries de façon à ce qu’elles se retrouvent dans un site d’enfouissement ou dans les déchets
solides recueillis par la municipalité.
• Apportez les batteries à un centre de recyclage ou d'élimination certié.
24
MISE AU REBUT DE LA BATTERIE SANS DANGERPOUR L’ENVIRONNEMENT
Not for Reproduction
Page 53

DÉPANNAGE
ROBLÈME CAUSE POSSIBLE SOLUTION
La tondeuse ne
démarre pas.
La batterie est à plat. Chargez la batterie.
Le levier de commande
du moteur/de la lame est
défectueux.
Remplacez l’interrupteur (contactez un centre de service
autorisé).
L'herbe a enfoncé à côté de la l
ame.
Enlever la pile. Vérier sous le pont pour garantir de l'herbe n'est
pas enfoncée à côté de la lame.
La batterie n’est pas branchée
au moteur.
Vériez la connexion entre la batterie et le moteur. Assurez-
vous que la pile est enclenchée correctement.
La batterie peut nécessiter un
entretien ou un remplacement.
Contactez un centre de service autorisé ou remplacez la
batterie.
La tondeuse coupe de
façon inégale.
La pelouse est inégale ou en
friche.
Vériez la zone de coupe.
La hauteur de coupe est mal
réglée.
Déplacez les roues à un réglage plus élevé.
La tondeuse ne
déchiquette pas bien.
Des brins d’herbe collent sous le
plateau de tonte.
Attendez que la pelouse sèche avant de la tondre.
L’accessoire de déchiquetage
n'est pas installé.
Installez l’accessoire de déchiquetage.
La tondeuse est difcile
à pousser.
Le gazon est long, ou encore, la
hauteur de coupe est trop basse.
Augmentez la hauteur de coupe.
L’arrière de la tondeuse et la
lame frottent contre l’herbe
dense.
Videz le sac arrière.
La tondeuse vibre et
est bruyante.
L'arbre du moteur est tordu. Arrêtez le moteur, et examinez les dommages.
La lame est déséquilibrée.
Réparez avant de remettre en marche. Si la vibration persiste,
contactez un centre de service autorisé.
25
Not for Reproduction
Page 54

GARANTIE LIMITÉE
Briggs & Stratton garantit la réparation ou le remplacement gratuit, pendant la période de garantie spéciée ci-dessous, de
toute pièce présentant des vices de matériaux ou de fabrication. Les frais de transport du produit à réparer ou remplacer
seront, dans le cadre de cette garantie, réglés par l'acheteur. Cette garantie court sur les périodes énoncées ci-dessous et est
assujettie aux conditions énoncées ci-dessous. Pour trouver le distributeur autorisé le plus proche an d'obtenir les services
couverts par la garantie, veuillez consulter notre carte de localisation de distributeur sur www.SNAPPER.com. L'acheteur doit
contacter le distributeur autorisé, puis lui apporter le produit à des ns d'inspection et de test.
Il n'y a pas d'autre garantie expresse. Les garanties implicites, y compris celles de qualité marchande et d'adaptation
à un emploi particulier, sont limitées à une année à partir de la date d'acquisition ou conformément à ce qui est prévu
par la loi. La responsabilité pour les dommages consécutifs ou indirects est exclue dans la mesure où l'exclusion
est prévue par la loi. Certains états ou pays ne permettent pas les limitations de durée de la garantie implicite. Certains
états ou pays n'autorisent pas l'exclusion ou la limitation des dommages consécutifs ou indirects. Dans ce cas, la limitation cidessus ne s'applique pas à votre cas. La présente garantie vous offre des droits juridiques spéciques et il se peut que vous
ayez d'autres droits qui varient d'une juridiction à une autre, ou d'un pays à un autre.**
PÉRIODE DE GARANTIE
Usage privé Usage professionnel
Equipement 60 mois 90 jours
Batterie et chargeur de batterie 24 mois Aucun
** En Australie - Nos produits sont livrés avec des garanties qui ne peuvent pas être exclues d'après les droits de la
consommation australiens. Vous pouvez obtenir un remplacement ou un remboursement en cas de défaillance majeure ou
en compensation de toute perte ou de tout dommage survenu dans le cadre des conditions raisonnablement prévisibles
d'utilisation du produit. Vous pouvez également bénécier de la réparation ou du remplacement des produits si al qualité de
ces derniers n'est pas acceptable et si le défaut n'entraîne pas de défaillance majeure. Pour trouver le distributeur autorisé
le plus proche an d'obtenir les services couverts par la garantie, veuillez consulter notre carte de localisation de distributeur
sur [insérer l'adresse du site Web], composer le 1300 274 447, ou envoyer une demande par voie électronique à l'adresse
salesenquires@briggsandstratton.com.au, Briggs & Stratton Australia Pty Ltd, 1 Moorebank Avenue, NSW, Australie, 2170.
La période de garantie commence à la date de l'achat par l'acheteur au détail ou commercial, initial. « Utilisation grand public
» fait référence à un emploi dans une résidence individuelle par un particulier. « Utilisation commerciale » indique toutes les
autres utilisations possibles, y compris commerciales, créatrices de revenus ou locatives. Une fois l'équipement utilisé à des
ns commerciales, il est considéré comme un produit d'utilisation commerciale dans le cadre de cette garantie.
An d'assurer une couverture totale et rapide de la garantie, enregistrez votre produit sur le site Web indiqué ci-dessus ou sur
www.onlineproductregistration.com, ou bien envoyez par la poste la carte d'enregistrement de la garantie remplie (si elle est
fournie), ou composez le 1-800-743-4115 (aux É.-U.).
Conservez votre reçu d'achat comme preuve. Si vous n'avez pas de preuve de la date de l'achat initial au moment de la
demande d'un service en vertu de la garantie, la date de fabrication du produit sera utilisée pour déterminer la période de
garantie. L'enregistrement du produit n'est pas requis pour obtenir un service en vertu de la garantie pour les produits Briggs
& Stratton.
26
Not for Reproduction
Page 55

27
AU SUJET DE LA GARANTIE
Un service en vertu de la garantie n'est disponible que par l'intermédiaire des distributeurs autorisés Snapper. Parfois,
les demandes de réparations dans le cadre de la garantie peuvent ne pas être pertinentes. La présente garantie couvre
uniquement les vices de matériaux ou de fabrication. Elle ne couvre pas les dommages causés par une utilisation
inappropriée ou abusive, un entretien ou une réparation inapproprié, ou l'usure normale.
Utilisation inappropriée ou emploi abusif – L'emploi approprié comme il est prévu pour ce produit est décrit dans le mode
d'emploi. L'utilisation du produit d'une façon non décrite dans le manuel d'utilisation ou l'emploi du produit après qu'il a été
endommagé a pour effet d'annuler la garantie. Vous ne pourrez vous prévaloir de la garantie si le numéro de série du produit
a été retiré, si le produit a été modié d'une manière quelconque ou s'il présente des preuves d'utilisation abusive, telles que
des marques de coups ou de corrosion par l'eau ou des produits chimiques.
Réparation ou entretien inapproprié – Ce produit doit être entretenu selon les procédures et les programmes d'entretien
décrits dans le manuel de l'utilisateur. En outre, il doit être dépanné ou réparé en utilisant des pièces d'origine Briggs &
Stratton ou des pièces équivalentes. Les dommages causés par un manque d'entretien ou l'utilisation de pièces n'étant pas
d'origine, ne sont pas couverts par la garantie.
Usure normale – Comme tous les appareils mécaniques, votre machine est sujette à l'usure même en cas d'entretien
approprié. Cette garantie ne couvre pas la réparation de pièces ou d'équipements usés par un usage normal. Les articles
d'entretien et d'usure, tels que ltres, courroies, lames etplaquettes de freins (les plaquettes de frein moteur sont couvertes)
ne sont pas couverts par la garantie, uniquement en raison de leur caractéristique d'usure, à moins que la cause ne soit due
à des vices de matériaux ou de fabrication.
Autres exclusions – Cette garantie ne couvre pas les dégâts dus à des accidents, des abus, des modifications, des
altérations ou un entretien incorrect, ni les détériorations provoquées par le gel ou par une agression chimique. Les pièces ou
accessoires rattachés ne faisant pas partie du conditionnement d'origine du produit ne sont également pas couverts. Cette
garantie ne comporte pas les moteurs ou équipement de démonstration, usagés, d'occasion ou remis à neuf. Cette garantie
ne couvre pas les détériorations provoquées par des catastrophes naturelles ou autres cas de force majeure dépassant le
contrôle des fabricants.
GARANTIE LIMITÉE
Not for Reproduction
Page 56

388062367 Rev: 00 (07-18-17)
LIGNE D’ASSISTANCE SANS FRAIS: 1-800-317-7833
Briggs & Stratton Corporation
P.O. Box 702
Milwaukee, WI 53201
Not for Reproduction
Page 57

Antes de hacer funcionar esta herramienta, lea cuidadosamente todas
las reglas de seguridad y las instrucciones.
Manual del Propietario
LÍNEA DE AYUDA GRATUITA: 1-800-317-7833
www.snapper.com
Podadora De Césped De 21 Pulgadas
Inalámbrica \ Autoimpulsada de 82V
1696860 (SXD21SPWM82)
Not for Reproduction
Page 58

Especicaciones del Producto ................................................................................. 2
Información sobre Seguridad ................................................................................... 3
Símbolos ................................................................................................................. 6
Funciones y Controles ............................................................................................. 7
Ensamblado ............................................................................................................ 8
Funcionamiento ..................................................................................................... 15
Batería y el Cargador ............................................................................................ 19
Mantenimiento ....................................................................................................... 21
Eliminación de la Batería que no Daña el Medio Ambiente ..................................... 24
Corrección de Problemas ...................................................................................... 25
Garantía Limitada .................................................................................................. 26
ESPECIFICACIONES DEL PRODUCTO
PODADORA DE CÉSPED DE 21 PULGADAS INALÁMBRICA \ AUTOIMPULSADA DE 82V
Tipo de batería ................................................................................................................................82 V Lithium-ion
Velocidad sin carga ...................................................................................................................................2800 RPM
Velocidad Auto-propulsada .................................................................................................1.6-4.9 fps (0.5-1.5 m/s)
Tamaño de la cubierta ..........................................................................................................................21” (53.3 cm)
Ajustes de altura .............................................................................................................1 3/8 - 3 3/4” (3.5 - 9.5 cm)
Par de apriete (perno de la cuchilla) ......................................................................................24-27 lb-ft (33-37 Nm)
Funciones .........................................3-en-1: triturado de compuesto orgánico,almacenaje trasero,descarga lateral
Peso(sin batería) ............................................................................................................................ 70.1 lbs (31.8 kg)
ÍNDICE
2
Exención de responsabilidad: *El voltaje inicial máximo de la batería (medido sin carga de trabajo) es de 82 voltios. Es
voltaje nominal es de 72.
Not for Reproduction
Page 59

INFORMACIÓN DE SEGURIDAD
GUARDAR ESTAS INSTRUCCIONES
ADVERTENCIA
Esta podadora puede amputar partes del cuerpo y arrojar objetos. El incumplimiento de las siguientes normas de
seguridad puede resultar en lesiones graves o la muerte.
ADVERTENCIA
Cuando se utiliza maquina de cortadoras de césped, las precauciones básicas de seguridad siempre debe ser seguido
para reducir el riesgo de incendio, descarga eléctrica, y lesiones personales, entre ellas las siguientes:
3
1. FUNCIONAMIENTO GENERAL
• Evite condiciones peligrosas. No use la máquina bajo la lluvia ni en césped mojado o húmedo.
• No use a la lluvia.
• Mantenga a los niños alejados – Todos los visitantes deberán permanecer a una distancia prudencial de la zona de
trabajo.
• Use la ropa adecuada. No use ropa holgada ni joyas que puedan quedar atrapadas en las piezas en movimiento. Se
recomienda el uso de guantes de protección y calzado de seguridad.
• Utilice gafas de seguridad. – Siempre utilice una máscara facial o una máscara para polvo si usa la podadora en
condiciones de polvo.
• Uso correcto del aparato – No use la podadora en tareas que no sean para las que fue diseñada.
• No fuerce el cortacésped. Realizará un trabajo mejor y más seguro a la velocidad para la que ha sido diseñada.
• No realice sobreesfuerzos – sitúese en una supercie nivelada y mantenga el equilibrio en todo momento.
• Manténgase alerta - No utilice el cortacésped cuando esté cansado. Preste atención a lo que está haciendo. Utilice el
sentido común.
• Guarde el cortacésped que no use en el interior - Cuando no está en uso, el cortacésped debe guardarse en un lugar
interior seco, bajo llave, fuera del alcance de los niños.
• Mantenga el cortacésped - Mantenga los bordes de corte alados y limpias para que realicen un trabajo mejor y más
seguro.
• Siga las instrucciones de lubricación y cambio de accesorios.
• Inspeccione periódicamente los cables del cortacésped y si están dañados llévelos a un centro de servicio autorizado.
• Mantenga las manijas secas, limpias y sin aceite ni grasa.
• Mantenga los dispositivos de seguridad (cubiertas, protectores, interruptores, etc.) en su sitio y en funcionamiento.
• Mantener las cuchillas aladas.
• Mantenga las manos y los pies alejados de las cuchillas y del área de corte.
• Los objetos que se golpean con la cuchilla de la cortadora de césped pueden causar lesiones graves a las personas.
Hay que examinar con atención la cortadora y quitar todos los objetos antes de cada uso.
• Si la máquina golpea un objeto extraño, siga estos pasos:
i) Pare el cortacésped, suelte el interruptor.
ii) Quite la batería.
iii) Verique si hay algún daño.
iv) Repare cualquier daño antes de volver a poner en funcionamiento y utilizar el cortacésped.
• Utilice solamente cuchillas de recambio originales.
• No cargue la podadora bajo la lluvia o en un lugar húmedo.
• Quite o desconecte la batería antes del mantenimiento, limpieza o retirada de material del cortacésped.
Not for Reproduction
Page 60

4
INFORMACIÓN DE SEGURIDAD
• Utilice baterías de repuesto aprobadas únicamente. Otras bateríaspueden ocasionar daños a la podadora. Solo deben
utilizarse baterías BSB2AH82 (2 amp/hora) o BSB4AH82 (4 amp/hora) o BSB5AH82 (5 amp/hora) de Briggs & Stratton.
Solo debe utilizarse el cargador BSRC82 o BSSC82de Briggs & Stratton.
• No tire la batería al fuego. La celda podría explotar. Compruebe la normativa local si existen instrucciones de desecho
especiales.
• No abra las baterías ni las corte. Las baterías dañadas puede liberar electrolitos corrosivos que pueden causar daño a
los ojos o piel. Podría ser tóxico si se le ingiere.
• Tenga cuidado al manipular las baterías para que no se produzca ningún cortocircuito con materiales conductores como
anillos, pulseras y llaves. La batería o el conductor pueden sobrecalentarse y provocar quemaduras.
• Lea, comprenda y siga todas las instrucciones de la máquina y del/de los manual/es antes de empezar.
• Solo se permite usarla a adultos responsables que conozcan las instrucciones para manejarla.
• Despeje la zona de objetos como piedras, cables, juguetes, etc., que podrían ser lanzados por la cuchilla. Permanezca
detrás de la empuñadura cuando el motor esté funcionando.
• Antes de utilizarla, asegúrese de que la zona está despejada y de que no hay personas en medio. Detenga la máquina si
alguien entra en el área.
• No la maneje con los pies descalzos o mientras lleve sandalias. Lleve siempre un calzado fuerte.
• No empuje la cortadora hacia atrás a menos que sea absolutamente necesario. Mire siempre debajo y detrás de usted
antes de moverse hacia atrás.
• No dirija nunca material descargado en dirección a una persona. Evite la descarga de material contra una pared u
obstrucción. El material puede rebotar hacia el operador. Detenga la hoja cuando pase por supercies con grava.
• No manipule el aparato sin el dispositivo de colección de césped completo, el protector de descarga, el protector trasero
o cualquier otro dispositivo de seguridad en su lugar o funcionando.
• No deje nunca la máquina en funcionamiento sin vigilar.
• Apague el motor y espere a que la cuchilla se detenga completamente antes de retirar el colector de césped o
desobstruir el ducto.
• Corte el césped solamente con luz de día o una buena luz articial.
• No haga funcionar el cortacésped bajo los efectos de alcohol o cualquier sustancia.
• No use nunca la cortadora en césped mojado. Asegúrese siempre de andar correctamente, no corra.
• Desactive el sistema de accionamiento si viene equipado así antes de encender el motor.
• Si la máquina comenzara a vibrar excesivamente, detenga el motor y busque la causa de inmediato. Por lo general, la
vibración advierte un problema.
• Use siempre protección para los ojos cuando utilice la máquina.
• Consulte las instrucciones del fabricante para manejar e instalar los accesorios de forma adecuada. Utilice únicamente
los accesorios aprobados por el fabricante.
2. USO EN PENDIENTES
• Las pendientes son una de las causas principales de accidentes por resbalones y caídas accidentales que pueden
provocar lesiones severas. El funcionamiento de la podadora en pendientes requiere tomar precauciones extraordinarias.
Si se siente inseguro en una pendiente, no use la podadora allí.
• Pode atravesando las pendientes; no hacia arriba ni hacia abajo. Tenga mucha precaución al cambiar de dirección en
una pendiente.
• Tenga cuidado con los pozos, surcos, piedras, objetos ocultos o montículos que puedan provocar que se resbale o
tropiece. El césped alto puede ocultar obstáculos.
• No use la cortadora en césped mojado o pendientes muy inclinadas. El poco apoyo puede causar accidentes por
resbalón o caída.
Not for Reproduction
Page 61

INFORMACIÓN DE SEGURIDAD
GUARDAR ESTAS INSTRUCCIONES
5
3. NIÑOS
Pueden ocurrir accidentes trágicos si el operador no está atento a la presencia de niños. Normalmente, los niños se
sienten atraídos por la máquina y por el corte. Nunca suponga que los niños van a permanecer donde les vio por última
vez.
• Mantenga a los niños fuera del área de trabajo y bajo estricta vigilancia de un adulto responsable.
• Esté alerta y apague la podadora si un niño o cualquier otra persona ingresan al área de trabajo.
• No permita que los niños utilicen la máquina.
• Tenga extremo cuidado cuando se acerque a esquinas ciegas, entradas de puertas, arbustos, árboles u otros objetos
puedan bloquearle la vista de un niño que pudiera correr hacia la podadora.
4. SERVICIO
• Mantenga tuercas, pernos y tornillos ajustados para asegurarse de que el equipo se encuentre en una condición de
trabajo segura.
• Nunca retire o manipule los dispositivos de seguridad. Compruebe su funcionamiento correcto con regularidad. No haga
nunca nada que interera con la función pretendida de un dispositivo de seguridad ni que reduzca la protección ofrecida
por un dispositivo de seguridad.
• Mantenga la máquina libre de hierba u otros restos que puedan acumularse. Deje enfriar la máquina antes de guardarla.
• Si choca un objeto extraño, detenga el motor y cambie el pasador de seguridad. Inspeccione minuciosamente si la
podadora se dañó. Repare los daños antes de usar la podadora.
• Nunca haga ajustes o reparaciones con el motor en marcha.
• Retire siempre el paquete de baterías de las cortadoras antes de efectuar ajustes, limpieza o reparaciones.
• Compruebe los componentes del dispositivo de colección de césped y el protector de descarga con frecuencia. Sustituya
con las piezas recomendadas del fabricante si es necesario.
• Las cuchillas están aladas y pueden cortar. Envuelva las cuchillas o use guantes. Realice las reparaciones con extremo
cuidado.
• Cuide o sustituya las etiquetas de seguridad y de instrucciones, según sea necesario.
ADVERTENCIA(PROPOSICIÓN65)
Este producto contiene un producto químico conocido en el Estado de California por: producir cáncer, malformaciones de
nacimiento/ anomalías congénitas u otros daños reproductivos.
Algo del polvo provocado por las lijas, sierras, trituradoras y taladros eléctricos, y otras actividades de construcción
Contiene químicos reconocidos como causantes de cáncer y defectos congénitos u otros daños en el aparato reproductivo.
Algunos ejemplos de estos químicos son:
• Plomo de pinturas con base de plomo,
• Sílice cristalina de ladrillos, cemento y otros productos de mampostería
• Arsénico y cromo de madera tratada con químicos.
El riesgo que corre a la exposición de estos químicos varía dependiendo de la frecuencia con que realiza estos tipos de
trabajos. Para reducir la exposición a estos químicos: trabaje en un área bien ventilada y con el equipamiento de seguridad
aprobado, como por ejemplo máscaras especialmente diseñadas para ltrar laspartículas microscópicas.
Not for Reproduction
Page 62
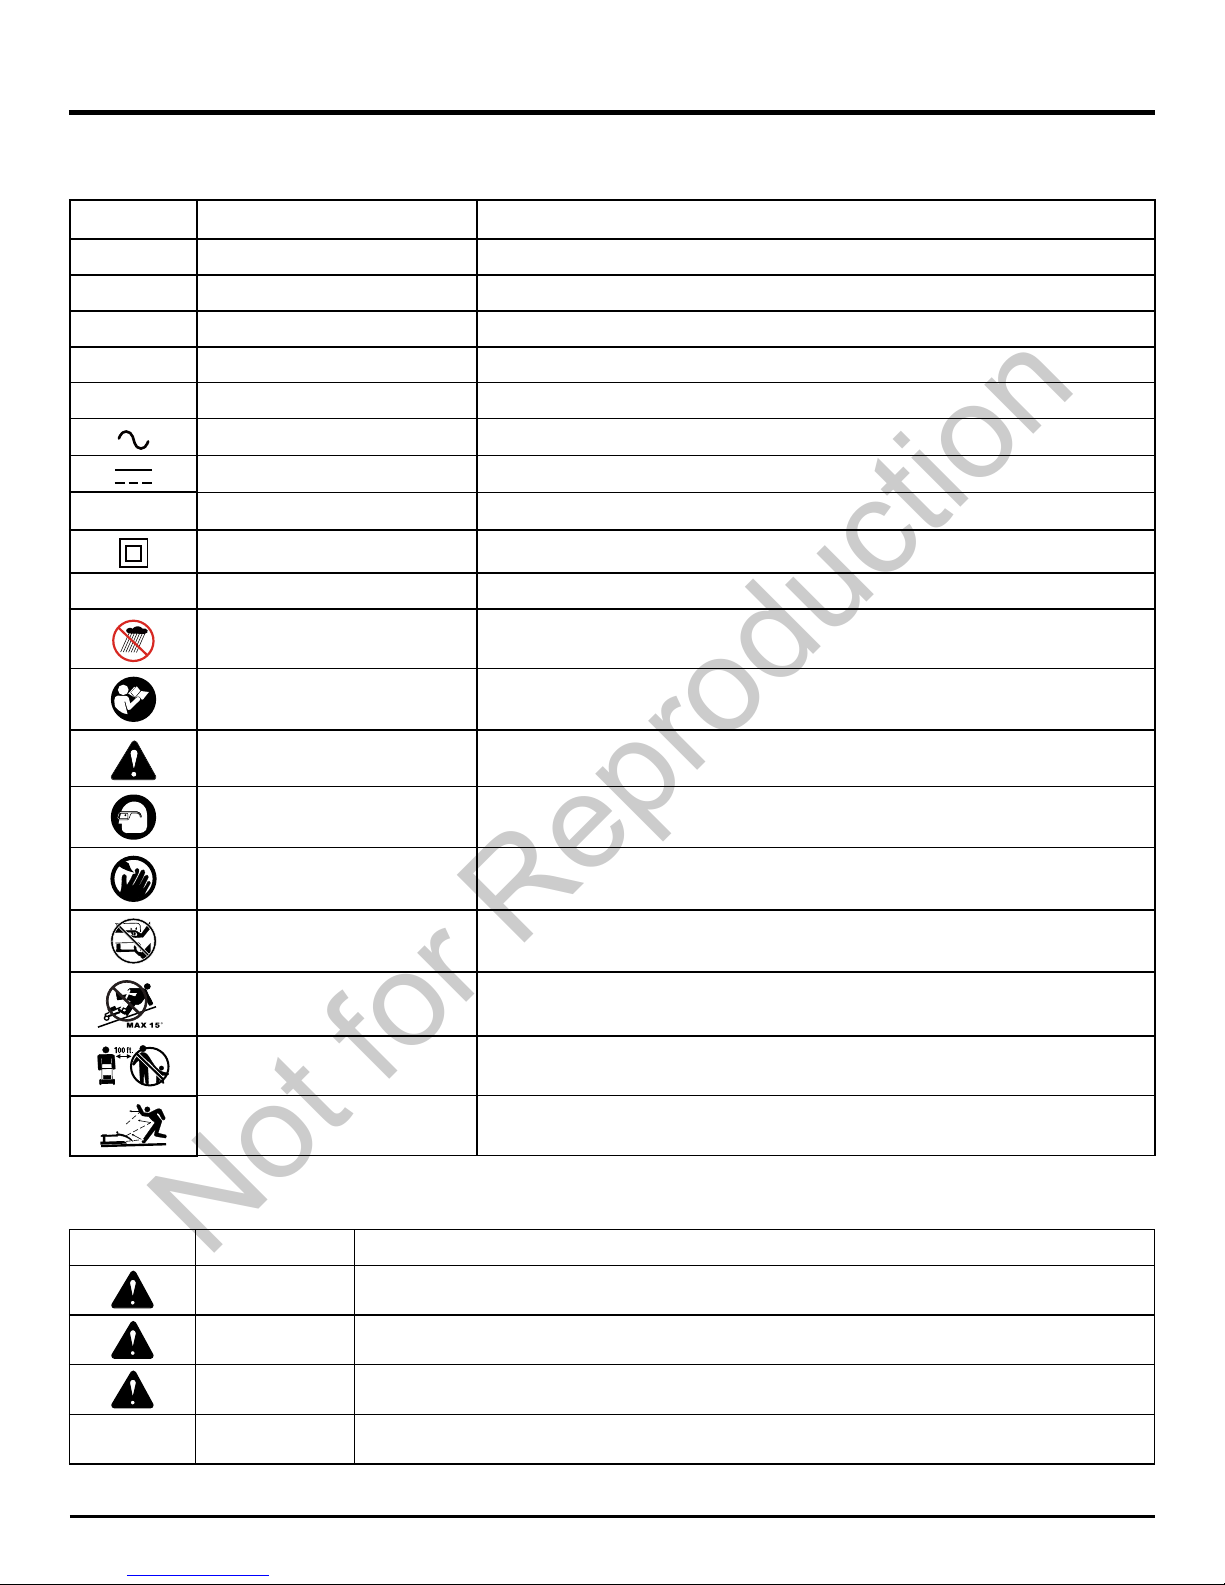
Algunos de los siguientes símbolos pueden ser usados en este producto. Obsérvelos y aprenda su signicado. La
interpretación correcta de estos símbolos permite una operación mejor y más segura.
6
SYMBOLS
SÍMBOLO NOMBRE DENOMINACIÓN/EXPLICACIÓN
V Voltios Voltaje
A Amperios Corriente
Hz Hertz Frecuencia(ciclos por segundo)
W Watts Potencia
min Minutos Tiempo
Corriente alterna Tipo de corriente
Corriente continua Tipo o característica de corriente
n
o
Velocidad sin carga Velocidad de giro al no haber carga
Fabricación Clase II Fabricación con doble aislamiento
/min Por minuto Revoluciones,carreras,velocidad supercial
Moje Condiciones Ponen
obre aviso
No exponga la unidad a la lluvia ni la use en lugares húmedos.
Lea el manual del operador
Para reducia el riesgo de lesiones,el usuario debe leer y comprender el
manual del operador antes de usar este producto.
Alerta de seguridad Precauciones para su seguridad.
Protección ocular
Use protección para los ojos con protectores laterales que cumpla con la
ANSI Z87.1 al usar este producto.
Mantenga las manos y los
pies alejados
Mantenga las manos y los pies alejados de las cuchillas y del área de
corte.
No extenderse No extienda las manos o los pies por debajo de la cubierta de la podadora.
No utilizar sobre pendientes
No utilice la podadora sobre pendientes superiores a los 15º. Corte sobre
la supercie de las pendientes y nunca de arriba a abajo.
Mantenga alejadas a las
personas presentes
Mantenga a los circunstantes a una distancia mínima de 30 m (100 pies).
Riesgo de rebote
Tenga cuidado para que los espectadores que puedan estar cerca no resulten
heridos por objetos extraños que puedan salir despedidos del cortacésped.
Las siguientes palabras de señalización y sus signicados tienen el objeto de explicar los niveles de riesgo relaciondos
con este producto.
SÍMBOLO SEÑAL SIGNIFICADO
PELIGRO
Indica una situación peligrosa inminente, la cual, si no se evita, causará la muerte o
lesiones serias.
ADVERTENCIA
CIIndica una situación peligrosa posible, la cual, si no se evita, podría causar la muerte o
lesiones serias.
PRECAUCIÓN
Indica una situación potencialmente peligrosa la cual, si no se evita, puede causar
lesiones leves o moderadas.
PRECAUCIÓN
(Sin el símbolo de alerta de seguridad) Indica una situación que puede producir daños
materiales.
GUARDAR ESTAS INSTRUCCIONES
Not for Reproduction
Page 63

Fig. 1
Lea el manual del operador y las normas de seguridad antes de manejar la podadora. Compare la ilustración en Fig. 1 con
la podadora para familiarizarse con la ubicación de los diferentes controles y ajustes. Guarde este manual para referencia
futura.
FUNCIONES Y CONTROLES
7
Botón de bloqueo para seguridad
Manija
superior
Palanca de control
Manija inferior
Bolsa
colectora
de césped
Puerta de
descarga
posterior
Palanca para ajuste de altura
Tapa de la batería
Puerta para
descarga lateral
Rueda trasera
Clavija para
compuesto
orgánico
Conducto
de descarga
lateral
Rueda
delantera
Controles
de velocidad
Autopropulsada
Palanca de autopropulsión
Not for Reproduction
Page 64

8
DESEMPAQUETADO
• Extraiga cuidadosamente de la caja la herramienta y los accesorios. Asegúrese de que estén presentes todos los
artículos enumerados en la lista de empaquetado.
• Inspeccione cuidadosamente la herramienta para asegurarse de que no haya sufrido ninguna rotura o daño durante el
transporte.
• No deseche el material de empaquetado hasta que haya inspeccionado cuidadosamente la herramienta y la haya
utilizado satisfactoriamente.
• Si hay piezas dañadas o faltantes, le suplicamos llamar al 1-800-317-7833 donde le brindaremos asistencia.
LISTA DE EMPAQUETADO
• Podadora • Perilla de la empuñadura x 4
• Clavija para compuesto orgánico • Perno del asa x 4
• Conducto de descarga lateral • Manual
• Bolsa colectora de césped
Nota: El enchufe acolchado viene colocado en la apertura de descarga trasera cuando se envía.
ADVERTENCIA
En caso de que se dañe o falte alguna pieza, no utilice este producto hasta que se hayan reemplazado las piezas. El uso
de un producto al que le faltan piezas o cuyas piezas están dañadas, puede producir lesiones personales graves.
ADVERTENCIA
No intente midofi car este producto o crear accesorios que no fueron recommendados para usar con eate producto.
Cualquier alteracion o midifi cacion se considerara como mal uso y podra resultar en una condición peligrosa que
conducirá a posibles lesiones personales serias.
ADVERTENCIA
No inserte la llave hasta que el montaje sea completo y la unidad esté lista para cortar. Si la máquina está mal montada,
podría arrancar accidentalmente y provocar graves daños personales.
ADVERTENCIA
Para evitar un arranque accidental que podría causar lesiones corporales serias, retire siempre la batería del producto al
ensamblar las piezas.
ADVERTENCIA
No utilice nunca el cortacésped sin los dispositivos de seguridad adecuados en su lugar y en perfectas condiciones. Nunca
use el cortacésped con dispositivos de seguridad dañados. La utilización de este producto con piezas dañadas o faltantes
podrá causar lesiones personales serias.
ENSAMBLADO
Not for Reproduction
Page 65

ENSAMBLADO
9
DESPLEGAR Y AJUSTAR EL MANGO INFERIOR (Consulte la gura 2)
ADVERTENCIA
Plegar y desplegar el mango incorrectamente puede dañar los cables y dar lugar a unas condiciones de funcionamiento
inseguras.
• No dañe los cables al plegar o desplegar el mando.
• Si el cable está dañado póngase en contacto con el establecimiento de servicio autorizado.
• Tire y gire 90º las perillas de los mangos (1) que están a los dos lados para aojar los mangos inferiores (2) de los dos
lados.
• Mueva los mangos inferiores hasta la posición de funcionamiento. Puede elevar o bajar el mango hasta colocarlo en la
posición más cómoda. Hay 3 posiciones (3) para elegir. Suelte las perillas de los mangos para colocar el mango inferior
en su sitio.
NOTA: Asegúrese de que ambos lados se jan en la misma posición durante el montaje adecuado.
Fig. 2
(2)
(1)
(3)
Posición de bloqueo
Posición de desbloqueo
Not for Reproduction
Page 66

INSTALACIÓN DEL MANGO SUPERIOR (Consulte la gura 3)
• Alinee los agujeros para montar de la manija superior (1) y la manija inferior (2). Introduzca el perno (3) de cabeza de
hongo y utilice las perillas (4) para apretarlos. Repita la operación por el otro lado.
ENSAMBLADO
10
Fig. 3
(2)
(1)
(3)
(4)
(4)
Not for Reproduction
Page 67

11
ENSAMBLADO
Fig. 4
(3)
(1)
(2)
(5)
(4)
COLOCACIÓN DEL COLECTOR DE CÉSPED (Consulte la gura 4)
• Levante la puerta de descarga posterior (1).
• Levante el receptor de hierba por su mango (2) y colóquelo debajo de la puerta de descarga posterior de modo que los
ganchos (3) del receptor de hierba (4) queden asentados en la barra de la puerta (5).
• Suelte la puerta de descarga posterior. Cuando estén correctamente instalados, los ganchos del receptor de hierba
saldrán por las aberturas de la puerta de descarga posterior.
NOTA: Cuando utilice el receptor de hierba no instale el deector de descarga lateral ni el tapón de ecubrimiento.
Not for Reproduction
Page 68

(2)
Fig. 5
(3)
(1)
ENSAMBLADO
INSTALACIÓN O RETIRO DE LA CLAVIJA PARA COMPUESTO ORGÁNICO (Consulte la gura 5)
• Para quitar el tapón de la función para cubrimiento con hojarasca , levante la puerta de descarga posterior (1).
• Tome la manija (2) del tapón de la función para cubrimiento con hojarasca y sáquelo mediante la manija.
• El tapón de la función para cubrimiento con hojarasca (3) se inserta angulado, por lo que es necesario ejercer un poco
de fuerza para quitarlo.
• Para instalar la bolsa para recolección de grama se debe quitar el tapón de la función para cubrimiento con hojarasca.
• Al quitar la bolsa para recolección de grama se debe colocar de regreso el tapón de la función para cubrimiento con
hojarasca.
12
Not for Reproduction
Page 69

ENSAMBLADO
INSTALACIÓN DEL DEFLECTOR DE DESCARGA LATERAL (Consulte la gura 6)
• Levante la puerta de descarga lateral (1).
• Alinee las ranuras (2) del deector (3) con los pasadores (4) de la Puerta de descarga lateral (1).
• Baje el deector hasta que los ganchos del piso de la podadora estén asegurados en las aberturas del deector.
• Suelte el deector y la puerta.
13
Fig. 6
(1)
(3)
(2)
(4)
Not for Reproduction
Page 70

ENSAMBLADO
PARA INSTALAR LA BATERÍA (Consulte la gura 7)
• Levante y sostenga la tapa de la batería (1).
• Alinee la batería (2) con el puerto de la batería de la podadora.
• Asegúrese de que el botón de liberación de la batería (3) trabe en su lugar y que la batería esté completamente asentada
y asegurada en la podadora antes de empezar la operación.
• Si la máquina no se va a utilizar inmediatamente, retire la batería.
• Cierre la tapa.
14
PARA RETIRAR LA BATERÍA (Consulte la gura 7)
• Libere la palanca de control (N) para detener la podadora.
• Abra la tapa de la batería.
• Presione el botón de liberación de la batería (3) en la podadora. Esto hará que la batería se salga ligeramente de la
herramienta.
• Retire la batería de la podadora.
Fig. 7
(3)
(1)
(2)
Not for Reproduction
Page 71

FUNCIONAMIENTO
ENCENDIDO / APAGADO DE LA PODADORA (Consulte la gura 8)
Para arrancar la podadora:
• Levante la tapa de la batería. Instale la batería.
• Presione y mantenga presionado el botón de bloqueo para seguridad (1).
• Hale la palanca de control (2) hacia arriba de la manija para encender la podadora y suelte el botón.
Para detener la podadora:
• Libere la palanca de control.
Arranque suave
Este cortacésped de LI-ION está equipado con una función de "arranque suave". Al arrancar inicialmente, el cortacésped se
llevará aprox. 3 segundos para llegar hasta la máxima velocidad. Si el cortacésped no arranca inicialmente: Retire la batería y
compruebe bajo la plataforma de corte para asegurarse de que no hay nada obstruyendo la cuchilla y que puede girar libremente
con la mano. Incluso una pequeña cantidad de hierba en la puesta en marcha evitará que el "arranque suave" empiece.
PRECAUCIÓN
No intente anular el funcionamiento de la botón de bloqueo para seguridad o palanca de control.
ADVERTENCIA
Una operadora en funcionamiento puede arrojar objetos extraños a los ojos del operador y, de esta manera, ocasionar graves
daños oculares. Siempre use gafas de seguridad cuando use la podadora y realice ajustes o reparaciones.
INSPECCIÓN DEL ÁREA DE CORTE. Retire piedras, palos, cables, juguetes y otros desechos que la cuchilla giratoria
pueda arrojar.
SIEFA AUTOPROPULSADA (Consulte la gura 8)
Para activar la función autopropulsión:
• Levante la tapa de la batería. Instale la batería.
• Tire la palanca de autopropulsión (3) hacia arriba para encontrar el mango.
Para desactivar la función autopropulsión:
• Suelte la palanca de autopropulsión.
Para ajustar la velocidad de la función autopropulsión:
• Tire la palanca de control de velocidad variable (4) hacia el símbolo del conejo para aumentar la velocidad.
• Empuje la palanca de control de velocidad variable (4) hacia el símbolo de la tortuga para disminuir la velocidad.
15
Fig. 8
(3)
(1)
(2)
(4)
Not for Reproduction
Page 72

AJUSTE DE LA ALTURA DE CORTE (Consulte la gura 9)
Al enviarse el aparato, las ruedas en el cortacésped se ajustan a una posición de corte bajo. Antes de usar el cortacésped
por primera vez, ajuste la posición del corte a la altura más adecuada para su cortacésped. El césped promedio debería
medir entre 38 mm y 50 mm durante los meses fríos y entre 50 mm y 83 mm durante los meses cálidos.
Para ajustar la altura de la hoja:
• Eleve la altura de la hoja sujetando la palanca de ajuste de altura (1) y moviéndola hacia la parte posterior de la
podadora.
• Baje la altura de la hoja sujetando la palanca de ajuste de altura (1) y moviéndola hacia la parte delantera de la podadora.
FUNCIONAMIENTO
16
Fig. 9
Ajustes de altura 1 3/8 - 3 3/4"
1er ajuste 1 3/8"
2º ajuste 1 7/8"
3er ajuste 2 1/8"
4º ajuste 2 5/8"
5º ajuste 3"
6º ajuste 3 3/8"
7º ajuste 3 3/4"
7
6
5
4
3
2
1
(1)
Not for Reproduction
Page 73

FUNCIONAMIENTO
17
Fig. 10
MANEJO EN PENDIENTES (Consulte la gura 10)
• Para su seguridad, antes de hacer funcionar esta podadora en un área inclinada o con lomas, utilice el registrador de
pendientes que ha sido incluido como parte de este manual para medir pendientes.
• Siempre asegúrese de su postura. Un resbalón y caída puede provocar lesiones serias. Si siente que está perdiendo el
equilibrio, suelte el mango de control del motor/cuchilla inmediatamente. La cuchilla para de girar en 3 segundos.
• No pode el pasto de precipicios,zanjas o terraplenes;podria perder la rmza de la postura o el equilibrio.
• No pode el césped en pendientes con un ángulo mayor a 15°.
ADVERTENCIA
No pode el césped en pendientes con un ángulo mayor a 15° (una elevación de aproximadamente 2-1/2 pies [0.75 metros]
cada 10 pies [3 metros]).
DO
BLE EN LA LÍNEA DE PUNTOS, REPRESENTANDO
LA PENDIENTE DE 15°
O EL POSTE DE UNA CERCA
LA ESQUINA DE UN EDIFICIO
UN POSTE DE ENERGÍA
OBSERVE Y MANTENGA ESTE NIVEL CON UN ÁRBOL VERTICAL
Not for Reproduction
Page 74

CONSEJOS DE PODA
NOTA: el rendimiento de la podadora será mucho mayor con una cuchilla losa, especialmente si de corta césped alto.
Asegúrese de revisar la cuchilla y alarla al menos una vez al año, según se describe en la sección Mantenimiento.
• Verique que no haya piedras, palos, cables ni otros objetos en el césped que puedan dañar las cuchillas o el motor.
Es posible que la podadora arroje estos objetos accidentalmente y en cualquier dirección, algo que puede ocasionar
lesiones personales graves al operador y a otras personas.
• Para evitar descargas eléctricas, no use la podadora en condiciones húmedas.
• No pode el césped en círculos. Muévase hacia adelante y atrás del césped.
• Cuando corte césped grueso, pase la podadora más lentamente para lograr un mejor corte y una adecuada descarga de
recortes. Para tener un césped sano, siempre corte un tercio o menos de su altura total. El césped promedio debe tener
aproximadamente de 3,8 a 5 cm (1-1/2 a 2 pulgadas) de altura en meses fríos y más de 5 cm (2 pulgadas) en meses
cálidos. Si hay crecimiento, el césped debe cortarse en otoñol.
CONSEJOS DE TRITURACIÓN DE COMPUESTO ORGÁNICO
NOTA: SIEMPRE INSPECCIONE EL ÁREA DONDE UTILIZARÁ LA PODADORA Y RETIRE PIEDRAS, PALOS, CABLES,
HUESOS Y OTROS DESECHOS QUE LA CUCHILLA GIRATORIA PUEDA ARROJAR.
• Libere la palanca de control para apagar la podadora si cruza un área con gravilla (la cuchilla podría arrojar piedras).
• Coloque la podadora en la altura de corte más alta cuando pode suelos duros o malezas altas.
• Para que la trituración sea efectiva, no corte césped húmedo ya que tiende a pegarse en el lado inferior de la plataforma y,
de esta manera, los recortes de césped no se trituran correctamente. Es posible que el césped nuevo o espeso necesite
un corte más angosto. La velocidad en el suelo debe ajustarse según la condición del césped. Si no ha podado y el
césped ha crecido más de 10 cm, pódelo dos veces para reducir su altura a un máximo de 8,3 cm.
• Camine a un ritmo constante y adecuado. Superponga las las. No deje que el césped crezca demasiado. En caso de
que esto suceda, comience en la posición de corte más alta y luego baje a la altura de corte deseada..
ADVERTENCIA
Si usted golpea un objeto extranjero, para el motor y quita la batería. Inspeccione minuciosamente si la podadora se dañó.
Repare los daños antes de usar la podadora. La vibración excesiva de la podadora durante su funcionamiento advierte un
daño. Inspeccione minuciosamente la podadora y repare los daños antes de usarla.
FUNCIONAMIENTO
18
VACIADO DE LA BOLSA PARA ENSA CAR LA HIER BA
(Consulte la gura 11)
• Detenga la podadora de césped, deje que las hojas se detengan
por completo y retire la batería.
• Levante la cubierta de descarga trasera.
• Levante la bolsa para ensacar la hierba por el mango para
retirarla de la podadora.
• Vierta el césped triturado para vaciar la bolsa.
• Levante la cubierta de descarga trasera y reinstale la bolsa para
ensacar la hierba como se ha descrito anteriormente en este
manual.
Fig. 11
Not for Reproduction
Page 75

PROCEDIMIENTO DE CARGA
NOTA: La batería no se envía completamente cargada. Se recomienda cargarla completamente antes de usarla por
primera vez para garantizar que se pueda obtener el máximo tiempo de funcionamiento. Esta batería de ión de litio no
desarrolla memoria y se le puede cargar en cualquier momento.
Carga a baja tensión:
Si la batería ha estado guardada con muy poca o ninguna carga durante un período largo de tiempo, el cargador se
pondrá en modo de recuperación, lo que signica que le llevará 20 horas cargar completamente la batería. Esto mejorará
la vida útil de la batería. Una vez que se ha cargado completamente, en la siguiente carga, volverá al modo de carga
estándar.
1. Enchufe el cargador en un tomacorriente de CA.
2. Coloque el paquete de baterías en el cargador.
Este es un cargador con diagnóstico. Las lámparas LED del cargador se iluminan de acuerdo a un orden especíco para
indicar el estado actual de la batería. Ellos son los siguientes:
19
BATERÍA Y EL CARGADOR
Nota de defecto falso:
Cuando la batería es insertada en el cargador y la luz LED enciende intermitentemente en ROJO, quite la batería por
1 minuto y luego vuelva a insertarla. Si la luz LED enciende intermitentemente en VERDE, la batería está cargando
de manera adecuada. Si la luz LED todavía enciende intermitentemente en ROJO, quite la batería y desconecte
el cargador por 1 minuto. Después de 1 minuto, conecte el cargador y vuelva a insertar la batería. Si la luz LED
enciende intermitentemente en VERDE, la batería está cargando de manera adecuada. Si la luz LED todavía enciende
intermitentemente en ROJO, la batería tiene un defecto y debe ser reemplazada.
LUZ DE LED DESCRIPCIÓN
Verde
Ve
rde intermitente
Roja Sobrecalentamiento
Roja intermitente
Carga fallida
Cargando Sobre–
calentmiento
Carga fallidaCarga
completa
Carga completa
Cargando
Not for Reproduction
Page 76

MONTAJE DEL CARGADOR
1. Este cargador se puede instalar en una pared atornillándolo con dos #8 tornillos (no incluidos).
2. Localice el lugar en el que quiere colgar el cargador.
3. Si la pared es de madera, utilice dos tornillos especiales para madera (no incluidos).
4. Taladre dos hoyos en el centro, a una distancia de 11,43 cm, y asegúrese de que estén alineados verticalmente.
5. Si la pared es de yeso, utilice anclajes (no incluidos) y tornillos especiales para colgarlo.
6. Este cargador de potencia está diseñado para colocarse en posición vertical o sobre el suelo.
20
BATERÍA Y EL CARGADOR
NOTA: Si no va a utilizar la batería y el cargador durante un periodo largo de tiempo, retire la batería del cargador y
desenchufe el cable de alimentación de CA.
Not for Reproduction
Page 77

MANTENIMIENTO
CAMBIO DE LA CUCHILLAE (Consulte la gura 12-13)
ADVERTENCIA
Para reducir el riesgo de descarga eléctrica, no exponga la podadora al agua. Se debe limpiar el lado inferior de la
plataforma de la podadora después de cada uso, ya que se acumulan recortes de césped, hojas, suciedad y otros
desechos, y producen óxido y corrosión.
• Retire la batería.
• Use guantes acolchados de cuero y calce un bloque de madera entre la cuchilla y la plataforma de la podadora a n de
evitar que la cuchilla gire cuando se retire la perilla (1).
• Utilice un casquillo o una llave de 27 mm para aojar la perilla (1) y sacar la cuchilla (2). Gire la tuerca “EN DIRECCIÓN
CONTRARIA A LAS MANECILLAS DEL RELOJ” para aojarla y “EN LA MISMA DIRECCIÓN QUE LAS MANECILLAS
DEL RELOJ” para ajustarla.
• Retire la perilla (1) y la cuchilla (2).
• Para volver a colocar la cuchilla, póngala con los bordes cortantes en dirección a la tierra. Ensamble la perilla como
se muestra a continuación. Apriete la tuerca de la hoja hacia abajo en el sentido horario y con una llave de torsión (no
incluida) para asegurar que el tornillo esté bien apretado. El torque recomendado para el tornillo de la cuchilla es 24-27
lb-ft (33-37 Nm).
NOTA: asegúrese de cambiar las partes en el mismo orden en el que se retiraron. Cuando coloque la cuchilla, verique que
los extremos curvos apunten a la plataforma de la podadora y no a la tierra.
21
Fig. 13Fig. 12
(2)
(1)
Not for Reproduction
Page 78

MANTENIMIENTO
LIMPIEZA DE LA PODADORA
ADVERTENCIA
Para reducir el riesgo de descarga eléctrica, no exponga la podadora al agua. Se debe limpiar el lado inferior de la
plataforma de la podadora después de cada uso, ya que se acumulan recortes de césped, hojas, suciedad y otros
desechos, y producen óxido y corrosión.
Retire toda acumulación de césped y hojas en y alrededor de la cubierta del motor (no use agua). Limpie la podadora
con un paño seco de vez en cuando. Si se acumulan desechos en el lado inferior de la unidad mientras la está usando,
detenga el motor desconéctelo del suministro de electricidad. Incline la podadora hacia adelante o hacia un lado y raspe
el lado inferior hasta limpiarlo con una herramienta apropiada.
ALMACENAJE DEL CORTACÉSPED
Debe seguir los pasos a continuación antes de guardar la podadora de césped.
• Limpie la podadora según las instrucciones anteriores.
• Inspeccione y cambie o ale la cuchilla de ser necesario. Consulte la sección de mantenimiento.
• Lubricar la podadora.Almacene la podadora en un área seca y limpia. No la almacene cerca de materiales corrosivos,
como fertilizantes y cloruro sódico.
• Guarde la podadora en un lugar fresco y seco bajo techo, fuera del alcance de los niños. No la cubra con una lámina de
plástico sólido, ya que el plástico atrae humedad alrededor de la podadora y produce corrosión.
• Saque la batería y almacénela en un lugar fresco y seco, si es posible. Para aumentar la vida útil de la batería cárguela
cada dos semanas al no estar en uso..
• Quite la llave y guárdela en un lugar seguro fuera del alcance de los niños. Para almacenarla no es necesario quitar la batería.
ADVERTENCIA
Esta batería debe cargarse cada 3 meses cuando está guardada para mantener su capacidad al máximo.
• Cuando repare la podadora, utilice únicamente piezas de repuestos disponibles del fabricante. Para obtener piezas
de repuesto, llame a la línea de ayuda gratuita al 1-800-317- 7833. Si se utilizan piezas que no cumplen con las
especicaciones del equipo original,es posible que el rendimiento sea inadecuado y se vea comprometida la seguridad.
• Antes de limpiar, reparar o inspeccionar la podadora, verique que la cuchilla y todas las piezas con movimiento se
hayan detenido por completo, y retire la llave. A n de evitar arranques accidentales, retire la llave cuando la podadora
no está siendo usada. Retire la batería cuando realice ajustes o cuando cualquiera de las cuatros ruedas tiene que
levantarse del piso.
• Siga las instrucciones de lubricación y cambio de accesorios.
• Mantenga las manijas secas, limpias y sin aceite ni grasa.
• Para reducir el riesgo de incendio, mantenga el motor libre de acumulaciones de césped, hojas y desechos.
• A menduo verique que permos de montaje del motor y la cuchilla esten bien ajustados. Inspeccione visualmente si la
cuchilla está dañada (es decir, si está doblada, agrietada o desgastada).
• Mantenga la podadora con cuidado para el mejor y más seguro funcionamiento. Mantenga la cuchilla alada y limpia.Las
cuchilla estan alidas y pueden cortar.Envuela las cuchilla o use guantes. Realice las reparaciones con extremo cuidado.
• Mantenga tuercas, pernos y tornillos ajustados para asegurarse de que el equipo se encuentre en una condición de
trabajo segura.
• No manipule los dispositivos de seguridad. Verique su correcto funcionamiento regularmente.
• Si choca un objeto extraño, detenga el motor y cambie el pasador de seguridad. Inspeccione minuciosamente si la
podadora se dañó. Repare los daños antes de usar la podadora.
• Los componentes de la podadora pueden desgastarse y dañarse, y esto a su vez puede exponer las piezas en
movimiento y permitir que se arrojen objetos. Como una precaución deseguridad, revise frecuentemente los
componentes y cambie aquéllos que muestren signos de desgaste o daño.
• Cuando no esté en uso, guarde la podadora en un lugar seco bajo techo y fuera del alcance de los niños.
ADVERTENCIA
Al dar servicio o transportar la podadora quite siempre la batería.
22
Not for Reproduction
Page 79

MANTENIMIENTO
23
FUNCIÓN DE ALMACENAMIENTO VERTICAL (Consulte la gura 14 )
• Retire la batería del cortacésped. Retire la bolsa de colector de césped.
• Gire las perillas del mango a la posición de desbloqueo.
• Baje el conjunto del mango y gire las manillas del mango a la posición de bloqueo.
• Levante el cortacésped por la parte delantera a la posición vertical.
ADVERTENCIA
Siempre retire la batería el cortacésped antes de colocar la unidad en la posición de almacenamiento vertical.
INTERRUPTOR DE ALMACENAJE:
Cuando se gira completamente la manija a la posición de almacenaje, la podadora está equipada con un interruptor
secundario (1) que deshabilitará la podadora para que no se encienda en la posición de almacenaje. El interruptor
secundario (1) no reemplaza la necesidad de retirar la llave de seguridad y la batería para evitar un arranque accidental o
el uso no autorizado.
Posición de bloqueo
Posición de desbloqueo
Fig. 14
(1)
Not for Reproduction
Page 80

Las baterías que se utilizan en el paquete de baterías de esta podadora contienen los siguientes materiales tóxicos y
corrosivos: ION DE LITIO.
ADVERTENCIA
Se debe desechar los materiales tóxicos de la forma especificada para evitar contaminar el medio ambiente. Antes de
desechar los paquetes de baterías de ión de litio dañados o desgastados, póngase en contacto con su agencia local
para eliminación de desechos para obtener información e instrucciones específicas. Lleve las baterías a un centro local
para reciclaje o eliminación, certicado para eliminación. Si el paquete de baterías se raja o se quiebra, ya sea que tenga
fugas o no, no lo vuelva a cargar y no lo use. Deséchelo y reemplácelo con un paquete de baterías nuevo. ¡NO INTENTE
REPARARLA!
Obedezca las siguientes instrucciones para evitar lesiones y riesgos de incendio, explosión o choques eléctricos y para
evitar daños al medio ambiente:
• Para evitar lesiones y riesgo de incendio, explosión y descarga eléctrica, así como daños al medio ambiente: Cubra las
terminales de la batería con cinta adhesiva para trabajo pesado.
• NO intente retirar ni destruir ninguno de los componentes del paquete de batería.
• NO intente abrir el paquete de batería.
• Si se produce una fuga, los electrolitos liberados son corrosivos y tóxicos. NO introduzca el líquido enlos ojos, no lo
coloque en la cara ni lo trague.
• NO coloque las baterías en la basura común de su casa.
• NO las incinere.
• NO las coloque en lugares en los formarán parte de cualquier basural o ujo municipal de residuos sólidos.
• Colóquelas en un centro de reciclaje o eliminación certicado.
24
ELIMINACIÓN DE LA BATERÍA QUE NO DAÑA EL MEDIO AMBIENTE
Not for Reproduction
Page 81

SOLUCIÓN DE PROBLEMAS
25
PROBLEMA CAUSA POSIBLE SOLUCIÓN
La podadora no
arranca.
La batería no tiene carga. Cargue la batería.
El interruptor de control está
dañado.
Sustituya el interruptor (póngase en contacto con un centro de
servicio autorizado).
Pasto pegado al lado de la
hoja.
Quite beteria.Verique bajo plataforma para asegurar que césped
no sea atascado luego a la hoja.
La batería no es conectada al
motor.
Revise la conexión entre el conector del motor y la batería.
Asegúrese de que la batería se coloca en su lugar haciendo clic.
La batería puede requerir
servicio o reemplazo.
Póngase en contacto con un centro de servicio autorizado o
sustituya la batería.
La podadora corta
el césped de forma
despareja.
El césped es escabroso o
desparejo.
Revise el área a podar.
La altura de corte no se ajustó
correctamente.
Mueva las ruedas a una conguración más alta.
La podadora
no trituramulch
correctamente.
Hay recortes de césped
húmedo pegados en el lado
inferior de la plataforma.
Espere a que el césped se seque antes de podar.
El tapón de la función para
cubrimiento con hojarasca no
está en su lugar.
Instalación de la clavija para compuesto orgánico.
La podadora to es
pesada para empujar.
La grama está muy larga o la
altura de corte está muy baja.
Aumente la altura de corte.
La parte trasera de la carcaza
de la podadora y la cuchilla se
traban debido a que la grama
es muy densa.
Vacíe la bolsa para recolección de grama.
La podadora produce
ruidoand y vibración
excesivos.
El eje del motor está doblado. Detenga el motor y compruebe si hay daños.
La cuchilla no está
equilibrada.
Repárelos antes volver a arrancar. Si la vibración continúa,
póngase en contacto con un centro de servicio autorizado.
Not for Reproduction
Page 82

GARANTÍA LIMITADA
Briggs & Stratton se compromete a que, durante el período de garantía especicado a continuación, reparará o sustituirá,
de manera gratuita, cualquier pieza con defectos de material o fabricación, o de ambos. El comprador deberá correr con los
gastos de transporte del producto que envíe para reparación o reemplazo al amparo de esta garantía. Esta garantía tiene
vigencia y está sujeta a las condiciones que se establecen más adelante. Para el servicio de garantía, busque el distribuidor
de servicio autorizado más cercano en el mapa localizador de distribuidores en www.SNAPPER.com. El comprador debe
ponerse en contacto con el distribuidor autorizado y poner el producto a disposición del mismo para que lo inspeccione y lo
pruebe.
No existe otra garantía expresa. Las garantías implícitas, inclusive aquellas de comerciabilidad y de idoneidad para
un propósito en particular, se limitan al período de garantía expresado abajo, o hasta los límites permitidos por la
ley. La responsabilidad por daños fortuitos o indirectos está excluida en tanto lo permita la ley. Algunos países o
estados no permiten limitar la duración de una garantía implícita ni excluir o limitar los daños secundarios y derivados. Por
tanto, es posible que las limitaciones y exclusiones mencionadas no sean aplicables en su caso. Esta garantía le otorga
derechos legales especícos, y también podría tener otros que varían según el estado o el país.**
PERÍODO DE GARANTÍA
Uso particular Uso comercial
Equipo 60 meses 90 días
Cargador de batería y la batería 24 meses Ninguno
** En Australia, nuestros productos están cubiertos por garantías ineludibles de acuerdo con la legislación sobre consumo
de este país. Tiene derecho a un recambio o devolución en caso de avería grave y a una compensación por las posibles
pérdidas o daños razonables previsibles. Asimismo, si la vería no es grave, tiene derecho a que se reparen o reemplacen
los productos si no tienen una calidad aceptable. Para servicio de garantía, localice al distribuidor de servicio autorizado más
cercano con nuestro mapa en BRIGGSandSTRATTON.COM, llame al 1300 274 447, o bien, envíe un correo electrónico
a salesenquires@briggsandstratton.com.au, o escriba a Briggs & Stratton Australia Pty Ltd, 1 Moorebank Avenue, NSW,
Australia, 2170.
El período de garantía comienza en la fecha de compra por el primer consumidor o usuario comercial nal. «Uso particular»
signica uso doméstico residencial personal por un consumidor minorista. «Uso comercial» signica los demás usos, lo que
incluye el uso para propósitos comerciales, generar ingresos o alquiler. Una vez que el producto se haya usado para nes
comerciales, de ahí en adelante se considerará uso comercial a efectos de esta garantía.
A n de garantizar una pronta y completa cobertura de la garantía, registre su producto en el sitio web que se muestra arriba
o en www.onlineproductregistration.com, o envíe por correo la tarjeta de registro diligenciada (si se suministra), o llame al
1-800-743-4115 (en los EE. UU.).
Guarde el recibo comprobante de compra. Si no se proporciona una prueba de la fecha de compra inicial en el momento se
solicitar servicio de garantía, se utilizará la fecha de fabricación del producto para determinar el período de garantía. No es
necesario el registro del producto para obtener el servicio de garantía de los productos Briggs & Stratton.
26
Not for Reproduction
Page 83

27
ACERCA DE LA GARANTÍA
El servicio de garantía solo está disponible a través de los distribuidores de servicio autorizados de Snapper. La mayor parte
de las reparaciones bajo garantía se atienden de manera rutinaria, pero algunas veces las solicitudes de reparaciones bajo
garantía podrían no ser apropiadas Esta garantía SÓLO cubre defectos en materiales y mano de obra. No cubre los daños
ocasionados por un uso no adecuado o un mal uso, un mantenimiento o unas reparaciones inadecuadas ni el desgaste y la
rotura propios del uso.
Uso no adecuado y mal uso: el uso correcto y para el que se ha diseñado este equipo se describe en el manual del usuario.
Si el producto no se usa de la manera que se describe en el manual del usuario o si el producto se usa después de que haya
resultado dañado, quedará anulada la garantía. La garantía queda anulada si se ha borrado el número de serie del producto
o el producto ha sido modicado de alguna manera, o si el producto presenta indicios de haber sido usado incorrectamente,
por ejemplo, daños producidos por un impacto o daños producidos por corrosión química/agua.
Mantenimiento o reparaciones inadecuadas: el producto debe someterse a labores de mantenimiento de acuerdo con los
procedimientos y plazos establecidos en el manual del usuario, y para el mantenimiento y las reparaciones se deben utilizar
piezas Briggs & Stratton originales o equivalentes. La garantía no cubre los daños ocasionados por la falta de mantenimiento
o el uso de piezas no originales.
Desgaste normal: al igual que otros dispositivos mecánicos, el producto está sujeto a desgaste incluso si se realiza un
mantenimiento correcto. Esta garantía no cubrirá la reparación cuando el uso normal haya agotado la vida útil de una pieza o
del aparato. Los accesorios y elementos de mantenimiento como ltros, correas, hojas cortantes y pastillas de freno (excepto
las pastillas de freno de los motores) no están cubiertos por la garantía por sus propias características, a no ser que la causa
sea un defecto del material o de fabricación.
Otras exclusiones: esta garantía excluye cualquier daño provocado por accidente, uso incorrecto, modificaciones,
alteraciones, mantenimiento incorrecto, congelación o deterioro producido por productos químicos. También excluye
cualquier complemento o accesorio que no se incluyera en el paquete original del producto. Esta garantía no incluye equipos
o motores usados, reacondicionados, de segunda mano o de demostración. Esta garantía excluye los fallos debidos a
hechos fortuitos y a otros acontecimientos de fuerza mayor que escapan al control del fabricante.
GARANTÍA LIMITADA
Not for Reproduction
Page 84

388062367 Rev: 00 (07-18-17)
LÍNEA DE AYUDA GRATUITA: 1-800-317-7833
Briggs & Stratton Corporation
P.O. Box 702
Milwaukee, WI 53201
Not for Reproduction
 Loading...