

Page 1

Please do not return product to retailer.
Not for Reproduction
Por favor, no devuelva el producto al lugar de compra.
1-800-317-7833
www.snapper.com
Instruction Manual
Manual de Instrucciones
ENGLISH ESPAÑOL
60V Axial Blower
Model SB60V
WARNING
Read and follow all Safety Rules and Operating Instructions before
using this product. Failure to do so can result in serious injury.
ADVERTENCIA:
Lea el manual de instrucciones y siga todas las advertencias e
instrucciones de seguridad. El no hacerlo puede resultar en
lesiones graves.
Briggs & Stratton Power Products Group, LLC
Milwaukee, WI, USA
Rev. 01 11/15/15
:
1
Page 2
CONTENTS
Not for Reproduction
Identication of Safety Symbols 2
Product Specications 3
Safety Rules 4
Assembly 7
Operation 9
Maintenance 11
Troubleshooting Table 12
Exploded View 13
Parts List 14
Limited Warranty Statement 15
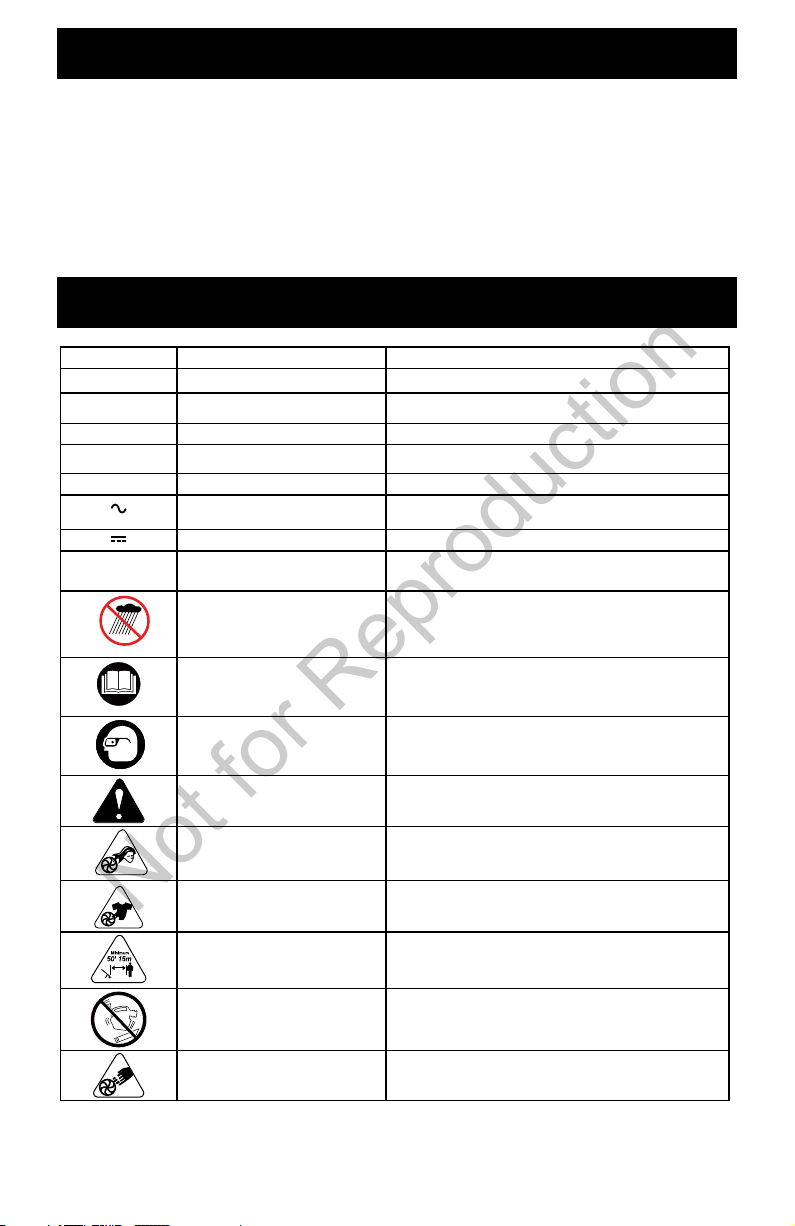
IDENTIFICATION OF SAFETY SYMBOLS
SYMBOL NAME DESIGNATION/EXPLANATION
V
A
Hz Hertz Frequency (cycles per second)
W
min Minutes Time
/min
Volts Voltage
Amperes Current
Watts Power
Alternating Current Type of current
Direct Current Type or a characteristic of current
Per Minute
Wet Conditions Alert Do not expose to rain or use in damp locations
Read The Operator’s Manual
Wear Eye Protection
Revolutions, strokes, surface speed, orbits etc.,
per minute
To reduce the risk of injury user must read and
understand operator’s manual before using this
product.
Always wear eye protection with side shields
marked to comply with ANSI Z87.1 with
operating this equipment
Safety Alert Precautions that involve your safety.
Long Hair
Loose Clothing
Keep Bystanders Away Keep all bystanders at least 50 ft. away.
Blower Tubes Do not operate without tubes in place.
Impeller Blades
Failure to keep long hair away from the air inlet
could result in personal injury.
Failure to keep loose clothing from being drawn
into air intake could result in personal injury.
Rotating impeller blades can cause severe
injury.
2
Page 3

IDENTIFICATION OF SAFETY SYMBOLS
Not for Reproduction
The following signal words and meanings are intended to explain the levels of risk associated
with this product.
Symbol Name Designation/Explanation
DANGER
WARNING
CAUTION
CAUTION
Indicates an imminently hazardous situation, which, if not
avoided, could result in death or serious injury.
Indicates a potentially hazardous situation, which, if not avoided,
could result in death or serious injury.
Indicates a potentially hazardous situation, which, if not avoided,
may result in minor or moderate injury.
(Without Safety Alert Symbol) Indicates a situation that may
result in property damage.
SPECIFICATIONS
Motor: 60v Brushless Motor
Air Volume: 450 CFM
Air Speed (Max): 120 MPH
Speed Control: Variable Speed (with Cruise Control)
Unit Weight (without battery): 5.1 lbs
Unit Weight (with battery): 7.4 lbs
Included Battery Pack: SBA2560V
Charger: SCH60V
Compatible Battery Packs (sold separately):
SBA260V - 60V 2 Ah Battery
SBA2560V - 60V 2.5 Ah Battery
SBA460V - 60V 4 Ah Battery
3
Page 4

GENERAL SAFETY RULES
Not for Reproduction
READ ALL INSTRUCTIONS
READ AND UNDERSTAND ALL
INSTRUCTIONS. Failure to follow all
instructions listed below may result in electric
shock, re and/or serious personal injury.
WARNING:
safety precautions must be followed. For your
own safety and that of bystanders, please
read these instructions before operating the
device. Do not use the device without reading
the instruction manual. Please keep the
instruction manual safe for later use.
READ ALL INSTRUCTIONS
BEFORE USING (THIS BLOWER)
• Do not leave appliance plugged in. Unplug
from outlet when not in use and before
servicing.
• Do not allow to be use as a toy. Close
attention is necessary when used by or
near children.
• Use only as described in this manual.
Use only manufacturer’s recommended
attachments.
• Do not use with a damaged plug or cord. If
the tool is not working as it should, or if it
has been dropped, damaged, left outdoors,
or dropped into water, return it to an
authorized service centre.
• Do not pull or carry by the cord, use the
cord as a handle, close a door on a cord,
or pull the cord around sharp edges or
corners. Do not run appliances over the
cord. Keep the cord away from heated
surfaces.
• Do not unplug by pulling on the cord. To
unplug, grasp the plug, not the cord.
• Do not handle the plug or any other
appliances with wet hands.
• Do not put any object into openings. Do
not use with any opening blocked. Keep
openings free of dust, lint, hair, and
anything that may reduce air ow.
• Keep hair, loose clothing, ngers and
all body parts away from openings and
moving parts.
• Turn off all controls before unplugging.
• Use extra care when cleaning on stairs.
• Do not use to pick up ammable or
combustible liquids, such as gasoline, or
use in areas where they may be present.
WHEN USING (THIS BLOWER)
• Do not operate power tools in an explosive
atmosphere, such as in the presence of
ammable liquids, gases, or dust. Power
tools create sparks that may ignite the dust
or fumes.
When using this device,
• To reduce the risk of electric shocks, this
tool has a polarized plug (one blade is
wider than the other) and will require the
use of a polarized extension cord. The
plug will only t into a polarized extension
cord one way. If the plug does not t fully
into the extension cord, reverse the plug.
If the plug still does not t, obtain a correct
polarized extension cord. A polarized
extension cord will require the use of a
polarized wall outlet. This plug will only t
into the polarized wall outlet one way. If the
plug does not t fully into the wall outlet,
reverse the plug. If the plug still does not
t, contact a qualied electrician to install
the proper wall outlet. Do not change the
equipment plug, extension cord receptacle,
or extension cord plug in any way.
• Avoid body contact with grounded surfaces
such as pipes, radiators, ranges, and
refrigerators. There is an increased risk of
electric shock if your body is grounded.
• Do not expose power tools to rain or wet
conditions. Water entering a power tool will
increase the risk of electric shock--Store
indoors.
• Do not handle or plug-in tools with wet
hands.
• Never allow children to operate the
equipment. Never allow adults to operate
the equipment without proper instruction.
• Wear eye protection that is marked to
comply with ANSI Z87.1 when operating
this product.
• Wear heavy long pants, boots, and gloves.
Avoid loose garments or jewellery that
could get caught in moving parts of the
machine or its motor.
• Do not force the tool. Use the correct tool
for your application. The correct tool will
work more efciently and safely when it
is used at the rate that it was designed to
work at.
• Do not operate the equipment while
barefoot or when wearing sandals or similar
lightweight footwear. Wear protective
footwear that will protect your feet and
improve your footing on slippery surfaces.
• Secure long hair so it is above shoulder
level to prevent entanglement in any
moving parts.
• Keep rm footing and balance. Do not
overreach. Overreaching can result in loss
of balance.
• Do not allow children or untrained
individuals to use this unit.
• Avoid accidental start-ups. Be sure the
power switch is not on before plugging in.
Turn off power switch before unplugging.
• Do not use the tool if the switch does not
turn it on or off. Any tool that cannot be
4
Page 5

GENERAL SAFETY RULES
Not for Reproduction
controlled with the switch is dangerous,
and must be repaired.
• Do not leave the tool unattended when
plugged in. Unplug from the power outlet
when not in use, before servicing, and
before storing the tool. Such preventative
safety measures reduce the risk of starting
the tool accidentally.
• Keep all bystanders, children, and pets at
least 50’ (15 m) away.
• For household use only.
• Use only Snapper batteries (Model
SBA260V, SBA2650V, and SBA460V)
• Do not operate this unit when you are tired,
ill, or under the inuence of alcohol, drugs,
or medication.
• Do not operate in poor lighting.
• Keep all parts of your body away from any
moving parts and all hot surfaces of the
unit.
• Do not put any object into openings. Do
not use with any opening blocked. Keep
openings free of dust, lint, hair, and
anything that may reduce air ow.
• Check the work area before each use.
Remove all objects that can be thrown or
become entangled in the machine, such as
rocks, broken glass, nails, wire, or string.
• Use only identical manufacturer’s
replacement parts and accessories. Use
of any other parts may create a hazard or
cause product damage.
FOR BATTERY-OPERATED APPLIANCE
• Prevent unintentional starting. ensure
the switch is in the off-position before
connecting to battery pack, picking up
or carrying the appliance. carrying the
appliance with your nger on the switch or
energizing appliance that have the switch
on invites accidents.
• Disconnect the battery pack from the
appliance before making any adjustments,
changing accessories, or storing appliance.
Such preventive safety measures
reduce the risk of starting the appliance
accidentally.
• Recharge only with the charger specied
by the manufacturer. A charger that is
suitable for one type of battery pack may
create a risk of re when used with another
battery pack.
.
:
• Use appliances only with specically
designated battery packs. Use of any other
battery packs may create a risk of injury
and re.
• When battery pack is not in use, keep it
away from other metal objects, like paper
clips, coins, keys, nails, screws or other
small metal objects, that can make a
connection from one terminal to another.
Shorting the battery terminals together
may cause burns or a re.
• Under abusive conditions, liquid may be
ejected from the battery; avoid contact.
If contact accidentally occurs, ush with
water. If liquid contacts eyes, additionally
seek medical help. Liquid ejected from the
battery may cause irritation or burns.
• Do not use a battery pack or appliance
that is damaged or modied. Damaged
or modied batteries may exhibit
unpredictable behavior resulting in re,
explosion or risk of injury.
• Do not expose a battery pack or appliance
to re or excessive temperature. Exposure
to re or temperature above 212°C may
cause explosion.
• Have servicing performed by a qualied
repair person using only identical
replacement parts. This will ensure that the
safety of the product is maintained.
SAVE THESE INSTRUCTIONS
SERVICE
Tool service must be performed only by
qualied repair personnel. Service or
maintenance performed by unqualied
personnel may result in a risk of injury. Please
call 1-800-317-7833 for customer support.
5
Page 6

GENERAL SAFETY RULES
Not for Reproduction
CHILD SAFETY
Tragic accidents can occur if the operator is
not aware of the presence of children.
• Keep children out of the working
area and under the watchful care of a
responsible adult.
• Do not allow children under the age
of 14 to operate this blower. Children
who are 14 years of age and older must
read and understand the operating
instructions and safety rules in this
manual and must be trained and
supervised by a parent.
• Stay alert, and turn the blower off if a
child or any other person enters the
working area.
• Use extreme care when approaching
blind corners, doorways, shrubs, trees,
or other objects that may obscure your
view of a child who may run into the
path of the blower.
WARNING:
Some dust created by power sanding, sawing,
grinding, drilling, and other construction
activities contains chemicals known to cause
cancer, birth defects or other reproductive
harm. Some examples of these chemicals
are:
• Lead from lead-based paints
• Crystalline silica from bricks and cement
and other masonry products, and
• Arsenic and chromium from chemically
treated lumber.
Your risk of exposure to these chemicals
varies depending on how often you do this
type of work. To reduce your exposure to
these chemicals, work in a well-ventilated
area, and work with approved safety
equipment, such as dust masks that are
specially designed to lter out microscopic
particles.
SAVE THESE INSTRUCTIONS
(PROPOSITION 65)
6
Page 7

ASSEMBLY
Not for Reproduction
PACKING LIST
PART NAME FIGURE QTY
60V Blower
Blower Tube
60V 2.5Ah Battery
60V Charger
Operator’s
Manual
Quick
Start Guide
Lea el manual de instrucciones y siga todas las advertencias e
instrucciones de seguridad. El no hacerlo puede resultar en
lesiones graves.
AVERTISSEMENT:
Lirelemanueld’instructions et bien respectert ousl es avertissementsettoutesles instructionsde sécurité.Toutdé fautde le fair e
pourraitentraînerdesblessuresg raves.
Briggs & Stratton Power Products Group, LLC
Milwaukee, WI, USA
Rev. 00 07/30/15
2
STARTING/STOPPING THE TRIMMER
2
Missing parts, accessories or need a service center?
Call: 1-800-317-7833 www.snapper.com
WARNING:
Read and follow all Safety Rules and Operating Instructions before
using this product. Failure to do so can result in serious injury.
ADVERTENCIA:
BRUSHLESS STRING TRIMMER
WARNING:
must read and understand the operator's manual before using this product.
1
INSTALLING AN ATTACHMENT TO THE POWER HEAD
4
2
3
5
1
ATTACHING THE AUXILIARY HANDLE
1
3
2. Place one hand on the trigger handle.
Place the other hand on the auxiliary
handle.
3. Press and hold the lock-out button (2)
and squeeze the switch trigger (1). The
string trimmer will turn ON.
4. Release the lock-out button. The string
trimmer will stay on as long as the switch
1
trigger is held.
5. Release switch trigger to stop.
Do Not Return to Store
Pleasedonot return product to retailer.
Porfavor,nod evuelva el producto al lugard ec ompra.
Veuilleznepasr etourner le produita ud étaillant.
1-800-317-7833
www.snapper.com
InstructionManual
ManualdeI nstrucciones
Manueld’Instructions
60V LITHIUM-ION
CORDLESS STRING TRIMMER
Model ST60V
F
R
A
N
Ç
A
I
S
60V LITHIUM-ION
QUICK START GUIDE
ST60V
This Quick Start Guide is not a substitute for reading the operator's manual. To reduce the risk of injury or death, user
ATTACHING THE GUARD
1. Invert the string trimmer to access the
trimmer head.
2. Remove supplied screws (1) from the
trimmer head (4) with a philips
2
screwdriver (not included).
3
3. Place the guard (2) on to the trimmer
4
head.
4. Align the screw holes (3) on the guard
with the screw holes on the trimmer head.
5. Insert the screws into the trimmer
head, fastening the guard in place using a
Phillps head screwdriver (not included).
Note: Remove the rubber insert that is
located in the shaft prior to assembling
the string trimmer.
1. Loosen the attachment knob (1) on the
5
coupler (5).
2. Push in the release button (2) located
on the attachment shaft (3). Align the
LOOSEN
release button with the positioning hole
(4) and slide the two shafts together.
TIGHTEN
1
Rotate the attachment shaft until the
button locks into the positioning hole.
3. Tighten the attachment knob securely.
1. Press the auxiliary handle (1) onto the
power head shaft so that the handle is
angled toward the rear handle that allows
for comfortable operation.
2. Slide the auxiliary handle over the
holder (2) and ensure the holder fits
between the slots on the auxiliary handle.
3. Align the holes on the auxiliary handle
with the holes on holder.
4. Insert the handle knob (3) through the
auxiliary handle.
5. Tighten until there is no movement in
the handle.
1. Ensure a fully charged battery is
installed into the string trimmer.
APS
OÑ
L
EHS
1
1
1
1
E
N
ILG
1
1
WARNING:
entire Operator’s Manual and follow all
Read and understand
warnings and instructions. Failure to follow all
instructions may result in electric shock, re
and/or serious personal injury.
UNPACKING
This product requires assembly.
• Carefully remove the product and any
accessories from the box. Make sure that all
items listed in the packing list are included.
• Inspect the tool carefully to make sure
no breakage or damage occurred during
shipping.
• Do not discard the packing material until you
have carefully inspected and satisfactorily
operated the tool.
• If any parts are damaged or missing, please
call 1-800-317-7833.
WARNING:
if any parts on the packing list are already
assembled to your product when you unpack
it. Parts on this list are not assembled to the
product by the manufacturer and require
customer installation. Use of a product that
may have been improperly assembled could
result in serious personal injury.
WARNING:
damaged or missing, do not operate this
product until the parts are replaced. Use of
this product with damaged or missing parts
could result in serious personal injury.
Do not use this product
If any parts are
WARNING:
modify this product or create accessories not
Do not attempt to
recommended for use with this string trimmer.
Any such alteration or modication is misuse
and could result in a hazardous condition
leading to possible serious personal injury.
WARNING:
battery until assembly is complete. Failure to
Do not install the
comply could result in accidental starting and
possible serious personal injury.
7
Page 8

ASSEMBLY
Not for Reproduction
BATTERY INSTALLATION
1. Align the battery with the battery opening.
2. Grasp the blower handle rmly.
3. Insert the battery into the battery opening
until the battery release button locks into
place.
4. Push down on the battery until it locks into
place. You should hear a "click" once it is
installed.
BATTERY REMOVAL
1. Press the battery release button. This will
cause the battery to raise out of the tool.
2. Grasp the blower handle rmly. Pull the
battery pack out of the handle.
Battery release button
NOTE: The battery pack ts snugly into the
handle to prevent accidental dislodging. It
may require a strong pull to remove.
BLOWER TUBE ASSEMBLY
WARNING:
starting that could cause serious personal
injury, always remove the battery pack from
the tool when assembling parts.
GrooveTube
1. Align either of the grooves on the tube with
the tabs on the blower housing. Slide the tube
onto the blower housing until the tab engages
the grooves.
To prevent accidental
Tab
LockUnlock
IMPORTANT: The battery is not shipped fully
charged. It is recommended that the battery be
fully charged before initial use. With regular
use, the battery pack will take 1 hours or less
to fully charge. It is recommended that the
battery be charged every 3 months when the
blower is not in use.
2. Turn the tube in the direction of the arrow
until both of the tabs slide into the lock
positions.
Lock position
8
Page 9

OPERATION
Not for Reproduction
KNOW YOUR AXIAL BLOWER(See Figure 1)
The safe use of this product requires an understanding of the information in this instruction
manual as well as a knowledge of the project you are attempting. Before using this product,
familiarize yourself with all operating features and safety rules.
Cruise Control Lever
Switch Trigger
Blower Tube
TRIGGER
Starts/stops the ow of air through the blower.
BATTERY RELEASE BUTTON
Releases the battery pack from the blower
BLOWER TUBE
The blower tube can be easily installed on the blower without any additional tools.
.
Battery Release Button
60-volt Lithium-Ion
Battery
Fig. 1
CRUISE CONTROL LEVER
Allows you to lock-in the desired air ow.
9
Page 10

OPERATION
Not for Reproduction
WARNING:
with this product to make you careless.
Remember that a careless fraction of a
second is sufcient to inict serious injury.
WARNING:
attachments or accessories not recommended
by the manufacturer of this product. The
use of attachments or accessories not
recommended can result in serious personal
injury. Before each use, inspect the entire
product for damaged, missing, or loose
parts, such as screws, nuts, bolts, caps,etc.
Securely tighten all fasteners and caps and
do not operate this product until all missing or
damaged parts are replaced.
APPLICATION
You may use this product for the purposes
listed below:
• Clearing hard surfaces such as driveways
and walkways.
• Keeping decks and driveways free from
leaves and pine needles.
CHARGE BEFORE FIRST USE.
WARNING:
battery pack from the product when you
are assembling parts, making adjustments,
cleaning, or when not in use. Removing
battery pack will prevent accidental starting
that could cause serious personal injury.
STARTING/STOPPING THE BLOWER
(See Figure 2)
• Ensure that the battery is installed in the
blower.
• Squeeze the trigger to start the blower.
• Release the trigger to stop.
NOTE: This blower has a variable speed
trigger. To decrease the speed slowly release
the trigger switch to desired speed.
Do not allow familiarity
Do not use any
Always remove
CRUISE CONTROL LEVER (See Figure 3)
• Move the cruise control lever toward the
rear of the blower. This will increase the
air speed and ow.
• Release the cruise control lever once it
has reached the desire air speed.
• To stop the blower, move the cruise control
lever completely forward.
INCREASE
DECREASE/
OFF
Fig. 3
OPERATING THE BLOWER
• To keep from scattering debris, blow
around the outer edges of a debris pile.
Never blow directly into the center of a
pile.
• To reduce sound levels, limit the number of
pieces of equipment used at any one time.
• Use rakes and brooms to loosen debris
before blowing. In dusty conditions, slightly
dampen surfaces when water is available.
• Conserve water by using power blowers
instead of hoses for many lawn and
garden applications, including areas such
as gutters, screens, patios, grills, porches,
and gardens.
• Watch out for children, pets, open
windows, or cars, and blow debris safely
away.
• After using blowers or other equipment,
clean up. Dispose of debris properly.
Trigger
Fig. 2
10
Page 11

MAINTENANCE
Not for Reproduction
WARNING:
In order to avoid personal injury and
the risk of re and electric shock, remove the
battery pack before adjusting, inspecting, or
cleaning the blower.
CLEANING
Remove the battery pack.
1. Brush or blow dust and debris out of the
air vents using compressed air or a vacuum.
Keep the air vents free of obstructions,
sawdust, and wood chips. Do not spray, wash,
or immerse the air vents in water.
2. Wipe off the housing and the plastic
components using a moist, soft cloth. Do
not use strong solvents or detergents on the
plastic housing or plastic components. Certain
household cleaners may cause damage, and
may cause a shock hazard.
BATTERY PACK
• Store the battery pack charged.
• Once the charging light turns green,
remove the battery from the charger and
disconnect the charger from the outlet.
• Recharge the battery pack anytime you
have notice there is less power. Never
let the battery pack become completely
discharged.
• After charging, the battery pack may
be stored in the charger as long as the
charger is not plugged in.
11
Page 12

TROUBLESHOOTING TABLE
Not for Reproduction
WARNING:
recommended remedies below except remedies that require operation of the unit
PROBLEM POSSIBLE CAUSE SOLUTION
Unit will not start.
The unit will start, but air will
not ow through the tube.
Cruise Control Lever doesn't
work.
Always stop unit and remove the battery before performing all of the
1. To secure the battery pack, make
sure the battery is fully secured in the
1. Battery is not secure.
2. Battery is not charged.
3. Defective power switch.
Blocked tube.
The screw is loose.
blower. Refer to Installing the Battery
section in this manual.
2. Charge the battery pack according
to the instructions included with your
model.
3. Call 1-800-317-7833 for technical
service.
Inspect the intake vent and blower
tube for any blockage of air ow. If so,
remove the blockage.
Tighten the screw with a phillips head
screwdriver.
.
12
Page 13

EXPLODED VIEW
Not for Reproduction
3
2
5
4
6
1
13
Page 14

PARTS LIST
Not for Reproduction
ITEM NO. PART NO. DESCRIPTION QTY
1 34103811A Blower Tube 1
2 311011943 Blower Assembly 1
3 341051809B Rear Vent Housing 1
4 3220505A Rear Vent Screws 4
5 211011351 Battery 1
6 211011332 Charger 1
14
Page 15

LIMITED WARRANTY
Not for Reproduction
Sunrise Global Marketing, LLC hereby
warranties this product, to the original
purchaser with proof of purchase, for a
period of four (4) years against defects in
materials, parts or workmanship.
Sunrise Global Marketing, LLC, at its own
discretion will repair or replace any and all
parts found to be defective, through normal
use, free of charge to the customer. This
warranty is valid only for units which have
been used for personal use that have not
been hired or rented for industrial/ commercial
use, and that have been maintained in
accordance with the instructions in the
owners’ manual supplied with the product
from new.
Battery and charger carries a two (2) years
warranty against defects in workmanship
and materials. Batteries must be charged
in accordance with the operator’s manuals
directions and regulations in order to be valid.
Brushless motor carries a ten (10) year motor
warranty against defects in workmanship and
materials.
Items not covered by warranty:
1. Any part that has become inoperative due
to misuse, commercial use, abuse, neglect,
accident, improper maintenance, or alteration;
or
2. The unit, if it has not been operated and/
or maintained in accordance with the owner's
manual; or
3. Normal wear, except as noted below;
4. Routine maintenance items such as
lubricants, blade sharpening;
5. Normal deterioration of the exterior nish
due to use or exposure.
Snapper helpline
Warranty service is available by calling the
Snapper toll-free helpline, 9 a.m. to 5 p.m.
EST. at 1-800-317-7833
Transportation Charges:
Transportation charges for the movement
of any power equipment unit or attachment
are the responsibility of the purchaser. It
is the purchaser’s responsibility to pay
transportation charges for any part submitted
for replacement under this warranty unless
such return is requested in writing by Sunrise
Global Marketing, LLC.
15
Page 16

ÍNDICE
Not for Reproduction
Identication of Safety Symbols 16
Especicaciones del producto 17
Reglas generales de seguridad 18
Ensamblaje 21
Funcionamiento 24
Mantenimiento 25
Resolución de averías 26
Diagrama de componentes 27
Lista de piezas 28
Garantía 29
SÍMBOLOS
SÍMBOLO NOMBR E DESIGNACIÓN/EXPLICACIÓN
V
A
Hz Hertz Frecuencia (ciclos por segundo)
W
min Minutos Tiempo
/min
Voltios Voltaje
Amperios Corriente
Vatios Potencia eléctrica
Corriente alterna Tipo de corriente
Corriente directa Tipo o característica de la corriente
Por minuto
Alerta de condiciones
húmedas
Lea el manual del operador
Protección de los ojos y los
oídos
Revoluciones, carreras,velocidad supercial,
órbitas, etc. por minuto
No la exponga a la lluvia ni la use en lugares
húmedos o mojados
Para reducir el riesgo de lesiones el usuario
debe leer y comprender el manual del operador
antes de usar el producto.
Lleve siempre protección ocular con placas
laterales que lleven la marca de conformidad
ANSI Z87.1 y protección para los oídos cuando
utilice este equipo.
Alerta de seguridad Precautions that involve your safety.
Cabello largo
Ropa suelta
Mantenga alejados a los
espectadores
Tubo de soplado No opere sin los tubos en su lugar.
Impeller Blades
Si no se mantiene alejado el cabello largo de la
entrada de aire se podrían provocar lesiones
personales.
Si no se evita que la ropa suelta sea succionada
hacia la entrada de aire se podrían provocar
lesiones personales.
Mantenga a todos los espectadores a 15 m. (50
pies) de distancia por lo menos.
Las palas del rotor en movimiento pueden
causar lesiones graves.
16
Page 17

SÍMBOLOS
Not for Reproduction
Los siguientes rótulos y signicados se usan para explicar el nivel de riesgo relacionado con
este producto.
SÍMBOLO AVISO SIGNIFICADO
DANGER
Indica situaciones inminentemente peligrosas que, si no se
evitan, resultan en la muerte o en lesiones serias.
ADVERTENCIA
PRECAUCIÓN
PRECAUCIÓN
Indica situaciones potencialmente peligrosas que, si no se
evitan, podrían resultar en la muerte o en lesiones serias.
Indica situaciones potencialmente peligrosas que, si no
se evitan, podrían resultar en lesiones entre mínimas y
moderadas.
(Sin el símbolo de alerta por seguridad) indica una
situación que podría resultar en daños a la propiedad.
ESPECIFICACIONES
Motor: Motor sin escobillas de 60 V
Volumen de aire: 450 CFM
Velocidad del aire (Max): 120 MPH
Control de velocidad: Velocidad variable (con control de velocidad)
Peso (sin batería): 5.1 lbs
Peso da la unidad con la batería: 7.4 lbs
Incluye paquete de la batería: SBA2560V
Cargador: SCH60V
Baterías compatibles (se venden por
separado):
SBA260V - 60V 2 Ah Batería
SBA2560V - 60V 2.5 Ah Batería
SBA460V - 60V 4 Ah Batería
17
Page 18

REGLAS GENERALES DE SEGURIDAD
Not for Reproduction
• No use el aparato para recoger líquidos
ADVERTENCIA:
LIRE ET ASSIMILER LES PRÉSENTES
INSTRUCTIONS.Toute négligence à l'égard
des instructions fournies ci-après peut
être la cause d’un choc électrique, d’un
incendie ou d’un grave accident corporel.
ADVERTENCIA:
dispositivo, debe seguir las siguientes
instrucciones de seguridad. Por su propia
seguridad y la de los que le rodean, lea estas
instrucciones antes de utilizar el aparato. No
use el dispositivo sin haber leído el manual
de instrucciones. Conserve el manual de
instrucciones para futuras referencias.
LEA TODAS LAS INSTRUCCIONES
ANTES DEL PRIMER USO (DEL APARATO)
• Preste atención al aparato cuando esté
enchufado. Desenchufe el aparato de
la toma de corriente cuando no esté en
uso y antes de cualquier operación de
mantenimiento. No utilizar en el exterior o
sobre supercies mojadas.
• No permita que se utilice como juguete. Es
necesario prestar mucha atención cuando
se utiliza cerca de niños.
• Utilizar únicamente como se describe en
este manual. Utilice sólo los complementos
recomendados por el fabricante.
• No utilice un conector dañado. Si el
aparato no funciona como debería o si se
ha caído, se ha dañado, se ha dejado al
aire libre o se ha caído en agua, llévelo a
un centro de servicio autorizado.
• No tire ni lleve por el cable el aparato,
no use el cable como asa, no cierre una
puerta sobre el cable o pase el cable por
supercies y esquinas aladas. No use el
aparato sobre el cable. Mantenga el cable
lejos de supercies calefactadas.
• No desconecte el aparato tirando del
cable. Para desenchufar, tire el enchufe,
no del cable.
• No toque el enchufe ni ningún otro aparato
con las manos mojadas.
• No coloque ningún objeto en las aberturas.
No utilice con cualquier abertura
bloqueada. Mantenga las aberturas libres
de polvo, pelusas, pelo y cualquier cosa
que pueda reducir el ujo de aire.
• Mantenga el cabello, la ropa suelta, los
dedos y todas las partes del cuerpo
alejados de las aberturas y piezas móviles.
• Desactive todos los controles antes de
desenchufar.
• Tenga especial cuidado al limpiar en las
escaleras.
VEUILLEZ
Al utilizar este
combustibles o inamables, tales como
gasolina, ni en áreas donde estos puedan
estar presentes.
DURANTE EL USO (DEL APARATO)
• No opere herramientas eléctricas en
entornos explosivos, por ejemplo ante la
presencia de líquidos, gases o aserrín
inamables. Las herramientas eléctricas
producen chispas que podrían incendiar el
aserrín o los vapores.
• Para reducir el riesgo de descarga
eléctrica, esta herramienta tiene un
enchufe polarizado (una lámina es más
ancha que la otra) y requiere el uso de
un cable de extensión polarizado. El
enchufe encajará en un cable de extensión
polarizado de una sola manera. Si el
enchufe no entra completamente en el
cable de extensión, invierta el enchufe. Si
el enchufe sigue sin encajar, obtenga un
cable de extensión polarizado adecuado.
Un cable de extensión polarizado
requerirá el uso de una toma de corriente
polarizada. Este enchufe encajará en
la toma de corriente polarizada de una
sola manera. Si el enchufe no encaja
completamente en la toma de corriente,
invierta el enchufe. Si el enchufe sigue
sin encajar, póngase en contacto con un
electricista cualicado para que instale la
toma de corriente adecuada. No cambie
el enchufe del equipo, el receptáculo del
cable de extensión o el enchufe del cable
de extensión de ninguna manera.
• Evite el contacto corporal con super cies
conectadas a tierra, como tuberías,
radiadores, estufas y refrigeradores. Existe
un mayor riesgo de descargas eléctricas si
su cuerpo está conectado a tierra.
• No exponga las herramientas eléctricas a
la lluvia o humedad. Si entra agua en una
herramienta eléctrica podría aumentar el
riesgo de descargas eléctricas. Almacenar
en interior.
• No manipule o conecte las herramientas
con las manos mojadas.
• No manipule o conecte las herramientas
con las manos mojadas. No permita que
los niños utilicen el equipo. No permita
que ningún adulto utilice este equipo sin la
debida instrucción.
• Use protección ocular y auditiva que
cumplan la norma ANSI Z87.1 al utilizar
este producto.
• Use guantes, botas y pantalones
resistentes. Evite usar ropa holgada o joyas
que podrían engancharse en las piezas
móviles de la máquina o de su motor.
• No fuerce la herramienta. Utilice la
herramienta correcta para su aplicación.
El aparato funcionará de manera más
18
Page 19

REGLAS GENERALES DE SEGURIDAD
Not for Reproduction
eciente y segura si se utiliza según el
ritmo para el que fue diseñado.
• No utilice el equipo mientras está descalzo
o cuando lleve sandalias o un calzado
ligero similar. Utilice calzado de protección
que proteja sus pies y mejore su agarre en
supercies resbaladizas.
• Recoja el cabello largo para que quede por
encima del nivel de los hombros y evitar
así que se enmarañe en cualquier pieza
móvil.
• Manténgase rme y equilibrado. No realice
sobreesfuerzos. Una sobreextensión
puede resultar en la pérdida del equilibrio.
• No permita que niños o individuos sin
experiencia utilicen este aparato.
• Evite el arranque accidental. Asegúrese de
que el interruptor no está activado antes de
enchufar. Apague el botón de encendido
antes de desenchufarlo.
• No utilice la herramienta si el interruptor
no enciende ni apaga. Cualquier
herramienta que no puede ser controlada
con el interruptor es peligrosa y debe ser
reparada.
• No deje el aparato descuidado mientras
esté enchufado. Desenchufe el aparato de
la toma cuando no se esté utilizando, antes
de realizar trabajos de mantenimiento
y antes de guardarlo. Estas medidas
preventivas de seguridad reducen el riesgo
de arranque accidental de la herramienta.
• Las personas, niños y animales deberán
estar a 50’ (15 m) del aparato como
mínimo.
• Sólo para uso doméstico.
• Utilice solo baterías Snapper (Model
SBA260V, SBA2650V, and SBA460V)
• No utilice este aparato si está cansado o si
se encuentra bajo la inuencia de drogas,
alcohol o medicamentos.
• No trabaje con poca luz.
• Mantenga todas las partes de su cuerpo
lejos de cualquier parte móvil y todas las
supercies calientes de la unidad.
• No coloque ningún objeto en las aberturas.
No utilice con cualquier abertura
bloqueada. Mantenga las aberturas libres
de polvo, pelusas, pelo y cualquier cosa
que pueda reducir el ujo de aire.
• Compruebe el área de trabajo antes de
cada uso. Retire todos los objetos como
rocas, cristales rotos, clavos, cables o
cuerdas que puedan salir despedidos o
quedar enganchados en la máquina.
• Utilice sólo piezas y accesorios de
recambio del mismo fabricante. El uso de
otras piezas puede ocasionar riesgos o
daños en el producto.
.
PARA EL APARATO QUE FUNCIONA CON
• Evite la puesta en marcha accidental
de la herramienta. Asegúrese de que el
interruptor está en posición OFF antes
de conectar la herramienta a una batería,
y levantar o transportar el aparato. El
transporte del aparato con el dedo sobre
el interruptor o la conexión del aparato
con el interruptor en ON puede causar
accidentes.
• Desconecte la batería de la herramienta
de alimentación antes de hacer cualquier
ajuste, sustitución de accesorios, o
almacenar el aparato. Estas medidas
preventivas de seguridad reducen el riesgo
de arranque accidental del aparato.
• Recargue la unidad solamente con el
cargador especicado por el fabricante.
Podría haber un riesgo de incendio cuando
se utilice un cargador con una batería para
la que no está diseñado.
• Utilice el aparato solo con baterías
especícamente diseñadas para éste.
Utilizar cualquier otro tipo de baterías
puede causar lesiones o un riesgo de
incendio.
• Cuando la batería no está en uso,
manténgala alejada de otros objetos
metálicos como clips, monedas, llaves,
clavos, tornillos u otros objetos metálicos
pequeños que puedan crear una conexión
desde una terminal a otra. Si se produjese
un cortocircuito en los terminales de la
batería, éste podría causar quemaduras o
un incendio.
• En condiciones abusivas, podría salir
expulsado líquido de la batería, por lo
que debería evitar el contacto con éste.
Si se produce un contacto accidental,
enjuáguese las manos con agua. Si el
líquido entra en contacto con los ojos,
acuda inmediatamente al médico. Si el
líquido es expulsado de la batería podría
causar irritación o quemaduras.
• No utilice una batería o apartado dañado
o modicado. Las baterías dañadas o
modicadas pueden compor tarse de modo
imprevisto que puede causar incendio,
explosión o riesgo de lesión.
• No exponga ni las baterías ni el aparato
al fuego ni a altas temperaturas. La
exposición a temperaturas superiores a
212°C puede provocar una explosión.
• Su producto debería ser reparado por
personas cualicadas, que deberían utilizar
únicamente piezas de repuesto idénticas.
Esto garantizará la seguridad a la hora de
utilizar el producto.
GUARDE ESTAS INSTRUCCIONES
19
Page 20

REGLAS GENERALES DE SEGURIDAD
Not for Reproduction
SERVICIO
Las reparaciones deben quedar en manos de
un técnico cualicado, utilizando únicamente
piezas de recambio originales. De este modo
podrá utilizar su herramienta eléctrica sin
peligro. El servicio o mantenimiento realizado
por personal no cualicado puede resultar en
un riesgo de lesión. Llame al 1-800-317-7833
para recibir asistencia.
SEGURIDAD DE NIÑOS
Si el operador no se percata de la presencia
de niños, se pueden generar accidentes
trágicos.
• Mantenga a los niños alejados del área
de trabajo y bajo el cuidado atento de
un adulto responsable.
• No deje que niños menores de 14 años
operen este recortador. Los niños de 14
años o más deben leer y comprender
las instrucciones de funcionamiento y
las reglas de seguridad de este manual
y uno de sus padres les debe capacitar
y supervisar.
• Manténgase alerta, y apague el
recortador si un niño o cualquier otra
persona ingresa al área de trabajo.
• Tenga extremo cuidado al acercarse a
esquinas ciegas, entradas, arbustos,
árboles u otros objetos que le pudieran
obstruir la visión de niños, los cuales
pudieran correr hacia el área de trabajo
del recortador.
ADVERTENCIA:
El polvo creado por la arena a chorro, el
aserrado, esmerilado, taladrado y otras
actividades de la construcción podría
contener productos químicos que se sabe
provocan cáncer, defectos de nacimiento
y otras lesiones reproductivas. Algunos
ejemplos de estos productos químicos son:
• Plomo en pintura a base de plomo
• Sílice cristalino en ladrillos, cemento y
otros productos de mampostería, y
• Arsénico y cromo de madera con
tratamiento químico.
Su riesgo de exposición a estos productos
químicos depende de la frecuencia en que
efectúe este tipo de trabajo. Para reducir
su exposición a estos productos químicos,
trabaje en áreas bien ventiladas y use equipo
de seguridad aprobado, tal como máscaras
contra el polvo especialmente diseñadas para
ltrar partículas microscópicas.
GUARDE ESTAS INSTRUCCIONES
(PROPOSICIÓN 65)
20
Page 21

ENSAMBLA
Not for Reproduction
LISTA DE PIEZAS
NOMBRE DE FIGURA QTD
60V La Pieza
Tubo del
ventilador
60V 2.5Ah Batería
60V Cargador
Manual de
instrucciones
Guía para
comienzo
rápido
Lea el manual de instrucciones y siga todas las advertencias e
instrucciones de seguridad. El no hacerlo puede resultar en
lesiones graves.
AVERTISSEMENT:
Lirelemanueld’instructions et bien respectert ousl es avertissementsettoutesles instructionsde sécurité.Toutdé fautde le fair e
pourraitentraînerdesblessuresg raves.
Briggs & Stratton Power Products Group, LLC
Milwaukee, WI, USA
Rev. 00 07/30/15
2
STARTING/STOPPING THE TRIMMER
2
Missing parts, accessories or need a service center?
Call: 1-800-317-7833 www.snapper.com
WARNING:
Read and follow all Safety Rules and Operating Instructions before
using this product. Failure to do so can result in serious injury.
ADVERTENCIA:
BRUSHLESS STRING TRIMMER
WARNING:
must read and understand the operator's manual before using this product.
1
INSTALLING AN ATTACHMENT TO THE POWER HEAD
4
2
3
5
1
ATTACHING THE AUXILIARY HANDLE
1
3
2. Place one hand on the trigger handle.
Place the other hand on the auxiliary
handle.
3. Press and hold the lock-out button (2)
and squeeze the switch trigger (1). The
string trimmer will turn ON.
4. Release the lock-out button. The string
trimmer will stay on as long as the switch
1
trigger is held.
5. Release switch trigger to stop.
Do Not Return to Store
Pleasedonot return product to retailer.
Porfavor,nod evuelva el producto al lugard ec ompra.
Veuilleznepasr etourner le produita ud étaillant.
1-800-317-7833
www.snapper.com
InstructionManual
ManualdeI nstrucciones
Manueld’Instructions
60V LITHIUM-ION
CORDLESS STRING TRIMMER
Model ST60V
F
R
A
N
Ç
A
I
S
60V LITHIUM-ION
QUICK START GUIDE
ST60V
This Quick Start Guide is not a substitute for reading the operator's manual. To reduce the risk of injury or death, user
ATTACHING THE GUARD
1. Invert the string trimmer to access the
trimmer head.
2. Remove supplied screws (1) from the
trimmer head (4) with a philips
2
screwdriver (not included).
3
3. Place the guard (2) on to the trimmer
4
head.
4. Align the screw holes (3) on the guard
with the screw holes on the trimmer head.
5. Insert the screws into the trimmer
head, fastening the guard in place using a
Phillps head screwdriver (not included).
Note: Remove the rubber insert that is
located in the shaft prior to assembling
the string trimmer.
1. Loosen the attachment knob (1) on the
5
coupler (5).
2. Push in the release button (2) located
on the attachment shaft (3). Align the
LOOSEN
release button with the positioning hole
(4) and slide the two shafts together.
TIGHTEN
1
Rotate the attachment shaft until the
button locks into the positioning hole.
3. Tighten the attachment knob securely.
1. Press the auxiliary handle (1) onto the
power head shaft so that the handle is
angled toward the rear handle that allows
for comfortable operation.
2. Slide the auxiliary handle over the
holder (2) and ensure the holder fits
between the slots on the auxiliary handle.
3. Align the holes on the auxiliary handle
with the holes on holder.
4. Insert the handle knob (3) through the
auxiliary handle.
5. Tighten until there is no movement in
the handle.
1. Ensure a fully charged battery is
installed into the string trimmer.
APS
OÑ
L
EHS
1
1
1
1
E
N
ILG
1
1
ADVERTENCIA:
todas las instrucciones antes de usar
Lea y comprenda
este producto. El incumplimiento de las
instrucciones siguientes puede ser causa de
descargas eléctricas, incendios y lesiones
personales graves.
DESEMPAQUETADO
Embarcamos este producto completamente
armado.
• Retire con cuidado el producto y los
accesorios de la caja. Asegúrese de que
están incluidos
todos los elementos que guran en la lista del
paquete de embalaje.
• Revise el producto con atención para
asegurarse de que no se produjeron daños o
roturas
durante el transporte.
• No tire el material de embalaje hasta que
haya revisado con atención y haya utilizado el
producto de manera satisfactoria.
.• Si falta alguna parte dañada o se encuentra
dañada, llame al 1-800-317-7833 para que le
proporcionen asistencia.
ADVERTENCIA:
producto si ya está montado en el producto
algún elemento de la lista del paquete de
embalaje cuando lo desembale. El fabricante
no ha montado los elementos de esta lista en
el producto y requieren de la instalación del
cliente. Usar un producto que puede haber
sido mal montado podría provocar graves
daños personales.
No utilice este
ADVERTENCIA:
estas están dañadas, no opere este producto
Si faltan piezas o
hasta reemplazar dichas piezas. El uso de
este producto con piezas dañadas o faltantes
podría provocar lesiones personales
graves.
ADVERTENCIA:
modicar este producto ni crear accesorios
No intente
que no estén recomendados para usar
con este soplador. Cualquier alteración o
modicación de ese tipo representa mal uso
y puede generar condiciones peligrosas que
causen posibles lesiones personales graves.
ADVERTENCIA:
batería hasta completar el ensamblaje. De lo
No coloque la
contrario la unidad puede ponerse en marcha
accidentalmente, con el consiguiente riesgo
de lesiones serias.
21
Page 22

ENSAMBLA
Not for Reproduction
BATERÍA
PARA INSERTARLO
1. Alinee la batería del paquete de baterías
con el hueco en la carcaza del soplador.
2.Sujete rmemente el mango
3. Presione el paquete de baterías hasta que
calce a presión en su posición.
4.Empuje la batería en el mango hasta que
ambos lados se bloquean. El botón de cierre
hace clic una vez cerrado en su lugar.
PARA SACARLO
1. Pulse el botón de liberación de la batería.
Esto hará que la batería salga del aparato
ligeramente.
2.Sujete rmemente el mango. Retire la
batería de la empuñadura.
Botón de liberación de la batería
.
MONTAJE DEL TUBO DEL SOPLADOR
ADVERTENCIA:
Para evitar un arranque accidental que
podría causar lesiones corporales serias,
retire siempre la batería de la herramienta al
ensamblar las piezas.
RanuraTubo
1. Alinee cada uno de los surcos en el tubo
con las lengüetas en la carcasa del soplador.
Empuje el tubo hacia la carcasa del soplador
hasta que la lengüeta se enganche en los
surcos.
Pestaña
Desbloquear Bloqueo
NOTA: El paquete de baterías encaja
cómodamente en la manija para evitar que se
salga accidentalmente. Podría ser necesario tirar
fuertemente de él para sacarlo.
IMPORTANTE: El paquete de baterías no está
cargado al momento de la compra. Antes de
usar el soplador por primera vez, coloque el
paquete de baterías en el cargador de baterías
y cárguelo completamente. Asegúrese de
leer todas las precauciones de seguridad y de
seguir las instrucciones en la sección titulada
Procedimiento para cargar.
2. Gire el tubo en el sentido de la echa
hasta que ambas las lengüetas deslicen
para las posiciones de bloqueo.
Bloqueo de posicion
22
Page 23

CONOZCA SU SOPLADOR
Not for Reproduction
CONOZCA SU SOPLADOR (Vea la gura 1)
Para usar con seguridad este producto es necesario comprender la información que se
presenta en el producto y en el presente manual del operador, así como tener conocimiento
del proyecto que se intenta efectuar. Antes de usar este producto, familiarícese con todas las
características de funcionamiento y las reglas de seguridad.
Control de velocidad
Gatillo
Tubo de soplado
GATILLO
Inicia / Detiene el ujo de aire a través del ventilador.
BOTÓN DE SALIDA DE LA BATERÍA
Desbloquee la batería del soplador.
TUBO DE SOPLADO
Se puede instalar fácilmente el tubo de soplado en el soplador sin herramientas adicionales.
Botón de liberación de la batería
Batería de iones de
litio de 60 voltios
Fig. 1
INTERRUPTOR DE CONTROL DE VELOCIDAD
Permite bloquear el ujo de aire en el nivel deseado.
23
Page 24

FUNCIONAMIENTO
Not for Reproduction
ADVERTENCIA:
atención aunque esté familiarizado con el
producto. Recuerde que un despiste
de una sola fracción de segundo es suciente
para causar daños graves.
ADVERTENCIA:
conexiones ni accesorios que no estén
recomendados por el fabricante de este
producto. El uso de conexiones o accesorios
no recomendados podría causar graves
daños personales. Antes de cada uso,
inspeccione todo el producto para comprobar
si hay piezas dañadas, extraviadas o sueltas
como tornillos, tuercas, pernos, tapas, etc.
Apriete bien todos los tornillos y las tapas
y no haga funcionar el producto hasta que
todas las partes que faltan o dañadas sean
reemplazadas.
APLICACIÓN
Puede utilizar este producto para los nes
que guran a continuación:
• Mantenga despejadas las supercies
duras, como entradas para coches y
senderos.
• Mantenga siempre las cubiertas y oricios
de entrada libres de hojas yo agujas de
pino.
CÁRGUELO ANTES DE USARLO POR
PRIMERA VEZ.
ADVERTENCIA:
batería del producto cuanto esté instalando
piezas, haciendo ajustes, limpiándolo o
cuando no esté en uso. Retirar la batería
evitará un arranque accidental que puede
provocar lesiones personales graves.
ARRANCAR/DETENER EL SOPLADOR
( Fig. 2)
• Asegúrese de que la batería está instalada
en el soplador.
• Apriete el botón para arrancar el soplador.
• Para variar la velocidad gire gradualmente
el gatillo.
NOTA: Este soplador dispone de un gatillo
para el control de velocidad. Para reducir la
velocidad, suelte lentamente el gatillo hasta
alcanzar la velocidad deseada.
Preste especial
No utilice
Retire siempre la
Gatillo
INTERRUPTOR DE CONTROL DE
VELOCIDAD ( Fig. 3)
• Mueva la palanca de control de velocidad
hacia la parte posterior del soplador. La
velocidad y el ujo de aire aumentarán.
• Suelte la palanca de control de velocidad
una vez que haya alcanzado la velocidad
de aire deseada.
• Para detener el soplador, desplace
la palanca de control de velocidad
completamente hacia adelante.
INCREMENTAR
REDUCIR/
APAGAR
Fig. 3
FUNCIONAMIENTO DEL SOPLADOR
• Para evitar la dispersión de los escombros,
dirija el soplador hacia los bordes
exteriores de un montón de escombros.
Nunca dirija el soplador directamente al
centro de un montón de escombros.
• Para reducir los niveles de ruido, limite
el número de piezas del equipo que se
utilicen al mismo tiempo.
• Use rastrillos y escobas para esparcir los
desechos antes de utilizar el soplador.
En condiciones de polvo, humedezca
ligeramente la supercie cuando haya
agua disponible.
• Ahorre agua utilizando sopladores en lugar
de mangueras para muchas aplicaciones
de césped y jardín, incluyendo áreas tales
como canalones, pantallas, enrejados,
barbacoas, porches y jardines.
• Preste especial atención a los niños,
mascotas, ventanas abiertas, o coches
recién lavados, cuando vaya a utilizar el
soplador. Después de usar sopladores u
otros equipos, limpie la zona. Deshágase
de los desechos adecuadamente.
• Después de usar sopladores u otros
equipos, limpie la zona. Deshágase de los
desechos adecuadamente.
Fig. 2
24
Page 25

MANTENIMIENTO
Not for Reproduction
ADVERTENCIA:
Con el n de evitar lesiones personales y el
riesgo de incendio y descargas eléctricas,
extraiga la batería antes de ajustar, la
inspección, o la limpieza del ventilador.
LIMPIEZA
Retire la batería.
1. Cepillo o soplar el polvo y escombros
en el aire rejillas de ventilación con aire
comprimido o una aspiradora. Mantenga las
rejillas de ventilación libres de obstrucciones,
aserrín y astillas de madera. No rocíe, lavado,
inmersión o las salidas de aire en el agua.
2. Limpie la caja y los componentes de
plástico utilizando un suelo húmedo, un
paño suave. No utilice disolventes fuertes o
detergentes en la carcasa de plástico o de
componentes de plástico. Algunos productos
de limpieza pueden causar daños, y puede
causar un peligro de choque.
BATERÍA
• Guarde la batería recargada por completo.
• Cuando las luces de recarga se pongan
verdes, retire la batería del cargador y
desconecte el cargador de la toma.
• No guarde la batería en el aparato ni en el
cargador.
• Después de la carga, se puede guardar
la batería en el cargador, siempre que el
cargador no esté enchufado.
25
Page 26

TABLA DIAGNOSTICA
Not for Reproduction
ADVERTENCIA:
cualquiera de las reparaciones recomendadas a continuación que no requieran que la unidad
esté en operación.
PROBLEMA CAUSAS POSIBLES SOLUCIONES
La unidad no arranca.
La herramienta arrancará,
pero no uirá aire a través
del tubo.
La palanca de control
de crucero no funciona.
S iempre apague el aparato y desconecte la bujía antes de hacer
1. Para asegurar la batería, asegúrese
1. La batería no está bien
colocada.
2. La batería no tiene
carga.
3. La batería no tiene carga.
Tubo bloqueado.
El tornillo está suelto.
de que está bien colocada en el
soplador. Consulte la sección de
Instalación de la batería mencionada
anteriormente en este manual.
2. Cargue el paquete de baterías de
acuerdo a las instrucciones que se
incluyen con su modelo.
3. Call 1-800-317-7833 for technical
service.
Inspeccione la entrada de aire y el
tubo del soplador para ver si el ujo de
aire está bloqueado. Si es así, retire el
bloqueo.
Apriete el tornillo con un destornillador
de cruz.
26
Page 27

DIAGRAMA DE COMPONENTES
Not for Reproduction
3
2
5
4
6
1
27
Page 28

LISTA DE PIEZAS
Not for Reproduction
ARTICULO NO. PIEZA NO. DESCRIPCIÓN CANTIDAD
1 34103811A Tubo del ventilador 1
2 311011943 Conjunto del ventilador 1
3 341051809B Estructura de la rejilla trasera 1
4 3220505A Tornillos de la rejilla trasera 4
5 211011351 Batería 1
6 211011332 Cargador 1
28
Page 29

LIMITED WARRANTY
Not for Reproduction
Por la presente, Sunrise Global Marketing,
LLC garantiza este producto, al comprador
original con justificante de compra, durante
un período de cuatro (4) años contra defectos
de materiales, piezas o fabricación.
Sunrise Global Marketing, LLC, a su propio
criterio, reparará o reemplazará todas y cada
una de las piezas que estén defectuosas,
mediante un uso normal, sin cargo alguno
para el cliente. Esta garantía sólo es válida
para las unidades que se hayan utilizado para
uso personal que no hayan sido contratadas
o alquiladas para uso industrial/comercial,
y que se hayan mantenido de acuerdo con
las instrucciones del manual de propietario
suministrado con el producto nuevo.
La batería y cargador tiene dos (2) años de
garantía contra defectos de fabricación y
materiales. Las baterías deben ser cargadas
de acuerdo con las instrucciones del manual
de usuario y la normativa en vigor para ser
válida.
El motor sin escobillas tiene diez (10) años
de garantía del motor contra defectos de
fabricación y materiales.
ARTÍCULOS NO CUBIERTOS POR LA
GARANTÍA AL CONSUMIDOR:
1. Cualquier pieza que haya resultado
inoperativa debido al mal uso, abuso,
negligencia, accidente, mantenimiento
inadecuado, o modicación, o
2. La unidad, si no se ha utilizado y/o
mantenido de acuerdo con el manual de
propietario, o
3. Desgaste normal, excepto como se indica
a continuación;
4. Elementos de mantenimiento rutinario tales
como lubricantes, alado de cuchillas;
5. El deterioro normal del acabado exterior
debido al uso o la exposición.
LÍNEA TELEFÓNICA PARA AYUDA DE
SNAPPER
Se puede obtener servicio relacionado con la
garantía llamando de lunes a viernes entre
las 9 a.m. y las 5 p.m. a nuestra línea gratis
para ayuda, el1-800-317-7833
GASTOS DE TRANSPORTE:
Los gastos de transporte para el movimiento
de cualquier unidad de equipos motorizados o
accesorio son responsabilidad del comprador.
Es responsabilidad del comprador pagar los
gastos de transporte para cualquier pieza
enviada para reemplazo bajo esta garantía a
menos que GREENWORKS™ solicite dicha
devolución por escrito.
29
 Loading...