

Page 1

For Parts Call K&T 606-678-9623 or 606-561-4983
Instruction Manual
Manual de Instrucciones
Manuel d’Instructions
SB2000M
IMPORTANT MANUAL -- Do not throw away
MANUAL IMPORTANTE -- No lo descarte
MANUEL IMPORTANT -- À Conserver
ENGLISH
ESPAÑOL
WARNING:
Read and follow all Safety Rules and Operating Instructions before
using this product. Failure to do so can result in serious injury .
ADVERTENCIA:
Lea el manual de instrucciones y siga todas las advertencias e
instrucciones de seguridad. El no hacerlo puede resultar en lesiones
graves.
AVERTISSEMENT:
Veuillez lire le manuel d’instructions et bien respecter tous les
avertissements et toutes les instructions de sécurité. Tout défaut
de le faire pourrait entraîner des blessures graves.
Electrolux Home Products
104 Warren Road
Augusta, GA 30907
CopyrightE2004 ElectroluxHome Products, Inc.
530163810
2/2/04
FRANÇAIS
www.mymowerparts.com
Page 2

For Parts Call K&T 606-678-9623 or 606-561-4983
SAFETY RULES
WARNING:
Safety Rules and Precautions can result in
serious injury.
KNOW YOURUNIT
Readyour instructionmanualcarefullyuntil
S
you completely understand and can follow
all warningsandsafety rules beforeoperating the unit.
Restrict unit to users who understand and
D
will follow all warnings and safety rules in
this manual.
WARNING:
ing unit. Remove all debris and hard objects
such as ro cks, glass, wire, etc. that can ricochet, be thrown, or otherwise cause injury or
damage during operation.
Use your unit as a blower for:
Sweeping debris or grass clippings from
D
drivew ays, sidewalks, pat ios, etc.
Blowing grassclippings, straw,or leavesinto
D
piles, aroun djoints, or b etween bricks.
Use your unit as a vacuum for:
Picking up dry material such as leaves,
D
grass, small twigs, and bits of paper.
For best results during vacuum use, operate
D
your unit at high speed.
Moveslowly backandforthover themate-
D
rial as youvacuum. Avoidforcingthe unit
intoapileofdebris asthiscanclogtheunit.
Keep the vacuum tubeabout an inch above
D
thegroundforbestresults.
PLAN AHEAD
Always wear eye protection when operat-
D
ing, servicing, or performing maintenance
on unit.Wearing eye protection will helpto
preventrocks ordebrisfrom beingblown or
ricocheting into eyes and face which can
result in blindness and/or serious injury.
Eye protection should be marked Z87.
Always wear foot protection. Do not go
D
barefoot or wearsandals.
Always wear respirator orface mask when
D
working with unit in dusty environments.
Secure hairabove shoulderlength. Secure
D
or remove jewelry, loose clothing, or clothing with loosely hanging straps, ties, tassels, etc. They can be caught in moving
parts.
Donot o perat eunitwhenyouaretired,ill, up-
D
set, or if you are under the influence of alcohol, drugs, or medication.
Keep children, bystanders, and animals
D
away from workarea a minimum of 30feet
(10meters)when startingor operatingunit.
Do notpoint the blower nozzleinthe direction of people orpets.
HANDLEFUEL WITHCAUTION,ITIS
HIGHLY FLAMMABLE
Eliminate all sourcesof sparks orflame (in-
D
cluding smoking, openflames, or workthat
cancausesparks)intheareaswherefuel is
mixed, poured, or stored.
Failure to follow all
Inspect area before start-
Mix and pour fuelin anoutdoor area; store
D
fuel ina cool,dry,wellventilatedplace;use
an approved, marked container for all fuel
purposes.
Do not smoke while handling fuel or while
D
operating the unit.
Make sure the unit is properly assembled
D
and in goodoperatingcondition.
Do not fill fuel tank while engine is hot or
D
running.
Avoidspilling fuel oroil. Wipeup fuelspills
D
before starting engine.
Moveatleast10 feet(3 meters) awayfrom
D
fuel andfuelingsitebeforestarting engine.
Always store gasoline in a container ap-
D
proved for flammable liquids.
OPERATE YOUR UNITSAFELY
WARNING:
opening the vacuum inlet door. The engine
must be stopped and the impeller blades no
longerturningtoavoidserious injury from the
rotating blades.
Inspect unit before each use for worn,
D
loose, missing, or damaged parts. Do not
use until unit is in proper working order.
Keep outside surfaces free ofoil andfuel.
D
Never start or run engine inside a closed
D
room, building or other unventilated area.
Breathing exhaust fumes can kill.
To avoid static electricity shock, do not
D
wear rubber gloves or any other insulated
gloves while operating unit.
Do not set unit on any surface except a
D
clean, hard area while engine is running.
Debris such as gravel, sand, dust, grass,
etc.couldbe pickedupbytheair intakeand
thrown out through discharge opening,
damagingunit, property,or causingserious
injury to bystanders or operator.
Avoiddangerous environments.Donotuse
D
in unventilated areas or where explosive
vapors or carbon monoxide build up could
be present.
Do notoverreach oruse fromunstable sur-
D
faces suchas ladders, trees,steep slopes,
rooftops,etc.Keepfirmfootingandbalance
at all times.
Never place objects inside the blower
D
tubes; always direct the blowing debris
awayfrompeople,animals,glass,andsolid
objects such as trees, automobiles, walls,
etc.Theforceofair cancauserocks,dirt,or
sticks to bethrownortoricochetwhich can
hurt people or animals, break glass, or
cause other damage.
Never run unit without the proper equip-
D
ment attached.When using your unitas a
blower,always install blowertubes. When
usingyour unitasavacuum,always install
vacuumtubesandvacuum bagassembly.
Makesure vacuumbagassembly is completely zipped.
Check air intake opening, blower tubes,
D
vacuum tubes,and elbow tubefrequently,
always with engine stopped and spark
Stop the engine before
-- 2 --
www.mymowerparts.com
Page 3
For Parts Call K&T 606-678-9623 or 606-561-4983
plug disconnected. Keep vents and discharge tubesfree of debris which can accumulate and restrict proper air flow.
Never place any object in the air intake
D
opening as this could restrict proper air flow
and cause damage to the unit.
Never use for spreading chemicals, fertil-
D
izers, orothersubstances whichmay contain toxic materials.
To avoid spreading fire, do not use near
D
leaf or brush fires, fireplaces, barbecue
pits, ashtrays, etc.
Use onlyfor jobsexplainedin thismanual.
D
MAINTAIN YOUR UNIT PROPERLY
Have all maintenance other than the rec-
D
ommendedproceduresdescribedin theinstruction manual performed by an authorized service dealer.
Disconnect spark plug before performing
D
maintenance except for carburetor adjustments.
Use only recommended Snappe rt/Weed
D
Eater!replacementparts;use ofanyother
parts may void your warranty and cause
damage toyourunit.
Empty fuel tank before storing the unit. Use
D
upfuel leftincarburetor bystartingengineand
letting it run until it sto ps.
Do not use any accessory or attachment
D
other than thoserecommendedbymanufacturer for use with your unit.
Donotstore theunit orfuel ina closedarea
D
where fuel vapors can reach sparks or an
openflamefrom hotwaterheaters,electric
motors or switches, furnaces, etc.
Store inadry area outof reach ofchildren.
D
SPECIAL NOTICE:
tions throughprolongeduse of gasolinepowered handtools could cause blood vessel or
nerve damage in the fingers, hands, and
joints of peopleprone tocirculation disorders
or abnormal swelling. Prolonged use in cold
weatherhasbeenlinkedtoblood vesseldamagein otherwise healthypeople. Ifsymptoms
occur such as numbness, pain, loss of
strength, change in skin color or texture, or
loss of feeling in thefingers,hands, or joints,
discontinue the use of this tool and seek
medical attention. An antivibration system
does not guarantee the avoidance of these
problems. Userswhooperatepowertoolson
a continual and regular basis must monitor
closely theirphysicalconditionandthe condition of this tool.
SPECIALNOTICE:
est Land and in some states, including California (Public Resources Codes 4442 and
4443),Idaho,Maine,Minnesota, NewJersey,
Oregon, and Washington: Certain internal
combustion engines operated on forest,
brush,and/orgrass coveredlandin theabove
areas are required to be equipped with a
spark arresting screen, maintained in effectiveworkingorder,orthe enginemust beconstructed, equipped, and maintained for the
preventionof fire. Checkwith yourstate orlocal authorities for regulations pertaining to
these requirements. Failure to follow these
requirementsis aviolationof thelaw.Thisunit
is not factoryequipped with aspark arresting
screen; however, a spark arresting screenis
available asanoptional part.Ifasparkarresting screen is required in your area, contact
your authorizedservice dealer forthe correct
kit. Thespark arrestingscreen, blowertubes,
andnozzles mustbeassembled to unit tobe
in full compliance with regulations.
Exposure to vibra-
For userson U.S. For-
ASSEMBLY
WARNING:
the impeller blades have stoppedturning before opening the vacuum inlet door or attempting to insert or remove the vacuum or
blower tubes. The rotatingblades can cause
serious injury. Always disconnect the spark
plug before performing maintenance or accessing movable parts.
WARNING:
assembled, check each step to insure your
unit is properly assembled and all fasteners
are secure. Follow all safety information in
the manual andon the unit.
A standardscrewdriver is required foras-
D
sembly.
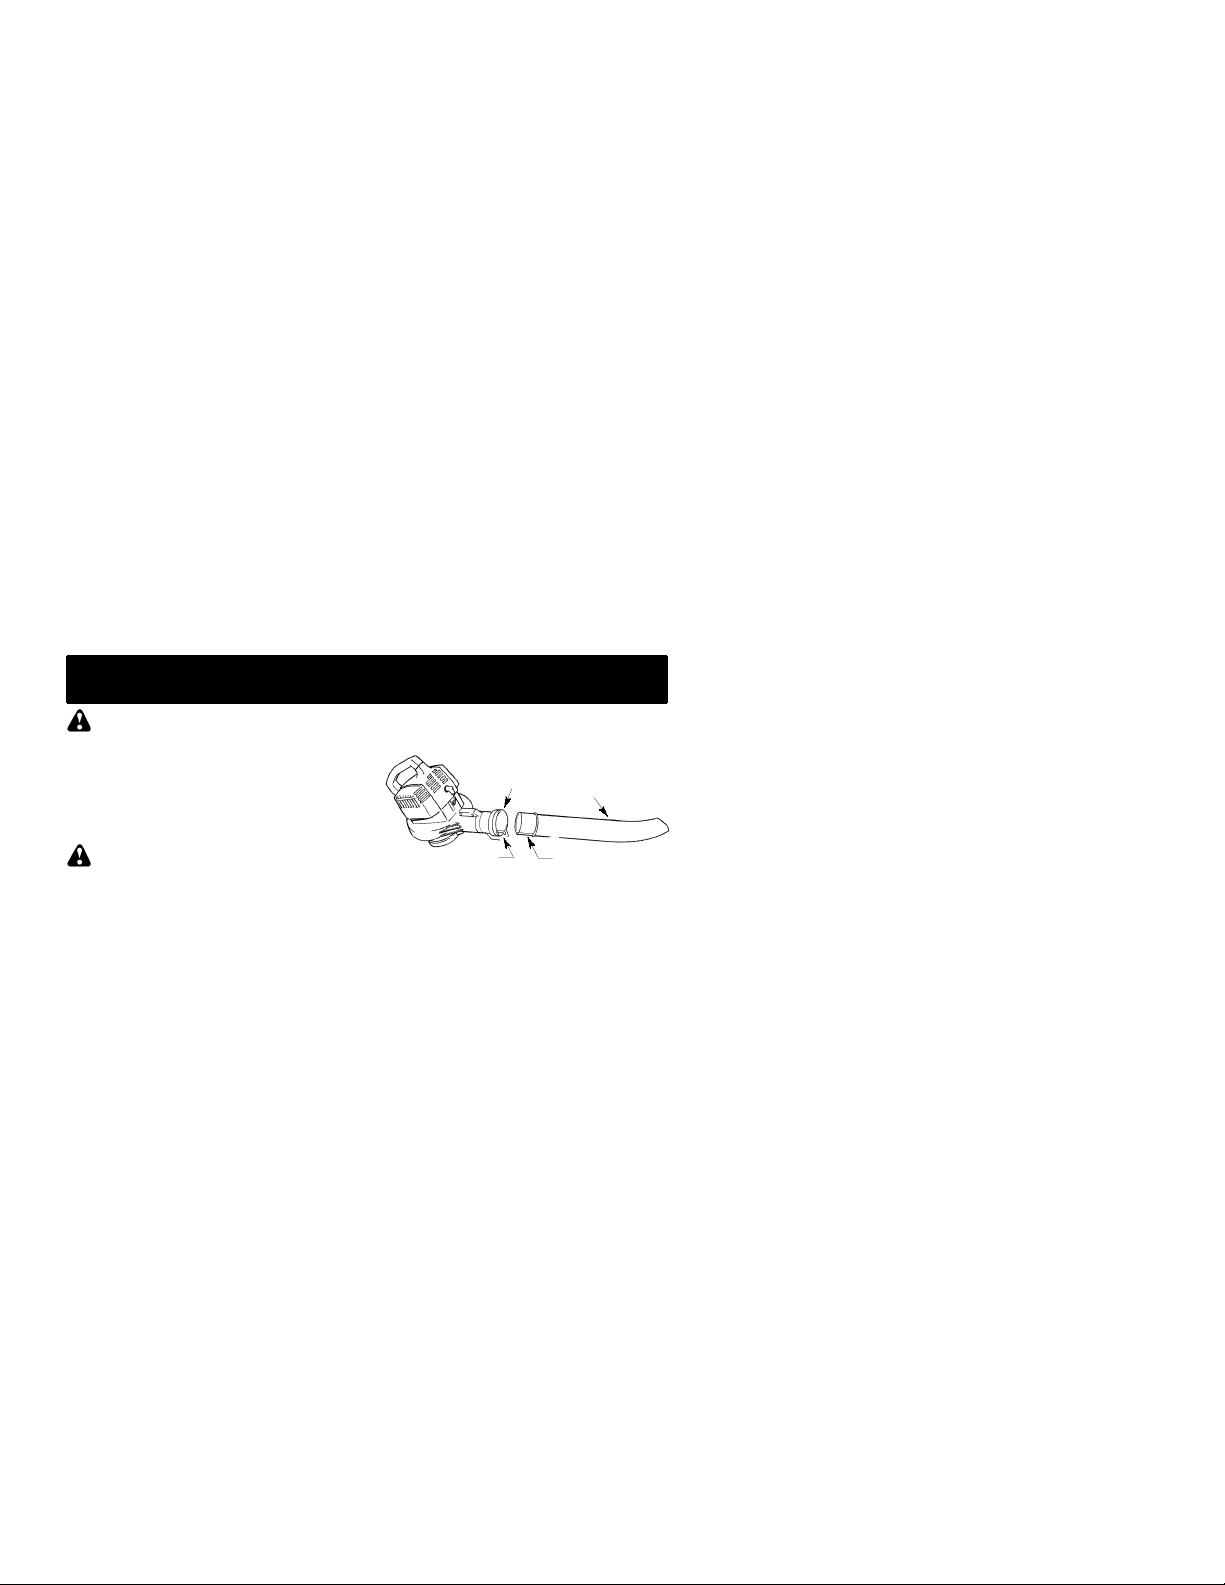
BLOWERTUBEASSEMBLY
1. Align the rib on the blower tube with the
groove in the blower outlet;slide the tube
into place.
Stop engineand besure
If you receive your unit
Knobmust beloose enoughtoallow
NOTE:
blower tube to be inserted in blower outlet.
Loosen knob by turningcounterclockwise.
2. Securethetubeby turningthe knobclockwise.
3. Toremove thetube, turntheknobcounterclockwise to loosen the tube; removethe
tube.
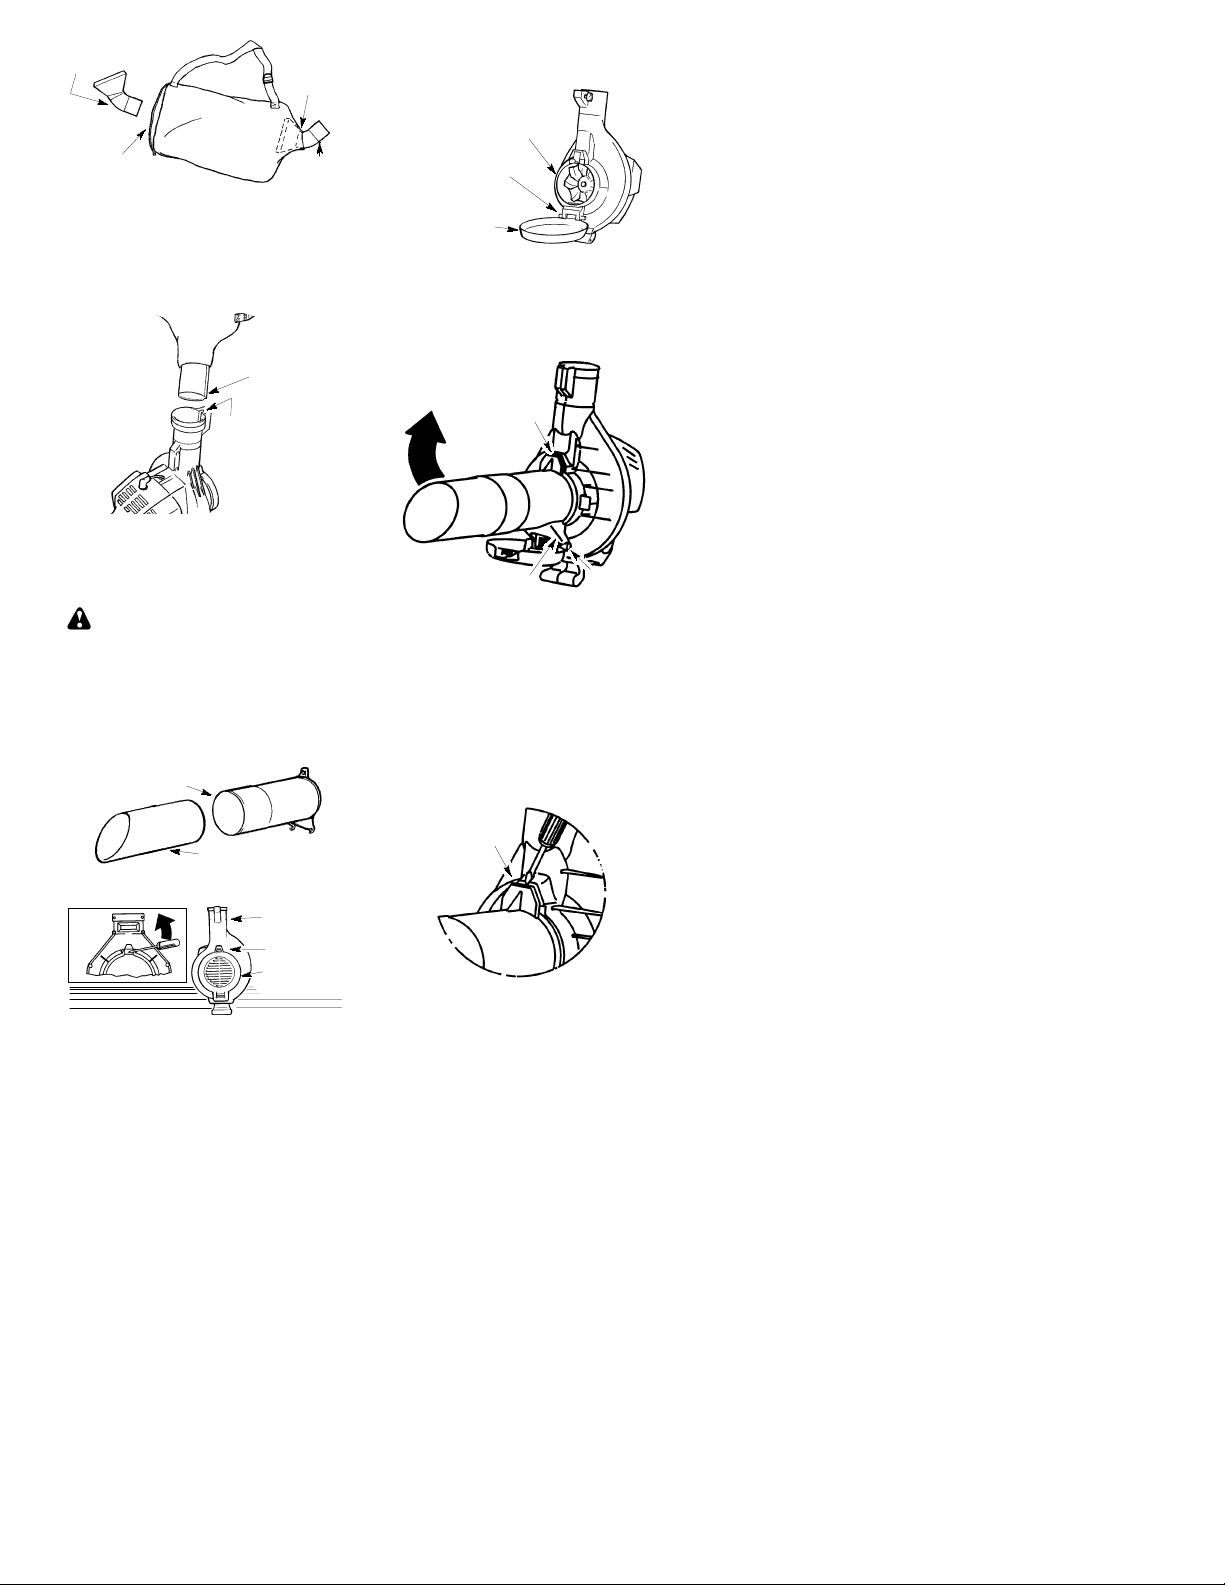
VACUUM BAG ASSEMBLY
1. Open the zipper on the vacuum bag and
insert the elbow tube.
2. Push the small end of the elbow tube
through thesmall opening in the bag.
Groove
Blower
Outlet
Blower
Tube
Rib
-- 3 --
www.mymowerparts.com
Page 4
For Parts Call K&T 606-678-9623 or 606-561-4983
Elbow
Tube
Zipper
Opening
Makesureedgeofthesmallopening
NOTE:
is flush against the flared area of the elbow
tube, and the rib on the elbow tube is on the
bottom.
3. Closethezipper onthe bag.Makesurethe
zipper is closed completely.
4. Remove blower tubefromengine.
Small
Opening
Rib
Rib
4. Holdthevacuum inletcoveropenuntilupper vacuum tube is installed.
Vacuum Inlet
RetainingPost
Vacuum
Inlet
Cover
5. Placethe hooksof theupper vacuumtube
on the retaining postsofthe unit.
6. Pivot the tube until it is secured to the
blower unit by the vacuum inlet latch.
Groove
5. Inserttheelbowtube intothebloweroutlet.
Make sure elbow tube rib is aligned with
the blower outlet groove.
6. Turnknob clockwisetosecure elbowtube.
VACUUM TUBE ASSEMBLY
WARNING:
the impeller blades have stoppedturning before opening the vacuum inlet door or attempting to insert or remove the vacuum or
blower tubes. The rotatingblades can cause
serious injury.
1. Align the lower vacuum tube as shown.
Push lowervacuumtube into uppervacuum tube.
Upper V acuum
Tube
2. Insertthe tipof ascrewdriverinto thelatch
area of thevacuum inlet.
Latch
Area
3. Gentlytiltthehandleof thescrewdrivertoward the back of the unit to release the
latch while pullingup on the vacuum inlet
cover with your other hand.
Stop engineand besure
Lower VacuumTube
Blower
Outlet
Latch Area
Vacuum
Inlet Cover
PIVOT
Inlet Cover
Latch
Hook
HOW TO CONVERT UNIT FROM
VACUUM USE TOBLOWER USE
1. Remove the vacuum tubes by inserting
the tip of ascrewdriver into the latcharea
of the vacuum inlet.
2. Gently tilt handle of screwdriver toward
the back of the unit to release the latch
whilepullinguponthe uppervacuumtube
with your other hand.
Latch Area
3. Remove the vacuum bag.
4. Close the vacuum inlet cover and make
sure it is latched closed.
5. Reinstall the blower tube (see BLOWER
TUBE ASSEMBLY).
-- 4 --
Retaining
Post
www.mymowerparts.com
Page 5

For Parts Call K&T 606-678-9623 or 606-561-4983
SHOULDERSTRAPADJUSTMENT
1. Hold th eunit as shown withth e muf f lerside
facing away from your body and clothes.
2. Pass the shoulder strap over your head
and ontoyourright shoulder.
3. Extend yourleftarm towardthe rearof the
vacuum bag.
4. Adjust shoulder strap until the vacuum
bag/shoulder strap seam lies between
your thumb andindex finger.
5. Make sure air flows freely from the elbow
tubeinto bag. Ifbag is kinked, theunit will
not operateproperly.
OPERATION
KNOW YOURBLOWER
READTHIS INSTRUCT IONMANUALA NDSAFETYRULESBE FOREOPERA TI NGYOURUNIT.
Comp are the illustrations withyourunit tofamiliar izeyourselfwith thelo cationof thevariouscontro ls
and adjustments. Save this manual for future reference.
Lower
Vacuum Tube
Upper
Vacuum Tube
Vacuum Bag
Elbow Tube
Blower
Tube
THROTTLE LEVER
TheTHROTTLELEVER is usedtoselectthe
desiredenginespeedandto stopthe engine.
Movethethrottlelever tothe
full speed operation. Move the throttle lever
tothe
engine, move the throttle lever to theSTOP
position.
PRIMERBUTTON
The PRIMER BUTTON removes air from the
carburetor a nd f uel lines a nd fillsthem wit hfuel.
This allows you to start the en gine with fewer
pulls on the starter rope. Activate primer button
by pressingit andallowing itto return toits original position.
positionfor idlespeed. Tostopthe
Spark Plug
positionfor
Primer Button
Throttle
Lever
CHOKE LEVER
The CHOKE helps to supply fuel to the engine
to aid in cold starting. Activate the choke by
moving the choke lever to the FULL CHOKE
position.After engineattemptsto start,movethe
choke lever to the HALF CHOKE position.
Once engine starts, move choke lever to the
RUN p osition.
Choke Lever
Fuel Mix
Fill Cap
Starter
Rope
Rear
Handle
-- 5 --
www.mymowerparts.com
Page 6

For Parts Call K&T 606-678-9623 or 606-561-4983
OPERA TINGPOSITION
Eye
Protection
Blower
OPERA TINGTIPS
While vacuuming or blowing debris, hold
S
the unit with the muffler side facing away
from yourbody andclothes (seeOPERATING POSITIONillustration above).
To reduce the risk of hearing loss
S
associated with sound level(s), hearing
protection is required.
T o reduce the risk of injury associated with
S
contacting rotating parts, stop the engine before installin g or re m oving a ttachm ents. Do
not operate without guard(s) in place.
Operate powerequipmento nly atreasonable
S
hours- -notea rly in themorning or late at night
whenpe oplemightbe disturbed. Comply with
times listed in local ordinances. Usual recommendations are 9:00 a .m. to 5:00 p.m.,
Monday though Saturday.
To reduce noise levels, limit the numberof
S
pieces of equipment used atany one time.
To reduce noise levels, operate power
S
blowers at the lowest possible throttle
speed to dothe job.
Use rakesand broomsto loosendebris be-
S
fore blowing.
In dusty conditions, slightly dampen sur-
S
faces oruse amister attachmentwhen water is available.
Conserve water by using power blowers
S
instead of hoses for many lawn and garden
applications, including areas such as gutters,
screens, patios, g r ills,porches ,andg ardens.
Watchoutfor children,pets,openwindows,
S
or freshly washed cars. Blow debris away
safely.
Use thefull blower nozzle extension sothe
S
air stream can work close to the ground.
After using blowers and other equipment,
S
CLEAN UP! Dispose of debris in trash receptacles.
BEFORE STARTINGENGINE
WARNING:
information in thesafety rules before youbegin.Ifyou donot understandthe safetyrules,
do not attempt to fuel your unit. Call
1-800-554-6723
FUELING ENGINE
WARNING:
when refueling.
Vacuum
Be sure to read the fuel
.
Remove fuel cap slowly
This engine is certified to operate on unleaded gasoline. Before operation, gasoline
must be mixed with a good quality synthetic
2-cycle air-cooled engine oil designed to be
mixed at a ratio of 40:1. Snappert/Weed
Eater!brand synthetic oil is recommended.
Mix gasoline andoil ataratio of 40:1. A40:1
ratio isobtained bymixing 3.2ounces (95ml)
ofoil with1 gallon (4liters)of unleaded gasoline. DO NOT USEautomotive oil or boatoil.
These oils will cause engine damage.When
mixing fuel,follow instructionsprintedon container. Once oil is added to gasoline, shake
container momentarily to assurethat the fuel
is thoroughly mixed. Always read andfollow
the safety rules relating to fuelbeforefueling
your unit.
IMPORTANT
Experience indicates that alcohol blended
fuels (called gasohol or using ethanol or
methanol)can attractmoisture whichleads to
separation and formation of acids during
storage. Acidic gas can damage the fuel
systemofan enginewhilein storage.Toavoid
engine problems, empty the fuel system
beforestoragefor 30days orlonger.Drainthe
gastank,starttheengineandletit rununtilthe
fuellines andcarburetorareempty.Usefresh
fuel next season. Never use engine or
carburetorcleaner productsin thefuel tankor
permanent damagemay occur.
Unit must beplaced on its side when
NOTE:
add ing fue l(see illustrationbelow) .
TO STOP THE ENGINE
To stop the engine, move the throttle lever
D
to the ST OPposition.
BEFORE STARTINGTHEENGINE
WARNING:
the tubes aresecure before usingtheunit.
Fuel engine. Move at least 10 feet (3me-
D
ters) awayfrom the fuelingsite.
Hold the unit in the starting position as
D
shown. Make sure the blower end is directed away from people, animals, glass,
and solid objects.
YouMUSTmakesure
-- 6 --
www.mymowerparts.com
Page 7

For Parts Call K&T 606-678-9623 or 606-561-4983
STARTING POSITION
Blower
Vacuum
WARNING:
holdtheunitasillustrated.Donotsetunitonany
surface except aclean, hardareawhen starting
engine or while engine is running. Debris such
as gravel, sand, dust, grass, etc. could be
picked up by the air intake and thrown out
through the discharge open ing, damaging the
unit or property,o r causing serious injury to bystanders or the operator.
STARTING A COLD ENGINE
1. Move throttle lever to the position.
2. Move choke lever to the FULL CHOKE
position.
3. Slowly press the primer button 8 times.
Throttle Lever
4. Pull starter rope sharply until engine attemptsto run,butnomorethan5 pulls(below 30_F, 8 pulls).
When starting engine,
Primer Button
Choke Lever
If engineattempts tostartbefore the
NOTE:
th
5
pull, go to next step immediately.
5. Move the choke lever to the HALF
CHOKE position.
6. Pull the starter rope sharply until the engine runs,but nomorethan 5pulls (below
30_F, 10 pulls).
7. After a 5 second warm--up, move the
choke lever to the RUN position.
8. Allow the unit to run for30 more seconds
at the RUN position before moving the
throttle lever to
If engine has not started after 5 pulls (at HALF
CHOKE), repeatSTARTING ACOLD ENGINE
procedure. Ifenginestill does notstart, proceed
to STAR TING A FLOODED ENGINE.
9. To stopthe engine, moveth ethrottle lever to
theS TOP position.
position.
STARTING A WARM ENGINE
NOTE:
follow STARTING A COLD ENGINE procedure. Do notfill fuel tank while engine is hot.
1. Move throttle lever to the
2. Pull starter ropesharply until engineruns,
NOTE
rope5 more pulls. Ifengine still does notrun,
it is probably flooded.
3. To stopthe engine, moveth ethrottle lever to
ST ARTING A FLOODED ENGINE
Flooded engines can be started by placing the
choke lever in the RUN position. Move throttle
lever to the fast position
until engine starts.After enginestarts, movethe
throttle lever tothe slow position
eng ine to id le.
Star ting could require pu lling the starter rope
many times depending on how badly the unit is
flooded.
If unit still doesn’t start refer to the TROUBLESHOOTING TABLE or call 1-800-554-672 3
If fuel tank is empty, add fuel; then,
but no more than5 pulls.
If enginehas not started, pull starter
:
theS TOP position.
; then, pull rope
position.
toallow
.
MAINTENANCE
WARNING:
unless engine and muffler are cold. A hot
muffler can cause serious burns.
WARNING:
the impeller blades have stoppedturning before opening the vacuum inlet door or attempting to insert or remove the vacuum or
blower tubes. The rotatingblades can cause
serious injury. Always disconnect the spark
plug before performing maintenance or accessing movable parts.
GENERALRECOMMENDATIONS
Thewarrantyonthisunit doesnot coveritems
that have been subjected to operator abuse
or negligence. To receive full value from the
warranty, the operatormust maintain unit as
Avoid touching muffler
Stop engineand besure
instructed in this manual. Various adjustments will need to be made periodically to
properly maintain your unit.
CHECK FORLOOSE
FASTENERSAND PARTS
Spark Plug Boot
S
Air Filter
S
Housing Screws
S
Muffler
S
CHECK FOR DAMAGED OR WORN
PARTS
Contact an authorized service dealer for replacement of damaged orworn parts.
Fuel Tank -- Do not useu nit iffuel tank shows
S
signs of damage or leaks.
VacuumBag-- Do notuse vacuum bag if it
S
is torn or damaged.
-- 7 --
www.mymowerparts.com
Page 8

For Parts Call K&T 606-678-9623 or 606-561-4983
INSPECTANDCLEANUNIT AND
DECALS
After each use, inspect complete unit for
S
looseor damagedparts. Cleantheunitand
decals usingadampcloth withamilddetergent.
Wipe off unit with a clean dry cloth.
S
CLEAN AIR FILTER
Air Filter
Cover
Air Filter
Cleaning the airfilter:
A dirty air filter decreases engine performance and increases fuel consumption and
harmful emissions. Always clean or replace
air filter after every 5 hours of operation or
yearly, whichever comes first.
1. Clean thecover andthe area around it to
keepdebris fromfalling intothecarburetor
chamber when thecover is removed.
2. Remove parts asillustrated.
Donotclean filterin gasolineorother
NOTE:
flammable solvent.Doingso can createa fire
hazardor produceharmfulevaporativeemissions.
3. Wash the filter in soap and water.
4. Allow filter to dry.
5. Apply a few drops of oil to the filter;
squeeze filter to distribute oil.
6. Replace parts.
REPLACE SPARK PLUG
Replace spark plug each year to ensure the
engine starts easier and runs better. Set
sparkplug gapat 0.025inch.Ignitiontiming is
fixed, nonadjustable.
1. Twist, then pull off spark plug boot.
2. Removespark plugfrom cylinder anddiscard.
3. Replace with Champion RCJ-6Y spark
plug and tighten securely with a 3/4 inch
socket wrench.
4. Reinstall the spark plug boot.
Screws
REPLACE FUELFILTER
Toreplacefuel filter,drainunit byrunningit dry
of fuel,then remove fuelcap/retainerassembly fromtank. Pull filter fromtank andremove
itfromthefuel line.Install newfuelfilteronfuel
line; reinstall parts.
Fuel Line
Fuel Filter
CHECK MUFFLERMOUNTING
SCREWS
Once each year, ensure muffler mounting
screws are secure and tightened properly to
prevent damage.
Mounting
Screw
Muffler Cover
Screws
1. Loosen andremovethe 2screws fromthe
muffler cover.
2. Remove themuf flercover.
3. Tighten the2 mufflermounting screws securely.
4. Reinstall muffler cover and 2 screws.
Tighten securely.
CARBURETOR ADJUSTMENTS
Thereis no screw foridleadjustment onyour
blower. The throttle lever is used to control
engine speed. The throttle lever can be
placed in one of four positions: STOP, IDLE
, FULLTHROTTLE or , and one
or
intermittentposition. Ifyourenginewill notrun
properly or you require further assistance,
contact an authorized service dealer or call
1--800--554--6723.
Holes
STORAGE
WARNING:
steps after each use:
Allow engine to cool, and secure the unit
S
before storing or transporting.
Store unit and fuelin a well ventilated area
S
where fuel vapors cannot reach sparks or
Perform the following
open flames from water heaters, electric
motors or switches, furnaces, etc.
Store unit with all guardsinplace.Position
S
unit so that any sharp object cannot accidentally cause injury.
Store unit and fuel well out of the reach of
S
children.
-- 8 --
www.mymowerparts.com
Page 9

For Parts Call K&T 606-678-9623 or 606-561-4983
SEASONALSTORAGE
Prepareunit for storageat endofseasonor if
it will not beused for 30days or more.
If yourunitis to be storedfor aperiod of time:
Clean the entire unit before lengthy stor-
S
age.
Store in a clean dry area.
S
Lightly oil external metal surfaces.
S
FUEL SYSTEM
Under FUELING ENGINE in the OPERATIONsectionof thismanual,seemessage labeled IMPORTANT regarding the use of gasohol in your engine.
Fue l stabilizer is an acceptable alternative in
minimizing the formation of fuel gum deposits
dur ing storage.Add st abilizerto gasoline infuel
tank or fuel storage container. Follow the mix
instr u ctions found on stabilizer container . Run
engineat le ast 5minutes af ter addingstabilize r.
TROUBLESHOOTINGTABLE
WARNING:
recommended remedies below other than remedies that require operation of the unit.
TROUBLE
Enginewill not
start.
Enginewill not
idle properly.
Enginewill not
accelerate,
lacks power, or
dies under a
load.
Engine smokes
excessively.
Engine runs hot.
Always stop unitand disconnectsparkplugbefore performing any ofthe
CAUSE REMEDY
1. Engine flooded.
2. Fuel tank empty.
3. Spark plug not firing.
4. Fuel not reaching
carburetor.
5. Compressionlow.
1. Fuel not reaching
carburetor.
2. Carburetorrequires
adjustment.
3. Crankshaft seals worn.
4. Compressionlow.
1. Air filter dirty.
2. Fuel not reaching
carburetor.
3. Spark plug fouled.
4. Carburetorrequires
adjustment.
5. Carbon build up.
6. Compression low.
1. Choke partially on.
2. Fuel mixture incorrect.
3. Air filter dirty.
4. Carburetorrequires
adjustment.
1. Fuel mixture incorrect.
2. Spark plug incorrect.
3. Carburetorrequires
adjustment.
4. Carbon build up.
ENGINE
Remove sparkplug andpour1teaspoonof
S
40:1,2-cycle engineoil (air cooled)through
the spark plug opening. Slowly pull the
starter rope 8 to10 times to distribute oil.
Replacesparkplug withnew oneofrecom-
S
mended type andheat range.
Clean air filter.
S
Check entire unit for loose screws, nuts,
S
and bolts. Replace any damaged, broken,
or worn parts.
At the beginning of the next season, use
S
only freshfuelhavingtheproper gasolineto
oil ratio.
OTHER
Do not store gasoline from one season to
S
another.
Replaceyourgasolinecanif itstarts torust.
S
1. See “Starting a Flooded Engine”
in Operation section.
2. Fill tank with correct fuel mixture.
3. Install new spark plug.
4. Check for dirty fuel filter; replace.
Check for kinked or split fuel line;
repair or replace.
5. Contact an authorized service dealer.
1. Check for dirty fuel filter; replace.
Check for kinked or split fuel line;
repair or replace.
2. Contact an authorized service dealer.
3. Contact an authorized service dealer
4. Contact an authorized service dealer.
1. Clean or replace air filter.
2. Check for dirty fuel filter; replace.
Check for kinked or split fuel line;
repair or replace.
3. Clean or replace spark plug
and re-gap.
4. Contact an aut horizedservice dea ler.
5. Contact an aut horizedservice dea ler.
6. Contact an aut horizedservice dea ler.
1. Adjust choke.
2. Empty fuel tank and refill with
correct fuel mixture.
3. Clean or replace air filter.
4. Contact an authorized service dealer.
1. See “Fueling Engine” in Operation
section.
2. Replace with correct spark plug.
3. Contact an authorized service dealer.
4. Contact an authorized service dealer.
-- 9 --
www.mymowerparts.com
Page 10

For Parts Call K&T 606-678-9623 or 606-561-4983
LIMITED WARRANTY
ELECTROLUX HOME PRODUCTS, INC.,
warrantsto theoriginal purchaserthat eachnew
Snapper
free from defects in material and workmanship
and agrees to repair or replace under this warranty any defective gasoline product or attachment as follows from the original date of purchase:
2 YEARS--
household purposes.
90 DAYS - -
commercial, professional, or income producing
purposes.
30 DAYS --
purposes.
This warranty is not transferable and does not
cover damage or liability caused by imp r oper
handling, improper maintenance, or the use of
accessories and/or attachments notspecifically
recommended by
PRODUCTS, INC.,
this warranty does not cover tune-ups, spark
plugs, filters, starter ropes, starter springs, cutting line,or rotating headparts thatwill wearand
require replacementwithreasonableuse during
the warranty period. This warranty does not
YOUR WARRANTY RIGHTS AND OBLIGATIONS:
Protection Agency and ELECTROLUX
HOMEPRODUCTS,INC.,arepleasedtoexplain the emissions control system warranty
on your year 2002--2004 small off--road engine. ELECTROLUX HOME PRODUCTS,
INC.,mustwarrant theemission control systemon yoursmall off--roadenginefortheperiods of time listed below provided there has
been noabuse,neglect, or improper maintenance of your small off--road engine. Your
emission control system includes parts such
as the carburetor and the ignition system.
Whereawarrantableconditionexists,ELECTROLUX HOME PRODUCTS,INC., will repair your small off--road engine at no cost to
you. Expenses covered under warranty includediagnosis,partsandlabor.
TURER’SWARRANTYCOVERAGE:
emissions related part on your engine (as
listed under Emissions Control Warranty
PartsList) is defectiveoradefect inthe materialsorworkmanshipof theengine causesthe
failure of such an emission related part, the
part will be repaired or replaced by ELECTROLUX HOME PRODUCTS,INC.
ER’S WARRANTY RESPONSIBILITIES:
As the small off--road engine owner, you are
responsible for the performance of the required maintenance listed in your instruction
manual. ELECTROLUX HOME PRODUCTS, INC., recommends that you retain all
receipts covering maintenanceon yoursmall
off--road engine, but ELECTROLUX HOME
PRODUCTS, INC., cannot deny warranty
brand gasoline toolo rattachmentis
tttt
Parts and Labor, when used for
Parts and Labor, when used for
Parts and Labor , if used for rental
ELECTROLUX HOME
for this tool. Additionally,
U.S. EPA
EMISSION CONTROL WARRANTY STATEMENT
The U. S. Environmental
MANUFAC-
Ifany
OWN-
cover predelivery setup or normal adjustments
explained in the instruction manual.
THIS WARRANTY GIVES YOU SPECIFIC
LEGAL RIGHT S, AND YOU MAY HAVE
OTHER RIGHTS WHI CH VAR Y FROM
STA T E TO ST ATE.
NO CLAIMS FOR CONSEQUENTIAL OR
OTHER DAMAGES WILL BE ALLOWED,
AND THERE ARE NO OTHER EXPRESS
WARRANTIES EXCEPT THOSE EXPRESSLY STIPULA TED HEREIN.
SOME STATES DO NOT ALLOW LIMITATIONS ON HOW LONG AN IMPLIED WARRANTY LASTS OR THE EXCLUSION OR
LIMIT ATIONS OF INCIDENTAL OR CONSEQUENTIAL DAMAGES, SO THE ABOVE
LIMITA T IONS OR EXCLUSI ON MAY NOT
APPLY TO YOU.
The policy of
DUCTS, INC.,
products. Therefore,
PRODUCTS, INC.,
change, modify, or discontinue models, designs, specifications, and accessories of all
products atany time withoutnotice orobligation
to any purchaser.
solelyfor thelack ofreceiptsorforyourfailure
to ensure the performance of all scheduled
maintenance. As thesmall off--road engine
owner,you should beawarethat ELECTROLUX HOME PRODUCTS, INC., may deny
you warrantycoverage if your small off--road
engine or a partof it has failed duetoabuse,
neglect, improper maintenance, unapproved
modifications, orthe useofparts notmade or
approvedby theoriginal equipmentmanufacturer. Y ouare responsiblefor presentingyour
small off--road engine to an ELECTROLUX
HOME PRODUCTS,INC., authorized repair
centeras soonas aproblem exists. Warranty
repairs should be completed in areasonable
amountof time, notto exceed30 days. Ifyou
have any questions regarding your warranty
rightsandresponsibilities,you shouldcontact
your nearestauthorizedservice centerorcall
ELECTROLUXHOMEPRODUCTS,INC.,at
1--800--554--6723.
MENCEMENT DATE:
begins on thedatethe small off--road engine
is purchased.
This warranty shall be for a period of two
yearsfrom theinitial dateof purchase.
IS COVERED: REPAIR OR REPLACEMENTOF PARTS.
any warranted part will be performed at no
charge to the owner at an approved ELECTROLUX HOMEPRODUCTS, INC., servicing center. If youhave any questions regarding your warranty rights and responsibilities,
you should contact your nearest authorized
service centeror call ELECTROLUX HOME
PRODUCTS, INC., at 1--800--554--6723.
ELECTROLUX HOME PRO-
is to continuously improve its
ELECTROLUX HOME
reserves the right to
WARRANTY COM-
The warranty period
LENGTH OF COVERAGE:
Repair or replacementof
-- 1 0 --
WHAT
www.mymowerparts.com
Page 11

For Parts Call K&T 606-678-9623 or 606-561-4983
WARRANTY PERIOD:
whichisnotscheduledfor replacementasrequired maintenance, or which is scheduled
only forregularinspection to the effect of“repair or replace as necessary” shall be warrantedfor2 years. Any warrantedpartwhich
is scheduled for replacement as required
maintenanceshall bewarrantedfor theperiod
of time up tothefirst scheduledreplacement
point for that part.
shall not be charged for diagnostic labor
which leads to the determination that a warrantedpartis defective if the diagnostic work
is performed at an approved ELECTROLUX
HOME PRODUCTS, INC., servicing center.
CONSEQUENTIAL DAMAGES:
TROLUXHOME PRODUCTS,INC.,maybe
liable for damages to other engine components caused by the failure of a warranted
part still under warranty.
COVERED:
glect, or improper maintenance are not covered.
use of add--on or modified parts can be
grounds for disallowing a warranty claim.
ELECTROLUXHOME PRODUCTS, INC.,is
This engine is certified to be emissions compliant for the following use:
All failurescaused byabuse,ne-
ADD--ON ORMODIFIEDPARTS:
Moderate (50 hours)
Intermediate (125 hours)
Extended (300hours)
Any warranted part
DIAGNOSIS:
WHAT IS NOT
The owner
ELEC-
not liable to cover failures ofwarrantedparts
caused by the use of add--on or modified
parts.
HOW TO FILE A CLAIM:
any questionsregardingyour warrantyrights
andresponsibilities, youshould contact your
nearest authorized service center or call
ELECTROLUXHOMEPRODUCTS,INC.,at
1--800--554--6723.
RANTY SERVICE:
pairs shall be provided at all ELECTROLUX
HOME PRODUCTS, INC., service centers.
Call 1--800--554--6723.
REPLACEMENT AND REPAIR OF EMISSION RELATED PARTS:
LUXHOMEPRODUCTS,INC., approvedreplacement part used in the performance of
any warrantymaintenanceor repair onemission related parts will be provided without
charge to the owner if the part is underwarranty.
EMISSION CONTROL WARRANTY
PARTS LIST:
Spark Plug (covered up to maintenance
The
schedule),IgnitionModule.
STATEMENT:
the performance of all required maintenance
as defined in the instruction manual.
Carburetor, Ignition System:
The owner is responsible for
If you have
WHERE TO GET WAR-
Warranty services or re-
MAINTENANCE,
Any ELECTRO-
MAINTENANCE
-- 11 --
www.mymowerparts.com
 Loading...