

Page 1

Operator's Manual
22" Self-Propelled
WalkBehindMower
f
ModelNo. Description
7800709
7800755
SPV2270HW
NSPV2270HW
7104299
Rev.-
Page 2

Thank You for purchasing this quality-built Snapper product. We're pleased that you placed your confi-
dence in the Snapper brand. When operated and maintained according to the instructions in this manual,
your Snapper product will provide many years of dependable service.
This manual contains safety information to makeyou aware of the hazards and risks associated with the
machine and how to avoid them. This machine is designed and intended only for finish cutting of
established lawns and is not intended for any other purpose. It is important that you read and understand
these instructions thoroughly before attempting to start or operate this equipment. Save these original
instructions for future reference.
Completethe following information on your Snapperpurchase.
Date of Purchase
Retailer
Retailer's Phone Number
Equipment
Engine
Model Number
SerialNumber
Model .Type. Code
Snapper is a trademark of
Briggs & Stratton PowerProducts Group, LLC
Milwaukee, WI, USA.
Copyright © 2010, Briggs & Stratton Corporation
Milwaukee, WI, USA. All Rights Reserved.
Page 3
Table of Contents
OperatorSafety ................................................ 4
Assembly .................................................... 6
Unpacking ......................................................... 6
Handle ............................................................ 6
HandleHeight ...................................................... 7
Grass Bag ......................................................... 8
Side Discharge Deflector ............................................. 10
Mulching Tips ..................................................... 11
How to Preparethe Engine ........................................... 11
FinalPreparation ................................................... 11
Operation ................................................... 12
Engine Stop Lever .................................................. 12
WheelDrive System ................................................ 12
Stopping the Engine ................................................ 12
Starting the Engine ................................................. 13
Rules for Safeand Effective Operation .................................. 13
Maintenance ................................................. 14
MaintenanceChart ................................................. 14
Engine Maintenance ................................................ 15
EngineTipping .................................................... 15
Lubrication ....................................................... 15
Adjusting the Height of Cut ........................................... 15
Adjusting the Drive Cable ............................................ 16
BladeService ..................................................... 17
Removingthe Blade ............................................. 17
Sharpeningthe Blade ............................................ 17
Checkingthe Levelof Cut ......................................... 17
Cleaningthe Mower Housing ......................................... 18
Preparing the Mower for Storage ...................................... 20
Troubleshooting............................................... 21
Warranty .................................................... 22
SlopeGuide ................................................. 23
WARNING
Batteryposts, terminals and related accessoriescontain
lead and lead compounds, chemicals knownto the Stateof
California to cause cancer and birth defects or other
reproductiveharm. Wash handsafter handling.
WARNING
Engineexhaust,some of its constituents, andcertain
vehicle components contain or emit chemicals known to
the State of California to causecanceror other reproductive
harm.
Page 4

OperatorSafety
WARNING:This powerful cutting machine is capable of amputating handsand feet and canthrow objects
that can cause injury and damage! Failureto comply with the following SAFETYinstructions could result in
serious injury or death to the operator or other persons.The owner of the machine must understand these
instructions and must allow only persons who understandthese instructions to operate machine. Each
personoperating the machine must beof sound mind and body and must not be under the influence of any
substance,which might impair vision, dexterityor judgment. If you haveany questions pertaining to your
machinewhich your dealer cannotanswer to your satisfaction, contact Customer Service (1-800-317-7833
or www.snapper.com).
Protection for Children
Tragic accidents canoccur if the operator is not alert to the
presenceof children. Children are oftenattracted to the
machine andthe mowing activity. Neverassumethat
children will remain whereyou lastsaw them.
1. KEEPchildren out of the mowing area andunder the
watchful careof a responsibleadult other than the operator.
2. DONOTallow children in yard when machine is operated
andturn machine OFFif anyone enters the area.
3. DONOTallow pre-teenagechildren to operate machine.
4. ALLOW only responsible adults & teenagerswith mature
judgment under close adult supervision to operate machine.
5. DONOTpull mower backwardsunless absolutely
necessary.LOOKand SEEbehindand down for children,
pets and hazards before and while backing.
6. USEEXTRACAREwhen approaching blind corners,
shrubs, trees, or other objects that may obscure vision.
SlopeOperation
1. Slopesare a major factor relatedto slip and fall acci-
dents,which can result in severe injury.All slopes require
extra caution. If you feel uneasyon a slope, DO NOTmow
it.
2. Mow across slopes, neverup-and-down. Exercise
extremeCAUTIONwhen changing directions on slopes. DO
NOTmow steep slopes or other areaswhere stability or
traction is in doubt. Referto the Slope Guideat the end of
this manual.
3. Useextra carewith grass catchers or other attachments;
these affect the handling andthe stability of the machine.
Preparation
1. Read,understand, and follow instructions and warnings
in this manual and on the mower, engine and attachments.
Knowthe controls and the proper useof the mower before
starting.
2. Only mature, responsible persons shall operatethe
machine and only after proper instruction.
3. Data indicates that operators age60 and above,are
involved in a largepercentageof mower-related injuries.
Theseoperators should evaluatetheir ability to operatethe
mower safely enough to protect themselvesand others
from serious injury.
Preparation
(ContinuedFromPrevious Column)
4. Handlefuel with extra care. Fuelsareflammable and
vapors are explosive. Useonly an approvedfuel container.
DONOTremovefuel capor addfuel with engine running.
Add fuel outdoors only with engine stopped and cool. Clean
spilled fuel and oil from machine. DO NOTsmoke.
5. Checkthe areato be mowed and removeall objects such
as toys, wire, rocks, limbs and other objects that could
cause injury if thrown by bladeor interfere with mowing.
Also notethe location of holes, stumps, and other possible
hazards.
6. Keeppeople and pets out of the mowing area.
Immediately,STOPBlade,Stop engineand Stop mower if
anyone enters the area.
7. Checkshields, deflectors, switches, blade controls and
other safety devicesfrequently for proper operation and
location.
8. Make sureall safety decalsare clearly legible. Replaceif
damaged.
9. Protectyourself when mowing and wear safety glasses, a
dust mask, long pants, and substantialfootwear. DONOT
mow barefooted or with sandals.
10. Know how to STOPbladeand engine quickly in
preparationfor emergencies.
11. Use extra carewhen loading or unloading the machine
into a trailer or truck.
12. Checkgrass catchercomponents frequently for signs of
wear or deterioration and replaceas neededto prevent
injury from thrown objects going through weak or torn
spots.
Safe Handlingof Gasoline
Toavoid personal injury or property damage, use extreme
care in handling gasoline. Gasolineis extremely flammable
and the vapors are explosive.
1. Extinguishall cigarettes, cigars, pipes and other sources
of ignition.
2. Use only anapprovedfuel container.
3. DONOTremovefuel cap or add fuel with the engine
running. Allow the engineto cool before refueling.
4. DONOTrefuel the machineindoors.
5. DONOTstore the machine or fuel container inside where
there is an openflame, spark or pilot light such as on a
water heater or other appliances.
4 www.snapper.com
Page 5

OperatorSafety
Safe Handling of Gasoline
(ContinuedFromPreviousPage)
6. DONOTfill fuel containers inside a vehicle or on a truck
or trailer bed with a plastic liner. Always placethe contain-
erson the ground away from the vehicle beforefilling.
7. Removegas-poweredequipment from the vehicle or
trailer and refuelit on the ground. If this is not possible,
then refuelequipment using a portable container, rather
than a gasoline dispenser nozzle.
8. DONOTstart gas poweredequipment in enclosedvehi-
cles or trailers.
9. Keepthe nozzlein contact with the rim of the fuel tank or
container opening at all times until fueling is complete. DO
NOTusea nozzlelock-open device
10. If fuel is spilled on clothing, change clothing
immediately.
11. DONOToverfill a fuel tank. Replacefuel cap and tighten
securely.
Operation
1. DONOTput hands or feet nearor under rotating parts.
Keepclearof discharge areawhile engine is running.
2. STOPenginewhen crossing gravel drives, walks, or
roads, and under any conditions where thrown objects
might be a hazard.
3. Mow only in daylight or good artificial light.
4. DONOToperate mower while under the influence of
alcohol or drugs.
5.After striking a foreign object or if mower vibrates
abnormally,STOPthe engine, disconnect and securespark
plug wire. Inspect the mower for anydamageand repair the
damagebeforestarting.
6. DONOTmow near drop offs, ditches or embankments.
Operatorcould lose footing or balance.
7. STAYALERTfor holes and other hidden hazards.Tall
grass can hide obstacles. Keepawayfrom ditches,
washouts, culverts, fencesand protruding objects.
8. DONOTmow on wet grass. Always be sure of your
footing. Keepa firm hold on the handleand walk, neverrun.
Slipping could cause injury.
9.ALWAYSstay behind handlewhen engine (motor) is
running.
10. DONOTleavethe machinewith the engine running.
STOPBLADEand STOPENGINEbeforeleavingthe opera-
tors position for any reason.
11. Beforecleaning, repairing or inspecting make certain
engine,blade and all moving parts haveSTOPPED.
Disconnectand secure spark plug wire awayfrom plug to
prevent accidental starting.
12. STOPengineand wait until the bladecomes to com-
pleteSTOPbefore removing grass bagand/or clearing
grass.
Operation
(ContinuedFromPreviousColumn)
13. DONOToperatemower without the entire grass catch-
er, rear guard or other safety devicesin place and working.
DONOTpoint discharge at people, passingcars, windows
or doors.
14. DONOTdischarge materialagainst awall or obstruc-
tion. Material may ricochet back towards the operator.
15. Slow down beforeturning.
16. Watchout for traffic when near or crossing roadways.
17. DONOToperateengine in enclosedareas. Engine
exhaust gasescontain carbon monoxide, a deadly poison.
18. Onlyuse accessoriesapprovedby the manufacturer.
See manufacturer's instructions for proper operation and
installation of accessories.
MaintenanceandStorage
1. DONOTstore mower or fuel container inside where
fumes may reachan open flame, sparkor pilot light such as
in awater heater,furnace, clothes dryer or other gasappli-
ance. Allow engine to cool before storing machine in an
enclosure. Store fuel container out of reachof children in a
well ventilated, unoccupied building.
2. Keepmower and enginefree of grass, leavesor excess
greaseto reducefire hazardand engine overheating.
3. Whendraining fuel tank, drain fuel into an approved
container outdoors and awayfrom open flame.
4. Keepall bolts, especially bladebolts, nuts and screws
properly tight. Checkthat all cotter pins are in proper
position.
5. Alwaysprovide adequateventilation when running
engine. Engineexhaust gasescontain carbon monoxide, a
deadly poison.
6. Serviceengine and makeadjustments only when engine
is stopped. Removespark plug wire from spark plug and
secure wire awayfrom spark plug to prevent accidental
starting.
7. DONOTchange engine governor speedsettings or
overspeed engine.
8. Checkgrass bag assembly frequently for wear or
deterioration to avoidthrown objects and exposure to
moving parts. Replacewith new bag if loose seams or tears
are evident. Replaceslider or bag adapter if brokenor
cracked.
9. Mower bladesare sharp and can cut. Wrap the bladesor
wear heavy leather gloves and use CAUTIONwhen handling
them.
10. DONOTtest for spark by grounding spark plug next to
spark plug hole; spark plug could ignite gas exiting engine.
11. Havemachine serviced by anauthorized dealerat least
once a year and havethe dealer install anynew safety
devices.
12. Use only factory authorized replacementparts or like
parts when making repairs.
Page 6

Assembly
WARNING:Beforedoingany assemblyor
maintenancetothe mower,removethe wire
from the sparkplug.
NOTE.In this instruction book, left and right describe the
location of a part with the operator standing behind the
handle.
Unpacking
The mower was fully assembledatthe factory.When the
mower was put in the carton, the handlewas put in the
storage position. Toput the handle in the operating position,
follow the steps below.
Handle
1. Removethe mower from the carton.
2. Removeall packing material from the mower and the
handle.
3. Removethe wingnuts (A, Figure 1), washers (not
shown), and bolts (B) from the right and left handle
brackets (C).
Figure 1: Unfolding the lower handle
NOTE.Do not remove thelower set of handlehardware (D).
4. Raisethe lower handle, aligning it with one of thethree
sets of holes in the handle brackets (C). Reinstallthe
bolts, washers and wingnuts.
5. Put the upper handle(A, Figure 2) in the operating
(upright) position. Tighten the wingnuts (B).
NOTE.Theheight of the handle can be set for operator
comfort. See "HandleHeight".
CAUTION:Becareful whenyou fold or raisethe handle. Do
not damagethe cables.A cable that is bent will not work
correctly. Beforeyou usethe unit, replacea bent or damaged
cable.
,
Hold the engine stop lever againstthe handle.(Refer to
section entitled 'EngineStop Lever'.) Slowly pull the
recoil-start grip (A, Figure3). Toattach the recoil-start
grip to the rope guide (B), twist the rope through the
rope guide mounted on the right sideof the handle.
Figure2: Unfolding the upper handle
Figure3: Attaching the recoil-start grip
6 www.snapper.com
Page 7

Adjusting the Handle Height
1. Removethe wingnuts (A, Figure4), washers (not
shown), and bolts (B) from the right and left handle
brackets (C).
Note. Donot remove the lower set of handle hardware(D).
2. Adjust the handleto a higher or lower height adjustment
hole (A, Figure 5).
Assembly
Figure4: Removing the handleadjustment hardware
3. Reinstallthe bolts, washers and wingnuts removed in
Step 1.
Figure5: Height adjustment holes
(Components removed for clarity)
Page 8

Assembly
Assemblingthe GrassBag
Note: On some models, the side mounted discharge deflector
is temporarily attached (for shipping purposes) to the rearof
the mower. Beforeassembly of thegrass bag, remove the
side mounted discharge deflector.
1. Slide the frame assembly (A, Figure 6) into the grass
bag (B). Make sure the handle(C) is on the outside of
the grass bag.
2. First, attachthe clips (A, Figure 7) to the side of the
frame assembly. Next,attach the clips to the top and
bottom of the frame assembly.
Figure6: Installing the frame assembly
Figure7. Installing the bag clips
8 www.snapper.com
Page 9
Mounting the Grass Bag
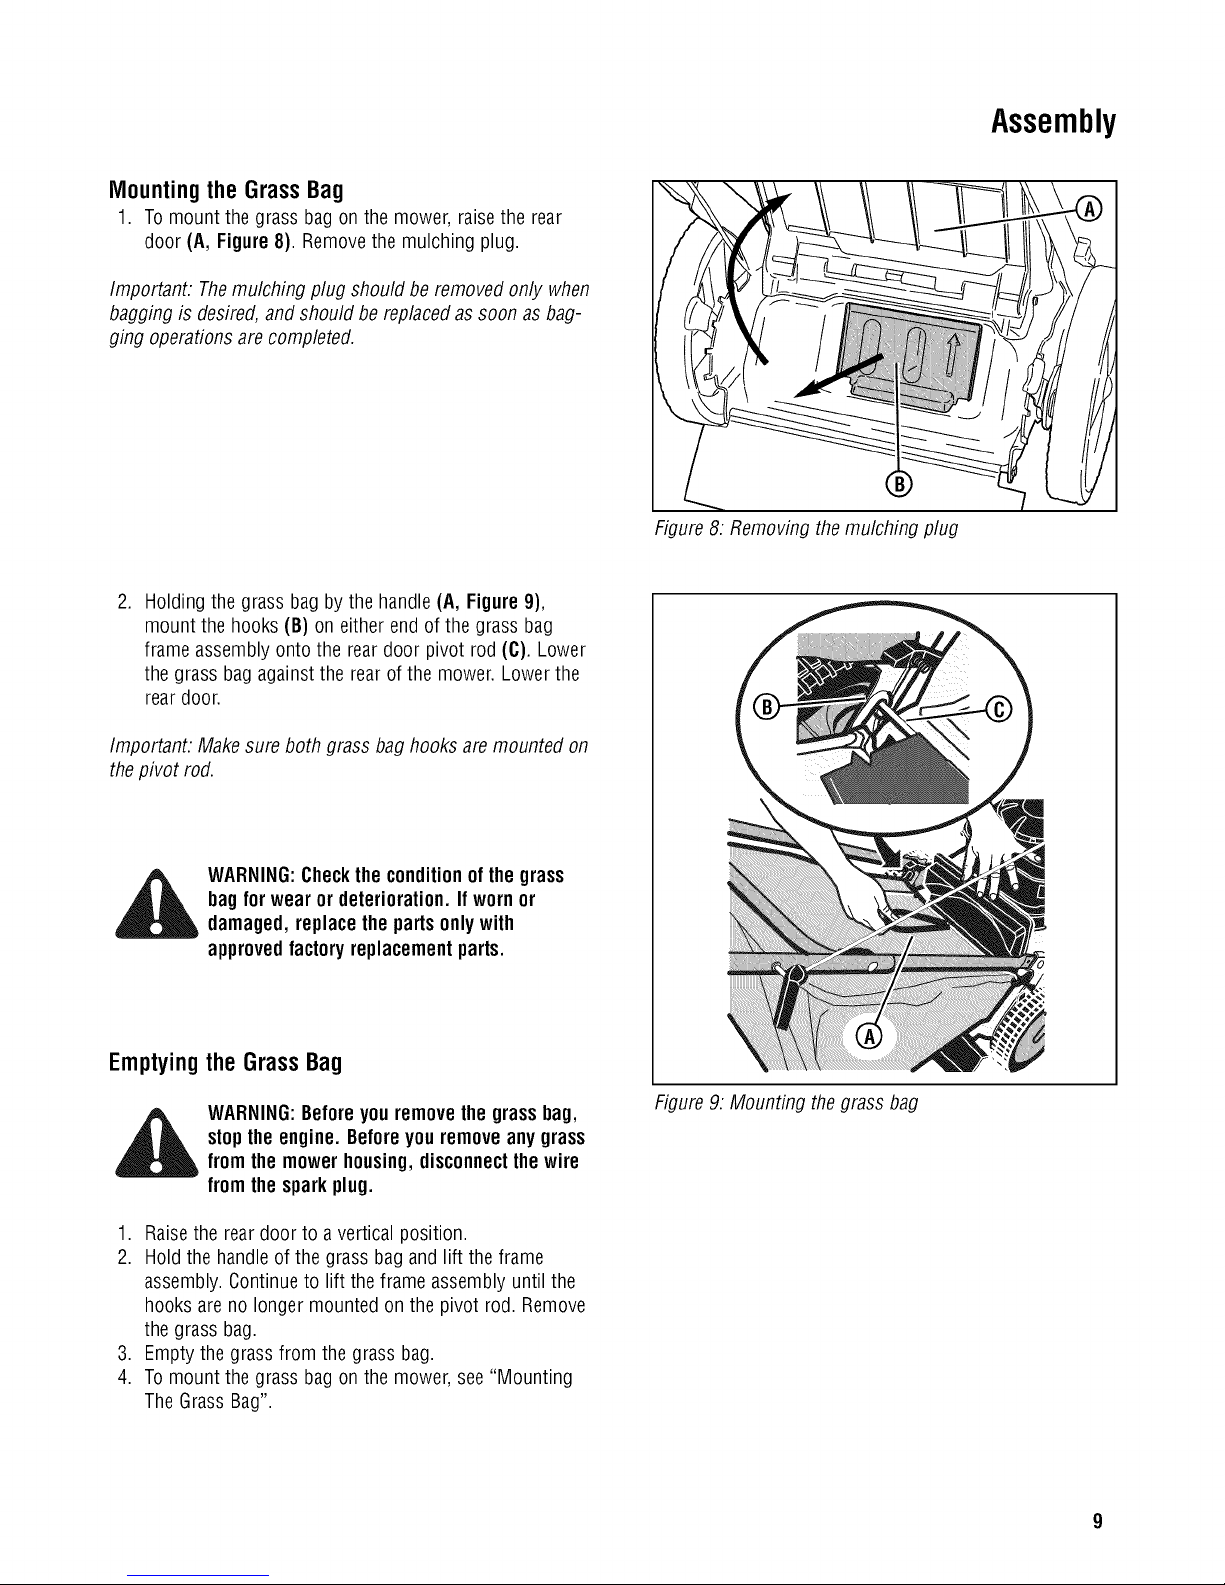
1. Tomount the grass bag on the mower, raisethe rear
door (A, Figure 8). Removethe mulching plug.
Important: Themulching plug should be removed only when
bagging is desired, and should be replaced as soon as bag-
ging operations are completed.
.
Holding the grass bag by the handle (A, Figure 9),
mount the hooks (B) on either end of the grass bag
frame assembly onto the reardoor pivot rod (C). Lower
the grass bag againstthe rear of the mower. Lower the
rear door.
Assembly
Figure8: Removing the mulching plug
Important: Makesure both grass bag hooks are mounted on
the pivot rod.
WARNING:Checkthe conditionof the grass
bagfor wear or deterioration. If worn or
damaged,replacethe parts onlywith
approvedfactoryreplacementparts.
Emptying the Grass Bag
WARNING:Beforeyou removethe grassbag,
stopthe engine. Beforeyou removeany grass
from the mower housing,disconnectthewire
from the sparkplug.
1. Raisethe rear door to a vertical position.
2. Hold the handle of the grass bag and lift the frame
assembly.Continueto lift the frame assembly until the
hooks are no longer mounted on the pivot rod. Remove
the grass bag.
3. Empty the grass from the grass bag.
4. Tomount the grass bag onthe mower, see "Mounting
The GrassBag".
Figure9: Mounting thegrass bag
Page 10

Assembly
Attachingthe SideMountedDischargeDeflector
WARNING:To prevent the enginefrom
starting,disconnectthe wire from the
sparkplug.
For shipping purposes, the side deflector was not installed.
Locate the side deflector and install as follows.
1. Raisethe mulcher cover (A, Figure 18).
2. Attach the sidedeflector (B). Make sure the locking tabs
(C) go through the slots in the side deflector.
3. Lower the mulcher cover (A, Figure 11).
4. Attach thewire to the spark plug.
Figure 10:Installing the side discharge deflector
Figure 11:Releasingthe mulcher cover
10 www.snapper.com
Page 11
Assembly
Mulching Tips
Mulching finely cuts the grass so that the grass can be easily
recycled. Becausethe nutrients are returned to the soil, the
lawn will need lessfertilizer. Tocorrectly mulch the lawn,
follow the tips below.
• Thegrass must be dry. If the grass is wet, it will be
difficult to cut and cause heavyclumps of grass.
• Thegrass must not be too tall. The maximum height to
effectively cut is 4 1/2 inches.Set the height adjusters
so that only the top third of the grass is cut.
• If the grass is more than 4 1/2 inches high, two
mowings will be necessary.Forthe first mowing, setthe
height adjusters in the highest position. Then, lower the
height adjusters for the second mowing.
Preparing the Engine
ENGINEDOESNOTCONTAINOILORGASOLINE
Using the bottle of oil supplied in the carton, fill the engine
with the proper amount of oil. Seethe engine manufacturer's
instructions for the type of gasoline and oil to use. Before
you usethe unit, readthe information on safety, operation,
maintenance,and storage.
WARNING:Followthe enginemanufacturer's
instructionsforthetype ofgasolineand oil to
use. Alwaysusea safetygasolinecontainer.
Donot smokewhen addinggasoline to the
engine.When insidean enclosure,do not
fill with gasoline. Beforeyou add gasoline,
stopthe engine. Letthe enginecool for
severalminutes.
• Keepa sharp edge onthe blade. A bladethat is not
sharp will causethe ends of the grass to become brown.
• Cleanthe undersideof the mower housing. Grassand
other debris cankeepthe mower from working
correctly.
If the quality of cut is marginal, try the following:
• Set the height adjusters at a higher cutting height.
• Cutthe grass more frequently.
• Operatethe mower at a slower ground speed.
• Overlapthe cutting swathsinstead of cutting a full
swath with each pass.
• Mow across the marginal areasa secondtime.
IMPORTANT:This unit is equipped with an internal
combustion engine and must not be usedon or nearany
unimproved forest-covered, brush-coveredor grass-covered
and unless the engine'sexhaust system is equipped with a
spark arrester meeting applicable localor state laws (if any).
If a spark arrester is used, it must be maintained in effective
working order by the operator.
Inthe Stateof Californiathe above is requiredby law
(Section 4442 of the California Public ResourcesCode).
Otherstates may havesimilar laws. Federallaws apply on
federal lands. Seean Authorized Service Centerfor a spark
arrester for the muffler.
Note:Actual sustained enginepower will likely be lower due
to operating limitations and environmental factors.
Note: Theoperation of a new engine will sometimes result in
a slight amount of smoke. Thissmoke is caused by paint or
oil on or around the muffler. This is normal and only
expectedduring initial operation.
Final Preparation
Beforeyou usethe mower, checkthe assembly of the
wheels,the handle,and the controls. Makesure all the
fasteners are tight. Make surethe throttle control (if
equipped) and the engine stop leverwork correctly.
If the mower is equippedwith height adjusters, makesure
the height adjusters function properly. Beforestarting the
engine, makesure eachheight adjuster is set atthe desired
height. See"Adjusting The Height Of Cut" in the Maintenance
sections.
11
Page 12

Operation
EngineStopLever
Releasethe engine stop lever (A, Figure12) and the engine
and the blade will automatically stop. To run the engine, hold
the engine stop lever in the Operatingposition (B).
Beforeyou start the engine,operatethe engine stop lever
severaltimes. Makesure the cable moves easily.
4_ WARNING:Forsafe operation, the drive
Figure 13: Operatingthe wheeldrive system
systemmustimmediately disengagewhenthe
drivelever is released. If the drive system
doesnotdisengagecorrectly,do notoperate
the mower until thedrive systemis adjusted
or repaired by an authorizedservice center.
Figure 12:Operatingthe engine stop lever
Wheel DriveSystem
The mower has a wheeldrive system. Operatethe drive
system asfollows.
1. Hold the engine stop lever (A, Figure 12) in the
OperatingPosition (B).
2. Slowly pull the drive lever(A, Figure 13) back. The
drive system is now engaged. To increaseground
speed, slowly pull the drive leverfarther back. To
decreaseground speed,slowly releasethe drive lever.
3. Todisengagethe drive system and stop the engine,
completely releasethe engine stop lever.
4. Todisengage only the drive system, releasethe drive
lever.The drive system will disengage but the engine
will continue to run.
Note: Whenthe drivesystem is disengagedon a new unit, it
is possible for the wheelsto rotate if lifted off the ground.
This is normal and will stop after one or two hours of opera-
tion.
Stoppingthe Engine
Tostop the engine, releasethe engine stop lever.Disconnect
the wire from the spark plug to prevent the engine from
starting.
Beforeyou start the engine,check the engine stop cable.
Make sure the engine stop cableis assembled correctly.
Beforeyou operate the unit, replace a bent or damaged
engine stop cable.
12 www.snapper.com
Page 13
Startingthe Engine
WARNING:The blade will rotate
when the engineruns.
IMPORTANT:Beforeyou start the engine, operate the engine
stop lever severaltimes. Make sure the enginestop cable
moves freely.
Note: Theengine design does not include a throttle control
or an enginespeed adjustment. Theengine is set at thebest
speed for cutting grass, bagging grass, and for extended
engine life.
Note: Models equipped with ReadyStart _ engines do not
feature a primer button. Seethe engine manufacturer's
instructions for further information.
.
Checkthe oil.
2.
Fill the fuel tank with regular unleadedgasoline. Make
sure the gasoline is clean. Leadedgasolinewill increase
deposits and shorten the life of the valves.
Note: Do not usegasohol or methanol Donot usepremium
unleadedgasoline.
Operation
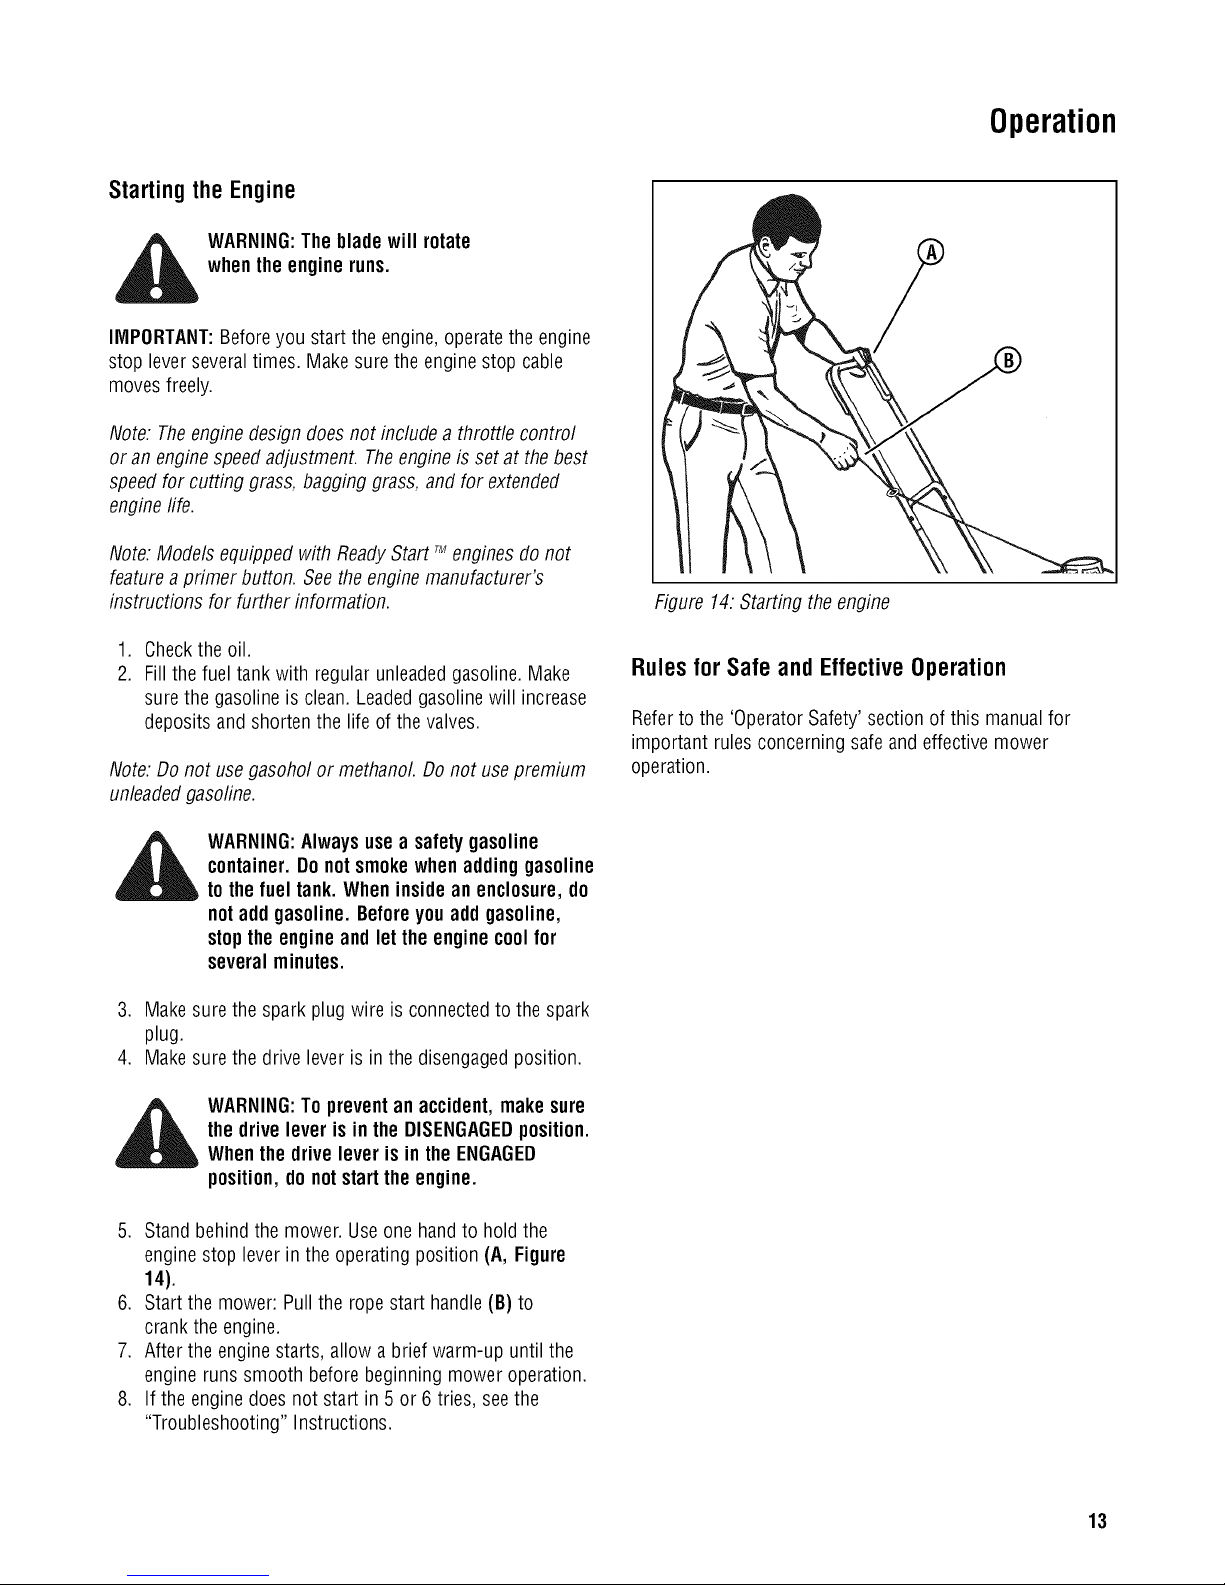
Figure 14:Starting the engine
Rules for Safe and Effective Operation
Referto the 'Operator Safety'section of this manualfor
important rules concerning safe andeffective mower
operation.
WARNING:Alwaysusea safetygasoline
container.Do notsmokewhenaddinggasoline
to thefuel tank. When insidean enclosure,do
notadd gasoline.Beforeyou addgasoline,
stopthe engine and letthe engine coolfor
severalminutes.
3. Make sure the spark plug wire is connectedto the spark
plug.
4. Make sure the drive lever is in the disengaged position.
WARNING:To prevent an accident, make sure
the drive lever is in the DISENGAGEDposition.
Whenthe drive lever is in the ENGAGED
position,donot startthe engine.
5. Stand behind the mower. Useone handto hold the
engine stop lever in the operating position (A, Figure
14).
6. Start the mower: Pull the rope start handle (B) to
crank the engine.
7. After the engine starts, allow a brief warm-up until the
engine runs smooth before beginning mower operation.
8. If the engine does not start in 5 or 6 tries, seethe
"Troubleshooting" Instructions.
13
Page 14

Maintenance
MaintenanceChart
WARNING:Beforeyou make an inspection,
adjustment(exceptcarburetor),or repair, stop
the engine and disconnectthewire fromthe
sparkplug.
!!!!
Every8 Hoursor Daily
Checkengine stop lever
Cleandebris off mower
Checkmower for loosehardware
Cleanbattery and cables (if equipped)
Lubricate mower
Checkmower belt
Checkmower blade **
Checkmower blade stopping time
First5 Hours
Changeengineoil
Checkengine oil level
Cleanengine air filter and pre-cleaner(if equipped) **
Changeengineoil
Replaceoil filter (if equipped)
Replaceair filter
Replacepre-cleaner(if equipped)
* Whichevercomes first.
**Check blademore often in regionswith sandy soils or
high dust conditions.
Inspect muffler and spark arrester (if equipped)
Replacespark plug
Replacefuel filter (if equipped)
Cleanengine air cooling system
* Whichevercomes first.
**Clean more often in dusty conditions or when airborne
debris is present.
14 www.snapper.com
Page 15

Maintenance
EngineMaintenance
Use the following maintenancesection to keepyour unit in
good operating condition. All the maintenance information
for the engine is in the engine manual. Beforeyou start the
engine, readthis book.
WARNING:Beforeyou make an inspection,
adjustment(exceptcarburetor),or repair, stop
the engine and disconnectthewire fromthe
sparkplug.
Engine Tipping
Whenyou servicethe engine, inspectthe blade, or cleanthe
underside of the mower housing; make sure to alwaystip the
engine with the spark plug up (Figure 15). Transporting or
tipping the enginewith the spark plug down will cause:
Lubrication
1. For maximum performance, lubricate thewheels and all
pivot points with engine oil every 25 hours.
2. Tolubricate the engine, referto the engine manual.
Note: Do not lubricate the engine stop cable. Lubricants will
damagethe cableand prevent the cablefrom moving freely.
Replacethe cableif bent or damaged.
• Hard starting.
• Enginesmoking.
• Spark plug fouling.
• Oil or gas saturation of the air filter.
Figure 15:No forward engine tipping
Adjusting the Height of Cut
_b ARNING:The blade will rotate whenthe
Tochangethe height of cut, move the position of the
adjuster arm at eachwheel (A, Figure 16). Make sure each
adjuster arm is in the same position so that the mower will
cut level.
engineruns. Beforeyou changetheheight of
cut, stoptheengine and disconnectthewire
from the sparkplug.
1. Disengagethe adjuster arm.
2. Move the adjuster arm to another position.
Figure 16:Adjusting the height of cut
15
Page 16

Maintenance
Adjustingthe DriveCable
WARNING:Beforeyou adjustthe drive cable,
release the engine stoplever andwait for the
engineto stop.
If the drive system doesnot engageand disengagecorrectly,
checkthe handlefor correct assembly.Make surethat all
parts are in good condition, not broken or bent, and that all
fasteners are tight.
Worn parts and cablestretch will changethe performance of
the drive system. When you mow in high or thick grass or
on hills, the drive system can slip. If the drive system is
slipping, adjust asfollows ortake the mower to an
authorized service center.
IMPORTANT:Beforeyou start the engine, operate the engine
stop lever severaltimes. Make sure the enginestop cable
moves freely.
Note: Theengine design doesnot include a throttle control
or an enginespeed adjustment. Theengine is setat the best
speed for cutting grass, bagging grass, and for extended
enginelife.
1. If the drive system is slipping, loosen the jam nut (B,
Figure17) on the adjustment turnbuckle (A), and rotate
the ferrule (C) one-half turn in the direction shown. Test
the drive system and check for slippage.
2. If the drive system still slips, adjust again. Again, test
the drive system.
3. Repeatthe adjustment and test until the drive system
does not slip.
4. Beforeyou begin to mow, make sure the drive system
will correctly disengageand that the mower will stop. If
the drive system will not disengage,take the mower to
an authorized service center before you operatethe
mower.
Figure 17.Adjusting the drive cable
16 www.snapper.com
Page 17

BladeService
WARNING:Beforeyou inspectthe blade or the
blade adapter, disconnectthewire tothe
sparkplug. If the blade hits anobject, stopthe
engine. Disconnectthewire to thesparkplug.
Checkthe unitfor damage.
Frequentlycheckthe blade for wear or damage such as
cracks. Frequentlycheckthe bolt that holds the blade.Keep
the bolt tight. If the blade hits an object, stop the engine.
Disconnectthe wire to the spark plug. Checkthe blade
adapter(A, Figure 18) for damage. Checkfor a bent or
damagedblade,a badly worn blade,or other damage.Before
you operatethe unit, damaged partsmust be replacedwith
factory replacementparts. Forsafety, replace the blade every
two years. Keepa sharp edge on the blade.A bladethat is
not sharpwill causethe ends of the grass to becomebrown.
Removethe blade as follows.
Maintenance
Removingthe Blade
WARNING:Beforeyou removethe blade,
disconnectthe wire to thespark plug. The
bladehassharpedges.Whenyou holdthe
blade, use glovesor clothmaterial to protect
yourhands.
1. Drain the fuel tank.
2. Lift the side of the mower that hasthe muffler or spark
plug.
3. Use apieceof wood to keepthe bladefrom rotating.
4. Removethe bolt (B, Figure18) that holds the blade
with a 9/16" (14mm) wrench.
5. Checkthe blade (C)according to the "Blade Service"
instructions. Replacea badly worn or damaged blade
with a factory replacementblade.
6. Mount the blade with the curvededgestoward the
housing. If the blade is upsidedown, the blade will not
cut correctly and can causean accident.
7. Fastenthe blade with the original washer (D) and bolt.
Make sure the outside rim of the Bellevillewasher is
toward the blade.
8. Tighten the bolt that holds the bladeto a torque of 30
foot pounds.
WARNING:Alwayskeepthe boltthatholdsthe
blade tight. A looseboltor blade cancause an
accident.
Figure 18:Removing the blade
SharpeningtheBlade
4_ WARNING:Vibration is the result if the blade
1. Sharpenthe bladetwo times a year or every 25 hours.
2. If the blade is on the unit, do not sharpen. Removethe
blade according to the instructions in "Removing The
Blade".
3. Cleanthe bladewith a brush, soap, andwater. Checkthe
blade. Lookfor cracks, nicks, or other damage. Replace
a blade that is badly worn, bent, or damagedwith a
factory replacementblade.
4. Sharpenthe blade(A, Figure19, next page) with a file
(B). Makesure you keepthe original beveledcutting
edge.
5. Make sure the blade is balanced. Usea screwdriver (C)
and hold the blade parallelto the ground (D) as shown.
A bladethat is balancedwill stay parallel to the ground.
If the blade is not balanced,the heavyend will rotate
toward the ground. Sharpenthe heavyend until the
blade is balanced.
6. A new blade will cut better than a badly worn blade.
Everytwo years replacethe old bladewith a factory
replacementblade.
is notcorrectlybalanced.A bladethat is
damagedwith crackscan break andcause
anaccident.
Checking the Level of Cut
Testthe unit in a small area. If the height of cut is not level
or if the cut grass is not discharged, the causecan be: (1)
the blade is bent or damaged, (2) the blade is not sharp, (3)
a worn blade, (4) or a broken blade adapter.Before you use
the unit, correct the problem.
17
Page 18

Maintenance
, % ,
_J L_
Figure 19:Sharpening the blade
Cleaningthe MowerHousing
WARNING:Theblade will rotate when the
engine runs. Beforeyou cleanthe mower hous-
ing, stop the engine and disconnectthe wire
from the spark plug.
Grassand other debris can keepthe mower from working
correctly. After you mow, cleanthe mower housing as
follows.
1. Stop the engine.
2. Disconnectthe wire from the sparkplug.
3. Cleandirt and debrisfrom the top of the mower hous-
ing. Cleanwith soap and water.Wipe off excess water
before storage.
Washout Port
WARNING:Use appropriateeye protection.
WARNING:Keeppeople and pets out of
the area.
1. Be sure the grass bag and side discharge deflector are
removed,and the mulching plug is installed.
2. Setthe height of cut to the lowest position. Referto the
'Adjusting the Height of Cut' section of this manual.
3. Move the mowerto aflat, level, concreteor paved
surface.
4. Stop the engine.
5. Connectthe male end of a standard garden hoseto the
washout port connector (A, Figure 20, nextpage).
6. Turnon the water supply to the garden hose.
7. Start the engineand run until no more debris emerges
from under the mower housing.
_ ARNING:Stay behind the handle while the
8. Stop the engine.
9. Turnoff the water supply to the garden hose.
10.Disconnect the gardenhosefrom thewashout port
connector.
11.Start the engineand run for 2-3 minutes, to allow the
bottom of the mower housing to dry.
engine is running.
Thewashout port allows hands-free cleaning of the bottom
of the mower housing. To use the washout port:
18 www.sflapper.com
Page 19

WARNING:Do not attempt mowing operations
while using the washout port.
WARNING:Do not attempt to look under or
reachunder the mower housing for any reason
while using the washout port. Serious injury
can result.
Maintenance
Figure20: Washoutport
Preparing the Mowerfor Storage
WARNING:Do notremovegasoline while
insidea building, near a fire, or while you
smoke.Gasolinefumes can cause an
explosionor a fire.
1. Drain the fuel tank.
2. Let the engine run until it is out of gasoline.
3. Drain the oil from the warm engine.Fill the engine
crankcasewith newoil.
4. Removethe spark plug from the cylinder. Pour one
ounce of oil into the cylinder. Slowly pull the recoil-start
grip so that the oil will protect the cylinder. Install a new
spark plug in the cylinder.
5. Cleanthe dirt anddebrisfrom the cylinder cooling fins
and the engine housing.
6. Cleanthe bottom of the mower housing.
7. Make sure the grass bag is empty of grass. Grass
remainingin the bag during storage will damagethe
bag.
8. Completely clean the mower to protect the paint.
9. Foldthe handles(if desired).
CAUTION:Be careful whenyou fold or raisethe handle.Do
not damagethe cables.A cable that is bent will not work
correctly. Beforeyou usethe unit, replacea bent or damaged
cable.
10. Put the unit in a building that hasgood ventilation.
19
Page 20

Troubleshooting
The enginewill not start.
1. Make sure the fuel tank is filled with clean gasoline. Do not use old gasoline.
2. Thewiring harnessis disconnected.Connectthe wiring harness.
3. Make sure the wire for the spark plug is connectedto the spark plug.
4. Thereis too much gasoline in the engine cylinder. Removeand dry the spark plug. Pull the recoil-start grip severaltimes.
Install the spark plug. Connectthe wire to the spark plug. Start the engine.
5. Theengine is difficult to start in heavyor high grass. Move the mower to acleandry surface.
6. Make sure the engine stop leveris in the operating position.
The enginewill not stop.
1. Releasethe engine stop lever.
2. Checkthe enginestop cable. Replacethe cableif bent or damaged.
Engineperformance is bad.
1. Checkthe height of cut settings. Raisethe height of cut if the grass is high.
2. Checkthe bottom of the blade housing. Cleanthe blade housing of grass and other debris.
3. Checkthe wire to the spark plug. Makesure the wire is connected.
4. Cleanthe engine cooling fins of grass and other debris.
5. Checkthe spark plug gap. Referto the engine manual.
6. Checkthe amount of oil in the engine. Fill with oil if necessary.
7. Checkthe engineair cleaner.Refer to the engine manual.
8. Thegasoline is bad. Drain and cleanthe fuel tank. Fill the fuel tank with clean gasoline.
Excessivevibration.
1. Removethe blade. Checkthe blade and balanceif necessary.Seethe blade maintenanceinstructions.
2. Checkfor a bent or broken blade. A damaged blade is dangerousand mustbe replaced.
3. Checkthe blade adapter.Replacea brokenblade adapter.
4. If the vibration continues, take the mower to an Authorized Service Center.
The grasswill notdischargecorrectly.
1. Cleanthe bottom of the mower housing.
2. Checkfor a badlyworn blade.Remove and sharpenthe blade. Forsafety, replacethe blade every two years with a factory
replacementblade.
The grassis notcuteven.
1. Checkthe height adjustment at eachwheel. The height adjustment must be the same for each wheel.
2. Make sure the blade is sharp.
3. Checkfor a bent or broken blade. A damaged blade is dangerous and must be replaced.
4. Checkfor abroken blade adapter.Replace a brokenblade adapter.
20 www.snapper.com
Page 21

Warranty
LiMiTED WARRANTY
Briggs & Stratton Power Products Group, LLC will repair and/or replace, free of charge, any part(s) of the equipment that is
defective in material or workmanship or both. Briggs & Stratton Corporation will repair andlor replace, free of charge, any
part(s) of the Briggs and Stratton engine* (if equipped) that is defective in material or workmanship or both. Transportation
charges on product submitted for repair or replacement under this warranty must be borne by purchaser. This warranty is
effective for the time periods and subject to the conditions stated below. For warranty service, find the nearest Authorized
Service Dealer using our dealer Iocator at www.BriggsandStratton.com or www.Snapper.com.
There is no other express warranty. Implied warranties, including those of merchantability and fitness for a particular
purpose, are limited to one year from purchase or to the extent permitted by law. Liability for incidental or consequential
damages are excluded to the extent exclusion is permitted by law.
Some states or countries do not allow limitations on how long an implied warranty lasts, and some states or countries do
not allow the exclusion or limitation of incidental or consequential damages, so the above limitation and exclusion may not
apply to you. This warranty gives you specific legal rights and you may also have other rights which vary from state to state
or country to country.
The warranty period begins on the date of purchase by the first retail consumer or commercial end user, and continues for the
period of time stated above. "Consumer use" means personal residential household use by a retail consumer. "Commercial
use" means all other uses, including use for commercial, income producing or rental purposes. Once product has experienced
commercial use, it shall thereafter be considered as commercial use for purposes of this warranty.
No warranty registration is necessary to obtain warranty on Briggs & Stratton products. Save your proof of purchase receipt. If you
do not provide proof of the initial purchase date at the time warranty service is requested, the manufacturing date of the product will
be used to determine warranty eligibility.
We welcome warranty repair and apologize to you for being inconvenienced. Warranty service is available only through servicing
dealers authorized by Briggs & Stratton or BSPPG, LLC.
Most warranty repairs are handled routinely, but sometimes requests for warranty service may not be appropriate. This warranty
only covers defects in materials or workmanship. It does not cover damage caused by improper use or abuse, improper
maintenance or repair, normal wear and tear, or stale or unapproved fuel.
improper Use and Abuse - The proper, intended use of this product is described in the Operator's Manual. Using the product in
a way not described in the Operator's Manual or using the product after it has been damaged will void your warranty. Warranty is
not allowed if the serial number on the product has been removed or the product has been altered or modified in any way, or if the
product has evidence of abuse such as impact damage, or water/chemical corrosion damage.
improper Maintenance or Repair - This product must be maintained according to the procedures and schedules provided in the
Operator's Manual, and serviced or repaired using genuine Briggs & Stratton parts. Damage caused by lack of maintenance or use
of non-original parts is not covered by warranty.
Normal Wear - Like all mechanical devices, your unit is subject to wear even when properly maintained. This warranty does not
cover repairs when normal use has exhausted the life of a part or the equipment. Maintenance and wear items such as filters,
belts, cutting blades, and brake pads (engine brake pads are covered) are not covered by warranty due to wear characteristics
alone, unless the cause is due to defects in material or workmanship.
Stale Fuel - In order to function correctly, this product requires fresh fuel that conforms to the criteria specified in the Operator's
Manual. Damage caused by stale fuel (carburetor leaks, clogged fuel tubes, sticking valves, etc is not covered by warranty.
* Applies to Briggs and Stratton engines only. Warranty coverage of non-Briggs and Stratton engines is provided by the engine manufacturer.
21
Page 22

Notes
22 www.snapper.com
Page 23

¢D
=m
¢D
O
m
GO
o_
t
l
Operate a walk-behind mower
across the face of slopes,
never up or down slopes.
10 DEGREES 15 DEGREES
Operate a riding mower
up or down slopes, never
across the face of slopes.
On a riding mower to determine if a slope is safe to mow: (1)disengage the blade(s), (2) put the unit in reverse, and (3) try to back straight up the
slope, ifyou can back up the slope, it isgenerally safe to mow. However, if you do not feel safe, or if you are not completely sure, use this guide
anddo not mow a slope that is greater than 15 degrees. If the riding mower is used with a pull-behind or rear mounted attachment,
do not operate the unit on a slope that is greater than 10 degrees.
A 15 degree slope is a hitl that increases in height at approximately 2.5 feet in 10 feet.
A 10 degree slope is a hill that increases in height at approximately 1.7 feet in 10 feet.
Use extreme care at all times, and avoid sudden turns or maneuvers. Follow other instructions in this manual for safety in mowing on
slopes. Operate a riding mower up or down slopes, never across the face of slopes. Operate a walk-behind mower across the face
of slopes, never up or down slopes. Use extra care when operating on or near slopes and obstructions.
Page 24

22" Self-Propelled
WalkBehindMower
Product Specifications
DeckSize (it?)
Height of Cut (in)
TransmissionType
Ground Speed (mph)
Engine Power (filbs)
Engine Displacement (cc)
FuelTank Capacity (qt)
CommonServiceParts
Blade Control Cable
WheelDrive Cable
Cutter Blade
Drive Belt
Power Rating:The gross power rating for individual gas engine models is labeled in accordancewith SAE(Society of
Automotive Engineers) code J1940 (Small EnginePower & TorqueRating Procedure),and rating performance has been
obtained and corrected in accordancewith SAEJ1995 (Revision 2002-05). Torquevalues arederived at 3060 RPM; horsepow-
er values are derived at 3600 RPM. Net powervalues are taken with exhaust and air cleaner installed whereas gross power val-
ues are collected without these attachments. Actual gross engine power will be higher than net enginepower and is affected
by, among other things, ambient operating conditions and engine-to-engine variability. Giventhe wide array of products on
which engines are placed,the gas engine may not develop the ratedgross powerwhen usedin a given pieceof power equip-
ment. This difference is due to a variety of factors including, but not limited to, the variety of engine components (air cleaner,
exhaust, charging, cooling, carburetor,fuel pump, etc.), application limitations, ambient operating conditions (temperature,
humidity, altitude), and engine-to-engine variability. Dueto manufacturing and capacity limitations, Briggs & Stratton may sub-
stitute an engine of higher rated power for this Series engine.
SPV2270HW/ NSPV2270HW
22
1.25- 4
VariableSpeed/Gear
0 - 4.2
7.00
190
1.0
Part Number
7101395YP
7103767YP
7103288YP
7103362YP
SNAPPER
www.snapper.com
Page 25

Manualparael operador
22" autopropulsado
Cortac6spedWalkBehind
No deModelo Descripci6n
7800709 SPV2270HW
7800755 NSPV2270HW
Page 26

Gracias por adquirir este producto Snapper de alta calidad. Le agradecemos la confianza que Vd. ha deposi-
tado en la marca Snapper. Cuando sea hecho funcionar y se realice su mantenimiento de conformidad con
las instrucciones de este manual, su producto Snapper le ofrecer_ muchos a_os de funcionamiento fiable.
Este manual contiene informaci6n de seguridad para avisarle de los peligros y riesgos asociados con el
dispositivo y sobre el modo de evitarlos. Esta m_quina est_ dise_ada y concebida 0nicamente para el
corte final de c6sped asentado y no para cualquier otro prop6sito. Es importante que leay comprenda
estas instrucciones con detenimiento antes de proceder a arrancar o hacer funcionar este equipo.
Conserve estas instrucciones originales para consultarlas en el futuro.
Completela siguienteinformaci6n sobre la adquisici6n de su producto Snapper.
Fecha de compra
Minorista
N0mero de tel6fono del vendedor minorista
Equipo
Motor
N0mero de modelo
N0merode serie
Modelo
Tipo C6digo
Snapper es una marcacomercial de
Briggs & Stratton PowerProducts Group, LLC
Milwaukee, WI, USA.
Copyright © 2010, Briggs & Stratton Corporation
Milwaukee, WI, USA. Reservadostodos los derechos.
Page 27

Indice
Seguridaddeloperador ................................................. 4
IVIontaje ............................................................ 6
Desempaque .............................................................. 6
Asidero ................................................................... 6
Ajuste de la altura del asidero (manillar) ......................................... 7
Bolsa de c6sped ............................................................ 8
Placa parael modo detriturado ............................................... 10
Deflector dedescarga lateral ................................................. 10
Recomendacionesacerca del triturado ......................................... 11
C6mo preparar el motor .................................................... 11
Preparacidnfinal .......................................................... 11
IVlanejo ........................................................... 12
Palancade paradadel motor ................................................. 12
Sistema de tracci6n de las ruedas (Unidadesautopropulsadas) ...................... 12
Paradadel motor .......................................................... 12
Arranque del motor ........................................................ 13
Reglas para un manejoseguro y efectivo ....................................... 13
Mantenimiento ...................................................... 14
Tablade mantenimiento .................................................... 14
Mantenimiento del motor .................................................... 15
Inclinaci6n del motor ....................................................... 15
Lubricaci6n .............................................................. 15
Ajuste de la altura de corte .................................................. 15
Ajuste del cable del sistema de traccidn de las ruedas ............................. 16
Servicio de mantenimiento de la cuchilla ........................................ 17
Desmontajede la cuchilla ................................................. 17
Afilado de la cuchilla .................................................... 17
Verificacidn del nivel de corte ............................................. 17
Limpieza de la cubierta del cortac6sped ........................................ 18
Preparacidn del cortac6sped paraalmacenamiento ............................... 19
Soluci6n de problemas ................................................. 20
Garantia ........................................................... 21
Guiaparamanejarenpendientes ......................................... 23
ADVERTENCIA
Los bornes, terminalesy otros accesoriosrelacionadoscon las
baterhs contienenplomo y compuestosde plomo, productosqu[-
micos consideradosporel estadode californiacomo la causade
c_.ncery defectosdenacimiento u otros trastornosdelaparatorepro-
ductor.I_.veselas manosdespu6sde estarencontactocon ellos.
ADVERTENCIA
Los gasesde escapedel motor, algunos de sus constituyentes
y ciertos componentes del veh[culo contienen o emiten
productos qu[micos considerados por el estado de california
como la causa de c_.nceru otros trastornos delaparato
reproductor.
Page 28

Seguridaddeloperador
ADVERTENClA:iEstapotentem_quinacortac6spedpuedeIlegaraamputarmanosy piesy puedelanzarobjetos
_, quepuedencausarlesionesyda_os! Elnocumplimientodelas siguientesinstruccionesdeSEGURIDADpuede
resultarenlesionesgraveso muertedeloperadoru otraspersonas.Elpropietariode lam_quinadeber_compren-
derestasinstruccionesy permitir_utilizarlam_quina0nicamenteapersonasquecomprendanestasinstrucciones.
Todaslaspersonasque haganfuncionarlam_quinadeber_nserdue_asdesi mentaly fisicamentey no deber_n
hallarsebajolainfluenciade ning0ntipo desustanciasquepuedandeteriorarsus capacidadesvisuales,su destreza
o capacidaddejuicio.Si tienecualquiertipo de preguntasrelativasasu m_quinaquesu distribuidornopueda
responderleasusatisfacci6n,p6ngaseencontactocon el DepartamentodeAtenci6nalCliente(1-800-317-7833o
www.snapper.com).
Protecci6n a la infancia
Puedenocurrir accidentestr_gicossi el operadorno est_aten-
to a lapresenciadeni_os. Losni_os suelensentirseatraidos
por la unidady por laactividaddelcortac6sped.Nuncapre-
supongaquelos ni_ospermanecer_ndondelos vio por 01tima
vez.
1.MANTENGAa losni_osfuerade lazonadesegadoy bajola
atentavigilanciade unadultoqueseresponsabilicedeellos,
apartedel operadorde la m_quina.
2.NOPERMITEque los ni_ospermanezcanen lazonacuando
est6funcionandola m_quinay DESCONECTELAsi cualquier
personaentraen lazona.
3.NOPERMITAquemenorespreadolescenteutilicenla m_quina.
4. PERMITA0NICAMENTEqueadultos responsablesy adoles-
centescon maduracapacidaddejuicio y bajo lacercanasuper-
visi6n de un adulto utilicenla m_quina.
5.NORETROCEDAconel cortac6spedamenosqueseaabso-
lutamentenecesario.MIREdetr_sy debajode Vd.antesde
retrocedery antesde retrocedery mientrasIo hagapor si hay
ni_os,animalesdom6sticosu otros peligros.
6. PONGAUNCUIDADOESPECIALal acercarseaesquinascie-
gas,arbustos,_rbolesu otros objetosque puedanobstaculizar
lavisi6n.
Funcinamientoen pendientes
1.Laspendientesson un factor principal en losaccidentespor
deslizamientoscaidas,que puedenresultarengraveslesiones.
Laspendientesdetoda claseexigenla mayorprecauci6n.Si
no se sienteseguro sobre unapendiente,NOUTILICEelcor-
tac6spedsobreella.
2.En las pendientes,utilice el cortac6speda Io ancho,nunca
dearribaa abajo.TengaextremoCUIDADOcuandocambiede
direcci6nen pendientes.NOUTILICEel cortac6spedenpendi-
entespronunciadoni en otraszonasenque laestabilidado la
capacidadde tracci6nseaninciertas.RemitasealaGuiade
Inclinaci6nqueencontrar_alfinal de estemanual.
3. Pongael mayorcuidadocon los recogedoresdehierbay
otros elementosanexos:afectanal manejoy a la estabilidadde
la m_quina.
Preparaci6n
1.Lea,entienday siga lasinstruccionesy advertenciascon-
tenidasen estemanualy sobreel cortac6sped,elmotor y los
elementosadjuntos.Debeconocerlos controlesy la forma de
utilizaci6ndelcortac6spedadecuadaantesdeempezar.
2.0nicamentedeber_hacerfuncionarla m_quinapersonas
madurasy responsables,y 0nicamentetras la adecuada
instrucci6n.
3.Losdatos indicanque operadoresde 60 o m_sa_osest_n
implicadosen unamplio porcentajede lesionesrelacionadas
conel uso de cortac6spedes.Estosoperadoresdeber_nevalu-
ar su capacidaddeutilizarla unidadde maneraIosuficiente-
menteseguracomo paraprotegersea si mismosya los
demosfrentea graveslesiones.
4 www.snapper.com
Preparaci6n
(Continuaci6nde la columnaprevia)
4. Manipuleelcombustiblecon especialprecauci6n.Loscom-
bustiblesson inflamablesy sus vapores,explosivos.Utiliceun
recipientedecombustiblehomologado.NOretirelatapadel
combustibleni a_adacombustibleconel motor en marcha.
A_adacombustible0nicamenteenexterioresy conel motor
paradoyfrio. Limpieel combustibley aceitederramadossobre
la m_quina.NOfume.
5. Compruebela zonacuyo c6spedhayadeser cortadoy retire
objetoscomo sonjuguetes,cables,piedras,ramasy otros ele-
mentosque puedancausarlesionessi sonlanzadospor la
cuchilla o interfierenconel funcionamientodelcortac6sped.
Tengaencuentatambi6nla ubicaci6ndeagujeros,troncos
cortadosy otros posiblespeligros.
6. Mantengaa personasyanimalesdom6sticosfuerade la
zonadecorte.DETENGAde formainmediatala cuchilla,el
motor y elcortac6spedsi cualquierpersonaentraenla zona.
7. Compruebeconfrecuenciaeladecuadofuncionamientoy
ubicaci6nde broqueles,deflectores,conmutadores,controles
de la cuchillay otros dispositivosde seguridad.
8. Cerci6resedequetodaslas calcomaniasseleencon clari-
dad. Reempl_celassi est_nda_adas.
9. Prot6jasecuandocorteel c6spedy usegafasprotectoras,
mascarasantipolvo,pantaloneslargosy calzadoconsistente.
NOcorteel c6spedcon los pies desnudoso con sandalies.
10.Debesabercomo DETENERlacuchillay el motorcon rapi-
dezantecualquieremergencia.
11.Extremelaprecauci6ncuandocargueo descarguela
m_quinadecamionesofurgonetas.
12.Compruebeconfrecuencialos componentesdelrecogedor
de hierbaen buscade signosde desgasteo deterioroy rep6n-
palosseg0nsea necesarioparaevitarlesionesproducidaspor
el lanzamientodeobjetosa trav6sde puntosd6bileso desgar-
rados.
Manipulaci6nsegurade la gasolina
Paraevitarlesionespersonaleso da_osen los bienes,extreme
la precauci6ncuandomanipulegasolina.La gasolinaes
extremadamenteinflamabley susvaporesson explosivos.
1.Apaguecigarrillos,puros, pipasy cualquierotrafuentede
fuego.
2. Utiliceun recipientede combustiblehomologado.
3. NOretirelatapadel combustiblenia_adacombustiblecon
el motor en marcha.D6tiempo al motor paraque seenfrie
antesde reponerelcombustible.
4. NOpongacombustibleen lam_quinaen espaciosinteriores.
5. NOalmacenelam_quinani el contenedordecombustibleen
interioresen quehayallamasexpuestas,chispaso lucespilo-
tos como lasdelos calentadoresdeaguau otros dispositivos.
6. NuncaIlenerecipientesdecombustibleenel interiorde
vehiculoso sobreel lechode uncami6no remolquecon
revestimientosde pl_stico.Sit0e los recipientessobreel suelo,
lejosdel vehiculo,antesde Ilenarlos.
Page 29

Seguridaddeloperador
Manipulaci6nsegurade la gasolina
(Continuaci6ndela p gina anterior)
7. Retiredelvehiculoo cami6nel equipamientoqueseali-
mentede gasolinay repongael combustiblesobresu suelo.
Siello noes posible,repongaelcombustibledel equipouti-
lizandoun contenedorport_tily no con boqillasdosificadoras
degasolina.
8.NOarranqueequiposalimentadospor gasolinaenvehiculos
o camionescerrados.
9.Mantengala boquillaencontactoconel bordede labocadel
tanqueo recipientedecombustibleentodo momentoy hasta
habercompletadoel Ilenado.NOuse undispositivo paratrabar
y abrir boquillas.
10.Si se derramacombustiblesobresu ropa,c_mbiesede
inmediato.
11.NOIlenedemasiadoel tanquede combustible.Vuelvaa
situarla tapadel combustibleyajOstelafirmemente.
Funcionamiento
1.NOcoloque las manoso pies cercao debajode piezasgira-
torias. Mantengadespejadalazonade descargamientrasel
motor est6en marcha.
2.DETENGAelmotor cuandoatraviesezonas,paseoso
caminosdegravao encualquiersituaci6nenque puedanlan-
zarseobjetosqueconstituyanun peligro.
3.Utiliceel cortac6spedOnicamenteen horasde luzo con
suficienteluzartificial.
4. NOutilice launidadcuandosehallebajo los efectosdel
alcoholo de drogas.
5.Si golpeaun objeto extra_oo el cortac6spedvibrade forma
anormal,DETENGAel motor y desconectey asegureelcable
dela bujia.Inspeccioneelcortac6spedenbuscadeposibles
da_osy,si esel caso, rep_relosantesdevolvera arrancarlo.
6.NOutiliceel cortac6spedcercabajadas,zanjasoter-
raplenes.El operadorpodriadejarde hacerpie operderel
equilibrio.
7.ESTEALERTAantelapresenciade hoyosy otros peligros
ocultos.La hierbaaltapuedeocultar obst_culos.Mant6ngase
lejosde cunetas,deslaves,alcantarillas,cercasy objetosque
puedansalirproyectados.
8.NOutiliceel cortac6spedsobrehierbahOmeda.Cerci6rese
siemprede hacerpie.Mantengaasidoconfuerzael mangoy
avancelentamente,sin correr.Perderel piepuedecausaracci-
dentesqueproduzcanlesiones.
9.Mant6ngaseSIEMPREdetrasdel mangocuandoel motor
est6en funcionamiento.
10.NOabandonelam_quinaconel motor enmarcha.DETEN-
GALA CUCHILLAy PAREELMOTORantesdeabandonarpor
cualquierraz6nel puestodeoperador.
11.Antesdelimpiar, repararo inspeccionar,cerci6resedeque
sehayanDETENIDOel motor,la cuchillaytodas las partes
m6viles.Desconectey asegureelcablede la bujia lejosdel
conectorparaevitararranquesaccidentales.
12.DETENGAelmotory esperehastaquela cuchillaquecom-
pletamenteDETENIDAantesde retirar la bolsade hierbay/o
retirarla hierba.
13.NOhagafuncionarel cortac6spedsinque el recogedorde
hierba,la protecci6nposteriory los demosdispositivosde
seguridadest6nensu lugaryen funcionamiento.NOapuntela
descargahaciapersonas,cochesentr_nsito, ventanaso puer-
tas.
Funcionamiento
(Continuaci6ndela columnaprevia)
14.NOdescarguematerialescontra paredesu obst_culos.Los
materialespuederebotarhaciaeloperador.
15.Reduzcalavelocidadantesde realizargiros.
16.Tengaprecauci6ncon eltr_fico cuandosehallecercade
vias decomunicaci6no crucepor elias.
17.NOhagafuncionar el motor enzonascerradas. Los gases
del tubo deescapedel motor contienemon6xidode carbono,
unvenenoletal.
18.UtiliceOnicamenteaccesoriosaprobadospor elfabricante.
Remitasealas instruccionesdelfabricanteparaobtenerinfor-
maci6nsobreel adecuadofuncionamientoe instalaci6nde
accesorios.
Mantenimientoy almacenamiento
1. NOalmaceneelcortac6spedni el contenedordecom-
bustibleeninterioresen quelos humospuedanalcanzarlla-
masexpuestas,chispaso lucespilotos como lasdelos calen-
tadoresdeagua,hornosu otrosdispositivosqueutilicencom-
bustibles.Permitaqueel motor se enfrie antesdealmacenarla
m_quinaenun lugar cerrado.Almaceneel contenedordecom-
bustiblefueradel alcancedelos ni_osen unaconstrucci6n
ventiladadesocupada.
2. Mantengael cortac6spedysu motor librede hierba,hojas o
excesode grasaparareducirel riesgode incendioy el sobre-
calentamientodel motor.
3. Cuandodreneeltanquedecombustible,dreneel com-
bustiblehastaun contenedorhomologadoy h_galoen espa-
cios exterioresy lejosdellamasexpuestas.
4. Mantengaprocedentementeajustadostodos los pernos,
especialmentelospernosdela cuchilla,tuercasy tornillos.
Compruebequetodos loscontrapinossehallanen laposici6n
adecuada.
5. Procurequehayasiempreunaventilaci6nadecuadaantesde
ponerel motor enfuncionamiento.Losgasesdeltubode escape
del motor contienemon6xidodecarbono,un venenoletal.
6. Onicamenterealicereparacionesy ajustesen elmotor cuan-
do 6stese halleparado.Retireel cablede la bujiade la bujiay
asegOrelolejosde la bujia paraevitar elarranqueaccidental.
7. NOcambielosajustesdevelocidaddel reguladordel motor
o el motor de sobrevelocidad.
8. Compruebela junta de la bolsade hierbaen buscade des-
gasteso signosde deterioroparaevitarquesalgandespedidos
objetosy laexposici6nde partesm6viles.SustitOyalapor una
nuevabolsasi aparecencosturassueltaso desgarramientos.
Sustituyael dispositivodeslizanteoel adaptadordela bolsasi
apareceroto o agrietado.
9. Lascuchillasdel cortac6spessonafilandasy puedenpro-
ducir cortes. Envuelvalascuchillaso utilicegruesosguantes
de cueroy extremela PRECAUCIONcuandolasmanipule.
10.NOcompruebela existenciade chispasbasandolabujia
junto al orificio de la bujia;la chispapodr_prenderlagasolina
que salgadel motor.
11.Realiceel mantenimientodela m_quinaatrav6sde undis-
tribuidor al menosunavezal a_oy hagaqueel distribuidor le
instaletodo nuevodispositivode seguridad.
12.Solo use piezasdereposici6nautorizadasporla f_bricao
partessimilaresal hacerreparaciones.
Page 30

Montaje
ADVERTENCIA:Antesde realizarcualquierensam-
blaje o mantenimientoalcortac_sped,desconecte
elcabledela bujia.
NOTA:En este manualde instrucciones, las indicaciones izquierda y
derecha describen la ubicaci6n de una pieza teniendoel usuafio
parado detr_s delasidero.
Desempaque
El cortac6sped se ensambl6 completamente en laf_.brica.Cuandoel
cortac6spedse coloc6 en la caja de cart6n, el asidero se coloc6 en
la posici6n de almacenamiento. Paracolocar el asidero en la posi-
ci6n deoperaci6n, siga los siguientes pasos.
Asidero
1. Saqueel cortac6spedde la cajade cart6n.
2. Remuevatodo el material de empaquedel cortac6sped y el
asidero.
3. Retire las tuercas de alas (A, Figura 1}, las arandelas(no
mostradas) y los pernos(B} de las abrazaderasizquierda y
derechadel mango (6}.
NOTA:Noretire eljuego inferior deaditamentosdel mango(D).
4. Levantela manija inferior, aline_.ndolacon uno de los tres jue-
gos de agujeros de los soportes de manija (C}. Vuelva a insta-
lar los pernos,arandelas y tuercas de alas.
5. Coloque la manija superior (A, Figura2) en la posici6n opera-
tiva (hacia arriba). Apriete las tuercas mariposa (B).
NOTA:La altura del asideropuede ajustarse para comodidad del
usuafio. Vea"Ajustedela altura del asidero".
PRECAUCION:Tengacuidado al plegar o levantar el asidero. No
da_e loscables. Un cable (mec_.nico)que est,. doblado no fun-
cionar_,correctamente. Antes de utilizar la unidad, reemplaceun
cable da_ado o doblado.
.
Oprima la palancade paradadel motor contra el asidero.
(Consulte la secci6n titulada 'Palancade parada del motor').
Halelentamente el mango (A, Figura 3} del cable retr_.ctilde
arranque. Para sujetar el mango del cable retr_.ctilde arranque
a la gu[a (B} del cable, entrelaceel cable atrav6s de la gu[a de
cable montada en el lado derecho del asidero.
Figura 1:extensi6n de la manija inferior
®
Figura2: extensi6n de la manija superior
6 www.snapper.com
Figura3: Sujeci6n del mango del cable retr_ctil dearranque
Page 31

Ajustede la alturade manejo
1. Retire las tuercas de alas (A, Figura 4), las arandelas(no
mostradas) y los pernos(B) de las abrazaderasizquierda y
derechadel mango (C).
Nota:No retireeljuego inferior deaditamentosdel mango (D).
2. Ajusteel mango hasta un orificio de ajuste de altura inferior o
superior (A, Figura 5).
Montaje
Figura4: Retirada de los aditamentos deajuste del mango
3. Vuelvaa instalar los pernos, arandelasy tuercas de alas reti-
radas en el Paso 1.
Figura5: Orificios de ajustede altura
(Componentesretirados para mayor claridad)
Page 32

Montaje
Ensamblajede la bolsa de c_sped
(No todoslosmodelos)
Nora:En algunos modelo& el deflector dedescarga de montaje lat-
eral se sujeta demanera temporal (parapropSsitos de envfo) a la
parte trasera del cortac#sped.Antes de ensamblarla bolsa de
c#sped, remueva el deflector de descargade montaje lateral
1. Desliceel armaz6n (A, Figura 6) dentro de la bolsa de c6sped
(B). Verifique que la manija (C) est,. en el lado exterior de la
bolsa de c6sped.
2. Primero, sujete los ganchos(A, Figura 7) al costado del
armaz6n. Luego, sujete los ganchos a la parte superior e
inferior del armaz6n.
Figura6: Instalaci6n del armazSn
Figura 7.Instalaci6n de los ganchos de la bolsa
8 www.snapper.com
Page 33

Montaje de la bolsa de c_sped (No todos los
modelos)
1. Para montar la bolsa de c6sped en el cortac6sped, levante la
puertatrasera (A, Figura 8). Desmonte el elemento detritura-
do (B).
Importante: El elemento de triturado solo debe desmontarse quan-
do se deseael empacado en bolsa, y debecolocarse nuevamente
tan pronto como se terminen las operacionesde empacadoen
bolsa.
,
Sosteniendo la bolsa de c6sped mediante lamanija (A, Figura
9), monte los ganchos (B) de ambos extremos del armaz6n de
la bolsa de c6spedsobre la barra-pivote (C) de la puerta
trasera. Bajela bolsa de c6spedcontra la partetrasera del cor-
tac6sped.Baje la puerta trasera.
Importante: Verifique que ambos ganchos de la bolsa de cbsped
est#n montados en la barra-pivote.
ADVERTENCIA:Reviselacondici6ndela bolsade
c_spedencuantoa desgasteodeterioro.Si est_
desgastadao danada,reemplacelaspiezass61o
conpiezasderepuestoaprobadasporf_brica.
Montaje
Figura8: Desmontaje del elemento de triturado
Vaciadodela bolsadec_sped(Notodoslos
modelos)
ADVERTENCIA:Antesdedesmontarla bolsa de
c_sped,detengael motor.Antesderetirarc_sped
dela cubiertadelcortac_sped,desconecteelcable
dela bujia.
1. Levantela puertatrasera hasta la posici6n vertical.
2. Agarre la manija de la bolsade c6spedy levante elarmaz6n.
Contin0e levantando elarmaz6n hasta que los ganchos ya no
est6n montados en la barra-pivote. Desmonte la bolsa de
c6sped.
3. Vacieel c6sped de la bolsa de c6sped.
4. Para montar la bolsade c6sped en el cortac6sped, vea
"Montaje de la Bolsa de C6sped".
Figura9: Montaje de la bolsa de c#sped
Page 34

Montaje
Sujeci6ndel deflectorde descargade montajelateral
ADVERTENCIA:Paraevitarque
elmotorarranque,desconecte
elcabledela bujia.
Para propdsitos de env[o, no se instal6 el deflector lateral. Localice
el deflector lateral e instale de la siguiente manera.
1. Levantelacubierta del triturador (A, Figura 10).
2. Sujeteel deflector lateral(B). Verifique que las leng_Jetasde
enganche(C} atraviesa las ranuras en el deflector lateral.
4. Baje la cubierta deltriturador (A, Figura11).
5. Conecteel cable a la bujh.
Figura 10: InstalaciCn del deflector de descarga lateral
Figura 11: LiberaciCnde la cubbrta del triturador
10 www.snapper.com
Page 35

Montaje
Recomendacionesacerca deltriturado
Eltriturador corta en trozos peque_os el c6sped para que el c6sped
pueda reciclarse fD.cilmente. Yaque los nutrientes son regresados
al suelo, el c6spednecesitarD,menosfertilizante. Paratriturar cor-
rectamente el c6sped, siga las recomendacionessiguientes.
• El c6sped debe estarseco. Si el c6spedestD.hOmedo,este serD.
dificil de cortar y causarD,masas pesadasde c6sped.
• El c6sped no debeestar demasiado alto. Laaltura maxima para
Iograr un corte efectivo es de4-1/2 pulgadas. Fijelos ajusta-
dores de altura de modo que s61ose corte latercera parte
superior del c6sped.
• Si el c6spedtiene unaaltura superior a 4-1/2 pulgadas,serD.n
necesariasdos operaciones decorte con el cortac6sped. Para
la primera operaci6n de corte con el cortac6sped,fije los ajus-
tadores dealtura en la posici6n mD.salta. Luego, baje los ajus-
tadores dealtura para la segundaoperaci6n decorte con el
cortac6sped.
Prepararel motor
ELMOTORNOCONTIENEACEITENIGASOLINA
Utilizando la botella de aceite suministrada en la cajade cart6n,
Ileneel motor con la cantidad de aceiteapropiada. Vea las instruc-
ciones del fabricante del motor para averiguar eltipo de gasolinay
aceiteque se debe utilizar. Antes de utilizar la unidad, lea la infor-
maci6n sobre seguridad, operaci6n, mantenimiento y almace-
namiento.
ADVERTENCIA:Sigalas instruccionesdelfabricante
delmotorparaaveriguareltipodegasolinay
aceitequesedebeutilizar.Siempreutiliceun
recipientedeseguridadparala gasolina.Nofume
mientrasseagregagasolinaal tanquede com-
bustible.Cuandoseest_dentrode unlugarcerra-
do,noIlenecongasolina.Antesdeagregarla
gasolina,detengaelmotor.Permitaque el motor
seenfriedurantevariosminutos.
• Mantengaafilada la cuchilla. Unacuchilla que no estD.afilada
provocarD,que los extremos delc6sped sevuelvan de color
marr6n.
• Limpie el lado de abajo de la cubierta del cortac6sped. El
c6spedy otros residuos pueden evitar que el cortac6spedfun-
cione correctamente.
Si la calidaddel corte es secundaria, ensaye Io siguiente:
• Fijelos ajustadores dealtura en unaaltura de corte mD.salta.
• Corteel c6spedmD.sfrecuentemente.
• Maneje el cortac6speda una velocidad de avance mD.slenta.
• Traslapelasfranjas decorte en vezde cortar unafranja com-
pletacon cada pasada.
• Cortedos veces el c6speda trav6s de las Areasde margen.
IMPORTANTE:Estaunidad estD.equipada con un motor de com-
busti6n interna y no debeutilizarse en o cercade ninguna D.reade
bosque o cubierta con maleza,a menos que el sistema de escape
del motor est6 equipado con un supresor de chispas que cumpla
las leyeslocales o estatalesaplicables (si existen). Si se utiliza un
supresor de chispas, 6stedebe ser mantenido en buenestado de
funcionamiento por parte del operador.
Enel Estadode California Io anterior es exigido por ley (Secci6n
4442 delC6digo de Recursos POblicosde California). Otros estados
podrfan tener leyessimilares. Las leyesfederales se aplican enter-
ritorios federales. Visite un Centro de Servicio Autorizado para con-
seguir un supresor de chispas parael silenciador.
Nota: Es posible que la potencb realsostenida del motor sea inferi-
or debido a limitaciones operafivasy factores del medio ambiente.
Nota: La operaci6n de un motor nuevo algunas vecesprovocar#
una /evecantidad de humo. Estehumo es causadopor pintura o
aceiteen o alrededor del silenciador. Esto es normal y sSIose
esperadurante la operaci6n iniciaL
Preparaci6n final
Antes debeutilizar el cortac6sped, revise las ruedas, el asidero y los
controles. Verifique quetodos los tornillos estD.napretados.
Verifique queel control del acelerador (en caso detenerlo) y la
palanca de paradadel motor funcionan correctamente.
Si el cortac6spedestD.equipado con ajustadores de altura, verifique
que los ajustadores de altura funcionan apropiadamente. Antes de
arrancar el motor, verifique que cada ajustador de altura estD.fijado
en la altura deseada.Vea "Ajuste de la Altura de Corte" en las sec-
ciones de Mantenimiento.
11
Page 36

Manejo
Palancade paradadel motor
Libere la palancade paradadel motor (A, Figura 12) y el motor y la
cuchilla sedetendr_.nautom_.ticamente.Paramantener en fun-
cionamiento el motor, sostenga la palancade parada del motor en
la posici6n de operaci6n (B).
Antes dearrancar el motor, accione varias veces la palanca de para-
da del motor. Verifique que el cable se muevef_.cilmente.
Figura 12: OperaciSnde la palancade parada del motor
temadetracci6ndebedesactivarseinmediata-
_lb DVERTENCIA:Paraunaoperaci6nsegura,elsis-
mentecuandoseliberalapalancadelsistemade
tracci6n.Siel sistemadetracci6nnosedesactiva
correctamente,noopereel cortac_spedhastaque
elsistemadetracci6nseaajustadoo reparadopor
uncentrodeservicioautorizado.
Figura 13: OperaciSndel sistema de tracciSn de/as ruedas
Sistemade tracci6n(propulsi6n)
El cortac6sped tiene un sistema de tracci6n de las ruedas. Maneje
el sistema de tracci6n de la siguiente manera.
1. Sostenga la palancade parada del motor (A, Figura12) en la
posici6n de operaci6n (B).
2. Tire lentamente de la palancade tracci6n (A, Figura 13) hacia
atr_.s.Elsistema de transmisi6n est,.ahora acoplado.
Paraaumentar la velocidad detierra, tire lentamentede la
palanca detracci6n m_.shaciaatr_.s.Paradisminuir la veloci-
dadde tierra, suelte lentamente la palancade tracci6n.
3. Paradesactivar el sistema de tracci6n y detener el motor,
libere completamente la palancade paradadel motor.
4. Paradesacoplar s61oelsistema de transmisi6n, libere la
palanca detracci6n. El sistema detracci6n se desactivar_,pero
el motor continuar_,en funcionamiento.
Nota: Cuandoel sistema de tracciSn est# desacfivado en una unidad
nueva, es posible que /asruedas giren si selevantan del suelo. Esto
es normaly dejar# de sucederdespu#s de una o dos horas de
operaciSn.
Paradadel motor
Paradetener el motor, libere la palancade paradadel motor.
Desconecte el cable (el6ctrico) de la bujia para evitar que el motor
arranque.
Antesde arrancar el motor, revise el cable (mec_.nico)de paradadel
motor. Verifique que el cable de paradadel motor est,.ensamblado
correctamente.Antes de operar la unidad, reemplace un cable de
parada de motor, daSadoo
doblado.
12 www.snapper.com
Page 37

Encendidodel motor
ADVERTENCIA:La cuchillagirar_ cuandoel motor
se ponga en funcionamiento.
IMPORTANTE:Antes de arrancar el motor, accionevariasveces la
palanca de paradadel motor. Verifique que el cablede parada del
motor se mueve libremente.
Nota: El disefio del motor no incluye un control del acelerador o un
ajuste de la velocidaddel motor. El motor est_ ajustado en lamejor
velocidadpara el corte de c#sped,para el empacadoen bolsa del
c#spedy para una vida E/tilprolongadadel motor.
Nota: Los modelos equipados con motores Ready StartTM no tienen
bot6n cebador. Vealas instrucciones del fabricante del motor para
obtener informaci6n adicionaL
,
Reviseel nivel de aceite.
2.
Lleneel tanque de combustible con gasolina normal sin
plomo. Verifique que la gasolina est,. limpia. La gasolina con
plomo aumentar_,los dep6sitos y acortar_,la vida de las
v_.lvulas.
Nota: No utilice gasohol ni metanoL No utilice gasolina premium sin
plomo.
Manejo
Figura 14:Arranque del motor
Reglaspara un manejoseguroy efectivo
Consulte la secci6n 'Manejo Seguro' de este manual para obtener
reglas importantes relacionadas con el manejoseguro y efectivo del
cortac6sped.
ADVERTENCIA:Siempreutiliceunrecipientede
seguridadparala gasolina.Nofumemientras
agregagasolinaaltanquedecombustible.Cuando
seest_dentrodeunlugarcerrado,noagregue
gasolina.Antesde agregargasolina,detengael
motory permitaqueel motorseenfriedurante
variosminutos.
3. Verifique que el cable de la bujia est&conectadoa la bujia.
4. $61olos modelos autopropulsados - Verifique que la palanca
del sistema de tracci6n est,. en la posici6n desactivada.
ADVERTENCIA:Paraevitarunaccidente,verifique
quelapalancadelsistemadetracci6nest_en la
posici6nDESACTIVADA(DISENGAGED).Cuandola
palancadelsistemade tracci6nest_enlaposici6n
ACTIVADA(ENGAGED),noarranqueel motor.
5. P_.resedetr_.sdel cortac6sped. Utilice una mano para sostener
la palancade paradadel motor en la posici6n de operaci6n
(A, Figure14).
6. Arranque el cortac6sped: Hale el mango(B) del cable de
arranque para encenderel motor.
7. Despu6sque el motor arranque, permita un breve periodo de
calentamiento hastaque el motor funcione suavemente antes
de iniciar la operaci6n del cortac6sped.
8. Siel motor no arranca en 5 o 6 intentos, vea las instrucciones
"Soluci6n de problemas".
13
Page 38

Mantenimiento
Tablade mantenimiento
ADVERTENCIA:Antesde realizarunainspecci6n,
ajuste(exceptoel carburador)oreparaci6n;deten-
gael motory desconecteel cablede la bujia.
Cada8 horas odiariamente
Revisarel palancade paradadel motor
Limpiar los desechosdel cortac6sped
Cada25 horas oanualmente* ...............................................................................
Revisarcortac6spedpor si tuviesen piezassueltas
Cada50 horas oanualmente* ...............................................................................
Limpiar la baterfay el cableado (si equipado)
Consulteal distribuidor cada afio para
Lubricarel cortac6sped
Revisarla correa del cortac6sped
Revisarla cuchilla del cortac6sped**
Comprobar el tiempo de detenci6n de la cuchillade la
segadora
* Lo que ocurra en primer lugar.
**Revise la cuchilla m_s a menudo en regionesque tengan
suelos arenosos yen condiciones en las que exista
mucho polvo.
Primeras 5 horas
Cambiarel aceitedel motor
Cada8 horasodiariamente
Comprobar el nivel de aceitedel motor
Cada25 horas oanualmente *
Limpiar el filtro y el depurador deaire del motor
(si equipado) **
Cada50 horas oanualmente *
Cambiarel aceitedel motor
Sustituir el filtro de aceite(si equipado)
Anualmente...........................
Sustituir el filtro de aire
Sustituir el depurador(si equipado)
Inspeccionar el silenciador y la pantallaantichispas
(si equipado)
Sustituir la bujfa
Sustituir el filtro de combustible (si equipado)
Limpiar el sistema de refrigeraci6n de airedel motor
* Lo que ocurra en primer lugar
**En condicionesen las que existapolvo o suciedad en
forma de particulas en suspensi6n, limpiar m_sa
menudo.
14 www.snapper.com
Page 39

iVlantenimiento
Mantenimientodel motor
Utilice la siguiente secci6n de Mantenimiento para mantener su
unidad en buenascondiciones de funcionamiento. Toda la
informaci6n de mantenimiento parael motor est,. en el
"Manual de Instrucciones del Motor". Antes de arrancar el motor,
leaeste manual.
ADVERTENCIA:Antesde realizarunainspecci6n,
ajuste(exceptoel carburador)oreparaci6n;deten-
gael motory desconecteel cablede la bujia.
Inclinaci6ndel motor
Cuando usted suministre servicio de mantenimiento al motor,
inspeccione la cuchilla, o limpie el lado de abajo de la cubierta del
cortac6sped; aseg_resede inclinar el motor siempre teniendo arriba
la buj[a (Figura 15}. Eltransporte o inclinaci6n del motor con la
buj[aabajo causar_.:
Lubricaci6n
1. Para m_.ximodesempe_o, lubrique con aceite de motor, cada
25 horas, las ruedas y todos los puntos de pivote.
2. Para lubricar el motor, consulte el "Manual de Instrucciones
del Motor".
• Arranque dificil.
• Ahumado del motor.
• Ensuciado de la bujia.
• Saturaci6n de aceite o gasolina del filtro de aire.
Figura 15. No incline hacb adelanteel motor
Ajustede la alturade corte
se pongaenfuncionamiento.Antesdecambiarla
_ ADVERTENCIA:La cuchillagirar_cuandoel motor
alturadecorte,detengaelmotorydesconecteel
cabledelabujia.
Nota: No lubrique el cable deparada del motor. Los lubricantes
dafiar#n el cabley evitar#n que el cable se mueva libremente.
Reemplaceel cable si est#doblado odafiado.
Paracambiar la altura de corte, mueva la posici6n del brazo
ajustador en cada rueda (A, Figura16). Verifique que cadabrazo
ajustador est,. en la misma posici6n de modo que el cortac6sped
cortar_,de manera nivelada.
1. Desengancheel brazoajustador.
2. Mueva el brazoajustador a otra posici6n.
Figura 16:Ajuste de la altura de corte
15
Page 40

iVlantenimiento
Ajustedel cable del sistema de tracci6nde las
ruedas
ADVERTENCIA:Antesde ajustarel cabledelsis-
temadetracci6nde lasruedas,liberelapalanca
deparadadelmotory esperequeel motorse
detenga.
Si el sistema detracci6n no se activay desactiva correctamente,
revise el asidero en cuanto a ensamblaje correcto. Verifique que
todas las piezasest_.nen buenas condiciones, queno est_.nrotas ni
dobladas,y que todos los tornillos est_.napretados.
Las piezasdesgastadasy el cablealargado cambiar_.nelfun-
cionamiento del sistema detracci6n de las ruedas.AI cortar el
c6speden c6sped alto o grueso, o enterrenos inclinados, el sis-
tema detracci6n puede deslizarse. Si el sistema detracci6n se est,.
deslizando,ajuste de lasiguiente manera o Ileveel cortac6sped a
un centro de servicio autorizado.
IMPORTANTE:Antes de arrancar el motor, accionevarias veces la
palanca de paradadel motor. Verifique que el cablede parada del
motor se mueve libremente.
Nota: El disefio del motor no incluye un control del acelerador o un
ajuste de la velocidaddel motor. El motor est_ ajustado en lamejor
velocidadpara el corte de cbsped,para el empacadoen bolsa del
cbspedy para una vida fitil prolongada del motor.
1. Siel sistema detracci6n seest&.deslizando,afloje la contrat-
uerca (B, Figura 17} en la tensor de ajuste (A}, y gire el
casquillo (C} media (1/2) vuelta en ladirecci6n mostrada.
Pruebeel sistema detracci6n y reviseen cuanto al desliza-
miento.
2. Si el sistema detracci6n sigue desliz_.ndose,ajuste nueva-
mente. Nuevamente,pruebeel sistema de tracci6n.
3. Repita el ajuste y pruebe hasta que el sistema detracci6n no
sedeslice.
4. Antes de empezar acortar el c6sped, verifique que el sistema
detracci6n se desactiva correctamente y que el cortac6sped
sedetiene. Si el sistema detracci6n no se desactiva,Ileve el
cortac6speda un centro de servicio autorizado antes de colo-
carlo enfuncionamiento.
Figura 17.Ajuste del cable del sbtema de tracci6n de las ruedas
16 www.snapper.com
Page 41

Serviciode mantenimientode la cuchilla
ADVERTENCIA:Antesde inspeccionarlacuchillao
eladaptadordecuchilla,desconecteel cabledela
bujia.Si lacuchillagolpeaunobjeto,detengael
motor.Desconecteel cabledelabujia.Revisela
unidadenbuscadedanos.
Revisefrecuentemente lacuchilla en cuanto a desgaste o dafio tales
como grietas. Revise frecuentemente el perno quesostiene la
cuchilla. Mantenga apretado el perno. Si la cuchilla golpea un obje-
to, detenga el motor. Desconecteel cable de la buj[a. Reviseel
adaptador (A, Figura18) de lacuchilla en cuanto a dafio. Revise en
busca de unacuchilla doblada o dafiada,una cuchilla gravemente
desgastada,u otro dafio.Antes de operar la unidad, las piezas
dafiadas deben reemplazarsecon piezasde repuesto def_.brica. Por
seguridad, reemplace cada dos afios la cuchilla. Mantengaafilada la
cuchilla. Una cuchilla que no est&afilada provocar& que los
extremos del c6sped se vuelvan de color marr6n. Desmonte la
cuchilla de lasiguiente manera.
Desmontajede la cuchilla
ADVERTENCIA:Antesde desmontarla cuchilla,
desconecteel cabledela bujia.Lacuchilla
tienenhordescortantes.AIsostenerlacuchilla,
utiliceguantesotelaparaprotegersusmanes.
iVlantenimiento
Figura 18: Desmontajede la cuchilla
Afiladode la cuchilla
ADVERTENCIA:Lavibraci6nesel resultadodeuna
1. Drene eltanque de combustible.
2. Levanteel lado del cortac6sped que tiene el silenciador o la
bujia.
3. Utilice un trozo de maderapara evitar que la cuchilla gire.
4. Remueva el perno (B, Figura 18) que sostiene la cuchilla,
mediante una Ilavede 9/16" (14 mm).
5. Revisela cuchilla (C) de acuerdo con las instrucciones de
"Servicio de Mantenimiento de laCuchilla".Reemplaceuna
cuchilla gravementedesgastada o da_adacon una cuchilla de
repuesto de f_.brica.
6. Monte la cuchilla con los hordes curvos dirigidos haciala
cubierta. Si la cuchilla est,. invertida, la cuchilla no cortar_,cor-
rectamente y puedecausar un accidente.
7. Sujete la cuchilla con la arandela (D) original y el perno.
Verifique queel borde exterior de la arandela Bellevilleest,.
dirigida hacia la cuchilla.
8. Aprieteel perno que sostiene la cuchilla hasta un apriete de30
libras-pie.
ADVERTENCIA:Siempremantengaapretadoel
pernoquesostienela cuchilla.Unacuchillaoperno
flojopuedencausarunaccidente.
_ cuchillaquenoest_balanceadacorrectamente.
1. Afile la cuchilla dos vecesal afio o cada 25 horas.
2. Si la cuchilla est,.en la unidad, no la afile. Desmonte la
cuchilla de acuerdo con las instrucciones en "Desmontajede la
Cuchilla".
3. Limpie la cuchilla con un cepillo, jab6n y agua. Revisela
cuchilla. Inspeccione en busca de grietas, picaduras u otros
daSos. Reemplaceuna cuchilla que est,. gravemente desgasta-
da, doblada, o daSada,con una cuchilla de repuesto def_.bri-
ca.
4. Afile la cuchilla (A, Figura 19, siguientep_gina) con una lima
(B). Aseg0rese de mantener el borde de corte biselado original
(Figura30).
5. Verifique que la cuchilla est&balanceada. Utilice un destornil-
lador (C)y sostenga la cuchilla de manera paralela al suelo (D)
seg0n se muestra. Una cuchilla queest,. balanceadaper-
manecer¶lela al suelo. Si la cuchilla no est&balanceada,
el extremo pesado girarD,hacia el suelo.Nile el extremo pesa-
do hasta que la cuchilla est6 balanceada.
6. Unacuchilla nuevacortar_,mejor que una cuchilla gravemente
desgastada.Cadados afios, reemplace la cuchilla vieja con
unacuchilla de repuesto de f_.brica.
Unacuchillaqueest_danadacongrietaspuede
romperseycausarunaccidente.
Verificaci6ndel nivel de corte
Pruebe launidad en una _.reapeque_a.Si la altura de corte no est,.
nivelada o si el c6sped cortado no se descarga, lacausa puedeser:
(1) la cuchilla est,. dobladao daSada,(2) la cuchilla no est,. afilada,
(3) unacuchilla desgastada, (4) o un adaptador de cuchilla roto.
Antesde utilizar la unidad, corrija el problema.
17
Page 42

iVlantenimiento
, % ,
_J h
Figura 19:Afilado de la cuchilla
Limpieza de la cubierta del cortac6sped
ADVERTENCIA:Lacuchillagirar_cuandoelmotorse
pongaenfuncionamiento.Antesdelimpiarlacubierta
delcortac6sped,detengael motorydesconecteel
cablede labujia.
El c6spedy otros residuos puedenevitar que el cortac6sped fun-
cione correctamente. Despu6s de cortar el c6sped, limpie la cubier-
ta del cortac6sped, de la siguiente manera.
.
Detengael motor.
2.
Desconecteel cable de la buj[a.
3.
Limpie la suciedad y los residuos de la parte superior e inferi-
or de la cubierta del cortac6sped. Limpie con jab6n y agua.
Remueva con un trapo el exceso de aguaantes de almacenar
la unidad.
Puertode deslave
ADVERTENCIA:Useuna protecci6n ocular adecuada.
ADVERTENCtA:Mantengaa laspersonasy los
animalesdom6sticoslejosdelazonadetrabajo.
1. Aseg0rese de que la bolsa para hierba y el deflector de descar-
ga lateral est6n quitados y que el tap6n de cubrici6n de suelos
est6 instalado.
2. Ajuste la altura de corte hasta la posici6n m_.sbaja.Consulte
la secci6n "Ajuste de laaltura de corte" de este manual.
3. Mueva el cortac6sped a unasuperficie lisa y nivelada de
cemento o pavimentada.
4. Detenga el motor
5. Conecteel extremo macho de unamanguera est_.ndarcon el
conector del puerto de deslave (A, Figura 20, pd.gina
siguiente).
6. Sit0e en posici6n ON (encendido)el suministro de agua para
la manguera.
7. Arranque el motor y deje que funcione hastaque no salga m_.s
suciedad de debajo de la carcasa del cortac6sped.
mientraselmotorest6funcionando.
_ DVERTENClA:Mant6ngasedetrdsdelmango
8. Detenga el motor
9. Sit0e en posici6n OFF(apagado) el suministro de agua para la
manguera.
10. Desconecte la manguera del conector del puerto de deslave.
11.Arranque el motor y deje que funcione durante 2-3 minutos
para permitir que sesequela parte inferior de la carcasadel
cortac6sped.
El puerto de deslave lepermite limpiar la parte inferior de la carcasa
del cortac6spedsin usar las manos. Parausar el puerto de deslave:
18 www.sflapper.com
Page 43

ADVERTENClA:Nointenterealizaroperacionesde
cortemientrasseusael puertodedeslave.
ADVERTENClA:Nointentemiraro tocarlaparte
inferiordelacarcasadelcortac6spedbajoninguna
circunstanciamientrasseusaelpuertodedeslave.
Puedenproducirselesionesgraves.
iVlantenimiento
Figura20: Puerto de deslave
Preparaci6ndel cortac_spedpara almacenamiento
ADVERTENCIA:Noextraigagasolinamientrasse
est_enel interiordeunaedificaci6n,cercade
unallama,o mientrasustedfuma.Losvapores
dela gasolinapuedencausarunaexplosi6no
unincendio.
1. Drene eltanque de combustible.
2. Permita queel motor permanezcaenfuncionamiento hasta
quese le agote la gasolina.
3. Drene elaceite del motor caliente. Llene el c_.rterdel motor
con aceite nuevo.
4. Remueva la bujfa del cilindro. Vierta una onzade aceite dentro
del cilindro. Halelentamente el mango del cable retr_.ctilde
arranque para queel aceite proteja elcilindro. Instale una bujfa
nueva enel cilindro.
5. Limpie la suciedad y residuos de lasaletas de enfriamiento del
cilindro y de lacarcasadel motor.
6. Limpie la parte inferior de la cubierta del cortac6sped.
7. Verifique que la bolsa de c6sped est,.vac[a. Elc6sped queper-
maneceen la bolsa durante el almacenamientodaSar_,la
bolsa.
8. Limpie completamenteel cortac6sped para proteger lapintura.
9. Pliegueel asidero (si se desea).
PRECAUCION:Tengacuidado al plegar o levantarel asidero. No
daSelos cables. Un cable (mec_.nico)que est,. doblado no fun-
cionar_,correctamente. Antes de utilizar la unidad, reemplaceun
cable daSadoo doblado.
10. Coloque la unidad en unaedificaci6n quetenga buena venti-
laci6n.
19
Page 44

Soluci6ndeproblemas
El motornoarranca.
1. Verifique queel tanque de combustible est,. Ileno con gasolina limpia. No utilice gasolina vieja.
2. Elconector de cablesest,. desconectado. Conecteel conector de cables.
3. Verifique que el cable (el6ctrico) de la bujfa est,. conectado a la bujfa.
4. Hay demasiadagasolina en el cilindro del motor. Remuevay sequela bujfa. Halevarias veces elmango del cable retr_.ctilde arranque.
Instale la bujfa. Conecteel cablea la bujfa.Arranque el motor.
5. Elmotor es diffcil de arrancar en c6spedalto o pesado.Mueva el cortac6sped hacia una superficie seca y limpia.
6. Verifique quela palancade parada del motor est,. en la posici6n de operaci6n.
El motornose detiene.
1. Libere lapalancade paradadel motor.
2. Reviseel cable (mec_.nico)de paradadel motor. Reemplaceel cable si est,.doblado o da_ado.
El funcionamiento del motor es defectuoso.
1. Reviselos ajustes de la altura de corte. Aumente la altura de corte si el c6sped es alto.
2. Revisela parle inferior de lacubierta de la cuchilla. Limpie la cubierta de la cuchilla para remover c6spedy otros residuos.
3. Reviseel cable de la buj[a.Verifique que el cable est,. conectado.
4. Limpie las aletas de enfriamiento del motor para remover c6spedy otros residuos.
5. Revisela separaci6n entre electrodos de la bujfa.Consulte el Manual del Motor..
6. Verifique lacantidad deaceite en elmotor. Llenecon aceite si es necesario.
7. Reviseel filtro de aire del motor. Consulte el Manual del Motor.
8. La gasolina est,. deficiente. Drene y limpie el tanquede combustible. Lleneel tanque de combustible con gasolina limpia.
Vibraci6nexcesiva.
1. Desmonte lacuchilla. Revisela cuchilla y el balancesi es necesario.Yea las instrucciones de mantenimiento de la cuchilla.
2. Reviseen busca de una cuchilla doblada o rota. Unacuchilla dafiadaes peligrosay debereemplazarse.
3. Reviseel adaptador de la cuchilla. Reemplace un adaptadorde cuchillaroto.
4. Si la vibraci6n contin0a. Ileve el cortac6sped a un Centro de Servicio Autorizado.
El c_spednose descargacorrectamente.
1. Limpie la parle inferior de la cubierta del cortac6sped.
2. Reviseen busca de una cuchilla gravemente desgastada. Desmonte y afile la cuchilla. Por seguridad, reemplacela cuchilla cada dos
a_oscon una cuchilla de repuesto de f_.brica.
El c_spednose cortade manerauniforme.
1. Reviseel ajuste de altura en cadarueda. El ajuste de altura debeser el mismo para cada rueda.
2. Verifique quela cuchilla est,. afilada.
3. Reviseen buscade una cuchilla doblada o rota. Una cuchilla danada es peligrosa y debe reemplazarse.
4. Reviseen buscade un adaptador de cuchilla roto. Reemplace un adaptador de cuchilla roto.
20 www.snapper.com
Page 45

Garantia
GARANTIA LIMITADA
Briggs & Stratton Power Products Group, LLC reparara ylo reemplazara, sin cargo, cualquier pieza del equipo que este
defectuosa en material o fabricaci6n o ambos. Briggs & Stratton Corporation reparara ylo reemplazar& sin cargo, cualquier
pieza del motor* de Briggs and Stratton (siesta equipado con este) que este defectuosa en material o fabricaci6n o ambos. El
comprador debe cubrir los gastos de transporte del producto que se envie para reparaci6n o reemplazo segQn esta garantia.
Esta garantia esta en vigencia por los periodos y sujeta alas condiciones que se establecen mas adelante. Para el servicio de
garantia, busque el distribuidor de servicio autorizado mas cercano usando el mapa Iocalizador de distribuidores en
www.BriggsandStratton.com o www.Snapper.com.
No existe otra garantia expresa. Las garantias implicitas, inclusive aquellas de comerciabilidad y de idoneidad para un
prop6sito en particular se limitan a un ado a partir de la fecha de compra o hasta los limites permitidos por la ley. La
responsabilidad por dados directos o emergentes esta excluida segt_n Io permita le ley.
AIgunos estados o paises no permiten limitaciones sobre la duraci6n de una garantia implicita y algunos estados o paises
no permiten la exclusi6n o limitaci6n de dados directos o indirectos, por Io que puede que la limitaci6n y exclusi6n anterior no
se aplique a usted. Esta garantia le otorga derechos legales especificos y tambien podria ejercer otros derechos que varian
segQn el estado o el pals.
El periodo de garantia comienza en la fecha de compra por el primer usuario final de consumo minorista o comercial, y continQa
durante el periodo de tiempo que se indica anteriormente. "Uso de consumo" significa uso domestico residencial personal por un
consumidor minorista. "Uso comercial" significa todos los otros usos, Io que incluye el uso para prop6sitos comerciales, generar
ingresos o alquiler. Una vez que el producto se haya usado para fines comerciales, de ahi en adelante se considerara como para
uso comercial a efectos de esta garantia.
No es necesario registrar la garantia para obtener el servicio de garantia para productos Briggs & Stratton. Guarde el recibo del
comprobante de la compra. Si no proporciona un comprobante de la fecha de compra inicial en el momento en que se solicite el
servicio de garantia, se usara la fecha de fabricaci6n del producto se usara para determinar si tiene derecho a la garantia.
Aceptamos las reparaciones pot el servicio de garantia y nos disculpamos pot las molestias. El servicio de garantia se encuentra
disponible solamente a traves de concesionarios de servicio autorizados por Briggs & Stratton o BSPPG, LLC.
La mayoria de las reparaciones por el servicio de garantia se gestionan de manera rutinaria, aunque en ocasiones puede que
las solicitudes de servicio de garantia no sean adecuadas. Esta garantia solamente cubre defectos de material o fabricaci6n.
No cubre los da_os ocasionados pot un uso incorrecto o un mal uso, un mantenimiento o unas reparaciones inadecuadas, el
desgaste y la rotura propios del uso, o el uso de un combustible en mal estado o no aprobado.
Uso no adecuado y real uso - El uso correcto y para el que se ha concebido este equipo se describe en el manual del usuario.
Si el producto no se usa de la manera que se describe en el manual del usuario o si el producto se usa despues de que haya
resultado da5ado, quedara anulada la garantia. La garantia queda anulada si se ha borrado el nOmero de serie del producto o
el producto ha sido modificado de alguna manera, o si el producto presenta indicios de haber sido usado incorrectamente, por
ejemplo, da5os producidos por un impacto, o da5os producidos por corrosi6n quimica/agua.
Reparaci6n o mantenimiento incorrectos - Este producto debe mantenerse de acuerdo con los procedimientos y el calendario
que se proporcionan en el manual del usuario, y debe ser reparado usando para ello piezas originales de Briggs & Stratton. La
garantia no cubre los da5os ocasionados por la falta de mantenimiento o el uso de piezas no originales.
Desgaste normal - Como otros dispositivos mecanicos, su unidad esta sujeta a un desgaste incluso si se realiza en ella un
mantenimiento correcto. Esta garantia no cubre las reparaciones cuando el uso normal ha agotado la vida Otil de una pieza o del
equipo. Las piezas que sufren desgaste y que deben someterse a programas de mantenimiento tales como los filtros, la correas,
las cuchillas de corte y las zapatas del freno (las zapatas del freno del motor estan cubiertas por la garantia) no estan cubiertas
por la garantia debido a que Qnicamente pueden desgastarse, a menos que el origen del desgaste sean defectos en el material o
en la fabricaci6n.
Combustible en real estado - Para que este producto funciona correctamente, se necesita combustible fresco (reciente) que
cumpla los criterios especificados en el manual del usuario. Los da5os ocasionados por el combustible viejo (en mal estado),
como fugas en el carburador, tubos de combustible obstruidos, valvulas obstruidas, etc. no estan cubiertos por la garantia.
* Esto solo se aplica a los motores de Briggs and Stratton. La cobertura de la garantia de los motores no fabricados por Briggs and Stratton la
ofrece el fabricante del motor.
21
Page 46

Notas
22 www.snapper.com
Page 47

=m
=l
E
_m
GUiAPARAMANEJARENPENDIENTES
"*" .. 15 - APUNTE Y SOSTENGAESTA GUIAA NIVEL CON UN ARBOL VERTICAL, LA ESQUINA
..... I ...... o_oRAOos DE UNA ESTRUCTURA, UN POSTE DE ENERGIAELI_CTRICA0 UNA VALLA.
i i ................;..............
I .......... _" ulb
eOI, I_®O_OIQQI I
Manejeelcortac_spedde empujea
Ioanchoenlas pendientes,nunca
haciaarribayhaciaabajo.
e eltractorcortac_sped
haciaarribay haciaabajoenlas
pendientes,nuncaa Ioancho.
O'3
Paradeterminarsinoespeligrosocortarel c_spedenunapendientecuandomanejauntractorcortac_sped:(1) desengranelacuchilla(s),(2) pongala m;iquinaen marcha
atr;_s,y(3) pruebeascenderla pendienteretrocediendoen linearecta.Si puedehacerlo,porIo generalno espeligrosocortarel c_sped.Sin embargo,si nosesienteseguro,
o noest;_totalmenteconvencido,useestaguiaynocorteel c_spedenunapendientequeseamayorque15grados.Si est;_usandoel tractorcortac_spedconunaccesorio
remolcadoo demontajetrasero,noIomanejeenunapendientequeseamayorque10grados.
Unapendientede15 gradosesuncerrocuyaalturaaumentaaproximadamente2.5 piesen10 pies.
Unapendientede10gradosesuncerrocuyaalturaaumentaaproximadamente1.7 piesen 10pies.
Prestemuchaatencibnentodomomento,y evitelosvirajesomaniobrasbruscas.Parasuseguridad,respeteotrasinstruccionesencontradasenestemanual
mientrascortac_spedenpendientes.IVlanejeeltractorcortac_speddesubidaobajadaenlas pendientes,nuncaa Ioanchodelasmismas.IVlanejeel cortac_sped
deempujea Ioanchode laspendientes,nuncasubiendoo bajando.Seasumamentecuidadosocuandomanejeeno cercadependientesyobstrucciones.
Page 48

Cortac6spedWalkBehindauto-
propulsadode22"
Especificacionesdel Producto
Tamaffode plataforma (pulg.)
Altura de corte (pulg.)
Tipo detransmisi6n
Velocidad de avance(mph)
Potencia del motor (pies@s)
Cilindrada del motor (cc)
Capacidaddeltanque de
combustible (cuartodegal4n)
Piezasde repuestocomunes
Cablepara elcontrol de cuchilla
Cabledetracci6n de ruedas
Cuchillade corte
Correadetransmisi6n
Clasificaci6n de Potencia: La clasificaci6n de potencia total para los modelos individuales de motores a gas se etiqueta de acuerdo con el
c6digo J1940 de SAE(Sociedad de Ingenieros Automotrices) (Procedimiento de Clasificaci6n de Potencia & Torque del Motor PequeSo)y la
clasificaci6n de desempeSose ha obtenido y se ha corregido deacuerdo con SAEJ1995 (Revisi6n2002-05).Los valores de Torque se
derivan a 3060 RPM; los valores de potenciase derivan a 3600 RPM. Los valores netos de potencia setoman con escapey filtro de aire
instalado mientras que los valores de potenciatotal se recogen sin estos accesorios. Lapotencia total real del motor puede ser mayor que la
potencia neta del motor y estar afectadapor, entre otras cosas, condiciones ambientales de operaci6n y variabilidad de motor a motor. Dado
el amplio conjunto de productos en los cuales son puestos los motores, el motor a gas podria no desarrollar la potenciatotal nominal cuan-
do sea usado en una parte dadadel equipo acoplado. Estadiferencia se debe a una variedad de factores que incluyen, sin limitarse a, I avier-
dadde componentes del motor (filtro de aire,sistema de escape,sistema de carga, sistema de enfriamiento, carburador, bomba de com-
bustible, etc.), limitaciones de la aplicaci6n, condiciones ambientales de operaci6n (temperatura, humedad, altitud), y a la variabilidad de
motor a motor. Debido alas limitaciones de fabricaci6n y capacidad Briggs & Stratton puede sustituir un motor de potencia nominal m_.s
alta por estaSerie de motor.
SPV2270HW / NSPV2270HW
22
1.25- 4
Velocidad/Relaci6nvariable
0 - 4.2
7.00
190
1.0
N_mero de Pieza
7101395YP
7103767YP
7103288YP
7103362YP
SNAPPER
www.snapper.com
 Loading...