

Page 1

Safety Instructions & Operator's Manual for
Not for
Reproduction
22” WALK BEHIND
MOWERS
Models
S2265 (7800189)
SP2265 (7800165)
SPV22675HW (7800190)
NS2265 (7800228)
NSP2265 (7800229)
NSPV22675HW (7800230)
NOTE: Specifications are correct at time of printing and are subject to change without notice.
* Actual sustained engine power will likely be lower due to operating limitations and environmental factors. Please refer to ‘Engine Power Rating Information’ for
further details.
Manual No. 7102320 (I.R. 1/15/2008)
TP 100-5333-IR-WB-N
Page 2

Thank You for purchasing this quality-built Snapper mower. We’re pleased that you placed your
Not for
Reproduction
confidence in the Snapper brand. When operated and maintained according to the instructions in this
manual, your Snapper mower will provide many years of dependable service.
This manual contains safety information to make you aware of the hazards and risks associated with the
machine and how to avoid them. This machine is designed and intended only for finish cutting of
established lawns and is not intended for any other purpose. It is important that you read and understand
these instructions thoroughly before attempting to start or operate this equipment. Save these
instructions for future reference.
PRODUCT REGISTRATION
IMPORTANT: KEEP THIS INFORMATION FOR YOUR PERSONAL RECORDS
(Complete the following information on your Snapper purchase)
Date of Purchase__________________________________________________________________
Retailer_________________________________________________________________________
Retailer's Phone Number___________________________________________________________
Equipment
Model Number______________________________________________________________
Serial Number ______________________________________________________________
Engine
Model_________________________Type__________________Trim___________________
It is very important that you register your purchase with Snapper to ensure warranty coverage. Please
mail your product registration card to:
Snapper at P.O. Box 777, McDonough, Georgia 30253.
Or you may register online at www.snapper.com.
You can contact us at our website, or if you would like to speak with a Customer Service
Representative, call us at the Snapper Customer Relations Center at 1-800-317-7833. For faster
service please have your Serial Number and Model Number available.
SNAPPER is a trademark of
Simplicity Manufacturing, Inc.
Port Washington, WI, USA.
Briggs & Stratton Yard Power Products Group
Copyright © 2008, Briggs & Stratton Corporation
Milwaukee, WI, USA. All Rights Reserved.
Page 3

Table of Contents
Not for
Reproduction
Operator Safety . . . . . . . . . . . . . . . . . . . . . . . . . . . . . . . . . . . . . . . . . . . . . . . .2
Important Operator Safety Instructions . . . . . . . . . . . . . . . . . . . . . . . . . . . . . . . . . .2
Operator Safety
Preparation . . . . . . . . . . . . . . . . . . . . . . . . . . . . . . . . . . . . . . . . . . . . . . . . . . .4
Unpacking . . . . . . . . . . . . . . . . . . . . . . . . . . . . . . . . . . . . . . . . . . . . . . . . . . . . . . . . .4
Handle . . . . . . . . . . . . . . . . . . . . . . . . . . . . . . . . . . . . . . . . . . . . . . . . . . . . . . . . . . . .4
Handle Height . . . . . . . . . . . . . . . . . . . . . . . . . . . . . . . . . . . . . . . . . . . . . . . . . . . . . .5
Grass Bag . . . . . . . . . . . . . . . . . . . . . . . . . . . . . . . . . . . . . . . . . . . . . . . . . . . . . . . . .6
Side Discharge Deflector . . . . . . . . . . . . . . . . . . . . . . . . . . . . . . . . . . . . . . . . . . . . . .8
Mulching Tips . . . . . . . . . . . . . . . . . . . . . . . . . . . . . . . . . . . . . . . . . . . . . . . . . . . . . .9
How to Prepare the Engine . . . . . . . . . . . . . . . . . . . . . . . . . . . . . . . . . . . . . . . . . . . .9
Final Preparation . . . . . . . . . . . . . . . . . . . . . . . . . . . . . . . . . . . . . . . . . . . . . . . . . . . .9
Operation . . . . . . . . . . . . . . . . . . . . . . . . . . . . . . . . . . . . . . . . . . . . . . . . . . .10
Engine Stop Lever . . . . . . . . . . . . . . . . . . . . . . . . . . . . . . . . . . . . . . . . . . . . . . . . . .10
Front Wheel Drive System (Self-Propelled Units) . . . . . . . . . . . . . . . . . . . . . . . . . .10
Stopping the Engine . . . . . . . . . . . . . . . . . . . . . . . . . . . . . . . . . . . . . . . . . . . . . . . .10
Starting the Engine . . . . . . . . . . . . . . . . . . . . . . . . . . . . . . . . . . . . . . . . . . . . . . . . .11
Rules for Safe and Effective Operation . . . . . . . . . . . . . . . . . . . . . . . . . . . . . . . . . .11
Maintenance . . . . . . . . . . . . . . . . . . . . . . . . . . . . . . . . . . . . . . . . . . . . . . . . .12
Engine Maintenance . . . . . . . . . . . . . . . . . . . . . . . . . . . . . . . . . . . . . . . . . . . . . . . .12
Engine Tipping . . . . . . . . . . . . . . . . . . . . . . . . . . . . . . . . . . . . . . . . . . . . . . . . . . . .12
Cleaning the Mower Housing . . . . . . . . . . . . . . . . . . . . . . . . . . . . . . . . . . . . . . . . .12
Lubrication . . . . . . . . . . . . . . . . . . . . . . . . . . . . . . . . . . . . . . . . . . . . . . . . . . . . . . .12
Adjusting the Height of Cut . . . . . . . . . . . . . . . . . . . . . . . . . . . . . . . . . . . . . . . . . . .12
Removing the Drive Belt . . . . . . . . . . . . . . . . . . . . . . . . . . . . . . . . . . . . . . . . . . . . .13
Adjusting the Drive Cable . . . . . . . . . . . . . . . . . . . . . . . . . . . . . . . . . . . . . . . . . . . .14
Blade Service . . . . . . . . . . . . . . . . . . . . . . . . . . . . . . . . . . . . . . . . . . . . . . . . . . . . .15
Removing the Blade . . . . . . . . . . . . . . . . . . . . . . . . . . . . . . . . . . . . . . . . . . . . .15
Sharpening the Blade . . . . . . . . . . . . . . . . . . . . . . . . . . . . . . . . . . . . . . . . . . . .15
Checking the Level of Cut . . . . . . . . . . . . . . . . . . . . . . . . . . . . . . . . . . . . . . . . .15
Preparing the Mower for Storage . . . . . . . . . . . . . . . . . . . . . . . . . . . . . . . . . . . . . .16
Preparation Operation Maintenance Troubleshooting Warranties
Troubleshooting . . . . . . . . . . . . . . . . . . . . . . . . . . . . . . . . . . . . . . . . . . . . . . .17
Warranty . . . . . . . . . . . . . . . . . . . . . . . . . . . . . . . . . . . . . . . . . . . . . . . . . . . .18
!
Battery posts, terminals and related accessories contain
lead and lead compounds, chemicals known to the State of
California to cause cancer and birth defects or other
reproductive harm. Wash hands after handling.
WARNING
!
!
Engine exhaust, some of its constituents, and certain
vehicle components contain or emit chemicals known to
the State of California to cause cancer or other reproductive
harm.
WARNING
!
1
Page 4

! !
Not for
Reproduction
Operator Safety
IMPORTANT OPERATOR SAFETY INSTRUCTIONS
WARNING: This powerful cutting machine is capable of amputating hands and feet and can throw objects
that can cause injury and damage! Failure to comply with the following SAFETY instructions could result in
serious injury or death to the operator or other persons. The owner of the machine must understand these
instructions and must allow only persons who understand these instructions to operate machine. Each
person operating the machine must be of sound mind and body and must not be under the influence of any
substance, which might impair vision, dexterity or judgment. If you have any questions pertaining to your
machine which your dealer cannot answer to your satisfaction, call or write the Customer Service
Department at SNAPPER, McDonough, Georgia 30253. Phone: (1-800-317-7833).
Protection for Children
Tragic accidents can occur if the operator is not alert to the
presence of children. Children are often attracted to the
machine and the mowing activity. Never assume that
children will remain where you last saw them.
1. KEEP children out of the mowing area and under the
watchful care of a responsible adult other than the operator.
2. DO NOT allow children in yard when machine is operated
and turn machine OFF if anyone enters the area.
3. DO NOT allow pre-teenage children to operate machine.
4. ALLOW only responsible adults & teenagers with mature
judgment under close adult supervision to operate machine.
5. DO NOT pull mower backwards unless absolutely
necessary. LOOK and SEE behind and down for children,
pets and hazards before and while backing.
6. USE EXTRA CARE when approaching blind corners,
shrubs, trees, or other objects that may obscure vision.
Slope Operation
1. Slopes are a major factor related to slip and fall accidents, which can result in severe injury. All slopes require
extra caution. If you feel uneasy on a slope, DO NOT mow
it.
2. Mow across slopes, never up-and-down. Exercise
extreme CAUTION when changing directions on slopes. DO
NOT mow steep slopes or other areas where stability or
traction is in doubt. Refer to the Slope Guide at the end of
this manual.
3. Use extra care with grass catchers or other attachments;
these affect the handling and the stability of the machine.
Preparation
1. Read, understand, and follow instructions and warnings
in this manual and on the mower, engine and attachments.
Know the controls and the proper use of the mower before
starting.
2. Only mature, responsible persons shall operate the
machine and only after proper instruction.
3. Data indicates that operators age 60 and above, are
involved in a large percentage of mower-related injuries.
These operators should evaluate their ability to operate the
mower safely enough to protect themselves and others
from serious injury.
Preparation
(Continued From Previous Column)
4. Handle fuel with extra care. Fuels are flammable and
vapors are explosive. Use only an approved fuel container.
DO NOT remove fuel cap or add fuel with engine running.
Add fuel outdoors only with engine stopped and cool. Clean
spilled fuel and oil from machine. DO NOT smoke.
5. Check the area to be mowed and remove all objects such
as toys, wire, rocks, limbs and other objects that could
cause injury if thrown by blade or interfere with mowing.
Also note the location of holes, stumps, and other possible
hazards.
6. Keep people and pets out of the mowing area.
Immediately, STOP Blade, Stop engine and Stop mower if
anyone enters the area.
7. Check shields, deflectors, switches, blade controls and
other safety devices frequently for proper operation and
location.
8. Make sure all safety decals are clearly legible. Replace if
damaged.
9. Protect yourself when mowing and wear safety glasses, a
dust mask, long pants, and substantial footwear. DO NOT
mow barefooted or with sandals.
10. Know how to STOP blade and engine quickly in
preparation for emergencies.
11. Use extra care when loading or unloading the machine
into a trailer or truck.
12. Check grass catcher components frequently for signs of
wear or deterioration and replace as needed to prevent
injury from thrown objects going through weak or torn
spots.
Safe Handling of Gasoline
To avoid personal injury or property damage, use extreme
care in handling gasoline. Gasoline is extremely flammable
and the vapors are explosive.
1. Extinguish all cigarettes, cigars, pipes and other sources
of ignition.
2. Use only an approved fuel container.
3. DO NOT remove fuel cap or add fuel with the engine
running. Allow the engine to cool before refueling.
4. DO NOT refuel the machine indoors.
5. DO NOT store the machine or fuel container inside where
there is an open flame, spark or pilot light such as on a
water heater or other appliances.
www.snapper.com2
Page 5

Important Operator Safety Instructions (Continued)
Not for
Reproduction
! !
Operator Safety
Safe Handling of Gasoline
(Continued From Previous Page)
6. DO NOT fill fuel containers inside a vehicle or on a truck
or trailer bed with a plastic liner. Always place the containers on the ground away from the vehicle before filling.
7. Remove gas-powered equipment from the vehicle or
trailer and refuel it on the ground. If this is not possible,
then refuel equipment using a portable container, rather
than a gasoline dispenser nozzle.
8. DO NOT start gas powered equipment in enclosed vehicles or trailers.
9. Keep the nozzle in contact with the rim of the fuel tank or
container opening at all times until fueling is complete. DO
NOT use a nozzle lock-open device
10. If fuel is spilled on clothing, change clothing
immediately.
11. DO NOT overfill a fuel tank. Replace fuel cap and tighten securely.
Operation
1. DO NOT put hands or feet near or under rotating parts.
Keep clear of discharge area while engine is running.
2. STOP engine when crossing gravel drives, walks, or
roads, and under any conditions where thrown objects
might be a hazard.
3. Mow only in daylight or good artificial light.
4. DO NOT operate mower while under the influence of
alcohol or drugs.
5. After striking a foreign object or if mower vibrates
abnormally, STOP the engine, disconnect and secure spark
plug wire. Inspect the mower for any damage and repair
the damage before starting.
6. DO NOT mow near drop offs, ditches or embankments.
Operator could lose footing or balance.
7. STAY ALERT for holes and other hidden hazards. Tall
grass can hide obstacles. Keep away from ditches,
washouts, culverts, fences and protruding objects.
8. DO NOT mow on wet grass. Always be sure of your
footing. Keep a firm hold on the handle and walk, never
run. Slipping could cause injury.
9. ALWAYS stay behind handle when engine (motor) is
running.
10. DO NOT leave the machine with the engine running.
STOP BLADE and STOP ENGINE before leaving the operators position for any reason.
11. Before cleaning, repairing or inspecting make certain
engine, blade and all moving parts have STOPPED.
Disconnect and secure spark plug wire away from plug to
prevent accidental starting.
12. STOP engine and wait until the blade comes to complete STOP before removing grass bag and/or clearing
grass.
Operation
(Continued From Previous Column)
13. DO NOT operate mower without the entire grass catcher, or guards in place discharge guard, rear guard or other
safety devices in place and working. DO NOT point discharge at people, passing cars, windows or doors.
14. DO NOT discharge material against a wall or obstruction. Material may ricochet back towards the operator.
15. Slow down before turning.
16. Watch out for traffic when near or crossing roadways.
17. DO NOT operate engine in enclosed areas. Engine
exhaust gases contain carbon monoxide, a deadly poison.
18. Only use accessories approved by the manufacturer.
See manufacturer’s instructions for proper operation and
installation of accessories.
Maintenance and Storage
1. DO NOT store mower or fuel container inside where
fumes may reach an open flame, spark or pilot light such as
in a water heater, furnace, clothes dryer or other gas appliance. Allow engine to cool before storing machine in an
enclosure. Store fuel container out of reach of children in a
well ventilated, unoccupied building.
2. Keep mower and engine free of grass, leaves or excess
grease to reduce fire hazard and engine overheating.
3. When draining fuel tank, drain fuel into an approved
container outdoors and away from open flame.
4. Keep all bolts, especially blade bolts, nuts and screws
properly tight. Check that all cotter pins are in proper
position.
5. Always provide adequate ventilation when running
engine. Engine exhaust gases contain carbon monoxide, a
deadly poison.
6. Service engine and make adjustments only when engine
is stopped. Removed spark plug wire from spark plug and
secure wire away from spark plug to prevent accidental
starting.
7. DO NOT change engine governor speed settings or
overspeed engine.
8. Check grass bag assembly frequently for wear or
deterioration to avoid thrown objects and exposure to
moving parts. Replace with new bag if loose seams or tears
are evident. Replace slider or bag adapter if broken or
cracked.
9. Mower blades are sharp and can cut. Wrap the blades or
wear heavy leather gloves and use CAUTION when handling
them.
10. DO NOT test for spark by grounding spark plug next to
spark plug hole; spark plug could ignite gas exiting engine.
11. Have machine serviced by an authorized SNAPPER
dealer at least once a year and have the dealer install any
new safety devices.
12. Use only genuine SNAPPER replacement parts to
assure that original standards are maintained.
3
Page 6
Preparation
Not for
Reproduction
WARNING: Before doing any assembly or
maintenance to the mower, remove the wire
from the spark plug.
NOTE: In this instruction book, left and right describe the
location of a part with the operator standing behind the
handle.
Unpacking
The mower was fully assembled at the factory. When the
mower was put in the carton, the handle was put in the
storage position. To put the handle in the operating position,
follow the steps below.
Preparation
Handle
1. Remove the mower from the carton.
2. Remove all packing material from the mower and the
handle.
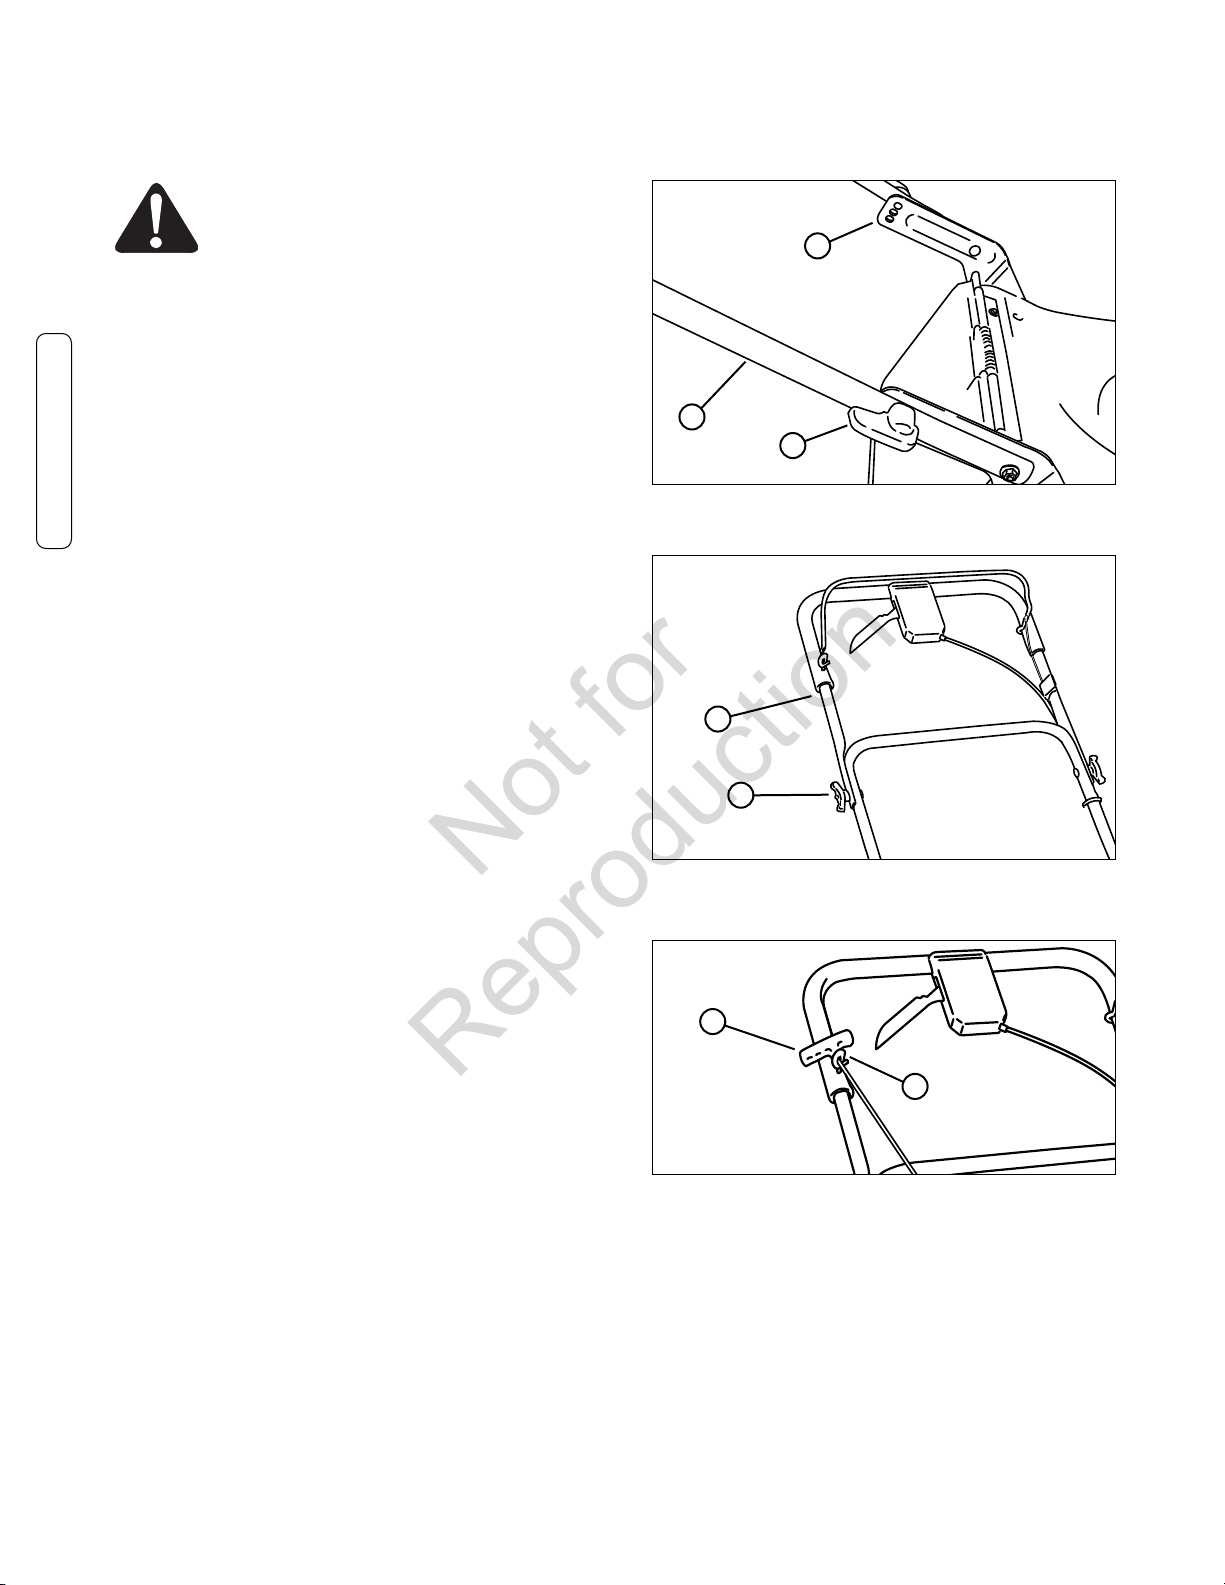
3. Turn the knobs (A, Figure 1) on either side of the lower
handle (B) to retract the locking pins. Raise the lower
handle, aligning it with one of the three sets of holes in
the handle brackets (C). Turn the knobs to release the
locking pins and secure the lower handle.
4. Put the upper handle (A, Figure 2) in the operating
(upright) position. Tighten the wingnuts (B).
NOTE: The height of the handle can be set for operator
comfort. See “Handle Height”.
CAUTION: Be careful when you fold or raise the handle. Do
not damage the cables. A cable that is bent will not work
correctly. Before you use the unit, replace a bent or damaged
cable.
C
B
A
Figure 1: Unfolding the lower handle
A
B
Figure 2: Unfolding the upper handle
5. Hold the engine stop lever against the handle. (Refer to
section entitled ‘Engine Stop Lever’.) Slowly pull the
recoil-start grip (A, Figure 3). To attach the recoil-start
grip to the rope guide (B), twist the rope through the
rope guide mounted on the right side of the handle.
Figure 3: Attaching the recoil-start grip
A
B
www.snapper.com4
Page 7
Preparation (Continued)
Not for
Reproduction
Handle Height
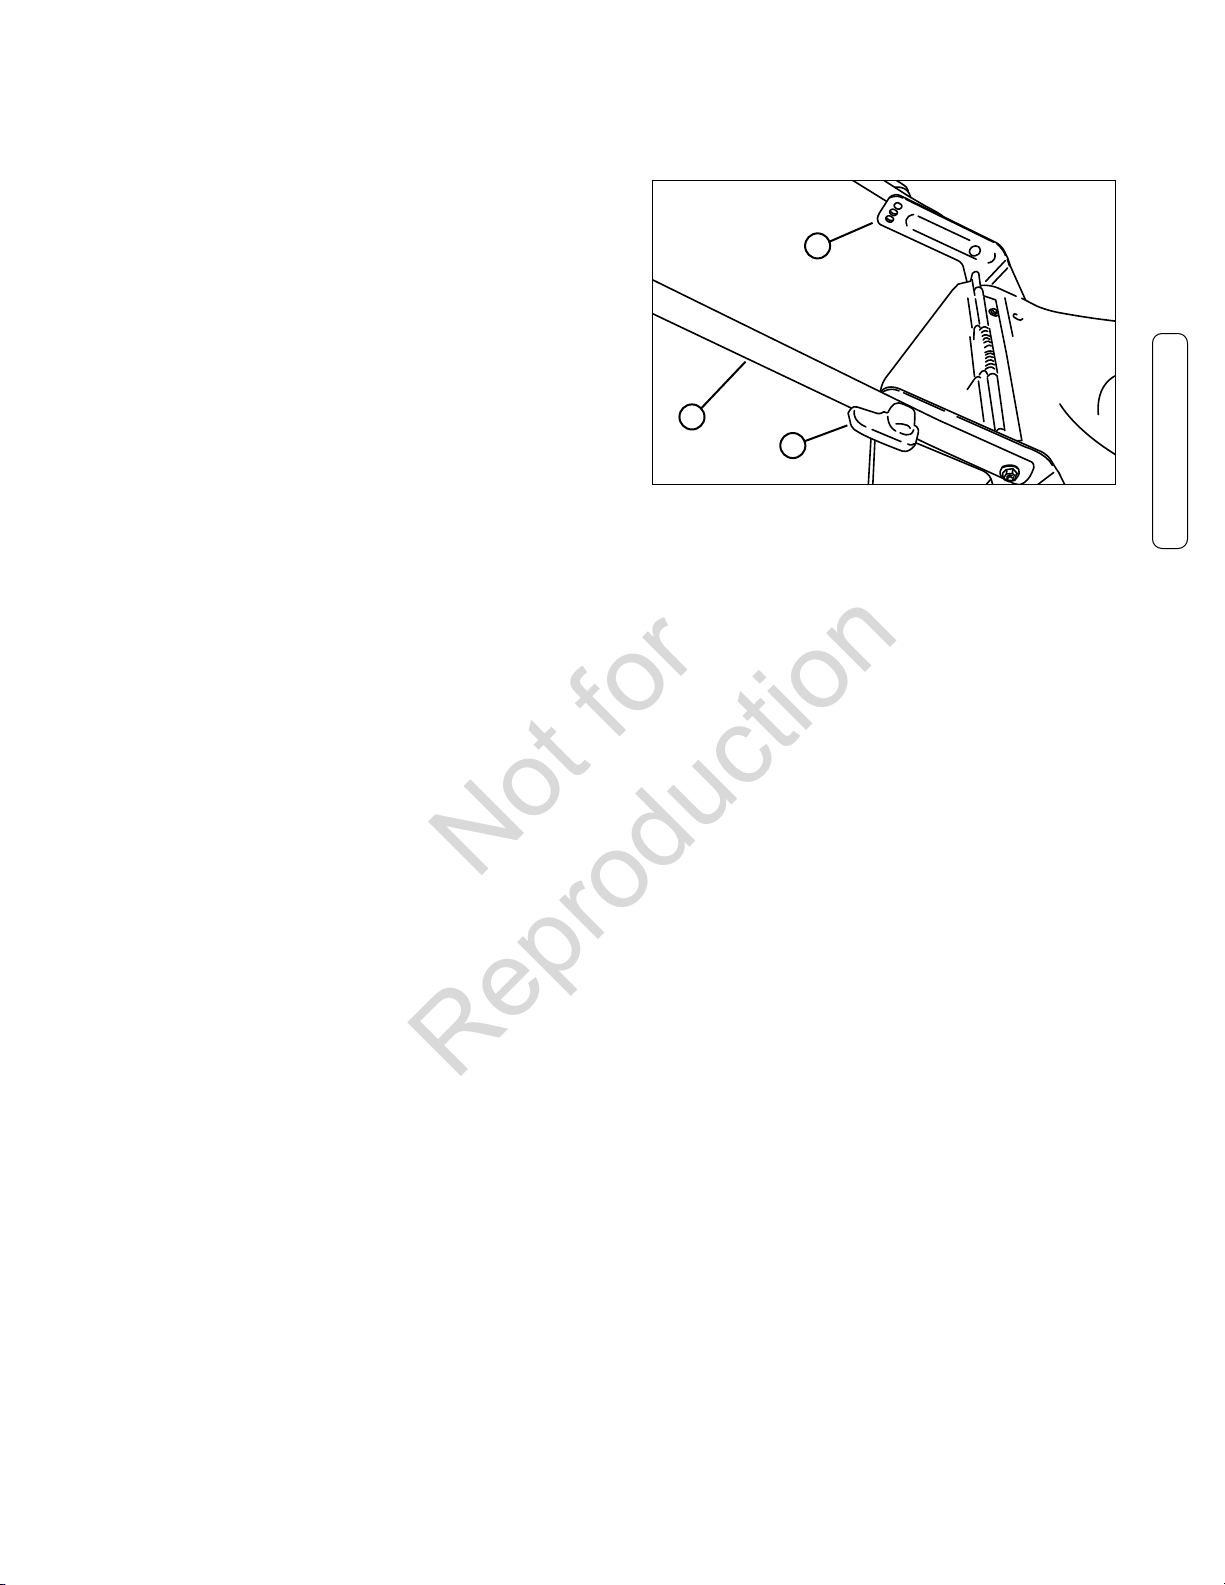
1. Turn the knobs (A, Figure 4) on either side of the lower
handle (B) to retract the locking pins. Align the lower
handle with the desired set of holes in the handle
brackets (C). Turn the knobs to release the locking pins
and secure the lower handle.
Note: Do not remove the lower set of bolts and nuts securing
the lower handle.
C
Preparation
B
A
Figure 4: Adjusting the handle height
5
Page 8
Preparation (Continued)
Not for
Reproduction
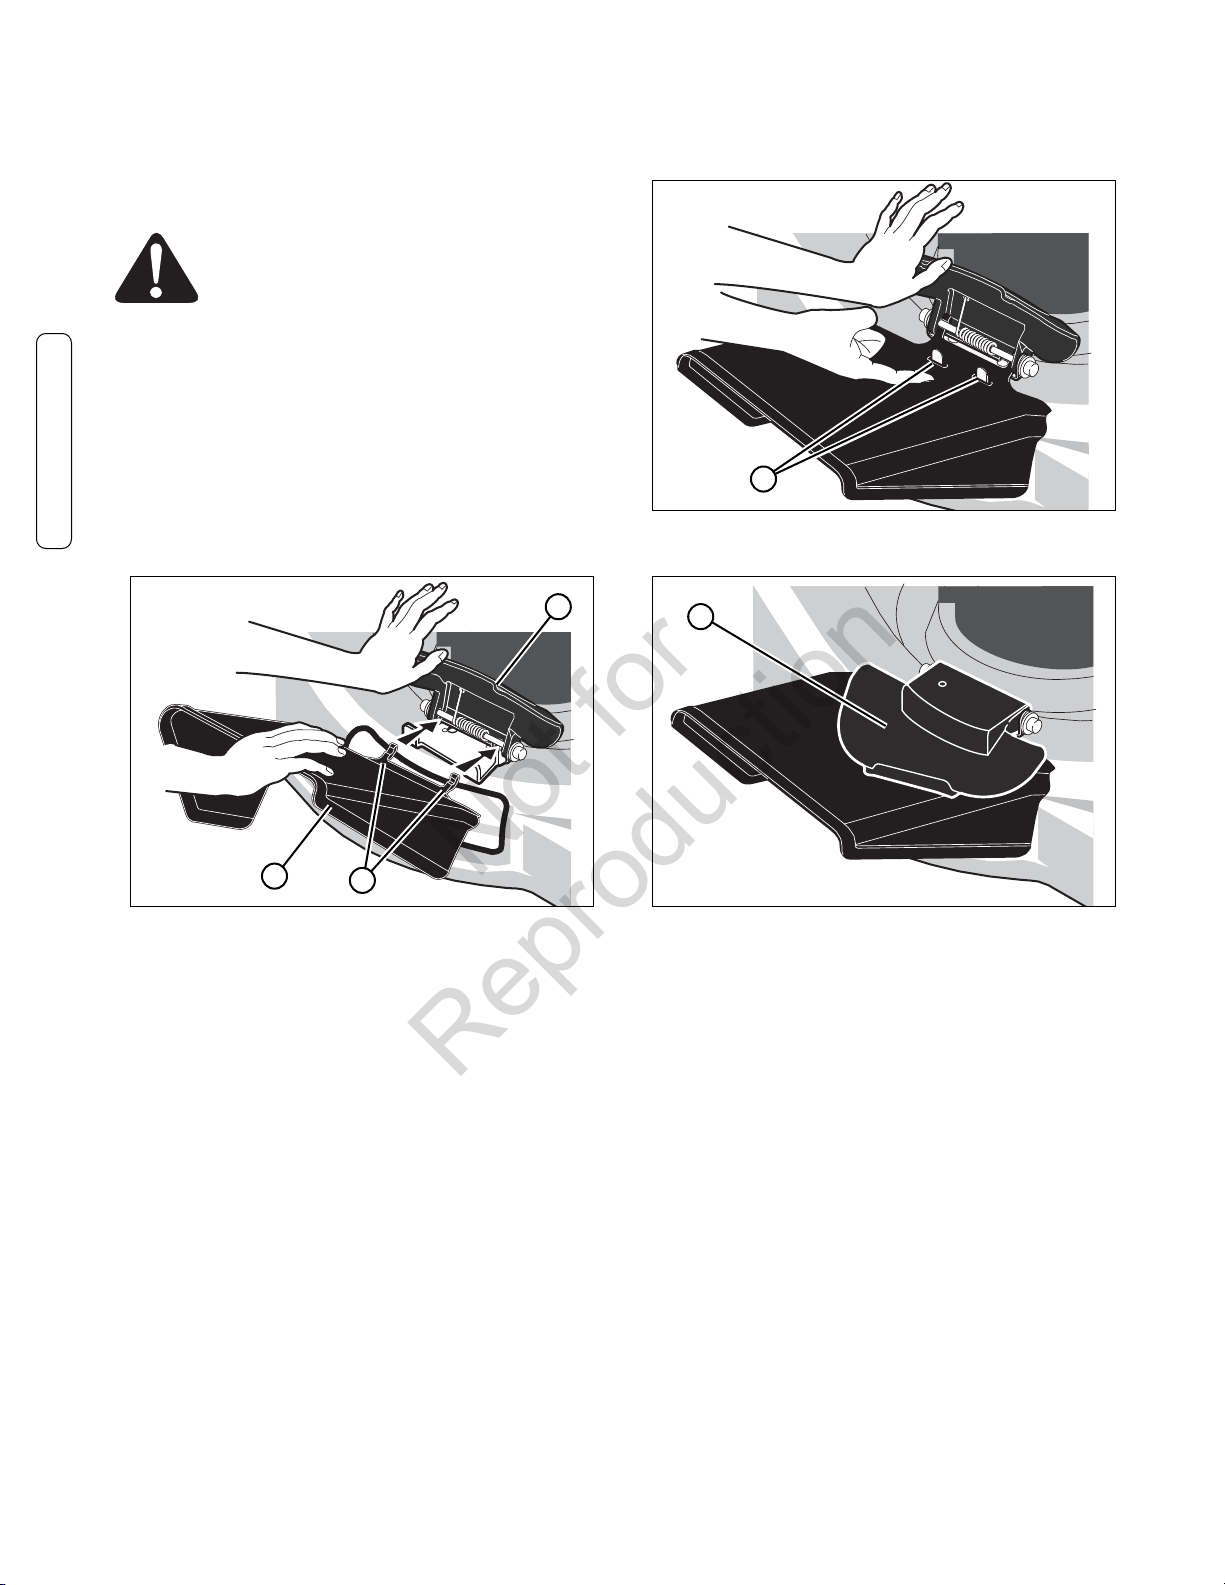
Assembling the Grass Bag
Note: On some models, the side mounted discharge deflector
is temporarily attached (for shipping purposes) to the rear of
the mower. Before assembly of the grass bag, remove the
side mounted discharge deflector.
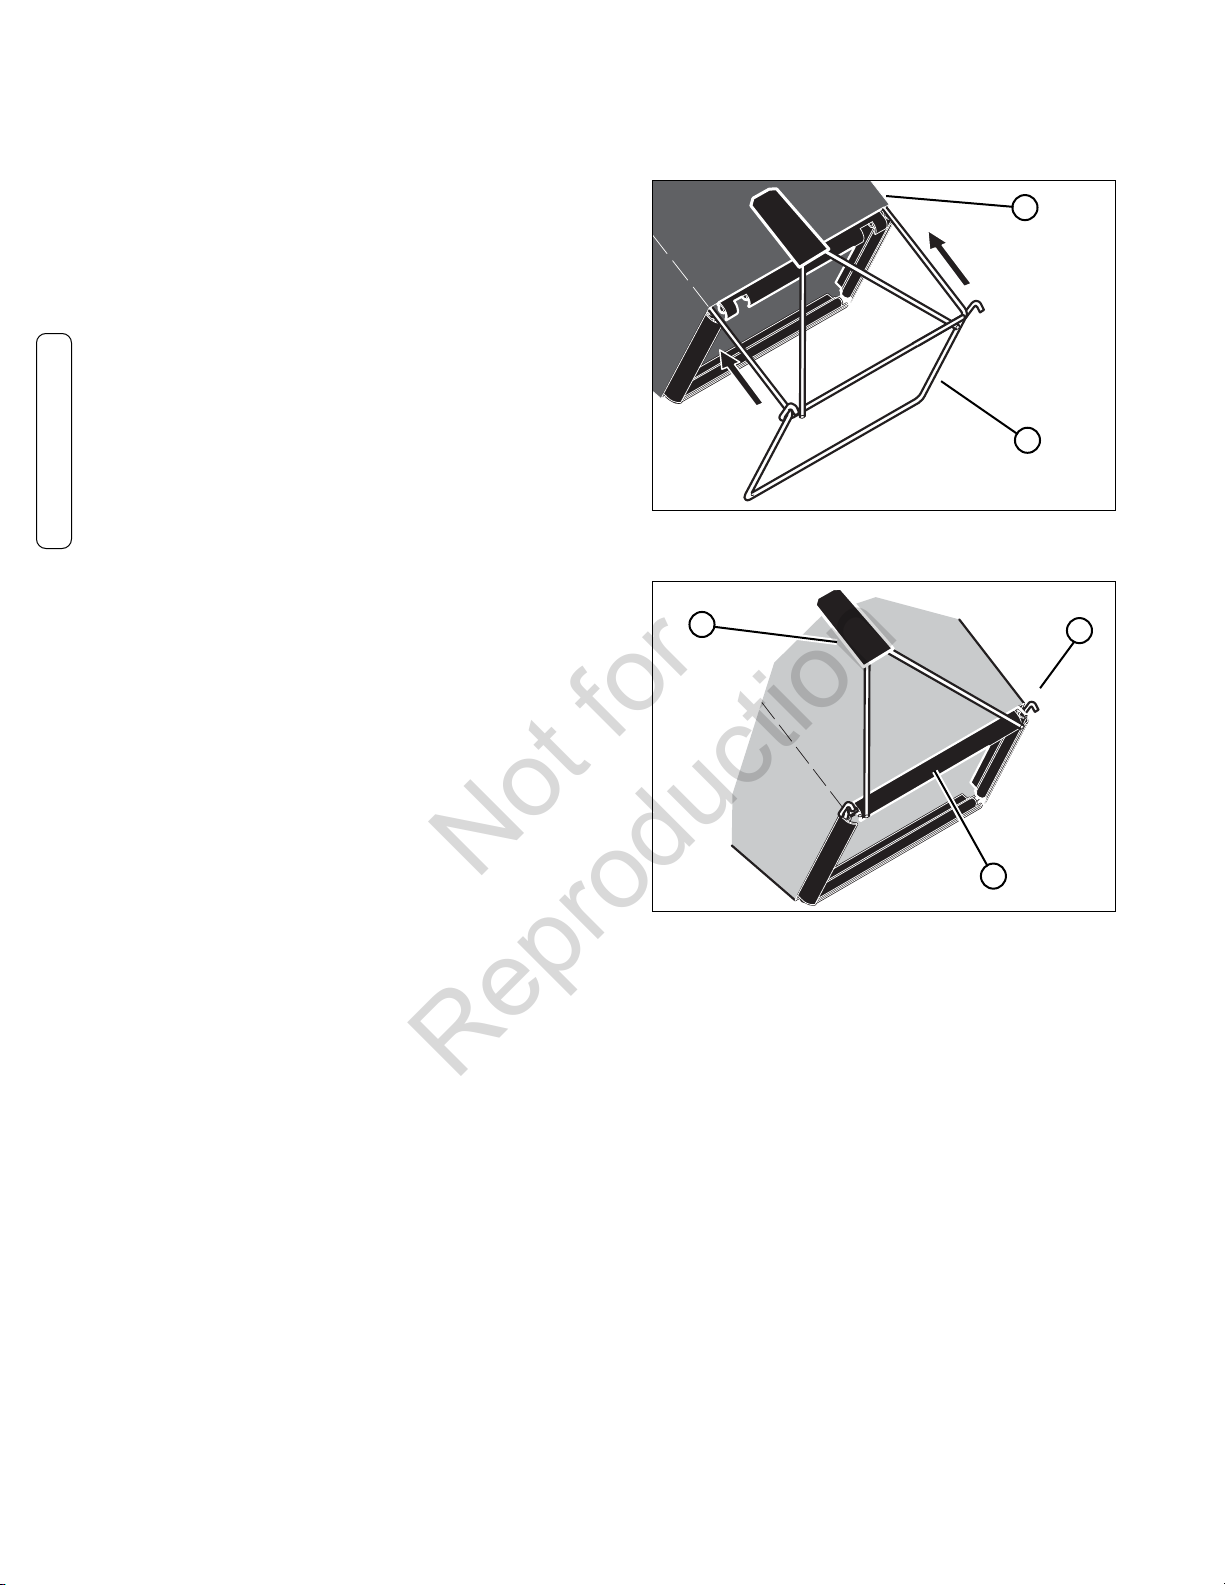
1. Slide the frame assembly (A, Figure 5) into the grass
bag (B).
Preparation
2. Make sure the handle (A, Figure 6) is on the outside of
the grass bag.
Figure 5: Installing the frame assembly
A
B
A
C
3. First, attach the clips (B, Figure 6) to the side of the
frame assembly (C). Next, attach the clips to the top and
bottom of the frame assembly.
B
Figure 6: Installing the bag clips
www.snapper.com6
Page 9
Preparation (Continued)
Not for
Reproduction
Mounting the Grass Bag
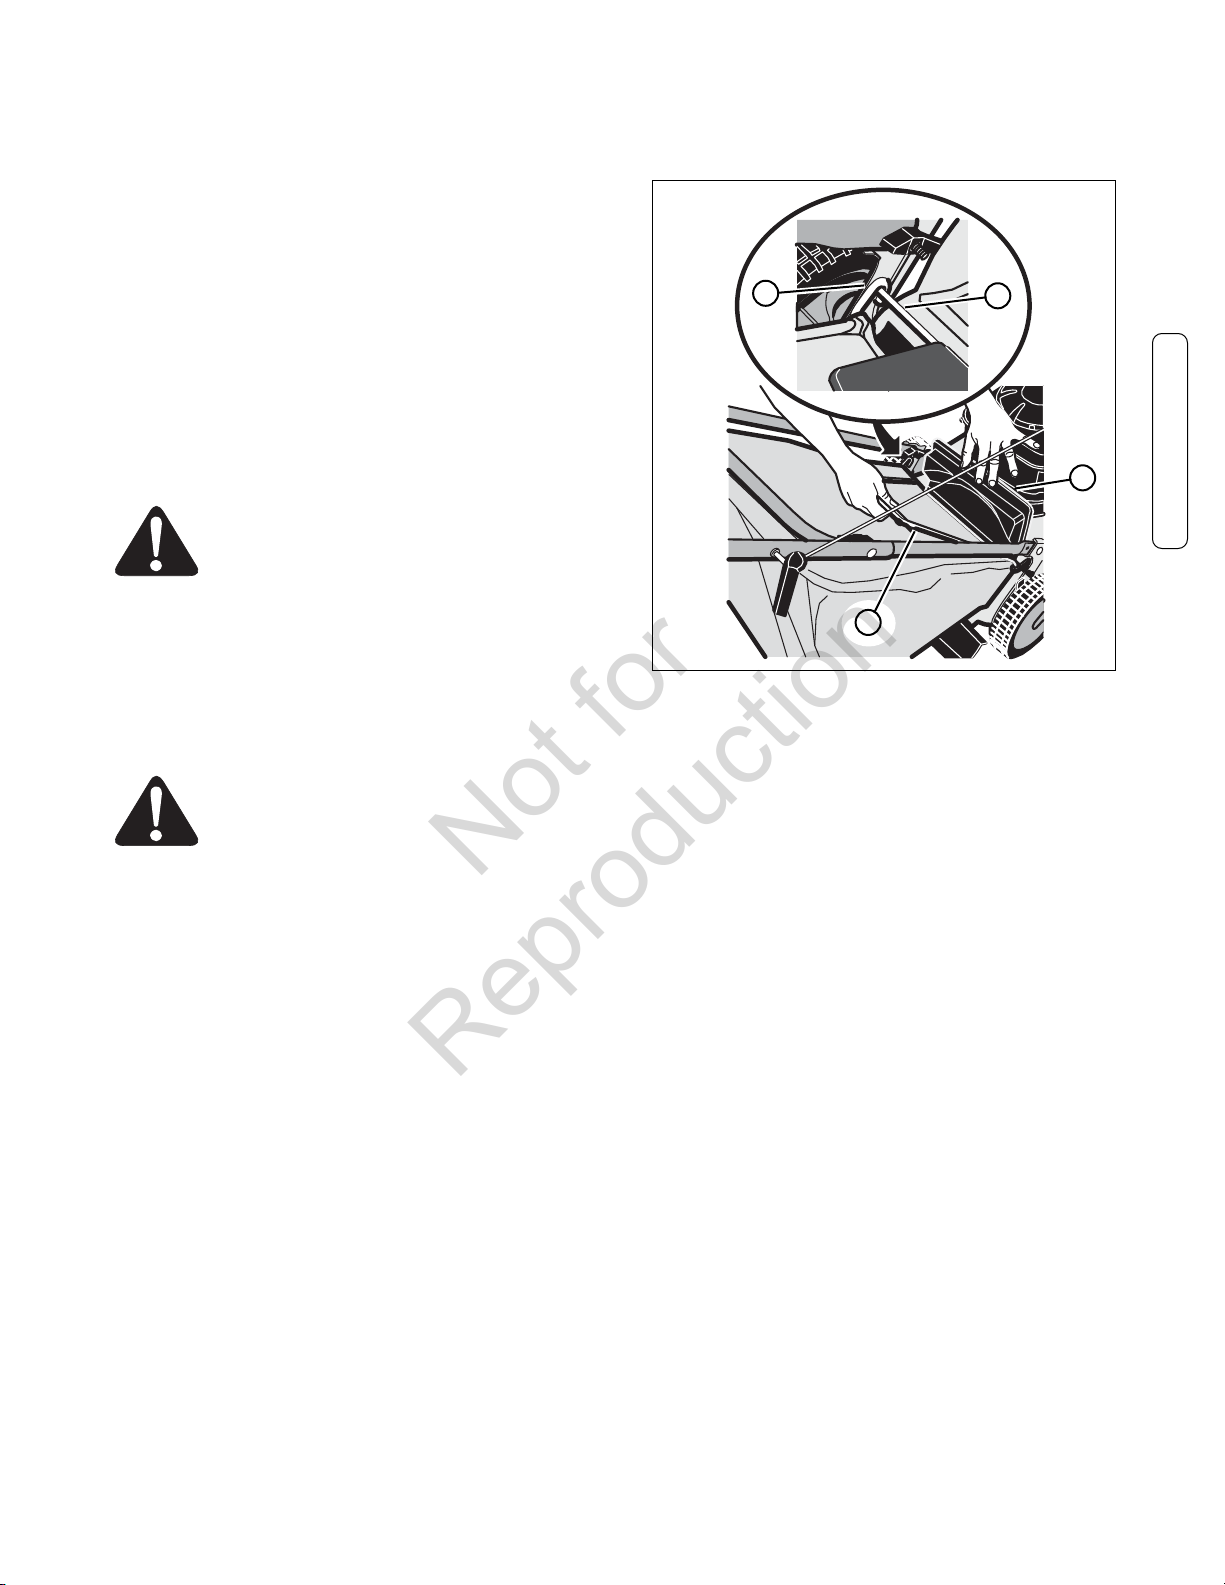
1. To mount the grass bag on the mower, raise the rear
door (A, Figure 7). Holding the grass bag by the handle
(B), mount the hooks (C) on either end of the grass bag
frame assembly onto the rear door pivot rod (D). Lower
the grass bag against the rear of the mower. Lower the
rear door.
C
D
Important: Make sure both grass bag hooks are mounted on
the pivot rod.
WARNING: Check the condition of the grass
bag for wear or deterioration. If worn or
damaged, replace the parts only with
approved factory replacement parts.
Emptying the Grass Bag
WARNING: Before you remove the grass bag,
stop the engine. Before you remove any grass
from the mower housing, disconnect the wire
from the spark plug.
1. Raise the rear door to a vertical position.
2. Hold the handle of the grass bag and lift the frame
assembly. Continue to lift the frame assembly until the
hooks are no longer mounted on the pivot rod. Remove
the grass bag.
3. Empty the grass from the grass bag.
4. To mount the grass bag on the mower, see “Mounting
The Grass Bag”.
Preparation
A
B
Figure 7: Mounting the grass bag
7
Page 10
Preparation (Continued)
Not for
Reproduction
Attaching the Side Mounted Discharge Deflector
WARNING: To prevent the engine from
starting, disconnect the wire from the
spark plug.
For shipping purposes, the side deflector was not installed.
Locate the side deflector and install as follows.
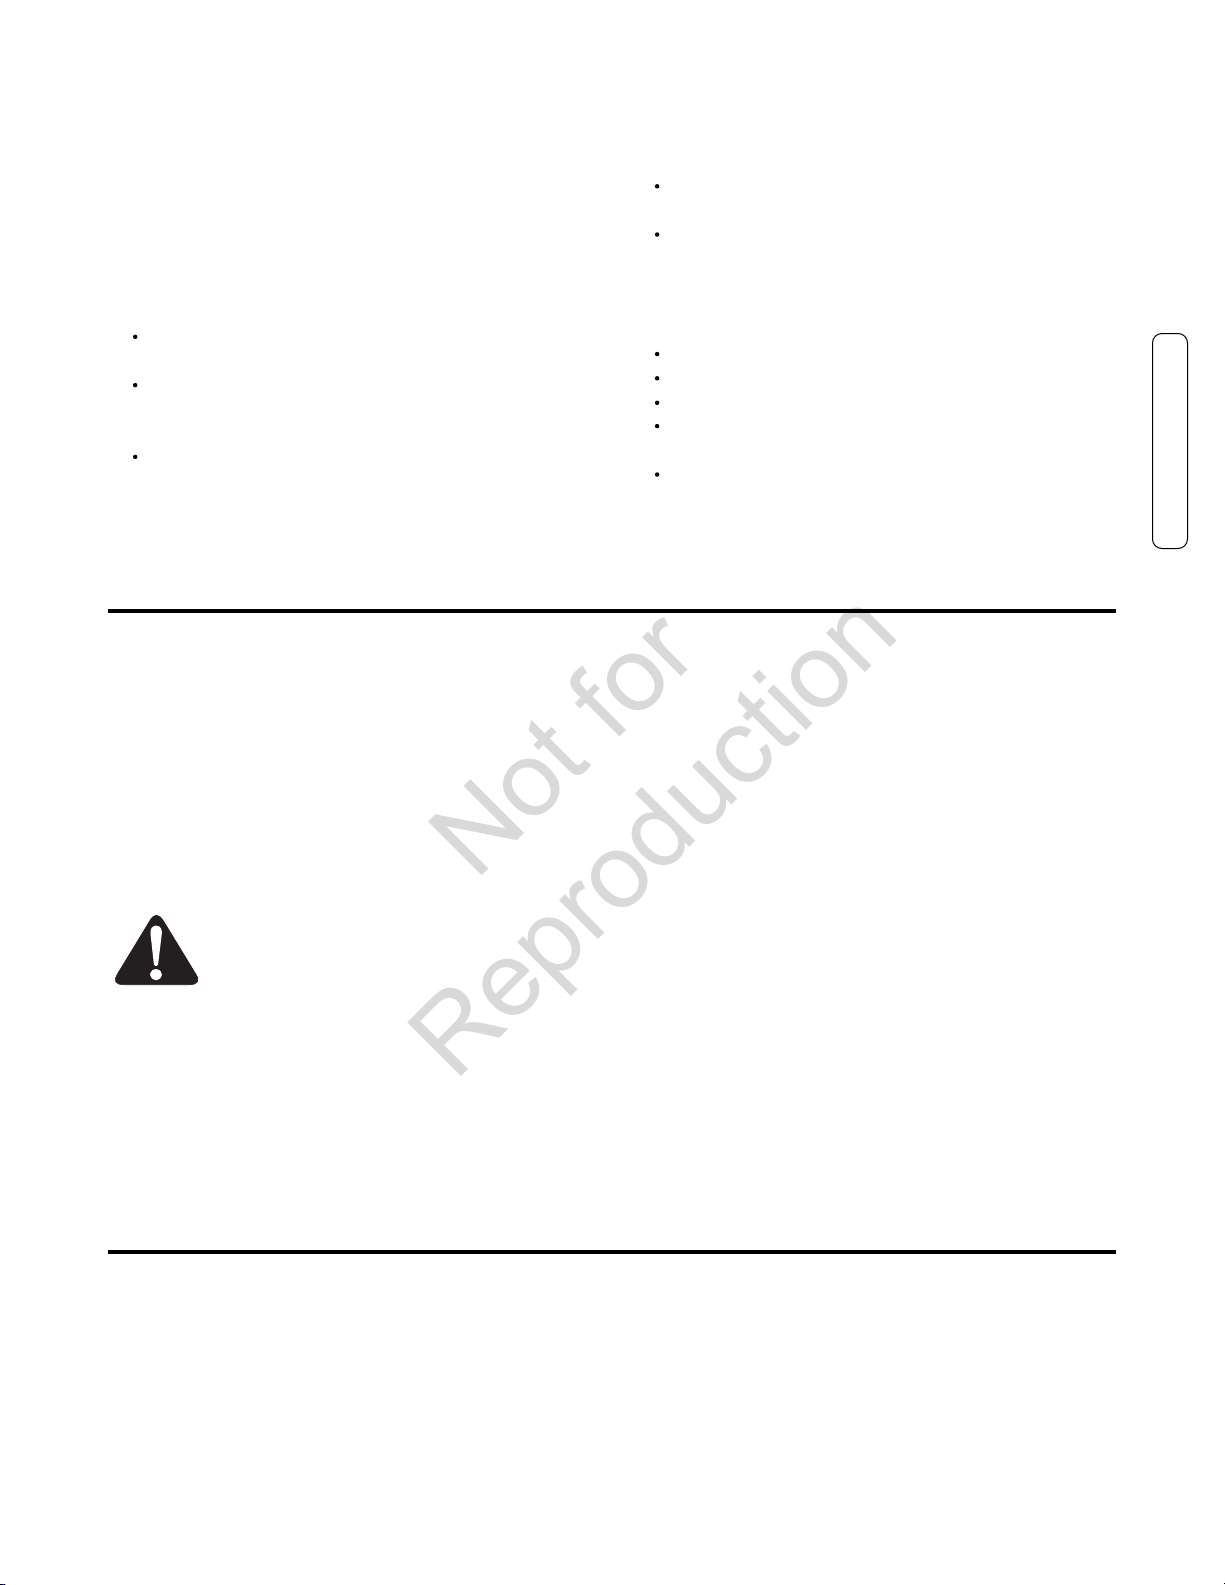
1. Raise the mulcher cover (A, Figure 8).
2. Slide the two tabs (B) on the side deflector (C) under
the pivot pin.
3. Lower the side deflector. Make sure the locking tab (A,
Preparation
Figure 9) goes through the slot in the side deflector.
4. Lower the mulcher cover (A, Figure 10).
5. Attach the wire to the spark plug.
A
Figure 9: Side discharge deflector locking tabs
C
Figure 8: Installing the side discharge deflector
B
A
A
Figure 10: Releasing the mulcher cover
www.snapper.com8
Page 11
Preparation (Continued)
Not for
Reproduction
Mulching Tips
Mulching finely cuts the grass so that the grass can be easily
recycled. Because the nutrients are returned to the soil, the
lawn will need less fertilizer. To correctly mulch the lawn,
follow the tips below.
The grass must be dry. If the grass is wet, it will be
difficult to cut and cause heavy clumps of grass.
The grass must not be too tall. The maximum height to
effectively cut is 4 1/2 inches. Set the height adjusters
so that only the top third of the grass is cut.
If the grass is more than 4 1/2 inches high, two
mowings will be necessary. For the first mowing, set the
height adjusters in the highest position. Then, lower the
height adjusters for the second mowing.
Preparing the Engine
ENGINE DOES NOT CONTAIN OIL OR GASOLINE
Using the bottle of oil supplied in the carton, fill the engine
with the proper amount of oil. See the engine manufacturer’s
instructions for the type of gasoline and oil to use. Before
you use the unit, read the information on safety, operation,
maintenance, and storage.
WARNING: Follow the engine manufacturer’s
instructions for the type of gasoline and oil to
use. Always use a safety gasoline container.
Do not smoke when adding gasoline to the
engine. When inside an enclosure, do not
fill with gasoline. Before you add gasoline,
stop the engine. Let the engine cool for
several minutes.
Keep a sharp edge on the blade. A blade that is not
sharp will cause the ends of the grass to become brown.
Clean the underside of the mower housing. Grass and
other debris can keep the mower from working
correctly.
If the quality of cut is marginal, try the following:
Set the height adjusters at a higher cutting height.
Cut the grass more frequently.
Operate the mower at a slower ground speed.
Overlap the cutting swaths instead of cutting a full
swath with each pass.
Mow across the marginal areas a second time.
IMPORTANT: This unit is equipped with an internal
combustion engine and must not be used on or near any
unimproved forest-covered, brush-covered or grass-covered
and unless the engine’s exhaust system is equipped with a
spark arrester meeting applicable local or state laws (if any).
If a spark arrester is used, it must be maintained in effective
working order by the operator.
In the State of California the above is required by law
(Section 4442 of the California Public Resources Code).
Other states may have similar laws. Federal laws apply on
federal lands. See an Authorized Service Center for a spark
arrester for the muffler.
Note: Actual sustained engine power will likely be lower due
to operating limitations and environmental factors.
Preparation
Note: The operation of a new engine will sometimes result in
a slight amount of smoke. This smoke is caused by paint or
oil on or around the muffler. This is normal and only
expected during initial operation.
Final Preparation
Before you use the mower, check the assembly of the
wheels, the handle, and the controls. Make sure all the
fasteners are tight. Make sure the throttle control (if
equipped) and the engine stop lever work correctly.
If the mower is equipped with height adjusters, make sure
the height adjusters function properly. Before starting the
engine, make sure each height adjuster is set at the desired
height. See “Adjusting The Height Of Cut” in the Maintenance
sections.
9
Page 12
Operation
Not for
Reproduction
Engine Stop Lever
Release the engine stop lever (A, Figure 11) and the engine
and the blade will automatically stop. To run the engine, hold
the engine stop lever in the Operating position (B).
Before you start the engine, operate the engine stop lever
several times. Make sure the cable moves easily.
B
A
Operation
Figure 11: Operating the engine stop lever
WARNING: For safe operation, the drive
system must immediately disengage when the
drive lever is released. If the drive system
does not disengage correctly, do not operate
the mower until the drive system is adjusted
or repaired by an authorized service center.
A
Figure 12: Operating the front wheel drive system
Stopping the Engine
Front Wheel Drive System
(Self-Propelled Units Only)
The mower has a front wheel drive system. Operate the drive
system as follows.
1. Hold the engine stop lever (A, Figure 11) in the
Operating Position (B).
2. Models SP2265 & NSP2265: Pull the drive lever (A,
Figure 12) completely back. The drive system is now
engaged.
Models SPV22675HW & NSPV22675HW: Slowly pull
the drive lever back. The drive system is now engaged.
To increase ground speed, slowly pull the drive lever farther back. To decrease ground speed, slowly release the
drive lever.
3. To disengage the drive system and stop the engine,
completely release the engine stop lever.
4. To disengage only the drive system, release the drive
lever. The drive system will disengage but the engine
will continue to run.
Note: When the drive system is disengaged on a new unit, it
is possible for the front wheels to rotate if lifted off the
ground. This is normal and will stop after one or two hours
of operation.
To stop the engine, release the engine stop lever. Disconnect
the wire from the spark plug to prevent the engine from
starting.
If the engine will not stop, hold a screwdriver against the
spark plug and against the engine cooling fins. The spark will
go to ground and the engine will stop. Before you start the
engine, check the engine stop cable. Make sure the engine
stop cable is assembled correctly. Before you operate the
unit, replace a bent or damaged engine stop cable.
www.snapper.com10
Page 13
Operation (Continued)
Not for
Reproduction
Starting the Engine
WARNING: The blade will rotate
when the engine runs.
IMPORTANT: Before you start the engine, operate the engine
stop lever several times. Make sure the engine stop cable
moves freely.
Note: The engine design does not include a throttle control
or an engine speed adjustment. The engine is set at the best
speed for cutting grass, bagging grass, and for extended
engine life.
1. Check the oil.
2. Fill the fuel tank with regular unleaded gasoline. Make
sure the gasoline is clean. Leaded gasoline will increase
deposits and shorten the life of the valves.
Note: Do not use gasohol or methanol. Do not use premium
unleaded gasoline.
WARNING: Always use a safety gasoline
container. Do not smoke when adding gasoline
to the fuel tank. When inside an enclosure, do
not add gasoline. Before you add gasoline,
stop the engine and let the engine cool for
several minutes.
3. Make sure the spark plug wire is connected to the spark
plug.
4.
Self-Propelled Models Only
is in the disengaged position.
WARNING: To prevent an accident, make sure
the drive lever is in the DISENGAGED position.
When the drive lever is in the ENGAGED
position, do not start the engine.
- Make sure the drive lever
A
Figure 13: The engine primer button
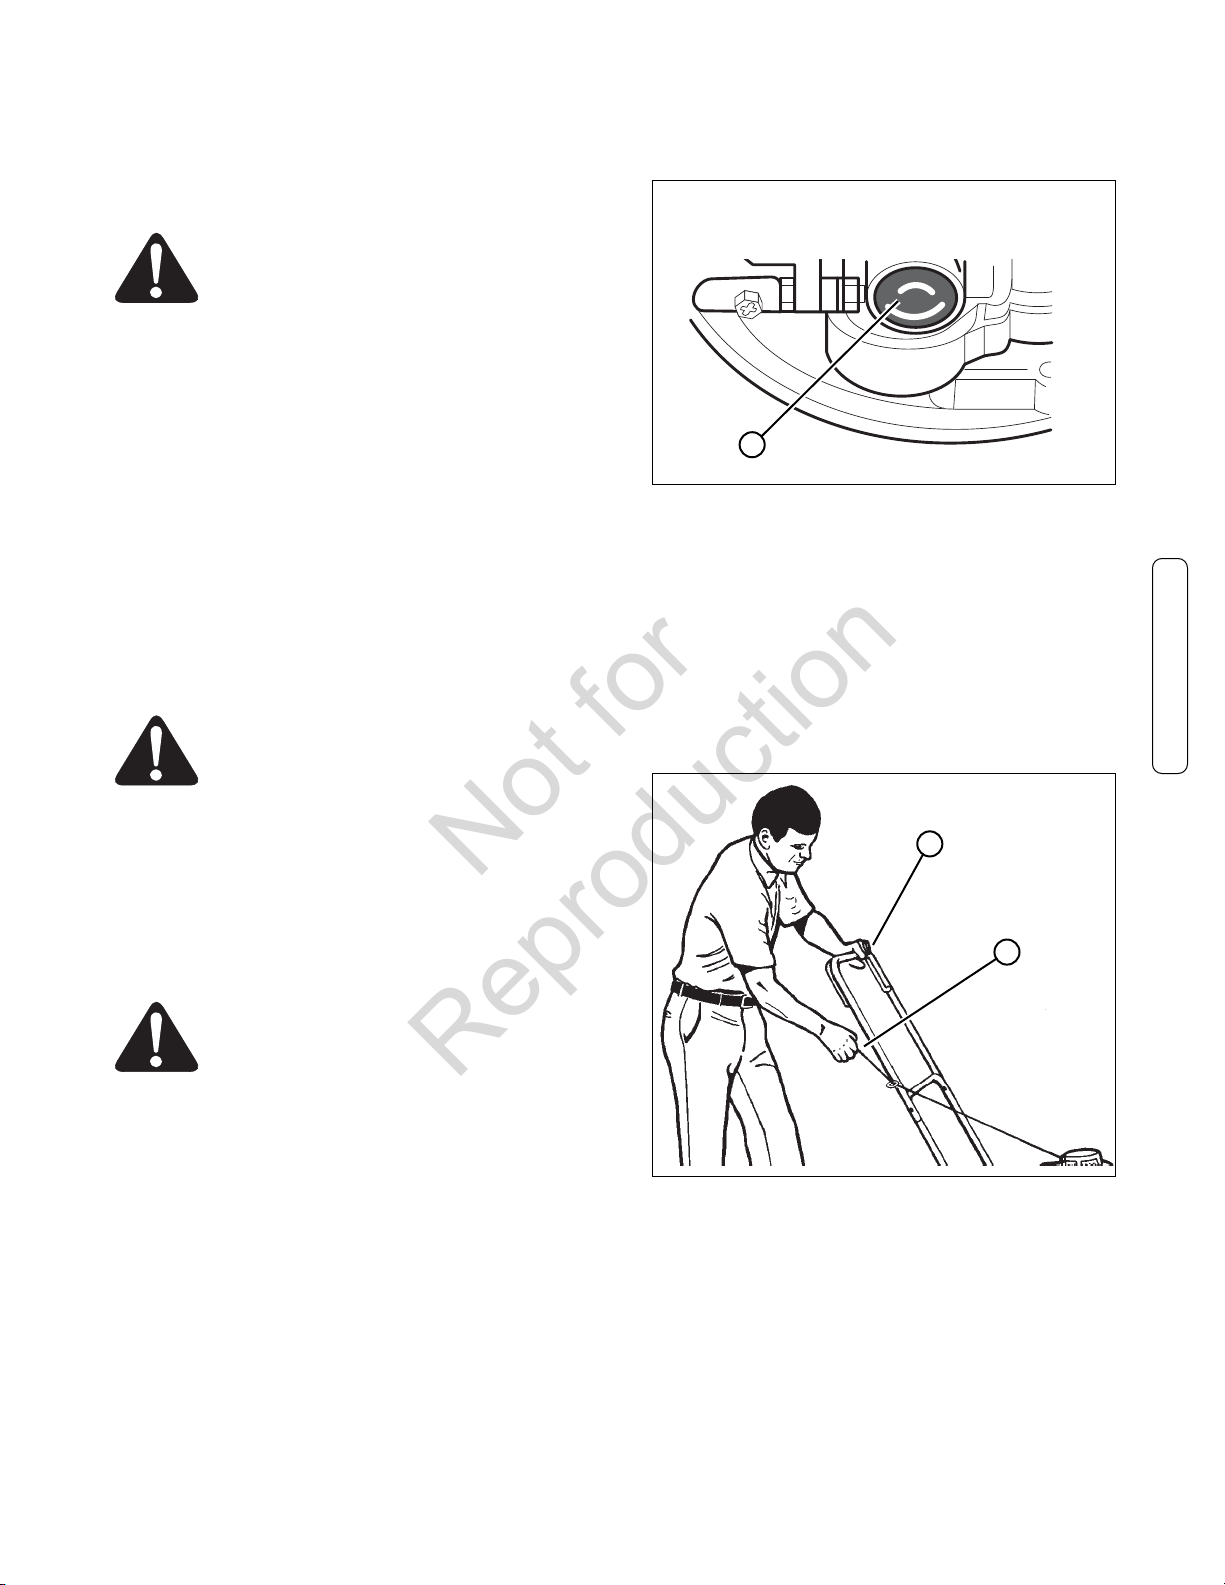
6. Stand behind the mower. Use one hand to hold the
engine stop lever in the operating position (A, Figure
14). Use the other hand to hold the recoil-start grip (B).
7. Make sure the recoil-start rope is not obstructed or
caught between the upper and lower handles. Rapidly
pull the recoil-start grip. Slowly return the recoil-start
grip.
8. If the engine does not start in 5 or 6 tries, see the
“Problem and Repair” Instructions.
A
B
Operation
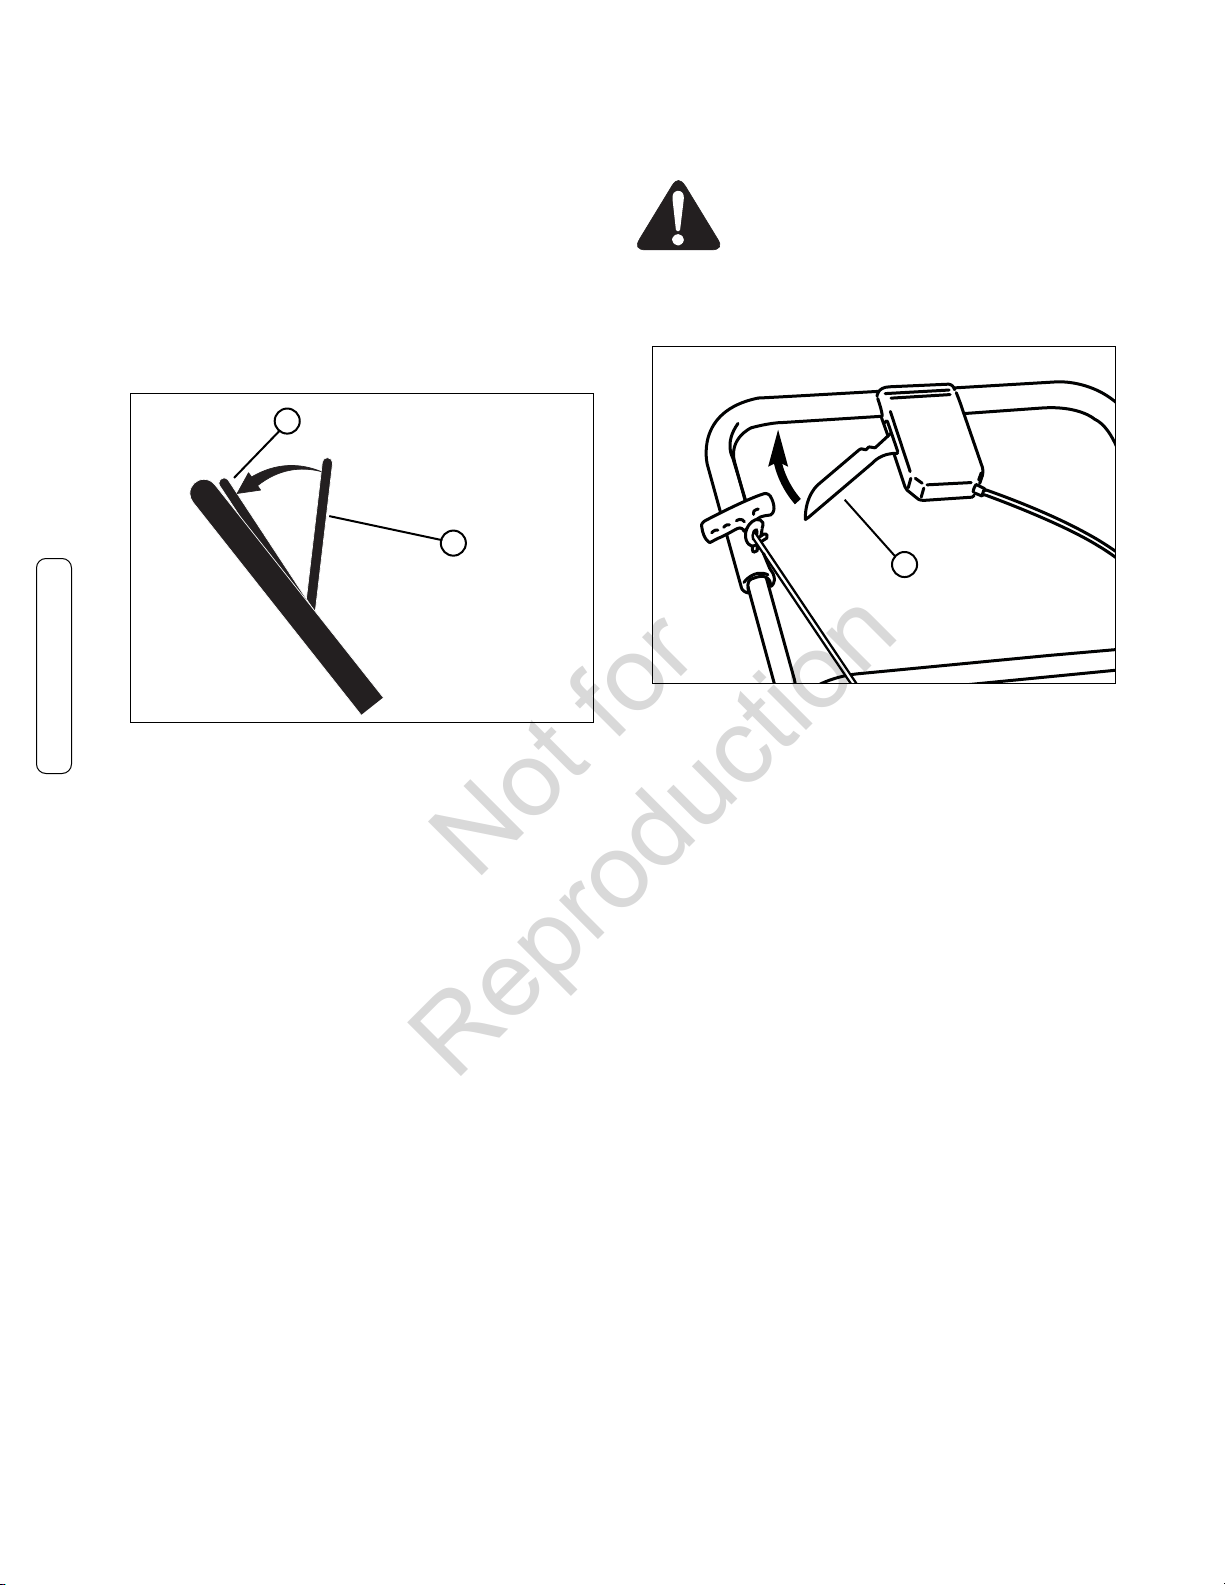
5. The primer button (A, Figure 13) is on the side of the
engine. Push the primer button. Every time you push the
primer button, wait two seconds. For the number of
times required to push the primer button, see the engine
manufacturer’s instructions.
Note: Do not use the primer button to start a warm engine.
Note: Models equipped with Ready Start TMengines do not
feature a primer button. See the engine manufacturer’s
instructions for further information.
Figure 14: Starting the engine
Rules for Safe and Effective Operation
Refer to the ‘Operator Safety’ section of this manual for
important rules concerning safe and effective mower
operation.
11
Page 14
Maintenance
Not for
Reproduction
Engine Maintenance
Use the following maintenance section to keep your unit in
good operating condition. All the maintenance information
for the engine is in the “Engine Instruction Book”. Before you
start the engine, read this book.
WARNING: Before you make an inspection,
adjustment (except carburetor), or repair, stop
the engine and disconnect the wire from the
spark plug.
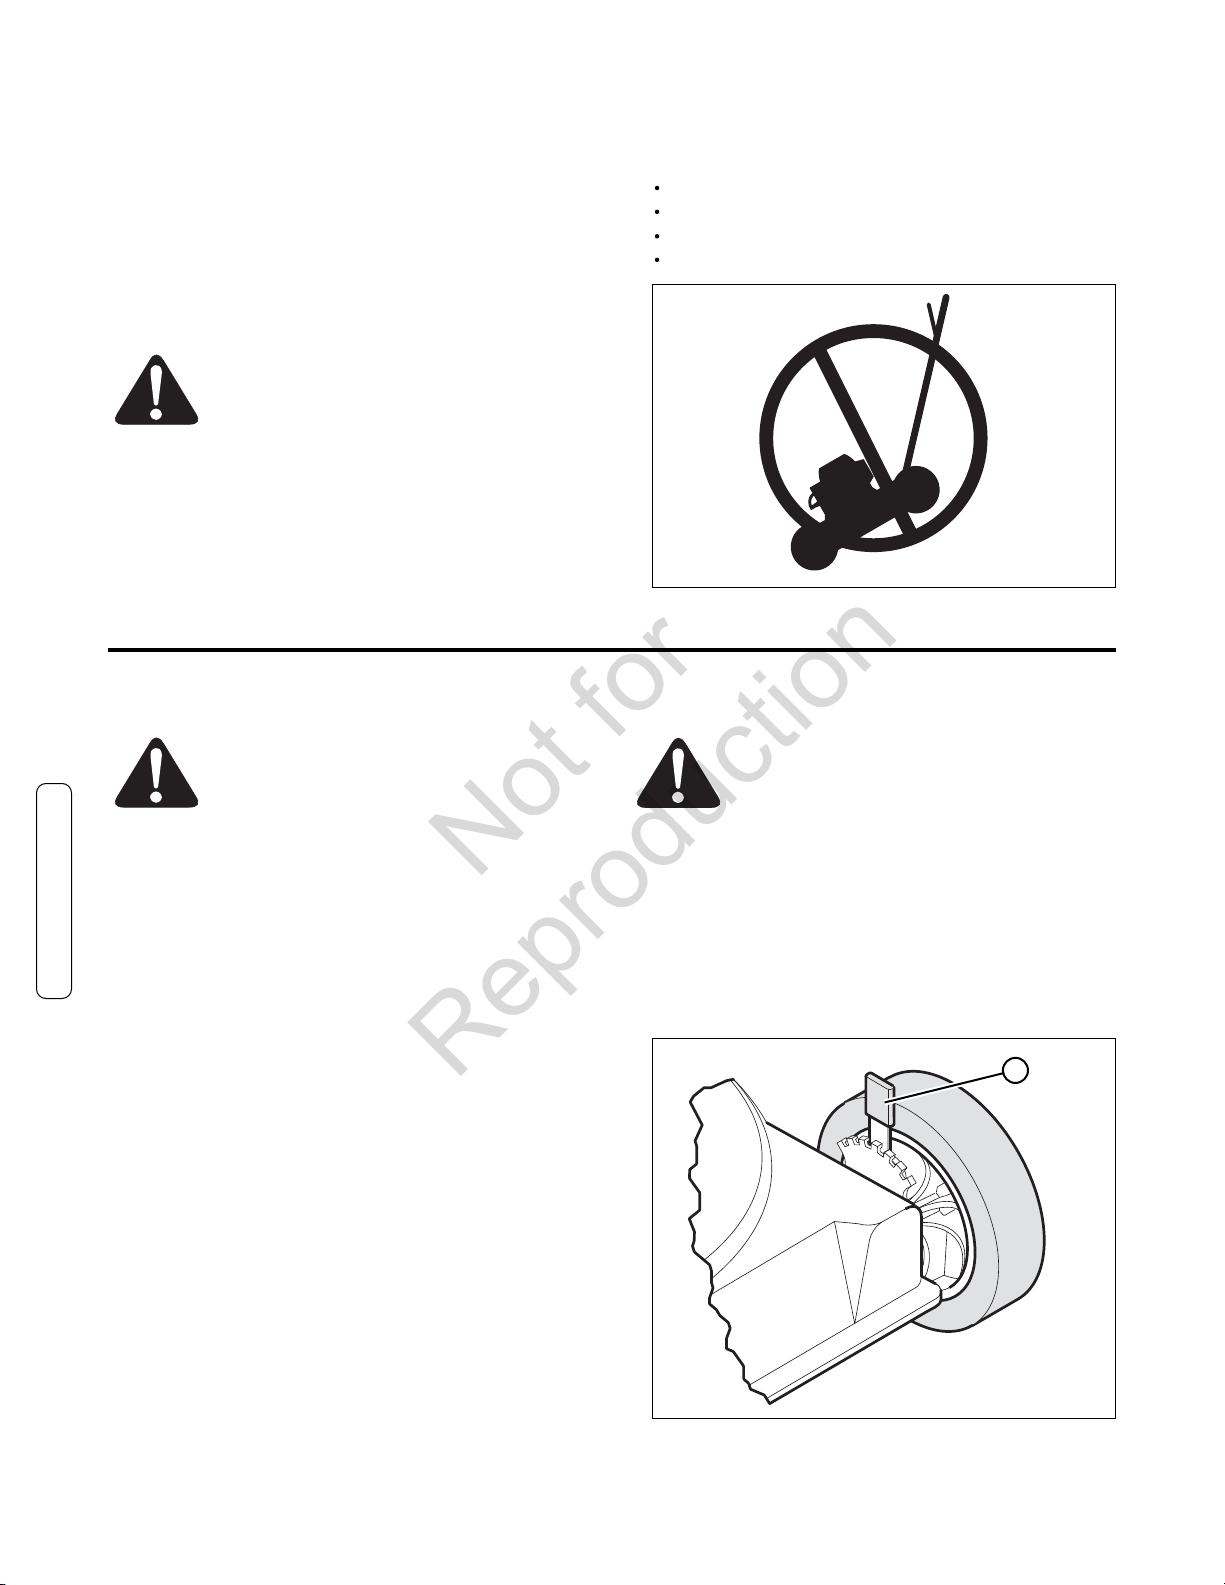
Engine Tipping
When you service the engine, inspect the blade, or clean the
underside of the mower housing; make sure to always tip the
engine with the spark plug up (Figure 15). Transporting or
tipping the engine with the spark plug down will cause:
Cleaning the Mower Housing
WARNING: The blade will rotate when the
engine runs. Before you clean the mower
housing, stop the engine and disconnect the
wire from the spark plug.
Hard starting.
Engine smoking.
Spark plug fouling.
Oil or gas saturation of the air filter.
Figure 15: No forward engine tipping
Adjusting the Height of Cut
WARNING: The blade will rotate when the
engine runs. Before you change the height of
cut, stop the engine and disconnect the wire
from the spark plug.
Grass and other debris can keep the mower from working
correctly. After you mow, clean the mower housing as
follows.
Maintenance
1. Stop the engine.
2. Disconnect the wire from the spark plug.
3. Clean dirt and debris from the top and the bottom of the
mower housing. Clean with soap and water. Wipe off
excess water before storage.
Lubrication
1. For maximum performance, lubricate the wheels and all
pivot points with engine oil every 25 hours.
2. To lubricate the engine, refer to the “Engine Instruction
Book”.
Note: Do not lubricate the engine stop cable. Lubricants will
damage the cable and prevent the cable from moving freely.
Replace the cable if bent or damaged.
To change the height of cut, move the position of the
adjuster arm at each wheel (A, Figure 16). Make sure each
adjuster arm is in the same position so that the mower will
cut level.
1. Disengage the adjuster arm.
2. Move the adjuster arm to another position.
A
Figure 16: Adjusting the height of cut
www.snapper.com12
Page 15
Maintenance (Continued)
Not for
Reproduction
Removing the Drive Belt
(Self-Propelled Units Only)
WARNING: Before you remove the belt,
disconnect the wire from the spark plug.
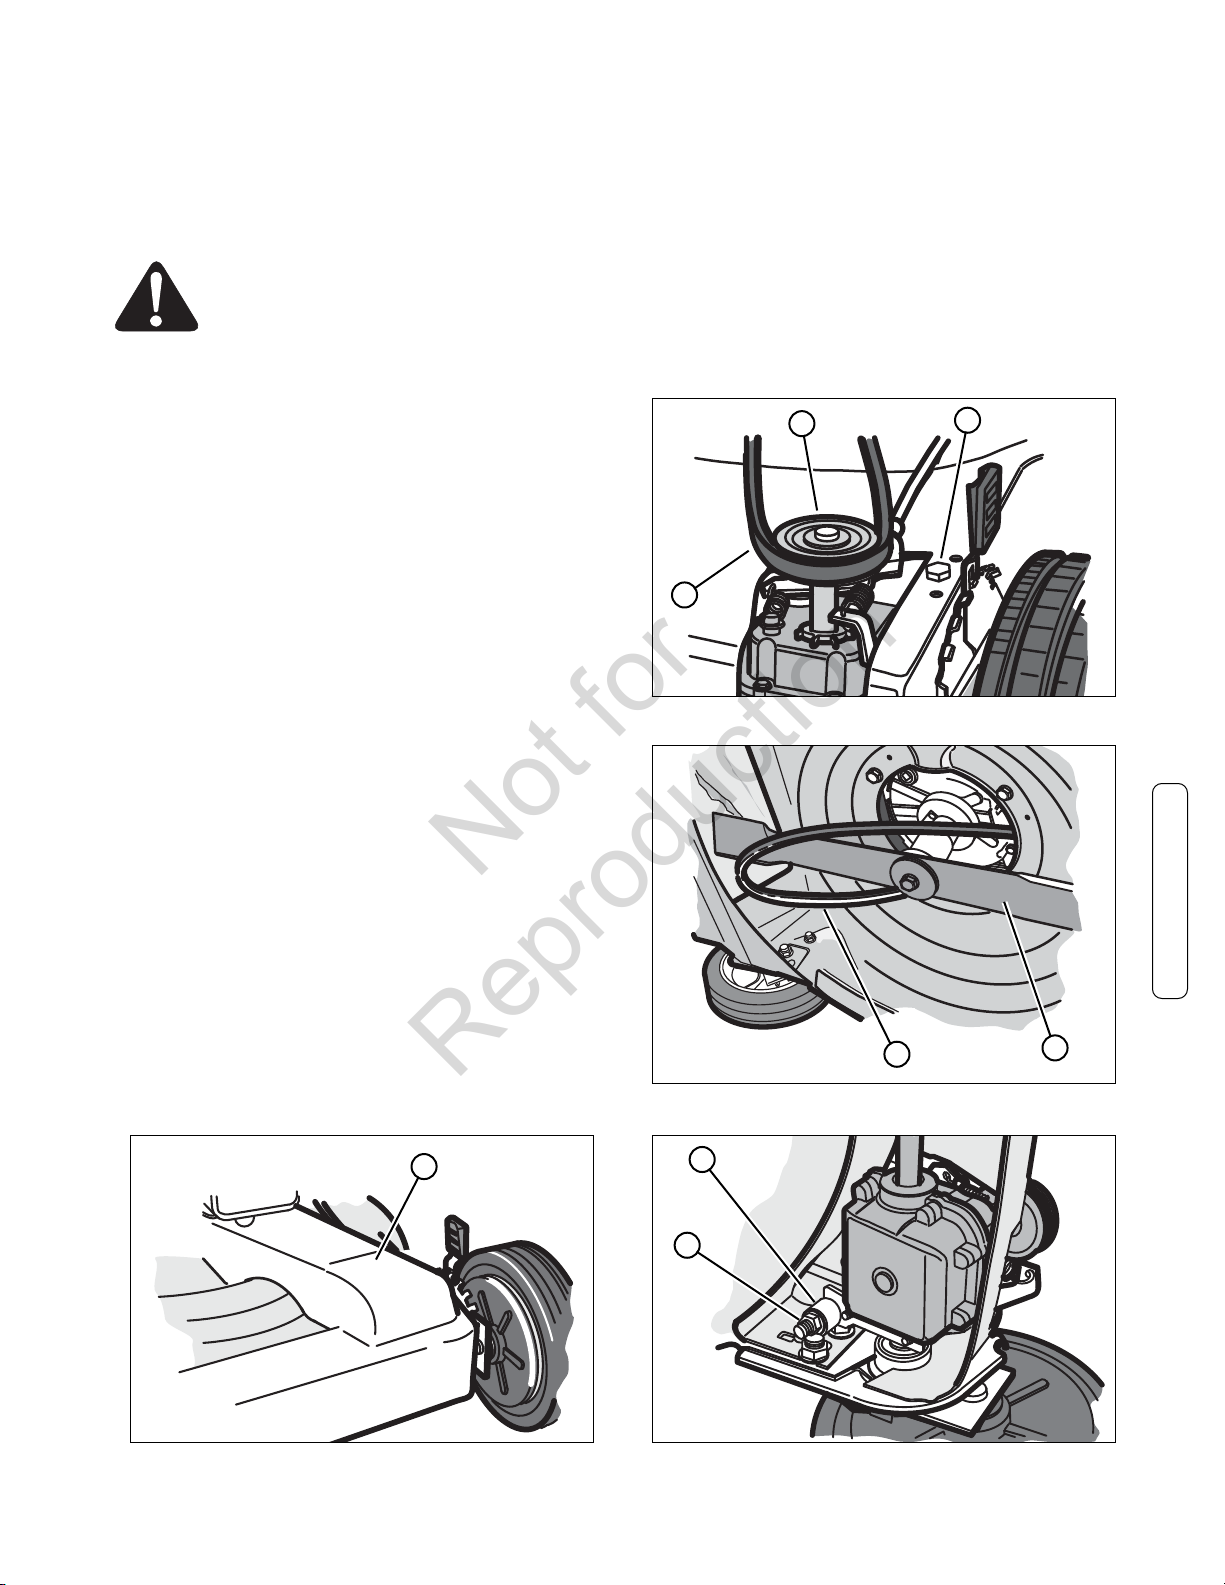
1. Remove the screws that secure the belt cover (A, Figure
17). Remove the belt cover.
Note: The screws that secure the belt cover are located
beneath the deck.
2. To remove the drive belt, tip the mower up. See “Engine
Tipping” in the Maintenance section.
3. (SP2265 & NSP2265 Only): Loosen the belt tension bolt
(A, Figure 18).
Note: Models SPV22675HW & NSPV22675HW have a belt
guide on the transmission that must be removed prior to belt
removal. Be sure to replace after belt installation.
4. Remove the front of the drive belt (B) from the transmission pulley (C).
5. To remove the rear of the drive belt (A, Figure 19), slip
the drive belt over the end of the blade (B).
Note: Models SPV22675HW & NSPV22675HW have belt
guides around the engine pulley that must be removed prior
to belt removal. Be sure to replace after belt installation.
b. Then, loosen the adjuster nut only enough to allow
the spacer to turn. The tension on the drive belt is now
correct.
8. Install the belt cover.
9. Before you begin to mow, make sure the drive system
will correctly disengage and that the mower will stop. If
the drive system will not disengage, take the mower to
an authorized service center before you operate the
mower.
C
B
Figure 18: Loosening the belt tension bolt
A
Maintenance
Note: Make sure you replace the drive belt only with a
replacement belt from the factory.
6. To assemble the drive belt, reverse the above steps.
7. (SP2265 & NSP2265 Only): Set the belt tension.
a. Tighten the adjuster nut (A, Figure 20) until the nut
touches the spacer (B). Try to turn the spacer. When the
adjuster nut touches the spacer, the spacer will not turn.
A
Figure 17: Removing the belt cover
A
Figure 19: Removing the belt
B
A
Figure 20: Setting the belt tension
B
13
Page 16

Maintenance (Continued)
Not for
Reproduction
Adjusting the Drive Cable
(Self-Propelled Units Only)
WARNING: Before you adjust the drive cable,
release the engine stop lever and wait for the
engine to stop.
If the drive system does not engage and disengage correctly,
check the handle for correct assembly. Make sure that all
parts are in good condition, not broken or bent, and that all
fasteners are tight.
Worn parts and cable stretch will change the performance of
the drive system. When you mow in high or thick grass or
on hills, the drive system can slip. If the drive system is
slipping, adjust as follows or take the mower to an
authorized service center.
IMPORTANT: Before you start the engine, operate the engine
stop lever several times. Make sure the engine stop cable
moves freely.
Note: The engine design does not include a throttle control
or an engine speed adjustment. The engine is set at the best
speed for cutting grass, bagging grass, and for extended
engine life.
1. If the drive system is slipping, loosen the jam nut (B,
Figure 21) on the adjustment turnbuckle (A), and rotate
the ferrule (C) one-half turn in the direction shown. Test
the drive system and check for slippage.
2. If the drive system still slips, adjust again. Again, test
the drive system.
3. Repeat the adjustment and test until the drive system
does not slip.
4. Before you begin to mow, make sure the drive system
will correctly disengage and that the mower will stop. If
the drive system will not disengage, take the mower to
an authorized service center before you operate the
mower.
Maintenance
B
A
C
Figure 21: Adjusting the drive cable
www.snapper.com14
Page 17

Maintenance (Continued)
Not for
Reproduction
Blade Service
WARNING: Before you inspect the blade or the
blade adapter, disconnect the wire to the spark
plug. If the blade hits an object, stop the
engine. Disconnect the wire to the spark plug.
Check the unit for damage.
A
Frequently check the blade for wear or damage such as
cracks. Frequently check the bolt that holds the blade. Keep
the bolt tight. If the blade hits an object, stop the engine.
Disconnect the wire to the spark plug. Check the blade
adapter (A, Figure 22) for damage. Check for a bent or
damaged blade, a badly worn blade, or other damage. Before
you operate the unit, damaged parts must be replaced with
factory replacement parts. For safety, replace the blade every
two years. Keep a sharp edge on the blade. A blade that is
not sharp will cause the ends of the grass to become brown.
Remove the blade as follows.
Removing the Blade
WARNING: Before you remove the blade,
disconnect the wire to the spark plug. The
blade has sharp edges. When you hold the
blade, use gloves or cloth material to protect
your hands.
1. Drain the fuel tank.
2. Lift the side of the mower that has the muffler or spark
plug.
3. Use a piece of wood to keep the blade from rotating.
4. Remove the bolt (B, Figure 22) that holds the blade
with a 9/16” (14mm) wrench.
5. Check the blade (C) according to the “Blade Service”
instructions. Replace a badly worn or damaged blade
with a factory replacement blade.
6. Mount the blade with the curved edges toward the
housing. If the blade is upside down, the blade will not
cut correctly and can cause an accident.
7. Fasten the blade with the original washer (D) and bolt.
Make sure the outside rim of the Belleville washer is
toward the blade.
8. Tighten the bolt that holds the blade to a torque of 30
foot pounds.
WARNING: Always keep the bolt that holds the
blade tight. A loose bolt or blade can cause an
accident.
C
D
A
D
Figure 22: Removing the blade
B
B
C
Sharpening the Blade
WARNING: Vibration is the result if the blade
is not correctly balanced. A blade that is
damaged with cracks can break and cause
an accident.
1. Sharpen the blade two times a year or every 25 hours.
2. If the blade is on the unit, do not sharpen. Remove the
blade according to the instructions in “Removing The
Blade”.
3. Clean the blade with a brush, soap, and water. Check the
blade. Look for cracks, nicks, or other damage. Replace
a blade that is badly worn, bent, or damaged with a
factory replacement blade.
4. Sharpen the blade (A, Figure 23, next page) with a file
(B). Make sure you keep the original beveled cutting
edge.
5. Make sure the blade is balanced. Use a screwdriver (C)
and hold the blade parallel to the ground (D) as shown.
A blade that is balanced will stay parallel to the ground.
If the blade is not balanced, the heavy end will rotate
toward the ground. Sharpen the heavy end until the
blade is balanced.
6. A new blade will cut better than a badly worn blade.
Every two years replace the old blade with a factory
replacement blade.
Checking the Level of Cut
Test the unit in a small area. If the height of cut is not level
or if the cut grass is not discharged, the cause can be: (1)
the blade is bent or damaged, (2) the blade is not sharp, (3)
a worn blade, (4) or a broken blade adapter. Before you use
the unit, correct the problem.
15
Maintenance
Page 18

Maintenance (Continued)
Not for
Reproduction
C
D
Figure 23: Sharpening the blade
A
B
Preparing the Mower for Storage
WARNING: Do not remove gasoline while
inside a building, near a fire, or while you
Maintenance
1. Drain the fuel tank.
2. Let the engine run until it is out of gasoline.
3. Drain the oil from the warm engine. Fill the engine
crankcase with new oil.
4. Remove the spark plug from the cylinder. Pour one
ounce of oil into the cylinder. Slowly pull the recoil-start
grip so that the oil will protect the cylinder. Install a new
spark plug in the cylinder.
smoke. Gasoline fumes can cause an
explosion or a fire.
5. Clean the dirt and debris from the cylinder cooling fins
and the engine housing.
6. Clean the bottom of the mower housing.
7. Make sure the grass bag is empty of grass. Grass
remaining in the bag during storage will damage the
bag.
8. Completely clean the mower to protect the paint.
9. Fold the handles (if desired).
CAUTION: Be careful when you fold or raise the handle. Do
not damage the cables. A cable that is bent will not work
correctly. Before you use the unit, replace a bent or damaged
cable.
10. Put the unit in a building that has good ventilation.
www.snapper.com16
Page 19

Troubleshooting
Not for
Reproduction
The engine will not start.
1. Make sure the fuel tank is filled with clean gasoline. Do not use old gasoline.
2. On a cold engine, push the primer button (optional on some models). For the number of times required to push the
primer button, see the engine manufacturer’s instructions.
3. Make sure the wire for the spark plug is connected to the spark plug.
4. Adjust the Carburetor. Refer to the engine manual.
5. There is too much gasoline in the engine cylinder. Remove and dry the spark plug. Pull the recoil-start grip several times.
Install the spark plug. Connect the wire to the spark plug. Start the engine.
6. The engine is difficult to start in heavy or high grass. Move the mower to a clean dry surface.
7. Make sure the engine stop lever is in the operating position.
8. Make sure the fuel valve is in the ON position. Refer to the engine manual.
The engine will not stop.
1. Release the engine stop lever.
2. Check the engine stop cable. Replace the cable if bent or damaged.
Engine performance is bad.
1. Check the height of cut settings. Raise the height of cut if the grass is high.
2. Check the bottom of the blade housing. Clean the blade housing of grass and other debris.
3. Check the wire to the spark plug. Make sure the wire is connected.
4. Clean the engine cooling fins of grass and other debris.
5. Check the carburetor adjustments. Refer to the engine manual.
6. Check the spark plug gap. Set the spark plug gap at 0.030”.
7. Check the amount of oil in the engine. Fill with oil if necessary.
8. Check the engine air cleaner. Refer to the engine manual.
9. The gasoline is bad. Drain and clean the fuel tank. Fill the fuel tank with clean gasoline.
Excessive vibration.
1. Remove the blade. Check the blade and balance if necessary. See the blade maintenance instructions.
2. Check for a bent or broken blade. A damaged blade is dangerous and must be replaced.
3. Check the blade adapter. Replace a broken blade adapter.
4. If the vibration continues, take the mower to an Authorized Service Center.
The grass will not discharge correctly.
1. Clean the bottom of the mower housing.
2. Check for a badly worn blade. Remove and sharpen the blade. For safety, replace the blade every two years with a factory
replacement blade.
The grass is not cut even.
1. Check the height adjustment at each wheel. The height adjustment must be the same for each wheel.
2. Make sure the blade is sharp.
3. Check for a bent or broken blade. A damaged blade is dangerous and must be replaced.
4. Check for a broken blade adapter. Replace a broken blade adapter.
Troubleshooting
17
Page 20

2 YEAR LIMITED WARRANTY
Not for
Reproduction
For two (2) years from purchase date for the original purchaser’s residential, non-commercial use, SNAPPER, through any
authorized SNAPPER dealer will replace, free of charge (except for taxes where applicable), any part or parts found upon
examination by the factory at McDonough, Georgia, to be defective in material or workmanship or both.
For ninety (90) days from purchase date for the original purchaser’s commercial, rental, or other non-residential use, SNAPPER, through any authorized SNAPPER dealer will replace, free of charge, any part or parts found upon examination by the
factory at McDonough, Georgia, to be defective in material or workmanship or both.
All transportation costs incurred by the purchaser in submitting material to an authorized SNAPPER dealer for replacement
under this warranty must be paid by the purchaser.
This warranty does not apply to certain transmissions, to engines and their components, and batteries, as these items are warranted separately. This warranty does not apply to parts that have been damaged by accident, alteration, abuse, improper
lubrication, normal wear, or other cause beyond the control of SNAPPER. This warranty does not cover any machine or component part that has been altered or modified changing safety, performance, or durability.
Batteries have a one (1) year warranty period with free replacement if required for one (1) year from the original purchase
date. SNAPPER will not be responsible for any installation cost incurred. The battery warranty only covers original equipment
batteries and does not cover damage to the battery or machine caused by neglect or abuse, destruction by fire, explosion,
freezing, overcharging, improper maintenance, or use of improper electrolyte.
There is no other express warranty.
DISCLAIMER OF WARRANTY
Implied warranties, including those of merchantability and fitness for a particular purpose, are limited to two (2) years
from purchase date for the original purchaser’s residential or other non-commercial use, and ninety (90) days from purchase for the original purchaser’s commercial, rental or other non-residential use, and to the extent permitted by law, any
and all implied warranties are excluded. This is the exclusive remedy. Liabilities for consequential damages, under any
and all warranties are excluded.
Some states do not allow limitations on how long an implied warranty lasts, or do not allow the exclusion or limitation of
incidental or consequential damages, so the above limitation or exclusion may not apply to you.
This warranty gives you specific legal rights, and you may also have other rights which vary from state to state.
WARNING: THE USE OF REPLACEMENT PARTS OTHER THAN GENUINE SNAPPER PARTS MAY IMPAIR THE SAFETY OF
SNAPPER PRODUCTS AND WILL VOID ANY LIABILITY AND WARRANTY BY SNAPPER ASSOCIATED WITH THE USE OF
SUCH PARTS.
IMPORTANT: Please fill out the attached SNAPPER Product Registration Card immediately and mail to:
Snapper’s Product Registration Center, P.O. Box 1379, McDonough, Georgia 30253
Warranties
www.snapper.com18
Page 21

Slope Guide
Not for
Reproduction
19
Page 22

Notes
Not for
Reproduction
www.snapper.com20
Page 23

Notes
Not for
Reproduction
21
Page 24

22” WALK BEHIND
Not for
Reproduction
MOWERS
Product Specifications
Deck Size
Height of Cut
Transmission Type
(Self-Propelled Units Only)
Ground Speed
(Self-Propelled Units Only)
Engine Power
Engine Displacement
Fuel Tank Capacity
(in)
(in)
(mph)
(ft lbs)
(qt)
(cc)
S2265 /
NS2265
22 22 22
1.5 - 3.5 1.5 -3.5 1.5 - 3.5
N/A Single Speed/Gear Variable Speed/Gear
N/A 2.3 0 - 4.2
6.50 6.50 6.75
190 190 190
1.6 1.6 1.6
SP2265 /
NSP2265
SPV22675HW /
NSPV22675HW
Common Service Parts Part Number
Blade Control Cable
Wheel Drive Cable
Wheel Drive Cable
Cutter Blade
Drive Belt
Drive Belt
(SP2265 & NSP2265 Only)
(SPV22675HW & NSPV22675HW Only)
(All)
(SP2265 & NSP2265 Only)
(SPV22675HW & NSPV22675HW Only)
(All)
7101395
7101401
7101396
7100851
7101193
7100913
Engine Power Rating Information: The gross power rating for individual gas engine models is labeled in accordance with SAE
(Society of Automotive Engineers) code J1940 (Small Engine Power & Torque Rating Procedure), and rating performance has
been obtained and corrected in accordance with SAE J1995 (Revision 2002-05). Torque values are derived at 3060 RPM;
horsepower values are derived at 3600 RPM. Actual gross engine power will be lower and is affected by, among other things,
ambient operating conditions and engine-to-engine variability. Given both the wide array of products on which engines are
placed and the variety of environmental issues applicable to operating the equipment, the gas engine will not develop the rated
gross power when used in a given piece of power equipment (actual "on-site" or net horsepower). This difference is due to a
variety of factors including, but not limited to, accessories (air cleaner, exhaust, charging, cooling, carburetor, fuel pump, etc.),
application limitations, ambient operating conditions (temperature, humidity, altitude), and engine-to-engine variability. Due to
manufacturing and capacity limitations, Briggs & Stratton may substitute an engine of higher rated power for this Series
engine.
Snapper Products
535 Macon Street
22
McDonough, GA 30253
1-800-317-7833
www.snapper.com
Page 25

Instrucciones de seguridad y Manual del operador de las
Not for
Reproduction
CORTADORAS DE CÉSPED CON
CONDUCTOR A PIE SNAPPER
DE 55.9 cm (22")
Modelos
S2265 (7800189)
SP2265 (7800165)
SPV22675HW (7800190)
NS2265 (7800228)
NSP2265 (7800229)
NSPV22675HW (7800230)
®
NOTA: las especificaciones son correctas a la fecha de impresión, y están sujetas a cambios sin aviso previo.
* La potencia sostenida real del motor será probablemente menor, debido a limitaciones operativas y factores ambientales. Para obtener más detalles, consulte
'Información sobre especificación de potencia del motor'.
Manual No. 7102320 (I.R. 1/15/2008)
TP 125-5333-IR-WB-N
Page 26

Gracias por comprar este producto de calidad Snapper. Nos complace que haya puesto su confianza en la marca
Not for
Reproduction
Snapper. Cuando se maneja y mantiene de acuerdo a las instrucciones que aparecen en este manual, su producto
Snapper brindará muchos años de servicio seguro.
Este manual contiene información sobre la seguridad para que esté enterado de los peligros y riesgos asociados
con la máquina y cómo evitarlos. Esta máquina está diseñada y destinada solamente para el corte de acabado de
los céspedes establecidos y para ningún otro fin. Es importantee que lea detenidamente estas instrucciones antes
de intentar poner en marcha o manejar este equipo. Guarde estas instrucciones para referencia en el futuro.
REGISTRO DEL PRODUCTO
IMPORTANTEE: GUARDE ESTA INFORMACIÓN PARA SU ARCHIVO PERSONAL
(Llene la información siguiente sobre su compra Snapper)
Fecha de compra _ _ _ _ _ _ _ _ _ _ _ _ _ _ _ _ _ _ _ _ _ _ _ _ _ _ _ _ _ _ _ _ _ _ _ _ _ _ _ _ _ _ _ _ _ _ _ _ _ _ _ _ _ _ _ _ _ _ _ _ _ _ _ _ _ _ _ _ _ _ _ _ _ _ _ _ _ _ _ _ _ _ _ _ _ _ _ _ _ _ _ _ _ _ _ _ _ _ _ _ _ _ _ _ _ _ _ _ _ _ _ _ _ _ _ _ _ _ _ _ _ _ _ _ _ _ _ _ _ _ _ _ _ _ _ _ _ _ _ _ _ _ _ _ _ _ _ _ _ _ _ _ _ _ _ _ _ _ _ _ _ _ _ _ _ _ _ _ _ _ _ _ _ _ _ _ _ _ _ _ _ _ _ _ _ _ _ _ _ _ _ _ _ _ _ _ _ _ _ _ _ _ _ _ _ _ _ _ _ _ _ _ _ _ _ _ _ _ _ _ _ _ _ _ _ _ _ _ _ _ _ _ _ _ _ _ _ _ _ _ _ _ _ _ _ _ _ _ _ _ _ _ _ _ _ _ _ _ _ _ _ _ _ _ _ _ _ _ _ _ _ _ _ _ _ _ _ _ _ _ _ _ _ _ _ _ _ _ _ _ _ _ _ _ _ _ _ _ _ _ _ _ _ _ _ _ _ _ _ _ _ _ _ _ _ _ _ _ _ _ _ _ _ _ _ _ _ _ _ _ _ _ _ _ _ _ _ _ _ _ _ _ _ _ _ _ _ _ _ _ _ _ _ _ _ _ _ _ _ _ _ _ _ _ _ _ _ _ _ _ _ _ _ _ _ _ _ _ _ _ _ _ _ _ _ _ _ _ _ _
Concesionario
Número de teléfono del concesionario
Equipo
Motor
Es muy importantee que usted inscriba su compra con Snapper para asegurar la cobertura de garantía.
Envíe su tarjeta de registro del producto a:
Snapper at P.O. Box 777, McDonough, Georgia 30253.
O puede registrar en la red en www.snapper.com.
Puede contactarnos en nuestro sitio web, o si desea hablar con un representante de servicio al cliente, llámenos al Centro de Atención al Cliente Snapper al 1-800-317-7833. Para agilizar el servicio, tenga a mano el
número de serie y de modelo de su máquina.
_ _ _ _ _ _ _ _ _ _ _ _ _ _ _ _ _ _ _ _ _ _ _ _ _ _ _ _ _ _ _ _ _ _ _ _ _ _ _ _ _ _ _ _ _ _ _ _ _ _ _ _ _ _ _ _ _ _ _ _ _ _ _ _ _ _ _ _ _ _ _ _ _ _ _ _ _ _ _ _ _ _ _ _ _ _ _ _ _ _ _ _ _ _ _ _ _ _ _ _ _ _ _ _ _ _ _ _ _ _ _ _ _ _ _ _ _ _ _ _ _ _ _ _ _ _ _ _ _ _ _ _ _ _ _ _ _ _ _ _ _ _ _ _ _ _ _ _ _ _ _ _ _ _ _ _ _ _ _ _ _ _ _ _ _ _ _ _ _ _ _ _ _ _ _ _ _ _ _ _ _ _ _ _ _ _ _ _ _ _ _ _ _ _ _ _ _ _ _ _ _ _ _ _ _ _ _ _ _ _ _ _ _ _ _ _ _ _ _ _ _ _ _ _ _ _ _ _ _ _ _ _ _ _ _ _ _ _ _ _ _ _ _ _ _ _ _ _ _ _ _ _ _ _ _ _ _ _ _ _ _ _ _ _ _ _ _ _ _ _ _ _ _ _ _ _ _ _ _ _ _ _ _ _ _ _ _ _ _ _ _ _ _ _ _ _ _ _ _ _ _ _ _ _ _ _ _ _ _ _ _ _ _ _ _ _ _ _ _ _ _ _ _ _ _ _ _ _ _ _ _ _ _ _ _ _ _ _ _ _ _ _ _ _ _ _ _ _ _ _ _ _ _ _ _ _ _ _ _ _ _ _ _ _ _ _ _ _ _ _ _ _ _ _ _ _ _ _ _ _ _ _ _ _ _ _ _ _ _ _ _ _ _ _ _ _ _ _ _ _ _ _ _ _
_ _ _ _ _ _ _ _ _ _ _ _ _ _ _ _ _ _ _ _ _ _ _ _ _ _ _ _ _ _ _ _ _ _ _ _ _ _ _ _ _ _ _ _ _ _ _ _ _ _ _ _ _ _ _ _ _ _ _ _ _ _ _ _ _ _ _ _ _ _ _ _ _ _ _ _ _ _ _ _ _ _ _ _ _ _ _ _ _ _ _ _ _ _ _ _ _ _ _ _ _ _ _ _ _ _ _ _ _ _ _ _ _ _ _ _ _ _ _ _ _ _ _ _ _ _ _ _ _ _ _ _ _ _ _ _ _ _ _ _ _ _ _ _ _ _ _ _ _ _ _ _ _ _ _ _ _ _ _ _ _ _ _ _ _ _ _ _ _ _ _ _ _ _ _ _ _ _ _ _ _ _ _ _ _ _ _ _ _ _ _ _ _ _ _ _ _ _ _ _ _ _ _ _ _ _ _ _ _ _ _ _ _ _ _ _ _ _ _ _ _ _ _ _ _ _ _ _ _ _ _ _ _ _ _ _ _ _ _ _ _ _ _ _ _ _ _ _ _ _ _ _ _ _ _ _ _ _ _ _ _ _ _ _ _ _ _ _ _ _ _ _ _ _ _ _ _ _ _ _ _ _ _ _ _ _ _ _ _ _ _ _ _ _ _ _
Nº de modelo _ _ _ _ _ _ _ _ _ _ _ _ _ _ _ _ _ _ _ _ _ _ _ _ _ _ _ _ _ _ _ _ _ _ _ _ _ _ _ _ _ _ _ _ _ _ _ _ _ _ _ _ _ _ _ _ _ _ _ _ _ _ _ _ _ _ _ _ _ _ _ _ _ _ _ _ _ _ _ _ _ _ _ _ _ _ _ _ _ _ _ _ _ _ _ _ _ _ _ _ _ _ _ _ _ _ _ _ _ _ _ _ _ _ _ _ _ _ _ _ _ _ _ _ _ _ _ _ _ _ _ _ _ _ _ _ _ _ _ _ _ _ _ _ _ _ _ _ _ _ _ _ _ _ _ _ _ _ _ _ _ _ _ _ _ _ _ _ _ _ _ _ _ _ _ _ _ _ _ _ _ _ _ _ _ _ _ _ _ _ _ _ _ _ _ _ _ _ _ _ _ _ _ _ _ _ _ _ _ _ _ _ _ _ _ _ _ _ _ _ _ _ _ _ _ _ _ _ _ _ _ _ _ _ _ _ _ _ _ _ _ _ _ _ _ _ _ _ _ _ _ _ _ _ _ _ _ _ _ _ _ _ _ _ _ _ _ _ _ _ _ _ _ _ _ _ _ _ _ _ _ _ _ _ _ _ _ _ _ _ _ _ _ _ _ _ _ _ _ _ _ _ _ _ _ _ _ _ _ _ _ _ _ _ _ _ _ _ _ _ _ _ _ _ _ _ _ _ _ _ _ _ _ _ _ _ _ _ _ _ _ _ _ _ _ _ _ _ _ _ _ _ _ _ _ _ _ _ _ _ _ _ _ _ _ _ _ _ _ _ _
Nº de _ _ _ _ _ _ _ _ _ _ _ _ _ _ _ _ _ _ _ _ _ _ _ _ _ _ _ _ _ _ _ _ _ _ _ _ _ _ _ _ _ _ _ _ _ _ _ _ _ _ _ _ _ _ _ _ _ _ _ _ _ _ _ _ _ _ _ _ _ _ _ _ _ _ _ _ _ _ _ _ _ _ _ _ _ _ _ _ _ _ _ _ _ _ _ _ _ _ _ _ _ _ _ _ _ _ _ _ _ _ _ _ _ _ _ _ _ _ _ _ _ _ _ _ _ _ _ _ _ _ _ _ _ _ _ _ _ _ _ _ _ _ _ _ _ _ _ _ _ _ _ _ _ _ _ _ _ _ _ _ _ _ _ _ _ _ _ _ _ _ _ _ _ _ _ _ _ _ _ _ _ _ _ _ _ _ _ _ _ _ _ _ _ _ _ _ _ _ _ _ _ _ _ _ _ _ _ _ _ _ _ _ _ _ _ _ _ _ _ _ _ _ _ _ _ _ _ _ _ _ _ _ _ _ _ _ _ _ _ _ _ _ _ _ _ _ _ _ _ _ _ _ _ _ _ _ _ _ _ _ _ _ _ _ _ _ _ _ _ _ _ _ _ _ _ _ _ _ _ _ _ _ _ _ _ _ _ _ _ _ _ _ _ _ _ _ _ _ _ _ _ _ _ _ _ _ _ _ _ _ _ _ _ _ _ _ _ _ _ _ _ _ _ _ _ _ _ _ _ _ _ _ _ _ _ _ _ _ _ _ _ _ _ _ _ _ _ _ _ _ _ _ _ _ _ _ _ _ _ _ _ _ _ _ _ _ _ _ _ _ _ _ _ _ _ _ _ _ _ _ _ _ _ _ _ _ _ _ _ _ _ _ _ _ _ _ _ _ _ _ _ _ _ _ _ _
M
o d e l o _ _ _ _ _ _ _ _ _ _ _ _ _ _ _ _ _ _ _ _ _ _ _ _ _ _ _ _ _ _T i p o _ _ _ _ _ _ _ _ _ _ _ _ _ _ _ _ _ _ _ _ _ _ _ _ _ _ _ _ _ _ _T r i m _ _ _ _ _ _ _ _ _ _ _ _ _ _ _ _ _ _ _ _ _ _ _ _ _ _ _ _ _ _ _
SNAPPER es una marca comercial de
Simplicity Manufacturing, Inc.
Port Washington, WI, USA.
Briggs & Stratton Yard Power Products Group
Copyright © 2008, Briggs & Stratton Corporation
Milwaukee, WI, EE.UU. Todos los derechos reservados.
Page 27

Índice
Not for
Reproduction
Seguridad del operador . . . . . . . . . . . . . . . . . . . . . . . . . . . . . . . . . . . . . . . . . . . . . . . . .2
Instrucciones importantees de seguridad del operador . . . . . . . . . . . . . . . . . . . . . . . . . . . . . .2
Preparación . . . . . . . . . . . . . . . . . . . . . . . . . . . . . . . . . . . . . . . . . . . . . . . . . . . . . . . . .4
Desempaque . . . . . . . . . . . . . . . . . . . . . . . . . . . . . . . . . . . . . . . . . . . . . . . . . . . . . . . . . . . . . .4
Asidero . . . . . . . . . . . . . . . . . . . . . . . . . . . . . . . . . . . . . . . . . . . . . . . . . . . . . . . . . . . . . . . . . . .4
Ajuste de la altura del asidero (manillar) . . . . . . . . . . . . . . . . . . . . . . . . . . . . . . . . . . . . . . . . .5
Bolsa de césped . . . . . . . . . . . . . . . . . . . . . . . . . . . . . . . . . . . . . . . . . . . . . . . . . . . . . . . . . . . .6
Placa para el modo de triturado . . . . . . . . . . . . . . . . . . . . . . . . . . . . . . . . . . . . . . . . . . . . . . . .8
Deflector de descarga lateral . . . . . . . . . . . . . . . . . . . . . . . . . . . . . . . . . . . . . . . . . . . . . . . . . .8
Recomendaciones acerca del triturado . . . . . . . . . . . . . . . . . . . . . . . . . . . . . . . . . . . . . . . . . .9
Cómo preparar el motor . . . . . . . . . . . . . . . . . . . . . . . . . . . . . . . . . . . . . . . . . . . . . . . . . . . . .9
Preparación final . . . . . . . . . . . . . . . . . . . . . . . . . . . . . . . . . . . . . . . . . . . . . . . . . . . . . . . . . . .9
Manejo . . . . . . . . . . . . . . . . . . . . . . . . . . . . . . . . . . . . . . . . . . . . . . . . . . . . . . . . . . .10
Palanca de parada del motor . . . . . . . . . . . . . . . . . . . . . . . . . . . . . . . . . . . . . . . . . . . . . . . . .10
Sistema de tracción de las ruedas delanteras (Unidades autopropulsadas) . . . . . . . . . . . . .10
Parada del motor . . . . . . . . . . . . . . . . . . . . . . . . . . . . . . . . . . . . . . . . . . . . . . . . . . . . . . . . . .10
Arranque del motor . . . . . . . . . . . . . . . . . . . . . . . . . . . . . . . . . . . . . . . . . . . . . . . . . . . . . . . .11
Reglas para un manejo seguro y efectivo . . . . . . . . . . . . . . . . . . . . . . . . . . . . . . . . . . . . . . .11
Seguridad del operador
Preparación Manejo Mantenimiento Solución de problemas Garantías
Mantenimiento . . . . . . . . . . . . . . . . . . . . . . . . . . . . . . . . . . . . . . . . . . . . . . . . . . . . . .12
Mantenimiento del motor . . . . . . . . . . . . . . . . . . . . . . . . . . . . . . . . . . . . . . . . . . . . . . . . . . . .12
Inclinación del motor . . . . . . . . . . . . . . . . . . . . . . . . . . . . . . . . . . . . . . . . . . . . . . . . . . . . . . .12
Limpieza de la cubierta del cortacésped . . . . . . . . . . . . . . . . . . . . . . . . . . . . . . . . . . . . . . . .12
Lubricación . . . . . . . . . . . . . . . . . . . . . . . . . . . . . . . . . . . . . . . . . . . . . . . . . . . . . . . . . . . . . .12
Ajuste de la altura de corte . . . . . . . . . . . . . . . . . . . . . . . . . . . . . . . . . . . . . . . . . . . . . . . . . .12
Desmontaje de la correa de transmisión . . . . . . . . . . . . . . . . . . . . . . . . . . . . . . . . . . . . . . . .13
Ajuste del cable del sistema de tracción de las ruedas . . . . . . . . . . . . . . . . . . . . . . . . . . . . .14
Servicio de mantenimiento de la cuchilla . . . . . . . . . . . . . . . . . . . . . . . . . . . . . . . . . . . . . . . .15
Desmontaje de la cuchilla . . . . . . . . . . . . . . . . . . . . . . . . . . . . . . . . . . . . . . . . . . . . . . . . .15
Afilado de la cuchilla . . . . . . . . . . . . . . . . . . . . . . . . . . . . . . . . . . . . . . . . . . . . . . . . . . . .15
Verificación del nivel de corte . . . . . . . . . . . . . . . . . . . . . . . . . . . . . . . . . . . . . . . . . . . . .15
Preparación del cortacésped para almacenamiento . . . . . . . . . . . . . . . . . . . . . . . . . . . . . . .16
Solución de problemas . . . . . . . . . . . . . . . . . . . . . . . . . . . . . . . . . . . . . . . . . . . . . . . . .17
Garantía . . . . . . . . . . . . . . . . . . . . . . . . . . . . . . . . . . . . . . . . . . . . . . . . . . . . . . . . . . .18
!
Los bornes , terminales y otros accesorios relacionados con las
baterías contienen plomo y compuestos de plomo, productos químicos considerados por el estado de california como la causa de
cáncer y defectos de nacimiento u otros trastornos del aparato reproductor. lávese las manos después de estar en contacto con ellos.
ADVERTENCIA
!
!
Los gases de escape del motor, algunos de sus constituyentes
y ciertos componentes del vehículo contienen o emiten
productos químicos considerados por el estado de california
como la causa de cáncer u otros trastornos del aparato
reproductor.
ADVERTENCIA
!
1
Page 28

Instrucciones importantees de seguridad
Not for
Reproduction
! !
ADVERTENCIA: Esta potente máquina cortacésped es capaz de amputar las manos y los pies y puede arrojar objetos
causando lesiones e incluso la muerte. Si no se respetan las instrucciones de SEGURIDAD siguientes tanto el operador
como otras personas corren peligro de sufrir lesiones o la muerte. El propietario de la máquina debe entender estas
instrucciones y permitir que esta máquina la manejen únicamente las personas que entienden estas instrucciones. Toda
persona que maneje esta máquina debe estar en buenas condiciones físicas y psíquicas y no haber bebido ni ingerido
ninguna droga o fármaco que pueda perjudicar la visión, dexteridad o discernimiento. Ante cualquier duda respecto a
Seguridad del operador
su máquina que su concesionario no pueda solucionar para su satisfacción, llame o escriba al Customer Service
Department, SNAPPER, McDonough, Georgia 30253. Phone: (1-800-317-7833).
Protección para los niños
Pueden ocurrir accidentes de trágicas consecuencias si el operador no está alerta a la presencia de niños en el lugar. Los niños
son frecuentemente atraídos a la máquina y a la actividad de corte
de césped o hierba. Nunca de por sentado que los niños permanecerán en el mismo lugar que usted los vio la última vez.
1. MANTENGA a los niños fuera de la zona de trabajo y bajo el
cuidado vigilante de un adulto responsable, que no sea el operador.
2. NO permita a los niños en el jardín mientras la máquina está
funcionando y APAGUE el motor cuando alguien entra a la zona de
trabajo.
3. NO permita que jóvenes menores de edad manejen la máquina.
4. PERMITA que solamente personas adultas o adolescentes
responsables que demuestren buen criterio manejen esta
máquina, pero bajo supervisión de un adulto.
5. NO tire de la máquina hacia atrás salvo que sea absolutamente
necesario. MIRE HACIA ATRÁS y hacia abajo para asegurarse de
que no hay niños pequeños, mascotas y objetos peligrosos antes
y mientras retrocede con la máquina.
6. PRESTE MUCHA ATENCIÓN al acercarse a las curvas sin visibilidad, arbustos, árboles u otros objetos que puedan obstruir la
visión.
Manejo en pendientes
1. Las pendientes son un factor importantee relacionado con los
accidentes por pérdida deslizamiento y caídas, los cuales pueden
ocasionar lesiones graves. Todas las pendientes requieren actuar
con mucha cautela. Si se siente inseguro en una pendiente, NO
corte el césped o hierba allí.
2. Corte el césped a lo ancho en las pendientes, nunca hacia arriba y hacia abajo. Preste MUCHA ATENCIÓN cuando cambie de
dirección en las pendientes. NO corte el césped en pendientes
empinadas u otras zonas donde la estabilidad o tracción sea
dudosa. Consulte la Guía para trabajar en pendientes presentada al
final de este manual
3. Tenga sumo cuidado con los recogedores de hierba y otros
accesorios; estos pueden afectar la maniobrabilidad y la estabilidad de la máquina.
Preparación
1. Lea, comprenda y respete todos los mensajes de advertencia y
las instrucciones incluidas en la máquina, el motor y los implementos. Aprenda la ubicación de todos los mandos y practique
cómo usarlos antes de poner en marcha la máquina.
2. Esta máquina debe ser manejada por personas adultas y
responsables y solamente después de haber recibido las instrucciones correspondientes.
Preparación
(viene de la columna anterior)
3. Datos registrados indican que los operadores mayores de 60
años sufren un gran porcentaje de accidentes relacionados con
cortacéspedes. Estos operadores deben evaluar su capacidad para
manejar las máquinas de cortar césped de una manera lo suficientemente segura para protegerse ellos mismos y los demás contra
la posibilidad de sufrir lesiones graves.
4. Maneje el combustible con mucho cuidado. El combustible es
inflamable y los vapores son explosivos. Use un recipiente aprobado para combustible. NO quite el tapón del depósito de combustible ni reposte de combustible mientras el motor está funcionando. Llene el depósito de combustible al aire libre solamente
cuando el motor está apagado y frío. Limpie los derrames de combustible de la máquina. NO fume.
5. Inspeccione el lugar de trabajo y quite todos los objetos tales
como juguetes, alambres, piedras, ramas y otros objetos que
pudieran causar lesiones al ser arrojados por la cuchilla o estorbar
el paso de la máquina. También esté atento a la ubicación de los
agujeros, tocones y otros riesgos posibles.
6. Mantenga a la personas y mascotas a una distancia segura de
la máquina. Si alguien entra a la zona donde está cortando el
césped, inmediatamente PARE las cuchillas, APAGUE el motor y
PARE la máquina.
7. Revise frecuentemente los protectores, deflectores, conmutadores, mandos de la cuchilla y otros dispositivos de seguridad
para cerciorarse de que están correctamente colocados y funcionando bien.
8. Asegúrese de que todos los rótulos de seguridad están claramente legibles. Reemplace los que están dañados.
9. Protéjase cuando corte el césped. Use gafas de seguridad, pantalones largos y calzado grueso. NO corte el césped estando
descalzo o con sandalias.
10. Sepa cómo PARAR la cuchilla y el motor rápidamente en el
caso de emergencias.
11. Tenga mucho cuidado cuando suba o baje la máquina a un
remolque o camión.
12. Revise frecuentemente los componentes del recogedor de
hierba en busca de daño o deterioro, y reemplácelos según sea
necesario para impedir que ocurran lesiones a causa de objetos
arrojados a través de puntos débiles o desgastados.
Manejo seguro de la gasolina
Para evitar lesiones personales o daños físicos, tenga mucho
cuidado al manipular gasolina. La gasolina es extremadamente
inflamable y los vapores son explosivos
1. Apague los cigarrillos, cigarros, pipas y otras fuentes de ignición.
2. Use solamente un contenedor aprobado para combustible.
3. NO quite la tapa del depósito de combustible ni cargue combustible mientras el motor está funcionando. Deje que el motor se
enfríe antes de cargar combustible.
www.snapper.com2
Page 29

Instrucciones importantees de seguridad (Continuación)
Not for
Reproduction
! !
Seguridad del operador
Manejo seguro de la gasolina
(viene de la columna anterior)
4. NO cargue combustible con la máquina puertas adentro.
5. NO guarde la máquina o el contenedor de combustible dentro
de lugares donde haya llama expuesta, chispas o luz piloto, tal
como en un calentador de agua u otro artefacto electrodoméstico. 6. NO llene los contenedores de combustible dentro de un
vehículo o un camión o plataforma de remolque con un forro de
plástico. Antes de llenarlos, coloque siempre los contenedores en
el suelo lejos del vehículo.
7. Retire el equipo con motor de gasolina del vehículo o remolque
y reabastézcalo de gasolina en el suelo. En caso de no ser posible, reabastezca el equipo utilizando un contenedor portátil, en vez
de una boquilla surtidora de gasolina.
8. NO arranque el equipo con motor de gasolina en vehículos o
remolques cerrados.
9. Mantenga la boquilla en contacto con el reborde del depósito o
boca del contenedor de combustible todo el tiempo hasta completar el repostaje. NO use un dispositivo para bloquear abierta la
boquilla.
10. En caso de derramar combustible en la ropa, cámbiesela
inmediatamente.
11. NUNCA llene en exceso el depósito de combustible. Coloque
la tapa de combustible y apriétela firmemente.
Manejo
1. NO ponga las manos o los pies cerca o debajo de las piezas
giratorias. Sitúese lejos del punto de descarga mientras el motor
está funcionando.
2. APAGUE el motor cuando cruce calzadas de gravilla, aceras o
caminos, y en cualquier situación donde exista el riesgo de que
objetos sean arrojados por las cuchillas.
3. Corte el césped durante el día o con buena luz artificial.
4. NO maneje el cortacésped si está en estado de ebriedad o bajo
los efectos de drogas.
5. Después de golpear algún objeto extraño, o si la cortadora
vibra en forma anormal, DETENGA el motor, desconecte el cable
de la bujía y sujételo. Inspeccione la cortadora para verificar si
hay algún daño, y en caso afirmativo repárelo antes de arrancar
nuevamente.
6. NO corte el césped cerca de barrancos, zanjas o terraplenes. El
operador podría perder el equilibrio o apoyo.
7. ESTE ALERTA a los hoyos y otros peligros ocultos. La hierba
alta puede ocultar los obstáculos. Manténgase alejado de las zanjas, socavones, alcantarillas, vallados y objetos salientes.
8. NO corte el césped mojado. Asegúrese de tener una buena base
de apoyo. Sujétese firmemente del manillar y camine, no corra.
Un resbalón puede causarle lesiones.
9. Permanezca SIEMPRE detrás de la manija cuando el motor esté
en marcha.
10. NO deje la máquina sin vigilancia mientras el motor está funcionando. PARE LA CUCHILLA y APAGUE EL MOTOR antes de
alejarse de la máquina por cualquier motivo.
11. Antes de limpiar, reparar o inspeccionar la máquina,
asegúrese de que el motor, la cuchilla y todas las piezas móviles
están DETENIDAS. Desconecte el cable de la bujía y átelo lejos de
la bujía para evitar el arranque accidental.
12. APAGUE el motor y espere hasta que la cuchilla esté PARADA
por completo antes de quitar el recogedor y/o desatascar césped.
Manejo
(viene de la columna anterior)
13. NO maneje la cortadora sin que el recogedor de hierba completo, la protección de descarga, la protección posterior u otros
dispositivos de seguridad, estén colocados y funcionando correctamente. NO apunte la descarga hacia la gente, automóviles, ventanas o puertas.
14. NO descargue material contra una pared u obstrucción. El
material puede rebotar hacia atrás, dirigiéndose hacia el operador.
15. Aminore la marcha antes de dar la vuelta.
16. Preste atención al tráfico cuando esté cerca de calzadas o vaya
a cruzarlas.
17. NO haga funcionar el motor en recintos cerrados. Los gases
de escape del motor contienen monóxido de carbono, un veneno
mortal.
18. Utilice únicamente accesorios aprobados por el fabricante. Vea
las instrucciones del fabricante para una correcta operación e
instalación de accesorios.
Mantenimiento y almacenamiento
1. NO guarde la máquina ni el bidón de combustible dentro de un
local donde los vapores pueden quedar en contacto con llama
expuesta, chispas o llama piloto de un calentador de agua, horno,
secadora de ropa u otros artefactos de gas. Espere que el motor
se enfríe antes de guardar la máquina en un local cerrado. Guarde
el bidón de combustible lejos del alcance de los niños en un recinto desocupado y bien ventilado.
2. Para reducir el riesgo de provocar un incendio y de calentar en
exceso el motor, mantenga el motor libre de hierba, hojas o grasa
sobrante.
3. Cuando vacíe el depósito de combustible, hágalo a un bidón
aprobado en un lugar al aire libre y lejos de llama expuesta.
4. Mantenga todos los pernos, tuercas y tornillos bien apretados.
Compruebe que todas las chavetas o pasadores hendidos estén en
el lugar debido.
5. Suministre siempre una ventilación adecuada cuando haga funcionar el motor en el interior de un recinto. Los gases de escape
contienen monóxido de carbono, un veneno inodoro y letal.
6. Repare el motor y haga ajustes solamente con el motor parado.
Desconecte el cable de la bujía y átelos lejos de la bujía para evitar
el arranque accidental.
7. NO cambie los reglajes de velocidad del regulador ni sobrepase
la velocidad del motor.
8. Para evitar que objetos sean arrojados y que las piezas móviles
queden al descubierto, revise frecuentemente la bolsa del recogedor en busca de deterioro o desgaste. Coloque una bolsa nueva si
las costuras están descosidas o hay evidencia de rasgaduras.
Reemplace el deslizador o adaptador del recogedor si está roto o
agrietado.
9. La cuchilla del cortacésped es filosa y puede cortar. Envuelva la
cuchilla o use guantes de cuero grueso, y tenga PRECAUCIÓN al
manipularla.
10. NO pruebe en cuanto a chispa conectando a tierra la bujía al
lado del orificio de inserción de la bujía, la bujía podría encender el
gas que sale del motor.
11. Solicite un servicio de mantenimiento para la máquina por
parte de un distribuidor SNAPPER autorizado al menos una vez al
año, y solicite al distribuidor que instale cualquier nuevo dispositivo de seguridad.
12. Sólo utilice piezas de repuesto SNAPPER genuinas para garantizar que se mantienen los estándares originales.
3
Page 30

Preparación
Not for
Reproduction
ADVERTENCIA: Antes de realizar cualquier ensamblaje o mantenimiento al cortacésped, desconecte
el cable de la bujía.
NOTA: En este manual de instrucciones, las indicaciones izquierda y
derecha describen la ubicación de una pieza teniendo el usuario
parado detrás del asidero.
Desempaque
El cortacésped se ensambló completamente en la fábrica. Cuando el
cortacésped se colocó en la caja de cartón, el asidero se colocó en
la posición de almacenamiento. Para colocar el asidero en la posición de operación, siga los siguientes pasos.
Preparación
Asidero
1. Saque el cortacésped de la caja de cartón.
2. Remueva todo el material de empaque del cortacésped y el
asidero.
3. Gire las perillas (A, Figura 1) de los lados de la manija inferior
(B) para retraer los pasadores de sujeción. Levante la manija
inferior, alineándola con uno de los tres juegos de agujeros de
los soportes de manija (C). Gire las perillas para liberar los
pasadores de sujeción y asegurar la manija inferior.
4. Coloque la manija superior (A, Figura 2) en la posición operativa (hacia arriba). Apriete las tuercas mariposa (B).
C
B
A
Figura 1: extensión de la manija inferior
A
NOTA: La altura del asidero puede ajustarse para comodidad del
usuario. Vea "Ajuste de la altura del asidero".
PRECAUCION: Tenga cuidado al plegar o levantar el asidero. No
dañe los cables. Un cable (mecánico) que está doblado no funcionará correctamente. Antes de utilizar la unidad, reemplace un
cable dañado o doblado.
5. Oprima la palanca de parada del motor contra el asidero.
(Consulte la sección titulada 'Palanca de parada del motor').
Hale lentamente el mango (A, Figura 3) del cable retráctil de
arranque. Para sujetar el mango del cable retráctil de arranque
a la guía (B) del cable, entrelace el cable a través de la guía de
cable montada en el lado derecho del asidero.
B
Figura 2: extensión de la manija superior
A
B
Figura 3: Sujeción del mango del cable retráctil de arranque
www.snapper.com4
Page 31

Preparación (Continuación)
Not for
Reproduction
Altura de la manija
(excepto los modelos de ruedas altas)
1. Gire las perillas (A, Figura 4) de los lados de la manija inferior
(B) para retraer los pasadores de sujeción. Alinee la manija
inferior con el juego de agujeros correspondiente de los
soportes de manija (C). Gire las perillas para liberar los
pasadores de sujeción y asegurar la manija inferior.
Nota: No remueva el conjunto inferior de pernos y tuercas que aseguran el asidero inferior.
C
Preparación
B
A
Figura 4: ajuste de la altura de la manija
5
Page 32

Preparación (Continuación)
Not for
Reproduction
Ensamblaje de la bolsa de césped
(No todos los modelos)
Nota: En algunos modelos, el deflector de descarga de montaje lateral se sujeta de manera temporal (para propósitos de envío) a la
parte trasera del cortacésped. Antes de ensamblar la bolsa de
césped, remueva el deflector de descarga de montaje lateral.
1. Deslice el armazón (A, Figura 5) dentro de la bolsa de césped
(B).
Preparación
2. Verifique que la manija (A, Figura 6) está en el lado exterior de
la bolsa de césped.
3. Primero, sujete los ganchos (B, Figura 6) al costado del
armazón (C). Luego, sujete los ganchos a la parte superior e
inferior del armazón.
Figura 5: Instalación del armazón
A
B
A
C
B
Figura 6: Instalación de los ganchos de la bolsa
www.snapper.com6
Page 33

Preparación (Continuación)
Not for
Reproduction
Montaje de la bolsa de césped (No todos los
modelos)
1. Para montar la bolsa de césped en el cortacésped, levante la
puerta trasera (A, Figura 7). Sosteniendo la bolsa de césped
mediante la manija (B), monte los ganchos (C) de ambos
extremos del armazón de la bolsa de césped sobre la barrapivote (D) de la puerta trasera. Baje la bolsa de césped contra
la parte trasera del cortacésped. Baje la puerta trasera.
C
D
Importante: Verifique que ambos ganchos de la bolsa de césped
están montados en la barra-pivote.
ADVERTENCIA: Revise la condición de la bolsa de
césped en cuanto a desgaste o deterioro. Si está
desgastada o dañada, reemplace las piezas sólo
con piezas de repuesto aprobadas por fábrica.
Vaciado de la bolsa de césped (No todos los
modelos)
ADVERTENCIA: Antes de desmontar la bolsa de
césped, detenga el motor. Antes de retirar césped
de la cubierta del cortacésped, desconecte el cable
de la bujía.
1. Levante la puerta trasera hasta la posición vertical.
2. Agarre la manija de la bolsa de césped y levante el armazón.
Continúe levantando el armazón hasta que los ganchos ya no
estén montados en la barra-pivote. Desmonte la bolsa de
césped.
3. Vacíe el césped de la bolsa de césped.
4. Para montar la bolsa de césped en el cortacésped, vea
"Montaje de la Bolsa de Césped".
Preparación
A
B
Figura 7: Montaje de la bolsa de césped
7
Page 34

Preparación (Continuación)
Not for
Reproduction
Sujeción del deflector de descarga de montaje lateral
ADVERTENCIA: Para evitar que
el motor arranque, desconecte
el cable de la bujía.
Para propósitos de envío, no se instaló el deflector lateral. Localice
el deflector lateral e instale de la siguiente manera.
1. Levante la cubierta del triturador (A, Figura 8).
2. Deslice las dos lengüetas (B) del deflector lateral (C) debajo
del pasador-pivote.
3. Baje el deflector lateral. Verifique que la lengüeta de enganche
Preparación
(A, Figura 9) atraviesa la ranura en el deflector lateral.
4. Baje la cubierta del triturador (A, Figura 10).
5. Conecte el cable a la bujía.
A
Figura 9: Lengüetas de enganche del deflector de descarga lateral
C
Figura 8: Instalación del deflector de descarga lateral
B
A
A
Figura 10: Liberación de la cubierta del triturador
www.snapper.com8
Page 35

Preparación (Continuación)
Not for
Reproduction
Recomendaciones acerca del triturado
El triturador corta en trozos pequeños el césped para que el césped
pueda reciclarse fácilmente. Ya que los nutrientes son regresados
al suelo, el césped necesitará menos fertilizante. Para triturar correctamente el césped, siga las recomendaciones siguientes.
El césped debe estar seco. Si el césped está húmedo, este será
difícil de cortar y causará masas pesadas de césped.
El césped no debe estar demasiado alto. La altura máxima para
lograr un corte efectivo es de 4-1/2 pulgadas. Fije los ajustadores de altura de modo que sólo se corte la tercera parte
superior del césped.
Si el césped tiene una altura superior a 4-1/2 pulgadas, serán
necesarias dos operaciones de corte con el cortacésped. Para
la primera operación de corte con el cortacésped, fije los ajustadores de altura en la posición más alta. Luego, baje los ajustadores de altura para la segunda operación de corte con el
cortacésped.
Preparar el motor
EL MOTOR NO CONTIENE ACEITE NI GASOLINA
Utilizando la botella de aceite suministrada en la caja de cartón,
llene el motor con la cantidad de aceite apropiada. Vea las instrucciones del fabricante del motor para averiguar el tipo de gasolina y
aceite que se debe utilizar. Antes de utilizar la unidad, lea la información sobre seguridad, operación, mantenimiento y almacenamiento.
ADVERTENCIA: Siga las instrucciones del fabricante
del motor para averiguar el tipo de gasolina y
aceite que se debe utilizar. Siempre utilice un
recipiente de seguridad para la gasolina. No fume
mientras se agrega gasolina al tanque de combustible. Cuando se está dentro de un lugar cerrado, no llene con gasolina. Antes de agregar la
gasolina, detenga el motor. Permita que el motor
se enfríe durante varios minutos.
Mantenga afilada la cuchilla. Una cuchilla que no está afilada
provocará que los extremos del césped se vuelvan de color
marrón.
Limpie el lado de abajo de la cubierta del cortacésped. El
césped y otros residuos pueden evitar que el cortacésped funcione correctamente.
Si la calidad del corte es secundaria, ensaye lo siguiente:
Fije los ajustadores de altura en una altura de corte más alta.
Corte el césped más frecuentemente.
Maneje el cortacésped a una velocidad de avance más lenta.
Traslape las franjas de corte en vez de cortar una franja completa con cada pasada.
Corte dos veces el césped a través de las áreas de margen.
IMPORTANTE: Esta unidad está equipada con un motor de combustión interna y no debe utilizarse en o cerca de ninguna área de
bosque o cubierta con maleza, a menos que el sistema de escape
del motor esté equipado con un supresor de chispas que cumpla
las leyes locales o estatales aplicables (si existen). Si se utiliza un
supresor de chispas, éste debe ser mantenido en buen estado de
funcionamiento por parte del operador.
En el Estado de California lo anterior es exigido por ley (Sección
4442 del Código de Recursos Públicos de California). Otros estados
podrían tener leyes similares. Las leyes federales se aplican en territorios federales. Visite un Centro de Servicio Autorizado para conseguir un supresor de chispas para el silenciador.
Nota: Es posible que la potencia real sostenida del motor sea inferior debido a limitaciones operativas y factores del medio ambiente.
Preparación
Nota: La operación de un motor nuevo algunas veces provocará
una leve cantidad de humo. Este humo es causado por pintura o
aceite en o alrededor del silenciador. Esto es normal y sólo se
espera durante la operación inicial.
Preparación final
Antes debe utilizar el cortacésped, revise las ruedas, el asidero y los
controles. Verifique que todos los tornillos están apretados.
Verifique que el control del acelerador (en caso de tenerlo) y la
palanca de parada del motor funcionan correctamente.
Si el cortacésped está equipado con ajustadores de altura, verifique
que los ajustadores de altura funcionan apropiadamente. Antes de
arrancar el motor, verifique que cada ajustador de altura está fijado
en la altura deseada. Vea "Ajuste de la Altura de Corte" en las secciones de Mantenimiento.
9
Page 36

Manejo
Not for
Reproduction
Palanca de parada del motor
Libere la palanca de parada del motor (A, Figura 11) y el motor y la
cuchilla se detendrán automáticamente. Para mantener en funcionamiento el motor, sostenga la palanca de parada del motor en
la posición de operación (B).
Antes de arrancar el motor, accione varias veces la palanca de parada del motor. Verifique que el cable se mueve fácilmente.
B
A
Manejo
Figura 11: Operación de la palanca de parada del motor
ADVERTENCIA: Para una operación segura, el sistema de tracción debe desactivarse inmediatamente cuando se libera la palanca del sistema de
tracción. Si el sistema de tracción no se desactiva
correctamente, no opere el cortacésped hasta que
el sistema de tracción sea ajustado o reparado por
un centro de servicio autorizado.
A
Figura 12: Operación del sistema de tracción de las ruedas
delanteras
Sistema de tracción (propulsión) delantera
(Sólo las unidades autopropulsadas)
El cortacésped tiene un sistema de tracción de las ruedas
delanteras. Maneje el sistema de tracción de la siguiente manera.
1. Sostenga la palanca de parada del motor (A, Figura 11) en la
posición de operación (B).
2. Modelos SP2265 y NSP2265: tire de la palanca de tracción
(A, Figura 12) completamente hacia atrás. El sistema de transmisión está ahora acoplado.
Modelos SPV22675HW y NSPV22675HW: tire lentamente de
la palanca de tracción hacia atrás. El sistema de transmisión
está ahora acoplado.
Para aumentar la velocidad de tierra, tire lentamente de la
palanca de tracción más hacia atrás. Para disminuir la velocidad de tierra, suelte lentamente la palanca de tracción.
3. Para desactivar el sistema de tracción y detener el motor,
libere completamente la palanca de parada del motor.
4. Para desacoplar sólo el sistema de transmisión, libere la
palanca de tracción. El sistema de tracción se desactivará pero
el motor continuará en funcionamiento.
Nota: Cuando el sistema de tracción está desactivado en una unidad
nueva, es posible que las ruedas delanteras giren si se levantan del
suelo. Esto es normal y dejará de suceder después de una o dos
horas de operación.
Parada del motor
Para detener el motor, libere la palanca de parada del motor.
Desconecte el cable (eléctrico) de la bujía para evitar que el motor
arranque.
Si el motor no se detiene, coloque un destornillador contra la bujía
y contra las aletas de enfriamiento del motor. La bujía se conectará
a tierra y el motor se detendrá. Antes de arrancar el motor, revise el
cable (mecánico) de parada del motor. Verifique que el cable de
parada del motor está ensamblado correctamente. Antes de operar
la unidad, reemplace un cable de parada de motor, dañado o
doblado.
www.snapper.com10
Page 37

Manejo (Continuación)
Not for
Reproduction
Encendido del motor
ADVERTENCIA: La cuchilla girará cuando el motor
se ponga en funcionamiento.
IMPORTANTE: Antes de arrancar el motor, accione varias veces la
palanca de parada del motor. Verifique que el cable de parada del
motor se mueve libremente.
Nota: El diseño del motor no incluye un control del acelerador o un
ajuste de la velocidad del motor. El motor está ajustado en la mejor
velocidad para el corte de césped, para el empacado en bolsa del
césped y para una vida útil prolongada del motor.
1. Revise el nivel de aceite.
2. Llene el tanque de combustible con gasolina normal sin
plomo. Verifique que la gasolina está limpia. La gasolina con
plomo aumentará los depósitos y acortará la vida de las
válvulas.
Nota: No utilice gasohol ni metanol. No utilice gasolina premium sin
plomo.
ADVERTENCIA: Siempre utilice un recipiente de
seguridad para la gasolina. No fume mientras agrega gasolina al tanque de combustible. Cuando se
está dentro de un lugar cerrado, no agregue gasolina. Antes de agregar gasolina, detenga el motor y
permita que el motor se enfríe durante varios minutos.
3. Verifique que el cable de la bujía está conectado a la bujía.
4.
Sólo los modelos autopropulsados
del sistema de tracción está en la posición desactivada.
- Verifique que la palanca
A
Figura 13: El botón cebador del motor
6. Párese detrás del cortacésped. Utilice una mano para sostener
la palanca de parada del motor en la posición de operación
(A, Figure 14). Utilice la otra mano para agarrar el mango (B)
del cable retráctil de arranque.
7. Verifique que el cable retráctil de arranque no está atrancado o
atrapado entre las posiciones superior e inferior. Hale rápidamente el mango del cable retráctil de arranque. Regrese lentamente el mango del cable retráctil de arranque.
8. Si el motor no arranca en 5 o 6 intentos, vea las instrucciones
"Problema y Reparación".
A
Manejo
ADVERTENCIA: Para evitar un accidente, verifique
que la palanca del sistema de tracción está en la
posición DESACTIVADA (DISENGAGED). Cuando la
palanca del sistema de tracción está en la posición
ACTIVADA (ENGAGED), no arranque el motor.
5. El botón cebador (A, Figura 13) está al lado del motor. Oprima
el botón cebador. Cada vez que usted oprima el botón cebador,
espere dos segundos. Para averiguar el número de veces que
se requiere oprimir el botón cebador, vea las instrucciones del
fabricante del motor.
Nota: No utilice el botón cebador para arrancar un motor caliente.
Nota: Los modelos equipados con motores Ready StartTMno tienen
botón cebador. Vea las instrucciones del fabricante del motor para
obtener información adicional.
B
Figura 14: Arranque del motor
Reglas para un manejo seguro y efectivo
Consulte la sección 'Manejo Seguro' de este manual para obtener
reglas importantes relacionadas con el manejo seguro y efectivo del
cortacésped.
11
Page 38

Mantenimiento
Not for
Reproduction
Mantenimiento del motor
Utilice la siguiente sección de Mantenimiento para mantener su
unidad en buenas condiciones de funcionamiento. Toda la
información de mantenimiento para el motor está en el
"Manual de Instrucciones del Motor". Antes de arrancar el motor,
lea este manual.
ADVERTENCIA: Antes de realizar una inspección,
ajuste (excepto el carburador) o reparación; detenga el motor y desconecte el cable de la bujía.
Inclinación del motor
Cuando usted suministre servicio de mantenimiento al motor,
inspeccione la cuchilla, o limpie el lado de abajo de la cubierta del
cortacésped; asegúrese de inclinar el motor siempre teniendo arriba
la bujía (Figura 15). El transporte o inclinación del motor con la
bujía abajo causará:
Limpieza de la cubierta del cortacésped
ADVERTENCIA: La cuchilla girará cuando el motor
se ponga en funcionamiento. Antes de limpiar la
cubierta del cortacésped, detenga el motor y
desconecte el cable de la bujía.
Arranque difícil.
Ahumado del motor.
Ensuciado de la bujía.
Saturación de aceite o gasolina del filtro de aire.
Figura 15: No incline hacia adelante el motor
Ajuste de la altura de corte
ADVERTENCIA: La cuchilla girará cuando el motor
se ponga en funcionamiento. Antes de cambiar la
altura de corte, detenga el motor y desconecte el
cable de la bujía.
El césped y otros residuos pueden evitar que el cortacésped funcione correctamente. Después de cortar el césped, limpie la cubierta del cortacésped, de la siguiente manera.
Mantenimiento
1. Detenga el motor.
2. Desconecte el cable de la bujía.
3. Limpie la suciedad y los residuos de la parte superior e inferior de la cubierta del cortacésped. Limpie con jabón y agua.
Remueva con un trapo el exceso de agua antes de almacenar
la unidad.
Lubricación
1. Para máximo desempeño, lubrique con aceite de motor, cada
25 horas, las ruedas y todos los puntos de pivote.
2. Para lubricar el motor, consulte el "Manual de Instrucciones
del Motor".
Nota: No lubrique el cable de parada del motor. Los lubricantes
dañarán el cable y evitarán que el cable se mueva libremente.
Reemplace el cable si está doblado o dañado.
Para cambiar la altura de corte, mueva la posición del brazo ajustador en cada rueda (A, Figura 16). Verifique que cada brazo ajustador está en la misma posición de modo que el cortacésped cortará
de manera nivelada.
1. Desenganche el brazo ajustador.
2. Mueva el brazo ajustador a otra posición.
A
Figura 16: Ajuste de la altura de corte
www.snapper.com12
Page 39

Mantenimiento (Continuación)
Not for
Reproduction
Desmontaje de la correa de transmisión
(Sólo las unidades autopropulsadas)
ADVERTENCIA: Antes de desmontar la correa,
desconecte el cable de la bujía.
1. Remueva el tornillo que sujeta la cubierta de correa
(A, Figura 17). Remueva la cubierta de la correa.
Nota: los tornillos que aseguran la cubierta de la correa están ubicados debajo de la plataforma.
2. Para desmontar la correa de transmisión, incline el cortacésped. Vea "Inclinación del Motor" en la sección
Mantenimiento.
3. (SP2265 y NSP2265 únicamente): afloje el perno de tensión
de la correa (A, Figura 18).
Nota: los modelos SPV22675HW y NSPV22675HW tienen en la
transmisión una guía de correa, que debe quitarse antes de
desmontar la correa. Asegúrese de volver a colocarla después de
instalar la correa.
4. Remueva la parte delantera de la correa de transmisión (B)
fuera de la polea de transmisión (C).
5. Para remover la parte trasera de la correa de transmisión
(A, Figura 19), deslice la correa de transmisión sobre el
extremo de la cuchilla (B).
b. Luego, afloje la tuerca ajustadora sólo lo suficiente para permitir que el espaciador gire. La tensión de la correa de transmisión ahora está correcta.
8. Instale la cubierta de la correa.
9. Antes de empezar a cortar el césped, verifique que el sistema
de tracción se desactiva correctamente y que el cortacésped
se detiene. Si el sistema de tracción no se desactiva, lleve el
cortacésped a un centro de servicio autorizado antes de colocarlo en funcionamiento.
C
B
Figura 18: Aflojamiento del perno de tensión de la correa
A
Nota: los modelos SPV22675HW y NSPV22675HW tienen en la
transmisión una guía de correa, que debe quitarse antes de
desmontar la correa. Asegúrese de volver a colocarla después de
instalar la correa.
Nota: Asegúrese de reemplazar la correa de transmisión sólo con
una correa de repuesto de la fábrica.
6. Para montar la correa de transmisión, invierta los anteriores
pasos.
7. (SP2265 y NSP2265 únicamente): Ajuste la tensión de la correa.
a. Apriete la tuerca ajustadora (A, Figura 20) hasta que la tuerca haga contacto con el espaciador (B). Trate de girar el espaciador. Cuando la tuerca ajustadora haga contacto con el espaciador, el espaciador no girará.
A
Figura 19: Desmontaje de la correa
B
A
Mantenimiento
A
B
Figura 17: Remoción de la cubierta de la correa
Figura 20: Ajuste de la tensión de la correa
13
Page 40

Mantenimiento (Continuación)
Not for
Reproduction
Ajuste del cable del sistema de tracción de las
ruedas
(Sólo las unidades autopropulsadas)
ADVERTENCIA: Antes de ajustar el cable del sistema de tracción de las ruedas, libere la palanca
de parada del motor y espere que el motor se
detenga.
Si el sistema de tracción no se activa y desactiva correctamente,
revise el asidero en cuanto a ensamblaje correcto. Verifique que
todas las piezas están en buenas condiciones, que no están rotas ni
dobladas, y que todos los tornillos están apretados.
Las piezas desgastadas y el cable alargado cambiarán el funcionamiento del sistema de tracción de las ruedas. Al cortar el
césped en césped alto o grueso, o en terrenos inclinados, el sistema de tracción puede deslizarse. Si el sistema de tracción se está
deslizando, ajuste de la siguiente manera o lleve el cortacésped a
un centro de servicio autorizado.
IMPORTANTE: Antes de arrancar el motor, accione varias veces la
palanca de parada del motor. Verifique que el cable de parada del
motor se mueve libremente.
Nota: El diseño del motor no incluye un control del acelerador o un
ajuste de la velocidad del motor. El motor está ajustado en la mejor
velocidad para el corte de césped, para el empacado en bolsa del
césped y para una vida útil prolongada del motor.
1. Si el sistema de tracción se está deslizando, afloje la contrat-
uerca (B, Figura 21) en la tensor de ajuste (A), y gire el
casquillo (C) media (1/2) vuelta en la dirección mostrada.
Pruebe el sistema de tracción y revise en cuanto al deslizamiento.
2. Si el sistema de tracción sigue deslizándose, ajuste nuevamente. Nuevamente, pruebe el sistema de tracción.
3. Repita el ajuste y pruebe hasta que el sistema de tracción no
se deslice.
4. Antes de empezar a cortar el césped, verifique que el sistema
de tracción se desactiva correctamente y que el cortacésped
se detiene. Si el sistema de tracción no se desactiva, lleve el
cortacésped a un centro de servicio autorizado antes de colocarlo en funcionamiento.
Mantenimiento
A
B
C
Figura 21: Ajuste del cable del sistema de tracción de las ruedas
www.snapper.com14
Page 41

Mantenimiento (Continuación)
Not for
Reproduction
Servicio de mantenimiento de la cuchilla
ADVERTENCIA: Antes de inspeccionar la cuchilla o
el adaptador de cuchilla, desconecte el cable de la
bujía. Si la cuchilla golpea un objeto, detenga el
motor. Desconecte el cable de la bujía. Revise la
unidad en busca de daños.
A
Revise frecuentemente la cuchilla en cuanto a desgaste o daño tales
como grietas. Revise frecuentemente el perno que sostiene la
cuchilla. Mantenga apretado el perno. Si la cuchilla golpea un objeto, detenga el motor. Desconecte el cable de la bujía. Revise el
adaptador (A, Figura 22) de la cuchilla en cuanto a daño. Revise en
busca de una cuchilla doblada o dañada, una cuchilla gravemente
desgastada, u otro daño. Antes de operar la unidad, las piezas
dañadas deben reemplazarse con piezas de repuesto de fábrica. Por
seguridad, reemplace cada dos años la cuchilla. Mantenga afilada la
cuchilla. Una cuchilla que no está afilada provocará que los
extremos del césped se vuelvan de color marrón. Desmonte la
cuchilla de la siguiente manera.
Desmontaje de la cuchilla
ADVERTENCIA: Antes de desmontar la cuchilla,
desconecte el cable de la bujía. La cuchilla
tienen bordes cortantes. Al sostener la cuchilla,
utilice guantes o tela para proteger sus manos.
1. Drene el tanque de combustible.
2. Levante el lado del cortacésped que tiene el silenciador o la
bujía.
3. Utilice un trozo de madera para evitar que la cuchilla gire.
4. Remueva el perno (B, Figura 22) que sostiene la cuchilla,
mediante una llave de 9/16" (14 mm).
5. Revise la cuchilla (C) de acuerdo con las instrucciones de
"Servicio de Mantenimiento de la Cuchilla". Reemplace una
cuchilla gravemente desgastada o dañada con una cuchilla de
repuesto de fábrica.
6. Monte la cuchilla con los bordes curvos dirigidos hacia la
cubierta. Si la cuchilla está invertida, la cuchilla no cortará correctamente y puede causar un accidente.
7. Sujete la cuchilla con la arandela (D) original y el perno.
Verifique que el borde exterior de la arandela Belleville está
dirigida hacia la cuchilla.
8. Apriete el perno que sostiene la cuchilla hasta un apriete de 30
libras-pie.
ADVERTENCIA: Siempre mantenga apretado el
perno que sostiene la cuchilla. Una cuchilla o perno
flojo pueden causar un accidente.
C
D
A
D
Figura 22: Desmontaje de la cuchilla
B
B
C
Afilado de la cuchilla
ADVERTENCIA: La vibración es el resultado de una
cuchilla que no está balanceada correctamente.
Una cuchilla que está dañada con grietas puede
romperse y causar un accidente.
1. Afile la cuchilla dos veces al año o cada 25 horas.
2. Si la cuchilla está en la unidad, no la afile. Desmonte la
cuchilla de acuerdo con las instrucciones en "Desmontaje de la
Cuchilla".
3. Limpie la cuchilla con un cepillo, jabón y agua. Revise la
cuchilla. Inspeccione en busca de grietas, picaduras u otros
daños. Reemplace una cuchilla que está gravemente desgastada, doblada, o dañada, con una cuchilla de repuesto de fábrica.
4. Afile la cuchilla (A, Figura 23, siguiente página) con una lima
(B). Asegúrese de mantener el borde de corte biselado original
(Figura 30).
5. Verifique que la cuchilla está balanceada. Utilice un destornillador (C) y sostenga la cuchilla de manera paralela al suelo (D)
según se muestra. Una cuchilla que está balanceada permanecerá paralela al suelo. Si la cuchilla no está balanceada,
el extremo pesado girará hacia el suelo. Afile el extremo pesado hasta que la cuchilla esté balanceada.
6. Una cuchilla nueva cortará mejor que una cuchilla gravemente
desgastada. Cada dos años, reemplace la cuchilla vieja con
una cuchilla de repuesto de fábrica.
Mantenimiento
Verificación del nivel de corte
Pruebe la unidad en una área pequeña. Si la altura de corte no está
nivelada o si el césped cortado no se descarga, la causa puede ser:
(1) la cuchilla está doblada o dañada, (2) la cuchilla no está afilada,
(3) una cuchilla desgastada, (4) o un adaptador de cuchilla roto.
Antes de utilizar la unidad, corrija el problema.
15
Page 42

Mantenimiento (Continuación)
Not for
Reproduction
C
D
Figura 23: Afilado de la cuchilla
A
B
Preparación del cortacésped para almacenamiento
ADVERTENCIA: No extraiga gasolina mientras se
está en el interior de una edificación, cerca de una
llama, o mientras usted fuma. Los vapores de la
Mantenimiento
1. Drene el tanque de combustible.
2. Permita que el motor permanezca en funcionamiento hasta
que se le agote la gasolina.
3. Drene el aceite del motor caliente. Llene el cárter del motor
con aceite nuevo.
4. Remueva la bujía del cilindro. Vierta una onza de aceite dentro
del cilindro. Hale lentamente el mango del cable retráctil de
arranque para que el aceite proteja el cilindro. Instale una bujía
gasolina pueden causar una explosión o un incendio.
nueva en el cilindro.
5. Limpie la suciedad y residuos de las aletas de enfriamiento del
cilindro y de la carcasa del motor.
6. Limpie la parte inferior de la cubierta del cortacésped.
7. Verifique que la bolsa de césped está vacía. El césped que permanece en la bolsa durante el almacenamiento dañará la
bolsa.
8. Limpie completamente el cortacésped para proteger la pintura.
9. Pliegue el asidero (si se desea).
PRECAUCION: Tenga cuidado al plegar o levantar el asidero. No
dañe los cables. Un cable (mecánico) que está doblado no funcionará correctamente. Antes de utilizar la unidad, reemplace un
cable dañado o doblado.
10. Coloque la unidad en una edificación que tenga buena venti-
www.snapper.com16
Page 43

Solución de problemas
Not for
Reproduction
El motor no arranca.
1. Verifique que el tanque de combustible está lleno con gasolina limpia. No utilice gasolina vieja.
2. En un motor frío, oprima el botón cebador (opcional en algunos modelos). Para averiguar el número de veces requerido para oprimir el
botón cebador, vea las instrucciones del fabricante del motor.
3. Verifique que el cable (eléctrico) de la bujía está conectado a la bujía.
4. Ajuste el carburador. Consulte el Manual del Motor.
5. Hay demasiada gasolina en el cilindro del motor. Remueva y seque la bujía. Hale varias veces el mango del cable retráctil de arranque.
Instale la bujía. Conecte el cable a la bujía. Arranque el motor.
6. El motor es difícil de arrancar en césped alto o pesado. Mueva el cortacésped hacia una superficie seca y limpia.
7. Verifique que la palanca de parada del motor está en la posición de operación.
8. Verifique que la válvula de combustible está en la posición ON (Abierta). Consulte el Manual del Motor.
El motor no se detiene.
1. Libere la palanca de parada del motor.
2. Revise el cable (mecánico) de parada del motor. Reemplace el cable si está doblado o dañado.
El funcionamiento del motor es defectuoso.
1. Revise los ajustes de la altura de corte. Aumente la altura de corte si el césped es alto.
2. Revise la parte inferior de la cubierta de la cuchilla. Limpie la cubierta de la cuchilla para remover césped y otros residuos.
3. Revise el cable de la bujía. Verifique que el cable está conectado.
4. Limpie las aletas de enfriamiento del motor para remover césped y otros residuos.
5. Revise los ajustes del carburador. Consulte el Manual del Motor.
6. Revise la separación entre electrodos de la bujía. Establezca la separación entre electrodos de la bujía en 0.030".
7. Verifique la cantidad de aceite en el motor. Llene con aceite si es necesario.
8. Revise el filtro de aire del motor. Consulte el Manual del Motor.
9. La gasolina está deficiente. Drene y limpie el tanque de combustible. Llene el tanque de combustible con gasolina limpia.
Vibración excesiva.
1. Desmonte la cuchilla. Revise la cuchilla y el balance si es necesario. Vea las instrucciones de mantenimiento de la cuchilla.
2. Revise en busca de una cuchilla doblada o rota. Una cuchilla dañada es peligrosa y debe reemplazarse.
3. Revise el adaptador de la cuchilla. Reemplace un adaptador de cuchilla roto.
4. Si la vibración continúa, lleve el cortacésped a un Centro de Servicio Autorizado.
El césped no se descarga correctamente.
1. Limpie la parte inferior de la cubierta del cortacésped.
2. Revise en busca de una cuchilla gravemente desgastada. Desmonte y afile la cuchilla. Por seguridad, reemplace la cuchilla cada dos
años con una cuchilla de repuesto de fábrica.
El césped no se corta de manera uniforme.
1. Revise el ajuste de altura en cada rueda. El ajuste de altura debe ser el mismo para cada rueda.
2. Verifique que la cuchilla está afilada.
3. Revise en busca de una cuchilla doblada o rota. Una cuchilla dañada es peligrosa y debe reemplazarse.
4. Revise en busca de un adaptador de cuchilla roto. Reemplace un adaptador de cuchilla roto.
Solución de problemas
17
Page 44

GARANTÍA LIMITADA DE 2 AÑOS
Not for
Reproduction
Por dos (2) años a contar de la fecha de compra de este producto para ser usado por el comprador original, SNAPPER, por intermedio de cualquier concesionario autorizado SNAPPER reemplazará, gratuitamente (con la excepción de impuestos donde sean
aplicables), cualquier pieza o piezas que después de ser examinadas por la fábrica en McDonough, Georgia, EE.UU., mostrara tener
defectos en el material o en la fabricación o ambos.
Para el equipo de uso comercial, de alquiler u otro uso no residencial de propiedad del comprador original, SNAPPER, a través de
cualquier concesionario autorizado SNAPPER, por un período de noventa (90) días a contar de la fecha de compra, reemplazará
gratuitamente cualquier parte o partes que al ser examinadas por la fábrica en McDonough, Georgia, se le encuentre algún defecto
en el material o fabricación o ambos.
Todos los gastos de transporte incurridos por el comprador al enviar el material a un concesionario autorizado SNAPPER para su
reemplazo según lo estipulado en esta garantía, correrán por cuenta del comprador.
Esta garantía no aplica a ciertas transmisiones, a motores y sus componentes, y baterías, dado que esos componentes están
garantizados por separado. Esta garantía no cubre las piezas dañadas por accidente, alteración, maltrato, lubricación incorrecta,
desgaste normal u otras causas ajenas a la voluntad de SNAPPER. Esta garantía no cubre ninguna máquina o componente que
haya sido alterado o modificado, cambiando la seguridad, el comportamiento o la durabilidad.
Las baterías tienen un período de garantía de un (1) año con reemplazo gratuito si se solicita en el transcurso de un (1) año a partir
de la fecha de compra original. SNAPPER no es responsable por ningún coste incurrido en la instalación. La garantía de la batería
solamente cubre las baterías del equipo original y no cubre ningún daño de la batería o máquina causado por descuido o maltrato,
destrucción por incendio, explosión, congelación, carga excesiva, mantenimiento inadecuado o uso del electrólito incorrecto.
No existe ninguna otra garantía expresa.
Garantías
RENUNCIA DE GARANTÍA
Las garantías implícitas, incluidas las de comerciabilidad e idoneidad o aptitud para un propósito en particular, están limitadas a dos (2) años a contar de la fecha de compra del producto de uso residencial u otro uso no comercial por el comprador
original, y por noventa (90) días a contar de la fecha de compra del producto de uso comercial, de alquiler u otro uso no residencial por el comprador original, y hasta el punto permitido por la ley. Todas las garantías implícitas quedan excluidas. Esta
es la única solución. Las responsabilidades civiles por daños indirectos, bajo cualesquiera y todas las garantías, quedan
excluidas.
Algunos estados no permiten limitaciones en relación con la duración de una garantía implícita, o no permiten la exclusión o
limitación de los daños incidentales o indirectos, de tal manera que es posible que las anteriores limitaciones o exclusiones
no se apliquen en su caso en particular.
Esta garantía le da derechos legales específicos, y usted puede tener otros derechos los cuales varían de un estado a otro.
ADVERTENCIA: EL USO DE PIEZAS DE RECAMBIO/REPUESTO APARTE DE LAS PIEZAS ORIGINALES SNAPPER PUEDE PERJUDICAR LA SEGURIDAD DE LOS PRODUCTOS SNAPPER Y ANULARÁ TODA RESPONSABILIDAD Y GARANTÍA EMITIDA POR
SNAPPER ASOCIADA CON EL USO DE TALES PIEZAS.
IMPORTANTE: Sírvase llenar inmediatamente la tarjeta de registro del producto SNAPPER que se adjunta y remítala a:
Snapper's Product Registration Center, P.O. Box 1379, McDonough, Georgia 30253 USA
www.snapper.com18
Page 45

Guía para manejar en pendientes
Not for
Reproduction
Para determinar si no es peligroso cortar el césped en una pendiente cuando maneja un tractor cortacésped: (1) desengrane la cuchilla(s), (2) ponga la máquina en marcha
atrás, y (3) pruebe ascender la pendiente retrocediendo en línea recta. Si puede hacerlo, por lo general no es peligroso cortar el césped. Sin embargo, si no se siente seguro,
o no está totalmente convencido, use esta guía y no corte el césped en una pendiente que sea mayor que 15 grados. Si está usando el tractor cortacésped con un accesorio
remolcado o de montaje trasero, no lo maneje en una pendiente que sea mayor que 10 grados.
Una pendiente de 15 grados es un cerro cuya altura aumenta aproximadamente 2.5 pies en 10 pies.
Una pendiente de 10 grados es un cerro cuya altura aumenta aproximadamente 1.7 pies en 10 pies.
Preste mucha atención en todo momento, y evite los virajes o maniobras bruscas. Para su seguridad, respete otras instrucciones encontradas en este manual
mientras corta césped en pendientes. Maneje el tractor cortacésped de subida o bajada en las pendientes, nunca a lo ancho de las mismas. Maneje el cortacésped
de empuje a lo ancho de las pendientes, nunca subiendo o bajando. Sea sumamente cuidadoso cuando maneje en o cerca de pendientes y obstrucciones.
15 GRADOS
10 GRADOS
APUNTE Y SOSTENGA ESTA GUÍA A NIVEL CON UN ÁRBOL VERTICAL, LA ESQUINA
CORTE AQUÍ PARA USAR LA GUÍA
15 GRADOS
Maneje el cortacésped de empuje a
lo ancho en las pendientes, nunca
hacia arriba y hacia abajo.
DE UNA ESTRUCTURA, UN POSTE DE ENERGÍA ELÉCTRICA O UNA VALLA.
PLIEGUE EN LA LÍNEA DE PUNTOS
GUÍA PARA MANEJAR EN PENDIENTES
Maneje el tractor cortacésped
hacia arriba y hacia abajo en las
pendientes, nunca a lo ancho.
19
Page 46

Notas
Not for
Reproduction
www.snapper.com20
Page 47

Notas
Not for
Reproduction
21
Page 48

CORTADORAS DE CÉSPED CON CONDUCTOR
Not for
Reproduction
®
A PIE SNAPPER
DE 55.9 cm (22")
Especificaciones del Producto
Tamaño de plataforma
Altura de corte
Tipo de transmisión
(Sólo las unidades autopropulsadas)
Velocidad de avance
(Sólo las unidades autopropulsadas)
Potencia del motor
Cilindrada del motor
Capacidad del tanque de
combustible
Piezas de repuesto comunes Número de Pieza
Cable para el control de cuchilla
Cable de tracción de ruedas
Cable de tracción de ruedas
Cuchilla de corte
Correa de transmisión
Correa de transmisión
(cuarto de galón)
(pulg.)
(pulg.)
(mph)
(pies-lbs)
(cc)
(Todos)
(SP2265 y NSP2265 únicamente)
(SPV22675HW y NSPV22675HW únicamente)
(Todos)
(SP2265 y NSP2265 únicamente)
(SPV22675HW y NSPV22675HW únicamente)
S2265 /
NS2265
22 22 22
1.5 - 3.5 1.5 -3.5 1.5 - 3.5
N/A
N/A 2.3 0 - 4.2
6.50 6.50 6.75
190 190 190
1.6 1.6 1.6
SP2265 /
NSP2265
Velocidad/Relación
única
SPV22675HW /
NSPV22675HW
Velocidad/Relación
variable
7101395
7101401
7101396
7100851
7101193
7100913
Información sobre la potencia nominal del motor: La potencia nominal bruta para los modelos de motor de gasolina individuales está etiquetada de acuerdo con el código J1940 (Procedimiento de Cálculo de los Valores Nominales del Torque y Potencia de Motores Pequeños)
de la SAE (Society of Automotive Engineers), y el desempeño nominal ha sido obtenido y corregido de acuerdo con el código SAE J1995
(Revisión 2002-05). Los valores de torque son calculados a 3060 RPM; los valores de caballos de fuerza son calculados a 3600 RPM. La
potencia bruta real del motor será inferior y es afectada por, entre otras cosas, las condiciones operativas ambientales y la variabilidad de
motor a motor. Dadas ambas, la amplia variedad de productos en los cuales se colocan los motores y la variedad de factores ambientales
aplicables a la operación del equipo, el motor de gasolina no desarrollará la potencia bruta nominal cuando se utiliza en una pieza dada de
equipo motriz (real "en-sitio" o caballos de fuerza netos). Esta diferencia se debe a una variedad de factores, que incluyen, pero no se limitan
a, los accesorios (filtro de aire, tubo de escape, característica de cargado, enfriamiento, carburador, bomba de combustible, etc.), limitaciones de aplicación, condiciones operativas ambientales (temperatura, humedad, altitud), y variabilidad de motor a motor. Debido a limitaciones de fabricación y capacidad, Briggs & Stratton podría sustituir motor de mayor potencia nominal por el motor de esta Serie.
Snapper Products
535 Macon Street
22
McDonough, GA 30253
1-800-317-7833
www.snapper.com
 Loading...