

Operator's Manual
Manual No. 7104021 (Rev. ‘A’, 10/19/2010)
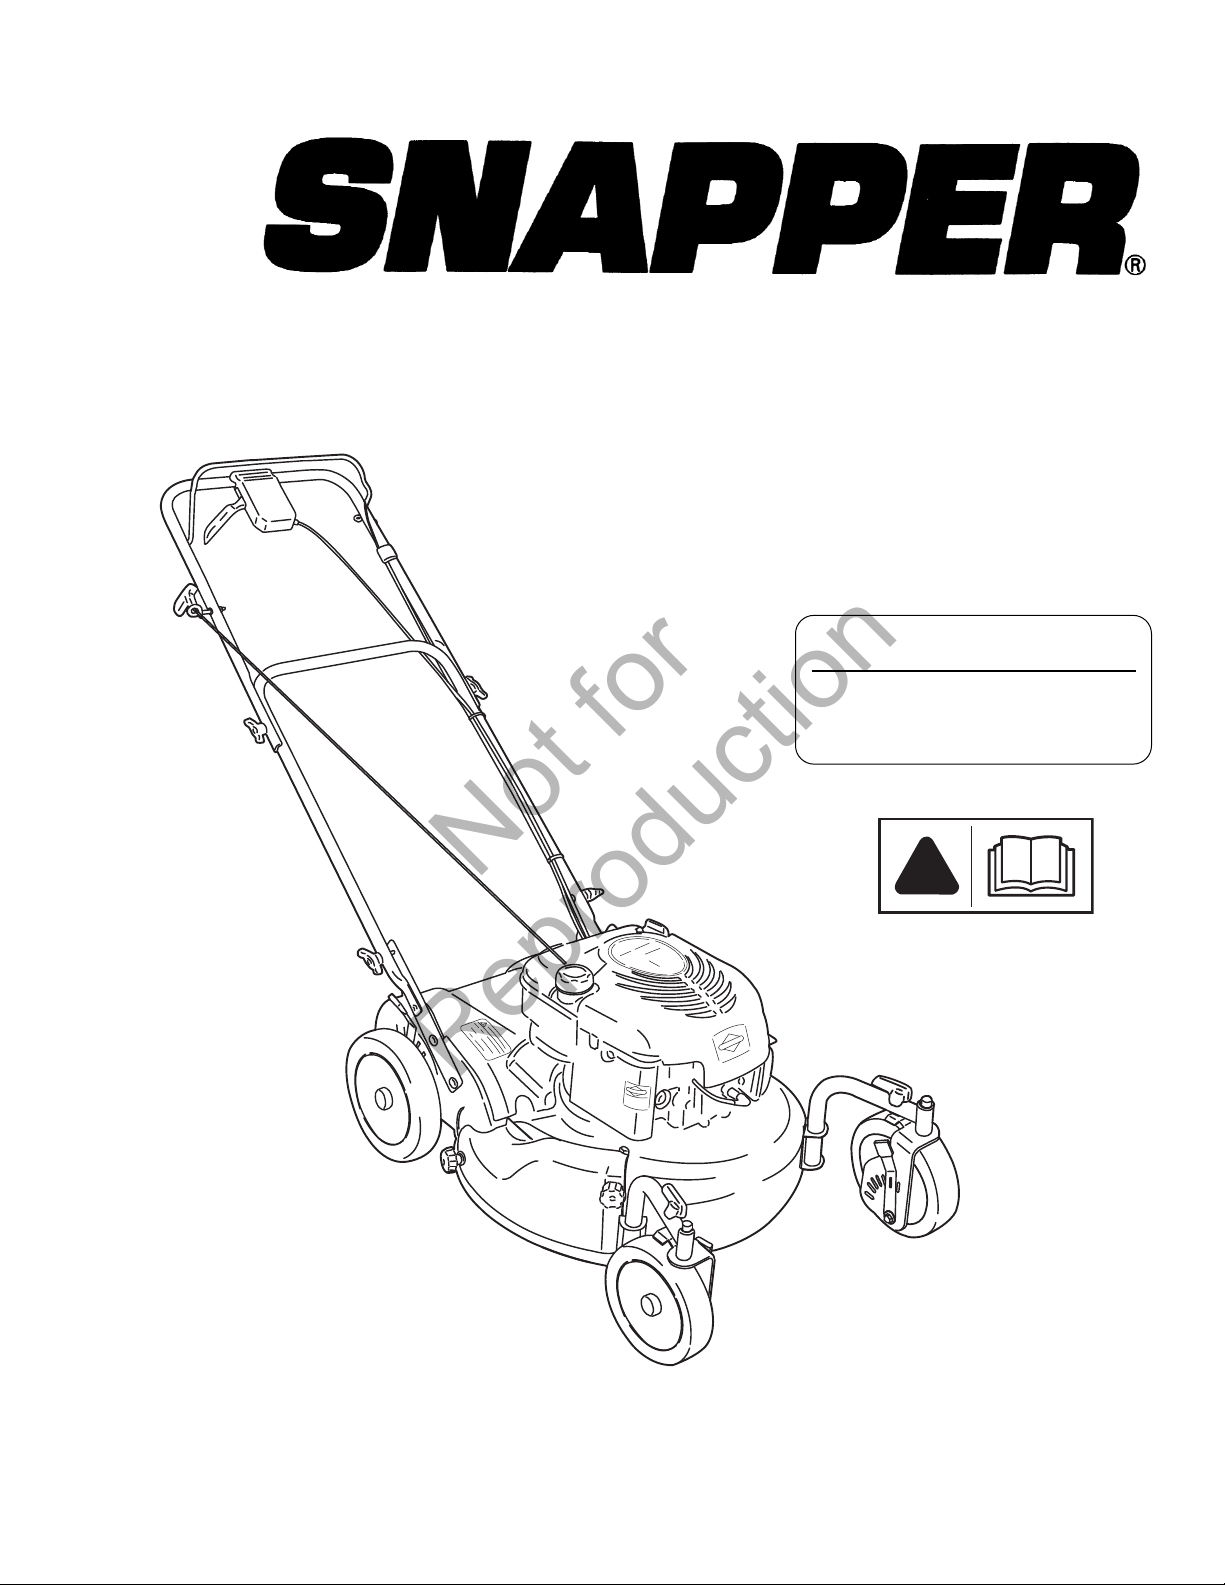
21” VARIABLE SPEED
SWIVEL WHEEL
WALK BEHIND
MOWER
Model No.Description
7800448 ESPV211S
7800730 ERPV21675SW
Not for
Reproduction
Not for
Reproduction
!

Thank You for purchasing this quality-built Snapper mower. We’re pleased that you placed your
confidence in the Snapper brand. When operated and maintained according to the instructions in this
manual, your Snapper mower will provide many years of dependable service.
This manual contains safety information to make you aware of the hazards and risks associated with the
machine and how to avoid them. This machine is designed and intended only for finish cutting of
established lawns and is not intended for any other purpose. It is important that you read and understand
these instructions thoroughly before attempting to start or operate this equipment. Save these original
instructions for future reference.
Complete the following information on your purchase.
Date of Purchase__________________________________________________________________
Retailer_________________________________________________________________________
Retailer's Phone Number___________________________________________________________
Equipment
Model Number______________________________________________________________
Serial Number ______________________________________________________________
Engine
Model_________________________T
ype__________________Code___________________
SNAPPER is a trademark of
Briggs & Stratton Power Products Group, LLC
Milwaukee, WI, USA.
Copyright © 2010, Briggs & Stratton Corporation
Milwaukee, WI, USA. All Rights Reserved.
Not for
Reproduction
Not for
Reproduction

3
Table of Contents
Operator Safety . . . . . . . . . . . . . . . . . . . . . . . . . . . . . . . . . . . . . . . . . . . . . . . .4
Operator Safety Instructions . . . . . . . . . . . . . . . . . . . . . . . . . . . . . . . . . . . . . . . . . . .4
Decal Identification . . . . . . . . . . . . . . . . . . . . . . . . . . . . . . . . . . . . . . . . . . . . . . . . . .6
Features and Controls . . . . . . . . . . . . . . . . . . . . . . . . . . . . . . . . . . . . . . . . . . .8
Operation . . . . . . . . . . . . . . . . . . . . . . . . . . . . . . . . . . . . . . . . . . . . . . . . . . . .9
Before Starting . . . . . . . . . . . . . . . . . . . . . . . . . . . . . . . . . . . . . . . . . . . . . . . . . . . . .9
Starting the Mower . . . . . . . . . . . . . . . . . . . . . . . . . . . . . . . . . . . . . . . . . . . . . . . . . .9
Propelling the Mower . . . . . . . . . . . . . . . . . . . . . . . . . . . . . . . . . . . . . . . . . . . . . . . .9
Stopping the Mower . . . . . . . . . . . . . . . . . . . . . . . . . . . . . . . . . . . . . . . . . . . . . . . . .9
Locking the Swivel Wheels . . . . . . . . . . . . . . . . . . . . . . . . . . . . . . . . . . . . . . . . . . .10
Handle Height Adjustment . . . . . . . . . . . . . . . . . . . . . . . . . . . . . . . . . . . . . . . . . . .10
Cutting Height Adjustment . . . . . . . . . . . . . . . . . . . . . . . . . . . . . . . . . . . . . . . . . . .10
Mulching Operation . . . . . . . . . . . . . . . . . . . . . . . . . . . . . . . . . . . . . . . . . . . . . . . . .11
Removing the Mulching Cover . . . . . . . . . . . . . . . . . . . . . . . . . . . . . . . . . . . . . . . .11
Installing the Discharge Deflector . . . . . . . . . . . . . . . . . . . . . . . . . . . . . . . . . . . . . .11
Installing the Grass Bag . . . . . . . . . . . . . . . . . . . . . . . . . . . . . . . . . . . . . . . . . . . . .12
Maintenance . . . . . . . . . . . . . . . . . . . . . . . . . . . . . . . . . . . . . . . . . . . . . . . . .13
Maintenance Chart . . . . . . . . . . . . . . . . . . . . . . . . . . . . . . . . . . . . . . . . . . . . . . . . .13
Change Engine Oil . . . . . . . . . . . . . . . . . . . . . . . . . . . . . . . . . . . . . . . . . . . . . . . . . .14
Service Air Filter . . . . . . . . . . . . . . . . . . . . . . . . . . . . . . . . . . . . . . . . . . . . . . . . . . .14
Check Interlock Safety System . . . . . . . . . . . . . . . . . . . . . . . . . . . . . . . . . . . . . . . .14
Clean Debris Off Mower . . . . . . . . . . . . . . . . . . . . . . . . . . . . . . . . . . . . . . . . . . . . .14
Drive Control . . . . . . . . . . . . . . . . . . . . . . . . . . . . . . . . . . . . . . . . . . . . . . . . . . . . . .14
Storage Procedure . . . . . . . . . . . . . . . . . . . . . . . . . . . . . . . . . . . . . . . . . . . . . . . . .15
Troubleshooting . . . . . . . . . . . . . . . . . . . . . . . . . . . . . . . . . . . . . . . . . . . . . . .16
Warranty . . . . . . . . . . . . . . . . . . . . . . . . . . . . . . . . . . . . . . . . . . . . . . . . . . . .17
Slope Guide . . . . . . . . . . . . . . . . . . . . . . . . . . . . . . . . . . . . . . . . . . . . . . . . .19
Not for
Reproduction
Not for
Reproduction

www.snapper.com4
!
WARNING: This powerful cutting machine is capable of amputating hands and feet and can throw objects
that can cause injury and damage! Failure to comply with the following SAFETY instructions could result in
serious injury or death to the operator or other persons. The owner of the machine must understand these
instructions and must allow only persons who understand these instructions to operate machine. Each
person operating the machine must be of sound mind and body and must not be under the influence of any
substance, which might impair vision, dexterity or judgment. If you have any questions pertaining to your
machine which your dealer cannot answer to your satisfaction, contact the Customer Service Department
(1-800-935-2967).
Protection for Children
Tragic accidents can occur if the operator is not alert to the
presence of children. Children are often attracted to the
machine and the mowing activity. Never assume that children
will remain where you last saw them.
1. KEEP children out of the mowing area and under the watchful care of a responsible adult other than the operator.
2. DO NOT allow children in yard when machine is operated
and turn machine OFF if anyone enters the area.
3. DO NOT allow pre-teenage children to operate machine.
4. ALLOW only responsible adults & teenagers with mature
judgment under close adult supervision to operate machine.
5. DO NOT pull mower backwards unless absolutely necessary.
LOOK and SEE behind and down for children, pets and hazards
before and while backing.
6. USE EXTRA CARE when approaching blind corners, shrubs,
trees, or other objects that may obscure vision.
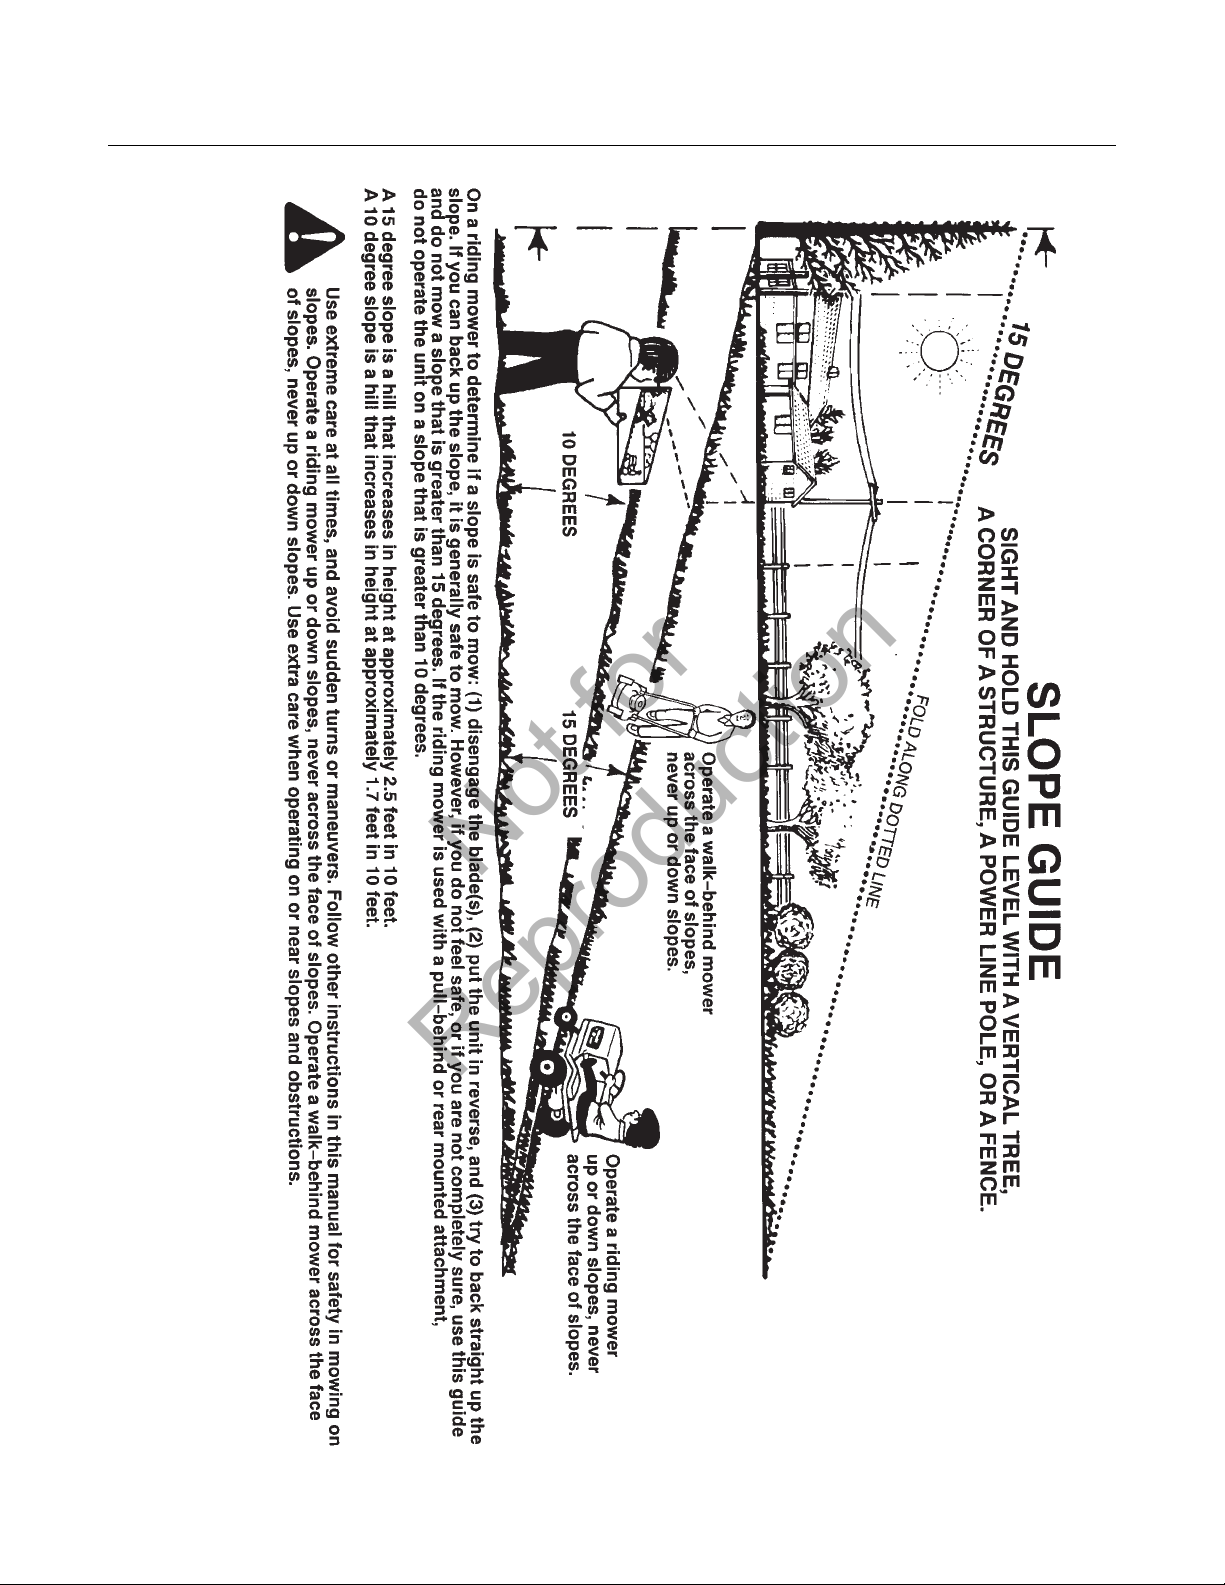
Slope Operation
1. Slopes are a major factor related to slip and fall accidents,
which can result in severe injury. All slopes require extra
caution. If you feel uneasy on a slope, DO NOT mow it.
2. Mow across slopes, never up-and-down. Exercise extreme
CAUTION when changing directions on slopes. DO NOT mow
steep slopes or other areas where stability or traction is in
doubt. Refer to the Slope Guide at the end of this manual.
3. Use extra care with grass catchers or other attachments;
these affect the handling and the stability of the machine.
Preparation
1. Read, understand, and follow instructions and warnings in
this manual and on the mower, engine and attachments. Know
the controls and the proper use of the mower before starting.
2. Only mature, responsible persons shall operate the machine
and only after proper instruction.
3. Data indicates that operators age 60 and above, are involved
in a large percentage of mower-related injuries. These
operators should evaluate their ability to operate the mower
safely enough to protect themselves and others from serious
injury.
4. Handle fuel with extra care. Fuels are flammable and vapors
are explosive. Use only an approved fuel container. DO NOT
remove fuel cap or add fuel with engine running. Add fuel
outdoors only with engine stopped and cool. Clean spilled fuel
and oil from machine. DO NOT smoke.
Preparation
(Continued From Previous Column)
5. Check the area to be mowed and remove all objects such as
toys, wire, rocks, limbs and other objects that could cause
injury if thrown by blade or interfere with mowing. Also note
the location of holes, stumps, and other possible hazards.
6. Keep people and pets out of the mowing area. Immediately,
STOP Blade, Stop engine and Stop mower if anyone enters the
area.
7. Check shields, deflectors, switches, blade controls and other
safety devices frequently for proper operation and location.
8. Make sure all safety decals are clearly legible. Replace if
damaged.
9. Protect yourself when mowing and wear safety glasses, a
dust mask, long pants, and substantial footwear. DO NOT mow
barefooted or with sandals.
10. Know how to STOP blade and engine quickly in preparation
for emergencies.
11. Use extra care when loading or unloading the machine into
a trailer or truck.
12. Check grass catcher components frequently for signs of
wear or deterioration and replace as needed to prevent injury
from thrown objects going through weak or torn spots.
Safe Handling of Gasoline
To avoid personal injury or property damage, use extreme care
in handling gasoline. Gasoline is extremely flammable and the
vapors are explosive.
1. Extinguish all cigarettes, cigars, pipes and other sources of
ignition.
2. Use only an approved fuel container.
3. DO NOT remove fuel cap or add fuel with the engine
running. Allow the engine to cool before refueling.
4. DO NOT refuel the machine indoors.
5. DO NOT store the machine or fuel container inside where
there is an open flame, spark or pilot light such as on a water
heater or other appliances.
6. DO NOT fill fuel containers inside a vehicle or on a truck or
trailer bed with a plastic liner. Always place the containers on
the ground away from the vehicle before filling.
7. Remove gas-powered equipment from the vehicle or trailer
and refuel it on the ground. If this is not possible, then refuel
equipment using a portable container, rather than a gasoline
dispenser nozzle.
Operator Safety
Not for
Reproduction
Not for
Reproduction

5
Safe Handling of Gasoline
(Continued From Previous Page)
8. DO NOT start gas powered equipment in enclosed vehicles
or trailers.
9. Keep the nozzle in contact with the rim of the fuel tank or
container opening at all times until fueling is complete. DO
NOT use a nozzle lock-open device
10. If fuel is spilled on clothing, change clothing immediately.
11. DO NOT overfill a fuel tank. Replace fuel cap and tighten
securely.
Operation
1. DO NOT put hands or feet near or under rotating parts. Keep
clear of discharge area while engine is running.
2. STOP engine when crossing gravel drives, walks, or roads,
and under any conditions where thrown objects might be a
hazard.
3. Mow only in daylight or good artificial light.
4. DO NOT operate mower while under the influence of alcohol
or drugs.
5. After striking a foreign object or if mower vibrates
abnormally, STOP the engine, disconnect and secure spark
plug wire. Inspect the mower for any damage and repair the
damage before starting.
6. DO NOT mow near drop offs, ditches or embankments.
Operator could lose footing or balance.
7. STAY ALERT for holes and other hidden hazards. Tall grass
can hide obstacles. Keep away from ditches, washouts,
culverts, fences and protruding objects.
8. DO NOT mow on wet grass. Always be sure of your footing.
Keep a firm hold on the handle and walk, never run. Slipping
could cause injury.
9. ALWAYS stay behind handle when engine (motor) is
running.
10. DO NOT leave the machine with the engine running. STOP
BLADE and STOP ENGINE before leaving the operators
position for any reason.
11. Before cleaning, repairing or inspecting make certain
engine, blade and all moving parts have STOPPED. Disconnect
and secure spark plug wire away from plug to prevent
accidental starting.
12. STOP engine and wait until the blade comes to complete
STOP before removing grass bag and/or clearing grass.
13. DO NOT operate mower without the entire grass catcher, or
guards in place discharge guard, rear guard or other safety
devices in place and working. DO NOT point discharge at
people, passing cars, windows or doors.
14. DO NOT discharge material against a wall or obstruction.
Material may ricochet back towards the operator.
15. Slow down before turning.
16. Watch out for traffic when near or crossing roadways.
Operation
(Continued From Previous Column)
17. DO NOT operate engine in enclosed areas. Engine exhaust
gases contain carbon monoxide, a deadly poison.
18. Only use accessories approved by the manufacturer. See
manufacturer’s instructions for proper operation and
installation of accessories.
Maintenance and Storage
1. DO NOT store mower or fuel container inside where fumes
may reach an open flame, spark or pilot light such as in a
water heater, furnace, clothes dryer or other gas appliance.
Allow engine to cool before storing machine in an enclosure.
Store fuel container out of reach of children in a well
ventilated, unoccupied building.
2. Keep mower and engine free of grass, leaves or excess
grease to reduce fire hazard and engine overheating.
3. When draining fuel tank, drain fuel into an approved
container outdoors and away from open flame.
4. Keep all bolts, especially blade bolts, nuts and screws
properly tight. Check that all cotter pins are in proper position.
5. Always provide adequate ventilation when running engine.
Engine exhaust gases contain carbon monoxide, a deadly
poison.
6. Service engine and make adjustments only when engine is
stopped. Removed spark plug wire from spark plug and secure
wire away from spark plug to prevent accidental starting.
7. DO NOT change engine governor speed settings or
overspeed engine.
8. Check grass bag assembly frequently for wear or
deterioration to avoid thrown objects and exposure to moving
parts. Replace with new bag if loose seams or tears are
evident. Replace slider or bag adapter if broken or cracked.
9. Mower blades are sharp and can cut. Wrap the blades or
wear heavy leather gloves and use CAUTION when handling
them.
10. DO NOT test for spark by grounding spark plug next to
spark plug hole; spark plug could ignite gas exiting engine.
11. Have machine serviced by an authorized dealer at least
once a year and have the dealer install any new safety devices.
12. Use only genuine replacement parts to assure that original
standards are maintained.
Operator Safety
Not for
Reproduction
Not for
Reproduction

www.snapper.com6
Warning Instructions:
A. Read, understand and follow instructions and warnings in
the operator’s manual, as well as on the mower, engine and
attachments before operating.
B. Indicates possible severe injury from rotating cutting blades.
C. Do not operate without entire grass catcher or guard in
place.
D. Keep children and others out of mowing area.
CA
DB
Serial Tag:
A. Manufacturing (Part) Number
B. Description/Model Number
C. Serial Number
D. Manufacturer Information
E. Sound Power
F. Unit Mass
G. Kilowatts
H. Max RPM’s
I. Year of Manufacture
J. European Certification
E
A
F
D
B
C
G
H
J
I
Decal Identification
Operator Safety
Not for
Reproduction
Not for
Reproduction
Mfg. No. XXXXXXX
WALK BEHIND LAWN MOWER
S/N XXXXXXXXXX
BRIGGS & STRATTON YPPG
MILWAUKEE, WI USA
XX
2010
dB
kg: XX
kW: X.XX
XXXX max

7
Control Head Decal:
A. Engage/Fast
B. Slow/Disengage
B
A
Blade Control:
A. Stop
B. Run
B
A
Operator Safety
Not for
Reproduction
Not for
Reproduction

8
IMPORTANT
The figures and illustrations in this manual are provided
for reference only and may differ from your specific
model. Contact your dealer if you have questions.
A. Oil Fill Cap and Dipstick
B. Fuel Filler Cap
C. Mulching Cover
D. Rear Height Adjustment Latch (2)
E. Front Height Adjustment Latch (2)
F. Swivel Wheel Lock Knob (2)
G. Blade Control
H. Rope Start Handle
I. Drive Control
E
C
D
H
I
G
A
B
www.snapper.com
F
Features and Controls
Not for
Reproduction
Not for
Reproduction
9
Before Starting
1. Check the guards, deflectors, grass bag, adapter, and
covers to make sure all are in place and securely
tightened.
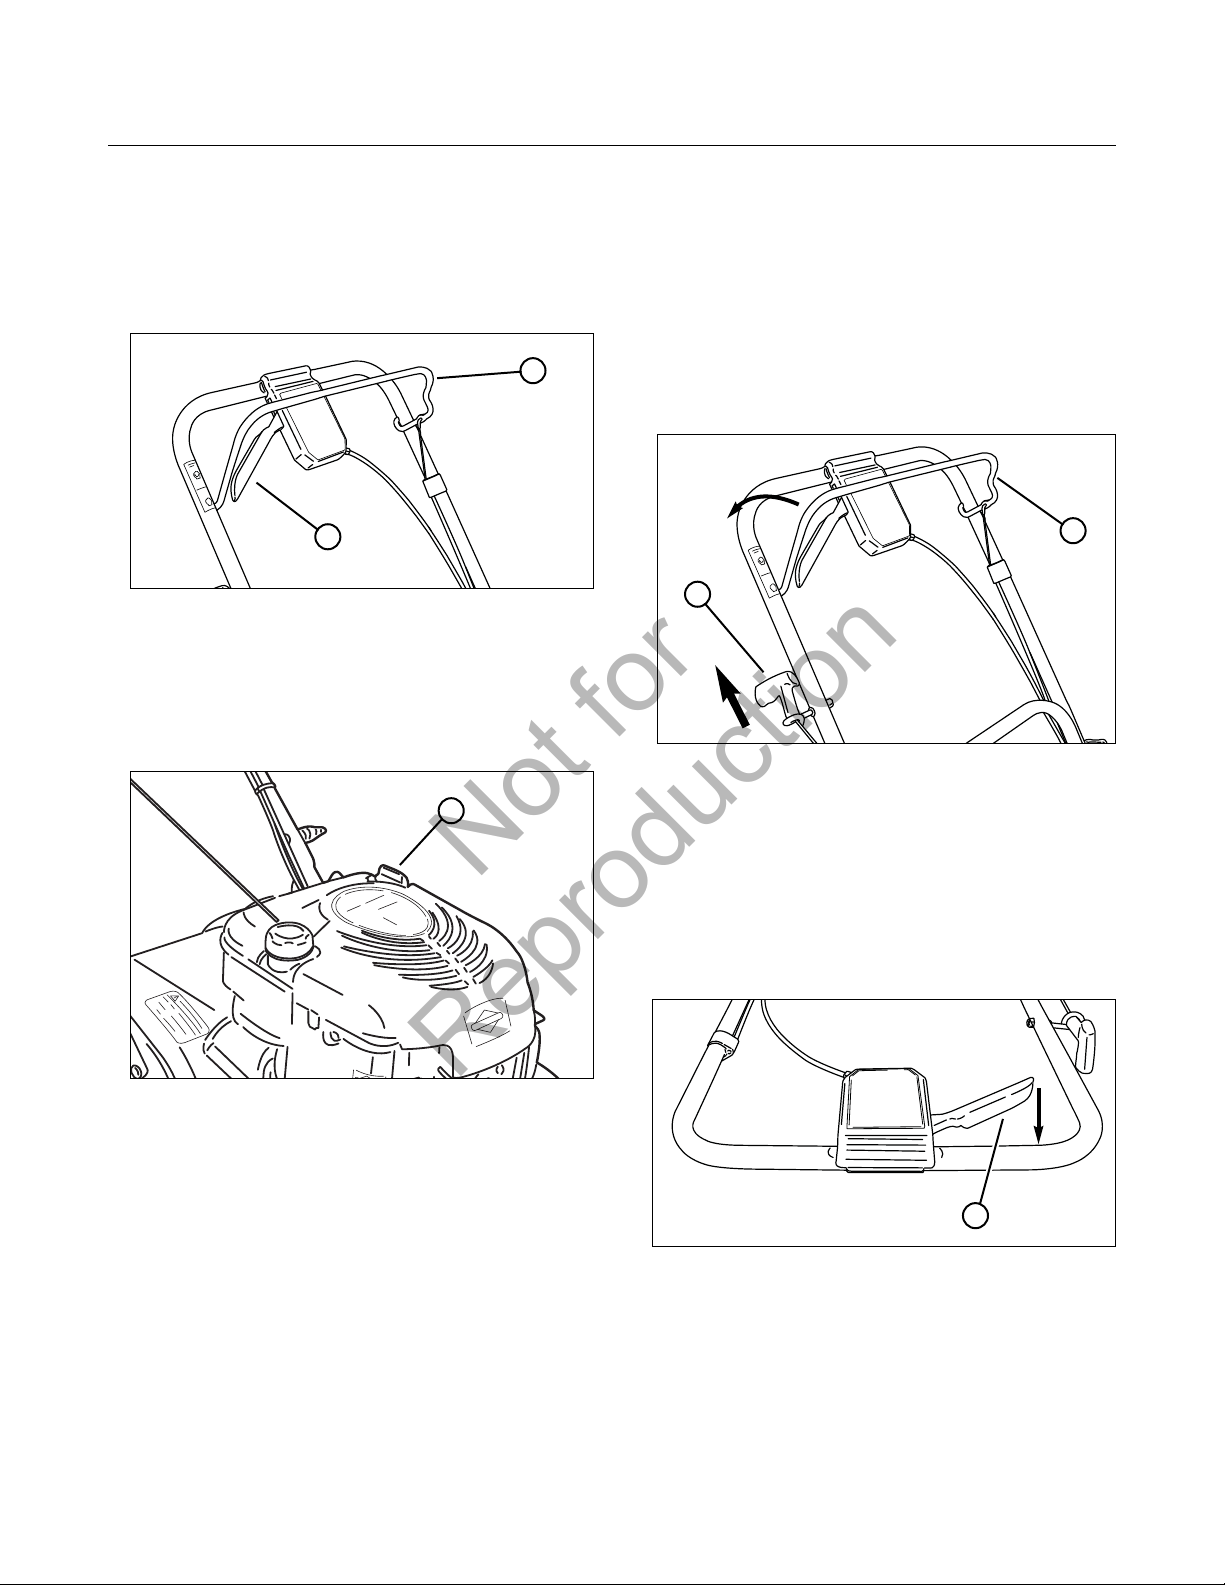
2. Check the blade control (A, Figure 1) and drive
control (B) to insure they work freely.
3. Check the cutting height. Adjust to the desired height.
Refer to the Section ‘Cutting Height Adjustment’.
4. Check the engine oil (A, Figure 2) and add oil as needed
to bring the level up to the ‘full’ mark. Refer to the
Engine Owner’s Manual for oil specifications.
5. Add fuel to the tank after pushing the mower outside
where fumes can safely dissipate. Fill the tank to 1-1/2
inches below the top of the filler neck (to allow for fuel
expansion). Make sure the cap is tightened after fueling.
Refer to the Engine Owners Manual for fuel
specifications.
6. Clean the exterior surfaces of the cutting deck and
engine of any accumulation of spilled fuel, dirt, grass,
oil, etc. Keep the engine air intake screen and cooling
fins clear at all times.
Starting the Mower
This Briggs & Stratton engine is equipped with a
Ready StartTMfeature, and does not require priming.
1. Squeeze and hold the blade control (A, Figure 3)
against the handle.
2. Pull the rope start handle (B) to crank the engine.
3. To stop the engine (and blade), release the blade
control.
4. After the engine starts, allow a brief warm-up until the
engine runs smooth before beginning mower operation.
Propelling the Mower
1. Start the engine.
2. Begin squeezing the drive control (A, Figure 4) back
toward the handle to engage the wheel drive and propel
the mower forward. Forward speed can be increased
by squeezing the drive control further back toward
the handle.
Stopping the Mower
1. Stop forward motion of the mower by releasing the
drive control.
2. Stop the engine and blade by releasing the blade
control.
Figure 2: Checking engine oil
B
A
Figure 1: Mower controls
A
B
A
Figure 3: Starting the mower
Figure 4: Drive control
(Blade control removed for clarity)
A
Operation
Not for
Reproduction
Not for
Reproduction
10
Locking the Swivel Wheels
The front wheels can be locked to keep the mower traveling
in a straight line.
1. Move the mower straight ahead a few feet so the
casters are facing forward.
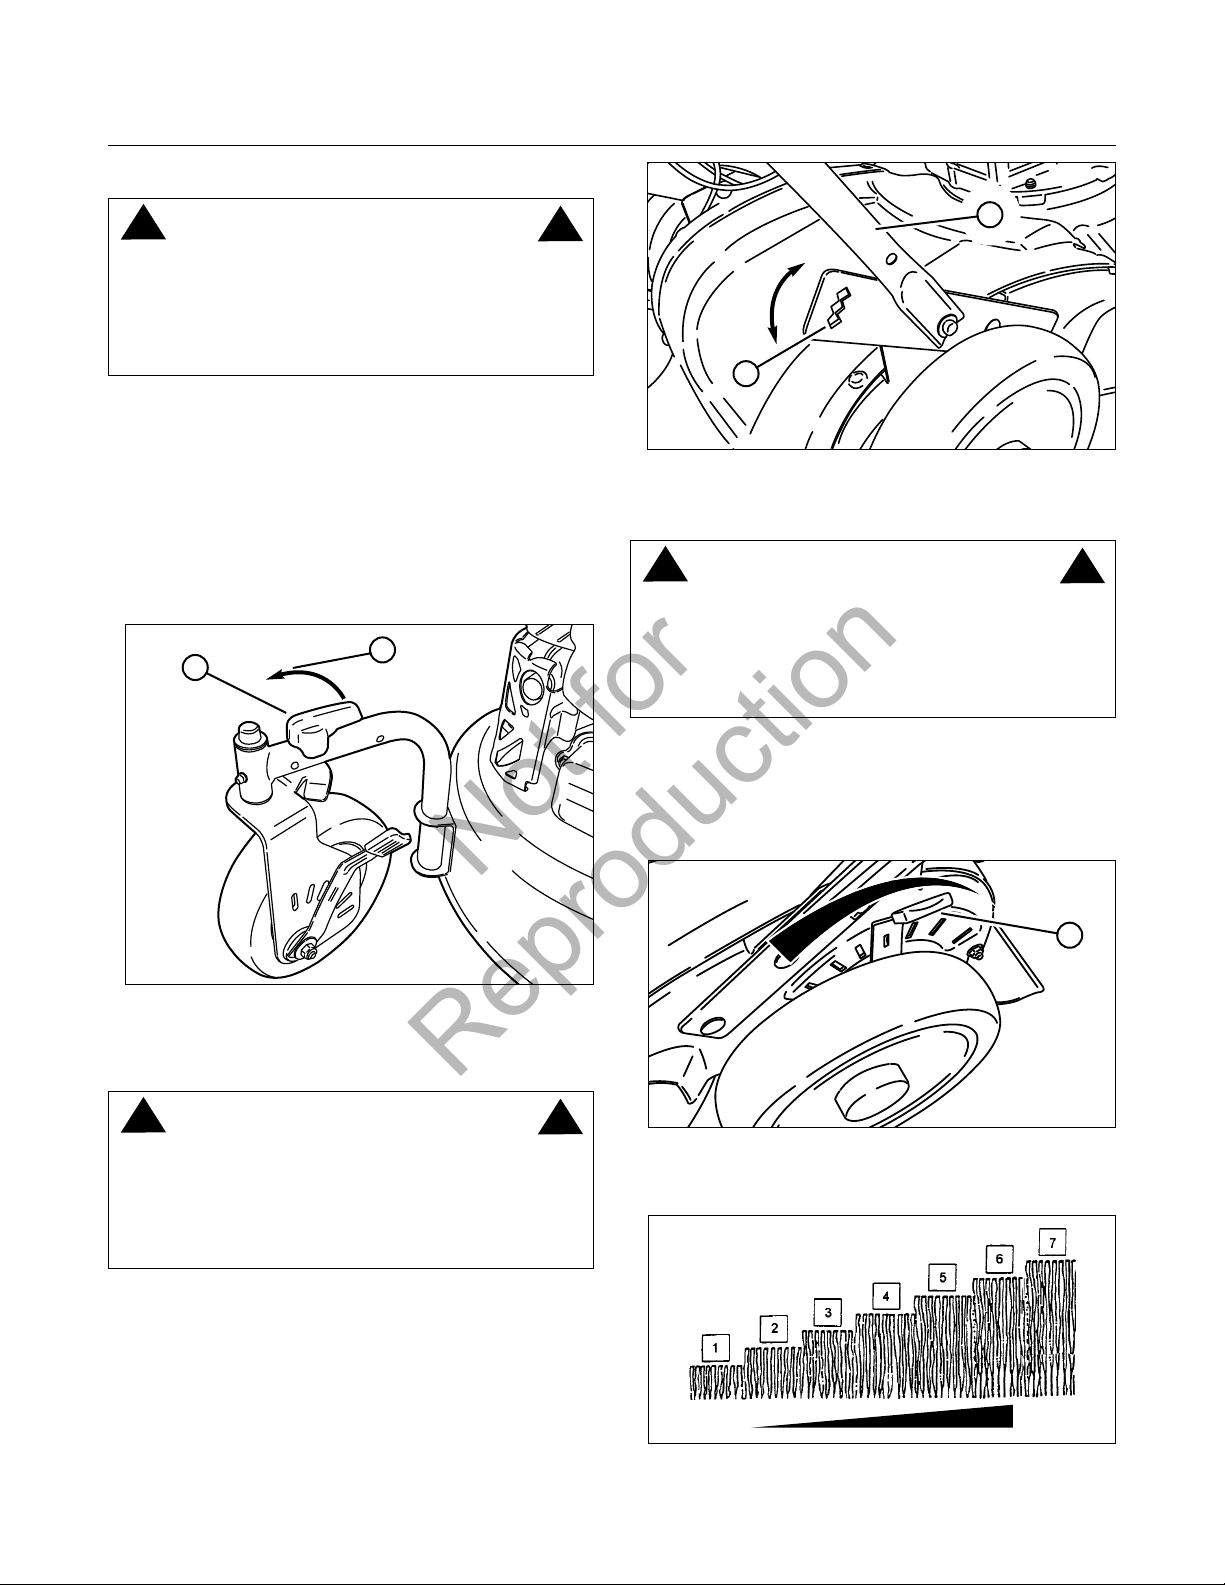
2. Move the swivel caster lock knobs (A, Figure 5) to the
‘lock’ position (shown) to lock the casters in the forward
position.
3. To release the casters, simply move the swivel caster
lock knobs to the ‘unlock’ position (B).
Handle Height Adjustment
For greater operator comfort, the height of the mower handle
can be adjusted.
1. Remove the T-knobs and carriage bolts securing the
lower handle (A, Figure 6) to the mounting brackets (B).
2. Align the holes in the handle assembly with one of the
three handle height adjustment holes in the mounting
bracket.
3. Replace the removed hardware, tightening securely.
Cutting Height Adjustment
1. Pull the height adjusting latch (A, Figure 7) outward and
move to the desired cutting height.
2. Set all wheels at the same cutting height. The highest
cutting position is Notch 7 (Figure 8). The lowest
cutting position is Notch 1.
www.snapper.com
Figure 6: Adjusting the handle height
B
WARNING
DO NOT attempt any maintenance, adjustments or service
with engine and blade running. STOP engine and blade.
Disconnect spark plug wire and secure away from spark
plug. Engine and components are HOT. Avoid serious
burns, allow sufficient time for all components to cool.
!
!
WARNING
DO NOT attempt any maintenance, adjustments or service
with engine and blade running. STOP engine and blade.
Disconnect spark plug wire and secure away from spark
plug. Engine and components are HOT. Avoid serious
burns, allow sufficient time for all components to cool.
!
!
Figure 7: Adjusting cutting height
A
4.00 in1.25 in
Figure 8: Cutting height settings (approximate)
A
(Rear wheel shown; front wheel similar)
Figure 5: Locking the swivel caster
B
A
WARNING
DO NOT attempt any maintenance, adjustments or service
with engine and blade running. STOP engine and blade.
Disconnect spark plug wire and secure away from spark
plug. Engine and components are HOT. Avoid serious
burns, allow sufficient time for all components to cool.
!
!
Operation
Not for
Reproduction
Not for
Reproduction
11
Mulching Operation
For best mulching results, cut up to a maximum of 1/3 of
grass blade length and recycle ONLY when grass is dry.
1. Set all wheels in the highest cutting position (Notch 7).
2. Proceed mowing slowly. If the grass is very dense,
lower each rear wheel latch one notch lower than the
front wheel latches to improve mulching performance.
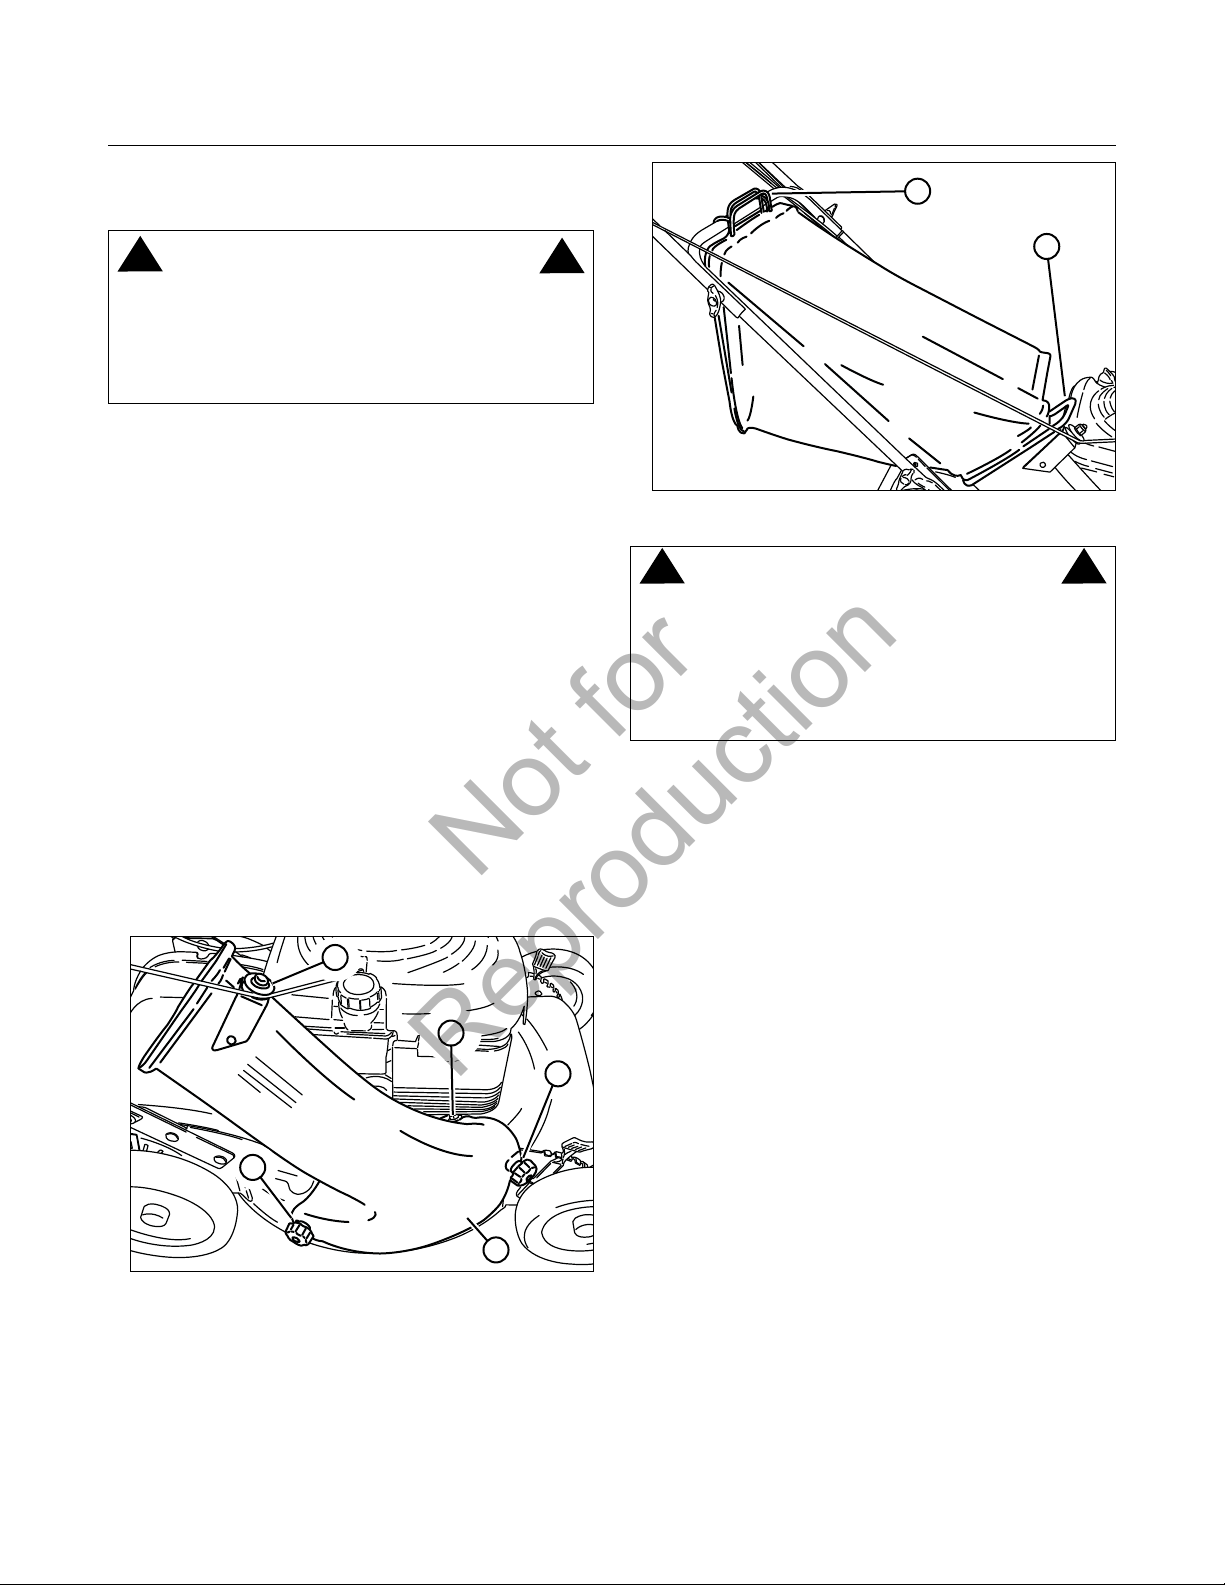
Removing the Mulching Cover
Important: The mulching cover should remain on the
machine at all times, unless alternate discharge operations
are desired, such as side discharging or bagging.
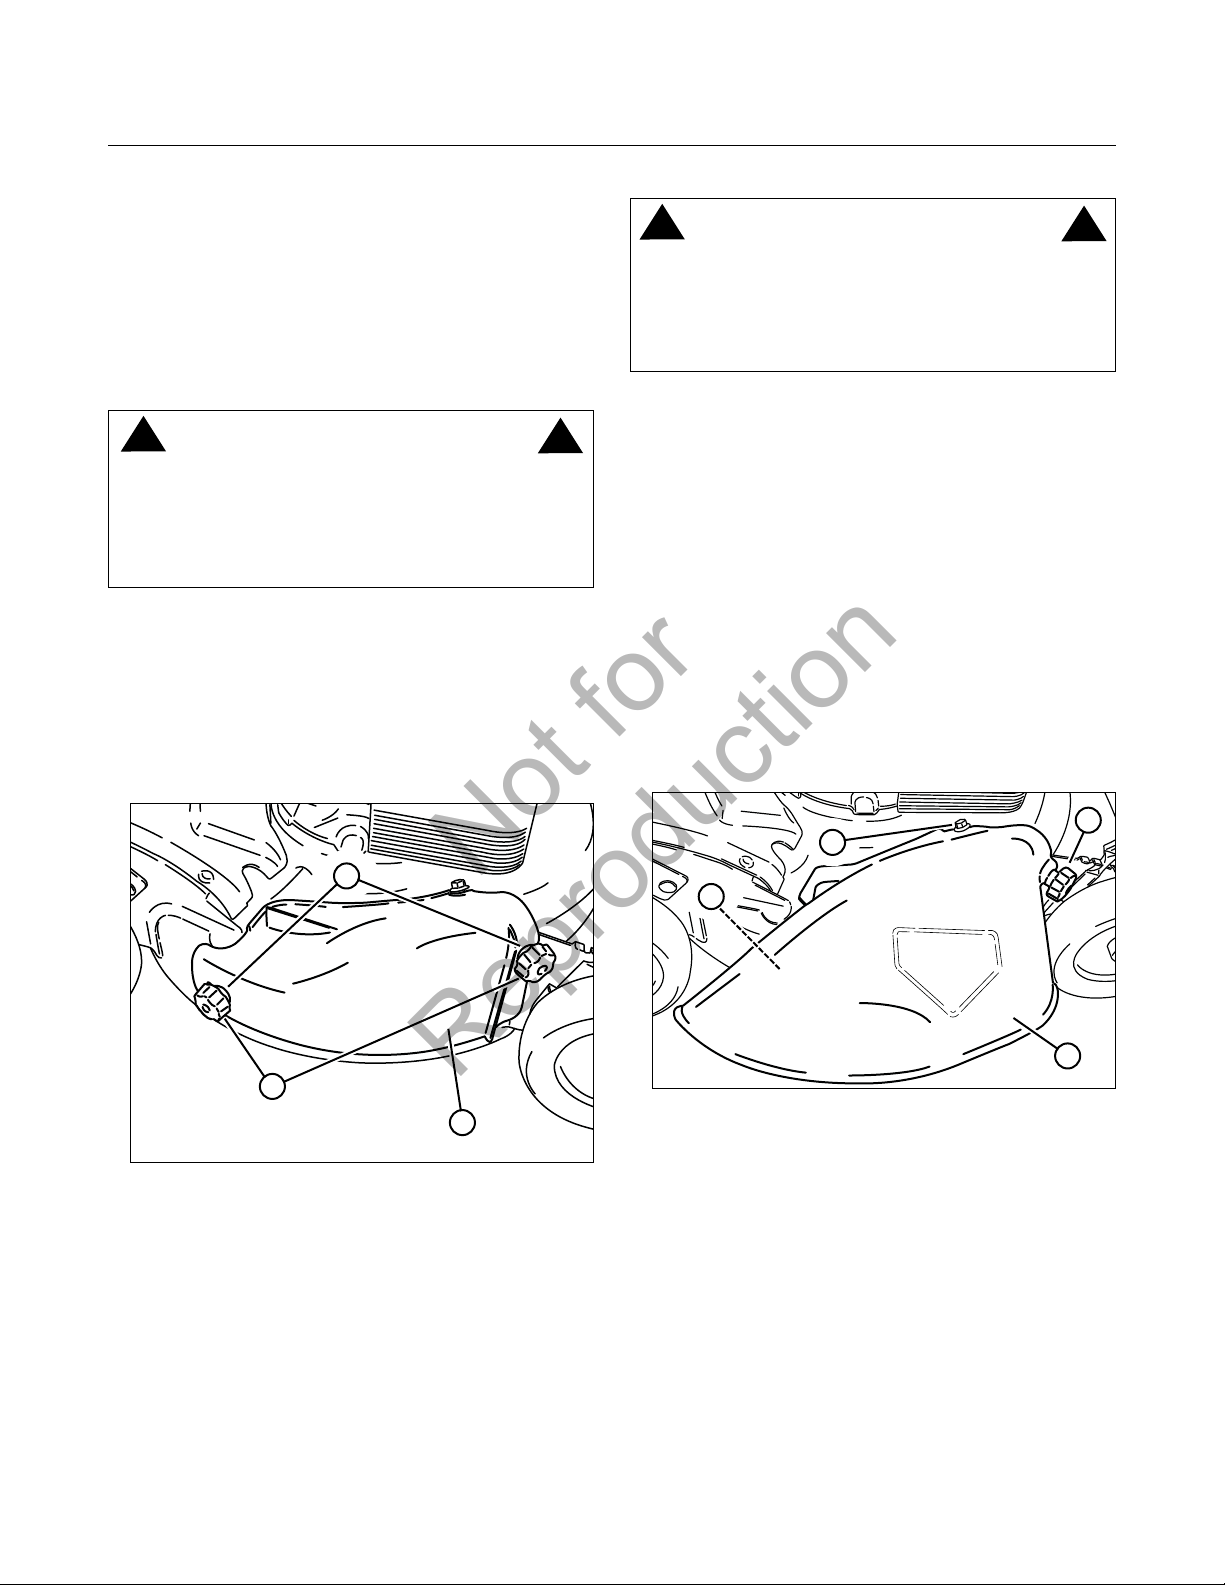
1. Remove the knob nuts (A, Figure 9) and internal/
external tooth lock washers (B) securing the mulching
cover (C) to the mower deck.
2. Remove the cover.
Installing the Discharge Deflector
1. Remove the mulching cover. Refer to the Section
entitled “Removing the Mulching Cover”.
2. Install the deflector (A, Figure 10) to the deck in place
of the mulching cover, making sure that:
• The front hole (B) on the outside front of the
deflector fits over the stud where the front of the
mulching cover was originally secured
• The slot (C) on top of the deflector slips under the
restraining nut on top of the deck (under the right
front corner of the engine)
• The slot (D) on the inside rear of the deflector slips
onto the stud behind the rear of the discharge
opening, where the rear of the mulching cover was
originally secured.
3. Install the internal/external tooth lock washers and knob
nuts onto the studs and tighten securely.
Figure 9: Removing the mulching cover
A
C
B
WARNING
DO NOT attempt any maintenance, adjustments or service
with engine and blade running. STOP engine and blade.
Disconnect spark plug wire and secure away from spark
plug. Engine and components are HOT. Avoid serious
burns, allow sufficient time for all components to cool.
!
!
WARNING
DO NOT attempt any maintenance, adjustments or service
with engine and blade running. STOP engine and blade.
Disconnect spark plug wire and secure away from spark
plug. Engine and components are HOT. Avoid serious
burns, allow sufficient time for all components to cool.
!
!
Figure 10: Installing the discharge deflector
B
A
C
D
Operation
Not for
Reproduction
Not for
Reproduction
12
Installing the Grass Bag
(Optional Accessory on Some Models)
1. Remove the mulching cover. Refer to the Section
entitled “Removing the Mulching Cover”.
2. Install the grass bag adapter (A, Figure 11) to the deck
in place of the mulching cover, making sure that:
• The front hole (B) on the outside front of the
adapter fits over the stud where the front of the
mulching cover was originally secured
• The slot (C) on top of the adapter slips under the
restraining nut on top of the deck (under the right
front corner of the engine)
• The slot (D) on the rear of the adapter slips onto
the stud behind the rear of the discharge opening,
where the rear of the mulching cover was
originally secured.
3. Install the internal/external tooth lock washers and knob
nuts onto the studs and tighten securely.
4. Route the recoil rope around the outside of the rope
guide pulley (E).
Note:
The recoil rope can be slackened by squeezing the
blade control against the handle.
5. Install the grass bag by sliding the connector (A, Figure
12) over the adapter flange.
6. Attach the grass bag hooks (B) over the middle handle
cross bar.
www.snapper.com
WARNING
Grass Catcher bags are made of woven fabric, and are
subject to deterioration and wear during normal usage.
Check condition of bag before each use. Immediately
replace worn or damaged catcher bags with only bags
recommended by the manufacturer. The grass catcher
is optional equipment on some models.
!
!
Figure 11: Installing the grass bag adapter
Figure 12: Installing the grass bag
B
A
B
D
A
E
C
WARNING
DO NOT attempt any maintenance, adjustments or service
with engine and blade running. STOP engine and blade.
Disconnect spark plug wire and secure away from spark
plug. Engine and components are HOT. Avoid serious
burns, allow sufficient time for all components to cool.
!
!
Operation
Not for
Reproduction
Not for
Reproduction

Maintenance Chart
13
WARNING
DO NOT attempt any maintenance, adjustments or service
with engine and blade running. STOP engine and blade.
Disconnect spark plug wire and secure away from spark
plug. Engine and components are HOT. Avoid serious
burns, allow sufficient time for all components to cool.
Wear heavy leather gloves when handling or working
around cutting blades. Blades are extremely sharp and can
cause severe injury.
!
!
MOWER
Every 8 Hours or Daily
Check safety interlock system
Clean debris off mower
Every 25 Hours or Annually *
Check mower for loose hardware
See Dealer Annually to
Lubricate mower
Check mower blade **
Check mower blade stopping time
Check drive belt
Clean battery and cables (if equipped)
ENGINE
First 5 Hours
Change engine oil
Every 8 Hours or Daily
Check engine oil level
Every 25 Hours or Annually *
Clean engine air filter and pre-cleaner (if equipped) **
Every 50 Hours or Annually *
Change engine oil
Replace oil filter (if equipped)
Annually
Replace air filter
Replace pre-cleaner (if equipped)
See Dealer Annually to
Inspect muffler and spark arrester (if equipped)
Replace spark plug
Replace fuel filter (if equipped)
Clean engine air cooling system
* Whichever comes first
**Check blades more often in regions with sandy soils or
high dust conditions.
* Whichever comes first
**Clean more often in dusty conditions or when airborne
debris is present.
Maintenance
Not for
Reproduction
Not for
Reproduction
14 www.snapper.com
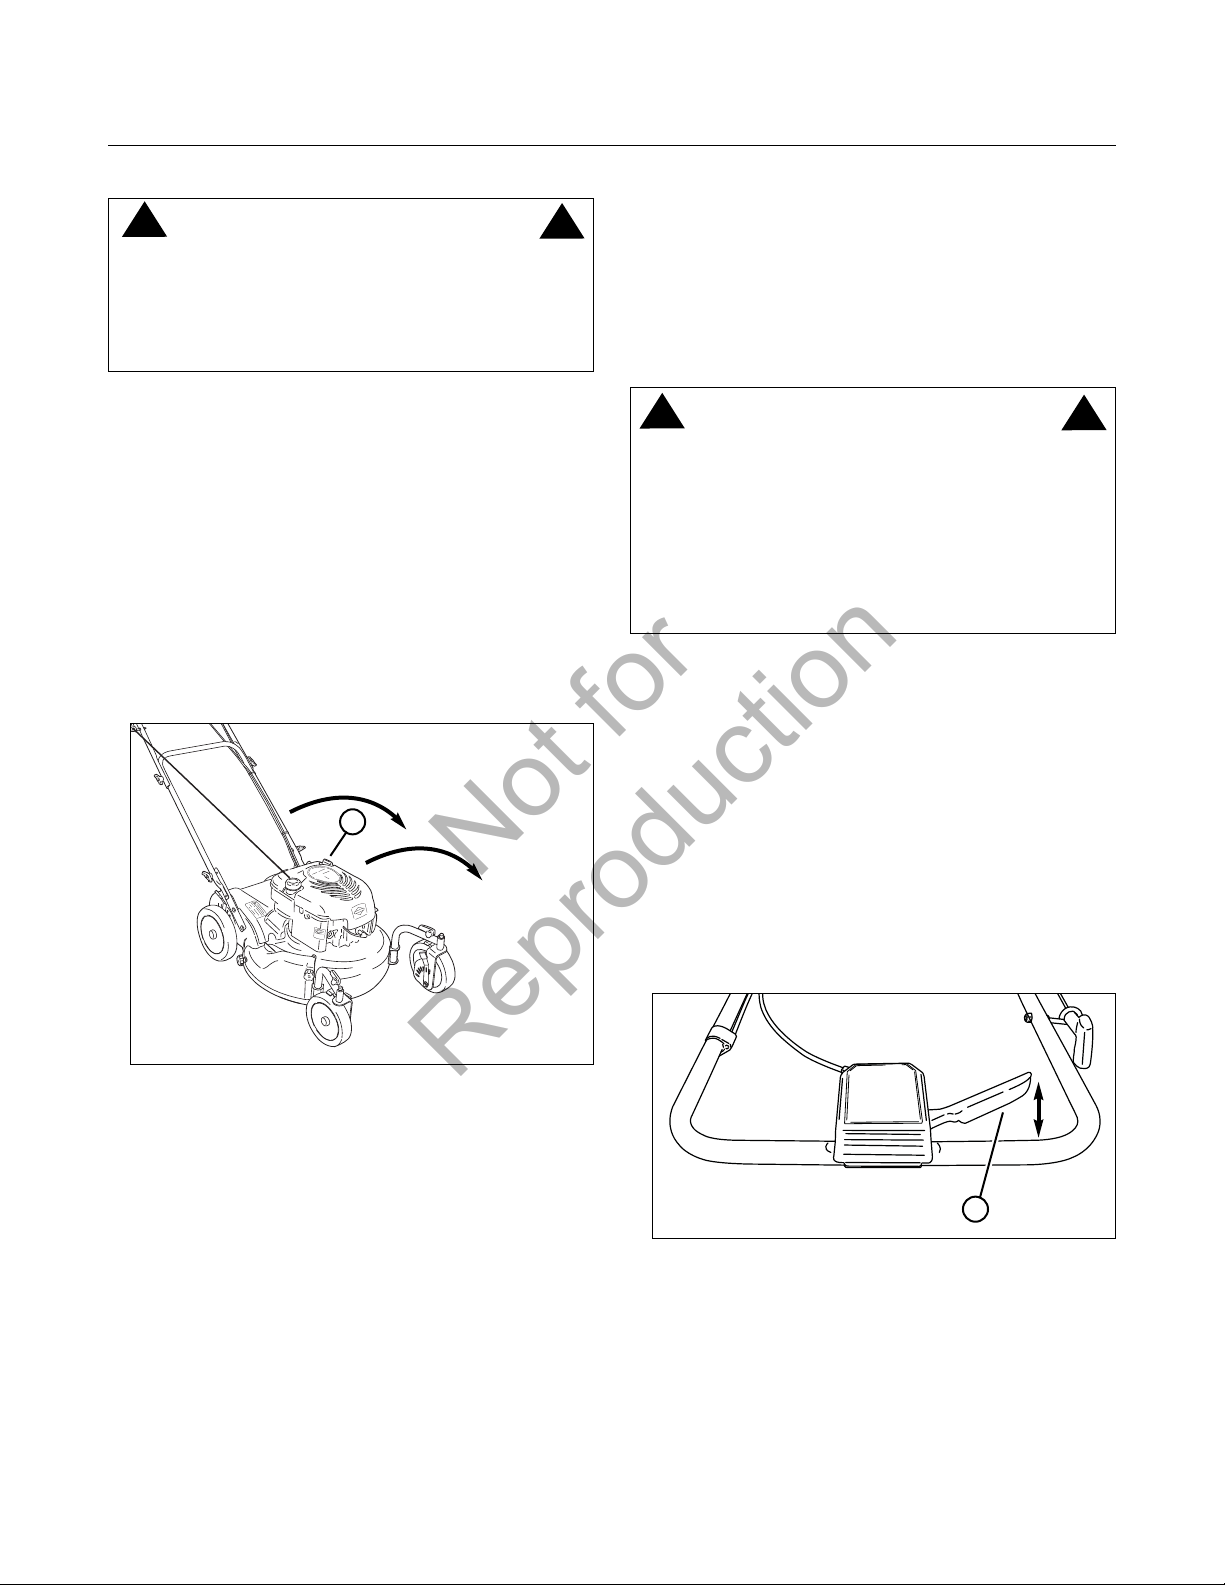
Change Engine Oil
1. Refer to the Engine Manual for proper oil specifications,
procedures and proper service intervals.
2. For the simplest/cleanest oil change, simply turn the
mower on its side to drain the oil, as shown. Drain the
oil through the dipstick tube (A, Figure 13) into a
container. Allow sufficient time for all the oil to drain.
Important: Drain the fuel tank before tipping the machine.
DO NOT tip the machine with the carburetor or spark plug
down. Oil from the crankcase will saturate the air filter and
cause the engine to be hard to start or not start at all. If
contamination does occur, the air filter will have to be
replaced.
3. Dispose of drain oil properly.
4. Fill the engine with oil as specified in the Engine Manual.
Do Not overfill.
Service Air Filter
Refer to the engine owner’s manual for air filter service
instructions.
Check Safety Interlock System
1. Start the mower.
2. Release the blade. The engine must stop within 3
seconds.
If the engine does not stop, do not use the mower. Bring the
mower to an authorized dealer for service.
Clean Debris Off Mower
1. Clean dirt and debris from the top of the mower deck.
2. Clean any debris buildup on or around the engine, etc.
While cleaning, check components for wear and damage.
Replaced worn and damaged components immediately.
Drive Control
The drive control (A, Figure 14) should engage the
transmission when the lever is squeezed back against the
handlebar, and disengage the transmission when the lever is
released. If the transmission does not fully engage or
disengage, contact your authorized Snapper dealer before
operating the mower.
Figure 13: Draining the engine oil
WARNING
DO NOT attempt any maintenance, adjustments or service
with engine and blade running. STOP engine and blade.
Disconnect spark plug wire and secure away from spark
plug. Engine and components are HOT. Avoid serious
burns, allow sufficient time for all components to cool.
!
!
A
WARNING
DO NOT attempt any maintenance, adjustments or service
with engine and blade running. STOP engine and blade.
Disconnect spark plug wire and secure away from spark
plug. Engine and components are HOT. Avoid serious
burns, allow sufficient time for all components to cool.
Wear heavy leather gloves when handling or working
around cutting blades. Blades are extremely sharp and can
cause severe injury.
!
!
Maintenance
Figure 14: Drive control
A
(Components removed for clarity)
Not for
Reproduction
Not for
Reproduction

15
Storage Procedure
Refer to the Engine Owner’s Manual for directions regarding
engine storage preparations. Prepare the mower for “end of
season” storage as follows:
1. Disconnect the spark plug wire and secure away from
the spark plug.
2. Drain the fuel from the fuel tank and let the engine run
until all fuel is out of the carburetor.
3. Use a brush or compressed air to remove loose debris,
then use a damp cloth to wipe down the unit.
4. Tilt the mower up on its rear wheels and thoroughly
clean the underside of the deck. Do not tilt the mower
with the spark plug or carburetor down. Scrape away
any accumulation of grass with a putty knife and/or
wire brush.
5. Lubricate all exposed metal with a light coating of oil to
prevent corrosion.
6. Carefully fold the handles, flexing the control cables to
prevent cable damage.
7. Store the mower in a shed or other dry area, protected
from weather.
WARNING
DO NOT attempt any maintenance, adjustments or service
with engine and blade running. STOP engine and blade.
Disconnect spark plug wire and secure away from spark
plug. Engine and components are HOT. Avoid serious
burns, allow sufficient time for all components to cool.
Wear heavy leather gloves when handling or working
around cutting blades. Blades are extremely sharp and can
cause severe injury.
!
!
Maintenance
Not for
Reproduction
Not for
Reproduction

16 www.snapper.com
PROBLEM PROBABLE CAUSE CORRECTIVE ACTION
Engine Will Not Start 1. Fuel tank empty. 1. Fill fuel tank with fresh fuel.
2. Spark plug wire disconnected. 2. Place spark plug wire onto spark plug.
Engine Stalls or Loses
Power After Running
1. Blade control is released or is not being held
securely against handle.
1. Blade control should be held securely against
handle at all times during operation of mower.
2. Fuel tank empty. 2. Fill with fuel to proper level.
3. Engine air pre-cleaner and or air cleaner dirty. 3. Clean free of all debris.
4. Spark plug defective or gap set improperly. 4. Service spark plug.
5. Water, debris or stale fuel in fuel system. 5. Drain and clean fuel system.
Excessive Vibration 1. Damaged, out of balance or bent mower
blade.
1. Contact authorized dealer.
2. Loose blade components. 2. Contact authorized dealer.
3. Loose or missing air lift (if equipped). 3. Contact authorized dealer.
4. Lumpy or frayed belt. 4. Contact authorized dealer.
Mower Will Not Move /
Loss Of Traction
1. Build-up of debris on or around wheel drive
components.
1. Clean debris.
2. Transmission cable adjustment required. 2. Contact authorized dealer.
3. Drive belt requires replacement. 3. Contact authorized dealer.
4. Damaged transmission. 4. Contact authorized dealer.
Cutting Grass
Improperly
1. Cutting height too low or high. 1. Adjust cutting height.
2. Forward ground speed too fast. 2. Move ground speed control to a slower speed.
3. Terraced cut, side to side. 3. Adjust height of cut with height adjust levers.
4. Excessive deck pitch, front to rear. 4. Adjust height of cut with height adjust levers.
5. Cutting blade dull or damaged. 5. Contact authorized dealer.
Poor Grass Discharge 1. Forward speed too fast. 1. Move ground speed control to a slower speed.
2. Grass is wet. 2. Mow when grass is dry.
3. Excessively worn or damaged blade. 3. Contact authorized dealer.
4. Build up of grass clippings and debris under
deck.
4. Clean deck.
5. Improper blade installed on deck. 5. Contact authorized dealer.
6. Blade installed improperly on deck. 6. Contact authorized dealer.
Oil Leaking 1. Loose dipstick. 3. Make sure dipstick/oil filler cap is securely in
place.
2. Loose drain plug. 2. Check and tighten drain plug.
3. Oil level is overfilled. 3. drain excess oil.
4. Damaged oil seals. 4. Contact authorized dealer.
Troubleshooting
Not for
Reproduction
Not for
Reproduction

17
BRIGGS & STRATTON POWER PRODUCTS GROUP, L.L.C. OWNER WARRANTY POLICY
WARRANTY PERIOD
ABOUT YOUR WARRANTY
Item Consumer Use Commercial Use:
Equipment 2 Years 90 Days
Engine* 2 Years 90 Days
Battery 1 Year 1 Year
LIMITED WARRANTY
Briggs & Stratton Power Products Group, LLC will repair and/or replace, free of charge, any part(s) of the equipment that is defective in
material or workmanship or both. Briggs & Stratton Corporation will repair and/or replace, free of charge, any part(s) of the Briggs and
Stratton engine* (if equipped) that is defective in material or workmanship or both. Transportation charges on product submitted for repair
or replacement under this warranty must be borne by purchaser. This warranty is effective for the time periods and subject to the conditions stated below. For warranty service, find the nearest Authorized Service Dealer using our dealer locator at
www.BriggsandStratton.com.
There is no other express warranty. Implied warranties, including those of merchantability and fitness for a particular purpose, are limited
to one year from purchase or to the extent permitted by law. Liability for incidental or consequential damages are excluded to the extent
exclusion is permitted by law.
Some states or countries do not allow limitations on how long an implied warranty lasts, and some states or countries do not allow the
exclusion or limitation of incidental or consequential damages, so the above limitation and exclusion may not apply to you. This warranty
gives you specific legal rights and you may also have other rights which vary from state to state or country to country.
The warranty period begins on the date of purchase by the first retail consumer or commercial end user, and continues for the period of time
stated above. “Consumer use” means personal residential household use by a retail consumer. “Commercial use” means all other uses,
including use for commercial, income producing or rental purposes. Once product has experienced commercial use, it shall thereafter be
considered as commercial use for purposes of this warranty.
No warranty registration is necessary to obtain warranty on Briggs & Stratton products. Save your proof of purchase receipt. If you do not
provide proof of the initial purchase date at the time warranty service is requested, the manufacturing date of the product will be used to
determine warranty eligibility.
We welcome warranty repair and apologize to you for being inconvenienced. Warranty service is available only through servicing dealers
authorized by Briggs & Stratton or BSPPG, LLC.
Most warranty repairs are handled routinely, but sometimes requests for warranty service may not be appropriate. This warranty only covers
defects in materials or workmanship. It does not cover damage caused by improper use or abuse, improper maintenance or repair, normal
wear and tear, or stale or unapproved fuel.
Improper Use and Abuse - The proper, intended use of this product is described in the Operator’s Manual. Using the product in a way not
described in the Operator’s Manual or using the product after it has been damaged will void your warranty. Warranty is not allowed if the
serial number on the product has been removed or the product has been altered or modified in any way, or if the product has evidence of
abuse such as impact damage, or water/chemical corrosion damage.
Improper Maintenance or Repair - This product must be maintained according to the procedures and schedules provided in the Operator’s
Manual, and serviced or repaired using genuine Briggs & Stratton parts. Damage caused by lack of maintenance or use of non-original parts
is not covered by warranty.
Normal Wear - Like all mechanical devices, your unit is subject to wear even when properly maintained. This warranty does not cover repairs
when normal use has exhausted the life of a part or the equipment. Maintenance and wear items such as filters, belts, cutting blades, and
brake pads (engine brake pads are covered) are not covered by warranty due to wear characteristics alone, unless the cause is due to defects
in material or workmanship.
Stale Fuel - In order to function correctly, this product requires fresh fuel that conforms to the criteria specified in the Operator’s Manual.
Damage caused by stale fuel (carburetor leaks, clogged fuel tubes, sticking valves, etc) is not covered by warranty.
* Applies to Briggs and Stratton engines only. Warranty coverage of non-Briggs and Stratton engines is provided by the engine manufacturer.
Warranty
Not for
Reproduction
Not for
Reproduction

18
Notes
www.snapper.com
Not for
Reproduction
Not for
Reproduction
19
Slope Guide
Not for
Reproduction
Not for
Reproduction

Engine Power Rating Information: The gross power rating for individual gas engine models is labeled in accordance with
SAE (Society of Automotive Engineers) code J1940 (Small Engine Power & Torque Rating Procedure), and rating performance has been obtained and corrected in accordance with SAE J1995 (Revision 2002-05). Torque values are derived at 3060
RPM; horsepower values are derived at 3600 RPM. Actual gross engine power will be lower and is affected by, among other
things, ambient operating conditions and engine-to-engine variability. Given both the wide array of products on which engines
are placed and the variety of environmental issues applicable to operating the equipment, the gas engine will not develop the
rated gross power when used in a given piece of power equipment (actual "on-site" or net power). This difference is due to a
variety of factors including, but not limited to, accessories (air cleaner, exhaust, charging, cooling, carburetor, fuel pump,
etc.), application limitations, ambient operating conditions (temperature, humidity, altitude), and engine-to-engine variability.
Due to manufacturing and capacity limitations, Briggs & Stratton may substitute an engine of higher rated power for this
Series engine.
Common Service Parts Part Number
Blade Control Cable 7100074YP
Wheel Drive Control Cable 7104004YP
Cutter Blade (Double Wave) 7100242AYP
Cutter Blade (Ninja - Quad) 7026407AYP
Drive Belt 7100883YP
Product Specifications
Deck Size (in) 21
Height of Cut (in) 1.25 - 4
Transmission Type Gear
Ground Speed (mph) 0 - 4
Engine Power (gross torque) 6.75
Engine Displacement (cc) 190
Fuel Tank Capacity (qt) 1.0
20
www.snapper.com
1-800-935-2967
21” VARIABLE SPEED
SWIVEL WHEEL
WALK BEHIND
MOWER
Not for
Reproduction
Not for
Reproduction
Manuel d’utilisation
TONDEUSE À GAZON
À ROUES PIVOTANTES
À VITESSE VARIABLE
DE 21 PO
N° de modèle Description
7800448 ESPV211S
7800730 ERPV21675SW
Not for
Reproduction
Not for
Reproduction
!

Merci d’avoir acheté cette tondeuse Snapper de qualité. Nous sommes heureux que vous ayez fait
confiance à la marque Snapper. Lorsqu’elle est utilisée et entretenue conformément aux instructions de
ce manuel, la tondeuse Snapper fournira de nombreuses années de service fiable.
Ce manuel contient des informations de sécurité indiquant les dangers et les risques associés à la
machine et la façon de les éviter. Cette machine est conçue et prévue exclusivement pour la coupe de
finition de pelouses bien établies et n’est destinée à aucun autre emploi. Il est important de lire et de
comprendre ces instructions dans leur intégralité avant de tenter de démarrer ou de faire fonctionner ce
matériel. Conservez ces instructions pour toute consultation ultérieure.
Consignez les renseignements suivants concernant votre achat.
Date d’achat_______________________________________________________________________
Revendeur________________________________________________________________________
Numéro de téléphone du revendeur____________________________________________________
Matériel
Numéro de modèle___________________________________________________________
Numéro de série______________________________________________________________
Moteur
Modèle________________________Type__________________Code___________________
SNAPPER est une marque de commerce de
Briggs & Stratton Power Products Group, LLC
Milwaukee, WI, États-Unis.
Copyright © 2010, Briggs & Stratton Corporation
Milwaukee, WI, États-Unis. Tous droits réservés.
Not for
Reproduction
Not for
Reproduction

33
Table des matières
Sécurité de l’opérateur . . . . . . . . . . . . . . . . . . . . . . . . . . . . . . . . . . . . . . . . . . .4
Consignes de sécurité de l’opérateur . . . . . . . . . . . . . . . . . . . . . . . . . . . . . . . . . . . .4
Identification des étiquettes . . . . . . . . . . . . . . . . . . . . . . . . . . . . . . . . . . . . . . . . . . .6
Caractéristiques et commandes . . . . . . . . . . . . . . . . . . . . . . . . . . . . . . . . . . . . .8
Fonctionnement . . . . . . . . . . . . . . . . . . . . . . . . . . . . . . . . . . . . . . . . . . . . . . . .9
Avant le démarrage . . . . . . . . . . . . . . . . . . . . . . . . . . . . . . . . . . . . . . . . . . . . . . . . . .9
Démarrer la tondeuse . . . . . . . . . . . . . . . . . . . . . . . . . . . . . . . . . . . . . . . . . . . . . . . .9
Faire avancer la tondeuse . . . . . . . . . . . . . . . . . . . . . . . . . . . . . . . . . . . . . . . . . . . . .9
Arrêter la tondeuse . . . . . . . . . . . . . . . . . . . . . . . . . . . . . . . . . . . . . . . . . . . . . . . . . .9
Verrouiller les roues pivotantes . . . . . . . . . . . . . . . . . . . . . . . . . . . . . . . . . . . . . . . .10
Réglage de la hauteur du guidon . . . . . . . . . . . . . . . . . . . . . . . . . . . . . . . . . . . . . .10
Réglage de la hauteur de coupe . . . . . . . . . . . . . . . . . . . . . . . . . . . . . . . . . . . . . . .10
Déchiquetage . . . . . . . . . . . . . . . . . . . . . . . . . . . . . . . . . . . . . . . . . . . . . . . . . . . . .11
Dépose du couvercle de déchiquetage . . . . . . . . . . . . . . . . . . . . . . . . . . . . . . . . . .11
Pose du déflecteur d’éjection . . . . . . . . . . . . . . . . . . . . . . . . . . . . . . . . . . . . . . . . .11
Pose du sac de ramassage . . . . . . . . . . . . . . . . . . . . . . . . . . . . . . . . . . . . . . . . . . .12
Entretien . . . . . . . . . . . . . . . . . . . . . . . . . . . . . . . . . . . . . . . . . . . . . . . . . . . .13
Tableau d’entretien . . . . . . . . . . . . . . . . . . . . . . . . . . . . . . . . . . . . . . . . . . . . . . . . .13
Changement de l’huile moteur . . . . . . . . . . . . . . . . . . . . . . . . . . . . . . . . . . . . . . . .14
Entretien du filtre à air . . . . . . . . . . . . . . . . . . . . . . . . . . . . . . . . . . . . . . . . . . . . . .14
Contrôler le système de verrouillage de sécurité . . . . . . . . . . . . . . . . . . . . . . . . . .14
Nettoyage des débris de la tondeuse . . . . . . . . . . . . . . . . . . . . . . . . . . . . . . . . . . .14
Commande de propulsion . . . . . . . . . . . . . . . . . . . . . . . . . . . . . . . . . . . . . . . . . . . .14
Procédure de remisage . . . . . . . . . . . . . . . . . . . . . . . . . . . . . . . . . . . . . . . . . . . . . .15
Dépannage . . . . . . . . . . . . . . . . . . . . . . . . . . . . . . . . . . . . . . . . . . . . . . . . . .16
Garantie . . . . . . . . . . . . . . . . . . . . . . . . . . . . . . . . . . . . . . . . . . . . . . . . . . . .17
Guide de pente . . . . . . . . . . . . . . . . . . . . . . . . . . . . . . . . . . . . . . . . . . . . . . .19
Not for
Reproduction
Not for
Reproduction

www.snapper.com4
!
AVERTISSEMENT : Cette puissante machine de coupe est capable d’amputer les mains et les pieds et peut projeter des
objets susceptibles de causer des blessures et des dégâts ! Veiller à respecter les consignes de SÉCURITÉ sous peine
de blessures graves ou de mort de l’opérateur et autres personnes. Le propriétaire de la machine doit comprendre ces
instructions et doit autoriser uniquement les personnes qui comprennent ces instructions à utiliser la machine. Toute
personne qui utilise la machine doit être saine d’esprit et de corps et ne doit être sous l’emprise d’aucune substance
susceptible d’altérer la vue, la dextérité ou le jugement. Pour toutes questions concernant la machine auxquelles le
revendeur ne peut répondre de façon satisfaisante, contacter le Service après-vente (1-800-935-2967).
Protection des enfants
Des accidents tragiques sont possibles si l’opérateur n’est pas
conscient de la présence d’enfants. Les enfants sont souvents
attirés par la machine et par l’activité de tonte. Ne jamais supposer
que les enfants resteront au dernier endroit où ils ont été vus.
1. GARDER les enfants hors de la zone de tonte et sous la
surveillance attentive d’un adulte responsable autre que l’opérateur.
2. NE PAS permettre la présence d’enfants dans le jardin lorsque
la machine est utilisée et ARRÊTER la machine si quiconque entre
dans la zone.
3. NE PAS laisser d’enfants pré-adolescents utiliser la machine.
4. PERMETTRE uniquement à des adultes responsables et à des
adolescents à l’esprit mûr sous l’étroite surveillance d’un adulte
d’utiliser la machine.
5. NE PAS tirer la tondeuse en marche arrière, sauf absolue
nécessité. REGARDER vers le bas et derrière soi pour VOIR s’il y a
des enfants, animaux ou autres dangers avant et pendant la
marche arrière.
6. FAIRE PREUVE DE BEAUCOUP DE PRÉCAUTION à l’approche de
coins sans visibilité, buissons, arbres et autres obstacles à la vue.
Fonctionnement en pente
1. Les pentes sont un facteur fréquemment associé aux glissements
et aux chutes, qui peuvent causer des blessures graves. Faire
preuve de prudence supplémentaire sur toutes les pentes. Si on
n’est pas confortable sur une pente, NE PAS la tondre.
2. Tondre les pentes latéralement, jamais de haut en bas. Faire
preuve de très grande PRÉCAUTION lors des changements de
direction sur une pente. NE PAS tondre des pentes raides ou
autres surfaces sur lesquelles la stabilité ou l’adhérence sont
doûteuses. Se reporter au Guide de pente à la fin de ce manuel.
3. Faire preuve de beaucoup de précaution avec les bacs de
ramassage et autres accessoires susceptibles d’altérer la
maniabilité et la stabilité de la machine.
Préparation
1. Lire, comprendre et respecter les instructions et les mises en
garde de ce manuel et sur la tondeuse, le moteur et les
accessoires. Veiller à connaître les commandes et la bonne
utilisation de la tondeuse avant de démarrer.
2. Seules des personnes mûres et responsables doivent utiliser la
machine et uniquement après une instruction correcte.
3. Les statistiques indiquent que les opérateurs de 60 ans ou plus
sont impliqués dans une importante proportion des blessures
associées aux outils à moteur. Ces utilisateurs doivent évaluer leur
capacité à faire fonctionner la tondeuse de manière suffisamment
sûre pour se protéger et protéger autrui de toute blessure grave.
4. Manipuler l’essence avec précaution. L’essence est inflammable
et ses vapeurs sont explosives. Utiliser uniquement un bidon
d’essence homologué. NE PAS enlever le bouchon d’essence ni
ajouter d’essence avec le moteur en marche. Faire le plein à
l’extérieur uniquement, avec le moteur arrêté et froid. Nettoyer
l’essence et l’huile renversés sur la machine. NE PAS fumer.
Préparation
(suite de la colonne précédente)
5. Contrôler la zone à tondre et enlever tous les objets tels que
jouets, câbles, pierres, branches et autres objets susceptibles de
causer des blessures en cas d’éjection par la lame ou de faire
obstacle à la tonte. Noter aussi l’emplacement des trous, souches
et autres dangers possibles.
6. Tenir les personnes et animaux hors de la zone à tondre.
ARRÊTER la lame, couper le moteur et arrêter la tondeuse
immédiatement si quiconque entre dans la zone.
7. Contrôler fréquemment le bon fonctionnement et l’emplacement
des écrans, déflecteurs, commutateurs, commandes de lame et
autres dispositifs de sécurité.
8. Vérifier que tous les autocollants de sécurité sont bien lisibles.
Les changer s’ils sont endommagés.
9. Se protéger durant la tonte et porter des lunettes de sécurité,
un masque à poussière, un pantalon long et des chaussures
solides. NE PAS tondre pieds nus ou en sandales.
10. Savoir comment ARRÊTER la lame et le moteur rapidement en
cas d’urgence.
11. Faire preuve de beaucoup de précaution pour charger ou
décharger la machine sur une remorque ou un camion.
12. Vérifier fréquemment l’absence d’usure et de détérioration des
pièces du sac de ramassage et les changer le cas échéant pour
éviter les blessures par projection d’objets à travers les parois
usées ou déchirées.
Manipulation sans danger de l’essence
Pour éviter toute blessure corporelle ou tout dommage matériel,
faire preuve d’extrême prudence lors de la manipulation d’essence.
L’essence est extrêmement inflammable et les vapeurs sont
explosives.
1. Éteindre les cigarettes, cigares, pipes et autres sources
d’inflammation.
2. Utiliser uniquement un bidon d’essence homologué.
3. NE PAS enlever le bouchon d’essence ni ajouter d’essence avec
le moteur en marche. Laisser le moteur refroidir avant de faire le
plein.
4. NE PAS refaire le plein d’essence à l’intérieur.
5. NE PAS remiser la machine ou le bidon d’essence en présence
d’une flamme nue, d’étincelles ou d’une veilleuse, telle que dans
un chauffe-eau ou autre appareil.
6. NE PAS remplir les bidons d’essence à l’intérieur d’un véhicule
ou sur un camion ou un plateau de camion recouvert de plastique.
Toujours placer les bidons sur le sol à l’écart du véhicule avant de
les remplir.
7. Décharger la machine à essence du camion ou de la remorque
et faire le plein sur le sol. Si ce n’est pas possible, faire le plein
avec un bidon portable plutôt qu’avec le pistolet de pompe à
essence.
Sécurité de l’opérateur
Not for
Reproduction
Not for
Reproduction

5
Manipulation sans danger de l’essence
(suite de la page précédente)
8. NE PAS démarrer une machine à essence dans un véhicule ou
une remorque fermés.
9. Garder en permanence le pistolet au contact du rebord de
l’ouverture du réservoir ou du bidon d’essence jusqu’à la fin du
plein. NE PAS utiliser le loquet d’ouverture du pistolet.
10. En cas d’éclaboussures d’essence sur les vêtements, en
changer immédiatement.
11. NE PAS trop remplir le réservoir. Remettre le bouchon
d’essence en place et bien serrer.
Fonctionnement
1. NE PAS placer les mains ou les pieds près ou sous des pièces
en rotation. Rester à l’écart de la zone d’éjection pendant la
marche du moteur.
2. ARRÊTER le moteur pour traverser des allées, chemins ou
routes de gravier ou chaque fois qu’il y a un danger de projection
d’objets.
3. Tondre uniquement durant la journée ou sous une bonne
lumière artificielle.
4. NE PAS utiliser la tondeuse alors qu’on est sous l’emprise de
l’alcool ou de drogues.
5. Après avoir heurté un objet étranger ou si la tondeuse vibre
anormalement, ARRÊTER le moteur puis débrancher et attacher le
câble de bougie. Contrôler l’état de la tondeuse et réparer tout
dommage avant de la démarrer.
6. NE PAS tondre à proximités d’à-pics, fossés ou talus sous peine
de perdre pied ou l’équilibre.
7. PRENDRE GARDE aux trous et autres dangers dissimulés.
L’herbe haute peut cacher des obstacles. Rester à l’écart de
fossés, avaloirs, ponceaux, clôtures et autres objets en saillie.
8. NE PAS tondre de l’herbe mouillée. Veiller à toujours avoir le
pied ferme. Tenir fermement le guidon et marcher, ne pas courir.
Un dérapage peut causer des blessures.
9. TOUJOURS rester derrière le guidon lorsque le moteur est en
marche.
10. NE PAS quitter la machine avec le moteur en marche.
ARRÊTER LA LAME et COUPER LE MOTEUR avant de quitter la
position de conduite, quelle qu’en soit la raison.
11. Avant de nettoyer, réparer ou contrôler la tondeuse, s’assurer
que le moteur, la lame et toutes les pièces mobiles sont
ARRÊTÉES. Débrancher et attacher le câble de bougie à l’écart
pour empêcher tout démarrage accidentel.
12. COUPER le moteur et attendre l’ARRÊT complet de la lame
avant d’enlever le sac de ramassage ou de dégager l’herbe.
13. NE PAS utiliser la tondeuse sans le sac de ramassage complet,
la protection arrière ou autres dispositifs de sécurité en place et en
bon état de marche. NE PAS diriger l’éjection vers des personnes,
voitures, fenêtres ou portes.
14. NE PAS éjecter de matières contre un mur ou autre obstacle.
Ces matières peuvent rebondir vers l’opérateur.
15. Ralentir avant de tourner.
16. Prendre garde à la circulation à proximité ou pour traverser
une chaussée.
Fonctionnement
(suite de la colonne précédente)
17. NE PAS faire fonctionner le moteur dans un espace fermé. Les
gaz d’échappement contiennent du monoxyde de carbone, un
poison mortel.
18. Utiliser exclusivement des accessoires homologués par le
fabricant. Pour la pose et l’utilisation des accessoires, voir les
instructions du fabricant.
Entretien et remisage
1. NE PAS remiser la tondeuse ou le bidon de d’essence dans un
endroit où les vapeurs peuvent atteindre une flamme nue, une
étincelle ou une veilleuse, telle que celle d’un chauffe-eau, d’une
chaudière, d’un sèche-linge ou autre appareil à gaz. Laisser le
moteur refroidir avant de remiser la machine dans un espace
fermé. Remiser le bidon d’essence hors de portée des enfants
dans un bâtiment inoccupé et bien aéré.
2. Garder la tondeuse et le moteur exempts d’herbe, de feuilles et
d’excès de graisse afin de réduire les risques de feu et de
surchauffe du moteur.
3. Lors de la vidange du réservoir d’essence, vider l’essence dans
un récipient homologué, à l’extérieur et à l’écart de flammes nues.
4. Garder tous les boulons, en particulier ceux de la lame, les
écrous et les vis bien serrés. Vérifier que toutes les goupilles
fendues sont en bonne place.
5. Toujours prévoir une aération suffisante durant la marche du
moteur. Les gaz d’échappement contiennent du monoxyde de
carbone, un poison mortel.
6. Effectuer les réglages et l’entretien du moteur uniquement avec
le moteur arrêté. Enlever le câble de la bougie et l’attacher à l’écart
de la bougie pour empêcher tout démarrage accidentel.
7. NE PAS changer les réglages du régulateur de vitesse ni faire
tourner le moteur en surrégime.
8. Vérifier fréquemment l’absence d’usure et de détérioration du
sac de ramassage pour éviter les projections d’objets et
l’exposition à des pièces en mouvement. En présence de coutures
lâches ou de déchirures, remplacer par un sac neuf. Changer la
coulisse ou l’adaptateur de sac s’ils sont cassés ou fissurés.
9. Les lames de la tondeuse sont affûtées et coupantes.
Envelopper les lames ou porter des gants de cuir épais et faire
preuve de PRÉCAUTION pour les manipuler.
10. NE PAS mettre la bougie à la terre contre le bord du trou de
bougie pour vérifier l’étincelle ; cela peut enflammer les vapeurs
s’échappant du moteur.
11. Faire réviser la machine par un concessionnaire agréé au
moins une fois par an et faire poser tout nouveau dispositif de
sécurité par le concessionnaire.
12. Utiliser exclusivement des pièces de rechange d’origine pour
assurer le maintien des normes d’origine.
Sécurité de l’opérateur
Not for
Reproduction
Not for
Reproduction

www.snapper.com6
Mises en garde :
A. Lire, comprendre et respecter les instructions et mises en garde
dans le manuel de l’utilisateur, ainsi que sur la tondeuse, le
moteur et les accessoires avant utilisation.
B. Signale un risque de blessure grave par des lames en rotation.
C. Ne pas utiliser sans le sac de ramassage complet ou les
protections en place.
D. Tenir les enfants et autres personnes hors de la zone de tonte.
CA
DB
Étiquette signalétique :
A. Numéro (Réf.) du fabricant
B. Description/Numéro de modèle
C. Numéro de série
D. Fabricant
E. Puissance acoustique
F. Masse unitaire
G. Puissance
H. Régime maxi.
I. Année de fabrication
J. Certification européenne
E
A
F
D
B
C
G
H
J
I
Identification des étiquettes
Sécurité de l’opérateur
Not for
Reproduction
Not for
Reproduction
Mfg. No. XXXXXXX
WALK BEHIND LAWN MOWER
S/N XXXXXXXXXX
BRIGGS & STRATTON YPPG
MILWAUKEE, WI USA
XX
2010
dB
kg: XX
kW: X.XX
XXXX max

7
Étiquette de la tête de commande :
A. Engager/Rapide
B. Lent/Débrayer
B
A
Commande de lame :
A. Arrêt
B. Marche
B
A
Sécurité de l’opérateur
Not for
Reproduction
Not for
Reproduction

www.snapper.com8
IMPORTANT
Les figures et illustrations de ce manuel sont fournies à titre
indicatif et peuvent différer du modèle considéré. Pour toute
question, communiquer avec le concessionnaire.
A. Bouchon et jauge d’huile
B. Bouchon d’essence
C. Couvercle de déchiquetage
D. Loquet de réglage de hauteur arrière (2)
E. Loquet de réglage de hauteur avant (2)
F. Bouton de verrouillage de pivotement (2)
G. Commande de lame
H. Poignée de lanceur
I. Commande de propulsion
E
C
D
H
I
G
A
B
F
Caractéristiques et commandes
Not for
Reproduction
Not for
Reproduction

9
Avant le démarrage
1. Vérifier que les protections, déflecteurs, sac de ramassage,
adaptateur et couvercles sont tous en place et solidement
fixés.
2. Vérifier que la commande de lame (A, Figure 1) et la
commande de propulsion (B) fonctionnent librement.
3. Contrôler la hauteur de coupe. Régler sur la hauteur
souhaitée. Se reporter à la section « Réglage de la hauteur
de coupe ».
4. Contrôler l’huile moteur (A, Figure 2) et compléter le
niveau le cas échéant jusqu’au repère FULL (plein). Voir les
caractéristiques de l’huile dans le Manuel d’utilisation du
moteur.
5. Faire le plein d’essence après avoir amené la tondeuse à
l’extérieur, où les vapeurs peuvent se dissiper sans danger.
Remplir le réservoir jusqu’à 3,8 cm (1-1/2 po) sous le haut
du col de remplissage (pour permettre la dilatation de
l’essence). Veiller à bien serrer le bouchon après avoir
refait le plein. Voir les caractéristiques de l’essence dans le
Manuel d’utilisation du moteur.
6. Nettoyer les surfaces extérieures du carter de coupe et du
moteur de tout dépôt d’essence renversée, saleté, herbe,
huile, etc. Garder la prise d’air et les ailettes de
refroidissement du moteur dégagées en permanence.
Démarrer la tondeuse
Ce moteur Briggs & Stratton est équipé du dispositif Ready
Start
TM
et ne nécessite pas d’amorçage.
1. Tenir la commande de lame (A, Figure 3) serrée contre le
guidon.
2. Tirer la poignée de lanceur (B) pour démarrer le moteur.
3. Pour arrêter le moteur (et la lame), relâcher la commande
de lame.
4. Une fois que le moteur a démarré, le laisser brièvement
chauffer jusqu’à ce qu’il tourne sans raté avant de
commencer à tondre.
Faire avancer la tondeuse
1. Démarrer le moteur.
2. Serrer progressivement la commande de propulsion (A,
Figure 4) vers le guidon pour embrayer l’entraînement des
roues et faire avancer la tondeuse. Pour augmenter la
vitesse de marche avant, serrer la commande de
propulsion plus près du guidon.
Arrêter la tondeuse
1. Pour interrompre l’avance de la tondeuse, relâcher la
commande de propulsion.
2. Relâcher la commande de lame pour arrêter le moteur et la
lame.
Figure 2 : Contrôler l’huile moteur
B
A
Figure 1 : Commandes de la tondeuse
A
B
A
Figure 3 : Démarrer la tondeuse
Figure 4 : Commande de propulsion
(commande de lame enlevée pour plus de clarté)
A
Fonctionnement
Not for
Reproduction
Not for
Reproduction

www.snapper.com10
Verrouiller les roues pivotantes
Les roues avant peuvent être verrouillées pour faire avancer la
tondeuse en ligne droite.
1. Faire avancer la tondeuse droit devant sur quelques mètres
de manière à redresser les roues pivotantes.
2. Placer les boutons de verrouillage de pivotement (A,
Figure 5) en position « verrouillage » (représentée) pour
bloquer les roues en position avant.
3. Pour libérer les roues, il suffit de ramener les boutons de
verrouillage en position « déverrouillage » (B).
Réglage de la hauteur du guidon
Pour le confort de l’opérateur, le guidon de la tondeuse est
réglable en hauteur.
1. Déposer les manettes en T et les boulons qui maintiennent
le bas du guidon (A, Figure 6) sur les supports de fixation
(B).
2. Aligner les trous de fixation du guidon avec l’un des trois
trous de réglage de hauteur dans les supports de fixation.
3. Remonter la visserie déposée précédemment et bien serrer.
Réglage de la hauteur de coupe
1. Tirer le loquet de réglage de hauteur (A, Figure 7) vers
l’extérieur et le placer sur la hauteur de coupe souhaitée.
2. Régler toutes les roues sur la même hauteur de coupe. La
position de coupe la plus haute est l’encoche 7 (Figure 8).
La position de coupe la plus basse est l’encoche 1.
Figure 6 : Réglage de la hauteur du guidon
B
AVERTISSEMENT
NE PAS effectuer d’entretien, réglage ou réparation avec le
moteur et la lame en marche. ARRÊTER le moteur et la lame.
Débrancher le câble de la bougie d’allumage et l’attacher à
l’écart de la bougie. Le moteur et ses pièces sont CHAUDS.
Pour éviter les brûlures graves, laisser refroidir toutes les
pièces suffisamment longtemps.
! !
Figure 7 : Réglage de la hauteur de coupe
A
10,2 cm
3,2 cm
Figure 8 : Réglages de hauteur de coupe (approximatifs)
A
(roue arrière représentée ; roue avant semblable)
Figure 5 : Verrouiller les roues pivotantes
B
A
AVERTISSEMENT
NE PAS effectuer d’entretien, réglage ou réparation avec le
moteur et la lame en marche. ARRÊTER le moteur et la lame.
Débrancher le câble de la bougie d’allumage et l’attacher à
l’écart de la bougie. Le moteur et ses pièces sont CHAUDS.
Pour éviter les brûlures graves, laisser refroidir toutes les
pièces suffisamment longtemps.
! !
Fonctionnement
Not for
Reproduction
Not for
Reproduction

11
Déchiquetage
Pour obtenir un déchiquetage optimal, couper jusqu’à un
maximum de 1/3 de la longueur des brins d’herbe et déchiqueter
UNIQUEMENT lorsque l’herbe est sèche.
1. Régler toutes les roues sur la position de coupe la plus
haute (encoche 7).
2. Commencer à tondre lentement. Si l’herbe est très dense,
abaisser les roues arrière d’un cran par rapport au réglage
de hauteur des roues avant pour améliorer le déchiquetage.
Dépose du couvercle de
déchiquetage
Important : Le couvercle de déchiquetage doit rester en
permanence sur la machine, sauf si une autre méthode
d’éjection est souhaitée, telle que la décharge latérale ou le
ramassage.
1. Déposer les boutons à écrou (A, Figure 9) et les rondellesfreins dentelées (B) qui maitiennent le couvercle de
déchiquetage (C) sur le carter.
2. Enlever le couvercle.
Pose du déflecteur d’éjection
1. Déposer le couvercle de déchiquetage. Se reporter à la
section « Dépose du couvercle de déchiquetage ».
2. Poser le déflecteur (A, Figure 10) sur le carter à la place du
couvercle de déchiquetage, en s’assurant que :
• Le trou avant (B) sur l’extérieur avant du déflecteur
s’engage sur le goujon auquel était fixé l’avant du
couvercle de déchiquetage
• La rainure (C) sur le dessus du déflecteur glisse sous
l’écrou de blocage sur le dessus du carter (sous le coin
avant droit du moteur)
• La rainure (D) à l’intérieur de l’arrière du déflecteur
s’engage sur le goujon derrière l’ouverture d’éjection,
auquel était fixé l’arrière du couvercle de déchiquetage.
3. Poser les rondelles freins dentelées et les boutons à écrou
sur les goujons et bien serrer.
Figure 9 : Dépose du couvercle de déchiquetage
A
C
B
AVERTISSEMENT
NE PAS effectuer d’entretien, réglage ou réparation avec le
moteur et la lame en marche. ARRÊTER le moteur et la lame.
Débrancher le câble de la bougie d’allumage et l’attacher à
l’écart de la bougie. Le moteur et ses pièces sont CHAUDS.
Pour éviter les brûlures graves, laisser refroidir toutes les
pièces suffisamment longtemps.
! !
Figure 10 : Pose du déflecteur d’éjection
B
A
C
D
Fonctionnement
Not for
Reproduction
Not for
Reproduction

www.snapper.com12
Pose du sac de ramassage
(accessoire en option sur certaines modèles)
1. Déposer le couvercle de déchiquetage. Se reporter à la
section « Dépose du couvercle de déchiquetage ».
2. Poser l’adaptateur de sac de ramassage (A, Figure 11) sur
le carter à la place du couvercle de déchiquetage, en
s’assurant que :
• Le trou avant (B) sur l’extérieur avant de l’adaptateur
s’engage sur le goujon auquel était fixé l’avant du
couvercle de déchiquetage
• La rainure (C) sur le dessus de l’adaptateur glisse
sous l’écrou de blocage sur le dessus du carter (sous
le coin avant droit du moteur)
• La rainure (D) à l’arrière de l’adaptateur s’engage sur
le goujon derrière l’ouverture d’éjection, auquel était
fixé l’arrière du couvercle de déchiquetage.
3. Poser les rondelles freins dentelées et les boutons à écrou
sur les goujons et bien serrer.
4. Faire passer le cordon de lanceur sur l’extérieur de la poulie
de guidage (E).
Remarque :
Pour détendre le cordon de lanceur, serrer la
commande de lame contre le guidon.
5. Pour mettre le sac de ramassage en place, enfiler le
connecteur (A, Figure 12) sur la bride de l’adaptateur.
6. Passer les crochets du sac de ramassage (B) sur la barre
transversale au milieu du guidon.
AVERTISSEMENT
Les sacs de ramassage sont fabriqués en toile tissée et sujets
à usure et détérioration durant l’emploi normal. Vérifier l’état
du sac avant chaque utilisation. Remplacer immédiatement un
sac de ramassage usé ou endommagé exclusivement par un
sac recommandé par le fabricant. Le sac de ramassage est en
option sur certains modèle.
!
!
Figure 11 : Pose de l’adaptateur de sac de ramassage
Figure 12 : Pose du sac de ramassage
B
A
B
D
A
E
C
AVERTISSEMENT
NE PAS effectuer d’entretien, réglage ou réparation avec le
moteur et la lame en marche. ARRÊTER le moteur et la lame.
Débrancher le câble de la bougie d’allumage et l’attacher à
l’écart de la bougie. Le moteur et ses pièces sont CHAUDS.
Pour éviter les brûlures graves, laisser refroidir toutes les
pièces suffisamment longtemps.
! !
Fonctionnement
Not for
Reproduction
Not for
Reproduction

13
Tableau d’entretien
AVERTISSEMENT
NE PAS effectuer d’entretien, réglage ou réparation avec le
moteur et la lame en marche. ARRÊTER le moteur et la lame.
Débrancher le câble de la bougie d’allumage et l’attacher à
l’écart de la bougie. Le moteur et ses pièces sont CHAUDS.
Pour éviter les brûlures graves, laisser refroidir toutes les
pièces suffisamment longtemps. Porter des gants de cuir
épais pour manipuler ou travailler autour de lames de coupe.
Les lames sont extrêmement coupantes et peuvent provoquer
des blessures graves.
! !
TONDEUSE
Toutes les 8 heures ou chaque jour
Contrôler le système de verrouillage de sécurité
Nettoyer les débris de la tondeuse
Toutes les 25 heures ou chaque année *
Contrôler le serrage de la visserie
Voir le concessionnaire chaque année pour
Lubrifier la tondeuse
Contrôler la lame de coupe **
Contrôler le temps d’arrêt de la lame
Contrôler la courroie d’entraînement
Nettoyer la batterie et les câbles (le cas échéant)
MOTEUR
Premières 5 heures
Changer l’huile moteur
Toutes les 8 heures ou chaque jour
Vérifier le niveau d’huile moteur
Toutes les 25 heures ou chaque année *
Nettoyer le filtre à air moteur et le préfiltre (le cas échéant) **
Toutes les 50 heures ou chaque année *
Changer l’huile moteur
Changer le filtre à huile (le cas échéant)
Chaque année
Changer le filtre à air
Changer le préfiltre (le cas échéant)
Voir le concessionnaire chaque année pour
Contrôler le silencieux et le pare-étincelles (le cas échéant)
Changer les bougies d’allumage
Changer le filtre à essence (le cas échéant)
Nettoyer le système de refroidissement à air du moteur
* À la première de ces échéances
**Contrôler la lame plus souvent dans les régions à sols
sablonneux ou dans des conditions très poussiéreuses.
* À la première de ces échéances
**Nettoyer plus souvent dans les atmosphères poussiéreuses
ou en présence d’impuretés en suspension dans l’air.
Entretien
Not for
Reproduction
Not for
Reproduction

www.snapper.com14
Changement de l’huile moteur
1. Voir les caractéristiques de l’huile, les procédures et les
intervalles corrects dans le manuel du moteur.
2. Pour vidanger l’huile de la manière la plus simple et propre,
il suffit de coucher la tondeuse sur le côté, comme sur
l’illustration. Vidanger l’huile par le tube de jauge (A,
Figure 13) dans un récipient. Attendre suffisamment
longtemps pour vider toute l’huile.
Important : Vider le réservoir d’essence avant de basculer la
machine. NE PAS basculer la machine du côté du carburateur
ou de la bougie. Cela saturerait le filtre à air d’huile issue du
carter, ce qui provoquerait d’importants problèmes de
démarrage. Si cela se produit, le filtre à air souillé doit être
changé.
3. Éliminer l’huile vidangée comme il se doit.
4. Remplir le moteur avec un huile indiquée dans le manuel
du moteur. Ne pas trop remplir.
Entretien du filtre à air
Voir les instructions d’entretien du filtre à air dans le manuel
d’utilisation du moteur.
Contrôler le système de verrouillage
de sécurité
1. Démarrer la tondeuse.
2. Relâcher la commande de lame. Le moteur doit s’arrêter
dans les 3 secondes.
Si le moteur ne s’arrête pas, ne pas utiliser la tondeuse.
Amener la tondeuse à un concessionnaire agréé pour
réparation.
Nettoyage des débris de la tondeuse
1. Nettoyer la saleté et les débris présents sur le dessus du
carter.
2. Nettoyer tout dépôt de saleté sur et autour du moteur, etc.
Lors du nettoyage, vérifier également l’état et le degré d’usure
des pièces. Changer immédiatement les pièces usées et
endommagées.
Commande de propulsion
La commande de propulsion (A, Figure 14) doit embrayer la
transmission lorsque le levier est serré contre le guidon et la
débrayer lorsque le levier est relâché. Si la transmission ne
s’embraye ou débraye pas complètement, contacter le
concessionnaire agréé Snapper avant d’utiliser la tondeuse.
Figure 13 : Vidange de l’huile moteur
AVERTISSEMENT
NE PAS effectuer d’entretien, réglage ou réparation avec le
moteur et la lame en marche. ARRÊTER le moteur et la lame.
Débrancher le câble de la bougie d’allumage et l’attacher à
l’écart de la bougie. Le moteur et ses pièces sont CHAUDS.
Pour éviter les brûlures graves, laisser refroidir toutes les
pièces suffisamment longtemps.
!
!
A
AVERTISSEMENT
NE PAS effectuer d’entretien, réglage ou réparation avec le
moteur et la lame en marche. ARRÊTER le moteur et la lame.
Débrancher le câble de la bougie d’allumage et l’attacher à
l’écart de la bougie. Le moteur et ses pièces sont CHAUDS.
Pour éviter les brûlures graves, laisser refroidir toutes les
pièces suffisamment longtemps. Porter des gants de cuir
épais pour manipuler ou travailler autour de lames de coupe.
Les lames sont extrêmement coupantes et peuvent provoquer
des blessures graves.
! !
Entretien
Figure 14 : Commande de propulsion
A
(pièces enlevées pour plus de clarté)
Not for
Reproduction
Not for
Reproduction

15
Procédure de remisage
Voir les instructions concernant la préparation du moteur pour
le remisage dans le Manuel d’utilisation du moteur. Préparer la
tondeuse pour le remisage de fin de saison comme suit :
1. Débrancher le fil de la bougie et l’écarter de la bougie.
2. Vider l’essence du réservoir et laisser le moteur tourner
jusqu’à vider complètement le carburateur.
3. Utiliser une brosse ou de l’air comprimé pour enlever les
débris lâches puis un chiffon humide pour essuyer la
machine.
4. Basculer la tondeuse sur ses roues arrière et nettoyer avec
soin le dessous du carter. Ne pas basculer la tondeuse du
côté de la bougie ou du carburateur. Racler toute
accumulation d’herbe avec une spatule et/ou une brosse
métallique.
5. Lubrifier tout métal visible avec une légère couche d’huile
pour éviter la corrosion.
6. Replier le guidon avec précaution, en fléchissant les câbles
pour éviter de les endommager.
7. Remiser la tondeuse dans une cabane de jardin ou autre
endroit sec protégé des intempéries.
AVERTISSEMENT
NE PAS effectuer d’entretien, réglage ou réparation avec le
moteur et la lame en marche. ARRÊTER le moteur et la lame.
Débrancher le câble de la bougie d’allumage et l’attacher à
l’écart de la bougie. Le moteur et ses pièces sont CHAUDS.
Pour éviter les brûlures graves, laisser refroidir toutes les
pièces suffisamment longtemps. Porter des gants de cuir
épais pour manipuler ou travailler autour de lames de coupe.
Les lames sont extrêmement coupantes et peuvent provoquer
des blessures graves.
! !
Entretien
Not for
Reproduction
Not for
Reproduction

www.snapper.com16
PROBLÈME CAUSE PROBABLE MESURE CORRECTIVE
Le moteur ne
démarre pas
1. Réservoir d’essence vide. 1. Faire le plein avec de l’essence fraîche.
2. Bougie débranchée. 2. Brancher le câble de bougie sur la bougie.
Le moteur cale ou perd
de la puissance après
avoir tourné
1. Commande de lame relâchée ou pas tenue
fermement contre le guidon.
1. Serrer en permanence la commande de lame
fermement contre le guidon durant la marche de la
tondeuse.
2. Réservoir d’essence vide. 2. Remplir d’essence jusqu’au niveau correct.
3. Préfiltre à air ou filtre à air du moteur sales. 3. Nettoyer complètement.
4. Bougie défectueuse ou écartement mal réglé. 4. Réparer la bougie.
5. Eau, débris ou essence éventée dans le circuit. 5. Vidanger et nettoyer le circuit d’essence.
Vibrations excessives 1. Lame de coupe endommagée, déséquilibrée ou
déformée.
1. Consulter un concessionnaire agréé.
2. Pièces de lame desserrées. 2. Consulter un concessionnaire agréé.
3. Aileron desserré ou manquant (le cas échéant). 3. Consulter un concessionnaire agréé.
4. Courroie bosselée ou effilochée. 4. Consulter un concessionnaire agréé.
La tondeuse n’avance
pas / perte de traction
1. Dépôts de débris sur ou autour des mécanismes
d’entraînement des roues.
1. Nettoyer les débris.
2. Réglage du câble de transmission nécessaire. 2. Consulter un concessionnaire agréé.
3. La courroie d’entraînement doit être changée. 3. Consulter un concessionnaire agréé.
4. Transmission endommagée. 4. Consulter un concessionnaire agréé.
Mauvaise coupe
de l’herbe
1. Hauteur de coupe trop haute ou basse. 1. Régler la hauteur de coupe.
2. Vitesse d’avance trop rapide. 2. Placer le levier de propulsion sur une vitesse plus
lente.
3. Tonte en dents de scie, latéralement. 3. Ajuster les leviers de réglage de hauteur de
coupe.
4. Inclinaison excessive du carter d’avant en
arrière.
4. Ajuster les leviers de réglage de hauteur de
coupe.
5. Lame de coupe émoussée ou endommagée. 5. Consulter un concessionnaire agréé.
Mauvais éjection d’herbe 1. Vitesse d’avance trop rapide. 1. Placer le levier de propulsion sur une vitesse plus
lente.
2. L’herbe est mouillée. 2. Tondre quand l’herbe est sèche.
3. Lame excessivement usée ou endommagée. 3. Consulter un concessionnaire agréé.
4. Accumulation d’herbe et de débris sous le carter
de coupe.
4. Nettoyer le carter de coupe.
5. Mauvaise lame posée sur la tondeuse. 5. Consulter un concessionnaire agréé.
6. Lame mal posée sur la tondeuse. 6. Consulter un concessionnaire agréé.
Fuite d’huile 1. Jauge d’huile mal fermée. 1. Vérifier que le bouchon-jauge d’huile est
correctement en place.
2. Bouchon de vidange desserré. 2. Contrôler et serrer le bouchon de vidange.
3. Niveau d’huile trop haut. 3. Vidanger l’excédent d’huile.
4. Joints d’huile endommagés. 4. Consulter un concessionnaire agréé.
Dépannage
Not for
Reproduction
Not for
Reproduction

17
GARANTIE PROPRIÉTAIRE DE BRIGGS & STRATTON POWER PRODUCTS GROUP, L.L.C.
PÉRIODE DE GARANTIE
À PROPOS DE LA GARANTIE
GARANTIE LIMITÉE
Briggs & Stratton Power Products Group, LLC s’engage à réparer ou à remplacer, sans frais, toute pièce de la machine qui présente un
défaut de matériau, de main-d’oeuvre ou les deux. Briggs & Stratton Corporation s’engage à réparer ou à remplacer, sans frais, toute
pièce du moteur Briggs & Stratton* (le cas échéant) qui présente un défaut de matériau, de main-d’oeuvre ou les deux. Les frais de
transport des produits soumis pour réparation ou échange aux termes de cette garantie sont à la charge de l’acheteur. Cette garantie est
valable pendant les périodes et sujette aux conditions établies ci-dessous. Pour recourir à la garantie, trouver le concessionnaire
réparateur agréé le plus proche à l’aide de notre localisateur de concessionnaire à www.BriggsandStratton.com.
Il n’existe aucune autre garantie expresse. Les garanties implicites, notamment de qualité marchande et d’adaptation pour un emploi
particulier, sont limitées à une durée d’un an à compter de la date d’achat ou dans la mesure autorisée par la loi. La responsabilité pour
les dommages indirects ou consécutifs sont exclus dans la mesure autorisée par la loi.
Certains états ou pays n’autorisent pas les limitations de durée des garanties implicites et certains états ou pays n’autorisent pas
l’exclusion ou la limitation des dommages indirects ou consécutifs, par conséquent les limites et exclusions ci-dessus peuvent ne pas
s’appliquer au cas présent. La présente garantie vous offre des droits légaux spécifiques et il se peut que vous ayez d’autres droits qui
varient d’un état ou pays à un autre.
Cette garantie débute à la date d’achat par l’utilisateur grand public ou commercial initial et est valable pendant la durée indiquée ci-dessus.
Un « utilisation grand public » fait référence à un emploi dans une résidence individuelle par un particulier. Une « utilisation commerciale »
fait référence à tous les autres emplois, notamment à des fins commerciales, lucratives ou locatives. Une fois qu’un produit a connu une
utilisation commerciale, il sera considéré d’usage commercial pour les besoins de cette garantie.
Aucun enregistrement n’est requis pour valider la garantie sur les produits Briggs & Stratton. Conserver le justificatif d’achat. Si aucun
justificatif de la date d’achat n’est fourni lors d’un recours à la garantie, la date de fabrication du produit est utilisée pour déterminer
l’applicabilité de la garantie.
Vos réparations sous garantie sont les bienvenues et nous vous prions d’accepter nos excuses pour le dérangement. Le recours à la garantie
est possible uniquement par l’intermédiaire des concessionnaires réparateurs agréés Briggs & Stratton ou BSPPG, LLC.
La majorité des réparations sous garantie sont généralement prises en charge, mais ils arrive que certains demandes de recours à la garantie
ne soient pas admissibles. Cette garantie couvre uniquement les défauts de matériaux ou de main-d’oeuvre. Elle ne couvre pas les
dommages causés par un emploi inapproprié ou abusif, un entretien ou une réparation inappropriés, l’usure normale ou un carburant éventé
ou non homologué.
Emploi inapproprié et abusif - L’emploi prévu correct de ce produit est décrit dans le manuel d’utilisation. L’utilisation du produit d’une
façon non décrit dans le manuel d’utilisation ou l’emploi du produit après qu’il a été endommagé a pour effet d’annuler la garantie. La
garantie n’est pas admissible si le numéro de série de série du produit a été supprimé, si le produit a subi de quelconques altérations ou
modifications ou si le produit présente des indications d’emploi abusif telles que dommages de choc ou dommages de corrosion par l’eau
ou des produits chimiques.
Entretien ou réparation inappropriés - Ce produit doit être entretenu conformément aux procédures et aux calendriers fournis dans le
manuel d’utilisation et être réparé avec des pièces Briggs & Stratton d’origine. Les dommages résultant d’un défaut d’entretien ou de l’emploi
de pièces autres que des pièces d’origine ne sont pas couverts par la garantie.
Usure normale - Comme tous les dispositifs mécaniques, cette machine, même correctement entretenue, est sujette à l’usure. Cette garantie
ne couvre pas les réparations de pièces ou de la machine rendues inutilisables par l’usure normale. L’entretien et les pièces d’usure telles
que les filtres, courroies, lames de coupeitems et patins de frein (les patins de frein de moteur sont couverts) ne sont pas couverts par la
garantie pour des raisons d’usure seules, sauf si leur défaillance est causée par des défauts de matériau ou de main-d’oeuvre.
Essence éventée - Pour fonctionner correctement, ce produit nécessite une essence fraîche qui soit conforme aux critères spécifiés dans le
manuel d’utilisation. Les dommages causés par une essence éventée (fuites de carburateur, tubes de carburant obstrués, soupapes grippées,
etc.) ne sont pas couverts par la garantie.
* S’applique aux moteurs Briggs and Stratton seulement. La couverture en garantie de moteurs autres que Briggs and Stratton est assurée par le fabricant du
moteur.
Garantie
Élément Utilisation grand public Utilisation commerciale
Machine 2 ans 90 jours
Moteur* 2 ans 90 jours
Batterie 1 an 1 an
Not for
Reproduction
Not for
Reproduction

18
Remarques
www.snapper.com
Not for
Reproduction
Not for
Reproduction

19
GUIDE DE PENTE
15 DEGRÉS
VOIR ET TENIR CE NIVEAU DE RÉFÉRENCE SUR UN ARBRE VERTICAL, UN COIN
D’UNE STRUCTURE, UN POTEAU ÉLECTRIQUE, OU UNE BARRIÈRE
PLIER SUR LE POINTILLÉ
Pousser une tondeuse horizontale
sur la pente, jamais de bas en
haut.
Fonctionnement autoporté
en montant et en descendant
les pentes ; ne jamais
tondre en travers des
pentes.
15 DEGRÉS10 DEGRÉS
Avec une tondeuse autoportée, pour déterminer si une pente peut être tondue : (1) désengager la (les) lame(s), (2) embrayer l’unité en marche arrière, (3) essayer de
prendre la pente en marche arrière et de rester bien droit. Si vous pouvez reculer sur la pente, c’est qu’elle est généralement sécuritaire. Toutefois, si vous ne vous
sentez pas en sécurité ou si vous n’êtes pas complètement certain, utiliser ce guide et ne pas tondre une pente supérieure à 15 degrés. Si la tondeuse autoportée est
utilisée avec un accessoire tracté ou fixé à l’arrière, ne pas conduire l’unité sur une pente ayant une pente supérieure à 10 degrés.
Une pente de 15 degrés est une pente qui augmente verticalement de 0,8 m (2,5 pi) pour une base horizontale de 3 m (10 pi) approximativement.
Une pente de 10 degrés est une pente qui augmente verticalement de 0,5 m (1,7 pi) pour une base horizontale de 3 m (10 pi) approximativement.
Soyez prudent en tout temps et évitez les virages et les manoeuvres brusques. Suivre les autres directives de ce manuel pour tondre sécuritairement sur
les pentes. Fonctionnement autoporté en montant et en descendant les pentes ; ne jamais tondre en travers des pentes. Pousser une tondeuse horizontale
sur la pente, jamais de bas en haut. Soyez toujours prudent lorsque vous tondez près des pentes ou des obstacles.
Guide de pente
Not for
Reproduction
Not for
Reproduction

Information sur la puissance nominale du moteur : L’indication de la puissance nominale brute de modèles individuels de moteurs
à essence est conforme au code J1940 (procédure de détermination de la puissance et du couple nominaux de petits moteurs) de la
SAE (Society of Automotive Engineers) et les performances nominales ont été obtenues et corrigées conformément à SAE J1995
(Révision 2002-05). Les valeurs de couple sont établies à 3060 tr/min, les valeurs de puissance à 3600 tr/min. La puissance moteur
brute réelle est inférieure et est influencée, entre autres, par les conditions d’utilisation ambiantes et la variabilité d’un moteur à
l’autre. Compte tenu du large éventail de produits sur lesquels les moteurs sont installés et de la variété des paramètres
environnementaux applicables au fonctionnement des équipements, le moteur à essence ne développe pas sa puissance nominale
brute une fois qu’il est utilisé sur un matériel donné (puissance nette ou réelle « sur site »). Cette différence est liée à une variété
de facteurs, notamment, mais sans s’y limiter, aux accessoires (filtre à air, échappement, charge, refroidissement, carburateur,
pompe à essence, etc.), limites des applications, conditions ambiantes d’exploitation (température, humidité, altitude) et variabilité
d’un moteur à l’autre. Pour des raisons de limites de fabrication ou de capacité, il est possible que Briggs & Stratton remplace un
moteur de cette série par un modèle de puissance nominale supérieure.
Pièces de rechange courantes Référence
Câble de commande de lame 7100074YP
Câble de commande de propulsion 7104004YP
Lame de coupe (double ondulation) 7100242AYP
Lame de coupe (Ninja - Quad) 7026407AYP
Courroie d’entraînement 7100883YP
Caractéristiques du produit
Taille du carter (cm/in) 53,3/21
Hauteur de coupe (cm/in) 3,2 - 10,2/1,25 - 4
Type de transmission Engrenages
Vitesse d’avance (km/h / mph) 0 - 6,4/0 - 4
Puissance moteur (couple brut) 6,75
Cylindrée du moteur (cc) 190
Capacité du réservoir d’essence (l/qt) 0,9/1,0
20
www.snapper.com
1-800-935-2967
TONDEUSE À GAZON
À ROUES PIVOTANTES
À VITESSE VARIABLE
DE 53 CM
Not for
Reproduction
Not for
Reproduction

Betriebsanleitung
21 Zoll HANDGEFÜHRTER
RASENMÄHER MIT VARIABLER
GESCHWINDIGKEIT UND
SCHWENKRÄDERN
Modell-Nr. Beschreibung
7800448 ESPV211S
7800730 ERPV21675SW
Not for
Reproduction
Not for
Reproduction
!

Vielen Dank für den Kauf eines hochwertigen Snapper-Produktes. Wir freuen uns, dass Sie Vertrauen in
die Marke Snapper haben. Bei Betrieb und Instandhaltung gemäß den Angaben in dieser Betriebsanleitung
wird Ihnen der Snapper-Rasenmäher viele Jahre zuverlässigen Einsatz bieten.
Diese Anleitung enthält Sicherheitsinformationen, die Sie über die Gefahren und Risiken beim Betrieb
dieser Maschine informieren, und wie diese vermieden werden. Diese Maschine ist nur zum Fertigmähen
von gepflegten Rasenflächen vorgesehen und darf für keine anderen Zwecke verwendet werden. Es ist
wichtig, dass Sie diese Anweisungen gründlich durchlesen, bevor Sie diese Maschine verwenden. Heben
Sie diese Orignalanweisungen zum späteren Nachschlagen auf.
Bitte geben Sie die folgenden Kaufinformationen an.
Kaufdatum___________________________________________________________________________
Verkaufsstelle________________________________________________________________________
Telefonnummer der Verkaufsstelle________________________________________________________
Ausrüstung
Modellnummer__________________________________________________________________
Seriennummer __________________________________________________________________
Motor
Modell_________________________Typ__________________Code_______________________
SNAPPER ist eine Marke der
Briggs & Stratton Power Products Group, LLC
Milwaukee, WI, USA.
Copyright © 2010, Briggs & Stratton Corporation
Milwaukee, WI, USA. Alle Rechte vorbehalten.
Not for
Reproduction
Not for
Reproduction

3
Inhaltsverzeichnis
Betriebssicherheit . . . . . . . . . . . . . . . . . . . . . . . . . . . . . . . . . . . . . . . . . . . . . .4
Sicherheitsanweisungen für den Benutzer . . . . . . . . . . . . . . . . . . . . . . . . . . . . . . . .4
Identifizierung der Aufkleber . . . . . . . . . . . . . . . . . . . . . . . . . . . . . . . . . . . . . . . . . . .6
Funktionsmerkmale und Bedienungselemente . . . . . . . . . . . . . . . . . . . . . . . . . . .8
Betrieb . . . . . . . . . . . . . . . . . . . . . . . . . . . . . . . . . . . . . . . . . . . . . . . . . . . . . .9
Vor dem Anlassen . . . . . . . . . . . . . . . . . . . . . . . . . . . . . . . . . . . . . . . . . . . . . . . . . . .9
Anlassen des Rasenmähers . . . . . . . . . . . . . . . . . . . . . . . . . . . . . . . . . . . . . . . . . . .9
Fahren des Rasenmähers . . . . . . . . . . . . . . . . . . . . . . . . . . . . . . . . . . . . . . . . . . . . .9
Anhalten des Rasenmähers . . . . . . . . . . . . . . . . . . . . . . . . . . . . . . . . . . . . . . . . . . . .9
Arretieren der Schwenkräder . . . . . . . . . . . . . . . . . . . . . . . . . . . . . . . . . . . . . . . . .10
Einstellen der Griffhöhe . . . . . . . . . . . . . . . . . . . . . . . . . . . . . . . . . . . . . . . . . . . . . .10
Einstellen der Schnitthöhe . . . . . . . . . . . . . . . . . . . . . . . . . . . . . . . . . . . . . . . . . . .10
Mulchbetrieb . . . . . . . . . . . . . . . . . . . . . . . . . . . . . . . . . . . . . . . . . . . . . . . . . . . . . .11
Entfernen des Mulchdeckels . . . . . . . . . . . . . . . . . . . . . . . . . . . . . . . . . . . . . . . . . .11
Anbringen des Auswurfschachts . . . . . . . . . . . . . . . . . . . . . . . . . . . . . . . . . . . . . . .11
Anbringen des Grasfangsacks . . . . . . . . . . . . . . . . . . . . . . . . . . . . . . . . . . . . . . . . .12
Wartung . . . . . . . . . . . . . . . . . . . . . . . . . . . . . . . . . . . . . . . . . . . . . . . . . . . .13
Wartungstabelle . . . . . . . . . . . . . . . . . . . . . . . . . . . . . . . . . . . . . . . . . . . . . . . . . . .13
Wechseln des Motoröls . . . . . . . . . . . . . . . . . . . . . . . . . . . . . . . . . . . . . . . . . . . . .14
Warten des Luftfilters . . . . . . . . . . . . . . . . . . . . . . . . . . . . . . . . . . . . . . . . . . . . . . .14
Prüfen des Sicherheitssystems . . . . . . . . . . . . . . . . . . . . . . . . . . . . . . . . . . . . . . . .14
Reinigen des Rasenmähers . . . . . . . . . . . . . . . . . . . . . . . . . . . . . . . . . . . . . . . . . . .14
Fahrantriebshebel . . . . . . . . . . . . . . . . . . . . . . . . . . . . . . . . . . . . . . . . . . . . . . . . . .14
Einlagerung . . . . . . . . . . . . . . . . . . . . . . . . . . . . . . . . . . . . . . . . . . . . . . . . . . . . . . .15
Fehlersuche . . . . . . . . . . . . . . . . . . . . . . . . . . . . . . . . . . . . . . . . . . . . . . . . .16
Garantie . . . . . . . . . . . . . . . . . . . . . . . . . . . . . . . . . . . . . . . . . . . . . . . . . . . .17
Anleitung für das Arbeiten am Hang . . . . . . . . . . . . . . . . . . . . . . . . . . . . . . . . .19
Not for
Reproduction
Not for
Reproduction

www.snapper.com4
!
VORSICHT: Diese leistungsstarke Mähmaschine kann Hände und Füße abtrennen und Objekte auswerfen, die
Verletzungen und Schäden verursachen können! Wenn die folgenden SICHERHEITS-Anweisungen nicht beachtet
werden, kann es zu schweren oder tödlichen Verletzungen des Benutzers oder von Umstehenden kommen. Der Besitzer
der Maschine muss diese Anweisungen verstehen und darf nur Personen die Bedienung der Maschine gestatten, die
diese Anweisungen verstehen. Alle Personen, die die Maschine bedienen, müssen bei gesundem Verstand und in guter
körperlicher Verfassung sein und dürfen nicht unter der Einwirkung von Stoffen stehen, die das Sehvermögen, die
Geschicklichkeit und das Urteilvermögen beeinträchtigen. Bei Fragen zu Ihrer Maschine, die vom Händler nicht
zufriedenstellend beantwortet werden konnten, wenden Sie sich bitte an die Kundendienstabteilung (1-800-935-2967).
Schutzmaßnahmen für Kinder
Unzureichende Aufmerksamkeit des Bedieners in der Nähe von
Kindern kann zu tragischen Unfällen führen. Kinder interessieren
sich häufig für Maschinen und Mäharbeiten. Niemals annehmen,
dass Kinder dort bleiben, wo sie zuletzt gesehen wurden.
1. Kinder aus dem Mähbereich FERNHALTEN und von einem
anderen verantwortungsbewussten Erwachsenen (nicht dem
Benutzer) beaufsichtigen lassen.
2. Kinder NICHT in den Garten lassen, wenn die Maschine betrieben
wird. Die Maschine ABSTELLEN, wenn andere Personen den
Arbeitsbereich aufsuchen.
3. Kindern vor dem Teenage-Alter die Inbetriebnahme der Maschine
NICHT erlauben.
4. Nur verantwortlichen Erwachsenen und Teenagern mit gesundem
Urteilvermögen unter strikter Aufsicht durch Erwachsene den Betrieb
der Maschine GESTATTEN.
5. Den Rasenmäher NICHT nach hinten ziehen, es sei denn dies ist
absolut notwendig. Vor dem und beim Rückwärtsfahren nach hinten
und unten BLICKEN, um Kinder, Haustiere und Gefahren zu
erkennen.
6. Bei Annäherung an nicht einsehbare Ecken, Sträucher, Bäume
oder andere Objekte, die die Sicht beeinträchtigen können,
BESONDERS VORSICHTIG VORGEHEN.
Arbeiten am Hang
1. Besonders an Hängen besteht Unfallgefahr durch Ausrutschen
und Stürze, die zu schweren oder tödlichen Verletzungen führen
können. An Hängen daher immer äußerst vorsichtig vorgehen. Wenn
Sie sich an einem Hang unsicher fühlen, diesen NICHT mähen.
2. An Hängen quer zum Hang mähen – nicht auf und ab. Bei
Wechseln der Richtung an Hängen äußerst VORSICHTIG arbeiten.
KEINE steilen Hänge oder andere Flächen mähen, an denen Stabilität
oder Bodenhaftung zweifelhaft ist. Siehe „Anleitung für das Arbeiten
am Hang“ am Ende dieser Anleitung.
3. Beim Betrieb mit montierten Grasfangvorrichtungen oder anderen
Anbaugeräten besonders vorsichtig arbeiten, da diese das
Fahrverhalten und die Stabilität der Maschine beeinträchtigen
können.
Vorbereitung
1. Alle in dieser Anleitung und auf dem Rasenmäher, Motor und den
Anbaugeräten enthaltenen Anweisungen und Warnhinweise lesen
und befolgen. Machen Sie sich vor dem Anlassen mit den
Bedienelementen sowie der ordnungsgemäßen Verwendung des
Rasenmähers vertraut.
2. Nur erwachsene, verantwortliche Personen dürfen die Maschine
bedienen und nur nach angemessener Einweisung.
3. Untersuchungen haben ergeben, dass Bediener im Alter ab 60
Jahren überproportional in Unfälle mit Verletzungen durch
Rasenmäher verwickelt sind. Diese Bediener sollten ihre Fähigkeit
zur sicheren Bedienung des Rasenmähers realistisch einschätzen,
um sich und andere Personen vor schweren Verletzungen zu
schützen.
4. Vorsichtig mit Kraftstoff umgehen. Kraftstoffe sind brennbar und
Dämpfe können explodieren. Ausschließlich zugelassene
Kraftstoffbehälter verwenden. Den Tankdeckel NICHT entfernen bzw.
die Maschine nicht auftanken, während der Motor läuft. Nur im
Freien bei abgestelltem und kühlem Motor auftanken. Verschütteten
Kraftstoff und Öl von der Maschine entfernen. NICHT rauchen.
Vorbereitung
(Fortsetzung von letzter Spalte)
5. Die Fläche, die gemäht werden soll, prüfen und alle Gegenstände
wie Spielsachen, Draht, Steine, Äste und andere Objekte entfernen,
die beim Wegschleudern durch das Mähmesser Verletzungen
verursachen oder die Mäharbeiten behindern können. Außerdem
sich die Lage von Löchern, Baumstümpfen und anderen möglichen
Gefahren merken.
6. Personen und Haustiere vom Mähbereich fernhalten. Das
Mähmesser sofort STOPPEN, den Motor abstellen und den
Rasenmäher anhalten, sobald jemand den Arbeitsbereich betritt.
7. Alle Schutzabdeckungen, Prallbleche, Schalter, den
Messerantriebsbügel sowie andere Sicherheitsvorrichtungen häufig
auf korrekte Funktionsweise und Anordnung prüfen.
8. Sicherstellen, dass alle Sicherheitsaufkleber gut leserlich sind. Bei
Beschädigung ersetzen.
9. Schützen Sie sich bei Mäharbeiten und tragen Sie eine
Schutzbrille, Staubmaske, lange Hose und stabiles Schuhwerk.
NICHT barfuß oder in Sandalen mähen.
10. Sie müssen wissen, wie das Mähmesser und der Motor schnell
ABGESTELLT werden, um für Notfälle vorbereitet zu sein.
11. Beim Auf- oder Abladen der Maschine auf einen bzw. von einem
Anhänger oder Lkw äußerst vorsichtig vorgehen.
12. Die Komponenten der Grasfangvorrichtung häufig auf Anzeichen
von Abnutzung oder Zustandsverschlechterung prüfen und diese
nach Bedarf ersetzen, um Verletzungen durch weggeschleuderte
Gegenstände zu vermeiden, die schwache oder gerissene Stellen
durchdringen.
Sicherer Umgang mit Kraftstoff
Verletzungen oder Sachschäden vermeiden, indem besonders
vorsichtig mit Kraftstoff umgegangen wird. Kraftstoffe sind äußerst
leicht entflammbar und Dämpfe sind explosiv.
1. Zigaretten, Zigarren, Pfeifen und andere Zündquellen fernhalten.
2. Ausschließlich zugelassene Kraftstoffbehälter verwenden.
3. Den Tankdeckel NICHT entfernen bzw. die Maschine nicht
auftanken, während der Motor läuft. Den Motor vor dem Auftanken
abkühlen lassen.
4. Die Maschine NICHT in geschlossenen Räumen auftanken.
5. Maschine oder Kraftstoffbehälter NICHT an einem Ort lagern, an
dem offene Flammen, Funken oder Zündflammen, wie z. B. die eines
Warmwasserbereiters oder eines anderen Haushaltsgeräts,
vorhanden sind.
6. Kraftstoffbehälter nie in einem Fahrzeug oder auf der Ladefläche
eines Lkws oder Anhängers mit Kunststoffboden füllen. Behälter vor
dem Füllen stets vom Fahrzeug entfernt auf den Boden stellen.
7. Benzinbetriebene Ausrüstung aus dem Fahrzeug oder Anhänger
nehmen und auf dem Boden auftanken. Falls dies nicht möglich ist,
diese Ausrüstung mit Hilfe eines tragbaren Behälters anstelle einer
Zapfpistole füllen.
Betriebssicherheit
Not for
Reproduction
Not for
Reproduction

5
Sicherer Umgang mit Kraftstoff
(Fortsetzung von letzter Seite)
8. Benzinbetriebene Geräte NICHT in geschlossenen Fahrzeugen
oder Anhängern anlassen.
9. Die Zapfpistole ständig mit dem Rand des Kraftstofftanks oder
der Behälteröffnung in Kontakt halten, bis der Tank/Behälter
vollständig gefüllt ist. KEINE Vorrichtung mit feststellbarer
Zapffunktion verwenden.
10. Falls Kraftstoff auf Kleidung verschüttet wurde, die Kleidung
sofort wechseln.
11. Den Kraftstofftank NICHT überfüllen. Den Tankdeckel wieder fest
schließen.
Betrieb
1. Hände und Füße NICHT in die Nähe oder unter rotierende Teilen
bringen. Bei laufendem Motor Abstand vom Auswurfbereich halten.
2. Den Motor ABSTELLEN, wenn Schotterwege, Bürgersteige oder
Straßen gequert werden und unter allen Bedingungen, bei denen
Gegenstände weggeschleudert werden können.
3. Nur bei Tageslicht oder ausreichender künstlicher Beleuchtung
mähen.
4. Den Rasenmäher NICHT unter Einfluss von Alkohol oder Drogen
betreiben.
5. Nachdem ein Hindernis angeschlagen wurde oder wenn der
Rasenmäher ungewöhnlich vibriert, den Motor ABSTELLEN und das
Zündkabel abziehen und sichern. Den Mäher auf Schäden
überprüfen und reparieren, bevor er wieder in Betrieb genommen
wird.
6. NICHT in der Nähe von Gefällen, Gräben oder Böschungen
mähen. Der Benutzer könnte ausrutschen oder das Gleichgewicht
verlieren.
7. Auf Löcher und andere verborgene Gegenstände ACHTEN.
Hindernisse können durch hohes Gras verdeckt sein. Gräben,
Abflusskanäle, Auswaschungen, Zäune und vorstehende Hindernisse
meiden.
8. KEIN nasses Gras mähen. Immer auf sicheren Halt achten. Den
Griff sicher festhalten und gehen, niemals laufen. Ausrutschen kann
Verletzungen verursachen.
9. IMMER hinter dem Griff bleiben, wenn der Motor läuft.
10. Die Maschine NICHT verlassen, wenn der Motor läuft. DAS
MÄHMESSER STOPPEN und den MOTOR ABSTELLEN, bevor die
Bedienungsposition aus beliebigem Grunde verlassen wird.
11. Vor der Reinigung, Reparatur oder Prüfung sicherstellen, dass
Motor, Mähmesser und alle beweglichen Teile zum STILLSTAND
gekommen sind. Das Zündkabel abklemmen und von der Zündkerze
entfernt sichern, um unbeabsichtigtes Starten zu verhindern.
12. Den Motor ABSTELLEN und warten, bis das Mähmesser ganz
zum STILLSTAND gekommen ist, bevor der Grasfangsack und/oder
Gras entfernt wird.
13. Die Maschine NICHT verwenden, wenn nicht die gesamte
Grasfangvorrichtung, hintere Schutzabdeckung oder andere
Sicherheitseinrichtungen angebaut sind und richtig funktionieren.
Den Auswurf NICHT auf Personen, vorbeifahrende Autos, Fenster
oder Türen richten.
14. Den Auswurf von Material gegen Wände oder andere
Gegenstände VERMEIDEN. Andernfalls kann das Material zum
Bediener zurückgeworfen werden.
15. Vor einem Richtungswechsel die Geschwindigkeit reduzieren.
16. Beim Überqueren von Straßen bzw. in der Nähe von Straßen auf
den Verkehr achten.
Betrieb
(Fortsetzung von letzter Spalte)
17. Den Motor NICHT in einem geschlossen Raum laufen lassen.
Motorabgase enthalten Kohlenmonoxid, ein tödliches Gas.
18. Nur Zubehörteile verwenden, die vom Hersteller zugelassen sind.
Die korrekte Funktionsweise und Anbringung dieser Zubehörteile in
der Herstelleranleitung nachlesen.
Wartung und Lagerung
1. Den Rasenmäher oder Kraftstoffbehälter NICHT an einem
geschlossenen Ort lagern, an dem offene Flammen, Funken oder
Zündflammen, wie z. B. die eines Warmwasserbereiters,
Wäschetrockners oder eines anderen gasbetriebenen
Haushaltsgeräts, vorhanden sind. Warten, bis der Motor abgekühlt
ist, bevor die Maschine in einem geschlossenen Gebäude gelagert
wird. Kraftstoffbehälter außerhalb der Reichweite von Kindern in
einem gut entlüfteten, nicht bewohnten Gebäude aufbewahren.
2. Den Rasemäher und Motor frei von Gras, Laub oder starken
Fettablagerungen halten, um Brandgefahr und Motorüberhitzung zu
verhüten.
3. Beim Entleeren des Kraftstofftanks den Kraftstoff im Freien und
abseits von offenen Flammen in einen zugelassenen Behälter
entleeren.
4. Alle Schrauben, speziell die Mähmesserbolzen, -muttern und
Schrauben, müssen immer korrekt festgezogen sein. Prüfen, dass
alle Splinte in der vorgeschriebenen Position sind.
5. Bei laufendem Motor immer für ausreichende Entlüftung sorgen.
Motorabgase enthalten Kohlenmonoxid, ein tödliches Gas.
6. Motor nur im abgestelltem Zustand warten oder justieren. Das
Zündkabel abziehen und von der Zündkerze entfernt sichern, um
unbeabsichtigtes Starten zu verhindern.
7. Die Einstellung des Motordrehzahlreglers NICHT ändern und den
Motor NICHT mit überhöhter Drehzahl betreiben.
8. Die Grasfangvorrichtung häufig auf Abnutzung oder
Zustandsverschlechterung prüfen, damit keine Gegenstände
weggeschleudert werden und bewegten Teile freiliegen. Einen neuen
Sack anbringen, wenn dieser lose Nähte oder Risse aufweist. Den
Schieber oder Sackadapter austauschen, wenn dieser defekt oder
gerissen ist.
9. Mähmesser sind scharf und können Schnittverletzungen
hervorrufen. Beim Umgang mit Mähmessern VORSICHTIG sein,
diese umwickeln oder Lederschutzhandschuhe tragen.
10. Die Funkenprüfung NICHT durch Masseschließen der Zündkerze
neben dem Zündkerzenloch durchführen; der Funke kann Gas
entzünden, das aus dem Motor austritt.
11. Die Maschine mindestens einmal pro Jahr von einem
autorisierten Händer warten lassen und vom Händler neue
Sicherheitsvorrichtungen anbringen lassen.
12. Nur Original-Ersatzteile benutzen, damit die Einhaltung aller
ursprünglichen Standards gewährleistet ist.
Betriebssicherheit
Not for
Reproduction
Not for
Reproduction

www.snapper.com6
Vorsichtshinweise:
A. Alle in dieser Betriebsanleitung und auf dem Rasenmäher,
Motor und den Anbaugeräten enthaltenen Anweisungen und
Warnhinweise vor dem Betrieb lesen und befolgen.
B. Weist auf die Gefahr schwerer Verletzungen durch sich
drehende Mähmesser hin.
C. Nur mit angebrachter Grassammelvorrichtung oder der
Schutzabdeckung betreiben.
D. Kinder und andere Personen aus dem Mähbereich fernhalten.
CA
DB
Seriennummernschild:
A. Fertigungsnummer
B. Beschreibung/Modellnummer
C. Seriennummer
D. Herstellerinformationen
E. Schallpegel
F. Maschinengewicht
G. kW
H. Max. Drehzahl
I. Baujahr
J. Europäisches Zertifikat
E
A
F
D
B
C
G
H
J
I
Identifizierung der Aufkleber
Betriebssicherheit
Not for
Reproduction
Not for
Reproduction
Mfg. No. XXXXXXX
WALK BEHIND LAWN MOWER
S/N XXXXXXXXXX
BRIGGS & STRATTON YPPG
MILWAUKEE, WI USA
XX
2010
dB
kg: XX
kW: X.XX
XXXX max

7
Steuerkopf-Aufkleber:
A. Einkuppeln/Schnell
B. Langsam/Auskuppeln
B
A
Messerbetriebsbügel:
A. Stopp
B. Betrieb
B
A
Betriebssicherheit
Not for
Reproduction
Not for
Reproduction

www.snapper.com8
WICHTIG
Die Zeichnungen und Abbildungen in diesem Handbuch
dienen nur zur Bezugnahme und können von Ihrem Modell
abweichen. Wenden Sie sich bei Fragen an Ihren Händler.
A. Öleinfülldeckel/Messstab
B. Tankdeckel
C. Mulchdeckel
D. Arretierung der hinteren Höhenverstellung (2)
E. Arretierung der vorderen Höhenverstellung (2)
F. Schwenkrad-Sperrknopf (2)
G. Messerbetriebsbügel
H. Startseilzuggriff
I. Fahrantriebshebel
E
C
D
H
I
G
A
B
F
Funktionsmerkmale und Bedienungselemente
Not for
Reproduction
Not for
Reproduction
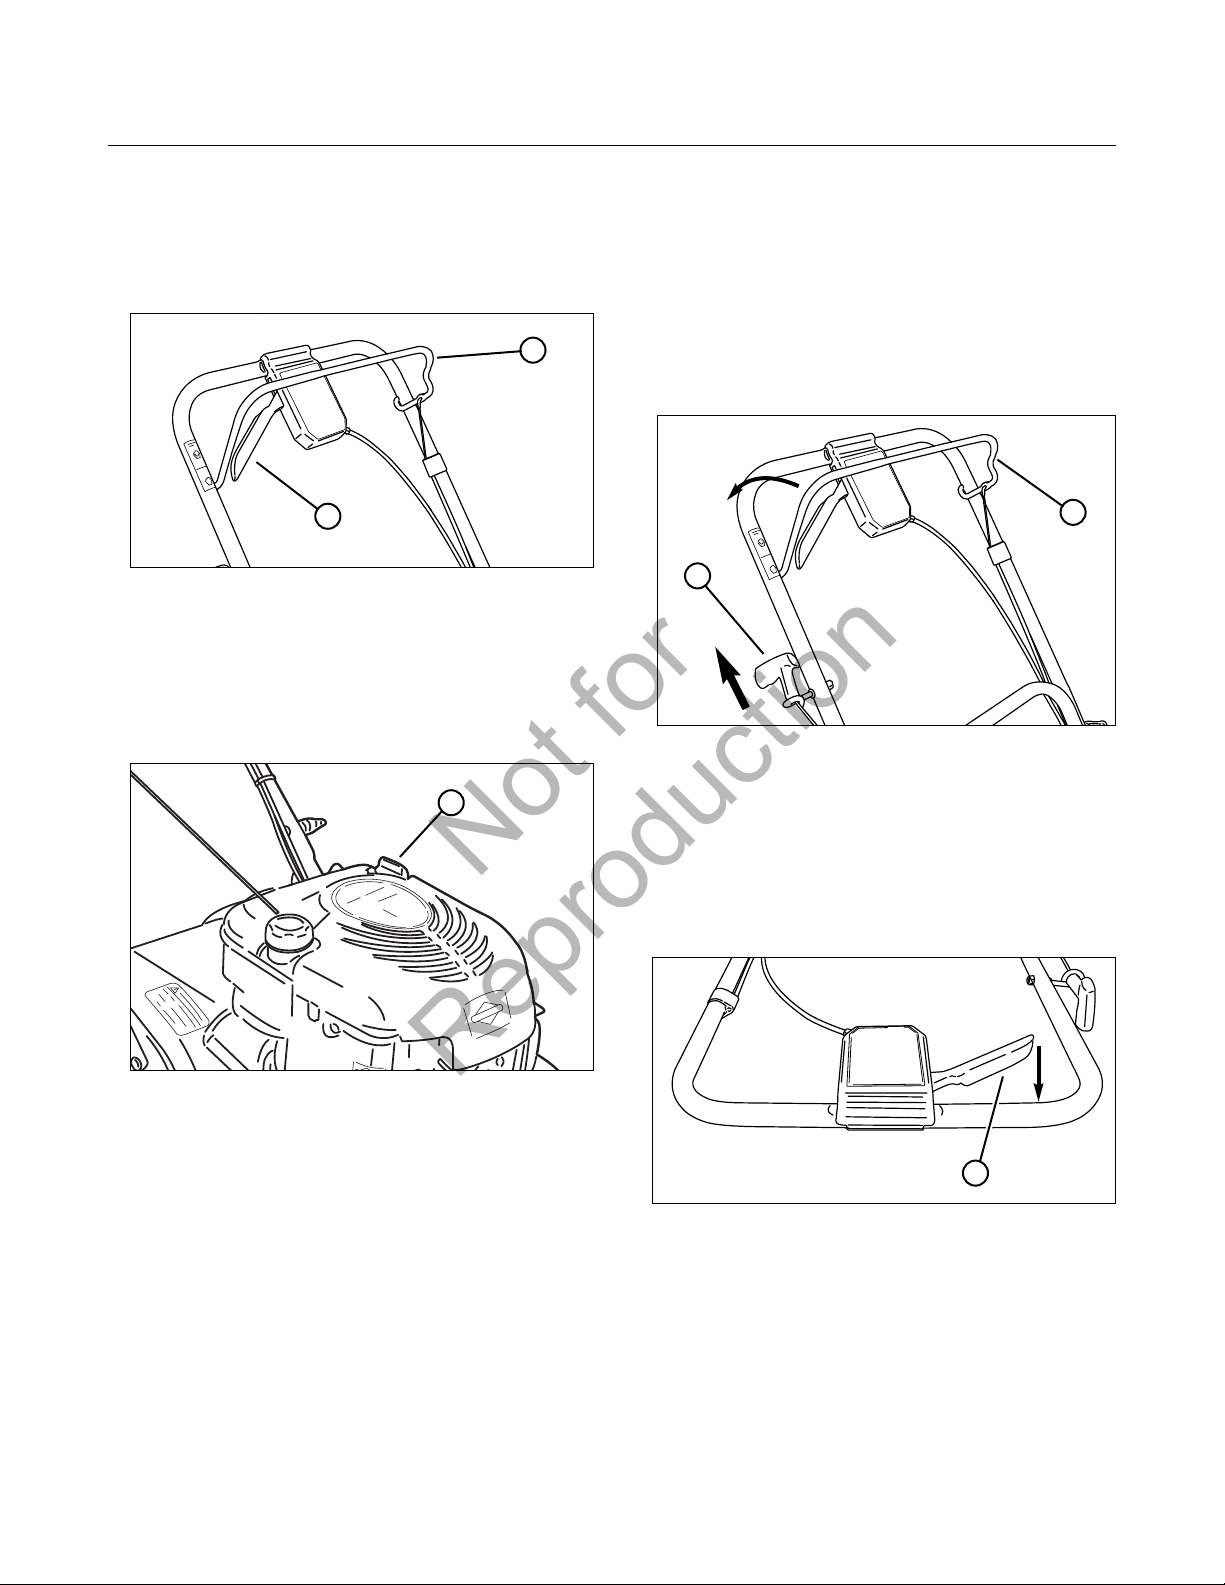
9
Vor dem Anlassen
1. Schutzabdeckungen, Prallbleche, Grasfangsack, Adapter
und Deckel prüfen, um sicherzustellen, dass alle
angebracht und sicher festgezogen sind.
2. Messerantriebsbügel (A, Abb. 1) und Fahrantriebshebel (B)
auf unbehinderte Funktionsweise prüfen.
3. Die Schnitthöhe prüfen. Auf die gewünschte Höhe
einstellen. Siehe Abschnitt „Einstellen der Schnitthöhe“.
4. Motorölstand prüfen (A, Abb. 2) und nach Bedarf Öl
einfüllen, bis der Füllstand die „Voll“-Markierung erreicht.
Angaben zum Öl sind in der Betriebsanleitung des Motors
zu finden.
5. Den Rasenmäher ins Freie schieben und dann den
Kraftstofftank auftanken, damit Dämpfe sicher entweichen
können. Den Tank bis 3,8 cm (1-1/2 Zoll) unter dem
Einfüllstutzen füllen (Platz für Kraftstoffausdehnung
lassen). Sicherstellen, dass der Tankdeckel nach dem
Auftanken festgezogen wird. Angaben zum Kraftstoff sind
in der Betriebsanleitung des Motors zu finden.
6. Die Außenflächen des Mähwerks und Motors von
verschüttetem Kraftstoff, Schmutz, Gras, Öl usw. reinigen.
Den Motor-Ansaugfilter und die Kühlrippen immer frei
halten.
Anlassen des Rasenmähers
Dieser Briggs & Stratton-Motor ist mit der Funktion Ready
Start
TM
ausgestartet und muss nicht vorgepumpt werden.
1. Den Messerantriebsbügel (A, Abb. 3) gegen den Griff
gedrückt halten.
2. Am Startseilzuggriff (B) ziehen, um den Motor anzukurbeln.
3. Um den Motor (und das Mähmesser) abzustellen, den
Messerantriebsbügel loslassen.
4. Den Motor nach dem Anspringen kurz warmlaufen lassen,
bis der Motor ruhig läuft und erst dann mit den
Mäharbeiten beginnen.
Fahren des Rasenmähers
1. Den Motor anlassen.
2. Den Fahrantriebshebel (A, Abb. 4) nach hinten zum Griff
drücken, um den Radantrieb einzukuppeln und den
Rasenmäher nach vorne zu fahren. Die Fahrgeschwindigkeit
kann erhöht werden, indem der Fahrantriebshebel weiter
nach hinten in Richtung Griff geschoben wird.
Anhalten des Rasenmähers
1. Die Vorwärtsfahrt des Mähers anhalten, indem der
Fahrantriebshebel losgelassen wird.
2. Den Motor und das Mähmesser abstellen, indem der
Messerantriebsbügel losgelassen wird.
Abbildung 2: Prüfen des Motoröls
B
A
Abbildung 1: Mäherbedienelemente
A
B
A
Abbildung 3: Anlassen des Rasenmähers
Abbildung 4: Fahrantriebshebel
(Messerantriebsbügel zur Verdeutlichung entfernt)
A
Betrieb
Not for
Reproduction
Not for
Reproduction

www.snapper.com10
Arretieren der Schwenkräder
Die Vorderräder können arretiert werden, damit der Rasenmäher
in einer Geraden fährt.
1. Den Rasenmäher einige Meter gerade nach vorne fahren,
damit die Räder nach vorne zeigen.
2. Die Schwenkrad-Sperrknöpfe (A, Abb. 5) in die
Sperrstellung schieben (dargestellt), um die Schwenkräder
in der Vorwärtsstellung zu arretieren.
3. Zum Lösen der Schwenkräder die Schwenkrad-Sperrknöpfe
in die Freigabestellung (B) schieben.
Einstellen der Griffhöhe
Zur bequemeren Bedienung kann die Höhe des
Rasenmähergriffs eingestellt werden.
1. Die T-Knöpfe und Schlossschrauben entfernen, mit denen
die untere Grifftstange (A, Abb. 6) an den
Befestigungshalterungen (B) gesichert ist.
2. Die Löcher in der Griffstange auf eines der drei
Griffhöheneinstellungslöcher in der Befestigungshalterung
ausrichten.
3. Die entfernten Befestigungsteile einsetzen und sicher anziehen.
Einstellen der Schnitthöhe
1. Die Höheneinstellverriegelung (A, Abb. 7) nach außen
ziehen und auf die gewünschte Schnitthöhe einstellen.
2. Alle Räder auf die gleiche Schnitthöhe einstellen. Die
höchste Einstellung ist Kerbe 7 (Abb. 8). Die niedrigster
Einstellung ist Kerbe 1.
Abbildung 6: Einstellen der Griffhöhe
B
VORSICHT
KEINE Wartungsarbeiten, Einstellungen bzw. KEINEN Service
bei laufendem Motor und Mähmesser durchführen. Den Motor
und das Mähmesser ABSTELLEN. Das Zündkabel abklemmen
und von der Zündkerze entfernt befestigen. Motor und
Komponenten sind HEISS. Um schwere Verbrennungen zu
vermeiden, alle Komponenten ausreichend lang abkühlen
lassen.
! !
Abbildung 7: Einstellen der Schnitthöhe
A
10,2 cm3,2 cm
Abbildung 8: Schnitthöheneinstellungen (ungefähr)
A
(Hinterrad abgebildet, Vorderrad ähnlich)
Abbildung 5: Arretieren der Schwenkräder
B
A
VORSICHT
KEINE Wartungsarbeiten, Einstellungen bzw. KEINEN Service
bei laufendem Motor und Mähmesser durchführen. Den Motor
und das Mähmesser ABSTELLEN. Das Zündkabel abklemmen
und von der Zündkerze entfernt befestigen. Motor und
Komponenten sind HEISS. Um schwere Verbrennungen zu
vermeiden, alle Komponenten ausreichend lang abkühlen
lassen.
! !
Betrieb
Not for
Reproduction
Not for
Reproduction

11
Mulchbetrieb
Für beste Mulching-Ergebnisse maximal 1/3 der Grashalmlänge
mähen und NUR recyceln, wenn das Gras trocken ist.
1. Alle Räder auf die höchste Schnittposition einstellen (Kerbe
7).
2. Langsam mähen. Wenn das Gras sehr dicht ist, die beiden
Hinterradverriegelungen um eine Kerbe niedriger als die
Vorderradverriegelungen einstellen, um die MulchingLeistung zu verbessern.
Entfernen des Mulchdeckels
Wichtig: Der Mulchdeckel muss immer an der Maschine
angebracht sein, es sei denn es sind andere Auswurfmethoden
wie seitlicher Auswurf oder Grasfangsack erwünscht.
1. Die Knopfmuttern (A, Abb. 9) und Innen-/
Außenzahnscheiben (B) entfernen, mit denen der
Mulchdeckel (C) am Mähwerk befestigt ist.
2. Den Deckel abnehmen.
Anbringen des Auswurfschachts
1. Den Mulchdeckel abnehmen. Siehe Abschnitt „Entfernen
des Mulchdeckels“.
2. Den Auswurfschacht (A, Abb. 10) am Mähwerk anstelle
des Mulchdeckels anbringen und Folgendes sicherstellen:
• Das vordere Loch (B) an der vorderen Außenseite des
Auswurfschachts passt über den Zapfen, an dem das
Vorderteil des Mulchdeckels befestigt war;
• Der Schlitz (C) oben auf dem Auswurfschacht rutscht
unter die Sicherungsmutter auf der Mähwerkoberseite
(unter der rechten vorderen Ecke des Motors);
• Der Schlitz (D) auf der hinteren Innenseite des
Auswurfschachts rutscht auf den Zapfen hinter der
Rückseite der Auswurföffnung, an dem das Heckteil
des Mulchdeckels befestigt war.
3. Die Innen-/Außenzahnscheiben und Knopfmuttern auf den
Zapfen anbringen und sicher festziehen.
Abbildung 9: Entfernen des Mulchdeckels
A
C
B
VORSICHT
KEINE Wartungsarbeiten, Einstellungen bzw. KEINEN Service
bei laufendem Motor und Mähmesser durchführen. Den Motor
und das Mähmesser ABSTELLEN. Das Zündkabel abklemmen
und von der Zündkerze entfernt befestigen. Motor und
Komponenten sind HEISS. Um schwere Verbrennungen zu
vermeiden, alle Komponenten ausreichend lang abkühlen
lassen.
! !
Abbildung 10: Anbringen des Auswurfschachts
B
A
C
D
Betrieb
Not for
Reproduction
Not for
Reproduction

www.snapper.com12
Anbringen des Grasfangsacks
(bei einigen Modellen Zusatzausstattung)
1. Den Mulchdeckel abnehmen. Siehe Abschnitt „Entfernen
des Mulchdeckels“.
2. Den Grasfangsackadapter (A, Abb. 11) am Mähwerk
anstelle des Mulchdeckels anbringen und Folgendes
sicherstellen:
• Das vordere Loch (B) an der vorderen Außenseite des
Adapters passt über den Zapfen, an dem das
Vorderteil des Mulchdeckels befestigt war;
• Der Schlitz (C) oben auf dem Adapter rutscht unter die
Sicherungsmutter auf der Mähwerkoberseite (unter
der rechten vorderen Ecke des Motors);
• Der Schlitz (D) auf der hinteren Innenseite des
Adapters rutscht auf den Zapfen hinter der Rückseite
der Auswurföffnung, an dem das Heckteil des
Mulchdeckels befestigt war.
3. Die Innen-/Außenzahnscheiben und Knopfmuttern auf den
Zapfen anbringen und sicher festziehen.
4. Den Starterseilzug um die Außenseite der
Seilführungsscheibe (E) wickeln.
Hinweis:
Der Starterseilzug kann gelockert werden, indem der
Messerantriebsbügel gegen den Griff gedrückt wird.
5. Den Grasfangsack anbringen, indem das Anschlussstück
(A, Abb. 12) über den Adapterflansch geschoben wird.
6. Die Grasfangsackhaken (B) über der mittleren
Griffquerstange befestigen.
VORSICHT
Grasfangsäcke bestehen aus einem Stoffgewebe, dessen
Zustand sich bei normalem Gebrauch verschlechtern und
abnutzen kann. Den Zustand des Sacks vor jeder Verwendung
prüfen. Abgenutzte oder beschädigte Grasfangsäcke sofort
durch vom Hersteller empfohlene Säcke ersetzen. Die
Grasfangvorrichtung ist bei einigen Modellen eine
Zusatzausstattung.
! !
Abbildung 11: Anbringen des Grasfangsackadapters
Abbildung 12: Anbringen des Grasfangsacks
B
A
B
D
A
E
C
VORSICHT
KEINE Wartungsarbeiten, Einstellungen bzw. KEINEN Service
bei laufendem Motor und Mähmesser durchführen. Den Motor
und das Mähmesser ABSTELLEN. Das Zündkabel abklemmen
und von der Zündkerze entfernt befestigen. Motor und
Komponenten sind HEISS. Um schwere Verbrennungen zu
vermeiden, alle Komponenten ausreichend lang abkühlen
lassen.
! !
Betrieb
Not for
Reproduction
Not for
Reproduction
13
Wartungstabelle
VORSICHT
KEINE Wartungsarbeiten, Einstellungen bzw. KEINEN Service
bei laufendem Motor und Mähmesser durchführen. Den Motor
und das Mähmesser ABSTELLEN. Das Zündkabel abklemmen
und von der Zündkerze entfernt befestigen. Motor und
Komponenten sind HEISS. Um schwere Verbrennungen zu
vermeiden, alle Komponenten ausreichend lang abkühlen
lassen. Beim Umgang oder der Arbeit mit den Mähmessern
starke Lederhandschuhe tragen. Die Mähmesser sind extrem
scharf und können schwere Verletzungen verursachen.
!
!
RASENMÄHER
Alle 8 Betriebsstunden oder täglich
Sicherheitssystem prüfen
Verunreinigungen vom Rasenmäher reinigen
Alle 25 Betriebsstunden oder jährlich *
Rasenmäher auf lose Befestigungsteile prüfen
Den Händler jährlich für folgende Aufgaben aufsuchen:
Rasenmäher schmieren
Mähmesser prüfen **
Zeit bis zum Anhalten der Mähmesser prüfen
Antriebsriemen prüfen
Batterie und -kabel reinigen (sofern vorhanden)
MOTOR
Erste 5 Betriebsstunden
Motoröl wechseln
Alle 8 Betriebsstunden oder täglich
Motorölstand prüfen
Alle 25 Betriebsstunden oder jährlich *
Motorluftfilter und Vorfilter (sofern vorhanden) reinigen **
Alle 50 Betriebsstunden oder jährlich *
Motoröl wechseln
Ölfilter ersetzen (falls vorhanden)
Jährlich
Luftfilter ersetzen
Vorfilter ersetzen (falls vorhanden)
Den Händler jährlich für folgende Aufgaben aufsuchen:
Schalldämpfer und Funkenfänger prüfen (sofern vorhanden)
Zündkerze austauschen
Kraftstofffilter ersetzen (falls vorhanden)
Motorluftkühlsystem reinigen
* Je nachdem, was zuerst eintritt
**Mähmesser in Regionen mit sandigen Böden oder starker
Staubentwicklung häufiger prüfen.
* Je nachdem, was zuerst eintritt
**Bei staubigen Bedingungen oder starker Verunreinigung der
Luft häufiger reinigen.
Wartung
Not for
Reproduction
Not for
Reproduction

www.snapper.com14
Wechseln des Motoröls
1. Angaben zum Öl, Verfahren und korrekte
Wartungsintervalle sind in der Betriebsanleitung des
Motors zu finden.
2. Für einen einfachen und sauberen Ölwechsel den
Rasenmäher wie dargestellt auf die Seite kippen, um das Öl
abzulassen. Das Öl durch das Messstabrohr (A, Abb. 13) in
einen Behälter ablassen. Ausreichend Zeit vorsehen, um
das gesamte Öl abzulassen.
Wichtig: Den Kraftstofftank vor dem Umkippen der Maschine
entleeren. Die Maschine NICHT mit dem Vergaser oder der
Zündkerze nach unten UMKIPPEN. Öl aus dem Kurbelgehäuse
sättigt den Luftfilter und der Motor kann danach nur schwer
oder überhaupt nicht angelassen werden. Bei einer
Verunreinigung muss der Luftfilter ersetzt werden.
3. Das Altöl vorschriftsmäßig entsorgen.
4. Den Motor den Angaben in der Motor-Betriebsanleitung
entsprechend mit Motoröl füllen. Nicht überfüllen.
Warten des Luftfilters
Anweisungen zur Wartung des Luftfilters sind in der
Betriebsanleitung des Motors zu finden.
Prüfen des Sicherheitssystems
1. Den Rasenmäher anlassen.
2. Den Bügel loslassen. Der Motor muss sich innerhalb von
3 Sekunden abstellen.
Wenn sich der Motor nicht abstellt, den Rasenmäher nicht
verwenden. Den Rasenmäher zum Service zu einem
autorisierten Händler bringen.
Reinigen des Rasenmähers
1. Schmutz und Rückstände von der Oberseite des Mähwerks
entfernen.
2. Angesammelte Verunreinigungen vom Motor und rund um
den Motor usw. entfernen.
Bei der Reinigung die Komponenten auf Abnutzung und
Schäden prüfen. Abgenutzte und beschädigte Komponenten
unverzüglich ersetzen.
Fahrantriebshebel
Der Fahrantriebshebel (A, Abb. 14) muss das Getriebe
einkuppeln, wenn der Hebel zum Griff gedrückt wird, und das
Getriebe auskuppeln, wenn der Hebel losgelassen wird. Wenn
das Getriebe nicht komplett ein- oder auskuppelt, vor dem
Betrieb des Rasenmähers Ihren autorisierten Snapper-Händler
verständigen.
Abbildung 13: Motoröl ablassen
VORSICHT
KEINE Wartungsarbeiten, Einstellungen bzw. KEINEN Service
bei laufendem Motor und Mähmesser durchführen. Den Motor
und das Mähmesser ABSTELLEN. Das Zündkabel abklemmen
und von der Zündkerze entfernt befestigen. Motor und
Komponenten sind HEISS. Um schwere Verbrennungen zu
vermeiden, alle Komponenten ausreichend lang abkühlen
lassen.
! !
A
VORSICHT
KEINE Wartungsarbeiten, Einstellungen bzw. KEINEN Service
bei laufendem Motor und Mähmesser durchführen. Den Motor
und das Mähmesser ABSTELLEN. Das Zündkabel abklemmen
und von der Zündkerze entfernt befestigen. Motor und
Komponenten sind HEISS. Um schwere Verbrennungen zu
vermeiden, alle Komponenten ausreichend lang abkühlen
lassen. Beim Umgang oder der Arbeit mit den Mähmessern
starke Lederhandschuhe tragen. Die Mähmesser sind extrem
scharf und können schwere Verletzungen verursachen.
! !
Wartung
Abbildung 14: Fahrantriebshebel
A
(Komponenten wurden zur Veranschaulichung entfernt)
Not for
Reproduction
Not for
Reproduction

15
Einlagerung
Vorbereitungen zur längeren Lagerung des Motors sind in der
Betriebsanleitung des Motors zu finden. Den Rasenmäher bei
der Lagerung am Saisonende wie folgt vorbereiten:
1. Das Zündkabel abklemmen und von der Zündkerze entfernt
befestigen.
2. Den Kraftstoff aus dem Kraftstofftank ablassen und den
Motor laufen lassen, bis der Vergaser keinen Kraftstoff
mehr enthält.
3. Lose Verunreinigungen mit einer Bürste oder Druckluft
entfernen. Die Maschine danach mit einen feuchten Tuch
abwischen.
4. Den Rasenmäher auf den Hinterrädern hochkippen und die
Mähwerkunterseite gründlich reinigen. Den Rasenmäher
nicht mit dem Vergaser oder der Zündkerze nach unten
kippen. Angesammeltes Gras mit einem Dichtungsschaber
und/oder einer Drahtbürste abkratzen.
5. Eine dünne Ölschicht auf alle freiliegenden Metallteile
auftragen, um Korrosion zu verhindern.
6. Die Griffe behutsam umklappen und die Steuerkabel
biegen, damit diese nicht beschädigt werden.
7. Den Rasenmäher in einem Schuppen oder an einem
anderen trockenen, witterungsgeschützten Ort einlagern.
VORSICHT
KEINE Wartungsarbeiten, Einstellungen bzw. KEINEN Service
bei laufendem Motor und Mähmesser durchführen. Den Motor
und das Mähmesser ABSTELLEN. Das Zündkabel abklemmen
und von der Zündkerze entfernt befestigen. Motor und
Komponenten sind HEISS. Um schwere Verbrennungen zu
vermeiden, alle Komponenten ausreichend lang abkühlen
lassen. Beim Umgang oder der Arbeit mit den Mähmessern
starke Lederhandschuhe tragen. Die Mähmesser sind extrem
scharf und können schwere Verletzungen verursachen.
!
!
Wartung
Not for
Reproduction
Not for
Reproduction

www.snapper.com16
PROBLEM WAHRSCHEINLICHE URSACHE ABHILFEMASSNAHME
Motor springt nicht an 1. Kraftstofftank leer. 1. Den Kraftstofftank mit frischem Kraftstoff füllen.
2. Zündkabel abgeklemmt. 2. Zündkabel an Zündkerze anbringen.
Motor stirbt ab oder
verliert während des
Betriebs Kraft
1. Messerantriebsbügel losgelassen oder nicht fest
gegen Griff gedrückt.
1. Messerantriebsbügel muss beim Mäherbetrieb
immer fest gegen den Griff gedrückt werden.
2. Kraftstofftank leer. 2. Mit Kraftstoff auf den richtigen Füllstand auffüllen.
3. Motorvorfilter und/oder Luftfilter verschmutzt. 3. Von allen Rückständen reinigen.
4. Zündkerze defekt oder Elektrodenspalt falsch
eingestellt.
4. Zündkerze warten.
5. Wasser, Schmutz oder alter Kraftstoff im
Kraftstoffsystem.
5. Kraftstoffsystem entleeren und reinigen.
Übermäßige Vibration 1. Mähmesser beschädigt, nicht ausgewuchtet oder
verbogen.
1. Den Vertragshändler benachrichtigen.
2. Lose Mähmesserkomponenten. 2. Den Vertragshändler benachrichtigen.
3. Druckheber lose oder fehlt (falls vorhanden). 3. Den Vertragshändler benachrichtigen.
4. Klumpiger oder ausgefranster Riemen. 4. Den Vertragshändler benachrichtigen.
Rasenmäher bewegt sich
nicht / mangelnde
Bodenhaftung.
1. Verunreinigungen am oder um
Radantriebskomponenten angesammelt.
1. Verunreinigungen entfernen.
2. Getriebeseilzug muss eingestellt werden. 2. Den Vertragshändler benachrichtigen.
3. Fahrantriebsriemen muss ausgetauscht werden. 3. Den Vertragshändler benachrichtigen.
4. Getriebe beschädigt. 4. Den Vertragshändler benachrichtigen.
Gras wird mangelhaft
geschnitten
1. Schnitthöhe zu hoch oder niedrig. 1. Schnitthöhe korrigieren.
2. Zu hohe Fahrgeschwindigkeit. 2. Fahrgeschwindigkeitshebel auf langsamere
Geschwindigkeit einstellen.
3. Terrassenförmiger Schnitt, Seite zu Seite. 3. Schnitthöhe mit den Höhenverstellhebeln
einstellen.
4. Zu starke Mähwerkneigung, vorne nach hinten. 4. Schnitthöhe mit den Höhenverstellhebeln
einstellen.
5. Mähmesser sind stumpf oder beschädigt. 5. Den Vertragshändler benachrichtigen.
Schlechter Grasauswurf 1. Zu schnelle Fahrgeschwindigkeit. 1. Fahrgeschwindigkeitshebel auf langsamere
Geschwindigkeit einstellen.
2. Gras ist nass. 2. Gras mähen, wenn es trocken ist.
3. Stark abgenutztes oder beschädigtes
Mähmesser.
3. Den Vertragshändler benachrichtigen.
4. Ansammlungen von Gras und Verunreinigungen
unter dem Mähwerk.
4. Mähwerk reinigen.
5. Falsches Mähmesser in Mähwerk eingebaut. 5. Den Vertragshändler benachrichtigen.
6. Mähmesser falsch in das Mähwerk eingebaut. 6. Den Vertragshändler benachrichtigen.
Ölleckagen 1. Messstab locker. 1. Sicherstellen, dass der
Messstab/Ölverschlussdeckel sicher angebracht ist.
2. Ablassschraube locker. 2. Ablassschraube prüfen und festziehen.
3. Zu hoher Ölstand. 3. Überschüssiges Öl ablassen.
4. Öldichtungen beschädigt. 4. Den Vertragshändler benachrichtigen.
Fehlersuche
Not for
Reproduction
Not for
Reproduction

17
BRIGGS & STRATTON POWER PRODUCTS GROUP, L.L.C. EIGENTÜMERGARANTIE
GARANTIEDAUER
ÜBER DIE GARANTIE
BESCHRÄNKTE GARANTIE
Briggs & Stratton Power Products Group, LLC wird alle Teile des Geräts kostenlos reparieren und/oder ersetzen, die Material- oder
Fertigungsmängel aufweisen. Briggs & Stratton Corporation wird alle Teile des Briggs and Stratton Motors* (falls vorhanden) kostenlos
reparieren und/oder ersetzen, die Material- oder Fertigungsmängel aufweisen. Transportkosten für Produkte, die zur Reparatur oder zum
Teileaustausch unter dieser Garantie eingeschickt werden, müssen von Kunden getragen werden. Diese Garantie gilt für die unten
angeführen Zeiträume und unterliegt den unten angegebenen Bedingungen. Für Garantieservice suchen Sie bitte den nähesten
Vertragshändler auf unserer Händlerkarte unter www.BriggsandStratton.com.
Es gelten keine anderen ausdrücklichen Garantien. Implizierte Garantien, einschließlich handelsübliche Qualität oder Eignung für einen
bestimmten Zweck, sind beschränkt auf ein Jahr ab Kaufdatum oder auf das gesetzlich vorgeschriebene Mindestausmaß. Haftung für
zufällige oder Folgeschäden ist ausgeschlossen, soweit dies gesetzlich zulässig ist.
In einigen Staaten oder Ländern ist keine Einschränkung des Zeitraums für implizierte Garantien zulässig und einige Staaten und Länder
gestatten die Einschränkung von zufälligen oder Folgeschäden nicht; die obige Einschränkung und Ausschließung gilt daher in diesen
Fällen eventuell nicht. Diese Garantie gibt Ihnen spezielle Rechte; je nach Staat oder Land können Sie auch noch andere Rechte haben.
Die Garantiefrist beginnt am Kaufdatum, an dem der Einzelhandelskunde oder gewerbliche Endbenutzer das Produkt erworben hat, und
erstreckt sich über den oben angeführten Zeitraum. „Private Verwendung“ bedeutet Benutzung in einem Haushalt durch einen
Einzelhandelskunden. „Gewerbliche Verwendung” bedeutet alle anderen Verwendungszwecke, einschließlich für gewerbliche Zwecke, Zwecke
zum Erzielen eines Einkommens oder für Maschinenverleih. Nachdem ein Produkt einmal für einen gewerblichen Zweck verwendet wurde,
wird es unter dieser Garantie als gewerblich benutztes Produkt eingestuft.
Es ist keine Garantieanmeldung erforderlich, um die Garantie für Produkte der Marke Briggs & Stratton zu erhalten. Heben Sie Ihren
Kaufbeleg auf. Wenn Sie keinen Kaufbeleg vorweisen können, um das Kaufdatum anzugeben, wird die Garantiedeckung anhand des
Fertigungsdatums des Produktes ermittelt.
Wir wissen Reparaturen unter der Garantie zu schätzen und entschuldigen uns für etwaige Unannehmlichkeiten. Garantieservice kann nur bei
Vertraghändlern durchgeführt werden, die von Briggs & Stratton oder BSPPG, LLC dazu autorisiert wurden.
Die meisten Garantiereparaturen sind routinemäßig; es kann jedoch manchmal vorkommen, dass Anforderungen von Garantieservice nicht
zulässig sind. Diese Garantie deckt nur Material- und/oder Fertigungsmängel. Sie deckt keine Schäden, die durch falschen Einsatz oder
Missbrauch, unsachgemäße Wartung oder Reparatur, normale Abnutzung oder alten oder unzulässigen Kraftstoff verursacht werden.
Falscher Einsatz und Missbrauch - Der korrekte, vorgesehene Einsatz dieses Produktes ist in der Betriebsanleitung angeführt. Wenn das
Produkt auf andere Weise eingesetzt wird, als in der Betriebsanleitung beschrieben, oder wenn es nach einer Beschädigung benutzt wird,
wird die Garantie ungültig. Die Garantie ist nichtig, wenn die Seriennummer des Produktes entfernt wurde oder wenn das Produkt verändert
oder modifiziert wurde oder wenn das Produkt Anzeichen von Missbrauch aufweist, wie Aufprallschäden oder Schäden durch Wasser-/
Chemikalienkorrosion.
Unsachgemäße Wartung oder Reparatur - Dieses Produkt muss den Verfahren und Intervallen in der Betriebsanleitung gemäß gewartet
werden und es muss unter Verwendung von Original-Briggs & Stratton-Ersatzteilen gewartet oder repariert werden. Schäden durch
mangelnde Wartung oder Einsatz von Nachbauteilen sind nicht von der Garantie gedeckt.
Normale Abnutzung - Wie alle mechanischen Geräte unterliegt Ihr Gerät Abnutzungserscheinungen, auch bei korrekter Wartung. Die Garantie
deckt keine Reparaturen, wenn die normale Verwendung die Lebensdauer des Teiles oder Produktes beendet hat. Wartungs- und
Verschleißteile wie Filter, Riemen, Mähmesser und Bremsbeläge (Motorbremsbeläge sind gedeckt) sind bei Abnutzungserscheinungen nicht
von der Garantie gedeckt, es sei denn diese sind auf Material- und Fertigungsmängel zurückzuführen.
Alter Kraftstoff - Für korrekte Funktionsweise muss dieses Produkt mit frischem Kraftstoff betrieben werden, der den in der
Betriebsanleitung angeführten Kriterien entspricht. Durch alten Kraftstoff verursachte Schäden (Vergaserundichtigkeit, verstopfte
Kraftstoffleitungen, klemmende Ventile usw.) sind nicht von der Garantie gedeckt.
* Gilt nur für Briggs and Stratton Motoren. Garantiedeckung von Nicht-„Briggs and Stratton“-Motoren werden vom Motorhersteller bereitgestellt.
Garantie
Teil Private Verwendung Gewerbliche Verwendung
Ausrüstung 2 Jahre 90 Tage
Motor* 2 Jahre 90 Tage
Batterie 1 Jahr 1 Jahr
Not for
Reproduction
Not for
Reproduction

18
Notizen:
www.snapper.com
Not for
Reproduction
Not for
Reproduction

19
ANLEITUNG FÜR DAS ARBEITEN AM HANG
15 GRAD
HALTEN SIE DIESE ANLEITUNG AUSGERICHTET AUF EINEN
SENKRECHTEN BAUMSTAMM, EINE HAUSKANTE,
EINEN LEITUNGSMASTEN ODER ZAUN.
ENTLANG DER PUNKTIERTEN LINIE FALTEN
Mit einem handgeführten
Rasenmäher muss quer
zum Hang, nicht hinauf oder
hinunter gemäht werden.
Mit einem Aufsitzmäher
muss hinauf oder hinunter,
nicht quer zum Hang
gemäht werden.
15 GRAD10 GRAD
Bei einem Aufsitzmäher wie folgt bestimmen, ob die Hangneigung zum Mähen sicher ist: (1) Messer auskuppeln, (2) Rückwärtsgang einlegen und
(3) versuchen den Hang gerade hinauf zu reversieren. Wenn das möglich ist, kann der Hang im allgemeinen sicher gemäht werden. Wenn Sie sich
nicht sicher fühlen oder unsicher sind, ob der Hang gemäht werden kann, halten Sie sich an diese Anleitung und mähen sie keinen Hang mit
einer Neigung von mehr als 15 Grad. Wenn der Aufsitzmäher mit einem gezogenen oder heckmontierten Anbaugerät benutzt wird, die Maschine
nicht bei einer Neigung von mehr als 10 Grad betreiben.
Eine Neigung von 15 Grad ist ein Hügel, der in 3 m Entfernung um 0,8 m ansteigt.
Eine Neigung von 10 Grad ist ein Hügel, der in 3 m Entfernung um 0,5 m ansteigt.
Immer besonders vorsichtig arbeiten, plötzliche Richtungsänderungen und abrupte Manöver vermeiden. Die Informationen in dieser
Anleitung zur Sicherheit beim Mähen auf Hängen befolgen. Mit einem Aufsitzmäher muss hinauf oder hinunter, nicht quer zum Hang
gemäht werden. Mit einem handgeführten Rasenmäher muss quer zum Hang gemäht werden. Beim Betrieb auf Hängen und in der
Nähe von Hindernissen besonders vorsichtig sein.
Anleitung für das Arbeiten am Hang
Not for
Reproduction

Motornennleistungsinformationen: Die Bruttonennleistung auf den Typenschildern der Benzinmotormodelle entsprechen
SAE (Society of Automotive Engineers) Code J1940 (Verfahren zur Ermittlung von Nennleistung und -drehmoment von
Kleinmotoren) und die Nennleistung wurde auf Grundlage von SAE J1995 (Revision 2002-05) ermittelt und korrigiert.
Drehmomentwerte werden bei 3060 U/min, Leistungswerte bei 3600 U/min ermittelt. Die tatsächliche Bruttonennleistung des
Motors wird geringer sein und wird u. a. durch Umgebungsbetriebsbedingungen und Schwankungen von Motor zu Motor
beeinflusst. Auf Grund der großen Breite an Produkten, in denen Motoren eingesetzt werden, und der Vielzahl von
Umgebungsbedingungen, die den Betrieb der Maschine beeinflussen, erreicht der Benzinmotor ggf. die angegebene Nennleistung
nicht, wenn er in einer motorbetriebenen Maschine verwendet wird (tatsächliche „ortsgebundene“ oder Netto-Leistung). Dieser
Unterschied ist auf verschiedene Faktoren zurückzuführen, u. a. Nebenverbraucher (Luftfilter, Auspuff, Ladesystem, Kühlanlage,
Vergaser, Kraftstoffpumpe usw.), Einschränkungen der Anwendung, Umgebungsbetriebs-bedingungen (Temperatur, Luftfeuchtigkeit,
Seehöhe) und Schwankungen von Motor zu Motor. Auf Grund von Fertigungs- und Kapazitätseinschränkungen kann Briggs &
Stratton den Motor dieser Serie wahlweise durch einen Motor mit höherer Leistung ersetzen.
Ersatzteile für alle Modelle Bestellnummer
Messerantriebs-Seilzug 7100074YP
Radantriebsseilzug 7104004YP
Mähmesser (Doppelwelle) 7100242AYP
Mähmesser (Ninja - Quad) 7026407AYP
Antriebsriemen 7100883YP
Technische Daten des Produktes
Mähwerkdurchmesser (cm/Zoll) 53,3/21
Schnitthöhe (cm/Zoll) 3,2 - 10,2/1,25 - 4
Getriebetyp Zahnrad
Fahrgeschwindigkeit (km/h/mph) 0 - 6,4/0 - 4
Motorleistung (Bruttodrehmoment) 6,75
Motorhubraum (ccm) 190
Kraftstofftank-Fassungsvermögen (l/qt) 0,9/1,0
20
www.snapper.com
1-800-935-2967
21 Zoll HANDGEFÜHRTER
RASENMÄHER MIT VARIABLER
GESCHWINDIGKEIT UND
SCHWENKRÄDERN
Not for
Reproduction
Not for
Reproduction

Gebruikershandleiding
21 DUIM HANDMAAIER MET
VARIABEL TOERENTAL
EN ZWENKWIELEN
Modelnr.Beschrijving
7800448 ESPV211S
7800730 ERPV21675SW
Not for
Reproduction
Not for
Reproduction
!

Hartelijk dank voor de aankoop van deze hoogwaardige Snapper-grasmaaier. We zijn blij dat u vertrouwt
op de Snapper-merkproducten. Uw Snapper-maaier zal u vele jaren betrouwbare dienst bewijzen, wanneer
u het toestel gebruikt en onderhoudt zoals vermeld in de instructies in deze handleiding.
Deze handleiding bevat veiligheidsinformatie om u te wijzen op de gevaren en risico’s van deze machine
en hoe u deze kunt vermijden. Deze machine is alleen ontworpen en bedoeld voor het afmaaien van
bestaande gazons en voor geen enkel ander doel. Het is belangrijk dat u deze instructies leest en begrijpt
voordat u de maaier probeert te starten of te bedienen. Bewaar deze originele instructies voor
toekomstig gebruik.
Vul na aankoop de volgende gegevens in.
Aankoopdatum_____________________________________________________________________
Winkel___________________________________________________________________________
Telefoonnummer winkel_____________________________________________________________
Uitrusting
Modelnummer_______________________________________________________________
Serienummer _______________________________________________________________
Motor
Model_________________________Type__________________Code___________________
SNAPPER is een handelsmerk van
Briggs & Stratton Power Products Group, LLC
Milwaukee, WI, VS.
Copyright © 2010, Briggs & Stratton Corporation
Milwaukee, WI, VS. Alle rechten voorbehouden.
Not for
Reproduction
Not for
Reproduction

3
Inhoudsopgave
Veiligheid van de gebruiker . . . . . . . . . . . . . . . . . . . . . . . . . . . . . . . . . . . . . . .4
Veiligheidsinstructies voor de gebruiker . . . . . . . . . . . . . . . . . . . . . . . . . . . . . . . . . .4
Stickerplaatsen . . . . . . . . . . . . . . . . . . . . . . . . . . . . . . . . . . . . . . . . . . . . . . . . . . . . .6
Functies en bedieningselementen . . . . . . . . . . . . . . . . . . . . . . . . . . . . . . . . . . .8
Bediening . . . . . . . . . . . . . . . . . . . . . . . . . . . . . . . . . . . . . . . . . . . . . . . . . . . .9
Vóór het starten . . . . . . . . . . . . . . . . . . . . . . . . . . . . . . . . . . . . . . . . . . . . . . . . . . . .9
Starten van de maaier . . . . . . . . . . . . . . . . . . . . . . . . . . . . . . . . . . . . . . . . . . . . . . . .9
Rijden met de maaier . . . . . . . . . . . . . . . . . . . . . . . . . . . . . . . . . . . . . . . . . . . . . . . .9
Stoppen van de maaier . . . . . . . . . . . . . . . . . . . . . . . . . . . . . . . . . . . . . . . . . . . . . . .9
Vergrendelen van de zwenkwielen . . . . . . . . . . . . . . . . . . . . . . . . . . . . . . . . . . . . . .10
Afstelling van de hendelhoogte . . . . . . . . . . . . . . . . . . . . . . . . . . . . . . . . . . . . . . . .10
Afstelling van de maaihoogte . . . . . . . . . . . . . . . . . . . . . . . . . . . . . . . . . . . . . . . . .10
Mulchen . . . . . . . . . . . . . . . . . . . . . . . . . . . . . . . . . . . . . . . . . . . . . . . . . . . . . . . . .11
Verwijderen van de mulchplaat . . . . . . . . . . . . . . . . . . . . . . . . . . . . . . . . . . . . . . . .11
Monteren van de afvoerdeflector . . . . . . . . . . . . . . . . . . . . . . . . . . . . . . . . . . . . . .11
Monteren van de grasopvangzak . . . . . . . . . . . . . . . . . . . . . . . . . . . . . . . . . . . . . .12
Onderhoud . . . . . . . . . . . . . . . . . . . . . . . . . . . . . . . . . . . . . . . . . . . . . . . . . .13
Onderhoudschema . . . . . . . . . . . . . . . . . . . . . . . . . . . . . . . . . . . . . . . . . . . . . . . . .13
Verversen van de motorolie . . . . . . . . . . . . . . . . . . . . . . . . . . . . . . . . . . . . . . . . . .14
Onderhoud van het luchtfilter . . . . . . . . . . . . . . . . . . . . . . . . . . . . . . . . . . . . . . . . .14
Controleren van het veiligheidsvergrendelsysteem . . . . . . . . . . . . . . . . . . . . . . . . .14
Vuil van de maaier verwijderen . . . . . . . . . . . . . . . . . . . . . . . . . . . . . . . . . . . . . . . .14
Aandrijfhendel . . . . . . . . . . . . . . . . . . . . . . . . . . . . . . . . . . . . . . . . . . . . . . . . . . . . .14
Opslagprocedure . . . . . . . . . . . . . . . . . . . . . . . . . . . . . . . . . . . . . . . . . . . . . . . . . . .15
Problemen oplossen . . . . . . . . . . . . . . . . . . . . . . . . . . . . . . . . . . . . . . . . . . . .16
Garantie . . . . . . . . . . . . . . . . . . . . . . . . . . . . . . . . . . . . . . . . . . . . . . . . . . . .17
Hellinggids . . . . . . . . . . . . . . . . . . . . . . . . . . . . . . . . . . . . . . . . . . . . . . . . . .19
Not for
Reproduction
Not for
Reproduction

www.snapper.com4
!
WAARSCHUWING: Deze krachtige maaimachine kan handen en voeten amputeren en voorwerpen wegslingeren die
persoonlijk letsel en materiële schade kunnen veroorzaken! Het niet naleven van de navolgende VEILIGHEIDSinstructies
zou kunnen leiden tot ernstig of dodelijk letsel van de gebruiker of andere personen. De eigenaar van de machine moet
deze instructies begrijpen en mag enkel personen die deze instructies begrijpen toestemming geven om de machine te
bedienen. Iedereen die de machine gebruikt, moet gezond van geest en lichaam zijn en mag niet onder de invloed zijn
van enig middel dat het zicht, reactievermogen of beoordelingsvermogen nadelig zou kunnen beïnvloeden. Als u vragen
hebt over uw machine die uw dealer niet naar tevredenheid kan beantwoorden, kunt u bellen naar de afdeling
Klantenservice (in de VS 1-800-935-2967).
Bescherming van kinderen
Er kunnen zich tragische ongelukken voordoen indien de gebruiker
van de grasmaaier niet bedacht is op de aanwezigheid van kinderen.
Kinderen worden vaak aangetrokken door de machine en het
maaien. Ga er nooit van uit dat kinderen op de plaats blijven staan
waar u ze het laatst zag.
1. HOUD kinderen UIT DE BUURT van het maaigebied en laat een
andere verantwoordelijke volwassene goed op ze passen.
2. Geef kinderen GEEN toestemming om zich in de tuin op te
houden als de machine is ingeschakeld en schakel de machine UIT
als iemand het maaigebied betreedt.
3. Laat GEEN kinderen jonger dan 14 jaar de machine bedienen.
4. LAAT alleen verantwoordelijke volwassenen en tieners met een
goed beoordelingsvermogen onder toezicht van een volwassene
de machine bedienen.
5. Trek de maaier NIET achterwaarts tenzij dit absoluut
noodzakelijk is. KIJK naar achteren en naar onderen of er geen
kinderen, huisdieren en andere gevaren aanwezig zijn vóór en
tijdens het achteruit rijden.
6. WEES EXTRA VOORZICHTIG bij het naderen van blinde hoeken,
struiken, bomen of andere voorwerpen die het zicht kunnen
beperken.
Gebruik op hellingen
1. Hellingen vormen een belangrijk gevaar vanwege de kans op
struikelen en vallen waardoor ernstig letsel kan ontstaan. Op elke
helling moet u extra voorzichtig zijn. Als u zich op een helling niet
op uw gemak voelt, maai daar dan NIET.
2. Maai hellingen horizontaal, nooit op en neer. Wees uiterst
VOORZICHTIG bij het veranderen van richting op hellingen. Maai
GEEN steile hellingen of andere plaatsen waar u aan de stabiliteit
of tractie twijlfelt. Raadpleeg de Hellinggids aan het einde van deze
handleiding.
3. Wees extra voorzichtig met grasopvangzakken of andere
hulpstukken; deze kunnen het gedrag en de stabiliteit van de
machine nadelig beïnvloeden.
Voorbereiding
1. Lees, begrijp en volg de instructies en de waarschuwingen in
deze handleiding en op de maaier, motor en hulpstukken. Zorg dat
u de bedieningselementen en het correct gebruik van de machine
kent voordat u de machine start.
2. Enkel volwassen personen met verantwoordelijkheidsgevoel
mogen de machine bedienen en enkel nadat ze correct
geïnstrueerd zijn.
3. Uit gegevens blijkt dat gebruikers vanaf de leeftijd van 60 jaar
betrokken zijn bij een groot percentage van ongevallen met
maaiers die letsel tot gevolg hebben. Gebruikers in die
leeftijdcategorie moeten beoordelen of zij in staat zijn de maaier
veilig genoeg te gebruiken om zichzelf en anderen te behoeden
voor ernstig letsel.
4. Ga extra voorzichtig om met brandstof. Brandstof is
ontbrandbaar en de dampen zijn ontplofbaar. Gebruik uitsluitend
een goedgekeurde brandstoftank. U mag de brandstofdop NIET
verwijderen en GEEN brandstof bijvullen wanneer de motor loopt.
U mag uitsluitend in de buitenlucht brandstof bijvullen met
uitgeschakelde en afgekoelde motor. Veeg gemorste brandstof en
olie van de machine. NIET roken.
Voorbereiding
(Vervolg van vorige kolom)
5. Controleer het te maaien gebied en verwijder alle voorwerpen
zoals speelgoed, draden, stenen, takken en andere voorwerpen die
letsel zouden kunnen veroorzaken wanneer ze door het maaiblad
worden weggeslingerd of het maaien zouden kunnen hinderen. Let
ook op gaten, stronken en andere mogelijke gevaren.
6. Houd personen en huisdieren weg uit de buurt van het
maaigebied. Als iemand het maaigebied betreedt, moet u het
maaiblad onmiddellijk STOPPEN, de motor uitschakelen en de
machine stoppen.
7. Controleer regelmatig of schermen, deflectoren, schakelaars,
bedieningselementen voor het maaiblad en andere
veiligheidsvoorzieningen goed werken en zijn aangebracht.
8. Zorg dat alle veiligheidsstickers duidelijk leesbaar zijn. Vervang
ze indien ze beschadigd zijn.
9. Bescherm uzelf tijdens het maaien en draag een veiligheidsbril,
een stofmasker, een lange broek en stevige schoenen. Maai NIET
op blote voeten of met sandalen.
10. Zorg dat u weet hoe u het maaiblad en de motor snel kunt
STOPPEN zodat u voorbereid bent op mogelijke noodgevallen.
11. Wees extra voorzichtig wanneer u de machine op een
aanhangwagen of vrachtwagen zet of ze eraf haalt.
12. Controleer de onderdelen van de grasopvangbak frequent op
tekenen van slijtage of beschadiging en vervang ze indien nodig
om letsel te vermijden door weggeslingerde voorwerpen die door
zwakke en versleten plekken dringen.
Veilig omgaan met benzine
Om persoonlijk letsel of materiële schade te vermijden, moet u
uiterst voorzichtig omgaan met benzine. Benzine is uiterst
ontvlambaar en de dampen ervan zijn explosief.
1. Doof alle sigaretten, sigaren, pijpen en andere
ontstekingsbronnen.
2. Gebruik uitsluitend een goedgekeurde brandstoftank.
3. U mag de brandstofdop NIET verwijderen of GEEN brandstof
bijvullen wanneer de motor loopt. Laat de motor afkoelen vóór u
benzine bijvult.
4. U mag binnen GEEN benzine bijvullen.
5. Berg de machine of de brandstofbus NIET op in een ruimte met
een open vlam, vonk of waakvlam, zoals in de buurt van een boiler
of ander toestel.
6. Vul brandstofbussen NIET binnen in een voertuig of op een
vrachtwagen of aanhangwagen met een plastic bodembekleding.
Plaats de bussen altijd op de grond en uit de buurt van het
voertuig voordat u ze vult.
7. Haal apparaten die op benzine werken uit het voertuig of de
aanhangwagen en vul ze op de grond bij. Indien dit niet mogelijk
is, vul ze dan met behulp van een draagbare brandstoftank in
plaats van uit een benzinepomp.
Veiligheid van de gebruiker
Not for
Reproduction
Not for
Reproduction

5
Veilig omgaan met benzine
(Vervolg van vorige pagina)
8. Start toestellen die op benzine werken NIET in afgesloten
voertuigen of aanhangwagens.
9. Houd het mondstuk steeds in contact met de rand van de
brandstoftank of opening tot het bijvullen is voltooid. Gebruik
GEEN voorzieningen die het mondstuk vanzelf open houden.
10. Als u brandstof op uw kleding hebt gemorst, trek dan
onmiddellijk iets anders aan.
11. Vul de brandstoftank niet TE VEEL. Breng de dop weer aan en
draai deze stevig vast.
Bediening
1. Plaats uw handen of voeten NIET dichtbij of onder
ronddraaiende onderdelen. Blijf uit de buurt van het afvoergedeelte
als de motor loopt.
2. STOP de motor als u opritten, wandelpaden of wegen met grind
oversteekt en overal waar wegslingerende voorwerpen een gevaar
zouden kunnen vormen.
3. Maai uitsluitend bij daglicht of bij goed kunstlicht.
4. Gebruik het toestel NIET onder invloed van alcohol of drugs.
5. Nadat u een vreemd voorwerp hebt geraakt of als de maaier
abnormaal sterkt trilt, moet u de motor STOPPEN en de
bougiekabel ontkoppelen en beveiligen. Inspecteer de maaier op
eventuele schade en repareer deze voordat u de maaier weer start.
6. Maai NIET in de buurt van steile dalingen, grachten of wallen.
De gebruiker kan dan zijn houvast of evenwicht verliezen.
7. WEES OP UW HOEDE voor gaten of andere verborgen gevaren.
Obstakels kunnen door hoog gras aan het zicht worden
onttrokken. Blijf uit de buurt van sloten, grachten, bruggetjes,
schuttingen en uitstekende voorwerpen.
8. Maai NIET als het gras nat is. Kijk altijd goed waar uw voeten
staan. Houd de hendel stevig vast en loop rustig; ren nooit.
Uitglijden zou letsel kunnen veroorzaken.
9. Blijf ALTIJD achter de hendel als de motor draait.
10. Verlaat de machine NIET als de motor loopt. STOP HET
MAAIBLAD en STOP DE MOTOR voordat u om een of andere
reden de maaier verlaat.
11. Vóór het schoonmaken, repareren of inspecteren, dient u altijd
te zorgen dat bepaalde motor- en maaibladonderdelen en alle
bewegende delen STILSTAAN. Maak de bougiekabel los en
bevestig deze op een veilige afstand van het contact om te
voorkomen dat de motor per ongeluk start.
12. STOP de motor en wacht totdat het maaiblad helemaal is
GESTOPT voordat u de grasopvangzak en/of gras verwijdert.
13. Gebruik de maaier ALLEEN als de volledige grasopvangzak, het
achterscherm of andere veiligheidsvoorzieningen zijn aangebracht
en goed werken. Richt de grasafvoer NIET op personen, auto’s die
voorbij rijden, vensters of deuren.
14. VERMIJD de afvoer van materiaal tegen een wand of obstakel.
Het materiaal kan terugkaatsen naar de gebruiker.
15. Verlaag uw snelheid voordat u een bocht neemt.
16. Let op het verkeer als u in de buurt van een weg werkt of een
weg moet oversteken.
Gebruik
(Vervolg van vorige kolom)
17. Laat de motor NIET lopen in afgesloten ruimten.
Motoruitlaatgassen bevatten koolmonoxide, een dodelijk gif.
18. Gebruik enkel hulpstukken die door de fabrikant zijn
goedgekeurd. Zie de instructies van de fabrikant voor correct
gebruik en montage van accessoires.
Onderhoud en opslag
1. Berg de maaier of brandstoftank NIET op in een ruimte waar
gassen met een open vlam, vonk of waakvlam in contact kunnen
komen, zoals in de buurt van een boiler, kachel, wasdroger of
ander gastoestel. Laat de motor afkoelen voordat u de machine in
een gesloten ruimte opbergt. Bewaar de brandstofbus buiten het
bereik van kinderen in een goed geventileerde, vrije ruimte.
2. Houd de maaier en motor uit de buurt van gras, bladeren of
overtollig vet om brandgevaar en oververhitting van de motor te
verminderen.
3. Bij het aftappen van de brandstoftank dient u de brandstof
buiten en uit de buurt van een open vlam in een goedgekeurde
opvangbak af te tappen.
4. Zorg dat alle bouten, vooral de bouten van het maaiblad,
moeren en schroeven goed vastzitten. Controleer of alle
splitpennen correct zijn aangebracht.
5. Zorg altijd voor voldoende ventilatie als de motor loopt.
Motoruitlaatgassen bevatten koolmonoxide, een dodelijk gif.
6. Onderhoud en aanpassingen van de motor mogen enkel
uitgevoerd worden als de motor uitgeschakeld is. Maak de
bougiekabel los en bevestig deze op een veilige afstand van het
contact om te voorkomen dat de motor per ongeluk start.
7. Wijzig de toerentalregelaar van de motor NIET en gebruik de
maaier ook niet bij een TE HOOG toerental.
8. Controleer de grasopvangzak regelmatig op slijtage of
beschadiging om het weggeslingeren van voorwerpen en
blootstelling aan bewegende delen te voorkomen. Vervang de
grasopvangzak als de naden loszitten of scheuren zichtbaar zijn.
Vervang de schuif of zakadapter als deze gebroken of gescheurd
is.
9. Maaibladen zijn scherp en kunnen snijwonden veroorzaken.
Wikkel een doek etc. rondom de bladen of draag stevige leren
handschoenen en wees VOORZICHTIG als u eraan werkt.
10. Test NIET op vonken door de bougie naast de bougieopening
te houden; bougie kan gas doen ontsteken dat uit de motor
ontsnapt.
11. Laat de machine tenminste één keer per jaar door een erkende
dealer onderhouden en laat de dealer alle nieuwe
veiligheidsvoorzieningen monteren.
12. Gebruik uitsluitend originele vervangende onderdelen om
ervoor te zorgen dat de originele normen nageleefd worden.
Veiligheid van de gebruiker
Not for
Reproduction
Not for
Reproduction

www.snapper.com6
Waarschuwingen:
A. Lees, begrijp en volg de instructies en de waarschuwingen in de
gebruikershandleiding en op de maaier, motor en hulpstukken
voordat u de maaier gebruikt.
B. Duidt op mogelijk ernstig letsel door ronddraaiende maaibladen.
C. Gebruik de maaier niet zonder de volledige grasopvangzak of
scherm.
D. Houd kinderen en anderen uit de buurt van het maaigebied.
CA
DB
Serieplaatje:
A. Productie(onderdeel)nummer
B. Beschrijving/modelnummer
C. Serienummer
D. Fabrikantgegevens
E. Geluidsniveau
F. Massa-eenheid
G. Kilowatt
H. Max. toerental
I. Bouwjaar
J. Europese certificatie
E
A
F
D
B
C
G
H
J
I
Stickerplaatsen
Veiligheid van de gebruiker
Not for
Reproduction
Not for
Reproduction
Mfg. No. XXXXXXX
WALK BEHIND LAWN MOWER
S/N XXXXXXXXXX
BRIGGS & STRATTON YPPG
MILWAUKEE, WI USA
XX
2010
dB
kg: XX
kW: X.XX
XXXX max

7
Hendelsticker:
A. Inschakelen/snel
B. Langzaam/uitschakelen
B
A
Maaibladhendel:
A. Stoppen
B. Lopen
B
A
Veiligheid van de gebruiker
Not for
Reproduction
Not for
Reproduction

www.snapper.com8
BELANGRIJK
De afbeeldingen en illustraties in deze handleiding zijn
uitsluitend bedoeld als referentie en kunnen afwijken van uw
eigen model. Neem bij vragen contact op met uw dealer.
A. Olievuldop en peilstok
B. Benzinedop
C. Mulchplaat
D. Hoogtevergrendeling achter (2)
E. Hoogtevergrendeling voor (2)
F. Vergrendelknop voor zwenkwielen (2)
G. Maaibladhendel
H. Startkabel
I. Aandrijfhendel
E
C
D
H
I
G
A
B
F
Functies en bedieningselementen
Not for
Reproduction
Not for
Reproduction
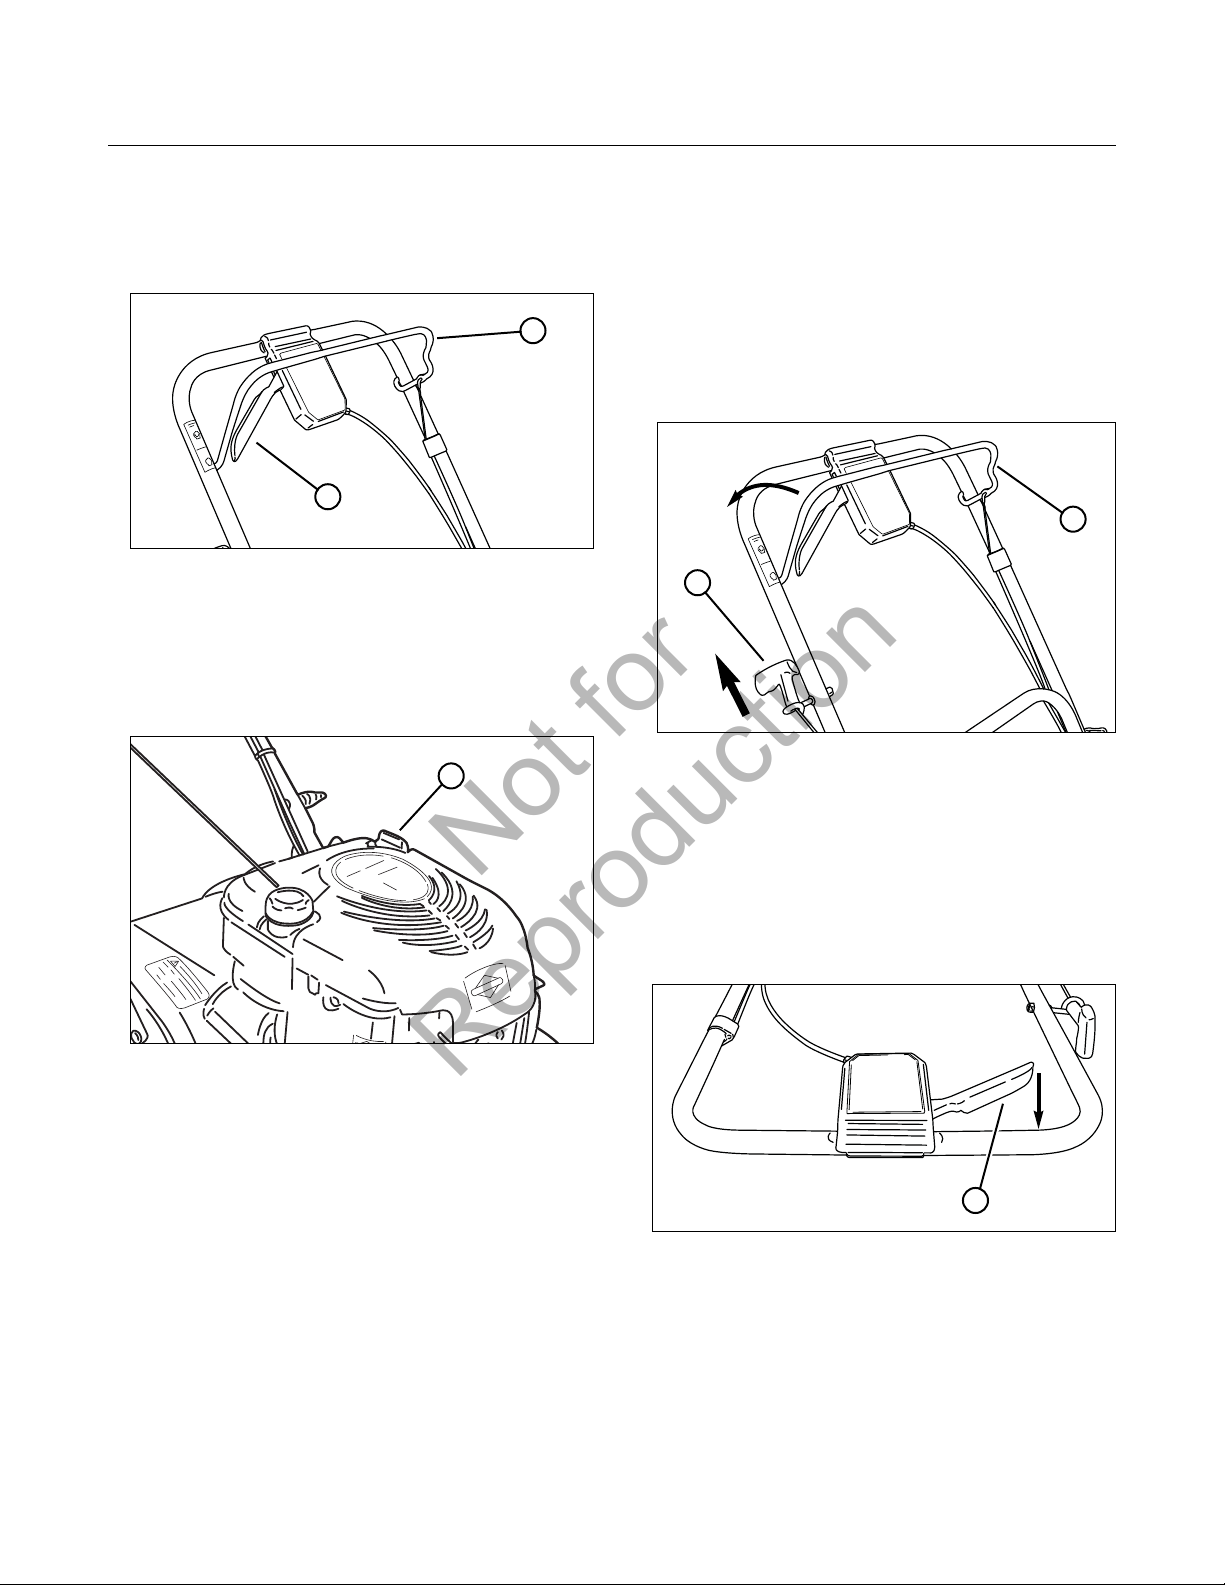
9
Vóór het starten
1. Controleer of alle schermen, deflectoren, grasopvangzak,
adapter en afdekplaten zijn aangebracht en goed vastzitten.
2. Controleer of de maaibladhendel (A, figuur 1) en
aandrijfhendel (B) goed en vrij bewegen.
3. Controleer de maaihoogte. Stel deze in op de gewenste
hoogte. Zie onder “Afstelling van de maaihoogte”.
4. Controleer het motoroliepeil (A, figuur 2) en voeg indien
nodig olie toe zodat de oliepeil op de “vol”-streep staat.
Raadpleeg de handleiding van de motorfabrikant voor
oliespecificaties.
5. Vul de tank met brandstof nadat u de maaier naar buiten
hebt geduwd waar dampen gemakkelijk kunnen vervliegen.
Vul de tank tot 3,8 cm (1-1/2 duim) onder de bovenkant
van de vulnek (zodat de brandstof zich kan uitzetten). Zorg
na het vullen dat u dop weer stevig vastdraait. Raadpleeg
de handleiding van de motorfabrikant voor
brandstofspecificaties.
6. Reinig eventueel gemorste brandstof, vuil, gras, olie etc.
van de buitenkanten van het maaidek en de motor. Zorg dat
het luchtinlaatscherm van de motor en de koelribben altijd
schoon zijn.
Starten van de maaier
Deze Briggs & Stratton-motor is uitgerust met een Ready
Start
TM
-functie, waardoor handmatige priming niet meer nodig
is.
1. Druk en houd de maaibladhendel (A, figuur 3) tegen de
hendel.
2. Trek aan de startkabel (B) om de motor te starten.
3. Laat de maaibladhendel los als u de motor (en het
maaiblad) wilt stoppen.
4. Laat de motor na het starten iets warmlopen totdat de
motor soepel draait voordat u met het maaien begint.
Rijden met de maaier
1. Start de motor.
2. Druk de aandrijfhendel (A, figuur 4) langzamerhand naar
achteren naar de hendel om de wielaandrijving in te
schakelen en de maaier vooruit te laten lopen. De
voorwaartse snelheid kan worden verhoogd door de
aandrijfhendel verder naar achteren naar de hendel te
duwen.
Stoppen van de maaier
1. Stop de voorwaartse beweging van de maaier door de
aandrijfhendel los te laten.
2. Stop de motor en het maaiblad door de maaibladhendel los
te laten.
Figuur 2: Controleren van het motoroliepeil
B
A
Figuur 1: Bedieningselementen van de maaier
A
B
A
Figuur 3: Starten van de maaier
Figuur 4: Aandrijfhendel
(maaibladhendel voor de duidelijkheid verwijderd)
A
Bediening
Not for
Reproduction
Not for
Reproduction

www.snapper.com10
Vergrendelen van de zwenkwielen
De voorwielen kunnen worden vergrendeld zodat de maaier in
een rechte lijn loopt.
1. Beweeg de maaier ca. 1 meter recht vooruit zodat de wielen
rechtuit wijzen.
2. Zet de vergrendelknoppen van de zwenkwielen (A, figuur 5)
in de vergrendelde stand (“lock”) zoals weergegeven om de
zwenkwielen in de voorwaartse stand te vergrendelen.
3. Om de zwenkwielen te ontgrendelen, hoeft u alleen de
vergrendelknoppen voor de zwenkwielen in de
ontgrendelde stand (“unlock”) te zetten (B).
Afstelling van de hendelhoogte
Voor meer comfort voor de gebruiker kan de hoogte van de
maaierhendel worden aangepast.
1. Verwijder de T-knoppen en slotschroeven waarmee de
onderste hendel (A, figuur 6) aan de montagebeugels (B)
is bevestigd.
2. Lijn de gaten in de hendel uit met een van de drie overige
hendelverstelgaten in de montagebeugel.
3. Breng de bouten en knoppen weer aan en draai ze stevig vast.
Afstelling van de maaihoogte
1. Trek de hoogtevergrendeling (A, figuur 7) naar buiten en
zet deze in de gewenste maaihoogte.
2. Zet alle wielen op dezelfde maaihoogte. De hoogste
maaistand is inkeping 7 (figuur 8). De laagste maaihoogte
is inkeping 1.
Figuur 6: Afstelling van de hendelhoogte
B
WAARSCHUWING
Voer GEEN onderhoud, aanpassingen of service uit als de
motor en/of het maaiblad draait. STOP de motor en het
maaiblad. Maak de bougiekabel los en houd deze uit de buurt
van de bougie. Motor en onderdelen zijn HEET. Voorkom
ernstige brandwonden door alle componenten lang genoeg te
laten afkoelen.
! !
Figuur 7: Afstelling van de maaihoogte
A
10,2 cm
3,2 cm
Figuur 8: Maaihoogte-instellingen (schatting)
A
(achterwiel weergegeven; voorwiel identiek)
Figuur 5: Vergrendelen van het zwenkwiel
B
A
WAARSCHUWING
Voer GEEN onderhoud, aanpassingen of service uit als de
motor en/of het maaiblad draait. STOP de motor en het
maaiblad. Maak de bougiekabel los en houd deze uit de buurt
van de bougie. Motor en onderdelen zijn HEET. Voorkom
ernstige brandwonden door alle componenten lang genoeg te
laten afkoelen.
! !
Bediening
Not for
Reproduction
Not for
Reproduction
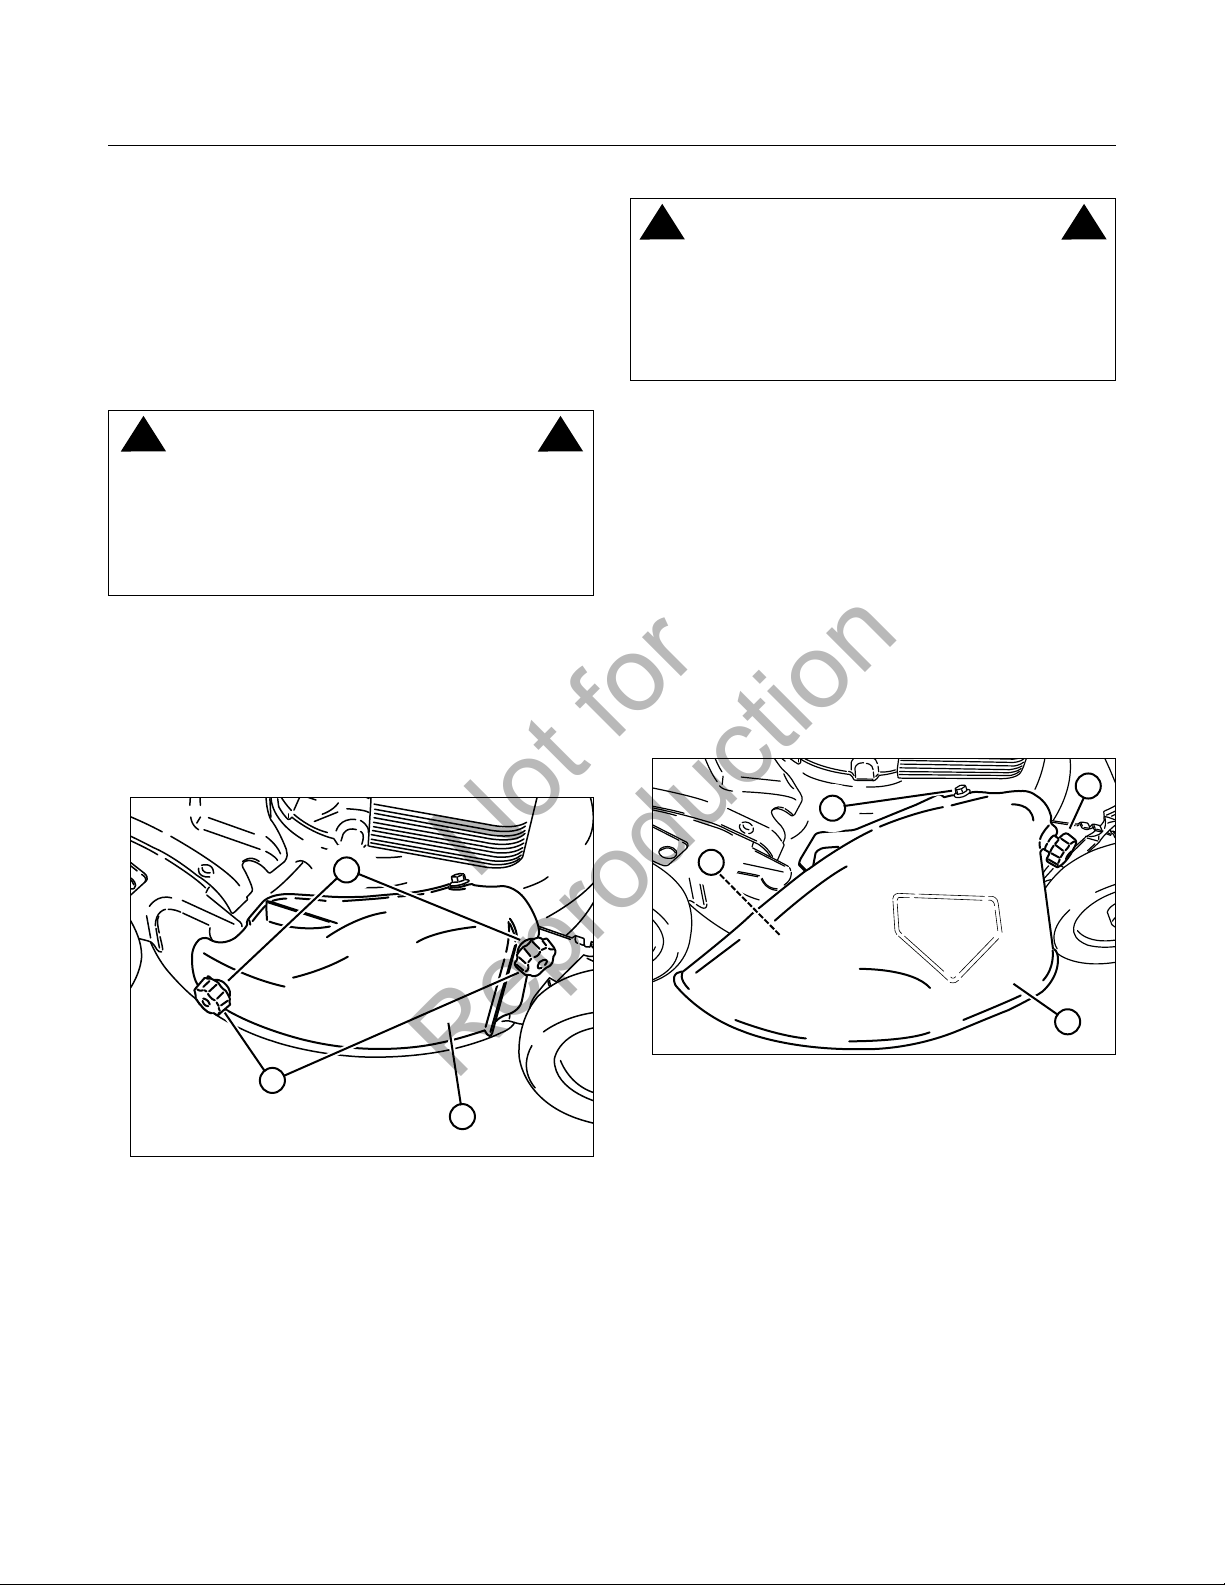
11
Mulchen
Voor de beste mulchresultaten dient maximaal 1/3 van de
grassprietlengte te worden gemaaid en worden gerecycled
ALLEEN als het gras droog is.
1. Zet alle wielen in de hoogte maaistand (inkeping 7).
2. Maai langzaam. Als het gras zeer dicht is, laat beide
achterwielen dan één inkeping zakken dan de voorwielen
om beter te mulchen.
Verwijderen van de mulchplaat
Belangrijk: de mulchplaat moet altijd op de machine blijven
zitten, tenzij andere afvoeropties gewenst zijn zoals afvoer aan
de zijkant of gebruik van een grasopvangzak.
1. Verwijder de knopmoeren (A, figuur 9) en de inwendige/
uitwendige vertande sluitringen (B) waarmee de mulchplaat
(C) aan het maaidek is bevestigd.
2. Verwijder de plaat.
Monteren van de afvoerdeflector
1. Verwijder de mulchplaat. Zie onder “Verwijderen van de
mulchplaat”.
2. Bevestig de deflector (A, figuur 10) aan het maaidek in
plaats van de mulchplaat en zorg er daarbij voor dat:
• het voorste gat (B) voor aan de buitenkant van de
deflector over de pen past waar de voorkant van de
mulchplaat oorspronkelijk was bevestigd
• de sleuf (C) bovenop de deflector onder de borgmoer
bovenop het maaidek glijdt (onder de hoek rechtsvoor
van de motor)
• de sleuf (D) achter aan de binnenkant van de deflector
op de pen achter de achterkant van de afvoeropening
schuift, waar de achterkant van de mulchplaat
oorspronkelijk was bevestigd.
3. Monteer de inwendige/uitwendige vertande sluitringen en
knopmoeren op de pennen en draai deze stevig vast.
Figuur 9: Verwijderen van de mulchplaat
A
C
B
WAARSCHUWING
Voer GEEN onderhoud, aanpassingen of service uit als de
motor en/of het maaiblad draait. STOP de motor en het
maaiblad. Maak de bougiekabel los en houd deze uit de buurt
van de bougie. Motor en onderdelen zijn HEET. Voorkom
ernstige brandwonden door alle componenten lang genoeg te
laten afkoelen.
! !
Figuur 10: Monteren van de afvoerdeflector
B
A
C
D
Bediening
Not for
Reproduction
Not for
Reproduction

www.snapper.com12
Monteren van de grasopvangzak
(Optionele accessoire bij sommige modellen)
1. Verwijder de mulchplaat. Zie onder “Verwijderen van de
mulchplaat”.
2. Bevestig de adapter voor de grasopvangzak (A, figuur 11)
aan het maaidek in plaats van de mulchplaat en zorg er
daarbij voor dat:
• het voorste gat (B) voor aan de buitenkant van de
adapter over de pen past waar de voorkant van de
mulchplaat oorspronkelijk was bevestigd
• de sleuf (C) bovenop de adapter onder de borgmoer
bovenop het maaidek glijdt (onder de hoek rechtsvoor
van de motor)
• de sleuf (D) aan de achterkant van de adapater op de
pen achter de achterkant van de afvoeropening schuift,
waar de achterkant van de mulchplaat oorspronkelijk
was bevestigd.
3. Monteer de inwendige/uitwendige vertande sluitringen en
knopmoeren op de pennen en draai deze stevig vast.
4. Leidt de terugtrekstartkabel rondom de buitenkant van de
koordgeleider (E).
Opm.:
De terugtrekstartkabel kan iets losser worden gemaakt
door de maaibladhendel tegen de hendel te duwen.
5. Monteer de grasopvangzak door de connector (A, figuur 12)
over de adapterflens te schuiven.
6. Bevestig de grasopvangzakhaken (B) over dwarsbalk van
de middelste hendel.
WAARSCHUWING
Grasopvangzaken zijn gemaakt van gewoven stof en kunnen
worden beschadigd en slijten tijdens normaal gebruik.
Controleer de toestand van de zak vóór elk gebruik. Vervang
versleten of beschadigde opvangzakken onmiddellijk en alleen
door zakken die door de fabrikant worden aanbevolen. Bij
sommige modellen is de grasopvangzak is een optionele
uitrusting.
! !
Figuur 11: Monteren van de grasopvangzakadapter
Figuur 12: Monteren van de grasopvangzak
B
A
B
D
A
E
C
WAARSCHUWING
Voer GEEN onderhoud, aanpassingen of service uit als de
motor en/of het maaiblad draait. STOP de motor en het
maaiblad. Maak de bougiekabel los en houd deze uit de buurt
van de bougie. Motor en onderdelen zijn HEET. Voorkom
ernstige brandwonden door alle componenten lang genoeg te
laten afkoelen.
! !
Bediening
Not for
Reproduction
Not for
Reproduction
13
Onderhoudschema
WAARSCHUWING
Voer GEEN onderhoud, aanpassingen of service uit als de
motor en/of het maaiblad draait. STOP de motor en het
maaiblad. Maak de bougiekabel los en houd deze uit de buurt
van de bougie. Motor en onderdelen zijn HEET. Voorkom
ernstige brandwonden door alle componenten lang genoeg te
laten afkoelen. Draag stevig leren handschoenen bij de
omgang met of werken rondom maaibladen. De maaibladen
zijn zeer scherp en kunnen ernstig letsel veroorzaken.
! !
MAAIER
Om de 8 uur of dagelijks
Controleer het veiligheidsvergrendelsysteem
Verwijder het vuil van de maaier
Om de 25 uur of jaarlijks*
Controleer de maaier op losse bevestigingsmiddelen
Raadpleeg uw dealer jaarlijks om
de maaier te smeren
het maaiblad te controleren **
de stoptijd van het maaiblad te controleren
de aandrijfriem te controleren
de accu en kabels te reinigen (indien aanwezig)
MOTOR
De eerste 5 uren
Ververs de motorolie
Om de 8 uur of dagelijks
Controleer het motoroliepeil
Om de 25 uur of jaarlijks*
Reinig het motorluchtfilter en het voorfilter
(indien aanwezig) **
Om de 50 uur of jaarlijks*
Ververs de motorolie
Vervang het oliefilter (indien aanwezig)
Jaarlijks
Vervang het luchtfilter
Vervang het voorfilter (indien aanwezig)
Raadpleeg uw dealer jaarlijks om
de geluiddemper en vonkenvanger te inspecteren
(indien aanwezig)
de bougie te vervangen
het brandstoffilter te vervangen (indien aanwezig)
het luchtkoelsysteem van de motor te reinigen
* Welke als eerste komt
**Controleer de bladen vaker bij gebruik op zandige bodem of
in zeer stoffige omgevingen.
* Welke als eerste komt
**In stoffige omgevingen of als vuildeeltjes in de lucht
aanwezig is, moet u vaker reinigen.
Onderhoud
Not for
Reproduction
Not for
Reproduction

www.snapper.com14
Verversen van de motorolie
1. Raadpleeg de handleiding van de motorfabrikant voor de
juiste oliespecificaties, procedures en de juiste
onderhoudsintervallen.
2. De olie kan op de gemakkelijkste/schoonste manier worden
ververst door de maaier op zijn zijkant te draaien en de olie
weg te laten lopen (zie afbeelding). Tap de olie via een
peilstokslang (A, figuur 13) af in een bak. Neem voldoende
tijd zodat alle olie is afgetapt.
Belangrijk: Tap de brandstoftank af voordat u de machine
kantelt. Kantel de machine NIET zodanig dat de carburateur of
bougie omlaag zijn gericht. Olie uit het carter zal het luchtfilter
verzadigen waardoor de motor moeilijk of helemaal niet meer
kan worden gestart. Als vervuiling optreedt, moet het luchtfilter
worden vervangen.
3. Voer de afgetapte olie op de juiste manier af.
4. Vul de motor met olie volgens de specificaties in de
handleiding van de motorfabrikant. Vul de tank niet teveel.
Onderhoud van het luchtfilter
Raadpleeg de handleiding van de motorfabrikant voor specifieke
onderhoudsinstructies voor het luchtfilter.
Controleren van het
veiligheidsvergrendelsysteem
1. Start de maaier.
2. Laat het maaibladhendel los. De motor moeten binnen
3 seconden stoppen.
Als de motor niet stopt, mag de maaier niet worden gebruikt.
Breng de maaier naar een erkende dealer voor onderhoud.
Vuil van de maaier verwijderen
1. Verwijder stof en vuil van de bovenkant van het maaidek.
2. Reinig eventueel opgehoopt vuil op of rondom de motor
etc.
Controleer de onderdelen tijdens het reinigen op slijtage en
beschadiging. Vervang versleten en beschadigde onderdelen
onmiddellijk.
Aandrijfhendel
De aandrijfhendel (A, Figuur 14) moet de transmissie
inschakelen als de handel naar achteren tegen de stuurstang
wordt geduwd en moet de transmissie uitschakelen als de
hendel wordt losgelaten. Als de transmissie niet volledig wordt
in- of uitgeschakeld, moet u contact opnemen met uw erkende
Snapper-dealer voordat u de maaier gebruikt.
Figuur 13: Aftappen van de motorolie
WAARSCHUWING
Voer GEEN onderhoud, aanpassingen of service uit als de
motor en/of het maaiblad draait. STOP de motor en het
maaiblad. Maak de bougiekabel los en houd deze uit de buurt
van de bougie. Motor en onderdelen zijn HEET. Voorkom
ernstige brandwonden door alle componenten lang genoeg te
laten afkoelen.
! !
A
WAARSCHUWING
Voer GEEN onderhoud, aanpassingen of service uit als de
motor en/of het maaiblad draait. STOP de motor en het
maaiblad. Maak de bougiekabel los en houd deze uit de buurt
van de bougie. Motor en onderdelen zijn HEET. Voorkom
ernstige brandwonden door alle componenten lang genoeg te
laten afkoelen. Draag stevig leren handschoenen bij de
omgang met of werken rondom maaibladen. De maaibladen
zijn zeer scherp en kunnen ernstig letsel veroorzaken.
! !
Onderhoud
Figuur 14: Aandrijfhendel
A
(onderdelen voor de duidelijkheid verwijderd)
Not for
Reproduction
Not for
Reproduction

15
Opslagprocedure
Raadpleeg de handleiding van de motorfabrikant voor
instructies voor het voorbereiden van de motor op opslag.
Bereid de maaier als volgt voor op opslag aan het “einde van het
seizoen”:
1. Maak de bougiekabel los en bevestig de kabel op veilige
afstand van de ontstekingsbougie.
2. Tap de brandstof uit de brandstoftank af en laat de motor
lopen totdat alle brandstof uit de carburateur is verdwenen.
3. Verwijder met een borstel of perslucht los vuil en veeg de
maaier dan met een vochtige doek af.
4. Til de maaier op zijn achterwielen op en reinig de onderkant
van het dek grondig. Kantel de machine niet zodanig dat de
bougie of carburateur omlaag zijn gericht. Krab eventueel
opgehoopt gras met een plamuurmes en/of metalen borstel
eraf.
5. Smeer alle blootliggende metalen delen met een lichte
olielaag om corrosie te voorkomen.
6. Vouw de handels voorzichtig en strek de hendelkabels om
te voorkomen dat de kabels beschadigd worden.
7. Berg de maaier op in een schuur of op een andere droge
plaats, waar het tegen de weersinvloeden is beschermd.
WAARSCHUWING
Voer GEEN onderhoud, aanpassingen of service uit als de
motor en/of het maaiblad draait. STOP de motor en het
maaiblad. Maak de bougiekabel los en houd deze uit de buurt
van de bougie. Motor en onderdelen zijn HEET. Voorkom
ernstige brandwonden door alle componenten lang genoeg te
laten afkoelen. Draag stevig leren handschoenen bij de
omgang met of werken rondom maaibladen. De maaibladen
zijn zeer scherp en kunnen ernstig letsel veroorzaken.
! !
Onderhoud
Not for
Reproduction
Not for
Reproduction

www.snapper.com16
PROBLEEM MOGELIJKE OORZAAK OPLOSSING
Motor wil niet starten 1. Brandstoftank leeg. 1. Vul de brandstoftank met verse brandstof.
2. Bougiekabel niet aangesloten. 2. Steek de bougiekabel op de bougie.
Motor slaat af of
verliest vermogen
nadat het is gestart
1. Maaibladhendel wordt losgelaten of wordt niet
stevig genoeg tegen de hendel aangehouden.
1. Maaibladhendel moet tijdens het gebruik van de
maaier altijd stevig tegen de hendel worden
vastgehouden.
2. Brandstoftank leeg. 2. Vul de tank met brandstof tot aan het juiste peil.
3. Luchtvoorfilter of luchtfilter van de motor
vervuild.
3. Verwijder al het vuil.
4. Bougie defect of elektrodenafstand niet goed
ingesteld.
4. Voer onderhoud uit aan de bougie.
5. Water, vuil of oude brandstof in het
brandstofsysteem.
5. Tap het brandstofsysteem af en reinig het.
Overmatig trillen 1. Maaiblad beschadigd, niet goed uitgelanaceerd
of verbogen.
1. Raadpleeg een erkende dealer.
2. Losse maaibladonderdelen. 2. Raadpleeg een erkende dealer.
3. Luchtfilter zit los of ontbreekt (indien aanwezig). 3. Raadpleeg een erkende dealer.
4. Beschadigde of gerafelde riem. 4. Raadpleeg een erkende dealer.
Maaier beweegt niet /
verlies tractie
1. Vuil hoopt zich op of rondom de onderdelen van
de wielaandrijving.
1. Verwijder het vuil.
2. Transmissiekabel moet worden afgesteld. 2. Raadpleeg een erkende dealer.
3. Aandrijfriem moet worden vervangen. 3. Raadpleeg een erkende dealer.
4. Transmissie beschadigd. 4. Raadpleeg een erkende dealer.
Gras wordt niet
goed gemaaid
1. Maaihoogte is te hoog of te laag. 1. Stel de maaihoogte af.
2. Voorwaartse snelheid te hoog. 2. Kies met de aandrijfhendel een lagere snelheid.
3. Zijwaarts schuin maaien. 3. Stel de maaihoogte af met de maaihoogtehendels.
4. Overmatig schuine stand van het maaidek, van
voren naar achteren.
4. Stel de maaihoogte af met de maaihoogtehendels.
5. Maaiblad stomp of beschadigd. 5. Raadpleeg een erkende dealer.
Slechte grasafvoer 1. Snelheid te hoog. 1. Kies met de aandrijfhendel een lagere snelheid.
2. Gras is nat. 2. Maai als het gras droog is.
3. Ernstig versleten of beschadigd maaiblad. 3. Raadpleeg een erkende dealer.
4. Opeenhoping van gemaaid gras en vuil onder
het maaidek.
4. Reinig het maaidek.
5. Verkeerd maaiblad op het dek gemonteerd. 5. Raadpleeg een erkende dealer.
6. Maaiblad verkeerd op het dek gemonteerd. 6. Raadpleeg een erkende dealer.
Olielekkage 1. Peilstok zit los. 1. Zorg dat de peilstok/olievuldop goed vastzit.
2. Aftapplug zit los. 2. Controleer en draai de aftapplug vast.
3. Oliepeil te hoog. 3. Tap overtollige olie af.
4. Olieafdichtingen beschadigd. 4. Raadpleeg een erkende dealer.
Problemen oplossen
Not for
Reproduction
Not for
Reproduction

17
BELEID VAN BRIGGS & STRATTON POWER PRODUCTS GROUP, L.L.C. INZAKE EIGENAARSGARANTIE
GARANTIEPERIODE
OVER UW GARANTIE
BEPERKTE GARANTIE
Briggs & Stratton Power Products Group, LLC zal alle onderdelen van het apparaat met materiaal- en/of fabricagefouten gratis repareren
en/of vervangen. Briggs & Stratton Corporation zal alle onderdelen van de Briggs and Stratton motor* met materiaal- en/of
fabricagefouten gratis repareren en/of vervangen. Transportkosten voor producten die worden teruggestuurd ter reparatie of vervanging
onder deze garantie komen voor rekening van de koper. Deze garantie is van kracht gedurende de onderstaande perioden en onder de
onderstaande voorwaarden. Voor garantieservice kunt u de dichtstbijzijnde erkende servicedealer vinden met behulp van de
dealerzoekfunctie op www.BriggsandStratton.com.
Er zijn geen andere expliciete garanties van toepassing. Impliciete garanties, inclusief voor verkoopbaarheid en geschiktheid voor een
bepaald doel, zijn beperkt tot één jaar na aankoop of in de wettelijke toegestane mate. Aansprakelijkheid voor incidentele of gevolgschade
wordt uitgesloten voorzover dit wettelijk toegestaan is.
Bepaalde staten of landen staan geen beperkingen toe over hoe lang een impliciete garantie geldig is en bepaalde staten of landen staan
geen uitsluiting of beperking toe voor incidentele of gevolgschade, zodat de hoger vermelde beperking en uitsluiting misschien niet op u
van toepassing is. Deze garantie verleent u specifieke wettelijke rechten en het is mogelijk dat u ook andere rechten hebt die per staat of
per land verschillen.
De garantieperiode start op de datum van aankoop door de eerste consument (detailhandel) of commerciële eindgebruiker en is geldig
gedurende de hierboven vermelde periode. “Consumentengebruik“ betekent persoonlijk huishoudelijk gebruik door een particuliere
consument. “Commercieel gebruik” betekent ieder ander gebruik, inclusief het gebruik voor commerciële huurdoeleinden of voor het
genereren van inkomen. Zodra het product voor commerciële doelen is gebruikt, zal het hierna worden beschouwd als commercieel gebruik
voor doeleinden van deze garantie.
Er is geen garantieregistratie vereist om een garantie op Briggs & Stratton-producten te krijgen. Bewaar uw kwitantie als aankoopbewijs. Als
u geen bewijs kunt leveren van de oorspronkelijke datum op het moment waarop u om garantieservice verzoekt, zal de productiedatum van
het product worden gebruikt om te bepalen of het product onder de garantie valt.
U kunt altijd een beroep doen op onze reparatie onder garantie en we verontschuldigen ons voor het geleden ongemak. Garantieservice
wordt alleen verleend door servicedealers die door Briggs & Stratton of BSPPG, LLC zijn erkend.
De meeste reparaties onder garantie worden routinematig afgehandeld, maar aan bepaalde garantieverzoeken kan soms niet worden voldaan.
Deze garantie geldt alleen voor materiaal- en/of fabricagefouten. Het geldt niet voor schade die is veroorzaakt door verkeerd gebruik of
misbruik, verkeerd onderhoud of reparatie, normale slijtage of het gebruik van verschaalde of niet-goedgekeurde brandstof.
Verkeerd gebruik en misbruik - Het juiste, bedoelde gebruik van dit product wordt beschreven in de gebruikershandleiding. Als u het
product gebruikt op een manier die niet is beschreven in de gebruikershandleiding of als u het product gebruikt nadat het is beschadigd,
vervalt uw garantie. Garantie is niet toegestaan als het serienummer op het product is verwijderd of als het product op een of andere manier
is gewijzigd of aangepast, of als het product blijkt te zijn mishandeld zoals herkenbaar is aan inslagschade of beschadiging door
water/chemische corrosie.
Verkeerd onderhoud of reparatie - Dit product moet worden onderhouden volgens de procedures en schema’s in de gebruikershandleiding
en voor service- en reparatiewerkzaamheden moeten originele Briggs & Stratton-onderdelen worden gebruikt. Schade die is veroorzaakt door
gebrekkig onderhoud of het gebruik van niet-originele onderdelen valt niet onder de garantie.
Normale slijtage - Net zoals alle mechanische apparaten is ook uw apparaat onderhevig aan slijtage zelfs als het goed wordt onderhouden.
Deze garantie dekt de reparatie niet wanneer de levensduur van een onderdeel of het apparaat door normaal gebruik is verstreken.
Onderdelen die moeten worden onderhouden en aan slijtage onderhevig zijn zoals filters, riemen, snijbladen en remblokken (met uitzondering
van motorremblokken) vallen niet onder de garantie als het uitsluitend om slijtagekenmerken gaat, maar wel als er sprake is van materiaalen/of fabricagefouten.
Verschaalde brandstof - Om goed te werken, heeft dit product brandstof nodig die voldoet aan de specificaties in de gebruikershandleiding.
Schade die is veroorzaakt door verschaalde brandstof (lekkage van de carburateur, verstopte brandstofslangen, vastzittende kleppen etc) valt
niet onder de garantie.
* Geldt alleen voor Briggs and Stratton-motoren. De garantie voor niet-Briggs and Stratton-motoren wordt gegeven door de motorfabrikant.
Garantie
Onderdeel Consumentengebruik Commercieel gebruik
Apparatuur 2 jaar 90 dagen
Motor* 2 jaar 90 dagen
Accu 1 jaar 1 jaar
Not for
Reproduction
Not for
Reproduction

18
Opmerkingen
www.snapper.com
Not for
Reproduction
Not for
Reproduction

19
HELLINGGIDS
15 GRADEN
HOUD DIT HULPMIDDEL OP ÉÉN LIJN MET EEN VERTICALE BOOM,
EEN HOEK VAN EEN BOUWWERK, EEN ELECTRICITEITSPAAL
OF EEN SCHUTTING.
VOUW LANGS DE GESTIPPELDE LIJN
Maai hellingen met een
handmaaier altijd horizontaal,
nooit op en neer.
Maai hellingen met een
zitmaaier altijd horizontaal,
nooit op en neer.
15 GRADEN10 GRADEN
Ga als volgt te werk om voor een zitmaaier te bepalen of een helling veilig kan worden gemaaid: (1) schakel het (de) maaiblad(en) uit, (2) zet de
maaier in zijn achteruit en (3) probeer de helling rechts achteruit op te rijden. Als u de helling recht op kunt rijden, kun u deze meestal veilig
maaien. Als u zich echter niet veilig voelt of als u het niet helemaal zeker weet, gebruik dan dit hulpmiddel en maai geen helling van meer dan
15 graden. Als u aan de achterkant van de zitmaaier een aanhangwagen of hulpstuk hebt bevestigd, mag u geen helling van meer dan 10 graden
maaien.
Een helling van 15 graden is een helling die met ca. 0,8 m per 3 m stijgt.
Een helling van 10 graden is een helling die met ca. 0,5 m per 3 m stijgt.
Wees altijd zeer voorzichtig en voorkom plotselinge bochten of manoeuvres. Volg ook de overige informatie in deze handleiding voor
het veilig maaien van hellingen. Maai hellingen met een zitmaaier altijd op en neer op, nooit horizontaal. Maai hellingen met een
zitmaaier altijd horizontaal. Wees extra voorzichtig als u op of nabij hellingen en obstakels maait.
Hellinggids
Not for
Reproduction
Not for
Reproduction

Informatie betreffende het nominale motorvermogen: het nominale brutovermogen voor afzonderlijke modellen met benzinemotor
wordt gegeven volgens SAE (Society of Automotive Engineers), code J1940 (Small Engine Power & Torque Rating Procedure) en
het nominale vermogen is verkregen en gecorrigeerd volgens SAE J1995 (revisie 2002-05). Koppelwaarden zijn afgeleid bij
3060 RPM; paardenkrachtwaarden zijn afgeleid bij 3600 RPM. Het werkelijke brutomotorvermogen zal minder zijn en wordt o.a.
beïnvloed door omgevingsomstandigheden en verschillende tussen motoren. Gezien de vele verschillende producten waarop onze
motoren worden aangebracht en de diverse omgevingsfactoren die van toepassing zijn op het gebruik van de machines, zal de
benzinemotor niet het nominale brutovermogen ontwikkelen wanneer hij wordt gebruikt in een door een motor aangedreven
machine (feitelijk vermogen “ter plaatse” of nettovermogen). Dit verschil wordt veroorzaakt door diverse factoren waaronder, maar
niet uitsluitend, accessoires (luchtfilter, uitlaat, opladen, koelen, carburateur, brandstofpomp etc.), toepassingsbeperkingen,
omgevingsomstandigheden (temperatuur, accessoires, hoogte) en verschillen tussen motoren. Vanwege productie- en
capaciteitsbeperkingen kan het zijn dat Briggs & Stratton een motor met een hoger nominaal vermogen gebruikt in plaats van de
standaardmotor voor deze serie.
Meest gebruikelijke
serviceonderdelen
Onderdeelnummer
Kabel voor maaibladhendel 7100074YP
Kabel voor wielaandrijfhendel 7104004YP
Maaiblad (dubbel gegolfd) 7100242AYP
Maaiblad (Ninja/Quad) 7026407AYP
Aandrijfriem 7100883YP
Productspecificaties
Maaidekafmeting (cm/inch) 53,3/21
Maaihoogte (cm/inch) 3,2 - 10,2/1,25 - 4
Transmissietype Tandwielkast
Basissnelheid (kph/mph) 0 - 6,4/0 - 4
Motorvermogen (brutokoppel) 6,75
Motor cilinderinhoud (cc) 190
Inhoud brandstoftank (l/qt) 0,9/1,0
20
www.snapper.com
1-800-935-2967
21 DUIM HANDMAAIER MET
VARIABEL TOERENTAL
EN ZWENKWIELEN
Not for
Reproduction
Not for
Reproduction

Manuale per l’operatore
FALCIATRICE DA 21 POLLICI
A VELOCITÀ VARIABILE
CON RUOTE GIREVOLI
GUIDATA CAMMINANDO
N. di modello Descrizione
7800448 ESPV211S
7800730 ERPV21675SW
Not for
Reproduction
Not for
Reproduction
!

La ringraziamo di avere acquistato questa falciatrice Snapper di alta qualità. Siamo lieti che abbia posto
la Sua fiducia in un prodotto di marca Snapper. Se viene usata e mantenuta seguendo le istruzioni del
presente manuale, questo falciatrice Snapper Le darà molti anni di servizio affidabile.
Il presente manuale contiene istruzioni sulla sicurezza finalizzate a rendere l’utente consapevole dei
pericoli e dei rischi associati con la macchina e come evitarli. Questa macchina è stata progettata ed è
prevista solo per la falciatura di tappeti erbosi e non per altri scopi. È importante leggere e comprendere
completamente queste istruzioni prima di cercare di avviare o utilizzare la macchina. Conservare
l’originale delle presenti istruzioni per potervi fare riferimento in futuro.
Compilare le seguenti informazioni con riferimento all’acquisto.
Data di acquisto_____________________________________________________________________
Rivenditore_________________________________________________________________________
Numero telefonico del rivenditore_______________________________________________________
Apparecchio
Numero di modello_____________________________________________________________
Numero di serie________________________________________________________________
Motore
Modello_________________________Tipo__________________Codice___________________
SNAPPER è un marchio di fabbrica di
Briggs & Stratton Power Products Group, LLC
Milwaukee, WI, USA.
Copyright © 2010 Briggs & Stratton Corporation
Milwaukee, WI, USA. Tutti i diritti riservati.
Not for
Reproduction
Not for
Reproduction

3
Indice
Sicurezza dell’operatore . . . . . . . . . . . . . . . . . . . . . . . . . . . . . . . . . . . . . . . . . .4
Istruzioni per la sicurezza dell’operatore . . . . . . . . . . . . . . . . . . . . . . . . . . . . . . . . . .4
Etichetta di identificazione . . . . . . . . . . . . . . . . . . . . . . . . . . . . . . . . . . . . . . . . . . . . .6
Caratteristiche e comandi . . . . . . . . . . . . . . . . . . . . . . . . . . . . . . . . . . . . . . . . .8
Uso . . . . . . . . . . . . . . . . . . . . . . . . . . . . . . . . . . . . . . . . . . . . . . . . . . . . . . . .9
Prima di iniziare . . . . . . . . . . . . . . . . . . . . . . . . . . . . . . . . . . . . . . . . . . . . . . . . . . . .9
Avvio della falciatrice . . . . . . . . . . . . . . . . . . . . . . . . . . . . . . . . . . . . . . . . . . . . . . . .9
Spinta della falciatrice . . . . . . . . . . . . . . . . . . . . . . . . . . . . . . . . . . . . . . . . . . . . . . . .9
Arresto della falciatrice . . . . . . . . . . . . . . . . . . . . . . . . . . . . . . . . . . . . . . . . . . . . . . .9
Bloccaggio delle ruote girevoli . . . . . . . . . . . . . . . . . . . . . . . . . . . . . . . . . . . . . . . .10
Regolazione dell’altezza del manubrio . . . . . . . . . . . . . . . . . . . . . . . . . . . . . . . . . . .10
Regolazione altezza di taglio . . . . . . . . . . . . . . . . . . . . . . . . . . . . . . . . . . . . . . . . . .10
Uso per pacciamatura . . . . . . . . . . . . . . . . . . . . . . . . . . . . . . . . . . . . . . . . . . . . . . .11
Rimozione della calotta di pacciamatura . . . . . . . . . . . . . . . . . . . . . . . . . . . . . . . . .11
Montaggio del deflettore di scarico . . . . . . . . . . . . . . . . . . . . . . . . . . . . . . . . . . . . .11
Montaggio del sacco dell’erba . . . . . . . . . . . . . . . . . . . . . . . . . . . . . . . . . . . . . . . .12
Manutenzione . . . . . . . . . . . . . . . . . . . . . . . . . . . . . . . . . . . . . . . . . . . . . . . .13
Tabella di manutenzione . . . . . . . . . . . . . . . . . . . . . . . . . . . . . . . . . . . . . . . . . . . . .13
Cambio dell’olio motore . . . . . . . . . . . . . . . . . . . . . . . . . . . . . . . . . . . . . . . . . . . . .14
Manutenzione del filtro dell’aria . . . . . . . . . . . . . . . . . . . . . . . . . . . . . . . . . . . . . . .14
Controllo del sistema degli interblocchi di sicurezza . . . . . . . . . . . . . . . . . . . . . . .14
Pulizia dei detriti nella falciatrice . . . . . . . . . . . . . . . . . . . . . . . . . . . . . . . . . . . . . . .14
Comando di trasmissione . . . . . . . . . . . . . . . . . . . . . . . . . . . . . . . . . . . . . . . . . . . .14
Rimessaggio e conservazione . . . . . . . . . . . . . . . . . . . . . . . . . . . . . . . . . . . . . . . . .15
Individuazione e soluzione dei problemi . . . . . . . . . . . . . . . . . . . . . . . . . . . . . .16
Garanzia . . . . . . . . . . . . . . . . . . . . . . . . . . . . . . . . . . . . . . . . . . . . . . . . . . . .17
Guida per l’uso sui pendii . . . . . . . . . . . . . . . . . . . . . . . . . . . . . . . . . . . . . . . .19
Not for
Reproduction
Not for
Reproduction

www.snapper.com4
!
AVVERTENZA: Questa potente macchina di falciatura è in grado di amputare mani e piedi e può scagliare oggetti che
possono causare lesioni o danni! La mancata osservanza delle seguenti istruzioni di SICUREZZA può risultare in lesioni
gravi o letali all’operatore o agli astanti. Chi possiede questa macchina deve comprendere le presenti istruzioni e deve
far sì che altre persone che usano la macchina le comprendano. Chiunque usa la macchina deve essere in buone
condizioni fisiche e mentali e non deve essere in stato di intossicazione che può menomare la vista, l’abilità o il
giudizio. Se si hanno domande sulla macchina alle quali il rivenditore non è in grado di rispondere in modo
soddisfacente, mettersi in contatto con il Reparto di assistenza clienti (1-800-935-2967).
Protezione dei bambini
Quando l’operatore non presta attenzione alla presenza di bambini
si possono verificare incidenti tragici. I bambini sono spesso attratti
dalla macchina e dall’attività che la circonda. Non assumere mai
che i bambini rimarranno fermi dove sono stati visti l’ultima volta.
1. TENERE i bambini fuori dall’area in cui si sta lavorando e sotto
la supervisione attenta di un altro adulto responsabile.
2. NON permettere che i bambini siano sul prato quando la
macchina è in uso e SPEGNERE la macchina quando una persona
qualsiasi entra nella zona.
3. NON consentire che i bambini di età inferiore ai 13 anni usino la
macchina.
4. PERMETTERE che la macchina sia usata solo da persone adulte
o da bambini di 13 ani di età, o di età superiore, dotati di buon
giudizio e sotto la supervisione di una persona adulta.
5. NON tirare la falciatrice all’indietro a meno che non sia
assolutamente necessario. Prima di spostarsi all’indietro, e durante
il movimento, GUARDARSI alle spalle e in basso per accertarsi che
non ci siano bambini, animali domestici e altri pericoli.
6. PRESTARE ATTENZIONE SPECIALE quando ci si avvicina a una
curva cieca, a cespugli, ad alberi o ad altri oggetti che possono
impedire la visibilità.
Uso su terreno in pendenza
1. I pendii rappresentano un fattore importante negli incidenti di
scivolata e caduta che possono risultare in lesioni gravi. L’uso su
terreno in pendenza richiede che si presti attenzione particolare.
Se non ci si sente a proprio agio su terreno in pendenza, NON
usare la falciatrice.
2. Falciare trasversalmente su terreno in pendenza e mai in salita o
in discesa. Fare moltissima ATTENZIONE quando si cambia
direzione in salita o in discesa. NON usare la falciatrice su forti
pendii o altre zone in cui la stabilità o l’aderenza siano dubbie.
Vedere la Guida per l’uso sui pendii alla fine del presente manuale.
3. Prestare attenzione particolare quando si usano il raccoglitore
dell’erba o altri accessori perché essi influiscono sul maneggio e
sulla stabilità della macchina.
Preparazione
1. Leggere, comprendere e seguire le istruzioni e le avvertenza del
presente manuale e quelle affisse sulla falciatrice, sul motore e
sugli accessori. Prima di iniziare, familiarizzarsi con i comandi e
con l’uso corretto della falciatrice.
2. Questa macchina dovrà essere operata solo da persone mature,
responsabili e opportunamente addestrate.
3. Risultati di studio indicano che gli operatori di 60 anni di età o
di età maggiore sono coinvolti in molti degli infortuni dovuti all’uso
di macchine di falciatura. Tali operatori dovranno valutare la propria
capacità di usare la falciatrice in modo sufficientemente sicuro da
garantire che non causeranno lesioni a se stessi o ad altri.
4. Gestire il carburante con attenzione particolare. I carburanti
sono infiammabili e i loro vapori possono esplodere. Usare solo
contenitori di carburante approvati. NON togliere mai il tappo del
serbatoio del carburante, o fare il rifornimento, con il motore
acceso. Rifornire di carburante all’aperto con il motore fermo e
freddo. Togliere carburante e olio versati sulla macchina. NON
fumare.
Preparazione (segue dalla colonna precedente)
5. Ispezionare la zona da falciare e togliere tutti gli oggetti estranei
come giocattoli, fili, sassi, rami e altri oggetti che possono essere
causa di lesioni se scagliati dalla lama o che possono interferire
con la falciatura. Notare anche la posizione di buche, ceppi e altri
possibili pericoli.
6. Tenere altre persone e animali domestici lontani dall’area di
falciatura. Se un’altra persona entra nella zona di lavoro,
FERMARE immediatamente la lama, fermare il motore e fermare la
falciatrice.
7. Ispezionare frequentemente le protezioni, i deflettori, gli
interruttori, i comandi della lama e altri dispositivi di sicurezza per
accertarsi che siano a posto e funzionino in modo corretto.
8. Accertarsi che tutte le etichette di sicurezza siano chiaramente
leggibili. Sostituirle se sono danneggiate.
9. Quando si usa la falciatrice proteggersi indossando occhiali di
sicurezza, una maschera antipolvere, pantaloni lunghi e scarpe
robuste. NON usare la falciatrice a piedi nudi o indossando dei
sandali.
10. Per essere pronti ad affrontare situazioni di emergenza,
imparare come FERMARE rapidamente la lama e il motore.
11. Fare attenzione speciale quando si carica o scarica la macchina
da un rimorchio o da un autocarro.
12. Ispezionare frequentemente i componenti del raccoglitore
dell’erba per accertarsi che non ci siano segni di consumo o
guasti e sostituire secondo necessità per evitare lesioni dovute a
oggetti scagliati che sono passati attraverso punti di
indebolimento o rottura.
Gestione sicura della benzina
Per evitare lesioni alla persona e danni materiali prestare
moltissima attenzione quando si maneggia la benzina. La benzina
è altamente infiammabile e i suoi vapori sono esplosivi.
1. Spegnere sigarette, sigari, pipe e altre fonti di accensione.
2. Usare solo contenitori di carburante approvati.
3. NON togliere mai il tappo del serbatoio del carburante o fare il
rifornimento con il motore acceso. Lasciare che il motore si
raffreddi prima di fare rifornimento.
4. NON fare rifornimento con la macchina al chiuso.
5. NON conservare mai la macchina o i contenitori del carburante
in un luogo chiuso in cui ci sia una fiamma viva o una fiamma
pilota, come in vicinanza di uno scaldaacqua o altro
elettrodomestico.
6. NON riempire mai i contenitori all’interno di un veicolo o
camion o su un pianale di rimorchio con fodera di plastica. Prima
di riempire, sistemare sempre il recipiente sul terreno e lontano
dal veicolo.
7. Rimuovere dal veicolo o dal rimorchio le apparecchiature
alimentate a benzina e riempire il serbatoio con l’unità a terra. Se
non fosse possibile, fare il rifornimento usando un contenitore
portatile invece di usare il boccaglio del distributore di benzina.
Sicurezza dell’operatore
Not for
Reproduction
Not for
Reproduction

5
Gestione sicura della benzina
(segue dalla pagina precedente)
8. NON avviare apparecchiature alimentate a benzina all’interno di
veicoli o rimorchi chiusi.
9. Tenere sempre il boccaglio a contatto con il bordo del serbatoio
o del contenitore di carburante finché il rifornimento non sia finito.
NON usare il dispositivo di bloccaggio per tenere il boccaglio
aperto.
10. Cambiarsi immediatamente se si è versato carburante sui
propri indumenti.
11. NON riempire il serbatoio del carburante in modo eccessivo.
Rimettere il tappo del carburante e serrare in modo sicuro.
Uso
1. NON mettere le mani o i piedi vicino o sotto le parti ruotanti.
Tenersi lontani dalla zona di scarico mentre il motore è in moto.
2. FERMARE il motore quando si attraversa un passo carraio, un
sentiero o una strada di ghiaia e in tutte le situazioni in cui un
oggetto scagliato può costituire un pericolo.
3. Falciare solo di giorno o in buone condizioni di illuminazione
artificiale.
4. NON operare la falciatrice in stato di ebbrezza o sotto l’effetto di
medicinali o sostanze stupefacenti.
5. Dopo avere urtato contro un oggetto estraneo, o se la falciatrice
si mette a vibrare in modo anomalo, FERMARE il motore e
scollegare e fissare in modo sicuro il filo della candela. Ispezionare
la falciatrice per accertarsi che non ci siano danni e riparare
eventuali danni prima di riavviarla.
6. NON falciare in prossimità di abbassamenti di terreno, fossati o
alzaie. L’operatore potrebbe perdere l’appiglio dei piedi o
l’equilibrio.
7. STARE IN GUARDIA per buche e altri pericoli nascosti. L’erba
alta nasconde gli ostacoli. Tenersi lontani da fossati, erosioni,
chiaviche, reticolati e oggetti sporgenti.
8. NON falciare erba bagnata. Essere sempre certi del proprio
appoggio. Tenere un saldo appiglio sul manubrio e camminare,
mai correre. Una scivolata può causare lesioni.
9. Quando il motore è in marcia tenersi SEMPRE dietro al
manubrio.
10. NON allontanarsi dalla macchina con il motore in moto. Prima
di abbandonare la posizione dell’operatore per una ragione
qualsiasi FERMARE LA LAMA e FERMARE IL MOTORE.
11. Prima di pulire, riparare o ispezionare l’unità, accertarsi che il
motore, la lama e tutti gli elementi in movimento siano FERMI.
Scollegare e fissare in modo sicuro il filo della candela per tenerlo
lontano dalla stessa ed evitare un avviamento fortuito.
12. FERMARE il motore e aspettare che la lama si sia FERMATA
del tutto prima di togliere il sacco dell’erba e/o togliere l’erba.
13. NON usare la falciatrice senza che l’intero raccoglitore
dell’erba, la protezione posteriore o altri dispositivi di sicurezza
siano al loro posto e funzionanti. NON orientare lo scarico verso le
persone, automobili di passaggio, finestre o porte.
14. NON scaricare materiali contro un muro o un ostacolo. Il
materiale potrebbe rimbalzare verso l’operatore.
15. Rallentare prima di sterzare.
16. Quando si attraversa una strada, o ci si trova in prossimità di
una strada, fare attenzione al traffico.
Uso
(segue dalla colonna precedente)
17. NON tenere il motore in moto in posti racchiusi. I gas di
scarico del motore contengono monossido di carbonio, un veleno
letale.
18. Usare solo accessori approvati dal produttore. Per usare e
installare gli accessori in modo corretto vedere le istruzioni del
produttore.
Manutenzione e rimessaggio
1. NON riporre la falciatrice o un contenitore del carburante al
chiuso dove i vapori possono essere esposti a una fiamma viva,
una scintilla o a una fiamma pilota come quella di uno
scaldaacqua, di un impianto di riscaldamento, di
un’asciugabiancheria o di altro apparecchio a gas. Lasciare che il
motore si raffreddi prima di riporre la macchina al chiuso. Riporre
i contenitori di carburante fuori della portata dei bambini, in un
posto ben ventilato in una struttura disabitata.
2. Per evitare il pericolo di un incendio, o il rischio di surriscaldare
il motore, tenere la falciatrice e il motore privi di erba, foglie o
grasso in eccesso
3. Quando si svuota il serbatoio, versare il carburante all’aperto, e
lontano da fiamme, in un contenitore approvato.
4. Tenere tutti i bulloni, soprattutto quelli della lama, i dadi e le viti
opportunamente serrati. Controllare che le coppiglie siano al loro
posto.
5. Quando il motore è in moto fornire sempre ventilazione
adeguata. I gas di scarico del motore contengono monossido di
carbonio, un veleno letale.
6. Eseguire interventi di assistenza e regolazione solo quando il
motore è fermo. Togliere il filo dalla candela e fissarlo in modo
sicuro lontano dalla stessa onde evitare un avviamento fortuito.
7. NON modificare le impostazioni del regolatore del motore o
alzare il limitatore di velocità del motore.
8. Ispezionare frequentemente il sacco dell’erba per controllare
che non ci siano segni di usura o guasti onde evitare che oggetti
siano scagliati o che parti in movimento siano esposte. Sostituire
con un sacco nuovo se vi sono segni evidenti di cuciture allentate
o lacerazioni. Sostituire il portasacco o adattatore del sacco se è
rotto o incrinato.
9. Le lame della falciatrice sono affilate e possono tagliare.
Quando si maneggiano le lame avvolgerle o indossare guanti di
pelle robusti e prestare ATTENZIONE.
10. NON provare la candela mettendola a terra in prossimità del
suo foro perché una scintilla potrebbe infiammare i vapori di
carburante provenienti dal motore.
11. Fare eseguire la manutenzione a un rivenditore autorizzato
almeno una volta l’anno e chiedere al rivenditore di installare
eventuali dispositivi di sicurezza nuovi.
12. Usare solo parti del produttore per garantire di mantenere lo
standard operativo originale.
Sicurezza dell’operatore
Not for
Reproduction
Not for
Reproduction

www.snapper.com6
Istruzioni di avvertenza:
A. Prima dell’uso, leggere, comprendere e seguire le istruzioni e le
avvertenze del manuale per l’operatore e quelle apposte sulla
falciatrice, sul motore e sugli accessori.
B. Segnala la possibilità di lesione grave causata dalle lame in
rotazione.
C. Non operare senza l’intero raccoglitore dell’erba o senza la
protezione a posto.
D. Tenere i bambini e altre persone lontani dalla zona di falciatura.
CA
DB
Targhetta di matricola:
A. Codice (parte) del produttore
B. Descrizione/Numero di modello
C. Numero di serie
D. Informazioni sul produttore
E. Potenza sonora
F. Peso della macchina
G. kW di consumo
H. RPM massimo
I. Anno di fabbricazione
J. Certificazione europea
E
A
F
D
B
C
G
H
J
I
Etichetta di identificazione
Sicurezza dell’operatore
Not for
Reproduction
Not for
Reproduction
Mfg. No. XXXXXXX
WALK BEHIND LAWN MOWER
S/N XXXXXXXXXX
BRIGGS & STRATTON YPPG
MILWAUKEE, WI USA
XX
2010
dB
kg: XX
kW: X.XX
XXXX max

7
Etichetta della testa di comando:
A. Innesto/veloce
B. Lento/disinnesto
B
A
Comando della lama:
A. Arresto
B. In marcia
B
A
Sicurezza dell’operatore
Not for
Reproduction
Not for
Reproduction
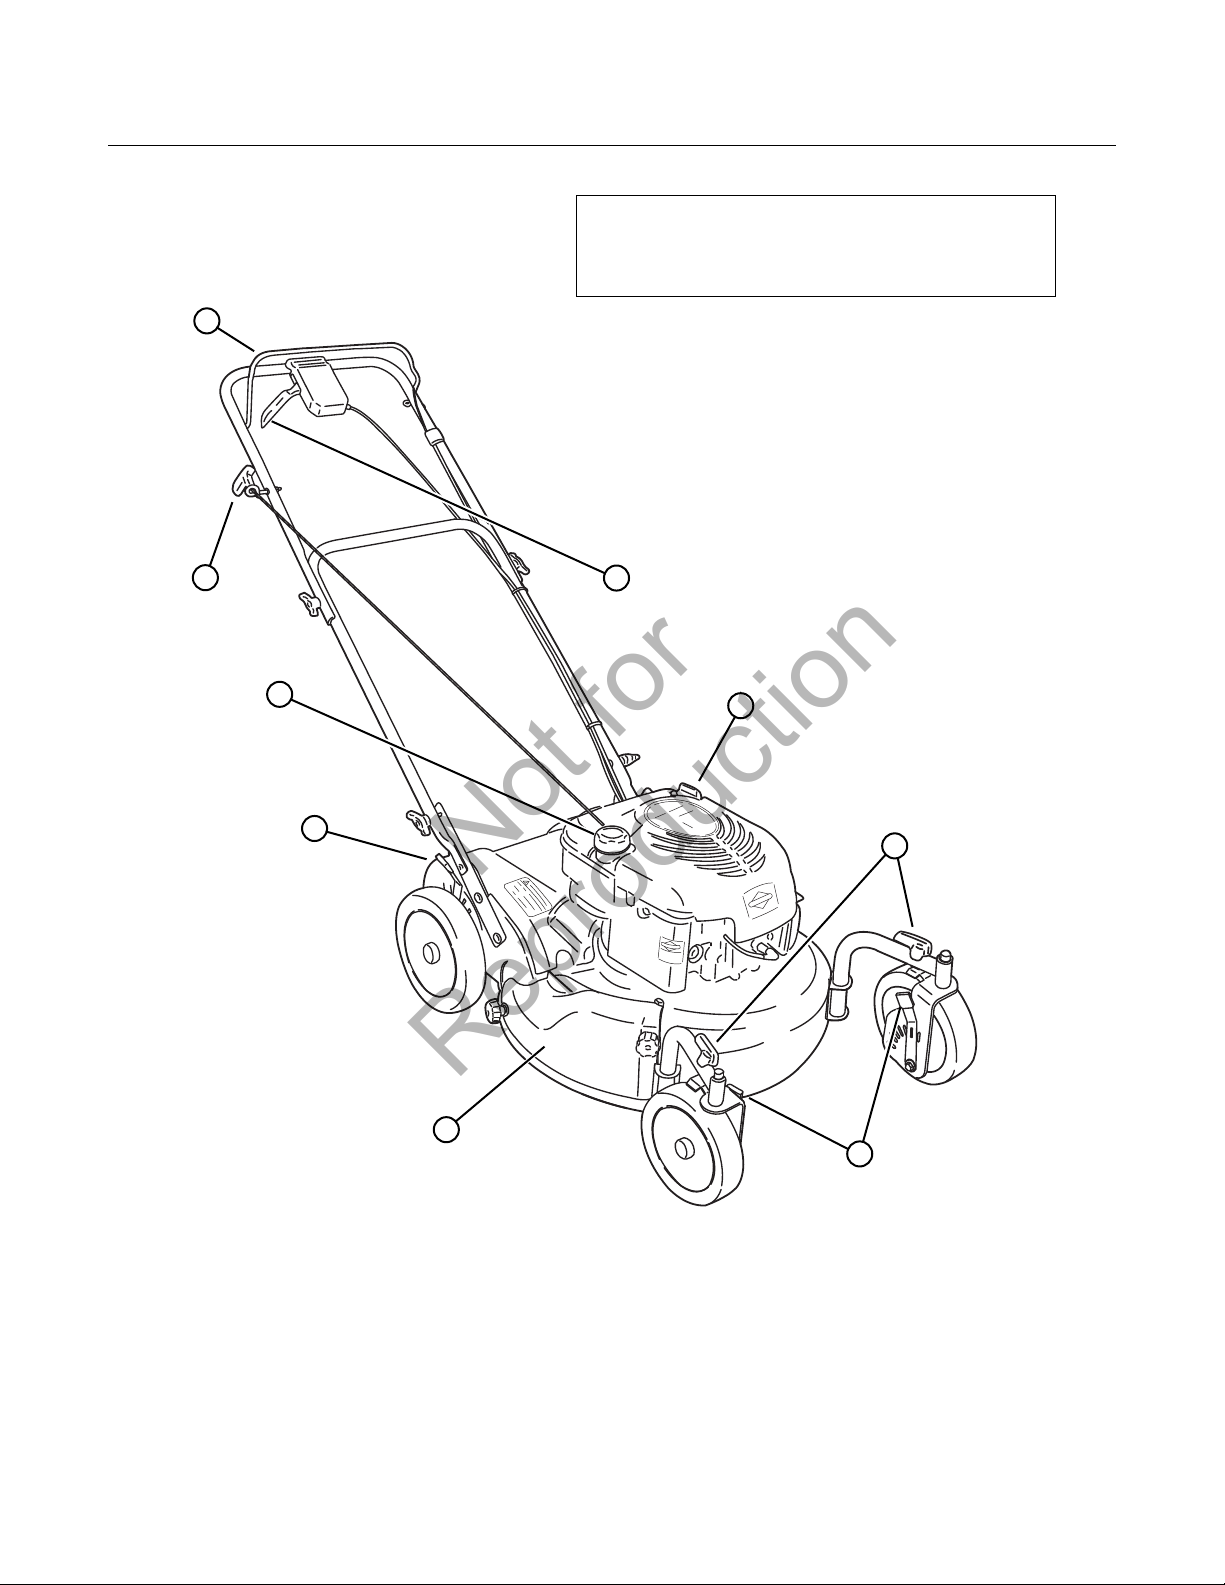
www.snapper.com8
IMPORTANTE
Le istruzioni e le figure del presente manuale hanno solo scopo
di riferimento e potranno essere diverse dal prodotto specifico.
In caso di domande contattare il proprio rivenditore.
A. Tappo di riempimento e asta di livello dell’olio
B. Tappo di rifornimento del carburante
C. Copertura di pacciamatura
D. Leva di regolazione dell’altezza posteriore (2)
E. Leva di regolazione dell’altezza anteriore (2)
F. Manopola di bloccaggio delle ruote girevoli (2)
G. Comando della lama
H. Impugnatura del cavo di avviamento
I. Comando di trasmissione
E
C
D
H
I
G
A
B
F
Caratteristiche e comandi
Not for
Reproduction
Not for
Reproduction

9
Prima di iniziare
1. Ispezionare le protezioni, i deflettori, il raccoglitore del’erba,
l’adattatore e le coperture per accettarsi che tutto sia a posto e
serrato in modo sicuro.
2. Controllare il comando della lama (A, figura 1) e il comando di
trasmissione (B) per accertarsi che si muovano liberamente.
3. Controllare l’altezza di taglio. Regolare all’altezza desiderata.
Vedere la sezione “Regolazione dell’altezza di taglio”.
4. Controllare l’olio motore (A, figura 2) e aggiungere olio
secondo necessità per portare il livello sino all’altezza del
segno di “pieno”. Per i dati relativi all’olio, vedere il manuale
per il proprietario del motore.
5. Rifornire di carburante dopo avere mosso la falciatrice
all’aperto dove i vapori si possono dissipare in condizioni di
sicurezza. Riempire il serbatoio sino a 3,8 cm (1-1/2 pollice) al
disotto della parte alta del collo di riempimento (per consentire
l’espansione del carburante). Dopo avere rifornito di carburante
accertarsi che il tappo sia serrato. Per i dati relativi al
carburante, vedere il manuale per il proprietario del motore.
6. Pulire le superfici esterne del piano di falciatura e del motore
togliendo eventuali accumuli di versamenti di carburante e di
sporco, erba, olio, ecc. Mantenere sempre pulite la griglia della
presa d’aria del motore e le alette di raffreddamento.
Avvio della falciatrice
Questo motore Briggs & Stratton è dotato della funzione Ready
Start
TM
e non richiede adescamento.
1. Stringere e tenere stretto il comando della lama (A, figura 3)
contro il manubrio.
2. Tirare l’impugnatura del cavo di avviamento (B) per mettere in
moto il motore.
3. Per fermare il motore (e la lama), rilasciare il comando della
lama.
4. Quando il motore si è avviato, lasciare che si scaldi finché la
sua marcia non è regolare, prima di iniziare il lavoro di
falciatura.
Spinta della falciatrice
1. Avviare il motore.
2. Cominciare stringendo il comando di trasmissione (A, figura 4)
contro il manubrio per innestare la ruota di guida e spingere la
falciatrice avanti. La velocità di marcia avanti può essere
aumentata stringendo maggiormente il comando di
trasmissione contro il manubrio.
Arresto della falciatrice
1. Fermare la marcia in avanti della falciatrice rilasciando il
comando di trasmissione.
2. Per fermare il motore e la lama, rilasciare il comando della
lama.
Figura 2: Controllo del’olio motore
B
A
Figura 1: Comandi della falciatrice
A
B
A
Figura 3: Avvio della falciatrice
Figura 4: Comando di trasmissione
(il comando della lama è stato omesso per chiarezza)
A
Uso
Not for
Reproduction
Not for
Reproduction

www.snapper.com10
Bloccaggio delle ruote girevoli
Le ruote anteriori possono essere bloccate per far sì che la
falciatrice viaggi in linea diritta.
1. Spostare la falciatrice in avanti per un paio di metri in modo
che le ruote siano orientate in avanti.
2. Spostare le manopole di bloccaggio delle ruote girevoli (A,
figura 5) sulla posizione “bloccato” (illustrata) per bloccare le
ruote in posizione avanti.
3. Per sbloccare le ruote basta spostare le manopole di
bloccaggio delle ruote girevoli sulla posizione “sbloccato” (B).
Regolazione dell’altezza del
manubrio
L’altezza del manubrio della falciatrice può essere regolata per
migliorare la comodità dell’operatore.
1. Togliere la manopola a T e i bulloni a legno che fissano la parte
inferiore del manubrio (A, figura 6) alle staffe di montaggio
(B).
2. Allineare i fori del gruppo del manubrio con quelli di una delle
tre posizioni di regolazione del manubrio.sulle staffe di
montaggio.
3. Rimontare la ferramenta tolta e serrare in modo sicuro.
Regolazione dell’altezza di taglio
1. Tirare la leva di regolazione dell’altezza (A, figura 7) verso
fuori e spostarla sulla posizione di altezza di taglio desiderata.
2. Impostare tutte le ruote sulla stessa altezza di taglio. L’altezza
di taglio più alta è quella corrispondente alla tacca numero 7
(Figura 8). La posizione di taglio più bassa è quella della tacca
numero 1.
Figura 6: Regolazione dell’altezza del manubrio
B
AVVERTENZA
NON tentare di eseguire interventi di manutenzione, regolazione o
assistenza quando il motore è in moto e la lama è in movimento.
FERMARE il motore e la lama. Scollegare il filo della candela e
fissarlo in modo sicuro lontano dalla stessa. Il motore e gli altri
componenti sono MOLTO CALDI. Lasciare che tutti i componenti
si raffreddino per evitare ustioni gravi.
! !
Figura 7: Regolazione dell’altezza di taglio
A
10,2 cm
(4,00 pollici)
3,2 cm
(1,25 pollici)
Figura 8: Impostazioni dell’altezza di taglio (approssimata)
A
(sono illustrate le ruote posteriori, quelle anteriori sono simili)
Figura 5: Bloccaggio delle ruote girevoli
B
A
AVVERTENZA
NON tentare di eseguire interventi di manutenzione, regolazione o
assistenza quando il motore è in moto e la lama è in movimento.
FERMARE il motore e la lama. Scollegare il filo della candela e
fissarlo in modo sicuro lontano dalla stessa. Il motore e gli altri
componenti sono MOLTO CALDI. Lasciare che tutti i componenti
si raffreddino per evitare ustioni gravi.
! !
Uso
Not for
Reproduction
Not for
Reproduction

11
Uso per pacciamatura
Per ottenere i migliori risultati di pacciamatura, tagliare un massimo
di 1/3 del filo d’erba e riciclare SOLO quando l’erba è asciutta.
1. Impostare tutte le ruote alla posizione di taglio più alta (tacca
numero 7).
2. Procedere alla falciatura lentamente. Se l’erba è molto fitta, per
migliorare le prestazioni di pacciamatura impostare entrambe
le ruote posteriori una tacca più in basso di quelle anteriori.
Rimozione della calotta di
pacciamatura
Importante: La calotta di pacciamatura dovrebbe rimanere sempre
sulla macchina a meno che non si desideri uno scarico diverso
come, ad esempio, lo scarico laterale o l’insaccatura.
1. Togliere i dadi a manopola (A, figura 9) e le rondelle dentate di
sicurezza interna/esterna (B) che fissano la calotta di
pacciamatura in posizione (C) sul piano della falciatrice.
2. Rimuovere la calotta.
Montaggio del deflettore di scarico
1. Rimuovere la calotta di pacciamatura. Vedere la sezione
intitolata “Rimozione della calotta di pacciamatura”.
2. Montare il deflettore (A, figura 10) sul piano della falciatrice, al
posto della calotta di pacciamatura, accertandosi che:
• Il foro anteriore (B) sulla parte esterna anteriore del
deflettore si adatti sul bullone al quale era inizialmente
fissata la parte anteriore della calotta di pacciamatura.
• L’apertura (C) sulla parte superiore del deflettore si
inserisca sotto il dado di tenuta sulla parte alta del piano
(sotto l’angolo anteriore destro del motore).
• L’apertura (D) all’interno della parte posteriore del
deflettore si adatti sul bullone situato dietro la parte
posteriore dell’apertura di scarico, dove era inizialmente
fissata la parte posteriore della calotta di pacciamatura.
3. Rimontare le rondelle dentate di sicurezza e i dadi a manopola
sui bulloni e serrare in modo sicuro.
Figura 9: Rimozione della calotta di pacciamatura
A
C
B
AVVERTENZA
NON tentare di eseguire interventi di manutenzione, regolazione o
assistenza quando il motore è in moto e la lama è in movimento.
FERMARE il motore e la lama. Scollegare il filo della candela e
fissarlo in modo sicuro lontano dalla stessa. Il motore e gli altri
componenti sono MOLTO CALDI. Lasciare che tutti i componenti
si raffreddino per evitare ustioni gravi.
! !
Figura 10: Montaggio del deflettore di scarico
B
A
C
D
Uso
Not for
Reproduction
Not for
Reproduction

www.snapper.com12
Montaggio del sacco dell’erba
(accessorio opzionale su alcuni modelli)
1. Rimuovere la calotta di pacciamatura. Vedere la sezione
intitolata “Rimozione della calotta di pacciamatura”.
2. Montare l’adattatore del sacco dell’erba (A, figura 11) sul
piano della falciatrice, al posto della calotta di pacciamatura,
accertandosi che:
• Il foro anteriore (B) sulla parte esterna anteriore
dell’adattatore si adatti sul bullone al quale era
inizialmente fissata la parte anteriore della calotta di
pacciamatura.
• L’apertura (C) sulla parte superiore dell’adattatore si
inserisca sotto il dado di tenuta sulla parte alta del piano
(sotto l’angolo anteriore destro del motore).
• L’apertura (D) all’interno della parte posteriore
dell’adattatore si adatti sul bullone situato dietro la parte
posteriore dell’apertura di scarico, dove era inizialmente
fissata la parte posteriore della calotta di pacciamatura.
3. Rimontare le rondelle dentate di sicurezza e i dadi a manopola
sui bulloni e serrare in modo sicuro.
4. Fare passare il cavo di contraccolpo attorno alla parte esterna
della puleggia di guida del cavo (E).
Nota:
Il cavo di contraccolpo può essere allentato stringendo il
comando della lama contro il manubrio.
5. Montare il sacco dell’erba inserendo il connettore (A, figura 12)
sulla flangia dell’adattatore.
6. Attaccare i ganci del sacco dell’erba (B) sulla barra trasversale
intermedia del manubrio.
AVVERTENZA
I sacchi di raccolta dell’era sono di tessuto e sono soggetti a
deteriorarsi e consumarsi nel corso dell’uso normale. Prima
dell’uso controllare sempre le condizioni del sacco. Sostituire
immediatamente raccoglitori consumati o danneggiati usando
solo sacchi consigliati dal produttore. Il raccoglitore dell’erba è
un accessorio opzionale su alcuni modelli.
! !
Figura 11: Montaggio dell’adattatore del sacco dell’erba
Figura 12: Montaggio del sacco dell’erba
B
A
B
D
A
E
C
AVVERTENZA
NON tentare di eseguire interventi di manutenzione, regolazione o
assistenza quando il motore è in moto e la lama è in movimento.
FERMARE il motore e la lama. Scollegare il filo della candela e
fissarlo in modo sicuro lontano dalla stessa. Il motore e gli altri
componenti sono MOLTO CALDI. Lasciare che tutti i componenti
si raffreddino per evitare ustioni gravi.
! !
Uso
Not for
Reproduction
Not for
Reproduction

13
Tabella di manutenzione
AVVERTENZA
NON tentare di eseguire interventi di manutenzione, regolazione o
assistenza quando il motore è in moto e la lama è in movimento.
FERMARE il motore e la lama. Scollegare il filo della candela e
fissarlo in modo sicuro lontano dalla stessa. Il motore e gli altri
componenti sono MOLTO CALDI. Lasciare che tutti i componenti
si raffreddino per evitare ustioni gravi. Quando si maneggiano le
lame di taglio, o quando si lavora in loro prossimità, Indossare
dei robusti guanti di pelle. Le lame solo molto affilate e possono
causare lesioni gravi.
! !
FALCIATRICE
Ogni 8 ore o giornalmente
Controllare il sistema degli interblocchi di sicurezza
Pulire i detriti nella falciatrice
Ogni 25 ore o una volta l’anno *
Controllare che non ci siano elementi allentati
Visitare il rivenditore una volta l’anno per
Lubrificare la falciatrice
Ispezionare la lama della falciatrice **
Verificare il tempo di arresto della lama di falciatura
Controllare la cinghia di trasmissione
Pulire la batteria e i cavi (se in dotazione)
MOTORE
Dopo le prime 5 ore
Cambiare l’olio motore
Ogni 8 ore o giornalmente
Controllare il livello dell’olio motore
Ogni 25 ore o una volta l’anno *
Pulire il filtro dell’aria e il pre-depuratore (se in dotazione) **
Ogni 50 ore o una volta l’anno *
Cambiare l’olio motore
Sostituire il filtro dell’olio (se in dotazione)
Una volta l’anno
Sostituire il filtro dell’aria
Sostituire il pre-depuratore (se in dotazione)
Visitare il rivenditore una volta l’anno per
Ispezionare la marmitta e il parascintille (se in dotazione)
Sostituire la candela
Sostituire il filtro del carburante (se in dotazione)
Pulire l’impianto di raffreddamento ad aria del motore
* Il primo a verificarsi
**Controllare la lama con maggior frequenza in regioni con
terreno sabbioso o con molta polvere.
* Il primo a verificarsi
**Pulire con frequenza maggiore in condizioni polverose o
quando vi sono detriti trasportati dall’aria.
Manutenzione
Not for
Reproduction
Not for
Reproduction

www.snapper.com14
Cambio dell’olio motore
1. Per i dati tecnici corretti per l’olio e per le procedure e gli
intervalli di cambio, vedere il Manuale del motore.
2. Per il cambio d’olio più semplice/pulito basta mettere la
falciatrice sul suo lato e scolare l’olio come mostrato. Scolare
l’olio in un contenitore tramite il tubo dell’asta di livello (A,
figura 13). Aspettare sufficientemente a lungo affinché tutto
l’olio si scoli.
Importante: Svuotare il serbatoio del carburante prima di mettere la
macchina sul suo fianco. NON mettere la macchina sul fianco con il
carburatore o la candela rivolti in basso. L’olio proveniente dal
basamento del motore impregnerà il filtro dell’aria e renderà il
motore difficile da avviare o impedirà che si avii. Se ciò si verifica si
renderà necessario sostituire il filtro dell’aria.
3. Eliminare l’olio in modo opportuno.
4. Riempire il motore con olio che soddisfa i dati specificati nel
Manuale del motore. Non riempire troppo.
Manutenzione del filtro dell’aria
Per istruzioni sulla manutenzione del filtro dell’aria vedere il
manuale per l’utente del motore.
Controllo del sistema degli
interblocchi di sicurezza
1. Avviare la falciatrice
2. Rilasciare la lama. Il motore deve fermarsi entro 3 secondi.
Non usare la falciatrice se il motore non si ferma. Portare la
falciatrice a un rivenditore autorizzato per gli interventi di
assistenza.
Pulizia dei detriti nella falciatrice
1. Togliere sporco e detriti dalla parte superiore del piano della
falciatrice.
2. Togliere eventuali accumuli di detriti sul motore, o attorno a
esso, ecc.
Mentre si esegue la pulizia, controllare i componenti per verificare
che non ci siano segni di usura o danni. Sostituire immediatamente
le parti consumate o danneggiate.
Comando di trasmissione
Il comando di trasmissione (A, figura 14) dovrebbe innestare la
trasmissione quando si tira la leva di comando contro il manubrio e
sganciarla quando la leva è rilasciata. Se la trasmissione non si
impegna o disimpegna completamente, mettersi in contatto con il
proprio rivenditore autorizzato Snapper prima di usare la falciatrice.
Figura 13: Scolatura dell’olio motore
AVVERTENZA
NON tentare di eseguire interventi di manutenzione, regolazione o
assistenza quando il motore è in moto e la lama è in movimento.
FERMARE il motore e la lama. Scollegare il filo della candela e
fissarlo in modo sicuro lontano dalla stessa. Il motore e gli altri
componenti sono MOLTO CALDI. Lasciare che tutti i componenti
si raffreddino per evitare ustioni gravi.
! !
A
AVVERTENZA
NON tentare di eseguire interventi di manutenzione, regolazione o
assistenza quando il motore è in moto e la lama è in movimento.
FERMARE il motore e la lama. Scollegare il filo della candela e
fissarlo in modo sicuro lontano dalla stessa. Il motore e gli altri
componenti sono MOLTO CALDI. Lasciare che tutti i componenti
si raffreddino per evitare ustioni gravi. Quando si maneggiano le
lame di taglio, o quando si lavora in loro prossimità, Indossare
dei robusti guanti di pelle. Le lame solo molto affilate e possono
causare lesioni gravi.
! !
Manutenzione
Figura 14: Comando di trasmissione
A
(componenti rimossi per chiarezza)
Not for
Reproduction
Not for
Reproduction

15
Rimessaggio e conservazione
Per istruzioni sulla preparazione del motore per il rimessaggio
vedere il manuale per il proprietario del motore. Preparare la
falciatrice per il rimessaggio di “fine stagione” nel modo seguente:
1. Scollegare il filo della candela e fissarlo in modo sicuro
lontano dalla stessa.
2. Togliere la benzina dal serbatoio del carburante e lasciare il
motore in moto fino a quando tutto il carburante è fuoriuscito
dal carburatore.
3. Servendosi di una spazzola o di aria compressa togliere i
detriti quasi staccati e quindi pulire l’unità con un panno
umido.
4. Inclinare la falciatrice alzandola sulle ruote posteriori e pulire
completamente la parte inferiore. Non inclinare la falciatrice
con il carburatore o la candela rivolti in basso. Togliere
eventuali accumuli di grasso servendosi di una spatola per
stucco e/o di una spazzola metallica.
5. Lubrificare tutte le parti metalliche esposte coprendole con un
leggero strato d’olio per evitare corrosione.
6. Piegare le impugnature con attenzione flettendo i cavi di
comando per evitare che si danneggino.
7. Conservare la falciatrice in un riparo o altro posto asciutto
protetto dalle intemperie.
AVVERTENZA
NON tentare di eseguire interventi di manutenzione, regolazione o
assistenza quando il motore è in moto e la lama è in movimento.
FERMARE il motore e la lama. Scollegare il filo della candela e
fissarlo in modo sicuro lontano dalla stessa. Il motore e gli altri
componenti sono MOLTO CALDI. Lasciare che tutti i componenti
si raffreddino per evitare ustioni gravi. Quando si maneggiano le
lame di taglio, o quando si lavora in loro prossimità, Indossare
dei robusti guanti di pelle. Le lame solo molto affilate e possono
causare lesioni gravi.
! !
Manutenzione
Not for
Reproduction
Not for
Reproduction

www.snapper.com16
PROBLEMA CAUSA PROBABILE AZIONE DI RIMEDIO
Il motore non si avvia 1. Il serbatoio del carburante è vuoto. 1. Fare il pieno con carburante fresco.
2. Il cavo della candela è scollegato. 2. Fissare il cavo della candela sulla stessa.
Il motore si arresta o
perde potenza dopo
essere stato in moto
1. Il comando della lama è stato rilasciato o non è
tenuto fermamente contro il manubrio.
1. Il comando della lama dovrebbe essere mantenuto
fermamente contro il manubrio tutto il tempo in cui si
usa la falciatrice.
2. Il serbatoio del carburante è vuoto. 2. Rifornire sino al livello corretto.
3. Il pre-depuratore dell’aria del motore, o il filtro
dell’aria, è sporco.
3. Pulire togliendo tutti i detriti.
4. La candela è difettosa o la distanza tra gli elettrodi
non è corretta.
4. Fare la manutenzione della candela.
5. L’impianto del carburante è contaminato da acqua,
detriti o carburante vecchio.
5. Svuotare l’impianto e pulire.
Vibrazione eccessiva 1. La lama di taglio è danneggiata, sbilanciata o
piegata.
1. Rivolgersi a un rivenditore autorizzato.
2. Componenti della lama allentati. 2. Rivolgersi a un rivenditore autorizzato.
3. Dispositivo ad aria allentato o mancante
(se in dotazione).
3. Rivolgersi a un rivenditore autorizzato.
4. Cinghia con protuberanze o sfilacciature. 4. Rivolgersi a un rivenditore autorizzato.
La falciatrice non falcia /
perdita di aderenza
1. Accumulo di detriti sui componenti della ruota di
guida o attorno a essi.
1. Pulire togliendo i detriti.
2. Il cavo di trasmissione ha necessità di essere
regolato.
2. Rivolgersi a un rivenditore autorizzato.
3. La cinghia di trasmissione deve essere sostituita. 3. Rivolgersi a un rivenditore autorizzato.
4. La trasmissione è danneggiata. 4. Rivolgersi a un rivenditore autorizzato.
L’erba non è tagliata in
modo corretto
1. L’altezza di taglio è troppo bassa o troppo alta. 1. Regolare l’altezza di taglio.
2. Velocità effettiva in avanti troppo alta. 2. Spostare il comando della velocità effettiva su di un
valore più basso.
3. Taglio a gradoni da lato a lato. 3. Regolare l’altezza di taglio servendosi delle leve di
regolazione dell’altezza.
4. Pendenza del piano eccessiva dalla parte anteriore
a quella posteriore.
4. Regolare l’altezza di taglio servendosi delle leve di
regolazione dell’altezza.
5. Lama di falciatura smussata o danneggiata. 5. Rivolgersi a un rivenditore autorizzato.
Insufficiente scarico
dell’erba
1. La velocità in avanti è troppo alta. 1. Spostare il comando della velocità effettiva su di un
valore più basso.
2. L’erba è bagnata. 2. Falciare quando l’erba è asciutta.
3. Lama danneggiata o consumata in modo eccessivo. 3. Rivolgersi a un rivenditore autorizzato.
4. Accumulo di pezzetti d’erba e detriti sotto il piano. 4. Pulire il piano.
5. Lama sbagliata montata sul piano. 5. Rivolgersi a un rivenditore autorizzato.
6. Lama montata sul piano in modo sbagliato. 6. Rivolgersi a un rivenditore autorizzato.
Perdita d’olio 1. Asta di livello allentata. 1. Accertarsi che l’asta di livello e il tappo di
riempimento siano a posto in modo sicuro.
2. Tappo di scolatura allentato. 2. Controllare e serrare il tappo di scolatura.
3. Riempimento d’olio oltre il livello massimo. 3. Spurgare l’olio in eccesso.
4. Tenute dell’olio danneggiate. 4. Rivolgersi a un rivenditore autorizzato.
Individuazione e soluzione dei problemi
Not for
Reproduction
Not for
Reproduction

17
POLITICA DI GARANZIA BRIGGS & STRATTON POWER PRODUCTS GROUP, L.L.C. PER IL PROPRIETARIO
DURATA DELLA GARANZIA
INFORMAZIONI SULLA GARANZIA
GARANZIA LIMITATA
Briggs & Stratton Power Products Group, LLC riparerà e/o sostituirà gratuitamente qualsiasi parte della macchina che si dimostri
difettosa per materiale o lavorazione o entrambi. Briggs & Stratton Corporation riparerà e/o sostituirà gratuitamente qualsiasi parte del
motore* Briggs and Stratton (se in dotazione) che si dimostri difettosa per materiale o lavorazione o entrambi. Le spese di trasporto del
prodotto di cui si richiede la sostituzione o riparazione in garanzia sono a carico dell’acquirente. La presente garanzia è effettiva per la
durata riportata sotto e alle condizioni sottoesposte. Per assistenza in garanzia, rivolgersi al più vicino rivenditore autorizzato reperibile
tramite il sito Web all’indirizzo www.BriggsandStratton.com.
Non vi è nessun’altra garanzia esplicita. Le garanzie implicite, incluso quelle di commerciabilità e idoneità a scopo particolare, sono
limitate alla durata di un anno dalla data di acquisto, o nella misura consentita dalla legge. La responsabilità per danni imprevisti o
indiretti è esclusa nella misura in cui tale esclusione è consentita dalla legge.
Alcuni Stati o Paesi non permettono le limitazioni di durata delle garanzie implicite e alcuni Stati o Paesi non consentono l’esclusione o
la limitazione di danni imprevisti o indiretti e perciò le limitazioni ed esclusioni di cui sopra potrebbero non essere applicabili nel caso
particolare. La presente garanzia conferisce specifici diritti legali e il proprietario potrà avere anche altri diritti che variano da Stato a
Stato o da Paese a Paese.
Il periodo di garanzia decade dalla data di acquisto da parte del primo acquirente consumatore al dettaglio o utente consumatore
commerciale e continua per la durata indicata sopra. “Utente consumatore” indica una famiglia in una residenza che ha acquistato al
dettaglio. “Utente commerciale” indica tutti gli altri acquirenti, incluso quelli che intendono usare l’unità a scopi di affari come per lavoro in
proprio o per noleggio. Una volta che il prodotto è stato utilizzato per utenza commerciale, verrà sempre considerato come tale ai fini della
presente garanzia.
Per ottenere assistenza in garanzia per i prodotti Briggs & Stratton non è richiesta nessuna registrazione. Conservare lo scontrino di ricevuta
dell’acquisto. Se non si fornisce prova della data di acquisto quando si richiede assistenza, verrà utilizzata la data di fabbricazione del
prodotto per stabilire se esso ha diritto alla garanzia.
Siamo lieti di poter riparare i prodotti in garanzia e ci scusiamo di qualsiasi inconveniente all’utente. L’assistenza in garanzia è disponibile
solo presso i rivenditori Briggs & Stratton or BSPPG, LLC. autorizzati a fornire tale servizio.
La maggioranza delle riparazioni in garanzia è gestita di routine ma a volte le richieste per assistenza in garanzia non sono opportune. La
presente garanzia copre solo difetti di materiali o lavorazione. Essa non copre danni causati da uso inadatto o da cattivo uso, manutenzione o
riparazioni erronee, consumo e usura normali o uso di carburante vecchio o non approvato.
Uso inadatto o cattivo uso - L’uso adatto previsto per questo prodotto è quello descritto nel Manuale per l’operatore. L’uso del prodotto in
un modo diverso da quanto descritto nel Manuale per l’operatore, o l’uso del prodotto danneggiato, invalida la garanzia. La garanzia non è
concessa se il numero di serie del prodotto è stato rimosso o se il prodotto è stato alterato in un modo qualsiasi o se il prodotto mostra
segni evidenti di cattivo uso come, ad esempio, danneggiamento da urto o corrosione dovuta ad acqua o agenti chimici.
Manutenzione e riparazioni erronee - Questo prodotto è soggetto a manutenzione in accordo con le procedure e i programmi indicati nel
Manuale per l’operatore e gli interventi di manutenzione e riparazione devono essere eseguiti utilizzando parti originali Briggs & Stratton. I
danni causati da mancata manutenzione o dall’uso di parti non originali non sono coperti dalla garanzia.
Usura normale - Come qualsiasi altra apparecchiatura meccanica, questa unità è soggetta a usura anche quando è sottoposta a
manutenzione opportuna. La presente garanzia non copre la riparazione nel caso in cui il prodotto o la parte siano giunti al termine della loro
durata di uso normale. Gli articoli di manutenzione e consumo come filtri, cinghie, lame di falciatura e pattini del freno (i pattini del freno
motore sono coperti dalla garanzia) non sono coperti dalla garanzia per quanto riguarda la loro usura, a meno che essa non sia il risultato di
un difetto di materiale o lavorazione.
Carburante vecchio - Per funzionare in modo corretto, questo prodotto richiede che si usi carburante fresco che si conforma ai dati
specificati per esso nel Manuale per l’operatore. I danni causati da carburante vecchio (perdite al carburatore, tubi del carburante otturati,
valvole incollate, ecc.) non sono coperti dalla garanzia.
* Si applica solo ai motori Briggs and Stratton. La garanzia per i motori di marca diversa da Briggs and Stratton è fornita dal produttore del motore.
Garanzia
Articolo Utente consumatore Utente commerciale
Apparecchio 2 anni 90 giorni
Motore* 2 anni 90 giorni
Batteria 1 anno 1 anno
Not for
Reproduction
Not for
Reproduction

18
Note
www.snapper.com
Not for
Reproduction
Not for
Reproduction
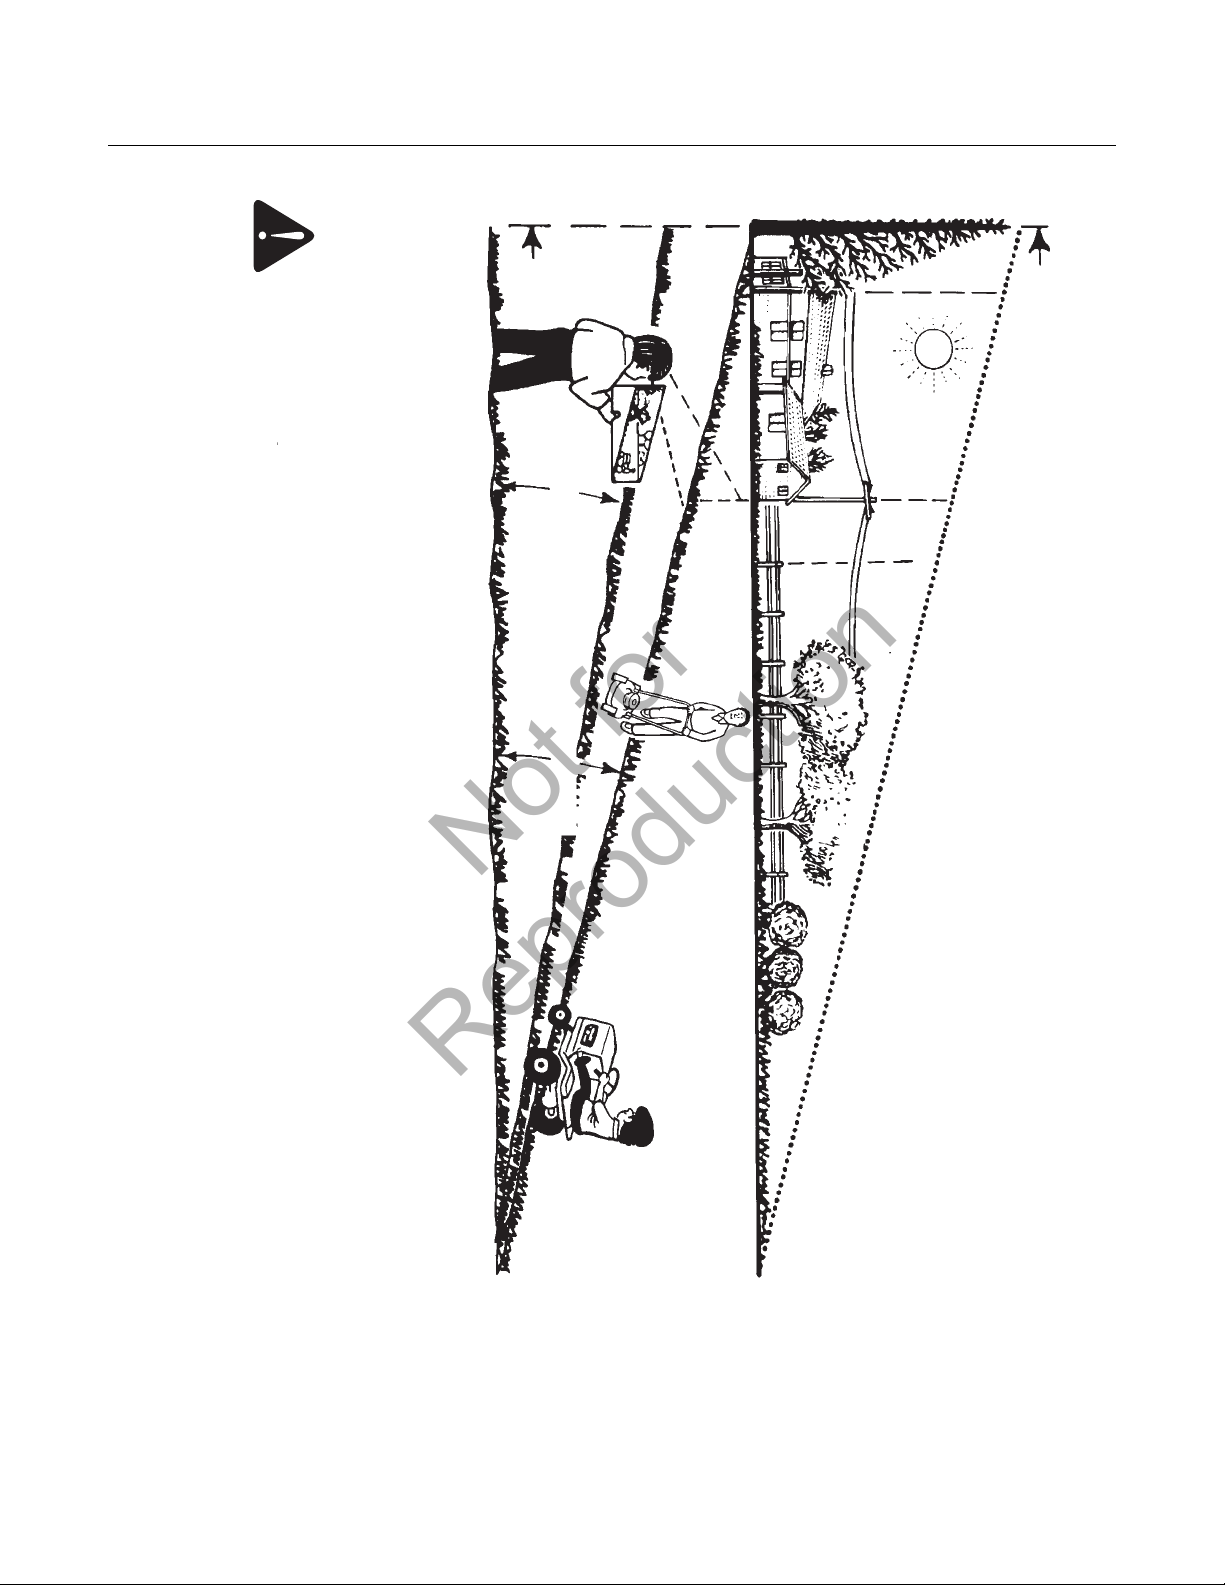
19
GUIDA PER L’USO SUI PENDII
15 GRADI
AGGIUSTARE E TENERE LA PRESENTE GUIDA ALLINEATA CON UN
ALBERO VERTICALE, CON L’ANGOLO DI UNA STRUTTURA,
CON UN PALO DELLA LUCE O CON UNA RECINZIONE.
DOBLE PIEGARE LUNGO LA LINEA TRATTEGGIATALA LÍNEA DE PUNTOS
Usare le falciatrici guidate
camminando spostandosi
da un lato all’altro del pendio,
mai in salita o in discesa.
Usare le falciatrici con
seggiolino spostandosi in
salita o in discesa, mai da
un lato all’altro del pendio.
15 GRADI10 GRADI
Per determinare se un pendio è sicuro per l’uso di falciatrici con seggiolino: (1) disimpegnare la lama o lame, (2) mettere l’unità in retromarcia e
(3) provare a salire sul pendio spostandosi all’indietro. Se si può salire il pendio all’indietro, si potrà generalmente usare la falciatrice in modo
sicuro. Tuttavia, se non ci si sente sicuri, o si è incerti, usare la presente guida e non falciare se la pendenza è superiore a 15 gradi. Se la falciatrice
con seggiolino è dotata di accessorio trainato o montato posteriormente, non usare l’unità su pendio con inclinazione superiore ai 10 gradi.
Un terreno con 15 gradi di pendenza è un terreno la cui altitudine aumenta di circa 0,8 m (2,5 piede) su di una distanza di 3 m (10 piede).
Un terreno con 10 gradi di pendenza è un terreno la cui altitudine aumenta di circa 0,5 m (1,7 piede) su di una distanza di 3 m (10 piede).
Prestare sempre moltissima attenzione ed evitare sterzate o movimenti bruschi. Per falciare in modo sicuro su terreni in pendenza,
seguire le informazioni fornite nel presente manuale. Usare le falciatrici con seggiolino spostandosi in salita o in discesa, mai da un
lato all’altro del pendio. Usare le falciatrici guidata camminando spostandosi da un lato all’altro del pendio. Prestare attenzione
speciale quando si falcia sui pendii, in vicinanza di pendii e in prossimità di ostruzioni.
Guida per l’uso sui pendii
Not for
Reproduction
Not for
Reproduction

Dati nominali di potenza del motore: Le etichette dei dati nominali di potenza lorda per i modelli con motore sono fornite in conformità a
SAE (Society of Automotive Engineers), codice J1940 (Small Engine Power & Torque Rating Procedure), e i dati di prestazione sono stati
ricavati e corretti in conformità a SAE J1995 (Revisione 2002-05). I valori di coppia sono stati derivati a 3060 RPM, i valori di potenza
cavallo motore sono stati derivati a 3600 RPM. La potenza lorda reale può essere inferiore a causa di, fra altri fattori, condizioni operative
ambientali e variabilità da motore a motore. Considerando sia la vasta gamma di prodotti su cui i nostri motori vengono installati che la
varietà di condizioni degli ambienti operativi, è possibile che il motore a benzina non sviluppi il valore nominale di potenza lorda quando
viene usato in una particolare installazione (potenza reale netta o “in sito”). La differenza è dovuta a diversi fattori compreso, ma non
limitato a, accessori (filtro dell’aria, scarico, carica, raffreddamento, carburatore, pompa del carburante, ecc.), restrizioni applicative,
condizioni operative ambientali (temperatura, umidità, altitudine) e variabilità del motore. A causa di limitazioni produttive e di capacità,
Briggs & Stratton potrà sostituire questo motore di serie con un motore di potenza nominale superiore.
Pezzi di ricambio/
manutenzione comuni
Codice del
pezzo
Cavo di comando della lama 7100074YP
Cavo di comando trasmissione delle ruote 7104004YP
Lama di taglio (a doppia curvatura) 7100242AYP
Lama di taglio (Ninja - Quad) 7026407AYP
Cinghia di trasmissione 7100883YP
Dati tecnici del prodotto
Misura del piano (cm/pollici) 53,3/21
Altezza di taglio (cm/pollici) 3,2 - 10,2/1,25 - 4
Tipo di trasmissione Ingranaggi
Velocità effettiva (km all’ora/miglia all’ora) 0 - 6,4/0 - 4
Potenza del motore (coppia lorda) 6,75
Cilindrata del motore (cc) 190
Capacità del serbatoio del carburante
(l/quarti di gallone)
0,9/1,0
20
www.snapper.com
1-800-935-2967
FALCIATRICE DA 21 POLLICI
A VELOCITÀ VARIABILE
CON RUOTE GIREVOLI
GUIDATA CAMMINANDO
Not for
Reproduction
Not for
Reproduction
 Loading...