

Snapper Easy Line Series, Easy Line ESPV21, Easy Line ESPV21S Safety Instructions & Operator's Manual
Page 1

Safety Instructions & Operator’s Manual for
Not for
Reproduction
EUROPEAN
21” ‘EASY LINE’
WALK BEHIND
MOWERS
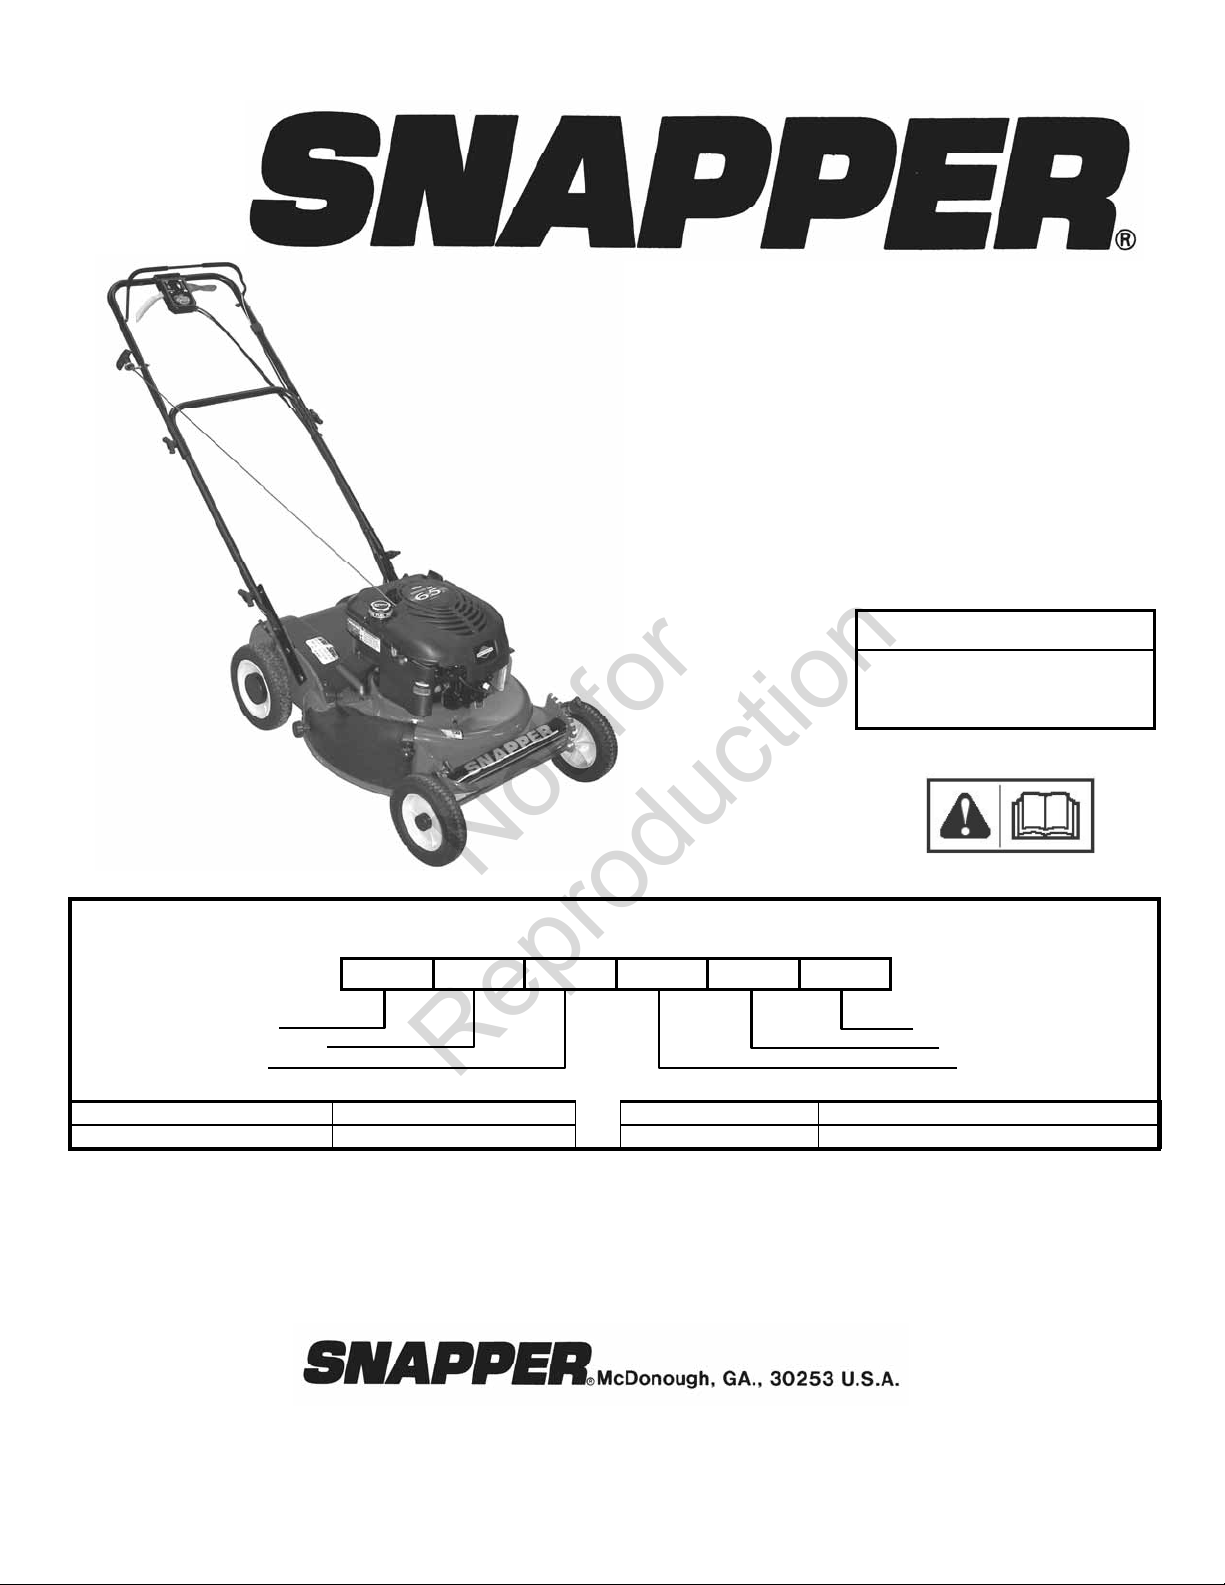
MODEL NUMBER EXPLANATION
E S P V 21 S
EUROPEAN MODEL OPTION DESIGNATION
MODEL DESIGNATION CUTTING WIDTH
SELF-PROPELLED VARIABLE SPEED
E – European Model P – Self Propelled Model V – Variable Speed 21 – 21” Cutting Width
S – ‘Easy Line’ S – Swivel Front Wheels
Thank you for buying a SNAPPER Product! Before operating your Walk Behind, read this manual carefully and
pay particular attention to the “IMPORTANT SAFETY INSTRUCTIONS” on Pages 2 - 4. Remember that all power
equipment can be dangerous if used improperly. Also keep in mind that SAFETY requires careful use in
accordance with the operating instructions and common sense. Save these original instructions for
future reference.
BRIGGS & STRATTON YARD POWER PRODUCTS GROUP
COPYRIGHT © 2010, BRIGGS & STRATTON CORPORATION
MILWAUKEE, WI, USA. ALL RIGHTS RESERVED
MANUAL No. 7104351 (Rev. ‘-’, 2/16/2010)
ESPV21S (7800065)
MODELS
ESPV21 (7800064)
Page 2

IMPORTANT SAFETY INSTRUCTIONS
Not for
Reproduction
WARNING: This powerful cutting machine is capable of amputating hands and feet and can throw objects that
can cause injury and damage! Failure to comply with the follow ing SAFETY instructions could result in serious
injury or death to the operator or other persons. The owner of the machine must understand these instructions
and must allow only persons who understand these instructions to operate machine. Each person operating
the machine must be of sound mind and body and must not be under the influence of any substance, which
might impair vision, dexterity or judgment. If you have any questions pertaining to your machine which your
dealer cannot answer to your satisfaction, call or write the Customer Service Department at SNAPPER,
McDonough, Georgia 30253. Phone: (1-800-935-2967).
PROTECTION FOR CHILDREN
Tragic accidents can occur if the operator is not alert to
the presence of children. Children are often attracted to
the machine and the mowing activity. Never assume
that children will remain where you last saw them.
1. KEEP children out of the mowing area and under
the watchful care of a responsible adult other than
the operator.
2. DO NOT allow children in yard when machine is
operated and turn machine OFF if anyone enters
the area.
3. DO NOT allow pre-teenage children to operate
machine.
4. ALLOW only responsible adults & teenagers with
mature judgment under close adult supervision to
operate machine.
5. DO NOT pull mow er backwards unless absolutely
necessary. LOOK and SEE behind and down for
children, pets and hazards before and while
backing.
6. USE EXTRA CARE when approaching blind
corners, shrubs, trees, or other objects that may
obscure vision.
SLOPE OPERATION
1. Slopes are a major factor related to slip and fall
accidents, which can result in severe injury. All
slopes require extra caution. If you feel uneasy on
a slope, DO NOT mow it.
2. Mow across slopes, never up-and-dow n. Exercise
extreme CAUTION when changing directions on
slopes. DO NOT mow steep slopes or other areas
where stability or traction is in doubt.
3. Use extra care with grass catchers or other
attachments; these affect the handling and the
stability of the machine.
PREPARATION
1. Read, understand, and follow instructions and
warnings in this manual and on the mower, engine
and attachments. Know the controls and the
proper use of the mower before starting.
2. Only mature, responsible persons shall operate the
machine and only after proper instruction.
PREPARATION
(Continued From Previous Column)
3. Data indicates that operators age 60 and above, are
involved in a large percentage of mower-related
injuries. These operators should evaluate their
ability to operate the mower safely enough to
protect themselves and others from serious injury.
4. Handle fuel with extra care. Fuels are flammable
and vapors are explosive. Use only an approved
fuel container. DO NOT remove fuel cap or add fuel
with engine running. Add fuel outdoors only with
engine stopped and cool. Clean spilled fuel and oil
from machine. DO NOT smoke.
5. Check the area to be mowed and remove all
objects such as toys, wire, rocks, limbs and other
objects that could cause injury if thrown by blade
or interfere with mowing. Also note the location of
holes, stumps, and other possible hazards.
6. Keep people and pets out of the mowing area.
Immediately, STOP Blade, Stop engine and Stop
mower if anyone enters the area.
7. Check shields, deflectors, switches, blade controls
and other safety devices frequently for proper
operation and location.
8. Make sure all safety decals are clearly legible.
Replace if damaged.
9. Protect yourself when mowing and wear safety
glasses, long pants and substantial footwear. DO
NOT mow barefooted or with sandals.
10. Know how to STOP blade and engine quickly in
preparation for emergencies.
11. Use extra care when loading or unloading the
machine into a trailer or truck.
12. Check grass catcher components frequently for
signs of wear or deterioration and replace as
needed to prevent injury from thrown objects
going through weak or torn spots.
SAFE HANDLING OF GASOLINE
To avoid personal injury or property damage, use
extreme care in handling gasoline. Gasoline is
extremely flammable and the vapors are explosive
1. Extinguish all cigarettes, cigars, pipes and other
sources of ignition.
2. Use only an approved fuel container.
2
Page 3

IMPORTANT SAFETY INSTRUCTIONS
Not for
Reproduction
SAFE HANDLING OF GASOLINE
(Continued From Previous Page)
3. DO NOT remove fuel cap or add fuel with the engine
running. Allow the engine to cool before refueling.
4. DO NOT refuel the machine indoors.
5. DO NOT store the machine or fuel container inside
where there is an open flame, spark or pilot light
such as on a water heater or other appliances.
6. DO NOT fill fuel containers inside a vehicle or on a
truck or trailer bed with a plastic liner. Always place
the containers on the ground away from the vehicle
before filling.
7. Remove gas-powered equipment from the vehicle or
trailer and refuel it on the ground. If this is not
possible, then refuel equipment using a portable
container, rather than a gasoline dispenser nozzle.
8. DO NOT start gas powered equipment in enclosed
vehicles or trailers.
9. Keep the nozzle in contact with the rim of the fuel
tank or container opening at all times until fueling is
complete. DO NOT use a nozzle lock-open device
10. If fuel is spilled on clothing, change clothing
immediately.
11. DO NOT overfill a fuel tank. Replace fuel cap and
tighten securely.
OPERATION
1. DO NOT put hands or feet near or under rotating
parts. Keep clear of discharge area while engine is
running.
2. STOP engine when crossing gravel drives, walks, or
roads, and under any conditions where thrown
objects might be a hazard.
3. Mow only in daylight or good artificial light.
4. DO NOT operate mower while under the influence of
alcohol or drugs.
5. After striking a foreign object or if mower vibrates
abnormally, STOP the engine, disconnect and
secure spark plug wire. Inspect the mow er for any
damage and repair the damage before starting.
6. DO NOT mow near drop offs, ditches or
embankments. Operator could lose footing or
balance.
7. STAY ALERT for holes and other hidden hazards.
Tall grass can hide obstacles. Keep away from
ditches, washouts, culverts, fences and protruding
objects.
8. DO NOT mow on wet grass. Always be sure of your
footing. Keep a firm hold on the handle and walk,
never run. Slipping could cause injury.
9. ALWAYS stay behind handle when engine (motor) is
running.
10. DO NOT leave the machine with the engine running.
STOP BLADE and STOP ENGINE before leaving the
operators position for any reason.
OPERATION
(Continued From Previous Column)
11. Before cleaning, repairing or inspecting make
certain engine, blade and all moving parts have
STOPPED. Disconnect and secure spark plug wire
away from plug to prevent accidental starting.
12. STOP engine and wait until the blade comes to
complete STOP before removing grass bag and/or
clearing grass.
13. DO NOT operate mower without the entire grass
catcher, discharge guard, rear guard or other safety
devices in place and working. DO NOT point
discharge at people, passing cars, windows or
doors.
14. DO NOT discharge material against a wall or
obstruction. Material may ricochet back towards the
operator.
15. Slow down before turning.
16. Watch out for traffic when near or crossing
roadways.
17. DO NOT operate engine in enclosed areas. Engine
exhaust gases contain carbon monoxide, a deadly
poison.
18. Only use accessories approved by the
manufacturer. See manufacturer’s instructions for
proper operation and installation of accessories.
MAINTENANCE AND STORAGE
1. DO NOT store mower or fuel container inside where
fumes may reach an open flame, spark or pilot light
such as in a water heater, furnace, clothes dryer or
other gas appliance. Allow engine to cool before
storing machine in an enclosure. Store fuel
container out of reach of children in a well
ventilated, unoccupied building.
2. Keep mower and engine free of grass, leaves or
excess grease to reduce fire hazard and engine
overheating.
3. When draining fuel tank, drain fuel into an approved
container outdoors and away from open flame.
4. Keep all bolts, especially blade bolts, nuts and
screws properly tight. Check that all cotter pins are
in proper position.
5. Always provide adequate ventilation when running
engine. Engine exhaust gases contain carbon
monoxide, a deadly poison.
6. Service engine and make adjustments only when
engine is stopped. Removed spark plug wire from
spark plug and secure wire away from spark plug to
prevent accidental starting.
7. DO NOT change engine governor speed settings or
overspeed engine.
8. Check grass bag assembly frequently for wear or
deterioration to avoid thrown objects and exposure
to moving parts. Replace with new bag if loose
seams or tears are evident. Replace slider or bag
adapter if broken or cracked.
3
Page 4

IMPORTANT SAFETY INSTRUCTIONS
Not for
Reproduction
MAINTENANCE AND STORAGE
(Continued From Previous Page)
9. Mower blades are sharp and can cut. Wrap the
blades or wear heavy leather gloves and use
CAUTION when handling them.
10. DO NOT test for spark by grounding spark plug next
to spark plug hole; spark plug could ignite gas
exiting engine.
11. Have machine serviced by an authorized SNAPPER
dealer at least once a year and have the dealer install
any new safety devices.
12. Use only genuine SNAPPER replacement parts to
assure that original standards are maintained.
4
Page 5

TABLE OF CONTENTS
Not for
Reproduction
IMPORTANT SAFETY INSTRUCTIONS...................................................................... 2 - 4
TABLE OF CONTENTS......................................................................................................5
SECTION 1 - FAMILIARIZATION.......................................................................................6
SECTION 2 - OPERATING INSTRUCTIONS............................................................... 7-10
Pre-start Checklist................................................................................................7
Starting & Stopping Engine & Blades................................................................7
Propelling Mower .................................................................................................8
Handle Height Adjustment ..................................................................................8
Cutting Height Adjustment..................................................................................9
Recycling Operation.............................................................................................9
Installation of Side Discharge Deflector ..........................................................10
Installation of Grass Bag Adapter ....................................................................10
Installation of Grass Bag...................................................................................10
SECTION 3 - MAINTENANCE INSTRUCTIONS .......................................................11-12
Change Engine Oil..............................................................................................11
Check Mower Blade ...........................................................................................11
Check Engine Drive Belt....................................................................................11
Service - Periodic ...............................................................................................11
Engine ..............................................................................................................11
Air Filter............................................................................................................11
Engine Oil.........................................................................................................11
Safety Interlock System..................................................................................12
Wheel Drive Components...............................................................................12
Storage Procedure .............................................................................................12
SECTION 4 - REPAIR.......................................................................................................13
Mower Blade Replacement................................................................................13
Blade Sharpening...............................................................................................13
TROUBLESHOOTING......................................................................................................14
SERVICE SCHEDULE......................................................................................................15
Maintenance/Replacement Parts......................................................................15
DECAL IDENTIFICATION .......................................................................................... 16-17
WARRANTY......................................................................................................................18
5
Page 6
Section 1 - FAMILIARIZATION
Not for
Reproduction
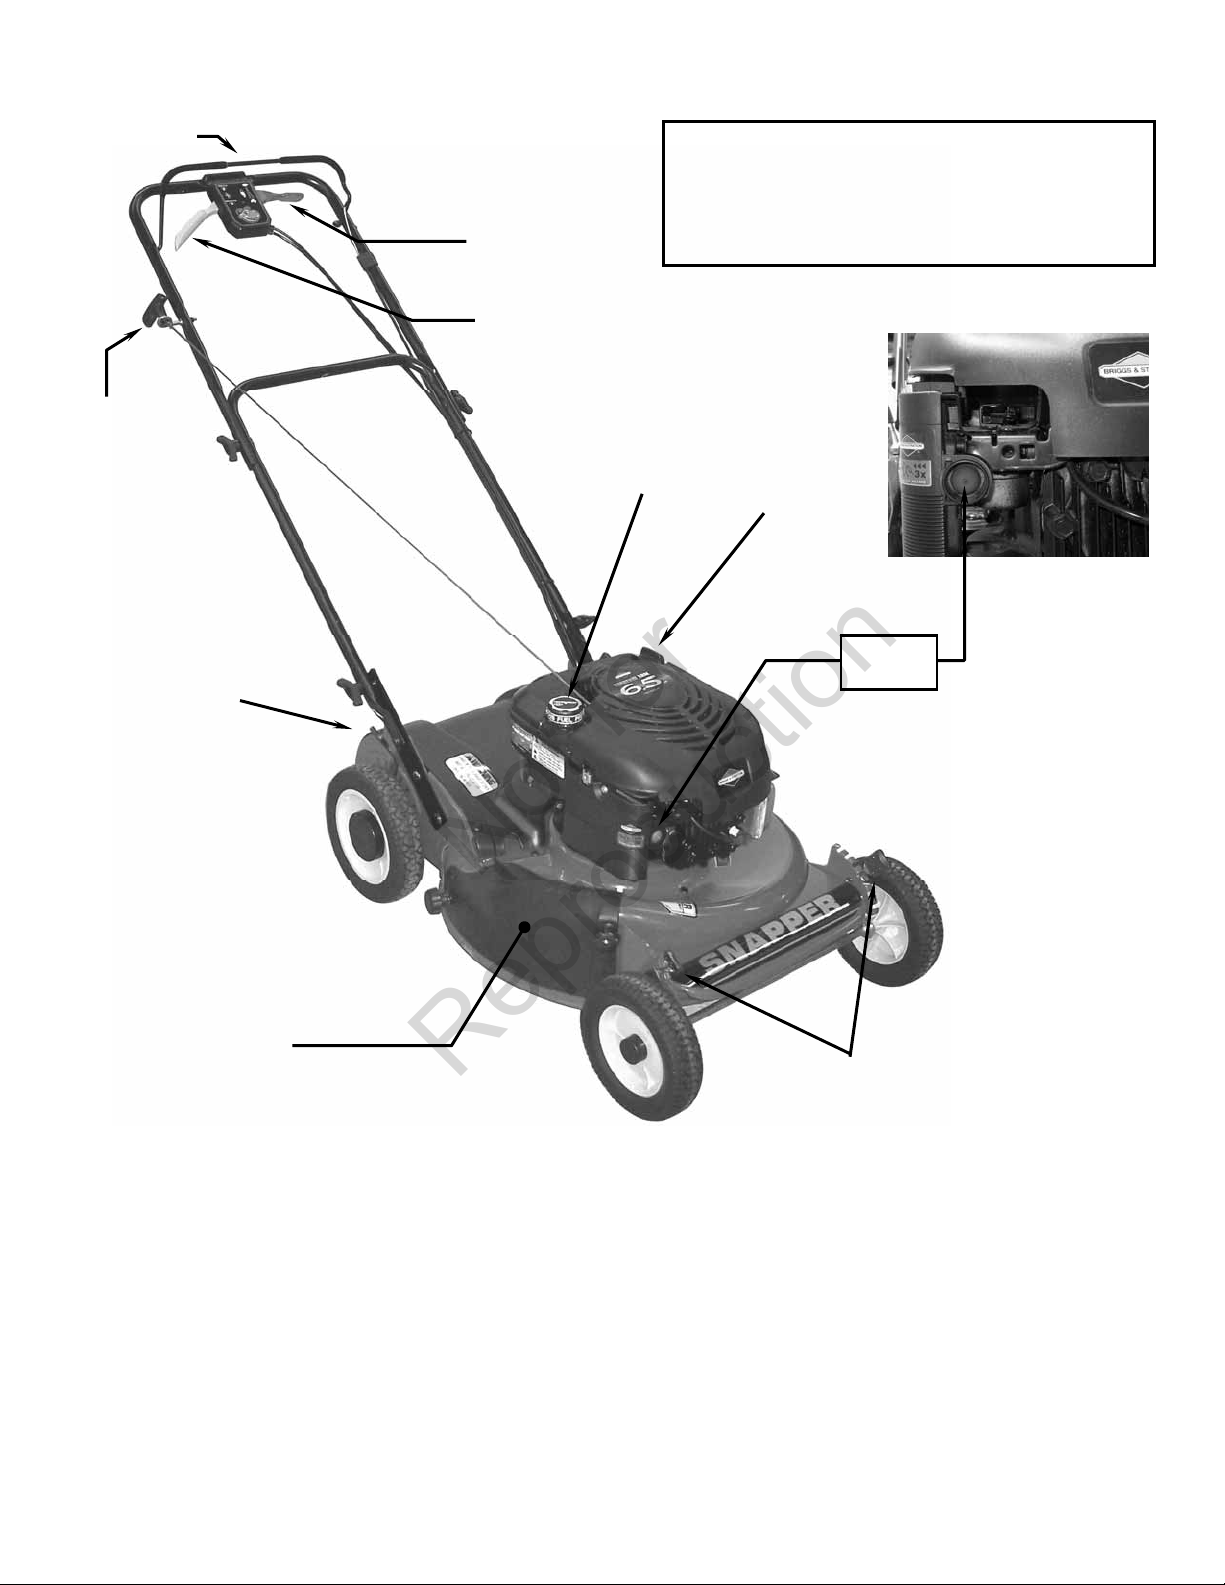
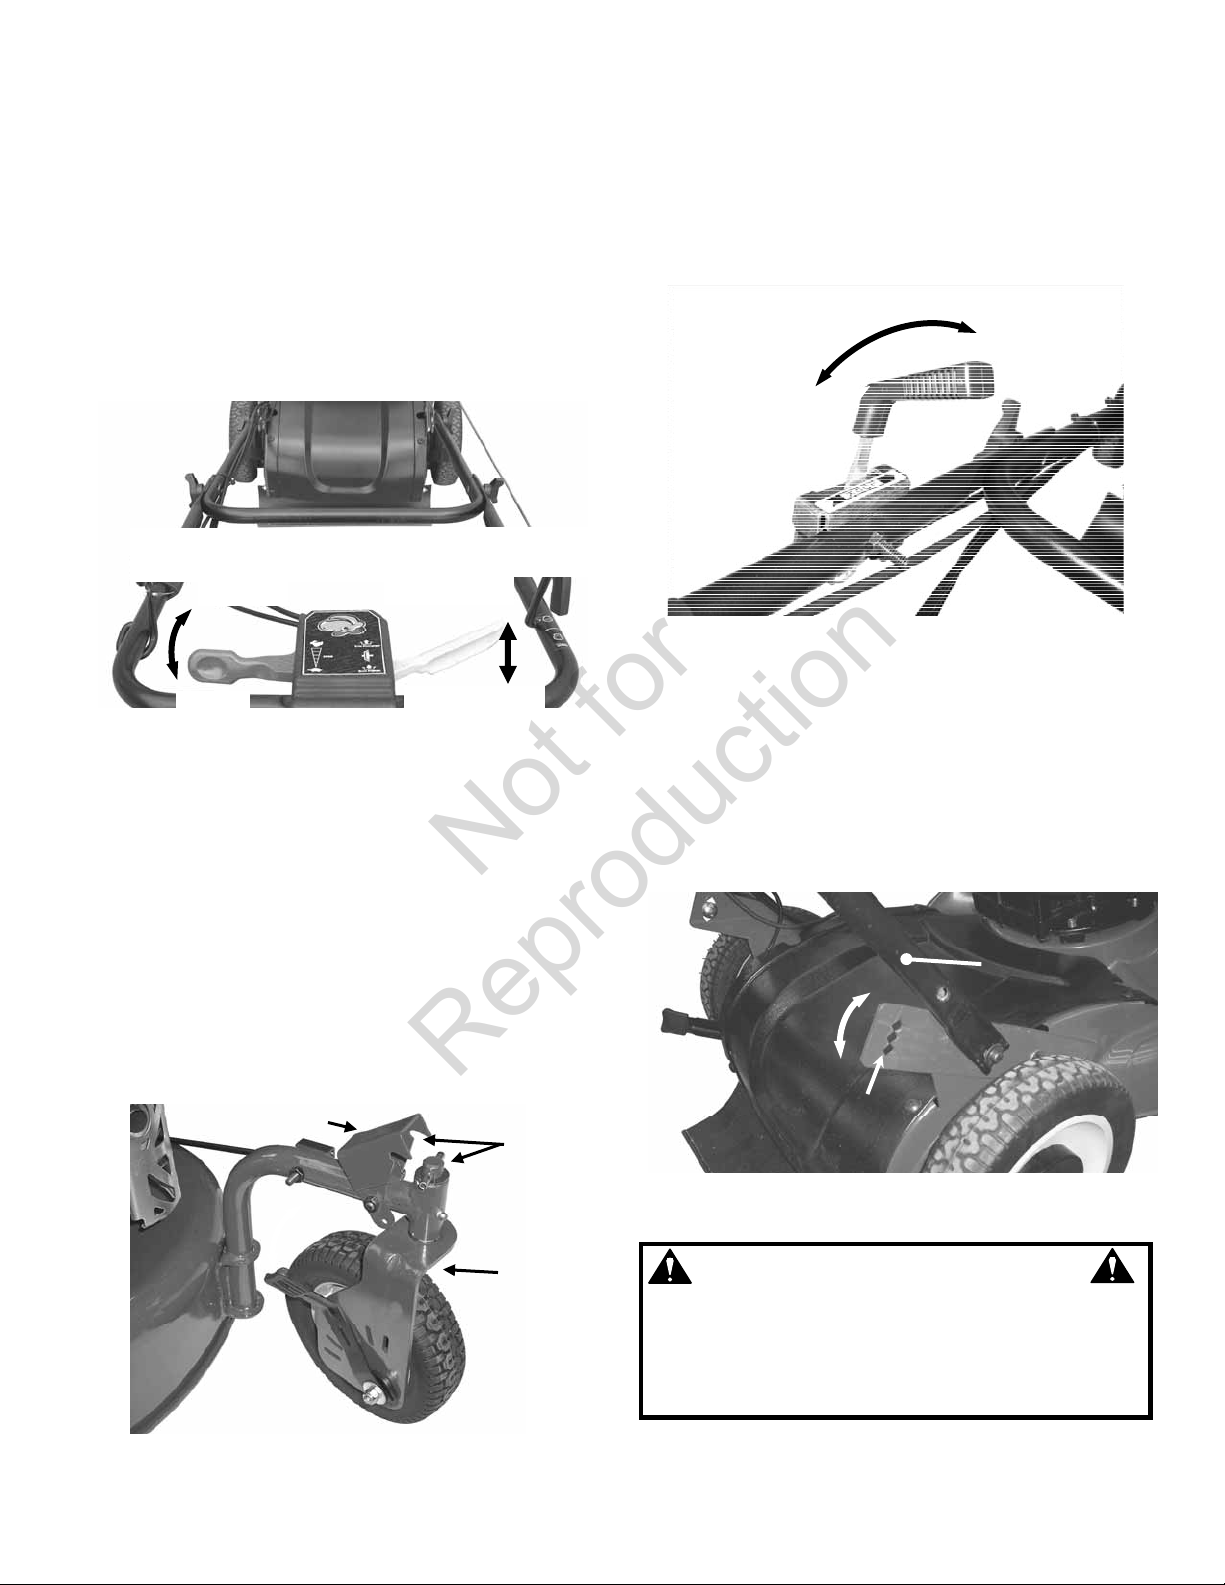
BLADE
CONTROL
ROPE START
HANDLE
REAR HEIGHT
ADJUSTMENT
LATCH
1.1 INTRODUCTION
This manual has been prepared for the operators of
the SNAPPER ‘EASY LINE’ WALK BEHIND
MOWERS. Its purpose, aside from recommending
operating and routine service requirements, is to
promote safety through the use of accepted
operating practices. Read, Understand and Follow
the “IMPORTANT SAFETY INSTRUCTIONS” on
Pages 2 - 4 of this manual and all safety messages
on the mower and attachments before operating the
mower.
RECYCLING
COVER
GROUND SPEED
CONTROL
WHEEL DRIVE CONTROL
FIGURE 1.1
(MODEL ESPV21 SHOWN)
IMPORTANT
The figures and illustrations in this manual are
provided for reference only and may differ from
your specific model. Contact your Snapper
dealer if you have questions.
FUEL FILLER
CAP
1.2 NOMENCLATURE
The nomenclature drawing above, Figure 1.1, shows
the essential parts of the SNAPPER ‘EASY LINE’
WALK BEHIND MOWERS. It is recommended that
all operators of the mower become thoroughly
familiar with the controls, parts and operation of the
mower before operating. Specific details involving
the engine are found in the separate engine owner’s
manual. Study these manuals before operating and
keep both handy for future reference.
OIL FILL CAP
AND DIPSTICK
ENGINE
PRIMER
FRONT HEIGHT
ADJUSTMENT
LATCHES
6
Page 7

Section 2 - OPERATING INSTRUCTIONS
Not for
Reproduction
2.1 PRE-START CHECK LIST
Make the following checks and perform the service
required before each start-up.
2.1.1. Check guards, deflectors, grass bag, adapter
and covers to make sure all are in place and
securely tightened.
2.1.2. Check blade control, wheel drive control, and
ground speed control to insure they work freely. See
Figure 2.1.
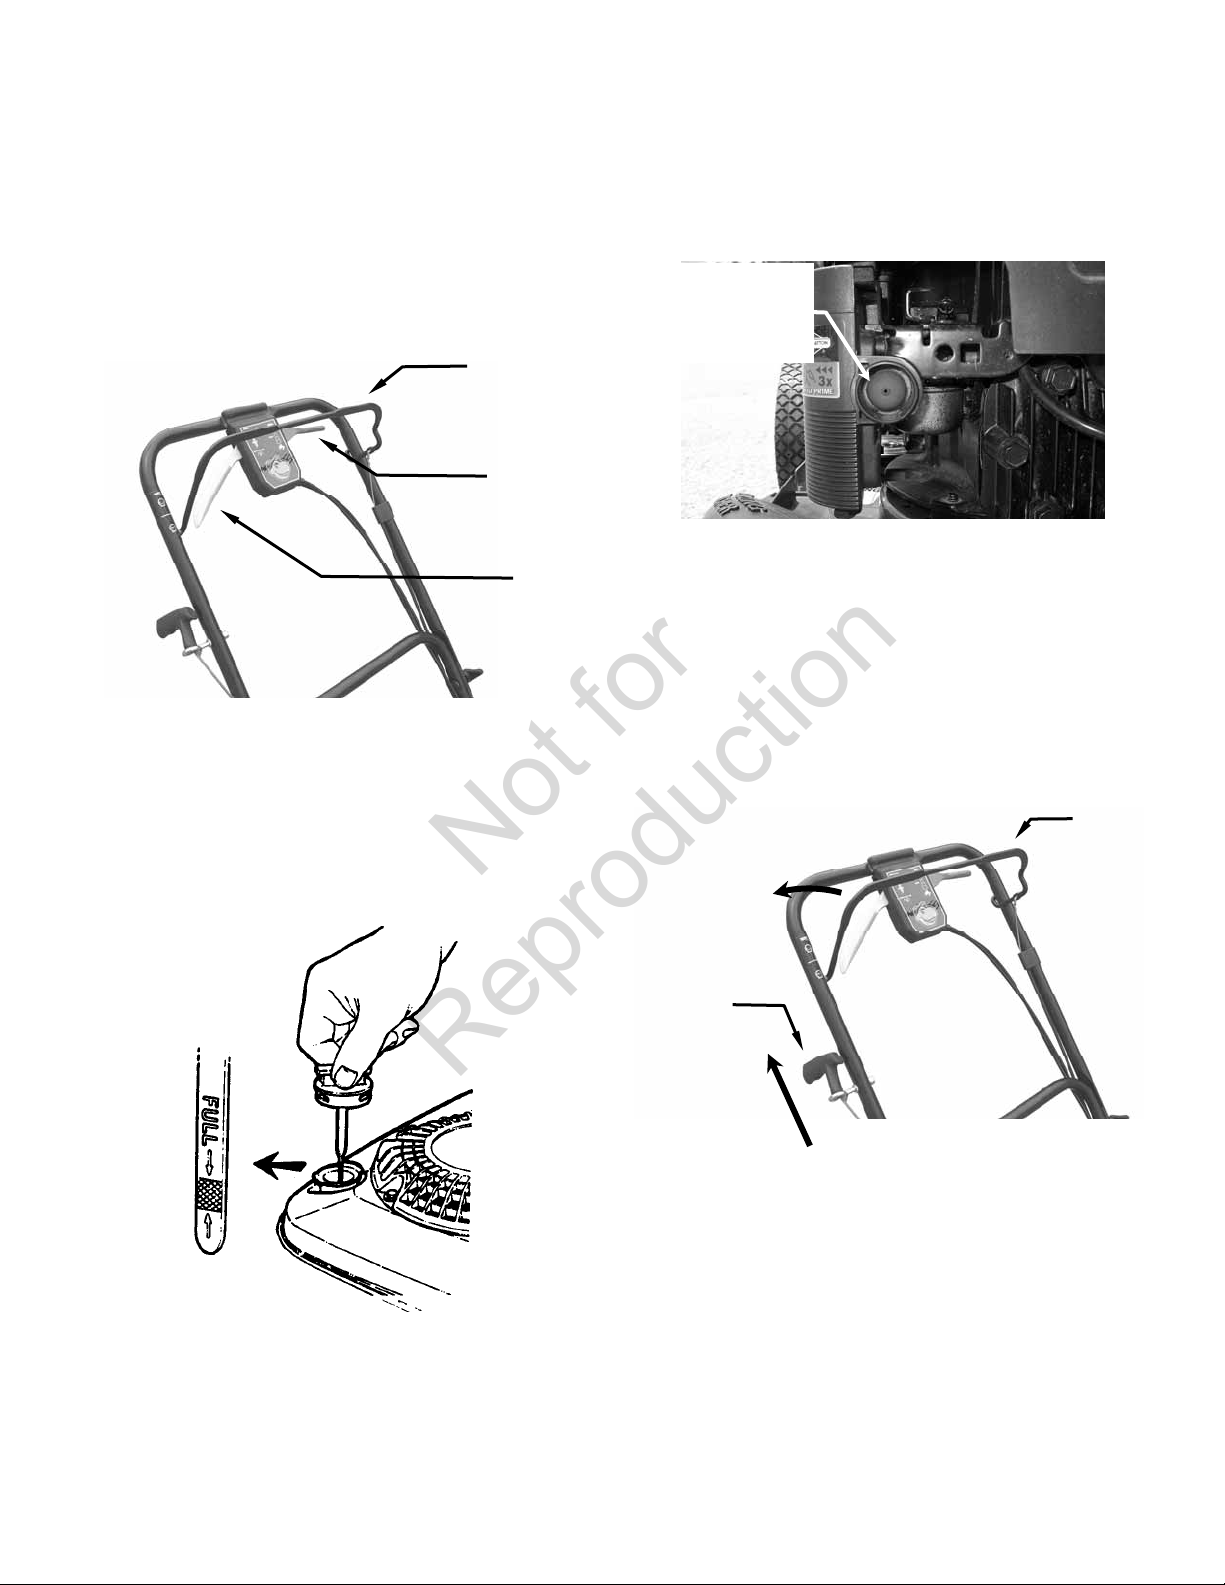
BLADE
CONTROL
GROUND SPEED
CONTROL
WHEEL DRIVE
CONTROL
FIGURE 2.1
2.1.3. Check cutting height. Adjust to desired height.
Refer to Section ‘Cutting Height Adjustment’.
2.1.4. Check engine oil and add oil as needed to bring
level up to the full mark. Refer to Engine Owner’s
Manual for oil specifications. See Figure 2.2.
2.2 STARTING & OPERATION
2.2.1. ENGINE & BLADE
1. Push primer button three times to start a cold
engine. See Figure 2.3. NOTE: The primer should
not be required to restart a warm engine.
PRIMER
BUTTON
(PUSH 3X)
2. Pull blade control against handle. See Figure
2.4.
3. Start Mower:
Pull rope start handle to crank engine. See
Figure 2.4.
PULL ROPE
START
HANDLE
FIGURE 2.3
SQUEEZE
BLADE
CONTROL
FIGURE 2.2
2.1.5. Add fuel to tank after pushing the mower
outside where fumes can safely dissipate. Make sure
cap is tightened after refueling. Refer to Engine
Owners Manual for specifications.
2.1.6. Clean exterior surfaces of cutting deck and
engine of any accumulation of spilled fuel, dirt, grass,
oil, etc. Keep engine air intake screen and cooling
fins clear at all times.
FIGURE 2.4
4. After engine starts, allow a brief warm-up until
engine runs smooth before beginning mower
operation.
NOTE: To stop the engine (and blade), release the blade
control.
7
Page 8
Section 2 - OPERATING INSTRUCTIONS
(3)
Not for
Reproduction
2.2 STARTING & OPERATION
2.2.2. PROPELLING MOWER
1. Start engine. Refer to Section “Starting &
Operation – Engine & Blade”.
2. Move ground speed control to the desired
speed position. See Figure 2.5.
3. Squeeze wheel drive control against handle to
engage wheel drive and propel mower forward.
Forward speed can be adjusted while mower is
moving by changing position of ground speed
control. See Figure 2.5.
2.3 STOPPING
Stop forward motion of mower by releasing the
wheel drive control. Stop engine and blade by
releasing the blade control.
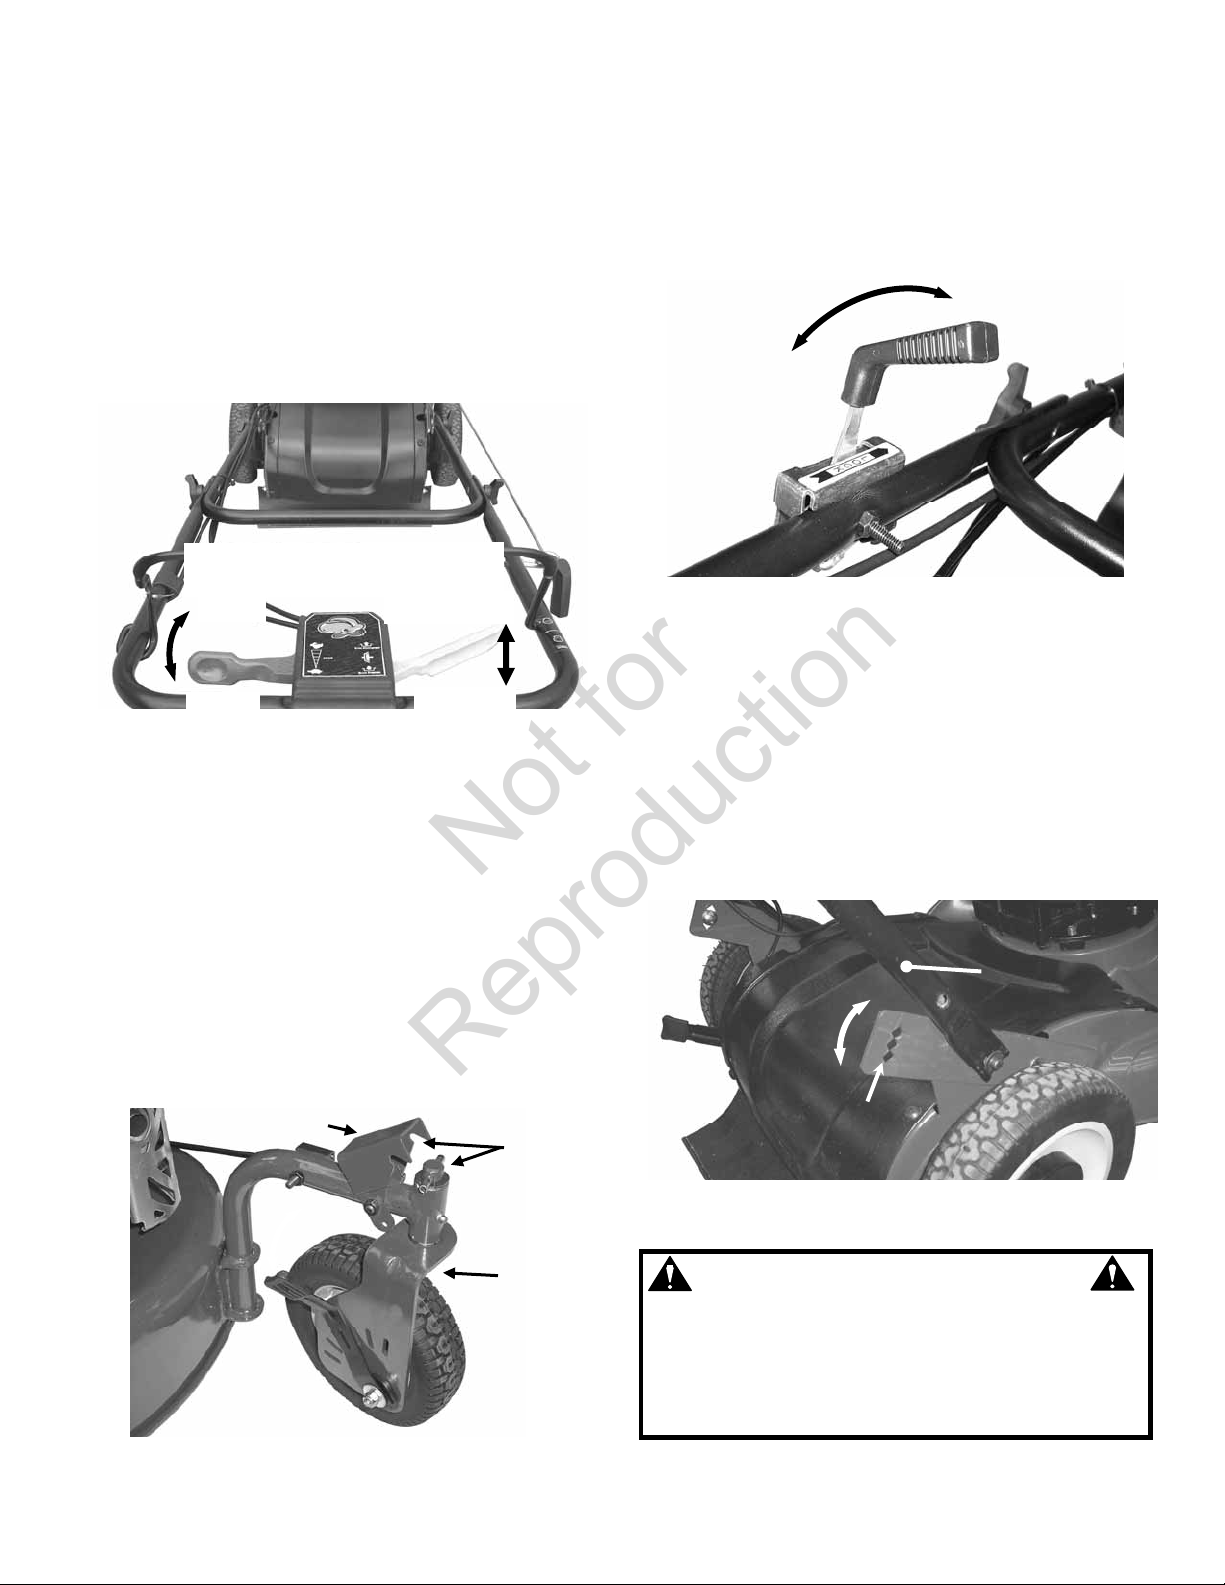
2.3 LOCKING SWIVEL WHEELS (ESPV21S ONLY)
The left front swivel wheel on the ESPV21S can
be locked to keep the mower traveling in a straight
line:
1. Move mower straight forward to align caster
stud pin with notches in swivel locking clip, located
above left caster stud. See Figure 2.6.
GROUND SPEED
CONTROL
FAST
SLOW
FIGURE 2.5
LOCKING
CLIP
WHEEL DRIVE
CONTROL
DISENGAGE
ENGAGE
ALIGN PIN
WITH
NOTCHES
2. Move swivel caster lock lever, located on left
side of handle assembly, to ‘LOCK’ position to lock
clip down over caster stud. See Figure 2.7.
3. To release caster, simply move swivel caster
lock lever back from locked position. See Figure
2.7.
UNLOCK
CASTER
2.4 HANDLE HEIGHT ADJUSTMENT
The height of the mower handle can be adjusted
as follows:
1. Remove T-knobs and carriage bolts securing
lower handle to mounting brackets.
2. Align holes in handle assembly with one of
three handle height adjustment holes in mounting
bracket. See Figure 2.8.
3. Replace removed hardware, tightening
securely.
FIGURE 2.7
HIGHER
LOWER
HANDLE HEIGHT
ADJUSTMENT
HOLES
FIGURE 2.8
LOCK
CASTER
HANDLE
ASSEMBLY
SWIVEL
CASTER
ASSEMBLY
FIGURE 2.6
DO NOT attempt any maintenance, adjustments or
service with engine and blade running. STOP
engine and blade. Disconnect spark plug wire and
secure away from spark plug. Engine and
components are HOT. Avoid serious burns, allow
sufficient time for all components to cool.
8
WARNING
Page 9

Section 2 - OPERATING INSTRUCTIONS
Not for
Reproduction
WARNING
DO NOT attempt any maintenance, adjustments or
service with engine and blade running. STOP
engine and blade. Disconnect spark plug wire and
secure away from spark plug. Engine and
components are HOT. Avoid serious burns, allow
sufficient time for all components to cool.
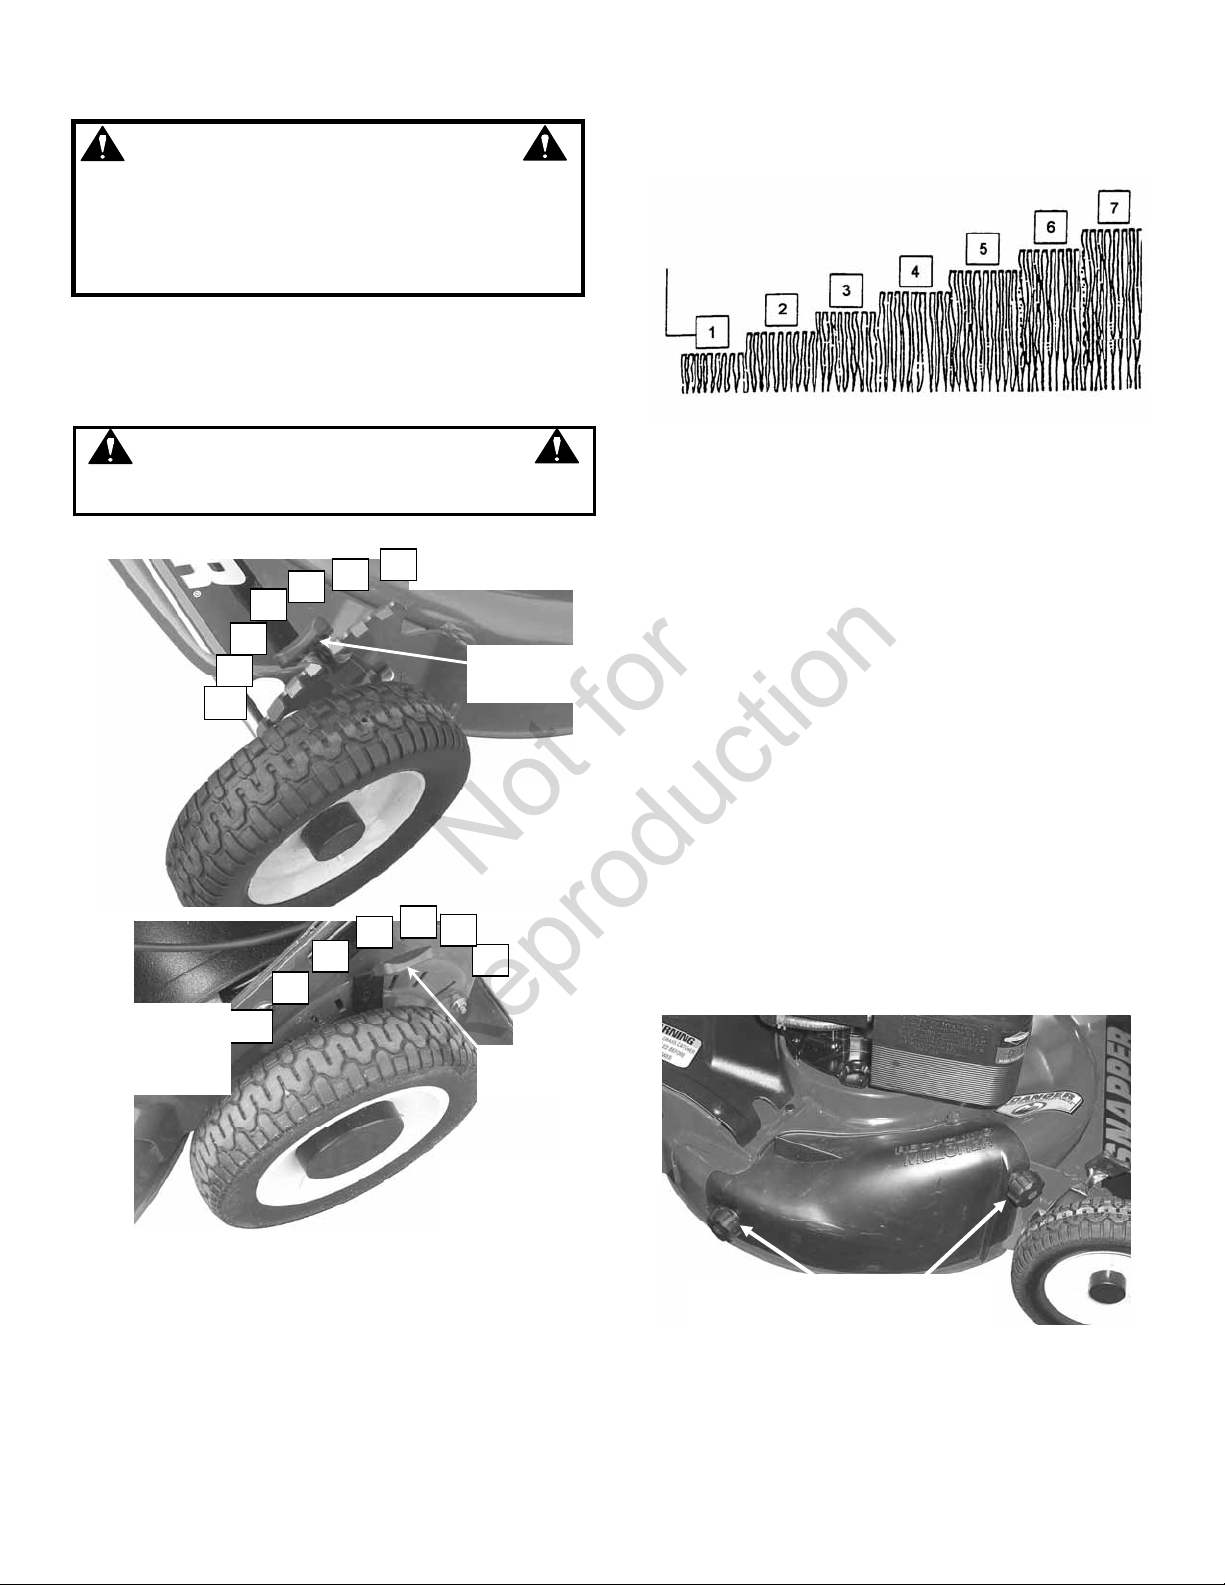
2.5 CUTTING HEIGHT ADJUSTMENT
1. Pull the height adjusting latch outward and
move to desired cutting height. See Figure 2.9.
WARNING
Stop engine and mower blade by releasing the
blade control before adjusting cutting height.
HIGHEST
CUTTING
HEIGHT
HIGHEST
CUTTING
HEIGHT
2
3
4
5
6
7
5
6
7
LOWEST CUTTING
1
HEIGHT
3
4
LATCH (IN
NOTCH # 4)
FRONT
WHEEL
(EXCEPT
ESPV21S)
2
1
LATCH (IN
NOTCH # 4)
LOWEST
CUTTING
HEIGHT
EACH NOTCH RAISES CUT 0.5”
LATCH
POSITIONS
1.2”
2.6 RECYCLING OPERATION
NOTE: For best recycling results, cut up to a maximum of 1/3
of grass blade length and recycle ONLY when grass is dry.
1. Set all wheels in the highest cutting position (Notch
7). Refer to Section “Cutting Height Adjustment”.
2. Move engine speed control to “FAST” (Rabbit)
position.
3. Move ground speed control to slowest speed
setting.
4. Proceed mowing slowly. If grass is very dense,
lower each rear wheel latch one notch lower than the
front wheel latches to improve recycling performance.
NOTE: The recycling cover should remain on the
machine at all times, unless alternate discharge
operations are desired, such as side discharging or
bagging.
TO REMOVE RECYCLING COVER:
Remove knob nuts and internal/external tooth lock
washers securing recycling cover to mower deck.
Remove cover. See Figure 2.11.
CUTTING HEIGHT SETTINGS
FIGURE 2.10
4.2”
REAR WHEEL
(ESPV21S FRONT
WHEEL SIMILAR)
FIGURE 2.9
2. Set all wheels at the same cutting height. The
highest cutting position is Notch 7. The lowest
cutting position is Notch 1. See Figure 2.10.
REMOVE KNOB NUTS
AND LOCK WASHERS
FIGURE 2.11
9
Page 10
Section 2 - OPERATING INSTRUCTIONS
Not for
Reproduction
WARNING
DO NOT attempt any maintenance, adjustments or
service with engine and blade running. STOP engine
and blade. Disconnect spark plug wire and secure
away from spark plug. Engine and components are
HOT. Avoid serious burns, allow sufficient time for
all components to cool.
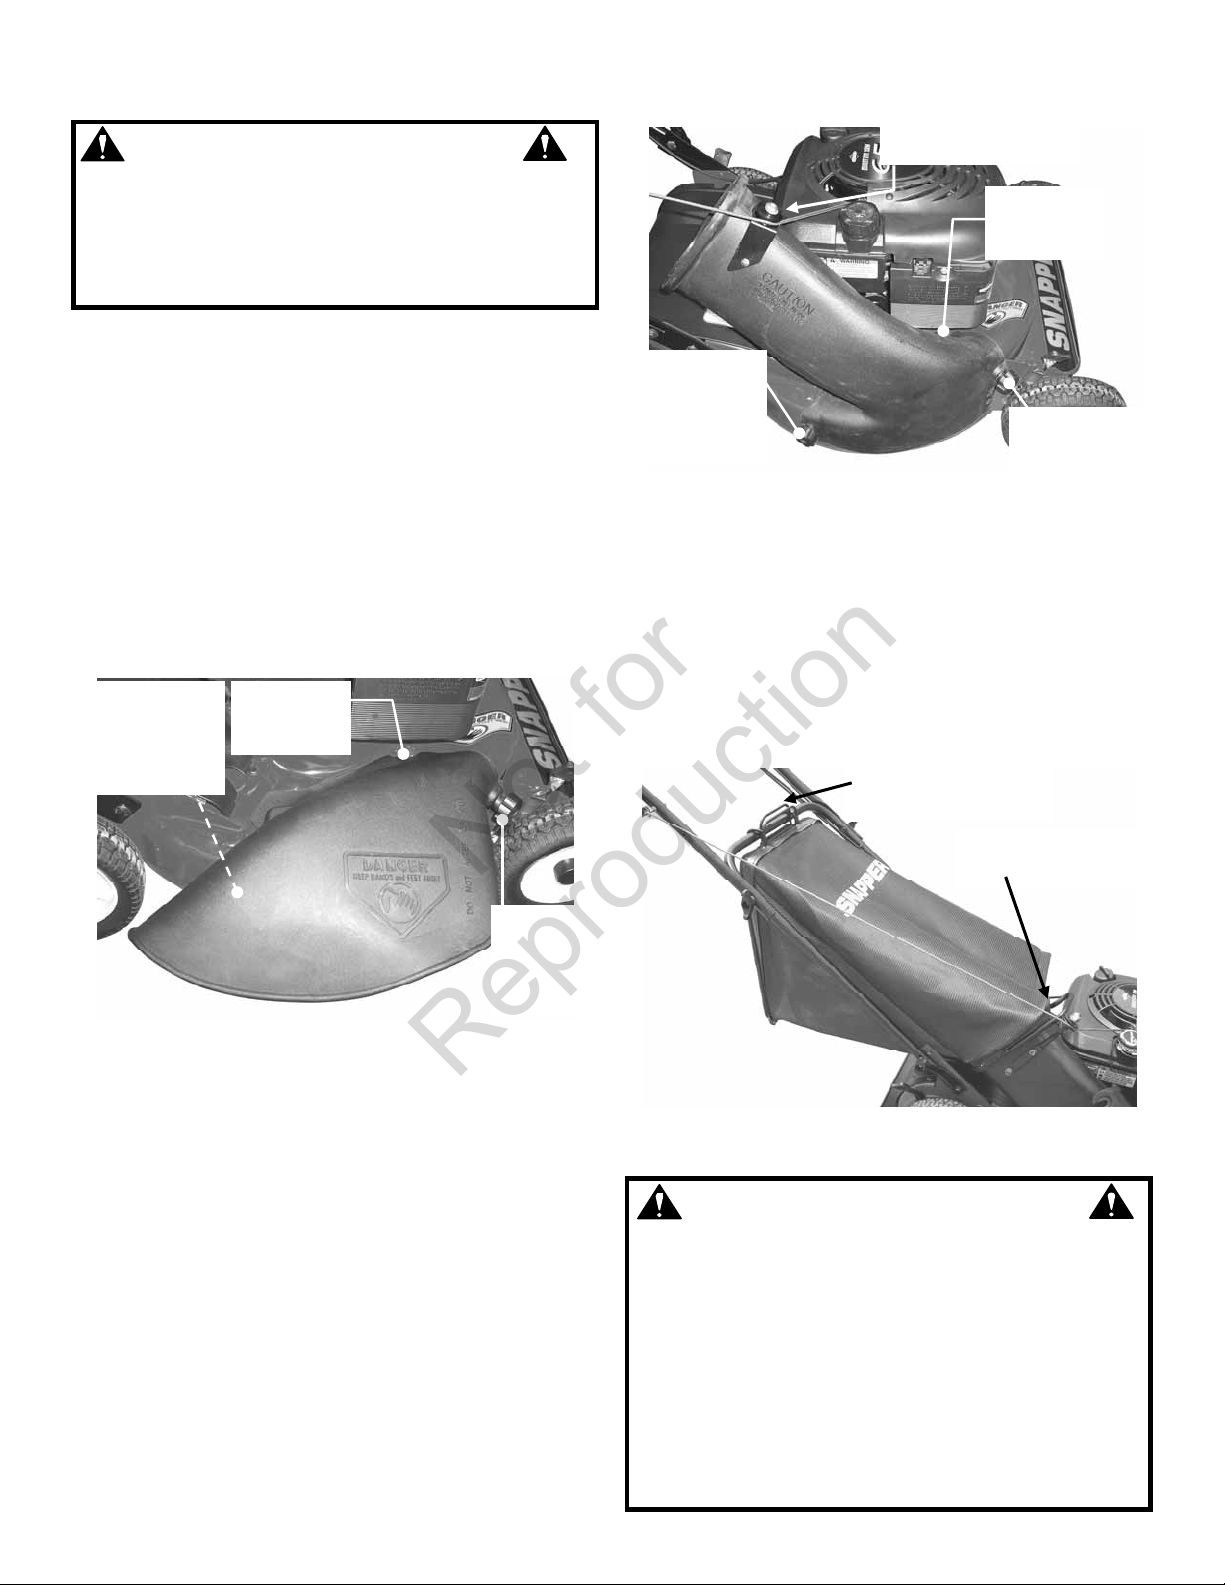
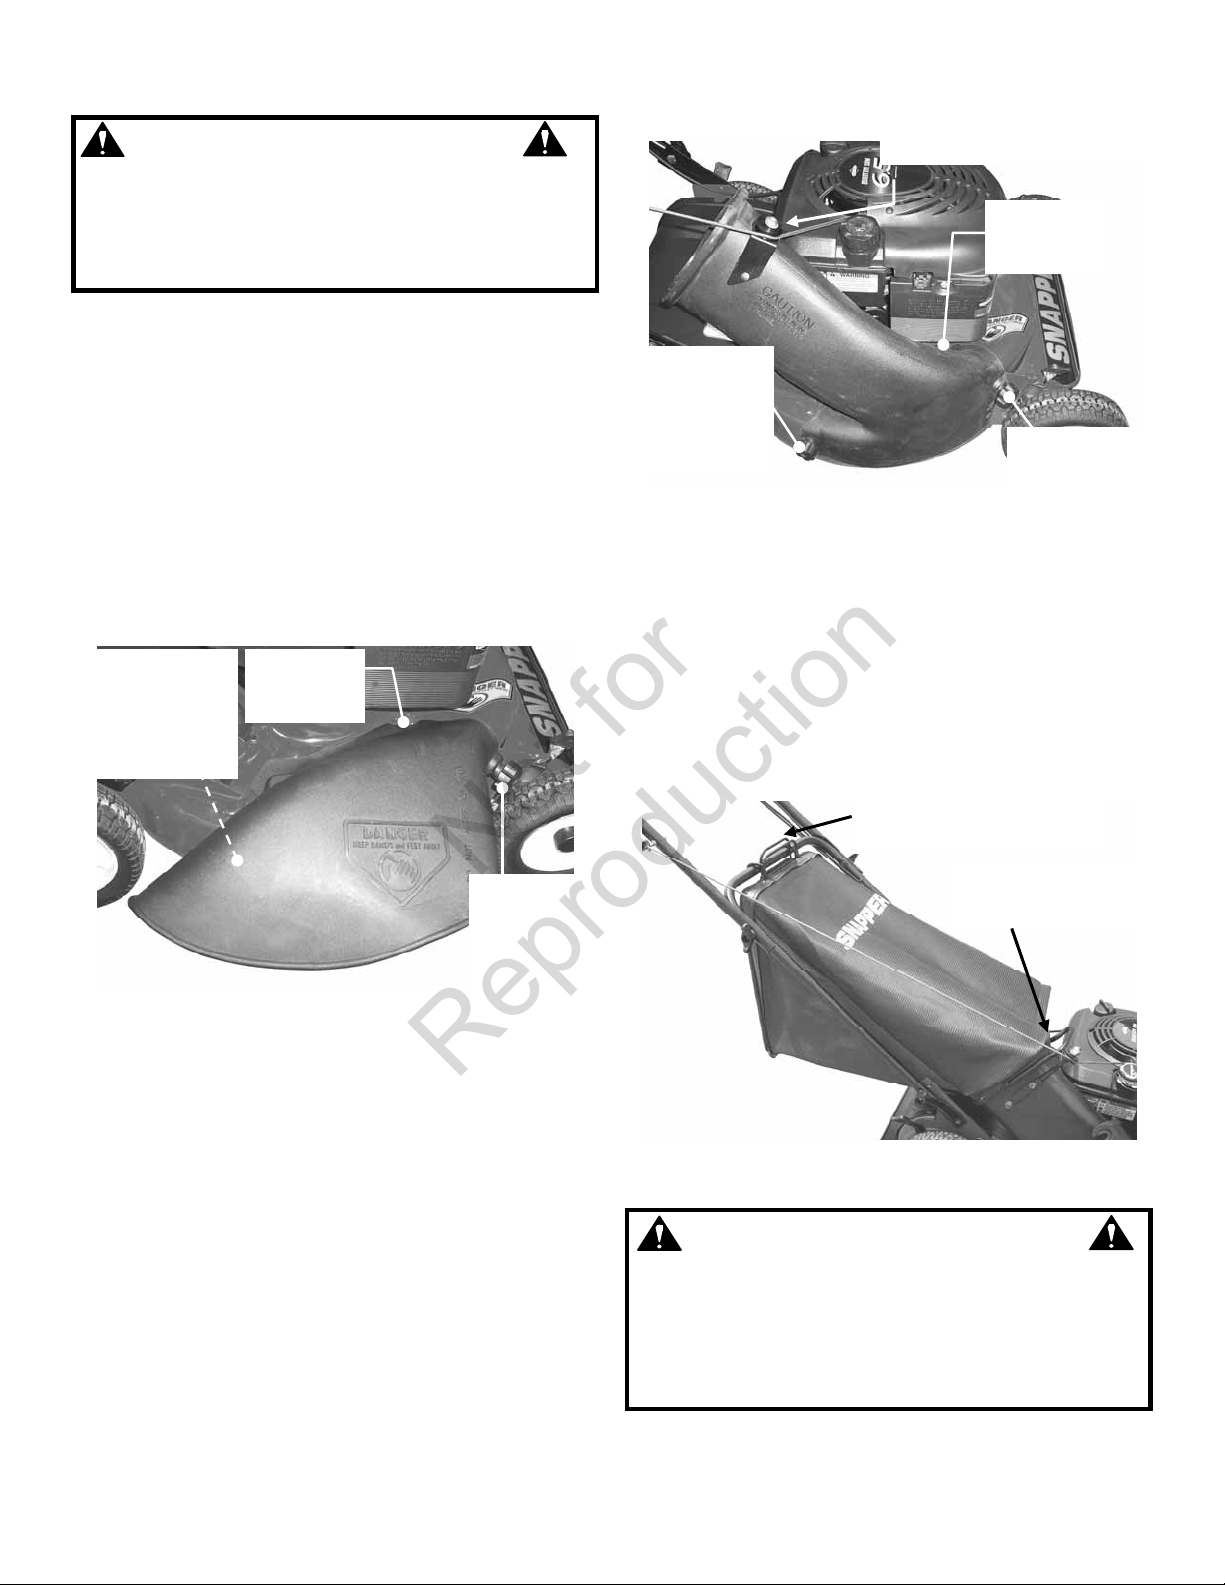
2.6 INSTALLATION OF SIDE DISCHARGE
DEFLECTOR
STEP 1: Remove recycling cover. Refer to Section
“Recycling Operation”.
STEP 2: Install deflector to deck in place of recycling cover,
making sure that: 1) front hole on outside front of deflector
fits over stud where front of recycling cover was originally
secured, 2) slot on top of deflector slips under restraining
nut on top of deck (under right front corner of engine), and
3) slot on inside rear of deflector slips onto stud behind rear
of discharge opening, where rear of recycling cover was
originally secured. Install internal/external tooth lock
washers and knob nuts onto studs and tighten securely.
See Figure 2.12.
REAR SLOT
OVER STUD;
INSTALL LOCK
WASHER AND
KNOB NUT
2.7 INSTALLATION OF GRASS BAG ADAPTER
(Optional Accessory on Some Models)
STEP 1: Remove recycling cover. Refer to Section
“Recycling Operation”.
STEP 2: Install grass bag adapter to the deck in place of
recycling cover, making sure that: 1) front hole on outside
front of adapter fits over stud where front of recycling cover
was originally secured, 2) slot on top of adapter slips under
restraining nut on top of deck (under right front corner of
engine), and 3) slot on bottom rear of adapter slips onto
stud behind rear of discharge opening, where rear of
recycling cover was originally secured. Install
internal/external tooth lock washers and knob nuts onto
studs and tighten securely. See Figure 2.13.
STEP 3: Route recoil rope around outside of rope guide
pulley. See Figure 2.13. (NOTE: Recoil rope may need to
be slackened. Refer to “Handle Assembly”.)
TOP
SLOT
UNDER NUT
FIGURE 2.12
FRONT HOLE
OVER STUD;
INSTALL LOCK
WASHER AND
KNOB NUT
REAR SLOT
OVER STUD;
INSTALL LOCK
WASHER AND
KNOB NUT
2.8 INSTALLATION OF GRASS BAG
(Door Type Bag)
STEP 1: Install grass bag adapter. Refer to Section
“Installation of Grass Bag Adapter”.
STEP 2: Install grass bag by opening adapter cover
(not shown) and sliding connector over adapter
flange. See Figure 2.14.
STEP 3: Attach grass bag hooks over middle handle
cross bar. See Figure 2.14.
DO NOT operate without entire Grass Catcher or
guard in place. Grass Catcher components are
subject to deterioration during normal use. Inspect
frequently and replace worn or damaged
components immediately.
Grass Catcher bags used on SNAPPER products are
made of woven fabric, and are subject to
deterioration and wear during normal usage. Check
condition of bag before each use. Immediately
replace worn or damaged catcher bags with only
bags recommended by SNAPPER. The grass catcher
is optional equipment on some models.
10
ROUTE RECOIL ROPE
AROUND PULLEY
FIGURE 2.13
HOOK DOOR AND
BAG HOOKS TO
MIDDLE HANDLE
FIGURE 2.14
WARNING
TOP
SLOT
UNDER NUT
FRONT HOLE
OVER STUD;
INSTALL LOCK
WASHER AND
KNOB NUT
SLIDE CONNECTOR
OVER FLANGE
Page 11

Section 3 – MAINTENANCE
Not for
Reproduction
3.1 INTRODUCTION
To retain the quality of the mower, use genuine
SNAPPER replacement parts only. Contact a local
SNAPPER dealer for parts and service assistance.
For the correct part or information for a particular
mower, always mention model and serial number.
WARNING
DO NOT attempt any maintenance, adjustments or
service with engine and blade running. STOP engine
and blade. Disconnect spark plug wire and secure
away from spark plug. Engine and components are
HOT. Avoid serious burns, allow sufficient time for
all components to cool. Wear heavy leather gloves
when handling or working around cutting blades.
Blades are extremely sharp and can cause severe
injury.
3.2 SERVICE - AFTER FIRST 5 HOURS
3.2.1. CHANGE ENGINE OIL
IMPORTANT: Drain fuel tank before tipping machine.
DO NOT tip machine with carburetor or spark plug down.
Oil from crankcase will saturate the air filter and cause the
engine to be hard to start or not start at all. If
contamination does occur, the air filter will have to be
replaced.
1. Refer to Engine Manual for proper oil
specifications, procedures and proper service
intervals.
For simplest/cleanest oil change, simply turn mower on its
side to drain oil, as shown in Figure 3.1. Drain oil through
dipstick tube into a container. Allow sufficient time for all oil
to drain.
FIGURE 3.1
2. Dispose of drain oil properly.
3. Fill engine with oil as specified in Engine Manual.
Do Not overfill.
3.2.2. CHECK MOWER BLADE
1. Disconnect spark plug wire and secure end away
from plug.
2. Tilt mower up on its rear wheels for access to the
blade cap screw. Do not tilt mower with spark plug or
carburetor down. See Figure 3.2.
3. Check torque of blade retaining cap screw.
Recommended torque should be 40 ft. lbs.
See Figure 3.2.
4. Check blade for sharpness, wear and damage.
Refer to Section “Blade Wear Limits”.
FIGURE 3.2
IMPORTANT: Drain fuel tank before tipping mower. DO
NOT tip machine with carburetor or spark plug down. Oil
from crankcase will saturate the air filter and cause the
engine to be hard to start or not start at all. If contamination
does occur, the air filter will have to be replaced.
3.2.3. CHECK ENGINE DRIVE BELT
1. Visually check engine drive belt for cracking,
fraying, severed or belt strands exposed. If worn or
damaged, replace belt before operating mower.
Contact a local SNAPPER dealer for parts and
service assistance.
3.3 SERVICE - PERIODIC
Perform all maintenance as described in the “Service
Schedule” section of this manual.
3.3.1. Engine
Service engine according to engine owner’s manual.
3.3.2. Air Filter
Refer to engine owner’s manual for service
instructions.
3.3.3. Engine Oil
Refer to engine owner’s manual for service
instructions.
11
RECOMMENDED
BLADE RETAINING
CAP SCREW TORQUE
VALUE SHOULD BE
40 FT. LBS.
Page 12

Section 3 – MAINTENANCE
Not for
Reproduction
WARNING
DO NOT attempt any maintenance, adjustments or
service with engine and blade running. STOP engine
and blade. Disconnect spark plug wire and secure
away from spark plug. Engine and components are
HOT. Avoid serious burns, allow sufficient time for
all components to cool. Wear heavy leather gloves
when handling or working around cutting blades.
Blades are extremely sharp and can cause severe
injury.
3.3.4. Safety Interlock System
1. Start the mower.
2. Release the blade control. The engine must
stop within 3 seconds.
If the engine does not stop, do not use the
mower. Bring to an authorized dealer for service.
3.3.5. Wheel Drive Components
Clean debris buildup on or around transmission,
axles, idler, pulleys, belt, etc. Check components for
wear or damage. Replace worn or damaged
components immediately.
3.4 STORAGE PROCEDURE
Refer to the Engine Owner’s Manual for directions
regarding engine storage preparations. Prepare the
mower for “end of season” storage as follows:
1. Drain fuel from fuel tank and let engine run until
all fuel is out of the carburetor.
2. Disconnect and remove the spark plug wire
away from spark plug before any other preparations
are made!
3. Tape all openings closed to prevent spraying
water into exhaust or air intakes during washing.
4. Tilt mower up on its rear wheels and thoroughly
clean the underside of the deck. Do not tilt mower
with spark plug or carburetor down. Scrape away
any accumulation of grass with a putty knife and or
wire brush.
5. Lubricate all exposed metal with a light coating
of oil to prevent corrosion.
6. On self-propelled models, move ground speed
control back to slow (‘turtle’) position to prevent
stretching of belt and/or idler spring.
7. Carefully fold the handles, “flexing” the control
cables to prevent cable damage.
8. Store the mower in a shed or other dry area,
protected from weather.
12
Page 13
Section 4 - REPAIR
Not for
Reproduction
WARNING
DO NOT attempt any maintenance, adjustments or
service with engine and blade running. STOP engine
and blade. Disconnect spark plug wire and secure
away from spark plug. Engine and components are
HOT. Avoid serious burns, allow sufficient time for
all components to cool. Wear heavy leather gloves
when handling or working around cutting blades.
Blades are extremely sharp and can cause severe
injury.
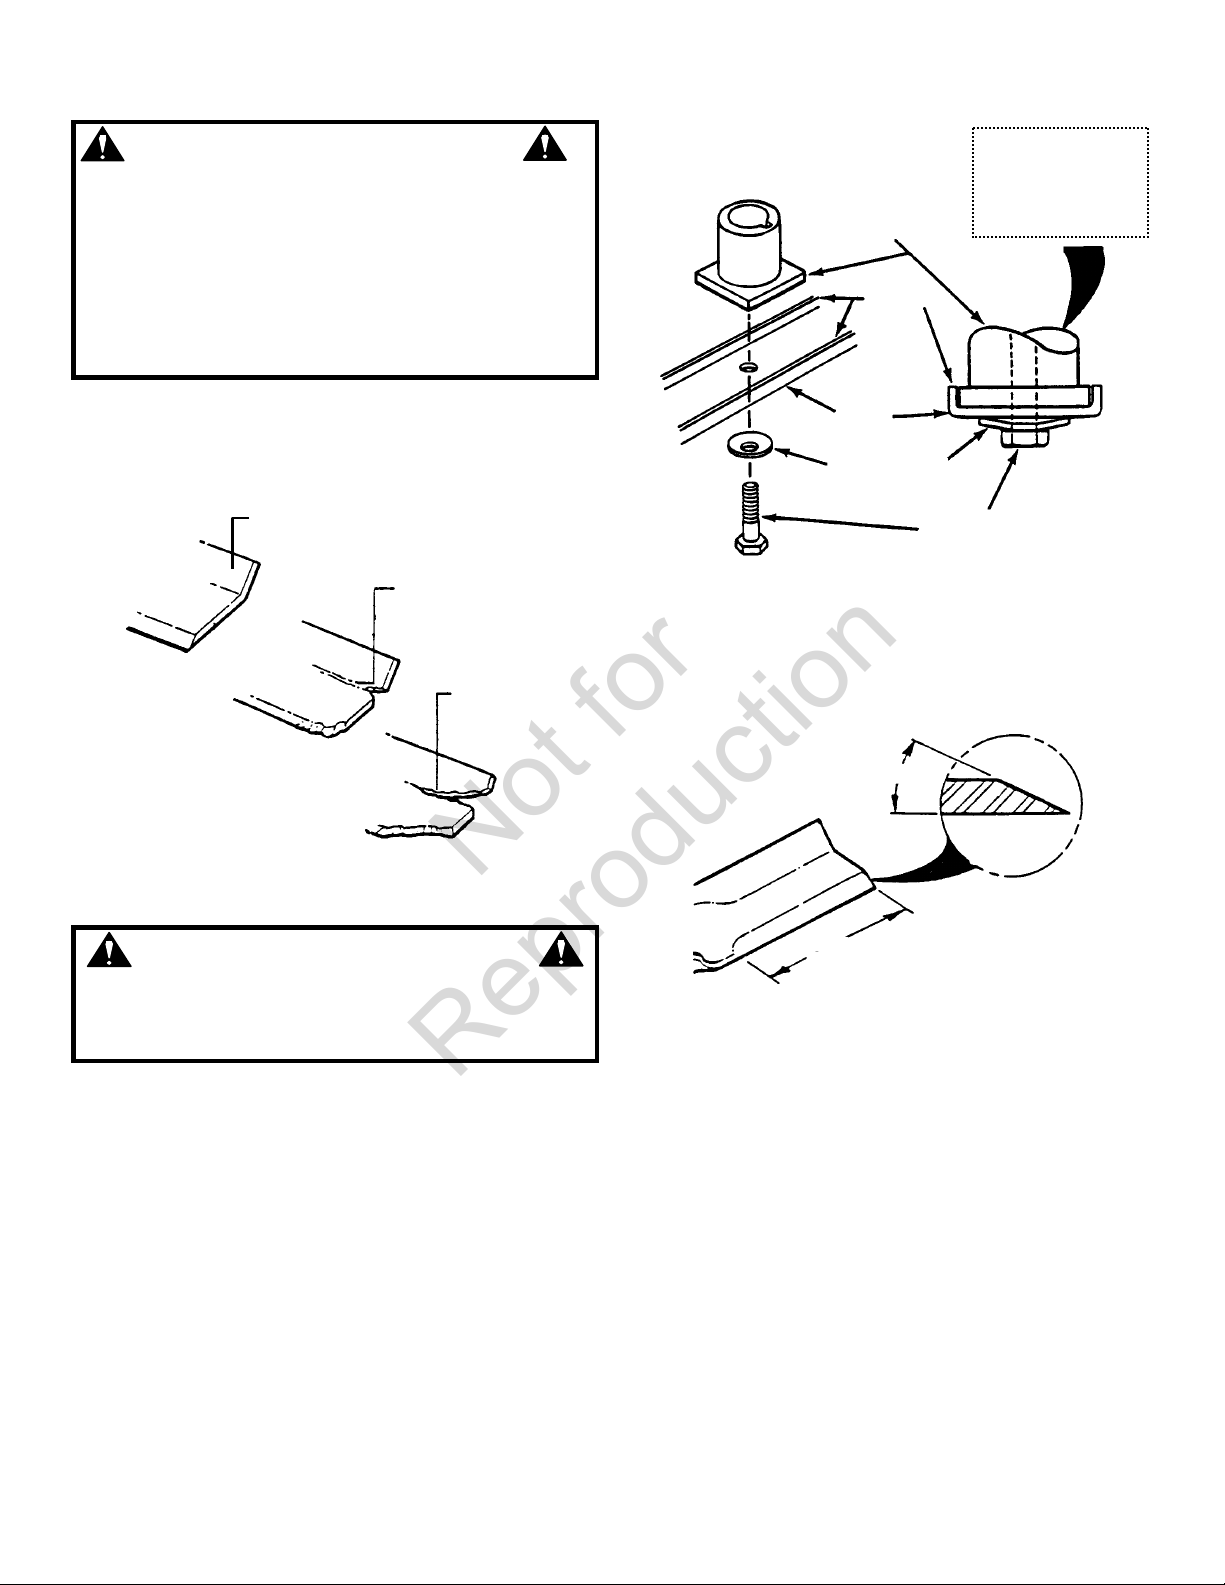
4.1 MOWER BLADE REPLACEMENT
4.1.1. STANDARD BLADE WEAR LIMIT
1. Inspect blade frequently for signs of excessive
wear or damage. See Figure 4.1.
NEW BLADE
WEAR LIMIT
(NOTCH STARTS)
DANGEROUS CONDITION !
DO NOT USE ON MOWER !
REPLACE WITH NEW
BLADE.
BLADE
HUB
FLANGE
BLADE
CONE WASHER
(Concave Side Up)
FIGURE 4.2
4. Sharpen blade on a grinding wheel at an angle of
22 to 28 degrees. DO NOT sharpen blade beyond
original cutting edge. See Figure 4.3.
DO NOT SHARPEN
BEYOND ORIGINAL
CUTTING EDGE
22-28º
MAKE SURE THAT
BLADE HUB IS
SEATED
BETWEEN
FLANGES
CAPSCREW
FIGURE 4.1
WARNING
DO NOT use a cutting blade that shows signs of
excessive wear or damage. Refer to Section
“MOWER BLADE REPLACEMENT” for proper blade
inspection and service procedures.
4.1.2. BLADE SHARPENING
1. Disconnect spark plug wire and secure end away
from plug.
IMPORTANT: Drain fuel tank before tipping mower.
DO NOT tip machine with carburetor or spark plug down.
Oil from crankcase will saturate the air filter and cause the
engine to be hard to start or not start at all. If
contamination does occur, the air filter will have to be
replaced.
2. Tilt mower up on its rear wheels. Do not tilt
mower with spark plug or carburetor down.
3. Remove blade. See Figure 4.2.
BLADE TIP
END VIEW OF
BLADE ASSEMBLY
ORIGINAL CUTTING EDGE
FIGURE 4.3
5. Check blade for balance. If necessary, correct
balance by grinding heavy end of blade.
6. Reinstall blade. See Figure 4.2. Check torque of
blade retaining cap screw. Recommended torque
should be 40 ft. lbs.
13
Page 14

TROUBLESHOOTING
Not for
Reproduction
PROBLEM PROBABLE CAUSE CORRECTIVE ACTION
Engine Will Not Start 1. Fuel tank empty. 1. Fill fuel tank with fresh fuel.
Using Recoil Starter 2. Engine needs priming. 2. Prime. Check Engine Manual for Instructions.
3. Spark plug wire disconnected. 3. Place spark plug wire onto spark plug.
Engine Stalls or Stops
After Running
2. Fuel tank empty. 2. Fill with fuel to proper level.
3. Engine air pre-cleaner and or air cleaner dirty. 3. Clean free of all debris.
4. Spark plug defective or gap set improperly. 4. Service spark plug.
5. Water, debris or stale fuel in fuel system. 5. Drain and clean fuel system.
Engine Loses Power 1. Engine air pre-cleaner or air cleaner dirty 1. Clean or replace filters.
2. Spark plug faulty. 2. Service spark plug.
3. Water, debris or stale fuel in fuel system. 3. Drain and clean fuel system.
Excessive Vibration 1. Damaged, out of balance or bent mower blade. 1. Service mower blade.
2. Loose blade components. 2. Service and tighten loose parts.
3. Loose or missing air lift (if equipped). 3. Replace air lifts. Tighten to proper torque.
4. Lumpy or frayed belt 4. Contact authorized SNAPPER dealer.
Mower Will Not Move
Loss Of Traction
(Self-Propelled Models)
Transmission Noise
(Self-Propelled Models)
Ground Speed
Too Fast / Too Slow;
Unable to Adjust
Ground Speed
(Variable-Speed Self-
Propelled Models)
Cutting Grass
Improperly
Poor Grass Discharge
Oil Leaking
1. Blade control is released or is not being held securely
against handle.
1. Build-up of debris on or around wheel drive
components.
2. Transmission clutch cable adjustment required. 2. Adjust transmission clutch cable.
3. Drive belt requires replacement.
4. Damaged transmission.
1. Transmission clutch cable adjustment required.
2. Damaged transmission.
1. Build-up of debris on or around ground speed control
components.
2. Ground speed control adjustment required. 2. Adjust ground speed control.
3. Drive belt requires replacement.
4. Damaged transmission.
1. Cutting height too low or high. 1. Adjust cutting height.
2. Forward ground speed too fast. 3. Move ground speed control to a slower speed.
3. Terraced cut, side to side. 4. Adjust height of cut with height adjust levers.
4. Excessive deck pitch, front to rear. 5. Adjust height of cut with height adjust levers.
5. Cutting blade dull or damaged. 6. Sharpen cutting edges or replace blade.
1. Forward speed too fast. 1. Move ground speed control to a slower speed.
2. Grass is wet. 2. Mow when grass is dry.
3. Excessively worn or damaged blade. 3. Service mower blade.
4. Build up of grass clippings and debris under deck. 4. Clean deck.
5. Improper blade installed on deck.
6. Blade installed improperly on deck. 6. Install blade properly.
1. Leaking engine case.
1. Blade control should be held securely against
handle at all times during operation of mower.
1. Clean debris.
3. Contact authorized SNAPPER dealer.
4. Contact authorized SNAPPER dealer.
1. Contact authorized SNAPPER dealer.
2. Contact authorized SNAPPER dealer.
1. Clean debris.
3. Contact authorized SNAPPER dealer.
4. Contact authorized SNAPPER dealer.
5. Install proper SNAPPER blade.
1. Contact authorized SNAPPER dealer.
2. Check and tighten drain plug.
3. Make sure dip stick or oil filler cap is securely
in place.
14
Page 15

SERVICE SCHEDULE
Not for
Reproduction
ITEM SERVICE PERFORMED REF. EACH
Engine Oil
Check Oil Level Page 7
25
USE 5 HRS
X
HRS
50
HRS
100
HRS
EACH
SEASON
Air Pre-Cleaner
Air Cleaner
Spark Plug
Engine Cooling
System
Drive Belt
Mower Blade
Mower Deck
Wheel Drive
Components
Front Caster
Bushing
(Swivel Wheel
Models Only)
*Change oil every 25 hours when operating under heavy load or high temperatures.
**Clean more often under dusty conditions or when air debris is present
MAINTENANCE/REPLACEMENT PARTS
Initial Oil Change Page 11
Periodic Oil Change Page 11
Clean Sponge Element Engine Manual
Clean or Replace Engine Manual
Replace Engine Manual
Clean Shroud & Fins Engine Manual
Check For Wear And
Tension
Check For Wear, Damage
& Replacement
Clean Debris
Accumulation
Clean Debris
Accumulation; Check for
Wear or Damage
Lubricate Page 8
Page 11
Page 13
Page 7
Page 12
X
X*
X**
X**
X
X**
X
X
X
X
X
MAINTENANCE PARTS
Blade Control Cable 7100074
Wheel Drive Control Cable 7100263
Ground Speed Control Cable 7100264
Cutter Blade (Double Wave) 7100242
Drive Belt 7100058
Parts Manual for 21” Easy Line Walk Behind Mower 7006205
Parts Manual for 21” Easy Line Walk Behind Mower (Swivel-Wheel) 7006206
15
Page 16
DECAL IDENTIFICATION
Not for
Reproduction
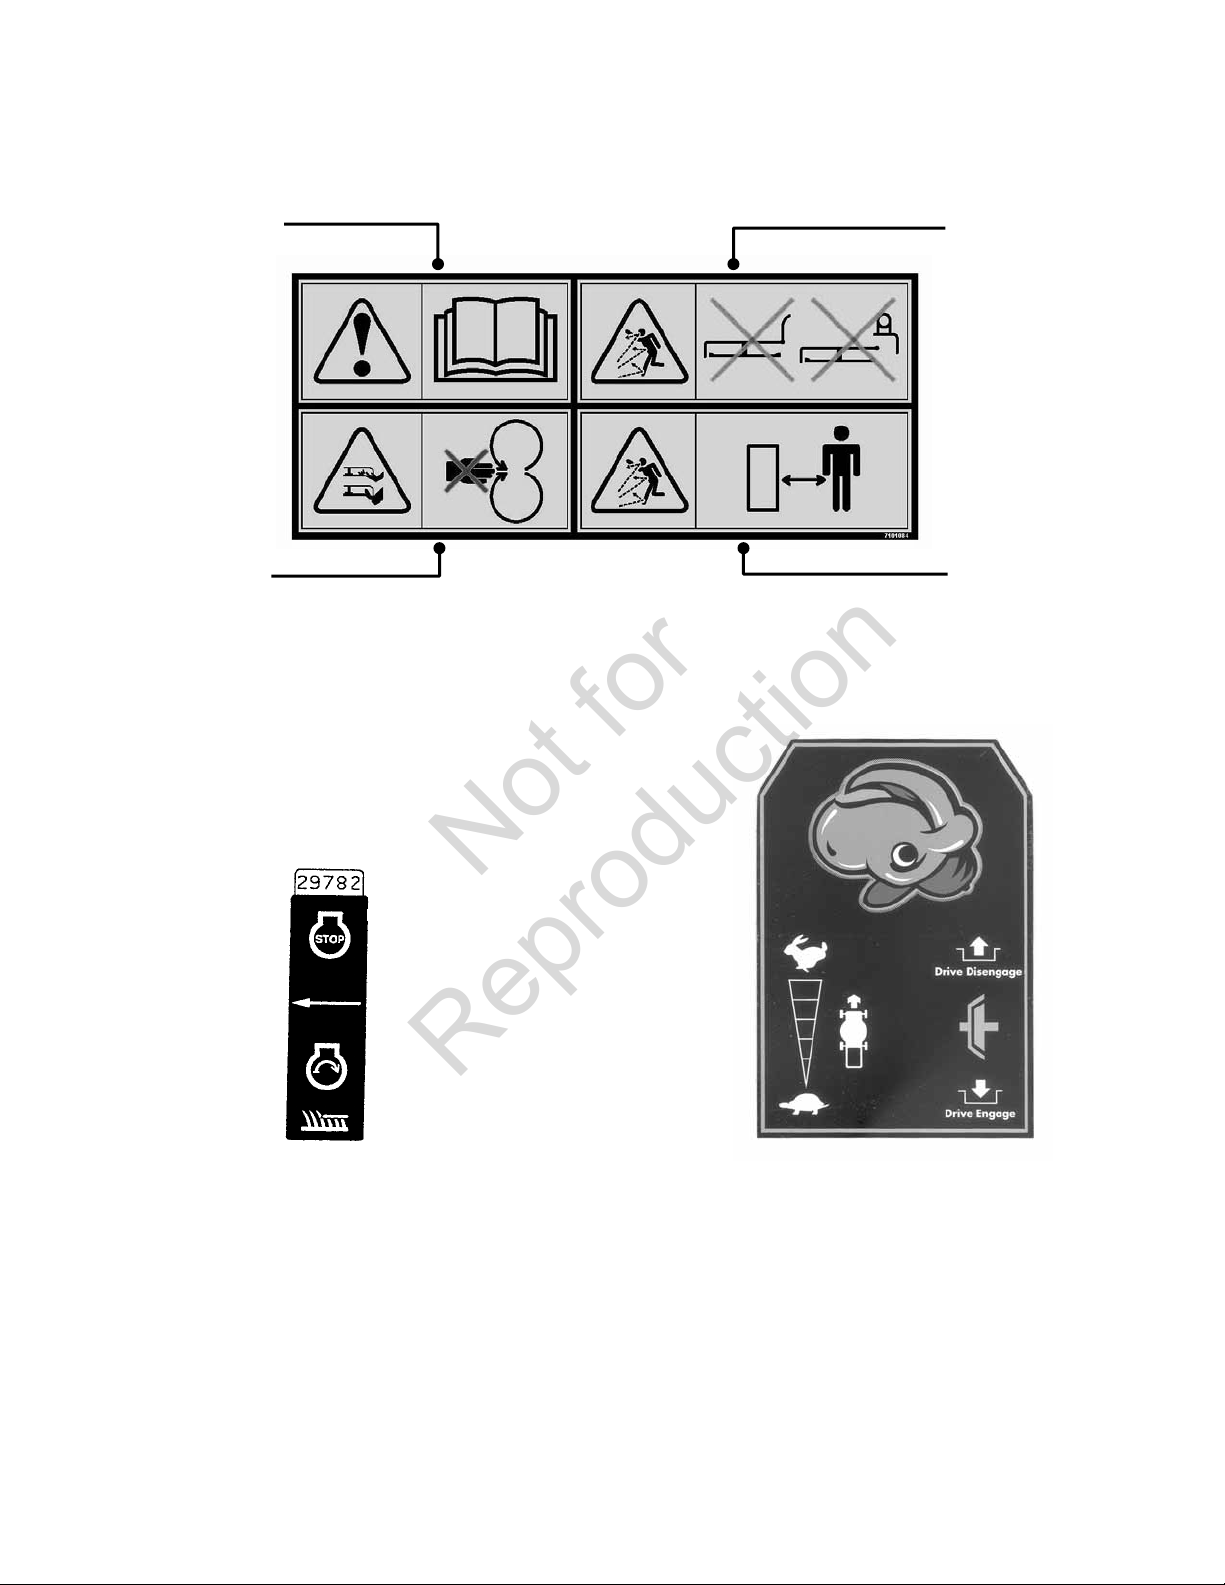
READ, UNDERSTAND
AND FOLLOW
INSTRUCTIONS AND
WARNINGS IN
OPERATOR’S
MANUALS, AND ON
THE MOWER, ENGINE
AND ATTACHMENTS
BEFORE OPERATING.
INDICATES
POSSIBLE
SEVERE INJURY
FROM ROTATING
CUTTING BLADES.
(1) WARNING INSTRUCTIONS.
(2) OPERATOR PRESENCE CONTROL (OPC): Arrow
points to the OPC bail. When bail is rotated
rearward, the engine may be started and will run as
indicated by the engine with rotating arrow. With the
engine running, the blade is rotating as indicated by
the cut grass symbol. When the bail is released and
rotates forward, the engine will stop.
DO NOT OPERATE
WITHOUT ENTIRE
GRASS CATCHER
OR GUARD IN
PLACE.
KEEP CHILDREN
AND OTHERS OUT
OF MOWING
AREA.
(3) SPEED SELECTOR: Shows direction of motion
and the ability to select ground speed by moving
lever forward or backward.
(4) CLUTCH: Moving the lever back toward the
handle engages the traction clutch and forward
motion starts. When the lever is released, the clutch
disengages and forward motion stops.
16
Page 17

DECAL IDENTIFICATION
Not for
Reproduction
(5) LWA-98: Indicates European noise level
certification.
(6) CE DECAL: Indicates European Certification.
17
Page 18
Not for
Reproduction
18
Page 19

NOTES
Not for
Reproduction
19
Page 20

Safety Instructions & Operator’s Manual for
Not for
Reproduction
EUROPEAN
21” ‘EASY LINE’
WALK BEHIND
MOWERS
IMPORTANT
Snapper products are built using engines that meet or exceed all applicable emissions requirements on the
date manufactured. The labels on those engines contain very important emissions information and critical
safety warnings. Read, Understand, and Follow all w arnings and instructions in this manual, the engine
manual, and on the machine, engine and attachments. If you have any questions about your Snapper
product, contact your local authorized Snapper dealer or contact Snapper Customer Service at Snapper,
McDonough, GA. 30253. Phone: (1-800-935-2967).
Engine Power Rating Information: The gross power rating for individual gas engine models is labeled in accordance
with SAE (Society of Automotive Engineers) code J1940 (Small Engine Power & Torque Rating Procedure), and rating
performance has been obtained and corrected in accordance with SAE J1995 (Revision 2002-05). Torque values are
derived at 3060 RPM; horsepower values are derived at 3600 RPM. Actual gross engine power will be lower and is
affected by, among other things, ambient operating conditions and engine-to-engine variability. Given both the wide
array of products on which engines are placed and the variety of environmental issues applicable to operating the
equipment, the gas engine will not develop the rated gross power when used in a given piece of power equipment
(actual "on-site" or net power). This difference is due to a variety of factors including, but not limited to, accessories (air
cleaner, exhaust, charging, cooling, carburetor, fuel pump, etc.), application limitations, ambient operating conditions
(temperature, humidity, altitude), and engine-to-engine variability. Due to manufacturing and capacity limitations, Briggs
& Stratton may substitute an engine of higher rated power for this Series engine.
20
Page 21
Consignes de sécurité et manuel d'utilisation pour le
Not for
Reproduction
TONDEUSES
EUROPÉENNES
AUTOTRACTÉES
ACCOMPAGNÉES
21” (53 CM) ‘EASY LINE’
EXPLICATION DE LA RÉFÉRENCE DE MODÈLE
E S P V 21 S
MODÈLE EUROPÉEN DÉSIGNATION D’OPTION
DÉSIGNATION DU MODÈLE LARGEUR DE COUPE
AUTO-PROPULSION VITESSE VARIABLE
E – Modèle européen P – Modèle autotracté V – Vitesse variable 21 – Largeur de coupe 21” (53 cm)
S – ‘Easy Line’ S – Roues avant pivotantes
Nous vous remercions d'avoir acheté un produit SNAPPER. Avant d'utiliser votre tondeuse, lisez attentivement ce manuel et portez
une attention particulière au chapitre intitulé " CONSIGNES DE SECURITE " se t r ouvant en page 2 et 4. Rappel e z- vous que t oute
machine peut être dangereuse si elle n'est pas utilisée correctement. De plus, n'oubliez pas que SECURITE rime avec bon usage de
la tondeuse, comme indiqué dans les consignes d'utilisation, mais aussi avec bon sens ! Conservez ces instructions d’origine
pour vous y reporter dans le futur.
BRIGGS & STRATTON YARD POWER PRODUCTS GROUP
COPYRIGHT © 2010, BRIGGS & STRATTON CORPORATION
MILWAUKEE, WI, USA. TOUS DROITS RÉSÉRVÉS
MODÈLES
ESPV21 (7800064)
ESPV21S (7800065)
Page 22

CONSIGNES DE SECURITE
Not for
Reproduction
Avertissement : Cette puissante tondeuse est capable de vous amputer d'un pied ou d'une main et peut projeter des objets
pouvant causer des accidents et des dommages. La non-observation des consignes de sécurité qui suivent pourrait entraîner des
lésions graves voire la mort de l'utilisateur ou d'autres personnes. Le propriétaire de la tondeuse doit comprendre toutes ces
consignes de sécurité et ne doit en autoriser l'usage qu'aux personnes les ayant elles-mêmes comprises. Les utilisateurs doivent
être sains de corps et d'esprit et ne doivent être sous l'influence d'aucune substance qui pourrait affecter leur vue, leurs réflexes
ou leur jugement. Si vous avez des questions concernant votre machine auxquelles votre revendeur ne pourrait pas répondre,
contactez par téléphone ou par écrit le service client à SNAPPER, McDonough, Georgia 30253, USA. Téléphone : 1-800-935-2967.
CONSIGNES POUR LES ENFANTS
Des accidents dramatiques peuvent survenir si l'utilisateur n'est
pas conscient de la présence d'enfants. Les enfants sont souvent
attirés par les machines et par la tonte en général. Ne supposez
jamais que des enfants resteront à l'endroit où vous les avez vus
pour la dernière fois.
1. ELOIGNEZ les enfants de la zone à tondre et laissez- les
sous la surveillance d'un adulte responsable autre que
l'opérateur de la machine.
2. NE PERMETTEZ PAS à des enfants de se trouver dans
la zone à tondre lorsque la tondeuse est en marche et
coupez le moteur si quelqu'un s'introduit dans la zone à
tondre.
3. NE LAISSEZ PAS de jeunes adolescents utiliser la
machine.
4. N'AUTORISEZ l'utilisation de la tondeuse qu'à des
adultes ou à des adolescents responsables sous la
surveillance d'adultes.
5.
NE TONDEZ PAS en marche arrière à moins que cela
soit absolument nécessaire. REGARDEZ bien en
arrière et en bas avant et pendant la marche arrière
pour détecter l'éventuelle présence d'enfants,
d'animaux ou de dangers.
6. SOYEZ EXTREMEMENT VIGILANT à l'approche de
virages sans visibilité, d'arbustes, d'arbres ou d'autres
objets pouvant réduire votre champ de vision.
UTILISATION DANS LES PENTES
1. Les pentes sont à l'origine d'une majorité des accidents
résultant de glissades ou de chutes. Ces accidents
peuvent entraîner des blessures graves. Si vous avez la
moindre appréhension avant de tondre une zone en
pente, NE LA TONDEZ PAS !
2. Les pelouses en pente se tondent transversalement,
jamais en montant et en descendant. Faites très
ATTENTION si vous êtes en pente et que vous changez
de direction. NE TONDEZ pas des pentes abruptes ou
d'autres endroits où la stabilité ou l'adhérence serait
douteuse.
3. Faites particulièrement attention avec les sacs de
ramassage d'herbe et autres accessoires, ils affectent la
conduite et la stabilité de la machine.
PREPARATION
Lisez et suivez les avertissements et les consignes
concernant le moteur, la machine et les accessoires.
Avant le démarage, familiarisez-vous avec les
commandes et la tondeuse.
L'utilisation de la tondeuse doit être uniquement réservée à
des personnes sûres, responsables et connaissant les
consignes d'utilisation de la tondeuse.
PREPARATION
(suite de la colonne précédente)
3. Les statistiques démontrent que les utilisateurs de 60
ans et plus sont les personnes plus souvent impliquées
dans les accidents liés aux tondeuses. Il est conseillé à
cette catégorie d'utilisateurs, d'évaluer leurs capacités à
manœuvrer la tondeuse sans risquer de blesser autrui
ou eux-mêmes.
4. Soyez particulièrement prudent lors de la manipulation
de carburants. Ils sont inflammables et leurs vapeurs
peuvent être la cause d'explosions. Ne conservez du
carburant QUE dans des bidons prévus à cet effet.
N'ENLEVEZ JAMAIS le bouchon du réservoir d'essence
ou n'ajoutez jamais d'essence quand le moteur est en
marche. Ne rajoutez de l'essence que si vous vous
trouvez à l'extérieur et que le moteur de la tondeuse est
arrêté et froid. Attention à bien nettoyer si vous avez fait
déborder de l'essence. NE FUMEZ PAS en manipulant
du carburant.
5. Inspectez la zone à tondre et enlevez tous les objets
(jouets, fils de fer, pierres, branches...) qui pourraient
blesser quelqu'un s'ils étaient projetés par la machine
ou qui pourraient vous gêner pendant la tonte. Par
ailleurs, notez bien l'emplacement des trous, des
souches d'arbres et des autres dangers.
6. Conservez une distance de sécurité entre la tondeuse et
d'autres personnes ou animaux.Si quelqu'un s'introduit
dans la zone à tondre, DEBRAYEZ immédiatement la
lame, coupez le moteur et arrêtez la tondeuse.
7. Vérifiez fréquemment le bon fonctionnement des
protections, des déflecteurs, des commutateurs, des
contrôles de lames et de tous les dispositifs de sécurité.
8. Assurez-vous de la bonne lisibilité de tous les
autocollants de sécurité. Remplacez-les s'ils sont
détériorés.
9. Pendant que vous tondez, protégez-vous et portez des
lunettes de protection, des pantalons longs et des
chaussures résistantes. NE TONDEZ PAS pieds-nus ou
en sandales.
10. Apprenez à DEBRAYER la lame rapidement et à arrêter
le moteur en cas d'urgence.
11. Faites très attention lors du chargement ou du
déchargement de la tondeuse sur un camion ou une
remorque.
12. Vérifiez fréquemment l'état d'usure du bac de
ramassage et remplacez-le si nécessaire, afin d'éviter
qu'un objet ne soit projeté et ne blesse quelqu'un en
paraticulier s'ilest trové ou usé.
MANUTENTION SÉCURISÉE DE L'ESSENCE
Pour éviter des dommages corporels ou matériels, faites très
attention en manipulant de l'essence. C'est un liquide très
inflammable, et ses vapeurs sont explosives.
1. Éteignez complètement cigarettes, cigares, pipes et
autres sources d'inflammation.
2. N'utilisez qu'un récipient prévu pour transporter de
l'essence.
2
Page 23

CONSIGNES DE SECURITE
Not for
Reproduction
MANUTENTION SÉCURISÉE DE L'ESSENCE
(suite de la page précédente)
3. N'ENLEVEZ PAS le bouchon de réservoir et ne faites
pas l'appoint en essence avec le moteur qui tourne.
Laissez le moteur refroidir avant de refaire le plein.
4. NE FA ITES PAS le plein dans un local.
5. NE STOCKEZ PAS la machine ou le bidon d'essence à
l'intérieur s'il y a une flamme nue, des étincelles, ou une
veilleuse comme sur un chauffe-eau ou d'autres
appareils.
6. NE REMPLISSEZ PAS les récipients d'essence dans un
véhicule ou sur un camion ou un plateau de remorque
qui auraient un revêtement plastique. Placez toujours
les récipients sur le sol et loin du véhicule pour le
remplissage.
7. Enlevez les équipements fonctionnant à l'essence du
véhicule ou de la remorque et refaites-en le plein au sol.
Si ce n'est pas possible, faites-le en utilisant un bidon
portable plutôt que l'embout de la pompe de
distribution.
8. NE DÉMARREZ PAS des équipements fonctionnant à
l'essence dans des véhicules ou remorques fermés.
9. Gardez l'embout de distribution en contact avec le bord
du réservoir ou du récipient à remplir en permanence
jusqu'au plein. N'UTILISEZ PAS un embout de
distribution qu'on puisse bloquer en position ouverte.
10. Si du carburant est renversé sur les vêtements,
changez-en immédiatement.
11. NE remplissez JAMAIS à ras le réservoir d'essence.
Remettez le bouchon du réservoir d'essence et serrez-le
bien.
UTILISATION
1. NE METTEZ PAS vos mains ou vos pieds à proximité ou
en dessous des éléments en rotation. Restez à l'écart de
la zone d'éjection lorsque le moteur tourne.
2. COUPEZ le moteur si vous devez traverser des allées de
graviers, des passages ou des routes ou bien lorsque
des objets projetés pourraient être source de dangers.
3. Tondez uniquement à la lumière du jour ou avec un bon
éclairage artificiel.
4. N'UTILISEZ PAS la tondeuse si vous êtes sous
l'influence d'alcools ou de drogues.
5. Si vous heurtez un objet ou si la tondeuse vibre de
manière anormale, ARRETEZ immédiatement le moteur
et retirez le fil de la bougie et assurez-vous qu'ils
n'entreront pas en contact. Inspectez la machine pour
vérifier si elle est endommagée et procédez aux
réparations avant de la redémarrer.
6. NE TONDEZ PAS des zones à proximité de ravins, de
fossés ou de berges.
7. FAITES ATTENTION aux trous et aux autres dangers
cachés. Une pelouse haute peut dissimuler des
obstacles. Restez à l'écart des fossés, des conduites,
des clôtures ou tous autres objets pouvant dépasser.
8. NE TONDEZ PAS un gazon humide. Ayez toujours un
pas sûr. Maintenez fermement la poignée et suivez la
tondeuse en marchant, vous ne devez jamais courir. Une
glissade pourrait entraîner des blessures.
9. TOUJOURS rester derrière la poignée quand la machine
(moteur) tourne.
10. NE QUITTEZ PAS la tondeuse si le moteur tourne.
11. Avant de nettoyer, réparer ou inspecter la tondeuse,
ARRETEZ LE MOTEUR et DEBRAYEZ LA LAME avant de
laisser de la tondeuse, pour quelque raison que ce soit.
assurez-vous que le moteur, la lame et tous les autres
éléments en rotation sont bien ARRETES. Retirez le fil
de la bougie et assurez-vous qu'ils n'entreront pas en
contact pour éviter un démarrage intempestif.
UTILISATION
(suite de la colonne précédente)
12. COUPEZ le moteur et attendez que la lame soit
complètement ARRETEE avant de retirer le sac de
ramassage et/ou de déboucher le conduit d'éjection.
13. N'UTILISEZ PAS la tondeuse sans que les déflecteurs, la
protection de déversement, la protection arrière et les
autres dispositifs de sécurité ne soient en place et
opérationnels, ou le dispositif de ramassage soient
correctement installés. N'ORIENTEZ JAMAIS l'éjection
en direction des personnes, des voitures, des portes ou
des fenêtres.
14. NE PAS décharger des matières contre un mur ou un
obstacle. Elles pourraient ricocher et repartir vers
l'opérateur.
15. Ralentissez avant de prendre un virage.
16. Faites attention à la circulation lorsque vous vous
trouvez près d'une route ou lorsque vous devez en
traverser une.
17. NE PAS OPERER la tondeuse dans un endroit sans
aération. Las gaz d'échappement contiennent du
monoxyde de carbone et peuvent être dangereux.
18. N'utiliser que des accessoires approuvés par le
constructeur. Se reporter aux instructions du
constructeur pour une installation et une utilisation
correctes des accessoires.
ENTRETIEN ET REMISAGE
1. NE STATIONNEZ JAMAIS une machine ou ne rangez
jamais un bidon de carburant dans un local où les
vapeurs de carburant pourraient entrer en contact avec
une flamme, une étincelle ou une veilleuse comme on
peut en trouver dans un chauffe-eau ou dans une
chaudière, un sèche-linge ou d'autres appareils
thermiques. Laissez refroidir le moteur avant de ranger
la tondeuse dans un local. Rangez le bidon de carburant
dans un endroit bien ventilé, inoccupé et hors de portée
des enfants.
2. Pour réduire les risques d'incendie ou de surchauffe du
moteur, veillez à ce qu'il n'ait pas d'herbe, de feuilles ou
de surplus de graisse sur le moteur.
3. Si vous devez vidanger le réservoir de carburant,
récupérez le carburant dans un bidon prévu à cet effet et
effectuez cette opération à l'extérieur et éloigné de toute
flamme.
4. Assurez-vous du bon serrage des écrous, des boulons
et des vis de la tondeuse. Vérifiez que toutes les
goupilles sont bien en place.
5. Si vous devez faire fonctionner la tondeuse à l'intérieur,
faites-le dans un pièce bien ventilée. Les gaz
d'échappement contiennent du monoxyde de carbone,
un gaz inodore et mortel.
6. Ne procédez à l'entretien du moteur et aux réglages que
si le moteur est coupé. Retirez le fil de la bougie et
assurez-vous qu'ils n'entreront pas en contact pour
éviter un démarrage intempestif.
7. NE MODIFIEZ PAS les réglages du régulateur de vitesse
du moteur.
8. Inspectez fréquemment le dispositif de ramassage et
vérifiez son état d'usure et ses détériorations, ceci pour
éviter la projection d'éléments tondus. Remplacez le sac
s'il est très détendu ou déchiré. Remplacez la glissière
ou l'adaptateur du sac s'ils sont cassés ou fendus.
9. Les lames de la tondeuse sont affûtées et coupantes.
Enveloppez-les ou portez des gants de cuir épais et
soyez particulièrement PRUDENT si vous devez les
manipuler.
3
Page 24

ENTRETIEN ET REMISAGE
Not for
Reproduction
(suite de la colonne précédente)
10. NE FAITES JAMAIS le test de l'étincelle en mettant votre
bougie à la masse sur le cylindre du moteur. L'étincelle
pourrait mettre feu au carburant qui se trouve dans le
cylindre.
11. Faites vérifier votre machine par votre revendeur
SNAPPER au moins une fois par an. Faites installer tout
nouveau système visant à améliorer la sécurité de votre
machine.
12. Utilisez uniquement des pièces détachées d'origine
SNAPPER pour optimiser les performances de votre
machine.
4
Page 25

TABLE DES MATIÈRES
Not for
Reproduction
IMPORTANTES INSTRUCTIONS DE SÉCURITÉ ...................................................... 2 - 4
TABLE DES MATIÈRES.....................................................................................................5
SECTION 1 - FAMILIARISATION ......................................................................................6
SECTION 2 - INSTRUCTIONS D’UTILISATION.......................................................... 7-10
Liste de contrôles initiaux .................................................................................. 7
Démarrage et fonctionnement de moteur et lame ............................................7
Propulsion de la tondeuse ..................................................................................8
Réglage de hauteur de poignée..........................................................................8
Réglage de hauteur de coupe .............................................................................9
Fonctionnement en recyclage.............................................................................9
Installation du déflecteur d’évacuation latérale..............................................10
Installation de l’adaptateur de sac à herbe......................................................10
Installation du sac à herbe................................................................................10
SECTION 3 - INSTRUCTIONS D'ENTRETIEN.......................................................... 11-12
Changement de l’huile moteur..........................................................................11
Vérification de lame de tondeuse .....................................................................11
Vérification de courroie d’entraînement du moteur .......................................11
Entretien périodique ..........................................................................................11
Moteur ..............................................................................................................11
Filtre à air.........................................................................................................11
Huile moteur ....................................................................................................11
Contrôler le système de verrouillage de sécurité........................................12
Composants d’entraînement des roues .......................................................12
Procédure d’entreposage..................................................................................12
SECTION 4 – RÉPARATION............................................................................................13
Remplacement de lame de tondeuse...............................................................13
Aiguisage de lame..............................................................................................13
DÉPANNAGE....................................................................................................................14
PÉRIODICITÉ DE L’ENTRETIEN.....................................................................................15
Pièces pour entretien/remplacement ...............................................................15
IDENTIFICATION DES DÉCALCOMANIES.............................................................. 16-17
GARANTIE........................................................................................................................18
5
Page 26

Section 1 - FAMILIARISATION
Not for
Reproduction
CONTRÔLE
DE LAME
POIGNÉE DE
CORDON DU
LANCEUR
VERROUILLAGE
DU RÉGLAGE
DE HAUTEUR
ARRIÈRE
1.1 INTRODUCTION
COUVERCLE
DE
RECYCLAGE
Ce manuel a été préparé pour les opérateurs des
TONDEUSES SNAPPER AUTOTRACTÉES ‘EASY LINE’.
Sa finalité, en plus de la recommandation des besoins
concernant l’utilisation et l’entretien de routine, est de
promouvoir votre sécurité au travers de l’usage de
pratiques opérationnelles acceptées. Lisez, assimilez et
respectez les IMPORTANTES INSTRUCTIONS DE
SÉCURITÉ des pages 2-4 de ce manuel, et tous les
messages de mise en garde sur la tondeuse et ses
accessoires avant de faire fonctionner la machine.
CONTRÔLE DE
VITESSE DE
DÉPLACEMENT
CONTRÔLE
D’ENTRAÎNEMENT DES
ROUES
BOUCHON DE
REMPLISSAGE DU
CARBURANT
ILLUSTRATION 1.1
(MODÈLE ESPV21 MONTRÉ)
Les schémas et illustrations dans ce manuel sont
fournies juste comme références, et peuvent différer
de votre modèle spécifique. Contactez votre
revendeur Snapper si vous avez des questions.
1.2 NOMENCLATURE
L’illustration 1.1 de nomenclature ci-dessus montre les
parties essentielles des TONDEUSES SNAPPER
AUTOTRACTÉES ‘EASY LINE’. Il est recommandé que
tous les opérateurs de la tondeuse se familiarisent avec les
contrôles, les pièces et le fonctionnement de la tondeuse
avant de la faire fonctionner. Des détails spécifiques
concernant le moteur se trouvent dans le manuel
d’utilisateur séparé de cette pièce. Étudiez ces manuels
avant de démarrer, et gardez-les sous la main comme
référence ultérieure.
6
IMPORTANT
BOUCHON DE
REMPLISSAGE
ET JAUGE
D’HUILE
AMORÇAGE
DU MOTEUR
VERROUILLAGE DU
RÉGLAGE DE
HAUTEUR AVANT
Page 27
Section 2 - INSTRUCTIONS D’UTILISATION
Not for
Reproduction
2.1 LISTE DE CONTRÔLES INITIAUX
Effectuez les vérifications qui suivent et le service nécessaire
avant chaque démarrage.
2.1.1. Vérifiez protections, déflecteurs, sac à herbe,
adaptateur et couvercles pour vous assurer que tout est en
place et bien attaché.
2.1.2. Vérifiez contrôle de lame, contrôle d’entraînement
des roues, et contrôle de vitesse de déplacement pour
vous assurer que les commandes jouent librement (voir
l’illustration 2.1).
CONTRÔLE
DE LAME
CONTRÔLE DE
VITESSE DE
DÉPLACEMENT
CONTRÔLE
D’ENTRAÎNEMENT
DES ROUES
ILLUSTRATION 2.1
2.1.3. Vérifiez la hauteur de coupe. Réglez si nécessaire
à la hauteur voulue (reportez-vous à la section sur le
réglage de hauteur de coupe).
2.1.4. Vérifiez le niveau d’huile moteur et faites l’appoint si
nécessaire pour amener le niveau au marquage « full ».
Reportez-vous au manuel d’utilisation du moteur pour les
spécifications de l’huile à employer (voir l’illustration 2.2).
2.1.6. Nettoyez les surfaces extérieures de la plate-forme
de coupe et du moteur pour éliminer toutes accumulations
d’éclaboussures de carburant, huile, graisse, saletés, etc.
Gardez propres la grille d’admission d’air et les ailettes de
refroidissement en permanence.
BOUTON
D'AMORÇAGE
(POUSSER
3 FOIS)
2.2 DÉMARRAGE ET FONCTIONNEMENT
2.2.1. MOTEUR ET LAME
1. Appuyez trois fois sur le bouton rouge de starter avant
de démarrer un moteur froid (voir l’illustration 2.3).
REMARQUE : Il n’y a pas besoin du starter pour
redémarrer un moteur déjà chaud.
2. Pressez la barre de contrôle de lame contre la poignée
(voir l’illustration 2.4).
3. Démarrez la tondeuse :
Tirez sur la poignée du cordon de lanceur pour
démarrer le moteur (voir l’illustration 2.4).
ILLUSTRATION 2.3
PRESSER
LE CONTRÔLE
DE LAME
ILLUSTRATION 2.2
2.1.5. Faites le plein d’essence dans le réservoir après
avoir sorti la tondeuse à l’extérieur où les vapeurs pourront
se dissiper sans danger. Assurez-vous de la bonne
fermeture du bouchon après le plein. Reportez-vous au
manuel d’utilisation du moteur pour les spécifications de
carburant.
TIRER LA
POIGNÉE DU
LANCEUR
ILLUSTRATION 2.4
4. Une fois le moteur démarré, prévoyez un temps bref
de chauffe jusqu’à ce que le moteur tourne rond avant de
commencer à utiliser la tondeuse.
REMARQUE: Pour arrêter le moteur (et la lame) il suffit de
relâcher la barre de contrôle de lame.
7
Page 28
Section 2 - INSTRUCTIONS D’UTILISATION
Not for
Reproduction
2.2 DÉMARRAGE ET FONCTIONNEMENT
2.2.2. PROPULSION DE LA TONDEUSE
1. Démarrez le moteur (se référer à la section
Démarrage et fonctionnement – Moteur et lame).
2. Passer le contrôle de vitesse de déplacement sur la
position voulue (voit l’illustration 2.5).
3. Pressez le contrôle d’entraînement des roues contre
la poignée pour embrayer l’entraînement des roues et
faire avancer la tondeuse. La vitesse de marche avant
peut être changée pendant le déplacement de la
tondeuse en changeant la position du contrôle de
vitesse de déplacement (voir l’illustration 2.5).
2.3 ARRÊT
2.3 VERROUILLAGE DE ROULETTE PIVOTANTE
(ESPV21S SEULEMENT)
CONTRÔLE DE VITESSE DE
DÉPLACEMENT
RAPIDE
LENT
ILLUSTRATION 2.5
Vous arrêtez le déplacement en avant de la tondeuse
en relâchant le contrôle d’entraînement des roues. Vous
arrêtez le moteur et la lame en relâchant le contrôle de
lame.
La roulette avant gauche pivotante de la ESPV21S peut
être bloquée pour que la tondeuse aille en ligne droite :
1. Déplacez la tondeuse tout droit vers l’avant pour
aligner l’axe du montant de roulette dans le fermoir de
blocage basculant, situé au dessus du montant de
roulette (voir l’illustration 2.6).
FERMOIR DE
BLOCAGE
CONTRÔLE D’ENTRAÎNEMENT
DES ROUES
DÉBRAYAGE
EMBRAYAGE
ALIGNER
L’AXE
AVEC LES
CRANS
2. Actionnez le levier de blocage de roulette pivotante
du côté gauche de l’ensemble de poignée, sur sa
position « LOCK » pour verrouiller le fermoir sur le
support de roulette (voir l’illustration 2.7).
3. Pour libérer la roulette, ramenez simplement ce levier
à l’opposé de la position de blocage (voir l’illustration
2.7).
DÉBLOCAGE
DE ROULETTE
2.4 RÉGLAGE DE HAUTEUR DE POIGNÉE
La hauteur de poignée de tondeuse peut se régler
comme suit :
1. Ôtez les boutons en T et les boulons de carrosserie
fixant la poignée du bas sur les supports de montage.
2. Alignez les trous dans l’ensemble de poignées avec
l’un des trous de réglage de hauteur de poignée dans le
support de montage (voir l’illustration 2.8).
3. Remettez la visserie ôtée en place, et serrez-la bien.
PLUS
HAUT
PLUS
BAS
TROUS DE
RÉGLAGE DE
HAUTEUR DE
POIGNÉE (3)
ILLUSTRATION 2.8
BLOCAGE DE
ROULETTE
ILLUSTRATION 2.7
ENSEMBLE
DE POIGNÉES
ILLUSTRATION 2.6
ENSEMBLE
DE
ROULETTE
PIVOTANT
NE PAS tenter d'entretien, réglage ou dépannage quand
le moteur et la lame tournent. ARRÊTER d'abord moteur
et lame. Débrancher le fil de bougie et l’attacher à l’écart
de la bougie. Le moteur et les composants sont CHAUDS.
Pour éviter des brûlures graves, laisser du temps pour
que tous les composants se refroidissent.
AVERTISSEMENT
8
Page 29
Section 2 - INSTRUCTIONS D’UTILISATION
Not for
Reproduction
AVERTISSEMENT
NE PAS tenter d'entretien, réglage ou dépannage quand
le moteur et la lame tournent. ARRÊTER d'abord moteur
et lame. Débrancher le fil de bougie et l’attacher à l’écart
de la bougie. Le moteur et les composants sont CHAUDS.
Pour éviter des brûlures graves, laisser du temps pour
que tous les composants se refroidissent.
2.5 RÉGLAGE DE HAUTEUR DE COUPE
1. Tirez le taquet de réglage de hauteur vers l’extérieur
et déplacez-le dans le cran de la hauteur voulue (voir
l’illustration 2.9).
AVERTISSEMENT
Arrêter le moteur et la lame de tondeuse en relâchant le
contrôle de lame avant de régler la hauteur de coupe.
HAUTEUR
DE COUPE
LA PLUS
GRANDE
HAUTEUR
DE COUPE
LA PLUS
GRANDE
2
3
4
5
6
7
5
6
7
HAUTEUR DE COUPE
1
LA PLUS FAIBLE
3
4
2
TAQUET (AU
CRAN N° 4)
ROUE
AVANT
(SAUF
ESPV21S)
HAUTEUR
1
DE
COUPE
LA PLUS
FAIBLE
TAQUET (AU
CRAN N° 4)
CHAQUE CRAN FAIT MONTER DE 0,5” (1,2 CM)
POSITIONS
DU TAQUET
1,2”
(3 cm)
2.6 FONCTIONNEMENT EN RECYCLAGE
REMARQUE : Pour les meilleurs résultats en recyclage, coupez au
maximum à la hauteur correspondant au tiers de la longueur de lame,
et recyclez SEULEMENT quand l'herbe est sèche.
1. Réglez toutes les roues sur la position de coupe la plus
haute (cran 7). Reportez-vous à la section de réglage de
hauteur de coupe.
2. Passez le contrôle de vitesse du moteur en position rapide
(FAST, dessin du lièvre).
3. Réglez le contrôle de vitesse de déplacement à la position
la plus lente.
4. Commencez à tondre lentement. Si l’herbe est très dense,
abaissez chacun des taquets d'un cran plus bas que ceux des
roues avant pour améliorer la performance du recyclage.
REMARQUE : Le couvercle de recyclage doit rester sur la
machine en permanence, sauf si des opérations
d'évacuation différentes sont désirées, comme
l'évacuation latérale ou la mise en sac.
POUR DÉPOSER LE COUVERCLE DE RECYCLAGE :
Enlevez les écrous moletés et les rondelles à dentures
intérieures/extérieures qui fixent le couvercle de recyclage sur la
plate-forme (voir l’illustration 2.11).
RÉGLAGES DE HAUTEUR DE COUPE
4,2”
(11 cm)
ILLUSTRATION 2.10
ROUE ARRIÈRE
(COMME ROUE
AVANT ESPV21S)
ILLUSTRATION 2.9
2. Réglez toutes les roues pour la même hauteur de
coupe. La position la plus haute correspond au cran 7,
la plus basse au cran 1 (voir l’illustration 2.10).
ENLEVER LES ÉCROUS MOLETÉS
ET LES RONDELLES À DENTURES
ILLUSTRATION 2.11
9
Page 30
Section 2 - INSTRUCTIONS D’UTILISATION
A
Not for
Reproduction
AVERTISSEMENT
NE PAS tenter d'entretien, réglage ou dépannage quand le
moteur et la lame tournent. ARRÊTER d'abord moteur et
lame. Débrancher le fil de bougie et l’attacher à l’écart de la
bougie. Le moteur et les composants sont CHAUDS. Pour
éviter des brûlures graves, laisser du temps pour que tous
les composants se refroidissent.
2.6 INSTALLATION DU DÉFLECTEUR D’ÉVACUATION
LATÉRALE
ÉTAPE 1 : Enlevez le couvercle de recyclage (référez-vous à la
section précédente de fonctionnement en recyclage).
ÉTAPE 2 : Installez le déflecteur sur le châssis à la place du
couvercle de recyclage, en vous assurant que : 1) le trou sur
l’extérieur de l’avant de déflecteur glisse sur le goujon là où l’avant
du couvercle de recyclage était fixé à l’origine, 2) la fente sur le
dessus du déflecteur glisse sous l'écrou de contention sur le
dessus du châssis (sous l’angle avant droit du moteur), et 3)
lafente sur l’intérieur de l’arrière du déflecteur glisse sur le goujon
là où l’arrière du couvercle de recyclage était fixé à l’origine (voir
l’illustration 3). Installez des rondelles de blocage à dentures
internes/externes et des écrous moletés sur les goujons et serrez
bien (voir l’illustration 2.12).
FENTE ARRIERE
SUR LE GOUJON
; AJOUTER
RONDELLE DE
BLOCAGE ET
ECROU MOLETE
2.7 INSTALLATION DE L’ADAPTATEUR DE SAC
(Accessoire en option sur certains modèles)
1 : Enlevez le couvercle de recyclage (référez-vous à la
ÉTAPE
section précédente de fonctionnement en recyclage).
ÉTAPE 2 : Installez l’adaptateur de sac à herbe sur la plate-forme
à la place du couvercle de recyclage , en vous assurant que : 1) le
trou sur l’extérieur de l’avant de l’adaptateur glisse sur le goujon là
où l’avant du couvercle de recyclage était fixé à l’origine, 2) la fente
sur le dessus de l’adaptateur glisse sous l'écrou de contention sur
le dessus du châssis (sous l’angle avant droit du moteur), et 3) la
fente sur l’intérieur de l’arrière de l’adaptateur glisse sur le goujon
là où l’arrière du couvercle de recyclage était fixé à l’origine (voir
l’illustration 3). Installez des rondelles de blocage à dentures
internes/externes et des écrous moletés sur les goujons et serrez
bien (voir l’illustration 2.13).
ÉTAPE 3 : Faites passer le cordon de lanceur autour de l’extérieur
de la poulie de guidage de cordon comme sur l’illustration 2.13.
(REMARQUE : Le cordon de lanceur peut avoir à être détendu,
reportez-vous à la section sur l'assemblage de poignées.)
FENTE DU
HAUT SOUS
L’ECROU
ILLUSTRATION 2.12
FENTE AVANT
SUR LE GOUJON ;
AJOUTER
RONDELLE DE
BLOCAGE ET
ECROU MOLETE
FENTE ARRIERE
SUR LE GOUJON ;
AJOUTER
RONDELLE DE
BLOCAGE ET
ECROU MOLETE
ILLUSTRATION 2.13
2.8 INSTALLATION DU SAC À HERBE
(Sac avec porte)
ÉTAPE 1 : Installez l’adaptateur de sac à herbe sur la plate-
forme à la place du couvercle de recyclage. Reportez-vous
aux instructions d'installation de l’adaptateur de sac.
ÉTAPE 2 : Installez le sac à herbe en ouvrant le couvercle
d’adaptateur (non montré) et en glissant le connecteur
par-dessus le rebord de l’adaptateur (voir l’illustration
2.14).
ÉTAPE 3 : Fixez les crochets de sac sur la traverse
latérale médiane de poignée (voir l’illustration 2.14).
ILLUSTRATION 2.14
AVERTISSEMENT
NE PAS travailler sans tout le sac à herbe ou la protection
en place. Les composantes du sac sont sujettes à
détérioration en fonctionnement normal. Inspecter l’état du
sac avant chaque usage. Remplacer immédiatement les
sacs usés ou abîmés avec seulement des sacs
recommandés par SNAPPER. Le sac à herbe n’est qu’en
option sur certains modèles.
PASSER LE CORDON DE
LANCEUR AUTOUR DE L
FENTE DU
HAUT SOUS
L’ECROU
FENTE AVANT
SUR LE GOUJON ;
CROCHETS DE SAC ET DE
PORTE SUR LA BARRE
TRANSVERSALE MEDIANE
AJOUTER
RONDELLE DE
BLOCAGE ET ECROU
MOLETÉ
GLISSER LE
CONNECTEUR SUR LE
REBORD
10
Page 31

Section 3 – INSTRUCTIONS D’ENTRETIEN
Not for
Reproduction
3.1 INTRODUCTION
Pour préserver la qualité de la tondeuse, n’utilisez que
des pièces de rechange SNAPPER d’origine. Contactez
votre revendeur SNAPPER local pour des pièces ou de
l’assistance pour le service. Afin de trouver la pièce ou
l’information correcte, mentionnez toujours le modèle et le
numéro de série de votre tondeuse.
AVERTISSEMENT
NE PAS tenter d'entretien, réglage ou dépannage quand le
moteur et la lame tournent. ARRÊTER d'abord moteur et
lame. Débrancher le fil de bougie et l’attacher à l’écart de la
bougie. Le moteur et les composants sont CHAUDS. Pour
éviter des brûlures graves, laisser du temps pour que tous
les composants se refroidissent.
Porter des gants en cuir épais pour manipuler les lames de
coupe ou intervenir autour. Elles sont extrêmement
tranchantes et peuvent occasionner des blessures graves.
3.2 ENTRETIEN – APRÈS LES 5 PREMIÈRES HEURES
3.2.1. CHANGEMENT DE L'HUILE MOTEUR
IMPORTANT: Vidangez le réservoir d’essence avant de
basculer la machine. NE basculez PAS la machine quand son
carburateur ou sa bougie sont enlevés. L’huile de carter
saturerait le filtre à air et rendrait difficile ou impossible le
démarrage du moteur. Si cette contamination se produisait il
faudrait remplacer le filtre à air.
Référez-vous au manuel du moteur pour le bon type
1.
d’huile, les procédures et la périodicité des interventions.
Pour procéder aux changements d’huile de façon simple et propre,
basculez simplement la tondeuse sur le côté pour la vidanger,
comme sur l’illustration 3.1. Vidangez toute l’huile par la jauge
dans un récipient. Laissez assez de temps pour que toute l’huile
puisse couler.
2. Mettez au rebut l’huile vidangée de façon
réglementaire.
3. Remplissez le carter d’huile comme spécifiée dans le
manuel du moteur. Ne dépassez pas la limite.
BASCULEZ LA TONDEUSE,
SUR LE CÔTÉ
ORIFICE DE
REMPLISSAGE
ILLUSTRATION 3.1
3.2.2. VÉRIFICATION DE LA LAME DE TONDEUSE
1. Débranchez le fil de bougie et attachez-le à l’écart de
la bougie.
2. Dressez la tondeuse sur ses roues arrière pour accéder
à la vis de blocage de lame. Ne bascu lez p as la machine
quand son carburateur ou sa bougie sont enlevés voir
l’illustration 3.2).
3. Vérifiez le couple de serrage de la vis de blocage de
lame, le couple recommandé est de 40 ft. Lbs (voir
l'illustration 3.2).
4. Vérifiez la lame pour affûtage, usure ou dommages.
Reportez-vous à la section sur les limites d’usure de lame.
IMPORTANT: Vidangez le réservoir d’essence avant de
basculer la machine.
carburateur ou sa bougie sont enlevés. L’huile de carter
saturerait le filtre à air et rendrait difficile ou impossible le
démarrage du moteur. Si cette contamination se produisait il
faudrait remplacer le filtre à air
3.2.3. VÉRIFICATION DE LA COURROIE
D’ENTRAÎNEMENT DU MOTEUR
1. Vérifiez visuellement la courroie d’entraînement du
moteur pour déceler craquelures, effilochage, brins de
courroie exposés ou endommagés. Si la courroie est
abîmée ou usée il faut la changer avant d’utiliser la
tondeuse. Contactez votre revendeur SNAPPER local
pour des pièces ou de l’assistance pour le service.
3.3 ENTRETIEN - PÉRIODIQUE
Effectuez tout l’entretien comme décrit dans la section de
périodicité d’entretien de ce manuel.
3.3.1. Moteur
Entretenez le moteur comme indiqué dans son manuel.
3.3.2. Filtre à air
Référez-vous au manuel d’utilisation du moteur pour les
instructions d’entretien.
3.3.3. Huile moteur
Référez-vous au manuel d’utilisation du moteur pour les
instructions d’entretien.
VALEUR DE COUPLE
RECOMMANDÉE
POUR LA VIS DE
BLOCAGE DE LAME :
40 FT. LBS.
ILLUSTRATION 3.2
NE basculez PAS la machine quand son
.
11
Page 32

Section 3 – INSTRUCTIONS D’ENTRETIEN
Not for
Reproduction
AVERTISSEMENT
NE PAS tenter d'entretien, réglage ou dépannage quand le
moteur et la lame tournent. ARRÊTER d'abord moteur et
lame. Débrancher le fil de bougie et l’attacher à l’écart de
la bougie. Le moteur et les composants sont CHAUDS.
Pour éviter des brûlures graves, laisser du temps pour que
tous les composants se refroidissent.
Porter des gants en cuir épais pour manipuler les lames
de coupe ou intervenir autour. Elles sont extrêmement
tranchantes et peuvent occasionner des blessures graves.
3.3.4. Contrôler le système de verrouillage de
sécurité
1. Démarrer la tondeuse.
2. Relâcher la commande de lame. Le moteur doit
s’arrêter dans les 3 secondes.
Si le moteur ne s’arrête pas, ne pas utiliser la
tondeuse. Amener la tondeuse à un concessionnaire
agréé pour réparation.
3.3.5. Composants d’entraînement des roues
Nettoyez les débris accumulés sur et autour de
transmission, axes, tendeur, poulies, courroie, etc. Vérifiez
si les composants sont usés ou endommagés. Remplacezles immédiatement si c’était le cas.
3.4 PROCÉDURE D’ENTREPOSAGE
Référez-vous au manuel d’utilisation du moteur pour les
directives sur les préparations à l’entreposage du moteur.
Préparez ainsi le moteur pour son entreposage en morte
saison :
1. Vidangez l’essence du réservoir et faites tourner le
moteur jusqu’à ce qu’il n’y en ait plus dans le carburateur.
2. Débranchez et mettez à l’écart le fil de bougie avant
de procéder à toute autre intervention !
3. Bouchez toutes les ouvertures avec de la bande
autocollante pour éviter que l’eau d’aspersion n’entre
durant le lavage dans les admissions ou échappements.
4. Dressez la tondeuse sur ses roues arrière et nettoyez
soigneusement le dessous de la plate-forme. NE b asc ulez
PAS la machine quand son carburateur ou sa bougie
sont enlevés. Grattez toute accumulation d’herbe avec
une raclette ou une brosse métallique.
5. Lubrifiez toutes les parties métalliques exposées avec
une couche légère d’huile afin de les protéger de la
corrosion.
6. Pour les modèles autopropulsés, ramenez le contrôle
de vitesse de déplacement en position lente (tortue) afin
d’éviter un étirement de la courroie et/ou du ressort de
tension.
7. Repliez soigneusement les poignées, en fléchissant
les câbles de contrôles pour éviter de les endommager.
8. Entreposez la tondeuse dans une remise ou un autre
lieu sec à l’abri des intempéries.
12
Page 33

Section 4 – RÉPARATION
(
)
Not for
Reproduction
AVERTISSEMENT
NE PAS tenter d'entretien, réglage ou dépannage quand le
moteur et la lame tournent. ARRÊTER d'abord moteur et
lame. Débrancher le fil de bougie et l’attacher à l’écart de la
bougie. Le moteur et les composants sont CHAUDS. Pour
éviter des brûlures graves, laisser du temps pour que tous
les composants se refroidissent.
Porter des gants en cuir épais pour manipuler les lames de
coupe ou intervenir autour. Elles sont extrêmement
tranchantes et peuvent occasionner des blessures graves.
4.1 REMPLACEMENT DE LA LAME DE TONDEUSE
4.1.1. LIMITE D’USURE DE LAME STANDARD
1. Inspectez souvent la lame pour y déceler des signes
d’usure ou dommages excessifs (voir l’illustration 4.1).
LAME NEUVE
S’ASSURER QUE
LE MOYEU DE
MOYEU
DE LAME
BRIDE
LAME
RONDELLE CONIQUE
(Concavité vers le haut)
LAME EST CALÉ
ENTRE LES
BRIDES
LIMITE D’USURE
DÉBUTS D’ENTAILLES
ÉTAT DANGEREUX ! À NE PAS
UTILISER SUR LA TONDEUSE
! À REMPLACER PAR UNE
LAME NEUVE.
ILLUSTRATION 4.1
AVERTISSEMENT
NE PAS utiliser une lame de coupe montrant des signes
excessifs d’usure ou de dommages. Référez-vous à la
section REMPLACEMENT DE LAME DE TONDEUSE pour
les procédures adéquates d’inspection de lame et
d’intervention.
4.1.2. AIGUISAGE DE LAME
1. Débranchez et mettez à l’écart le fil de bougie avant
de procéder
IMPORTANT: Vidangez le réservoir d’essence avant de
basculer la machine. NE basculez PAS la machine quand son
carburateur ou sa bougie sont enlevés. L’huile de carter
saturerait le filtre à air et rendrait difficile ou impossible le
démarrage du moteur. Si cette contamination se produisait il
faudrait remplacer le filtre à air.
Dressez la tondeuse sur ses roues arrière. NE ba sc ule z
2.
PAS la machine quand son carburateur ou sa bougie sont
enlevés.
3. Enlevez la lame (voir l’illustration 4.2).
.
VIS DE FIXATION
ILLUSTRATION 4.2
4. Aiguisez la lame sur une roue de meulage suivant un
angle d’attaque de 22 à 28° N’aiguisez PAS la lame audelà de son bord de coupe d’origine (voir l’illustration 4.3).
NE PAS AIGUISER
PLUS LOIN QUE LE
BORD DE COUPE
D’ORIGINE
BORD DE COUPE D’ORIGINE
ILLUSTRATION 4.3
5. Vérifiez l’équilibre de la lame. Si nécessaire corrigez-le
en meulant son extrémité lourde.
6. Réinstallez la lame (voir l’illustration 4.2). Vérifiez le
couple de serrage de la vis de blocage de lame, le couple
recommandé est de 40 ft. Lbs.
22-28º
BOUT DE
LAME
VUE LATÉRALE DE
L’ENSEMBLE DE LAME
13
Page 34

DÉPANNAGE
Not for
Reproduction
PROBLÈME CAUSE PROBABLE ACTION CORRECTRICE
Le moteur ne démarre
pas en actionnant le
cordon de lanceur
Le moteur cale ou
s’arrête après avoir
tourné
Perte de puissance du
moteur
Vibration excessive
La tondeuse ne se
déplace pas,
perte de traction
(Modèles auto-tractés)
Bruit de transmission
(Modèles auto-tractés)
Vitesse au sol trop
rapide/trop lente,
impossibilité de régler
la vitesse au sol
(Modèles auto-tractés à
vitesse variable)
Mauvaise coupe de
l’herbe
Mauvaise évacuation
de l’herbe
Fuite d’huile
1. Réservoir d’essence vide 1. Faire le plein d’essence fraîche.
2. Le moteur froid a besoin d'amorçage. 2. Ac t i v e r d ' amorç age (voir le manuel du moteur).
3. La bougie est débranchée. 3. Rebrancher le fil d’allumage sur la bougie.
1. Le contrôle de lame est relâché ou n’est pas assez
serré contre la poignée.
2. Réservoir d’essence vide. 2. Faire l’appoint d’essence jusqu’au bon niveau.
3. Encrassement du préfiltrage ou du filtre à air. 3. Nettoyer pour éliminer tous les débris.
4. Bougie défectueuse ou mauvais écartement. 4. Changer la bougie ou régler son écartement.
5. Eau, débris ou essence éventée dans le système de
carburant.
1. Encrassement du préfiltrage ou du filtre à air. 1. Nettoyer ou remplacer les filtres.
2. Bougie défectueuse. 2. Changer la bougie ou régler son écartement.
3. Eau, débris ou essence éventée dans le système de
carburant.
1. Lame de tondeuse déséquilibrée ou déformée. 1. Remettre la lame en bon état.
2. Fixation de lame desserrée. 2. Intervenir pour resserrer.
3. Coussin d’air lâche ou manquant (s’il y a lieu). 3. Remplacer l’équipement, serrer au bon couple.
4. Courroie en mauvais état ou effilochée. 4. Contacter votre revendeur SNAPPER agréé.
1. Accumulation de débris sur ou autour des composants
d’entraînement des roues. components.
2. Besoin de réglage du câble d’embrayage de
transmission.
3. Besoin de remplacement de la courroie d’entraînement.
4. Transmission endommagée.
1. Besoin de réglage du câble d’embrayage de
transmission.
2. Transmission endommagée.
1. Accumulation de débris sur ou autour des composants
de commande de vitesse au sol.
2. Besoin de réglage de vitesse de déplacement au sol. 2. Régler la vitesse de déplacement au sol.
3. Besoin de remplacement de la courroie d’entraînement.
4. Transmission endommagée.
1. Hauteur de coupe trop haute ou trop basse. 1. Régler la hauteur de coupe.
2. Vitesse de déplacement vers l’avant trop rapide. 2. Passer à une vitesse de déplacement
3. Coupe en dégradé latéral (non horizontale). 3. Régler à la bonne la hauteur de coupe avec
4. Mauvaise assiette avant/arrière de la plate-forme. 4. Régler à la bonne la hauteur de coupe avec
5. Lame de coupe émoussée ou endommagée. 5. Aiguiser les bords de coupe ou changer de
1. Vitesse de déplacement vers l’avant trop rapide. 1. Passer à une vitesse de déplacement
2. Herbe mouillée. 2. Attendre que l’herbe soit sèche pour tondre.
3. Lame de coupe émoussée ou endommagée. 3. Aiguiser les bords de coupe ou changer de
4. Accumulation de brins d’herbe et de débris sous la
plate-forme.
5. Lame installée d’un type incorrect.
6. Lame mal installée sous la plate-forme. 6. Installer correctement la lame.
1. Fuite au niveau du carter d’huile. 1. Vérifier et resserrer le bouchon de vidange.
1. Le contrôle de lame doit être tenu serré contre
la poignée en permanence pendant le
fonctionnement de la tondeuse.
5. Vidanger et regarnir le système de carburant.
3. Vidanger et regarnir le système de carburant.
1. Éliminer ces débris.
2. Contacter votre revendeur SNAPPER agréé.
3. Contacter votre revendeur SNAPPER agréé.
4. Contacter votre revendeur SNAPPER agréé.
1. Contacter votre revendeur SNAPPER agréé.
2. Contacter votre revendeur SNAPPER agréé.
1. Éliminer ces débris.
3. Contacter votre revendeur SNAPPER agréé.
4. Contacter votre revendeur SNAPPER agréé.
inférieure.
les leviers de réglage.
les leviers de réglage.
lame.
inférieure.
lame.
4. Nettoyer la plate-forme.
5. Installer une lame SNAPPER d’origine.
2. S’assurer que la jauge de niveau ou le
bouchon de remplissage sont bien remis en
place.
3. Contacter un revendeur SNAPPER agréé.
14
Page 35

PÉRIODICITÉ DE L’ENTRETIEN
Not for
Reproduction
PARTIE ENTRETIEN À
RÉALISER
Huile moteur
Préfiltrage de l’air
Filtre à air
Bougie
Vérifier le niveau Page 7
Changement initial
Changement périodique
Nettoyer l’élément éponge
Nettoyer ou remplacer
Remplacer
RÉF. CHAQUE
USAGE
X
Page 11
Manuel du
moteur
X
X*
X**
X**
X
5
H
25
H
50 H 100 H CHAQUE
SAISON
Refroidissement
du moteur
Courroie
d’entraînement
Lame de tondeuse
Plate-forme de
tondeuse
Composants
d’entraînement
des roues
Bagues de
roulette avant
(modèles à roue
orientable
uniquement)
*Changer l’huile toutes les 25 heures en cas d’usage intensif ou avec des températures élevées.
**Nettoyez plus souvent en environnement poussiéreux ou s’il y a des débris dans l’air.
PIÈCES POUR ENTRETIEN/RÉPARATION
Nettoyer gaine et ailettes
Déceler de l’usure et
vérifier la tension
Déceler de l’usure ou des
dommages, remplacer
Nettoyer l’accumulation de
débris
Nettoyer l’accumulation de
débris ; Déceler de l’usure
ou des dommages
Lubrifier
Page 11
Page 13
Page 7
Page 12
Page 8
X**
X
X
X
X
X
PIÈCES DÉTACHÉES
Câble de contrôle de lame 7100074
Câble de contrôle d’entraînement des roues 7100263
Câble de contrôle de vitesse de déplacement 7100264
Lame de coupe (Double ondulation) 7100242
Courroie d’entraînement 7100058
Manuel des pièces de tondeuse autotractée accompagnée 21” Easy Line 7006205
Manuel des pièces de tondeuse autotractée accompagnée 21” Easy Line
(roulette pivotante)
7006206
15
Page 36

IDENTIFICATION DES DÉCALCOMANIES
Not for
Reproduction
LISEZ, COMPRENEZ ET
SUIVEZ LES
INSTRUCTIONS ET
MISES EN GARDE DES
MANUELS ET SUR LES
ÉTIQUETTES DE LA
TONDEUSE, DU
MOTEUR ET DES
ACCESSOIRES AVANT
L'UTILISATION.
SIGNIFIE QUE LES
LAMES EN ROTATION
PEUVENT ENTRAINER
DES BLESSURES
GRAVES.
(1) INSTRUCTIONS DE MISE EN GARDE.
(2) CONTRÔLE DE PRÉSENCE D’OPÉRATEUR (OPC) : La
flèche point vers le bras d’OPC. Quand bras est tourné
vers l’arrière, le moteur peut être démarré et fonctionner
en tournant dans le sens indiqué par la flèche. Quand le
moteur tourne, la lame tourne comme c’est indiqué sur le
symbole de coupe d’herbe. Quand le bras est relâché et
revient vers l’avant, le moteur s’arrête.
NE PAS UTILISER
SANS LE BAC DE
RAMASSAGE OU LA
PROJECTION EN
PLACE.
GARDEZ ENFANTS
ET PERSONNES
HORS DE LA ZONE
DE TONTE.
(3) SÉLECTEUR DE VITESSE : Montre la direction du
déplacement et donne le choix de la vitesse de
déplacement en déplaçant le levier vers l’avant ou l’arrière.
(4) EMBRAYAGE : Le déplacement du levier vers la
poignée active l'embrayage de traction et le mouvement
vers l'avant commence. Quand le levier est relâché il y a
débrayage et arrêt du déplacement en avant.
16
Page 37

IDENTIFICATION DES DÉCALCOMANIES
Not for
Reproduction
(5) LWA-98 : Indique la certification européenne pour le
niveau de bruit.
(6) DÉCALCOMANIE CE : Indique la certification
européenne.
17
Page 38

Not for
Reproduction
18
Page 39

REMARQUES
Not for
Reproduction
19
Page 40

Consignes de sécurité et manuel d'utilisation pour le
Not for
Reproduction
TONDEUSES
EUROPÉENNES
AUTOTRACTÉES
ACCOMPAGNÉES
21” (53 CM) ‘EASY LINE’
IMPORTANT
Les produits Snapper sont construits avec des moteurs répondant au dépassant les normes de pollution en vigueur au moment de
leur fabrication. Les étiquettes sur ces moteurs contiennent des informations importantes et des notices de sécurité. Il faut lire,
comprendre et suivre tous les avertissements et consignes contenus dans ce manuel, le manuel du moteur, sur la machine et les
accessoires. Pour toute question regardant un produit Snapper, veuillez contacter votre vendeur Snapper ou le Snapper service
clientèle à Snapper, McDonough, GA. 30253. Tél: (1-800-935-2967).
Information sur la puissance nominale du moteur : L’indication de la puissance nominale brute de modèles individuels de
moteurs à essence est conforme au code J1940 (procédure de détermination de la puissance et du couple nominaux de petits
moteurs) de la SAE (Society of Automotive Engineers) et les performances nominales ont été obtenues et corrigées conformément à
SAE J1995 (Révision 2002-05). Les valeurs de couple sont établies à 3060 tr/min, les valeurs de puissance à 3600 tr/min. La
puissance moteur brute réelle est inférieure et est influencée, entre autres, par les conditions d’utilisation ambiantes et la variabilité
d’un moteur à l’autre. Compte tenu du large éventail de produits sur lesquels les moteurs sont installés et de la variété des
parameters environnementaux applicables au fonctionnement des équipements, le moteur à essence ne développe pas sa puissance
nominale brute une fois qu’il est utilisé sur un matériel donné (puissance nette ou réelle « sur site »). Cette différence est liée à une
variété de facteurs, notamment, mais sans s’y limiter, aux accessoires (filtre à air, échappement, charge, refroidissement,
carburateur, pompe à essence, etc.), limites des applications, conditions ambiantes d’exploitation (température, humidité, altitude) et
variabilité d’un moteur à l’autre. Pour des raisons de limites de fabrication ou de capacité, il est possible que Briggs & Stratton
remplace un moteur de cette série par un modèle de puissance nominale supérieure.
20
Page 41

Sicherheitsanweisungen & Betriebsanleitung
Not for
Reproduction
EUROPÄISCHE
SELBSTFAHRENDE
53 cm „EASY LINE“
RASENMÄHER
ERKLÄRUNG DER MODELLNUMMERN
E S P V 21 S
EUROPÄISCHES MODELL OPTIONSBEZEICHNUNG
MODELLKENNUNG SCHNITTBREITE
SELBSTFAHREND VARIABLE GESCHWINDIGKEIT
E – Europäisches Modell P – Selbstfahrendes Modell V – Variable Geschwindigkeit 21 – 53 cm Schnittbreite
S – „Easy Line“ S – Schwenkende Vorderräder
Danke, daß Sie ein SNAPPER-Gerät gekauft haben! Vor dem Betreiben Ihres Rasenmähers diese Betriebsanleitung sorgfältig durchlesen
und dabei besonders auf die Seiten 2 und 4, "WICHTIGE SICHERHEITSMASSNAHMEN", achten. Alle angetriebenen Geräte sind bei
falschem Gebrauch eine potentielle Gefahrenquelle. Denken Sie auch daran, daß Sicherheit den vorsichtigen Gebrauch in
Übereinstimmung mit der Betriebsanleitung und gesundem Menschenverstand voraussetzt. Bewahren Sie diese OriginalBedienungsanleitung für späteres Nachschlagen auf.
BRIGGS & STRATTON YARD POWER PRODUCTS GROUP
COPYRIGHT © 2010, BRIGGS & STRATTON CORPORATION
MILWAUKEE, WI, USA. ALLE RECHTE VORBEHALTEN
1
MODELLE
ESPV21 (7800064)
ESPV21S (7800065)
Page 42

WICHTIGE SICHERHEITSANWEISUNGEN
Not for
Reproduction
WARNUNG: Dieser leistungsstarke Rasentraktor kann Hände und Füße abtrennen und Gegenstände durch die Luft schleudern,
was zu Verletzungen und Sachschäden führen kann! Werden die folgenden SICHERHEITSANWEISUNGEN nicht befolgt, kann es zu
schweren Verletzungen u. U. mit Todesfolge des Fahrers oder anderer Personen kommen. Der Besitzer der Maschine muß diese
Anweisungen kennen und darf nur Personen diese Maschine betreiben lassen, die die Anweisungen ebenfalls kennen und
verstehen. Jeder, der diese Maschine fährt, muß körperlich und geistig gesund sein und darf nicht unter dem Einfluß von
irgendwelchen Substanzen stehen, die die Sicht, die Motorik oder das Urteilsvermögen einschränken. Wenn Sie irgendwelche
Fragen haben, die Ihr Händler nicht zu Ihrer Zufriedenheit beantworten kann, wenden Sie sich an die Abteilung Customer Service
bei SNAPPER, McDonough, Georgia 30253, USA. Tel.: (1-800-935-2967).
KINDER SCHÜTZEN
Tragische Unfälle ereignen sich, wenn der Fahrer des
Frontmähers nicht auf die Anwesenheit von Kindern achtet.
Kinder finden die Maschinen und das Mähen faszinierend.
Verlassen Sie sich niemals darauf, daß Kinder dort bleiben,
wo Sie sie zuletzt gesehen haben.
1. Kinder aus dem Mähbereich FERN HALTEN und von
einem achtsamen Erwachsenen, der nicht auch
gleichzeitig der Fahrer ist, überwachen lassen.
2. Kinder NICHT in den Garten bzw. auf die Grünfläche
lassen, wenn der Rasenmäher läuft. Den Rasenmäher
AUSSCHALTEN, sobald jemand das zu mähende
Gelände betritt.
3. Kinder unter 16 Jahren NICHT die Maschine benutzen
lassen.
4. NUR Erwachsene oder verantwortungsbewußte
Teenager, mit reifem Urteilsvermögen und unter
strenger Aufsicht durch einen Erwachsenen, die
Maschine benutzen lassen.
5. Den Rasenmäher NUR wenn absolut notwendig
rückwärts ziehen. Nach hinten und unten SCHAUEN und
auf Kinder, Haustiere und Gefahren ACHTEN, bevor und
während der Rasenmäher rückwärts gezogen wird.
6. BESONDERS VORSICHTIG bei der Annäherung von
nicht-einsehbaren Kurven, Büschen, Bäumen oder
anderen Objekten sein, die die Sicht versperren.
HANG BETRIEB
1. Hänge sind eine Hauptursache für Rutsch- und
Fallunfalle, die schwere Verletzungen zur Folge haben.
An allen Hängen besonders vorsichtig sein. Wenn Sie
sich an einem Hang unwohl fühlen, den Hang nicht
mähen.
2. Quer zum Hang und nicht von oben nach unten mähen.
Bei Richtungswechseln an Hängen besonders
vorsichtig sein. KEINE Steilhänge oder andere Bereiche
mähen, deren Stabilität oder Fußhalt zweifelhaft ist.
3. Bei Grasfangvorrichtungen oder anderem Zubehör
besonders vorsichtig sein, denn die Handhabung und
die Stabilität des Mähers werden davon verändert.
VORBEREITUNG
1. Die Anweisungen und Warnungen in dieser
Betriebsanleitung und auf der Maschine, dem Motor und
den Anbauten lesen, verstehen und befolgen. Die
Bedienelemente und ihren richtigen Gebrauch kennen,
bevor die Maschine gestartet wird.
2. Nur reife, verantwortungsbew ußte Personen dürfen die
Maschine fahren und das nur nach angemessener
Anleitung.
VORBEREITUNG
(Fortsetzung von vorheriger Spalte)
3. Untersuchungen haben ergeben, daß Personen ab 60
Jahren zu einem hohen Prozentsatz von Verletzungen in
Verbindung mit Mähmaschinen betroffen sind. Diese
Fahrer sollten daher ihre Tauglichkeit für ein sicheres
Betreiben des Frontmähers zu ihrem eigenen Schutz
und dem Schutz anderer vor schweren Verletzungen
überdenken.
4. Kraftstoff mit besonderer Vorsicht handhaben.
Kraftstoffe sind entzündlich und ihre Dämpfe explosiv.
Nur zugelassene Kraftstoffkanister verwenden. NIE den
Deckel des Kraftstofftanks abnehmen oder Kraftstoff
hinzufügen, wenn der Motor läuft. Kraftstoff nur im
Freien, bei abgeschaltetem und kaltem Motor
hinzufügen. Verschütteten Kraftstoff von der Maschine
abwaschen. NICHT rauchen.
5. Das Gelände, das gemäht werden soll, auf Spielzeug,
Draht, Steine, Äste und andere Objekte überprüfen und
diese entfernen, da sie vom rotierenden Messer in die
Luft geschleudert und jemanden verletzen können oder
aber das Mähen behindern. Merken Sie sich die Lage
von Bodenlöchern, Baumstümpfen und anderen
möglichen Gefahrenherden.
6. Personen und Haustiere in einer sicheren Entfernung
von der Maschine halten. Sofort die Messer
AUSSCHALTEN, den Motor AUSSCHALTEN und die
Maschine AUSSCHALTEN, wenn irgendjemand das
Mähgelände betritt.
7. Schutzhauben, Ablenkbleche, Schalter, Messerbedienelemente und andere Sicherheitsvorrichtungen
regelmäßig auf richtige Funktion und Anbringung
überprüfen.
8. Sicherstellen, daß alle Sicherheitsaufkleber deutlich
lesbar sind. Bei Beschädigung ersetzen.
9. Zum eigenen Schutz beim Mähen Schutzbrille, lange
Hosen und feste Schuhe tragen. NICHT barfuß oder in
Sandalen mähen.
10. Der Fahrer muß w issen, wie das Messer und der Motor
im Notfall schnell GESTOPPT werden können.
11. Beim Verladen oder Abladen der Maschine von einem
Anhänger oder LKW besonders vorsichtig sein.
12. Die Bauteile des Grasfängers regelmäßig auf Verschleiß
bzw. Verschlechterung überprüfen und ggf. ersetzen,
um Verletzungen durch geschleuderte Objekte, die
Schwachstellen durchdringen, zu verhindern.
SICHERER UMGANG MIT BENZIN
Zur Vermeidung von Verletzungen oder Sachschäden Benzin
mit größter Vorsicht handhaben. Benzin ist stark entzündlich
und seine Dämpfe explosiv.
1. Alle Zigaretten, Zigarren, Pfeifen und andere
Zündquellen löschen.
2. Nur einen zugelassenen Kraftstoffkanister verwenden.
2
Page 43

WICHTIGE SICHERHEITSANWEISUNGEN
Not for
Reproduction
SICHERER UMGANG MIT BENZIN
(Fortsetzung)
3. NIE den Deckel des Kraftstofftanks abnehmen oder
Kraftstoff hinzufügen, wenn der Motor läuft. Vor dem
Befüllen, den Motor abkühlen lassen.
4. Die Maschine NICHT in geschlossenen Räumen mit
Kraftstoff befüllen..
5. Die Maschine oder den Kraftstoffkanister NICHT in
geschlossenen Räumen aufbewahren, wo offene
Flammen, Funken oder Pilotflammen wie in
Warmwasserbereitern oder anderen Geräten vorhanden
sind.
6. Kraftstoffkanister NICHT in einem Fahrzeug oder auf einer
Lkw- oder Hängerpritsche mit Kunststoffverkleidung
befüllen. Vor dem Befüllen den Kraftstoffkanister auf den
Boden in einiger Entfernung vom Fahrzeug aufstellen..
7. Benzinbetriebene Aggregate vom Fahrzeug oder Anhänger
herunternehmen und auf dem Boden mit Kraftstoff
befüllen. Wenn das nicht möglich ist, die Ausrüstung mit
einem tragbaren Kanister anstelle einer Zapfpistole
befüllen.
8. Benzinbetriebene Ausrüstung NICHT in einem
geschlossenen Fahrzeug bzw. Anhänger anlassen.
9. Bis zum Abschluss der Befüllung ständig mit der
Zapfpistole den Stutzen des Kraftstofftanks oder -kanisters
berühren. Die automatische Abschaltvorrichtung an der
Zapfpistole NICHT verwenden!.
10. Wenn Kraftstoff auf Kleidung verschüttet wurde, sofort die
Kleidung wechseln.
11. Den Kraftstofftank NIE überfüllen. Den Kraftstofftankdeckel
wieder aufsetzen und festschrauben.
BETRIEB
1. Hände oder Füße NICHT in die Nähe oder unter drehende
Teile bringen. Bei laufendem Motor vom
Grasauswurfbereich fernbleiben.
2. Den Motor zum Überqueren von Schottereinfahrten,
Bürgersteigen oder Straßen AUSSCHALTEN sowie unter
jeden Geländebedingungen, wo weggeschleuderte Objekte
eine Gefahr darstellen können.
3. Nur bei Tag oder guter künstlicher Beleuchtung mähen.
4. Den Rasenmäher NICHT unter Alkohol- oder Drogeneinfluß
betreiben.
5. Sobald ein Fremdkörper getroffen wird oder der
Rasenmäher ungewöhnlich vibriert, den Motor
AUSSCHALTEN, das Zündkabel abziehen und entfernt
sichern. Den Rasenmäher vor dem Starten auf
Beschädigung überprüfen und entsprechend reparieren.
6. NICHT in der Nähe von Steilabfällen, Gräben oder
Böschungen mähen. Sie könnten Ihren Halt oder Ihr
Gleichgewicht verlieren.
7. Auf Bodenlöcher und andere versteckte Gefahren
ACHTEN. Unter hohem Gras können sich Hindernisse
verbergen. Gräben, Unterspülungen, Dükern, Zäunen und
vorstehenden Objekten fernbleiben.
8. KEIN nasses Gras mähen. Immer sicheren Halt
sicherstellen. Den Mähergriff gut festhalten und gehen,
nicht rennen. Ein Ausrutschen kann schwere Verletzungen
zur Folge haben.
9. Bei laufendem Motor IMMER hinter der Lenkstange
bleiben.
10. Den Rasenmäher nicht mit laufendem Motor stehen lassen.
Das MESSER und den MOTOR AUSSCHALTEN, bevor der
Rasenmäher aus irgendeinem Grund verlassen wird.
BETRIEB
(Fortsetzung von vorheriger Spalte)
11. Vor dem Reinigen, Reparieren oder Warten sicherstellen,
daß der Motor, das Messer und alle beweglichen Teile
AUSGESCHALTET sind und stillstehen. Zündkabel von
Zündkerze abziehen und entfernt sichern, um ein
versehentliches Anlassen zu vermeiden.
12. Den Motor AUSSCHALTEN und warten, bis das Messer
vollständig stillsteht, bevor der Grasfangkorb bzw.
Grasreste entfernt werden.
13. Die Maschine NUR DANN betreiben, wenn der gesamte
Grasfangkorb und alle Schutzvorrichtungen vorne,
seitlich und hinten an ihrem Platz sind und
funktionieren.
14. Material NICHT gegen eine Wand oder ein Hindernis
entladen. Das Material könnte auf den Fahrer
zurückgeschleudert werden.
15. Vor dem Wenden die Geschwindigkeit senken.
16. Auf den Straßenverkehr in der Nähe oder beim
Überqueren von Straßen achten.
17. Den Motor NICHT in geschlossenen Räumen laufen
lassen. Motorabgase enthalten Kohlenmonoxid, ein
tödliches Gift.
18. Nur vom Hersteller zugelassenes Zubehör verwenden.
Siehe Anweisungen des Herstellers für richtigen Betrieb
und Einbau des Zubehörs.
WARTUNGSANLEITUNG UND LAGERUNG
1. Die Maschine oder den Kraftstoffkanister NICHT in
geschlossenen Räumen aufbewahren, wo Dämpfe
offene Flammen, Funken oder Pilotflammen wie in
Warmwasserbereitern, Brennern, Wäschetrocknern oder
anderen gasbetriebenen Geräten erreichen können. Den
Motor abkühlen lassen, bevor die Maschine in einem
geschlossenen Raum gelagert wird. Kraftstoffkanister
außerhalb der Reichweite von Kindern in einem gut
belüfteten, unbewohnten Bereich aufbewahren.
2. Den Motor von Gras, Laub bzw. übermäßigem Fett frei
halten, um Brandgefahr und Überhitzen des Motors zu
vermeiden.
3. Beim Ablassen des Kraftstofftanks den Kraftstoff im
Freien und fern von offenen Flammen in einen
zugelassenen Behälter ablassen.
4. Alle Bolzen, Muttern und Schrauben müssen richtig
angezogen sein. Kontrollieren ob alle Splinte an Ihrem
Einbauort sind.
5. In Innenräumen immer für ausreichende Belüftung
sorgen, wenn der Motor läuft. Abgase enthalten
Kohlenmonoxid, ein geruchloses und tödliches Giftgas.
6. Nur bei ausgeschaltetem Motor den Motor warten oder
einstellen. Zündkabel von Zündkerze abziehen und
entfernt sichern, um ein versehentliches Anlassen zu
vermeiden.
7. Die Einstellungen des Motorreglers NICHT ändern bzw .
den Motor NICHT überdrehen.
8. Die Baugruppe Grasfangkorb regelmäßig auf Verschleiß
oder Verschlechterung überprüfen, um zu verhindern,
daß Objekte herumgeschleudert oder sich bewegende
Teile freigelegt werden. Durch neuen Grasfangkorb
ersetzen, sobald offene Nähte oder Risse sichtbar
werden. Den Schieber oder Korbadapter ersetzen, wenn
zerbrochen oder gerissen.
9. Das Messer ist sehr scharf. Um Verletzungen zu
vermeiden das Messer einwickeln oder schwere
Lederhandschuhe tragen und sehr VORSICHTIG mit ihm
umgehen.
3
Page 44

WARTUNGSANLEITUNG UND LAGERUNG
Not for
Reproduction
(Fortsetzung)
10. Zur Funkenprüfung die Zündkerze NIEMALS neben der
Zündkerzenbohrung erden; die Zündkerze könnte
vorhandenes Gas im Motor zünden.
11. Maschine mindestens einmal im Jahr von einem
zugelassenen SNAPPER-Händler überprüfen und warten
lassen. Neue Sicherheitsvorrichtung vom Händler
einbauen lassen.
12. Nur SNAPPER-Markenersatzteile verwenden, um sicherzustellen, daß Originalstandard eingehalten wird.
4
Page 45

INHALTSVERZEICHNIS
Not for
Reproduction
WICHTIGE SICHERHEITSANWEISUNGEN................................................................ 2 - 4
INHALTSVERZEICHNIS.....................................................................................................5
KAPITEL 1 - SICH VERTRAUT MACHEN.........................................................................6
KAPITEL 2 – BETRIEBSANLEITUNG......................................................................... 7-10
Prüfliste vor dem Start.........................................................................................7
Motor und Messer ein- und ausschalten ...........................................................7
Selbstfahrender Rasenmäher .............................................................................8
Griffhöhe einstellen..............................................................................................8
Schnitthöhe einstellen.........................................................................................9
Recycling-Funktion..............................................................................................9
Seiten-Auswurfablenkblech einbauen.............................................................10
Grasfangbeuteladapter einbauen.....................................................................10
Grasfangbeutel einbauen..................................................................................10
KAPITEL 3 – WARTUNGSANLEITUNG.................................................................... 11-12
Motoröl wechseln...............................................................................................11
Messer überprüfen.............................................................................................11
Motorantriebsriemen überprüfen .....................................................................11
Inspektion - regelmäßig.....................................................................................11
Motor ................................................................................................................11
Luftfilter............................................................................................................11
Motoröl.............................................................................................................12
Prüfen des Sicherheitssystems.....................................................................12
Radantriebsbauteile........................................................................................12
Lagerverfahren ...................................................................................................12
KAPITEL 4 – REPARATUR .............................................................................................13
Messer wechseln................................................................................................13
Messer schärfen.................................................................................................13
FEHLERSUCHE................................................................................................................14
WARTUNGSPLAN............................................................................................................15
Wartungs-/Ersatzteile.........................................................................................15
AUFKLEBERIDENTIFIKATION ................................................................................. 16-17
GARANTIE........................................................................................................................18
5
Page 46

Kapitel 1 - SICH VERTRAUT MACHEN
Not for
Reproduction
MESSERHEBEL
ANREISSSTARTERGRIFF
GESCHWINDIGKEITS
REGLER
RADANTRIEBSHEBEL
KRAFTSTOFF-
HINTERE
R HÖHENEINSTELL
HEBEL
RECYCLINGABDECKUNG
Die Zahlen und Abbildungen in diesem
Handbuch dienen nur der Erklärung und
können von Ihrem spezifischen Modell
abweichen. Bitten wenden Sie sich an Ihren
SNAPPER-Händler, wenn Sie Fragen haben.
Abb. 1.1
(MODELL ESPV21 ABGEBILDET)
1.1 EINFÜHRUNG
Diese Betriebsanleitung wurde für die Benutzer von
SELBSTFAHRENDEN SNAPPER „EASY LINE“
RASENMÄHER geschrieben. Sie soll abgesehen
von der Empfehlung von Funktions- und
routinemäßigen Wartungsanforderungen die
Sicherheit durch die Verwendung anerkannter
Betriebspraktiken fördern. Die „WICHTIGEN
SICHERHEITSANWEISUNGEN“ auf Seite 2 bis 4
dieser Betriebsanleitung sowie alle
Sicherheitshinweise auf dem Rasenmäher und
seinem Zubehör lesen, verstehen und befolgen,
bevor das Gerät in Betrieb genommen wird.
1.2 NOMENKLATUR
Die Nomenklaturzeichnung oben, Abb. 1.1, zeigt die
wichtigsten Bauteile des SELBSTFAHRENDEN
SNAPPER „EASY LINE“ MÄHERS. Es wird
empfohlen, dass sich alle Benutzer dieses
Rasenmähers eingehend mit den Bauteilen und ihrer
Funktion vertraut machen, bevor sie den
Rasenmäher betreiben. Spezifische Details zum
Motor befinden sich in der eigenständigen
Betriebsanleitung des Motors. Diese
Betriebsanleitungen vor der Inbetriebnahme lesen
und für künftigen Gebrauch griffbereit haben.
WICHTIG
ÖLFÜLLSCHRAUBE u.
MESSSTAB
PRIMER
KNOPF
VORDERE
HÖHENEINSTELL
HEBEL
6
Page 47

Kapitel 2 – BETRIEBSANLEITUNG
)
Not for
Reproduction
2.1 PRÜFLISTE VOR DEM START
Vor der Inbetriebnahme Folgendes überprüfen und
die erforderlichen Wartungsarbeiten durchführen.
2.1.1. Schutzvorrichtungen, Ablenkbleche,
Grasfangbeutel, Adapter und Abdeckungen
überprüfen, um sicherzustellen, dass sie an ihrem
Platz und fest angebracht sind.
2.1.2. Den Messerhebel, Radantriebshebel und
Geschwindigkeitsregler auf freie Bewegung
überprüfen. Siehe Abb. 2.1.
MESSERHEBEL
GESCHWINDIGKEITSREGLER
RADANTRIEBSHEBEL
2.2 EINSCHALTEN UND BETRIEB
Siehe Betriebsanleitung des Motors für
Spezifikationen.
2.1.6. Außenflächen des Mähwerks und Motors von
verschüttetem Kraftstoff, Schmutz, Gras, Öl usw.
befreien. Das Lufteinlasssieb und die Kühlrippen
immer sauber halten.
2.2.1. MOTOR UND MESSER
1. Den Primerknopf dreimal zum Starten eines
kalten Motors drücken: Siehe Abb. 2.3. HINWEIS:
Den Primerknopf nicht zum erneuten Starten eines
heißen Motors verwenden.
PRIMERKNOPF (3X
DRÜCKEN
Abb. 2.1
2.1.3. Schnitthöhe überprüfen. Auf gewünschte
Höhe einstellen. Siehe Kapitel „Schnitthöheneinstellung“.
2.1.4. Den Motorölstand überprüfen und ggf.
nachfüllen, um den Ölstand auf die FULL-Marke zu
bringen. Siehe Betriebsanleitung des Motors für
Ölspezifikationen. Siehe Abb. 2.2.
2.1.5. Den Rasenmäher ins Freie schieben und
Kraftstoff in den Kraftstofftank füllen, damit die
Dämpfe gefahrlos verdunsten können. Den
Tankdeckel nach dem Tanken fest verschließen.
Abb. 2.2
Abb. 2.3
2. Den Messerhebel zum Griff ziehen. Siehe Abb.
2.4.
3. Den Mäher starten.
Den Anreißstartergriff zum Ankurbeln des Motors
herausziehen. Siehe Abb. 2.4.
MESSERHEBEL
DRÜCKEN
ANREISSSTARTERGRIFF
ZIEHEN
Abb. 2.4
4. Den Motor nach dem Starten warm laufen
lassen, bis er ruhig läuft. Erst dann mit dem Mähen
beginnen.
HINWEIS: Den Motor (und das Messer) durch Loslassen
des Messerhebels ausschalten.
7
Page 48

Kapitel 2 – BETRIEBSANLEITUNG
Not for
Reproduction
2.2 EINSCHALTEN UND BETRIEB
2.2.2. SELBSTFAHRENDER RASENMÄHER
1. Den Motor anlassen. Siehe Kapitel „Einschalten
und Betrieb – Motor und Messer“.
2. Den Geschwindigkeitsregler auf die gewünschte
Fahrgeschwindigkeit stellen. Siehe Abb. 2.5.
3. Radantriebshebel gegen den Griff drücken, um
den Radantrieb einzuschalten und den Mäher
vorwärts fahren zu lassen. Die
Vorwärtsgeschwindigkeit kann bei fahrendem Mäher
durch Ändern der Position des
Geschwindigkeitsreglers eingestellt werden. Siehe
Abb. 2.5.
GESCHWINDIGKEITSREGLER
SCHNELL
RADANTRIEBS
HEBEL
LÖSEN
LANGSAM
Abb. 2.5
BETÄTIGEN
2.3 AUSSCHALTEN
Vorwärtsbewegung des Rasenmähers durch
Loslassen des Radantriebshebels stoppen. Motor
und Messer durch Loslassen des Messerhebels
ausschalten.
2.3 SPERREN DER SCHWENKRÄDER (NUR
ESPV21S)
Das linke vordere Schwenkrad am ESPV21S kann
gesperrt werden, damit der Mäher in einer graden
Linie fährt.
1. Den Mäher gerade vorwärts fahren, um den
Radbolzenstift mit den Kerben in der
Schwenksperrschelle auszurichten, die sich über
dem linken Radbolzen befindet. Siehe Abb. 2.6.
SPERRSCHELLE
STIFT MIT
KERBEN
AUSRICHTEN
2.4 GRIFFHÖHE EINSTELLEN
2. Schwenkradsperrhebel auf der linken Griffseite
in die Stellung „GESPERRT“ bewegen, um die
Schelle über den Radbolzen zu arretieren. Siehe
Abb. 2.7.
3. Zum Lösen des Rads den
Schwenkradsperrhebel wieder aus der gesperrten
Stellung herausbewegen. Siehe Abb. 2.7.
RAD
SPERREN
RAD
ENTSPERREN
Abb. 2.7
Die Griffhöhe des Rasenmähers kann
folgendermaßen verstellt werden:
1. Die Drehgriffe und Trägerschrauben entfernen,
die den unteren Griff an den Haltern befestigen.
2. Die Löcher im Griff mit einer der drei
Griffhöheneinstelllöcher in der Halterung
ausrichten. Siehe Abb. 2.8.
3. Die ausgebauten Befestigungsteile wieder
einsetzen und festziehen.
HÖHER
GRIFFBAUGRUPPE
TIEFER
GRIFFHÖHENEINSTELLÖCHER
(3)
Abb. 2.8
BAUGRUPPE
SCHWENKRAD
KEINE Einstellungs-, Wartungs- oder
Servicearbeiten bei laufendem Motor oder
WARNUNG
drehendem Messer durchführen. Motor und Messer
AUSSCHALTEN. Zündkabel von Zündkerze
abziehen und entfernt sichern. Motor und Bauteile
Abb. 2.6
sind HEISS. Schwere Verbrennungen vermeiden
und alle Bauteile ausreichend abkühlen lassen.
8
Page 49

Kapitel 2 – BETRIEBSANLEITUNG
Not for
Reproduction
WARNUNG
KEINE Einstellungs-, Wartungs- oder
Servicearbeiten bei laufendem Motor oder
drehendem Messer durchführen. Motor und Messer
AUSSCHALTEN. Zündkabel von Zündkerze
abziehen und entfernt sichern. Motor und Bauteile
sind HEISS. Schwere Verbrennungen vermeiden
und alle Bauteile ausreichend abkühlen lassen.
2.5 SCHNITTHÖHENEINSTELLUNG
1. Den Höheneinstellhebel nach außen ziehen und
auf die gewünschte Schnitthöhe bringen. Siehe
Abb. 2.9.
WARNUNG
Motor und Messer durch Loslassen des
Messerhebels ausschalten, bevor Schnitthöhe
eingestellt wird.
HÖCHSTE
SCHNITTHÖHE
HÖCHSTE
SCHNITTHÖHE
2
3
4
5
6
7
5
6
7
NIEDRIGSTE
1
SCHNITT-HÖHE
3
4
HEBEL (IN
KERBE 4)
VORDERRAD
(AUSSER
ESPV21S)
2
1
HEBEL (IN
KERBE 4)
3 cm
2.6 RECYCLING-FUNKTION
HINWEIS: Für beste Recycling-Ergebnisse maximal 1/3 der
Grashalmlänge abschneiden und NUR recyceln, wenn das
Gras trocken ist.
HINWEIS: Die Recycling-Abdeckung muss immer
an der Maschine angebracht sein, es sei denn,
andere Auswurfvarianten werden verwendet, wie
z.B. Seitenauswurf oder –beutel.
RECYCLING-ABDECKUNG ENTFERNEN
Drehgriffmuttern und Zahnscheiben mit Innen/Außenzähnen entfernen, mit denen die RecyclingAbdeckung am Mähwerk befestigt wird. Abdeckung
entfernen. Siehe Abb. 2.11.
MIT JEDER KERBE WIRD
SCHNITT 1,2 cm HÖHER
HEBELSTELLUNGEN
SCHNITTHÖHENEINSTELLUNGEN
Abb. 2.10
1. Alle Räder auf die höchste Schnittstellung stellen
(Kerbe 7). Siehe Kapitel „Schnitthöheneinstellung“.
2. Den Motordrehzahlregler auf „SCHNELL“ (Hase)
stellen.
3. Den Geschwindigkeitsregler auf langsamste
Geschwindigkeit einstellen.
4. Langsam weiter mähen. Wenn der Grasbewuchs
sehr dicht ist, beide Hinterradriegel um eine Kerbe
weiter absenken als die Vorderradriegel, um die
Recycling-Leistung zu verbessern.
NIEDRIGSTE
SCHNITTHÖHE
10,7
cm
HINTERRAD
(ESPB21S
VORDERRAD
ÄHNLICH)
2. Alle Räder auf gleiche Schnitthöhe einstellen.
Abb. 2.9
Die höchste Schnitthöhenstellung ist Kerbe 7. Die
niedrigste Schnitthöhenstellung ist Kerbe 1. Siehe
Abb. 2.10.
DREHGRIFFMUTTERN UND
ZAHNSCHEIBEN ENTFERNEN
Abb. 2.11
9
Page 50

Kapitel 2 – BETRIEBSANLEITUNG
Not for
Reproduction
WARNUNG
KEINE Einstellungs-, Wartungs- oder Servicearbeiten bei
laufendem Motor oder drehendem Messer durchführen.
Motor und Messer AUSSCHALTEN. Zündkabel von
Zündkerze abziehen und entfernt sichern. Motor und
Bauteile sind HEISS. Schwere Verbrennungen vermeiden
und alle Bauteile ausreichend abkühlen lassen.
2.6 SEITEN-AUSWURFABLENKBLECH EINBAUEN
SCHRITT 1: Recycling-Abdeckung entfernen. Siehe Kapitel
„Recycling-Betrieb“.
SCHRITT 2: Ablenkblech am Mähwerk anstelle der RecyclingAbdeckung anbringen und Folgendes sicherstellen: 1. Das
vordere Loch an der vorderen Außenseite des Ablenkblechs
passt über den Bolzen, an dem die Vorderseite der RecyclingAbdeckung ursprünglich befestigt war. 2. Der Schlitz oben am
Ablenkblech gleitet unter die Sicherungsmutter oben am
Mähwerk (unter rechter vorderer Ecke des Motors). 3. Der
Schlitz auf der hinteren Innenseite des Ablenkblechs gleitet auf
den Bolzen hinter die Hinterseite der Auswurföffnung, wo die
Rückseite der Recycling-Abdeckung ursprünglich befestigt
war. Zahnscheiben mit Innen-/Außenzähnen und
Drehgriffmuttern auf die Bolzen setzen und festschrauben.
Siehe Abb. 2.12.
HINTERER
SCHLITZ ÜBER
BOLZEN;
ZAHNSCHEIBE
UND
DREHGRIFFMUTTER
MONTIEREN
2.7 GRASFANGBEUTELADAPTER EINBAUEN
(Option bei einigen Modellen)
SCHRITT 1: Recycling-Abdeckung entfernen. Siehe Kapitel
„Recycling-Betrieb“.
SCHRITT 2: Grasfangbeuteladapter am Mähwerk anstelle der
Recycling-Abdeckung anbringen und Folgendes sicherstellen: 1.
Das vordere Loch an der vorderen Außenseite des Ablenkblechs
passt über den Bolzen, an dem die Vorderseite der RecyclingAbdeckung ursprünglich befestigt war. 2. Der Schlitz oben am
Ablenkblech gleitet unter die Sicherungsmutter oben am Mähwerk
(unter rechter vorderer Ecke des Motors). 3. Der Schlitz auf der
hinteren Innenseite des Ablenkblechs gleitet auf den Bolzen hinter
die Hinterseite der Auswurföffnung, wo die Rückseite der
Recycling-Abdeckung ursprünglich befestigt war. Zahnscheiben
mit Innen-/Außenzähnen und Drehgriffmuttern auf die Bolzen
setzen und festschrauben. Siehe Abb. 2.13.
SCHRITT 3: Anreißstarterschnur um Außenseite der
Riemenscheibe führen. Siehe Abb. 2.13. (HINWEIS: Die
Anreißstarterschnur muss ggf. gelockert werden. Siehe
„Griffbaugruppe“.)
OBERER
SCHLITZ
UNTER
MUTTER
VORDERES LOCH ÜBER BOLZEN;
ZAHNSCHEIBE UND
DREHGRIFFMUTTER MONTIEREN
Abb. 2.12
HINTERER
SCHLITZ ÜBER
BOLZEN;
ZAHNSCHEIBE
UND
DREHGRIFFMUTTER
MONTIEREN
2.8 GRASFANGBEUTEL EINBAUEN
(Grasfangbeutel mit Klappe)
SCHRITT 1: Den Grasfangbeuteladapter montieren.
Siehe Abschnitt „Grasfangbeuteladapter einbauen“.
SCHRITT 2: Den Grasfangbeutel einbauen, dazu die die
Adapterabdeckung (nicht abgebildet) anheben und den
Verbinder über den Adapterflansch schieben. Siehe Abb.
2.14.
SCHRITT 3: Die Haken des Grasfangbeutels an der
Querstange der Tragegriffe einhaken. Siehe Abb. 2.14.
ANREISSSTARTERSCHNUR UM
RIEMENSCHEIBE FÜHREN
Abb. 2.13
TÜR- UND BEUTELHAKEN AN MITTLERER
GRIFFQUERSTANGE EINHAKEN
VERBINDER ÜBER
FLANSCH SCHIEBEN
Abb. 2.14
OBERER
SCHLITZ
UNTER
MUTTER
VORDERES
LOCH ÜBER
BOLZEN;
ZAHNSCHEIBE
UND
DREHGRIFFMUTTER
MONTIEREN
WARNUNG
NUR mit ordnungsgemäß montiertem, komplettem
Grasfangbeutel und allen Schutzvorrichtungen
betreiben. Die Bauteile des Grasfangbeutels unterliegen
normalem Verschleiß während des Gebrauchs.
Regelmäßig kontrollieren und verschlissene oder
beschädigte Bauteile sofort ersetzen.
Grasfangbeutel in SNAPPER-Produkten sind aus
Textilmaterial und können bei normalem Einsatz altern
und verschleißen. Vor jedem Einsatz den Zustand der
Beutel kontrollieren. Verschlissene oder beschädigte
Grasfangbeutel sofort durch Neue ersetzen, die von
SNAPPER empfohlen werden. Der Grasfangbeutel ist
bei einigen Modellen eine Option.
10
Page 51

Kapitel 3 - WARTUNGSANLEITUNG
Not for
Reproduction
3.1 EINFÜHRUNG
Um die Qualität des Rasenmähers beizubehalten,
nur SNAPPER-Markenersatzteile verwenden.
Wenden Sie sich an einen örtlichen SNAPPERHändler für Ersatzteile und Hilfe bei der Wartung.
Für das richtige Ersatzteil oder Informationen zu
einem bestimmten Rasenmäher immer die Modellund Seriennummer angeben.
Motors angegeben mit Öl auffüllen. Nicht überfüllen.
WARNUNG
KEINE Einstellungs-, Wartungs- oder Servicearbeiten
bei laufendem Motor oder drehendem Messer
durchführen. Motor und Messer AUSSCHALTEN.
Zündkabel von Zündkerze abziehen und entfernt
sichern. Motor und Bauteile sind HEISS. Schwere
Verbrennungen vermeiden und alle Bauteile
ausreichend abkühlen lassen. Schwere
Lederhandschuhe beim Umgang mit oder Arbeiten
nahe der Schneidmesser tragen. Messer sind extrem
scharf und können schwere Verletzungen
verursachen.
3.2 INSPEKTION - NACH DEN ERSTEN 5
BETRIEBSSTUNDEN
3.2.1. MOTORÖL WECHSELN
WICHTIG: Den Kraftstofftank ablassen, bevor die
Maschine gekippt wird. Den Rasenmäher NICHT mit
dem Vergaser oder der Zündkerze nach unten kippen. Öl
aus dem Kurbelgehäuse sättigt das Luftfilter und
erschwert so das Starten des Motors, falls er überhaupt
angeht. Wenn es zu Verunreinigung kommt, muss das
Luftfilter ersetzt werden.
1. Siehe Motor-Benutzerhandbuch für empfohlene
Ölspezifikationen, Verfahren und Ölwechselintervalle.
Für einen einfachen und sauberen Ölwechsel den Mäher
auf die Seite legen und das Öl ablassen, siehe Abb. 3.1.
Das Öl durch das Rohr des Messstabs in einen Behälter
ablaufen lassen. Ausreichende Zeit für ein vollständiges
Ablaufen des Öls zulassen.
Abb. 3.1
2. Altöl vorschriftsmäßig entsorgen.
MÄHER AUF DIE SEITE LEGEN.
ÖLFÜLLSTUTZEN
WICHTIG: Den Kraftstofftank ablassen, bevor der
Rasenmäher gekippt wird. Den Rasenmäher NICHT mit
dem Vergaser oder der Zündkerze nach unten kippen. Öl
aus dem Kurbelgehäuse sättigt das Luftfilter und erschwert so
das Starten des Motors, falls er überhaupt angeht. Wenn es zu
Verunreinigung kommt, muss das Luftfilter ersetzt werden.
3.3 INSPEKTION - REGELMÄSSIG
Alle Wartungsarbeiten wie im Kapitel „Wartungsplan“ in
dieser Betriebsanleitung durchführen.
11
3. Den Motor wie in der Betriebsanleitung des
3.2.2. MESSER ÜBERPRÜFEN
1. Zündkabel von Zündkerze abziehen und entfernt
sichern.
2. Den Rasenmäher kippen und auf seine Hinterräder
stellen, um an die Kopfschraube des Messers zu
gelangen. Den Rasenmäher nicht mit der Zündkerze
oder dem Vergaser nach unten kippen. Siehe Abb.
3.2.
3. Das Anziehmoment der Messerrückhalteschraube
überprüfen. Das empfohlene Anziehmoment beträgt
54 Nm. Siehe Abb. 3.2.
4. Messer auf Schärfe, Verschleiß und Beschädigung
überprüfen. Siehe Kapitel „Verschleißgrenzen
Messer“.
Empfohlenes
Anzugsmoment für
Messerkopfschraube
ist 54 Nm.
Abb. 3.2
3.2.3. MOTORANTRIEBSRIEMEN ÜBERPRÜFEN
1. Den Motorantriebsriemen visuell auf Risse,
Ausfransen, zerschnittene oder freiliegende
Riemenstränge überprüfen. Bei Verschleiß oder
Beschädigung Riemen vor dem Betreiben des
Rasenmähers ersetzen. Wenden Sie sich an einen
örtlichen SNAPPER-Händler für Ersatzteile und
Hilfe bei der Wartung.
3.3.1. Motor
Den Motor gemäß Betriebsanleitung des Motors
warten.
3.3.2. Luftfilter
Siehe Wartungsanleitung in der Betriebsanleitung des
Motors.
Page 52

Kapitel 3 - WARTUNGSANLEITUNG
Not for
Reproduction
WARNUNG
KEINE Einstellungs-, Wartungs- oder
Servicearbeiten bei laufendem Motor oder
drehendem Messer durchführen. Motor und Messer
AUSSCHALTEN. Zündkabel von Zündkerze abziehen
und entfernt sichern. Motor und Bauteile sind HEISS.
Schwere Verbrennungen vermeiden und alle
Bauteile ausreichend abkühlen lassen. Schwere
Lederhandschuhe beim Umgang mit oder Arbeiten
nahe der Schneidmesser tragen. Messer sind extrem
scharf und können schwere Verletzungen
verursachen.
3.3.3. Motoröl
Siehe Wartungsanleitung in der Betriebsanleitung
des Motors.
3.3.4. Prüfen des Sicherheitssystems
1. Den Rasenmäher anlassen.
2. Den Bügel loslassen. Der Motor muss sich
innerhalb von 3 Sekunden abstellen.
Wenn sich der Motor nicht abstellt, den
Rasenmäher nicht verwenden. Den Rasenmäher
zum Service zu einem autorisierten Händler
bringen.
3.3.5. Radantriebsbauteile
Schmutzaufbau an oder um Getriebe, Achsen,
Spannrolle, Riemenscheiben, Riemen usw. Beuteile
auf Verschleiß oder Beschädigung überprüfen.
Verschlissene oder beschädigte Bauteile sofort
ersetzen.
3.4 LAGERVERFAHREN
Siehe Betriebsanleitung des Motors für Anweisungen
zum Vorbereiten des Motors auf die Lagerung. Den
Rasenmäher folgendermaßen für die Lagerung am Ende
der Saison vorbereiten:
1. Kraftstoff aus dem Kraftstofftank ablassen und
den Motor laufen lassen, bis kein Kraftstoff mehr im
Vergaser ist.
2. Das Zündkabel von der Zündkerze abziehen
und entfernt sichern, bevor irgendwelche
Vorbereitungen getroffen werden.
3. Alle Öffnungen mit Klebeband verschließen,
damit kein Spritzwasser beim Waschen in das
Auspuff- oder Ansaugluftsystem gelangen kann.
4. Den Rasenmäher auf seine Hinterräder stellen
und die Unterseite des Mähwerks gründlich
reinigen. Den Rasenmäher nicht mit der Zündkerze
oder dem Vergaser nach unten kippen.
Grasansammlungen mit einem Kittmesser oder
einer Drahtbürste entfernen.
5. Freigelegtes Metall mit einem leichten Ölfilm
überziehen, damit es nicht rostet.
6. Bei selbstfahrenden Modellen den
Geschwindigkeitsregler auf die langsame Stellung
(Schildkröte) zurückbewegen, um ein Dehnen des
Riemens bzw. der Spannrollenfeder zu vermeiden.
7. Die Mähergriffe vorsichtig einklappen, dabei die
Steuerkabel biegen, damit sie nicht beschädigt
werden.
8. Den Rasenmäher in einem Gartenhaus oder
einem anderen trockenen Bereich lagern, der
witterungsgeschützt ist.
12
Page 53

Kapitel 4 – REPARATUR
Not for
Reproduction
WARNUNG
KEINE Einstellungs-, Wartungs- oder Servicearbeiten
bei laufendem Motor oder drehendem Messer
durchführen. Motor und Messer AUSSCHALTEN.
Zündkabel von Zündkerze abziehen und entfernt
sichern. Motor und Bauteile sind HEISS. Schwere
Verbrennungen vermeiden und alle Bauteile
ausreichend abkühlen lassen. Schwere
Lederhandschuhe beim Umgang mit oder Arbeiten
nahe der Schneidmesser tragen. Messer sind extrem
scharf und können schwere Verletzungen
verursachen.
4.1 MESSER WECHSELN
4.1.1. VERSCHLEISSGRENZE
STANDARDMESSER
1. Das Messer regelmäßig auf Zeichen für starken
Verschleiß oder Beschädigung kontrollieren. Siehe
Abb. 4.1.
NEUES
MESSER
VERSCHLEISSGRENZE
(KERBENANSATZ)
GEFÄHRLICHER
ZUSTAND!
NICHT IM RASENMÄHER
VERWENDEN!
DURCH NEUES MESSER
ERSETZEN.
3. Das Messer ausbauen. Siehe Abb. 4.2.
MESSERNABE
FLANSCH
MESSER
KEGELSCHEIBE
(Konkave Seite
nach oben)
KOPFSCHRAUBE
Abb. 4.2
4. Das Messer auf einer Schleifscheibe in einem
Winkel von 22 bis 28 Grad schleifen. Das Messer
NICHT über die Originalschnittkante hinaus
schleifen. Siehe Abb. 4.3.
DAS MESSER
NICHT ÜBER DIE
ORIGINALSCHNITT
KANTE HINAUS
SCHLEIFEN
22-28°
SICHERSTELLEN,
DASS
MESSERNABE
ZWISCHEN
FLANSCHEN
SITZT
MESSERSPITZE
Abb. 4.1
WARNUNG
KEIN Messer verwenden, das Zeichen starken
Verschleißes oder starker Beschädigung aufweist.
Siehe Kapitel „MESSER WECHSELN“ für richtiges
Inspektions- und Wartungsverfahren für das Messer.
4.1.2. MESSER SCHLEIFEN
1. Zündkabel von Zündkerze abziehen und entfernt
sichern.
WICHTIG: Den Kraftstofftank ablassen, bevor der
Rasenmäher gekippt wird. Den Rasenmäher NICHT
mit dem Vergaser oder der Zündkerze nach unten
kippen. Öl aus dem Kurbelgehäuse sättigt das Luftfilter
und erschwert so das Starten des Motors, falls er
überhaupt angeht. Wenn es zu Verunreinigung kommt,
muss das Luftfilter ersetzt werden.
2. Den Rasenmäher auf seine Hinterräder hoch
kippen. Den Rasenmäher nicht mit der Zündkerze
oder dem Vergaser nach unten kippen.
ENDANSICHT
MESSER
ORIGINALSCHNITTKANTE
Abb. 4.3
5. Das Messer auf Unwucht überprüfen. Falls
erforderlich, die Unwucht durch Schleifen des
schweren Messerendes korrigieren.
6. Das Messer wieder einbauen. Siehe Abb. 4.2.
Das Anzugsmoment der Messerrückhalteschraube
überprüfen. Das empfohlene Anzugsmoment
beträgt 54 Nm.
13
Page 54

FEHLERSUCHE
Not for
Reproduction
PROBLEM MÖGLICHE URSACHE ABHILFE
1. Kraftstofftank leer. 1. Kraftstofftank mit frischem Kraftstoff betanken. Motor startet nicht mit
Anreißstarter
Motor stirbt im Betrieb
ab
Motor verliert Leistung 1. Motor-Vorreiniger oder -Luftfilter schmutzig. 1. Filter reinigen oder ersetzen.
Starke Vibrationen 1. Messer beschädigt, unwuchtig oder verbogen. 1. Messer warten.
Rasenmäher bewegt
sich nicht oder verliert
Traktion
(Selbstfahrende
Modelle)
2. Motor muss vorgefüllt werden. 2. Vorfüllen (Primer). Siehe Motor-Betriebsanleitung.
3. Zündkabel nicht angeschlossen. 3. Zündkabel auf Zündkerze stecken.
1. Messerhebel gelöst oder nicht fest am Griff
2. Kraftstofftank leer. 2. Bis zum richtigen Füllstand auftanken.
3. Motor-Vorreiniger oder -Luftfilter schmutzig. 3. Von allem Unrat befreien.
4. Zündkerze defekt oder Elektrodenabstand falsch
5. Wasser, Schmutz oder alter Kraftstoff in der
2. Zündkerze fehlerhaft. 2. Zündkerze warten.
3. Wasser, Schmutz oder alter Kraftstoff in der
2. Lose Messerbauteile. 2. Lose Teile warten und anziehen.
3. Auftrieb lose oder fehlt (sofern vorhanden). 3. Auftriebe ersetzen. Auf richtiges Anzugsmoment
4. Riemen klumpig oder eingerissen. 4. Einen zugelassenen SNAPPER-Händler fragen.
festgehalten.
eingestellt.
Kraftstoffanlage.
Kraftstoffanlage.
1. Schmutzansammlung an oder um
Radantriebsbauteile(n).
2. Getriebekupplungsseilzug muss eingestellt
werden.
3. Antriebsriemen muss ersetzt werden.
4. Getriebe beschädigt.
1. Messerhebel muss bei Mäherbetrieb immer fest am
Griff anliegen.
4. Zündkerze warten.
5. Kraftstoffanlage ablassen und reinigen.
3. Kraftstoffanlage ablassen und reinigen.
anziehen.
1. Schmutz beseitigen.
2. Einen zugelassenen SNAPPER-Händler fragen.
3. Einen zugelassenen SNAPPER-Händler fragen.
4. Einen zugelassenen SNAPPER-Händler fragen.
Geräusch vom Getriebe
(Selbstfahrende
Modelle)
Fahrgeschwindigkeit zu
schnell / zu langsam.
Fahrgeschwindigkeit
kann nicht eingestellt
werden.
(Selbstfahrende Modelle
mit variabler
Geschwindigkeit)
Schneidet Gras
ungleichmäßig
Schlechter Grasauswurf
Öl läuft aus
1. Getriebekupplungsseilzug muss eingestellt werden.
2. Getriebe beschädigt.
1. Schmutzansammlung an oder um
Fahrhebelbauteile(n).
2. Fahrhebel muss eingestellt werden. 2. Fahrhebel einstellen.
3. Antriebsriemen muss ersetzt werden.
4. Getriebe beschädigt.
1. Schnitthöhe zu niedrig oder zu hoch. 1. Schnitthöhe einstellen.
2. Fahrgeschwindigkeit zu schnell. 3. Geschwindigkeitsregler auf eine langsamere
3. Schnitt von links nach rechts gestuft.
4. Mähwerk von vorn nach hinten zu stark geneigt.
5. Messer stumpf oder beschädigt.
1. Fahrgeschwindigkeit zu schnell. 1. Geschwindigkeitsregler auf eine langsamere
2. Gras ist nass.
3. Messer stark verschlissen oder beschädigt.
4. Mähgut und Schmutz unter Mähwerk
angesammelt.
5. Falsches Messer am Mähwerk eingebaut.
6. Messer nicht richtig im Mähwerk eingebaut.
1. Motorgehäuse undicht.
2. Erst mähen, wenn Gras trocken ist.
4. Schnitthöhe mit Höheneinstellhebeln einstellen.
6. Schnittkanten schleifen oder Messer ersetzen.
3. Messer warten.
6. Messer richtig einbauen.
1. Einen zugelassenen SNAPPER-Händler fragen.
2. Einen zugelassenen SNAPPER-Händler fragen.
1. Schmutz beseitigen.
3. Einen zugelassenen SNAPPER-Händler fragen.
4. Einen zugelassenen SNAPPER-Händler fragen.
Geschwindigkeit stellen.
5. Schnitthöhe mit Höheneinstellhebeln einstellen.
Geschwindigkeit stellen.
4. Mähwerk reinigen.
5. Richtiges SNAPPER-Messer einbauen.
1. Einen zugelassenen SNAPPER-Händler
aufsuchen.
2. Ablassschraube überprüfen und festschrauben.
3. Sicherstellen, dass Messstab und Ölfüllschraube
fest an ihrem Platz sind.
14
Page 55

Not for
Reproduction
TEIL DURCHZUFÜHRENDE
WARTUNG
Motoröl
Ölstand überprüfen Seite 7
WARTUNGSPLAN
BEZUG
IMMER
Std.
X
5
25
Std.
50
Std.
100
Std.
JEDE
SAISON
Vorreiniger
Luftfilter
Zündkerze
Motorkühlanlage
Antriebsriemen
Messer
Mähwerk
Radantriebs-
bauteile
Buchsen der
vorderen
Schwenkrollen
(nur Modelle mit
Schwenkrollen)
* Öl alle 25 Betriebsstunden bei Betrieb unter starker Last oder hohen Temperaturen wechseln.
**Unter staubigen Bedingungen oder hoher Luftverschmutzung häufiger reinigen
WARTUNGS-/ERSATZTEILE
Erster Ölwechsel Seite 11
Regelmäßiger
Ölwechsel
Schwammeinsatz
reinigen
Reinigen oder ersetzen Motorbetriebs-
Ersetzen MotorbetriebsMotorhaube und
Kühlrippen reinigen
Auf Verschleiß und
Spannung überprüfen
Auf Verschleiß u.
Beschädigung
überprüfen, ggf. ersetzen
Von
Schmutzansammlung
befreien
Von Schmutzansammlung befreien,
auf Verschleiß oder
Beschädigung
überprüfen
Schmieren Seite 8
Seite 11
Motorbetriebs-
anleitung
anleitung
anleitung
Motorbetriebsanleitung
Seite 11
Seite 13
Seite 7
Seite 12
X
X*
X**
X**
X
X**
X
X
X
X
X
WARTUNGSTEILE
Messersteuerkabel 7100074
Radantriebsteuerkabel 7100263
Geschwindigkeitsreglerkabel 7100264
Messer (Doppelwelle) 7100242
Antriebsriemen 7100058
Teilehandbuch für selbstfahrende Mäher mit 53 cm Mähwerk 7006205
Teilehandbuch für selbstfahrende Mäher mit 53 cm Mähwerk
(Schwenkrad)
15
7006206
Page 56

AUFKLEBERIDENTIFIKATION
Not for
Reproduction
DIE ANWEISUNGEN UND
WARNUNGEN IN DEN
BETRIEBSANLEITUNGEN, AM
MOTOR DES UND DEN
ANBAUTEN ZUM
RASENMÄHER LESEN,
VERSTEHEN UND
BEFOLGEN.
WEIST AUF
MÖGLICHE,
SCHWERE
VERLETZUNGEN
DURCH DREHENDE
MESSER HIN.
(1) WARNUNGSANWEISUNGEN.
(2) ANWESENHEITSKONTROLLE BENUTZER: Pfeil
zeigt auf Benutzerhängebügel. Wenn Hängebügel
nach hinten gedreht wird, kann der Motor
angelassen werden und läuft wie vom drehenden
Pfeil angezeigt. Bei laufendem Motor dreht das
Messer wie im Symbol „Grasschnitt“ gezeigt. Wenn
der Hängebügel freigegeben wird und sich vordreht,
geht der Motor aus.
NICHT BETREIBEN,
OHNE DASS DER
GESAMTE
GRASFANGKORB
UND ALLE
SCHUTZVORRICHTU
NGEN AN IHREM
PLATZ SIND.
KINDER UND
ANDERE PERSONEN
VOM MÄHBEREICH
FERN HALTEN.
(3) GESCHWINDIGKEITSREGLER: Zeigt Fahrrichtung und Geschwindigkeitswahl durch Vor- oder
Zurückbewegen des Reglers an.
(4) KUPPLUNG: Wenn der Hebel zum Griff
zurückbewegt wird, greift die Friktionskupplung und
der Rasenmäher bewegt sich vorwärts. Wenn der
Hebel freigegeben wird, löst sich die Kupplung und
die Vorwärtsbewegung stoppt.
16
Page 57

AUFKLEBERIDENTIFIKATION
Not for
Reproduction
(5) LWA-98: Zertifizierung nach europäischer
Lärmschutzrichtlinie.
(6) CE-AUFKLEBER: Weist auf europäische
Zertifizierung hin.
17
Page 58

Not for
Reproduction
18
Page 59

NOTIZEN
Not for
Reproduction
19
Page 60

Sicherheitsanweisungen & Betriebsanleitung für
Not for
Reproduction
EUROPÄISCHE
SELBSTFAHRENDE
53 cm „EASY LINE“
RASENMÄHER
WICHTIG
Snapper-Produkte sind mit Motoren ausgerüstet, die alle geltende Emissionsanforderungen zum Herstellungsdatum erfüllen oder
übertreffen. Die Aufkleber auf diesen Motoren enthalten sehr wichtige Emissionsinformationen und Sicherheitswarnungen. Alle
Warnungen und Anweisungen in dieser Betriebsanleitung, dem Motorhandbuch und auf der Maschine, dem Motor und den
Anbauten lesen, verstehen und befolgen. Wenn Sie Fragen zu Ihrem Snapper-Produkt haben, wenden Sie sich bitte an Ihren
zugelassenen lokalen Snapper-Händler oder direkt an den Snapper Customer Service, McDonough, GA 30253, USA. Tel.: +1 800
935-2967.
Motornennleistungsinformationen: Die Bruttonennleistung auf den Typenschildern der Benzinmotormodelle entsprechen SAE
(Society of Automotive Engineers) Code J1940 (Verfahren zur Ermittlung von Nennleistung und -drehmoment von Kleinmotoren) und
die Nennleistung wurde auf Grundlage von SAE J1995 (Revision 2002-05) ermittelt und korrigiert. Drehmomentwerte werden bei
3060 U/min, Leistungswerte bei 3600 U/min ermittelt. Die tatsächliche Bruttonennleistung des Motors wird geringer sein und wird u. a.
durch Umgebungsbetriebsbedingungen und Schwankungen von Motor zu Motor beeinflusst. Auf Grund der großen Breite an
Produkten, in denen Motoren eingesetzt werden, und der Vielzahl von Umgebungsbedingungen, die den Betrieb der Maschine
beeinflussen, erreicht der Benzinmotor ggf. die angegebene Nennleistung nicht, wenn er in einer motorbetriebenen Maschine
verwendet wird (tatsächliche „ortsgebundene“ oder Netto-Leistung). Dieser Unterschied ist auf verschiedene Faktoren
zurückzuführen, u. a. Nebenverbraucher (Luftfilter, Auspuff, Ladesystem, Kühlanlage, Vergaser, Kraftstoffpumpe usw.),
Einschränkungen der Anwendung, Umgebungsbetriebs-bedingungen (Temperatur, Luftfeuchtigkeit, Seehöhe) und Schwankungen
von Motor zu Motor. Auf Grund von Fertigungs- und Kapazitätseinschränkungen kann Briggs & Stratton den Motor dieser Serie
wahlweise durch einen Motor mit höherer Leistung ersetzen.
20
Page 61

Veiligheidsvoorschriften en gebruikshandleiding voor
Not for
Reproduction
EUROPESE
21” (53 CM ) ‘EASY LINE’
LOOPMAAIERS
VERKLARING VAN HET MODELNUMMER
E S P V 21 S
EUROPEES MODEL OPTIENAAM
MODELNAAM MAAIBREEDTE
ZELFRIJDEND VARIABELE SNELHEID
E – Europees model P – Zelfrijdend model V – Variabele snelheid 21” (53 cm) Maaibreedte
S – ‘Easy Line’ S – Zwenkende voorwielen
Dank u voor de aanschaf van een SNAPPER-product! Gelieve vóór u de Loopmaaier gebruikt deze handleiding zorgvuldig te lezen
en in het bijzonder aandacht te schenken aan de "BELANGRIJKE VEILIGHEIDSVOORSCHRIFTEN" op bladzijden 2 & 3. O nthoud
dat alle gemotoriseerde machines gevaarlijk kunnen zijn wanneer men ze verkeerd gebruikt. Onthoud dat veiligheid een voorzichtig
gebruik veronderstelt. Respecteer de instructies en gebruik uw gezond verstand. Bewaar deze originele instructies voor
toekomstig gebruik.
BRIGGS & STRATTON YARD POWER PRODUCTS GROUP
COPYRIGHT © 2010, BRIGGS & STRATTON CORPORATION
MILWAUKEE, WI, USA. ALLE RECHTEN VOORBEHOUDEN
MODELLEN
ESPV21 (7800064)
ESPV21S (7800065)
Page 62

BELANGRIJKE VEILIGHEIDSVOORSCHRIFTEN
Not for
Reproduction
WAARSCHUWING: Deze krachtige maaier kan handen en voeten amputeren en voorwerpen wegslingeren die verwondingen en
schade kunnen veroorzaken! Het niet naleven van deze VEILIGHEIDSVOORSCHRIFTEN kan de gebruiker of andere personen
ernstig of zelfs dodelijk verwonden. De eigenaar van de machine moet deze voorschriften begrijpen en mag de maaier uitsluitend
laten gebruiken door personen die de voorschriften begrijpen. Elke persoon die de machine gebruikt moet bij zijn volle verstand
zijn, lichamelijk gezond, en niet onder de invloed van eender welke stof die het gezicht, de motoriek of het beoordelingsvermogen
kan beïnvloeden. Als u vragen over uw machine hebt waarop uw distributeur het antw oord schuldig blijft, belt of schrijft u naar de
klantendienst van SNAPPER, McDonough, Georgia 30253, telefoon 00-1-800-935-2967.
VOORZORGEN VOOR KINDEREN
Er kunnen tragische ongevallen gebeuren als de gebruiker niet
alert is voor de aanwezigheid van kinderen. Kinderen worden
vaak aangetrokken door de machine en het maaien. Veronderstel
nooit dat kinderen op de plaats zullen blijven waar u hen het
laatst hebt gezien.
1. HOUD KINDEREN UIT DE BUURT van de maaizone en
zorg dat ze door een verantwoordelijke volwassene (niet
de bestuurder) in de gaten worden gehouden.
2. LAAT GEEN kinderen in de tuin wanneer de machine in
gebruik is. Schakel de machine UIT wanneer iemand het
terrein betreedt.
3. LAAT DE MACHINE niet gebruiken door kinderen onder
de 13 jaar.
4. LAAT ALLEEN volwassenen of verantwoordelijke
tieners met het beoordelingsvermogen van een
volwassene en onder volwassen toezicht de machine
gebruiken.
Trek de maaier NIET achterwaarts, tenzij het volstrekt
5.
noodzakelijk is. KIJK terwijl u achterwaarts gaat
achterom en naar omlaag, zodat u kinderen,
huisdieren en gevaren kunt ZIEN.
6. WEES BIJZONDER VOORZICHTIG wanneer u blinde
hoeken nadert, struiken, bomen of andere objecten die
het gezicht belemmeren.
GEBRUIK OP EEN HELLING
1. Hellingen zijn een belangrijke oorzaak van ongevallen
door uitglijden en vallen, die tot ernstige verwondingen
kunnen leiden. Wees op elke helling extra voorzichtig.
Maai de helling NIET als u zich niet veilig voelt.
2. Maai heen en weer in de breedte van de helling, nooit op
en neer. Wees UITERST VOORZICHTIG als u op een
helling van richting verandert. MAAI NIET op steile
hellingen of op andere terreinen waar de stabiliteit of de
tractie onzeker zijn.
3. Wees extra voorzichtig met graszakken en andere
uitbreidingen; ze beïnvloeden de hanteerbaarheid en de
stabiliteit van de machine.
VOORBEREIDING
1. Lees deze handleiding en respecteer de
waarschuwingen en de voorschriften in deze
handleiding, op maaimachine, op de motor en op de
uitbreidingen. Zorg dat u de bedieningen en het juiste
gebruik van de machine kent voor u ze start.
2. De machine mag uitsluitend worden gebruikt door rijpe,
verantwoordelijke personen die de nodige instructies
hebben ontvangen.
VOORBEREIDING
(vervolg van vorige kolom)
3. Uit de statistieken blijkt dat gebruikers van 60 jaar en
ouder betrokken zijn bij een hoog percentage
ongevallen met maaiers. Deze gebruikers moeten
beoordelen of zij in staat zijn om de maaier voldoende
veilig te bedienen om zichzelf en anderen tegen ernstige
verwondingen te beschermen.
4. Ga uiterst voorzichtig om met brandstof. Brandstof is
ontvlambaar en dampen kunnen ontploffen. Gebruik
uitsluitend goedgekeurde brandstofcontainers. Verwijder
NOOIT het deksel van de brandstoftank en voeg nooit
brandstof toe terwijl de motor draait. Voeg in de buitenlucht
alleen brandstof toe wanneer de motor uitgeschakeld en
koud is. Verwijder gemorste brandstof van de machine.
ROOK NIET.
5. Controleer het terrein dat gemaaid moet w orden. Verwijder
alle voorwerpen zoals speelgoed, kabels, stenen,
boomtakken en andere voorwerpen die verwondingen
kunnen veroorzaken als ze door het mes worden
weggeslingerd of het maaien hinderen. Let ook op de plaats
van kuilen, stronken en andere mogelijke gevaren.
6. Houd mensen en dieren op een veilige afstand van de
machine. Indien iemand het terrein betreedt, moet u
onmiddellijk de messen STOPPEN, de motor STOPPEN
en de machine STOPPEN.
7. Controleer de beschermkappen, deflectors, schakelaars,
mesregelaars en andere veiligheidsvoorzieningen
regelmatig op hun goede werking en plaatsing.
8. Zorg dat alle veiligheidslabels duidelijk leesbaar zijn.
Vervang ze als ze beschadigd zijn.
9. Bescherm uzelf tijdens het maaien. Draag een
veiligheidsbril, een lange broek en stevig schoeisel.
MAAI NIET op blote voeten of sandalen.
10. Zorg dat u weet hoe u het mes en de motor snel kunt
UITSCHAKELEN, zodat u voorbereid bent op
noodsituaties.
11. Wees bijzonder voorzichtig wanneer u de machine op
een aanhangwagen of vrachtwagen laadt of lost.
12. Controleer de onderdelen van de grasbak regelmatig op
sporen van slijtage of beschadiging. Vervang ze indien
nodig, om verwondingen te voorkomen als gevolg van
weggeslingerde voorwerpen die door zwakke of
versleten plaatsen zouden scheuren.
VEILIG OMGAAN MET BENZINE
Om persoonlijke letsels of schade aan eigendommen te
voorkomen, moet u uiterst voorzichtig met benzine omgaan.
Benzine is buitengewoon ontvlambaar en produceert
explosieve dampen.
1. Doof alle sigaretten, sigaren, pijpen en andere bronnen
van vuur.
2. Gebruik uitsluitend goedgekeurde benzinecontainers.
2
Page 63

BELANGRIJKE VEILIGHEIDSVOORSCHRIFTEN
Not for
Reproduction
VEILIG OMGAAN MET BENZINE
(vervolg van de vorige bladzijde)
3. Verw ijder de tankstop NIET en vul de tank NIET bij terwijl
de motor draait. Laat de motor afkoelen voor u bijtankt.
4. Vul de brandstoftank NIET binnenshuis.
5. Bewaar de machine of brandstofcontainers NIET
binnenhuis, in de buurt van open vuur, vonken of
waakvlammen van bijvoorbeeld een boiler of andere
toestellen.
6. Vul een brandstofcontainer NOOIT in een voertuig of op
een vrachtwagen of aanhangwagen met plastic vloer. Zet
de containers altijd op de grond, weg van het voertuig,
voor u ze vult.
7. Verwijder gasmotoren uit het voertuig of de
aanhangwagen en vul ze op de grond. Als dat onmogelijk
is, vult u ze met behulp van een draagbare container en
niet via een benzinepomp.
8. Start een benzinemotor NOOIT in een besloten voertuig of
aanhangwagen.
9. Houd het mondstuk altijd in contact met de rand van de
tank of container tot u klaar bent met het vullen. GEBRUIK
GEEN systeem dat de vergrendeling van het mondstuk
openhoudt.
10. Als u benzine op uw kleding morst, moet u onmiddellijk
andere kleren aantrekken.
11. De brandstoftank NOOIT overvullen. Plaats de stop terug
en draai hem stevig vast.
GEBRUIK
1. Houd uw handen en voeten UIT DE BUURT van draaiende
onderdelen. Blijf uit de buurt van de uitworp wanneer de
motor draait.
2. STOP de motor als u grindpaden, w andelpaden of wegen
oversteekt en in alle situaties waarin weggeslingerde
voorwerpen gevaar kunnen opleveren.
3. Maai alleen overdag of bij goed kunstlicht.
4. GEBRUIK DE MAAIER niet onder de invloed van alcohol of
drugs.
5. Als u een vreemd voorwerp raakt of als de maaier abnormaal
vibreert, STOPT u de motor, koppelt u de bougiekabel af en
bevestigt u hem uit de buurt van de bougie. Inspecteer de
maaier op schade en herstel de schade voor u opnieuw start.
6. MAAI NIET in de buurt van abrupte niveauverschillen,
grachten of dijken. U zou kunnen uitglijden en vallen.
7. KIJK UIT voor kuilen en andere verborgen gevaren. Hoog
gras kan obstakels verbergen. Blijf uit de buurt van grachten,
weggespoelde grond, duikers, omheiningen en
uitspringende objecten.
8. MAAI NIET op nat gras. Wees altijd op uw hoede voor
uitglijden. Houd de duwboom stevig vast. Stap rustig in
plaats van te lopen. Uitglijden kan verwondingen
veroorzaken.
9. Blijf ALTIJD achter de duwboom wanneer de motor draait
10. Laat de maaier NIET met draaiende motor achter. STOP DE
MESSEN en STOP DE MOTOR voor u om gelijk welke reden
de gebruikersplaats verlaat.
GEBRUIK
(vervolg van vorige kolom)
11. Voor u de maaier reinigt, herstelt of inspecteert, moet u
zorgen dat de motor, de messen en alle bewegende delen
GESTOPT ZIJN. Koppel de bougiekabel af en bevestig hem
uit de buurt van de bougie, om toevallig starten te
voorkomen.
12. STOP de motor en wacht tot de messen volledig
STILSTAAN voor u de graszak verwijdert en/of gras
opruimt
13. Gebruik de machine NIET als de grasvanger of de
beveiligingen niet volledig geïnstalleerd zijn en niet
operationeel zijn. Richt de uitwerpopening nooit op
mensen, voorbijrijdende auto's, vensters of deuren.
14. Werp het maaisel NIET uit tegen een muur of een
versperring. Het maaisel kan dan terugslaan in de richting
van de bestuurder.
15. Vertraag voor u draait.
16. Kijk uit voor verkeer in de omgeving of bij het oversteken
van wegen.
17. Laat de motor NIET draaien in een gesloten ruimte.
Uitlaatgassen bevatten koolmonoxide, een dodelijk vergif.
18. Gebruik uitsluitend door de fabrikant goedgekeurde
accessoires. Raadpleeg de instructies van de fabrikant
voor de juiste installatie en bediening van de accessoires.
ONDERHOUD EN OPSLAG
1. Bewaar de machine of een brandstofcontainer NOOIT in
een gesloten ruimte waar brandstofdampen in contact
zouden kunnen komen met een open vlam, een vonk of
een waakvlam, zoals van een boiler, oven, droger of een
ander gastoestel. Laat de motor afkoelen voor u de
machine in een gesloten ruimte plaatst. Bewaar de
brandstofcontainer buiten het bereik van kinderen, in een
goed geventileerd, onbewoond gebouw.
2. Zorg dat de motor vrij blijft van gras, bladeren of overtollig
vet, om het gevaar op brand of oververhitting van de motor
te beperken.
3. Wanneer u de brandstoftank laat leeglopen, vangt u de
brandstof op in een goedgekeurde container, buitenshuis
en uit de buurt van elke open vlam.
4. Zorg dat alle bouten, moeren en schroeven stevig
vastzitten. Controleer of alle splitpennen goed zijn
aangebracht.
5. Zorg altijd voor voldoende verluchting als u de motor
binnenshuis laat draaien. Uitlaatgassen bevatten
koolmonoxide, een reukloos en dodelijk vergif.
6. Voer onderhoud en afstellingen uitsluitend uit nadat de
motor gestopt is. Koppel de bougiekabel af en bevestig
hem uit de buurt van de bougie, om toevallig starten te
voorkomen.
7. Wijzig NOOIT de afstelling van de toerenregelaar en laat de
motor niet tegen een te hoog toerental draaien.
8. Controleer de graszak regelmatig op slijtage en
beschadiging, om te voorkomen dat voorwerpen zouden
worden weggeslingerd of bewegende onderdelen
bereikbaar zouden zijn. Vervang de glijder of de adapter
van de zak als hij gebroken of gebarsten is.
3
Page 64

ONDERHOUD EN OPSLAG
Not for
Reproduction
(vervolg van de vorige bladzijde)
9. Messen zijn scherp en kunnen snijden. Wanneer u ze
hanteert, moet u ze inpakken of dikke leren handschoenen
dragen. Wees altijd VOORZICHTIG.
10. Test de vonk NOOIT door de bougie naast het bougiegat
tegen de massa te houden: de vonk zou brandstofdampen
die uit de motor ontsnappen kunnen doen ontploffen.
11. Laat de machine minstens één keer per jaar nakijken door
een bevoegde SNAPPER distributeur. Laat de distributeur
eventuele nieuwe veiligheidsvoorzieningen installeren.
12. Gebruik uitsluitend originele SNAPPER onderdelen, als
garantie voor uw veiligheid en de kwaliteit van het
resultaat.
4
Page 65

INHOUD
Not for
Reproduction
BELANGRIJKE VEILIGHEIDSVOORSCHRIFTEN ..................................................... 2 - 4
INHOUD ..............................................................................................................................5
DEEL 1 - DE MACHINE LEREN KENNEN ........................................................................6
DEEL 2 - GEBRUIKSINSTRUCTIES............................................................................ 7-10
Checklist vóór het starten...................................................................................7
Motor en mes starten en stoppen.......................................................................7
Met de maaier rijden.............................................................................................8
De hoogte van de duwboom afstellen................................................................8
De maaihoogte afstellen......................................................................................9
Recycleren ............................................................................................................9
De zijdeflector installeren..................................................................................10
De adapter voor de graszak installeren ...........................................................10
De graszak installeren .......................................................................................10
DEEL 3 - ONDERHOUDSINSTRUCTIES .................................................................. 11-12
De motorolie vervangen.....................................................................................11
Het maaimes controleren ..................................................................................11
De aandrijfriem controleren ..............................................................................11
Onderhoud - Periodiek.......................................................................................11
Motor ................................................................................................................11
Luchtfilter.........................................................................................................11
Motorolie..........................................................................................................11
Componenten van de wielaandrijving ..........................................................12
Controleren van het v eiligheidsvergrendelsysteem....................................12
Opslagprocedure................................................................................................12
DEEL 4 - HERSTELLING .................................................................................................13
Het maaimes vervangen....................................................................................13
Het mes slijpen...................................................................................................13
PROBLEMEN OPLOSSEN ..............................................................................................14
ONDERHOUDSSCHEMA.................................................................................................15
Onderhoud/Reserveonderdelen........................................................................15
IDENTIFICATIE VAN DE LABELS............................................................................. 16-17
WAARBORG.....................................................................................................................18
5
Page 66

Deel 1 - DE MACHINE LEREN KENNEN
Not for
Reproduction
MESHENDEL
HANDVAT
STARTKOORD
HENDEL
MAAIHOOGTE
ACHTERAAN
1.1 INLEIDING
DEKSEL
RECYCLEERHUIS
Deze handleiding is opgesteld voor de gebruikers
van de SNAPPER ‘EASY LINE’ LOOPMAAIERS.
Zorg dat u de "BELANGRIJKE VEILIGHEIDSVOORSCHRIFTEN" op bladzijde 2 en 4 van deze
handleiding en alle veiligheidsberichten op de maaier
en zijn uitbreidingen leest, begrijpt en respecteert
voor u de maaier gebruikt.
HENDEL
RIJSNELHEID
HENDEL
WIELAANDRIJVING
FIGUUR 1.1
(MODEL ESPV21)
De tekeningen en illustraties in deze
handleiding dienen uitsluitend ter referentie en
kunnen verschillen van uw specifieke model.
Raadpleeg uw Snapper-distributeur als u
vragen zou hebben.
TANKDOP
1.2 BENAMINGEN
Figuur 1.1 toont de essentiële delen van de
SNAPPER ‘EASY LINE’ LOOPMAAIERS. Het is
aanbevolen dat elke gebruiker van deze machine
zich goed vertrouwd maakt met de bedieningen,
onderdelen en werking van de maaier voor hij ze
gebruikt. Specifieke details over de motor vindt u in
de afzonderlijke handleiding van de motor.
Bestudeer de twee handleidingen voor u de machine
gebruikt en bewaar ze, zodat u ze later kunt
raadplegen.
BELANGRIJK
OLIEDOP EN
PEILSTOK
MOTORINJECTOR
HENDEL MAAIHOOGTE
VOORAAN
6
Page 67

Deel 2 - GEBRUIKSINSTRUCTIES
Not for
Reproduction
2.1 CHECKLIST VÓÓR HET STARTEN
Voer de volgende controles en het gepaste
onderhoud uit vóór u de machine start.
2.1.1. Controleer of alle beschermkappen,
deflectors, de graszak, de adapter en deksels goed
aangebracht en stevig bevestigd zijn.
2.1.2. Controleer of de meshendel en de hendel
voor de wielaandrijving vrij bewegen. Zie Figuur 2.1.
MESHENDEL
2.2 STARTEN EN GEBRUIK
HENDEL
RIJSNELHEID
HENDEL
WIELAANDRIJVING
2.1.5. Doe brandstof in de tank nadat u de maaier
naar buiten hebt gebracht, zodat dampen veilig
kunnen ontsnappen. Zorg dat u na het vullen de
tankdop goed sluit. Raadpleeg de handleiding van
de motor voor de specificaties.
2.1.6. Reinig de buitenzijde van het maaihuis en de
motor en verwijder gemorste brandstof, zand, gras,
olie enz. Zorg dat het rooster van de luchtinlaat en
de koelvinnen altijd vrij zijn.
2.2.1. MOTOR EN MES
1. Druk driemaal op de knop om een koude motor
te starten. Zie Figuur 2.3. OPMERKING: Een
warme motor heeft geen injectie nodig.
INJECTORKNOP
(3 x DRUKKEN)
FIGUUR 2.1
2.1.3. Controleer de maaihoogte. Stel ze af op de
gewenste hoogte. Zie het gedeelte “De maaihoogte
afstellen”.
2.1.4. Controleer het oliepeil van de motor en voeg
olie tot het merkteken bereikt is. Raadpleeg de
handleiding van de motor voor de specificaties van de
olie. Zie Figuur 2.2.
FIGUUR 2.3
2. Trek de meshendel tegen de duwboom. Zie
Figuur 2.4.
3. Start de maaier:
Trek aan het startkoord om de motor te starten.
Zie Figuur 2.4.
TREK DE
MESHENDEL
TEGEN DE
DUWBOOM
HANDVAT
STARTKOORD
FIGUUR 2.4
FIGUUR 2.2
4. Laat de motor na het starten even opwarmen, tot
hij vlot draait.
OPMERKING: Stop de motor (en het mes) door de
meshendel los te laten.
7
Page 68

Deel 2 - GEBRUIKSINSTRUCTIES
(3)
Not for
Reproduction
2.2 STARTEN EN GEBRUIK
2.2.2. MET DE MAAIER RIJDEN
1. Start de motor. Raadpleeg het gedeelte
"Starten & Gebruik – Motor en mes”.
2. Plaats de hendel voor de rijsnelheid in de
gewenste stand. Zie Figuur 2.5.
3. Trek de hendel van de wielaandrijving tegen de
duwboom, om de aandrijving in te schakelen en
de maaier voorwaarts te doen rijden. Tijdens het
rijden kunt u de snelheid aanpassen door de
hendel voor de rijsnelheid te verplaatsen. Zie
Figuur 2.5.
2.3 STOPPEN
Stop de voorwaartse beweging door de hendel
van de wielaandrijving los te laten. Stop motor en
het mes door de meshendel los te laten.
2.3 DE ZWENKWIELEN BLOKKEREN (ALLEEN
ESPV21S)
U kunt het linkse zwenkwiel van de ESPV21S
blokkeren, zodat de maaier recht blijft rijden:
1. Rijd de maaier recht vooruit, zodat de pen van
het wenkwiel in lijn komt met de gleuven van de
vergrendelingsclip boven het linkse zwenkwiel. Zie
Figuur 2.6.
HENDEL
RIJSNELHEID
SNEL
TRAAG
FIGUUR 2.5
VERGRENDELINGSCLIP
WIELAANDRIJVING
ONTKOPPELEN
KOPPELEN
PEN IN LIJN
MET
INKEPINGEN
2. Plaats de grendel, links op de duwboom in de
stand “LOCK” om de clip over de pen te doen
sluiten. Zie Figuur 2.7.
3. Plaats de grendel in de andere positie om het
zwenkwiel los te maken. Zie Figuur 2.7.
ZWENKWIEL
GEBLOKKEERD
ZWENKWIEL
VRIJ
FIGUUR 2.7
2.4 DE HOOGTE VAN DE DUWBOOM AFSTELLEN
De hoogte van de duwboom kan als volgt worden
afgesteld:
1. Verwijder de T-knoppen en de bouten die de
onderzijde van de duwboom aan de
montagebeugels bevestigen.
2. Breng de gaten van de duwboom in lijn met
een van de drie afstellingsgaten van de
montagebeugel. Zie Figuur 2.8.
3. Plaats het beslag terug en draai stevig vast.
DUWBOOM
HOGE
LAGER
AFSTELLINGSGATEN
HOOGTE DUWBOOM
FIGUUR 2.8
ZWENKWIEL
FIGUUR 2.6
Voer GEEN afstellingen, onderhoud of herstellingen uit
terwijl de motor en het mes draaien. STOP de motor en
het mes. Verwijder de bougiekabel van de bougie en
bevestig hem uit de buurt van de bougie. De onderdelen
en de motor zijn HEET. Laat de motor en de onderdelen
voldoende afkoelen, om ernstige brandwonden te
voorkomen.
8
WAARSCHUWING
Page 69

Deel 2 - GEBRUIKSINSTRUCTIES
Not for
Reproduction
WAARSCHUWING
Voer GEEN afstellingen, onderhoud of herstellingen uit
terwijl de motor en het mes draaien. STOP de motor en
het mes. Verwijder de bougiekabel van de bougie en
bevestig hem uit de buurt van de bougie. De onderdelen
en de motor zijn HEET. Laat de motor en de onderdelen
voldoende afkoelen, om ernstige brandwonden te
voorkomen.
2.5 DE MAAIHOOGTE AFSTELLEN
1. Trek de grendel voor het afstellen van de
hoogte naar buiten en plaats op de gewenste
maaihoogte. Zie Figuur 2.9.
WAARSCHUWING
Stop de motor en het mes door de meshendel los te
laten voor u de maaihoogte afstelt.
HOOGSTE
MAAIHOOGTE
HOOGSTE
MAAIHOOGTE
2
3
4
5
6
7
5
6
7
1
4
LAAGSTE
MAAIHOOGTE
GRENDEL (IN
INKEPING 4)
VOORWIEL
(BEHALVE
ESPV21S)
3
2
1
GRENDEL (IN
INKEPING 4)
LAAGSTE
MAAIHOOGTE
ELKE INKEPING IS 0,5” (1,2 cm) HOGER
POSITIES VAN
DE INKEPINGEN
1.2”
(3 cm)
2.6 RECYCLEREN
OPMERKING: Voor de beste resultaten maait u ten hoogste
1/3 van de lengte van het gras en recycleert u ALLEEN als
het gras droog is.
1. Stel alle wielen af op de hoogste maaihoogte
(inkeping 7). Zie “De maaihoogte afstellen”.
2. Plaats de toerenregelaar in de stand "FAST"
(Konijn).
3. Plaats de hendel voor de rijsnelheid in de laagste
stand.
4. Begin langzaam te maaien. Als het gras erg dicht is,
plaatst u de vergrendelingen van de twee achterwielen
één inkeping lager dan die van de voorwielen, om het
recyclageresultaat te verbeteren.
OPMERKING: Het recyclagedeksel moet zich altijd
op de machine bevinden, tenzij u voor een
alternatieve afvoer kiest, zoals de zijwaartse
uitworp of de graszak.
OM HET RECYCLAGEDEKSEL TE VERWIJDEREN:
Verwijder de knopmoeren en de sluitringen aan binnenen buitenzijde die het recyclagedeksel aan het maaihuis
bevestigen. Verwijder het deksel. Zie Figuur 2.11.
INSTELLING VAN DE MAAIHOOGTE
FIGUUR 2.10
4.2”
(11 cm)
ACHTERWIEL
(ZELFDE VOOR
VOORWIEL ESPV21S)
2. Stel alle wielen af op dezelfde maaihoogte. De
hoogste maaihoogte komt overeen met inkeping 7.
De laagste maaihoogte komt overeen met
inkeping 1. Zie Figuur 2.10.
FIGUUR 2.9
VERWIJDER KNOPMOEREN
EN SLUITRINGEN
FIGUUR 2.11
9
Page 70

Deel 2 - GEBRUIKSINSTRUCTIES
Not for
Reproduction
WAARSCHUWING
Voer GEEN afstellingen, onderhoud of herstellingen uit
terwijl de motor en het mes draaien. STOP de motor en het
mes. Verwijder de bougiekabel van de bougie en bevestig
hem uit de buurt van de bougie. De onderdelen en de
motor zijn HEET. Laat de motor en de onderdelen
voldoende afkoelen, om ernstige brandwonden te
voorkomen.
2.6 DE ZIJDEFLECTOR INSTALLEREN
STAP 1: Verwijder het recyclagedeksel. Zie “Recycleren”.
STAP 2: Installeer de deflector op de plaats van het deksel op het
maaihuis. Zorg dat: 1) het voorste gat aan de buitenkant van de
deflector over de pen past, waar het recyclagedeksel bevestigd
was, 2) de gleuf bovenaan de deflector onder de moer aan de
bovenzijde van het maaihuis glijdt (onder de hoek rechts voor van
de motor) en 3) de gleuf aan de achterkant van de binnenzijde van
de deflector over de pen achter de achterzijde van de
uitwerpopening glijdt, waar de achterzijde van het recyclagedeksel
bevestigd was. Plaats sluitringen aan de binnen- en buitenzijde en
draai de knopmoeren stevig op de pennen vast. Zie Figuur 2.12.
ACHTERSTE
GLEUF OVER
PEN; PLAATS
SLUITRING EN
KNOPMOER
2.7 DE ADAPTER VOOR DE GRASZAK
INSTALLEREN
(Optie bij sommige modellen)
STAP 1: Verwijder het recyclagedeksel. Zie “Recycleren”.
STAP 2: Installeer de adapter op de plaats van het deksel op het
maaihuis. Zorg dat: 1) het voorste gat aan de buitenkant van de
adapter over de pen past, waar het recyclagedeksel bevestigd
was, 2) de gleuf bovenaan de adapter onder de moer aan de
bovenzijde van het maaihuis glijdt (onder de hoek rechts voor van
de motor) en 3) de gleuf aan de achterkant van de binnenzijde van
de adapter over de pen achter de achterzijde van de
uitwerpopening glijdt, waar de achterzijde van het recyclagedeksel
bevestigd was. Plaats sluitringen aan de binnen- en buitenzijde en
draai de knopmoeren stevig op de pennen vast. Zie Figuur 2.13.
STAP 3: Leid het startkoord langs de buitenzijde van de
poelie. Zie Figuur 2.13. (OPMERKING: Het is mogelijk dat
u het startkoord losser moet maken.
BOVENSTE
GLEUF ONDER
MOER
FIGUUR 2.12
VOORSTE GAT
OVER PEN;
PLAATS
SLUITRING EN
KNOPMOER
ACHTERSTE GLEUF
OVER PEN; PLAATS
SLUITRING EN
KNOPMOER
2.8
(Zak van het deurtype)
Gebruik de maaier NIET zonder de volledige grasvanger of de
afscherming. De onderdelen van de grasvanger slijten bij normaal
gebruik. Inspecteer de grasvanger regelmatig en vervang versleten
of beschadigde onderdelen onmiddellijk.
De graszakken van de SNAPPER-producten zijn gemaakt van
textiel en verslijten tijdens het normale gebruik. Controleer de
staat van de zak voor elk gebruik. Vervang versleten of
beschadigde zakken onmiddellijk en gebruik alleen door SNAPPER
aanbevolen zakken. De graszak is een optie bij sommige modellen.
LEID HET STARTKOORD
ROND DE POELIE
BOVENSTE GLEUF
ONDER MOER
VOORSTE GAT
OVER PEN;PLAATS
FIGUUR 2.13
SLUITRING EN
KNOPMOER
DE GRASZAK INSTALLEREN
STAP 1: Plaats de adapter voor de graszak. Zie “De adapter
voor de graszak installeren”.
STAP 2: Installeer de graszak door het adapterdeksel te
openen (niet geïllustreerd) en de connector over de flens van
de adapter te schuiven. Zie Figuur 2.14.
STAP 3: Bevestig de haken van de graszak aan de
middenstang van de duwboom. Zie Figuur 2.14.
HAAK DE DEUR EN DE HAKEN
VAN DE ZAK OVER DE
MIDDENSTANG
SCHUIF DE CONNECTOR
OVER DE FLENS
FIGUUR 2.14
WAARSCHUWING
10
Page 71

Deel 3 – ONDERHOUD
Not for
Reproduction
3.1 INLEIDING
Om de kwaliteit van de maaier niet in het gedrang te
brengen, mag u uitsluitend originele
SNAPPER-onderdelen gebruiken. Neem voor
onderdelen en hulp bij het onderhoud contact op
met de plaatselijke SNAPPER-distributeur.
Vermeld altijd het model en het serienummer om
het juiste onderdeel of informatie te krijgen voor een
bepaalde maaier.
WAARSCHUWING
Voer GEEN afstellingen, onderhoud of herstellingen
uit terwijl de motor en het mes draaien. STOP de
motor en het mes. Verwijder de bougiekabel van de
bougie en bevestig hem uit de buurt van de bougie.
De onderdelen en de motor zijn HEET. Laat de motor
en de onderdelen voldoende afkoelen, om ernstige
brandwonden te voorkomen. Draag dikke leren
handschoenen wanneer u de maaimessen hanteert
of eraan werkt. De messen zijn buitengew oon scherp
en kunnen ernstige verwondingen veroorzaken.
3.2 ONDERHOUD - NA DE EERSTE 5 UUR
3.2.1. DE MOTOROLIE VERVANGEN
BELANGRIJK: Maak de brandstoftank leeg voor u de
machine kantelt. Kantel de machine NIET met de
carburator of de bougie naar omlaag. De olie uit het carter
zou in het luchtfilter lopen, zodat de motor moeilijk hof
helemaal niet zou starten. Als het luchtfilter toch vuil
wordt, moet u hem vervangen.
1. Raadpleeg de handleiding van de motor voor de
specificaties van de olie en de service-intervallen.
Om de olie zo eenvoudig en schoon mogelijk te vervangen,
kantelt u de maaier op zijn kant om de olie te laten
weglopen, zoals in Figuur 3.1. Laat de olie door het buisje
van de peilstok in een blik lopen. Wacht tot alle olie
weggelopen is.
KANTEL DE MAAIER OP ZIJN KANT
VULOPENING OLIE
FIGUUR 3.1
2. Ruim de olie op de juiste manier op.
3. Vul de motor met olie volgens de specificaties
van de handleiding van de motor. Niet overvullen.
3.2.2. HET MAAIMES CONTROLEREN
1. Verwijder de bougiekabel van de bougie en
bevestig hem uit de buurt van de bougie.
2. Kantel de maaier op zijn achterwielen, zodat u de
bevestigingsschroef van het mes kunt bereiken.
Kantel de maaier niet met de bougie of de carburator
naar omlaag. Zie Figuur 3.2.
3. Controleer het torsiekoppel van de tapbout van het
mes. Het aanbevolen torsiekoppel is 40 ft. lbs. Zie
Figuur 3.2.
4. Controleer het mes op zijn scherpte, slijtage en
beschadiging. Raadpleeg het gedeelte
“Slijtagegrenzen van het mes”.
FIGUUR 3.2
BELANGRIJK: Maak de brandstoftank leeg voor u de
machine kantelt. Kantel de machine NIET met de
carburator of de bougie naar omlaag. De olie uit het carter
zou in het luchtfilter lopen, zodat de motor moeilijk hof
helemaal niet zou starten. Als de luchtfilter toch vuil wordt,
moet u hem vervangen.
3.2.3. DE AANDRIJFRIEM CONTROLEREN
1. Controleer of de aandrijfriem niet gebarsten,
uitgerafeld of gescheurd is en of de buitenlaag niet
afgesleten is. Vervang een versleten of
beschadigde riem voor u de maaier gebruikt. Neem
voor onderdelen en hulp bij het onderhoud contact
op met de plaatselijke SNAPPER-distributeur.
3.3 ONDERHOUD - PERIODIEK
Voer al het onderhoud uit dat vermeld wordt in het
gedeelte "Onderhoudsschema" van deze handleiding.
3.3.1. Motor
Onderhoud de motor volgens de handleiding van de
motor.
3.3.2. Luchtfilter
Raadpleeg de handleiding van de motor voor
instructies.
3.3.3. Motorolie
Raadpleeg de handleiding van de motor voor
instructies.
11
HET AANBEVOLEN
TORSIEKOPPEL VOOR
DE TAPBOUT IS 40 FT.
LBS.
Page 72

Deel 3 – ONDERHOUD
Not for
Reproduction
WAARSCHUWING
Voer GEEN afstellingen, onderhoud of herstellingen
uit terwijl de motor en het mes draaien. STOP de
motor en het mes. Verwijder de bougiekabel van de
bougie en bevestig hem uit de buurt van de bougie.
De onderdelen en de motor zijn HEET. Laat de motor
en de onderdelen voldoende afkoelen, om ernstige
brandwonden te voorkomen. Draag dikke leren
handschoenen wanneer u de maaimessen hanteert
of eraan werkt. De messen zijn buitengewoon
scherp en kunnen ernstige verwondingen
veroorzaken.
3.3.4. Controleren van het
veiligheidsvergrendelsysteem
1. Start de maaier.
2. Laat het maaibladhendel los. De motor moeten
binnen 3 seconden stoppen.
Als de motor niet stopt, mag de maaier niet
worden gebruikt. Breng de maaier naar een
erkende dealer voor onderhoud.
3.3.5. Componenten van de wielaandrijving
Verwijder vuil op of rond de transmissie, de assen,
spanrol, poelies, riem enz. Controleer de
componenten op slijtage of beschadiging. Vervang
versleten of beschadigde onderdelen onmiddellijk.
3.4 OPSLAGPROCEDURE
Raadpleeg de handleiding van de motor voor de
instructies voor de opslag van de motor. Bereid de
maaier als volgt voor op de opslag op het einde van het
seizoen:
1. Laat de brandstof uit de brandstoftank lopen en
laat de motor draaien tot alle brandstof uit de
carburator is.
2. Koppel de bougiekabel af en verwijder hem van
de bougie voor u enige andere voorbereiding
uitvoert!
3. Plak alle openingen af, om te voorkomen dat
tijdens het afwassen water in de uitlaat of de
luchtinlaat komt.
4. Kantel de maaier op zijn achterwielen en maak
de onderzijde van het maaihuis grondig schoon.
Kantel de maaier niet met de bougie of de
carburator naar omlaag. Schraap met een
plamuurmes en/of een staalborstel alle afzettingen
van gras weg.
5. Smeer alle blootgestelde metalen delen met een
lichte laag olie, om corrosie te voorkomen.
6. Draai bij zelfrijdende modellen de hendel voor
de rijsnelheid naar de stand “traag” (schildpad) om
te voorkomen dat de riem en/of de veer van de
spanrol worden uitgerekt.
7. Vouw de duwboom voorzichtig naar voren en
buig de bedieningskabels om ze niet te
beschadigen.
8. Bewaar de maaier in een schuur of op een
andere droge plaats, beschermd tegen
weersinvloeden.
12
Page 73

Deel 4 - HERSTELLING
Not for
Reproduction
WAARSCHUWING
Voer GEEN afstellingen, onderhoud of herstellingen
uit terwijl de motor en het mes draaien. STOP de
motor en het mes. Verwijder de bougiekabel van de
bougie en bevestig hem uit de buurt van de bougie.
De onderdelen en de motor zijn HEET. Laat de motor
en de onderdelen voldoende afkoelen, om ernstige
brandwonden te voorkomen. Draag dikke leren
handschoenen wanneer u de maaimessen hanteert
of eraan werkt. De messen zijn buitengew oon scherp
en kunnen ernstige verwondingen veroorzaken.
4.1 HET MAAIMES VERVANGEN
4.1.1.SLIJTAGEGRENS VAN HET
STANDAARDMES
1. Inspecteer het mes regelmatig op sporen van
abnormale slijtage of beschadiging. Zie Figuur 4.1.
NIEUW MES
MESNAAF
FLENS
MES
CONISCHE SLUITRING
(Concave kant boven)
ZORG DAT DE
MESNAAF
TUSSEN DE
FLENZEN ZIT
TAPBOUT
SLIJTAGEGRENS
(BEGIN INKEPING
GEVAARLIJK!
HET MES IN DEZE
STAAT NIET
GEBRUIKEN
VERVANG DOOR EEN
NIEUW MES8
FIGUUR 4.1
WAARSCHUWING
Een maaimes dat sporen van abnormale slijtage of
beschadiging vertoont NIET GEBRUIKEN. Raadpleeg
“HET MAAIMES VERVANGEN” voor de juiste
inspectie- en onderhoudsprocedures.
4.1.2. HET MAAIMES SLIJPEN
1. Verwijder de bougiekabel van de bougie en
bevestig hem uit de buurt van de bougie.
BELANGRIJK: Maak de brandstoftank leeg voor u de
machine kantelt. Kantel de machine NIET met de
carburator of de bougie naar omlaag. De olie uit het carter
zou in het luchtfilter lopen, zodat de motor moeilijk hof
helemaal niet zou starten. Als het luchtfilter toch vuil
wordt, moet u hem vervangen.
2. Kantel de maaier op zijn achterwielen. Kantel de
machine niet met de carburator of de bougie naar
omlaag.
3. Verwijder het mes. Zie Figuur 4.2.
FIGUUR 4.2
4. lijp het mes op een slijpschijf in een hoek van 22
tot 28 graden. SLIJP HET NIET voorbij de
bestaande snijrand. Zie Figuur 4.3.
SLIJP HET MES NIET
VOORBIJ DE
OORSPRONKELIJKE
RAND
OORSPRONKELIJKE SNIJRAND
5. Controleer de balans van het mes nadat u het
hebt geslepen. Corrigeer de balans indien nodig
door het zwaarste uiteinde bij te slijpen.
6. Installeer het mes opnieuw. Zie Figuur 4.2. Geef
de montagebouten van het mes het aanbevolen
torsiekoppel van 40 ft. lbs.
22-28º
MESPUNT
UITEINDE
MESMONTAGE
FIGUUR 4.3
13
Page 74

PROBLEMEN OPLOSSEN
Not for
Reproduction
PROBLEEM WAARSCHIJNLIJKE OORZAAK OPLOSSING
De motor start niet met
het startkoord
De motor hapert of valt
uit nadat hij heeft
gedraaid
De motor verliest
kracht
Abnormale trilling
Maaier rijdt niet
(geen tractie)
(zelfrijdende modellen)
Transmissie maakt
lawaai
(zelfrijdende modellen)
1. De brandstoftank is leeg. 1. Vul de brandstoftank met verse brandstof.
2. De motor heeft choke of injector nodig. 2. Gebruik de choke/injectorknop. Raadpleeg de
handleiding van de motor voor instructies.
3. De bougiekabel zit los. 3. Bevestig de bougiekabel aan de bougie.
1. De meshendel is losgelaten of wordt niet stevig tegen
de duwboom getrokken.
2. De brandstoftank is leeg. 2. Vul de brandstoftank met verse brandstof.
3. De voorfilter of luchtfilter is vuil. 3. Reinig de filters.
4. De bougie is defect of de elektrodenafstand is fout. 4. Onderhoud de bougie.
5. Het brandstofsysteem is vervuild door water, vuil of
slechte brandstof.
1. De voorfilter of luchtfilter is vuil. 1. Reinig of vervang de filters.
2. De bougie is defect. 2. Onderhoud de bougie.
3. Het brandstofsysteem is vervuild door water, vuil of
slechte brandstof.
1. Beschadigd, slecht gebalanceerd of verbogen mes. 1. Onderhoud het mes.
2. Losse onderdelen van de messen. 2. Draai de losse onderdelen vast.
3. Losse of ontbrekende airlift (indien de machine ervan
voorzien is).
4. Oneffen of uitgerafelde riem.
1. Ophoping van vuil op of rond de componenten van de
snelheidsregeling.
2. Transmissiekabel moet worden afgesteld.
3. Drijfriem moet worden vervangen.
4. Beschadigde transmissie
1. Transmissiekabel moet worden afgesteld. 1. Stel de transmissiekabel af.
2. Beschadigde transmissie.
1. De meshendel moet tijdens het gebruik van
de maaier altijd goed tegen de duwboom
worden getrokken.
5. Laat het brandstofsysteem leeglopen en reinig
het
3. Laat het brandstofsysteem leeglopen en reinig
het.
3. Vervang de airlifts. Draai ze vast met het
juiste torsiekoppel.
4. Raadpleeg uw erkende SNAPPER-dealer.
1. Maak schoon.
2. Raadpleeg uw erkende SNAPPER-dealer.
3. Raadpleeg uw erkende SNAPPER-dealer.
4. Raadpleeg uw erkende SNAPPER-dealer.
2. Raadpleeg uw erkende SNAPPER-dealer.
Rijsnelheid te hoog/te
laag; kan niet
worden afgesteld
(zelfrijdende modellen
met variabele snelheid)
Gras wordt slecht
gemaaid
Slechte uitworp
van het gras
De maaier verliest olie
1. Ophoping van vuil op of rond de componenten van de
snelheidsregeling.
2. Regeling rijsnelheid moet worden afgesteld. 2. Stel de rijsnelheid af.
3. Drijfriem moet worden vervangen.
4. Beschadigde transmissie.
1. De maaihoogte is te laag of te hoog. 1. Stel de maaihoogte bij.
2. De voorwaartse snelheid is te hoog. 2. Verplaats de toerenhendel naar een lagere
3. Ongelijkmatig maairesultaat in zijwaartse richting. 3. Stel de maaihoogte bij met de hendels voor de
4. Te sterke helling van het maaihuis van voor naar
achter.
5. Het mes is bot, versleten of beschadigd. 5. Slijp het mes of vervang het.
1. De voorwaartse snelheid is te hoog. 1. Verplaats de toerenhendel naar een lagere
2. Het gras is nat. 2. Maai als het gras droog is.
3. Versleten of beschadigd mes. 3. Onderhoud het mes.
4. Gemaaid gras of resten hebben zich onder het
maaihuis samengepakt.
5. Het verkeerde mes is geïnstalleerd.
6. Het mes is verkeerd geïnstalleerd. 6. Installeer het mes correct.
1. Lekkend carter.
1. Maak schoon.
3. Raadpleeg uw erkende SNAPPER-dealer.
4. Raadpleeg uw erkende SNAPPER-dealer.
versnelling.
afstelling van de hoogte.
4. Stel de maaihoogte bij met de hendels voor de
afstelling van de hoogte.
versnelling.
4. Het maaihuis reinigen.
5. Installeer het juiste SNAPPER mes.
1. Raadpleeg uw erkende SNAPPER-
distributeur.
2. De aftapplug controleren en vastdraaien.
3. Zorg dat de peilstok of de oliedop goed zijn
aangebracht.
14
Page 75

ONDERHOUDSSCHEMA
Not for
Reproduction
ITEM ONDERHOUD REF. ELK
Motorolie
Oliepeil controleren Pagina 7
GEBRUIK
X
5
UREN
25
UREN
50
UREN
100
UREN
ELK
SEIZOEN
Voorfilter
Luchtfilter
Bougie
Motorkoeling
Aandrijfriem
Maaimes
Maaihuis
Componenten
wielaandrijving
Bussen
voorwielen
(alleen
modellen met
zwenkwiel)
* Ververs de olie om de 25 uren als u met zware belastingen of hoge temperaturen werkt.
**Vaker reinigen als u in stoffige omstandigheden werkt of er veel deeltjes in de lucht zweven.
ONDERHOUDS/RESERVEONDERDELEN
Eerste olieverversing Pagina 11
Periodieke
olieverversing
Sponselement reinigen Handleiding
Reinigen of vervangen Handleiding
Vervangen Handleiding
Mantel en koelvinnen
reinigen
Slijtage en spanning
controleren
Controleren op slijtage,
schade & vervanging
Maaisel en resten
verwijderen
Resten verwijderen;
controleren op slijtage of
schade
Smeren Pagina 8
Pagina 11
motor
motor
motor
Handleiding
motor
Pagina 11
Pagina 13
Pagina 7
Pagina 12
X
X*
X**
X**
X
X**
X
X
X
X
X
ONDERDELEN VOOR HET ONDERHOUD
Kabel voor de mesregeling 7100074
Kabel voor de regeling van de wielaandrijving 7100263
Kabel voor de regeling van de rijsnelheid 7100264
Maaimes (dubbele golf) 7100242
Aandrijfriem 7100058
Handleiding onderdelen voor de 21” Easy Line Loopmaaier 7006205
Handleiding onderdelen voor de 21” Easy Line Loopmaaier
(zwenkwielen))
15
7006206
Page 76
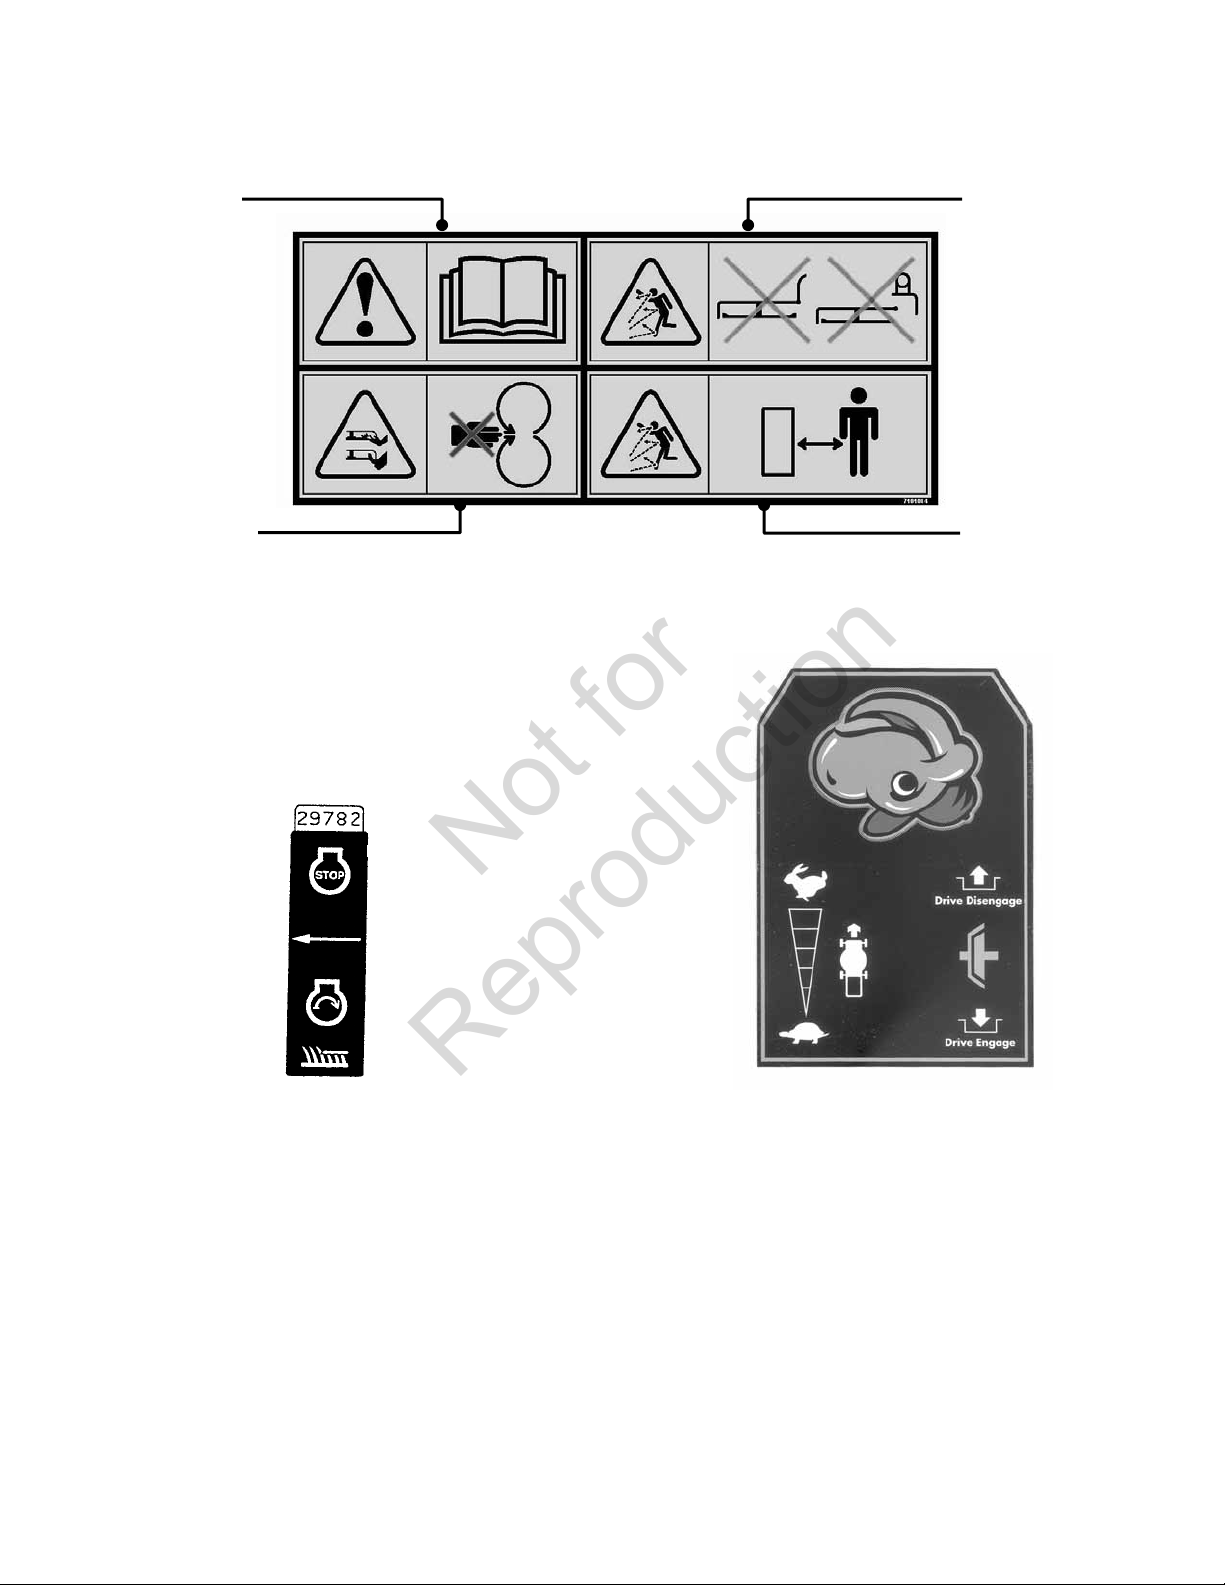
IDENTIFICATIE VAN DE LABELS
Not for
Reproduction
LEES, BEGRIJP EN
RESPECTEER DE
INSTRUCTIES EN
WAARSCHUWINGEN IN
DE HANDLEIDING EN OP
DE MAAIER, DE MOTOR
EN DE UITBREIDINGEN
VOOR U ZE GEBRUIKT.
WIJST OP MOGELIJKE
ERNSTIGE
VERWONDINGEN DOOR
HET DRAAIENDE MES.
(1) WAARSCHUWINGSINSTRUCTIES.
(2) CONTROLE VAN DE AANWEZIGHEID VAN DE
GEBRUIKER ("DODEMANSHENDEL"): De pijl wijst
naar de dodemanshendel. Wanneer de hendel naar
achter wordt gedraaid, kan men de motor starten en
zal hij lopen, zoals wordt aangegeven door de motor
met draaiende pijl. Als de motor loopt, draait het
mes, zoals aangeven door het symbool voor
gemaaid gras. Als de hendel wordt losgelaten en
naar voren draait, zal de motor stilvallen.
NIET GEBRUIKEN
ZONDER DE
VOLLEDIGE
GRASVANGER OF
BESCHERMKAP.
HOUD KINDEREN EN
ANDEREN BUITEN DE
MAAIZONE.
(3) SNELHEIDSHENDEL: Toont de richting van de
verplaatsing en de mogelijkheid om de rijsnelheid te
kiezen door de hendel te draaien.
(4) KOPPELING: Als u de hefboom naar de hendel
toe brengt, wordt de koppeling ingeschakeld en rijdt
de maaier vooruit. Als de hefboom wordt losgelaten,
lost de koppeling en stopt de voorwaartse
beweging.
16
Page 77

IDENTIFICATIE VAN DE LABELS
Not for
Reproduction
(5) LWA-98: IWijst op de Europese certificatie voor
het geluidsniveau.
(6) CE DECAL: Wijst op de Europese certificatie.
17
Page 78

Not for
Reproduction
18
Page 79

NOTITIES
Not for
Reproduction
19
Page 80

Veiligheidsvoorschriften en gebruikshandleiding voor
Not for
Reproduction
EUROPESE
21” (53 CM) ‘EASY LINE’
LOOPMAAIERS
BELANGRIJK
De producten van Snapper zijn gebouwd met motoren die aan alle geldende vereisten voor de uitlaatgassen op het ogenblik van de
fabricage voldoen, of die deze vereisten overtreffen. De etiketten op de motoren vermelden zeer belangrijke informatie over de
uitstoot, samen met kritieke veiligheidswaarschuwingen. Zorg dat u alle waarschuw ingen en instructies in deze handleiding, in de
handleiding van de motor en op de machine, de motor en de uitbreidingen leest, begrijpt en respecteert. Als u vragen hebt over uw
product van Snapper, raadpleegt u uw erkende Snapper distributeur of neemt u contact op met de Klantendienst van Snapper, bij
Snapper, McDonough, GA. 30253. Telefoon: 1-800-935-2967.
Informatie betreffende het nominale motorvermogen: het nominale brutovermogen voor afzonderlijke modellen met benzinemotor
wordt gegeven volgens SAE (Society of Automotive Engineers), code J1940 (Small Engine Power & Torque Rating Procedure) en het
nominale vermogen is verkregen en gecorrigeerd volgens SAE J1995 (revisie 2002-05). Koppelwaarden zijn afgeleid bij 3060 RPM;
paardenkrachtwaarden zijn afgeleid bij 3600 RPM. Het werkelijke brutomotorvermogen zal minder zijn en wordt o.a. beïnvloed door
omgevingsomstandigheden en verschillende tussen motoren. Gezien de vele verschillende producten waarop onze motoren worden
aangebracht en de diverse omgevingsfactoren die van toepassing zijn op het gebruik van de machines, zal de benzinemotor niet het
nominale brutovermogen ontwikkelen wanneer hij wordt gebruikt in een door een motor aangedreven machine (feitelijk vermogen “ter
plaatse” of nettovermogen). Dit verschil wordt veroorzaakt door diverse factoren waaronder, maar niet uitsluitend, accessoires
(luchtfilter, uitlaat, opladen, koelen, carburateur, brandstofpomp etc.), toepassingsbeperkingen, omgevingsomstandigheden
(temperatuur, accessoires, hoogte) en verschillen tussen motoren. Vanwege productie- en capaciteitsbeperkingen kan het zijn dat
Briggs & Stratton een motor met een hoger nominaal vermogen gebruikt in plaats van de standaardmotor voor deze serie.
20
Page 81

Norme di sicurezza e Manuale operatore per
Not for
Reproduction
TOSAERBA EUROPEI
‘EASY LINE’
A MOTORE DA 21” (53 CM)
LEGENDA DEL NUMERO DI MODELLO
E S P V 21 S
MODELLO EUROPEO SIGLA OPZIONE
SIGLA MODELLO LARGHEZZA DI TAGLIO
A MOTORE VELOCITÀ VARIABILE
E – Modello europeo P – Modello a motore V – Velocità variabile 21 – Larghezza di taglio 21” (51 cm)
S – ‘Easy Line’ S – Ruote anteriori orientabili
Grazie per aver acquistato un prodotto SNAPPER! Prima di utilizzare la macchina, leggere attentamente questo manuale,
prestando particolare attenzione alle “IMPORTANTI ISTRUZIONI SULLA SICUREZZA” indicate alle Pagine 2 - 4. Si ricorda che
qualsiasi attrezzatura a motore può essere pericolosa, se utilizzata impropriamente. Inoltre, si ricorda che il funzionamento della
macchina in completa SICUREZZA richiede l'applicazione delle istruzioni operative e l'uso del buon senso. Conservare queste
istruzioni originali per futuro riferimento.
BRIGGS & STRATTON YARD POWER PRODUCTS GROUP
COPYRIGHT © 2010, BRIGGS & STRATTON CORPORATION
MILWAUKEE, WI, USA. TUTTI I DIRITTI RISERVATI
MODELLI
ESPV21 (7800064)
ESPV21S (7800065)
Page 82

IMPORTANTI ISTRUZIONI SULLA SICUREZZA
Not for
Reproduction
AVVERTENZA: questa potente macchina da taglio è in grado di amputare mani e piedi e di proiettare oggetti che possono causare
lesioni e danni! L'inosservanza delle seguenti norme di SICUREZZA può provocare gravi lesioni o incidenti mortali all'operatore o a
terzi. Il proprietario della macchina è tenuto a leggere attentamente queste istruzioni ed a consentire l'uso della macchina
esclusivamente a persone a conoscenza di dette istruzioni. Ogni persona addetta all'uso della macchina deve essere in perfette
condizioni fisiche e psichiche e non deve trovarsi sotto l'influsso di sostanze che possano comprometterne le facoltà visive,
motorie o mentali. Per eventuali chiarimenti sulla macchina cui il concessionario non sia in grado di fornire risposte esaurienti,
contattare telefonicamente o a mezzo lettera il Reparto Assistenza Clienti della SNAPPER, McDonough, Georgia 30253. Telefono: 1800-935-2967.
PRECAUZIONI PER I BAMBINI
L'operatore deve prestare la massima attenzione all'eventuale
presenza di bambini, per evitare incresciosi incidenti. I bambini
vengono spesso attratti dalla macchina e dalle operazioni di
falciatura. I bambini sono imprevedibili: non dare mai per
scontato che restino immobili.
1. TENERE i bambini lontani dall'area di lavoro e sotto
l'attenta sorveglianza di un adulto responsabile diverso
dall'operatore.
2. NON consentire l'accesso al prato ai bambini quando la
macchina è in funzione; se qualcuno si avvicina all'area
di lavoro, SPEGNERE immediatamente la macchina.
3. NON consentire l'uso della macchina a minorenni.
4. L'uso della macchina E' CONSENTITO esclusivamente
ad adulti o giovani responsabili sotto l'attenta
supervisione di un adulto.
5. NON azionare il tosaerba in retromarcia, se non
strettamente necessario. Prima di procedere a
retromarcia e durante la guida GUARDARE indietro ed in
basso verificando che non vi siano bambini piccoli,
animali o altri pericoli.
6. PRESTARE LA MASSIMA ATTENZIONE in prossimità di
angoli ciechi, arbusti, alberi o altri oggetti che possono
limitare la visuale.
FUNZIONAMENTO SUI PENDII
1. I pendii costituiscono zone pericolose, in quanto
comportano il rischio di slittamenti e cadute, con
conseguenti gravi lesioni. E' necessario prestare la
massima attenzione su qualsiasi pendio. Se l'operatore
non si sente sicuro, si consiglia di EVITARE l'area
interessata.
2. Falciare i pendii percorrendoli completamente; non
procedere a marcia avanti e poi in retromarcia. Prestare
la massima ATTENZIONE durante le sterzate sui pendii.
NON lavorare su pendii eccessivamente ripidi o in altre
aree che offrono scarsa stabilità o aderenza.
3. Prestare la massima attenzione in caso di impiego di
raccoglierba o altri accessori, che modificano la
maneggevolezza e la stabilità della macchina.
PREPARAZIONE
1. Leggere attentamente ed attenersi a tutte le istruzioni ed
indicazioni di avvertenza riportate in questo manuale e
sulla macchina, sul motore e sugli accessori. Prima di
avviare la macchina familiarizzarsi con i comandi ed il
corretto uso della stessa.
2. L'uso della macchina è consentito esclusivamente a
persone mature e responsabili, previo adeguato
addestramento.
PREPARAZIONE
(Segue dalla colonna precedente)
3. Le statistiche indicano che gli operatori di età pari o
superiore ai 60 anni sono spesso coinvolti in incidenti
dovuti all'uso del tosaerba. Pertanto, tali operatori sono
tenuti a valutare le proprie capacità d'uso del tosaerba
in completa sicurezza per sé e per gli altri.
4. Il carburante è infiammabile ed i vapori sono esplosivi:
maneggiarlo con estrema cautela. Usare esclusivamente
contenitori approvati. NON rimuovere il tappo del
serbatoio né rabboccare con il motore in funzione.
Rabboccare esclusivamente all'aperto, a motore fermo e
freddo. Eliminare dalla macchina eventuali fuoriuscite di
carburante NON fumare.
5. Controllare l'area di lavoro e rimuovere oggetti quali
giocattoli, cavi, sassi, rami ed altri oggetti estranei, che
potrebbero causare lesioni, se proiettati dalla lama, o
interferire con le operazioni di falciatura. Inoltre,
prestare attenzione a buche, ceppi d'albero ed altri
potenziali pericoli.
6. Tenere persone ed animali domestici a distanza di
sicurezza dalla macchina. Se qualcuno si avvicina
all'area di lavoro, FERMARE immediatamente le lame,
ARRESTARE il motore e SPEGNERE la macchina.
7. Controllare frequentemente il funzionamento ed il
posizionamento di protezioni, deflettori, interruttori,
comandi lama ed altri dispositivi di sicurezza.
8. Accertarsi che tutti gli adesivi riportanti avvisi di
sicurezza siano perfettamente leggibili. Se danneggiati,
sostituirli.
9. Proteggersi adeguatamente durante le operazioni di
falciatura, indossando occhiali di sicurezza, calzoni
lunghi e scarpe resistenti. NON utilizzare il tosaerba
scalzi o se si indossano sandali.
10. Apprendere le procedure di ARRESTO rapido della lama
e del motore, in vista di situazioni di emergenza.
11. Prestare la massima attenzione durante il caricamento o
lo scaricamento della macchina su/da un rimorchio o
autocarro.
12. Controllare frequentemente lo stato di usura e di
degrado dei componenti del raccoglierba; sostituirli se
necessario per evitare lesioni dovute all'espulsione di
oggetti da componenti deboli o usurati. NON utilizzare il
tosaerba scalzi o se si indossano sandali.
USO IN SICUREZZA DEL CARBURANTE
Per evitare infortuni o danni alla proprietà, prestare la massima
attenzione quando si maneggia il carburante. La benzina è
estremamente infiammabile ed i vapori sono esplosivi.
1. Spegnere sigarette, sigari, pipe ed altri fonti di ignizione.
2. Usare esclusivamente contenitori approvati.
2
Page 83

IMPORTANTI ISTRUZIONI SULLA SICUREZZA
Not for
Reproduction
USO IN SICUREZZA DEL CARBURANTE
(Segue dalla pagina precedente)
3. NON rimuovere il tappo del serbatoio né eseguire il
rifornimento con il motore in funzione. Attendere che il
motore si sia raffreddato prima di eseguire il rifornimento.
4. NON rifornire il serbatoio in spazi chiusi.
5. NON tenere la macchina o i contenitori di carburante in aree
coperte in presenza di fiamme libere, scintille o fiammelle
pilota, come nel caso di scaldabagno o altri elettrodomestici.
6. NON riempire i contenitori del carburante all'interno del
veicolo o su un autocarro o pianale di rimorchio con
rivestimento in plastica. Posizionare sempre i contenitori a
terra e lontani dal veicolo prima di riempirli.
7. Rimuovere eventuali attrezzature a gas dal veicolo o dal
rimorchio ed eseguire il rifornimento a terra. Se ciò non è
possibile, eseguire il rifornimento usando un contenitore
portatile al posto della normale pistola distributrice di
benzina.
8. NON avviare le attrezzature a gas in veicoli o rimorchi chiusi.
9. Tenere sempre la pistola a contatto con il bordo del
serbatoio o con l'apertura del contenitore fino al termine del
rifornimento. NON usare dispositivi di blocco in apertura
della pistola.
10. In caso il carburante si versi sugli indumenti, cambiarsi
immediatamente.
11. NON riempire eccessivamente il serbatoio. Riposizionare il
tappo e serrarlo a fondo.
FUNZIONAMENTO
1. NON avvicinare o inserire le mani o i piedi sotto alle parti
rotanti. Quando il motore è in funzione, tenersi lontani
dall'area di scarico.
2. ARRESTARE il motore quando si attraversano viali in
ghiaietto, camminamenti o strade ed in qualsiasi condizione
che presenti il rischio di proiezione di oggetti.
3. Eseguire le operazioni di falciatura solo alla luce del giorno o
con un'illuminazione artificiale sufficiente.
4. NON utilizzare il tosaerba sotto l'influsso di alcool o farmaci.
5. In caso di urto con un corpo estraneo, oppure se il tosaerba
vibra in modo anomalo, ARRESTARE il motore e scollegare
il filo della candela, fissandolo a debita distanza. Prima di
riprendere l'uso della macchina, ispezionarla e riparare gli
eventuali danni.
6. NON lavorare in prossimità di dislivelli, fossati o argini, che
possono compromettere la stabilità dell'operatore.
7. PRESTARE ATTENZIONE alle buche e ad altri pericoli
nascosti. L'erba alta può nascondere degli ostacoli. Tenersi
lontani da fossati, terreni franosi, canali di drenaggio, recinti
ed altri oggetti sporgenti.
8. NON falciare erba bagnata. L'operatore deve sempre trovarsi
in condizioni di massima stabilità. Tenere saldamente
l'impugnatura e procedere camminando; non correre, per
evitare eventuali cadute con conseguenti lesioni.
9. Restare SEMPRE dietro l'impugnatura quando il motore è in
funzione.
10. NON abbandonare la macchina con il motore in funzione.
FERMARE LA LAMA ed ARRESTARE IL MOTORE prima di
lasciare il posto di guida, per qualsiasi ragione.
11. Prima di effettuare interventi di pulizia, riparazioni o ispezioni
assicurarsi che il motore, la lama e tutte le parti rotanti siano
FERME. Per impedire l'accensione accidentale, scollegare il
filo dalla candela fissandolo a debita distanza.
USO IN SICUREZZA DEL CARBURANTE
(Segue dalla colonna precedente)
12. Prima di rimuovere la sacca raccoglierba e/o eliminare
l'erba, ARRESTARE il motore ed attendere che la lama si
FERMI completamente.
13. NON utilizzare il tosaerba senza il raccoglierba o la
protezione di scarico, la protezione posteriore o gli altri
dispositivi di sicurezza installati e funzionanti. NON
orientare lo scarico verso persone, macchine in transito,
finestre o porte.
14. NON orientare lo scarico verso muri o ostruzioni. Il
materiale può infatti ricadere sull'operatore.
15. Rallentare prima di una curva.
16. Prestare attenzione al traffico in prossimità o durante
l'attraversamento di strade pubbliche.
17. NON avviare il motore in aree chiuse. I gas di scarico del
motore contengono ossido di carbonio, un veleno
mortale.
18. Usare esclusivamente accessori approvati dal
costruttore. Per informazioni sul funzionamento e
l'installazione corretti degli accessori attenersi alle
istruzioni del costruttore
MANUTENZIONE ED IMMAGAZZINAGGIO
1. NON tenere la macchina o i contenitori di carburante in
aree coperte ove i fumi possano raggiungere fiamme
libere, scintille o fiammelle pilota, come nel caso di
scaldabagno, caldaie, asciugatrici o altri
elettrodomestici a gas. Prima di ricoverare la macchina
in un'area chiusa, lasciar raffreddare il motore.
Conservare il contenitore del carburante lontano dalla
portata dei bambini, in un'area ben ventilata e sgombra.
2. Per limitare il rischio di incendi e di surriscaldamento
del motore, mantenere il motore pulito da erba, foglie o
grasso eccedente.
3. Durante lo svuotamento del serbatoio, versare il
carburante in un contenitore approvato, all'aperto e
lontano da fiamme libere.
4. Controllare periodicamente il serraggio di bulloni, dadi e
viti. Verificare che le coppiglie siano posizionate
correttamente.
5. Se il motore viene azionato in un'area chiusa, fornire
un'adeguata ventilazione. I gas di scarico contengono
ossido di carbonio, un veleno inodore e mortale.
6. Effettuare gli interventi di manutenzione e regolazione al
motore esclusivamente a motore fermo. Per impedire
l'accensione accidentale, scollegare il filo dalla candela
fissandolo a debita distanza.
7. NON modificare le impostazioni di velocità del
regolatore del motore e non azionare il motore a regimi
eccessivi.
8. Ispezionare frequentemente il gruppo sacca
raccoglierba controllandone lo stato di usura e
deterioramento, per evitare la proiezione di oggetti e
l'esposizione alle parti rotanti. Se le cuciture sono
rovinate o la sacca è tagliata, sostituirla. Se l'attacco
scorrevole o l'adattatore della sacca sono rotti o
fessurati, sostituirli.
9. Le lame della falciatrice sono affilate e possono
provocare tagli. Avvolgerle adeguatamente o indossare
guanti in pelle spessi e prestare ATTENZIONE quando si
maneggiano le lame.
10. NON provare il funzionamento delle candele collegando
a massa la candela in prossimità della relativa sede; la
scintilla potrebbe incendiare la benzina in uscita dal
motore.
3
Page 84

MANUTENZIONE ED IMMAGAZZINAGGIO
Not for
Reproduction
(Segue dalla colonna precedente)
11. Far revisionare la macchina da un concessionario
autorizzato SNAPPER almeno una volta l'anno; il
concessionario dovrà provvedere all'installazione di
qualsiasi dispositivo di sicurezza di nuova fattura.
12. Usare esclusivamente parti di ricambio originali
SNAPPER, per garantire il mantenimento delle
prestazioni originali della macchina.
4
Page 85

INDICE
Not for
Reproduction
IMPORTANTI ISTRUZIONI SULLA SICUREZZA........................................................ 2 - 4
INDICE ................................................................................................................................5
SEZIONE 1 - PRELIMINARI...............................................................................................6
SEZIONE 2 - ISTRUZIONI OPERATIVE...................................................................... 7-10
Controlli preliminari ...........................................................................................7
Avviamento e arresto del motore e delle lame................................................7
Azionamento del tosaerba.................................................................................8
Regolazione dell'altezza dell'impugnatura ......................................................8
Regolazione dell'altezza di taglio .....................................................................9
Riciclaggio ..........................................................................................................9
Installazione del deflettore di scarico laterale...............................................10
Installazione dell'adattatore della sacca raccoglierba .................................10
Installazione della sacca raccoglierba...........................................................10
SEZIONE 3 - ISTRUZIONI SULLA MANUTENZIONE............................................... 11-12
Cambio dell'olio motore...................................................................................11
Controllo della lama della falciatrice..............................................................11
Controllo della cinghia di comando motore..................................................11
Manutenzione - Periodica................................................................................11
Motore...........................................................................................................11
Filtro dell'aria...............................................................................................11
Olio motore ..................................................................................................11
Controllo del sistema degli interblocchi di sicurezza .............................12
Componenti del comando ruote................................................................12
Procedura di immagazzinaggio ......................................................................12
SEZIONE 4 - RIPARAZIONI.............................................................................................13
Sostituzione delle lame della falciatrice ........................................................13
Affilatura delle lame .........................................................................................13
RICERCA DEI GUASTI ....................................................................................................14
TABELLA DI MANUTENZIONE.......................................................................................15
Manutenzione/parti di ricambio ......................................................................15
IDENTIFICAZIONE DEGLI ADESIVI.......................................................................... 16-17
GARANZIA........................................................................................................................18
5
Page 86

Sezione 1 - PRELIMINARI
Not for
Reproduction
COMANDO
LAMA
MANOPOLA
DEL CAVO DI
AVVIAMENTO
MANUALE
FERMO
POSTERIORE DI
REGOLAZIONE
ALTEZZA
COPERTURA
PER
RICICLAGGIO
1.1 INTRODUZIONE
Il presente manuale è destinato agli operatori dei TOSAERBA
A MOTORE SNAPPER ‘EASY LINE’. Scopo del manuale,
oltre a raccomandare le procedure operative standard ed i
normali requisiti di manutenzione, è promuovere la sicurezza
mediante l'adozione delle pratiche operative riconosciute.
Prima di utilizzare la macchina, si prega di leggere e seguire
le "IMPORTANTI ISTRUZIONI SULLA SICUREZZA" fornite
alle Pagine 2 - 4 del presente manuale e tutti i messaggi
relativi alla sicurezza applicati sul Tosaerba e sui relativi
attrezzi.
COMANDO
VELOCITÀ AL
SUOLO
COMANDO RUOTE
(IN FIGURA, MODELLO ESPV21)
TAPPO DI
RIEMPIMENTO
CARBURANTE
FIGURA 1.1
1.2 NOMENCLATURA
IMPORTANTE
Le Figura e le illustrazioni contenute in questo
manuale sono fornite a scopo puramente
indicativo e possono differire dal modello in
uso. Per eventuali chiarimenti rivolgersi al
Concessionario Snapper.
TAPPO DI
RIEMPIMENTO
OLIO E ASTINA
DI LIVELLO
INNESCO
MOTORE
FERMI
ANTERIORI DI
REGOLAZIONE
ALTEZZA
La precedente Figura 1.1, contenente la nomenclatura, illustra
i componenti fondamentali del TOSAERBA A MOTORE
SNAPPER ‘EASY LINE . Prima di utilizzare la macchina si
consiglia agli operatori di familiarizzarsi completamente con i
comandi, i componenti ed il funzionamento. Informazioni
specifiche relative al motore sono fornite nell'apposito
manuale del motore. Prima di utilizzare la macchina leggere
entrambi i manuali e tenerli a disposizione per futura
consultazione
6
Page 87

Sezione 2 – ISTRUZIONI OPERATIVE
A
Not for
Reproduction
2.1 CONTROLLI PRELIMINARI
Prima di ogni avviamento, eseguire i seguenti controlli ed
effettuare i necessari interventi.
2.1.1. Controllare che protezioni, deflettori, sacca raccoglierba,
adattatore e coperchi siano installati e fissati correttamente.
2.1.2. Controllare che comando lama, comando ruote e
comando velocità al suolo siano installati e funzionino
correttamente. Vedi Figura 2.1.
COMANDO
LAMA
COMANDO
VELOCITÀ AL
SUOLO
2.1.3. Controllare l'altezza di taglio. Regolare all'altezza
desiderata. Consultare la sezione "Regolazione dell'altezza di
taglio".
2.1.4. Controllare l'olio motore, rabboccando se necessario fino
a portare il livello alla tacca pieno (full). Per i dati tecnici dell'olio,
consultare il Manuale del motore. Vedi Figura 2.2.
FIGURA 2.1
COMANDO
RUOTE
2.2 AVVIAMENTO E FUNZIONA MENTO
2.2.1. MOTORE E LAMA
1. Se il motore è freddo, premere tre volte il pulsante
dell ' i n ne s c o . Vedi Figura 2.3. NOTA: se il motore è caldo non
dovrebbe essere necessario l'uso dell'innesco.
PULSANTE
DI INNESCO
(PREMERE 3
VOLTE)
2. Tirare il comando lama verso l'impugnatura. Vedi Figura
2.4.
3. Azionare il tosaerba.
TIRARE LA
MANOPOLA
DEL CAVO
DI AVVIAMENTO
MANUALE
FIGURA 2.3
Tirare la manopola del dispositivo di avviamento
manuale, per far girare il motore. Vedi Figura 2.4.
PREMERE IL
COMANDO
LAM
FIGURA 2.4
4. Una volta avviato il motore, lasciarlo scaldare brevemente
fino a quando non gira regolarmente, prima di azionare il
tosaerba.
NOTA: per arrestare il motore (e la lama) è sufficiente rilasciare il
comando lama.
FIGURA 2.2
2.1.5. Aggiungere carburante nel serbatoio dopo aver
portato il tosaerba all'aperto, per agevolare la dispersione dei
vapori. Ultimato il rabbocco, verificare che il tappo sia stretto.
Per i dati tecnici consultare il Manuale del motore.
2.1.6. Pulire le superfici esterne della piattaforma di taglio e del
motore, eliminando eventuali fuoriuscite di carburante o depositi
di detriti, erba, olio, ecc. Mantenere la retina della presa d'aria del
motore e le alette di raffreddamento costantemente pulite.
7
Page 88

Sezione 2 – ISTRUZIONI OPERATIVE
A
Not for
Reproduction
2.2 AVVIAMENTO E FUNZIONA MENTO
2.2.2. AZIONAMENTO DEL TOSAERBA
1. Avviare il motore. Consultare la Sezione “Avviamento e
funzionamento – Motore e lama”.
2. Portare il comando velocità a terra sulla posizione
desiderata. Vedi Figura 2.5.
3. Premere il comando ruote contro l'impugnatura per
inserirlo e far avanzare il tosaerba. La velocità a marcia
avanti può essere regolata modificando la posizione del
comando velocità a terra. Vedi Figura 2.5.
COMANDO VELOCITÀ
AL SUOLO
MASSIMO
COMANDO
RUOTE
DISINSERIMENTO
2.3 ARRESTO
Arrestare l'avanzamento del tosaerba rilasciando il
comando ruote. Arrestare il motore e la lama rilasciando il
comando lama.
2.3 BLOCCO DELLE RUOTE ORIENTABILI (SOLO ESPV21S)
La ruota orientabile anteriore sinistra del modello ESPV21S
può essere bloccata per far sì che il tosaerba avanzi in
linea.
1. Far avanzare il tosaerba in linea retta per allineare il
perno del prigioniero della ruota alle tacche presenti nel
fermaglio di blocco, situato sopra il prigioniero della ruota
orientabile sinistra. Vedi Figura 2.6.
MINIMO
FIGURA 2.5
FERMAGLIO
DI BLOCCO
FIGURA 2.6
INSERIMENTO
ALLINEARE
IL PERNO
ALLE
TACCHE
GRUPPO
RUOTE
ORIENTABILI
2. Portare la leva di blocco della ruota orientabile, situata
sul lato sinistro del gruppo impugnatura, nella posizione di
blocco (LOCK), per chiudere il fermaglio sul prigioniero
della ruota. Vedi Figura 2.7.
3. Per rilasciare la ruota orientabile, è sufficiente riportare
indietro la leva dalla posizione di blocco. Vedi Figura 2.7.
2.4 REGOLAZIONE DELL'ALTEZZA
DELL'IMPUGNATURA
L'altezza dell'impugnatura del tosaerba è regolabile, come
descritto di seguito.
1. Allentare le manopole a T ed i dadi a legno che fissano
l'impugnatura inferiore alle staffe di montaggio.
2. Allineare i fori presenti nel gruppo impugnatura ad uno
dei tre fori di regolazione dell'altezza dell'impugnatura nella
staffa di montaggio. Vedi Figura 2.8.
3. Rimontare gli elementi di fissaggio rimossi, serrandoli
saldamente.
NON eseguire interventi di manutenzione,
regolazione o assistenza con il motore e la lama in
funzione. ARRESTARE il motore e fermare la lama.
Rimuovere il filo dalla candela e fissarlo a debita
distanza dalla candela. Il motore ed i relativi
componenti raggiungono temperature ELEVATE.
Per evitare gravi ustioni, prima di intervenire sulla
macchina lasciar raffreddare i componenti.
SBLOCCO
DELLA RUOTA
MASSIMA
MINIMA
FORI (3) DI
REGOLAZIONE
ALTEZZA
IMPUGNATUR
AVVERTENZA
FIGURA 2.7
FIGURA 2.8
BLOCCO DELLA
RUOTA
GRUPPO
IMPUGNATURA
8
Page 89

Sezione 2 – ISTRUZIONI OPERATIVE
Not for
Reproduction
AVVERTENZA
NON eseguire interventi di manutenzione,
regolazione o assistenza con il motore e la lama in
funzione. ARRESTARE il motore e fermare la lama.
Rimuovere il filo dalla candela e fissarlo a debita
distanza dalla candela. Il motore ed i relativi
componenti raggiungono temperature ELEVATE.
Per evitare gravi ustioni, prima di intervenire sulla
macchina lasciar raffreddare i componenti.
2.5 REGOLAZIONE DELL'ALTEZZA DI TAGLIO
1. Tirare il fermo di regolazione altezza verso l'esterno e
portarlo nella posizione desiderata. Vedi Figura 2.9.
AVVERTENZA
Prima di regolare l'altezza di taglio, arrestare il
motore e la lama del tosaerba rilasciando il
comando lama.
ALTEZZA
MASSIMA
DI TAGLIO
ALTEZZA
MASSIMA
DI TAGLIO
2
3
4
5
6
7
5
6
7
ALTEZZA MINIMA DI
1
TAGLIO
3
4
2
FERMO
(NELLA
TACCA N. 4)
RUOTA
ANTERIORE
(TRANNE
ESPV21S)
ALTEZZA
1
MINIMA DI
TAGLIO
FERMO
(NELLA
TACCA N. 4)
POSIZIONI
DEL FERMO
1.2”
(3 CM)
2.6 RICICLAGGIO
NOTA: per ottenere risultati ottimali, tagliare l'erba fino ad un
massimo di 1/3 della lunghezza dello stelo e riciclarla SOLO
quando l'erba è asciutta.
1. Regolare tutte le ruote alla massima altezza di taglio
(tacca 7). Consultare la Sezione “Regolazione dell'altezza di
taglio”.
2. Portare il comando regime motore nella posizione "MASSIMO"
(lepre).
3. Portare il comando regime motore nella posizione di regime
minimo.
4. Far avanzare il tosaerba lentamente. Se l'erba è molto fitta,
abbassare il fermo delle ruote posteriori di una tacca rispetto alle
ruote anteriori, per migliorare la resa del riciclaggio.
NOTA: la copertura per riciclaggio è progettata per restare
costantemente installata sulla macchina, a meno che non si
desideri effettuare operazioni di scarico alternative, quali
scarico laterale o raccolta.
RIMOZIONE DELLA COPERTURA PER RICICLAGGIO
Rimuovere le manopole con dado e le rondelle dentate di sicurezza
interne/esterne che fissano la copertura per riciclaggio alla
piattaforma del tosaerba. Rimuovere la copertura. Vedi Figura 2.11.
OGNI TACCA ALZA DI 0.5” (1,2 CM)
IMPOSTAZIONI
DELL'ALTEZZA DI TAGLIO
FIGURA 2.10
4.2”
(11 CM)
RUOTA
POSTERIORE
(SIMILE ALLA
2. Impostare tutte le ruote alla medesima altezza di taglio.
La posizione corrispondente all'altezza di taglio massima è
la tacca n. 7. La posizione corrispondente all'altezza di
taglio minima è la tacca n. 1. Vedi Figura 2.10.
FIGURA 2.9
RUOTA ANTERIORE
ESPV21S)
RIMUOVERE LE MANOPOLE
CON DADO E LE RONDELLE
DI SICUREZZA
FIGURA 2.11
9
Page 90

Sezione 2 – ISTRUZIONI OPERATIVE
Not for
Reproduction
AVVERTENZA
NON eseguire interventi di manutenzione, regolazione o
assistenza con il motore e la lama in funzione.
ARRESTARE il motore e fermare la lama. Rimuovere il filo
dalla candela e fissarlo a debita distanza dalla candela. Il
motore ed i relativi componenti raggiungono temperature
ELEVATE. Per evitare gravi ustioni, prima di intervenire
sulla macchina lasciar raffreddare i componenti.
2.6 INSTALLAZIONE DEL DEFLETTORE DI SCARICO
LATERALE
FASE 1: rimuovere la copertura per riciclaggio. Consultare la
Sezione “Riciclaggio”.
FASE 2: installare il deflettore sulla piattaforma al posto della
copertura per riciclaggio, verificando che: 1) il foro anteriore esterno
del deflettore si inserisca nel prigioniero cui in precedenza era fissata
la parte anteriore della copertura per riciclaggio, 2) la scanalatura
presente sulla sommità del deflettore si inserisca sotto il dado di
ritegno sulla sommità della piattaforma (sotto l'angolo anteriore destro
del motore), infine 3) la scanalatura presente nella parte posteriore
interna del deflettore si inserisca nel prigioniero cui in precedenza era
fissata la parte posteriore della copertura per riciclaggio. Installare le
rondelle dentate di sicurezza interne/esterne e le manopole con dado
sui prigionieri e serrare saldamente. Vedi Figura 2.12.
SCANALATURA
POSTERIORE SUL
PRIGIONIERO;
INSTALLARE
RONDELLA DI
SICUREZZA E
MANOPOLA CON
DADO
2.7 INSTALLAZIONE DELL'ADATTATORE DELLA SACCA
RACCOGLIERBA
(accessorio facoltativo su alcuni modelli)
FASE 1: rimuovere la copertura per riciclaggio. Consultare la
Sezione “Riciclaggio”.
FASE 2: installare l'adattatore della sacca raccoglierba sulla
piattaforma al posto della copertura per riciclaggio, verificando che: 1)
il foro anteriore esterno dell'adattatore si inserisca nel prigioniero cui in
precedenza era fissata la parte anteriore della copertura per
riciclaggio, 2) la scanalatura presente sulla sommità dell'adattatore si
inserisca sotto il dado di ritegno sulla sommità della piattaforma (sotto
l'angolo anteriore destro del motore), infine 3) la scanalatura presente
nella parte posteriore inferiore dell'adattatore si inserisca nel
prigioniero posto dietro la parte posteriore dell'apertura di scarico, cui
in precedenza era fissata la parte posteriore della copertura per
riciclaggio. Installare le rondelle dentate di sicurezza interne/esterne e
le manopole con dado sui prigionieri e serrare saldamente. Vedi
Figura 2.13.
FASE 3: instradare il cavo del dispositivo di avviamento manuale
intorno alla parte esterna della puleggia della guida. Vedi Figura 2.13.
(NOTA: se necessario, allentare il cavo. Consultare “Gruppo
impugnatura”.)
SCANALATURA
SUPERIORE
SOTTO IL DADO
FIGURA 2.12
FORO ANTERIORE
SUL PRIGIONIERO;
INSTALLARE
RONDELLA DI
SICUREZZA E
MANOPOLA CON
DADO
SCANALATURA
POSTERIORE SUL
PRIGIONIERO;
INSTALLARE
RONDELLA DI
SICUREZZA E
MANOPOLA CON
DADO
2.8 INSTALLAZIONE DELLA SACCA RACCOGLIERBA
(sacca a sportello)
FASE 1: installare l'adattatore della sacca raccoglierba.
Consultare la Sezione “Installazione dell'adattatore della sacca
raccoglierba”.
FASE 2: installare la sacca raccoglierba aprendo la copertura
dell'adattatore (non in figura) ed inserendo il connettore sulla
flangia dell'adattatore. Vedi Figura 2.14.
FASE 3: fissare i ganci della sacca raccoglierba alla traversa
dell'umpugnatura intermedia. Vedi Figura 2.14.
NON azionare la macchina senza il raccoglierba completo o la
protezione installati. I componenti del raccoglierba sono
soggetti a degrado durante il normale uso. Eseguire ispezioni
frequenti e sostituire immediatamente i componenti usurati o
danneggiati.
Le sacche raccoglierba usate per i prodotti SNAPPER sono
realizzate in tessuto e sono soggette a degrado e usura
durante il normale funzionamento. Controllare lo stato della
sacca prima di ogni utilizzo. Se usurata o danneggiata,
sostituirla immediatamente con le sacche consigliate da
SNAPPER. La sacca raccoglierba è un componente opzionale
su alcuni modelli.
INSTRADARE IL CAVO DI
AVVIAMENTO INTORNO
ALLA PULEGGIA
FIGURA 2.13
FISSARE I GANCI DI SPORTELLO E
SACCA ALLA TRAVERSA
DELL'IMPUGNATURA INTERMEDIA
INSERIRE IL
CONNETTORE SULLA
FLANGIA
FIGURA 2.14
AVVERTENZA
SCANALATURA
SUPERIORE
SOTTO IL DADO
FORO ANTERIORE
SUL PRIGIONIERO;
INSTALLARE
RONDELLA DI
SICUREZZA E
MANOPOLA CON
10
Page 91

Sezione 3 – MANUTENZIONE
Not for
Reproduction
3.1 INTRODUZIONE
Per mantenere le prestazioni ottimali del tosaerba, usare
esclusivamente parti di ricambio originali SNAPPER. Per
l'ordinazione delle parti di ricambio ed interventi di assistenza,
rivolgersi al concessionario SNAPPER di zona. Per ottenere le
corrette parti di ricambio o informazioni su un particolare
tosaerba, indicare sempre il modello ed il numero di matricola.
AVVERTENZA
NON eseguire interventi di manutenzione, regolazione o
assistenza con il motore e la lama in funzione. ARRESTARE il
motore e fermare la lama. Rimuovere il filo dalla candela e fissarlo
a debita distanza dalla candela. Il motore ed i relativi componenti
raggiungono temperature ELEVATE. Per evitare gravi ustioni,
prima di intervenire sulla macchina lasciar raffreddare i
componenti. Indossare guanti di pelle spessi quando si
maneggiano o si lavora intorno alle lame da taglio; queste
infatti sono estremamente affilate e possono causare gravi
lesioni.
3.2 MANUTENZIONE – DOPO LE PRIME 5 ORE
3.2.1. CAMBIO DELL'OLIO MOTORE
IMPORTANTE: scaricare il serbatoio del carburante prima di
ribaltare la macchina. NON ribaltare la macchina lasciando il
carburatore o la candela rivolti verso il basso. In questo caso infatti
l'olio del basamento satura il filtro dell'aria, rendendo difficile o
addirittura compromettendo la successiva accensione del motore. In
caso di contaminazione, è necessario sostituire il filtro dell'aria
1. Per i dati tecnici dell'olio, le procedure e gli intervalli di
manutenzione corretti, consultare il Manuale del motore.
Per effettuare un cambio dell'olio semplice/pulito, è sufficiente
ribaltare il tosaerba di lato e scaricare l'olio, come illustrato nella
Figura 3.1. Scaricare l'olio tramite il tubo dell'astina di livello
raccogliendolo in un contenitore. Attendere fino al completo
scarico dell'olio.
Smaltire l'olio esausto adeguatamente.
2.
3. Riempire il motore con olio come specificato nel Manuale
del motore. Non riempire eccessivamente.
RIBALTARE IL TOSAERBA DI LATO
TAPPO DI
RIEMPIMENTO
OLIO
FIGURA 3.1
3.2.2 CONTROLLO DELLA LAMA DELLA
FALCIATRICE
1. Rimuovere il filo dalla candela, fissandolo a debita
distanza dalla candela stessa.
2. Ribaltare il tosaerba sulle ruote posteriori, per accedere
alla vite della lama. Prestare attenzione a non lasciare il
carburatore o la candela rivolti verso il basso. Vedi Figura
3.2.
3. Controllare la coppia di serraggio della vite di tenuta della
lama. Il valore consigliato è 40 ft. lb. Vedi Figura 3.2.
4. Controllare lo stato di affilatura, usura e danneggiamento della
lama. Consultare la Sezione "Limiti di usura della lama".
COPPIA DI SERRAGGIO
CONSIGLIATA PER LA
VITE DI RITEGNO DELLA
LAMA: 40 FT. LB.
FIGURA 3.2
IMPORTANTE: scaricare il serbatoio del carburante prima di
ribaltare la macchina. NON ribaltare la macchina lasciando il
carburatore o la candela rivolti verso il basso. In questo caso infatti
l'olio del basamento satura il filtro dell'aria, rendendo difficile o
addirittura compromettendo la successiva accensione del motore. In
caso di contaminazione, è necessario sostituire il filtro dell'aria.
3.2.3. CONTROLLO DELLA CINGHIA DI COMANDO
MOTORE
1. Controllare visivamente la cinghia di comando motore
verificando che non sia incrinata, sfilacciata, spezzata o con i
trefoli esposti. Se usurata o danneggiata, sostituire la cinghia
prima di azionare il tosaerba. Per l'ordinazione delle parti di
ricambio ed interventi di assistenza, rivolgersi al concessionario
SNAPPER di zona.
3.3 MANUTENZIONE - PERIODICA
Eseguire tutti gli interventi di manutenzione descritti nella Sezione
“Tabella di manutenzione” del presente manuale.
3.3.1. Motore
Eseguire la manutenzione del motore attenendosi al manuale del
motore.
3.3.2. Filtro dell'aria
Per le istruzioni sulla manutenzione consultare il manuale del
motore.
3.3.3. Olio motore
Per le istruzioni sulla manutenzione consultare il manuale del
motore.
11
Page 92

Sezione 3 – MANUTENZIONE
Not for
Reproduction
AVVERTENZA
NON eseguire interventi di manutenzione, regolazione o
assistenza con il motore e la lama in funzione. ARRESTARE il
motore e fermare la lama. Rimuovere il filo dalla candela e
fissarlo a debita distanza dalla candela. Il motore ed i relativi
componenti raggiungono temperature ELEVATE. Per evitare
gravi ustioni, prima di intervenire sulla macchina lasciar
raffreddare i componenti. Indossare guanti di pelle spessi
quando si maneggiano o si lavora intorno alle lame da taglio;
queste infatti sono estremamente affilate e possono causare
gravi lesioni.
3.3.4. Controllo del sistema degli interblocchi di
sicurezza
1. Avviare la falciatrice.
2. Rilasciare la lama. Il motore deve fermarsi entro 3
secondi.
Non usare la falciatrice se il motore non si ferma. Portare
la falciatrice a un rivenditore autorizzato per gli interventi di
assistenza.
3.3.5. Componenti del comando ruote
Eliminare eventuali depositi di detriti su o intorno a
trasmissione, assali, rinvio, pulegge, cinghia, ecc. Controllare
che i componenti non siano usurati o danneggiati. Sostituire
immediatamente i componenti usurati o danneggiati.
3.4 PROCEDURA DI IMMAGAZZINAGGIO
Per informazioni sulla corretta procedura di immagazzinaggio del
motore, consultare il Manuale del motore. Preparare il tosaerba
per l'immagazzinaggio di "fine stagione" attenendosi alle seguenti
istruzioni.
1. Scaricare il carburante dal serbatoio e far girare il motore
fino a svuotare completamente il carburatore.
2. Prima di proseguire, scollegare e rimuovere il filo della
candela fissandolo a debita distanza!
3. Coprire con del nastro isolante tutte le aperture, per
evitare l'ingresso di acqua nello scarico o nelle prese d'aria
durante il lavaggio.
4. Ribaltare il tosaerba sulle ruote posteriori e pulire
accuratamente la parte inferiore della piattaforma. Prestare
attenzione a non lasciare la macchina con la candela o il
carburatore rivolti verso il basso. Raschiare eventuali
depositi di erba con una spatola e/o una spazzola di ferro.
5. Lubrificare tutte le superfici metalliche esposte con un
velo d'olio, per evitare la corrosione.
6. Sui modelli a motore, portare il comando velocità al suolo
nella posizione di regime minimo (‘tartaruga) per evitare la
tensione eccessiva della cinghia e/o della molla di rinvio.
7. Ripiegare con cautela le impugnature in avanti, flettendo
i cavi di comando per evitare di danneggiarli.
8. Riporre il tosaerba in un capanno o altro luogo asciutto,
al riparo dagli agenti atmosferici.
12
Page 93

Sezione 4 - RIPARAZIONE
)
V
Not for
Reproduction
AVVERTENZA
NON eseguire interventi di manutenzione, regolazione o
assistenza con il motore e la lama in funzione. ARRESTARE il
motore e fermare la lama. Rimuovere il filo dalla candela e fissarlo
a debita distanza dalla candela. Il motore ed i relativi componenti
raggiungono temperature ELEVATE. Per evitare gravi ustioni,
prima di intervenire sulla macchina lasciar raffreddare i
componenti. Indossare guanti di pelle spessi quando si
maneggiano o si lavora intorno alle lame da taglio; queste
infatti sono estremamente affilate e possono causare gravi
lesioni.
4.1 SOSTITUZIONE DELLE LAME DELLA FALCIATRICE
4.1.1. LIMITE DI USURA DELLA LA M A STANDARD
1. Ispezionare la lama frequentemente verificando eventuali
segni di usura eccessiva o danni. Vedi Figura 4.1.
LAMA
LIMITE DI USURA
(INIZIA A FORMARSI
LA TACCA)
CONDIZIONE DI
PERICOLO!
NON USARE SUL
TOSAERBA !
MOZZO
LAMA
FLANGIA
LAMA
RONDELLA CONICA
(lato concavo rivolto
verso l'alto
VERIFICARE CHE
IL MOZZO LAMA
SIA INSERITO TRA
LE FLANGE
VITE
FIGURA 4.2
4. Affilare la lama su una mola ad un'angolazione compresa
tra 22 e 28 gradi. NON superare il bordo di taglio esistente.
Vedi Figura 4.3.
NON SUPERARE IL
BORDO DI TAGLIO
ORIGINALE
22-28º
FIGURA 4.1
AVVERTENZA
NON usare una lama che mostri segni di usura eccessiva o
danneggiamenti. Per informazioni sulle corrette procedure
di ispezione e manutenzione delle lame, consultare la
Sezione “SOSTITUZIONE DELLE LAME DELLA
FALCIATRICE”.
4.1.2. AFFILATURA DELLE LAME
1. Scollegare il filo della candela fissandolo a debita
distanza dalla candela stessa.
IMPORTANTE: scaricare il serbatoio del carburante prima di
ribaltare la macchina. NON ribaltare la macchina lasciando il
carburatore o la candela rivolti verso il basso. In questo caso infatti
l'olio del basamento satura il filtro dell'aria, rendendo difficile o
addirittura compromettendo la successiva accensione del motore. In
caso di contaminazione, è necessario sostituire il filtro dell'aria.
2. Ribaltare il tosaerba sulle ruote posteriori. Verificare che
candela o carburatore non siano orientati verso il basso.
3. Rimuovere la lama. Vedi Figura 4.2.
PUNTA
DELLA
GRUPPO LAMA
ISTO DALLA
BORDO DI TAGLIO ORIGINALE
FIGURA 4.3
5. Controllare il bilanciamento della lama. Se necessario,
correggerlo molando l'estremità pesante della lama.
6. Rimontare la lama. Vedi Figura 4.2. Controllare che la
vite di ritegno della lama sia serrata alla coppia consigliata,
40 ft. lb.
13
Page 94

RICERCA DEI GUASTI
Not for
Reproduction
PROBLEMA POSSIBILE CAUSA RIMEDIO
Il motore non parte
usando il cavo di
avviamento manuale
Il motore parte e va in
stallo
Il motore perde
potenza
Vibrazione eccessiva
Il tosaerba non si
muove
Perdita di trazione
(modelli semoventi)
Trasmissione rumorosa
(modelli semoventi)
Velocità al suolo
troppo alta/troppo
bassa; regolazione
della velocità al suolo
impossibile
(modelli semoventi a
velocità variabile)
Taglio non corretto
Scarico dell'erba
insufficiente
Perdita d'olio
1. Serbatoio del carburante vuoto. 1. Riempire il serbatoio co n carburante pulito.
2. Il motore richiede l'uso dell'innesco. 2. Usare l'innesco. Per le relative istruzioni consultare il
3. Filo della candela scollegato. 3. Collegare il filo alla candela.
1. Comando lama rilasciato o non tenuto correttamente
contro l'impugnatura.
2. Serbatoio del carburante vuoto. 2. Riem p ir e i l s e r b a t oi o f i no a l l iv e l lo c o r r et t o .
3. Prefiltro dell'aria motore o filtro dell'aria sporchi. 3. Eliminare completamente eventuali detriti.
4. Candela difettosa o distanza non corretta. 4. Eseguire la manutenzione della candela.
5. Presenza di acqua, detriti o carburante stantio
nell'impianto di alimentazione.
1. Prefiltro dell'aria motore o filtro dell'aria sporchi 1. Pulire o sostituire i filtri.
2. Candela difettosa. 2. Eseguire la manutenzione della candela.
3. Presenza di acqua, detriti o carburante stantio
nell'impianto di alimentazione.
1. Lama della falciatrice danneggiata, sbilanciata o
deformata.
2. Componenti della lama allentati. 2. Ispezionare e serrare le parti allentate.
3. Aletta allentata o mancante (se installata). 3. Sostituire le alette, serrandole alla coppia indicata.
4. Cinghia nodosa o sfilacciata. 4. Rivolgersi al concessionario autorizzato SNAPPER.
1. Deposito di detriti su o intorno ai componenti del
comando ruote.
2. Cavo della frizione della trasmissione da regolare.
3. Cinghia di comando da sostituire.
4. Trasmissione danneggiata.
1. Cavo della frizione della trasmissione da regolare.
2. Trasmissione danneggiata.
1. Deposito di detriti su o intorno ai componenti del
comando velocità al suolo.
2. Comando velocità al suolo da regolare. 2. Regolare il comando velocità al suolo.
3. Cinghia di comando da sostituire.
4. Trasmissione danneggiata.
1. Altezza di taglio troppo bassa o alta. 1. Regolare l'altezza di taglio.
2. Regime in marcia avanti troppo elevato. 2. Impostare il comando velocità al suolo su un regime
3. Taglio disuguale in senso laterale. 3. Regolare l'altezza di taglio mediante le apposite leve.
4. Passo longitudinale della piattaforma eccessivo. 4. Regolare l'altezza di taglio mediante le apposite leve.
5. Lama priva di filo o danneggiata. 5. Affilare i bordi di taglio o sostituire la lama.
1. Regime in marcia avanti troppo elevato. 1. Impostare il comando velocità al suolo su un regime
2. Erba bagnata. 2. Attendere che l'erba sia asciutta.
3. Lama eccessivamente usurata o danneggiata. 3. Eseguire la manutenzione della lama della
4. Depositi di erba tagliata e detriti sotto alla piattaforma. 4. Pulire la piattaforma.
5. La lama installata sulla piattaforma non è corretta.
6. La lama è mal installata sulla piattaforma. 6. Installare la lama in modo corretto.
1. Perdita dalla scatola del motore.
Manuale del motore.
1. Durante il funzionamento del tosaerba, il comando
lama va tenuto costantemente contro l'impugnatura.
5. Scaricare e pulire l'impianto di alimentazione.
3. Scaricare e pulire l'impianto di alimentazione.
1. Eseguire la manutenzione della lama.
1. Eliminare i detriti.
2. Rivolgersi al concessionario autorizzato SNAPPER.
3. Rivolgersi al concessionario autorizzato SNAPPER.
4. Rivolgersi al concessionario autorizzato SNAPPER.
1. Rivolgersi al concessionario autorizzato SNAPPER.
2. Rivolgersi al concessionario autorizzato SNAPPER.
1. Eliminare i detriti.
3. Rivolgersi al concessionario autorizzato SNAPPER.
4. Rivolgersi al concessionario autorizzato SNAPPER.
inferiore.
inferiore.
falciatrice.
5. Installare la lama SNAPPER corretta.
1. Rivolgersi al concessionario autorizzato SNAPPER.
2. Pulire e serrare il tappo di scarico.
3. Assicurarsi che l'astina di livello o il tappo di
riempimento dell'olio siano installati correttamente.
14
Page 95

TABELLA DI MANUTENZIONE
Not for
Reproduction
ARTICOLO INTERVENTO DA
ESEGUIRE
Controllo del livello
Olio motore
dell'olio
Cambio dell'olio iniziale Pagina 11
RIF. AD
OGNI
USO
Pagina 7
OGNI
ORE
X
X
5
OGNI
25
ORE
OGNI
50
ORE
OGNI
100
ORE
OGNI
STAGIONE
Prefiltro
dell'aria
Filtro dell'aria
Candela
Impianto di
raffreddamento
motore
Cinghia di
comando
Lama della
falciatrice
Piattaforma
Componenti
del comando
ruote
Boccole ruote
anteriori
orientabili (solo
per modelli con
ruote
orientabili)
*Cambiare l'olio ogni 25 ore quando si opera con carichi pesanti o a temperature elevate.
**In presenza di polvere o di pulviscolo nell'aria, pulire con maggiore frequenza.
MANUTENZIONE/PARTI DI RICAMBIO
Cambio periodico
dell'olio
Pulizia dell'elemento in
spugna
Pulizia o sostituzione Manuale del
Sostituzione Manuale del
Pulizia di protezione e
alette
Controllo usura e
tensione
Controllo usura, danni e
sostituzione
Eliminazione dei depositi
di detriti
Eliminazione dei depositi
di detriti; controllo usura o
danni
Lubrificazione Pagina 8
Pagina 11
Manuale del
motore
motore
motore
Manuale del
motore
Pagine 11
Pagina 13
Pagina 7
Pagina 12
X*
X**
X**
X
X**
X
X
X
X
X
PARTI DI RICAMBIO
Cavo del comando lama 7100074
Cavo del comando ruote 7100263
Cavo del comando velocità al suolo 7100264
Lama da taglio (a doppia onda) 7100242
Cinghia di comando 7100058
Manuale dei ricambi per Tosaerba a motore Easy Line da 21” 7006205
Manuale dei ricambi per Tosaerba a motore Easy Line da 21” (con ruote
orientabili)
15
7006206
Page 96

IDENTIFICAZIONE DEGLI ADESIVI
Not for
Reproduction
PRIMA DELL'USO,
LEGGERE
ATTENTAMENTE E
SEGUIRE LE
ISTRUZIONI E LE
AVVERTENZE
INDICATE NEI
MANUALI
OPERATORE ED
APPLICATE SULLA
MACCHINA, SUL
MOTORE E SUGLI
ACCESSORI.
INDICA IL POSSIBILE
RISCHIO DI GRAVI
LESIONI DOVUTE
ALLE LAME DA
TAGLIO ROTANTI.
(1) ISTRUZIONI ED AVVERTENZE.
(2) COMANDO PRESENZA DELL'OPERATORE
(CPO): la freccia punta verso il dispositivo CPO.
Quando il dispositivo è ruotato all'indietro, è
possibile avviare il motore, come indicato dal
simbolo del motore con la freccia che gira. Quando il
motore è in funzione, la lama ruota, come indicato
dal simbolo dell'erba tagliata. Rilasciando il
dispositivo, questo ruota in avanti ed il motore si
arresta.
NON UTILIZZARE
SENZA IL
RACCOGLIERBA
COMPLETO O LA
PROTEZIONE
INSTALLATI.
TENERE I BAMBINI E
GLI ASTANTI
LONTANI DALL'AREA
DI LAVORO.
(3) SELETTORE VELOCITÀ: indica la direzione di
marcia e la possibilità di selezionare la velocità al
suolo, spostando avanti o indietro la leva.
(4) FRIZIONE: portando la leva all'indietro, verso
l'impugnatura, si innesta la frizione e la macchina
inizia ad avanzare a marcia avanti. Rilasciando la
leva, la frizione si disinnesta e la macchina si
arresta.
16
Page 97

IDENTIFICAZIONE DEGLI ADESIVI
Not for
Reproduction
(5) LWA-98: indica la certificazione europea in
merito al livello di emissioni sonore.
(6) ADESIVO CE: indica la certificazione europea.
17
Page 98

Not for
Reproduction
18
Page 99

NOTA
Not for
Reproduction
19
Page 100

Norme di sicurezza e Manuale operatore per
Not for
Reproduction
TOSAERBA EUROPEI
‘EASY LINE’
A MOTORE DA 21” (53 CM)
IMPORTANTE
I prodotti Snapper sono realizzati impiegando motori che soddisfano o superano tutti i requisiti applicabili sulle emissioni, alla data
di fabbricazione. Le etichette applicate su tali motori contengono informazioni basilari sulle emissioni ed avvertenze della massima
importanza per la sicurezza. Leggere attentamente e seguire tutte le indicazioni di avvertenza e le istruzioni contenute in questo
manuale, nel manuale del motore nonché sulla macchina, sul motore e sugli accessori. Per ricevere ulteriori informazioni sul
prodotto Snapper acquistato, rivolgersi al concessionario autorizzato Snapper di zona oppure contattare il Servizio clienti
aziendale presso Snapper, McDonough, GA. 30253. Telefono: 1-800-935-2967.
Dati nominali di potenza del motore: Le etichette dei dati nominali di potenza lorda per i modelli con motore sono fornite in
conformità a SAE (Society of Automotive Engineers), codice J1940 (Small Engine Power & Torque Rating Procedure), e i dati di
prestazione sono stati ricavati e corretti in conformità a SAE J1995 (Revisione 2002-05). I valori di coppia sono stati derivati a 3060
RPM, i valori di Potenza cavallo motore sono stati derivati a 3600 RPM. La potenza lorda reale può essere inferiore a causa di, fra
altri fattori, condizioni operative ambientali e variabilità da motore a motore. Considerando sia la vasta gamma di prodotti su cui i
nostri motori vengono installati che la varietà di condizioni degli ambienti operativi, è possibile che il motore a benzina non sviluppi il
valore nominale di potenza lorda quando viene usato in una particolare installazione (potenza reale netta o “in sito”). La differenza è
dovuta a diversi fattori compreso, ma non limitato a, accessori (filtro dell’aria, scarico, carica, raffreddamento, carburatore, pompa del
carburante, ecc.), restrizioni applicative, condizioni operative ambientali (temperatura, umidità, altitudine) e variabilità del motore. A
causa di limitazioni produttive e di capacità, Briggs & Stratton potrà sostituire questo motore di serie con un motore di potenza
nominale superiore.
20
 Loading...