

Page 1
Not for
Reproduction
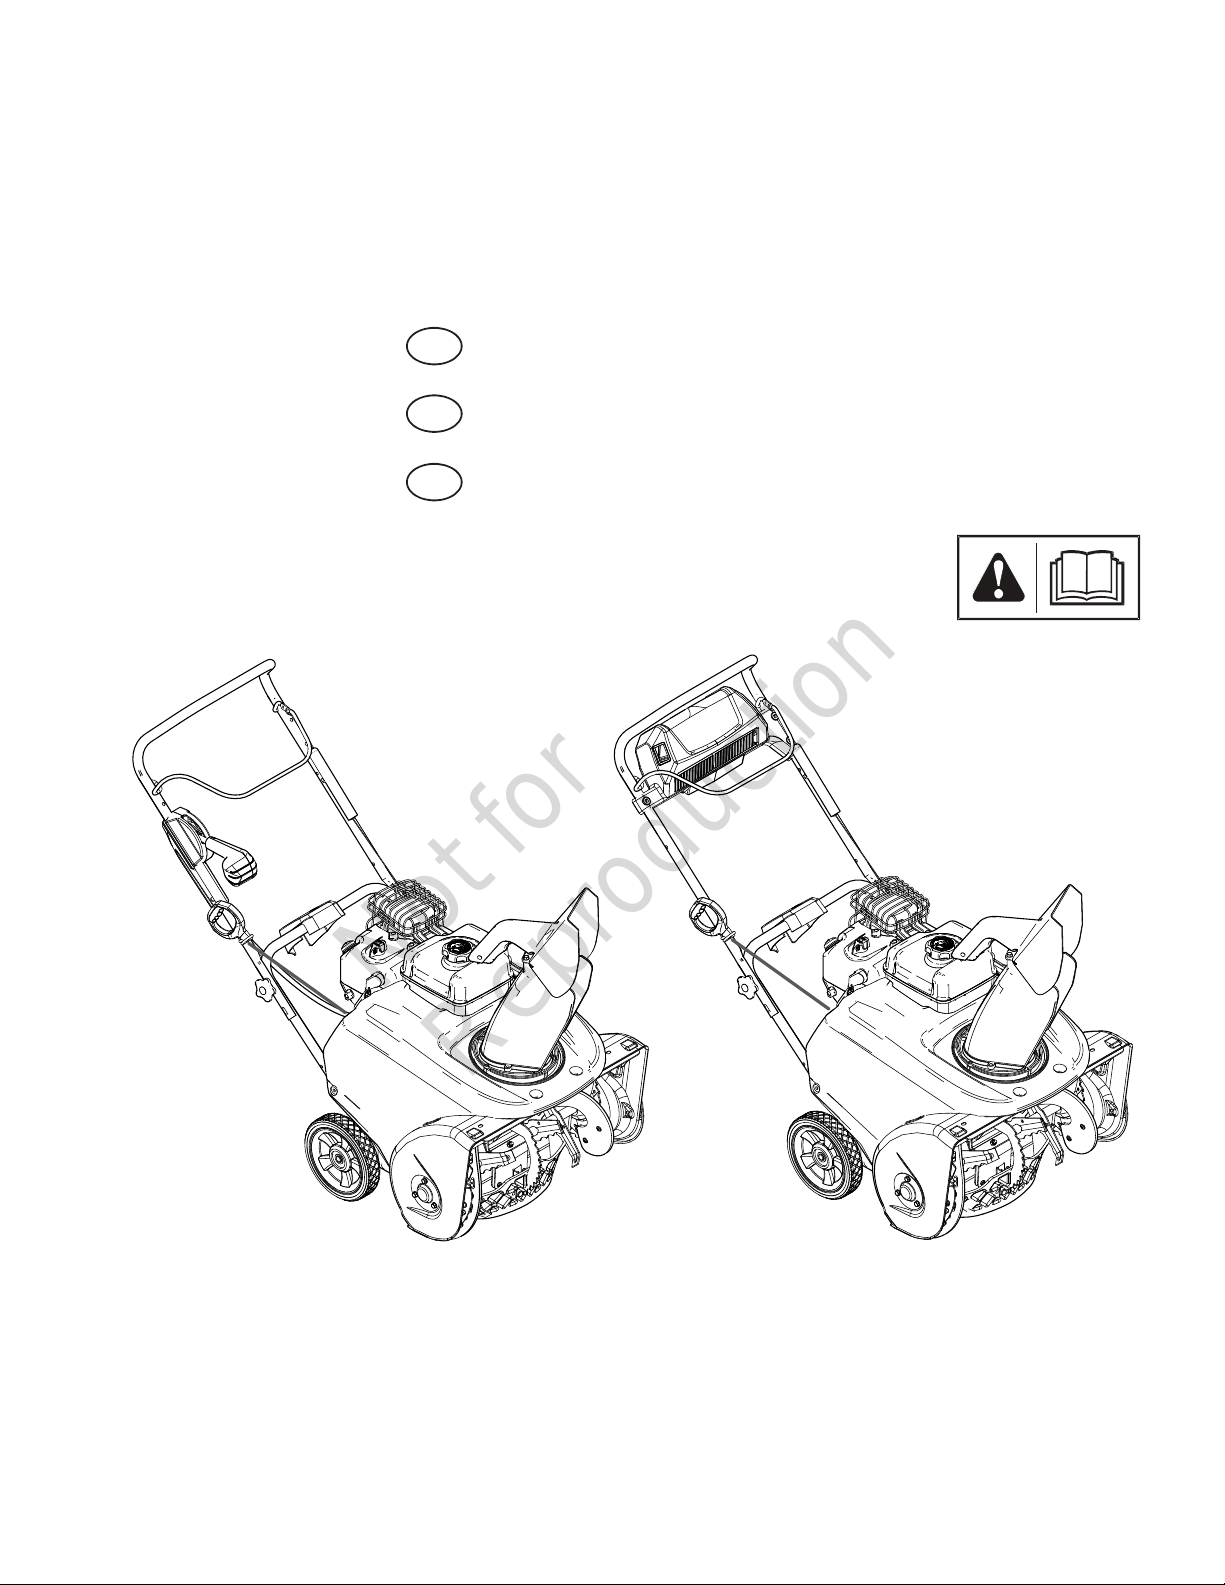
Single Stage Snowthrower
Soplador de nieve de una etapa
Soufeuse à neige à simple
en
es
fr
Operator’s Manual
Manual del operador
Manuel de l'opérateur
Copyright © 2014
Briggs & Stratton Power Products Group, LLC
Milwaukee, WI USA
All rights reserved.
80009699
Revision B
Page 2
Not for
Reproduction
Operator Safety
Table of Contents
Operator Safety ................................................................... 2
Features and Controls ......................................................... 8
Operation .............................................................................9
Maintenance ...................................................................... 14
Storage .............................................................................. 16
Troubleshooting ................................................................. 17
Emissions Warranty ........................................................... 19
Specications .................................................................... 20
NOTE: Please refer to the Customer Contact Guide and Setup
Instructions for additional information.
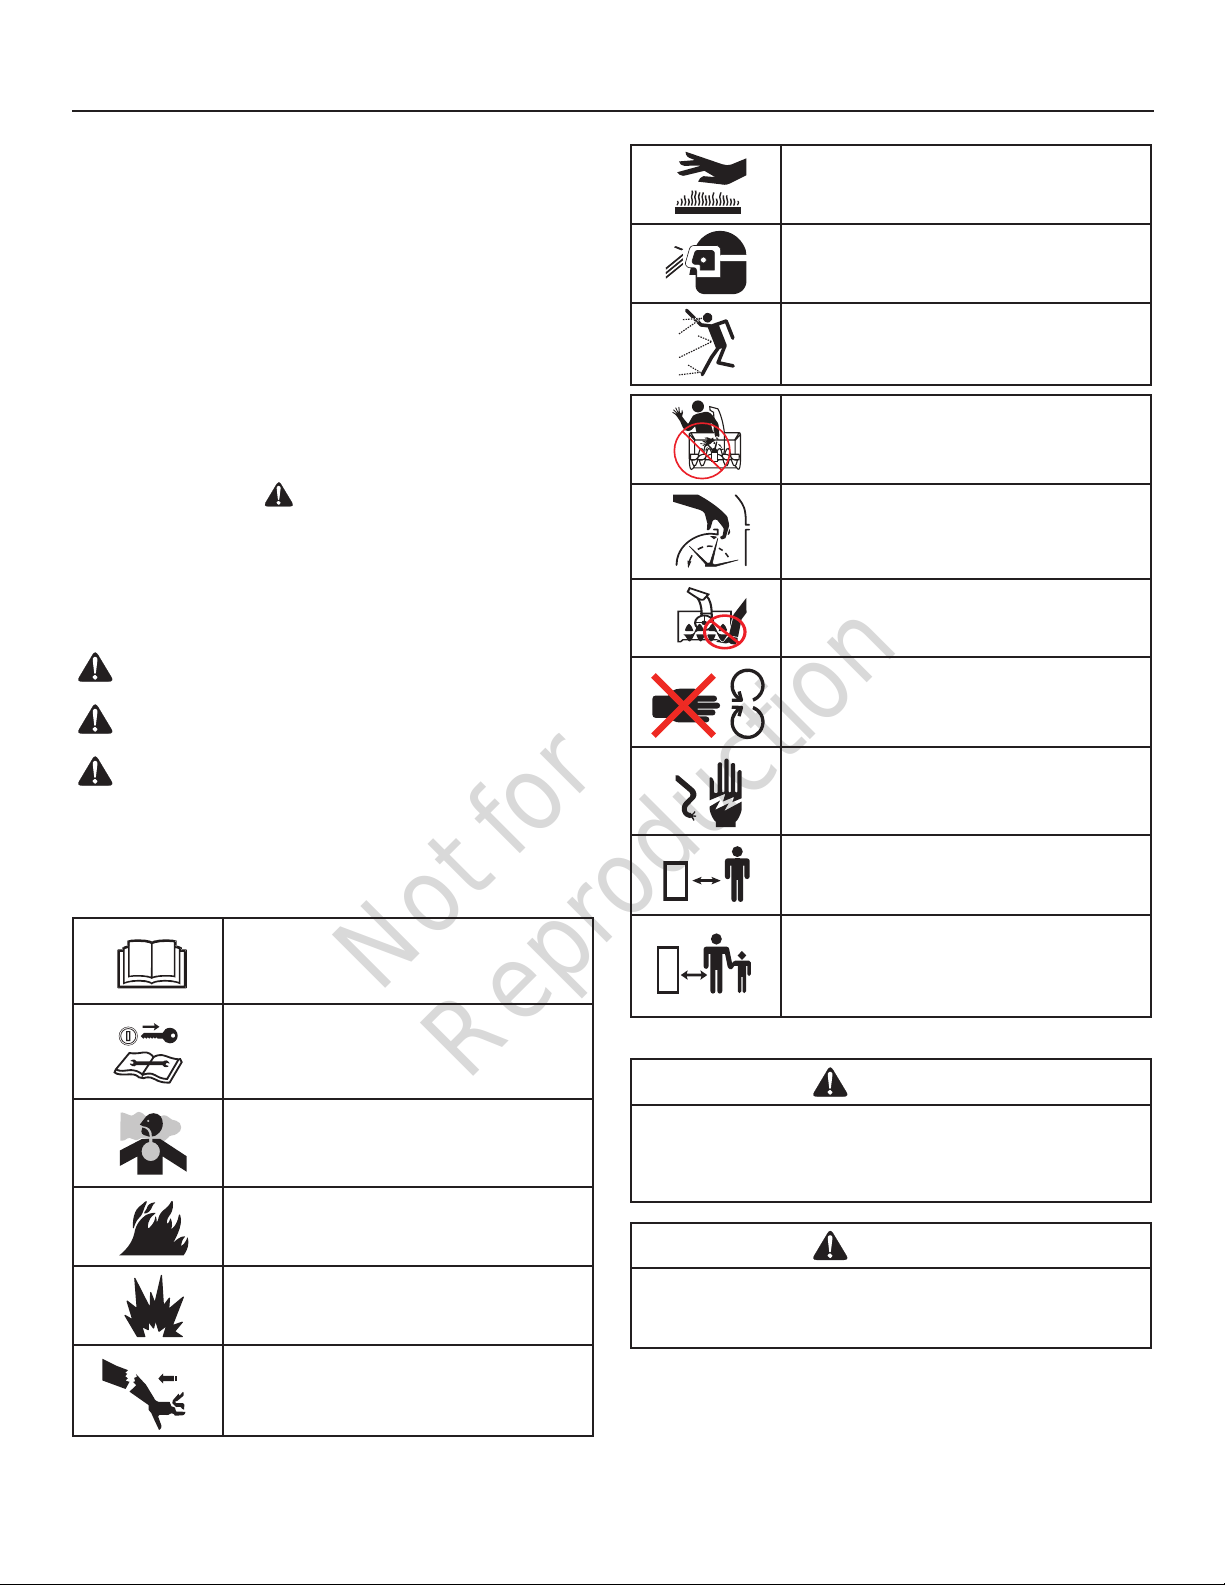
Hot surface hazard
Wear safety glasses
Thrown objects hazard
Safety Alert Symbol and Signal Words
The safety alert symbol is used to identify safety information
about hazards that can result in personal injury. A signal word
(DANGER, WARNING, or CAUTION) is used with the alert symbol
to indicate the likelihood and potential severity of injury. In
addition, a hazard symbol may be used to represent the type of
hazard.
DANGER indicates a hazard which, if not avoided, will
result in death or serious injury.
WARNING indicates a hazard which, if not avoided, could
result in death or serious injury.
CAUTION indicates a hazard which, if not avoided, could
result in minor or moderate injury.
NOTICE indicates an action that could result in damage to
the product.
Hazard Symbols and Meanings
Read the Operator’s Manual
Amputation hazard - rotating impeller
Amputation hazard - rotating impeller
Amputation hazard - rotating auger
Entanglement hazard - rotating parts
Electric shock hazard
Keep safe distance away
Keep children away
Remove key before performing
maintenance
Carbon monoxide poisoning hazard
Fire hazard
Explosion hazard
Kickback hazard
2
WARNING
Certain components in this product and its related accessories
contain chemicals known to the State of California to cause
cancer, birth defects, or other reproductive harm. Wash hands
after handling.
WARNING
The engine exhaust from this product contains chemicals
known to the State of California to cause cancer, birth defects,
or other reproductive harm.
Page 3

Not for
Reproduction
Operator Safety
WARNING
• Hand contact with the rotating impeller inside the discharge
chute is the most common cause of injury associated with
snowthrowers.
• This snowthrower is capable of amputating hands and feet,
and throwing objects. Read and observe all the safety
instructions in this manual. Failure to do so could result in
death or serious injury.
WARNING
Read, understand, and follow all the
instructions on the snowthrower and in the
operator’s manual before operating this unit.
Failure to observe the safet y instructions in this
manual could result in death or serious injury.
• Save these original instructions for future reference.
• Be thoroughly familiar with the controls and the proper use
of the snowthrower.
• Make sure you are properly trained before operating the
snowthrower.
• Know how to stop the unit and disengage the controls
quickly.
• Never allow anyone to operate the snowthrower without
proper instruction.
• Always follow the instructions in the operator’s manual, if
the snowthrower will be stored for an extende d period.
• Maintain or replace safety and instruction labels as
necessary.
• Never attempt to make major repairs on the snowthrower
unless you have been properly trained. Improper servicing
of the snowthrower can result in hazardous operation,
equipment damage, and voiding of the product warranty.
DANGER
Keep hands, feet, and clothing away from
rotating parts. Rotating parts can contact
or entangle hands, feet, hair, clothing, or
accessories.
Failure to observe these safety instructions
will result in traumatic amputation or severe
laceration.
• Whenever cleaning, repairing, or inspecting the
snowthrower, make sure the engine is OFF, spark plug wire
is disconnected, and all moving parts have stopped.
• Do not put hands or feet near or under rotating parts. Keep
clear of the discharge opening at all times.
• Never operate the snowthrower without proper guards, and
other safety devices in place and working.
• Never leave the snowthrower unattended while engine is
running. Always disengage the auger and traction controls,
stop engine, and remove keys.
• Keep all loose clothing away from the front of the
snowthrower and auger. Scarves, mittens, dangling
drawstrings, loose clothes, and pants can quickly become
caught in the rotating device and amputation will occur. Tie
up long hair and remove jewelry.
• Run the machine a few minutes after discharging snow to
prevent freeze-up of the collector/impeller.
• Disengage power to the collector/impeller when
snowthrower is transported or not in use.
WARNING
Objects can be picked up by auger and thrown
from chute. Never discharge snow toward
bystanders or allow anyone in front of the
snowthrower. Failure to observe these safety
instructions will result in death or serious injury.
DANGER
Discharge chute contains rotating impeller
to throw snow. Never clear or unclog the
discharge chute with your hands. Fingers can
quickly become caught in the impeller. Always
use a clean-out tool.
Failure to observe these safety instructions
will result in traumatic amputation or severe
laceration.
• Always wear safety glasses or eye shields during
operation, and while performing an adjustment or repair.
• Always be aware of the direction the snow is being
thrown. Nearby pedestrians, pets, or property may be
harmed by objects being thrown.
• Be aware of your environment while operating the
snowthrower. Don’t run over items such as gravel,
doormats, newspapers, toys, and rocks hidden under
snow, as they can all be thrown from the chute or jam in
the auger.
• Use extreme caution when operating on or crossing
gravel drives, walks, or roads.
• Adjust the collector housing height to clear gravel or
crushed rock surface.
• Never operate the snowthrower near glass enclosures,
automobiles, window wells, drop-offs, and the like without
proper adjustment of the discharge chute angle.
• Familiarize yourself with the area in which you plan to
operate the snowthrower. Mark off boundaries of walkways
and driveways.
en
3
Page 4

Not for
Reproduction
Operator Safety
WARNING
Tragic accidents can occur if the operator is
not alert to the presence of children. Children
are often attracted to the unit and the operating
activity. Never assume the children will remain
where you last saw them.
• Keep children out of the area during operation. Children are
often attracted to the equipment. Be mindful of all persons
present.
• Be alert and turn unit off if children enter the area.
• Never allow children to operate the unit.
• Use extra care when approaching blind corners, shrubs,
trees, or other objects that may obscure vision. Children
may be present.
WARNING
Engines give off carbon monoxide, an
odorless, colorless, poison gas. Breathing
carbon monoxide can cause nausea, fainting,
or death.
• Keep fuel away from sparks, open flames, pilot lights, heat,
and other ignition sources.
• Check fuel lines, cap, and fittings frequently for cracks or
leaks. Replace if necessary.
• Use an approved fuel container.
• If fuel spills, wait until it evaporates before starting engine.
When Starting Engine
• Ensure that spark plug, muffler, fuel cap, and air cleaner (if
equipped) are in place and secured.
• Do not crank the engine with the spark plug removed.
• If fuel is spilled, do not attempt to start the engine, but move
the snowthrower away from the area of the spill, and avoid
creating any source of ignition, until the fuel vapors have
dissipated.
• Do not over-prime the engine. Follow the engine starting
instructions in this manual.
• If the engine floods, set choke (if equipped) to OPEN/RUN
position, move throttle (if equipped) to FAST position and
crank until engine starts.
When Operating Equipment
• Do not tip the snowthrower at an angle which causes the
fuel to spill.
• Do not choke the carburetor to stop the engine.
• Never run the engine with the air cleaner assembly (if
equipped) or the air filter (if equipped) removed.
• Start and run engine outdoors.
• Do not run the engine in an enclosed area, even if doors or
windows are open.
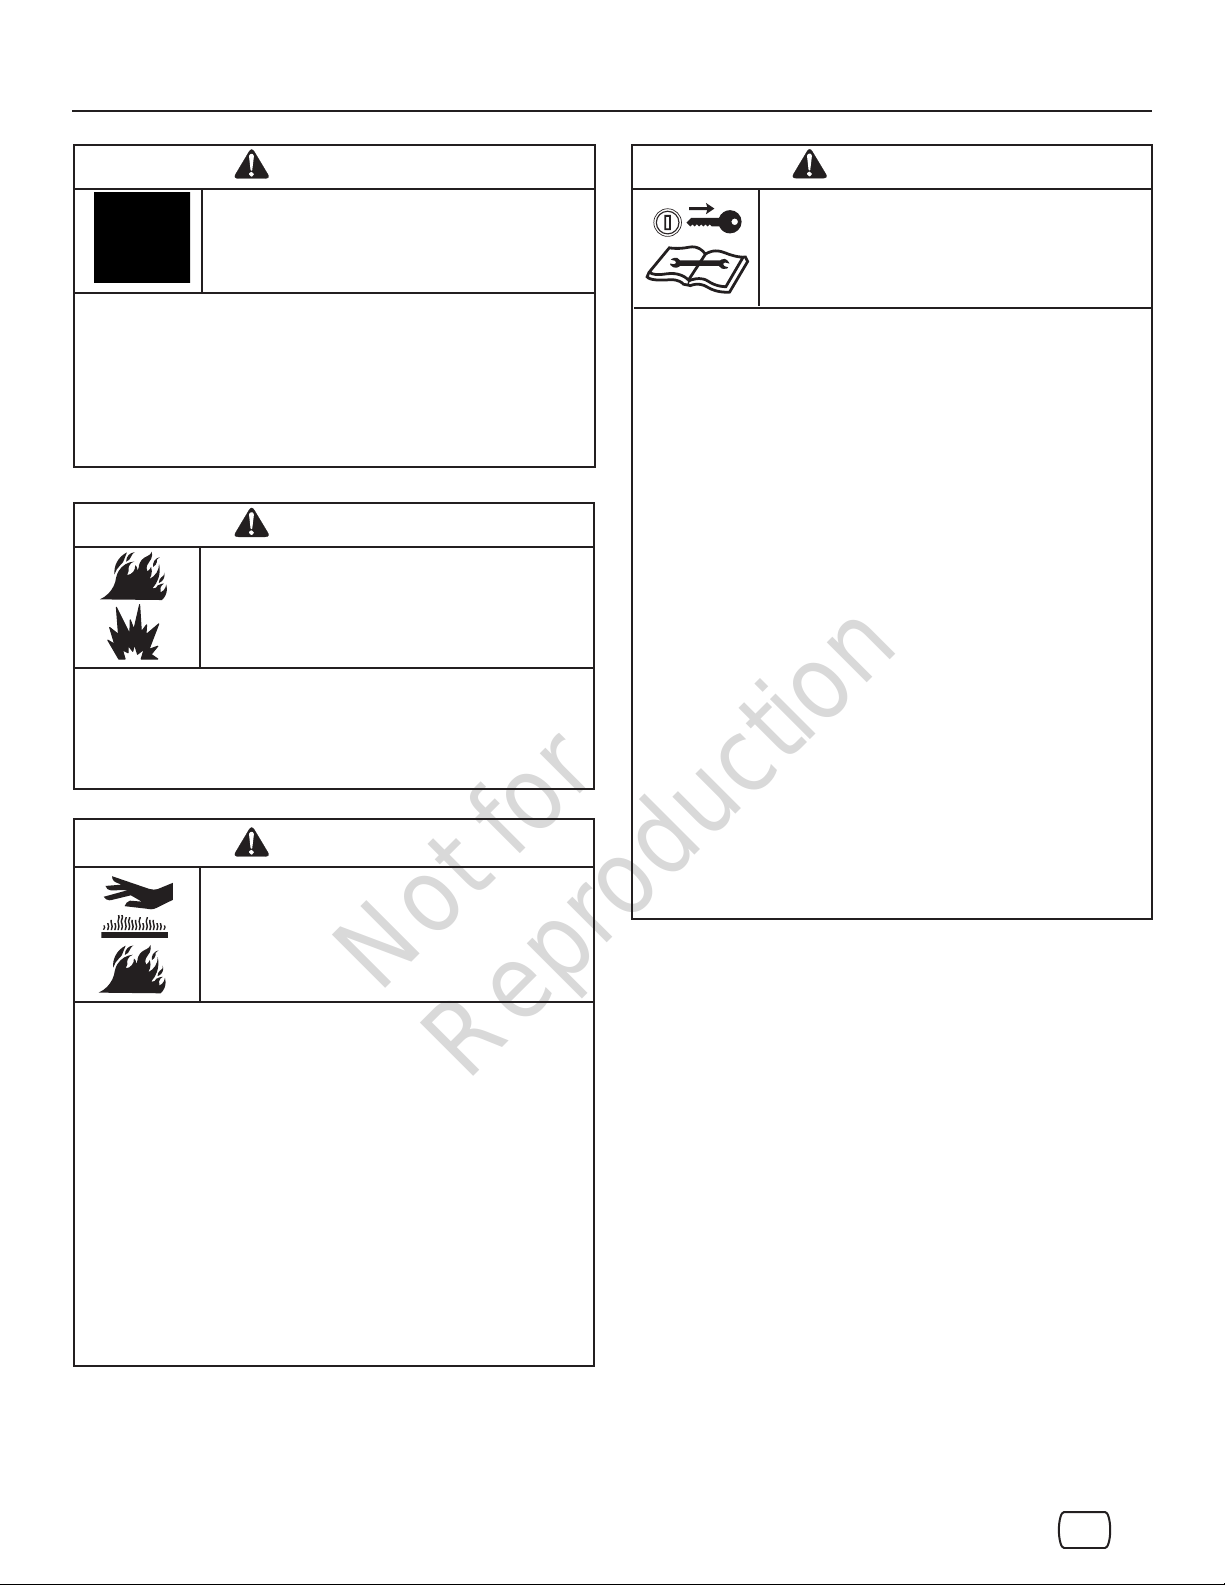
WARNING
Fuel and its vapors are extremely flammable
and explosive. Always handle fuel with
extreme care.
Failure to observe these safety instructions can
cause a fire or explosion which will result in
severe burns or death.
When Adding Fuel
• Turn off engine and let cool at least 2 minutes before
removing the fuel cap and adding fuel.
• Fill fuel tank outdoors or in a well ventilated area.
• Do not overfill the fuel tank. To allow for the expansion of
gasoline, do not fill above the bottom of the fuel tank neck.
When Changing Oil
• If you drain the oil from the top oil fill tube, the fuel tank
must be empty or fuel can leak out and result in a fire or
explosion.
When Transporting Equipment
• Transport with fuel tank EMPTY, or with fuel shut-off valve
OFF.
When Storing Gasoline or Equipment With Fuel in Tank
• Store away from furnaces, stoves, water heaters, or other
appliances that have pilot light or other ignition source
because they can ignite fuel vapors.
4
Page 5
Not for
Reproduction
Operator Safety
WARNING
Safe operation of the snowthrower requires
the proper care and maintenance of the
engine.
• Disengage all clutches and shift into neutral before starting
the engine.
• Let the engine adjust to outdoor temperatures before
starting to clear snow.
• Use a grounded three-wire plug for all snowthrowers
equipped with electric drive motors or electric starting
motors.
WARNING
Starting engine creates sparking.
Sparking can ignite nearby flammable gases.
Explosion and fire could result.
• If there is natural or LP gas leakage in area, do not start
engine.
• Do not use pressurized starting fluids because vapors are
flammable.
WARNING
Running the engine produces heat. Engine
parts, especially muffler, become extremely
hot.
Failure to observe these safety instructions
could result in severe thermal burns on contact.
WARNING
This snowthrower must be properly
maintained to ensure safe operation and
performance. Failure to observe the safety
instructions in this manual could result in
death or serious injury.
• When performing any maintenance or repairs on the
snowthrower, shut OFF the engine, disconnect spark plug
wire, and keep the wire away from the plug to prevent
someone from accidently starting the engine.
• Check shear bolts and other hardware at frequent intervals
for proper tightness.
• Keep nuts and bolts tight and keep snowthrower in good
condition.
• Never tamper with safety devices. Check their proper
operation regularly and make necessary repairs if they are
not functioning properly.
• Components are subject to wear, damage, and deterioration.
Frequently check components and replace with
recommended parts, when necessary.
• Check control operation frequently. Adjust and service as
required.
• Use only factory authorized replacement parts, or like, parts
when making repairs.
• Always comply with factory specifications on all settings and
adjustments.
• Use only factory authorized, or like, attachments and
accessories such as wheel weights, counterweights, or cabs.
• Never attempt to make any adjustments while the engine
is running (except when specifically recommended by the
factory).
• Never touch a hot engine or muffler. Allow muffler, engine
cylinder, and fins to cool before touching.
• Remove debris from muffler area and cylinder area.
• Install and maintain in working order a spark arrester before
using equipment on forest-covered, grass-covered, or
brush-covered unimproved land.
• It is a violation of California Public Resource Code,
Section 4442, to use or operate the engine on any forestcovered, brush-covered, or grass-covered land unless
the exhaust system is equipped with a spark arrester, as
defined in Section 4442, maintained in effective working
order. Other states or federal jurisdictions may have
similar laws. Contact the original equipment manufacturer,
retailer, or dealer to obtain a spark arrester designed for the
exhaust system installed on this engine.
en
5
Page 6
Not for
Reproduction
Operator Safety
WARNING
This snowthrower is only as safe as the operator. If it is misused, or not properly maintained,
it can be dangerous. Remember you are responsible for your safety and those around you.
• Keep the area of operation clear of all persons, particularly
small children and pets.
• Thoroughly inspect the area where the snowthrower will be
used and remove all doormats, sleds, boards, wires, and
other foreign objects.
• Do not operate the snowthrower without wearing adequate
winter clothing.
• Wear footwear that will improve footing on slippery surfaces.
• Use caution to avoid slipping or falling especially when
operating the snowthrower in reverse.
• Never operate the snowthrower without good visibility or
light. Always be sure of your footing, and keep a firm hold on
the handles.
• Do not clear snow across the face of slopes. Use extreme
caution when changing direction on slopes. Do not attempt
to clear steep slopes.
• Do not overload the machine capacity by attempting to clear
snow too quickly.
• Never operate the snowthrower at high transport speeds on
slippery surfaces. Look behind the snowthrower and use
care when operating in reverse.
• Do not use the snowthrower on surfaces above ground level
such as roofs of residences, garages, porches, or other such
structures or buildings.
• Operators should evaluate their ability to operate the
snowthrower safely enough to protect themselves and
others from injury.
• The snowthrower is intended to remove snow only. Do not
use the snowthrower for any other purpose.
• Do not carry passengers.
• After striking a foreign object, shut OFF the engine,
disconnect the cord on electric motors, thoroughly inspect
the snowthrower for any damage, and repair the damage
before restarting and operating the snowthrower.
• If the snowthrower vibrates abnormally, shut OFF the
engine. Vibration is generally a warning of trouble. See an
authorized dealer if necessary for repairs.
• For models equipped with electric starting motors,
disconnect the power cord after the engine starts.
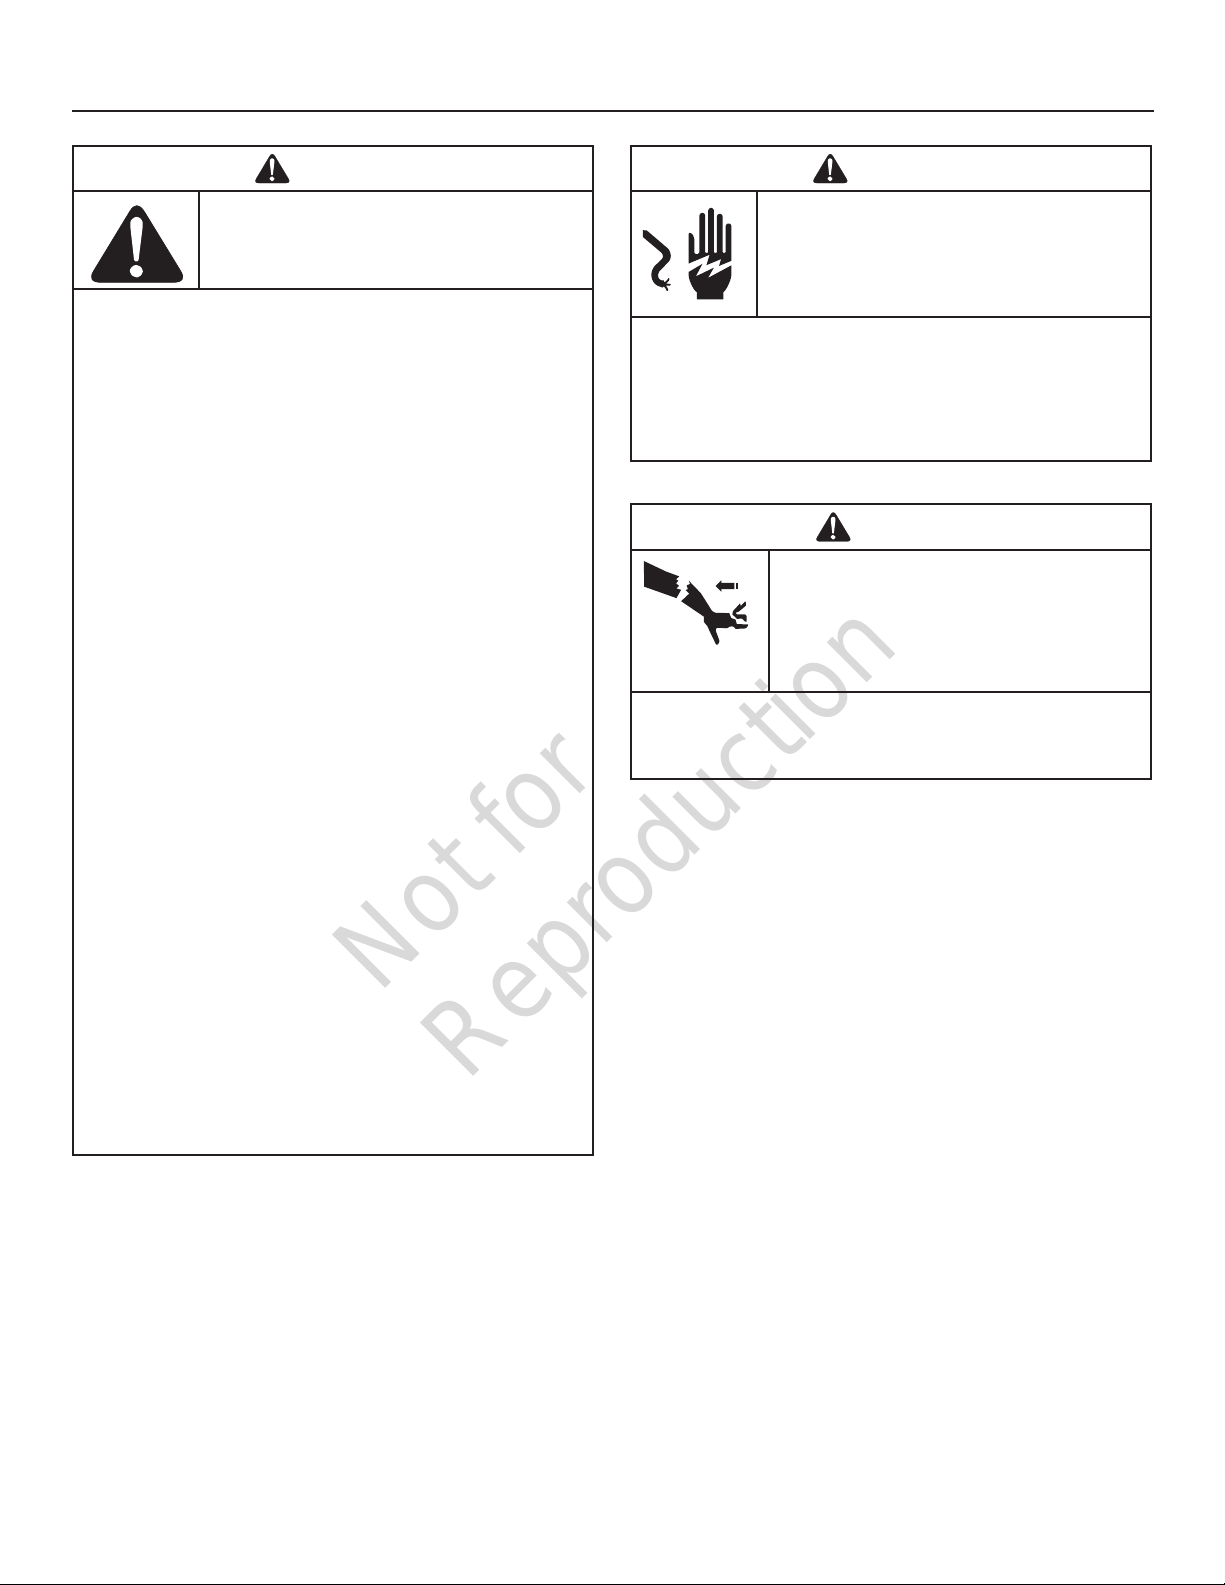
WARNING
Damaged or ungrounded power cords could
cause electric shock.
Electric shock could cause severe burns or
death.
When Using the Electric Starter
• The power cord must be properly grounded at all times.
• Use only a three-conductor power cord properly grounded
to the power source.
• If the extension cord is damaged, it must be replaced a
qualied person to avoid a hazard.
WARNING
Rapid retraction of the starter cord (kickback)
will pull your hand and arm toward the engine
faster than you can let go.
Broken bones, fractures, bruises, or sprains
could result.
When Starting the Engine
• Pull the starter cord slowly until resistance is felt and then
pull rapidly to avoid kickback.
6
Page 7
Not for
Reproduction
Operator Safety
A
B
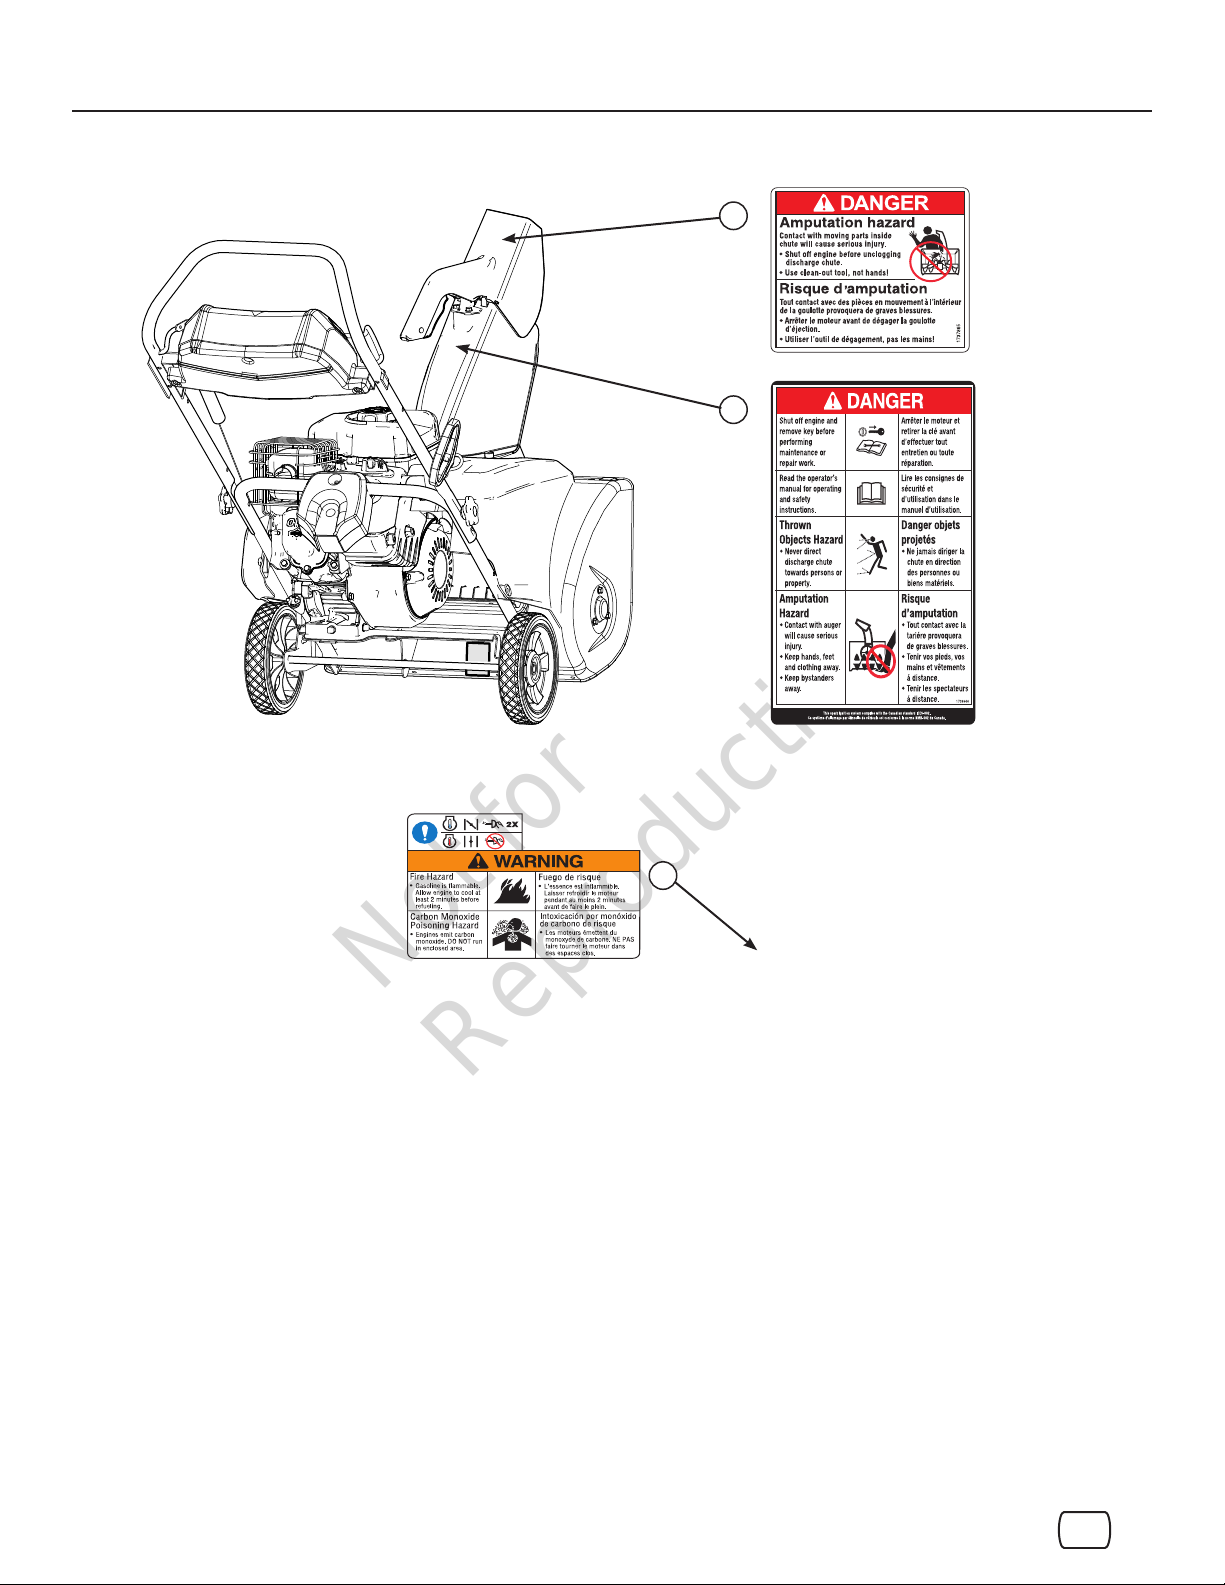
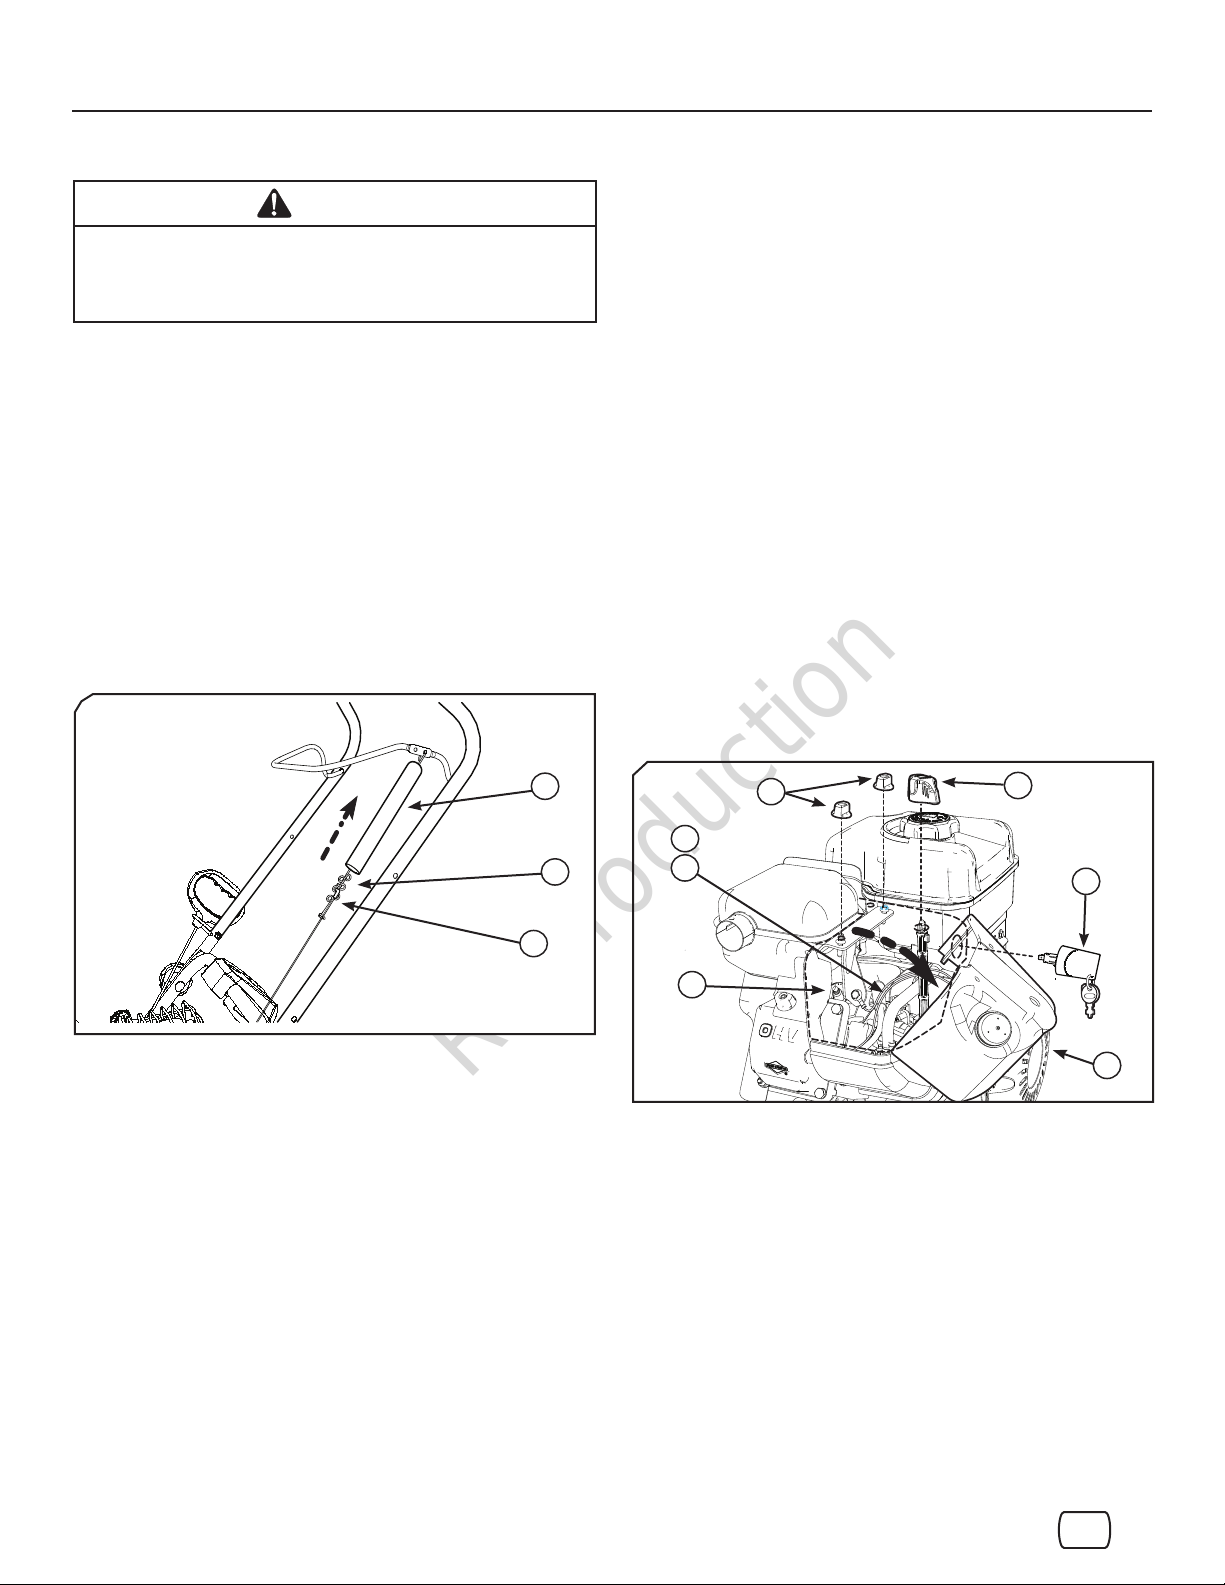
Safety Decals
Before operating the snowthrower, read and understand the
installed safety decals. The cautions and warnings are provided
to help you avoid personal injury or damage to your snowthrower.
If any safety decals become damaged or illegible, order
replacements from your local authorized service dealer.
A — Part No. 1737865 Chute Danger Decal
B — Part No. 1739966 Auger Danger Decal
C — Part No. 279655 Engine Warning Decal
C
en
7
Page 8
Not for
Reproduction
Features and Controls
1739977
A
B
C
B
H
N
D
E
G
O
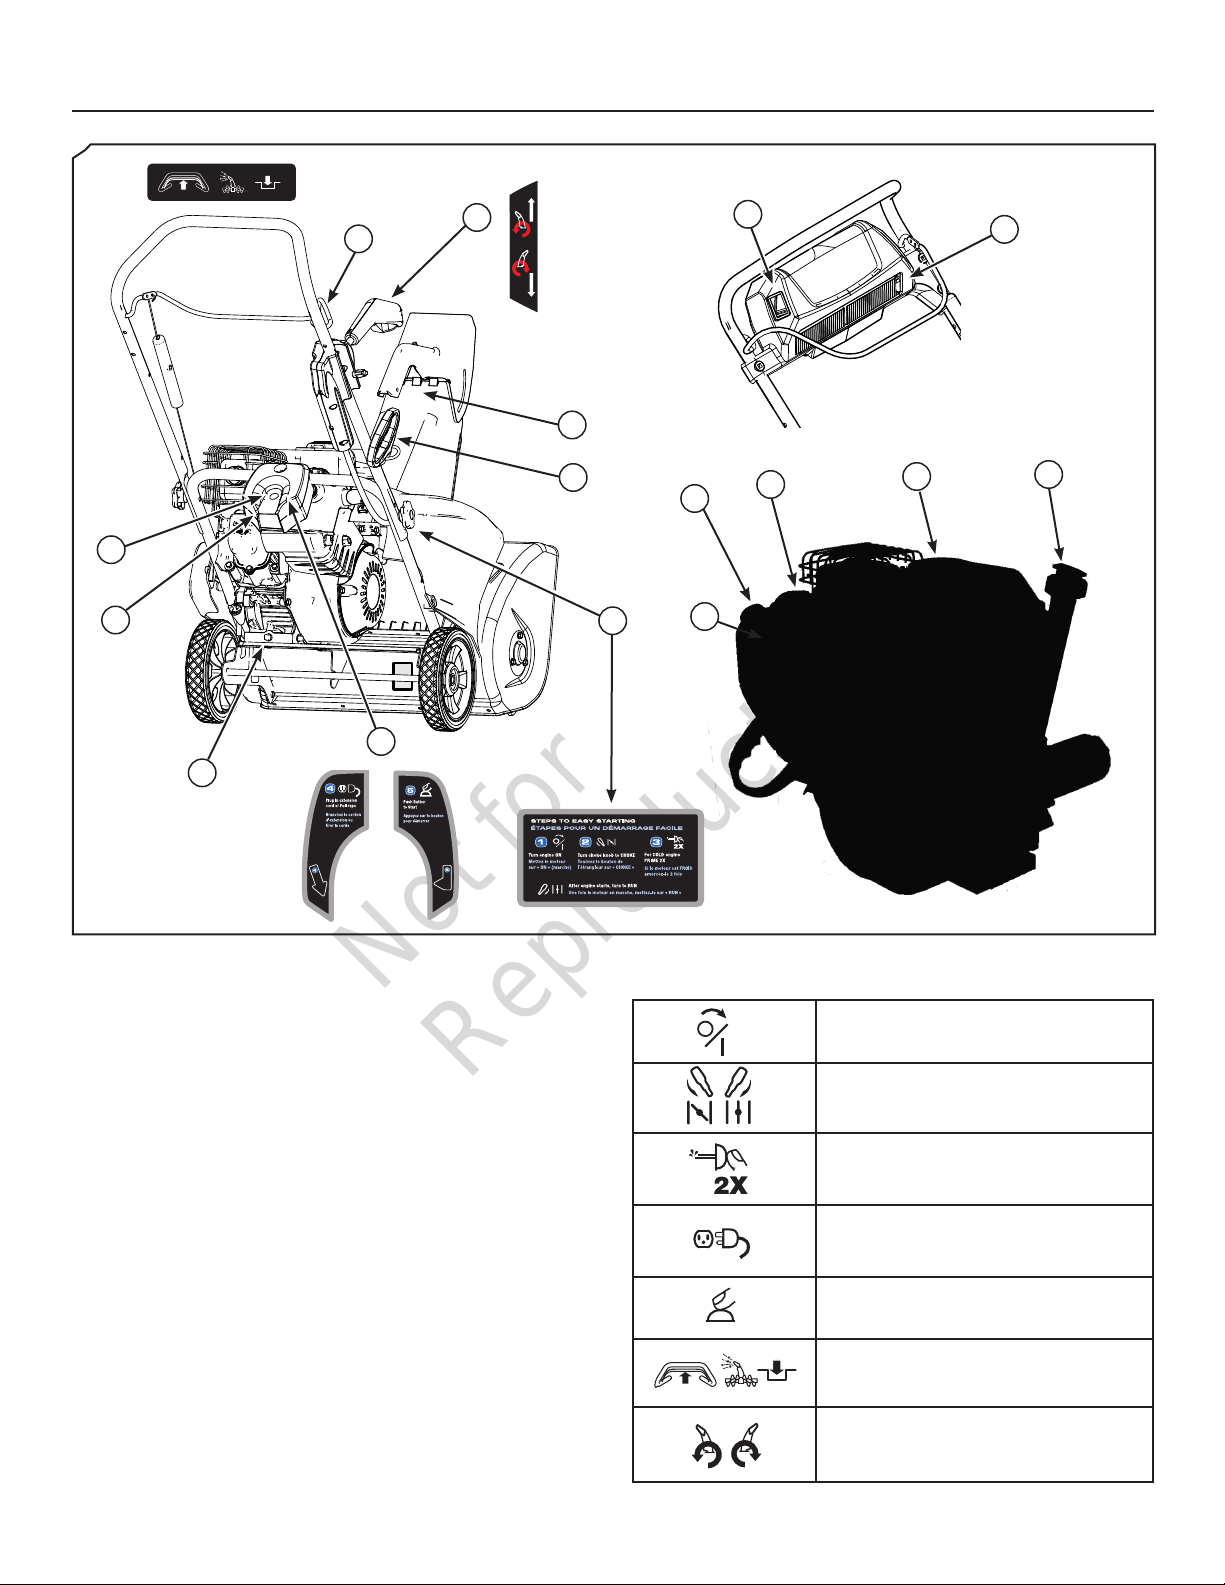
Snowthrower and Engine Controls
A — Auger Control
B
— Chute Control - Switch Mount (if equipped)
Chute Control - Handle Mount (if equipped)
C
— Deector Control - Trigger
D
— Starter Button
E
— Starter Receptacle
F
— Starting Instructions Decal (if equipped)
G
— Starting Instructions Decal (if equipped)
H
— Headlight (if equipped)
I
— Choke Control
J — Fuel Tank and Cap
K — Oil Fill/Dipstick
L
— Primer Button
M — ON/OFF or Push/Pull Key
N — Starter Cord Handle
O — Oil Drain Plug
8
L
F
M
I
J
Control Symbols and Meanings
On / O switch
Choke closed; choke open
Push primer 2 times
Plug in extension cord
Press button to start
Engage auger control
Rotate chute control
K
Page 9
Not for
Reproduction
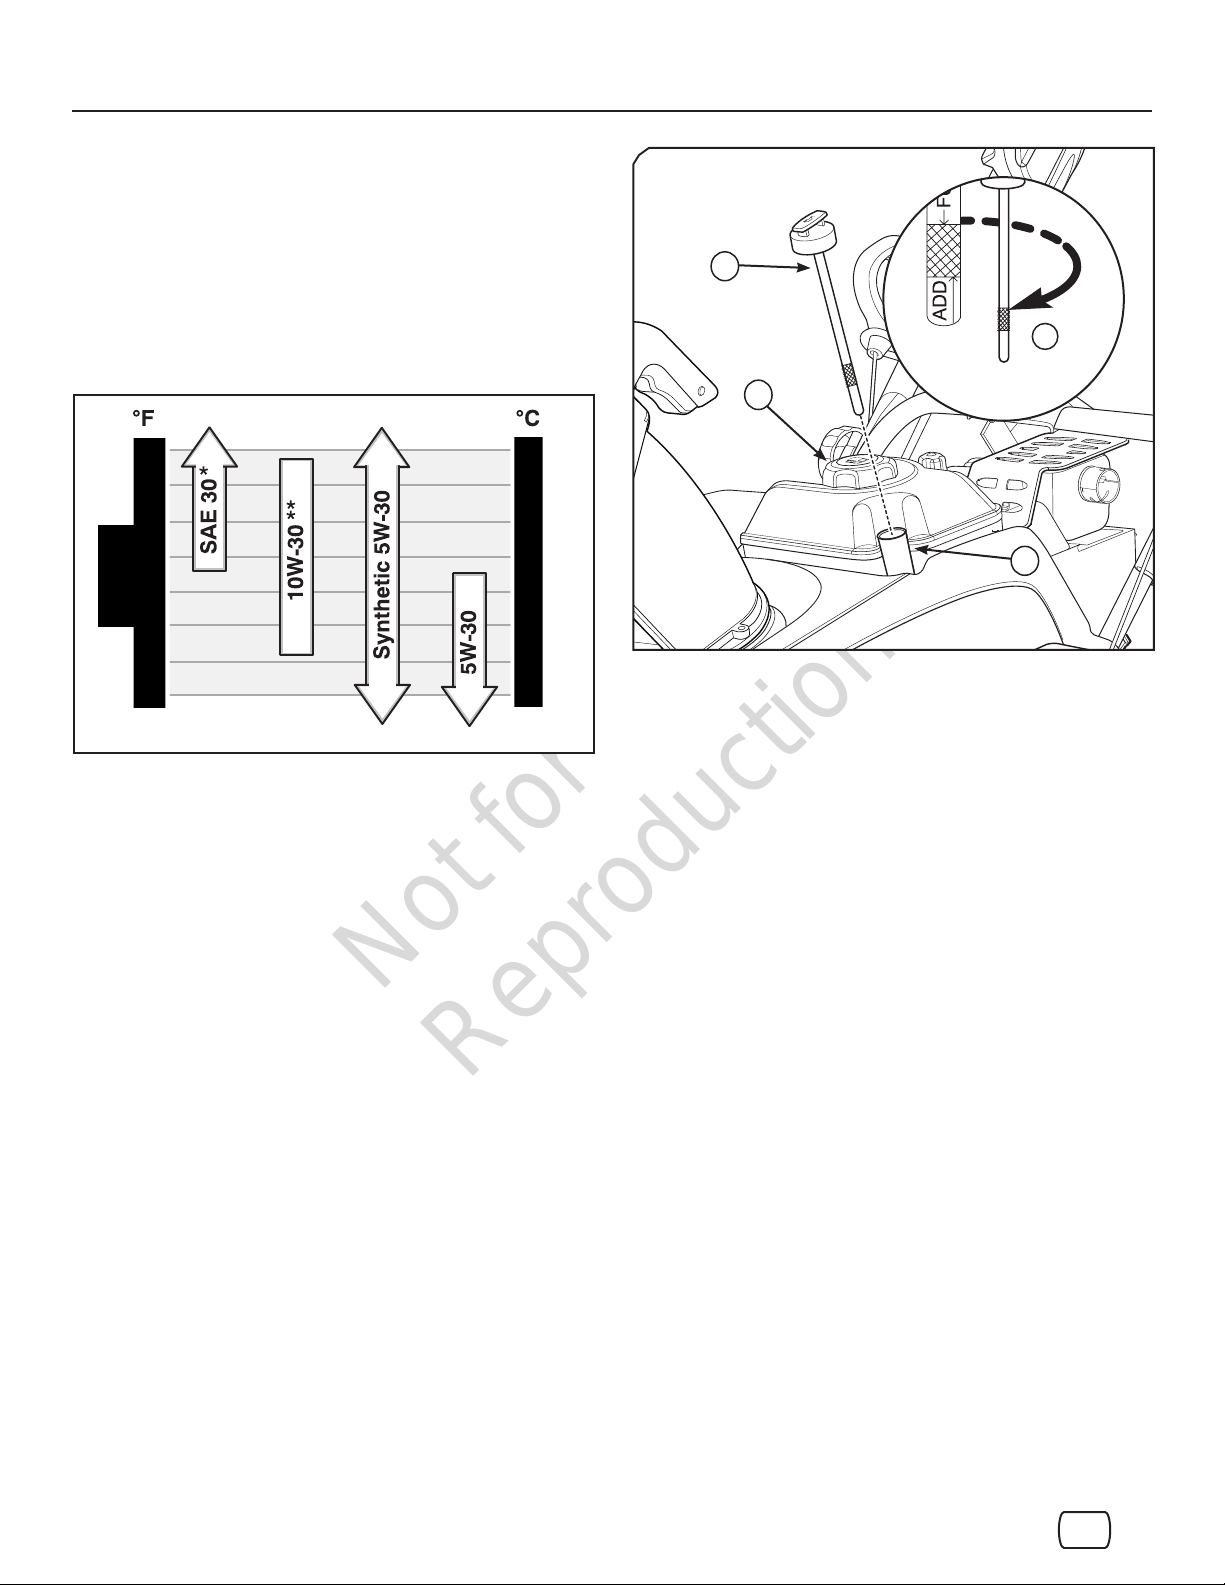
Oil Recommendations
NOTICE: The engine was shipped from the factory without oil.
Before you start the engine, ensure that you add oil according to
the instructions in this manual. If you start the engine without oil, it
will be damaged beyond repair and will not be covered under the
warranty.
Use a high quality detergent oil classified for Service SG, SH,
SJ, SL, or higher. Synthetic 5W30 motor oil is acceptable for all
temperatures. DO NOT mix oil with gasoline. See chart below for
oil recommendations.
Operation
A
C
D
B
* Below 40°F (4°C) the use of SAE 30 will result in hard starting.
** Above 80°F (27°C) the use of 10W-30 may cause increased oil con-
sumption. Check oil level more frequently.
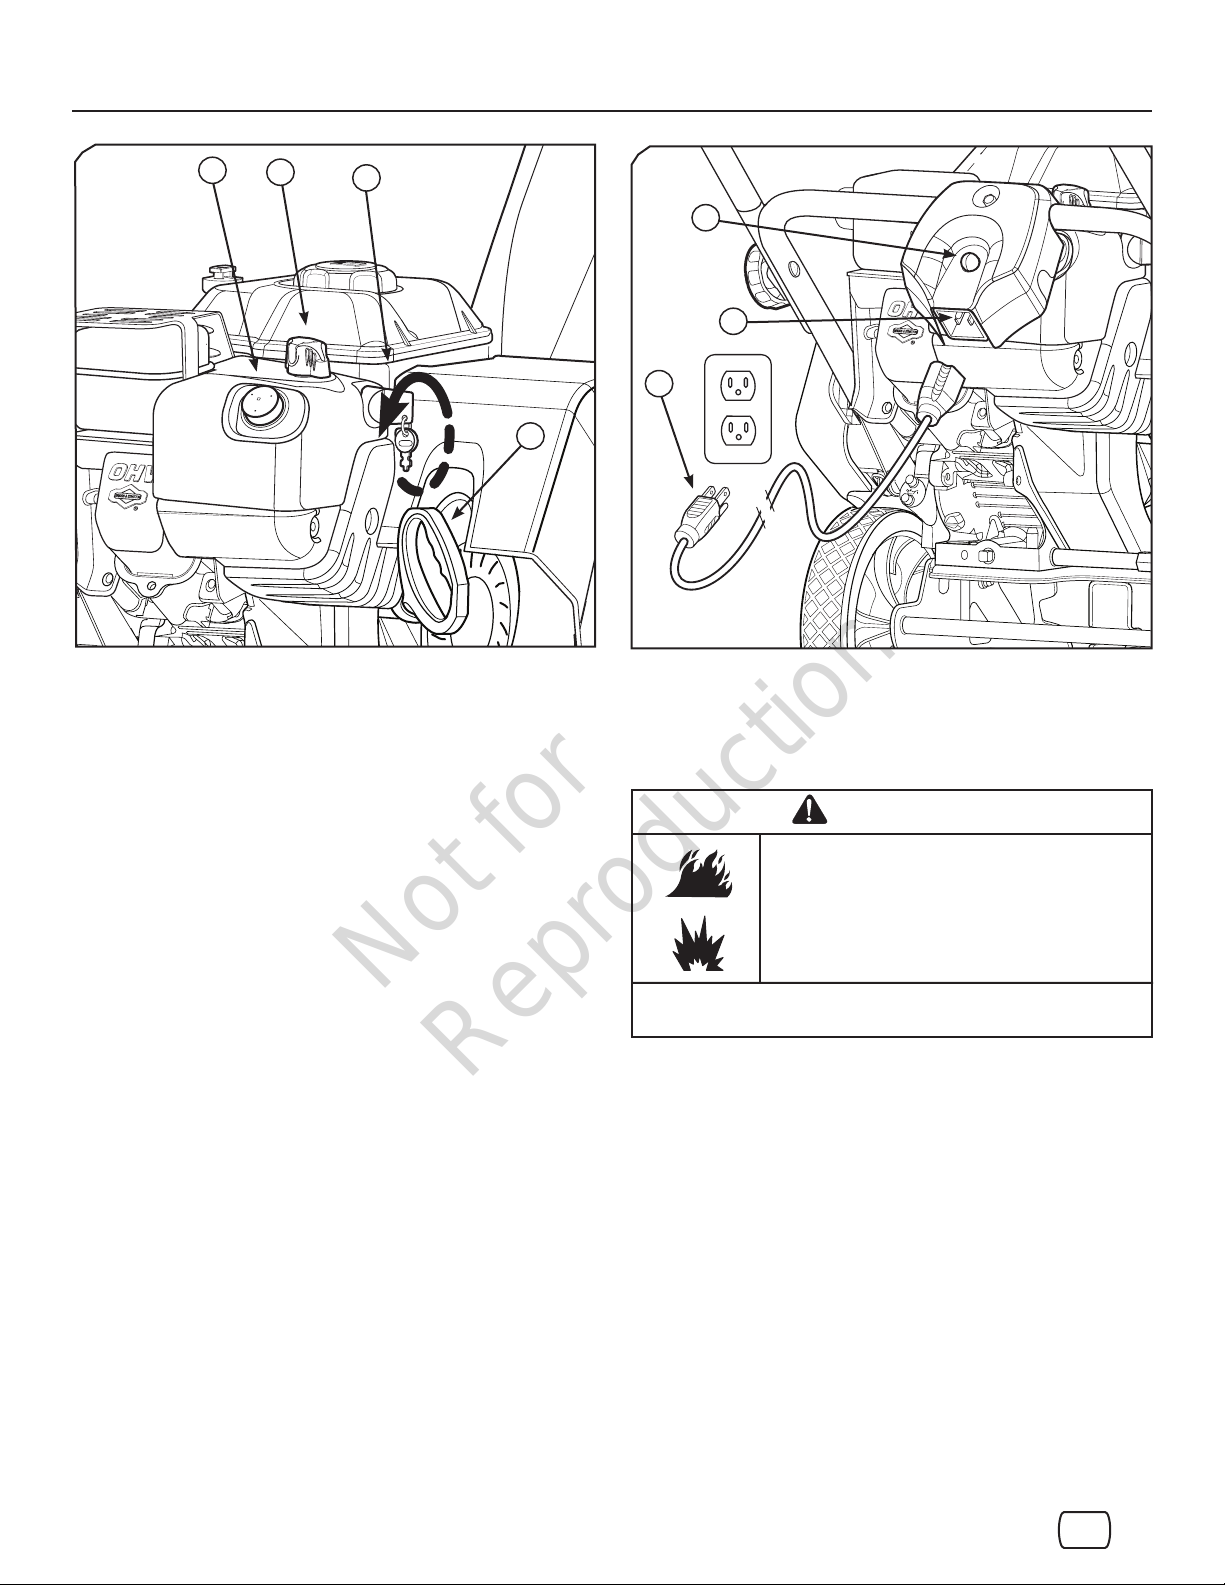
Add Oil / Check Oil Level
1. Ensure the snowthrower is level.
2. Clean the oil dipstick area of any debris.
3. See Specifications for the oil capacity.
4. Remove the oil dipstick (A, Figure 1) and wipe it with a clean
cloth.
5. Add oil slowly into the engine oil fill (B).
6. Wait one minute and then insert the oil dipstick and turn it
clockwise to tighten.
7. Remove the oil dipstick and check the oil level.
8. If necessary, add oil until the level reaches the full mark (C) on
the oil dipstick. Do not overfill.
9. Insert and tighten the oil dipstick securely.
Figure 1
Fuel Recommendations
Fuel must meet these requirements:
• Clean, fresh, unleaded gasoline.
• A minimum of 87 octane / 87 AKI (91 RON). For high altitude
use, see below.
• Gasoline with up to 10% ethanol (gasohol) is acceptable.
NOTICE: Do not use unapproved gasolines, such as E15 and
E85. Do not mix oil in gasoline or modify the engine to run on
alternate fuels. Use of unapproved fuels will cause damage to
engine components, which will not be covered under warranty.
To protect the fuel system from gum formation, mix a fuel
stabilizer into the fuel. See Storage. All fuel is not the same. If
starting or performance problems occur, change fuel providers
or change brands. This engine is certified to operate on gasoline.
The emissions control system for this engine is EM (Engine
Modifications).
High Altitude
At altitudes over 5,000 feet (1524 meters), a minimum 85 octane
/ 85 AKI (89 RON) gasoline is acceptable. For carbureted
engines, high altitude adjustment is required to remain emissions
compliant. Operation without this adjustment will cause decreased
performance, increased fuel consumption, and increased
emissions. Contact a Briggs & Stratton Authorized Service Dealer
for high altitude adjustment information.
Operation of the engine at altitudes below 2,500 feet (762
meters) with the high altitude adjustment is not recommended.
For Electronic Fuel Injection (EFI) engines, no high altitude
adjustment is necessary.
en
9
Page 10
Not for
Reproduction
Operation
Add Fuel
WARNING
Fuel and its vapors are extremely flammable
and explosive. Always handle fuel with
extreme care.
Failure to observe these safety instructions can
cause a fire or explosion which will result in
severe burns or death.
When Adding Fuel
• Turn off engine and let cool at least 2 minutes before
removing the fuel cap and adding fuel.
• Fill fuel tank outdoors or in a well ventilated area.
• Do not overfill the fuel tank. To allow for the expansion of
gasoline, do not fill above the bottom of the fuel tank neck.
• Keep fuel away from sparks, open flames, pilot lights, heat,
and other ignition sources.
• If fuel spills, wait until it evaporates before starting engine.
WARNING
Damaged or ungrounded power cords could
cause electric shock.
Electric shock could cause severe burns or
death.
When Using the Electric Starter
• The power cord must be properly grounded at all times.
• Use only a three-conductor power cord properly grounded
to the power source.
• If the extension cord is damaged, it must be replaced a
qualied person to avoid a hazard.
NOTE: The electric starter is designed for a three-conductor
power cord only and operates on standard household current. If a
properly grounded electrical source is not available, DO NOT use
the electric starter. Contact a licensed electrician for installation of
a properly grounded system.
1. Clean the fuel cap area of dirt and debris. Remove the fuel cap
(D, Figure 1).
2. Fill the fuel tank with fuel. To allow for expansion of the fuel, do
not fill above the bottom of the fuel tank neck.
3. Install the fuel cap.
Start the Engine
WARNING
Fuel and its vapors are extremely flammable
and explosive. Always handle fuel with
extreme care.
Failure to observe these safety instructions can
cause a fire or explosion which will result in
severe burns or death.
When Starting Engine
• Ensure that spark plug, muffler, fuel cap, and air cleaner (if
equipped) are in place and secured.
• Do not crank the engine with the spark plug removed.
• If fuel is spilled, do not attempt to start the engine, but move
the snowthrower away from the area of the spill, and avoid
creating any source of ignition, until the fuel vapors have
dissipated.
• Do not over-prime the engine. Follow the engine starting
instructions in this manual.
• If the engine floods, set choke (if equipped) to OPEN/RUN
position, move throttle (if equipped) to FAST position and
crank until engine starts.
WARNING
Engines give off carbon monoxide, an
odorless, colorless, poison gas. Breathing
carbon monoxide can cause nausea, fainting,
or death.
• Start and run engine outdoors.
• Do not run the engine in an enclosed area, even if doors or
windows are open.
WARNING
Rapid retraction of the starter cord (kickback)
will pull your hand and arm toward the engine
faster than you can let go.
Broken bones, fractures, bruises, or sprains
could result.
When Starting the Engine
• Pull the starter cord slowly until resistance is felt and then
pull rapidly to avoid kickback.
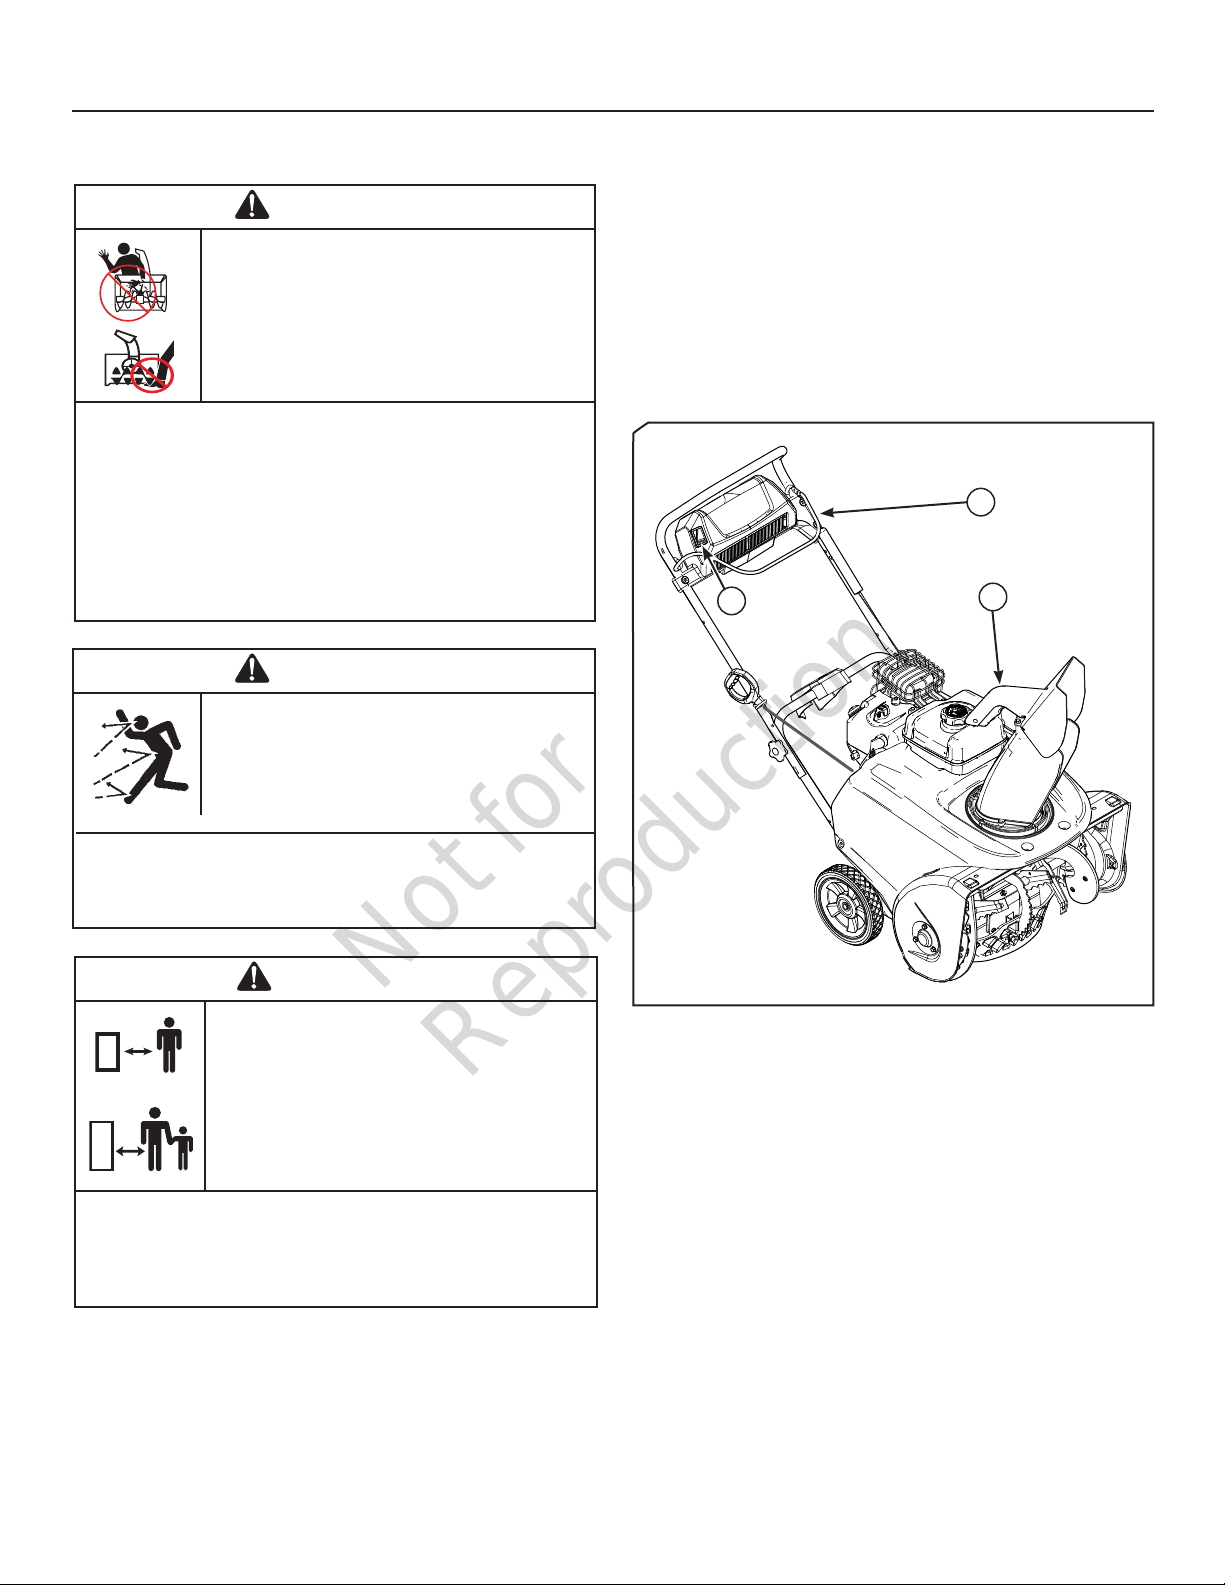
1. Check the oil level. See Add Oil / Check Oil Level.
2. Ensure the auger control is disengaged.
3. Insert the ON/OFF key (A, Figure 2) and turn to the ON
position or insert the Push/Pull key, if equipped.
10
Page 11
Not for
Reproduction
Operation
C
4. Turn the choke control (B) to the closed position.
NOTE: Do not close the choke control to start a warm engine.
5. Press the primer button (C) two times.
NOTE: Do not press the primer button to start a warm engine.
6. Rewind start: Firmly hold the starter cord (D). Pull the starter
cord slowly until resistance is felt, then pull rapidly.
7. Electric start: First connect the power cord (not supplied)
(E, Figure 3) to the starter receptacle (F) and then into a wall
receptacle. If an additional power cord is required, ensure it is
a three-conductor cord.
8. Electric start: Press the starter button (G). After the engine
starts, disconnect the power cord from the wall receptacle first
and then from the starter receptacle.
NOTICE: To extend the life of the starter, use short starting
cycles (five seconds maximum). Wait one minute between
starting cycles.
9. As the engine warms up, move the choke control (B, Figure 2)
to the open position.
NOTE: If the engine does not start after three attempts, see
Troubleshooting.
B
A
D
Figure 2
G
F
E
Figure 3
Stop the Engine
WARNING
Gasoline and vapors are extremely flammable
and explosive.
Fire or explosion can cause severe burns or
death.
• Do not choke the carburetor to stop the engine.
1. Turn the ON/OFF key (A, Figure 2) to the OFF position or
remove the Push/Pull key, if equipped.
2. Keep the key in a safe place out of the reach of children. The
engine cannot be started without the key.
en
11
Page 12
Not for
Reproduction
Operation
Operate the Snowthrower
DANGER
This snowthrower is capable of amputating
hands and feet, and throwing objects. Hand
contact with the rotating auger inside the
discharge chute is the most common cause of
injury associated with snowthrowers.
• Read and observe all the safety instructions in this
manual. Failure to do so will result in death or serious
injury.
• Never clear or unclog the discharge chute with your hands.
Fingers can quickly become caught and traumatic amputa-
tion or severe laceration will result.
• Always use a clean-out tool to clear or unclog the dis-
charge chute.
WARNING
Ice, gravel, or other unintended objects can be
picked up by the auger and thrown from the
chute with force.
1. Start the engine and allow it to warm up several minutes. See
Start the Engine.
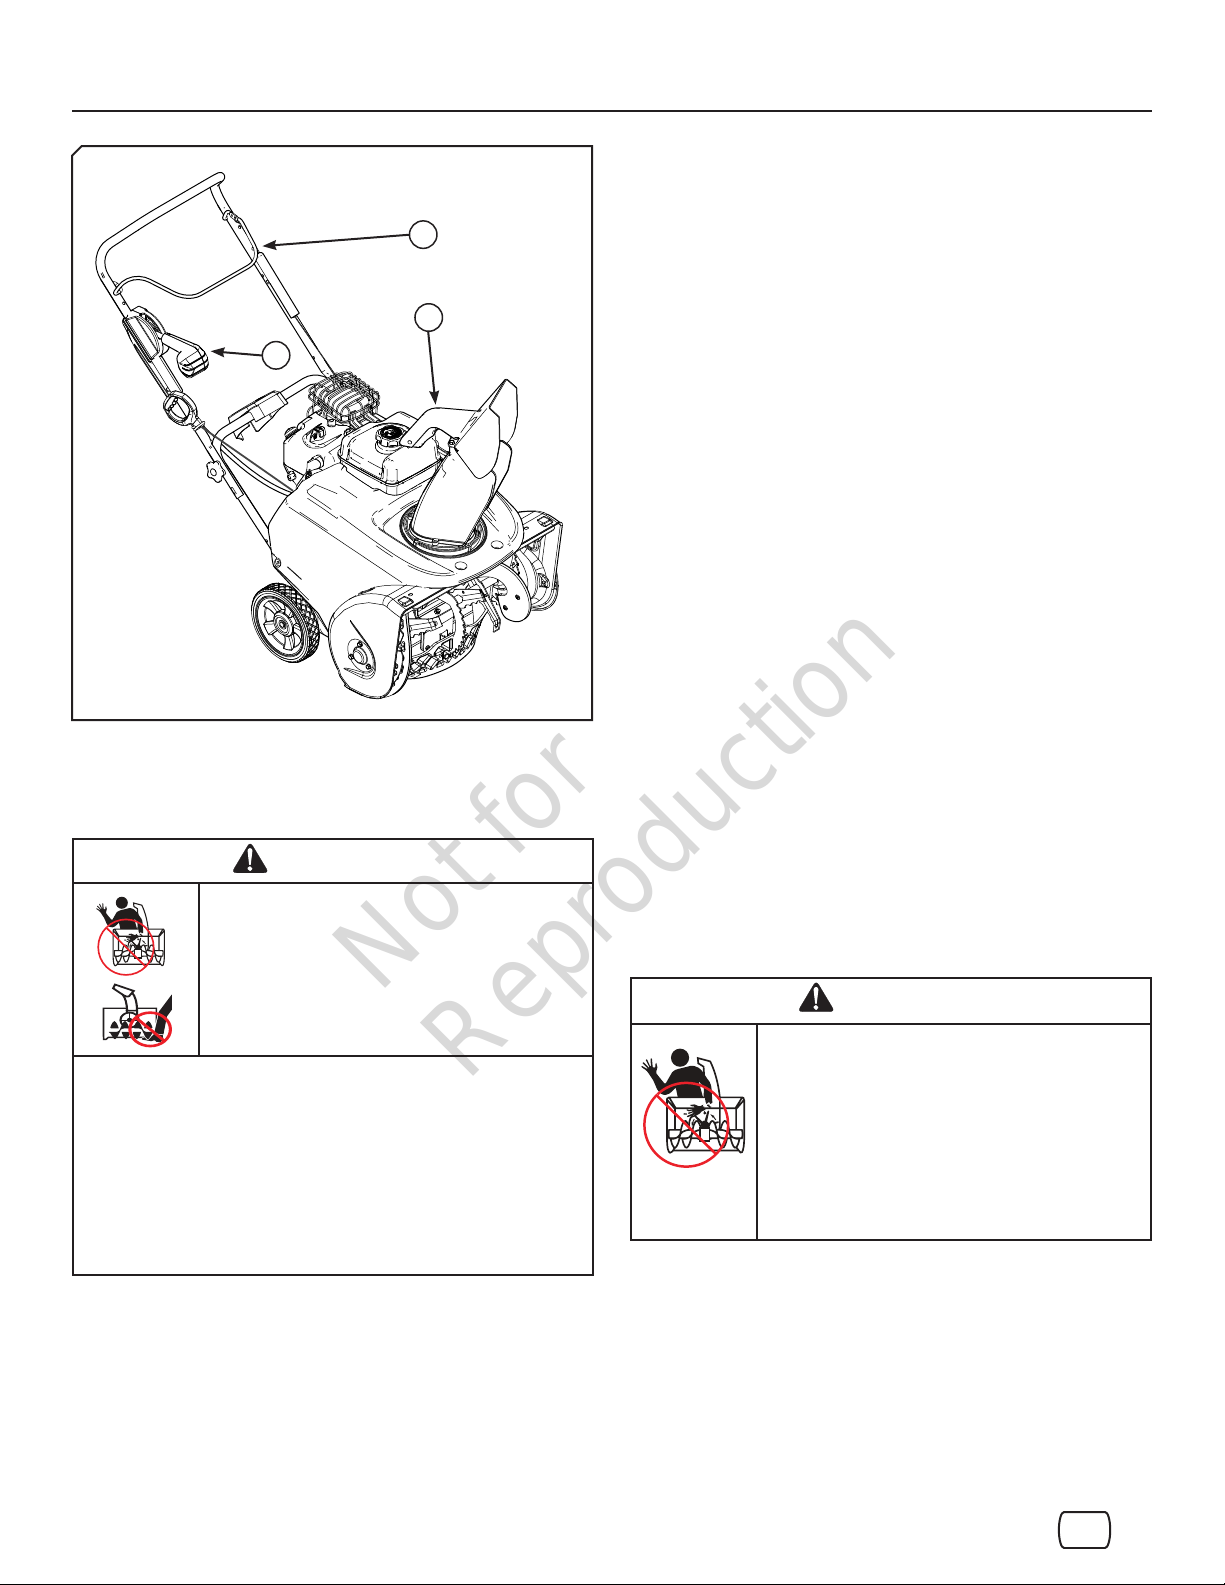
2. Adjust the direction of the chute and the angle of the deflector
to the desired positions. See Discharge Chute and
Deflector.
3. Pull the auger control (C, Figure 4, Figure 5) against the
handle to engage the auger.
4. When clearing snow is completed, release the auger control.
5. Allow the engine to run for one minute, then stop the engine.
See Stop the Engine.
C
A
B
Objects thrown from the chute could cause
death, serious injury, or property damage.
• Always be aware of the direction the snow if being thrown.
• Adjust the collector housing height to clear gravel or
crushed rock surface.
WARNING
Tragic accidents can occur if the operator is
not alert to the presence of children. Children
are often attracted to the unit and the operating
activity. Never assume the children will remain
where you last saw them.
• Keep children out of the area during operation. Children are
often attracted to the equipment. Be mindful of all persons
present.
• Be alert and turn unit off if children enter the area.
Figure 4
12
Page 13
Not for
Reproduction
Operation
1. Start the snowthrower and engage the auger control (C,
Figure 4, Figure 5) for several seconds.
2. Release the auger control.
C
B
3. The auger must stop within 5 seconds after the auger control
is released. If it does not:
a. Adjust the control cable.
b. If the auger still does not stop within 5 seconds, see an
Authorized Dealer.
A
Snowthrower Safety Test
DANGER
This snowthrower is capable of amputating
hands and feet, and throwing objects. Hand
contact with the rotating auger inside the
discharge chute is the most common cause of
injury associated with snowthrowers.
Figure 5
Discharge Chute and Deector
Chute Rotation - Switch Mount (if equipped)
1. Press the switch to rotate the chute (A, Figure 4).
2. Release the switch to lock the chute in the desired position.
Chute Rotation - Handle Mount (if equipped)
1. Squeeze and hold the button on the chute control handle (A,
Figure 5).
2. Push the handle forward or pull it rearward to rotate the chute.
3. Release the button to lock the chute in the desired position.
NOTICE: Do not use excessive force when trying to operate
the control.
Deflector Adjustment
1. Squeeze and hold the button on the deflector control handle
(B, Figure 4, Figure 5).
2. Move the control handle up or down to adjust the snow
discharge height and distance.
3. Release the button to lock the deflector in the desired
position.
Clearing a Clogged Discharge Chute
DANGER
• Read and observe all the safety instructions in this
manual. Failure to do so will result in death or serious
injury.
• Never clear or unclog the discharge chute with your hands.
Fingers can quickly become caught and traumatic amputa-
tion or severe laceration will result.
• Always use a clean-out tool to clear or unclog the dis-
charge chute.
Discharge chute contains rotating impeller
to throw snow. Never clear or unclog the
discharge chute with your hands. Fingers can
quickly become caught in the impeller. Always
use a clean-out tool.
Failure to observe these safety instructions
will result in traumatic amputation or severe
laceration.
1. STOP THE ENGINE!
2. Ensure that the impeller blades have stopped rotating.
3. Use a clean-out tool to remove snow from the discharge
chute. Never clear a clogged discharge chute with your
hands!
en
13
Page 14
Not for
Reproduction
Maintenance
Maintenance Schedule
First 5 Hours
Change oil
Before Each Use
Check engine oil level
Perform the snowthrower safety test
Check scraper bar and rubber auger for wear
After Each Use
Remove accumulated snow and slush to prevent freezing of the
controls, wheels, discharge chute, and auger
Every 25 Hours or Annually
Check snowthrower for loose hardware
Check auger control cable adjustment
Every 50 Hours or Annually
Change engine oil
Check condition of muer and muer guard
Annually
Replace sparkplug
Check valve clearance *
* Not required unless problems are noted with engine
performance. See an authorized service dealer for this item.
2. Remove the oil drain plug (B, Figure 7) and tilt the
snowthrower slightly to drain the oil into an appropriate
container.
3. After the oil has drained, install and tighten the oil drain plug.
A
Figure 6
Emissions Control Service
Maintenance, replacement, or repair of the emissions control
devices and systems may be performed by any non-road engine
repair establishment or individual. However, to obtain “no charge”
emissions control service, the work must be performed by a
factory authorized dealer.
Change Oil
Used oil is a hazardous waste product and must be disposed of
properly. Do not discard with household waste. Check with your
local authorities, service center, or dealer for safe disposal or
recycling facilities.
Remove Oil
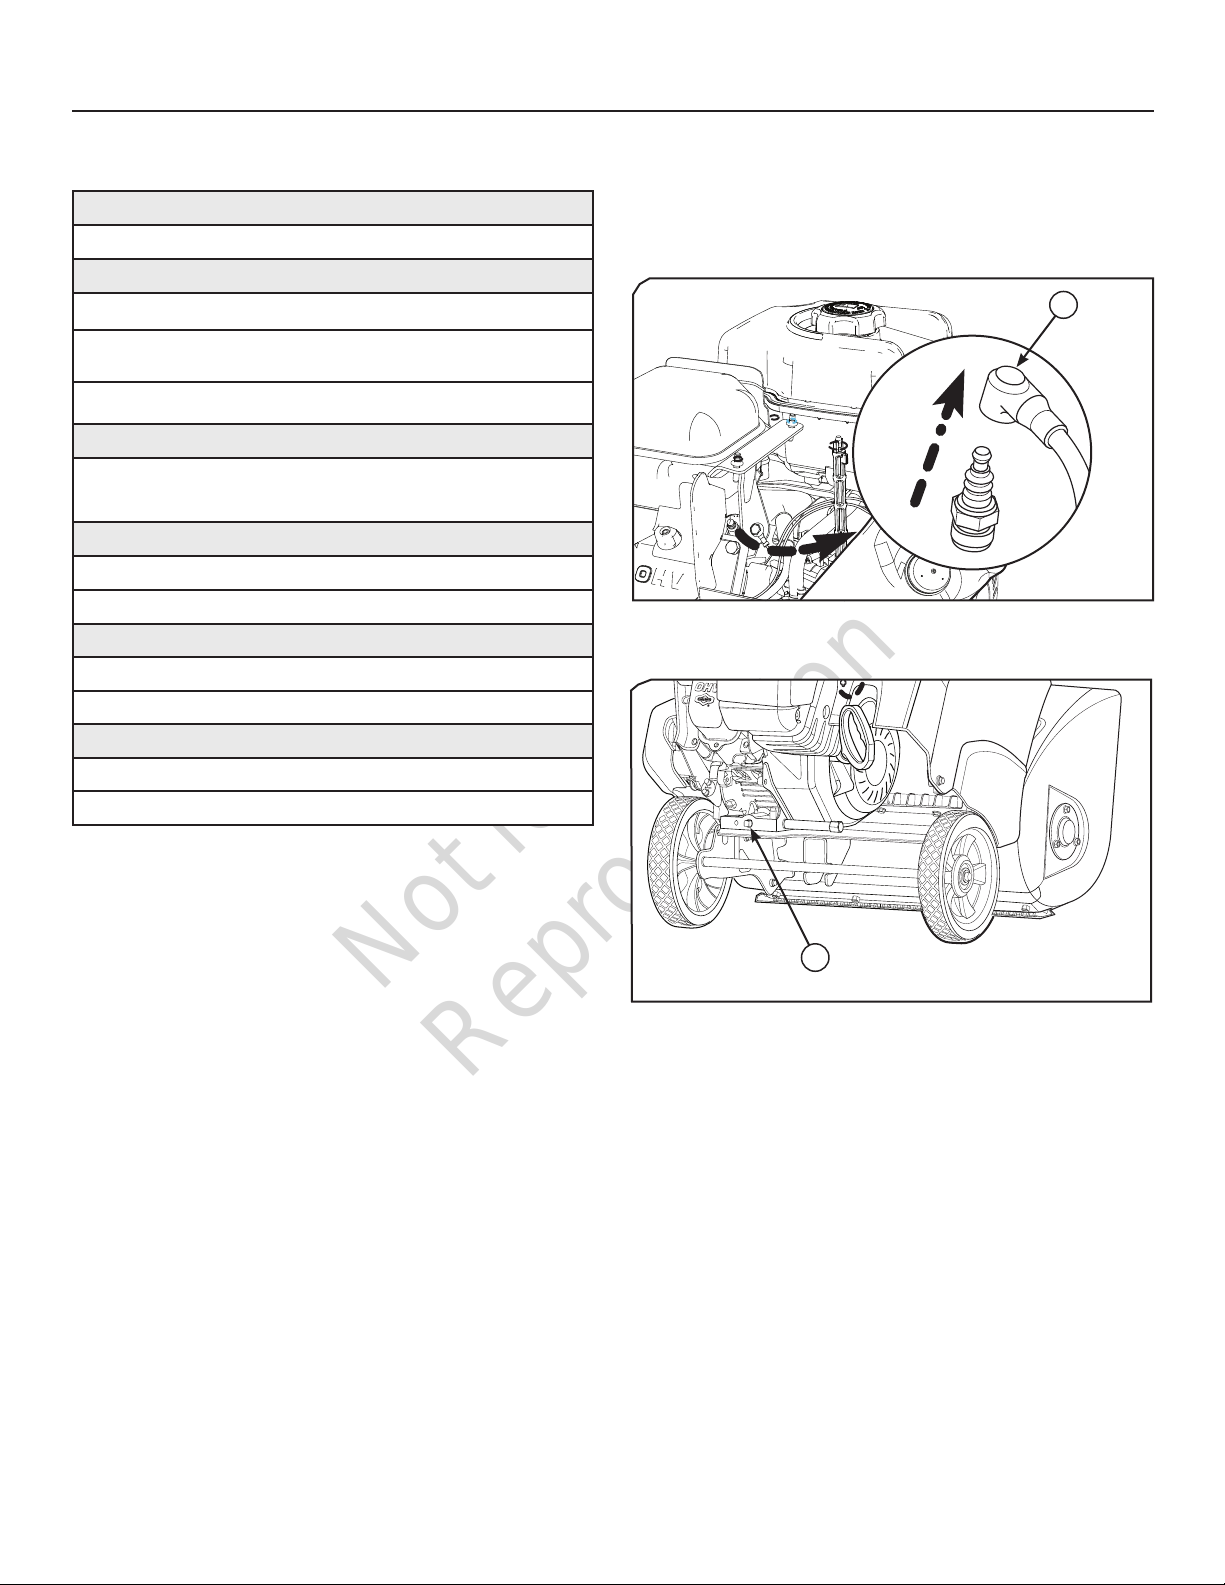
1. With engine off but still warm, remove the key and then
disconnect the sparkplug wire (A, Figure 6) and secure it
away from the sparkplug.
NOTE: To access the sparkplug wire, you must remove the
snow hood from the engine. See Access the Sparkplug.
B
Figure 7
Add Oil
1. Ensure the snowthrower is level.
2. Clean the oil dipstick area of any debris.
3. See Specifications for the oil capacity.
4. Remove the oil dipstick (A, Figure 1) and wipe it with a clean
cloth.
5. Add oil slowly into the engine oil fill (B).
6. Wait one minute and then insert the oil dipstick and turn it
clockwise to tighten.
7. Remove the oil dipstick and check the oil level.
8. If necessary, add oil until the level reaches the full mark (C) on
the oil dipstick. Do not overfill.
9. Insert and tighten the oil dipstick securely.
14
Page 15
Not for
Reproduction
Maintenance
Control Cable Adjustment
WARNING
The auger must stop within 5 seconds after the auger control is
released. If it does not, adjust the control cable. See Adjust-
ment below or contact an authorized service dealer to adjust
the control cable.
Inspection
The auger should rotate only when the auger control is engaged
and must stop within 5 seconds when the auger control is
released. If the auger does not rotate or does not stop as
described, adjust the control cable or contact an authorized
service dealer to adjust the control cable.
If the drive belt has broken, contact an authorized service dealer
to replace the belt and adjust the control cable.
Adjustment
1. Stop the engine and remove the key. See Stop the Engine.
2. Lift the cable cover (A, Figure 8) to expose the adjustment
loops (B) and the cable end fitting (C).
4. Lower the cable cover into place.
5. Repeat the inspection procedure above. If the auger does not
rotate or does not stop as described, contact an authorized
service dealer to have the snowthrower inspected.
Access the Sparkplug
To access the sparkplug, the snow hood must be removed as
follows:
1. Turn the ON/OFF key (A, Figure 9) to the OFF position or
remove the Push/Pull key, if equipped.
2. Grasp the choke control knob (B) and pull up to remove it.
3. Remove the mounting screws or knobs (C) on the snow
hood.
4. Lift the snow hood (D) off the base and tilt it forward. Do not
disconnect the primer hose (E) or the keyswitch wire (F).
5. Disconnect the sparkplug wire, then remove the sparkplug (G)
to clean or replace it. See Specifications.
6. After installing the sparkplug, connect the sparkplug wire.
7. Ensure that the primer hose and keyswitch wire are properly
connected, then fit the snow hood into the base and secure
with the mounting screws or knobs.
8. Align the slots in the choke control knob with the tabs on
the choke shaft and push down to install. If the knob is not
properly installed, the choke control will not operate.
A
B
C
Figure 8
3. Remove the end fitting from the adjustment loop and reinstall
as follows:
• If the auger rotates while the auger control is not
engaged, lengthen the control cable by installing
the end fitting in the next lowest loop (decrease belt
tension).
• If the auger does not rotate when the auger control is
engaged, shorten the control cable by installing the end
fitting in the next highest loop (increase belt tension).
NOTE: Some slack must remain in the cable when the auger
control is not engaged.
C
E
F
G
B
A
D
Figure 9
en
15
Page 16
Not for
Reproduction
Maintenance
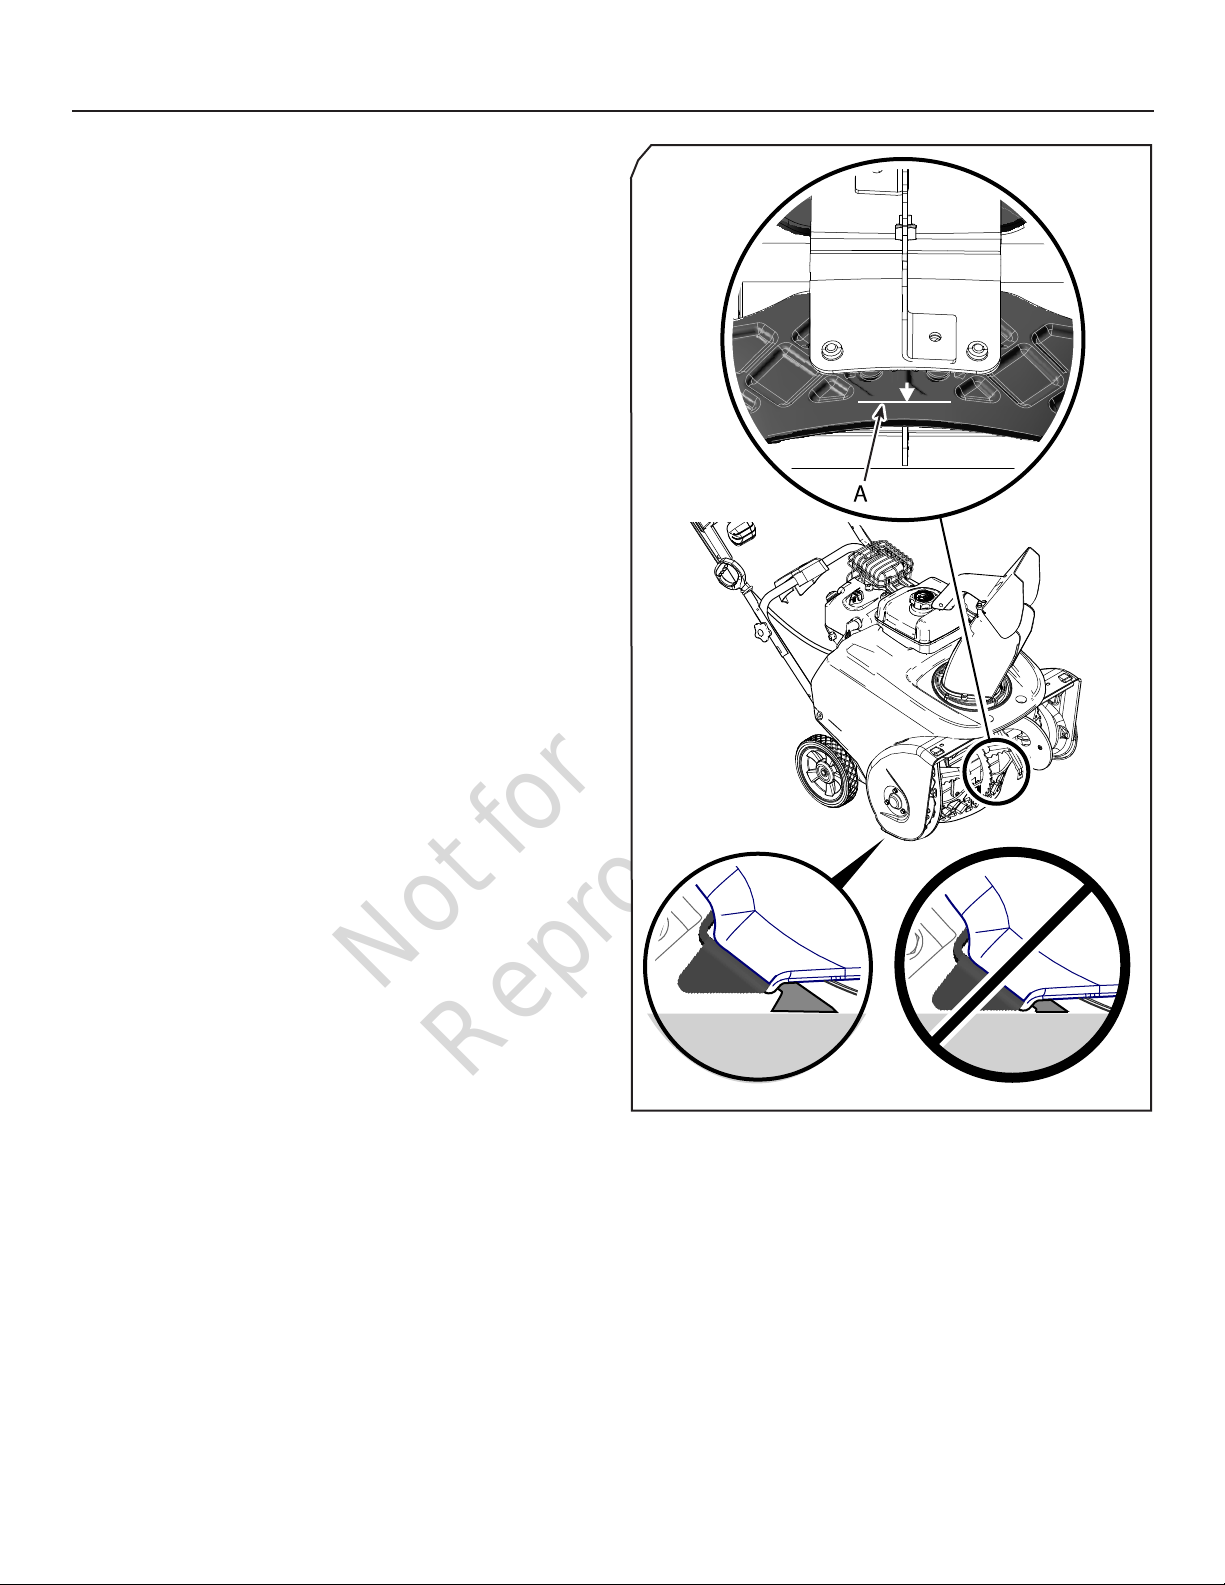
Auger and Scraper Bar Maintenance
Before each use, check wear limit on rubber auger and gap
between scraper bar support and ground (A, Figure 10).
• If wear limit on the rubber auger is reached, the two
rubber flights need replacing. See authorized dealer.
• If scraper bar support makes contact with the ground,
the scraper bar needs replacing. See authorized dealer.
16
Figure 10
Page 17
Not for
Reproduction
Storage
Storage
WARNING
Fuel and its vapors are extremely flammable
and explosive. Always handle fuel with
extreme care.
Failure to observe these safety instructions can
cause a fire or explosion which will result in
severe burns or death.
When Storing Gasoline or Equipment With Fuel in Tank
• Store away from furnaces, stoves, water heaters, or other
appliances that have pilot light or other ignition source
because they can ignite fuel vapors.
Fuel System
Fuel can become stale when stored over 30 days. Stale fuel
causes acid and gum deposits to form in the fuel system
or on essential carburetor parts. To keep fuel fresh, use
Briggs & Stratton® Advanced Formula Fuel Treatment
& Stabilizer, available wherever Briggs & Stratton genuine
service parts are sold.
Engine Oil
While the engine is still warm, change the engine oil. See
Maintenance.
Before Placing in Storage
1. Thoroughly clean the snowthrower.
2. Remove the sparkplug. Clean and re-gap, if necessary,
or replace the sparkplug.
3. Make sure all nuts, bolts, and screws are securely
fastened.
4. Inspect moving parts for wear or damage. Replace
parts as necessary.
5. Lubricate the controls and moving parts.
6. Spray unpainted metal surfaces with a rust preventative.
7. Fold down the upper handle, if desired.
8. For indoor storage, cover the snowthrower and store it
in a dry area away from furnaces, stoves, water heaters,
or other appliances that have pilot lights or other ignition
sources.
9. For outdoor storage, raise the snowthrower off the
ground and cover it with a heavy tarpaulin.
There is no need to drain gasoline from the engine if a fuel
stabilizer is added according to instructions. Run the engine
for 2 minutes to circulate the stabilizer throughout the fuel
system before storage. If gasoline in the engine has not
been treated with a fuel stabilizer, it must be drained into an
approved container. Run the engine until it stops from lack
of fuel. The use of a fuel stabilizer in the storage container is
recommended to maintain freshness.
After Removing from Storage
1. Raise the upper handle and tighten the handle knobs
securely.
2. Remove the oil dipstick and check the oil level. If
necessary, add oil until the level reaches the FULL mark
on the oil dipstick. Do not overfill.
3. Fill the fuel tank with fresh fuel.
4. Ensure that all guards, shields, and covers are in place
and that all fasteners are tight.
en
17
Page 18

Not for
Reproduction
Troubleshooting
Problem Cause Solution
Auger does not stop when
auger control is released
Control cable requires
adjustment
Adjust the control cable. If the cable adjustment does not solve the
problem, see an authorized dealer.
Auger does not turn when
auger control is engaged
Chute rotation or deector
adjustment does not work
Engine does not start Key is off or not inserted Turn key to the ON position or insert Push/Pull key.
Engine is hard to start or
runs poorly
Excessive vibration Loose parts or damaged
Scraper bar does not
clean hard surface
Snowthrower does not
discharge snow
Control cable requires
adjustment
Fasteners are too tight;
handle mount control
damaged
Chute or deflector is frozen Clear snow or ice from chute and deflector parts; place snowthrower in a
Primer not pressed Press primer button twice before pulling starter rope.
Out of fuel Fill fuel tank with fresh fuel.
Choke open - cold engine Turn choke to closed position before pulling starter rope.
Engine flooded Turn choke to open position; pull starter rope several times until engine
No spark Connect sparkplug wire; replace sparkplug.
Water in fuel or old fuel Drain fuel tank; fill fuel tank with fresh fuel.
Cord not plugged in or circuit
breaker tripped (electric start
models)
Incorrect oil Change oil to lighter viscosity (such as 5W-30).
Sparkplug fouled, worn, or
gapped incorrectly
Choke control set incorrectly Open choke control gradually as engine warms up.
parts
Scraper bar worn Scraper bar needs replacing. Contact an authorized service dealer.
Control cable requires
adjustment
Adjust the control cable. If the cable adjustment does not solve the
problem, see an authorized dealer.
Contact an authorized service dealer.
heated area until snow or ice melts.
starts.
Plug in cord or replace defective cord; reset circuit breaker.
Clean and re-gap sparkplug; replace sparkplug. Contact an authorized
service dealer.
Stop snowthrower immediately. Contact an authorized service dealer.
Adjust the control cable. See Maintenance section or contact an
authorized service dealer to adjust the cable.
Drive belt worn or broken See authorized dealer to replace the belt.
Discharge chute clogged
with snow
Snowthrower does not
self-propel
Rubber auger is worn or
damaged
18
STOP THE ENGINE! Ensure that the auger has stopped rotating. Use
a clean-out tool to remove snow from the discharge chute. Never clear
a clogged discharge chute with your hands! Refer to “Warnings” in
Operator Safety section.
Rubber auger needs replacing. Contact an authorized service dealer.
Page 19

Not for
Reproduction
Emissions Warranty
Engines at or less than 80 cc displacement are certified to be emissions compliant for 300
California, U.S. EPA, and Briggs & Stratton Corporation Emissions Control Warranty Statement
Your Warranty Rights And Obligations
For Briggs & Stratton Engine Models with “F” Trim Designation
(Model-Type-Trim Representation xxxxxx xxxx Fx)
The California Air Resources Board, U.S. EPA, and Briggs & Stratton (B&S) are pleased
to explain the emissions control system warranty on your Model Year 2014-2015 engine/
equipment. In California, new small off-road engines and large spark ignited engines less
than or equal to 1.0 liter must be designed, built, and equipped to meet the State’s stringent
anti-smog standards. B&S must warrant the emissions control system on your engine/
equipment for the periods of time listed below provided there has been no abuse, neglect, or
improper maintenance of your engine/equipment.
Your exhaust emissions control system may include parts such as the carburetor or fuel
injection system, ignition system, and catalytic converter. Also included may be hoses, belts,
connectors, sensors, and other emissions-related assemblies. Your evaporative emission
control system may include parts such as: carburetors, fuel tanks, fuel lines, fuel caps, valves,
canisters, filters, vapor hoses, clamps, connectors, and other associated components. Where
a warrantable condition exists, B&S will repair your engine/equipment at no cost to you
including diagnosis, parts, and labor.
Manufacturer’s Warranty Coverage:
Small off-road engines and large spark ignited engines less than or equal to 1.0 liter, and
any related emissions components of the equipment, are warranted for two years*. If any
emissions-related part on your B&S engine/equipment is defective, the part will be repaired
or replaced by B&S.
Briggs & Stratton Emissions Control Warranty Provisions
The following are specific provisions relative to your Emissions Control Warranty Coverage.
It is in addition to the B&S engine warranty for non-regulated engines found in the Operator’s
Manual.
1. Warranted Emissions Parts
Coverage under this warranty extends only to the parts listed below (the emissions control
systems parts) to the extent these parts were present on the B&S engine and/or B&S
supplied fuel system.
a. Fuel Metering System
• Cold start enrichment system (soft choke)
• Carburetor and internal parts
• Fuel pump
• Fuel line, fuel line fittings, clamps
• Fuel tank, cap and tether
• Carbon canister
b. Air Induction System
• Air cleaner
• Intake manifold
• Purge and vent line
c. Ignition System
• Spark plug(s)
• Magneto ignition system
d. Catalyst System
• Catalytic converter
• Exhaust manifold
• Air injection system or pulse valve
e. Miscellaneous Items Used in Above Systems
• Vacuum, temperature, position, time sensitive valves and switches
• Connectors and assemblies
2. Length of Coverage
For a period of two years from date of original purchase*, B&S warrants to the original
purchaser and each subsequent purchaser that the engine is designed, built, and equipped
so as to conform with all applicable regulations adopted by the Air Resources Board;
that it is free from defects in material and workmanship that could cause the failure of a
warranted part; and that it is identical in all material respects to the engine described in
January 2014
* Two years or for the time period listed in the respective engine or product warranty
statement, whichever is greater.
Owner’s Warranty Responsibilities:
• As the engine/equipment owner, you are responsible for the performance of the required
maintenance listed in your Operator’s Manual. B&S recommends that you retain all
receipts covering maintenance on your engine/equipment, but B&S cannot deny warranty
solely for the lack of receipts or your failure to ensure the performance of all scheduled
maintenance.
• As the engine/equipment owner, you should however be aware that B&S may deny you
warranty coverage if your engine/equipment or a part has failed due to abuse, neglect,
improper maintenance, or unapproved modifications.
• You are responsible for presenting your engine/equipment to a B&S distribution center,
servicing dealer, or other equivalent entity, as applicable, as soon as a problem exists.
The warranty repairs should be completed in a reasonable amount of time, not to exceed
30 days. If you have any questions regarding your warranty rights and responsibilities, you
should contact B&S at 1-800-444-7774 (in USA) or BRIGGSandSTRATTON.COM.
the manufacturer’s application for certification. The warranty period begins on the date the
engine is originally purchased.
* Two years or for the time period listed in the respective engine or product warranty
statement, whichever is greater.
The warranty on emissions-related parts is as follows:
• Any warranted part that is not scheduled for replacement as required maintenance in
• Any warranted part that is scheduled only for regular inspection in the Operator’s Manual
• Any warranted part that is scheduled for replacement as required maintenance in the
• Add-on or modified parts that are not exempted by the Air Resources Board may not
3. Consequential Coverage
Coverage shall extend to the failure of any engine components caused by the failure of any
warranted emissions parts.
4. Claims and Coverage Exclusions
Warranty claims shall be filed according to the provisions of the B&S engine warranty
policy. Warranty coverage does not apply to failures of emissions parts that are not original
equipment B&S parts or to parts that fail due to abuse, neglect, or impr
set forth in the B&S engine warranty policy. B&S is not liable for warranty coverage of failures
of emissions parts caused by the use of add-on or modified parts.
ator’s Manual supplied, is warranted for the warranty period stated above. If
the Oper
any such part fails during the period of warranty coverage, the part will be repaired or
replaced by B&S at no charge to the owner. Any such part repaired or replaced under the
warranty will be warranted for the remaining warranty period.
supplied, is warranted for the warranty period stated above. Any such part repaired or
replaced under warranty will be warranted for the remaining warranty period.
Operator’s Manual supplied, is warranted for the period of time prior to the first scheduled
replacement point for that part. If the part fails prior to the first scheduled replacement,
the part will be repaired or replaced by B&S at no charge to the owner. Any such part
repaired or replaced under warranty will be warranted for the remainder of the period prior
to the first scheduled replacement point for the part.
be used. The use of any non-exempted add-on or modified parts by the owner will be
grounds for disallowing a warranty claim. The manufacturer will not be liable to warrant
failures of warranted parts caused by the use of a non-exempted add-on or modified part.
oper maintenance as
Look For Relevant Emissions Durability Period and Air Index Information
On Your Small Off-Road Engine Emissions Label
Engines that are certified to meet the California Air Resources Board (CARB) small off-road
Emissions Standard must display information regarding the Emissions Durability Period
and the Air Index. Briggs & Stratton makes this information available to the consumer on our
emissions labels. The engine emissions label will indicate certification information.
The Emissions Durability Period describes the number of hours of actual running time for
which the engine is certified to be emissions compliant, assuming proper maintenance in
accordance with the Operator’s Manual. The following categories are used:
Moderate:
Engines at or less than 80 cc displacement are certified to be emissions compliant for 50
hours of actual engine running time. Engines greater than 80 cc displacement are certified to
be emissions compliant for 125 hours of actual engine running time.
Intermediate:
Engines at or less than 80 cc displacement are certified to be emissions compliant for 125
hours of actual engine running time. Engines greater than 80 cc displacement are certified to
be emissions compliant for 250 hours of actual engine running time.
Extended:
hours of actual engine running time. Engines greater than 80 cc displacement are certified to
be emissions compliant for 500 hours of actual engine running time.
For example, a typical walk-behind lawn mower is used 20 to 25 hours per year. Therefore,
the Emissions Durability Period of an engine with an intermediate rating would equate to
10 to 12 years.
Briggs & Stratton engines are certified to meet the United States Environmental Protection
Agency (USEPA) Phase 2 or Phase 3 emissions standards. The Emissions Compliance
Period referred to on the Emissions Compliance label indicates the number of operating
hours for which the engine has been shown to meet Federal emissions requirements.
For engines at or less than 80 cc displacement:
Category C = 50 hours, Category B = 125 hours, Category A = 300 hours
For engines greater than 80 cc displacement and less than 225 cc displacement:
Category C = 125 hours, Category B = 250 hours, Category A = 500 hours
For engines of 225 cc or more displacement:
Category C = 250 hours, Category B = 500 hours, Category A = 1000 hours
en
19
Page 20
Not for
Reproduction
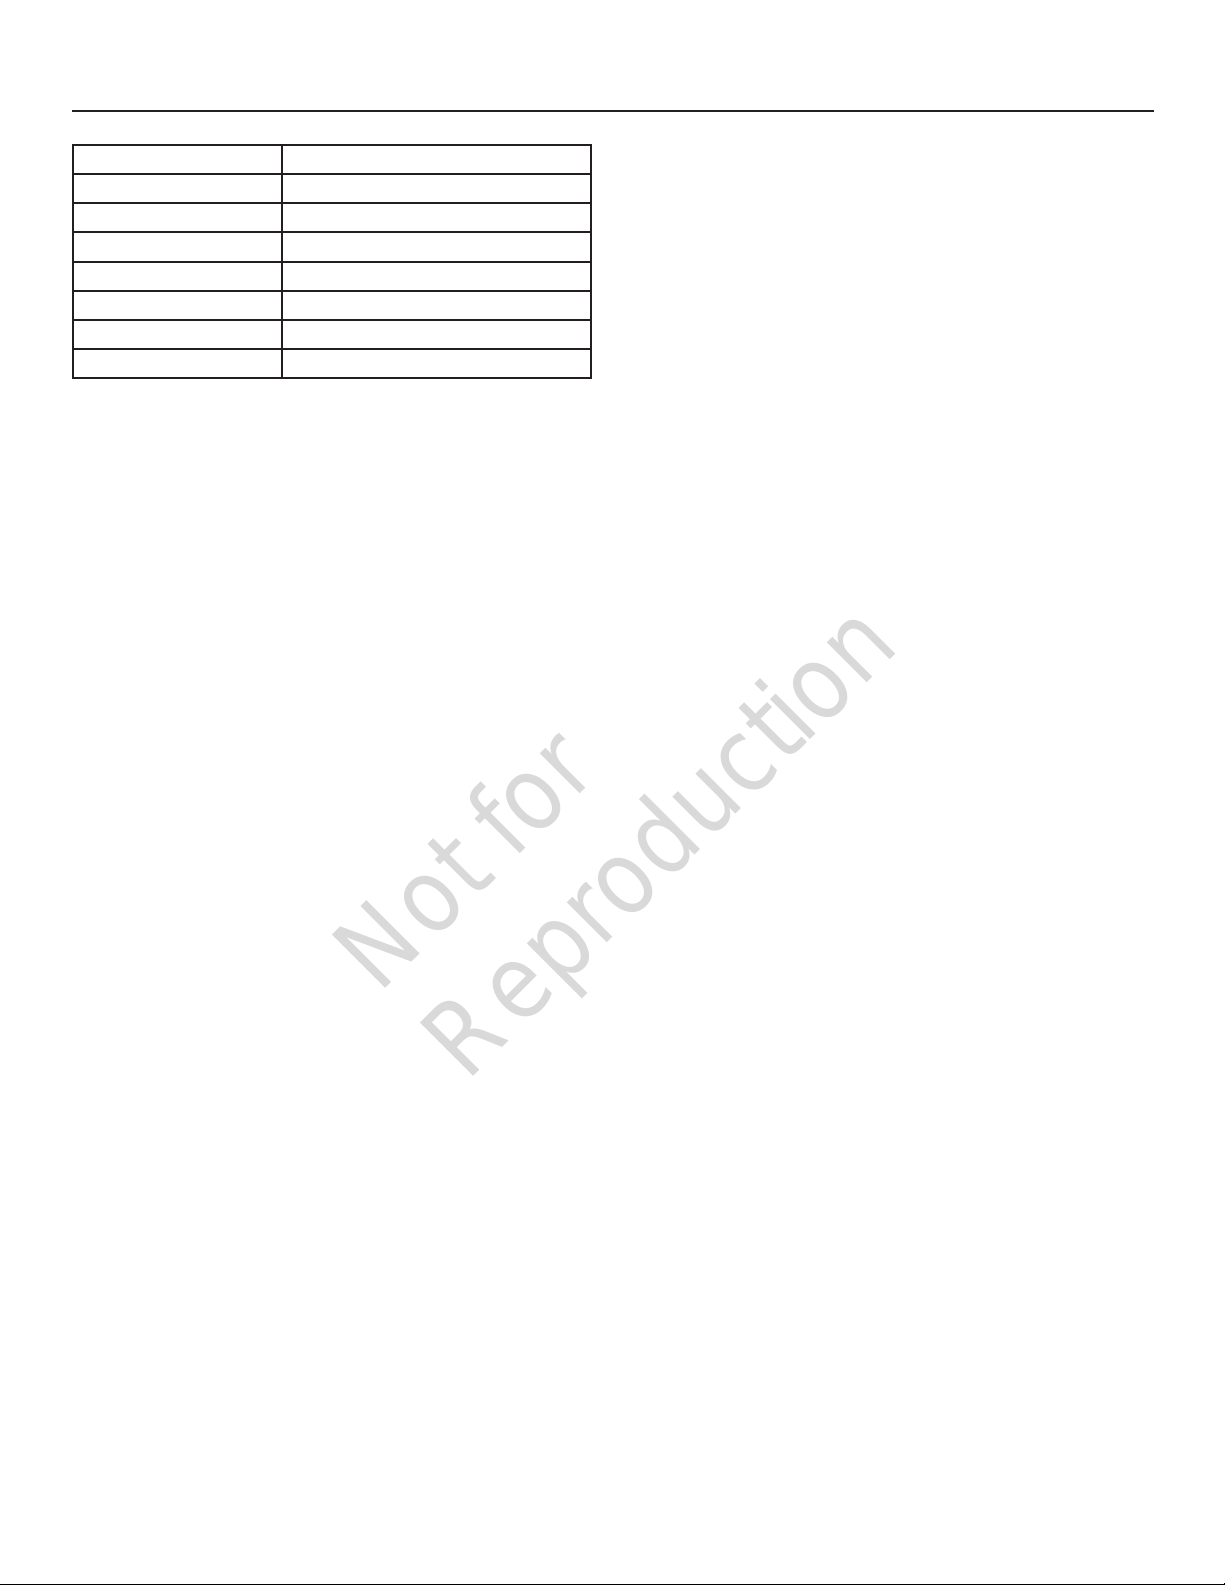
Specifications
Engine Brand Briggs & Stratton
Engine Model Series Snow Series
Engine Type 4-Cycle
Starting System Recoil Start and Electric Start
Oil Capacity 20 oz (0,59 L)
Fuel Tank Capacity 3.0 qts (2,8 liters)
Sparkplug Gap .030 in (0,76 mm)
Sparkplug Torque 180 lb-in (20 Nm)
The spark ignition system on this snowthrower complies with Canadian standard ICES-002.
Power Ratings
The gross power rating for individual gasoline engine models is labeled in accordance with SAE (Society of Automotive Engineers)
code J1940 Small Engine Power & Torque Rating Procedure, and is rated in accordance with SAE J1995. Torque values are derived
at 2600 RPM for those engines with “rpm” called out on the label and 3060 RPM for all others; horsepower values are derived at 3600
RPM. The gross power curves can be viewed at www.BRIGGSandSTRATTON.COM. Net power values are taken with exhaust and air
cleaner installed whereas gross power values are collected without these attachments. Actual gross engine power will be higher than
net engine power and is aected by, among other things, ambient operating conditions and engine-to-engine variability. Given the wide
array of products on which engines are placed, the gasoline engine may not develop the rated gross power when used in a given piece of
power equipment. This dierence is due to a variety of factors including, but not limited to, the variety of engine components (air cleaner,
exhaust, charging, cooling, carburetor, fuel pump, etc.), application limitations, ambient operating conditions (temperature, humidity,
altitude), and engine-to-engine variability. Due to manufacturing and capacity limitations, Briggs & Stratton may substitute an engine of
higher rated power for this engine.
20
Page 21

Not for
Reproduction
en
21
Page 22

Not for
Reproduction
Seguridad del operador
Índice
Seguridad del operador ....................................................... 2
Características y controles.................................................... 8
Operación ............................................................................ 9
Mantenimiento .................................................................... 14
Almacenamiento ................................................................. 16
Resolución de problemas ................................................... 17
Garantía de emisiones......................................................... 19
Especicaciones ................................................................ 20
NOTA: Consulte la Guía de contacto del cliente y las Instrucciones
de configuración para obtener información adicional.
Peligro de supercie caliente
Use anteojos de seguridad
Peligro de objetos arrojados
Símbolo de alerta de seguridad y palabras
de señalización
El símbolo de alerta de seguridad se usa para identicar la
información de seguridad acerca de los peligros que pueden
provocar lesiones corporales. Una palabra de señalización
(PELIGRO, ADVERTENCIA o PRECAUCIÓN) se usa con el
símbolo de alerta para indicar la probabilidad y la posible
gravedad de la lesión. Además, se puede usar un símbolo de
peligro para representar el tipo de peligro.
PELIGRO indica un peligro, que si no se evita, provocará
la muerte o lesiones graves.
ADVERTENCIA indica un peligro, que si no se evita, podría
provocar la muerte o lesiones graves.
PRECAUCIÓN indica un peligro, que si no se evita, podría
provocar lesiones leves o moderadas.
AVISO indica una acción que podría dañar el producto.
Símbolos de peligro y signicados
Lea el manual del operador
Peligro de amputación: propulsor giratorio
Peligro de amputación: propulsor giratorio
Peligro de amputación: barrena giratoria
Peligro de atrapamiento: piezas giratorias
Peligro de descarga eléctrica
Mantenga una distancia prudente
Mantenga alejados a los niños
Retire la llave antes de realizar el
mantenimiento
Peligro de envenenamiento con monóxido
de carbono
Peligro de incendio
Peligro de explosión
Peligro de contragolpe
2
ADVERTENCIA
Ciertos componentes de este producto y de sus accesorios
relacionados contienen sustancias químicas que el estado de
California ha declarado como cancerígenas, productoras de
defectos de nacimiento u otros daños reproductivos. Lávese
las manos después de manipular estos elementos.
ADVERTENCIA
El escape del motor de este producto contiene sustancias
químicas que el estado de California ha declarado como
cancerígenas, productoras de defectos de nacimiento u otros
daños reproductivos.
Page 23

Not for
Reproduction
Seguridad del operador
ADVERTENCIA
• Tocar el propulsor giratorio con la mano dentro del conducto
de descarga es la causa más común de lesiones relacionadas
con los sopladores de nieve.
• Este soplador de nieve es capaz de amputar manos y pies
y de arrojar objetos. Lea y cumpla todas las instrucciones de
seguridad de este manual. No hacerlo podría provocar la
muerte o lesiones graves.
ADVERTENCIA
Lea, comprenda y siga todas las instrucciones que
aparecen en el soplador de nieve y en el manual
del operador antes de hacer funcionar la unidad.
No cumplir con las instrucciones de seguridad de
este manual podría provocar la muerte o lesiones
graves.
• Conserve estas instrucciones originales para consulta futura.
• Familiarícese completamente con los controles y el uso
adecuado del soplador de nieve.
• Asegúrese de estar adecuadamente capacitado antes de
operar el soplador de nieve.
• Sepa cómo detener la unidad y desactivar los controles
rápidamente.
• Nunca permita que alguien opere el soplador de nieve sin
tener la instrucción adecuada.
• Siga siempre las instrucciones del manual del operador si va
a almacenar el soplador de nieve por un largo periodo.
• Mantenga o cambie las etiquetas de instrucciones y de
seguridad cuando sea necesario.
• Nunca intente realizar reparaciones significativas en el
soplador de nieve, a no ser que haya recibido la capacitación
necesaria. El mantenimiento inadecuado del soplador
de nieve puede tener como resultado un funcionamiento
peligroso, daños al equipo y la anulación de la garantía del
producto.
PELIGRO
Mantenga alejados de las piezas giratorias las
manos, los pies y la ropa suelta. Las piezas
giratorias pueden tocar o enredarse con las
manos, los pies, el pelo, la ropa o los accesorios.
No cumplir con estas instrucciones de seguridad
provocará amputaciones traumáticas o
desgarros graves.
• Siempre que limpie, repare o inspeccione el soplador de nieve,
asegúrese de que el motor esté APAGADO, que el cable de la
bujía de encendido esté desconectado y que todas las pieza
móviles se hayan detenido.
• No coloque las manos o los pies cerca o debajo de las piezas
giratorias. Manténgase alejado de la abertura de descarga en
todo momento.
• Nunca opere el soplador de nieve sin las protecciones
adecuadas u otros dispositivos de seguridad en su lugar y
funcionando.
• Nunca deje el soplador de nieve sin supervisión mientras el
motor está funcionando. Siempre desactive la barrena y los
controles de tracción, detenga la máquina y retire las llaves.
• Mantenga toda la ropa suelta alejada del frente del soplador
de nieve y de la barrena. Las bufandas, los mitones, los
cordones desatados, la ropa suelta y los pantalones pueden
ser atrapados rápidamente por el dispositivo giratorio, lo que
provocará una amputación. Amárrese el pelo lago y sáquese
las joyas.
• Haga funcionar la máquina unos minutos antes de descargar
la nieve para prevenir el congelamiento del colector y el
propulsor.
ADVERTENCIA
La barrena puede levantar los objetos y arrojarlos
por el conducto. Nunca descargue la nieve hacia
los transeúntes ni permita que nadie esté delante
del soplador de nieve. No cumplir con estas
instrucciones de seguridad provocará la muerte o
lesiones graves.
PELIGRO
El conducto de descarga contiene un propulsor
giratorio que arroja la nieve. Nunca despeje
o destape el conducto de descarga con las
manos. El propulsor puede atrapar los dedos
rápidamente. Siempre use una herramienta de
limpieza.
No cumplir con estas instrucciones de seguridad
provocará amputaciones traumáticas o desgarros
graves.
• Siempre use anteojos de seguridad o visera protectora
durante la operación y mientras realiza un ajuste o una
reparación.
• Siempre esté atento a la dirección en que se arroja la nieve.
Los objetos arrojados pueden dañar a peatones, mascotas o
la propiedad que se encuentre cerca.
• Esté atento al ambiente mientras opera el soplador de nieve.
No lo haga funcionar sobre elementos tales como grava,
felpudos, periódicos, juguetes y rocas ocultas bajo la nieve,
ya que pueden ser arrojados desde el conducto o atascarse
en la barrena.
• Tenga sumo cuidado cuando lo opere sobre o a través de
entradas, calzadas o caminos de grava.
• Ajuste la altura de la carcasa del colector para despejar la
grava o la superficie de roca triturada.
• Nunca opere el soplador de nieve cerca de vitrinas,
automóviles, pozos de ventanas de sótano, puntos de
descenso y similares sin ajustar el ángulo del conducto de
descarga en forma adecuada.
• Familiarícese con el área donde planea operar el soplador de
nieve. Delimite los senderos y las calzadas.
es
3
Page 24

Not for
Reproduction
Seguridad del operador
ADVERTENCIA
Pueden ocurrir accidentes trágicos si el
operador no está atento a la presencia de
niños. Los niños suelen sentirse atraídos por
la unidad y por la actividad de la operación.
Nunca suponga que los niños permanecerán
donde los vio por última vez.
• Mantenga a los niños fuera del área durante la operación.
Los niños, a menudo, se sienten atraídos por el equipo.
Tenga conciencia de todas las personas presentes.
• Esté atento y apague el equipo si hay niños que ingresen al
área.
• Nunca permita que niños operen la unidad.
• Tenga especial cuidado cuando se acerque a esquinas
de poca visibilidad, arbustos, árboles u otros objetos que
puedan impedir la visión. Puede haber niños presentes.
ADVERTENCIA
Los motores emiten monóxido de carbono,
un gas venenoso que carece de olor y de
color. Respirar monóxido de carbono puede
ocasionar náuseas, desmayos o incluso la
muerte.
• Arranque y haga funcionar el motor en el exterior.
• No haga funcionar el motor en un área encerrada, aun
cuando las puertas o las ventanas se encuentren abiertas.
• Mantenga el combustible alejado de chispas, llamas
abiertas, luces piloto, calor y otras fuentes de ignición.
• Verifique con frecuencia las tuberías de combustible, la
tapa y los conectores, para constatar si presentan grietas o
fugas. Cámbielos si es necesario.
• Use un recipiente de combustible aprobado.
• Si se derramó combustible, espere hasta que se haya
evaporado antes de arrancar el motor.
Cuando arranque el motor
• Asegúrese de que la bujía de encendido, el silenciador, la tapa
de llenado de combustible y el filtro de aire (si está equipado)
estén fijos y colocados en su lugar.
• No arranque el motor sin la bujía de encendido instalada.
• Si se derrama combustible, no intente arrancar el motor; sino
que aleje el soplador de nieve del área del derrame y evite
crear una fuente de ignición hasta que se hayan disipado los
vapores del combustible.
• No cebe en exceso el motor. Siga las instrucciones de
arranque del motor que aparecen en este manual.
• Si el motor se ahoga, ajuste el estrangulador (si está
equipado) en la posición ABIERTO / MARCHA, mueva
el acelerador (si está equipado) a la posición RÁPIDO y
arranque el motor.
Cuando opere el equipo
• No incline el soplador de nieva aun ángulo en el que pueda
provocar derrame de combustible.
• No ahogue el carburador para detener el motor.
• Nunca haga funcionar el motor sin haber instalado el conjunto
de purificador de aire (si está equipado) o el filtro de aire (si
está equipado).
Cuando cambie el aceite
• Si drena el aceite del tubo de llenado de aceite superior, el
tanque de combustible debe estar vacío o el combustible
puede derramarse y provocar un incendio o una explosión.
ADVERTENCIA
El combustible y sus vapores son
extremadamente inflamables y explosivos.
Siempre manipule el combustible con
extremo cuidado.
No cumplir con estas instrucciones de
seguridad puede provocar un incendio o una
explosión que ocasionará quemaduras graves
o la muerte.
Cuando agregue combustible
• Apague el equipo y deje que se enfríe al menos
por 2 minutos antes de retirar la tapa de llenado de
combustible y agregar combustible.
• Llene el tanque de combustible en exteriores o en un
área bien ventilada.
• No llene excesivamente el tanque de combustible. Para
permitir la expansión de la gasolina, no llene el tanque
por arriba de la parte inferior del cuello.
4
Cuando transporte el equipo
• Transpórtelo con el tanque de combustible VACÍO o con la
válvula de paso del combustible CERRADA.
Cuando almacene gasolina o el equipo con combustible en
el tanque
• Almacénelo alejado de hornos, estufas, calentadores de
agua u otros aparatos que tengan luz piloto u otra fuente de
ignición, ya que pueden prender fuego con los vapores del
combustible.
Page 25

Not for
Reproduction
Seguridad del operador
ADVERTENCIA
El funcionamiento seguro del soplador
de nieve requiere del cuidado y el
mantenimiento adecuados del motor.
• Desactive todos los embragues y colóquelos en neutro
antes de arrancar la máquina.
• Deje que el motor se adapte a la temperatura exterior antes
de comenzar a despejar la nieve.
• Use un tomacorriente de tres clavijas con conexión a tierra
para todos los sopladores de nieve equipados con motores
de transmisión eléctrica o con motores de arranque
eléctricos.
ADVERTENCIA
El arranque del motor forma chispas.
Las chispas pueden incendiar los gases
inflamables que se encuentran cerca.
Podría provocar una explosión o un incendio.
• Si en el área existe una fuga de gas natural o gas licuado,
no arranque el motor.
• No presurice los fluidos de arranque porque los vapores
son inflamables.
ADVERTENCIA
El funcionamiento del motor produce calor. Las
piezas del motor se calientan extremadamente,
especialmente el silenciador.
No cumplir con estas instrucciones de
seguridad podría provocar graves quemaduras
térmicas por contacto.
ADVERTENCIA
El soplador de nieve se debe mantener en
forma adecuada para asegurar una operación
y un rendimiento seguros. No cumplir con las
instrucciones de seguridad de este manual
podría provocar la muerte o lesiones graves.
• Cuando realice mantenimientos o reparaciones en el
soplador de nieve, APAGUE el motor, desconecte el cable
de la bujía de encendido y mantenga el cable alejado del
tomacorriente para evitar que alguien arranque el motor
accidentalmente.
• Revise los pernos de la cizalla y otras piezas metálicas
frecuentemente para verificar que estén apretadas
adecuadamente.
• Mantenga las tuercas y pernos apretados y el soplador de
nieve en buenas condiciones.
• Nunca altere los dispositivos de seguridad. Verifique
periódicamente que funcionen bien, y realice todas las
reparaciones necesarias si no funcionan correctamente.
• Los componentes están sujetos a desgaste, daños
y deterioro. Revise regularmente los componentes y
reemplácelos con piezas recomendadas cuando sea
necesario.
• Revise frecuentemente la operación de control. Ajuste y
repare, según sea necesario.
• Solo use piezas de repuesto autorizadas de fábrica o
piezas similares al hacer reparaciones.
• Siempre cumpla con las especificaciones de la fábrica
para todas las configuraciones y ajustes.
• Use solo accesorios autorizados de fábrica o piezas
similares, tales como pesos, contrapesos o cabinas.
• Nunca intente hace ajustes mientras el motor está
funcionando (excepto cuando el fabricante lo recomiende
específicamente).
• Nunca toque un motor o un silenciador caliente. Deje que
el silenciador, los cilindros del motor y las aletas se enfríen
antes de tocarlos.
• Retire los residuos del área del silenciador y del área de los
cilindros.
• Instale un supresor de chispas y manténgalo en
condiciones de funcionamiento antes de usar el equipo en
terrenos baldíos cubiertos con maleza, grama o árboles.
• Es una violación del Código de Recursos Públicos de
California, Sección 4442, utilizar u operar el motor en
cualquier espacio con árboles, maleza o grama, a no ser
que el sistema de escape esté equipado con un supresor
de chispas, según lo definido en la Sección 4442, que se
mantenga en correctas condiciones de funcionamiento.
Otros estados o jurisdicciones federales pueden tener
leyes similares. Comuníquese con el fabricante original del
equipo, vendedor o distribuidor para obtener un supresor
de chispas diseñado para el sistema de escape instalado
en este motor.
es
5
Page 26

Not for
Reproduction
Seguridad del operador
ADVERTENCIA
Estos sopladores de nieve son tan seguros
como lo sea el operador. Si se usa de manera
indebida o no se realiza el mantenimiento
adecuado, puede ser peligroso. Recuerde,
usted es responsable de su seguridad y la de
quienes lo rodean.
• Mantenga el área de operación despejada de personas,
particularmente de niños pequeños y mascotas.
• Inspeccione completamente el área donde utilizará el
soplador de nieve y retire todos los felpudos, trineos, tablas,
cables y otros objetos extraños.
• No opere el soplador de nieve sin usar la ropa de invierno
adecuada.
• Use calzado que le permita mantenerse en pie sobre
superficies resbalosas.
• Sea precavido para evitar resbalar o caer, especialmente
cuando opere el soplador de nieve marcha atrás.
• Nunca opere el soplador de nieve sin tener buena
iluminación o visibilidad. Siempre fíjese por dónde camina y
sujétese firmemente de los mangos.
• No despeje la nieve sobre las laderas de una pendiente.
Tenga extremo cuidado cuando cambie de dirección
sobre las pendientes. No intente despejar las pendientes
empinadas.
• No intente despejar la nieve demasiado rápido, ya que esto
sobrecarga la capacidad de la máquina.
• Nunca opere el soplador de nieve en velocidades de
transportes altas sobre superficies resbalosas. Mire detrás
del soplador de nieve y tenga cuidado cuando lo opere
marcha atrás.
• Nunca use el soplador de nieve sobre superficies sobre
el nivel del suelo, tales como techos de las residencias,
cocheras, porches u otras estructuras similares o
edificaciones.
• Los operadores deberían evaluar su capacidad para operar
el soplador de nieve de manera lo suficientemente segura
para protegerse a sí mismos y a los demás contra lesiones.
• El soplador de nieve está diseñado solo para retirar nieve.
No use el soplador de nieve para otros propósitos.
• No lleve pasajeros.
• Después de golpear un objeto extraño, APAGUE el motor,
desconecte el cable de alimentación en los motores
eléctricos, inspeccione completamente el soplador de
nieve para verificar los daños y repárelos antes de volver a
arrancar y operar el soplador de nieve.
• Si el soplador de nieve vibra en forma anormal, APAGUE el
motor. La vibración generalmente advierte de un problema.
Consulte a un distribuidor autorizado si necesita repararlo.
• En los modelos equipados con motores de arranque
eléctrico, desconecte el cable de alimentación después de
que arranque el motor.
ADVERTENCIA
Los cables de alimentación dañados o que
no tengan conexión a tierra podrían provocar
descargas eléctricas.
Las descargas eléctricas podrían provocar
quemaduras graves o la muerte.
Cuando use el motor de arranque eléctrico
• El cable de alimentación debe estar conectado
adecuadamente a tierra en todo momento.
• Use solo un cable de alimentación de tres conductores
conectado adecuadamente a tierra en la fuente de
energía.
• Si el cable de extensión está dañado, debe reemplazarlo
una persona calicada para evitar algún peligro.
ADVERTENCIA
La veloz retracción del cordón del motor de
arranque (contragolpe) tirará su mano y su
brazo hacia el motor más rápido de lo que
puede retirarlos.
Podría ocasionar huesos quebrados,
fracturas, moretones o esguinces.
Cuando arranque el motor
• Tire del cable del motor de arranque lentamente hasta
que sienta resistencia y luego tire rápidamente de él para
evitar el contragolpe.
6
Page 27

Not for
Reproduction
Seguridad del operador
A
B
Calcomanías de seguridad
Antes de operar el soplador de nieve, lea y comprenda las
calcomanías de seguridad instaladas. Las precauciones y las
advertencias que se entregan son para ayudarle a evitar lesiones
personales o daños en el soplador de nieve.
Si alguna de las calcomanías de seguridad viene dañada o
ilegible, solicite a su distribuidor de servicio autorizado que la
reemplace.
A — Pieza N.º 1737865 Calcomanía de peligro para conducto
B — Pieza N.º 1739966 Calcomanía de peligro para barrena
C — Pieza N.º 279655 Calcomanía de advertencia para motor
C
es
7
Page 28

Not for
Reproduction
Características y controles
1739977
A
B
C
B
H
N
D
E
G
O
Controles del soplador de nieve y del motor
A — Control de barrena
B — Control del conducto: montaje de interruptor (si está
equipado)
Control del conducto: montaje del mango (si está equipado)
C — Control del deector: gatillo
D — Botón de arranque
E — Receptáculo de arranque
F — Calcomanía con instrucciones de arranque (si está
equipado)
G — Calcomanía con instrucciones de arranque (si está
equipado)
H — Luces delanteras (si está equipado)
I — Control del estrangulador
J — Tanque y tapa de combustible
K — Llenado y varilla de aceite
L — Botón del cebador
M — ENCENDIDO y APAGADO o llave de tire y empuje
N — Mango del cable de arranque
O — Tapón de drenaje de aceite
8
L
F
M
I
J
Símbolos de control y signicados
Interruptor de encendido y apagado
Estrangulador abierto; estrangulador
cerrado
Pulse el cebador 2 veces
Enchufe el cable de alimentación
Presione el botón para arrancar
Active el control de la barrena
Gire el control del conducto
K
Page 29

Not for
Reproduction
Recomendaciones de aceite
AVISO: El motor se envía sin aceite desde la fábrica. Antes de
arrancar el motor, asegúrese de que ha agregado aceite de
acuerdo a las instrucciones de este manual. Si arranca el motor
sin aceite, lo dañará sin posibilidad de reparación y no estará
cubierto por la garantía.
Use un aceite detergente de alta calidad clasificado para
servicios SG, SH, SJ, SL o mayores. El aceite de motor sintético
5W30 se adecuado para altas temperaturas. NO mezcle aceite
con gasolina. Consulte el cuadro a continuación sobre las
recomendaciones de aceite.
Operación
A
C
D
B
* El uso de SAE 30 bajo los 4 °C (40 °F) ocasionará un arranque difícil.
** El uso de 10W-30 sobre los 27 °C (80 °F) puede provocar el aumento
de consumo de aceite. Revise el nivel de aceite con mayor frecuencia.
Agregue aceite y revise el nivel de aceite
1. Asegúrese de que el soplador de nieve esté derecho.
2. Limpie los residuos del área de la varilla de aceite.
3. Consulte en Especificaciones para conocer la capacidad de
aceite.
4. Retire la varilla de aceite. (A, Figura 1) y pásele un trapo
limpio.
5. Agregue aceite lentamente en el llenado de aceite del motor
(B).
6. Espere un minuto, luego inserte la varilla de aceite y gírela en
sentido de las agujas del reloj para apretarla.
7. Retire la varilla de aceite y revise el nivel de aceite.
8. Si es necesario, agregue aceite hasta que el nivel alcance la
marca lleno (C) en la varilla de aceite. No lo llene en exceso.
9. Inserte y apriete firmemente la varilla de aceite.
Figura 1
Recomendaciones de combustible
El combustible debe cumplir con los siguientes requisitos:
• Gasolina limpia y nueva, sin plomo.
• Un mínimo de 87 octanos/87 AKI (91 RON). Para uso en
lugares elevados, ver a continuación.
• Gasolina con hasta un 10% de etanol (gasohol) es aceptable.
AVISO: No use gasolinas no aprobadas, como E15 y E85. No
mezcle aceite en la gasolina ni modifique el motor para que
funcione con combustibles alternativos. El uso de combustibles
no aprobados dañará a los componentes del motor, los que no
estarán cubiertos bajo la garantía.
Para proteger el sistema de combustible contra la formación de
goma, mézclele un estabilizador de combustible al combustible.
Vea Almacenaje. Todos los combustibles no son iguales. Si
ocurren problemas de desempeño o en el arranque, cambie de
proveedor de combustible o de marca. El funcionamiento de
este motor con gasolina está certificado. El sistema de control de
emisiones de este motor es EM (Modificaciones del Motor).
Grandes alturas
En alturas de más de 5.000 pies (1524 metros), una gasolina
con un mínimo de 85 octano/85 AKI (89 RON) es aceptable.
Para motores carburados, se requiere ajuste de gran altura
para mantener la conformidad con las normas de emisiones.
El funcionamiento sin este ajuste causará menor desempeño,
mayor consumo de combustible y más emisiones. Contacte un
Distribuidor de Servicio Autorizado de Briggs & Stratton para
información sobre el ajuste para grandes alturas.
No se recomienda el funcionamiento del motor a alturas inferiores
a 2.500 pies (762 metros)con el kit de grandes alturas. Para
motores de Inyección de Combustible Electrónica (EFI, por su
sigla en inglés), no se requiere ajuste para gran altitud.
es
9
Page 30

Not for
Reproduction
Operación
Agregar combustible
ADVERTENCIA
El combustible y sus vapores son
extremadamente inflamables y explosivos.
Siempre manipule el combustible con extremo
cuidado.
No cumplir con estas instrucciones de seguridad
puede provocar un incendio o una explosión que
ocasionará quemaduras graves o la muerte.
Cuando agregue combustible
• Apague el equipo y deje que se enfríe al menos por 2 minutos
antes de retirar la tapa de llenado de combustible y agregar
combustible.
• Llene el tanque de combustible en exteriores o en un área bien
ventilada.
• No llene excesivamente el tanque de combustible. Para
permitir la expansión de la gasolina, no llene el tanque por
arriba de la parte inferior del cuello.
• Mantenga el combustible alejado de chispas, llamas abiertas,
luces piloto, calor y otras fuentes de ignición.
• Si se derramó combustible, espere hasta que se haya
evaporado antes de arrancar el motor.
ADVERTENCIA
Los cables de alimentación dañados o que
no tengan conexión a tierra podrían provocar
descargas eléctricas.
Las descargas eléctricas podrían provocar
quemaduras graves o la muerte.
Cuando use el motor de arranque eléctrico
• El cable de alimentación debe estar conectado
adecuadamente a tierra en todo momento.
• Use solo un cable de alimentación de tres conductores
conectado adecuadamente a tierra en la fuente de energía.
• Si el cable de extensión está dañado, debe reemplazarlo una
persona calicada para evitar algún peligro.
NOTA: El arranque eléctrico está diseñado solo para un cable
de alimentación de tres conductores y opera con corriente
domiciliaria estándar. Si no tiene disponible una fuente eléctrica
conectada a tierra en forma adecuada, NO use el arranque
eléctrico. Comuníquese con un electricista autorizado para la
instalación de un sistema con conexión a tierra adecuado.
ADVERTENCIA
1. Limpie la suciedad y los desechos del área de la tapa del
combustible. Retire la tapa del combustible (D, Figura 1).
2. Llene el tanque con combustible. Para permitir la expansión
del combustible, no llene el tanque por arriba de la parte
inferior del cuello.
3. Instale la tapa del combustible.
Arranque del motor
ADVERTENCIA
El combustible y sus vapores son
extremadamente inflamables y explosivos.
Siempre manipule el combustible con extremo
cuidado.
No cumplir con estas instrucciones de seguridad
puede provocar un incendio o una explosión que
ocasionará quemaduras graves o la muerte.
Cuando arranque el motor
• Asegúrese de que la bujía de encendido, el silenciador, la tapa
de llenado de combustible y el filtro de aire (si está equipado)
estén fijos y colocados en su lugar.
• No arranque el motor sin la bujía de encendido instalada.
• Si se derrama combustible, no intente arrancar el motor; sino
que aleje el soplador de nieve del área del derrame y evite
crear una fuente de ignición hasta que se hayan disipado los
vapores del combustible.
• No cebe en exceso el motor. Siga las instrucciones de
arranque del motor que aparecen en este manual.
• Si el motor se ahoga, ajuste el estrangulador (si está
equipado) en la posición ABIERTO / MARCHA, mueva el
acelerador (si está equipado) a la posición RÁPIDO y arranque
el motor.
Los motores emiten monóxido de carbono, un
gas venenoso que carece de olor y de color.
Respirar monóxido de carbono puede ocasionar
náuseas, desmayos o incluso la muerte.
• Arranque y haga funcionar el motor en el exterior.
• No haga funcionar el motor en un área encerrada, aun
cuando las puertas o las ventanas se encuentren abiertas.
ADVERTENCIA
La veloz retracción del cordón del motor de
arranque (contragolpe) tirará su mano y su
brazo hacia el motor más rápido de lo que
puede retirarlos.
Podría ocasionar huesos quebrados, fracturas,
moretones o esguinces.
Cuando arranque el motor
• Tire del cable del motor de arranque lentamente hasta
que sienta resistencia y luego tire rápidamente de él para
evitar el contragolpe.
1. Verifique el nivel de aceite. Consulte en Agregue aceite /
Revise el nivel de aceite.
2. Asegúrese de que el control de la barrena esté desactivado.
3. Inserte la llave de ENCENDIDO y APAGADO (A, Figura 2) y
gírela a la posición ENCENDIDO o inserte la llave de tire y
empuje, si está equipada.
10
Page 31

Not for
Reproduction
Operación
C
4. Gire el control del estrangulador (B) a la posición cerrada.
NOTA: No cierre el control del estrangulador para arrancar un
motor caliente.
5. Pulse el dos veces el botón del cebador (C).
NOTA: No pulse el botón del cebador para arrancar un motor
caliente.
6. Arranque de rebobinado: Sostenga firmemente el cable de
arranque (D). Tire del cable de arranque lentamente hasta
que sienta resistencia, entonces tire rápidamente de él.
7. Arranque eléctrico: Primero conecte el cable de
alimentación (no suministrado) (E, Figura 3) al receptáculo de
arranque (F) y luego al receptáculo de la pared. Si requiere
un cable de alimentación adicional, asegúrese de que sea un
cable de tres conductores.
8. Arranque eléctrico: Presione el botón de arranque
(G). Después arrancar el motor, desconecte el cable de
alimentación: primero del receptáculo de la pared y luego del
receptáculo de arranque.
AVISO: Para prolongar la vida útil del arranque, use ciclos
de arranque cortos (máximo de cinco segundos). Espere un
minuto entre cada ciclo de arranque.
9. A medida que el motor se calienta, mueva el control del
estrangulador (B, Figura 2) a la posición abierta.
NOTA: Si el motor no arranca después de tres intentos,
consulte en Resolución de problemas.
B
A
D
Figura 2
G
F
E
Figura 3
Detención del motor
ADVERTENCIA
La gasolina y sus vapores son extremadamente
inflamables y explosivos.
El fuego o la explosión pueden causar
quemaduras graves o la muerte.
• No ahogue el carburador para detener el motor.
1. Gire la llave de ENCENDIDO y APAGADO (A, Figura 2) a la
posición APAGADO o retire la llave de tire y empuje, si está
equipada.
2. Mantenga la llave en un lugar seguro fuera del alcance de los
niños. No puede arrancar el motor sin la llave.
es
11
Page 32

Not for
Reproduction
Operación
Operación del soplador de nieve
PELIGRO
Este soplador de nieve es capaz de amputar
manos y pies y de arrojar objetos. Tocar la
barrena giratoria con la mano dentro del
conducto de descarga es la causa más común
de lesiones relacionadas con los sopladores de
nieve.
Lea y cumpla todas las instrucciones de seguridad de este
manual. No hacerlo podría provocar la muerte o lesiones graves.
• Nunca despeje o destape el conducto de descarga con las
manos. Los dedos puede atraparse rápidamente y provocar
amputaciones traumáticas o desgarros graves.
• Siempre use una herramienta de limpieza para despejar o
destapar el conducto de descarga.
ADVERTENCIA
La barrena puede levantar hielo, grava u otros
objetos en forma accidental y arrojarlos con fuerza
por el conducto.
Los objetos arrojados desde el conducto pueden
provocar la muerte, lesiones graves o daños a la
propiedad.
1. Arranque el motor y deje que se caliente por varios minutos.
Consulte en Arranque del motor.
2. Ajuste la dirección del conducto y el ángulo del deflector en la
posición deseada. Consulte en Descarga del conducto y el
deflector.
3. Tire del control de la barrena (C, Figura 4, Figura 5) en contra
de la manilla para activar la barrena.
4. Cuando haya despejado toda la nieve, suelte el control de la
barrena.
5. Deje que el motor funcione por un minuto, luego deténgalo.
Consulte en Detención del motor.
C
A
B
• Siempre esté atento a la dirección en que se arroja la nieve.
• Ajuste la altura de la carcasa del colector para despejar la
grava o la superficie de roca triturada.
ADVERTENCIA
Pueden ocurrir accidentes trágicos si el operador
no está atento a la presencia de niños. Los niños
suelen sentirse atraídos por la unidad y por la
actividad de la operación. Nunca suponga que
los niños permanecerán donde los vio por última
vez.
• Mantenga a los niños fuera del área durante la operación.
Los niños, a menudo, se sienten atraídos por el equipo. Tenga
conciencia de todas las personas presentes.
• Esté atento y apague el equipo si hay niños que ingresen al
área.
Figura 4
12
Page 33

Not for
Reproduction
Operación
1. Arranque el soplador de nieve y active el control de la barrena
(C, Figura 4, Figura 5) durante varios segundos.
2. Suelte el control de la barrena.
C
B
3. La barrena debe detenerse dentro de 5 segundos después de
que haya soltado el control de la barrena. Si no es así:
a. Ajuste el cable de control.
b. Si la barrena no se detiene dentro de 5 segundos,
consulte un distribuidor autorizado.
A
Figura 5
Prueba de seguridad del soplador de nieve
PELIGRO
Este soplador de nieve es capaz de amputar
manos y pies y de arrojar objetos. Tocar la
barrena giratoria con la mano dentro del
conducto de descarga es la causa más común
de lesiones relacionadas con los sopladores de
nieve.
Descarga del conducto y el deector
Giro del conducto: montaje del mango (si está equipado)
1. Presione el interruptor para girar el conducto (A, Figura 4).
2. Suelte el interruptor para bloquear el conducto en la posición
deseada.
Giro del conducto: montaje del mango (si está equipado)
1. Mantenga apretado el botón del mango de control del
conducto (A, Figura 5).
2. Pulse el mango hacia adelante o tírelo hacia atrás para girar el
conducto.
3. Suelte el botón para bloquear el conducto en la posición
deseada.
AVISO: No use fuerza excesiva cuando trate de operar el
control.
Ajuste del deflector
1. Mantenga apretado el botón del mango de control del
deflector (B, Figura 4, Figura 5)
2. Mueva el mango de control hacia arriba o hacia abajo para
ajustar la altura y la distancia de la descarga de nieve.
3. Suelte el botón para bloquear el deflector en la posición
deseada.
Cómo despejar o destapar el conducto de
descarga
• Lea y cumpla todas las instrucciones de seguridad de este
manual. No hacerlo podría provocar la muerte o lesiones
graves.
• Nunca despeje o destape el conducto de descarga con las
manos. Los dedos puede atraparse rápidamente y provocar
amputaciones traumáticas o desgarros graves.
• Siempre use una herramienta de limpieza para despejar o
destapar el conducto de descarga.
PELIGRO
El conducto de descarga contiene un propulsor
giratorio que arroja la nieve. Nunca despeje
o destape el conducto de descarga con las
manos. El propulsor puede atrapar los dedos
rápidamente. Siempre use una herramienta de
limpieza.
No cumplir con estas instrucciones de seguridad
provocará amputaciones traumáticas o desgarros
graves.
1. ¡DETENGA EL MOTOR!
2. Asegúrese de que las cuchillas del propulsor han dejado de
girar.
3. Use una herramienta de limpieza para retirar la nieve desde el
conducto de descarga. Nunca despeje o destape el conducto
de descarga con las manos.
13
es
Page 34

Not for
Reproduction
Mantenimiento
Programa de mantenimiento
Primeras 5 horas
Cambie el aceite
Antes de cada uso
Revise el nivel de aceite del motor
Realice la prueba de seguridad del soplador de nieve
Revise si la barra raspadora o la barrena de caucho están
desgastadas
Antes de cada uso
Retire la nieve acumulada y medio derretida para evitar que se
congelen los controles, las ruedas, el conducto de descarga y la
barrena.
Cada 25 horas o anualmente
Revise si el soplador de nieve tiene piezas sueltas
Revise el ajuste del cable de control de la barrena
Cada 50 horas o anualmente
Cambie el aceite del motor
Revise la condición en que se encuentra el silenciador y la
protección del silenciador
Anualmente
Reemplace la bujía de encendido
Revise el huelgo de la válvula *
* No se requiere a menos que note problemas con el rendimiento del
motor. Consulte a un distribuidor de servicio autorizado para este
asunto.
Servicio de control de emisiones
El mantenimiento, el reemplazo o la reparación de los sistemas y
dispositivos de control de emisiones los puede realizar cualquier
individuo o taller de reparaciones que trabaje con motores que
no sean para carreteras. Sin embargo, para obtener el servicio
de control "sin recargo", el trabajo debe realizarlo un distribuidor
autorizado de fábrica.
Cambio de aceite
El aceite usado es un producto de residuo peligroso y debe
desecharse de manera adecuada. No lo bote con la basura
de la casa. Revise con las autoridades locales, centros de
servicios o distribuidores cómo desecharlo en forma segura o las
instalaciones de reciclaje.
Retiro del aceite
1. Con el motor apagado, pero aún caliente, retire la llave y luego
desconecte el cable de la bujía de encendido (A, Figura 6) y
asegúrelo lejos de la bujía.
NOTA: Para acceder al cable de la bujía de encendido, debe
retirar la cubierta para nieve del motor. Consulte en Acceso a
la bujía de encendido.
2. Retire el tapón de drenaje de aceite (B, Figura 7) e incline
el soplador de nieve levemente para drenar el aceite en un
recipiente adecuado.
3. Después de que haya drenado el aceite, instale y apriete el
tapón de drenaje del aceite.
A
Figura 6
B
Figura 7
Cómo agregar aceite
1. Asegúrese de que el soplador de nieve esté derecho.
2. Limpie los residuos del área de la varilla de aceite.
3. Consulte en Especificaciones para conocer la capacidad de
aceite.
4. Retire la varilla de aceite. (A, Figura 1) y pásele un trapo
limpio.
5. Agregue aceite lentamente en el llenado de aceite del motor
(B).
6. Espere un minuto, luego inserte la varilla de aceite y gírela en
sentido de las agujas del reloj para apretarla.
7. Retire la varilla de aceite y revise el nivel de aceite.
8. Si es necesario, agregue aceite hasta que el nivel alcance la
marca lleno (C) en la varilla de aceite. No lo llene en exceso.
9. Inserte y apriete firmemente la varilla de aceite .
14
Page 35

Not for
Reproduction
Mantenimiento
Ajuste del cable de control
ADVERTENCIA
La barrena debe detenerse dentro de 5 segundos después
de que haya soltado el control de la barrena. Si no es así,
ajuste el cable de control. Consulte a continuación en Ajuste
o comuníquese con un distribuidor de servicio autorizado para
ajustar el cable de control.
Inspección
La barrena debería girar solo cuando el control de la barrena esté
activado y debe detenerse dentro de 5 segundos cuando suelte el
control de la barrena. Si la barrena no gira o no se detiene como
debe, ajuste el cable de control o comuníquese con un distribuidor
de servicio autorizado para ajustar el cable de control.
Si la correa de transmisión está rota, comuníquese con un
distribuidor de servicio autorizado para reemplazarla y ajustar el
cable de control.
Ajuste
1. Detenga el motor y retire la llave. Consulte en Detención del
motor.
2. Levante la funda del cable (A, Figura 8) para exponer los
bucles de ajuste (B) y la pieza de extremidad del cable (C).
A
4. Baje la funda del cable a su lugar.
5. Repita el procedimiento de inspección descrito anteriormente.
Si la barrena no gira o no se detiene como debe,
comuníquese con un distribuidor de servicio autorizado para
que inspeccione el soplado de nieve.
Acceso a la bujía de encendido
Para acceder a la bujía de encendido, debe sacar la cubierta para
la nieve de la siguiente manera:
1. Gire la llave de ENCENDIDO y APAGADO (A, Figura 9) a la
posición APAGADO o retire la llave de tire y empuje, si está
equipada.
2. Agarre la perilla de control del estrangulador (B) y tírela hacia
arriba para sacarla.
3. Retire los pernos de montaje o las perillas (C) de la cubierta
para la nieve.
4. Levante la cubierta para la nieve (D) de la base e inclínela
hacia adelante. No desconecte la manguera del cebador (E)
o el cable de la llave de contacto. (F).
5. Desconecte el cable de la bujía de encendido, luego retire
la bujía de encendido (G) para limpiarla o reemplazarla.
Consulte en Especificaciones.
6. Después de instalar la bujía de encendido, conecte el cable
de la bujía.
7. Asegúrese de que la manguera del cebador y el cable de la
llave de contacto estén conectados correctamente, luego
encaje la cubierta para la nieve en la base con los pernos de
montaje o las perillas.
8. Alinee las ranuras de la perilla de control del estrangulador
con las lengüetas del eje del estrangulador y presiónelas
hacia abajo para instalarlas. Si la perilla no está instalada
correctamente, no podrá operar el control del estrangulador.
C
Figura 8
3. Retire la pieza de extremidad desde el bucle de ajuste y
vuelva a instalarla de la siguiente manera:
• Si la barrena gira mientras el control de la barrena
está desactivado, instale la conexión del extremo en el
próximo bucle inferior para alargar el cable de control
(disminuya la tensión de la correa).
• Si la barrena no gira cuando se activa el control de la
barrena, instale la pieza de extremidad en el próximo
bucle superior para acortar el cable de control (aumente
la tensión de la correa).
NOTA: El cable debe quedar un poco holgado cuando el
control de la barrena esté desactivado.
B
C
E
F
G
B
A
D
Figura 9
es
15
Page 36

Not for
Reproduction
Mantenimiento
Mantenimiento de la barrena y de la barra de
raspado
Antes de cada uso, controle el límite de desgaste en la barrena
de caucho y la brecha entre el soporte de la barra de raspado y el
suelo (A, Figura 10).
• Si se ha alcanzado el límite de desgaste en la barrena de
caucho, se debe sustituir los dos tramos de caucho. Vea al
distribuidor autorizado.
• Si el soporte de la barra de raspado toca el suelo, se debe
sustituir la barra de raspado. Vea al distribuidor autorizado.
16
Figura 10
Page 37

Not for
Reproduction
Almacenamiento
Almacenaje
ADVERTENCIA
El combustible y sus vapores son
extremadamente inflamables y explosivos.
Siempre manipule el combustible con
extremo cuidado.
No cumplir con estas instrucciones de
seguridad puede provocar un incendio o una
explosión que ocasionará quemaduras graves
o la muerte.
Cuando almacene gasolina o el equipo con combustible
en el tanque
• Almacénelo alejado de hornos, estufas, calentadores de
agua u otros aparatos que tengan luz piloto u otra fuente
de ignición, ya que pueden prender fuego con los vapores
del combustible.
Sistema de combustible
El combustible puede echarse a perder cuando se lo almacena
más de 30 días. El combustible echado a perder provoca
la formación de depósitos de ácido y goma en el sistema
de combustible o en piezas esenciales del carburador.
Para mantener el combustible limpio, use el Tratamiento y
Estabilizador de Combustible con Fórmula Avanzada Briggs
& Stratton®, disponible en todos los lugares en los que se
vendan piezas de servicio genuinas de Brigss & Stratton.
No es necesario drenar la gasolina del motor si se agrega un
estabilizador de combustible de acuerdo con las instrucciones.
Ponga en marcha el motor por 2 minutos para circular el
estabilizador por todo el sistema de combustible antes de
almacenar. Si no se ha tratado a la gasolina en el motor con un
estabilizador de combustible, se lo debe drenar en un recipiente
aprobado. Ponga en marcha el motor hasta que se detenga por
falta de combustible. Se recomienda el uso de un estabilizador
de combustible en el recipiente de almacenaje para mantener la
frescura.
Aceite del motor
Con el motor aún caliente, cambie el aceite del motor. Consulte
en Mantenimiento.
Antes de dejarlo almacenado
1. Limpie completamente el soplador de nieve.
2. Retire la bujía de encendido. Limpie y vuelva a separar, si es
necesario, o reemplace la bujía de encendido.
3. Asegúrese de que todas las tuercas, pernos y tornillos están
sujetos firmemente .
4. Inspeccione las piezas móviles en busca de desgaste o daño.
Reemplace las piezas si es necesario.
5. Lubrique los controles y las piezas móviles.
6. Rocíe las superficies de metal sin pintar con un anticorrosivo.
7. Pliegue hacia abajo el mango superior, si lo desea.
8. Para almacenamiento en interiores, cubra el soplador de nieve
y almacénelo en un área seca alejada de hornos, estufas,
calentadores de agua y otros aparatos que tengan luces
pilotos u otras fuentes de ignición.
9. Para almacenamiento en exteriores, coloque el soplador de
nieve sobre el nivel del piso y cúbralo con una lona gruesa
impermeabilizada.
Después de sacarlo del almacenamiento
1. Levante el mango superior y apriete firmemente las perillas
del mango.
2. Retire la varilla de aceite y revise el nivel de aceite. Si es
necesario, agregue aceite hasta que el nivel alcance la marca
LLENO en la varilla de aceite. No lo llene en exceso.
3. Llene el tanque con combustible fresco.
4. Asegúrese de que todas las protecciones, barreras y
cubiertas están en su lugar y de que todos los sujetadores
están firmes.
es
17
Page 38

Not for
Reproduction
Resolución de problemas
Problema Causa Solución
La barrena no se detiene
cuando suelta el control
de la barrena
La barrena no gira cuando
el control de la barrena
está activado
El cable de control requiere ajuste Ajuste el cable de control. Si el ajuste del cable no resuelve el
El cable de control requiere ajuste Ajuste el cable de control. Si el ajuste del cable no resuelve el
problema, consulte un distribuidor autorizado.
problema, consulte un distribuidor autorizado.
El giro del conducto o el
ajuste del deector no
funciona
El motor no arranca No ha insertado la llave o está en
El motor está duro para
arrancar o no funciona
bien
Los sujetadores están demasiados
apretados; el control de montaje
del mango está dañado
El conducto o el deflector están
congelados
posición apagada
No presionó el cebador Presione el botón del cebador dos veces antes de tirar de la cuerda
No hay combustible Llene el tanque con combustible fresco.
El estrangulador está abierto: el
motor está frío
Motor ahogado Coloque el estrangulador en posición abierta; tire de la cuerda de
No se producen chispas Conecte el cable de la bujía de encendido; reemplace la bujía de
Hay agua en el combustible o el
combustible está rancio
El cable no está enchufado o el
disyuntor se disparó (en modelos
de arranque eléctrico)
Aceite incorrecto Cambie el aceite a uno de viscosidad más ligera (como el 5W-30).
La bujía de arranque falló, está
gastada o está separada de forma
incorrecta
El ajuste del estrangulador está
ajustado de forma incorrecta
Comuníquese con un distribuidor de servicio autorizado.
Despeje la nieve o el hielo de las piezas del conducto o del
deflector; coloque el soplador de nieve en un área calefaccionada
hasta que la nieve o el hielo se derritan.
Gire la llave a la posición ENCENDIDA o inserte la llave de tire y
empuje.
de arranque.
Coloque el estrangulador en posición cerrada antes de tirar la
cuerda de arranque.
arranque varias veces hasta que el motor arranque.
encendido.
Drene el tanque del combustible; llene el tanque del combustible
con combustible fresco.
Enchufe el cable o reemplace el cable defectuoso; restablezca el
disyuntor.
Limpie y vuelva a separar la bujía de encendido; reemplace la
bujía de encendido. Comuníquese con un distribuidor de servicio
autorizado.
Abra el control del estrangulador gradualmente a medida que el
motor se calienta.
Vibración excesiva Piezas sueltas o dañadas Detenga el soplador de nieve inmediatamente. Comuníquese con
La barra raspadora no
limpia las supercies
duras
El soplador de nieve no
descarga la nieve
El soplador de nieve no se
autoimpulsa
La barra raspadora está
desgastada
El cable de control requiere ajuste Ajuste el cable de control. Consulte en la sección Mantenimiento o
La correa de transmisión está
desgastada o rota
Descargue el conducto tapado
con nieve
El caucho de la barrena está
desgastado o dañado
un distribuidor de servicio autorizado.
La barra raspadora necesita reemplazo. Comuníquese con un
distribuidor de servicio autorizado.
comuníquese con un distribuidor de servicio autorizado para ajustar
el cable.
Consulte un distribuidor autorizado para reemplazar la correa.
¡DETENGA EL MOTOR! Asegúrese de que la barrena ha dejado de
girar. Use una herramienta de limpieza para retirar la nieve desde
el conducto de descarga. Nunca despeje o destape el conducto de
descarga con las manos. Consulte las “Advertencias” en la sección
de Seguridad del operador.
El caucho de la barrena necesita reemplazo. Comuníquese con un
distribuidor de servicio autorizado.
18
Page 39

Not for
Reproduction
Garantía de emisiones
Declaración de garantía de control de emisiones de California, EPA de los EE. UU. y Briggs & Stratton Corporation
Para los modelos de motor Briggs & Stratton con designación de orientación "F"
(Modelo-Tipo-Orientación Representación xxxxxx xxxx Fx)
El Consejo de Recursos del Aire de California, la EPA de los EE. UU. y Briggs & Stratton
(B&S) le explican a continuación la garantía del sistema de control de emisiones de su motor
o equipo modelo 2014 y 2015. En California, los motores pequeños todo terreno y los motores
grandes encendidos por chispa de 1 litro o menos deben estar diseñados, construidos y
equipados para cumplir con las estrictas normas anticontaminación del estado. B&S debe
garantizar el sistema de control de emisiones en su motor o equipo por los períodos de
tiempo que se indican a continuación, siempre que no haya habido abuso, descuido o
mantenimiento inapropiado en su motor o equipo.
El sistema de control de emisiones puede incluir piezas como el carburador o el sistema de
inyección de combustible, el sistema de arranque y el convertidor catalítico. También puede
incluir mangueras, correas, conectores, sensores y otros conjuntos relacionados con las
emisiones. Su sistema de control de emisiones evaporatorias puede incluir piezas como:
carburadores, tanques de combustible, mangueras de combustible, tapas de combustible,
válvulas, recipientes, filtros, mangueras de vapor, abrazaderas, conectores y otros
componentes asociados. Si se cumplen las condiciones de la garantía, B&S reparará el motor
o equipo sin costo alguno, lo que incluye el diagnóstico, las piezas y la mano de obra.
Cobertura de la garantía del fabricante:
Los motores pequeños todo terreno los motores grandes de encendido por chispa de 1 litro o
menos y cualquier componente de emisiones relacionado del equipo están bajo garantía por
dos años.* Si alguna pieza del motor o equipo B&S relacionada con las emisiones estuviera
Derechos y obligaciones de la garantía
Disposiciones de la garantía de control de emisiones de Briggs & Stratton
A continuación se detallan las disposiciones específicas relacionadas con la Cobertura de la
garantía de control de emisiones. Se añaden a la garantía de motores de B&S para motores
no regulados, que figura en el Manual del operario.
1. Piezas relacionadas con emisiones bajo garantía
La presente garantía cubre únicamente las piezas que se indican a continuación (piezas del
sistema de control de emisiones) siempre que tales piezas estuvieran presentes en el motor
de B&S o en el sistema de combustible que suministra B&S.
a. Sistema de medición de combustible
• Sistema de enriquecimiento para arranque en frío (estrangulador electrónico)
• Carburador y piezas internas
• Bomba de combustible
• Mangueras de combustible, acoplamientos de las mangueras de combustible, abrazaderas
• Tanque de combustible, tapón y traba
• Recipiente de carbono
b. Sistema de inducción de aire
• Depurador de aire
• Colector de admisión
• Conducto de vaciado y ventilación
c. Sistema de encendido
• Bujías de encendido
• Sistema de ignición magnético
d. Sistema catalizador
• Convertidor catalítico
• Colector de escape
• Sistema de inyección de aire o válvula de impulso
e. Elementos varios usados en los sistemas anteriores
• Válvulas e interruptores de vacío, temperatura y posición en función del tiempo
• Conectores y conjuntos
2. Duración de la cobertura
Durante un período de dos años desde la fecha de compra original*, B&S garantiza al
propietario original y a todo propietario posterior que el motor está diseñado, fabricado y
equipado conforme a la normativa vigente adoptada por el Air Resources Board; que no
tiene defectos de materiales ni de mano de obra que provoquen el fallo de un componente
cubierto; y que es idéntico en todos los aspectos materiales al motor descrito en la aplicación
de certificación del fabricante. El período de garantía comienza en la fecha de adquisición
original del motor.
* Dos años o por el período indicado en la cláusula de garantía del motor o producto
respectivo, el que sea superior.
Busque la información pertinente del período de durabilidad de emisiones y el índice de aire
en la etiqueta de emisiones del motor pequeño todo terreno
Los motores con certificación de cumplimiento de la normativa sobre emisiones de motores
pequeños todo terreno del Consejo de Recursos del Aire de California (CARB) deben mostrar
información sobre el período de durabilidad de las emisiones y el índice de aire. Briggs &
Stratton ofrece esta información al consumidor mediante etiquetas de emisiones. La etiqueta
de emisiones del motor contiene la información de certificación.
El período de durabilidad de las emisiones indica la cantidad de horas durante las cuales
el motor puede funcionar cumpliendo las normas sobre emisiones, siempre que se realicen
las operaciones de mantenimiento adecuadas de acuerdo con el manual del operario. Se
utilizan las siguientes categorías:
Moderado:
Los motores con desplazamiento inferior a 80 cc o tienen certificación de conformidad
de emisiones por 50 horas del tiempo real de funcionamiento. Los motores con un
desplazamiento superior a 80 cc tienen certificación de conformidad de emisiones por 125
horas del tiempo real de funcionamiento.
Intermedio:
Los motores con desplazamiento inferior a 80 cc tienen certificación de conformidad de
emisiones por 125 horas del tiempo real de funcionamiento del motor. Los motores con un
desplazamiento superior a 80 cc tienen certificación de conformidad de emisiones por 250
horas del tiempo real de funcionamiento.
Enero de 2014
defectuosa, B&S la reparará o sustituirá.
* Dos años o por el período indicado en la cláusula de garantía del motor o producto
respectivo, el que sea superior.
Responsabilidades del propietario con respecto a la garantía:
• Como propietario del motor o equipo, usted es responsable de llevar a cabo todas
las operaciones de mantenimiento que se enumeran en el manual del operario. B&S
recomienda conservar todos los recibos relativos al mantenimiento del motor o equipo,
pero B&S no puede denegar la garantía basándose únicamente en la falta de recibos o en
la imposibilidad por parte del propietario de asegurar la correcta realización de todas las
operaciones de mantenimiento.
• Como propietario del motor o equipo, debe ser consciente de que B&S puede denegar la
cobertura de la garantía si el motor o equipo o parte de él falla debido a un uso indebido,
descuido, un mantenimiento inadecuado o modificaciones no autorizadas.
• Usted es responsable de presentar su motor o equipo a un centro de distribución de B&S,
distribuidor autoriz
momento en que surja un problema. Las reparaciones cubiertas por la garantía se llevarán
a cabo en un plazo razonable no superior a 30 días. En caso de tener preguntas sobre los
derechos y responsabilidades relativos a la garantía, comuníquese con B&S al 1-800-4447774 (en EE. UU.) o en BRIGGSandSTRATTON.COM.
La garantía sobre las piezas relacionadas con las emisiones es la siguiente:
• Todas las piezas cubiertas por la garantía que no se deban sustituir como parte del plan
de mantenimiento obligatorio detallado en el manual del propietario entregado, quedarán
cubiertas por la garantía durante el período de la garantía especificado anteriormente. Si
alguna de estas piezas falla durante el período de cobertura de la garantía, B&S deberá
repararla o sustituirla sin cargo alguno para el propietario. Las piezas que se reparen o
sustituyan en virtud de la garantía estarán cubiertas por la garantía durante el período de
garantía restante.
• Todas las piezas cubiertas por la garantía que solo se deban inspeccionar periódicamente
según el manual del pr
período de la garantía especificado anteriormente. Las piezas que se reparen o sustituyan
en virtud de la garantía estarán cubiertas por la garantía durante el período de garantía
restante.
• Las piezas cubiertas por la garantía que se deban sustituir como parte del plan de
mantenimiento obligatorio detallado en el manual del propietario entregado, quedarán
cubiertas por la garantía hasta el momento en que se indique que es necesario hacer
la primera sustitución. Si la pieza falla antes de la fecha de la primera sustitución, B&S
la reparará o sustituirá sin cargo alguno para el propietario. Las piezas que se reparen o
sustituyan en virtud de la garantía estarán cubiertas por la garantía durante el período de
garantía hasta llegar a la fecha de la primera sustitución.
• No se podrán utilizar piezas complementarias o modificadas no exentas por el Consejo
de Recursos del Aire. Si el propietario usa piezas complementarias o modificadas no
exentas, dará lugar a la anulación de la reclamación de garantía. El fabricante no será
responsable de las fallas de piezas cubiertas por la garantía que se deban al uso de una
pieza complementaria o modificada no exenta.
3. Cobertura indirecta
La cobertura se extenderá hasta la falla de cualquiera de los componentes del motor
ocasionada por la falla de piezas relacionadas con emisión que se encuentren bajo garantía.
4. Reclamos y exclusiones de la cobertura
Las reclamaciones de garantía se presentarán de conformidad con las disposiciones
de la política de garantía del motor de B&S. La cobertura no aplica a las fallas de piezas
relacionadas con el sistema de emisiones cubiertas por la garantía que no sean originales de
B&S ni a las fallas debidas a uso indebido, descuido o mantenimiento inadecuado, conforme
a las disposiciones de la política de garantía de motores B&S. B&S no será responsable de
la cobertura de la garantía de fallas de piezas relacionadas con el sistema de emisiones
cubiertas por la garantía provocadas por el uso de componentes complementarios o
modificados.
Extendido:
Los motores con desplazamiento inferior a 80 cc tienen certificación de conformidad de
emisiones por 300 horas del tiempo real de funcionamiento del motor. Los motores con
desplazamiento superior a 80 cc tienen certificación de conformidad de emisiones por 500
horas del tiempo real de funcionamiento del motor.
Por ejemplo, un cortacésped con operario a pie se suele utilizar entre 20 y 25 horas al año.
Por lo tanto, el período de durabilidad de las emisiones de un motor con clasificación
intermedia equivaldría entre 10 y 12 años.
Los motores Briggs & Stratton cuentan con la certificación de cumplimiento de la fase 2 o
3 de las normativas sobre emisiones de la Agencia de Protección del Medioambiente de
los Estados Unidos (USEPA). El período de cumplimiento de la normativa sobre emisiones
que figura en la etiqueta de cumplimiento de emisiones indica la cantidad de horas de
funcionamiento durante las cuales el motor ha demostrado cumplir los requisitos federales
sobre emisiones.
Para motores con un desplazamiento inferior a 80 cc:
Categoría C = 50 horas, Categoría B = 125 horas, Categoría A = 300 horas
Para motores con desplazamiento superior a 80 cc y desplazamiento inferior a 225 cc:
Categoría C = 125 horas, Categoría B = 250 horas, Categoría A = 500 horas
Para motores con un desplazamiento superior a 225 cc:
Categoría C = 250 horas, Categoría B = 500 horas, Categoría A = 1000 horas
ado de servicio u otra entidad equivalente, según corresponda, en el
opietario entregado, quedarán cubiertas por la garantía durante el
es
19
Page 40

Not for
Reproduction
Especificaciones
Marca del motor Briggs & Stratton
Serie del modelo del
motor
Tipo de motor De 4 ciclos
Sistema de arranque Arranque de retroceso y arranque
Capacidad de aceite 0,59 L (20 onzas)
Capacidad del tanque
de combustible
Espacio de la bujía de
encendido
Torsión de la bujía de
encendido
El sistema de ignición de la bujía de encendido del soplador de nieve cumple con la norma ICES-002 canadiense.
Clasicación de potencia
La clasicación de potencia bruta para modelos de motor de gasolina individual está etiquetada de acuerdo con el código J1940
(Small Engine Power & Torque Rating Procedure) de la SAE (Society of Automotive Engineers), y está clasicada de conformidad con
el código SAE J1995. Los valores de torsión se obtienen a 2600 RPM en los motores que indican “rpm” en la etiqueta y a 3060 RPM
en los otros; los valores de potencia en caballos de fuerza se obtienen a 3600 RPM. Las curvas de potencia bruta se pueden ver en
www.BRIGGSandSTRATTON.COM Los valores de potencia neta se obtienen con un ltro de aire y escape instalado, mientras que los
valores de potencia bruta se recopilan sin estos accesorios. La potencia bruta real del motor es superior a la neta y depende, entre otros
factores, de las condiciones ambientales de uso y de las variaciones entre distintos motores del mismo modelo. Dada la amplia gama
de productos donde se instalan los motores, el motor de gasolina puede no desarrollar la potencia bruta nominal cuando se utiliza en
una pieza del equipo de potencia determinada. Esta diferencia se debe, entre otros, a los siguientes factores: accesorios (ltro de aire,
escape, carga, refrigeración, carburador, bomba de combustible, etc.), limitaciones de la aplicación, condiciones ambientales de uso
(temperatura, humedad, altitud) y variaciones entre distintos motores de un mismo modelo. A causa de las limitaciones de fabricación y
de capacidad, Briggs & Stratton podrá sustituir este motor por un motor con mayor clasicación de potencia.
Serie para nieve
eléctrico
2,8 litros (3,0 cuartos de galón)
0,76 mm (0,030 pulgadas)
20 Nm (180 libras-pulgadas)
20
Page 41

Not for
Reproduction
es
21
Page 42

Not for
Reproduction
Sécurité de l'utilisateur
Table des matières
Sécurité de l’utilisateur ......................................................... 2
Caractéristiques et commandes ........................................... 8
Fonctionnement ................................................................... 9
Entretien ............................................................................ 14
Entreposage ....................................................................... 16
Dépannage ......................................................................... 17
Garantie Contrôle d’émission ............................................ 19
Spécications ..................................................................... 20
REMARQUE : Veuillez vous reporter au Guide des personnesressources pour le client et aux Instructions de montage pour des
informations supplémentaires.
Symbole d’alerte de sécurité et motsindicateurs
Le symbole d’alerte de sécurité est utilisé pour identier des
informations de sécurité sur les dangers pouvant entraîner des
blessures corporelles. Un mot-indicateur (DANGER, AVERTISSEMENT ou MISE EN GARDE) est utilisé avec le symbole d’alerte
pour indiquer la probabilité et la gravité potentielle des blessures.
De plus, un symbole de danger peut être utilisé pour représenter
un type de danger.
DANGER indique un danger qui, si non évité, causera la
mort ou des blessures sérieuses.
AVERTISSEMENT indique un danger qui, si non évité, peut
résulter à la mort ou blessure grave.
MISE EN GARDE indique un danger qui, si non évité,
pourrait causer des blessures mineures ou modérées.
AVIS indique une situation qui pourrait causer des
dommages au produit.
Risque de surface chaude
Porter des lunettes de sécurité
Risque de projection d'objets
Risque d'amputation - impulseur en mouvement
Risque d'amputation - impulseur en mouvement
Risque d'amputation - tarière en mouvement
Risque d'emmêlement - pièces en mouvement
Risque de décharge électrique
Se tenir à une distance sécuritaire
Symboles de danger et signications
Lire le manuel d’utilisation
Enlever la clé avant d’eectuerun entretien
Risque d’empoisonnement au monoxyde
de carbone
Risque d’incendie
Risque d’explosion
Risque de rebond
Garder hors de la portée des enfants
AVERTISSEMENT
Certains composants de cet équipement et de ses accessoires
contiennent des produits chimiques reconnus dans l'état de
Californie comme étant cause de cancer, d'anomalies congéni-
tales ou d'autres eets néfastes sur la fonction de reproduction.
Se laver les mains après la manipulation.
AVERTISSEMENT
L'échappement du moteur de cet appareil contient des produits chimiques connus selon l'État de la Californie de causer
le cancer, des anomalies congénitales ou autre eet nuisible à
la reproduction.
2
Page 43

Not for
Reproduction
Sécurité de l'utilisateur
AVERTISSEMENT
• Le contact des mains avec la turbine rotative dans la goulotte
d'éjection est la cause la plus courante de blessure associée
aux souffleuses à neige.
• Cette souffleuse à neige est capable d’amputer les mains et
les pieds, et de projeter des objets. Lisez et observez toutes
consignes de sécurité contenues dans ce manuel. Le défaut
de le faire pourrait résulter en de graves blessures voire la
mort.
AVERTISSEMENT
Lire, comprendre et suivre toutes les instructions
sur la souffleuse à neige et dans le manuel de
l’opérateur avant de faire fonctionner cette unité.
À défaut d’observer les instructions de sécurité
dans ce manuel peut résulter à la mort ou une
blessure grave.
• Conservez ces instructions d’origine pour vous y référer
ultérieurement.
• Soyez complètement familier avec les commandes et
l’utilisation appropriée de la souffleuse à neige.
• Assurez-vous que vous êtes adéquatement formé avant de
faire fonctionner la souffleuse à neige.
• Sachez comment arrêter l’appareil et déclencher les
commandes rapidement.
• Ne laissez jamais une autre personne faire fonctionner la
souffleuse à neige sans formation adéquate.
• Suivez toujours les instructions dans le manuel de l’opérateur,
si la souffleuse à neige sera entreposée pour une période
prolongée.
• Veuillez maintenir ou remplacer les étiquettes de sécurité et
d’instructions si nécessaire.
• N’essayez jamais de faire des réparations majeures sur
la souffleuse à neige à moins d’être adéquatement formé.
L’entretien inadéquat de la souffleuse à neige peut résulter en
un fonctionnement dangereux, des dommages à l’équipement
et l’annulation de la garantie du produit.
DANGER
Le conduit d’éjection contient un impulseur
rotatif pour éjecter la neige. Ne débouchez ou ne
dégagez jamais le conduit d’éjection avec vos
mains. Les doigts peuvent facilement être prises
dans l’impulseur. Utilisez toujours un outil de
nettoyage.
À défaut d’observer ces instructions de sécurité
résultera à une amputation traumatique ou
dilacératon grave.
DANGER
Gardez les mains, les pieds et les vêtements
loin des pièces rotatives. Les pièces rotatives
peuvent contacter ou enchevêtrer les mains,
les pieds, les cheveux, les vêtements ou
accessoires.
À défaut d'observer ces instructions de sécurité
résultera à une amputation traumatique ou
dilacératon grave.
• Lors du nettoyage, de la réparation ou de l’inspection de
la souffleuse à neige, assurez-vous que le moteur est à la
position ARRÊT, que la bougie d’allumage est débranchée et
que toutes les pièces mobiles sont arrêtées.
• Ne placez jamais les mains ou les pieds près ou en-dessous
des pièces en mouvement. Toujours se tenir à l’écart de
l’ouverture d’éjection.
• Ne faites jamais fonctionner la souffleuse à neige sans les
protecteurs appropriés, et autres dispositifs de sécurité en
place lors du fonctionnement.
• Ne laissez jamais votre souffleuse à neige sans surveillance
lorsque le moteur est en marche. Toujours débrayer les
commandes de tarière et de traction, arrêter le moteur et retirer
les clés.
• Assurez-vous que vos vêtements lâches ne sont pas à la
portée du devant de la souffleuse à neige et de la tarière. Les
foulards, les mitaines, les cordons pendants, les vêtements
lâches et pantalons peuvent rapidement être pris dans le
dispositif rotatif et une amputation en résultera. Attachez les
cheveux longs et enlevez les bijoux.
AVERTISSEMENT
Les objets peuvent être ramassés par la tarière
et projetés du conduit. Ne déchargez jamais la
neige vers les spectateurs ou ne permettez jamais
personne devant la souffleuse à neige. À défaut
d'observer ces instructions de sécurité dans ce
manuel résultera à la mort ou blessure grave.
• Portez toujours des lunettes de sécurité ou un écran
protecteur pendant le fonctionnement et lors d’un ajustement
ou réparation.
• Soyez attentif de la direction d’où la neige est
éjectée. Les piétons tous près, les animaux domestiques ou
les propriétés peuvent être endommagés par la projection
des objets.
• Soyez attentif à votre environnement pendant le
fonctionnement de la souffleuse à neige. Ne passez pas par
dessus des objets comme le gravier, les tapis d’accueil, les
journaux, les jouets et les pierres cachées sous la neige,
puisqu’ils peuvent tous être projetés du conduit ou bloqués
dans la tarière.
• Soyez très prudent lors du fonctionnement sur ou traversant
les voies d’accès, les trottoirs ou les routes de gravel.
• Ajustez la hauteur du boîtier de collection pour dégager le
gravel ou toutes autres matières rocheuses.
• N’utilisez jamais la souffleuse à neige à proximité de vitres,
de voitures, de puits de fenêtres, de descentes ou autres
sans réglage adéquat de l’angle d’éjection.
• Familiarisez-vous avec l’endroit dans lequel vous planifiez
faire fonctionner la souffleuse à neige. Marquez les bornes
des voies d’accès et des trottoirs.
fr
3
Page 44

Not for
Reproduction
Sécurité de l'utilisateur
AVERTISSEMENT
Des accidents tragiques peuvent se produire si
l’utilisateur ne fait pas attention à la présence
d’enfants. Les enfants sont souvent attirés par
la machine et le soufflage de neige. Ne jamais
supposer que les enfants resteront là où ils ont
été vus pour la dernière fois.
• Gardez les enfants hors de portée pendant le fonctionnement.
Les enfants sont souvent attirés à l’équipement. Soyez attentif
des personnes présentes.
• Faire preuve de vigilance et arrêter la machine si des enfants
pénètrent dans la zone.
• Ne jamais laisser les enfants se servir de la machine.
• Prenez bien soin lorsque vous approchez des coins sans
visibilités, les arbustes, les arbres ou les autres objets qui vous
cachent la vue. Des enfants peuvent être présents.
AVERTISSEMENT
Les moteurs émettent du monoxyde de carbone,
un gaz toxique sans odeur ni couleur. Le fait de
respirer le monoxyde de carbone peut causer
des nausées, des évanouissements ou la mort.
• Veuillez faire fonctionner le moteur dehors.
• Ne faites pas fonctionner le moteur dans un endroit enfermé,
même si les portes ou les fenêtres sont ouvertes.
AVERTISSEMENT
Le carburant et ses vapeurs sont extrêmement
inflammables et explosifs. Veuillez bien prendre
soin avec précaution du carburant.
À défaut d'observer ces instructions de sécurité
peut causer un feu ou explosion qui résultera à
des brûlures graves ou la mort.
Lors du remplissage de carburant
• Arrêtez le moteur et laissez refroidir pour au moins 2 minutes
avant d’enlever le bouchon de réservoir pour ajouter le
carburant.
• Remplissez le réservoir de carburant dehors ou dans un
endroit bien ventilé.
• Ne remplissez pas trop le réservoir de carburant. Pour
permettre l’expansion de l’essence, ne remplissez pas au-
dessus le bas du cou du réservoir de carburant.
• Garder le carburant loin des étincelles, des flammes nues, des
veilleuses, de la chaleur et autres sources d'allumage.
• Vérifiez souvent les lignes de carburant, le bouchon et les
accessoires pour fissures et fuites. Remplacer si nécessaire.
• Utilisez un réservoir de carburant approuvé.
• Si le carburant se renverse, attendre jusqu'à ce qu'il soit
évaporé avant de mettre en marche le moteur.
Lors du démarrage du moteur
• Assurez-vous que la bougie d'allumage, le silencieux, le
bouchon de carburant et filtre à air (si équippé) sont en place
et bien fixés.
• Lorsque la bougie d'allumage est enlevée, ne mettez pas en
marche le moteur.
• Si le carburant est renversé, n'essayez pas de mettre en
marche le moteur, mais déplacez la souffleuse à neige loin de
la section du dégât et évitez de créer toute source d'ignition
jusqu'à ce que les vapeurs de carburant se soient évaporées.
• N'amorcez pas trop le moteur. Suivez les instructions dans ce
manuel pour mettre le moteur en marche.
• Si le moteur est noyé, veuillez régler le volet de départ (si
équippé) à la position OUVERT / MARCHE, déménager
l'accélateur (si équippé) à la position VITE et mettre en marche
le moteur.
Lors du fonctionnement de l'équipement
• N'inclinez pas la souffleuse à neige à un angle qui cause un
renversement de carburant.
• N'étouffez pas le carburateur pour arrêter le moteur.
• Si l'assemblage d'épurateur (si équippé) ou le filtre à air est
enlevé, ne faites pas fonctionner le moteur.
Lors du remplacement de l'huile
• Si la vidange de l'huile est faite par le tube de remplissage du
haut, le réservoir de carburant doit être vide ou le carburant
peut s'écouler et peut résulter en feux ou explosion.
Lors du transport de l'équipement
• Transportez lorsque le réservoir est VIDE, ou lorsque la
soupape d'arrêt est FERMÉE.
Entreposage de carburant ou d'équipement avec du
carburant dans le réservoir
• Entreposez loin des fournaises, des poêles, des chauffe-eaux
ou autres appareils qui ont une flamme d'allumage ou autre
source d'allumage qui peut allumer les vapeurs de carburant.
4
Page 45

Not for
Reproduction
Sécurité de l'utilisateur
AVERTISSEMENT
Le fonctionnement sans danger de la souffleuse
à neige exige un soin et un entretien appropriés
du moteur.
• Débrayez tous les volets de départ et changez la vitesse au
neutre avant de faire démarrer le moteur.
• Laissez le moteur s’ajuster à la température extérieure avant
de commencer de déblayer la neige.
• Utilisez une fiche trifilaire mise à la terre pour toutes
souffleuses à neige munies d’un moteur d’entraînement
électrique ou d’un moteur de démarrage électrique.
AVERTISSEMENT
La mise en marche du moteur créée une gerbe
d’étincelles.
L’étincelle peut mettre le feu au gaz inflammable
tout près.
Explosion et incendie pourraient en résulter.
• Si il y a une fuite de pétrole liquéfié PL dans l’endroit où vous
êtes, n’essayez pas de faire fonctionner le moteur.
• N’utilisez pas des fluides sous pression à cause que les
vapeurs sont inflammables.
AVERTISSEMENT
Le fonctionnement du moteur produit de la
chaleur. Les pièces du moteur, en particulier le
silencieux, deviennent extrèmement chaud.
À défaut d’observer ces instructions de sécurité
peut résulter à des brûlures thermiques graves au
contact.
AVERTISSEMENT
Cette souffleuse à neige doit être adéquatement
entretenue pour assurer un fonctionnement et une
performance en toute sécurité. À défaut d'observer
les instructions de sécurité dans ce manuel peut
résulter à la mort ou une blessure grave.
• Lors de l'entretien ou de la réparation de la souffleuse à neige,
arrêtez le moteur (OFF), déconnectez le fil de bougie et gardez
le fil loin de la bougie an d'empêcher quelqu'un de mettre en
marche le moteur accidentellement.
• Vérifiez les boulons de cisaillement et autre quincaillerie à
intervalles fréquents pour s'assurer d'un serrage adéquat.
• Garder les écrous et boulons bien serrés et la souffleuse à neige
en bon état de marche.
• Ne touchez pas les dispositifs de sécurité. Vérifier régulièrement
leur bon fonctionnement et réparer le cas échéant.
• Les composants sont sujets à s'user, s'endommager et à se
détériorer. Vérifiez fréquemment les composants et remplacez
les pièces recommandés au besoin.
• Vérifiez la commande de fonctionnement fréquemment. Ajuster
et réparer le cas échéant.
• Utilisez seulement des pièces de remplacement autorisées
par l'usine, ou des pièces semblables, lorsque vous faites des
réparations.
• Conformez toujours avec les spécifications du fabricant sur tous
les réglages et ajustements.
• Utilisez seulement des accessoires et des équipements
autorisés par l'usine, ou semblables, comme des poids de roues,
des contrepoids, ou des cabines.
• N'essayez jamais de faire des ajustements pendant que le
moteur est en marche ( à l'exception de la recommendation
spécifique du fabricant).
• Ne jamais toucher un moteur ou un silencieux chaud. Laisser
le silencieux, le cylindre de moteur et les ailettes refroidir avant
de toucher.
• Enlevez tous débris de la section du silencieux et de la section
du cylindre.
• Installer et entretenir en bon état le pare-étincelles avant
d’utiliser l’équipement sur une terre brute de couverture de
forêt, de gazon ou de brousse.
• L’utilisation ou le fonctionnement du moteur sur des terrains
forestiers, broussailleux ou herbeux constitue une violation
de la Section 4442 du Code des ressources publiques de
Californie, à moins que le système d’échappement ne soit
équipé d’un pare-étincelles, comme le définit la Section
4442, maintenu en bon état de marche. D’autres provinces
ou juridictions fédérales peuvent avoir des lois similaires.
Communiquer avec le fabriquant, détaillant ou revendeur
d’origine de l’équipement pour obtenir un pare-étincelles
conçu pour le système d’échappement installé sur ce moteur.
fr
5
Page 46

Not for
Reproduction
Sécurité de l'utilisateur
AVERTISSEMENT
Cette soueuse à neige est aussi sûr que l'est
son utilisateur. Si mal utilisée ou mal entretenue, ceci peut être dangereux. Souvenez-vous
que vous êtes responsable pour votre sécurité
et de ceux près de vous.
• Gardez hors de portée du fonctionnement toutes personnes,
en particulier les petits enfant et les animaux domestiques.
• Inspectez complètement l'endroit où la souffleuse à neige
sera utilisée et enlevez tous tapis d'accueils, les luges, les
planches à neige, les cordons d'alimentation et autres corps
étrangers.
• Ne faites pas fonctionner la souffleuse à neige sans porter
des vêtements de neige convenables.
• Le port de chaussures améliorera la stabilité sur des
surfaces glissantes.
• Soyez attentif pour éviter de glisser ou de tomber
particulièrement lors du fonctionnement de la souffleuse à
neige en marche arrière.
• Ne jamais utiliser la machine si la visibilité est mauvaise ou
si la lumière est insuffisante. Toujours garder un bon équilibre
et tenir fermement les poignées.
• Ne déblayez pas la neige de la surface des pentes. Soyez
très prudent lors du changement de direction sur les pentes.
Ne pas tenter de déblayer des pentes raides.
• Ne surchargez pas la capacité de la machine en essayant de
déblayer la neige trop vite.
• Ne jamais faire fonctionner la souffleuse à neige à une haute
vitesse de transport sur des surfaces glissantes. Regarder
derrière la souffleuse à neige et être prudent lors du
fonctionnement en marche arrière.
• N'utilisez pas la souffleuse à neige sur des surfaces au-
dessus du sol comme les toits des résidences, les garages,
les vérandas ou toutes autres structures ou édifices.
• Les opérateurs doivent évaluer leur abilité de faire
fonctionner la souffleuse à neige en toute sécurité
suffisamment pour protéger eux-mêmes et les autres de
blessures.
• La souffleuse à neige est conçue pour enlever la neige
seulement. N'utilisez pas la souffleuse à neige pour toute
autre raison.
• NE PAS transporter de passagers.
• Après avoir frappé un corps étranger, fermez le moteur à
ARRÊT, déconnectez le cordon des moteurs électriques,
inspectez complètement la souffleuse à neige pour aucun
dommage, et réparez le dommage avant de recommencer et
de faire fonctinner la souffleuse à neige.
• Si la souffleuse à neige secousse d'une manière
anormale, fermez le moteur à ARRÊT. Toute vibration est
généralement un avertissement de problème. Veuillez voir un
concessionnaire agéé pour de réparation nécessaire.
• Pour des modèles munis avec des moteurs de démarrage
électrique, débranchez le cordon d'alimentation après la
mise en marche du moteur.
AVERTISSEMENT
Les cordons d'alimentation endommagés ou non
mis à la terre pourraient provoquer une décharge
électrique.
Une décharge électrique pourrait causer des
brûlures graves voire la mort.
Lors de l'utilisation du démarreur électrique
• Le cordon d'alimentation doit être correctement mis à la terre
en tout temps.
• Utiliser uniquement un cordon d'alimentation trois conducteurs
correctement mis à la terre à la source d'alimentation.
• Si la rallonge est endommagée, elle doit être remplacée par
une personne qualiée pour éviter tout danger.
AVERTISSEMENT
Une rétraction rapide du cordon du démarreur
(eet de rebond) tirera votre main et votre bras
vers le moteur plus rapidement que l'on ne peut
relâcher le cordon du démarreur.
Des os cassés, des fractures, des bleus, ou des
foulures peuvent en résulter.
Lors du démarrage du moteur
• Tirer lentement le cordon du démarreur jusqu'à ce qu'une
résistance soit ressentie puis tirer rapidement pour éviter
tout eet de rebond.
6
Page 47

Not for
Reproduction
Sécurité de l'utilisateur
A
B
Autocollants de sécurité
Avant de faire fonctionner la souffleuse à neige, lire et comprendre
les autocollants de sécurité installés. Les mises en garde et les
avertissements sont fournis pour vous aider à éviter des blessures
corporelles et des dommages à votre souffleuse à neige.
Si n'importe quel autocollant de sécurité devient endommagé ou
illisible, commander des autocollants de remplacement de votre
centre de service agréé.
A — Pièce No. 1737865 Autocollant Danger Conduit
B — Pièce No. 1739966 Autocollant Danger Tarière
C — Pièce No. 279655 Autocollant Avertissement Moteur
C
fr
7
Page 48

Not for
Reproduction
Caractéristiques et commandes
1739977
B
A
B
C
H
N
D
E
G
O
Commandes de la soueuse à neige et du
moteur
A — Commande de la tarière
B — Commande du conduit d'éjection - Montage de
l'interrupteur (si équipé)
Commande du conduit d'éjection - Montage de la poignée
(si équipé)
C — Commande de déecteur - Gâchette
D — Bouton du démarreur
E — Prise du démarreur
F — Autocollant Instructions de démarrage (si équipé)
G — Autocollant Instructions de démarrage (si équipé)
H — Phare avant (si équipé)
I
— Commande de starter
J
— Réservoir de carburant et bouchon
K
— Remplissage d'huile/Jauge d'huile
L
— Bouton d'amorceur
M
— Clé MARCHE/ARRÊT ou Pousser/Tirer
N
— Poignée du cordon de démarreur
O
— Bouchon de vidange d'huile
8
L
F
M
I
J
Symboles de commande et signications
Interrupteur Marche/Arrêt
Volet de départ fermé; volet de départ
ouvert
Appuyer 2 fois sur l'amorceur
Brancher la rallonge
Appuyer sur le bouton pour démarrer
Embrayer la commande de tarière
Commande de rotation du conduit
K
Page 49

Not for
Reproduction
Recommandations relatives à l'huile
REMARQUE : Le moteur est expédié de l'usine rempli d'huile.
Avant démarrer le moteur, s'assurer d'ajouter de l'huile selon les
instructions dans ce manuel. Si vous démarrez le moteur sans
huile, il sera endommagé de manière irréversible et ne sera pas
couvert par la garantie.
Utiliser de l'huile détergente de haute qualité de grade « SG, SH,
SJ, SL, ou plus haut ». L'huile synthétique 5W30 pour moteur
est acceptable pour toutes températures. NE PAS mélanger
l'huile avec l'essence. Voir le tableau ci-dessous pour des
recommandations d'huile.
Fonctionnement
A
C
D
B
* Sous 40 °F (4 °C) l'utilisation de SAE 30 causera une diculté de
mise en marche.
** Au-dessus 80 °F (27 °C) l'utilisation de 10W-30 peut causer une
augmentation de consommation d'huile. Vérier le niveau d'huile plus
fréquemment.
Ajouter de l'huile/Vérier le niveau d'huile.
1. S'assurer que la souffleuse à neige est de niveau.
2. Nettoyer de tous débris la zone de la jauge d’huile.
3. Voir Spécifications pour la capacité d'huile.
4. Enlever la jauge d'huile A, Figure 1) et l'essuyer avec un
chiffon propre.
5. Ajouter lentement l'huile dans l'orifice de remplissage d'huile
du moteur (B).
6. Attendre une minute puis insérer la jauge d'huile et tourner
dans le sens horaire pour serrer.
7. Enlever la jauge d’huile et vérifier le niveau d’huile.
8. Si nécessaire, ajouter de l'huile jusqu'au repère FULL (plein)
(C) sur la jauge d'huile. Ne pas trop remplir.
9. Insérer la jauge d’huile et la serrer.
Figure 1
Recommandations de carburant
Le carburant doit répondre à ces exigences :
• Essence sans plomb, propre et récemment achetée.
• Au minimum 87 octanes/87 AKI (91 RON). Pour une utilisation
en haute altitude, voir ci-dessous.
• Une essence avec jusqu’à 10 % d’éthanol (essence-alcool)
est acceptable.
REMARQUE : Ne pas utiliser d'essences non approuvées
telles que E15 et E85. Ne pas mélanger de l'huile avec
l'essence ou modifier le moteur afin qu'ils puissent utiliser des
carburants alternatifs. L'utilisation de carburants non approuvés
endommagera les composants du moteur et annulera la garantie
du moteur.
Pour protéger le système d'alimentation contre la formation de
dépôts, mélanger un stabilisateur de carburant au carburant. Voir
Entreposage. Tous les carburants ne sont pas identiques. Si
des problèmes de démarrage ou de performance se produisent,
changer de fournisseur de carburant ou changer de marque.
Ce moteur est certifié pour fonctionner à partir de l'essence.
Le système de contrôle des émissions pour ce moteur est EM
(Modifications du moteur).
Haute altitude
À des altitudes supérieures à 1 524 mètres (5 000 pieds),
de l’essence d’au minimum 85 octanes/85 AKI (89 RON) est
acceptable. Pour les moteurs carburés, un réglage pour les
hautes altitudes est requis pour rester en conformité avec les
normes d’émissions. Faire fonctionner le moteur sans ce réglage
donnera lieu à des performances moindres, une consommation
de carburant supérieure et une augmentation des émissions.
Consulter un revendeur agréé Briggs & Stratton pour avoir des
informations sur les ajustements de haute altitude.
Il n’est pas recommandé de faire fonctionner le moteur à des
altitudes inférieures à 2 500 pieds (762 mètres) avec l’ajustement
de haute altitude. Pour les moteurs à système d’injection
électronique (EFI), aucun ajustement de haute altitude est
nécessaire.
fr
9
Page 50

Not for
Reproduction
Fonctionnement
Ajouter du carburant
AVERTISSEMENT
Le carburant et ses vapeurs sont extrêmement
inflammables et explosifs. Veuillez bien prendre
soin avec précaution du carburant.
À défaut d’observer ces instructions de sécurité
peut causer un feu ou explosion qui résultera à
des brûlures graves ou la mort.
Lors du remplissage de carburant
• Arrêtez le moteur et laissez refroidir pour au moins 2 minutes
avant d’enlever le bouchon de réservoir pour ajouter le
carburant.
• Remplissez le réservoir de carburant dehors ou dans un
endroit bien ventilé.
• Ne remplissez pas trop le réservoir de carburant. Pour
permettre l’expansion de l’essence, ne remplissez pas au-
dessus le bas du cou du réservoir de carburant.
• Garder le carburant loin des étincelles, des flammes nues, des
veilleuses, de la chaleur et autres sources d’allumage.
• Si le carburant se renverse, attendre jusqu’à ce qu’il soit
évaporé avant de mettre en marche le moteur.
AVERTISSEMENT
Les cordons d'alimentation endommagés ou non
mis à la terre pourraient provoquer une décharge
électrique.
Une décharge électrique pourrait causer des
brûlures graves voire la mort.
Lors de l'utilisation du démarreur électrique
• Le cordon d'alimentation doit être correctement mis à la
terre en tout temps.
• Utiliser uniquement un cordon d'alimentation trois conducteurs correctement mis à la terre à la source d'alimenta-
tion.
• Si la rallonge est endommagée, elle doit être remplacée
par une personne qualiée pour éviter tout danger.
REMARQUE : Le démarreur électrique est conçu pour un
cordon d'alimentation trois conducteurs seulement et fonctionne
sur le courant domestique standard. Si une source électrique
correctement mise à la terre n'est pas disponible, NE PAS utiliser
le démarreur électrique. Communiquer avec un électricien qualié
pour installer un système correctement mis à la terre.
1. Nettoyer la zone autour du bouchon de réservoir en enlevant
toute la poussière et les débris. Enlever le bouchon du
réservoir de carburant (D, Figure 1).
2. Remplir le réservoir de carburant avec de l'essence. Pour
permettre à l'essence de se dilater, ne pas dépasser la base
du col du réservoir de carburant en le remplissant.
3. Replacer le bouchon du réservoir.
Démarrer le moteur
AVERTISSEMENT
Le carburant et ses vapeurs sont extrêmement
inflammables et explosifs. Veuillez bien prendre
soin avec précaution du carburant.
À défaut d’observer ces instructions de sécurité
peut causer un feu ou explosion qui résultera à
des brûlures graves ou la mort.
Lors du démarrage du moteur
• Assurez-vous que la bougie d’allumage, le silencieux, le
bouchon de carburant et filtre à air (si équippé) sont en place
et bien fixés.
• Lorsque la bougie d’allumage est enlevée, ne mettez pas en
marche le moteur.
• Si le carburant est renversé, n’essayez pas de mettre en
marche le moteur, mais déplacez la souffleuse à neige loin de
la section du dégât et évitez de créer toute source d’ignition
jusqu’à ce que les vapeurs de carburant se soient évaporées.
• N’amorcez pas trop le moteur. Suivez les instructions dans ce
manuel pour mettre le moteur en marche.
• Si le moteur est noyé, veuillez régler le volet de départ (si
équippé) à la position OUVERT / MARCHE, déménager
l’accélateur (si équippé) à la position VITE et mettre en marche
le moteur.
AVERTISSEMENT
Les moteurs émettent du monoxyde de carbone,
un gaz toxique sans odeur ni couleur. Le fait de
respirer le monoxyde de carbone peut causer
des nausées, des évanouissements ou la mort.
• Veuillez faire fonctionner le moteur dehors.
• Ne faites pas fonctionner le moteur dans un endroit
enfermé, même si les portes ou les fenêtres sont ouvertes.
AVERTISSEMENT
Une rétraction rapide du cordon du démarreur (eet de rebond) tirera votre main et
votre bras vers le moteur plus rapidement
que l'on ne peut relâcher le cordon du démarreur.
Des os cassés, des fractures, des bleus, ou
des foulures peuvent en résulter.
Lors du démarrage du moteur
• Tirer lentement le cordon du démarreur jusqu'à ce qu'une
résistance soit ressentie puis tirer rapidement pour éviter
tout eet de rebond.
1. Vérifier le niveau d’huile. Voir Ajouter de l'huile/Vérifier le
niveau d'huile.
2. S'assurer que la commande de tarière est débrayée.
3. Insérer la clé MARCHE/ARRÊT (A, Figure 2) et tourner à la
position MARCHE ou insérer la clé Pousser/Tirer, si équipé.
10
Page 51

Not for
Reproduction
Fonctionnement
C
4. Tourner la commande d'étrangleur (B) à la position fermé.
REMARQUE : Ne pas fermer la commande d'étrangleur pour
démarrer un moteur chaud.
5. Appuyer sur le bouton d'amorceur (C) deux fois.
REMARQUE : Ne pas appuyer sur le bouton d'amorceur pour
démarrer un moteur chaud.
6. Démarrage rembobinage : Tenir fermement le cordon
du démarreur (D). Tirer lentement le cordon du démarreur
jusqu’à ce que vous sentiez une résistance, puis tirer
rapidement.
7. Démarrage électrique : Connecter d'abord le cordon
d'alimentation (non fourni) (E, Figure 3) à la prise du
démarreur (F) puis dans une prise murale. Si un autre
cordon d'alimentation est nécessaire, s'assurer qu'il est trois
conducteurs.
8. Démarrage électrique : Appuyer sur le bouton du démarreur
(G). Une fois le moteur démarré, déconnecter d'abord le
cordon d'alimentation de la prise murale et ensuite de la prise
du démarreur.
REMARQUE : Pour prolonger la durée de vie du démarreur,
utiliser des cycles de démarrage courts (cinq secondes
maximum). Attendre une minute entre les cycles de
démarrage.
9. Au fur et à mesure que le moteur se réchauffe, déplacer la
commande d'étrangleur (B, Figure 2) à la position ouvert.
REMARQUE : Si le moteur ne démarre pas après trois
tentatives, voir Dépannage.
B
A
D
Figure 2
G
F
E
Figure 3
Arrêter le moteur
AVERTISSEMENT
L'essence et les vapeurs sont extrèmement
flammables et explosifs.
Un incendie ou une explosion peut provoquer
des brûlures graves voire la mort.
• N'étouffez pas le carburateur pour arrêter le moteur.
1. Tourner la clé MARCHE/ARRÊT (A, Figure 2) à la position
ARRÊT ou enlever la clé Pousser/Tirer, si équipé.
2. Garder la clé dans un endroit sécuritaire hors de la portée des
enfants. Le moteur ne peut pas être démarré sans la clé.
11
fr
Page 52

Not for
Reproduction
Fonctionnement
Utilisation de la soueuse à neige
DANGER
Cette souffleuse à neige est capable
d’amputer les mains ou les pieds et de
projeter des objets. Le contact des mains
avec la tarière en mouvement dans le conduit
d'éjection est la cause la plus courante de
blessure associée aux souffleuses à neige.
• Lisez et observez toutes consignes de sécurité contenues
dans ce manuel. Le défaut de le faire résultera en de
graves blessures voire la mort.
• Ne débouchez ou ne dégagez jamais le conduit d'éjection
avec vos mains. Les doigts peuvent rapidement se coincer
et une amputation traumatique ou des lacérations graves
en résulteront.
• Utilisez toujours un outil de nettoyage pour déboucher ou
dégager le conduit d'éjection.
AVERTISSEMENT
La glace, le gravier ou autres objets non prévus
peuvent être ramassés par la tarière et projetés
du conduit avec force.
Les objets projetés du conduit pourraient
provoquer des dommages matériels, des
blessures sévères voire la mort.
1. Démarrer le moteur et le laisser se réchauffer quelques
minutes. Voir Démarrer le moteur.
2. Ajuster la direction du conduit et l'angle du déflecteur aux
positions désirées. Voir Conduit d'éjection et Déflecteur.
3. Tirer la commande de tarière (C, Figure 4, Figure 5) contre la
poignée pour embrayer la tarière.
4. Lorsque la neige est ramassée, relâcher la commande de
tarière.
5. Laisser le moteur tourner pendant une minute, puis arrêter le
moteur. Voir Arrêter le moteur.
C
A
B
• Soyez toujours attentif de la direction où la neige est
éjectée.
• Ajustez la hauteur du boîtier de collection pour dégager le
gravel ou toutes autres matières rocheuses.
AVERTISSEMENT
Des accidents tragiques peuvent se produire si
l’utilisateur ne fait pas attention à la présence
d’enfants. Les enfants sont souvent attirés par
la machine et le soufflage de neige. Ne jamais
supposer que les enfants resteront là où ils ont
été vus pour la dernière fois.
• Gardez les enfants hors de portée pendant le
fonctionnement. Les enfants sont souvent attirés à
l'équipement. Soyez attentif des personnes présentes.
• Faire preuve de vigilance et arrêter la machine si des
enfants pénètrent dans la zone.
Figure 4
12
Page 53

Not for
Reproduction
Fonctionnement
1. Démarrer la souffleuse à neige et embrayer la commande de
tarière (C, Figure 4, Figure 5) pendant quelques secondes.
2. Relâcher la commande de tarière.
C
B
3. La tarière doit s'arrêter en dedans de 5 secondes une fois la
commande de tarière relâchée. Si ce n’est pas le cas :
a. Ajuster le câble de commande.
b. Si la tarière ne s'arrête toujours pas dans les cinq (5)
secondes, consulter un concessionnaire agréé.
A
Test de sécurité de la soueuse à neige
DANGER
Cette souffleuse à neige est capable
d’amputer les mains ou les pieds et de
projeter des objets. Le contact des mains
avec la tarière en mouvement dans le conduit
d'éjection est la cause la plus courante de
blessure associée aux souffleuses à neige.
Figure 5
Conduit d'éjection et Déecteur
Rotation du conduit d'éjection - Montage de l'interrupteur (si
équipé)
1. Appuyer sur l'interrupteur pour faire tourner le conduit (A,
Figure 4).
2. Relâcher l'interrupteur pour verrouiller le conduit à la position
désirée.
Rotation du conduit d'éjection - Montage de la poignée (si
équipé)
1. Presser et tenir le bouton sur la poignée de la commande du
conduit (A, Figure 5).
2. Pousser la poignée vers l'avant ou la tirer vers l'arrière pour
tourner le conduit.
3. Relâcher le bouton pour verrouiller le conduit à la position
désirée.
REMARQUE : Ne pas trop forcer quand vous essayez de
manipuler la commande.
Ajustement du déflecteur
1. Presser et tenir le bouton sur la poignée de la commande du
déflecteur (B, Figure 4, Figure 5).
2. Déplacer la poignée de commande vers le haut ou vers le bas
pour ajuster la hauteur et la distance d'éjection de la neige.
3. Relâcher le bouton pour verrouiller le déflecteur à la position
désirée.
Dégager un conduit d'éjection obstrué
• Lisez et observez toutes consignes de sécurité contenues
dans ce manuel. Le défaut de le faire résultera en de
graves blessures voire la mort.
• Ne débouchez ou ne dégagez jamais le conduit d'éjection
avec vos mains. Les doigts peuvent facilement se coincer
et une amputation traumatique ou dilacération grave en
résultera.
• Utilisez toujours un outil de nettoyage pour déboucher ou
dégager le conduit d'éjection.
DANGER
Le conduit d'éjection contient un impulseur
rotatif pour éjecter la neige. Ne débouchez ou
ne dégagez jamais le conduit d'éjection avec
vos mains. Les doigts peuvent facilement être
prises dans l'impulseur. Utilisez toujours un
outil de nettoyage.
À défaut d'observer ces instructions de sécurité
résultera à une amputation traumatique ou
dilacératon grave.
1. ARRÊTER LE MOTEUR !
2. Assurez-vous que les ailettes de l'impulseur ont arrêté de
tourner.
3. Utiliser un outil de nettoyage pour enlever la neige du conduit
d'éjection. Ne jamais dégager un conduit d'éjection bouché
avec vos mains !
fr
13
Page 54

Not for
Reproduction
Entretien
Calendrier d'entretien
Les 5 premières heures
Changement de l’huile
Avant chaque utilisation
Vérier le niveau d'huile du moteur
Eectuer le test de sécurité de la soueuse à neige
Vériez l'usure de la barre de raclage et de la tarière en caout-
chouc
Après chaque utilisation
Enlever la neige et la gadoue accumulées an d'empêcher le
gel des commandes, des roues, du conduit d'éjection, et de la
tarière
Toutes les 25 heures ou 1 fois l'an
Vérier la soueuse à neige pour la présence d'éléments desserrés
Vérier l'ajustement du câble de commande de la tarière
Toutes les 50 heures ou 1 fois l’an
Changer l’huile du moteur
Vérier la condition du silencieux et du protège-silencieux
Tous les ans
Remplacer la bougie d’allumage
Vérifier le jeu de soupape *
* Non requis à moins que des problèmes soient notés au niveau du
moteur. Consulter un centre de service agréé pour cet élément.
2. Enlever le bouchon de vidange d'huile (B, Figure 7) et incliner
légèrement la souffleuse à neige pour vidanger l'huile dans un
contenant approprié.
3. Une fois que l’huile est vidangée, installer et serrer le bouchon
de vidange d'huile.
A
Figure 6
Service du Contrôle des émissions
L’entretien, le remplacement ou la réparation des dispositifs et
systèmes de contrôle des émissions peuvent être effectués par
tout établissement de réparation de moteurs hors route ou par
une personne qualifiée. Cependant, pour obtenir un service du
contrôle des émissions « sans frais », le travail doit être effectué
par un concessionnaire agréé par l’usine.
Changement de l’huile
L’huile vidangée est un produit de résidus dangereux et elle doit
être jetée de façon appropriée. Ne pas la jeter avec les déchets
ménagers. Vérifier avec les autorités locales, les centres de
services ou le concessionnaire, où se trouvent les installations
d’élimination des déchets ou de recyclage.
Vidanger l’huile
1. Pendant que le moteur est arrêté mais encore chaud, enlever
la clé puis déconnecter le câble de la bougie (A, Figure 6) et le
tenir à l’écart de la bougie.
REMARQUE : Pour avoir accès au câble de la bougie, vous
devez enlever le capot de neige du moteur. Voir Accéder à la
bougie d’allumage.
14
B
Figure 7
Ajouter de l'huile
1. S'assurer que la souffleuse à neige est de niveau.
2. Nettoyer de tous débris la zone de la jauge d’huile.
3. Voir Spécifications pour la capacité d'huile.
4. Enlever la jauge d'huile (A, Figure 1) et l'essuyer avec un
chiffon propre.
5. Ajouter lentement l'huile dans l'orifice de remplissage d'huile
du moteur (B).
6. Attendre une minute puis insérer la jauge d'huile et tourner
dans le sens horaire pour serrer.
7. Enlever la jauge d’huile et vérifier le niveau d’huile.
8. Si nécessaire, ajouter de l'huile jusqu'au repère FULL (plein)
(C) sur la jauge d'huile. Ne pas trop remplir.
9. Insérer la jauge d’huile et la serrer.
Page 55

Not for
Reproduction
Entretien
Ajustement du câble de commande
AVERTISSEMENT
La tarière doit s'arrêter en dedans de 5 secondes une fois la
commande de tarière relâchée. Si ce n'est pas le cas, ajuster le câble de commande. Voir Ajustement ci-dessous ou
communiquer avec un centre de service autorisé pour ajuster
le câble de commande.
Inspection
La tarière devrait tourner seulement lorsque la commande de
tarière est embrayée et doit arrêter en dedans de 5 secondes
lorsque la commande de tarière est relâchée. Si la tarière ne
tourne pas ou n'arrête pas tel que décrit, ajuster le câble de la
commande ou communiquer avec un centre de service autorisé
pour ajuster le câble de la commande.
Si la courroie d'entraînement s'est brisée, communiquer avec
un centre de service autorisé pour remplacer la courroie et pour
ajuster le câble de la commande.
Ajustement
1. Arrêter le moteur et enlever la clé. Voir Arrêter le moteur.
2. Soulever le couvercle du câble (A, Figure 8) pour exposer les
boucles d'ajustement (B) et l'embout d'extrémité du câble (C).
A
4. Abaisser le couvercle du câble.
5. Répéter la procédure d'inspection ci-dessus. Si la tarière ne
tourne pas ou n'arrête pas tel que décrit, communiquer avec
un centre de service autorisé pour faire inspecter la souffleuse
à neige.
Accéder à la bougie d'allumage
Pour accéder à la bougie d'allumage, le capot de neige doit être
enlevé selon les directives suivantes :
1. Tourner la clé MARCHE/ARRÊT (A, Figure 9) à la position
ARRÊT ou enlever la clé Pousser/Tirer, si équipé.
2. Agripper le bouton de commande d'étrangleur (B) et tirer vers
le haut pour l'enlever.
3. Enlever les vis de montage ou les boutons (C) sur le capot de
neige.
4. Soulever le capot de neige (D) de la base et l'incliner vers
l'avant. Ne pas déconnecter le tuyau de l'amorceur (E) ou le
câble de l'interrupteur à clé (F).
5. Déconnecter le câble de la bougie, puis enlever la bougie (G)
pour la nettoyer ou la remplacer. Voir Spécifications.
6. Après avoir installé la bougie, connecter le câble de la bougie.
7. S'assurer que le tuyau de l'amorceur et le câble de
l'interrupteur à clé sont bien branchés, puis remettre le capot
à neige dans la base et fixer avec les vis de montage ou les
boutons.
8. Aligner les fentes dans le bouton de commande d'étrangleur
avec les languettes sur l'arbre d'étrangleur et pousser vers le
bas pour installer. Si le bouton est mal installé, la commande
d'étrangleur ne fonctionnera pas.
C
Figure 8
3. Enlever l'embout d'extrémité de la boucle d'ajustement et
installer de nouveau comme suit :
• Si la tarière tourne lorsque la commande de tarière n'est
pas embrayée, allonger le câble de la commande en
installant l'embout d'extrémité dans la prochaine boucle
plus basse (diminuer la tension de la courroie)
• Si la tarière ne tourne pas lorsque la commande
de tarière est embrayée, raccourcir le câble de la
commande en installant l'embout d'extrémité dans la
prochaine boucle plus haute (augmenter la tension de
la courroie).
REMARQUE : Il doit y avoir un peu de jeu dans le câble
lorsque la commande.
C
B
E
F
G
B
A
D
Figure 9
15
fr
Page 56

Not for
Reproduction
Entretien
Entretien de la tarière et de la barre de
raclage
Avant chaque utilisation, vériez la limite d'usure sur la
tarière en caoutchouc et l'espace entre le support de la
barre de raclage et le sol (A, Figure 10).
• Si la limite d'usure sur la tarière en caoutchouc est
atteinte, la tarière en caoutchouc doit être remplacée.
Veuillez voir un concessionnaire agréé.
• Si le support de la barre de raclage entre en contact
avec le sol, la barre de raclage doit être remplacée.
Veuillez voir un concessionnaire agréé.
16
Figure 10
Page 57

Not for
Reproduction
Entreposage
Entreposage
AVERTISSEMENT
Le carburant et ses vapeurs sont extrêmement inammables et explosifs. Veuillez bien prendre soin avec
précaution du carburant.
À défaut d'observer ces instructions de sécurité peut
causer un feu ou explosion qui résultera à des brûlures
graves ou la mort.
Entreposage de carburant ou d'équipement avec
du carburant dans le réservoir
• Entreposer loin des fournaises, des poêles, des
chauffe-eaux ou autres appareils qui ont une veilleuse ou autre source d'allumage qui peut allumer
les vapeurs de carburant.
Circuit d'alimentation
Le carburant peut s'éventer s'il est entreposé plus de 30
jours. Un carburant éventé cause la formation de dépôts
acides et de gomme dans le système d'alimentation ou
sur les pièces essentielles du carburateur. Pour garder
l'essence fraîche, utiliser le stabilisateur et traitement
d'essence à formule évoluée de Briggs & Stratton®,
disponible partout où les pièces d'origine d'entretien de
Briggs & Stratton sont vendues.
Il n'est pas nécessaire de vidanger l'essence du moteur si
un stabilisateur de carburant est ajouté conformément aux
directives. Faire tourner le moteur pendant 2 minutes pour
faire circuler le stabilisateur dans le système de carburant
avant l'entreposage. Si l'essence dans le moteur n'a pas
été traitée avec un stabilisateur de carburant, elle doit être
vidangée dans un récipient homologué. Faire fonctionner le
moteur jusqu’à ce qu’il s’arrête par manque de carburant.
L’utilisation d’un stabilisateur de carburant dans le récipient de remisage est recommandée pour que le carburant
conserve toutes ses propriétés.
Huile à moteur
Pendant que le moteur est encore chaud, remplacer l'huile.
Voir Entretien.
Avant de mettre en entreposage
1. Nettoyer soigneusement la souffleuse à neige.
2. Enlever la bougie d'allumage. Nettoyer et corriger
l'écartement de la bougie, si nécessaire, ou remplacer
la bougie.
3. S'assurer que tous les écrous, les boulons et les vis
sont fixés solidement.
4. Vérifier l’usure ou les dommages sur les pièces mobiles.
Remplacer les pièces au besoin.
5. Lubrifier les commandes et les pièces mobiles.
6. Vaporiser les surfaces en métal non peint avec un
antirouille.
7. Plier la poignée supérieure, si désiré.
8. Pour un entreposage à l'intérieur, recouvrir la souffleuse
à neige et entreposer dans un endroit sec loin des
fournaises, poêles, chauffe-eau, ou autres appareils qui
ont des veilleuses ou autres sources d'allumage.
9. Pour un entreposage à l'extérieur, soulever la souffleuse
à neige de terre et la recouvrir avec une bâche épaisse.
Avant de remettre en service après entreposage
1. Lever la poignée supérieure et bien serrer les boutons
de la poignée.
2. Enlever la jauge d’huile et vérifier le niveau d’huile. Si
nécessaire, ajouter de l'huile jusqu'au repère FULL
(plein) sur la jauge d'huile. Ne pas trop remplir.
3. Remplir le réservoir avec de l'essence fraîche.
4. Assurez-vous que tous les protecteurs, les écrans et les
couvercles sont en place et que toutes les attaches sont
serrées.
17
fr
Page 58

Not for
Reproduction
Dépannage
Problème Cause Solution
La tarière n'arrête pas
lorsque la commande de
tarière est relâchée
La tarière ne tourne pas
lorsque la commande de
tarière est embrayée
La rotation du conduit ou
l'ajustement du déecteur
ne fonctionne pas
Le câble de commande doit être
ajusté
Le câble de commande doit être
ajusté
Les attaches sont trop serrées;
la commande du montage de
poignée est endommagée
Ajuster le câble de commande. Si le réglage du câble ne résout pas
le problème, consulter un concessionnaire agréé.
Ajuster le câble de commande. Si le réglage du câble ne résout pas
le problème, consulter un concessionnaire agréé.
Communiquer avec un centre de service autorisé.
Le conduit ou le déflecteur est gelé Dégager la neige ou la glace du conduit et des pièces du déflecteur;
Le moteur ne démarre pas La clé est mal entrée ou non
Le moteur démarre
dicilement ou tourne
mal
Vibration excessive Pièces lâches ou pièces
La barre de raclage ne
nettoie pas la surface
dure
La soueuse à neige
n'éjecte pas la neige
insérée
Amorceur non appuyé Appuyer sur le bouton d'amorceur deux fois avant de tirer le cordon
Plus d'essence Remplir le réservoir avec de l'essence fraîche.
Étrangleur ouvert - moteur froid Tourner l'étrangleur à la position fermé avant de tirer le cordon du
Moteur noyé Tourner l'étrangleur à la position ouvert; tirer le cordon du démarreur
Pas d'étincelles Connecter le câble de la bougie d'allumage; remplacer la bougie
Présence d'eau dans le carburant
ou vieux carburant
Cordon non branché ou
disjoncteur déclenché (modèles à
démarrage électrique)
Mauvaise huile Changer l'huile pour une viscosité plus légère (telle une 5W-30).
Bougie encrassée, usée, ou mal
écartée
Commande de l'étrangleur mal
réglée
endommagées
Barre de raclage usée Barre de raclage a besoin d'être remplacée. Communiquer avec un
Le câble de commande doit être
ajusté
placer la souffleuse à neige dans un endroit chauffé jusqu'à ce que
la neige ou la glace fonde.
Mettre la clé à la position MARCHE ou insérer la clé Pousser/Tirer.
du démarreur.
démarreur.
plusieurs fois jusqu'à ce que le moteur démarre.
d'allumage.
Vidanger le réservoir; faire le plein avec de l’essence nouvelle.
Brancher le cordon ou remplacer le cordon si défectueux;
réinitialiser le disjoncteur.
Nettoyer et corriger l'écartement de la bougie; remplacer la bougie.
Communiquer avec un centre de service autorisé.
Ouvrir la commande de l'étrangleur graduellement au fur et à
mesure que le moteur se réchauffe.
Arrêter la souffleuse à neige immédiatement. Communiquer avec
un centre de service autorisé.
centre de service autorisé.
Ajuster le câble de commande. Voir Entretien ou communiquer
avec un centre de service autorisé pour ajuster le câble.
Courroie d'entraînement usée ou
cassée
Conduit d'éjection obstrué avec de
la neige
La soueuse à neige
n'avance pas d'elle-même
La tarière en caoutchouc est usée
ou endommagée
18
Voir un centre autorisé pour remplacer la courroie.
ARRÊTER LE MOTEUR ! S'assurer que la tarière a arrêté de
tourner. Utiliser un outil de nettoyage pour enlever la neige du
conduit d'éjection. Ne jamais dégager un conduit d'éjection bouché
avec vos mains ! Consulter les « Avertissements » dans la section
Sécurité de l'utilisateur.
Tarière en caoutchouc a besoin d'être remplacée. Communiquer
avec un centre de service autorisé.
Page 59

Not for
Reproduction
Garantie Contrôle d'émission
Californie, US Environmental Protection Agency (USEPA) et Énoncé de garantie du dispositif antipollution de Briggs & Stratton
Corporation
Pour les modèles de moteur Briggs & Stratton avec désignation de coupe « F »
Le California Air Resources Board (CARB), l’USEPA et Briggs & Stratton (B&S) ont le plaisir
d'expliquer la garantie du dispositif antipollution installé sur ce moteur/ce matériel année
modèle 2014-2015. En Californie, les nouveaux petits moteurs hors route et les gros moteurs
à explosion de cylindrée de moins de ou égal à 1,0 litre doivent être conçus, fabriqués et
équipés pour satisfaire les normes sévères anti-smog de l'état. B&S doit garantir le dispositif
antipollution de ce moteur/matériel pendant la durée indiquée ci-dessous sous réserve de
l'absence d'abus, négligence ou mauvais entretien de ce petit moteur hors route.
Votre dispositif antipollution peut comprendre des pièces comme le carburateur ou le système
d’injection de combustible, le système d’allumage et le convertisseur catalytique. Il peut
aussi y avoir des tuyaux, des courroies, des connecteurs, des capteurs et d’autres dispositifs
en rapport avec les émissions. Le système de contrôle de l'évaporation de carburant
peut comprendre des pièces telles que : les carburateurs, les réservoirs d'essence, les
canalisations d'essence, les bouchons d'essence, les soupapes, les filtres, les carters, les
boyaux d'évaporation, les attaches, les raccords et autres composants associés. Dans le cas
d'un défaut couvert par la garantie, B&S réparera votre petit moteur hors route/votre matériel
sans frais et ce, incluant le diagnostic, les pièces et la main d'œuvre.
Couverture de garantie du fabricant :
Les petits moteurs hors route et les gros moteurs à explosion de cylindrée inférieure ou
égale à 1,0 litre, et tous les composants liés aux émissions de cet équipement, sont garantis
pendant deux ans * Si une pièce antipollution du moteur/matériel B&S couverte par la garantie
est défectueuse, B&S la réparera ou la remplacera.
Vos droits et obligations relatifs à la garantie
(Représentation Modèle – Type – Coupe xxxxxx xxxx Fx)
* Pendant deux ans ou pendant la période figurant sur le certificat de garantie respectif du
moteur ou du produit si elle est supérieure à deux ans.
Responsabilités du propriétaire dans le cadre de la garantie :
• En tant que propriétaire de petit moteur/matériel hors route, vous êtes responsable de
l’exécution de l’entretien requis indiqué dans le manuel d’utilisation. B&S recommande
de conserver tous les reçus en rapport avec l'entretien du petit moteur/matériel hors
route ; toutefois, B&S ne peut re
l'impossibilité de produire les reçus ou que vous n'avez pas effectué toutes les étapes de
l'entretien prévu.
• Néanmoins, vous devez savoir, en tant que propriétaire de petit moteur/matériel hors route,
que B&S peut refuser le bénéfice de la garantie si votre moteur/matériel, ou une pièce, est
défaillant en raison d'abus, de négligence, d'entretien inadéquat ou de modifications non
approuvées.
• Dès qu'un problème survient, vous avez la responsabilité de faire examiner votre moteur
de génératrice ou matériel dans un centre de distribution B&S, un centre de services
ou une entité équivalente, selon le cas. Les réparations couvertes par la garantie
doivent être effectuées dans un délai raisonnable, n'excédant pas 30 jours. Si vous
avez des questions au sujet de vos droits et responsabilités reliés à la garantie, veuillez
communiquer avec un représentant de Briggs & Stratton au 1-800-444-7774 (aux É.-U.) ou
BRIGGSandSTRATTON.COM.
fuser la garantie uniquement parce que vous êtes dans
Dispositions de la garantie contre les défauts du dispositif antipollution de Briggs & Stratton
Les dispositions qui suivent sont spécifiques à la couverture de garantie des défauts du
dispositif antipollution. Elle est un ajout à la garantie sur les moteurs de B&S pour les moteurs
non régulés, figurant dans le manuel d’utilisation.
1. Pièces d'émissions garanties
La couverture de cette garantie n’englobe que les pièces énumérées ci-dessous (pièces du
dispositif antipollution) dans la mesure où ces pièces étaient présentes sur le moteur B&S et/
ou sur le système d'alimentation B&S fourni.
a. Système de contrôle d’alimentation en carburant
• Dispositif d’enrichissement pour démarrage à froid (étrangleur à glissement)
• Carburateur et pièces internes
• Pompe à carburant
• Conduit d’essence, raccords de conduit d’essence, brides de serrage
• Réservoir d'essence, bouchon et attache
• Absorbeur de vapeurs d’essence
b. Circuit d’entrée d’air
• Filtre à air
• Collecteur d’admission
• Ligne de purge et d’évacuation
c. Système d'allumage
• Bougie(s) d’allumage
• Système d’allumage à magnéto
d. Système de catalyseur
• Convertisseur catalytique
• Collecteur d’échappement
• Système d’injection d’air ou soupape d’impulsion
e. Éléments divers utilisés dans les systèmes précédemment mentionnés
• Soupapes et interrupteurs de dépression, de température, de position, à délai critique
• Connecteurs et dispositifs
2. Durée de la couverture
Pendant une période de deux ans à compter de la date de l'achat initial, B&S garantit à
l'acheteur initial et à tout acheteur suivant que le moteur a été conçu, construit et équipé
conformément à toutes les réglementations applicables adoptées par le Air Resources
Board ; qu'il est dépourvu de défauts matériels et de fabrication pouvant provoquer le
dysfonctionnement d'une pièce couverte par la garantie ; et qu'il est identique en tous points
matériels au moteur décrit dans la demande de certification du fabricant. La période de
garantie commence à la date d'achat initial du moteur.
* Pendant deux ans ou pendant la période figurant sur le certificat de garantie respectif du
moteur ou du produit si elle est supérieure à deux ans.
La garantie sur les pièces antipollution est la suivante
• Toute pièce couverte par la garantie dont le remplacement n'est pas planifié dans le cadre
de l'entretien obligatoire décrit dans le manuel d'utilisation fourni est garantie pendant la
période indiquée ci-dessus. Si une telle pièce fait défaut pendant la période de couverture
de la garantie, la pièce sera réparée ou remplacée par B&S sans frais pour le propriétaire.
Cette pièce réparée ou remplacée dans le cadre de la garantie restera garantie pendant la
période de garantie restant à courir.
• Toute pièce couverte par la garantie dont seul l'examen est planifié dans le manuel
d'utilisation fourni est garantie pendant la période indiquée ci-dessus. Cette pièce réparée
ou remplacée dans le cadre de la garantie restera garantie pendant la période de garantie
restant à courir.
• Toute pièce couver
obligatoire dans le manuel d'utilisation est garantie pendant la période précédant le
premier point de remplacement prévu pour cette pièce. Si la pièce fait défaut avant
le remplacement prévu, la pièce sera réparée ou remplacée par B&S sans frais
pour le propriétaire. Toute pièce réparée ou remplacée en vertu de la garantie sera
garantie pendant la durée restant à courir de la période précédant le premier point de
remplacement prévu pour la pièce.
• Les pièces ajoutées ou modifiées ne faisant pas l'objet d’une exemption par Air Resources
Board ne doivent pas être utilisées. L'utilisation de pièces non exemptées, ajoutées ou
modifiées par le propriétaire sera un motif pour rejeter une demande de garantie. Il n'est
pas de la responsabilité du fabricant de garantir les défectuosités des pièces garanties
causées par l’utilisation de pièces ajoutées ou modifiées qui ne font pas l'objet d’une
exemption.
3. Protection consécutive
La couverture s'étend à toute défaillance de l'un des composants du moteur consécutive à la
défectuosité d'une des pièces garanties encore couverte par la garantie.
4. Exclusions de demande et de protection
Les réclamations au titre de la garantie doivent être présentées conformément aux
dispositions de la politique de garantie du moteur de B&S. La protection de garantie ne
s'applique pas aux défaillances de pièces de contrôle d'émissions qui ne sont des pièces
d'équipement d'origine B&S, ni aux défaillances de pièces causées par l'abus, la négligence
ou ;e mauvais entretien tels qu'énoncés dans les provisions de garantie B&S du moteur.
B&S n'est pas responsable de la couverture sous garantie du dysfonctionnement des pièces
antipollution provoqué par l'utilisation de pièces supplémentaires ou modifiées.
te par la garantie dont le remplacement fait partie de l’entretien
Consulter l’information concernant la période de durabilité des émissions et l’indice d’air
sur l’étiquette d’émissions de votre petit moteur hors-route
Les renseignements concernant la période de durabilité des émissions et l'indice de pollution
atmosphérique doivent être fournis avec les moteurs qui répondent aux normes relatives
aux émissions de la California Air Resources Board (CARB). Briggs & Stratton rend cette
information disponible aux consommateur sur les étiquettes des émissions. L’étiquette des
émissions du moteur fournit des renseignements sur la certification.
La période de durabilité des émissions décrit le nombre d’heures pendant lesquelles le
moteur peut fonctionner en respectant les normes relatives aux émissions, en supposant que
l’entretien est effectué conformément au Calendrier d'entretien. Les catégories utilisées sont
les suivantes :
Modéré :
Les cylindrées de 80 cc ou moins sont certifiées conformes aux normes d’émissions pour 50
heures réelles de fonctionnement du moteur. Les cylindrées de plus de 80 cc sont certifiées
conformes aux normes d’émissions pour 125 heures réelles de fonctionnement du moteur.
Intermédiaire :
Les cylindrées de 80 cc ou moins sont certifiées conformes aux normes d’émissions pour 125
heures réelles de fonctionnement du moteur. Les cylindrées de plus de 80 cc sont certifiées
conformes aux normes d’émissions pour 250 heures réelles de fonctionnement du moteur.
Prolongé :
Les cylindrées de 80 cc ou moins sont certifiées conformes aux normes d’émissions pour 300
heures réelles de fonctionnement du moteur. Les cylindrées de plus de 80 cc sont certifiées
conformes aux normes d’émissions pour 500 heures réelles de fonctionnement du moteur.
Par exemple, une tondeuse poussée typique est utilisée environ 20 à 25 heures par année.
Donc, la période de durabilité des émissions pour un moteur avec un classement
intermédiaireéquivaut de 10 à 12 années.
Les moteurs Briggs & Stratton sont certifiés conformes aux normes de phase 2 ou phase 3
sur les émissions de l’USEPA (United States Environmental Protection Agency). La période
de conformité des émissions indiquée sur l’étiquette de conformité des émissions indique le
nombre d’heures de fonctionnement pendant lesquelles le moteur a démontré qu’il respectait
les exigences fédérales en matière d’émissions.
Pour les cylindrées de 80 cc ou moins :
Catégorie C = 50 heures, Catégorie B = 125 heures, Catégorie A = 300 heures
Pour les cylindrées de plus de 80 cc et de moins de 225 cc :
Catégorie C = 125 heures, Catégorie B = 250 heures, Catégorie A = 500 heures
Pour les cylindrées de 225 cc ou plus :
Catégorie C = 250 heures, Catégorie B = 500 heures, Catégorie A = 1000 heures
Janvier 2014
fr
19
Page 60

Not for
Reproduction
Spécifications
Marque du moteur Briggs & Stratton
Série de modèles du
moteur
Type de moteur 4 temps
Système de démar-
rage
Capacité d'huile 20 oz (0,59 L)
Capacité du réservoir
d'essence
Écartement des élec-
trodes
Couple Bougie d'allu-
mage
Le dispositif d'allumage par étincelle sur cette soueuse à neige est conforme à la norme canadienne ICES-002.
Puissance nominale
La puissance nominale brute pour les modèles de moteurs à essence individuels est étiquetée conformément au code J1940 (Small
Engine Power & Torque Rating Procedure) de la SAE (Society of Automotive Engineers), et est évaluée conformément à SAE J1995.
Les valeurs de couple sont dérivées à 2 600 tr/min pour les moteurs avec « tr/min » sur l'étiquette et 3 060 tr/min pour tous les autres;
les valeurs de puissance sont dérivées à 3 600 tr/min. Les courbes de puissance brute peuvent être consultées au www.BRIGGSandSTRATTON.COM. Les valeurs nettes de puissance sont prises alors que l'échappement et le ltre à air sont installés alors que les valeurs
brutes de puissance sont mesurées sans ces accessoires. La puissance brute réelle du moteur sera supérieure à la puissance nette du
moteur et sera aectée, entre autres, par les conditions de fonctionnement ambiantes ainsi que par les diérences entre moteurs. Étant
donné la vaste gamme de produits sur lesquels les moteurs sont installés, le moteur à essence peut ne pas développer la puissance
nominale brute lorsqu'il est utilisé pour entraîner une pièce d'appareil donnée. Cette diérence est causée par diérents facteurs dont,
mais sans s'y limiter, la variété des composants du moteur (ltre à air, échappement, chargement, refroidissement, carburateur, pompe
à essence, etc.), les limites de l'appareil, les conditions de fonctionnement ambiantes (température, humidité, altitude) et les diérences
entre les moteurs. En raison des limites de fabrication et de capacité, Briggs & Stratton peut substituer un moteur de plus grande puissance pour ce moteur.
Série Neige
Lanceur à rappel et Démarrage
électrique
3,0 pintes (2,8 litres)
0,030 po (0,76 mm)
180 po-lb (20 Nm)
20
Page 61

Not for
Reproduction
21
fr
Page 62

Not for
Reproduction
22
Page 63

Not for
Reproduction
23
fr
Page 64

Not for
Reproduction
24
 Loading...