

Snapper S2265FC, 7800263, 7800262, SPV22675HWFC, 7800264 Safety Instructions & Operator's Manual
...Page 1

Safety Instructions & Operator's Manual for
NOTE: Specifications are correct at time of printing and are subject to change without notice.
* Actual sustained engine power will likely be lower due to operating limitations and environmental factors. Please refer to ‘Engine Power Rating Information’ for
further details.
Manual No. 7101687 (Rev. ‘-’, 4/7/2008)
TP 100-5386---WB-N
22” WALK BEHIND
MOWERS
Models
S2265FC (7800262)
SP2265FC (7800263)
SPV22675HWFC (7800264)
Page 2

Briggs & Stratton Yard Power Products Group
Copyright © 2008, Briggs & Stratton Corporation
Milwaukee, WI, USA. All Rights Reserved.
Thank You for purchasing this quality-built Snapper mower. We’re pleased that you placed your
confidence in the Snapper brand. When operated and maintained according to the instructions in this
manual, your Snapper mower will provide many years of dependable service.
This manual contains safety information to make you aware of the hazards and risks associated with the
machine and how to avoid them. This machine is designed and intended only for finish cutting of
established lawns and is not intended for any other purpose. It is important that you read and understand
these instructions thoroughly before attempting to start or operate this equipment. Save these
instructions for future reference.
PRODUCT REGISTRATION
IMPORTANT: KEEP THIS INFORMATION FOR YOUR PERSONAL RECORDS
(Complete the following information on your Snapper purchase)
Date of Purchase__________________________________________________________________
Retailer_________________________________________________________________________
Retailer's Phone Number___________________________________________________________
Equipment
Model Number______________________________________________________________
Serial Number ______________________________________________________________
Engine
Model_________________________Type__________________Trim___________________
It is very important that you register your purchase with Snapper to ensure warranty coverage. Please
mail your product registration card to:
Snapper at P.O. Box 1379, McDonough, Georgia 30253.
You can contact us at our website (www.snapper.com), or if you would like to speak with a Customer
Service Representative, call us at the Snapper Customer Relations Center at 1-800-317-7833. For
faster service please have your Serial Number and Model Number available.
SNAPPER is a trademark of
Briggs & Stratton Power Products Group, LLC
Jefferson, WI, USA.
Page 3

1
Operator Safety
Preparation Operation Maintenance Troubleshooting Warranties
Table of Contents
Operator Safety . . . . . . . . . . . . . . . . . . . . . . . . . . . . . . . . . . . . . . . . . . . . . . . .2
Important Operator Safety Instructions . . . . . . . . . . . . . . . . . . . . . . . . . . . . . . . . . .2
Preparation . . . . . . . . . . . . . . . . . . . . . . . . . . . . . . . . . . . . . . . . . . . . . . . . . . .4
Unpacking . . . . . . . . . . . . . . . . . . . . . . . . . . . . . . . . . . . . . . . . . . . . . . . . . . . . . . . . .4
Handle . . . . . . . . . . . . . . . . . . . . . . . . . . . . . . . . . . . . . . . . . . . . . . . . . . . . . . . . . . . .4
Handle Height . . . . . . . . . . . . . . . . . . . . . . . . . . . . . . . . . . . . . . . . . . . . . . . . . . . . . .5
Grass Bag . . . . . . . . . . . . . . . . . . . . . . . . . . . . . . . . . . . . . . . . . . . . . . . . . . . . . . . . .6
Side Discharge Deflector . . . . . . . . . . . . . . . . . . . . . . . . . . . . . . . . . . . . . . . . . . . . . .8
Mulching Tips . . . . . . . . . . . . . . . . . . . . . . . . . . . . . . . . . . . . . . . . . . . . . . . . . . . . . .9
How to Prepare the Engine . . . . . . . . . . . . . . . . . . . . . . . . . . . . . . . . . . . . . . . . . . . .9
Final Preparation . . . . . . . . . . . . . . . . . . . . . . . . . . . . . . . . . . . . . . . . . . . . . . . . . . . .9
Operation . . . . . . . . . . . . . . . . . . . . . . . . . . . . . . . . . . . . . . . . . . . . . . . . . . .10
Engine Stop Lever . . . . . . . . . . . . . . . . . . . . . . . . . . . . . . . . . . . . . . . . . . . . . . . . . .10
Front Wheel Drive System (Self-Propelled Units) . . . . . . . . . . . . . . . . . . . . . . . . . .10
Stopping the Engine . . . . . . . . . . . . . . . . . . . . . . . . . . . . . . . . . . . . . . . . . . . . . . . .10
Starting the Engine . . . . . . . . . . . . . . . . . . . . . . . . . . . . . . . . . . . . . . . . . . . . . . . . .11
Rules for Safe and Effective Operation . . . . . . . . . . . . . . . . . . . . . . . . . . . . . . . . . .11
Maintenance . . . . . . . . . . . . . . . . . . . . . . . . . . . . . . . . . . . . . . . . . . . . . . . . .12
Engine Maintenance . . . . . . . . . . . . . . . . . . . . . . . . . . . . . . . . . . . . . . . . . . . . . . . .12
Engine Tipping . . . . . . . . . . . . . . . . . . . . . . . . . . . . . . . . . . . . . . . . . . . . . . . . . . . .12
Cleaning the Mower Housing . . . . . . . . . . . . . . . . . . . . . . . . . . . . . . . . . . . . . . . . .12
Lubrication . . . . . . . . . . . . . . . . . . . . . . . . . . . . . . . . . . . . . . . . . . . . . . . . . . . . . . .12
Adjusting the Height of Cut . . . . . . . . . . . . . . . . . . . . . . . . . . . . . . . . . . . . . . . . . . .12
Removing the Drive Belt . . . . . . . . . . . . . . . . . . . . . . . . . . . . . . . . . . . . . . . . . . . . .13
Adjusting the Drive Cable . . . . . . . . . . . . . . . . . . . . . . . . . . . . . . . . . . . . . . . . . . . .14
Blade Service . . . . . . . . . . . . . . . . . . . . . . . . . . . . . . . . . . . . . . . . . . . . . . . . . . . . .15
Removing the Blade . . . . . . . . . . . . . . . . . . . . . . . . . . . . . . . . . . . . . . . . . . . . .15
Sharpening the Blade . . . . . . . . . . . . . . . . . . . . . . . . . . . . . . . . . . . . . . . . . . . .15
Checking the Level of Cut . . . . . . . . . . . . . . . . . . . . . . . . . . . . . . . . . . . . . . . . .15
Preparing the Mower for Storage . . . . . . . . . . . . . . . . . . . . . . . . . . . . . . . . . . . . . .16
Troubleshooting . . . . . . . . . . . . . . . . . . . . . . . . . . . . . . . . . . . . . . . . . . . . . . .17
Warranty . . . . . . . . . . . . . . . . . . . . . . . . . . . . . . . . . . . . . . . . . . . . . . . . . . . .18
WARNING
Battery posts, terminals and related accessories contain
lead and lead compounds, chemicals known to the State of
California to cause cancer and birth defects or other
reproductive harm. Wash hands after handling.
!
!
WARNING
Engine exhaust, some of its constituents, and certain
vehicle components contain or emit chemicals known to
the State of California to cause cancer or other reproductive
harm.
!
!
Page 4

www.snapper.com2
Operator Safety
! !
Protection for Children
Tragic accidents can occur if the operator is not alert to the
presence of children. Children are often attracted to the
machine and the mowing activity. Never assume that
children will remain where you last saw them.
1. KEEP children out of the mowing area and under the
watchful care of a responsible adult other than the operator.
2. DO NOT allow children in yard when machine is operated
and turn machine OFF if anyone enters the area.
3. DO NOT allow pre-teenage children to operate machine.
4. ALLOW only responsible adults & teenagers with mature
judgment under close adult supervision to operate machine.
5. DO NOT pull mower backwards unless absolutely
necessary. LOOK and SEE behind and down for children,
pets and hazards before and while backing.
6. USE EXTRA CARE when approaching blind corners,
shrubs, trees, or other objects that may obscure vision.
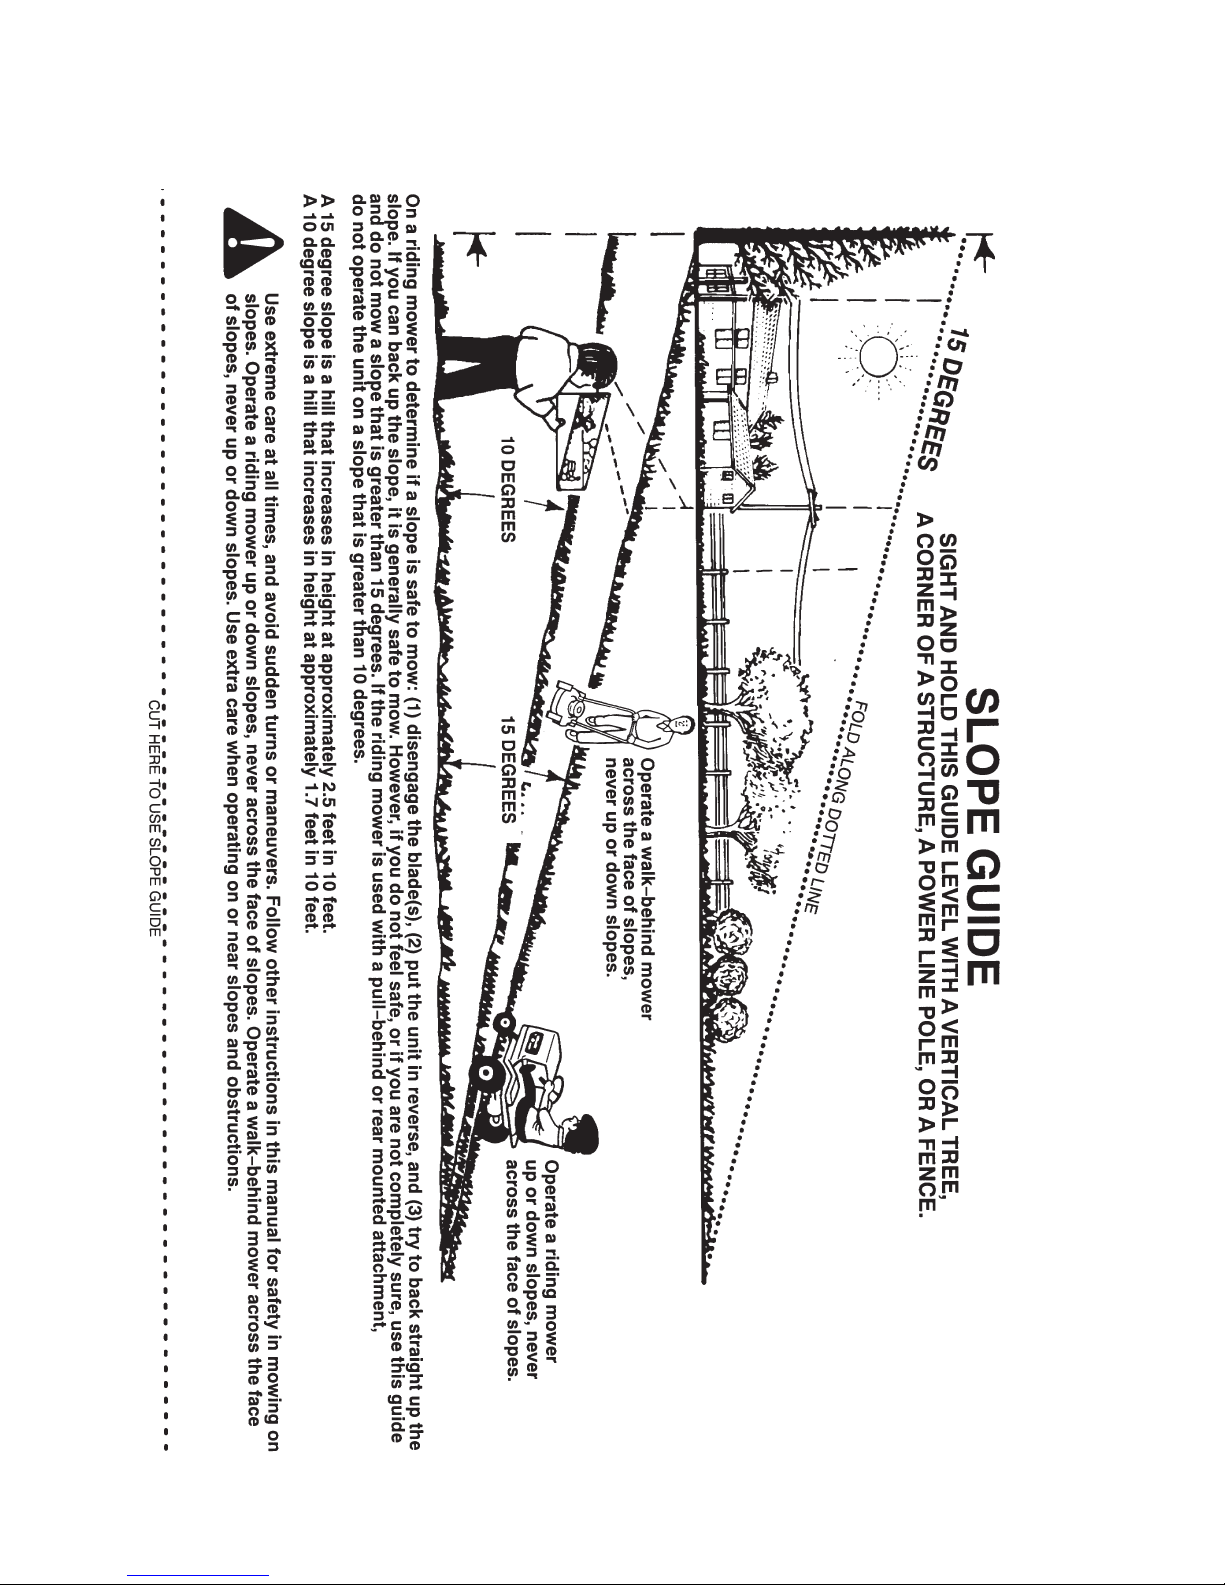
Slope Operation
1. Slopes are a major factor related to slip and fall accidents, which can result in severe injury. All slopes require
extra caution. If you feel uneasy on a slope, DO NOT mow
it.
2. Mow across slopes, never up-and-down. Exercise
extreme CAUTION when changing directions on slopes. DO
NOT mow steep slopes or other areas where stability or
traction is in doubt. Refer to the Slope Guide at the end of
this manual.
3. Use extra care with grass catchers or other attachments;
these affect the handling and the stability of the machine.
Preparation
1. Read, understand, and follow instructions and warnings
in this manual and on the mower, engine and attachments.
Know the controls and the proper use of the mower before
starting.
2. Only mature, responsible persons shall operate the
machine and only after proper instruction.
3. Data indicates that operators age 60 and above, are
involved in a large percentage of mower-related injuries.
These operators should evaluate their ability to operate the
mower safely enough to protect themselves and others
from serious injury.
Preparation
(Continued From Previous Column)
4. Handle fuel with extra care. Fuels are flammable and
vapors are explosive. Use only an approved fuel container.
DO NOT remove fuel cap or add fuel with engine running.
Add fuel outdoors only with engine stopped and cool. Clean
spilled fuel and oil from machine. DO NOT smoke.
5. Check the area to be mowed and remove all objects such
as toys, wire, rocks, limbs and other objects that could
cause injury if thrown by blade or interfere with mowing.
Also note the location of holes, stumps, and other possible
hazards.
6. Keep people and pets out of the mowing area.
Immediately, STOP Blade, Stop engine and Stop mower if
anyone enters the area.
7. Check shields, deflectors, switches, blade controls and
other safety devices frequently for proper operation and
location.
8. Make sure all safety decals are clearly legible. Replace if
damaged.
9. Protect yourself when mowing and wear safety glasses, a
dust mask, long pants, and substantial footwear. DO NOT
mow barefooted or with sandals.
10. Know how to STOP blade and engine quickly in
preparation for emergencies.
11. Use extra care when loading or unloading the machine
into a trailer or truck.
12. Check grass catcher components frequently for signs of
wear or deterioration and replace as needed to prevent
injury from thrown objects going through weak or torn
spots.
Safe Handling of Gasoline
To avoid personal injury or property damage, use extreme
care in handling gasoline. Gasoline is extremely flammable
and the vapors are explosive.
1. Extinguish all cigarettes, cigars, pipes and other sources
of ignition.
2. Use only an approved fuel container.
3. DO NOT remove fuel cap or add fuel with the engine
running. Allow the engine to cool before refueling.
4. DO NOT refuel the machine indoors.
5. DO NOT store the machine or fuel container inside where
there is an open flame, spark or pilot light such as on a
water heater or other appliances.
IMPORTANT OPERATOR SAFETY INSTRUCTIONS
WARNING: This powerful cutting machine is capable of amputating hands and feet and can throw objects
that can cause injury and damage! Failure to comply with the following SAFETY instructions could result in
serious injury or death to the operator or other persons. The owner of the machine must understand these
instructions and must allow only persons who understand these instructions to operate machine. Each
person operating the machine must be of sound mind and body and must not be under the influence of any
substance, which might impair vision, dexterity or judgment. If you have any questions pertaining to your
machine which your dealer cannot answer to your satisfaction, call or write the Customer Service
Department at SNAPPER, McDonough, Georgia 30253. Phone: (1-800-317-7833).
Page 5

3
Operator Safety
! !
Important Operator Safety Instructions (Continued)
Safe Handling of Gasoline
(Continued From Previous Page)
6. DO NOT fill fuel containers inside a vehicle or on a truck
or trailer bed with a plastic liner. Always place the containers on the ground away from the vehicle before filling.
7. Remove gas-powered equipment from the vehicle or
trailer and refuel it on the ground. If this is not possible,
then refuel equipment using a portable container, rather
than a gasoline dispenser nozzle.
8. DO NOT start gas powered equipment in enclosed vehicles or trailers.
9. Keep the nozzle in contact with the rim of the fuel tank or
container opening at all times until fueling is complete. DO
NOT use a nozzle lock-open device
10. If fuel is spilled on clothing, change clothing
immediately.
11. DO NOT overfill a fuel tank. Replace fuel cap and tighten securely.
Operation
1. DO NOT put hands or feet near or under rotating parts.
Keep clear of discharge area while engine is running.
2. STOP engine when crossing gravel drives, walks, or
roads, and under any conditions where thrown objects
might be a hazard.
3. Mow only in daylight or good artificial light.
4. DO NOT operate mower while under the influence of
alcohol or drugs.
5. After striking a foreign object or if mower vibrates
abnormally, STOP the engine, disconnect and secure spark
plug wire. Inspect the mower for any damage and repair
the damage before starting.
6. DO NOT mow near drop offs, ditches or embankments.
Operator could lose footing or balance.
7. STAY ALERT for holes and other hidden hazards. Tall
grass can hide obstacles. Keep away from ditches,
washouts, culverts, fences and protruding objects.
8. DO NOT mow on wet grass. Always be sure of your
footing. Keep a firm hold on the handle and walk, never
run. Slipping could cause injury.
9. ALWAYS stay behind handle when engine (motor) is
running.
10. DO NOT leave the machine with the engine running.
STOP BLADE and STOP ENGINE before leaving the operators position for any reason.
11. Before cleaning, repairing or inspecting make certain
engine, blade and all moving parts have STOPPED.
Disconnect and secure spark plug wire away from plug to
prevent accidental starting.
12. STOP engine and wait until the blade comes to complete STOP before removing grass bag and/or clearing
grass.
Operation
(Continued From Previous Column)
13. DO NOT operate mower without the entire grass catcher, or guards in place discharge guard, rear guard or other
safety devices in place and working. DO NOT point discharge at people, passing cars, windows or doors.
14. DO NOT discharge material against a wall or obstruction. Material may ricochet back towards the operator.
15. Slow down before turning.
16. Watch out for traffic when near or crossing roadways.
17. DO NOT operate engine in enclosed areas. Engine
exhaust gases contain carbon monoxide, a deadly poison.
18. Only use accessories approved by the manufacturer.
See manufacturer’s instructions for proper operation and
installation of accessories.
Maintenance and Storage
1. DO NOT store mower or fuel container inside where
fumes may reach an open flame, spark or pilot light such as
in a water heater, furnace, clothes dryer or other gas appliance. Allow engine to cool before storing machine in an
enclosure. Store fuel container out of reach of children in a
well ventilated, unoccupied building.
2. Keep mower and engine free of grass, leaves or excess
grease to reduce fire hazard and engine overheating.
3. When draining fuel tank, drain fuel into an approved
container outdoors and away from open flame.
4. Keep all bolts, especially blade bolts, nuts and screws
properly tight. Check that all cotter pins are in proper
position.
5. Always provide adequate ventilation when running
engine. Engine exhaust gases contain carbon monoxide, a
deadly poison.
6. Service engine and make adjustments only when engine
is stopped. Removed spark plug wire from spark plug and
secure wire away from spark plug to prevent accidental
starting.
7. DO NOT change engine governor speed settings or
overspeed engine.
8. Check grass bag assembly frequently for wear or
deterioration to avoid thrown objects and exposure to
moving parts. Replace with new bag if loose seams or tears
are evident. Replace slider or bag adapter if broken or
cracked.
9. Mower blades are sharp and can cut. Wrap the blades or
wear heavy leather gloves and use CAUTION when handling
them.
10. DO NOT test for spark by grounding spark plug next to
spark plug hole; spark plug could ignite gas exiting engine.
11. Have machine serviced by an authorized SNAPPER
dealer at least once a year and have the dealer install any
new safety devices.
12. Use only genuine SNAPPER replacement parts to
assure that original standards are maintained.
Page 6
www.snapper.com4
WARNING: Before doing any assembly or
maintenance to the mower, remove the wire
from the spark plug.
NOTE: In this instruction book, left and right describe the
location of a part with the operator standing behind the
handle.
Unpacking
The mower was fully assembled at the factory. When the
mower was put in the carton, the handle was put in the
storage position. To put the handle in the operating position,
follow the steps below.
Handle
1. Remove the mower from the carton.
2. Remove all packing material from the mower and the
handle.
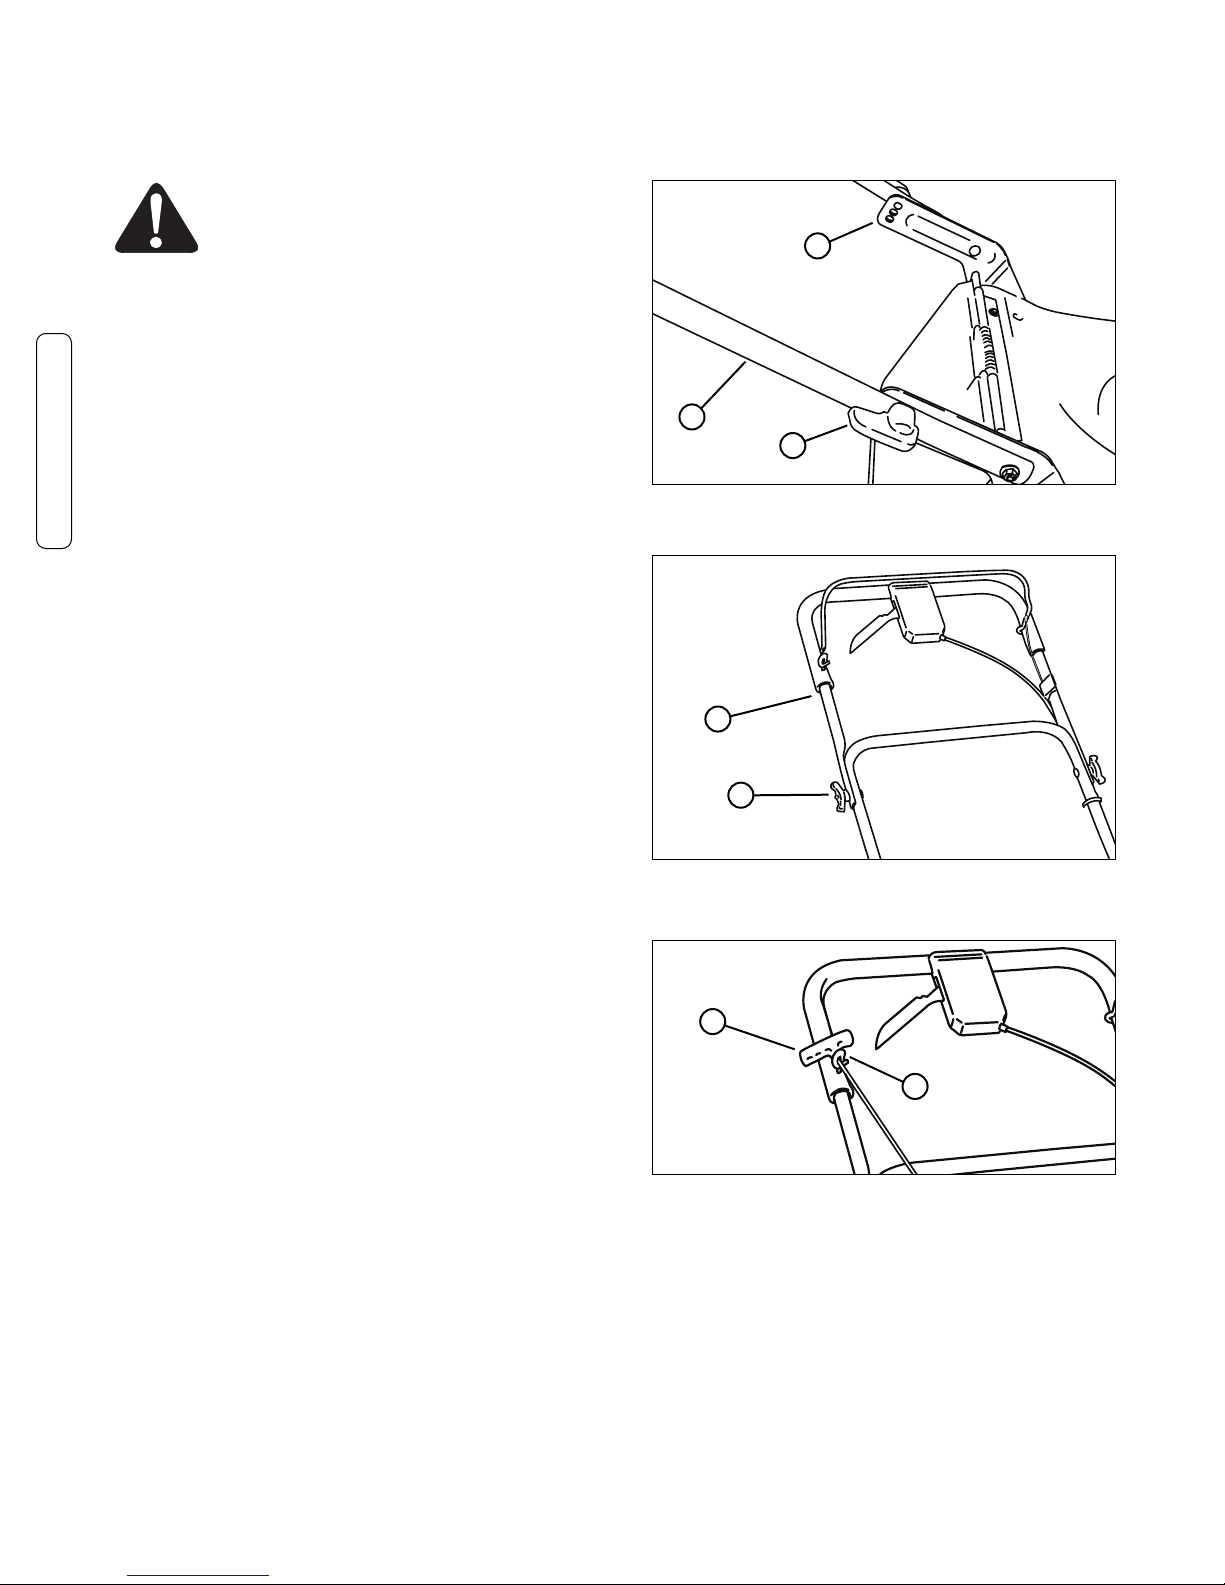
3. Turn the knobs (A, Figure 1) on either side of the lower
handle (B) to retract the locking pins. Raise the lower
handle, aligning it with one of the three sets of holes in
the handle brackets (C). Turn the knobs to release the
locking pins and secure the lower handle.
4. Put the upper handle (A, Figure 2) in the operating
(upright) position. Tighten the wingnuts (B).
NOTE: The height of the handle can be set for operator
comfort. See “Handle Height”.
CAUTION: Be careful when you fold or raise the handle. Do
not damage the cables. A cable that is bent will not work
correctly. Before you use the unit, replace a bent or damaged
cable.
5. Hold the engine stop lever against the handle. (Refer to
section entitled ‘Engine Stop Lever’.) Slowly pull the
recoil-start grip (A, Figure 3). To attach the recoil-start
grip to the rope guide (B), twist the rope through the
rope guide mounted on the right side of the handle.
A
Figure 1: Unfolding the lower handle
Preparation
B
C
Figure 3: Attaching the recoil-start grip
B
A
Figure 2: Unfolding the upper handle
A
Preparation
B
Page 7
5
Handle Height
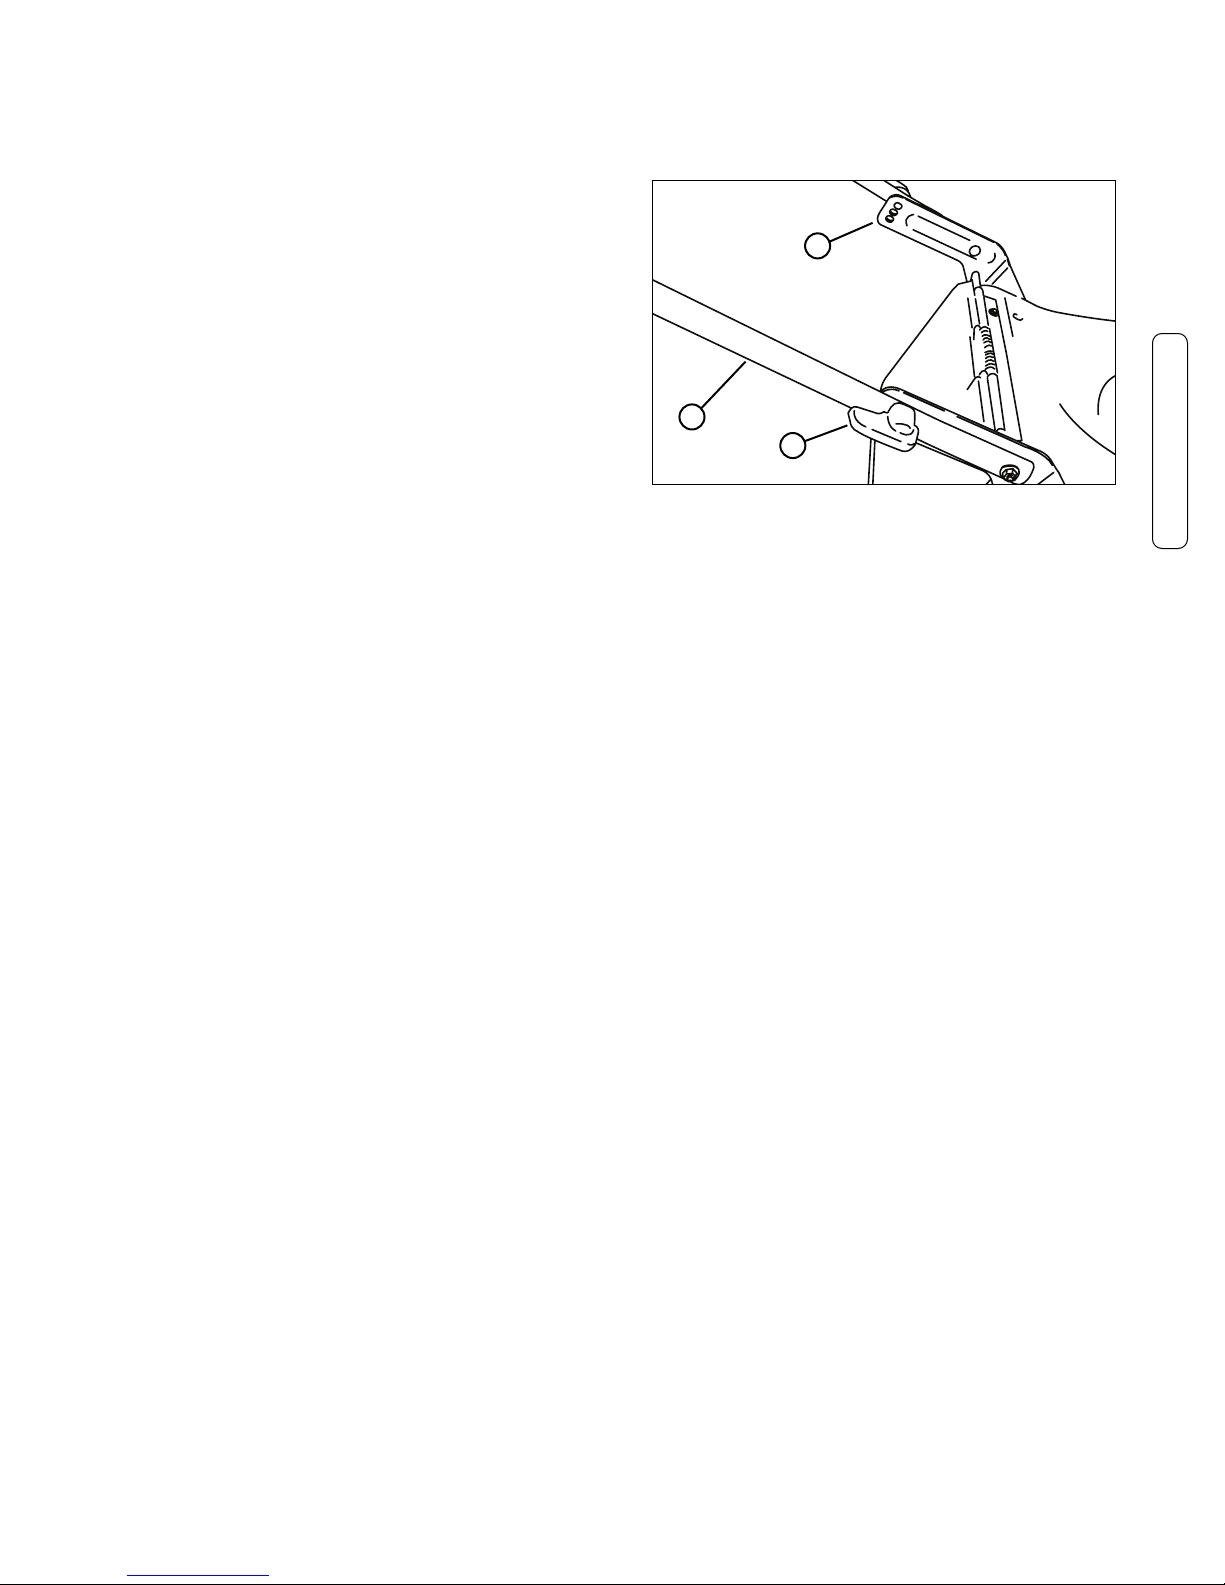
1. Turn the knobs (A, Figure 4) on either side of the lower
handle (B) to retract the locking pins. Align the lower
handle with the desired set of holes in the handle
brackets (C). Turn the knobs to release the locking pins
and secure the lower handle.
Note: Do not remove the lower set of bolts and nuts securing
the lower handle.
Preparation
Preparation (Continued)
A
Figure 4: Adjusting the handle height
B
C
Page 8
www.snapper.com6
Assembling the Grass Bag
Note: On some models, the side mounted discharge deflector
is temporarily attached (for shipping purposes) to the rear of
the mower. Before assembly of the grass bag, remove the
side mounted discharge deflector.
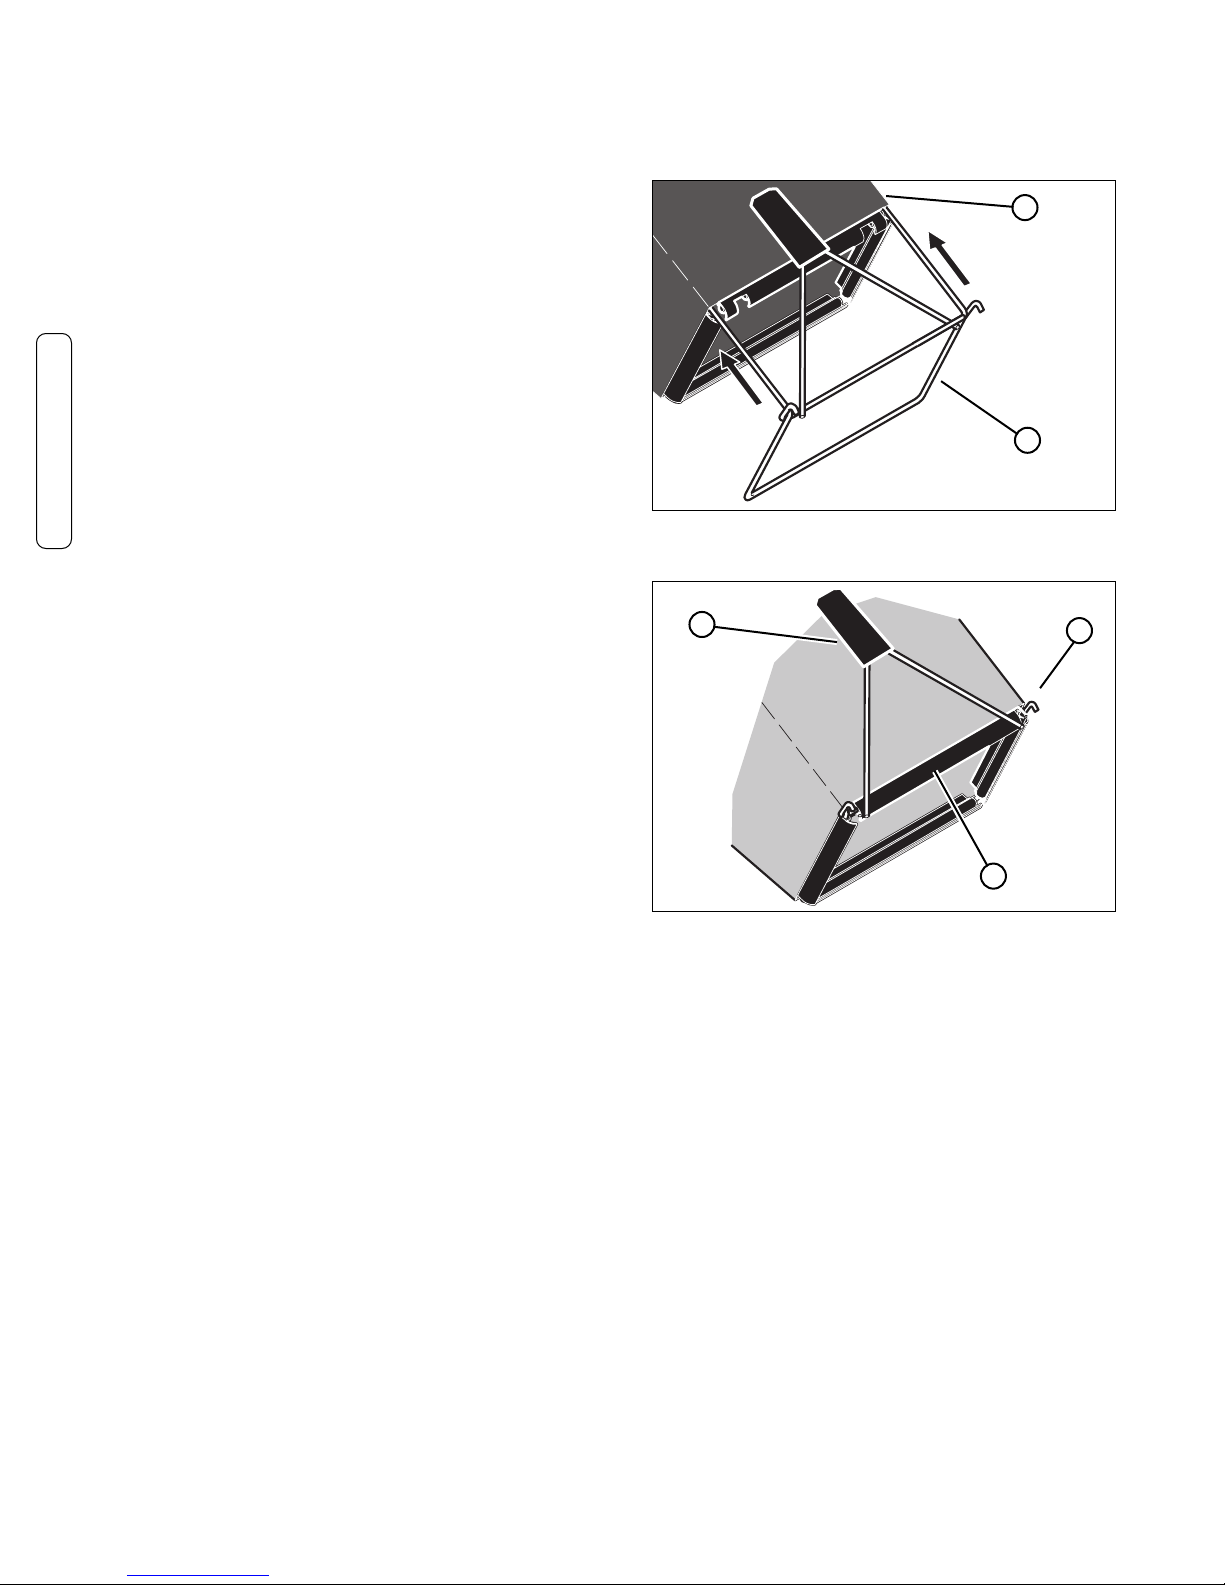
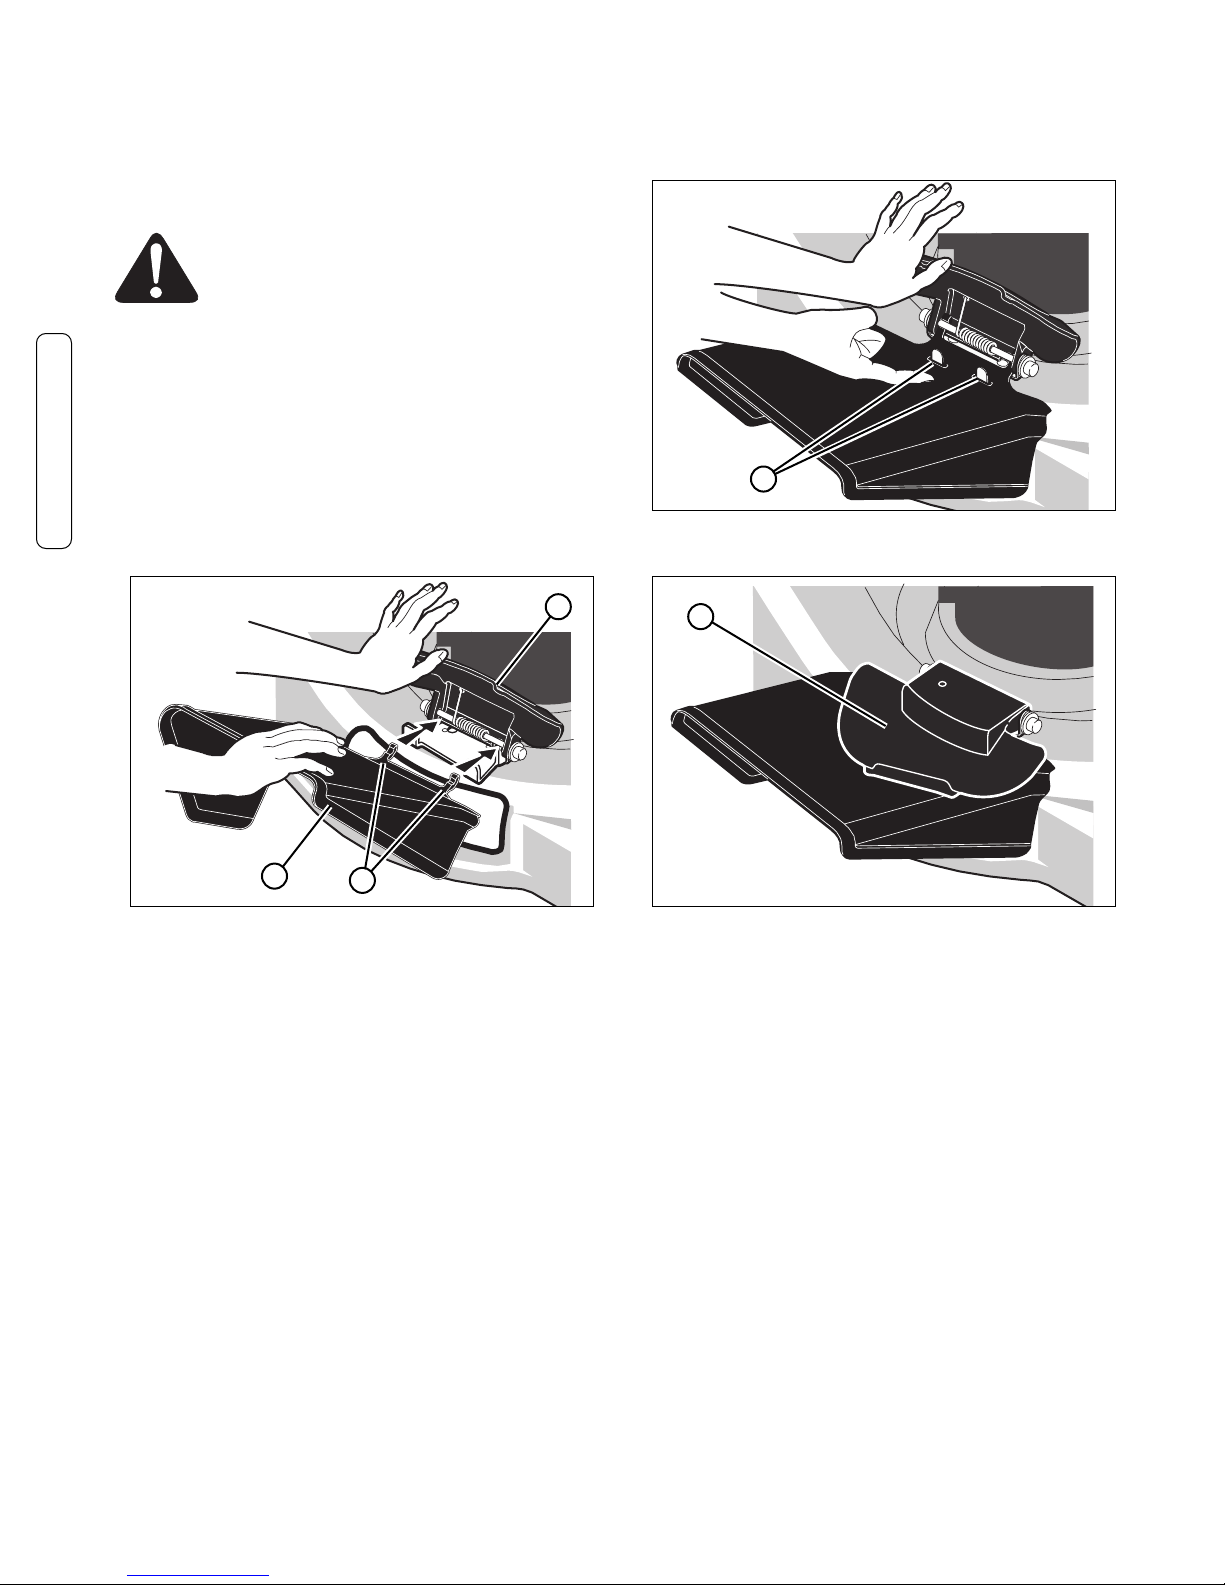
1. Slide the frame assembly (A, Figure 5) into the grass
bag (B).
2. Make sure the handle (A, Figure 6) is on the outside of
the grass bag.
3. First, attach the clips (B, Figure 6) to the side of the
frame assembly (C). Next, attach the clips to the top and
bottom of the frame assembly.
Preparation
B
Figure 5: Installing the frame assembly
A
B
Figure 6: Installing the bag clips
A
C
Preparation (Continued)
Page 9
7
Mounting the Grass Bag
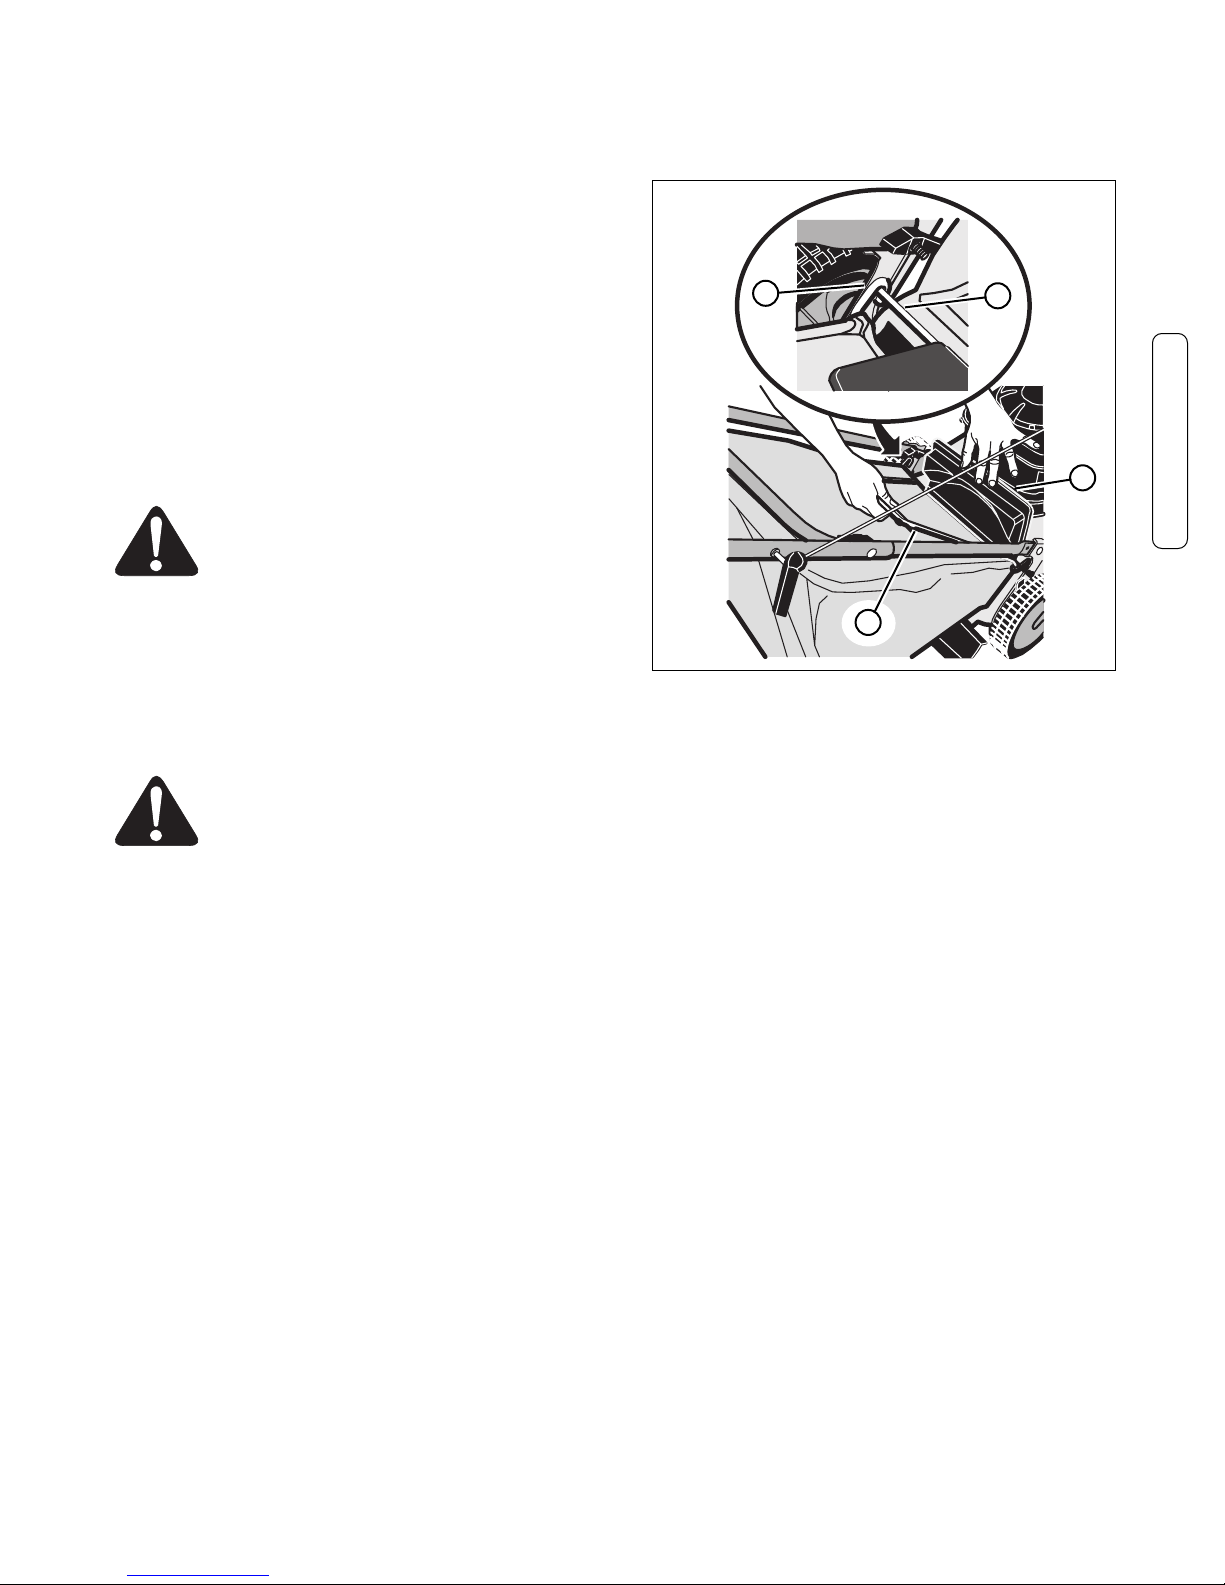
1. To mount the grass bag on the mower, raise the rear
door (A, Figure 7). Holding the grass bag by the handle
(B), mount the hooks (C) on either end of the grass bag
frame assembly onto the rear door pivot rod (D). Lower
the grass bag against the rear of the mower. Lower the
rear door.
Important: Make sure both grass bag hooks are mounted on
the pivot rod.
WARNING: Check the condition of the grass
bag for wear or deterioration. If worn or
damaged, replace the parts only with
approved factory replacement parts.
Emptying the Grass Bag
WARNING: Before you remove the grass bag,
stop the engine. Before you remove any grass
from the mower housing, disconnect the wire
from the spark plug.
1. Raise the rear door to a vertical position.
2. Hold the handle of the grass bag and lift the frame
assembly. Continue to lift the frame assembly until the
hooks are no longer mounted on the pivot rod. Remove
the grass bag.
3. Empty the grass from the grass bag.
4. To mount the grass bag on the mower, see “Mounting
The Grass Bag”.
Preparation
Figure 7: Mounting the grass bag
C
D
A
B
Preparation (Continued)
Page 10
www.snapper.com8
Attaching the Side Mounted Discharge Deflector
WARNING: To prevent the engine from
starting, disconnect the wire from the
spark plug.
For shipping purposes, the side deflector was not installed.
Locate the side deflector and install as follows.
1. Raise the mulcher cover (A, Figure 8).
2. Slide the two tabs (B) on the side deflector (C) under
the pivot pin.
3. Lower the side deflector. Make sure the locking tab (A,
Figure 9) goes through the slot in the side deflector.
4. Lower the mulcher cover (A, Figure 10).
5. Attach the wire to the spark plug.
Preparation
Figure 8: Installing the side discharge deflector
Figure 9: Side discharge deflector locking tabs
Figure 10: Releasing the mulcher cover
A
C
A
B
A
Preparation (Continued)
Page 11

9
Preparing the Engine
ENGINE DOES NOT CONTAIN OIL OR GASOLINE
Using the bottle of oil supplied in the carton, fill the engine
with the proper amount of oil. See the engine manufacturer’s
instructions for the type of gasoline and oil to use. Before
you use the unit, read the information on safety, operation,
maintenance, and storage.
WARNING: Follow the engine manufacturer’s
instructions for the type of gasoline and oil to
use. Always use a safety gasoline container.
Do not smoke when adding gasoline to the
engine. When inside an enclosure, do not
fill with gasoline. Before you add gasoline,
stop the engine. Let the engine cool for
several minutes.
Note: The operation of a new engine will sometimes result in
a slight amount of smoke. This smoke is caused by paint or
oil on or around the muffler. This is normal and only
expected during initial operation.
IMPORTANT: This unit is equipped with an internal
combustion engine and must not be used on or near any
unimproved forest-covered, brush-covered or grass-covered
and unless the engine’s exhaust system is equipped with a
spark arrester meeting applicable local or state laws (if any).
If a spark arrester is used, it must be maintained in effective
working order by the operator.
In the State of California the above is required by law
(Section 4442 of the California Public Resources Code).
Other states may have similar laws. Federal laws apply on
federal lands. See an Authorized Service Center for a spark
arrester for the muffler.
Note: Actual sustained engine power will likely be lower due
to operating limitations and environmental factors.
Preparation
Final Preparation
Before you use the mower, check the assembly of the
wheels, the handle, and the controls. Make sure all the
fasteners are tight. Make sure the throttle control (if
equipped) and the engine stop lever work correctly.
If the mower is equipped with height adjusters, make sure
the height adjusters function properly. Before starting the
engine, make sure each height adjuster is set at the desired
height. See “Adjusting The Height Of Cut” in the Maintenance
sections.
Preparation (Continued)
Mulching Tips
Mulching finely cuts the grass so that the grass can be easily
recycled. Because the nutrients are returned to the soil, the
lawn will need less fertilizer. To correctly mulch the lawn,
follow the tips below.
The grass must be dry. If the grass is wet, it will be
difficult to cut and cause heavy clumps of grass.
The grass must not be too tall. The maximum height to
effectively cut is 4 1/2 inches. Set the height adjusters
so that only the top third of the grass is cut.
If the grass is more than 4 1/2 inches high, two
mowings will be necessary. For the first mowing, set the
height adjusters in the highest position. Then, lower the
height adjusters for the second mowing.
Keep a sharp edge on the blade. A blade that is not
sharp will cause the ends of the grass to become brown.
Clean the underside of the mower housing. Grass and
other debris can keep the mower from working
correctly.
If the quality of cut is marginal, try the following:
Set the height adjusters at a higher cutting height.
Cut the grass more frequently.
Operate the mower at a slower ground speed.
Overlap the cutting swaths instead of cutting a full
swath with each pass.
Mow across the marginal areas a second time.
Page 12

www.snapper.com10
Operation
Engine Stop Lever
Release the engine stop lever (A, Figure 11) and the engine
and the blade will automatically stop. To run the engine, hold
the engine stop lever in the Operating position (B).
Before you start the engine, operate the engine stop lever
several times. Make sure the cable moves easily.
Front Wheel Drive System
(Self-Propelled Units Only)
The mower has a front wheel drive system. Operate the drive
system as follows.
1. Hold the engine stop lever (A, Figure 11) in the
Operating Position (B).
2. Model SP2265FC: Pull the drive lever (A, Figure 12)
completely back. The drive system is now engaged.
Model SPV22675HWFC: Slowly pull the drive lever
back. The drive system is now engaged. To increase
ground speed, slowly pull the drive lever farther back.
To decrease ground speed, slowly release the drive
lever.
3. To disengage the drive system and stop the engine,
completely release the engine stop lever.
4. To disengage only the drive system, release the drive
lever. The drive system will disengage but the engine
will continue to run.
Note: When the drive system is disengaged on a new unit, it
is possible for the front wheels to rotate if lifted off the
ground. This is normal and will stop after one or two hours
of operation.
WARNING: For safe operation, the drive
system must immediately disengage when the
drive lever is released. If the drive system
does not disengage correctly, do not operate
the mower until the drive system is adjusted
or repaired by an authorized service center.
Stopping the Engine
To stop the engine, release the engine stop lever. Disconnect
the wire from the spark plug to prevent the engine from
starting.
If the engine will not stop, hold a screwdriver against the
spark plug and against the engine cooling fins. The spark will
go to ground and the engine will stop. Before you start the
engine, check the engine stop cable. Make sure the engine
stop cable is assembled correctly. Before you operate the
unit, replace a bent or damaged engine stop cable.
Figure 11: Operating the engine stop lever
Figure 12: Operating the front wheel drive system
A
B
A
Operation
Page 13
11
Operation
Starting the Engine
WARNING: The blade will rotate
when the engine runs.
IMPORTANT: Before you start the engine, operate the engine
stop lever several times. Make sure the engine stop cable
moves freely.
Note: The engine design does not include a throttle control
or an engine speed adjustment. The engine is set at the best
speed for cutting grass, bagging grass, and for extended
engine life.
1. Check the oil.
2. Fill the fuel tank with regular unleaded gasoline. Make
sure the gasoline is clean. Leaded gasoline will increase
deposits and shorten the life of the valves.
Note: Do not use gasohol or methanol. Do not use premium
unleaded gasoline.
WARNING: Always use a safety gasoline
container. Do not smoke when adding gasoline
to the fuel tank. When inside an enclosure, do
not add gasoline. Before you add gasoline,
stop the engine and let the engine cool for
several minutes.
3. Make sure the spark plug wire is connected to the spark
plug.
4.
Self-Propelled Models Only
- Make sure the drive lever
is in the disengaged position.
WARNING: To prevent an accident, make sure
the drive lever is in the DISENGAGED position.
When the drive lever is in the ENGAGED
position, do not start the engine.
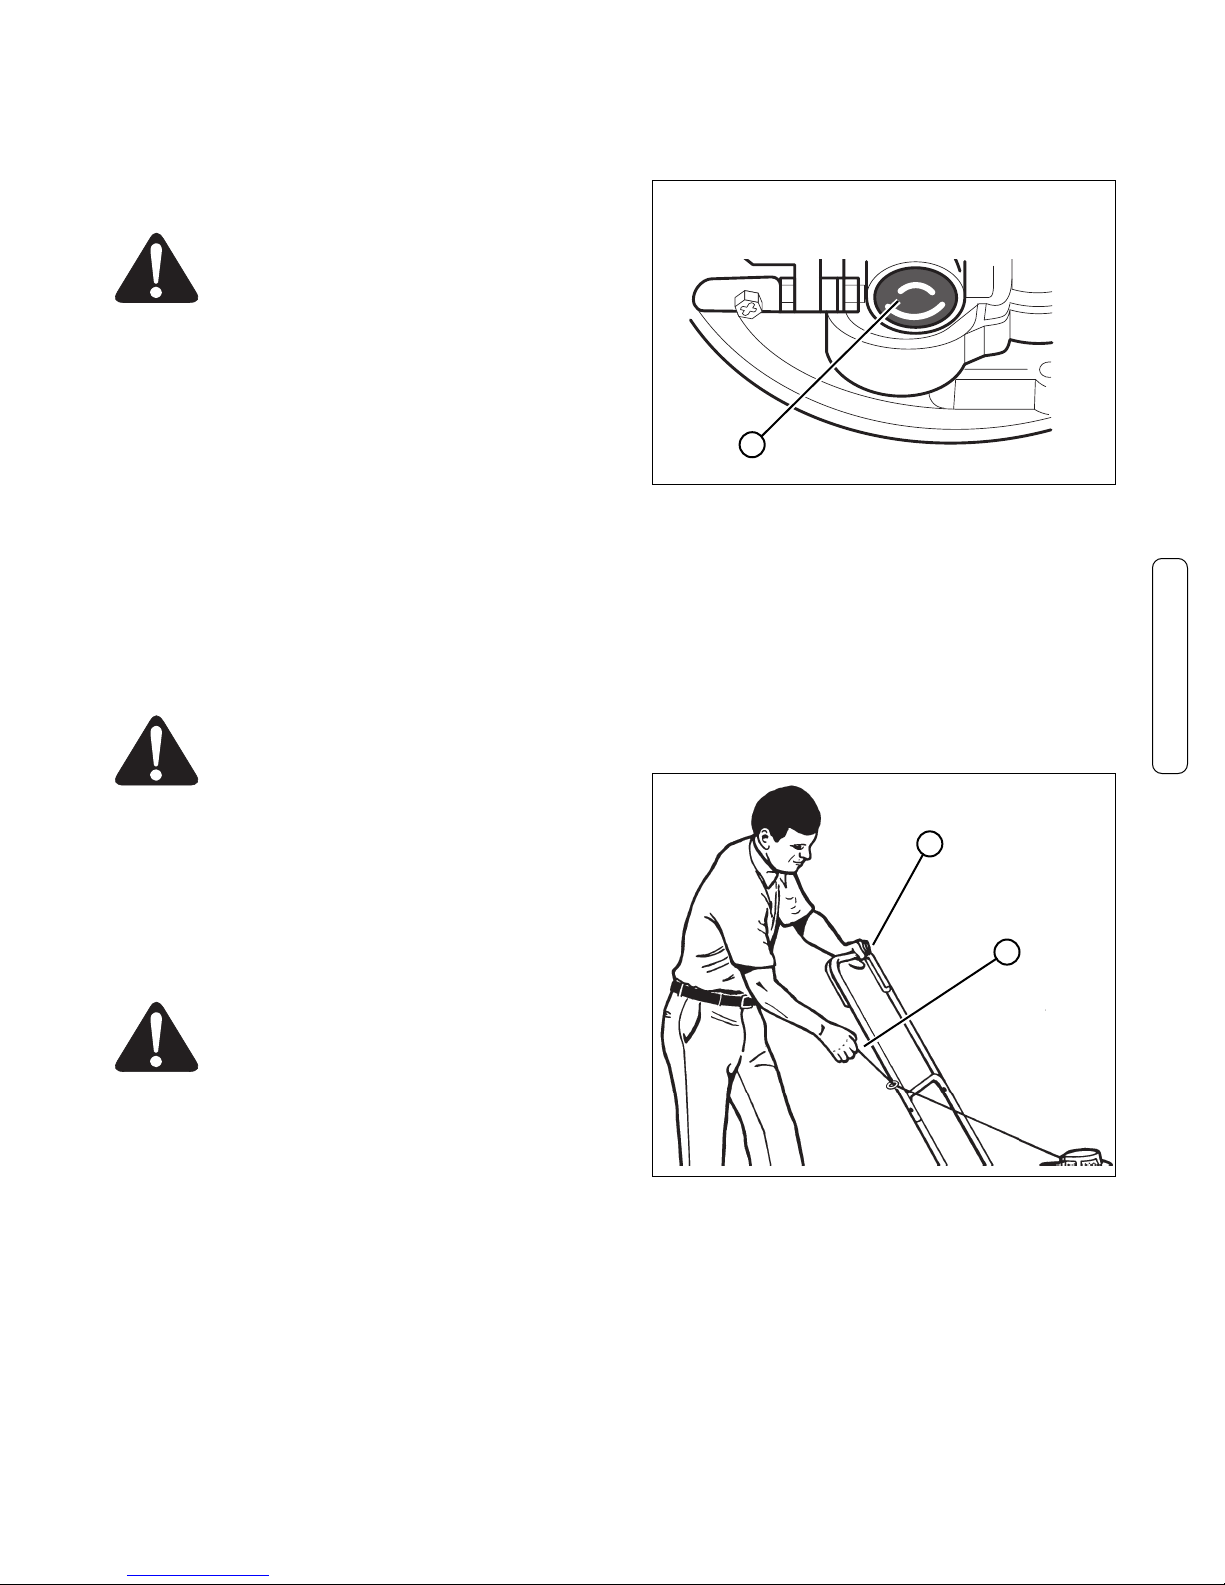
5. The primer button (A, Figure 13) is on the side of the
engine. Push the primer button. Every time you push the
primer button, wait two seconds. For the number of
times required to push the primer button, see the engine
manufacturer’s instructions.
Note: Do not use the primer button to start a warm engine.
Note: Models equipped with Ready Start TMengines do not
feature a primer button. See the engine manufacturer’s
instructions for further information.
6. Stand behind the mower. Use one hand to hold the
engine stop lever in the operating position (A, Figure
14). Use the other hand to hold the recoil-start grip (B).
7. Make sure the recoil-start rope is not obstructed or
caught between the upper and lower handles. Rapidly
pull the recoil-start grip. Slowly return the recoil-start
grip.
8. If the engine does not start in 5 or 6 tries, see the
“Problem and Repair” Instructions.
Rules for Safe and Effective Operation
Refer to the ‘Operator Safety’ section of this manual for
important rules concerning safe and effective mower
operation.
Figure 13: The engine primer button
Figure 14: Starting the engine
A
B
A
Operation (Continued)
Page 14
www.snapper.com12
Maintenance
Engine Maintenance
Use the following maintenance section to keep your unit in
good operating condition. All the maintenance information
for the engine is in the “Engine Instruction Book”. Before you
start the engine, read this book.
WARNING: Before you make an inspection,
adjustment (except carburetor), or repair, stop
the engine and disconnect the wire from the
spark plug.
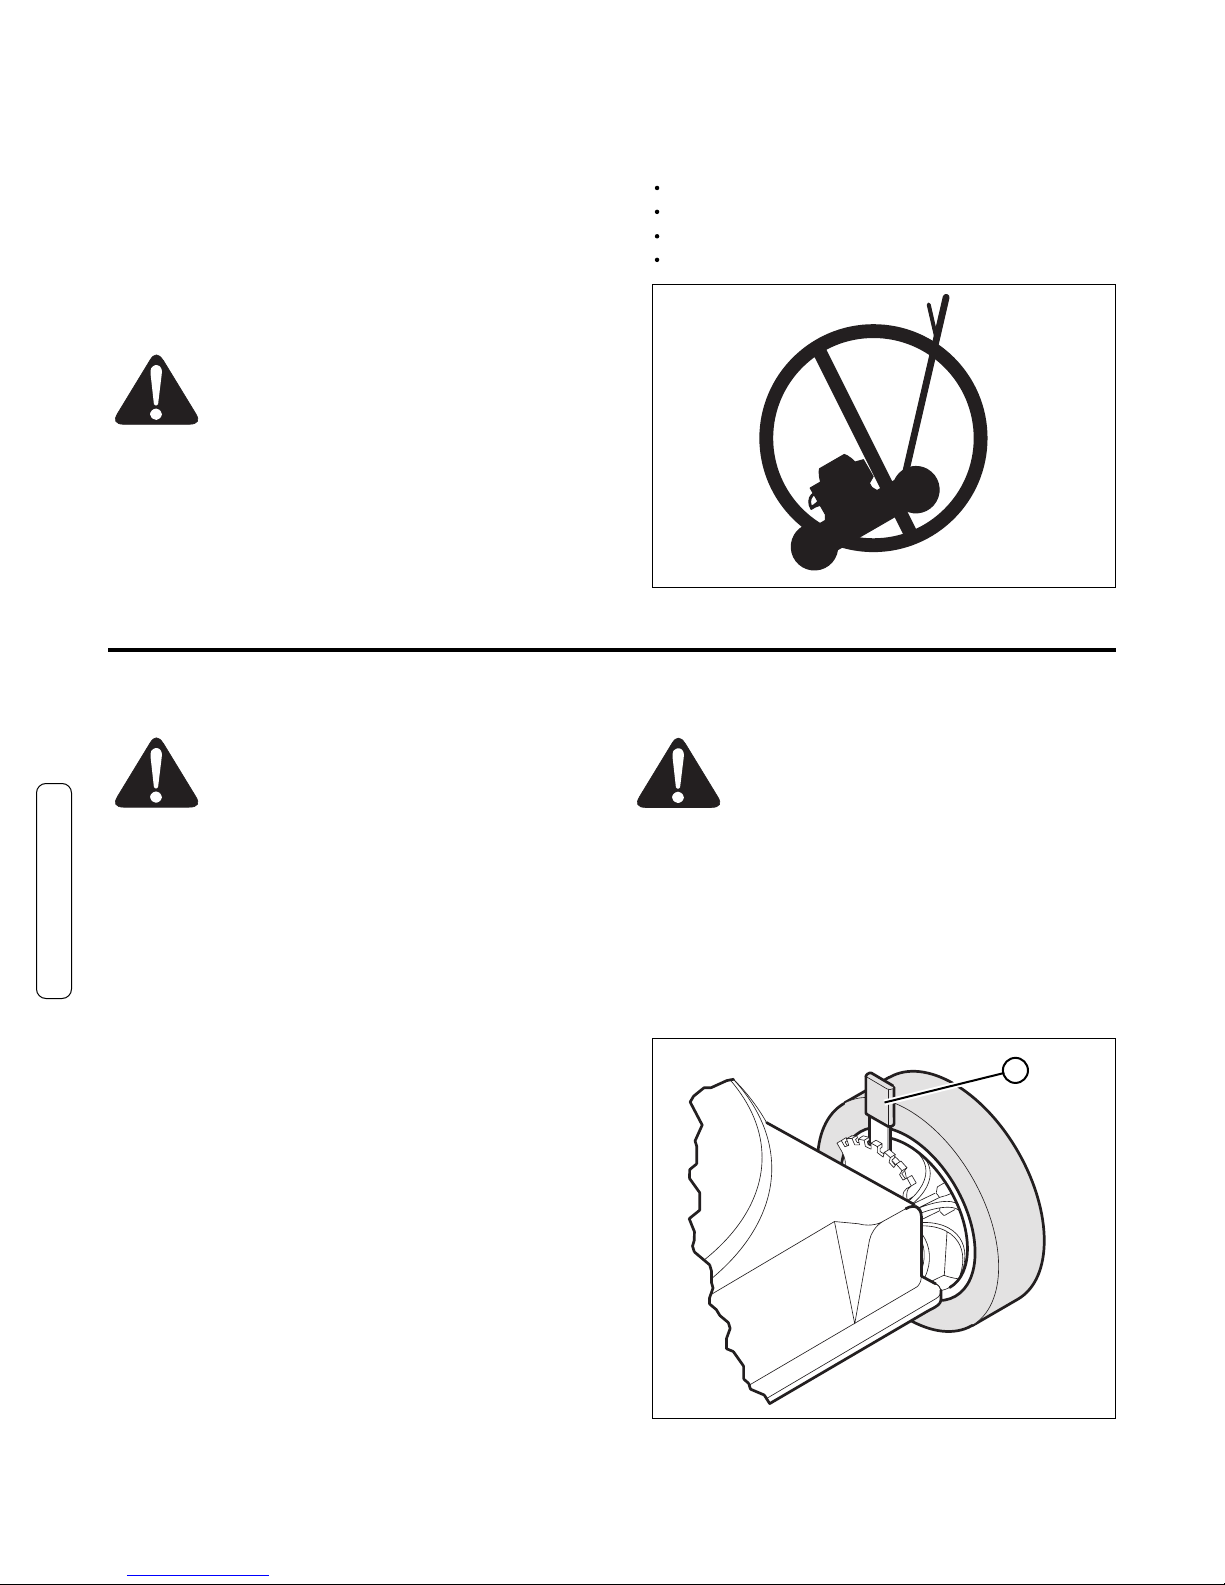
Engine Tipping
When you service the engine, inspect the blade, or clean the
underside of the mower housing; make sure to always tip the
engine with the spark plug up (Figure 15). Transporting or
tipping the engine with the spark plug down will cause:
Hard starting.
Engine smoking.
Spark plug fouling.
Oil or gas saturation of the air filter.
Figure 15: No forward engine tipping
Cleaning the Mower Housing
WARNING: The blade will rotate when the
engine runs. Before you clean the mower
housing, stop the engine and disconnect the
wire from the spark plug.
Grass and other debris can keep the mower from working
correctly. After you mow, clean the mower housing as
follows.
1. Stop the engine.
2. Disconnect the wire from the spark plug.
3. Clean dirt and debris from the top and the bottom of the
mower housing. Clean with soap and water. Wipe off
excess water before storage.
Lubrication
1. For maximum performance, lubricate the wheels and all
pivot points with engine oil every 25 hours.
2. To lubricate the engine, refer to the “Engine Instruction
Book”.
Note: Do not lubricate the engine stop cable. Lubricants will
damage the cable and prevent the cable from moving freely.
Replace the cable if bent or damaged.
Adjusting the Height of Cut
WARNING: The blade will rotate when the
engine runs. Before you change the height of
cut, stop the engine and disconnect the wire
from the spark plug.
To change the height of cut, move the position of the
adjuster arm at each wheel (A, Figure 16). Make sure each
adjuster arm is in the same position so that the mower will
cut level.
1. Disengage the adjuster arm.
2. Move the adjuster arm to another position.
Figure 16: Adjusting the height of cut
A
Maintenance
Page 15
13
Maintenance
Removing the Drive Belt
(Self-Propelled Units Only)
WARNING: Before you remove the belt,
disconnect the wire from the spark plug.
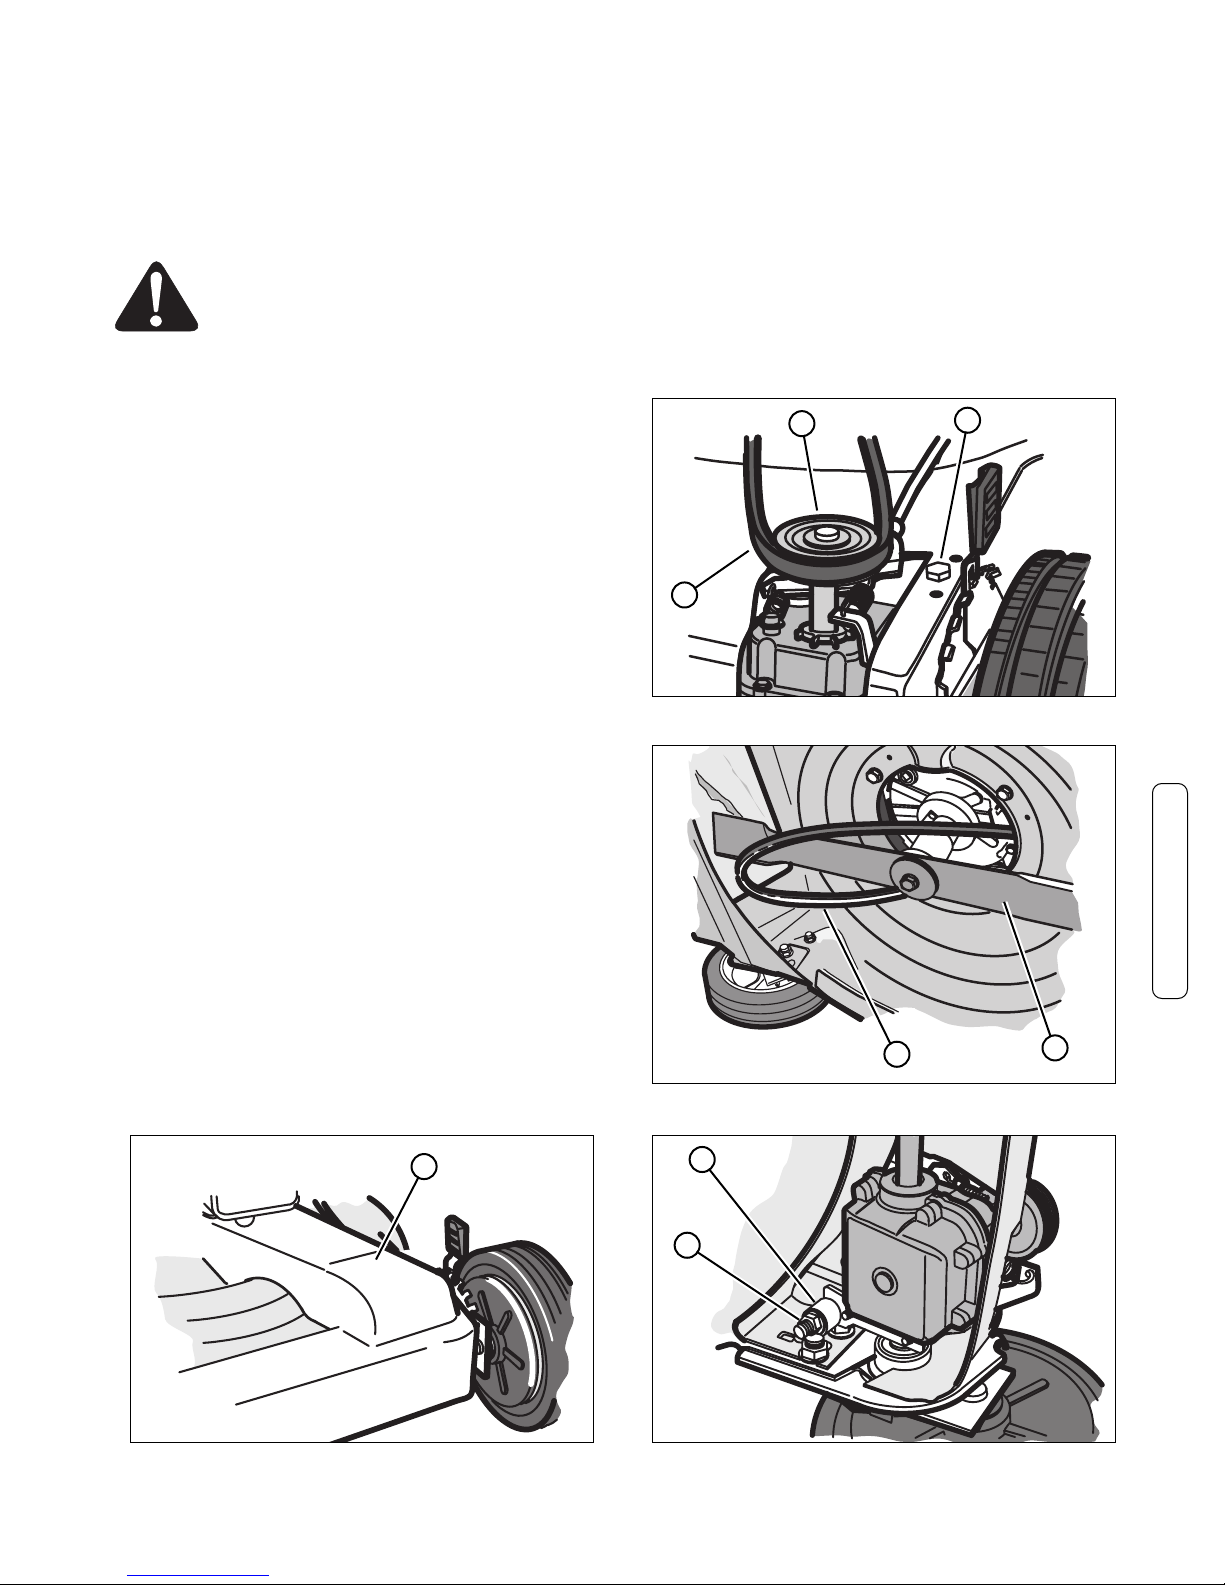
1. Remove the screws that secure the belt cover (A, Figure
17). Remove the belt cover.
Note: The screws that secure the belt cover are located
beneath the deck.
2. To remove the drive belt, tip the mower up. See “Engine
Tipping” in the Maintenance section.
3. (SP2265FC Only): Loosen the belt tension bolt (A,
Figure 18).
Note: Model SPV22675HWFC has a belt guide on the
transmission that must be removed prior to belt removal. Be
sure to replace after belt installation.
4. Remove the front of the drive belt (B) from the transmission pulley (C).
5. To remove the rear of the drive belt (A, Figure 19), slip
the drive belt over the end of the blade (B).
Note: Model SPV22675HWFC has belt guides around the
engine pulley that must be removed prior to belt removal.
Be sure to replace after belt installation.
Note: Make sure you replace the drive belt only with a
replacement belt from the factory.
6. To assemble the drive belt, reverse the above steps.
7. (SP2265FC Only): Set the belt tension.
a. Tighten the adjuster nut (A, Figure 20) until the nut
touches the spacer (B). Try to turn the spacer. When the
adjuster nut touches the spacer, the spacer will not turn.
b. Then, loosen the adjuster nut only enough to allow
the spacer to turn. The tension on the drive belt is now
correct.
8. Install the belt cover.
9. Before you begin to mow, make sure the drive system
will correctly disengage and that the mower will stop. If
the drive system will not disengage, take the mower to
an authorized service center before you operate the
mower.
Figure 18: Loosening the belt tension bolt
B
Figure 19: Removing the belt
A
Figure 20: Setting the belt tension
A
Figure 17: Removing the belt cover
A
B
A
C
B
Maintenance (Continued)
Page 16
www.snapper.com14
Maintenance
Adjusting the Drive Cable
(Self-Propelled Units Only)
WARNING: Before you adjust the drive cable,
release the engine stop lever and wait for the
engine to stop.
If the drive system does not engage and disengage correctly,
check the handle for correct assembly. Make sure that all
parts are in good condition, not broken or bent, and that all
fasteners are tight.
Worn parts and cable stretch will change the performance of
the drive system. When you mow in high or thick grass or
on hills, the drive system can slip. If the drive system is
slipping, adjust as follows or take the mower to an
authorized service center.
IMPORTANT: Before you start the engine, operate the engine
stop lever several times. Make sure the engine stop cable
moves freely.
Note: The engine design does not include a throttle control
or an engine speed adjustment. The engine is set at the best
speed for cutting grass, bagging grass, and for extended
engine life.
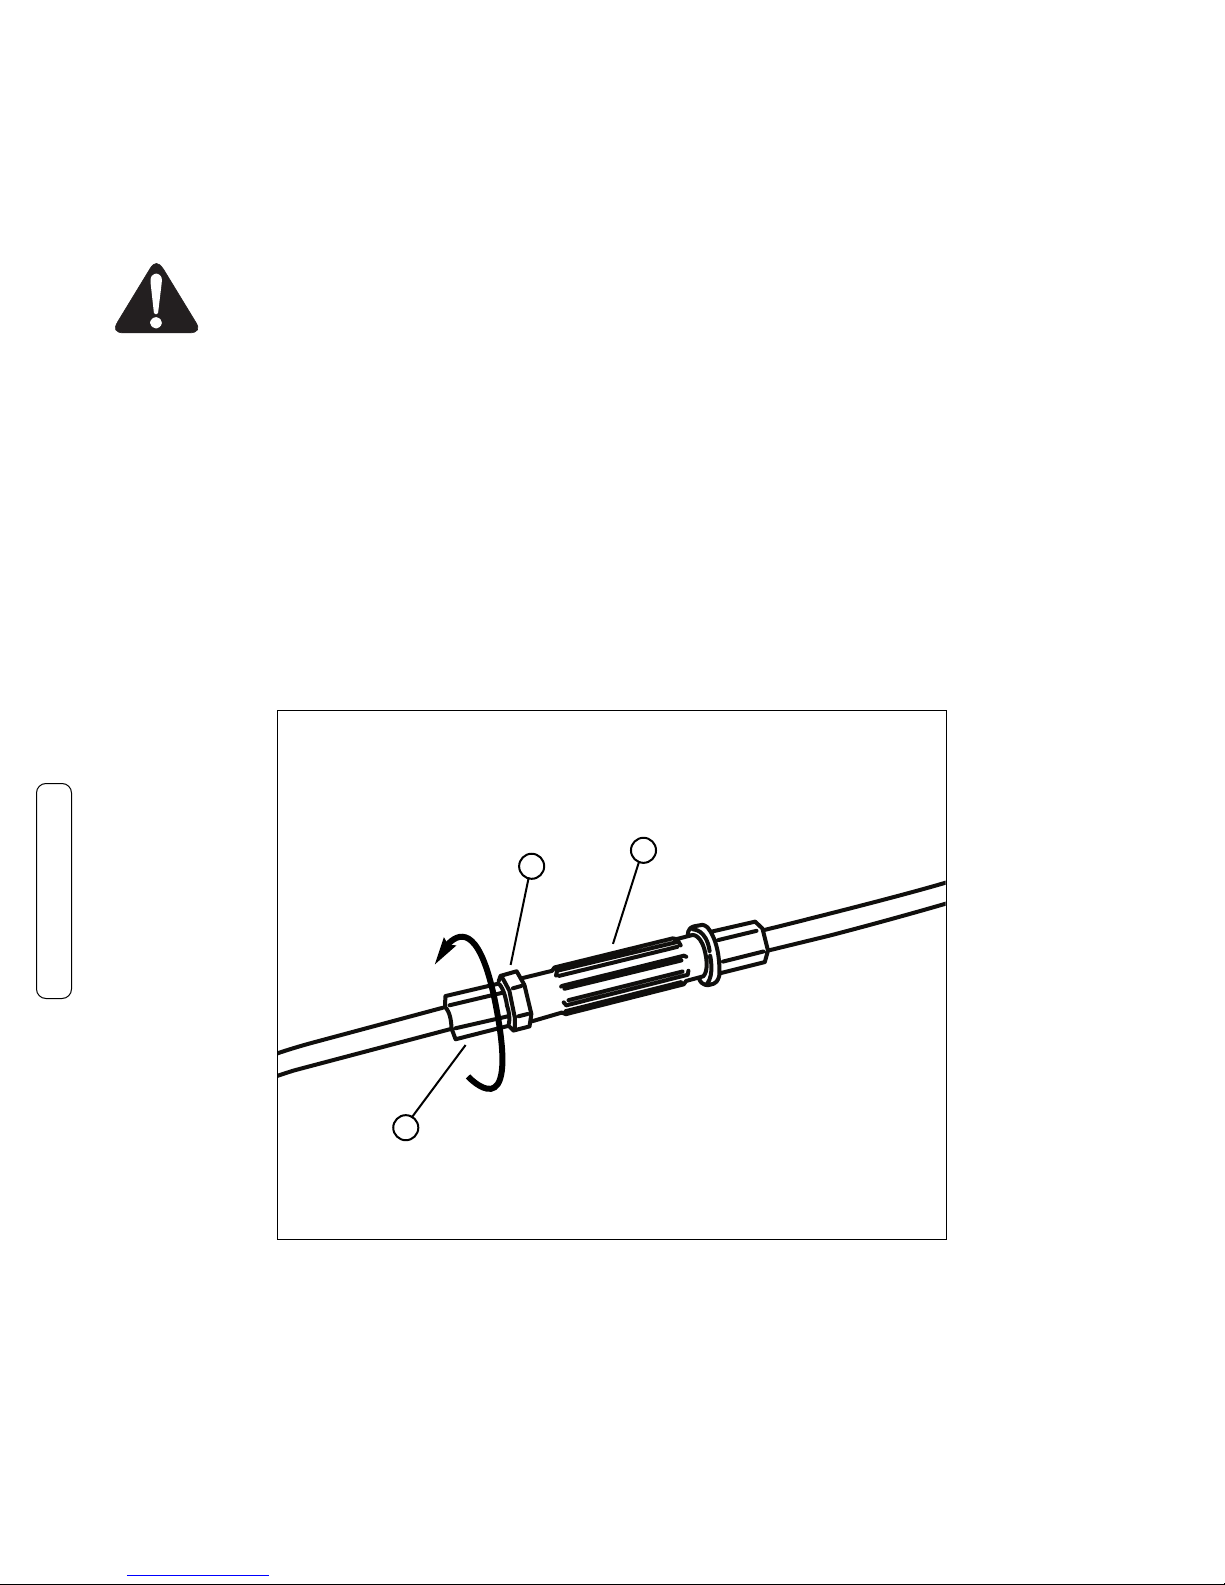
1. If the drive system is slipping, loosen the jam nut (B,
Figure 21) on the adjustment turnbuckle (A), and rotate
the ferrule (C) one-half turn in the direction shown. Test
the drive system and check for slippage.
2. If the drive system still slips, adjust again. Again, test
the drive system.
3. Repeat the adjustment and test until the drive system
does not slip.
4. Before you begin to mow, make sure the drive system
will correctly disengage and that the mower will stop. If
the drive system will not disengage, take the mower to
an authorized service center before you operate the
mower.
Figure 21: Adjusting the drive cable
C
Maintenance (Continued)
A
B
Page 17
15
Maintenance
Blade Service
WARNING: Before you inspect the blade or the
blade adapter, disconnect the wire to the spark
plug. If the blade hits an object, stop the
engine. Disconnect the wire to the spark plug.
Check the unit for damage.
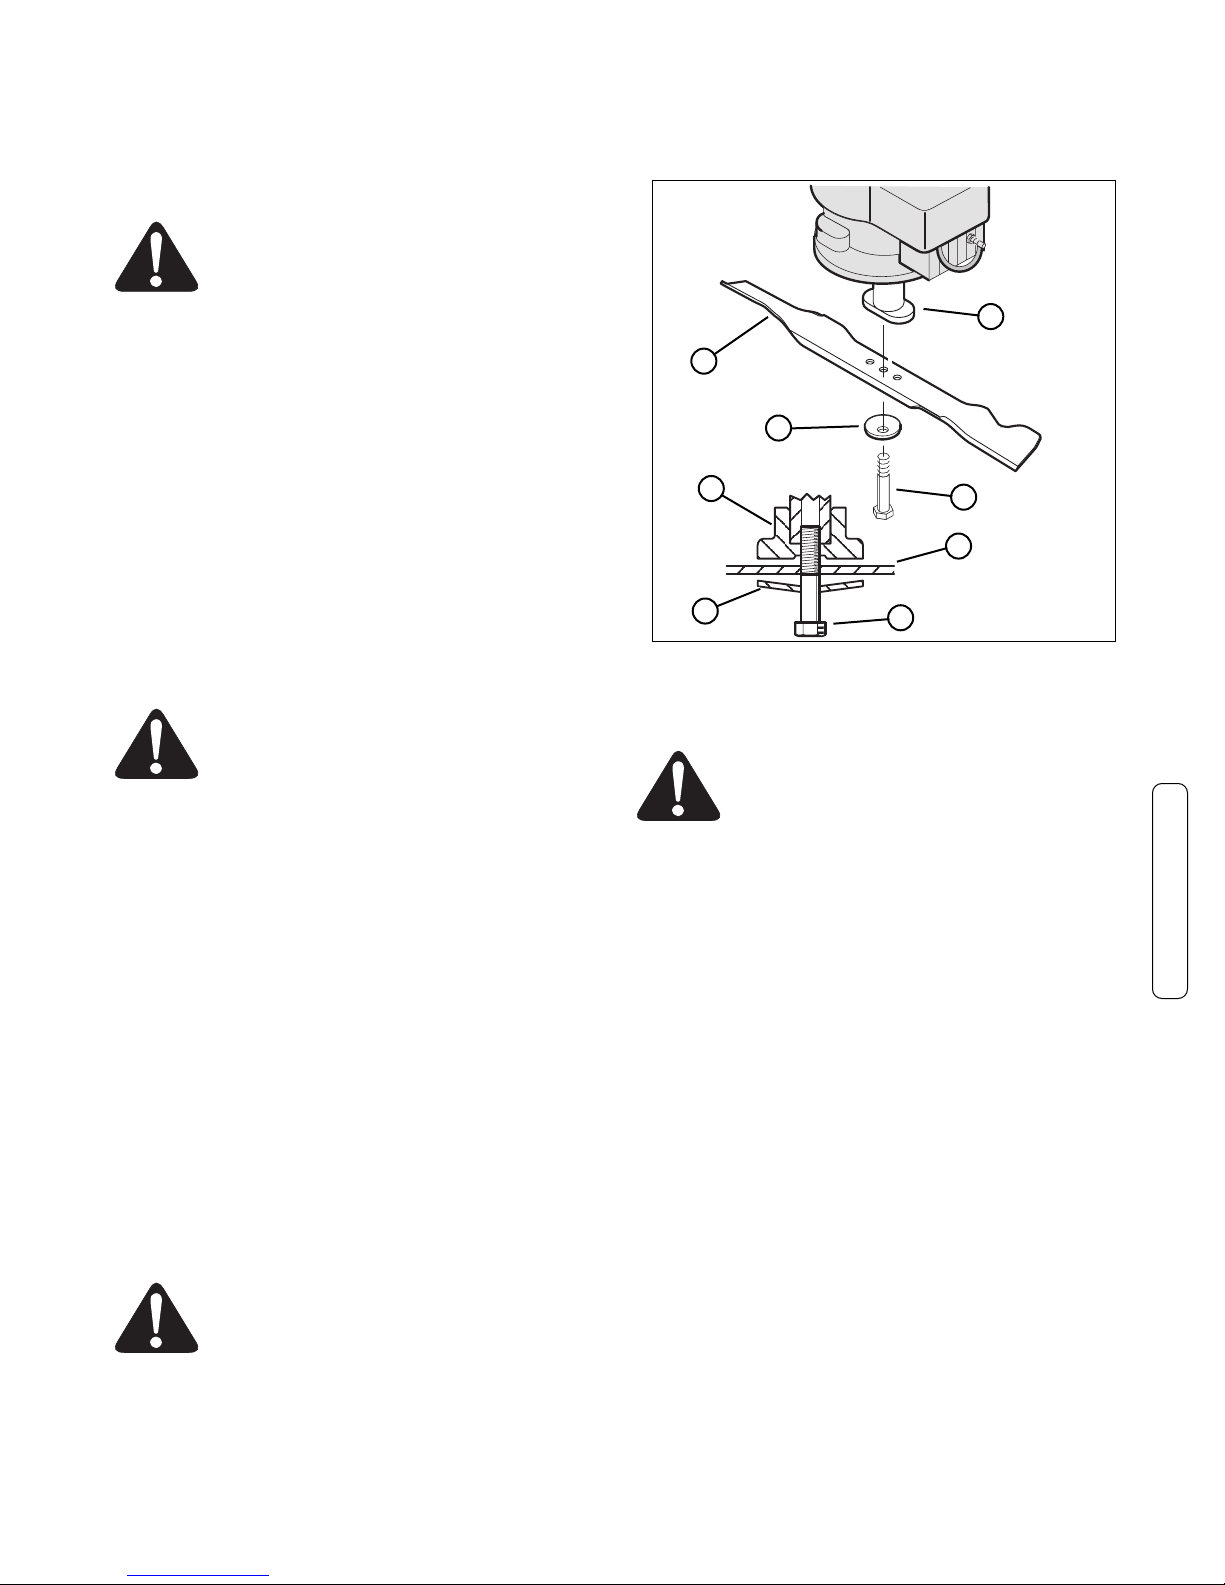
Frequently check the blade for wear or damage such as
cracks. Frequently check the bolt that holds the blade. Keep
the bolt tight. If the blade hits an object, stop the engine.
Disconnect the wire to the spark plug. Check the blade
adapter (A, Figure 22) for damage. Check for a bent or
damaged blade, a badly worn blade, or other damage. Before
you operate the unit, damaged parts must be replaced with
factory replacement parts. For safety, replace the blade every
two years. Keep a sharp edge on the blade. A blade that is
not sharp will cause the ends of the grass to become brown.
Remove the blade as follows.
Removing the Blade
WARNING: Before you remove the blade,
disconnect the wire to the spark plug. The
blade has sharp edges. When you hold the
blade, use gloves or cloth material to protect
your hands.
1. Drain the fuel tank.
2. Lift the side of the mower that has the muffler or spark
plug.
3. Use a piece of wood to keep the blade from rotating.
4. Remove the bolt (B, Figure 22) that holds the blade
with a 9/16” (14mm) wrench.
5. Check the blade (C) according to the “Blade Service”
instructions. Replace a badly worn or damaged blade
with a factory replacement blade.
6. Mount the blade with the curved edges toward the
housing. If the blade is upside down, the blade will not
cut correctly and can cause an accident.
7. Fasten the blade with the original washer (D) and bolt.
Make sure the outside rim of the Belleville washer is
toward the blade.
8. Tighten the bolt that holds the blade to a torque of 30
foot pounds.
WARNING: Always keep the bolt that holds the
blade tight. A loose bolt or blade can cause an
accident.
Sharpening the Blade
WARNING: Vibration is the result if the blade
is not correctly balanced. A blade that is
damaged with cracks can break and cause
an accident.
1. Sharpen the blade two times a year or every 25 hours.
2. If the blade is on the unit, do not sharpen. Remove the
blade according to the instructions in “Removing The
Blade”.
3. Clean the blade with a brush, soap, and water. Check the
blade. Look for cracks, nicks, or other damage. Replace
a blade that is badly worn, bent, or damaged with a
factory replacement blade.
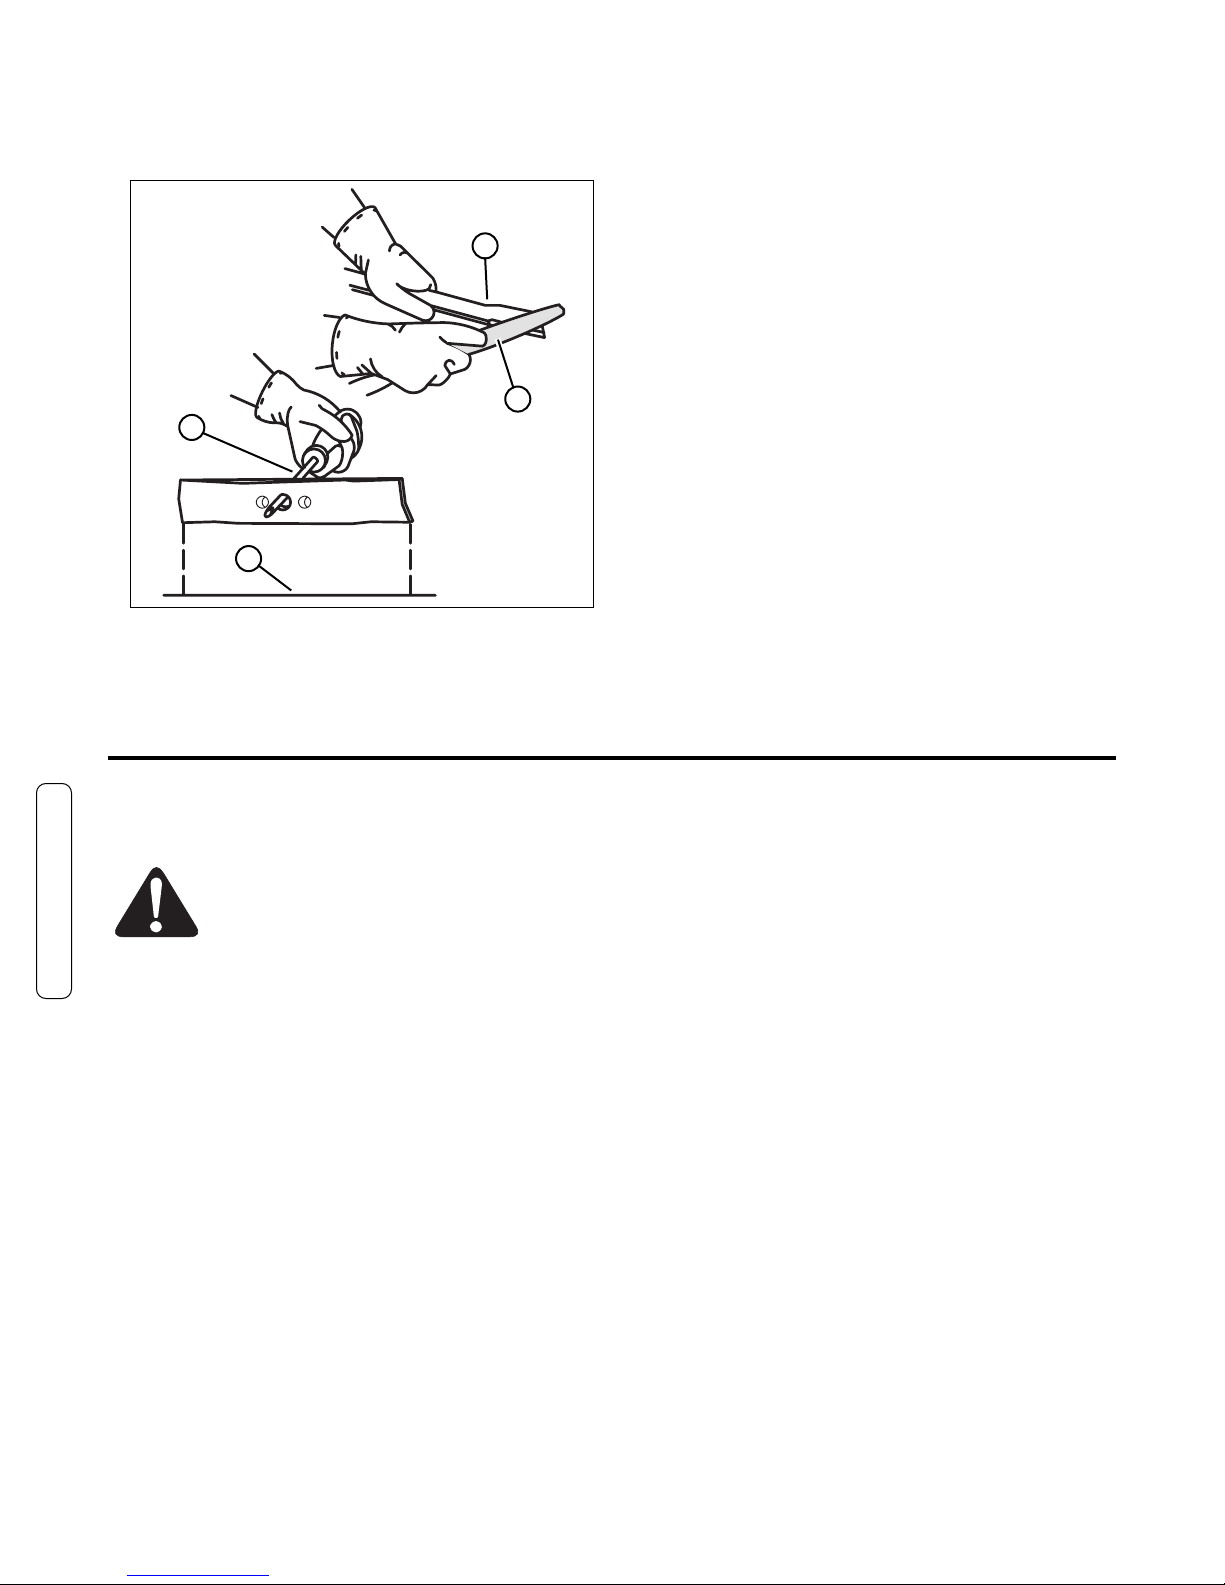
4. Sharpen the blade (A, Figure 23, next page) with a file
(B). Make sure you keep the original beveled cutting
edge.
5. Make sure the blade is balanced. Use a screwdriver (C)
and hold the blade parallel to the ground (D) as shown.
A blade that is balanced will stay parallel to the ground.
If the blade is not balanced, the heavy end will rotate
toward the ground. Sharpen the heavy end until the
blade is balanced.
6. A new blade will cut better than a badly worn blade.
Every two years replace the old blade with a factory
replacement blade.
Checking the Level of Cut
Test the unit in a small area. If the height of cut is not level
or if the cut grass is not discharged, the cause can be: (1)
the blade is bent or damaged, (2) the blade is not sharp, (3)
a worn blade, (4) or a broken blade adapter. Before you use
the unit, correct the problem.
Figure 22: Removing the blade
D
B
D
C
B
C
A
A
Maintenance (Continued)
Page 18
www.snapper.com16
Maintenance
Figure 23: Sharpening the blade
D
C
B
A
Preparing the Mower for Storage
WARNING: Do not remove gasoline while
inside a building, near a fire, or while you
smoke. Gasoline fumes can cause an
explosion or a fire.
1. Drain the fuel tank.
2. Let the engine run until it is out of gasoline.
3. Drain the oil from the warm engine. Fill the engine
crankcase with new oil.
4. Remove the spark plug from the cylinder. Pour one
ounce of oil into the cylinder. Slowly pull the recoil-start
grip so that the oil will protect the cylinder. Install a new
spark plug in the cylinder.
5. Clean the dirt and debris from the cylinder cooling fins
and the engine housing.
6. Clean the bottom of the mower housing.
7. Make sure the grass bag is empty of grass. Grass
remaining in the bag during storage will damage the
bag.
8. Completely clean the mower to protect the paint.
9. Fold the handles (if desired).
CAUTION: Be careful when you fold or raise the handle. Do
not damage the cables. A cable that is bent will not work
correctly. Before you use the unit, replace a bent or damaged
cable.
10. Put the unit in a building that has good ventilation.
Maintenance (Continued)
Page 19

17
Troubleshooting
The engine will not start.
1. Make sure the fuel tank is filled with clean gasoline. Do not use old gasoline.
2. On a cold engine, push the primer button (optional on some models). For the number of times required to push the
primer button, see the engine manufacturer’s instructions.
3. Make sure the wire for the spark plug is connected to the spark plug.
4. Adjust the Carburetor. Refer to the engine manual.
5. There is too much gasoline in the engine cylinder. Remove and dry the spark plug. Pull the recoil-start grip several times.
Install the spark plug. Connect the wire to the spark plug. Start the engine.
6. The engine is difficult to start in heavy or high grass. Move the mower to a clean dry surface.
7. Make sure the engine stop lever is in the operating position.
8. Make sure the fuel valve is in the ON position. Refer to the engine manual.
The engine will not stop.
1. Release the engine stop lever.
2. Check the engine stop cable. Replace the cable if bent or damaged.
Engine performance is bad.
1. Check the height of cut settings. Raise the height of cut if the grass is high.
2. Check the bottom of the blade housing. Clean the blade housing of grass and other debris.
3. Check the wire to the spark plug. Make sure the wire is connected.
4. Clean the engine cooling fins of grass and other debris.
5. Check the carburetor adjustments. Refer to the engine manual.
6. Check the spark plug gap. Set the spark plug gap at 0.030”.
7. Check the amount of oil in the engine. Fill with oil if necessary.
8. Check the engine air cleaner. Refer to the engine manual.
9. The gasoline is bad. Drain and clean the fuel tank. Fill the fuel tank with clean gasoline.
Excessive vibration.
1. Remove the blade. Check the blade and balance if necessary. See the blade maintenance instructions.
2. Check for a bent or broken blade. A damaged blade is dangerous and must be replaced.
3. Check the blade adapter. Replace a broken blade adapter.
4. If the vibration continues, take the mower to an Authorized Service Center.
The grass will not discharge correctly.
1. Clean the bottom of the mower housing.
2. Check for a badly worn blade. Remove and sharpen the blade. For safety, replace the blade every two years with a factory
replacement blade.
The grass is not cut even.
1. Check the height adjustment at each wheel. The height adjustment must be the same for each wheel.
2. Make sure the blade is sharp.
3. Check for a bent or broken blade. A damaged blade is dangerous and must be replaced.
4. Check for a broken blade adapter. Replace a broken blade adapter.
Troubleshooting
Page 20

www.snapper.com18
Warranties
2 YEAR LIMITED WARRANTY
For two (2) years from purchase date for the original purchaser’s residential, non-commercial use, SNAPPER, through any
authorized SNAPPER dealer will replace, free of charge (except for taxes where applicable), any part or parts found upon
examination by the factory at McDonough, Georgia, to be defective in material or workmanship or both.
For ninety (90) days from purchase date for the original purchaser’s commercial, rental, or other non-residential use, SNAPPER, through any authorized SNAPPER dealer will replace, free of charge, any part or parts found upon examination by the
factory at McDonough, Georgia, to be defective in material or workmanship or both.
All transportation costs incurred by the purchaser in submitting material to an authorized SNAPPER dealer for replacement
under this warranty must be paid by the purchaser.
This warranty does not apply to certain transmissions, to engines and their components, and batteries, as these items are warranted separately. This warranty does not apply to parts that have been damaged by accident, alteration, abuse, improper
lubrication, normal wear, or other cause beyond the control of SNAPPER. This warranty does not cover any machine or component part that has been altered or modified changing safety, performance, or durability.
Batteries have a one (1) year warranty period with free replacement if required for one (1) year from the original purchase
date. SNAPPER will not be responsible for any installation cost incurred. The battery warranty only covers original equipment
batteries and does not cover damage to the battery or machine caused by neglect or abuse, destruction by fire, explosion,
freezing, overcharging, improper maintenance, or use of improper electrolyte.
There is no other express warranty.
DISCLAIMER OF WARRANTY
Implied warranties, including those of merchantability and fitness for a particular purpose, are limited to two (2) years
from purchase date for the original purchaser’s residential or other non-commercial use, and ninety (90) days from purchase for the original purchaser’s commercial, rental or other non-residential use, and to the extent permitted by law, any
and all implied warranties are excluded. This is the exclusive remedy. Liabilities for consequential damages, under any
and all warranties are excluded.
Some states do not allow limitations on how long an implied warranty lasts, or do not allow the exclusion or limitation of
incidental or consequential damages, so the above limitation or exclusion may not apply to you.
This warranty gives you specific legal rights, and you may also have other rights which vary from state to state.
WARNING: THE USE OF REPLACEMENT PARTS OTHER THAN GENUINE SNAPPER PARTS MAY IMPAIR THE SAFETY OF
SNAPPER PRODUCTS AND WILL VOID ANY LIABILITY AND WARRANTY BY SNAPPER ASSOCIATED WITH THE USE OF
SUCH PARTS.
IMPORTANT: Please fill out the attached SNAPPER Product Registration Card immediately and mail to:
Snapper’s Product Registration Center, P.O. Box 1379, McDonough, Georgia 30253
Page 21
19
Slope Guide
Page 22

www.snapper.com20
Notes
Page 23

21
Notes
Page 24

www.snapper.com
Engine Power Rating Information: The gross power rating for individual gas engine models is labeled in accordance with SAE
(Society of Automotive Engineers) code J1940 (Small Engine Power & Torque Rating Procedure), and rating performance has
been obtained and corrected in accordance with SAE J1995 (Revision 2002-05). Torque values are derived at 3060 RPM;
horsepower values are derived at 3600 RPM. Actual gross engine power will be lower and is affected by, among other things,
ambient operating conditions and engine-to-engine variability. Given both the wide array of products on which engines are
placed and the variety of environmental issues applicable to operating the equipment, the gas engine will not develop the rated
gross power when used in a given piece of power equipment (actual "on-site" or net horsepower). This difference is due to a
variety of factors including, but not limited to, accessories (air cleaner, exhaust, charging, cooling, carburetor, fuel pump, etc.),
application limitations, ambient operating conditions (temperature, humidity, altitude), and engine-to-engine variability. Due to
manufacturing and capacity limitations, Briggs & Stratton may substitute an engine of higher rated power for this Series
engine.
Common Service Parts Part Number
Blade Control Cable
(All)
7101395
Wheel Drive Cable
(SP2265FC Only)
7101401
Wheel Drive Cable
(SPV22675HWFC Only)
7101396
Cutter Blade
(All)
7100851
Drive Belt
(SP2265FC Only)
7101193
Drive Belt
(SPV22675HWFC Only)
7100913
Product Specifications
S2265FC SP2265FC SPV22675HWFC
Deck Size
(in)
22 22 22
Height of Cut
(in)
1.5 - 3.5 1.5 -3.5 1.5 - 3.5
Transmission Type
(Self-Propelled Units Only)
N/A Single Speed/Gear Variable Speed/Gear
Ground Speed
(mph)
(Self-Propelled Units Only)
N/A 2.3 0 - 4.2
Engine Power
(ft lbs)
6.50 6.50 6.75
Engine Displacement
(cc)
190 190 190
Fuel Tank Capacity
(qt)
1.6 1.6 1.6
22
Snapper Products
535 Macon Street
McDonough, GA 30253
22” WALK BEHIND
MOWERS
1-800-317-7833
Page 25

Consignes de sécurité et mode d’emploi des
REMARQUE : Les caractéristiques sont correctes au moment de l’impression et sont sujettes à modifications sans préavis.
* La puissance continue réelle du moteur est susceptible d’être inférieure en raison de limites d’exploitation et de facteurs environnementaux.
Pour plus de détails, voir « Information sur la puissance nominale du moteur ».
Manual Nº 7101687 (Rev. ‘-’, 4/7/2008)
TP 121-5386---WB-N
TONDEUSE À
GAZON DE 56 cm
Modèles
S2265FC (7800262)
SP2265FC (7800263)
SPV22675HWFC (7800264)
Page 26

Briggs & Stratton Yard Power Products Group
Copyright © 2008, Briggs & Stratton Corporation
Milwaukee, WI, États-Unis. Tous droits réservés.
Merci d’avoir acheté cette tondeuse Snapper de qualité. Nous sommes heureux que vous ayez fait
confiance à la marque Snapper. Lorsqu’elle est utilisée et entretenue conformément aux instructions de
ce manuel, la tondeuse Snapper fournira de nombreuses années de service fiable.
Ce manuel contient des informations de sécurité indiquant les dangers et les risques associés à la
machine et la façon de les éviter. Cette machine est conçue et prévue exclusivement pour la coupe de
finition de pelouses bien établies et n’est destinée à aucun autre emploi. Il est important de lire et de
comprendre ces instructions dans leur intégralité avant de tenter de démarrer ou de faire fonctionner ce
matériel. Conservez ces instructions pour toute consultation ultérieure.
ENREGISTREMENT DU PRODUIT
IMPORTANT : CONSERVEZ CES RENSEIGNEMENTS DANS VOS DOSSIERS PERSONNELS
(Consignez les renseignements suivants concernant l’achat de votre produit Snapper)
Date d’achat______________________________________________________________________
Revendeur_______________________________________________________________________
Numéro de téléphone du revendeur___________________________________________________
Matériel
Numéro de modèle___________________________________________________________
Numéro de série_____________________________________________________________
Moteur
Modèle________________________Type__________________Habillage_______________
Il est très important d’enregistrer l’achat auprès de Snapper pour assurer la couverture par la
garantie. Envoyez l’enregistrement du produit par courrier à :
Snapper - P.O. Box 1379, McDonough, Georgia 30253 - État-Unis.
Vous pouvez communiquer avec nous par notre site Web (www.snapper.com) ou, pour parler à un
représentant du Service après-vente, appelez le Centre de relations avec la clientèle Snapper au
1-800-317-7833. Pour bénéficier d’un service rapide, ayez le Numéro de série et le Numéro de
modèle à disposition.
SNAPPER est une marque de commerce de
Briggs & Stratton Power Products Group, LLC
Jefferson, WI, États-Unis.
Page 27

1
Sécurité de l’opérateur
Préparation Fonctionnement Entretien Dépannage Garanties
Table des matières
Sécurité de l’opérateur . . . . . . . . . . . . . . . . . . . . . . . . . . . . . . . . . . . . . . . . . . .2
Importantes consignes de sécurité de l’opérateur . . . . . . . . . . . . . . . . . . . . . . . . . .2
Préparation . . . . . . . . . . . . . . . . . . . . . . . . . . . . . . . . . . . . . . . . . . . . . . . . . . .4
Déballage . . . . . . . . . . . . . . . . . . . . . . . . . . . . . . . . . . . . . . . . . . . . . . . . . . . . . . . . .4
Guidon . . . . . . . . . . . . . . . . . . . . . . . . . . . . . . . . . . . . . . . . . . . . . . . . . . . . . . . . . . .4
Hauteur du guidon . . . . . . . . . . . . . . . . . . . . . . . . . . . . . . . . . . . . . . . . . . . . . . . . . .5
Sac de ramassage . . . . . . . . . . . . . . . . . . . . . . . . . . . . . . . . . . . . . . . . . . . . . . . . . . .6
Déflecteur d’éjection latérale . . . . . . . . . . . . . . . . . . . . . . . . . . . . . . . . . . . . . . . . . . .8
Conseils de déchiquetage . . . . . . . . . . . . . . . . . . . . . . . . . . . . . . . . . . . . . . . . . . . . .9
Comment préparer le moteur . . . . . . . . . . . . . . . . . . . . . . . . . . . . . . . . . . . . . . . . . .9
Préparation finale . . . . . . . . . . . . . . . . . . . . . . . . . . . . . . . . . . . . . . . . . . . . . . . . . . .9
Fonctionnement . . . . . . . . . . . . . . . . . . . . . . . . . . . . . . . . . . . . . . . . . . . . . . .10
Barre d’arrêt du moteur . . . . . . . . . . . . . . . . . . . . . . . . . . . . . . . . . . . . . . . . . . . . .10
Système d’entraînement des roues avant (modèles autotractés) . . . . . . . . . . . . . .10
Arrêter le moteur . . . . . . . . . . . . . . . . . . . . . . . . . . . . . . . . . . . . . . . . . . . . . . . . . . .10
Démarrer le moteur . . . . . . . . . . . . . . . . . . . . . . . . . . . . . . . . . . . . . . . . . . . . . . . . .11
Règles pour un fonctionnement sûr et efficace . . . . . . . . . . . . . . . . . . . . . . . . . . .11
Entretien . . . . . . . . . . . . . . . . . . . . . . . . . . . . . . . . . . . . . . . . . . . . . . . . . . . .12
Entretien du moteur . . . . . . . . . . . . . . . . . . . . . . . . . . . . . . . . . . . . . . . . . . . . . . . .12
Basculement du moteur . . . . . . . . . . . . . . . . . . . . . . . . . . . . . . . . . . . . . . . . . . . . .12
Nettoyage du carter de tondeuse . . . . . . . . . . . . . . . . . . . . . . . . . . . . . . . . . . . . . .12
Lubrification . . . . . . . . . . . . . . . . . . . . . . . . . . . . . . . . . . . . . . . . . . . . . . . . . . . . . .12
Réglage de la hauteur de coupe . . . . . . . . . . . . . . . . . . . . . . . . . . . . . . . . . . . . . . .12
Dépose de la courroie . . . . . . . . . . . . . . . . . . . . . . . . . . . . . . . . . . . . . . . . . . . . . . .13
Réglage du câble d’avance . . . . . . . . . . . . . . . . . . . . . . . . . . . . . . . . . . . . . . . . . . .14
Entretien de la lame . . . . . . . . . . . . . . . . . . . . . . . . . . . . . . . . . . . . . . . . . . . . . . . .15
Dépose de la lame . . . . . . . . . . . . . . . . . . . . . . . . . . . . . . . . . . . . . . . . . . . . . . .15
Affûtage de la lame . . . . . . . . . . . . . . . . . . . . . . . . . . . . . . . . . . . . . . . . . . . . . .15
Contrôle du niveau de coupe . . . . . . . . . . . . . . . . . . . . . . . . . . . . . . . . . . . . . . .15
Préparation de la tondeuse pour le remisage . . . . . . . . . . . . . . . . . . . . . . . . . . . . .16
Dépannage . . . . . . . . . . . . . . . . . . . . . . . . . . . . . . . . . . . . . . . . . . . . . . . . . .17
Garantie . . . . . . . . . . . . . . . . . . . . . . . . . . . . . . . . . . . . . . . . . . . . . . . . . . . .18
AVERTISSEMENT
Les bornes de batterie, les cosses et autres accessoires associés
contiennent du plomb et des composés de plomb, des
substances chimiques décrétées responsables de cancer,
anomalies congénitales et autres troubles de la reproduction par
l’état de Californie. Se laver le mains après manipulation.
!
!
AVERTISSEMENT
L’échappement du moteur, certains de ses constituants et
certaines parties du véhicule contiennent ou dégagent des
substances chimiques décrétées responsables de cancer et
autres troubles de la reproduction par l’état de Californie.
!
!
Page 28

www.snapper.com2
Sécurité de l’opérateur
! !
Protection des enfants
Des accidents tragiques sont possibles si l’opérateur n’est pas
conscient de la présence d’enfants. Les enfants sont souvents
attirés par la machine et par l’activité de tonte. Ne jamais supposer
que les enfants resteront au dernier endroit où ils ont été vus.
1. GARDER les enfants hors de la zone de tonte et sous la
surveillance attentive d’un adulte responsable autre que
l’opérateur.
2. NE PAS permettre la présence d’enfants dans le jardin lorsque
la machine est utilisée et ARRÊTER la machine si quiconque entre
dans la zone.
3. NE PAS laisser d’enfants pré-adolescents utiliser la machine.
4. PERMETTRE uniquement à des adultes responsables et à des
adolescents à l’esprit mûr sous l’étroite surveillance d’un adulte
d’utiliser la machine.
5. NE PAS tirer la tondeuse en marche arrière, sauf absolue
nécessité. REGARDER vers le bas et derrière soi pour VOIR s’il y a
des enfants, animaux ou autres dangers avant et pendant la
marche arrière.
6. FAIRE PREUVE DE BEAUCOUP DE PRÉCAUTION à
l’approche de coins sans visibilité, buissons, arbres et autres
obstacles à la vue.
Fonctionnement en pente
1. Les pentes sont un facteur fréquemment associé aux
glissements et aux chutes, qui peuvent causer des blessures
graves. Faire preuve de prudence supplémentaire sur toutes les
pentes. Si on n’est pas confortable sur une pente, NE PAS la
tondre.
2. Tondre les pentes latéralement, jamais de haut en bas. Faire
preuve de très grande PRÉCAUTION lors des changements de
direction sur une pente. NE PAS tondre des pentes raides ou
autres surfaces sur lesquelles la stabilité ou l’adhérence sont
doûteuses. Se reporter au Guide de pente à la fin de ce manuel.
3. Faire preuve de beaucoup de précaution avec les bacs de
ramassage et autres accessoires susceptibles d’altérer la
maniabilité et la stabilité de la machine.
Préparation
1. Lire, comprendre et respecter les instructions et les mises en
garde de ce manuel et sur la tondeuse, le moteur et les
accessoires. Veiller à connaître les commandes et la bonne
utilisation de la tondeuse avant de démarrer.
2. Seules des personnes mûres et responsables doivent utiliser la
machine et uniquement après une instruction correcte.
3. Les statistiques indiquent que les opérateurs de 60 ans ou plus
sont impliqués dans une importante proportion des blessures
associées aux outils à moteur. Ces utilisateurs doivent évaluer leur
capacité à faire fonctionner la tondeuse de manière suffisamment
sûre pour se protéger et protéger autrui de toute blessure grave.
Préparation
(suite de la colonne précédente)
4. Manipuler l’essence avec précaution. L’essence est inflammable
et ses vapeurs sont explosives. Utiliser uniquement un bidon
d’essence homologué. NE PAS enlever le bouchon d’essence ni
ajouter d’essence avec le moteur en marche. Faire le plein à
l’extérieur uniquement, avec le moteur arrêté et froid. Nettoyer
l’essence et l’huile renversés sur la machine. NE PAS fumer.
5. Contrôler la zone à tondre et enlever tous les objets tels que
jouets, câbles, pierres, branches et autres objets susceptibles de
causer des blessures en cas d’éjection par la lame ou de faire
obstacle à la tonte. Noter aussi l’emplacement des trous, souches
et autres dangers possibles.
6. Tenir les personnes et animaux hors de la zone à tondre.
ARRÊTER la lame, couper le moteur et arrêter la tondeuse
immédiatement si quiconque entre dans la zone.
7. Contrôler fréquemment le bon fonctionnement et l’emplacement
des écrans, déflecteurs, commutateurs, commandes de lame et
autres dispositifs de sécurité.
8. Vérifier que tous les autocollants de sécurité sont bien lisibles.
Les changer s’ils sont endommagés.
9. Se protéger durant la tonte et porter des lunettes de sécurité,
un masque à poussière, un pantalon long et des chaussures
solides. NE PA tondre pieds nus ou en sandales.
10. Savoir comment ARRÊTER la lame et le moteur rapidement en
cas d’urgence.
11. Faire preuve de beaucoup de précaution pour charger ou
décharger la machine sur une remorque ou un camion.
12. Vérifier fréquemment l’absence d’usure et de détérioration des
pièces du sac de ramassage et les changer le cas échéant pour
éviter les blessures par projection d’objets à travers les parois
usées ou déchirées.
Manipulation sans danger de l’essence
Pour éviter toute blessure corporelle ou tout dommage matériel,
faire preuve d’extrême prudence lors de la manipulation d’essence.
L’essence est extrêmement inflammable et les vapeurs sont
explosives.
1. Éteindre les cigarettes, cigares, pipes et autres sources
d’inflammation.
2. Utiliser uniquement un bidon d’essence homologué.
3. NE PAS enlever le bouchon d’essence ni ajouter d’essence avec
le moteur en marche. Laisser le moteur refroidir avant de faire le
plein.
4. NE PAS refaire le plein d’essence à l’intérieur.
5. NE PAS remiser la machine ou le bidon d’essence en présence
d’une flamme nue, d’étincelles ou d’une veilleuse, telle que dans
un chauffe-eau ou autre appareil.
IMPORTANTES CONSIGNES DE SÉCURITÉ DE L’OPÉRATEUR
AVERTISSEMENT : Cette puissante machine de coupe est capable d’amputer les mains et les pieds et peut projeter des
objets susceptibles de causer des blessures et des dégâts ! Veiller à respecter les consignes de SÉCURITÉ sous peine
de blessures graves ou de mort de l’opérateur et autres personnes. Le propriétaire de la machine doit comprendre ces
instructions et doit autoriser uniquement les personnes qui comprennent ces instructions à utiliser la machine. Toute
personne qui utilise la machine doit être saine d’esprit et de corps et ne doit être sous l’emprise d’aucune substance
susceptible d’altérer la vue, la dextérité ou le jugement. Pour toute question concernant la machine et pour laquelle le
concessionnaire n’a pas de réponse satisfaisante, appeler ou écrire au Service après-vente : Customer Service
Department, SNAPPER, McDonough, Georgia 30253. Téléphone : (1-800-317-7833).
Page 29

3
Sécurité de l’opérateur
! !
Importantes consignes de sécurité de l’opérateur (suite)
Manipulation sans danger de l’essence
(suite de la page précédente)
6. NE PAS remplir les bidons d’essence à l’intérieur d’un véhicule
ou sur un camion ou un plateau de camion recouvert de plastique.
Toujours placer les bidons sur le sol à l’écart du véhicule avant de
les remplir.
7. Décharger la machine à essence du camion ou de la remorque
et faire le plein sur le sol. Si ce n’est pas possible, faire le plein
avec un bidon portable plutôt qu’avec le pistolet de pompe à
essence.
8. NE PAS démarrer une machine à essence dans un véhicule ou
une remorque fermés.
9. Garder en permanence le pistolet au contact du rebord de
l’ouverture du réservoir ou du bidon d’essence jusqu’à la fin du
plein. NE PAS utiliser le loquet d’ouverture du pistolet.
10. En cas d’éclaboussures d’essence sur les vêtements, en
changer immédiatement.
11. NE PAS trop remplir le réservoir. Remettre le bouchon
d’essence en place et bien serrer.
Fonctionnement
1. NE PAS placer les mains ou les pieds près ou sous des pièces
en rotation. Rester à l’écart de la zone d’éjection pendant la
marche du moteur.
2. ARRÊTER le moteur pour traverser des allées, chemins ou
routes de gravier ou chaque fois qu’il y a un danger de projection
d’objets.
3. Tondre uniquement durant la journée ou sous une bonne
lumière artificielle.
4. NE PAS utiliser la tondeuse alors qu’on est sous l’emprise de
l’alcool ou de drogues.
5. Après avoir heurté un objet étranger ou si la tondeuse vibre
anormalement, ARRÊTER le moteur puis débrancher et attacher le
câble de bougie. Contrôler l’état de la tondeuse et réparer tout
dommage avant de la démarrer.
6. NE PAS tondre à proximités d’à-pics, fossés ou talus afin de ne
pas perdre pied ou l’équilibre.
7. PRENDRE GARDE aux trous et autres dangers dissimulés.
L’herbe haute peut cacher des obstacles. Rester à l’écart de
fossés, avaloirs, ponceaux, clôtures et autres objets en saillie.
8. NE PAS tondre de l’herbe mouillée. Veiller à toujours avoir le
pied ferme. Tenir fermement le guidon et marcher, ne pas courir.
Un dérapage peut causer des blessures.
9. TOUJOURS rester derrière le guidon lorsque le moteur est en
marche.
10. NE PAS quitter la machine avec le moteur en marche.
ARRÊTER LA LAME et COUPER LE MOTEUR avant de quitter la
position de conduite, quelle qu’en soit la raison.
11. Avant de nettoyer, réparer ou contrôler la tondeuse, s’assurer
que le moteur, la lame et toutes les pièces mobiles sont
ARRÊTÉES. Débrancher et attacher le câble de bougie à l’écart
pour empêcher tout démarrage accidentel.
12. COUPER le moteur et attendre l’ARRÊT complet de la lame
avant d’enlever le sac de ramassage ou de dégager l’herbe.
13. NE PAS utiliser la tondeuse sans le sac de ramassage
complet, ni sans la protection d’éjection, la protection arrière ou
autres dispositifs de sécurité en place et en bon état de marche.
NE PAS diriger l’éjection vers des personnes, voitures, fenêtres ou
portes.
Fonctionnement
(suite de la colonne précédente)
14. NE PAS éjecter de matières contre un mur ou autre obstacle.
Ces matières peuvent rebondir vers l’opérateur.
15. Ralentir avant de tourner.
16. Prendre garde à la circulation à proximité ou pour traverser
une chaussée.
17. NE PAS faire fonctionner le moteur dans un espace fermé. Les
gaz d’échappement contiennent du monoxyde de carbone, un
poison mortel.
18. Utiliser exclusivement des accessoires homologués par le
fabricant. Pour la pose et l’utilisation des accessoires, voir les
instructions du fabricant.
Entretien et remisage
1. NE PAS remiser la tondeuse ou le bidon de d’essence dans un
endroit où les vapeurs peuvent atteindre une flamme nue, une
étincelle ou une veilleuse, telle que celle d’un chauffe-eau, d’une
chaudière, d’un sèche-linge ou autre appareil à gaz. Laisser le
moteur refroidir avant de remiser la machine dans un espace
fermé. Remises le bidon d’essence hors de portée des enfants
dans un bâtiment inoccupé et bien aéré.
2. Garder la tondeuse et le moteur exempts d’herbe, de feuilles et
d’excès de graisse afin de réduire les risques de feu et de
surchauffe du moteur.
3. Lors de la vidange du réservoir d’essence, vider l’essence dans
un récipient homologué, à l’extérieur et et à l’écart de flammes
nues.
4. Garder tous les boulons, en particulier ceux de la lame, les
écrous et les vis bien serrés. Vérifier que toutes les goupilles
fendues sont en bonne place.
5. Toujours prévoir une aération suffisante durant la marche du
moteur. Les gaz d’échappement contiennent du monoxyde de
carbone, un poison mortel.
6. Effectuer les réglages et l’entretien du moteur uniquement avec
le moteur arrêté. Enlever le câble de la bougie et l’attacher à l’écart
de la bougie pour empêcher tout démarrage accidentel.
7. NE PAS changer les réglages du régulateur de vitesse ni faire
tourner le moteur en surrégime.
8. Vérifier fréquemment l’absence d’usure et de détérioration du
sac de ramassage pour éviter les projections d’objets et
l’exposition à des pièces en mouvement. En présence de coutures
lâches ou de déchirures, remplacer par un sac neuf. Changer la
coulisse ou l’adaptateur de sac s’il sont cassés ou fissurés.
9. Les lames de la tondeuse affûtées et coupantes. Envelopper les
lames ou porter des gants de cuir épais et faire preuve de
PRÉCAUTION pour les manipuler.
10. NE PAS mettre la bougie à la terre contre le bord du trou de
bougie pour vérifier l’étincelle ; cela peut enflammer les vapeurs
s’échappant du moteur.
11. Faire réviser la machine par un concessionnaire SNAPPER
agréé au moins une fois par an et faire poser tout nouveau
dispositif de sécurité par le concessionnaire.
12. Utiliser exclusivement des pièces de rechange SNAPPER
d’origine pour assurer le maintien des normes d’origine.
Page 30

www.snapper.com4
AVERTISSEMENT : Avant toute opération
d’assemblage ou d’entretien sur la tondeuse,
débrancher le câble de la bougie.
REMARQUE : Dans ce manuel, la gauche et la droite décrivent
l’emplacement d’une pièce pour un opérateur debout derrière le
guidon.
Déballage
La tondeuse est entièrement assemblée à l’usine. Lors de
l’emballage de la tondeuse, son guidon est placé en position de
remisage. Suivre les instructions ci-dessous pour remettre le
guidon en position d’utilisation.
Guidon
1. Sortir la tondeuse du carton.
2. Enlever tous les matériaux d’emballage de la tondeuse et du
guidon.
3. Tourner les boutons (A, Figure 1) de part et d’autre du guidon
inférieur (B) pour rétracter les broches de verrouillage. Relever
le guidon inférieur, en l’alignant sur l’un des trois groupes de
trous dans le support de guidon (C). Tourner les boutons pour
libérer les broches de verrouillage et bloquer le guidon
inférieur.
4. Placer le haut du guidon (A, Figure 2) en position d’utilisation
(haute). Serrer les écrous à ailettes (B).
REMARQUE : La hauteur du guidon peut être réglée en fonction de
l’opérateur. Voir « Hauteur du guidon ».
ATTENTION : Replier ou relever le guidon avec précaution. Éviter
d’endommager les câbles. Un câble coudé ne fonctionnera pas
correctement. Avant d’utiliser la machine, changer tout câble coudé
ou endommagé.
5. Tenir la barre d’arrêt du moteur serrée contre le guidon
(se reporter à la section « Barre d’arrêt du moteur »). Tirer
lentement la poignée du lanceur (A, Figure 3). Pour accrocher
la poignée du lanceur au guide de cordon (B), enrouler le
cordon à travers le guide fixé sur le côté droit du guidon.
A
Figure 1 : Déplier le guidon inférieur
Préparation
B
C
Figure 3 : Accrocher la poignée du lanceur
B
A
Figure 2 : Déplier le guidon supérieur
A
Préparation
B
Page 31

5
Hauteur du guidon
1. Tourner les boutons (A, Figure 4) de part et d’autre du guidon
inférieur (B) pour rétracter les broches de verrouillage. Aligner
le guidon inférieur sur le groupe de trous souhaité des
supports de guidon (C). Tourner les boutons pour libérer les
broches de verrouillage et bloquer le guidon inférieur.
Remarque : Ne pas déposer les boulons et écrous de fixation au
bas du guidon inférieur.
Préparation
Préparation (suite)
A
Figure 4 : Réglage de la hauteur du guidon
B
C
Page 32

www.snapper.com6
Assemblage du sac de ramassage
Remarque : Sur certains modèles, le déflecteur d’éjection latéral est
provisoirement fixé (pour les besoins du transport) à l’arrière de la
tondeuse. Avant d’assembler le sac de ramassage, décrocher le
déflecteur d’éjection latéral.
1. Enfiler l’armature (A, Figure 5) dans le sac de ramassage (B).
2. S’assurer que la poignée (A, Figure 6) est sur l’extérieur du
sac de ramassage.
3. Encliqueter d’abord les barrettes (B, Figure 6) sur les côtés de
l’armature (C). Ensuite, encliqueter les barrettes sur le dessus
et le dessous de l’armature.
Préparation
B
Figure 5 : Mise en place de l’armature
A
B
Figure 6 : Pose des barrettes du sac
A
C
Préparation (suite)
Page 33

7
Pose du sac de ramassage
1. Pour poser le sac de ramassage sur la tondeuse, relever le
volet arrière (A, Figure 7). En tenant le sac de ramassage par
la poignée (B), engager les crochets (C) de part et d’autre de
l’armature du sac sur la tige pivot du volet arrière (D).
Abaisser le sac de ramassage contre l’arrière de la tondeuse.
Abaisser le volet arrière.
Important : S’assurer que les deux crochets du sac de ramassage
sont engagés sur la tige pivot.
AVERTISSEMENT : Vérifier l’état d’usure et de
détérioration du sac de ramassage. S’il est usé ou
endommagé, remplacer les pièces exclusivement
par des pièces de rechange homologuées par le
fabricant.
Vider le sac de ramassage
AVERTISSEMENT : Avant de décrocher le sac de
ramassage, arrêter le moteur. Avant de nettoyer
l’herbe du carter de la tondeuse, débrancher le
câble de la bougie.
1. Relever le volet arrière jusqu’en position verticale.
2. Tenir le sac de ramassage par la poignée et soulever l’armature
du sac. Continuer de soulever l’armature jusqu’à dégager
complètement les crochets de la tige pivot. Enlever le sac de
ramassage.
3. Vider l’herbe du sac de ramassage.
4. Pour remettre le sac de ramassage sur la tondeuse, voir
« Pose du sac de ramassage ».
Préparation
Figure 7 : Pose du sac de ramassage
C
D
A
B
Préparation (suite)
Page 34

www.snapper.com8
Pose du déflecteur d’éjection latéral
AVERTISSEMENT : Pour éviter tout démarrage du
moteur, débrancher le câble de la bougie.
Pour les besoins du transport, le déflecteur d’éjection latéral n’est
pas en place. Trouver le déflecteur latéral et le poser de la manière
suivante.
1. Relever le couvercle de déchiquetage (A, Figure 8).
2. Enfiler les deux pattes (B) du déflecteur latéral (C) sous la
broche pivot.
3. Abaisser le déflecteur latéral. Vérifier que les pattes de blocage
(A, Figure 9) traversent les rainures du déflecteur latéral.
4. Abaisser le couvercle de déchiquetage (A, Figure 10).
5. Brancher le câble sur la bougie.
Préparation
Figure 8 : Pose du déflecteur d’éjection latéral
Figure 9 : Pattes de blocage du déflecteur d’éjection latéral
Figure 10 : Abaissement du couvercle de déchiquetage
A
C
A
B
A
Préparation (suite)
Page 35

9
Préparation du moteur
LE MOTEUR NE CONTIENT NI HUILE NI ESSENCE
En utilisant le bidon d’huile fourni dans l’emballage, remplir le
moteur de la bonne quantité d’huile. Voir le type d’huile et
d’essence à utiliser dans les instructions du fabricant du moteur.
Avant d’utiliser la machine, lire les informations concernant la
sécurité, le fonctionnement, l’entretien et le remisage.
AVERTISSEMENT : Respecter les instructions du
fabricant du moteur concernant le type d’huile et
d’essence à utiliser. Toujours utiliser un bidon
d’essence sécurisé. Ne pas fumer durant le plein
d’essence. Ne pas faire le plein d’essence dans un
espace fermé. Avant de faire le plein d’essence,
arrêter le moteur. Laisser le moteur refroidir
pendant plusieurs minutes.
Remarque : Le fonctionnement d’un moteur neuf produit parfois
une légère quantité de fumée. Cette fumée est causée par la
peinture ou l’huile sur ou autour du silencieux. Ceci est normal et
devrait se produit uniquement durant la première utilisation.
IMPORTANT : Cette machine est équipée d’un moteur à combustion
interne et ne doit pas être utilisée sur ou à proximité de terres non
aménagées boisées, broussailleuses ou herbeuses, sauf si le
système d’échappement du moteur est équipé d’un pare-étincelles
conforme à la réglementation en vigueur (le cas échéant). Si un
pare-étincelles est utilisé, veiller à le maintenir en bon état de
marche.
Ce qui précède est exigé par la loi dans l’état de Californie (Section
4442 du California Public Resources Code). Il est possible que
d’autres juridictions prévoient des dispositions semblables. Les lois
fédérales s’appliquent sur les terrains domaniaux. Pour équiper
l’échappement d’un pare-étincelles, consulter un centre de service
après-vente agréé.
Remarque : La puissance continue réelle du moteur est susceptible
d’être inférieure en raison de limites d’exploitation et de facteurs
environnementaux.
Préparation
Préparation finale
Avant d’utiliser la tondeuse, contrôler l’assemblage des roues, du
guidon et des commandes. Vérifier que toute la visserie est bien
serrée. Vérifier que la commande des gaz (le cas échéant) et la
barre d’arrêt du moteur fonctionnent correctement.
Si la tondeuse est équipée de mécanismes de hauteur de roues,
vérifier qu’ils fonctionnent correctement. Avant de démarrer le
moteur, vérifier que chaque mécanisme de hauteur est réglé sur la
hauteur coupe souhaitée. Voir « Réglage de la hauteur de coupe »
dans la section Entretien.
Préparation (suite)
Conseils de déchiquetage
Le déchiquetage consiste à couper finement l’herbe pour qu’elle
soit facile à recycler. Comme les éléments nutritifs sont rendus au
sol, la pelouse nécessite moins d’engrais. Suivre les conseils cidessous pour déchiqueter correctement l’herbe.
• L’herbe doit être sèche. Si l’herbe est mouillée, elle est
difficile à couper et produit de lourdes touffes d’herbe.
• L’herbe ne doit pas être trop haute. La hauteur maximal pour
assurer une tonte efficace est 11,4 cm (4 1/2 pouces). Régler
la hauteur de coupe de manière à tondre le tiers supérieur de
l’herbe seulement.
• Si l’herbe est plus haute que 11,4 cm (4 1/2 pouces), deux
tontes sont nécessaires. Pour la première tonte, régler la
hauteur de coupe sur la position la plus haute. Abaisser
ensuite la hauteur de coupe pour la seconde tonte.
• Garder les tranchants de lame bien affûtés. Une lame
émoussée provoque le brunissement de l’extrémité des brins
d’herbe.
• Nettoyer le dessous du carter de tondeuse. L’herbe et autres
débris peuvent empêcher la tondeuse de fonctionner
correctement.
Si la qualité de coupe est peu satisfaisante, essayer ce qui suit :
• Régler la hauteur de coupe plus haut.
• Tondre la pelouse plus souvent.
• Utiliser la tondeuse à une vitesse d’avance plus lente.
• Faire chevaucher les bandes de tonte plutôt que de tondre
sur toute la largeur à chaque passe.
• Tondre les surfaces peu satisfaisantes une seconde fois.
Page 36

www.snapper.com10
Fonctionnement
Barre d’arrêt du moteur
Relâcher la barre d’arrêt du moteur (A, Figure 11) et le moteur et la
lame s’arrêtent automatiquement. Pour faire fonctionner le moteur,
tenir la barre en position de marche (B).
Avant de démarrer le moteur, actionner plusieurs fois la barre
d’arrêt du moteur. Vérifier que le câble s’actionne facilement.
Système d’entraînement des roues avant
(modèles autotractés uniquement)
La tondeuse comporte des roues motrices avant. Le système de
traction s’utilise de manière ci-dessous.
1. Tenir la barre d’arrêt du moteur (A, Figure 11) en position de
marche (B).
2. Modèle SP2265FC : Tirer le levier d’avance (A, Figure 12) à
fond vers soi. Le système de traction est alors embrayé.
Modèle SPV22675HWFC : Tirer lentement le levier d’avance
vers soi. Le système de traction est alors embrayé. Pour
augmenter la vitesse de déplacement, tirer lentement le levier
d’avance plus loin vers soi. Pour réduire la vitesse de
déplacement, relâcher lentement le levier d’avance.
3. Pour débrayer le système de traction et arrêter le moteur,
relâcher complètement la barre d’arrêt du moteur.
4. Pour débrayer le système de traction seulement, relâcher le
levier d’avance. Le système de traction se débraye mais le
moteur continue de tourner.
Remarque : Sur une machine neuve, lorsque le système de traction
est débrayé, il est possible que les roues avant tournent lorsqu’elles
sont décollées du sol. Ceci est normal et cessera au bout d’une ou
deux heures d’utilisation.
AVERTISSEMENT : Pour la sécurité, le système de
traction doit se débrayer immédiatement lorsque le
levier d’avance est relâché. Si le système de
traction ne se débraye pas correctement, ne pas
utiliser la tondeuse tant que le système de traction
n’est pas ajusté ou réparé par un centre de
réparation agréé.
Arrêter le moteur
Pour arrêter le moteur, relâcher la barre d’arrêt du moteur.
Débrancher le câble de la bougie pour éviter tout démarrage du
moteur.
Si le moteur ne s’arrête pas, tenir un tournevis contre la bougie et
contre les ailettes de refroidissement du moteur. La bougie est mise
à la terre et le moteur s’arrête. Avant de démarrer le moteur,
contrôler le câble d’arrêt du moteur. Vérifier qu’il est correctement
assemblé. Avant de faire fonctionner la machine, changer un câble
d’arrêt du moteur coudé ou endommagé.
Figure 11 : Utilisation de la barre d’arrêt du moteur
Figure 12 : Commande des roues motrices avant
A
B
A
Fonctionnement
Page 37

11
Fonctionnement
Démarrer le moteur
AVERTISSEMENT : La lame tourne lorsque le
moteur est en marche.
IMPORTANT : Avant de démarrer le moteur, actionner plusieurs fois
la barre d’arrêt du moteur. Vérifier que le câble d’arrêt du moteur
s’actionne librement.
Remarque : Le moteur n’est pas équipé d’une commande des gaz ni
d’un réglage du régime. Le moteur est réglé sur le régime optimal
pour la tonte, le ramassage de l’herbe et la durabilité du moteur.
1. Contrôler l’huile.
2. Remplir le réservoir de carburant d’essence sans plomb
ordinaire. Vérifier que l’essence est propre. L’essence au
plomb accroît les dépôt et réduit la durée de vie des soupapes.
Remarque : Ne pas utiliser de d’essence-alcool (gasohol) ni de
méthanol. Ne pas utiliser de supercarburant sans plomb.
AVERTISSEMENT : Toujours utiliser un bidon
d’essence sécurisé. Ne pas fumer durant le plein
d’essence. Ne pas faire le plein d’essence dans un
espace fermé. Avant de faire le plein d’essence,
arrêter le moteur et le laisser refroidir pendant
plusieurs minutes.
3. Vérifier que le câble de bougie est branché sur la bougie.
4.
Modèles autotractés uniquement
- Vérifier que le levier
d’avance est en position débrayée.
AVERTISSEMENT : Pour éviter les accidents, vérifier
que le levier d’avance est en position DÉBRAYÉE.
Si le levier d’avance est en position EMBRAYÉE,
ne pas démarrer le moteur.
5. Le bouton d’amorçage (A, Figure 13) se trouve sur le côté du
moteur. Appuyer sur le bouton d’amorçage. Après chaque
poussée sur le bouton d’amorçage, attendre deux secondes.
Voir le nombre de poussées du bouton d’amorçage requis
dans les instructions du fabricant du moteur.
Remarque : Ne pas utiliser le bouton d’amorçage pour démarrer un
moteur chaud.
Remarque : Le modèles équipés d’un moteur Ready Start
TM
ne
comportent pas de bouton d’amorçage. Pour de plus amples
renseignements, voir les instructions du fabricant du moteur.
6. Se tenir derrière la tondeuse. Tenir d’une main la barre d’arrêt
du moteur en position de marche (A, Figure 14). De l’autre
main, saisir la poignée du lanceur (B).
7. Vérifier que le cordon du lanceur n’est pas obstrué ni coincé
entre les deux parties du guidon. Tirer vivement la poignée du
lanceur. Ramener lentement la poignée du lanceur.
8. Si le moteur ne démarre pas au bout de 5 ou 6 tentatives, se
reporter aux instructions de « Dépannage ».
Règles pour un fonctionnement sûr et efficace
Voir les règles importantes permettant une utilisation sûre et
efficace de la tondeuse dans la section « Sécurité de l’opérateur ».
Figure 13 : Le bouton d’amorçage du moteur
Figure 14 : Démarrer le moteur
A
B
A
Fonctionnement (suite)
Page 38

www.snapper.com12
Entretien
Entretien du moteur
Les instructions d’entretien qui suivent permettent de garder la
machine en bon état de marche. Toutes les informations d’entretien
du moteur figurant dans le mode d’emploi du moteur. Veiller à le
lire avant de démarrer le moteur.
AVERTISSEMENT : Avant d’effectuer un contrôle, un
ajustement (sauf carburateur) ou une réparation,
arrêter le moteur et débrancher le câble de la
bougie.
Basculement du moteur
Pour effectuer l’entretien du moteur, contrôler la lame ou nettoyer le
dessous du carter de tondeuse, veiller à toujours basculer le moteur
avec la bougie vers le haut (Figure 15). Le transport ou le
basculement du moteur avec la bougie vers le bas a les effets
suivants :
• Problèmes de démarrage.
• Dégagement de fumée.
• Encrassement de la bougie.
• Saturation du filtre à air par l’huile ou l’essence.
Figure 15 : Ne pas basculer le moteur vers l’avant
Nettoyage du carter de tondeuse
AVERTISSEMENT : La lame tourne lorsque le
moteur est en marche. Avant de nettoyer le carter
de tondeuse, arrêter le moteur et débrancher le
câble de la bougie.
L’herbe et autres débris peuvent empêcher la tondeuse de
fonctionner correctement. Après avoir tondu, nettoyer le carter de
tondeuse de la manière suivante.
1. Arrêter le moteur.
2. Débrancher le câble de la bougie.
3. Nettoyer la saleté et les débris du dessus et du dessous du
carter de tondeuse. Nettoyer à l’eau et au savon. Essuyer
l’excès d’eau avant remisage.
Lubrification
1. Pour assurer des performances optimales, lubrifier les roues
et toutes les articulation à l’huile moteur toutes les 25 heures.
2. Pour lubrifier le moteur, consulter le mode d’emploi du
moteur.
Remarque : Ne pas lubrifier le câble d’arrêt du moteur. Les
lubrifiants endommagent le câble et peuvent l’empêcher de
coulisser librement. Changer le câble s’il est coudé ou endommagé.
Réglage de la hauteur de coupe
AVERTISSEMENT : La lame tourne lorsque le
moteur est en marche. Avant de changer la hauteur
de coupe, arrêter le moteur et débrancher le câble
de la bougie.
Pour changer la hauteur de coupe, modifier la position du levier de
réglage de chaque roue (A, Figure 16). S’assurer que chaque levier
de réglage est dans la même position pour que la tondeuse coupe
horizontalement.
1. Dégager le levier de réglage.
2. Placer le levier de réglage dans la position souhaitée.
Figure 16 : Réglage de la hauteur de coupe
A
Entretien
Page 39

13
Entretien
Dépose de la courroie
(modèles autotractés uniquement)
AVERTISSEMENT : Avant de déposer la courroie,
débrancher le câble de la bougie.
1. Enlever les vis de fixation du protège-courroie (A, Figure 17).
Déposer le protège-courroie.
Remarque : Les vis de fixation du protège-courroie se trouvent
sous le carter de tondeuse.
2. Pour déposer la courroie, basculer la tondeuse vers l’arrière.
Voir « Basculement du moteur » dans la section Entretien.
3. (SP2265FC uniquement) : Desserrer le boulon de tension de la
courroie (A, Figure 18).
Remarque : Le modèle SPV22675HWFC comportent un guide de
courroie sur la transmission qui doit être déposé avant la courroie.
Veiller à bien le remettre en place après la pose de la courroie.
4. Dégager l’avant de la courroie (B) de la poulie de transmission
(C).
5. Pour dégager l’arrière de la courroie (A, Figure 19), glisser la
courroie par-dessus le bout de la lame (B).
Remarque : Le modèle SPV22675HWFC comportent des guides de
courroie autour de la poulie du moteur qui doivent être déposées
avant la courroie. Veiller à bien les remettre en place après la pose
de la courroie.
Remarque : Veiller à remplacer la courroie exclusivement par une
courroie de rechange d’origine.
6. Pour poser la courroie, inverser les étapes ci-dessus.
7. (SP2265FC uniquement) : Régler la tension de courroie.
a. Serrer l’écrou de réglage (A, Figure 20) jusqu’à ce qu’il
touche la bague d’espacement (B). Essayer de tourner la
bague. Lorsque l’écrou de réglage touche la bague, la
bague ne tourne pas.
b. Ensuite, desserrer l’écrou juste assez pour permettre à la
bague de tourner. Le tension de la courroie est alors
correcte.
8. Poser le protège-courroie.
9. Avant de commencer à tondre, vérifier que le système de
traction se débraye correctement et que la tondeuse s’arrête.
Si le système de traction ne se débraye pas, confier la
tondeuse à un centre de réparation agréé avant de l’utiliser.
Figure 18 : Desserrage du boulon de tension de courroie
B
Figure 19 : Dépose de la courroie
A
Figure 20 : Réglage de la tension de courroie
A
Figure 17 : Dépose du protège-courroie
A
B
A
C
B
Entretien (suite)
Page 40

www.snapper.com14
Entretien
Réglage du câble d’avance
(modèles autotractés uniquement)
AVERTISSEMENT : Avant de régler la câble
d’avance, relâcher la barre d’arrêt du moteur et
attendre l’arrêt du moteur.
Si le système de traction ne s’embraye ou débraye pas
correctement, vérifier le bon assemblage du guidon. S’assurer que
toutes les pièces sont en bon état, ni cassées ni déformées, et que
toute la visserie est bien serrée.
L’usure des pièces et l’étirement du câble altèrent le fonctionnement
du système de traction. Lors de la tonte d’herbes hautes ou
épaisses ou en pente, le système de traction peut patiner. Si le
système de traction patine, le régler de la manière suivante ou
confier la tondeuse à un centre de réparation agréé.
IMPORTANT : Avant de démarrer le moteur, actionner plusieurs fois
la barre d’arrêt du moteur. Vérifier que le câble d’arrêt du moteur
s’actionne librement.
Remarque : Le moteur n’est pas équipé d’une commande des gaz ni
d’un réglage du régime. Le moteur est réglé sur le régime optimal
pour la tonte, le ramassage de l’herbe et la durabilité du moteur.
1. Si le système de traction patine, desserrer le contre-écrou
(B, Figure 21) sur le tendeur de câble (A) et tourner la virole
(C) d’un demi-tour dans le sens indiqué. Essayer le système
de traction pour voir s’il patine.
2. Si le système de traction patine, répéter le réglage. L’essayer
une nouvelle fois.
3. Répéter le réglage et l’essai jusqu’à ce que le système ne
patine plus.
4. Avant de commencer à tondre, vérifier que le système de
traction se débraye correctement et que la tondeuse s’arrête.
Si le système de traction ne se débraye pas, confier la
tondeuse à un centre de réparation agréé avant de l’utiliser.
Figure 21 : Réglage du câble d’avance
C
Entretien (suite)
A
B
Page 41

15
Entretien
Entretien de la lame
AVERTISSEMENT : Avant de contrôler la lame ou
l’adaptateur de lame, débrancher le câble de la
bougie. Si la lame heurte un objet, couper le
moteur. Débrancher le câble de la bougie. Vérifier
que la machine n’est pas endommagée.
Contrôler fréquemment l’état d’usure et de détérioration (fissures,
etc.) de la lame. Contrôler fréquemment le boulon de fixation de la
lame. Garder le boulon bien serré. Si la lame heurte un objet,
couper le moteur. Débrancher le câble de la bougie. Contrôler l’état
de l’adaptateur de lame (A, Figure 22). Voir si la lame est
déformée, endommagée, très usée ou autre. Avant d’utiliser la
machine, veiller à remplacer les pièces endommagées par des
pièces de rechange d’origine. Pour des raisons de sécurité, changer
la lame tous les deux ans. Garder les tranchants de lame bien
affûtés. Une lame émoussée provoque le brunissement de
l’extrémité des brins d’herbe. Déposer la lame de la manière
suivante.
Dépose de la lame
AVERTISSEMENT : Avant de déposer la lame,
débrancher le câble de la bougie. La lame a des
tranchants affûtés. Pour tenir la lame, utiliser des
gants ou du tissu pour protéger les mains.
1. Vider le réservoir d’essence.
2. Soulever le côté silencieux ou bougie de la tondeuse.
3. Utiliser un cale en bois pour empêcher la lame de tourner.
4. Déposer le boulon le fixation (B, Figure 22) de la lame avec
une clé de 9/16 po (14 mm).
5. Contrôler la lame (C) suivant les instructions
d’ « Entretien de la lame ». Remplacer une lame très usée ou
endommagée par une lame de rechange d’origine.
6. Poser la lame avec les bords incurvés vers le carter de
tondeuse. Si la lame est à l’envers, elle ne coupe pas
correctement et peut provoquer un accident.
7. Serrer la lame avec la rondelle (D) et le boulon d’origine.
S’assurer que le bord extérieur de la rondelle Belleville est
contre la lame.
8. Serrer le boulon de fixation de la lame à un couple de 40,7 Nm
(30 pi.lb).
AVERTISSEMENT : Toujours garder le boulon de
fixation de la lame bien serré. Un boulon ou une
lame desserrés peuvent provoquer un accident.
Affûtage de la lame
AVERTISSEMENT : Les vibrations résultent d’un
mauvais équilibrage de la lame. Une lame qui
comporte des fissures peut se casser et provoquer
un accident.
1. Affûter la lame deux fois par an ou toutes les 25 heures.
2. Ne pas affûter la lame sur la machine. Déposer la lame
conformément aux instructions de « Dépose de la lame ».
3. Nettoyer la lame avec une brosse, de l’eau et du savon.
Contrôler la lame. Vérifier l’absence de fissures, entailles et
autres dommages. Remplacer une lame très usée, déformée
ou endommagée par une lame de rechange d’origine.
4. Affûter la lame (A, Figure 23, page suivante) avec une lime
(B). Veiller à conserver le biseau d’origine du tranchant.
5. S’assurer que la lame est équilibrée. Utiliser un tournevis (C)
et tenir la lame parallèlement au sol (D) comme sur
l’illustration. Une lame équilibrée reste paralèlle au sol. Si la
lame est déséquilibrée, le côté lourd s’abaisse vers le sol.
Affûter le côté lourd jusqu’à ce que la lame soit équilibrée.
6. Une lame neuve coupe mieux qu’une lame très usée. Tous les
deux ans, remplacer la lame usagée par une lame de rechange
d’origine.
Contrôle du niveau de coupe
Essayer la machine sur une petite surface. Si la hauteur de coupe
n’est pas uniforme ou si l’herbe n’est pas éjectée, les causes
possibles sont : (1) lame déformée ou endommagée, (2) lame
émoussée, (3) lame usée, (4) adaptateur de lame cassé. Corriger le
problème avant d’utiliser la machine.
Figure 22 : Dépose de la lame
D
B
D
C
B
C
A
A
Entretien (suite)
Page 42

www.snapper.com16
Entretien
Figure 23 : Affûtage de la lame
D
C
B
A
Préparation de la tondeuse pour le remisage
AVERTISSEMENT : Ne pas vidanger l’essence à
l’intérieur d’un bâtiment, près d’un feu ou en
fumant. Les vapeurs d’essence peuvent provoquer
une explosion ou un incendie.
1. Vider le réservoir d’essence.
2. Laisser le moteur tourner jusqu’à épuisement de l’essence.
3. Vidanger l’huile du moteur chaud. Remplir le carter du moteur
d’huile neuve.
4. Déposer la bougie du cylindre. Verser 3 cl (une once) d’huile
dans le cylindre. Tirer lentement la poignée du lanceur pour
répandre l’huile et protéger le cylindre. Poser une bougie
neuve sur le cylindre.
5. Nettoyer la saleté et les débris des ailettes de refroidissement
du cylindre et du carter du moteur.
6. Nettoyer le dessous du carter de la tondeuse.
7. S’assurer que le sac de ramassage est vide. La présence
d’herbe dans le sac durant le remisage endommage le sac.
8. Nettoyer complètement la tondeuse pour protéger la peinture.
9. Replier le guidon (facultatif).
ATTENTION : Replier ou relever le guidon avec précaution. Éviter
d’endommager les câbles. Un câble coudé ne fonctionnera pas
correctement. Avant d’utiliser la machine, changer tout câble coudé
ou endommagé.
10. Ranger la machine dans un local bien aéré.
Entretien (suite)
Page 43

17
Dépannage
Le moteur ne démarre pas.
1. Vérifier que le réservoir est rempli d’essence propre. Ne pas utiliser d’essence vieille.
2. Si le moteur est froid, appuyer sur le bouton d’amorçage (en option sur certains modèles). Voir le nombre de poussées du bouton
d’amorçage requis dans les instructions du fabricant du moteur.
3. Vérifier que le câble de bougie est branché sur la bougie.
4. Adjuster le carburateur. Consulter le manuel du moteur.
5. Il y a trop d’essence dans le cylindre du moteur. Déposer et sécher la bougie. Tirer plusieurs fois sur la poignée du lanceur Remettre la
bougie en place. Brancher le câble sur la bougie. Démarrer le moteur.
6. Le moteur démarre difficilement dans les herbes épaisses et hautes. Placer la tondeuse sur une surface propre et sèche.
7. Vérifier que la barre d’arrêt du moteur est en position de marche.
8. Vérifier que la barre d’arrêt du moteur est en position de marche. Consulter le manuel du moteur.
Le moteur ne s’arrête pas.
1. Relâcher la barre d’arrêt du moteur.
2. Contrôle le câble d’arrêt du moteur. Changer le câble s’il est coudé ou endommagé.
Le moteur fonctionne mal.
1. Contrôler les réglages de hauteur de coupe. Relever la hauteur de coupe si l’herbe est haute.
2. Contrôler le dessous du carter de la tondeuse. Nettoyer l’herbe et autres débris du carter de la tondeuse.
3. Contrôler le câble de la bougie. Vérifier qu’il est branché.
4. Nettoyer l’herbe et autres débris des ailettes de refroidissement du moteur.
5. Contrôler les réglages du carburateur. Consulter le manuel du moteur.
6. Contrôler l’écartement des électrodes. Régler l’écartement sur 0,762 mm (0.030 po).
7. Vérifier le niveau d’huile dans le moteur. Le compléter le cas échéant.
8. Contrôler le filtre à air du moteur. Consulter le manuel du moteur.
9. L’essence est mauvaise. Vidanger et nettoyer le réservoir d’essence. Remplir le réservoir avec de l’essence propre.
Vibrations excessives.
1. Déposer la lame. Contrôler la lame et l’équilibrer le cas échéant. Voir les instructions d’entretien de la lame.
2. Vérifier que la lame n’est pas déformée ni cassée. Une lame endommagée est dangereuse et doit être changée.
3. Contrôler l’adaptateur de lame. Changer un adaptateur de lame cassé.
4. Si les vibrations continuent, confier la tondeuse à un centre de réparation agréé.
L’herbe n’est pas éjectée correctement.
1. Nettoyer le dessous du carter de la tondeuse.
2. Voir si la lame est très usée. Déposer et affûter la lame. Pour des raisons de sécurité, remplacer la lame tous les deux ans par une lame
de rechange d’origine.
L’herbe n’est pas tondue uniformément.
1. Contrôler le réglage de hauteur de chaque roue. Le réglage de hauteur doit être le même sur chaque roue.
2. S’assurer que la lame est affûtée.
3. Vérifier que la lame n’est pas déformée ni cassée. Une lame endommagée est dangereuse et doit être changée.
4. Vérifier que l’adaptateur de lame n’est pas cassé. Changer un adaptateur de lame cassé.
Dépannage
Page 44

www.snapper.com18
Garanties
GARANTIE LIMITÉE 2 ANS
Pendant deux (2) ans à compter de la date d’achat pour une utilisation résidentielle non commerciale par l’acheteur initial,
SNAPPER, par l’intermédiaire de tout concessionnaire SNAPPER agréé, s’engage à remplacer, sans frais (sauf taxes le cas
échéant), toute pièce jugée, après examen par l’usine de McDonough (Géorgie), présenter un défaut de matériau, de maind’oeuvre ou les deux.
Pendant quatre-vingt-dix (90) jours à compter de la date d’achat pour une utilisation commerciale, locative ou autre non
résidentielle par l’acheteur initial, SNAPPER, par l’intermédiaire de tout concessionnaire SNAPPER agréé, s’engage à
remplacer, sans frais, toute pièce jugée, après examen par l’usine de McDonough (Géorgie), présenter un défaut de
matériau, de main-d’oeuvre ou les deux.
Tous les frais de port encourus par l’acheteur pour soumettre le matériel à un concessionnaire SNAPPER agréé à des fins
de remplacement sous couvert de cette garantie sont à la charge de l’acheteur.
Cette garantie ne s’applique pas à certaines transmissions, aux moteurs et à leurs composants ni aux batteries, car ces
articles font l’objet d’une garantie distincte. Cette garantie ne s’applique pas aux pièces qui ont été endommagées par
accident, altération, emploi abusif, mauvaise lubrification, usure normale ou autre cause échappant au contrôle de
SNAPPER. Cette garantie ne couvre aucune machine ou pièce de machine ayant été altérée ou modifiée de manière à
changer sa sécurité, ses performances ou sa durabilité.
Les batteries ont une période de garantie de un (1) an, avec remplacement gratuit si nécessaire pendant un (1) an à
compter de la date d’achat initiale. SNAPPER n’est pas responsable des frais de pose engagés. La garantie de la batterie
couvre uniquement les batteries d’origine et ne couvre pas les dommages de la batterie ou de la machine causés par
négligence ou emploi abusif, destruction par le feu, explosion, gel, surcharge, mauvais entretien ou utilisation d’un mauvais
électrolyte.
Il n’existe aucune autre garantie expresse.
AVERTISSEMENT
Les garanties implicites, notamment de qualité marchande et d’adaptation pour un emploi particulier, sont limitées à
une durée de deux (2) ans à compter de la date d’achat pour une utilisation résidentielle non commerciale par
l’acheteur initial et de quatre-vingt-dix (90) jours à compter de l’achat pour une utilisation commerciale, locative ou
autre non résidentielle par l’acheteur initial et, dans la mesure autorisée par la loi, toutes les garanties implicites sont
exclues. Ceci est le recours exclusif. Les responsabilités pour dommages consécutifs aux termes de toutes les garanties
sont exclus.
Certains états ou provinces n’autorisent pas les limitations de durée des garanties implicites ou n’autorisent pas
l’exclusion ou la limitation des dommages indirects ou consécutifs, par conséquent les limites ou exclusions ci-dessus
peuvent ne pas s’appliquer au cas présent.
La présente garantie vous offre des droits légaux spécifiques et il se peut que vous ayez d’autres droits qui varient d’une
juridiction à
une autre.
AVERTISSEMENT : L’UTILISATION DE PIÈCES DE RECHANGE AUTRES QUE DES PIÈCES SNAPPER D’ORIGINE PEUT
ALTÉRER LA SÉCURITÉ DES PRODUITS SNAPPER ET A POUR EFFET D’ANNULER TOUTE RESPONSABILITÉ ET GARANTIE
PAR SNAPPER EN RAPPORT AVEC L’UTILISATION DE TELLES PIÈCES.
IMPORTANT : Veuillez remplir immédiatement la carte d’enregistrement de produit SNAPPER jointe et l’envoyer par courrier à :
Snapper’s Product Registration Center, P.O. Box 1379, McDonough, Georgia 30253 - États-Unis
Page 45

19
Guide de pente
Une pente de 15 degrés est une pen
Une pente de 10 degrés est une pente qui augmente verticalement de 51,8 cm (1,7 pi) pour une base horizontale de 304,8 cm (10 pi) approximativement.
sur la pente, jamais de bas en haut. Soyez toujours prudent lorsqu
Soyez prudent en tout temps et évitez les virages et les manoeuvres brusques. Suivre les aut
les pentes. Fonctionnement autoporté en montant et en descendant les pentes ; ne jamais tondre en travers des pentes. Pousser une tondeuse horizontale
DÉCOUPER ICI POUR UTILISER LE GUIDE DE PENTE
e vous tondez près des pentes ou des obstacles.
utilisée avec un accessoire tracté ou fixé à l’arrière, ne pas conduire l’unité sur une pente ayant une pente supérieure à 10 degrés.
te qui augmente verticalement de 76,2 cm (2,5 pi) pour une base horizontale de 304,8 cm (10 pi) approximativement.
sentez pas en sécurité ou si vous n’
prendre la pente en marche arrière et de rester bien droit. Si vous pouvez reculer sur la pente, c’est qu’elle est généralement sécuritaire. Toutefois, si vous ne vous
êtes pas complètement certain, utiliser ce guide et ne pas tondre une pente supérieure à 15 degrés. Si la tondeuse autoportée est
Avec une tondeuse autoportée, pour déterminer si une pente peut êt
re tondue : (1) désengager la (les) lame(s), (2) embrayer l’unité en marche arrière, (3) essayer de
15 DEGRÉS10 DEGRÉS
15 DEGRÉS
VOIR ET TENIR CE NIVEAU DE RÉFÉRENCE SUR UN ARBRE VERTICAL, UN COIN
D’UNE STRUCTURE, UN POTEAU ÉLECTRIQUE, OU UNE BARRIÈRE
GUIDE DE PENTE
haut.
sur la pente, jamais de bas en
Pousser une tondeuse horizontale
PLIER SUR LE POINTILLÉ
res directives de ce manuel pour tondre sécuritairement sur
tondre en travers des
pentes.
les pentes ; ne jamais
en montant et en descendant
Fonctionnement autoporté
Page 46

www.snapper.com20
Notes
Page 47

21
Notes
Page 48

www.snapper.com
Information sur la puissance nominale du moteur : L’indication de la puissance nominale brute de modèles individuels de moteurs à
essence est conforme au code J1940 (procédure de détermination de la puissance et du couple nominaux de petits moteurs) de la SAE
(Society of Automotive Engineers) et les performances nominales ont été obtenues et corrigées conformément à SAE J1995 (Révision
2002-05). Les valeurs de couple sont établies à 3060 tr/min, les valeurs de puissance à 3600 tr/min. La puissance moteur brute réelle est
inférieure et est influencée, entre autres, par les conditions d’utilisation ambiantes et la variabilité d’un moteur à l’autre. Compte tenu du
large éventail de produits sur lesquels les moteurs sont installés et de la variété des paramètres environnementaux applicables au
fonctionnement des équipements, le moteur à essence ne développe pas sa puissance nominale brute une fois qu’il est utilisé sur un
matériel donné (puissance nette ou réelle « sur site »). Cette différence est liée à une variété de facteurs, notamment, mais sans s’y limiter,
aux accessoires (filtre à air, échappement, charge, refroidissement, carburateur, pompe à essence, etc.), limites des applications, conditions
ambiantes d’exploitation (température, humidité, altitude) et variabilité d’un moteur à l’autre. Pour des raisons de limites de fabrication ou
de capacité, il est possible que Briggs & Stratton remplace un moteur de cette série par un modèle de puissance nominale supérieure.
Pièces de rechange courantes Référence
Câble de commande de lame
(tous)
7101395
Câble de commande de traction
(SP2265FC uniquement)
7101401
Câble de commande de traction
(SPV22675HWFC uniquement)
7101396
Lame de coupe
(tous)
7100851
Courroie d’entraînement
(SP2265FC uniquement)
7101193
Courroie d’entraînement
(SPV22675HWFC uniquement)
7100913
Caractéristiques du produit
S2265FC SP2265FC SPV22675HWFC
Taille carter de coupe
(cm/po)
55,9/22 55,9/22 55,9/22
Hauteur de coupe
(cm/po)
3,8 - 8,9/1,5 - 3,5 3,8 - 8,9/1,5 - 3,5 3,8 - 8,9/1,5 - 3,5
Type de transmission
(modèles autotractés uniquement)
Néant Vitesse
unique/engrenages
Vitesse
variable/engrenages
Vitesse d’avance
(km/h / mph)
(modèles autotractés uniquement)
Néant 3,7/2,3 0 - 6,8/0 - 4,2
Puissance moteur
(pi.lb)
6,50 8,8/6,50 9,2/6,75
Cylindrée du moteur
(cc)
190 190 190
Capacité du réservoir d’essence
(l/qt.)
1,5/1,6 1,5/1,6 1,5/1,6
22
Snapper Products
535 Macon Street
McDonough, GA 30253 - États-Unis
TONDEUSES À GAZON
DE 56 cm
1-800-317-7833
Page 49

Parts Manual fo
r
22" VARIABLE SPEED HIGH WHEEL
WALK BEHIND MOWERS
MODEL
NSPV22675HW (7800230)
SPV22675HW (7800190)
SPV22675HWFC (7800264)
Briggs & Stratton Yard Power Products Group
535 Macon Road
McDonough, GA, 30253 U.S.A.
800-935-2967
Manual No. 7102508
Revision IR, TP 400-5394-IR-WB-N4/11/2008
Page 50

s
PAGE GROUP
4
6
10
12
14
16
Handles and Controls (SPV22)
Deck Assembly (SPV22)
Engine and Blade Assembly (SPV22)
Height-of-Cut Assemblies
Transmission (22")
Decals (22")
Table Of Content
22" VARIABLE SPEED HIGH WHEEL
Manual No. 7102508
3
TP 400-5394-IR-WB-N
Page 51

Manual No. 7102508 22" VARIABLE SPEED HIGH WHEEL
TP 400-5394-IR-WB-N
4
Page 52

Handles and Controls (SPV22)
p
y
Part No Descri
1 7101312 1 HANDLE, Plastic Upper, WBM
2 7101415 1 ASSY, Control Head, 22” WBM, VS, HW (incl. cable & handle)
3 7101321BH 1 BAIL, Plastic Handle, WBM
4 7090015 2 BOLT, 1/4-20 x 1-3/4” Round Head Square Neck, GR 2
5 2860694 2 NUT, 1/4-20 Hex Flange Nyloc,YZ
6 7300670A 1 PLATE, Control Panel- Plastic Handle
7 7100225 4 SCREW, #8-16 Torxplus Recessed Pan Head, Twin Helix
8 7300649BH 2 HANDLE, Connecting 21”/22” WBM
9 7101410 1 ROPE GUIDE (1/4-20 thread)
10 7035744 2 KNOB, 5/16-18 Wing (Black)
11 7091189 2 BOLT, 5/16-18 x 2” Curved Head Square Neck, GR 2
12 7024649 3 WIRE TIE,11 Inch Standard Black Nylon
13 7300667BH 1 HANDLE, Lower, 22” WBM, Hi-Wheel
14 7101395 1 CABLE, Bail, 22” WBM
15 7101202 2 KNOB, Quick Release
16 7101199 2 BUSHING, Handle Pin
17 7101200 2 SPRING, Compression
18 7101198 2 PIN, Handle Adjust
19 7090958 2 BOLT, 5/16-18X x 1-1/2” Round Head Short Square Neck, GR 5
20 7090951 2 NUT, 5/16-18 Large Head Center Lock, Black
21 7101246 1 GRASSBAG, 22” RD
22 7101230A 1 BAG FRAME, 22” WBM
23 7026421 1 GRIP, Rectangular (Black)
24 7090391 2 WASHER, 5/16” Internal Tooth Lock
tionItem Qt
Note
Footnotes:
Manual No. 710250822" VARIABLE SPEED HIGH WHEEL
5
TP 400-5394-IR-WB-N
Page 53

Deck Assembly (SPV22)
Manual No. 7102508 22" VARIABLE SPEED HIGH WHEEL
TP 400-5394-IR-WB-N
6
Page 54

Deck Assembly (SPV22)
p
y
Part No Descri
1 7300400D 1 DECK, 22” Walk, 3-N-1
2 722848 3 SCREW, 1/4-20 x 11/16” Pan Head Torx, Self-Tap
3 7091020 4 PUSHNUT, 1/4”
4 7300855D 1 BRACKET, Chute
5 7300856D 1 PLATE, Mulch, 22” RB Scotts
6 722507 1 SPRING, Torsion, Chute
7 7101067 1 ROD, Pivot
8 721682 1 COVER, Mulch, Plastic, Black
9 721681 1 SIDE CHUTE, Plastic, Black
10 7102422 1 GUARD, Rear
11 7091286 4 SCREW, #10-24 x 1/2” Hex Washer Self-Tap, SEMS
12 7091619 6 NUT, 3/8-16 Hex Flange Lock, YZ
13 7501056 1 * ASSY, HOC, Right Rear, 22” WBM
14 7501055 1 * ASSY, HOC, Left Rear, 22” WBM
15 7501058 1 * ASSY, HOC, Left Front, 22” WBM, Propelled
16 7501057 1 * ASSY, HOC, Right Front, 22” WBM, Propelled
17 7100633 4 GRIP, Height Latch
18 7500546 2 ASSY, Wheel, 12 x 2 Idle, BB, Snapper Cool Gray incl. two 1-1/8” O.D. Flanged
19 7500542 2 ASSY, Drive Wheel, 8 x 2, BB, Snapper Charcoal Gray incl. two 1-1/8” O.D. Flanged
20 722604 4 WASHER, 1” OD x .387 ID, FLAT
21 7091585 4 NUT, 3/8-16 Hex Center Lock, YZ
22 7101393 2 HUBCAP, 12” Wheel, Snapper Cool Gray
23 7101350 2 HUBCAP, 8” & 9” Wheel Spoked- Snapper Cool Gray
24 7101243 1 DOOR, 22” Rear
25 7101070 1 ROD, Pivot, Rear Door
26 7101461 1 SPRING, Torsion, Rear Door, 22” WBM
27 7300583BH 1 BRACKET, Lower Handle, LH, 22” WBM, HW
28 7300582BH 1 BRACKET, Lower Handle, RH, 22” WBM, HW
29 7091811 2 BOLT, 5/16-18 x 5/8” Hex Flange Lock- YZ
30 7091601 2 NUT, 5/16-18 Hex Flange Lock, GR 5, YZ
31 7014341 4 RETAINING RING Waldes #5133-50 or equiv.
32 7101207 2 GEAR, Pinion, 22” WBM, FWD
33 7101402 2 DUST SHIELD, 22” WBM, FWD
34 7900054 4 SCREW, 3/8-16 x 3/4” Hex Head Cap, GR 5, YZ
35 7100857 1 TRANSMISSION, Rocker, 22” WBM HW, VS
36 7101270 2 PIN, Drive, 22” WBM, FWD
37 7300854D 1 BAFFLE, Rear, 22” Deck
tionItem Qt
Note
Ball Bearings (p/n 7101380)
Ball Bearings (p/n 7101380)
Footnotes:
Note: * See Height-of-Cut Assemblies page
Manual No. 710250822" VARIABLE SPEED HIGH WHEEL
7
TP 400-5394-IR-WB-N
Page 55

Deck Assembly (SPV22)
Manual No. 7102508 22" VARIABLE SPEED HIGH WHEEL
TP 400-5394-IR-WB-N
8
Page 56

Deck Assembly (SPV22)
p
y
Part No Descri
38 7300440D 1 BAFFLE, Front, 22” WBM
tionItem Qt
Note
Footnotes:
Note: * See Height-of-Cut Assemblies page
Manual No. 710250822" VARIABLE SPEED HIGH WHEEL
9
TP 400-5394-IR-WB-N
Page 57

Engine and Blade Assembly (SPV22)
Manual No. 7102508 22" VARIABLE SPEED HIGH WHEEL
TP 400-5394-IR-WB-N
10
Page 58

Engine and Blade Assembly (SPV22)
p
y
Part No Descri
1 1 * ENGINE, B&S, 675 Ser, B3, X-Spec (Mod. 126T02-0675-B3) used on SPV22675HW
1 1 * ENGINE, B&S, 675 Ser, X-Spec, F3 (Mod. 126L02-0675-F3) used on NSPV22675HW
1 1 * ENGINE, B&S, 675 Ser, X-Spec B1, FC (Mod. 126T02-0177-
B1)
2 7101449 1 ASSY, Engine Spacer, 22” WBM, Propelled (includes 3 bushings, p/n
3 7300400D 1 DECK, 22” Walk, 3-N-1
4 7101195 1 COVER, Front Deck, 22” FWD
5 7900018 2 SCREW, 4.8 x 1.59 x 13mm Hi-Lo, Round Washer Head Torx
6 7101302 2 SPACER, Belt Guide, 22” VS
7 7101024 2 BELT GUIDE, Engine, 22” VS
8 7101451 2 SCREW, 3/8-16 x 3” Hex Washer Self-Tap
9 7091214 1 KEY, #HP-506 Hi-Pro
10 7100437 1 PULLEY, Engine
11 7092086 1 SET SCREW, 5/16-18 x 1/2” Hex Recess
12 7100740 1 BLADE HUB, 22” Deck
14 721890 1 WASHER, .38” ID x 1.183 OD Bellville
15 720351 1 BOLT, 3/8-16 NS x 2-1/2” Hex Head
16 094696 2 SCREW, #8-18 x 1-1/4” Pan Head Thread Forming
17 794552 1 SHROUD, Engine, Snapper Waterfall
tionItem Qt
Note
used on SPV22675HWFC
7101448)
Footnotes:
NOTE: * Purchase engine parts from engine manufacturer dealer.
11
Manual No. 710250822" VARIABLE SPEED HIGH WHEEL
TP 400-5394-IR-WB-N
Page 59

Height-of-Cut Assemblies
Manual No. 7102508 22" VARIABLE SPEED HIGH WHEEL
TP 400-5394-IR-WB-N
12
Page 60

Height-of-Cut Assemblies
p
y
Part No Descri
1 7501056 1 ASSY, HOC, Right Rear, 22” WBM
2 7501055 1 ASSY, HOC, Left Rear, 22” WBM
3 7501057 1 ASSY, HOC, Right Front, 22” WBM, Propelled
4 7501058 1 ASSY, HOC, Left Front, 22” WBM, Propelled
5 7091497 2 SCREW, 3/8-16 x 1-1/2” Hex Head Cap, GR 5, YZ
6 7900047 2 WASHER, .391 x 1 x 14 Gage Flat
7 7900046 2 WASHER, .76 x 1.25 x .180 Flat
8 7101205 2 LEVER, HOC, 22” WBM
9 7500409 1 ASSY, Rear Axle, RH 22” WBM
10 7500408 1 ASSY, Rear Axle, LH 22” WBM
11 722611 4 WASHER, 1 ID x 1.64 OD Bellville
12 7300529 1 PLATE, Index, HOC, Rear
13 721899 2 SPACER, Height Adjust
14 7013847 2 RETAINER, 3/8” Bolt
15 720118 2 RETAINING RING, .906 ID x .078 Thick
16 7500404 2 ASSY, Front Axle 22”, Propelled
17 7101212 2 LEVER, HOC, 22” WBM
18 7300528 1 PLATE, HOC, Front Right, 22” WBM
19 7300527 1 PLATE, HOC, Front Left, 22” WBM
20 720685 2 RETAINER, Bearing
21 720761 2 BALL BEARING
tionItem Qt
Note
Footnotes:
13
Manual No. 710250822" VARIABLE SPEED HIGH WHEEL
TP 400-5394-IR-WB-N
Page 61

Transmission (22")
Manual No. 7102508 22" VARIABLE SPEED HIGH WHEEL
TP 400-5394-IR-WB-N
14
Page 62

Transmission (22")
p
y
Part No Descri
1 7100857 1 TRANSMISSION, Rocker, 22” WBM HW, VS
2 7900032 8 SCREW, 7mm x 1 x .550 AB Point
3 7100913 1 BELT, Traction Drive, 22” Pivot Handle 3L Section; 31.94 effective length
4 7101009 1 BELT GUIDE, Transmission, 22” WBM
5 7091195 2 SCREW, #10-16 x 3/4” Pan Head Self-Tap, Combo
tionItem Qt
Note
Footnotes:
15
Manual No. 710250822" VARIABLE SPEED HIGH WHEEL
TP 400-5394-IR-WB-N
Page 63

Decals (22")
Manual No. 7102508 22" VARIABLE SPEED HIGH WHEEL
TP 400-5394-IR-WB-N
16
Page 64

Decals (22")
p
y
Part No Descri
1 7101538 1 DECAL, Front Cover, 22” Snapper, FWD
2 7102153 1 DECAL, Briggs Engine, Snapper
3 7102151 1 DECAL, Briggs Engine, 675 Series
3 7102172 1 DECAL, Engine, TP, 675, Snapper, FC (not shown) similar in appearance to 7102151
4 7013010 1 DECAL, Danger, Cut Finger
5 7102286 1 DECAL, CPSC Blade
6 7101429 1 DECAL, Control Head, VS, Snapper, FC
7 7101536 1 DECAL, Control Head, VS, Snapper
8 7101394 1 DECAL, Warning, Rear Discharge Door
9 7102275 1 DECAL, Customer Service
10 7101671 1 DECAL, WB Safety, French/English
tionItem Qt
Note
Footnotes:
17
Manual No. 710250822" VARIABLE SPEED HIGH WHEEL
TP 400-5394-IR-WB-N
Page 65

Page 66

Parts Manual fo
r
22" VARIABLE SPEED HIGH WHEEL
WALK BEHIND MOWERS
IT IS THE POLICY OF BRIGGS & STRATTON CORP TO IMPROVE ITS
PRODUCTS WHENEVER IT IS POSSIBLE AND PRACTICAL TO DO SO.
WE RESERVE THE RIGHT TO MAKE CHANGES OR ADD
IMPROVEMENTS AT ANY TIME WITHOUT INCURRING ANY
OBLIGATION TO MAKE SUCH CHANGES ON PRODUCTS
Briggs & Stratton Yard Power Products Group
535 Macon Road
McDonough, GA, 30253 U.S.A.
800-935-2967
www.snapper.com
Copyright © 2008
Milwaukee, WI USA. All Rights Reserved
Briggs & Stratton Corporation
Manual No. 7102508
Revision IR,
TP 400-5394-IR-WB-N
4/11/2008
Page 67

126T02−0177−B1
Illustrated Parts List
Model Series
126T02−
TYPE NUMBER
0177−B1.
TABLE OF CONTENTS
Air Cleaner 3. . . . . . . . . . . . . . . . . . . . . . . . .
Blower Housing 4. . . . . . . . . . . . . . . . . . . .
Camshaft 2. . . . . . . . . . . . . . . . . . . . . . . . . .
Carburetor 3. . . . . . . . . . . . . . . . . . . . . . . . .
Controls 4. . . . . . . . . . . . . . . . . . . . . . . . . . .
Crankcase Cover/Sump 2. . . . . . . . . . . . .
Crankshaft 2. . . . . . . . . . . . . . . . . . . . . . . . .
Cylinder 2. . . . . . . . . . . . . . . . . . . . . . . . . . .
Engine Gasket Set 2. . . . . . . . . . . . . . . . . .
Flywheel 4. . . . . . . . . . . . . . . . . . . . . . . . . . .
Fuel Supply 3. . . . . . . . . . . . . . . . . . . . . . . .
Governor Spring 4. . . . . . . . . . . . . . . . . . . .
Ignition 4. . . . . . . . . . . . . . . . . . . . . . . . . . . .
Lubrication 2. . . . . . . . . . . . . . . . . . . . . . . . .
Piston/Rings/Connecting Rod 2. . . . . . .
Rewind Starter 4. . . . . . . . . . . . . . . . . . . . .
Valve Gasket Set 2. . . . . . . . . . . . . . . . . . .
FILE IN SECT. 2 OF SERVICE MANUAL
FORM MS−4257−04/15/2008
PRINTED IN U.S.A.
All rights reserved. No part of this material may be reproduced or transmitted,
in any form or by any means, electronic or mechanical, including photocopying,
recording or by any information storage and retrieval system, without permission
in writing from Briggs & Stratton Corporation.
COPYRIGHTby BRIGGS & STRATTON CORPORATION
Page 68

126T02−0177−B1
25
13
227
337
562
615
404
616
505
383
1058 OPERATOR’S MANUAL
306
307
7
5
27
1
869
870
871
34
1386
33
868
36
35
1387
2
40
40
1388
16
584
585
50
684
51
3
45
45
718
332
1330 REPAIR MANUAL
8
9
11
54
847
287
10
523
842
525
20
163
524
585
617
668
842
883
51
29
32A
32
46
1095 VALVE GASKET SET
7
43
9
883
24
15
22
741
524
4
12
20
26
12
28
27
358 ENGINE GASKET SET
3
7
9
4257−1 Assemblies include all parts shown in frames. 04/15/2008
1
Page 69

126T02−0177−B1
365
118
276
125
163
109
633A
108
127
133
975
117
137
276
134
276
97
633
130
104
617
121 CARBURETOR OVERHAUL KIT
1059
134
137
163
104
127
957
972
617
633
276
190
187
601
AUTOCHOKE SYSTEM
425
968
445
883
291
966
163
11A
443
300
81
613
4257−2 Assemblies include all parts shown in frames. 04/15/2008
2
Page 70

188
126T02−0177−B1
222
745
923
356
621
922
209
202
363
334
333
851
362
332
455
23
608
55
1211
1210
459
456
689
597
65
592
58
60
305
304
1036 EMISSIONS LABEL
37
78
4257−3 Assemblies include all parts shown in frames. 04/15/2008
3
Page 71

126T02−0177−B1
REF. PART REF. PART REF. PART
NO. NO. DESCRIPTION NO. NO. DESCRIPTION NO. NO. DESCRIPTION
1 697322 Cylinder Assembly
2 399269 Kit−Bushing/Seal
(Magneto Side)
3 K299819S Seal−Oil
(Magneto Side)
4 493279 Sump−Engine
5 691160 Head−Cylinder
7 K∅692249 Gasket−Cylinder Head
8 695250 Breather Assembly
9 K∅699472 Gasket−Breather
10 691125 Screw
(Breather Assembly)
11 691781 Tube−Breather
11A 691923 Tube−Breather
(Air Cleaner
Primer Base)
12 K692232 Gasket−Crankcase
13 690912 Screw
(Cylinder Head)
15 691680 Plug−Oil Drain
16 691450 Crankshaft
20 K399781S Seal−Oil
(PTO Side)
22 691092 Screw
(Crankcase
Cover/Sump)
23 691987 Flywheel
24 222698S Key−Flywheel
25 795429 Piston Assembly
(Standard)
−−−−−−− Note −−−−−
795430 Piston
Assembly
(.020” Oversize)
26 795431 Ring Set
(Standard)
−−−−−−− Note −−−−−
795432 Ring Set
(.020” Oversize)
27 691866 Lock−Piston Pin
28 499423 Pin−Piston
29 499424 Rod−Connecting
32 691664 Screw
(Connecting Rod)
(Short)
32A 695759 Screw
(Connecting Rod)
(Long)
33 262651S Valve−Exhaust
34 262652S Valve−Intake
35 691270 Spring−Valve
(Intake)
36 691270 Spring−Valve
(Exhaust)
37 793756 Guard−Flywheel
40 692194 Retainer−Valve
43 691997 Slinger−Governor/Oil
45 690548 Tappet−Valve
46 691449 Camshaft
50 794305 Manifold−Intake
51 K7794306 Gasket−Intake
54 691650 Screw
(Intake Manifold)
55 691421 Housing−
Rewind Starter
58 697316 Rope−Starter
(Cut To
Required Length)
60 281434S Grip−Starter Rope
65 690837 Screw
(Rewind Starter)
78 691108 Screw
(Flywheel Guard)
81 691740 Lock−Muffler Screw
97 696565 Shaft−Throttle
104 D691242 Pin−Float Hinge
108 795935 Valve−Choke
109 795936 Shaft−Choke
117 691428 Jet−Main
(Standard)
118 695042 Jet−Main
(High Altitude)
121 498260 Kit−Carburetor
Overhaul
125 794304 Carburetor
(AutoChoke System)
127 D694468 Plug−Welch
130 696564 Valve−Throttle
133 398187 Float−Carburetor
134 D398188 Kit−Needle/Seat
137 Dz693981 Gasket−Float Bowl
163 795629 Gasket−Air Cleaner
187 791766 Line−Fuel
(Cut to
Required Length)
188 693399 Screw
(Control Bracket)
190 690940 Screw
(Fuel Tank)
202 691829 Link−
Mechanical Governor
209 699056 Spring−Governor
(No Color)
222 795937 Bracket−Control
227 690783 Lever−
Governor Control
276 Dz271716 Washer−Sealing
287 690940 Screw
(Dipstick Tube)
291 790830 Thermostat
300 790828 Muffler
304 791383 Housing−Blower
(Compliance)
305 691108 Screw
(Blower Housing)
306 790836 Shield−Cylinder
307 690345 Screw
(Cylinder Shield)
332 690662 Nut
(Flywheel)
333 793353 Armature−Magneto
334 691061 Screw
(Magneto Armature)
337 802592S Plug−Spark
356 692390 Wire−Stop
358 794307 Gasket Set−Engine
362 793351 Shield−Spark Plug
363 19069 Flywheel Puller
365 691688 Screw
(Carburetor)
383 89838S Wrench−Spark Plug
404 690272 Washer
(Governor Crank)
425 690670 Screw
(Air Cleaner Cover)
443 692523 Screw
(Air Cleaner
Primer Base)
445 491588S Filter−
Air Cleaner Cartridge
455 791960 Cup−Flywheel
456 692299 Plate−Pawl Friction
459 281505S Plate−Ratchet
505 691251 Nut
(Governor
Control Lever)
523 499621 Dipstick
524 K692296 Seal−Dipstick Tube
525 495265 Tube−Dipstick
562 691119 Bolt
(Governor
Control Lever)
584 697734 Cover−
Breather Passage
585 K691879 Gasket−
Breather Passage
592 690800 Nut
(Rewind Starter)
597 691696 Screw
(Pawl Friction Plate)
601 791850 Clamp−Hose
K Engine Gasket Set−Reference 358
D Carburetor Overhaul Kit−Reference 121
4257−4 Assemblies include all parts shown in frames. 04/15/2008
∅ Valve Gasket Set−Reference 1095
4
Page 72

126T02−0177−B1
REF. PART REF. PART REF. PART
NO. NO. DESCRIPTION NO. NO. DESCRIPTION NO. NO. DESCRIPTION
608 497680 Starter−Rewind
613 790833 Screw
(Muffler)
615 690340 Retainer−
Governor Shaft
616 698801 Crank−Governor
617 270344S Seal−O Ring
(Intake Manifold)
621 692310 Switch−Stop
633 D
z691321 Seal−Choke/Throttle
Shaft
(Throttle Shaft)
633A 693867 Seal−Choke/Throttle
Shaft
(Choke Shaft)
684 690345 Screw
(Breather
Passage Cover)
689 691855 Spring−Friction
718 690959 Pin−Locating
741 795755 Gear−Timing
745 691648 Screw
(Brake)
842 K691031 Seal−O Ring
(Dipstick Tube)
847 692047 Dipstick/Tube
Assembly
851 692424 Terminal−Spark Plug
868 697338 Seal−Valve
869 691155 Seat−Valve
(Intake)
870 690380 Seat−Valve
(Exhaust)
871 262001 Bushing−Valve Guide
(Exhaust)
−−−−−−− Note −−−−−
63709 Bushing−Valve
Guide
(Intake)
883 K∅691881 Gasket−Exhaust
922 692135 Spring−Brake
923 695891 Brake
957 692046 Cap−Fuel Tank
(Black)
966 795259 Base−
Air Cleaner Primer
968 692298 Cover−Air Cleaner
972 699374 Tank−Fuel
975 493640 Bowl−Float
1036 Label−Emissions
(Available From A
Briggs & Statton
Authorized Dealer)
1058 277039 Operator’s Manual
1059 692311 Kit−Screw/Washer
(Fuel Tank)
1095 498528 Gasket Set−Valve
1210 498144 Pulley/Spring
Assembly
(Pulley)
1211 498144 Pulley/Spring
Assembly
(Spring)
1330 270962 Manual−Repair
1386 790848 Vane−Air
1387 790849 Spring−Air Vane
1388 790850 Screw
(Air Vane)
K Engine Gasket Set−Reference 358
D Carburetor Overhaul Kit−Reference 121
4257−5 Assemblies include all parts shown in frames. 04/15/2008
∅ Valve Gasket Set−Reference 1095
5
Page 73

Page 74

 Loading...