

Page 1
3100 PSI MAX
2.5 GPM MAX
PRESSURE WASHER
Operator’s Manual
Model No. 580.752640
Part No. 208908GS Draft - (01/22/2009)
• Safety
• Assembly
• Operation
• Maintenance
• Parts
• Español, p. 32
HOURS: Mon. - Fri. 8 a.m. to 5 p.m. (CT)
PRESSURE WASHER
CUSTOMER HELPLINE
1-800-317-7833
Sears, Roebuck and Co., Hoffman Estates, IL 60179 U.S.A.
Visit our website: www.sears.com
ADVERTENCIA
Antes de utilizar el producto, lea este
manual y siga todas las Reglas de
Seguridad e Instrucciones de Uso.
WARNING
Before using this product, read this
manual and follow all Safety Rules
and Operating Instructions.
This pressure washer is rated in accordance to the Pressure Washer Manufacturer’s Association
(PWMA) standard PW101 (Testing and Rating Performance of Pressure Washers).
Esta limpiadora a presión está clasificada conforme a la norma PW101 (comprobación y clasificación de rendimiento de limpiadoras
a presión) de la Asociación de fabricantes de bombas a presión (Pressure Washer Manufacturer’s Association, PWMA).
Page 2

2
TABLE OF CONTENTS
WARRANTY . . . . . . . . . . . . . . . . . . . . . . . . . . . . . . . . . . . . . . . . . . 2
REPAIR PROTECTION AGREEMENT. . . . . . . . . . . . . . . . . . . . . . . . 2
SAFETY RULES . . . . . . . . . . . . . . . . . . . . . . . . . . . . . . . . . . . . . . 3-5
FEATURES AND CONTROLS. . . . . . . . . . . . . . . . . . . . . . . . . . . . . . 6
ASSEMBLY . . . . . . . . . . . . . . . . . . . . . . . . . . . . . . . . . . . . . . . . 7-10
OPERATION. . . . . . . . . . . . . . . . . . . . . . . . . . . . . . . . . . . . . . . 11-14
SPECIFICATIONS . . . . . . . . . . . . . . . . . . . . . . . . . . . . . . . . . . . . . 15
MAINTENANCE . . . . . . . . . . . . . . . . . . . . . . . . . . . . . . . . . . . . 16-20
STORAGE . . . . . . . . . . . . . . . . . . . . . . . . . . . . . . . . . . . . . . . . . . . 21
TROUBLESHOOTING . . . . . . . . . . . . . . . . . . . . . . . . . . . . . . . . . . 22
REPLACEMENT PARTS . . . . . . . . . . . . . . . . . . . . . . . . . . . . . . 23-27
EMISSION CONTROL WARRANTY . . . . . . . . . . . . . . . . . . . . . 28-29
NOTES. . . . . . . . . . . . . . . . . . . . . . . . . . . . . . . . . . . . . . . . . . . 30-31
ESPAÑOL. . . . . . . . . . . . . . . . . . . . . . . . . . . . . . . . . . . . . . . . . 32-55
HOW TO ORDER PARTS . . . . . . . . . . . . . . . . . . . . . . . . BACK PAGE
WARRANTY
SNAPPER TWO-YEAR LIMITED WARRANTY
For the first year from the date of purchase, if this Snapper product fails due to a defect in material or workmanship, return it
to any Sears store or Parts & Repair Center in the United States for free repair.
For the second year from the date of purchase, if any part of this Snapper product fails due to a defect in material or
workmanship, a new part will be supplied free of charge. You must pay the labor cost if you wish to have it installed.
This warranty applies for only 90 days from the date of purchase if this product is ever used for commercial or rental
purposes.
This warranty gives you specific legal rights, and you may also have other rights which vary from state to state.
Sears, Roebuck and Co., Hoffman Estates, IL 60179
© 2009
REPAIR PROTECTION AGREEMENT
Congratulations on making a smart purchase.
Your new pressure washer is designed and manufactured for
years of dependable operation. But like all products, it may
require repair from time to time. That’s when having a Repair
Protection Agreement can save you money and aggravation.
Here’s what the Repair Protection Agreement* includes:
• Expert service by our 10,000 professional repair
specialists
• Unlimited service and no charge for parts and labor on
all covered repairs
• Product replacement up to $1500 if your covered
product can’t be fixed
• Discount of 10% from regular price of service and related
installed parts not covered by the agreement; also, 10%
off regular price of preventive maintenance check
• Fast help by phone – we call it Rapid Resolution – phone
support from a Sears representative. Think of us as a
“talking owner’s manual”.
Once you purchase the Repair Protection Agreement, a
simple phone call is all it takes for you to schedule service.
You can call anytime day or night, or schedule a service
appointment online.
The Repair Protection Agreement is a risk-free purchase. If
you cancel for any reason during the product warranty
period, we will provide a full refund. Or, a prorated refund
anytime after the product warranty period expires. Purchase
your Repair Protection Agreement today!
Some limitations and exclusions apply. For prices and
additional information in the U.S.A. call 1-800-827-6655.
* Coverage in Canada varies on some items. For full
details, call Sears Canada at 1-800-361-6665.
Sears Installation Service
For Sears professional installation of home appliances,
garage door openers, water heaters, and other major home
items, in the U.S.A. or Canada call 1-800-4-MY-HOME®.
Page 3
3
Read this manual carefully and become familiar
with your pressure washer. Know its applications,
its limitations, and any hazards involved.
Important Safety Information
Safety Symbols and Meanings
The safety alert symbol indicates a potential personal
injury hazard. A signal word (DANGER, WARNING, or
CAUTION) is used with the alert symbol to designate a degree
or level of hazard seriousness. A safety symbol may be used
to represent the type of hazard. The signal word NOTICE is
used to address practices not related to personal injury.
DANGER indicates a hazard which, if not avoided, will
result in death or serious injury.
WARNING indicates a hazard which, if not avoided, could
result in death or serious injury.
CAUTION indicates a hazard which, if not avoided, could
result in minor or moderate injury.
NOTICE address practices not related to personal injury.
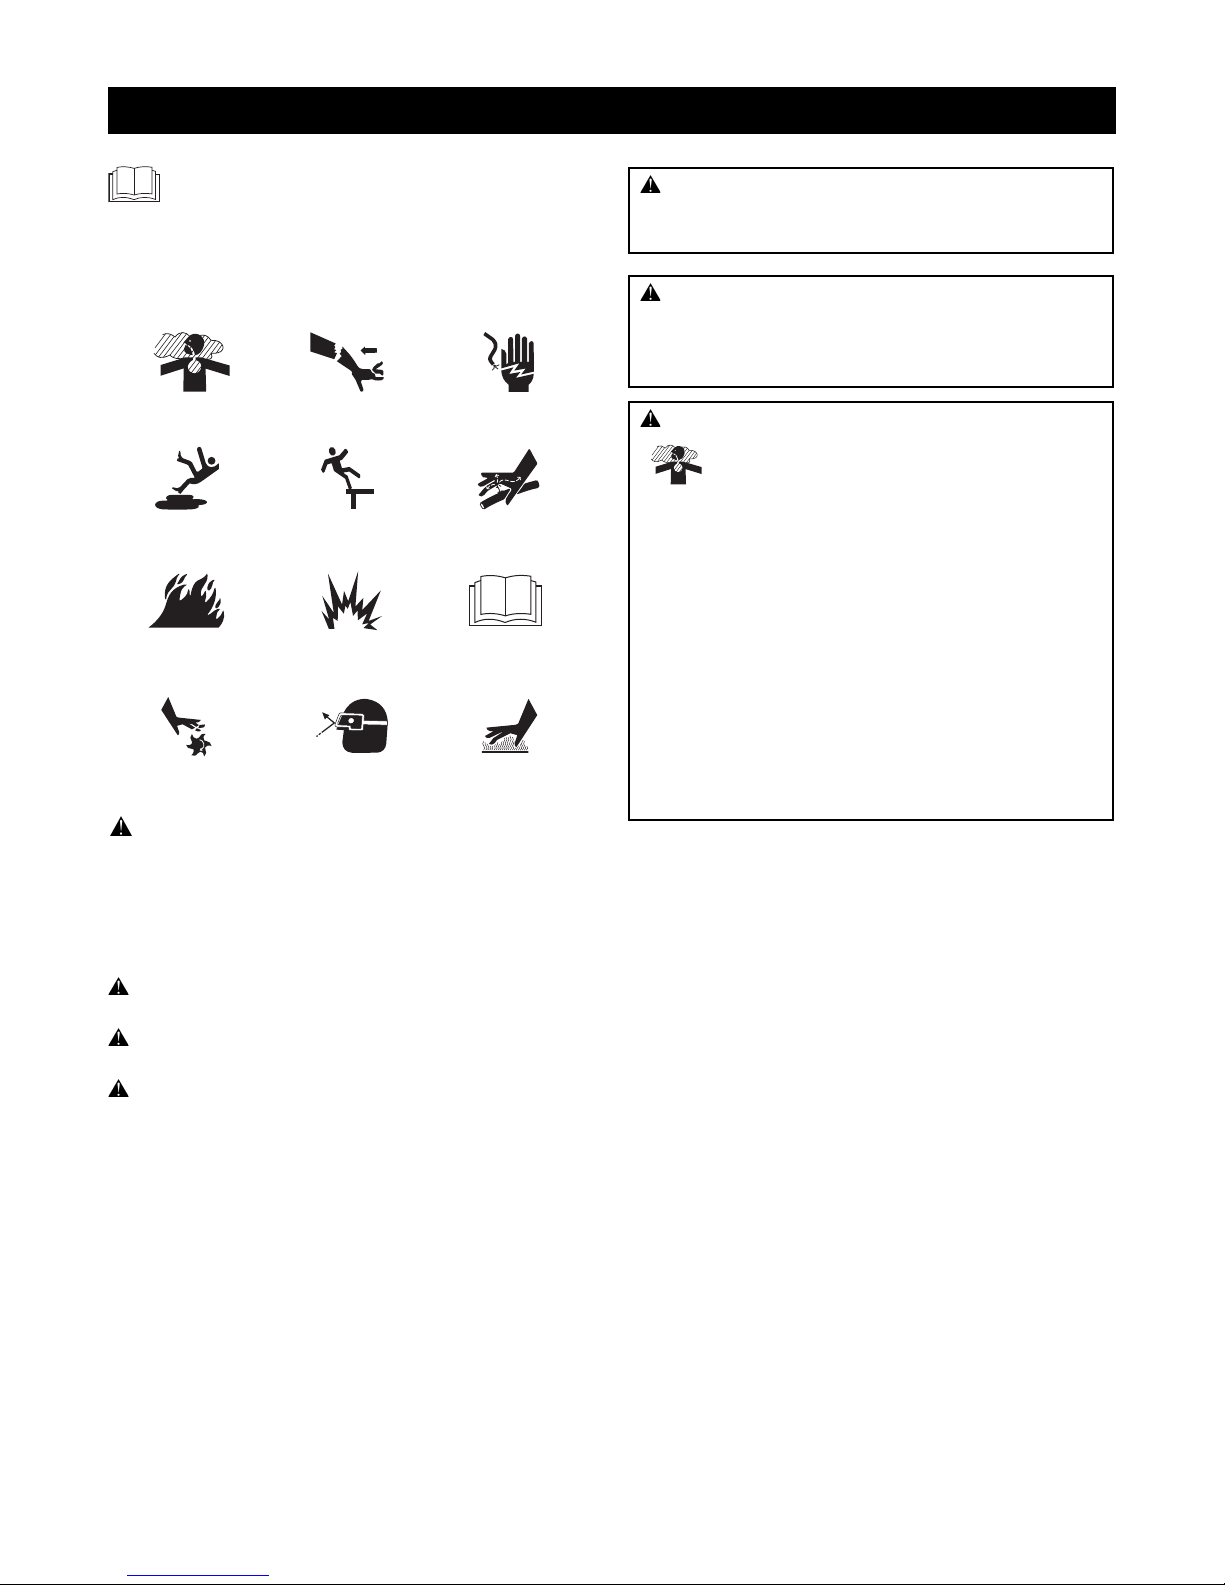
SAFETY RULES
Fire
Explosion
Toxic Fumes
Hot Surface
Moving Parts
Electrical Shock
Slippery Surface
Fall
Kickback
Flying Objects
Fluid Injection
Operator’s Manual
WARNING: The engine exhaust from this product
contains chemicals known to the State of California to
cause cancer, birth defects, or other reproductive harm.
WARNING: This product contains lead and lead
compounds, known to the State of California to cause
birth defects or other reproductive harm. Wash your
hands after handling this product.
WARNING: Running engine gives off carbon
monoxide, an odorless, colorless, poison gas.
Breathing carbon monoxide can cause headache,
fatigue, dizziness, vomiting, confusion, seizures,
nausea, fainting or death.
Some chemicals or detergents may be harmful if inhaled
or ingested, causing severe nausea, fainting, or
poisoning.
• Operate pressure washer ONLY outdoors.
• Keep exhaust gas from entering a confined area through
windows, doors, ventilation intakes, or other openings.
• DO NOT start or run engine indoors or in an enclosed area,
even if windows and doors are open.
• Use a respirator or mask whenever there is a chance that
vapors may be inhaled.
• Read all instructions with mask so you are certain the mask will
provide the necessary protection against inhaling harmful
vapors.
Page 4
4
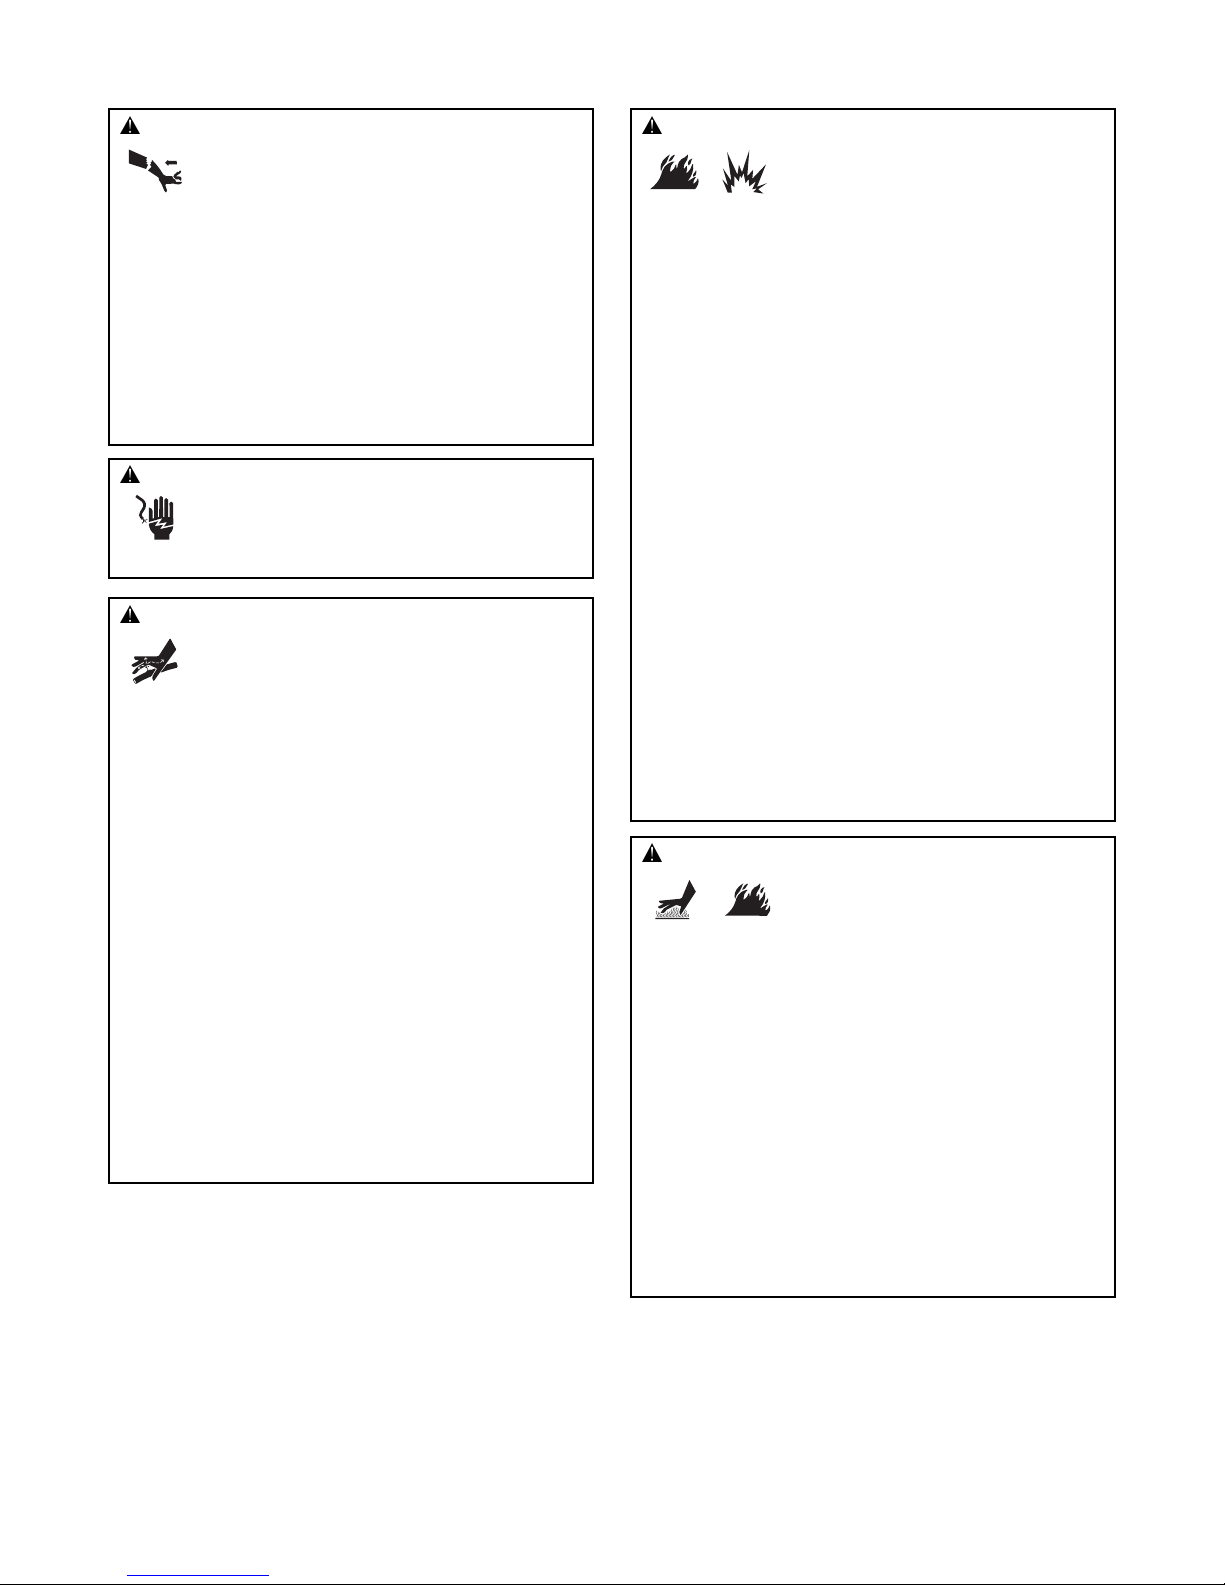
WARNING: The high pressure stream of water that this
equipment produces can cut through skin and
its underlying tissues, leading to serious injury
and possible amputation.
Spray gun traps high water pressure, even when engine is
stopped and water is disconnected, which can cause
injury.
• DO NOT allow CHILDREN to operate pressure washer.
• NEVER repair high pressure hose. Replace it.
• NEVER repair leaking connections with sealant of any kind.
Replace o-ring or seal.
• NEVER connect high pressure hose to nozzle extension.
• Keep high pressure hose connected to pump and spray gun
while system is pressurized.
• ALWAYS point spray gun in safe direction, press red button
and squeeze spray gun trigger to release high pressure, every
time you stop engine.
• NEVER aim spray gun at people, animals, or plants.
• DO NOT secure spray gun in open position.
• DO NOT leave spray gun unattended while machine is running.
• NEVER use a spray gun which does not have a trigger lock or
trigger guard in place and in working order.
• Always be certain spray gun, nozzles and accessories are
correctly attached.
WARNING: Contact with muffler area can result in
serious burns.
Exhaust heat/gases can ignite
combustibles, structures or damage
fuel tank causing a fire.
• DO NOT touch hot parts and AVOID hot exhaust gases.
• Allow equipment to cool before touching.
• Keep at least 5 feet (152 cm) of clearance on all sides of
pressure washer including overhead.
• It is a violation of California Public Resource Code, Section
4442, to use or operate the engine on any forest-covered,
brush-covered, or grass-covered land unless the exhaust
system is equipped with a spark arrester, as defined in Section
4442, maintained in effective working order. Other states or
federal jurisdictions may have similar laws.
Contact the original equipment manufacturer, retailer, or dealer
to obtain a spark arrester designed for the exhaust system
installed on this engine.
• Replacement parts must be the same and installed in the same
position as the original parts.
WARNING: Fuel and its vapors are extremely
flammable and explosive.
Fire or explosion can cause severe burns
or death.
WHEN ADDING OR DRAINING FUEL
• Turn pressure washer OFF and let it cool at least 2 minutes
before removing fuel cap. Loosen cap slowly to relieve pressure
in tank.
• Fill or drain fuel tank outdoors.
• DO NOT overfill tank. Allow space for fuel expansion.
• If fuel spills, wait until it evaporates before starting engine.
• Keep fuel away from sparks, open flames, pilot lights, heat, and
other ignition sources.
• DO NOT light a cigarette or smoke.
WHEN STARTING EQUIPMENT
• Ensure spark plug, muffler, fuel cap, and air cleaner are in place.
• DO NOT crank engine with spark plug removed.
WHEN OPERATING EQUIPMENT
• DO NOT tip engine or equipment at angle which causes fuel to
spill.
• DO NOT spray flammable liquids.
WHEN TRANSPORTING OR REPAIRING EQUIPMENT
• Transport/repair with fuel tank EMPTY or with fuel shutoff valve
OFF.
• Disconnect spark plug wire.
WHEN STORING FUEL OR EQUIPMENT WITH FUEL IN TANK
• Store away from furnaces, stoves, water heaters, clothes
dryers, or other appliances that have pilot light or other ignition
source because they can ignite fuel vapors.
WARNING: Risk of electrocution.
Contact with power source can cause electric
shock or burn.
• NEVER spray near power source.
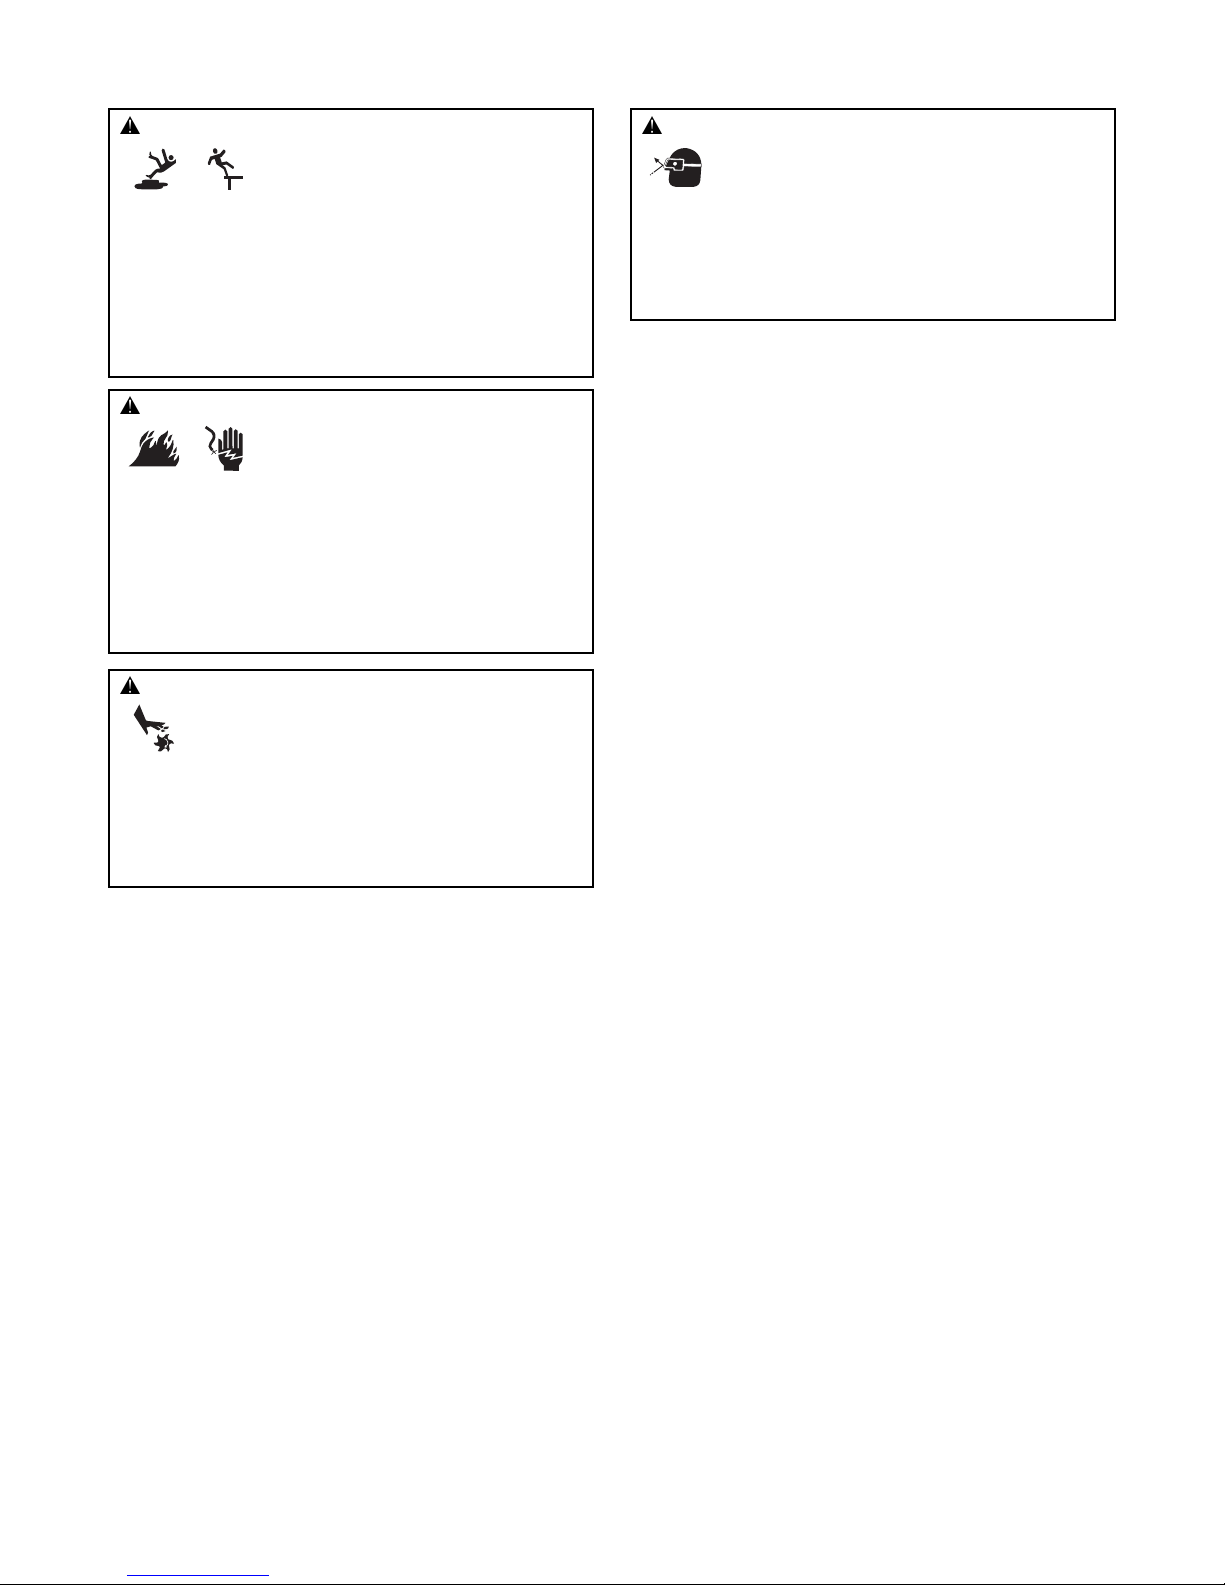
WARNING: Starter cord kickback (rapid retraction) can
result in bodily injury. Kickback will pull hand and
arm toward engine faster than you can let go.
Broken bones, fractures, bruises, or sprains
could result.
• NEVER pull starter cord without first relieving spray gun
pressure.
• When starting engine, pull cord slowly until resistance is felt
and then pull rapidly to avoid kickback.
• After each starting attempt, where engine fails to run, always
point spray gun in safe direction, press red button and squeeze
spray gun trigger to release high pressure.
• Firmly grasp spray gun with both hands when using high
pressure spray to avoid injury when spray gun kicks back.
Page 5
5
NOTICE: High pressure spray may damage fragile items
including glass.
• DO NOT point spray gun at glass when using MAX (0°) nozzle.
• NEVER aim spray gun at plants.
NOTICE: Improper treatment of pressure washer can
damage it and shorten its life.
• If you have questions about intended use, ask dealer or contact
Sears.
• NEVER operate units with broken or missing parts, or without
protective housing or covers.
• DO NOT by-pass any safety device on this machine.
• DO NOT tamper with governed speed.
• DO NOT operate pressure washer above rated pressure.
• DO NOT modify pressure washer in any way.
• Before starting pressure washer in cold weather, check all parts
of the equipment to be sure ice has not formed there.
• NEVER move machine by pulling on hoses. Use handle provided
on unit.
• Check fuel system for leaks or signs of deterioration, such as
chafed or spongy hose, loose or missing clamps, or damaged
tank or cap. Correct all defects before operating pressure washer.
• This equipment is designed to be used with Sears authorized parts
ONLY. If equipment is used with parts that DO NOT comply with
minimum specifications, user assumes all risks and liabilities.
WARNING: Unintentional sparking can result in fire or
electric shock.
WHEN ADJUSTING OR MAKING REPAIRS TO YOUR PRESSURE
WASHER
• Disconnect the spark plug wire from the spark plug and place
the wire where it cannot contact spark plug.
WHEN TESTING FOR ENGINE SPARK
• Use approved spark plug tester.
• DO NOT check for spark with spark plug removed.
WARNING: Starter and other rotating parts can
entangle hands, hair, clothing, or accessories.
• NEVER operate pressure washer without protective housing or
covers.
• DO NOT wear loose clothing, jewelry or anything that may be
caught in the starter or other rotating parts.
• Tie up long hair and remove jewelry.
WARNING: Risk of eye injury.
Spray can splash back or propel objects.
• Always wear indirect vented (chemical splash) safety goggles
marked to comply with ANSI Z87.1 when using or in vicinity of
this equipment.
• NEVER substitute safety glasses or dry-condition goggles for
indirect vented safety goggles.
WARNING: Use of pressure washer can create puddles
and slippery surfaces.
Kickback from spray gun can cause you
to fall.
• Operate pressure washer from a stable surface.
• The cleaning area should have adequate slopes and drainage to
reduce the possibility of a fall due to slippery surfaces.
• Be extremely careful if you must use the pressure washer from
a ladder, scaffolding, or any other similar location.
• Firmly grasp spray gun with both hands when using high
pressure spray to avoid injury when spray gun kicks back.
Page 6
6
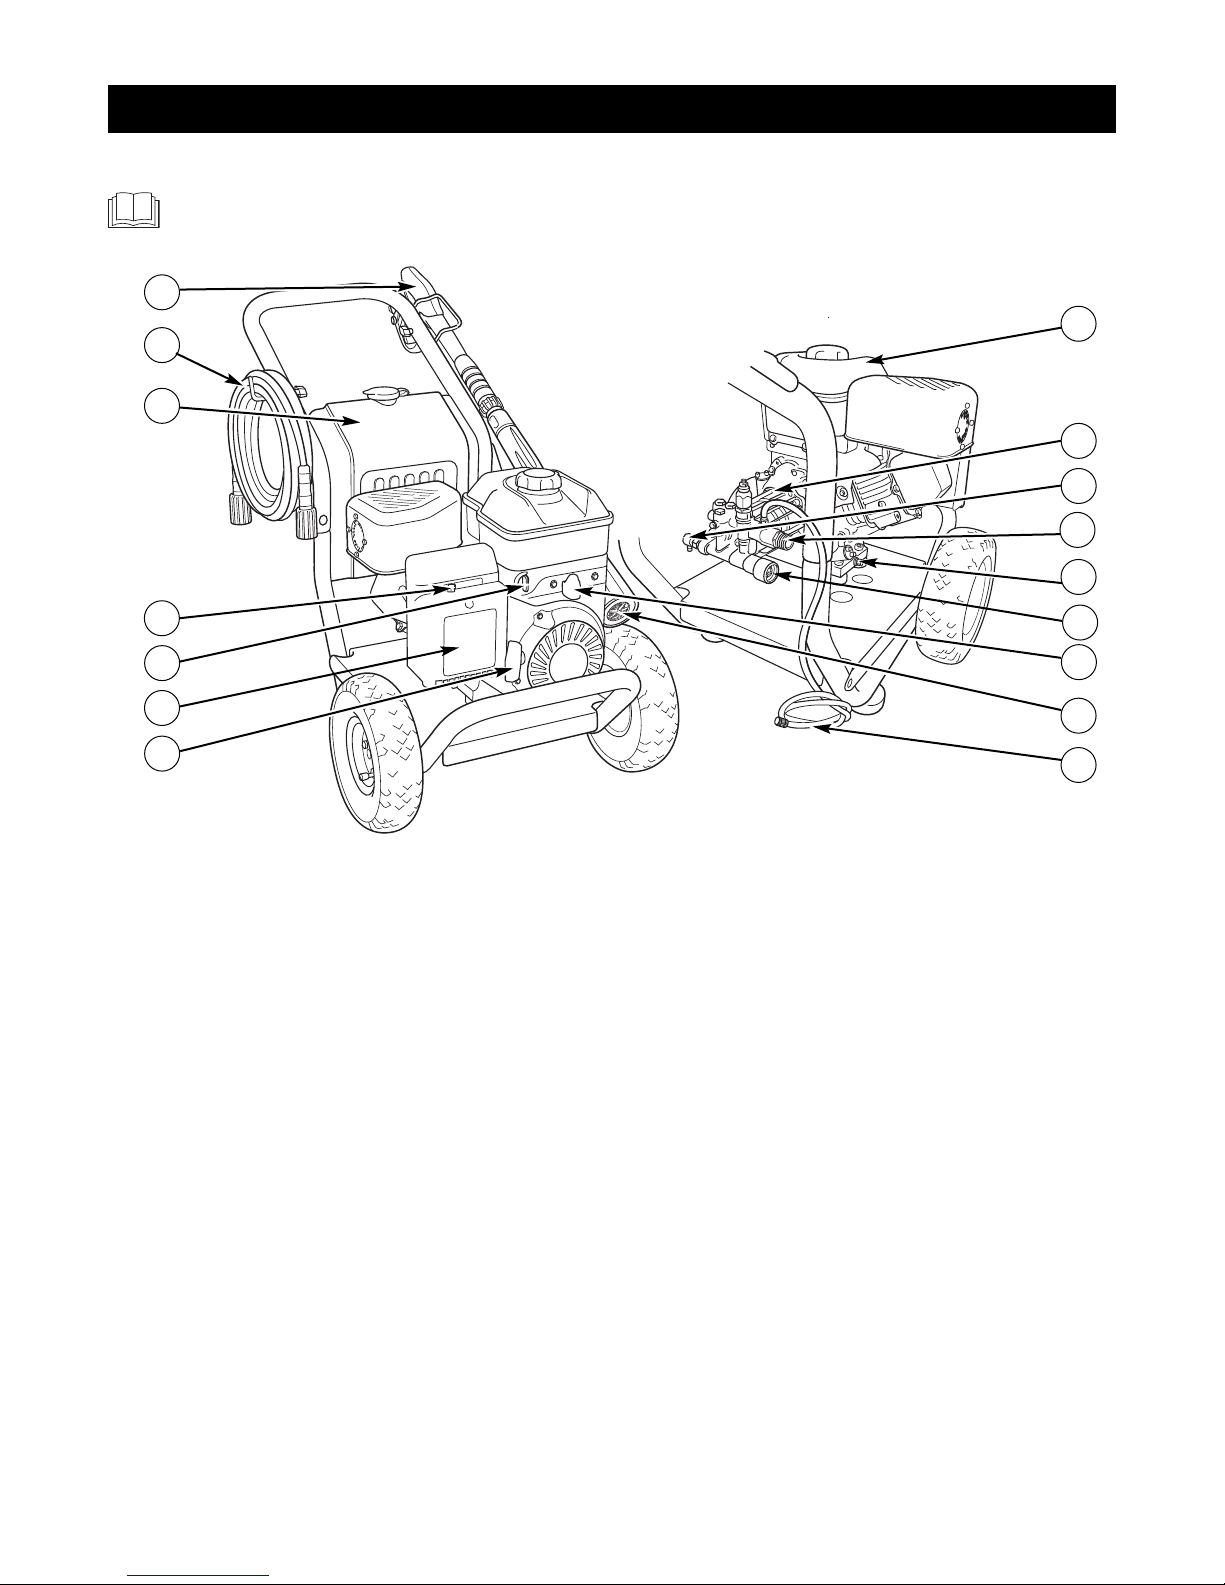
KNOW YOUR PRESSURE WASHER
Read the Operator’s Manual and safety rules before operating your pressure washer.
Compare the illustrations with your pressure washer to familiarize yourself with the locations of various controls and
adjustments. Save this manual for future reference.
FEATURES AND CONTROLS
L
A
B
J
M
F
H
S
E
G
R
C
P
A - Spray Gun — Controls the application of water onto
cleaning surface with trigger device. Includes trigger lock.
B - High Pressure Hose — Connect one end to water pump
and the other end to spray gun.
C - Cleaning Tank – Use to hold up to two gallons (7.6 l) of
pressure washer safe detergent.
D - Choke Lever — Prepares a cold engine for starting.
E - Fuel Valve — Used to turn fuel supply on and off to
engine.
F - Air Filter — Protects engine by filtering dust and debris
out of intake air.
G - Recoil Starter — Used for starting the engine manually.
H - Standard Detergent Siphoning Tube/Filter — Use to
siphon pressure washer safe detergents into the low
pressure stream.
J - PrecisionSpray™ Selector — Contains six different
setting for various applications.
K - Throttle Lever — Sets engine in starting mode for recoil
starter and stops a running engine.
L - Water Inlet — Connection for garden hose.
M - Oil Drain — Drain engine oil here.
N - High Pressure Outlet — Connection for high pressure
hose.
P - Automatic Cool Down System — Cycles water through
pump when water reaches 125°-155°F. Warm water will
discharge from pump onto ground. This system prevents
internal pump damage.
R - Pump — Develops high pressure.
S - Fuel Tank — Fill tank with regular unleaded fuel. Always
leave room for fuel expansion.
Items Not Shown:
Identification Label (near rear of base plate) — Provides
model and serial number of pressure washer. Please have
these readily available if calling for assistance.
Oil Fill — Check and add engine oil here.
Warning/Operating Instructions Tag — Identifies hazards
and proper procedure to start/stop pressure washer.
D
N
K
Page 7
7
Your pressure washer requires some assembly and is ready
for use only after it has been properly serviced with the
recommended oil and fuel.
If you have any problems with the assembly of your
pressure washer, please call the pressure washer helpline
at 1-800-317-7833.
UNPACK PRESSURE WASHER
1. Remove everything from carton except pressure washer.
2. Open carton completely by cutting each corner from top
to bottom.
3. Remove pressure washer from carton.
CARTON CONTENTS
Check all contents. If any parts are missing or damaged, call
the pressure washer helpline at 1-800-317-7833.
• Main Unit
• Handle
• Cleaning Tank
• High Pressure Hose
• Spray Gun
• PrecisionSpray™ Selector
• Spray Gun Wireform
• Detergent Siphon Hose
• Oil Bottle
• Parts Bag (which includes the following):
• Operator’s Manual
• Owner’s Registration Card
• Handle Fastening Hardware Kit (which includes):
• Carriage Bolts (2)
• “L” Bolt
• Plastic Knobs (4)
• Tree Clips (4)
Become familiar with each piece before assembling the
pressure washer. Identify all contents with the illustration on
page 6. If any parts are missing or damaged, call the
pressure washer helpline at 1-800-317-7833.
ASSEMBLING PRESSURE WASHER
Your Snapper pressure washer will need assembly before
operation:
1. Fill out and send in registration card.
2. Attach handle and cleaning tank.
3. Connect detergent siphon hose to pump.
4. Add oil to engine crankcase.
5. Add fuel to fuel tank.
6. Connect pressure hose to spray gun and pump.
7. Connect water supply to pump.
8. Attach PrecisionSpray™ selector to spray gun.
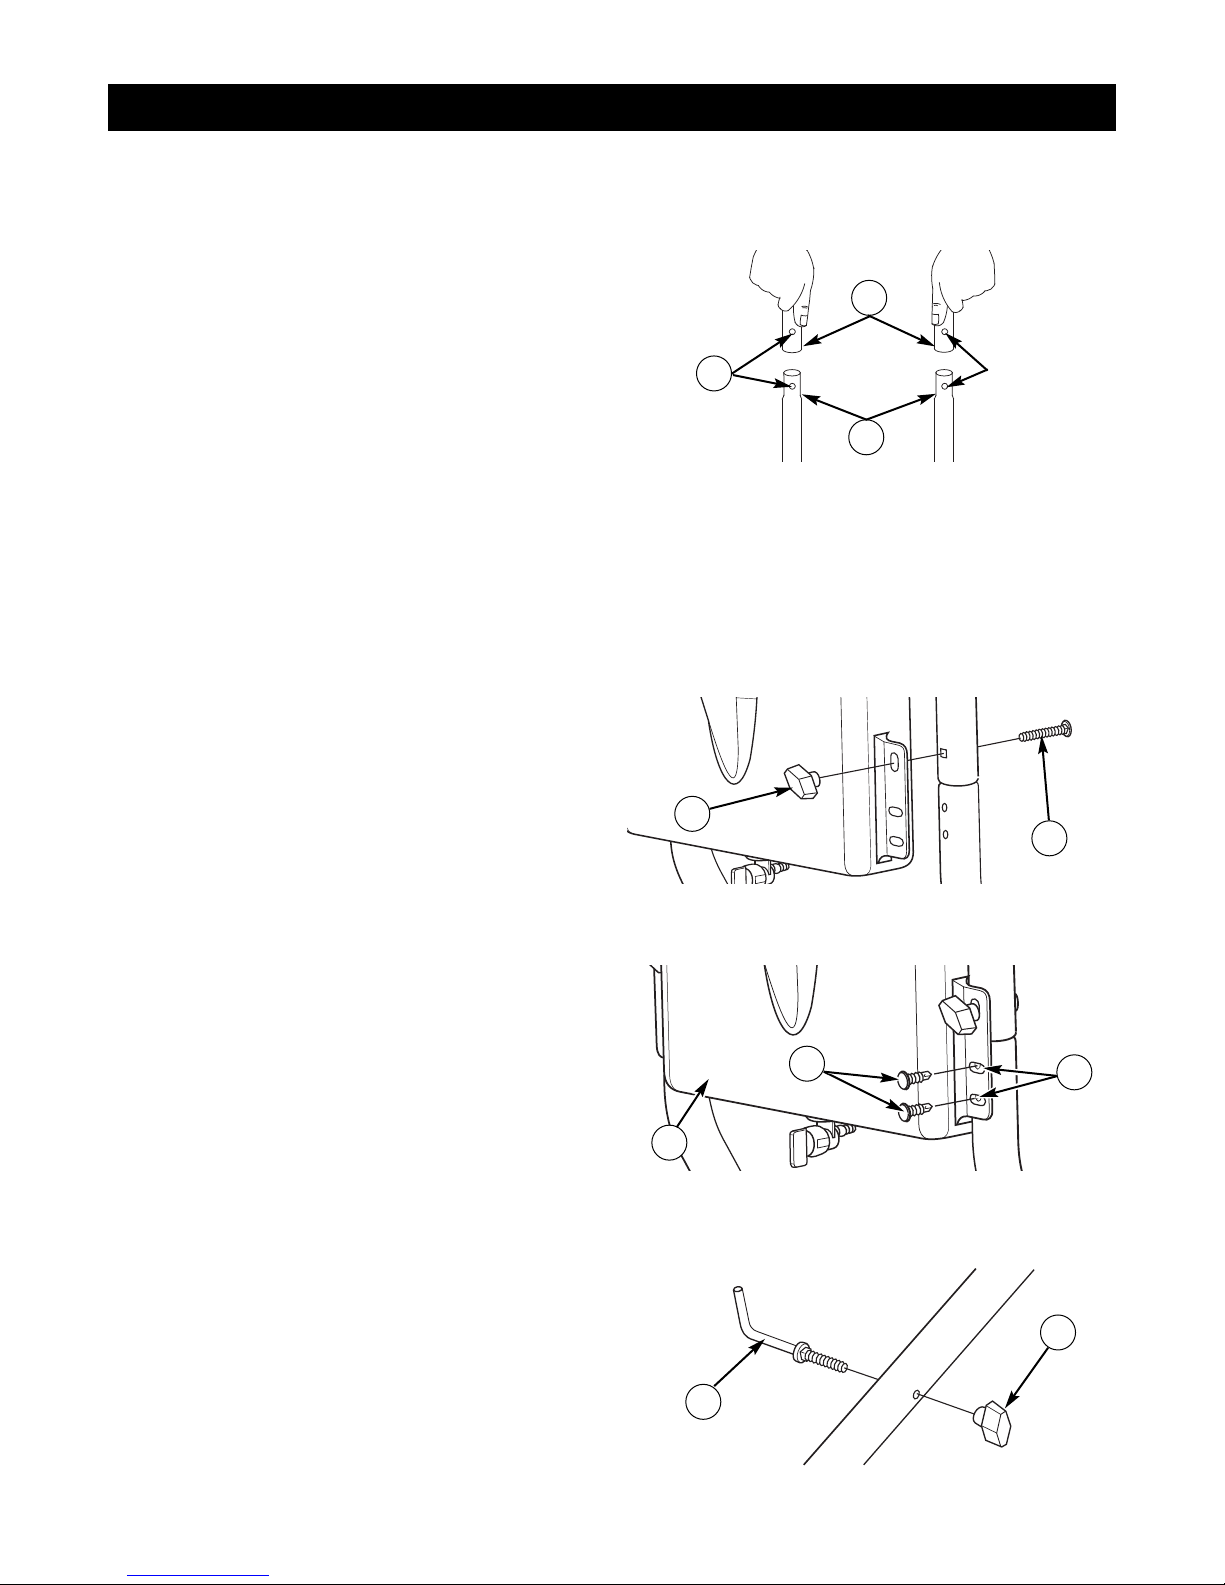
Attach Handle and Cleaning Tank
1. Place handle (A) onto handle supports (B) connected to
main unit. Make sure holes (C) in handle align with holes
(C) on handle supports.
NOTE: It may be necessary to move the handle supports
from side to side in order to align the handle so it will slide
over the handle supports.
2. Place cleaning tank over holes on handle and handle
supports (viewing from rear of unit).
3. Insert carriage bolts (D) through top holes of the handle,
handle supports and cleaning tank from front of unit and
attach a plastic knob (E) from rear of unit. Tighten by
hand.
4. Push tree clips (F) into bottom holes (G) of cleaning
tank (H) and holes on handle supports until they sit flat
against cleaning tank.
5. Insert “L” bolt (J) through hole on left side of handle
(viewing from front of unit). Hold bolt in place and attach
a plastic knob (K) from inside of unit. Tighten by hand.
ASSEMBLY
C
A
B
E
D
H
F
G
J
K
Page 8
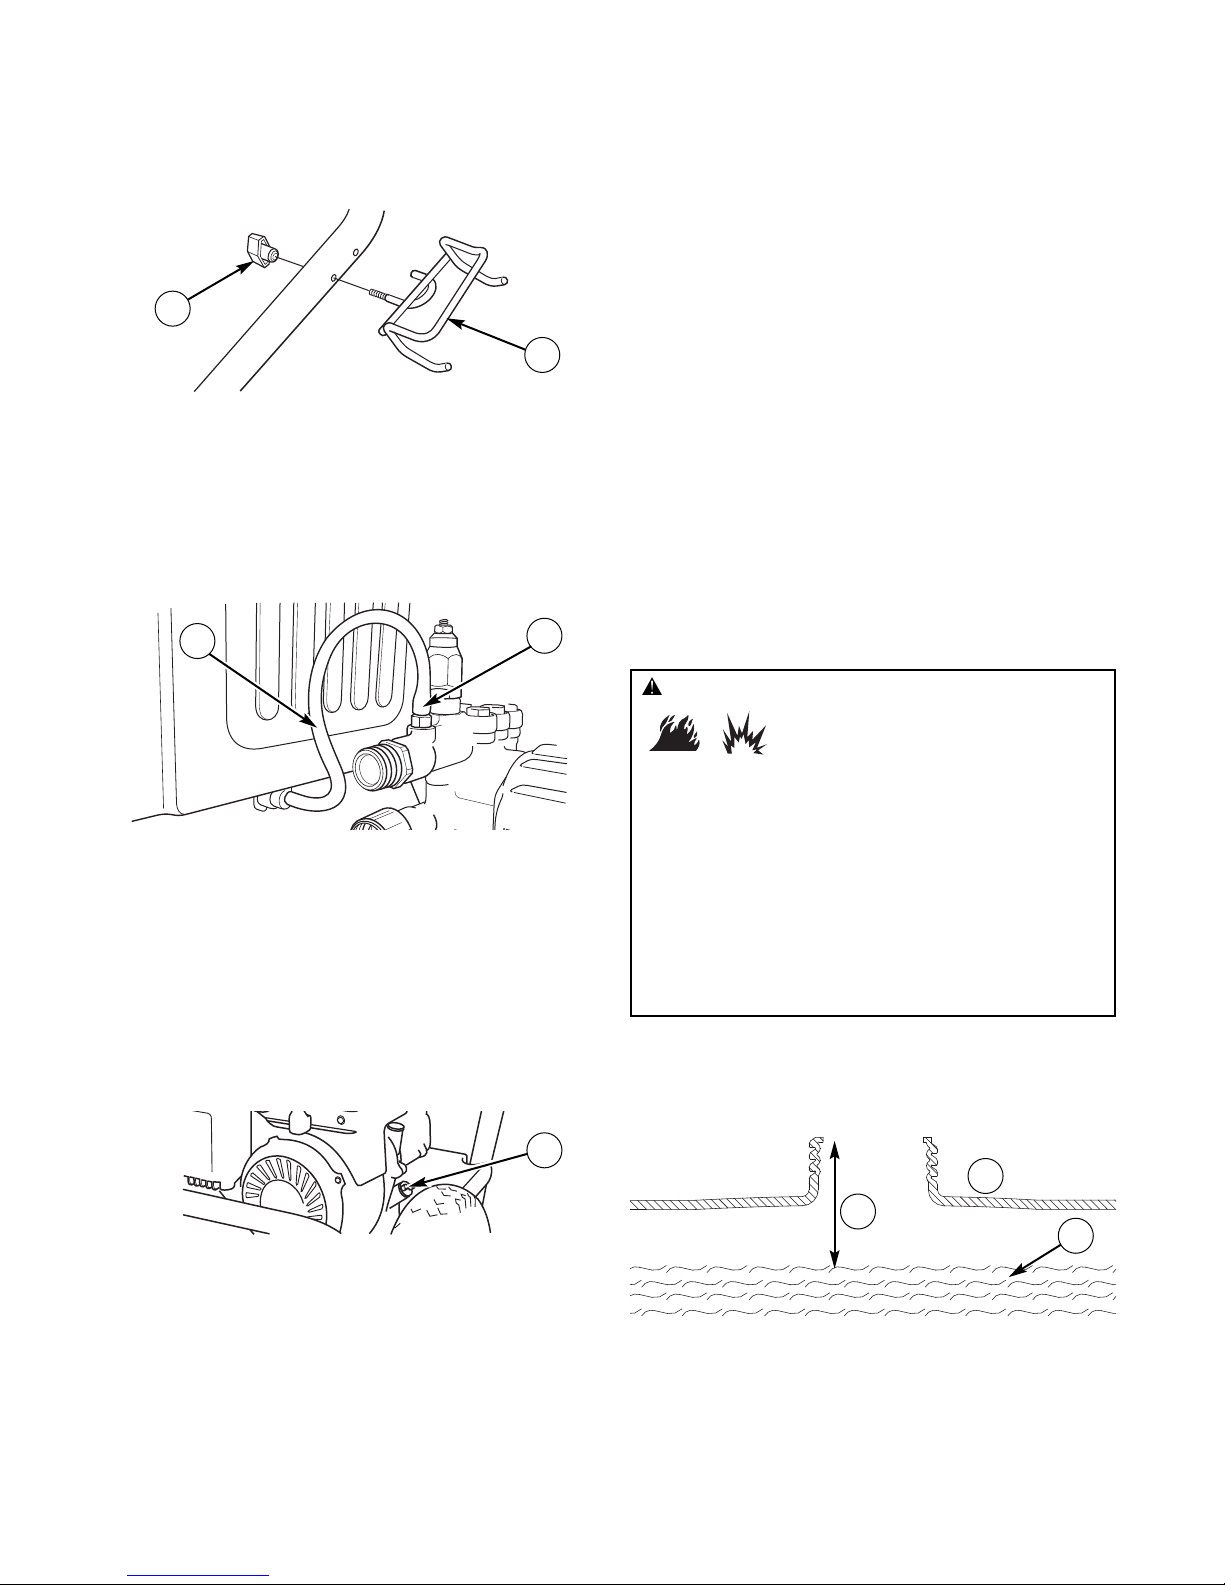
6. Insert spray gun holder wireform (A) through hole just
above cleaning tank on right side of handle (viewing
from front of unit). Hold wireform in place and attach a
plastic knob (B) from inside of unit. Tighten by hand.
Attach Detergent Siphon Hose to Pump
The pressure washer is equipped with two detergent
siphoning hoses. One is attached to the cleaning tank and
one is loose for siphoning pressure washer safe detergents
from a bottle or container.
Attach one of the detergent siphon hoses (C) to the barbed
hose fitting (D) on the pump.
IMPORTANT: Only one detergent siphoning hose can be used
at a time. When cleaning tank is not used, make sure
detergent shut-off valve on cleaning tank is in the “Off”
position.
Add Engine Oil
1. Place pressure washer on a flat, level surface.
2. Clean area around oil fill and remove yellow oil fill cap.
3. Using oil funnel (optional), slowly pour contents of
provided oil bottle into oil fill opening (E) to the point of
overflowing.
NOTICE: Improper treatment of pressure washer can
damage it and shorten its life.
• DO NOT attempt to crank or start the engine before it has been
properly serviced with the recommended oil. This may result in an
engine failure.
4. Replace oil fill cap and fully tighten.
Add Fuel
Fuel must meet these requirements:
• Clean, fresh, unleaded gasoline.
• A minimum of 87 octane/87 AKI (91 RON). High altitude
use, see High Altitude.
• Gasoline with up to 10% ethanol (gasohol) or up to 15%
MTBE (methyl tertiary butyl ether) is acceptable.
NOTICE: Avoid pressure washer damage.
Failure to follow Operator’s Manual for fuel
recommendations voids warranty.
• DO NOT use unapproved gasoline such as E85.
• DO NOT mix oil in gasoline.
• DO NOT modify engine to run on alternate fuels.
To protect the fuel system from gum formation, mix in a fuel
stabilizer when adding fuel. See Storage. All fuel is not the
same. If you experience starting or performance problems
after using fuel, switch to a different fuel provider or change
brands. This engine is certified to operate on gasoline. The
emission control system for this engine is EM (Engine
Modifications).
1. Clean area around fuel fill cap, remove cap.
2. Slowly add regular unleaded fuel (F) to fuel tank (G). Be
careful not to overfill. Allow about 1.5" (4 cm) (H) of
tank space for fuel expansion.
3. Install fuel cap and wait for any spilled fuel to evaporate.
8
H
G
F
B
A
C
D
WARNING: Fuel and its vapors are extremely
flammable and explosive.
Fire or explosion can cause severe burns
or death.
WHEN ADDING FUEL
• Turn pressure washer OFF and let it cool at least 2 minutes
before removing fuel cap. Loosen cap slowly to relieve pressure
in tank.
• Fill fuel tank outdoors.
• DO NOT overfill tank. Allow space for fuel expansion.
• If fuel spills, wait until it evaporates before starting engine.
• Keep fuel away from sparks, open flames, pilot lights, heat, and
other ignition sources.
• DO NOT light a cigarette or smoke.
E
Page 9
9
CAUTION! Alcohol-blended fuels (called gasohol, ethanol or
methanol) can attract moisture, which leads to separation and
formation of acids during storage. Acidic gas can damage the
fuel system of an engine while in storage.
To avoid engine problems, the fuel system should be treated
with a fuel preserver or emptied before storage of 30 days or
longer. If adding a fuel preserver, fill the fuel tank with fresh
fuel. If only partially filled, air in the tank will promote fuel
deterioration during storage. If fuel preserver is not used,
drain the fuel tank, start the engine and let it run until the fuel
lines and carburetor are empty. Use fresh fuel next season. See
Storage for additional information.
NEVER use engine or carburetor cleaner products in the fuel
tank as permanent damage may occur.
High Altitude
At altitudes over 5,000 feet (1524 meters), a minimum
85 octane / 85 AKI (89 RON) gasoline is acceptable. To
remain emissions compliant, high altitude adjustment is
required. Operation without this adjustment will cause
decreased performance, increased fuel consumption, and
increased emissions. See a qualified Sears dealer for high
altitude adjustment information. Operation of the engine at
altitudes below 2,500 feet (762 meters) with the high altitude
kit is not recommended.
FreshStart® Fuel Cap
The FreshStart® fuel cap (A) is designed to hold a
cartridge (B) which contains fuel preserver. Adding fuel
preserver helps keep fuel fresh and carburetors clean for
easier starting all season long. The FreshStart® fuel cap, if
equipped with a cartridge, automatically drips concentrated
fuel preserver into your fuel tank so you don’t have to add it
yourself.
NOTE: FreshStart® fuel preserver cartridge is available as an
optional accessory, retail item 7133386. It is not included
with the pressure washer. Contact the original equipment
manufacturer, retailer, or dealer to obtain a cartridge
designed for the FreshStart® fuel cap installed on this
engine.
Read and follow all instructions and warnings given in the
FreshStart® fuel preserver cartridge package.
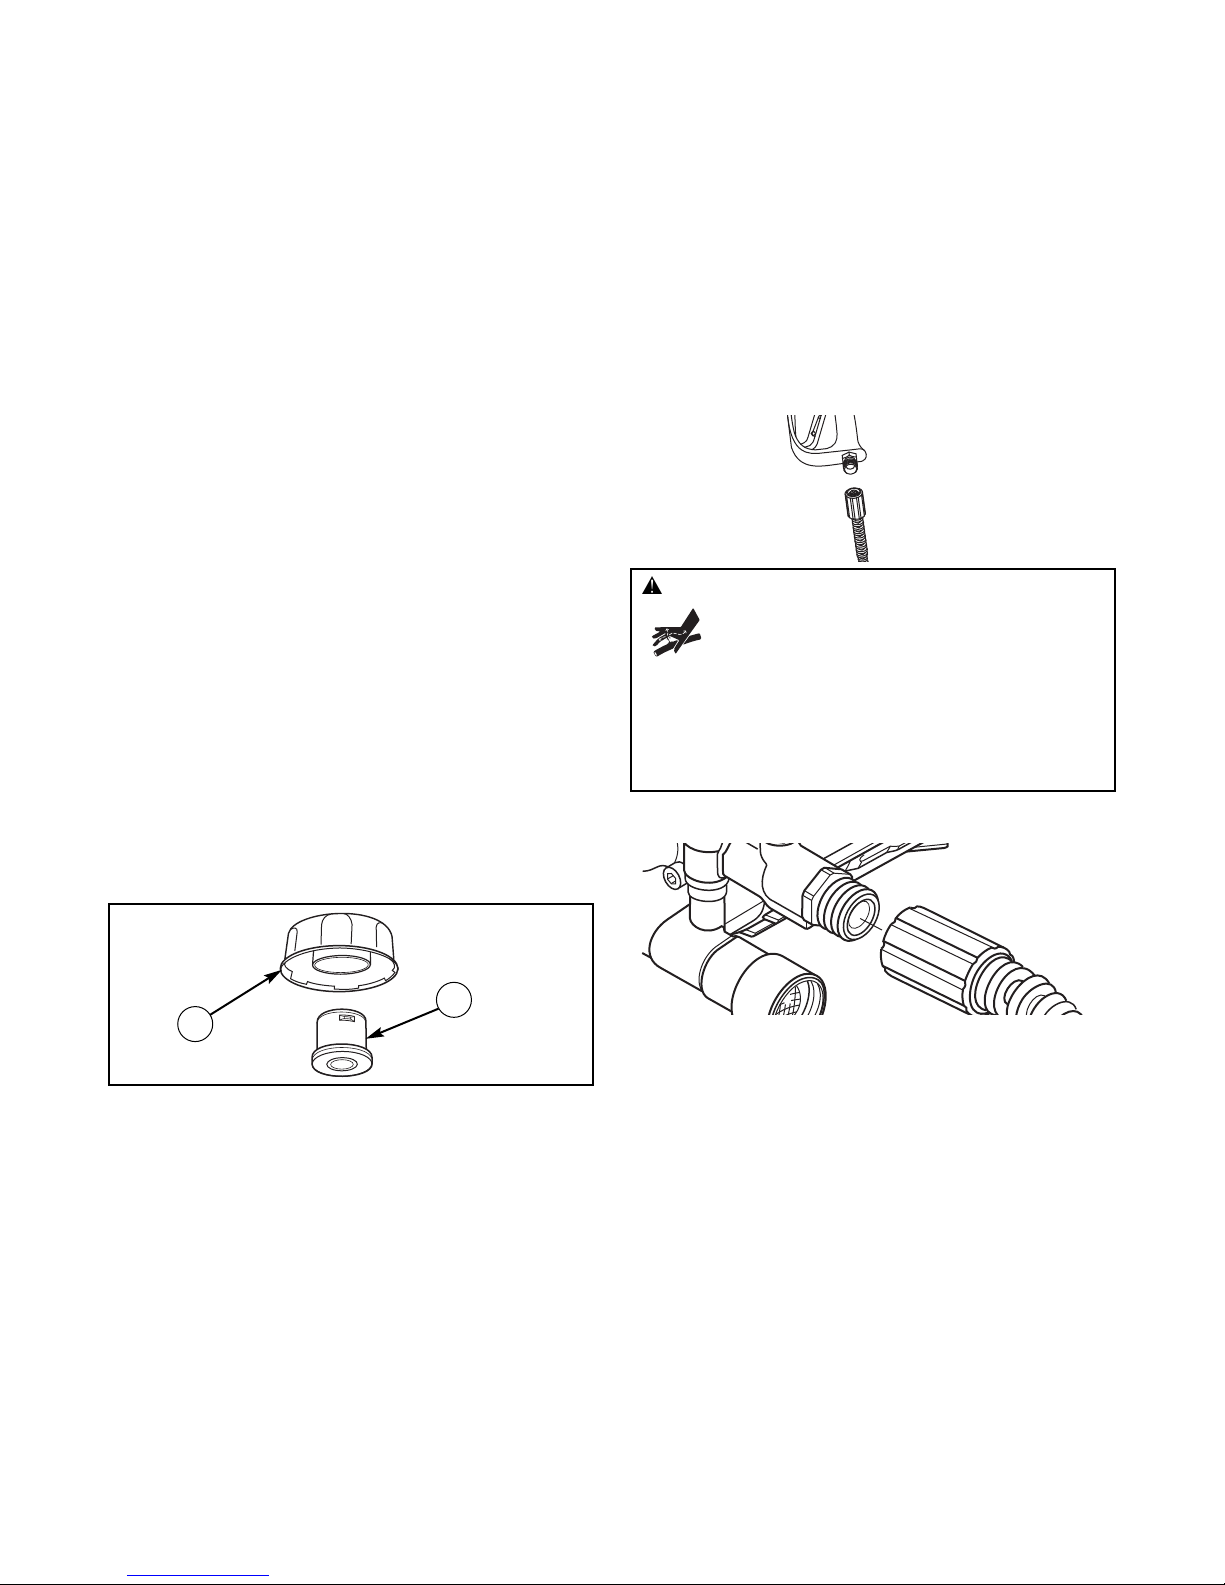
Connect Hose and Water Supply to Pump
NOTICE: DO NOT run the pump without the water supply
connected and turned on.
• Damage to equipment resulting from failure to follow this
instruction will void warranty.
NOTE: Remove and discard the shipping caps from the
pump’s high pressure outlet and water inlet before attaching
hoses.
1. Uncoil high pressure hose and attach one end of hose to
base of spray gun. Tighten by hand.
2. Attach other end of high pressure hose to high pressure
outlet on pump. Tighten by hand.
WARNING: The high pressure stream of water that this
equipment produces can cut through skin and
its underlying tissues, leading to serious injury
and possible amputation.
• NEVER connect high pressure hose to nozzle extension.
• Keep high pressure hose connected to pump and spray gun
while system is pressurized.
• Always be certain spray gun, nozzles and accessories are
correctly attached.
A
B
Page 10
10
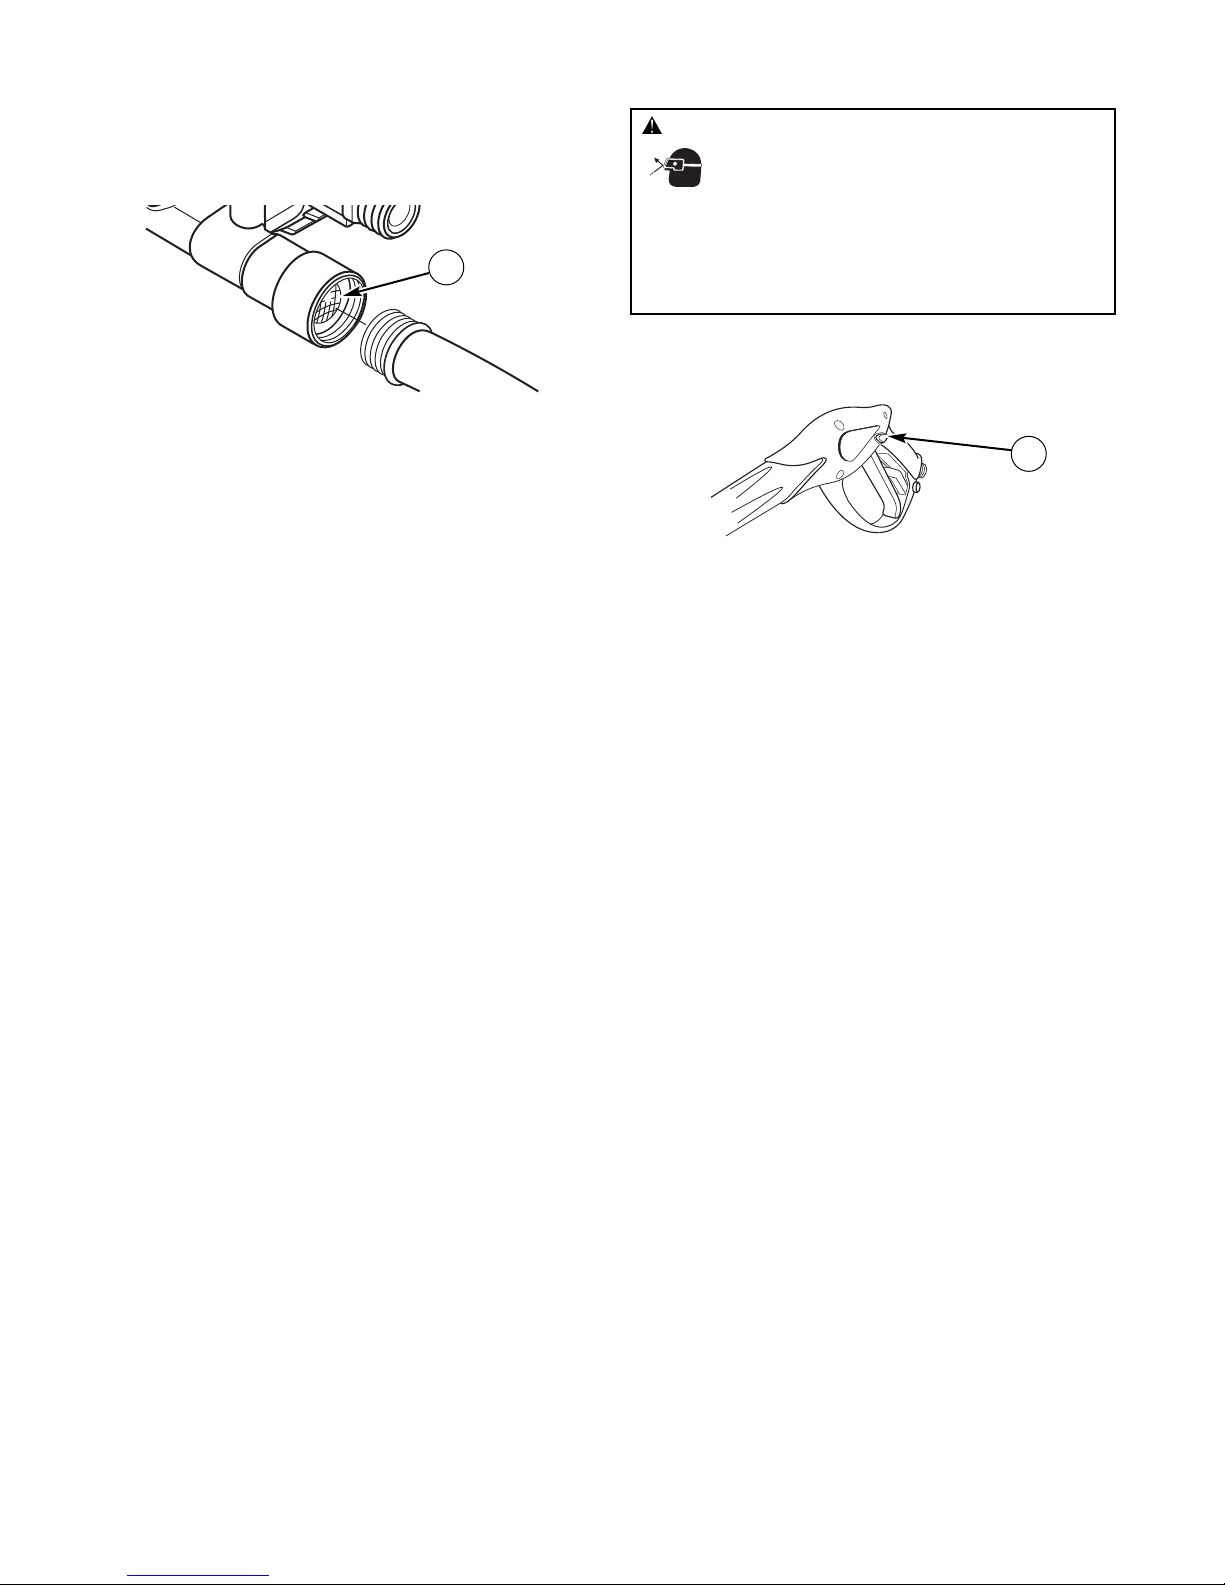
3. Before connecting garden hose to water inlet, inspect
inlet screen. Clean screen (A) if it contains debris or have
it replaced if damaged. DO NOT run pressure washer if
inlet screen is damaged or missing.
4. Run water through garden hose for 30 seconds to flush
it of debris. Turn off water.
IMPORTANT: DO NOT siphon standing water for the water
supply. Use ONLY cold water (less than 100°F).
5. Connect garden hose (not to exceed 50 feet in length) to
water inlet. Tighten by hand.
NOTICE: Using a One Way Valve (vacuum breaker or check
valve) at pump inlet can cause pump or inlet connector
damage.
• There MUST be at least ten feet of unrestricted garden hose
between the pressure washer inlet and any device, such as a
vacuum breaker or check valve.
• Damage to equipment resulting from failure to follow this
instruction will void warranty.
6. Turn ON the water, press red button (B) on the gun and
squeeze the trigger to purge the pump system of air and
impurities.
Checklist Before Starting Engine
Review the unit to ensure you have performed all of the
following:
1. Be sure to read Safety Rules and Operation sections
before using the pressure washer.
2. Make sure handle is in place and secure.
3. Check that oil has been added to proper level in engine
crankcase.
4. Add proper fuel to fuel tank.
5. Check for proper hose connections (high pressure and
water supply) and that there are no kinks, cuts, or
damage to the high pressure hose.
6. Provide proper water supply (not to exceed 100°F).
A
B
WARNING: Risk of eye injury.
Spray can splash back or propel objects.
• Always wear indirect vented (chemical splash) safety goggles
marked to comply with ANSI Z87.1 when using or in vicinity of
this equipment.
• NEVER substitute safety glasses or dry-condition goggles for
indirect vented safety goggles.
Page 11

11
HOW TO USE YOUR PRESSURE WASHER
If you have any problems operating your pressure washer,
please call the pressure washer helpline at 1-800-317-7833.
Pressure Washer Location
Pressure Washer Clearance
Place pressure washer outdoors in an area that will not
accumulate deadly exhaust gas. DO NOT place pressure
washer where exhaust gas (A) could accumulate and enter
inside or be drawn into a potentially occupied building.
Ensure exhaust gas is kept away from any windows, doors,
ventilation intakes, or other openings that can allow exhaust
gas to collect in a confined area. Prevailing winds and air
currents should be taken into consideration when positioning
pressure washer.
To Start Your Pressure Washer
To start your engine-powered pressure washer for the first
time, follow these instructions step-by-step. This information
also applies whenever you start the engine after you have let
the pressure washer sit idle for at least a day.
1. Place pressure washer near an outside water source
capable of supplying water at a flow rate greater than
3.5 gallons per minute and no less than 20 PSI at
pressure washer end of garden hose.
2. Check that high pressure hose is tightly connected to
spray gun and pump. See Assembly for illustrations.
3. Make sure unit is in a level position.
4. Connect garden hose to water inlet on pressure washer
pump.
NOTICE: DO NOT run the pump without the water supply
connected and turned on.
• Damage to equipment resulting from failure to follow this
instruction will void warranty.
5. Turn ON the water, press red button on the gun and
squeeze the trigger to purge the pump system of air and
impurities.
6. Attach PrecisionSpray™ Selector to spray gun according
to PrecisionSpray™ Selector instruction sheet.
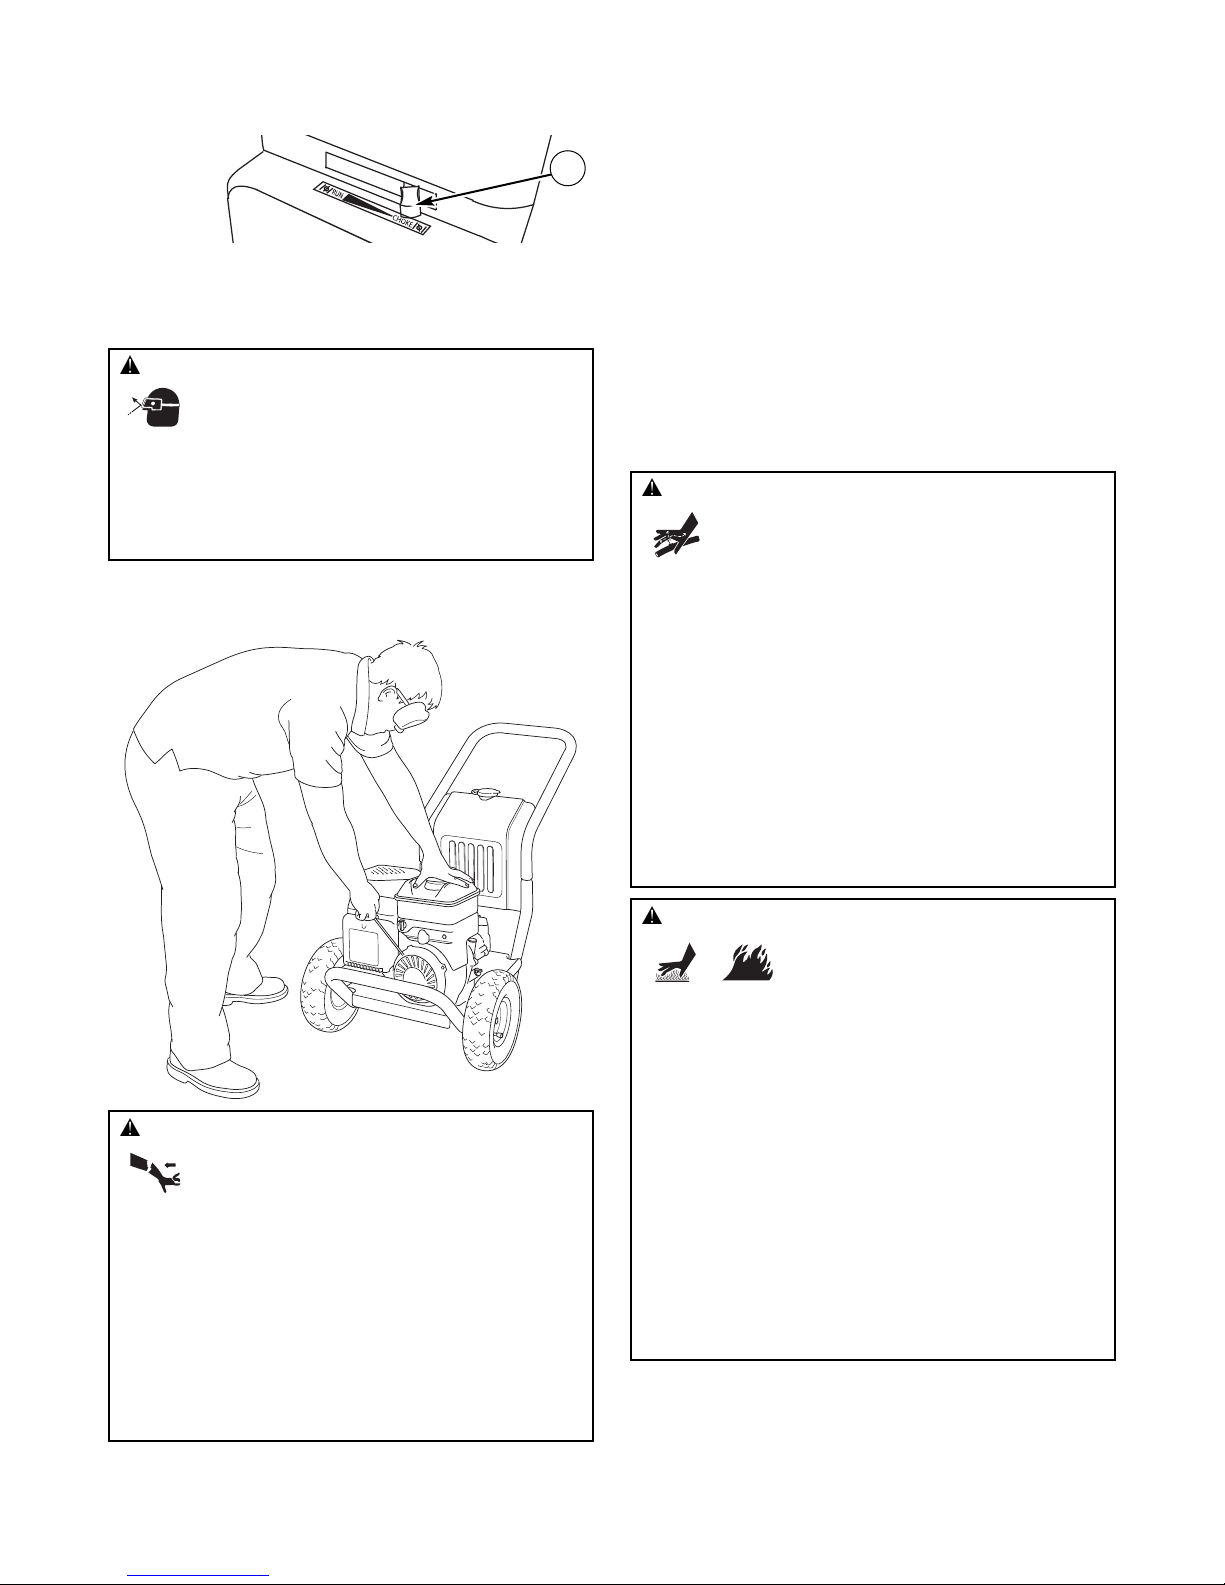
7. Rotate fuel shut-off valve to “On” position (B) (fully
counter-clockwise).
8. Move throttle lever (C) to “Fast” position, shown here as
a rabbit.
OPERATION
A
B
WARNING: Running engine gives off carbon monoxide,
an odorless, colorless, poisonous gas.
Breathing carbon monoxide can cause headache,
fatigue, dizziness, vomiting, confusion, seizures,
nausea, fainting or death.
• Operate pressure washer ONLY outdoors.
• Keep exhaust gas from entering a confined area through
windows, doors, ventilation intakes, or other openings.
• DO NOT start or run engine indoors or in an enclosed area,
even if windows and doors are open.
WARNING: Exhaust heat/gases can ignite
combustibles, structures or damage fuel tank
causing a fire.
• Keep at least 5 ft. (152 cm) clearance on all sides of pressure
washer including overhead.
C
Page 12
12
9. Move choke lever (B) to “Choke” position.
NOTE: For a warm engine, be sure the choke lever is in the
“Run” position.
IMPORTANT: Before starting the pressure washer, be sure
you are wearing safety goggles as described below.
10. When starting engine, position yourself as
recommended, grasp handle and pull recoil starter
lightly until you feel some resistance, then pull briskly.
11. Return recoil starter slowly. DO NOT let rope “snap
back” against starter.
12. When engine starts, slowly move choke lever to “Run”
position, as engine warms. If engine falters, move choke
lever to “Choke” position, then to “Run” position.
13. After each starting attempt, where engine fails to run,
always point gun in safe direction, press red button and
squeeze spray gun trigger to release high pressure.
Move choke lever to “Choke” position, and repeat steps
10 through 12.
14. If engine fails to start after six pulls, move choke lever to
“Run” position, and repeat steps 10 through 12.
NOTE: Always keep the throttle lever in the “Fast” position
when operating the pressure washer.
B
WARNING: Risk of eye injury.
Spray can splash back or propel objects.
• Always wear indirect vented (chemical splash) safety goggles
marked to comply with ANSI Z87.1 when using or in vicinity of
this equipment.
• NEVER substitute safety glasses or dry-condition goggles for
indirect vented safety goggles.
WARNING: Starter cord kickback (rapid retraction) can
result in bodily injury. Kickback will pull hand and
arm toward engine faster than you can let go.
Broken bones, fractures, bruises, or sprains
could result.
• NEVER pull starter cord without first relieving spray gun
pressure.
• When starting engine, pull cord slowly until resistance is felt
and then pull rapidly to avoid kickback.
• After each starting attempt, where engine fails to run, always
point spray gun in safe direction, press red button and squeeze
spray gun trigger to release high pressure.
• Firmly grasp spray gun with both hands when using high
pressure spray to avoid injury when spray gun kicks back.
WARNING: Contact with muffler area can result in
serious burns.
Exhaust heat/gases can ignite
combustibles, structures or damage
fuel tank causing a fire.
• DO NOT touch hot parts and AVOID hot exhaust gases.
• Allow equipment to cool before touching.
• Keep at least 5 feet (152 cm) of clearance on all sides of
pressure washer including overhead.
• It is a violation of California Public Resource Code, Section
4442, to use or operate the engine on any forest-covered,
brush-covered, or grass-covered land unless the exhaust
system is equipped with a spark arrester, as defined in Section
4442, maintained in effective working order. Other states or
federal jurisdictions may have similar laws.
Contact the original equipment manufacturer, retailer, or dealer
to obtain a spark arrester designed for the exhaust system
installed on this engine.
• Replacement parts must be the same and installed in the same
position as the original parts.
WARNING: The high pressure stream of water that this
equipment produces can cut through skin and
its underlying tissues, leading to serious injury
and possible amputation.
Spray gun traps high water pressure, even when engine is
stopped and water is disconnected, which can cause
injury.
• DO NOT allow CHILDREN to operate pressure washer.
• Keep high pressure hose connected to pump and spray gun
while system is pressurized.
• NEVER aim spray gun at people, animals, or plants.
• DO NOT secure spray gun in open position.
• DO NOT leave spray gun unattended while machine is running.
• NEVER use a spray gun which does not have a trigger lock or
trigger guard in place and in working order.
• Always be certain spray gun, nozzles and accessories are
correctly attached.
Page 13
13
How to Stop Your Pressure Washer
1. Release spray gun trigger and let engine idle for two
minutes.
2. Move throttle to SLOW position, then STOP position.
3. ALWAYS point spray gun in a safe direction, press red
button and squeeze spray gun trigger to release retained
high water pressure.
IMPORTANT: Spray gun traps high water pressure, even
when engine is stopped and water is disconnected.
How to Use PrecisionSpray™ Selector
Refer to the PrecisionSpray™ Selector instruction sheet for
proper use.
NOTICE: Product damage will occur if the gun trigger is
squeezed while the Selector is in-between nozzle settings.
• NEVER turn the Selector while spraying.
Cleaning and Applying Detergent
To apply detergent follow these steps:
1. Attach one of the detergent siphon hoses following
instructions Attach Detergent Siphon Hose to Pump.
NOTICE: Contact with the hot muffler can damage detergent
siphoning tube.
• When inserting the siphon into a detergent solution bottle, route
the tube so as to keep it from inadvertently contacting the hot
muffler.
2. Prepare detergent solution as required by job.
3. Make sure detergent shut-off valve on cleaning tank is in
“Off” position.
4. If using cleaning tank, pour detergent into cleaning tank.
NOTE: The cleaning tank holds two gallons.
NOTICE: Cleaning tank damage may occur if not drained
prior to removing handle.
5. Rotate PrecisionSpray™ Selector to a low pressure
position, as described in the PrecisionSpray™ Selector
instuction sheet.
NOTE: Detergent cannot be applied with the PrecisionSpray™
Selector in a high pressure position.
6. Make sure garden hose is connected to water inlet.
Check that high pressure hose is connected to spray gun
and pump. Turn on water.
NOTICE: You must attach all hoses before you start the
engine.
• Starting the engine without all the hoses connected and without
the water turned ON will damage the pump.
• Damage to equipment resulting from failure to follow this
instruction will void warranty.
7. Start engine following instructions How to Start Your
Pressure Washer.
WARNING: The high pressure stream of water that this
equipment produces can cut through skin and
its underlying tissues, leading to serious injury
and possible amputation.
Spray gun traps high water pressure, even when engine is
stopped and water is disconnected, which can cause
injury.
• Keep high pressure hose connected to pump and spray gun
while system is pressurized.
• ALWAYS point spray gun in safe direction, press red button
and squeeze spray gun trigger to release high pressure, every
time you stop engine.
WARNING:
Backfire, fire or engine damage could
occur.
• DO NOT stop engine by moving choke control to “Choke”
position ( ).
CAUTION: Chemicals can cause bodily injury, and/or
property damage.
• NEVER use caustic liquid with pressure washer.
• Use ONLY pressure washer safe detergents/soaps. Follow all
manufacturers instructions.
Page 14
14
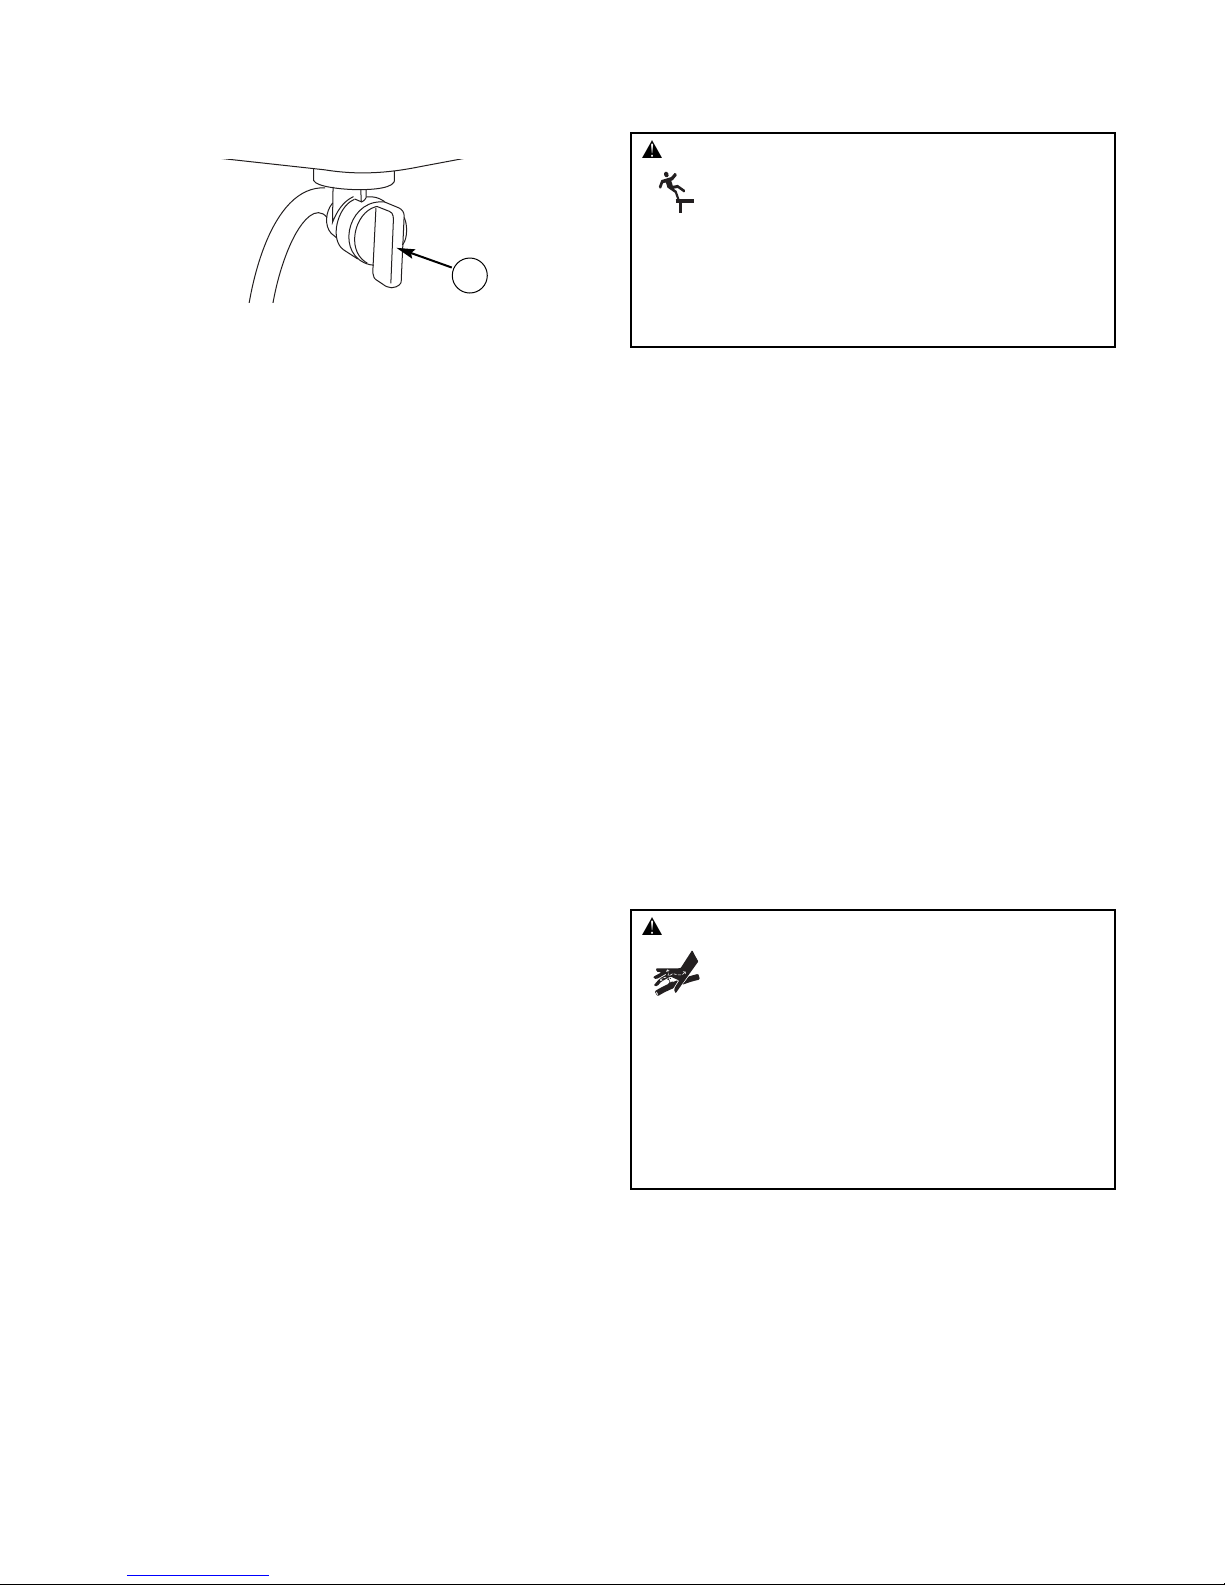
8A. If using cleaning tank, rotate detergent shut-off valve on
cleaning tank to “On” position (A).
IMPORTANT: If using detergent siphoning hose, make sure
detergent shut-off valve on cleaning tank is in the “Off”
position.
8B. If using detergent siphoning hose, place small filter end
of detergent siphoning tube into detergent container.
NOTICE: Contact with the hot muffler can damage detergent
siphoning tube.
• When inserting the siphon into a detergent solution bottle, route
the tube so as to keep it from inadvertently contacting the hot
muffler.
NOTE: Make sure the filter is fully submerged in detergent
while applying detergent.
9. Apply detergent to a dry surface, starting at lower
portion of area to be washed and work upward, using
long, even, overlapping strokes.
10. Allow detergent to "soak in" for 3-5 minutes before
washing and rinsing. Reapply as needed to prevent
surface from drying. DO NOT allow detergent to dry on
(prevents streaking).
IMPORTANT: When using the detergent siphoning hose, you
must flush the detergent siphoning system after each use by
placing the filter into a bucket of clean water, then run the
pressure washer in low pressure for 1-2 minutes.
Pressure Washer Rinsing
After detergent is applied, scour the surface and rinse it clean
as follows:
1. If using cleaning tank, rotate detergent shut-off valve on
cleaning tank to “Off” position.
2. Rotate PrecisionSpray™ Selector to a high pressure
position, as described in the PrecisionSpray™ Selector
instruction sheet.
3. Keep spray gun a safe distance from spray surface.
4. Apply a high pressure spray to a small area and then
check the surface for damage. If no damage, proceed to
step 5.
5. Start at top of area to be rinsed, working down with
same overlapping strokes used for cleaning.
Cleaning Detergent Siphoning Tube
If you used the detergent siphoning tube, you must flush it
with clean water before stopping the engine.
1. Place detergent siphoning tube/filter in a bucket full of
clean water.
2. Rotate PrecisionSpray™ Selector to a low pressure
position, as described in the PrecisionSpray™ Selector
instruction sheet.
3. Flush for 1-2 minutes.
4. Shut off engine following instructions How to Stop
Pressure Washer and turn off water supply.
5. ALWAYS point spray gun in a safe direction push red
button and squeeze spray gun trigger to release retained
high water pressure.
IMPORTANT: Spray gun traps high water pressure, even
when engine is stopped and water is disconnected.
Automatic Cool Down System (Thermal Relief)
If you run the engine on your pressure washer for
3-5 minutes without pressing the trigger on the spray gun,
circulating water in the pump can reach temperatures above
125°F. The system engages to cool the pump by discharging
the warm water onto the ground.
A
WARNING: The high pressure stream of water that this
equipment produces can cut through skin and
its underlying tissues, leading to serious injury
and possible amputation.
Spray gun traps high water pressure, even when engine is
stopped and water is disconnected, which can cause
injury.
• Keep high pressure hose connected to pump and spray gun
while system is pressurized.
• ALWAYS point spray gun in safe direction, press red button
and squeeze spray gun trigger to release high pressure, every
time you stop engine.
WARNING: Kickback from spray gun can cause you to
fall.
• Operate pressure washer from a stable surface.
• Be extremely careful if you must use the pressure washer from
a ladder, scaffolding, or any other similar location.
• Firmly grasp spray gun with both hands when using high
pressure spray to avoid injury when spray gun kicks back.
Page 15

15
ENGINE TECHNICAL INFORMATION
This is a single cylinder, overhead valve (OHV), air cooled
engine. It is a low emissions engine.
In the State of California, Model 120000 engines are certified
by the California Air Resources Board to meet emissions
standards for 125 hours. Such certification does not grant
the purchaser, owner or operator of this engine any
additional warranties with respect to the performance or
operational life of this engine. The engine is warranted solely
according to the product and emissions warranties stated
elsewhere in this manual.
Power Ratings
The gross power rating for individual gas engine models is
labeled in accordance with SAE (Society of Automotive
Engineers) code J1940 (Small Engine Power & Torque
Rating Procedure), and rating performance has been
obtained and corrected in accordance with SAE J1995
(Revision 2002-05). Torque values are derived at 3060 RPM;
horsepower values are derived at 3600 RPM. Actual gross
engine power will be lower and is affected by, among other
things, ambient operating conditions and engine-to-engine
variability. Given both the wide array of products on which
engines are placed and the variety of environmental issues
applicable to operating the equipment, the gas engine will not
develop the rated gross power when used in a given piece of
power equipment (actual "on-site" or net power). This
difference is due to a variety of factors including, but not
limited to, accessories (air cleaner, exhaust, charging,
cooling, carburetor, fuel pump, etc.), application limitations,
ambient operating conditions (temperature, humidity,
altitude), and engine-to-engine variability. Due to
manufacturing and capacity limitations, Briggs & Stratton
may substitute an engine of higher rated power for this
Series engine.
This pressure washer is rated in accordance to the Pressure
Washer Manufacturer’s Association (PWMA) standard
PW101 (Testing and Rating Performance of Pressure
Washers).
PRODUCT SPECIFICATIONS
Pressure Washer Specifications
Max Outlet Pressure . . . . . . . . . . . . . . . . . . . . . . . 3,100 PSI
Max Flow Rate . . . . . . . . . . . . . . . . . . . . . . . . . . . . . 2.5 GPM
Detergent Mix . . . . . . . . . . . . . . . . . . . . . . . . Use as directed
Water Supply Temperature . . . . . . . . . . Not to exceed 100°F
Engine Specifications
Bore . . . . . . . . . . . . . . . . . . . . . . . . . . . . . . . . 2.672 in. (68mm)
Stroke . . . . . . . . . . . . . . . . . . . . . . . . . . . . . . 2.204 in. (56mm)
Displacement . . . . . . . . . . . . . . . . . . . . . . . . 12.48 in. (206 cc)
Spark Plug
Resistor Type: . . . . . . . . . . . . . . .
Briggs & Stratton 491055
Long Life Platinum: . . . . . . . . . . . .Briggs & Stratton 5066
Set Gap To: . . . . . . . . . . . . . . . . . . . . . . 0.030inch (0.76mm)
Armature Air Gap: . . . . . . . . . . . 0.010-0.014 in.(0.25-0.36mm)
Valve clearance with valve springs installed and piston 1/4 in.
(6 mm) past top dead center (check when engine is cold).
Intake . . . . . . . . . . . . . . . . . . . . 0.004-0.006 in.(0.10-0.15 mm)
Exhaust . . . . . . . . . . . . . . . . . . 0.009-0.011 in.(0.23-0.28 mm)
Fuel Capacity . . . . . . . . . . . . . . . . . . . . . . . . . . . . . . . 1.6 Quarts
Oil Capacity . . . . . . . . . . . . . . . . . . . . . . . . 20 Ounces (0.6 liter)
NOTE: For practical operation, the engine load should not
exceed 85% of rated power. Engine power will decrease
3-1/2% for each 1,000 feet (300 meters) above sea level and
1% for each 10° F (5.6° C) above 77° F (25° C). It should
operate satisfactorily at an angle up to 15°.
SPECIFICATIONS
Page 16
16
OWNER’S RESPONSIBILITIES
Follow the hourly or calendar intervals, whichever occurs
first. More frequent service is required when operating in
adverse conditions noted below.
1
Clean if clogged. Replace if perforated or torn.
2
Service more often under dirty or dusty conditions.
General Recommendations
Regular maintenance will improve the performance and
extend the life of the pressure washer. See any Sears or
other qualified service dealer for service.
The pressure washer warranty does not cover items that
have been subjected to operator abuse or negligence. To
receive full value from the warranty, the operator must
maintain pressure washer as instructed in this manual
including proper storage as detailed in Storage.
Some adjustments will need to be made periodically to
properly maintain your pressure washer.
All service and adjustments should be made at least once
each season. Follow the requirements in the Maintenance
Schedule chart above.
NOTE: Once a year you should clean or replace the spark
plug and replace the air filter. A new spark plug and clean air
filter assure proper fuel-air mixture and help your engine run
better and last longer.
Pump Oil
DO NOT attempt any oil maintenance on this pump. The
pump is pre-lubricated and sealed from the factory, requiring
no additional maintenance for the life of the pump.
Emissions Control
Maintenance, replacement, or repair of the emissions
control devices and systems may be performed by any nonroad engine repair establishment or individual. However,
to obtain ”no charge” emissions control service, the work
must be performed by a factory authorized dealer. See the
Emissions Warranty.
Before Each Use
1. Check engine oil level.
2. Clean debris.
3. Check detergent siphoning hoses/cleaning tank for
damage.
4. Check water inlet screen for damage.
5. Check high pressure hose for leaks.
6. Check spray gun for leaks.
7. Purge pump of air and contaminants.
PRESSURE WASHER MAINTENANCE
Clean Debris
Daily or before use, clean accumulated debris from pressure
washer. Keep linkage, spring and controls clean. Keep area
around and behind muffler free from any combustible debris.
Inspect cooling air slots and openings on the pressure
washer. These openings must be kept clean and
unobstructed.
Pressure washer parts should be kept clean to reduce the
risk of overheating and ignition of accumulated debris.
• Use a damp cloth to wipe exterior surfaces clean.
NOTICE: Improper treatment of pressure washer can
damage it and shorten its life.
• DO NOT insert any objects through cooling slots.
• Use a soft bristle brush to loosen caked on dirt, oil, etc.
• Use a vacuum cleaner to pick up loose dirt and debris.
Check and Clean Inlet Screen
Examine garden hose inlet screen. Clean if it is clogged or
replace if it is torn.
MAINTENANCE
First 5 Hours
• Change engine oil
Every 8 Hours or Daily
• Check/clean water inlet screen
1
• Check high pressure hose
• Check detergent siphoning hoses/tank
• Check spray gun and assembly for leaks
• Clean debris
• Check engine oil level
Every 25 Hours or Yearly
• Service engine air cleaner
2
Every 50 Hours or Yearly
• Change engine oil
2
• Inspect muffler and spark arrester
Every 100 Hours or Yearly
• Service spark plug
• Clean cooling system
2
Page 17
17
Check High Pressure Hose
High pressure hoses can develop leaks from wear, kinking,
or abuse. Inspect hose before each use. Check for cuts,
leaks, abrasions, bulging of cover, or damage or movement
of couplings. If any of these conditions exist, replace hose
immediately.
Check Detergent Siphoning Hoses/Cleaning Tank
Examine the cleaning tank and detergent siphoning hoses
and clean if clogged. The hose should fit tightly on the
barbed fitting of the pump and detergent shut-off valve.
Examine the hoses for leaks or tears. Replace the tank or
hoses if either is damaged.
Check Spray Gun
Examine the hose connection to the spray gun and make
sure it is secure. Test the trigger by pressing the red button
and making sure the trigger “springs back” into place when
you release it. You should not be able to press the trigger
without pressing the red button. Replace spray gun
immediately if it fails any of these tests.
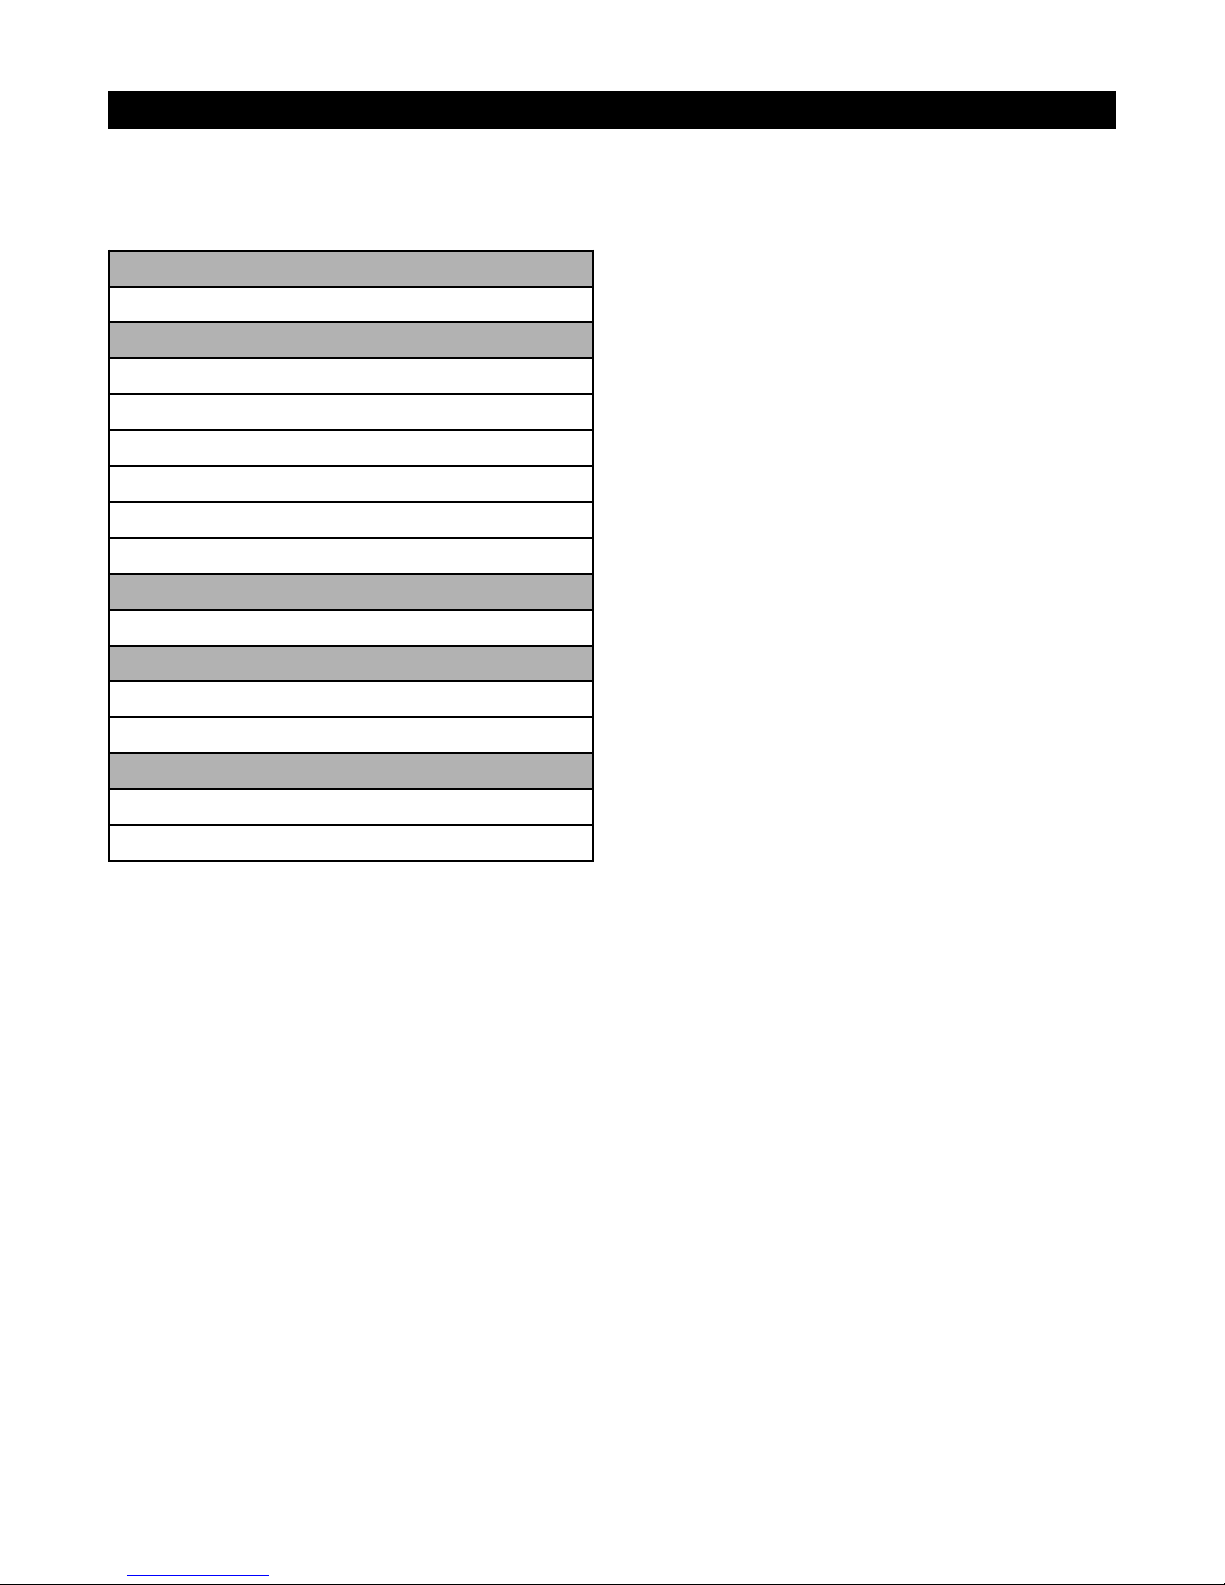
Nozzle Maintenance
A pulsing sensation felt while squeezing the spray gun trigger
may be caused by excessive pump pressure. The principal
cause of excessive pump pressure is a nozzle clogged or
restricted with foreign materials, such as dirt, etc. To correct
the problem, immediately clean the nozzle following these
instructions:
1. Shut off engine and turn off water supply.
2. ALWAYS point spray gun in a safe direction, press red
button and squeeze spray gun trigger to release retained
high water pressure.
3. Disconnect PrecisionSpray™ Selector from spray gun.
4. Use a small paper clip to free any foreign material
clogging or restricting the high pressure nozzles (A).
5. Using a garden hose, remove additional debris by back
flushing water through PrecisionSpray™ Selector. Back
flush between 30 to 60 seconds.
6. Reconnect PrecisionSpray™ Selector to spray gun.
7. Make sure garden hose is connected to water inlet.
Check that high pressure hose is connected to spray gun
and pump. Turn on water.
8. Start engine following instructions How to Start Your
Pressure Washer.
9. Test pressure washer by operating with each nozzle
selection.
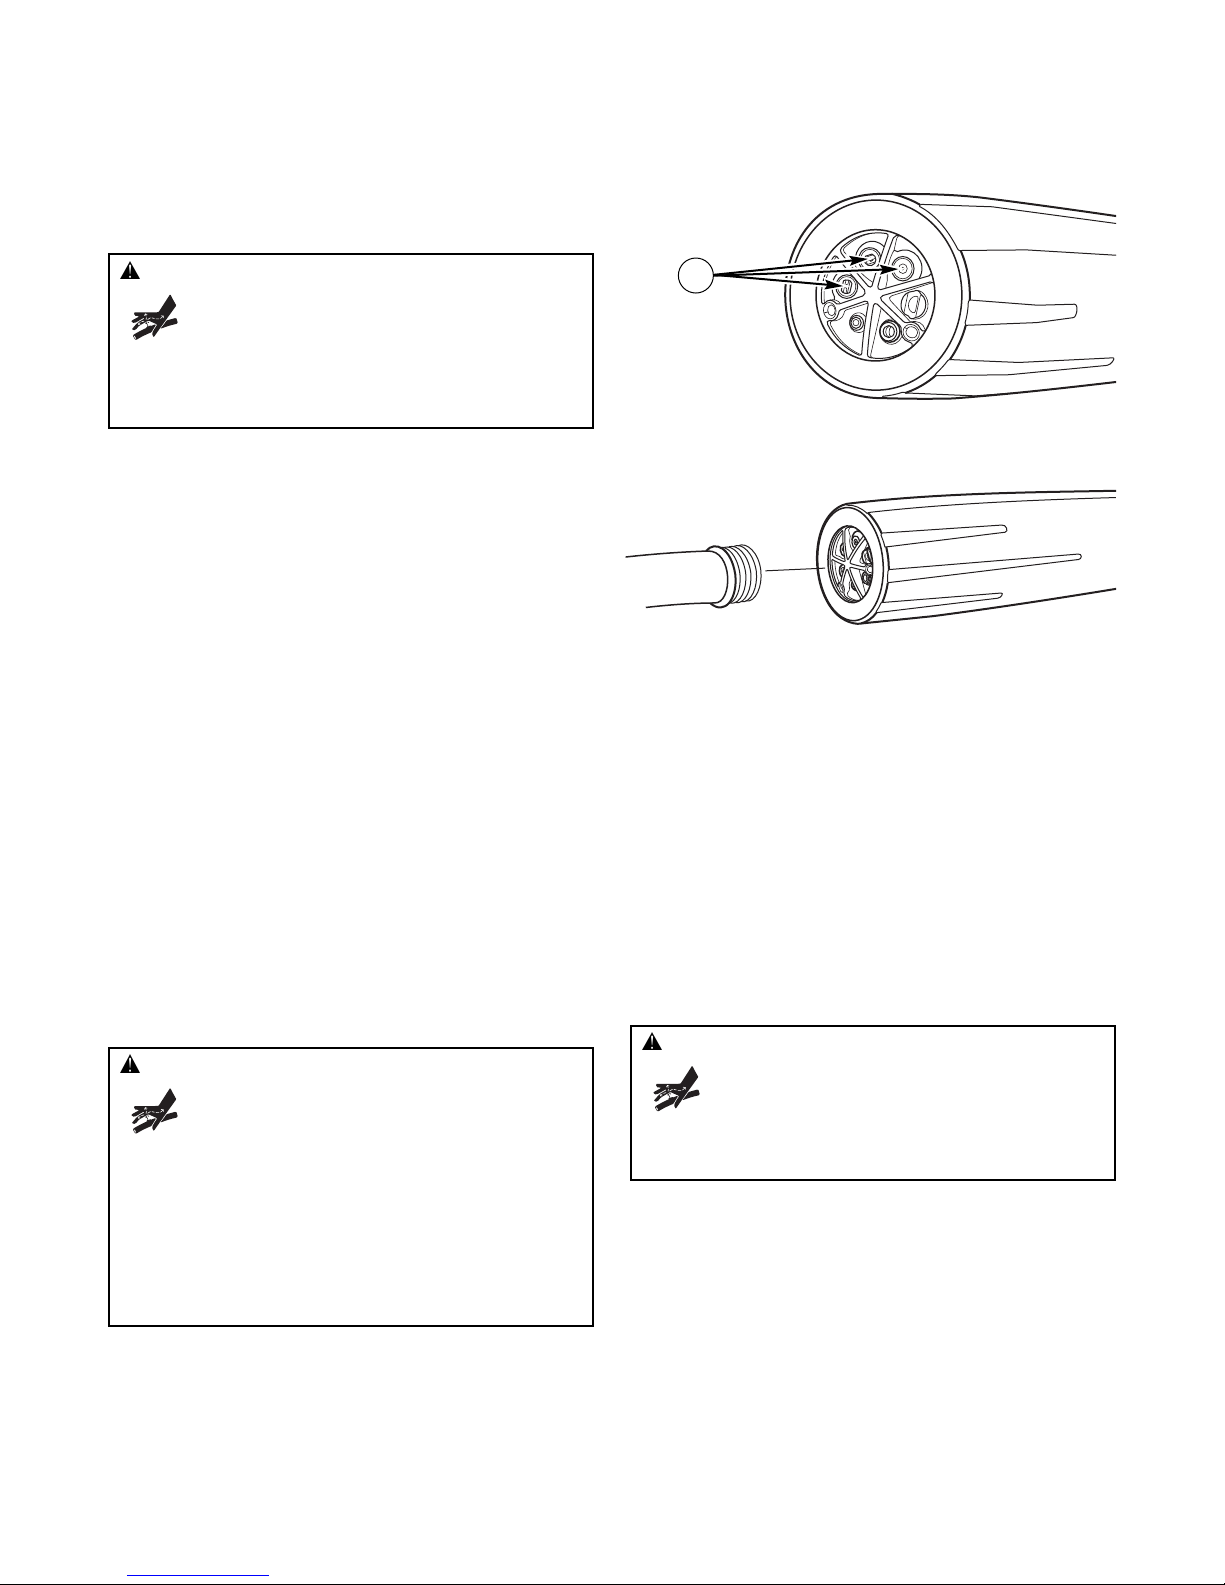
O–Ring Maintenance
Purchase an O–Ring Repair Kit at your local Sears or by
calling 1-800-4-MY-HOME (469-4663) or online at
www.sears.com. It is not included with the pressure washer.
This kit includes replacement o-rings, rubber washer and
water inlet filter. Refer to the instruction sheet provided in the
kit to service your unit’s o-rings.
WARNING: The high pressure stream of water that this
equipment produces can cut through skin and
its underlying tissues, leading to serious injury
and possible amputation.
• NEVER repair high pressure hose. Replace it.
• Replacement hose rating MUST exceed maximum pressure
rating of unit.
WARNING: The high pressure stream of water that this
equipment produces can cut through skin and
its underlying tissues, leading to serious injury
and possible amputation.
Spray gun traps high water pressure, even when engine is
stopped and water is disconnected, which can cause
injury.
• Keep high pressure hose connected to pump and spray gun
while system is pressurized.
• ALWAYS point spray gun in safe direction, press red button
and squeeze spray gun trigger to release high pressure, every
time you stop engine.
WARNING: The high pressure stream of water that this
equipment produces can cut through skin and
its underlying tissues, leading to serious injury
and possible amputation.
• NEVER repair leaking connections with sealant of any kind.
Replace o-ring or seal.
A
Page 18

18
ENGINE MAINTENANCE
Oil
Oil Recommendations
We recommend the use of Briggs & Stratton Warranty
Certified oils for best performance. Other high-quality
detergent oils are acceptable if classified for service SF, SG,
SH, SJ or higher. DO NOT use special additives.
Outdoor temperatures determine the proper oil viscosity for
the engine. Use the chart to select the best viscosity for the
outdoor temperature range expected.
* Below 40°F (4°C) the use of SAE 30 will result in hard starting.
** Above 80°F (27°C) the use of 10W30 may cause increased oil
consumption. Check oil level more frequently.
NOTE: Synthetic oil meeting ILSAC GF-2, API
certification mark and API service symbol with
“SJ/CF ENERGY CONSERVING” or higher, is an
acceptable oil at all temperatures. Use of synthetic oil
does not alter required oil change intervals.
Checking Oil Level
Oil level should be checked prior to each use or at least every
8 hours of operation. Keep oil level maintained.
1. Make sure pressure washer is on a level surface.
2. Remove oil fill cap and wipe clean with cloth.
3. Verify oil is at the point of overflowing at oil fill opening.
Replace and tighten oil fill cap.
Adding Engine Oil
1. Make sure pressure washer is on a level surface.
2. Check oil level as described in Checking Oil Level.
3. If needed, slowly pour oil into oil fill opening to the point
of overflowing at oil fill cap.
4. Replace and tighten oil fill cap.
Changing Engine Oil
If you are using your pressure washer under extremely dirty
or dusty conditions, or in extremely hot weather, change oil
more often.
KEEP OUT OF REACH OF CHILDREN. DON'T
POLLUTE. CONSERVE RESOURCES. RETURN
USED OIL TO COLLECTION CENTERS.
Change oil while engine is still warm from running, as follows:
1. Make sure unit is on a level surface.
2. Disconnect the spark plug wire from the spark plug and
place the wire where it cannot contact spark plug.
3. Clean area around oil drain plug (A). The oil drain plug is
located at base of engine, opposite carburetor.
4. Remove oil drain plug and drain oil completely into a
suitable container.
5. Reinstall oil drain plug and tighten securely. Remove oil
fill cap.
6. Slowly pour oil (about 20 oz.) into oil fill opening (B) to
the point of overflowing (C) at oil fill cap.
7. Reinstall oil fill cap. Finger tighten cap securely.
8. Wipe up any spilled oil.
A
B
C
WARNING: Unintentional sparking can result in fire or
electric shock.
WHEN ADJUSTING OR MAKING REPAIRS TO YOUR PRESSURE
WASHER
• Disconnect the spark plug wire from the spark plug and place
the wire where it cannot contact spark plug.
WHEN TESTING FOR ENGINE SPARK
• Use approved spark plug tester.
• DO NOT check for spark with spark plug removed.
CAUTION: Avoid prolonged or repeated skin contact
with used motor oil.
• Used motor oil has been shown to cause skin cancer in certain
laboratory animals.
• Thoroughly wash exposed areas with soap and water.
Page 19

19
Service Air Cleaner
Your engine will not run properly and may be damaged if you
run it with a dirty air cleaner. Service more often if operating
under dirty or dusty conditions. Replacements are available
at your local Sears service center.
To service the air cleaner, follow these steps:
1. Loosen screw (A) and tilt cover (B) down.
2. Carefully remove cartridge (C) assembly.
3. To clean cartridge, gently tap pleated paper side on a flat
surface.
4. Reinstall clean or new cartridge assembly inside cover.
5. Insert cover’s tabs (D) into slots in bottom of base (E).
6. Tilt cover up and tighten screw securely to base.
NOTE: You can purchase new air filter elements by calling
1-800-4-MY-HOME (469-4663).
Service Spark Plug
Changing the spark plug will help your engine to start easier
and run better.
1. Clean area around spark plug.
2. Remove and inspect spark plug.
3. Replace spark plug if electrodes are pitted, burned or
porcelain is cracked. Use the recommended replacement
plug. See Specifications.
4. Check electrode gap with wire feeler gauge and reset
spark plug gap to recommended gap if necessary (see
Specifications).
5. Install spark plug and tighten firmly.
NOTE: You can purchase a new spark plug by calling
1-800-4-MY-HOME (469-4663).
Inspect Muffler and Spark Arrester
Inspect the muffler for cracks, corrosion, or other damage.
Remove the spark arrester, if equipped, and inspect for
damage or carbon blockage. If replacement parts are required,
make sure to use only original equipment replacement parts.
Air Cooling System
Over time debris may accumulate in cylinder cooling fins and
cannot be observed without partial engine disassembly. For
this reason, we recommend you have an qualified Sears
service dealer clean the cooling system (F) per
recommended intervals (see Maintenance Schedule). Equally
important is to keep top of engine free from debris. See
Clean Debris.
C
E
B
A
D
WARNING: Contact with muffler area can result in
serious burns.
Exhaust heat/gases can ignite
combustibles, structures or damage
fuel tank causing a fire.
• DO NOT touch hot parts and AVOID hot exhaust gases.
• Allow equipment to cool before touching.
• Keep at least 5 feet (152 cm) of clearance on all sides of
pressure washer including overhead.
• It is a violation of California Public Resource Code, Section
4442, to use or operate the engine on any forest-covered,
brush-covered, or grass-covered land unless the exhaust
system is equipped with a spark arrester, as defined in Section
4442, maintained in effective working order. Other states or
federal jurisdictions may have similar laws.
Contact the original equipment manufacturer, retailer, or dealer
to obtain a spark arrester designed for the exhaust system
installed on this engine.
• Replacement parts must be the same and installed in the same
position as the original parts.
F
Page 20

20
AFTER EACH USE
Water should not remain in the unit for long periods of time.
Sediments or minerals can deposit on pump parts and
“freeze” pump action. Follow these procedures after every
use:
1. Flush detergent system by turning its detergent shut-off
valve to “Off” position and run pressure washer with
PrecisionSpray™ Selector in a low pressure position.
Flush for one to two minutes.
2. Shut off engine, turn off water supply, point gun in a
safe direction, press red button and squeeze trigger to
relieve trapped pressure and let engine cool.
3. Disconnect hose from spray gun and high pressure
outlet on pump. Drain water from hose, gun, and spray
tip extension. Use a rag to wipe off the hose.
4. Empty pump of all pumped liquids by pulling recoil
handle about 6 times. This should remove most liquid in
pump.
5. Coil high pressure hose on hook provided on handle.
6. Store unit in a clean, dry area.
7. If storing for more than 30 days see Long Term Storage
on next page.
WARNING: The high pressure stream of water that this
equipment produces can cut through skin and
its underlying tissues, leading to serious injury
and possible amputation.
Spray gun traps high water pressure, even when engine is
stopped and water is disconnected, which can cause
injury.
• Keep high pressure hose connected to pump and spray gun
while system is pressurized.
• ALWAYS point spray gun in safe direction, press red button
and squeeze spray gun trigger to release high pressure, every
time you stop engine.
WARNING: Fuel and its vapors are extremely
flammable and explosive.
Fire or explosion can cause severe burns
or death.
WHEN STORING FUEL OR EQUIPMENT WITH FUEL IN TANK
• Store away from furnaces, stoves, water heaters, clothes
dryers, or other appliances that have pilot light or other
ignition source because they can ignite fuel vapors.
Page 21

21
WINTER STORAGE
NOTICE: You must protect your unit from freezing
temperatures.
• Failure to do so will permanently damage your pump and render
your unit inoperable.
• Freeze damage is not covered under warranty.
To protect the unit from freezing temperatures:
1. Empty cleaning tank as follows:
a. Disconnect hose connected to injection fitting on
pump. Place end of hose into suitable container.
b. Rotate detergent shut-off valve to “On” position and
open the tanks cover. Gravity will empty tank
contents into container.
c. Reconnect hose to injection fitting on pump. Add
0.5 quart of clean fresh water to cleaning tank and
close tanks cover.
2. Flush detergent system by turning detergent shut-off
valve to “On” position, rotate PrecisionSpray™ Selector
to a low pressure position and run pressure washer.
Flush until cleaning tank is empty. Turn its detergent
shut-off valve to “Off” position.
3. Follow steps 2-5 in the previous section After Each Use.
4. Use pump saver, available at Sears retail item
7174403GS, to treat pump. This minimizes freeze
damage and lubricates pistons and seals.
5. If pump saver is not available, connect a 3-foot section
of garden hose to water inlet adapter. Pour
RV–antifreeze (antifreeze without alcohol) into hose. Pull
recoil handle twice. Disconnect 3-foot hose.
6. Store unit in a clean, dry area.
LONG TERM STORAGE
If you do not plan to use the pressure washer for more than
30 days, you must prepare the engine and pump for long
term storage.
It is important to prevent gum deposits from forming in
essential fuel system parts such as the carburetor, fuel filter,
fuel hose or tank during storage. Also, experience indicates
that alcohol-blended fuels (called gasohol, ethanol or
methanol) can attract moisture, which leads to separation
and formation of acids during storage. Acidic gas can
damage the fuel system of an engine while in storage.
Protect Fuel System
Fuel Additive:
Fuel can become stale when stored over 30 days. Stale fuel
causes acid and gum deposits to form in the fuel system or
on essential carburetor parts. To keep fuel fresh, use Briggs
& Stratton FRESH START® fuel stabilizer, available as a
liquid additive or a drip concentrate cartridge.
There is no need to drain gasoline from the engine if a fuel
stabilizer is added according to instructions. Run the engine
for 2 minutes to circulate the stabilizer throughout the fuel
system. The engine and fuel can then be stored up to
24 months.
If gasoline in the engine has not been treated with a fuel
stabilizer, it must be drained into an approved container. Run
the engine until it stops from lack of fuel. The use of a fuel
stabilizer in the storage container is recommended to
maintain freshness.
Change Oil
While engine is still warm, drain oil from crankcase. Refill
with recommended grade. See Changing Engine Oil.
Protect Pump
To protect the pump from damage caused by mineral
deposits or freezing, use PumpSaver, retail item 7174403GS,
to treat pump. This prevents freeze damage and lubricates
pistons and seals.
NOTE: PumpSaver is available as an optional accessory. It is
not included with the pressure washer. Contact your local
Sears service center to purchase PumpSaver.
NOTICE: You must protect your unit from freezing
temperatures.
• Failure to do so will permanently damage your pump and render
your unit inoperable.
• Freeze damage is not covered under warranty.
To use PumpSaver, make sure the pressure washer is turned
off and disconnected from supply water. Read and follow all
instructions and warnings given on the PumpSaver container.
Other Storage Tips
1. DO NOT store fuel from one season to another unless it
has been treated as described in Protect Fuel System.
2. Replace fuel container if it starts to rust. Rust and/or dirt
in fuel can cause problems if it’s used with this unit.
3. Cover unit with a suitable protective cover that does not
retain moisture.
4. Store unit in a clean and dry area.
STORAGE
WARNING: Storage covers can be flammable.
• DO NOT place a storage cover over a hot pressure washer.
• Let equipment cool for a sufficient time before placing the
cover on the equipment.
Page 22

22
TROUBLESHOOTING
Problem Cause Correction
Pump has following problems:
failure to produce pressure,
erratic pressure, chattering, loss
of pressure, low water volume.
1. PrecisionSpray™ Selector is in a
low pressure position.
2. Water inlet is blocked.
3. Inadequate water supply.
4. Inlet hose is kinked or leaking.
5. Clogged inlet hose strainer.
6. Water supply is over 100°F.
7. High pressure hose is blocked or
leaks.
8. Gun leaks.
9. Nozzle in PrecisionSpray™ Selector
is obstructed.
10. Pump is faulty.
1. Rotate PrecisionSpray™ Selector to a
high pressure position.
2. Clear inlet.
3. Provide adequate water flow.
4. Straighten inlet hose, patch leak.
5. Check and clean inlet hose strainer.
6. Provide cooler water supply.
7. Clear blocks in high pressure hose or
replace hose.
8. Replace gun.
9. Clean PrecisionSpray™ Selector nozzles.
10. Contact Sears service facility
Detergent fails to mix with spray.
1. Detergent shut-off valve is in the
“Off” position.
2. PrecisionSpray™ Selector is in a
high pressure position.
1. Rotate detergent shut-off valve to “On”
position.
2. Rotate PrecisionSpray™ Selector to a
low pressure position.
Engine runs good at no-load but
"bogs" when load is added.
Engine speed is too slow. Move throttle control to FAST position. If
engine still "bogs down", contact Sears
service facility.
Engine will not start; or starts and
runs rough.
1. Dirty air cleaner.
2. Out of fuel.
3. Stale fuel.
4. Spark plug wire not connected to
spark plug.
5. Bad spark plug.
6. Water in fuel.
7. Overchoking.
8. Excessively rich fuel mixture.
1. Clean or replace air cleaner.
2. Fill fuel tank.
3. Drain fuel tank; fill with fresh fuel.
4. Connect wire to spark plug.
5. Replace spark plug.
6. Drain fuel tank; fill with fresh fuel.
7. Open choke fully and crank engine.
8. Contact Sears service facility.
Engine shuts down during
operation.
Out of fuel. Fill fuel tank.
Engine lacks power. Dirty air filter. Replace air filter.
Engine "hunts" or falters.
Choke is opened too soon. Move choke to halfway position until engine
runs smoothly.
Page 23

23
PARTS
SNAPPER 3100 PSI Pressure Washer 580.752640
Main Unit — Exploded View and Parts List
Item Part # Description
1 209324GS BASE, w/Vib Mounts
2 AG208900GS HANDLE
3 192134GS KIT, Engine Mounting Hardware
4 194509GS KIT, Wheel
5 203901GS PUMP, Complete
6 189971GS Kit, Chemical Hose
7 23139DGS Key
8 B2384GS Filter, Inlet
9 204085GS Kit, Water Inlet
10 192914GS Kit, Hose Tail
11 208673GS Valve, Thermal Relief
12 B3222EGS CAP, Chem Tank
13 194264GS KIT, Hook
14 209325GS KIT, Chem Tank
195964GS Clip, Tree
192980GS Kit, Valve
15 209283GS HOSE
16 B2203GS KIT, Handle Fastening
17 201661GS KIT, Gun Holder
18 192553GS KIT, Vibration Mount
19 192131GS KIT, Pump Mounting Hardware
20 201202GS WAND, Precision Spray
21 199990GS GUN
900 NSP ENGINE (121012-0122-B8) (see
pages 24-27)
Items Not Illustrated
Part # Description
208908GS MANUAL, Operator’s
191267SGS AXLE
AB3061BGS OIL BOTTLE
695755 KNOB, Throttle
200658GS DECAL, Recoil
208925GS DECAL, Air Cleaner
208903GS DECAL, Engine
208918GS DECAL, Unit
194256GS KIT, Tag, Warning, Srv
Optional Accessories Not Illustrated
Part # Description
7175187 Garden Hose Quick Connect
7175197 Accessory Quick Connect
7175124 Rotating Brush Kit
7175122 30' Replacement Hose
7175116 O Ring Repair Kit
7175129 Turbo Nozzle
7175121 25' Extension Hose
7174402 Hose Reel
7174403 Pump Saver
7133386 CARTRIDGE, Fresh Start
7174404 Project Pro® PerfectMix™ Multi-
Purpose and Vehicle Cleaner
7174405 Project Pro® PerfectMix™ Concrete,
Brick, and Tile Cleaner
7174406 Project Pro® PerfectMix™ Mold and
Mildew Cleaner
Page 24

24
ENGINE, Briggs & Stratton, 121012 – Exploded View
Page 25

25
ENGINE, Briggs & Stratton, 121012 – Exploded View
Page 26

26
ENGINE, Briggs & Stratton, 121012 – Exploded View
Page 27

Item Part # Description
1 697322 Cylinder Assembly
2 399269 Kit-Bushing/Seal (Magneto Side)
3 299819s Seal-Oil (Magneto Side)
5 699486 Head-Cylinder
7 698210 Gasket-Cylinder Head
11 692600 Tube-Breather
12 699485 Gasket-Crankcase
13 699482 Screw (Cylinder Head)
15 691686 Plug-Oil Drain
15A 691682 Plug-Oil Drain
16 699445 Crankshaft
18 699804 Cover-Crankshaft
20 692550 Seal-Oil (PTO Side)
21 281658s Cap-Oil Fill
22 699478 Screw (Crankcase Cover/Sump)
23 699488 Flywheel
24 222698s Key-Flywheel
25 791968 Piston Assembly (Standard)
793000 Piston Assembly (.020” Oversize)
26 791969 Ring Set (Standard)
793001 Ring Set (.020” Oversize)
27 691866 Lock-Piston Pin
28 499423 Pin-Piston
29 690124 Rod-Connecting
30 791584 Dipper-Connecting Rod
32 691664 Screw (Connecting Rod) (Short)
32A 695759 Screw (Connecting Rod) (Long)
33 499642 Valve-Exhaust
34 795443 Valve-Intake
35 691304 Spring-Valve (Intake)
36 691304 Spring-Valve (Exhaust)
37 699661 Guard-Flywheel
40 692194 Retainer-Valve
45 690977 Tappet-Valve
46 693404 Camshaft
51 692555 Gasket-Intake
55 791848 Housing-Rewind Starter
58 693389 Rope-Starter
60 490652 Grip-Starter Rope
65 690837 Screw (Rewind Starter) (SAE)
65A 699228 Screw (Rewind Starter) (Metric) (Original Equipment)
78 699205 Screw (Flywheel Guard)
95 691636 Screw (Throttle Valve)
97 690024 Shaft-Throttle
98 398185 Kit-Idle Speed
104 691242 Pin-Float Hinge
108 692567 Valve-Choke
109 690023 Shaft-Choke
117 690048 Jet-Main (Standard)
118 497315 Jet-Main (High Altitude)
121 792006 Kit-Carburetor Overhaul
122 795643 Spacer-Carburetor
125 698474 Carburetor
127 691739 Plug-Welch
130 691181 Valve-Throttle
133 398187 Float-Carburetor
134 398188 Kit-Needle/Seat
137 693981 Gasket-Float Bowl
146 690979 Key-Timing
155 698214 Plate-Cylinder Head
161 699207 Base-Air Cleaner
163 696024 Gasket-Air Cleaner
186 692317 Connector-Hose
187 791766 Line-Fuel (Cut To Required Length)
187A 791867 Line-Fuel (Formed)
188 699479 Screw (Control Bracket)
190 699220 Screw (Fuel Tank)
192 694543 Adjustor-Rocker Arm
209 692579 Spring-Governor
209A 691278 Spring-Governor (Platinum)
219 693578 Gear-Governor
220 691724 Washer (Governor Gear)
222 793108 Bracket-Control
227 794367 Lever-Governor Control
Item Part # Description
238 691300 Valve-Cap
276 271716 Washer-Sealing
281 793122 Panel-Control
300 693593 Muffler
304 699598 Housing-Blower
305 699480 Screw (Blower Housing)
306 795334 Shield-Cylinder
307 699483 Screw (Cylinder Shield)
332 792723 Nut (Flywheel)
333 695711 Armature-Magneto
334 699477 Screw (Magneto Armature)
337 491055s Plug-Spark
356 692390 Wire-Stop
358 791797 Gasket Set-Engine
365 699484 Screw (Carburetor)
415 693463 Plug (Crankcase Cover)
425 699208 Screw (Air Cleaner Cover)
445 491588s Filter-Air Cleaner Cartridge
455 692591 Cup-Flywheel
456 692299 Plate-Pawl Friction
459 281505s Pawl-Ratchet
505 691251 Nut (Governor Control Lever)
552 692346 Bushing-Governor Crank
562 691119 Bolt (Governor Control Lever)
592 690800 Nut (Rewind Starter)
597 691696 Screw (Pawl Friction Plate)
601 791850 Clamp-Hose (Green)
608 795930 Starter-Rewind
613 699209 Screw (Muffler) (M6x20mm Long)
613A 699203 Screw (Muffler)
615 692576 Retainer-Governor Shaft
616 692547 Crank-Governor
619 699230 Screw (Cylinder Head Plate)
621 692310 Switch-Stop
632 693408 Spring/Link-Mechanical Governor
633 693867 Seal-Choke/Throttle Shaft (Choke Shaft)
633A 691321 Seal-Choke/Throttle Shaft (Throttle Shaft)
635 692076 Boot-Spark Plug
663 699206 Screw (Control Panel)
677 699203 Screw (Muffler Deflector)
689 691855 Spring-Friction (Rewind Starter)
692 690572 Spring-Detent
718 690959 Pin-Locating
741 695087 Gear-Timing
742 692564 Retainer-E Ring
746 790278 Gear-Idler
830 694544 Stud-Rocker Arm
832 693583 Guard-Muffler
836 699632 Screw (Muffler Guard) (M6x14mm Long)
851 493880s Terminal-Spark Plug
868 795440 Seal-Valve
869 691155 Seal-Valve
883 691893 Gasket-Exhaust
914 699480 Screw (Rocker Cover) (Bottom)
914A 692557 Screw (Rocker Cover) (Top)
914B 697551 Screw (Rocker Cover) (Center)
957 795027 Cap-Fuel Tank
957A 792647 Cap-Fuel Tank (Original Equipment)
958 698180 Valve-Fuel Shut Off
968 692584 Cover-Air Cleaner
971 690370 Screw (Air Cleaner Base to Carburetor)
972 694260 Tank-Fuel
975 790559 Bowl-Float
993 694088 Gasket-Cylinder Head Plate
1005 692592 Fan-Flywheel
1022 691890 Gasket-Rocker Cover
1023 499924 Cover-Rocker
1026 790287 Rod-Push
1029 691230 Arm-Rocker
1034 691343 Guide-Push Rod
1070 699201 Screw (Flywheel Fan)
1095 791798 Gasket Set-Valve
1210 791849 Pulley/Spring Assembly (Pulley)
1211 791849 Pulley/Spring Assembly (Spring)
27
ENGINE, Briggs & Stratton, 121012 – Parts List
Page 28

EMISSION CONTROL SYSTEM WARRANTY
28
In the USA and Canada, a 24-hour hotline, 1-800-469-4663, has a menu of pre-recorded messages offering you product maintenance
information.
California, U.S. EPA, and Sears Emissions
Control Warranty Statement
Your Warranty Rights And Obligations
The California Air Resources Board, U.S. EPA, and Sears,
Roebuck and Co., U.S.A. (Sears) are pleased to explain the
emissions control system warranty on your Model Year 2008
and later engine/equipment. In California, new small off-road
engines must be designed, built, and equipped to meet the
State’s stringent anti-smog standards. Sears must warrant
the emissions control system on your engine/equipment for
the periods of time listed below provided there has been no
abuse, neglect, or improper maintenance of your small offroad engine.
Your emissions control system may include parts such as
the carburetor or fuel injection system, fuel tank, ignition
system, and catalytic converter. Also included may be hoses,
belts, connectors, sensors, and other emissions-related
assemblies. Where a warrantable condition exists, Sears will
repair your engine/equipment at no cost to you including
diagnosis, parts, and labor.
Manufacturer’s Warranty Coverage:
Small off-road engines are warranted for two years. If any
emissions-related part on your engine/equipment is
defective, the part will be repaired or replaced by Sears.
Owner’s Warranty Responsibilities:
• As the small engine/equipment owner, you are
responsible for the performance of the required
maintenance listed in your owner’s manual. Sears
recommends that you retain all receipts covering
maintenance on your engine/equipment, but Sears
cannot deny warranty solely for the lack of receipts or
your failure to ensure the performance of all scheduled
maintenance.
• As the engine/equipment owner, you should however
be aware that Sears may deny you warranty coverage if
your engine/equipment or a part has failed due to
abuse, neglect, improper maintenance, or unapproved
modifications.
• You are responsible for presenting your
engine/equipment to a Sears distribution center,
servicing dealer, or other equivalent entity, as
applicable, as soon as a problem exists. The warranty
repairs should be completed in a reasonable amount of
time, not to exceed 30 days. If you have any questions
regarding your warranty rights and responsibilities, you
should contact Sears at (800) 469-4663.
Sears Emissions Control Warranty Provisions
The following are specific provisions relative to your
Emissions Control Warranty Coverage. It is in addition to the
Sears engine warranty for non-regulated engines found in
the Operator’s Manual.
1. Warranted Emissions Parts
Coverage under this warranty extends only to the parts
listed below (the emissions control systems parts) to
the extent these parts were present on the engine
purchased.
a. Fuel Metering System
• Cold start enrichment system (soft choke)
• Carburetor and internal parts
• Fuel pump
• Fuel line, fuel line fittings, clamps
• Fuel tank, cap and tether
• Carbon canister
b. Air Induction System
• Air cleaner
• Intake manifold
• Purge and vent line
c. Ignition System
• Spark plug(s)
• Magneto ignition system
d. Catalyst System
• Catalytic converter
• Exhaust manifold
• Air injection system or pulse valve
e. Miscellaneous Items Used in Above Systems
• Vacuum, temperature, position, time sensitive
valves and switches
• Connectors and assemblies
2. Length of Coverage
For a period of two years from date of original
purchase, Sears warrants to the original purchaser and
each subsequent purchaser that the engine is designed,
built, and equipped so as to conform with all applicable
regulations adopted by the Air Resources Board; that it
is free from defects in material and workmanship that
could cause the failure of a warranted part; and that it is
identical in all material respects to the engine described
in the manufacturer’s application for certification. The
warranty period begins on the date the engine is
originally purchased.
Page 29

29
The warranty on emissions-related parts is as follows:
• Any warranted part that is not scheduled for
replacement as required maintenance in the owner’s
manual supplied, is warranted for the warranty period
stated above. If any such part fails during the period of
warranty coverage, the part will be repaired or replaced
by Sears at no charge to the owner. Any such part
repaired or replaced under the warranty will be
warranted for the remaining warranty period.
• Any warranted part that is scheduled only for regular
inspection in the owner’s manual supplied, is warranted
for the warranty period stated above. Any such part
repaired or replaced under warranty will be warranted
for the remaining warranty period.
• Any warranted part that is scheduled for replacement as
required maintenance in the owner’s manual supplied, is
warranted for the period of time prior to the first
scheduled replacement point for that part. If the part fails
prior to the first scheduled replacement, the part will be
repaired or replaced by Sears at no charge to the owner.
Any such part repaired or replaced under warranty will be
warranted for the remainder of the period prior to the
first scheduled replacement point for the part.
• Add on or modified parts that are not exempted by the
Air Resources Board may not be used. The use of any
non exempted add on or modified parts by the owner
will be grounds for disallowing a warranty claim. The
manufacturer will not be liable to warrant failures of
warranted parts caused by the use of a non exempted
add on or modified part.
3. Consequential Coverage
Coverage shall extend to the failure of any engine
components caused by the failure of any warranted
emissions parts.
4. Claims and Coverage Exclusions
Warranty claims shall be filed according to the
provisions of the Sears engine warranty policy.
Warranty coverage does not apply to failures of
emissions parts that are not original equipment Sears
parts or to parts that fail due to abuse, neglect, or
improper maintenance as set forth in the Sears engine
warranty policy. Sears is not liable for warranty
coverage of failures of emissions parts caused by the
use of add-on or modified parts.
Look For Relevant Emissions Durability Period and Air
Index Information On Your Engine Emissions Label
Engines that are certified to meet the California Air Resources
Board (CARB) Emissions Standard must display information
regarding the Emissions Durability Period and the Air Index.
The engine manufacturer makes this information available to
the consumer on emissions labels. The engine emissions
label will indicate certification information.
The Emissions Durability Period describes the number of
hours of actual running time for which the engine is certified
to be emissions compliant, assuming proper maintenance in
accordance with the Operating & Maintenance Instructions.
The following categories are used:
Moderate: Engine is certified to be emissions compliant for
125 hours of actual engine running time.
Intermediate: Engine is certified to be emissions compliant
for 250 hours of actual engine running time.
Extended: Engine is certified to be emissions compliant for
500 hours of actual engine running time.
For example, a typical walk-behind lawn mower is used 20 to
25 hours per year. Therefore, the Emissions Durability
Period of an engine with an intermediate rating would
equate to 10 to 12 years.
Small off-road engines are certified to meet the United States
Environmental Protection Agency (USEPA) Phase 2
emissions standards. For Phase 2 certified engines, the
Emissions Compliance Period referred to on the Emissions
Compliance label indicates the number of operating hours for
which the engine has been shown to meet Federal emissions
requirements.
For engines less than 225 cc displacement.
Category C = 125 hours
Category B = 250 hours
Category A = 500 hours
For engines of 225 cc or more displacement.
Category C = 250 hours
Category B = 500 hours
Category A = 1000 hours
Page 30

30
NOTES
Page 31

31
NOTES
Page 32

32
TABLA DE CONTENIDOS
GARANTIA
GARANTÍA LIMITADA DE DOS AÑOS DE SNAPPER
Durante el primero año a partir de la fecha de compra, si este producto de Snapper falla debido a defectos de materiales o
mano, devuélvalo a cualquier almacén Sears o centro de reparación y repuestos de los Estados Unidos para su reparación
gratuita.
Durante el segundo año a partir de la fecha de compra, si cualquier pieza del producto de Snapper falla debido a defectos de
materiales o mano de obra, se suministrará gratuitamente una nueva pieza. Si desea que se instale la pieza, deberá pagar la
mano de obra.
Esta garantía se reducirá a 90 días desde la fecha de compra si esta limpiadora a presión se utiliza en algún momento con
fines comerciales o de alquiler.
Esta garantía le otorga determinados derechos legales y es posible que tenga otros derechos que pueden variar de un país o
estado a otro.
Sears, Roebuck and Co., Hoffman Estates, IL 60179
GARANTIA . . . . . . . . . . . . . . . . . . . . . . . . . . . . . . . . . . . . . . . . . .32
CONTRATO DE PROTECCIÓN PARA REPARACIONES . . . . . . . . .32
REGLAS DE SEGURIDAD . . . . . . . . . . . . . . . . . . . . . . . . . . . .33-35
CARACTERÍSTICAS Y CONTROLES . . . . . . . . . . . . . . . . . . . . . . .36
MONTAJE . . . . . . . . . . . . . . . . . . . . . . . . . . . . . . . . . . . . . . . .37-40
OPERACION . . . . . . . . . . . . . . . . . . . . . . . . . . . . . . . . . . . . . . .41-44
ESPECIFICACIONES . . . . . . . . . . . . . . . . . . . . . . . . . . . . . . . . . . .45
MANTENIMIENTO . . . . . . . . . . . . . . . . . . . . . . . . . . . . . . . . . .46-50
ALMACENAMIENTO . . . . . . . . . . . . . . . . . . . . . . . . . . . . . . . . . . .51
REPARACION DE DAÑOS REPUESTOS . . . . . . . . . . . . . . . . . . . .52
NOTAS . . . . . . . . . . . . . . . . . . . . . . . . . . . . . . . . . . . . . . . . . . . . .53
GARANTIA DEL CONTROL DE EMISIONES . . . . . . . . . . . . . . .54-55
COMO ORDENAR PARTES . . . . . . . . . . . . . . . PAGINA POSTERIOR
CONTRATO DE PROTECCIÓN PARA REPARACIONES
Felicidades por realizar una compra inteligente.
Su nuevo limpiadora a presión está diseñado y fabricado para
funcionar de manera fiable durante muchos años. Pero como todos
los productos, es posible que requiera reparación ocasionalmente.
Es en esos momentos, tener un contrato de protección para
reparaciones puede ahorrarle dinero y molestias.
A continuación se menciona lo que el contrato de protección
para reparaciones* contempla:
• Servicio experto de nuestros 10.000 especialistas profesionales
en reparación.
• Servicio ilimitado y sin costo en partes y mano de obra en
todas las reparaciones incluidas en la cobertura.
• Cambio del producto por hasta $1.500 si el producto incluido
en la cobertura no se puede reparar.
• Un 10% de descuento en el precio normal de servicio y en
partes instaladas relacionadas no incluidas en la cobertura del
contrato; asimismo, un 10% de descuento en el precio normal
de revisiones de mantenimiento preventivo.
• Ayuda telefónica rápida. Nuestro servicio de Solución rápida
consiste en apoyo telefónico por un representante de Sears.
Piense que somos un “manual del usuario parlante”.
Una vez que adquiera el contrato de protección para reparaciones,
sólo tiene que hacer una sencilla llamada telefónica para programar
un servicio. Puede llamar a cualquier hora del día o la noche, o
programar una cita de servicio en línea.
El contrato de protección para reparaciones es una compra segura.
Si lo cancela por cualquier motivo durante el período de garantía del
producto, le reembolsaremos el total de su dinero o una parte
proporcional en cualquier momento posterior al vencimiento del
período de garantía del producto. Adquiera hoy su contrato de
protección para reparaciones.
Aplican algunas limitaciones y exclusiones. Para conocer precios
y obtener información adicional en EE. UU., llame al
1-800-827-6655.
* La cobertura en Canadá varía en determinados artículos. Para
obtener todos los detalles, comuníquese a Sears Canadá al
1-800-361-6665.
Servicio de instalación de Sears
Para solicitar un servicio de instalación por parte de un profesional
de Sears para aparatos domésticos, puertas automáticas de garajes,
calentadores de agua y otros artículos domésticos importantes en
EE. UU. o Canadá, comuníquese al 1-800-4-MY-HOME®.
Page 33

33
REGLAS DE SEGURIDAD
Lea este manual minuciosamente y conozca a fondo las
partes y el funcionamiento de su máquina limpiadora a
presión. Conozca sus aplicaciones, sus limitaciones y los
peligros involucrados.
Información importante de seguridad
Símbolos sobre la seguridad y significados
El símbolo de alerta de seguridad indica un posible
riesgo para su integridad física. Se utiliza una palabra de
señalización (PELIGRO, ADVERTENCIA o PRECAUCIÓN)
junto con el símbolo de alerta para designar un grado o
nivel de gravedad de riesgo. Se puede utilizar un símbolo de
seguridad para representar el tipo de riesgo. La palabra de
señalización AVISO se utiliza para hacer referencia a una
práctica no relacionada con una lesión física.
PELIGRO indica un riesgo que, de no evitarse, provocará
la muerte o lesiones de gravedad.
ADVERTENCIA indica un riesgo que, de no evitarse,
podría provocar la muerte o lesiones de gravedad.
PRECAUCIÓN indica un riesgo que, de no evitarse, podría
provocar lesiones leves o moderadas.
AVISO hace referencia a una práctica no relacionada con una
lesión física.
Fuego
Explosión
Gases Tóxicos
Superficie Caliente
Partes en Movimiento
Descarga Eléctrica
Superficies Resbalosas
Caer
Contragolpe
Objetos Voladores
Inyección Líquida
Manual del Operario
ADVERTENCIA: El escape del motor de este producto
contiene elementos químicos reconocidos en el Estado de
California por producir cáncer, defectos de nacimiento u
otros daños de tipo reproductivo.
ADVERTENCIA: Este producto contiene plomo y
compuestos de plomo declarados causantes de
malformaciones y otros defectos congénitos por el Estado
de California. Lávese las manos después de manipular
este producto.
ADVERTENCIA: Riesgo de electrocución.
El contacto con los cables eléctricos puede
provocar electrocución y quemaduras.
• NUNCA rocíe cerca de una fuente de energía eléctrica.
ADVERTENCIA: Al motor funcionar, se produce
monóxido de carbono, un gas inodoro y
venenoso.
Respirar monóxido de carbono puede provocar
dolor de cabeza, fatiga, mareos, vómitos, confusión,
ataques, náuseas, desmayos o incluso la muerte.
Algunas sustancias químicas o los detergentes pueden
ser perjudiciales si inhalados o ingeridos, causando la
náusea severa, desmayando o para envenenar.
• Opere el limpiadora a presión SOLAMENTE al aire libre.
• Asegúrese de que los gases de escape no puedan entrar por
ventanas, puertas, tomas de aire de ventilación u otras
aberturas en un espacio cerrado en el que puedan acumularse.
• NO arranque ni deje funcionar el motor en interiores ni en
zonas cerradas, aunque haya ventanas y puertas abiertas.
• Utilice un respirador o máscara siempre que exista la
posibilidad de inhalar vapores.
• Lea todas las instrucciones de la máscara para asegurarse de
que le brindará la protección necesaria contra la inhalación de
vapores nocivos.
Page 34

34
ADVERTENCIA: El uso de limpiadora a presión puede
crear los charcos y superficies
resbalosas.
El retroceso de la pistola rociadora
puede provocar caídas.
• Utilice la limpiadora a presión desde una superficie estable.
• El área de limpieza deberá tener inclinaciones y drenajes
adecuados para disminuir la posibilidad de caídas debido a
superficies resbalosas.
• Extreme las precauciones si necesita utilizar la limpiadora a
presión desde una escalera, un andamio u otro lugar similar.
• Sujete firmemente la pistola rociadora con ambas manos
cuando aplique un rociado a alta presión para evitar lesiones
cuando se produzca el retroceso de la pistola.
ADVERTENCIA: El arrancador y otras piezas que rotan
pueden enredar las manos, el pelo, la ropa, o los
accesorios.
• NUNCA utilice la limpiadora a presión sin sus carcasas o tapas
de protección.
• NO use ropa suelta, joyas o elementos que puedan quedar
atrapados en el arranque o en otras partes rotatorias.
• Ate para arriba el pelo largo y quite la joyería.
ADVERTENCIA: La gasolina y sus vapores son
extremadamente inflamables y
explosivos.
El fuego o una explosión pueden causar
quemaduras severas e inclusive la muerte.
CUANDO ANADA COMBUSTIBLE O VACÍE EL DEPÓSITO
• Apague el limpiadora a presión (posición OFF) y déjelo enfriar al
menos por 2 minutos antes de remover la tapa de la
combustible. Afloje la tapa lentamente para dejar que la presión
salga del tanque.
• Llene o vacíe el depósito de combustible a la intemperie.
• NO llene demasiado el tanque. Permita al menos espacio para
la expansión del combustible.
• Si se ha derramado combustible, espere a que se evapore antes
de arrancar el motor.
• Mantenga la gasolina alejada de chispas, llamas abiertas,
pilotos, calor y otras fuentes de ignición.
• NO encienda un cigarrillo o fume.
CUANDO PONGA EN FUNCIONAMIENTO EL EQUIPO
• Compruebe que la bujía, el silenciador, el tapón del depósito de
combustible y el filtro de aire están instalados.
• NO arranque el motor sin la bujía instalada.
CUANDO OPERE EL EQUIPO
• NO incline el motor o el equipo, de tal manera que la gasolina
se pueda derramar.
• NO rocíe líquidos inflamables.
CUANDO TRANSPORTE O REPARE EL EQUIPO
• Transporte o repare el equipo con el tanque de combustible
vacío, o con la válvula para apagar el combustible, apagada
(posición OFF).
• Desconecte el cable de la bujía.
CUANDO ALMACENE O GUARDE EL EQUIPO CON COMBUSTIBLE
EN EL TANQUE
• Almacene alejado de calderas, estufas, calentadores de agua,
secadoras de ropa u otros aparatos electrodomésticos que
posean pilotos u otras fuentes de ignición, porque ellos pueden
encender los vapores de la combustible.
ADVERTENCIA: El retroceso (repliegue rápido) del cable
del arrancador puede producir lesiones. El
retroceso impedirá que el usuario suelte el cable a
tiempo y tirará de su mano y brazo hacia el motor.
Como resultado, podrían producirse fracturas,
contusiones o esguinces.
• NUNCA tire del cable del arrancador sin eliminar previamente la
presión de la pistola rociadora.
• Cuando arranque el motor, tire lentamente del cable hasta
sentir una resistencia y, a continuación, tire rápidamente de él
para evitar su retroceso.
• Después de cada intento de arranque, cuando el motor no
consiga arrancar, apunte con la pistola rociadora hacia una
dirección segura, pulse el botón rojo y apriete el gatillo para
descargar la presión.
• Sujete firmemente la pistola rociadora con ambas manos
cuando aplique un rociado a alta presión para evitar lesiones
cuando se produzca el retroceso de la pistola.
ADVERTENCIA: El contacto con la zona del silenciador
puede producir quemaduras graves.
Los gases y el calor de escape pueden
inflamar los materiales combustibles y
las estructuras o dañar el depósito de combustible y
provocar un incendio.
• NO toque las superficies calientes y evite los gases del escape a
alta temperatura.
• Permita que el equipo se enfríe antes de tocarlo.
• Deje un espacio mínimo de 1.5 m (5 pies) alrededor del
limpiadora a presión, incluida la parte superior.
• Utilizar el motor en un terreno boscoso, con maleza o cubierto
de hierba constituye una infracción al Código de recursos
públicos de California, a menos que el sistema de escape esté
equipado con una pantalla apagachispas, de acuerdo a la
definición de la Sección 4442, que se mantenga en buenas
condiciones de funcionamiento. En otros estados o
jurisdicciones federales puede haber leyes similares en vigor.
Póngase en contacto con el fabricante, el vendedor o el
distribuidor del equipo original para obtener una pantalla
apagachispas diseñada para el sistema de escape instalado en
este motor.
• Las piezas de recambio deben ser las mismas que las piezas
originales y estar instaladas en la misma posición.
Page 35

35
AVISO: El rociado de alta presión puede dañar elementos
frágiles, incluyendo el vidrio.
• NO dirija la pistola rociadora hacia un cristal cuando utilice la
boquilla MAX (punta de alfiler).
• NUNCA apunte la pistola a plantas.
AVISO: El tratamiento inadecuado del limpiadora a presión
puede dañarlo y acortar su vida productiva.
• Si usted tiene alguna pregunta acerca de las finalidades de uso del
generador, pregúntele a su concesionario o contacte a Sears.
• NUNCA deberán ser operadas las unidades con partes rotas o
ausentes, o sin la caja o cubiertas de protección.
• NO eluda ningún dispositivo de seguridad de esta máquina.
• NO intente alterar la velocidad controlada.
• NO utilice la limpiadora a presión por encima de su presión
nominal.
• NO haga ninguna modificación en la limpiadora a presión.
• Antes de poner en marcha la máquina limpiadora a presión en
clima frío, revise todas las partes del equipo y asegúrese de que
no se haya formado hielo sobre ellas.
• NUNCA mueva la máquina halando la manguera de alta presión.
Utilice la manija que viene con la unidad.
• Revise que el sistema de combustible no presente fugas o signos
de deterioro, como mangueras desgastadas o porosas,
sujetadores flojos o ausentes, tapa o tanque dañados. Corrija
todos los defectos antes de operar la máquina limpiadora a
presión.
• El equipo de alta presión está diseñado para ser utilizado
UNICAMENTE con las partes autorizadas Sears. Si utiliza este
equipo con partes que no cumplan con las especificaciones
mínimas, el usuario asume todos los riesgos y responsabilidades.
ADVERTENCIA: Chispear involuntario puede tener
como resultado el fuego o el golpe
eléctrico.
CUANDO AJUSTE O HAGA REPARACIONES A SU MÁQUINA
LIMPIADORA A PRESIÓN
• Siempre desconecte el alambre de la bujía y colóquelo donde
no pueda entrar en contacto con la bujía.
CUANDO PRUEBE LA BUJÍA DEL MOTOR
• Utilice un comprobador de bujías homologado.
• NO comprueba la chispa sin la bujía instalada.
ADVERTENCIA: Riesgo de lesiones oculares.
El agua rociada puede salpicar o propulsar
objetos.
• Cuando utilice este equipo o esté cerca de él, siempre use gafas
de seguridad con ventilación indirecta (contra salpicaduras de
productos químicos) marcadas para cumplir con ANSI Z87.1.
• NUNCA se ponga gafas de seguridad ni gafas para entornos
secos como sustituto de las gafas de seguridad con ventilación
indirecta.
ADVERTENCIA: El chorro de agua a alta presión que
este equipo produce, puede atravesar la piel y
los tejidos subcutáneos, provocando lesiones de
gravedad que podrían dar lugar a la amputación
de un miembro.
La pistola rociadora contiene agua a alta presión incluso con
el motor parado y el agua desconectada, que puede causar
la herida.
• NO permita en ningún momento que NIÑOS operen la máquina
limpiadora a presión.
• NUNCA repare la manguera de alta presión. Remplacela.
• NUNCA utilice ningún tipo de sellador para reparar una fuga en
una conexión. Sustituya la junta tórica o la junta.
• NUNCA conecte la manguera de alta presión al prolongador de
la boquilla.
• Mantenga conectada la manguera a la máquina o a la pistola de
rociado cuando el sistema esté presurizado.
• SIEMPRE que pare el motor, apunte con la pistola rociadora
hacia una dirección segura, pulse el botón rojo y apriete el
gatillo para descargar la presión.
• NUNCA apunte la pistola a la gente, animales o plantas.
• NO fije la pistola rociadora en la posición abierta.
• NO abandone la pistola rociadora cuando la máquina esté en
funcionamiento.
• NUNCA utilice una pistola rociadora cuyo seguro o protección
para el gatillo no esté en perfecto estado de funcionamiento.
• Asegúrese en todo momento de conectar correctamente la
pistola rociadora, las boquillas y los accesorios.
Page 36

36
CONOZCA SU MAQUINA LIMPIADORA A PRESIÓN
Lea el Manual del Operario y las reglas de seguridad antes de poner en marcha su limpiadora a presión.
Compare las ilustraciones con su limpiadora a presión para familiarizarse con las ubicaciones de los diferentes controles y ajustes.
Guarde este manual para referencias futuras.
CARACTERÍSTICAS Y CONTROLES
A - Pistola de Rociado — Controla la aplicación de agua sobre la
superficie de limpieza con el gatillo. Incluye cerrojo de seguridad.
B - Manguera de Alta Presión — Conecte un extremo a la pistola
de rociado y el otro extremo a la toma de alta presión.
C - Limpiar el Tanque — Permite almacenar hasta 7,6 litros
(2 galóns) de detergente para la limpiadora a presión.
D - Perilla del Cebador — Usada para arranque de motores fríos.
E - Válvula de Combustible — Permite abrir y cerrar la
alimentación de combustible al motor.
F - Filtro de Aire — El elemento de filtro tipo seco limita la cantidad
de suciedad y polvo que se introduce en el motor.
G - Arrancador de Retroceso — Usado para arrancar el motor
manualmente.
H - Filtro y Tubo para Recolección de Detergente — Usado para
succionar detergente de la botella de químicos a la corriente de
agua de baja presión.
J - PrecisionSpray™ Selector — Contiene seis escenarios
diferentes para diferentes aplicaciones de limpieza.
K - Palanca de Control de la Válvula de Regulación — Coloca el
motor en modo de arranque para el arrancador de retroceso y
detiene el motor en funcionamiento.
L - Entrada de Agua — Conexión para la manguera de jardín.
M - Tapón de Vaciado de Aceite — Permite vaciar el aceite del
motor.
N - Toma de Alta Presión — Conexión para la manguera de alta
presión.
P - Automático se Enfría Sistema — Los ciclos regan por bomba
cuando agua alcanza 125º-155ºF. Entibiar agua descargará de la
bomba en el suelo. Este sistema previene el daño interno de
bomba.
R - Bomba — Desarrolla alta presión de agua.
S - Tanque del Combustible — Llene el tanque con gasolina
regular sin contenido de plomo en este punto. Siempre
habitación de hoja para la expansión del combustible.
No mostrado:
Calcomanía Ejemplar de Datos (near rear of base plate) —
Proporciona el modelo y el número de serie de limpiadora a
presión. Tenga por favor estos prontamente disponible cuándo
llamar para la ayuda.
Etiqueta de Advertencia e Instrucciones — Identifica los riesgos e
indica el procedimiento adecuado de puesta en marcha o de parada
de la limpiadora a presión.
Tapa del Depósito del Aceite — Llene el motor con aceite aquí.
L
A
B
J
M
F
H
S
E
G
R
C
P
D
N
K
Page 37

37
MONTAJE
Su limpiadora a presión requiere de cierto ensamble y estará lista
para ser usado únicamente después de haber depositado el
combustible y el aceite recomendado.
Si tiene problemas con el ensamble de su máquina limpiadora a
presión, llame a la línea de ayuda de la máquina limpiadora a
presión al 1-800-317-7833.
Desembale la Limpiadora a Presión
1. Saque todo el contenido de la caja de cartón, a excepción de la
limpiadora a presión.
2. Abra completamente la caja de cartón cortando cada una de
sus esquinas de arriba abajo.
3. Saque la limpiadora a presión de la caja de cartón.
Contenido de la Caja
Revise el contenido de la caja. Si alguna de las partes no está
presente o está dañada, llame a la línea de ayuda de la máquina
limpiadora a presión al 1-800-317-7833.
• La unidad principal
•Asa
• Limpiar el tanque
• La manguera de alta presión
• Pistola de rociado
• Selector PrecisionSpray™
• Gancho de alambre de soporte de la pistola
• Manguera de sifón del detergente
• Aceite para motor
• Bolsa de partes (incluye los elementos descritos a continuación)
• Manual del operador
• Tarjeta de la matrícula
• Piezas para la asa (incluye lo siguiente):
• Pernos del Soporte (2)
• Perno "L"
• Perilla Plástica (4)
• Pinzas de árbol (4)
Familiarícese con cada parte antes de ensamblar la máquina
limpiadora a presión. Compare el contenido con la ilustración de la
página 36. Si alguna de la partes no está presente o se encuentra
dañada, llame a la línea de ayuda de la máquina limpiadora a
presión al 1-800-317-7833.
MONTAJE DEL LIMPIADORA A PRESIÓN
Usted deberá llevar a cabo los siguientes procedimientos antes de
poner en funcionamiento su limpiadora a presión:
1. Llene y mande en tarjeta de matrícula.
2. Conecte asa y limpiar el tanque a unidad principal.
3. Conecte la manguera de sifón del detergente a la bomba.
4. Añada aceite al motor.
5. Añada gasolina al tanque de combustible.
6. Conecte manguera a alta presión a pistola rociadora y a bomba.
7. Conecte el suministro de agua a bomba.
8. Conecte el selector PrecisionSpray™ a la pistola rociadora.
Conecte el Asa y Limpiar el Tanque
1. Coloque el asa (A) sobre los soportes del mismo (B) que ya
están adheridos a la unidad principal. Asegúrese de que los
orificios (C) en el asa estén alineados con los orificios (C) en los
soportes del mismo asa.
NOTA: Tal vez será necesario mover los soportes del asa de un lado
a otro para alinear el asa de tal manera que pueda deslizarse sobre
los soportes del mismo asa.
2. Coloque el limpiar el tanque sobre los orificios en el asa y los
soportes del asa (vista desde la parte trasera de la unidad).
3. Inserte los pernos de cabeza redonda (D) por los orificios
superiores del asa, los soportes del asa y limpiar el tanque
desde la parte delantera de la unidad y coloque un pomo de
plástico (E) desde la parte trasera de la unidad. Apriete a mano.
4. Inserte los pasadores de retención (F) en los orificios (G)
inferiores del limpiar el tanque (H) y los orificios del soportes
del asa hasta que queden empotrados en la limpiar el tanque.
5. Inserte el "L" perno (J) de la pistola a través del orificio situado
justo encima del panel, en el lado izquierdo del asa (vista
desde la parte delantera de la unidad). Sujete el "L" perno en su
posición y coloque un pomo de plástico (K) desde el interior
de la unidad. Apriete a mano.
C
A
B
E
D
J
K
H
F
G
Page 38

5. Inserte el gancho de alambre de soporte (A) de la pistola a
través del orificio situado justo encima del limpiar el tanque en el
derecho de la asa (visto desde la parte delantera de la unidad).
Sujete el gancho de alambre en su posición y coloque un perilla
de plástico (B) desde el interior de la unidad. Apriete a mano.
Montaje de Manguera de Sifón del Detergente a
la Bomba
La limpiadora a presión está equipada con dos mangueras de
inyección de detergente. Una de ellas está conectada al limpiar el
tanque, y la otra está suelta y se utiliza para inyectar detergentes
aptos para la limpiadora a presión desde una botella u otro recipiente.
Conecte una de las mangueras de inyección de detergente (C) al
acoplamiento dentado de la manguera (D) de la bomba.
IMPORTANTE: Sólo se puede utilizar una de las mangueras de
inyección de detergente en un momento dado. Cuando no se utilice
el limpiar el tanque, asegúrese de que la llave de paso de detergente
del limpiar el tanque esté en la posición “Off”.
Agregue Aceite de Motor
1. Coloque la limpiadora a presión en una superficie plana y
nivelada.
2. Limpie la zona de alrededor del orificio de llenado de aceite y
quite el tapón amarillo.
3. Con la ayuda de un embudo (opcional), vierta lentamente todo
el contenido de la botella de aceite por el orificio de llenado de
aceite (E).
AVISO: El tratamiento inadecuado del limpiadora a presión
puede dañarlo y acortar su vida productiva.
• NO procure acodar ni empezar el motor antes ha sido atendido a
apropiadamente con el aceite recomendado. Esto puede tener
como resultado una avería del motor.
4. Vuelva a colocar el tapón y apriételo firmemente.
Agregue Gasolina
El combustible debe reunir los siguientes requisitos:
• Gasolina sin plomo limpia y nueva.
• Un mínimo de 87 octanos/87 AKI (91 RON). Para uso a gran
altitud, consulte Gran altitud.
• El motor admite gasolina con hasta un 10% de etanol (gasohol)
o hasta un 15% de MTBE (éter metil terbutílico).
AVISO: Evite el daño del limpiadora a presión.
El fracaso para seguir Manual de Operario para el
combustible reccomendations garantía de vacíos.
• NO utilice gasolina no autorizada; por ejemplo, E85.
• NO mezcle aceite con gasolina.
• NO modifique el motor para hacerlo funcionar con otros
combustibles.
Para evitar la formación de carbonilla en el circuito de combustible,
siempre que añada combustible, mézclelo con un estabilizador.
Consulte Almacenamiento. NO todos los combustibles son iguales.
Si detecta problemas de arranque o de rendimiento después de
utilizar un combustible, pruebe a cambiar de proveedor o de marca.
Este motor está certificado para funcionar con gasolina. Su sistema
de control de emisiones es EM (Modificaciones del motor).
1. Limpie el área alrededor de la tapa de llenado del combustible,
retire la tapa.
2. Añada lentamente gasolina sin plomo (F) al depósito de
combustible (G). NO añada combustible en exceso. Deje
aproximadamente 4 cm (1,5”) de espacio (H) en el depósito
para permitir la expansión del combustible, como se muestra.
38
H
G
F
ADVERTENCIA: La gasolina y sus vapores son
extremadamente inflamables y
explosivos.
El fuego o una explosión pueden causar
quemaduras severas e inclusive la muerte.
CUANDO ANADA COMBUSTIBLE EL DEPÓSITO
• Apague el limpiadora a presión (posición OFF) y déjelo enfriar al
menos por 2 minutos antes de remover la tapa de la
combustible. Afloje la tapa lentamente para dejar que la presión
salga del tanque.
• Llene el depósito de combustible a la intemperie.
• NO llene demasiado el tanque. Permita al menos espacio para
la expansión del combustible.
• Si se ha derramado combustible, espere a que se evapore antes
de arrancar el motor.
• Mantenga la gasolina alejada de chispas, llamas abiertas,
pilotos, calor y otras fuentes de ignición.
• NO encienda un cigarrillo o fume.
C
D
B
A
E
Page 39

39
3. Instale la tapa del tanque de combustible y la espera para algún
combustible rociado para evaporar.
¡PRECAUCIÓN! Los combustibles con mezcla de alcohol (gasohol,
etanol o metanol) pueden atraer la humedad y provocar la
separación y formación de ácidos durante el almacenamiento. Los
gases ácidos pueden dañar el circuito de combustible y el motor
durante el almacenamiento.
Para evitar este tipo de problemas, vacíe el circuito de combustible
cuando vaya a almacenar la unidad durante 30 días o más. Vacíe el
depósito de combustible, arranque el motor y déjelo funcionar hasta
que los conductos de combustible y el carburador queden vacíos.
Utilice combustible nuevo la próxima temporada. Para obtener más
información al respecto, consulte Almacenamiento.
NUNCA utilice productos limpiadores para motores o carburadores
en el depósito de combustible, ya que podrían provocar daños
permanentes.
Gran altitud
En altitudes superiores a 1.524 metros (5.000 pies), se deberá
utilizar gasolina con un mínimo de 85 octanos / 85 AKI (89 RON).
Para seguir cumpliendo la normativa sobre emisiones, es necesario
ajustar la unidad para su uso a gran altitud. De no realizarse este
ajuste, el rendimiento se reducirá y el consumo de combustible y
las emisiones aumentarán. Para obtener más información sobre el
ajuste para gran altitud, consulte con un distribuidor cualificado de
Sears. No se recomienda utilizar el motor a altitudes inferiores a
762 metros (2.500 pies) con el juego de gran altitud.
Tapón de combustible FreshStart®
El tapón de combustible FreshStart® (A) está diseñado para
albergar un cartucho (B) con aditivo para combustible. La adición
de un aditivo para combustible ayuda a mantener el combustible en
buen estado y los carburadores limpios para facilitar el arranque
durante toda la temporada. El tapón de combustible FreshStart®, si
está equipado con un cartucho, suministra automáticamente el
aditivo de combustible concentrado en el tanque de combustible, de
forma que usted no tenga que agregarlo.
NOTA: El cartucho de aditivo para combustible FreshStart® está
disponible como un accesorio opcional, número de catálogo
7174403. No está incluido en la limpiadora a presión. Póngase en
contacto con el fabricante del equipo original, el vendedor o el
distribuidor para obtener un cartucho diseñado para el tapón de
combustible FreshStart® instalado en este motor.
Lea y siga todas las instrucciones y advertencias del paquete del
cartucho de aditivo para combustible FreshStart®.
Conecte la Manguera y el Suministro de Agua a
la Bomba
AVISO: NO haga funcionar la bomba si no tiene el
suministro conectado y abierto.
• El daño a la limpiadora a presión, resultado de la desatención a
esta precaución, no será cubierto por la garantía.
NOTA: Antes de conectar las mangueras, retire y deseche los
tapones de transporte de la salida de alta presión y de la entrada de
agua de la bomba.
1. Retroceda la manguera a alta presión y conecte a la base de la
pistola rociadora. Apriete con la mano.
2. Conecte el otro extremo de la manguera a alta presión, a la
salida de alta presión de la bomba. Apriete con la mano.
A
B
ADVERTENCIA: El chorro de agua a alta presión que
este equipo produce, puede atravesar la piel y
los tejidos subcutáneos, provocando lesiones de
gravedad que podrían dar lugar a la amputación
de un miembro.
• NUNCA conecte la manguera de alta presión al prolongador de
la boquilla.
• Mantenga conectada la manguera a la máquina o a la pistola
de rociado cuando el sistema esté presurizado.
• Asegúrese en todo momento de conectar correctamente la
pistola rociadora, las boquillas y los accesorios.
Page 40

40
3. Antes de que conecte la manguera de jardín a la entrada de
agua, inspeccione el colador de la entrada. Limpie el colador (A)
si tiene residuos o solicite su remplazo si está dañado. NO haga
funcionar la limpiadora a presión si el filtro de entrada falta o
está dañado.
4. Haga correr el agua a través de la manguera de su jardín por
30 segundos para limpiar cualquier escombro que se
encuentre en ella. Desconecte el agua.
IMPORTANTE: Hace NO agua de parar de siphon para el
abastecimiento de agua. Use agua SOLO fría (menos que 100ºF).
5. Conecte la manguera de jardín (no exceder 50 pies en la
longitud) a la entrada del agua. Apriete con la mano.
AVISO: El uso de una válvula unidireccional (igualador de
presión o válvula de retención) en la entrada de la bomba
puede producir daños en la bomba o en el conector de
entrada.
• DEBE haber un mínimo de 3 metros (10 pies) de manguera de
riego libre entre la entrada de la limpiadora a presión y cualquier
dispositivo, como un igualador de presión o una válvula de
retención).
• El daño a la limpiadora a presión, resultado de la desatención a
esta precaución, no será cubierto por la garantía.
6. Abra el grifo, pulse el botón rojo (B) de la pistola rociadora y
apriete el gatillo para eliminar el aire y las impurezas del
sistema de bombeo.
LISTA DE REVISION PREVIA AL ARRANQUE
DEL MOTOR
Revise la unidad para asegurarse que ha llevado a cabo los
siguientes procedimientos:
1. Asegúrese de leer las secciones Reglas de Seguridad y
Operación antes de usar el limpiadora a presión.
2. Revise que los sujetadores del carrete de la manguera estén
apretados.
3. Revise que haya sido depositado aceite y esté al nivel correcto
en la caja del cigüeñal del motor.
4. Deposite la gasolina adecuada en el tanque del combustible.
5. Revise que todas las conexiones de las mangueras (alta
presión y suministro de agua) estén apretadas correctamente y
que no existan dobleces, cortes o daño de la manguera de alta
presión.
6. Proporcione el suministro de agua adecuado (que no exceda
los 100ºF).
A
B
ADVERTENCIA: Riesgo de lesiones oculares.
El agua rociada puede salpicar o propulsar
objetos.
• Cuando utilice este equipo o esté cerca de él, siempre use gafas
de seguridad con ventilación indirecta (contra salpicaduras de
productos químicos) marcadas para cumplir con ANSI Z87.1.
• NUNCA se ponga gafas de seguridad ni gafas para entornos
secos como sustituto de las gafas de seguridad con ventilación
indirecta.
Page 41

41
COMO USAR SU LIMPIADORA A PRESIÓN
Si tiene problemas con el funcionamiento de su máquina limpiadora
a presión, por favor llame a la línea de ayuda de la máquina
limpiadora a presión al 1-800-317-7833.
Ubicación del limpiadora a presión
Espacio libre alrededor del limpiadora a presión
Coloque la limpiadora a presión a la intemperie en una zona en
donde no se acumulen gases de escape mortales. Asegúrese de que
los gases de escape (A) no puedan entrar por ventanas, puertas,
tomas de aire de ventilación u otras aberturas en un espacio
cerrado en el que puedan acumularse. Tenga en cuenta los vientos y
las corriente de aire preponderantes cuando elija la ubicación del
limpiadora a presión.
Para Poner en Marcha el Limpiadora a Presión
Para darle arranque a su limpiadora a presión movido a motor por
primera vez, siga estas instrucciones paso a paso. Esta información
acerca de la puesta en marcha inicial también es válida para cuando
vaya a darle arranque al motor después de haberlo dejado la
máquina limpiadora a presión fuera de funcionamiento por lo
menos un día.
1. Coloque la máquina limpiadora a presión en un área cercana a
una suministro de agua exterior capaz de abastecer agua a un
volumen mayor de 3.5 galones por minuto en no menos que
20 PSI en el fin de arandela de presión de la manga del jardín.
2. Revise que la manguera de alta presión se encuentre conectada
firmemente a la pistola de rociado y a la bomba. Vea Montaje.
3. Asegúrese que la unidad esté nivelada.
4. Conecte la manguera de jardín a la entrada del agua. Aprietela
con la mano.
AVISO: NO haga funcionar la bomba si no tiene el
suministro conectado y abierto.
• El daño a la limpiadora a presión, resultado de la desatención a
esta precaución, no será cubierto por la garantía.
5. Abra el grifo, pulse el botón rojo de la pistola rociadora y
apriete el gatillo para eliminar el aire y las impurezas del
sistema de bombeo.
6. Conecte el selector PrecisionSpray™ a la pistola rociadora
como se explica en la hoja de instrucciones correspondiente.
7. Gire la válvula del combustible a la posición "On" (B). El asidero
de la válvula del combustible debe ser vertical (señalar hacia el
suelo) para el combustible para fluir.
8. Mueva el control de la válvula de admisión (C) a la posición
"Rápido" ("Fast"), que se distingue con la figura de un conejo.
OPERACION
ADVERTENCIA: Al motor funcionar, se produce
monóxido de carbono, un gas inodoro y
venenoso.
Respirar monóxido de carbono puede provocar
dolor de cabeza, fatiga, mareos, vómitos, confusión,
ataques, náuseas, desmayos o incluso la muerte.
• Opere el limpiadora a presión SOLAMENTE al aire libre.
• Asegúrese de que los gases de escape no puedan entrar por
ventanas, puertas, tomas de aire de ventilación u otras
aberturas en un espacio cerrado en el que puedan acumularse.
• NO arranque ni deje funcionar el motor en interiores ni en
zonas cerradas, aunque haya ventanas y puertas abiertas.
ADVERTENCIA: Los gases y el calor de escape pueden
inflamar los materiales combustibles y las
estructuras o dañar el depósito de combustible y
provocar un incendio.
• Deje un espacio mínimo de 1.5 m (5 pies) alrededor del
limpiadora a presión, incluida la parte superior.
A
B
C
Page 42

42
9. Mueva la palanca del ahogador (B) a la posición "Ahogado"
("Choke").
NOTA: En el caso de que el motor esté caliente, asegúrese de que la
palanca del ahogador se encuentre en la posición "En marcha" ("Run").
IMPORTANTE: Antes de arrancar la limpiadora a presión, asegúrese
de ponerse gafas de seguridad como se describe a continuación.
10. Cuando arranque el motor, colóquese en la posición que se
recomienda a continuación. Sujete la manija y hale ligeramente
la manija del arranque hasta que sienta cierta resistencia.
Después hálela rápidamente.
11. Jale la cuerda de arranque lentamente. NO permita que la cuerda
regrese bruscamente en contra del arrancador.
12. Cuando arranque el motor, mueva lentamente la palanca del
ahogador a la posición "En marcha" ("Run"). Si el motor falla,
mueva la palanca a la posición "Ahogado" ("Choke"), y después
a la posición "En marcha" ("Run").
13. Después de cada intento de arranque, cuando el motor no
consiga arrancar, apunte con la pistola rociadora hacia una
dirección segura, pulse el botón rojo y apriete el gatillo para
descargar la presión. Mueva la palanca del ahogador a la
posición "Ahogado" ("Choke"), y repite los pasos 10 por 12.
14. Si el motor no arranca después de 6 tirones, mueva la palanca
del ahogador a la posición "En marcha" ("Run"), y repite los
pasos 10 por 12.
B
ADVERTENCIA: El retroceso (repliegue rápido) del cable
del arrancador puede producir lesiones. El
retroceso impedirá que el usuario suelte el cable a
tiempo y tirará de su mano y brazo hacia el motor.
Como resultado, podrían producirse fracturas,
contusiones o esguinces.
• NUNCA tire del cable del arrancador sin eliminar previamente la
presión de la pistola rociadora.
• Cuando arranque el motor, tire lentamente del cable hasta
sentir una resistencia y, a continuación, tire rápidamente de él
para evitar su retroceso.
• Después de cada intento de arranque, cuando el motor no
consiga arrancar, apunte con la pistola rociadora hacia una
dirección segura, pulse el botón rojo y apriete el gatillo para
descargar la presión.
• Sujete firmemente la pistola rociadora con ambas manos
cuando aplique un rociado a alta presión para evitar lesiones
cuando se produzca el retroceso de la pistola.
ADVERTENCIA: Riesgo de lesiones oculares.
El agua rociada puede salpicar o propulsar
objetos.
• Cuando utilice este equipo o esté cerca de él, siempre use gafas
de seguridad con ventilación indirecta (contra salpicaduras de
productos químicos) marcadas para cumplir con ANSI Z87.1.
• NUNCA se ponga gafas de seguridad ni gafas para entornos
secos como sustituto de las gafas de seguridad con ventilación
indirecta.
ADVERTENCIA: El contacto con la zona del silenciador
puede producir quemaduras graves.
Los gases y el calor de escape pueden
inflamar los materiales combustibles y
las estructuras o dañar el depósito de combustible y
provocar un incendio.
• NO toque las superficies calientes y evite los gases del escape a
alta temperatura.
• Permita que el equipo se enfríe antes de tocarlo.
• Deje un espacio mínimo de 1.5 m (5 pies) alrededor del
limpiadora a presión, incluida la parte superior.
• Utilizar el motor en un terreno boscoso, con maleza o cubierto
de hierba constituye una infracción al Código de recursos
públicos de California, a menos que el sistema de escape esté
equipado con una pantalla apagachispas, de acuerdo a la
definición de la Sección 4442, que se mantenga en buenas
condiciones de funcionamiento. En otros estados o
jurisdicciones federales puede haber leyes similares en vigor.
Póngase en contacto con el fabricante, el vendedor o el
distribuidor del equipo original para obtener una pantalla
apagachispas diseñada para el sistema de escape instalado en
este motor.
• Las piezas de recambio deben ser las mismas que las piezas
originales y estar instaladas en la misma posición.
ADVERTENCIA: El chorro de agua a alta presión que
este equipo produce, puede atravesar la piel y
los tejidos subcutáneos, provocando lesiones de
gravedad que podrían dar lugar a la amputación
de un miembro.
La pistola rociadora contiene agua a alta presión incluso con
el motor parado y el agua desconectada, que puede causar
la herida.
• NO permita en ningún momento que NIÑOS operen la máquina
limpiadora a presión.
• Mantenga conectada la manguera a la máquina o a la pistola de
rociado cuando el sistema esté presurizado.
• NUNCA apunte la pistola a la gente, animales o plantas.
• NO fije la pistola rociadora en la posición abierta.
• NO abandone la pistola rociadora cuando la máquina esté en
funcionamiento.
• NUNCA utilice una pistola rociadora cuyo seguro o protección
para el gatillo no esté en perfecto estado de funcionamiento.
• Asegúrese en todo momento de conectar correctamente la
pistola rociadora, las boquillas y los accesorios.
Page 43

NOTA: Siempre mantenga la control de válvula de regulación en el
“Rápido” (“Fast”) posicione cuándo operar la limpiadora a presión.
Cómo Detener su Limpiadora a Presión
1. Suelte el gatillo de la pistola rociadora y deje funcionar el
motor al ralentí durante dos minutos.
2. Mueva el acelerador a la posición “Slow” (Lento), y luego a la
posición “Stop” (Parada).
3. SIEMPRE fusil de punto en una dirección segura, presione el
seguro (botón rojo) y el disparador del fusil del rocío del
estrujón para liberar la presión retenida de la pleamar.
IMPORTANTE: La pistola rociadora contiene agua a alta presión
incluso con el motor parado y el agua desconectada.
Cómo Utilizar el Selector PrecisionSpray™
Consulte las instrucciones de uso en la hoja de instrucciones del
selector PrecisionSpray™.
AVISO: El producto sufrirá daños si se aprieta el gatillo de la
pistola con el selector situado entre dos posiciones de boquilla.
• NUNCA gire el selector durante el rociado.
Limpieza y Aplicación del Detergente
Para aplicar el detergente, siga los siguientes pasos:
1. Conecte una de las mangueras de inyección de detergente
conforme a las instrucciones que se detallan en la sección
Conecte la manguera de inyección de detergente a la bomba.
AVISO: El contacto con el silenciador a alta temperatura
puede producir daños en el tubo de inyección de detergente.
• Cuando coloque el filtro en la botella del detergente, coloque el
tubo de manera que no entre en contacto accidentalmente con el
silenciador caliente.
2. Prepare la solución detergente siguiendo las instrucciones del
fabricante.
3. Asegúrese de que la llave de paso de detergente del limpiar el
tanque está en la posición “Off”.
4. Si utiliza un limpiar el tanque, vierta detergente en su interior.
NOTA: La capacidad del limpiar el tanque es de 7,6 l (2 galóns).
AVISO: El limpiar el tanque puede resultar dañado si no se
vacía antes de quitar el asa.
5. Gire el selector PrecisionSpray™ hasta una posición de baja
presión, como se describe en la hoja de instrucciones.
NOTA: No se puede aplicar detergente con el selector
PrecisionSpray™ en una posición de alta presión.
6. Asegúrese de que la manguera del jardín esté conectada a la
entrada de agua. Compruebe que la manguera de alta presión
esté conectada a la pistola rociadora y a la bomba. Abra la
alimentación de agua.
AVISO: Usted deberá conectar todas las mangueras antes
de darle arranque al motor.
• Arrancar el motor sin tener todas las mangueras conectadas y sin
el suministro de agua ABIERTO (ON) causará el daño de la bomba.
• El daño a la limpiadora a presión, resultado de la desatención a
esta precaución, no será cubierto por la garantía.
7. Arranque el motor conforme a las instrucciones de Puesta en
funcionamiento de la limpiadora a presión.
8A. Si utiliza el limpiar el tanque, gire la llave de paso de
detergente del depósito hasta la posición “On” (A).
IMPORTANTE: Si utiliza una manguera de inyección de detergente,
asegúrese de que la llave de paso de detergente del limpiar el
tanque está en la posición “Off”.
8B. Si utiliza una manguera de inyección de detergente, coloque el
extremo del filtro pequeño del tubo de inyección de detergente
en el recipiente del detergente.
AVISO: El contacto con el silenciador a alta temperatura
puede producir daños en el tubo de inyección de detergente.
• Cuando coloque el filtro en la botella del detergente, coloque el
tubo de manera que no entre en contacto accidentalmente con el
silenciador caliente.
NOTA: Asegúrese de que el filtro esté totalmente sumergido
mientras se aplica el detergente.
43
ADVERTENCIA: El chorro de agua a alta presión que
este equipo produce, puede atravesar la piel y
los tejidos subcutáneos, provocando lesiones de
gravedad que podrían dar lugar a la amputación
de un miembro.
La pistola rociadora contiene agua a alta presión incluso con
el motor parado y el agua desconectada, que puede causar
la herida.
• Mantenga conectada la manguera a la máquina o a la pistola de
rociado cuando el sistema esté presurizado.
• SIEMPRE que pare el motor, apunte con la pistola rociadora
hacia una dirección segura, presione el seguro (botón rojo) y
apriete el gatillo para descargar la presión y evitar el retroceso.
ADVERTENCIA: El motor podría petardear, incendiarse
o dañarse.
• NO coloque la palanca estranguladora en la posición "Choke"
() para parar el motor.
PRECAUCIÓN: Los productos químicos pueden
provocar lesiones de gravedad y/o daños materiales.
• NUNCA utilice líquidos cáusticos con la limpiadora a presión.
• Use EXCLUSIVAMENTE detergentes o jabones especiales para
la limpiadora a presión. Siga todas las instrucciones del
fabricante.
A
Page 44

44
9. Aplique el detergente sobre la superficie seca, comenzando en
la parte inferior del área y dirigiéndose hacia arriba, utilizando
movimientos largos, parejos y superpuestos.
10. Permita que el detergente "penetre" de 3 a 5 minutos antes de
enjuagar. Vuelva a aplicarlo cuando sea necesario para evitar
que la superficie se seque. NO permita que el detergente se
seque. Si permite que el detergente se seque, la superficie
podría quedar con manchas.
IMPORTANTE: Si utiliza la manguera de inyección de detergente,
limpie el circuito de inyección de detergente después de cada uso.
Para ello, coloque el filtro en un cubo de agua fría y haga funcionar
la limpiadora a baja presión durante 1 ó 2 minutos.
Enjuage de la Máquina Limpiadora a Presión
Después de haber aplicado el detergente, refriegue la superficie
y enjuagela de la siguiente manera:
1. Asegúrese de que la válvula de paso de detergente está en la
posición “Off”.
2. Gire el selector PrecisionSpray™ hasta una posición de alta
presión, como se describe en la hoja de instrucciones.
3. Mantenga la pistola de rociado a una distancia segura del área
que planea rociar.
4. Aplique un rociado de alta presión a una pequeña zona y luego
compruebe si se ha producido algún tipo de daño. Si no
aprecia daños, continúe en el paso 5.
5. Comience en la parte superior del área que va a enjuagar,
dirigiéndose hacia abajo con los mismos movimientos
superpuestos que utilizó para la limpieza.
Limpieza del tubo de inyección de detergente
Si usó el tubo, debe lavarlo con agua limpia antes de parar el motor.
1. Coloque el filtro y la inyección de detergente en un balde lleno
de agua limpia.
2. Gire el selector PrecisionSpray™ hasta una posición de baja
presión, como se describe en la hoja de instrucciones.
3. Lave de 1 a 2 minutos.
4. Pare el motor siguiendo las instrucciones de la sección Cómo
detener su limpiadora a presión y cierre la entrada de agua.
5. SIEMPRE apunte la pistola rociador hacia una dirección
segura, oprima el botón rojo y apriete el gatillo de la pistola
rociadora para liberar la presión.
IMPORTANTE: La pistola rociadora contiene agua a alta presión
incluso cuando el motor está apagado y el tubo de agua está
desconectado.
Sistema de Enfriamiento Automático
(Alivio Térmico)
El agua que circula dentro de la bomba puede alcanzar temperaturas
entre los 125º-155ºF si hace funcionar el motor de su máquina
limpiadora a presión de 3 a 5 minutos sin oprimir el gatillo de la
pistola de rociado. El sistema de enfriamiento automático se activa a
esta temperatura y enfría la bomba descargando agua caliente en el
piso, evitando así el daño interno de la bomba.
ADVERTENCIA: El retroceso de la pistola rociadora
puede provocar caídas.
• Utilice la limpiadora a presión desde una superficie estable.
• Extreme las precauciones si necesita utilizar la limpiadora a
presión desde una escalera, un andamio u otro lugar similar.
• Sujete firmemente la pistola rociadora con ambas manos
cuando aplique un rociado a alta presión para evitar lesiones
cuando se produzca el retroceso de la pistola.
ADVERTENCIA: El chorro de agua a alta presión que
este equipo produce, puede atravesar la piel y
los tejidos subcutáneos, provocando lesiones de
gravedad que podrían dar lugar a la amputación
de un miembro.
La pistola rociadora contiene agua a alta presión incluso con
el motor parado y el agua desconectada, que puede causar
la herida.
• Mantenga conectada la manguera a la máquina o a la pistola de
rociado cuando el sistema esté presurizado.
• SIEMPRE que pare el motor, apunte con la pistola rociadora
hacia una dirección segura, presione el seguro (botón rojo) y
apriete el gatillo para descargar la presión y evitar el retroceso.
Page 45

45
INFORMACIÓN TÉCNICA SOBRE EL MOTOR
El motor es de uno cilindros, de válvulas en cabeza (OHV),
refrigerado por aire y de baja emisión.
En el Estado de California, los motores de la serie 120000 han
obtenido la certificación del California Air Resources Board (Consejo
de recursos de aire de California) de cumplimiento de la normativa
sobre emisiones durante 125 horas. Esta certificación no supone
para el comprador, el propietario o el usuario ninguna garantía
adicional en lo relativo al rendimiento y a la vida útil del motor. Las
garantías del motor atañen exclusivamente al producto y a las
emisiones que se declaran en este manual.
Potencia Nominal
El valor de potencia bruta de cada modelo de motor de gasolina se
indica en la etiqueta conforme a los requisitos del código J1940
(Procedimiento de valoración de potencia y par de pequeños
motores) de la SAE (Society of Automotive Engineers, Sociedad de
ingenieros de automoción). Los valores nominales se han obtenido
y corregido conforme al código SAE J1995 (Revisión 2002-05). Los
valores de par se obtienen a 3060 rpm, y los valores de potencia, a
3600 rpm. La potencia bruta real del motor será inferior y
dependerá, entre otros factores, de las condiciones ambientales de
uso y de las variaciones entre distintos motores del mismo modelo.
Dada la amplia variedad de productos que utilizan nuestros motores
y la multitud de factores ambientales que pueden afectar a su
funcionamiento, es posible que el motor de gasolina no desarrolle
toda su potencia bruta nominal en determinados equipos (potencia
real “in situ”). Esta diferencia se debe, entre otros, a los siguientes
factores: accesorios (filtro de aire, escape, carga, refrigeración,
carburador, bomba de combustible, etc.), limitaciones de la
aplicación, condiciones ambientales de uso (temperatura, humedad,
altitud) y variaciones entre distintos motores de un mismo modelo.
Briggs & Stratton podrá sustituir el motor de esta serie por otro de
mayor potencia nominal en caso de limitaciones de fabricación o
capacidad.
Esta limpiadora a presión está clasificada conforme a la norma
PW101 (comprobación y clasificación de rendimiento de
limpiadoras a presión) de la Asociación de fabricantes de bombas a
presión (Pressure Washer Manufacturer’s Association, PWMA).
ESPECIFICACIONES DEL PRODUCTO
Especificaciones de la Máquina Limpiadora a
Presión
Presión de salida máxima . . . . . . . . . . . . . . . . . . . . . . . . .3,100 PSI
Caudal máximo . . . . . . . . . . . . . . . . . . . . . . . . . . . . . . . . . .2.5 GPM
Mezcla de químicos . . . . . . . . . . . . . . . . . .Use según instrucciones
Temperatura del suministro
de agua . . . . . . . . . . . . . . . . . . . . . . . . . . . .Que no exceda los 100ºF
Especificaciones del Motor
Diámetro de camisa . . . . . . . . . . . . . . . . . .68 mm (2,672 pulgadas)
Carrera . . . . . . . . . . . . . . . . . . . . . . . . . . . .56 mm (2,204 pulgadas)
Desplazamiento . . . . . . . . . . . . . . . . . . . . . .206 cc (12,48 pulgadas)
Bujía
Tipo de reóstato: . . . . . . . . . . . . . . . . . .Briggs & Stratton 491055
Tipo de larga de vida de platino: . . . . . . . .Briggs & Stratton 5066
Calibrar Separación a: . . . . . . . . . . . . .0.030 pulgadas (0.76 mm)
Entrehierro del inducido: . . . . . . . . . . . . . . . . . . . . . . .0,25-0,36 mm
(0,010-0,014
pulgadas)
Holgura de la válvula con muelles de válvula instalados y pistón de
6 mm (0,25 pulgadas) pasado el punto muerto superior (comprobar
con el motor en frío)
Admisión . . . . . . . . . . . . . . . 0,10-0,15 mm (0,004-0,006 pulgadas)
Escape . . . . . . . . . . . . . . . . . 0,23-0,28 mm (0,009-0,011 pulgadas)
Capacidad de Gasolina . . . . . . . . . . . . . . . . . . . . . . . . . .1.6 Cuartos
Capacidad de Aceite . . . . . . . . . . . . . . . . . . . . . .0.6 litros (20 onzas)
NOTA: Para un mejor funcionamiento, la carga de potencia no debe
superar el 85% de la potencia nominal. La potencia del motor se
reducirá un 3,5% por cada 300 metros (1.000 pies) de altitud y un
1% por cada 5,6 ºC (10 ºF) a partir de 25 ºC (77 ºC). Funcionará
satisfactoriamente en un ángulo de hasta 15º.
ESPECIFICACIONES
Page 46

46
MANTENIMIENTO
PLAN DE MANTENIMIENTO
Siga los intervalos de horas o de calendario, los que sucedan
antes. Si opera en condiciones adversas (señaladas más
abajo) es necesario un mantenimiento más frecuente.
1
Limpiar si está obstruido. Remplazar si está perforado o roto.
2
Servicio más a menudo bajo condiciones de suciedad o polvo.
Recomendaciones generales
El mantenimiento periódico mejorará el rendimiento y prolongará la
vida útil del limpiadora a presión. Si necesita asistencia, consulte
con un distribuidor de Sears o con otro distribuidor cualificado.
La garantía de la máquina limpiadora a presión NO cubre los
elementos que han sido sujetos a abuso o negligencia por parte del
operador. Para hacer válida la cobertura total de la garantía, el
operador deberá mantener la lavadora de presión tal y como se indica
en el manual, incluyendo su adecuado almacenamiento, como se
describe en la sección Almacenamiento en el Invierno y
Almacenamiento prolongado.
NOTA: Una vez al año, usted deberá limpiar o remplazar la bujía y el
filtro de aire. Una bujía nueva y un filtro de aire limpio garantizan
una mezcla de combustible-aire adecuada y le ayuda a su motor a
funcionar mejor y a tener una vida útil más prolongada.
Bomba de Aceite
NO realice ninguna operación de mantenimiento con el aceite de la
bomba. La bomba se suministra prelubricada y sellada en fábrica, y
no requiere lubricación adicional durante su vida útil.
Control de Emisiones
Cualquier establecimiento o individuo especializado en la
reparación de motores que no sean de automoción puede
encargarse del mantenimiento, la sustitución y la reparación de
los dispositivos y sistemas de control de emisiones.No obstante,
para realizar la revisión gratuita de control de emisiones, deberá
acudir a un distribuidor autorizado por el fabricante. Véase Garantía
de emisiones.
Antes de Cada Uso
1. Revise el nivel de aceite del motor.
2. Limpie los residuos.
3. Revise si existen daños en el colador de la entrada de agua.
4. Revise si existen daños en el mangueras del detergente y
limpiar el tanque.
5. Revise si existen daños en el manguera de alta presión.
6. Revise si existen fugas en el conjunto de la pistola rociadora.
7. Elimine el aire y los contaminantes de la bomba.
MANTENIMIENTO DE LA MAQUINA
LAVADORA A PRESION
Limpie los Residuos
Limpie a diario, o antes de cada uso, los residuos acumulados en el
limpiadora a presión. Mantenga limpias las conexiones, los muelles
y los mandos. Limpie todo resto de combustible de la zona que
rodea al silenciador y de detrás del mismo. Inspeccione las ranuras
para aire de enfriamiento y la apertura del limpiadora a presión.
Estas aperturas deberán mantenerse limpias y despejadas.
Mantenga limpios los componentes del limpiadora a presión para
reducir el riesgo de sobrecalentamiento e ignición de los residuos
acumulados.
• Utilice un trapo húmedo para limpiar las superficies exteriores.
AVISO: El tratamiento inadecuado del limpiadora a presión
puede dañarlo y acortar su vida productiva.
• NO inserte cualquier objeto a través de las ranuras de enfriamiento.
• Puede usar un cepillo de cerdas suaves para retirar la suciedad
endurecida, aceite, etc.
• Puede usar una máquina aspiradora para eliminar suciedad y
residuos sueltos.
Revise y Limpie el Colador de Entrada
Examine el colador de entrada de la manguera de jardín. Límpielo si
está tapado o remplacelo si está roto.
Primeras Cinco (5) Horas
• Cambie el aceite del motor
Cada 8 horas o diario
• Revise/limpie el filtro de la entrada de agua
1
• Revise la manguera de alta presión
• Revise la mangueras del detergente/limpiar el tanque
• Revise la pistola aspersora y verifique que no haya
fugas en el ensamblaje
• Limpie los residuos
• Compruebe el nivel de aceite
Cada 25 horas o una vez al año
• Mantenimiento del filtro de aire
2
Cada 50 horas o una vez al año
• Cambie el aceite del motor
2
• Inspeccione el silenciador y la pantalla apagachispas
Cada 100 horas o una vez al año
• Servicio a la bujía
• Limpie el sistema de refrigeración
2
Page 47

Revise la Manguera de Alta Presión
La manguera de alta presión pueden desarrollar fugas debido al
desgaste, dobleces o abuso. Revise la manguera antes de cada uso.
Revise si existen cortes, fugas, abrasiones, levantamiento de la
cubierta, daño o movimiento de los acoplamientos. Si existe
cualquiera de estas condiciones, remplace la manguera
inmediatamente.
Revise la Mangueras del Detergente y Limpiar el
Tanque
Examine el mangueras del detergente y limpiar el tanque y límpielo
si se encuentra sucio. El mangueras debería quedar apretado en la
pieza. Examine el mangueras para ver si existe cualquier tipo de
goteo o está roto. Reemplace el mangueras del detergente y limpiar
el tanque si alguno de ellos se encuentra dañado.
Revise la Pistola Rociadora
Examine la conexión de la manguera con la pistola rociadora y
asegúrese de que es correcta. Pruebe el gatillo pulsando el botón
rojo y asegúrese de que el gatillo retrocede a su sitio al soltarlo. No
debería poder apretar el gatillo sin pulsar primero el botón rojo.
Cambie inmediatamente la pistola rociadora si falla cualquiera de
estas pruebas.
Mantenimiento de la Boquilla
Si siente una sensación pulsante al momento de apretar el gatillo de
la pistola rociadora, puede que sea causada por la presión excesiva
en la bomba. La causa principal de la presión excesiva en la bomba
es cuando la boquilla se encuentra atascada o tapada con materiales
extraños, tales como tierra, etc. Para corregir el problema, limpie
inmediatamente la boquilla siga las instrucciones siguientes:
1. Apague el motor y apague el suministro de agua.
2. Apunte SIEMPRE con la pistola rociadora hacia una dirección
segura, pulse el botón rojo y apriete el gatillo para descargar el
agua a alta presión restante.
3. Desconecte el selector PrecisionSpray™ de la pistola rociadora.
4. Utilice un pequeño clip para papel para eliminar todo material
extraño que pueda obstruir las boquillas (A).
5. Utilice una manguera de riego para eliminar los restos
haciendo pasar agua por el selector PrecisionSpray™ en el
sentido contrario al del rociado durante 30 a 60 segundos.
6. Vuelva a conectar el selector PrecisionSpray™ a la pistola
rociadora.
7. Asegúrese de que la manguera del jardín está conectada a la
entrada de agua. Compruebe que la manguera de alta presión
está conectada a la pistola rociadora y a la bomba. Abra la
alimentación de agua.
8. Ponga en marcha el motor siguiendo las instrucciones de la
sección Cómo poner en funcionamiento la limpiadora a
presión.
9. Pruebe la limpiadora a presión utilizándola con las distintas
boquillas.
Mantenimiento de los Anillos 'O'
Compre una O–Juego de Reparación de Anillo en sus Sears locales
o llamando 1-800-4-MY-HOME (469-4663) o en línea en
www.sears.com. No se incluye con la arandela de la presión. Este
juego incluye los anillos del reemplazo O, arandela de caucho y filtro
de cala de agua. Refiérase a la hoja de la instrucción proporcionada
en el juego para atender a su unidad’los anillos de s O.
47
ADVERTENCIA: El chorro de agua a alta presión que
este equipo produce, puede atravesar la piel y
los tejidos subcutáneos, provocando lesiones de
gravedad que podrían dar lugar a la amputación
de un miembro.
• NUNCA repare la manguera de alta presión. Remplacela.
• Remplacela con una manguera que cumpla con la capacidad
mínima de presión de su limpiadora a presión.
ADVERTENCIA: El chorro de agua a alta presión que
este equipo produce, puede atravesar la piel y
los tejidos subcutáneos, provocando lesiones de
gravedad que podrían dar lugar a la amputación
de un miembro.
La pistola rociadora contiene agua a alta presión incluso con
el motor parado y el agua desconectada, que puede causar
la herida.
• Mantenga conectada la manguera a la máquina o a la pistola de
rociado cuando el sistema esté presurizado.
• SIEMPRE que pare el motor, apunte con la pistola rociadora
hacia una dirección segura, presione el seguro (botón rojo) y
apriete el gatillo para descargar la presión y evitar el retroceso.
ADVERTENCIA: El chorro de agua a alta presión que
este equipo produce, puede atravesar la piel y
los tejidos subcutáneos, provocando lesiones de
gravedad que podrían dar lugar a la amputación
de un miembro.
• NUNCA utilice ningún tipo de sellador para reparar una fuga en
una conexión. Sustituya la junta tórica o la junta.
A
Page 48

48
MANTENIMIENTO DEL MOTOR
Aceite
Recomendaciones sobre el aceite
Para obtener el mejor rendimiento, recomendamos utilizar aceites
certificados con garantía Briggs & Stratton. También se pueden
utilizar otros aceites detergentes de alta calidad con clasificación de
servicio SF, SG, SH, SJ o superior. NO utilice aditivos especiales.
Las temperaturas exteriores determinan la viscosidad adecuada del
aceite para el motor. Utilice el cuadro para seleccionar la mejor
viscosidad para el intervalo de temperatura exterior previsto.
* Por debajo de 4 °C (40 °F), el uso de aceite SAE 30 provocará
dificultades de arranque.
** Por encima de 27 °C (80 °F) el uso de aceite 10W30 puede
aumentar el consumo de aceite. Compruebe el nivel de aceite
con mayor frecuencia.
NOTA: Todo aceite sintético que cumpla las
especificaciones ILSAC GF-2, con marca de certificación
API y con símbolo de servicio API (se muestra a la
izquierda) con “SJ/CF ENERGY CONSERVING” o superior
es un aceite aceptable a todas las temperaturas. El uso de
aceite sintético no altera los intervalos de cambio de aceite
indicados.
Comprobación del nivel de aceite
Compruebe el nivel de aceite antes de cada uso o cada 8 horas de
funcionamiento, como mínimo. Rellene si es necesario.
1. Coloque el limpiadora a presión sobre una superficie nivelada.
2. Quite el tapón de llenado de aceite y límpielo con un trapo.
3. Compruebe que el aceite llega hasta el punto de
desbordamiento en el orificio de llenado.
4. Instale el tapón de llenado de aceite, apriete firmemente.
Adición de Aceite del Motor
1. Coloque el limpiadora a presión sobre una superficie nivelada.
2. Compruebe el nivel de aceite tal como se indica en la sección
Comprobación del nivel de aceite.
3. Si es necesario, vierta lentamente aceite por el orificio de
llenado hasta el punto de desbordamiento en el tapón de
llenado de aceite.
4. Instale el tapón de llenado de aceite, apriete firmemente.
Cambio de Aceite del Motor
Si está utilizando su generador bajo condiciones de extrema
suciedad o polvo, o en un clima demasiado caliente, haga el cambio
de aceite más frecuentemente.
MANTENER FUERA DEL ALCANCE DE LOS NIÑOS. NO
CONTAMINE. CONSERVE LOS RECURSOS. DEPOSITE EL
ACEITE USADO EN UN PUNTO DE RECOGIDA.
Cambie el aceite cuando el motor siga estando caliente después
de haber funcionado:
1. Asegúrese de que la unidad esté en una superficie plana.
2. Desconecte el cable de la bujía de esta y colóquelo donde no
pueda entrar en contacto con la bujía.
3. Limpie la zona de alrededor del tapón de vaciado de aceite (A),
situado en la base del motor, al otro lado del carburador.
4. Quite el tapón de llenado de aceite y vacíe todo el aceite en un
recipiente adecuado.
5. Vuelva a colocar el tapón de vaciado y apriételo bien. Quite el
tapón de llenado de aceite.
6. Vierta lentamente unos 0,6 litros (20 onzas) de aceite por el
orificio de llenado (B) hasta el punto de desbordamiento (C).
7. Vuelva a colocar el tapón de llenado de aceite. Apriételo
firmemente a mano.
8. Limpie los residuos de aceite.
A
B
C
PRECAUCIÓN:
Evite el contacto prolongado o repetido
de piel con aceite usado de motor.
• El aceite usado del motor ha sido mostrado al cancer de la piel
de la causa en ciertos animales del laboratorio.
• Completamente lavado expuso áreas con el jabón y el agua.
ADVERTENCIA: Chispear involuntario puede tener
como resultado el fuego o el golpe
eléctrico.
CUANDO AJUSTE O HAGA REPARACIONES A SU MÁQUINA
LIMPIADORA A PRESIÓN
• Siempre desconecte el alambre de la bujía y colóquelo donde
no pueda entrar en contacto con la bujía.
CUANDO PRUEBE LA BUJÍA DEL MOTOR
• Utilice un comprobador de bujías homologado.
• NO comprueba la chispa sin la bujía instalada.
Page 49

Servicio del Depurador de Aire
Su motor no funcionará adecuadamente y puede dañarse si usted lo
hace funcionar con un depurador de aire sucio. Suministre servicio
más frecuentemente si la unidad funciona bajo condiciones de
mucha suciedad o polvo. Los repuestos se encuentran disponibles
en su centro de servicio local Sears.
Para dar servicio al filtro de aire, siga los pasos que se detallan a
continuación:
1. Afloje el tornillo (A) y quite la cubierta (B).
2. Remueva cuidadosamente el cartucho (C).
3. Para limpiar el cartucho, golpee ligeramente su costado de
papel plegado sobre una superificie firme.
4. Reinstale el juego de cartucho nuevo o limpio debajo de la
cubierta.
5. Inserte las lengüetas (D) de la cubierta en las ranuras que se
encuentran en el fondo de la base (E).
6. Coloque la cubierta en su lugar y apriete el tornillo firmemente
a la base.
NOTA: Usted puede comprar los elementos del filtro de aire nuevos
llamando al 1-800-4-MY-HOME (469-4663).
Remplace la Bujía
Cambie la bujía ayudará a su motor a arrancar más fácilmente y
funcionar mejor.
1. Limpie el área alrededor de la bujía y retírela.
2. Retire y revise la bujía.
3. Cambie la bujía si los electrodos están picados o quemados o
si la porcelana está agrietada. Utilice la bujía de repuesto
recomendada. Consulte Especificaciones.
4. Compruebe la separación del electrodo con un calibrador de
alambre y ajuste el espacio de la bujía a la medida
recomendada si fuera necesario (véase Especificaciones).
5. Instale la bujía y aprietela firmemente.
NOTA: Puede adquirir nuevos
bujía al número telefónico
1-800-4-MY-HOME (469-4663).
Inspeccione el Silenciador y la Pantalla
Apagachispas
Inspeccione que el silenciador no presente fisuras, corrosión u
otros daños. Desmonte la pantalla apagachispas, si cuenta con una,
y verifique que no presente daños ni obstrucción por carbón. En
caso de que se necesiten piezas de recambio, asegúrese de usar
solamente piezas de recambio originales para el equipo.
NOTA: Para obtener el número de parte llame al 1-800-4-MY-HOME
(469-4663).
Sistema de Refrigeración de Aire
Con el tiempo, se pueden acumular residuos en las aletas de
refrigeración del cilindro y pasar inadvertidos mientras no se
desmonte parcialmente el motor. Recomendamos que encargue la
limpieza del sistema de refrigeración (F) a un distribuidor autorizado
de servicio Sears siguiendo los intervalos recomendados (consulte
la sección Calendario de Mantenimiento). Es igualmente importante
que no se acumulen residuos en el motor. Consulte la sección
Limpie los Residuos.
49
ADVERTENCIA: El contacto con la zona del silenciador
puede producir quemaduras graves.
Los gases y el calor de escape pueden
inflamar los materiales combustibles y
las estructuras o dañar el depósito de combustible y
provocar un incendio.
• NO toque las superficies calientes y evite los gases del escape a
alta temperatura.
• Permita que el equipo se enfríe antes de tocarlo.
• Deje un espacio mínimo de 1.5 m (5 pies) alrededor del
limpiadora a presión, incluida la parte superior.
• Utilizar el motor en un terreno boscoso, con maleza o cubierto
de hierba constituye una infracción al Código de recursos
públicos de California, a menos que el sistema de escape esté
equipado con una pantalla apagachispas, de acuerdo a la
definición de la Sección 4442, que se mantenga en buenas
condiciones de funcionamiento. En otros estados o
jurisdicciones federales puede haber leyes similares en vigor.
Póngase en contacto con el fabricante, el vendedor o el
distribuidor del equipo original para obtener una pantalla
apagachispas diseñada para el sistema de escape instalado en
este motor.
• Las piezas de recambio deben ser las mismas que las piezas
originales y estar instaladas en la misma posición.
F
C
E
B
A
D
Page 50

50
DESPUES DE CADA USO
No deberá haber agua en la unidad por largos períodos de tiempo.
Los sedimentos de minerales se pueden depositar en partes de la
bomba y “congelar” su funcionamiento. Lleve a cabo estos
procedimientos después de cada uso:
1. Limpie el circuito de detergente girando la llave de paso de
detergente hasta la posición “Off” y haga funcionar la
limpiadora a presión con el selector PrecisionSpray™ en una
posición de baja presión. Prolongue la limpieza entre uno y dos
minutos.
2. Pare el motor, cierre la alimentación de agua, apunte con la
pistola rociadora hacia una dirección segura, pulse el botón
rojo y apriete el gatillo para descargar la presión. Deje enfriar el
motor.
3. Desconecte manga del fusil del rocío y salida alta de presión
en la bomba. Desagüe agua de la manga, del fusil, y de la
extensión de boquilla. Use un harapo para quitar la manga.
4. Saque todos los líquidos de la bomba halando la manija de
retroceso aproximadamente 6 veces. Esto deberá evacuar la
mayoría del líquido de la bomba.
5. Enrolle la manguera y cuélguela del gancho situado en el asa.
6. Almacene la unidad en una área limpia y seca.
7. Si planea almacenar la unidad por más de 30 días, vea la
sección Almacenamiento Prolongado en próxima página.
ADVERTENCIA: El chorro de agua a alta presión que
este equipo produce, puede atravesar la piel y
los tejidos subcutáneos, provocando lesiones de
gravedad que podrían dar lugar a la amputación
de un miembro.
La pistola rociadora contiene agua a alta presión incluso con
el motor parado y el agua desconectada, que puede causar
la herida.
• Mantenga conectada la manguera a la máquina o a la pistola de
rociado cuando el sistema esté presurizado.
• SIEMPRE que pare el motor, apunte con la pistola rociadora
hacia una dirección segura, presione el seguro (botón rojo) y
apriete el gatillo para descargar la presión y evitar el retroceso.
ADVERTENCIA: La gasolina y sus vapores son
extremadamente inflamables y
explosivos.
El fuego o una explosión pueden causar
quemaduras severas e inclusive la muerte.
CUANDO ALMACENE O GUARDE EL EQUIPO CON COMBUSTIBLE
EN EL TANQUE
• Almacene alejado de calderas, estufas, calentadores de agua,
secadoras de ropa u otros aparatos electrodomésticos que
posean pilotos u otras fuentes de ignición, porque ellos pueden
encender los vapores de la combustible.
Page 51

51
ALMACENAMIENTO PARA INVIERNO
AVISO: Usted deberá proteger su unidad de las
temperaturas de congelamiento.
• Si no lo hace, dañará permanentemente la bomba y la unidad no
podrá funcionar.
• La garantía no cubre el daño de la unidad ocasionado por
congelamiento.
Para proteger la unidad de las temperaturas de congelamiento:
1. Vacíe la limpiar el tanque como se indica a continuación:
a. Desconecte la manguera conectada al acoplamiento de
inyección de la bomba. Coloque el extremo de la bomba
en un recipiente adecuado.
b. Gire las llaves de paso de detergente hasta la posición
"On" y abra la tapa del depósito. El contenido del depósito
se vaciará por gravedad en el recipiente.
c. Vuelva a conectar la manguera al acoplamiento de
inyección de la bomba. Añada 0,5 litros de agua dulce
limpia el tanque y cierre las tapas de la tanque.
2. Limpie el circuito de limpieza. Para ello, sitúe la llave de paso
de detergente en la posición “On”, gire el selector
PrecisionSpray™ a una posición de baja presión y ponga en
funcionamiento la limpiadora a presión. Limpie el circuito hasta
que se vacíe el primer depósito. Gire la llave de paso de
detergente hasta la posición “Off”.
3. Siga los pasos 2-5 en la sección previa Despues de Cada Uso.
4. Utilice un protector de bomba, disponible en Sears con el
número de catálogo 7174403GS, para cuidar la bomba. Aquél
protege a la unidad contra el congelamiento y lubrica tanto los
pistones como los empaques.
5. Si el protector de bomba no está disponible, conecte un tramo
de 3 pies de manguera de jardín a la entrada de agua. Vierta
anticongelante RV (anticongelante sin alcohol) en la manguera.
Jale la manija de arranque dos veces. Desconecte después la
manguera de 3 pies.
6. Almacene la unidad en una área limpia y seca.
ALMACENAMIENTO PROLONGADO
Si usted no planea usar la máquina limpiadora a presión por más de
30 días, deberá preparar el motor para un almacenamiento
prolongado.
Es importante evitar la formación de depósitos de goma en las
partes esenciales del sistema del combustible tales como
carburador, filtro del combustible, manguera o tanque del
combustible durante el almacenamiento. También, la experiencia
indica que los combustibles con mezclas de alcohol (llamados
gasohol, etanol o metanol) pueden atraer la humedad, lo que lleva a
la separación y formación de ácidos durante el almacenamiento. La
gasolina ácida puede dañar el sistema del combustible de un motor
durante el almacenamiento.
Proteja el Sistema de Combustible
Aditivo para Combustible:
El combustible puede estar pasado 30 días después de su
almacenamiento. El combustible pasado provoca la formación de
residuos ácidos y de carbonilla en el circuito de combustible y en
los componentes básicos del carburador. Para mantener el
combustible en buen estado, utilice el estabilizador de combustible
FRESH START® de Briggs & Stratton en cualquiera de sus
variantes: líquido o cartucho concentrado con goteo.
Si se añade un estabilizador de combustible conforme a las
instrucciones, no será necesario vaciar el motor de combustible.
Haga funcionar el motor durante dos minutos para que el
estabilizador circule por todo el circuito de combustible. El motor y
el combustible se pueden almacenar hasta 24 meses.
Si no se ha añadido un estabilizador de combustible a la gasolina,
deberá vaciar completamente el motor utilizando un contenedor
homologado. Deje funcionar el motor hasta que se agote el
combustible. Se recomienda utilizar un estabilizador de combustible
en el contenedor de almacenamiento para mantener la gasolina en
buen estado.
Cambio de Aceite
Con el motor todavía caliente, drene el aceite de la caja del cigüeñal.
Vuelva a llenarlo con el grado de aceite recomendado. Vea Cambio
de Aceite.
Protección de la Bomba
Para proteger la bomba frente a los daños que causan los depósitos
minerales o la congelación, use PumpSaver, número de catálogo
7174403GS para cuidar la bomba. Esto evita los daños derivados de
la congelación y lubrica los pistones y las juntas.
NOTA: El PumpSaver están disponible sólo como un accesorio
opcional. NO es incluido con la arandela de la presión. Avise el más
cercano servicio autorizado central para comprar PumpSaver.
Al uso el PumpSaver, cerciórese la arandela de la presión se apaga
y desconecta del agua del suministro. Lea y siga todas
instrucciones y las advertencias dadas en el contenedor de
PumpSaver.
Otras sugerencias para el almacenamiento
1. NO guarde combustible de una temporada a otra a menos que
lo haya tratado como se indica en la sección Aditivo para
combustible.
2. Reemplace la caneca de gasolina si comienza a oxidarse. El
óxido y/o la suciedad en la gasolina le causará problemas.
3. Cubra su unidad con una cubierta de protección adecuada que
no retenga humedad.
4. Almacene la unidad en un área limpia y seca.
ALMACENAMIENTO
ADVERTENCIA: Las cubiertas para almacenamiento
pueden ser inflamables.
• NO coloque una cubierta encima de un limpiadora a presión
caliente.
• Deje que la unidad se enfríe lo suficientemente antes de que le
coloque la cubierta.
Page 52

52
REPARACION DE DAÑOS
Problema Causa Solución
La bomba presenta los siguientes
problemas: no produce presión,
produce una presión errada,
traqueteo, pérdida de presión, bajo
volumen de agua.
1. El selector PrecisionSpray™ está en una
posición de baja presión.
2. La entrada de agua está bloqueada.
3. Suministro de agua inadecuado.
4. La manguera de entrada está doblada o
presenta fugas.
5. El colador de la manguera de entrada está
tapado.
6. El suministro de agua está por encima de
los 100ºF.
7. La manguera de alta presión está
bloqueada o presenta fugas.
8. La pistola presenta fugas.
9. La boquilla del selector PrecisionSpray™
está obstruida.
10. Bomba defectuosa.
1. Gire el selector PrecisionSpray™ hasta una
posición de alta presión.
2. Limpie la entrada.
3. Proporcione flujo de agua adecuado.
4. Estire la manguera de entrada, coloque un
parche en la fuga.
5. Revise y limpie el colador de la manguera de
entrada.
6. Proporcione suministro de agua más fría.
7. Retire las obstrucciones de la manguera de
salida.
8. Remplace la pistola.
9. Limpie las boquillas del selector
PrecisionSpray™.
10. Póngase en contacto con el centro de servicio
Sears.
El detergente no se mezcla con el
rociado.
1. Las llaves de paso de detergente están en
la posición “Off”.
2. El selector PrecisionSpray™ está en una
posición de alta presión.
1. Gire la llave de paso de detergente del limpiar
el tanque deseado hasta la posición “On”.
2. Gire el selector PrecisionSpray™ hasta una
posición de baja presión.
El motor funciona bien cuando no
tiene cargas, pero funciona "mal"
cuando se conecta una carga.
La velocidad del motor es demasiado lenta. Mueva el control de la válvula de regulación a la
posición FAST (RAPIDO). Si el motor continua
funcionando mal, póngase en contacto con el
centro de servicio Sears.
El motor no arranca; o arranca y
funciona mal.
1. Depurador de aire sucio.
2. Sin gasolina.
3. Gasolina vieja.
4. El alambre de la bujía no está conectado a
la bujía.
5. Bujía mala.
6. Agua en la gasolina.
7. Estrangulación excesiva.
8. Mezcla de combustible demasiado rica.
1. Limpie o remplace el depurador de aire.
2. Llene el tanque de combustible.
3. Drene el tanque de gasolina; llénelo con
combustible fresco.
4. Conecte el alambre a la bujía.
5. Remplace la bujía.
6. Drene el tanque de gasolina; llénelo con
combustible fresco.
7. Abra el cebador por completo y haga girar el
motor.
8. Póngase en contacto con el centro de servicio
Sears.
El motor se apaga durante la
operación.
Sin gasolina. Llene el tanque de combustible.
El motor no tiene fuerza. Filtro de aire sucio. Remplace el filtro de aire.
El motor intenta estabilizarse o su
funcionamiento no es constante.
Cebador abierto demasiado rápido Mueva el cebador a la posición intermedia hasta
que el motor funcione normalmente.
Page 53

53
NOTAS
Page 54

54
GARANTIA DEL SISTEMA DE CONTROL DE EMISIONES
Sears, Roebuck and Co., U.S.A. (Sears), California Air Resources Board (Consejo de Recursos sobre el Aire de California, CARB, por
sus siglas en inglés) y United States Environmental Protection Agency (Agencia de Protección Ambiental de EE.UU. , EPA, por sus
siglas en inglés).
Declaración de garantía del sistema de control de emisiones
(derechos y obligaciones del propietario para la garantía contra defectos)
California Air Resources Board (CARB), U.S. EPA y Sears le explican a continuación
la garantía del sistema de control de emisiones de su pequeño motor para máquinas
de servicio (SORE, Small Offroad Engine). En California, los modelos de pequeños
motores para máquinas de servicio a partir del año 2006 deben estar diseñados,
fabricados y equipados conforme a los exigentes estándares de lucha contra la
contaminación del Estado.
En otras regiones de Estados Unidos, los nuevos motores para interiores de
ignición por chispa certificados para modelos año 1997 y posteriores deben
cumplir con normas similares establecidas por la EPA de EE.UU. Sears debe
garantizar el sistema de control de emisiones de su motor para los períodos
indicados a continuación, siempre y cuando no se haya abusado, descuidado o
dado mantenimiento incorrecto al motor pequeño para exteriores.
Su sistema de control de emisiones incluye piezas como el carburador, el filtro de
aire, el sistema de arranque, el tubo de combustible, el silenciador y el convertidor
catalítico. También puede incluir conectores y otros conjuntos relacionados con las
emisiones.
Cuando exista una condición que pueda ser cubierta por la garantía, Sears
reparará el motor pequeño para exteriores sin costo alguno, incluyendo el
diagnóstico, las partes de repuesto y la mano de obra.
Cobertura de la garantía de Sears, Roebuck and Co. contra defectos en el
control de emisiones
Los pequeños motores para máquinas de servicio están garantizados contra defectos
de las piezas de control de emisiones durante un período de dos años, conforme a las
siguientes disposiciones. Si cualquier pieza del motor con cobertura es defectuosa,
será reparada o sustituida por Sears.
Responsabilidades del propietario para la garantía
Como propietario del motor pequeño para exteriores, usted es responsable de
realizar las actividades de mantenimiento requeridas que se indican en
Instrucciones de uso y mantenimiento. Sears recomienda que conserve todos los
recibos que cubran el mantenimiento de su motor pequeño para exteriores, pero
Sears no puede negar la garantía solamente por la falta de recibos ni por su
imposibilidad de garantizar la realización de todas las actividades de
mantenimiento programadas.
Como propietario del motor pequeño para exteriores, usted siempre debe tener
en cuenta que Sears podrá negar la cobertura de la garantía si su motor pequeño
para exteriores o una parte del mismo presenta fallas debido a abuso, descuido,
mantenimiento incorrecto o modificaciones no aprobadas.
Usted es responsable de presentar su motor pequeño para exteriores a un
distribuidor autorizado de servicio de Sears aprobado tan pronto como se
presente el problema.
Las reparaciones cubiertas por la garantía se llevarán a cabo en un plazo
razonable, no superior a 30 días en ningún caso.
Si tiene alguna pregunta con respecto a sus derechos y responsabilidades para la
garantía, póngase en contacto con un representante de servicio Sears al 1-800469-4663.
La garantía de emisiones es una garantía contra defectos. Los defectos se juzgan
en función del rendimiento normal del motor. La garantía no dependerá de
ninguna prueba de emisiones en funcionamiento.
Disposiciones de la garantía de Sears, Roebuck and Co. contra defectos en el
control de emisiones
Las siguientes son disposiciones específicas relacionadas con la cobertura de la
garantía contra defectos en el control de emisiones. Se añade a la garantía de
motores de Sears para motores no regulados, que figura en las Instrucciones de
uso y mantenimiento.
1. Partes garantizadas
La cobertura bajo esta garantía incluye solamente aquellas partes que se
enumeran a continuación (las partes del sistema de control de emisiones)
en la medida que dichas partes hayan estado presentes en el motor
adquirido.
a. Sistema de medición de combustible
• Sistema de enriquecimiento para arranque en frío
• Carburador y partes internas
• Bomba de combustible
• Tubo de combustible, acoplamientos del tubo de combustible,
abrazaderas
• Depósito de combustible, tapón y cadena
• Bote de carbono
b. Sistema de inducción de aire
• Filtro de aire
• Colector de entrada
• Línea de purga y ventilación
c. Sistema de ignición
• Bujías
• Sistema de ignición por magneto
d. Sistema catalizador
• Convertidor catalítico
• Colector de escape
• Sistema de inyección de aire o válvula por impulsos
e. Distintos elementos utilizados en los sistemas anteriores
• Válvulas e interruptores de vacío, temperatura, posición y de
detección de tiempo
• Conectores y conjuntos
2. Vigencia de la cobertura
Sears garantiza al propietario inicial y a cada comprador subsiguiente que
las partes garantizadas estarán libres de defectos en material y en mano de
obra, que ocasionen fallas de las partes garantizadas durante un período de
dos años a partir de la fecha en que el motor sea entregado al comprador
minorista.
3. No habrá cargos
La reparación o reemplazo de cualquier parte garantizada se realizará sin
cargo alguno para el propietario, incluyendo la mano de obra de diagnóstico
que derive en la determinación de que una parte garantizada está defectuosa,
si la labor de diagnóstico se realiza en un Centro de servicio Sears aprobado.
4. Reclamos y exclusiones de cobertura
Los reclamos vinculados con la garantía se presentarán conforme a las
disposiciones de la Póliza de garantía de Sears. La cobertura de la garantía
se excluirá para aquellas fallas de partes garantizadas que no sean partes
originales de Sears o debido a abuso, descuido o mantenimiento incorrecto,
según se establece en la Póliza de garantía de motores de Sears. Sears no
es responsable por la cobertura de fallas de partes garantizadas ocasionadas
por el uso de partes adicionales, no originales o modificadas.
5. Mantenimiento
Cualquier parte garantizada cuyo reemplazo no esté programado como
mantenimiento requerido o que esté programada únicamente para
inspección frecuente con el fin de "reparar o reemplazar conforme sea
necesario", estará garantizada en cuanto a defectos por el período de la
garantía. Cualquier parte garantizada cuyo reemplazo esté programado
como mantenimiento requerido tendrá solamente una garantía contra
defectos únicamente por el período hasta el primer reemplazo programado
para esa parte. Se podrá utilizar cualquier parte de repuesto que tenga un
rendimiento y durabilidad equivalentes, al realizar cualquier actividad de
mantenimiento o reparación. El propietario es responsable de realizar todo
el mantenimiento requerido, según se define en Instrucciones de uso y
mantenimiento de Sears.
6. Cobertura consiguiente
La cobertura bajo la presente se ampliará a la falla de cualquier componente
del motor provocada por un desperfecto en cualquier parte garantizada que
siga gozando de la cobertura de la garantía.
En EE.UU. y Canadá contamos con una línea de emergencia las 24 horas (1-800-469-4663), que ofrece un menú de mensajes pregrabados con información sobre
mantenimiento de productos.
Page 55

55
Información sobre emisiones
Los motores con certificación de cumplimiento de la normativa
sobre emisiones del California Air Resources Board (CARB) deben
mostrar información sobre el período de durabilidad de las
emisiones y el índice de aire. El fabricante del motor ofrece esta
información al consumidor mediante etiquetas de emisiones. La
etiqueta de emisiones del motor contiene la información de
certificación.
El Período de Durabilidad de las Emisiones indica el número de
horas durante las cuales el motor puede funcionar cumpliendo las
normas sobre emisiones, siempre que se realicen las operaciones
de mantenimiento que se detallan en las instrucciones de uso y
mantenimiento. Se utilizan las siguientes categorías:
Moderado: El motor está certificado para cumplir la normativa
sobre emisiones durante 125 horas de funcionamiento real.
Intermedio: El motor está certificado para cumplir la normativa
sobre emisiones durante 250 horas de funcionamiento real.
Prolongado: El motor está certificado para cumplir la normativa
sobre emisiones durante 500 horas de funcionamiento real.
Por ejemplo, un cortacésped con operario a pie se suele utilizar
entre 20 y 25 horas al año. Por tanto, el Período de Durabilidad de
las Emisiones de un motor con clasificación intermedia equivaldría
a 10-12 años.
Algunos motores cuentan con la certificación de cumplimiento de la
fase 2 de las normas sobre emisiones de la United States
Environmental Protection Agency (USEPA, Agencia estadounidense
de protección del medioambiente ). En el caso de los motores con
certificación de fase 2, el período de cumplimiento de la normativa
sobre emisiones que figura en la etiqueta de cumplimiento de
emisiones indica el número de horas de funcionamiento durante las
cuales el motor ha demostrado cumplir los requisitos federales
sobre emisiones.
Para motores de menos de 225 cc:
Categoría C = 125 horas
Categoría B = 250 horas
Categoría A = 500 horas.
Para motores de 225 cc o más:
Categoría C = 250 horas
Categoría B = 500 horas
Categoría A = 1000 horas.
Page 56

 Loading...