

Page 1
4/2003
1
TP 300-3862-00-SW-S
Snapper Form No. 24536
Simplicity Form No. 1725536-00
Dealer Setup
& Adjustment Instructions
319 Series Single Stage Snowthrower
TABLE OF CONTENTS:
SAFETY RULES........................................................2
SETUP PROCEDURES
Quick Setup List.......................................................3
Unboxing and Assembly .........................................4
Fill Gas Tank.............................................................5
Auger Cable Adjustment .........................................6
Test Run....................................................................6
ATTENTION SETUP PERSONNEL:
319 Series Snowthrowers
Mfg. No. Description
1694382 319M, 3HP Snowthrower, Manual Start
1694383 319E, 3HP Snowthrower, Electric Start
This Dealer Setup Instruction applies to the following units:
Sections and items denoted by the Setup symbol provide the information necessary to fully
assemble, test, and prepare the units
described above for delivery to your customers.
A Quick Setup List
is provided on page 3 of this
booklet to help you identify and check that the items
have been performed.
The safety warnings provided in this guide and
in the operator's manual included with the unit
contain important information that must be
obeyed when assembling, setting-up, operating, servicing, transporting, or storing the unit.
These warnings are highlighted by the safety alert triangle symbol shown above, which signifies that an important safety message is being provided.
You must read, understand, and follow these warnings and instructions, and use safe shop and work
practices at all times while working on or around this
unit and all other outdoor power equipment.
These instructions may cover additional models
issued after their printing. Refer to the Dealer
Setup Binder Index for complete listings.
Page 2
319 Single Stage Snowthrower
TP 300-3862-00-SW-S
4/2003
2
Read these safety rules and follow them closely. Failure to obey these rules could result in loss of control of equipment, severe personal injury or death to you, yourself or bystanders, or damage to property or equipment. This auger is capable of amputating
hands and feet and throwing objects. The triangle in text signifies important cautions or warnings which must be followed.
SAFETY RULES
WARNING
This unit is a “single-stage” snowthrower.
The auger feeds the snow back into the housing
and throws the snow out the discharge chute. If
bodily contact is made with the auger or impeller
when they are rotating, severe personal injury
will occur.
To avoid injury, keep others and yourself away
from the auger and the discharge chute whenever
the engine is running. Read and follow all of the
safety rules and warnings in this manual.
General
• Read the Operator’s Manual carefully. Be thoroughly familiar with all controls and proper equipment use.
• Never allow children to operate the machine. Do not allow
adults to operate it without proper instruction.
• Keep the area of operation clear of all persons, particularly
small children and pets.
• Never discharge material toward any person or pet.
• Make sure:
a. Snowthrower is in good operating condition;
b. All safety devices and shields are in place and working;
c. All adjustments are correct.
Preparation
• Never attempt to make any adjustment while engine is running.
• Thoroughly inspect the area where the snowthrower is to
be used and remove all objects such as door mats, sleds,
boards, wires and sticks.
• Disengage all clutches (release Auger Control lever) before
starting engine.
• Do not operate snowthrower without wearing proper winter
clothing. Wear footwear which improves footing on slippery
surfaces.
• Handle gasoline with care - it is highly flammable.
a. Use approved gasoline container.
b. Never remove the fuel tank cap or add gasoline to a
running or hot engine.
c. Never fill the fuel tank indoors.
d. Wipe up spilled gasoline.
• Do not run engine indoors. Exhaust fumes are deadly.
Operation
• Keep hands and feet away from rotating parts. Keep clear
of discharge opening at all times.
• Always clear snow up and down the face of slopes, never
across the face. Use extreme caution when changing direction on slopes. Do not attempt to clear slopes over 17.7%
(10
°).
• Use extreme caution when operating on or crossing drives,
walks or roads. Stay alert for hidden hazards and traffic.
• Be especially careful not to touch snowthrower parts which
might be hot from operation. Allow such parts to cool
before attempting to maintain, adjust or service.
• If unit starts to vibrate abnormally, disengage drives and
stop the engine. Check immediately for the cause.
Vibration is generally a warning of trouble.
• Never operate machine at high transport speeds on slippery surfaces. Use care when backing up.
• Before leaving operator’s position for any reason:
- shut off engine,
- remove the Engine Key and
- wait for all moving parts to stop.
• Before cleaning, repairing or inspecting the unit, make certain all moving parts have stopped. Remove the key to prevent accidental starting.
• Always use a grounded, 3-wire plug receptacle for electric
starting.
• Adjust snow discharge angle for safe flow when operating
WARNING
To avoid serious injury, do not put your hands
into the auger housing or discharge chute. If
auger stalls or chute becomes plugged, use the
following procedure to remove objects or clear
the chute:
1.Release the Auger Control.
2.Shut off the engine.
3.Remove the Engine Key.
4.Wait for moving parts to stop.
5.Use a narrow board to remove foreign objects
and clear the chute or auger. Never put your
hands into the auger or discharge chute.
6.If servicing is needed, remove cover
and disconnect spark plug wire.
near glass enclosures, automobiles, window wells,
dropoffs, etc.
• Do not overload machine capacity by clearing snow at too
fast a ground speed.
• Disengage Auger Control when transporting or not in use.
• Never operate the snowthrower without good visibility or
light. Always be sure of your footing.
• Do not change the engine governor settings or overspeed
the engine.
• Never direct the discharge chute at bystanders; nor allow
anyone in front of the unit while it is operational.
• Never operate this machine without all of the proper guards
or other safety protective devices in place.
Maintenance & Storage
• Keep all nuts, bolts and screws tight to ensure that the
equipment is in safe operating condition.
• Never store equipment with gasoline in the tank in a build-
ing where fumes may reach an open flame or spark. Allow
the engine to cool before storing in any enclosure.
• Always refer to the Operator’s Manual for important details if
snowthrower is to be stored for an extended period.
• Run auger drive a few seconds after completion of throwing
snow to help clear out snow and prevent icing and freeze-up
on unit.
Page 3

Quick Setup List -
319 Single Stage Snowthrower
4/2003
3
TP 300-3862-00-SW-S
Page Setup Procedure Steps to Perform
4 Unbox & Assemble ❏ Remove Unit From Box.
❏ Install Discharge Chute
❏ Assemble Handle Bars
(Be careful not to pinch the auger cable)
5 Fill Gas Tank ❏ Fill Gas Tank
6 Adjust Auger Cable ❏ Adjust auger Cable
6 Test Run ❏ Check Primer
❏ Check Choke
❏ Check Recoil Starter
❏ Check Electric Starter (Where Applicable)
❏ Check Auger Control Cable
❏ Check Kill Switch
❏ Check Chute Rotator
❏ Check Deflector
Page 4
319 Single Stage Snowthrower
TP 300-3862-00-SW-S
4/2003
4
Unboxing & Assembly
1. Using a utility knife, open the box and remove the
snowthrower.
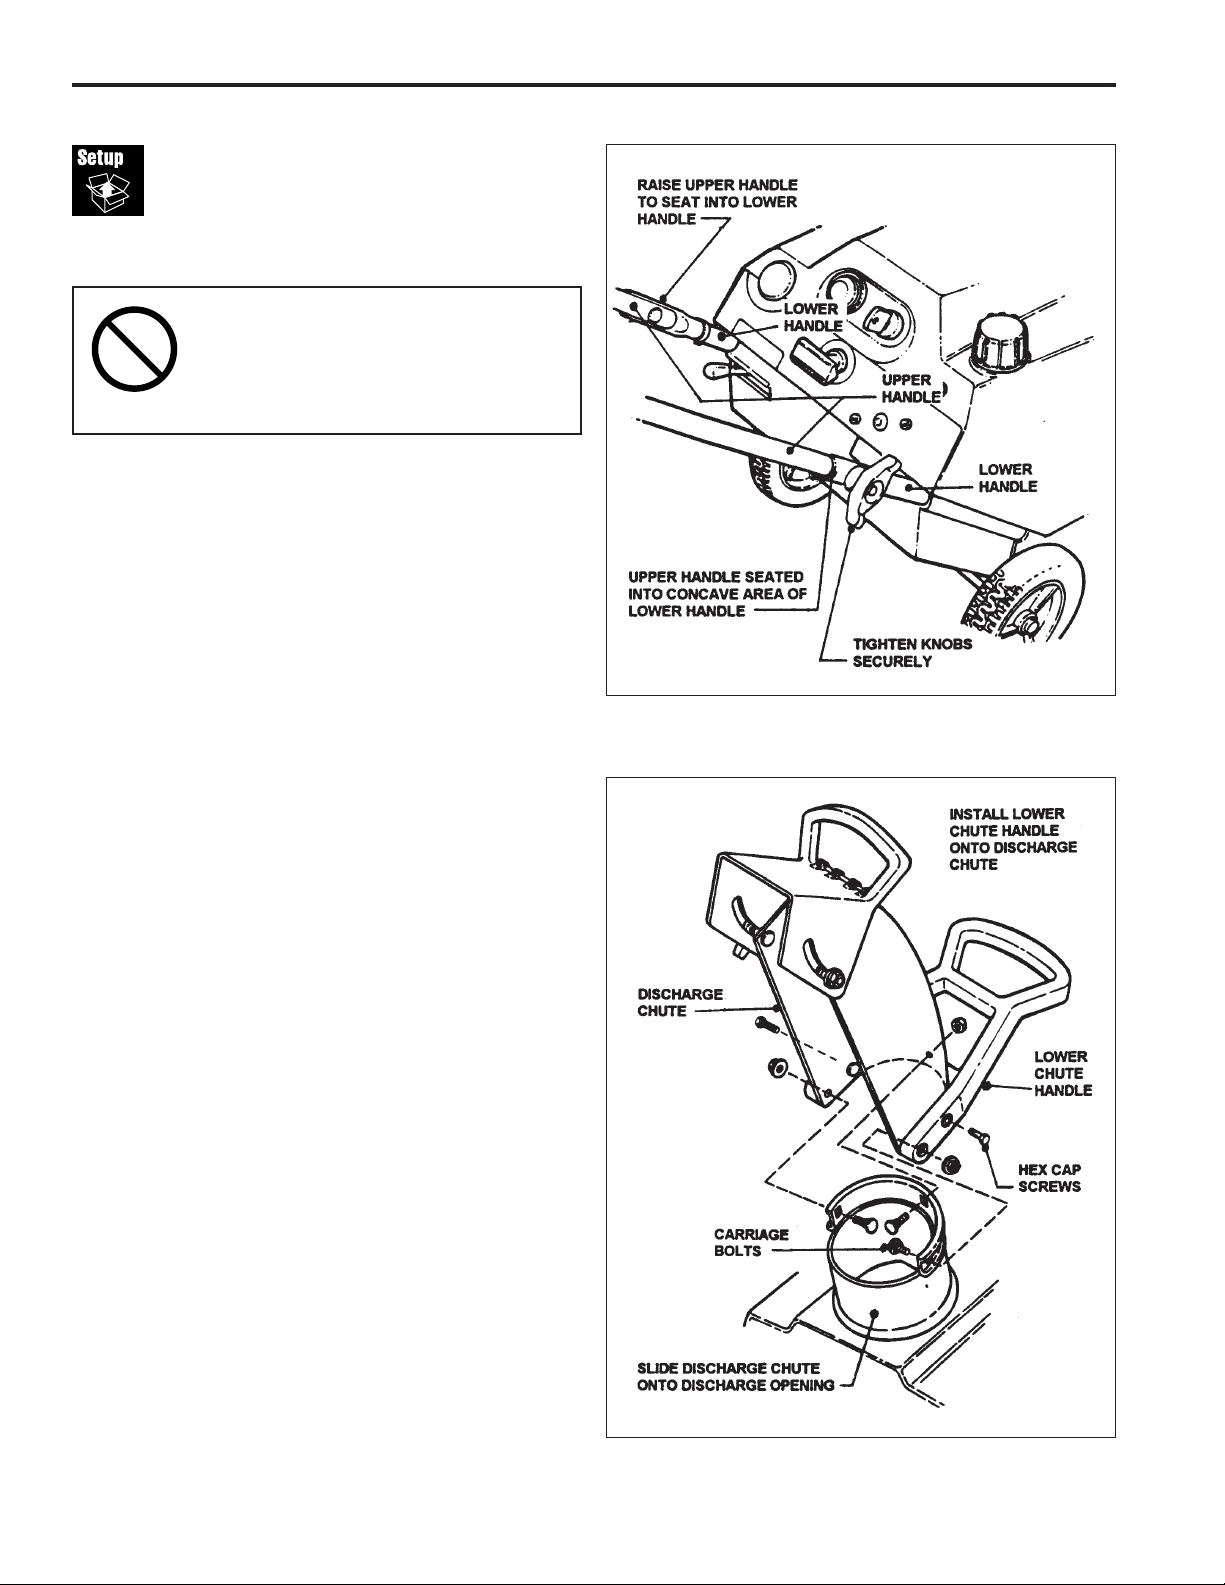
2. The right side upper handle is bolted to the outside of
the lower handle for shipping purposes. Unbolt and
move the right side upper handle to the inside of the
lower handle. Reinstall the bolt and knob. Lift up the
folding handle to align it with lower handle and tighten
the wing knobs securely as shown in Figure 1.
3. Install the lower chute handle onto the discharge
chute with two hex head capscrews (Figure 2).
4. Install the chute/handle assembly onto the discharge
opening and secure with three carriage bolts and nuts
(Figure 2). Tighten all hardware securely. Do not
overtighten.
IMPORTANT NOTE
When removing the snowthrower from
the box and unfolding the handle bars
DO NOT PINCH THE AUGER CONTROL
CABLE IN THE HANDLE BARS.
Figure 1. Install Handle Bars
Figure 2. Install Discharge Chute
Page 5

FUEL TO OIL MIXTURE CHART (50:1)
U.S. Imperial Metric
Gasoline 2 Cycle Oil Gasoline 2 Cycle Oil Gasoline 2 Cycle Oil
Gallons Ounces Gallons Ounces Liters Milliliters
1 2.5 1 2.8 4 80 ml
2 5 2 5.6 8 160 ml
5 13 5 14.1 20 400 ml
319 Single Stage Snowthrower
4/2003
5
TP 300-3862-00-SW-S
Fill Gas Tank
Fuel and Oil Mixture
The snowthrower uses a two cycle engine that requires a
mixture of fuel (gasoline) and oil for lubrication of engine
bearings and other moving parts.
The correct fuel/oil mixture ratio for the five horsepower
engine is 50 to 1. Use fuel/oil mixture chart shown.
NOTE: To prevent damage to engine, carefully
observe recommended fuel to oil mixing ratio and
procedures.
• Gasoline and oil must be premixed in a clean fuel
container.
• Always use fresh, unleaded, winter grade fuel
• Never put plain, unmixed fuel into fuel tank. Shake
fuel container each time before filling fuel tank.
• Never use “stale” fuel left over from last season or
stored for long periods.
• DO NOT USE MULTI VISCOSITY OILS, SUCH AS
10W-30 or 10W-40.
Proper Fuel Mixing Procedure
1. Fill approved clean fuel container one quarter full with
fresh unleaded fuel - one quart (one liter) in a one
gallon (4 liter) container.
2. Pour recommended amount of high quality two
cycle oil — 2.5 ounces (80 ml) into fuel container for
one gallon (4 liters) of fuel. (NOTE: DO NOT USE
MULTI VISCOSITY OILS, SUCH AS 10W-30 or
10W-40.)
3. Reinstall cap on the fuel container and shake container vigorously so oil mixes with gasoline.
4. Unscrew cap and fill container with fuel. Shake container again.
5. Remove fuel tank cap and carefully pour mixed fuel
into the fuel tank, filling to 1/2 inch (1.5 cm) below
filler neck to allow room for expansion. Never put
plain, unmixed fuel into fuel tank. Shake fuel container each time before filling fuel tank.
WARNING
Gasoline is highly flammable and must be handled
with care. Never fill the tank when the engine is hot
or running. Always move outdoors to fill the tank.
Keep snowthrower and gasoline away from open
flame or spark.
Figure 5. Proper Fuel Mixing Procedure
A. Fill Container with 1 Quart (1 Liter) of fuel
B. 2.5 Ounces (80 ml) of two-cycle oil
C. Combine in container, then shake container
D. Additional fuel brings total to 1 Gallon (4 liters)
A
B DC
Page 6

Test Run
Test run the unit for several minutes. Check that the following work properly:
319 Single Stage Snowthrower
TP 300-3862-00-SW-S
4/2003
6
• Primer
• Choke
• Recoil Starter
• Electric Starter
(Where Applicable)
• Auger Control Cable
• Kill Switch
• Chute Rotator
• Deflector
Auger Control Cable
Adjustment
DO NOT over-tighten the cable. The control
cable must have some slack when in the
disengaged position for the auger brake to
function properly. If the auger does not stop
within 5 seconds of the auger control being
released, see your dealer.
WARNING
Inspection
1. Inspect the auger cable for kinks, wear, or frayed
cable strands. Replace if worn or damaged.
2. Start the engine.
3. Engage the auger control for 5 seconds.
4. Disengage the auger control. The auger should stop
in 5 seconds or less. If not, perform the auger control
adjustment.
Adjustment
1. Turn the engine OFF.
2. With the auger control disengaged, measure the
length of the cable spring (A, Figure 4).
3. Engage the auger control and measure the length of
the expanded cable spring (A, Figure 5).
The cable spring should be stretched 1/2”-3/4”
(1.3cm-1.9cm) when the auger control is engaged. If
not, proceed to step 4.
4. Loosen the jam nut (B, Figure 4) at the upper end of
the cable. Hold the threaded end of the cable and
turn the cable clockwise until the desired extension is
achieved. Retighten the jam nut and repeat steps 2-
3.
If the cable sheath cannot be adjusted to achieve
1/2”-3/4” (1.3cm-1.9cm) of spring deflection, the
auger belt idler pulley can be adjusted. See the following section.
Figure 4. Auger Cable Adjustment - Disengaged
A. Cable Spring
B. Jam Nut
A
B
1
2
3
4
5
Figure 5. Auger Cable Adjustment - Engaged
A. Cable Spring
A
MANUFACTURING INC.
500 N Spring Street / PO Box 997
Port Washington, WI 53074-0997 USA
www.simplicitymfg.com
© Copyright 2003 Simplicity Manufacturing, Inc.
All Rights Reserved. Printed in USA
5
4
3
2
1
 Loading...