

EN DE
Instruction Manual
Instructions d'utilisation
Bedienungsanleitung
Manuale di istruzioni
Manual de instrucciones
Instruktionsmanual
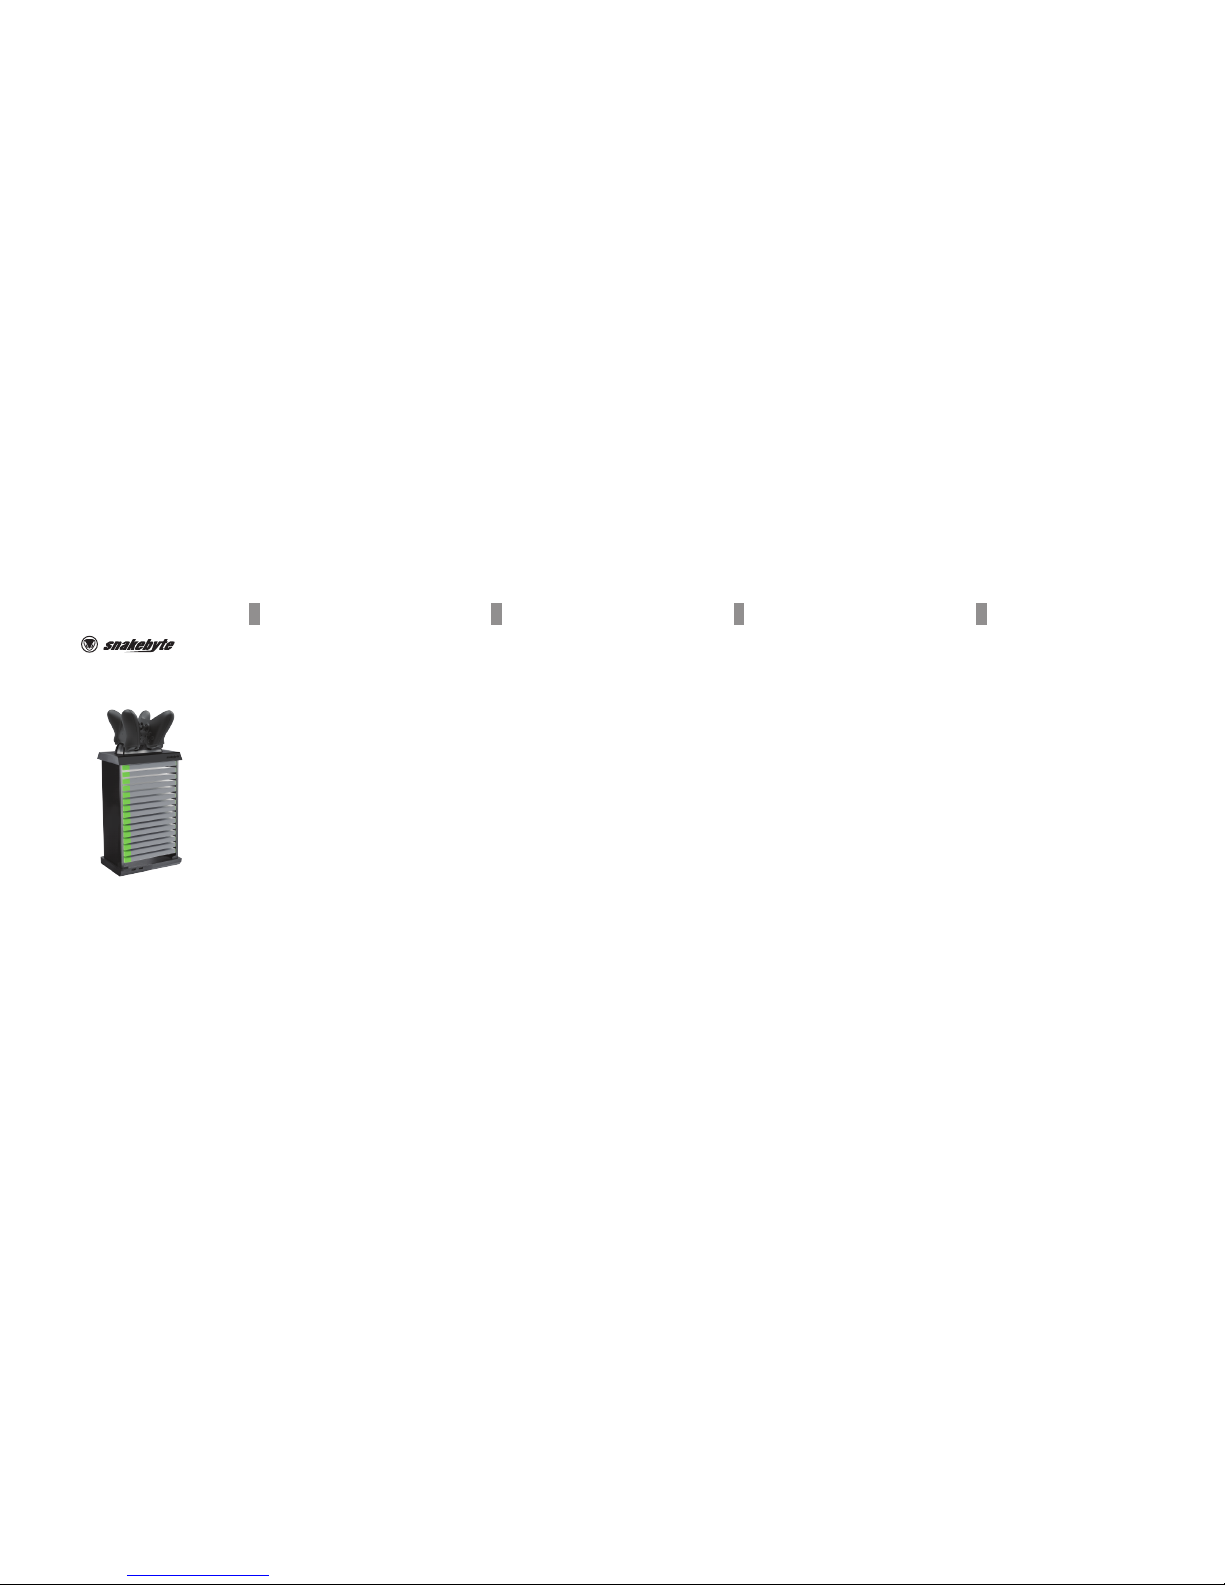
CHARGE:TOWER PRO™ for XBOX ONE™/ XBOX ONE™ S/XBOX ONE™ X
PRODUCT INFORMATION
Thank you for choosing snakebyte’s CHARGE:TOWER PRO™. Please read this guide for important safety and
health information and retain it for future reference.
CONTENT
1x Top Plate 1x Base Plate 1x Left Side Plate 1x Right Side Plate 1x Charging Dock 2x Wire Clip 2x Velcro Strip
2x Battery Packs 1x Power Supply
OPERATING INSTRUCTION CHARGE:TOWER PRO™ SB910401 / SB910418
GAME STORAGE ASSEMBLY
• Slide the Left Side Plate and Right Side Plate into the Base Plate.
• Slide the upper sides of the Side Plates into the Top Plate.
• Place Charging Dock into the recessed area of Top Plate.
• If necessary apply Velcro Strips to Top Plate and bottom of Charging Dock to secure its position.
INSTALLING THE BATTERY PACK
• Insert the Battery Pack into the battery compartment of the Xbox® Wireless Controller.
SETTING UP THE CHARGING DOCK
• Connect the Power Plug to the Power Supply to the Power Input on the back of the Charging Dock.
• Place Charging Dock into the recessed area of the Top Plate.
• Connect Power Supply to an electrical outlet.
CHARGING THE XBOX® WIRELESS CONTROLLER
• Place the Xbox® Wireless Controller, with the Battery Pack inserted, onto the Charging Dock.
LED CHARGING STATUS INDOCATOR
• While charging is in progress, the LED Charging Status Indicators will light red.
• LED colour will change to green, when charging is completed.
• The Xbox® Wireless Controller is not properly placed on the charging position on the charging base.
• The Battery Pack is not correctly inserted into the Xbox® Wireless Controller.
TROUBLESHOOTING
The LEDs on the charging base do not light up.
• The DC in 5V connector is not correctly inserted in the DC in input on the charging base.
• The charging base is not plugged into an electrical outlet.
• The DualShock®4 Wireless Controller is not properly placed on the charging position on the charging base.
• The Micro USB-Adaptor has not been properly attached to the DualShock®4 Wireless Controller.
TECHNICAL SPECIFICATIONS
• Model number SB910401 / SB910418
Power Supply
• Input: AC 100 – 240V (50/60Hz), 0.3A maximal
• Output: DC 5V/ 1.5A
Charging Dock
• Input: DC 5V/1,5A
SAFETY PRECAUTIONS
• Only operate the power supply with the correct voltage (AC 100 – 240V).
• Do not use voltage transformers, adapter plugs or similar devices in conjunction with the power supply.
• Use the power supply with a nearby, easily accessible socket.
• Do not pull on the USB charging cable.
• Only use the power supply indoor.
• Protect the power supply and USB charging cable from dust, moisture, fluids, high temperature, direct
sunlight, microwaves and shocks.
• Do not touch the connectors of the power supply and USB charging cable with fingers, or metallic objects.
• Do not use the power supply or USB charging cable after they came in contact with fluids.
• Do not use power supply or USB charging cable when they are damaged.
• Immediately unplug the power supply, if it or the USB charging cable emits strange noises, smells or smoke.
• Do not open the power supply and do not try to repair it.
CLEANING
• Clean only with a soft, dry cloth. Avoid cleaning solutions, solvents or other chemicals and do not attempt
CHARGE:TOWER PRO™ für XBOX ONE™/ XBOX ONE™ S/XBOX ONE™ X
PRODUKTINFORMATION
Vielen Dank, dass Sie sich für snakebyte's CHARGE:TOWER PRO™ entschieden haben. Bitte lesen Sie die
folgenden Sicherheitshinweise aufmerksam durch und bewahren Sie die Anleitung auf.
INHALT
1x Kopfplatte 1x Fußplatte 1x L. Seitenplatte 1x R. Seitenplatte 1x Ladeschale 2x Kabelklemme 2x Klettstreifen
2xAkku-Packs 1x Netzteil
BEDIENUNGSANLEITUNG CHARGE:TOWER PRO™ SB910401 / SB910418
ZUSAMMENBAU
• Führen Sie die Linke und Rechte Seitenplatte in die entsprechenden Einschübe der Fußplatte ein.
• Setzen Sie die Kopfplatte oben auf.
• Stellen Sie die Ladeschale in die dafür vorgesehene Einbuchtung auf der Kopfplatte.
• Falls nötig können Sie die Ladeschale mithilfe der Klettstreifen an der Kopfplatte fixieren.
INSTALLATION DER AKKU-PACKS
• Legen Sie das Akku-Pack in den Batterieschacht des Xbox®Wireless Controllers ein.
ANSCHLUSS DER LADESCHALE
• Verbinden Sie den Ladestecker des Netzteils mit der Ladebuchse der Ladeschale.
• Platzieren Sie die Ladeschale in der dafür vorgesehenen Ausbuchtung der Kopfplatte.
• Schließen Sie das Netzteil an eine Steckdose an.
AUFLADEN DER XBOX® WIRELESS CONTROLLER
• Legen Sie den Xbox® Wireless Controller mit dem eingelegten Akku-Pack in die Ladeschale.
LED LADESTATUSANZEIGE
• Die LED Ladestatusanzeigen leuchten während des Ladevorgangs rot.
• Die LED-Farbe wechselt zu grün sobald der Ladevorgang abgeschlossen ist.
• Wenn kein Xbox®Wireless Controller in der Ladeschale liegt, ist die LED Ladestandanzeige ausgeschaltet.
• Bitte nehmen Sie den Xbox®Wireless Controller nach Abschluss des Ladevorgangs von der Ladeschale.
TROUBLESHOOTING
Die LED Ladestatusanzeige leuchtet nicht.
• Der Ladestecker ist nicht korrekt mit der Ladebuchse verbunden.
• Die Ladeschale ist nicht am Strom angeschlossen.
• Der Xbox®Wireless Controller befindet sich nicht in der korrekten Position um geladen zu werden.
• Das Akku-P ack ist nicht korrekt in den Xbox® Wireless Controller eingelegt.
TECHNISCHE DATEN
• Modellnummer: SB910401 / SB910418
Netzteil
• Eingangsspannung: 100 – 240V Wechselspannung (50/60Hz), 0.3A maximal
• Ausgangsspannung: 5V/ 1.5A Gleichspannung
Ladeschale
• EIngangsspannung: 5V/1,5A
SICHERHEITSHINWEISE
• Betreiben Sie das Netzteil ausschließlich mit der korrekten Netzspannung (100 – 240V (Wechselstrom)).
• Verwenden Sie keine Spannungswandler, Adapterstecker, oder Ähnliches zusammen mit dem Netzteil.
• Verwenden Sie gut erreichbare Steckdosen in unmittelbarer Nähe des Geräts.
• Ziehen Sie nicht am Ladekabel.
• Verwenden Sie das Netzteil ausschließlich im Haus.
• Schützen Sie Netzteil und Ladekabel vor Staub, Feuchtigkeit, Flüssigkeiten, hohen Temperaturen, direktem
Sonnenlicht, Mikrowellen und starken Erschütterungen.
• Berühren Sie die Anschlüsse von Netzteil und Ladekabel nicht mit Fingern, oder metallischen Gegenständen.
• Verwenden Sie Netzteil und Ladekabel nicht, nachdem sie mit Flüssigkeit in Kontakt gekommen sind.
• Verwenden Sie Netzteil und Ladekabel nicht, wenn sie beschädigt sind.
• Sollten Netzteil, oder Ladekabel ungewöhnliche Geräusche, Gerüche oder Rauchentwicklung verursachen,
ziehen Sie das Netzteil sofort aus der Steckdose.
• Öffnen Sie das Netzteil nicht und versuchen Sie nicht, es bei Beschädigungen selbst zu reparieren.
REINIGUNG
• Reinigen Sie das Produkt nur mit einem weichen, trockenen Tuch. Vermeiden Sie Reinigungslösungen.
CHARGE:TOWER PRO™ pour XBOX ONE™/XBOX ONE™ S/XBOX ONE™X
INFORMATIONS PRODUIT
Merci d’avoir acheté la CHARGE:TOWER PRO™. Veuillez lire ce guide pour des informations importantes
relatives à la sécurité et à la santé, et le conserver pour référence ultérieure.
CONTENU
1× Plaque supérieure 1× Socle 1× Plaque latérale gauche 1× Plaque latérale droite 1× Station de recharge
2× Fixation de fil 2× Bande velcro 2x Batterie 1x Source de courant
UTILISATION / CONNECTER LE CHARGE:TOWER PRO™ SB910401 / SB910418 / ASSEMBLAGE
• Faire glisser la plaque latérale gauche et la plaque latérale droite dans le socle.
• Faire glisser les parties supérieures des plaques latérales dans la plaque supérieure.
• Placer la station de recharge dans la partie renfoncée de la plaque supérieure.
• Si nécessaire, vous pouvez réparer le plateau avec les bandes Velcro sur la plaque de tête.
INSTALLATION DES BATTERIE
• Insérez la batterie dans le compartiment des piles du contrôleur sans fil Xbox®.
INSTALLATION DE LA STATION DE RECHARGE
• Connecter la fiche d’alimentation à l’alimentation électrique à l’arrière de la station de recharge.
• Placer la station de recharge dans la partie renfoncée de la plaque supérieure.
• Connecter la prise électrique à une prise de courant.
RECHARGER LES MANETTES SANS FIL XBOX®
• Placez le contrôleur sans fil Xbox®, avec la batterie insérée, sur le dock de chargement.
INDICATEUR DE STATUT DE CHARGE LED
• Pendant la recharge, les indicateurs de statut de charge à LED seront rouges.
• Les LED deviendront vert une fois la recharge terminée.
• Les LED s’éteindront si aucune manette sans fil DualShock®4 ne se trouve sur la station de recharge.
• Veuillez enlever la manette de la station de recharge dès que la recharge est terminée.
RÉSOLUTION DES PROBLÈMES
Les LED sur la station de recharge ne s’allument pas.
• La prise de charge n'est pas correctement connectée à la prise de charge.
• Les LED deviendront vert une fois la recharge terminée.
• Les LED s’éteindront si aucune manette sans fil Xbox® ne se trouve sur la station de recharge.
• Veuillez enlever la manette sans fil Xbox® de la station de recharge dès que la recharge est terminée.
SPÉCIFICATIONS TECHNIQUES
• Numéro de modèle: SB910401 / SB910418
Power Supply
• La puissance d'entrée: AC 100 – 240V (50/60Hz), 0.3A maximal
• Puissance de sortie: DC 5V/ 1.5A
Berceau de charge
• La puissance d'entrée: DC 5V/1,5A
AVERTISSEMENTS DE SÉCURITÉ
• N'utilisez le chargeur qu'avec le voltage approprié (AC 100 – 240V).
• N'utilisez pas de transformateur électrique, d'adaptateur ou autres appareils de ce type avec le chargeur.
• Utilisez le chargeur sur une prise proche et facile d'accès.
• Ne tirez pas sur le câble d'alimentation USB.
• N'utilisez le chargeur qu'à l'intérieur.
• Protégez le chargeur et le câble d'alimentation USB de la poussière, l'humidité, les liquides, les
températures élevés, l'exposition directe à la lumière du soleil, les micro-ondes et les chocs.
• Ne touchez pas les connecteurs du chargeur avec les doigts ou objets métalliques.
• Ne pas utiliser le produit lorsqu'il entre en contact avec des liquides.
• N'utilisez pas le chargeur et le câble d'alimentation USB s'ils sont endommagés.
• Débranchez immédiatement le chargeur s'il émet, ou que le câble d'alimentation USB émet, des bruits
étranges, des odeurs ou de la fumée.
• N'ouvrez pas le chargeur et n'essayez pas de le réparer.
NETTOYAGE
• Nettoyez le produit uniquement avec un chiffon doux et sec. Évitez les solutions de nettoyage.
CHARGE:TOWER PRO
™
IT
CHARGE:TOWER PRO™ per XBOX ONE™/XBOX ONE™ S/XBOX ONE™X
INFORMAZIONI SUL PRODOTTO
Grazie per aver scelto CHARGE:TOWER PRO™ di snakebyte. Si prega di leggere questa guida per importanti informazioni sulla sicurezza e sulla salute e di conservarla per riferimenti futuri.
CONTENUTO DELLA CONFEZIONE
1x Piastra superiore 1x Piastra inferiore 1x Piastra laterale sinistra 1x Piastra laterale destra 1x Stazione di
ricarica 2x Clip per il cavo 2x Strisce in velcro 2x Pacotes de bateria 1x Fonte de energia
OPERAZIONE / CONNETTERE IL CHARGE:TOWER PRO™ SB910401 / SB910418 / ASSEMBLAGGIO
• Fai scivolare la piastra laterale sinistra e la piastra laterale destra nella piastra inferiore.
• Fai scivolare le parti superiori delle piastre laterali nella piastra superiore.
• Posiziona la stazione di ricarica nell’incasso della piastra superiore.
• Fissare il vassoio con le strisce di Velcro sulla piastra di testa.
INSTALAÇÃO DOS BATERIA
• Insira a bateria no compartimento da bateria do Xbox® Wireless Controller.
IMPOSTARE LA STAZIONE DI RICARICA
• Collega il connettore all’alimentatore all’ingresso energetico sul retro della stazione di ricarica.
• Posiziona la stazione di ricarica nell’incavo della piastra superiore.
• Collega l’alimentatore ad una presa elettrica.
RICARICA CONTROLLER WIRELESS EN XBOX®
• Collocare il controller wireless Xbox®, con il pacco batteria inserito, sul dock di ricarica.
INDICATORE DI STATO DI CARICA LED
• Durante il processo di ricarica, l’indicatore di stato di carica LED si illuminerà di rosso.
• Il colore del LED diventerà verde al completamento della carica.
• Il LED si disattiverà quando non saranno presenti controller wireless Xbox® nella stazione di ricarica.
• Rimuovi i controller wireless Xbox® dalla stazione di ricarica dopo che la carica è completa.
RISOLUZIONE DEI PROBLEMI
I LED sulla base di carica non si accendono.
• Il connettore da 5V DC in non è correttamente inserito nell’ingresso DC in della base di carica.
• La base di carica non è collegata ad una presa elettrica.
• Il controller wireless Xbox®non è nella posizione corretta per caricare.
• L’adattatore Micro USB non è stato collegato correttamente al controller wireless Xbox®.
SPECIFICHE TECNICHE
• Numero di modello: SB910401 / SB910418
Alimentazione elettrica
• Potenza di ingresso: AC 100 – 240V (50/60Hz), 0.3A maximal
• Potenza di uscita: DC 5V/ 1.5A
Base di ricarica
• Input: DC 5V/1,5A
AVVERTENZE DI SICUREZZA
• Utilizzare l’alimentatore esclusivamente col voltaggio corretto (AC 100 – 240V).
• Non utilizzare convertitori di tensione, connettori adattatori o simili, insieme all'alimentazione.
• Usare l’alimentatore con una presa vicina e di facile accesso.
• Non tirare il cavo di ricarica USB.
• Utilizzare l’alimentatore esclusivamente al chiuso.
• Proteggi alimentatore e cavo di ricarica USB da polvere, umidità, liquidi, alte temperature, luce solare
diretta, microonde e colpi.
• Non toccare i connettori di alimentatore e cavo di ricarica USB con le dita o con oggetti metallici.
• Non utilizzare alimentatore e cavo di ricarica USB dopo che sono entrati in contatto con liquidi.
• Non utilizzare alimentatore e cavo di ricarica USB se danneggiati.
• Scollegare immediatamente l’alimentatore se questo io il cavo di ricarica USB emettono rumori o odori
strani oppure fumo.
• Non aprire l’alimentatore e non tentare di ripararlo.
PULITURA
• Pulire solo con un panno pulito e asciutto. Evitare soluzioni detergenti, solventi o altre sostanze chimiche
e non tentare di pulire i connettori poiché ciò potrebbe danneggiare il prodotto.
FR
CUSTOMER SUPPORT / TECHNICAL SUPPORT
snakebyte distribution GmbH
Konrad-Zuse-Strasse 13
58239 Schwerte / Germany
Email: Support@mysnakebyte.com
Website: www.mysnakebyte.com
SUPPORT CLIENT / SUPPORT TECHNIQUE
snakebyte distribution GmbH
Konrad-Zuse-Strasse 13
58239 Schwerte / Germany
Email: Support@mysnakebyte.com
Website: www.mysnakebyte.com
KUNDENSUPPORT / TECHNISCHER SUPPORT
snakebyte distribution GmbH
Konrad-Zuse-Strasse 13
58239 Schwerte / Deutschland
Telefon: +49 (0) 0800-4022300
Email: Support@mysnakebyte.com
Webseite: www.mysnakebyte.com
ASSISTENZA CLIENTI / ASSISTENZA TECNICA
snakebyte distribution GmbH
Konrad-Zuse-Strasse 13
58239 Schwerte / Germany
Email: Support@mysnakebyte.com
Website: www.mysnakebyte.com
CHARGE:TOWER PRO™ til XBOX ONE™/XBOX ONE™ S/XBOX ONE™X
PRODUKTINFORMATION
Tak fordi du valgte snakebyte's CHARGE:TOWER PRO™. Læs venligst denne guide for vigtige sikkerheds og
helbredsinformation og opbevar den for fremtidig reference.
INDHOLD
1 x Top-plade 1 x Bundplade 1 x Plade venstre side 1 x Plade højre side 1 x Ladestationen
2 x Ledningsclips 2 x Burrelukning 2x Batteri pakke 1x Strømforsyning
TILSLUTNING AF CHARGE:TOWER PRO™ SB910401 / SB910418// SAMLING
• Skub venstre og højre sideplade ind i basispladen.
• Skub oversiden af sidepladerne ind i top-pladen.
• Anbring ladestationen i det forsænkede område af top-pladen.
• Brug om nødvendigt burrelukninger på top-pladen og bunden af ladestationen for at sikre den.
INSTALLATION AF BATTERI PAKKE
• Sæt batteriet i batterirummet på Xbox® Wireless Controller.
OPSÆTNING AF LADESTATIONEN
• Tilslut strømstikket til strømforsyningen til strømindgangen på bagsiden af ladestationen.
• Anbring ladestationen i det forsænkede område af top-pladen.
• Tilslut strømforsyningen til en stikkontakt.
OPLADNING AF XBOX® WIRELESS CONTROLLER
• Placer Xbox® Wireless Controller, med batteripakken indsat, på ladestationen.
LED-LADESTATUSINDIKATOR
• DC ind 5V-stikket er ikke sat korrekt ind i DC ind-hunstikket på ladestationen.
• Ladestationen er ikke tilsluttet en stikkontakt.
• Xbox® Wireless Controlleren er ikke korrekt anbragt i opladningspositionen på ladestationen.
• Batteripakken er ikke sat korrekt i Xbox® Wireless Controller.
FEJLFINDING
LED’erne på ladestationen tændes ikke.
• DC ind 5V-stikket er ikke sat korrekt ind i DC ind-hunstikket på ladestationen.
• Ladestationen er ikke tilsluttet en stikkontakt.
• DualShock®4 Wireless Controlleren er ikke korrekt anbragt i opladningspositionen på ladestationen.
• Mikro USB-adapteren er ikke korrekt fastgjort til DualShock®4 Wireless Controlleren.
TECHNISKE SPECIFIKATIONER Model Nummber: SB910401 / SB910418
Power Supply: Input: AC 100 – 240V (50/60Hz), 0.3A maximal
Output: DC 5V/ 1.5A
Ladestation: Input: DC 5V/1,5A
SAFETY PRECAUTIONS
• Brug kun strømforsyningen med den korrekte spænding (AC 100 – 240V).
• Undlad at bruge spændings-transformatorer, adapterstik eller lignende enheder i forbindelse med
strømforsyningen.
• Brug strømforsyningen med en let tilgængelig stikkontakt i nærheden.
• Undlad at trække i USB-opladerkablet.
• Brug kun strømforsyningen indendørs.
• Beskyt strømforsyningen og USB-opladerkablet mod støv, fugt, væsker, høje temperaturer, direkte sollys,
mikrobølger og stød.
• Undlad at røre ved strømforsyningens stik og USB-opladerkablet med fingrene eller med metalgenstande.
• Undlad at bruge strømforsyningen eller USB-opladerkablet, når disse har været i kontakt med væsker.
• Undlad at bruge strømforsyningen eller USB-opladerkablet, når disse er blevet skadet.
• Træk straks strømforsyningens stik ud af stikdåsen, hvis den eller USB-opladerkablet udsender mærkelige lyde,
lugte eller røg.
• Undlad at åbne strømforsyningen og forsøg ikke at reparere den.
RENGØRING
• Rengør kun med en blød, tør klud. Undgå rensemidler, opløsningsmidler eller andre kemikalier, og forsøg ikke
at rengøre forbindelsesstik, da dette kan skade produktet.
DK
CHARGE:TOWER PRO™ para XBOX ONE™/XBOX ONE™ S/XBOX ONE™X
INFORMAÇÕES SOBRE O PRODUTO
Agradecemos pela escolha do CHARGE:TOWER PRO™ da snakebyte. Leia este manual para obter
importantes informações de segurança e saúde, e guarde-o para consultas futuras.
CONTEÚDO
1x Placa Superior 1x Placa Base 1x Placa Lateral Esquerda 1x Placa Lateral Direita
1x Base de Carregamento 2x Clipe para Fios 2x Tira de Velcro 2x Pacotes de bateria 1x Fonte de energia
INSTRUÇÕES DE FUNCIONAMENTO CHARGE:TOWER PRO™ SB910401 / SB910418/ MONTAGEM
• Deslize a Placa Lateral Esquerda e a Placa Lateral Direito para a Placa Base.
• Deslize os lados superiores das Placas Laterais para a Placa Superior.
• Coloque a Base de Carregamento na área recuada da Placa Superior.
• Aplique tiras de velcro para a placa superior e parte inferior da base de carga.
INSTALAÇÃO DOS BATERIA
• Insira a bateria no compartimento da bateria do Xbox® Wireless Controller.
CONFIGURAR A BASE DE CARREGAMENTO
• Conecte a alimentação à fonte de alimentação
• Coloque a Base de Carregamento na área recuada da Placa Superior.
• Conecte a Fonte de Alimentação a uma tomada elétrica.
RICARICA CONTROLLER WIRELESS EN XBOX®
• Collocare il controller wireless Xbox®, con il pacco batteria inserito, sul dock di ricarica.
INDICADOR LED DO ESTADO DA BATERIA
• Enquanto carrega, os indicadores LED do Estado da Bateria estarão com a luz vermelha.
• A cor da LED irá mudar para verde quando o carregamento estiver completo.
• A LED desligar-se-á quando o Controlador Sem Fios Xbox® é colocado na Base de Carregamento.
• Remova os controladores da estação de carregamento após a conclusão do carregamento.
RESOLUÇÃO DE PROBLEMAS
As LEDs na Base de Carregamento não acendem.
• O DC no conector de 5V não está corretamente inserido no DC na entrada da base de carregamento.
• A base de carregamento não está ligada a uma tomada elétrica.
• O controlador não está colocado corretamente na posição de carga na base de carga.
•A bateria não está inserida corretamente no Xbox®Wireless Controller.
ESPECIFICAÇÕES TÉCNICAS Número do modelo: SB910401 / SB910418
Fonte de energia Potência de entrada: AC 100 – 240V (50/60Hz), 0.3A maximal
Potência de saída: DC 5V/ 1.5A
Carregador Potência de entrada: DC 5V/1,5A
AVISOS DE SEGURANÇA
• A fonte de alimentação só deve ser operada com a voltagem correta (100 - 240V AC).
• Não utilize transformadores de voltagem, fichas adaptadoras ou aparelhos semelhantes em conjunto
com a fonte de alimentação.
• Ligue a fonte de alimentação a uma tomada próxima e de fácil acesso.
• Não puxe o cabo de carregamento USB.
• Utilize apenas a fonte de alimentação dentro de casa.
• Proteja a fonte de alimentação e o cabo de carregamento USB do pó, humidade, fluidos, elevadas
temperaturas, contacto solar direto, micro-ondas e choques.
• Não toque nos conetores da fonte de alimentação e do cabo de carregamento USB com os dedos ou
objetos metálicos.
• Não utilize a fonte de alimentação ou o cabo de carregamento USB após o seu contacto com fluidos.
• Não utilize a fonte de alimentação ou o cabo de carregamento USB se estiverem danificados.
• Remova de imediato a fonte de alimentação da tomada se esta ou o cabo de carregamento USB
emitirem ruídos, cheiros ou fumos estranhos.
• Não abra a fonte de alimentação e não tente repará-la.
LIMPEZA
• Limpe apenas com um pano macio e seco. Evite soluções de limpeza, solventes ou outros químicos e não
tente limpar os conectores visto que isto pode danificar o produto.
POES
CHARGE:TOWER PRO™ por XBOX ONE™/XBOX ONE™ S/XBOX ONE™X
INFORMACIÓN DE PRODUCTO
Gracias por elegir el CHARGE:TOWER PRO™ de snakebyte. Por favor, lee esta guía para obtener
información importante de seguridad y salud y guárdala para consultas futuras.
CONTENIDO
1x Placa superior 1x Placa base1x Placa lateral izquierda 1x Placa lateral derecha 1x Base de carga
2x Clips de alambre 2x Tiras de velcro 2x bateria 1x fuente de alimentación
INSTALLAZION / CONECTAR CHARGE:TOWER PRO™ SB910401 / SB910418/ MONTAJE
• Deslice la placa lateral izquierda y la placa lateral derecha en la placa base.
• Deslice los lados superiores de las placas laterales en la placa superior.
• Coloque la base de carga en la zona hueca de la placa superior.
• Coloque las tiras de velcro en la placa superior y la parte inferior de la base de carga.
INSTALACIÓN DE LOS BATERIA
• Inserte la batería en el compartimento de las pilas del Controlador inalámbrico Xbox®.
CONFIGURACIÓN DE LA BASE DE CARGA
• Collegare la spina di alimentazione all'alimentazione elettrica all'alimentazione elettrica.
• Coloque la base de carga en la zona hueca de la placa superior.
• Conecte la fuente de alimentación a una toma de corriente.
CARGA DEL CONTROLADOR INALÁMBRICO XBOX®
Coloque el Controlador inalámbrico Xbox®, con la batería insertada, en el Dock de carga.
INDICADOR DE ESTADO DE CARGA LED
• Mientras se está cargando, los indicadores LED de estado de carga se encenderán en color rojo.
• La base de carga no está conectada a una toma de corriente
• El LED se apagará cuando no se encuentre un controlador inalámbrico en la base de carga.
• Por favor, retire los controladores inalámbricos Xbox® de la base de carga después de que se haya
completado la carga.
RESOLUCIÓN DE PROBLEMAS
Los LED de la base de carga no se encienden.
• El conector DC en 5V no está insertado correctamente en la entrada de CC de la base de carga.
• La base de carga no está conectada a una toma de corriente.
• El controlador inalámbrico Xbox® no está colocado correctamente en la posición de carga de la base
• La batería no está insertada correctamente en el Controlador inalámbrico Xbox.
ESPECIFICACIONES TÉCNICAS Número de modelo: SB910401 / SB910418
Fuente de alimentación Entrada: AC 100 – 240V (50/60Hz), 0.3A maximal
Salida: DC 5V/ 1.5A
Soporte de carga Entrada: DC 5V/1,5A
ADVERTENCIAS DE SEGURIDAD
• Utiliza la fuente de alimentación únicamente con la tensión adecuada (CA 100 - 240 V).
• No emplees transformadores de tensión, enchufes adaptadores ni dispositivos similares junto con la
fuente de alimentación.
• Conecta la fuente de alimentación a una toma de corriente próxima y de fácil acceso.
• No tires directamente del cable de carga USB.
• Utiliza la fuente de alimentación únicamente en interiores.
• Protege la fuente de alimentación y el cable de carga USB del polvo, la humedad, los líquidos, las altas
temperaturas, la luz solar directa, las microondas y los golpes.
• No toques los conectores de la fuente de alimentación con los dedos u otros objetos metálicos.
• No utilice el producto cuando entre en contacto con líquidos.
• No utilices la fuente de alimentación o el cable de carga USB si han sufrido cualquier tipo de daño.
• Desenchufa inmediatamente la fuente de alimentación si esta o el cable de carga USB emiten ruidos
extraños, olores o humo.
• No abras la fuente de alimentación ni trates de repararla
LIMPIEZA
• Limpie el producto solo con un paño suave y seco. No use productos de limpieza, disolventes u otros
productos químicos y no intente limpiar los conectores, ya que esto podría dañar el producto.
Item Number: SB910401 / SB910418
ATENCIÓN AL CLIENTE / SOPORTE TÉCNICO
snakebyte distribution GmbH
Konrad-Zuse-Strasse 13
58239 Schwerte / Germany
Email: Support@mysnakebyte.com
Website: www.mysnakebyte.com
APOIO AO CLIENTE / APOIO TÉCNICO
snakebyte distribution GmbH
Konrad-Zuse-Strasse 13
58239 Schwerte / Germany
Email: Support@mysnakebyte.com
Website: www.mysnakebyte.com
KUNDESUPPORT / TEKNISK SUPPORT
snakebyte distribution GmbH
Konrad-Zuse-Strasse 13
58239 Schwerte / Germany
Email: Support@mysnakebyte.com
Website: www.mysnakebyte.com
COPYRIGHT INFORMATION
©2017. All rights reserved. This document may not in whole or in part be reproduced, stored in a retrieval system,
transmitted in any form or by any means, electronic, mechanical, photocopying, recording, or otherwise, or reduced to
any electronic medium or machine-readable form without prior consent, in writing, from snakebyte dristibution GmbH.
Microsoft is a registered trademark of Microsoft Corporation. Xbox® and Xbox One® are registered trademarks of
Microsoft Corporation. This product is not designed, manufactured, approved, sponsored, or endorsed by Microsoft.
Snakebyte is a registered trademark of snakebyte distribution GmbH. All trademarks are the properties of their respective
owners.
Microsoft est une marque déposée de Microsoft Corporation. Xbox®et Xbox One® sont des marques déposées de
Microsoft Corporation. Ce produit n'a pas été conçu, fabriqué, approuvé, commandité ou recommandé par Microsoft.
Snakebyte est une marque déposée de snakebyte distribution GmbH. Toutes les marques commerciales appartiennent
à leurs propriétaires respectifs.
EU DECLARATION OF CONFORITY
Hereby we guarantee that snakebyte distribution GmbH, located at 13 Konrad-Zuse-Str., Schwerte 58239
Germany, is marketing this device (CHARGE:TOWER PRO™) under the brand name CHARGE:TOWER PRO™ and
complies with the legal requirements and the requirements of Directive 2014/53/EU. This notification is listed
under:
http://mysnakebyte.com/main-menu/support/downloads.html
KONFORMITÄTSERKLÄRUNG
Hiermit erklärt snakebyte distribution GmbH, Konrad-Zuse-Str. 13, Schwerte 58239 Germany, dass dieses Produkt
den grundlegenden Anforderungen und anderen relevanten Auflagen der Richtlinien 2014/53/EU entspricht,
soweit zutreffend. Die gemäß dem Konformitätsbewertungsverfahren erforderlichen technischen Unterlagen
können an folgender Stelle eingesehen werden:
http://mysnakebyte.com/main-menu/support/downloads.html
Warning: Changes or modifications to this unit not expressly approved by the party responsible for compliance
could void the user’s authority to operate the equipment.
NOTE: This equipment has been tested and found to comply with the limits for Class B digital device, pursuant
to Part 15 of the FCC Rules. These limits are designed in a residential installation. This equipment generates, uses,
and can radiate radio frequency energy and, if not installed and used in accordance with the instructions, may
cause harmful interference to radio communications. However, there is no guarantee that interference will not
occur in a particular installation. If this equipment does cause harmful interference to radio or television
reception, which can be determined by turning the equipment off and on, the user is encouraged to try to
correct the interference by one or more of the following measure:
- Reorient or relocate the receiving antenna.
- Increase the separation between the equipment and receiver.
- Connect the equipment into an outlet on a circuit different from that to which the receiver is connected.
- Consult the dealer or an experienced radio TV technician for help.
Shielded cables must be used with this unit to ensure compliance with the Class B FCC limits.
WEEE (Waste Electrical and Electronic Equipment Directive)
If you eventually want to dispose of this product at a later time, please observe the following
instruc- tions: Electronic equipment should not be disposed of together with household waste.
Please recycle the device if the appropriate recycling ways are available to you. Please
contact your local authority or retailer and ask them for advice on recycling.
RoHS
This product has been certified as RoHS compliant in accordance with Directive 2014/53/EU.
Disposal of batteries/rechargeable batteries
Please follow regional guidelines for the disposal of rechargeable batteries or contact local
au- thorities, your household waste disposal service or the shop where you purchased the
product. Batteries/rechargeable batteries must not be disposed of into the normal household
garbage. Please use a rechargeable battery disposal in your neighborhood or community, if
available.
LI-ION
 Loading...