


BEDIENUNGSANLEITUNG
MANUAL
ENDE


INHALTSVERZEICHNIS
PACKUNGSINHALT Auspacken und Überprüfung des Inhalts S. 07
Displayschutzfolie S. 07
Kundensupport / Technischer Support S. 07
DAS GERÄT Bildschirm S. 08
Anschlüsse S. 08
BASIS BEDIENUNGSANLEITUNG Stromverbrauch S. 09
Lautstärkentasten S. 09
Freischaltung des Bildschirms S. 09
Navigieren auf dem Home Bildschirm S. 10
WLAN und allgemeine Einstellungen S. 11
Verbindung zum PC über USB S. 11
PROFILE / KINDERSICHERUNG Grundsätzliche Einstellungen S. 12
Wie lege ich ein Profil für mein Kind an? S. 12
Wohin gehört welche App? S. 18
Eigene Ordner/Kategorien erstellen S. 19
Eigene Ordner löschen/bearbeiten S. 21
KINDERPROFILE Kinder-Profile editieren S. 22
Zwischen Profilen wechseln S. 23
APPS Wie lade ich Apps? S. 24
Speicherplatz S. 24
DE
WIRELESS LAN-VORSCHRIFTEN S. 25
BATTERIEN UND REISEN S. 26
RECHTLICHE HINWEISE S. 26 - S. 28
3

DE
Lieber Kunde,
vielen Dank, dass Sie sich für den Kauf unseres Produktes entschieden haben.
Wir wünschen Ihnen viele schöne Stunden Spielfreude. Bei Design und Produktion
des Geräts wurden die größten Sicherheitsmaßnahmen getroffen. Dennoch kann
unabhängig davon eine unsachgemäße Bedienung des Geräts zu Stromschlag
und anderen Gefahren führen. Um diese Gefahren zu vermeiden, möchten wir Sie
bitten, die Bedienungsanleitung genau zu lesen und folgende Maßnahmen, die wir
Ihnen im Detail aufführen werden, zu beachten:
WICHTIGE VORKEHRUNGEN
Sicherheitsvorkehrungen
Um einen Stromschlag zu vermeiden, versuchen Sie niemals das Gehäuse zu
öffnen.
Zerlegen Sie das Gerät niemals selbst und versuchen Sie nicht, es selbst zu
reparieren oder zu modifizieren.
Setzen Sie das Gerät niemals Regen oder hoher Feuchtigkeit aus. Gießen
Sie niemals Flüssigkeit über das Gerät, und benutzen Sie das Gerät nicht mit
feuchten Händen. Setzen Sie das Gerät keiner hohen Luftfeuchtigkeit oder
Wasser aus, um einen Stromschlag zu vermeiden.
Benutzen Sie das Gerät nicht, wenn es gerade von einem kalten in einem
warmen Raum transportiert wurde, und umgekehrt.
Sollte das Gerät eine Störung aufweisen, darf das Gerät nur in einer genehmigten
Servicewerkstatt repariert werden. Bitte öffnen Sie das Gehäuse niemals selbst.
Reinigen Sie das Gerät niemals mit Alkohol, sondern nur mit einem weichen
Tuch. Das Gerät darf nur gereinigt werden, wenn das Gerät vom Strom genom-
men wurde.
Benutzen Sie nur das, dem Gerät beigefügte, AC/DC-Ladegerät.
Versuchen Sie niemals, fremde Objekte in das Gerät einzuführen, um es zu
öffnen. Es besteht die Gefahr eines Stromschlags.
4

Bedienungswarnhinweise
Nutzen Sie ausschließlich das mitgelieferte 5Vdc 2A Ladegerät.
Bitte laden Sie das Gerät komplett auf, bevor Sie es das erste Mal benutzen.
Vermeiden Sie, dass das Gerät direktem Sonnenlicht, hoher Luftfeuchtigkeit
und hohen Temperaturen über 40 Grad ausgesetzt wird.
Schalten Sie das Gerät niemals in kurzen Intervallen aus oder ein. Wenn Sie
das Gerät abschalten, warten Sie mindestens 10 Sekunden, bevor Sie es
wieder einschalten.
Legen Sie niemals schwere Gegenstände auf das Gerät. Werfen Sie das Gerät
nicht auf den Boden.
Üben Sie keinen Druck auf den Bildschirm aus.
Die Audio- und Bildqualität kann durch ein elektromagnetisches Umfeld oder
Strahlung von Magneten massiv beeinflusst werden.
Benutzen Sie das Gerät nicht während Sie joggen, und betrachten Sie den
Bildschirm nicht, während Sie in Bewegung sind, da dies zu unerwarteten
Unfällen und Verletzungen führen kann.
DE
5

DE
WARNUNG – Weitere mögliche Folgen bei zu langer Nutzung/Spieldauer des Geräts
Das Spielen von Videospielen kann nach mehreren Stunden zu Muskelver-
spannungen und Augenreizungen führen. Hieraus kann sich Tunnelblick oder
eine Tendinitis entwickeln. Bitte beachten Sie hierzu unsere Warnhinweise, um
diese möglichen Folgen zu vermeiden.
Vermeiden Sie eine lange Spieldauer. Es wird empfohlen, dass Eltern die ange-
messene Spieldauer ihrer Kinder überwachen.
Sie sollten alle 10 bis 15 Minuten eine Spielpause machen, auch wenn Sie
glauben, diese nicht zu benötigen.
Falls Ihre Hände, Gelenke oder Augen während des Spiels ermüden, sollten Sie
unverzüglich eine Pause einlegen, bevor Sie das Spiel fortführen.
Falls die oben genannten Symptome, vor oder nach dem Spiel, gehäuft auftreten,
sollten Sie Ihren Arzt aufsuchen.
Langes Spielen von Videospielen kann zu Bewegungseinschränkungen führen.
Falls Sie während der Nutzung des Geräts ein Schwindelgefühl verspüren,
Nutzen Sie das Gerät nicht über einen längeren Zeitraum bei hoher
sollten Sie unverzüglich aufhören und eine Pause einlegen. Führen Sie das
Lautstärke, um mögliche Schäden an Ihrem Gehör zu vermeiden.
Spiel nicht fort, solange Sie sich nicht wohlfühlen.
6

PACKUNGSINHALT
In dieser Packung sind folgende Produkte enthalten:
1 x TABLET
1 x LADEGERÄT
1 x KOPFHÖRER
1 x SCHUTZHÜLLE
1 x BEDIENUNGSANLEITUNG
1 x USB-KABEL
1 x ADAPTER USB ZU MICRO-USB
DISPLAYSCHUTZFOLIE
Hinweis: Bitte entfernen Sie die Displayschutzfolie, bevor Sie das Gerät in
Betrieb nehmen. Die Folie ist teilweise schwer erkennbar, da sie maschinell
und blasenfrei aufgebracht ist!
KUNDENSUPPORT / TECHNISCHER SUPPORT
Bei Fragen zur Handhabung dieses Produkts wenden Sie sich bitte an:
Snakebyte europe GmbH
Konrad-Zuse-Strasse 13
58239 Schwerte
Deutschland
DE
Telefon: +49 (0) 800 402 26 00
Bürozeiten von 10:00 Uhr bis 16:00 Uhr
E-Mail: support@snakebyte-group.com
http://mysnakebyte.com
7

DE
4 5 6 7 8 9
3
2
1
1. Steckplatz für
MICRO SD CARD (TF)
2. Lautstärke Plus (+) / Minus (-)
3. 3,5mm Stereo Kopfhörer Anschluss
4. EIN / AUS / STANDBY / RESET
Laden des Geräts
Verbinden Sie den Stecker aus dem Ladegerät mit dem Stromanschluss (5).
Bevor Sie das Gerät in Betrieb nehmen, sollte das Gerät für mindestens 8 Stunden
aufgeladen werden.
5. Stromanschluss (5V / 2A)
6. USB OTG & HOST
7. Mikrophon
8. Kamera Rückseite
9. Kamera Front
8

BASIS BEDIENUNGSANLEITUNG
Stromverbrauch / Standby Taste
Kurzes Andrücken des Ein/Ausschalters bringt das Gerät in den Standby Modus,
durch erneutes Andrücken ist das Gerät wieder funktionsbereit.
Um das Gerät abzuschalten, halten Sie den Ein/Ausschalter 4 gedrückt.
Zurücksetzen (Reset) des Geräts
Für den Fall, dass das Gerät nicht reagiert, können Sie das Gerät neu starten,
indem Sie die den Ein/Ausschalter 4 für ≥10 Sekunden drücken. Dann drücken Sie
den Ein/Ausschalter für 4 Sekunden, damit das Gerät wieder hochfährt.
Lautstärkentasten
Erhöhen oder Verringern Sie die Lautstärke mit der + oder – Taste.
Freischaltung des Bildschirms
Ziehen Sie mit dem Finder das Symbol nach oben, um den Bildschirm freizuschalten.
Hinweis: Das System schaltet sich automatisch ab, wenn es sich im
Ruhezustand befindet, oder im Moment nicht genutzt wird.
DE
9

DE
NAVIGATION AUF DEM HOME BILDSCHIRM
Drücken Sie die Zurück-Taste , um zum vorherigen Menü zu gelangen.
Drücken Sie die Home-Taste , um wieder zur Startseite zu gelangen.
Drücken Sie auf die Laufende Anwendungen Taste , um die Miniaturansichten von den Anwendungen (Apps) zu sehen, die gerade geöffnet sind.
Um eine App zu öffnen, drücken Sie auf die gewünschte App.
Um eine App zu schließen, schieben Sie diese nach rechts oder links.
Drücken Sie die Kamera-Taste , um einen Schnappschuss von Ihrem
Bildschirm zu machen.
10

EINSTELLUNGEN
Berühren Sie das Zahnradsymbol, um die Einstellungen zu öffnen.
WLAN Einstellungen
Hinweis: Vergewissern Sie sich, dass Sie sich in der WLAN-Zone befinden und mit
dem Netzwerk verbunden sind, um Zugang zum Internet zu erhalten.
Schieben Sie den WLAN-Schalter in die ON-Position, um das Gerät für eine
drahtlose Verbindung zum Internet zu aktivieren.
Wenn die lokalen Netzwerke dieses Zeichen anzeigen, bedeutet dies, dass Sie
kein Passwort benötigen, und direkt verbunden werden.
Dieses Zeichen bedeutet, dass das Netzwerk verschlüsselt ist, und Sie zuerst
ein Passwort eingeben müssen, bevor die Verbindung hergestellt werden kann.
Sie können das von Ihnen gewünschte Netzwerk auswählen, indem Sie mit dem
Finger darauf tippen. Sollte ein Passwort erforderlich sein, geben Sie das Kennwort
ein, und Sie werden verbunden.
Tippen auf erweiterte Funktionen ermöglicht Ihnen, die IP und MAC Adressen einzusehen.
Hinweis: Beim Eingeben eines WLAN-Passworts ist es empfehlenswert, das Kennwort einzublenden, um zu sehen, welche Zeichen eingegeben werden.
DE
Verbindungen zum PC über USB
Verbinden Sie das USB-Kabel zwischen Ihrem PC und dem Gerät. Nachdem die
Verbindung hergestellt ist, drücken Sie auf dieses USB-Symbol am oberen
Rand des Bildschirms und ziehen Sie den Finger nach unten, um das USB-Menü zu
öffnen. Folgen Sie den Bildschirmanweisungen, um Daten zwischen PC und Tablet
auszutauschen.
11

DE
PROFILE / KINDERSICHERUNG
Grundsätzliche Einstellungen
Sprachauswahl
Die voreingestellte Sprache des “KidsTab f2” ist Deutsch.
Sie können die Sprachauswahl jederzeit in den Android-Einstellungen auf Englisch
ändern.
WLAN-Verbindung:
Wählen Sie einen WLAN-Hotspot und stellen Sie eine WLAN-Verbindung her.
Genauere Informationen zum Einrichten einer WLAN-Verbindung finden Sie unter
dem Punkt WLAN-Einstellungen in diesem Handbuch.
Datums- und Zeiteinstellungen:
Sollten Sie nicht über das Internet verbunden sein, stellen Sie bitte das korrekte
Datum und die Uhrzeit ein.
WIE LEGE ICH EIN PROFIL FÜR MEIN KIND AN?
Snakebytes “KidsTab f2” bietet die Möglichkeit, mehrere Kinderprofile anzulegen
und zu bestimmen, wie lange Ihr Kind das Tablet benutzen darf, und welche Apps
in dem Profil zur Verfügung stehen. Diese Einstellungen können Sie in vier einfachen Schritten vornehmen.
Schritt für Schritt
1. Schritt: Master-Passwort einrichten
2. Schritt: Kinder-Profil benennen und Passwort zuweisen
3. Schritt: Nutzungsdauer festlegen
4. Schritt: Apps festlegen, die Ihr Kind nutzen darf
12

1. SCHRITT: Master-Passwort einrichten
Sobald Sie das “KidsTab f2” einschalten, gelangen Sie automatisch zu der Startseite, auf der Sie Ihr Master-Passwort anlegen können.
Mit diesem Passwort verfügen Sie über Administrationsrechte und können:
Kinder-Profile anlegen, editieren und löschen
Ordner anlegen, editieren und löschen
Die Nutzungsdauer des Tablets festlegen
Entscheiden, welche Apps Ihrem Kind zur Verfügung stehen sollen
Wählen Sie eine der Fragen aus der Liste und beantworten Sie diese so, dass Sie
sich leicht daran erinnern können. Bestätigen Sie Ihre Eingabe mit OK.
DE
Screenshot „Master-Passwort einrichten“
Hinweis: Falls Sie Ihr Passwort vergessen haben, wenden Sie sich bitte an
unseren Kundensupport.
13

DE
2. SCHRITT: Kinder-Profil benennen und Passwort zuweisen
Nachdem Sie Ihr Master-Passwort eingerichtet haben, gelangen Sie automatisch
zu dem Profil-Screen.
1. Tragen Sie zuerst den Namen für das Profil ein.
2. Wählen Sie ein leicht zu merkendes Passwort. Mit diesem Passwort aktiviert
Ihr Kind das Profil.
3. Weisen Sie dem Profil eines der Bilder zu.
Screenshot „Name und Passwort festlegen“
14

3. SCHRITT: Nutzungsdauer festlegen
Wollen Sie die tägliche Nutzungsdauer beschränken, gehen Sie wie folgt vor:
1. Drücken Sie zuerst auf den Zeitbegrenzungs-
Button um ihn auf „EIN“ zu stellen
2. Drücken Sie auf “Zeit einstellen” um zum
Zeitmanagement-Menü zu gelangen.
3. Wählen Sie die Zeitspanne aus, in der das Tablet täglich verfügbar
sein soll, und bestätigen Sie mit „WEITER“.
DE
Screenshot „Nutzungsdauer festlegen“
15

DE
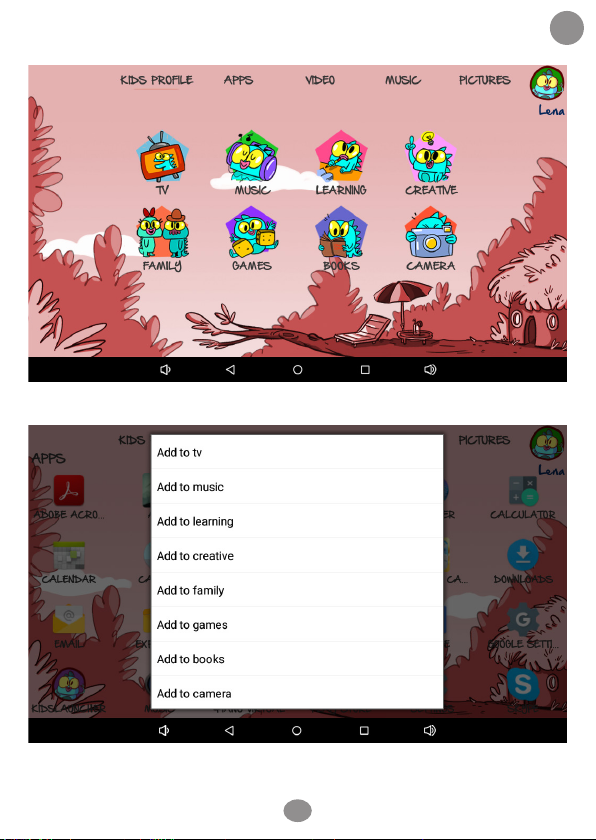
4. SCHRITT: Apps festlegen, die Ihr Kind nutzen darf
Ihr Kind kann in seinem Profil nur Applikationen sehen und verwenden, die Sie
zuvor hinterlegt haben. Um Applikationen zu hinterlegen, gehen Sie wie folgt vor.
1. Drücken Sie zuerst auf das Icon “Apps für diesen Account ändern“
2. Wischen Sie nach links, um zu dem Reiter „Apps“ zu gelangen. Neu heruntergeladene Applikationen werden hier gespeichert.
3. Drücken Sie im Reiter “Apps” auf die Applikation, die Sie dem Kinder-Profil
zuweisen möchten, und halten Sie diese so lange gedrückt, bis ein Menü
erscheint.
4. Wählen Sie im Menü eine Kategorie aus, in die Sie die Applikation einsortieren
wollen. Die Applikation wird automatisch zugewiesen.
5. Fahren Sie fort, bis Sie alle gewünschten Applikationen zugewiesen haben.
6. Um den Vorgang abzuschließen und das Kinder-Profil zu aktivieren, drücken
Sie in der rechten oberen Ecke auf das Profil-Bild und bestätigen Sie mit
“Weiter”.
16

17DE18

DE
Wohin gehört welche App?
FERNSEHEN
In diese Kategorie gehören alle Apps rund um das Thema Fernsehen
und Videos.
MUSIK
In diese Kategorie passen alle Apps zum Thema Musik.
LERNEN
In diese Kategorie gehören alle Apps rund um das Thema Lernen und
Lernspiele.
KREATIV
Für kreative Apps wie Malen oder Zeichnen ist dies die richtige Kategorie.
SPIEL
Spiel und Spaß!
LESEN
Die richtige Kategorie für E-Books und Hörbücher.
KAMERA
Die Kategorie für Kamera und Galerie.
FAMILIE / ELTERN
Die Kategorie für Familienspiele.
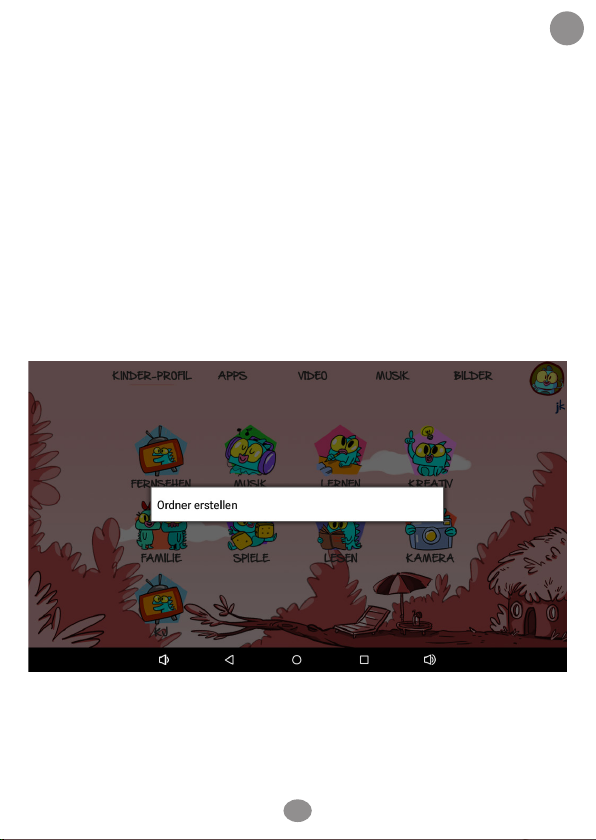
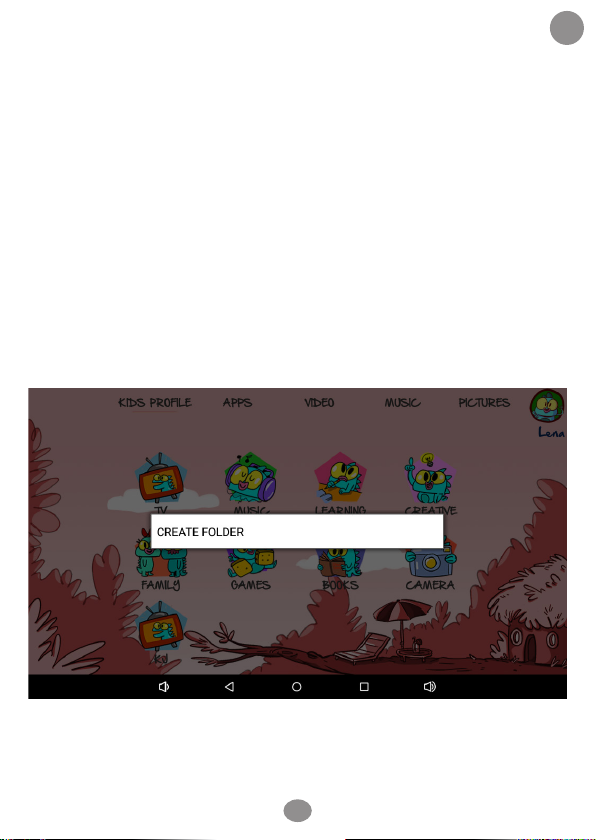
Eigene Ordner/Kategorien erstellen
Wollen Sie eigene Ordner erstellen, gehen Sie wie folgt vor:
1. Drücken Sie zuerst wieder auf das Icon “Apps für diesen Account ändern“.
2. Wischen Sie nach rechts, um auf den Hauptbildschirm zu gelangen
(Screenshot „Ordner erstellen“).
3. Rechts neben den Ordnern drücken Sie so lange bis das Auswahlfenster mit
dem Text: “Ordner erstellen” erscheint.
DE
Screenshot „Ordner erstellen“
19

DE
4. Drücken Sie auf den Text „Ordner erstellen“ und bestimmen Sie im folgenden
Menü den Namen des Ordners und wählen Sie ein passendes Symbol.
5. Nach dem Speichern ist der Ordner sofort verfügbar und wird auf der
Startseite angezeigt.
Screenshot „Ordner benennen“
20

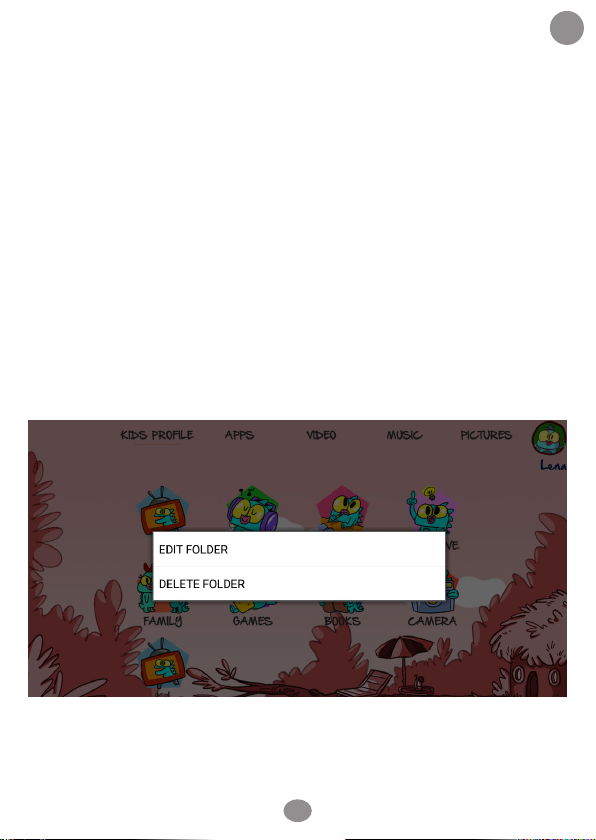
Eigene Ordner löschen oder bearbeiten
Sie können Ihre selbst erstellten Ordner jederzeit löschen oder umbenennen.
Nur die acht vorinstallierten Ordner können weder umbenannt noch gelöscht
werden.
1. Drücken Sie so lange auf den Ordner, den Sie editieren oder löschen wollen,
bis das Menü „Ordner bearbeiten / Ordner löschen“ erscheint.
2. Um Ordner zu löschen, wählen Sie “Ordner löschen” und bestätigen Sie den
Vorgang.
3. Um Ordner zu bearbeiten, wählen Sie “Ordner bearbeiten”. Sie gelangen
nun wieder in das bekannte Menü und können Ihre gewünschten
Änderungen vornehmen.
DE
Screenshot „Ordner bearbeiten/Ordner löschen“
21

DE
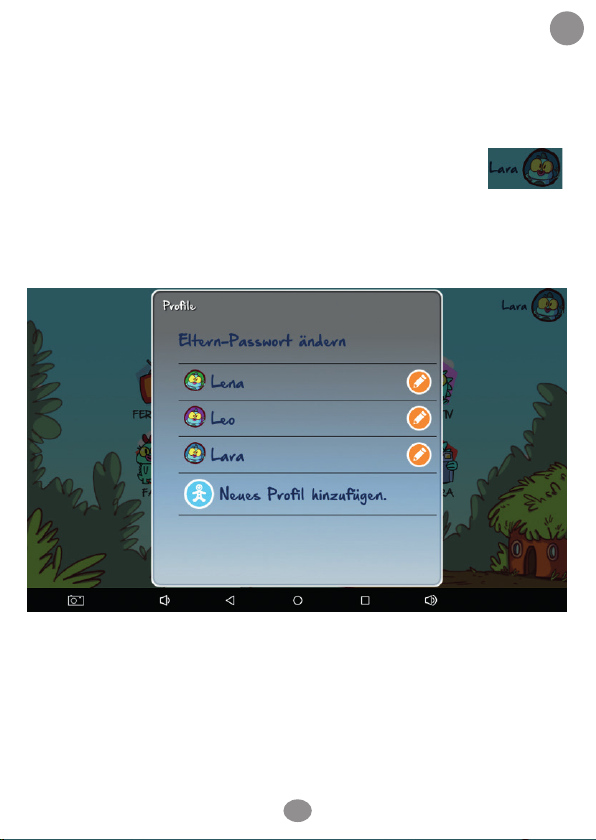
Kinder-Profile editieren
Wollen Sie ein Kinder-Profil editieren, um beispielsweise neue Apps zuzuweisen,
oder Name und Passwort des Profils zu ändern, gehen Sie bitte wie folgt vor:
1. Drücken Sie auf das Kinder-Icon in der rechten oberen Ecke des
Hauptbildschirms und geben Sie Ihr Elternpasswort ein.
2. Sie gelangen zum Profil-Menü.
Screenshot „Profil Menü“
3. Hier drücken Sie auf den „Stift“ neben dem Profil, dass Sie
editieren möchten.
4. Im darauf erscheinenden Menü können Sie auf bekannte Weise
alle gewünschten Änderungen vornehmen.
22
Zwischen Profilen wechseln
Wollen Sie oder ihre Kinder zwischen Profilen wechseln, gehen Sie bitte wie folgt
vor:
1. Zuerst auf das Kinder-Icon in der rechten oberen Ecke drücken.
2. Im Menü auf den Namen des gewünschten Profils drücken.
3. Das Passwort für das Profil eingeben, um das Profil zu aktivieren.
DE
23
Screenshot „Profile wechseln“
DE
Wie lade ich Apps?
Um neue Apps auf dem Tablet zu installieren, nutzen Sie bitte die App “Play Store”.
Hier müssen Sie sich zunächst mit Ihrem Google-Konto anmelden oder ein neues
Konto erstellen, falls Sie noch kein Google-Konto besitzen sollten.
Neue Apps befinden sich nach dem Herunterladen im Reiter “Apps”.
Speicherplatz
Sollte die Meldung „Speicherplatz ist voll“ erscheinen oder ein App-Download fehlschlagen, weil zu wenig Speicherplatz vorhanden ist, versuchen Sie zunächst das
Gerät neu zu starten, da eventuell der Zwischenspeicher des Gerätes vollständig
belegt ist. Sollte ein Neustart nicht helfen, müssen Sie Apps deinstallieren.
Hardware
Screen 7” kapazitiver Touchscreen mit einer Auflösung von 1024*600
CPU CPU Rockchip RK3126 Quad- core A9 1.3GHz
GPU ARM Mali-400 MP2
Betriebssystem Android 5.1.1.
Arbeitsspeicher 512MB RAM
Speicher 8GB Flash-Speicher
Anschlüsse
W-LAN High-Speed 802.11 / b g n
Kamera 2.0MP
Akku
Betriebstemperatur Temp.: 0°C - +60°C
Lagertemperatur Temp.: -10°C - +80°C
Micro UBS2.0 für PC-Anschluss
Micro USB2.0 OTG für Anschluss von USB-Massenspeichergeräten oder USB-
Mäusen und -Keyboards
TF-Kartenleser (SDHC unterstützt bis zu 32GB)
3.5mm Stereo-Kopfhöreranschluss
5V DC-in via Hohlstecker
2000mAh aufladbare Batterie
24

Wireless LAN-Vorschriften – Informationen
Je nach Modell darf das integrierte schnurlose (Wireless LAN) Tablet/Gerät nur in
den folgenden Ländern verwendet werden: Österreich, Belgien, Bulgarien, Tschechische Republik, Dänemark, Finnland, Frankreich, Deutschland, Griechenland, Ungarn,
Island, Irland, Italien, Luxemburg, Niederlade, Norwegen, Polen, Portugal, Rumänien,
Slowakei, Slowenien, Spanien, Schweden, Schweiz, Türkei und England.
Nutzungsbedingungen
Bei Verwendung von IEEE 802.11 b/g/n Wireless LAN Standard sind die Kanäle 1
bis 13 (2.4 GHz…2.4835GHz) für den Innen- und Außenbereich wählbar, jedoch mit
restriktiven Bedingungen in Frankreich, Italien und Norwegen wie folgt:
Frankreich: Wenn das Gerät im Innenbereich genutzt wird, können alle Kanäle
ohne restriktive Bedingungen genutzt werden. Im Außenbereich dürfen lediglich
die Kanäle 1 bis 6 genutzt werden. Das bedeutet, dass die W-LAN-Funktion im Peerto-peer nur dann im freien Außenbereich verwendet werden kann, wenn der Peer
die Kommunikation über einen autorisierten Kanal (z.B. zwischen 1 und 6) herstellt.
Beim Infrastruktur-Modus vergewissern Sie sich im Vorfeld, dass der Zugangspunkt
aus einem Kanal zwischen 1 bis 6 ist, bevor Sie die Verbindung konfigurieren.
Italien: Die Nutzung des W-LAN ist in diesem Land gesetzlich geregelt, sowie die
Entsorgung von elektronischen Bauteilen. Die private Nutzung wird durch Gesetzesdekret 1.8.2003, Nr. 259 („Code für Elektronische Kommunikation“) geregelt.
Dieses Gesetz besagt, dass die vorherige Einholung einer Genehmigung erforderlich
ist unter Artikel 104. Artikel 105 beschreibt, wann eine private Nutzung erlaubt ist
in Bezug auf den Zugang in das öffentliche W-LAN, sowie zu den Telekom Netzen.
Hierzu wurde ein Dekret vom 28.05.2003 in einer geänderten Fassung erlassen
nach Art. 25 (allgemeine Genehmigung für elektronische Kommunikationsnetze
und –Dienste).
DE
Norwegen: Die Nutzung einer Funkausrüstung ist nicht erlaubt in einem geografischen Radius von 20km vom Zentrum von Ny-Alesund, Svalbard.
25

DE
Batterien und Reisen
Wenn Sie in die USA reisen und sich innerhalb der USA befinden, möchten wir
Sie darauf aufmerksam machen, dass das US-Verkehrsministerium kürzlich neue
Regelungen veröffentlicht hat, welche Reisende in die USA bezüglich Lithium Metall
Batterien und Lithium-Ionen-Batterien zu beachten haben. Für weitere Details und
Informationen besuchen Sie die Website http://safetravel.dot.gov/whats_new_
batteries.html.
Andere Regionen in der Welt haben ähnliche oder die gleichen Regelungen. Bitte
prüfen Sie bei Ihren lokalen Behörden die neuesten Informationen über Reisen mit
Batterien.
Copyright Information
©2016. All rights reserved. This document may not in whole or in part be reproduced, stored in a retrieval system, transmitted in any form or by any means,
electronic, mechanical, photocopying, recording, or otherwise, or reduced to any
electronic medium or machine-readable form without prior consent, in writing, from
Snakebyte Europe GmbH.
Kids Tab f2 is a registered trademark of Snakebyte Europe GmbH. The logo’s, standards, software, and/or product names mentioned herein are manufacturer and
publisher trademarks and are used only for the purpose of identification.
Disclaimer
The publishers and author assume no responsibility whatsoever for the uses made
of this material or for decisions based on its use. Further, Snakebyte Europe GmbH
makes no warranties, either expressed or implied, regarding the contents of this
product, its completeness, accuracy, merchantability, or fitness for any particular
purpose. Neither the publisher nor anymore else who has been involved with the
creating, production, or delivery of the material shall be liable for any reason and
improvements and/or changes in the products and/or options described in this
document may be made at any time and without notice.
26

AndroidTM is a Trademark of Google Inc.
All other brand and product names used throughout this document are trademarks
or registered trademarks of their respective companies. The brand and product
names are used in editorial fashion only and for the benefit of such companies.
No such use, or the use of any trade name, is intended to convey endorsement or
other affiliation with the document.
The software bundled with this product includes software files subject to certain
open source license requirements. Such open software files are subject solely to
the terms of the relevant open source software license. The open source software
on this device is provided to you on an “AS IS” basis to the maximum extent permitted by applicable law. The preferred license for he Android Open Source Project
is the Apache Software License, 2.0 (“Apache 2.0” or which you may obtain a copy
via this link: http://www.apache.org/licenses/LICENSE-2.0. The Linux kernel patches
are unter the GPLv2 license of which you may obtain a copy via http://www.kernel.
org/pub/linux/kernel/COPING. You may also obtain a copy of GNU General Public
License, Version 3 at http://www.gnu.org/licenses/gpl.html
For the relevant copyright and licensing terms of the open source files contained
on the device, please access the “Open source license” section located at: Settings
=> About Tablet => Legal information and then “Open Source Licenses”.
Until three (3) years after our last shipment of this product, you may obtain a copy
of the source code corresponding to the binaries for any GPL-Licensed file by contacting us and you will be send a link to the desired source code or we can provide
the source code on a physical medium (like DVD) at a minimal service charge. We
offer this source code and service to everyone receiving this information.
DE
Product specifications are subject to change without prior notice
27
DE
WEEE (Elektro- und Elektronik-Altgeräte-Richtlinie)
Sollten Sie irgendwann zu einem späteren Zeitpunkt dieses Produkt entsorgen wollen, beachten
Sie bitte folgende Hinweise: Elektroschrott sollte nicht mit dem Hausmüll entsorgt werden.
Bitte recyceln Sie das Gerät, sofern Ihnen die entsprechenden Möglichkeiten zur Verfügung
stehen. Setzen Sie sich mit Ihren kommunalen Behörden oder Ihrem Einzelhändler in Verbindung, und fragen Sie diese um Rat bezüglich der Wiederverwertung.
RoHS
Dieses Produkt wurde als RoHs-Konform gemäß Richtlinie 2011/65/EU zertifiziert.
Entsorgung der Batterie /Akkus
Beachten Sie die regionalen Richtlinien zur Entsorgung von Akkus oder setzen Sie bei den
örtlichen Behörden oder den kommunalen Entsorgungsbetrieben oder dem Geschäft, in dem Sie
das Produkt gekauft haben. Die Batterie / Akkus dürfen nicht in den normalen Hausmüll gelangen. Verwenden Sie ein Akku Endlager in Ihrer Nachbarschaft oder Gemeinde, falls verfügbar.
EU DECLARATION OF CONFORMITY
Hiermit wird versichert, dass die Snakebyte Europe GmbH, mit Sitz 58239 Schwerte, Konrad-Zuse-Str. 13, dieses Gerät (Kids Tablet PC) unter dem Markennamen Kids Tab f2 führt, und die
gesetzlichen Richtlinien und Anforderungen unter 1999/5/EC erfüllt. Diese Anzeige wird geführt
unter:
www.snakebyte-group.com
LI-ION
28
29DE30

EN
DE
MANUAL

INDEX
CONTENTS Unpacking and inspection S. 35
Display protection sheet S. 35
Customer support S. 35
TABLET Screen S. 36
Ports S. 36
BASIC MANUAL Power S. 37
Volume function S. 37
Unlock screen S. 38
Home screen S. 38
WLAN settings S. 39
Connect PC via USB S. 39
PROFILES / PARENTAL CONTROL Basic settings S. 40
How to create a kids profile? S. 40
Apps and categories S. 44
Create own folder S. 47
Edit own folder S. 49
KIDS PROFILES Edit kids profiles S. 50
Switch between profiles S. 51
APPS Downloading apps S. 52
Disk space S. 52
EN
DE
WLAN INSTRUCTIONS S. 53
BATTERY S. 54
LEGAL NOTES S. 54 - S. 56
31

DE
EN
Dear Customer,
Thank you for buying our product! We wish you many fun hours of playing. The
strictest security measures have been taken during the design and production of
the device. However, improper operation of the device can lead to electric shock
and other hazards. To avoid these hazards, we would like to ask you to carefully
read the User Guide and observe the following measures in detail:
IMPORTANT PRECAUTIONS
Safety precautions
To avoid an electric shock, never attempt to open the housing.
Never disassemble the device and do not attempt to repair or to modify it
yourself.
Never expose the device to rain or high humidity. Never pour liquid over the
device and never use the device with wet hands. To avoid an electric shock, do
not expose the device to high humidity or water.
Do not use the device if it was transported from a cold room into a warm
room, and vice versa.
If the device has a malfunction, it should only be repaired at an authorized
service center. Please never attempt to open the housing yourself.
Never clean the unit with alcohol and use a soft cloth only. Clean the device
only after it has been disconnected from the power supply.
Only use the AC/DC charger that came with the device.
Never attempt to insert foreign objects into the device to open it. This may
result in electric shock.
32

Warnings
Use only the supplied 5 VDC 2A charger.
Please charge the device fully before using it for the first time.
Avoid exposing the device to direct sunlight, high humidity and high tempera-
tures above 40 degrees.
Never turn the device off or on at short intervals. If you turn the device off,
wait at least 10 seconds before you turn it back on.
Never place heavy objects on the device. Do not throw the device on the floor.
Do not apply pressure to the screen.
The audio and picture quality can be heavily influenced by an electromagnetic
environment or magnetic radiation.
Do not use the device while jogging, and do not look at the screen while you
are in motion as this can lead to unexpected accidents and injuries.
DE
EN
33

EN
DE
WARNING – Other possible consequences for using/playing on the device for too
long
Playing video games can cause muscle spasms and eye irritation after several
hours. This can lead to the development of tunnel vision or tendinitis. Please
head our warnings to avoid these consequences.
Avoid playing video games for longer periods of time. Parents are recommen-
ded to monitor the adequate playing time of their children.
You should take a break every 10 to 15 minutes even if you think that you
don‘t need it.
If your hands, joints or eyes get tired during the game, you should take a
break immediately before you continue playing.
Please consult your doctor if the above symptoms frequently occur before or
after playing video games.
Playing video games for a long time can lead to impaired movement.
Falls Sie während der Nutzung des Geräts ein Schwindelgefühl verspüren,
Do not use the device for a prolonged period of time at high volume to avoid
sollten Sie unverzüglich aufhören und eine Pause einlegen. Führen Sie das
Spiel nicht fort, solange Sie sich nicht wohlfühlen.
possible damage to your hearing.
34

Content
1 x TABLET
1 x CHARGER
1 x HEADPHONE
1 x CASE
1 x MANUAL
1 x USB-CABLE
1 x CABLE USB TO MICRO-USB
SCREEN PROTECTOR
Important: Please remove the screen protector before using the device. The
film is sometimes difficult to see because it was applied by a machine to
avoid bubbles.
CUSTOMER SUPPORT / TECHNICAL SUPPORT
If you have any questions please get in touch with us:
Snakebyte europe GmbH
Konrad-Zuse-Strasse 13
58239 Schwerte
Germany
EN
DE
Phone: +49 (0)211-781 789 89 555
E-Mail: support@snakebyte-group.com
http://mysnakebyte.com
35

EN
DE
4 5 6 7 8 9
3
2
1
1. Slot for MICRO SD CARD (TF)
2. Volume plus (+) / minus (-)
3. 3,5mm Stereo headphone port
4. ON / OFF / STANDBY / RESET
5. POWER CONNECTION (5V / 2A)
Charging the device
Connect the plug from the charger to the power connector (5).
Before using the device, it should be charged for at least 8 hours.
6. USB OTG & HOST
7. Microphone
8. Camera back
9. Camera front
36

BASIC OPERATING INSTRUCTIONS
Power / standby button
Short press on the On/Off switch brings the device into standby mode. If you press
the switch again, the device will be ready for operation.
To turn off the device, press and hold the On/Off switch 4.
Resetting the device
If the device does not respond, you can restart it by pressing the On/Off switch 4
for ≥10 seconds. Then press and hold the On/Off switch for 4 seconds to reboot the
device.
Volume buttons
Use the + or – button to turn the volume up or down.
Unlocking the screen
Drag the icon upwards to unlock the screen
Important! The system automatically turns off when it is in the idle state or
is not used at the moment.
EN
DE
37

EN
DE
NAVIGATION ON THE HOME SCREEN
Press the Back button to go to the previous menu.
Press the Home button to go back to the home page.
Press the Applications button to view the thumbnails of applications that are
open at the moment.
Click on the desired app to open it.
To close an app, slide it to the right or left.
Press the Camera button to take a snap shot of your screen.
38

SETTINGS
Touch the gear icon to open the Settings.
WLAN (Wi-Fi) Settings
Note: Make sure that you are in the Wi-Fi zone and are connected to the network
to access the Internet.
Slide the Wi-Fi switch to the ON-Position to enable wireless connection to the
internet.
If the local networks show this sign it means that you don‘t need a password
and can directly connect to the Internet.
This sign means that the network is encrypted, and you must enter a password before you can connect to the Internet.
You can select the desired network by tapping it with your finger. Enter the password if required, and you will be connected.
Tapping on Advanced features allows you to view the IP and MAC addresses.
Note: When you enter a Wi-Fi password, we recommend displaying the password
to see which characters you are entering.
Connection to the PC via USB
Connect the USB cable to your PC and the device. After the connection is established, press the USB icon on the top of the screen and drag your finger down to
open the USB menu. Follow the on-screen instructions to exchange data between
your PC and the tablet.
EN
DE
39

EN
DE
PROFILES / PARENTAL CONTROL
Basic settings
Language selection
The default language of “KidsTab f2” is German.
You can change the language to English in the Android settings at any time.
Wi-Fi connection:
Select a Wi-Fi hotspot and connect to it.
More information about setting up a Wi-Fi connection can be found in Wi-Fi settings in this guide.
Date and time settings:
If you are not connected over the Internet, please set the correct date and time.
HOW DO I CREATE A PROFILE FOR MY CHILD?
Snakebytes “KidsTab f2” allows you to create multiple child profiles and to determine how long your child can use the tablet and which apps are available in the
profile. All settings can be completed in four easy steps.
Step by step
1. Set your master password
2. Name the child profile and create a password
3. Set the period of use
4. Add apps that your child can use
40

STEP 1: Set your master password
When you turn on KidsTab, it automatically takes you to the home page where you
can create your master password.
With this password you have administrator‘s rights and can:
Create, edit and delete child profiles
Create, edit and delete folders
Set the period of use for the tablet
Decide which apps should be available to your child
Select a question from the list and provide an answer that you can easily remember. Press OK to confirm your entry.
EN
DE
Screenshot „Startscreen“
Important:
If you forgot your password, please contact our customer support!
41

EN
DE
STEP 2: Name the child profile and create a password
After you have created your master password, you will automatically be redirected
to the profile screen. You can complete all the settings here.
1. First, select the name and password for the profile.
2. Name the profile, for example using your child‘s name, and select an
easy-to-remember password. Your child will need this password to log into
his/her personal profile.
3. Select one of the predefined images for the profile.
42
Screenshot „name and password“

STEP 3: Set the period of use
If you want to restrict the daily use, please do the following:
1. First click on the time limit button to turn it ON.
2. Click on “Set time” to go to the time
management menu.
3. Select the length of time, during which your child can use KidsTablet daily,
and press “OK” to confirm.
EN
DE
43
Screenshot „set the period of use“

EN
DE
STEP 4: Add apps that your child can use
Your child can only see and use applications in his or her profile that you have
previously saved. You can save applications by moving them into folder. To do this,
simply:
1. First press the icon „Set up profile apps“
2. Swipe to the left to go to the “Apps” tab. Newly downloaded applications are
stored and can be added from here.
3. In the “Apps” tab, click on the application that you want to add to the child
profile and hold it until a menu is displayed.
4. Select a category in the menu where you want to move the application to.
The application will be added automatically.
5. Continue until you have added all the desired applications.
6. To complete the process and activate the child profile, press on the profile
picture in the upper right corner and click “OK” to confirm.
44
EN
DE
Screenshot „Apps für Kinderprofil hinzufügen“
Screenshot „APPS“
45
Screenshot „Kategorien“
Screenshot „move applications“
EN
DE
Which app should go where
TV
This category includes all apps related to television and videos.
MUSIC
All music related apps fall into this category.
LEARNING
This category includes all apps related to learning and educational
games.
CREATIVE
This is the correct category for creative apps such as apps related to
painting or drawing.
GAME
Fun and games!
READING
This is the correct category for E-books and audiobooks.
CAMERA
The category for camera and gallery.
FAMILY / PARENTS
This is the category for family games.
46
Creating your own folders/categories
If you want to create your own folder, please do the following:
1. Again, press the icon “Set up profile apps”.
2. Swipe to the right to access the main screen with the folders.
3. Press until you see the selection window with the following text: “Create
folder”.
EN
DE
Screenshot „create folder“
47

EN
DE
4. Press on “Create folder”, set the name of the folder in the following menu and
choose an appropriate icon.
5. The folder will be available right after you save it, and you will be able to add
applications.
Screenshot „name folder“
48
Deleting and editing your folders
You can delete or rename the folder you created at any time.
However, the eight pre-installed folders cannot be renamed or deleted.
1. Press on the folder you want to edit or delete until you see the menu “Edit
folder / delete folder”.
2. To delete a folder, select “Delete folder” and confirm the action.
3. To edit a folder, select “Edit folder”. You will be redirected to the
familiar menu where you can make the desired changes.
EN
DE
49
Screenshot „edit / delete folder“

EN
DE
Editing child profiles
If you want to edit a child profile (for example, you want to add new apps or
change name and password of the child profile), please do the following:
1. Click on the children icon in the upper-right corner of the main
screen and enter your parent password.
2. You will be redirected to the profile menu.
3.
4. Click on the “pencil” next to the profile you want to change.
4. This will open the menu where you can make all the desired
changes.
50
Screenshot „Profil menu“

Switching between profiles
If you or your children want to switch between profiles, please do the following:
1. First click on the children icon in the upper right corner.
2. Click on the name of the desired profile in the menu.
3. Enter the password for the profile to activate it.
EN
DE
Screenshot „switching profiles“
51

EN
DE
Downloading apps
Please use the “Play Store” app to install more apps on the tablet.
Here, you will have to first sign in with your Google account or create a new
account if you do not have one.
After you download an app, it will be located in the “Apps” tab.
Disc space
If you see the “Memory is full” message or can‘t download an app because there
is not enough storage space, try first to reboot the device as the cache memory of
the device may be full. If restarting does not help, uninstall apps.
Hardware
Screen 7” capacitive touchscreen 1024*600
CPU CPU Rockchip RK3126 Quad- core A9 1.3GHz
GPU ARM Mali-400 MP2
Operating system Android 5.1.1.
Main memory 512MB RAM
Memory 8GB flash memory
Ports
W-LAN / Wi-Fi High-Speed 802.11 / b g n
Camera Rear cam 2.0MP
Battery 2000mAh rechargeable battery
Operating temperature Temp.: 0°C - +60°C
Storage temperature Temp.: -10°C - +80°C
Micro UBS2.0 for PC port
Micro USB2.0 OTG
for USB-Mouse or USB-Keyboards
TF-card reader (SDHC provied up to 32GB)
3.5mm stereo headphone port
5V DC
52

Wireless LAN regulations – Information
Depending on the model, the integrated wireless (wireless LAN) tablet/device may
only be used in the following countries: Austria, Belgium, Bulgaria, Czech Republic,
Denmark, Finland, France, Germany, Greece, Hungary, Iceland, Ireland, Italy, Luxembourg, Netherlands, Norway, Poland, Portugal, Romania, Slovakia, Slovenia, Spain,
Sweden, Switzerland, Turkey and England.
Terms of use
When using IEEE 802.11 b/g/n wireless LAN standard, you will be able to select
channels 1 to 13 (2.4 GHz... 2.4835GHz) for indoor and outdoor use. However, certain
restrictive conditions will apply in France, Italy and Norway as follows:
France: If the device is used indoors, all channels will be available without any
restrictive conditions. However, only channels 1 to 6 may be used outdoors. This
means that the WLAN function in peer-to-peer mode can only be used outdoors if
the peer establishes communication through an authorized channel (from 1 to 6). In
the infrastructure mode, please make sure in advance that the access point is from
a channel 1 to 6 before you configure the connection.
Italy: The use of WLAN is regulated by law in this country, as well as the disposal
of electronic components. Private use is governed by Legislative Decree dated
8/1/2003, No. 259 (“Code for electronic communications”). This decree states that
the prior obtainment of a permit is required under Article 104. Article 105 describes
when a private use is permitted with regard to the access to public WLAN and
the telecom networks. For this, a decree was issued on 5/28/2003 in an amended
version pursuant to Article 25 (general authorization of electronic communications
networks and services).
EN
DE
Norway: The use of radio equipment is not allowed in a geographical radius of 20
km from the center of Ny-Alesund, Svalbard.
53

EN
DE
Batteries and traveling
If you travel to the United States and are located within the United States, we
want you to know that the US Department of Transportation has recently published new regulations concerning lithium metal batteries and lithium-ion batteries,
which people traveling to the United States have to observe. For further details
and information, visit the website http://safetravel.dot.gov/whats_new_batteries.
html.
Other regions of the world have similar or the same regulations. Please contact
your local authorities to obtain the latest information about traveling with batteries.
Copyright Information
©2016. All rights reserved. This document may not in whole or in part be reproduced, stored in a retrieval system, transmitted in any form or by any means,
electronic, mechanical, photocopying, recording, or otherwise, or reduced to any
electronic medium or machine-readable form without prior consent, in writing, from
Snakebyte Europe GmbH.
Kids Tab f2 is a registered trademark of Snakebyte Europe GmbH. The logo’s, standards, software, and/or product names mentioned herein are manufacturer and
publisher trademarks and are used only for the purpose of identification.
Disclaimer
The publishers and author assume no responsibility whatsoever for the uses made
of this material or for decisions based on its use. Further, Snakebyte Europe GmbH
makes no warranties, either expressed or implied, regarding the contents of this
product, its completeness, accuracy, merchantability, or fitness for any particular
purpose. Neither the publisher nor anymore else who has been involved with the
creating, production, or delivery of the material shall be liable for any reason and
improvements and/or changes in the products and/or options described in this
document may be made at any time and without notice.
54

AndroidTM is a Trademark of Google Inc.
All other brand and product names used throughout this document are trademarks
or registered trademarks of their respective companies. The brand and product
names are used in editorial fashion only and for the benefit of such companies.
No such use, or the use of any trade name, is intended to convey endorsement or
other affiliation with the document.
The software bundled with this product includes software files subject to certain
open source license requirements. Such open software files are subject solely to
the terms of the relevant open source software license. The open source software
on this device is provided to you on an “AS IS” basis to the maximum extent permitted by applicable law. The preferred license for he Android Open Source Project
is the Apache Software License, 2.0 (“Apache 2.0” or which you may obtain a copy
via this link: http://www.apache.org/licenses/LICENSE-2.0. The Linux kernel patches
are unter the GPLv2 license of which you may obtain a copy via http://www.kernel.
org/pub/linux/kernel/COPING. You may also obtain a copy of GNU General Public
License, Version 3 at http://www.gnu.org/licenses/gpl.html
For the relevant copyright and licensing terms of the open source files contained
on the device, please access the “Open source license” section located at: Settings
=> About Tablet => Legal information and then “Open Source Licenses”.
Until three (3) years after our last shipment of this product, you may obtain a copy
of the source code corresponding to the binaries for any GPL-Licensed file by contacting us and you will be send a link to the desired source code or we can provide
the source code on a physical medium (like DVD) at a minimal service charge. We
offer this source code and service to everyone receiving this information.
EN
DE
Product specifications are subject to change without prior notice
55

EN
DE
WEEE (Waste Electrical and Electronic Equipment Directive)
If you eventually want to dispose of this product at a later time, please observe the following instructions: Electronic equipment should not be disposed of together with household waste. Please recycle
the device if the appropriate recycling ways are available to you. Please contact your local authority
or retailer and ask them for advice on recycling.
RoHS
This product has been certified as RoHS compliant in accordance with Directive 2011/65/CE.
Disposal of batteries/rechargeable batteries
Please follow regional guidelines for the disposal of rechargeable batteries or contact local authorities, your household waste disposal service or the shop where you purchased the product.
Batteries/rechargeable batteries must not be disposed of into the normal household garbage.
Please use a rechargeable battery disposal in your neighborhood or community, if available.
LI-ION
EU DECLARATION OF CONFORMITY
Hereby we guarantee that Snakebyte Europe GmbH, located at 13 Konrad-Zuse-Str., Schwerte
58239, Germany, is marketing this device (Kids Tablet PC) under the brand name Kids Tab f2
and complies with the legal requirements and the requirements of Directive 1999/5/EC. This
notification is listed under:
www.snakebyte-group.com
56

EN
DE
57
 Loading...