

Page 1
T55003
TPMS Tool Manual
To ensure correct operation and service, read the following
instructions before operating the T55003 Tool.
1. T55003 INTRODUCTION
The T55003 interacts with the tire pressure sensor through
wireless (radio frequency) communication to:
• Retrieve data from the tire pressure sensor
• Verify the identities of each tire
pressure sensor mounted on vehicle
• Assist a technician to reset TPMS
on the vehicle
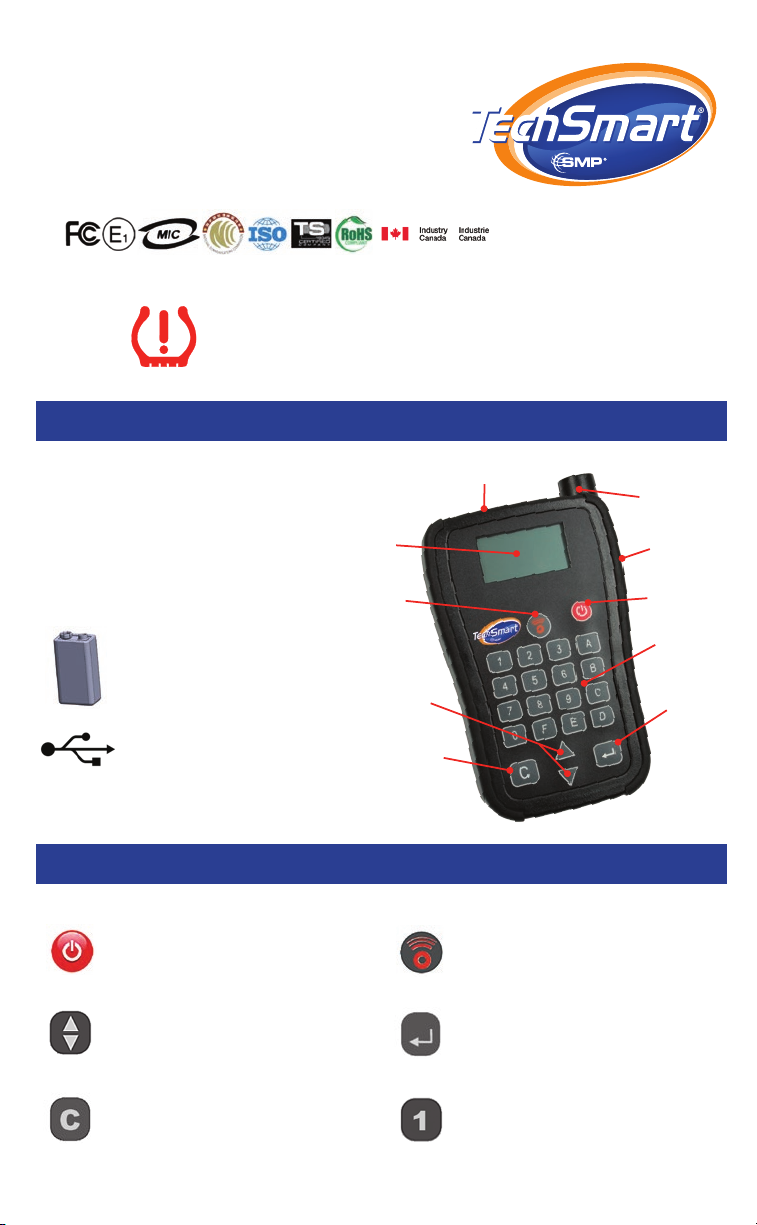
9 volt battery Included,
rechargeable – install in
back of tool prior to operation
USB Connection – to connect
with computer to download
software updates
LCD
Display
Transmit
Key
2. KEYPAD SUMMARY AND FUNCTIONS
Power Key – power on the tool;
check battery status
Arrow Keys – navigation through menu
and adjust options up and down
Arrow
Keys
Cancel
Cradle
key
Transmit Key – to start a test cycle
Selection Key – press to enter chosen
function or validate an option
Antenna
USB
Port
Power
Key
Keypad
Selection
Key
Cancel Key – press to return to the
previous menu without option validation
or press and hold to turn off tool
Keypad – key in sensor identication number
1
Page 2
Power Key
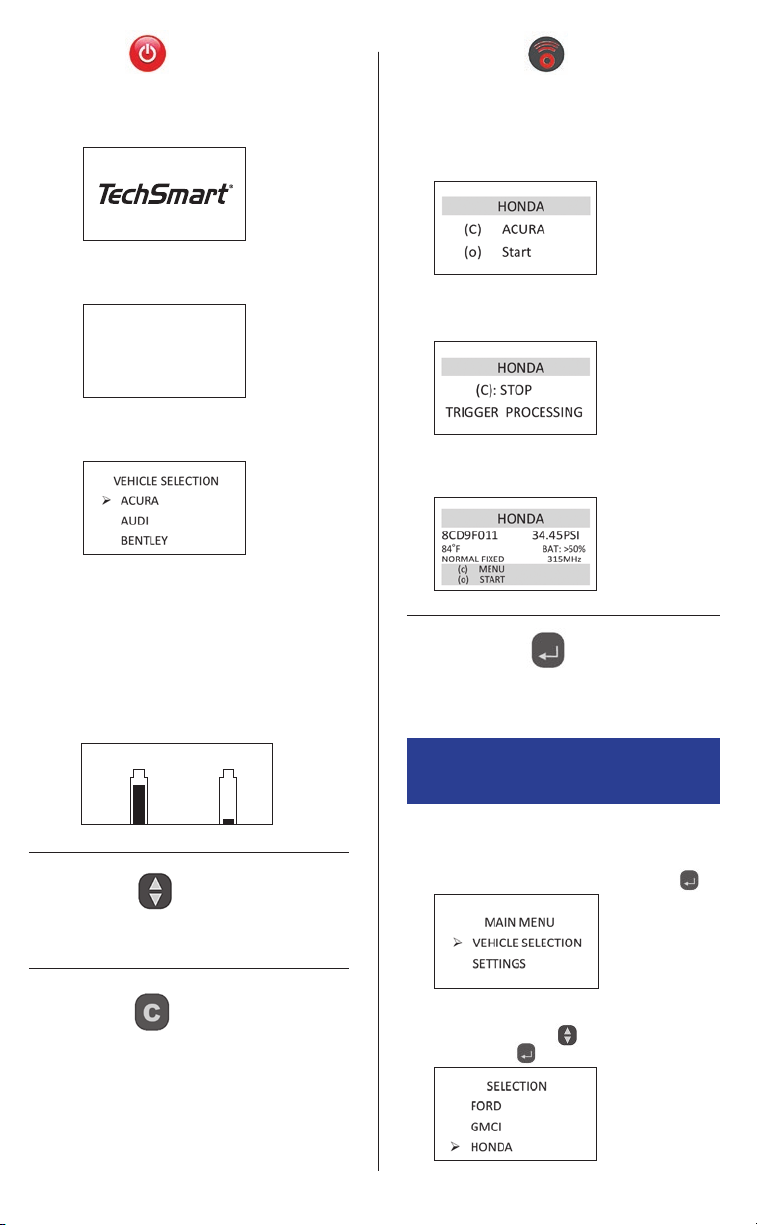
(A) Press the Power Key to power on the tool
(1) At power on, the tool displays the
TechSmart
(2) Then it displays the software
version number.
(3) Finally, the tool displays the vehicle
selection menu.
(B) Press and hold Power Key after powering on
to display battery status
(1) When the tool is powered on, press the
Power Key to display the battery level.
(2) If the battery power is low, “LOW BATT” will
ash and the tool will turn off. Recharge
the 9V battery with the included charger to
restore power to the tool.
®
logo.
TechSmart
Version 001-01
BATTERY LEVEL LO W BAT T
Transmit Key
Starts the acquisition cycle for a sensor
(1) After selecting a vehicle from the “VEHICLE
SELECTION” on the main menu, the screen will
indicate “(o) READ SENSOR”. Press the Transmit
Key to gather sensor information.
(2) After pressing the Transmit Key, the message
“TRIGGER PROCESSING” is displayed.
(3) After a few seconds, the tool will vibrate, make
a noise and display the tire sensor data.
Selection Key
Press the Selection Key to open a menu, enter an
option or conrm an option
3. QWIK-SENSOR™ ACTIVATION
FOR OE SENSOR REPLACEMENT
Arrow Keys
Scroll up/down or increase/decrease
numerical values
Cancel Key
(A) Press the Cancel Key to return to previous
page without modifying an option
(B) Press and hold the Cancel Key for 3 seconds
to power off the tool
2
Activate Sensor
(1) From the main menu, select the “VEHICLE
SELECTION” option with the Selection Key
(2) Proceed to select the desired vehicle manufacturer
using the Arrow Keys
Selection Key
, and enter using the
.
.
Page 3
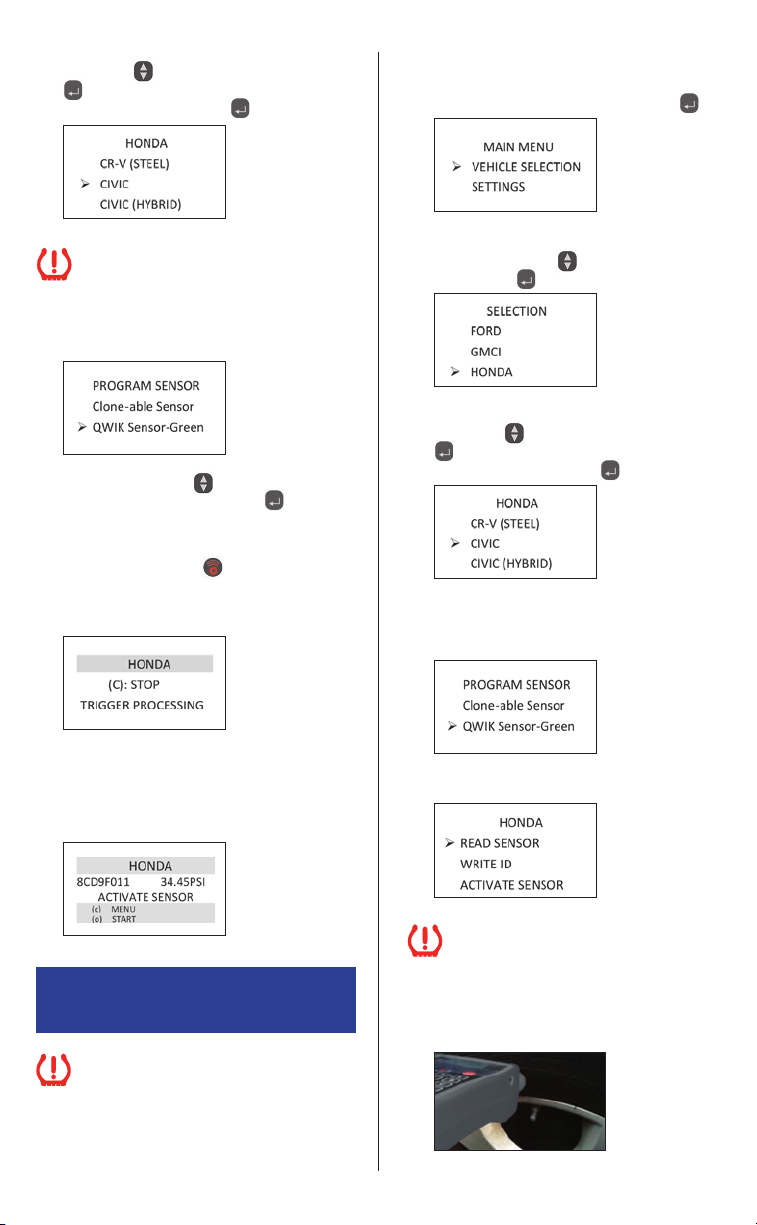
(3) Proceed to desired manufacturer model using the
Arrow Keys
and enter with the Selection Key
. After choosing model, indicate production
year using the Selection Key
.
Scan OE Sensor ID Number
(1) From the main menu, select the “VEHICLE
SELECTION” option with the Selection Key
.
Ensure the car being worked on is at least
10 feet from all cars and TPMS sensors
(OE, Clone-able, or QWIK-SENSOR
™
).
(4) Select QWIK-SENSOR™. Correct sensor color will
be displayed based on inputted information.
(5) Using the Arrow Keys
SENSOR” using the Selection Key
QWIK-SENSOR
™
select “ACTIVATE
. Place the
in the cradle or if the sensor is
in the wheel, ensure the PSI is ‘0’.
(6) Press the Transmit Key . The tool will begin
to locate and receive data from the selected
tire sensor, indicated by the message
“TRIGGER PROCESSING”.
(7) After a few seconds, the tool will vibrate,
make a noise and display the tire sensor
data. The QWIK-SENSOR
™
is now activated
and can be relearned to the vehicle following
OE relearn procedure.
(2) Proceed to select the desired vehicle manufacturer
using the Arrow Keys
Selection Key
, and validate with the
.
(3) Proceed to desired manufacturer model using the
Arrow Keys
and enter with the Selection Key
. After choosing model, indicate production
year using the Selection Key
(4) Select Clone-able sensor or QWIK-SENSOR™.
For QWIK-SENSOR
™
correct sensor color will be
.
displayed based on inputted information.
(5) Select “READ SENSOR”.
4. OE SENSOR REPLACEMENT
USING TECHSMART® “COPY ID”
Before removing tires, complete all steps
through step (15). Use TPMS Application
and Cross Reference Guide to determine
appropriate OE-Matching Clone-able sensor or
QWIK-SENSOR
™
needed to replace OE sensors.
Ensure the car being worked on is at least
10 feet from other vehicles and TPMS sensors
(OE, Clone-able, or QWIK-SENSOR™).
(6) Place tool by tire (start at left front). Position the
tool near the valve stem between the rim and
rubber, as shown.
3
Page 4
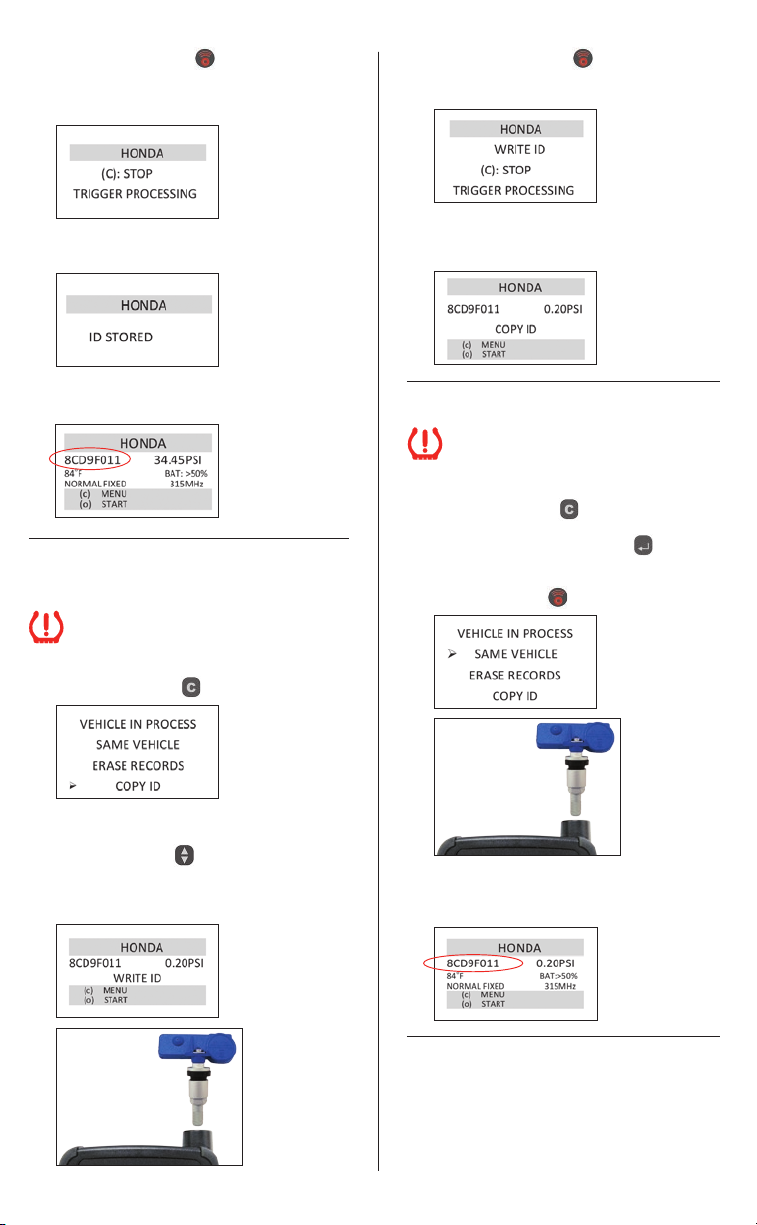
(7) Press the Transmit Key . The tool will begin
to locate and receive data from the selected
tire sensor, indicated by the message
“TRIGGER PROCESSING”.
(8) The screen will indicate that the OE sensor ID
number has been stored into the tool’s memory.
(12) Press the Transmit Key to begin writing
the OE sensor ID number onto the Clone-able
sensor or QWIK-SENSOR
™
.
(13) The tool will display “COPY ID” and write the OE
sensor ID number onto the new
or QWIK-SENSOR
™
.
Clone-able sensor
(9) Display will show sensor information. Log OE ID
number and tire location.
Write ID to Clone-able sensor or
QWIK-SENSOR
™
Ensure the car being worked on is at least
10 feet from other vehicles and TPMS sensors
(OE, Clone-able, or QWIK-SENSOR
™
).
(10) Press the Cancel Key to display sensor menu.
(11) To write the OE sensor ID that was just detected
to a new Clone-able sensor or QWIK-SENSOR
use the Arrow Keys
to display OE
Clone-able sensor or
and select “COPY ID”
sensor information. Place the
QWIK-SENSOR™ in front
™
of
T55003 antenna or in the cradle, as shown.
ID Verication
Ensure the car being worked on is at
least 10 feet from other vehicles and
TPMS sensors (OE, Clone-able, or
QWIK-SENSOR
(14) Press the Cancel Key to go back to the
“VEHICLE IN PROCESS” menu. Scroll to “SAME
VEHICLE” and press Selection Key
programmed Clone-able sensor or QWIK-SENSOR™
in front of the antenna or the cradle, as shown and
press Transmit Key
,
Match this number with the number recorded in step
(9) to verify that the correct OE ID number has been
written onto the Clone-able sensor or QWIK-SENSOR
™
).
. Hold the
.
™
.
Installation
(15) Break down tire in accordance with vehicle
manufacturer’s specications, remove OE
sensor, install new
on car and pressurize.
or above the minimum tire pressure listed on
the placard of the car.
4
sensor on wheel, replace tire
Ensure tire pressure is at
Page 5
Repeat for remaining tires. All OE sensors
should have UNIQUE ID NUMBER. All
Clone-able sensor or QWIK-SENSOR
™
should be cloned to match the OE number for a
specic tire location exactly. Remove old sensors
from the area.
If you are experiencing difculties, please
see Troubleshooting Guide on page 7.
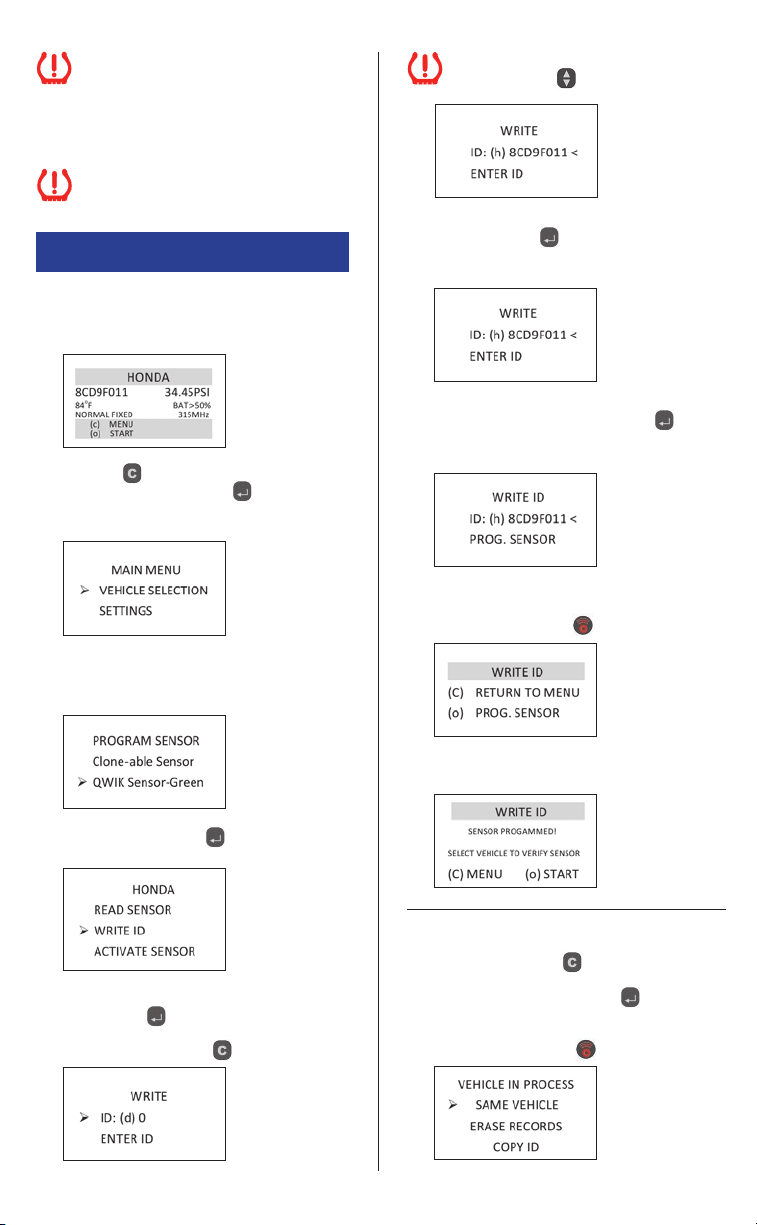
5. MANUAL ID WRITING
(1) To retrieve general OE sensor information, refer
to steps 1 – 9 of Scan OE Sensor ID Number
on pages 3 – 4.
(2) Press the key to return to the main menu.
From the main menu, select
SELECTION” to enter sensor writing menu.
Choose make, model and year.
“VEHICLE
When entering ID, select (h) hexadecimal
with arrow keys
. Then enter ID number.
(6) Once the sensor ID has been entered, press
the Selection Key
again to move arrow to
left side of screen. The “ENTER ID” message
will change to “PROG. SENSOR”
(7)
Place the new Clone-able sensor or QWIK-SENSOR™
or in the cradle, as shown and select
again
to move arrow to left side of screen. The “ENTER
ID” message will change to “PROG. SENSOR”.
(3) Select Clone-able sensor or QWIK-SENSOR™.
For QWIK-SENSOR
™
correct sensor color will be
displayed based on inputted information.
(4) Press the Selection Key to choose
“WRITE ID”.
(5) Once in the sensor writing menu, press the
Selection Key
to input sensor ID. Arrow will
move from left side to right side of screen. Clear
old numbers by pressing
.
(8) To program the OE sensor ID onto the new
Clone-able sensor or QWIK-SENSOR
press the Transmit Key
™
,
.
(9) The new Clone-able sensor or QWIK-SENSOR™ is
now programmed with the OE sensor’s ID number.
ID Verication
(10) Press the Cancel Key to go back to the
“VEHICLE IN PROCESS” menu. Scroll to “SAME
VEHICLE” and press Select Key
programmed Clone-able sensor or QWIK-SENSOR™
in front of the antenna or the cradle, as shown
and press Transmit Key
. Hold the
.
5
Page 6
Match this number with the number recorded in step
9 to verify that the correct OE ID number has been
written onto the Clone-able sensor or QWIK-SENSOR
The sensor is ready to be installed on the vehicle.
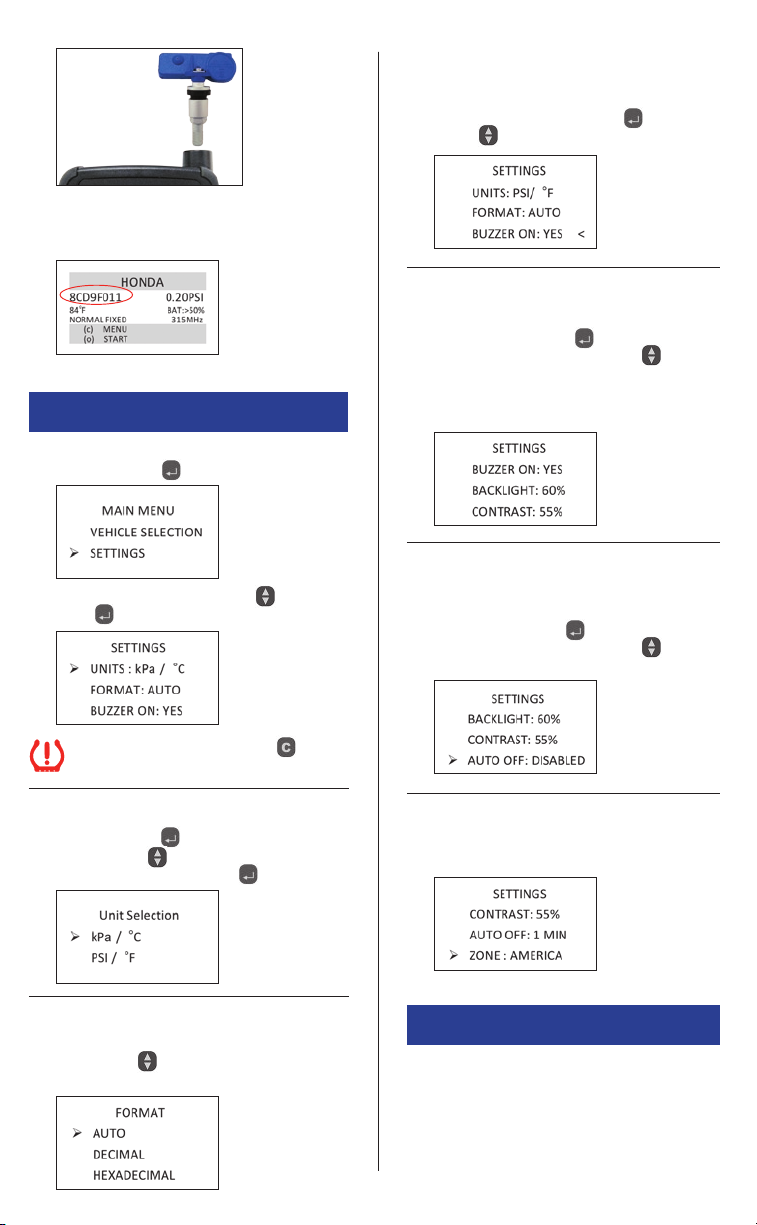
6. ADJUSTING T55003 SETTINGS
Buzzer
User can select if the tool will vibrate after receiving
tire sensor information. Scroll to “BUZZER ON” on
settings screen, press Selection Key
Arrow Keys
™
.
to toggle between “YES” or “NO”.
Backlight/Contrast
User can adjust the brightness and contrast of
display. Press Selection Key
right of display and use the Arrow Keys
adjust ±1%.
Tip: A brighter display will consume battery
more quickly
and use
to move cursor to
to
(1) From the main menu, select “SETTINGS” with
the Selection Key
(2) Use the up and down Arrow Keys and
, the feature to be adjusted.
select
After adjusting setting, use the key
to return to main menu.
.
Units
Use the Selection Key to enter unit selection and
use the Arrow Keys
(kPa/ °C or PSI/ °F) and select with
to highlight desired units
.
Format
Change the display format between decimal and
hexadecimal with
automatically changes format based on input.
. The preset setting is AUTO that
Auto-Off
User can adjust how quickly the tool will turn off
after a period of non-use. This feature can also be
disabled. Press Select Key
right of display and use the Arrow Keys
desired amount of auto-off time.
to move cursor to the
to select
Zone
User can modify the zone between America, Europe,
Asia and other.
7. UPDATING T55003 SOFTWARE
To access the latest software version for your
TechSmart
www.QWIKSENSOR.com
®
T55003, please visit:
6
Page 7
NOTICE
This device complies with Part 15 of the FCC Rules
and with RSS-210 of Industry Canada. Operation is
subject to the following two conditions:
(1) This device will not cause harmful interference
(2) This device must accept any interference
received, including interference that may cause
undesired operation.
Any changes or modications in construction
of this device which are not expressly
approved by the party responsible for
compliance could void the user’s authority
to operate the equipment.
8. TROUBLESHOOTING GUIDE
PROBLEM: TPMS light remains on after installation
of new sensors.
SOLUTION: May require over-inating tire and then
reducing PSI to proper level to activate sensor(s).
Spare tire may be equipped with TPMS. Check
vehicle owner’s manual to verify if TPMS monitors
spare tire. If so, ensure proper air pressure and
functioning sensor in spare tire.
PROBLEM: Newly written ID number on Clone-able
sensor or QWIK-SENSOR
number after using “COPY ID”.
SOLUTION: Check your format in settings. Change
to appropriate format. Hexadecimal reads ID number
in alphanumeric format (numbers and letters) while
decimal format reads ID number in only numeric
format (numbers only). Try writing the sensor
manually or go through the auto relearn process.
PROBLEM: After scanning sensor, “NO SENSOR
DETECTED” appears on screen.
SOLUTION: Try re-positioning the T55003 tool.
Ensure correct sensor is being used via the “TPMS
Application & Cross Reference Guide” and matches
the OE part number of the sensor on the vehicle.
Ensure the vehicle being worked on is at least 10
feet from all other vehicles and TPMS sensors (OE,
Clone-able, or QWIK-SENSOR
near the valve stem between the rim and rubber.
PROBLEM: TPMS lamp is illuminated in vehicle after
removing damaged OE sensors.
SOLUTION: Remove uninstalled OE sensors from the
area as damaged sensors will continue to transmit signal.
™
does not match the OE ID
™
). Position the tool
9. TECHNICAL SPECIFICATIONS
Dimensions: 152mm x 82mm x 33mm
Battery: 9V
Communication port: USB
Display: 4 line LCD, 65mm x 32mm
Weight: 220g
Temperatures: Operational: 5°C to 45°C /
41°F to 113°F
Storage: 0°C to 60°C /
32°F to 140°F
Relative humidity: 70% - 80%
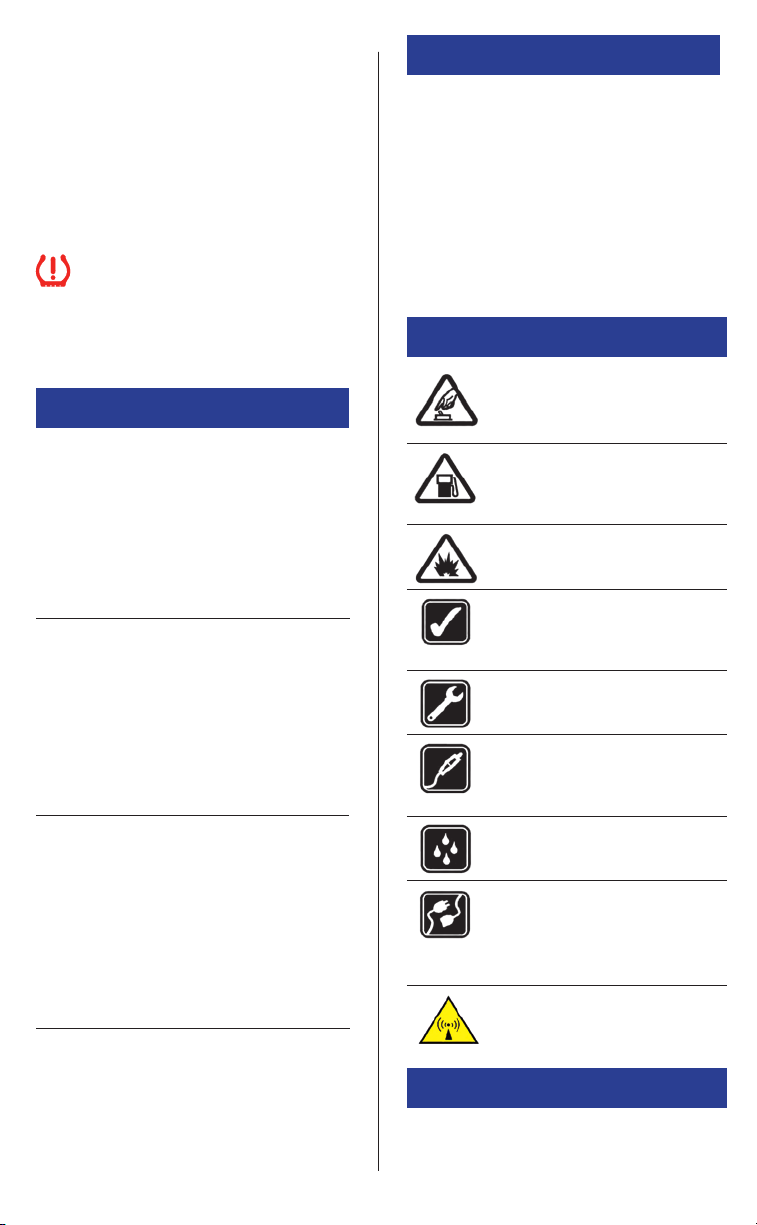
10. SAFETY TIPS
SWITCH ON SAFELY
Do not switch on the device when
wireless tool is prohibited or when it
may cause interference or danger.
SWITCH OFF WHEN REFUELING
Do not use the device when lling
vehicle with gasoline. Do not use near
fuel or chemicals.
SWITCH OFF NEAR BLASTING
Adhere to any restrictions. Do not use
the tool when blasting is in progress.
USE SENSIBLY
Use only in normal conditions as
indicated in product instructions. Do
not touch the antenna unnecessarily.
QUALIFIED SERVICE
Only qualied personnel may install or
repair this device.
ENHANCEMENTS AND BATTERIES
Use only approved enhancements and
batteries for the T55003 tool. Do not
connect incompatible products.
WATER RESISTANCE
The tool is not water resistant – keep
it dry.
CONNECTING TO OTHER DEVICES
When connecting to any other device,
read user guide for detailed safety
instructions. Do not connect
incompatible products.
THIS DEVICE IS A RADIO
TRANSMITTER AND RECEIVER.
11. CARE AND MAINTENANCE
The T55003 is a product of superior design and
craftsmanship and should be treated with care.
Follow the suggestions below to help maintain
warranty coverage:
7
Page 8

• Keep the device dry. Precipitation, humidity and
all types of moisture may contain minerals that
will corrode electronic circuits. If device does get
wet, remove the battery and allow the device to
dry completely before replacing.
• Do not use or store the tool in dusty, or dirty areas.
Keep the electronic components clean.
• Do not store the device in hot areas. High
temperatures can shorten the life of electronic
devices, damage batteries and warp or melt
certain plastics.
• Do not attempt to open the device other than
instructed in this guide.
• Do not drop, knock or shake the device. Rough
handling can break internal circuit boards
and mechanics.
• Do not use harsh chemicals, cleaning solvent or
strong detergent to clean the device. Do not paint
the device. Paint can clog the moving parts and
prevent proper operation.
• Do not touch the main display with hard or angular
material. Objects like earrings or jewelry may
scratch the display.
• Use a soft, clean and dry cloth to clean the device.
• Use only the supplied antenna. Unauthorized
antennas, modications or attachments could
damage the device and may violate regulations
governing radio devices.
• The power connection cord is NOT COMPATIBLE
with a USB interface. Please do not use with other
USB devices.
All of the above suggestions apply equally to your
device, battery or any enhancements. If device is
not working properly, contact Standard Motor
Products, Inc.
13. WARRANTY
Standard Motor Products, Inc. products are guaranteed
from material defects for 365 days after the date
of purchase. If the product fails under normal
circumstances within the rst year, Standard Motor
Products, Inc. will repair or replace the product.
Product will not be replaced or repaired if damaged
from misuse or incorrect application. To obtain
repair or replacement of the product under warranty,
please contact Standard Motor Products, Inc. Proof
of purchase and date of purchase are required to
validate the warranty claim.
Standard Motor Products, Inc. is not liable for any
direct or consequential loss or property damage
arising from use of product.
Warranty does not cover tire valves or
screws for tire valves. The tire valves
and screws need to be replaced when
rotating tires, changing tires or changing
the TPMS sensors. If installing/reinstalling
a TPMS sensor, new valves and screws
should be used.
We recommend that you only use
Standard Motor Products, Inc. replacement
parts. Other brands will not function
properly with this tool.
14. QUESTIONS
Any questions pertaining to warranty information
or other questions not answered in the preceding
pages can be answered by the TechSmart
of purchase or by Standard Motor Products, Inc.’s
Customer Service.
®
place
12. RF CERTIFICATION
This device meets guidelines for exposure to
radio waves.
This device is a radio transmitter and receiver. It is
designed not to exceed the limits for exposure to
radio waves recommended by international
guidelines developed by the independent scientic
organization ICNIRP and include safety margins
designed to assure the protection of all persons,
regardless of age and health.
For further information see ICNIRP “guidelines for
limiting exposure to time-varying electric, magnetic
and electromagnetic eld (up to 300GHz)” or contact
Standard Motor Products, Inc.
The SAR value for this device is less than 5W/kg.
This value is the reference level for general public
exposure to time varying electric and magnetic
elds (unperturbed rms values) for the 3-150 KHz
frequency range.
8
1-888-621-8767 (USA)
1-877-666-5325 (Canada)
For additional information on TPMS and TechSmart®
products, visit
www.QWIKSENSOR.com
Thank you for your purchase
and enjoy your new
®
TechSmart
T55003
Clone-able Tool!
TS10885
 Loading...