

SMK FC007 User Manual
9
3
5
4
1
2
8
7
6
qs
qa
0
Bluetooth® Laser Mouse
VGP-BMS80
Operating Instructions
4-158-720-11(1)
English
WARNING
To reduce the risk of fire or electric shock, do not
expose the unit to rain or moisture.
Owner’s Record
The model number and the serial number are located inside the battery
compartment of the mouse. Record the serial number in the space provided
below. Refer to this number whenever you call your Sony dealer regarding this
product.
Model No. VGP-BMS80
Serial No.____________________
Caution
Do not look directly into the lens. The laser light may cause eye injury.
To prevent battery fluid leaks and damage, observe the following precautions:
• Insert the batteries with the correct +/– orientation.
• Do not charge dry cell batteries.
• Do not mix old and new batteries, or batteries of a different type.
• If the mouse has not been used for a long time, remove the batteries.
• If a battery fluid leak occurs, carefully wipe the battery compartment, and
insert new batteries.
• To prevent accidental operation, be careful not to press any buttons when
replacing the batteries.
If any solid object or liquid falls onto the mouse, disconnect it and have it
checked by qualified personnel before continuing its use.
Do not place the mouse in a location where it is:
• On an unstable surface
• In very humid areas or where there is no ventilation
• Subject to excessive dust
• Subject to direct sunlight or extreme heat
• Extremely cold
If the mouse is brought directly from a cold to a warm location or is placed in a
very damp room, moisture may condense on the inside of the mouse. If this
occurs, the mouse may not work properly.
In this case, wait about 30 minutes for the moisture to evaporate. If the mouse
does not work properly after one hour, consult your nearest Sony dealer.
For customers in the U.S.A.
The following FCC statement applies only to the version of this model
manufactured for sale in the USA.
Other versions may not comply with FCC technical regulations.
This equipment has been tested and found to comply with the limits for a Class
B digital device, pursuant to Part 15 of the FCC Rules. These limits are designed
to provide reasonable protection against harmful interference in a residential
installation. This equipment generates, uses, and can radiate radio frequency
energy and, if not installed and used in accordance with the instructions, may
cause harmful interference to radio communications. However, there is no
guarantee that interference will not occur in a particular installation. If this
equipment does cause harmful interference to radio or television reception,
which can be determined by turning the equipment off and on, the user is
encouraged to try to correct the interference by one or more of the following
measures:
– Reorient or relocate the receiving antenna.
– Increase the separation between the equipment and receiver.
– Connect the equipment into an outlet on a circuit different from that to which
the receiver is connected.
– Consult the dealer or an experienced radio/TV technician for help.
You are cautioned that any changes or modifications not expressly approved in
this manual could void your authority to operate this equipment.
For questions regarding your product or for the Sony Service Center nearest you,
call 1-888-476-6972 in the United States or 1-800-961-7669 in Canada.
This device complies with Part 15 of the FCC Rules. Operation is subject to the
following two conditions: (1) this device may not cause harmful interference, and
(2) this device must accept any interference received, including interference that
may cause undesired operation.
For customers in Canada
This Class B digital apparatus complies with Canadian ICES-003.
Operation is subject to the following two conditions: (1) this device may not
cause harmful interference, and (2) this device must accept any interference
received, including interference that may cause undesired operation of the
device.
For customers in the U.S.A. and Canada
This equipment complies with FCC/IC radiation exposure limits set forth
for uncontrolled equipment and meets the FCC radio frequency (RF)
Exposure Guidelines in Supplement C to OET65 and RSS-102 of the IC
radio frequency (RF) Exposure rules. This equipment has very low levels of
RF energy that it deemed to comply without maximum permissive
exposure evaluation (MPE). But it is desirable that it should be installed and
operated with at least 20cm and more between the radiator and person’s
body (excluding extremities: hands, wrists, feet and ankles).
This device and its antenna(s) must not be co-located or operating with any
other antenna or transmitter except Grant condition.
The equipment is classified as a CLASS 1 LASER PRODUCT and complies
with the Laser Products Safety Standard IEC 60825-1(1993) +A1 (1997) +A2
(2001)/EN 60825-1(1994) +A1 (2002) +A2 (2001).
Caution - Repair and maintenance of this equipment should be made only
by Sony authorized technicians. Improper repairs and use can create safety
hazards.
Caution - Use of controls or adjustments or performance of procedures
other than those specified herein may result in hazardous radiation
exposure.
You can find the following sticker on the bottom of equipment.
For customers in Europe
Hereby, Sony declares that this product is in compliance with the essential
requirements and other relevant provisions of Directive 1999/5/EC.
To obtain a copy of the Declaration of Conformity (DoC) with the R&TTE
Directive, please access the following URL.
http://www.compliance.sony.de/
This product also complies with EN 55022 Class B and EN 55024 for use in
following areas: residential, commercial and light industrial.
The equipment is classified as a CLASS 1 LASER PRODUCT and complies
with the Laser Products Safety Standard IEC 608251(1993)+A1(1997)+A2(2001)/EN 60825-1(1994)+A1(2002)+A2(2001).
Caution - Repair and maintenance of this equipment should be made only
by Sony authorized technicians. Improper repairs and use can create safety
hazards.
Caution - Use of controls or adjustments or performance of procedures
other than those specified herein may result in hazardous radiation
exposure.
You can find the following sticker on the bottom of equipment.
Do not open wireless devices, as opening them, for whatever reason, could
lead to damages that are not covered by the guarantee.
Repair and maintenance of this equipment should be made only by Sony
authorized technicians. Improper repairs and use can create safety hazards.
Printed on 70% or more recycled paper using VOC (Volatile Organic Compound)-free vegetable oil
based ink.
© 2009 Sony Corporation / Printed in Japan
In some situations or environments, the use of Bluetooth wireless technology
might be restricted by the proprietor of the building or responsible
representatives of the organization, for example onboard airplanes, in
hospitals or in any other environment where the risk of interference with
other devices or services is perceived or identified as harmful.
If you are uncertain of the policy that applies to the use in a specific
organisation or environment, you are encouraged to ask for authorization
to use Bluetooth wireless technology prior to switching it on.
Consult your physician or the manufacturer of personal medical devices
(pacemakers, hearing aids, etc.) regarding any restrictions on the use of
Bluetooth wireless technology.
Disposal of AA batteries
• This wireless device is powered by AA batteries.
• For installing the batteries, please refer to the “Inserting Batteries into the
Mouse” section of this manual.
•
Do not handle damaged or leaking batteries. Dispose of promptly and properly.
• Batteries may explode or leak if recharged, disposed of in fire, mixed
with other types of battery or improperly installed.
•
Batteries used in these devices may present a fire or chemical burn hazard
if mistreated. Do not disassemble, heat above 60°C or incinerate.
•
Replace only with the same or equivalent type recommended by the manufacturer.
• Keep away from children.
• Dispose of properly at end-of-life.
• In some areas, the disposal of batteries in household or business waste
may be prohibited. Please use the appropriate public collection system.
Disposal of Old Electrical & Electronic
Equipment (Applicable in the European
Union and other European countries with
separate collection systems)
This symbol on the product or on its packaging indicates that
this product shall not be treated as household waste. Instead it
shall be handed over to the applicable collection point for the
recycling of electrical and electronic equipment. By ensuring this
product is disposed of correctly, you will help prevent potential
negative consequences for the environment and human health,
which could otherwise be caused by inappropriate waste
conserve natural resources. For more detailed information about recycling of this
product, please contact your local Civic Office, your household waste disposal service
or the shop where you purchased the product.
handling of this product. The recycling of materials will help to
Disposal of waste batteries (applicable in
the European Union and other European
countries with separate collection
systems)
This symbol on the battery or on the packaging indicates that the
battery provided with this product shall not be treated as
household waste.
On certain batteries this symbol might be used in combination with
(Pb) are added if the battery contains more than 0.0005% mercury or 0.004% lead.
By ensuring these batteries are disposed of correctly, you will help prevent potentially
negative consequences for the environment and human health which could otherwise be
caused by inappropriate waste handling of the battery. The recycling of the materials will
help to conserve natural resources.
In case of products that for safety, performance or data integrity reasons require a
permanent connection with an incorporated battery, this battery should be replaced by
qualified service staff only.
To ensure that the battery will be treated properly, hand over the product at end-of-life to
the applicable collection point for the recycling of electrical and electronic equipment.
For all other batteries, please view the section on how to remove the battery from the
product safely.
Hand the battery over to the applicable collection point for the recycling of waste
batteries. For more detailed information about recycling of this product or battery, please
contact your local Civic Office, your household waste disposal service or the shop where
you purchased the product.
The manufacturer of this product is Sony Corporation, 1-7-1 Konan Minatoku Tokyo,
108-0075 Japan
a chemical symbol. The chemical symbols for mercury (Hg) or lead
For customers in other countries and regions
The equipment is classified as a CLASS 1 LASER PRODUCT and complies
with the Laser Products Safety Standard IEC 60825-1(1993) +A1 (1997) +A2
(2001)/EN 60825-1(1994) +A1 (2002) +A2 (2001).
Caution - Repair and maintenance of this equipment should be made only
by Sony authorized technicians. Improper repairs and use can create safety
hazards.
Caution - Use of controls or adjustments or performance of procedures
other than those specified herein may result in hazardous radiation
exposure.
You can find the following sticker on the bottom of equipment.
Trademarks and notice
VAIO is a trademark of Sony Corporation.
Microsoft, Windows, Windows Vista and Internet Explorer are registered
trademarks of Microsoft Corporation in the United States and/or other
countries.
The Bluetooth word mark and logos are owned by the Bluetooth SIG, Inc., and
any use of such marks by Sony Corporation is under license. Other trademarks
and Trade names are those of their respective owners.
PlayStation and PLAYSTATION are registered trademarks of Sony Computer
Entertainment Inc.
In this manual, Microsoft® Windows Vista® Home Basic, Microsoft® Windows
Vista® Home Premium, Microsoft® Windows Vista® Business and Microsoft
Windows Vista® Ultimate are referred to as Windows Vista.
In this manual, Windows® 7 Ultimate, Windows® 7 Professional, Windows® 7
Home Premium, Windows® 7 Home Basic or Windows® 7 Starter are referred to
as Windows 7.
All other names of systems, products, and services are trademarks of their
respective owners. In this manual, the ™ or ® marks are not specified.
For the rights of usage concerning the supplied software, refer to the license
agreement for each software.
Sony is not responsible for damages caused by this product, the software
supplied within this product, passive damage, or claims from a third party.
This product or the software supplied with this product may be subject to
change without notice for modification.
®
Before use
Bluetooth Laser Mouse VGP-BMS80 can be connected to a VAIO personal
computer or PLAYSTATION3 without using a dedicated device driver, and
it is a multifunctional mouse which can be used in the following operation
modes.
z Hint
For details on switching operation mode, see back page.
• PC mode
There are 2 PC modes available for the mouse to operate your computer: Air
mode and Mouse mode
Air mode
You can freely operate a personal computer at a distance from the display. For
example, you can operate a personal computer connected to a TV to play
movies or music, or view a Web browser from the comfort of the sofa in your
living room.
Mouse mode
You can use the mouse as a Bluetooth multifunctional laser mouse near a
personal computer.
• PS3 mode
There are 2 PS3 modes to operate PLAYSTATION3 with the mouse: Air mode
and Mouse mode.
If you connect the mouse to PS3, you can control PS3 in the same way as a PS3
controller or visit web site (air mode). You can control as the mouse (mouse
mode).
However, you cannot operate the mouse as a game controller.
You can move the mouse pointer freely with the Optical Finger Sensor in
the middle of the mouse (free cursor).
You can also input an URL, for example, or perform essential keyword
searches using the supplied software keyboard. It is convenient for viewing
a Web browser and searching (PC mode only).
The mouse can be used with a following VAIO personal computer:
(As of September 2009)
• A Sony VAIO personal computer pre-installed with Windows Vista
(after SP1) or Windows 7 and equipped with Bluetooth technology.
(To install the supplied software on the computer, prepare a disc drive as
ROM drive.)
About compliant model details, refer to VAIO homepage:
VAIO homepage: http//www.VAIO.sony.co.jp/
Note
Depending on a personal computer or software version you are using, the mouse
may not function correctly. For detailed information on suitable operating
environments and VAIO Bluetooth compatibility, refer to the VAIO Customer
Link homepage.
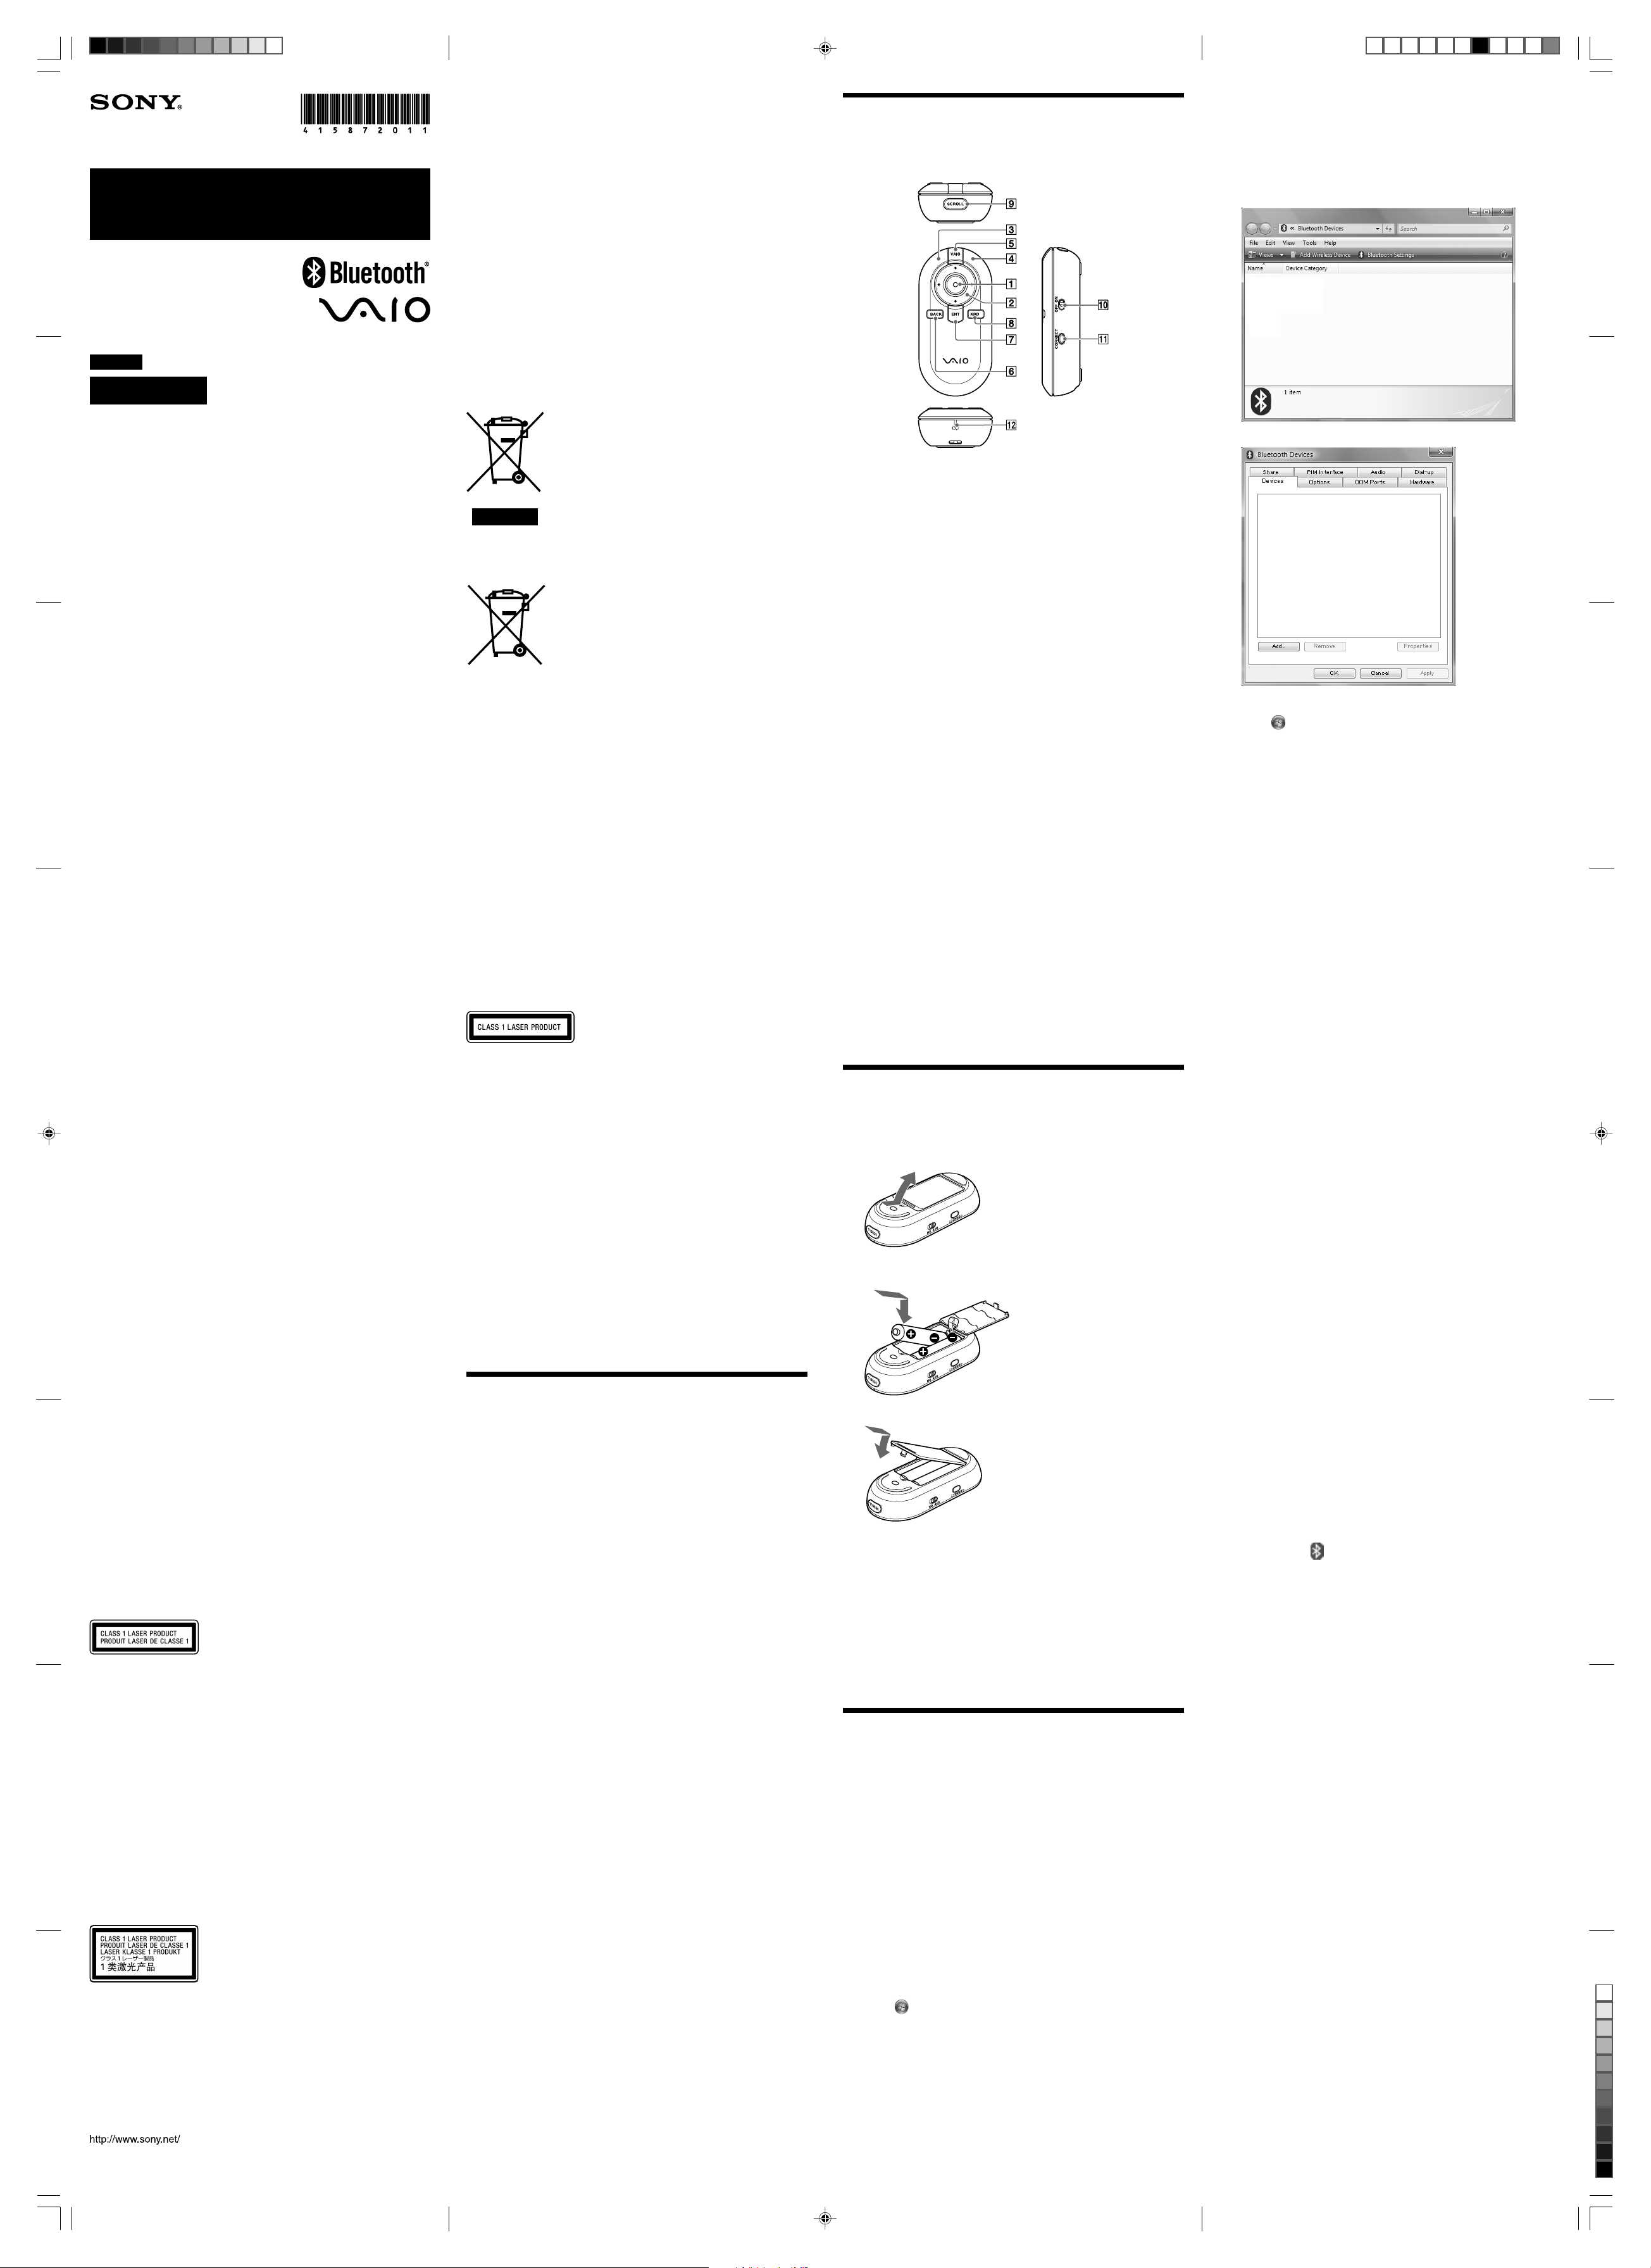
Controls and part names
This section explains controls and functions in PC mode. For details on
button functions in PS3 mode, refer to “Using as PLAYSTATION 3
controller (PS3 mode)” on the next page.
1 Optical Finger Sensor
In air mode
Stroke the button to move the pointer. Pressing the button works the
same way as left clicking a standard mouse. In addition, holding down
this button momentarily enters drag-lock state for easy dragging. To
unlock drag-lock, click again.
In PC mode
Stroking the button works the same way as the wheel button on a
standard mouse for scrolling a window. Pressing the button works the
same way as left clicking a standard mouse.
2 T R t r button
Move the pointer from right to left, or up and down.
3 Left button / 4 Right button
These buttons work the same way as left/right clicking a standard
mouse.
5 VAIO button
Run configured software on the mouse in advance.
z Hints
• To use the VAIO button, install the supplied software.
• For details on changing the running software, refer to Help. (Refer to “To
see Help” on the next page too.)
6 BACK (Backspace) button
Functions the same way as the Back space key of keyboard. You can
back to previous page on the Web browser.
7 ENT (Enter) button
Functions the same way as the Enter key on a standard keyboard.
8 KBD (Keyboard) button
Opens the dedicated software keyboard. When the software keyboard
is displayed, confirm the character input and close the software
keyboard.
z Hint
To use the dedicated software keyboard, install the supplied software.
9 SCROLL button
Air mode
Switches to the Optical Finger Sensor to scroll operation. For details
about the scrolling operation, refer to Help. (Refer to “To see Help” on
the next page too.)
Mouse mode
Switches to air mode.
q; POWER switch
qa CONNECT button
qs Status light
The status light flashing slowly indicates that the battery life is running
low. In addition, number of blinking of status light indicates current
operation mode or setting status.
Inserting batteries into the mouse
1 Slide the POWER switch located on the right side of the
mouse to OFF.
2 Turn the mouse over to open the battery compartment
cover.
3 Insert the two supplied LR06 (size AA) batteries using
the correct +/– orientation.
4 Close the battery compartment cover.
z Hint
Under normal operating conditions, a set of alkaline batteries lasts about
three months*. When cursor movement becomes sluggish and the
communication distance between the mouse and your personal computer
decreases, check the status light on the mouse.
When not using the mouse, close the button cover to set the power to off.
This will extends battery life.
* This estimate is based on five hours of use per day, five days per week.
These could be different depending on the usage environment.
Replacing the batteries
The status light flashing orange indicates that the battery life is running
low. Replace the batteries when this occurs.
Enabling communication
between the mouse and your
personal computer
Use the Bluetooth software installed on your personal computer to enable
communication between the mouse and your personal computer.
Note
Activate the Bluetooth software on your personal computer. Operation of the
Bluetooth software may vary depending on your personal computer.
For details, refer to the manuals provided with your personal computer.
The setup instructions vary based on your operating system and you are
directed to corresponding steps.
If your computer is pre-installed with Windows 7, go directly
to the instructions in Case A.
If your computer is pre-installed with Windows Vista, follow
these steps (In certain situations, you may be directed to the
instructions in Case B or Case C, depending on the Bluetooth window
displayed):
1 Click (Start), then “Control Panel.”
2 Click the “Hardware and Sound” icon.
3 If the “Bluetooth Devices” icon is in the “Hardware and
Sound” window:
Go to step 4.
If the “Bluetooth Devices” icon is not visible in the
“Hardware and Sound” window:
Close the “Control Panel” and go to Case D.
4 Click the “Bluetooth Devices” icon, and verify the
contents of the window displayed.
Note
If you switch to Classic View, double-click the “Bluetooth Devices” icon.
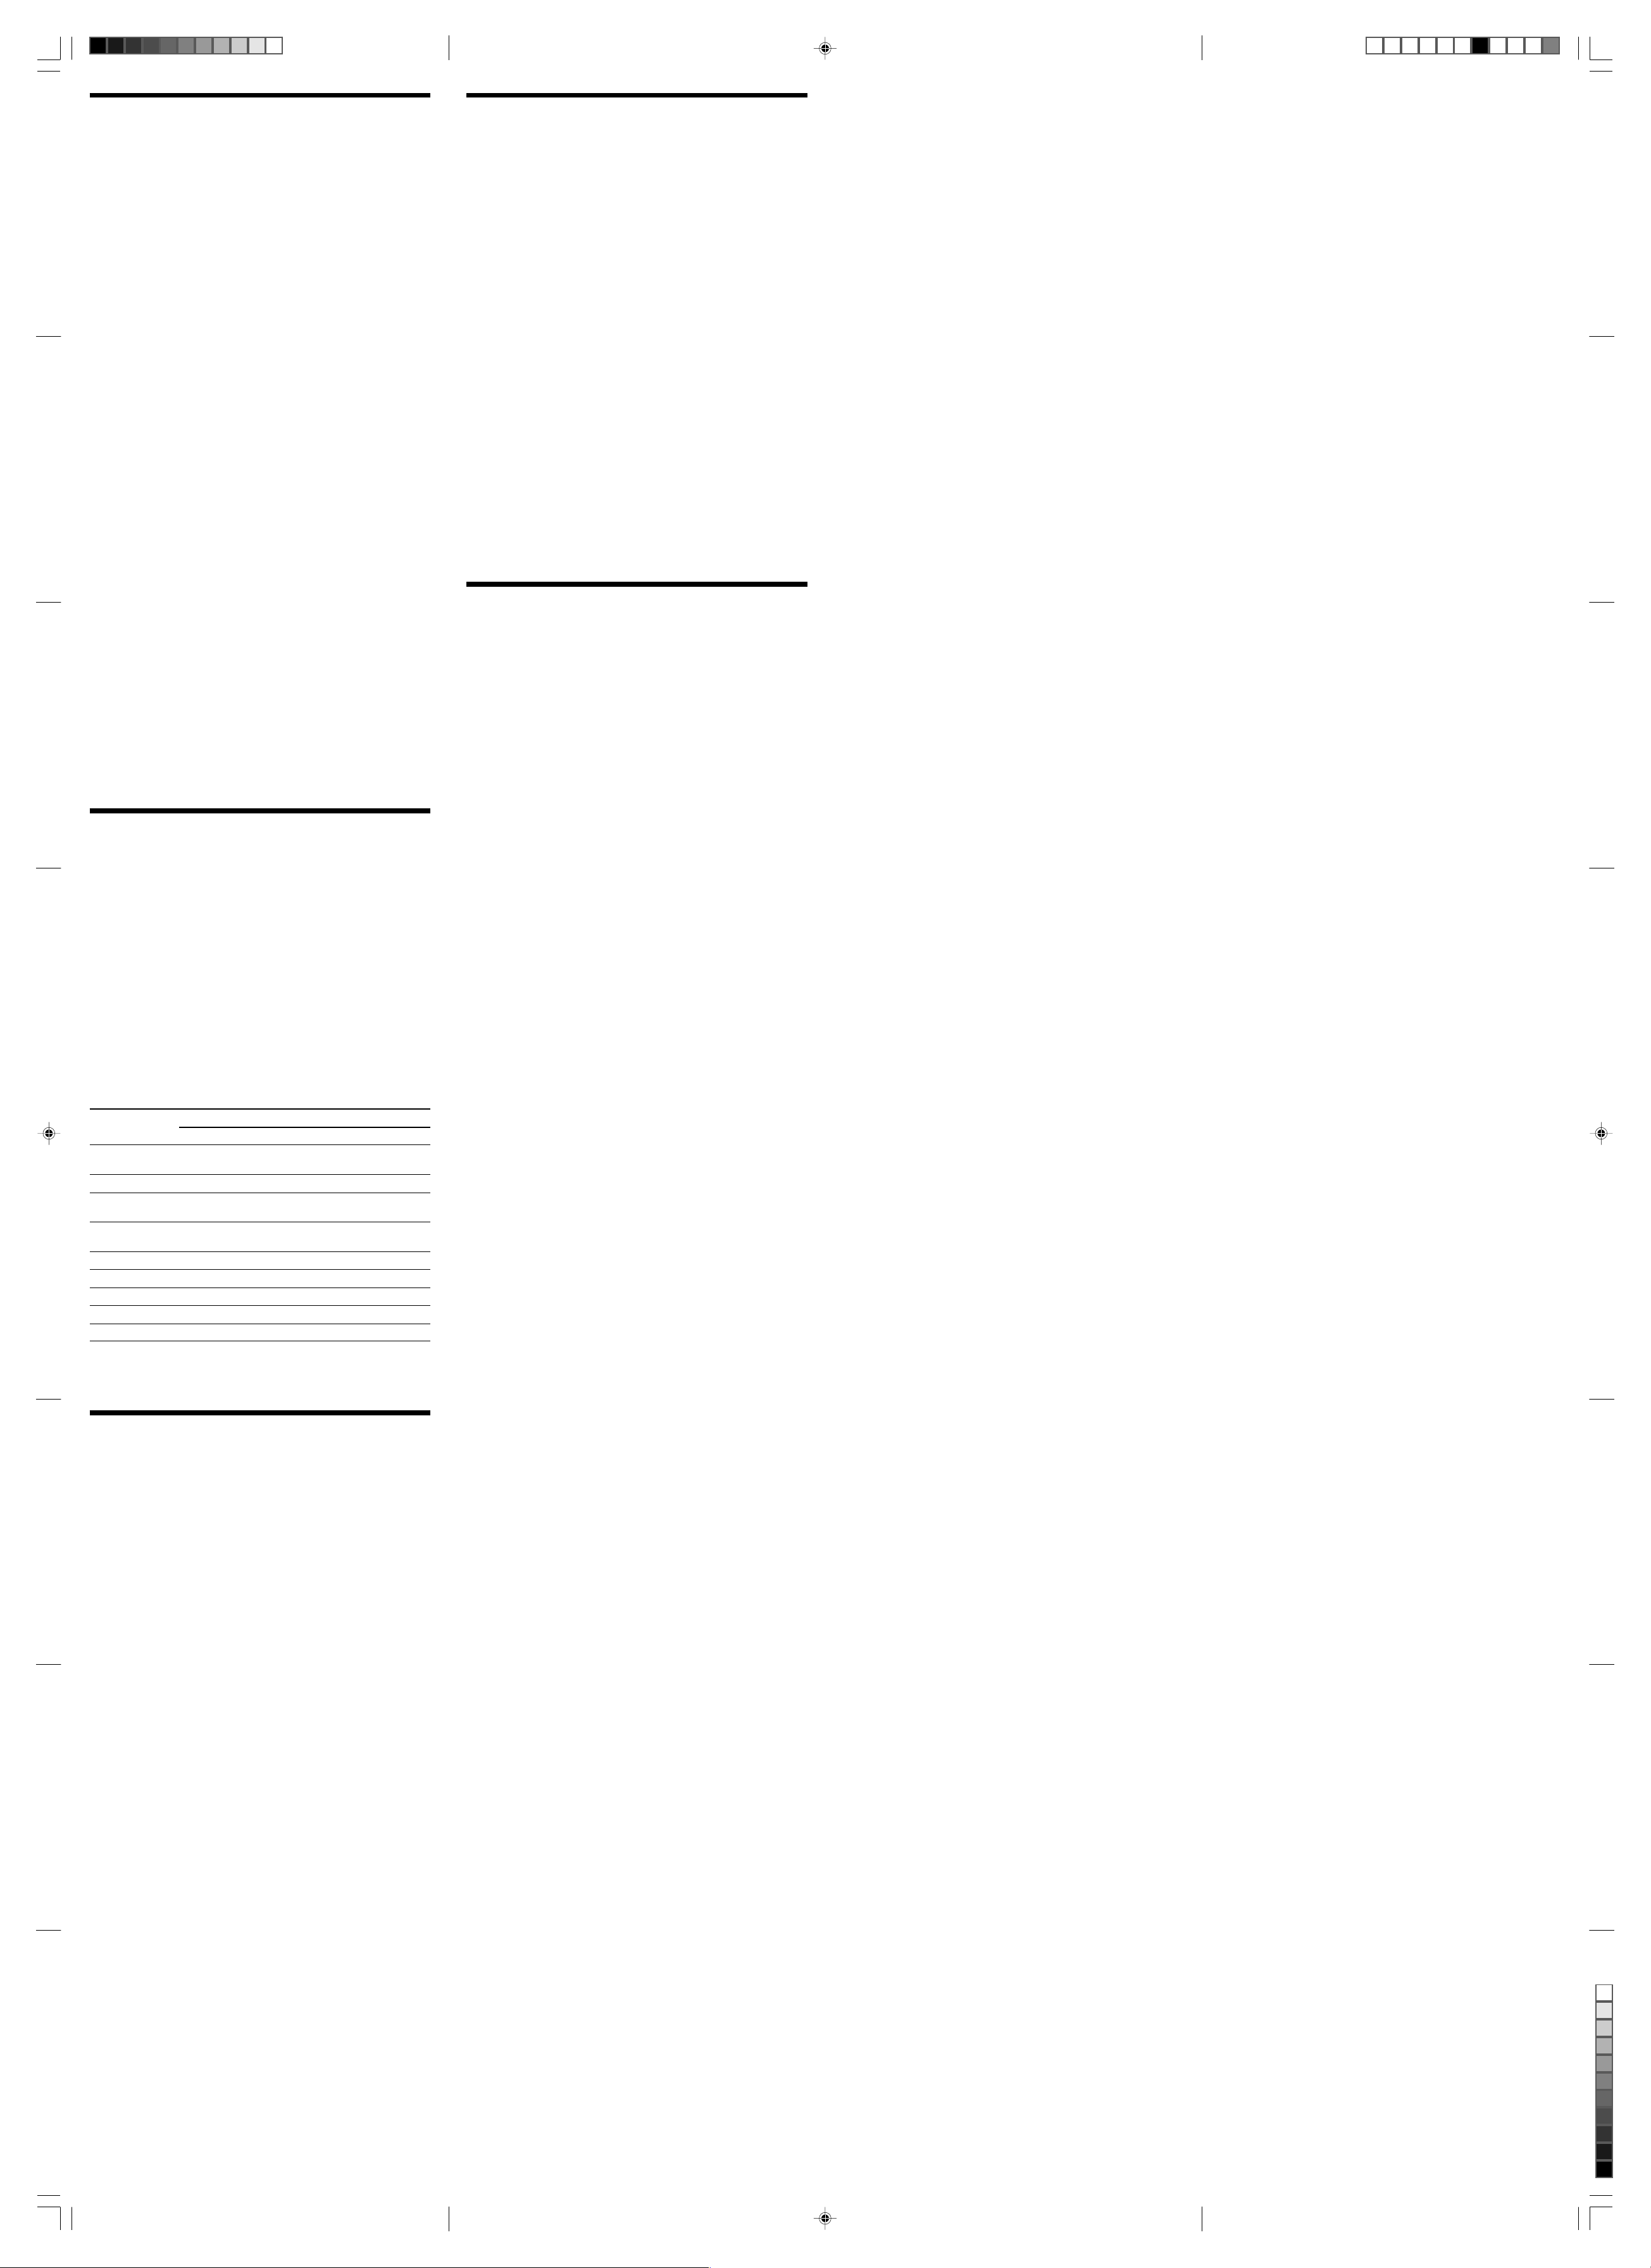
5 Review the Bluetooth Devices windows shown here.
If you see window 1, go to the instructions in Case B. If you see
window 2, go to the instructions in Case C.
Window 1
Window 2
Case A
1 Click (Start), then click “Devices and Printers.”
2 Slide the POWER switch of the mouse to ON.
3 Press the CONNECT button located on the right side of
the mouse.
4 Click “Add a device” in the “Devices and Printers”
window.
5 In the device list, select “VGP-BMS80,” and click “Next.”
z Hint
If the “Select a pairing option” window is displayed, select “Pair
without using a code,” and click “Next.”
6 Click “Close” in the “Add a device” window.
7 Stroke the Optical Finger Sensor. If the pointer displayed
on your screen moves appropriately, the connection is
complete.
Case B
1 Slide the POWER switch of the mouse to ON.
2 Press the CONNECT button located on the right side of
the mouse.
The status light flashes green.
3 On the “Bluetooth Devices” window, click the “Add
Wireless Device” icon.
4 In the device list, select “VGP-BMS80,” and click “Next.”
z Hint
If the “Pair with a Wireless Device” window is displayed, select
“Pair without using a code,” and click “Next.”
5 On the “Pair with a Wireless Device” window, click
“Close.”
6 Close the “Bluetooth Devices” window.
7 Stroke the Optical Finger Sensor. If the pointer displayed
on your screen moves appropriately, the connection is
complete.
Case C
1 Slide the POWER switch of the mouse to ON.
2 On the “Bluetooth Devices” window, select the
“Devices” tab and click “Add.”
The “Add Bluetooth Device Wizard” appears.
3 Press the CONNECT button located on the right side of
the mouse.
The status light flashes green.
4 Select the “My device is set up and ready to be found”
check box and click “Next.”
5 In the device list, select “VGP-BMS80,” and click “Next.”
6 Select “Don’t use a passkey” and click “Next.”
7 Click “Finish.”
8 Click “OK.”
9 Stroke the Optical Finger Sensor. If the pointer displayed
on your screen moves appropriately, the connection is
complete.
Case D
1
Slide the POWER switch of the mouse to ON.
2 Double-click in the notification area in the bottom
right corner of your personal computer’s desktop.
The “Bluetooth Settings” screen appears.
3 Click “New Connection.”
The “Add New Connection” wizard screen appears.
4 Press the CONNECT button located on the right side of
the mouse.
The status light flashes green.
5 Select “Express Mode” and click “Next.”
The search for Bluetooth devices begins.
6 In the device list, select “VGP-BMS80,” and click “Next.”
7 If the “Add New Connection” wizard disappears,
connection is complete. Go to step 10.
8 If the prompt to connect the HID (Human Interface
Device) device appears, click “OK.”
9 Verify the contents of the window displayed, and click
“Next.”
10 Stroke the Optical Finger Sensor. If the pointer displayed
on your screen moves appropriately, the connection is
complete.
Disconnecting
Slide the POWER switch of the mouse to OFF.
Reconnection
Slide the POWER switch of the mouse to ON, then reconnect.
Note
It may take time to reconnect after turning off the mouse.
Operating distance of the mouse
The mouse can normally be operated within about a 10 m (32 ft.) radius around
the personal computer. Depending on the usage environment, sometimes the
usable distance may be shorter, preventing normal operation.
In such a case, take the following measures:
• Use the mouse as far away from other wireless devices as possible.
• Use the mouse closer to the personal computer.
• Use a mouse pad.
VGP-BMS80_4-158-720-11(1)
Installing the supplied software
Specifications
Install the supplied software to use the software keyboard.
Notes
• Have access to a disc drive, such as a CD-ROM drive. In this manual, a disc
drive such as CD-ROM drive is referred to as “CD-ROM drive.” For details on
your CD-ROM drive, refer to the manuals provided or included with your
personal computer or CD-ROM drive.
• Before installing the supplied software, be sure to install the latest updates on
your Windows OS. In addition, close all other software.
• Log on as authorized of “An administrator of the computer.”
• About the latest version of the supplied software, refer to the VAIO
homepage.
• The supplied software cannot be installed on PS3.
• This equipment works with a Windows-installed standard driver (there is no
need for a special device driver).
1 To run Windows, turn on your personal computer.
2 Place the supplied install CD into CD-ROM drive.
z Hint
If an initial window is not displayed automatically, click
“Setup.exe” of the CD-ROM, and click “Run as administrator.”
3 On the “Install or run program” window, click “Run of
Setup.exe.”
If the “User Account Control” window on your screen displayed, click
“Continue.”
4 Install the supplied software following the displayed
instructions.
If you go to Tutorial, you can learn air mode using the mouse and
software keyboard. Let’s try using the mouse in air mode.
Switching operation mode
z Hints
• At a default setting, operation mode is set with air mode.
• To switch to PS3 mode, refer to “Using as PLAYSTATION 3 controller (PS3
mode).”
Switching to air mode
Move your finger over the Optical Finger Sensor from side to side several
times, or press the SCROLL button.
Switching to mouse mode
Place the mouse on the table, and move it quickly from side to side several
times. You can also switch to mouse mode pressing the left and right button
at the same time (PC mode only).
To see Help
Details on operation, setup of the mouse and troubleshooting are explained
in the Help section.
Seeing Help
Press the KBD button, and select [Tool] – [Help] on the displayed software
keyboard.
Using as PLAYSTATION 3
controller (PS3 mode)
If you connect the mouse to PS3, it can be used in the same way as a PS3
controller in air mode or mouse mode.
Switching to PS3 mode
Press and hold the BACK button, and slide the POWER switch to ON.
The status light blinks twice, and the mouse switches to PS3 mode.
z To return to PC mode from PS3 mode
Turn the power off. Press and hold the BACK button, and slide the POWER
switch to ON again. The status light blinks once, and the mouse returns to PC
mode.
Connecting the mouse to PS3
1 Set the mouse to PS3 mode.
2 Register the mouse as a Bluetooth device on PS3.
About corresponding functions of the mouse
buttons and PS3 controller
Mouse button
Optical Finger
Sensor
T R t r button Directional button T R t r button
Left button L1 button – (As left button
Right button f button – (As right button
VAIO button PS button –
BACK button × button –
ENT button s button –
KBD button SELECT button –
SCROLL button START button –
In air mode In mouse mode
a button –
PS3 controller
of standard mouse)
of standard mouse)
z Hint
For details on switching air mode/mouse mode, refer to “Switching
operation mode.”
Precautions
Bluetooth communications
• The 2.4 GHz band used by Bluetooth and wireless LAN devices is also
used by various other devices. Bluetooth devices incorporate technology
that minimizes interference from other devices using the same
wavelength. However, communication speed and achievable distances
may be reduced. Interference from other devices can also stop
communications altogether.
• The data transfer rate will vary depending on distance and obstacles
between devices, device configuration, radio interference, operating
system, software application, and so on. In some cases, communication
may be interrupted.
• Communication range will vary according to whether walls or other
obstacles are located between devices, the material used in walls, the
presence of radio frequency interference and other environmental
conditions, and the type of software being used.
• If wireless LAN and Bluetooth functionality are used at the same time on
the same personal computer, communication speed may be reduced due
to electromagnetic interference, and other unwanted effects may occur.
Care of mouse
Clean the outside of the mouse with a soft, dry cloth or a soft cloth lightly
moistened with a mild detergent solution. Do not use any type of abrasive
pad, scouring powder, or solvent such as alcohol or benzine.
Communication method Bluetooth Standard Ver. 2.1+EDR
Position tracking method Laser sensor
Sensor resolution 300 dot/cm (800 dpi)
Output Bluetooth Standard Power Class 2
Communication distance 10 m (32 ft.) max. line of sight *
Frequency band 2.4 GHz
Power requirements 3 V DC (two LR06 [SIZE AA] alkaline batteries)
Battery life Approx. 3 months (alkaline batteries) **
Dimensions Approx. 56.4 × 34.1 × 121.7 mm
Mass Approx. 110 g (3.9 oz) (including batteries)
Operating temperature 5 °C to 35 °C (41 °F to 95 °F)
Operating humidity 20% to 80% (not condensed), provided that
Storage temperature –20 °C to +60 °C (–4 °F to +140 °F)
Storage humidity 10% to 90% (not condensed), provided that
Accessories LR06 (size AA) Alkaline batteries (2)
* The communication range varies, due to walls or other obstacles between
devices, the materials used in the walls, environmental conditions such as
radio frequency interference, and the software program used.
** This estimate is based on five hours of use per day, five days per week. These
could be different depending on the usage environment.
Design and specifications are subject to change without notice.
(2.3 × 1.4 × 4.8 in.) (w × h × d)
(temperature gradient less than 10 °C (18 °F)/
hour)
humidity is less than 65% at 35 °C (95 °F)
(hygrometer reading of less than 29 °C (84 °F))
(temperature gradient less than 10 °C (18 °F)/
hour)
humidity is less than 20% at 60 °C (140 °F)
(hygrometer reading of less than 35 °C (95 °F)
Installer disk
Operating Instructions (this document) (1)
Warranty Card (1)
Troubleshooting
Before refering to the VAIO customer link, follow the explanations below,
and check the keyboard again. Details on solutions are also described in
Help.
If a problem persists, refer to the VAIO customer link.
The laser does not light up when Slide the power switch of the mouse
to ON.
c The laser light from the lens part is invisible. This is not a malfunction.
The pointer/cursor does not move (smoothly) when I move the mouse.
❒ Your computer’s operating system may not be compatible with this
equipment.
c Use a supported operating system.
❒ The mouse is not turned on.
c If the mouse is turned off, the mouse and your personal computer are not
communicating. Slide the power switch of the mouse to ON.
c Battery life may be running low. Replace the batteries. For more
information, see “Inserting batteries into the mouse.”
❒ The mouse and the personal computer are not communicating.
c For more information, see the topic, “Cannot connect to the personal
computer.”
❒ The mouse is being used on an unsuitable surface (in mouse mode).
c Due to the characteristics of the laser sensor, the mouse may not work
properly on transparent surfaces. Avoid using on such surfaces, or use a
commercially available mouse pad that is compatible with a laser sensor
mouse.
❒ The CONNECT button is pressed while operating the mouse.
c If the CONNECT button is pressed while operating the mouse, the mouse
goes into a standby mode for about 3 minutes and cannot be operated
during this time. If you press the CONNECT button, slide the POWER
switch of the mouse to ON again, before beginning operation.
❒ The mouse may have difficulty communicating in an environment with
2.4 GHz wireless LAN or other Bluetooth communication.
c It is best to use the mouse in a location with low interference from
wireless devices.
c Your mouse may be experiencing interference from other Bluetooth
devices that are connected to your computer. Disconnect them all once,
wait a few seconds, then connect them again.
c Processing performed by Windows or other software may temporarily
disable the mouse. Wait a few moments for the processing to finish
before using the mouse.
c You may find some useful solutions in your personal computer’s operating
instructions. Refer to the manuals provided or included with your personal
computer.
Cannot connect to the personal computer.
❒ The mouse is not turned on.
c If the mouse is turned off, the mouse and your personal computer are not
communicating. Slide the power switch of the mouse to ON.
c Battery life may be running low. Replace the batteries. For more
information, see “Inserting batteries into the mouse.”
❒ Communication status between the mouse and your personal computer
may not have been properly established.
c Make sure your personal computer is set as below.
- The WIRELESS switch is set to ON.
- Bluetooth function is in operation.
For details on how to set the WIRELESS switch or Bluetooth function, refer
to the manuals provided or included with your personal computer.
❒ Slide the power switch of the mouse to OFF once, and after a few
seconds, slide it to ON again to connect to the personal computer. For
details on connecting, see “Enabling communication between the
mouse and your personal computer.”
❒ If the mouse and the personal computer are too far apart, transmission
may be affected. The maximum communication distance between the
mouse and the personal computer is about a
metal table or if obstacles are between the mouse and the personal
computer, the usable distance may be less. Connect the mouse and the
personal computer as close is practically possible.
❒ Depending on usage environment, communication distance may
decrease, and improper operation may result. In such a case, keep other
electronic equipment away from the host field.
The scrolling features do not work.
❒ Your computer’s operating system may not be compatible with this
equipment.
c Use a supported operating system.
❒ A software not compatible with the scroll function may be running.
c The program you are using is not compatible with the scrolling features.
When I am using the mouse, the display goes dark or the personal
computer enters power saving mode.
❒ Change the power management settings for the personal computer to
prevent it from entering power saving mode. For details, refer to the
manuals provided or included with your personal computer.
❒ Touch the touchpad or press any key on the keyboard to exit power
saving mode.
Exiting power saving mode with the mouse is not possible.
❒ Press any key on the keyboard.
The mouse does not move smoothly after returning from the power
saving mode.
❒ Deactivate the Bluetooth connection, wait a few seconds, and then
reestablish connection.
I am asked to input a key when connecting to my personal computer.
❒ Input “0000” as the key.
Your personal computer fails to install the software.
❒ Your computer’s operating system may not be compatible with this
equipment.
c Use a supported operating system.
❒ Close all software before installing.
In air mode, the pointer does not move when you touch the Optical
Finger Sensor.
❒ The mouse is set to scroll-lock mode.
c Press the SCROLL button.
10 m (32 ft.)
. If used on a
VGP-BMS80_4-158-720-11(1)
 Loading...