

Page 1
Revised 4.23.10
Installation Instructions:
(Part # SB76793)
SRC TJ Tubular Doors
NOTE: Carefully read entire instructions thoroughly before
attempting to install this part.
Parts Included Qty
93-8003 Driver Side Door 1
93-8008 Passenger Side Door 1
93-5682 Door Hinge 4
90-4242 Weather Stripping 2
90-5783 Limit Strap Bracket 2
90-6714 Hardware Pack:
Tube Door 1
3/8” X 1” Stainless Steel Button Head Bolt 8
3/8” Flat Washer 20
3/8” Stover Nut 12
769401 Limit Strap 2
INSTALLATION:
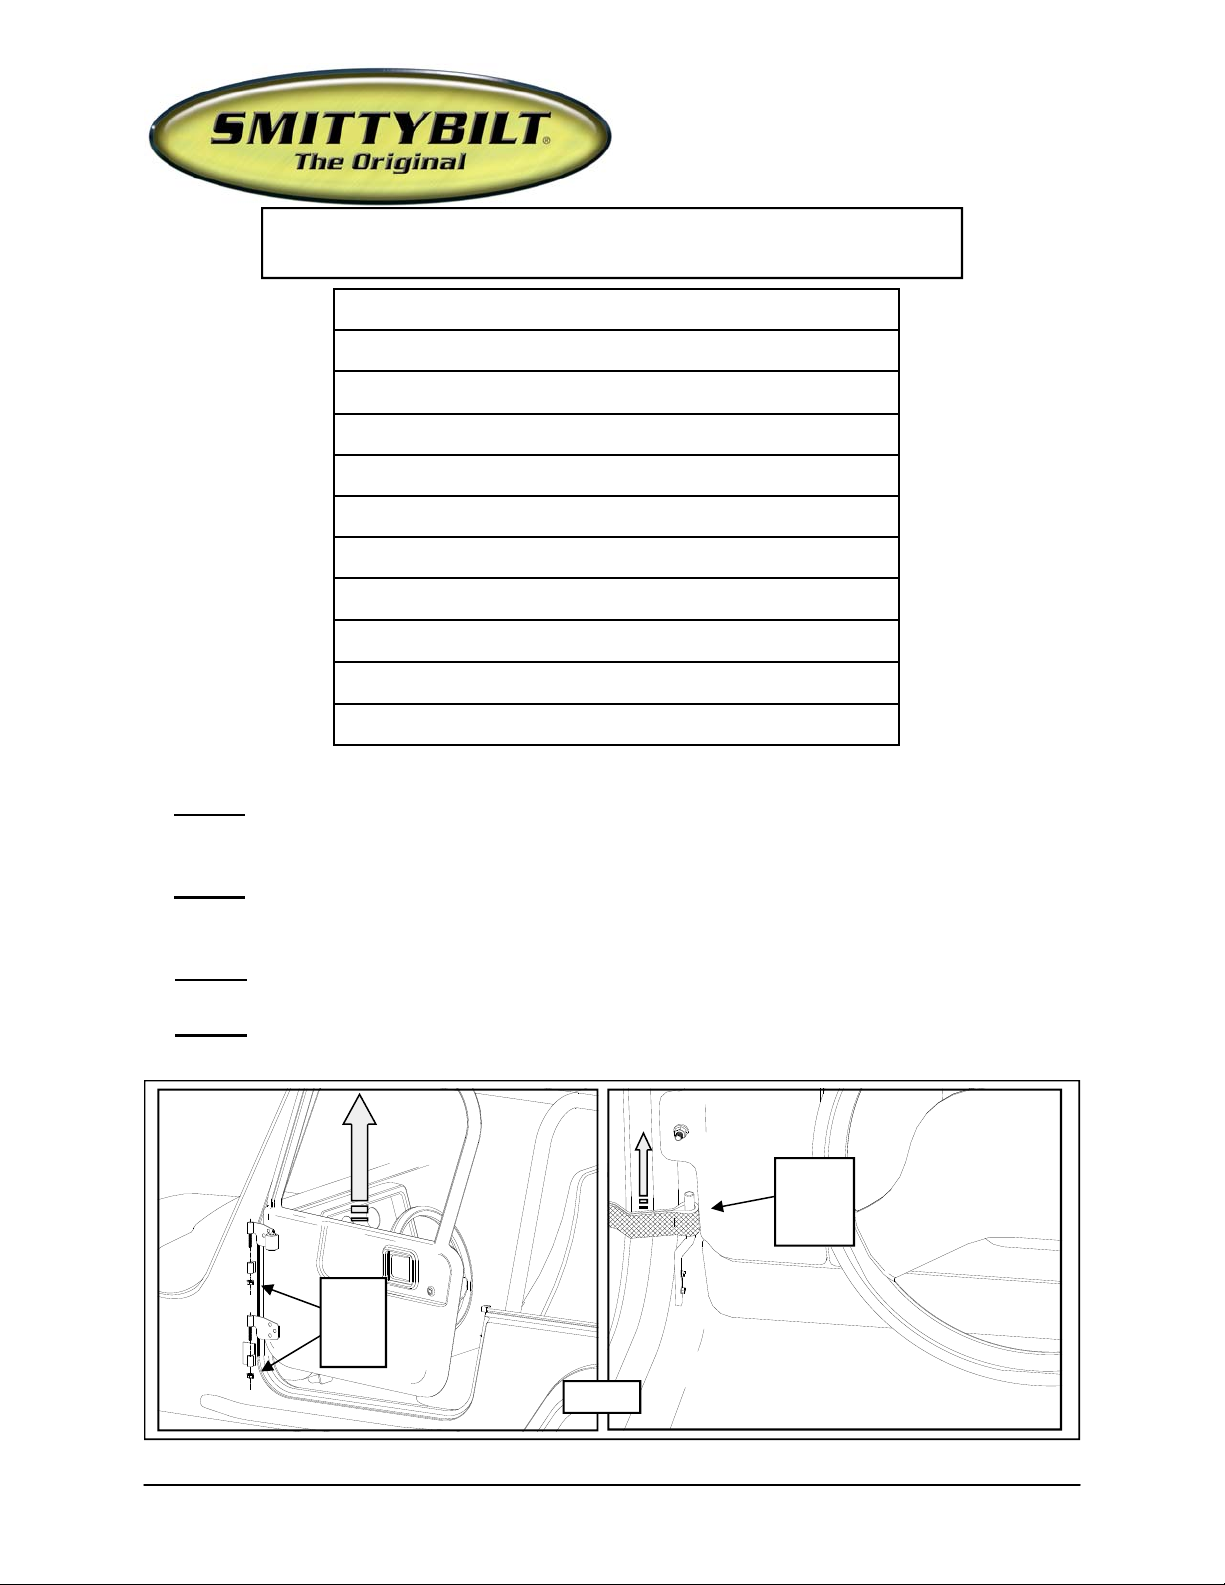
Step 1: Starting on the driver side of the vehicle, remove the (2) OE door hinge retaining
nuts. (Fig. A)
Step 2: Open the door and unhook the door limit strap from the mount inside the vehicle.
(Fig. A)
Step 3: Carefully lift and remove the door from the vehicle.
Step 4:
Install the supplied limit strap bracket (90-5783) onto the new limit strap (769401).
(Fig. B)
OE
Hinge
Nut
(Fig A)
769401
Limit
Strap
For Technical Support/Warranty Information please call 310-762-9944
Smittybilt, 400 W Artesia, Compton, CA 90220
Page 2
Revised 4.23.10
Installation Instructions:
(Part # SB76793)
SRC TJ Tubular Doors
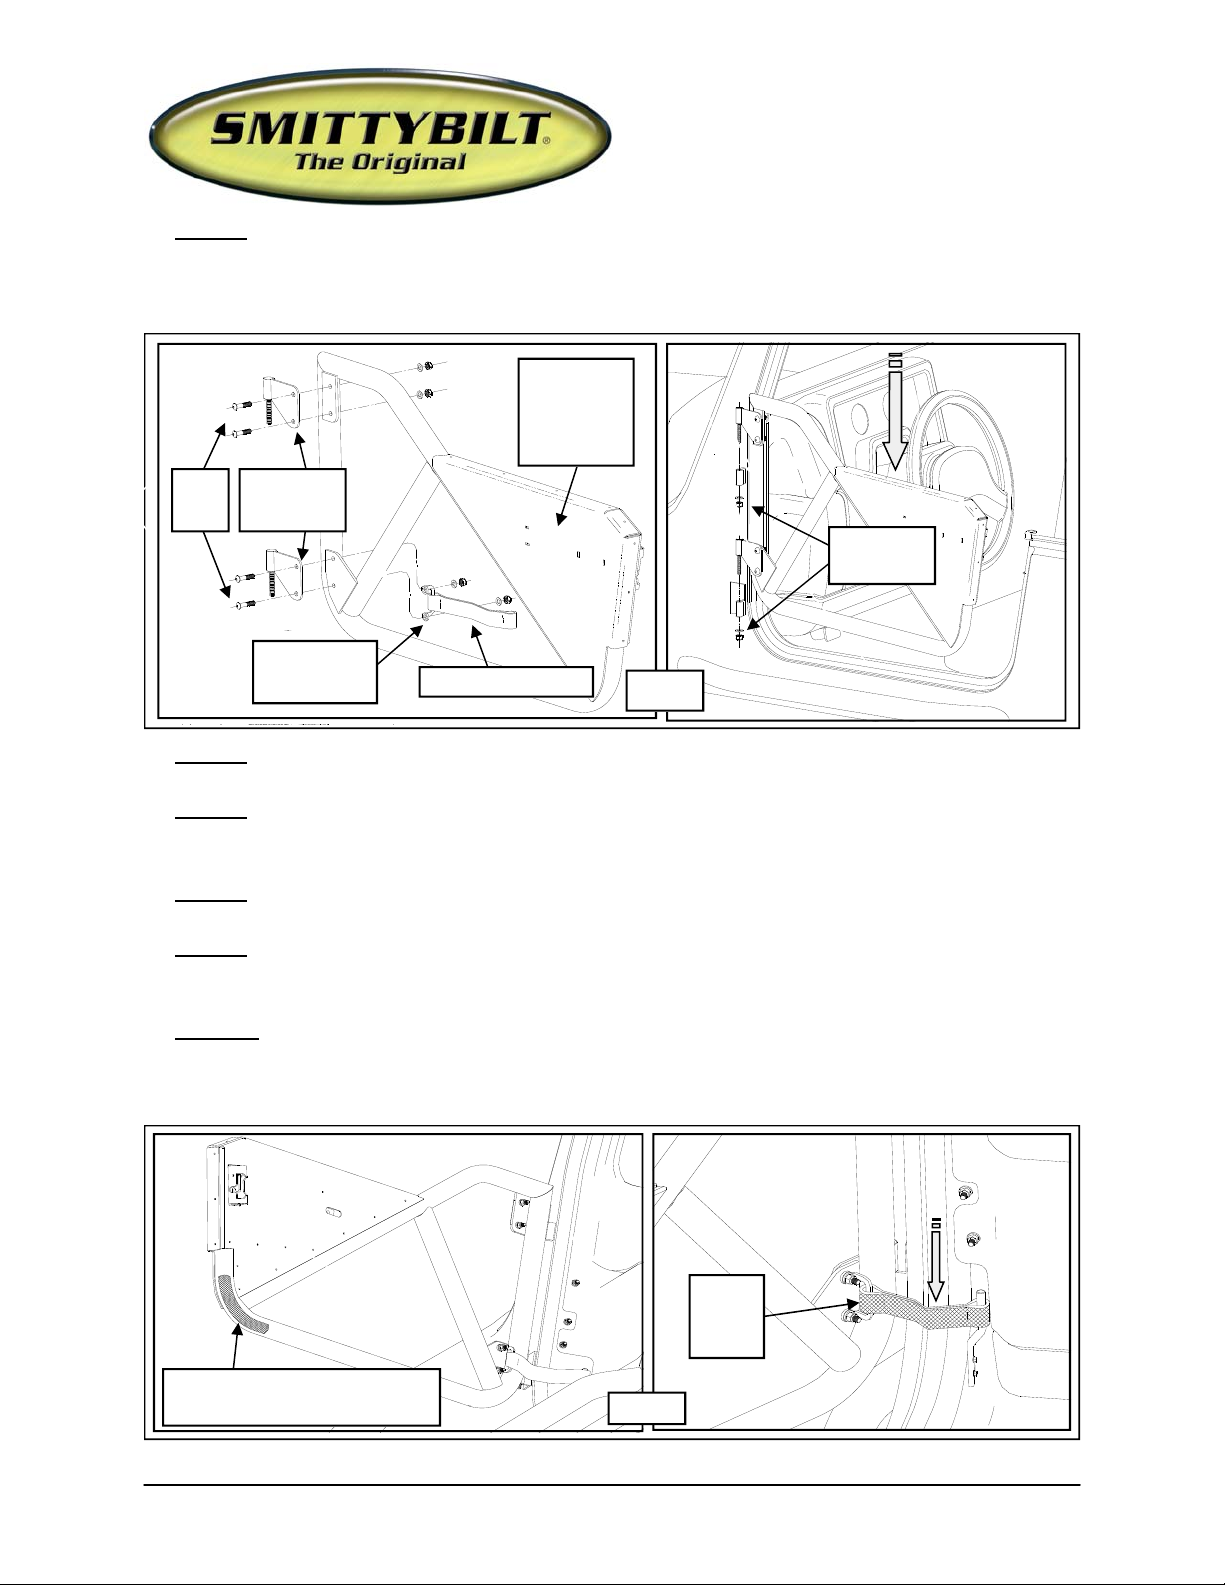
Step 5: Attach the (2) door hinges (93-5682) to the new door (93-8003 and 93-8008) using
the (4) supplied 3/8” X 1” stainless bolts and hardware. Install the limit strap (769401) and
bracket (90-5783) to the lower hinge bolts as well. Leave the bolts snug only at this time.
(Fig. B)
Tube Door
93-8003 drvr
and
93-8008 pass
3/8” Nuts &
Washers
3/8”
Bolts
93-5682
Door Hinge
90-5783 Limit
Strap Bracket
769401 Limit Strap
(Fig B)
Step 6: Carefully install the door assembly onto the vehicle hinges. (Fig B)
Step 7: Carefully close the door and latch it to the door striker. Adjust the door striker if the
door won’t close properly.
Step 8: Carefully adjust the (2) front door hinges to level the door on the vehicle. (Fig B)
Step 9: Once the door is adjusted properly torque the hardware according to the chart on
page 3.
Step 10:
Install the provided weather stripping onto the door where the door makes contact
with the vehicle door jamb. (Fig. C)
NOTE: Failure to properly install the weather stripping may result in vibration or
other noise.
Install Weather Stripping 90-4242
Where Door Contacts Jam
For Technical Support/Warranty Information please call 310-762-9944
Smittybilt, 400 W Artesia, Compton, CA 90220
769401
Limit
Strap
(Fig C)
Page 3

Revised 4.23.10
X
X
Installation Instructions:
(Part # SB76793)
SRC TJ Tubular Doors
Step 11: Reinstall the new (769401) limit strap to the mount on the inside of the vehicle.
(Fig. C)
Step 12: Repeat the previous steps on the remaining side of the vehicle.
Step 13: Installation is now complete.
Stainless Steel Finish – Aluminum polish may be used to polish small scratches and scuffs on the finish. Mild
soap, window or glass cleaner may be used to clean the finish. Dual state powder coat finish – Mild soap, window or glass cleaner may be used to clean the finish. In order to protect the finish, you may wax your product on a
regular basis with pure carnauba automotive wax. Do not use any types of soap, polish or was that contains abrasive that could damage the finish. Textured coated finishes should be cleaned with a mild soap on a damp
sponge. Do not apply polish or was that requires to be removed by means of buffing. This type of wax is commonly used at car wash facilities. Chrome Finish – Mild soap, window or glass cleaner may be used to clean the
finish. In order to protect the finish you should wax your product on a regular basis with pure carnauba automotive
wax. Do not use any types of soap, polish or was that contains abrasive that could damage the finish.
Bolt Torque and ID
Deci m al Syst em Metric System
All Torques in Ft. Lbs.
Bolt Size Grade 5 Grade8 Bolt Size Class 9.8 Class 10.9 Class 12.9
5/16 15 20 M6 5 9 12
3/830 45 M818 23 27
7/16 45 60 M10 32 45 50
1/2 65 90 M12 55 75 90
9/16 95 130 M14 85 120 145
5/8 13 5 175 M16 130 165 210
3/4 185 280 M18 170 240 290
T T
D D
L L
1/ 2-1 3x1. 75 HHCS
D T L
G = Grade (Bolt Strength) P = Property Class (Bolt Strength)
D = Nomin a l Diameter (Inches) D = Nominal Diameter (Millimeters)
T = Thread Count (Threads per Inc h) T = Thread Pitch (Thread Width, m m)
L = Length (Inches) L = Length (Millimeters)
X = Description (Hex Head Cap Screw) X = Description (Hex Head Cap Screw)
Grade 5 Grade 8
(No. of Marks + 2)
Product cleaning and maintenance instructions
G
M12-1. 25 x50 HHCS
D T L
P
For Technical Support/Warranty Information please call 310-762-9944
Smittybilt, 400 W Artesia, Compton, CA 90220
Page 4

Revised 4.23.10
Installation Instructions:
(Part # SB76793)
SRC TJ Tubular Doors
Limited Warranties
Smittybilt’s products are covered under the following limited warranties only. Note that the duration of the limited
warranty differs according to the material and finish of the product purchased. Subject to the duration and conditions of the limited warranty stated below, Smittybilt warrants to the original retail purchaser that its products are
free from defects in material and workmanship. All other warranties and representations express or implied, are
hereby disclaimed, including fitness for merchantability and buyer’s intended use or purpose. All parts are sold
“AS IS” except for the limited warranties granted herein. Buyer assumes all risks as to the selection, suitability
and performance of all goods and products selected. This limited warranty does not cover damage or impairment
in any part due to misuse, improper installation, accident or contact with on-roa d or off-road hazards, product
modification, improper or inadequate cleaning and/or maintenance. Smittybilt is not responsible for items damaged during shipping. This warranty is not transferable from the original buyer. For the original Buyer to be eligible for the limited warranty coverage, the Buyer must provide proof of purchase. Smittybilt strongly recommends
returning the warranty registration card.
Customer’s remedy hereunder shall be limited only to repair or replacement (at Smittybilt’s option) of any defective part(s) returned to Smittybilt at customer’s expense. The determination of whether or not a returned part is
defective or subject to coverage under the limited warranties stated herein shall be made at Smittybilt’s sole discretion.
Duration of Limited Warranty
Limited Lifetime Warranty on Stainless Steel Products -
Smittybilt stainless steel products carry the foregoing limited repair or replacement warranty against workmanship and defects in the material so long as the original purchaser retains the original stainless steel parts.
Limited Five (5) Year / 50,000 Mile Pro-Rata Warranty (whichever occurs first) on Dual-Stage Pow der
Coating Products -
Smittybilt dual-stage powder coated products carry the foregoing limited repair or replacement warranty for a
period of (5) years or 50,000 miles (whichever occurs first) from date of purchase against workmanship and
defects in the material, provided that any claim submitted after (2.5) years from date of purchase shall, if accepted, be satisfied by Smittybilt offering customer a credit on the purchase of a replacement product equal to
fifty percent (50%) of customer’s initial purchase price.
Limited Three (3) Year / 36,000 Mile Pro-Rata Warranty (whichever occurs first) on Chrome Products-
Smittybilt chrome products finished carry the foregoing limited repair or replacement warranty for a period of
three (3) years or 36,000 miles against workmanship and defects in the material (whichever occurs first) from
the date of purchase.
To assure product quality, Smittybilt reserves the right to change product design, material, specification and finishes without prior notice to customers. This limited warranty gives you specific legal rights and you may also
have other rights, which may vary from state to state. Some states do not allow limitations on how long an implied
warranty lasts, so the above limitations may not apply as to you. Also, some states do not allow the exclusion or
limitation of incidental or consequential damages, so the above limitations or exclusions may not apply to you.
Smittybilt reserves the right to discontinue product lines and substitute products, or provide other remedies th an
those listed in this limited warranty for those discontinued products.
For Technical Support/Warranty Information please call 310-762-9944
Smittybilt, 400 W Artesia, Compton, CA 90220
 Loading...