

Page 1
Installation Instructions
Sure Steps (Part # CN012-S4)
1992-1999 Suburban 4 Door
QTY PART # DESCRIPTION
1 CN012-S4L Sure-Step, left side
1 CN012-S4R Sure-Step, right side
1 603722 hardware kit
1 720009 warranty statement
NOTE: Please read this information before installing. Check components received with components listed above. NO
DRILLING REQUIRED for installation of these Sure-Step side bars. To obtain correct installation, we recommend
you to follow these step by step installation instructions carefully. Please take care when installing this product to
protect the finish and your investment. For Technical Support please call (951) 736 8686.
Step One: Locate hardware marked 603722. Check contents of 603722 with the hardware listed below.
QTY PART # DESCRIPTION
2 901119 12mm x 1.75mm x 120mm hex bolts
6 901011 1/2 flat washers
6 901012 1/2 split lock washers
4 000000 1/2-13 x 2” hex bolts, GR.5
2 901132 2 1/2 od. spacers, zinc plated
4 #30 3” plastic rings
1 801086L front support bracket, left side
1 801086R front support bracket, right side
1 801357L rear support bracket, left side
1 801357R rear support bracket, right side
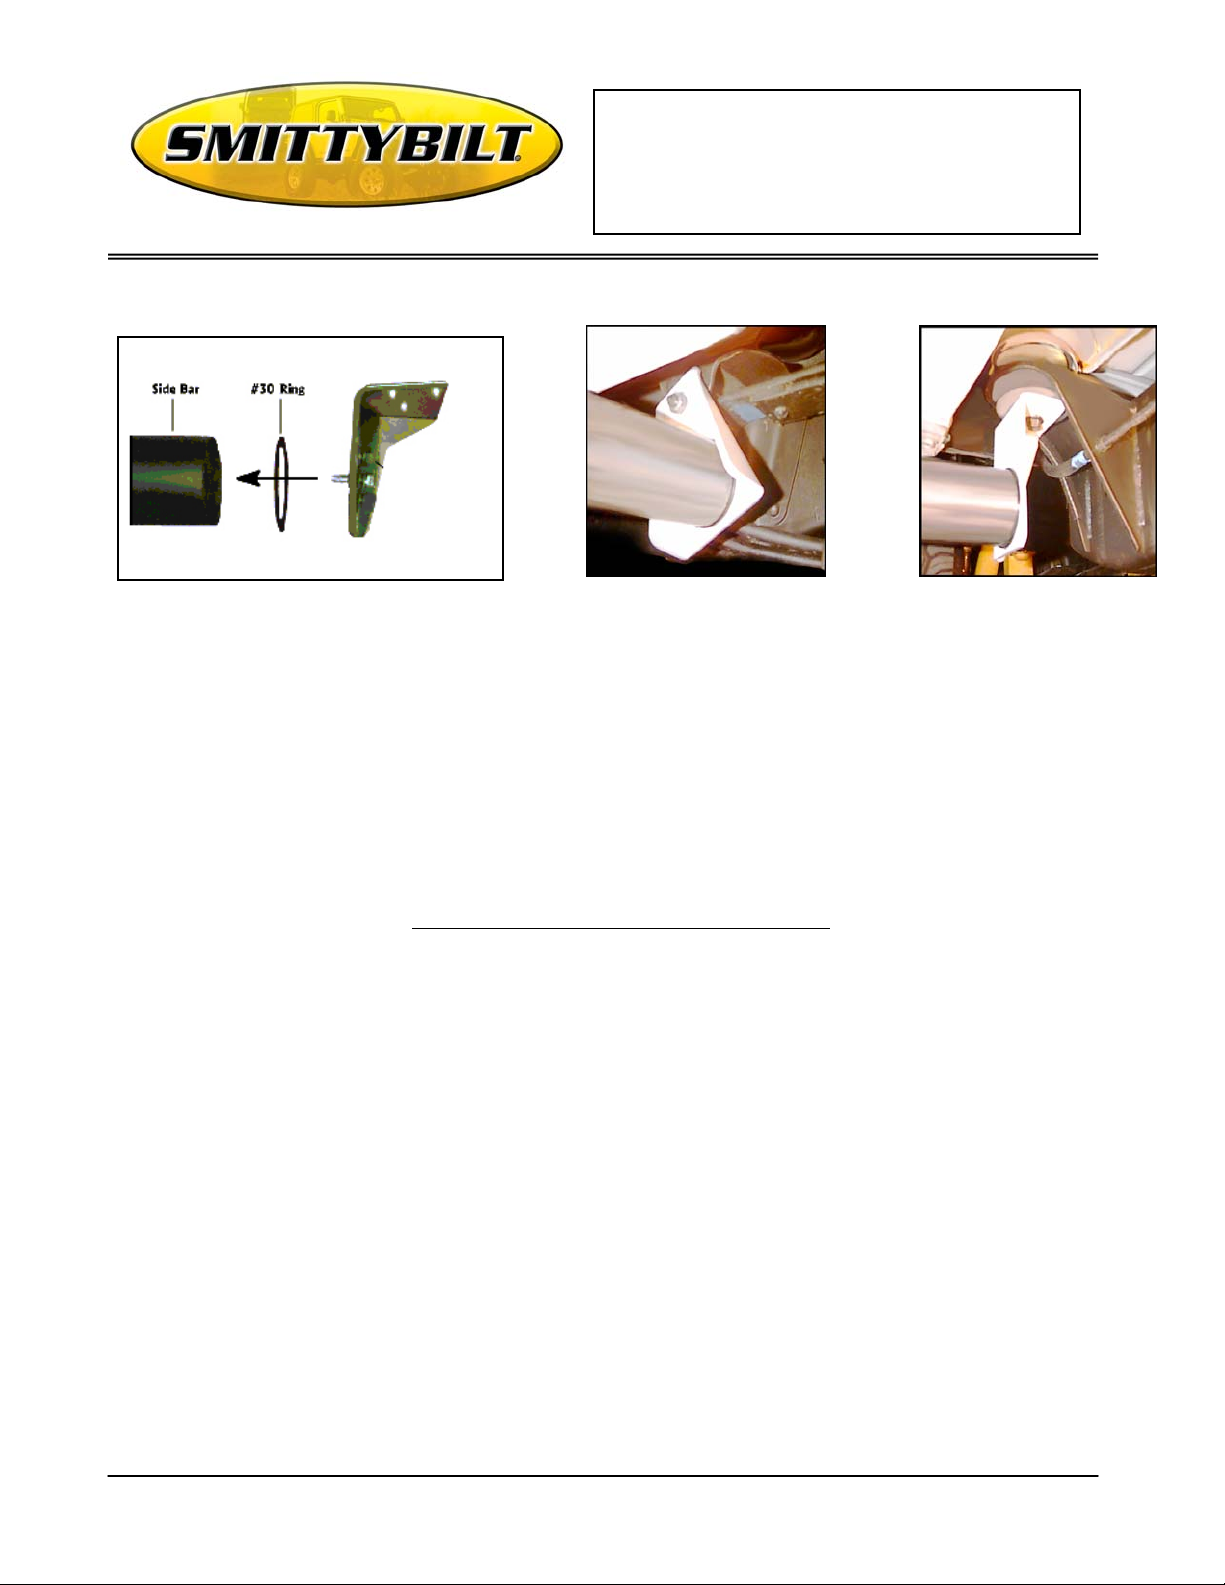
Step Two: Locate the CN012-S4L side bar, one 801086L support brack et, one #30 plastic ring, two ½ x 2” hex bolts, two
½” flat washers and two ½” split lock w ashers. Secure the br acket and ring to the side bar using the h ardware
listed in this step. (Fig #1) Do not fully tight en hardware at his time. Repeat this procedure on the other end of
the side bar using the 801357L support bracket.
Step Three: Locate one 901132 spacer, one 12mm hex bolt, two ½” flat washers and one ½” split lock washer. Remove th e
front cab mount bolt located under the cab. Remove the rear spring hanger nut. “CAUTION” do not remove
the rear spring hanger bolt, doing so coul d resu lt in inju ry o r dama ge to th e v ehi cl e. Place the spacer over
the spring hanger bolt and position the rear support bracket over the rear spring hanger bolt. Secure the support
bracket and spacer to the spring hanger with the factory nut as shown in fig #2. Do no t fully tighten the nut at
this time. Position the front support bracket under the front cab mount. Secure the support bracket to the bottom
of the cab mount as shown in fig #3 u sing th e remain ing h ardware list ed in th is st ep. Fu lly ti ghten all h ard war e
at this time. Torque part 901119 to 50 ft. lbs., 901030 to 30 ft. lbs. and the rear spring hanger nut to 80 ft. lbs.
For Technical Support/Warranty Information please call 310-762-9944
Smittybilt, 400 West Artesia Blvd, Compton, CA 90220
Page 2
Installation Instructions
Sure Steps (Part # CN012-S4)
1992-1999 Suburban 4 Door
Fig #1 Fig #2 Fig #3
(Photos are for reference only, actual brackets may be different)
Step Four: Repeat steps two and three on opposite side of vehicle.
Be sure to use all hardware supplied and tighten all bolts.
IMPORTANT: Sure-Step side bars have a 300 lb. weight capacity. To protect your investment, wax this product after
installing. Regular waxing is recommended to add a protective layer over the finish.
Product cleaning and maintenance instructions
Stainless Steel Finish – Aluminum polish may be used to polish small scratches and scuffs on the finish. Mild soap,
window or glass cleaner may be used to clean the finish. Dual state powder coat finish – Mild soap, window or glass
cleaner may be used to clean the finish. In order to protect the finish, you may wax your product on a regular basis with
pure carnauba automotive wax. Do not use any types of soap, polish or was that contains abrasive that could damage
the finish. Textured coated finishes should be cleaned with a mild soap on a damp sponge. Do not apply polish or
was that requires to be removed by means of buffing. This type of wax is commonly used at car wash facilities.
Chrome Finish – Mild soap, window or glass cleaner may be used to clean the finish. In order to protect the finish you
should wax your product on a regular basis with pure carnauba automotive wax. Do not use any types of soap, polish or
was that contains abrasive that could damage the finish.
Smittybilt’s products are covered under the following limited warranties only. Note that the duration of the limited warranty differs
according to the material and finish of the product purchased. Subject to the duration and conditions of the limited warranty stated
below, Smittybilt warrants to the original retail purchaser that its products are free from defects in material and workmanship. All
other warranties and representations express or implied are hereby disclaimed, including fitness for merchantability and buyer’s
intended use or purpose. All parts are sold “AS IS” except for the limited warranties granted herein. Buyer assumes all risks as to
the selection, suitability and performance of all goods and products selected. This limited warranty does not cover damage or
impairment in any part due to misuse, improper installation, accident or contact with on-road or off-road hazards, product
modification, improper or inadequate cleaning and/or maintenance. Smittybilt is not responsible for items damaged during
For Technical Support/Warranty Information please call 310-762-9944
Smittybilt, 400 West Artesia Blvd, Compton, CA 90220
Page 3

Installation Instructions
Sure Steps (Part # CN012-S4)
1992-1999 Suburban 4 Door
shipping. This warranty is not transferable from the original buyer. For the original Buyer to be eligible for the limited warranty
coverage, the Buyer must provide proof of purchase. Smittybilt strongly recommends returning th e warranty registration card.
Customer’s remedy hereunder shall be limited only to repair or replacement (at Smittybilt’s option) of any defective part(s) returned
to Smittybilt at customer’s expense. The determination of whether or not a returned part is defective or subject to coverage under
the limited warranties stated herein shall be made at Smittybilt’s sole discretion.
Duration of Limited Warranty
1. Limited Lifetime Warranty on Stainless Steel Products -
Smittybilt stainless steel products carry the foregoing limited repair or replacement warranty against workmanship and defects
in the material so long as the original purchaser retains the original stainless steel parts.
2. Limited Five (5) Year / 50,000 Mile Pro-Rata Warranty (whichever occurs first) on Dual-Stage Powder Coating
Products -
Smittybilt dual-stage powder coated products carry the foregoing limited repair or replacement warranty for a period of (5)
years or 50,000 miles (whichever occurs first) from date of purchase against workmanship and defects in the material, provided
that any claim submitted after (2.5) years from date of purchase shall, if accepted, be satisfied by Smittybilt offering customer a
credit on the purchase of a replacement product equal to fifty percent (50%) of customer’s initial purchase price.
3. Limited Three (3) Year / 36,000 Mile Pro-Rata Warranty (whichever occurs first) on Chrome Products -
Smittybilt chrome products finished carry the foregoing limited repair or replacement warranty for a period of three (3) years or
36,000 miles against workmanship and defects in the material (whichever occurs first) from the date of purchase.
Requesting Warranty Coverag e
To make a claim under this limited warranty, customer must:
(1) Call Smittybilt, at (888) 717-5797 for a return authorization code (RAC) and/or Smittybilt may require photographic proof of
defect before issuing an (RAC); (2) return the defective part, properly packaged to prevent further damage to the product, postage
prepaid, together with dated proof of purchase receipt and identifying return authorization code (RAC) on the outside of the
packaging to Smittybilt at 1600 Walnut Parkway, Compton, CA 90220. Warranty claims can not be determined until the returned
merchandise is inspected. A minimum charge of fifteen percent (15%) may be added for all products which are determined to be
returned for reasons other than warranty. Additional charges may be applied if merchandise is damaged or unsellable upon receipt.
For Technical Support/Warranty Information please call 310-762-9944
Smittybilt, 400 West Artesia Blvd, Compton, CA 90220
 Loading...